

Page 1

User’s Guide
HP
Color Copier
Page 2

©Copyright Hewlett-Packard Company 1999
p
pp
p
y
g
p
y
p
All rights are reserved. No part of the
document may be photocopied, reproduced,
or translated to another language without the
prior written consent of Hewlett-Packard
Company.
Publication number: C6690-90101
First edition: January 1999
Printed in U.S.A., Germany, or Singapore
Notice
The information contained in this document
is subject to change without notice and
should not be construed as a commitment by
the Hewlett-Packard Company.
Hewlett-Packard assumes no
res
onsibility for any errors that may
ear in this document, nor does it
a
make ex
of an
material, includin
the im
merchantabilit
articular purpose.
Company shall not be liable for incidental or
consequential damages in connection with, or
arising out of the furnishing, performance, or
use of this document and the program
material which it describes.
ressed or implied warranty
kind with regard to this
, but not limited to,
lied warranties of
and fitness for a
The Hewlett-Packard
: Regulatory information can be found in
Note
Chapter 8.
It is not lawful in many places to make copies
of the following items. When in doubt, check
with a legal representative first.
Governmental paper or documents:
◆
- Passports
- Immigration papers
- Selective service papers
- Identification badges, cards, or insignias
Governmental stamps:
◆
- Postage stamps
- Food stamps
Checks or drafts drawn on Governmental
◆
agencies
Paper currency, traveler’s checks, or money
◆
orders
Certificates of deposit
◆
Copyrighted works
◆
Page 3

contents
HP Color Copier User’s Guide
iii
About This Guide . . . . . . . . . . . . . . . . . . . . . . . . . . . . . . . . . . . . . . . . . . . . . . . . . . . . . . . . . . . . v
Conventions Used . . . . . . . . . . . . . . . . . . . . . . . . . . . . . . . . . . . . . . . . . . . . . . . . . . . . . . . v
Chapter 1 — Welcome!
Chapter 2 — Setting Up Your New HP Color Copier
Step 1 — Unpack Your HP Color Copier . . . . . . . . . . . . . . . . . . . . . . . . . . . . . . . . . . . . . . . 2-1
Step 2 — Attach the Front-Panel Overlay . . . . . . . . . . . . . . . . . . . . . . . . . . . . . . . . . . . . . . . 2-4
Step 3 — Load Paper in Your HP Color Copier . . . . . . . . . . . . . . . . . . . . . . . . . . . . . . . . . . 2-5
Step 4 — Install Print Cartridges . . . . . . . . . . . . . . . . . . . . . . . . . . . . . . . . . . . . . . . . . . . . . . 2-7
Step 5 — Connect the Power Cord . . . . . . . . . . . . . . . . . . . . . . . . . . . . . . . . . . . . . . . . . . . 2-10
Step 6 — Align Your Print Cartridges . . . . . . . . . . . . . . . . . . . . . . . . . . . . . . . . . . . . . . . . . 2-12
Changing the Front-Panel Language . . . . . . . . . . . . . . . . . . . . . . . . . . . . . . . . . . . . . . . . . . 2-12
Chapter 3 — All About Paper
HP Papers . . . . . . . . . . . . . . . . . . . . . . . . . . . . . . . . . . . . . . . . . . . . . . . . . . . . . . . . . . . . . . . . 3-1
Paper Choices When Copying . . . . . . . . . . . . . . . . . . . . . . . . . . . . . . . . . . . . . . . . . . . . . . . . 3-2
Using the Right Front-Panel Paper Type When Copying . . . . . . . . . . . . . . . . . . . . . . . 3-2
Choose the appropriate paper type category for the paper you are using . . . . . . . . . . . . . . . 3-3
Tips on Loading Paper in the IN Tray . . . . . . . . . . . . . . . . . . . . . . . . . . . . . . . . . . . . . . . . . . 3-3
All Papers . . . . . . . . . . . . . . . . . . . . . . . . . . . . . . . . . . . . . . . . . . . . . . . . . . . . . . . . . . . . 3-3
HP Papers . . . . . . . . . . . . . . . . . . . . . . . . . . . . . . . . . . . . . . . . . . . . . . . . . . . . . . . . . . . . 3-4
Special Considerations When Using Transparency Film . . . . . . . . . . . . . . . . . . . . . . . 3-4
Other Paper Tray Considerations . . . . . . . . . . . . . . . . . . . . . . . . . . . . . . . . . . . . . . . . . . . . . . 3-5
Automatic Document Feeder (ADF) Requirements . . . . . . . . . . . . . . . . . . . . . . . . . . . . . . . 3-5
Chapter 4 — Copying
How to Make Copies . . . . . . . . . . . . . . . . . . . . . . . . . . . . . . . . . . . . . . . . . . . . . . . . . . . . . . . 4-1
Controlling How Copies Look . . . . . . . . . . . . . . . . . . . . . . . . . . . . . . . . . . . . . . . . . . . . . . . . 4-3
Changing Copy Settings Using the Front-Panel Buttons . . . . . . . . . . . . . . . . . . . . . . . . 4-3
Clear/Stop . . . . . . . . . . . . . . . . . . . . . . . . . . . . . . . . . . . . . . . . . . . . . . . . . . . . . . . 4-3
Select/Resume . . . . . . . . . . . . . . . . . . . . . . . . . . . . . . . . . . . . . . . . . . . . . . . . . . . . 4-3
Copy Quality (Best/Normal/Fast) . . . . . . . . . . . . . . . . . . . . . . . . . . . . . . . . . . . . . 4-3
Reduce/Enlarge . . . . . . . . . . . . . . . . . . . . . . . . . . . . . . . . . . . . . . . . . . . . . . . . . . . 4-4
Special Features . . . . . . . . . . . . . . . . . . . . . . . . . . . . . . . . . . . . . . . . . . . . . . . . . . . 4-4
Paper Type . . . . . . . . . . . . . . . . . . . . . . . . . . . . . . . . . . . . . . . . . . . . . . . . . . . . . . . 4-5
Lighter/Darker . . . . . . . . . . . . . . . . . . . . . . . . . . . . . . . . . . . . . . . . . . . . . . . . . . . . 4-6
Color Intensity . . . . . . . . . . . . . . . . . . . . . . . . . . . . . . . . . . . . . . . . . . . . . . . . . . . . 4-6
Menu . . . . . . . . . . . . . . . . . . . . . . . . . . . . . . . . . . . . . . . . . . . . . . . . . . . . . . . . . . . 4-6
Changing Copy Settings Using the Menu Commands . . . . . . . . . . . . . . . . . . . . . . . . . 4-7
Photo Mode . . . . . . . . . . . . . . . . . . . . . . . . . . . . . . . . . . . . . . . . . . . . . . . . . . . . . . 4-7
Copy Paper Size . . . . . . . . . . . . . . . . . . . . . . . . . . . . . . . . . . . . . . . . . . . . . . . . . . . 4-7
TE (Text Enhancement) . . . . . . . . . . . . . . . . . . . . . . . . . . . . . . . . . . . . . . . . . . . . . 4-7
ELC (Enhance Light Colors) . . . . . . . . . . . . . . . . . . . . . . . . . . . . . . . . . . . . . . . . . 4-8
Page 4

iv
Contents
Changing Default Settings . . . . . . . . . . . . . . . . . . . . . . . . . . . . . . . . . . . . . . . . . . . . . . . . . . . 4-8
Creating Your Own Default Settings . . . . . . . . . . . . . . . . . . . . . . . . . . . . . . . . . . . . . . . 4-8
Restoring the Factory Default Settings . . . . . . . . . . . . . . . . . . . . . . . . . . . . . . . . . . . . . 4-8
Chapter 5 — Troubleshooting and Maintaining Your HP Color Copier
Cleaning the Exterior Case . . . . . . . . . . . . . . . . . . . . . . . . . . . . . . . . . . . . . . . . . . . . . . . . . . 5-1
Cleaning the Glass . . . . . . . . . . . . . . . . . . . . . . . . . . . . . . . . . . . . . . . . . . . . . . . . . . . . . . . . . 5-1
How to Clear a Paper Jam in the ADF . . . . . . . . . . . . . . . . . . . . . . . . . . . . . . . . . . . . . . . . . . 5-2
How to Clear a Paper Jam in the Main Unit . . . . . . . . . . . . . . . . . . . . . . . . . . . . . . . . . . . . . 5-2
Paper Jam with Front-Panel Message . . . . . . . . . . . . . . . . . . . . . . . . . . . . . . . . . . . . . . 5-2
Paper Jams in the Back of the Unit . . . . . . . . . . . . . . . . . . . . . . . . . . . . . . . . . . . . . . . . 5-2
How to Use the Self-Test Page . . . . . . . . . . . . . . . . . . . . . . . . . . . . . . . . . . . . . . . . . . . . . . . 5-3
How to Clean Cartridges . . . . . . . . . . . . . . . . . . . . . . . . . . . . . . . . . . . . . . . . . . . . . . . . . . . . 5-4
Front-Panel Messages . . . . . . . . . . . . . . . . . . . . . . . . . . . . . . . . . . . . . . . . . . . . . . . . . . . . . . 5-5
Additional Troubleshooting Tips . . . . . . . . . . . . . . . . . . . . . . . . . . . . . . . . . . . . . . . . . . . . . 5-6
Chapter 6 — Hewlett-Packard Limited Warranty
HP Year 2000 (Y2K) Warranty . . . . . . . . . . . . . . . . . . . . . . . . . . . . . . . . . . . . . . . . . . . . . . . 6-1
For Consumer Products Distributed Through Resellers . . . . . . . . . . . . . . . . . . . . . . . . 6-1
Extent of Limited Warranty . . . . . . . . . . . . . . . . . . . . . . . . . . . . . . . . . . . . . . . . . . . . . . . . . . 6-1
Warranty Service . . . . . . . . . . . . . . . . . . . . . . . . . . . . . . . . . . . . . . . . . . . . . . . . . . . . . . . . . . 6-3
Express Service . . . . . . . . . . . . . . . . . . . . . . . . . . . . . . . . . . . . . . . . . . . . . . . . . . . . . . . 6-3
Warranty Upgrades . . . . . . . . . . . . . . . . . . . . . . . . . . . . . . . . . . . . . . . . . . . . . . . . . . . . . . . . 6-3
Returning Your HP Color Copier for Service . . . . . . . . . . . . . . . . . . . . . . . . . . . . . . . . . . . . 6-3
Chapter 7 — Support Services
Get Help from HP . . . . . . . . . . . . . . . . . . . . . . . . . . . . . . . . . . . . . . . . . . . . . . . . . . . . . . . . . 7-1
Online Services . . . . . . . . . . . . . . . . . . . . . . . . . . . . . . . . . . . . . . . . . . . . . . . . . . . . . . . 7-1
Internet . . . . . . . . . . . . . . . . . . . . . . . . . . . . . . . . . . . . . . . . . . . . . . . . . . . . . . . . . . 7-1
HP Customer Support . . . . . . . . . . . . . . . . . . . . . . . . . . . . . . . . . . . . . . . . . . . . . . . . . . 7-1
Prepare Your HP Color Copier for Shipment . . . . . . . . . . . . . . . . . . . . . . . . . . . . . . . . 7-2
Calling in the U.S. During Warranty . . . . . . . . . . . . . . . . . . . . . . . . . . . . . . . . . . . 7-3
Calling in the U.S. Post-Warranty . . . . . . . . . . . . . . . . . . . . . . . . . . . . . . . . . . . . . 7-4
Chapter 8 — Technical Information
Copy Specifications . . . . . . . . . . . . . . . . . . . . . . . . . . . . . . . . . . . . . . . . . . . . . . . . . . . . . . . . 8-1
Copy Speed and Resolution . . . . . . . . . . . . . . . . . . . . . . . . . . . . . . . . . . . . . . . . . . . . . . 8-1
Copy Margins . . . . . . . . . . . . . . . . . . . . . . . . . . . . . . . . . . . . . . . . . . . . . . . . . . . . . . . . 8-2
Paper Specifications . . . . . . . . . . . . . . . . . . . . . . . . . . . . . . . . . . . . . . . . . . . . . . . . . . . . . . . . 8-2
Paper-Tray Capacities . . . . . . . . . . . . . . . . . . . . . . . . . . . . . . . . . . . . . . . . . . . . . . . . . . 8-2
Paper Sizes . . . . . . . . . . . . . . . . . . . . . . . . . . . . . . . . . . . . . . . . . . . . . . . . . . . . . . . . . . . 8-2
Automatic Document Feeder . . . . . . . . . . . . . . . . . . . . . . . . . . . . . . . . . . . . . . . . . . . . . 8-3
Power Specifications . . . . . . . . . . . . . . . . . . . . . . . . . . . . . . . . . . . . . . . . . . . . . . . . . . . . . . . 8-3
Environmental Specifications . . . . . . . . . . . . . . . . . . . . . . . . . . . . . . . . . . . . . . . . . . . . . . . . 8-3
Physical Specifications . . . . . . . . . . . . . . . . . . . . . . . . . . . . . . . . . . . . . . . . . . . . . . . . . . . . . 8-3
Ordering Accessories and Supplies . . . . . . . . . . . . . . . . . . . . . . . . . . . . . . . . . . . . . . . . . . . . 8-3
Regulatory Notices . . . . . . . . . . . . . . . . . . . . . . . . . . . . . . . . . . . . . . . . . . . . . . . . . . . . . . . . 8-4
Declaration of Conformity . . . . . . . . . . . . . . . . . . . . . . . . . . . . . . . . . . . . . . . . . . . . . . . . . . . 8-5
Page 5

Contents
v
About This Guide
This guide will help you get started and show you how to perform the most
Conventions Used
IMPORTANT
NOTE
TIP
common tasks with your HP Color Copier.
Throughout this guide, we use specific conventions to help you quickly
identify information:
boldface Bold typeface identifies a specific button name or
CAUTION
WARNING
command you need to enter.
This label calls attention to an operating procedure,
practice, or the like, which, if not correctly
performed or adhered to, could result in damage to or
destruction of part or all of the product or your data.
Do not proceed beyond a Caution label until you
fully understand and have met the indicated
conditions.
This label identifies significant information.
This label identifies information you should know
before you continue.
This label precedes helpful hints.
This label calls attention to a procedure, practice, or
the like, which, if not correctly performed or adhered
to, could result in personal injury. Do not proceed
beyond a Warning label until you fully understand
and have met the indicated conditions.
Page 6

vi
Page 7
HP Color Copier User’s Guide
1-1
Welcome!
1
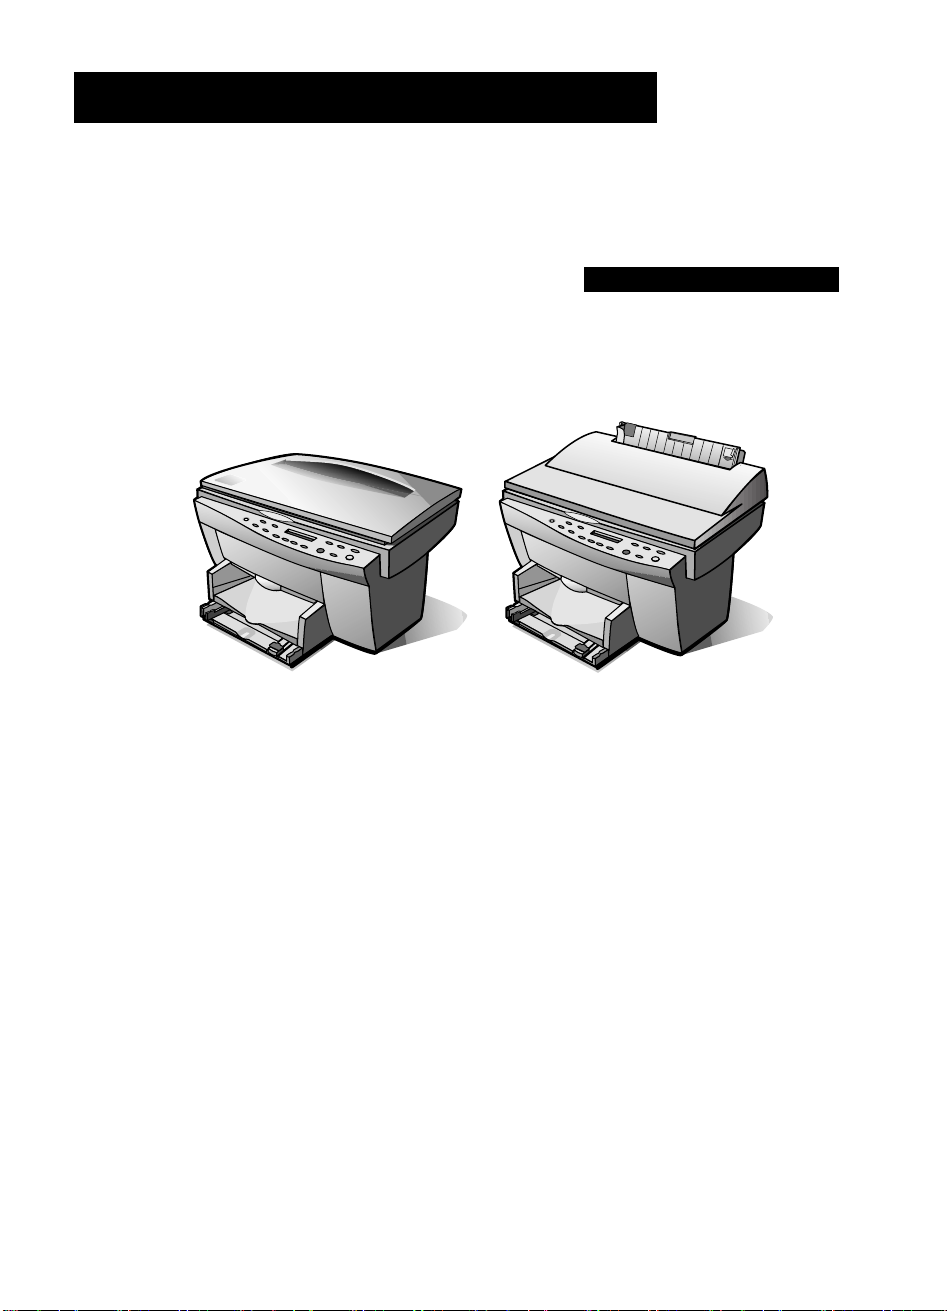
Welcome to your new HP Color Copier! This guide will help you set up and
use your new HP Color Copier.
If you have the HP Color Copier without the automatic document feeder
(ADF), the lid functions as a paper holder.
You can produce high-quality color and black-and-white copies using a
variety of paper types and sizes, including iron-on transfers.
You can enlarge or reduce the size of the copies you make from 25% to 400%
of the image’s original size. You can make the image lighter or darker, adjust
the color intensity, and specify the quality of the copies you make. You can
also use special digital copying features to help you create business cards,
brochures, name badges — and even posters.
Page 8

1-2
Welcome!
Page 9
HP Color Copier User’s Guide
2-1
Setting Up Your New
HP
Color Copier
Follow the steps in the order shown.
IMPORTANT
Do not turn on your HP
Color Copier
until you are instructed to do so
.
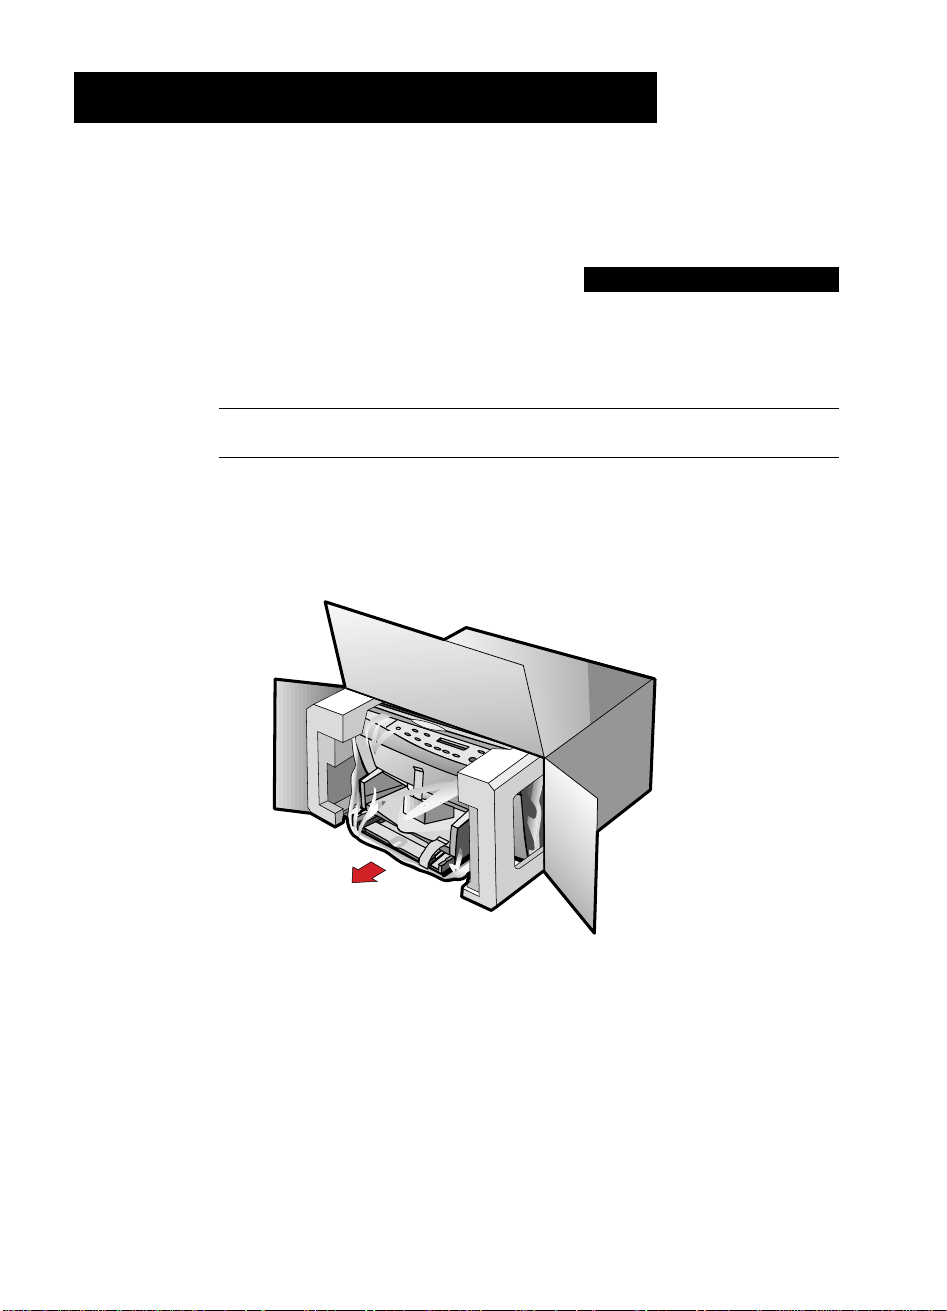
Step 1 — Unpack Your HP
Color Copier
1
2
Remove the cardboard tray containing the accessory items.
Rest the box on its side, and pull out your HP Color Copier.
2
Page 10
2-2
Setting Up Your New HP
Color Copier
3
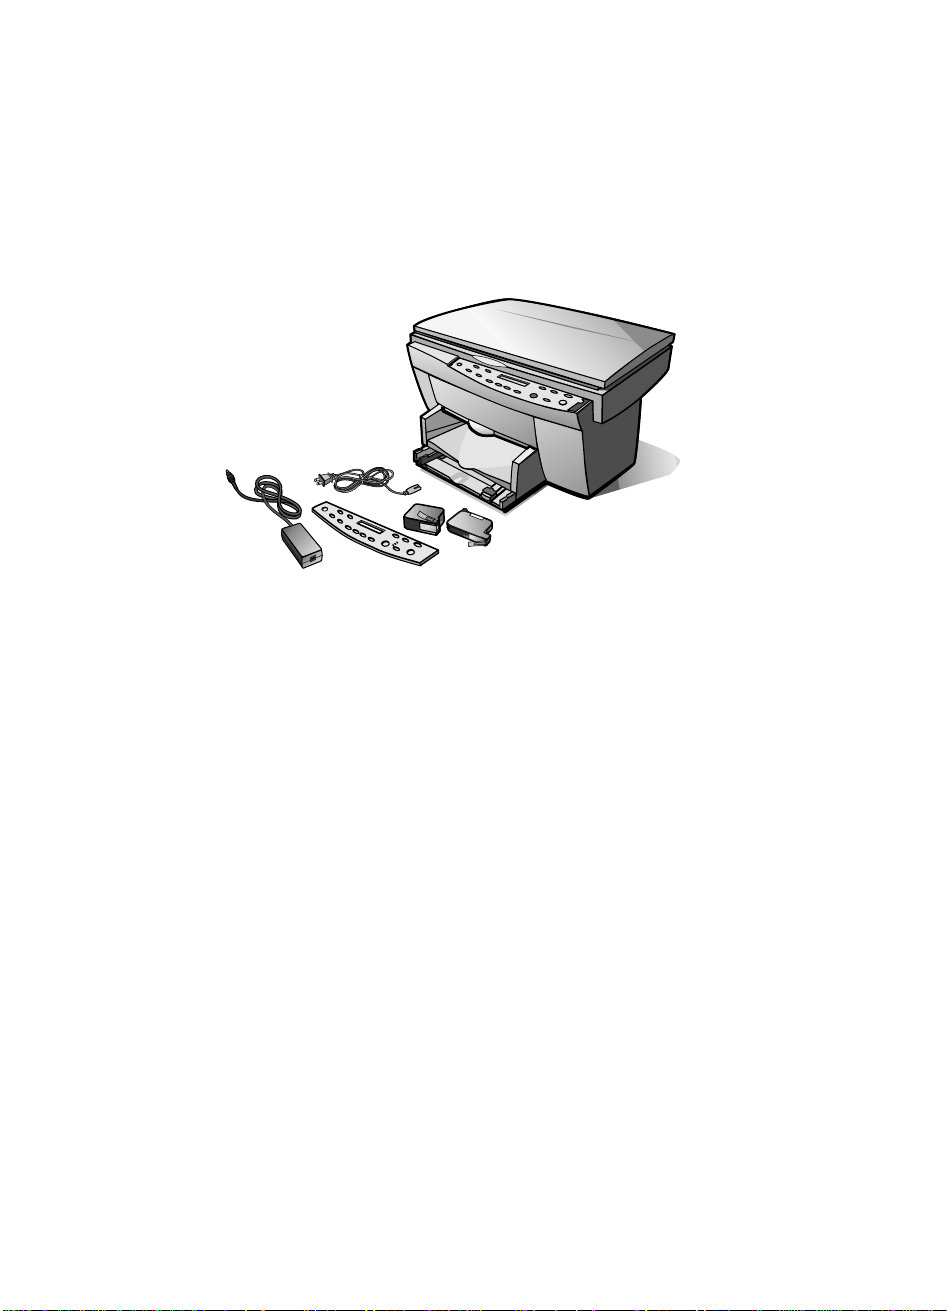
Verify that the following items are included with your HP Color Copier:
a
b
c
d
4
Power supply (AC/DC adapter) with attached cord
(HP part number 0950-2880)
Power cord
Front-panel overlay with text on it
One black and one color print cartridge
If any of the items are missing or damaged, contact the dealer from whom
you purchased your HP Color Copier.
a
b
d
c
Choose a location and environment for your HP Color Copier.
◆
Use your HP Color Copier only within normal office temperature
and humidity ranges. For recommended ranges, see “Environmental
Specifications” in Chapter 8.
◆
Avoid direct sunlight or locations where a quick change in
temperature might cause condensation inside the unit.
◆
Make sure the location is well ventilated. Dust, gases, or fumes
(such as ammonia or paint thinner) can damage the unit.
◆
Choose a site that is level, flat, and stable. The HP Color Copier
vibrates and needs to be on a sturdy surface.
◆
Be sure a grounded outlet is nearby and easily accessible.
◆
If your unit has an automatic document feeder (ADF), make sure
that you can open the lid all the way by placing your HP Color
Copier at least 9 inches (230 mm) from the wall.
Page 11
HP Color Copier User’s Guide
2-3
5
Remove the packaging materials (plastic wrap, cardboard insert, and
6
packing tape) from the outside of the unit.
If your HP Color Copier has an automatic document feeder (ADF),
remove the packaging materials from the ADF lid.
Page 12
2-4
Setting Up Your New HP
Color Copier
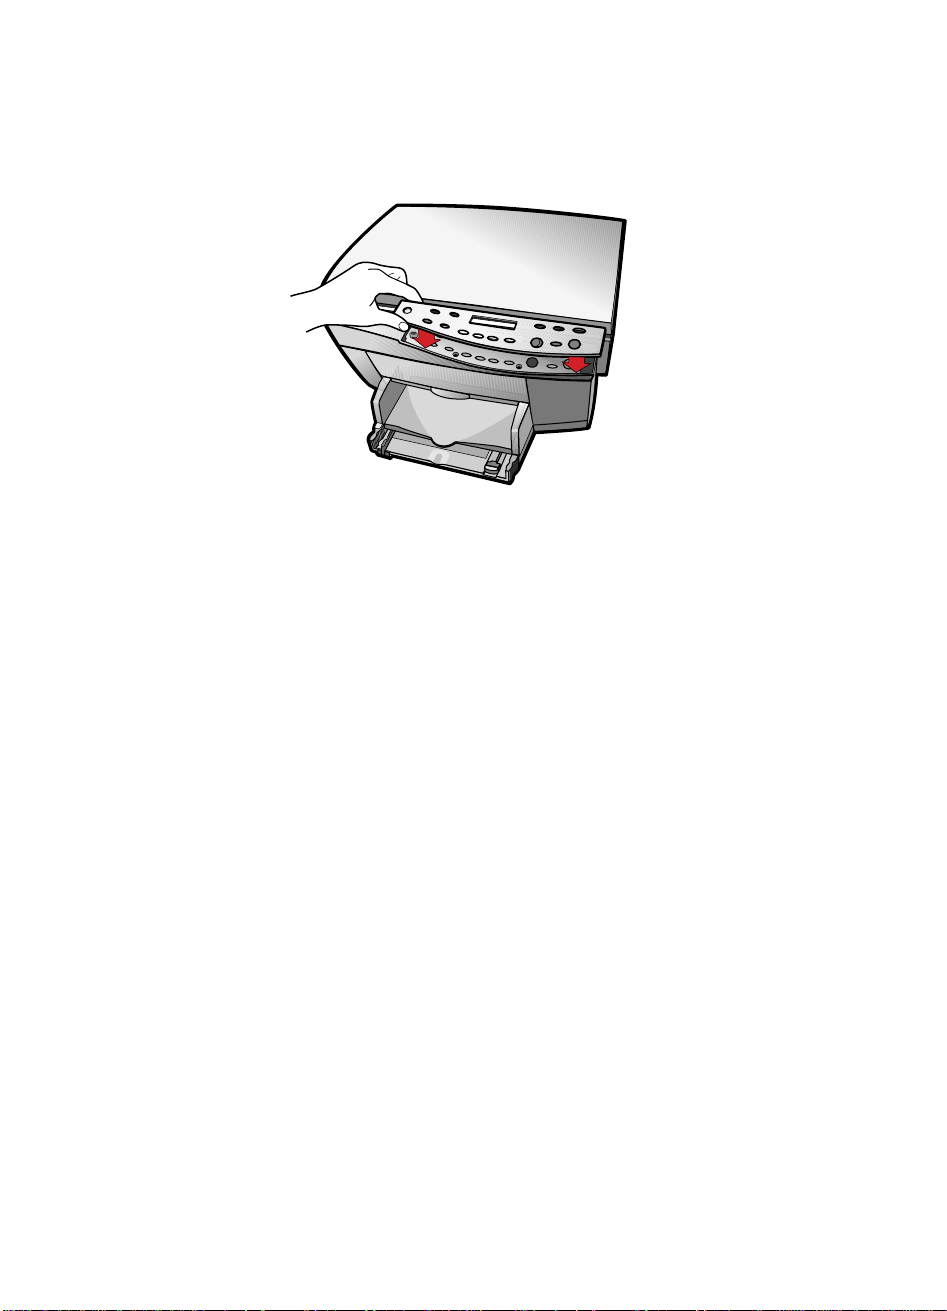
Step 2 — Attach the Front-Panel Overlay
1
Align the front-panel overlay with the front panel buttons.
2
Push straight down firmly on both ends and the middle to snap the overlay into place.
Page 13
HP Color Copier User’s Guide
2-5
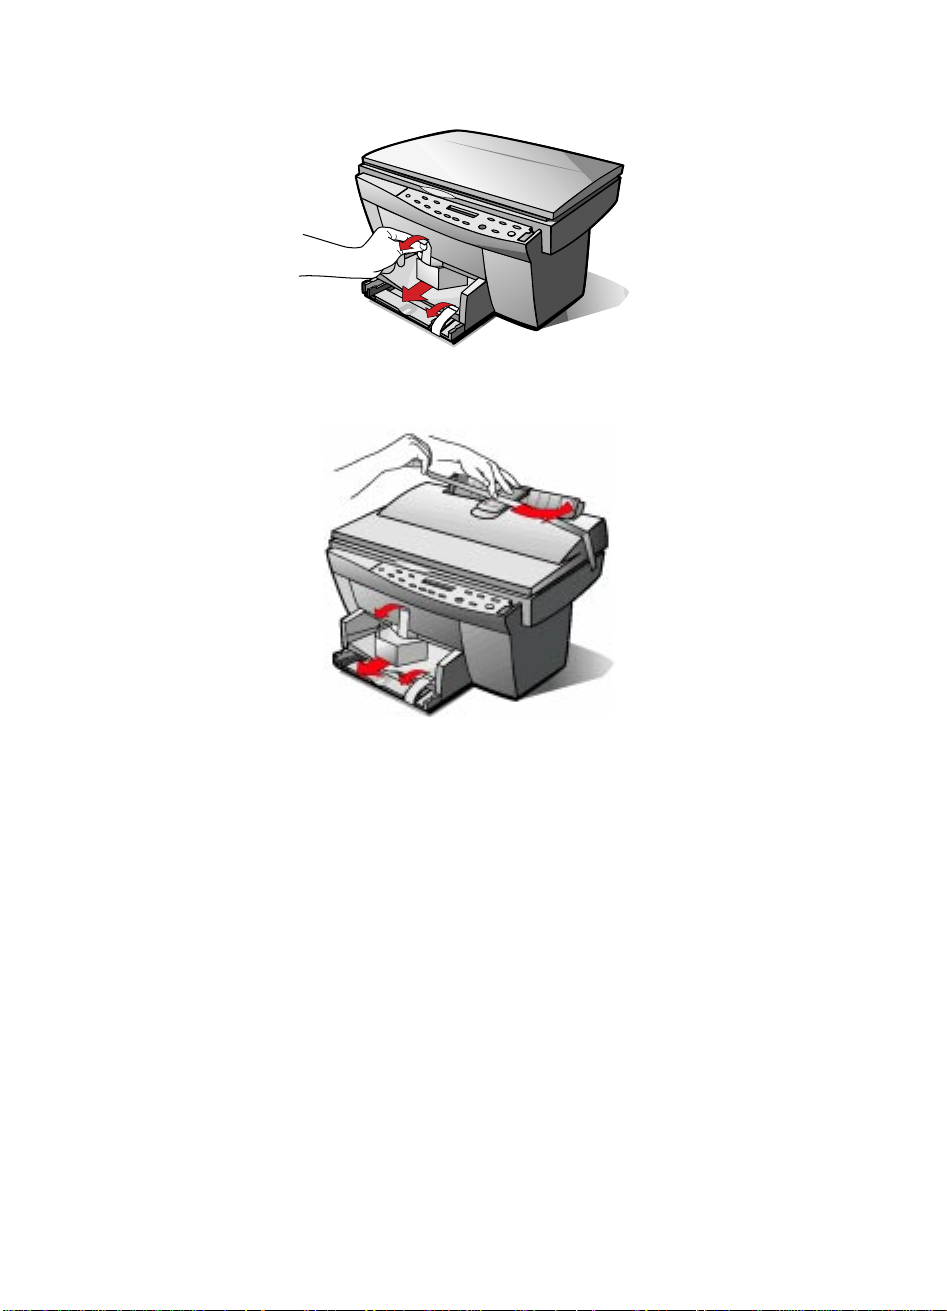
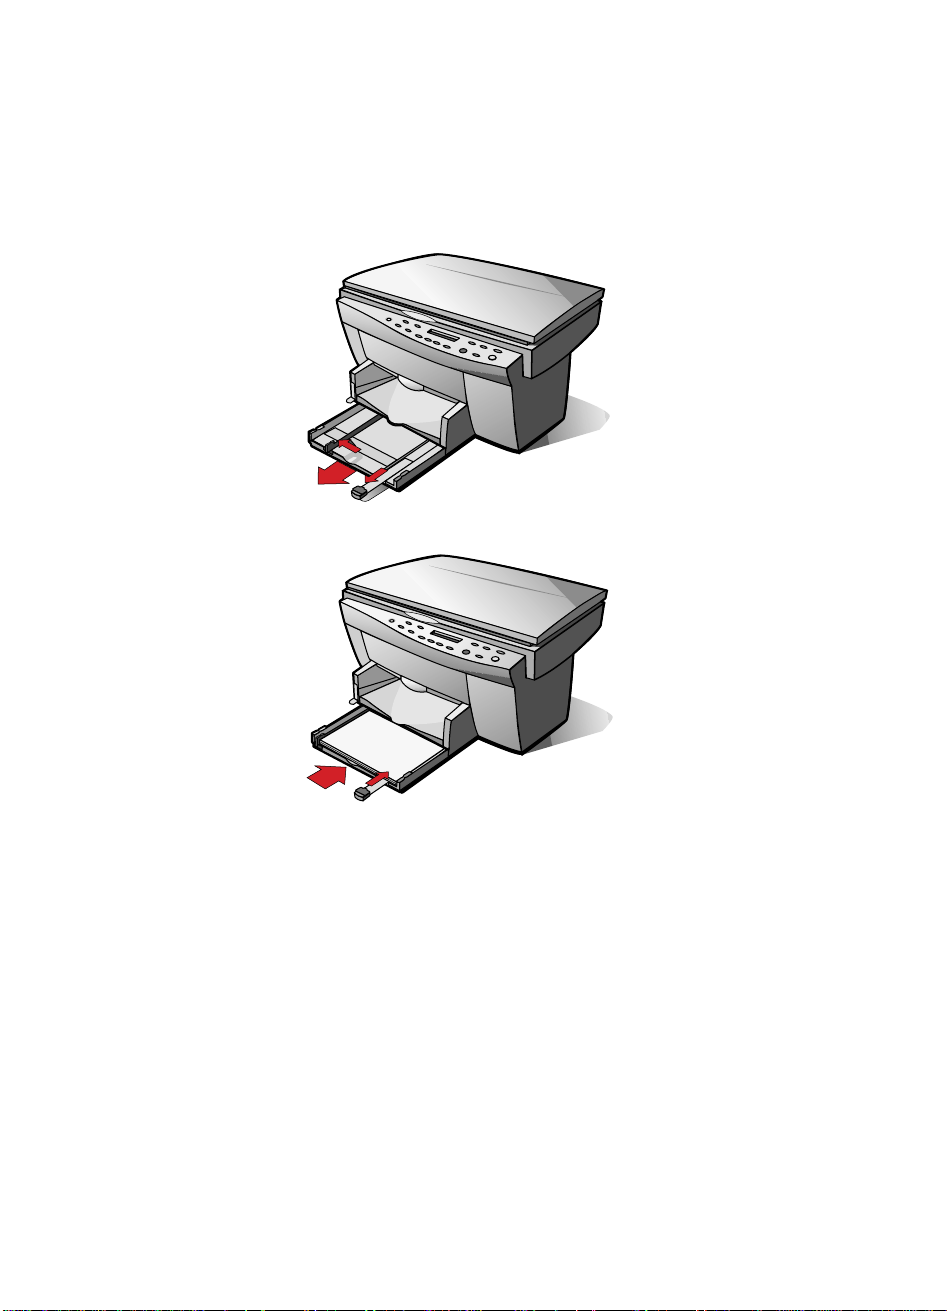
Step 3 — Load Paper in Your HP
Color Copier
1
Remove the packaging materials from the HP Color Copier, if you have
2
3
4
not already done so.
Slide the paper width and length adjusters to their outermost positions.
As you pull the paper length adjuster out, the bottom (IN) tray also slides
out.
Insert paper into the IN tray, print side down, until it stops.
Slide the paper width and length adjusters in until they stop at the edges of the paper.
Page 14

2-6
Setting Up Your New HP
Color Copier
5
Push the IN tray back toward the unit until it stops, and lower the top
(OUT) tray if you raised it before inserting paper.
For information about loading specific paper types, see Chapter 3, “All
About Paper.”
For information about paper tray capacities, see Chapter 8, “Technical
Information.”
Page 15
HP Color Copier User’s Guide
2-7
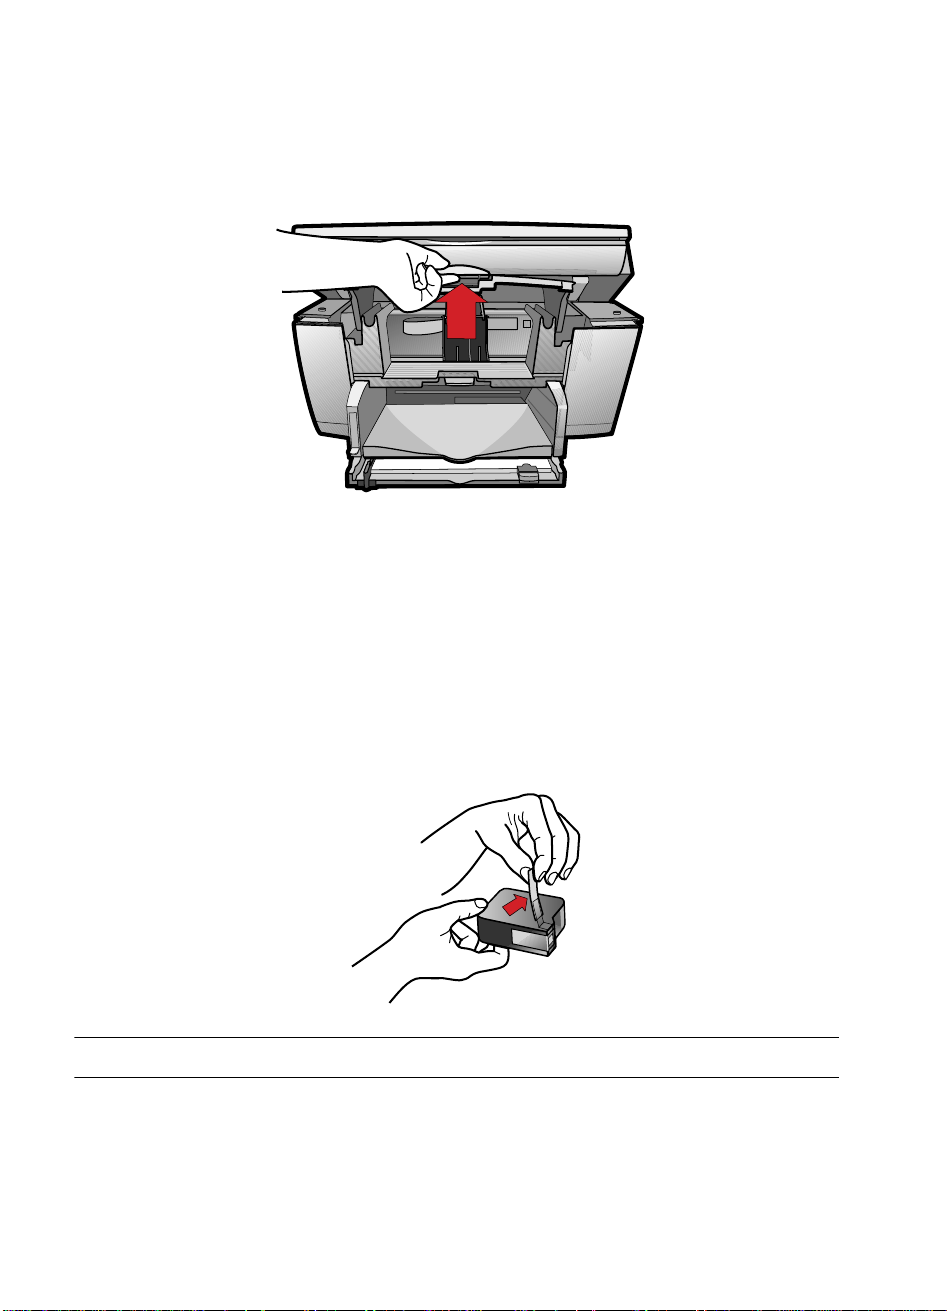
Step 4 — Install Print Cartridges
1
Locate the print-cartridge access door on the front of the HP Color
2
3
TIP
4
5
CAUTION
Do not touch the gold-colored contacts.
Copier, just above the OUT tray.
Pull the latch on the print-cartridge access door toward you and raise it
up until it is fully extended.
Remove the cardboard insert from the inside of the unit.
Save the packaging materials in case you ever need to move or
ship your HP Color Copier.
The print-cartridge carriage will be in the middle of the access area. The
carriage contains two slots designed to hold one color print cartridge and
one black print cartridge. You should have received one of each type of
cartridge with your new HP Color Copier.
Raise both latches on the carriage.
Remove the color print cartridge (the thicker one) from its packaging
and, being careful to touch only the black plastic, gently remove both the
green pull tab and blue tape covering the nozzles.
Page 16
2-8
Setting Up Your New HP
Color Copier
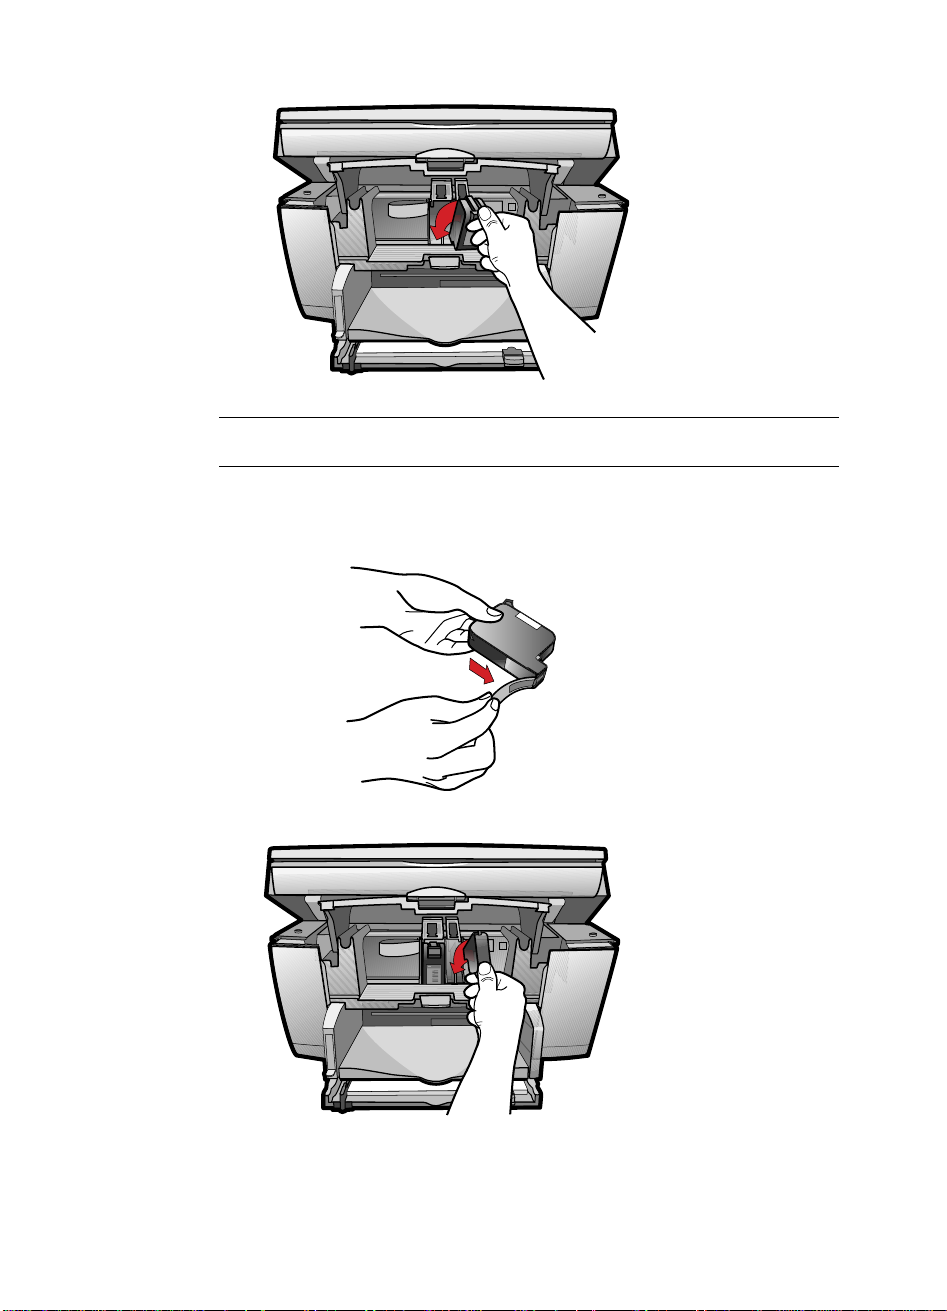
6
Push the color print cartridge firmly down into the slot on the left.
NOTE
The print-cartridge label should be facing you after the cartridge is inserted.
7
8
Remove the black print cartridge (the thinner one) from its packaging
and, being careful to touch only the black plastic, gently remove both the
green pull tab and blue tape covering the nozzles.
Push the black print cartridge firmly down into the slot on the right.
Page 17

HP Color Copier User’s Guide
2-9
9
Lower each print-cartridge latch down onto the top of the cartridge, and
10
NOTE
Both print cartridges must be correctly installed (with the green tab and blue tape
removed) for your HP
Color Copier
to work. Make sure that the following things are
done before continuing:
•
Cartridges are pushed firmly into their slots.
•
Cartridge labels are facing toward you.
•
Both print-cartridge latches are down and locked.
•
Print-cartridge access door is closed and latched.
•
IN tray is pushed in completely.
•
Paper length adjuster is pushed firmly against the paper stack.
•
OUT tray is fully down.
push down until the latch locks firmly into place.
Close the print-cartridge access door.
Page 18
2-10
Setting Up Your New HP
Color Copier
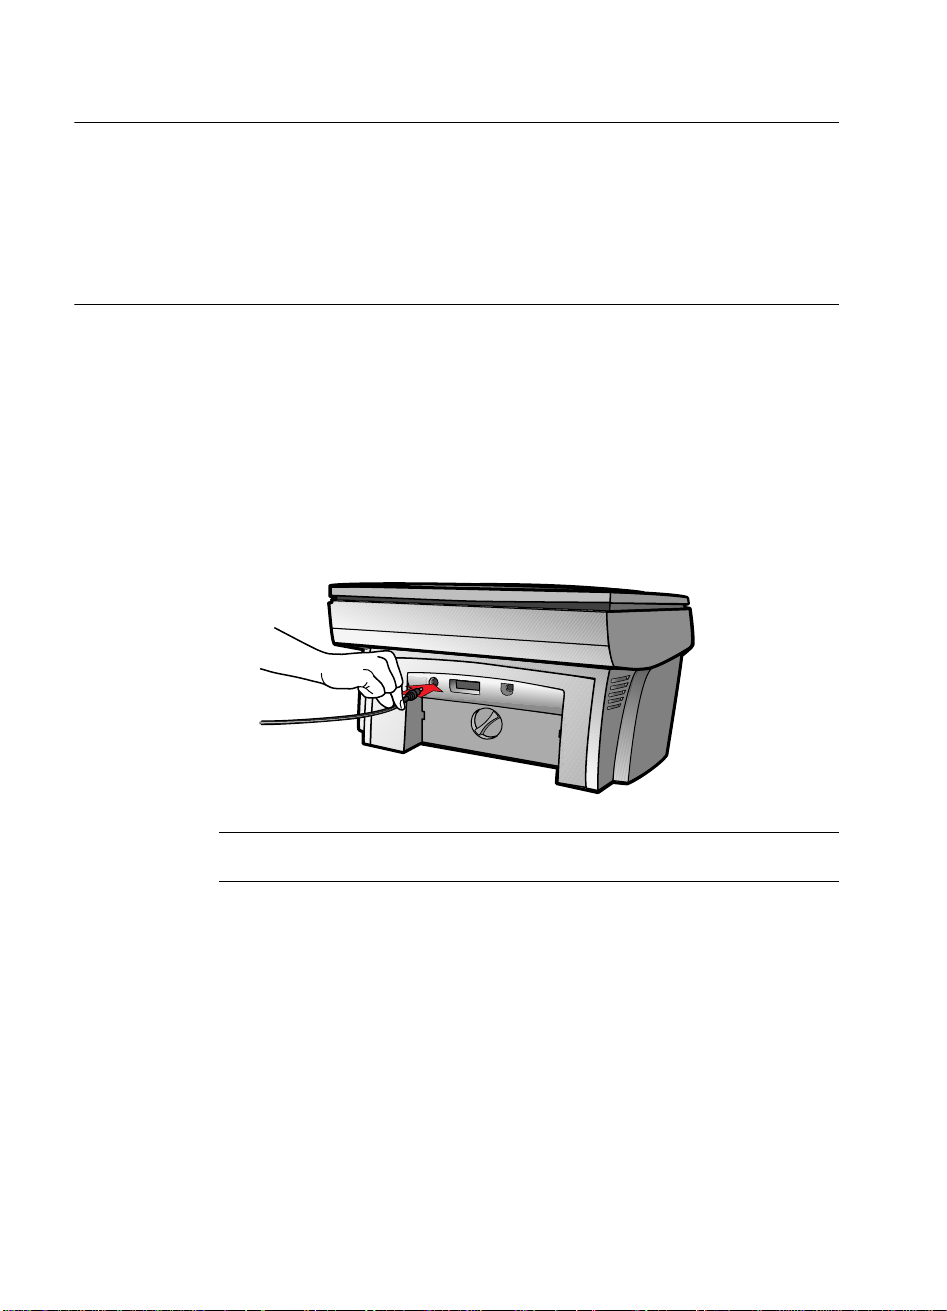
Step 5 — Connect the Power Cord
WARNING
Choose a power outlet that is easy to access. This allows you to shut off power
quickly.
Power is present in the product even if the white power button on the left side of the
unit’s front panel was used to turn the unit off. To shut off power completely,
disconnect the power cord.
For safe operation, use the power cord with a properly grounded outlet.
Use only the power supply (HP part number 0950-2880) that came with your HP
Color
Copier
. Using another adapter may be hazardous.
The HP Color Copier comes with a power supply adapter, to which an
1
2
NOTE
Make sure that the cord is securely attached; otherwise, it may not work.
output cord is permanently attached, and a main power cord for the
country to which it is shipped. If the plug on the main power cord does
not look familiar, contact your dealer or local HP Sales and Support
Office.
Plug the power supply output cord into the back of the HP Color Copier.
The power supply connector is located on the back of the unit.
If you have an ADF unit and the lid cord is not already attached, connect
the cord securely to the back of the HP Color Copier.
The lid connector is located on the back of the unit.
Page 19

HP Color Copier User’s Guide
2-11
3
Plug the adapter end of the main power cord into the power supply
4
5
adapter.
Plug the power outlet end of the separate power cord into the power outlet.
To turn the unit on, press the white power button on the left side of the front panel.
When your HP Color Copier is on, a light appears on the front panel, and
text appears in the front-panel display . If you do not see these, check the
power cord connections from the back of the unit to the power-supply
adapter and from the power-supply adapter to the power outlet.
Page 20

2-12
Setting Up Your New HP
Color Copier
Step
6
— Align Your Print Cartridges
Before you start using your HP Color Copier, you need to align the print
NOTE
If the messages are not in your language, you can change the language before
aligning your cartridges. Follow the instructions provided later under “Changing the
Front-Panel Language.”
1
2
Changing the Front-Panel Language
1
2
3
4
5
6
cartridges to ensure the best copy quality.
When you turn on your HP Color Copier for the first time, you will see the
message “Initializing,” followed by the message “Press Resume to Align
Cartridges” on the front-panel display.
If “Press Resume to Align Cartridges” or “Align Cartridges” appears on
the front-panel display of your HP Color Copier, press the Select/
Resume button on the front panel of the unit.
The HP Color Copier prints a page with three sets of paired lines on it. A
set of numbered, horizontal lines appears at the top of the page, and two
sets of vertical lines, each with a unique letter, appear in the middle and
at the bottom of the page.
Follow the instructions on the page above each set of paired lines.
Congratulations! You have finished setting up your HP Color Copier. Now
you are ready to start using it.
To switch to a different language, do the following:
While holding down the Select/Resume button, press the Color
Intensity button, and then release both buttons.
Press Select/Resume.
The current language appears on the front-panel display.
Press the minus (–) or plus (+) button to scroll through the available
languages until the language you need appears on the display.
The available languages include: English, Español, Deutsch, Français,
Italiano, Portugués, Nederlands, Dansk, Norsk, Svenska, and Suomi.
Press Select/Resume to choose the displayed language.
The current paper size appears on the front-panel display.
Press the minus (–) or plus (+) button until the desired paper size
appears on the display.
Press Select/Resume to choose the displayed paper size.
Page 21

HP Color Copier User’s Guide
3-1
All About Paper
3
HP Papers
This chapter explains the paper types you can use when copying. It also
presents some tips on loading paper and transparency film and specifies paper
requirements for originals used in the automatic document feeder (ADF).
For a current list of HP papers, visit our Web site:
http://www.hp.com/go/copiers
The HP Color Copier is designed to copy onto a variety of paper types and
weights, including plain paper. Be sure that all paper is free of rips, dust,
wrinkles, and curled or bent edges.
For highest quality results, use the following HP papers:
◆
HP Bright White Inkjet Paper delivers high-contrast colors and sharp
text. It is opaque enough for two-sided color printing, with no
show-through. It is ideal for newsletters, reports, proposals, and flyers.
◆
HP Premium Photo Paper is a high-quality, glossy-finish, photo-based
inkjet paper. It looks and feels like a photograph and can be mounted
under glass or in an album. HP Photo paper dries rapidly and resists
fingerprints and smudges.
◆
HP Iron-On T-Shirt Transfers can be used to transfer your designs or
photos onto T-shirts, sweatshirts, and fabric crafts.
◆
HP Premium Inkjet Rapid-Dry Transparency Film is designed to make
your color presentations vivid and even more impressive. This film is
easy to use and handle and dries quickly without smudging.
◆
HP Premium Heavyweight Inkjet Paper is matte-coated on both sides for
two-sided copying. It is the perfect choice for near-photographic
reproductions and business graphics for report covers, special
presentations, brochures, mailers, and calendars.
◆
HP Premium Inkjet Paper is the ultimate coated paper for
high-resolution copying. A smooth-matte finish makes it ideal for your
special documents.
◆
HP Photo Paper uses Kodak Image Enhancements technology to give
you excellent skin tones and true-to-life landscape colors.
Page 22

3-2
All About Paper
◆
Paper Choices When Copying
Using the Right Front-Panel Paper Type When Copying
NOTE
If you select Iron-On, the HP
Color Copier
automatically copies using the Mirror digital
copying feature.
HP Premium Inkjet Transparency Film is specifically designed for use
with your HP Color Copier to give you the best results with your
overhead transparency presentations.
◆
HP Greeting Card Paper and HP Glossy Greeting Card Paper allow you
to make your own greeting cards and invitations.
You should copy only onto letter (A)- and A4-sized papers.
The paper type you select determines how your HP Color Copier copies onto
the paper you are using. Each time you load a different type of paper in the
IN tray or document feeder, set the corresponding paper type on the front
panel.
To Copy on this Paper Select this Paper Type
(from the Front Panel)
Copier Paper Plain Paper
Letterhead Plain Paper
HP Bright White Inkjet Paper Plain Paper
HP Premium Inkjet Paper Premium Inkjet
HP Premium Inkjet Heavyweight
Paper
Other inkjet papers Premium Inkjet
HP Photo Paper Premium Photo
HP Premium Photo Paper Premium Photo
Other photo papers Premium Photo
HP Premium Inkjet Transparency
Film
HP Premium Inkjet Rapid-Dry
Transparency Film
Other transparency films Transparency
HP Greeting Card Paper Plain Paper
HP Glossy Greeting Card Paper Plain Paper
HP Iron On T-Shirt Transfers Iron-On (see following note)
Other specialty papers Plain Paper
Labels (see following note) Plain Paper
Premium Inkjet
Transparency
RapidDry Trans
Page 23

HP Color Copier User’s Guide
3-3
Tips on Loading Paper in the IN Tray
All Papers
◆
HP Papers
Special Considerations When Using Transparency Film
NOTE
We recommend using only HP Premium Inkjet or Rapid-Dry Transparency Film when
copying on transparencies. Other transparency film can jam in the HP
Color Copier
.
Be sure that paper is free of rips, dust, wrinkles, and curled or bent edges.
◆
Make sure all the paper in the stack is the same size and type.
◆
Tap the stack on a flat surface to even the edges of the paper.
◆
Put the paper into the IN tray with the print side down and with the
letterhead (top of the page) forward.
◆
Push the paper forward into the IN tray until it stops.
◆
Slide the paper width and length adjusters to fit snugly against the edges
of the paper stack. Be sure that the paper stack lies flat in the IN tray and
fits under the tab of the paper-length adjuster.
◆
HP Premium Inkjet Paper: Locate the gray arrow on the nonprinting
side of the paper, and insert paper with the arrow side facing up.
◆
HP Premium Photo Paper: Load the shiny side facing down. Always
load at least 5–10 sheets in the IN tray. You can place the photo paper
sheets on top of plain paper.
◆
HP Premium Transparency Film: Insert the film so that the white
transparency strip, with arrows and the HP logo, is on top and going into
the tray first.
◆
HP Iron-On T-Shirt Transfers: For best results, manually feed one
sheet at a time, with the unprinted side facing down. Flatten the transfer
sheet completely before using it; do not load curled sheets. To prevent
curling, keep transfer sheets sealed in the original package until just
before using.
◆
Load a maximum of 25 transparency sheets at a time.
◆
Be sure to specify Transparency as the Paper Type setting.
◆
Ink dries slower on film. Be sure to allow enough time for the ink to dry
before using the transparency.
◆
If you are copying from a transparency (that is, your original is printed
on transparency film), place a blank piece of paper over the transparency
on the copier glass.
Page 24

3-4
All About Paper
Other Paper Tray Considerations
To avoid paper jams, remove papers from the OUT tray frequently. OUT tray
Automatic Document Feeder (ADF) Requirements
NOTE
Load only letter (A)- or A4-sized papers in the ADF. Load only plain paper or HP
special papers such as HP Premium Inkjet Paper.
Slick-surfaced papers, such as glossy papers, will also jam in the ADF. A full-page
color graphic printed on a color laser printer develops a slick surface.
capacity is affected by the type of paper and the amount of ink you are using.
For more information, see Chapter 8, “Technical Information.”
◆
Load a maximum of 30 originals at a time when using letter (A)- or
A4-sized papers.
◆
Load only plain paper (white and color), letterhead, and HP Premium
Inkjet Paper in the 16–24 lb (60–90 gsm) range.
◆
Always insert originals with the printed-side facing back in the feeder
and the top of the paper to the right. Align the paper with the right side
of the ADF.
◆
Do not start copying until the “Document loaded” message appears
briefly on the front panel display and you see the Copy Quality lights
flash.
◆
Do not load colored originals printed on a color laser printer.
Page 25

HP Color Copier User’s Guide
4-1
Copying
4
How to Make Copies
1
2
3
This chapter explains how to make copies and how to use the special copying
features of the HP Color Copier.
.
Turn on the HP Color Copier by pressing the white power button located
on the left side of the unit’s front panel.
Load the paper.
Choose one of the following for placing your original:
◆
If you are not using an automatic document feeder (ADF), place
your original face down on the glass with the top edge along the
white border. If the original is a photo, place the top of the photo
along the white border, close to the white arrow.
◆
If you are using an ADF, place your originals in the feeder with the
printed side facing toward the back and with the top to the right.
Align the paper with the right side of the ADF. Be sure to put fullsized pages only in the ADF , and adjust the page guide to the length
of the originals.
Page 26

4-2
Copying
As you load the originals, the message “Document loaded” appears
NOTE
For more information about the types of paper you can use in the ADF, see Chapter
3, “All About Paper.”
4
5
6
NOTE
To avoid paper jams, remove copies from the OUT tray frequently. OUT tray capacity
is affected by the type of paper and the amount of ink you are using. For tray
capacities, see Chapter 8, “Technical Information.”
briefly on the front-panel display.
To specify the number of copies, press Number of Copies until the
desired number appears on the display.
If the number of copies is already displayed on the front panel and you
want to change it, press the minus (-) or plus (+) button until the correct
number appears on the display.
To adjust the way your copy will look, use the copy quality (Best,
Normal, and Fast), Reduce/Enlarge, Paper Type, Lighter/Darker,
and Color Intensity buttons.
For more information about using these buttons, see “Controlling How
Copies Look” later in this chapter.
Start copying by doing one of the following:
◆
Press the Black button to make black-and-white copies.
◆
Press the Color button to make color copies.
Page 27

HP Color Copier User’s Guide
4-3
Controlling How Copies Look
The copy settings control how your copies look.This section explains how to
Changing Copy Settings Using the Front-Panel Buttons
Clear/Stop
Select/Resume
Copy Quality (Best/Normal/Fast)
change settings using the front-panel buttons and menu commands.
The copy settings are reset to their default settings two minutes after each
copy job is complete. If you consistently modify settings to change the way
your copies look, make those your new default settings. For more
information, see “Creating Your Own Default Settings” later in this chapter.
Use Clear/Stop to cancel copy settings you have specified or to stop copying.
When you press Clear/Stop to cancel copy settings, they are reset to default
settings.
When you press Clear/Stop to stop copying, the message “Copy Cancelled”
appears on the display. After a few seconds, the HP Color Copier cancels the
job.
Use Select/Resume to confirm copy settings you have specified.
The copy quality button changes the speed and quality of the copies you
make. (This button is not labeled “copy quality.” It is the small button beneath
the three small lights labeled Best, Normal, and Fast.)
To change the quality setting, press the button until the light next to the setting
you want to use is lit. You can choose from the following settings:
Best produces the highest quality for all paper and eliminates the banding
◆
(striping) effect that sometimes occurs in solid areas. Best copies more
slowly than the other quality settings.
◆ Normal delivers high-quality output and is the recommended setting for
most of your copying. Normal is the recommended setting for all paper
types and is faster than Best.
◆ Fast copies faster than the Normal setting, and the text is of comparable
quality. Using Fast also cuts down on the frequency of replacing your
print cartridges because it uses less ink.
Page 28

4-4
Copying
Reduce/Enlarge
The Reduce/Enlarge button lets you quickly reduce or enlarge originals to the
NOTE
1
2
NOTE
There is a small margin around the edge of the paper that the HP Color Copier cannot
copy onto.
For more information see Chapter 8,“Technical Information
.”
Also, see
Entire 91% and Auto Fit below.
Special Features
1
2
size you want.
Some Reduce/Enlarge features let you specify the exact percent reduction or
enlargement you want and they are shown in the display with the minus/plus
(–+) signs. Press the minus (–) or plus (+) button once to change the
percentage by one. Hold down the minus (–) or plus (+) button to change the
percentage by increments of five.
To change the reduction and enlargement settings, do the following:
Press Reduce/Enlarge until the setting you want appears on the display.
Press Select/Resume to select the new Reduce/Enlarge setting.
The following features are available with Reduce/Enlarge:
◆ Normal 100%
◆ Entire 91% reduces your copy slightly to ensure that the whole image,
makes a copy that is the same size as your original.
out to all the edges, is copied.
◆ Auto Fit pre-scans the original to determine where its edges are, and then
reduces or enlarges the original to fit on the paper you are using.
When enlarging, Auto Fit increases the size of the copy to the largest size
that will fit on the page without distorting the image and centers the
image on the page.
◆ Custom 100% (– +) lets you specify an exact reduction or enlargement
percentage between 25% and 400%. This range varies slightly between
models.
Max 400% (– +) enlarges the original to the highest enlargement
◆
percentage.
Min 25% (– +) reduces the original to the lowest reduction percentage.
◆
You can select digital copying features using this button.
To select a feature, do the following:
Press Special Features until the setting you want appears on the display .
Press Select/Resume to select the new setting.
Page 29

HP Color Copier User’s Guide
4-5
The following Special Features are available:
NOTE
When you select Iron-On as the paper type on the front panel, the HP Color Copier
automatically selects Mirror as the Reduce/Enlarge setting.
Paper Type
1
2
Normal
◆
◆ Poster 400% (– +) determines how to divide up the original image and
●
indicates that no special feature has been selected.
enlarge each part to end up with an image that is up to 400% larger than
your original. Poster centers the image on the sheets. A poster may be
created using up to 25 sheets of paper (5 sheets wide and 5 sheets long).
2 on 1 allows you to copy two pages in succession which the HP Color
◆
Copier then reduces and prints on one page. If copying manually from
the glass, you will be prompted for the second page with a message on
the front-panel display. The message remains until you press either
Select/Resume or Clear/Stop.
◆ Clone 100% (– +) fits as many copies of the original as will fit on one
sheet of the paper you are using.
◆ Mirror 100% (– +) reverses the image of your original and makes a copy
based on the percent reduction/enlargement percentage that you specify.
You can use Mirror to copy favorite photos or images onto HP Iron-On
T-Shirt Transfers, and then iron the transfer sheets to make custom
t-shirts, banners, and flags. Y ou can also use Mirror to copy presentation
materials onto HP Premium Inkjet Transparency film. Then, when you
flip each film over to make your presentation, you can write on it and
erase, without worrying about smearing the ink.
The Paper Type button affects how the HP Color Copier makes copies. You
must select the appropriate setting for the kind of paper you are using. For
more information about selecting the proper paper type, see Chapter 3, “All
About Paper,” earlier in this guide.
To change the paper type, do the following:
Press Paper Type repeatedly to scroll through the list of paper types.
When the paper type you are using appears on the front-panel display,
press Select/Resume.
Page 30

4-6
Copying
Lighter/Darker
Use Lighter/Darker to adjust the lightness and darkness of the copies you
1
2
3
Color Intensity
1
2
3
Menu
1
2
make. To do so:
Press Lighter/Darker.
The range of values appears as a circle on a scale on the display.
Press the minus (–) or plus (+) button to make the copy lighter or darker.
The circle moves to the left or right, depending on the button you press.
Press Select/Resume to confirm your selection.
Use Color Intensity to make colors on your copy more vivid or more subtle.
To do so:
Press Color Intensity.
The range of color intensity values appears as a circle on a scale on the
front-panel display.
Press the minus (–) or plus (+) button to make the colors more subtle or
intense.
The circle moves to the left or right, depending on the button you press.
Press Select/Resume to confirm your selection.
With the Menu button, you can change some additional copy settings.You can
also change some default settings of the HP Color Copier that are not related
to copying.
To change settings using the menu commands, do the following:
Press Menu repeatedly to scroll through the list of available commands.
After the command you want to change appears on the display, press
either minus (–), plus (+) or Select/Resume to choose it.
For more information about changing specific menu commands, see
“Changing Copy Settings Using the Menu Commands” and “Changing
Default Settings” later in this chapter.
Page 31

HP Color Copier User’s Guide
4-7
Changing Copy Settings Using the Menu Commands
Photo Mode
Photo Mode temporarily turns the Text Enhancement (TE) setting off and the
1
2
3
Copy Paper Size
1
2
3
4
WARNING
Do not copy onto envelopes or other smaller-sized papers. Copying onto smaller-
sized papers can damage your HP Color Copier.
TE (Text Enhancement)
1
2
3
Enhance Light Colors (ELC) setting on for optimal copying of a photograph.
For more information about using the TE and ELC settings, see “TE (Text
Enhancement)” and “ELC (Enhance Light Colors)” later in this chapter.
To use the Photo Mode, do the following:
Press Menu until Photo Mode (–+) ❍ appears.
Press the plus (+) button to select Photo Mode.
The small circle to the right of the (– +) is filled in
Photo Mode is enabled; it is cleared ❍ when Photo Mode is turned off.
Press Select/Resume to confirm your selection.
Copy Paper Size lets you copy on either letter-sized (8.5-by-11-inches) or
A4-sized (210-by-297-mm) paper.
To change the copy paper size, do the following:
Press Menu until Copy Paper Size appears.
Press Select/Resume to view the current default paper size.
Press the minus (–) or plus (+) button to toggle between the paper sizes.
Press Select/Resume to choose the paper size you want.
●
to indicate that
TE sharpens the edges of black text. It is turned on by default and should
usually be left on. (TE is automatically turned off when you select Photo
Mode.) However, turn TE off if:
Large, black typefaces look splotchy (not smooth).
◆
Horizontal grainy or white bands appear in light- to medium-gray areas.
◆
Thin, colored objects or lines contain black sections.
◆
To turn TE on or off, do the following:
Press Menu until TE appears.
Press the minus (–) or plus (+) button to switch between off ❍ and
●
.
on
Press Select/Resume to confirm your selection.
Page 32

4-8
Copying
ELC (Enhance Light Colors)
ELC enhances light-colored backgrounds in documents and improves the
.)
1
2
3
Changing Default Settings
NOTE
To change the default language, see “Changing the Front-Panel Language” in
Chapter 2.
Creating Your Own Default Settings
1
2
3
NOTE
Current settings are indicated by a solid circle
. Default settings have no special
indicator.
Restoring the Factory Default Settings
1
2
appearance of very pale colors. It is turned off by default and should usually
be left off. (ELC is automatically turned on when you select Photo Mode
However, turn ELC on if pale colors are copying as white.
To turn ELC on or off, do the following:
Press Menu until ELC appears.
Press the minus (–) or plus (+) button to switch between off ❍ and
on●.
Press Select/Resume to confirm your selection.
This section explains how to change the default front-panel settings.
If you consistently use settings on the front panel other than the default
settings, you can make those your new default settings. You can change most
settings. To create new default settings:
Set all options the way you want them.
Press Menu until Set Defaults appears.
Press Select/Resume to confirm your selection.
●
You can return all the front-panel settings to their factory default settings. To
do so:
Press the Menu button until Factory Defaults appears.
Press Select/Resume to confirm your selection.
Page 33

HP Color Copier User’s Guide
5-1
Troubleshooting and
Maintaining Your
HP Color Copier
5
Cleaning the Exterior Case
Cleaning the Glass
WARNING
Turn off the HP Color Copier and unplug the power cord before cleaning. Even though
the HP Color Copier is off, power is still being supplied if the cord is plugged in.
1
2
CAUTION
Do not use abrasives, acetone, benzene, or carbon tetrachloride on the glass;
these can damage it. Do not place liquids directly on the glass.
They may seep
under it and damage your HP Color Copier.
3
This chapter provides instructions for keeping your HP Color Copier in top
working condition. Perform the maintenance procedures as necessary.
This chapter also presents procedures for resolving paper jams in the paper
tray and automatic document feeder (ADF). It also lists some of the messages
that may appear on the HP Color Copier front-panel display.
Use a soft, damp, lint-free cloth to wipe dust, smudges, and stains off the case.
The interior of the HP Color Copier does
away from the interior of the HP Color Copier.
Dirty glass (fingerprints, smudges, and so on) slows down copying
performance by as much as half a minute! This is because the scanner is
actually processing the smudges on the glass. Keep the glass clean.
not
require cleaning.
Keep fluids
To clean the glass:
Turn off the HP Color Copier, unplug the power cord, and raise the lid.
Clean the glass with a soft cloth or sponge slightly moistened with a
nonabrasive glass cleaner.
Dry the glass with a chamois or cellulose sponge to prevent spotting.
Page 34

5-2
Troubleshooting and
Maintaining Your HP Color Copier
How to Clear a Paper Jam in the ADF
If “Automatic Document Feeder Jam. Clear jam then press Resume.” appears
1
2
3
4
How to Clear a Paper Jam in the Main Unit
Paper Jam with Front-Panel Message
1
2
3
Paper Jams in the Back of the Unit
1
2
3
4
5
on the front-panel display, do the following:
Remove your originals from the ADF.
Lift the lid, and clear the paper path.
Lower the lid, and replace your originals in the ADF.
Press Select/Resume on the front panel to continue.
If “Paper Jam” appears on the front-panel display, do the following:
Slide the IN tray out, remove any wrinkled and torn paper from the IN
tray, remove any paper coming out into the OUT tray, and reload new
paper in the IN tray.
Turn the HP Color Copier off and then on again.
Process your job again.
If paper jams in the rear of the HP Color Copier, follow these steps:
Turn the knob on the rear access door 1/4-turn counter clockwise to the
unlocked position, which releases the door.
Remove the door, and pull the jammed paper out of the unit.
Replace the door in the back of the unit, and turn the knob clockwise to
the locked position.
Turn the HP Color Copier off and then on again.
Process your job again.
Page 35

HP Color Copier User’s Guide
5-3
How to Use the Self-Test Page
The self-test page lets you know whether the HP Color Copier is operating
1
2
How to Clean Cartridges
1
2
NOTE
If copy quality still seems poor after you clean the cartridges, replace the one, black
or color, that is affected.
properly. It lists current, default front-panel settings, and tells whether the
ADF is attached properly.
To print a self-test page:
Press Menu until “Self-Test Page” appears on the display.
Press Select/Resume.
The test page has a set of lines that should appear unbroken, and colored
bars that should appear solid. The intensity of the colors varies,
depending on the type of paper you are using (that is, plain paper,
HP Premium Inkjet Paper, and so on).
Use the Clean Cartridges feature when the self-test page shows streaking or
white lines through any of the colored bars. Do not clean cartridges
unnecessarily. This wastes ink and shortens the life of your print cartridges.
To clean the cartridges:
Press Menu until “Clean Cartridges” appears on the display.
Press Select/Resume.
The message “Cleaning” appears on the display, and a sample page is
printed.
Page 36

5-4
Troubleshooting and
Maintaining Your HP Color Copier
Front-Panel Messages
Message What You Should Do
Additional cleaning will be
ineffective.
Automatic Document
Feeder Jam. Clear jam then
press Resume.
Black ink low
Black ink out soon.
Cartridge carriage blocked.
Close latches over print
cartridges, then turn power
off then on.
__Error. Record number
then call for service.
Paper jam. Clear the paper jam, and then turn the power off and then on
Power Save On. The HP Color Copier has not been used for 12 hours or more.
Remove and check black
cartridge. Verify Part
Number: 51645A or
51645G.
Replace the print cartridge.
See “How to Clear a Paper Jam in the ADF” earlier in this
chapter.
Replace the black ink cartridge at your earliest convenience.
Replace the black ink cartridge immediately.
Make sure the print cartridges are installed and the latches
are closed, and then turn the power off and on.
Turn the power off and then on again. If this does not work,
record the error number and contact HP.
again.
Press any button on the front panel or load originals in the
ADF.
The wrong black cartridge may be installed, or it may be
installed incorrectly. Remove it and replace it with the
correct cartridge, or insert it correctly.
Remove and check (black or
color) cartridge.
Remove and check color
cartridge. Verify Part
Number: C1823A, C1823D,
or C1823G.
Remove original from the
document glass.
One of the print cartridges is either incorrectly installed, the
wrong type, or defective. Remove the applicable print
cartridge, and then reinsert it. Make sure to remove the tape
from the print cartridge, and close the latch securely. If this
does not solve the problem, replace the cartridge.
The wrong tri-color cartridge may be installed, or it may be
installed incorrectly. Remove it, and replace it with the
correct cartridge or insert it correctly .
Remove the original from the document glass, and then press
Select/Resume on the front panel. If there is no original on
the glass, turn the unit off and then on again.
Page 37

HP Color Copier User’s Guide
5-5
Additional Troubleshooting Tips
Front-Panel Messages (Continued)
Message What You Should Do
Scanner system failure. The scanner bulb is becoming too dim to work properly, or
the unit needs servicing. Turn the power off and then on
again. If the message continues and the light does not come
on, your HP Color Copier needs to be serviced. See “HP
Customer Support” in Chapter 7 for more information.
Issue What You Should Do
Auto Fit, Clone, or Poster is
not working.
I hear a loud noise, and the
message “Cartridge carriage
blocked” appears on the
display.
Make sure to place the original in the correct position (see
Chapter 4), make sure that the glass, lid, and ADF are all
clean and free from smudges and dust, and make sure that the
ADF cable is plugged in.
The shipping insert was left inside the print-cartridge
carriage, or the latches were left open after the print
cartridges were inserted. Open the print-cartridge access
door, and remove the insert or close the latches. Turn the
HP Color Copier off and then on again.
Page 38

5-6
Troubleshooting and
Maintaining Your HP Color Copier
Page 39

HP Color Copier User’s Guide
6-1
Hewlett-Packard
Limited Warranty
6
HP Year 2000 (Y2K) Warranty
For Consumer Products Distributed Through Resellers
Extent of Limited Warranty
HP Color Copier
Duration of Limited Warranty (Hardware): 1 Year
Duration of Limited Warranty (Print Cartridges): 90 Days
Subject to all of the terms and limitations of the HP Limited Warranty
Statement provided with this HP Product, HP warrants that this HP Product
will be able to accurately process date data (including, but not limited to,
calculating, comparing, and sequencing) from, into, and between the
twentieth and twenty-first centuries, and the years 1999 and 2000, including
leap year calculations, when used in accordance with the Product
documentation provided by HP (including any instructions for installing
patches or upgrades), provided that all other products (e.g. hardware,
software, firmware) used in combination with such HP Product(s) properly
exchange date data with it. The duration of the Year 2000 warranty extends
through January 31, 2001.
1 HP warrants to you, the end-user customer, that HP hardware,
accessories and supplies will be free from defects in materials and
workmanship after the date of purchase, for the period specified above.
If HP receives notice of such defects during the warranty period, HP will,
at its option, either repair or replace products which prove to be
defective. Replacement products may be either new or like-new.
2 HP warrants to you that HP software will not fail to execute its
programming instructions after the date of purchase, for the period
specified above, due to defects in material and workmanship when
properly installed and used. If HP receives notice of such defects during
the warranty period, HP will replace software media which does not
execute its programming instructions due to such defects.
Page 40

6-2
Hewlett-Packard Limited Warranty
3 HP does not warrant that the operation of HP products will be
uninterrupted or error free. If HP is unable, within a reasonable time, to
repair or replace any product to a condition as warranted, you will be
entitled to a refund of the purchase price upon prompt return of the
product.
4 HP products may contain remanufactured parts equivalent to new in
performance or may have been subject to incidental use.
5 Warranty does not apply to defects resulting from (a) improper or
inadequate maintenance or calibration, (b) software, interfacing, parts or
supplies not supplied by HP , (c) unauthorized modification or misuse, (d)
operation outside of the published environmental specifications for the
product, or (e) improper site preparation or maintenance.
6 HP MAKES NO OTHER EXPRESS WARRANTY OR CONDITION
WHETHER WRITTEN OR ORAL. TO THE EXTENT ALLOWED BY
LOCAL LAW, ANY IMPLIED WARRANTY OR CONDITION OF
MERCHANTABILITY, SATISFACTORY QUALITY, OR FITNESS
FOR A PARTICULAR PURPOSE IS LIMITED TO THE DURATION
OF THE EXPRESS WARRANTY SET FORTH ABOVE. Some
countries, states or provinces do not allow limitations on the duration of
an implied warranty , so the above limitation or exclusion might not apply
to you. This warranty gives you specific legal rights and you might also
have other rights that vary from country to country, state to state, or
province to province.
7 TO THE EXTENT ALLOWED BY LOCAL LAW, THE REMEDIES
IN THIS WARRANTY STATEMENT ARE YOUR SOLE AND
EXCLUSIVE REMEDIES. EXCEPT AS INDICATED ABOVE, IN NO
EVENT WILL HP OR ITS SUPPLIERS BE LIABLE FOR LOSS OF
DATA OR FOR DIRECT, SPECIAL, INCIDENTAL,
CONSEQUENTIAL (INCLUDING LOST PROFIT OR DATA), OR
OTHER DAMAGE, WHETHER BASED IN CONTRACT, TORT, OR
OTHERWISE. Some countries, States or provinces do not allow the
exclusion or limitation of incidental or consequential damages, so the
above limitation or exclusion may not apply to you.
Page 41

HP Color Copier User’s Guide
6-3
Warranty Service
Express Service
To obtain HP express repair service, the customer must contact an HP service
Warranty Upgrades
Returning Your HP Color Copier for Service
office or an HP Customer Support Center for basic troubleshooting first.
If a customer unit needs a minor part replacement and these parts can
normally be replaced by the customer, the customer-replaceable components
may be serviced through expedited part shipment. In this event, HP will
prepay shipping charges, duty and taxes; provide telephone assistance on
replacement of the component; and pay shipping charges, duty, and taxes for
any part that HP asks to be returned.
For some repairs, the HP Customer Support Center may direct customers to
designated Authorized Service Providers who are certified by HP to service
the HP Color Copier.
Extended warranties and service option upgrades may be obtained through
your local HP authorized dealer or HP service centers.
In the U.S. and Canada, extended warranties may also be obtained by calling
HP at 1-800-446-0522.
Before returning your HP Color Copier for service, you must call HP
Customer Support. See Chapter 7, “Support Services,” for steps to take before
calling Customer Support.
Page 42

6-4
Hewlett-Packard Limited Warranty
Page 43

HP Color Copier User’s Guide
7-1
Support Services
7
Get Help from HP
Online Services
Internet
HP FIRST
HP Customer Support
1
2
This chapter explains how to get support for your HP Color Copier.
If you are unable to find the answer you need in this guide, you can contact
one of the HP support services listed in the following pages. Support services
are available in the U.S. and Canada
If you have Internet access, you can get help from the HP Web site at:
http://www.hp.com/go/copiers
Here you can find the latest product information and answers to frequently
asked questions to help you get the most from your HP Color Copier.
To order printed user guides, a front-panel overlay, or any other replaceable
parts in the U.S. or Canada, dial:
(888) HP DISKS (473-4757)
Call HP FIRST to request information to be faxed directly to you. HP offers
this service free of charge. To use HP FIRST, you need a touch-tone phone
and a 9600-baud, Group 3 fax machine so you can receive the information.
If you need to contact HP Customer Support, do the following before you
call:
Make sure that the unit is plugged in and powered on, that the specified
inkjet print cartridges are installed correctly, and that the recommended
paper is properly loaded in the IN tray.
Review Chapter 2, “Setting Up Your New HP Color Copier,” and
Chapter 5, “Troubleshooting and Maintaining Your HP Color Copier.”
Page 44

7-2
Support Services
3
Try resetting the unit by powering it off and then on again, using the
4
5
6
Prepare Your HP
Color Copier
for Shipment
1
2
3
CAUTION
Print cartridges that remain inside may damage your HP
Color Copier
.
4
5
6
white button located on the left side of the unit’s front panel.
Call the HP FIRST toll-free number or check the HP Web site at
http://www.hp.com/go/copiers for more information that might help.
If you are still experiencing problems and need to speak with an
HP Customer Support Representative, do the following:
◆
Have your serial number ready.
◆
Make a color copy.
◆
Be prepared to describe your problem in detail.
Call HP Customer Support. Be near your HP Color Copier when you
call.
If after contacting HP Customer Support you are requested to send your
HP Color Copier in for service, do the following:
Turn on the HP Color Copier.
Open the print-cartridge access door.
Remove both print cartridges, and leave the print-cartridge latches
flipped back.
Place the print cartridges in an airtight bag so they will not dry out, and
put them aside (do not send them with the HP Color Copier, unless
instructed to by the HP customer support call agent).
Turn off the HP Color Copier. You will see the message “Shutting
Down” on the front-panel display.
Close the print-cartridge access door.
Page 45

HP Color Copier User’s Guide
7-3
7
If available, pack the HP Color Copier for shipment using the original
NOTE
Shipping damage caused by improper packaging is not covered under the warranty.
8
Calling in the U.S. During Warranty
packing materials.
If you do not have the original packaging materials, you can request a
replacement package set from HP Customer Support.
Include the following items in the box:
◆
A brief description of symptoms for service personnel (samples of
print quality problems are helpful).
◆
A copy of the sales slip or other proof of purchase to establish the
warranty coverage period.
◆
Your name, address, and a phone number where you can be reached
during the day .
Call (208) 323-2551 Monday through Friday from 6:00 A.M. to 10:00 P.M.
Mountain Standard Time (MST) and Saturdays from 9:00 A.M. to 4:00 P.M.
MST. This service is free during the warranty period; however, your standard
long-distance phone charges still apply.
Page 46

7-4
Support Services
Calling in the U.S. Post-Warranty
If your product is not under warranty, you can call (800) 999-1148. A percall, out-of-warranty support fee will be charged to your credit card. You can
also call (900) 555-1500 ($2.50 per minute) from 6:00 A.M. to 10:00 P.M.
MST and Saturdays from 9:00 A.M. to 4:00 P.M. MST. Charges begin only
when you are connected with a support technician. (Prices and hours are
subject to change without notice.)
Support service is free during the warranty period; however, your standard
long-distance phone charges will apply. In some cases, a flat fee per single
incident will also apply:
Country HP FIRST Number HP Support Number
U.S. during warranty (800) 333-1917 (208) 323-2551
U.S. post-warranty
(per-call charge)
U.S. post-warranty
(per-minute charge)
Canada (800) 333-1917 (905) 206-4663
(800) 333-1917 (800) 999-1148
(800) 333-1917 (900) 555-1500
Page 47

HP Color Copier User’s Guide
8-1
Technical Information
Copy Specifications
Copy speed may vary according to the complexity of the document.
Copy Speed and Resolution
Text
Color
Text
Color
◆
Digital image processing
◆
Up to 99 copies from original
◆
Digital zoom from 25 - 400%
◆
Poster, Max, Mirror, 2 on 1, Clone
Speed Maximum Resolution
8
Fast
Normal
Best
10 cpm 6 cpm 1200 x 300 dpi 1200 x 300 dpi
9 cpm 2 cpm 1200 x 300 dpi 1200 x 300 dpi
1.5 cpm 0.4 cpm 2400 x 600 dpi 2400 x 600 dpi
Page 48

8-2
Technical Information
Copy Margins
Paper Specifications
Paper-Tray Capacities
NOTE
OUT tray capacity is affected by the type of paper and the amount of ink you are using.
HP recommends emptying the OUT tray frequently.
Paper Sizes
Top Bottom Left Right
U.S. Letter
Copy at 100% and Clone .04 in. (1.0 mm) .46 in. (11.7 mm) .25 in. (6.4 mm) .25 in. (6.4 mm)
Reductions/Enlargements
and Special Modes
2 on 1 .38 in. (9.65 mm) .38 in. (9.65 mm) 1.05 in. (26.67 mm)1.05 in. (26.67 mm)
.46 in. (11.7 mm) .46 in. (11.7 mm) .38 in. (9.65 mm) .38 in. (9.65 mm)
U.S. Legal
Copy at 100% and Clone .04 in. (1.0 mm) .46 in. (11.7 mm) .25 in. (6.4 mm) .25 in. (6.4 mm)
Reductions/Enlargements
and Special Modes
2 on 1 .9 in. (22.86 mm) .9 in. (22.86 mm) .3 in. (7.62 mm) .3 in. (7.62 mm)
.46 in. (11.7 mm) .46 in. (11.7 mm) .38 in. (9.65 mm) .38 in. (9.65 mm)
A4
Copy at 100% and Clone .04 in. (1.0 mm) .46 in. (11.7 mm) .125 in. (3.2 mm) .125 in. (3.2 mm)
Reductions/Enlargements
and Special Modes
2 on 1 .38 in. (9.65 mm) .38 in. (9.65 mm) .39 in. (9.91 mm) .39 in. (9.91 mm)
.04 in. (1.0 mm) .46 in. (11.7 mm) .37 in. (9.40 mm) .37 in. (9.40 mm)
Weight Input Tray* Output Tray*
Plain Paper
Transparencies
* Maximum capacity
16-24 lb. 100 50 black
20 color
N/A 25 25 or less
U.S. Letter
U.S. Legal
A4
8.5 in. x 11 in.
8.5 in. x 14 in.
210 x 297 mm
Page 49

HP Color Copier User’s Guide
8-3
Automatic Document Feeder
Power Specifications
Environmental Specifications
Physical Specifications
Ordering Accessories and Supplies
Weight Quantity
U.S. Letter*
A4
* Supports plain paper and most HP special papers. Does not support photo papers,
transparencies, envelopes or labels.
16 - 24 lbs. 30 16 - 24 lbs. 30
◆
Source (Input) Voltage
◆
Input Frequency
◆
Current
◆
Operating Temperature Ranges
◆
Recommended Operating Temperature Ranges
◆
Humidity
◆
Non-operating (Storage) Temperature Ranges
* Figures are based on using the AC adapter that came with your HP Color Copier (HP part number
0950-2880).
◆
Height
◆
Width
◆
Depth
◆
Weight
:
1A maximum
:
15% – 80% RH non-condensing
:
Base
:
18.45 in. (46.9 cm)
:
17.25 in. (43.8 cm)
:
Base
Base/Fax
:
100 – 240 VAC*
:
50 – 60 Hz
:
0º – 45º C (32º – 113ºF)
: 12.63 in. (32.1 cm);
: 26.2 lb (11.89 kg);
: 33.1 lb (15.03 kg)
:
5º – 40º C (41º – 104º F)
:
40º – 70º C (104º – 158º F)
A
DF
: 19.75 in. with tray extenders up (50.2 cm)
Base/ADF
: 31.71 lb (14.40 kg);
In the U.S., you may order printer supplies by calling HP Direct (800) 538-8787 for the name
of your local authorized HP dealer. To order replaceable parts, call HP Direct for more
information. Outside the U.S., call your local authorized HP dealer.
Supplies/Accessories HP Reorder Number
Inkjet Print Cartridges
HP Black Print Cartridge C51645A or C51645G
HP Color Print Cartridge C1823A, C1823D, or C1823G
Page 50

8-4
Technical Information
Regulatory Notices
FCC Statement (U.S.A.)
The United States Federal Communications Commission (in 47 CFR 15.105) has specified that
the following notice be brought to the attention of users of this product.
Declaration of Conformity: This equipment has been tested and found to comply with the limits
for a Class B digital device, pursuant to part 15 of the FCC Rules. Operation is subject to the
following two conditions: (1) this device may not cause harmful interference, and (2) this device
must accept any interference received, including interference that may cause undesired
operation. Class B limits are designed to provide reasonable protection against harmful
interference in a residential installation. This equipment generates, uses, and can radiate radio
frequency energy and, if not installed and used in accordance with the instructions, may cause
harmful interference to radio communications. However, there is no guarantee that interference
will not occur in a particular installation. If this equipment does cause harmful interference to
radio or television reception, which can be determined by turning the equipment off and on, the
user is encouraged to try to correct the interference by one or more of the following measures:
◆
reorient the receiving antenna
◆
increase the separation between the equipment and the receiver
◆
connect the equipment into an outlet on a circuit different from that to which the receiver is
connected
◆
consult the dealer or an experienced radio/TV technician for help
Product Regulations Manager, Hewlett-Packard Company, San Diego 619-655-4100.
The user may find the following booklet prepared by the Federal Communications Commission
helpful: How to Identify and Resolve Radio-TV Interference Problems. This booklet is available
from the US Government Printing Office, Washington DC, 20402. Stock No. 004-000-00345-4.
CAUTION
: Pursuant to Part 15.21 of the FCC Rules, any changes or modifications to this
equipment not expressly approved by the Hewlett-Packard Company, may cause harmful
interference and void the FCC authorization to operate this equipment.
Telecommunications General Approval (UK)
Pursuant to Section 22 of Telecommunications Act of 1984, this product is approved for
secondary attachment to approved primary attachment devices connected to the
telecommunications network under the General Approval (NS/G/1234/5/100003).
DOC Statement (Canada)
Le present appareil numerique n'emet pas de bruitis radioelectriques depassant les limits
applicables aux appareils numeriques de la class B prescrites dans le Reglement sur le
brouillage radioelectrique edicte par le ministere des Communications du Canada.
This digital apparatus does not exceed the Class B limits for radio noise emissions from digital
apparatus set out in the Radio Interference Regulations of the Canadian Department of
Communications.
Geräuschemission
LpA < 70 dB
am Arbeitsplatz
im Normalbetrieb
nach DIN 45635 T. 19
Page 51

HP Color Copier User’s Guide
8-5
Declaration of Conformity
according to ISO/IEC Guide 22 and EN45014
Manufacturer’s Name and Address:
Hewlett-Packard Company, 16399 West Bernardo Drive, San Diego, California
92127-1899, USA.
declares, that the product
Product Name: HP Color Copier 170, 270, 160, 260
Model Number(s): C668xA, where x=5 or 6
C669yA, where y=0 or 1
Product Options: HP Color Copier 270 & 260 includes ADF HP part # C6681-60020
conforms to the following Product Specifications:
Safety: EN60950:1992 +A1, A2, & A3
IEC 950:1991 +A1, A2, A3, & A4
UL1950, 3rd Edn: 1995
CSA22.2 No. 950 3rd Edn: 1995
NOM-019-SCFI-1993
EMKO TSE(74-SEC)207/1994
EMC: CISPR22:1993/EN55022:1994 - Class B
EN50082-1:1992
IEC 1000-3-2:1995 / EN61000-3-2:1995
IEC 1000-3-3:1994 / EN61000-3-3:1995
Taiwan CNS13438
FCC Part 15 - Class B / ICES-003, Issue 2 / VCCI-2
Supplementary Information
LED’S IN THIS PRODUCT ARE CLASS I IN ACCORDANCE TO IEC825-1
and EN60825-1.
The Product herewith complies with the requirements of the Low Voltage Directive
73/23/EEC and EMC Directive 89/336/EEC, and carries the CE marking accordingly.
Page 52

8-6
Technical Information
VCCI-2
printer will insert
Page 53

Please complete the following for future reference.
HP Color Copier:
Serial Number:
Date of Purchase:
Place of Purchase:
Address:
Phone Number:
Service Contract Number:
Date of Contract Expiration:
Safety Symbols
Owner’s Information
If present, this symbol is placed on the
HP Color Copier where it is necessary
for you to refer to the manual to
understand a hazard.
!
If present, this symbol is placed on the
HP Color Copier within the area where
hazardous voltage is present. Only
trained service persons should perform
work in this area.
If present, this symbol is placed on the
HP Color Copier within the area where
electrostatic discharge (ESD) may
occur. ESD can damage the HP Color
Copier’s electronic components. A void
touching electronic components or
circuit paths. Use proper grounding
devices when circuits are open to
outside areas.
Page 54

HP Color Copier User’s Guide
I-1
index
Numerics
2 on 1 4-5
A
AC/DC adapter 2-10
accessories, ordering
aligning print cartridges
Auto Fit
automatic document feeder (ADF)
4-4
clearing a jam 5-2
loading originals
paper specifications
requirements
8-3
8-3
2-12
3-5
3-5
B
Best copy quality 4-3
black-and-white copies, making
C
cartridges, print
aligning
2-12
cleaning
installing
ordering
cleaning
exterior case
glass
print cartridges
Clear/Stop button
clearing paper jam
Clone 100%
color copies, making
color enhancement on copies
Color Intensity button
connecting the power cord
copy
margins
resolution
specifications
speed
copy quality
Best setting
button
Fast setting
Normal setting
settings
copying
adjusting color intensity
adjusting lightness or darkness
black and white
canceling
changing copy paper size
color
enhancing light colors
enhancing text
5-4
2-7
8-3
5-1
5-1
4-2
8-1
4-3
4-5
4-3
8-2
4-3
8-1
4-3
4-3
4-3
5-2
8-1
5-4
4-2
4-3
4-7
4-6
4-2
2-10
4-8
4-6
4-7
4-8
4-2
how to
4-1
paper choices
paper-type settings
placing the original
using Photo Mode
using the Menu button
Custom 100%
customer support
3-2
4-5
4-1
4-7
4-6
4-4
7-1
D
declaration of conformity 8-5
default settings
changing 4-8
factory
4-8
language
paper size
2-12
2-12
E
Entire 91% 4-4
environment
environmental specifications
error messages on the front panel
express service
2-2
8-3
5-5
6-3
F
factory default settings 4-8
Fast copy quality
fax from HP FIRST
front panel
changing the default settings
language, changing
messages
overlay, attaching
4-3
2-12, 5-5
7-1
4-8
2-12
2-4
G
glass, cleaning 5-1
greeting cards
3-2
H
help
faxed to you
support services
HP Customer Support
HP FIRST
HP papers
4-6
7-1
7-1
7-1
7-1
3-1
Page 55

I-2
Index
I
inkjet paper
about
3-1
tips on loading
installing print cartridges
Internet
7-1
iron-on t-shirt transfers
3-1
about
tips on loading
3-4
3-4
J
jammed paper 5-2
L
language, changing 2-12
Lighter/Darker button
loading paper
2-5
4-6
M
maintenance
cleaning cartridges
cleaning exterior case
cleaning glass
margins, copy
Max 400%
Menu button
messages
changing the language used 2-12
front panel
Min 25%
minus button
Mirror 100%
4-4
8-2
4-4
4-6
4-4
4-5
5-1
2-12, 5-5
2-7
5-4
5-1
2-12
size
sizes
8-2
specifications
tips on loading
transparency film
Paper Type button
paper-tray capacity
paper-type settings
phone numbers
photo paper
about 3-1
tips on loading
photographs, copying
physical specifications
placing the original for copying
plus button
Poster 400%
power button
power cord
adapter
connecting
power specifications
print cartridges
aligning 2-12
cleaning
installing
ordering
problems
clean cartridges 5-4
front-panel messages
paper jam
print self-test page
tips for resolving
4-4
4-5
4-1
2-10
8-3
5-4
2-7
8-2
3-3
4-5
8-2
4-5
7-3, 7-4
3-4
2-10
8-3
5-2
3-1, 3-2
4-7
8-3
5-3
5-6
5-5
4-1
N
Normal 100% 4-4
Normal copy quality
notices, regulatory
4-3
8-4
O
online support 7-1
ordering accessories and supplies
original, placing for copying
overheads
3-1, 3-2
about
tips on loading
tips on using
3-4
4-1
3-4
P
paper
changing copy paper size
choices for copying
greeting card
HP papers
inkjet
iron-on t-shirt transfers
jam
loading
photo
5-2
3-1
3-1
2-5
3-1
3-2
3-2
3-1
R
Reduce/Enlarge button 4-4
reduce/enlarge settings
2 on 1 4-5
Auto Fit
Clone 100%
8-3
4-7
Custom 100%
Entire 91%
Max 400%
Min 25%
Mirror 100%
Normal 100%
Poster 400%
regulatory information
requirements, ADF
returning HP Color Copier for service
4-4
4-5
4-4
4-4
4-4
4-4
4-5
4-4
4-5
8-4
8-3
6-3, 7-1
Page 56

HP Color Copier User’s Guide
I-3
S
Select/Resume button 4-3
self-test page
service
settings
shipping HP Color Copier
specifications, technical
supplies, ordering
support
5-3
before you call
express warranty
HP Customer Support
returning HP Color Copier
support
telephone numbers
copy quality 4-3
factory default
paper-type
customer
HP FIRST
Internet
online services
services
telephone numbers
6-3, 7-1
6-3
7-1
4-8
4-5
8-1
8-3
7-1
7-1
7-1
7-1
7-1
T
technical specifications 8-1
telephone numbers
test, printing self-test page
text enhancement on copies
tips
5-6
transparency film
about 3-1, 3-2
tips on loading
tips on using
troubleshooting
clean cartridges 5-4
front-panel messages
paper jam
print self-test page
tips
5-6
t-shirt transfers
about
tips on loading
two on one, copying
7-3, 7-4
3-4
3-4
5-2
3-1
5-3
3-4
4-5
7-1
7-3, 7-4
7-2
7-3, 7-4
5-3
4-7
5-5
6-3, 7-1
U
upgrades, warranty 6-3
W
warranty
before you call
service
upgrades
Year 2000
Web site
3-1, 7-1
6-3, 7-1
6-3
6-3
6-1
Page 57

I-4
Index
 Loading...