


Hozelock Cyprio Ecopower 8000, Ecopower 20000, Ecopower 12000, 1862, 1864 User Manual
...
EcopowEr
8000/12000/20000
1862
1864
1866
1866
Hozelock Ltd.
Midpoint Park, Birmingham,
B76 1AB. England
Tel: +44 (0) 121 313 1122
www.hozelock.com
33911-000
1862
1864
?
www.hozelock.com
1a
1860
1860
1864
1866
1b
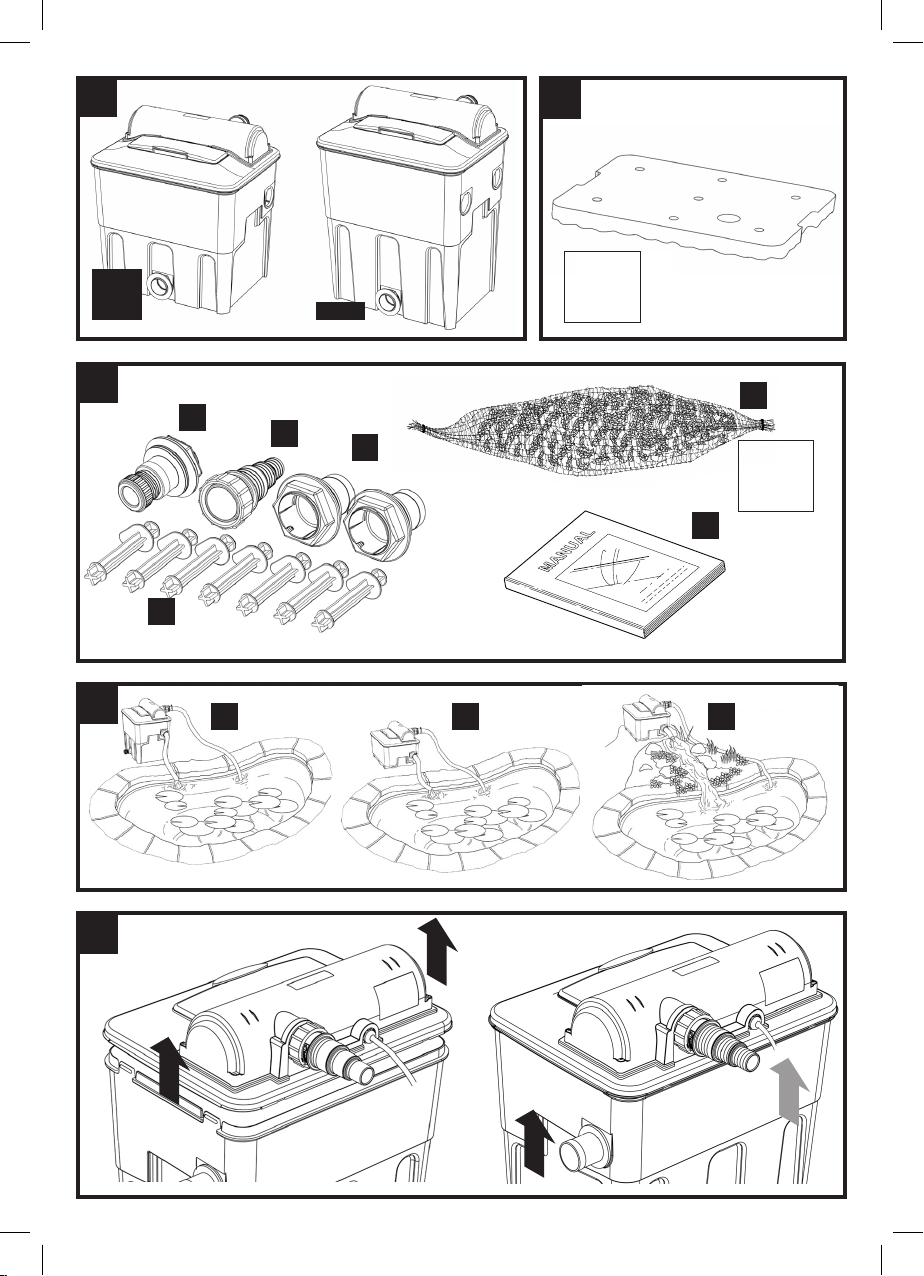
1860 x1
1860 x1
1864 x1
1866 x2
1
d
f
e
g
1860 x1
1860 x1
1864 x1
1866 x2
h
c
2
a b c
3
2

4
5
7
x
8
6
✗
25mm
32mm
40mm
9
10
✓
3
11 12
13 14
y
15 16
z
17
4
STOP

GB
Thank you for choosing a Hozelock quality product,
you can be assured of many years of reliable service
from this product.
INSTALLATION &
OPERATING INSTRUCTIONS
READ THESE INSTRUCTIONS CAREFULLY
BEFORE ATTEMPTING INSTALLATION.
FAILURE TO OBSERVE THE FOLLOWING
NOTICES MAY RESULT IN INJURY, PRODUCT
DAMAGE OR LOSS OF FISH.
KEEP THESE INSTRUCTIONS FOR FUTURE
REFERENCE.
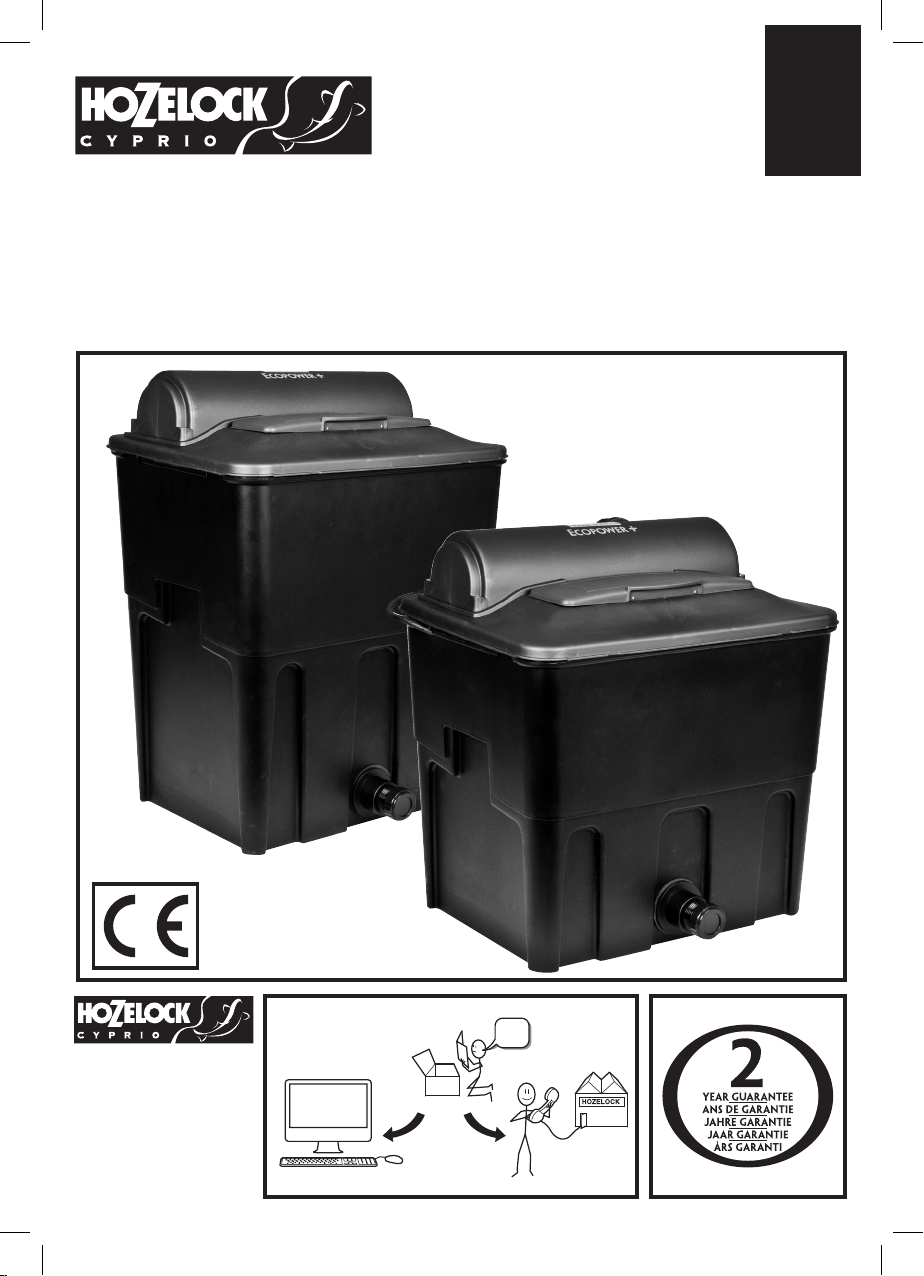
Hozelock Cyprio Ecopower+ garden pond filters can
be sited almost anywhere (See Fig 2a,2b,2c). Used
with the appropriate pond pump, it will improve water
clarity, remove unwanted solid matter from the pond
and convert dissolved organic and chemical fish waste
into harmless compounds.
In addition, these combined filter/UVC units will give
Guaranteed Clear Water if the advice given in the
Hozelock Cyprio Filter Equipment Selection Chart and
in these instructions is adhered to.
Attention: UV Caution
This appliance contains a UV-C emitter. Unintended
use of the appliance or damage to the housing may
result in the escape of dangerous UV-C radiation.
UV-C radiation may, even in little doses, cause harm to
the eyes and skin. The lamp is fitted with an interlock
that will turn the lamp off in the event that the
electrical housing is opened.
When switched on, the lamp can be checked for
operation in dark conditions, by switching off the
supply pump briefly and looking for a bluish glow
from bottom of the Venturi (Fig 7 (x)). Do not run the
product dry.
Warning: Do not attempt to operate the UV-C
emitter when the top cover is removed from the
product‘s lid.
Warning: The appliance must be disconnected from
the supply before replacing the UV-C emitter
Important
This appliance must only be used by or under the
supervision of a responsible adult who is capable
of using the appliance in a safe way and who
understands the hazards involved. Use and store this
appliance out of reach of children and persons with
reduced physical, sensory, or mental capabilities.
Maintenance of the electrical housing should only
be carried out by a suitably qualified person or at a
Service Centre.
Warning:
Safety & Electrical Connections
1.1 WARNING: ALWAYS UNPLUG OR
DISCONNECT ALL APPLIANCES IN THE POND
FROM THE ELECTRICITY SUPPLY BEFORE
PUTTING YOUR HANDS IN THE WATER
WHILST EQUIPMENT IS BEING INSTALLED,
REPAIRED, MAINTAINED OR HANDLED.
1.2 This filter has been designed for the use with
garden ponds only. Do not use this filter for any
other use (i.e. do not use this filter in swimming
pools, etc). Using the product for any other
application may result in injury or product
damage.
1.3 Appliances that are obviously damaged must
not be operated.
1.4 The clear tube inside the unit is made from
quartz glass and care should be taken during
installation and maintenance. We recommend
the use of eye protection and suitable gloves.
1.5 Your Ecopower+ filter is weatherproof but not
submersible. Position the unit upright near the
pond but not where it can fall into the water or
where the ground can become waterlogged (See
the section, “Installation”).
1.6 Important:
This product is supplied with 5m of 3-core
electric cable. The plug supplied with this
product is not waterproof and it must be
connected to the mains supply inside a dry
weatherproof enclosure according to your local
regulations.
Permanent installations to the mains supply
(hard wiring), must conform to the national and
local wiring regulations. If in any doubt about
wiring to the mains supply, consult a qualified
electrician or local electricity authority.
1.7 If an extension cable is required, this should be
connected to the end of the unit cable using
a weatherproof connector. The joint must be
positioned in a suitable weatherproof housing.
The extension cable should be of 3 core
0.75mm2 Polychloroprene rubber insulated cable
(ref: HO5 RN-F) and permanently wired to the
mains supply as described above in 1.6.
1.8 WARNING: This appliance MUST be earthed
and it is essential that the connections are made
using the following code:
• BROWN - live
• BLUE - neutral
• GREEN/YELLOW - earth.
1.9 Exposed cable runs should be sensibly positioned
and protected by armoured conduit, especially
if there is a risk of contact with gardening
5

equipment such as forks and lawnmowers, or
children and domestic animals.
1.10 Do not operate this product if the mains supply
cable has become damaged in any way. If the
cable is damaged, the unit should be disposed of
according to local regulations.
1.11 A 30mA maximum Residual Current Device
(RCD) MUST be fitted to the mains supply.
1.12 Permanent installations to the mains supply
(hard wiring), must conform to the national and
local wiring regulations. If in any doubt about
wiring to the mains supply, consult a qualified
electrician or local electricity authority.
1.13 Do not use the supply cable to lift the unit, as
this may cause damage. If the product needs to
be moved, the product should be switched off
and lifted by gripping both sides of the vessel
(Fig 3) or to lift the lid, grip both sides of the lid
(Fig 3).
1.14 Do not operate your filter dry.
1.15 Do not operate or leave the unit in freezing
conditions. (See the section, “Winter Storage”).
1.16 This product is not suitable for water
temperatures above 35ºC or below 0ºC.
1.17 Only use accessories which have been designed
for use with this product. The use of any other
accessories or spares may invalidate your
guarantee.
General Guidance
2.1 The Technical Information Chart overleaf gives
general guidance on the specifications of the
filter, recommended flow rates and flexible hose
diameter for garden ponds up to 10000 litres.
However, for best results several other condition
factors should be taken into consideration, as
these reduce the capabilities of the filter.
•Pond depth: Hozelock Cyprio recommends a
minimum depth of 1.2m (4’) for Koi ponds. For a
pond with an average depth of less than 0.75m
(2’ 6”) the Condition Factor is + 25%. Shallow
ponds are subject to full penetration of sunlight,
and warm up quickly. This encourages algae
growth.
•Location: Pond location determines the daily
amount of sunlight or shade a pond receives.
Ponds exposed to full sunshine throughout the
day have a Condition Factor of +25%.
•Climate: Climate affects water temperatures
and fish activity rate/feeding requirements. The
more active the fish, the greater the demands
on the filtration system. In hot climates (ie
South Africa), the Condition Factor is +35%.
In temperate climates (ie Southern Europe),
the Condition Factor is +15%. In a Northern
6
European climate (ie most areas of Great
Britain), the Condition Factor is +0%.
•EXAMPLE: You have a 2200 litre goldfish
pond 0.75m deep (Condition Factor +25%). You
live in London – a Northern European climate
(Condition Factor +0%). The pond is exposed to
full sunlight (+25%). The effective volume of your
pond is therefore increased by 50% (25% + 25%),
and you would need to size your equipment as
though your pond held 3300 litres.
2.2 Flow Rate: For best results the pond volume
should pass through the Ecopower+ every
1½ - 2½ hours, the fastest flow rate being
recommended for Koi ponds. Do not exceed the
maximum flow rate, as stated in the Technical
Information Chart overleaf. Correct flow rate is
essential if you are to obtain clear water. If your
installation does not suffer from high losses (ie
long hose runs) it may be necessary to adjust the
flow to achieve the 1½ - 2½ hours turnover rate
using a flow control hose tap.
Small diameter hose, unnecessarily long hose
runs and a high pumping lift (‘head’) can all
considerably reduce a pump’s output. We
recommend choosing a pump that will deliver
the required flow against full static lift (= vertical
distance between pond surface and filter inlet),
plus 0.6m (2ft) to allow for friction losses in
hoses.
The object of filtration is to transfer waste
material from the pond into the filter, and so
any pump used as part of the package should
be capable of handling solids such as Hozelock
Cyprio’s range of Aquaforce pumps which have
been specifically designed for ponds in the size
range covered by Ecopower+. The pump should
be positioned in the deepest part of the pond to
ensure the best circulation of water in the pond
and maximise its solids handling capability. The
pump should be installed on a flat level platform
which is raised 300mm off the bottom of the
pond. This will prevent the pump sucking dirt
directly from the bottom of the pond and will
also ensure that sufficient water remains in the
pond in the event of accidental leakage of pond
water.
How to check your flow rate: Take a container
of a known volume and time how long it takes to
fill (in seconds). Then divide 3600 by the number
of seconds it takes to fill the container, and
multiply by the volume (litres or gallons) of the
container. The result will be the flow rate in litres
or gallons per hour (lph or gph).
2.3 Fish Stocking Density: Under normal conditions
and feeding regime, the Ecopower+ range will
support up to 50cm per 1000 litres (10” of fish
per 100 gallons) of pond capacity. Introduce

fish slowly over the first few weeks, up to 20% of
maximum recommended level, increasing this if
you wish to 50% after six months. The balance
will allow for fish growth.
2.4 Pond Treatments: Some medications/
treatments can degrade very quickly by UVC
radiation. Consider switching off the filter
during disease treatment. The mechanical and
biological filtration will continue to work.
If treating your pond for blanketweed, turn
off your pump and filter for the duration of
treatment until the treated blanketweed has
been removed from the pond.
2.5 Extra care should be taken with any hose
connections as leaks will result in loss of water
from the pond.
Before First Use
Inappropriate handling of this product during transit
may result in damage to the quartz tube. Please
inspect the quartz tube and seal before installation.
See the section “Maintenance” for details on how to
access the quartz tube and lamp.
Installation
3.1 Important: Do not use a pump with a flow
rate greater than that shown in the Technical
Information chart overleaf or a maximum head
greater than 3.5m with the Ecopower+ range of
filters.
3.2 Important: Ecopower must only be installed in
an upright vertical position.
Locate the Ecopower+ on firm, level ground
where you can access it conveniently.
Ecopower filters are pump fed, external filter
with an integral UVC unit, suited to either above
ground (Fig. 2a), in-ground (Fig. 2b) installation
adjacent to your pond or concealed at the top of
a waterfall (Fig 2c).
If you choose to install your filter above ground,
place the filter on flat level ground.
If you choose to part bury your filter, the
excavation should be firmly back filled with
compacted sand to support the unit.
Always ensure that the filter outlet(s) are at
least 100mm above the level of the water in
your pond.
3.3 Connection - Place the unit next to the pond and
route the cable back to the mains supply. Ensure
that you allow for enough cable for positioning
the product in the desired location in the pond.
3.4 For transportation the drain outlet has been
fitted to the vessel back to front. Remove
this by unscrewing the nut and replace it the
correct way round as shown in (Fig 4).
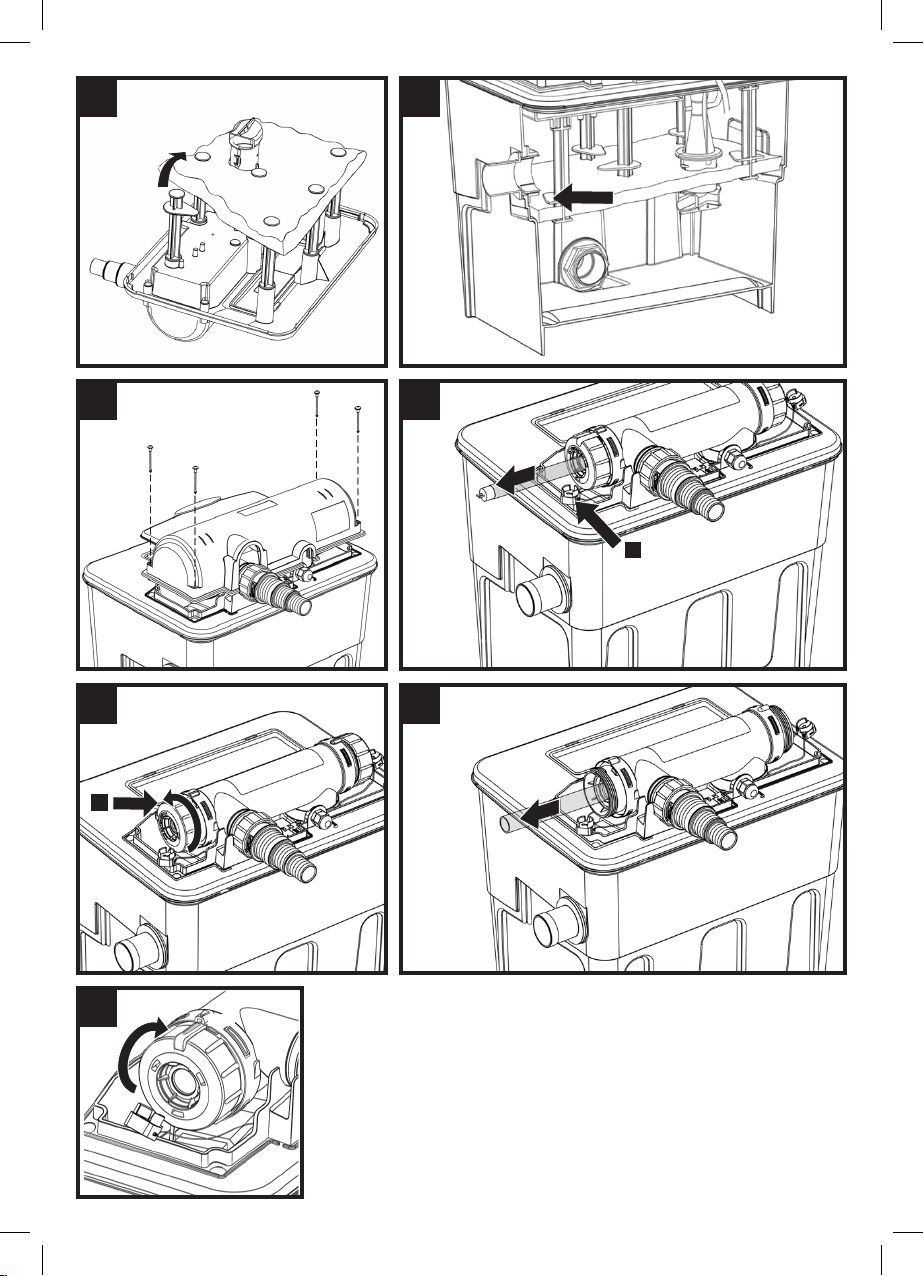
3.5 Turn the lid upside down and push the foam
spacer legs (Fig 1c) into the spaces indicated
shown in Fig 5. The point at the end of the legs
should point inwards as shown in Fig 6.
NEVER USE A HAMMER TO FIT THE LEGS !
3.6 Push the foam (x2 on Ecopower+ 20000) onto
the ends of the foam spacer legs. The large hole
fits over the end of the yellow venturi outlet
(Fig 7). The foam will only fit one way with the
dimples facing away from the lid.
3.7 Ecopower+ filters incorporate an inlet hose tail
(Fig 1f) to fit 20 - 40mm (3⁄4” – 11⁄2”) hose
(refer to Technical Information Chart overleaf)
and outlet hose tail(s) (Fig 1e) to fit 40mm (1
1⁄ 2”) hose. The pump inlet and filter outlet
pipe should be at opposite ends of the pond for
optimal water circulation in the pond. Bear this
in mind when purchasing, measuring and cutting
the Cypriflex hose.
Cut the inlet hose tail on your Ecopower+ Filter
to the size appropriate for the diameter of the
hose to be used (Fig 8) and fit it to the filter inlet
(Fig 9). Attach a suitable length hose between
the supply pump and the filter inlet securing the
hose to the hosetails using a Hozelock Cyprio
hoseclip, available separately.
3.8 The filter outlet connector and overflow
moulding(s) (x2 on Ecopower+ 10000) should be
secured to the side of the vessel (Fig 10).
The outlet hose (if fitted) should be secured in
the same way as the inlet hose. Avoid kinks and
bends, and keep hose runs as short as possible
(preferably less than 1m) to minimise flow
restrictions.
For best results we recommend that the end of
the outlet hose (if fitted) does not dip into the
pond.
3.9 Gently locate the lid onto the vessel and snap
down around the rim. Looking through the
viewing hatch, ensure that the foam sheet is
positioned below the outlet(s) in the vessel (Fig
12).
Operation
4.1 Connect the filter’s supply cord (See section 1 –
Safety & Electrical Connections). This switches
on the UVC lamp. You can check that the lamp is
working in dark conditions by switching off the
pump briefly and looking for the blue glow from
the end of the yellow venturi outlet (Fig. 7 (x)) .
4.2 Switch on the pump.
4.3 Periods of Operation: Keep the filter working 24
hours a day. Ideally it should run all year round
but at least throughout the feeding season
7

(ie until water temperature falls below 10ºC).
In winter, operating the pump and filter will
maintain a basic level of useful bacteria in the
Ecopower+ and will help prevent the pond icing
over in all but the severest weather conditions.
If the pump is switched off for winter, the filter
media (foam and/or plastic biomedia) must be
thoroughly washed before resuming filtration
in the spring, and your Ecopower+ will need to
be re-matured from scratch (see ‘Maturation’).
Never feed your fish when the filter is not in use.
Maturation
5.1 Biological maturation means that the filter
has built up enough nitrifying bacteria to
convert harmful fish and other organic waste
(ie ammonia, nitrite) into relatively harmless
nitrate. The process normally takes 6-8 weeks,
but depends on many factors such as water
temperature, feeding rate and stocking density.
Speed up maturation by adding a maturing
agent such as Hozelock Cyprio Filter Start.
Cleaning
6.1 Ecopower+ filters deliver maximum performance
with minimum maintenance.
However, as the foam blocks up less water can
flow through the foam and cleaning becomes
necessary. If the pond is very dirty, the filter
may need cleaning every few days at first, as
it takes up waste matter very quickly. Once the
pond becomes clearer, there will be less waste
to remove and the filter will need cleaning less
often.
WARNING: Prolonged running of the filter
when it needs cleaning will result in difficulty in
cleaning and may reduce the life of the foam.
Switch off and isolate (by removing the fuse) the
pump supplying water to the filter when it needs
cleaning and the power supply to the Ecopower+
unit.
6.2 Switch off the supply pump at the mains.
6.3 Switch off Ecopower+ at the mains.
6.4 Gently remove the lid from the vessel (Fig 3).
6.5 Remove the foam(s) (Fig 11) and rinse it in the
water left in the vessel. Do not over clean. Drain
the vessel of all the waste and water.
6.6 Reposition the clean foam sheet onto the ends
of the foam spacer ensure that the foam is
positioned with the venturi passing through it
and with the dimples in the foam facing away
from the lid.
6.7 Switch the supply to the Ecopower+ on and
check that the UVC lamp is working.
6.8 Gently locate the lid onto the vessel and snap
8
down around the rim. Looking through the
viewing hatch, ensure that the foam sheet is
positioned below the outlet(s) in the vessel (Fig
12).
6.9 Restart the pump, checking for leaks, which if
left undetected could result in the pond being
drained of water.
6.10 The biomedia is contained within a mesh
bag. Normally, there is no need to remove the
biomedia as any cleaning may kill the colonies
of bacteria that make toxic waste harmless.
However if the biomedia becomes heavily
clogged, then remove the mesh bag containing
the biomedia and rinse it is a bucket clean pond
water and then replace it into the vessel. Never
use tap water to clean the biomedia.
Maintenance
Maintenance of the electrical housing should only
be carried out by a suitably qualified person or at a
Service Centre.
Refer to the section “Safety & Electrical
Connections” before attempting any maintenance.
Warning: Read these maintenance instructions
before opening the appliance.
7.1 Replacing the UV lamp.
Warning: The appliance must be disconnected
from the power supply before disconnecting
the UV-C emitter.
A UV lamp’s effectiveness reduces significantly
over time so you should replace your lamp every
12 months even if the lamp is still functioning.
Remember: The product is fitted with an
interlock that will turn the lamp off when the top
cover is removed, so you can only see if the lamp
is working in dark conditions, switching off the
pump briefly and looking for a bluish glow from
bottom of the Venturi (Fig 7 (x)).
Warning: Do not attempt to operate the UV-C
emitter when the top cover is removed from
the product’s lid.
Warning: The appliance must be disconnected
from the supply before replacing the UV-C
emitter.
7.1.1 Switch off the supply pump at the mains.
7.1.2 Switch off Ecopower+ at the mains.
7.1.3 Remove the top cover / viewing hatch by
removing the four screws (Fig 13).
7.1.4 Pull off the lamp terminals (Fig 14 y). Slide
out the lamp (Fig 14). Dispose of the old lamp
according to local regulations.
7.1.5 Slide in the replacement lamp and push the
lamp terminals onto both ends of the UVC lamp.

7.1.6 Refit the top cover / viewing hatch and replace
the four screws. The lamp will not work unless
the top cover is screwed down.
7.1.7 Switch the supply to the Ecopower+ on and
check that the UVC lamp is working.
7.1.8 Restart the supply pump.
7.2 Care of the quartz tube.
Especially in hard water areas the quartz tube
sheathing the UVC lamp may become covered in
lime scale. This will reduce the efficiency of the
unit if it is allowed to build up. To clean, follow
the below procedure.
7.2.1 Switch off the supply pump at the mains.
7.2.2 Switch off Ecopower+ at the mains.
7.2.3 Remove the top cover / viewing hatch by
removing the four screws (Fig 13).
7.2.4 Remove the lamp as described above in 7.1.
7.2.5 Unscrew the two YELLOW compression nuts at
each end of the UV housing and place to one
side (Fig 15).
7.2.6 Slide out the quartz tube (Fig 16).
7.2.7 Wipe the outside of the quartz tube with a soft
cloth moistened with a gentle cleaning agent
(e.g. vinegar and water).
7.2.8 Inspect the quartz tube for any damage. If the
quartz is cracked or damaged in any way, it
should be disposed of and a new one fitted.
7.2.9 Slide the quartz tube back into the UVC unit.
Reattach one of the yellow compression nuts
loosely. Do not screw down.
7.2.10 Reattach the other yellow compression nut.
Screw both compression nuts down at the same
time. The quartz tube will align itself in the
correct position. Screw down each nut until the
stop on each yellow compression nut hits the
stop on the UV shroud. The line on the nut will
line up with the arrow on the UV Shroud. Do not
attempt to screw the yellow compression nuts
beyond the stop position (Fig 17).
7.2.11 Refit the lamp as described above in 7.1.
7.2.12 Refit the top cover / viewing hatch and replace
the four screws. The lamp will not work unless
the top cover is screwed down.
7.2.13 Restart the supply pump checking for leaks.
7.2.14 Switch the supply to the Ecopower+ on.
Winter Storage
When not in use, the unit should be removed,
thoroughly washed and cleaned, dried and stored in a
dry frost protected area. Always store the unit with the
lid off to ensure adequate ventilation and drying.
Contact/Spare Parts
For product advice and spares please contact
Hozelock Cyprio Consumer Services on 0121 313 1122
or visit www.hozelock.com
Hozelock Cyprio Clearwater Guarantee
WE GUARANTEE YOU CLEAR WATER OR YOUR
MONEY BACK for a Hozelock Cyprio Ecopower+ when
used with the appropriate pump.
NOTE: IN SOME CASES IT CAN TAKE UP TO 8
WEEKS FOR YOUR WATER TO BECOME CLEAR.
This guarantee runs for 12 months after purchase,
provided that
•Youhavefollowedtheinstallationandoperating
instructions.
•Youareusingequipmentofthecorrectsizeand
stocking level according to Hozelock Cyprio’s sizing
information.
•YouconsultourHelpline(01213131122)early
enough for any problems to be put right.
•Theproducthasbeenreturnedundamaged.
A refund can only be authorised by Hozelock Cyprio
and is made only at the place of purchase to the value
of the purchase price of the Ecopower+ only. A Proof
of Purchase will be required. Please note that the
Clearwater Guarantee does not cover loss of water
clarity when blanketweed, as opposed to greenwater
algae, is the cause.
2 Year Product Guarantee
If this Ecopower+ (excluding lamp) becomes
unserviceable within 2 years of the date of purchase
it will be repaired or replaced at our option free of
charge, unless in our opinion it has been damaged.
Liability is not accepted for damage due to accident,
improper installation or use. Liability is limited to
replacement of the faulty unit. This guarantee is
not transferable. It does not affect your statutory
rights. To obtain the benefits of this guarantee, firstly
contact Hozelock Cyprio Consumer Services (0121
313 1122) who may request that the unit is sent along
with proof of purchase directly to the address below.
Hozelock Cyprio Consumer Services on 0121 313 1122
or visit www.hozelock.com
Do not dispose of electrical appliances as unsorted
municipal waste, use separate collection facilities.
Contact your local government for information
regarding the collection systems available. If
electrical appliances are disposed of in landfills or
dumps, hazardous substances can leak into the groundwater
and get into the food chain, damaging your health and
well-being. In the EU, when replacing old appliances with new
ones, the retailer is legally obligated to take back your old
appliance for disposal at least free of charge.
9
Troubleshoting / FAQs
Problem Possible cause Remedy
Check that the pump is working and switched
on.
Check supply hose and pond return hose for
blockages.
Check supply hose and pond return hose for
blockages.
The pond water clarity should start to improve
within 2-3 weeks, but full biological maturation
can take 6-8 weeks before the filter is fully
effective.
Check you are using the appropriate filter for
your pond set up.
Move the pump or the outlet of the pond return
hose so that they are as far apart as possible.
Only feed your fish with as much food as can
be consumed in a few minutes. only feed once
per day.
No water flow through
filter to pond.
Reduced flow through
filter
Water does not clear
Supply pump not switched on or not working.
Supply hose blocked.
Foams are blocked. Clean filter (See “Cleaning”).
Supply hose blocked.
New Filter has not matured yet.
Wrong sized filter for your pond.
Wrong size supply pump. Check your flow rate. See 2.2.
Blown UV lamp. Replace UV lamp.
Old UV lamp. Replace UV lamp every 12 months.
Lamp not working Check fuse, RCD and wiring.
Foams need cleaning. Clean filter (See “Cleaning”).
The outlet of the pond return hose is positioned
above the supply pump
Pond is overstocked with fish. Reduce the quantity of fish in your pond.
Overfeeding.
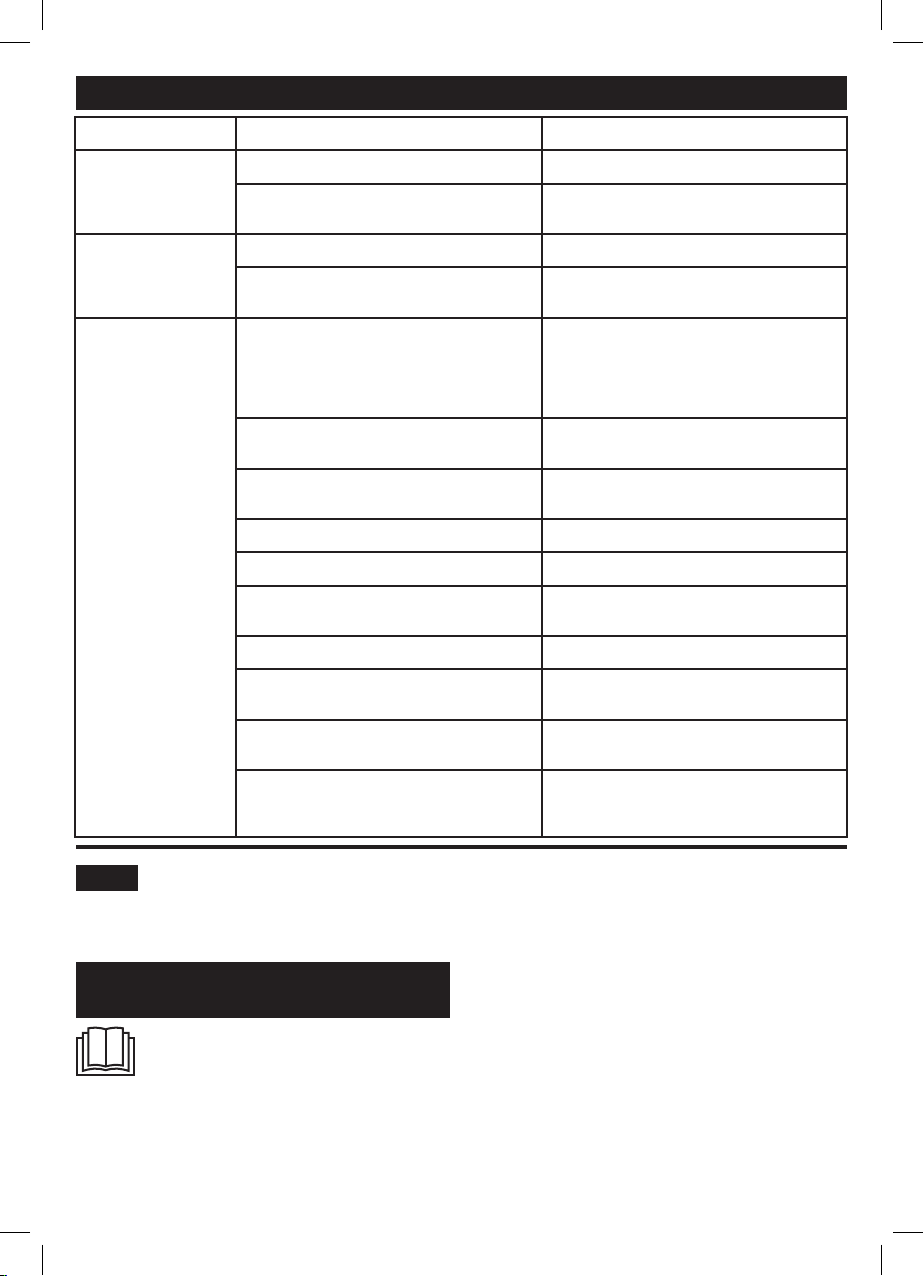
Technical Information
Part Number 1862 1864 1866
Range Ecopower+
Model 8000 12000 20000
Volt s 230V 50Hz
UVC (W) 8W 12W 16W
Total Power (W ) 14 20 22
Maximum Pond size without Fish 8000 ltr (1760 gal) 12000 ltr (2640 gal) 20000ltr (4400 gal)
Maximum Pond size with Fish 4000 ltr (880 gal) 6000 ltr (1320 gal) 10000 ltr (2200 gal)
Max recommended Flow, Qmax,
(lph)
Recommended
Hose Internal
Diameter
IP Rating IPX4 IPX4 IPX4
Water Temperature Tmin-Tmax, (°C) 1-35°C 1-35°C 1-35°C
* Measured under controlled conditions
Inlet
Outlet
10
2000 lph (440 gal) 2500 lph (550 gph) 4500 lph (9900 gph)
20-40mm 20-40mm 20-40mm
40mm 40mm 40mm

F
Merci d’avoir choisi un produit de qualité Hozelock,
vous pouvez être certain que ce produit assurera de
nombreuses années de service fiable.
INSTRUCTIONS D’INSTALLATION ET
DE FONCTIONNEMENT
LIRE ATTENTIVEMENT CES
INSTRUCTIONS AVANT INSTALLATION.
LE NON RESPECT DES INSTRUCTIONS
SUIVANTES PEUT ENTRAÎNER DES BLESSURES,
DES DOMMAGES SUR L’APPAREIL OU LA PERTE DE
POISSONS.
CONSERVEZ CES INSTRUCTIONS POUR RÉFÉRENCE
ULTÉRIEURE.
Le filtre de bassin de jardin Hozelock Cyprio Ecopower+
peut être installé presque partout (Voir Fig 2a, 2b,
2c). Utilisé avec la pompe appropriée, il améliore la
clarté de l’eau, permet de retirer les débris indésirables
de l’eau du bassin et de transformer les déchets
organiques et chimiques des poissons en composés
inoffensifs.
En outre, ces unités filtres/UVC combinées vous
offrent une eau propre garantie si vous respectez
le tableau de sélection des équipements de filtres
Hozelock Cyprio, ainsi que les présentes instructions.
Attention: Avertissement concernant les
rayons UV
L’appareil contient un émetteur UVC. Une utilisation
inadaptée de l’appareil ou un endommagement du
boîtier pourrait provoquer la fuite de rayons UVC
dangereux. L’exposition aux rayons UVC peut, même
en petites doses, causer des brûlures des yeux et de
la peau. La lampe est munie d’un disjoncteur qui
l’éteindra si le boîtier électrique est ouvert.
Lorsqu’elle est allumée, on peut vérifier si la lampe
fonctionne dans un environnement sombre, en
arrêtant brièvement la pompe d’alimentation et en
recherchant une lueur bleuâtre au bas du Venturi (Fig
7 (x)). Ne faites pas fonctionner l’appareil à sec.
Avertissement: N’essayez pas de faire fonctionner
l’émetteur UVC lorsque le capot supérieur est retiré
du couvercle de l’appareil.
Avertissement: L’appareil doit être déconnecté
de l’alimentation électrique avant de remplacer
l’émetteur UVC.
Important
Cet appareil doit être uniquement utilisé par ou sous
la surveillance d’un adulte responsable qui est capable
de l’utiliser en toute sécurité et qui comprend les
dangers possibles. Utilisez et rangez cet appareil hors
de la portée des enfants et des personnes présentant
des capacités physiques, sensorielles ou mentales
réduites.
L’entretien du boitier électrique doit être
uniquement effectué par une personne qualifiée ou
un centre de services.
Avertissement: Sécurité et branche-
ments électriques
1.1 AVERTISSEMENT: IL EST IMPÉRATIF DE
DÉBRANCHER OU DE DÉCONNECTER DE
LA SOURCE D’ÉLECTRICITÉ TOUS LES
ÉQUIPEMENTS QUI SE TROUVENT DANS
LE BASSIN AVANT DE METTRE VOS MAINS
DANS L’EAU PENDANT QUE VOUS INSTALLEZ,
RÉPAREZ, ENTRETENEZ OU MANIPULEZ CES
ÉQUIPEMENTS.
1.2 Ce filtre a été exclusivement conçu pour un
usage avec des bassins de jardin. N’utilisez pas
ce filtre pour tout autre usage (par exemple, ne
l’utilisez pas dans une piscine, etc.). Toute autre
utilisation de ce produit pourrait entraîner des
blessures ou endommager l’appareil.
1.3 Les appareils endommagés ne doivent pas être
utilisés.
1.4 Le tube transparent à l’intérieur de l’unité est
en verre de quartz et nécessite une attention
particulière lors de l’installation et de l’entretien.
Nous vous recommandons d’utiliser les lunettes
et gants de protection qui conviennent.
1.5 Votre filtre Ecopower+ est étanche mais pas
submersible. Installez l’unité sur le plan vertical
près du bassin, mais évitez les endroits où elle
pourrait tomber dans l’eau ou les endroits
pouvant se gorger d’eau (Voir la section
«Installation»).
1.6 Important:
Ce produit est fourni avec un câble électrique à 3
fils d’une longueur de 5 mètres. La prise fournie
avec cet appareil n’est pas étanche et doit
être connectée à l’alimentation secteur dans
un boîtier sec et étanche conformément à la
réglementation locale.
Les installations permanentes sur l’alimentation
secteur doivent être conformes aux
réglementations locales et nationales en
matière de câblage. En cas de doute concernant
le câblage au secteur, contactez un électricien
qualifié ou le fournisseur d’électricité local.
1.7 Si une rallonge est nécessaire, elle doit être
raccordée à l’extrémité du câble de l’unité à
l’aide d’un connecteur étanche. Le joint doit
être placé dans un boîtier étanche adapté. La
rallonge doit être un câble à 3 fils avec une
section de 0,75mm2 et dotée d’une gaine
isolante en caoutchouc polychloroprène
11

(réf. HO5 RN-F) raccordé en permanence à
l’alimentation secteur comme indiqué ci-dessus
au point 1.6.
1.8 AVERTISSEMENT: Cet appareil DOIT être
branché à la terre et il est indispensable que les
branchements soient faits en utilisant les codes
suivants:
• MARRON - phase
• BLEU - neutre
• VERT/JAUNE - terre.
1.9 Les câbles exposés doivent être positionnés et
protégés dans des conduits blindés, notamment
lorsqu’ils peuvent entrer en contact avec du
matériel de jardinage tel que les fourches et les
tondeuses, ou avec des enfants ou des animaux.
1.10 Ne mettez jamais en marche l’appareil si le
câble d’alimentation est endommagé. Si le
câble est endommagé, la pompe doit être jetée
conformément à la réglementation locale.
1.11 Un disjoncteur de courant résiduel (RCD)
de 30mA maximum DOIT être monté sur
l’alimentation secteur.
1.12 Les installations permanentes sur l’alimentation
secteur (câblage solide) doivent être conformes
aux réglementations locales et nationales en
matière de câblage. En cas de doute concernant
le câblage au secteur, contactez un électricien
qualifié ou le fournisseur d’électricité local.
1.13 Ne levez jamais l’appareil par son câble
d’alimentation. Cela pourrait l’endommager.
Si l’appareil doit être déplacé, mettez-le hors
tension, puis levez-le en tenant les deux côtés
du récipient (Fig 3) ou pour lever le couvercle,
saisissez les deux côtés du couvercle (Fig 3).
1.14 Ne faites pas fonctionner votre filtre à sec.
1.15 Ne faites pas fonctionner l’unité et ne l’exposez
pas aux conditions de gel. (Voir la section
«Rangement hivernal»).
1.16 Cet appareil ne convient pas à une température
d’eau supérieure à 35°C ou inférieure à 0°C.
1.17 Utilisez uniquement les accessoires conçus pour
une utilisation avec cet appareil. L’utilisation de
tout autre accessoire ou pièce détachée pourrait
annuler votre garantie.
Indications d’ordre général
2.1 Le tableau des données techniques au verso
fournit des orientations générales sur les
spécifications du filtre, les débits recommandés
et le diamètre du tuyau flexible pour les bassins
de jardin jusqu’à 10000 litres. Cependant,
pour des résultats optimaux, il faut prendre en
compte plusieurs autres facteurs de condition,
car ils peuvent réduire l’efficacité du filtre.
12
• La profondeur du bassin: Hozelock Cyprio
recommande une profondeur minimale de 1,2m
(4po) pour les bassins de carpes koï. Pour un
bassin d’une profondeur moyenne de moins
de 0,75 m, le facteur de condition est de + 25
%. Les bassins peu profonds sont sujets à une
pénétration complète de la lumière du soleil, et
se réchauffent donc très vite. Cela favorise la
croissance des algues.
• L’emplacement: L’emplacement du bassin
détermine la quantité journalière de lumière
solaire ou d’ombre qu’il reçoit. Les bassins
exposés à la lumière directe du soleil toute la
journée ont un facteur de condition de +25%.
• Le climat: Le climat influence la température
de l’eau et le taux d’activité/les besoins
alimentaires des poissons. Plus les poissons sont
actifs, plus l’utilisation du système de filtrage
sera importante. Dans des zones à climat chaud
(par exemple en Afrique du Sud), le facteur de
condition est de +35%. Dans les zones à climat
tempéré (par exemple le sud de l’Europe), le
facteur de condition est de +15%. Dans la zone
climatique de l’Europe du Nord (c’est à dire la
plupart des régions de la Grande Bretagne), le
facteur de condition est de +0%.
• EXEMPLE: Vous avez un bassin pour poisson
rouge de 2 200 litres, et de 0,75 m de profondeur
(Facteur de condition de +25 %). Vous vivez à
Londres: zone climatique de l’Europe du Nord
(Facteur de condition de +0%). Le bassin est
exposé à la lumière directe du soleil (+25 %). Le
volume réel de votre bassin est, donc, augmenté
de 50% (25% + 25%), et il faudra choisir des
équipements qui correspondent à un bassin de
3300 litres.
2.2 Débit: Pour des résultats optimaux, le volume
d’eau du bassin doit passer à travers le filtre
Ecopower+ chaque 1 heure ½ - 2 heures ½,
correspondant au débit maximum recommandé
pour les bassins de carpes koï. Ne dépassez
pas le débit maximum, spécifié dans le tableau
d’informations techniques situé au verso. Un
débit correct est nécessaire pour obtenir une
eau claire. Si votre installation n’a pas de pertes
importantes (c’est-à-dire des tuyaux longs), il
sera peut-être nécessaire de régler le débit pour
atteindre le taux de renouvellement de l’eau en 1
heure ½ et 2 heures ½, ceci à l’aide d’un robinet
de contrôle de débit.
Des tuyaux de petit diamètre, des tuyaux trop
longs, ou une grande hauteur de pompage (tête)
peuvent réduire considérablement le débit d’une
pompe. Nous vous recommandons de choisir
une pompe fournissant le débit requis pour
compenser la hauteur statique de pompage (=
la distance verticale entre la surface du bassin

et l’entrée du filtre), plus 0,6m (2pi) pour
compenser les pertes dues au frottement dans
les tuyaux.
Le but de la filtration est de transférer les
déchets du bassin dans le filtre, et donc toute
pompe utilisée dans l’installation devra être
capable de transporter les déchets solides.
Nous recommandons l’utilisation des pompes
Hozelock Cyprio de la gamme Aquaforce,
spécialement conçues pour les bassins de
dimensions couvertes par Ecopower+. La pompe
doit être placée dans la partie la plus profonde
du bassin pour garantir la meilleure circulation
d’eau dans le bassin et maximiser la capacité
de transport des déchets solides. La pompe
doit être installée sur une plateforme plate
surélevée de 300mm par rapport au fond du
bassin. De cette manière, elle n’aspirera pas la
saleté directement du fond du bassin et laissera
suffisamment d’eau dans le bassin en cas de
fuite accidentelle.
Comment contrôler le débit: Prenez un
récipient d’un volume connu et chronométrez le
temps nécessaire pour le remplir (en secondes).
Divisez 3 600 par le nombre de secondes
nécessaire au remplissage du récipient, et
multipliez par le volume du récipient (en litres).
Le résultat sera le débit en litres par heure ou
gallons par heure (l/h ou g/h).
2.3 Densité de poissons dans le bassin: Dans
des conditions normales et avec un régime
alimentaire adapté, la gamme Ecopower+ peut
supporter jusqu’à 50cm de poissons par 1000
litres (10po de poisson pour 100 gallons) de
capacité de bassin. Introduisez les poissons
lentement au cours des premières semaines,
jusqu’à 20% du niveau maximum recommandé,
et augmentez jusqu’à 50% après 6 mois.
La différence permettra aux poissons de se
développer.
2.4 Traitements du bassin: Certains traitements/
médicaments peuvent rapidement se dégrader
sous l’effet des rayonnements UVC. Pensez
à arrêter le filtre pendant le traitement de
l’affection. Les filtrages mécanique et biologique
continueront de fonctionner.
Si vous traitez votre bassin contre les algues,
arrêtez la pompe et le filtre pendant toute la
durée du traitement, jusqu’au retrait complet
des algues traitées du bassin.
2.5 Un soin particulier doit être apporté aux
raccords de tuyaux, car toute fuite entraînera
des pertes d’eau du bassin.
Avant la première utilisation
La manipulation inappropriée de ce produit pendant
le transport peut endommager le tube quartz.
Veuillez inspecter le tube quartz et vérifier qu’il est
complètement étanche avant l’installation.
Voir la section «Entretien» pour des détails sur la
façon d’accéder au tube quartz et à la lampe.
Installation
3.1 Important: N’utilisez pas de pompe ayant un
débit supérieur à celui indiqué dans le tableau
des données techniques ou une hauteur
maximale supérieure à 3,5m avec les filtres de
la gamme Ecopower+.
3.2 Important: Installez les filtres Ecopower
uniquement en position verticale.
Placez le filtre Ecopower+ sur une surface solide,
équilibrée et facilement accessible.
Les filtres Ecopower sont alimentés par des
pompes, filtres externes avec unité UVC
intégrée, convenables pour des installations
au-dessus du sol (Fig. 2a), dans le sol (Fig. 2b), de
façon adjacente au bassin ou logée au sommet
d’une cascade (Fig 2c).
Si vous décidez d’installer votre filtre au-dessus
du sol, placez ce dernier sur un sol plat.
Si vous décidez d’enfouir partiellement
votre filtre, l’excavation doit être solidement
remblayée avec du sable compact pour soutenir
l’appareil.
Assurez-vous toujours que la/les sortie(s) du
filtre soit au minimum à 100mm au-dessus du
niveau de l’eau de votre bassin.
3.3 Connexion - Posez l’unité près du bassin et
acheminez le câble jusqu’à l’alimentation
secteur. Assurez-vous d’avoir assez de câble pour
positionner le produit à l’endroit désiré dans le
bassin.
3.4 Pour le transport, la sortie de vidange a été
montée sur la carrosserie de l’arrière vers
l’avant. Démontez-la en dévissant l’écrou et
remplacez-la correctement, comme indiqué à
la (Fig 4).
3.5 Retournez le couvercle et poussez les pattes
d’entretoise à mousse (figure 1c) dans les
espaces appropriés, comme indiqué à la Fig. 5.
Le point à l’extrémité des pattes doit pointer vers
l’intérieur, comme indiqué à la figure 6.
N’UTILISEZ JAMAIS UN MARTEAU POUR
INSTALLER LES PATTES!
3.6 Poussez la mousse (x2 sur Ecopower+ 20000)
à l’extrémité des pattes d’entretoise. Le grand
orifice s’emboîte dans l’extrémité de la sortie du
venturi jaune (figure 7). La mousse ne s’adapte
que d’une façon avec les alvéoles opposées du
couvercle.
13

3.7 Les filtres Ecopower+ possèdent un embout
de tuyau d’arrivée (figure 1f) compatible avec
un tuyau de 20 à 40mm (3/4 à 11/2po) (voir
Tableau des données techniques au verso) et
un ou plusieurs embouts de tuyau de sortie
(figure 1e) compatible avec un tuyau de 40mm
(1 1/2po). Le conduit d’admission de la pompe
et de sortie du filtre doit être aux extrémités
opposées du bassin pour une circulation
optimale de l’eau dans le bassin. Lors de l’achat,
gardez à l’esprit de mesurer et couper le tuyau
Cypriflex.
Coupez l’embout du tuyau d’arrivée sur votre
filtre Ecopower+ à la taille appropriée pour
le diamètre du tuyau à utiliser (figure 8) et
placez-le à l’orifice d’entrée du filtre (figure 9).
Installez un tuyau de longueur appropriée entre
la pompe d’alimentation et l’orifice d’entrée du
filtre, en fixant le tuyau aux embouts à l’aide
des clips de serrage Hozelock Cyprio, disponibles
séparément.
3.8 Le connecteur de sortie du filtre et le moulage
d’excès de débit (x2 sur Ecopower+ 10000)
doivent être fixés sur le côté du récipient (Figure
10).
Le tuyau de sortie (le cas échéant) doit être
fixé de la même manière que le tuyau d’arrivée.
Évitez les pliures et les coudes, et gardez le tuyau
aussi court que possible (de préférence inférieur
à 1m) pour minimiser les restrictions de débit.
Pour des résultats optimaux, nous
recommandons que l’extrémité du tuyau de
sortie (le cas échéant) ne soit pas plongée dans
le bassin.
3.9 Placez délicatement le couvercle sur le récipient
et enclenchez autour de la monture. En
regardant à travers la trappe de visualisation,
assurez-vous que la feuille de mousse est
positionnée sous la/les sortie(s) du récipient
(figure 12).
Fonctionnement
4.1 Connectez le cordon d’alimentation du filtre
(Voir section 1 – Sécurité et branchements
électriques). Ceci allume la lampe UVC. Vous
pouvez vérifier si la lampe fonctionne dans un
environnement sombre, en arrêtant brièvement
la pompe et en recherchant une lueur bleuâtre
à l’extrémité de la sortie du venturi jaune (Fig 7
(x)).
4.2 Allumez la pompe.
4.3 Périodes de fonctionnement: Laissez le filtre
fonctionner 24h/24. Idéalement, il devrait
fonctionner toute l’année mais il doit marcher
au moins tant que les poissons se nourrissent
(jusqu’à ce que la température de l’eau descende
14
sous les 10°C). En hiver, l’utilisation de la pompe
et du filtre permettra de maintenir un niveau
minimum de bactéries utiles dans l’Ecopower+
et protègera le bassin contre le gel dans les
conditions climatiques les plus extrêmes.
Si la pompe est arrêtée pour l’hiver, lavez
soigneusement les éléments filtrants (mousse
et/ou masses filtrantes en plastique) avant
de reprendre la filtration au printemps, et
votre Ecopower+ devra effectuer une nouvelle
maturation à partir de zéro (voir «maturation
»). Ne nourrissez jamais vos poissons lorsque le
filtre n’est pas en fonctionnement.
Maturation
5.1 La maturation biologique signifie que le filtre a
permis l’accumulation suffisante de bactéries
nutritives pour transformer les déchets nocifs
des poissons et autres déchets organiques
(ex.: ammoniaque, nitrite) en nitrate presque
inoffensif. Le processus prend normalement
entre 6 et 8 semaines, mais dépend de
nombreux facteurs tels que la température de
l’eau, le taux d’alimentation et la densité du
stockage. Accélérez la maturation en ajoutant
un agent de maturation comme le Hozelock
Cyprio Filter Start.
Nettoyage
6.2 Coupez l’alimentation de la pompe.
6.3 Déconnectez Ecopower+ de l’alimentation
secteur.
6.4 Retirez doucement le couvercle du récipient (Fig
3).
6.5 Enlevez la (les) mousse(s) (Fig 11) et rincez-la
(les) avec le reste d’eau du récipient. Ne faites
pas un nettoyage excessif. Videz le récipient de
tous les déchets et de l’eau.
6.6 Repositionnez la feuille de mousse propre
dans les extrémités de l’entretoise en mousse.
Assurez-vous que la mousse est placée de telle
sorte que le venturi passe à travers elle et les
alvéoles dans la mousse orientées ailleurs que
vers le couvercle.
6.7 Mettez en marche l’alimentation d’Ecopower+ et
vérifiez que la lampe UVC fonctionne.
6.8 Placez délicatement le couvercle sur le récipient
et enclenchez autour de la monture. En
regardant à travers la trappe de visualisation,
assurez-vous que la feuille de mousse est
positionnée sous la/les sortie(s) du récipient
(figure 12).
6.9 Redémarrez la pompe pour détecter la présence
des fuites, s’il y en a, le bassin sera vidé de son
eau.

6.10 La masse filtrante est contenue dans un sac en
filet. En temps normal, il n’est pas nécessaire
de retirer cette masse, le nettoyage pourrait
tuer les colonies de bactéries qui rendent les
débris toxiques inoffensifs. Toutefois, si la masse
filtrante est trop bouchée, alors retirez le sac
en filet la contenant et rincez-le dans un seau
d’eau du bassin propre et puis replacez-le dans le
récipient. N’utilisez jamais l’eau du robinet pour
le nettoyage de la masse filtrante.
Entretien
L’entretien du boitier électrique doit être
uniquement effectué par une personne qualifiée ou
un centre de services.
Référez-vous à la section «Sécurité et branchements
électriques» avant toute opération d’entretien.
Avertissement: Lisez ces instructions de
maintenance avant d’ouvrir l’appareil.
7.1 Remplacement de la lampe UV.
Avertissement: L’appareil doit être déconnecté
de l’alimentation électrique avant d’enlever
l’émetteur UV-C.
L’efficacité d’une lampe UV diminue de façon
importante avec le temps, il est donc conseillé de
changer de lampe UV tous les 12 mois, même si
celle-ci continue de fonctionner.
Rappelez-vous: L’appareil est équipé d’un
dispositif de verrouillage qui éteint la lampe au
retrait du capot supérieur, de telle sorte que vous
pouvez seulement voir si la lampe fonctionne
dans l’obscurité, en arrêtant brièvement la
pompe et en recherchant une lueur bleuâtre du
fond de la Venturi (Fig 7 (x)).
Avertissement: N’essayez pas de faire
fonctionner l’émetteur UVC lorsque le capot
supérieur est retiré du couvercle de l’appareil.
Avertissement: L’appareil doit être déconnecté
de l’alimentation électrique avant d’enlever
l’émetteur UVC.
7.1.1 Coupez l’alimentation de la pompe.
7.1.2 Déconnectez Ecopower+ de l’alimentation
secteur.
7.1.3 Enlevez le capot supérieur / la trappe de
visualisation en retirant les quatre vis (Fig 13).
7.1.4 Retirez les bornes de la lampe (Fig 14 y). Faites
glisser la lampe (Fig 14). Mettez la vieille lampe
au rebut conformément aux réglementations
locales.
7.1.5 Faites coulisser la lampe de rechange et poussez
les bornes de la lampe sur les deux extrémités de
la lampe UVC.
7.1.6 Remettez le capot supérieur / la trappe de
visualisation et replacez les quatre vis La lampe
ne fonctionnera pas à moins que le couvercle ne
soit vissé.
7.1.7 Mettez en marche l’alimentation d’Ecopower+ et
vérifiez que la lampe UVC fonctionne.
7.1.8 Redémarrez la pompe d’alimentation.
7.2 Nettoyage du tube quartz.
Le tube quartz protégeant la lampe UV peut se
recouvrir de tartre, en particulier dans les régions
à eau calcaire. Si on le laisse s’accumuler, il peut
nuire à l’efficacité de l’unité. Veuillez suivre la
procédure ci-dessous pour le nettoyage.
7.2.1 Coupez l’alimentation de la pompe.
7.2.2 Déconnectez Ecopower+ de l’alimentation
secteur.
7.2.3 Enlevez le capot supérieur / la trappe de
visualisation en retirant les quatre vis (Fig 13).
7.2.4 Retirez la lampe comme indiqué dans la section
7.1.
7.2.5 Dévissez les deux écrous de compression
JAUNES de chaque extrémité du boitier UV et
placez-les d’un côté (Fig 15).
7.2.6 Faites coulisser le tube quartz (Fig 16).
7.2.7 Nettoyez l’extérieur du tube quartz à l’aide d’un
chiffon doux imbibé d’un agent nettoyant (Ex:
vinaigre et eau).
7.2.8 Vérifiez que le tube quartz n’est pas
endommagé. Si le quartz est fissuré ou
endommagé, il doit être remplacé.
7.2.9 Faites coulisser le tube quartz dans l’unité UVC.
Remettez l’un des écrous de compression jaunes
sans le serrer. Ne vissez pas.
7.2.10 Remettez l’autre écrou de compression jaune.
Vissez les deux écrous de compression en même
temps. Le tube quartz va s’aligner lui-même
dans le bon sens. Vissez chaque écrou jusqu’à ce
que la butée de chaque écrou de compression
touche la butée du protecteur de contact UV. La
ligne sur l’écrou va s’aligner avec la flèche sur le
protecteur UV. N’essayez pas de visser les écrous
de compression jaunes au-dessus de la butée
(Fig 17).
7.2.11 Retirez la lampe comme indiqué dans la section
7.1.
7.2.12 Remettez le capot supérieur / la trappe de
visualisation et replacez les quatre vis La lampe
ne fonctionnera pas à moins que le couvercle ne
soit vissé.
7.2.13 Redémarrez la pompe d’alimentation en
vérifiant qu’il n’y ait pas de fuites.
7.2.14 Mettez en marche l’alimentation d’Ecopower+.
15
Rangement hivernal
Problème Cause possible Solution
L’eau ne traverse pas
du filtre vers le bassin.
Débit réduit dans le
filtre
L’eau ne s’éclaircit pas
Lorsqu’elle n’est pas utilisée, l’unité doit être retirée
du bassin, bien lavée et nettoyée, séchée et rangée
dans un endroit sec Rangez toujours l’unité avec le
couvercle démonté pour assurer le séchage et une
ventilation adéquate.
Contact / Pièces détachées
Pour des conseils et des pièces détachées, veuillez
contacter le Service Client d’Hozelock Cyprio au
01213131122 ou visiter le site www.hozelock.co
La garantie Eau claire d’Hozelock Cyprio
NOUS VOUS GARANTISSONS UNE EAU CLAIRE OU LE
REMBOURSEMENT DE VOTRE ACHAT d’un Hozelock
Cyprio Ecopower+ lorsqu’il est utilisé avec la pompe
adéquate.
NOTE: DANS CERTAINS CAS, IL FAUT PARFOIS
JUSQU’À 8SEMAINES POUR QUE L’EAU SOIT
LIMPIDE.
Cette garantie est de 12mois à partir de la date de
l’achat, à condition que:
•Vousayezrespectélesinstructionsd’installationet
de fonctionnement.
•Vousutilisezl’équipementàlatailleetauniveaude
stockage appropriés, conformément aux informations
de dimensionnement de Hozelock Cyprio.
•Vousayezcontacténotreserviced’assistance
téléphonique (01213131122) suffisamment à temps
pour la résolution de vos problèmes.
•Leproduitsoitretournénonendommagé.
Seule la société Hozelock Cyprio est habilitée à
autoriser un remboursement, et il ne pourra être
effectué que sur le lieu d’achat et à la valeur du prix
d’achat de l’Ecopower + uniquement. Une preuve
d’achat devra être produite. Veuillez noter que la
Garantie Eau claire couvre la perte de clarté de l’eau
due aux algues causant l’eau verte, mais ne couvre pas
la perte de clarté due aux algues filamenteuses.
Garantie de produit de 2ans
Si ce Ecopower+ (lampe UV exclue) devient inutilisable
dans les 2 ans à partir de la date d’achat, il sera
soit réparé soit remplacé gratuitement, sauf s’il
a été endommagé. Aucune responsabilité n’est
acceptée pour les dommages dus à un accident, une
mauvaise installation ou une mauvaise utilisation.
La responsabilité se limite au remplacement du
produit défectueux. Cette garantie est non cessible.
Cela n’affecte aucunement vos droits légaux. Pour
bénéficier des avantages de cette garantie, veuillez
d’abord contacter Hozelock Cyprio Consumer Services
(0121 313 1122) qui pourra vous demander de
renvoyer l’unité accompagnée d’une preuve d’achat
directement à l’adresse indiquée ci-dessous: Hozelock
Cyprio Consumer Services au 0121 313 1122 ou allez
sur www.hozelock.com
Ne jetez pas les appareils électriques dans les
déchets municipaux non triés, utilisez des
installations de collecte séparées. Contactez
votre collectivité locale pour davantage
d’informations sur les possibilités de collecte
disponibles. Si des appareils électriques sont jetés
dans une décharge, des substances dangereuses
peuvent se répandre dans le sol et terminer dans la
chaîne alimentaire, ce qui est dangereux pour votre
santé et votre bien-être. En Europe, lorsque vous
remplacez les anciens appareils par de nouveaux, le
distributeur est légalement obligé de reprendre votre
ancien appareil à mettre au rebut, et ce gratuitement.
Informations techniques
Numéro de pièce 1862 1864 18 66
Gamme Ecopower+
Modèle 8000 12000 20000
Volt s 230V 50Hz
Puissance UVC (W) 8W 12W 16W
Puissance totale (W) 14 20 22
Taille maximum du bassin sans poissons 4000 ltr (880 gal) 6000 ltr (1320 gal) 10000ltr (2200 gal)
Taille maximum du bassin avec poissons 2000 ltr (440 gal) 3000 ltr (660 gal) 5000 ltr (1100 gal)
Débit maximum recommandé, Qmax (l/h) 2000 lph (440 gal) 3000 lph (660 gph) 5000 lph (1100 gph)
Diamètre
intérieur
du tuyau
recommandé
Classification IP IPX4 IPX4 IPX4
Température de l’eau Tmin-Tmax, (°C) 1-35°C 1-35°C 1-35°C
*Mesures obtenues dans des conditions spécifiques
16
Entrée
Sortie
20-40mm 20-40mm 20-40mm
40mm 40mm 40mm
Dépannage / Foire aux questions
Problème Cause possible Solution
L’eau ne traverse pas
du filtre vers le bassin.
Débit réduit dans le
filtre
L’eau ne s’éclaircit pas
Pompe d'alimentation éteinte ou en panne. Vérifiez que la pompe est allumée et fonctionne.
Tuyau d'alimentation bouché.
Mousses bouchées. Nettoyez le filtre (Voir « Nettoyage »).
Tuyau d'alimentation bouché.
Le nouveau filtre n'est pas encore à maturation.
Mauvais dimensionnement de filtre pour votre
bassin.
Mauvais dimensionnement de la pompe
d'alimentation.
Lampe UV grillée. Remplacez la lampe UV.
Vieille lampe UV. Remplacez la lampe UV tous les 12 mois.
La lampe ne fonctionne pas
La mousse nécessite un nettoyage. Nettoyez le filtre (Voir « Nettoyage »).
Le tuyau de retour vers le bassin est posé audessus de la pompe d'alimentation.
Le bassin contient trop de poissons.
Trop de nourriture.
Vérifiez que les tuyaux d'alimentation et de
retour au bassin ne sont pas bouchés.
Vérifiez que les tuyaux d'alimentation et de
retour au bassin ne sont pas bouchés.
La clarté de l'eau du bassin devrait s'améliorer
dans 2 à 3 semaines, mais la maturation
biologique complète peut prendre 6 à
8 semaines avant que le filtre ne soit
complètement opérationnel.
Vérifiez que vous utilisez le filtre approprié à
votre configuration de bassin.
Vérifiez votre débit. Voir 2.2.
Vérifiez le fusible, le dispositif à courant résiduel
et le câblage électrique.
Déplacez la pompe ou le tuyau de retour pour
qu'ils soient aussi éloignés que possible.
Réduisez la quantité de poissons dans votre
bassin.
Ne mettez pas plus de nourriture que nécessaire
à la consommation des poissons en quelques
minutes.
D
Vielen Dank, dass Sie sich für ein Qualitätsprodukt von
Hozelock entschieden haben, welches Ihnen für viele
Jahre einen zuverlässigen Dienst erweisen wird.
INSTALLATIONS UND GEBRAUCHSAN
WEISUNGEN
LESEN SIE DIESE ANWEISUNGEN
SORGFÄLTIG DURCH, BEVOR SIE DIE
INSTALLATION ANGEHEN.
EINE NICHTBEACHTUNG DER FOLGENDEN
HINWEISE KANN ZU VERLETZUNGEN,
PRODUKTSCHÄDEN UND ZUM VERLUST VON
FISCHEN FÜHREN.
BEWAHREN SIE DIESE GEBRAUCHSANLEITUNG
ZUR SPÄTEREN BEZUGNAHME AUF.
Hozelock Cyprio Ecopower + Gartenteichfilter können
fast überall installiert werden (siehe Abb. 2a, 2b,
2c). Wenn der Gartenteichfilter mit der richtigen
Teichpumpe zum Einsatz kommt, verbessert er die
Wasserklarheit, entfernt unerwünschte Feststoffe
aus dem Teich und wandelt gelöste organische
sowie chemische Fischausscheidungen in harmlose
Verbindungen um.
Darüber hinaus sorgen diese kombinierten Filter-/
UVC-Einheiten für garantiert klares Wasser,
sofern die Empfehlungen in der Hozelock Cyprio
Filterauswahltabelle und dieser Gebrauchsanleitung
eingehalten werden.
17

Vorsicht: UV-Strahlung
Dieses Gerät enthält einen UV-C-Strahler. Durch
unbeabsichtigte Verwendung des Geräts oder eine
Beschädigung des Gehäuses kann gefährlicheUV-CStrahlung austreten. UV-C-Strahlung kann auch in
geringer Menge die Augen und die Haut schädigen.
Die UV-Lampe ist mit einer Verriegelung ausgestattet,
über welche die Lampe ausgeschaltet wird, wenn das
Elektrikgehäuse geöffnet wird.
In eingeschaltetem Zustand kann die Lampenfunktion
im Dunkeln durch kurzes Ausschalten der
Versorgungspumpe und Prüfung des bläulichen
Lichtscheins an der Stutzenunterseite geprüft werden
(Abb. 7 (x)). Lassen Sie das Gerät nicht trocken laufen.
Achtung: Versuchen Sie nicht, den UV-C-Strahler zu
benutzen, wenn die Abdeckung des Produktdeckels
entfernt wurde.
Achtung: Das Gerät muss vor dem Austausch des
UV-C-Strahlers von der Stromversorgung getrennt
werden.
Wichtig!
Dieses Gerät darf nur durch oder unter Aufsicht
eines verantwortlichen Erwachsenen verwendet
werden, welcher in der Lage ist, das Gerät sicher zu
verwenden und der die damit verbundenen Gefahren
versteht. Verwenden und lagern Sie dieses Gerät
außerhalb der Reichweite von Kindern und Personen
mit eingeschränkten physischen, sensorischen oder
geistigen Fähigkeiten.
Die Wartung des Schaltgehäuses darf nur von einer
entsprechend qualifizierten Person oder bei einem
Service-Center durchgeführt werden.
Achtung: Sicherheit und elektrische
Anschlüsse
1.1 WARNUNG: WÄHREND DER HANDHABUNG,
INSTALLATION, REPARATUR ODER
WARTUNG DER AUSRÜSTUNG MÜSSEN
IMMER ALLE GERÄTE IM TEICH VON DER
STROMVERSORGUNG GETRENNT SEIN,
BEVOR SIE IHRE HÄNDE INS WASSER
TAUCHEN.
1.2 Dieser Teichfilter ist ausschließlich für den
Gebrauch mit Gartenteichen vorgesehen.
Benutzen Sie den Filter zu keinem sonstigen
Zweck (d. h. er darf beispielsweise nicht für
Swimmingpools verwendet werden). Wenn
Sie das Produkt für andere Anwendungen
gebrauchen, können dadurch Verletzungen und
Produktschäden entstehen.
1.3 Geräte, die offensichtlich beschädigt sind,
dürfen nicht verwendet werden.
1.4 Die durchsichtige Röhre innerhalb des
18
Geräts besteht aus Quarzglas, daher muss
bei der Installation und Wartung vorsichtig
vorgegangen werden. Wir empfehlen einen
Augenschutz und geeignete Handschuhe zu
tragen.
1.5 Ihr Ecopower+ Filter ist wetterbeständig,
aber nicht tauchfest. Platzieren Sie das Gerät
aufrecht in der Nähe des Teichs. Vermeiden Sie
jedoch Stellen, wo das Gerät ins Wasser fallen
kann oder der Boden staunass werden kann
(siehe Abschnitt „Installation“).
1.6 Wichtig:
Dieses Produkt wird mit 5m 3-adrigem
Elektrokabel geliefert. Da der mit diesem
Produkt mitgelieferte Stecker nicht wasserdicht
ist, muss sein Anschluss am Stromnetz gemäß
Ihren lokalen Vorschriften innerhalb eines
trockenen und wetterfesten Gehäuses erfolgen.
Permanente Installationen am Stromnetz
(Festverdrahtungen) müssen die nationalen und
regionalen Verdrahtungsregelungen einhalten.
Wenden Sie sich an einen qualifizierten Elektriker
oder an die lokalen Stadtwerke, wenn Sie beim
Anschluss ans Stromnetz Zweifel haben.
1.7 Wenn ein Verlängerungskabel erforderlich ist,
muss dieses mit einem witterungsbeständigen
Stecker an das Gerätekabel angeschlossen
werden. Die Kupplung muss in einem geeigneten
witterungsbeständigen Gehäuse untergebracht
werden. Das Verlängerungskabel muss als
3-adriges Kabel mit je 0,75 mm2 Querschnitt
und Chloropren-Kautschuk-Isolierung (Ref. HO5
RN-F) ausgeführt sein und wie in Punkt 1.6
beschrieben fest mit dem Stromnetz verdrahtet
sein.
1.8 WARNUNG: Dieses Gerät MUSS geerdet
werden, und es ist überaus wichtig, die
Anschlüsse gemäß folgender Legende zu
machen:
•BRAUN – stromführend
•BLAU – Nullleiter
•GELB-GRÜN – Masse
1.9 Freiliegende Kabelführungen sollten
insbesondere dann vernünftig platziert und
durch ein Panzerrohr geschützt werden, wenn
die Gefahr besteht, dass die Führungen mit
Gartengeräten wie Gabeln und Rasenmähern
oder Kindern und Haustieren in Kontakt kommen
können.
1.10 Das Gerät darf nicht verwendet werden, wenn
das Netzkabel auf irgendeine Weise beschädigt
wurde. Wenn das Kabel beschädigt ist, muss
das Gerät gemäß den örtlichen Bestimmungen
entsorgt werden.

1.11 Im Stromnetz MUSS ein
Fehlerstromschutzschalter (RCD; für maximal 30
mA) vorgesehen sein.
1.12 Permanente Installationen am Stromnetz
(Festverdrahtungen) müssen die nationalen und
regionalen Verdrahtungsvorschriften einhalten.
Wenden Sie sich an einen qualifizierten Elektriker
oder an die lokalen Stadtwerke, wenn Sie beim
Anschluss ans Stromnetz Zweifel haben.
1.13 Verwenden Sie das Netzkabel nicht, um das
Gerät anzuheben, da dies zu Schäden führen
kann. Wenn das Produkt bewegt werden muss,
müssen Sie das Produkt ausschalten und an
beiden Seiten des Gehäuses greifen und heben
(Abb. 3) oder beide Seiten des Deckels greifen,
um diesen anzuheben (Abb. 3).
1.14 Der Filter darf nicht trocken laufen.
1.15 Das Gerät nicht bei Temperaturen unter 0 °C
in Betrieb nehmen oder aufbewahren. (siehe
Abschnitt „Aufbewahrung im Winter“).
1.16 Dieses Produkt eignet sich nicht für
Wassertemperaturen von über 35 °C oder unter
0 °C.
1.17 Benutzen Sie ausschließlich Zubehörteile, die für
den Gebrauch mit diesem Produkt vorgesehen
sind. Die Verwendung anderer Zubehör- und
Ersatzteile kann zum Verfall Ihrer Garantie
führen.
Allgemeine Leitfäden
2.1 Die Technische Informationstabelle auf der
Rückseite gibt allgemeine Hinweise zu
den technischen Filterdaten, empfohlene
Durchflussraten und Schlauchdurchmesser für
Gartenteiche bis 10.000 Liter. Zur Erzielung
bester Ergebnisse sollten jedoch mehrere weitere
Faktoren in Betracht gezogen werden, da diese
die Leistungsfähigkeit des Filters verringern.
•Teichtiefe:HozelockCyprioempfiehlteine
Mindesttiefe von 1,2 m bei Koi-Teichen. Bei
einem Teich mit einer durchschnittlichen
Tiefe von weniger als 0,75 m beträgt der
Zuschlagfaktor +25 %. Flache Teiche sind der
vollen Einwirkung des Sonnenlichts ausgesetzt,
sodass sie sich zügig erwärmen. Dies begünstigt
das Wachstum von Algen.
•Teichlage:DieTeichlagebestimmtdietägliche
Sonnenlicht-/Schattenmenge, die der Teich
erhält. Teiche, die den gesamten Tag lang der
Sonneneinstrahlung ausgesetzt sind, besitzen
einen Zuschlagfaktor von +25 %.
•Klima:DasKlimahatAuswirkungenaufdie
Wassertemperatur, die Bewegungsintensität
der Fische und ihren Futterbedarf. Je aktiver
die Fische, desto größer sind die Ansprüche an
die Filtrieranlage. In heißen Klimazonen (z. B.
Südafrika) beträgt der Zuschlagfaktor +35 %.
In gemäßigten Klimazonen (z. B. Südeuropa)
beträgt der Zuschlagfaktor +15 %. In einem
nordeuropäischen Klima (z. B. den meisten
Gegenden von Großbritannien) beträgt der
Zuschlagfaktor 0 %.
•BEISPIEL:SiehabeneinenGoldfischteichmit
einem Wasservolumen von 2200 Litern und einer
Tiefe von 0,75 m (Zuschlagfaktor +25 %).
Da Sie in London leben, handelt es sich dort um
ein nordeuropäisches Klima (Zuschlagfaktor
0 %). Ihr Teich ist den ganzen Tag der
Sonneneinstrahlung ausgesetzt (Zuschlagfaktor
+25 %). Das effektive Volumen Ihres Teichs
ist daher um 50 % (25 % + 25 %) größer, Sie
müssten Ihre Ausrüstung so auslegen, als würde
Ihr Teich 3300 Liter Wasser enthalten.
2.2 Durchflussrate: Zur Erzielung bester Resultate
sollte das Teichvolumen alle 1½ bis 2½ Stunden
den Ecopower+ Teichfilter durchfließen, was
die höchste Durchflussrate darstellt, die für
Koi-Teiche empfehlenswert ist. Wie der Tabelle
mit den technischen Informationen auf der
Rückseite zu entnehmen ist, darf die maximale
Durchflussrate nicht überschritten werden. Wenn
Sie klares Wasser erhalten wollen, ist die korrekte
Durchflussrate von wesentlicher Bedeutung.
Falls Ihre Installation keine hohen Verluste
einzubüßen hat (z. B. lange Schlauchführungen),
muss der Durchfluss möglicherweise mit einem
Schlauchventil eingestellt werden, um die
Umwälzrate des Teichvolumens von 1½ bis 2½
Stunden zu erreichen.
Schläuche mit kleinem Durchmesser, unnötig
lange Schlauchführungen und eine große
Förderhöhe können alle die Pumpenleistung
erheblich verringern. Wir empfehlen Ihnen, eine
Pumpe zu wählen, die gewährleistet, dass der
erforderliche Durchfluss bei voller statischer
Förderhöhe (der senkrechte Abstand zwischen
Teichoberfläche und Filtereinlass) plus 0,6 m für
die Reibungsverluste in den Schläuchen gegeben
ist.
Das Ziel der Filtration besteht darin, alle
Abfallstoffe aus dem Teich in den Teichfilter
zu leiten, sodass die dazugehörige Pumpe
für Feststoffe ausgelegt sein muss, wie z.
B. Hozelock Cyprios Auswahl an AquaforcePumpen, die insbesondere bei Teichen zum
Einsatz kommen, die eine Größe besitzen,
für die unsere Ecopower+ Filter geeignet
sind. Zur Gewährleistung der bestmöglichen
Wasserzirkulation und zur
Maximierung ihres Feststofffördervermögens
sollte die Pumpe an der tiefsten Stelle des Teichs
platziert werden. Installieren Sie die Pumpe auf
19

einer flachen und ebenen Plattform, die 300 mm
gegenüber dem Teichboden erhöht ist. Dadurch
vermeiden Sie, dass die Pumpe direkt Schmutz
vom Boden aufnimmt, und zudem bleibt dann
immer ausreichend Wasser im Teich, falls dieser
aus irgendeinem Grund Wasser verliert.
Wie Sie Ihre Durchflussrate überprüfen: Nehmen
Sie einen Behälter mit bekanntem Volumen und
stoppen Sie, wie lange es dauert, ihn zu füllen
(in Sekunden). Teilen Sie dann 3600 durch die
Anzahl der Sekunden, die Sie zum Füllen des
Behälters gebraucht haben, und multiplizieren
Sie das Ergebnis mit dem Behältervolumen
(Liter). Das Endergebnis ist die Durchflussrate in
Litern pro Stunde (l/h).
2.3 Fischbestandsdichte: Unter normalen
Bedingungen und bei planmäßiger Fütterung
unterstützen unsere Gartenteichfilter der Reihe
„Ecopower+“ bis zu 50 cm Fische pro 1000
Liter Teichvolumen. Setzen Sie in den ersten
paar Wochen langsam Ihre Fische ein, bis Sie
maximal 20% der empfohlenen Höchstmenge
erreicht haben, was Sie nach sechs Monaten
wunschgemäß auf 50% erhöhen können. Das
Gleichgewicht erlaubt ein Wachstum der Fische.
2.4 Teichbehandlung: Einige Medikamente/
Behandlungsmittel können durch UVC-Strahlung sehr schnell zerfallen. Der
Teichfilter sollte daher während einer
Krankheitsbehandlung ausgeschaltet sein. Die
mechanische und die biologische Filtration
werden weiterhin stattfinden.
Bei der Behandlung Ihres Teich gegen
Fadenalgen sollten Sie die Pumpe und den Filter
für die Dauer der Behandlung ausschalten, bis
die behandelten Fadenalgen aus dem Teich
entfernt wurden.
2.5 Bei jedem Schlauchanschluss ist oberste
Vorsicht geboten, weil undichte Stellen zu einem
Wasserverlust des Teichs führen.
Vor der ersten Verwendung
Unsachgemäßer Umgang mit diesem Produkt
während des Transports kann zu Schäden an der
Quarzglasröhre führen. Kontrollieren Sie bitte die
Quarzglasröhre und Dichtung vor dem Einbau.
Siehe Abschnitt „Wartung“ für Details zum Zugriff auf
die Quarzglasröhre und Lampe.
Installation
3.1 Wichtig: Unsere Gartenteichfilter Ecopower+
dürfen nicht mit einer Pumpe mit einer
Durchflussrate größer als in der technischen
Informationstabelle angegeben oder einer
maximalen Förderhöhe von mehr als 3,5m
20
verwendet werden.
3.2 Wichtig: Der Ecopower Filter darf nur aufrecht in
senkrechter Position verwendet werden.
Stellen Sie den Ecopower+ auf einem festen,
ebenen Untergrund auf, wo Sie ihn gut erreichen
können.
Bei den Ecopower Filtern handelt es sich um
externe Filter mit integrierter UVC-Einheit und
Versorgung über Pumpe, die entweder über dem
Boden (Abb. 2a) oder im Boden (Abb. 2b) neben
Ihrem Teich oder versteckt an der oberen Kante
eines Wasserfalls (Abb. 2c) installiert werden.
Wenn Sie Ihren Teichfilter auf den Boden setzen
wollen, muss dieser flach und eben sein.
Falls Sie Ihren Teichfilter jedoch teilweise
eingraben, sollten Sie den Umgebungsbereich
nach dem Einsetzen ins Loch fest mit dichtem
Sand füllen, um die Filtereinheit zu stützen.
Achten Sie immer darauf, dass der (die)
Filterauslässe mindestens 100 mm über dem
Wasserniveau Ihres Teichs sind.
3.3 Anschluss – Stellen Sie das Gerät neben dem
Teich auf und verlegen Sie das Kabel zur
Netzversorgung. Vergewissern Sie sich, dass
das Kabel lang genug ist, um das Gerät an der
gewünschten Stelle im Teich zu positionieren.
3.4 Für den Transport wurde der Auslassstutzen
verkehrt herum am Gehäuse montiert.
Entfernen Sie diesen durch Abschrauben der
Mutter und setzen Sie ihn richtig herum auf,
wie in (Abb. 4) gezeigt.
3.5 Den Deckel umdrehen und die SchaumgummiAbstandsnasen (Abb. 1c) in die in Abb. 5
gezeigten Aussparungen drücken. Der Punkt am
Ende der Nasen sollten, wie in Abb. 6 gezeigt,
nach innen zeigen.
NIE EINEN HAMMER ZUM ANPASSEN DER
NASEN VERWENDEN!
3.6 Den Schaumgummi (2 St. bei Ecopower+
20000) auf die Enden der SchaumgummiAbstandsnasen drücken. Die große Öffnung
passt über das Ende des gelben Auslassstutzens
(Abb. 7). Der Schaumgummi passt nur in
eine Richtung, mit den Noppen vom Deckel
abgewandt.
3.7 Die Ecopower+ Filter beinhalten einen
Zulaufschlauchanschluss (Abb. 1f) für 20 - 40
mm (3⁄4” – 11⁄2”) Schläuche (siehe technische
Informationstabelle auf Rückseite) und
Auslaufschlauchanschlüsse (Abb. 1e) für 40
mm (1 1⁄ 2”) Schlauch. Der Pumpenzulauf und
Filterauslauf sollten sich für eine optimale
Umwälzung des Teichwassers an den
entgegengesetzten Teichenden befinden.
Beachten Sie dies beim Kauf, Messen und
Zuschneiden des Cypriflex-Schlauchs.

Schneiden Sie den Zulaufschlauchanschluss an
Ihrem Ecopower+ Filter auf den Durchmesser
des verwendeten Schlauchs zu (Abb. 8) und
montieren Sie ihn am Filterzulauf (Abb. 9).
Montieren Sie einen Schlauch mit geeigneter
Länge zwischen der Versorgungspumpe und
dem Filterzulauf und sichern Sie den Schlauch
mit einer separat erhältlichen Hozelock Cyprio
Schlauchschelle am Schlauchstutzen.
3.8 Der Filterauslaufanschluss und die
Schwallleiste(n) (2 St. am Ecopower+ 10000)
müssen auf der Gehäuseseite befestigt werden
(Abb. 10).
Der Auslaufschlauch (falls montiert) sollte
auf die gleiche Weise wie der Zulaufschlauch
befestigt werden. Vermeiden Sie Knicke und
enge Kurven und halten Sie die Schlauchlänge
immer so kurz wie möglich (vorzugsweise
weniger als 1 m), um die Strömungswiderstände
zu minimieren.
Für optimale Ergebnisse sollte vermieden
werden, dass das Ende des Auslaufschlauchs
(falls vorhanden) in den Teich taucht.
3.9 Montieren Sie vorsichtig den Deckel auf dem
Gehäuse und rasten Sie umlaufend den Rand
ein. Prüfen Sie über das Schaufenster, dass die
Schaumstoffplatte unterhalb der Auslässe des
Gehäuses positioniert ist (Abb. 12).
Betrieb
4.1 Schließen Sie das Versorgungskabel des
Filters an (siehe Abschnitt 1 – Sicherheit
und elektrische Anschlüsse). Dadurch wird
die UV-Lampe eingeschaltet. Sie können die
Lampenfunktion im Dunkeln durch kurzes
Ausschalten der Versorgungspumpe und Prüfung
des bläulichen Lichtscheins am Ende des gelben
Stutzenauslasses kontrollieren (Abb. 7 (x)).
4.2 Schalten Sie die Pumpe ein.
4.3 Betriebszeiträume: Lassen Sie den Filter
täglich 24 Stunden laufen. Idealerweise
sollte er das ganze Jahr über oder zumindest
während der Fütterungszeit laufen (d. h. bis
die Wassertemperatur auf unter 10°C fällt).
Im Winter ist es sinnvoll, die Pumpe und den
Teichfilter laufen zu lassen, weil dadurch im
Filter eine Grundmenge an nützlichen Bakterien
verbleibt und dies dazu beiträgt, dass der Teich
unter extremen Bedingungen nicht vereist.
Wenn die Pumpe im Winter ausgeschaltet wird,
muss das Filtermedium (Schaumstoff bzw.
Kunststoff-Biomedium) vor der Wiederaufnahme
der Filtration im Frühjahr gründlich gewaschen
werden, und Ihr Ecopower+ muss von Grund auf
neu reifen (siehe „Reifung“). Füttern Sie niemals
Ihre Fische, wenn Ihr Teichfilter nicht in Betrieb
ist.
Reifung
5.1 Biologische Reifung bedeutet, dass der
Teichfilter genügend nitrifizierende
Bakterien angesammelt hat, um schädliche
Fischausscheidungen und sonstige organische
Abfallstoffe (wie Ammoniak und Nitrit) in relativ
harmloses Nitrat umzuwandeln. Der Prozess
dauert gewöhnlich 6 bis 8 Wochen, jedoch ist er
von vielen Faktoren wie der Wassertemperatur,
der Fütterungshäufigkeit und der
Fischbestandsdichte abhängig. Sie können
den Reifungsprozess beschleunigen, indem Sie
ein Reifungsmittel wie Hozelock Cyprios „Filter
Start“ hinzugeben.
Reinigung
6.1 Unsere Ecopower+ Filter bieten höchstes
Leistungsvermögen bei minimalem
Wartungsaufwand.
Nimmt die Blockierung jedoch zu, so verringert
sich die Durchflussrate, weil weniger Wasser
durch den Schaum fließen kann, was zur Folge
hat, dass der Filter gereinigt werden muss. Wenn
Ihr Gartenteich sehr schmutzig ist, muss der
Teichfilter am Anfang möglicherweise alle paar
Tage gereinigt werden, weil er die Abfallstoffe
sehr schnell aufnimmt. Sobald das Teichwasser
klarer wird, müssen weniger Abfallstoffe entfernt
werden, sodass der Filter auch seltener gereinigt
werden muss.
ACHTUNG: Längerer Betrieb des Filters,
wenn dieser gereinigt werden muss führt zu
einer erschwerten Reinigung und kann die
Lebensdauer des Schaums verkürzen.
Schalten Sie die Wasserversorgungspumpe aus
und unterbrechen Sie deren Stromversorgung
(durch Entfernen der Sicherung), sowie die
Stromversorgung der Ecopower+ Einheit, wenn
der Filter gereinigt werden muss.
6.2 Trennen Sie die Pumpe vom Stromnetz.
6.3 Trennen Sie den Ecopower+ vom Stromnetz.
6.4 Entfernen Sie vorsichtig den Deckel vom
Gehäuse (Abb. 3).
6.5 Entfernen Sie den Schaumstoff (Abb. 11) und
spülen Sie es mit dem Wasser aus dem Gehäuse.
Reinigen Sie ihn nicht zu stark. Lassen Sie
den gesamten Schmutz und Wasser aus dem
Gehäuse ab.
6.6 Positionieren Sie wieder die saubere
Schaumstoffplatte auf den Enden des
Schaumstoffabstandshalters, so dass der
Stutzen durch den Schaumstoff weist und die
Schaumstoffnoppen vom Deckel abgewandt
21

sind.
6.7 Schalten Sie die Stromversorgung des
Ecopower+ ein und prüfen Sie, dass die UVCLampe funktioniert.
6.8 Montieren Sie vorsichtig den Deckel auf dem
Gehäuse und rasten Sie umlaufend den Rand
ein. Prüfen Sie über das Schaufenster, dass die
Schaumstoffplatte unterhalb der Auslässe des
Gehäuses positioniert ist (Abb. 12).
6.9 Starten Sie die Pumpe, prüfen Sie auf Lecks, die,
falls sie unentdeckt bleiben, zu einem Leerlaufen
des Teichs führen könnten.
6.10 Das Biomedium befindet sich in einem
Netzbeutel. Normalerweise muss das
Biomedium nicht entfernt werden, da die
Reinigung die Bakterienkolonien, die giftige
Abfälle unschädlich machen, abtöten können.
Wenn das Biomedium jedoch stark verstopft
ist, entfernen Sie den Netzbeutel mit dem
Biomedium, spülen Sie ihn in einem Eimer
sauberem Teichwasser
Wartung
Die Wartung des Schaltgehäuses darf nur von einer
entsprechend qualifizierten Person oder bei einem
Service-Center durchgeführt werden.
Lesen Sie vor Wartungsarbeiten den Abschnitt
„Sicherheit und elektrische Anschlüsse“.
Achtung: Lesen Sie diese Wartungsanweisungen,
bevor Sie das Gerät öffnen.
7.1 Austausch der UV-Lampe.
Achtung: Das Gerät muss von der
Stromversorgung getrennt sein, bevor Sie den
UV-C-Strahler losmachen.
Da die Effektivität einer UV-Lampe im
Zeitablauf beträchtlich abnimmt, sollten Sie Ihre
Lampe auch dann alle 12 Monate austauschen,
wenn sie noch funktioniert.
Denken Sie an folgendes: Das Produkt ist mit
einer Verriegelung ausgestattet, welche die
Lampe beim Abnehmen des Deckels ausschaltet,
daher können Sie nur im Dunkeln sehen, ob
die Lampe funktioniert, indem Sie kurz die
Pumpe ausschalten und auf einen bläulichen
Lichtschein an der Stutzenunterseite achten
(Abb. 7 (x)).
Achtung: Versuchen Sie nicht, den UV-C-
Strahler zu benutzen, wenn die Abdeckung des
Produktdeckels entfernt wurde.
Achtung: Das Gerät muss vor dem Austausch
des UV-C-Strahlers von der Stromversorgung
getrennt werden.
7.1.1 Trennen Sie die Pumpe vom Stromnetz.
7.1.2 Trennen Sie den Ecopower+ vom Stromnetz.
22
7.1.3 Lösen Sie die vier Schrauben und entfernen Sie
den Deckel/das Schauglas (Abb. 13).
7.1.4 Ziehen Sie die Steckkontakte der Lampe ab (Abb.
14 y). Ziehen Sie die Lampe heraus (Abb. 14).
Entsorgen Sie die alte Lampe entsprechend der
lokalen Vorschriften.
7.1.5 Schieben Sie die Ersatzlampe hinein und
verbinden Sie die Steckkontakte an beiden
Enden der UVC-Lampe.
7.1.6 Montieren Sie den Deckel/das Schauglas und
bringen Sie die vier Schrauben an. Die Lampe
funktioniert nur, wenn der Deckel aufgeschraubt
ist.
7.1.7 Schalten Sie die Stromversorgung des
Ecopower+ ein und prüfen Sie, dass die UVCLampe funktioniert.
7.1.8 Schalten Sie wieder die Versorgungspumpe ein.
7.2 Pflege der Quarzglasröhre.
Insbesondere bei hartem Wasser kann die
Quarzglasröhre, welche die UV-Lampe umhüllt,
verkalken. Bei starker Verkalkung verringert sich
der Wirkungsgrad der Filtereinheit. Beachten Sie
zur Reinigung das folgende Verfahren.
7.2.1 Trennen Sie die Pumpe vom Stromnetz.
7.2.2 Trennen Sie den Ecopower+ vom Stromnetz.
7.2.3 Lösen Sie die vier Schrauben und entfernen Sie
den Deckel/das Schauglas (Abb. 13).
7.2.4 Entfernen Sie die Lampe, wie oben in 7.1
beschrieben.
7.2.5 Lösen Sie die beiden GELBEN Überwurfmuttern
auf jeder Seite des UV-Gehäuses und legen Sie
sie zur Seite (Abb. 15).
7.2.6 Ziehen Sie die Quarzglasröhre heraus (Abb. 16).
7.2.7 Wischen Sie die Quarzglasröhre außen mit
einem Lappen ab, der mit einer neutralen
Reinigungslösung befeuchtet wurde (z. B. Essig
und Wasser).
7.2.8 Prüfen Sie die Quarzglasröhre auf
Beschädigungen. Wenn das Quarzglas gerissen
oder irgendwie beschädigt ist, muss es entsorgt
und durch ein Neues ersetzt werden.
7.2.9 Schieben Sie die Quarzglasröhre wieder in die
UVC-Einheit. Montieren Sie locker eine der
gelben Überwurfmuttern. Sie schrauben Sie sie
nicht fest.
7.2.10 Montieren Sie die andere gelbe Überwurfmutter.
Schrauben Sie die beiden Überwurfmuttern
gleichzeitig fest. Die Quarzglasröhre richtet
sich selbstständig in der richtigen Position aus.
Schrauben Sie jede Mutter fest, bis der Anschlag
auf jeder gelben Überwurfmutter den Anschlag
auf der UV-Ummantelung berührt. Die Linie
auf der Mutter richtet sich mit dem Pfeil auf der
UV-Ummantelung aus. Versuchen Sie nicht, die
gelben Überwurfmuttern über den Anschlag (17)
hinweg festzuschrauben.
7.2.11 Montieren Sie die Lampe wieder, wie oben in 7.1
beschrieben.
7.2.12 Montieren Sie den Deckel/das Schauglas und
bringen Sie die vier Schrauben an. Die Lampe
funktioniert nur, wenn der Deckel aufgeschraubt
ist.
7.2.13 Schalten Sie wieder die Versorgungspumpe ein
und führen Sie eine Leckprüfung aus.
7.2.14 Schalten Sie die Stromversorgung des
Ecopower+ ein.
Aufbewahrung im Winter
Wenn es nicht verwendet wird, sollte das Gerät
aus dem Teich entfernt, gründlich gewaschen und
gereinigt, getrocknet und an einem trockenen,
frostgeschützten Ort aufbewahrt werden. Nehmen
Sie immer den Deckel ab, bevor Sie Ihr Gerät lagern,
um eine gute Durchlüftung und Trocknung zu
gewährleisten.
Kontakt/Ersatzteile
Bitte setzen Sie sich für Ersatzteile und
Produktberatung mit Hozelock Cyprios Kundendienst
in Verbindung (0121 313 1122), oder besuchen Sie uns
einfach auf www.hozelock.com.
Hozelock Cyprios „Klarwasser-Garantie“
WIR GARANTIEREN IHNEN KLARES TEICHWASSER,
ODER SIE ERHALTEN IHR GELD ZURÜCK, das Sie für
Ihren Teichfilter der Reihe „Ecopower+“ von Hozelock
Cyprio ausgegeben haben, sofern Sie ihn mit der
richtigen Pumpe verwenden.
HINWEIS: IN EINIGEN FÄLLEN KANN ES BIS ZU 8
WOCHEN DAUERN, BIS IHR WASSER KLAR WIRD.
Diese Garantie gilt unter folgenden Voraussetzungen
für 12 Monate nach Ihrem Kauf:
•SiehabendieInstallations-und
Betriebsanweisungen befolgt.
•SieverwendeneineAusrüstung,diekorrektgemäß
Hozelock Cyprios Auslegungsangaben ausgelegt ist.
•BeijedemzubehebendenProblemwenden
Sie sich früh genug an unsere Informations- und
Beratungsstelle (0121 313 1122).
•SiehabendasGerätunbeschädigtzurückgegeben.
Die Bewilligung einer Rückerstattung ist ausschließlich
Hozelock Cyprio vorbehalten. Eine mögliche
Rückerstattung erhalten Sie nur am Kaufort, in
Höhe des Kaufpreises des Ecopower+. Ein Kaufbeleg
ist erforderlich. Bitte beachten Sie, dass unsere
Klarwasser-Garantie keinen Verlust an Wasserklarheit
abdeckt, wenn Fadenalgen und nicht Grünalgen die
Ursache darstellen.
2 Jahre Produktgarantie
Wenn dieser Ecopower+ Filter (ausschließlich der UVLampe) innerhalb von 2 Jahren nach dem Kaufdatum
nicht mehr gewartet werden kann, werden wir ihn
unter der Bedingung kostenlos reparieren oder
austauschen, dass er unserer Meinung nach nicht
beschädigt wurde. Für Schäden auf Grund eines Stör-/
Unfalls oder einer unsachgemäßen Installation/
Verwendung kann Hozelock Cyprio nicht haftbar
gemacht werden. Die Haftung beschränkt sich auf den
Ersatz der fehlerhaften Filtereinheit. Diese Garantie
ist nicht übertragbar. Sie hat keine Auswirkungen
auf Ihre gesetzlichen Rechte. Zur Inanspruchnahme
der Garantie müssen Sie sich zunächst mit dem
Kundendienst von Hozelock Cyprio in Verbindung
setzen (+44 (0)121 313 1122), woraufhin die
Möglichkeit besteht, dass Sie darum gebeten werden,
das Gerät zusammen mit dem Kaufbeleg direkt an
folgende Adresse zu schicken. Der Kundendienst von
Hozelock Cyprio unter +44 (0)121 313 1122 oder
besuchen Sie www.hozelock.com
Entsorgen Sie alte Elektrogeräte nicht als
unsortierten Hausmüll, sondern nutzen Sie
dafür gesonderte Sammelstellen. Wenden Sie
sich an Ihre örtliche Behörde für
Informationen über die verfügbaren
Sammelanlagen/-systeme. Wenn alte Elektrogeräte
auf eine Müllkippe oder in eine Grube geworfen
werden, können gefährliche Substanzen austreten, die
dann ins Grundwasser und in die Nahrungskette
gelangen, was unsere Gesundheit und unser
Wohlbefinden beeinträchtigen würde. Wenn Sie in der
EU ein altes Elektrogerät gegen ein neues
austauschen, ist der Einzelhändler gesetzlich dazu
verpflichtet, Ihr Altgerät kostenlos zur Entsorgung
zurückzunehmen.
23
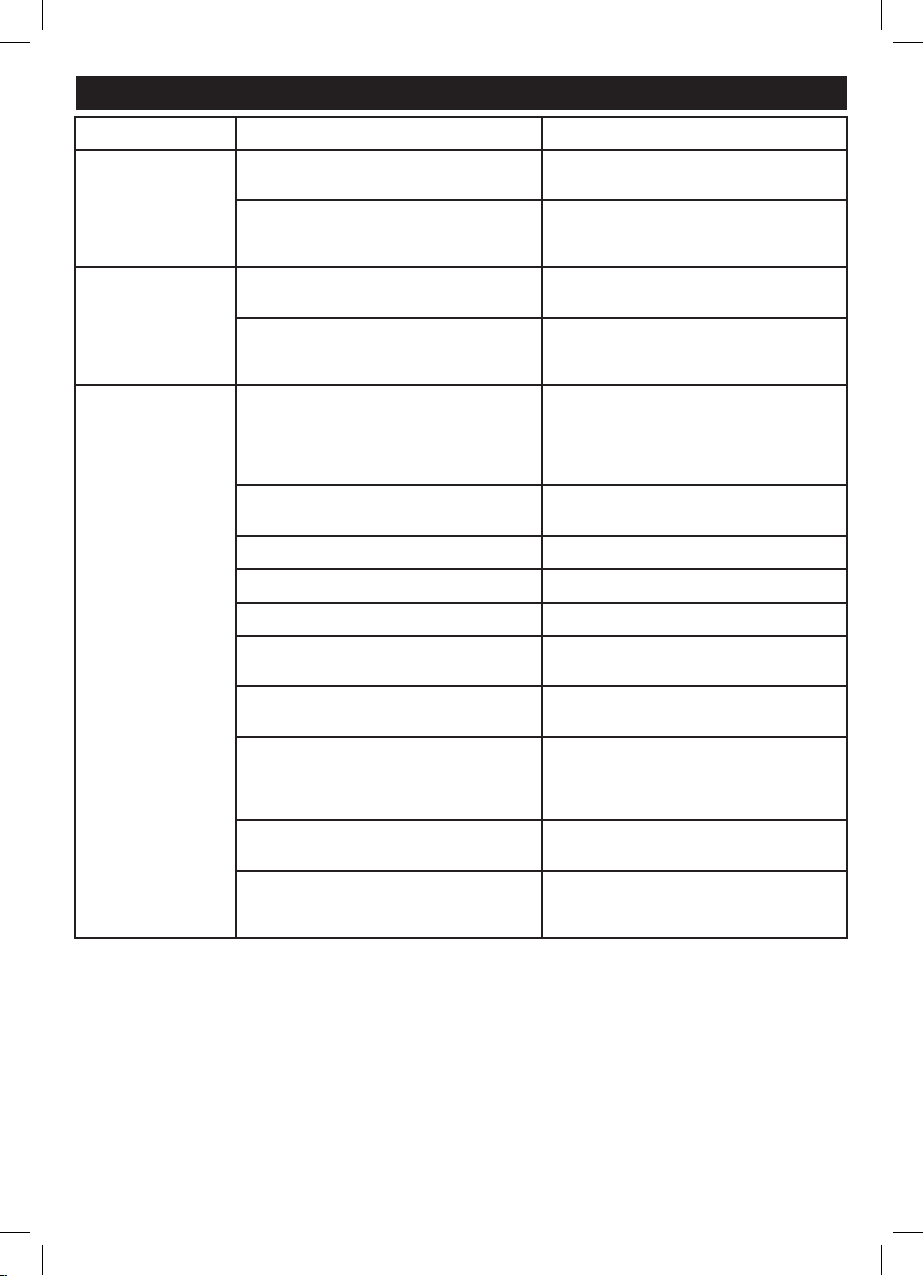
Fehlersuche/FAQ
Problem Mögliche Ursache Abhilfe
Kein Wasserfluss durch
den Filter in den Teich
Reduzierter Durchfluss
durch den Filter
Kein klarer werdendes
Teichwasser
Die Versorgungspumpe ist ausgeschaltet oder
funktioniert nicht.
Der Versorgungsschlauch ist verstopft.
Der Schaum blockiert den Wasserfluss.
Der Versorgungsschlauch ist verstopft.
Die Reifung des neuen Filters ist noch nicht
abgeschlossen.
Der Filter ist nicht für Ihren Teich ausgelegt.
Ungeeignete Versorgungspumpe Überprüfen Sie Ihre Durchflussrate. Siehe 2.2.
Defekte UV-Lampe Tauschen Sie die UV-Lampe aus.
Alte UV-Lampe Wechseln Sie alle 12 Monate die UV-Lampe.
UV-Lampe funktioniert nicht
Zu verschmutzter Schaum
Der Auslass des zum Teich zurückführenden
Schlauchs befindet sich über der
Versorgungspumpe.
Zu hoher Fischbestand im Teich
Überfütterung.
Überprüfen Sie, ob die Pumpe funktioniert, und
dass sie eingeschaltet ist.
Überprüfen Sie, ob der Versorgungsschlauch
und der zum Teich zurückführende Schlauch
verstopft sind.
Reinigen Sie den Filter (siehe Abschnitt
„Reinigung“).
Überprüfen Sie, ob der Versorgungsschlauch
und der zum Teich zurückführende Schlauch
verstopft sind.
Die Klarheit Ihres Teichwassers sollte sich
innerhalb von 2 bis 3 Wochen verbessern, jedoch
kann die gesamte biologische Reifung 6 bis 8
Wochen in Anspruch nehmen, sodass er dann
erst vollständig effektiv sein wird.
Achten Sie darauf, dass der Filter für den Aufbau
Ihres Gartenteichs ausgelegt ist.
Prüfen Sie die Sicherung, den Schutzschalter und
die Verkabelung.
Reinigen Sie den Filter (siehe Abschnitt
„Reinigung“).
Sorgen Sie dafür, dass sich die Pumpe und
der Auslass des zum Teich zurückführenden
Schlauchs weitmöglichst voneinander entfernt
befinden.
Verringern Sie die Menge an Fischen in Ihrem
Teich.
Geben Sie Ihren Fischen nur soviel Futter, wie sie
in wenigen Minuten verzehren können. Füttern
Sie nur einmal pro Tag.
24