

Page 1
KEYGUARD
Gefahrfreier Schlüsselkasten mit Alarmsicherung
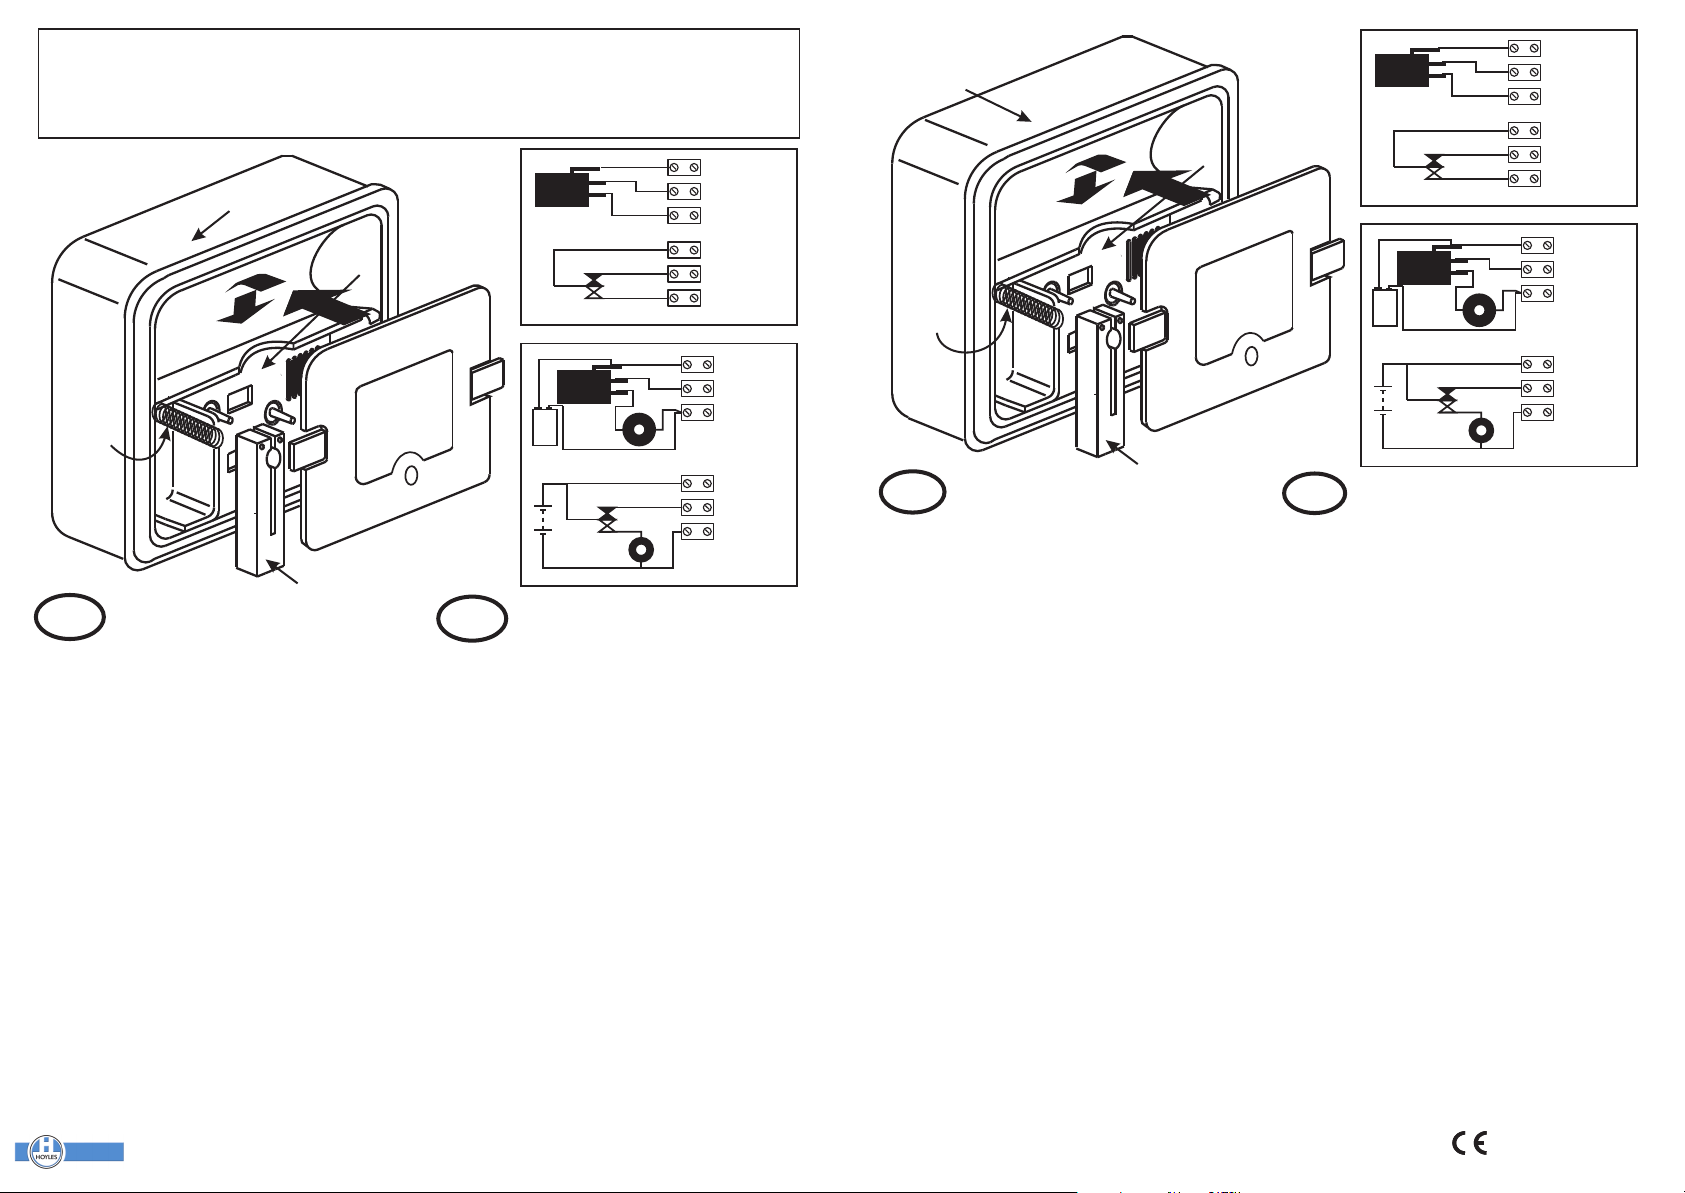
BACK-BOX
BOITER
KEYPLATE
COFFRET DE LA CLÉ
SPRING
RESSORT
BLOCKING PIECE
GBGB
The KEYGUARD is a new concept in key security. The window is
a non-hazardous clear plastic with frangible side tabs designed to
break in order to gain access to the key.
It is ideal in situations where a glass window would pose a hazard
food preparation areas, schools etc or wherever glass could
cause injury.
INSTALLATION.
1. Remove the plastic window and check that this is un- damaged,
particularly that the side tabs are intact. Keep the window in a safe
place until it is required to secure the key.
2. Fit the back box to the wall with the screws provided.
3a. If the KEYGUARD is a K/1000 version without alarm, refit the
keyplate with the two smaller screws. Fit the blocking piece and
spring as shown above. Hang the key on one of the pillars. It is
possible to break of any of he pillars in order to secure an access
control card.
3b. If the KEYGUARD is a K1010 version with an integral alarm
connect the battery before fitting the keyplate etc.. The alarm will
sound until the window is fitted.
3c. If the KEYGUARD is a K/1020 version for connection to a fire
or intruder alarme install all wiring and connect to the system.
Make all necessary electrical tests before fitting the window.
4. BEFORE FITTING THE WINDOW CHECK THAT THE
CORRECT KEY IS BEING SECURED. ONCE THE WINDOW IS
FITTED IT CANNOT BE REMOVED WITHOUT BREAKING
THE SIDE TABS.
5. The key can now only be retrieved by pulling on the top edge of
the window and breaking the side tabs.
6. If the KEYGUARD is an alarmed version it can be tested
periodically by gently pulling on the top left hand side of the
window until the alarm is tripped.
Hoyles Electronic Developments Ltd
T. 01744 886600 F. 01744 886607 E. sales@hoyles.com W. www.hoyles.com
PIECE DE BLOCKAGE
Non-hazardous alarmed keybox
Boitier à clé avec alarme
Cassetta a chiave con allarme
Red/Rouge
Blue/
Bleu
Yellow/Jaune
Red/Rouge
Blue/Bleu
Yellow/Jaune
Blue/Bleu
Red/
Rouge
9v
Blue/Bleu
Red/Rouge
9v
Black/
Noir
K/1020
Window in place
Plastique en place
K/1010
For connection to a
conventional control
use Red & Blue
Pour sortie reliée
au centrale utilisez
Rouge et Bleu
For connection to a
Multiguard control
use Red and Black
Pour sortie reliée
au Multiguard utilisez
Rouge et Noir
Window in place
Plastique en place
FF
KEYGUARD renforce la sécurité lors de la prise de la clé, en
éliminant les risques graves de coupures liés au boitier à clé
conventionnel équipé d'une vitre. KEYGUARD est équipé d'une
face avant en plastique.
KEYGUARD est particulièrement recommandé dans tous les
établissements recevant du public, en particulier écoles,
hôpitaux, administrations etc.. ainsi que dans l'industrie,
spécialement industries alimentaires.
MONTAGE.
1. Oter avec soin la face plastique. S'assurer que les ergots sonts
intacts. Ranger la face avant jusqu'à son utilisation.
2. Fixer le boiter sur le mur avec les vis.
3a. Pour le KEYGUARD K/1000 (modèle sans alarme), fixer le
coffret de la clé avec les petites vis. Introduire également la pièce
de blocage et le ressort comme indiqué sur le croquis. Placer la
clé, sur l'un des supports du boitier. Pour mettre un badge, casser
les supports.
3b. Pour le KEYGUARD K/1010 (modèle avec alarme), brancher
la pile avant de placer la face. L'alarme retentit dès cet instant
jusqu'à ce que la face soit en place.
3c. Pour le KEYGUARD K/1020 (modèle avec microswitch à
raccordé à une centrale) s'assurer, avant de placer la face avant,
que les branchements effectués au dos du boitier sont conformes
au croquis joint.
4. AVANT DE PLACER LA FACE PLASTIQUE SUR LE
BOITIER, CONTROLER QU'IL S'AGIT BIEN DE LA BONNE
CLE! Ensuite, il ne sera plus possible de la reprendre sans
enlever la face et casser les ergots!
5. Pour retirer la clé, saisir le haut de la face, le tirer vers soi. Les
ergots se cassent et l'alarme se déclenche.
6. Pour le KEYGUARD K/1010 et K/1020 on peut contrôler le
fonctionnement sans casser les ergots : tirer légèrement ver soi
le coin supérieur gauche de la face avant. Le microswitch est
libéré et déclenche l'alarme.
TRÄGERKASTEN
SCATOLA DA INCASSO
SCHÜSSELPLATTE
ALLOGGIAMENTO CHIAVE
FEDER
MOLLA
BLOCKIERSTÜCK
DD
Das KEYGUARD-Gerät ist ein neues Konzept in der
Schlüsselsicherheit. Das Fenster besteht aus gefahrfreiem
Kunststoff mit leicht zerbrechlichen Seitenzungen, die zum
Abbrechen bestimmt sind, um Zugang zum Schlüssel zu
erhalten. Das Gerät eignet sich ideal in Umgebungen, wo ein
Fenster aus Glas Gefahren mit sich bringt, z. B. in Bereichen, wo
Nahrungsmittel verarbeitet werden, in Schulen usw., oder überall
dort, wo Glas Verletzungen hervorrufen kann.
ELEMENTODI BLOCCAGGIO
INSTALLATION
1. Das Kunststofffenster entfernen und kontrollieren, dass es
nicht beschädigt ist, insbesondere auf die Unversehrtheit der
Seitenzungen achten. Das Fenster an einem sicheren Ort
aufbewahren, bis es zum Sichern des Schlüssels gebraucht wird.
2. Den Trägerkasten mit den mitgelieferten Schrauben an der
Wand befestigen.
3a. Wenn das KEYGUARD-Gerät eine K/1000 Version ohne
Alarm ist, die Schlüsselplatte mit den zwei kleineren Schrauben
wieder einbauen. Das Blockierstück und die Feder, wie oben
gezeigt, montieren. Den Schlüssel an einen der Stifte hängen.
Um eine Zugangskontrollkarte zu sichern, kann einer der Stifte
abgebrochen werden.
3b. Wenn das KEYGUARD-Gerät eine K/1010 Version mit
integriertem Alarm ist, die Batterie vor dem Einbau der
Schlüsselplatte etc. anschließen. Der Alarm ertönt solange, bis
das Fenster eingesetzt ist.
3c. Wenn das KEYGUARD-Gerät eine K/1020 Version zum
Anschluss an eine Feuer-oder Einbruch-Alarmanlage ist, die
gesamte Verdrahtung verlegen und an die Anlage anschließen.
Alle erforderlichen elektrischen Prüfungen vornehmen, bevor das
Fenster eingesetzt wird.
4. VOR DEM EINSETZEN DES FENSTERS VERGEWISSERN,
DASS DER RICHTIGE SCHLÜSSEL GESICHERT WIRD.
NACHDEM DAS FENSTER EINGESETZT WURDE, KANN ES
NICHT MEHR ENTFERNT WERDEN, OHNE DIE
SEITENZUNGEN ABZUBRECHEN.
5. Der Schlüssel kann jetzt nur noch entnommen werden, indem
an der Oberkante des Fensters gezogen und somit die
Seitenzungen abgebrochen werden.
6. Wenn das KEYGUARD-Gerät eine Version mit
Alarmsicherung ist, kann deren Funktionstüchtigkeit regelmäßig
überprüft werden, indem vorsichtig links oben am Fenster
gezogen wird, bis der Alarm ausgelöst wird.
Rot/Rosso
Blau/
Blu
Gelb/Giallo
Rot/Rosso
Blau/Blu
Gelb/Giallo
Blau/Blu
Rot/
Rosso
9v
Blau/Blu
Rot/Rosso
9v
Schwarz
/Nero
K/1020
Fenster in Position
Finestrella sistemata
K/1010
Zum Anschluss an
herkömmliche Kontrolleinrichtung
Rot und Blau verwenden
Per collegarsi ad un
comando convenzionale
utilizzare Rosso e Blu
Per collegarsi ad un
comando Multiguard
utilizzare Rosso e Nero
Zum Anschluss an
MULTIGUARD-Kontrolleinrichtung
Rot und Schwarz verwenden
Fenster in Position
Finestrella sistemata
II
KEYGUARD rappresenta un nuovo concetto in termini di
protezione delle chiavi. La finestrella è di plastica trasparente,
non pericolosa, con linguette laterali frangibili che si devono
spezzare per poter accedere alla chiave. KEYGUARD è
raccomandato in tutti gli edifici pubblici, come scuole, aree di
preparazione cibi, ecc. dove la rottura di una finestrella in vetro
potrebbe causare lesioni.
INSTALLAZIONE.
1. Togliere la finestrella di plastica e controllare che non sia
danneggiata, in modo particolare che le linguette laterali siano
intatte. Tenere la finestrella in un posto sicuro sino al momento del
suo utilizzo.
2. Fissare al muro la scatola da incasso con le viti fornite.
3a. Per il modello KEYGUARD K/1000 senza allarme, rimontare
l'alloggiamento chiave con le due viti più piccole. Sistemare
l'elemento di bloccaggio e la molla come indicato nel disegno.
Appendere la chiave su una delle colonnine. Per piazzare una
scheda di controllo dell'accesso, spezzare una delle colonnine.
3b. Per il modello KEYGUARD K/1010 con allarme integrale,
collegare la pila prima di montare l'alloggiamento chiave ecc.
L'allarme suonerà sino a quando non viene rimontata la
finestrella.
3c. Per il modello KEYGUARD K/1020 collegato ad un allarme
antincendio o antifurto, effettuare tutti i collegamenti all'impianto
ed eseguire i test necessari prima di rimontare la finestrella.
4. PRIMA DI RIMONTARE LA FINESTRELLA CONTROLLARE
DI AVERE INTRODOTTO LA CHIAVE GIUSTA, PERCHÉ IN
SEGUITO NON LA SI POTRÀ TOGLIERE SENZA SPEZZARE
LE LINGUETTE LATERALI.
5. Per ritirare la chiave, tirare verso di sé il bordo alto della
finestrella e spezzare le linguette laterali.
6. Per i modelli KEYGUARD con allarme, questo si può
collaudare periodicamente tirando delicatamente verso di sé
l'angolo della finestrella in alto a sinistra sino a quando l'allarme
scatta.
Dwg No: 60020:8 Iss 3 Apr 2001
 Loading...