

Page 1

Hoyer®Digital Scale
Models HLS-5-D & 59011A
User
Instruction
Manual &
Warranty
Page 2
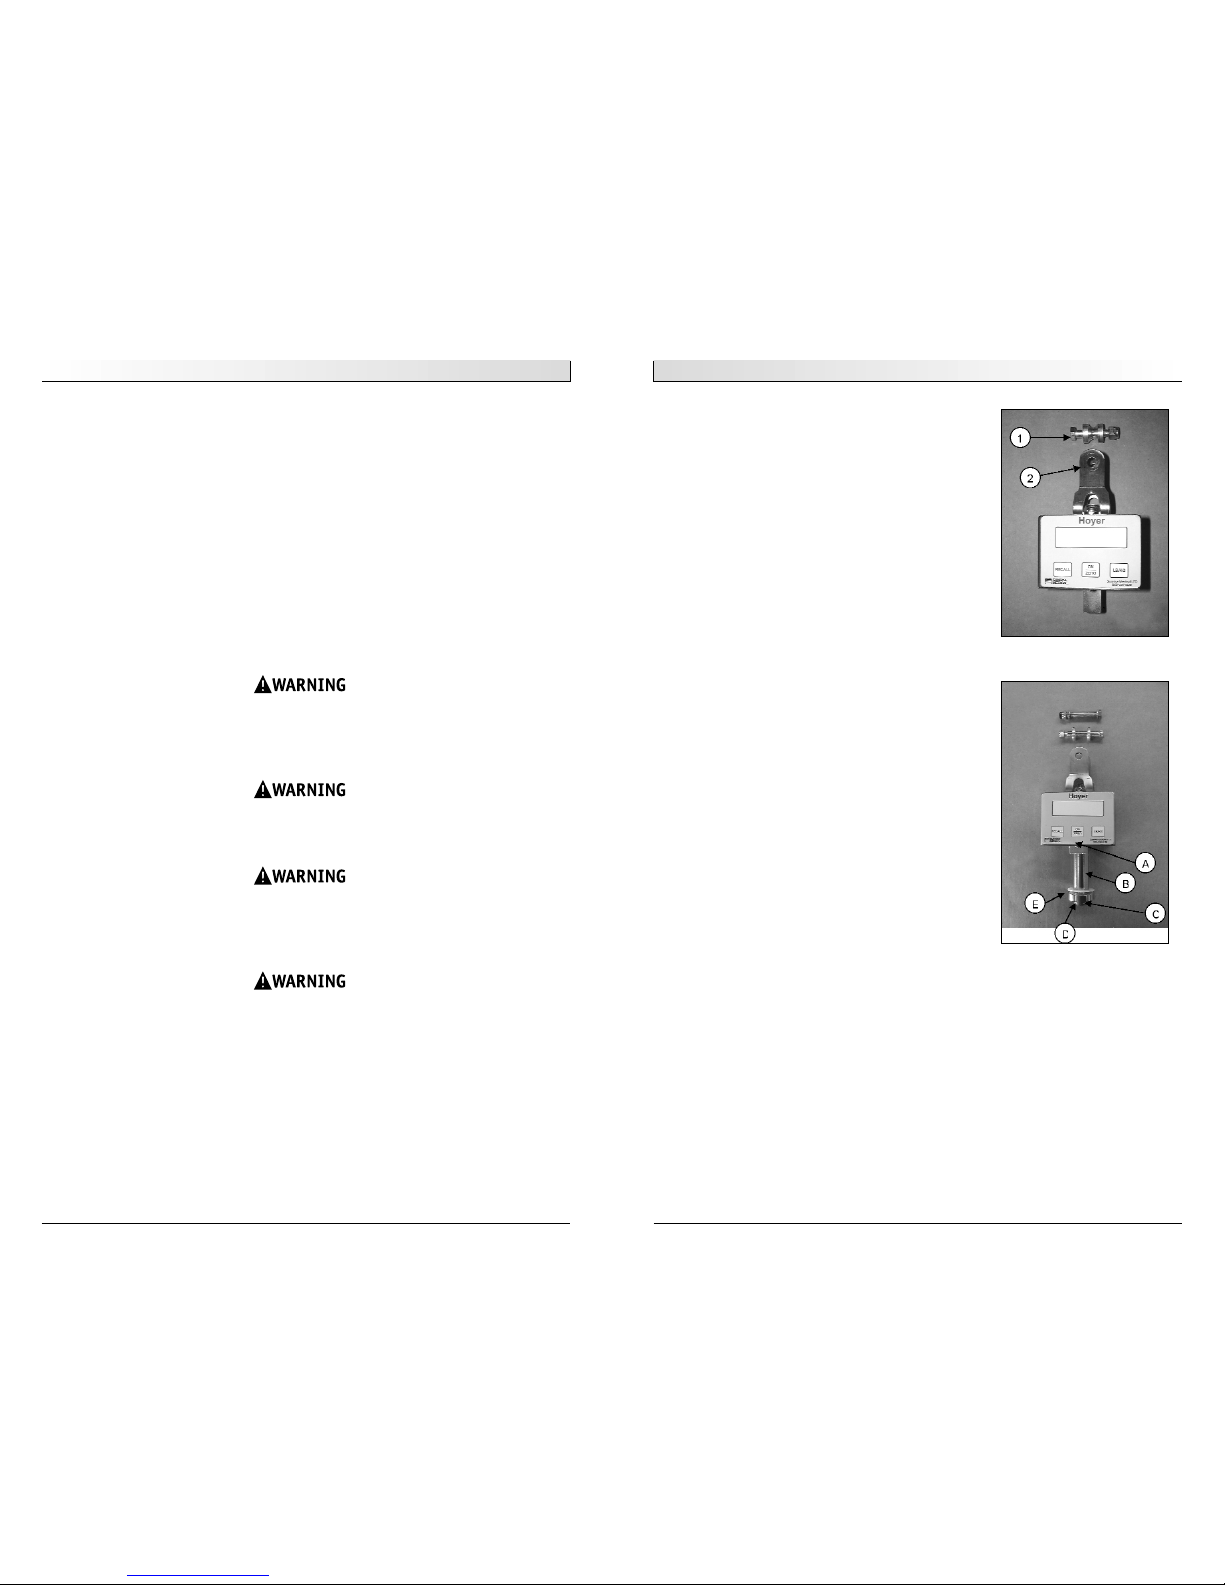
Table of Contents & Warnings
2
TABLE OF CONTENTS
Your Scale and Its Parts.................................................................................. 3
Specifications................................................................................................ 3
Assembly Instructions..................................................................................... 4
4 and 6 pt Cradle to Scale Assembly.............................................................. 4
Hoyer HML400 or HPL400 ............................................................................ 6
Classic Hoyer Lifters.................................................................................... 8
6 Point Hydraulic and Crank Lifters ............................................................... 8
Operating Instructions.................................................................................... 10
Battery Replacement ...................................................................................... 10
Warranty....................................................................................................... 11
NOTE– Assembly instructions pertain to the type of lifter boom that you will attaching
the scale for weighing. Follow the appropriate instructions based upon your
lifter and model ordered.
The Hoyer Digital Scale does not increase the maximum weight capacity of a
lifter. For maximum weight capacity of lifter please refer to the owners manual
that was shipped with the lifter, or for additional copies call Customer Service
at 1-800-333-4000.
For patient use refer to the separate manual "How to use a Patient Lifter"
included with your lifter. If you did not receive a copy or require additional
copies call Customer Service at 1-800-333-4000.
Using other manufacturers’ parts on Hoyer products is unsafe and may result
in serious injury to patient and/or attendant. Use only Hoyer lifter parts on
Hoyer products. Hoyer parts are not interchangeable with other manufacturers’ products. Replace worn parts immediately.
Torn, frayed, or broken slings could fail resulting in serious injury or death to
patient. Use slings in good condition only. Destroy and discard old and unusable
slings.
Your Scale and Its Parts / Specifications
3
YOUR SCALE AND ITS PARTS
Model # HLS-5-D (Figure 1)
Fits Model: C-HLA
Parts:
1. Bolt with Two Spacers & Two Washers
2. Scale Assembly
Model # 59011A (Figure 2)
Fits Models: C-HLA-2, C-HLA-2T, P-C-HLA-2, C-CB-L2,
HML400 & HPL402
Parts:
1. Poly bag of washers marked for use with
C-HLA-2, C-HLA-2T, P-C-HLA-2 & C-CB-L2
2. Poly bag of washers marked for use with
HML400 & HPL402
3. Hanger Post Comprised of:
A. Retainer Bolt
B. Sleeve
C. Lock Washer
D. Sleeve Bolt
E. Sleeve Bearing Washer
SPECIFICATIONS
Weight Capacity: ............................600 lbs. (272 kg)
Resolution: .......................0.1 %+/-1 digit of reading
Display: ..................................Liquid Crystal Display
Automatic Shut-Off:............................After 1 minute
Power Source: .....................................9 volt battery
Battery Life: ..................Approximately 3000 readings
Figure 1
Figure 2
Page 3
Assembly Instructions
4
Assembly Instructions
5
A. 4 AND 6 POINT CRADLE TO SCALE ASSEMBLY
Lifter Models: HML400 & HPL402
Scale Model Number: 59011A
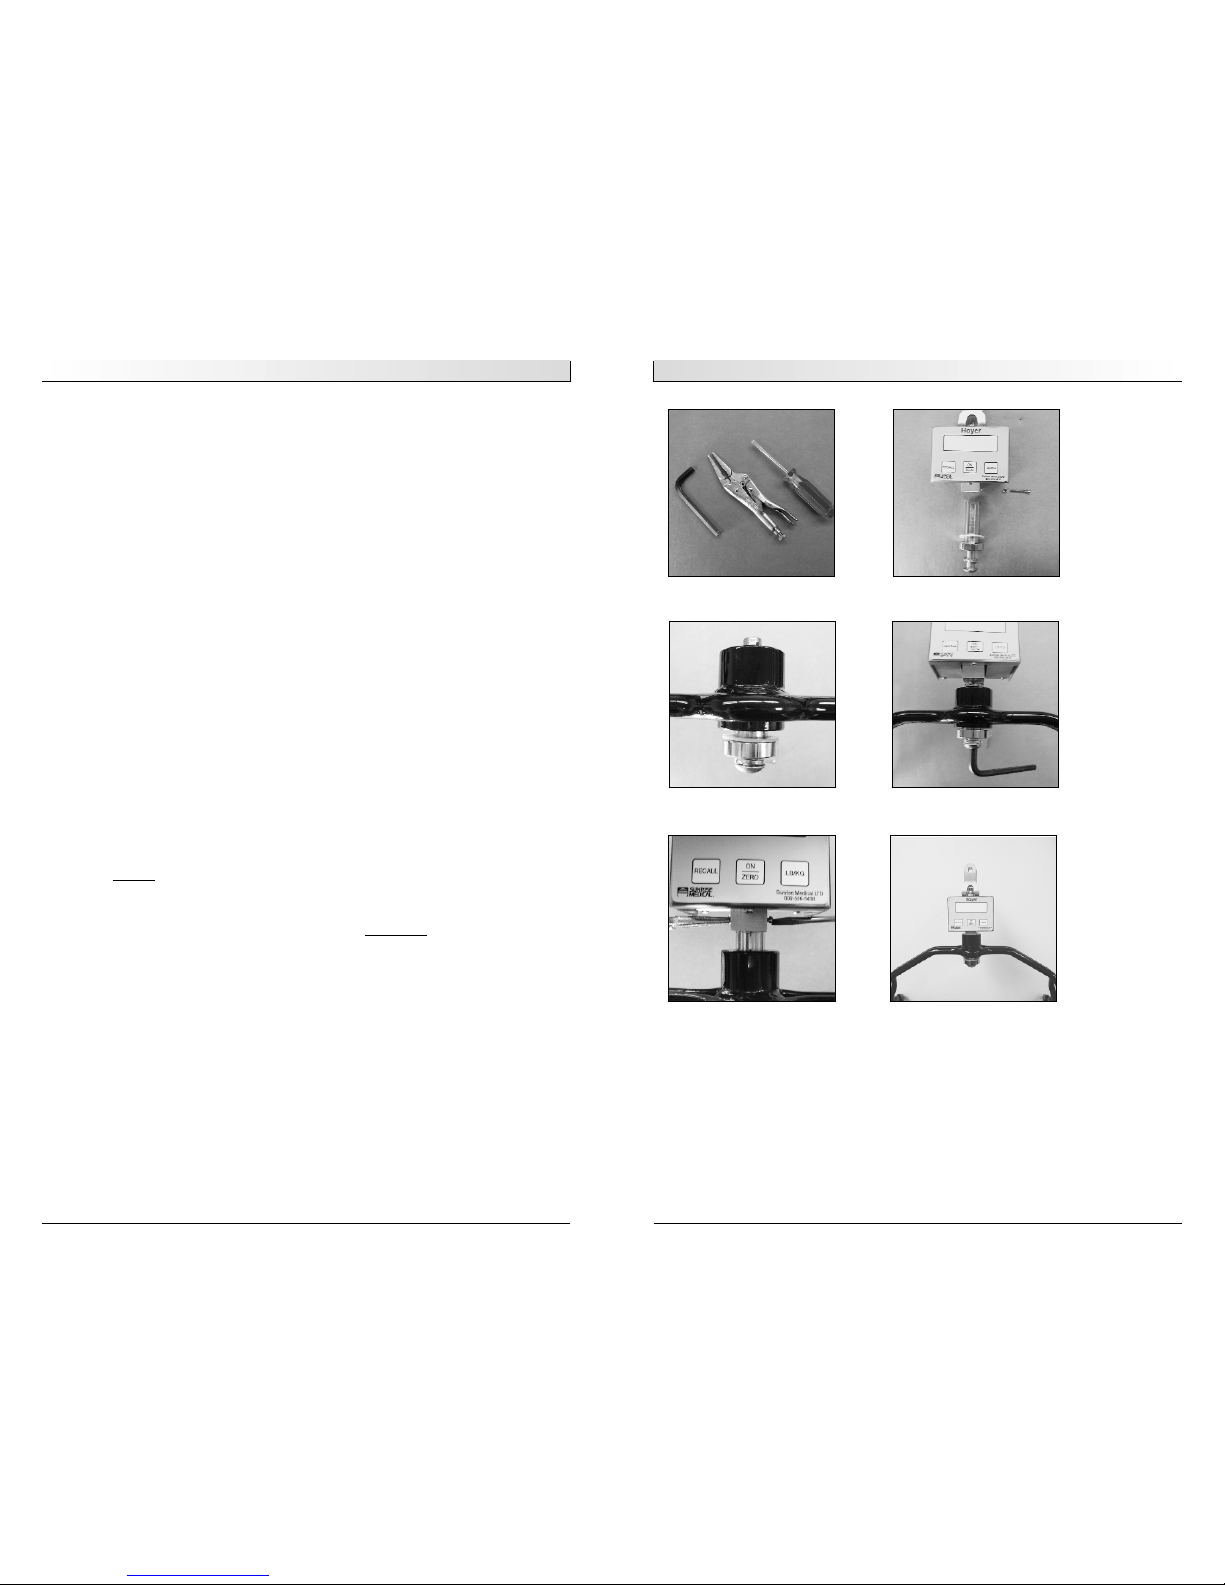
Tools Required (Figure 3):
• 5/16" Allen Wrench
• Needle Nose Pliers
• Screw Driver– Phillips
Assembly Instructions:
1. Disassemble cradle after removing from lifter.
2. Disassemble the scale's hanger post (Figure 4).
a. Using the screw driver and pliers, remove the retainer screw in the load cell.
b. Using the 5/16" allen wrench, remove the sleeve bolt and sleeve from the
scale.
3. Place the scale's sleeve into the lifter cradle (Figure 5).
a. Use the new sleeve bearing washer that is already supplied on the scale
sleeve. Make sure the old sleeve-bearing washer is removed.
b. Place the bolt and lock washer back into sleeve.
4. Connect the scale to cradle.
a. With the sleeve bolt in hand, take the scale in the other hand, and position
the bottom load cell threads over the bolt and start turning in (Figure 6).
Critical: There is a mill slot on the load cell and two smaller slots on the
sleeve. Position the sleeve so it fits into the slot. They MUST mate. Once
aligned, turn in the sleeve bolt with Allen wrench. Completely turn in the
bolt so the lock washer is fully compressed. Sugg
estion: For ease of handling, place cradle with scale on flat surface (i.e. table top) and align lift
holes to scale.
5. Install the retainer bolt. A 1/8" hole has been drilled through the load cell and
the sleeve bolt. The retainer screw must go through both. Look into the load cell
and use the Allen wrench to align the holes. Once aligned, install the retainer
bolt. It should go in cleanly. Tighten the nut accordingly (Figure 7).
6. Do a final inspection.
a. Make sure the sleeve bearing washer was installed.
b. Verify the scale swivels cleanly in the cradle (Figure 8).
Figure 3 Figure 4
Figure 5 Figure 6
Figure 7
Figure 8
Page 4

Assembly Instructions
7
Assembly Instructions
6
B. HOYER HML400 & HPL400
Scale Model Number: 59011A
Tools Required (Figure 9):
• 3/16" Allen Wrench
• 1/2" Box End Wrench or 1/2" Socket Wrench
Assembly Instructions:
1. Remove existing cradle and bolt assembly. Discard old bolt and use the new one
provided with scale (Figure 10).
2. Assemble scale to cradle. See section “4- and 6-point Cradle to Scale Assembly”
in this manual.
3. Select the appropriate poly bag of washers labeled for your lift model number
that were provided with the scale assembly.
4. Slide a metal washer onto bolt and insert partially in boom bracket. Place 2
nylon washers between the boom bracket and the scale bracket and push bolt
through both ends of the scale bracket. Stop and add the other 2 nylon washers
between the boom bracket and scale bracket. Push bolt all the way through,
then add the other metal washer (Figure 11).
5. Secure nut to bolt using the tools listed (Figure 12).
6. Make sure the scale assembly moves freely (Figure 13).
All shoulder bolts must engae through bracket on both sides. If bolt is not
fully engaged, misalignment and premature failure may result in injury/death
to patient/attendant.
Figure 9
Figure 10
Figure 11
Figure 12
Figure 13
Page 5

Assembly Instructions
9
Assembly Instructions
8
C. CLASSIC HOYER LIFTERS
Lifter Model: C-HLA
Scale Model Number: HLS-5-D
Tools Required (Figure 14):
• 9/16" Box End Wrench
• 9/16" Socket
• Socket Wrench w/2" Extension
Assembly Instructions:
1. Remove existing Spreader Bar.
2. Disassemble the bolt and spacers and place the spacers over the boom Spreader
Bar ring with the flat sides out (Figure 15).
3. Take scale assembly, and place top bracket over the spacers. Place bolt in bracket to hold (Figure 16).
4. Secure nut to bolt using the tools listed (Figure 17).
Replace the Spreader Bar on to the digital scale. Make sure the scale assembly
moves freely (Figure 18).
D. 4 AND 6 POINT CRADLE
Lifter Models: C-HLA-2, C-HLA-2T, P-C-HLA-2, C-CB-L2
Scale Model Number: 59011A
Tools Required (Figure 14):
• 9/16" Box End Wrench
• 9/16" Socket
• Socket Wrench with 2" Extension
Assembly Instructions:
1. Remove existing cradle and bolt assembly. Discard old bolt and use the new one
provided with the scale.
2. Assemble scale to cradle. See “4 and 6 pt Cradle to Scale Assembly “ instructions.
3. Place scale-cradle assembly top bracket in boom bracket. Place bolt plus one
washer in both brackets to hold. Place last washer and nut. Washers should be
outside of boom bracket (Figure 19).
4. Secure nut to bolt using the tools listed (Figure 20).
5. Make sure the scale assembly moves freely (Figure 21).
Figure 15
Figure 16
Figure 17
Figure 18
Figure 19
Figure 20 Figure 21
Figure 14
Page 6

Warranty
11
WARRANTY
1. If allowed by law, this warranty is in place of any other warranty (written or
oral, express or implied, including a warranty of merchantability, or fitness for a
particular purpose).
2. This warranty gives you certain legal rights. You may also have other rights that
vary from state to state.
3. The Hoyer Digital Scale is warranted to be free of manufacturing defects for one
year from date of the original consumer purchase.
4. For warranty service call 800.333.4000.
Operating Instructions
10
OPERATING INSTRUCTIONS
1. Once the Digital Scale has been properly installed on lifter and the sling or
stretcher is in place.
a. Select pounds or kilograms by setting the Kg/Lb. switch located on the left
side of the scale.
b. Press the “Zero” button to set scale system to zero. The digital zero will be
displayed for a few seconds, then the LCD will read “0.0”.
2. Remove the sling or stretcher.
3. Position the patient in the sling or on the stretcher.
4. Reattach the sling or stretcher to the cradle or swivel bar.
5. Carefully lift the patient. When the motion is stabilized, press the “ON” button.
6. Read and record the displayed weight data.
NOTE– The display will automatically turn itself off after approximately 60 seconds to
conserve battery power. If the display turns off before you are able to record
weight data, simply press the “ON” button once again.
7. Carefully lower patient and detach sling or scale from cradle or swivel bar.
Always reset scale to “Zero” whenever changes are made to the selection of cradles,
slings, chains, straps or stretchers.
BATTERY REPLACEMENT
The Hoyer Electronic Digital Scale is powered by a 9-volt battery. A new battery should
provide approximately 3000 readings before needing replacement. When battery needs
to be replaced, a "B" will appear on the display.
To Replace Battery:
1. Push black pad on back of unit to left.
2. Battery holder will slide out.
3. Remove old battery and replace with a new one.
4. Push holder back into scale
NOTE– Calibration and maintenance should be performed by trained factory authorized
Personnel ONLY. The Hoyer Digital Scale contains no serviceable parts.
Unauthorized tampering with the scale will void all warranties.
If you have questions or comments regarding the safe operation of the Hoyer Digital
Scale, please call Customer Service at 800.333.4000.
Page 7

Manufactured for:
Sunrise Medical
7477 East Dry Creek Parkway • Longmont, Colorado • 80503 USA
(800) 333-4000
In Canada (800) 263-3390
© 2003, Sunrise Medical 3.03
000-3560 Rev A
 Loading...