

Page 1
SMART PASS MANAGEMENT PLATFORM
USER MANUAL
VER 2.3.0
Page 2

TABLE OF CONTENTS
1. Installation and Login ................................................................5
Management Platform Login .....................................................5
Client Login ...............................................................................6
2. Console .....................................................................................7
3. Device Management .................................................................8
Device List .................................................................................8
Parameter Settings ....................................................................8
Power Control ............................................................................9
Body Temperature Test .............................................................9
Client Upgrade ........................................................................10
Volume Settings .......................................................................10
Auto-Start .................................................................................11
Application Daemon ................................................................11
Open the Door Remotely .........................................................12
Delete ......................................................................................12
Move Group .............................................................................12
Personalize Test ......................................................................12
Device Details .........................................................................13
Device Monitoring ...................................................................14
Grouping Operation in Bulk .....................................................15
Device Grouping Management ...............................................16
APK List ...................................................................................16
Delete APK ..............................................................................16
New APK .................................................................................16
4. Personnel Management ..........................................................17
Employee List ..........................................................................17
2
HOWARD INTERACTIVE KIOSK INSTALLATION GUIDE
Page 3

Add Employee Information Manually ......................................17
Import Employee Information in Bulk ......................................19
Import Portrait Photos in Bulk ..................................................20
Export Employee Information ..................................................21
Refresh Employee Information ................................................21
Staff Details and Editing ..........................................................21
Employee Grouping Management ..........................................22
Visitor Management .................................................................22
Add Visitor Individually ............................................................23
Export Visitor Information ........................................................24
Refresh Visitor Information ......................................................24
Visitor Details and Editing .......................................................24
Visitor Grouping Management ................................................25
Blacklist Management .............................................................25
Add Blacklist Individually ........................................................26
Export Blacklist ........................................................................26
Refresh Blacklist Information ...................................................27
Blacklist Details and Editing ....................................................27
Blacklist Grouping Management .............................................28
5. Pass Management ...................................................................29
Pass Records ..........................................................................29
Pass Permission ......................................................................29
Employee Pass Permission Settings .......................................30
Visitor Pass Permission Settings .............................................31
Revoke Permission ..................................................................32
Refresh Permission Information ...............................................32
FOR SUPPORT CALL: (888) 323 - 3151
3
Page 4

TABLE OF CONTENTS CONT’D
Blacklist Monitoring .................................................................33
Identication Record Query ....................................................34
Remove Monitoring .................................................................34
Permission Records ................................................................34
6. System Management ...............................................................35
Group Structure .......................................................................35
Attribution of Business Data ....................................................35
Group Management ................................................................36
User Management ...................................................................36
Role Management ...................................................................37
Business Management ............................................................37
System Settings .......................................................................38
7. Attendance Management ........................................................39
Attendance Rules ....................................................................39
Shift Settings ............................................................................39
Overtime Rules ........................................................................40
Public Holiday Settings ...........................................................41
Device Group Settings ............................................................42
Attendance Records ...............................................................43
Attendance Statistics ...............................................................46
4
HOWARD INTERACTIVE KIOSK INSTALLATION GUIDE
Page 5
1. INSTALLATION AND LOGIN
MANAGEMENT PLATFORM LOGIN
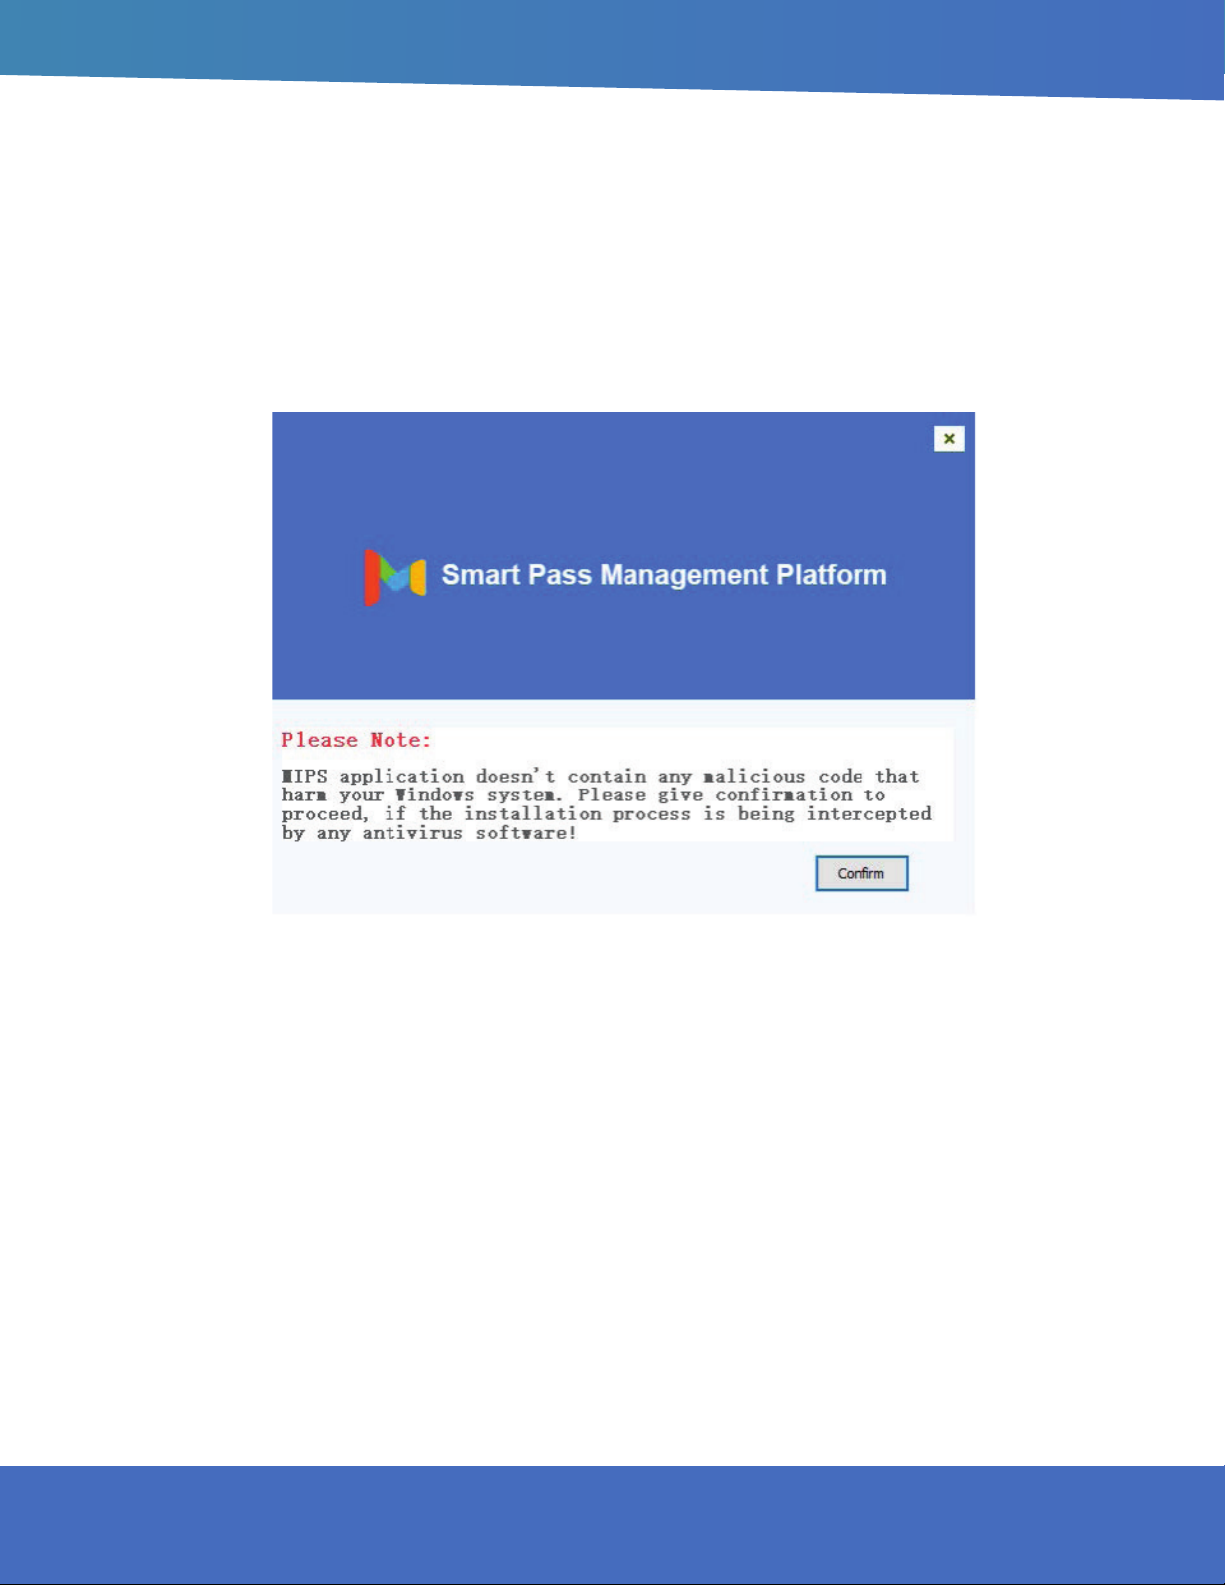
One-click installation: Double-click the exe installation le and follow the installation instructions for quick
installation.
Note: If the installation process is blocked by a system rewall or third-party antivirus software, always choose
to allow the program to operate. Otherwise, the installation process may fail and become unusable.
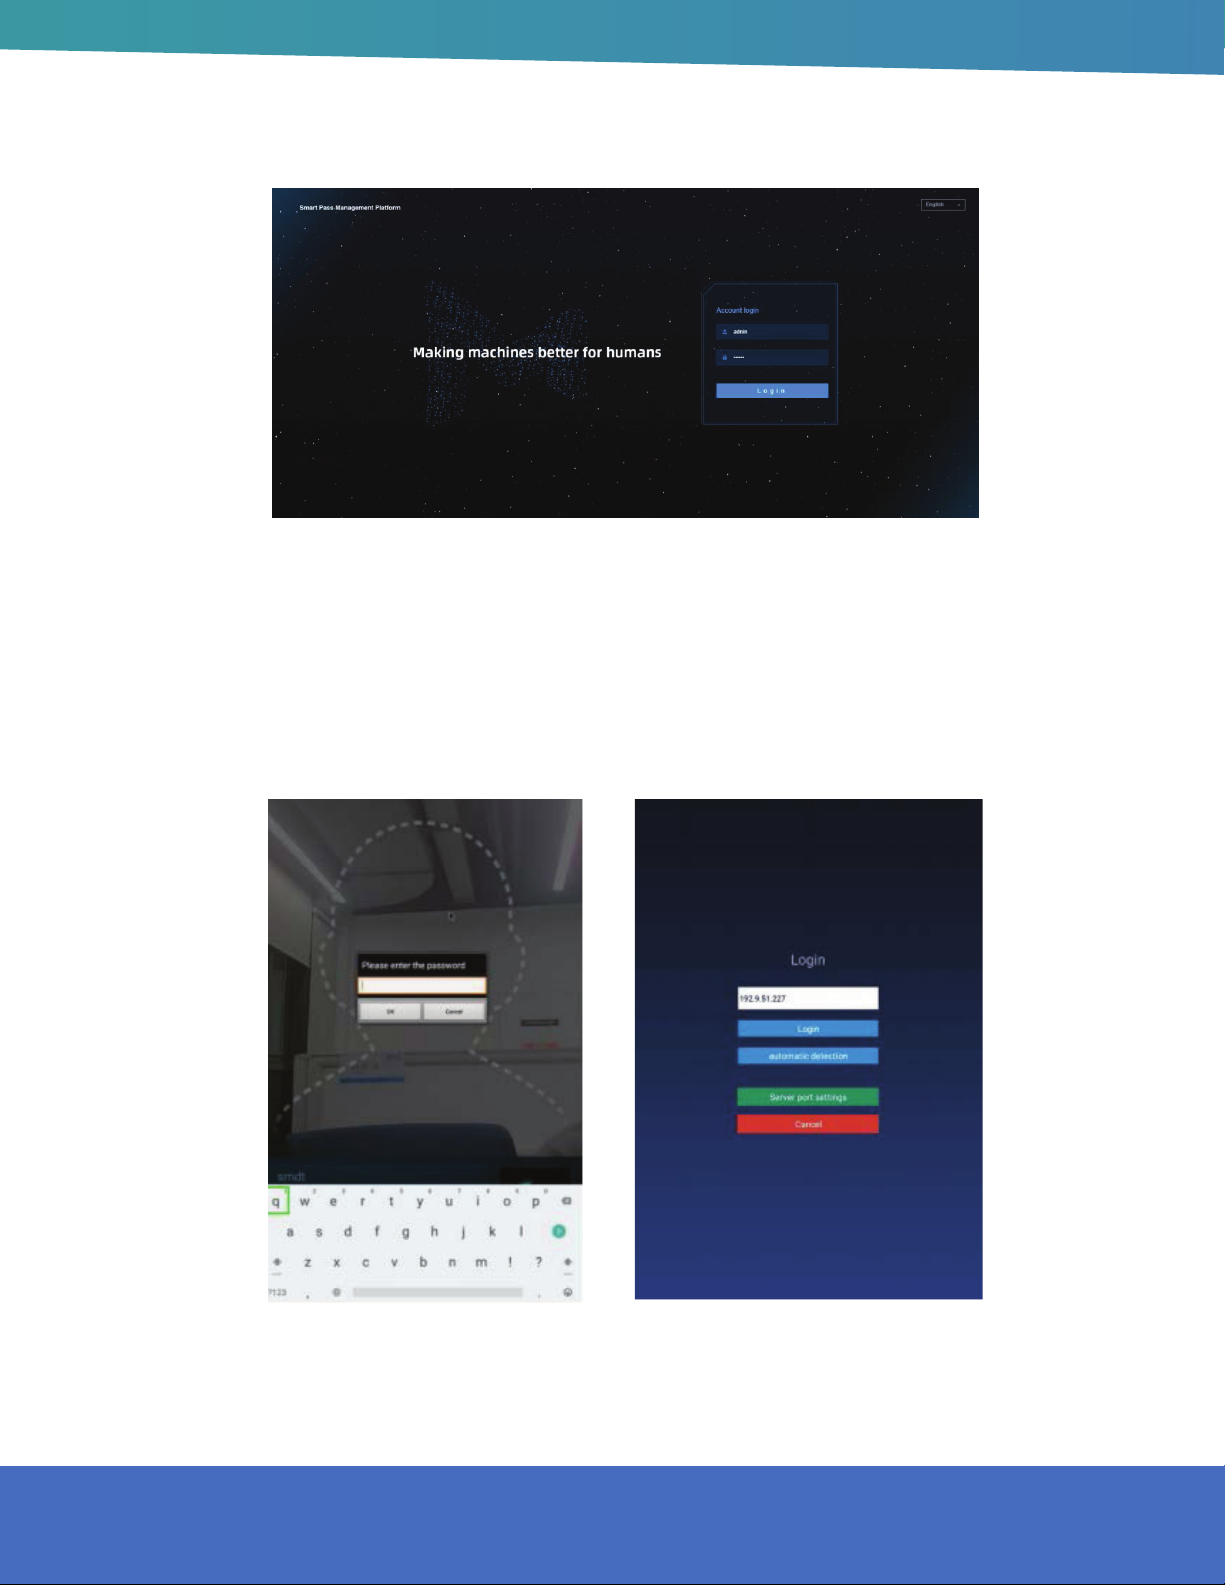
After the program is installed, the application service is automatically started by default.
After the start-up is complete, click the “Copy” button. Open the chrome browser and paste the link to open
the application service background. Enter your username and password to log in. (The default username:
admin password: 123456)
Application system upgrade: You only need to overwrite and install the application system software version
installation package higher than the current version.
FOR SUPPORT CALL: (888) 323 - 3151
5
Page 6
CLIENT LOGIN
1. Open the application on the device and click the middle mouse button. In the pop-up password-entry
window, enter the default password: 123456 and go to Settings.
2. Click the login administration and go in to login interface. Enter the same IP address as the IP on the web
service port and login in.
6
HOWARD INTERACTIVE KIOSK INSTALLATION GUIDE
Page 7
Note: Go in to login administration interface.Login in and go to application settings. Always enter the device
password before exiting the application.
The password can be set in the “parameter settings” under [device management] in website background
management system. It can also be set in “application password settings” under [settings] in terminal
application.
APPLICATION MANAGEMENT
Once logged in successfully, click the middle mouse button. Open the [application management] interface.
The current page displays login information: local name, local IP, connected server, and current login
status. It has the following six functions: login administration, application settings, face register, application
information, passing records and face databases. After login, click “Cancel login” and log out of the current
account.
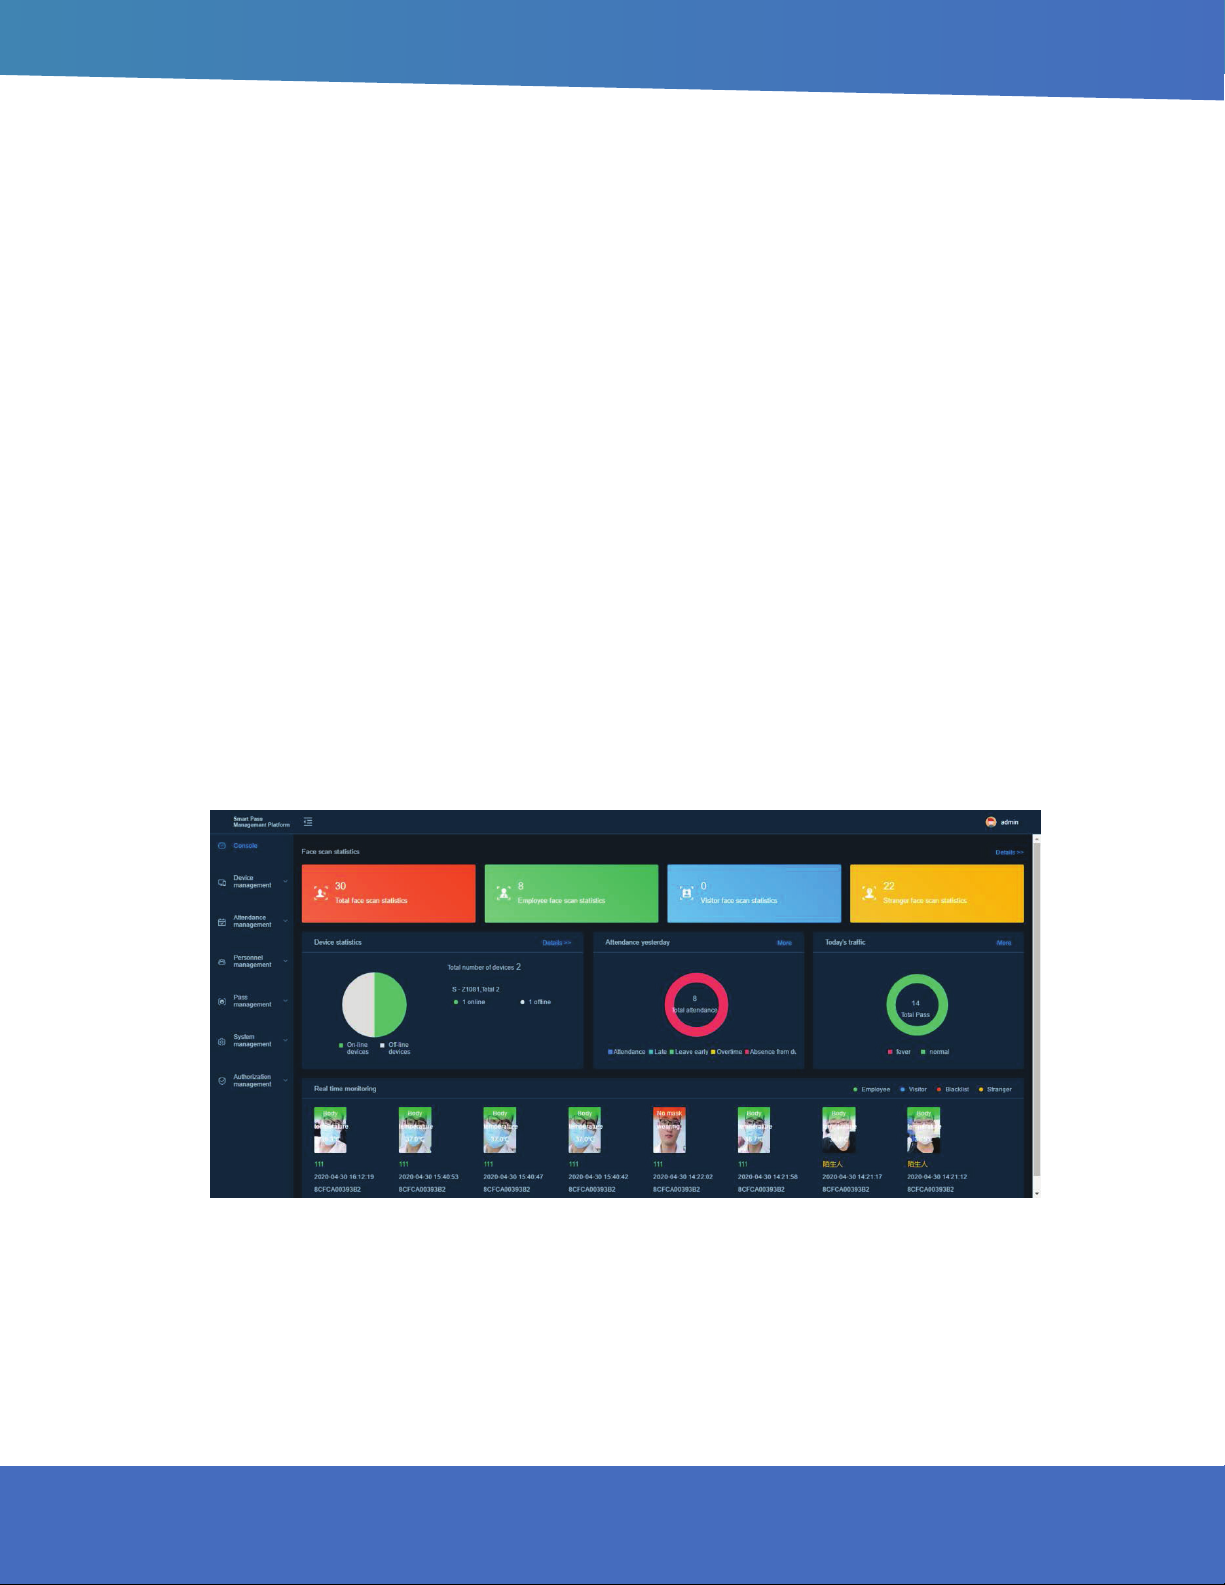
2. CONSOLE
It provides an overview of the number of devices and online status, statistics on the face scan (total face
scans, employee face scan, visitor face scan, stranger face scan); today’s pass and real-time monitoring
(employees, visitors, blacklists, and body temperatures); and provides quick access to view details.
FOR SUPPORT CALL: (888) 323 - 3151
7
Page 8
3. DEVICE MANAGEMENT
DEVICE LIST
[Device List] contains all device information connected to the system. You can perform single, multiple, and
grouping management operations on the device.
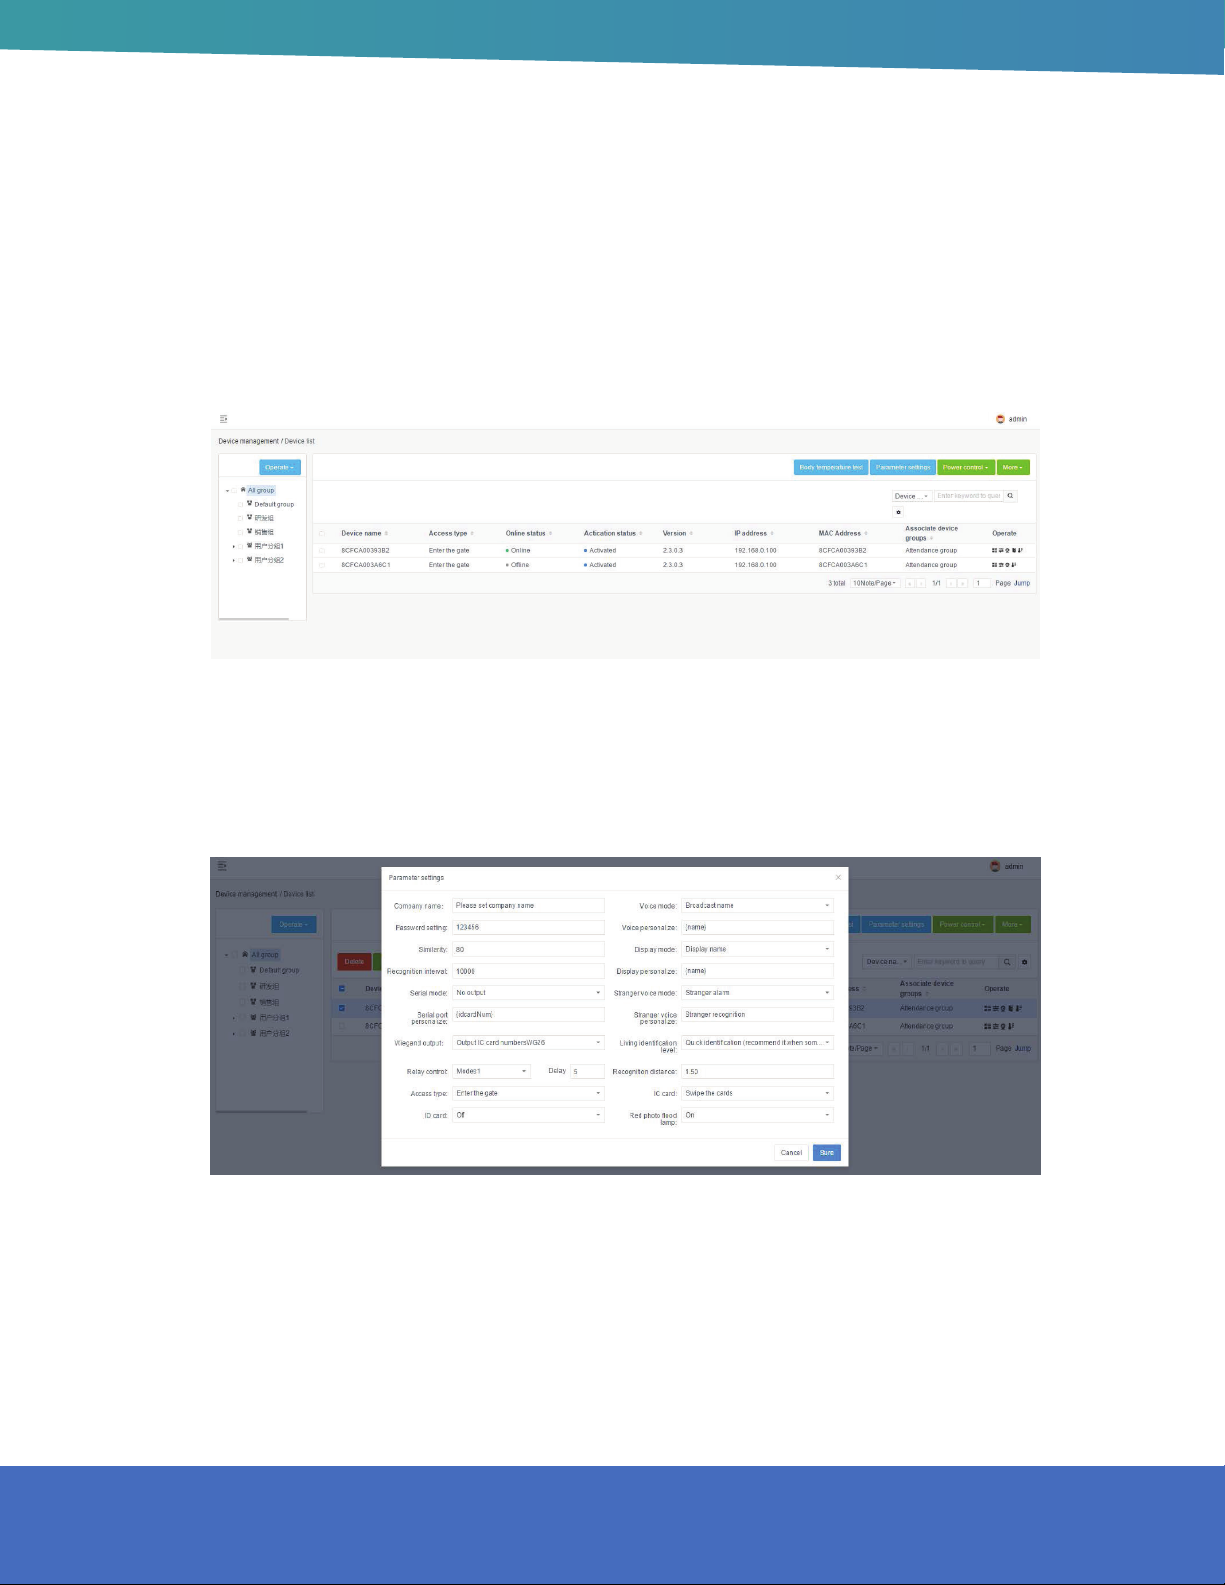
PARAMETER SETTINGS
Select the specied device in [Device List] and click Parameter settings to congure the parameter
information of the device, as shown in the gure below:
8
HOWARD INTERACTIVE KIOSK INSTALLATION GUIDE
Page 9
POWER CONTROL
Select the device in [Device list] and click “Shutdown,” “Restart,” and “Reset” under “ Power Control” to
remotely shut down, restart, and reset the device.
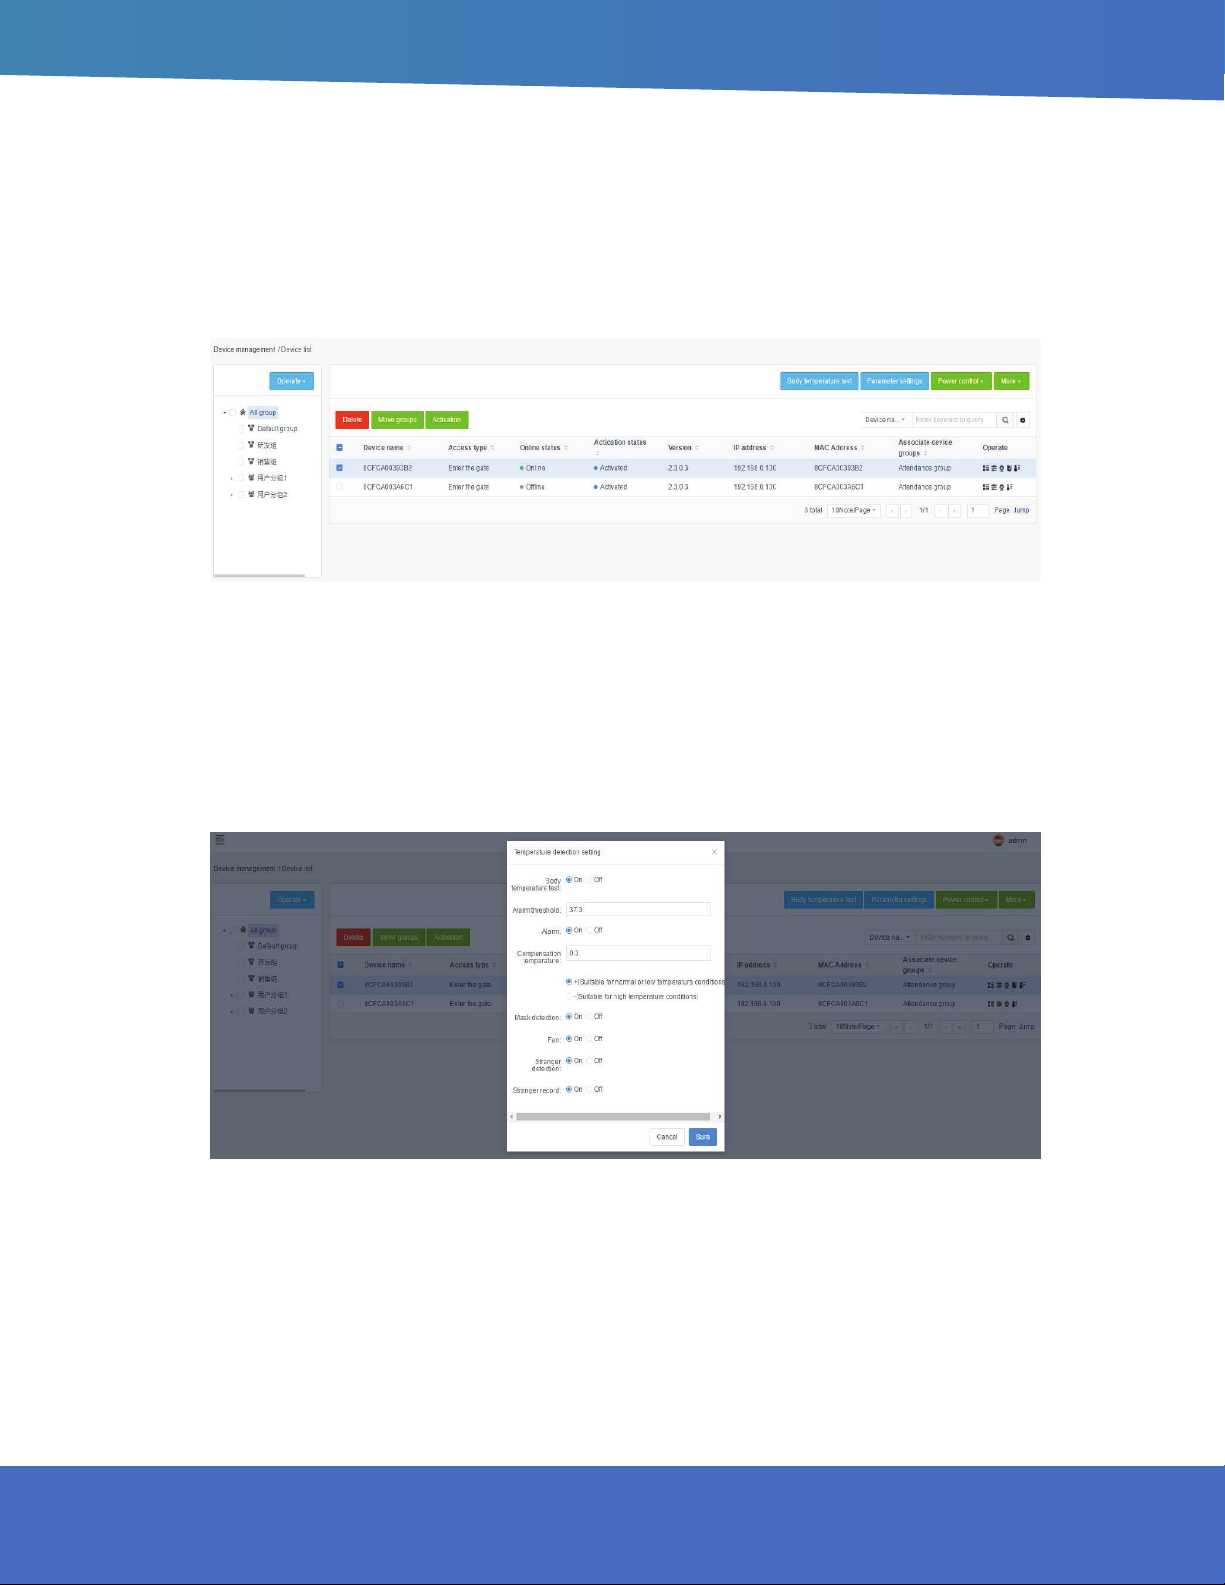
BODY TEMPERATURE TEST
Select the device in [Device list], or select the group, and click “Body temperature detection” to set the
parameters of temperature detection: temperature detection switch (default on), alarm threshold (default
37.3) and alarm switch, compensation temperature (default + value 0.3), mask settings (default off), fan
(default off), stranger detection (default off), and stranger record (default off).
FOR SUPPORT CALL: (888) 323 - 3151
9
Page 10
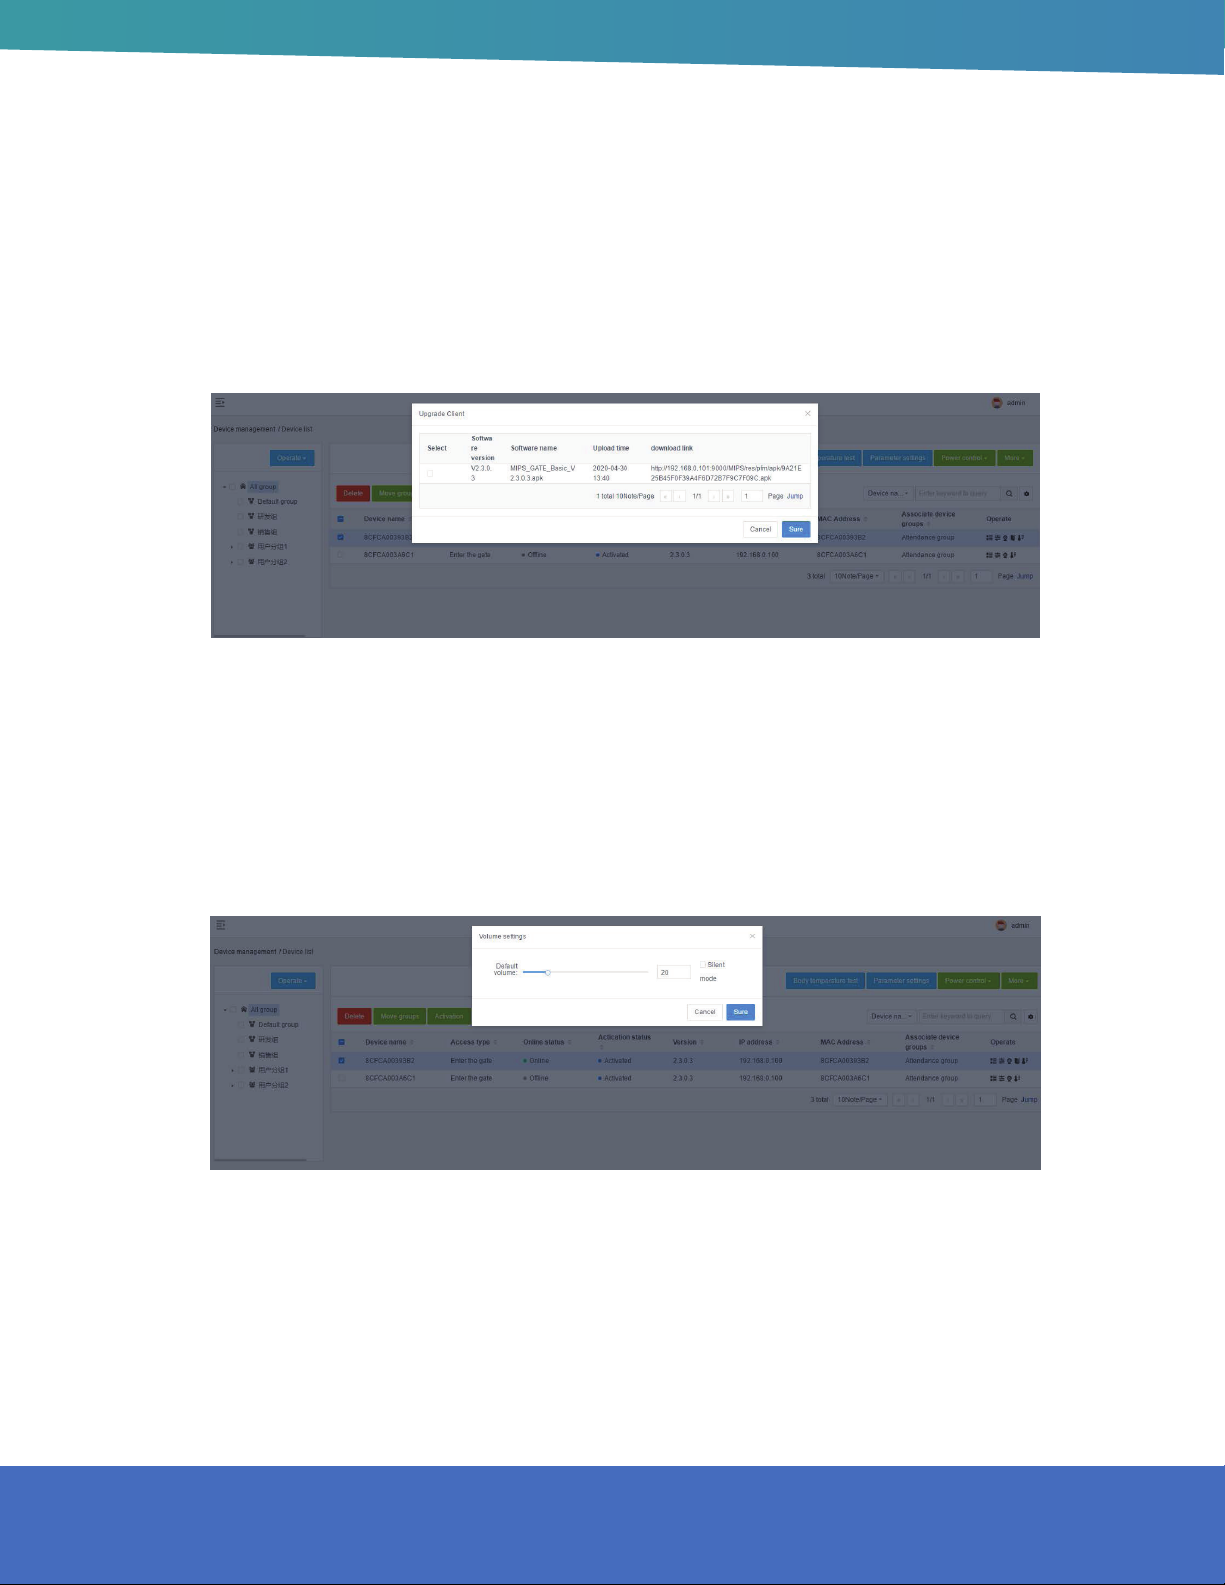
CLIENT UPGRADE
Select the device in [Device list] and click “More-Client upgrade” to enter the device software upgrade page.
On this page, you can see the list of uploaded device software. Select the software version of the device to
be upgraded and click the upgrade button to complete the device software upgrade operation. It supports
online and ofine upgrade operation.
VOLUME SETTINGS
1. General settings: Select the device in the [Device List] and click “More-Volume setting” to set the volume of
the selected device. The volume value can be set between 0-100 and the default is 20.
2. Silent setting: Select the device in [Device list], click “More-Volume setting”, and select “Silent mode” in the
pop-up tab.
10
HOWARD INTERACTIVE KIOSK INSTALLATION GUIDE
Page 11
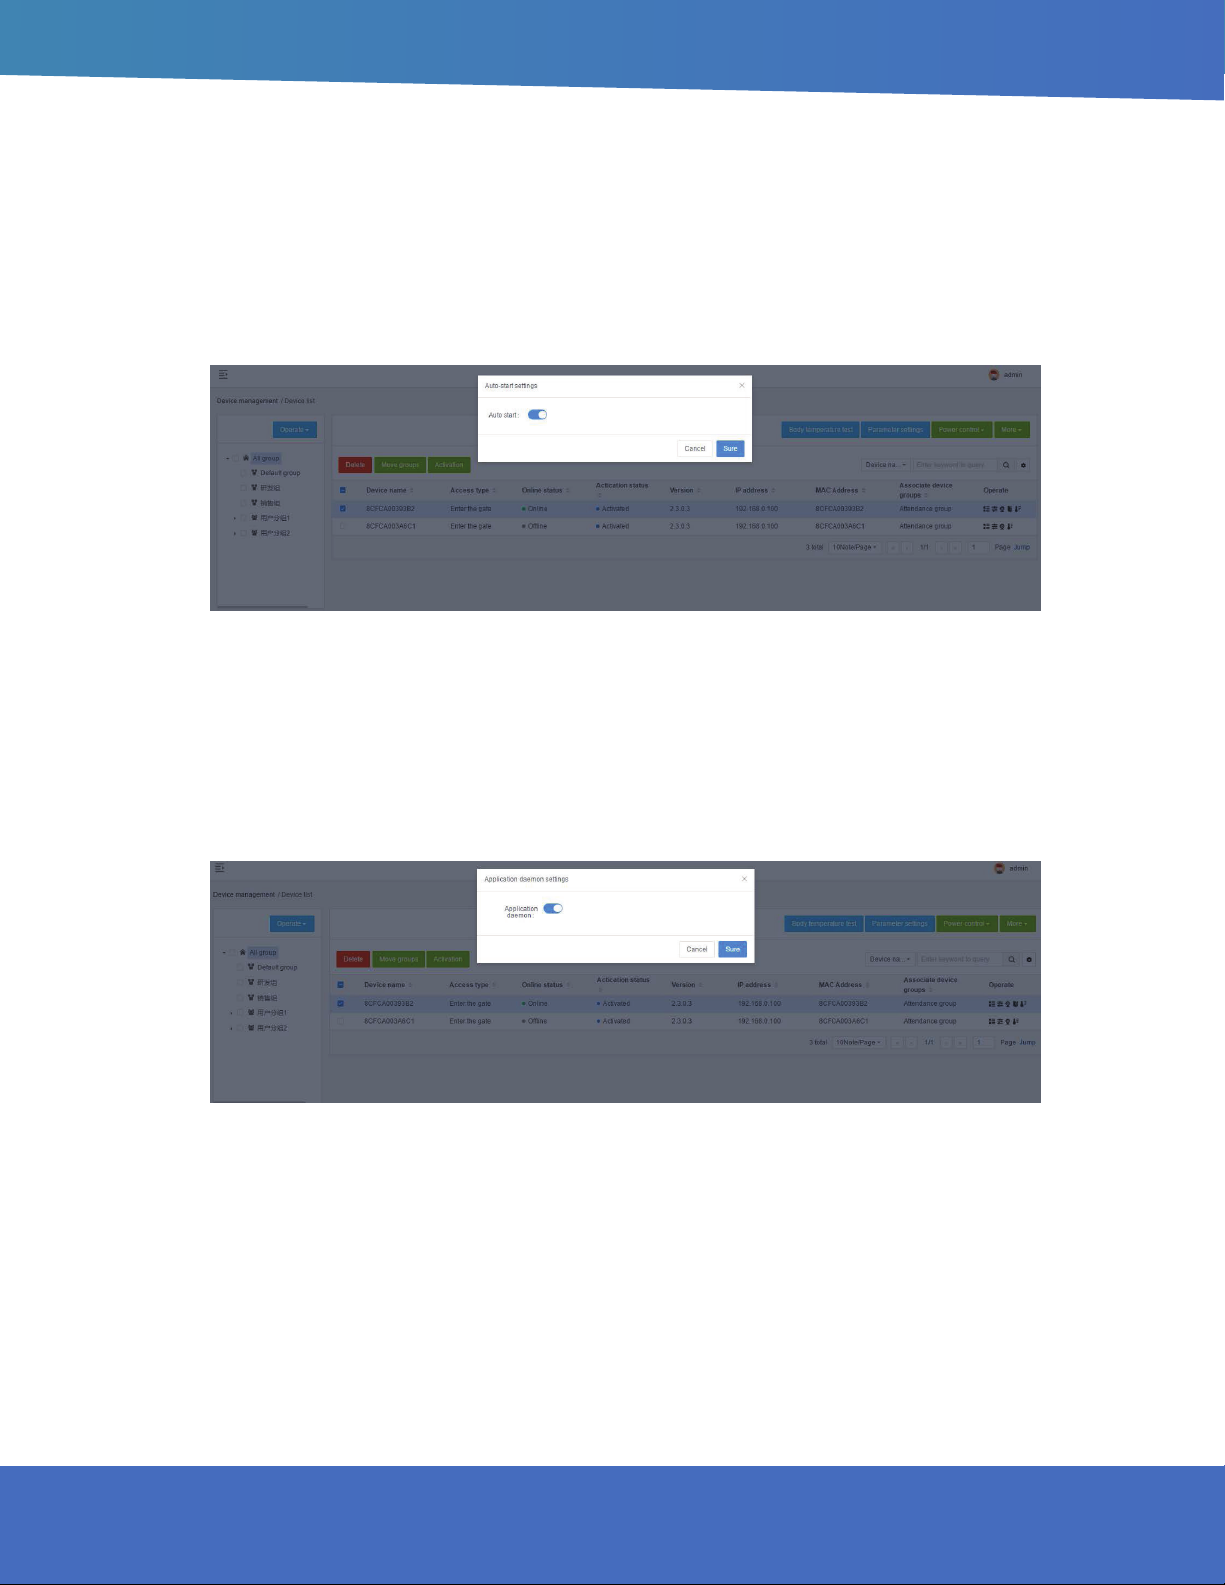
AUTO-START
Auto-start: When enabled, the application will start at start-up, and when it is closed, it will not start at start-up.
In [Device list], select the devices that need to be set to start automatically, and click the “More-Auto-start”
button to enable or disable this function.
APPLICATION DAEMON
Application daemon: When this function is enabled, the application will automatically jump back to
the playback interface within 1 minute after exiting the application page. When it is disabled, it will not
automatically jump back. In [Device list], select the devices that need to set application daemon, and click
the “More-Application daemon” button to enable or disable this function.
FOR SUPPORT CALL: (888) 323 - 3151
11
Page 12
OPEN THE DOOR REMOTELY
After corresponding to the device records in [Device list], click the “Open the door remotely” button to open
the corresponding gate.
DELETE
Select the device to be deleted in the [Device list] and click the “Delete” button to complete the delete
operation. Only ofine devices are supported. It supports single or multiple device operations.
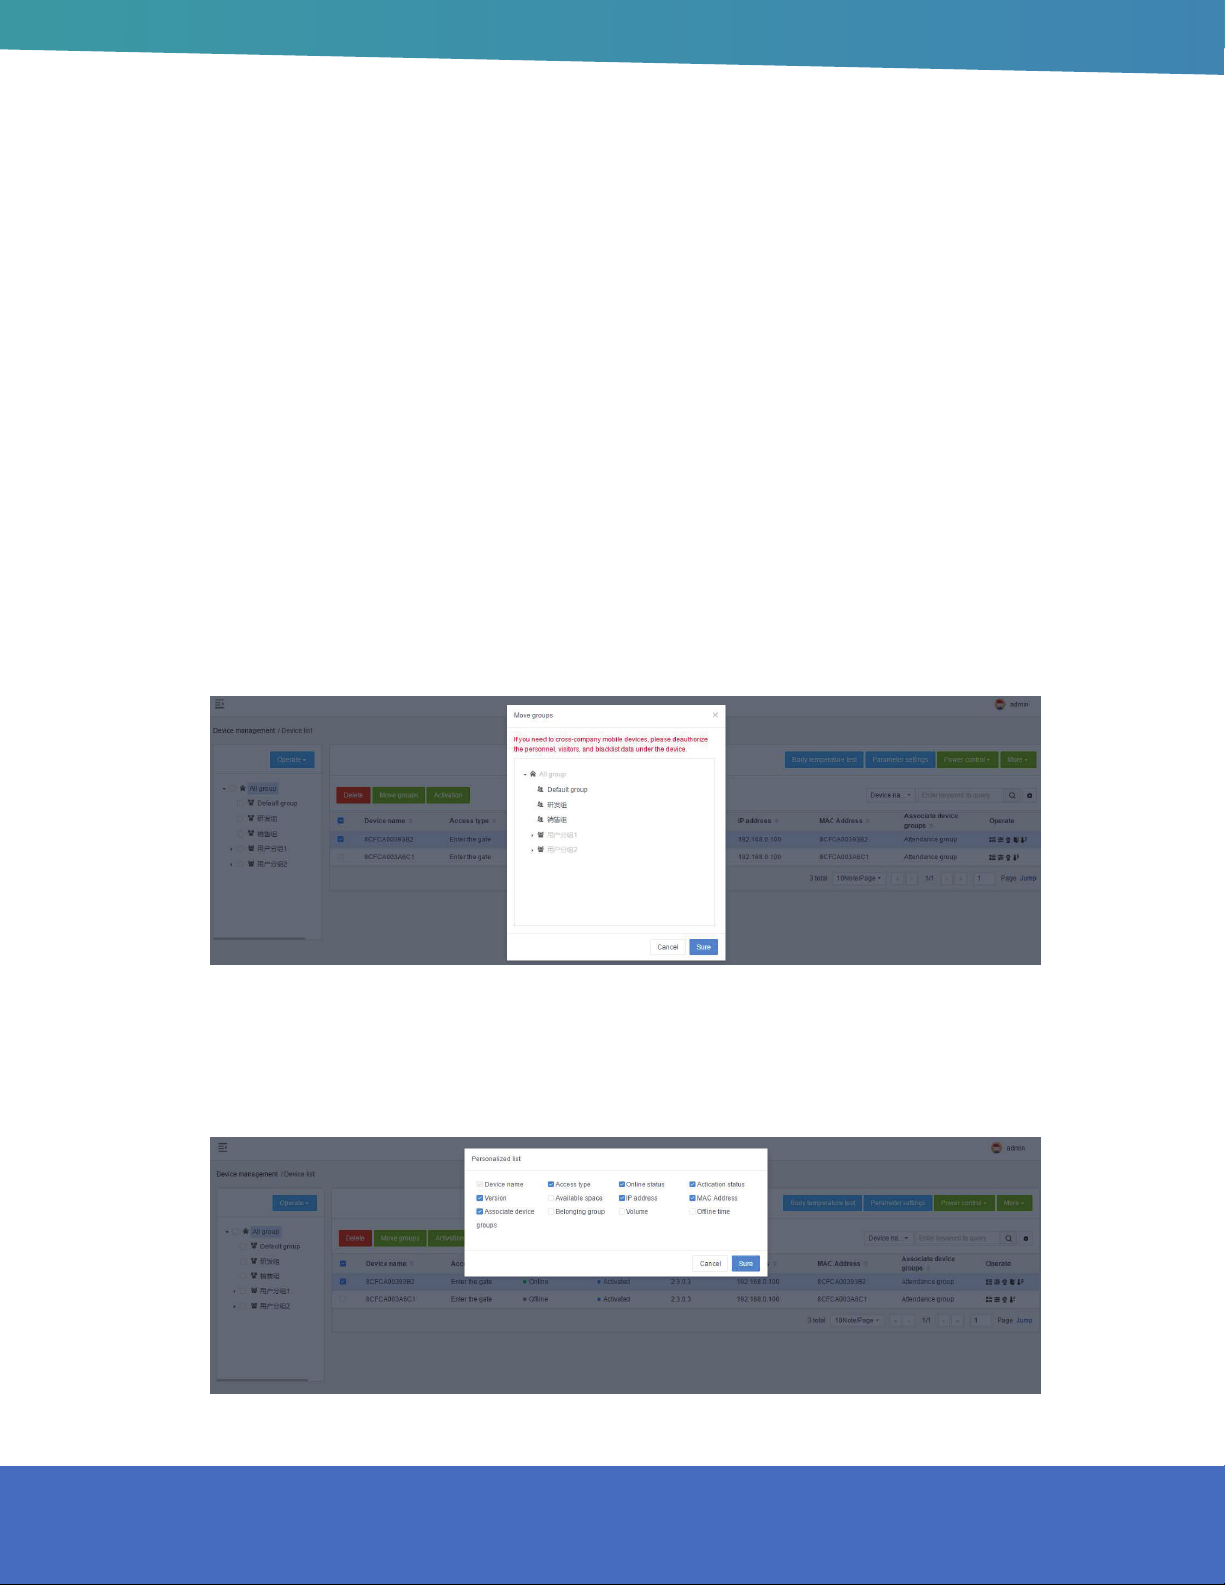
MOVE GROUP
In [Device list], select the devices that require mobile grouping and click “Mobile Grouping.” In the pop-up
window, select the target group you want to move to, and you can complete the group move operation after
you conrm it. It supports single or multiple device operations.
PERSONALIZE LIST
The information displayed in the list can be selected as needed in the “Personalize list”.
12
HOWARD INTERACTIVE KIOSK INSTALLATION GUIDE
Page 13
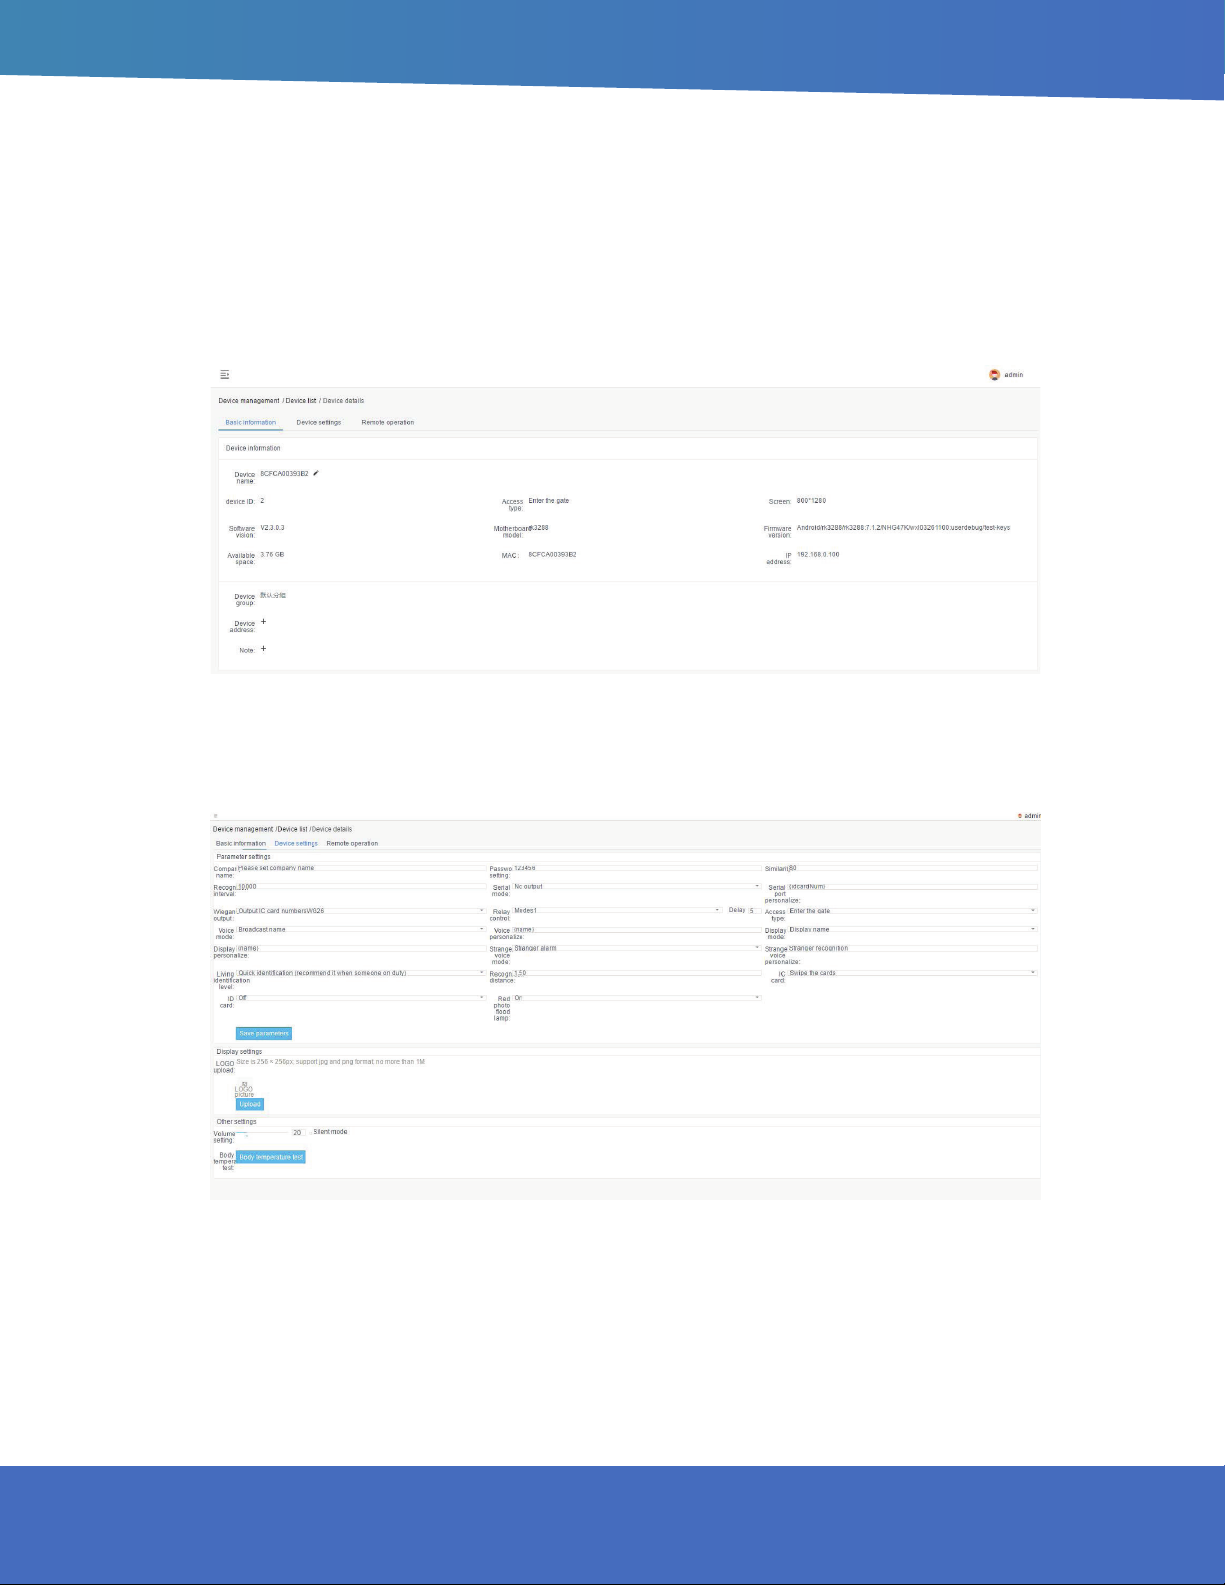
DEVICE DETAILS
The device details include basic information, device settings, and remote operation.
Basic information: view device information, edit device name, edit device address, etc.
Device information: You can view and modify device parameter information, display settings, and other
settings.
FOR SUPPORT CALL: (888) 323 - 3151
13
Page 14
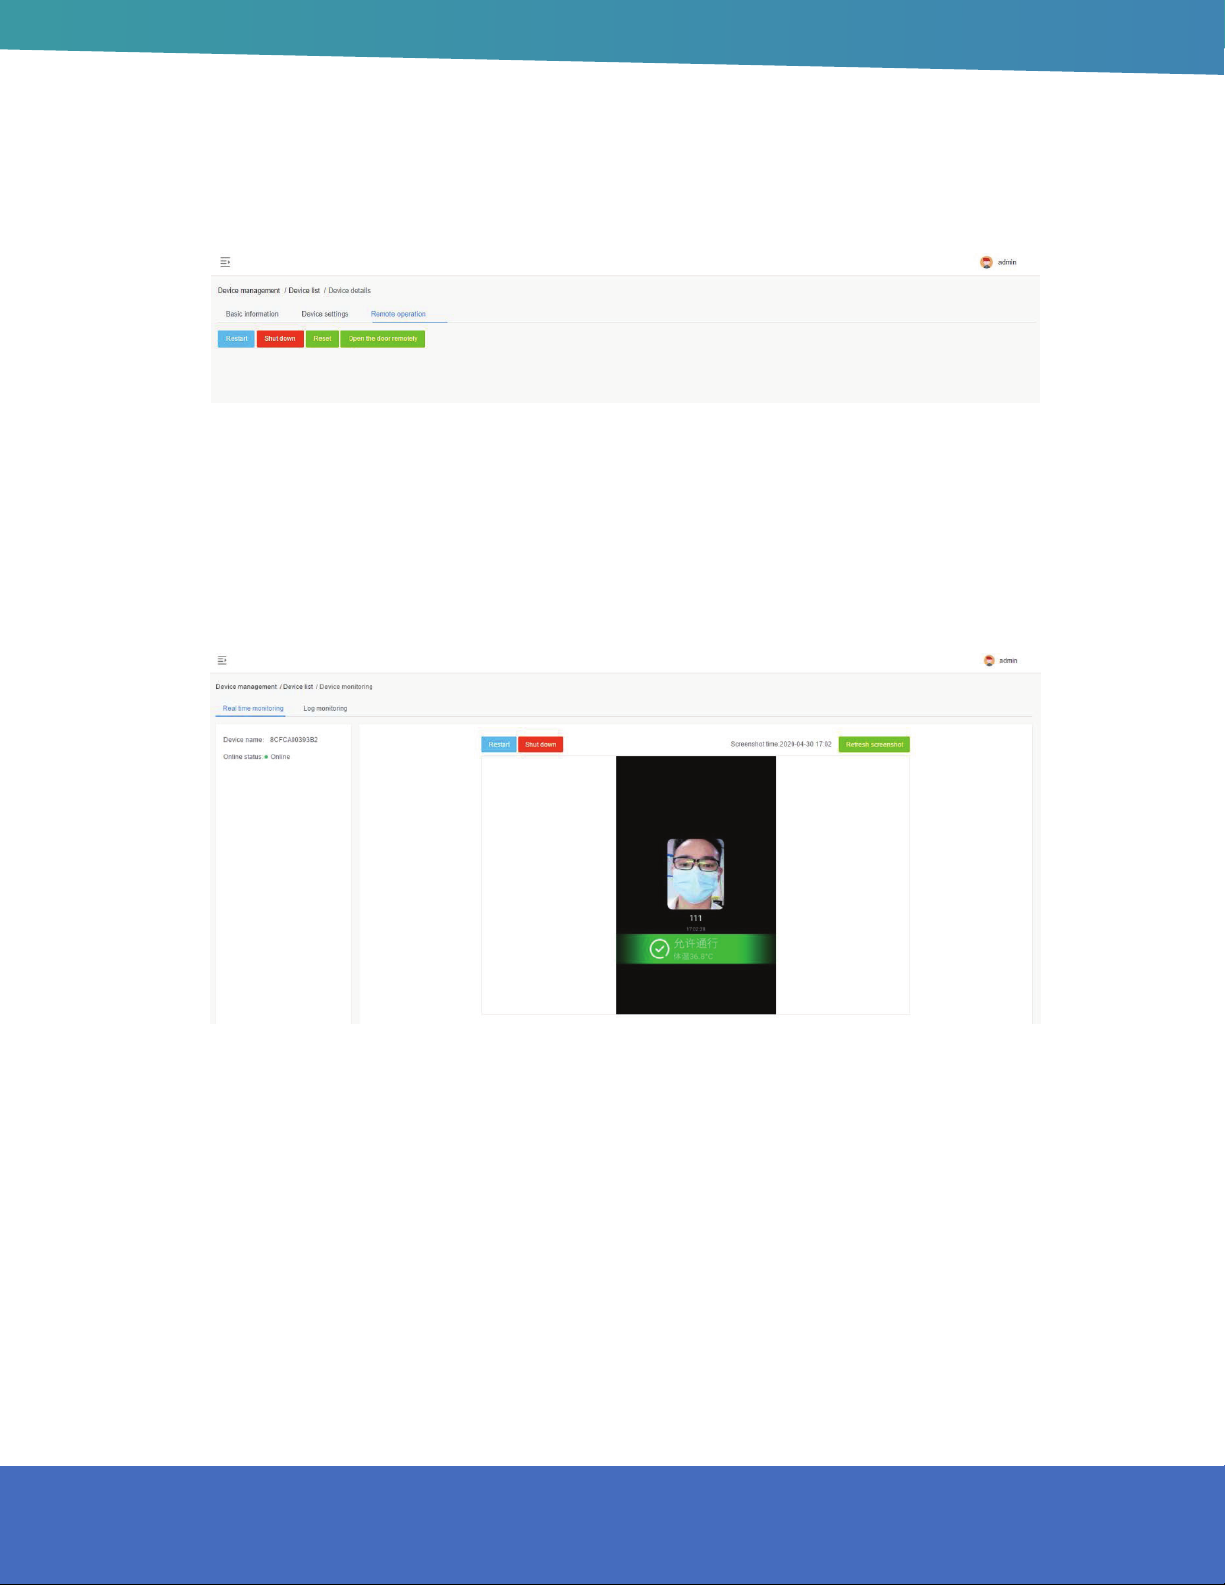
Device operation: restart, shutdown, reset and remote door opening.
DEVICE MONITORING
Device monitoring includes two parts: real-time monitoring and log monitoring.
Real-time monitoring: You can view the device name and online status, and load and display the current
screen of the device. You can also restart and shut down.
14
HOWARD INTERACTIVE KIOSK INSTALLATION GUIDE
Page 15
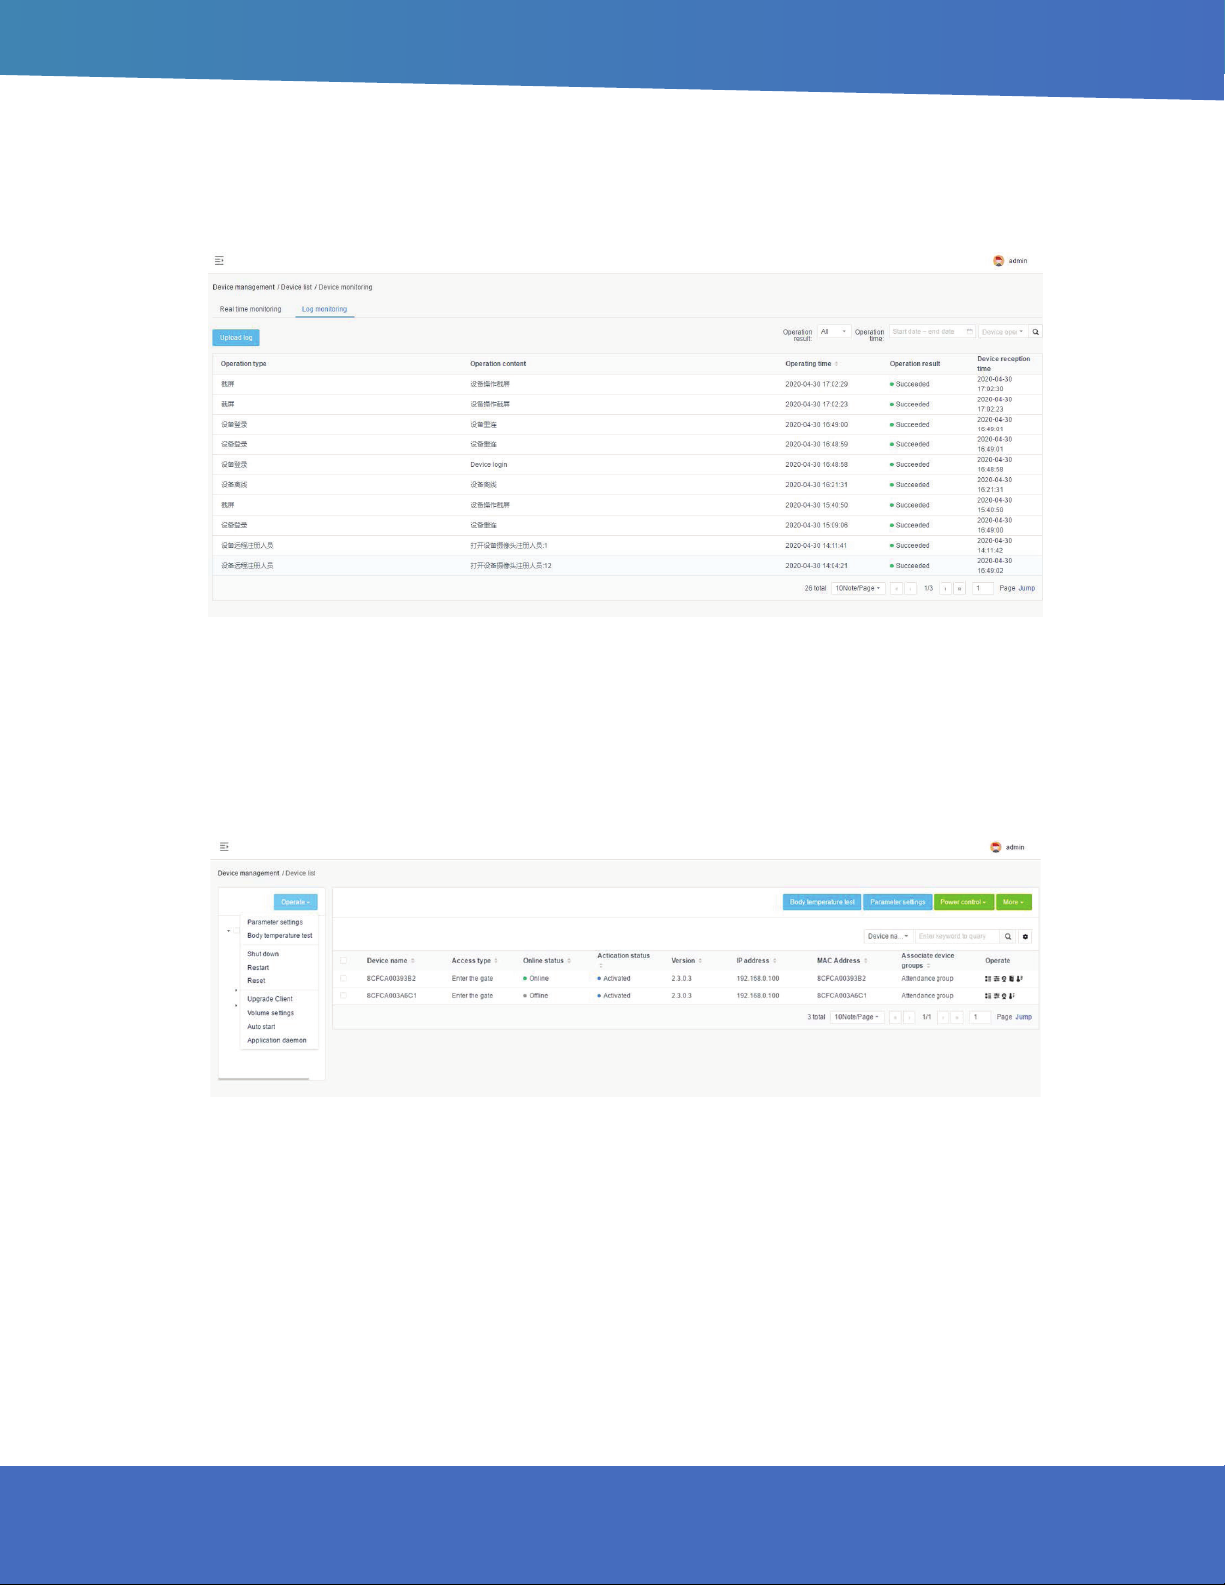
Log monitoring: View related operation logs of the device.
GROUPING OPERATION IN BULK
Batch operations can be performed in the device group by selecting the device group. It supports parameter
setting, shutdown, restart, reset, client upgrade, volume setting, auto-start and application daemon for the
entire device group, as shown below:
If there is no device under the selected group, this prompt will pop up: “There is no device under the
selected group, please select again.” If there are devices under the selected group, the original settings will
be overwritten after the batch setting is prompted.
FOR SUPPORT CALL: (888) 323 - 3151
15
Page 16

DEVICE GROUPING MANAGEMENT
Device grouping uses structure grouping by default. Each user group has a default device group. You can
add, modify, and delete device groups on the user group. The operation is similar to the user grouping in
[Group structure].
APK LIST
[APK list] The page contains client software list information, software version upload and delete operations.
DELETE APK
Select the software version to be deleted in the APK list, and click the trashcan icon.
NEW APK
Click the “New APK” button to open the [Version Upload] page and upload software les on this page.
16
HOWARD INTERACTIVE KIOSK INSTALLATION GUIDE
Page 17

4. PERSONNEL MANAGEMENT
EMPLOYEE LIST
The employee list is used to manage employee information, such as viewing, adding, editing, and exporting
employee information. Employee information can be added individually or in bulk. The batch adding
operation requires information import in bulk rst, and then portrait import in bulk.
ADD EMPLOYEE INFORMATION INDIVIDUALLY
1. In [Employee list], click the “Single addition” button to enter the employee addition page.
2. Fill in the personnel ID, name, gender, belonging group, phone number, ID card number, IC card number,
nationality, place of birth, date of birth, contact address and notes. Add a face recognition photo and click
“Save” to complete the employee creation operation.
FOR SUPPORT CALL: (888) 323 - 3151
17
Page 18

UPLOAD A FACE RECOGNITION PHOTO DESCRIPTION
UPLOAD FROM LOCAL
Click “Upload from local” to open the local folder, select the jpg and png portrait photos in the folder.
Note: Portrait photo specications
1. Please choose a front-facing/bare-headed photo that has been taken within the past three months. The
image should be clear with even lighting.
2. The recommended size is 640 px * 480 px, and the size should not exceed 500kb. Only jpg and png le are
supported.
3. Faces should account for more than 1/3 of the photo—Avoid blurry photos, wearing sunglasses,
excessive facial make-up, and head rotations.
REGISTER FROM DEVICE
Click “Register from Device” to open the Select Device window and select an online device. Once
determined, the device will enter the photo function. After the photo is taken and veried, the photo will be
sent back here from the client.
18
HOWARD INTERACTIVE KIOSK INSTALLATION GUIDE
Page 19

IMPORT EMPLOYEE INFORMATION IN BULK
In the [Employee list], click the “Add in Bulk - Information Import in Bulk” button.
1. First step, click “Download Template”. Download the Excel template le to your computer with the le name
“Personnel_import_template.xls”. Then ll in the employee information in bulk.
2. In the second step, click “Upload Excel le”. Select the Excel le with the employee information lled in
and
upload it. If the le is uploaded successfully, the upload success status and le name will be displayed.
3. In the third step, click “Start import”. During the import, there will be a progress bar showing “Importing
personnel information (1 / total number of people)”. After the import is completed, it prompts “Successful
batch import of personnel information”. After the import is completed, return to the [Person List] to view the
imported personnel information.
DESCRIPTION OF IMPORT METHOD
Import without overwriting: When importing a le two or more times, duplicate employees are not imported.
And the system will prompt abnormal duplicate information.
Overwrite import: The second import will overwrite the information of the employee that was imported for the
rst time without prompting for duplicate information.
DESCRIPTION OF IMPORT FAILURE EXCEPTION
The content or format of the uploaded Excel le is incorrect and does not meet the template specications.
Click to start the import, and a prompt will appear: “The le content or format is incorrect. Please ll in the
employee information according to the template requirements.
A eld in the employee is malformed or should not be duplicated. After the import fails, the reason for the
failure will be noted in a table. After modication, you can re-import.
FOR SUPPORT CALL: (888) 323 - 3151
19
Page 20

IMPORT PORTRAIT PHOTOS IN BULK
In the [Employee list], click the “Add in bulk - Portrait import in bulk”.
1. Click “Zip le selection” to open the Select Folder window and select the le upload. After the le upload is
successful, the current le storage path is displayed.
2. Click “Start Import,” and a progress bar will be displayed during the import: the number of imported les/
the total number of folders. And there will be a prompt message: x sheets have been successfully
imported, x sheets failed. After the import is complete, the progress bar displays: The portrait photos in this
folder have been imported.
DESCRIPTION OF PORTRAIT IMPORT RULES
[Portrait le naming] The naming of the portrait le needs to correspond to the personnel ID. After the upload
is successful, the corresponding person portrait information can be viewed in the person list.
[Format and size] Only two le formats of jpg and png are supported, and the size of each portrait le must
not exceed 500k. Files that do not meet the requirements will not be imported.
[Portrait Restriction] Faces need to account for more than 1/3 of the photo. Please choose a front-facing/
bare-headed photo taken within the past three months. The avatar is clear and the light is uniform. Avoid the
avatar; it cannot be used for face recognition.
[Select Folder Upload] After the above conditions are met, place the named portrait photos in the specied
folder and select the folder to import.
DESCRIPTION OF FAILED PORTRAIT IMPORT
If the size of an image le does not meet the requirements, the import will fail. After that, a table will appear to
display the information of the portrait le that has not been successfully imported. After modication, you can
re-import.
20
HOWARD INTERACTIVE KIOSK INSTALLATION GUIDE
Page 21

EXPORT EMPLOYEE INFORMATION
In [Employee list], click the “Export” button to export all employee information in the list to the le “Employee
Information.xls” and download it.
REFRESH EMPLOYEE INFORMATION
In [Employee list], click the “Refresh” button to refresh all employee information in the list to the latest state,
STAFF DETAILS AND EDITING
EMPLOYEE DETAILS
In [Employee list], after corresponding employee information, click the “Employee details” button, and you
can enter the details page to view specic employee information.
FOR SUPPORT CALL: (888) 323 - 3151
21
Page 22

EMPLOYEE EDIT
On the details page, click the edit button to modify the employee’s basic information and photo information.
After modifying the information, click Save.
EMPLOYEE GROUPING MANAGEMENT
Employee grouping uses the organizational structure grouping by default. There is a default employee
grouping under each user group. You can add, modify, or delete employee groupings on the user group by
yourself. The operation is similar to the user grouping in [Group Structure].
VISITOR MANAGEMENT
Visitor management is used to view, add, edit, and export visitor information.
22
HOWARD INTERACTIVE KIOSK INSTALLATION GUIDE
Page 23

ADD VISITOR INDIVIDUALLY
1. In [Visitor Management], click the “Single Add” button to enter the visitor adding page.
2. Fill in the visitor ID, name, gender, afliation group, mobile phone number, ID card number, IC card
number, ethnicity, nationality, date of birth, contact address and remarks; add face recognition photos and
click “Save” to complete the visitor operation.
UPLOAD A FACE RECOGNITION PHOTO DESCRIPTION
Upload from local
Click “Upload from local” to open the local folder, select the jpg and png portrait photos in the folder.
Note: Portrait photo specications
1. Please choose a front-facing/bare-headed photo taken within the past three months. The image should be
clear with even lighting.
2. The recommended size is 640 px * 480 px, and the size should not exceed 500kb. Only jpg and png le are
supported.
3. Faces should account for more than 1/3 of the photo—Avoid blurry photos, wearing sunglasses,
excessive facial make-up, and head rotations.
Register from device
Click “Register from Device” to open the select device window and select an online device. Once
determined, the device will enter the photo function. After the photo is taken and veried, the photo will be
sent back here from the client.
FOR SUPPORT CALL: (888) 323 - 3151
23
Page 24

EXPORT VISITOR INFORMATION
In [Visitor management], click the “Export” button to export all visitor information in the list to the le “Visitor
information.xls” and download it.
REFRESH VISITOR INFORMATION
In [Visitor management], click the “Refresh” button to refresh all visitor information in the list to the latest state.
VISITOR DETAILS AND EDITING
VISITOR DETAILS
In [Visitor management], after corresponding visitor information, click the “Visitor details” button to enter the
details page to view specic visitor information.
24
HOWARD INTERACTIVE KIOSK INSTALLATION GUIDE
Page 25

VISITOR EDIT
On the details page, click the edit button to modify the visitor’s basic information and photo information. After
modifying the information, click Save.
VISITOR GROUPING MANAGEMENT
Guest grouping uses the organizational structure grouping by default. Each user group has a default guest
grouping, which can add, modify, and delete guest groups on the user grouping. The operation is similar to
the user grouping in the [Group structure], which is not described in detail.
BLACKLIST MANAGEMENT
Blacklist management is used to view, add, edit, and export blacklist information.
FOR SUPPORT CALL: (888) 323 - 3151
25
Page 26

ADD BLACKLIST INDIVIDUALLY
1. In [Blacklist management], click the “Single Add” button to enter the blacklist addition page.
2. Fill in the blacklist ID, name, gender, belonging group, phone number, ID card number, IC card number,
ethnicity, birthplace, date of birth, contact address and remarks. Add face recognition photos and click
“Save” to complete the blacklist create operation.
UPLOAD A FACE RECOGNITION PHOTO DESCRIPTION
Upload from local
Click “Upload from local” to open the local folder, select the jpg and png portrait photos in the folder.
Note: Portrait photo specications
1. Please choose a front-facing/bare-headed photo taken within the past three months. The image must be
clear with even lighting.
2. The recommended size is 640 px * 480 px, and the size should not exceed 500kb. Only jpg and png le are
supported.
3. Faces should account for more than 1/3 of the photo—Avoid blurry photos, wearing sunglasses,
excessive facial make-up, and head rotations.
EXPORT BLACKLIST
In [Blacklist management], click the “Export” button to export all the blacklist information in the list to the le
“Blacklist information.xls” and download it.
26
HOWARD INTERACTIVE KIOSK INSTALLATION GUIDE
Page 27

REFRESH BLACKLIST INFORMATION
In [Blacklist management], click the “Refresh” button to refresh all the blacklist information in the list to the
latest state.
BLACKLIST DETAILS AND EDITING
BLACKLIST DETAILS
In [Blacklist management], after corresponding to the blacklist information, click the “Blacklist details” to enter
the details page to view the specic blacklist information.
FOR SUPPORT CALL: (888) 323 - 3151
27
Page 28

BACKLIST EDIT
On the details page, click the edit button to modify the basic information and photo information of the
blacklist. After modifying the information, click Save.
BLACKLIST GROUPING MANAGEMENT
The blacklist group uses the organizational structure group by default. Each user group has a default
blacklist group. You can add, modify, and delete blacklist groups on the user group. The operation is similar
to the user grouping in [Group Structure].
28
HOWARD INTERACTIVE KIOSK INSTALLATION GUIDE
Page 29

5. PASS MANAGEMENT
PASS RECORDS
View all the identication records on the device. These can be grouped and ltered by the device. The data
of body temperatures greater than or equal to 37.3 degrees will display in red font; temperatures less than
37.3 degrees will display green font; if no temperature is read, the data display will show “none”. There are
three pass statuses: Normal body temperature, Abnormal body temperature and No Mask.
PASS PERMISSION
Manage the access rights of added employees and visitors.
FOR SUPPORT CALL: (888) 323 - 3151
29
Page 30

EMPLOYEE PASS PERMISSION SETTINGS
Enter the [Pass permission] page and click the “Employee Access Authorization” button to enter the page.
1. Select personnel, devices, pass permission, and permanent effective time, then click the “Save” button to
start pass permission. After the device is successfully authorized, the person can pass through the gate
and the validity period is permanent.
2. Select personnel, devices, pass permission, and temporary effective time, then click the “Save” button to
start pass permission. After the device is successfully authorized, the person can pass through the gate
within the time range set by the validity period. If the validity period is exceeded, the recognition fails.
DESCRIPTION OF PASS PERMISSION
Click the Save button to start the pass permission. Present the current synchronization status, authorization
progress, number of successes and failures of each device in the form of a list, and display device names.
The person who failed the authorization is recorded in the “Verication Failure Description” table. You can
click “Export Settings Failed Number” to export and view the authorization failure information.
The person who fails the authorization, after modifying the corresponding failure information, can re-authorize
until the authorization is successful.
DESCRIPTION OF PASS PERMISSION
Select personnel and device, and revoke the permission. Click the “Save” button to start revoking the
permission. The deauthorization logic is the same as that of “pass permission”, except that the selected
person is removed from the selected device.
30
HOWARD INTERACTIVE KIOSK INSTALLATION GUIDE
Page 31

VISITOR PASS PERMISSION SETTINGS
On the [Pass permission] page, click the “Visitor pass permission” button to get onto the page.
PASS PERMISSION
Select the visitor. Select the device, pass permission, and valid time range. Click the “Save” button to start
the pass permission. After successful authorization on the device, the visitor can pass through the gate to be
valid within the set effective time range.
DESCRIPTION OF PASS PERMISSION
Click the Save button to start the pass permission. Present the current synchronization status of each device
in the form of a list, showing the device name, synchronization pass permissions, number of successful and
failed. The person who failed the permission is recorded in the “Verication Failure Description” table. You
can click “Export Settings Failed Number” to export and view the permission failure information.
Visitors who have failed authorization can revise the authorization after revising the corresponding failure
information until the authorization is successful.
REVOKE PASS PERMISSION
Select personnel, device and revoke the permission. Click the “Save” button to start. Revoke permission is
the same as “Pass permission”, except that the reassigned personnel are removed from the original device.
FOR SUPPORT CALL: (888) 323 - 3151
31
Page 32

REVOKE PERMISSION
In the authorized personnel list, you can click the “Revoke permission” button behind the list record to release
the authorization. After the removal is successful, the corresponding employees and visitors will have no pass
permissions. You can also check personnel records and click “Remove permissions” for batch operations.
REFRESH PERMISSION INFORMATION
On the [Pass permission] page, click the “Refresh” button to refresh all authorized information in the list to the
latest status.
32
HOWARD INTERACTIVE KIOSK INSTALLATION GUIDE
Page 33

BLACKLIST MONITORING
Enter the [Blacklist monitoring] page and click the “Blacklist monitoring settings” button.
BLACKLIST MONITORING SETTINGS
1. Select the blacklist and device and snap to report. Click the “Save” button to start the blacklist monitoring.
After the device is successfully monitored, the person will be recognized and captured when reporting
through the gate.
2. Select the blacklist and device, choose to enable the snapshot report function, and enable the alarm
sound. Click the “Save” button to start the blacklist monitoring. After the device is successfully monitored,
the person will be identied entering through the gate, snapped to report, and emit an alarm sound.
DESCRIPTION OF PASS PERMISSION
Click the “Sure” to start the blacklist monitoring. Present the current synchronization status of each device in
the form of a list, display the device name, synchronization monitoring progress, the number of successful
and the number of failed. The monitoring failures are recorded in the “Export Blacklist Monitoring Failure
Information” table. You can click the export table to view the monitoring failure information.
Blacklist personnel who failed to monitor, after modifying the corresponding failure information, can remonitor the settings until the monitoring registration is successful.
REMOVE BLACKLIST MONITORING
Select blacklist and device. And release blacklist monitoring. Click the “Save” button to start the release.
Conversely, only the selected blacklist is removed from the selected device for snapshot monitoring or alarm.
FOR SUPPORT CALL: (888) 323 - 3151
33
Page 34

IDENTIFICATION RECORD QUERY
Enter the [Blacklist monitoring] page. Click the “Identify Record Inquiry” button to enter the [Identify record
inquiry] page, and display the identication records of all blacklist personnel. Blacklist identication records
can be selected according to grouping, device, and date range inquiries.
REMOVE MONITORING
In the blacklist monitoring personnel list, you can click the “remove monitoring” button behind the list record
to release monitoring. After the removal is successful, the blacklist removes the snapshot monitoring or alarm
from the selected device. You can also check the personnel record and click “remove monitoring” to perform
batch operations.
PERMISSION RECORDS
[Permission records] The module contains the information records of the “Permission” and “Remove
permission” of employees and visitors, as well as the blacklist monitoring and contact monitoring setting
operations. You can enter the list to view the details of related records.
Permission records are as follow:
34
HOWARD INTERACTIVE KIOSK INSTALLATION GUIDE
Page 35

Permission details are as follow:
6. SYSTEM MANAGEMENT
GROUP STRUCTURE
[Group structure] The module is used to manage the group structure and enterprise user information
management in the enterprise. The hierarchical relationship is created and managed by admin or enterprise
administrator.
ATTRIBUTION OF BUSINESS DATA
Various business data generated by enterprise users will only be stored under the group-structure group in
the enterprise where they belong, and all business modules in the enterprise are grouped using the same
group structure.
In the same enterprise organization structure, users at a high level can access business data in a low-level
structure. Conversely, low-level users cannot access high-level business data and other companies cannot
access these data.
In the same enterprise group structure, business data between groups are visible within the group.
An enterprise administrator can manage all business data in the organization structure of the enterprise, but
cannot access data of other enterprises.
FOR SUPPORT CALL: (888) 323 - 3151
35
Page 36

GROUP MANAGEMENT
Create a group: select a group and click + to enter the [New Group] page. On this page, you only need to ll
in the group name and save it.
Modify and delete operations: (omitted)
Group permission description: visible in the default group.
USER MANAGEMENT
USER CREATION
Click “Add User” to enter the [Add User] page. Select the group. Fill in the user name and password. After
conrming the password, group administrator, and role; click “Submit”, as shown below:
Note: By default, it is a normal user. After selecting a normal user, you need to select a role. If you select an
administrator, you do not need to select a role to have all the permissions under this group.
Modify, query and, delete operations: (omitted)
User password modication: Note that only administrators (admin or company administrators) can reset
passwords for users in the group. Reset the password to 123456.
36
HOWARD INTERACTIVE KIOSK INSTALLATION GUIDE
Page 37

ROLE MANAGEMENT
[Role management] is used to create and manage roles. Roles are used to control various business function
modules and function operations of users in the system. It is composed of different function operation rights.
DESCRIPTION OF ROLES
Each enterprise can create one or more roles with different permission scopes, which are used to perform
different functions for different users in the enterprise group structure.
Role information is independent between enterprises, and each cannot be accessed by the other.
Note: The role of admin is the system super administrator, which can manage all the functional modules and
business data in the system. Among them, the functions of [System Settings] and [Enterprise Management]
can only be managed by admin users; other users cannot see these two modules, including enterprise
administrator users.
ROLE CREATION
Go to [Permission Management]-[Role Management], click the “Add Role” button to enter the [Add Role]
page.
BUSINESS MANAGEMENT
[Enterprise Management] The module can only be operated by the super administrator and is used to
create and manage enterprise accounts in the system. Each corporate account has corporate administrator
rights and can be used to log in to the system. After logging in to the system, the account can manage the
organizational structure, users, and roles within the enterprise, and can view and manage all business data
created by the enterprise users. But there is no operation authority for the [System Settings] and [Enterprise
Management] functions, nor can you see the data of other enterprise users.
Super administrators can create, modify, query, and delete enterprises, as shown in the following gure:
Note: Enterprise delete operation is supported. After deleting an enterprise, all data associated with the
enterprise will be deleted, and the devices under the enterprise will belong to the admin default group.
FOR SUPPORT CALL: (888) 323 - 3151
37
Page 38

[System Log] The system log list on the page contains the user’s operation date, function modules, log
details, operation results, operator and other information recorded during the use of the system.
SYSTEM SETTINGS
The system settings provide several functions such as “background service port”, “message service port”
and “database service port conguration”.
1. Support web service port congurable: background service port can be congured (between 9000-9999)
and the default is 9000; Message service port can be congured (between 7000-7999) and the default is
7788; Database service port can be congured (Between 3000-3999) and the default value is 3306. After
setting, you need to restart the background to take effect.
2. System time.
38
HOWARD INTERACTIVE KIOSK INSTALLATION GUIDE
Page 39

7. ATTENDANCE MANAGEMENT
[Attendance management] The module is used to customize the setting of working shifts and working time,
regulations of holidays and public holidays, query and export the attendance records and attendance
statistics of all personnel.
ATTENDANCE RULES
[Attendance rules] Add, modify and delete related rules including shifts, holidays, public holidays, and
device groups, etc.can be set in this module.
SHIFT SETTINGS
The shift setting contains a default shift. Click the new shift button to increase the shift. Click the modify shift
icon in the operation to modify the parameters in the current shift. Click the delete shift icon in the operation to
delete the current shift.
NEW SHIFT
Click the New shift button to open the new shift settings interface.
FOR SUPPORT CALL: (888) 323 - 3151
39
Page 40

SHIFT SETTINGS
1. The default is one shift. You can click the Add button to add shifts and set up to 4 shifts.
2. You can select / clear / customize the specic working / off time within the time period.
3. You can select and customize the minutes limit for late arrival and early departure in the notes.
4. Click the delete icon in the operation to delete this shift.
OVERTIME RULES
1. You can manually enter and select the length of time required to work overtime on workdays and the
time off work.
2. You can manually enter the length of time required for overtime on public holidays and holidays, as well
as working time and off time.
OVERTIME RULES
Click “New holiday” to customize the time period of various holidays. Click “Modify” to modify the parameters
of the currently set holiday. Click “ delete” to delete the current holiday.
NEW HOLIDAY
Click “New holiday” to open the new holiday interface.
40
HOWARD INTERACTIVE KIOSK INSTALLATION GUIDE
Page 41

HOLIDAY NAME
The name can be customized to enter no more than 32 characters.
START AND END DATE
The start date and end date of the newly added holiday can be customized.
NOTES
It can be customized to enter no more than 50 characters to explain the holiday.
PUBLIC HOLIDAY SETTINGS
You can customize the xed weekly rest days (Monday to Sunday). Click “Modify” to modify the parameters
of the currently set public holiday. Click “ Delete “ to delete the current public holiday.
NEW PUBLIC HOLIDAY
Click “New public holiday” to open the interface.
FOR SUPPORT CALL: (888) 323 - 3151
41
Page 42

PUBLIC HOLIDAY NAME
The name can be customized to enter no more than 32 characters.
OFF DAY
You can select single or multiple choices from Monday to Sunday as a custom xed weekly off day.
DEVICE GROUP SETTINGS
You can customize the new device group, and click the Modify to modify the device group information. Click
“ Delete” to delete a set device group.
NEW DEVICE GROUP
Click “New device group” to open the interface.
DEVICE GROUP NAME
The name can be customized to enter no more than 32 characters.
42
HOWARD INTERACTIVE KIOSK INSTALLATION GUIDE
Page 43

SELECT DEVICE
The “Cancel edit” button is displayed by default. At this time, you can check the devices in each group of the
associated account. After clicking the “Cancel edit” button once, the display changes to “Edit button” and the
device check box is grayed out and cannot be checked.
ATTENDANCE RECORDS
[Attendance records] The functions of this module include: query the attendance records of all employees by
time period and group, track employees by attendance status, query the daily attendance within a custom
time period by employee name and ID, query the attendance of employees by date record and export the
query result list le to download locally.
EMPLOYEE GROUPING LIST
In the list, the group name and group information are the same as the group data in [Employee list], which is
synchronized in real time according to the data changes in the employee list. After selecting all groups, the
attendance records of all employees are displayed on the right side of the interface. In the sub-group, only
the attendance records of the employees in the group are displayed.
ATTENDANCE RECORDS LIST - EMPLOYEE NAME, EMPLOYEE ID, EMPLOYEE GROUP
Display the name of the employee, the corresponding employee ID, and the employee group.
FOR SUPPORT CALL: (888) 323 - 3151
43
Page 44

ATTENDANCE RECORD LIST - DATE
1. By default, the attendance record date of the day before the query date is displayed.
2. If the day’s date belongs to a custom holiday, the “Holiday” icon will be displayed to the right of the date.
3. If the current day belongs to a custom public holiday, the “Off” icon will be displayed to the right of the
date.
4. If today’s date belongs to a customized holiday and public holiday, the “Off” and “Holiday” icons will be
displayed on the right side of the date.
ATTENDANCE - FIRST CLOCK-IN, LAST CLOCK-IN
The employee’s rst attendance is displayed in the rst clock-in, and the employee’s last attendance is
recorded in the last clock-in. If the employee did not attend that day, no data will be displayed.
ATTENDANCE - STATUS
1. If the employee commutes normally within the specied time, the status bar will not display the mark.
2, If the employee’s attendance record is normal within the specied time, no mark is displayed.
3. If the employee leaves early at the end of the day, the status bar marks early departure.
4. If the employee is absent from the day, the absence is marked in the status bar.
5. If the employee has overtime that day, the overtime mark will be displayed in the status bar.
6. If multiple marking conditions are met simultaneously, the status bar will display multiple markings.
ATTENDANCE RECORDS LIST - OPERATE
You can enter the Pass management - Pass record page to view the employee’s daily attendance details.
SEARCH BAR
Enter the employee’s name or ID in the search box and click “Enter” to query their attendance data.
44
HOWARD INTERACTIVE KIOSK INSTALLATION GUIDE
Page 45

RANGE SEARCH
Click the arrow button to the right of the search box to open the Range search interface.
The attendance status selects all by default. If you do not enter the date range and employee name, you can
query the current month attendance records of all employees.
Attendance status can be manually selected separately for normal, late, early departure and absence. You
can also customize the input or select the date and employee name / ID for a combined query within the
specied range.
Click the export button to download the employee attendance record form of the current query page.
TURN PAGE
1. By default, 10 records are displayed on each page. Click to manually select 15/20/25/50/100 records.
2. Select the Previous Page, Next Page, First Page and Last Page buttons to navigate the record, or enter a
number into the page number input box and click “Jump” to skip directly to this page.
FOR SUPPORT CALL: (888) 323 - 3151
45
Page 46

ATTENDANCE STATISTICS
[Attendance statistics] The module can query or export the data of normal and abnormal attendance of
employees at all times and within a specied range of time, working days, public holidays and overtime data
on holidays.
EMPLOYEE GROUP LIST
In the employee group list, the group name and group information are the same as the group data in
the [Employee list]. Data changes in the Employee list are synchronized in real time. After all groups are
selected, the attendance statistics of all employees will be displayed on the right side of the interface. The
sub-grouping only displays the employee attendance statistics of the group.
ATTENDANCE STATISTICS LIST - EMPLOYEE NAME, EMPLOYEE ID, EMPLOYEE GROUP
Display the name of the employee and the corresponding employee ID and employee group.
ATTENDANCE STATISTICS LIST - NORMAL DAYS, LATE ARRIVALS, DEPARTURES, ABSENCES
By default, the statistics of the current month of the query date are displayed. The employee’s normal days,
late arrivals, early departures, and absences will be displayed. If there is no record in the query time range, it
will be displayed as 0.
ATTENDANCE STATISTICS LIST - OVERTIME ON WORKING DAYS, HOLIDAYS, PUBLIC HOLIDAYS
By default, the statistics of the current month of the query date are displayed. It will display the total number
of hours and employees working overtime on working days, public holidays and holidays. If there is no record
in the query time range, it will be displayed as “-”.
46
HOWARD INTERACTIVE KIOSK INSTALLATION GUIDE
Page 47

ATTENDANCE STATISTICS LIST - OPERATE
1. Click the Attendance record icon on the left side of the interface to enter the Attendance management—
Attendance record page to view the employee’s attendance record for the day.
2. Click the Attendance record icon on the right side of the interface to enter the Pass management - Pass
record page to view the employee’s attendance details for the day.
SEARCH BAR
Enter the employee’s name or ID in the search box and click “Enter” to query their attendance data.
RANGE SEARCH
Click the arrow button to the right of the search box to open the range search interface.
The attendance status is selected as “all” by default. If you do not enter the date range and employee name,
the default is to query the attendance data of all employees in the current month.
Attendance status can be manually selected for normal, late, early departure and absence. You can also
customize the input or select the date and employee name / ID for a combined query within the specied
range.
Click the “Export” button to download the employee attendance record form of the current query page.
TURN PAGE
1. By default, 10 records are displayed on each page. Click to manually select 15/20/25/50/100 records.
2. Select the Previous Page, Next Page, First Page, and Last Page buttons to navigate the record, or enter a
number into the page number input box and click “Jump” to skip directly to this page.
FOR SUPPORT CALL: (888) 323 - 3151
47
Page 48

CONTACT INFORMATION
If you have any questions about our line of technology partner products, feel free to contact us for
more information.
General Information
Toll Free: 1.888.912.3151
Customer Support
Toll Free: 1.888.323.3151
Technical Support
We provide FREE telephone technical support
24/7 (excluding US holidays) for as long as
you own your Howard product. Our friendly,
US-based team of experts will answer your
questions about the product, hardware setup,
or installation, and with telephone hold times of
typically less than 1 minute!
For technical support call 888.323.3151
48
 Loading...