

Page 1
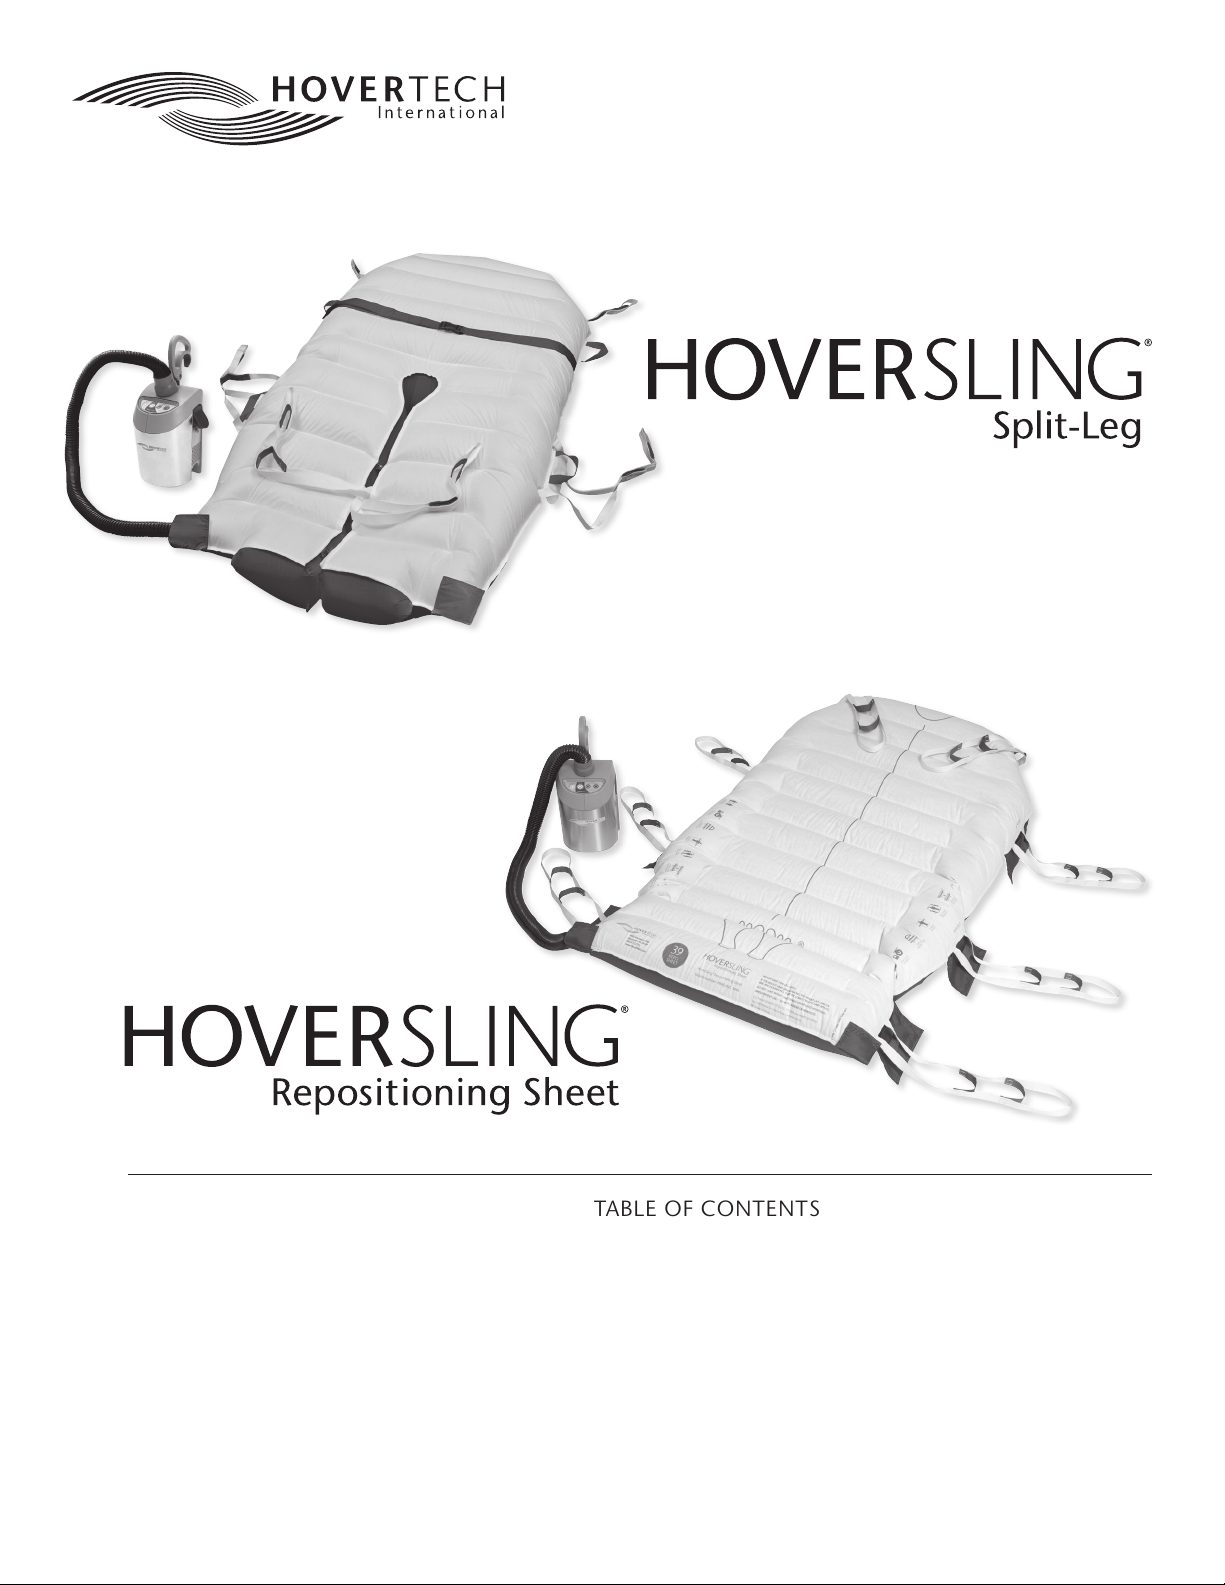
User Manual
TABLE OF CONTENTS
Symbol Reference ...............................................................................................2
Intended Use and Precautions .............................................................................2
Part Identification – HoverSling® Split-Leg ...........................................................3
HoverSling® Split-Leg Product Specifications/Required Accessories ....................3
HoverSling® Split-Leg Instructions for Use as a Transfer Mattress .........................4
HoverSling® Split-Leg Instructions for Use as a Sling .........................................4-5
Part Identification – HoverSling® Repositioning Sheet .........................................6
HoverSling® Repositioning Sheet Product Specifications/Required Accessories ...6
HoverSling® Repositioning Sheet Instructions for Use as a Transfer Mattress .......7
HoverSling® Repositioning Sheet Instructions for Use as a Sling .......................7-8
Part Identification – HT-Air® 1200 Air Supply ....................................................... 9
HT-Air® 1200 Air Supply Keypad Functions..........................................................9
Cleaning, Preventive Maintenance/Infection Control ........................................10
Warranty Statement...........................................................................................10
Returns and Repairs ...........................................................................................11
Page 2

User Manual
Symbol Reference
DECLARATION OF CONFORMITY
TO MEDICAL DEVICE DIRECTIVE
Intended Use and Precautions
INTENDED USE
The HoverSling® Split-Leg and HoverSling® Repositioning Sheet are
combination air-assisted transfer mattresses and lift slings. When used
as an air-assisted transfer mattress, the HoverTech Air Supply inflates the
HoverSling to cushion and cradle the patient, while air simultaneously
escapes from the holes on the underside, reducing the force needed to
move the patient by 80-90%. In this capacity,
to assist caregivers with lateral patient transfers,
proning. The HoverSling can also be used for vertical patient lifts with a
loop style hanger bar.
the HoverSling can be used
positioning, turning and
INDICATIONS
• Patients unable to assist in their own lateral or vertical transfer.
• Patients whose weight or girth poses a potential health risk for the
caregivers responsible for repositioning, vertically transferring or
laterally transferring said patients.
CONTRAINDICATIONS
• Patients who are experiencing thoracic, cervical or lumbar fractures
that are deemed unstable, unless using in conjunction with a spinal
board on top of the HoverSling (follow your state’s protocol regarding
use of spinal boards) for lateral transfers.
INTENDED CARE SETTINGS
• Hospitals, long term or extended care facilities
PRECAUTIONS FOR USE AS A
TRANSFER MATTRESS
• Caregivers must verify that all brakes have been engaged prior to
transfer.
• For safety, always use two people during patient transfers.
• Additional caregivers are recommended when moving a patient over
750 lbs./340kg.
• Never leave patient unattended on an inflated HoverSling.
• Only use the HoverSling for its intended purpose as described in this
manual.
• Only use attachments and/or accessories that are authorized by
HoverTech International.
• When transferring to a low air loss bed, set the bed mattress air flow to
the highest level for a firm transfer surface.
• Never attempt to move a patient laterally on an uninflated HoverSling.
• Ensure patient is centered on HoverSling before inflating.
PRECAUTIONS FOR USE AS A SLING
• Always use a minimum of two caregivers when operating
the HoverSling.
• The HoverSling should only be used by trained personnel.
• Only use attachments and/or accessories that are authorized by
HoverTech International.
• Before use, a risk assessment must be carried out to ensure that the
correct size HoverSling is being used for the patient.
• A clinical assessment should be carried out by a qualified nurse and
therapist before lifting patients with the HoverSling.
• Do not use the HoverSling lateral transfer handles to lift. Excessive
force on the lateral transfer handles can cause the HoverSling to tear.
• Make sure the HoverSling is not attached to any object other than the
loop style hanger bar.
• When connecting to loop style hanger bar, ensure shoulder strap loop
colors match on the patient’s left and right side and leg strap loop
colors match on the patient’s left and right side.
• Once the sling support straps are fully extended, make sure they are
properly connected to the hanger bar before the patient is lifted.
• For seated lifts, make sure the patient is sitting securely in the
HoverSling® Split-Leg before transferring or lifting.
• Never lift a patient higher than is necessary to complete the
lift/transfer.
• Never leave the patient unattended while using the HoverSling.
• Use the HoverSling according to both the lift and HoverSling
instructions.
• If the weight limit diers among the patient lift, hanger bar,
and HoverSling, then the lowest weight limit applies.
WARNING: If using the HoverSling® Repositioning Sheet for bed to chair
transfer, the chair MUST be reclined. If the chair does not recline, then
using the HoverSling Repositioning Sheet is not recommended.
WARNING: If there is any indication of damage, remove the HoverSling
from service and discard.
WARNING: In the OR: To prevent the patient from slipping, always deflate the
HoverSling and secure the patient and HoverSling to the OR table prior to moving
the table into an angled position.
PRECAUTIONS AIR SUPPLY
• Route the power cord in a manner to ensure freedom from hazard.
Avoid blocking the air intakes of the air supply.
• When using the HoverSling in the MRI environment, a 25 ft. specialty
MRI hose is required (available for purchase).
• CAUTION: Avoid electric shock. Do not open air supply.
• Reference product specific user manuals for operating instructions.
2 | HoverTech International HSManual Rev. C
Page 3
User Manual
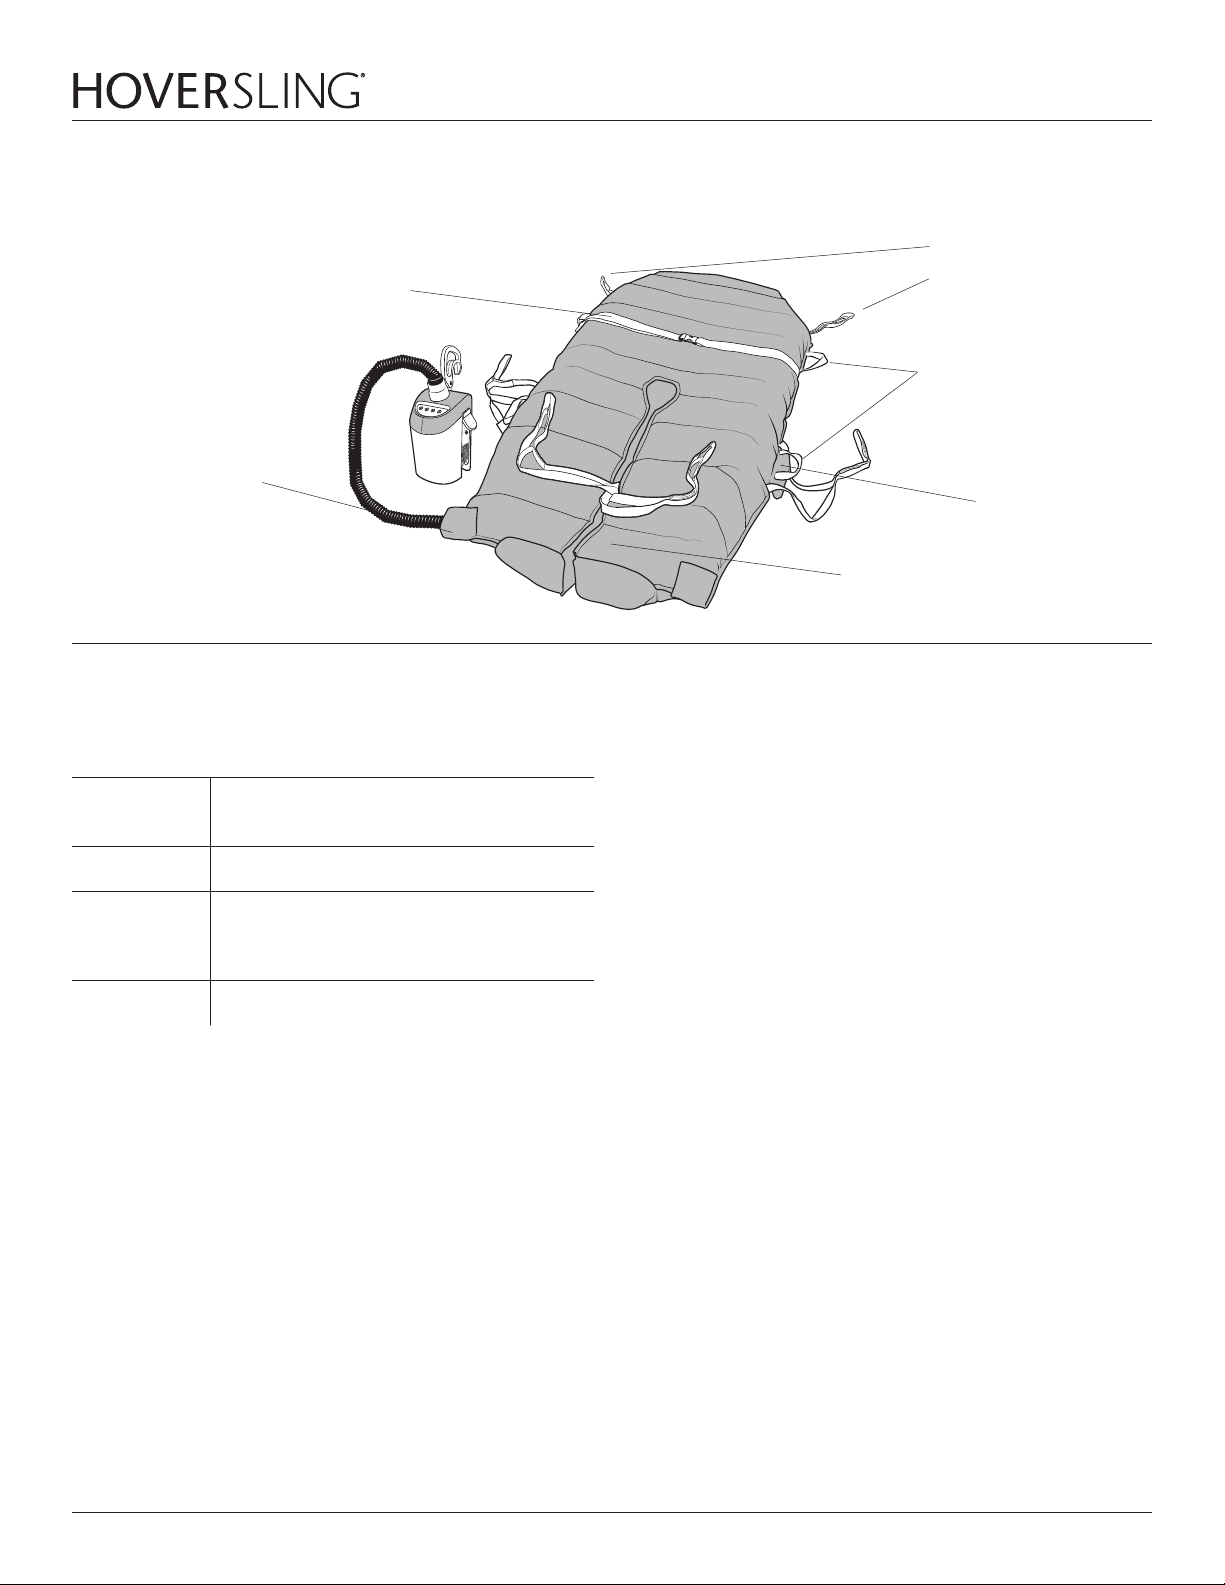
Part Identification – HoverSling® Split-Leg
Patient Safety Strap (1)
(DO NOT USE TO TRANSFER)
Air Supply Hose Inlets (2)
Sling Support Straps (6)
(white, beige and blue color coded
straps for easy identification)
Lateral Transfer Handles (4)
Strap Pockets (6)
Label Includes Model #,
Serial #, and Instructions for Use.
Product Specifications/Required Accessories
HOVERSLING SPLITLEG®
Material:
Construction: Sewn
Width:
Length: 75" (190 cm) inflated
Model #: HMSLING-34 – 34" W x 75" L (10 per box)
Model #: HMSLING-34-B* – 34" W x 75" L (10 per box)
WEIGHT LIMIT 700 LBS/ 318 KG
Model #: HMSLING-39 – 39" W x 75" L (5 per box)
Model #: HMSLING-39-B* – 39" W x 75" L (5 per box)
Model #: HMSLING-50 – 50" W x 75" L (5 per box)
Model #: HMSLING-50-B* – 50" W x 75" L (5 per box)
WEIGHT LIMIT 1000 LBS/ 454 KG
*Breathable model
Top: Polyester knit
Bottom: Nylon Twill
34" (86 cm) inflated
39" (99 cm) inflated
50" (127cm) inflated
REQUIRED ACCESSORY FOR USE
AS A TRANSFER MATTRESS:
Model #: HTAIR1200 (North American Version) – 120V~, 60Hz, 10A
Model #: HTAIR2300 (European Version) – 230V~, 50 Hz, 6A
Model #: HTAIR1000 (Japanese Version) – 100V~, 50/60 Hz, 12.5A
Model #: HTAIR2356 (Korean Version) – 230V~, 50/60 Hz, 6A
Model #: AIR200G (800 W) – 120V~, 60Hz, 10A
Model #: AIR400G (1100 W) – 120V~, 60Hz, 10A
REQUIRED ACCESSORY FOR USE AS A SLING:
Any patient lift with 2, 3, or 4-point loop style hanger bars intended for
use with:
• Mobile hoists with sling seats
• Hoist trolleys
• Stationary hoists fixed to the wall/walls, floor and/or ceiling
• Stationary free-standing hoists
HSManual Rev. C www.HoverMatt.com | 3
Page 4
User Manual
HoverSling® Split-Leg Instructions for Use as a Transfer Mattress
1. Ensure sling support straps are stowed in strap pockets and the four
(4) snaps located at the center leg and foot sections are connected.
2. Patient should preferably be in a supine position.
3. Place HoverSling Split-Leg underneath patient using a log-rolling
technique and secure patient safety strap loosely.
4. Plug the HoverTech Air Supply power cord into an electrical outlet.
5. Insert the hose nozzle into one of two hose entries at foot end of
HoverSling Split-Leg and snap into place.
6. Ensure that transfer surfaces are as close as possible and lock all
wheels.
7. If possible, transfer from a higher surface to a lower surface.
8. Turn on HoverTech Air Supply.
9. Push inflated HoverSling Split-Leg at an angle, either headfirst or feetfirst. Once half-way across, opposite caregiver should grasp closest
handles and pull to desired location.
10. Ensure patient is centered on receiving equipment prior to deflation.
11. Turn o Air Supply and employ the bed/stretcher rails. Unbuckle
patient safety strap.
NOTE: When using the 50” HoverSling Split-Leg, two air supplies may be
used for inflation.
HoverSling® Split-Leg Instructions for Use as a Sling
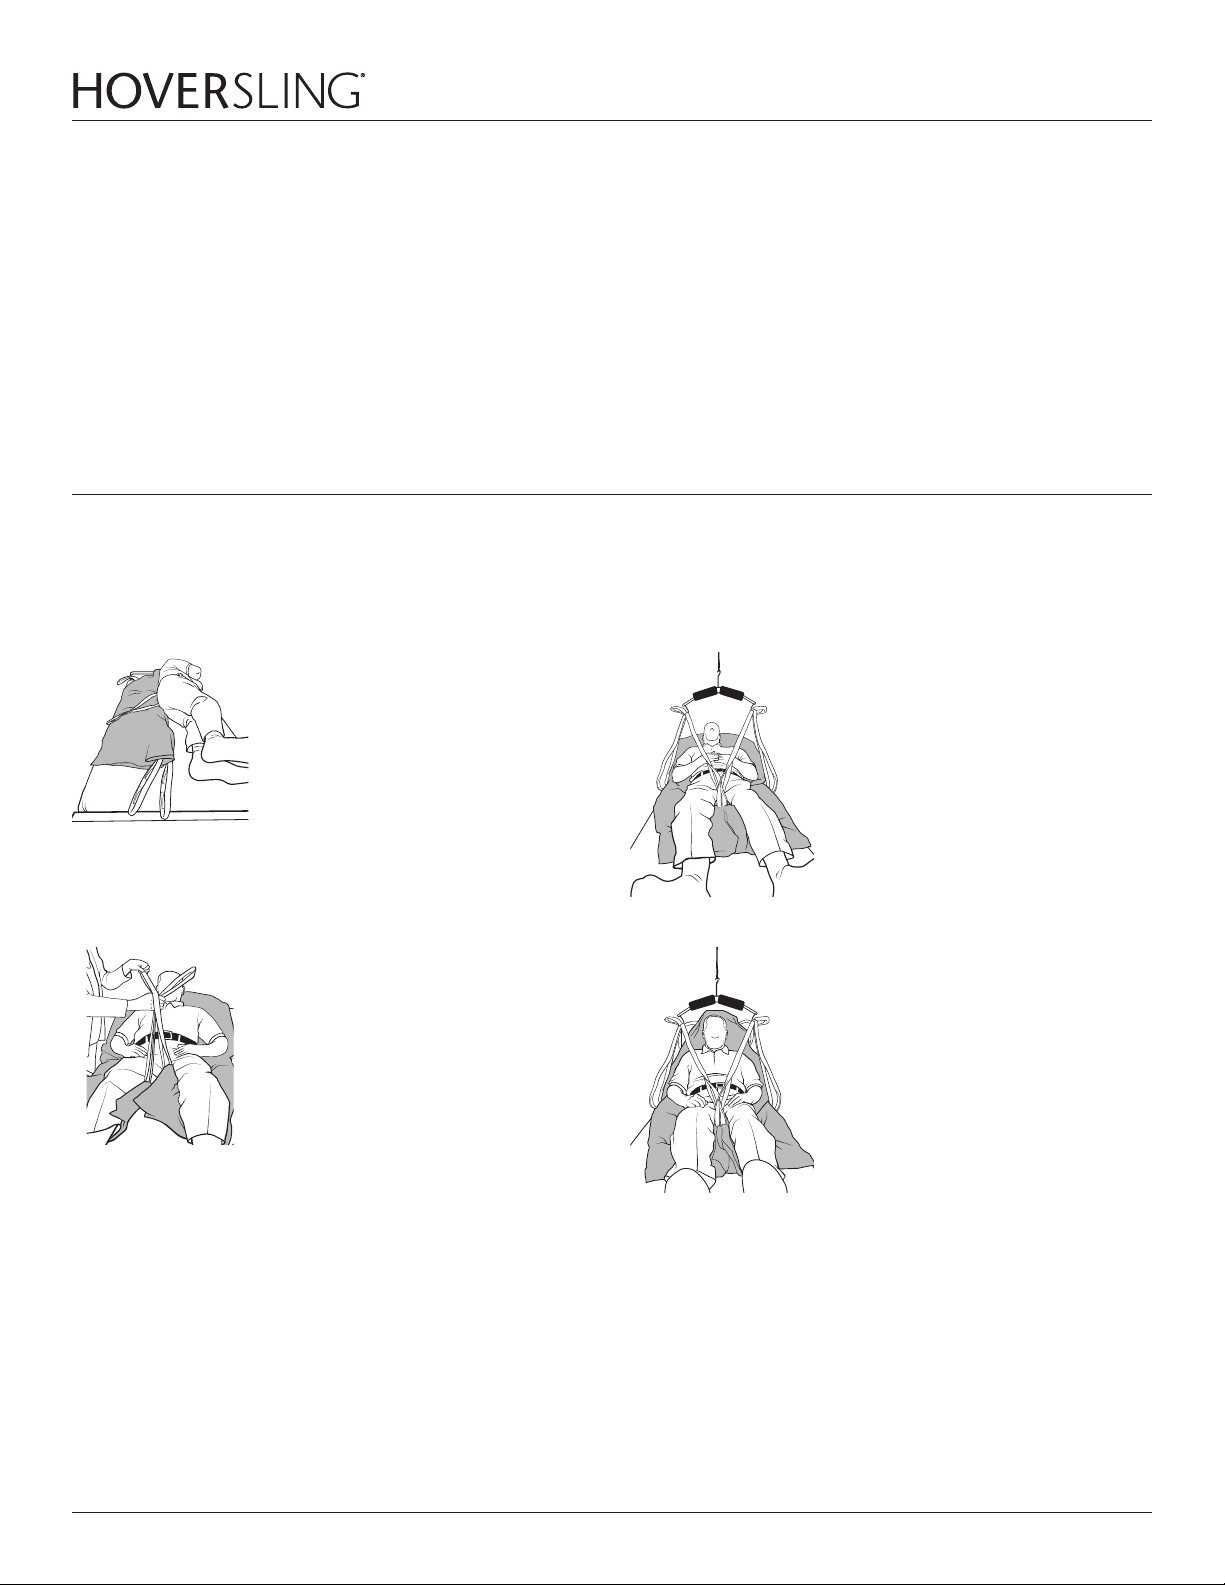
INSTRUCTIONS FOR USE PATIENT IN BED
Note: HoverSling Split-Leg has six (6) sling support straps that need to be
attached.
1. Option 1– Place the HoverSling Split-Leg
underneath patient using log-rolling
technique with the apex of the sling’s
horseshoe at the coccyx of the patient.
Elevate the head of the bed.
Option 2 – Elevate the head of the bed.
Lean patient forward and slide sling
behind patient’s back until the apex of
the horseshoe reaches the coccyx of the
patient. Have patient lean back to hold
sling in place.
3. Attach outside leg support straps to hanger
bar.
2. Release inside leg snaps. Cross inside leg
support straps by taking one leg support
strap and passing it through the other on
the opposite side. Attach inside leg supports to hanger bar.
4 | HoverTech International HSManual Rev. C
4. Attach shoulder straps to the hanger bar
for the proper safety and comfort of the
patient. [Color coded strap loops provide
easy identification to match strap placement
on the left and right side of the patient.
Shorter strap loops at shoulder (blue/
beige) create a more upright sitting position, while longer shoulder and leg strap
loops (white) increase recline angle and
reduce hip flexion].
Page 5
User Manual
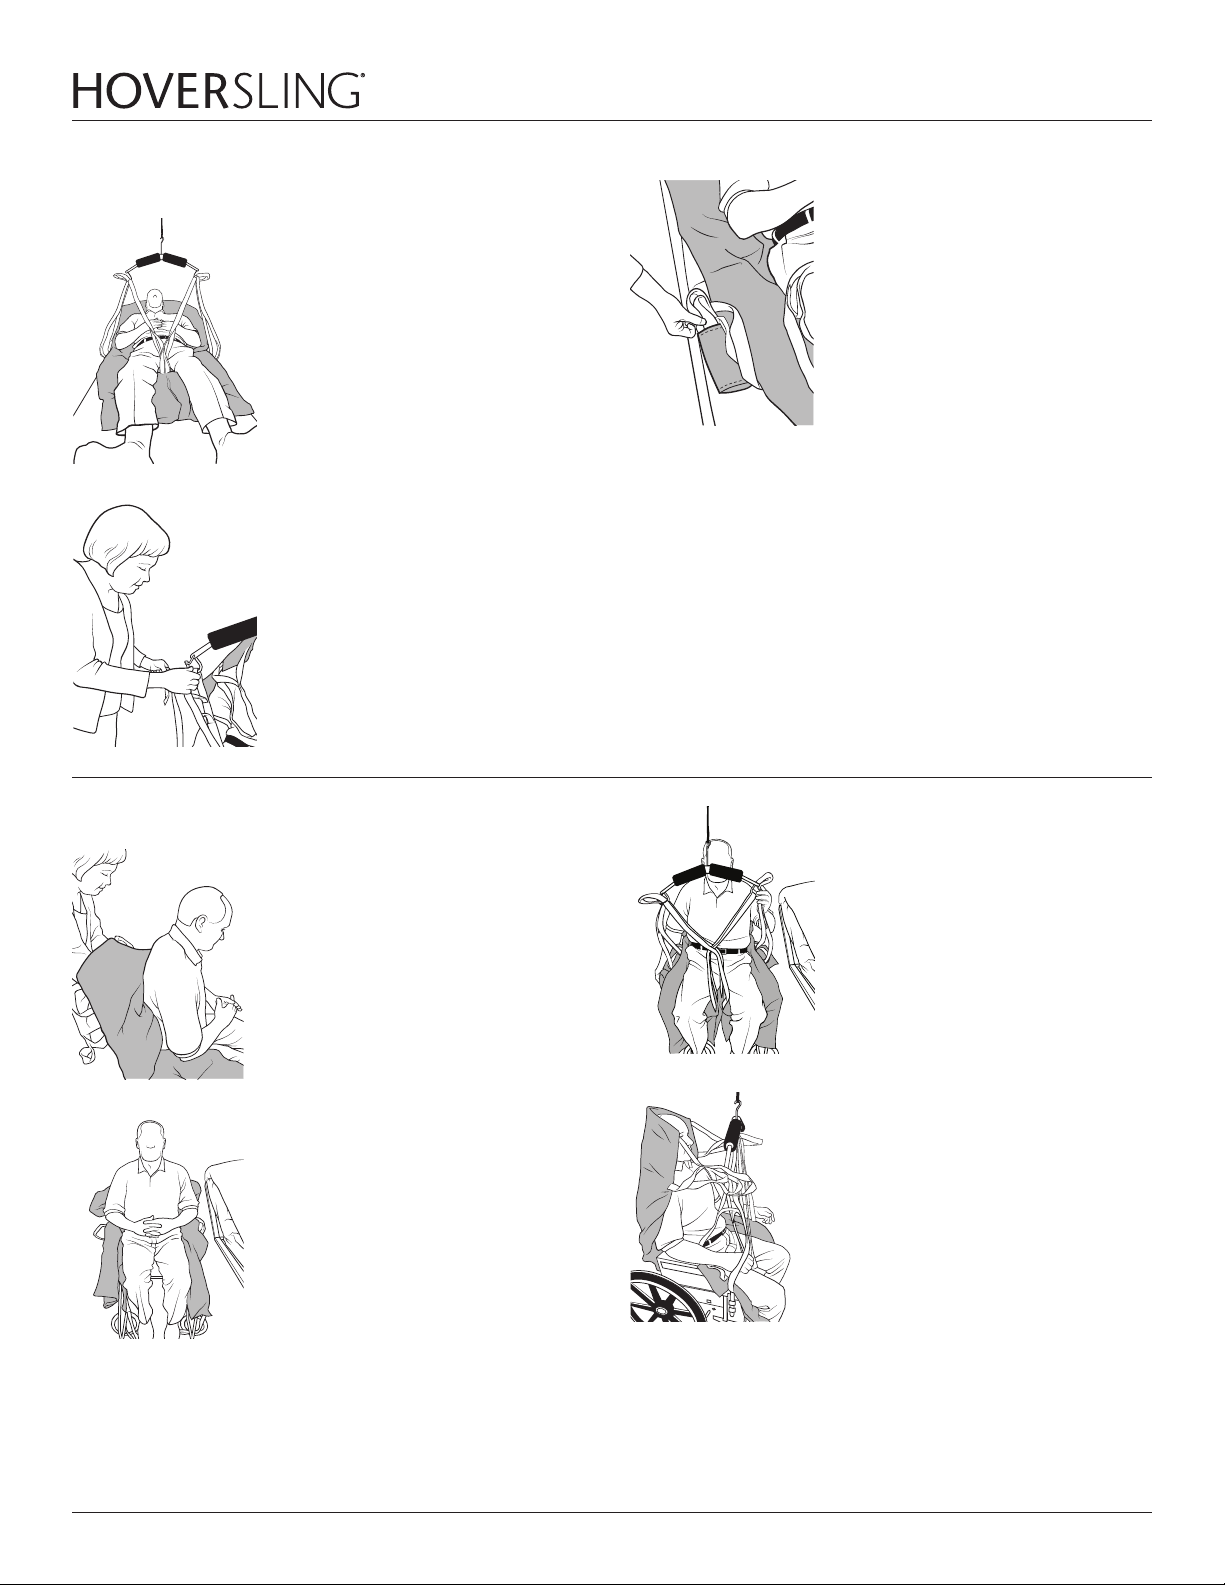
INSTRUCTIONS FOR USE BACK TO BED
1. Position patient above center of bed. Raise
head of bed and lower patient on to bed.
2. Detach strap loops from hanger bar.
3. Place the sling support straps back into the
strap pockets on the inside and outside
edges of the HoverSling Split-Leg.
INSTRUCTIONS FOR USE PATIENT IN CHAIR
1. Release leg snaps. Lean patient forward.
Place the apex of the sling’s horseshoe
behind the patient until you touch the
seat ensuring the sling is centered on the
patient’s torso. Have patient lean back
against the sling to hold it in place.
2. Place the leg sections along the side of the
hips and legs, then place each leg section
underneath each respective leg.
Cross inside leg support straps by taking one
3.
leg support strap and passing it through the
other on the opposite side. Attach inside and
outside leg support straps to hanger bar.
4. Attach shoulder straps to the hanger bar
for the proper safety and comfort of the
patient. [Color coded strap loops provide
easy identification to match strap placement on the left and right side of the
patient. Shorter strap loops at shoulder
(blue/ beige) create a more upright sitting
position, while longer shoulder and leg
strap loops (white) increase recline angle
and reduce hip flexion.]
HSManual Rev. C www.HoverMatt.com | 5
Page 6
User Manual
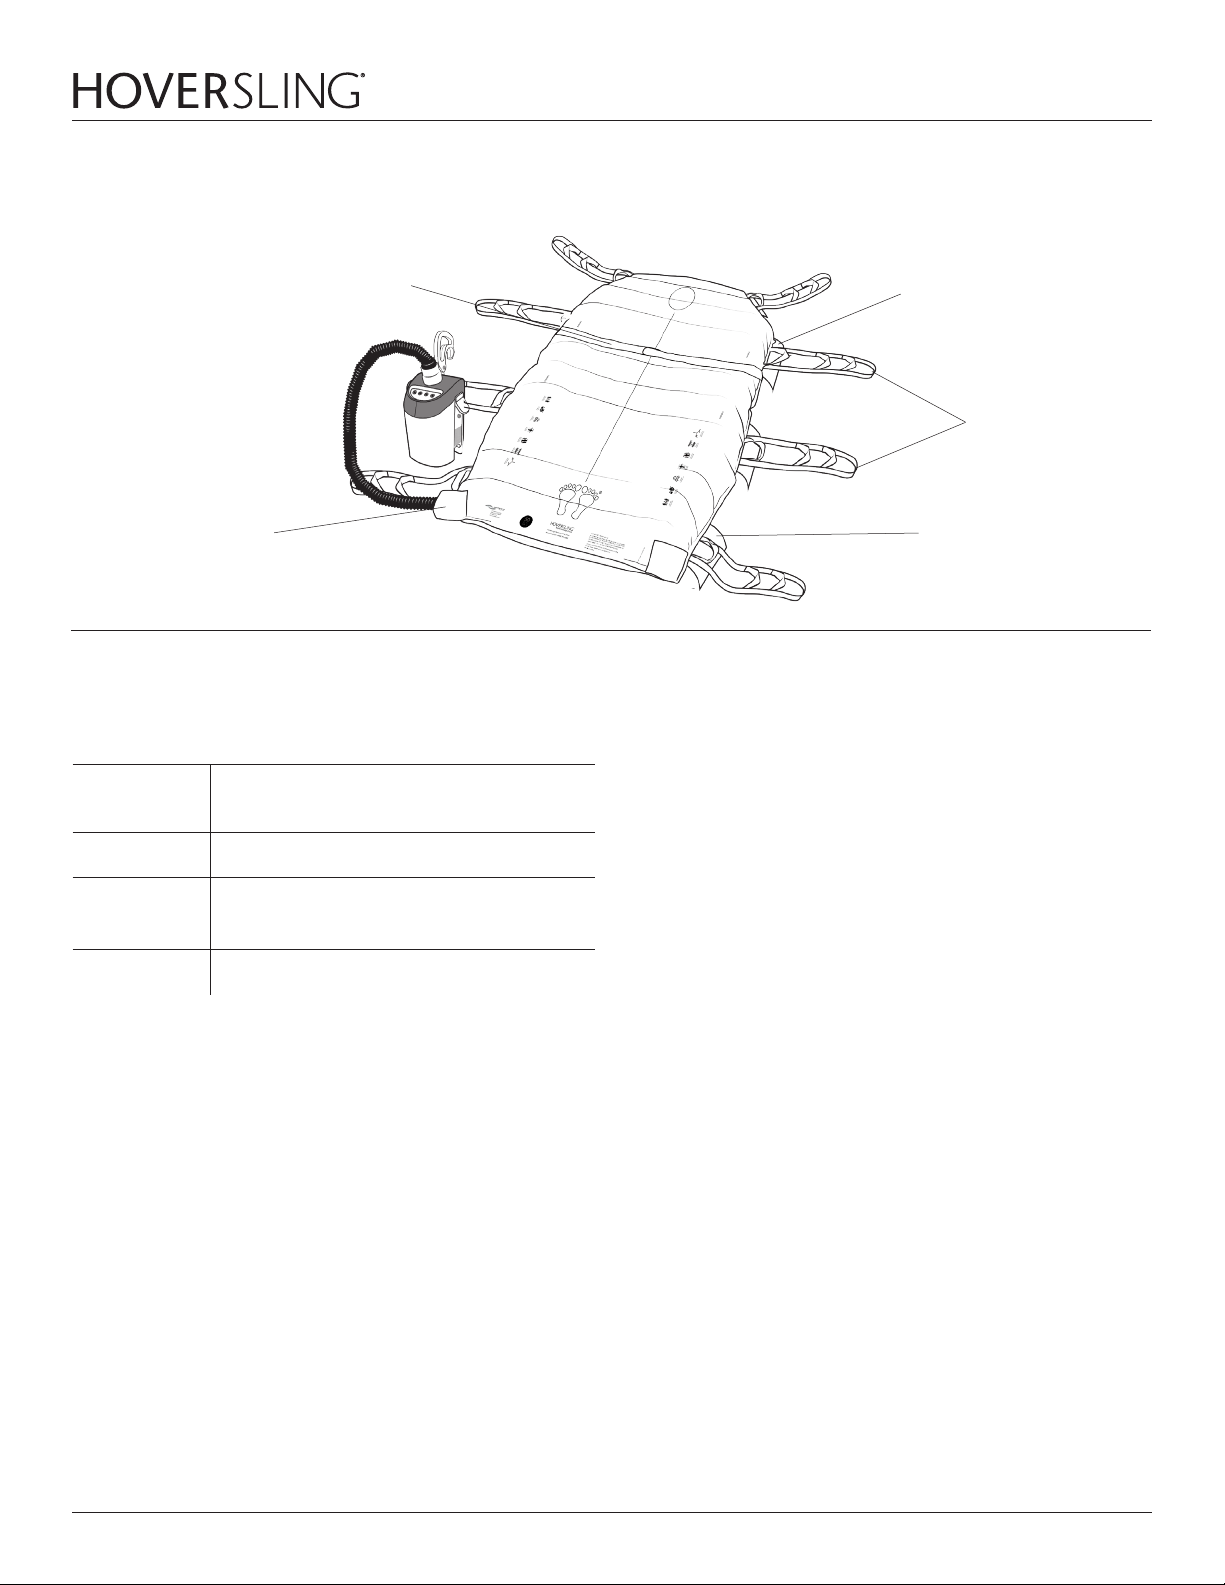
Part Identification – HoverSling® Repositioning Sheet
Patient Safety Strap (1)
(DO NOT USE TO TRANSFER)
Lateral Transfer Handles (8)
Sling Support Straps (8)
(white, beige and blue
color coded straps for
easy identification)
Hose Entries (2)
Product Specifications/Required Accessories
HOVERSLING® REPOSITIONING SHEET
Material:
Construction: Sewn
Width:
Length: 75" (190 cm) inflated
Model #: HMSLING-39RS-B – 39" W x 75" L (5 per box)*
Model #: HMSLING-50RS-B – 50" W x 75" L (5 per box) *
WEIGHT LIMIT 1000 LBS/ 454 KG
*Breathable model
Top: Polyester knit
Bottom: Nylon Twill
39" (99 cm) inflated
50" (127 cm) inflated
Strap Pockets (8)
REQUIRED ACCESSORY FOR USE
AS A TRANSFER MATTRESS:
Model #: HTAIR1200 (North American Version) – 120V~, 60Hz, 10A
Model #: HTAIR2300 (European Version) – 230V~, 50 Hz, 6A
Model #: HTAIR1000 (Japanese Version) – 100V~, 50/60 Hz, 12.5A
Model #: HTAIR2356 (Korean Version) – 230V~, 50/60 Hz, 6A
Model #: AIR200G (800 W) – 120V~, 60Hz, 10A
Model #: AIR400G (1100 W) – 120V~, 60Hz, 10A
REQUIRED ACCESSORY FOR USE AS A SLING:
Any patient lift with 2, 3, or 4-point loop style hanger bars intended for
use with:
• Mobile hoists
• Hoist trolleys
• Stationary hoists fixed to the wall/walls, floor and/or ceiling
• Stationary free-standing hoists
6 | HoverTech International HSManual Rev. C
Page 7
User Manual
HoverSling® Repositioning Sheet Instructions for Use as a Transfer Mattress
1. Ensure sling support straps are stowed in strap pockets.
2. Patient should preferably be in a supine position.
3. Place HoverSling Repositioning Sheet underneath patient using a
log-rolling technique and secure patient safety strap loosely.
4. Plug the HoverTech Air Supply power cord into an electrical outlet.
5. Insert the hose nozzle into one of two hose entries at foot end of
HoverSling Repositioning Sheet and snap into place.
6. Ensure that transfer surfaces are as close as possible and lock all
wheels.
7. If possible, transfer from a higher surface to a lower surface.
8. Turn on HoverTech Air Supply.
9. Push inflated HoverSling Repositioning Sheet at an angle, either headfirst or feetfirst. Once half-way across, opposite caregiver should grasp
closest handles and pull to desired location.
10. Ensure patient is centered on receiving equipment prior to deflation.
11. Turn o Air Supply and employ the bed/stretcher rails. Unbuckle
patient safety strap.
NOTE: When using the 50" HoverSling® Repositioning Sheet, two air
supplies may be used for inflation.
HoverSling® Repositioning Sheet Instructions for Use as a Sling
INSTRUCTIONS FOR USE PATIENT IN BED
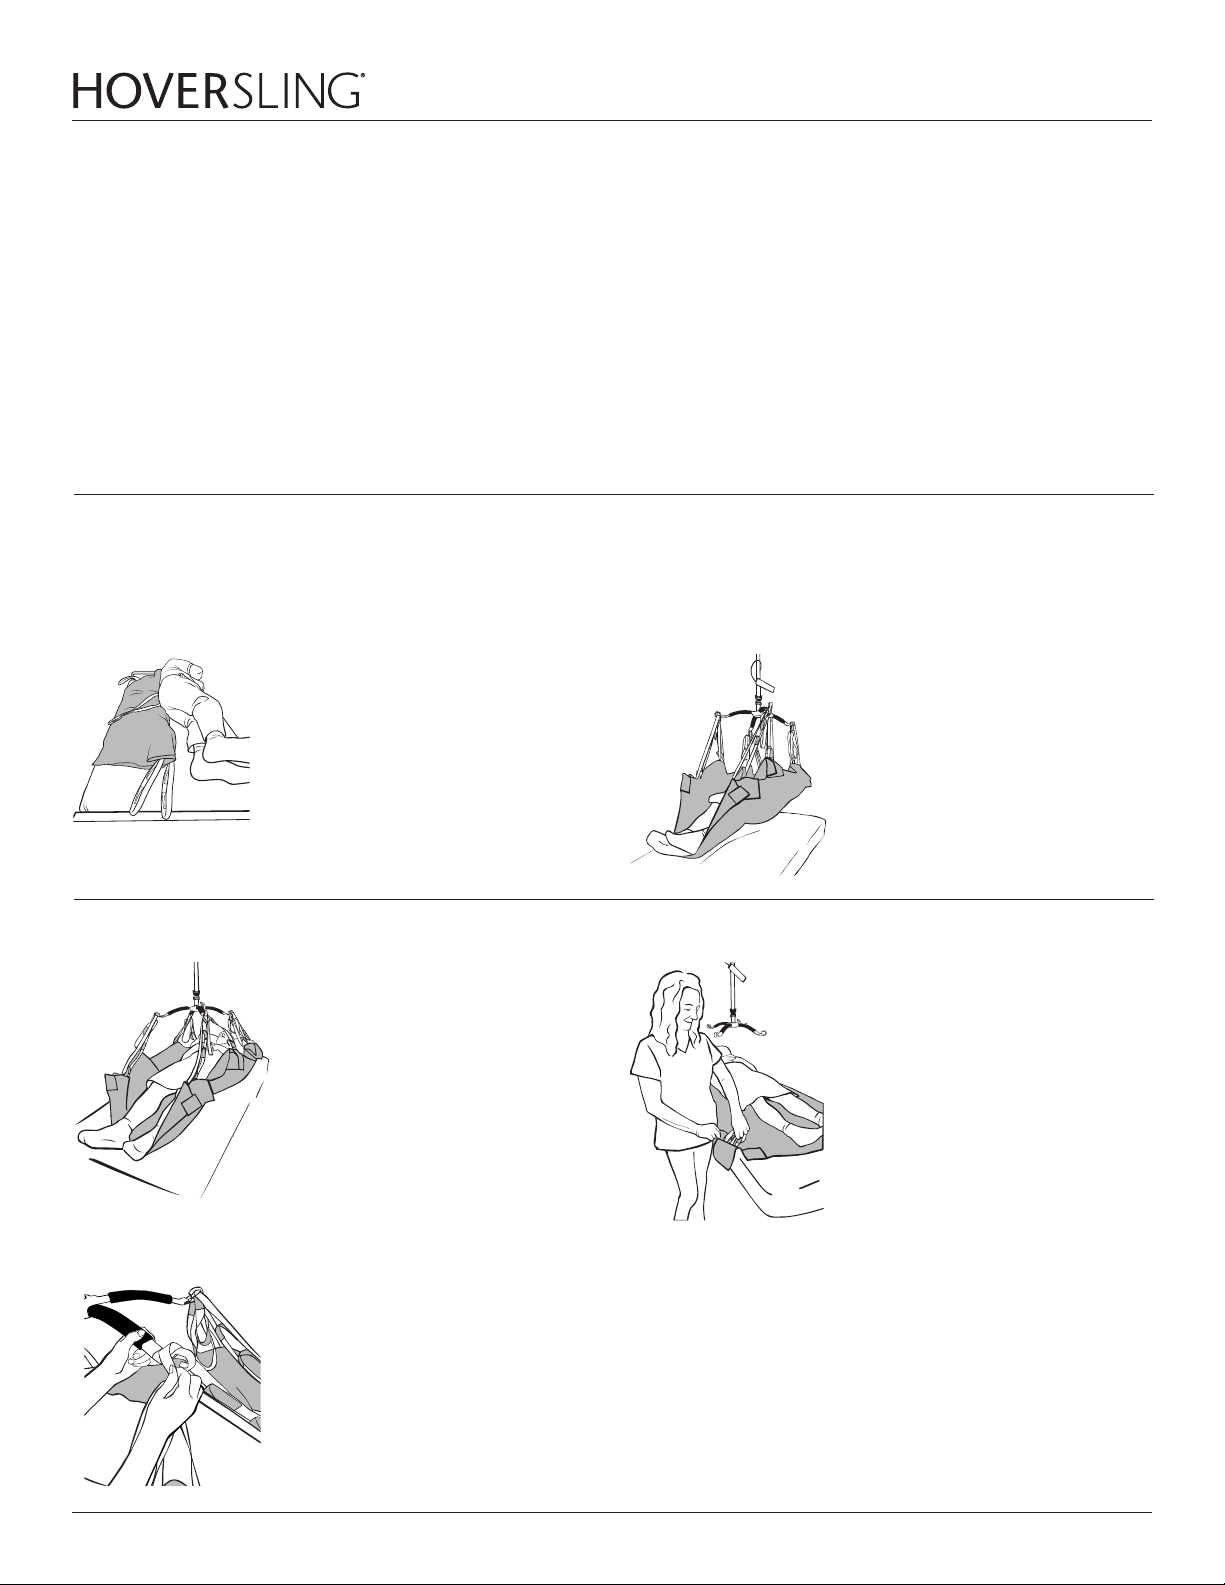
Note: HoverSling® Repositioning Sheet has eight (8) sling support straps
that need to be attached.
1. Place the HoverSling Repositioning Sheet
underneath patient using log-rolling
technique.
2. Attach all straps to the hanger bar for the
proper safety and comfort of the patient.
[Color coded strap loops provide easy
identification to match strap placement
on the left and right side of the patient.]
Lift patient according to lift manufacturer’s
instructions.
INSTRUCTIONS FOR USE BACK TO BED
1. Position patient above center of bed. Lower
patient on the bed.
2. Detach strap loops from hanger bar.
3. Place the sling support straps back into
the strap pockets on the inside and
outside edges of the HoverSling
Repositioning Sheet.
HSManual Rev. C www.HoverMatt.com | 7
Page 8
User Manual
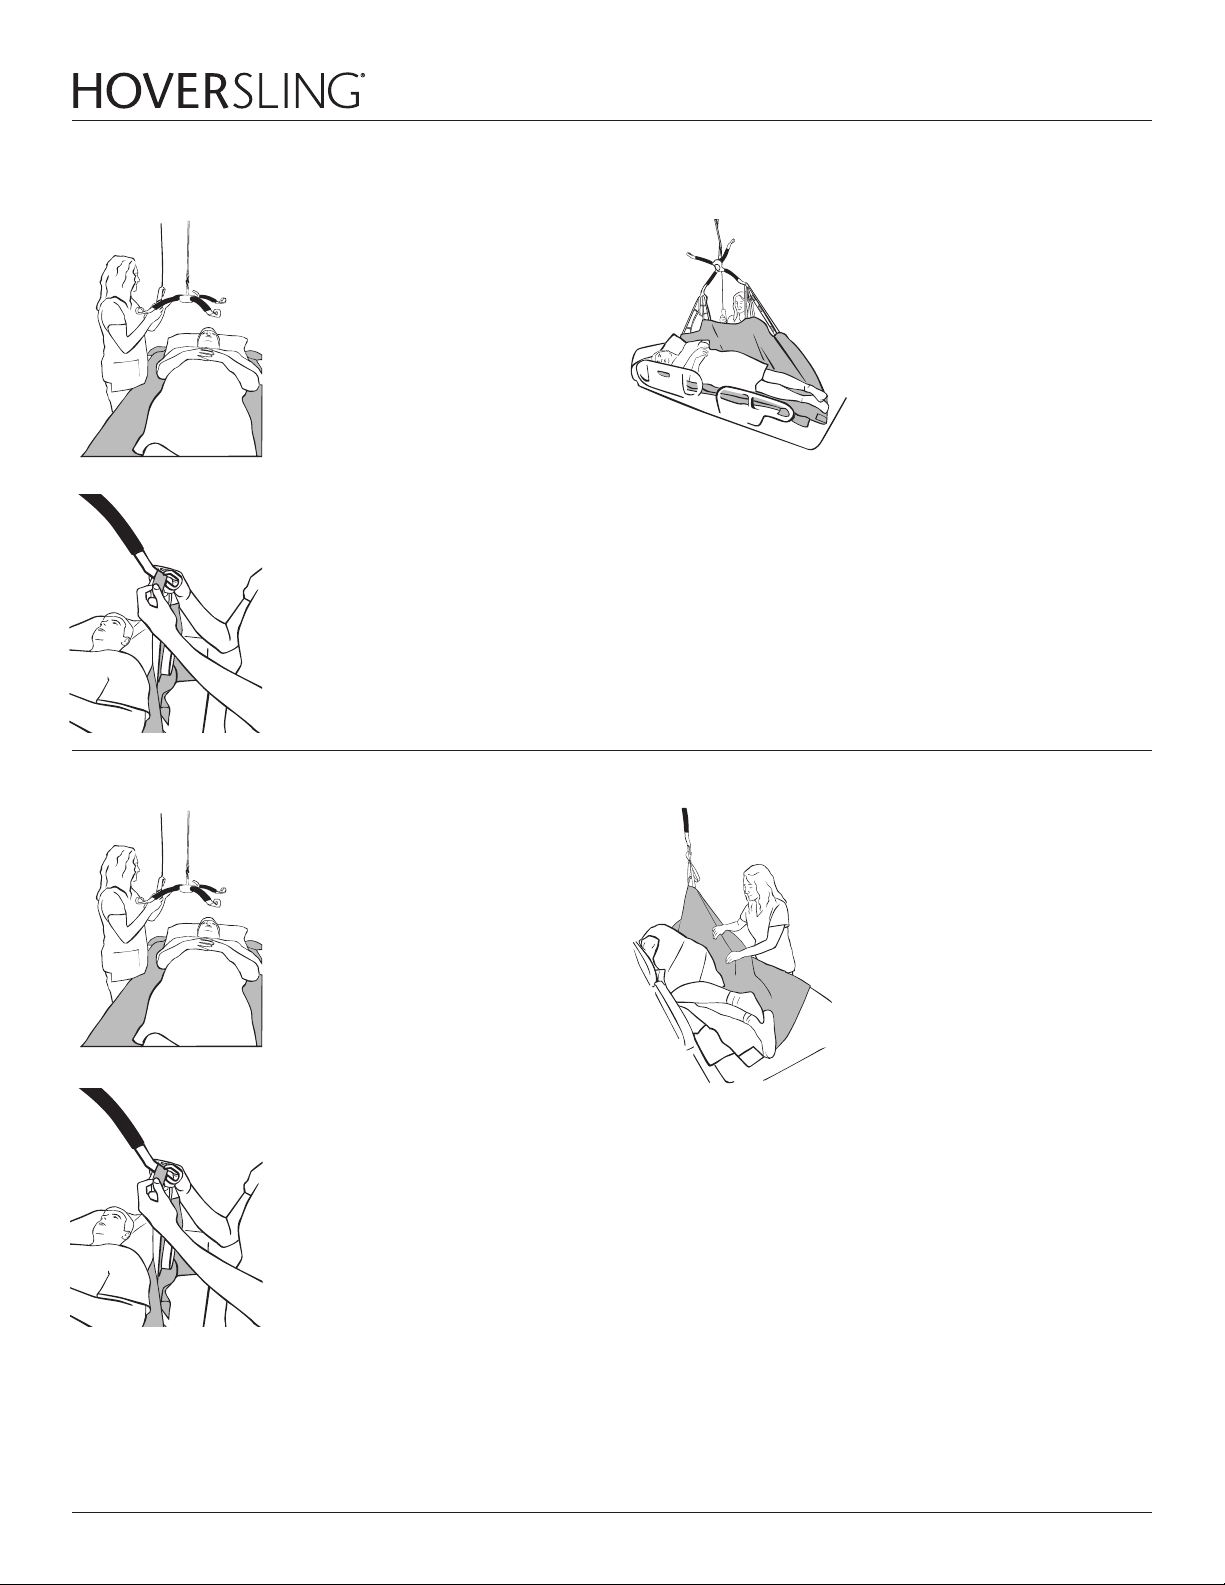
INSTRUCTIONS FOR USE LATERAL TURN
1. With patient centered on the HoverSling®
Repositioning Sheet, lower hanger bar to
comfortable working height.
2. Raise bed rails and attach all four (4) straps
on opposite side of patient turn to loops on
same side of hanger bar starting at
foot end.
3. As lift is raised, patient will turn towards
the opposite side of the bed the straps are
attached to. Use wedges to keep patient
in position if desired. After the task is
completed, lower hanger bar and remove
sling straps.
INSTRUCTIONS FOR USE HYGIENE TURN
1. With patient centered on the the
HoverSling Repositioning Sheet,
lower hanger bar to comfortable
working height.
2. Raise bed rails and attach the sling
strap that is closest to patient’s shoulder
to hanger bar.
3. As lift is raised, patient will begin to turn
to the side opposite the connected strap.
Leave sling in place to perform task. Once
task is completed, lower hanger bar and
remove sling strap.
8 | HoverTech International HSManual Rev. C
Page 9
User Manual
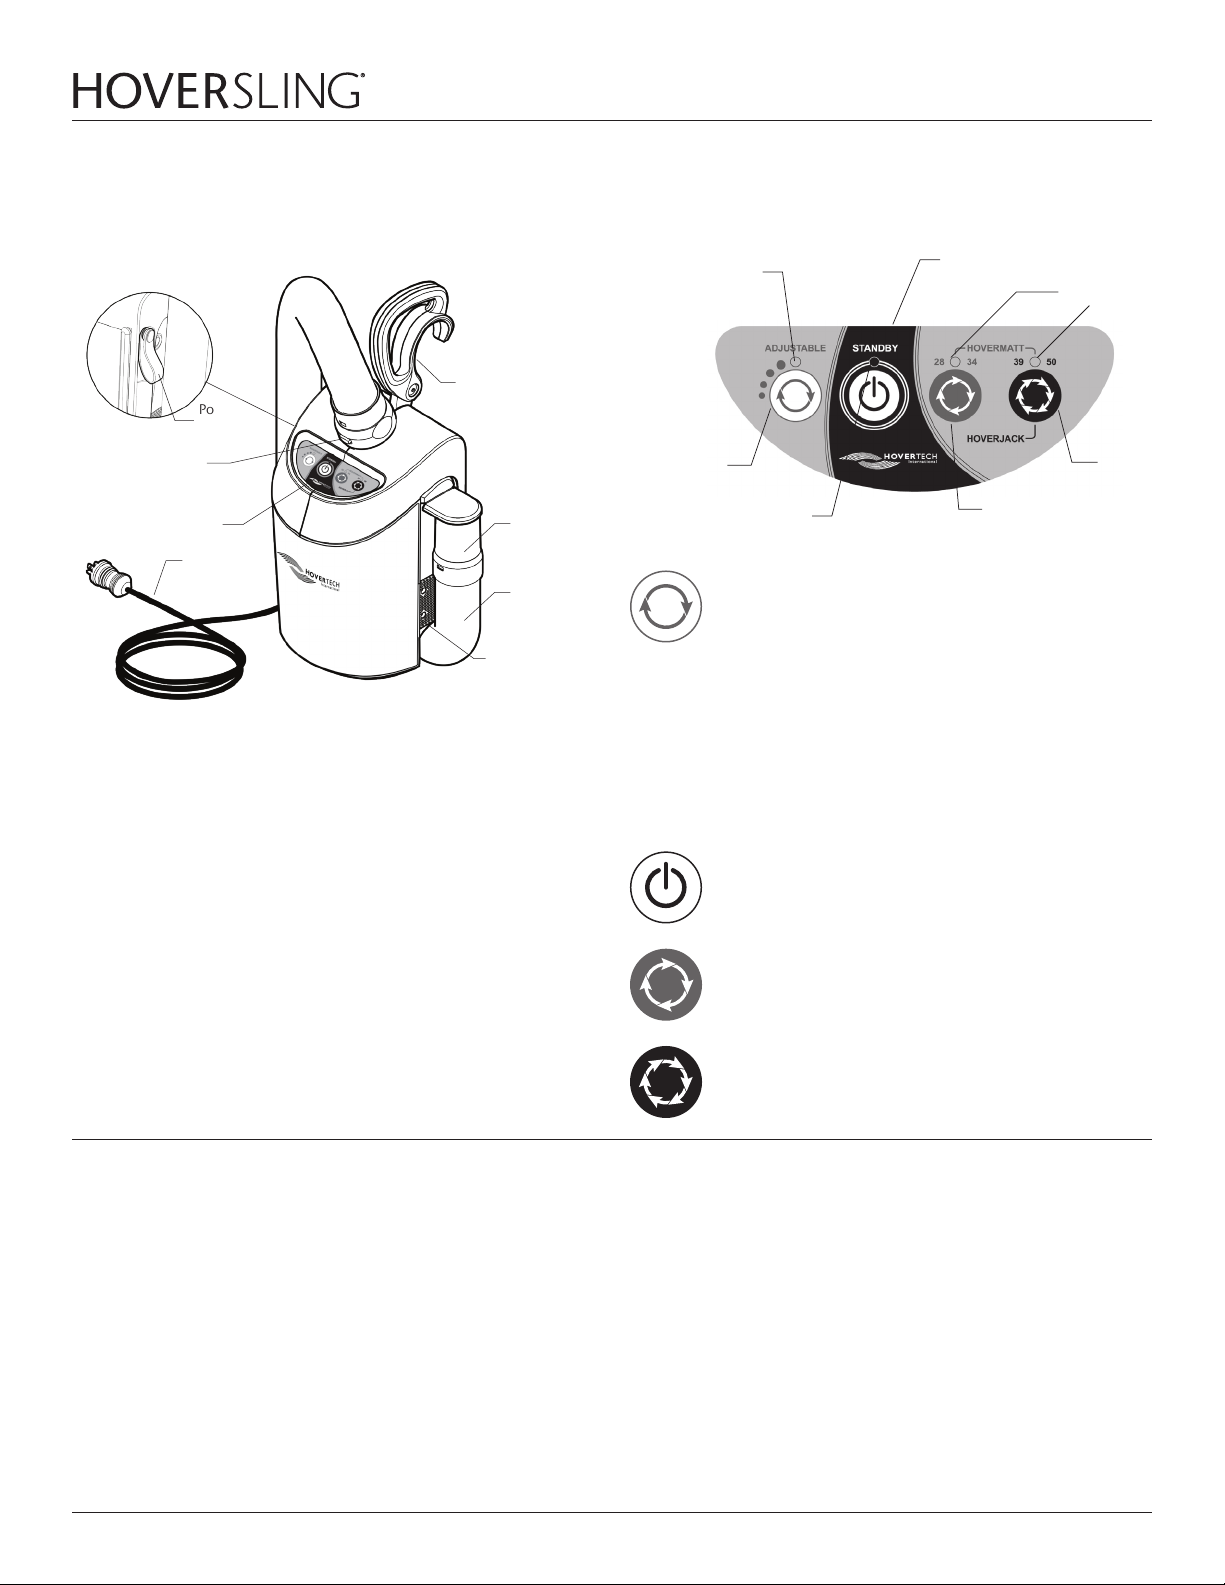
Part Identification
– HT-Air® 1200 Air Supply
Power
Cord
Strap
Hose Release Button
Control Panel Label
Power Cord
(US/UK/Euro)
WARNING: The HT-Air is not compatible with DC power supplies.
The HT-Air is not for use with the HoverJack Battery Cart.
Carrying Handle/
Attachment Hook
Hose
Nozzle
Hose
Air Filter
Cover
HT-Air® 1200 Air Supply Keypad Function
(Green Flashing LED)
Indication
Adjustable/
Pressure
Setting
Standby (Amber LED)
ADJUSTABLE: For use with HoverTech air-assisted positioning
devices. There are four dierent settings. Each press of the
button increases the air pressure and rate of inflation. The Green
Flashing LED will indicate the inflation speed by the number of
flashes (i.e. two flashes equals the second inflation speed).
All of the settings in the ADJUSTABLE range are substantially
lower than the HoverMatt and HoverJack settings. The
ADJUSTABLE function is not to be used for transferring.
The ADJUSTABLE setting is a safety feature that can be used
to ensure the patient is centered on HoverTech air-assisted
devices and to gradually accustom a patient who is timid or in
pain to both the noise and functionality of the inflated devices.
Power IndicationAdjustable Speed
Green LEDs
Transfer
Speed
High
Transfer
Speed
Low
Air200G/Air400G Air Supplies
If using HoverTech’s Air200G or Air400G Air Supplies, press the grey
button on the top of the canister to initiate air flow. Press the button
again to stop air flow.
STANDBY: Used to stop inflation/air flow (Amber LED indicates
STANDBY mode).
HOVERMATT 28/34: For use with 28" & 34" HoverMatts and
HoverSlings.
HOVERMATT 39/50 & HOVERJACK: For use with 39" & 50"
HoverMatts and HoverSlings and 32" & 39" HoverJacks.
HSManual Rev. C www.HoverMatt.com | 9
Page 10

Cleaning
User Manual
A HoverTech disposable sheet and/or absorbent chux can be placed on
top of the HoverSling to keep it clean. The HoverSling is a single-patient
use product and is not intended to be laundered. Discard if the device
becomes grossly soiled.
PREVENTIVE MAINTENANCE
The HoverSling should be checked before each use to ensure there is no
damage that would cause it not to function as intended. It should have all
safety straps, sling support straps and handles intact. The Do Not Launder
label should be intact. There should be no tears, holes or loose threads. If
such damage is found, the HoverSling should be discarded. The HoverSling
is intended to be used for the duration of the patient’s stay at the healthcare/
nursing facility. If the stay exceeds three months, the HoverSling should
be replaced.
Warranty Statement
The HoverSling is warranted to be free from defects in materials and workmanship. In the unlikely event that a problem arises as a result of a defect in
materials or workmanship, we will promptly replace the HoverSling within
ninety (90) days of purchase or in-service.
This warranty is not an unconditional guarantee for the life of the product.
Our warranty does not cover product damage that may result from use
contrary to Manufacturer’s instructions or specifications, misuse, abuse,
tampering, or damage due to mishandling. Warranty specifically does
not cover product damage that may result from using an air supply that
produces more than 3.5 psi to inflate the HoverSling.
Equipment that has been neglected, improperly maintained, repaired or
altered by someone other than an authorized representative of Manufacturer,
or operated in anyway contrary to the operating instructions, shall void this
warranty.
This warranty does not cover normal “wear and tear”. Component parts,
particularly any optional equipment, valve caps, their attachments and
cords, will show wear with use over time and eventually may need to be
refurbished or replaced. This normal type of wear is not covered by our
warranty, but we will provide prompt, high quality repair service and parts
at a nominal cost.
INFECTION CONTROL
If the HoverSling is used on an isolation patient, the hospital should employ
the same protocols/procedures it utilizes to discard other contaminated
single patient use devices.
AIR SUPPLY CLEANING AND MAINTENANCE
See air supply manual for reference.
NOTE: CHECK YOUR LOCAL/STATE/FEDERAL/INTERNATIONAL GUIDELINES
BEFORE DISPOSAL.
HoverTech International’s liability under this warranty and on any claim of
any kind for any loss or damage arising out of, connected with, or resulting
from the design, manufacture, sale, delivery, installation, repair or operation
of its products, whether in contract or tort, including negligence, shall not
exceed the purchase price paid for the product and upon expiration of the
applicable warranty period, all such liability terminates. The remedies which
this warranty provides are exclusive and HoverTech International shall not
be liable for any incidental or consequential damages.
There are no warranties, expressed or implied, which extend beyond this
warranty statement. The provisions of these warranty clauses are in lieu of
all other warranties, expressed or implied, and of all other obligations or
liabilities on HoverTech International’s part and they neither assume nor
authorize any other person to assume for HoverTech International any other
liability in connection with Manufacturer sale or lease of said products.
HoverTech International makes no warranty of merchantability or fitness for
a particular purpose. There is no warranty that the goods will be fit for a
particular purpose. By accepting the goods, the buyer acknowledges that
buyer has determined the goods are suitable for the buyer’s purposes.
MANUFACTURER’S SPECIFICATIONS ARE SUBJECT TO CHANGE.
10 | HoverTech International HSManual Rev. C
Page 11

User Manual
Returns and Repairs
All products being returned to HoverTech International (HTI) must have
a Returned Goods Authorization (RGA) number issued by the company.
Please call (800) 471-2776 and ask for a member of the RGA Team who will
issue you an RGA number. Any product returned without an RGA number
will cause a delay in the repair time.
HTI’s warranty covers manufacturer’s defects in material and workmanship.
If a repair is not covered under warranty, a minimum repair fee of $100 per
item will be assessed, plus return shipping. A Purchase Order for the repair
charge should be provided by the facility at the time the RGA number is
issued, should the repair not be covered under warranty. Lead-time for
repairs is approximately 1-2 weeks, not including shipping time.
Returned products should be sent to:
HoverTech International
Attn: RGA # ___________
4482 Innovation Way
Allentown, PA 18109
HSManual Rev. C www.HoverMatt.com | 11
Page 12

User Manual
12 | HoverTech International HSManual Rev. C
4482 Innovation Way
Allentown, PA 18109
800.471.2776
Fax 610.694.9601
www.HoverMatt.com
[email protected]
 Loading...