

Page 1
User Manual
TABLE OF CONTENTS
Symbol Reference ..........................................................2
Intended Use and Precautions ........................................2
Part Identification – EMS Evacuation HoverJack® Device
Part Identification – HT-Air® Air Supply
HT-Air® Keypad Functions ..............................................4
Air200G/Air400G Air Supplies ........................................4
Instructions for Use ........................................................5
Product Specifications/Required Accessories ..................6
Cleaning & Preventive Maintenance ..............................6
Warranty Statement........................................................7
Returns and Repairs ........................................................7
............................4
..3
Page 2

User Manual
Symbol Reference
DECLARATION OF CONFORMITY
TO MEDICAL DEVICE DIRECTIVE
Intended Use and Precautions
INTENDED USE
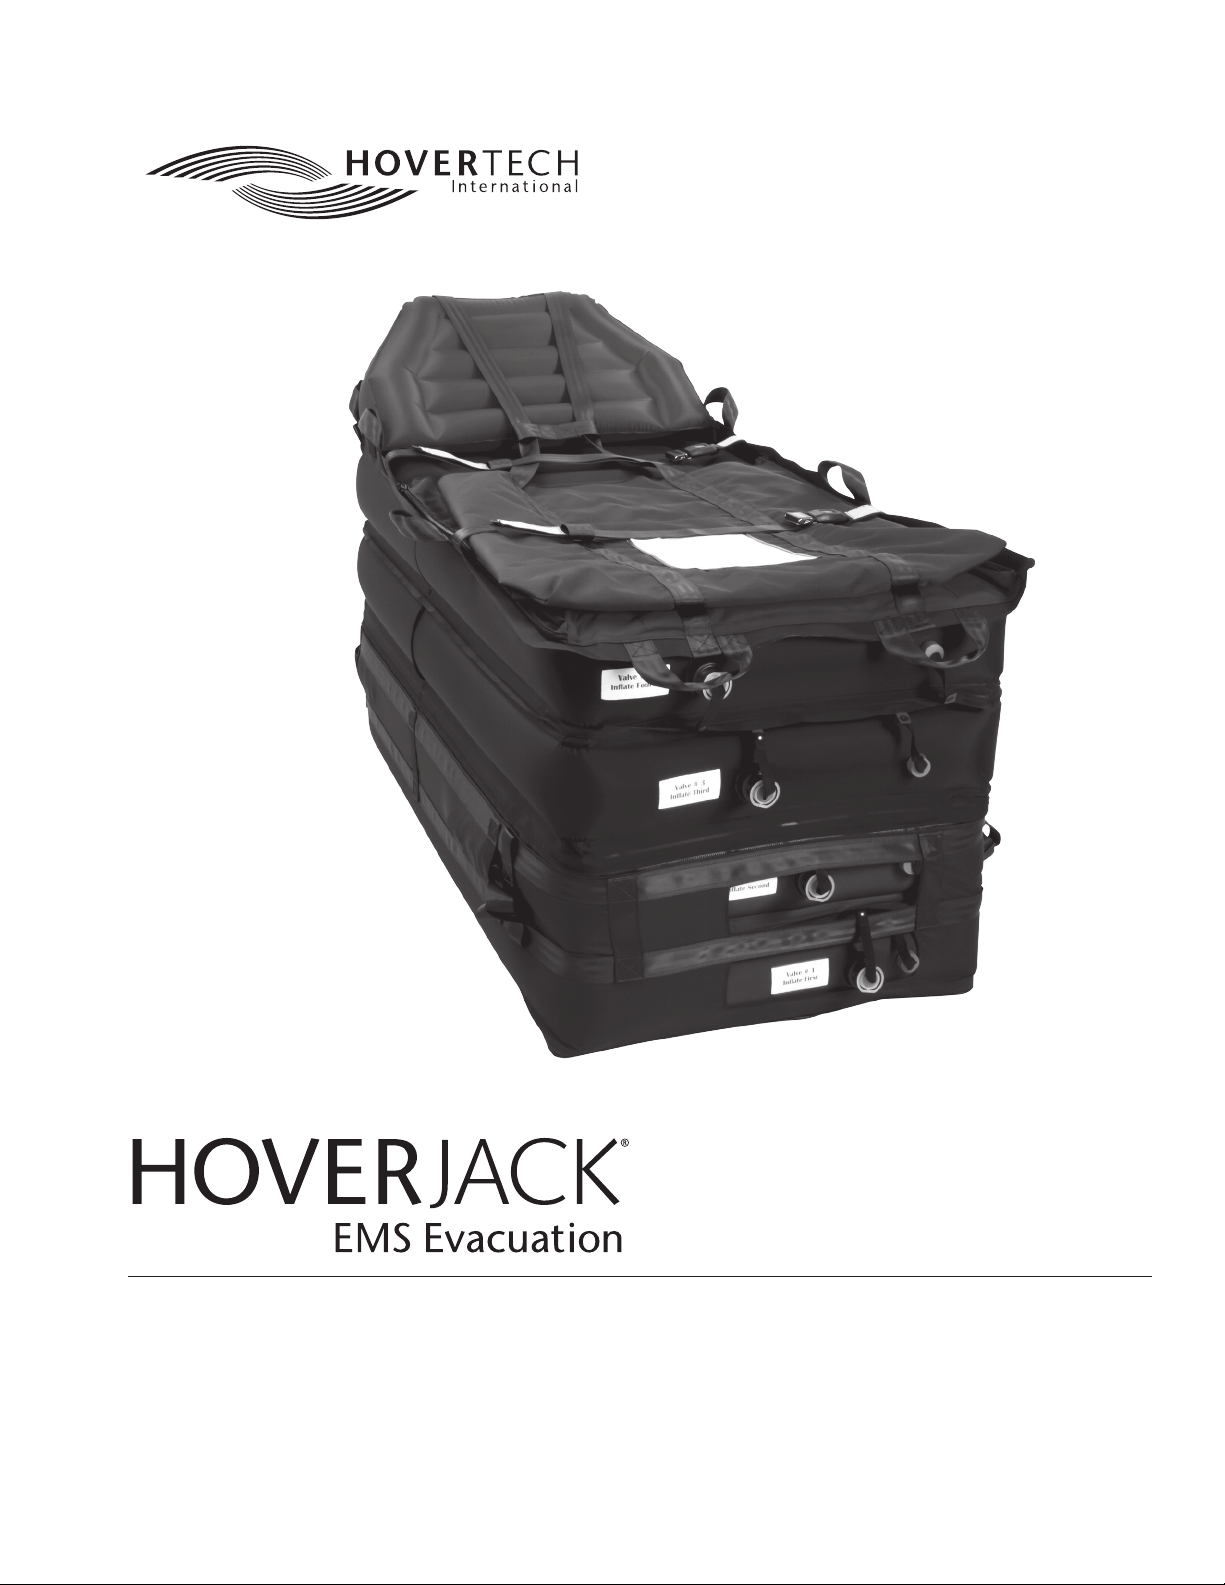
The EMS Evacuation HoverJack® Device is used to lift a patient in supine
position from the floor to bed or stretcher height, utilizing the HoverTech
Air Supply to inflate each of the four chambers. The EMS Evacuation
HoverJack can also be used to evacuate patients up or down stairs in the
event of an emergency.
INDICATIONS
• Patients unable to assist in their own vertical lift, such as after a fall
• Patients whose weight or girth poses a potential health risk for the
caregivers responsible for lifting or evacuating said patients
CONTRAINDICATIONS
• Patients who are experiencing thoracic, cervical or lumbar fractures
that are deemed unstable, unless using in conjunction with a spinal
board (follow your state’s protocol regarding use of spinal boards)
INTENDED CARE SETTINGS
• Hospitals, long term or extended care facilities, patient transport
services and EMS
PRECAUTIONS
• Make sure patient safety straps are secured before moving.
• Move the EMS Evacuation HoverJack using the transport straps and/or
the transport handles located along the top perimeter.
• Never use patient safety straps to pull the EMS Evacuation HoverJack,
as they may tear.
• When moving a patient on the inflated EMS Evacuation HoverJack, use
caution and move slowly.
• Additional caregivers are recommended when moving or evacuating a
patient over 250 lbs/113 kg.
• Never attempt to move a patient on an uninflated EMS Evacuation
HoverJack.
• Never leave a patient unattended on an inflated EMS Evacuation
HoverJack.
• Use this product only for its intended purpose as described in this
manual.
• Only use attachments and/or accessories that are authorized by
HoverTech International.
WARNING/CAUTION
• For safety, always use a minimum of two caregivers while using the
EMS Evacuation HoverJack.
• Reference product-specific user manuals for additional operating
instructions.
PRECAUTIONS
HOVERTECH INTERNATIONAL AIR SUPPLY
• Not for use in the presence of flammable anesthetics or in a hyperbaric
chamber or oxygen tent.
• Route the power cord in a manner to ensure freedom from hazard.
• Avoid blocking the air intakes of the HoverTech International Air
Supply.
• CAUTION: Avoid electric shock. Do not open HoverTech International
Air Supply.
2 | HoverTech International EMSEVHJManual, Rev. B
Page 3
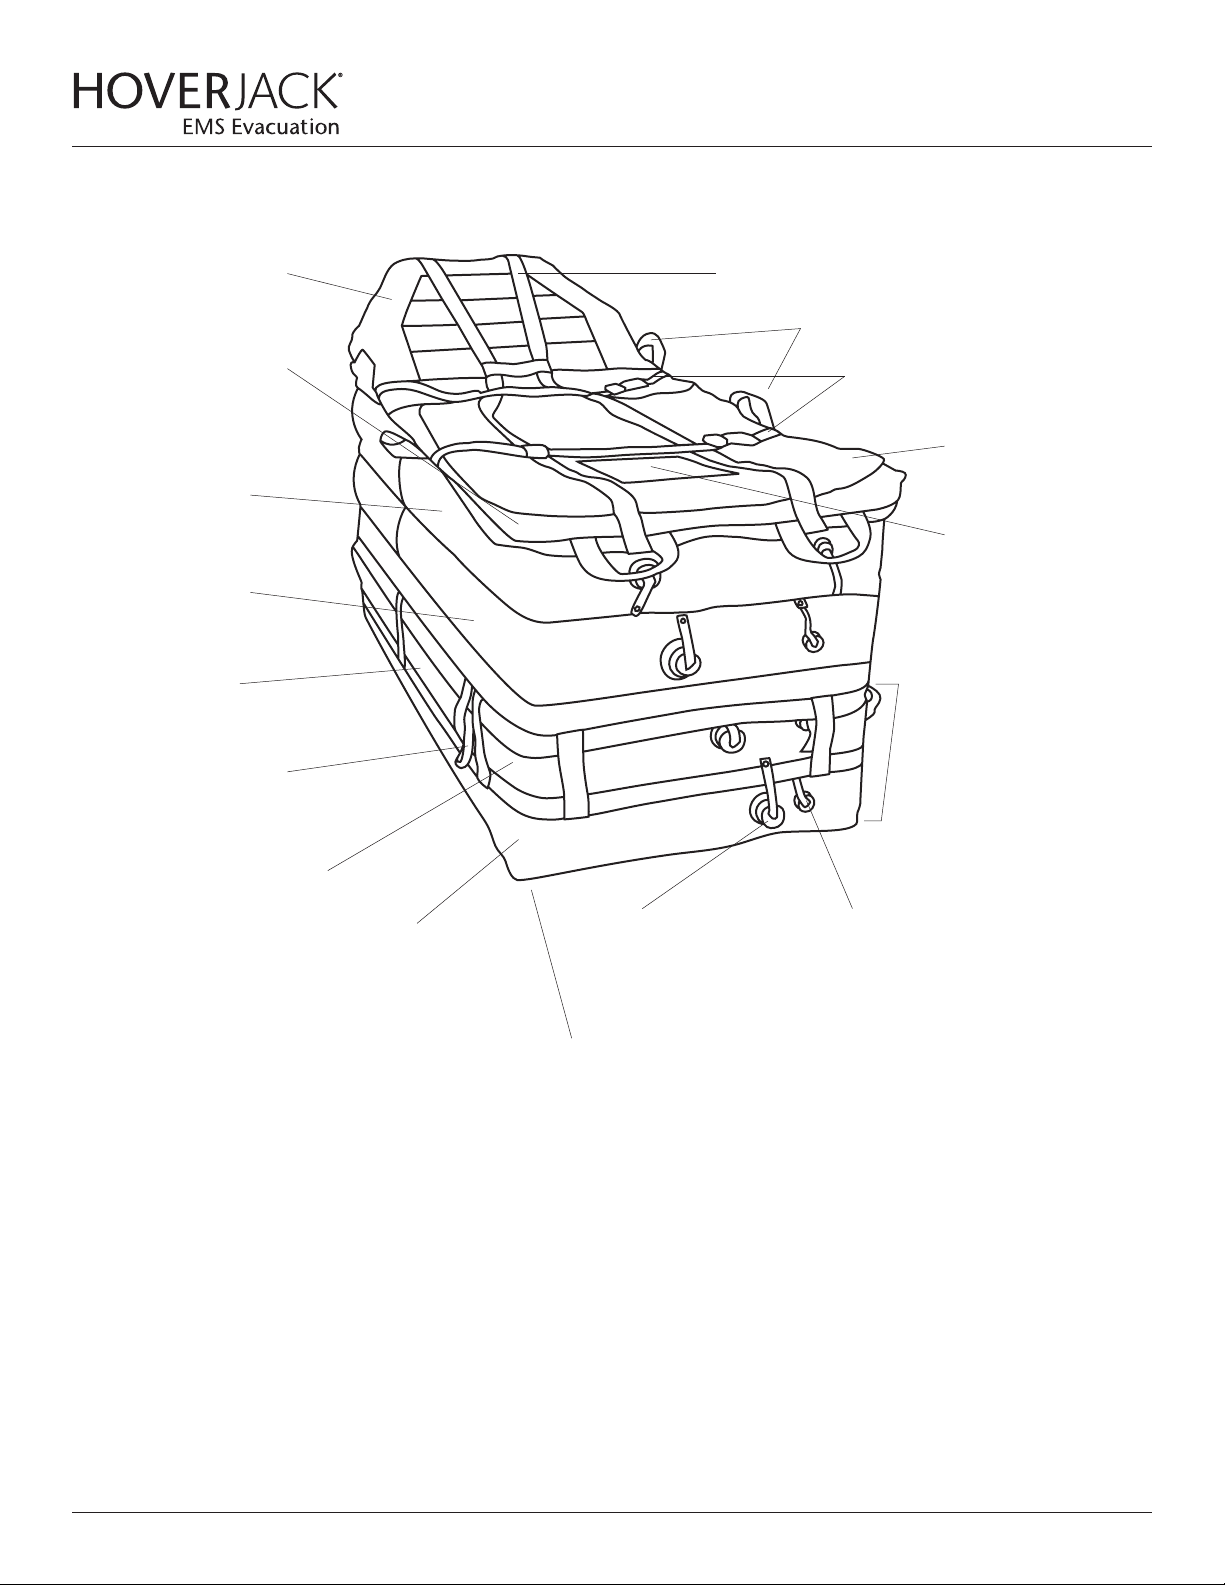
Part Identification
User Manual
Inflatable Wedge with Inlet Cap
and Valve & Red Deflate Cap
and Valve
Foot Pouch
Chamber 4
Chamber 3
Strap Pockets (2)
Transport Straps (4)
Fully Body Harness
Transport Handles (8)
Patient Safety Straps (2)
Accessory Pouch
Label includes:
Model#, Serial# and
Instructions for Use
Zippered Support Skirt
Chamber 2
Chamber 1
Red Deflate Cap and Valve (4)Inlet Cap and Valve (4)
Zippered Teflon Bottom
EMSEVHJManual, Rev. B www.HoverMatt.com | 3
Page 4
User Manual
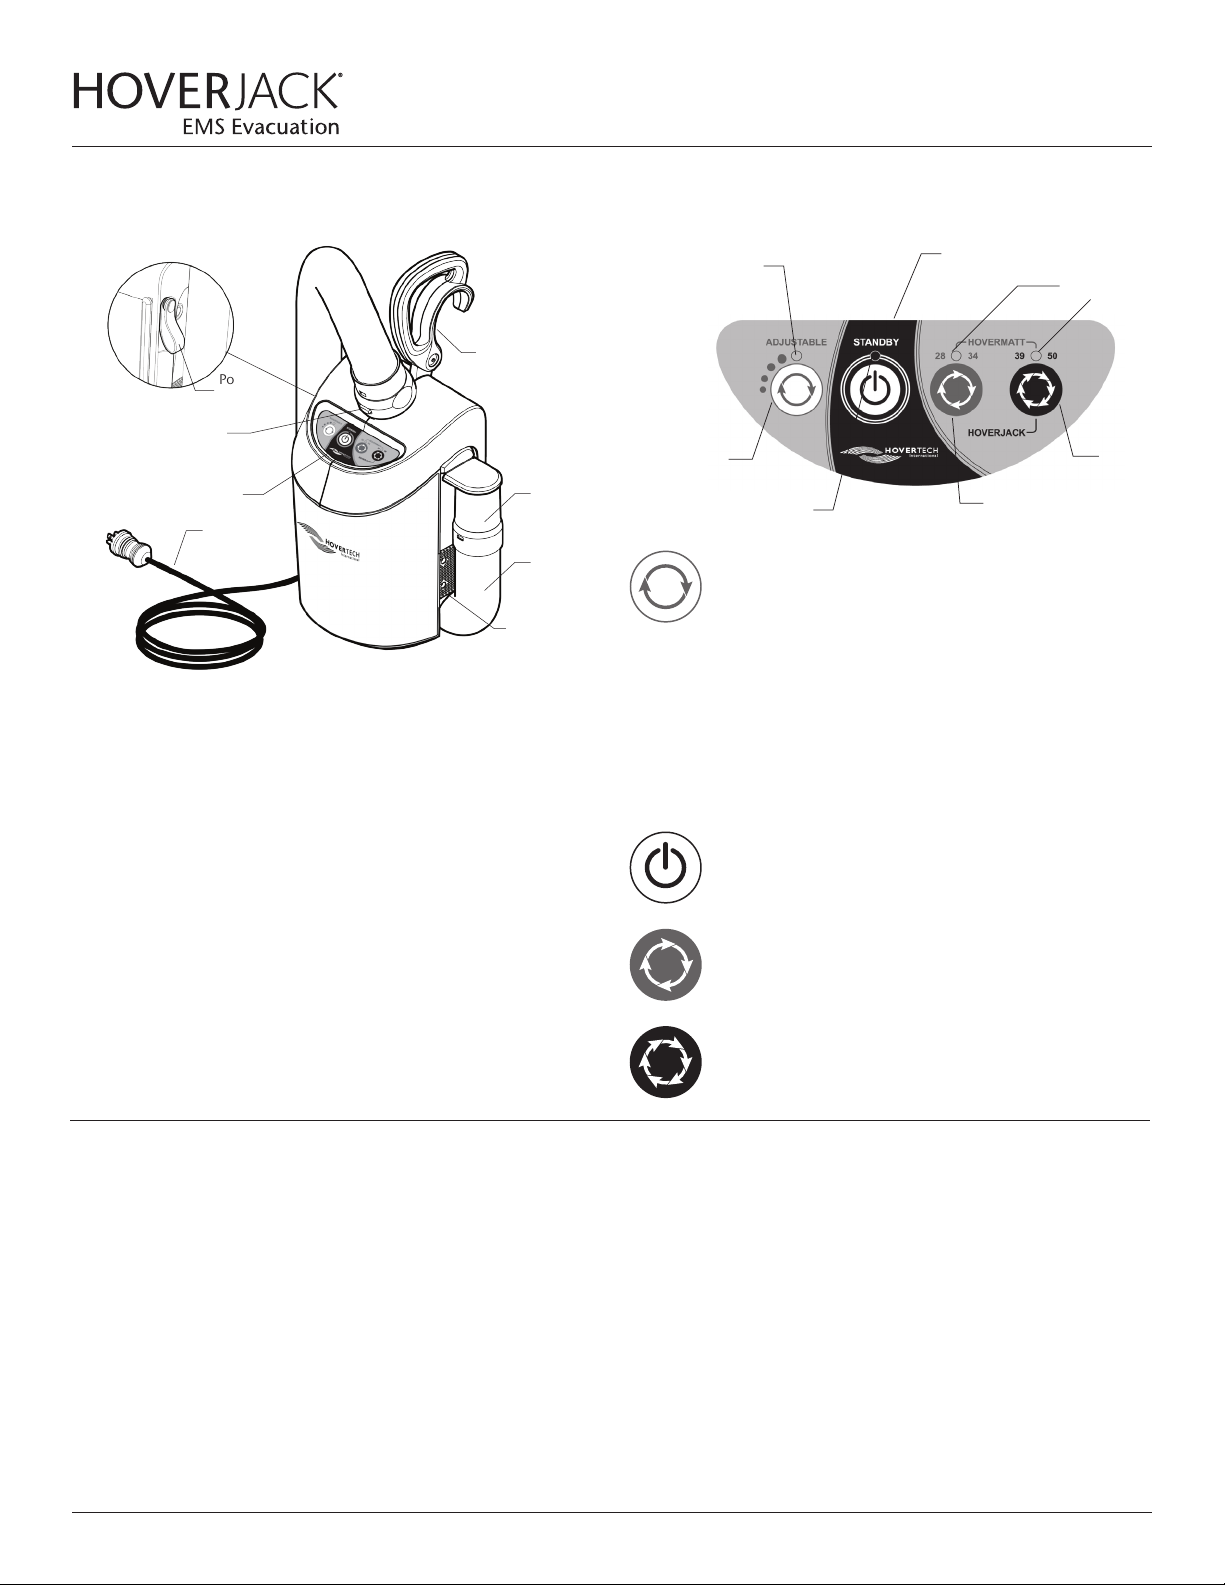
Part Identification – HT-Air® Air Supply
Carrying Handle/
Power
Cord
Strap
Hose Release Button
Control Panel Label
Power Cord
(US/UK/Euro)
WARNING: The HT-Air is not compatible with DC power supplies.
The HT-Air is not for use with the HoverJack Battery Cart.
Attachment Hook
Air Filter
Cover
Hose
Nozzle
Hose
HT-Air® Keypad Functions
Indication
(Green Flashing LED)
Adjustable/
Pressure
Setting
Standby (Amber LED)
ADJUSTABLE: For use with HoverTech air-assisted positioning
devices. There are four dierent settings. Each press of the
button increases the air pressure and rate of inflation. The Green
Flashing LED will indicate the inflation speed by the number of
flashes (i.e. two flashes equals the second inflation speed).
All of the settings in the ADJUSTABLE range are substantially
lower than the HoverMatt and HoverJack settings. The
ADJUSTABLE function is not to be used for transferring.
The ADJUSTABLE setting is a safety feature that can be used
to ensure the patient is centered on HoverTech air-assisted
devices and to gradually accustom a patient who is timid or in
pain to both the sound and functionality of the inflated devices.
Power IndicationAdjustable Speed
Green LEDs
Transfer
Speed
High
Transfer
Speed
Low
Air200G/Air400G Air Supplies
If using HoverTech’s Air200G or Air400G Air Supplies, press the grey
button on the top of the canister to initiate air flow. Press the button
again to stop air flow.
STANDBY: Used to stop inflation/air flow (Amber LED indicates
STANDBY mode).
HOVERMATT 28/34: For use with 28" & 34" HoverMatts and
HoverSlings.
HOVERMATT 39/50 & HOVERJACK: For use with 39" & 50"
HoverMatts and HoverSlings and 32" & 39" HoverJacks.
4 | HoverTech International EMSEVHJManual, Rev. B
Page 5

User Manual
EMS Evacuation HoverJack® Device Instructions for Use as an Air Patient Lift
1. Place EMS Evacuation HoverJack® Device on the floor next to the
patient, making sure the chamber with Valve #4 is on the top and the
chamber with Valve #1 is against the floor.
2. Make certain that all four red-capped deflation valves are capped
tightly.
3. Log-roll patient onto the deflated EMS Evacuation HoverJack and position patient with feet at the valve-end (where indicated), and loosely
secure patient safety straps. Straps will tighten during inflation.
4. The patient can be placed on top of the EMS Evacuation HoverJack
using the HoverMatt® Air Transfer System. (See HoverMatt manual
for instructions). If the HoverMatt is used, make certain that the
HoverMatt and patient are properly centered on the EMS Evacuation
HoverJack. Always deflate the HoverMatt prior to inflating the EMS
Evacuation HoverJack.
5. Plug the HoverTech International Air Supply power cord into an
electrical outlet.
6. Turn on the air supply to initiate air flow.
7. To begin inflation hold hose against inlet valve #1 of EMS Evacuation
HoverJack.
8. When fully inflated, remove hose. Valve will automatically close,
keeping chamber inflated.
CHAMBERS MUST BE FULLY INFLATED TO ENSURE STABILITY.
9. Using the same process, move to valve #2, valve #3 and valve #4
in exact succession, or until the EMS Evacuation HoverJack reaches
desired height.
10. Turn o HoverTech International Air Supply, and attach inlet valve
caps, if desired.
11. If transferring from the EMS Evacuation HoverJack onto an adjacent
surface, unbuckle patient safety straps.
12. If it is necessary to lower patient, release air by opening the uppermost
red deflate valve #4. When chamber #4 is fully deflated, move in
succession downward to fully deflate the EMS Evacuation HoverJack.
Caution: DO NOT RELEASE MULTIPLE CHAMBERS AT ONCE.
EMS Evacuation HoverJack® Device Instructions for Use as an Evacuation Device
1. To inflate, follow steps 1-4 of instructions for use as an air patient lift.
2. Unzip foot pouch and position EMS Evacuation HoverJack as close as
possible to adjacent surface.
3. Transfer patient from bed or stretcher onto EMS Evacuation HoverJack.
4. Ensure that the patient’s body is centered, and zip foot pouch.
5. If necessary, inflate the head-end wedge.
6. Using the buckles, secure safety straps over the patient and adjust
until taut.
7. Using footend transport straps and handles located around the perimeter of the EMS Evacuation HoverJack, pull patient to the nearest
stairwell, and position the EMS Evacuation HoverJack so that the
patient can be taken down the stairs feet first.
8. Before descending the stairs, chambers 3 and 4 must be fully deflated. To release air, slowly open the uppermost red deflate valve #4.
When chamber #4 is fully deflated, repeat the process for chamber
#3. DO NOT RELEASE MULTIPLE CHAMBERS AT ONCE.
9. Retighten patient safety straps after deflating chamber #3 and #4 to
ensure patient is secure.
10. Caregiver at headend will control evacuation using headend transport
straps. Caregiver at headend should be physically stronger.
A MINIMUM OF THREE CAREGIVERS (TWO AT HEADEND AND
ONE AT FOOTEND) SHOULD BE USED TO EVACUATE PATIENT
DOWN STAIRS).
11. While 2 caregivers hold the headend transport straps and handles,
the footend caregiver will begin to pull the patient down the stairs
with the footend transport strap. The Teflon-infused bottom material
will allow the EMS Evacuation HoverJack to slide down each flight. If
necessary, the footend caregiver can use his/her thigh to brace the
EMS Evacuation HoverJack and slow the descent. Once at ground
level, move the patient to safety.
ENSURE THAT PATIENT REMAINS CENTERED ON THE EMS
EVACUATION HOVERJACK, AND THAT HIS/HER HEAD DOES NOT
SLUMP FORWARD AND RESTRICT BREATHING DURING EVACUATION.
EMSEVHJManual, Rev. B www.HoverMatt.com | 5
Page 6
User Manual
Product Specifications/Required Accessories
Topside Material: Nylon oxford / nylon
Material:
Construction: RF-Welded
Width: 32” (81cm)
Length: 72” (183 cm)
Height: 30” (76 cm) Inflated [each chamber 7 1/2” (19 cm)]
Skirt: Cordura® fabric
Underside Material: Teflon® impregnated polyester
Cleaning & Maintenance
EMS EVACUATION HOVERJACK
CLEANING INSTRUCTIONS
In between patient use, the EMS Evacuation HoverJack should be wiped
down with a cleaning solution used by your facility for medical equipment
disinfection. A 10:1 bleach solution (10 parts water: one part bleach) or
disinfectant wipes can also be used. NOTE: Cleaning with bleach solution
may discolor fabric.
First remove any visible soil, then clean the area according to the cleaning
product manufacturer’s recommended dwell time and level of saturation.
A gentle scrub brush can also be used on the aected area, if necessary, to
help penetrate the EMS Evacuation HoverJack material.
Do not launder the EMS Evacuation HoverJack.
LATEX FREE
Model #: HJ32EV-2
WEIGHT LIMIT:
700 lbs (318 kg) for stairwell evacuation
1200 lbs (544 kg) for vertical lift
REQUIRED ACCESSORY:
Model #: HTAIR1200 (North American Version) – 120V~, 60 Hz, 10A
Model #: HTAIR2300 (European Version) – 230V~, 50 Hz, 6A
Model #: HTAIR1000 (Japanese Version) – 100V~, 50/60 Hz, 12.5A
Model #: HTAIR2356 (Korean Version) – 230V~, 50/60 Hz, 6A
Model #: Air200G (800 W) (North American Version) – 120V~, 60 Hz, 10A
Model #: Air400G (1100 W) (North American Version) – 120V~, 60 Hz, 10A
PREVENTIVE MAINTENANCE
The EMS Evacuation HoverJack should be periodically inspected to ensure
the following:
• All deflation valves are equipped with a red cap.
• The red caps are intact.
• All patient safety straps are attached.
• All buckles and zippers (if applicable) are intact and operational.
• Transport handles and straps are all attached.
• Inflation valves are all self-sealing with no evident leakage.
• There are no punctures or tears.
AIR SUPPLY CLEANING AND MAINTENANCE
See air supply manual for reference.
6 | HoverTech International EMSEVHJManual, Rev. B
Page 7

Warranty Statement
User Manual
The EMS Evacuation HoverJack® Device is warranted to be free from defects
in materials and workmanship for (1) one year. Warranty begins on date of
in-service by a HoverTech International representative or shipment date. In
the unlikely event that a problem arises as a result of a defect in materials or
workmanship, we will promptly repair your item or replace it if we feel that
it cannot be repaired – at our expense and discretion using current models
or parts performing the equivalent function – upon receipt of the original
item to our repair department.
You must pre-notify HoverTech International by phone (800-471-2776).
Item is to be insured by you against loss during transportation and must
be shipped with transportation and/or broker charges prepaid. Should any
HoverTech International product be returned that is not covered under
warranty, there will be a minimum $100 service charge plus shipping costs.
Lead time for repairs is approximately 2 weeks. Please refer to the Return
and Repairs section of this Manual for return instructions.
This warranty is not an unconditional guarantee for the life of the product.
Our warranty does not cover product damage that may result from use
contrary to manufacturer’s instructions or specifications, misuse, abuse,
tampering, or damage due to mishandling.
Equipment that has been neglected, improperly maintained, repaired or
altered by someone other than an authorized representative of manufacturer, or operated in anyway contrary to the operating instructions, shall
void this warranty.
Returns and Repairs
This warranty does not cover normal “wear and tear.” Component parts,
particularly any optional equipment, valve caps, their attachments and
cords, will show wear with use over time and eventually may need to be
refurbished or replaced. This normal type of wear is not covered by our
warranty, but we will provide prompt, high quality repair service and parts
at a nominal cost.
HoverTech International’s liability under this warranty and on any claim of
any kind for any loss or damage arising out of, connected with, or resulting
from the design, manufacture, sale, delivery, installation, repair or operation of its products, whether in contract or tort, including negligence, shall
not exceed the purchase price paid for the product and upon expiration of
the applicable warranty period, all such liability terminates. The remedies
which this warranty provides are exclusive and HoverTech International
shall not be liable for any incidental or consequential damages.
There are no warranties, expressed or implied, which extend beyond this
warranty statement. The provisions of these warranty clauses are in lieu
of all other warranties, expressed or implied, and of all other obligations
or liabilities on HoverTech International’s part and they neither assume nor
authorize any other person to assume for HoverTech International any other
liability in connection with manufacturer sale or lease of said products.
HoverTech International makes no warranty of merchantability or fitness
for a particular purpose. By accepting the goods, the buyer acknowledges
that buyer has determined the goods are suitable for the buyer’s purposes.
MANUFACTURER’S SPECIFICATIONS ARE SUBJECT TO CHANGE.
All products being returned to HoverTech International (HTI) must have
a Returned Goods Authorization (RGA) number issued by the company.
Please call (800) 471-2776 and ask for a member of the RGA Team who will
issue you an RGA number. Any product returned without an RGA number
will cause a delay in the repair time.
HTI’s warranty covers manufacturer’s defects in material and workmanship.
If a repair is not covered under warranty, a minimum repair fee of $100 per
item will be assessed, plus return shipping. A Purchase Order for the repair
charge should be provided by the facility at the time the RGA number is
issued, should the repair not be covered under warranty. Lead-time for
repairs is approximately 1-2 weeks, not including shipping time.
Returned products should be sent to:
HoverTech International
Attn: RGA # ___________
4482 Innovation Way
Allentown, PA 18109
EMSEVHJManual, Rev. B www.HoverMatt.com | 7
Page 8

User Manual
8 | HoverTech International EMSEVHJManual, Rev. B
4482 Innovation Way
Allentown, PA 18109
800.471.2776
Fax 610.694.9601
www.HoverMatt.com
[email protected]
 Loading...