

Page 1
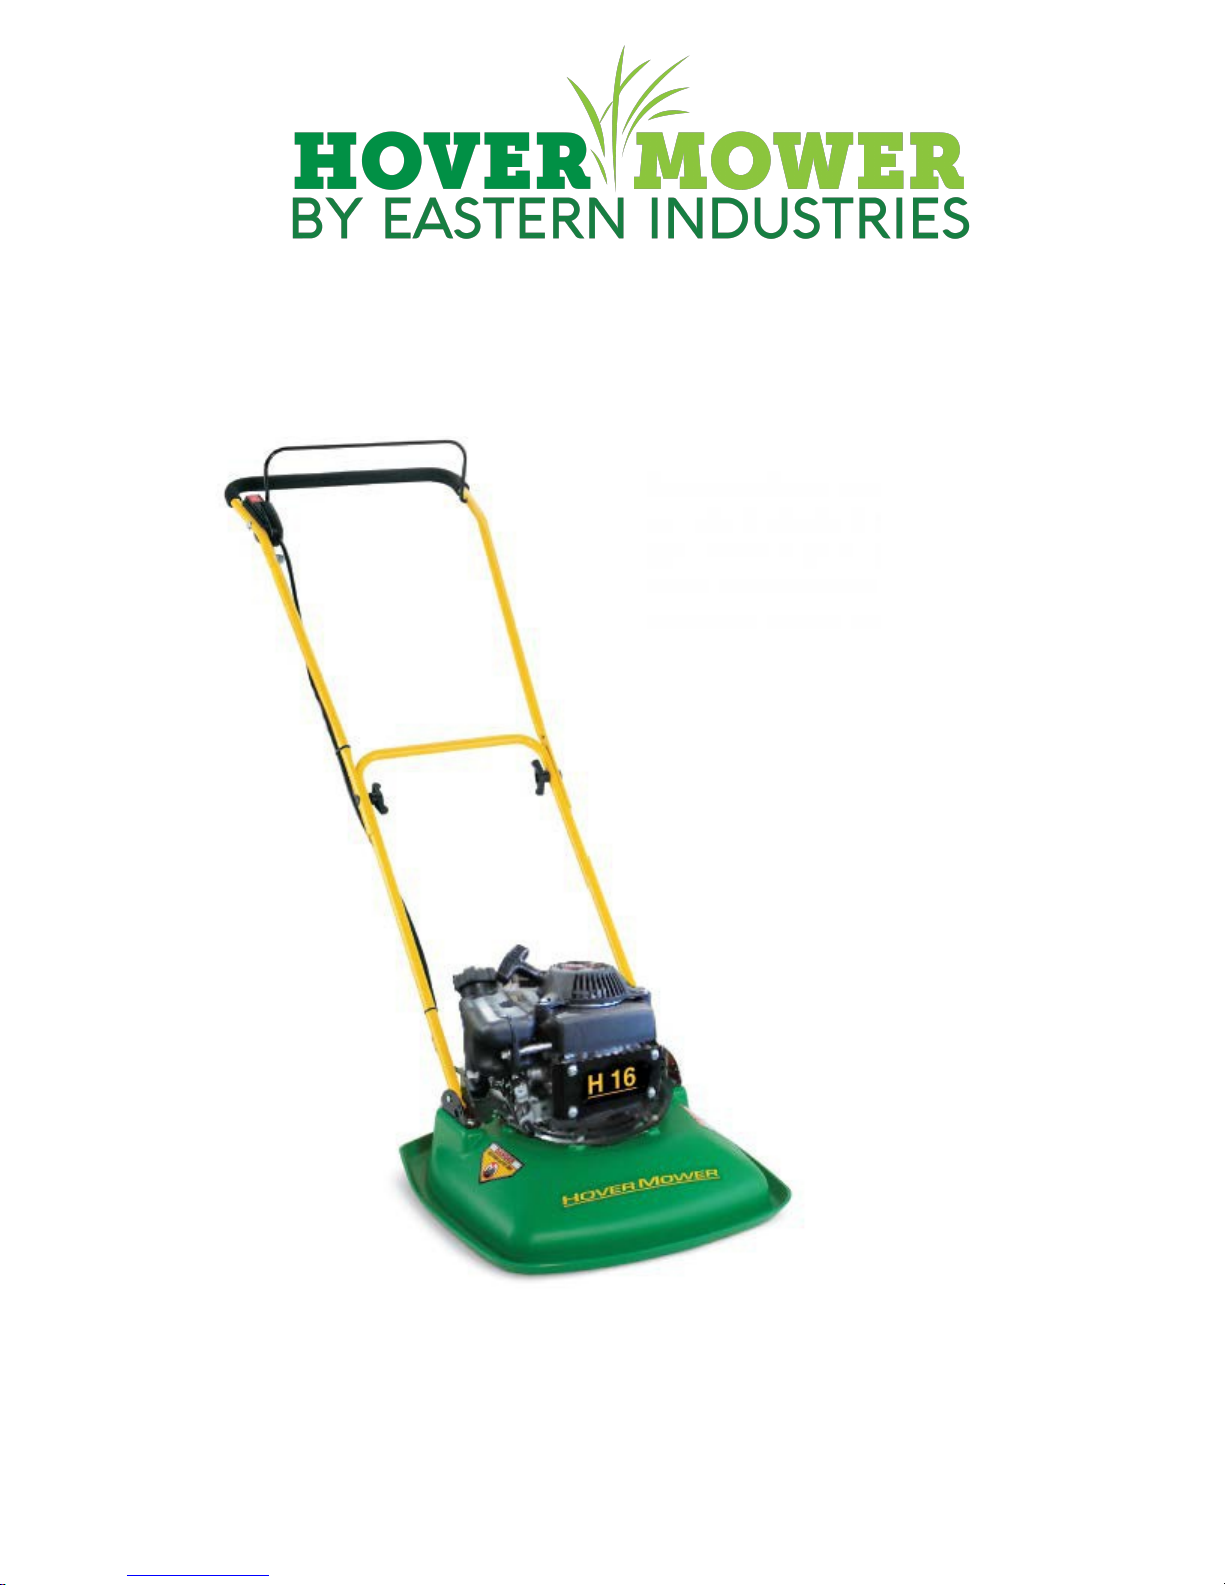
Model HM16H-4
___________________________________
Operator’s Manual
Page 2

Introduction
Read this Manual carefully to learn how to operate and maintain your product properly. The
information in this Manual can help you and others avoid injury and product damage. Although
Eastern Industries, Inc. designs and produces safe products, you are responsible for operating the
product properly and safely.
When you need service, genuine Eastern Industries, Inc. parts, or additional information, contact an
Authorized Eastern Industries, Inc. Dealer or Eastern Industries Inc. Customer Service and have the
model and serial number of your mower ready. For the Model and Serial numbers refer to the silver
tag attached to the rear of the mower housing.
Eastern Industries, Inc.
P O Box 338
Chester, NH 03036
USA
Tel: (800) 444-0407
Fax: (603) 437-0815
www.TheHoverMower.com
Write the Engine model and serial numbers in the space below.
Model # _______________________________
Serial #________________________________
Page 3

Contents
Pages
Warning 3
Safety Instructions
General Operations 4
Slope Operations 5-6
Children 6-7
Service 7-8
Model & Serial Number 9
Assembly
Installing the Handle 10
Preparing the Engine 11
Filling the Crankcase with Oil 11-12
Filling the Fuel Tank with Gasoline 12
Operation
Starting the Engine 13-13
Stopping the Engine 15
Adjusting the Cutting Height 16-17
Operating Tips 18
Maintenance
Recommended Maintenance Schedule 19
Checking the Engine Oil Level 20
Cleaning the Underside of the Lawn Mower 20
Servicing the Air Filter 20-21
Changing the Engine Oil 21
Maintaining the Cutter Disc 22
Draining the Fuel Tank and Carburetor 23
Servicing the Spark Plug 23
Storage 24
Troubleshooting 25-26
Schematics and Mower Parts 27-28
Warranty 29-30
WARNING!
This mower, when oriented in the front to back
position, is capable of continuous operation on slopes
reaching 45 degree inclines. The use of this mower
on inclines steeper than 45 degrees will cause severe
damage to the engine VOIDING ALL
APPLICABLE WARRANTIES.
Page 4

This lawn mower is capable of amputating hands and feet and
throwing objects. Failure to observe the following safety
instructions could result in serious injury or death.
General Operations
1. Read, understand and follow all instructions on the machine and in the Manual.
Be thoroughly familiar with the controls and the proper use of the mower before
starting.
2. Do not put hands or feet near or under rotating parts.
3. Only allow responsible individuals, who are familiar with the instructions, to
operate the mower.
4. Clear the area of objects such as rocks, toys, wire, bones, sticks etc., which could
be picked up and thrown by the blade.
5. Be sure the area is clear of other people before mowing. Stop the mower if anyone
enters the area.
6. Do not operate the mower when barefoot, wearing open sandal or regular shoes.
Always wear heavy boots or substantial footwear.
7. Do not pull mower backwards unless absolutely necessary. Look down and behind
before and while moving backwards.
8. Do not operate the mower without proper inspection of the safety and protective
devices.
9. Read the Operator’s Manual for proper operation and installation of accessories.
Only use accessories approved by Eastman Industries.
10. Shut the engine off when crossing gravel drives, walks or roads.
11. Shut the engine off whenever you leave the equipment.
12. Shut the engine off and wait until the blade comes to complete stop before
cleaning the mower or unclogging grass and debris.
13. Mow only in daylight or good artif icial light.
14. Do not operate the mower while under the inf luence of alcohol or drugs.
15. Never operate the mower in wet grass. Always be sure of your footing; keep a
f irm hold on the handle and walk; never run.
16. If the equipment should start to vibrate abnormally, stop the engine and check
immediately for the cause. Vibration is generally a warning of trouble.
17. Always wear safety goggles or safety glasses with side shields when operating
mower.
Page 5
Slope Operations
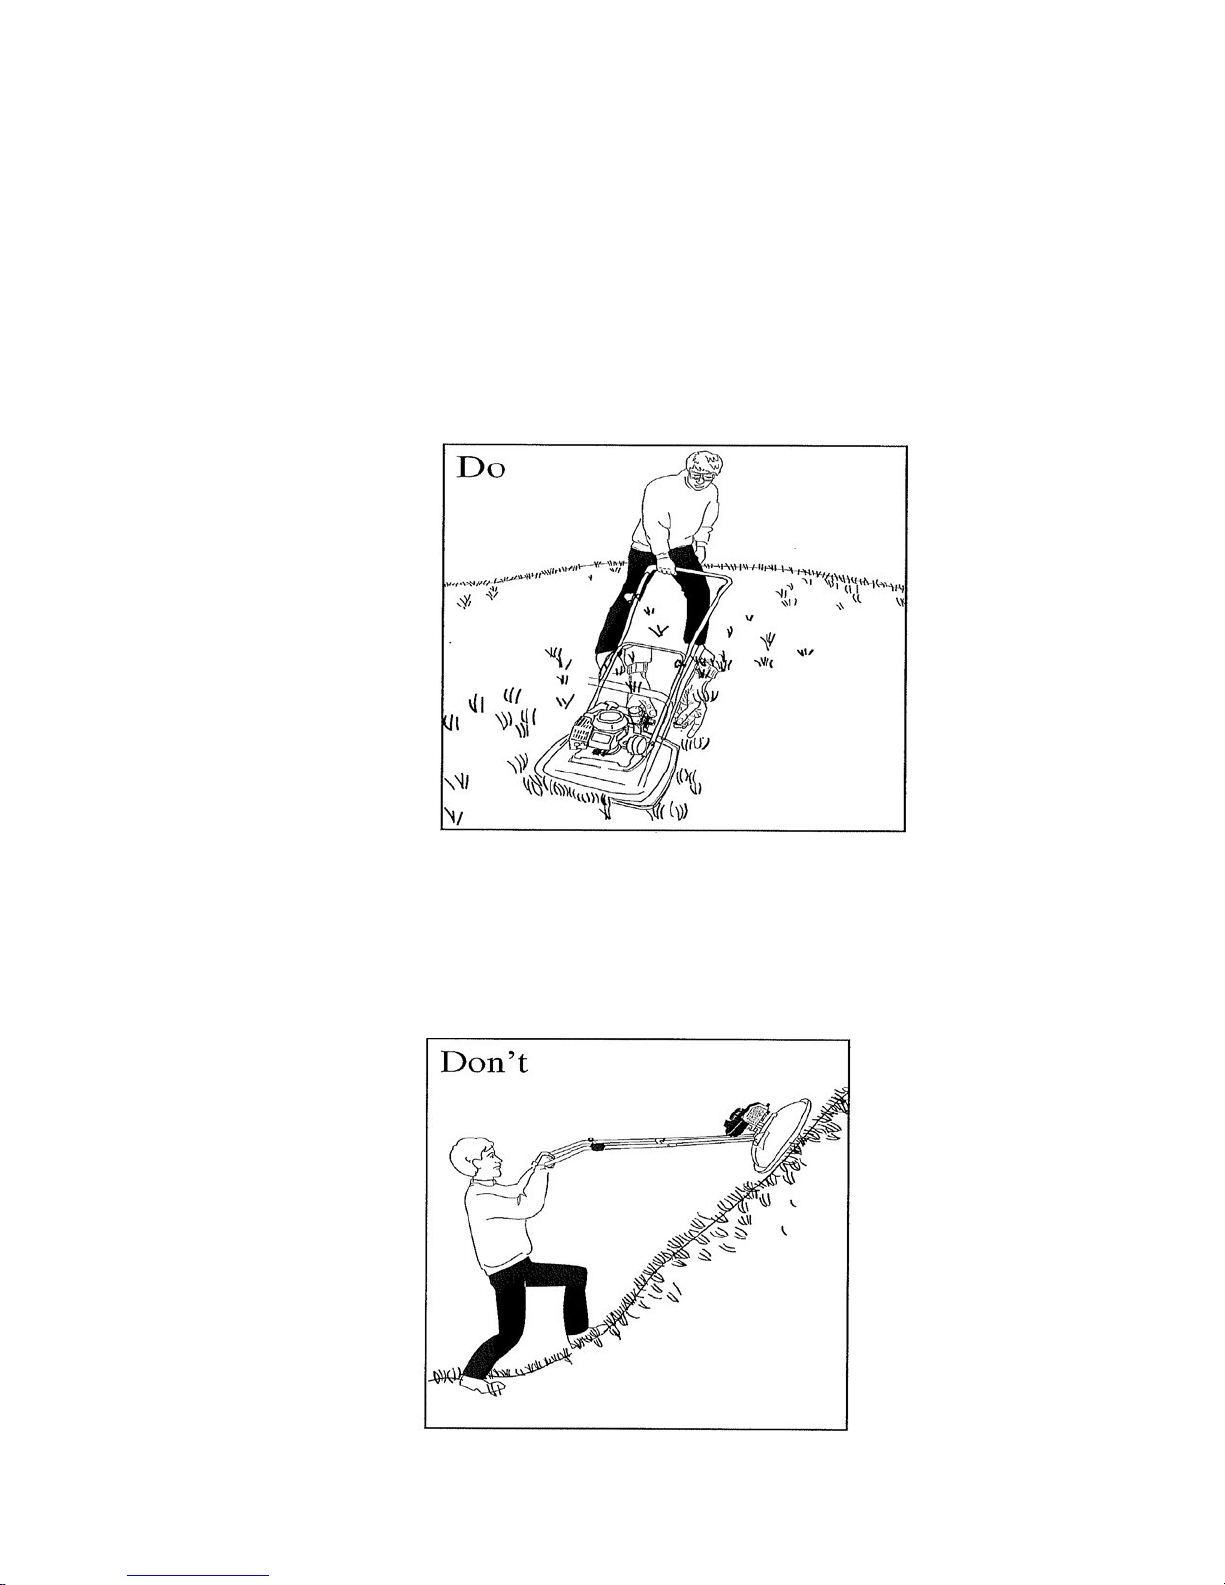
Slopes are a major factor related to slip and fall accidents, which can result in severe injury. All slopes
require extra caution. If you feel uneasy on a slope, do not mow it.
DO:
Mow across the face of slopes; not up and down. Exercise extreme caution when changing
directions on slopes.
Always keep the mower below you when mowing on the slope.
Remove objects such as rocks, tree limbs, etc.
Watch for holes, ruts or bumps. Tall grass can hide obstacles.
(Figure 1)
DO NOT:
Do not mow near drop-offs, ditches or embankments. The operator could lose footing or
balance.
Do not push the mower up the slope.
Do not mow slopes that are steeper than 45° incline.
Do not mow on wet grass. Reduced footing could cause slipping.
(Figure 2)
Page 6

Children
Tragic accidents can occur if the operator is not alert to the presence of children. Children are
often attracted to the mower. Never assume that children will remain where you last saw
them.
1. Keep children out of the mowing area and under the watchful care of a responsible
adult.
2. Be alert and turn mower off if children enter the area.
3. Before and while moving backwards, look behind and down for small children.
4. Never allow children to operate the mower.
5. Use extra care when approaching blind corners, shrubs, trees or other objects that
may obscure vision.
Service
1. Use extra care in handling gasoline and other fuels. Gasoline is highly flammable
and vapors are explosive.
a) Use only approved containers.
b) Never remove gas cap or add fuel with the engine running. Allow engine to
cool before refueling. Do not smoke.
c) Never refuel the mower indoors.
d) Never store the mower or fuel container inside where there is an open flame,
such as a water heater.
e) Never f ill containers inside a vehicle or on a truck or trailer bed with a plastic
liner. Always place containers on the ground away from your vehicle before
f illing.
f) When practical, remove the mower from the truck or trailer and refuel it on the
ground. If this is not possible, then refuel such equipment on a trailer with a
portable container, rather than from a gasoline dispenser nozzle.
g) Keep the nozzle in contact with the rim of the fuel tank or container opening at
all times until fueling is complete. Do not use a nozzle lock-open device.
h) If fuel is spilled on clothing, change clothing immediately.
Page 7

2. Never run an engine inside a closed area.
3. Never make adjustments or repairs with the engine running. Disconnect the spark
plug wire, and keep the wire away from the plug to prevent accidental starting.
4. Keep all nuts and bolts, especially blade attachment bolts, tight and keep
equipment in good condition.
5. Never tamper with safety devices. Check their proper operation regularly.
6. Keep mower free of grass, leaves or other debris build-up. Clean oil or fuel
spillage on the mower. Allow mower to cool before storing.
7. Stop and inspect the mower if you strike an object. Repair, if necessary, before
restarting.
8. Never attempt to remove grass or debris from mower while the engine is running.
9. Cutter disc components are subject to wear, damage and deterioration, which could
allow objects to be thrown. Frequently check components and, when necessary,
replace with Eastern Industries, Inc. recommended parts.
(Continued on next page)
10. Mower blade is sharp and can cut. Wrap the blade or wear gloves, and use extra
caution when servicing it.
11. Do not change the engine governor setting or overspeed the engine.
12. Maintain or replace safety and instruction labels as necessary.
WARNING: In order to prevent accidental starting when setting up, transporting,
adjusting or making repairs, always disconnect spark plug wire and place wire where it
cannot contact spark plug.
CAUTION: Muff ler and other engine parts become extremely hot during operation
and remain hot after engine has stopped. To avoid severe burns on contact, stay away
from these areas.
Consult the engine manual for more complete instructions regarding
engine maintenance and operation.
Page 8
Assembly
Installing the Handle
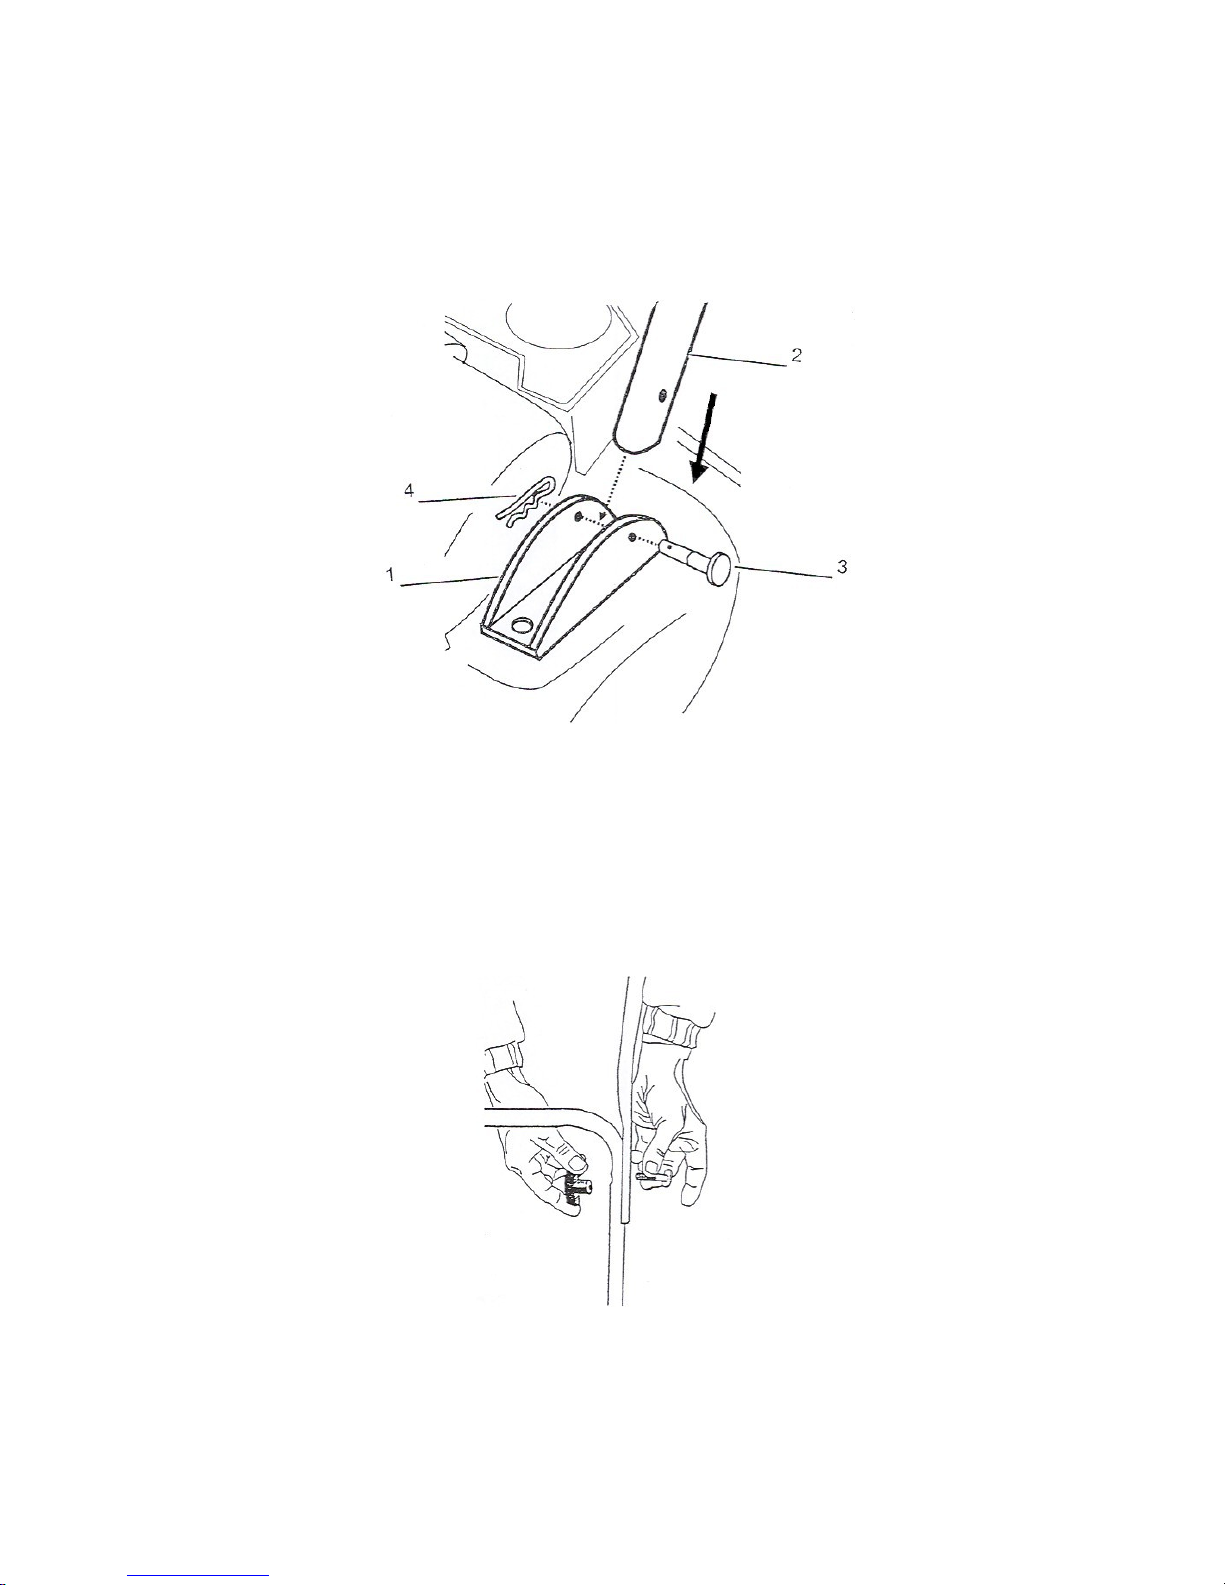
1. Mount the lower handle on the handle brackets with two (2) clevis and cotter pins. (Fig 3).
Figure 3
1. Handle Bracket 2. Lower Handle
3. Clevis Pin 4. Cotter Pin
2. Attach the upper handle to the lower handle, with four (4) 5/16”-18 x 1 ½” shoulder bolts and
wing nuts (Fig 4)
Figure 4
3. Secure the throttle cable neatly behind the handles using black tie wraps. Use one tie wrap for the
upper handle and one tie wrap for the lower handle.
Page 9
Preparing the Engine
IMPORTANT: The Engine is shipped without oil.
Fill the engine with oil prior to startup in order to avoid
serious damage to the engine.
Consult the engine manual for more complete
instructions regarding engine maintenance
and operation.
Filling the Crankcase with Oil
The crankcase holds 0.26 U.S. quarts (0.25 liters) of oil. Use only high-quality SAE 10W30 weight
detergent oil that has the American Petroleum Institute (API) service classif ication SF, SG, or
equivalent. SAE 30 W oil is recommended for ambient temperatures exceeding 80° F.
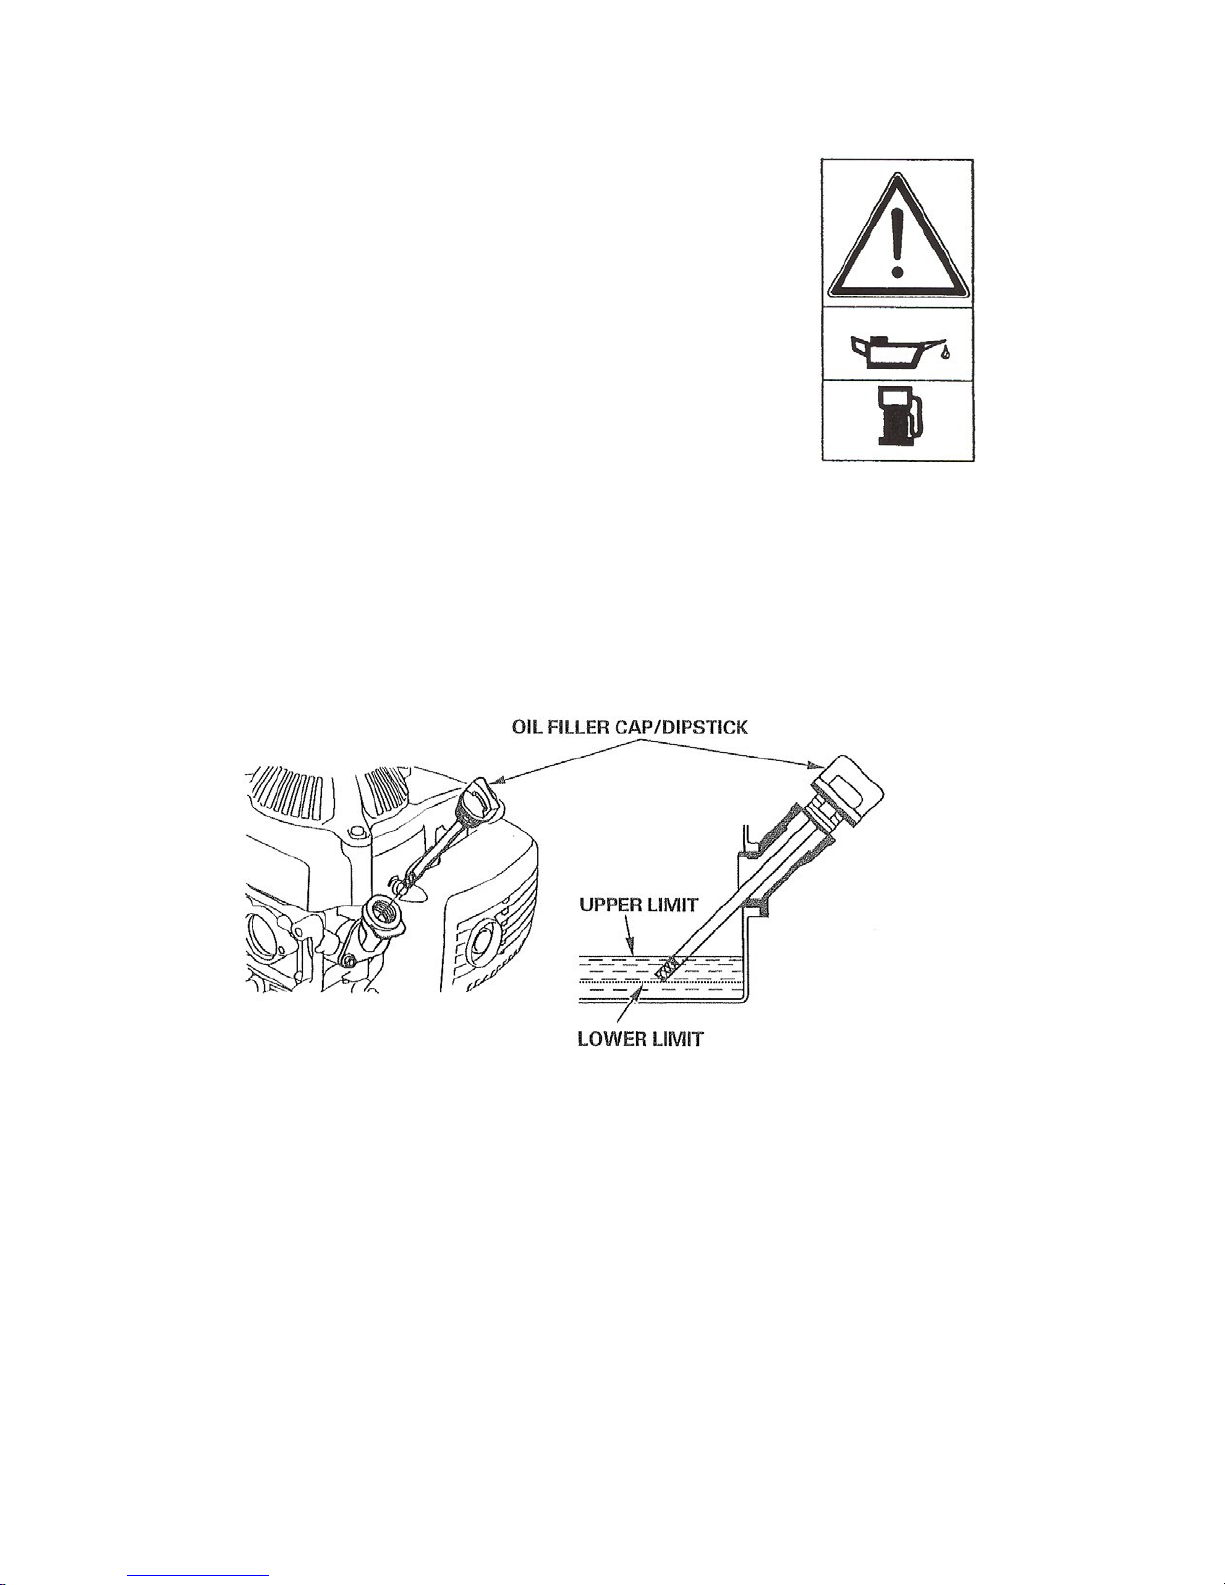
Before each use, ensure that the oil level is between the Lower and Upper limit marks on the dipstick.
(Fig.5)
Do not screw in the dipstick to check the oil.
To add oil:
1. Move the lawn mower to a level surface.
2. Stop the engine and wait for the blade to stop.
3. Clean around the dipstick.
4. Remove the dipstick by rotating the cap.
5. Wipe the dipstick clean with a clean cloth.
6. Insert the dipstick into the f iller neck BUT DO NOT SCREW IT IN. Then remove the dipstick
and read the oil level. (Fig. 5)
Figure 5
Page 10
7. If the oil level reading is below the Lower Limit mark on the dipstick, slowly pour only enough oil
into the f iller hole to raise the oil level to the Upper Limit mark on the dipstick. Do not overf ill the
crankcase with oil and run the engine; engine damage will result. Drain the excess oil until the oil
level on the dipstick is within the limit.
8. Insert the dipstick into the f iller neck and rotate the cap clockwise until it is tight.
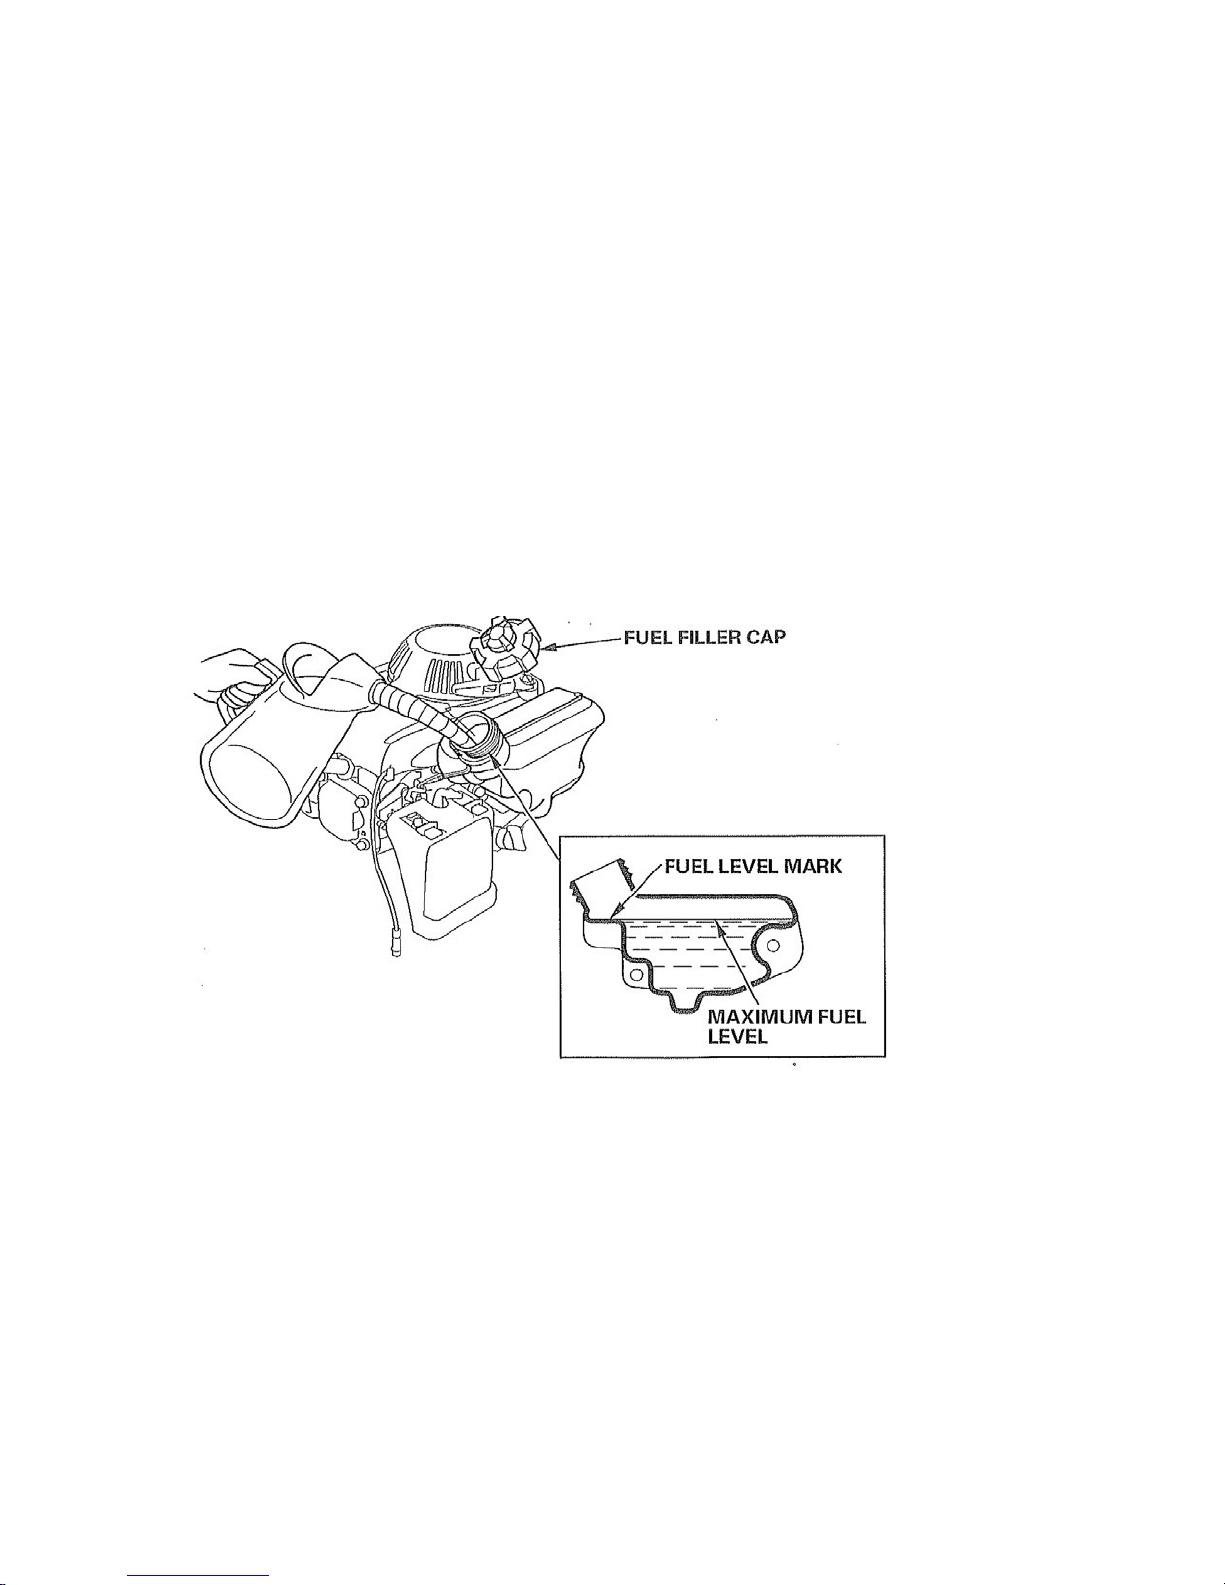
Filling the Fuel Tank with Gasoline
•
Use clean, fresh, lead-free gasoline with an octane rating of 86 or higher. Using unleaded gasoline
results in fewer combustion deposits and longer engine life.
•
Do not use gasoline containing more than 5% methanol, 10% ethanol, or 15% MTBE. Using fuels
containing a higher percentage of these additives will damage the engine and void manufacturer’s
warranty.
•
Do not use gasoline that is stale or has been stored since the last mowing season or longer.
To Fill the Tank:
1. Stop the engine and wait for the blade to stop.
2. Clean around the fuel tank (Fig 6)
3. Remove the cap from the tank.
4. Fill the fuel tank to the bottom of the fuel level limit in the neck of the fuel tank. Do not over f ill.
5. Install the cap and wipe up any spilled gasoline.
Figure 6
Page 11
Operation
Before you start, make sure the mower is placed on grass devoid of rocks and loose branches:
WARNING:
Never carry or tilt the mower with the carburetor leaning
toward the ground. This will cause gasoline and engine oil to
f low through the carburetor and soak the air filter. Replace the
soaked air f ilter before attempting to start the engine.
Starting the Engine
1. Connect the wire to the spark plug.
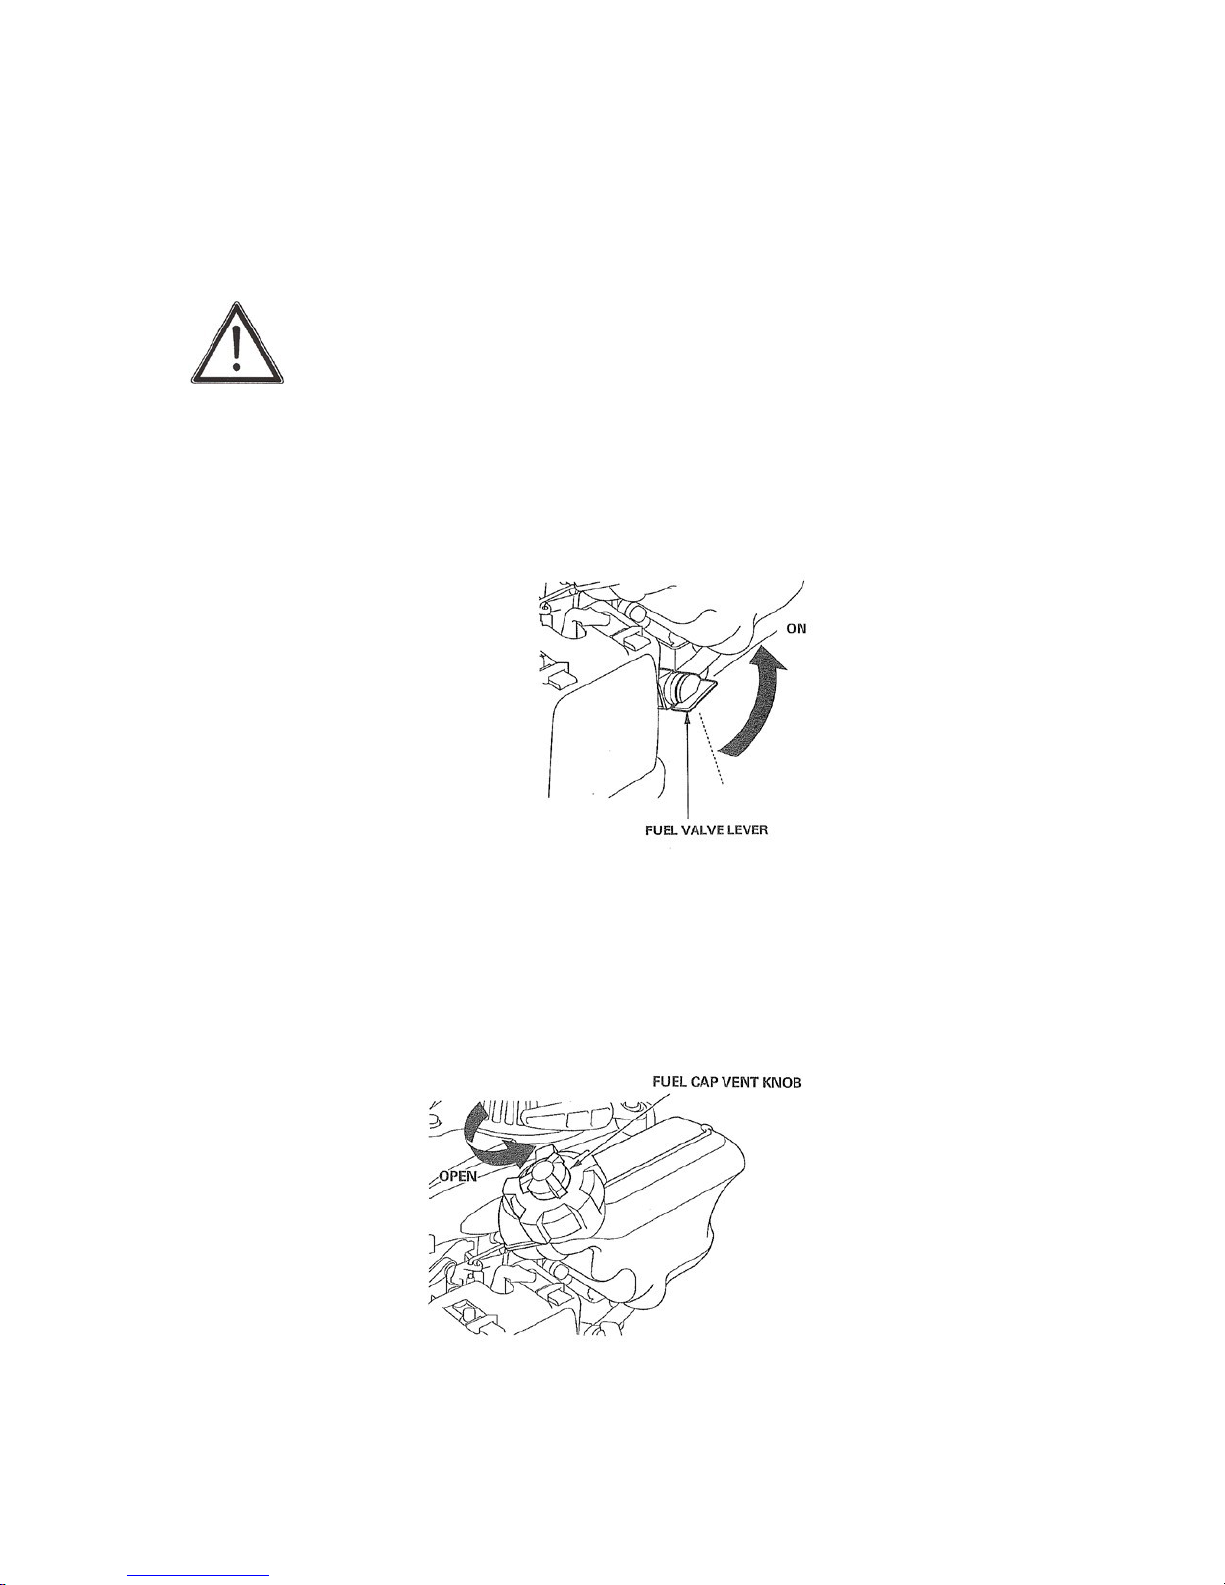
2. Turn the fuel valve to the ON position (Fig. 7)
Figure 7
3. Open the fuel tank vent by turning the vent knob at least 2 or 3 turns counterclockwise.
(Fig. 8)
Figure 8
Page 12
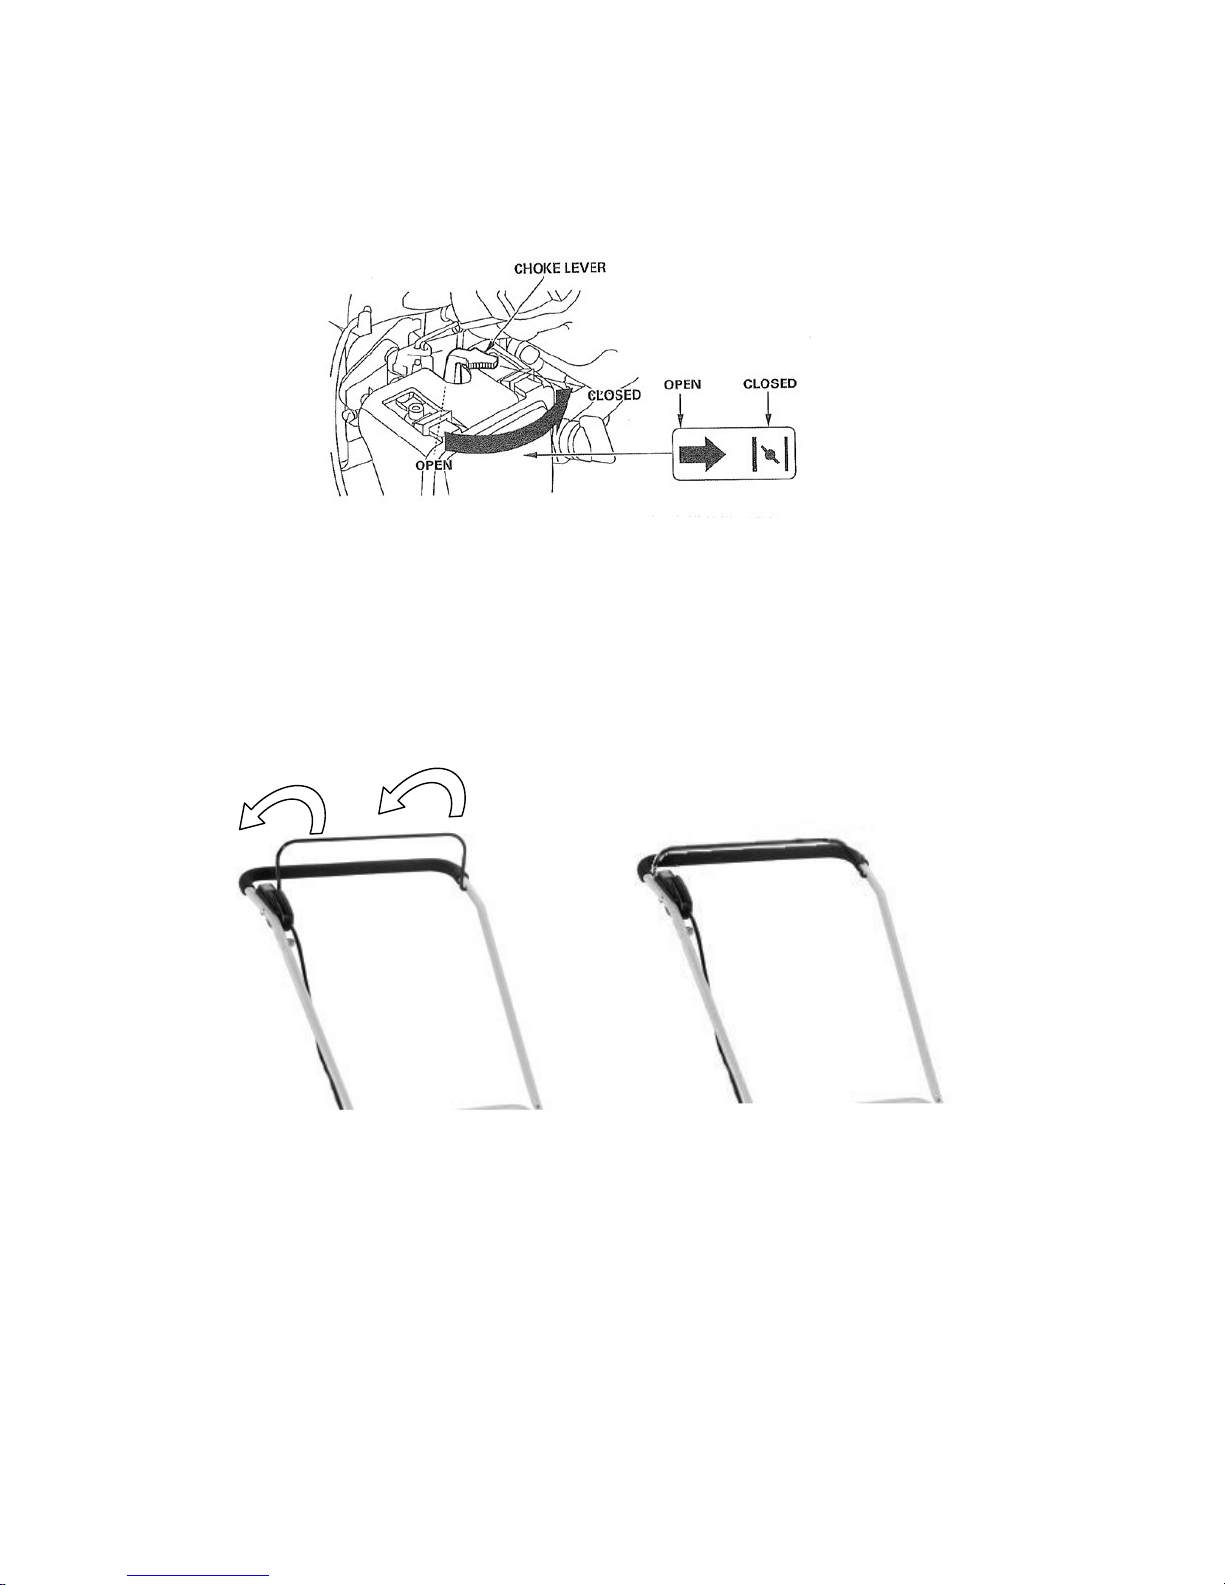
4.
To start a cold engine, move the choke lever to the CLOSED position.
To restart a warm engine, leave the choke lever in the OPEN position. (Fig. 9)
Figure 9
5.
Pull the bail arm in toward the handle
. (Fig 10)
Figure 10
Page 13
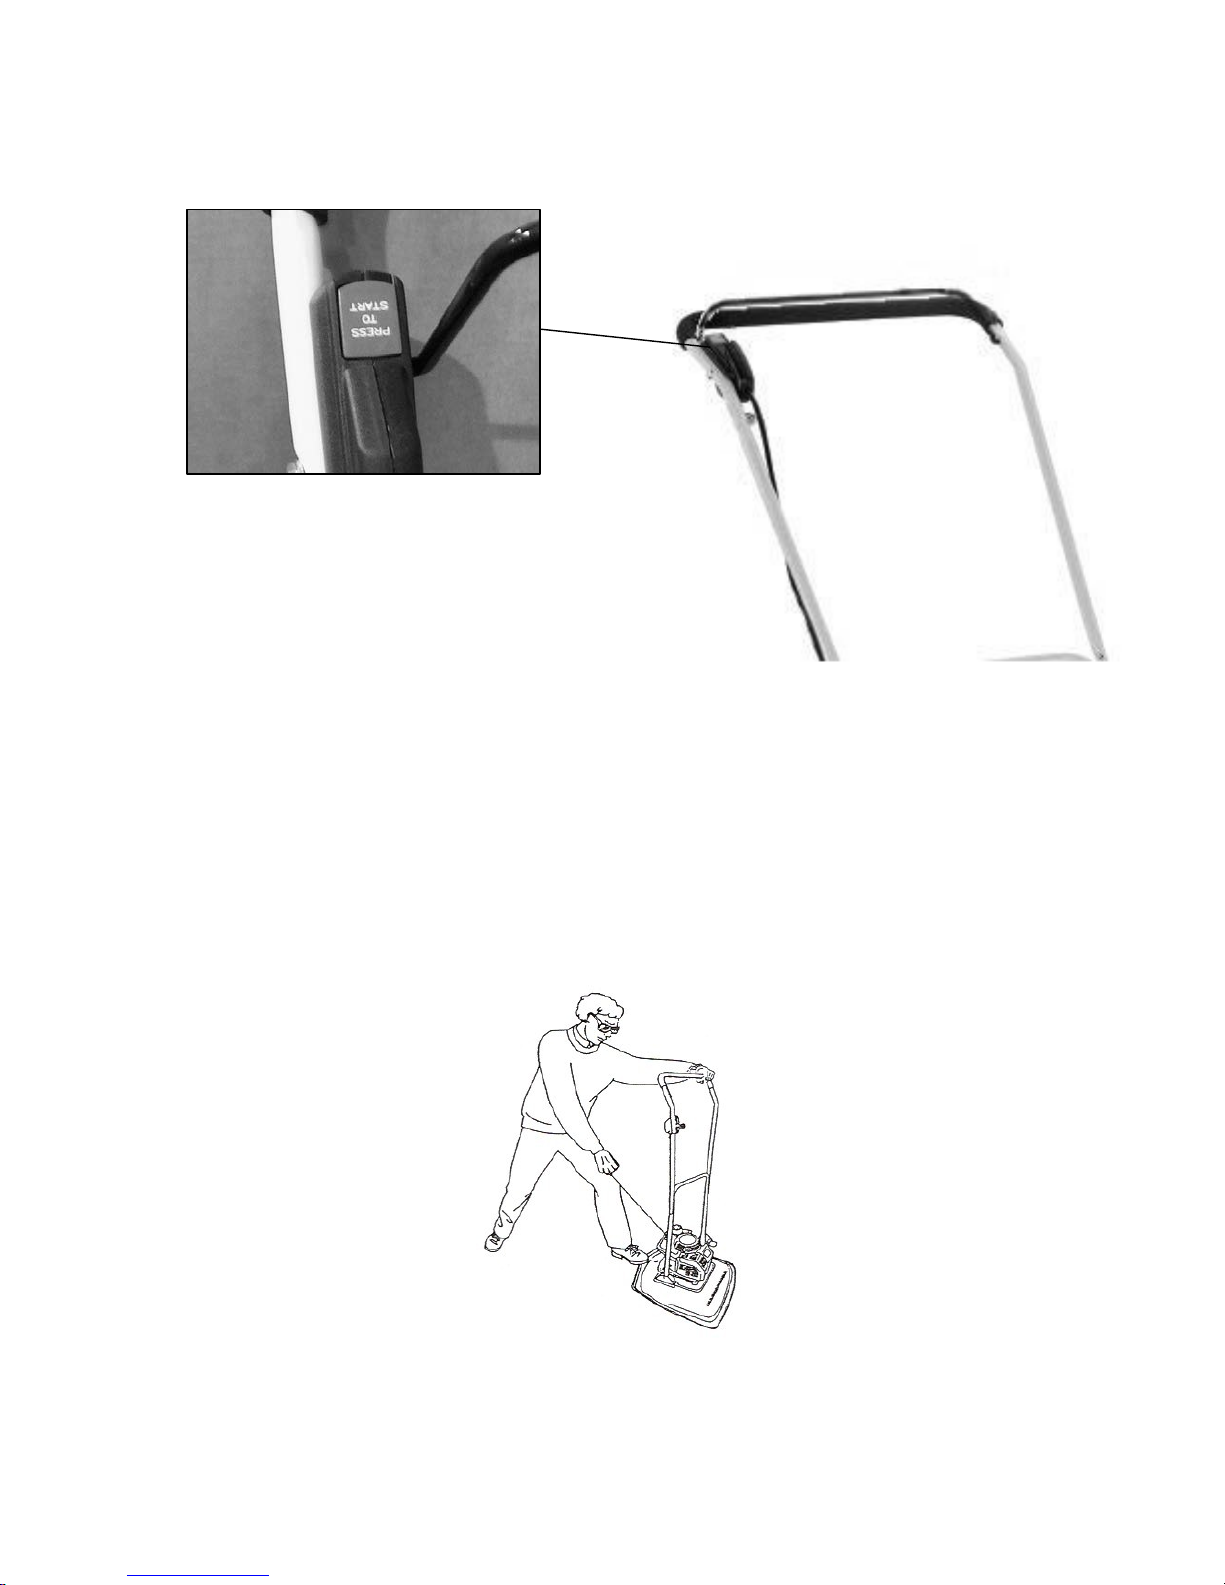
6. Press in the red starter button on the handle. (Fig. 11)
Figure 11
7. Pull the starter handle lightly until you feel resistance, then pull it sharply. (Fig. 12)
Figure 12
Page 14
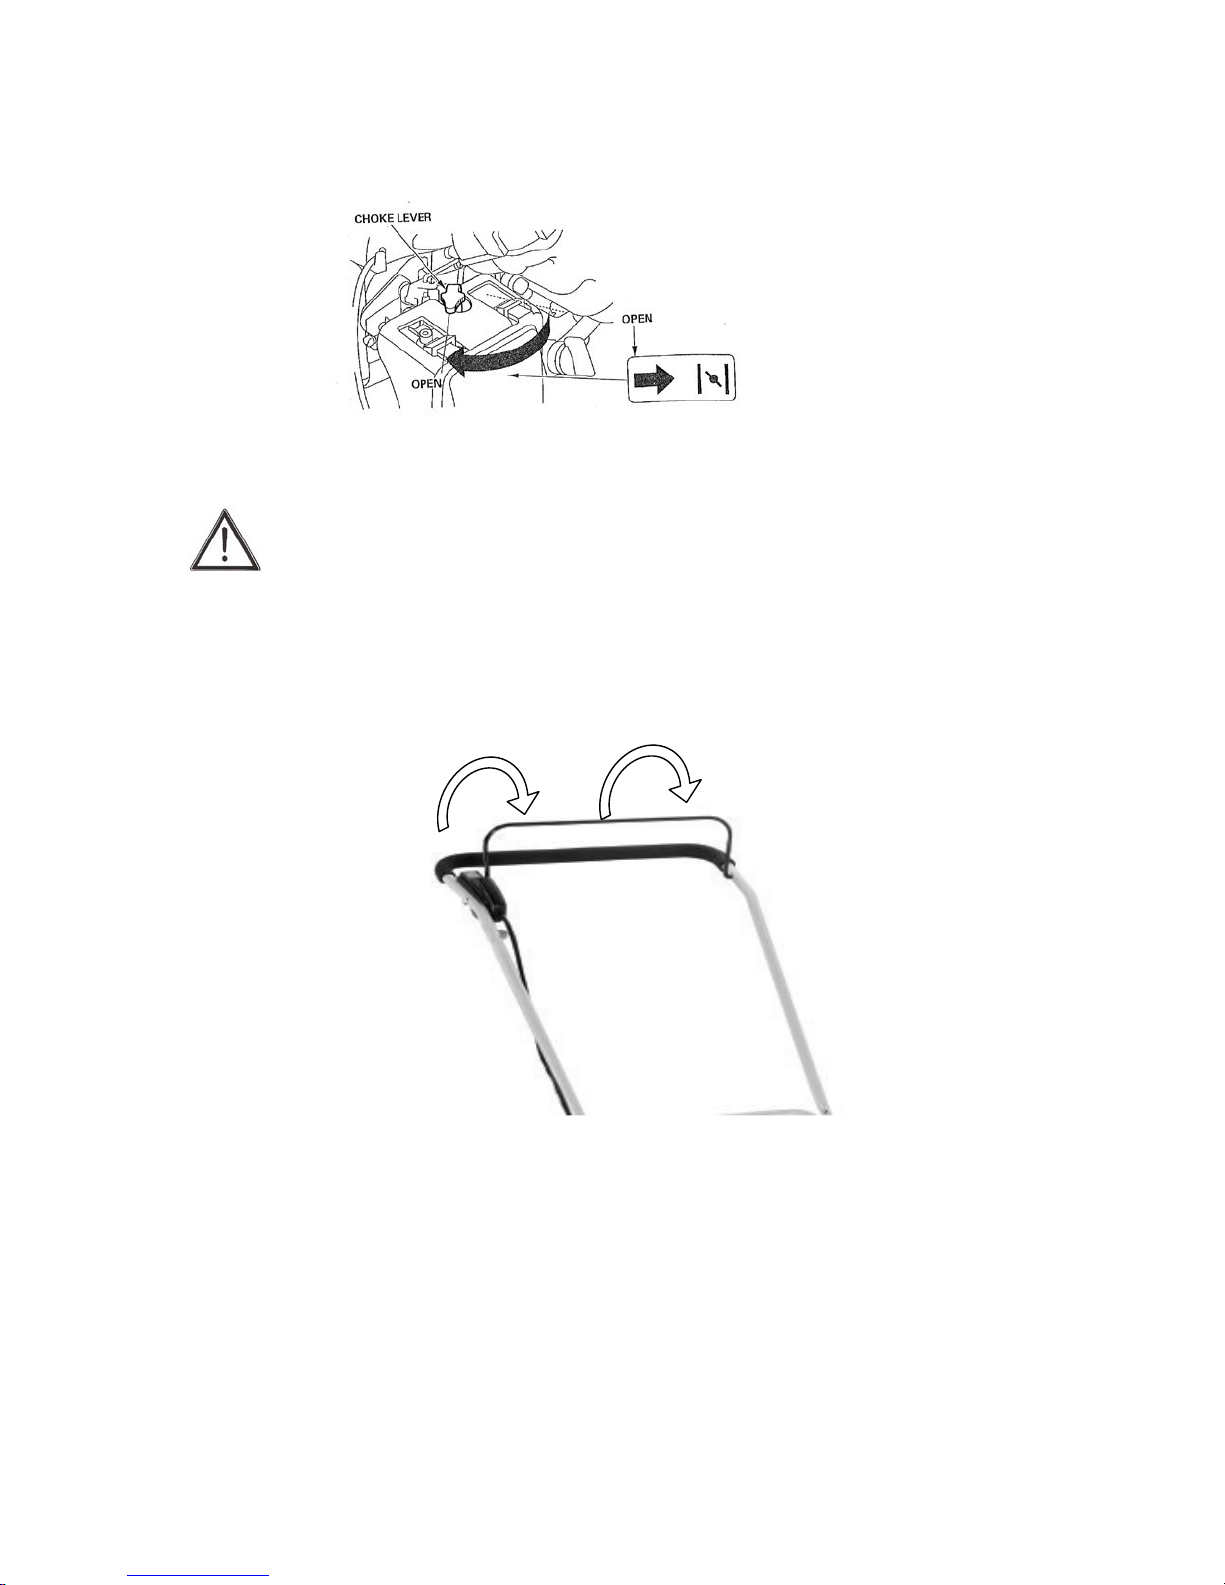
8. Move the choke lever to OPEN position gradually as the engine warms up. (Fig. 13)
Figure 13
The engine operates at a FIXED THROTTLE SPEED for optimum performance.
Stopping the Engine
1. Release the bail arm to stop the engine. (Fig 14)
Figure 14
Page 15

2. Disconnect the wire from the spark plug if you do not use the lawn mower or if you leave it
unattended.
3. Shut the fuel valve.
Adjusting the Cutting Height
The cutting height can be adjusted from 1/2” – 3”. The height is preset at approximately 2”. The
height can be raised or lowered in ¼” or ½” increments.
1. Stop the engine and wait for the blade to stop before adjusting the cutting height.
2. Tilt the mower to its left side making sure the carburetor is on the upside of the mower and away
from the ground. Never tilt the mower with the carburetor pointing toward the ground.
3. Remove the impeller retaining bolt, f lat washer and cutter disc. (Fig. 15)
Figure 15
Page 16
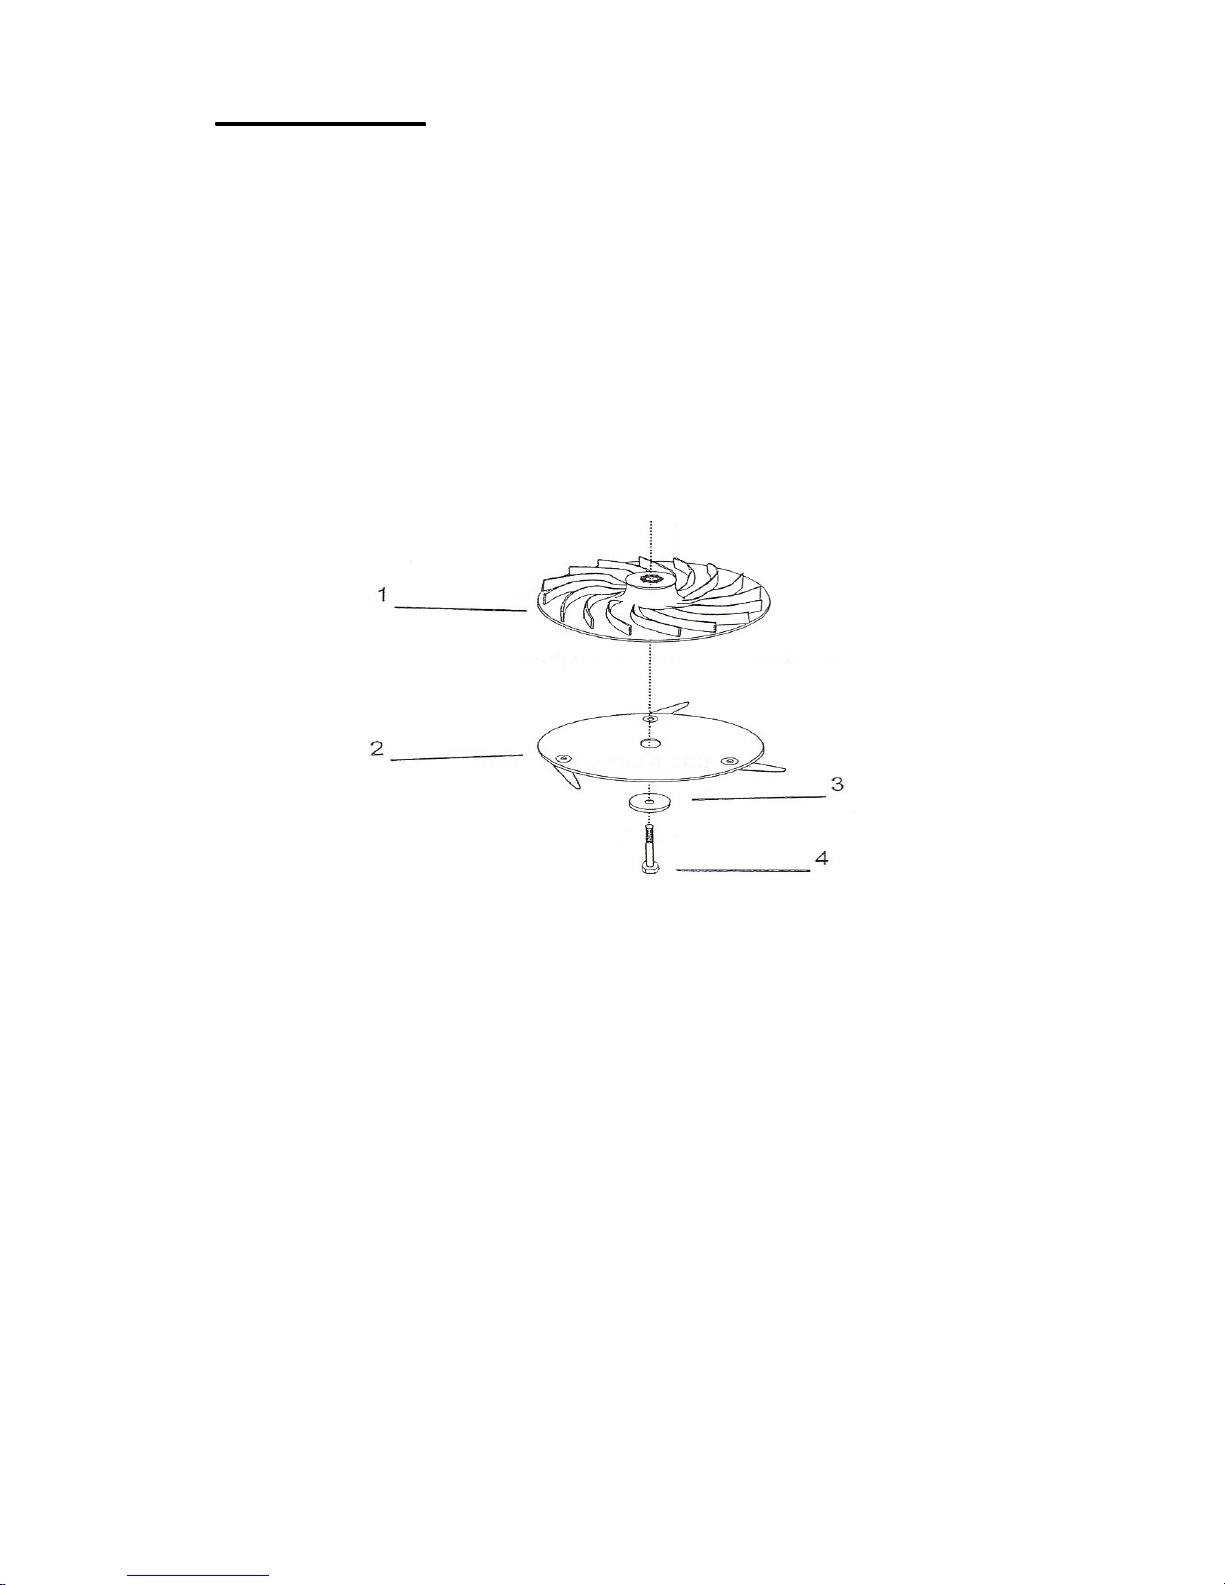
4. To obtain a higher cut remove the height adjustment spacer (s) from the impeller hub. Remount
the cutter disc to obtain the highest cut - do not use any spacers. Install the f lat washer and the
Impeller retaining bolt. Tighten the bolt securely. (Fig 16)
a. Remove the height adjustment spacer (s) from the impeller hub. (Fig 16)
b. Remount the cutter disc.
c. Install the f lat washer and the impeller retaining bolt.
d. Tighten the bolt securely.
e. To obtain the maximum cut height, do not use any spacers.
f. Use a 2 1/4” long Impeller retaining bolt when no adjustment spacers are used.
Figure 16
1. Impeller 3. Impeller Flat Washer
2. Cutter Disc 4. Impeller Retaining bolt
Page 17
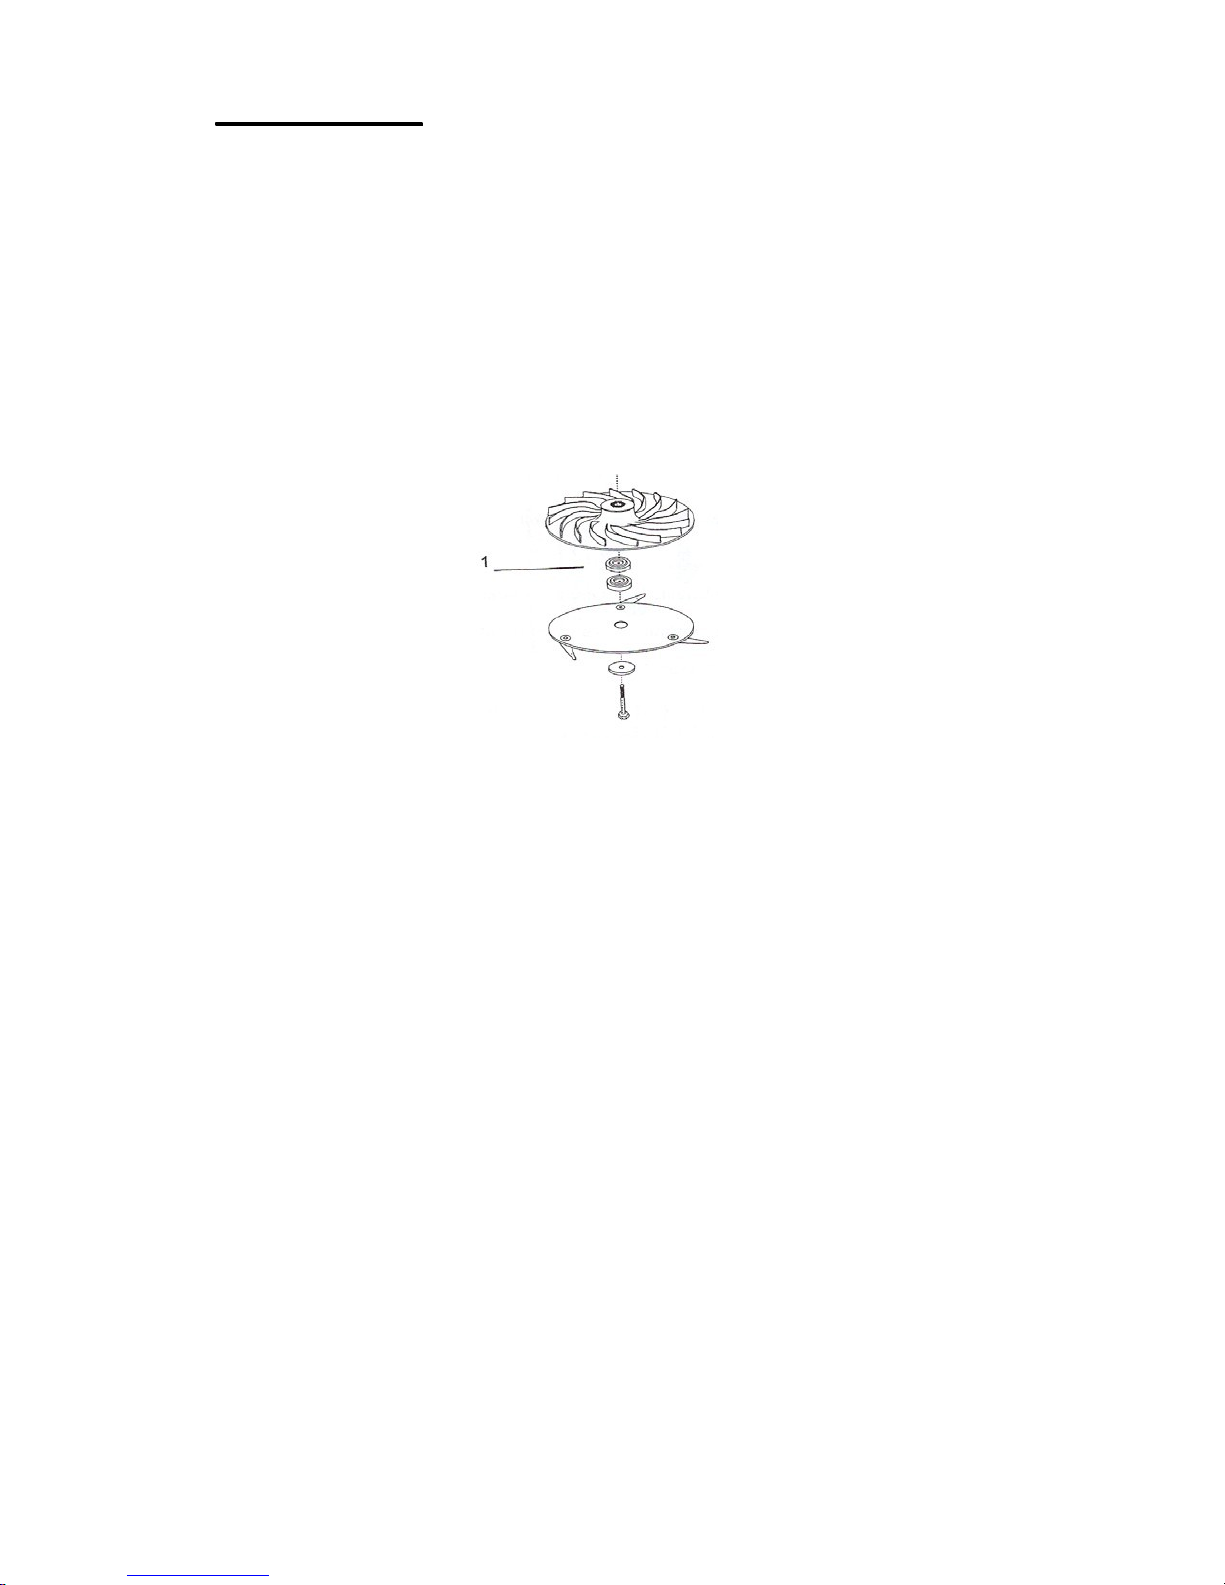
5. To obtain a lower cut add height adjustment spacer (s) between the impeller hub and the cutter
disc. Remount the cutter disc. Install the f lat washer and the impeller retaining bolt. Tighten the
bolt securely. (Fig. 17)
a. Add height adjustment spacer (s).
b. Remount the cutter disc.
c. Install the f lat washer and the impeller retaining bolt.
d. Tighten the bolt securely.
e. Use a 3 ¼ ” long impeller retaining bolt when one or two ½” spacer (s) or 2 or more ¼”
spacers are used.
Figure 17
1. Height Adjustment spacer
Page 18

Operating Tips
•
Review the safety instructions and read this Manual carefully before operating the lawn mower.
•
Never mow on slopes with inclines exceeding 45°.
•
Never attempt to mow by pushing the lawn mower up the slope.
•
Keep the mower pointing down when mowing slopes.
•
Always stay above the mower when mowing slopes.
•
Walk across the slopes not up and down.
•
Clear the area of sticks, stones, wire, branches and other debris that the blade could hit or throw.
•
Keep everyone, especially children and pets, away from the area of operation.
•
Avoid striking trees, walls, curbs or other solid objects. Never deliberately mow over any object.
•
If the lawn mower strikes an object or starts to vibrate, immediately stop the engine, disconnect the
wire from the spark plug and examine the lawn mower for damage.
•
Maintain sharp blades throughout the cutting season.
•
Replace the blades when necessary with original Eastman Industries replacement blades.
•
Mow only dry grass or leaves. Wet grass and leaves tend to clump on the yard and can cause the
lawn mower to plug or the engine to stall.
•
Wet grass or leaves can cause serious injury if you slip and come in contact with the blades.
•
Clean the underside of the lawn mower deck after each mowing. Keep the engine in good running
condition.
•
Clean the air f ilter frequently. Mulching stirs up more clippings and dust which clogs the air f ilter
and reduces engine performance.
•
Consult the Engine Operator’s Manual for more complete instructions regarding engine
maintenance and operation.
Page 19

Recommended Maintenance Schedule
Note: Determine the left and right sides of the machine from the normal operating position.
Service Interval Maintenance Procedure
Check the engine oil level.
Check the blades and blade attachment bolts. Tighten if they are loose.
Check the air cleaner.
Each Use
Remove grass clippings from the impeller f ins.
Remove the grass clippings and dirt from under the housing.
Clean the air intake area around the engine.
5 Hours
25 Hours
Check the blades and the blade attachment bolts. Tighten them if they
are loose.
Replace the blade mounting bolts if they are worn or damaged.
Inspect the cutter disc. Change if the cutter disc is bent or the pem
inserts are lose or worn.
Clean the air cleaner. (1)
Change the engine oil. (2) (3)
Clean – replace the air cleaner. (1)
50 Hours
Sharpen or replace the blade; maintain it more frequently if the edge
dulls quickly in rough or in sandy conditions.
Clean the fuel f ilter.
Check for leaks in the fuel system and/or a deteriorating fuel hose.
Replace parts if necessary.
Inspect the spark plug and replace it if necessary.
100 Hours
Clean – replace the air cleaner.
Clean the cooling system; remove grass clippings, debris, or dirt from
the engine air cooling f ins and starter. Clean the system more
frequently in dirty or high-chaff conditions.
150 Hours
Replace the air f ilter. Replace it more frequently in dusty conditions.
Replace the spark plug.
Storage
Empty the fuel tank before repairs or before storage.
(1) Service more frequently when used in dusty conditions.
(2) Change the engine oil after the f irst 5 operating hours (f irst oil change only).
(3) Change the engine oil every 25 hours when used under heavy load or high ambient temperature.
Page 20
Checking the Engine Oil Level
Before you use the lawn mower, make sure that the oil level is between the Upper and the Lower Limit
marks as shown on the dipstick. If the oil level is below the Lower Limit mark, add oil.
Cleaning the Underside of the Lawn Mower Housing
To ensure the best performance, keep the underside of the lawn mower housing clean.
1. Disconnect the spark plug wire and drain the fuel tank.
2. Tip the lawn mower onto its left side with the carburetor and air cleaner on the upside of the
mower and away from the ground. Remove the grass thoroughly and return the mower to upright position.
Servicing the Air Cleaner
Clean the f ilter element every 25 operating hours. Replace the f ilter element every season or every 150
operating hours - clean and replace the f ilter element more frequently in dusty conditions.
1. Stop the engine and wait for all moving parts to stop.
2. Disconnect the wire from the spark plug.
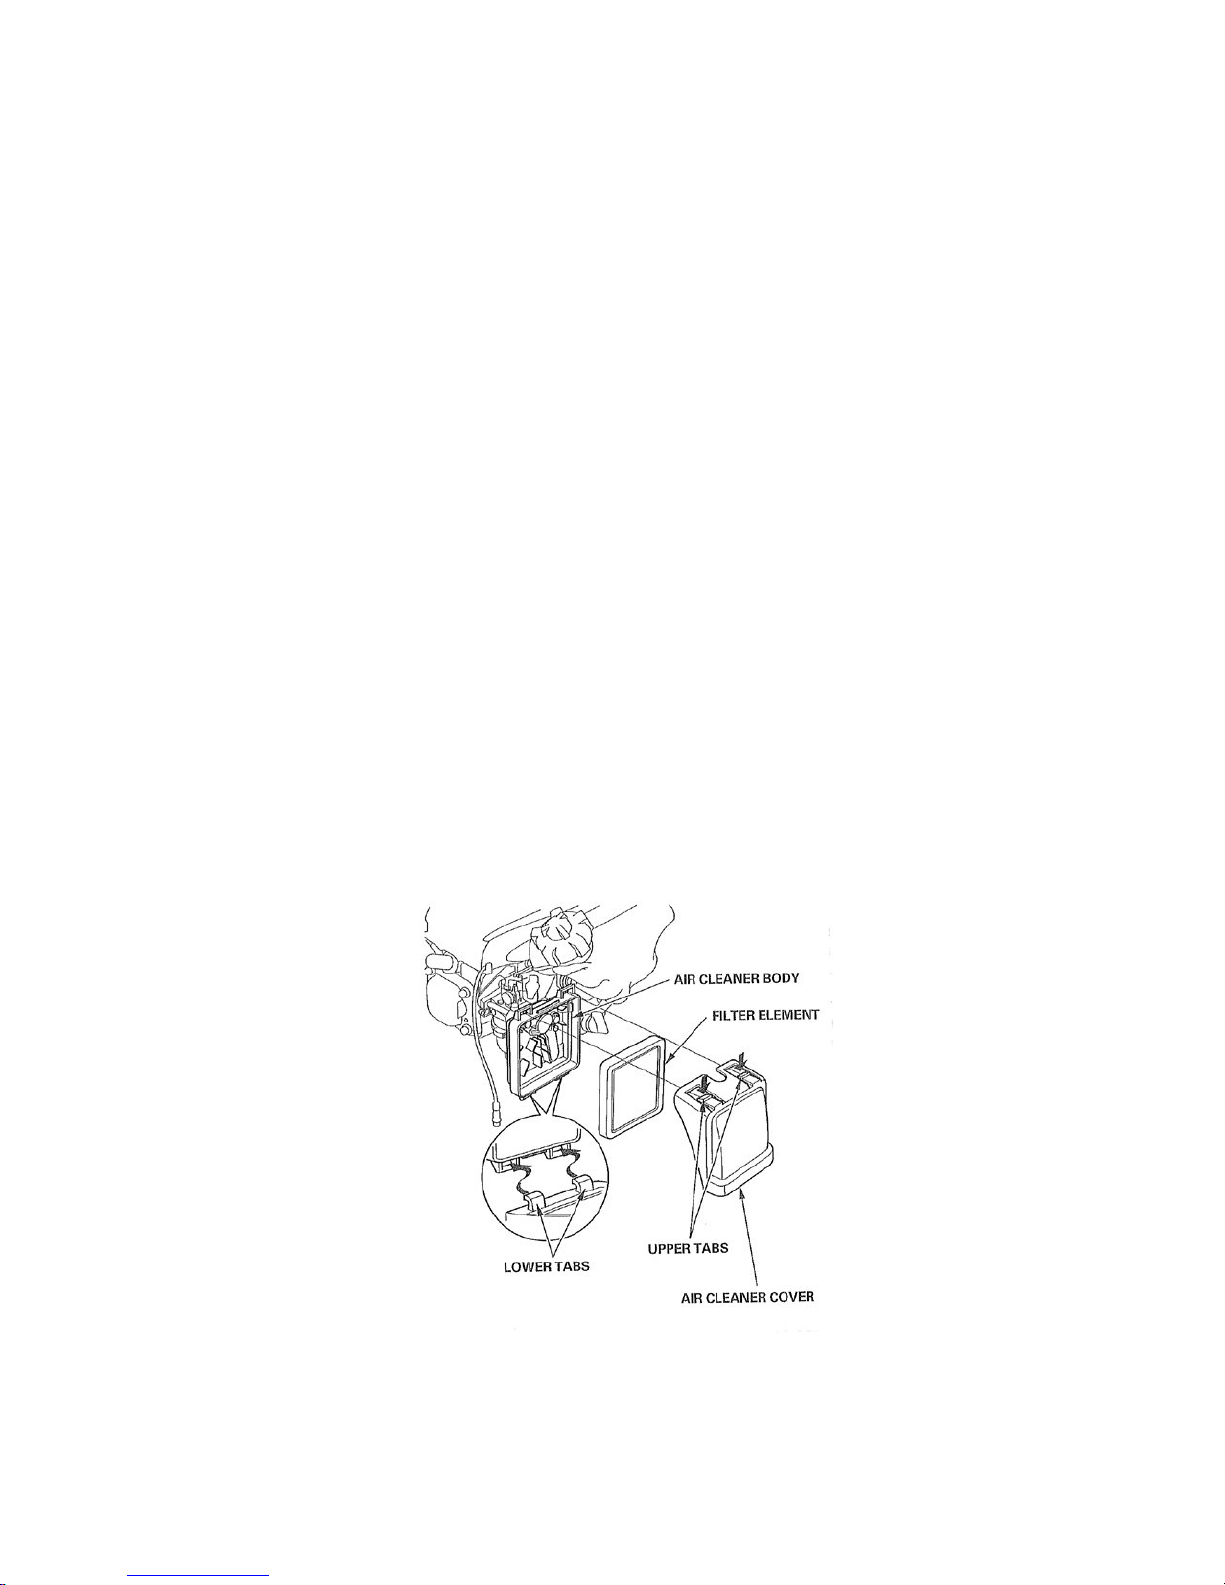
3. Press the latch tabs on the top of the f ilter cover and remove the cover. (Fig. 18)
Page 21
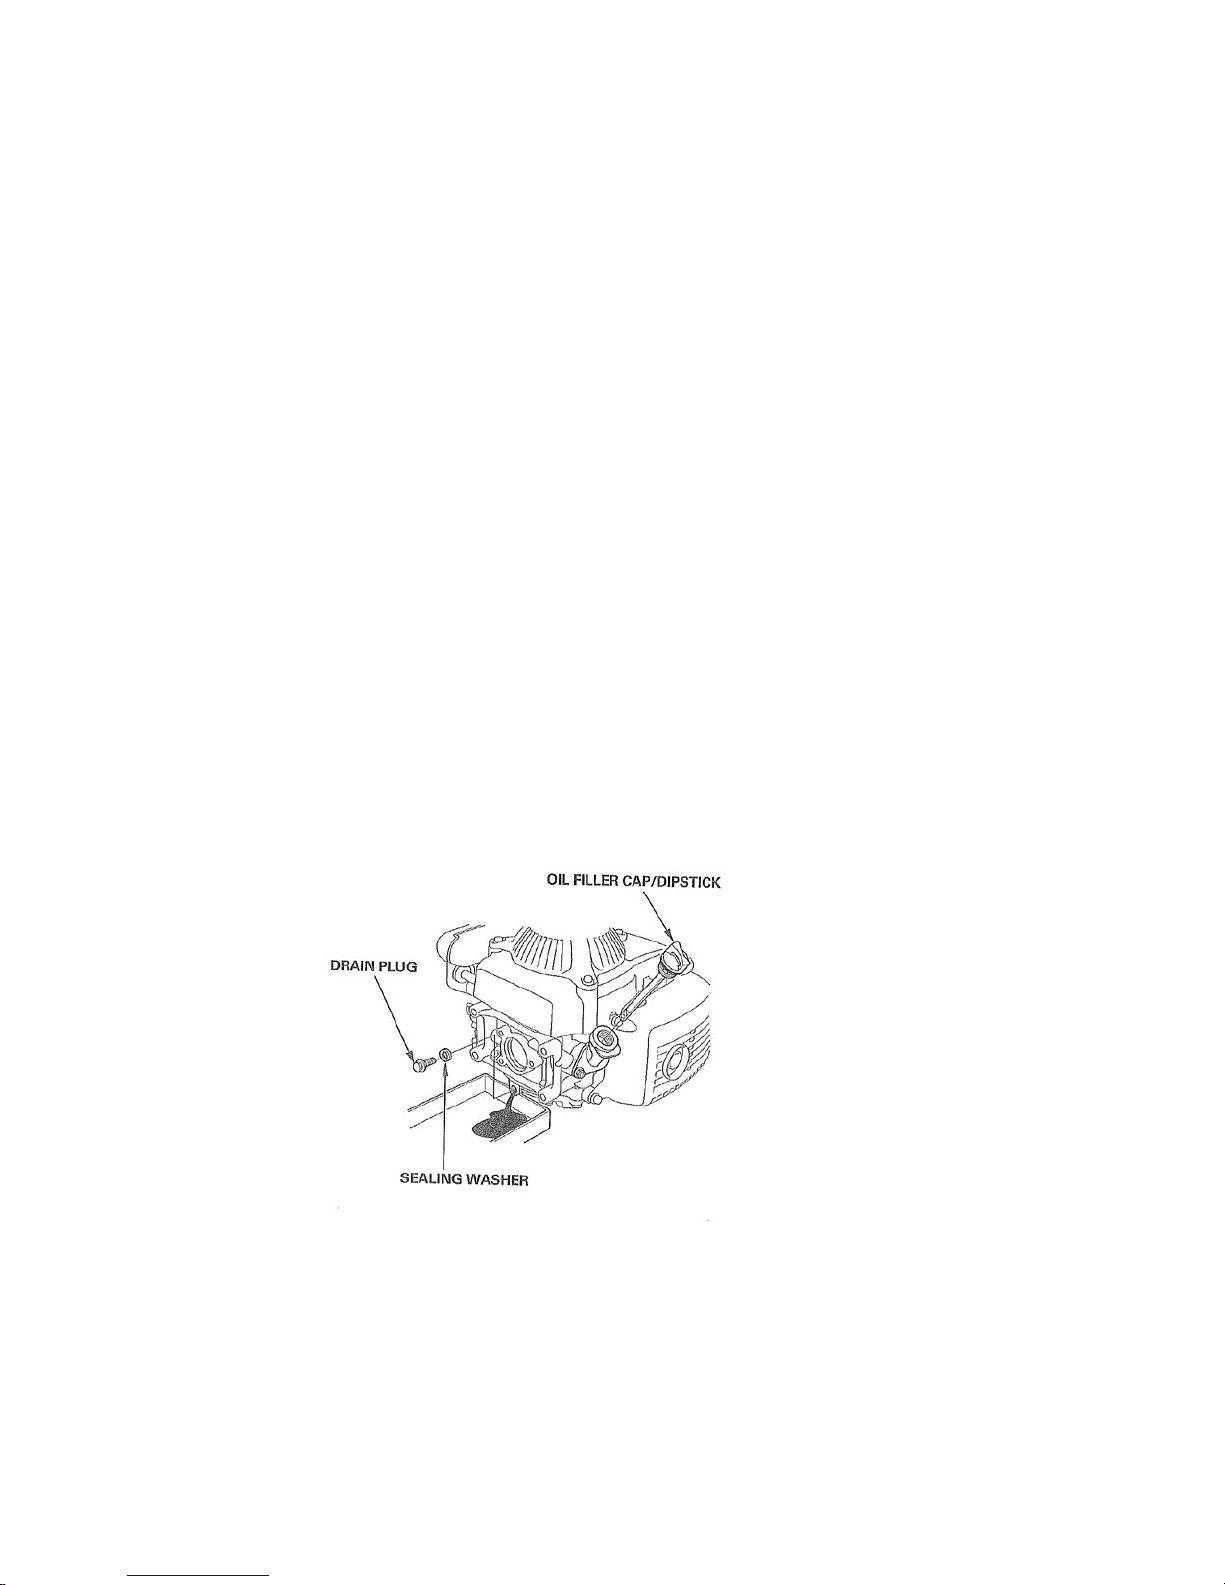
Figure 18
4. Clean the f ilter element in warm, soapy water. Rinse and allow to dry thoroughly. Or clean in
nonf lammable solvent and allow to dry.
5. Dip the f ilter element in clean engine oil, then squeeze out all excess oil. The engine will smoke
when started if too much oil is left in the f ilter element.
6. Wipe dirt from the air cleaner body and cover, using a moist rag. Be careful to prevent dirt from
entering the carburetor.
7. Install the f ilter element and cover.
Changing the Engine Oil
Change the oil after the f irst month or after 5 operating hours and then after every 6 months or every
50 operating hours.
1. Run the engine to warm the engine oil.
2. Stop the engine and wait for all moving parts to stop.
3. Disconnect the wire from the spark plug.
4. Turn the fuel valve to off position.
5. Remove the dipstick and drain the oil into a pan by removing the drain plug. (Fig 19)
Page 22

Figure 19
6. Recycle the used oil according to local codes.
7. Reinstall the oil drain plug and new washer, and tighten the oil drain plug securely.
Fill the crankcase to the Upper Limit line on the dipstick with fresh oil.
8.
Do not screw in the
dipstick to check the oil.
9. Wipe up any spilled oil.
Maintaining the Cutter Disc
Always mow with a balanced cutter disc making sure that the pem inserts, the blade attachment bolts
and blades are securely fastened to the disc.
1. Stop the engine and wait for all moving parts to stop.
2. Disconnect the wire from the spark plug.
3. Turn the fuel valve to off position.
4. Tip the lawn mower onto its left side with the carburetor and air cleaner on the upside of the
mower and away from the ground.
5. Remove the blade attachment bolts and the blades.
6. Check the cutter disc for f latness by placing a straight edge against the disc. Replace the disc if it
is bent, warped or damaged. Never operate the mower with a bent disc. A bent or damaged disc
will cause excessive vibration and hazardous operating conditions. Loose components can be
thrown causing serious injury or death.
7. Inspect the pem inserts embedded in the disc for looseness or wear. Replace the disc if the pems
are loose or damaged. Do not try to tighten the pems if they are loose. Loose pems can be thrown
into the operator’s path causing serious injury or death.
8. Inspect the blade attachment bolts for looseness or excessive wear. Tighten, if necessary. Replace
worn or damaged bolts. Loose or damaged blades and bolts can be thrown into the operator area
causing serious injury or death.
9. Inspect the blades for wear or damage. Replace worn and damaged blades. Worn or damaged
blades can be thrown into operator area causing serious injury or death.
Page 23
Removing the Blade
Grasp the cutter disc f irmly using a rag or a glove. Remove the blade mounting bolts using a ¼” Allen
wrench.
Installing the Blade
Make certain the blades are mated to the correct blade attachment bolts.
1. Mount the blades on the blade attachment bolts.
2. Screw the blade attachment bolts into the pem fasteners on the cutter disc.
3. The blades should f it snugly into the blade attachment bolts.
4. Tighten the bolts.
Draining the Fuel Tank and Carburetor
Clean the fuel f ilter element every 50 operating hours.
1. Stop the engine and wait for it to cool down.
2. Disconnect the wire from the spark plug.
3. Open the fuel valve by turning the lever to the open position.
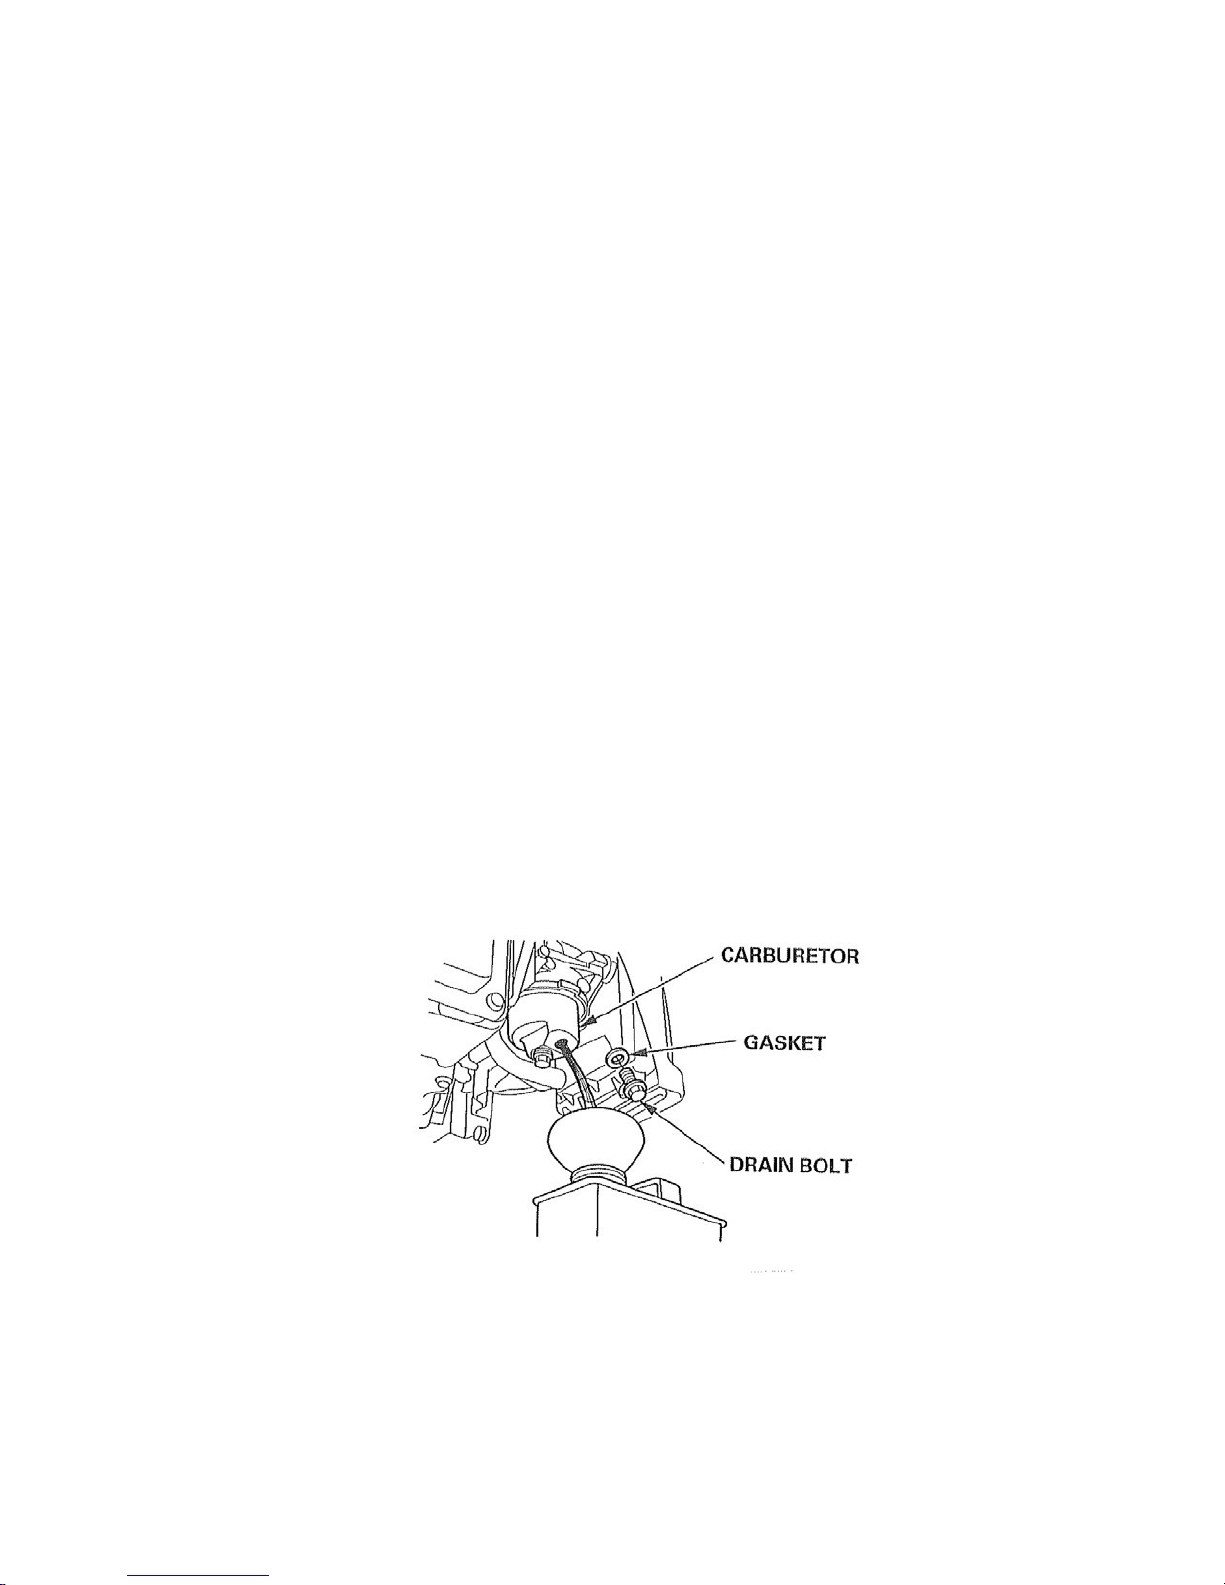
4. Remove the carburetor bowl drain bolt and gasket, then drain the fuel into an approved gasoline
container (Fig 20).
5. Do not force the carburetor bowl off the carburetor body.
Page 24

Figure 20
6. Install the drain bolt and tighten securely.
Servicing the Spark Plug
Check the spark plug after every 150 operating hours.
1. Stop the engine and wait for all moving parts to stop.
2. Disconnect the wire from the spark plug.
3. Clean around the spark plug.
4. Remove the spark plug from the cylinder head, with a 5/8 inch spark plug wrench.
5. Set the gap on the plug to 0.024 – 0.028 In (0.60 – 0.70 mm)
6. Install the spark plug and the gasket seal.
7. Connect the wire to the spark plug.
Storage
To prepare the lawn mower for storage, perform the recommended maintenance procedures. Refer to
Maintenance on page 19.
Store the lawn mower in a dry place. Empty the fuel tank after mowing the last time before storing the
lawn mower.
1. Run the lawn mower until the engine stops from running out of fuel.
2. When you can no longer start the engine, it is suff iciently dry.
Preparing the Engine
1. While the engine is still warm, change the oil from the crankcase.
2. Remove the spark plug.
3. Using an oil can, add about one tablespoon of oil to the crankcase through the spark plug hole.
4. Slowly rotate the engine several times, using the starter rope, to distribute the oil.
5. Install the spark plug. Do Not connect the wire to the spark plug.
General Information
1. Clean the lawn mower housing.
2. Check the condition of the blade.
3. Service the air f ilter.
4. Tighten all nuts, bolts and screws.
Page 25

Removing the Lawn Mower from Storage
1. Check and tighten all fasteners.
2. Remove the spark plug and spin the engine rapidly using the starter to blow excess oil from the
cylinder.
3. Clean the spark plug or replace it if it is cracked, broken or if the electrodes are worn.
4. Install the spark plug.
5. Fill the fuel tank with fresh gasoline.
6. Check the engine oil level.
7. Connect the wire to the spark plug.
Page 26

Troubleshooting
Problem Possible Cause Corrective Action
Engine does not start 1. The fuel tank is empty or 1. Drain and/or f ill the fuel tank with fresh
the fuel system contains gasoline. If the problem persists, contact
stale fuel. an Authorized Service Dealer.
2. The air f ilter is soaked with 2. Replace the f ilter.
oil or gasoline.
3. The engine is not in 3. Move the throttle lever to the Choke
Choke position. position.
4. The wire is not connected 4. Connect the wire to the spark plug.
to the spark plug.
5. The spark plug is pitted, 5. Check the spark plug and adjust the gap
fouled or the gap is if necessary. Replace the spark plug
incorrect. if it is pitted, fouled or cracked.
6. Starter switch malfunctions 6. Replace starter switch.
or is worn.
7. Starter switch wires worn 7. Repair and connect wire.
or not connected.
Engine starts hard 1. The fuel tank contains stale 1. Drain and f ill the fuel tank with fresh
or loses power fuel. gasoline.
2. The fuel cap vent hole is 2. Clean the fuel cap vent hole or replace
plugged. the fuel cap.
3. The air f ilter element is 3. Clean the air f ilter pre-cleaner and/or
dirty and is restricting the replace the air f ilter.
air f low.
4. The underside of the lawn 4. Clean the underside of the lawn mower
mower is clogged with. deck, the air intakes and impeller f ins.
clippings and debris.
5. The spark plug is pitted, 5. Check the spark plug and adjust the gap
fouled or the gap is if necessary. Replace the spark plug if
incorrect. it is pitted, fouled or cracked.
6. The engine oil level is low 6. Check the engine oil. Change the oil if
or the oil is dirty. it is dirty or add oil if it is low.
Page 27

Troubleshooting
Problem Possible Cause Corrective Action
The mower does not 1. The engine does not run at 1. Correct the engine speed.
hover the correct speed.
2. Air vents are clogged with 2. Clean and unclog.
grass clippings and debris.
3. Impeller f ins and underside 3. Remove the impeller. Thoroughly
of the deck are clogged clean the impeller and the deck.
with grass and debris.
Engine runs rough 1. The wire is not connected 1. Connect the wire to the spark plug.
to the spark plug.
2. The spark plug is pitted, 2. Check the spark plug and adjust the gap
fouled or the gap is if necessary. Replace the spark plug
incorrect. if it is pitted, fouled or cracked.
3. The throttle lever is not in 3. Move the throttle lever to the Run
the Run position. position.
4. The air f ilter element is 4. Clean the air f ilter element or
dirty and is restricting the replace the air f ilter.
air f low.
Mower or engine 1. The cutter disc is bent or 1. Replace the cutter disc.
vibrates excessively warped.
2. The blade attachment bolts 2. Tighten the blade attachment bolts.
are loose or missing.
3. The underside of the lawn 3. Clean the underside of the lawn
mower deck contains clip- mower deck.
pings and debris.
4. Cut Height Adjustment 4. Remount and tighten properly.
spacers are not properly
mounted.
5. The engine mounting bolts 5. Tighten the engine mounting bolts.
are loose.
Page 28
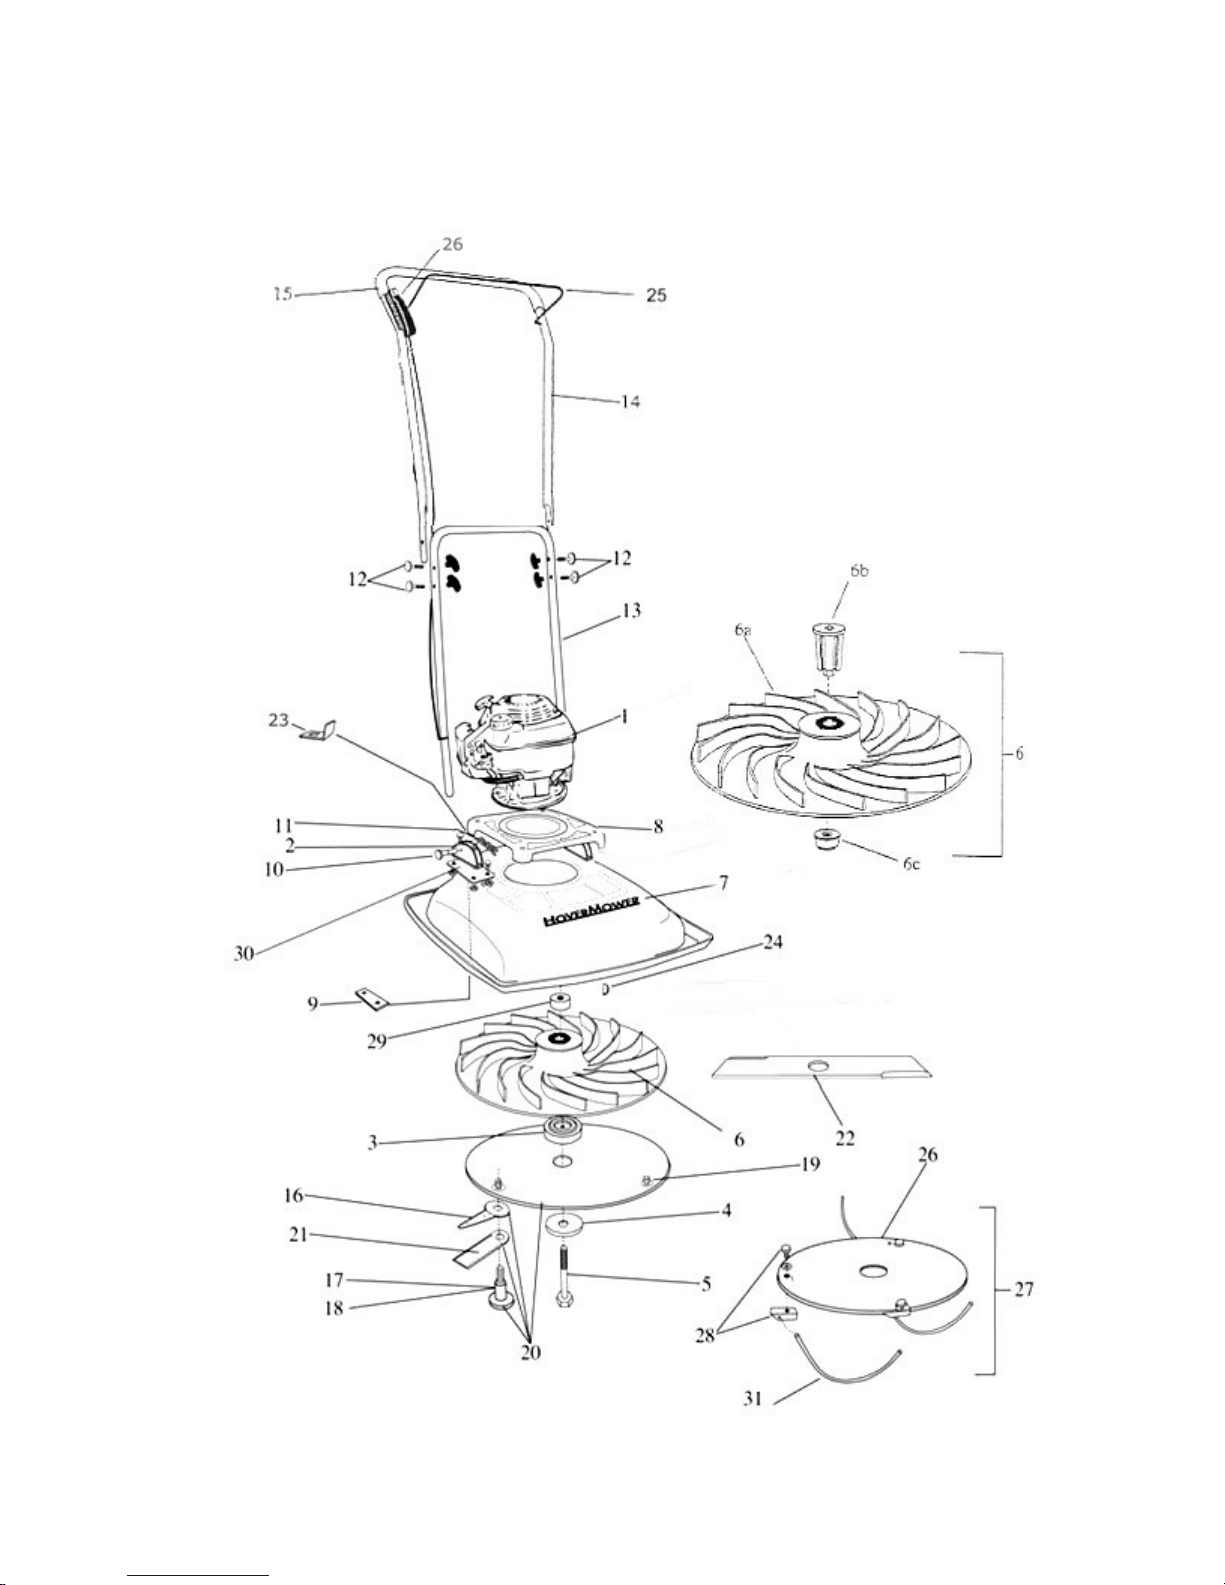
MOWER PARTS HM16H4
Page 29

PARTS LIST FOR MOWER # HM16H4
SCM# PART # DESCRIPTION
1 HM16GXV57 Honda 2 HP, 4 Cycle Engine--U.S & Euro Certified
2 HM 1550 Handle Bracket
3 HM16R-1556A Height Adjustment Spacer 1/2"
3 HM16R-1556B Height Adjustment Spacer 1/4"
4 HM16R-21557 Impeller Flat Washer
5 HM16R-225581 Impeller Retaining Bolt 2 1/4"
5 HM16R-225580 Impeller Retaining Bolt 2 3/4”
5 HM16R-225579 Impeller Retaining Bolt 3 1/4"
6 HM16R-22560N Impeller - Assembly
6a HM16R-225572 Impeller - 12”
6b HM16H-225570 Impeller Hub
6c HM16R-225571 Impeller Cap
7 HM16H-22562 Deck with Logos and Decals
8 HM16H-22565 Engine Mount
9 HM 22569 Handle Mounting Plate
10 HM 22573 Clevis Pin
11 HM 2257 Hair Pin Cotter Key
12 HM 22583 Handle Knob W/Hardware
13 HM 1549 Lower Handle
14 HM16R-22585N Upper Handle (With grip)
15 HM 1582 Handle Grip
16 HM 1601-12 Nylon Blades ( Pkg. Of 12)
17 HM 1602-3 Shoulder Bolts for Nylon Blades (Pkg. Of 3)
18 HM 1603-3 Shoulder Bolts for Stainless Steel Blades (Pkg. Of 3)
19 HM16R-22603 Cutter Disc
20 HM16R-22606N Cutter Disc Assy with Nylon Blades & Bolts
20 HM16R-22606S Cutter Disc Assy with Stainless Steel Blades & Bolts
21 HM 1605-3 Reversible Stainless Steel Blades (Pkg. Of 3)
22 HM16R-1607 Bar Blade (Not Available In The U.S.)
23 HM 1551 Handle Stop
24 HM16R-2175 Woodruff Key
25 HM16R-2172 Bail Arm
26 HM16R-2173 Starter Switch with Wiring Harness
27 HM16R-22613 Cutter Disc for Nylon String
28 HM16R-22613T Cutter Disc Assy. With Nylon String & Fasteners
29 HM 1600 String Attachment Fastener (Pkg. of 3)
30 HM 1615-1 .130" Magnum Gatorline - 1 lb. Donut
30 HM 1615-3 .130" Magnum Gatorline - 3 lb. Donut
HM16R-215584 Impeller "Pull" Bolt
HM16R-21563 4" Lift Kit
HM16R-2172C Bail Arm Upgrade Kit
HM16R-21590 12" Handle Extension Kit (
HM16R-2173L Starter Switch with Long Wiring Harness
HM 1549L Lower Handle Long
ACCESSORIES
Harness
)
Long Handle, Starter Switch w/Long
Page 30

EASTERN INDUSTRIES LIMITED WARRANTY STATEMENT EFFECTIVE MARCH 1, 2017
Eastern Industries, Inc. warrants to the original retail purchaser that this Eastern Industries, Inc. product is free
from defects in material and workmanship. Under normal use and maintenance from the date of retail purchase,
Eastern Industries, Inc. agrees to repair or replace at Eastern Industries, Inc. discretion, any defective product
free of charge at any authorized Eastern Industries, Inc. Servicing Dealer within the time limit listed below.
THIS LIMITED WARRANTY IS EXTENDED TO THE FIRST, ORIGINAL RETAIL PURCHASER
ONLY, AND IT IS NOT TRANSFERRABLE TO SUBSEQUENT OWNERS.
RESIDENTIAL OR NON-INCOME PRODUCING USE – 2YEARS.
Complete unit for residential, or non-income producing use, will be covered by this limited warranty for 2 years
from the date of retail purchase.
COMMERCIAL, INSTITUTIONAL, INDUSTRIAL OR INCOME PRODUCING USE – 1 YEAR.
Complete unit will be covered against defects in material and workmanship for a period of 1 year from the date
of purchase.
RENTAL USE – 60 DAYS.
Complete unit will be covered against defects in material and workmanship for a period of 60 days from the date
of purchase.
DISCLAIMER OF IMPLIED WARRANTIES
This limited warranty is in lieu of all other expressed or implied warranties, including any warranty of FITNESS
FOR A PARTICULAR PURPOSE and any implied warranty of MERCHANTABILITY otherwise applicable
to this purpose. Eastern Industries, Inc. shall not be liable for any special incidental or consequential damages.
•
Defects, malfunctions or failures resulting from abuse, misuse, neglect, modifications, alternation, normal
THE WARRANTY DOES NOT INCLUDE OR COVER:
wear, improper servicing, use of unauthorized attachments, stale fuel or any adverse reaction due to
incorrect storage procedures, including failure to provide or perform required maintenance services as
prescribed in the owner’s Manual. Preventative maintenance as outlined in the owner’s Manual is the
customer’s responsibility.
•
Cost of regular maintenance service or parts, such as filters, fuel, lubricants, oil changes, spark plugs, blade
sharpening, worn blade, cable/linkage adjustments, or brake and clutch adjustments.
•
Repairs necessary due to improper fuel, contaminants in the fuel system or failure to properly prepare the
fuel system prior to any period of non-use over three months.
•
Repair necessary due to failure to properly prepare the mower prior to any period of non-use.
•
Pickup and delivery charges.
All repairs covered by this warranty must be performed by an Authorized Eastern Industries, inc. Service Dealer
using Eastern Industries, Inc original parts.
For more information concerning engine warranty refer to the enclosed engine Manual and warranty
statement….
OWNER’S RESPONSIBILITY
The owner shall demonstrate reasonable care and follow preventative maintenance, storage, fuel and oil usage as
prescribed in the owner’s Manual. Should a product difficulty occur, you must, at your expense, arrange to
deliver or ship your Eastern Industries, Inc. unit for warranty repairs and arrange for pick-up or return of your
unit after the repairs have been made. If you do not know the location of your nearest authorized Eastman
Industries Servicing Dealer, call Eastern Industries, Inc. at 1-800-444-0407 during normal working hours.
Repair parts and accessories replaced under this warranty are warranted only for the balance of the warranty
period. All parts replaced under warranty become the property of Eastern Industries, Inc.
GENERAL CONDITIONS
Repair by an Authorized Eastern Industries, Inc. Dealer is your sole remedy under this warranty. Eastern
Industries, Inc. is not liable for indirect, incidental or consequential damages in connection with the use of
Eastern Industries, Inc. products covered by this warranty, including any cost or expense of providing substitute
equipment or service during reasonable periods of malfunction or non-use pending completion of repairs under
this warranty.
Rev 3-1-17
 Loading...