

Hoval BelariaSRM 6, BelariaSRM 8 User Reference Manual

User reference guide
Hoval BelariaSRM and Hoval Belaria compact SRM
BelariaSRM (4) Inneneinheit
BelariaSRM (6,8) Inneneinheit
BelariaSRM (11-16) Inneneinheit
Belaria compact SRM (4/180) IE
Belaria compact SRM (6,8/260) IE
Belaria compact SRM (11-16/260) IE
Subject to change | 4 211 876 / 00 – 11/12
User reference guide
Hoval BelariaSRM and Hoval Belaria compact SRM
English

Table of contents
User reference guide
2
BelariaSR04+08+16I3 + BelariaSRC04+08+16I3
Hoval BelariaSRM and Hoval Belaria compact SRM
4P330441-1 – 2012.11
4 211 876 / 00 – 11/12
Table of contents
1
General safety precautions ..............................
2
1.1
About the documentation ..........................................................
2
1.1.1 Meaning of warnings and symbols ............................
2
1.2
For the user ..............................................................................
2
2
About this document ........................................
3
3
About the system ..............................................
3
3.1
Components in a typical system layout ....................................
3
4
Operation ...........................................................
3
4.1
Overview: Operation .................................................................
3
4.2
The user interface at a glance ..................................................
4
4.2.1 Buttons .......................................................................
4
4.2.2 Status icons ...............................................................
4
4.3
Basic usage ..............................................................................
5
4.3.1 Using home pages .....................................................
5
4.3.2 Using the menu structure ...........................................
5
4.3.3 Turning ON/OFF controls ..........................................
5
4.4
Space heating/cooling control ...................................................
5
4.4.1 About space heating/cooling control ..........................
5
4.4.2 Setting the space operation mode .............................
5
4.4.3 Controlling the temperature .......................................
6
4.5
Domestic hot water control .......................................................
10
4.5.1 About domestic hot water control ..............................
10
4.5.2 Reheat mode .............................................................
10
4.5.3 Scheduled mode ........................................................
10
4.5.4 Scheduled + reheat mode .........................................
11
4.5.5 Using the DHW tank temperature home page ...........
11
4.5.6 Using the DHW tank booster mode ...........................
12
4.6
Advanced usage .......................................................................
12
4.6.1 Using quiet mode .......................................................
12
4.6.2 Using holiday mode ...................................................
13
4.6.3 Reading out information .............................................
14
4.6.4 Configuring date, time, units of measurement,
contrast and backlight ................................................
14
4.6.5 Configuring user profile and home pages ..................
15
4.6.6 Locking and unlocking buttons and functions ............
15
4.7
Preset values and schedules ....................................................
15
4.7.1 Using preset values ...................................................
15
4.7.2 Using and programming schedules ...........................
16
4.7.3 Schedules: Example ..................................................
16
4.7.4 Predefined schedules: Room temperature + leaving
water temperature (main) ..........................................
17
4.7.5 Predefined schedules: Leaving water temperature
(additional) .................................................................
17
4.7.6 Predefined schedules: DHW tank temperature .........
18
4.8
Menu structure: Overview .........................................................
19
4.9
Installer settings: Tables to be filled in by installer ....................
20
4.9.1 Quick wizard ..............................................................
20
4.9.2 Space heating/cooling control ....................................
20
4.9.3 Domestic hot water control [A.4] ................................
20
4.9.4 Contact/helpdesk number [6.3.2] ...............................
20
5
Energy saving tips ............................................
20
6
Maintenance and service .................................
21
6.1
Overview: Maintenance and service .........................................
21
6.2
To find the contact/helpdesk number ........................................
21
7
Troubleshooting ................................................
21
7.1
Overview: Troubleshooting .......................................................
21
7.2
To check the error history .........................................................
21
7.3
Symptom: You are feeling too cold (hot) in your living room ....
21
7.4
Symptom: The water at the tap is too cold ...............................
21
8
Relocation ..........................................................
21
8.1
Overview: Relocation ................................................................
21
9
Disposal .............................................................
21
9.1
Overview: Disposal ...................................................................
21
10
Glossary .............................................................
22
1 General safety precautions
1.1 About the documentation
▪ The original documentation is written in English. All other
languages are translations.
▪ The precautions described in this document cover very important
topics, follow them carefully.
▪ All activities described in the installation manual must be
performed by an authorized installer.
1.1.1 Meaning of warnings and symbols
DANGER
Indicates a situation that results in death or serious injury.
DANGER: RISK OF ELECTROCUTION
Indicates a situation that could result in electrocution.
DANGER: RISK OF BURNING
Indicates a situation that could result in burning because of
extreme hot or cold temperatures.
WARNING
Indicates a situation that could result in death or serious
injury.
CAUTION
Indicates a situation that could result in minor or moderate
injury.
NOTICE
Indicates a situation that could result in equipment or
property damage.
INFORMATION
Indicates useful tips or additional information.
1.2 For the user
▪ If you are not sure how to operate the unit, contact your installer.
▪ The appliance is not intended for use by persons, including
children, with reduced physical, sensory or mental capabilities, or
lack of experience and knowledge, unless they have been given
supervision or instruction concerning use of the appliance by a
person responsible for their safety. Children must be supervised to
ensure that they do not play with the product.
CAUTION
Do NOT rinse the unit. This may cause electric shocks or
fire.
NOTICE
▪ Do NOT place any objects or equipment on top of the
unit.
▪ Do NOT sit, climb or stand on the unit.
▪ Units are marked with the following symbol:
This means that electrical and electronic products may not be
mixed with unsorted household waste. Do NOT try to dismantle
the system yourself: the dismantling of the system, treatment of
the refrigerant, of oil and of other parts must be done by an
2 About this document
User reference guide
3
BelariaSR04+08+16I3 + BelariaSRC04+08+16I3
Hoval BelariaSRM and Hoval Belaria compact SRM
4P330441-1 – 2012.11
4 211 876 / 00 – 11/12
authorized installer and must comply with applicable legislation.
Units must be treated at a specialized treatment facility for reuse,
recycling and recovery. By ensuring this product is disposed of
correctly, you will help to prevent potential negative consequences
for the environment and human health. For more information,
contact your installer or local authority.
▪ Batteries are marked with the following symbol:
This means that the batteries may not be mixed with unsorted
household waste. If a chemical symbol is printed beneath the
symbol, this chemical symbol means that the battery contains a
heavy metal above a certain concentration.
Possible chemical symbols are: Pb: lead (>0.004%).
Waste batteries must be treated at a specialized treatment facility
for reuse. By ensuring waste batteries are disposed of correctly,
you will help to prevent potential negative consequences for the
environment and human health.
2 About this document
Thank you for purchasing this product. Please:
▪ Read the documentation carefully before operating the user
interface to ensure the best possible performance.
▪ Request the installer to inform you about the settings that he used
to configure your system. Check if he has filled in the installer
settings tables. If not, request him to do so.
▪ Keep the documentation for future reference.
Target audience
End users
Documentation set
This document is part of a documentation set. The complete set
consists of:
Document Contains… Format
General
safety
precautions
Safety instructions that
you must read before
operating your system
Paper (in the box of the
indoor unit)
Operation
manual
Quick guide for basic
usage
User
reference
guide
Detailed step-by-step
instructions and
background information
for basic and advanced
usage
CD/DVD (in the box of the
indoor unit)
Latest revisions of the supplied documentation may be available on
the regional Hoval website or via your installer.
Available screens
Depending on your system layout and installer configuration, not all
screens in this document may be available on your user interface.
Breadcrumbs
1 8 . 0 ° C >
2 0 . 0 ° C >
2 2 . 0 ° C >
2 4 . 0 ° C >
OK
17.4.1.1
E c o (h e a t i n g
)
C o m f o r t (h e a t i n
g
)
C o m f o r t (c o o l i n g
)
E c o (c o o l i n g
)
S e l e c t S c r o l l
R o o m t e m p e r a t u r e
Breadcrumbs help you to locate
where you are in the menu
structure of the user interface.
This document also mentions
these breadcrumbs.
Example: Go to [7.4.1.1] = Go to
> User settings > Preset
values > Room temperature >
Comfort (heating)
3 About the system
Depending on the system layout, the system can:
▪ Heat up a space
▪ Cool down a space (if a heating/cooling heat pump model is
installed)
▪ Produce domestic hot water (if a DHW tank is installed)
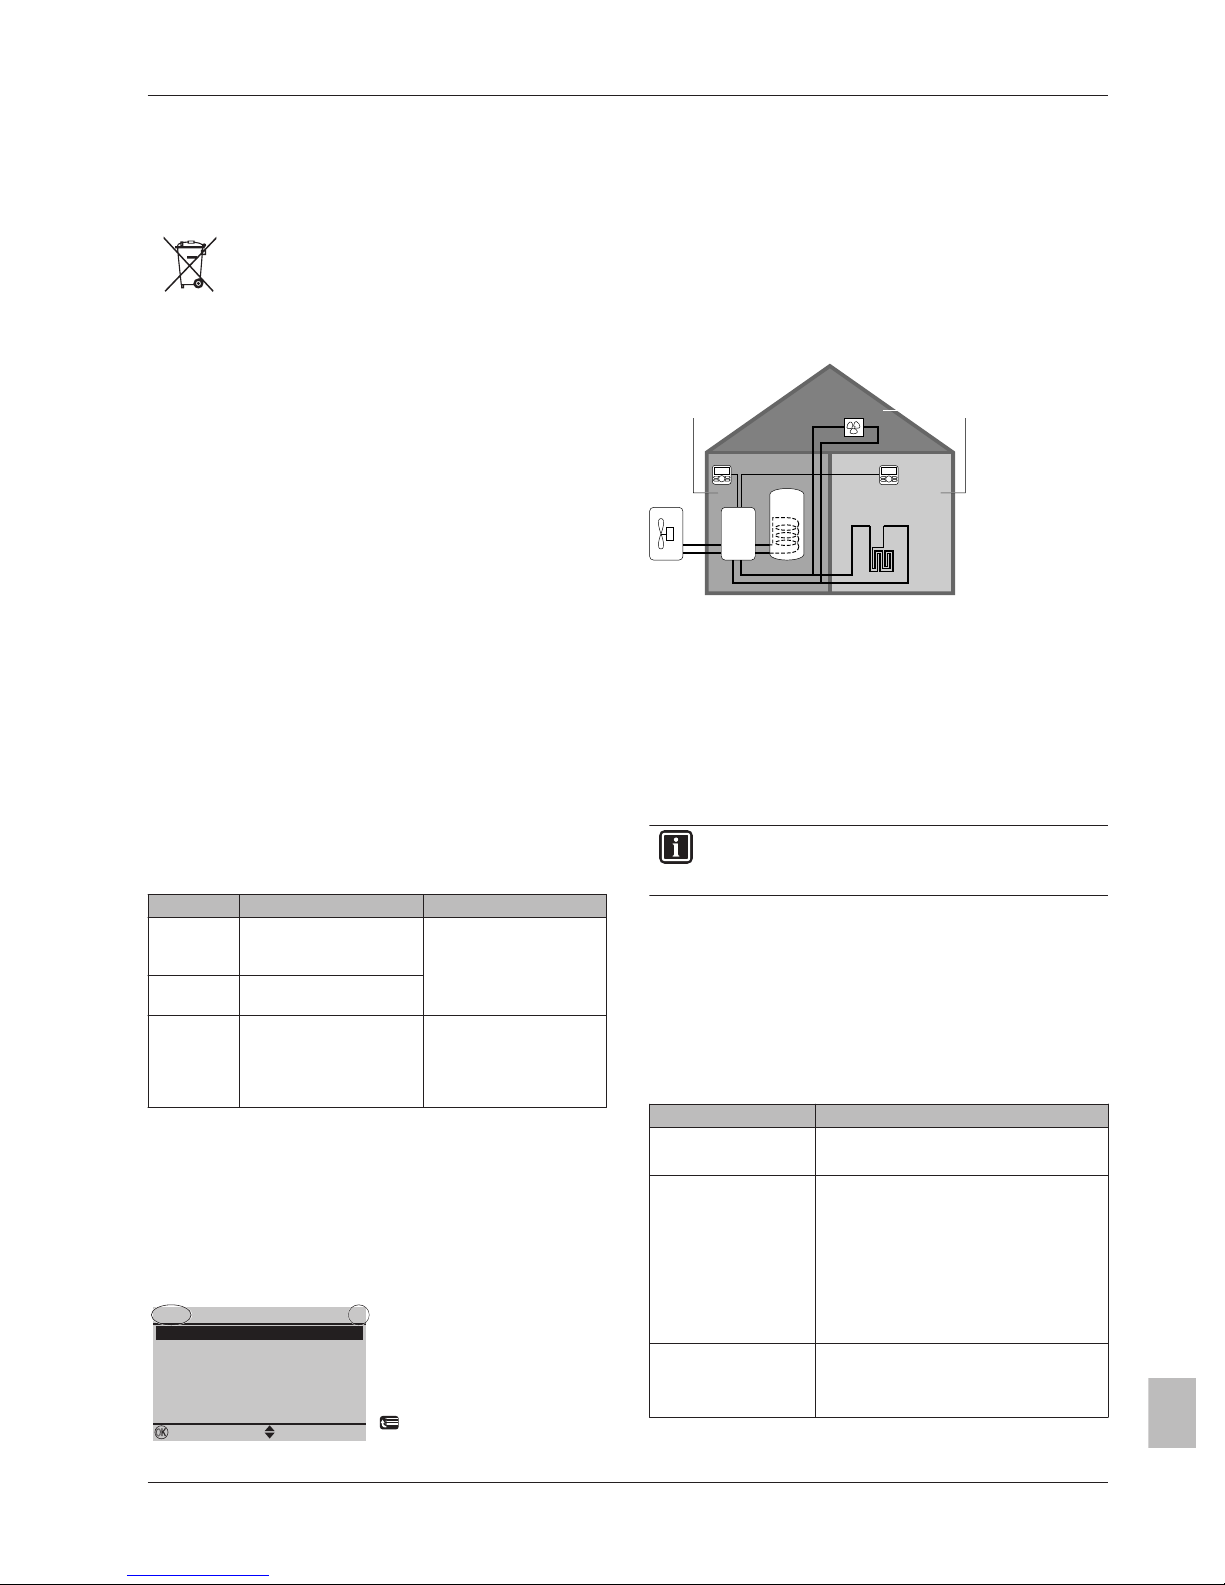
3.1 Components in a typical system layout
d
a b
c
e
f
g
BC A
A Main zone. Example: Living room.
B Additional zone. Example: Bedroom.
C Technical room. Example: Garage.
a Outdoor unit heat pump
b Indoor unit heat pump
c Domestic hot water (DHW) tank
d User interface at the indoor unit
e User interface in the living room, used as room thermostat
f Under floor heating
g Heat pump convectors or fan coil units
INFORMATION
Indoor and domestic hot water tank can be separated or
integrated depending on the indoor unit type.
4 Operation
4.1 Overview: Operation
You can operate the system via the user interface. This part
describes how to use the user interface:
Part Description
At a glance ▪ Buttons
▪ Status icons
Basic usage Information about:
▪ Home pages, where you can read out
and change settings that are meant for
daily usage
▪ Menu structure, where you can read out
and configure settings that are NOT
meant for daily usage
▪ ON/OFF controls
Space heating/cooling
control
How to control space heating/cooling:
▪ Setting the space operation mode
▪ Controlling the temperature
4 Operation
User reference guide
4
BelariaSR04+08+16I3 + BelariaSRC04+08+16I3
Hoval BelariaSRM and Hoval Belaria compact SRM
4P330441-1 – 2012.11
4 211 876 / 00 – 11/12
Part Description
Domestic hot water
control
How to control domestic hot water:
▪ Reheat mode
▪ Scheduled mode
▪ Scheduled + reheat mode
Advanced usage Information about:
▪ Quiet mode
▪ Holiday mode
▪ Reading out information
▪ Date, time, units of measurement,
contrast and backlight
▪ User profile and home pages
▪ Locking and unlocking buttons and
functions
Preset values and
schedules
▪ How to use preset values
▪ How to select and program schedules.
▪ Overview of predefined schedules
Menu structure Overview of menu structure
Installer settings table Overview of installer settings
4.2 The user interface at a glance
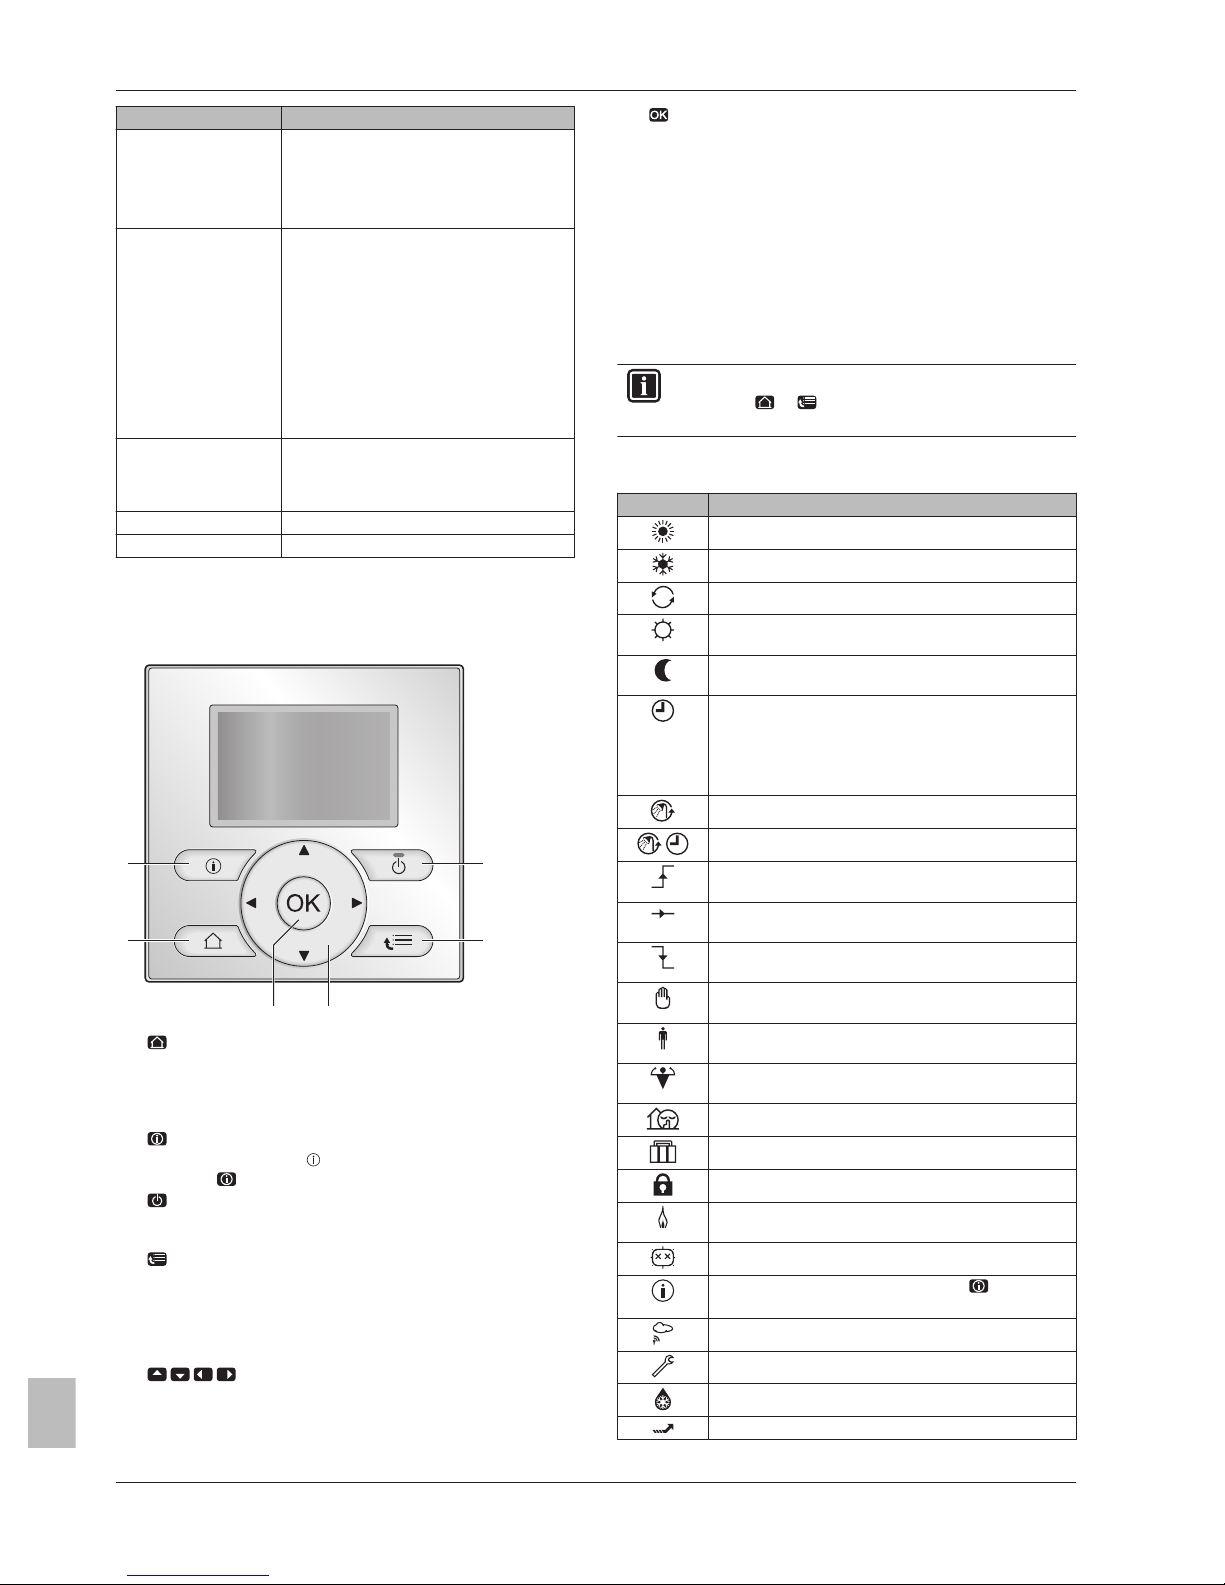
4.2.1 Buttons
a
ef
b
d
c
a
HOME PAGES
▪ Switches between home pages (when you are on a home
page).
▪ Goes to the default home page (when you are in the menu
structure).
b
MALFUNCTION INFORMATION
If a malfunction occurs, is displayed on the home pages. You
can press to display more information about the malfunction.
c
ON/OFF
Turns ON or OFF one of the controls (room temperature,
leaving water temperature, DHW tank temperature).
d
MENU STRUCTURE/BACK
▪ Opens the menu structure (when you are on a home page).
▪ Goes a level up in the menu structure (when you are
navigating in the menu structure).
▪ Goes back 1 step (example: when you are programming a
schedule in the menu structure).
e
NAVIGATING/CHANGING SETTINGS
▪ Navigates the cursor on the display.
▪ Navigates in the menu structure.
▪ Changes settings.
▪ Selects a mode.
f
OK
▪ Goes to the next step when you are programming a schedule
in the menu structure.
▪ Confirms a selection.
▪ Enters a submenu in the menu structure.
▪ Switches between displaying actual and desired values, or
between displaying actual and offset values (if applicable) on
the home pages.
▪ Enables you to activate or deactivate child lock if pressed for
more than 5 seconds on a home page.
▪ Enables you to activate or deactivate a function lock if
pressed for more than 5 seconds in the main menu of the
menu structure.
INFORMATION
If you press or while changing settings, the changes
will NOT be applied.
4.2.2 Status icons
Icon Description
Space operation mode = Heating.
Space operation mode = Cooling.
Unit is operating.
Desired room temperature = preset value (Comfort;
daytime).
Desired room temperature = preset value (Eco;
nighttime).
▪ On the room temperature home page: Desired
room temperature = according to the selected
schedule.
▪ On the DHW tank temperature home page:
DHW tank mode = Scheduled mode.
DHW tank mode = Reheat mode.
DHW tank mode = Scheduled + reheat mode.
At the next scheduled action, the desired temperature
will increase.
At the next scheduled action, the desired temperature
will NOT change.
At the next scheduled action, the desired temperature
will decrease.
The preset value (Comfort or Eco) or scheduled value
is temporarily overruled.
The system will produce domestic hot water for the
indicated number of persons.
The DHW tank booster mode is active or ready to be
activated.
Quiet mode is active.
Holiday mode is active or ready to be actived.
Child lock mode and/or function lock mode is active.
An external heat source is active. Example: Gas
burner.
The disinfection mode is active.
A malfunction occured. You can press to display
more information about the malfunction.
Weather-dependent mode is active.
User permission level = Installer.
Defrost/oil return mode is active.
Hot start mode is active.
4 Operation
User reference guide
5
BelariaSR04+08+16I3 + BelariaSRC04+08+16I3
Hoval BelariaSRM and Hoval Belaria compact SRM
4P330441-1 – 2012.11
4 211 876 / 00 – 11/12
Icon Description
Emergency operation is active.
4.3 Basic usage
4.3.1 Using home pages
About home pages
You can use the home pages to read out and change settings that
are meant for daily usage. What you can see and do on the home
pages is described where applicable. Depending on your system
layout, the following home pages may be possible:
▪ Room temperature (Room )
▪ Main leaving water temperature (LWT main)
▪ Additional leaving water temperature (LWT add)
▪ DHW tank temperature (Tank)
To go to a home page
1 Press .
Result: One of the home pages is displayed.
2 Press
again to display the next home page (if any).
4.3.2 Using the menu structure
About the menu structure
You can use the menu structure to read out and configure settings
that are NOT meant for daily usage. What you can see and do in the
menu structure is described where applicable. For an overview of
the menu structure, see "4.8 Menu structure: Overview" on
page 19.
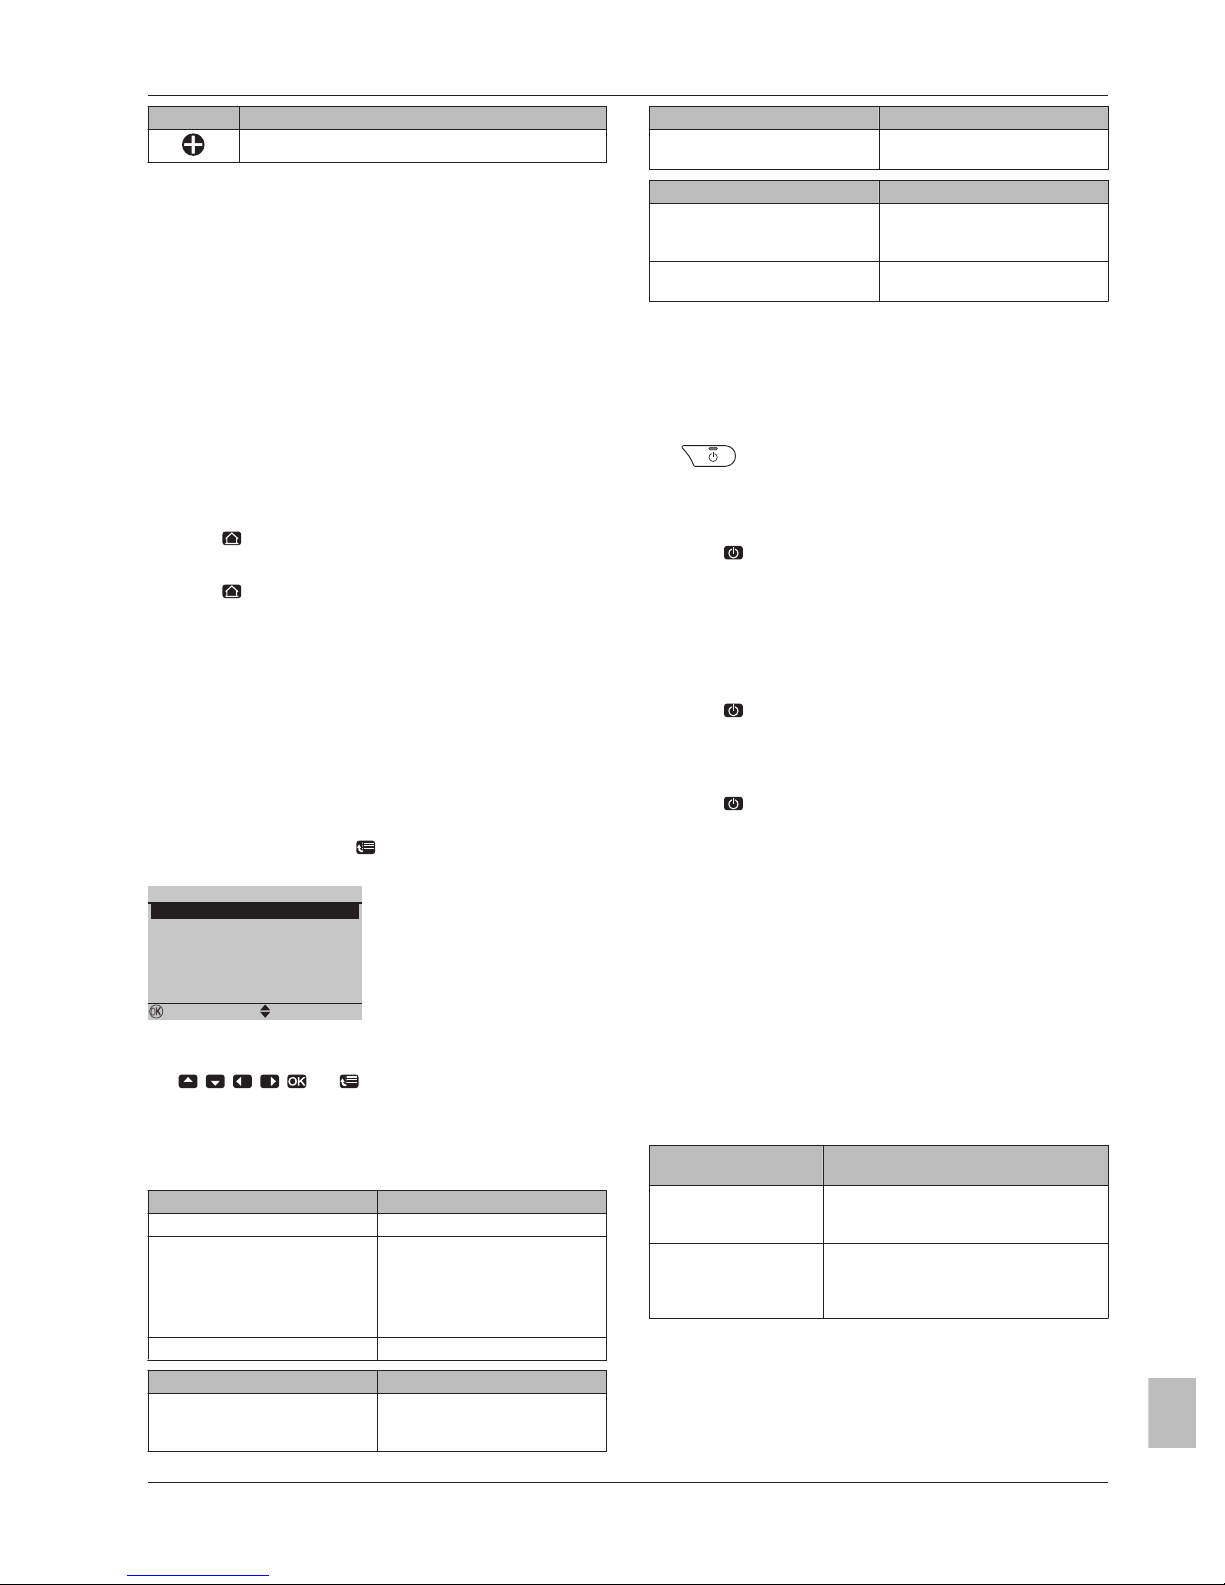
To go to the menu structure
1 From a home page, press .
Result: The menu structure is displayed.
>
>
>
>
>
>
1
OK
H o l i d a y
S e t t i m e / d a t e
Q u i e t m o d e
O p e r a t i o n m o d e
A u t o
H e a t i n g
S e l e c t s c h e d u l e s
I n f o r m a t i o n
S e l e c t S c r o l l
To navigate in the menu structure
Use , , , , and .
4.3.3 Turning ON/OFF controls
About turning ON/OFF controls
Before you can control… You have to turn ON…
Room temperature Room temperature control.
Main (+ additional) leaving water
temperature
Main (+ additional) leaving water
temperature control.
Main and additional leaving water
temperature control are always
turned ON or OFF together.
DHW tank temperature Domestic hot water control.
If you turn ON… Then…
Room temperature control Main (+ additional) leaving water
temperature control is
automatically turned ON.
If you turn ON… Then…
Main (+ additional) leaving water
temperature control
Room temperature control is
NOT automatically turned ON.
If you turn OFF… Then…
Room temperature control Main (+ additional) leaving water
temperature control is NOT
automatically turned OFF.
Main (+ additional) leaving water
temperature control
Room temperature control is
automatically turned OFF.
To check if a control is turned ON or OFF
1 Go to the home page of the control.
Example: Room temperature home page (Room ).
2 Check if the LED is ON or OFF.
Note: If the control is turned OFF, OFF is also displayed on the
screen.
To turn ON or OFF the room temperature control
1 Go to the room temperature home page (Room).
2 Press .
To turn ON or OFF the leaving water temperature
(main + additional) control
1 Go to one of the following the home pages:
▪ Main leaving water temperature home page (LWT main)
▪ Additional leaving water temperature home page (LWT add)
2 Press .
To turn ON or OFF the domestic hot water control
1 Go to the DHW tank temperature home page (Tank).
2 Press .
4.4 Space heating/cooling control
4.4.1 About space heating/cooling control
Controlling space heating/cooling typically consists of the following
stages:
1 Setting the space operation mode
2 Controlling the temperature
4.4.2 Setting the space operation mode
About space operation modes
Depending on your heat pump model, you have to tell the system
which space operation mode to use: heating or cooling.
If a… heat pump model
is installed
Then…
Heating/cooling The system can heat up and cool down a
space. You have to tell the system which
space operation mode to use.
Heating only The system can heat up a space, but
NOT cool down a space. You do NOT
have to tell the system which space
operation mode to use.
To tell the system which space operation to use, you can do the
following:
4 Operation
User reference guide
6
BelariaSR04+08+16I3 + BelariaSRC04+08+16I3
Hoval BelariaSRM and Hoval Belaria compact SRM
4P330441-1 – 2012.11
4 211 876 / 00 – 11/12
You can… Location
Check which space operation mode is
currently used.
Home pages:
▪ Room temperature
▪ Leaving water
temperature (main
+ additional)
Set the space operation mode. Menu structure
Restrict when automatic changeover is
possible.
To determine if a heating/cooling heat pump
model is installed
1 Press to go to the menu structure.
2 Check if [4] Operation mode is listed. If so, a heating/cooling
heat pump model is installed.
To check which space operation mode is currently
used
1 Go to one of the following the home pages:
▪ Room temperature home page (Room)
▪ Main leaving water temperature home page (LWT main)
▪ Additional leaving water temperature home page (LWT add)
2 Check the status icon:
If you see… Then…
Operation mode = heating.
Unit is NOT heating up your space.
However, the DHW tank can be
heating up.
Operation mode = heating.
Unit is heating up your space at this
moment.
Operation mode = cooling.
Unit is NOT cooling down your space.
However, the DHW tank can be
heating up.
Operation mode = cooling.
Unit is cooling down your space at this
moment.
To set the space operation mode
1 Go to [4]: > Operation mode.
2 Select one of the following and press
:
If you select… Then the space operation mode is…
Heating Always heating mode.
Cooling Always cooling mode.
Automatic Automatically changed by the software
based on the outdoor temperature
(and depending on installer settings
also the indoor temperature), and
takes monthly restrictions into account.
Note: Automatic changeover is only
possible under certain conditions.
To restrict when automatic changeover is possible
1 Go to [7.5]: > User settings > Allowed operation mode.
2 Select a month and press
.
3 Select Heating only, Cooling only or Heating/Cooling, and press
.
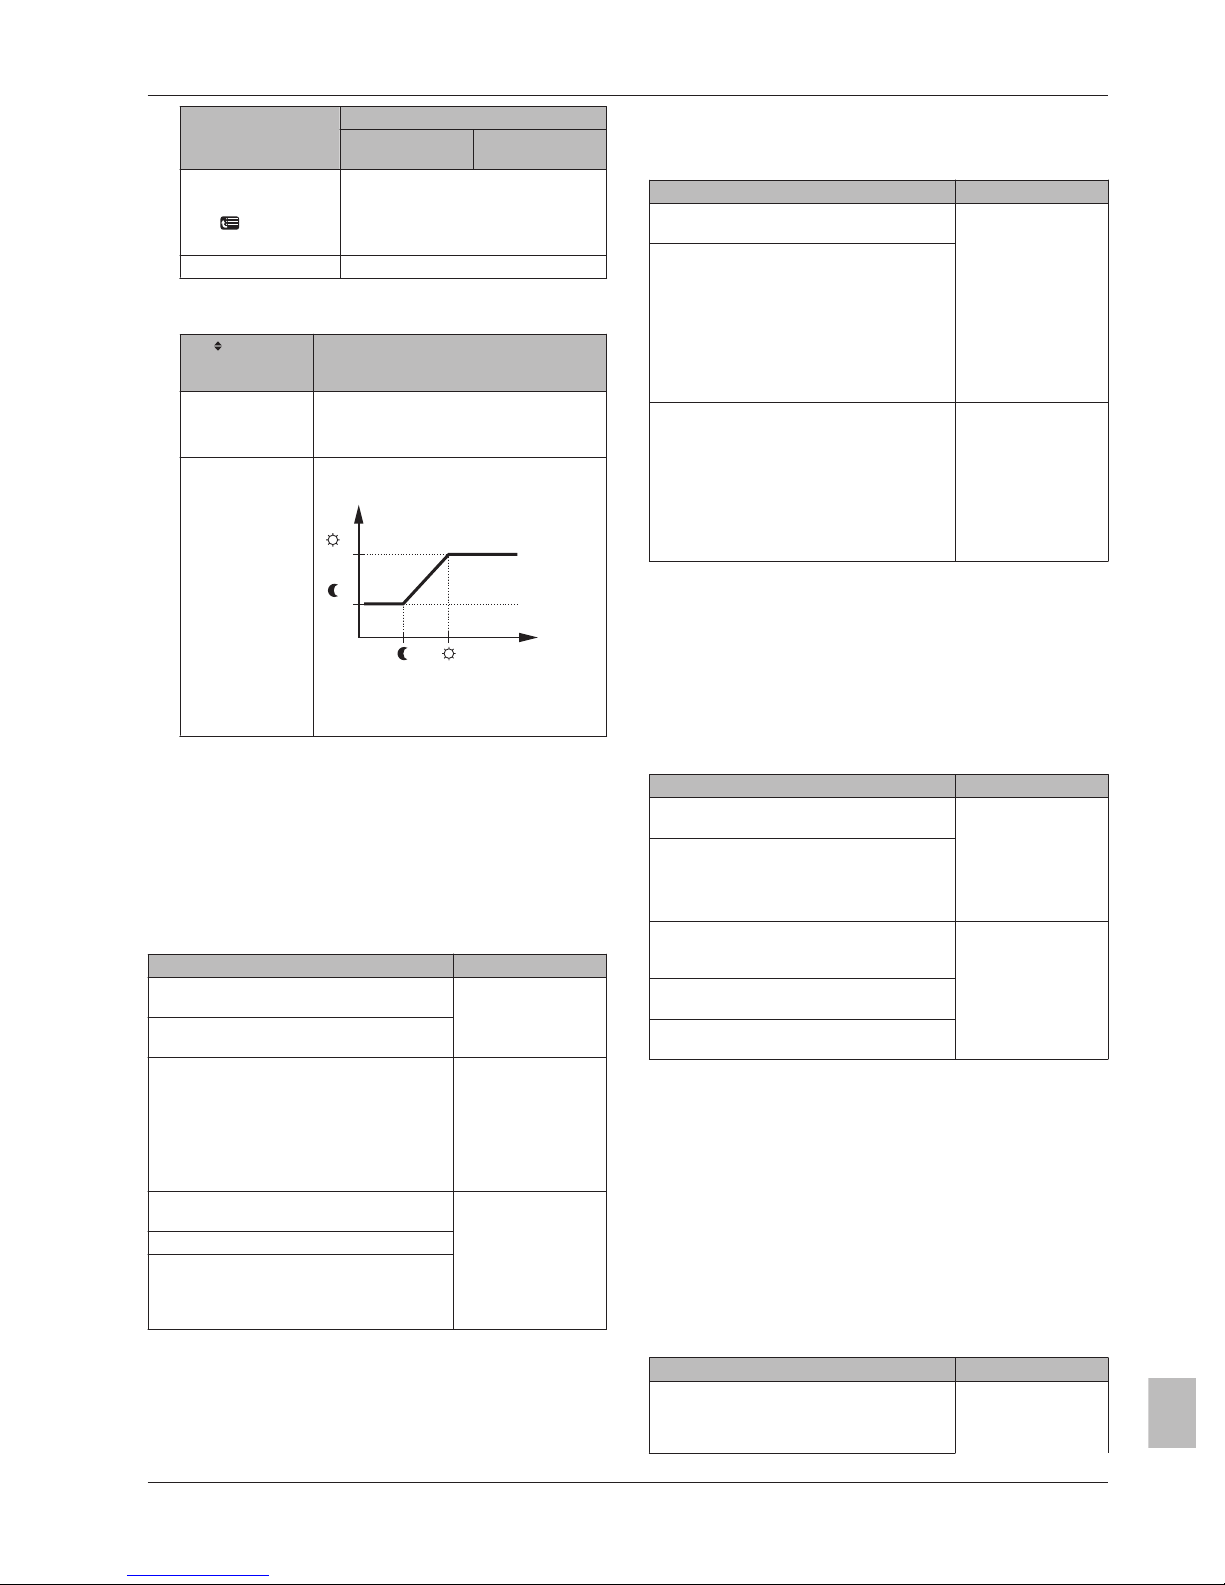
Typical automatic changeover restrictions
When Restriction
During cold season.
Example: October, November, December,
January, February and March.
Heating only
During warm season.
Example: June, July and August.
Cooling only
In-between.
Example: April, May and September.
Heating/Cooling
4.4.3 Controlling the temperature
About controlling the temperature
Depending on the system layout and installer configuration, you use
a different temperature control:
▪ Room thermostat control (linked or NOT linked)
▪ Leaving water temperature control
▪ External room thermostat control
To determine which temperature control you are using
(method 1)
Check the installer settings table filled in by the installer.
To determine which temperature control you are using
(method 2)
If you have 2 user interfaces, perform the following procedure on the
user interface at the indoor unit.
1 Press
multiple times to switch between home pages, and
check if the additional leaving water temperature home page
(LWT add) is available:
If … Then you have…
Available A main zone and an additional
zone
NOT available Only a main zone
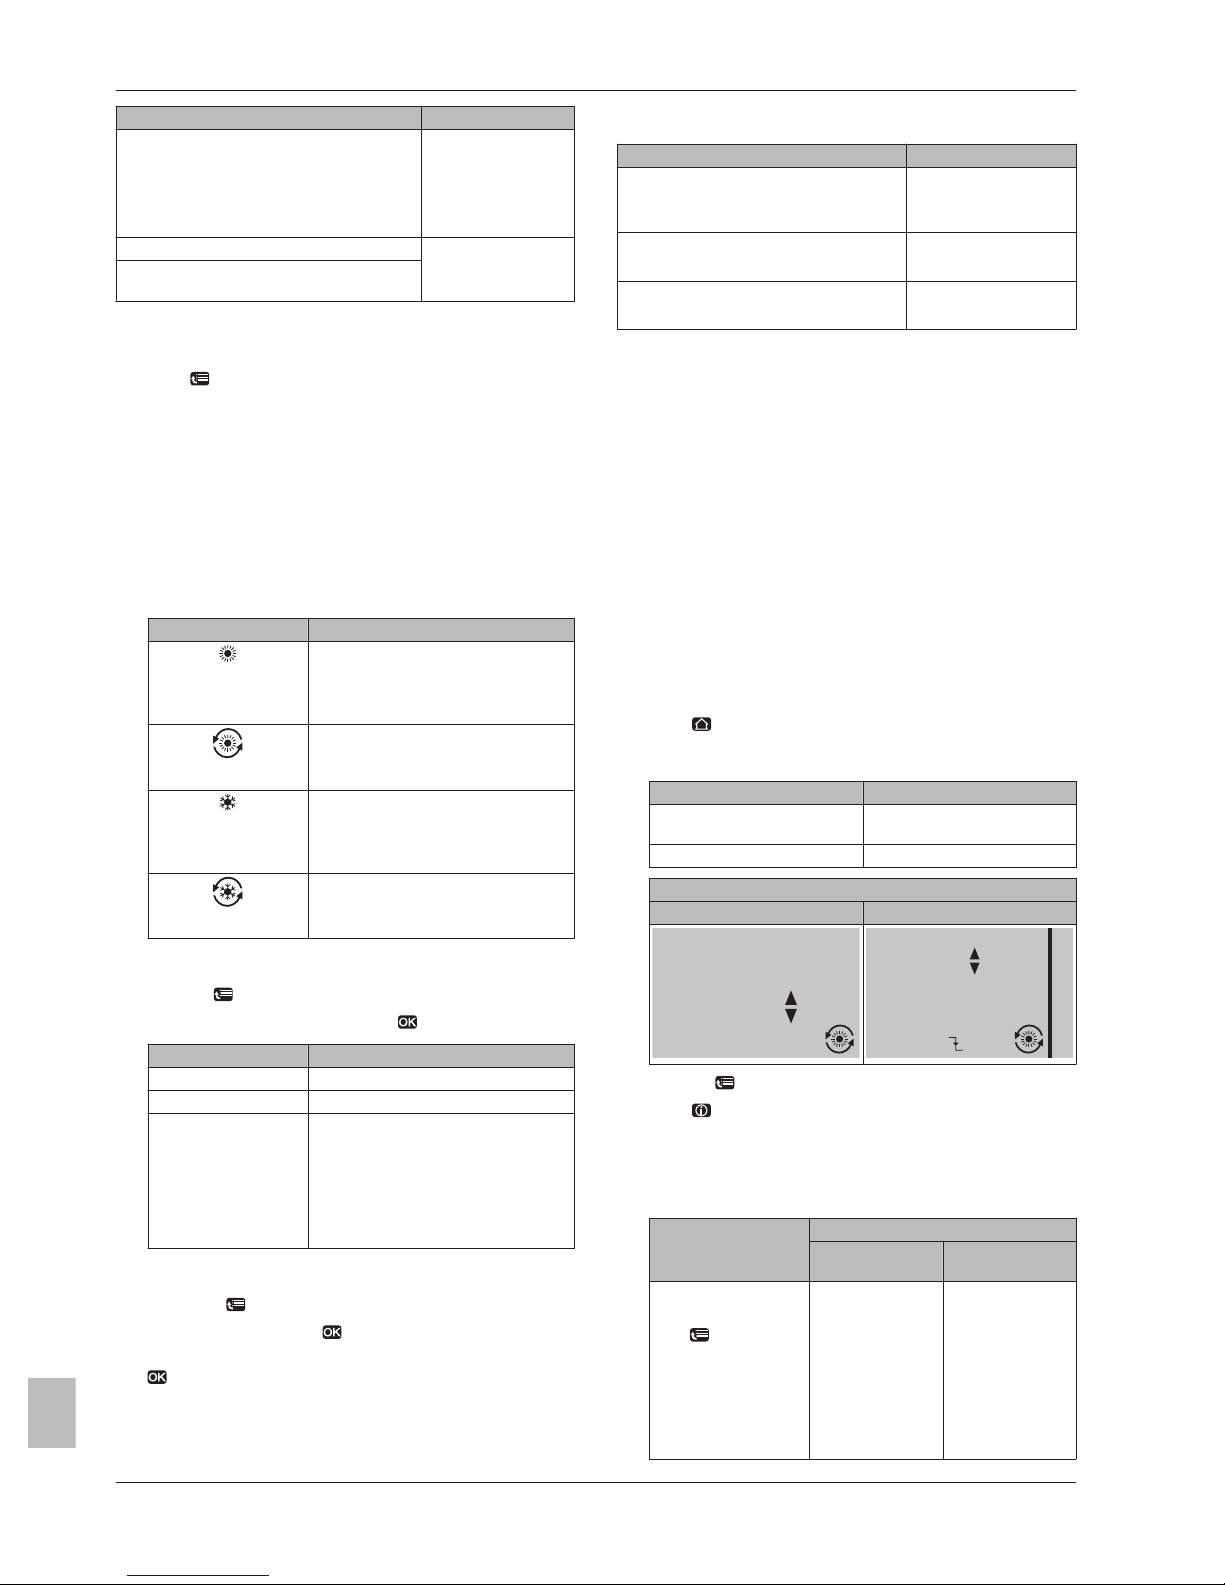
Typical additional leaving water temperature home page:
User profile = Basic User profile = Detailed
45°C
1 5 : 2 0
D e s i r e d t e m p e r a t u r e
Mon
LWT add
45°C
1 5 : 2 0
2 2 : 0 0
D e s i r e d t e m p e r a t u r e
Mon
LWT add
Mon
2 Go to [6]: > Information.
3 Press for more than 5 seconds.
Result: The user permission level switches to Adv. end user.
Additional information is displayed and "+" is added to the menu
title.
4 Check the following:
If… Then the temperature control is…
Main zone Additional zone
(if any)
Room temperature is
listed under:
[6.1]: > Information
> Sensor information
Room thermostat
control.
Go to next step to
check if leaving
water set point and
room temperature
set point are
linked.
External room
thermostat control.
4 Operation
User reference guide
7
BelariaSR04+08+16I3 + BelariaSRC04+08+16I3
Hoval BelariaSRM and Hoval Belaria compact SRM
4P330441-1 – 2012.11
4 211 876 / 00 – 11/12
If… Then the temperature control is…
Main zone Additional zone
(if any)
Thermostat main A is
listed under:
[6.5]: > Information
> Actuators
External room thermostat control.
Else Leaving water temperature control.
5 Only for room thermostat control: Go to the main leaving water
temperature home page (LWT main) and check the following:
Is displayed
next to the
set point?
Then leaving water set point and room
temperature set point are…
Yes NOT linked.
You can set the leaving water set point on
the home page.
No Linked by their preset values. You can set
the preset values in the menu structure.
35°C
18°C 22°C
30°C
T
l
T
r
▪ Tr: Room temperature
▪ Tl: Leaving water temperature
Room thermostat control
Room thermostat control means that you control the following:
▪ Room temperature of the main zone
▪ Leaving water temperature of the main zone
Room temperature of the main zone
To control the room temperature of the main zone, you can do the
following:
You can… Location
Read out the actual and desired room
temperature.
Room temperature
home page
Temporarily overrule the room temperature
schedule.
Change the mode from scheduled to preset
value.
If you do this, you also have to define (in the
menu structure):
▪ Preset values
▪ Overrule period (Temperature lock)
Room temperature
home page if user
profile = Detailed
Select which room temperature schedule
you want to use.
Menu structure
Program schedules.
Define preset values that are used by the
room temperature schedule, and when you
change the mode from scheduled to preset
value.
See also:
▪ "Using the room temperature home page" on page 8
▪ "To set the overrule period" on page 9
▪ "4.7 Preset values and schedules" on page 15
Leaving water temperature of the main zone
To control the leaving water temperature of the main zone, you can
do the following:
You can… Location
Read out the desired leaving water
temperature.
Leaving water
temperature home
page (main)
Adjust the leaving water temperature.
Condition: Leaving water set point is NOT
linked with the room temperature set point.
Only change this if the desired room
temperature cannot be reached.
Define preset values.
Condition: Leaving water set point is linked
with the room temperature set point.
Only change this if the desired room
temperature cannot be reached.
Menu structure
See also:
▪ "Using the leaving water temperature home pages (main +
additional)" on page 9
▪ "4.7 Preset values and schedules" on page 15
Leaving water temperature control
Leaving water temperature control means that you only control the
leaving water temperature. To control the leaving water temperature,
you can do the following:
You can… Location
Read out the desired leaving water
temperature (main + additional).
Leaving water
temperature home
pages (main +
additional)
▪ Adjust/overrule the leaving water
temperature (main).
▪ Adjust the leaving water temperature
(additional).
Select which leaving water temperature
schedule (main + additional) you want to
use.
Menu structure
Program leaving water temperature
schedule (main + additional).
Define preset values that are used by the
leaving water temperature schedule (main).
See also:
▪ "Using the leaving water temperature home pages (main +
additional)" on page 9
▪ "4.7 Preset values and schedules" on page 15
External room thermostat control
External room thermostat control means that you control the
following:
▪ Room temperature on the external thermostat control
▪ Leaving water temperature on the user interface (Hoval)
To control the leaving water temperature, you can do the following:
You can… Location
Read out the desired leaving water
temperature.
Leaving water
temperature home
pages (main +
additional)
4 Operation
User reference guide
8
BelariaSR04+08+16I3 + BelariaSRC04+08+16I3
Hoval BelariaSRM and Hoval Belaria compact SRM
4P330441-1 – 2012.11
4 211 876 / 00 – 11/12
You can… Location
Adjust the temperature.
Only change this if the desired room
temperature cannot be reached.
See also: "Using the leaving water temperature home pages (main +
additional)" on page 9.
Using the room temperature home page
Typical room temperature home pages
Depending on the user profile, you can do more or less on the home
page.
User profile = Basic User profile = Detailed
20.0°C
1 5 : 2 0
A c t u a l t e m p e r a t u r e
Mon
Room
20.0°C
1 5 : 2 0
1 7 : 3 0
A c t u a l t e m p e r a t u r e
S c he d u l e d
Tue
Mon
Room
To read out the actual and desired room temperature
1 Go to the room temperature home page (Room).
Result: You can read out the actual temperature.
20.0°C
A c t u a l t e m p e r a t u r e
2 Press .
Result: You can read out the desired temperature.
22.0°C
D e s i r e d t e m p e r a t u r e
To temporarily overrule the room temperature schedule
1 Go to the room temperature home page (Room).
2 Use or to adjust the temperature.
To change the mode from scheduled to preset value
Prerequisite: User profile = Detailed.
1 Go to the room temperature home page (Room).
2 Press or to select a preset value ( or ).
Example: Temporarily overruling the schedule AND changing
the mode to preset value
You have configured the following settings:
Settings Description
Preset values Comfort (heating) =
20°C
Desired temperature when
you are at home.
Eco (heating) = 18°C Desired temperature:
▪ When you are away
▪ During the night
Schedule 07:00 Comfort You are at home.
Desired temperature =
preset value (Comfort
(heating)).
09:00 Eco You are away.
Desired temperature =
preset value (Eco
(heating)).
Settings Description
17:00 Comfort You are at home.
Desired temperature =
preset value (Comfort
(heating)).
19:00 21°C You are at home and want
it to be a little warmer.
Desired temperature =
custom temperature.
23:00 Eco Desired temperature =
preset value (Eco
(heating)).
Overrule period
(Temperature
lock)
hours If you temporarily overrule
the schedule by a preset
value, after 2 hours the
schedule will be used
again.
If user profile = Basic, then you can temporarily overrule the room
temperature schedule by pressing or .
Situation Description
15:20 => Scheduled temperature
= preset value (Eco (heating))=
18°C.
You temporarily overrule the
schedule.
Desired temperature = custom
temperature = 19°C.
At the next scheduled action
(17:00), the schedule will be
used again.
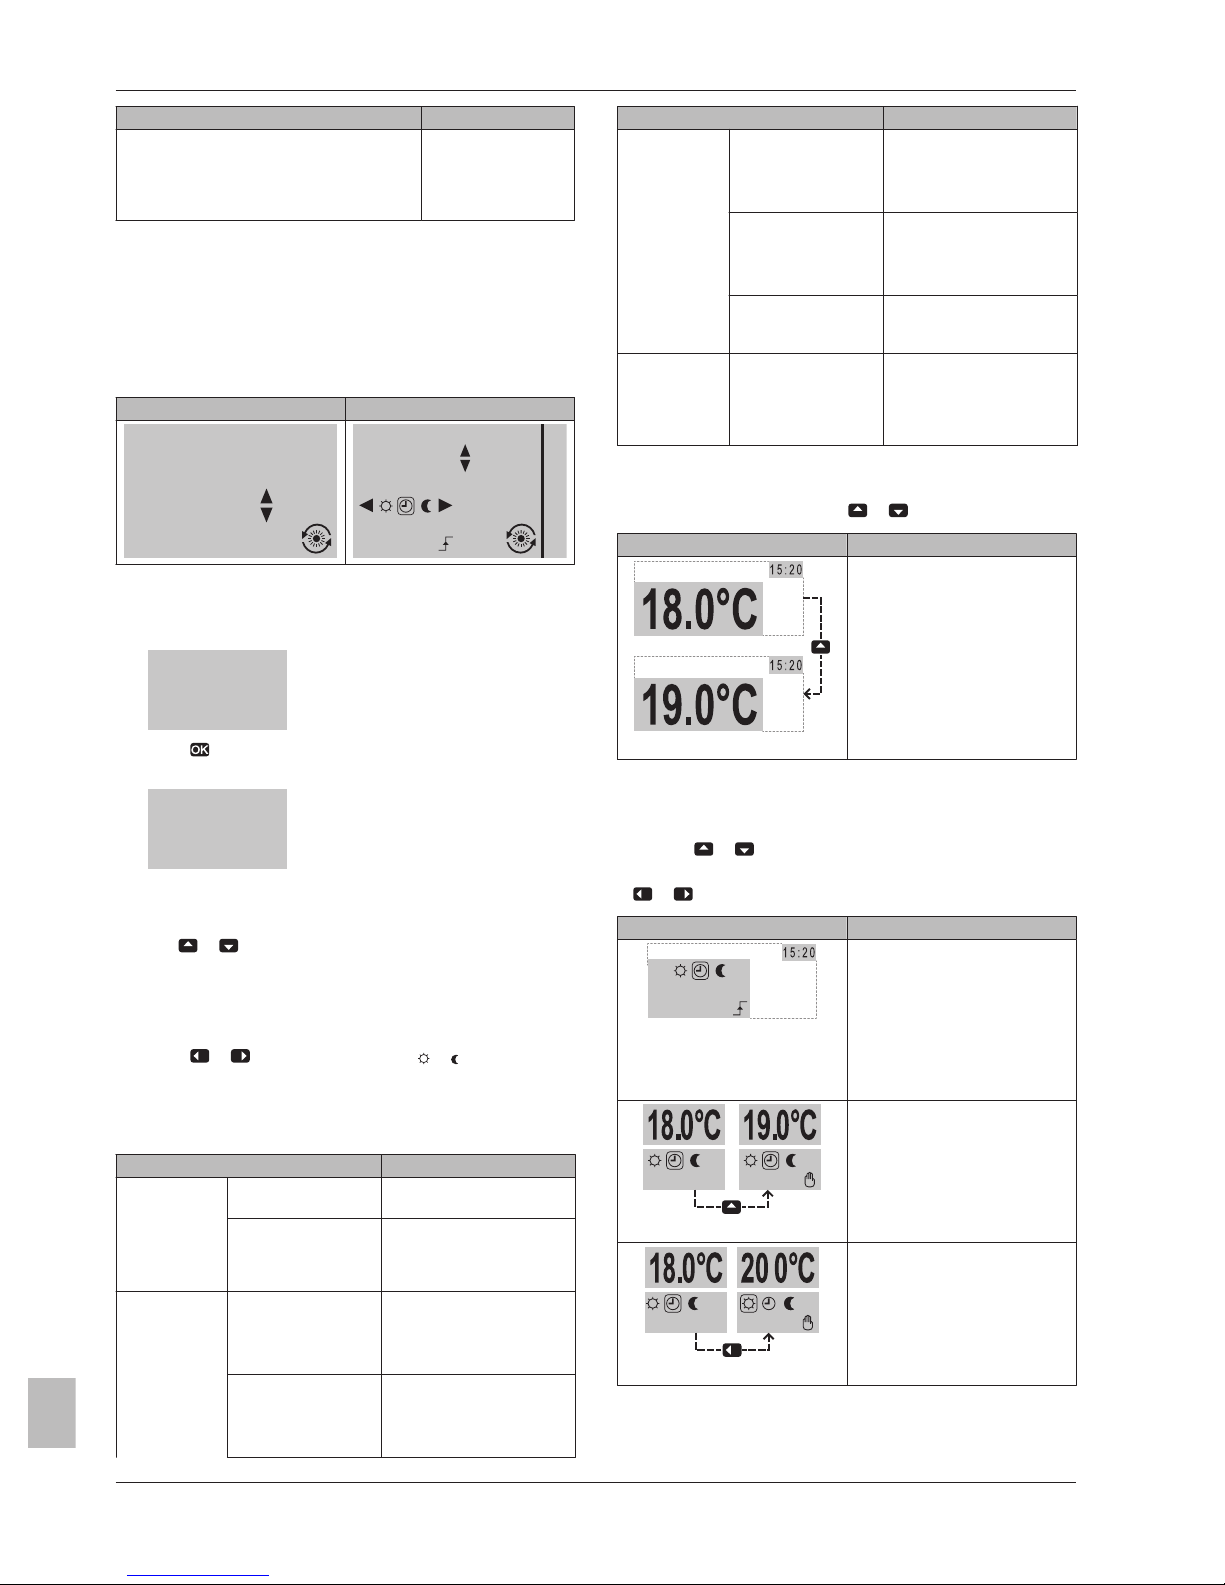
If user profile = Detailed, then you can:
▪ Temporarily overrule the room temperature schedule by
pressing
or (same as if user profile = Basic)
▪ Change the mode from scheduled to a preset value by pressing
or
Situation Description
1 7 : 0 0
S c h e d u l e d
Mo n
Room temperature schedule is
used.
15:20 => Desired temperature =
preset value (Eco (heating)) =
18°C.
The next scheduled action is at
17:00 and the desired
temperature will then increase.
You temporarily overrule the
schedule.
Desired temperature = custom
temperature = 19°C.
At the next scheduled action
(17:00), the schedule will be
used again.
You change the mode from
scheduled to preset value
(Comfort (heating)).
Desired temperature = preset
value (Comfort (heating)) = 20°C.
After 2 hours, the schedule will
be used again (17:20 => 20°C).
 Loading...