

Hougen 0904101 HMD904, 0904102 HMD904 Operator's Manual

OPERATOR’S MANUAL
HMD904 SERIES PORTABLE MAGNETIC DRILL
Covers Drill
Covers Drill
Part Numbers:
Part Numbers:
0904101
0904102
OM9040614 Printed in U.S.A.
HOUGEN
PORTABLE MAGNETIC DRILL
MODEL HMD904 SERIES
Welcome to Hougen
Congratulations on your purchase of the Hougen® Portable Magnetic Drill. Your model is designed to produce superior holes quickly and
efciently. Through constant innovation and development, Hougen is committed to provide you with hole producing tools and products to
help you be more productive.
Before attempting to operate your new Portable Magnetic Drill, please read all instructions rst. These include the Operator’s Manual and
Warning Label on the unit itself. With proper use, care, and maintenance, your model will provide you with years of effective hole drilling
performance. Once again, thank you for selecting our product and welcome to Hougen.
®
Specifications
Cutter Type........................Hougen "12,000-Series" and Copperhead™ Carbide
Hole Capacity....................7/16" to 1-1/2" (12mm-38mm)
Depth of Cut......................2" (50mm)
Motor.................................115V - 8A, 920W, 450 RPM
Net Weight.........................28.9 lbs. (13.1kg)
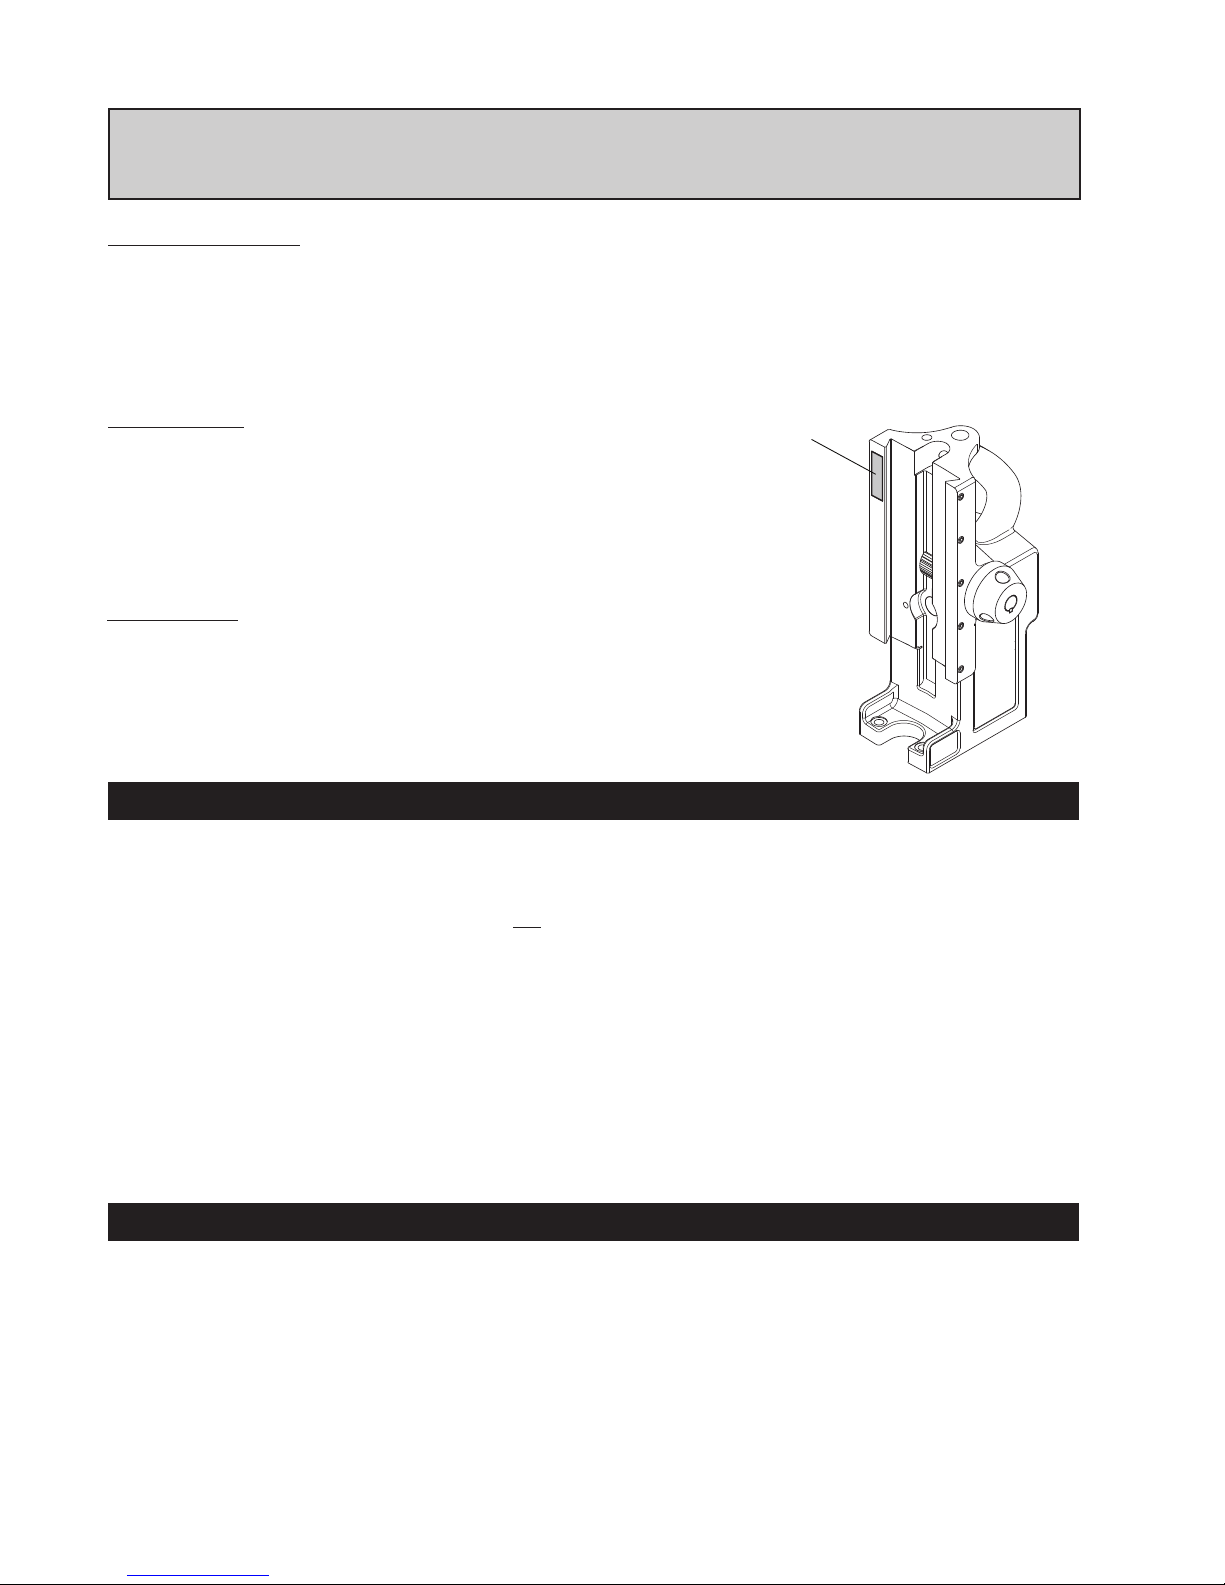
The HMD904 is offered in many versions. Refer to the Serial/Part number Label on your
housing to direct you to the correct breakdown.
Serial Number/
Part Number Label
Part Numbers
0904101 HMD904 115V
0904102 HMD904 115V with Coolant Bottle
UNPACKING YOUR NEW MAGNETIC DRILL
1. Open shipping carton and remove the literature and
hardware packages.
2. Read and Follow All Instructions before attempting
to operate your new Magnetic Drill.
3. Complete and mail the Product Registration Card now.
It is important that Hougen Manufacturing, Inc. have a
record of product ownership.
4. Open hardware package and check contents.
10565 1/8" Hex wrench for Gib Adjustment
04558 Feed handles (3)
04532 Feed handle knobs (3)
10506 Set screw for cutter installation (2)
10730 Safety chain
02635 Hex wrench for cutter installation
24166 7/32" Hex wrench
5. Using the handle of Magnetic Drill, lift unit out of the
shipping case.
6. Remove all packing and securing material from the drill
unit.
7. Screw the three Knobs into the three Feed Handles and
then screw Handles into the Hub Assembly. Do not over
tighten or may strip the knobs.
8. Your Magnetic Drill was factory adjusted prior to shipping.
Check to make sure that all gib adjustment screws, motor
mount screws, front support bracket screws, and magnet
mounting screws are snug and have not vibrated loose in
transit.
9. Your new Magnetic Drill comes complete with arbor
mounted. The 3/4" diameter arbor bore ts all 3/4"-shank
"12,000-Series" Hougen Cutters.
Reread Safety Warnings listed in the Operator’s Manual
and on the drill unit to avoid injury. Follow operating
procedures.
Welcome to Hougen 2
Safety Instructions 3-4
Safety Chain Instructions 4
Operation of Controls 5
Safety Switch Indicator Light 5
Pilot Light Switch 5
Installing Hougen Cutters 6
Operating Instructions 6
Coolant Bottle Assembly & Breakdown 7
HMD904 Assembly Breakdown 8-9
INDEX
115V Control Panel Breakdown 10
Motor Slide Assembly Breakdown 11
Motor Breakdown 12
Maintenance 13
Adjustment of Gibs & Arbor Adjustment 13
Arbor Removal & Installation 14
Hints & Remedies for Holemaking 15
Commercial / Industrial Limited Warranty 16
Authorized Warranty Repair Centers 16
2
SAFETY FIRST
Important Safety Instructions
WARNING: Read and understand all instructions. Failure to follow all instructions listed below,
may result in electrical shock, fire and/or serious personal injury.
Important Safety Instructions
Read and understand all instructions. Failure to follow all instructions listed below,
may result in electrical shock, fire and/or serious personal injury.
English
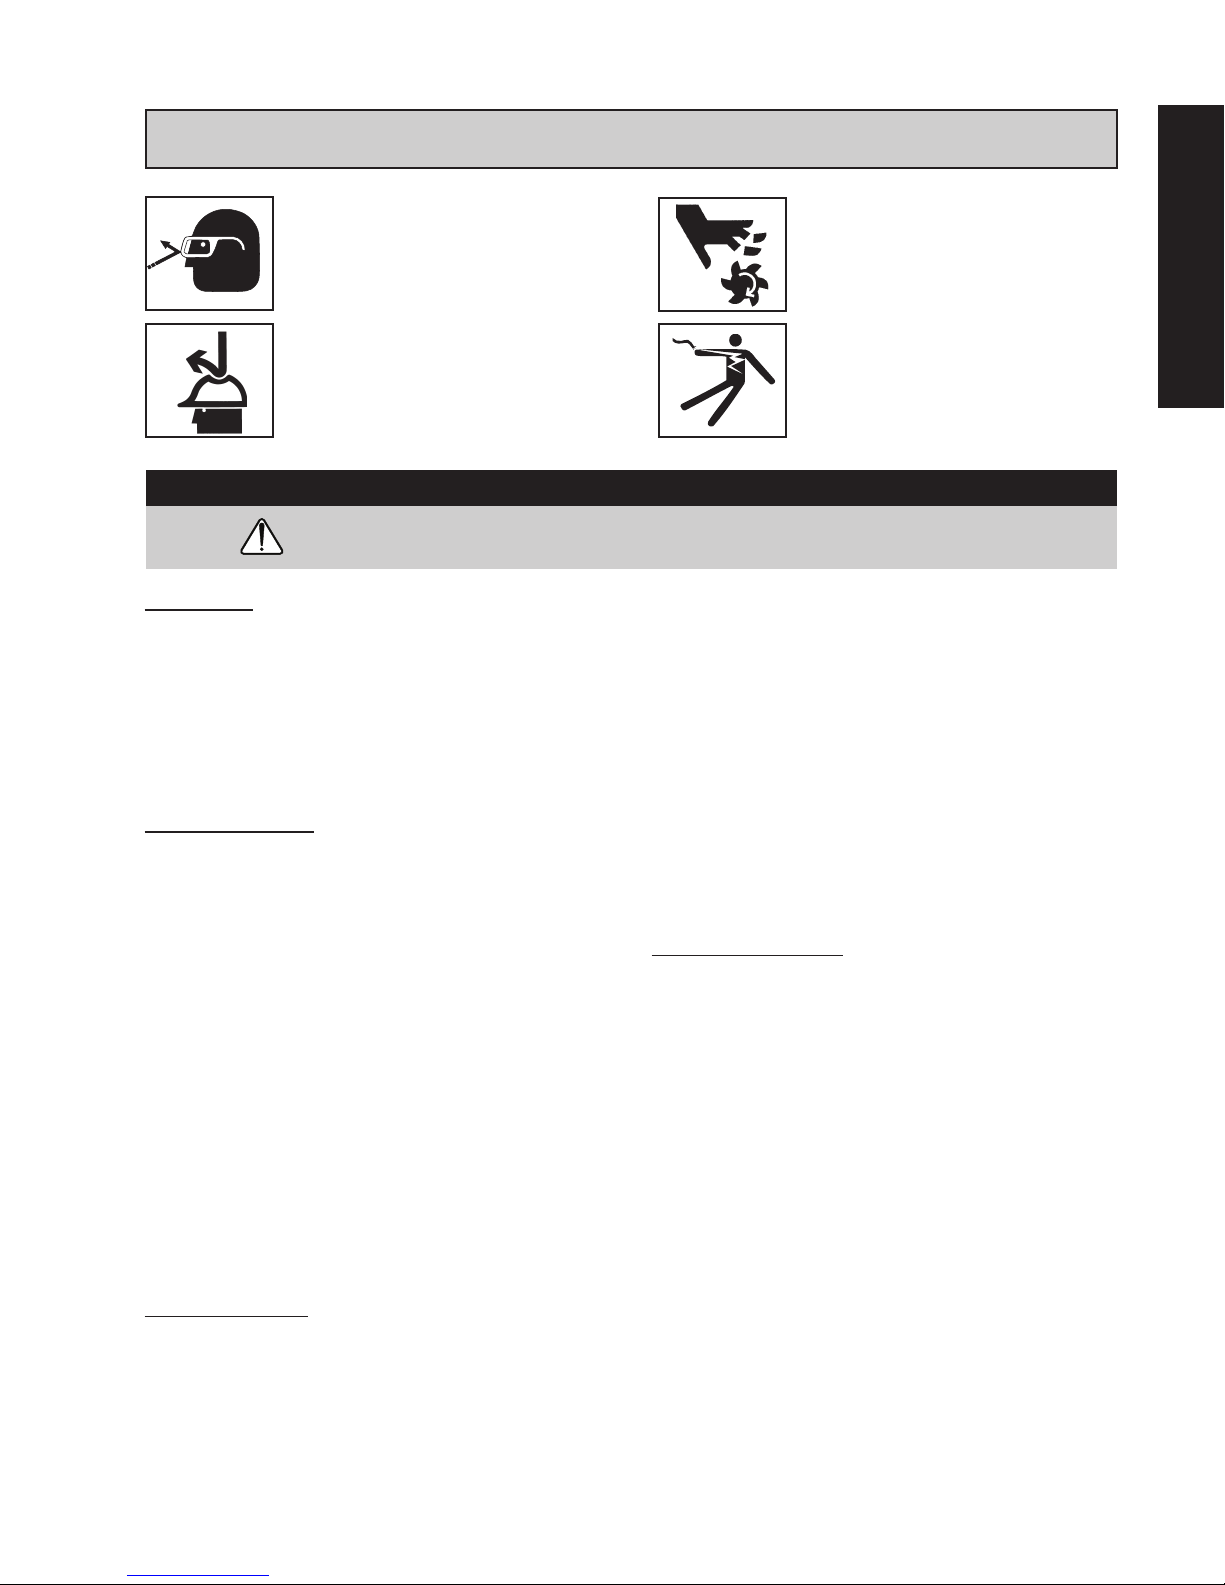
Always wear eye protection
while using cutting tools, or in
the vicinity of cutting.
CAUTION! Cutters are sharp.
Wear gloves when installing or
removing cutter from arbor. Do
not grab a rotating cutter.
English
CAUTION! The slug is ejected
at the end of the cut. Do not aim
cutter or arbor so that ejected
slug may hit someone around,
or below you.
IMPORTANT SAFETY INSTRUCTIONS
WARNING:
Work Area
Keep your work area clean and well lit. Cluttered benches and
dark areas invite accidents.
Do not operate power tools in explosive atmospheres, such as
in the presence of ammable liquids, gases or dust. Power tools
create sparks which may ignite the dust or fumes.
Keep bystanders, children, and visitors away while operating a
power tool. Distractions can cause you to loose control.
Electrical Safety
Grounded tools must be plugged into an outlet properly
installed and grounded in accordance with all codes and
ordinances. Never remove the ground prong or modify the
plug in any way. Do not use any adapter plugs. Check with a
qualied electrician if you are in doubt as to whether the outlet
is properly grounded. If the tools should electrically malfunction or
breakdown, grounding provides a low resistance path to carry
electricity away from the user.
Avoid body contact with grounded surfaces such as pipes,
radiators, ranges and refrigerators. There is an increase risk of
electric shock if your body is grounded.
Don’t expose power tools to rain or wet conditions. Water
entering a power tool will increase the risk of electric shock.
Do not abuse the cord. Never use the cord to carry the tools
or pull the plug from an putlet. Keep cord away from heat, oil,
sharp edges or moving parts. Replace damaged cords
immediatley. Damaged cords increase the risk of electric shock.
When operating a power tool outside, use an outdoor extension
cord marked "W-A" or "W"; These cords are rated for outdoor use
and reduce the risk of electrical shock.
Personal Safety
Stay alert, watch what you are doing and use common sense
when using a power tool. Do not use tool while tired or under
the inuence of drugs, alcohol, or medication. A moment of
inattention while operating power tools may result in serious
personal injury.
Dress properly. Do not wear loose clothing or jewelry. Contain
long hair. Keep your hair, clothing, and gloves away from
moving parts. Loose clothes, jewelry, or long hair can be caught
in moving parts.
Read and understand all instructions. Failure to follow all instructions listed below,
CAUTION! To prevent electric
shock, do not use power tools
near wet areas, or where power
tool may become wet.
sonal injury.
Avoid accidental starting. Be sure switch is off before plugging
in. Carrying tools with your nger on the switch or
plugging in tools that have the switch on invites accidents.
Remove adjusting keys or switches before turning the tool
on. A wrench or a key that is left attached to a rotating part of the
tool may result in personal injury.
Do not overreach. Keep proper footong and balance at all
times. Proper footing and balance enables better control of the
tool in unexpected situations.
Use safety equipment. Always wear eye protection. Dust mask,
no-skid safety shoes, hard hat, or hearing protection must be used
for appropriate conditions.
Always use safety chain. Mounting can release.
Tool Use and Care
Use clamps or other practical ways to secure and support the
work piece to a stable platform. Holding the work by hand or
against your body is unstable and may lead to loss of control.
Do not force the tool. Use the correct tool for your application.
The correct tool will do the job better and safer at the rate for which
it is designed.
Do not use tool if switch does not turn it on or off. Any tool
that cannot be controlled with the switch is dangerous and must
be repaired.
Disconnect the plug from the power source before making
any adjustments, changing accessories, or storing the tool.
Such preventative safety measures reduce the risk of starting the
tool accidently.
Store idle tools out of reach of children and other untrained
persons. Tools are dangerous in the hands of untrained users.
Maintain tools with care. Keep cutting tools sharp and clean.
Properly maintained tools, with sharp cutting edges are less likely
to bind and are easier to control.
Check for misalignment or binding of moving parts, breakage
of parts, and any other condition that may affect the tools
operation. If damaged, have the tool serviced before using.
Many accidents are caused by poorly maintained tools.
3
IMPORTANT SAFETY INSTRUCTIONS
metal parts of the drill to be made live. Remove chips
wrapped around Cutter and arbor after each hole. With
motor off and power disconnected, grasp chips with
leather gloved hand or pliers and pull while rotating
counterclockwise. Should the cutter become jammed in
the work, stop the unit immediately to prevent personal
injury. Disconnect the drill from the power supply and
loosen jammed cutter by turning the arbor counterclock-
wise. Never attempt to free the jammed cutter by starting
the motor. Service at authorized repair center only.
I
Operating Near Welding Equipment
DO NOT operate this unit on the same work surface that
welding is being performed on. Severe damage to the
unit, particularly the power cord, could occur. This could
also result in personal injury to the operator.
Circuit Breaker (If Applicable)
Changing of the circuit breaker to a higher amp rated breaker, or
bypassing the circuit breaker is not recommended and will void
product warranty.
Circuit Breaker Operation (If Applicable)
The circuit breaker is a thermal breaker. When it reaches the
higher temperature rating it will trip and cause the unit to shut
down. This is a protective device and can be reset after 5 to 10.
To reset the breaker, press the breaker button back in. If it does
not reset, let the unit cool a little longer until you can push the
button in and it stays in position.
Important Safety Instructions - Continued
WARNING: Read and understand all instructions. Failure to follow all instructions listed below,
may result in electrical shock, fire and/or serious personal injury.
Typical USA 230v
230v Type Plug
metal parts of the drill to be made live. Remove chips
wrapped around Cutter and arbor after each hole. With
motor off and power disconnected, grasp chips with
leather gloved hand or pliers and pull while rotating
counterclockwise. Should the cutter become jammed in
the work, stop the unit immediately to prevent personal
injury. Disconnect the drill from the power supply and
loosen jammed cutter by turning the arbor counterclock-
wise. Never attempt to free the jammed cutter by starting
the motor. Service at authorized repair center only.
I
Operating Near Welding Equipment
DO NOT operate this unit on the same work surface that
welding is being performed on. Severe damage to the
unit, particularly the power cord, could occur. This could
product warranty.
Important Safety Instructions - Continued
WARNING: Read and understand all instructions. Failure to follow all instructions listed below,
may result in electrical shock, fire and/or serious personal injury.
Typical USA 230v
230v Type Plug
metal parts of the drill to be made live. Remove chips
wrapped around Cutter and arbor after each hole. With
motor off and power disconnected, grasp chips with
leather gloved hand or pliers and pull while rotating
counterclockwise. Should the cutter become jammed in
the work, stop the unit immediately to prevent personal
injury. Disconnect the drill from the power supply and
loosen jammed cutter by turning the arbor counterclock-
wise. Never attempt to free the jammed cutter by starting
the motor. Service at authorized repair center only.
Plugs and Receptacles
product warranty.
Important Safety Instructions - Continued
WARNING: Read and understand all instructions. Failure to follow all instructions listed below,
may result in electrical shock, fire and/or serious personal injury.
Use only accessories that are recommended by the
manufacturer for your model. Accessories that may be suitable
for one tool, may become hazadous when used on another tool.
Service
Tool service must be performed only be qualied repair
personnel. Service or maintenance performed by unqualied
personnel could result in a risk of injury.
When servicing a tool, use only identical replacement parts.
Follow instructions in the Maintenance Section of this manual.
Use of unauthorized parts or failure to follow Maintenance
Instructions may create a risk of electric shock or injury.
Safe Electrical Connection
Your Mag Drill is rated for use on 115VAC or 230V at 50-60Hz.
Do not attempt to use drill on power sources rated other than this
Plugs and Receptacles
.
Outdoor Extension Cord Use
When tool is used outdoors, use only extension cords intended
for use outdoors and so marked.
Additional Safety Precautions
Arbor and cutter should never be used as a handheld. Keep
hands and clothing away from all moving parts. Do not use
Hougen Cutters where ejected slug might cause injury (slug
ejected at end of cut). Also, adhere to all operating instructions.
Do not drill through any surface that may contain live electrical
wiring. Drilling into a live wire could cause exposed metal parts
of the drill to be made live. Remove chips wrapped around
cutter and arbor after each hole. With motor off and power
disconnected, grasp chips with leather gloved hand or pliers and
pull while rotating counterclockwise. Should the cutter become
jammed in the work, stop the unit immediately to prevent personal
injury. Disconnect the drill from the power supply and loosen
jammed cutter by turning the arbor counterclockwise. Never
attempt to free the jammed cutter by starting the motor. Service at
authorized repair center only.
Operating Near Welding Equipment
Typical USA 120v
Typical USA 115V
Wet electrical connections are shock hazards.
To prevent the cutting uid from traveling along
the cord and contacting the plug or power outlet,
tie a drip loop as shown. Also elevate extension
cords or gang box connections.
Typical USA 230v
Typical USA 230V
230V Type I Plug
Extension Cords
Use only 3-wire extension cords that have a 3-prong grounding
type plug and 3-pole receptacles that accept the tool’s plug.
Replace or repair damaged cords. Make sure the conductor
size is large enough to prevent excessive voltage drop which
will cause loss of power and possible motor damage.
LENGTH
OF CORD,
FEET
Up to 25 16 18
26 - 50 14 18
51 - 100 10 16
101 - 200 8 14
201 - 300 6 12
301 - 500 4 10
RECOMMENDED
WIRE GAUGE
115V MOTOR
10 - 12 AMPS
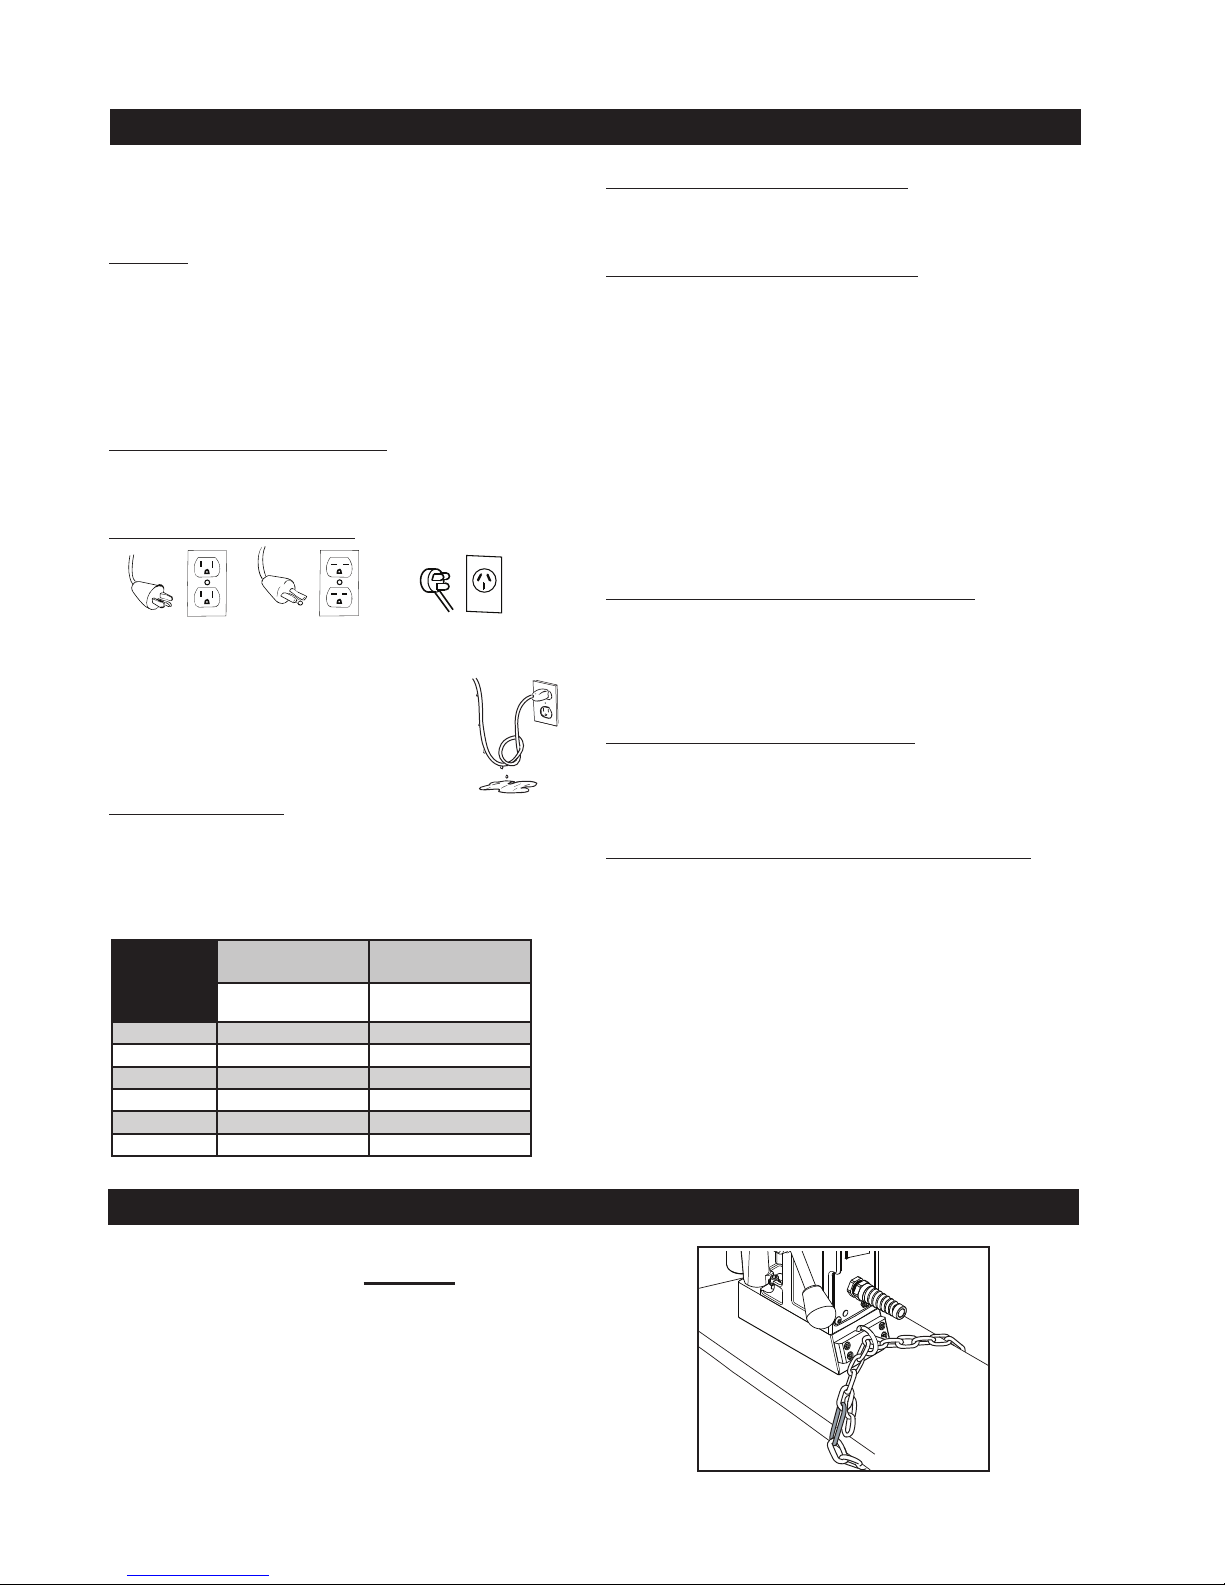
A safety chain should ALWAYS be used
whenever operating the drill.
The safety chain prevents the drill unit from falling, in
the event of a power failure or if the magnet breaks loose from
the work surface. The safety chain attaches to the drill by
running the chain thru the D-Ring on the back of the unit and
then continuing around the material and/or work surface. Adjust
the chain so it is tight and secure. Please refer to the diagram.
RECOMMENDED
WIRE GAUGE
230V MOTOR
5 - 6 AMPS
SAFETY CHAIN INSTRUCTIONS
DO NOT operate this unit on the same work surface that welding
is being performed on. Severe damage to the unit, particularly the
power cord, could occur. This could also result in personal injury
to the operator.
Circuit Breaker (If Applicable)
Changing of the circuit breaker to a higher amp rated breaker, or
bypassing the circuit breaker is not recommended and will void
product warranty.
Circuit Breaker Operation (If Applicable)
The circuit breaker is a thermal breaker. When it reaches the
higher temperature rating it will trip and cause the unit to shut
down. This is a protective device and can be reset after 5 to
10 minutes. To reset the breaker, press the breaker button back in.
If it does not reset, let the unit cool a little longer until you can push
the button in and it stays in position.
Save these instructions.
4
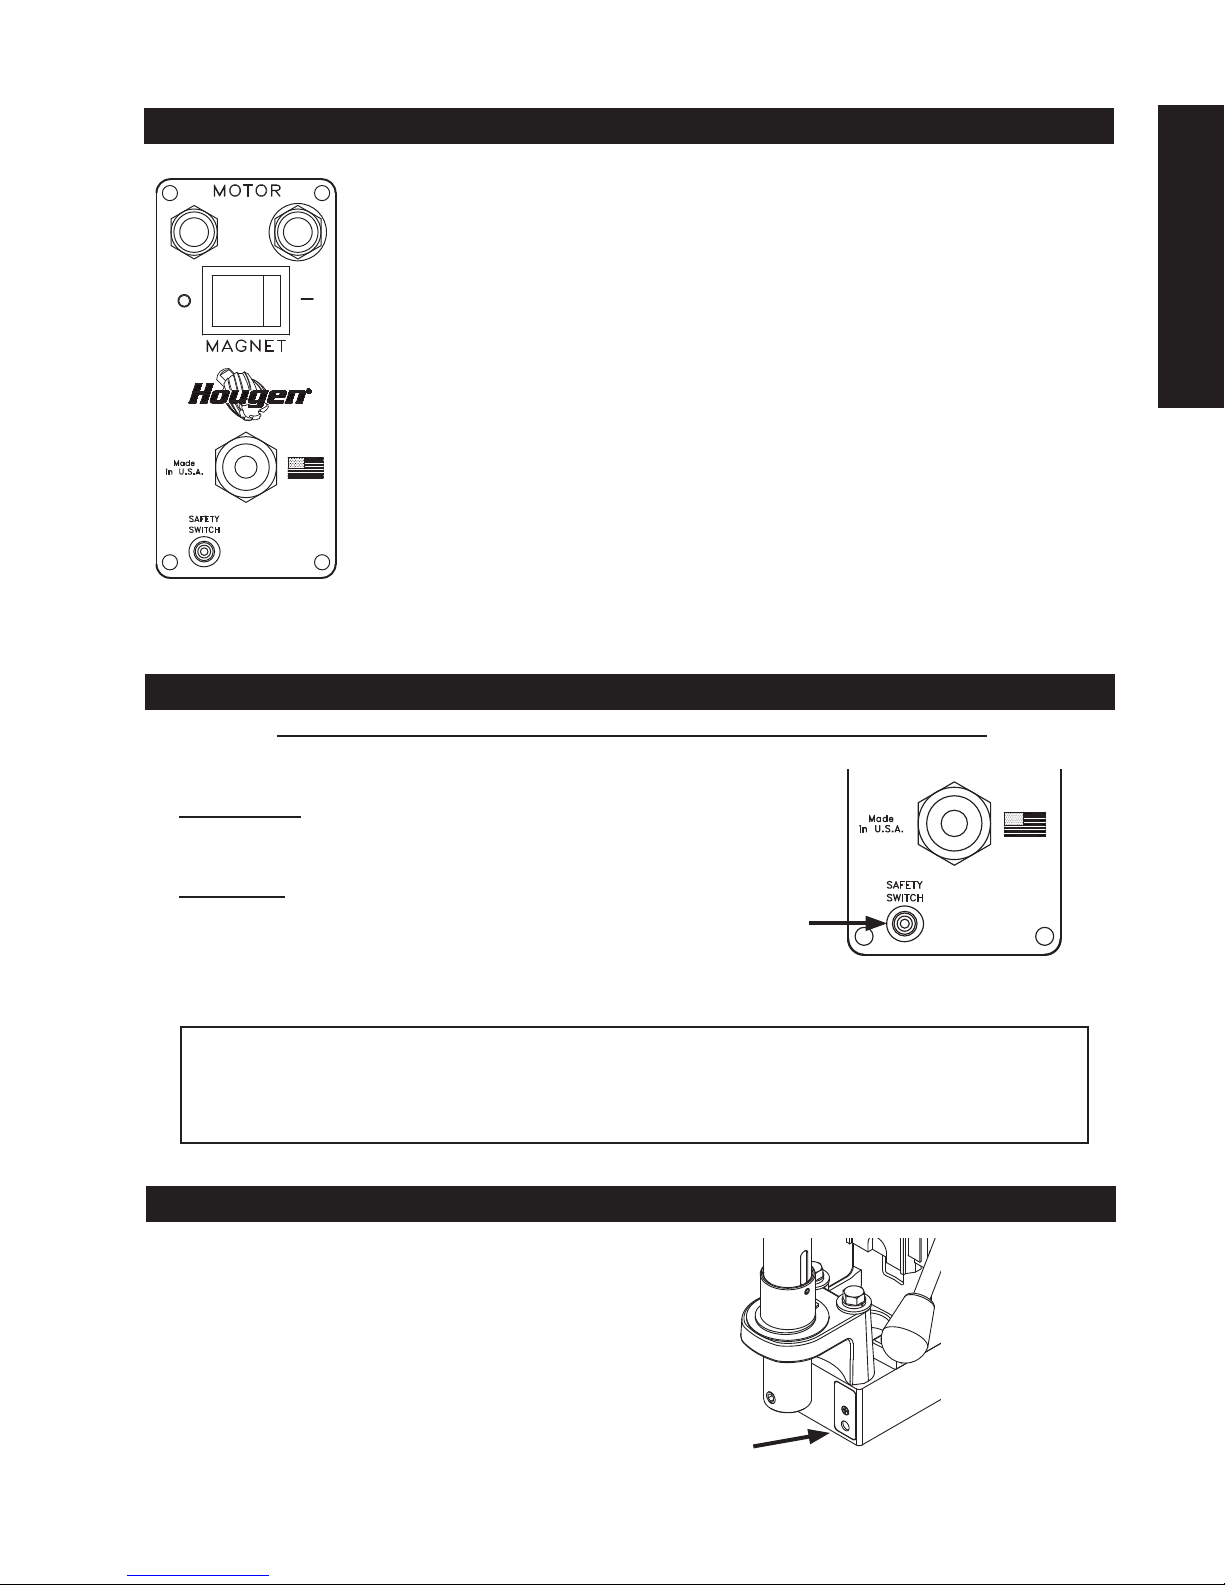
OPERATION OF CONTROLS BEFORE INSTALLING HOUGEN CUTTER
IMPORTANT: Before turning on the machine, it is important that the operator understands the
interrelated functions of the SAFETY SWITCH, MAGNET SWITCH, AND MOTOR SWITCHES.
READ SAFETY SWITCH INDICATOR LIGHT INSTRUCTIONS.
SAFETY SWITCH — Located in base of drill. Enables motor operation only when magnet is properly
seated on a clean and at work surface. Turns motor off if switch detects lift of unit.
MAGNET ON/OFF SWITCH — Energizes and De-energizes the magnetic base and activates the safety
switch. Motor can now be started by pushing the motor START switch.
MOTOR START/STOP SWITCHES — Starts and stops the motor
1. Place Magnetic Drill on clean, at steel plate that is at least 3/8" thick.
2. Plug unit into proper AC power source. DO NOT use with DC Power.
3. Locate the Magnet ON and OFF switch and the motor STOP and START switch.
4. NOTE: A loss of power will de-energize the magnetic base and deactivate the motor. When power
is restored, the magnet will reenergize, however, the motor START switch must be depressed
before the motor will start.
CONTROL PANEL
SWITCH PLATE
SAFETY SWITCH INDICATOR LIGHT
** SAFETY SWITCH LIGHT WILL COME ON AND REMAIN ON WHILE DRILL IS PLUGGED IN **
English
The Safety Switch Indicator Light is a Standard Safety Feature on Hougen portable
magnetic drills. Its purpose is to inform the user that an unsafe condition exists.
If light is Green:
In normal operation the safety switch light will be green. Motor "On" and "Off" Switches
function normally.
If light is Red:
A condition with the safety switch exists that needs to be corrected. Possible causes:
• Safety Switch is defective. Have drill serviced.
• Uneven work surface or material. Check work surface for atness.
• Dirt or chips under magnet. Clean work surface.
Material must be a least 3/8" thick. Material thinner than 3/8" will cause a "weak" magnet condition.
HOUGEN MANUFACTURING RECOMMENDS THAT CONDITIONS ARE CORRECTED SO LIGHT IS GREEN.
THIS ALLOWS FOR THE UNIT TO BE OPERATED IN A SAFE MANNER.
For any questions please contact Hougen Manufacturing’s Technical Service at (810) 635-7111.
PILOT LIGHT SWITCH
The Pilot Light is a Standard Feature on
Hougen portable magnetic drills. Its purpose is
to illuminate the work surface area for easier
viewing of pilot.
(The HMD904 has an "Always On" Feature)
CONTROL PANEL SWITCH PLATE
PILOT LIGHT
5
 Loading...