

Hot Wheels RC BLAZED DRONE RACERZ DRONE & VEHICLE EXPANSION PACK User Manual
DRONE & VEHICLE EXPANSION PACK
ERWEITERUNGSSET DROHNE UND FAHRZEUG / PACK D'EXPANSION DRONE ET VÉHICULE
PACCHETTO ESPANSIONE DRONE E VEICOLO / PAQUETE DE EXPANSIÓN DE DRONE Y VEHÍCULO
IMPORTANT: FOR OPERATIONAL USE, PLEASE REFER TO DRONE & VEHICLE SET (BTHW-DO1) MANUAL. IMPORTANT: POUR UN USAGE
OPÉRATIONNEL, VEUILLEZ VOUS RÉFÉRER AU MANUEL DE L'ENSEMBLE DRONE ET VÉHICULE (BTHW-DO1). WICHTIG: FÜR DEN
BETRIEB BITTE IM HANDBUCH DES SETS DROHNE + FAHRZEUG (BTHW-DO1) NACHSCHLAGEN. IMPORTANTE: PER L'USO OPERATIVO,
FARE RIFERIMENTO AL MANUALE DEL SET DRONE + VEICOLO (BTHW-DO1) IMPORTANTE: PARA USO OPERATIVO, CONSULTE EL
MANUAL DEL CONJUNTO DE DRONE Y VEHÍCULO (BTHW-DO1). BELANGRIJK: ZIE VOOR DE GEBRUIKSINSTRUCTIES DE HANDLEIDING
VAN DE DRONE- EN VOERTUIGSET (BTHW-DO1). DŮLEŽITÉ: INFORMACE O PROVOZU NAJDETE V NÁVODU PRO SOUPRAVU DRONU A
VOZIDLA (BTHW-DO1).
DRONE EN VOERTUIGUITBREIDINGSPAKKET / ROZŠIŘUJÍCÍ BALÍČEK: DRON A VOZIDLO
8+ Years
Jahre/Années/Anni
Años /Jaren/Let
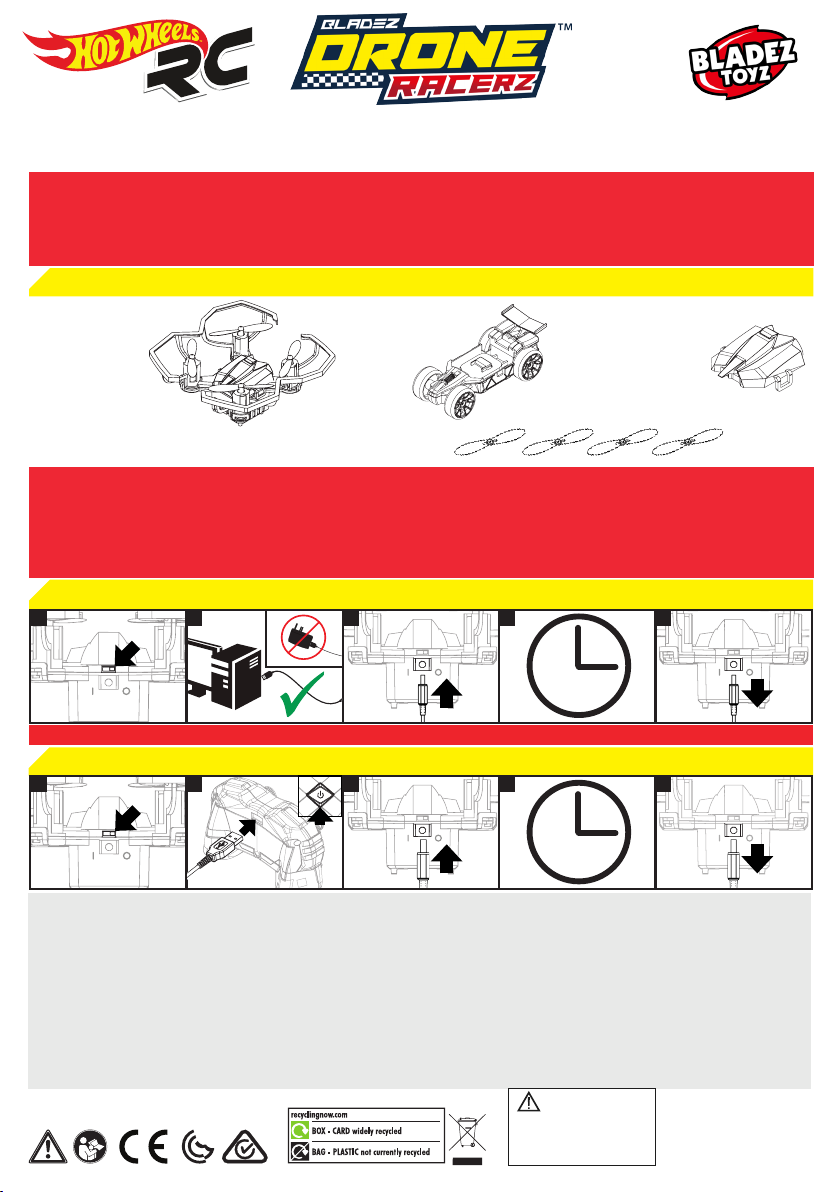
A. CONTENTS / CONTENU / INHALT / CONTENUTO / CONTENIDO / INHOUD / OBSAH
2.4 GHz Drone
2.4GHz Quadrocopter
2.4GHz Quadcopter
2.4GHz Quadrirotore
2.4GHz Drone
Cuadricoptero
2.4GHz Quadcopter
2.4GHz Kvadrokoptéra
Spare Rotor Blades
Pales de rotor de rechange / Ersatz-Rotorblätter / Pale rotore di ricambio
Palas del rotor de repuesto / Reserve-rotorbladen / Náhradní listy rotoru
IMPORTANT: DRONE RACER MAY NOT PERFORM CORRECTLY IF THE SPARE ROTOR BLADES ARE NOT INSTALLED CORRECTLY.
IMPORTANT : LE DRONE RACER NE PEUT PAS FONCTIONNER CORRECTEMENT SI LES PALES DE ROTOR NE SONT PAS INSTALLÉES
CORRECTEMENT. WICHTIG: DER DROHNE RACER ARBEITET MÖGLICHERWEISE NICHT RICHTIG; WENN DIE ERSATZ-ROTORBLÄTTER
NICHT ORDNUNGSGEMÄSS INSTALLIERT SIND. IMPORTANTE: DRONE RACER POTREBBE NON FUNZIONARE CORRETTAMENTE SE
LE PALE DEL ROTORE DI RICAMBIO NON SONO INSTALLATE CORRETTAMENTE. IMPORTANTE: DRONE RACER PUEDE NO FUNCION
AR CORRECTAMENTE SI LAS PALAS DEL ROTOR DE REPUESTO NO ESTÁN INSTALADAS CORRECTAMENTE. BELANGRIJK: ALS DE
RESERVE-ROTORBLADEN NIET GOED WORDEN GEMONTEERD, KAN HET ZIJN DAT DE DRONE RACER NIET GOED WERKT. DŮLEŽITÉ:
NESPRÁVNÁ MONTÁŽ NÁHRADNÍCH LISTŮ ROTORU MŮŽE MÍT ZA NÁSLEDEK NESPRÁVNÉ FUNGOVÁNÍ DRONU.
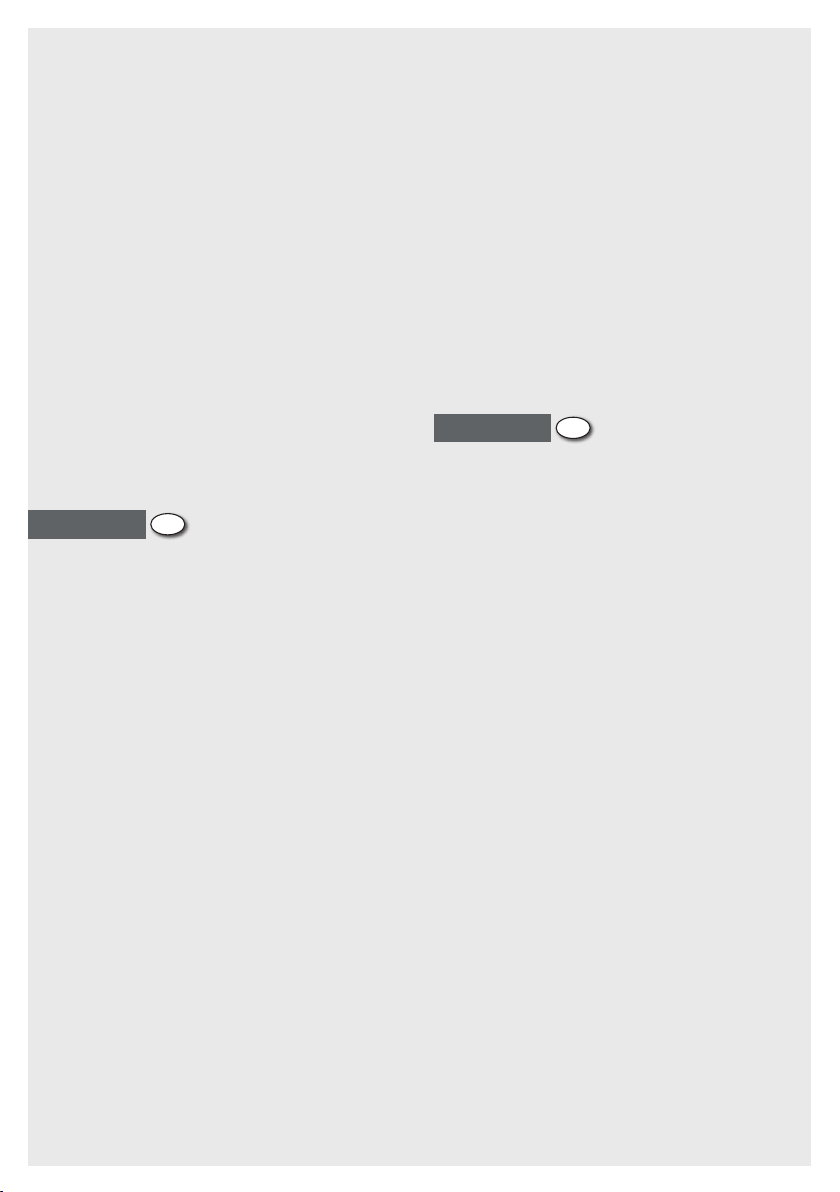
B. CHARGING FROM COMPUTER / RECHARGE DEPUIS UN ORDINATEUR / LADEN ÜBER DEN COMPUTER
RICARICA DAL COMPUTER / CARGA POR ORDENADOR / OPLADEN VIA DE COMPUTER / NABÍJENÍ PŘES POČÍTAČ
1 2 3 4 5
2
1
2
Chassis
Rahmen
Châssis
1
Telaio
Chasis
Onderstel
Podvozek
2
Spare Body Shell
Coque de rechange
Ersatz-Außenkörper
Scocca di ricambio
Carrocería de repuesto
Reservecarrosserie
Náhradní tělo
2
1
1
60 mins
IMPORTANT: DO NOT plug the USB charger into an AC Adapter
C. CHARGING FROM HANDSET / RECHARGE DEPUIS LE COMBINÉ / LADEN ÜBER DAS HANDGERÄT
RICARICA DAL RICEVITORE / CARGA POR EL AURICULAR / OPLADEN VIA DE HANDSET / NABÍJENÍ PŘES VYSÍLAČKU
1
1
2 3 4 5
60 mins
B. CHARGING FROM COMPUTER (USB charging cable not included)
The Drone Racer is supplied with an initial charge allowing you to start using
straight away. To prevent overcharging the battery please ensure the battery is fully
discharged before recharging. 1. Ensure the Drone Racer is switched off. 2. Plug
the USB into a computer/USB port. DO NOT plug the USB charger into an AC
Adapter. 3. Insert the USB cable pin connector in to the Drone Racer battery port,
located on the back of the drone. Be careful not to force the connectors as it may
cause damage. The RED LED on the USB will turn on, indicating that the Drone
Racer is charging. 4. The Drone Racer is charged after approximately 60 minutes.
The RED LED on the USB will go out, indicating that the Drone Racer battery is fully
charged. 5. Remove the USB cable pin connector from the Drone Racer battery port
once the charging is complete. DO NOT OVERCHARGE. Flight time 5-6 minutes.
Drive time 4-5 minutes.
150mAh 3.7V LiPo Micro Drone Battery included / inbegriffen
Inclus / incluso / incluido / ingesloten / zahrnuta
C. CHARGING FROM HANDSET (Handset not included)
1. Ensure the Drone Racer is switched off. 2. Plug the USB cable into the Drone
Racerz Handset and switch the handset on. The USB port is located on the
back of the handset. 3. Repeat steps 3-5 in ‘Charging from Computer’. DO NOT
OVERCH ARGE. Flight time 5-6 minutes. Drive time 4-5 minutes.
WARNING: This product is not suitable for anyone under the age of 8.
Remove all packaging before giving this toy to a child. Adult supervision
recommended. Colour and specication may vary. Please retain this
information for future reference. Warranty covers manufacturing faults only
and not damage caused by user error. For indoor and outdoor use. Only use
Battery charger provided. Do not touch spinning rotors. Keep ngers, hair
and loose clothing clear from the rotor blades when the vehicle is turned
WARNING:
CHOKING HAZARD
Small parts. Not for Children
under 3 years
.
BTHW-XO1
Made in China / Hergestellt in China
Fabriqué en Chine / Fabbricato in Cina
Hecho en China / Vervaardigd in Chin
Vyrobeno v Číně.
on. Risk of eye injury! Do not y near face to avoid injuries. Do not y in
adverse weather conditions. Fly in an area appropriate for intended use, free
of obstacles, animals and people, keeping a minimum distance of 10 meters
away. Maximum Range 25 metres. Do not y out of range. Do not y close to
ceilings or walls. Motors may become hot in ight - Do not touch. Operation is
strictly forbidden near high voltage poles, railway tracks, roads and swimming
pools. Always operate with direct visual contact.
Declaration of Conformity: Declaration of Conformity accordance with
guidelines 2014/53/EU RED. Hereby, Bladez Toyz, declares that this item is
in compliance with the essential requirements and other relevant provisions
of Directive 2014/53/EU (RED). The original declaration of conformity can be
viewed on the internet at: www.bladeztoyz.com/doc.
The Wheelie bin symbol indicates that the product and batteries must not
be disposed of with outher house hold waste as they may contain elements
which can have a harmful effect on the enviroment and human health. Please
use desigated collection points or recycling facilities when disposing of the
item and the batteries. Questions relating to this matter should be directed to
the organisation responsible for waste disposal or your specialist retailer.
Warning! The manufacturer is not responsible for any radio or television
interference which may be caused by unauthorised modications to the
equipment. Modications of this nature may invalidate the users consumer rights.
Battery Safety Information: Different types of batteries or new and used
batteries are not to be mixed. Non rechargeable batteries are not to be
recharged. Re-chargeable batteries are to be removed from the toy before
being recharged. Rechargeable batteries are only to be recharged under
adult supervision. Exhausted batteries are to be removed from the toy. Supply
terminals are not to be short circuited. Batteries to be replaced by an adult.
Batteries are to be inserted with the correct polarity. Do not dispose of batter-
ies in re as the battery may explode or leak. To prevent accidental operation
please remove batteries and power packs when not in use.
FRANÇAIS
B. RECHARGE DEPUIS UN ORDINATEUR (Câble de recharge USB non incluses)
Le Drone Racer est fourni avec une charge initiale qui vous permet de
commencer à l’utiliser immédiatement. An d’éviter toute surcharge de la
batterie, assurez-vous que la batterie soit complètement déchargée avant
de la recharger. 1. Assurez-vous que le Drone Racer soit sur arrêt. 2. Branchez la
prise USB à un ordinateur / port USB. NE PAS brancher le chargeur USB dans
un adaptateur secteur. 3. Insérez le connecteur à broches du câble USB dans
le port batterie du Drone Racer situé à l’arrière du drone. Veillez à ne pas forcer
sur les connecteurs, car cela pourrait les endommager. La LED ROUGE de la prise
USB s’allume, ce qui indique que le Drone Racer se recharge. 4. Le Drone Racer
est chargé au bout d’environ 60 minutes. La LED ROUGE de la prise USB s’éteint,
ce qui indique que le Drone Racer est complètement rechargé. 5. Retirez le
connecteur à broches du câble USB du port batterie du Drone Racer une fois la
recharge terminée. NE PAS SURCHARGER. Durée de vol de 5 à 6 minutes. Durée
de conduite de 4 à 5 minutes.
C. RECHARGE DEPUIS LE COMBINÉ (Combiné non inclus)
1. Assurez-vous que le Drone Racer soit sur arrêt. 2. Branchez la prise USB au
combiné Drone Racerz et mettez le combiné sur marche. Le port USB se trouve
à l’arrière du combiné. 3. Répétez les étapes 3 à 5 dans ‘Recharge depuis
un ord inateur ’. NE PAS SURCHARGER. Durée de vol de 5 à 6 minutes. Durée de
conduite de 4 à 5 minutes.
ATTENTION: Ce produit ne convient pas aux moins de 8 ans. Retirer tout
l’emballage avant de donner ce jouet à un enfant. La surveillance d’un adulte
est recommandé. Veuillez conserver l’emballage pour référence future. La
garantie couvre les défauts de fabrication seulement. Elle ne couvre pas les
dommages dus à une erreur de l’utilisateur. Destiné à un usage intérieur et
extérieur. N’utiliser que le chargeur de batterie fourni. Ne pas toucher les
rotors en rotation. Ne pas approcher les doigts, la chevelure et les vêtements
prés du moteur ou des roues lorsque l’appareil est sur « ON ». Risque de
blessure des yeux ! Pour éviter les blessures, ne pas voler à proximité du
visage. Ne pas voler dans des conditions météorologiques défavorables. Voler
dans une zone adaptée à l’utilisation prévue, sans obstacles, animaux et
personnes, en le tenant à une distance minimale de 10 mètres. Portée
maximale 25. Ne pas voler hors de portée. Ne pas voler à proximité des
plafonds ou des murs. Les moteurs peuvent s’échauffer en vol - Ne pas
toucher. L’utilisation est strictement interdite près des pylônes de haute
tension, des voies ferrées, des routes et des piscines. Toujours utiliser avec un
contact visuel direct.
F
Conformément à la directive
2014/53/UE RED Par la présente, Bladez Toz Ltd déclare que cette pièce est
conforme aux exigences essentielles et autres dispositions de la directive
2014/53/UE . La déclaration de conformité d‘origine peut être consultée sous
le lien Internet suivant: http://www.bladeztoyz.co.uk/doc.
Le fabricant n’est pas responsable des perturbations radio ou TV dues à des
modications non autorisées de cet équipement. De telles modications
peuvent annuler le droit d’utilisation de l’usager.
Consignes de sécurité relatives aux piles: Ne pas mélanger différents
types de piles ou bien des piles neuves et usagées. Ne pas recharger les piles
non recargables. Retirer les Piles rechargeables du jouet avant les rechargées.
Les piles regargables doivent etre rechargees uniquement en présence d’un
adulte. Retirer les piles usagées du jouet. Ne pas
court-circuiter les bornes d’alimentation. Les piles doivent etre remplacées par
un adulte. Les piles ou accumulateurs doivent être mis en place en respectant
la polarité. Ne pas jeter les piles au feu, car elles pourraient exploser ou
fuir. An d’éviter toute mise en marche inopinée, il est nécessaire de retirer
les piles et les accus du jouet lorsque celui-ci n’est pas utilisé. Le symbole
représentant un poubelle barrée signie que le produit et les piles ne dovient
pas etré jetés avec les ordures ménagères car ils contiennent des éléments
pouvant avoir des effets néfastes sur la santé et l’environnement. Merci
d’utiliser le points de collecte prévus à cet effet. Si vous avez des questions a
ce sujet, vous pouvez vous adresser a l’oganisme ressponsable de la collecte
des déchets ou a votre vendeur spécialisé.
DEUTSCH
B. LADEN ÜBER DEN COMPUTER (USB-Ladekabel Nicht Enthalten)
Der Drone Racer ist anfangs geladen, damit Sie sofort loslegen können. Um
ein Überladen der Batterie zu verhindern, stellen Sie bitte sicher, dass der
Akku vor dem Auaden vollständig entladen ist. 1. Stellen Sie sicher, dass der
Drone Racer ausgeschaltet ist. 2. Stecken Sie den USB-Stecker in einen
Computer-/USB-Anschluss. Schließen Sie das USB-Ladegerät NICHT
an einem Wechselstromadapter an. 3. Stecken Sie den Pinstecker des
USB-Kabels in den Akku-Anschluss an der Rückseite des Drone Racer. Achten
Sie darauf, den Stecker nicht mit Gewalt einzustecken, da dies zu Schäden
führen kann. Die ROTE LED am USB-Stecker schaltet sich ein und zeigt an,
dass der Drone Racer aufgeladen wird. 4. Der Drone Racer ist nach zirka 60
Minuten aufgeladen. Die ROTE LED am USB-Stecker erlischt und zeigt dadurch
an, dass der Akku des Drone Racer vollständig aufgeladen ist. 5. Entfernen
Sie den USB-Pinstecker vom Akkuanschluss des Drone Racer, sobald der
Ladevorgang abgeschlossen ist. NICHT ÜBERLADEN. Flugzeit 5-6 Minuten.
Fahrzeit 4-5 Minuten.
C. LADEN ÜBER DAS HANDGERÄT (Handgerät nicht im Lieferumfang enthalten)
1. Stellen Sie sicher, dass der Drone Racer ausgeschaltet ist. 2. Stecken Sie
den USB-Anschluss in das Handgerät des Drone Racerz und schalten Sie das
Handgerät ein. Der USB-Anschluss bendet sich auf der Rückseite des
Handgeräts. 3. Wiederholen Sie die Schritte 3-5 in ‘Laden über den
Computer’. NICHT ÜBERLADEN. Flugzeit 5-6 Minuten. Fahrzeit 4-5 Minuten.
ACHTUNG: Dieses Produkt ist nicht für Kinder unter 8 Jahren geeignet.
Entfernen Sie alle Verpackungselemente, bevor Sie das Spielzeug in
kinderhände geben. Aufsicht von Erwachsenen empfohlen. Farb- und
Inhaltsänderungen verhalten. Bitte bewahren Sie diese Informationen für
spätere Rückfragen auf. Die Garantie deckt nur Herstellungsfehler ab und
keine Beschädigungen aufgrund von Benutzerfehlern. Zur Verwendung
im Innen- und Außenbereich. Nur das mitgelieferte Batterieladegerät
verwenden. Drehende Rotoren nicht berühren. Finger, Haare und lose
Kleidung nicht in die Nähe des Motors oder der Räder bringen, wenn das
Gerät auf „ON“ geschaltet ist. Gefahr von Augenverletzungen! Nicht in der
Nähe von Gesichtern iegen, um Verletzungen zu vermeiden. Nicht bei
schlechten Witterungsverhältnissen iegen. Lassen Sie das Produkt in einem
für den bestimmungsgemäßen Gebrauch geeigneten Bereich iegen, der frei
von Hindernissen ist, und halten Sie einen Mindestabstand von 10 Metern
zu Menschen und Tieren ein. Maximale Reichweite 25. Nicht außerhalb der
Reichweite iegen. Nicht in der Nähe von Decken oder Wänden iegen.
Die Motoren können während des Flugs heiß werden - Nicht berühren. Der
Betrieb in der Nähe von Hochspannungsleitungen, Gleisanlagen, Straßen
und Schwimmbädern ist streng verboten. Beim Betrieb muss immer direkter
Sichtkontakt gehalten werden.
Konformitätserklärung gemäß Richtlinie 2014/53/EU RED
Hiermit erklärt Bladez Toyz Ltd, dass sich dieser Artikel in Übereinstimmung
mit den grundlegenden Anforderungen und den anderen relevanten
D
2
 Loading...