

Page 1

®
HIGHLIFE
Grandee™ • Envoy™ • Aria™ • Vanguard™ • Sovereign™ • Prodigy™ • Jetsetter™ • Triumph™
OWNER’S MANUAL 5 0HZ
COLLECTION
Page 2
®
Highlife
Collection
Watkins Wellness™ congratulates you on your decision to enjoy the finest spa available.
Welcome to the growing family of HOT SPRING spa owners.
Before you begin reviewing the manual, please take a moment to register your warranty. Doing so will assist us in contacting you for any
important product notification.
Prior to registering, you will need the serial number that is located within the equipment compartment of your HOT SPRING spa.
To register please go to http://www.hotspring.com/hot-tub-owners/hot-tub-product-warranty-registration or simply scan the QR code below:
FOR YOUR RECORDS
Spa Model/Serial Number:
Date Purchased:
Dealer:
Address:
Cover Serial Number:
Accessory Serial Number:
If you have any questions about any aspect of your spa's set-up, operation or maintenance, contact your authorized HOT SPRING
dealership. They are trained professionals who are familiar with the product as well as new spa ownership concerns. Their expertise will
facilitate the enjoyment of your new HOT SPRING spa.
IMPORTANT: Watkins Wellness reserves the right to change specifications, or design, without notification and without incurring any
obligation.
In most cities and counties, permits will be required for the installation of electrical circuits or the construction of exterior
surfaces (decks and gazebos). In addition, some communities have adopted residential barrier codes which may require
fencing and/or self-closing gates on the property to prevent unsupervised access to a pool (or spa) by children under 5 years
Important!
of age. Your HOT SPRING spa is equipped with a locking cover that meets the ASTM F1346-91 Standard for Safety Covers
and as a result, is usually exempt from most barrier requirements. As a general practice, your local Building Department will
inform you of any applicable barrier requirements at the time a permit is obtained for the installation of an electrical circuit.
Your HOT SPRING dealer can provide information on which permits may be required.
Page 3

TABLE OF CONTENTS
TABLE OF CONTENTS
SAFETY INFORMATION
IMPORTANT SAFETY INSTRUCTIONS .......................... 1
IMPORTANT
SPA INSTRUCTIONS ........................................................... 3
GETTING STARTED
SPA FEATURES .................................................................... 4
QUICK START-UP INSTRUCTIONS ................................. 5
EQUIPMENT COMPARTMENT .........................................7
WATER QUALITY AND MAINTENANCE
BASIC INFORMATION ......................................................... 8
CHEMICAL SAFETY ........................................................... 8
HOW TO ADD CHEMICALS
TO THE WATER .................................................................... 8
FUNDAMENTALS OF
WATER MAINTENANCE ..................................................... 9
THE HOT SPRING SPA WATER MAINTENANCE
PROGRAM ........................................................................... 10
VACATION WATER CARE INSTRUCTIONS ................. 11
WATER TERMINOLOGY ................................................... 12
OPERATING INSTRUCTIONS
HOME SCREEN .................................................................. 13
TEMPERATURE CONTROL ............................................. 14
MEMORY SCREEN ........................................................... 14
CLEAN CYCLE SCREEN ................................................ 14
SETTINGS SCREENS ...................................................... 14
JETS CONTROL SCREEN ............................................... 15
ACE WATER CARE SCREEN (OPTIONAL) .................. 15
MUSIC SYSTEM SCREEN (OPTIONAL) ....................... 15
LIGHTS CONTROL SCREEN ........................................... 16
CONTROL PANEL
SPA CARE AND MAINTENANCE
DRAIN & REFILL INSTRUCTIONS ..................................25
PREVENTION OF FREEZING .........................................25
FILTER SYSTEM................................................................. 26
FILTER CARTRIDGES
REMOVAL & CLEANING ...................................................26
CARE OF THE SPA PILLOWS ......................................... 26
CARE OF THE EXTERIOR ............................................... 27
CARE OF THE SPA COVER ............................................. 27
COVER LIFTER SYSTEM ................................................. 27
ELECTRICAL REQUIREMENTS
INSTALLATION .................................................................... 29
INSTALLATION INSTRUCTIONS
SITE PREPARATION ......................................................... 30
OUTDOOR AND PATIO INSTALLATION ........................ 30
DECK INSTALLATION ....................................................... 30
INDOOR/BASEMENT INSTALLATION ........................... 30
SPA LEVELING PREPARATION ...................................... 30
SPA LEVELING INSTRUCTIONS ....................................31
DELIVERY ACCESS .......................................................... 31
GROUND PREPARATION ................................................32
SERVICE INFORMATION
GENERAL INFORMATION................................................40
GFCI AND HIGH LIMIT THERMOSTAT .......................... 40
NO-FAULT™ HEATER AND INTEGRATED PRESSURE
SWITCH ................................................................................ 40
SILENT FLO™ 5000 CIRCULATION PUMP AND
CIRCULATION PUMP THERMAL CUT-OFF ................. 40
MISCELLANEOUS SERVICE INFORMATION .............40
JET MENU
GRANDEE (MODEL GGE) JET SYSTEM MENU ........ 17
ENVOY (MODEL KKE) JET SYSTEM MENU ............... 18
VANGUARD (MODEL VVE) JET SYSTEM MENU ...... 19
ARIA (MODEL ARE) JET SYSTEM MENU ....................20
SOVEREIGN (MODEL IIE) JET SYSTEM MENU ......... 21
TRIUMPH (MODEL TRHE) JET SYSTEM MENU ........ 22
PRODIGY (MODEL HE) JET SYSTEM MENU .............. 23
JETSETTER (MODEL JJE) JET SYSTEM MENU ....... 24
ACTS INVALIDATING WARRANTY ................................41
DISCLAIMERS ....................................................................41
WATKINS CUSTOMER SERVICE ................................... 41
TROUBLESHOOTING ....................................................... 41
GENERAL TROUBLESHOOTING GUIDE ..................... 42
LOGO LIGHT TROUBLESHOOTING GUIDE ................ 42
SPA WATER TROUBLESHOOTING GUIDE ................. 43
SPA SPECIFICATIONS ...................................................... 44
Page 4

Safety Information
IMPORTANT SAFETY
INSTRUCTIONS
(READ AND FOLLOW ALL
INSTRUCTIONS)
AVOIDING THE RISK TO CHILDREN
DANGER - RISK OF CHILD DROWNING
Extreme caution must be exercised to prevent unauthorized access
by children. To avoid accidents, ensure that children cannot use a spa
unless they are supervised at all times.
WARNING
To reduce the risk of injury, do not permit children to use this spa unless
they are closely supervised at all times.
• To reduce the risk of injury, lower water temperatures are
recommended for young children. Children are especially sensitive to
hot water.
• The device should not be used by persons (including children) with
reduced physical, sensory or metal capabilities, or lack of experience
and knowledge, unless they receive supervision or training.
DO:
• Make sure you always lock the child resistant locks after using the
spa for your children’s safety. Every HOT SPRING spa is equipped
with a locking cover that meets the ASTM F1346-91 Standard for
Safety Covers.
• Test the water temperature with your hand before allowing children to
enter the spa to be sure that it’s comfortable. Children are especially
sensitive to hot water.
• Remind children that wet surfaces can be very slippery. Make sure
that children are careful when entering or exiting the spa.
DON'T:
• Allow children to climb onto the spa cover.
• Allow children to have unsupervised access to the spa.
AVOIDING THE RISK OF
ELECTROCUTION
DANGER - RISK OF ELECTROCUTION
• Connect only to a grounded source.
• Do not bury the power cord. A buried power cord may result in death,
or serious personal injury due to electrocution if direct burial-type
cable is not used, or if improper digging occurs.
• A ground terminal (pressure wire connector) is provided on the control
box inside the unit to permit connection of a minimum 6 mm
AWG) solid copper bonding conductor between this point and any
metal equipment, metal water pipe, metal enclosures of electrical
equipment, or conduit within 1.5 m (5 feet) of the unit as needed to
comply with local requirements.
² (
No. 10
• Do not operate the main audio/video button controls on any external
media devices such as a CD or DVD player while inside in the spa.
Operation of integrated audio/video equipment through the spa
control panel or wireless remote is permitted and acceptable.
• Do not connect any auxiliary components (for example, cable
additional speakers, headphones, additional audio components) to
the audio system unless approved by Watkins Wellness .
• Do not self service audio component by opening spa door as this may
expose dangerous voltage or other risk of injury. Refer all servicing to
qualified service personnel.
• Do not attach an external antennae to a spa audio system unless
installed by a licensed electrician in accordance with National Electric
Code.
WARNING
• To reduce the risk of electrical shock, replace a damaged cord
immediately. Failure to do so may result in death or serious personal
injury due to electrocution.
• In order to avoid a hazard due to inadvertent resetting of the thermal
cut-out, this appliance must not be supplied through an external
switching device, such as a timer, or connected to a circuit that is
regularly switched on and off by the utility. n order to avoid a hazard
due to inadvertent resetting of the thermal cut-out, this appliance must
not be supplied through an external switching device, such as a timer,
or connected to a circuit that is regularly switched on and off by the
utility.
• Your spa must be supplied by a ground fault circuit interrupter residual current device (RCD) - with a tripping rating not exceeding
30 mA in an electrical subpanel. Always test the Ground Fault Circuit
Interrupter (GFCI) before each use of the spa. If the GFCI does not
perform properly, a ground current is flowing indication the possibility
of electric shock. Disconnect power to the spa until the fault has been
identified and corrected.
NOTE: Failure to wait 30 seconds before resetting the GFCI may
cause the spa’s Power Indicator (on the control panel) to blink. If this
occurs, repeat the GFCI test procedure.
• Install the spa so proper drainage is provided for the compartment
containing the electrical components.
DANGER - RISK OF ELECTRICAL SHOCK
• Install at least 1.5 m (5 feet) from all metal surfaces. A spa may
be installed within 1.5 m (5 feet) of a metal surface if each metal
surface is permanently connected by a minimum 6mm² solid copper
conductor attached to the wire ground connector on the terminal box
that is provided.
• Do not permit any external non spa integrated electrical appliances,
such as a light, telephone, radio, or television within (1.5 m) 5 feet
of a spa. Failure to maintain a safe distance may result in death, or
serious personal injury due to electrocution, if the appliance should fall
into the spa.
• Do not permit any electrical appliances, such as a light, telephone,
radio, or television within 1.5 m (5 feet) of a spa. Failure to maintain
a safe distance may result in death, or serious personal injury due to
electrocution, if the appliance should fall into the spa.
Page 1
Safety Information
Page 5

DO:
• Be sure your spa is connected to the power supply correctly - use a
licensed electrical contractor.
• Disconnect the spa from the power supply before draining the spa or
servicing the electrical components.
• Test the Ground Fault Circuit Interrupter(s) before each use.
• Replace audio components only with identical components (if your
spa is equipped with an audio component).
DON'T:
• Use the spa with the equipment compartment door removed.
• Place electrical appliances within 1.5 m (5 feet) of the spa.
• Use an extension cord to connect the spa to its power source. The
cord may not be properly grounded and the connection is a shock
hazard. An extension cord may cause a voltage drop, which will cause
overheating of the jet pump motor and motor damage.
• Attempt to open the electrical control box. There are no user serviceable
parts inside.
• Leave audio compartment door open (if your spa is equipped with an
audio compartment).
RISKS TO AVOID
DANGER - RISK OF INJURY
• To reduce the risk of injury to persons, DO NOT remove suction
fittings (filter standpipes) located in the filter compartment.
• The suction fittings in the spa are sized to match the specific water
flow created by the pump. Never replace a suction fitting with one
rated less than the flow rate marked on the original suction fitting.
• There is a danger of slipping and falling. Remember that wet surfaces
can be very slippery. Take care when entering or exiting the spa.
• Never operate spa if the suction fittings are broken or missing.
• People with infectious diseases should not use the spa.
• Keep any loose articles of clothing, long hair, or hanging jewelry away
from rotating jets or other moving components.
HEALTH PROBLEMS AFFECTED BY SPA USE
• Pregnant women should consult a physician before using spa.
• Persons suffering from obesity, or with a medical history of heart
disease, low or high blood pressure, circulatory system problems, or
diabetes should consult a physician before using spa.
UNCLEAN WATER
• Keep the water clean and sanitized with correct chemical care. The
recommended levels for your HOT SPRING spa are:
Free Available Chlorine:
1.0-5.0 ppm
Water pH:
7.2-7.8
• Refer to Water Quality and Maintenance section for complete
instructions.
IMPORTANT: Turn on the jet pump for a least ten minutes after adding
ANY spa water chemicals into the filter compartment.
Clean the filter cartridges monthly to remove debris and mineral buildup
which may affect the performance of the hydromassage jets, limit the
flow, or trip the high limit thermostat, which will turn off the entire spa.
Total Alkalinity:
40-120 ppm
Calcium Hardness:
Standard 50-150 ppm
ACE System 25-75 ppm
AVOIDING THE RISK OF HYPERTHERMIA
Prolonged immersion in hot water can result in HYPERTHERMIA, a
dangerous condition which occurs when the internal temperature of
the body reaches a level above normal 37°C (98.6°F). The symptoms
of hyperthermia include unawareness of impending hazard, failure to
perceive heat, failure to recognize the need to exit the spa, physical
inability to exit the spa, fetal damage in pregnant women, and
unconsciousness resulting in a danger of drowning.
INCREASED SIDE EFFECTS OF MEDICATION
• The use of drugs, alcohol may cause unconsciousness with the
possibility of drowning.
• Persons using medications should consult a physician before using
a spa; some medication may cause a user to become drowsy,
while other medication may affect heart rate, blood pressure, and
circulation.
• Persons taking medications which induce drowsiness, such as
tranquilizers, antihistamines, or anticoagulants should not use the
spa.
Safety Information
WARNING
The use of alcohol, drugs, or medication can greatly increase the risk of
fatal hyperthermia in hot tubs and spas.
TO REDUCE THE RISK OF INJURY
• The water in the spa should never exceed 40°C (104°F). Water
temperatures between 38°C and 40°C (100°F and 104°F) are
considered safe for a healthy adult. Lower water temperatures are
recommended for extended use (exceeding ten minutes) and for
young children. Extended use can cause hyperthermia.
• Pregnant or possibly pregnant women should limit spa water
temperatures to 38°C (100°F). Failure to do so may result in
permanent injury to your baby.
Page 2
Page 6

• Do not use spa immediately following strenuous exercise.
AVOIDING THE RISK OF SKIN BURNS
• To reduce the risk of injury, before entering a spa the user should
measure the water temperature with an accurate thermometer.
• Test the water with your hand before entering the spa to be sure it’s
comfortable.
SAFETY SIGN
Each HOT SPRING spa is shipped with a SAFETY SIGN in the owner’s
package. The sign, which is required as a condition of Product Listing,
should be permanently installed where it is visible to the users of the
spa. To obtain additional SAFETY SIGNS, contact your HOT SPRING
dealer and request Part #70798.
DON'T
• Leave the HOT SPRING spa exposed to the sun without water or the
cover in place. Exposure to direct sunlight can cause solar distress of
the shell material.
• Roll or slide the spa on its side. This will damage the siding.
• Lift or drag the vinyl cover by using the cover lock straps; always lift or
carry the cover by using the handles.
• Attempt to open the electrical control box. There are no user
serviceable parts inside. Opening of the control box by the spa owner
will void the warranty. If you have an operational problem, carefully go
through the steps outlined in the Troubleshooting section. If you are
not able to resolve the problem, contact your authorized HOT SPRING
dealer. Many problems can easily be diagnosed over the telephone by
an Authorized Service Technician.
SPA SHELL
Your HOT SPRING spa has an acrylic shell. Stains and dirt generally will not adhere
to your spa’s surface. A soft rag should easily remove most dirt. Most household
chemicals are harmful to your spa’s shell (see below for detailed information on cleaning
agents). Always rinse off any spa shell cleaning agent with fresh water.
IMPORTANT
SPA INSTRUCTIONS
The following contains important spa information, and we strongly
encourage you to read and apply them.
DO:
• Use and lock the vinyl cover when the spa is not in use, whether it is
empty or full.
• Follow the Spa Care and Maintenance recommendations stated in this
manual.
• Use only approved accessories and recommended spa chemicals and
cleaners.
• Provide adequate drainage to deal with overflow water.
SAVE THESE INSTRUCTIONS
IMPORTANT:
1. The following products are the ONLY approved cleaning agents for your HOT
SPRING spa shell: plain water, HOT SPRING FRESHWATER ® Spa Shine,
Soft Scrub®. The use of alcohol or any other household cleaner other than those
listed to clean the spa shell surface is NOT recommended. DO NOT use any
cleaning products containing abrasives or solvents since they may damage the shell
surface, specifically: Simple Green
CHEMICALS! Damage to the shell by use of harsh chemicals is not covered under
the warranty. Always rinse off any spa shell cleaning agent with fresh water.
2. Iron and copper in the water can stain the spa shell if allowed to go unchecked. Ask
your HOT SPRING dealer about a Stain and Scale Inhibitor to use if your spa has
a high concentration of dissolved minerals. (Watkins Wellness recommends
FRESHWATER Stain & Scale Defense.)
3. Keep all cleaners out of the reach of children and use care when applying.
®
, Windex® or Spa Mitt. NEVER USE HARSH
Page 3
Page 3
Safety Information
Page 7
Getting Started
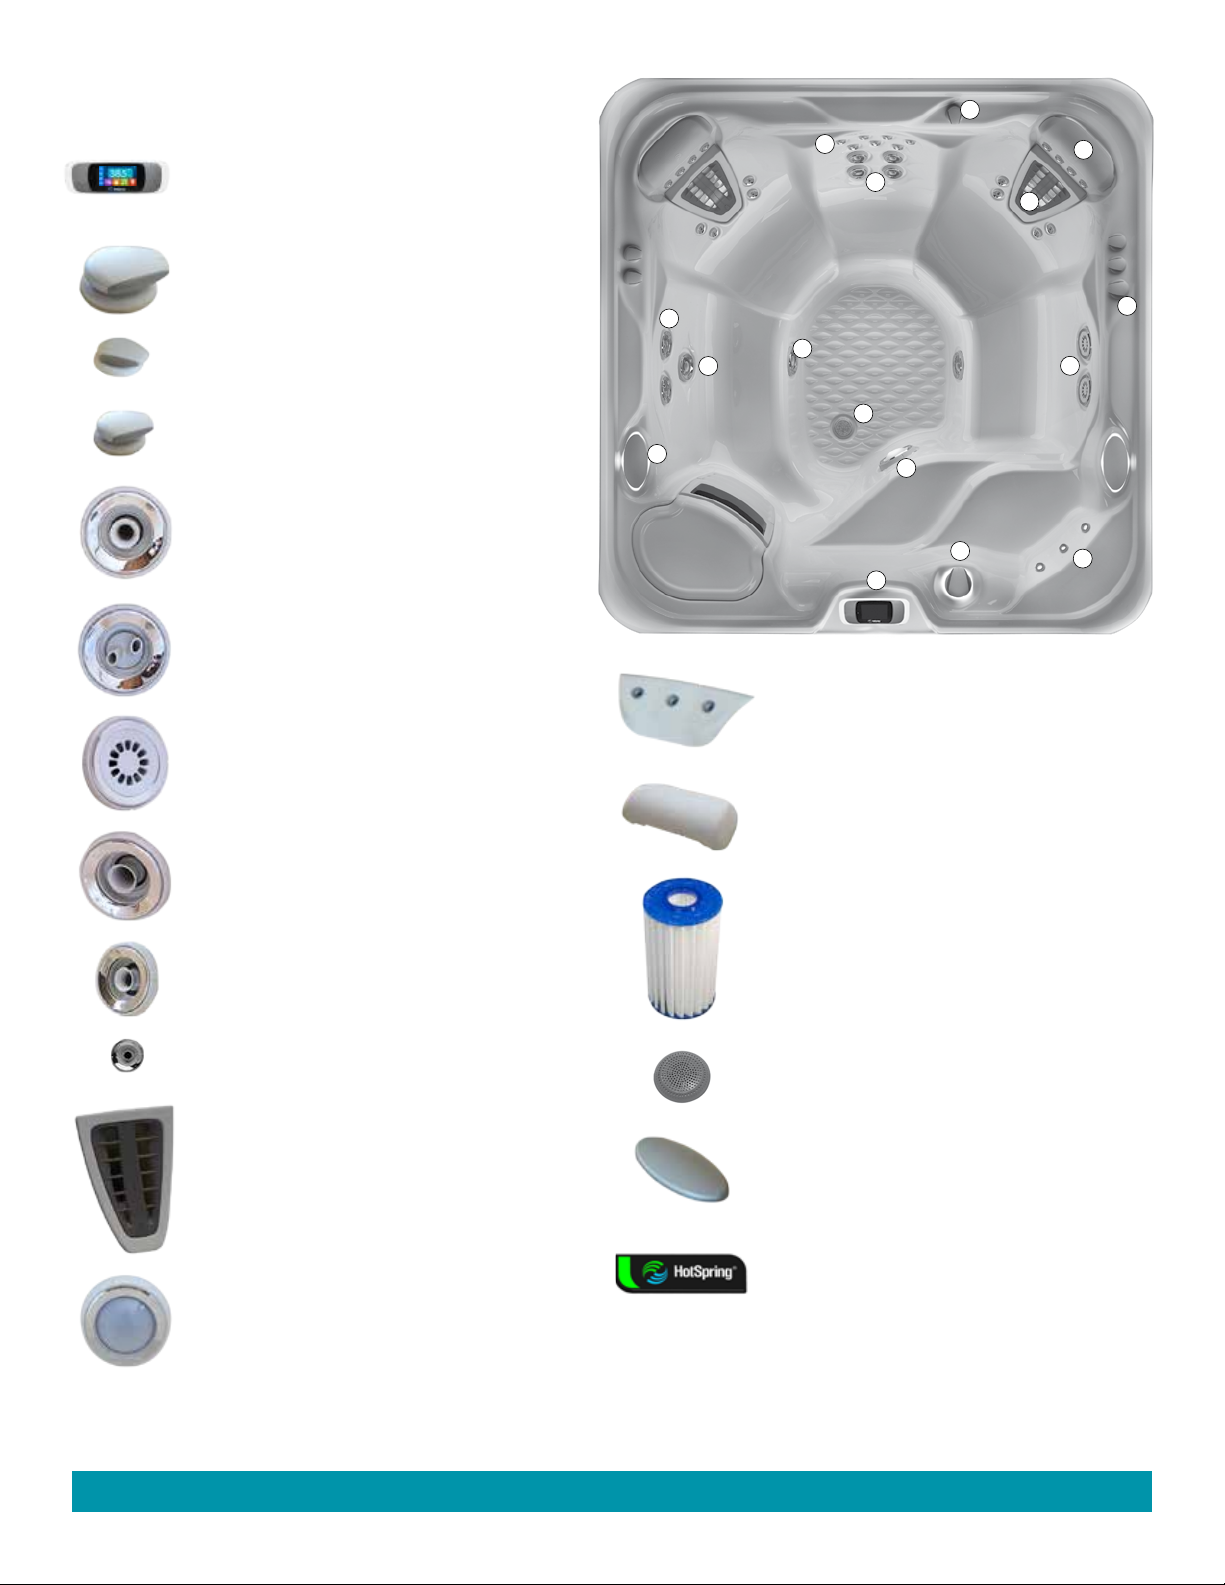
SPA FEATURES
1) Contol Panel. The control panel features a full
color LCD touchscreen to operate all spa functions
and features inside or outside of the spa.
2 ) The SmartJet ™ system lets you divert water
to different combinations of jets simply by turning
the lever.
3) The Comfort Control™ lever lets you dial in the
ideal amount of air for both the Precision™ and
Moto-Massage™ DX Jets.
4) The Water Feature lever adjusts the amount
of water that flows from the either one of the two
available water features.
5) The Hydromassage jet with directional nozzle
provides maximum performance.
6) The Hydromassage jet with dual port rotary
nozzle provides a V-shaped, pulsating massage.
3
10
9
6
5
17
8
16
12
2
1
14
11
4
7
13
7) The SoothingStream™ Jet has twelve nozzles
that provides treatment to your shoulders and
upper back.
8) The FootStream™ jet provides a maximumstrength massage with an invigorating, directional
whirlpool jet.
9) The HydroStream™ jet has a strong flow of
water and air which quickly soothes away tension.
10) The PRECISION directional or rotary jet
delivers a therapeutic massage.
11) The MOTO-MASSAGE DX is a moving jet. It
has two warm streams of water sweeping up and
down the entire length of your back.
™
13) The BellaFontana
water feature creates three
arcs of dancing water.
14) Pillow - Most spas come with one or more pillows.
15) Spa Filter provides 100% No-Bypass filtration, all
water passes through the filter before it re-enters the
spa (not illustrated).
16) This is the Heater Return and Spa Drain. Ozone
bubbles from the ozone system can also be seen
coming from the drain.
17) Speakers are included when a sound system is
ordered.
12) The Luminescense
Lighting system, you can individually control
each zone- underwater, bartop, pillows and water
features. The light shown is used underwater.
Getting Started
™
Four-Zone Multi-Color
Page 4
18) The HOT SPRING logo on the front of the
spa illuminates blue, green, yellow and red colors.
These colors indicate the power, ready, and status
of different spa functions without having to open the
cover to look at the control panel.
Page 4
Page 8

MOTO-MASSAGE DX JET
The MOTO-MASSAGE DX jet automatically travels up and down in a
sweeping motion, simulating the natural stroking effects of a manual
massage. The intensity of the MOTO-MASSAGE DX jet may be adjusted
by turning the COMFORT CONTROL lever.
The MOTO-MASSAGE DX jet has been factory adjusted to provide
maximum hydromassage, and to achieve full vertical travel with its
COMFORT CONTROL lever in the full air volume position. Should
the MOTO-MASSAGE DX jet not achieve full vertical travel and the
problem is not a closed air control valve or clogged filter cartridge, then
your HOT SPRING Service Center should be contacted.
IMPORTANT: A slow or non-moving MOTO-MASSAGE DX jet may
indicate that the filter cartridge pores are obstructed with dirt, body oils,
or calcification. Follow the filter cartridge cleaning procedures in the
Spa Care and Maintenance section of this manual.
HYDROMASSAGE JETS
The Hydromassage jets have two different nozzle options: directional
and dual port rotary. The directional nozzle allows you to aim the water
in the direction that feels best. The dual port rotary nozzle divides the
water flow into two streams, and then spins.
Turn the faceplate to increase and decrease the jet pressure.
ACCESSORY NOTE: Your HOT SPRING dealer stocks hydromassage
jet kits which can easily be installed in your spa to modify your jets from
directional to dual port rotary.
SOOTHINGSTREAM JET
The SOOTHINGSTREAM jet is another unique feature of HOT
SPRING spas. Its seven outlets are designed to massage the muscles
in the upper back and shoulders, gently and thoroughly. Turn the
faceplate clockwise to increase the jet pressure and counterclockwise
to decrease the jet pressure. Turn the faceplate to increase and
decrease the jet pressure.
PRECISION DIRECTIONAL OR ROTARY JETS
PRECISION jets are located above MOTO-MASSAGE DX jets and in
groups of various sizes. They are designed to perform a soft, soothing
massage on your back and shoulders. Adjust the pressure of the
PRECISION jets using the COMFORT CONTROL lever (located closest
to the PRECISION jets).
Refer to the drawings on the following pages to familiarize yourself
with the SMARTJET system menus for your spa. Please note that the
SMARTJET lever side of the spa is always considered the front when
referring to the locations of the different types of jets and jet systems.
The clock positions are correct when facing the spa, standing at
the SMARTJET lever.
FOOTSTREAM JET
The FOOTSTREAM jet is a large orifice hydromassage jet designed to
put maximum massaging action on a specific area of the body. It is located
in the lower part of the spa to afford optimal access for the massaging
of feet, legs, hips, and lower back. The intensity of the FOOTSTREAM
jets can be altered (except the ones found in the FootWell™ system)
using the COMFORT CONTROL lever. FOOTSTREAM jets located in
the FOOTWELL are not adjustable. Turn the faceplate to increase and
decrease the jet pressure.
WATER FEATURE
GRANDEE, ENVOY, VANGUARD, ARIA & SOVEREIGN spas are
equipped with a BELLAFONTANA water feature. This water feature can
be turned on or off when the two-speed pump is on low speed (tranquil
mode) or high speed. To function correctly, the water feature on/off lever
must be placed in the full on position only.
If the lever is not in the full on position when the pump is on high
speed, it is likely that the water feature will project water substantially
farther out into the spa as the on/off lever is opened. This is not proper
operation. If this occurs, the pump should be turned off, the water
feature lever rotated to the full on position and the pump turned on again.
CAUTION: Partial blockage of water flow at entrance of water feature
will cause the water to flow farther into or over the spa.
HOT SPRING LOGO LIGHT
The HOT SPRING logo on the front of the spa illuminates several
colors. These colors indicate the power, water temp ready and status of
the spa without having to open the cover to look at the control panel.
Status indicator - all spa
functions are working
properly when green
See Logo Light Trouble
shooting guide for more
color information
Ready Indicator: The GREEN indicator will light when the spa water
temperature is within 1°C (2°F) of the set temperature, and will turn
off when the temperature is outside of that range. If you increase or
decrease the temperature setting of the spa, the ready indicator will
turn off until the water temperature reaches the acceptable range
for the new temperature setting. A flashing RED indicator means a
problem may exists with the temperature sensor (see Logo Light
Troubleshooting section for more information).
Power Indicator: The BLUE indicator is ‘on’ when the spa is properly
supplied with power. It also provides a diagnostic function–a flashing
RED indicator indicates that the heater high limit has tripped, meaning
that either the spa water is above its acceptable temperature range, or
a malfunction has occurred within the spa (such as low circulation due
to clogged filters). An ‘off’ BLUE indicator means that there is a problem
with the spa control box or the power supplied to the spa (see Logo Light
Troubleshooting section for more information).
Status Indicator: A GREEN indicator is on when spa functions are
working normally. A YELLOW indicator is on when a spa function
requires attention. A RED indicator is on and flashing when there is an
issue with the spa functions and needs immediate attention (see Logo
Light Troubleshooting section for more information).
Ready indicator - water is ready, within
1°C of set temperature when green
Power indicator - Power to spa is on when blue
QUICK START-UP INSTRUCTIONS
BEFORE YOU FILL YOUR SPA
Make sure your spa has been properly installed per all local codes, this
includes the location of the spa, the foundation of the spa as well as the
electrical installation of the spa. Please see the Installation Instructions
section of this manual.
HYDROSTREAM JET
The Hydrostream jet is a mid-size hydromassage jet that delivers a great
massage to the feet, back and shoulder areas. Turn the faceplate to
increase and decrease the jet pressure.
Page 5
Getting Started
Page 9

DO:
• Know which water treatment system you will be using and make sure
you have necessary chemicals available. Read all of the instructions
that come with the system.
• Have FreshWater
• Have pH/Alkalinity Up & Down available.
• Know the "Hardness" of your water, contact your dealer to help you
with this information. See Water Quality and Maintenance for more
information.
IMPORTANT: Watkins Wellness does not recommend that the
spa be filled with “softened” water, as this may damage the spa’s
equipment.
• Purchase the Clean Screen
contaminants from the tap water. This is recommended, not required.
™
5-way Test Strips Available.
™
pre-filter to remove unwanted
DON'T:
• Power up the spa until it has been filled with water! Power to the
spa automatically activates critical components within the spa, such
as controls, heater, circulation pump, and other systems. If power
is supplied to these components prior to the spa being filled, the
components will be damaged, and this may result in a non-warranty
component failure.
DON'T:
• Fill the spa with hot water or cold water with cold water temperature
below 10º C (50º F)! Tripping of the high-limit thermostat may result
causing your spa to stop functioning.
DON'T:
• Use your spa after filling until all of the steps listed below START-UP
are completed!
• Add chlorine if treating your spa with polyhexamethylene biguanide
(Biguanide, PHMB, eg. BaquaSpa
®
) sanitizer.
START-UP
Your HOT SPRING spa has been thoroughly tested during the
manufacturing process to ensure reliability and long-term customer
satisfaction. A small amount of water may have remained in the
plumbing after testing and, as a result, may have spotted the spa shell
or the spa siding prior to delivery. Before filling the spa, wipe the spa
shell clean with a soft rag.
The following instructions must be read and followed exactly to ensure
a successful start-up or refill.
1. CLOSE ALL DRAINS AND FILL THE SPA with water through
the filter compartment. Your HOT SPRING spa water level should be
maintained approximately 4 cm above the top of the highest jet.
2. AFTER THE SPA HAS BEEN FILLED with water and the
equipment compartment door is secured, power must be applied to
the spa.
3. TO CHECK THE OPERATION OF THE JET SYSTEM and to
purge any remaining air from the heating system:
• Push the JETS icon on the Home Screen.
• Push the double jet icons to run the jet pumps on high speed for
one minute.
Page 6
• Press the OFF icon (far right) once the jet system is full operational
(as indicated by strong, non-surging jets), priming of the
complete, to shut the jets off.
Weak or surging jets are an indication of a low water level condition or
clogged filter cartridges.
IMPORTANT: Be sure the COMFORT CONTROL Levers (see
illustration in Spa Features section) are open by turning each one
clockwise and checking to see that the SMARTJET lever is pointing
in the position.
spa is
4. USING A TEST STRIP AND APPLICABLE CHEMICALS,
adjust Total Alkalinity (TA) to 80 ppm, Calcium Hardness (CH)
to 100 ppm (if using ACE system 50 ppm), then spa water pH to
between 7.4 and 7.8. These procedures are listed in the “Water
Quality and Maintenance” section.
IMPORTANT: Always add spa water chemicals directly into the
filter compartment with the jet pump on high speed for at least
ten minutes. Adjusting the Total Alkalinity (TA) as the first step is
important, as out-of-balance TA will affect your ability to adjust the
pH correctly and will prevent the sanitizer from operating effectively.
5. SUPERCHLORINATE THE SPA WATER by adding 1½
teaspoons of chlorine (sodium dichlor) per 950 liters (250 gallons)
of spa water. Press (Clean Cycle icon on home screen)
followed by pressing START to circulate the spa water for a tenminute period.
6. DURING THE SUPER-CHLORINATION PERIOD, rotate the
SMARTJET lever(s) through both operating positions, letting the
spa water circulate (with jets on) for equal periods of time. The HOT
SPRING spa's SMARTJET levers are designed to operate in the 3
o’clock and 9 o’clock positions.
7. SET THE TEMPERATURE CONTROL, the spa
pre-programmed to reach 38° C (100°F
within 18 to 24 hours. You may raise the water temperature by:
GRANDEE & ENVOY Models:
• Press the temperature window in the Home Screen to display
the Set Temperature Screen.
• Press or to change the water set temperature.
Place the vinyl cover on the spa and allow the water temperature
to stabilize. Make sure you secure the cover in place using the
cover locks. Periodically check the spa water temperature. When
the water temperature climbs above 32°C (90°F), proceed to the
next step.
To prevent tampering, you can lock your desired temperature
setting. Refer to the Main Control Panel section for details.
), and will normally do so
is
8. ROTATE THE SMARTJET SYSTEM LEVER(S) TO THE
PRIMARY POSITION
cycle as described in step 5 to
minutes to circulate the spa water. After the clean cycle is complete,
test the spa water for Free Available Chlorine (FAC) residual. If the
residual is between 3 and 5 ppm on the test strips (found in the test
kit) go on to the next step. If the residual is less than 3 ppm,
superchlorinate the spa water by adding 1½ teaspoons of chlorine
(sodium dichlor) per
the clean cycle again to circulate the spa water for another tenminute period.
950 liters (
(3 O’CLOCK)
turn on the CLEAN cycle for ten
250 gallons) of spa water. Activate
Activate the clean
Getting Started
Page 6
Page 10
9. ROTATE THE SMARTJET SYSTEM LEVER(S) TO 2ND
POSITION
described in step 5 to
the spa water
residual. If the residual is between 3 and 5 ppm on the test strips
(between 1-5 ppm if using the ACE system) go on to the next step.
If the residual is less than 3 ppm, superchlorinate the spa water by
adding 1½ teaspoons of chlorine (sodium dichlor) per 950 liters
(
250 gallons)
the spa water for another ten-minute period.
until both SMARTJET lever(s) operating positions have been
tested.
(9 O’CLOCK)
turn on the cycle for ten minutes to circulate
. Test the spa water for Free Available Chlorine (FAC)
of spa water.
Activate the clean cycle as
Activate the clean cycle again to circulate
Repeat this procedure
10. RECHECK the Total Alkalinity (TA) at 80 ppm, Calcium Hardness
(CH) at 100 ppm (if using ACE system 50 ppm), then spa water pH
at between 7.2 and . using a FRESHWATER 5-way test strip.
IMPORTANT: Make sure you adjust your Total Alkalinity first, as
an out-of-balance condition will affect your ability to adjust the pH
correctly, and will prevent the sanitizer from operating effectively.
The spa is ready for use when the spa water has circulated
through each SMARTJET lever operating position and the
chlorine level remains between 3 ppm and 5 ppm.
11. TEST WATER WEEKLY OR BEFORE EACH TIME
THE SPA IS USED
Getting Started
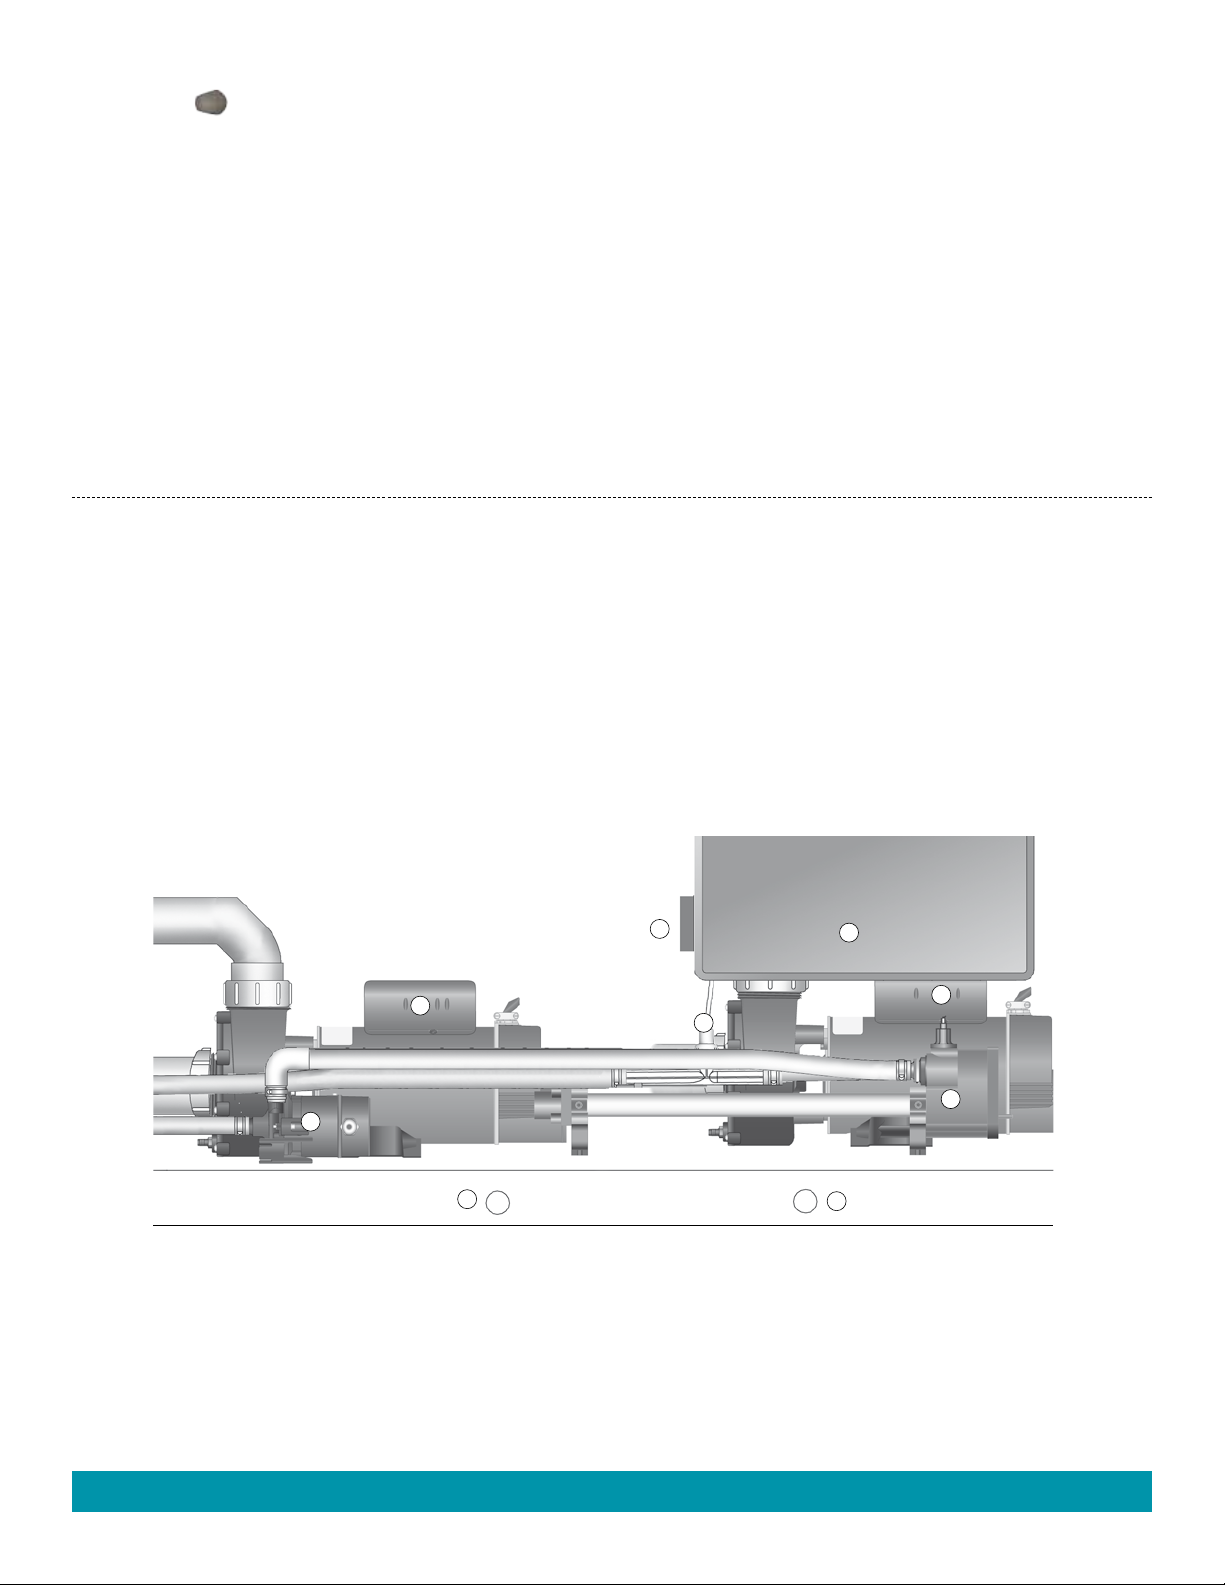
EQUIPMENT COMPARTMENT
The illustration below is to be used as a reference
only (your spa may look different). The equipment
compartment is located behind the front panel of the spa
below the control panel.
1
3
6
8
5
4
1
2
7
Page 7
EQUIPMENT COMPARTMENT
1. Wavemaster™ jet pump
2. NO-FAULT heater
3. SILENT FLO 5000 circulation pump
4. IQ 2020
* This drain may be reversed with other drain depending on your spa, the Main drain will always have a shut-off valve attached.
™
control box
Page 7
5. Ozone injector
6. *Main drain (with shut-off valve)
7. *Secondary drain
8. Bonding terminal
Getting Started
Page 11

Water Quality and Maintenance
Always observe the following guidelines:
• Allow only a responsible person to handle spa chemicals. Keep them
BASIC INFORMATION
It’s important to have clean water. Water maintenance is one of the
least understood, yet most important, areas of spa ownership. Your
dealer can guide you through the process of achieving and maintaining
perfect water in your spa, given your local conditions.
IMPORTANT: Water Terminology can be found at the end of this section
• Always read & refer to the owner's manual for complete
information.
• Test your water with a test strip once a week, or each time the spa is
used.
• Add chemicals in frequent small amounts to prevent overdosing the spa.
• Use the spa only when the chlorine level is between 1-5 ppm or
manually add chlorine as needed.
• When using ACE System, read & refer to the ACE owner's manual.
• It is the spa owner's responsibility to prevent over or under
chlorination.
IMPORTANT: Remember to change your water every three to four
months. Spas with the ACE Salt water Sanitizing System may not need
to drain as frequently - up to twelve months. Refer to the ACE Owner's
Manual for more detailed instructions.
Check with your HOT SPRING dealer to determine if water in your
region has unique qualities - such as high metal or mineral content that should be addressed.
Your program will depend on your water’s mineral content, how often
you use your spa, and how many people use it.
WATER QUALITY CHART
PARAMETER TARGET MIN - "OK" RANGE - MAX
pH 7.4 7.2 7.8
ALKALINITY 80 ppm 40 ppm 120 ppm
HARDNESS 100 ppm 50 ppm 150 ppm
HARDNESS (ACE SYSTEM) 50 ppm 25 ppm 100 ppm
CHLORINE 3 ppm 1 ppm 5 ppm
Maintaining the water quality and the cleanliness of the filters in your
spa is your responsibility. Keeping the spa water balanced prolongs the
life of the spa components and will make the water more comfortable.
Your dealer can guide you through the process of achieving and
maintaining perfect water in your spa, given your local conditions. Your
program will depend on your water’s mineral content, how often you
use your spa, and how many people use it. Watkins Wellness has
developed several water care systems and products to simplify water
care which are available from authorized HOT SPRING dealers.
ACE Salt Water Sanitizing System
HOT SPRING FreshWater
EverFresh
™
System
™
products
Vanishing Act
FRESHWATER 5-way Salt Test Strips
CLEAN SCREEN Prefilter
™
Calcium Remover
.
• Accurately measure the exact quantities specified, never more. Do not
• Handle all containers with care. Store in a cool, dry, well ventilated place.
• Always keep chemical containers closed when not in use. Replace
• Don't inhale fumes, or allow chemicals to come in contact with your
• Follow the emergency advice on the product label in case of
• Don't let chemicals get on surrounding surfaces or landscaping. Don't
• Never smoke around chemicals. Some fumes can be highly
• Don't store any chemicals in the spa equipment compartment.
HOW TO ADD CHEMICALS
TO THE WATER
IMPORTANT: All spa water chemicals, including granulated dichlor,
MPS, granulated pH increaser or decreaser, granulated total alkalinity
increaser, liquid stain and scale inhibitor, and liquid defoamer must
always be added directly into the filter compartment while the jet pump
is running in its high speed mode, and it must run for a minimum of ten
minutes.
To Administer Spa Water Chemicals:
1. Fold back the cover. Carefully remove and set aside the filter
2. On your Control Panel:
• Press on Home Screen to display Clean Cycle.
• Press Start to begin the Clean Cycle.
3. Carefully measure the recommended amount of chemical and slowly
4. Replace the filter compartment cover. After ten minutes, the jet pump
IMPORTANT: After administering a super chlorination treatment or
non-chlorine shock to your spa, leave the cover open for a minimum
of 20 minutes to allow the oxidizer gas to vent. A high concentration of
trapped oxidizer gas which may exist as a result of the shock treatment
(not daily sanitization) may eventually cause discoloration or vinyl
degradation to the bottom of the cover. This type of damage is considered
chemical abuse and is not covered under the terms of the limited warranty.
out of the reach of children.
overdose your spa.
caps on their proper containers.
eyes, nose, or mouth. Wash your hands immediately after use.
accidental contact, or if the chemical is swallowed. Call a doctor or the
local Poison Control Center. If a doctor is needed, take the product
container along with you so that the substance can be identified.
use a vacuum cleaner to clean up chemical spills.
flammable.
compartment cover.
pour it into the filter compartment. Use care not to splash chemicals
on your hands, in your eyes, on the spa shell surface, or on the spa
cabinet.
will automatically shut off to complete the procedure. Close and secure
the cover.
DANGER: Risk of Drowning: Never leave an open spa unattended!
CHEMICAL SAFETY
When using chemicals, read the labels carefully and follow directions
precisely. Though chemicals protect you and your spa when used
correctly, they can be hazardous in concentrated form.
Water Quality and Maintenance
FUNDAMENTALS OF
Page 8
Page 12
WATER MAINTENANCE
• Testing: Test the water weekly or each time the spa is used with
convenient FRESHWATER 5-way test strips or more accurate liquid/
tablet reagent test kit per instructions. Critical parameters: sanitizer
level, pH, Calcium Hardness (CH), and Total Alkalinity (TA). Store test
equipment in a dark, cool, dry place to maintain potency.
• Water Filtration: The 100% no by-pass 24 hour filtration used in
HOT SPRING spas provides the best approach to keeping water
clean by constantly circulating sanitizer and removing waste from the
spa. Regularly inspect and clean filters for peak performance.
• Chemical Balance/pH Control: It is important to adjust the primary
water parameters (Total Alkalinity, Calcium hardness, pH) into
the recommended ranges so that they are stabilized or balanced.
Balance the water chemistry every time you fill the spa with new
water and then during the
life of that body of water.
Keeping the water in
balance prevents damage
by holding the pH in a
safe range and preventing
calcium scale formation
on spa equipment. A low
pH can damage metal
components whereas a
high pH can cause high
levels of calcium to form
scale. Your dealer should
provide a detailed water
chemistry orientation soon after your new spa is filled for the very first
time.
• The following three water components must be kept in balance to avoid
damage to the spa. Do balance these components in the order they
are listed here as each will help you balance the next using a minimum
amount of chemicals.
1. Calcium Hardness (CH) – CH is the measure of the amount
of dissolved calcium in the water. Low levels can make the
water corrosive and high levels cause scale formation of spa
components. The recommended CH reading is between
50 - 150 ppm. A hardness of 50 ppm is recommended with
the ACE System. If the CH level is too high, lower it with the
VANISHING ACT calcium remover per instructions. Once in
balance, the CH reading normally remains stable until new water
is added. Great care must be taken when filling the spa from a
water softener to ensure that the calcium remains in balance and
avoid damage to the spa.
2. Total Alkalinity (TA) - TA is a measure of the water’s ability to
resist changes of pH or buffer capacity. A low TA allows the pH
to fluctuate easily. The recommended TA reading is between 40
- 120 ppm. To raise the TA, use HOT SPRING FRESHWATER
pH/Alkalinity Up (sodium hydrogen carbonate). To lower the TA,
use HOT SPRING FRESHWATER pH/Alkalinity Down (sodium
bisulfate). Once the TA is balanced, it normally remains stable
until the next drain/refill. We recommend you check the TA
reading once per month. Raising/lowering the TA may cause the
pH readings to fluctuate widely. Ignore the pH readings on the
test strip while you are balancing the TA.
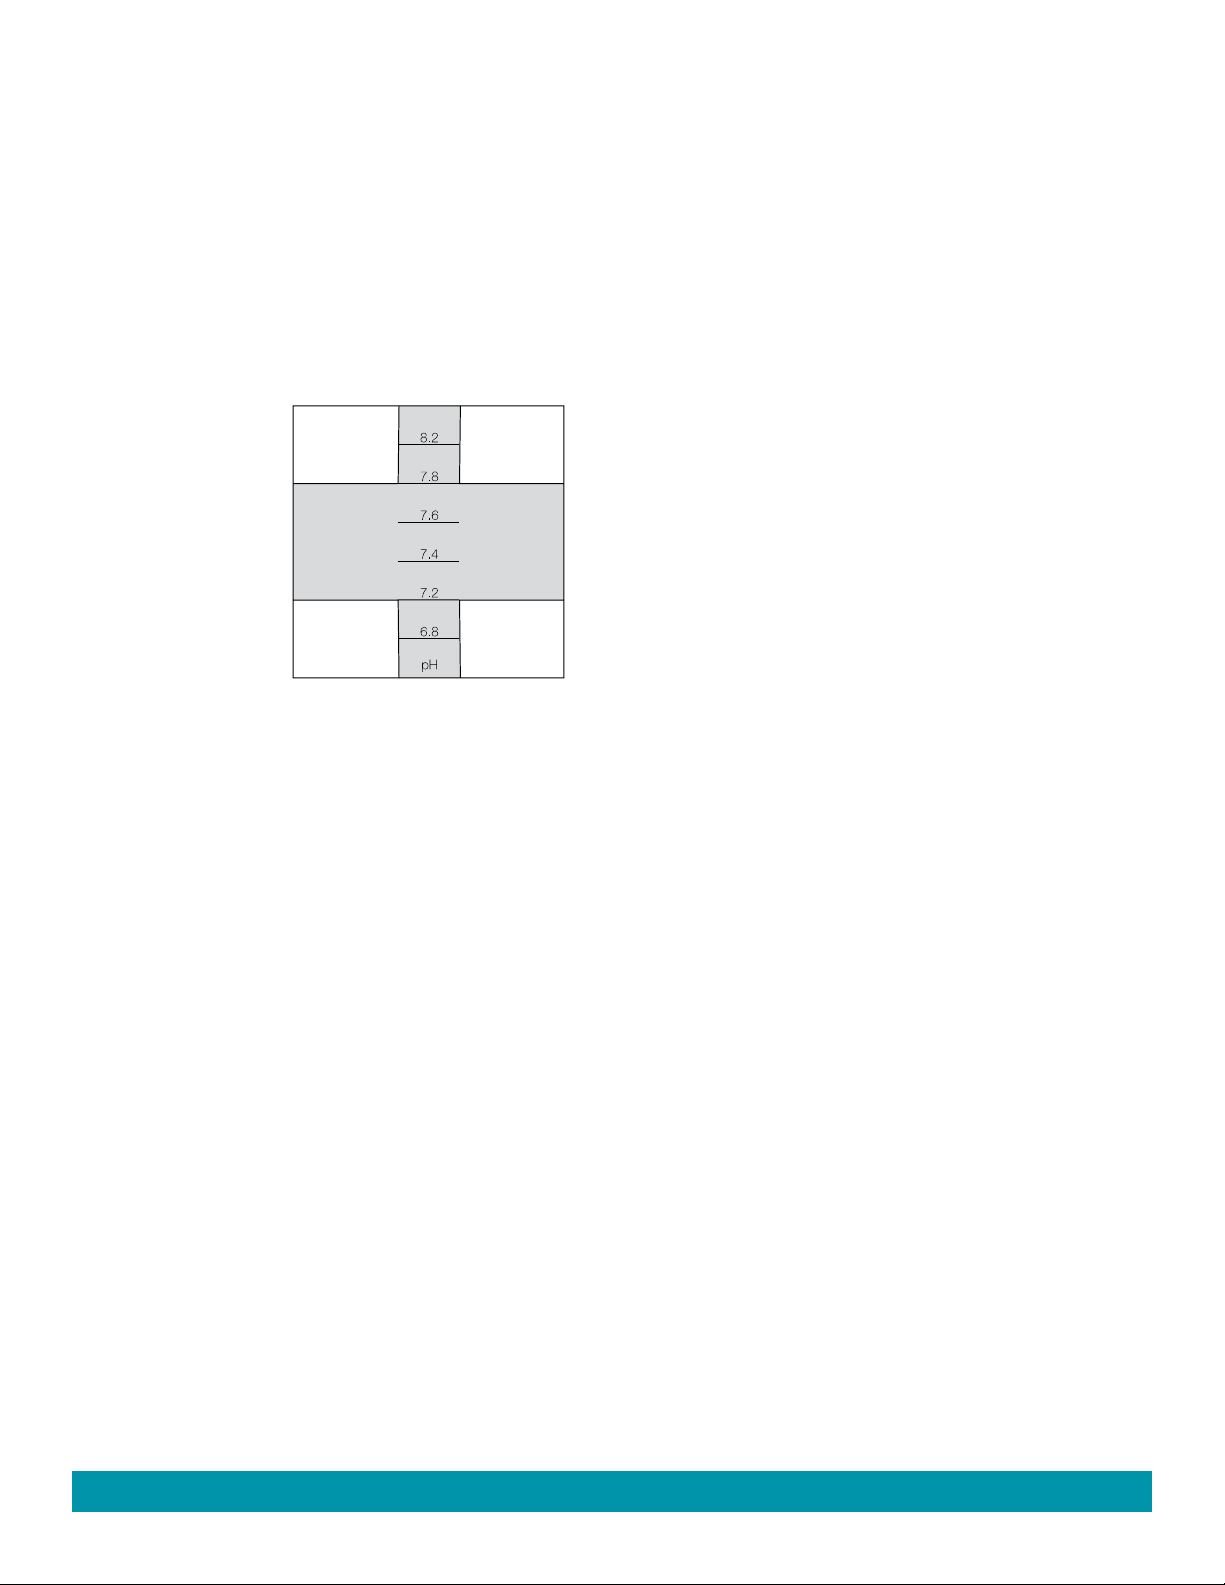
3. pH - The pH is the measure of the acidity and alkalinity.
Maintaining the proper pH level will optimize the effectiveness
of the sanitizer, preventing damage to the spa and physical
discomfort for spa users. A low pH dissipates sanitizer, causes
corrosion, and irritates spa users. A high pH level will neutralize
ALKALINE SPA
WATER
(SCALING
ZONE)
COMFORT
ZONE
ACIDIC SPA
WATER
(CORROSIVE
ZONE)
ADD pH
DECREASER
TO LOWER
pH
IDEAL
ADD pH
INCREASER
TO RAISE
pH
Page 9
sanitizer, promote scaling and cloud water. The recommended
pH reading is between 7.2 - 7.8. To lower the pH level, use HOT
SPRING FRESHWATER pH/Alkalinity Down (sodium bisulfate).
To raise the pH level, use FRESHWATER pH/Alkalinity Up
(sodium carbonate).
• Water Conditioners: Spa fill water varies from location to location
and user to user, therefore it is important to consult with your dealer for
an appropriate program.
a. VANISHING ACT – High levels of calcium and some minerals
can be removed from the water with the single use VANISHING
ACT. High calcium levels can cause scale formation on the spa
equipment and shell.
b. CLEAN SCREEN pre-filter –The CLEAN SCREEN pre-flter
should be used at every fill and top-off to remove contaminants
from the fill water, especially iron, copper, and manganese. Many
water sources including well water contain high concentrations of
minerals that can cause staining of the shell and plastics.
c. Stain and Scale control – For water high in calcium and minerals,
it may be necessary to use an anti-scalant like Stain and Scale
control. As water evaporates from your spa and new water is
added, the amount of dissolved minerals like calcium, copper, iron,
and manganese will increase. (Minimize evaporation by keeping
the cover on the spa whenever possible.) High iron or copper
content in the water may produce green or brown stains on the
spa.
d. Foam Inhibitors - Soap is introduced into the spa water from
users’ bodies and swimming apparel and can cause the spa
water to foam when the jets are used. Low levels of calcium
hardness (soft water) can increase foaming. Although ozone and
ACE can oxidize soap residual, it may become necessary to add
Foam Inhibitors to suppress the foam. Excessive soap in the
water may require a water change to resolve.
• Oxidizers: Ozone and Monopersulfate (MPS) are oxidizers used to
prevent the buildup of contaminants, maximize sanitizer efficiency,
minimize combined chlorine, and improve water clarity. They are
to be used in conjunction with EPA registered sanitizers. The
FRESHWATER III high output ozone system uses Corona Discharge
technology to produce a high concentration of ozone which is injected
into the spa water 24 hours per day. HOT SPRING FRESHWATER
Chlorine-Free Oxidizer, Monopersulfate (MPS) is a granular oxidizing
chemical.
• Sanitizers: Maintaining the recommended residual level of an EPA
registered sanitizer at all times will decrease the occurrence of unsafe
bacteria and viruses in your spa water. The recommended Free
Available Chlorine (FAC), the amount of available chlorine sanitizer,
is 3.0-5.0 ppm. A low FAC can allow bacteria and viruses to grow
rapidly in the warm water, and a high FAC can cause discomfort
to the user’s eyes, lungs, and skin. Each sanitizer carries its own
instructions regarding how much to use and when to add it to the spa
water. Consult your dealer for their recommendations and instructions
on proper sanitizing of the spa.
a. ACE Salt Water Sanitizing System
b. EVERFRESH Water Care System FRESHWATER Concentrated
Chlorinating Granules
c. Sodium Dichloro-s-Triazinetrione (sodium dichlor or chlorine)
d. Brominating Concentrate (one step granular bromine).
e. BaquaSpa® (please consult your BAQUASPA manual for
instructions on the use of this product).
IMPORTANT: DO NOT use tri-chlor chlorine, bromo-chloro-dimethyl-
Page 9
Water Quality and Maintenance
Page 13

hydantoin (BCDMH), or any type of compressed bromine or chlorine,
acid or any type of sanitizer which is not recommended by Watkins
Wellness.
THE HOT SPRING SPA WATER
MAINTENANCE PROGRAM
FILLING THE SPA WITH WATER
Use the CLEAN SCREEN pre-filter to remove unwanted contaminants
such as rust, dirt, detergents, and algae from the fill water. Dissolved
metals, copper, iron, and manganese are also removed. Instructions
are included with the CLEAN SCREEN pre-filter. Always fill the spa
through the filter compartment. Do not fill your spa using water from a
swimming pool as pool
spa and can damage your spa.
ADDING CHEMICALS TO THE WATER
All spa water chemicals, including granulated dichlor, MPS, granulated
pH increaser or decreaser, granulated total alkalinity increaser, liquid
stain and scale inhibitor, and liquid defoamer must always be added
directly into the filter compartment while the jet pump is running in its
high speed mode, and it must run for a minimum of ten minutes with the
cover off. Use the Clean button/feature to ensure that the chemicals
are properly mixed when adding.
BUILDING A SANITIZER ROUTINE
During the first month of ownership, measure the sanitizer residual
daily in order to establish a baseline of sanitizer needed vs. spa usage.
Sanitizer needed is the amount of FAC needed to accommodate the
number of users and their combined usage time. For example, two
spa users for twenty minutes every day creates regular demand on the
sanitizer that is used to determine how much sanitizer to add in order to
maintain the proper residual. If the usage pattern increases dramatically
with invited guests, the amount and frequency of sanitizer required
increases dramatically.
PERFORMING SUPER CHLORINATION/
NON-CHLORINE SHOCK TREATMENT
A weekly or monthly super chlorination (1.5 tsp dichlor/950 liters) or
shock (4tbs mps/950 liters) may be required of your chosen sanitation
program. Increasing chlorine to 5 ppm for 24-48 hours removes
excess waste and chloramines from the water. Sodium dichlor is 6x
stronger than MPS and may be a more appropriate for those users that
experience heavy bather load conditions. Operate all jets and leave
the cover open for a minimum of 20 minutes to allow the oxidizer gas
to vent to prevent damage and discoloration to the cover and pillows
after administering a super chlorination or shock to your spa. This type
of damage is considered chemical abuse and is not covered under the
terms of the limited warranty.
IMPORTANT
your spa.
there are children present!
: Always allow the FAC to fall below 5 ppm before using
DANGER: Never leave an open spa unattended, especially if
ACE SALT WATER SANITIZING SYSTEM
(OPTIONAL)
The ACE Salt Water Sanitizing System converts water and sodium
chloride salt into chlorine sanitizer. The ACE is compatible with
chemicals are very different from those used in a
Page 10
chlorine based systems and chemicals. Although the system is
reduced maintenance, it is not automatic. It is important that the user
regularly tests and balances the water. A calcium hardness of 50 ppm
is recommended to extend the life of the hardware. Consult the manual
for additional instructions.
EVERFRESH WATER CARE SYSTEM
(OPTIONAL)
The EVERFRESH water care system is comprised of the following
products:
• CLEAN SCREEN Pre-filter
• HOT SPRING FRESHWATER Concentrated Chlorinating Granules,
Sodium Dichlor
• HOT SPRING FRESHWATER Chlorine-Free Oxidizer, Monopersulfate
(MPS)
• FRESHWATER III high output ozone system
• FreshWater
The EVERFRESH system introduces silver ions into the spa water via
erosion of silver infused beads which inhibits bacteria growth. When
combined with MPS, or chlorine, waste is oxidized and removed from
the water. It is important to follow the recommended application and
maintenance programs outlined for each product’s use. If the spa is
being used over an extended period of time, such as a whole afternoon
or evening, additional sanitizer will be needed.
Required: Weekly Super Chlorinate/Shock the spa to reactivate the
silver ion cartridge, allow the release of silver ions, and quickly destroy
any remaining contaminants. Without this weekly shock treatment, the
silver ion cartridge may stop releasing silver ions into the water.
IMPORTANT: Use only Dichlor sanitizer. Silver is not compatible with
bromine and biguanides. Don't use a water clarifier. Clarifiers will cause
the spa water to become cloudy.
™
Silver Ion purifier
Ag+
MANUAL CHLORINE (SODIUM DICHLOR)
Watkins Wellness recommends the use of HOT SPRING
FRESHWATER
for sanitizing the water. Sodium dichlor is preferred because it is totally
soluble, dissolves quickly, and is nearly pH neutral. The recommended
FAC, the amount of available chlorine sanitize the spa, 3.0-5.0 ppm.
If the FAC is too low: Increase the FAC by adding granulated sodium
dichlor.
If the FAC is too high: Allow time to pass and the FAC level will
naturally drop over time.
If the spa smells of chlorine: Super chlorinate or shock the spa.
FAC chlorine does not have an odor whereas combined spent chlorine
(chloramines) has a strong chlorine odor that can be eliminated by
shocking the water.
IMPORTANT: There are several forms of stabilized chlorine available
for use in spas and swimming pools. It is extremely important to choose
one specifically designed for spas. Use of an incorrect product such
as tri-chlor which has a very low pH (2.6) and dissolves too quickly in
hot water, results in extremely high levels of chlorine that WILL cause
damage to your spa. Use of a liquid or compressed bromine/chlorine
or unapproved sanitizer WILL damage your spa and is specifically not
covered under the terms of the limited warranty.
Concentrated Chlorinating Granules (sodium dichlor)
Water Quality and Maintenance
Page 10
Page 14

OZONE MAINTENANCE
Reduced or no ozone bubbles coming from heater return (clogged
ozone injector) or no ozone, clean the injector:
1. Place 0.5 liter of white vinegar into a cup or bucket.
2. Carefully loosen the long tubing attached to the bottom of the
ozonator, located in the equipment compartment.
DANGER: Place the end of the tubing into the vinegar, making
certain that the end of the tubing sits at the bottom of the container.
3. Run the spa until all 0.5 liter of the vinegar is gone. This should allow
an ample flow of vinegar to be run through the injector and clear the
blockage.
4. Reinstall the tubing to the bottom of the ozonator.
Water chemistry damage is not covered by the warranty. The chemical
levels and water quality in the spa are under your direct control.
With proper basic care, the spa will provide many years of hot water
relaxation. If you are unsure about any chemical or its usage in the spa,
contact your Authorized Dealer, or Watkins Wellness.
DO:
• Add all chemicals slowly into the filter compartment with the jet pump
operating for ten minutes.
• Use special care if using baking soda to clean either the interior or
exterior plastic surfaces.
IMPORTANT: Watkins Wellness DOES NOT recommend the
use of any floating chemical dispenser. Damage to the spa shell or
components caused by a floating chemical dispenser is specifically not
covered under the terms of the limited warranty. Floating dispensers
can become trapped in one area and cause an over-sanitization or
release large chunks of sanitizer that very quickly chemically burns the
shell and cover.
DON'T:
• Use compressed sanitizers.
• Use a floater type sanitization system as a low or no maintenance
solution to your spa maintenance program.
• Use a sanitizer which is not designed for spas.
• Use swimming pool (muriatic) acid to lower pH.
• Use household bleach (liquid sodium hypochlorite).
• Broadcast or sprinkle the chemicals onto the water surface. This
method may cause chemically-induced spa surface blistering
(chemical abuse).
VACATION WATER CARE
INSTRUCTIONS
If you plan to be away from home, follow these instructions to ensure
that the water quality of your spa is maintained:
SHORT TIME PERIODS (3-5 DAYS)
1. Adjust the pH by following the instructions outlined in the Water Quality
and Maintenance section.
2. Sanitize the water by following the shock procedures also listed in the
Water Quality and Maintenance section.
3. Lock your cover in place using the coverlocks.
4. Upon your return, sanitize the water by following the shock
procedures, and balance the pH.
5. If ACE is installed, please refer to Tips section, vacation or limited use
in the ACE Owner's Manual.
Page 11
LONG TIME PERIODS (5-14 DAYS)
Prior to leaving:
1. At least one day before you leave, set the temperature to its lowest
level. This setting should represent an approximate water temperature
of 26°C (80°F).
IMPORTANT: Spa water oxidizers such as sodium dichlor (chlorine)
maintain their level of effectiveness substantially longer in warm water
26°C (80°F) than in hot water 38°C - 40°C (101°F to 104°F)
2. Adjust the pH as required. Sanitize the water by following the shock
procedures.
Upon your return:
3. Sanitize the water by following the shock procedures. Return the set
temperature to its original setting. The spa water will be safe for you to
use once the Free Available Chlorine residual level has dropped below
5.0 ppm.
IMPORTANT: If you will not be using your spa for an extended period
of time (in excess of 14 days) and an outside maintenance service
(or neighbor) is not available to assist with the water maintenance,
draining or winterizing of the spa is recommended. Spas equipped
with our FRESHWATER III ozone system can extend this to 4 weeks.
The FRESHWATER III ozone system does not guard against possible
freezing damage, however.
SUPPLEMENTAL WATER MAINTENANCE
Proper water sanitation and mineral balance (pH control) are absolutely
essential for a complete spa water maintenance program. Here are two
other popular water additives that are optional:
Mineral Deposit Inhibitors
As water evaporates from your spa and new water is added, the
amount of dissolved minerals will increase. (Minimize evaporation
by keeping the cover on the spa whenever possible.) The spa water
may eventually become “hard” (Calcium Hardness too high) enough
to damage the heater by calcifying its surface. Proper pH control can
minimize this.
Normal soap build-up will require water replacement regularly enough
that mineral deposits normally are not a problem.
Occasionally, high iron or copper content in the water may produce
green or brown stains on the spa. A stain and scale inhibitor may help
to reduce these metals.
IMPORTANT: Well water may contain high concentrations of minerals.
The use of a low water volume, extra-fine pore water filter (in-line prefilter such as the CLEAN SCREEN pre-filter) will help to remove many
of the larger particles during the filling of the spa. In-line pre-filters can
be purchased at your local HOT SPRING dealer.
Foam Inhibitors
Spa water requires changing due to the buildup of soap in the water.
Typically, soap will cause the spa water to foam when the jets are used.
Soap is introduced into the spa water from two sources: users’ bodies,
which retain a soap residual after showering, and swimming apparel,
which retains soap after washing.
Foam inhibitors can suppress foam, but cannot remove soap from the
water. Soap is very difficult to remove from the water because soap is
not oxidized by any chemical added to the spa. Only ozone can oxidize
soap.
Eventually the soap build-up in the water will be concentrated,
Page 11
Water Quality and Maintenance
Page 15

resulting in an unclean feeling on the bather’s skin, which is impossible
to remedy. When this occurs, it’s time to drain and refill the spa.
Depending on the soap input, the water should last about four months
before needing to be drained.
WATER TERMINOLOGY
The following chemical terms are used in this Water Quality and
Maintenance section. Understanding their meaning will help you to
better understand the water maintenance process.
Bromamines: Compounds formed when bromine combines with
nitrogen from body oils, urine, perspiration, etc. Unlike chloramines,
bromamines have no pungent odor, and are effective sanitizers.
Bromine: A halogen sanitizer (in the same chemical family as chlorine).
Bromine is commonly used in stick, tablet, or granular form.
Calcium Hardness: The amount of dissolved calcium in the spa water.
This should be approximately 50 -150 ppm (ACE: 25 – 75 ppm). High
levels of calcium can cause cloudy water and scaling. Low levels can
cause harm to the spa equipment.
Chloramines: Compounds formed when chlorine combines with
nitrogen from body oils, urine, perspiration, etc. Chloramines can cause
eye irritation as well
chloramines are weaker, slower sanitizers.
Chlorine: An efficient sanitizing chemical for spas. Watkins Wellness
recommends the use of sodium dichlor-type granulated chlorine. This
type is preferred because it is totally soluble and nearly pH neutral.
Chlorine (or Bromine) Residual: The amount of chlorine or bromine
remaining after chlorine or bromine demand has been satisfied. The
residual is, therefore,
to kill bacteria, viruses and algae.
Corrosion: The gradual wearing away of metal and plastic spa parts,
usually caused by chemical action. Generally, corrosion is caused by
low pH or by
the recommended ranges.
Halogen: Any one of these five elements: fluorine, chlorine, bromine,
iodine, and astatine.
MPS: Monopersulfate is the non-chlorine oxidizer used with the
FRESHWATER
Nitric Acid: The formulation of nitric acid, a highly corrosive chemical,
is a byproduct of the ozone generating process. Nitric acid is produced
in very small quantities and is readily dissolved in the water stream with
ozone.
as having a strong odor. Unlike bromamines,
the amount of sanitizer which is chemically available
water with levels of TA, CH, pH or sanitizer which are outside
silver ion purification system. Not a sanitizer.
AG+
Oxidizer: The use of an oxidizing chemical is to prevent the buildup
of contaminants, maximize sanitizer efficiency, minimize combined
chlorine and improve water clarity. See MPS and Ozone.
Ozone: Ozone is a powerful oxidizing agent which is produced in
nature and artificially by man. Ozone forms no byproducts, oxidizes
chloramines, and will not alter the water’s pH.
pH: The measure of the spa water’s acidity and alkalinity. The
recommended pH for the spa water is 7.2 to 7.8. Below 7.0 (considered
neutral), the spa water is too acidic and can damage the heating
system. Above 7.8, the water is too
water, and scale formation on the shell and heater.
ppm: The abbreviation of “parts per million”, the standard measurement
of chemical concentration in water. Identical to mg/l (milligrams per
liter).
Reagent: A chemical material in liquid, powder, or tablet form for use in
chemical testing.
Sanitizer: Sanitizers are added and maintained at recommended
residuals to protect bathers against pathogenic organisms which can
cause disease and infection in spa water.
Scale: Rough calcium-bearing deposits that can coat spa surfaces,
heaters, plumbing lines, and clog filters. Generally, scaling is caused by
mineral content combined with high pH. Additionally, scale forms more
readily at higher water temperatures.
Super-Chlorination: Also known as “shock treatment.” SuperChlorination is a process of adding significant doses of a quick
dissolving sanitizer (“dichlor” is recommended) to oxidize non-filterable
organic waste and to remove chloramines and bromamines.
Total Alkalinity (TA): The amount of bicarbonates, carbonates, and
hydroxides present in spa water. Proper total alkalinity is important for
pH control. If the TA is too high, the pH is difficult to adjust. If the TA is
too low, the pH will be difficult
range of TA in spa water is 40 to 120 ppm.
alkaline and can result in cloudy
to hold at the proper level. The desired
Water Quality and Maintenance
Page 12
Page 12
Page 16
Operating Instructions
Control Panel
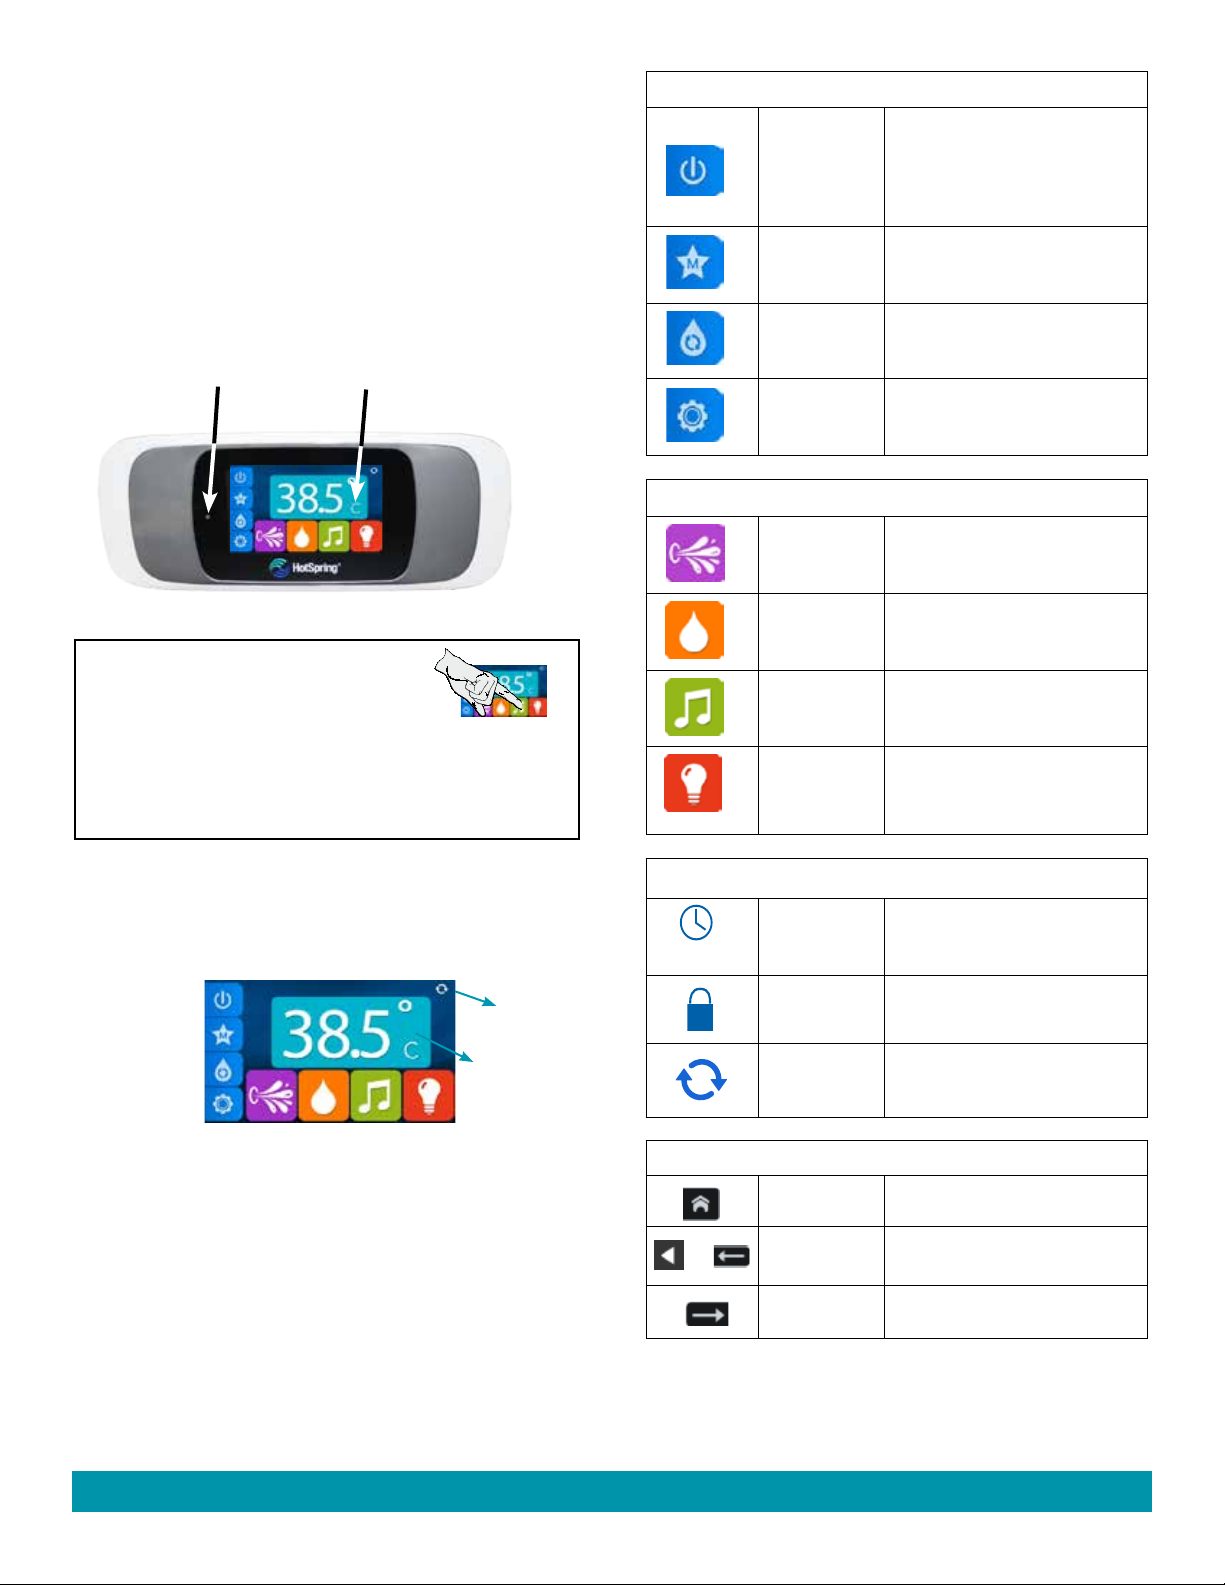
The control panel features a full color LCD touchscreen that provides
a quick visual check of the spa’s status and allows the user to set the
temperature, activate the jets & lights, lock the temperature and/or spa
functions. Other optional functions may also be available depending on
the spa model and accessory equipment that has been installed into the
spa.
Home Screen Functions:
Power Button
Memory
Screen
Press this icon to turn jets on
high and all lights on blue if both
are currently off, or will turn all
jets, lights, and music off if those
features are currently on.
Press this icon to access the
Memory screen.
Auto Brightness
Sensor
When activating a function or feature,
press with a light but distinctive touch, the
function or feature will activate as your
finger is removed from the touchscreen.
IMPORTANT: Never press down on the screen
with any part of your body especially when
entering or exiting the spa because it will
damage the screen.
Touch Screen
HOME SCREEN
The Home screen is the default screen. The temperature displayed
inside the Home screen is the actual temperature of the spa water.
Status
Indicators
Home Screen
Functions
{
Home Screen Features
{
Temperature
Control
Clean Cycle
Settings
Screen
Home Screen Features
Jets
ACE
Music
Lights
Status Indicators
Summer Timer
or
Auto Clean
Spa/Temp Lock
Invert Screen
Working Screen Icons
Press this icon to access the Clean
Cycle screen. Icon will flash when
Clean Cycle is on.
Press this icon to access the first
Settings screens.
Press this icon to access the Jets
control screen.
If installed, press this icon to
access the Water Care screen.
If installed, press this icon to
access the first Music screen.
Press this icon to access the first
Lighting screen.
This indicator is on whenever the
Summer Timer is ON or Auto Clean
is activated.
This indicator is on whenever the
Spa Lock or Temperature Lock is ON.
Press this indicator to invert the
screen.
CARE OF YOUR SCREEN:
Use only a clean microfiber cloth and water to clean your LCD screen.
Abrasive cloths, towels, paper towels, and similar items may cause
damage to the remote screen. Don't use around aerosol sprays, solvents,
or abrasives.
Page 13
Page 13
or
Home Icon
Return Icon
Advance Icon
Press to return to the Home screen.
Press to return to the previous
screen.
Press to advance to the next
screen.
Operating Instructions
Page 17
TEMPERATURE CONTROL
SETTINGS SCREENS
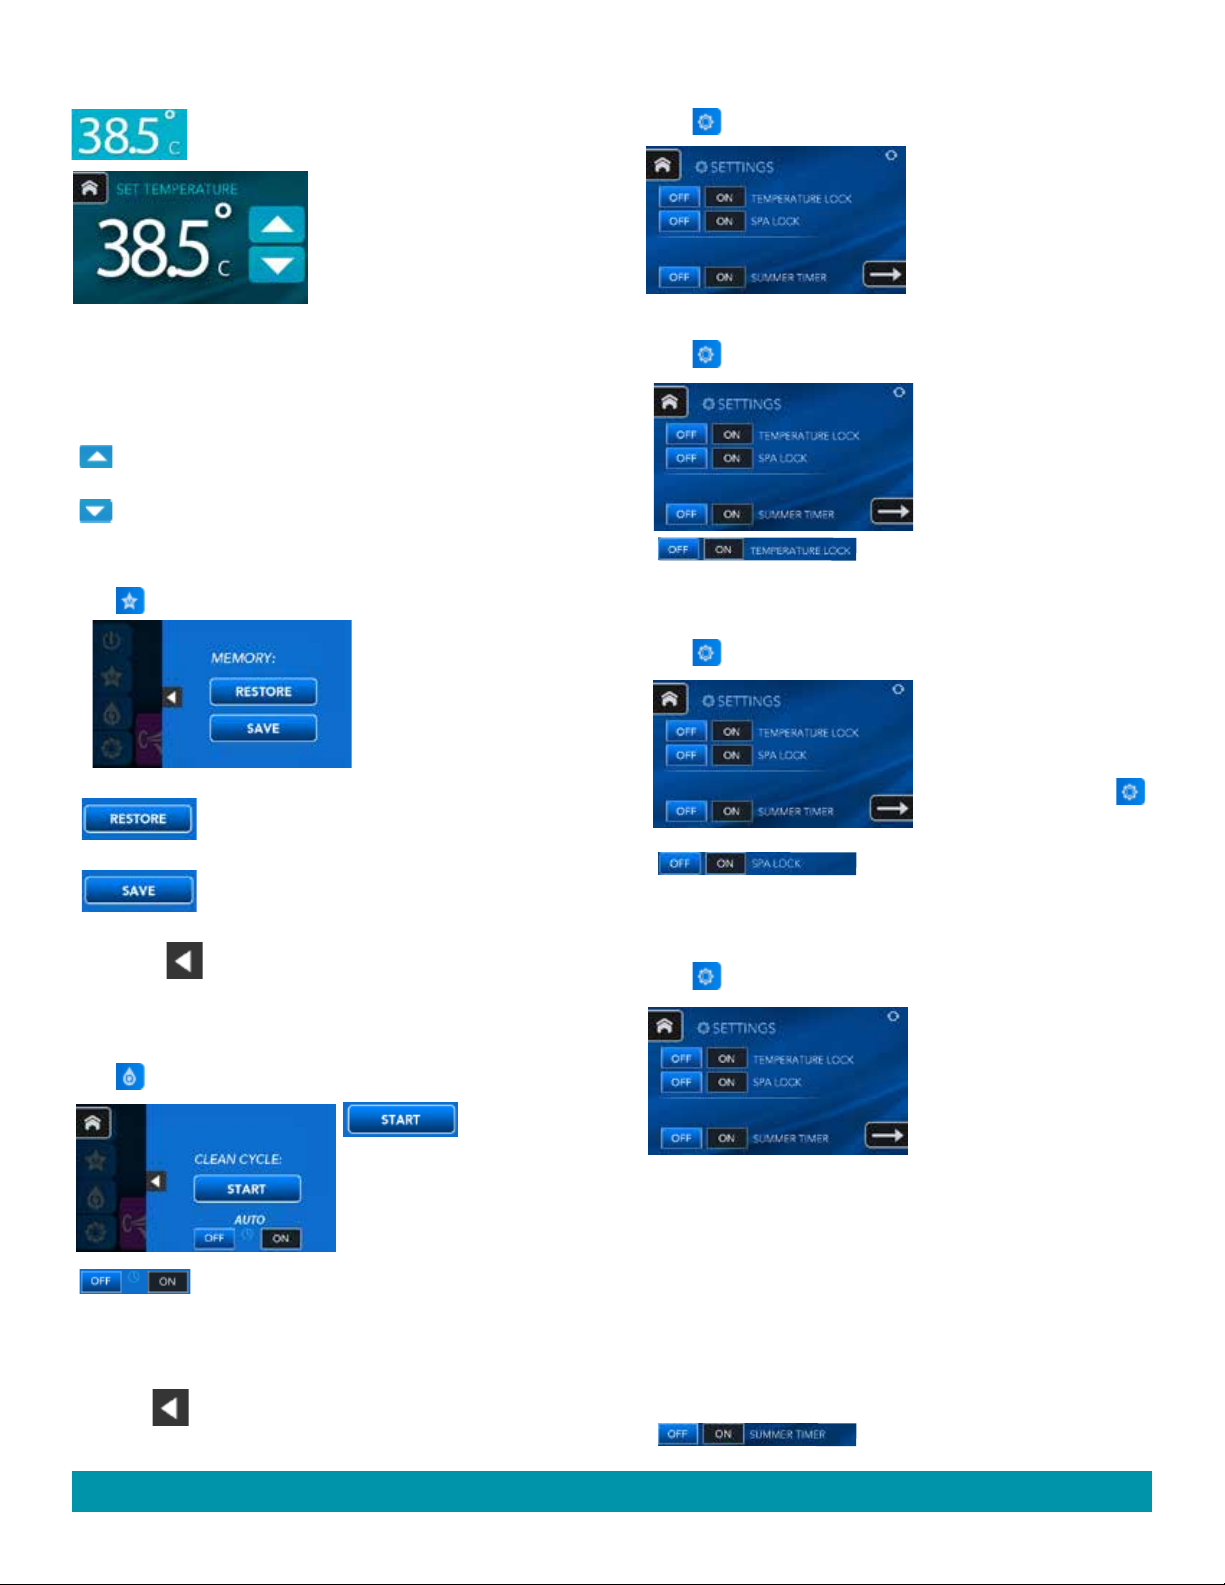
Press the actual temperature on Home screen to
display Set Temperature screen.
The set temperature range is from
80°F to 104°F (26°C to 40°C).
NOTE: The water temperature
may vary depending on the current
use and condition of your spa and
outside temperatures.
The factory set temperature of the spa water is 100°F (38°C).
The last temperature value set by the user will be stored in memory. If
power is disconnected from the spa, it will automatically revert to the last
set temperature when power is reapplied.
Press to raise set temperature of spa. Press and hold to
raise the temperature continuously.
Press to lower set temperature of spa. Press and hold to
lower the temperature continuously.
MEMORY SCREEN
Press on Home screen to display Memory screen.
Press to activate the last saved set of operating
functions.
Press to save the current set of operating
functions (jets and lights only).
Press on Home screen to display first Settings Screen.
The first Settings screen allows
you to turn Temperature Lock,
Spa Lock, and Summer Timer On
or Off.
TEMPERATURE LOCK
Press on Home screen to display Temperature Lock.
The Temperature Lock feature
prevents changing the desired
water temperature setting. All
other control panel functions
will operate normally while the
Temperature Lock is "ON".
Press and hold ON or OFF for
approximately 4 seconds to activate
or deactivate.
SPA LOCK
Press on Home screen to display Spa Lock.
When activated, the Spa Lock
feature disables all functions on
the control panel.
The control panel will not
respond to anything except
on the Home screen.
Press and hold ON or OFF for
approximately 4 seconds to activate
or deactivate.
Press to return to home screen if neither of the
above buttons are used. Screen will automatically
revert back after 10 seconds of non activity.
CLEAN CYCLE SCREEN
Press on Home screen to display Clean Cycle screen.
Press to start
the manual Clean Cycle. The
screen will briefly display CLEAN
CYCLE: ACTIVE. Activates jet
pump 1 on high speed for a ten
minute period.
Press & hold to activate and deactivate the Auto
Clean Cycle. If activated, a clean cycle will run
every 24 hours starting at the time ON was first
pressed (runs Jet 2 for 1 minute and Jet 1 for 9
minutes).
Press to return to Home screen. Screen will
Operating Instructions
automatically revert back after 10 seconds of non
activity.
Page 14
SUMMER TIMER
Press on Home screen to display Summer Timer.
• The Summer Timer can be
activated during extremely hot
summer months to help maintain
set water temperatures.
• Activating the Summer Timer
causes the heater to immediately
shut down. The circulation pump
will remain on for approximately 5 minutes pushing water through
the heater to cool it down.
• Both heater and circulation pump will remain off for eight hours.
The circulation pump and heater will automatically shut down
for the same eight hours every day until the Summer Timer is
deactivated.
• It is recommended to activate the Summer Timer in the morning so
that the spa is off during the hottest part of the day and so that the
circulation pump will start up again in the evening when you are
ready to enjoy the spa.
Press ON or OFF to activate or deactivate.
Page 14
Page 18
TEMPERATURE ºF/ ºC SETTING
JETS CONTROL SCREEN
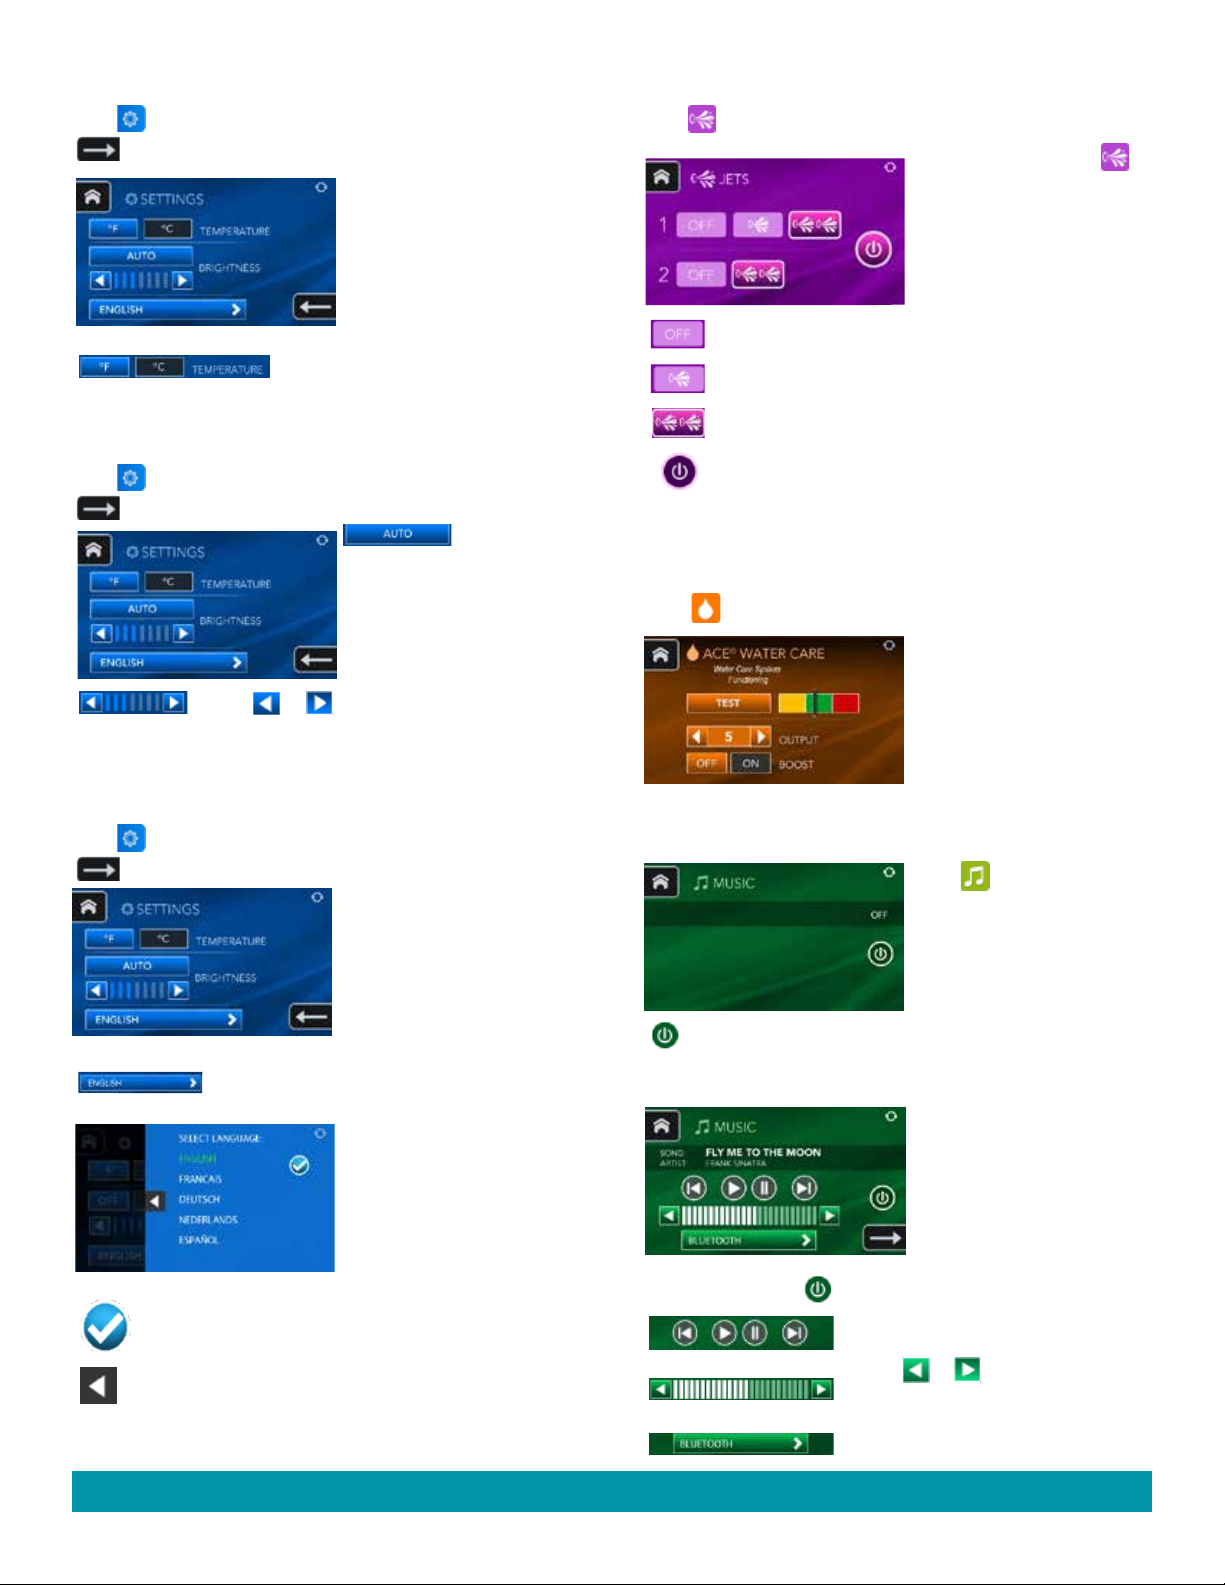
Press on Home screen to display first Settings screen, then press
to display Temperature in second Settings screen .
Press ºF or ºC to display temperature in
either Fahrenheit or Celsius.
SCREEN BRIGHTNESS
Press on Home screen to display first Settings screen, then press
to display Brightness in second Settings screen.
Press to activate
the auto brightness feature, a
sensor (located to the left of LCD
screen) will automatically adjust
the LCD to the ambient lighting
conditions.
Press or to turn AUTO brightness off and
manually
remote's screen. Press and hold either arrow to
continuously change the brightness setting.
increase or decrease the brightness of the
Press on the Home screen to display the Jets screen.
NOTE: If jets are off when is
pressed on the Home screen, low
speed jet pump will turn on.
Press to turn Jet pump off.
Press to turn Jet pump on low speed.
Press to turn Jet pump on high speed.
Press to turn ALL jet pumps off (if on) or all to High speed (if
off).
ACE WATER CARE SCREEN
(OPTIONAL)
Press on the Home screen to display ACE WATER CARE screen.
This icon will only display on
the Home screen if the spa has
the ACE WATER CARE
installed.
See ACE
more information.
Owner's Manual for
system
LANGUAGE
Press on Home screen to display first Settings screen, then press
to display the current language in second Settings screen.
The control panel screens can be
viewed in different languages
(ENGLISH illustrated).
Press to display Select Language screen.
Press on the new desired
language.
NOTE: Press advance arrow to
see more languages.
Press to activates the selected language. The conversion is
finished once the Home screen reappears.
Press to return to second Settings screen if check mark icon
is not pressed. Screen will automatically revert back after 10
seconds of non activity.
Page 15
MUSIC SYSTEM SCREEN (OPTIONAL)
Press on the Home screen to
access the Music System screen.
The Music icon will only display
on the Home screen if your spa
has the Music System installed.
Press to turn the Music system On.
NOTE: When the Music system is turned Off there is an 8 second delay
before Music system may be turned back ON.
The primary Music screen will
display a music player with
volume control and a Music
Source selection box.
Press to turn the Music system Off.
The player functions consist of Track
Down, Play, Pause and Track Up
Press or to decrease or increase
the volume.
Press to display the Select Music Source
screen.
Page 15 Operating Instructions
Page 19
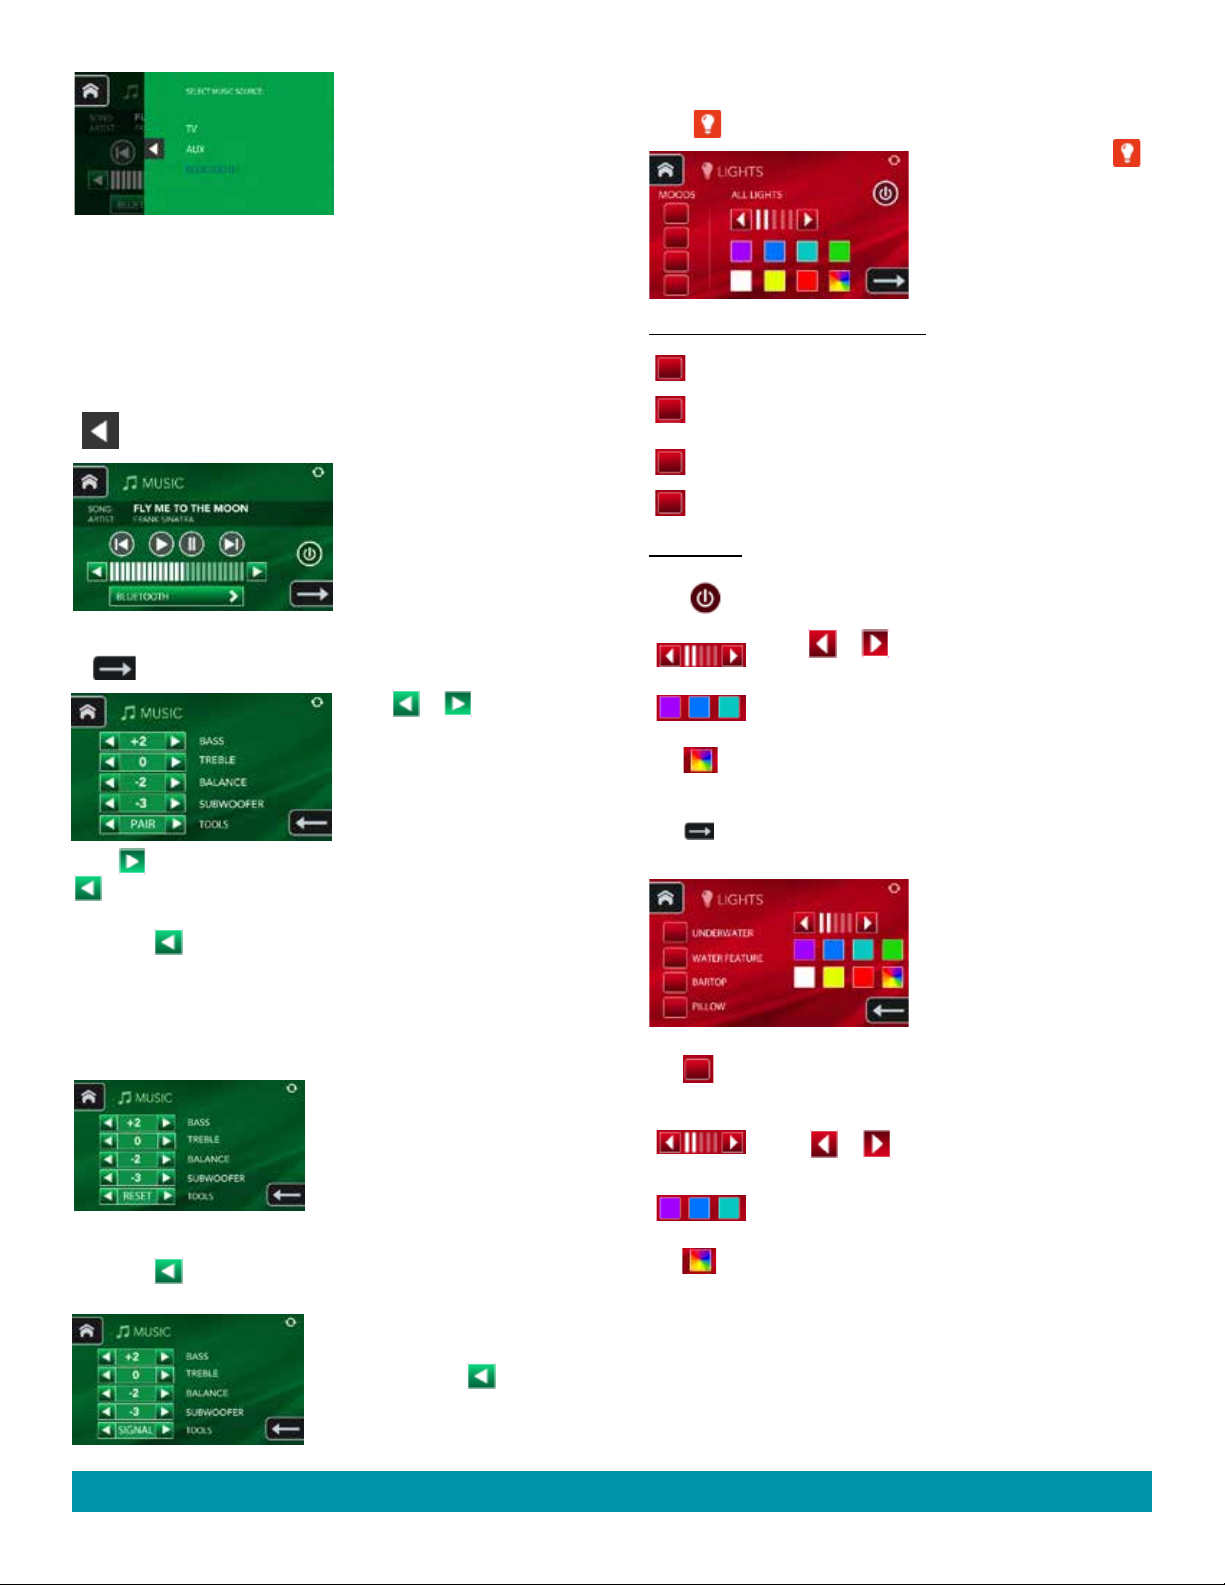
Press on the new desired Music
source.
TV This source requires a spa TV only available from your
HOT SPRING dealer.
AUX Source from a line level audio input
BLUETOOTH This source will work with any Bluetooth device. Find
My Spa BTXR on your Bluetooth device when pairing
to spa (see pairing information below).
Press to return to Primary Music screen. Screen will
automatically revert back after 10 seconds of non activity.
IMPORTANT: When using the
Bluetooth source, the player
functions may or may not work
depending on your Bluetooth
device. Not all Bluetooth devices
will respond to player functions.
Volume control will work on all
audio sources.
Press to advance to Secondary Music screen.
Press
increase the value for each
music feature.
Bass,Treble and Balance range
is from -5 to +5.
Subwoofer range is from 0 to 11.
Press in Tools to scroll between PAIR, SIGNAL and RESET, press
in Tools to activate the current function.
To PAIR your device:
• Press with PAIR displayed inside TOOLS box followed by
pressing "connect" next to My Spa BTXR on your device to pair. If
you do not see this, another device may already be connected (see
RESET below To Disconnect another Bluetooth device).
After pairing, you will be ready to use your Bluetooth device. Only one
paired Bluetooth device will work at a time.
Use RESET to disconnect any
device using the spa music system
so that another paired device may
be used. This is also necessary
when trying to pair multiple devices
because pairing is NOT possible
when another device is connected to
the music system.
• Press
device connected to the music system.
with RESET displayed inside TOOLS box to remove any
To view the signal strength between
your Bluetooth device and the
music system Press with
SIGNAL displayed inside TOOLS
box.
or
to decrease or
LIGHTS CONTROL SCREEN
Press on the Home screen to access the primary Lights screen.
NOTE: If lights are off when
is pressed on the Home screen,
all light zones will turn on to blue.
The primary Lights screen is
divided into two sections, the
MOODS section and the ALL
LIGHTS section.
MOODS (Preset colors and brightness):
Press to turn On Underwater lights (blue color).
Press to turn On Underwater (magenta), Bartop Waterfall and
Pillow (aqua).
Press to turn On Underwater & Pillow lights (aqua).
Press to turn On Pillow lights (white).
ALL LIGHTS:
Press to turn all lights On or Off. When all lights are
turned On they will all be blue.
Press or to decrease or increase the
brightness setting for all lights that are currently on.
Press any of the color boxes to turn that color on in all
light zones.
Press the multicolored box to turn color wheel on for
all light zones. Press the color wheel a second time to
stop the color wheel at a desired color.
Press to advance to the secondary Lights screen.
Select the color and brightness
for each desired light zone.
NOTE: Different colors and
brightness settings can be
selected for each individual zone.
Press the button next to the zone description to select
the desired lighting zone (only one light zone can be
selected at a time).
Press or to decrease or increase the
brightness setting for selected light zone.
Press any of the color boxes to turn that color on in the
selected light zone.
Press the multicolored box to turn color wheel on for
selected light zone. If more than one zone uses the
color wheel, the colors will automatically synchronize.
Press the color wheel a second time to stop the color
wheel at a desired color.
Operating Instructions
Page 16
Page 20
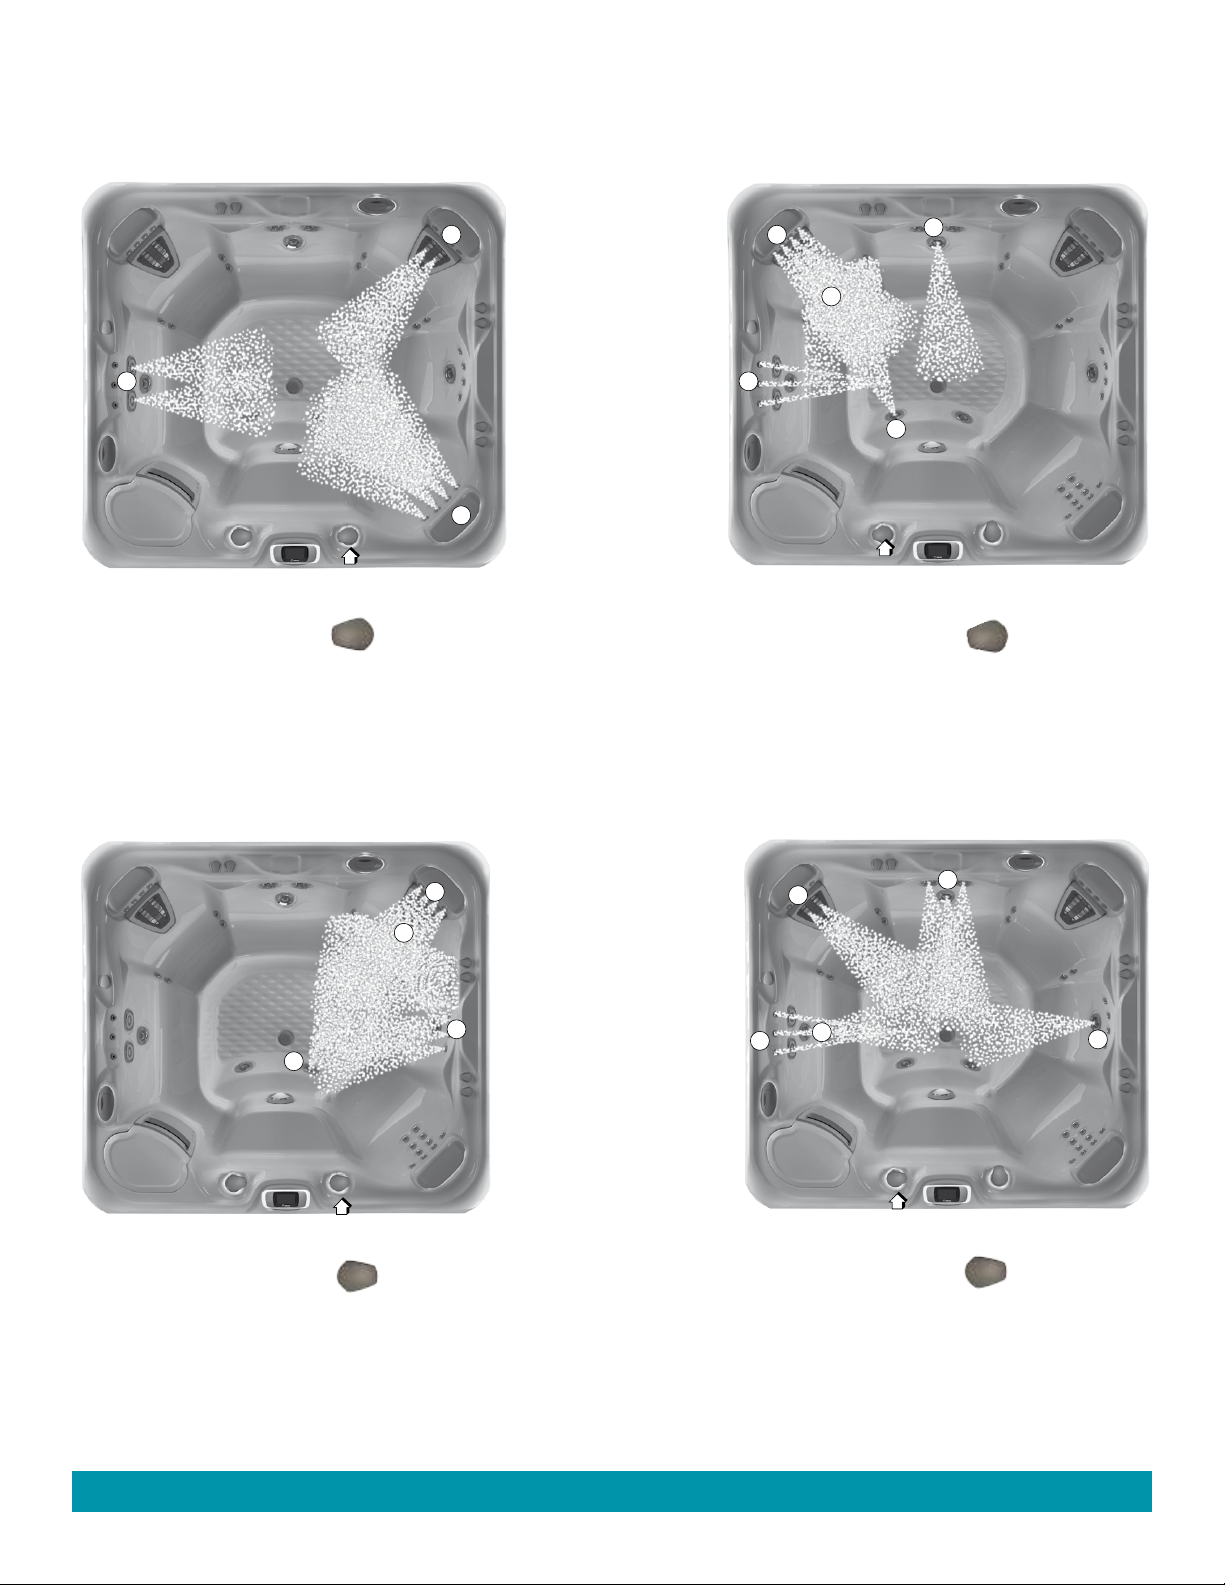
Jet Menu
GRANDEE (MODEL GGE) JET SYSTEM MENU
c
JET PUMP 1-JET SYSTEM 1
Right SMARTJET lever in position
a. 1 MOTO-MASSAGE DX jet
b. 10 directional PRECISION jets
c. 2 SOOTHINGSTREAM jets
a
b
b
a
d
c
e
JET PUMP 2-JET SYSTEM 1
Left SMARTJET lever in position
a. 1 MOTO-MASSAGE DX jet
b. 8 directional PRECISION jets
c. 1 directional hydromassage jet
d. 1 Water Feature
e. 1 FOOTSTREAM jets
b
a
d
JET PUMP 1-JET SYSTEM 2
Right SMARTJET lever in position
a. 1 MOTO-MASSAGE DX jet
b. 8 directional PRECISION jets
c. 4 directional PRECISION jets
d. 1 FOOTSTREAM jets
a
c
e
d
b
c
JET PUMP 2-JET SYSTEM 2
Page 17
Left SMARTJET lever in position
a. 1 MOTO-MASSAGE DX jet
b. 3 Jet-Cluster (2-dual port rotary jets, 1 directional
hydromassage jet)
c. 1 FOOTSTREAM jet
d. 1 directional hydromassage jet
e. 1 Water Feature
Page 17
Jet Menus
Page 21
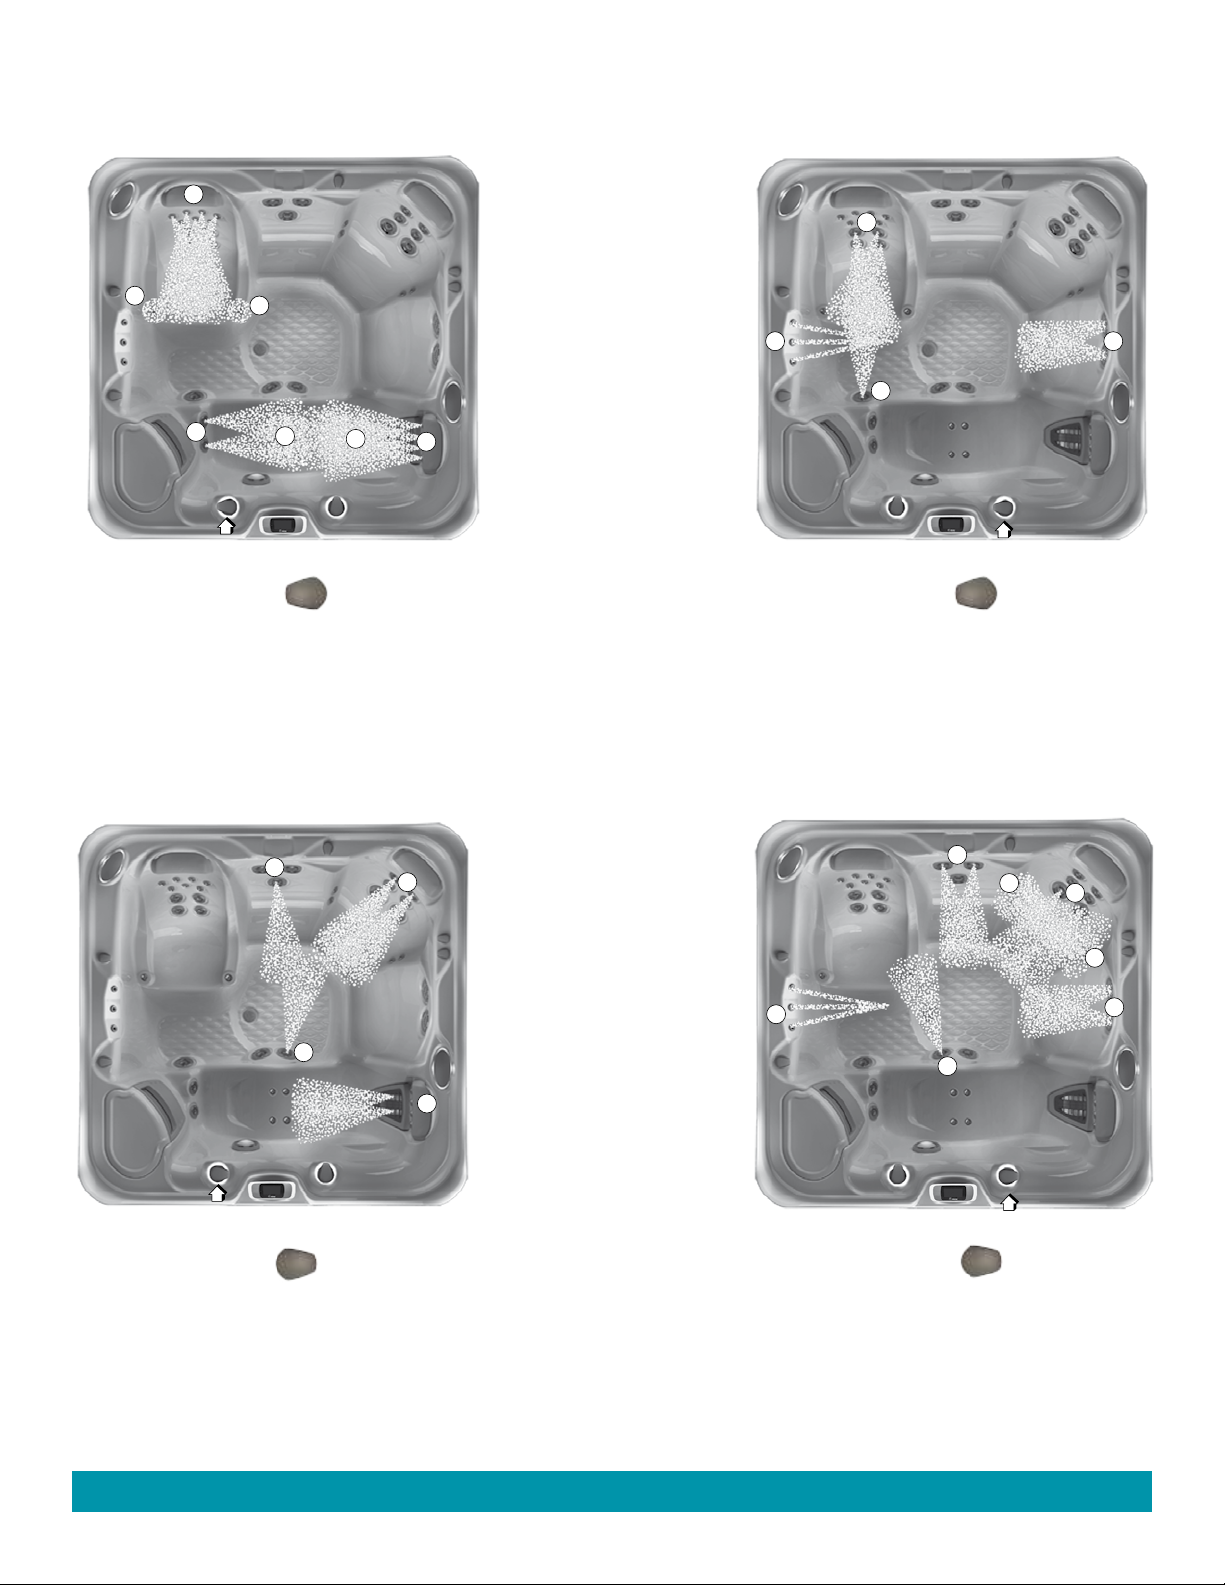
ENVOY (MODEL KKE) JET SYSTEM MENU
b
a
a
f
a
e
c
JET PUMP 1-JET SYSTEM 1
Left SMARTJET lever in position
a) 2 rotary PRECISION jets
b) 7 directional PRECISION jets
c) 1 MOTO-MASSAGE DX jet
d) 4 directional PRECISION jets
e) 4 directional PRECISION (calf) jets
f) 2 HYDROSTREAM jets
a
b
d
c
d
b
JET PUMP 2-JET SYSTEM 1
Right SMARTJET lever in position
a) 4 HYDROSTREAM jets
b) 2 SOOTHINGSTREAM jets
c) 1 FOOTSTREAM jets
d) 1
Water Feature
a
c
b
c
JET PUMP 1-JET SYSTEM 2
Left SMARTJET lever in position
a) 1 directional hydromassage
b) 4 HYDROSTREAM jets
c) 1 FOOTSTREAM jets
d) 1 MOTO-MASSAGE DX jet
Jet Menus
c
f
e
d
d
JET PUMP 2-JET SYSTEM 2
Right SMARTJET lever in position
Page 18
a) 2 dual port rotary jets
b) 2 directional hydromassage
c) 4 directional PRECISION jets
d) 2 SOOTHINGSTREAM jets
e) 1 FOOTSTREAM jets
f) 1
Water Feature
Page 18
Page 22
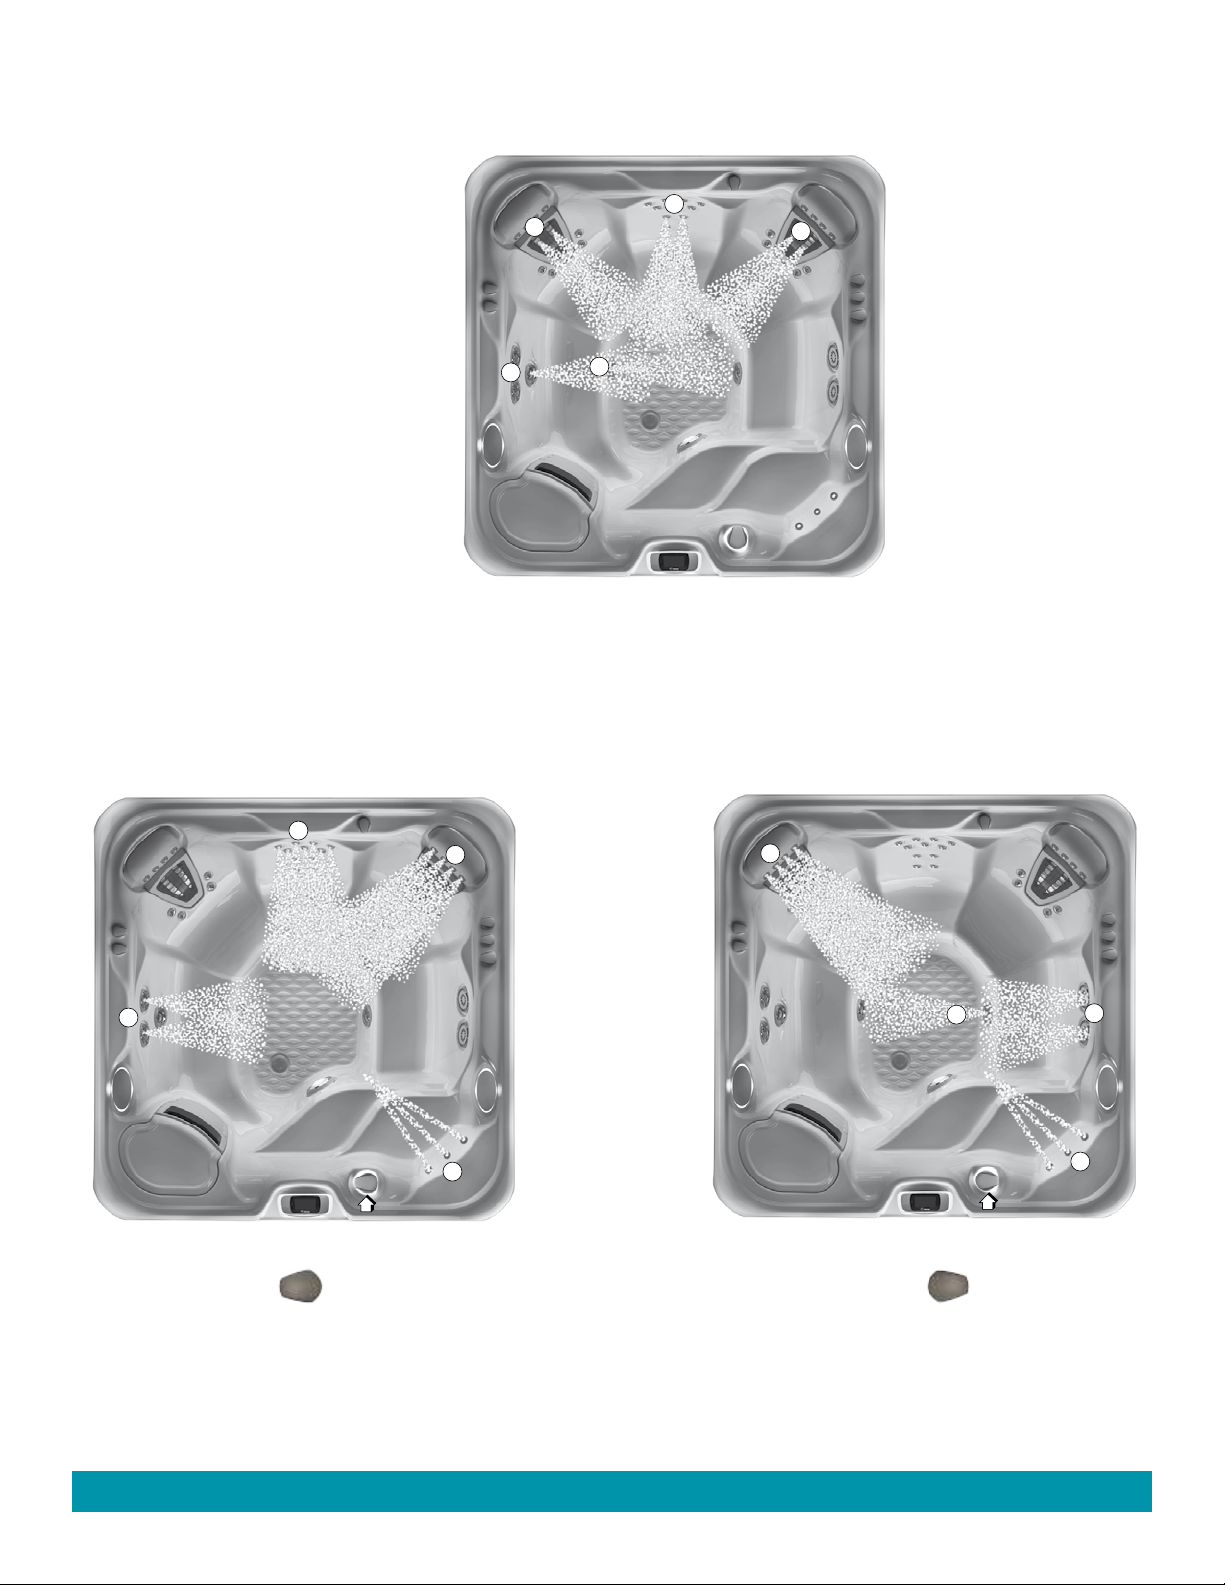
VANGUARD (MODEL VVE) JET SYSTEM MENU
b
a
c
e
d
JET PUMP 1-JET SYSTEM 1
a. 1 MOTO-MASSAGE DX jet
b. 4 directional PRECISION jets
c. 1 MOTO-MASSAGE DX jet
d. 1 FOOTSTREAM jet
e. 1 directional hydromassage jet
b
c
a
a
JET PUMP 2-JET SYSTEM 1
SMARTJET lever in position
a. 2 dual port rotary jets
b. 7 directional PRECISION jets
c. 8 directional PRECISION jets
d. 1 water feature
Page 19
c
d
b
d
JET PUMP 2-JET SYSTEM 2
SMARTJET lever in position
a. 8 directional PRECISION jets
b. 2 SOOTHINGSTREAM jets
c. 1 FOOTSTREAM jet
d. 1 water feature
Jet Menus
Page 23
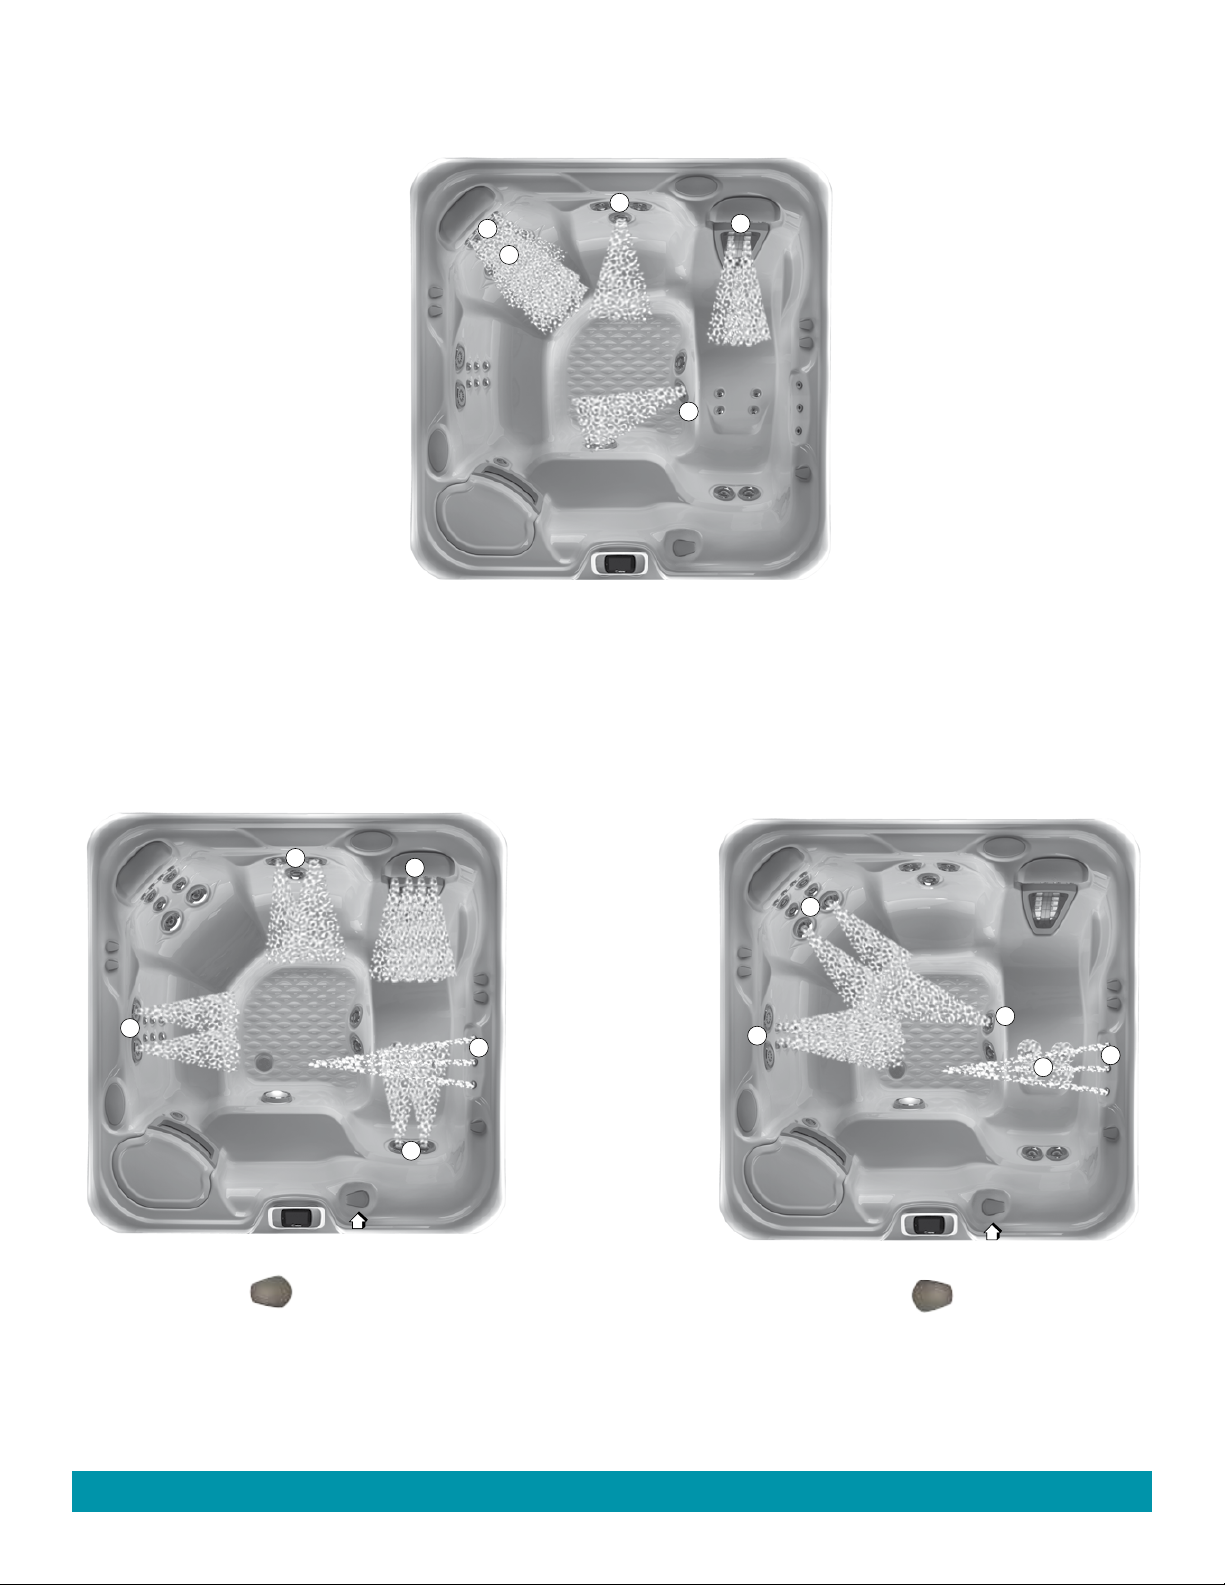
ARIA (MODEL ARE) JET SYSTEM MENU
c
a
b
JET PUMP 1
a) 4 PRECISION jets
b) 4 HYDROSTREAM jets
c) 1 Directional hydromassage
d) 1 MOTO-MASSAGE DX jet
e) 1 FOOTSTREAM jet
d
e
a
e
b
d
JET PUMP 2-JET SYSTEM 1
SMARTJET lever in position
a) 2-dual port rotary jets
b) 4 PRECISION jets above MOTO-MASSAGE DX
c) 1
Water Feature
d) 2 Directional hydromassage
e) 2 SOOTHING SEVEN jets
a
c
e
d
c
b
JET PUMP 2-JET SYSTEM 2
Page 20
SMARTJET lever in position
a) 2 Directional hydromassage
b) 1
Water Feature
c) 4 PRECISION jets
d) 1 FOOTSTREAM jet
e) 6 PRECISION jets
Jet Menus
Page 20
Page 24
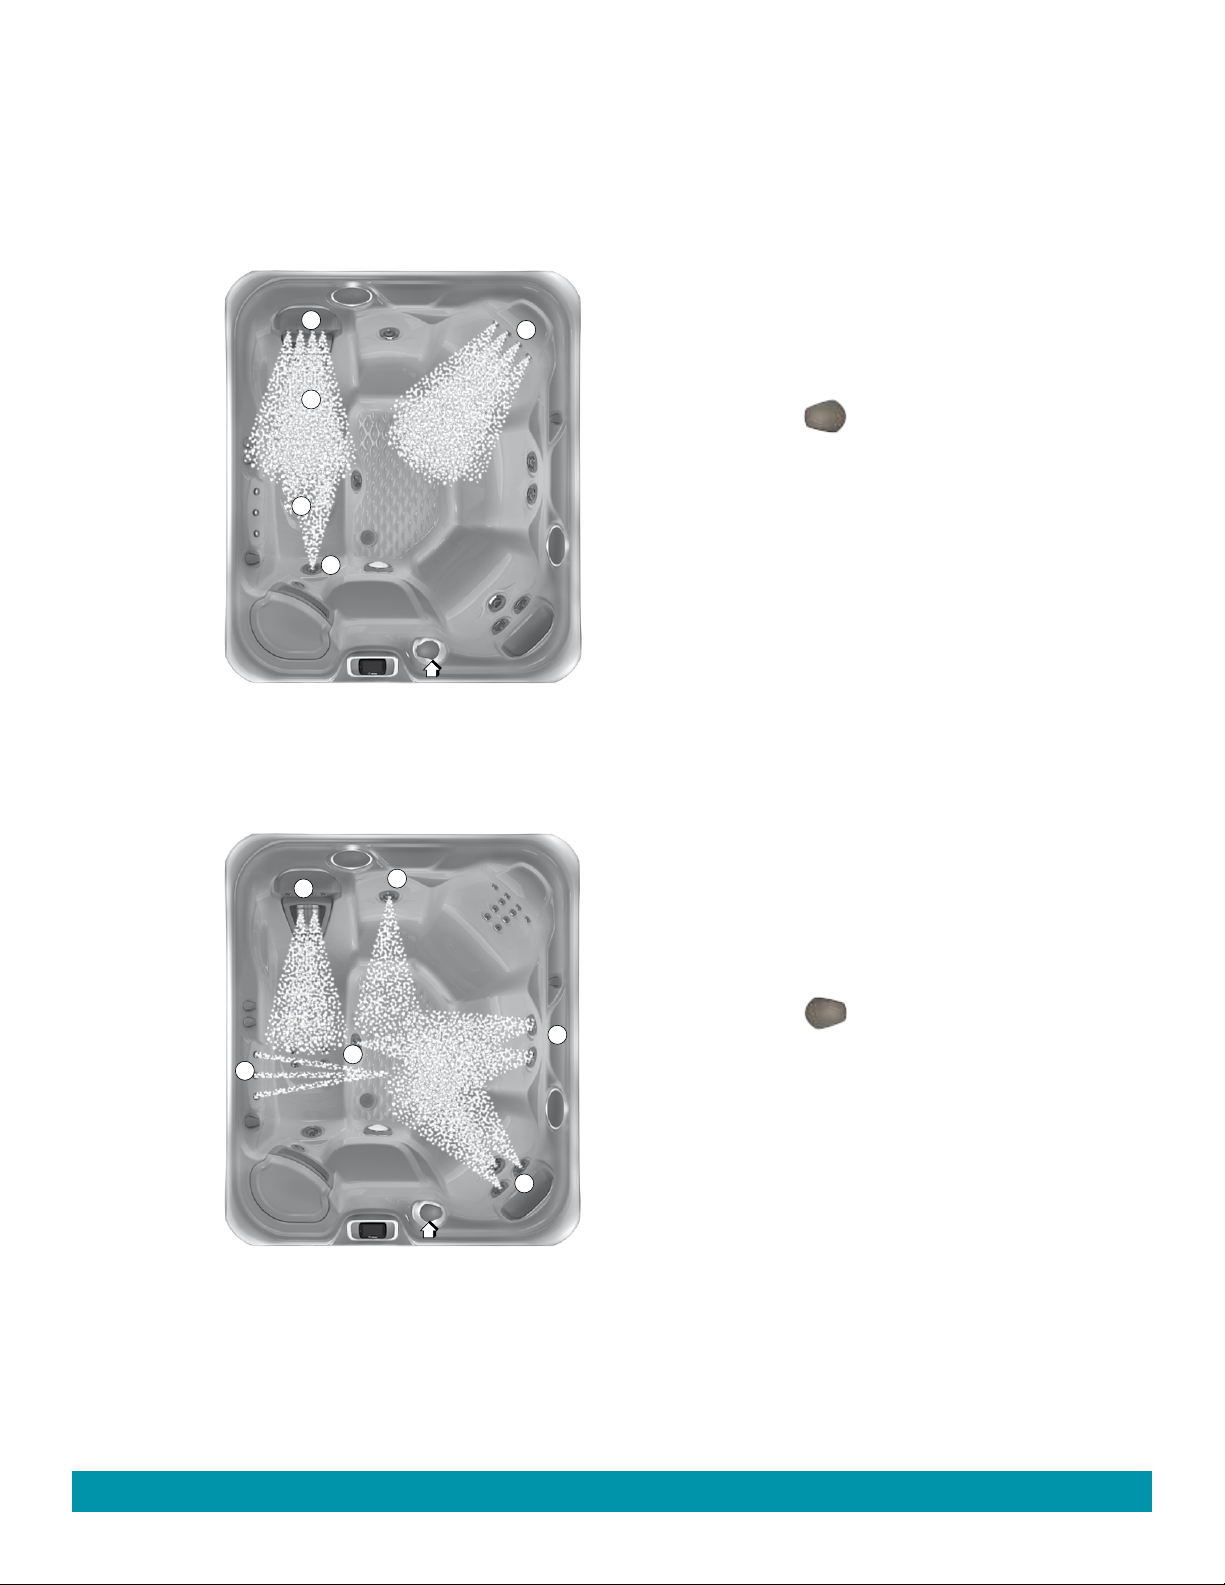
SOVEREIGN (MODEL IIE) JET SYSTEM MENU
b
a
c
JET SYSTEM 1
SMARTJET lever in position
a) 1 MOTO-MASSAGE DX jet
b) 4 directional PRECISION jets
e
c) 10 directional PRECISION jets
d) 1 directional hydromassage jets
d
a
b
e) 4 directional PRECISION (calf) jets
Page 21
JET SYSTEM 2
SMARTJET lever in position
e
c
f
d
Page 21
a) 1 MOTO-MASSAGE DX jet
b) 1 directional hydromassage jet
c) 2 SOOTHINGSTREAM jets
d) 3 Jet-Cluster system (2-dual port rotary, 1-directional
hydromassage)
e) 1 FOOTSTREAM jets
f) 1
Water Feature
Jet Menus
Page 25
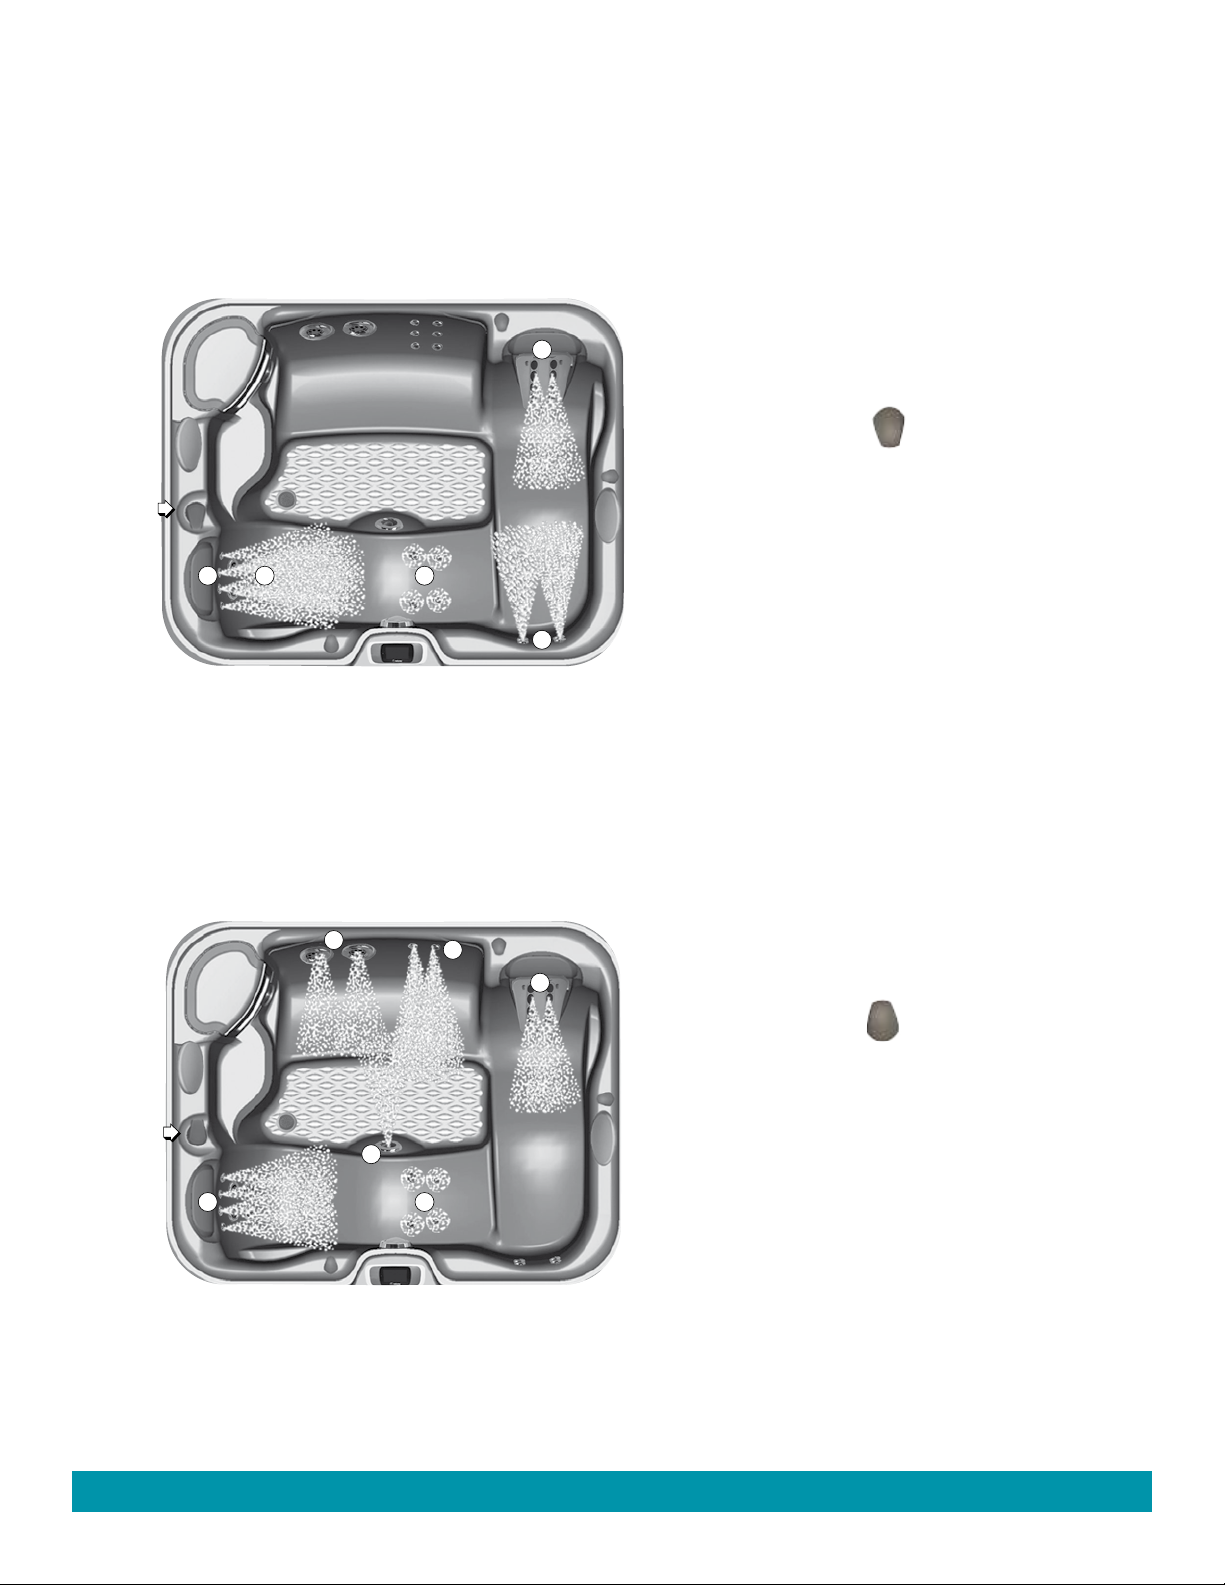
TRIUMPH (MODEL TRHE) JET SYSTEM MENU
a
JET SYSTEM 1
SMARTJET lever in position
a) 1 MOTO-MASSAGE DX Jet
b) 4 Directional PRECISION Jets in Lounge (feet)
c) 4 Directional PRECISION Jets (calf jets)
cde
b
d) 4 Directional HYDROSTREAM Jets
e) 4 Directional PRECISION Jets
Jet Menus
d
e
a
JET SYSTEM 2
SMARTJET lever in position
a) 1 MOTO-MASSAGE DX jet
b) 4 Directional PRECISION Jets (calf jets)
c) 4 Directional PRECISION Jets
f
d) 2 SOOTHINGSTREAM jets
e) 6 Directional PRECISION Jets
bc
f)
1 FOOTSTREAM jets
Page 22
Page 22
Page 26
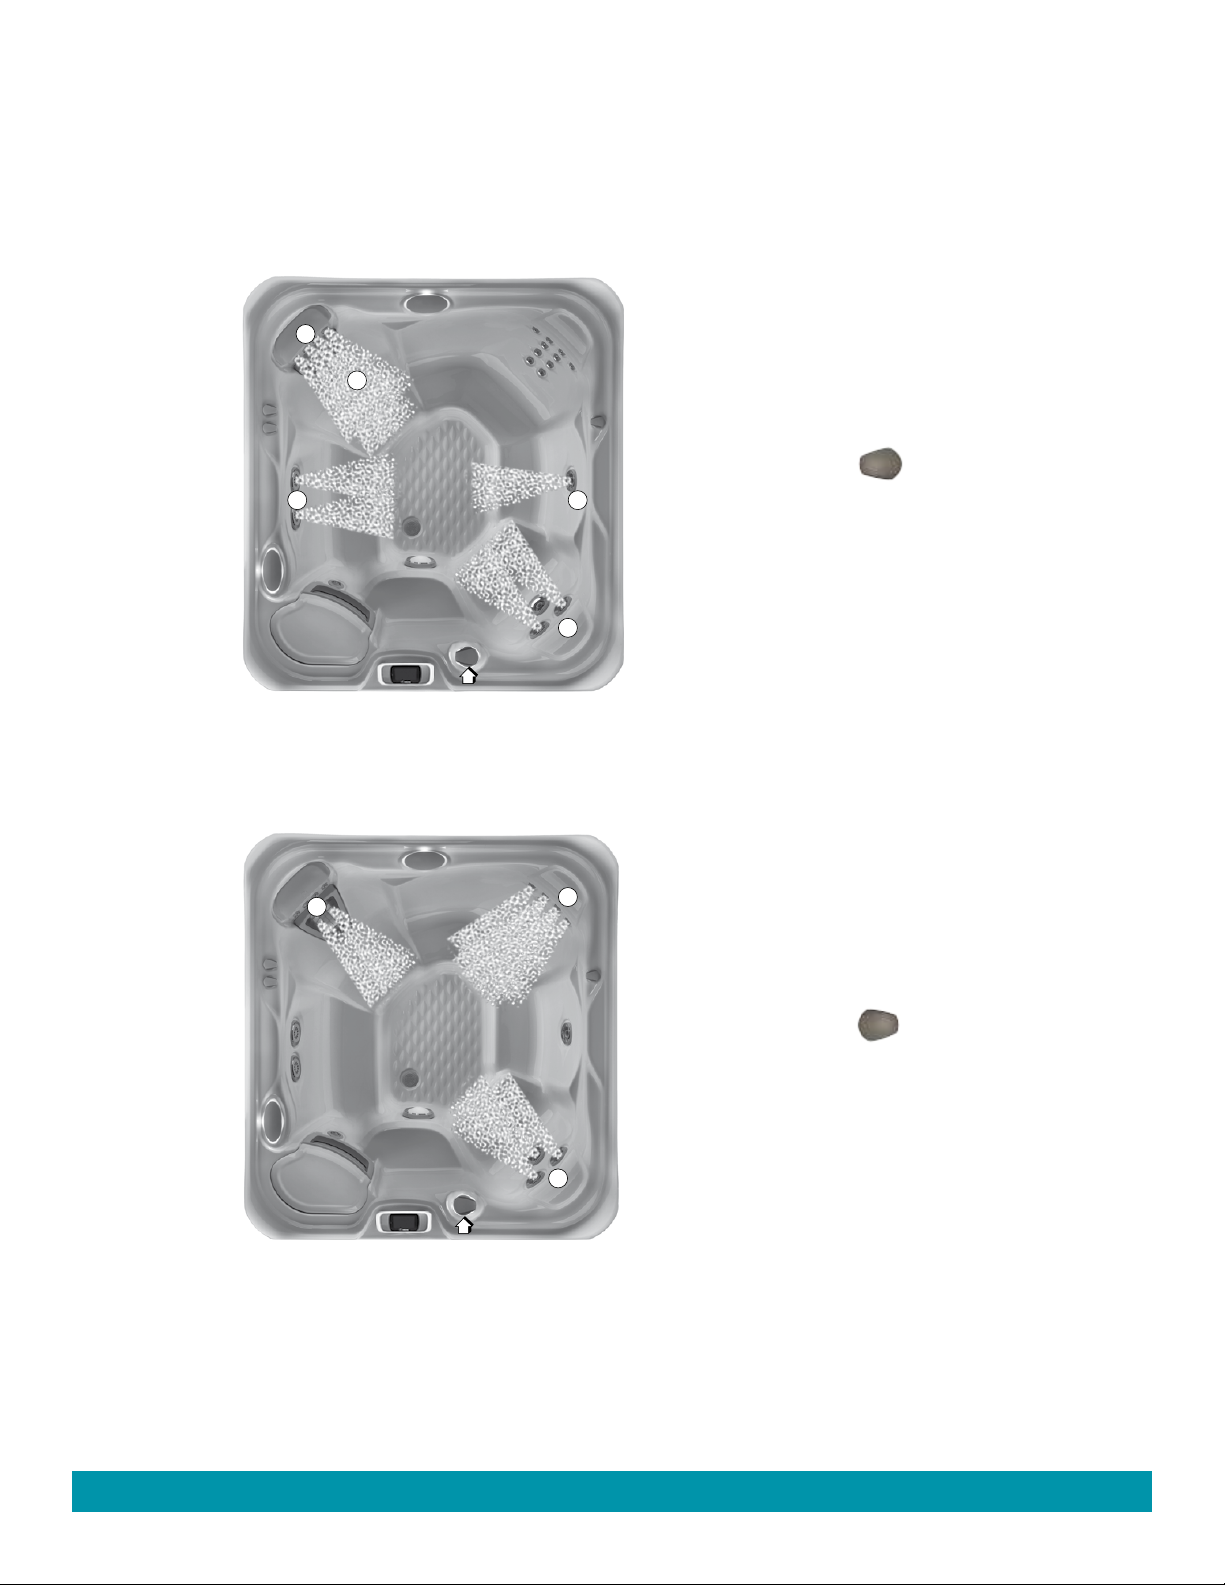
PRODIGY (MODEL HE) JET SYSTEM MENU
b
a
JET SYSTEM 1
SmartJet lever in position
e
c
a) 1 MOTO-MASSAGE DX jet
b) 4 directional PRECISION jets
c) 1 FOOTSTREAM jet
d) 2 dual port rotary
e) 2 SOOTHINGSTREAM jets
d
jets
a
b
JET SYSTEM 2
SmartJet lever in position
a) 1 MOTO-MASSAGE DX jet
b) 10 directional PRECISION jets
c) 3 Jet-Cluster system (2-dual port rotary, 1-directional
hydromassage)
c
Page 23
Page 23
Jet Menus
Page 27
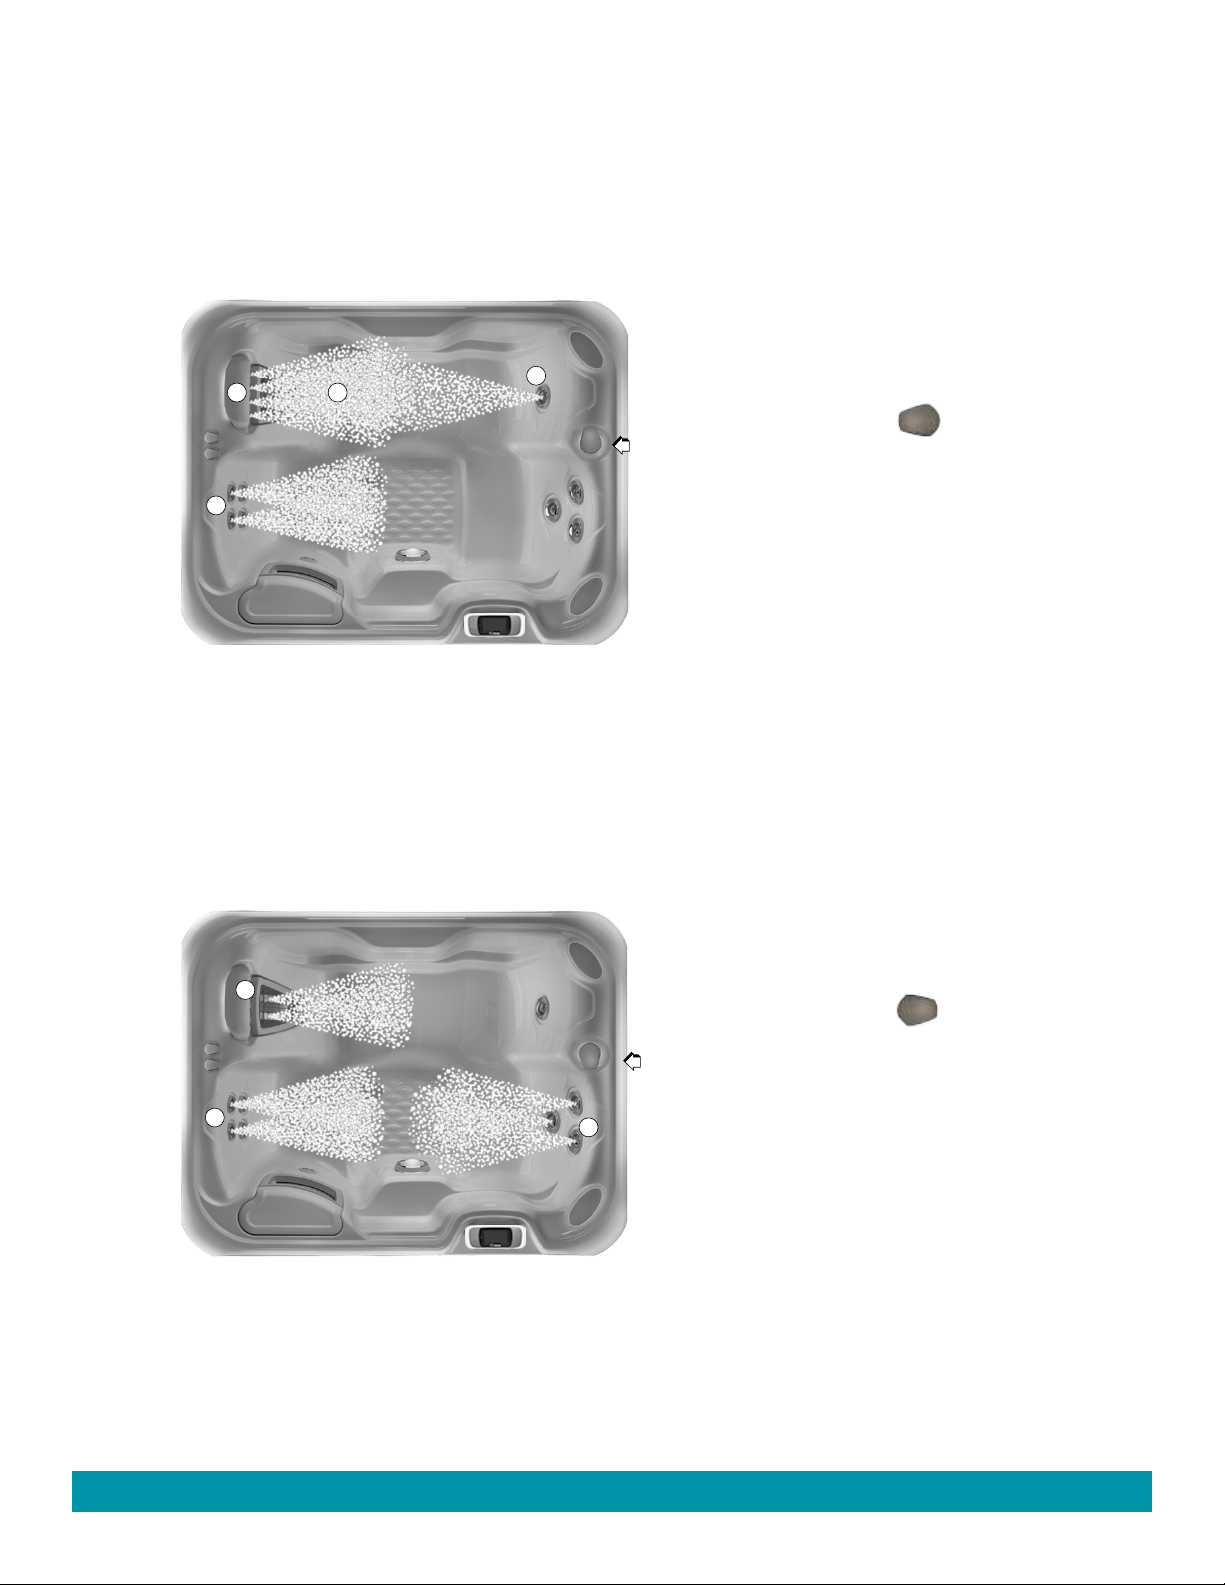
JETSETTER (MODEL JJE) JET SYSTEM MENU
c
d
a
JET SYSTEM 1
SMARTJET lever in position
a) 1 FOOTSTREAM jet
b) 4 HYDROSTREAM jets
b
c) 4 directional PRECISION jets
d) 1 MOTO-MASSAGE DX jet
Jet Menus
c
JET SYSTEM 2
SMARTJET lever in position
a) 3 Jet-Cluster system on front right (2-dual port rotary
jets, 1 directional hydromassage jet)
b
a
b) 4 HYDROSTREAM jets
c) 1 MOTO-MASSAGE DX jet
Page 24
Page 24
Page 28

Spa Care and Maintenance
• Blending warm water with the cold tap water so it exceeds 10°C (50°
Your HOT SPRING spa is manufactured from the highest quality, most
durable materials available. Even so, the spa care and maintenance
program you develop will ultimately determine how long your spa, and
its individual components, will last. Regular maintenance and following
the advice in this section will help you to protect your investment.
DRAIN & REFILL INSTRUCTIONS
IMPORTANT: It is NOT recommended to refill your spa when the
ambient temperature goes below 10°C (50°F).
1. Disconnect the spa from the power supply by tripping both of the
GFCI breakers located in the subpanel.
2. Locate the main drain valve for the spa and remove the drain cap.
Attach the inlet of a garden hose to the drain valve (to avoid flooding
of the foundation surrounding the spa) and route the outlet of the
hose to an appropriate draining area. Spa water with a high sanitizer
level may harm plants and grass.
3. Open the valve by turning the knob. The spa will drain by gravitational
flow.
IMPORTANT: All HOT SPRING spa models will drain almost
completely through the main drain valve and the secondary drain.
Equipment such as the jet pump and heating system will drain. Any
water remaining within the plumbing or equipment after draining will
only need to be removed if the spa is being winterized.
4. Allow most of the water to drain through the main drain.
5. Remove threaded cap from secondary drain. This will drain the
remaining water (about four liters) from the bleedline system.
6. When empty, inspect the spa shell and clean as required. (Follow
the Care of the Exterior instructions.)
7. Close the drain valve and reinstall the drain cap.
8. Reinstall threaded cap onto secondary drain.
9. Install new filters or clean existing with FRESHWATER filter cleaner.
IMPORTANT: Always clean and rotate the filter cartridges each time
the spa is drained for cleaning.
10. Refill the spa through the filter compartment using the CLEAN
SCREEN pre-filter
IMPORTANT: Refill water temperature must be between 10° - 21°C
to avoid high-limit tripping.
11. Follow the Quick Start-Up instructions in the Getting Started section.
COLD WATER REFILL
• When refilling your spa if the tap water is below 10°C (50°F) the
spa may go into a High Limit Protection mode (causing your spa to
stop functioning). If high limit tripping does occur, the fastest way to
reactivate the spa control system is to first disconnect power to the
spa completely, then warm the two sensors on top of the heater and
the vinyl tubing (located in the
equipment compartment) with a
hair dryer for approximately 10
minutes. Once you believe
the sensors and heater tubing
have been warmed sufficiently,
reconnect power to the spa.
.
PREVENTION OF FREEZING
Your spa has been designed and engineered for year-round use in
any climate. In some areas, extremely cold temperatures below -12°C
(10°F) combined with strong wind, may cause partial freezing of the jet
pump, even though the water inside the spa remains at the selected
temperature. The energy efficiency of the spa may also decrease
during these cold periods, as the heater will cycle more frequently.
As an additional precaution against partial freezing of some of the
components, the equipment compartment can be insulated with an
insulating kit (available from your local dealer). This insulating kit will
also help to maximize the spa’s energy efficiency.
IMPORTANT: When warmer weather returns approx. 15° - 21°C
(60°-70°F), the insulating kit must be removed to prevent overheating of
the jet pump.
WINTERIZING YOUR SPA
If you leave the spa unused for a long period of time in severely cold
weather, you should drain the spa and winterize it to avoid accidental
freezing due to a power or equipment failure.
Use only Propylene Glycol as your anti-freeze (available at most RV or
marine supply stores). This is non-toxic.
since it is toxic!
Warning: Failure to follow these instructions correctly can lead to freeze
damage not covered by warranty. It is strongly recommended that you
contact your local dealer to perform this service
1. Drain your spa following the Drain & Refill instructions steps 1-8.
2. Remove the filter cartridges, clean and store in a dry place.
3. If you spa has a wireless remote, remove from spa and store in a dry
IMPORTANT: These additional instructions must be utilized when
draining and winterizing your spa in climates where the temperature
falls below 0°C (32°F). A 20 liter combination (vacuum/blower) wet/
dry shop vac must be used to effectively remove water that is trapped
inside the plumbing lines.
4. Attach the vacuum’s hose to the blower side of the shop vac.
F) during the refilling process will also achieve the same results if that
is an option for you.
DANGER: Never use an automobile anti-freeze (Ethylene Glycol)
warm place.
a. Remove the filter standpipes by turning them counterclockwise.
(The standpipes may have a silicone sealant temporarily holding
them in place and it may take firm pressure to get them to initially
break free.)
b. Rotate SMARTJET levers to middle position and Water Feature
lever to open position.
c. Place the end of the vacuum hose in one of the filter openings and
cover the closest filter opening with a clean rag.
d. Turn on the blower function and allow it to blow out any water
remaining in the plumbing lines (approximately 3 to 5 minutes).
e. Turn the SMARTJET lever to the second position and allow that
system to purge.
f. If your spa is equipped with more than two jet systems, then each
jet system will also need to be blown out.
Page 25
Spa Care and Maintenance
Page 29

5. Attach the vacuum hose to the vacuum side of the shop vac. Vacuum
all openings and orifices as follows:
a. Jet openings: start with the jets at the top and move downward (if
suction is coming from another jet, block off the other jet using a
large rag – this will help pull out the water that is trapped deeper
inside the main line).
b. BELLAFONTANA water feature, if applicable (plug 2 openings and
use the shop vac to pull water from the 3
c. Filter compartment and MOTO-MASSAGE DX niche, if applicable
(removal of the faceplate may be necessary).
d. Main drain outlet (it may be necessary to cover the drain grate
tightly with a rag when vacuuming the main drain and secondary
freeze drain outlets to ensure water is drawn completely from the
internal plumbing system).
e. Secondary drain outlet and allow it to draw any remaining water
from the spa’s bleedlines (approximately 3 to 5 minutes).
6. Thoroughly dry the spa shell with a clean towel.
7. Replace the main and secondary drain caps.
IMPORTANT
non-toxic.
8. Using a long-extension funnel, pour anti-freeze into all standpipes,
filter suction fittings, jet orifices and Bella Fontana orifices.
Add enough anti-freeze to ensure adequate protection – in many
cases, you will see the liquid in the orifice, or coming out of another
location. Re-install the filter standpipes if removed.
9. Close the spa cover and fasten the cover tie downs. Cover the spa
cover with two pieces of plywood to evenly distribute the weight of
snow and ice. Secure a plastic sheet, or tarp, over the spa cover and
plywood.
10. Replace the equipment access door, if removed.
: Use only Propylene Glycol as your anti-freeze. This is
rd
opening).
OPENING INSTRUCTIONS:
1. Remove plywood and plastic sheet. Open the spa cover by
unfastening the cover tie downs.
2. Open drain to remove anti-freeze. Replace drain cap.
3. Follow the Start-up Procedures in the Quick Start-Up instructions
section of the Owner’s Manual. Do not install filters to prevent them
from exposure to the anti-freeze.
4. As part of this process, superchlorinate the spa water by adding three
teaspoons of chlorine (sodium dichlor) per 950 liters of spa water into
the filter compartment. This is twice the normal amount of chlorine
needed for superclorination. This extra amount of chlorine is needed
to destroy the anti-freeze. A defoamer may be needed to decrease the
amount of foam caused by the anti-freeze.
5. Drain your spa to ensure removal of anti-freeze. Do not drain water on
grass or plants due to excessive chlorine level.
6. After the spa has completely drained, re-install your filters and follow
the Start-up Procedures in the Quick Start-Up instructions of the
Owner’s Manual.
IMPORTANT: Always keep spa covered when not in use, whether it is
empty or full.
FILTER SYSTEM
HOT SPRING spas are equipped with balanced filtration, meaning
that the filter cartridges are sized to meet the needs of the jet pump
system. Additionally, a separate filter is dedicated to serving the 24-hour
circulation system.
As with any water filtering system, the filter cartridges may become
clogged, resulting in reduced water flow. It is important to maintain
a clean, unobstructed filtering system. This not only provides the
maximum performance from the jets, but allows the 24 hour filtration
system to function effectively. Rotating the placement of the filter
cartridges within the filter compartment after each cleaning will help to
extend their service life.
IMPORTANT: The frequency and duration of use, and the number of
occupants all contribute to determining the appropriate time between
filter cleanings. More use means that more frequent filter cleanings are
required. Failure to maintain the cartridges in a clean, unobstructed
manner will result in reduced water flow through the heater assembly
that may cause the High-Limit Thermostat, Heater Thermal Cut-off or
Circulation Pump Thermal Cut-off to trip. If this high-limit or thermal cutoff trip occurs during
spa water may freeze. Any damage to the spa (due to freezing) caused
as a result of poor maintenance (stated under misuse or abuse in the
HOT SPRING spa Limited Warranty), will not be covered by your spa
warranty.
WARNING: To reduce the risk of injury to persons using the spa,
DO NOT remove the suction fittings (filter standpipes) located in the
filter compartment and do not sit on the filter lid, in extreme cases the
lid could crack and break. This occurrence is considered abuse and is
not covered under warranty.
sub-freezing temperatures and goes unnoticed, the
FILTER CARTRIDGES
REMOVAL & CLEANING
1. Disconnect the spa from the power supply by tripping the breakers
located in the subpanel. Remove and carefully set aside the filter
compartment cover.
2. Remove any floating items from within the filter compartment.
3. Turn the filter retainer handle (located on the top of the filter cartridge)
counterclockwise until the retainer can be removed from the filter
standpipe.
4. Remove the filter retainer and cartridge.
IMPORTANT: Never remove the filter standpipes when debris is
present in the filter compartment. Debris may find its way into the
internal plumbing which may result in blockage. NEVER REMOVE
SUCTION FITTINGS.
5. Always clean standard filter using a filter degreaser, such as HOT
SPRING FRESHWATER Filter Cleaner, to remove mineral and
oil buildup. Simply soak the filter in the degreaser according to the
package directions, then place the filter on a clean surface and spray
until clean using a garden hose. It may be necessary to rotate the filter
while spraying to remove any debris lodged between the filter pleats.
The Tri-X
no dry cycle. Please contact your HOT SPRING dealer for details.
6. To reinstall the filter cartridge, reverse the order of steps in which it
was removed. Do not overtighten!
standpipe(s) removed!
™
filter can be cleaned in the dishwasher using no soap and
WARNING: Do not use the spa with the filter cartridges, or filter
Spa Care and Maintenance
Page 26
Page 30

CARE OF THE SPA PILLOWS
The spa pillows will provide years of comfort if treated with care. They
have been positioned above the water level to minimize the bleaching
effects of chlorinated water, and other spa water chemicals. To extend
their life, whenever the spa shell is being cleaned, the spa pillows
should be removed and cleaned. Body oils can be removed with a mild
soap and water solution. ALWAYS rinse off the spa pillows thoroughly
to remove any soap residue. The pillows can be conditioned with HOT
SPRING Cover Shield after cleaning. If the spa is not going to be
used for a long period of time (that is during a vacation, or if the spa is
winterized), or when the spa water is being super-chlorinated, the spa
pillows should be removed until the next spa use.
To remove and replace the spa pillows:
1. Carefully pull and lift on one end of pillow to stretch pillow (longer)
until the pillow is released from the plastic retainer. Once one end
is released, push pillow in opposite direction to remove from other
retainer.
2. Align pillow by locating the arrow on back side of pillow and facing the
arrow upwards.
3. Slide one end of pillow onto the spa retainer.
4. Pull other end of pillow; using both hands lift pillow above retainer and
with a stretching motion slide pillow recess onto retainer.
CARE OF THE EXTERIOR
SPA SHELL
Your HOT SPRING spa has an acrylic shell. Stains and dirt generally
will not adhere to your spa’s surface. A soft rag or a nylon scrubber
should easily remove most dirt. Most household chemicals are harmful
to your spa’s shell (see below for detailed information on cleaning
agents). Always rinse off any spa shell cleaning agent with fresh water.
IMPORTANT:
1. The following products are the ONLY approved cleaning agents
for your HOT SPRING spa shell: plain water, HOT SPRING
FRESHWATER Spa Shine, or Soft Scrub®. The use of alcohol or
any other household cleaner other than those listed to clean the
spa shell surface is NOT recommended. DO NOT use any cleaning
products containing abrasives or solvents since they may damage
the shell surface, specifically: Simple Green
NEVER USE HARSH CHEMICALS! Damage to the shell by use of
harsh chemicals is not covered under the warranty. Always rinse off
any spa shell cleaning agent with fresh water.
2. Iron and copper in the water can stain the spa shell if allowed to go
unchecked. Ask your HOT SPRING dealer about a stain and scale
inhibitor to use if your spa has a high concentration of dissolved
minerals. (Watkins Wellness recommends FRESHWATER Stain &
Scale Defense.)
3. Keep all cleaners out of the reach of children and use care when
applying.
EVERWOOD
HOT SPRING spas include an EVERWOOD HD spa cabinet.
EVERWOOD HD is made from a rigid polymer for durability and adds
a film finish that provides a rich, wood like appearance. Cleaning of the
EVERWOOD HD consists of simply spraying the cabinet with a mild
soap and water solution to remove any stains and residue.
Do not rub the EVERWOOD HD with an abrasive material or use
abrasive cleaners as this may damage its surface.
™
HD SPA CABINET
®
, Windex® or Spa Mitt.
SPASTONE™ CABINET
To clean your SPASTONE cabinet or steps, use a mild household
detergent and soft cloth or sponge, and wipe gently. Do not rub the
SPASTONE step or cabinet nor use abrasive cleansers, as these
will damage the SPASTONE painted surface. Following these simple
guidelines will result in a beautiful look for years to come!
Please note that as with any exterior paint, your HOT SPRING
SPASTONE product will fade and weather naturally over time. Contact
your dealer for touch-up paint and instructions.
CARE OF THE SPA COVER
WARNING: The cover is a manual safety cover that meets or
exceeds all prevailing requirements of ASTM 1346-91 for spa safety
covers when installed and used correctly as of the date of manufacture.
Non-secured, or improperly secured covers are a hazard.
Open the cover to its fully open position before use.
VINYL COVER
The vinyl spa cover is an attractive, durable foam insulation product.
Monthly cleaning and conditioning are recommended to maintain its
beauty.
To clean and condition the vinyl cover:
1. Remove the cover from the spa and gently lean it against a wall or
fence.
2. With a garden hose, spray the cover to loosen and rinse away dirt or
debris.
3. Using a large sponge and/or a soft bristle brush, and using a very mild
soap solution (one teaspoon dishwashing liquid with two gallons of
water), or baking soda (sodium bicarbonate), scrub the vinyl top in a
circular motion. Do not let the vinyl dry with a soap film on it before it can
be rinsed clean.
4. Scrub the cover’s perimeter and side flaps. Rinse clean with water.
5. Rinse off the underside of the cover with water only (use no soap), and
wipe it clean with a dry rag.
6. To condition the cover after cleaning, apply a thin film of HOT
SPRING Cover Shield to the vinyl surface and buff to a high luster.
IMPORTANT: To remove tree sap, use cigarette lighter fluid (not charcoal
lighter fluid). Use sparingly, and rinse with a saddle soap solution
immediately afterwards, then wipe dry.
DO:
• Remove snow buildup to avoid breakage of the foam core from the
additional weight of the snow.
• Lock cover lock straps to secure the cover when the spa is not in use.
DON'T:
• Drag or lift the spa cover using either the flaps, or the cover lock
straps.
• Walk, stand, or sit on the cover.
• Place any metal or heat transferring object on the cover or place any
type of plastic tarp or drop cloth over the cover as this may result in a
melted foam core, which would not be covered under the warranty.
• Use any lifting mechanisms, chemicals, or cleaners except those
recommended by Watkins Wellness, or its Authorized Sales and
Service Dealer.
Page 27
Spa Care and Maintenance
Spa Care and Maintenance
Page 31

COVER LIFTER SYSTEM
Clearance required behind cover when open:
™
CoverCradle
& COVERCRADLE II
76cm
HOW TO OPEN THE VINYL COVER
IMPORTANT: Never attempt to open or remove the vinyl cover by
grasping or pulling on the skirting or cover lock straps. The skirting will
tear, and torn skirting is not covered under the terms of the warranty.
Check for ice build-up around the gas springs and pivot points of
the retractable cover system. Ice buildup may damage system
components.
WARNING: The vinyl cover and retractable cover system a
recommended for use in wind conditions reaching above 40 kmh (25 mph).
IMPORTANT: If your spa is located in an area susceptible to high
winds, additional coverlock straps may be installed to minimize wind
damage to the cover.
1. With the cover lock straps unfastened, place one hand under the
cover skirting, between the spa and cover, to break the cover’s
vacuum seal. Then, fold the front half of the cover over onto the back
half.
2. If no rear access is available, stand to the side of the spa directly
adjacent to the hinge area of the folded cover.
a) For the COVERCRADLE retractable cover systems: Using both
hands, cup one hand under the lower half of the cover (just above
the water) and place the other along the side of the cover, just
above the skirt. Gently push (do not lift) with both hands towards the
opposite rear corner of the cover (diagonally). As the cover opens,
the gas springs will allow the cover to come to a gentle stop.
b) For the UPRITE retractable cover system: Simply lift the cover
at its center hinge, allowing it to move to the back of the spa and to
rest gently there.
c) For the LIFT ’N GLIDE retractable cover system: Slightly lift the
cover at front of spa, glide (push back until it stops), fold cover in
half and lift cover moving it to the back of the spa. Insert locking pin
into side of lifter to prevent accidental closure.
IMPORTANT: When opening a cover with a retractable cover system,
only use one of these three specific methods. Do not attempt to open the
cover in any other way. Damage caused by improper opening or closing
of the cover is not covered under the terms of the limited warranty.
UpRite
46cm
™
Lift ’n Glide
™
36cm
re not
HOW TO CLOSE THE COVER
1. Standing along side the cover, place one hand on the upper corner
of the cover and gently push forward in the direction of the spa. The
cover will rotate forward to cover half of the spa.
IMPORTANT: For the UPRITE or LIFT ’N GLIDE retractable cover
system, disengage the locking mechanism(s) before pushing the cover
forward.
2. Unfold the cover by lifting the handle located on the top (front) half of
the cover. Allow the unfolded half to fall down onto the spa. The air
pressure created by the cover falling will keep the vinyl skirting from
being trapped between the cover and the spa shell.
Spa Care and Maintenance
Page 28
Page 28
Page 32
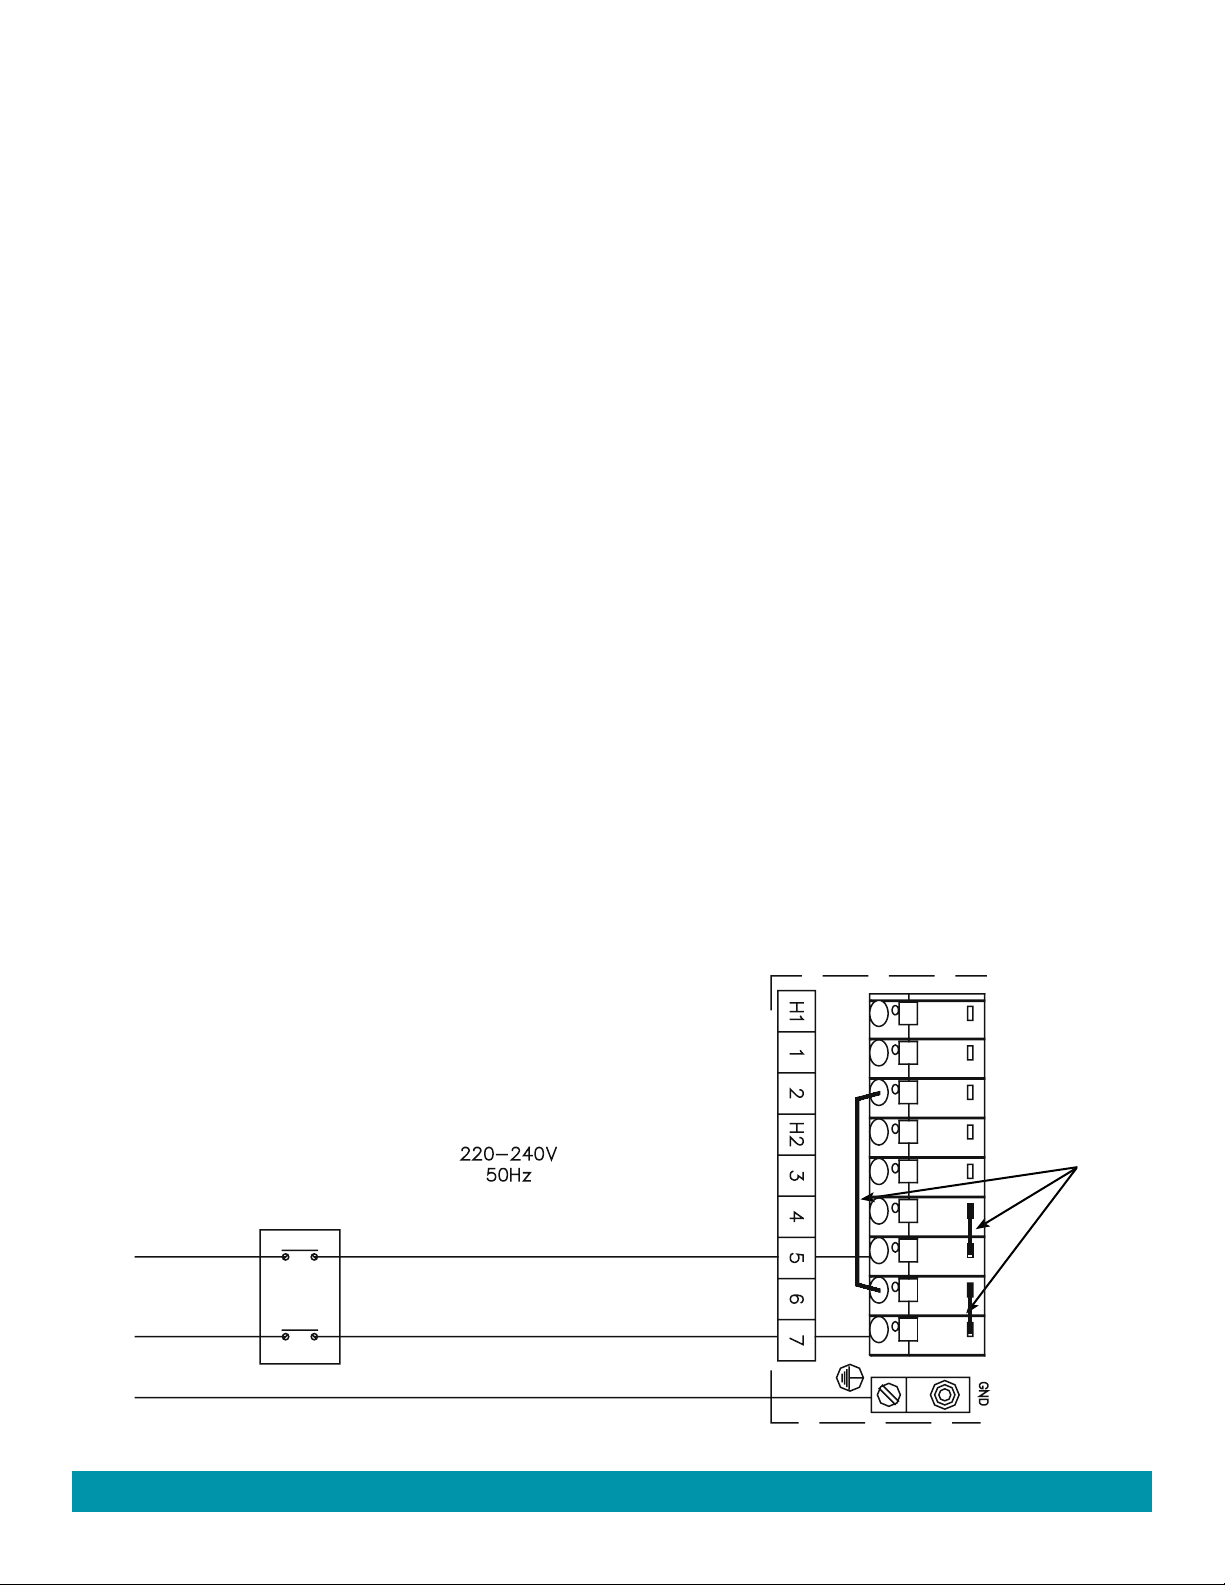
Electrical Requirements
INSTALLATION
IMPORTANT
Your HOT SPRING spa has been carefully designed to give you
maximum safety against electrical shock. Connecting the spa to an
improperly wired circuit will negate many of the spa’s safety features.
Improper wiring may also cause electrocution, risk of fire, and other
risks of injuries. Please read and follow the electrical installation
requirements and instructions for your specific spa model completely!
All HOT SPRING spa models, are equipped with a power indicator
(HOT SPRING Logo blue light) which, in addition to showing the spa
has power to it, has a diagnostic function as well. It will begin blinking
if the heater high-limit thermostat has tripped. If the power indicator
light is blinking, follow the instructions in the Troubleshooting section
to identify and correct the cause. The power indicator will stop blinking
once the problem has been corrected. The Power and Ready indicator
lights on the control panel also provide the same diagnostic function.
HOT SPRING spas must be wired in accordance with all applicable
local electrical codes. All electrical work should be done by an
experienced, licensed electrician. We recommend the use of
appropriate electrical conduit, fittings, and wire for all circuits.
This product requires a 10 amp (20 amp for GRANDEE, ENVOY,
VANGUARD & ARIA), single phase, 230 volt, three wire service (one
line, one neutral, one ground). The grounding conductor must be at
least the same gauge as the line conductors, but no smaller than
2.10 mm² (4.0 mm² for GRANDEE, ENVOY, VANGUARD & ARIA ). A
minimum 6 mm² (No. 10 AWG) solid copper bond may also be required.
Additionally, one main disconnect switch with at least 3 mm separation
between contacts must be used for all electrical circuits to the spa.
Mount the subpanel according to local codes, but not closer than 1.5 m
away (follow your local codes).
: Fill the spa with water before turning on the power.
CONDUIT INSTALLATION INSTRUCTIONS
1. To connect the electrical service, first detach the equipment
compartment door as follows:
• Remove the 6 door panel screws.
2. Pull bottom of panel away from spa then down in order to remove
door.
3. Locate the control box. Loosen the screws on the front of the
control box. Remove the screws and the control box cover.
4. Route the electrical conduit through the access opening between
the doorframe and the equipment compartment using one of the
knockouts provided. Install the supply conduit so as not to block
the drain valve.
5. Connect the supply conduit to the control box and connect the
wiring as detailed on the next page and on the wiring diagram
label on the inside of the control box cover. Once completed,
replace control box cover.
6. To replace equipment compartment door, place panel under bar
top first. Push bottom of door panel towards spa making sure all
3 snaps are fastened into spa frame or replace the 6 door panel
screws.
SERVICE NOTE: All HOT SPRING spa models are equipped with a
power-on indicator which, in addition to showing the spa has power to
it, has a diagnostic function as well. It will begin blinking if the heater
high limit thermostat has tripped.
IMPORTANT NOTICE: Your spa must be supplied by a ground fault
circuit interrupter - residual current device (RCD) - with a tripping rating
not exceeding 30 mA in an electrical subpanel. Because of varying
receptacle conditions in each country, Watkins Wellness DOES
NOT supply this device as a standard part of the spa. It is the sole
responsibility of the Authorized Watkins Wellness Dealer to select,
install and confirm the functioning condition of this device. Watkins
Wellness recommends this device be attached to the end of the spa’s
electrical cord. The GFCI must be installed by a licensed, qualified
electrician. GFCI devices must meet or exceed all national and local
electrical codes.
16A for SOVEREIGN, TRIUMPH, PRODIGY & JETSETTER
20A for GRANDEE, ENVOY, VANGUARD & ARIA
L1
BROWN
NEUTRAL
BLUE
GROUND
GREEN/YELLOW
GFCI BREAKER
Page 29
2
2.10 mm
for SOVEREIGN, TRIUMPH, PRODIGY & JETSETTER
2
(4.0 mm
for GRANDEE, ENVOY, VANGUARD & ARIA)
2
2.10 mm
for SOVEREIGN, TRIUMPH, PRODIGY & JETSETTER
2
(4.0 mm
for GRANDEE, ENVOY, VANGUARD & ARIA)
2
for SOVEREIGN, TRIUMPH, PRODIGY & JETSETTER
2.10 mm
2
(4.0 mm
for GRANDEE, ENVOY, VANGUARD & ARIA)
Factory Installed
Terminal Block
Power Jumpers
Electrical Requirements
Page 33
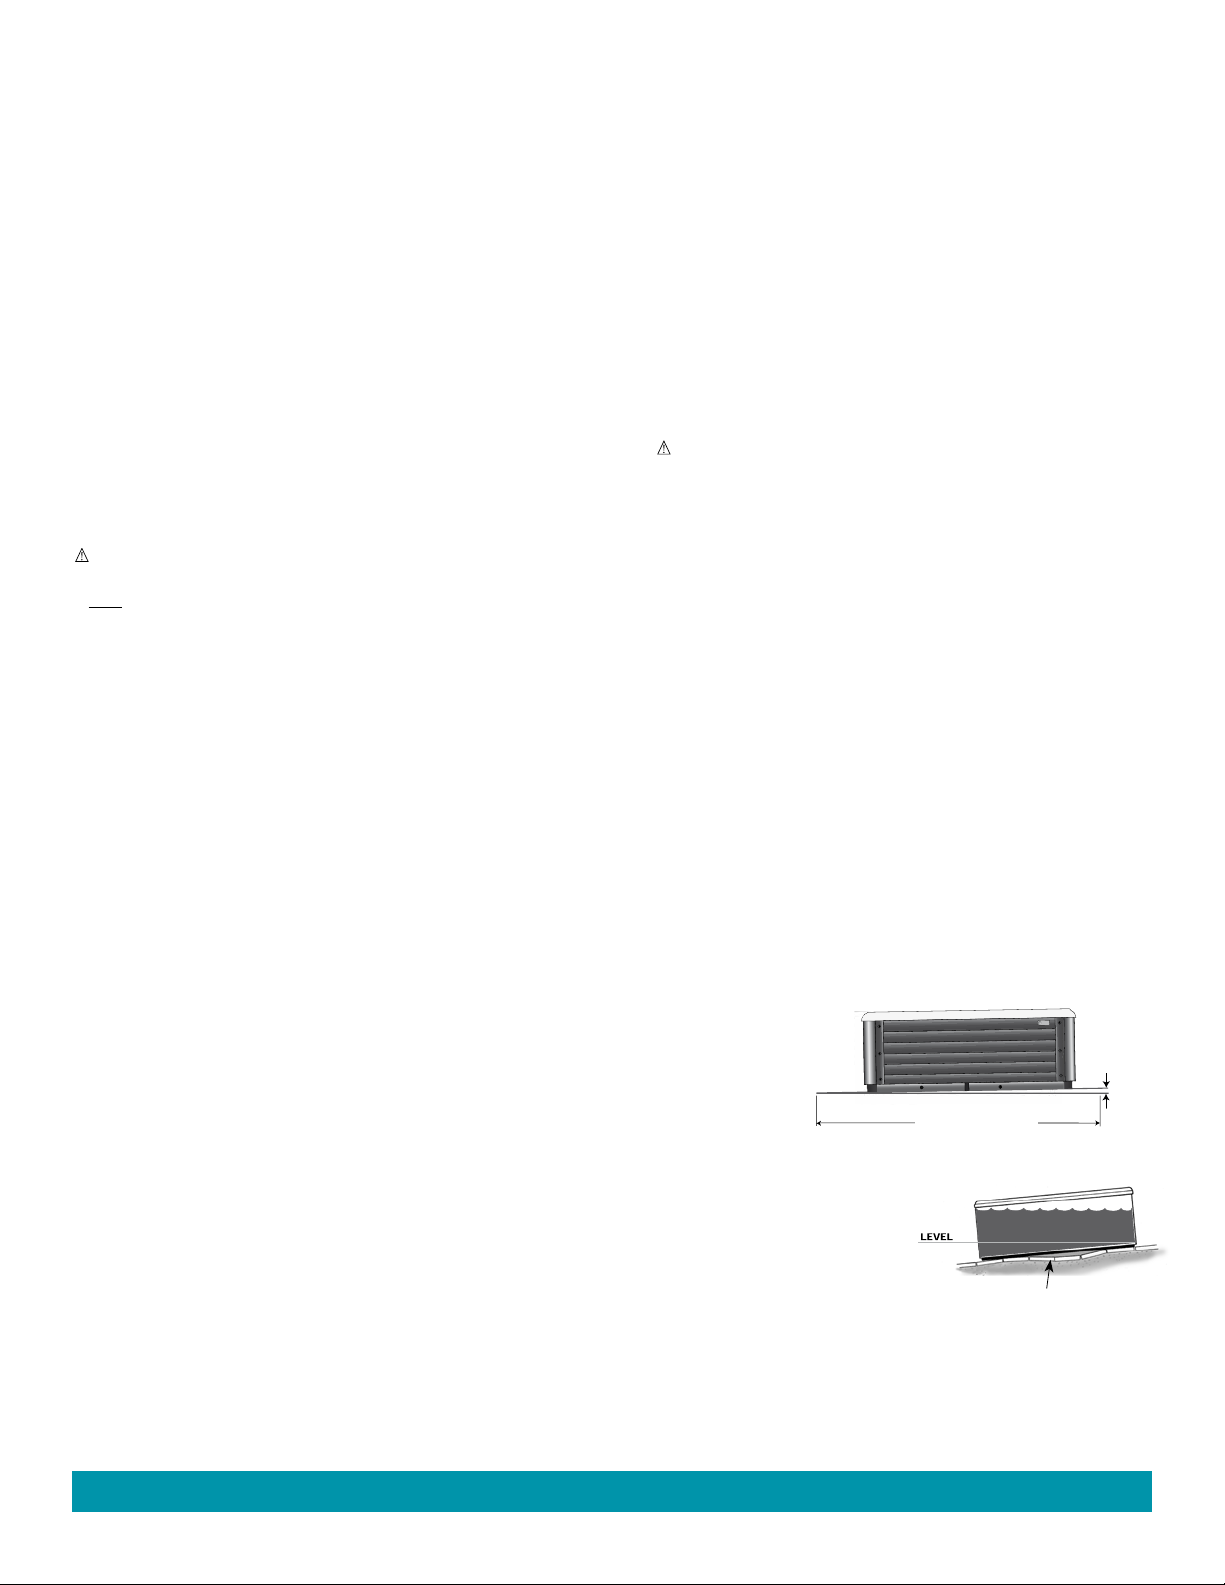
Installation Instructions
SITE PREPARATION
You probably have a spot picked out for your new spa, whether it’s
indoors or outdoors, on a patio or on a deck. Just make sure you check
the following:
• Always put your spa on a structurally sound, level surface. A filled spa
can weigh a great deal. Make certain that the location you choose can
support the weight.
• Don’t forget to level your spa before filling it. (See Spa Leveling
Instructions.)
• Be sure to locate your equipment compartment, which houses all of the
electrical components, in a pl
from it. Allowing water into the equipment compartment can cause
damage to the electronics, or may result in tripping the circuit breaker on
your house’s electrical panel.
• Leave yourself easy access to the circuit breakers.
• Leave access to the equipment compartment for periodic spa care and
maintenance.
WARNING: Damage to the spa’s equipment compartment
components or internal plumbing as a result of rodent infestation
is NOT covered under your warranty!
OUTDOOR AND PATIO
INSTALLATION
No matter where you put your new spa, it’s important that it has a solid
foundation to support it. In fact, structural damage to the spa, resulting
from incorrect installation, or placement on an inadequate foundation, is
not covered under the spa’s limited warranty.
If you install the spa outdoors, we recommend a reinforced concrete
pad at least ten centimeters (four inches) thick. The reinforcing rod
or mesh in the pad should be attached to a 6 mm² bonding wire per
national electrical codes (contact your local electrical code
inspector for more information; inspection for proper grounding may
be required before pouring concrete to form the slab).
If you place the spa on the ground, even temporarily, place stepping
stones under the leveling areas (see Spa Leveling Instructions). The
stones should be at least 5 cm thick and 30 cm square. Even with
stones in place, the spa will inevitably settle and become unlevel. Plus,
a spa surrounded by dirt or grass will soon be filled with dirt or grass
from users’ feet. So get it onto a solid foundation as soon as possible.
DECK INSTALLATION
To be certain your deck can support your spa, you must know the
deck’s maximum load capacity. Consult a qualified building contractor
or structural engineer. To find the weight of your spa, its contents and
occupants, refer to the Spa Specification chart. This weight per square
meter must not exceed the structure’s rated capacity, or serious structural
damage could result.
CAUTION: Watkins Wellness suggests a structural engineer or
contractor be consulted before the spa is placed on an elevated deck.
INDOOR/BASEMENT
INSTALLATION
Be aware of some special requirements if you place your spa indoors.
Water will accumulate around the spa, so flooring materials must
provide a good grip when wet. Proper drainage is essential to prevent
ace where water drainage will be away
compliance
a build-up of water around the spa. When building a new room for the
spa it is recommended that a floor drain be installed. The humidity will
naturally increase with the spa installed. Water may get into woodwork
and produce dry rot, mildew, or other problems. Check for airborne
moisture’s effects on exposed wood, paper, etc. in the room. To
minimize these effects, it is best to provide plenty of ventilation to the
spa area. An architect can help to determine if more ventilation must be
installed.
HOT SPRING spas are equipped with a vent to remove excessive
heat from the equipment compartment. Find this vent (its under the
bottom front left or right corner) and be sure the vent is not blocked by
anything, including carpeting.
Your HOT SPRING dealer can help you with local information such as
zoning regulations and building codes. They can also give you a copy
of our planning guide.
CAUTION: Do not install the spa on a heated floor.
WARNING: Please keep the area around your spa well
ventilated when it is installed indoors or in a confined area.
Inadequate ventilation around the spa could cause a build-up of a
higher-than-normal concentration of spa chemicals and/or bacterial
fragments. These dispersed spa chemicals and/or bacterial
fragments can be inhaled, and may result in breathing difficulties or
lung damage in certain people suffering from a compromised immune
system or respiratory infection. If you or other bathers are affected by
this condition, please seek medical attention as soon as possible.
In addition to the above, properly clean and maintain your spa as follows:
• Follow all procedures in this owner’s manual and printed instructions on all
water care (chemical) products packaging.
• Test the water regularly to ensure proper levels of sanitizers, pH, and other
water care requirements.
• Drain, clean, and refill your spa with fresh water on a regular schedule,
and in accordance with this owner’s manual.
• Clean the filter(s) at least once per month.
• Check to make sure you have proper circulation throughout your spa
water system.
• Have spa users bathe before entering the spa water.
SPA LEVELING PREPARATION
Concrete sloped at 1.5 cm per 3 m is preferred so that rain water
and water spillover
will run off and not
puddle underneath
the spa (water under
the spa for long
periods of time may
cause the wood to
deteriorate). Other
options are brick, stepping stone, or
blocks.
It is important to note that soft
surfaces, even when stepping
stones are used to evenly distribute
the weight of the spa, will have a
tendency to settle, thus resulting in
an unleveled spa.
Slope 1.5 cm per 3 m for proper drainage.
3 m
Stepping stones or brick may settle
causing the spa to be unlevel.
1.5 cm
Installation Instructions
Page 30
Page 34
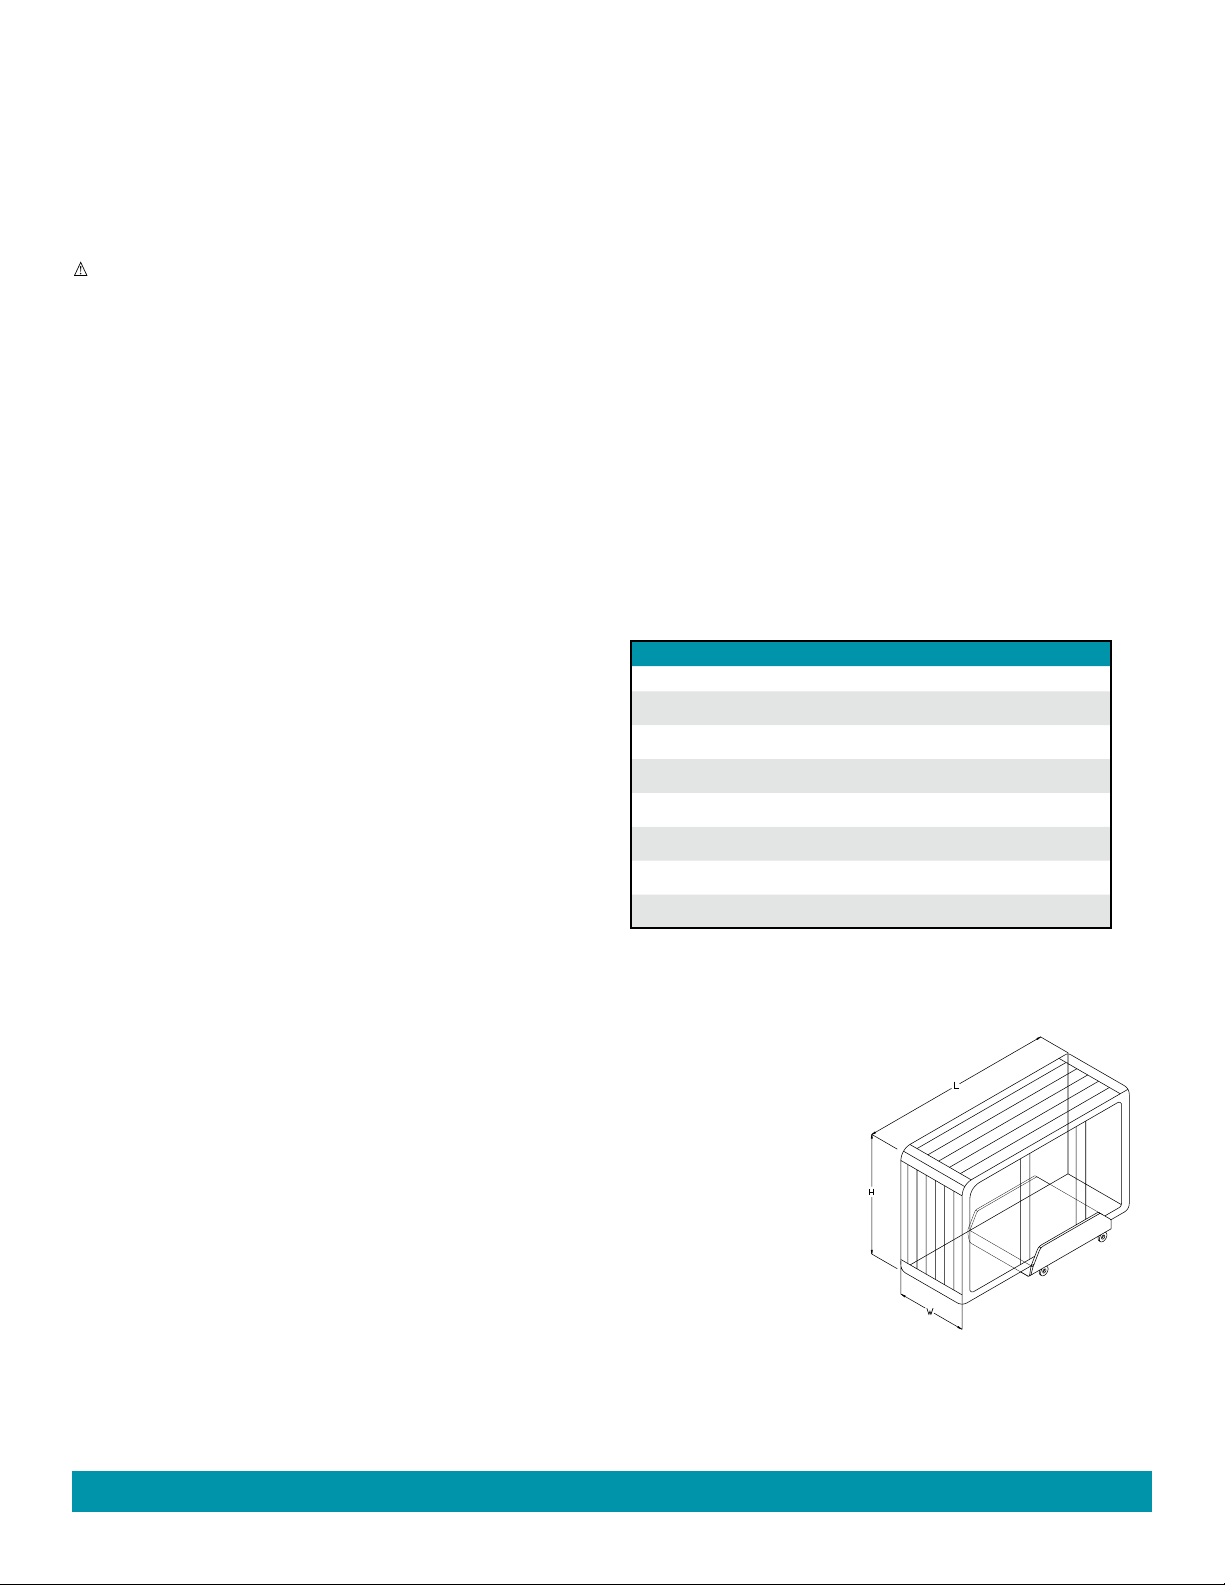
NOTE: Placing the spa on grass or dirt may increase the amount
of debris which is inadvertently brought into the spa water and may
cause harm to your equipment as well as the spa surface, which is not
covered under warranty.
SPA LEVELING INSTRUCTIONS
In order for your HOT SPRING spa to operate properly, and the internal
plumbing to drain completely, the spa must be level.
WARNING: Watkins Wellness recommends that a structural
engineer or contractor be consulted prior to placing the spa
on an elevated deck, or platform. Use the Dead Weight in the Spa
Specification chart to determine the structure’s requirements.
IMPORTANT: Watkins Wellness reserves the right to change any
specifications or design without incurring any obligation.
Approved Shim Material
• Cedar shingles • Exterior rated plywood
• Redwood • Exterior rated lumber
The shims used should vary in thickness from 0.5 cm to 1.0 cm and
should be cut into 5 cm x 10 cm rectangles.
NOTE: Due to the large size of the GRANDEE spa Watkins
Wellness requires the spa be installed on a level 10 cm thick
concrete pad or structurally engineered deck and NOT shimmed
in any mannor.
Leveling Instructions
1. Using a 2 m carpenter’s level (or a shorter level and a straight board
5 cm by 10 cm, 2.5 m long), check the spa to identify the highest,
and lowest corners.
2. With one end of the level resting on the highest corner of the spa
(and the opposite end resting on the lowest corner), gently raise the
lower end of the level by placing shims between the spa shell and
the level, until the level itself is level. This will tell you how many
shims are needed at that lowest corner.
3. Now carefully pivot the level, keeping the shimmed end where it
is, until the other end of the level rests on one of the other corners.
Check the level. Adjust the end of the level using the procedure
above. Carefully pivot the level again to the last corner, leaving the
pivot end at its original location, and repeat the procedure. Whatever
shims are on the three corners are the ones you will place under
those corners in the next steps.
4. Remove the level and set it aside. Carefully remove the shims and
keep them together, remembering the corner from which each set of
shims came.
5. With more than one person lifting, lift the lowest side of the spa (the
one with the most shims), and place a 10 cm x 10 cm block under
the spa pedestal, at the center of the side lifted.
6. Refer to the spa pedestal support diagram for your spa to locate
the leveling points for the elevated corners. Place the set of shims
corresponding to each corner directly under its designated leveling
point.
7. Lift the spa, remove the support block, and set the spa on the shims.
Repeat steps 5 through 7, if necessary, for the opposite side of the spa
8. Use the level to check the level of the spa. Make any necessary
adjustments.
9. Refer to the spa pedestal support diagram for your spa to locate the
remaining leveling points, each of which must now also be shimmed,
and carefully slide “helper” shims under the spa at their designated
.
locations. These helper shims should create a snug fit between the
foundation and the spa pedestal structure. If it is necessary to lift the
spa in order to place the helper shims, use care not to kick out the
original corner shims.
The following base support diagrams for the ENVOY, VANGUARD,
ARIA, SOVEREIGN, TRIUMPH, PRODIGY & JETSETTER spas
indicate the recommended shimming points.
Notice: Though designed for outdoor installation, your HOT SPRING
spa is not impervious to damage that may be caused by insects,
rodents, or other living creatures. A screen at the bottom of the spa's
equipment compartment is designed to minimize their ability to access
the equipment compartment and cause damage to the spa components
Please note, the electronics within the compartment need adequate
airflow to cool the equipment and maintain the optimal temperature
range. Sealing the opening completely, or allowing debris to build-up on
the screen mesh, will adversely affect the spas’ performance. Damage
to the spa or it’s components caused by an “act of nature”, rodent or
insect damage is not covered under the terms of your spa’s Limited
Warranty.
DELIVERY ACCESS
First, locate the dimensions of your spa on the following chart. The
dimensions shown are the measurements of the spa in the vertical
position, laid on its side.
Model W L H
GRANDEE (GGE) 97 cm 254 cm 231 cm
ENVOY (KKE) 97 cm 236 cm 231 cm
VANGUARD (VVE) 91 cm 221 cm 221 cm
ARIA (ARE) 91 cm 221 cm 221 cm
SOVEREIGN (IIE) 84 cm 236 cm 203 cm
TRIUMPH (TRHE) 84 cm 236 cm 188 cm
PRODIGY (HE) 84 cm 213 cm 198 cm
JETSETTER
Next, contact your dealer to find the height and width added by the
delivery cart which the dealer will use to deliver your new spa. Use the
height of the cart plus the dimension shown as H to determine
the vertical clearance required to pass the spa and
cart. Use the width of the cart, or dimension
W, whichever is greater, to determine
the maximum width of clearance
necessary.
NOTE: It may be necessary
to allow for additional overhead clearance if the spa
will be rolled up or down an
incline or moved up or down
a short flight of stairs.
(JJE)
74 cm 213 cm 165 cm
Page 31
Installation Instructions
Page 35
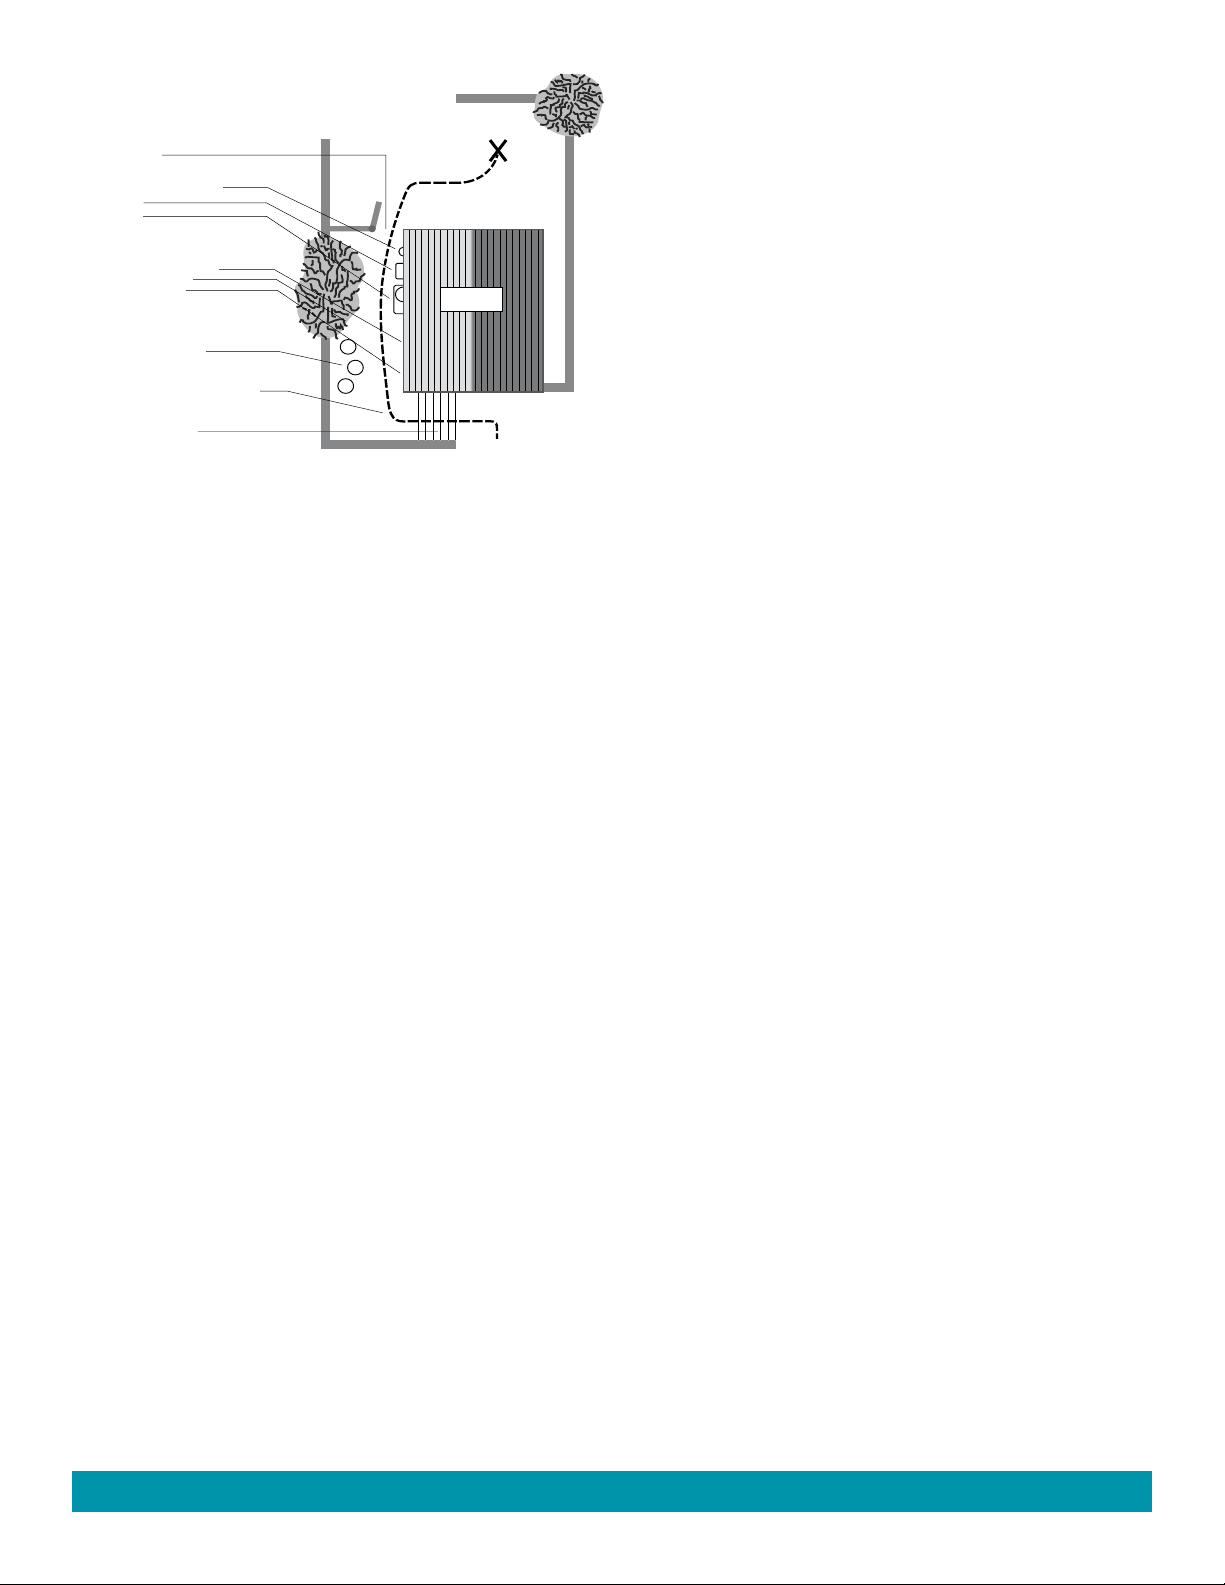
How is your width clearance?
BACK YARD
(GARDEN)
Check all gates
Protruding electric meters
Gas meters
A/C units
Do you have sufficient
overhead clearance?
Is the path clear?
Check low roof eaves,
overhanging branches,
rain gutters
Move away branches, dog
houses, firewood, etc.
If there is a 90º turn, can we clear it?
(The spa will not bend)
No more than 6 consecutive
stairs without a landing
STREET
Use the information above to determine the requirements for access to
your desired location.
It may be necessary to remove a gate, part of a fence, or other movable
obstructions in order to roll the spa to its installation site.
If the spa has to be taken off the cart to go over a wall (either because
the entry area is too narrow, the eaves are too low, the corner is too
tight, or the stairway is too steep), a crane will be required. This is a
common practice.
The crane has a truck-mounted boom which can fit right in your
driveway. It must be run by a licensed and insured operator. For a
charge, the crane operator will lift your spa over walls, buildings, or
any other obstruction and place it as close to the installation site as
possible. Crane delivery typically takes an average of 60 minutes to
complete.
NOTE: If your spa delivery requires the use of a crane, you may be
required to pay for its services at the completion of the delivery.
GROUND PREPARATION
Your HOT SPRING spa has been engineered to perform on all kinds
of common surfaces. While a concrete slab is best for long-term use*,
other foundations are acceptable so long as a level base is prepared
prior to delivery. Three foundation base pictures, shown at right,
represent examples of alternatives to a concrete slab for spas installed
without gazebos or other accessories.
*NOTE: A reinforced concrete pad at least 10 cm (4 inches) thick is
required for the GRANDEE spas, and recommended for the ENVOY,
VANGUARD, ARIA, SOVEREIGN, TRIUMPH, PRODIGY and
JETSETTER spas.
INSTALLATION NOTES:
• If stepping stones or railroad ties are selected for the spa foundation, they
should be pl
even distribution of the spa weight.
• It is important to note that soft surf
used to evenly distribute the weight of the spa, will still have a tendency to
settle, resulting in an unlevel spa.
• Remember, placing the spa on grass or dirt may increase the amount of
debris which is inadvertently brought into the spa water on the user’s feet.
If you are purchasing a deck package or a gazebo with your spa, a
solid foundation is mandatory. Placing them on any surface other than
a single level pad could create problems with their installation. Pictured
(right side) are a few of the recommended surfaces.
As a homeowner, it is your responsibility to provide a suitable, level
foundation for your spa. Keep in mind that most delivery crews are not
equipped to level and prepare spa sites.
NOTE: In order for the spa to operate properly and the internal
plumbing to drain completely, you must ensure that the spa is leveled
after it has been installed. The diagrams on the following pages
indicated the recommended shimming points on your spa’s base
support system. Your HOT SPRING delivery crew can help you perform
the procedure.
aced at the designated leveling areas of your spa to maintain
aces, even when stepping stones are
Installation Instructions
Page 32
Page 32
Page 36
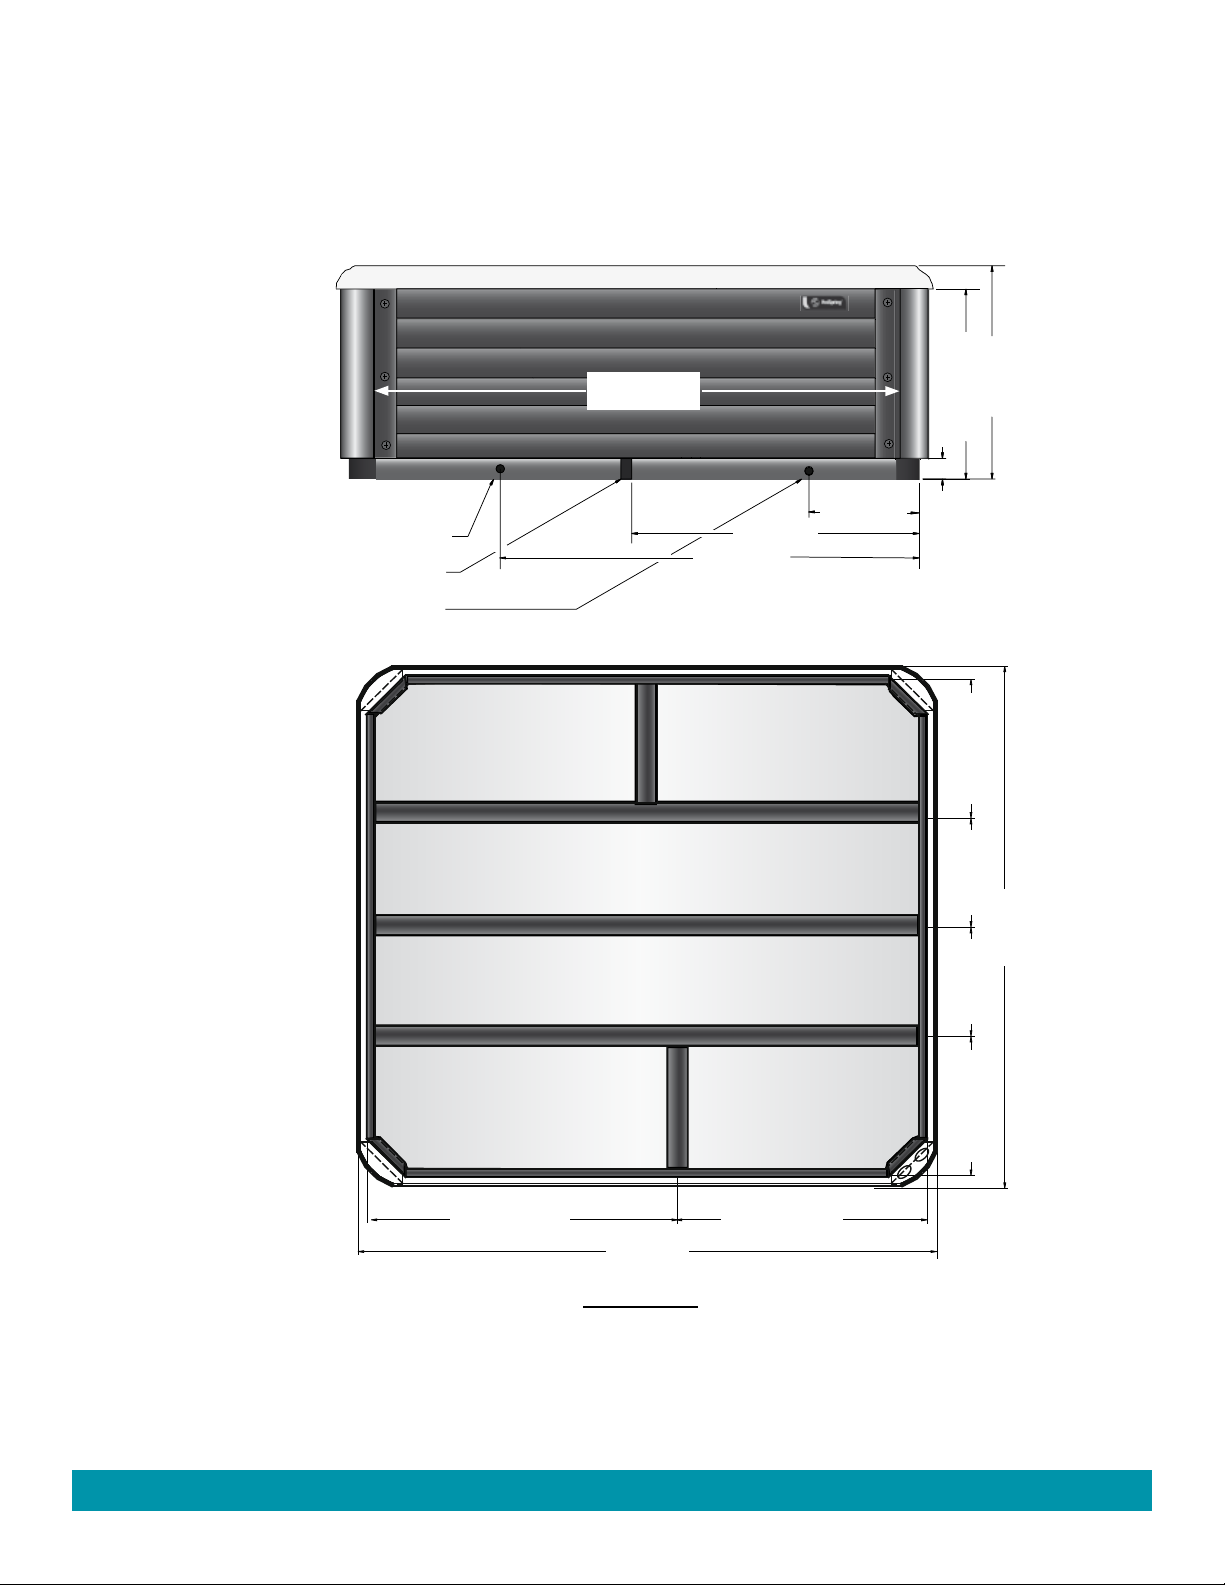
53.5" (136 cm) 43" (109 cm)
91" (231 cm)
19.5” (49.5 cm)
26.25" (66.5 cm)
19.5” (49.5 cm)
25.5" (64.5 cm)
100" (254 cm)
15.5" (39.5 cm)
71" (180.5 cm)
49" (124.5 cm)
3.5" (9 cm)
34.5" (87.5 cm)
38" (96.5 cm)
GRANDEE (MODEL GG)
GRANDEE (MODEL GGE)
Dimensions
NOTE: All dimensions are approximate; measure your spa before making critical design or
pathway decisions.
(Front view)
MAIN DRAIN
1.5” (4 cm) ELECTRICAL CUTOUT
(Location may vary 1/2” (1.5 cm) )
SECONDARY DRAIN
DOOR
84.5" (214.5 cm)
(Bottom view)
UPSIDE DOWN VIEW OF SPA
DOOR SIDE
Page 33
NOTE: Watkins Wellness requires that the GRANDEE be installed on a minimum 10 cm (4”) thick reinforced concrete pad or a deck
that is able to withstand more than 555 kg/m
²
(115 lbs. per square foot).
WARNING: The GRANDEE must not be shimmed in any manner.
Installation Instructions
Page 37
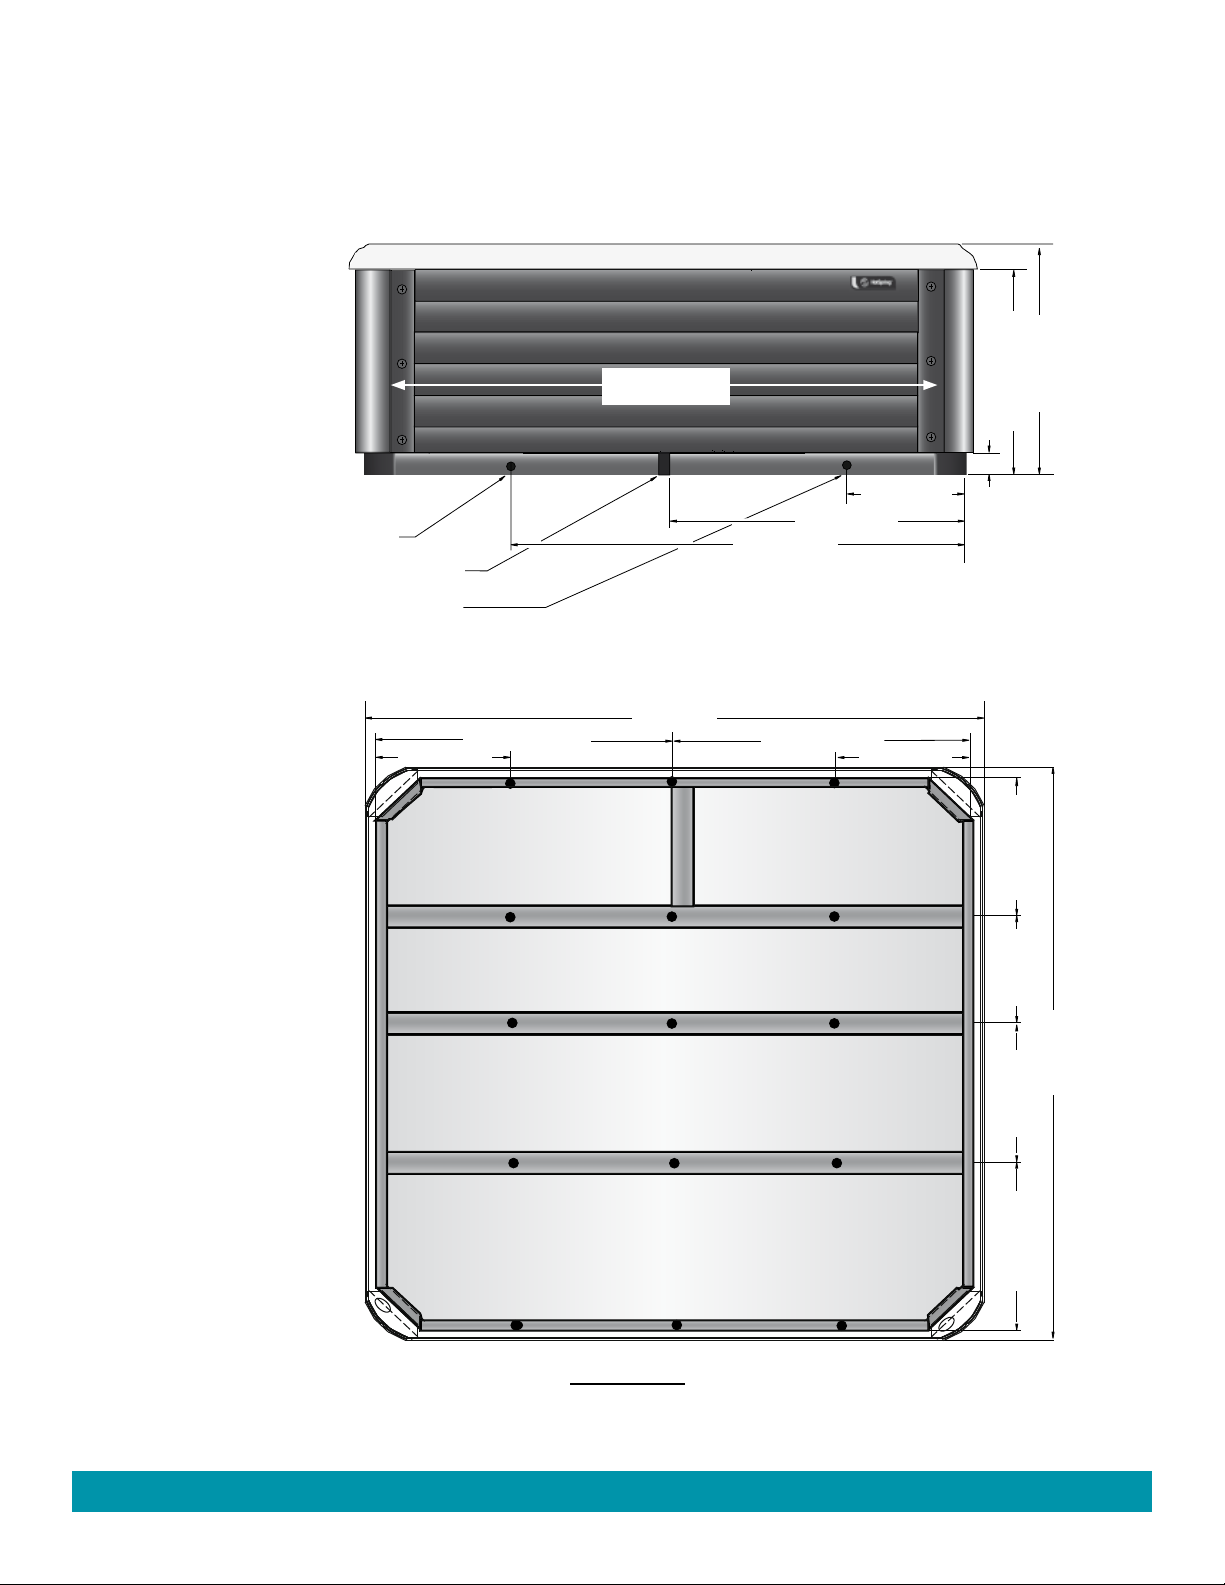
ENVOY (MODEL KK)
(
)
ENVOY (MODEL KKE)
Dimensions
NOTE: All dimensions are approximate; measure your spa before making critical design or
pathway decisions.
(Front view)
MAIN DRAIN
1.5” (4 cm) ELECTRICAL CUTOUT
(Location may vary 1/2” (1.5 cm) )
SECONDARY DRAIN
18" (45.5 cm)
DOOR
77.75" (197.5 cm)
42.5" (108 cm)
72.5" (184 cm)
93" (236 cm)
44.5" (113 cm) 44.5" (113 cm)
14.5" (37 cm)
18" (45.5 cm)
38" (96.5 cm)
34 " (86.5 cm)
3.5 " (9 cm)
22.25" (56.5 cm)
(Bottom view)
● IMPORTANT: The ENVOY has 15 leveling points (place shims at illustrated locations)
Installation Instructions
UPSIDE DOWN VIEW OF SPA
DOOR SIDE
17" (43 cm)
231 cm
91"
22" (56 cm)
26.5 " (67.5 cm)
Page 34
Page 38
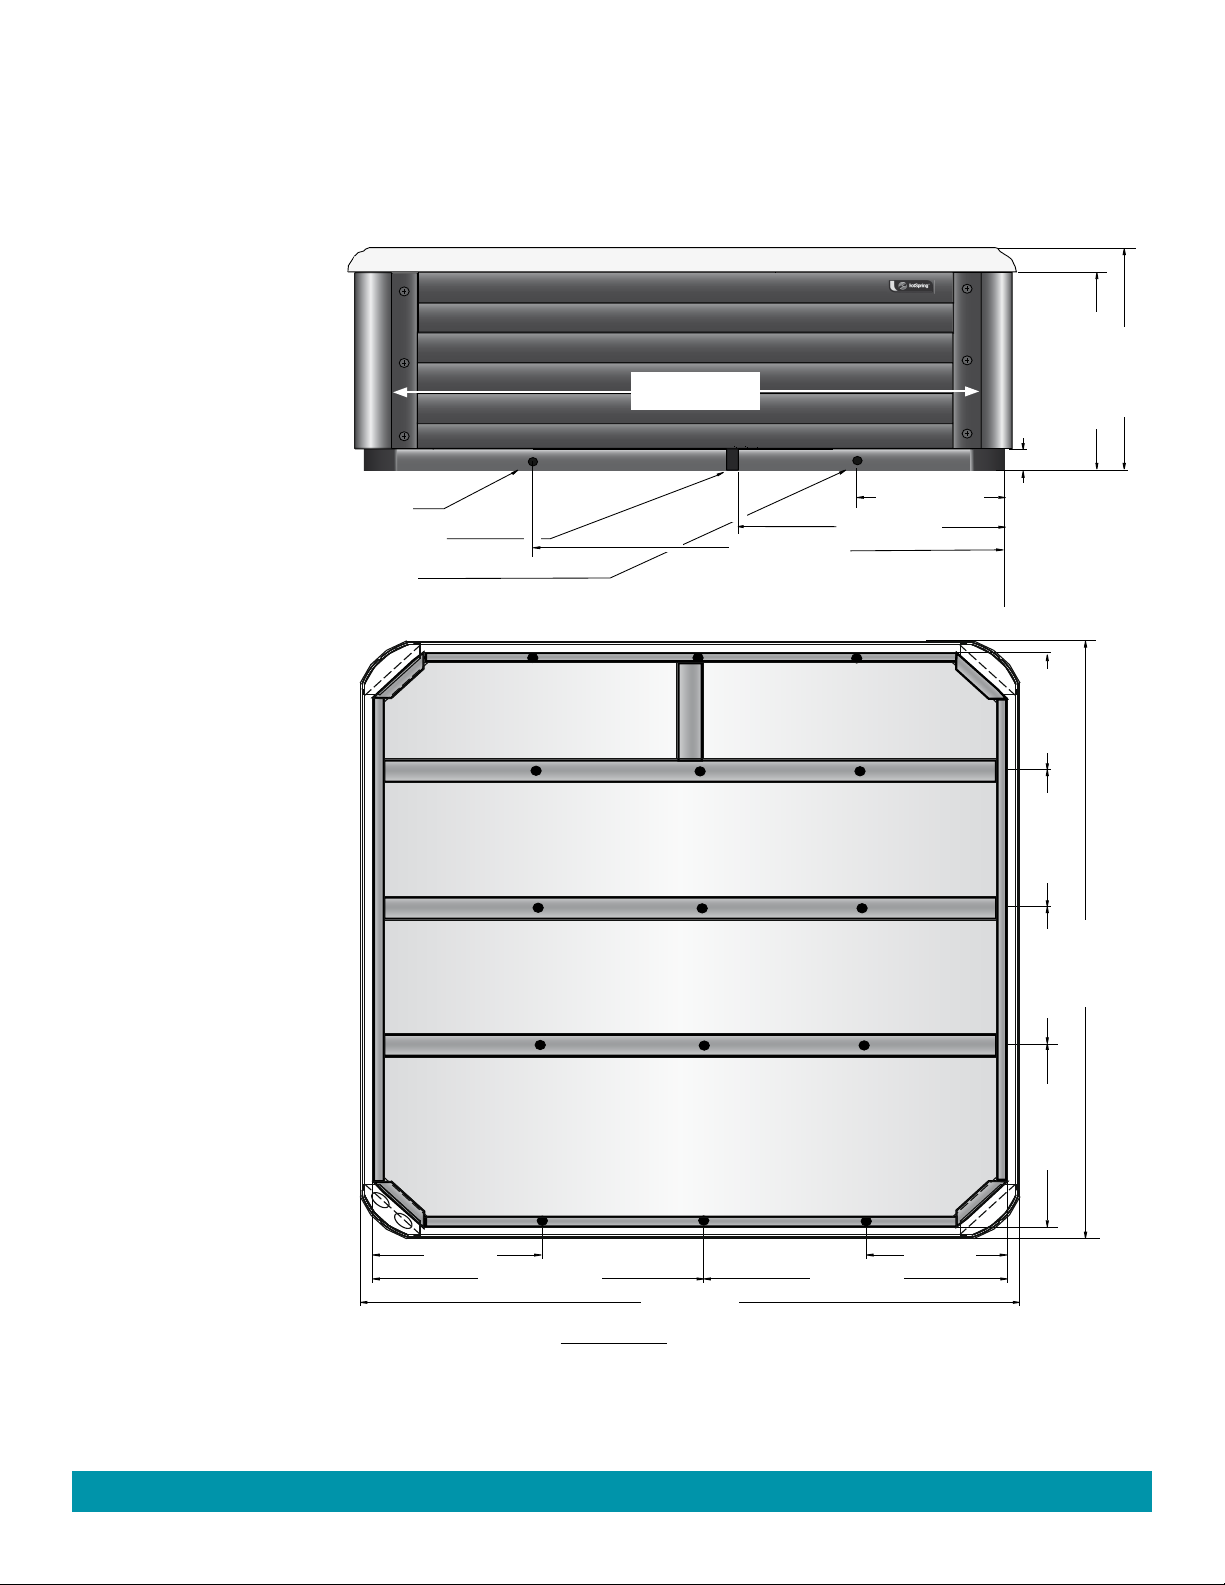
VANGUARD (MODEL VVE) & ARIA (MODEL ARE)
62 " (157.5 cm)
33" (84 cm)
21.5" (54.5 cm)
3.5 " (9 cm)
32 " (81 cm)
36" (91 cm)
41.5" (105 cm) 41.5" (105 cm)
18" (46 cm)18" (46 cm)
87" (221 cm)
20" (51 cm)
26.5" (67.5 cm)
20 " (51 cm)
17.25 " (44 cm)
87" (221 cm)
Dimensions
NOTE: All dimensions are approximate; measure your spa before making critical design or
pathway decisions.
(Front view)
MAIN DRAIN
1.5” (4 cm) ELECTRICAL CUTOUT
(Location may vary 1/2” (1.5 cm) )
SECONDARY DRAIN
(Bottom view)
DOOR
71.75" (182 cm)
UPSIDE DOWN VIEW OF SPA
Page 35
DOOR SIDE
● IMPORTANT: The VANGUARD & ARIA have 15 leveling points (place shims at illustrated locations)
Page 35 Installation Instructions
Page 39
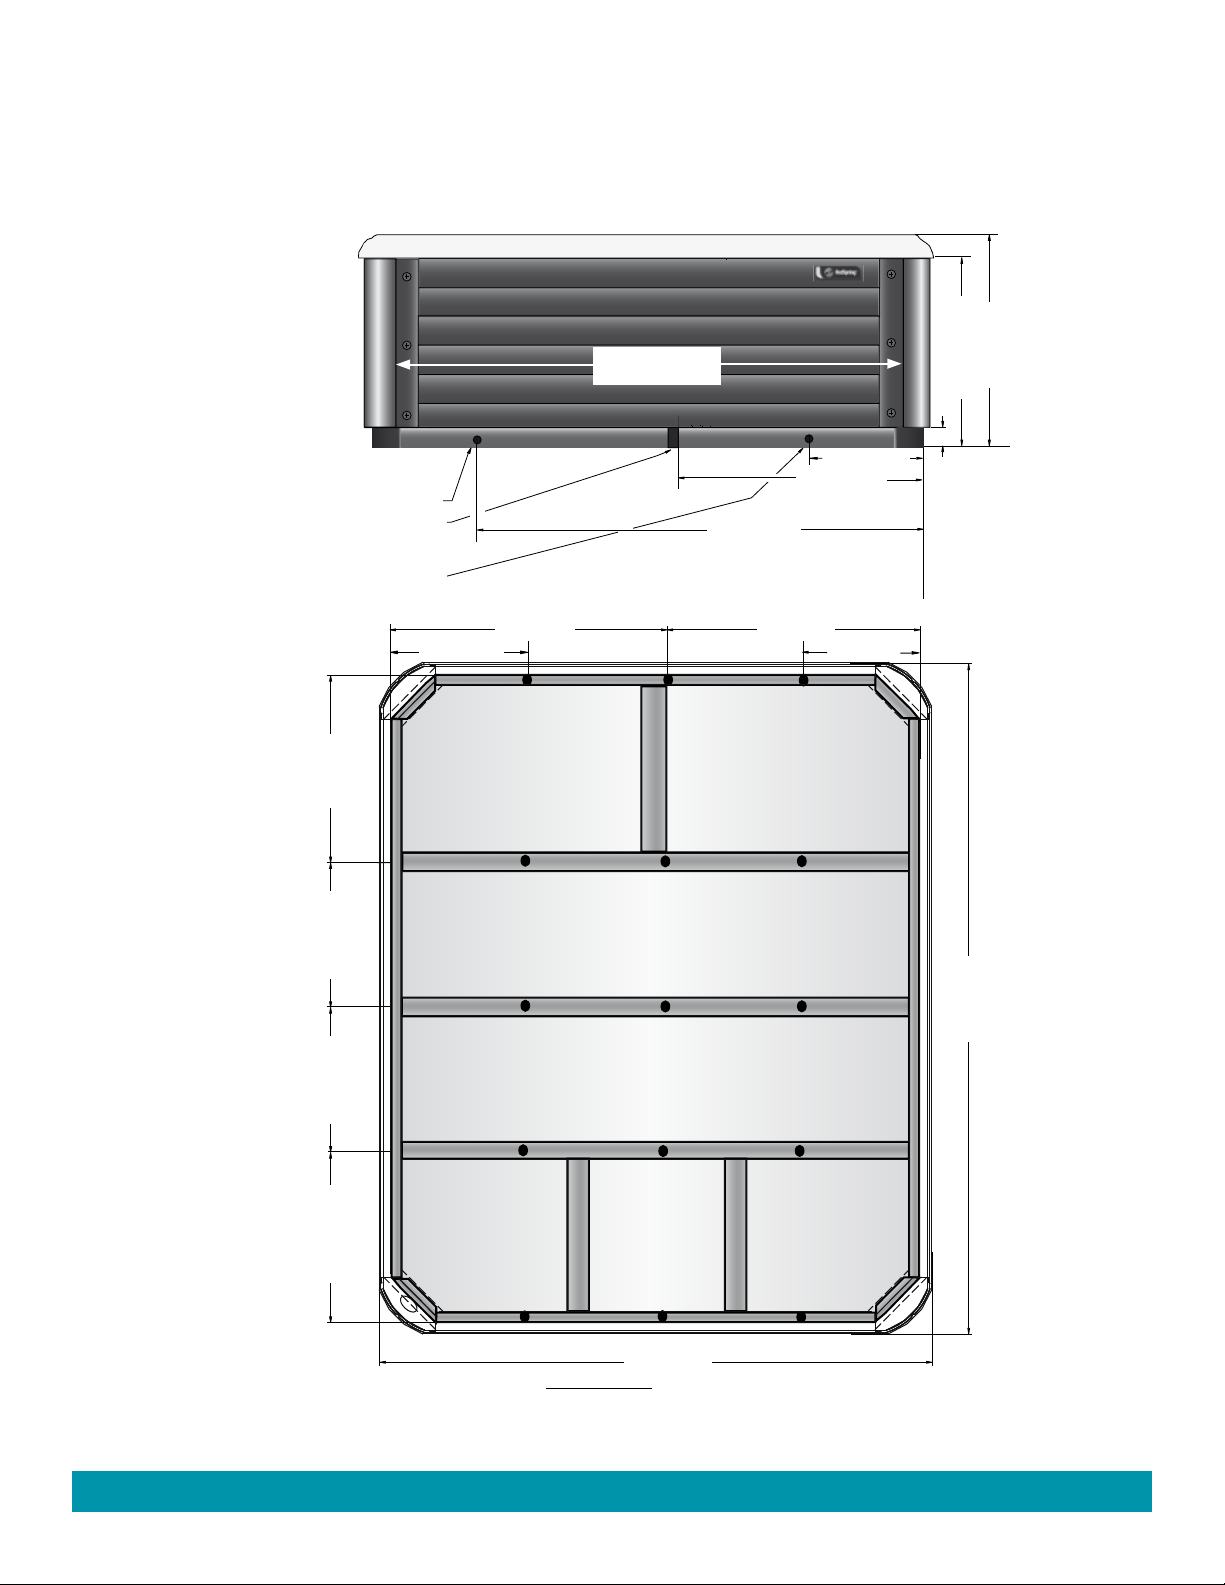
SOVEREIGN (Model II)
38" (96.5 cm)
18" (45.5 cm)
38" (96.5 cm)
18" (45.5 cm)
80" (203 cm)
93" (236 cm)
23.75" (60.3 cm) 20" (50.8 cm
)
20" (50.8 cm
)
26" (66 cm)
34.5" (87.5 cm)
3.5" (9 cm)
29 " (73.5 cm)
33" (84 cm)
14.5" (37 cm )
60" (152.5 cm)
SOVEREIGN (MODEL IIE)
Dimensions
NOTE: All dimensions are approximate; measure your spa before making critical design or
pathway decisions.
(Front view)
MAIN DRAIN
1.5” (4 cm) ELECTRICAL CUTOUT
(Location may vary 1/2” (1.5 cm) )
SECONDARY DRAIN
DOOR
65.25" (165.5 cm)
UPSIDE DOWN VIEW OF SPA
(Bottom view)
● IMPORTANT: The SOVEREIGN has 15 leveling points (place shims at illustrated locations)
Installation Instructions
Page 36
DOOR SIDE
Page 36
Page 40
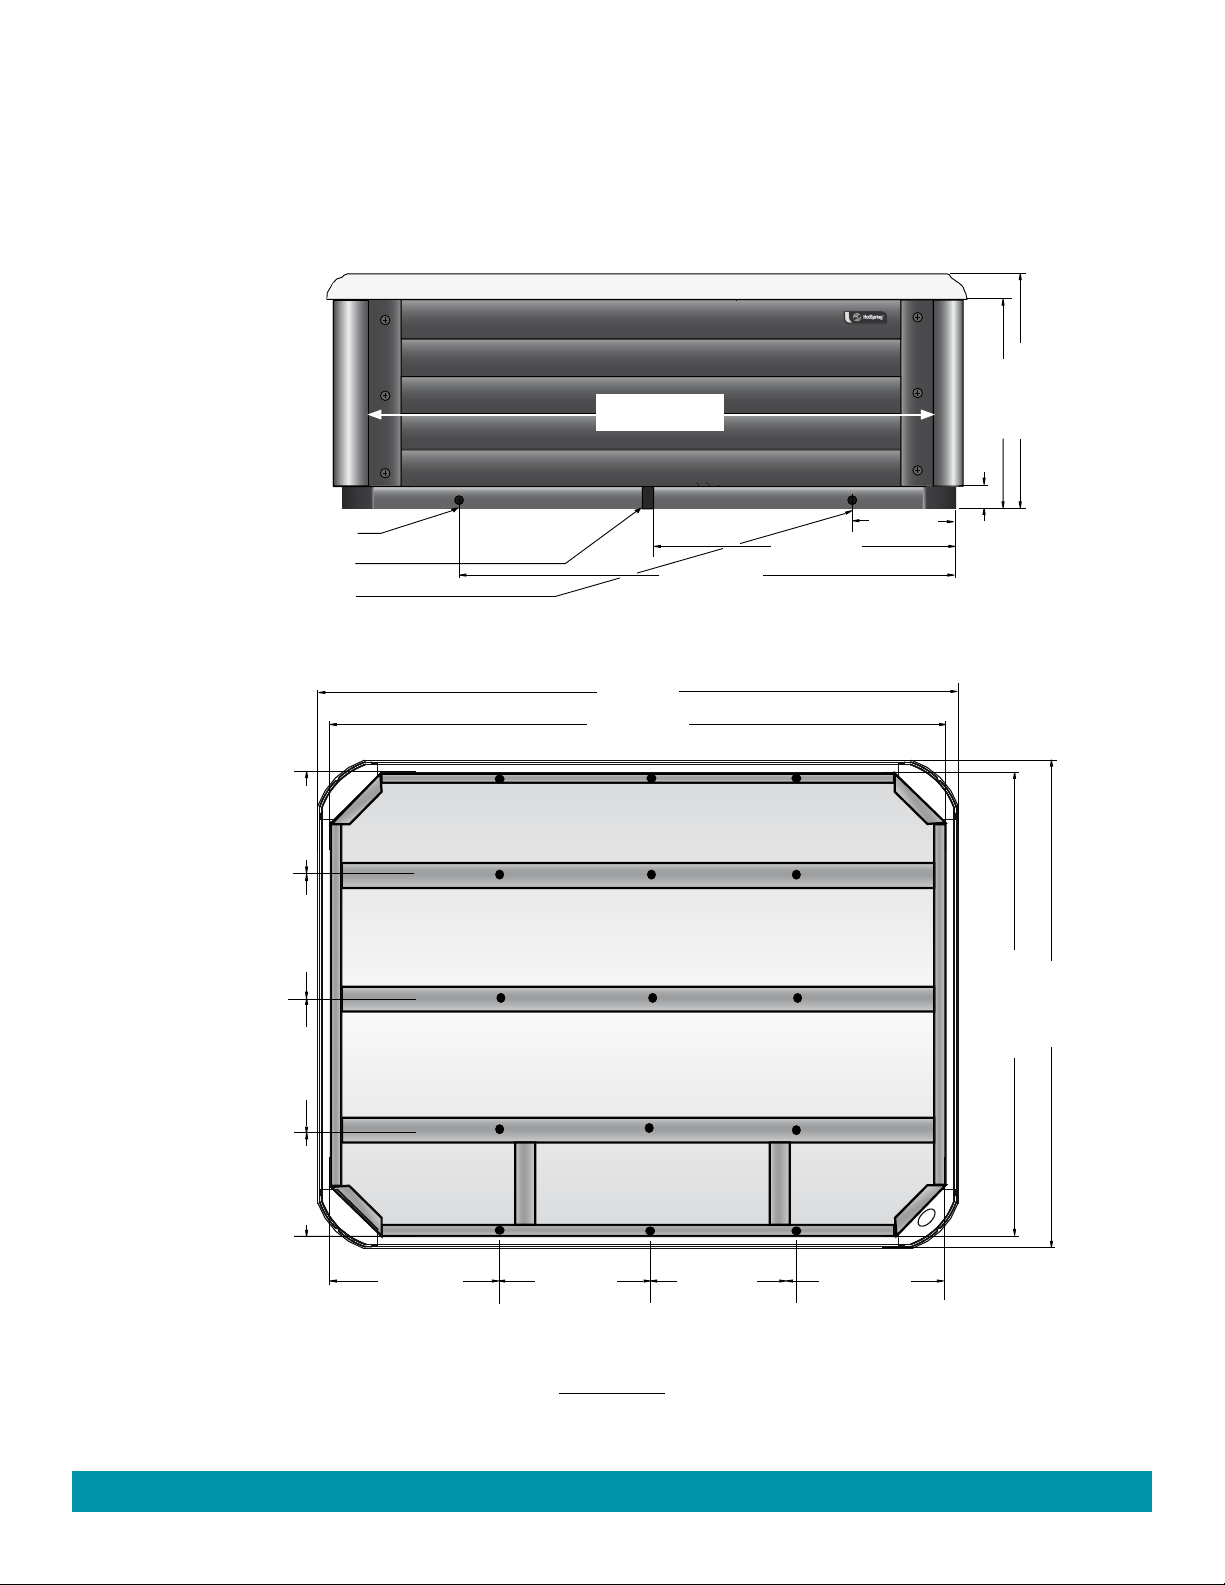
NOTE: All dimensions are approximate; measure your spa before making critical design or
TRIUMPH
TRIUMPH (MODEL TRHE)
Dimensions
pathway decisions.
(Front view)
MAIN DRAIN
1.5” (4 cm) ELECTRICAL CUTOUT
(Location may vary 1/2” (1.5 cm) )
SECONDARY DRAIN
17" (43 cm)
DOOR
78" (198 cm)
93" (236 cm)
89" (226 cm)
73" (185.5 cm)
43.5" (110.5 cm)
15" (38 cm)
29 " (73.5 cm)
3.5" (9 cm)
33" (84 cm)
(Bottom view)
Page 37
UPSIDE DOWN VIEW OF SPA
21" (53.5 cm) 19" (48.5 cm)
14.5" (37 cm)
Page 37
22.25" (56.5 cm)22.25" (56.5 cm) 22.25" (56.5 cm)22.25" (56.5 cm)
DOOR SIDE
● IMPORTANT: The TRIUMPH has 15 leveling points (place shims at illustrated locations)
Installation Instructions
70" (178 cm)
74" (188 cm)
Page 41
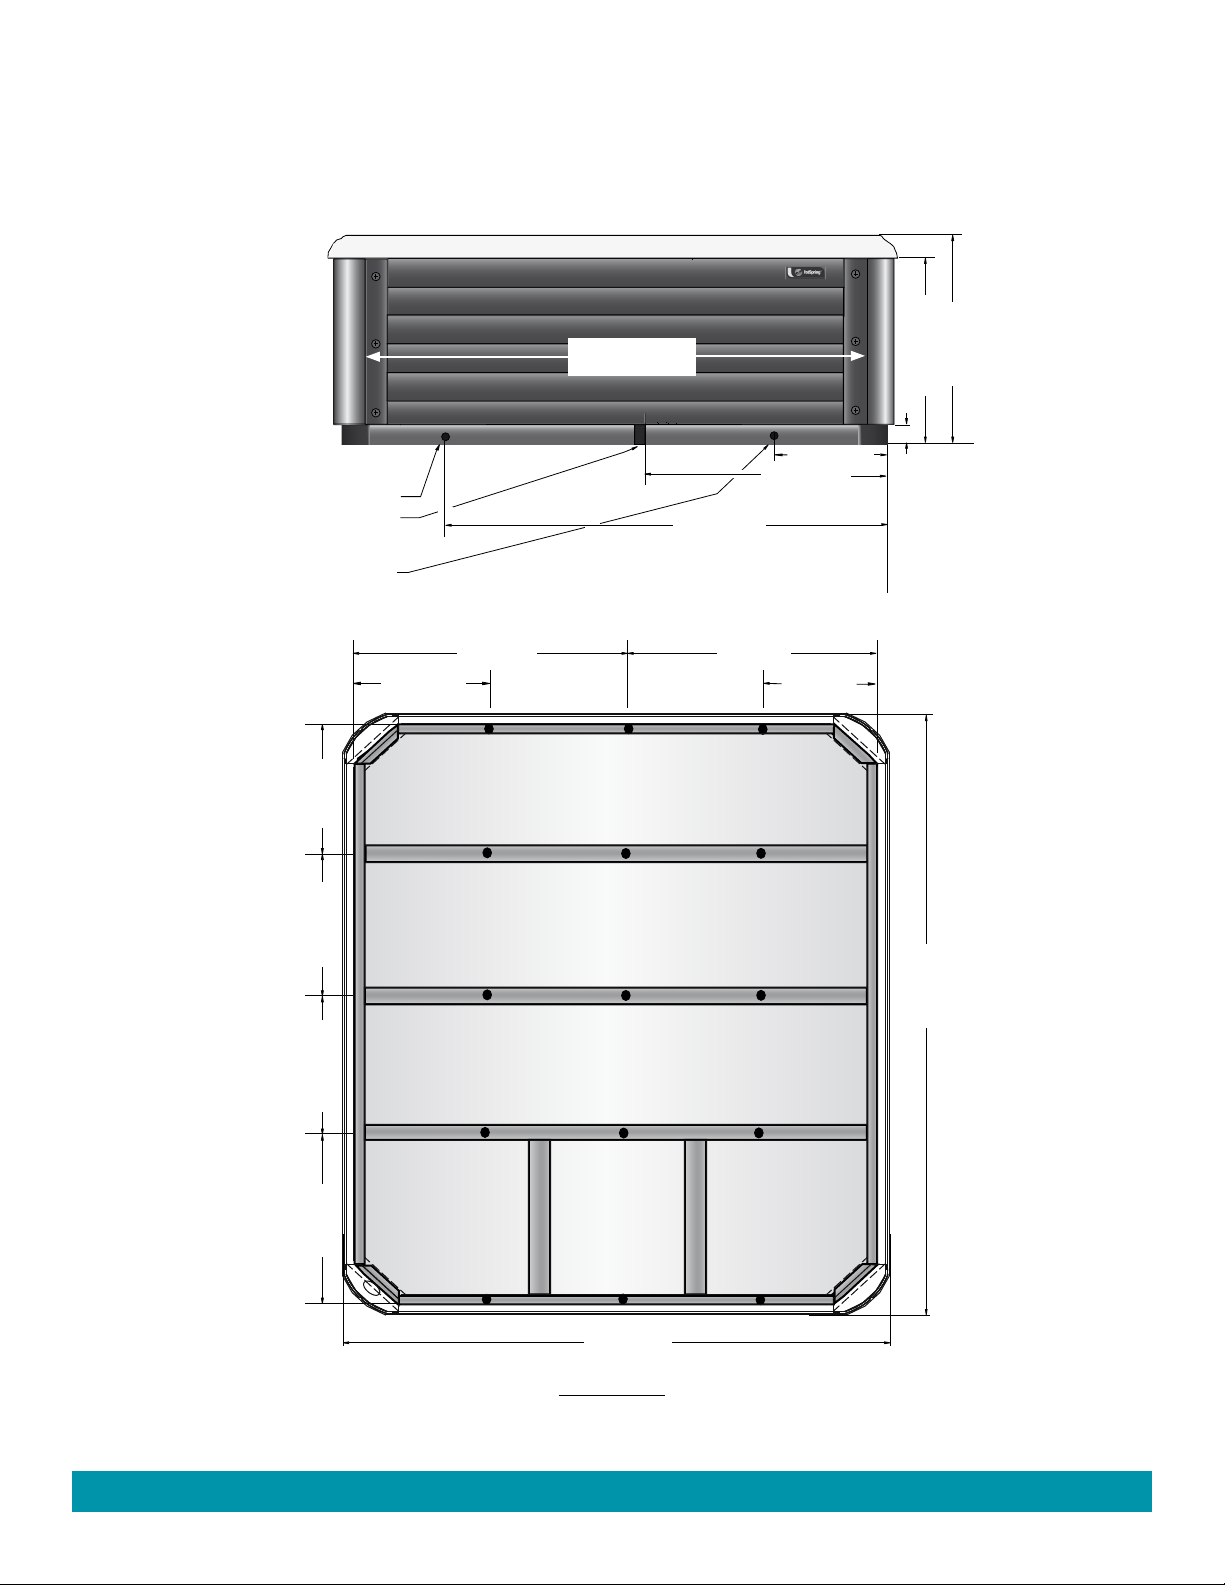
PRODIGY (MODEL HE)
Dimensions
NOTE: All dimensions are approximate; measure your spa before making critical design or
pathway decisions.
(Front view)
MAIN DRAIN
1.5” (4 cm) ELECTRICAL CUTOUT
(Location may vary 1/2” (1.5 cm) )
SECONDARY DRAIN
17" (43 cm)
)
18" (45.7 cm)
37" (94 cm)
DOOR
62.75" (159.5 cm)
61.5" (156.2 cm)
37" (94 cm)
14" (35.6 cm)
31.5" (80 cm)
18" (45.7 cm)
33" (83.8 cm)
29 " (73.6 cm)
3.5" (8.9 cm)
(Bottom view)
19" (48.3 cm
)
24" (61 cm) 19.5" (49.5 cm
● IMPORTANT: The PRODIGY has 15 leveling points (place shims at illustrated locations)
Installation Instructions
UPSIDE DOWN VIEW OF SPA
84" (213.4 cm)
Page 38
78" (198 cm)
DOOR SIDE
Page 38
Page 42
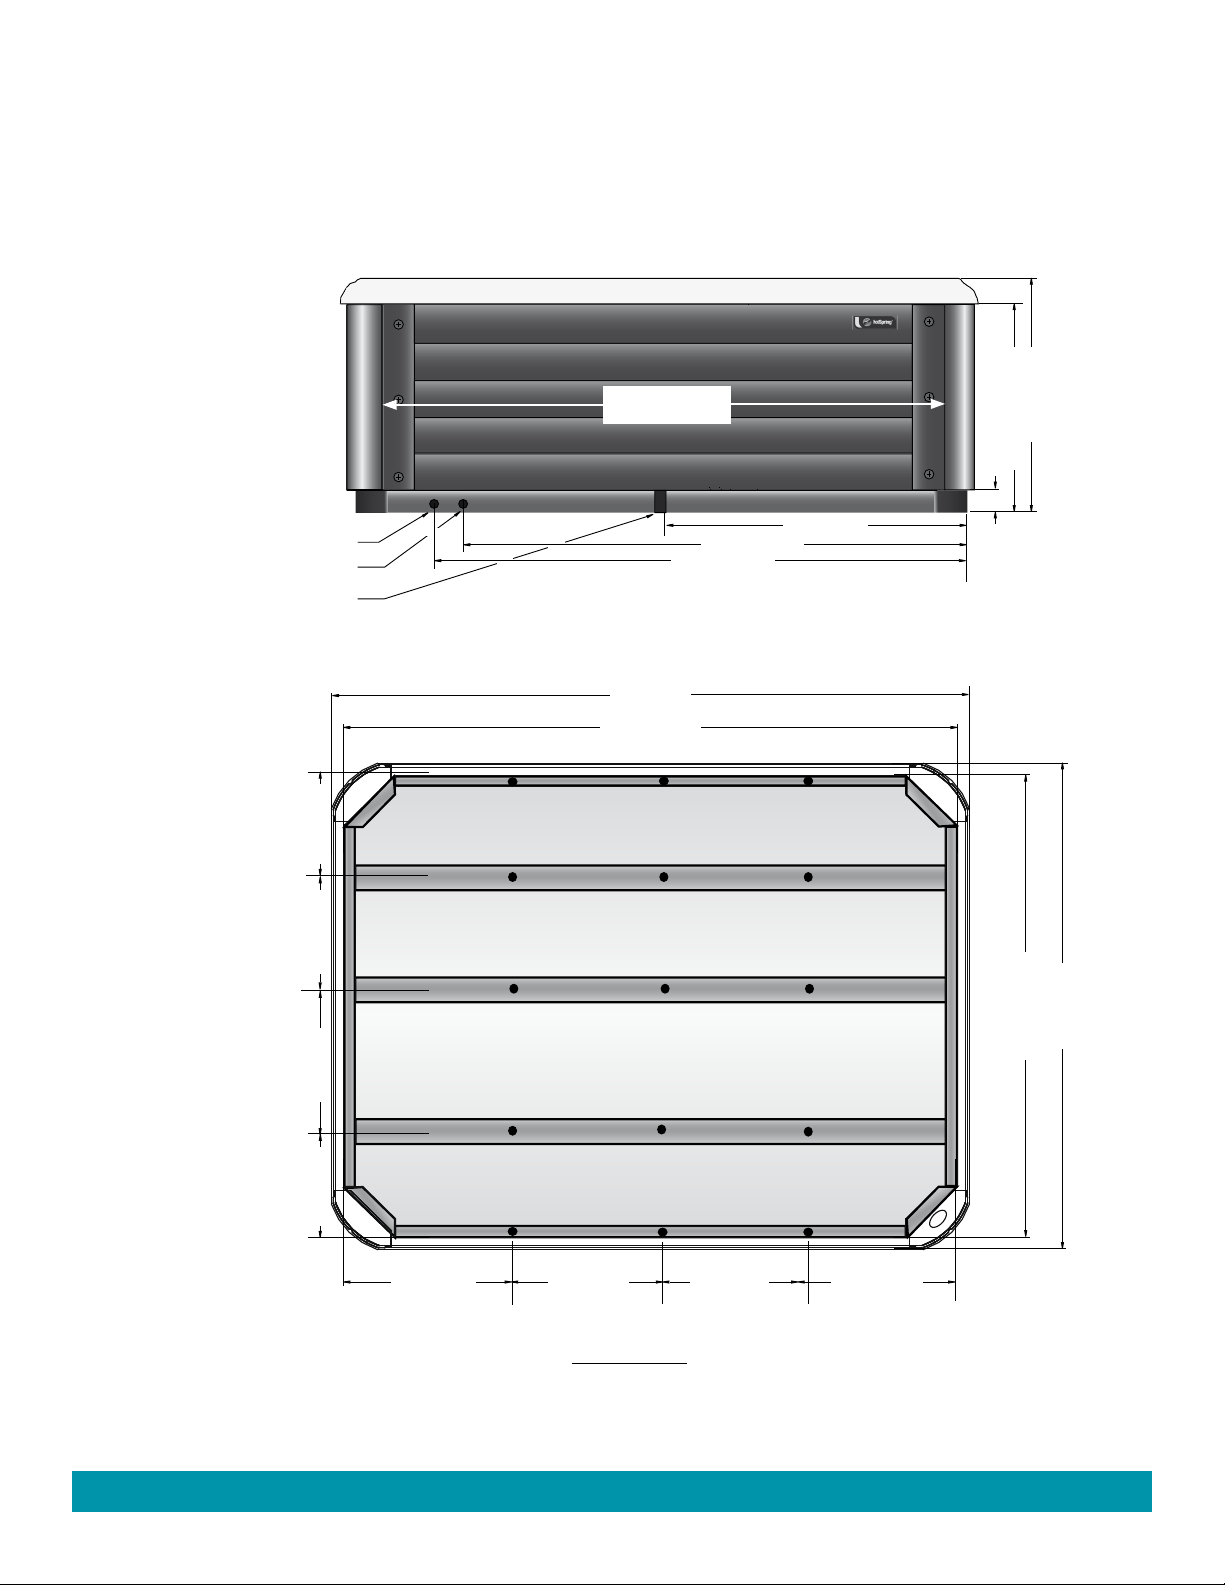
JJE
JETSETTER (MODEL JJE)
Dimensions
NOTE: All dimensions are approximate; measure your spa before making critical design or
pathway decisions.
(Front view)
SECONDARY DRAIN
MAIN DRAIN
1.5” (4 cm) ELECTRICAL CUTOUT
(Location may vary 1/2” (1.3 cm) )
13.5" (34.5 cm)
DOOR
69.25" (176 cm)
66" (167.5 cm)
84" (213 cm)
80" (203 cm)
29" (73.5 cm)
25 " (63.5 cm)
3" (7.5 cm)
42" (106.5 cm)
62" (157.5 cm)
(Bottom view)
Page 39
UPSIDE DOWN VIEW OF SPA
18" (45.5 cm) 15.5" (39.5 cm)
13.5" (34.5 cm)
Page 39
20" (51 cm)20" (51 cm) 20" (51 cm)20" (51 cm)
DOOR SIDE
● IMPORTANT: The JETSETTER has 15 leveling points (place shims at illustrated locations)
Installation Instructions
61" (155 cm)
65" (165 cm)
Page 43

Service Information
GENERAL INFORMATION
Your HOT SPRING spa has been designed to provide years of troublefree use. As with any appliance, problems may occasionally occur
that require the expertise of a qualified service person. Though such
simple repairs as resetting a GFCI switch or breaker, or resetting a
high limit thermostat may not require a service call, they may indicate
that a more serious condition exists. These conditions may require an
experienced service person. Before calling for service, please refer to
the Troubleshooting Guide. Always retain your original sales receipt for
future reference.
GFCI AND HIGH LIMIT THERMOSTAT
If your spa fails to operate at any time, first check the power supply to
the spa.
Check each of the GFCI breakers in the subpanel. If a GFCI has
tripped, reset it. If it will not reset, this may be an indication of a
ground fault (short circuit) within the electrical components. Contact an
Authorized Service Technician for a complete diagnosis.
If upon checking the GFCI’s you find that they have not tripped, check
the house breaker panel and ensure the main breaker for the electrical
circuit supplying the spa has not tripped. If it has, this is an indication
that the circuit was either overloaded or a ground fault exists between
the breaker panel and the spa receptacle or subpanel. Contact a
qualified electrician.
If upon checking the main house breaker and spa GFCI’s you find no
failures, check the high limit thermostat. To check it, simply turn off
power to the spa for 30 seconds. This will automatically reset the high
limit thermostat if it has tripped. If the spa energizes once you turn the
power back on, this indicates reduced water flow through the heating
system. Tripping of the high limit thermostat is normally a result of
one or a combination of these problems. 1) clogged filter cartridge,
2) blockage within the system plumbing, 3) a non-functioning heater
circulation pump, 4) power was not disconnected from the spa before it
was drained, 5) an air lock in the plumbing lines. (The Power Indicator
on the front of the spa’s control panel will also be blinking if the high
limit thermostat circuit has tripped.)
If the spa does not function after tripping and resetting the GFCI’s or
resetting the high limit thermostat, then the problem should be referred
to an Authorized Service Technician. Refer to the Heater section if the
spa operates but does not heat, or refer to the Troubleshooting Guide
for additional service information.
NO-FAULT HEATER AND
INTEGRATED PRESSURE SWITCH
Watkins Wellness unconditionally warrants the NO-FAULT
heater against any failure that would require replacement. This
warranty’s duration is equal to the time period identified in the
Component Warranty. This warranty defines unconditional as warranty
coverage without exception provided that the component has failed to
operate properly within the spa’s system. This means that conditions
that would normally invalidate the limited warranty, such as water
chemistry damage, do not apply to the NO-FAULT heater.
It is important to note that the NO-FAULT heater is protected by both
the heater high limit thermostat circuit and the integrated pressure
switch. The causes of heater high limit tripping are discussed in the
previous section.
If the spa is not heating, the red and green lights are blinking, but
the pump and light are operating, then the pressure switch may be
open. Opening of the pressure switch is normally a result of one or a
combination of these problems:
1. A clogged filter cartridge
2. Blockage within the system plumbing
3. Power was not disconnected to the spa before it was drained
4. An air lock in the plumbing lines
Once the problem has been identified and corrected the pressure
switch will close which will energize the heater.
SILENT FLO 5000 CIRCULATION
PUMP AND CIRCULATION PUMP
THERMAL CUT-OFF
The HOT SPRING SILENT FLO 5000 circulation pump is a dedicated,
water cooled, energy efficient, quiet pump that provides continuous
filtration for the spa. Since the SILENT FLO 5000 pump is water
cooled, it is equipped with a thermal cut-off to prevent the pump from
being damaged by running hot when water is not present.
Reset the circulation pump’s thermal cut-off by disconnecting power to
the spa and allowing the pump to cool.
Tripping of the thermal cut-off is normally the result of one or a
combination of these problems: 1) clogged filter cartridge, 2) blockage
within the system plumbing, 3) power was not disconnected to the spa
before it was drained, or 4) an air lock in the plumbing lines. Once the
problem has been identified and corrected the pump thermal cut-off will
be able to be reset which will allow it to operate normally.
MISCELLANEOUS SERVICE
INFORMATION
The control and high-limit thermostats are equipped with electronic
sensors that are connected to the spa’s plumbing. Never cut or kink
the wires that connect the sensors to the thermostats within the control
box.
The jet pump is equipped with a thermal overload cutoff switch that is
designed to protect the pump from overheating. If the pump shuts itself
off in an older spa, it could indicate failure of the pump motor bearings.
If the pump shuts itself off in a new spa, it is usually the result of one or
a combination of the following factors:
• Thermal overload: Although mass-produced, not all thermal overload
cutoffs are exactly the same. Some are more sensitive than others
and will shut the pump off at lower temperatures.
• High temperature: All HOT SPRING spa models are equipped
with a jet pump shroud that vents the heat generated by the pump
motor to the outside of the equipment compartment, and back into
the spa water. If the vent is blocked by masonry, grass or debris,
overheating of the jet pump may occur. Once the pump motor has
cooled sufficiently and any blockage has been removed from the vent
opening, the jet pump can be restarted.
• Friction: Sometimes the moving parts of a new pump are tight enough
to cause heat build-up due to friction. After a normal break-in period,
the pump will run cooler.
Service Information
Page 40
Page 44

• Improper wiring: If the spa is connected with an extension cord, and/or
the house wiring is undersized, the pump may starve for voltage and
therefore may draw more amperage and generate excessive heat.
• If the pump is shutting down due to excessive heat, make sure the
equipment compartment has adequate ventilation. The air gap at the
bottom must not be blocked. Should your jet pump continue to shut off
after short periods of use, contact a qualified service technician.
ACTS INVALIDATING WARRANTY
The limited warranty is void if the HOT SPRING spa has been
improperly installed, subjected to alteration, misuse, or abuse, or if any
repairs on the spa are attempted by anyone other than an authorized
representative of Watkins Wellness. Alteration shall include any
component or plumbing change, electrical conversion, or the addition
of any non-approved sanitation or water purification device, or heating
system which contributes to component or unit failure or unsafe
operating system. Misuse and abuse shall include: Any operation of
the spa other than in accordance with Watkins Wellness’s printed
instructions, or use of the spa in an application for which it is not
designed. Specifically: Use of the spa in a non-residential application;
damage caused by operation* of the spa outside the specified
voltage requirements (240V ±10%) or operation of the spa at water
temperatures outside the range of 1.7°C (35°F) and 49°C (120 °F);
damage caused by voltage spikes or “brown out” conditions; damage
caused by dirty, clogged or calcified filter cartridges (see Spa Care
and Maintenance instructions in this Owner’s Manual); damage to the
spa surface caused by the use of tri-chloro chlorine, BCDMH, chemical
tablets in a floater, acid, or any other spa sanitizing chemicals or spa
surface cleaners which are not recommended by Watkins Wellness;
damage caused by allowing undissolved spa sanitizing chemicals to
lie on the spa surface (no spa surface material can withstand this kind
of abuse); damage to components (excluding the NO-FAULT-1500
heater) or spa surface caused by improper pH balance or other
improper water chemistry maintenance; and damage to the spa
surfacecaused by leaving the spa uncovered while empty of water and
in direct exposure to sunlight (this may cause solar heating distress) are
considered abuses and may invalidate this warranty.
*Operation of the spa does not mean “use” of the spa! Watkins
Wellness does not recommend using the spa if the water temperature
is above or below the spa’s control panel temperature range.
The filter lid on the spa is not designed to support heavy weight loads
and should not be used as a seat. In extreme cases the lid could crack
and break. This occurrence is considered abuse and is not covered
under this warranty.
Acts of nature, and damage caused by animals, rodents, and insects
are considered abuses and are not covered under this warranty.
DISCLAIMERS
Watkins Wellness shall not be liable for loss of use of the HOT
SPRING spa or other incidental, consequential, special, indirect, or
punitive costs, expenses or damages, which may include but are not
limited to the removal of a permanent deck or other custom fixture or
the necessity for crane removal. Any implied warranty shall have a
duration equal to the duration of the applicable limited warranty stated
above. Some states do not allow limitations on how long an implied
warranty lasts. Under no circumstances shall Watkins Wellness or any
of its representatives be held liable for injury to any person or damage
to any property, however arising.
Some states do not allow the exclusion or limitation of incidental or
consequential damages, so the above limitations may not apply to you.
WATKINS CUSTOMER SERVICE
If you have any questions about any aspect of your HOT SPRING spa
set-up, operation or maintenance that have not been answered by this
manual, consult your HOT SPRING dealer.
Watkins Wellness can be reached at: +1 760 598 6464, Monday
through Friday, 8:00 to 17:00 Pacific Standard Time (PST), or e-mail
[email protected].
TROUBLESHOOTING
Should you experience any problem whatsoever, do not hesitate to
contact your authorized HOT SPRING dealer. On the following page
are some tips to help you to diagnose and rectify some more common
sources of trouble, if you choose to do so.
Page 41
Service Information
Page 45
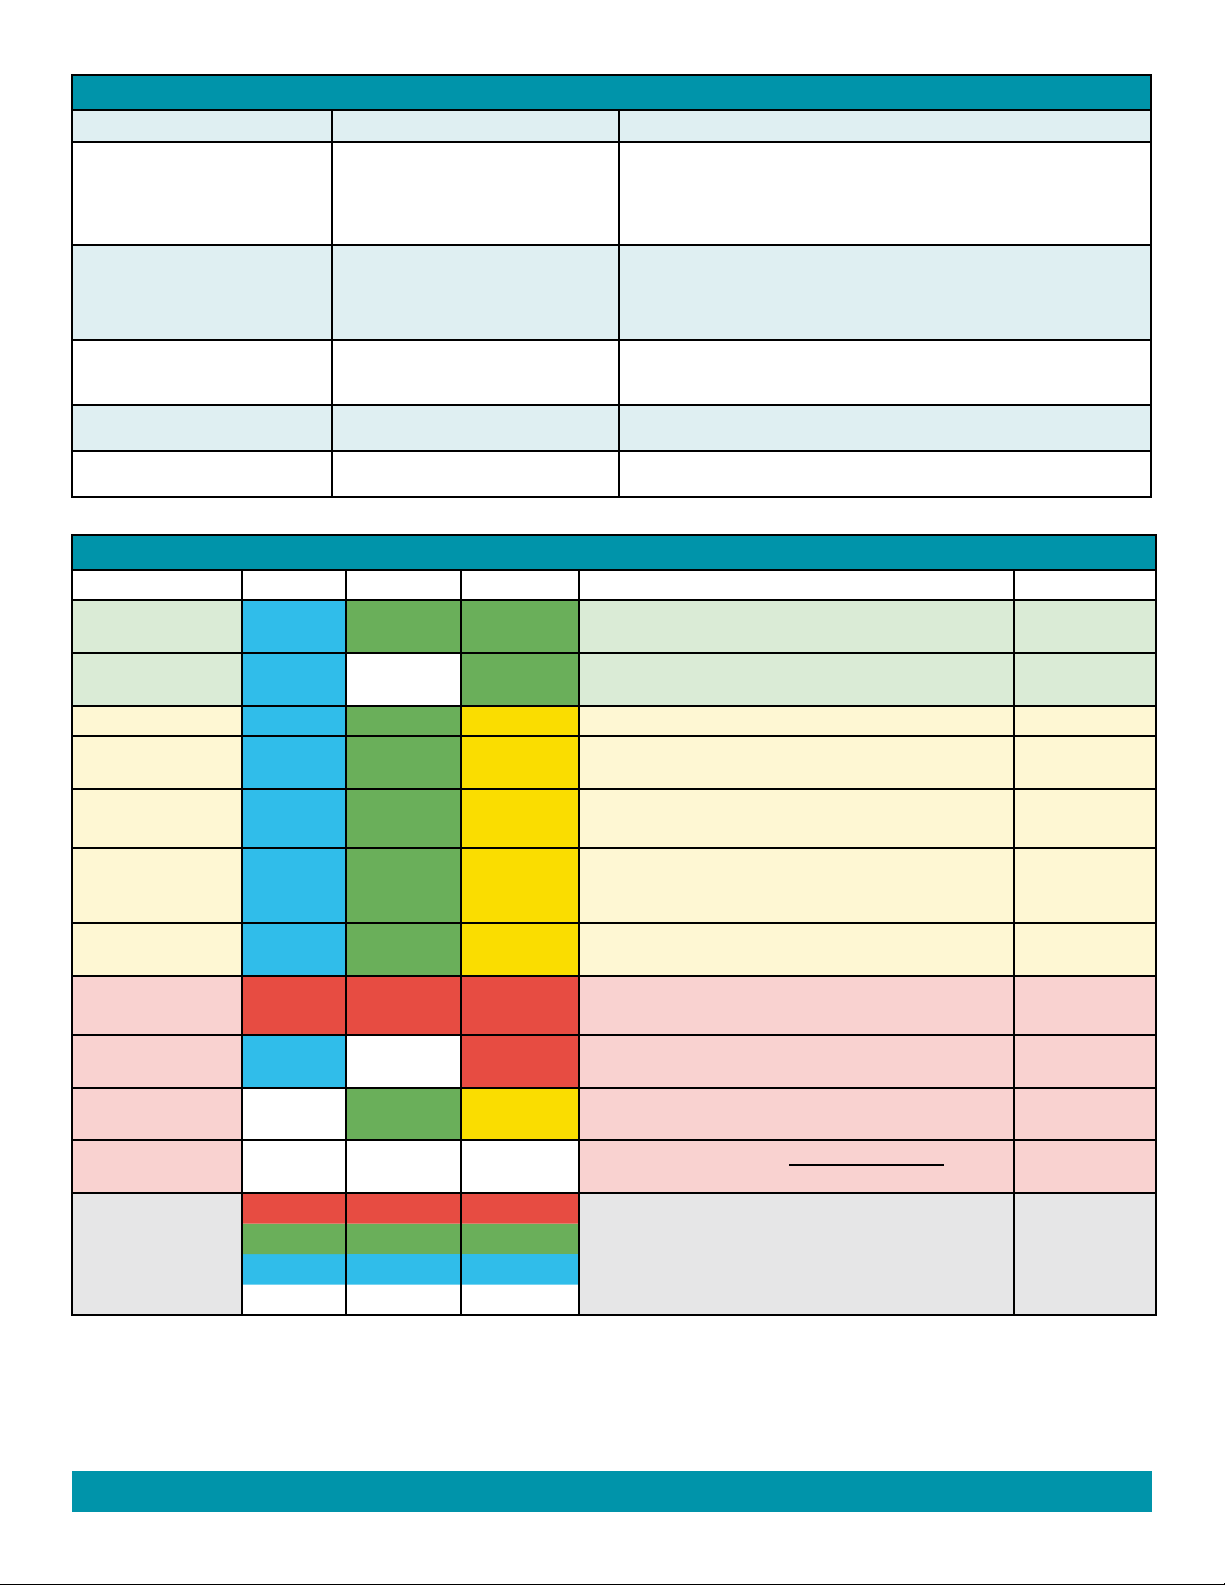
GENERAL OPERATION TROUBLESHOOTING GUIDE
Problem Probable causes Solutions
Entire spa is inoperative
Spa does not heat; jets and light
operate
Jets weak or surging
Light inoperative
MOTO-MASSAGE DX jet inoperative
or erratic
• Power failure
• GFCI tripped
• Heater high-limit thermostat tripped
• Spa lock activated
• Integrated pressure switch open
• Circulation pump thermal cut-off tripped
• Spa water level too low
• Filters clogged
• COMFORT CONTROL lever closed
• Spa lock activated
• Light wiring or assembly is faulty
• COMFORT CONTROL valves closed
• Filters clogged
• Check power source
• Reset GFCI; call for service if it will not reset
• Disconnect power for at least thirty seconds to reset heater high limit. If it will not reset,
check for clogged filters. If tripping continues, call for service.
• Deactivate spa lock
• Check for clogged filters. Integrated pressure switch will reset when the flow of water
through the heater has been restored. Call for service if the heater trips frequently.
• Check for clogged filters or air locks in plumbing. Disconnect power to the spa, allow
circulation pump to cool. Circulation pump thermal cut-off will reset when pump has cooled
and power is reapplied. Call for service if circulation pump thermal cut-off trips frequently.
• Add water
• Clean filters
• Open COMFORT CONTROL lever
• Deactivate spa lock
• Replace light assembly
• Open COMFORT CONTROL levers
• Clean filters
LOGO LIGHT TROUBLESHOOTING GUIDE
ALERT POWER READY STATUS SPA STATE / ACTION LCD Message
Spa is Ready Blue On Green On Green On Temperature within +/- 2 degrees F, Heater Available, ACE
Functioning*
Spa is not Ready Blue On OFF Green On Temperature not within +/- 2, Heater Available, ACE
Functioning*
Check ACE Blue On Green On/Off Yellow On ACE reminders (30days). ACE remains functioning* (On ACE Screen)
ACE Alerts- Offline Blue On Green On/Off Yellow Flash ACE Fault or Offline/Not Functioning (Low/High salt, ACE
System Fault)*
No Flow Fault
Pressure Sw Error
Cool Zone FaultHeat Only
Blue On Green On/Off Yellow
Flash
Blue On Green On/Off Yellow
Flash
Heater off – Control Panel => Check and Clean Filter, =>
Call for Service if necessary
Cool Zone detected, but reporting internal fault. Spa uses
own heater only*
=> Call for Service
Accessories Fault Blue On Green On/Off Yellow
Flash
Protection Mode Red
FLASH
Red
FLASH
Red
FLASH
Accessories power off, fault detected. No ACE, no music, no
lights => Call for Service
High Limit fault, heater relay fault, internal fault detected
(Heater, Jets off, Circulation on) => Call for Service
Control Sensor Fault Blue On OFFff Red FLASH Heater off => Call for Service E5: SENSOR
Heater Power Fault OFF Green On/Off Yellow Flash Heater off- No power detected => Call for Service E6: NO HEATER
Logo Comm Fault White White White
If Logo communication error. Spa status not known! Call for
Service
Red Red Red
Power Up
Green Green Green
Blue Blue Blue
Steps thru Red-Green-Blue-White color sequence at power
up.
White White White
(On ACE screen)
E2: NO FLOWCHECK FILTER
E4:
PERIPHERAL
FAULT
E11-16: COOL
ZONE OFFLINE
(Protection Mode
Screen)
FAULT
PWR
*Status shown only if accessory is installed
Service Information
Page 42
Page 46
SPA WATER MAINTENANCE TROUBLESHOOTING GUIDE
Problem Probable causes Solutions
Cloudy Water
Water Odor
Chlorine Odor
Musty Odor
Organic buildup / scum ring around spa
Algae Growth
Eye Irritation
Skin Irritation / Rash
Stains
Scale
• Dirty filters
• Excessive oils / organic matter
• Improper sanitization
• Suspended particles / organic matter
• Overused or old water
• Excessive organics in water
• Improper sanitization
• Low pH
• Chloramine level too high
• Low pH
• Bacteria or algae growth • Shock spa with sanitizer–if problem is visible or persistent, drain, clean and refill the spa
• Build-up of oils and dirt • Wipe off scum with clean rag – if severe, drain the spa, use a spa surface and tile cleaner to
• High pH
• Low sanitizer level
• Low pH
• Low sanitizer level
• Unsanitary water
• Free chlorine level above 5 ppm
• Total alkalinity and/or pH too low
• High iron or copper in source water
• High calcium content in water – total alkalinity
and pH too high
• Clean filters
• Shock spa with sanitizer
• Add sanitizer
• Adjust pH and/or alkalinity to recommended range
• Run jet pump(s) and clean filters
• Drain and refill the spa
• Shock spa with sanitizer
• Add sanitizer
• Adjust pH to recommended range
• Shock spa with sanitizer
• Adjust pH to recommended range
remove the scum, and refill the spa
• Shock spa with sanitizer and adjust pH
• Shock spa with sanitizer and maintain sanitizer level
• Adjust pH
• Shock spa with sanitizer and maintain sanitizer level
• Shock spa with sanitizer and maintain sanitizer level
• Allow free chlorine level to drop below 5 ppm before spa use
• Adjust total alkalinity and/or pH
• Use a metal deposit inhibitor
• Adjust total alkalinity and pH – if scale requires removal, drain the spa, scrub off the scale,
refill the spa and balance the water
Page 43
Service Information
Page 47

SPA SPECIFICATIONS
Spa Model Footprint
Dimension
GRANDEE
(Model GGE)
Seats 7
2.54m
x
2.31m
Adults
ENVOY
(Model KKE)
Seats 5
2.36m
x
2.31m
Adults
VANGUARD
(Model VVE)
Seats 6
2.21m
x
2.21m
Adults
ARIA
(Model ARE)
Seats 5
2.21m
x
2.21m
Adults
SOVEREIGN
(Model IIE)
Seats 6
2.36m
x
2.03m
Adults
Height Effective
Filter
Heater
(Watts)
Water
Capacity
Dry
Weight
Filled
Weight*
Area
97 cm 30m²** 1,500 1,700 liters 480 kg 2,740 kg
97 cm 30m²** 1,500 1,475 liters 430 kg 2,305 kg
91 cm 30m²** 1,500 1,275 liters 370 kg 2,125 kg
91 cm 30m²** 1,500 1,225 liters 370 kg
84 cm 18m² 1,500 1,200 liters 340 kg 2,020 kg
1,995 kg
Dead
Weight*
560
kg/m²
535
kg/m²
585
kg/m²
550
kg/m²
530
kg/m²
Electrical
Requirements
230 volt, 20 amp
Single phase GFCI
protected circuit
230 volt, 20 amp
Single phase GFCI
protected circuit
230 volt, 20 amp
Single phase GFCI
protected circuit
230 volt, 20 amp
Single phase GFCI
protected circuit
230 volt, 16 amp
Single phase GFCI
protected circuit
1
1
1
1
1
2
2
2
2
2
TRIUMPH
(Model TRHE)
Seats 4
Adults
PRODIGY
(Model HE)
Seats 5
Adults
JETSETTER
(Model JJE)
Seats 3
Adults
2.36m
x
1.88m
2.13m
x
1.98m
2.13m
x
1.65m
84 cm 18m² 1,500 1,275 liters 265 kg 1,860 kg
84 cm 18m² 1,500 1,100 liters 295 kg 1,795 kg
74 cm 18m² 1,500 750 liters 215 kg 1,205 kg
525
kg/m²
550
kg/m²
440
kg/m²
230 volt, 16 amp
Single phase GFCI
protected circuit
230 volt, 16 amp
Single phase GFCI
protected circuit
230 volt, 16 amp
Single phase GFCI
protected circuit
1
2
1
2
1
2
WARNING: Watkins Wellness suggests a structural engineer or contractor be consulted before the spa is placed on an elevated deck.
1 The current rating (Amps) may vary, depending on the country. Contact your HOT SPRING dealer for specific information regarding your spa model.
2 The GFCI may also be referred to as an ELCB (Earth Leakage Circuit Breaker) or as an RCD (Residual Current Device).
Page 44
* NOTE: The “Filled Weight” and “Dead Weight” of the spa includes the weight of the occupants (assuming an average occupant weight of 80 kg [175 lbs]).
** Effective filter area is based on 0.6 m² actual area per filter (5 filters used) with 10 times effectivity rating.
Service Information
Page 44
Page 48
This manual contains installation, operating, maintenance and service information for
the following 2018 HOT SPRING spa models:
MODELS EFFECTIVE DATE
GRANDEE (MODEL GGE) 12/17
ENVOY (MODEL KKE) 12/17
VANGUARD (MODEL V VE) 12/17
ARIA (MODEL ARE) 12/17
SOVEREIGN (MODEL IIE) 12/17
TRIUMPH (MODEL TRHE) 12/17
PRODIGY (MODEL HE) 12/17
JETSETTER (MODEL JJE) 12/17
©
2017 Watkins Wellness All Rights Reserved. Hot Spring, Highlife and ACE are trademarks of Watkins
Wellness, registered in the U.S., Canada, CTM and other countries. BaquaSpa is a trademark of
Arch UK Biocides Limited. iCast is a trademark of Soundcast, iPod is a trademark of Apple,Inc.
Vista, California USA
303758.18 A (12/17)
 Loading...