

Page 1
Manual
V01 | 05-2020 | Article number 12845 rev. 9
www.hotspot-titanium.co.uk
Page 2

(dd-mm-yyyy)
Purchase date: - -
Installation date: - -
Serial no:
First filter change: - -
Second filter change: - -
Third filter change: - -
Fourth filter change: - -
Fifth filter change: - -
HotSpot Titanium UK
90 Rockingham Street
Sheeld, S1 4EB
+44 (0)20 3192 1428
Page 3

Table of contents
1 Introduction 4
1.1 Application 5
1.2 Warranty 5
1.3 Liability 6
2 Operation of the HotSpot Titanium 7
2.1 Hot-mix functionality 8 litre base unit 7
2.2 IntelliProtect products 7
(electronic taps and heaters)
2.3 Spring-back-safety products 9
(mechanical taps and heaters)
3 Maintenance 10
3.1 Cleaning 10
3.2 Filter replacements 10
4 Technical specifications 11
5 Troubleshooting 13
5.1 Error messages (IntelliProtect systems) 13
5.2 Error messages (Spring-back-safety systems) 13
5.3 Malfunction table 14
6 Installation 15
6.1 IntelliProtect system parts 17
6.2 Spring-back-safety system parts 19
6.3 Installation steps 21
Page 4

1 Introduction
Congratulations on your purchase of the HotSpot
Titanium system you have bought a safe and reliable
quality product. The HotSpot Titanium boiling water
tapoperates in combination with your HotSpot
Titanium 4 or 8 litre base unit. The system provides you
with boiling water as well as hot and cold tap water like
every kitchen mixer tap. The taps of HotSpot Titanium
will always ensure safety for you and the people using
the tap.
This manual is intended as a reference for the end-user
and the installation technician. Using this manual, the
HotSpot Titanium 3-in-1 tap can be installed safely.
Store this manual carefully, you may need to use it in
the future. HotSpot Titanium has prepared this manual
with care. However, no rights may be derived from it.
Inconnection with continuous product innovation,
HotSpot Titanium reserves the right to change the
specifications at all times and without prior notice.
Thesecond part of this manual is intended for the
fitteronly. Carefully read the part of the guide that is
intended for you.
4 HotSpot Titanium Manual
Page 5

1.1 Application
The heater
The water heater is suitable for storage and heating of
drinking water under pressure. The water heater, fitted
with overpressure protection, should be connected to a
water mains with a water pressure that does not exceed
600 kPa (6 bar), otherwise, a pressure reducing valve
must be used. Any other use is not in accordance with
the intended purpose.
The tap
The tap should be connected to a HotSpot Titanium
base unit and may only be used in combination with a
HotSpot Titanium base unit. Any other usage is not in
accordance with the designated use.
1.2 Warranty
The HotSpot Titanium system has been manufactured
with the greatest care. HotSpot Titanium guarantees the
repair of all material and/or structural defects free of
charge within the warranty period.
Warranty period
• 2-year* warranty on the water heater, tap and
including accessories, without registration;
• 5-year* warranty on the products after registering the
product on the website;
• 20-years* leakage warranty for the registered owner
on corrosion of the titanium tank.
* starting from the date on the invoice
Warranty registration
Register your product online on our website within
3months after purchase to make use of the extended
warranty oer. The purchase invoice indicating the date
of purchase and products must be submitted.
Warranty claim
• In the event of a warranty claim, please provide the
model and the serial number of the water heater
located on the label on the rear of the base unit.
• You can request service via our website.
• The invoice together with the date of purchase must
be submitted for a service request.
Warranty conditions
• Boiling water filter requires replacement prior to
reaching its capacity or annually, whichever comes
first. Filter capacity can be found within the filter
manual.
5www.hotspot-titanium.co.uk
Page 6

• There are material and structural defects (to be
assessed by the manufacturer);
• The system is installed, used and maintained in
accordance with the supplied installation and
operating guide;
• The system has not undergone any structural
changes or adjustments;
• The defect is not the result of boiling dry, too hard or
too aggressive drinking water, aggressive liquids or
substances, damp or gasses and interior or exterior
corrosion or scaling;
• The defect is not the result of the owner’s own fault,
neglect or improper use.
Warranty exclusion
• General wear and tear of the product
• Transport damage
• Secondary damage, such as fire damage, loss of
profits, water damage or physical injury
• Failure to protect your HotSpot Titanium system
against limescale
1.3 Liability
HotSpot Titanium accepts no liability for damage or
bodily injury of any kind resulting from:
• Failure to follow the instructions in this manual;
• Carelessness during installation, use, maintenance
and repair of the system;
• Use not in accordance with the application;
• The use of components not supplied by the
manufacturer;
• Consequential damage due to leakage.
6 HotSpot Titanium Manual
Page 7

2 Operation of the HotSpot Titanium
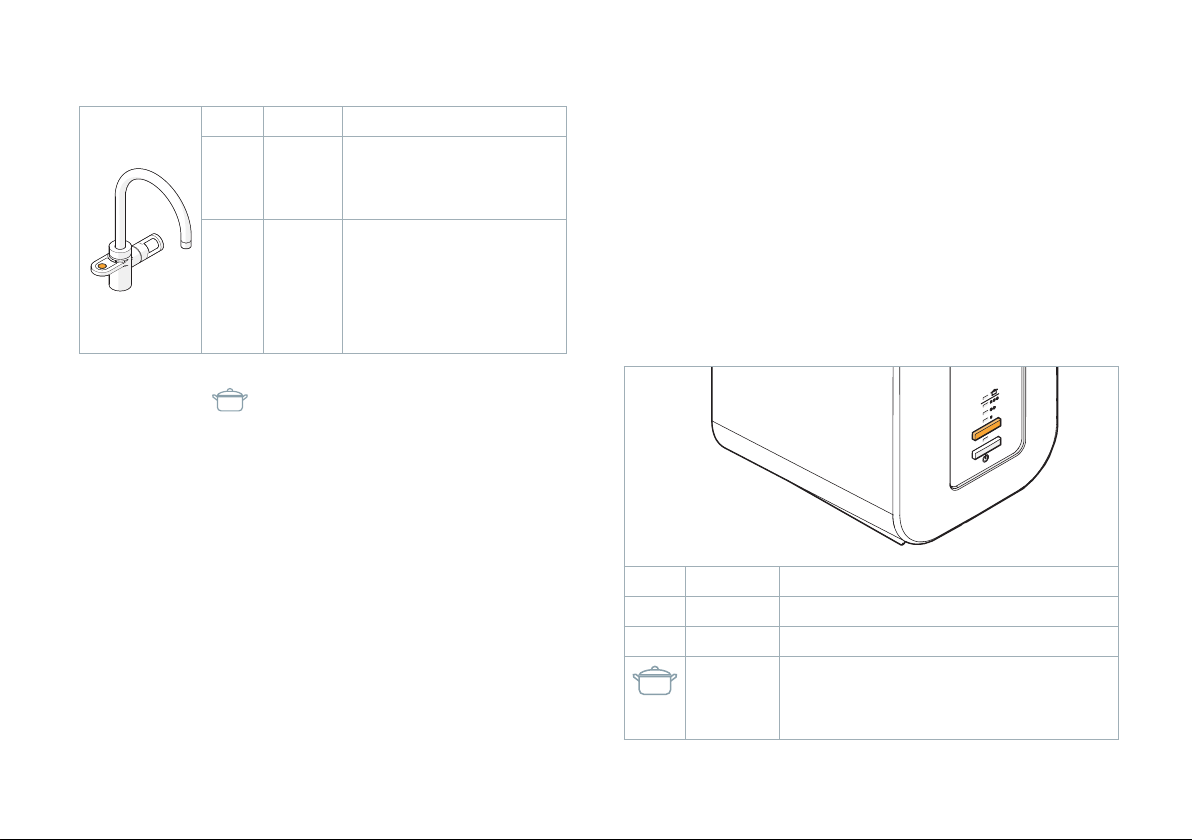
2.1 Hot-mix functionality 8 litre base unit
The 8 litre base unit can be the source of your hot
water. The 8 litre base unit is mixing the incoming
ambient water with the stored boiling water. The
temperature of the hot water can be controlled
between 35-70°C. The temperature can be set by
turning the knob at the top of the base unit, as shown
below. Turn the knob clockwise to reduce the
temperature and counter clockwise to increase the
temperature. You can find the connection scheme in
the installation instructions of this manual.
HotSpot Titanium oers two type of systems,
please look at the paragraph applicable for your
product. All our base units have an on/o button
which requires to be pressed for 2 seconds to turn
the base unit on or o.
2.2 IntelliProtect products
(electronic taps and heaters)
2.2.1 The IntelliProtect tap
Hotspot Titanium has 3 IntelliProtect safety levels on
the IntelliProtect tap. The default setting is IntelliProtect
level 2, without volume-filling functionality.
To use your tap for the first time:
Press (0.5 sec), release (0.5 sec) and press and hold. The
water will flow. Release when you have enough filtered
boiling water.
7www.hotspot-titanium.co.uk
Page 8
Using the tap with dierent IntelliProtect levels:
o Level 1 Press and hold
o o Level 2 Press (0.5 sec),
release (0.5 sec)
andpress and hold
o o o Level 3 Press (0.5 sec),
release (0.5 sec),
press (0.5 sec),
release (0.5 sec)
andpress and hold
Volume-filling (when switched on):
With this functionality you can easily get larger amounts
of boiling water. Use the level instruction as described
above and hold for 10 seconds until the red light beside
the press pad ceases to flash and stays red, press again
to stop.
2.2.2 The IntelliProtect base unit
How to adjust the IntelliProtect® settings on your heater:
The IntelliProtect® safety level can be set on the heater
to prevent accidental activation of the tap.
The default IntelliProtect® safety setting is level 2.
Changing the settings
On your heater you will find the IntelliProtect® control
button. Use the button to change and scroll through the
three IntelliProtect levels and volume-filling function.
The level of which the LED’s are on is selected.
Temperature indication light:
When the boiling water button is being used the light
will flash every second to indicate that the boiling water
is at its required temperature. If the light is flashing
quicker this means that the water within the heater is
heating up and not at boiling temperature yet.
8 HotSpot Titanium Manual
o Level 1 Press the tap button once
o o Level 2 Press the tap button twice
o o o Level 3 Press the tap button three times
Volumefilling
convenient when you regularly
require larger amounts of boiling
water
Page 9
The volume-filling functionality can be put on and o
by scrolling through the complete menu once. E.g. if
you are using the default setting of level 2 you need to
press three times to come to level 2 again, this three
times pressing will either put on or put o the volumefilling mode.
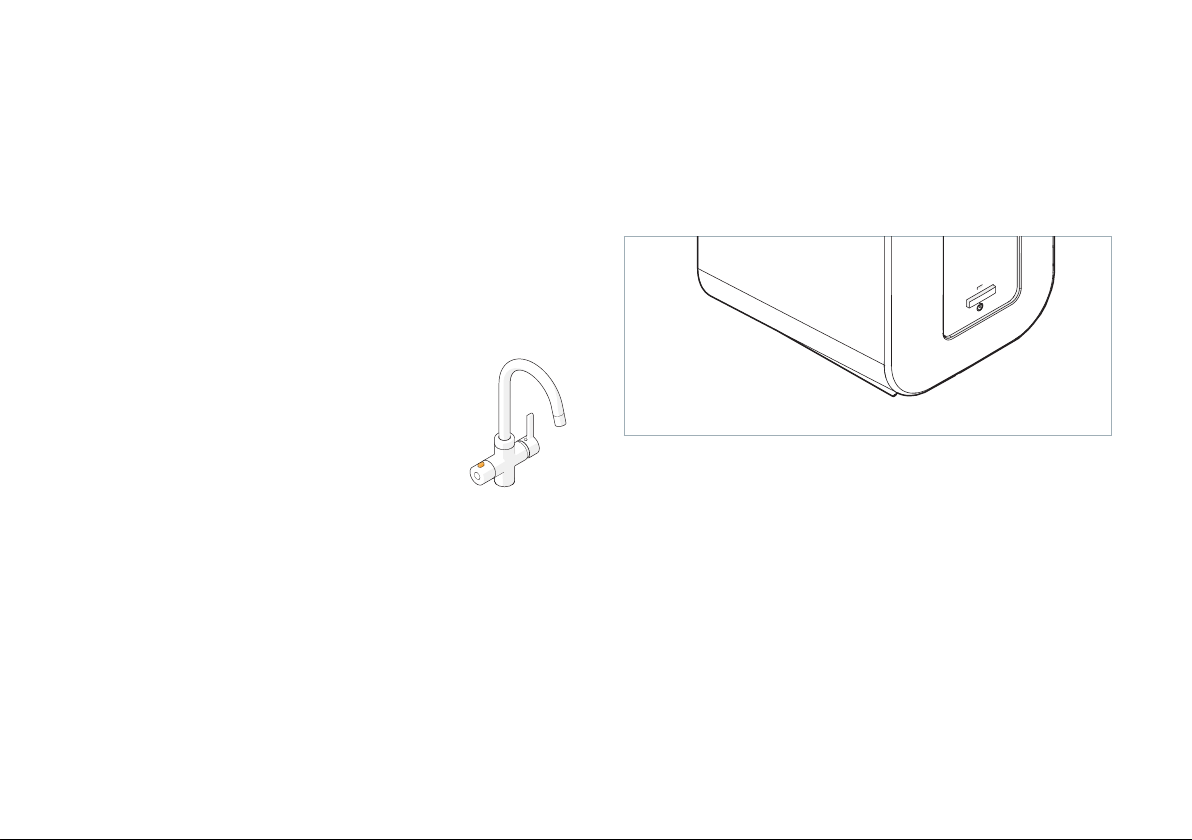
2.3 Spring-back-safety products (mechanical taps
and heaters)
2.3.1 The Spring-back-safety tap
The HotSpot Titanium Spring-back-safety
taps use a mechanical safety feature. By
pressing the button on the left part of the
tap and turning the knob backwards you can
activate the flow of boiling water. By turning
the knob further backwards you can control
the amount of boiling water flowing out of the tap.
When you release the knob it will automatically turn o
the boiling water.
2.3.2 The Spring-back-safety base unit
On our Spring-back-safety base units there is an on/o
button. On this type of base unit there is no option to
change the safety levels or use a volume-filling mode.
This contrary to with our IntelliProtect products.
9www.hotspot-titanium.co.uk
Page 10

3 Maintenance
When installing the HotSpot Titanium water heater, be
sure to check the quality of your water. The usage of a
boiling water filter is mandatory. For more information
about the water filters we refer you to our website or
the water filter manuals.
3.1 Cleaning
• Both the water heater housing and the tap body can
easily be cleaned with a soft cloth. Do not use
aggressive or abrasive detergents.
• We recommend to clean the aerator of the tap
periodically, this is located in the end of the spout of
the tap. Replacement parts of the aerator are
available at HotSpot Titanium.
3.2 Filter replacements
The cartridge of your boiling water filter should be
changed periodically. This is either:
• When the water filter cartridge has reached its
capacity. For more information about the capacity we
refer you to our filter manuals.
• When the water filter cartridge is installed for one
year, this is required due to hygienic reasons and
bacteria build-up.
The boiling water filter requires to be changed in
accordance with the above to keep the warranty
conditions available to your system.
10 HotSpot Titanium Manual
Page 11

4 Technical specifications
General information
Ambient temperature 4 – 38 °C
Operating humidity range 25 – 85% relative humidity (RH)
Maximum operating altitude 2000 m
Protection rating IPX4
Electrical information
Connection 13amp group earthed wall socket
Power supply 220-240 V ~ 50 Hz
Max. capacity 2100 Watt
Technical specifications
4 litre base unit 8 litre base unit
Dimensions 210 mm × 325 mm × 285 mm 210 mm × 525 mm × 285 mm
Weight when empty 4.5 kg 5.7 kg
Weight when full 8.5 kg 13.7 kg
Drinking water connection Cold water -
Standby-power use (in OFF status) 16 Watt 25 Watt
The boiler cannot be connected to the hot water supply (hot-fill connection is not possible)
11www.hotspot-titanium.co.uk
Page 12

Use information
4 litre base unit 8 litre base unit
Capacity of the boiler 4 litre 8 litre
Quantity of hot water @ 50 degrees - 15 litre
Maximum water supply pressure 5.5 bar 5.5 bar
Flow rate of the boiling water at 3.0 bar pressure 2 l/min 2 l/min
Safe pressure 8 bar 8 bar
Heating time from 10°C to 100°C 15 min 21 min
Temperature of mixed water (°C) - 35-70°C
12 HotSpot Titanium Manual
Page 13

5 Troubleshooting
The HotSpot Titanium boiling water system is a quality product developed on the basis of many years of experience,
and it is made of first-class materials. In the unlikely event of a malfunction, you can rectify it by using the table below.
If the action described does not have the required eect, pull the plug out of the wall socket and inform HotSpot
Titanium about this. First, note the product name, model number and the serial number of your HotSpot Titanium base
unit. You can find this information on the back of the base unit.
5.1 Error messages (IntelliProtect systems)
LEDs flashing Error message
o o o o o o
✗ ✗
✗ ✗
✗ ✗
✗ ✗ ✗
✗ ✗ ✗
✗ ✗ ✗
5.2 Error messages (Spring-back-safety systems)
For spring-back-safety systems there are no fault codes available.
Dry-boiling protection is activated
Tap button is malfunctioning
Electronic wire of the IntelliProtect tap is not
connected to the base unit
Tap button is malfunctioning
Lower temperature sensor is defective
Upper temperature sensor is defective
13www.hotspot-titanium.co.uk
Page 14

5.3 Malfunction table
Malfunction Explanation Solution
Not enough
water
Water heater is
leaking
No boiling water The IntelliProtect tap hose is not
Sputtering,
irregular flow
Waterpressure is too low Check another tap. If the pressure is too low, check the
mains stopcock and contact the water company
Shuto valve is not properly open Open the shuto valve
Calcification of the spout Clean/replace the aerator
Kinked hoses Bend back the hose(s) and possibly retighten the swivel to
prevent the hose developing another kink
Leaky hose coupling or leaky inner
tank
connected
Break in the cable of the tap Contact HotSpot Titanium or the fitter of your product
Valve defective Contact HotSpot Titanium or the fitter of your product
Water heater has not yet reached
the correct temperature
Sensor defect Contact HotSpot Titanium or the fitter of your product
The combination valve tap is
closed
Calcification of the spout Clean/replace the aerator
Contact HotSpot Titanium or the fitter of your product
Connect the IntelliProtect hose according to step. in the
installation instructions
Wait approx. 15 minutes after switching on
Fully open the combination valve tap (turn anti-clockwise)
14 HotSpot Titanium Manual
Page 15

6 Installation
Before getting started
In this part of the manual we will give you the
instructions for the installation of the HotSpot
Titanium products. Firstly we will show an overview
of the products components that you should have
in possession. Secondly we will explain how to
install the appliance step by step.
During the installation steps where the IntelliProtect
products are dierent compared to the Springback-safety products we will show you the
dierences. If there is no dierence we will only
show one drawing.
We use colors to indicate the dierent water hoses and
their application. We use blue for cold water, orange for
warm water and red for boiling water.
= Boiling
= Hot
= Cold
15www.hotspot-titanium.co.uk
Page 16

6.1 IntelliProtect system parts
9
10
11
Optional accessory
12
13
26
27
28
29
30
31
2
2x
3
1
2x
14
15
16
17
18
19
2x
2x
2x
4
5
6
7
2x
8
21
22
23
24
25
3x
3x
3x
36
37
33
34
20
16 HotSpot Titanium Manual
32
35
Page 17

1 IntelliProtect tap
20 Relief valve disharge hose
2 Metal tap base ring
3 Threaded bar
4 Rubber Horseshoe Clamp
5 Metal horseshoe clamp
6 Nut
7 Rubber base ring
8 Water filter cartridge
9 Water filter head
10 Water filter bracket
11 Angled flexi hose 3/8” – 3/8”
12 Flow meter
13 Washer
14 3/8" Washer
15 1/2"FI × 3/8"MI adaptor
16 1/2" Washer
17 Flat face insert adaptor 1/2"
18 Flexi Hose 3/8”MI × 3/8"FI
19 Flexi Hose 1/2”FI × 3/8”FI
21 3/8" tee F×M×M
22 Waste tee compression nut 40 mm
23 Waste tee compression ring 40 mm
24 Waste tee compression rubber 40 mm
25 Waste tee 40 mm
26 Condensate adaptor compression nut
27 Condensate adaptor compression rubber
28 40 mm Waste condensate adaptor
29 Zip-tie
30 Combination valve bracket
31 Combination valve
32 Zip-tie
33 Tundish
34 Tundish hose adaptor
35 Flat face insert adaptor 1/2"
36 IntelliProtect base unit
(electrical heater 4 or 8 litre)
37 Connector clip boiling water hose
17www.hotspot-titanium.co.uk
Page 18

6.2 Spring-back-safety system parts
1
* for worktops < 5 mm
14
15
16
17
18
19
2x
2x
2x
36
33
34
9
10
11
Optional accessory
12
13
26
27
28
29
30
31
2
3
4
5
6
*
7
2x
8
21
22
23
24
25
3x
3x
3x
20
18 HotSpot Titanium Manual
32
35
Page 19

1 Spring-back-safety tap
20 Relief valve disharge hose
2 Metal tap base ring
3 Undercounter securing rubber
4 Undercounter ring
5 Locking nut
6 Rubber base ring
7 Stability bracket
8 Water filter cartridge
9 Water filter head
10 Water filter bracket
11 Angled flexi hose 3/8” – 3/8”
12 Flow meter
13 Washer
14 3/8" Washer
15 1/2"FI × 3/8"MI adaptor
16 1/2" Washer
17 Flat face insert adaptor 1/2"
18 Flexi Hose 3/8”MI × 3/8"FI
21 3/8" tee F×M×M
22 Waste tee compression nut 40 mm
23 Waste tee compression ring 40 mm
24 Waste tee compression rubber 40 mm
25 Waste tee 40 mm
26 Condensate adaptor compression nut
27 Condensate adaptor compression rubber
28 40 mm Waste condensate adaptor
29 Zip-tie
30 Combination valve bracket
31 Combination valve
32 Zip-tie
33 Tundish
34 Tundish hose adaptor
35 Flat face insert adaptor 1/2"
36 Spring-back-safety base unit
(mechanical heater 4 or 8 litre)
19 Flexi Hose 1/2”FI × 3/8”FI
19www.hotspot-titanium.co.uk
Page 20

6.3 Installation steps
Ø 15 mm
Ø 40 mm
Ø 35 mm
min. 50 mm
70 mm
40 mm
Check if your cupboard interior meets all the
requirements for a successfull installation of the
Hotspot Titanium boiling water appliance. Please
check the following topics: 1) space, 2) electricity,
3) water supply and 4) drainage.
Cut a 40 mm wide hole in the drain pipe at 70 mm
above the cupboard floor.
20 HotSpot Titanium Manual
Page 21

Flush some water through the water supply
pipesto clear out any dirt.
Close o the main water supply.
21www.hotspot-titanium.co.uk
Page 22

Mount the Hotspot Titanium boiling water tap.
IntelliProtect tap Spring-back-safety tap
1 1
3
2
or or
7
2
6
4
5
6
22 HotSpot Titanium Manual
7
3
4
5
Page 23

Connect the tap to the cold water supply using the T-piece and optionally use the extension hose.
18
= Boiling
= Hot
= Cold
21
14
15
16
17
23www.hotspot-titanium.co.uk
Page 24

Connect the water filter to the spare branch on the T-piece on the mains water using the right angled flexible
>65 mm
hose.
Note! If the water filter is being mounted to the wall please leave at least 50 mm free space between the water
filter cartridge and the cabinet floor to ensure easy replacement of the cartridge.
Note! For all detailed information about the water filter, please look at the separate water filter manual
10
= Boiling
= Hot
= Cold
>65 mm
24 HotSpot Titanium Manual
9
11
8
Page 25

Optional: Connect the flowmeter to the filter.
= Boiling
= Hot
= Cold
12
13
25www.hotspot-titanium.co.uk
Page 26

Connect the overflow tundish to the combination valve. Fit the tundish straight in to the combination valve with
the thread.
Note! Do not loosen once tightened.
Note! Apply PTFE tape on the thread ends of both part 33 and 34. Those parts are highlighted with a circle.
= Boiling
26
= Hot
= Cold
31
33
34
Page 27

Connect the combination valve to the filter or flowmeter if installed.
Mount the combination valve bracket to the cabinet wall and secure the combination valve to the bracket with a
Zip-tie.
Note! The combination valve should be mounted inthecabinet as high as possible to ensure correct functionality.
32
= Boiling
= Hot
= Cold
30
19
>80 mm
27www.hotspot-titanium.co.uk
Page 28

Connect the overflow hose to the tundish and the existing drainage,
||| ||| ||||| |||||||| ||||| |||||||| ||||| |
|
|
|
|
|
|
|
|
|
|
|
|
|
|
|
|
|
|
||| ||| |
|
|
|
|
|
|
|
|
|
|
|
|
|
||| ||| ||||| || | ||||| ||||| ||| ||||| ||||| ||| ||||
>70 mm
ensuring you create a u bend trap in the hose to ensure waste smells are contained.
= Boiling
= Hot
= Cold
28 HotSpot Titanium Manual
||||| ||||| ||||| ||||| | ||||| ||||| ||||| ||
|
|
|
|
|
|
|
|
|
|
||||| ||||| ||||| ||||| | ||||| ||||| ||||| ||||| |||
|
|
|
|
|
|
|
|
|
|
|
|
|
>70 mm
||||| ||
|
|
|
|
|
|
|
|
20 22 23 26 27 2824
29
22
23
24
25
24
23
22
Page 29

Connect the cold water supply hose of the base unit to the combination valve.
= Boiling
= Hot
||||| ||||| ||||| ||||| ||||| ||||| | ||||| ||||| ||||| ||||
||||| ||||| ||||| |||||| ||||| ||||| ||||| ||||| ||||| ||||| ||||| ||||| |
|
|
|
|
|
|
|
|
|
|
|
|
|
|
||||| ||
|
|
|
|
|
|
|
|
|
|
|
|
|
|
|
|
|
|
= Cold
36
29www.hotspot-titanium.co.uk
Page 30

Connect the warm water hose from the tap to the base unit (8L only) or to the existing hot water supply in the
cabinet.
Optionally you can use an extension hose supplied.
= Boiling
= Hot
= Cold
30 HotSpot Titanium Manual
||||| ||||| ||||| ||||| ||||| ||||| | ||||| ||||| ||||| ||||
||||| ||||| ||||| |||||| ||||| ||||| ||||| ||||| ||||| ||||| ||||| ||||| |
|
|
|
|
|
|
|
|
|
|
|
|
|
|
||||| ||
|
|
|
|
|
|
|
|
|
|
|
|
|
|
|
|
|
|
8L base unit as
hot water supply
Existing
hot water supply
or
15
16
17
Page 31

Connect the boiling water hose from the tap to the base unit.
If you have the IntelliProtect base unit, connect the electronic cable from the tap to the base unit.
IntelliProtect base unit Spring-back-safety
= Boiling
= Hot
= Cold
base unit
||||| ||||| ||||| ||||| ||||| ||||| | ||||| ||||| ||||| ||||
||||| ||||| ||||| |||||| ||||| ||||| ||||| ||||| ||||| ||||| ||||| ||||| |
|
|
|
|
|
|
|
|
|
|
|
|
|
|
||||| ||
|
|
|
|
|
|
|
|
|
|
|
|
|
|
|
|
|
|
37
or
31www.hotspot-titanium.co.uk
Page 32

Open the main water supply and isolation valves and check all connections for any leaks while the
base unit fills up with water.
Note! In case of a leak, close the main water supply and inspect and fix the leaking connection.
Once you have ensured all connections are watertight, connect the base unit to the power supply.
Immediately after powering the unit, dispense boiling water to vent the air from within the base unit.
Dothis until water runs smoothly. Now the base unit can start heating up.
= Boiling
= Hot
= Cold
||||| ||||| ||||| ||||| ||||| ||||| | ||||| ||||| ||||| ||||
32 HotSpot Titanium Manual
||||| ||||| ||||| |||||| ||||| ||||| ||||| ||||| ||||| ||||| ||||| ||||| |
|
|
|
|
|
|
|
|
|
|
|
|
|
|
||||| ||
|
|
|
|
|
|
|
|
|
|
|
|
|
|
|
|
|
|
Page 33

Notes
Page 34

Page 35

Page 36

www.hotspot-titanium.co.uk
 Loading...