

Hot Spot Tempo, Relay, TX, Rhythm, SX Owner's Manual

Watkins Manufacturing Corporation congratulates you on your decision to enjoy the
finest spa available... Welcome to the growing family of HOT SPOT spa owners.
Before you begin reviewing the manual, please take a moment to register your warranty. Doing so will assist us in contacting you for any
important product notification.
Prior to registering, you will need the serial number that is located within the equipment compartment of your HOT SPOT spa.
To register please go to http:/www.hotspring.com/owners/product-registration or simply scan the QR code below:
FOR YOUR RECORDS
Spa Model/Serial Number:
Date Purchased:
Dealer:
Address:
Cover Serial Number:
Accessory Serial Number:
If you have any questions about any aspect of your spa's set-up, operation or maintenance, contact your authorized HOT SPRING
dealership. They are trained professionals who are familiar with the product as well as new spa ownership concerns. Their expertise will
facilitate the enjoyment of your new HOT SPOT spa.
IMPORTANT: Watkins Manufacturing Corporation reserves the right to change specifications, or design, without notification and without
incurring any obligation.
In most cities and counties, permits will be required for the installation of electrical circuits or the construction of exterior
surfaces (decks and gazebos). In addition, some communities have adopted residential barrier codes which may require
fencing and/or self-closing gates on the property to prevent unsupervised access to a pool (or spa) by children under 5 years
Important!
of age. Your HOT SPOT spa is equipped with a locking cover that meets the ASTM F1346-91 Standard for Safety Covers
and as a result, is usually exempt from most barrier requirements. As a general practice, your local Building Department will
inform you of any applicable barrier requirements at the time a permit is obtained for the installation of an electrical circuit.
Your HOT SPRING dealer can provide information on which permits may be required.

TABLE OF CONTENTS
TABLE OF CONTENTS
SAFETY INFORMATION
IMPORTANT SAFETY INSTRUCTIONS .............................. 1
IMPORTANT
SPA INSTRUCTIONS ............................................................. 3
GETTING STARTED
SPA FEATURES TEMPO RELAY & RHYTHM MODELS ... 4
SPA FEATURES SX & TX MODELS .....................................5
QUICK START-UP INSTRUCTIONS .................................... 6
START-UP ............................................................................... 7
PRIMING THE PUMP(S) ........................................................ 8
WATER QUALITY AND MAINTENANCE
BASIC INFORMATION ........................................................... 9
HOW TO ADD CHEMICALS
TO THE WATER...................................................................... 9
FUNDAMENTALS OF
WATER MAINTENANCE ..................................................... 10
THE HOT SPOT SPA WATER
MAINTENANCE PROGRAM ............................................... 11
VACATION WATER CARE INSTRUCTIONS ..................... 12
WATER TERMINOLOGY ..................................................... 13
OPERATING INSTRUCTIONS
SPA CONTROL PANEL ........................................................ 14
SYSTEM MODE ................................................................... 14
CLEANING MODE ................................................................ 14
TOOLS MENU .......................................................................15
AUDIO MENU (OPTIONAL).................................................16
JET MENU
TEMPO ® (MODEL TEM) ..................................................... 19
®
RELAY
RHYTHM ® (MODEL RHY) ................................................... 21
(MODEL REL) ...................................................... 20
SPA CARE AND MAINTENANCE
DRAIN & REFILL INSTRUCTIONS ..................................... 24
PREVENTION OF FREEZING ............................................ 24
FILTER SYSTEM .................................................................. 25
FILTER CARTRIDGES
REMOVAL & CLEANING .....................................................25
CARE OF THE SPA PILLOWS ............................................ 25
CARE OF THE EXTERIOR ..................................................26
CARE OF THE SPA CABINET ............................................26
CARE OF THE SPA COVER ............................................... 26
COVER LIFTER SYSTEM ................................................... 26
ELECTRICAL REQUIREMENTS
230 VOLT PERMANENTLY CONNECTED MODELS ......28
230 VOLT CONVERSION 30 OR 50 AMP
(SX & TX ONLY) .................................................................... 29
115 VOLT CONVERSION 30 AMP (SX & TX ONLY) ......... 29
115 VOLT GFCI SX & TX......................................................30
115 VOLT OPERATION (60Hz ONLY) ................................ 30
SERVICE INFORMATION
GENERAL INFORMATION .................................................. 31
GFCI AND HIGH LIMIT THERMOSTAT .............................. 31
MISCELLANEOUS SERVICE INFORMATION .................. 31
ACTS INVALIDATING WARRANTY .................................... 31
DISCLAIMERS ...................................................................... 31
WATKINS CUSTOMER SERVICE ...................................... 32
TROUBLESHOOTING ......................................................... 32
TROUBLESHOOTING ......................................................... 33
SPA SPECIFICATIONS ........................................................ 34
LIMITED WARRANTY .......................................................... 35
SX (MODEL SX) ................................................................... 22
TX (MODEL TX) ...................................................................23

Safety InformatIon
IMPORTANT SAFETY
INSTRUCTIONS
(READ AND FOLLOW ALL
INSTRUCTIONS)
AVOIDING THE RISK TO CHILDREN
DANGER - RISK OF CHILD DROWNING
Extreme caution must be exercised to prevent unauthorized access
by children. To avoid accidents, ensure that children cannot use a spa
unless they are supervised at all times.
WARNING
To reduce the risk of injury, do not permit children to use this spa unless
they are closely supervised at all times.
• To reduce the risk of injury, lower water temperatures are
recommended for young children. Children are especially sensitive to
hot water.
• Extreme caution must be exercised to prevent unauthorized access
by children. To avoid accidents, ensure that children cannot use a spa
unless they are supervised at all times.
DO:
• Make sure you always lock the child resistant locks after using the
spa for your children’s safety. Every HOT SPOT spa is equipped with
a locking cover that meets the ASTM F1346-91 Standard for Safety
Covers.
• Test the water temperature with your hand before allowing children to
enter the spa to be sure that it’s comfortable. Children are especially
sensitive to hot water.
• Remind children that wet surfaces can be very slippery. Make sure
that children are careful when entering or exiting the spa.
DON'T:
• Allow children to climb onto the spa cover.
• Allow children to have unsupervised access to the spa.
AVOIDING THE RISK OF ELECTROCUTION
DANGER - RISK OF ELECTROCUTION
• Connect only to a grounded source.
• Do not bury the power cord. A buried power cord may result in death,
or serious personal injury due to electrocution if direct burial-type cable
is not used, or if improper digging occurs.
• A ground terminal (pressure wire connector) is provided on the control
box inside the unit to permit connection of a minimum No. 8 AWG
(8.4 mm²) solid copper bonding conductor between this point and
any metal equipment, metal water pipe, metal enclosures of electrical
equipment, or conduit within five feet (1.5 m) of the unit as needed to
comply with local requirements.
• Do not operate the audio main controls while inside the spa (if spa is
equipped with an audio component).
• Do not connect any auxiliary components (for example, cable
additional speakers, headphones, additional audio components) to the
audio system unless approved by Watkins Manufacturing Corporation .
• Do not self service audio component by opening spa door as this may
expose dangerous voltage or other risk of injury. Refer all servicing to
qualified service personnel.
• Do not attach an external antennae to a spa audio system unless
installed by a licensed electrician in accordance with Article 810 of the
National Electric Code, ANSI/NFPA 70.
WARNING
• To reduce the risk of electrical shock, replace a damaged cord
immediately. Failure to do so may result in death or serious personal
injury due to electrocution.
• Your spa is provided with a Ground Fault Circuit Interrupter (GFCI)
for user and equipment protection. To ensure proper operation of this
important safety device, test according to the following instructions per
electrical configuration.
• Cord-Connected 115 volt, 15 or 20 amp models: The GFCI is
located at the end of the power cord. Before each use, with the unit
operating, push the TEST button. The unit should stop operating and
the GFCI power indicator will go out. Wait 30 seconds and then reset
the GFCI by pushing the RESET button. The GFCI power indicator will
turn on, restoring power to the spa. If the interrupter does not perform
in this manner, there may be an electrical malfunction and with it, the
possibility of an electric shock. Disconnect the power until the problem
has been corrected.
• 115 volt 30 amp hard wired, 230 volt permanently installed or
converted models:
• A ground terminal is provided on the terminal block (TB-1, system
ground terminal) located inside the control box. To reduce the risk
of electric shock, connect this terminal to the grounding terminal
of your electrical service or supply panel with a continuous green,
insulated copper wire. The wire must be equivalent in size to the
circuit conductors supplying the equipment. In addition, a bonding
terminal (pressure wire connector) is provided on the outside of
the control box for bonding to local ground points. To reduce the
risk of electric shock, this connector should be bonded with a No.
8 AWG (8.4 mm²) solid copper wire to any metal ladders, water
pipes, or other metal within 5 feet (1.5 m) of the spa to comply with
local requirements. The means of disconnection must be readily
accessible, but must be installed at least 5 feet (1.5 m) from the
spa.
• Your spa is provided with a suitably rated circuit breaker to open all
ungrounded supply conductors.
• Your spa uses ground fault circuit interrupters in the electrical
subpanel. Before each use of the spa and with the unit operating,
push the TEST button on each breaker. The switch should click
over to the “Trip” position. Wait 30 seconds and reset each GFCI
breaker by switching it completely off and then completely on.
The switch should then stay on. If either of the interrupters does
not perform in this manner, it is an indication of an electrical
malfunction and the possibility of an electric shock. Disconnect the
power until the fault has been identified and corrected.
IMPORTANT: Failure to wait 30 seconds before resetting the GFCI
may cause the spa’s Power Indicator (on the control panel) to blink. If
this occurs, repeat the GFCI test procedure.
Safety Information
Page 1
DANGER - RISK OF ELECTRICAL SHOCK
• Install at least 5 feet (1.5 m) from all metal surfaces. A spa may
be installed within 5 feet of a metal surface if each metal surface is
permanently connected by a minimum No. 8 AWG (8.4 mm²) solid
copper conductor attached to the wire ground connector on the
terminal box that is provided for this purpose if in accordance with
National Electrical Code ANSI/NMFPA70-1993.
• Do not permit any electrical appliances, such as a light, telephone,
radio, or television within 5 feet (1.5 m) of a spa. Failure to maintain
a safe distance may result in death, or serious personal injury due to
electrocution, if the appliance should fall into the spa.
• Install your spa is such a way that drainage is away from the electrical
compartment and from all electrical components.
DO:
• Be sure your spa is connected to the power supply correctly - use a
licensed electrical contractor.
• Disconnect the spa from the power supply before draining the spa or
servicing the electrical components.
• Test the Ground Fault Circuit Interrupter(s) before each use.
• Replace audio components only with identical components (if your spa
is equipped with an audio component).
DON'T:
• Use the spa with the equipment compartment door removed.
• Place electrical appliances within 5 feet (1.5m) of the spa.
• Use an extension cord to connect the spa to its power source. The
cord may not be properly grounded and the connection is a shock
hazard. An extension cord may cause a voltage drop, which will cause
overheating of the jet pump motor and motor damage.
• Attempt to open the electrical control box. There are no user serviceable
parts inside.
RISKS TO AVOID
DANGER - RISK OF INJURY
• To reduce the risk of injury to persons, DO NOT remove suction fittings
(filter standpipes) located in the filter compartment.
• The suction fittings in the spa are sized to match the specific water
flow created by the pump. Never replace a suction fitting with one
rated less than the flow rate marked on the original suction fitting.
• There is a danger of slipping and falling. Remember that wet surfaces
can be very slippery. Take care when entering or exiting the spa.
• Never operate spa if the suction fittings are broken or missing.
• Persons taking medications which induce drowsiness, such as
tranquilizers, antihistamines, or anticoagulants should not use the spa.
HEALTH PROBLEMS AFFECTED BY SPA USE
• Pregnant women should consult a physician before using spa.
• Persons suffering from obesity, or with a medical history of heart
disease, low or high blood pressure, circulatory system problems, or
diabetes should consult a physician before using spa.
UNCLEAN WATER
• Keep the water clean and sanitized with correct chemical care. The
recommended levels for your HOT SPRING spa are:
Free Available Chlorine:
3.0-5.0 ppm
Water pH:
7.2-7.8
• Refer to Water Quality and Maintenance section for complete
instructions.
IMPORTANT: Turn on the jet pump for a least ten minutes after adding
ANY spa water chemicals into the filter compartment.
Clean the filter cartridges monthly to remove debris and mineral buildup
which may affect the performance of the hydromassage jets, limit the
flow, or trip the high limit thermostat, which will turn off the entire spa.
Total Alkalinity:
40-120 ppm
Calcium Hardness:
50-150 ppm
AVOIDING THE RISK OF HYPERTHERMIA
Prolonged immersion in hot water can result in HYPERTHERMIA, a
dangerous condition which occurs when the internal temperature of
the body reaches a level above normal 98.6°F (37°C). The symptoms
of hyperthermia include unawareness of impending hazard, failure to
perceive heat, failure to recognize the need to exit the spa, physical
inability to exit the spa, fetal damage in pregnant women, and
unconsciousness resulting in a danger of drowning.
WARNING
The use of alcohol, drugs, or medication can greatly increase the risk of
fatal hyperthermia in hot tubs and spas.
TO REDUCE THE RISK OF INJURY
• People with infectious diseases should not use the spa.
• Keep any loose articles of clothing, long hair, or hanging jewelry away
from rotating jets or other moving components.
INCREASED SIDE EFFECTS OF MEDICATION
• The use of drugs, alcohol may cause unconsciousness with the
possibility of drowning.
• Persons using medications should consult a physician before using
a spa; some medication may cause a user to become drowsy, while
other medication may affect heart rate, blood pressure, and circulation.
Page 2
• The water in the spa should never exceed 104°F (40°C). Water
temperatures between 100°F and 104°F (36°C and 40°C) are
considered safe for a healthy adult. Lower water temperatures are
recommended for extended use (exceeding ten minutes) and for
young children. Extended use can cause hyperthermia.
• Pregnant or possibly pregnant women should limit spa water
temperatures to 100°F (36°C). Failure to do so may result in
permanent injury to your baby.
• Do not use spa immediately following strenuous exercise.
Safety Information

AVOIDING THE RISK OF SKIN BURNS
• To reduce the risk of injury, before entering a spa the user should
measure the water temperature with an accurate thermometer.
• Test the water with your hand before entering the spa to be sure it’s
comfortable.
SAFETY SIGN
Each HOT SPOT spa is shipped with a SAFETY SIGN in the owner’s
package. The sign, which is required as a condition of Product Listing,
should be permanently installed where it is visible to the users of the
spa. To obtain additional SAFETY SIGNS, contact your HOT SPRING
dealer and request Part #70798.
IMPORTANT
SPA INSTRUCTIONS
The following contains important spa information, and we strongly
encourage you to read and apply them.
DO:
• Use and lock the vinyl cover when the spa is not in use, whether it is
empty or full.
• Follow the Spa Care and Maintenance recommendations stated in this
manual.
• Use only approved accessories and recommended spa chemicals and
cleaners.
SPA SHELL
Your HOT SPOT spa has an acrylic shell. Stains and dirt generally will
not adhere to your spa’s surface. A soft rag should easily remove most
dirt. Most household chemicals are harmful to your spa’s shell (see
below for detailed information on cleaning agents). Always rinse off any
spa shell cleaning agent with fresh water.
IMPORTANT:
1. The following products are the ONLY approved cleaning agents
for your HOT SPOT spa shell: plain water, HOT SPRING
FRESHWATER Spa Shine, Brillianize
alcohol or any other household cleaner other than those listed to
clean the spa shell surface is NOT recommended. DO NOT use any
cleaning products containing abrasives or solvents since they may
damage the shell surface, specifically: Simple Green
Spa Mitt. NEVER USE HARSH CHEMICALS! Damage to the shell
by use of harsh chemicals is not covered under the warranty. Always
rinse off any spa shell cleaning agent with fresh water.
2. Iron and copper in the water can stain the spa shell if allowed to go
unchecked. Ask your HOT SPRING dealer about a Stain and Scale
Inhibitor to use if your spa has a high concentration of dissolved
minerals. (Watkins recommends FRESHWATER Stain & Scale
Defense.)
3. Keep all cleaners out of the reach of children and use care when
applying.
®
or Soft Scrub®. The use of
®
, Windex® or
DON'T
• Leave the HOT SPOT spa exposed to the sun without water or the
cover in place. Exposure to direct sunlight can cause solar distress of
the shell material.
• Roll or slide the spa on its side. This will damage the siding.
• Lift or drag the vinyl cover by using the cover lock straps; always lift or
carry the cover by using the handles.
• Attempt to open the electrical control box. There are no user
serviceable parts inside. Opening of the control box by the spa owner
will void the warranty. If you have an operational problem, carefully go
through the steps outlined in the Troubleshooting section. If you are
not able to resolve the problem, contact your authorized HOT SPRING
dealer. Many problems can easily be diagnosed over the telephone by
an Authorized Service Technician.
SAVE THESE INSTRUCTIONS
Safety Information
Page 3
GettInG Started
READY
READY
READY
READY
READY
READY
F1
F2
POWER
POWER
POWER
POWER
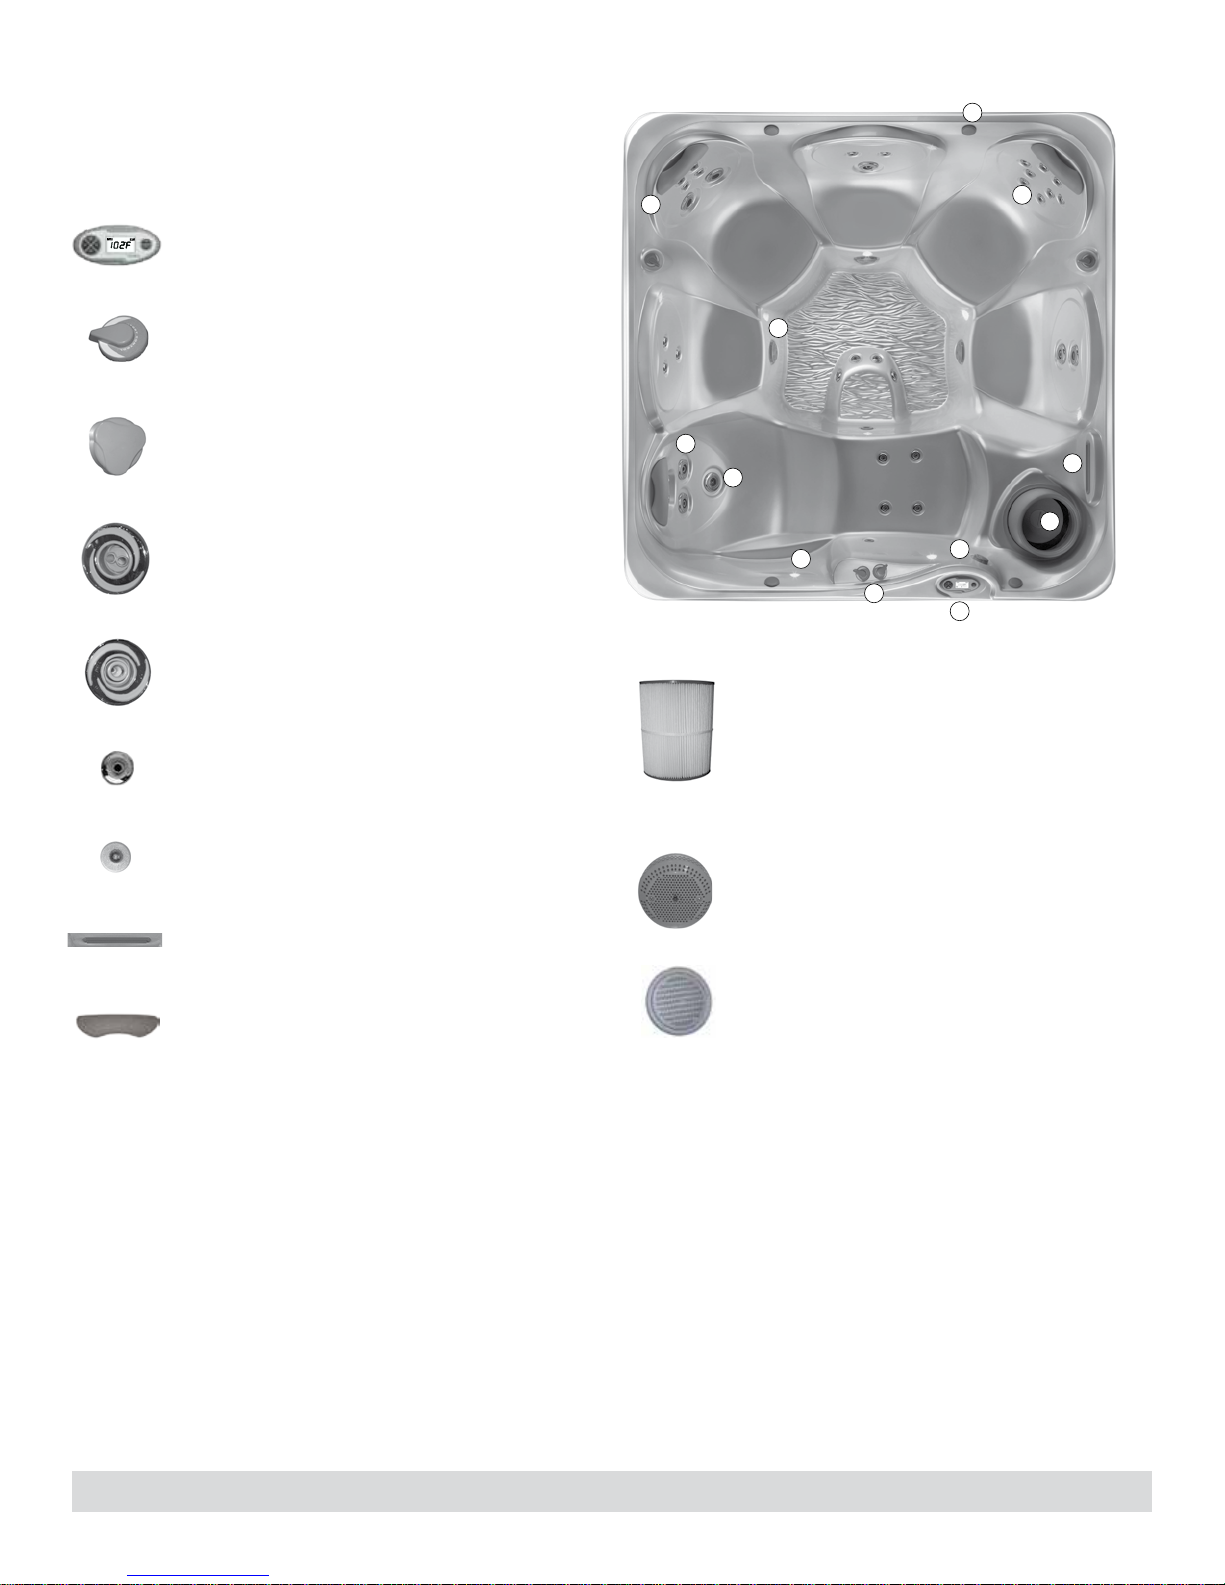
SPA FEATURES TEMPO, RELAY
& RHYTHM MODELS
1) Standard LCD Control Panel. The control
panel is accessible from inside or outside the spa
and is designed for ease of use.
12
9
6
2) The Air Control lever lets you dial in the ideal
amount of air for the Precision
®
jets.
3) The Water Feature lever adjusts the amount of
water that flows from the available water feature.
4) The Hydromassage jet with dual port rotary
nozzle provides a pulsating massage.
5) The Directional Hydromassage jet delivers a
therapeutic massage.
6) The PRECISION jet delivers a therapeutic
massage.
7) The multi-color LED points of light system,
you see multiple points of multi-color lighting.
11
5
4
7
2
3
1
8
10
10) Spa Filter provides the water filtration of the spa.
11) The spa drain/suction.
8) The water feature adds beauty to your spa
experience.
9) Pillow - All spas come with three or more
pillows.
Page 4
12) An optional factory installed speaker system is
available.
Getting Started
G
READY
READY
READY
READY
READY
READY
F1
F2
POWER
POWER
POWER
POWER
ettInG Started
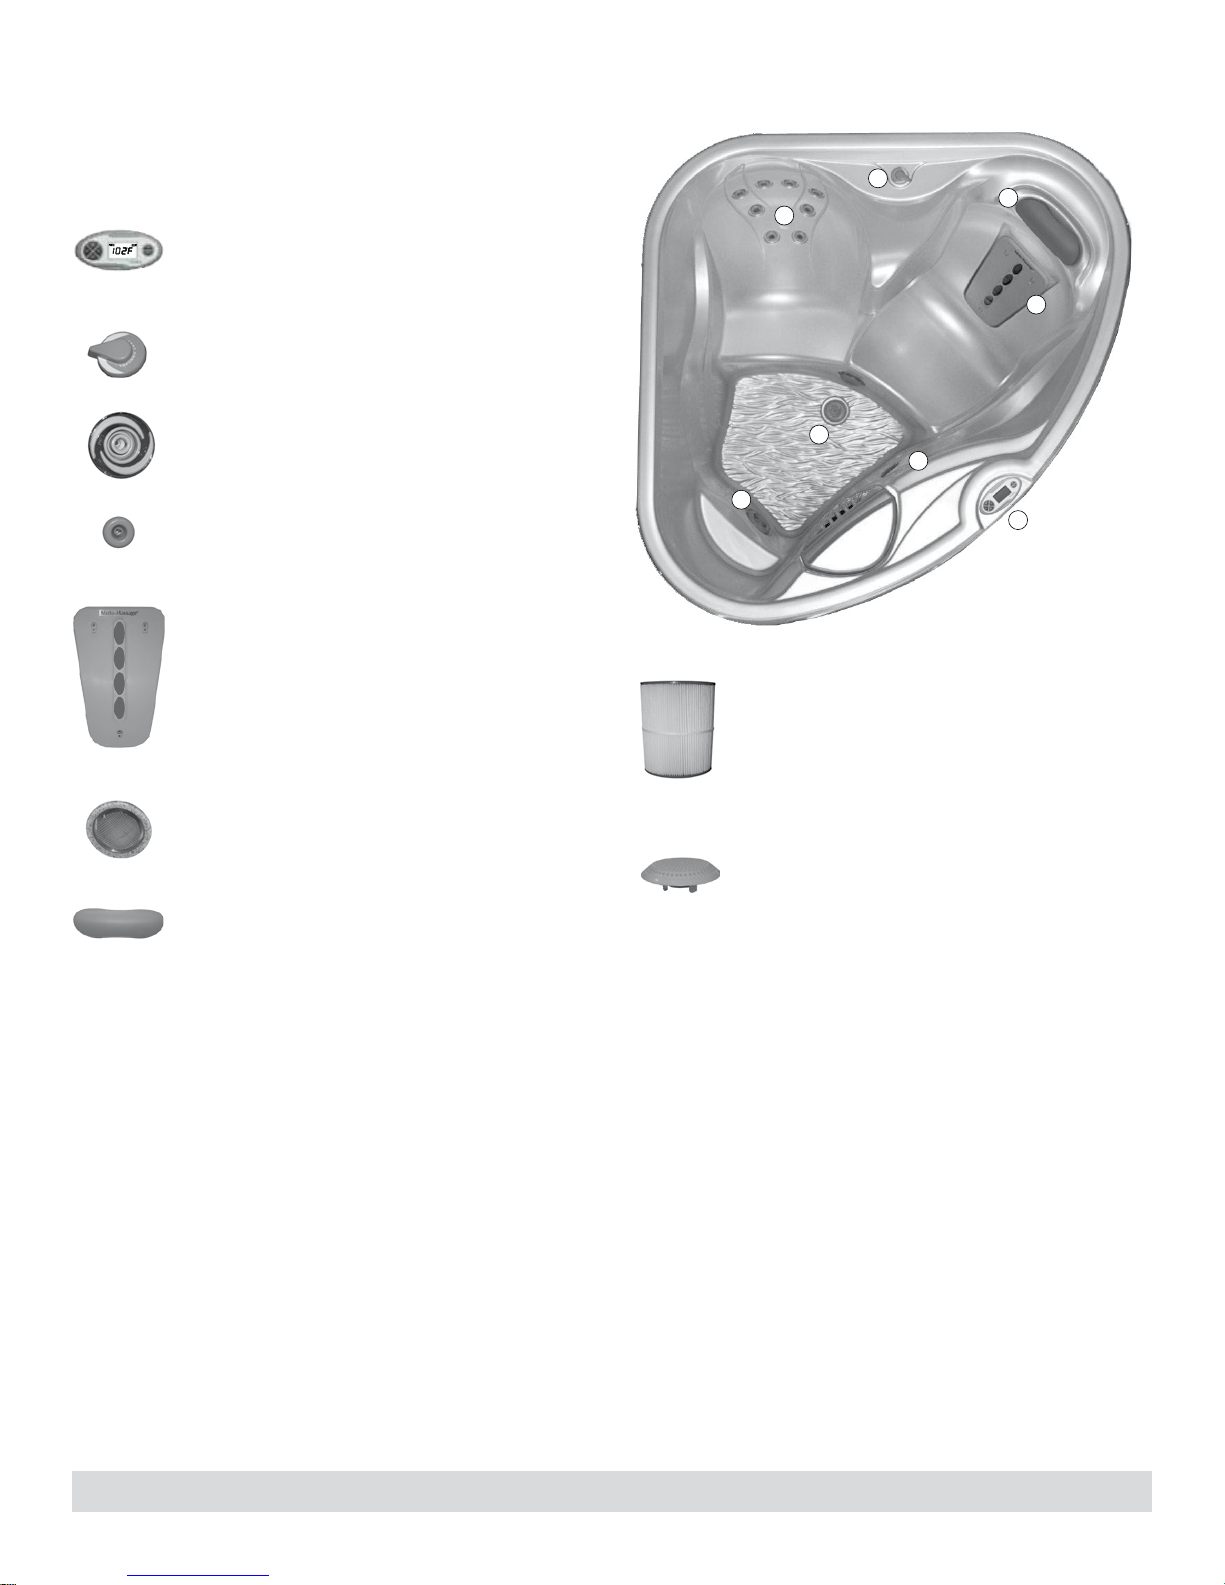
SPA FEATURES SX & TX MODELS
1) Standard LCD Control Panel. The control
panel is accessible from inside or outside the spa
and is designed for ease of use.
2
7
4
5
2) The Air Control lever lets you dial in the ideal
amount of air for the Moto-Massage
®
Jet
3) The Hydromassage jet targets the feet to
provide a direct stream massage.
4) The Precision jet delivers a therapeutic
massage.
5) The MOTO-MASSAGE is a moving jet. It has a
warm streams of water sweeping up and down the
entire length of your back.
6) LED dimmable light.
7) Pillow - Spas come with one or more pillows.
9
6
3
1
8) Spa Filter provides the water filtration of the spa.
(not shown in overhead picture above).
9) The spa drain.
Getting Started
Page 5

MOTO-MASSAGE (SX & TX MODELS ONLY)
The MOTO-MASSAGE jet automatically travels up and down in a
sweeping motion, simulating the natural stroking effects of a manual
massage. The intensity of the MOTO-MASSAGE jet may be adjusted by
turning the AIR CONTROL lever.
The MOTO-MASSAGE jet has been factory adjusted to provide
maximum hydromassage, and to achieve full vertical travel with its
AIR CONTROL lever in the full air volume position. Should the MOTOMASSAGE jet not achieve full vertical travel and the problem is not
a closed air control valve or clogged filter cartridge, then your HOT
SPRING Service Center should be contacted.
IMPORTANT: A slow or non-moving MOTO-MASSAGE jet may indicate
that the filter cartridge pores are obstructed with dirt, body oils, or
calcification. Follow the filter cartridge cleaning procedures in the Spa
Care and Maintenance section of this manual.
HYDROMASSAGE JETS
The larger jets in your spa allow you to re-direct the jet stream by
changing the position of the nozzle.
Regulate the force of the massage by rotating the jet face clockwise to
reduce the force or counter-clockwise to increase the force. Notice that
turning off the flow to some jets increases the flow to the other jets. To
avoid damage to your spa’s plumbing and components, do not turn off
more than half of these jets at the same time.
PRECISION JETS
PRECISION jets are small. They are designed to perform a soft,
soothing massage on your feet, calf, back and shoulders.
levers are used to change the air intensity of a group of PRECISION jets
simultaneously.
The Air Control
AIR CONTROL SYSTEM
AIR CONTROL VALVE: Turning the air control lever to the left position
allows for the same volume of air to flow to all individual jets and
PRECISION jets simultaneously. The jet faceplate on the larger jets is
then used to control the water intensity of each hydromassage jet.
NOTE: Always turn the air control lever to the right position anytime the
spa is not being used. This will help make the spa operate more quietly
and heat more efficiently when the vinyl cover is in place.
WATERFALL VALVE (TEMPO, RELAY &
RHYTHM MODELS ONLY)
The TEMPO, RELAY & RHYTHM spas are equipped with a cascading
water feature. It is activated by pressing the JETS button up to 3 times
when the jets are off and turning the waterfall valve clockwise. The flow
is regulated by turning the valve to the desired position.
When not in use turn the on/off valve to the OFF position.
QUICK START-UP INSTRUCTIONS
BEFORE YOU FILL YOUR SPA
Make sure your spa has been properly installed per all local codes, this
includes the location of the spa, the foundation of the spa as well as the
electrical installation of the spa. Installation instructions in the form of a
Pre-Delivery Instruction booklet can be obtained from either your HOT
SPRING dealer or online at:
www.HotSpring.com/planning-tools/pre-delivery-instructions
DO:
• Know which water treatment system you will be using and make sure
you have necessary chemicals available. Read all of the instructions
that come with the system.
• Have FRESHWATER
• Have pH/Alkalinity Up & Down available.
• Know the "Hardness" of your water, contact your dealer to help you
with this information. See Water Quality and Maintenance for more
information.
IMPORTANT: Watkins Manufacturing Corporation does not
recommend that the spa be filled with “softened” water, as this may
damage the spa’s equipment.
• Purchase the Clean Screen® pre-filter to remove unwanted
contaminants from the tap water. This is recommended, not required.
DON'T:
• Power up the spa until it has been filled with water! Power to the
spa automatically activates critical components within the spa, such
as controls, heater, circulation pump, and other systems. If power
is supplied to these components prior to the spa being filled, the
components will be damaged, and this may result in a non-warranty
component failure.
• Fill the spa with hot water or cold water with cold water temperature
below 50º F (10º C)! Tripping of the high-limit thermostat may result
causing your spa to stop functioning.
DON'T:
• Use your spa after filling until all of the steps listed below START-UP
are completed!
• Add chlorine if treating your spa with polyhexamethylene biguanide
(Biguanide, PHMB, eg. BaquaSpa
5-way Test Strips Available.
®
) sanitizer.
Page 6
Getting Started

START-UP
Your HOT SPOT spa has been thoroughly tested during the
manufacturing process to ensure reliability and long-term customer
satisfaction. A small amount of water may have remained in the
plumbing after testing and, as a result, may have spotted the spa shell
or the spa siding prior to delivery. Before filling the spa, wipe the spa
shell clean with a soft rag.
The following instructions must be read and followed exactly to ensure
a successful start-up or refill.
1. CLOSE DRAIN AND FILL THE SPA with water through the
filter compartment. Your HOT SPOT spa water level should be
maintained at a level one inch above the highest jet in the spa.
2. AFTER THE SPA HAS BEEN FILLED with water and the
equipment compartment door is secured, power must be applied
to the spa.
• 115 volt models: Connect the GFCI to the waterproof
receptacle and push the RESET button on the GFCI.
• 230 volt models:
the 50 amp GFCI breaker, verify the system is primed. Close
and secure the subpanel door.
3. TO CHECK THE OPERATION OF THE JET SYSTEM and
to purge any remaining air from the heating system:
TEMPO, RELAY & RHYTHM Models:
• Push the JETS button 3 times to run pumps on high speed, run
for one minute.
• Push the JETS button 2 more times to shut all the jets off.
SX & TX Models:
• Push the JETS button 2 times to run the jet pump on high
speed, run for one minute. Press JETS button one more time to
shut the JETS off.
Weak or surging jets are an indication of a low water level condition or
clogged filter cartridges.
IMPORTANT: Be sure the air Lever (see illustration in Spa Features
section) is open by turning clockwise until it stops. Combination jet
faces can be turned to completely shut off jet flow, these jets should
be open as well.
4. USING A TEST STRIP AND APPLICABLE CHEMICALS,
adjust Total Alkalinity (TA) to 80 ppm, Calcium Hardness (CH)
to 100 ppm, then spa water pH to between 7.2 and 7.8. These
procedures are listed in the “Water Quality and Maintenance”
section.
IMPORTANT: Always add spa water chemicals directly into the
filter compartment with the jet pump on high speed for at least
ten minutes. Adjusting the Total Alkalinity (TA) as the first step is
important, as out-of-balance TA will affect your ability to adjust
the pH correctly and will prevent the sanitizer from operating
effectively.
Open the door of the electrical subpanel,
reset
5. SUPERCHLORINATE THE SPA WATER by adding 1½
teaspoons of chlorine (sodium dichlor) per 250 gallons (950 liters)
of spa water with the spa in the Cleaning mode.
All HOT SPOT spas are equipped with a Cleaning mode. When
the mode is activated, the jet pump will turn on and run for ten
minutes (used for water maintenance). To activate the “Cleaning"
mode, press the MODE ( or ) button several times until the
CLEAN menu is displayed. Press the (+) button to activate the
CLEAN mode feature.
6. SET THE TEMPERATURE CONTROL, the spa
pre-programmed to reach 100°F (38° C
so within 18 to 24 hours. You may raise or lower the water
temperature by:
• Pressing the (+) button on the control panel to raise the
temperature.
• Pressing the (-) button on the control panel to lower the
temperature.
Place the vinyl cover on the spa and allow the water temperature
to stabilize. Make sure you secure the cover in place using the
cover locks. Periodically check the spa water temperature. When
the water temperature climbs above 90°F (32°C), proceed to the
next step.
To prevent tampering, you can lock your desired temperature
setting. Refer to the Operating section for details.
7. ACTIVATE THE CLEAN CYCLE as described in step 5 to
the CLEAN cycle to circulate the spa water. After the clean cycle
is complete, test the spa water for Free Available Chlorine (FAC)
residual. If the residual is between 3 and 5 ppm on the test strips
(found in the test kit) go on to the next step. If the residual is less
than 3 ppm, superchlorinate the spa water by adding 1½ teaspoons
of chlorine (sodium dichlor) per 250 gallons
water. Activate the clean cycle again to circulate the spa water for
another ten-minute period.
), and will normally do
is
(950 liters)
of spa
turn on
8. RECHECK the Total Alkalinity (TA) at 80 ppm, Calcium Hardness
(CH) at 100 ppm, then spa water pH at between 7.2 and 7.8. using
a FRESHWATER 5-way test strip.
IMPORTANT: Make sure you adjust your Total Alkalinity first, as
an out-of-balance condition will affect your ability to adjust the pH
correctly, and will prevent the sanitizer from operating effectively.
The spa is ready for use when the chlorine level remains
between 3 ppm and 5 ppm.
9. TEST WATER WEEKLY OR BEFORE EACH TIME
THE SPA IS USED
Getting Started
Page 7
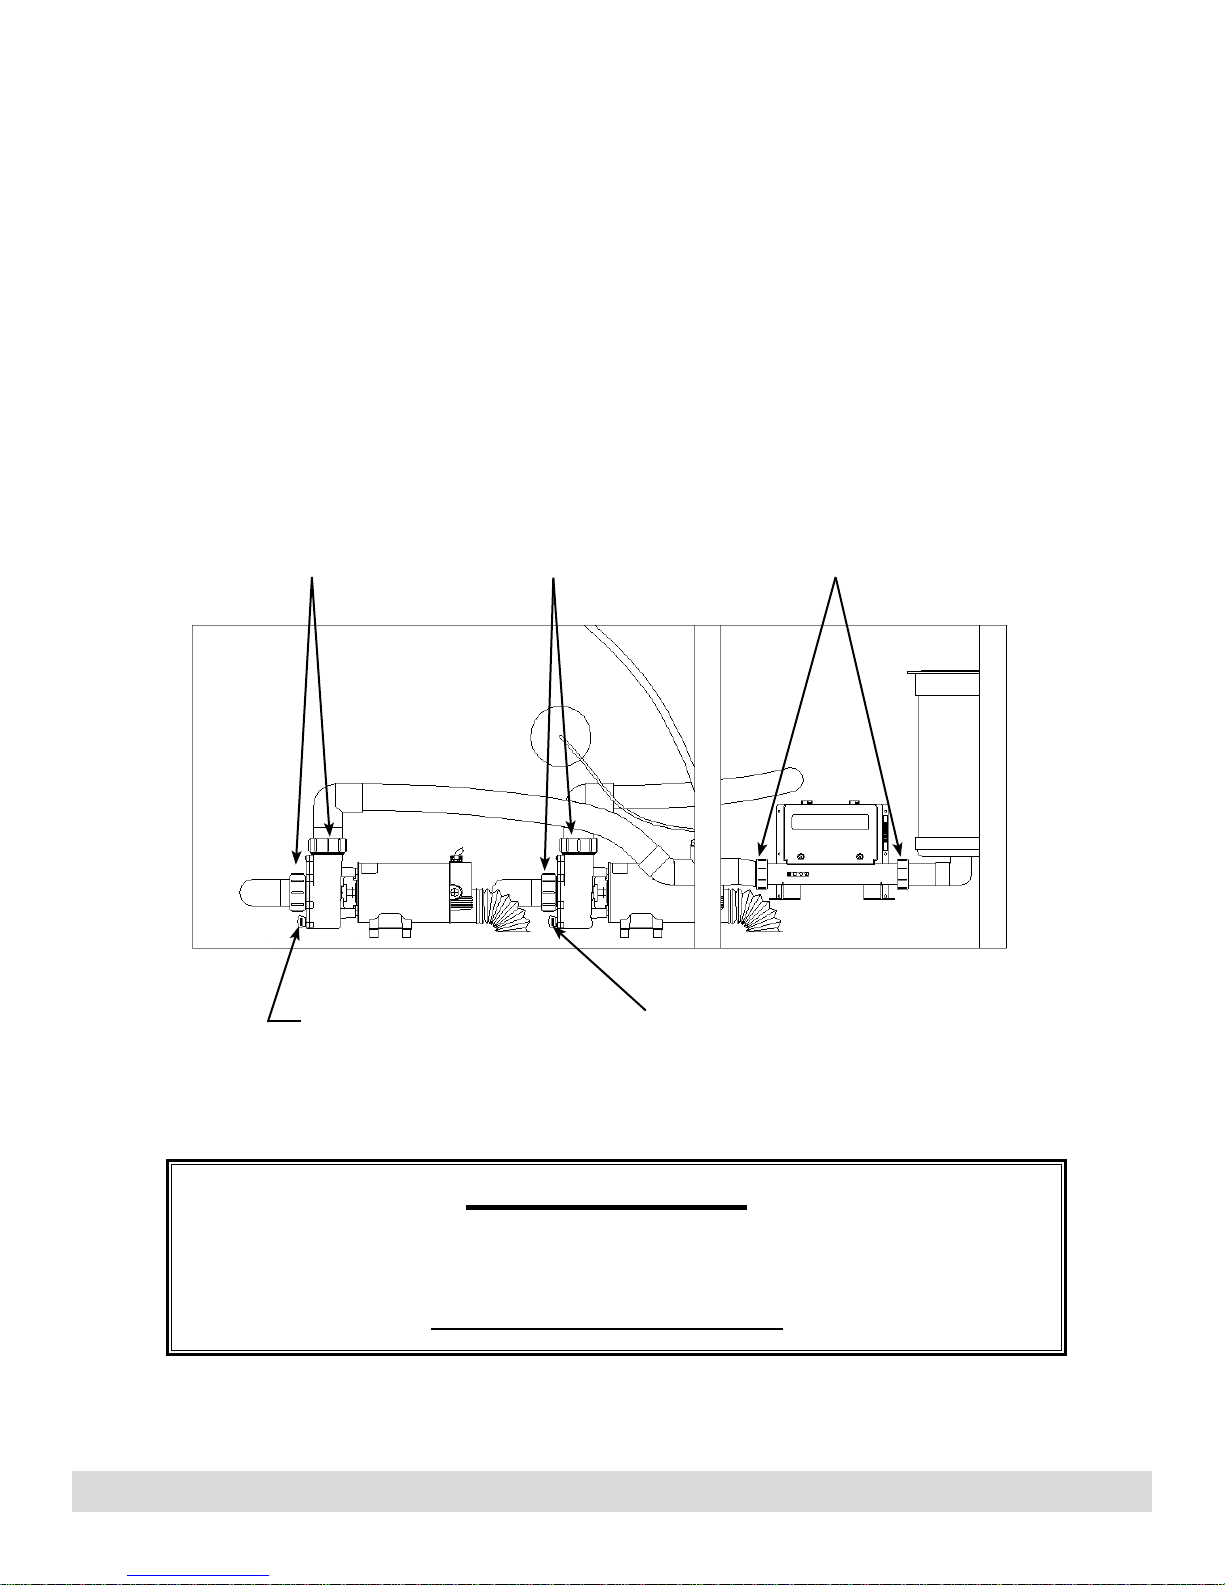
PRIMING THE PUMP(S)
Upon filling or refilling the spa, if a pump is operating and water is not flowing from any
of its jets, the pump may not be properly primed. To correct, refer to the illustration below
and perform the following procedures:
• Turn off power to the spa at the breaker and remove the equipment
compartment door.
• Loosen the union on the top of the pump(s) to allow the air to escape. When
water is present, hand-tighten the union.
• Turn power back on, activate the pump and check to make sure union is
tight enough to keep it from leaking. Re-install equipment door.
NOTE: Equipment compartment illustrated below will vary depending on
spa model.
PUMP
UNIONS
DRAIN
PLUG
PUMP
UNIONS
HEATER
UNIONS
DRAIN
PLUG
THE DRAIN CAP AND UNION FITTINGS IN THE EQUIPMENT COMPARTMENT
MAY LOOSEN DURING TRANSPORTATION. TO AVOID LEAKS, PLEASE
CHECK TO MAKE SURE THESE ARE HAND-TIGHT
IMPORTANT
PRIOR TO FILLING YOUR SPA.
Page 8
Getting Started
Water QualIty and
aIntenance
m
BASIC INFORMATION
It’s important to have clean water. Water maintenance is one of the least
understood, yet most important, areas of spa ownership. Your dealer
can guide you through the process of achieving and maintaining perfect
water in your spa, given your local conditions.
IMPORTANT: Water Terminology can be found at the end of this
section.
• Always read & refer to the owner's manual for complete information.
• Test your water with a test strip once a week, or each time the spa is used.
• Add chemicals in frequent small amounts to prevent overdosing the spa.
• Use the spa only when the chlorine level is between 1-5 ppm or
manually add chlorine as needed.
• It is the spa owner's responsibility to prevent over or under
chlorination.
• Drain & refill water 2-4 times per year depending on how often you
use your spa, and how many people use it.
IMPORTANT: Remember to change your water every three to four
months.
Check with your HOT SPRING dealer to determine if water in your
region has unique qualities - such as high metal or mineral content - that
should be addressed.
Your program will depend on your water’s mineral content, how often
you use your spa, and how many people use it.
WATER QUALITY CHART
PARAMETER TARGET MIN - "OK" RANGE - MAX
pH 7.4 7.2 7.8
ALKALINITY 80 ppm 40 ppm 120 ppm
HARDNESS 100 ppm 50 ppm 150 ppm
CHLORINE 3 ppm 1 ppm 5 ppm
Maintaining the water quality and the cleanliness of the filter in your spa
is your responsibility. Keeping the spa water balanced prolongs the life
of the spa components and will make the water more comfortable. Your
dealer can guide you through the process of achieving and maintaining
perfect water in your spa, given your local conditions. Your program will
depend on your water’s mineral content, how often you use your spa,
and how many people use it. Watkins Manufacturing Corporation has
developed several water care systems and products to simplify water
care which are available from authorized HOT SPRING dealers.
HOT SPRING FRESHWATER products
EverFresh
*For more information visit www.hotspring.com/save-water/
®
System
Vanishing Act
CLEAN SCREEN Prefilter
®
Calcium Remover
CHEMICAL SAFETY
When using chemicals, read the labels carefully and follow directions
precisely. Though chemicals protect you and your spa when used
correctly, they can be hazardous in concentrated form. Always observe
the following guidelines:
• Allow only a responsible person to handle spa chemicals. Keep them
out of the reach of children.
• Accurately measure the exact quantities specified, never more. Do not
overdose your spa.
• Handle all containers with care. Store in a cool, dry, well ventilated
place.
• Always keep chemical containers closed when not in use. Replace
caps on their proper containers.
• Don't inhale fumes, or allow chemicals to come in contact with your
eyes, nose, or mouth. Wash your hands immediately after use.
• Follow the emergency advice on the product label in case of accidental
contact, or if the chemical is swallowed. Call a doctor or the local
Poison Control Center. If a doctor is needed, take the product container
along with you so that the substance can be identified.
• Don't let chemicals get on surrounding surfaces or landscaping. Don't
use a vacuum cleaner to clean up chemical spills.
• Never smoke around chemicals. Some fumes can be highly flammable.
• Don't store any chemicals in the spa equipment compartment.
HOW TO ADD CHEMICALS
TO THE WATER
IMPORTANT: All spa water chemicals, including granulated dichlor,
MPS, granulated pH increaser or decreaser, granulated total alkalinity
increaser, liquid stain and scale inhibitor, and liquid defoamer must
always be added directly into the filter compartment while the jet pump
is running in its high speed mode, and it must run for a minimum of ten
minutes.
To Administer Spa Water Chemicals:
1. Fold back the cover. Carefully remove and set aside the filter
2. On your Control Panel:
3. Carefully measure the recommended amount of chemical and slowly
4. Replace the filter compartment cover. After ten minutes, the jet pump
IMPORTANT: After administering a super chlorination treatment or nonchlorine shock to your spa, leave the cover open for a minimum of 20
minutes to allow the oxidizer gas to vent. A high concentration of trapped
oxidizer gas which may exist as a result of the shock treatment (not daily
sanitation) may eventually cause discoloration or vinyl degradation to the
bottom of the cover. This type of damage is considered chemical abuse and
is not covered under the terms of the limited warranty.
compartment cover.
Push the MODE ( or ) button several times until the CLEAN
menu is displayed. Press the (+) button to activate the CLEAN
mode feature.
pour it into the filter compartment. Use care not to splash chemicals
on your hands, in your eyes, on the spa shell surface, or on the spa
cabinet.
will automatically shut off to complete the procedure. Close and
secure the cover.
DANGER: Risk of Drowning: Never leave an open spa unattended!
Water Quality and Maintenance
Page 9
 Loading...