

Hotronics FootWarmer CUSTOM Power Plus m4, FootWarmer CUSTOM Power Plus m3 User Manual
TEMP
Approx. Avg
Duration
n Range
COMFO
OU
! USING the FOOTWARMER POWER PLUS
THE STRENGTHS OF HOTRONIC"S FOOTWARMER POWER PLUS!
CONTENTS IN BOX
FootWarmer CUSTOM Power Plus m4 and Power Plus m3 both
contain:
2 Battery Packs with Integrated Heat Regulator
•
1 Pair of Heating Elements with Self-Adhesive Fabric Covers
•
and Strips
1 Recharger (global input 100-240VAC, 50/60Hz) with North
•
American and European Plug Adapters
Operating Instructions & Limited Warranty Card
•
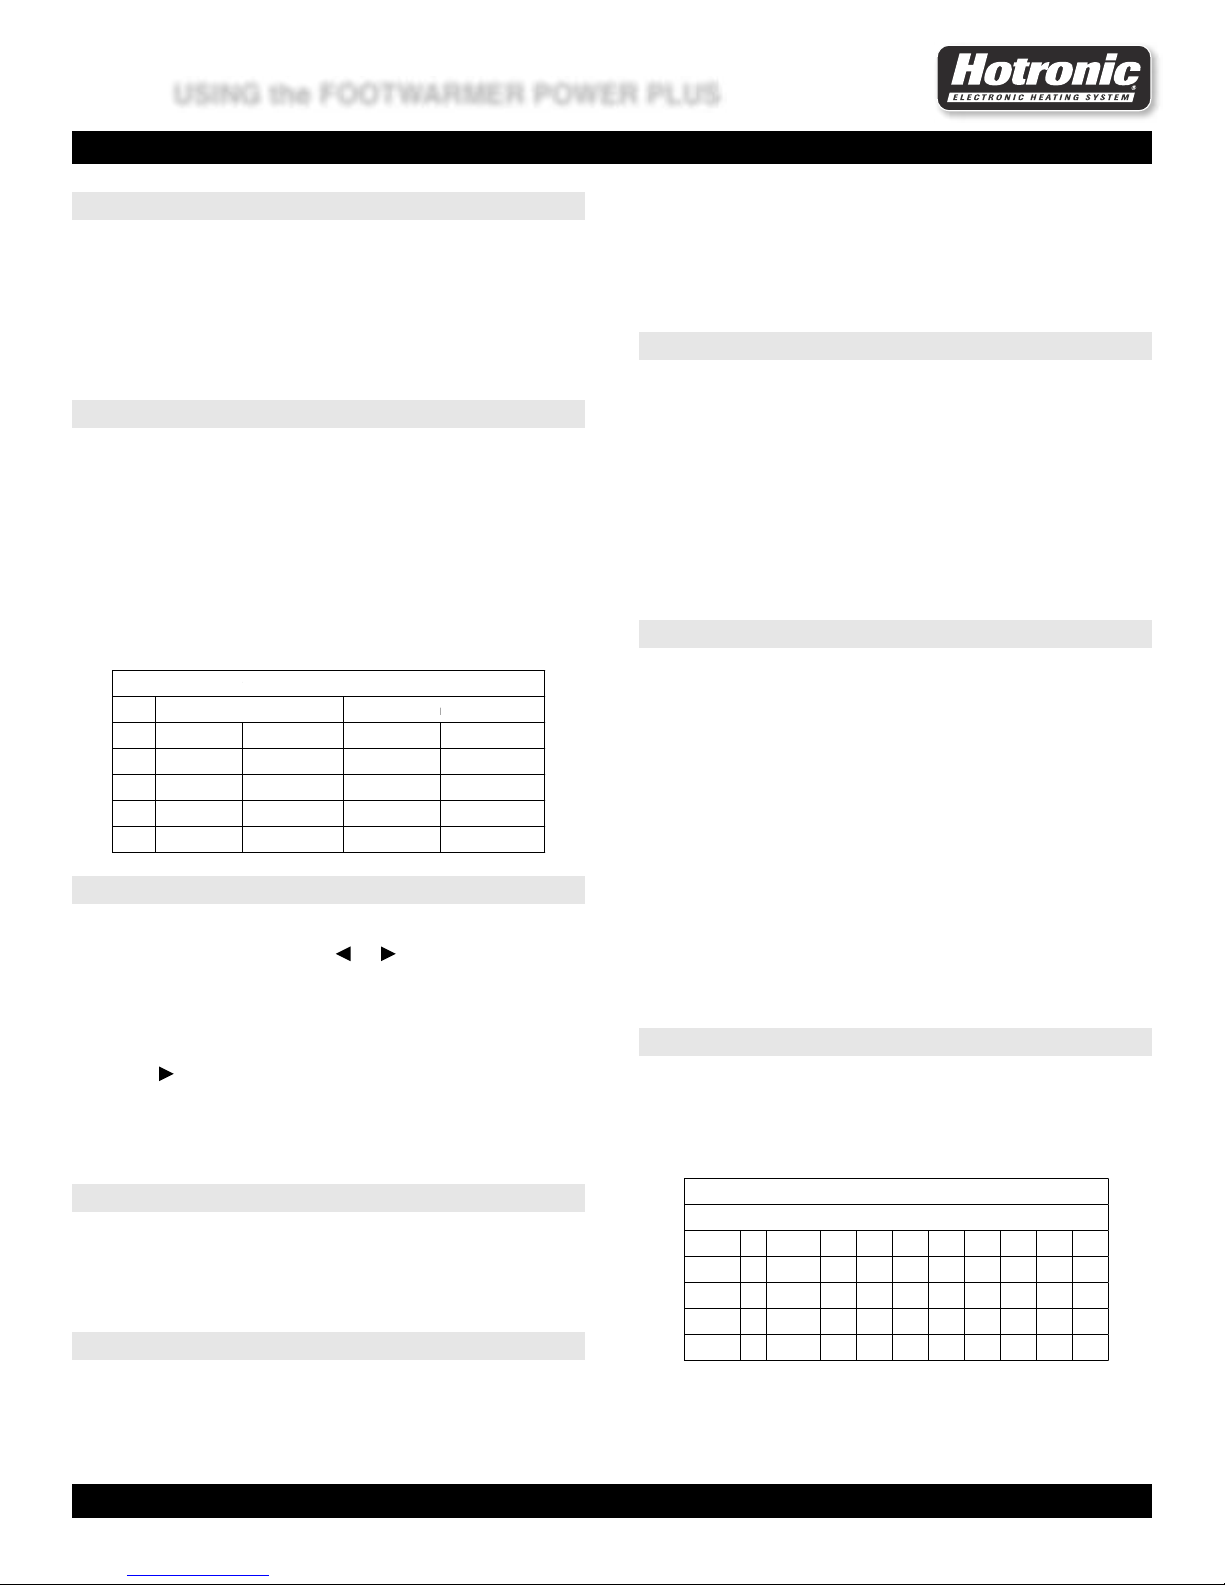
OVERVIEW
The Hotronic FootWarmer is dedicated to your foot wherever it goes and
easily transfers from one type of footwear to another. Based on
computer technology, Battery Pack"s micro-controller permits four (4)
temperature-duration settings. High quality, rechargeable NiMH batteries
are selected for cold temperature performance. Heating Elements locate
directly under toes. Recharger globally accepts input ranging from
100-240VAC, 50/60Hz. Following temperatures and durations are
approximations only as ratings are affected by recharging process and
various tolerances of batteries and electronics. Durations are
determined when Battery Packs are used in ambient temperature of
-4°F (-20°C).
Set. °C °F Power Plus m4 Power Plus m3
1 28°-32° 83°-89° 19-21 hrs 15-17 hrs
2 36°-41° 96°-106° 7-9 hrs 5.5-7 hrs
3 40°-47° 105°-116° 5-6.5 hrs 3.5-5 hrs
4 57°-62° 135°-144° 2.5-3.75 hrs 2-3 hrs
OPERATING BATTERY PACK SETTINGS
1. To turn on or off, press-and-hold ON or OFF until LED light is ON or
OFF (~2.0 seconds).
2. To change setting, press-and-hold or until setting LED light
changes (~0.5 seconds).
3. Once selected, setting 4 auto-resets to setting 3 after 3 minutes
(“timed setting 4”). (“Timed setting 4” LED lights are ON continuously
and do NOT blink.)
4. To use “continuous setting 4”, start at “timed setting 4”, then press
and hold until all LED lights blink (~5.0 seconds). (“Continuous
setting 4” LED lights BLINK continuously until setting is changed.)
5. DO NOT USE “TIMED SETTING 4” or ”CONTINUOUS SETTING 4”
for more than three minutes at a time as it may become too hot and
may result in burns. SEE CAUTIONS REGARDING BURNS.
2. WHEN BATTERY PACK IS ON ANY SETTING, INCLUDING OFF,
and you feel your foot getting hot, you think you might be getting a
burn, or you experience any early warning sensations of a burn,
IMMEDIATELY UNPLUG Heating Element from Battery Pack and
IMMEDIATELY REMOVE your foot from FootWarmer. See
CAUTIONS REGARDING BURNS.
USING HEAT SETTINGS
1. Use FootWarmer to maintain comfort and warmth. (Note: Prevent feet
from getting cold. Warming cold feet requires more energy, is less
effective, and is not intended use of FootWarmer.)
2. Before going into cold, set at 1, 2, or 3 to maintain comfort and
warmth.
3. For additional burst of heat, set to “timed setting 4”. “Timed setting 4”
auto-resets to setting 3 after 3 minutes.
4. DO NOT USE “TIMED SETTING 4” or ”CONTINUOUS SETTING 4”
for more than three minutes at a time as it may become too hot and
may result in burns. SEE CAUTIONS REGARDING BURNS.
5. Heat does not thermostatically cycle on and off. Settings 1 and 2
maintain warmth AND save energy.
WHAT TO EXPECT OF HEAT SETTINGS
1. Expect imperceptible heat to maintain comfort and warmth.
2. Do not expect “fireplace toes”.
3. Learn what personally works best over time.
4. Think of your FootWarmer as Thermo Active Insulation (TM). As cold
penetrates through insole, it draws heat off Element rather than toes.
Balanced heat is imperceptible yet maintains comfort and warmth.
Too much heat and feet feel excess heat. Too little heat and feet feel
cold penetrating through.
5. If feet are comfortable yet feel excess heat, turn to lower setting to
minimize perspiration and maximize battery duration.
6. If feet begin to feel cool, turn setting up to maintain comfort and
warmth.
7. If you think FootWarmer is not working, try turning left Battery Pack
off. If left foot becomes colder, FootWarmer is working.
8. Ability to feel heat and maintain comfort and warmth depends upon:
proper installation; type, fit, and dryness of footwear, sock, and insole;
foot callus size; activity levels; weather conditions; and other factors.
9. Expect bottom of toes to feel heat less than fingers and hands.
COMFORT AND WARMTH RANGES
When first learning use of FootWarmer, following chart may help in
setting selection. Chart represents approximate ranges for comfort and
warmth maintenance. First determine outside temperature then select
setting based on personal sensitivity to cold. More sensitive select left of
range. Less sensitive select right.
BATTERY PACK LED LIGHTS (LEDs)
1. Battery Pack LEDs indicate power is on or off and setting selected.
LEDs do not indicate charge level.
2. LEDs will not light when batteries are fully discharged, are below
minimum voltage cutoff level, or do not have enough power to heat
Element.
EXCESS HEAT ON ANY SETTING, INCLUDING OFF
1. WHEN BATTERY PACK LED stays ON and CANNOT BE TURNED
OFF, water may be around electrical contacts, may cause Heating
Element to become hot at any setting, and MAY RESULT IN BURNS.
See CAUTIONS REGARDING BURNS.
Winter Season 10-11! Page 3
° C >0 0 -4 -7 -10 -12 -15 -18 -21
Setting F >32 32 25 20 15 10 5 0 -5
1 • • • • •
2 • • • • • •
3 • • • • • •
KEEPING FEET WARM!

! USING the FOOTWARMER POWER PLUS
THE STRENGTHS OF HOTRONIC"S FOOTWARMER POWER PLUS!
RECOMMENDED OVERNIGHT RECHARGING PROCESS:
TIPS ON BATTERY PACK OPERATING TEMPERATURES
1. When going into temperatures below freezing (where Battery Packs
may be exposed), turn Battery Packs minimally to setting ONE as this
protects batteries from freezing and any harm that may occur due to
freezing.
2. Do not operate Battery Packs that have been OFF and in
temperatures below freezing as it may harm batteries and cause
Battery Packs to function improperly or not at all.
TIPS ON USING FOOTWARMER
1. Extremely poor circulation or extremely cold conditions may require
setting 2 or 3 for comfort and warmth. Extra Battery Packs extend all
day comfort and warmth.
2. Do not allow chair lift to hit you! Damage may result to you and your
FootWarmer.
3. Be careful walking down stairs! Battery Packs may catch stair edge
when mounted on back of boots.
4. Place heated insole (fabric surface up) directly underneath socked
foot. Do not place another insole over heated insole.
5. Proper fitting boots help maintain comfort and warmth. Tight boots
and improper fit restrict blood flow and compromise comfort and
warmth.
DRY BOOTS! DRY SOCKS!
1. If boots and socks are wet, expect cold feet.
2. Wet conductive heat loss is 23 times greater than dry heat loss. (W.
L. Gore & Associates, 1994)
3. Feet perspire more than any other part of your body except your head
and hands. Each foot perspires about 1/4 cup of water a day at rest
and one full cup when active. (W. L. Gore & Associates, 1994)
4. Maintain dry boots! Dry after each use! Each additional day of
moisture buildup makes warm feet more difficult. Consider boot dryer
(i.e., Hotronic"s Snapdry Boot & Glove Dryer).
5. Remove inner boots to dry between liner and boot shell.
6. Maintain dry, clean socks! Change midday for afternoon comfort and
warmth.
7. Use single pair of medium weight socks. Select wool blend,
polypropylene®, or thermax® type socks to wick moisture away and
keep feet dry and warm.
8. Do not use thick socks, neoprene socks, or reflective sock liners as
these keep heat from toes.
9. Do not use cotton or other moisture absorbing socks.
RECHARGING BATTERY PACKS
CAUTION - WARRANTY: Use Hotronic"s White Plug Recharger
•
ONLY for Power Plus m4 and Power Plus m3 Battery Packs. Using
other than Hotronic"s White Plug Recharger voids Warranty.
CONDITIONING CHARGE: When Battery Pack is new or has not
•
been used for more than 2 months, it is recommended to charge
Battery Pack for 48 to 72 hours uninterrupted. Conditioning Charge
brings new, unused, or unconditioned Battery Pack to full duration
and temperature potential.
FULLY CHARGED IN 3 HOURS OR LESS: Hotronic"s White Plug
•
Recharger detects when Battery Pack is fully charged and
automatically switches to trickle current recharging after
approximately 3 hours or less of full current recharging. Fully
charged, properly conditioned Battery Pack reaches full capacity
potential. Fully charged, unconditioned Battery Pack does NOT reach
full capacity potential. (See Conditioning Charge.)
•
Hotronic"s Recommended Recharging Process helps maintain
properly conditioned Battery Pack throughout season by recharging
overnight.
SUMMER AND LONG TERM STORAGE: Recharge Battery Pack as
•
per instructions for Recommended Overnight Recharging Process,
turn Battery Pack off, and store without Recharger or Heating
Element plugged in. RECOMMENDED BEST STORAGE
TEMPERATURES range from 5°-25°C (40°-80°F).
ELECTRIC INPUT: Recharger accepts electric input ranging from
•
100-240VAC, 50-60Hz.
OCCASIONAL FULL DISCHARGE: While not required of NiMH
•
batteries, Hotronic recommends an occasional full discharge before
fully recharging to help maintain optimal strength. Use “continuous
setting 4” for quickest discharge. Battery Pack is fully discharged
when Heating Element is no longer warm and all LEDs are off.
RECHARGE WHEN BATTERY PACK IS OFF: Hotronic recommends
recharging when Battery Pack is off. (Battery Pack is off when all LEDs
are off.) However, Battery Pack MAY be recharged at any setting. If
recharging while on setting 1, 2, 3, or 4, DO NOT CHANGE SETTING
DURING RECHARGING as this may cause recharging process to stop.
1. Plug Recharger into wall outlet using correct plug adapter (North
American, European, or other).
a. Recharger performs short self-test with brief red LED followed by
brief green LED and then LED off.
2. Attach each Battery Pack to Recharger.
3. Recharger LED is continuous red when detecting Battery Pack status
and during initial current and full current recharging.
a. If Battery Pack status is not okay or is not compatible, Recharger
LED will blink red within 20 minutes of continuous red.
b. Maximum duration for continuous red is approximately 3 hours at
which time Recharger LED becomes green.
4. Recharger LED is green once Battery Pack is fully charged and
indicates trickle current recharging.
a. One Battery Pack may reach full charge before other.
5. Battery Pack may be removed at any time during recharging process
and may be re-attached to Recharger at any time.
6. Once Recharger LED is green or when Recommended Overnight
Recharging Process is complete:
a. Unplug Battery Pack from Recharger.
b. Unplug Recharger from wall outlet.
7. To maintain maximum charge after recharging, turn Battery Pack off
and store without Recharger or Heating Element plugged in.
1. Expect all battery types to lose strength over time.
2. Expect optimal performance of newer Battery Packs.
3. Expect optimal performance with use shortly after recharging.
4. Expect less than optimal performance after recharging as each day,
week, or month passes before use.
5. Expect much less than optimal performance from Battery Packs
stored for 2 months or more. (See Conditioning Charge.)
6. Battery self-discharge rates may range from 1 to 3 percent per day.
7. When Battery Packs are unplugged and left on settings 1, 2, 3, or 4, a
slight increase in discharge results.
8. When unplugging Recharger from wall outlet, also unplug Battery
Packs from Recharger. When not unplugged, damage may occur to
Recharger and a slight increase in Battery Pack discharge may occur
regardless of setting.
WHAT TO EXPECT OF BATTERY PACKS
Winter Season 10-11! Page 4
KEEPING FEET WARM!
 Loading...