

Hotron HR80-HW Setup Instructions
HR80-HW
HR80-HW Setup Instructions
Thank you for purchasing the dual purpose HR80-HW Wired Digital Door Key / Digital Touch Pad.
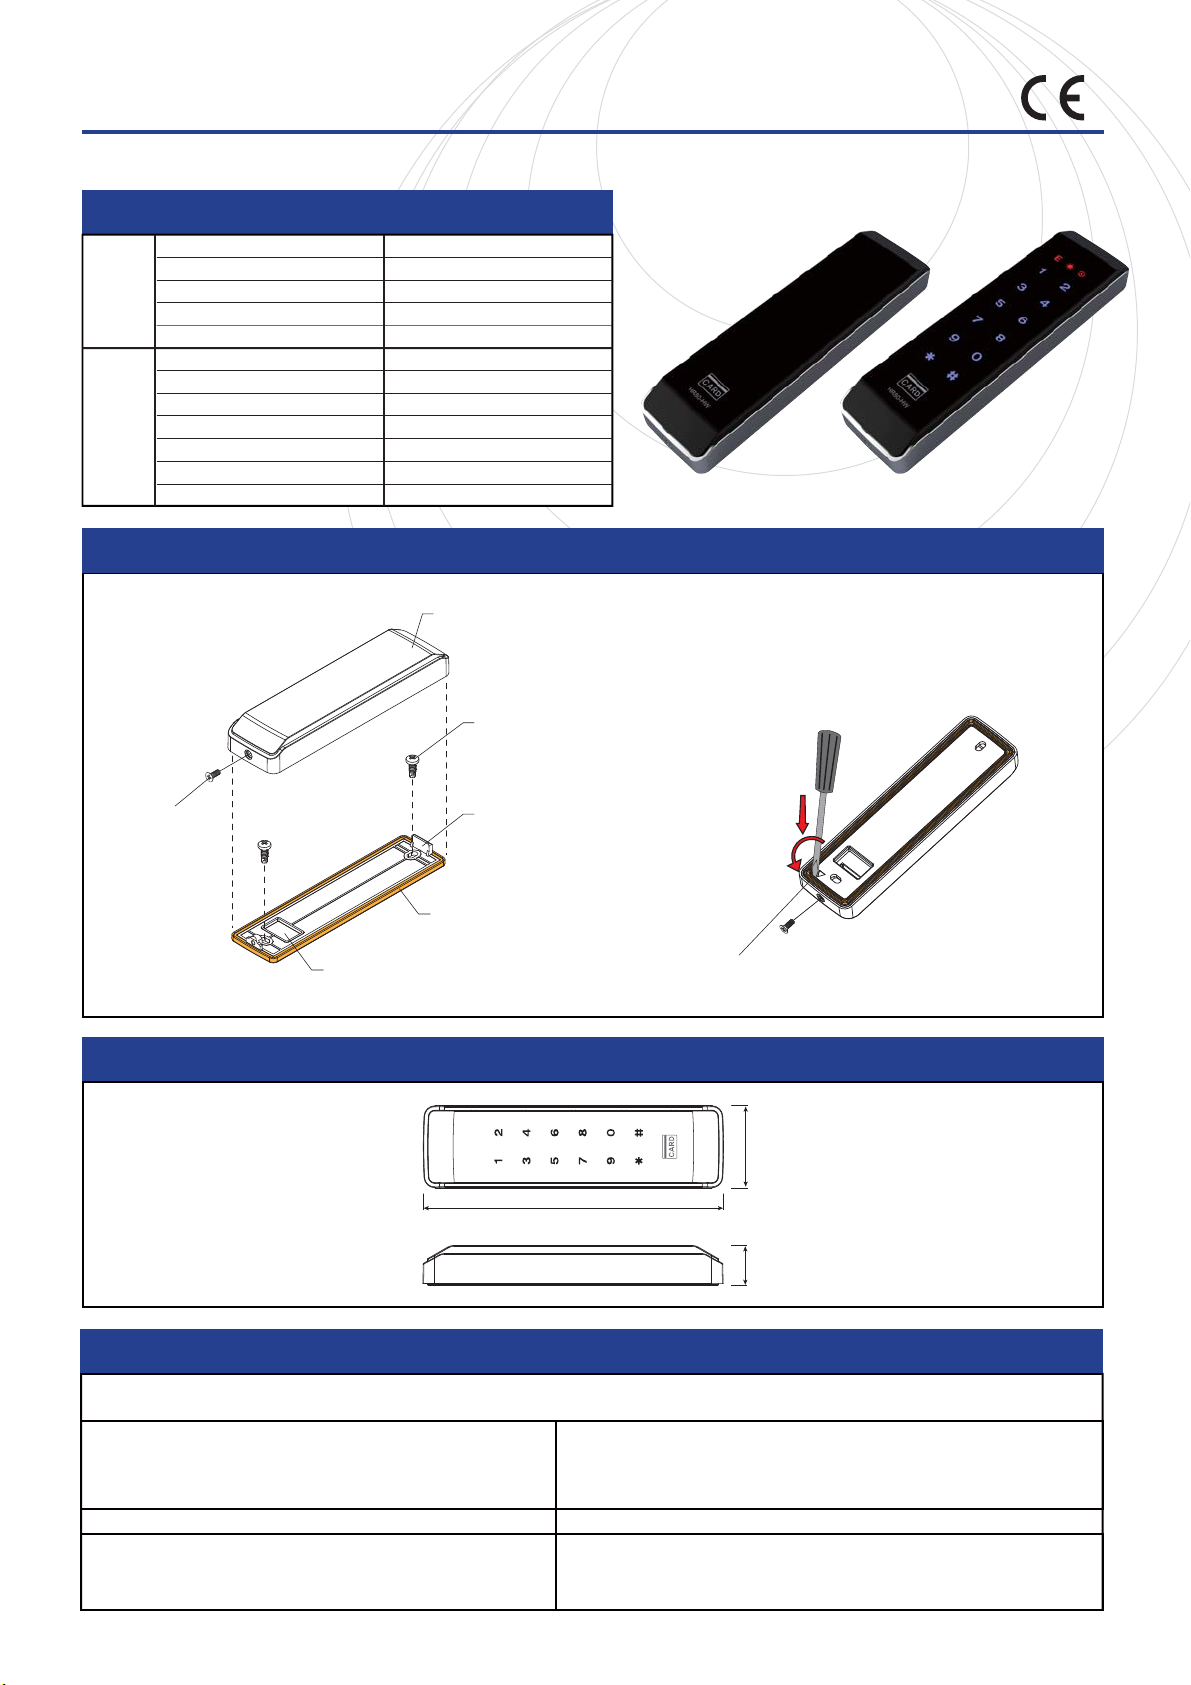
COMPOSITION & SPECIFICATIONS
Wired Digital Door Key main body
Mounting screws (4x16)
Mounting template
Connection wire
User’s Manual
CompositionSpecification
Power supply
Relay contact capacity
Operating temp
Type
Power consumption
Card type / Frequency ISO14443A(Mifare) / 13.56MHz
International Protection IP54 (water proof)
1
2
1
1
1 copy
DC 12~30V, AC 12~24V
24V/1A
-20℃~50
℃
Password / Card
300mA Under
GENERAL INFORMATION
Upper case
Mounting screws
HOTRON LTD.
Disassembling the upper case
Unfasten the screw bolt,
and use a flat blade (⊖)screwdriver
to disassemble it,
as shown in the figure below.
Screw bolt for
disassembling
/assembling
Connection
wire hole
Lower case
Water proof pad (Silicone rubber)
(When assembling the product,
the water proof pad should not be twisted)
Water proof pad (Silicone rubber)
Between outside gaps
DIMENSION
41
150
20
HR80-HW DECLARATION OF CONFORMITY
We manufacturer, hereby declare that the product satises all the technical regulations applicable to the product within
the scope of Council Directives 2006/95/EC, 2004/108/EC and 99/5/EC:
Description of Product:
Model: HR80-HW / Type:Digital Door Lock with card key for access control
Technology used is Capacitive Touch Switch and RFID
All essential radio test suites have been carried out.
Testing laboratory :
EMC Compliance Limited
Directives Fullled:
Radio : EN 302 291-1 V1.1.1 /-2 V1.1.1
EMC: EN 301 489-1 V1.9.2 /-3 V1.4.1
Safety: EN 60950-1: 2006+A11:2009+A1:2010+A12:2011
Date : Apr. 29, 2014
Authorized representative or manufacturer :
Hotron., LTD.
26 Dublin Street, Carlow, Ireland.
Tel. +353 (0)59 914 0345 / Fax. +353 (0)59 914 0543
unit : m/m
Hotron Ltd.
26 Dublin Street, Carlow, Ireland. Te l: +353 (0)59 914 0345 Fax: +353 (0)59 914 0543 Email: info@hotron.com Web: www.hotron.com
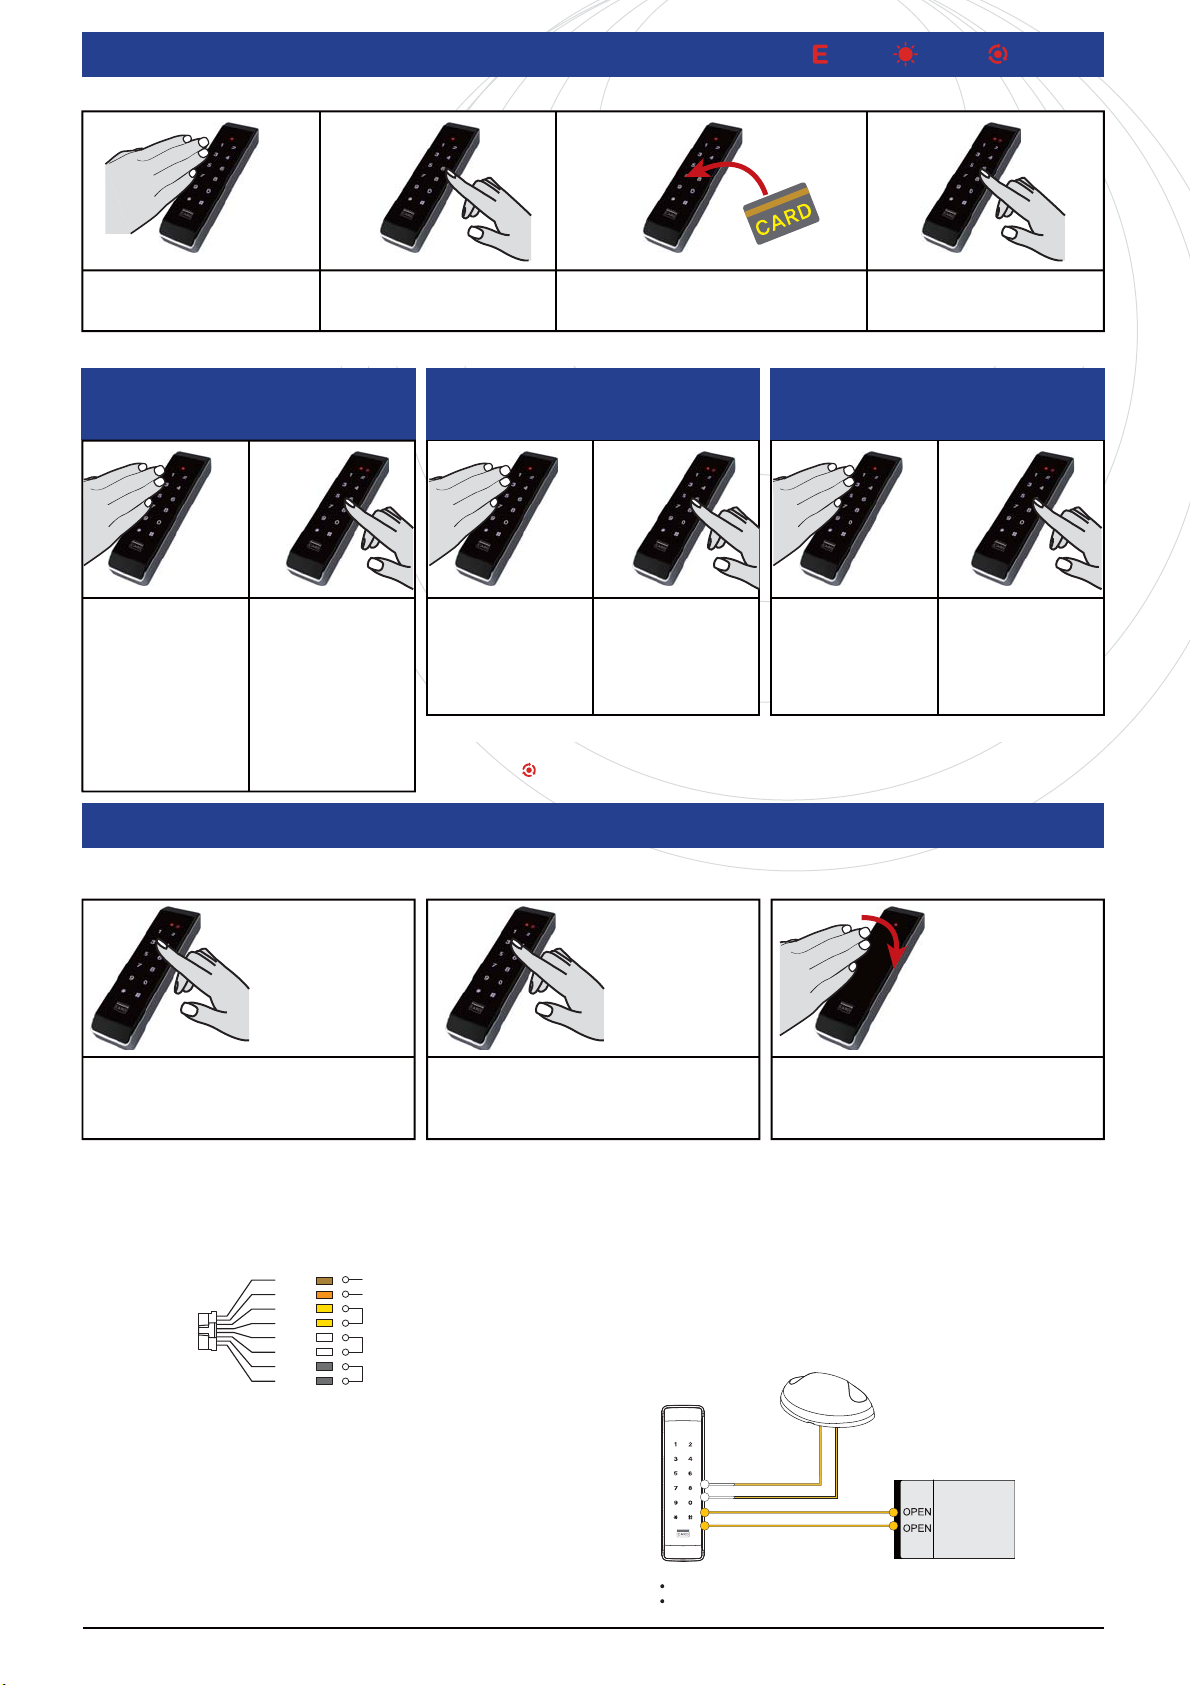
STEP 1
Card registration (Card type : ISO 14443)
Register by ISO 14443 (13.56MHz) Card only
: Error : Power : Action / Set
Touch the middle of the key pad. Key in the following digits 1,2,3,4
1,2,3,4 #1#
Access Card (Serial registration is possible)
OR
Card address(0001~1000) → Access Card
Note : Serial registration (If the first address is [0100], next address is [0101] automatically increase.)
STEP 2
Touch the middle of the
key pad.
Set a new 4 digit Master Code
for main menu access
Key in the following digits if
setting a master code for the
first time. 1,2,3,4 1,2,3,4
#
## 1,2,3,4# (insert new
*
master code) #
If changing a previous installed
master code, perform the
sequence above and replace
the default digits 1,2,3,4 with
the current master code.
STEP 3
Touch the middle of the
key pad.
Set a Keycode Password
Key in your 4 digital
Master Code twice,
then press #2# (insert 4 digit
keycode password) #
Note : Once the keycode password is saved, test by
entering the saved keycode and then press the # key.
The red icon on the HR80-HW should
be displayed showing it is operating correctly.
*
ADDITIONAL INSTRUCTIONS
(End)
*
Select your required function,
STEP 4
Touch the middle of the
key pad.
function (0) Card, Digital Key Pad or
function (1) Digital Key Pad only or
function (2) Card only
Key in your 4 digital
Master Code twice, then
press #10#
(insert 0 or 1 or 2) #
Default function (0)
Card, Digital Keypad mode.
*
Note : When you set the card function only, the keycode
doesn’t work. But if you want to change the function,
Tap HR80-HW several times then the number
will show up.
1. Function (0) Digital Push Pad Deactivation
2. Digital Push Pad Setting 3. Digital Push Pad Deleting
Function (1) Digital Push Pad Activation
Key in your 4 digital Master
Code twice, then press
#11# (insert 0 or 1) #
Default function (1) Digital Push Pad Activation
*
Every time you change, it will change set on and off
[Caution!] You must activate additional function before you
set digital push pad function
4. Adjusting Back Light (up to 9)
Key in 4 digit Master Code twice #12# 0~9 #
(0: off 9: Brightest / Default : 2)
*
5. Contact Time
Key in 4 digit Master Code twice #5# 01~60(1Sec.~60Sec.) #
(Default : 2Sec.)
Wiring
Brown
Orange
Yellow
Yellow
White
White
Gray
Gray
GND Output (Lock Power)
+12V Output(Lock Power)
Output Contact
External Input
Power (DC 12~30V, AC 12~24V)
*
6. Deleting a Card Address
Key in 4 digit Master Code twice #3# Card address(4digit or serial delete) #
7. Deleting a Card / Password
Card : Key in 4 digit Master Code twice #8#Access Card(Serial possible) #
Password : Key in 4 digit Master Code twice #8#(then 4 digit keycode you
want to delete) #
8. Contact Change (NO or NC)
*
Key in 4 digit Master Code twice #9# 0/1 # (0: NO, 1: NC / Default : NO)
*
*
Key in the following digits
(Enter your saved 4 digit
keycode)
followed by the keys 9
Digital Touch Pad will
be activated.
,
*
Every time you change, it will change set on and off
[Caution!] You must activate additional function before you
set digital push pad function
9. Clear All Cards / Passwords
Cards : Key in 4 digit Master Code twice #6#
Passwords : Key in 4 digit Master Code twice #7#
10. Restore factory settings
Key in your 4 digit Master Code twice
Once completed, your 4 digit Master Code is deleted.
To set a new Master Code, repeat step 2 above.
11. Sensor Lock function
Contact Output : NC
Sensor output contact
(white) (yellow)
Card reader output contact
Lock function on : Password + *
Lock function off : Password + #
Tap HR80-HW several
times then the number
will show up.
(Enter your saved 4
digit keycode)
followed by the
keys 9
*
#.
*
Automatic door controller
Hotron Ltd.
26 Dublin Street, Carlow, Ireland. Te l: +353 (0)59 914 0345 Fax: +353 (0)59 914 0543 Email: info@hotron.com Web: www.hotron.com
 Loading...