

Page 1

Instructions for use
WASHING MACHINE
GB
English,1
NL
Nederlands,37
WMD 742
F
Français,13
DE
Deutsch,25
Contents
Installation, 2-3
Unpacking and levelling
Connecting the electricity and water supplies
The first wash cycle
Technical data
Description of the washing machine, 4-5
Control panel
Display
Running a wash cycle, 6
Wash cycles and functions, 7
Table of wash cycles
Wash functions
Detergents and laundry, 8
Detergent dispenser drawer
Preparing the laundry
Special wash cycles
Load balancing system
Precautions and tips, 9
General safety
Disposal
Opening the porthole door manually
GB
Care and maintenance, 10
Cutting off the water or electricity supply
Cleaning the washing machine
Cleaning the detergent dispenser drawer
Caring for the door and drum of your appliance
Cleaning the pump
Checking the water inlet hose
Troubleshooting, 11
Service, 12
1
Page 2
Installation
GB
! This instruction manual should be kept in a safe place for
future reference. If the washing machine is sold, transferred
or moved, make sure that the instruction manual remains
with the machine so that the new owner is able to familiarise himself/herself with its operation and features.
! Read these instructions carefully: they contain vital infor-
mation relating to the safe installation and operation of the
appliance.
Unpacking and levelling
Unpacking
1. Remove the washing machine from its packaging.
2. Make sure that the washing machine has not been
damaged during the transportation process. If it has been
damaged, contact the retailer and do not proceed any
further with the installation process.
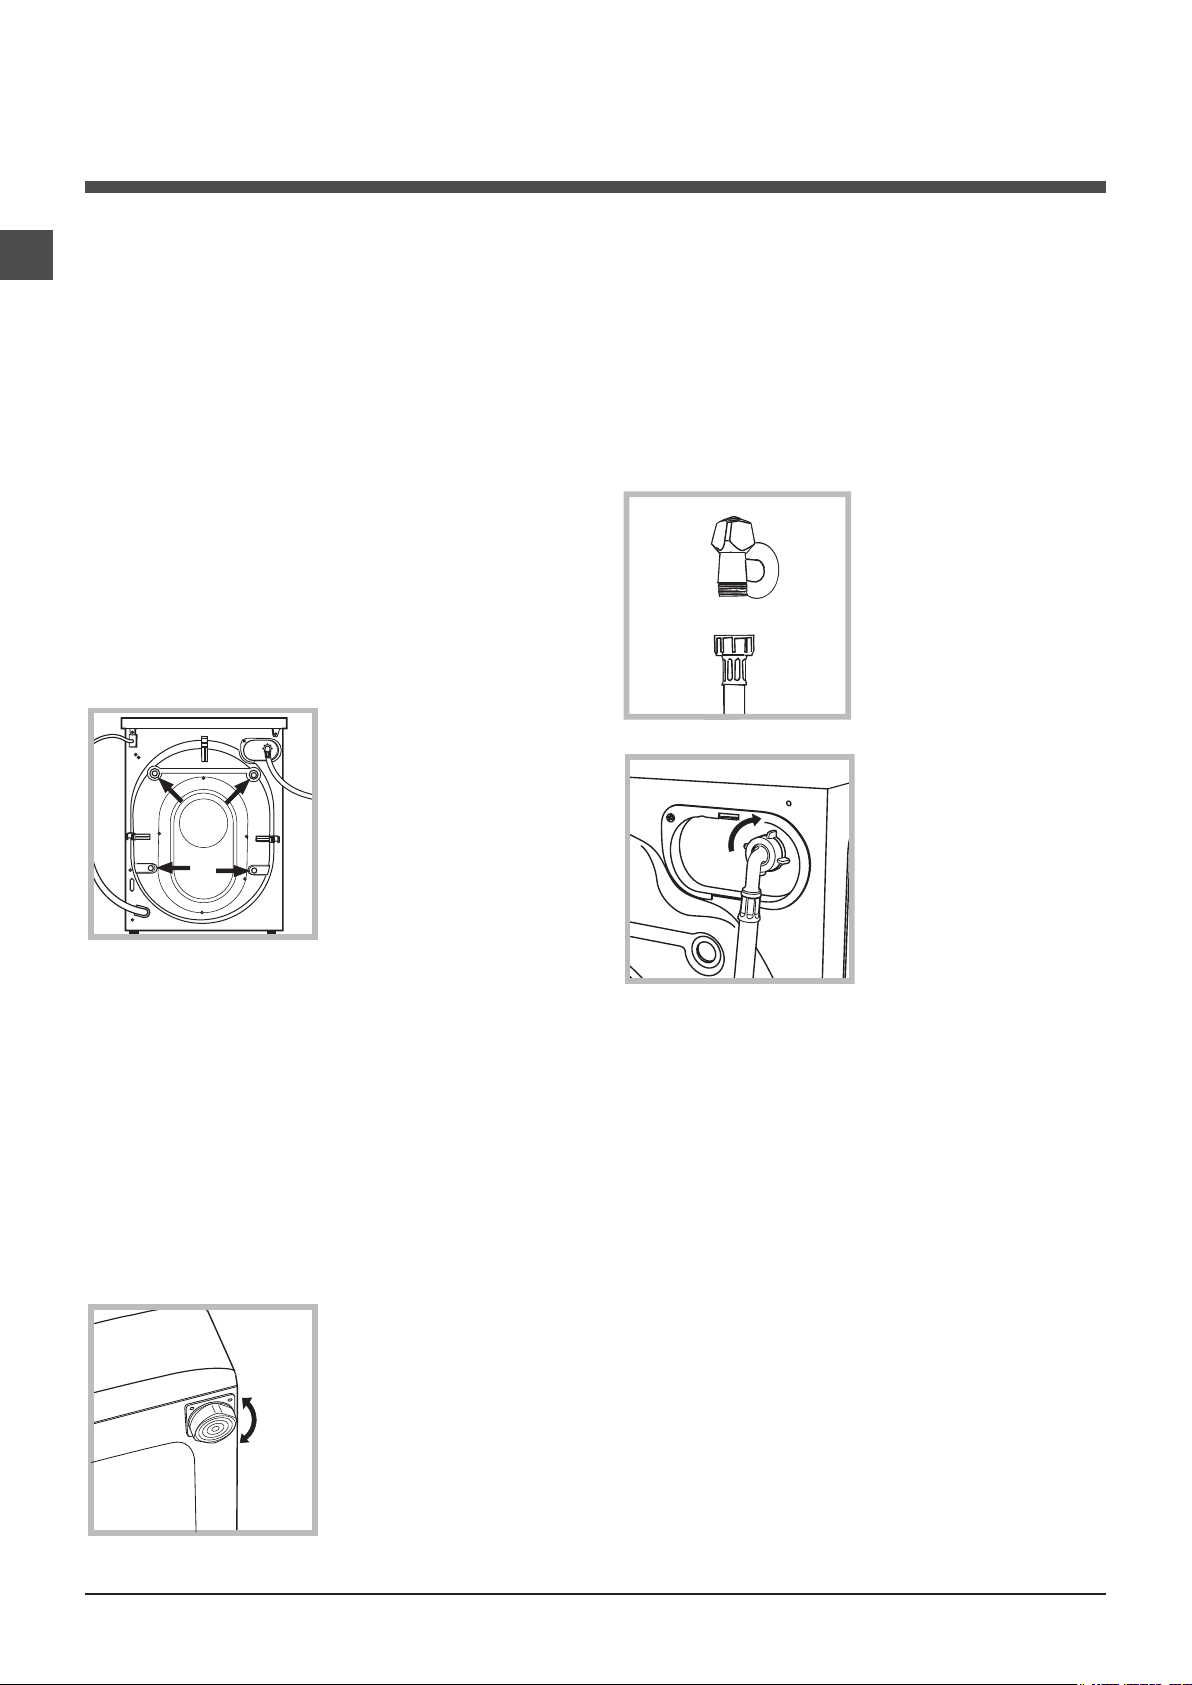
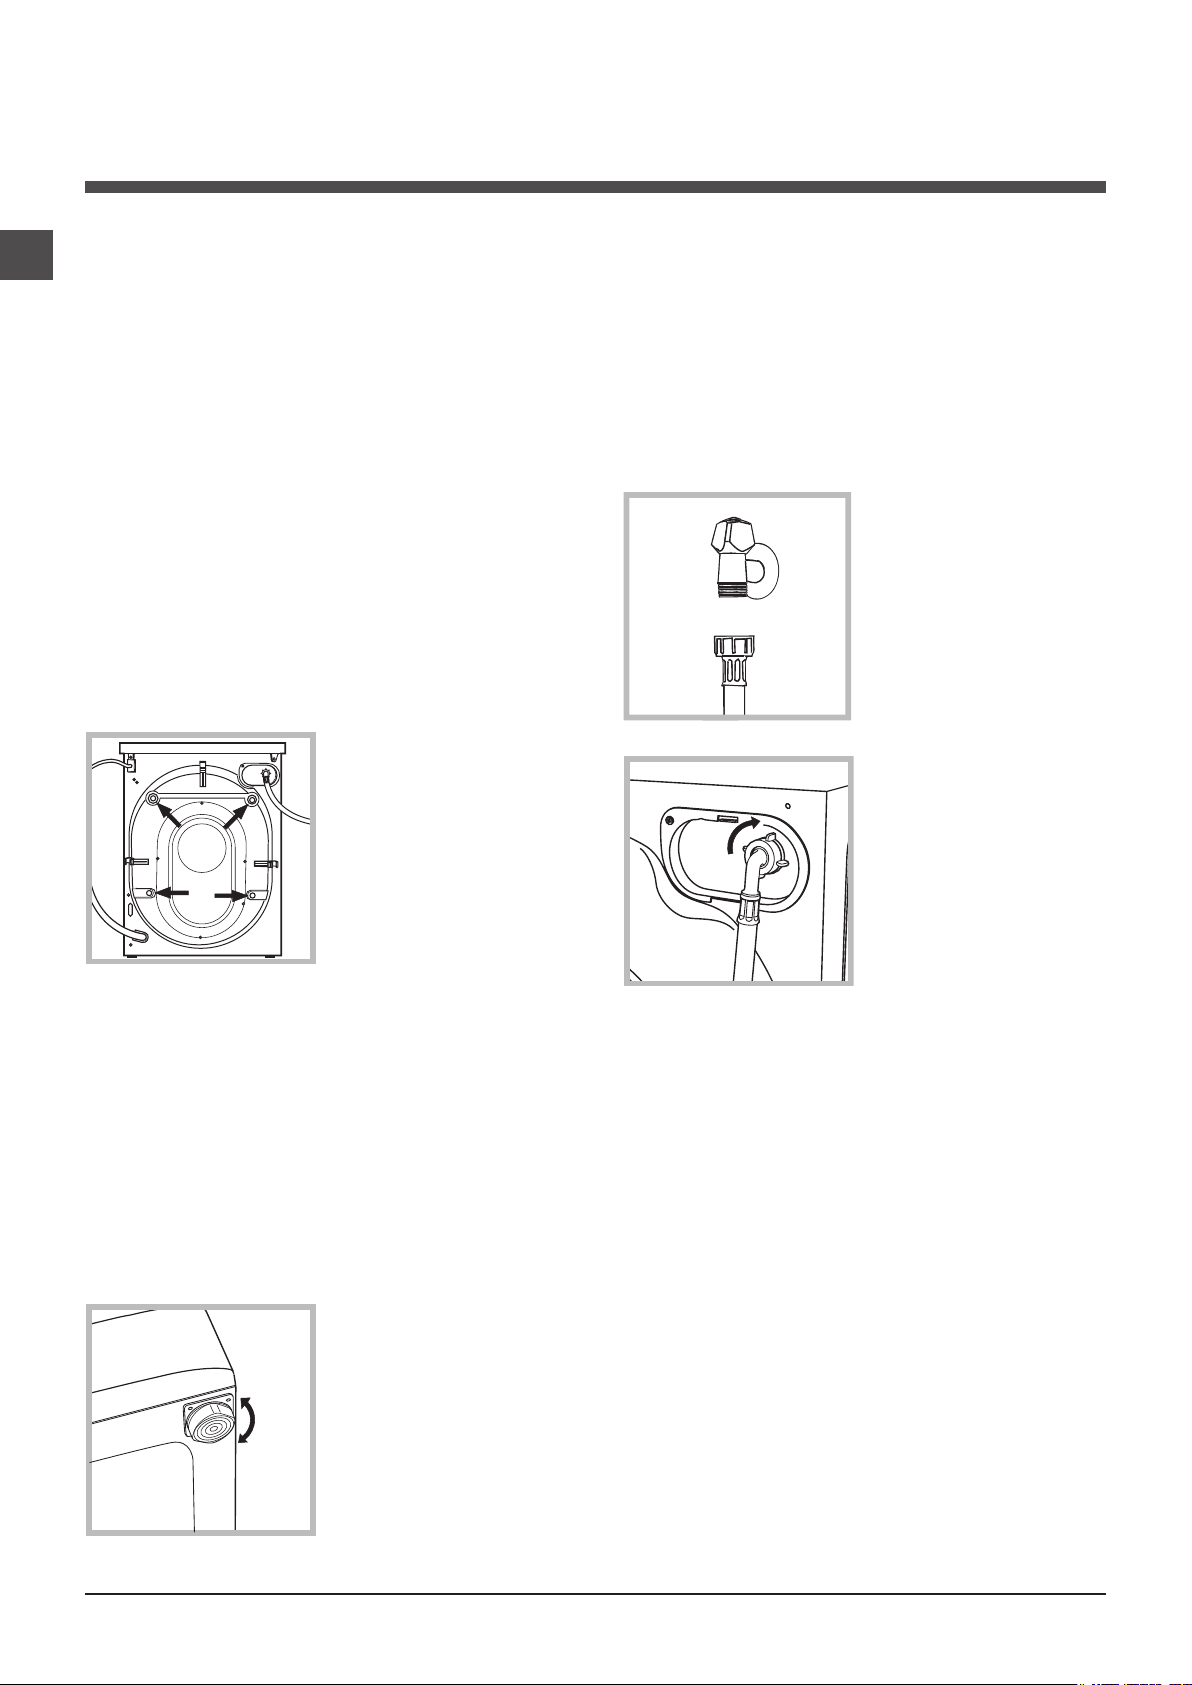
3. Remove the 4 protective
screws (used during transportation) and the rubber
washer with the corresponding spacer, located on the
rear part of the appliance
(see figure).
Levelling the machine correctly will provide it with stability,
help to avoid vibrations and excessive noise and prevent it
from shifting while it is operating. If it is placed on carpet or
a rug, adjust the feet in such a way as to allow a sufficient
ventilation space underneath the washing machine.
Connecting the electricity and water
supplies
Connecting the water inlet hose
1. Connect the supply pipe
by screwing it to a cold
water tap using a ¾ gas
threaded connection (see
figure).
Before performing the connection, allow the water to
run freely until it is perfectly
clear.
2. Connect the inlet hose
to the washing machine by
screwing it onto the corresponding water inlet of the
appliance, which is situated on the top right-hand
side of the rear part of the
appliance (see figure).
4. Close off the holes using the plastic plugs provided.
5. Keep all the parts in a safe place: you will need them
again if the washing machine needs to be moved to another location.
! Packaging materials should not be used as toys for
children.
Levelling
1. Install the washing machine on a flat sturdy floor, without
resting it up against walls, furniture cabinets or anything
else.
2. If the floor is not perfectly
level, compensate for any
unevenness by tightening
or loosening the adjustable front feet (see figure);
the angle of inclination,
measured in relation to the
worktop, must not exceed
2°.
3. Make sure that the hose is not folded over or bent.
! The water pressure at the tap must fall within the values
indicated in the Technical details table (see page 3).
! If the inlet hose is not long enough, contact a specialised
shop or an authorised technician.
! Never use second-hand hoses.
! Use the ones supplied with the machine.
2
Page 3
65 - 100 cm
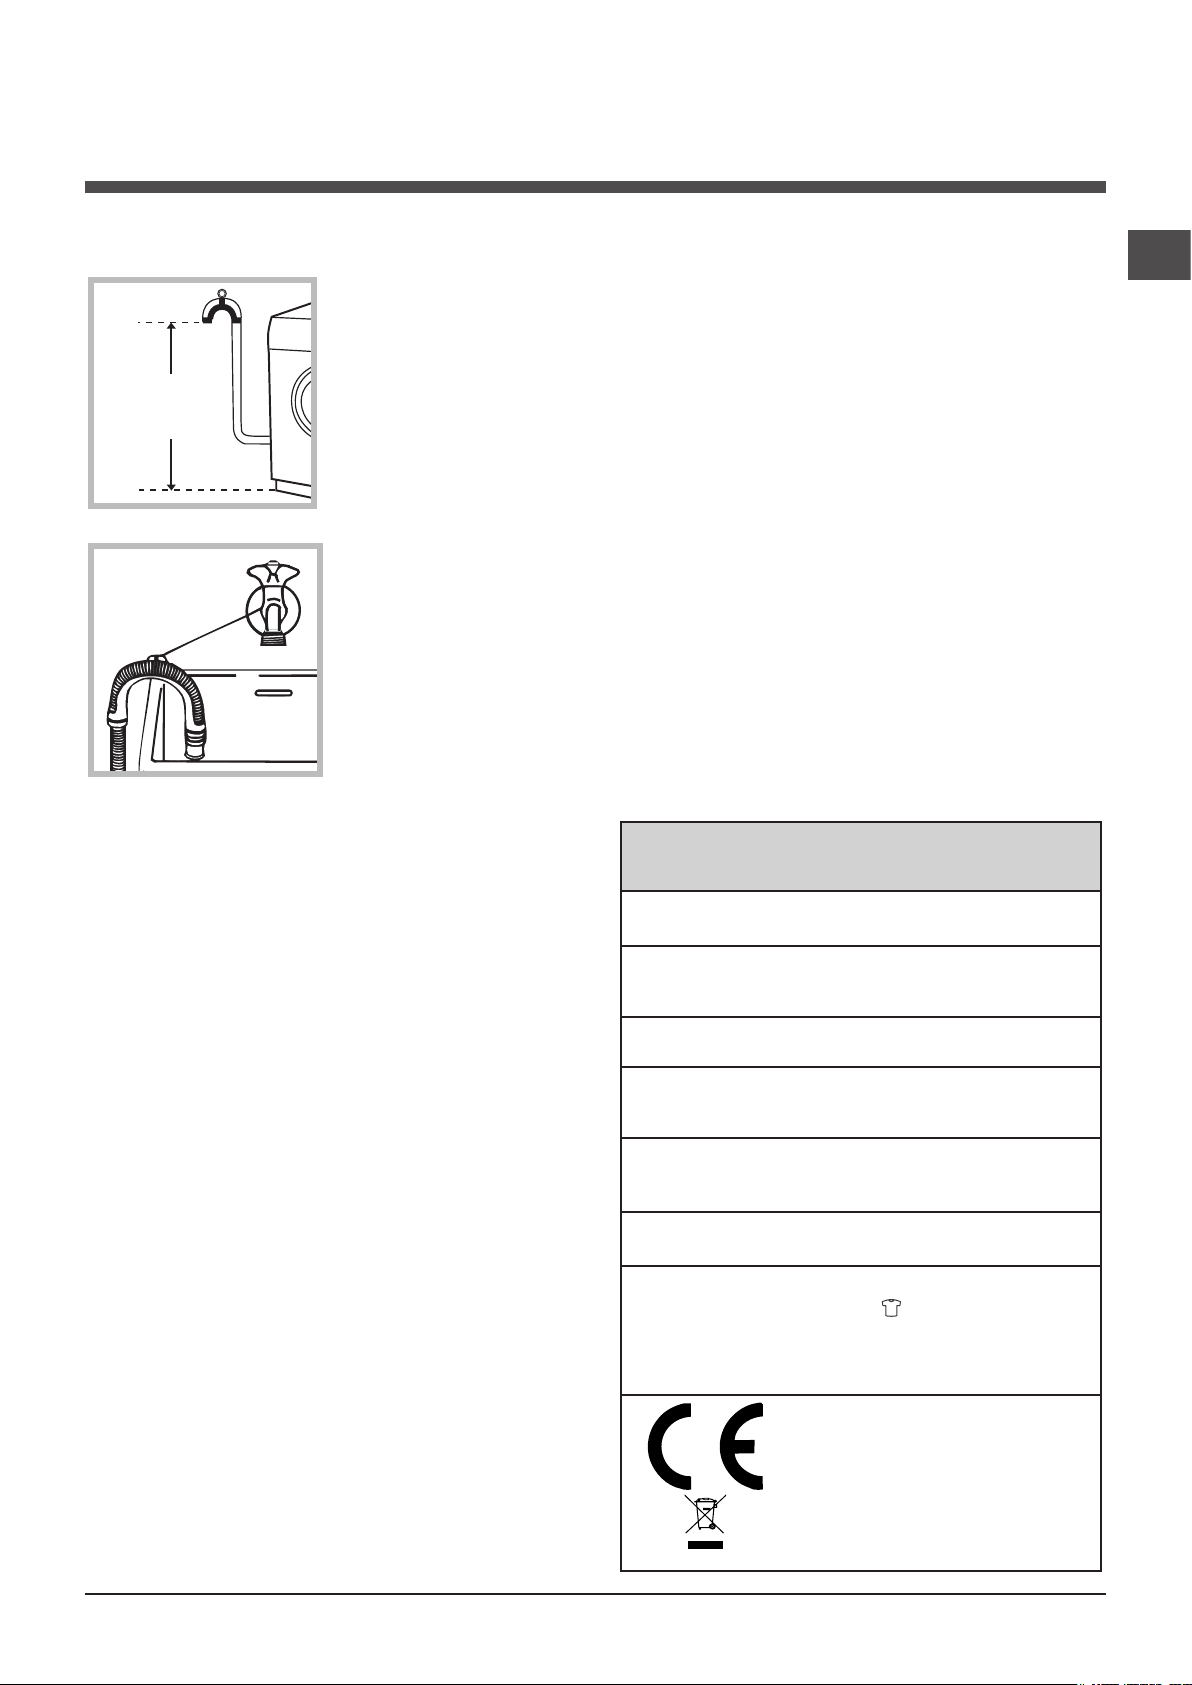
Connecting the drain hose
- 2004/108/EC (Electromagnetic Compatibility)
Connect the drain hose,
without bending it, to a drainage duct or a wall drain
located at a height between
65 and 100 cm from the
floor;
! Do not use extension cords or multiple sockets.
! The cable should not be bent or compressed.
! The power supply cable must only be replaced by autho-
rised technicians.
Warning! The company shall not be held responsible in the
event that these regulations are not respected.
The first wash cycle
GB
alternatively, rest it on
the side of a washbasin
or bathtub, fastening the
duct supplied to the tap
(see figure). The free end
of the hose should not be
underwater.
! We advise against the use of hose extensions; if it is
absolutely necessary, the extension must have the same
diameter as the original hose and must not exceed 150 cm
in length.
Electrical connections
Before plugging the appliance into the electricity socket,
make sure that:
• the socket is earthed and complies with all applicable
laws;
Once the appliance has been installed, and before you use
it for the first time, run a wash cycle with detergent and no
laundry, using the wash cycle “Auto Clean” (see “Cleaning
the washing machine”).
Technical data
Model
Dimensions
Capacity
Electrical
connections
WMD 742
width 59.5 cm
height 85 cm
depth 54 cm
from 1 to 7 kg
please refer to the technical data plate
fixed to the machine
• the socket is able to withstand the maximum power load
of the appliance as indicated on the Technical Data Plate
fixed on the machine;
• the power supply voltage falls within the values indicated
on the Technical Data Plate fixed on the machine;
• the socket is compatible with the plug of the washing
machine. If this is not the case, replace the socket or the
plug.
! The washing machine must not be installed outdoors,
even in covered areas. It is extremely dangerous to leave
the appliance exposed to rain, storms and other weather
conditions.
! When the washing machine has been installed, the elec-
tricity socket must be within easy reach.
Water connections
Spin speed
Test wash cycles
in accordance
with directives
1061/2010 and
1015/2010
maximum pressure 1 MPa (10 bar)
minimum pressure 0.05 MPa (0.5 bar)
drum capacity 52 litres
up to 1400 rotations per minute
programme
temperature 60°C (2nd press of the button);
temperature 40°C (3rd press of the button).
This appliance conforms to the following
EC Directives:
- 2006/95/EC (Low Voltage)
- 2002/96/EC
;
3
Page 4
Description of the washing machine
GB
Control panel
ON/OFF
WASH
Detergent dispenser drawer
Detergent dispenser drawer: used to dispense deter-
gents and washing additives (see “Detergents and laundry”).
CYCLE
SELECTOR
buttons
button
CLEANING
ACTION
button
DISPLAY
MY
CYCLE
button
ANTI
ALLERGY
RINSE
button
TEMPERATURE button : press to decrease the tem-
perature: the value will be shown on the display.
FUNCTION
buttons
DELAY
TIMER
button
SPIN SPEED
button
START/PAUSE
button with
indicator light
TEMPERATURE
button
CHILD LOCK
button
ON/OFF button : press this briefly to switch the machine on or off. The START/PAUSE indicator light, which
flashes slowly in a green colour shows that the machine is
switched on. To switch off the washing machine during the
wash cycle, press and hold the button for approximately 3
seconds; if the button is pressed briefly or accidentally the
machine will not switch off. If the machine is switched off
during a wash cycle, this wash cycle will be cancelled.
WASH CYCLE SELECTOR buttons: used to set the
desired wash cycle (see “Table of wash cycles”).
MY CYCLE button: press and hold the button to store a
cycle with your own set of preferences in the memory of
the machine. To recall a previously stored cycle, press the
MY CYCLE button.
FUNCTION buttons: press the button to select the
desired function. The corresponding indicator light on the
display will switch on.
CLEANING ACTION
wash intensity.
ANTI ALLERGY RINSE
the desired rinse type.
SPIN button : press to reduce or completely exclude
the spin cycle - the value is indicated on the display.
button : to select the desired
button : press to select
CHILD LOCK button : to activate the control panel
lock, press and hold the button for approximately 2
seconds. When the symbol is illuminated, the control
panel is locked. This means it is possible to prevent wash
cycles from being modified accidentally, especially where
there are children in the home. To deactivate the control
panel lock, press and hold the button for approximately 2
seconds.
DELAY TIMER button : press to set a delayed start
time for the selected wash cycle. The delay time will be
shown on the display.
START/PAUSE button with indicator light: when the green indicator light flashes slowly, press the button to start a
wash cycle. Once the cycle has started the indicator light
will remain lit in a fixed manner. To pause the wash cycle,
press the button again; the indicator light will flash in an
orange colour. If the symbol is not illuminated, the door
may be opened. To start the wash cycle from the point at
which it was interrupted, press the button again.
Standby mode
This washing machine, in compliance with new energy saving regulations, is fitted with an automatic standby system
which is enabled after about 30 minutes if no activity is
detected. Press the ON-OFF button briefly and wait for the
machine to start up again.
Consumption in off-mode: 1 W
Consumption in Left-on: 1 W
4
Page 5
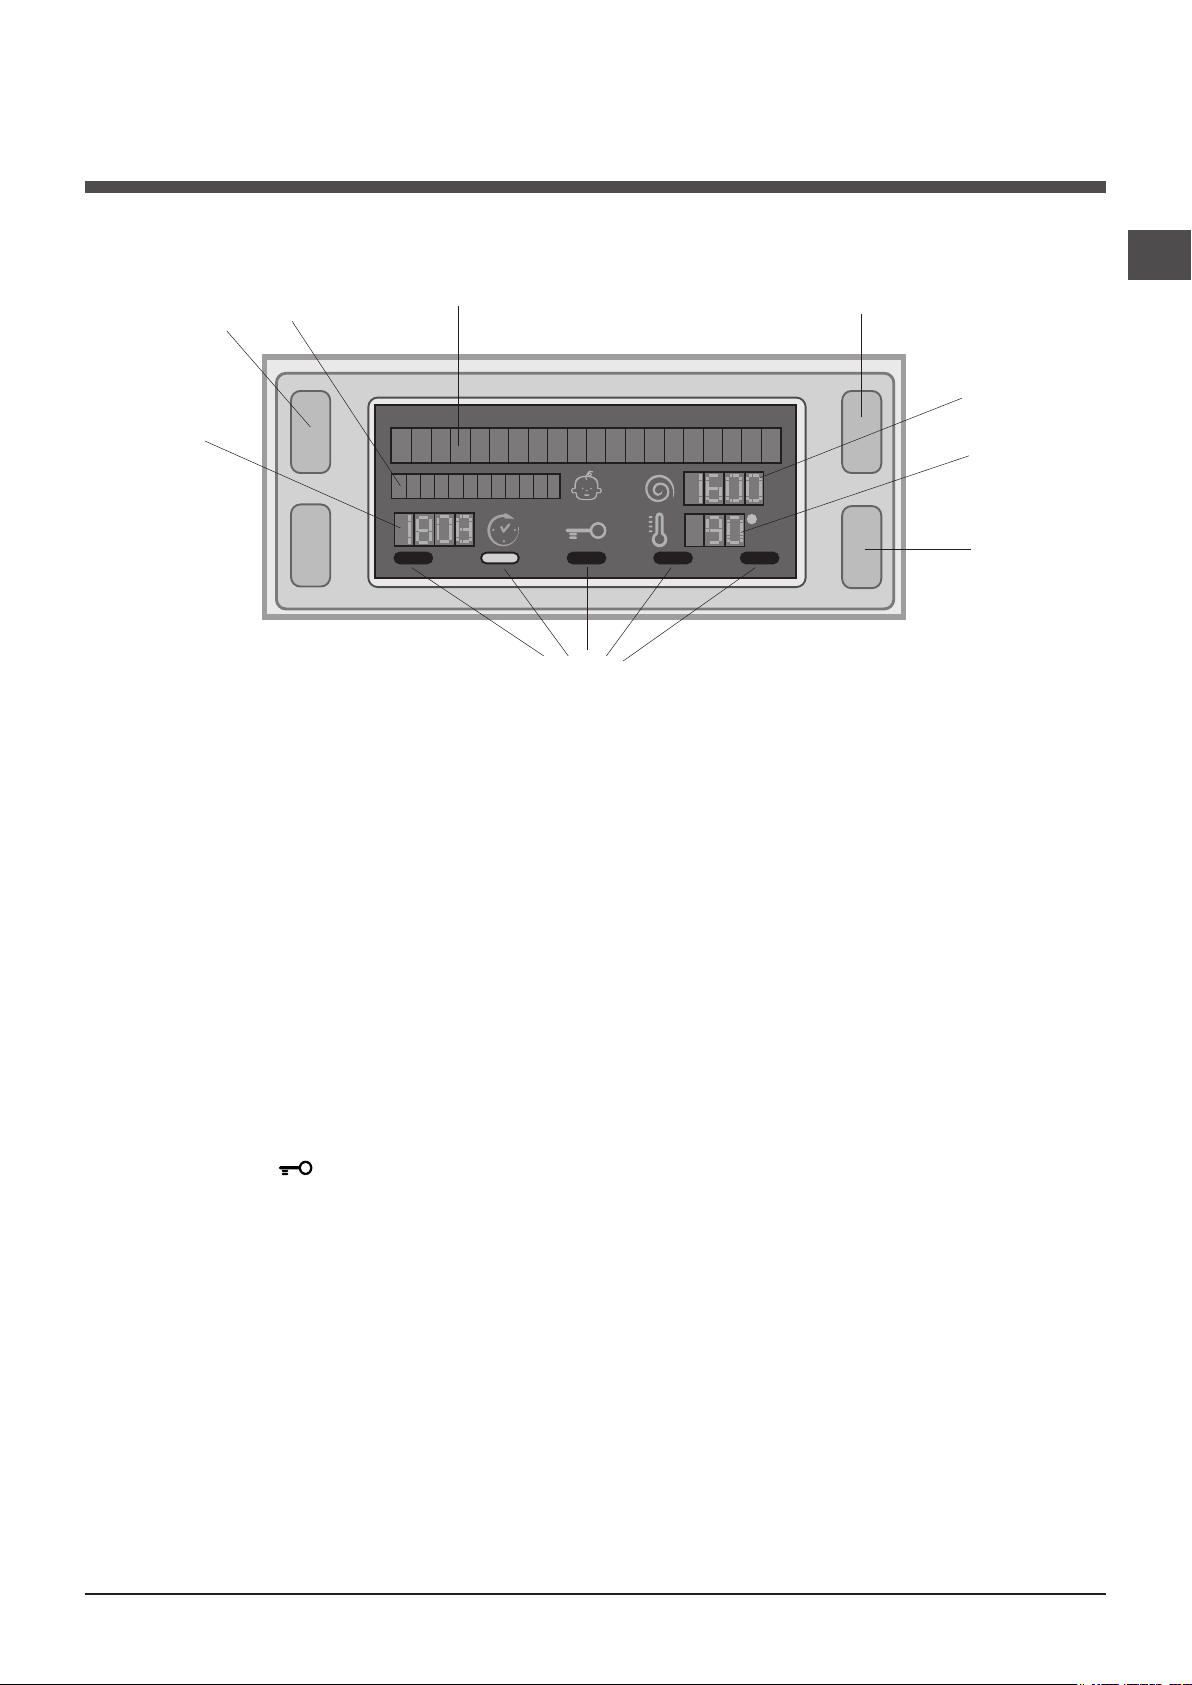
Display
GB
Z
B
A
X
D
C
E
Y
F
The display is useful when programming the machine and provides a great deal of information.
The two upper strings A and B provide details of the wash cycle selected, the wash cycle phase in progress and all information relating to the progress status of the wash cycle.
String C shows the time remaining until the end of the wash cycle in progress and, if a DELAYED START has been set, the
time remaining until the start of the selected wash cycle.
String D shows the maximum spin speed value (this depends on the selected wash cycle); if the wash cycle does not include
a spin cycle, the string remains unused.
String E shows the maximum temperature value which may be selected (this depends on the wash cycle used); if the temperature of the wash cycle cannot be modified, the string remains unused.
Indicator lights F correspond to the functions and light up when the selected function is compatible with the set wash cycle.
Door locked symbol
If the symbol is lit, this indicates that the washing machine door is locked to prevent it from being opened accidentally. To
prevent any damage from occurring, wait for the symbol to switch itself off before opening the appliance door.
N.B.: if the DELAYE TIMER function has been activated, the door cannot be opened; pause the machine by pressing the
START/PAUSE button if you wish to open it.
! The first time the machine is switched on, you will be asked to select the language and the display will automatically show
the language selection menu.
To select the desired language press the X and Y buttons; to confirm the selection press the Z button.
To change the language switch off the machine and press buttons X, Y, Z simultaneously until an alarm is heard: the
language-selection menu will be displayed again.
5
Page 6

Running a wash cycle
GB
1. SWITCH THE MACHINE ON. Press the On/Off
button ; the text POWER ON will appear on the
display and the START/PAUSE indicator light will flash
slowly in a green colour.
2. LOAD THE LAUNDRY. Open the porthole door.
Load the laundry, making sure you do not exceed
the maximum load value indicated in the table of
programmes on the following page.
3. MEASURE OUT THE DETERGENT. Open the
detergent dispenser drawer and pour the detergent into
the relevant compartments as described in “Detergents
and laundry”.
4. CLOSE THE DOOR.
5. SELECT THE WASH CYCLE. Press one of the WASH
CYCLE SELECTOR buttons to select the required wash
cycle; the name of the wash cycle will appear on the
display. A temperature and spin speed is set for each
wash cycle; these may be adjusted. The duration of the
cycle will appear on the display.
6. CUSTOMISE THE WASH CYCLE. Use the relevant
buttons:
Modifying the temperature and/or spin
speed. The machine automatically selects the
maximum temperature and spin speed set for the
selected wash cycle; these values cannot therefore
be increased. The temperature can be decreased by
pressing the button, until the cold wash “OFF”
setting is reached. The spin speed may be progressively
reduced by pressing the button, until it is completely
excluded (the “OFF” setting). If these buttons are
pressed again, the maximum values are restored.
! Exception: if the
programme is selected, the temperature can be
increased up to a value of 90°C.
Setting a delayed start.
To set a delayed start for the selected programme,
press the corresponding button repeatedly until the
required delay period has been reached. When this
option is enabled, the symbol lights up on the
display. To remove the delayed start function press the
button until the text “OFF” appears on the display.
Set the desired wash intensity.
Option makes it possible to optimise washing
based on the level of soil in the fabrics and on desired
wash cycle intensity.
Select the wash programme: the cycle will be
automatically set to “Normal” as optimised for garments
with an average level of soil (this setting is not applicable to
the “Wool” cycle, which is automatically set to “Delicate”).
For heavily-soiled garments press button until
the “Super Wash” level is reached. This level ensures
a high-performance wash due to a larger quantity of
water used in the initial phase of the cycle and due to
increased drum rotation. It is useful when removing the
most stubborn stains.
It can be used with or without bleach. If you wish to
bleach the items insert the additional compartment
(4) into compartment 1. When pouring the bleach, be
careful not to exceed the “max” level marked on the
central pivot (see figure pag. 8).
(60°C) (2nd press of the button)
For lightly-soiled garments or a more delicate treatment
of the fabrics, press button “ ” until the “Delicate”
level is reached. The cycle will reduce the drum rotation
to ensure washing results are perfect for delicate
garments. If the current selection can be neither set nor
changed, the display will show “Not allowed”.
Set the rinse type.
Option makes it possible to select the desired rinse
type for sensitive skin. Press the button once for the
“Extra Rinse” level, which makes it possible to select
an additional rinse after the standard cycle rinse and
remove all traces of detergent. Press the button again
for the “Sensitive Skin” level, which makes it possible to
select two additional rinses to the standard cycle rinses; it
is recommended for very sensitive skin. Press the button
for the third time for the “Anti allergy Rinse” level, which
makes it possible to select three additional rinses to the
standard cycle rinses and remove major allergens such as
pollen, mites, cat and dog hair. Press the button again to
go back to the “Normal Rinse” rinse type. If the current
adjustment can be neither set nor changed, the display will
show “Not allowed”.
Modifying the cycle settings.
• Press the button to enable the function; the indicator
light corresponding to the button will switch on.
• Press the button again to disable the function; the
indicator light will switch off.
! If the selected function is not compatible with the
programmed wash cycle, the indicator light will flash
and the function will not be activated.
! If the selected function is not compatible with
another function which has been selected previously,
the indicator light corresponding to the first function
selected will flash and only the second function will
be activated; the indicator light corresponding to the
enabled function will remain lit.
! The functions may affect the recommended load value
and/or the duration of the cycle.
7. START THE PROGRAMME. Press the START/PAUSE
button. The corresponding indicator light will become
green, remaining lit in a fixed manner, and the door will be
locked (the DOOR LOCKED symbol will be on). During
the wash cycle, the name of the phase in progress will
appear on the display. To change a wash cycle while
it is in progress, pause the washing machine using the
START/PAUSE button (the START/PAUSE indicator light
will flash slowly in an orange colour); then select the
desired cycle and press the START/PAUSE button again.
To open the door while a cycle is in progress, press
the START/PAUSE button; if the DOOR LOCKED
symbol is switched off the door may be opened. Press
the START/PAUSE button again to restart the wash cycle
from the point at which it was interrupted.
8. THE END OF THE WASH CYCLE. This will be
indicated by the text “END OF CYCLE” on the display;
when the DOOR LOCKED symbol switches off
the door may be opened. Open the door, unload the
laundry and switch off the machine.
! If you wish to cancel a cycle which has already begun,
press and hold the button. The cycle will be stopped
and the machine will switch off.
6
Page 7
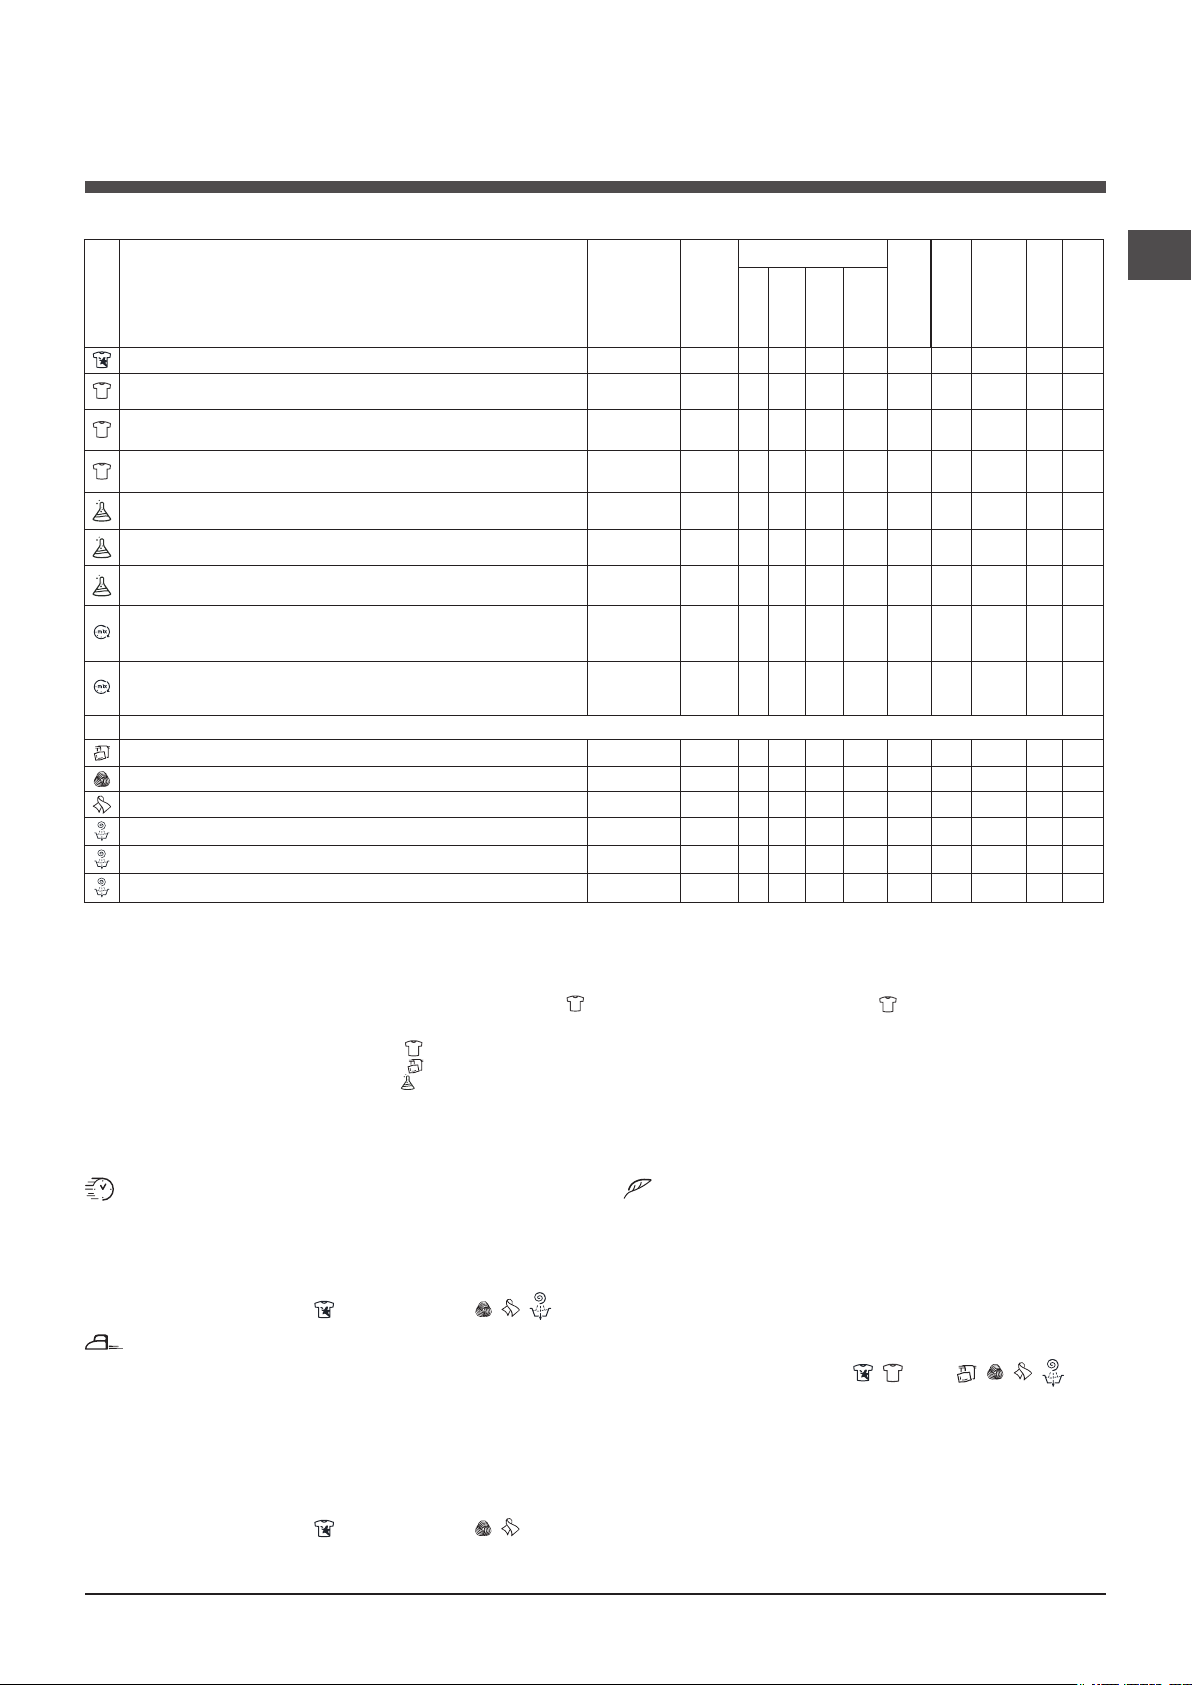
Wash cycles and functions
Table of wash cycles
Detergents
Description of the wash cycle
Wash cycles
Anti Stain
Cotton Prewash (1st press of the button): extremely soiled whites
and resistant colours.
White Cottons (1) (2nd press of the button): heavily soiled whites
and delicate colours.
Cottons Coloured (1-2) (3rd press of the button): lightly soiled whi-
tes and delicate colours.
Synthetics Resistant (1st press of the button): heavily soiled resi-
stant colours.
Synthetics Resistant (4) (1st press of the button): heavily soiled
resistant colours.
Synthetics Delicate (2nd press of the button): lightly soiled resistant
colours.
Fastwash 60' (1st press of the button): to refresh normal soiled
garments quickly (not suitable for wool, silk and clothes which
require washing by hand).
Fastwash 30' (2nd press of the button): to refresh lightly soiled
garments quickly (not suitable for wool, silk and clothes which
require washing by hand).
M
My Cycle: allows for any wash cycle to be stored.
Bed & Bath (3): washes bathroom laundry and bedlinen. 60° 1400 -
Woolmark Platinum (Wool): for wool, cashmere, etc. 40° 800 -
Ultradelicates
Fast spin Cottons (1st press of the button) - 1400 - - - - 7 - - - 16’
Rinse Cottons (2nd press of the button) - 1400 - - -
Pump out (3rd press of the button) - 0 - - - - 7 - - - 2’
The length of cycle shown on the display or in this booklet is an estimation only and is calculated assuming standard working conditions. The actual duration can
vary according to factors such as water temperature and pressure, the amount of detergent used, the amount and type of load inserted, load balancing and any
wash options selected.
Max.
temp.
(°C)
40° 1400 -
90° 1400
60°
(Max. 90°C)
40° 1400 -
60° 800 -
40° 800 -
40° 800 -
60° 1400 -
30° 800 -
30° 0 -
Max.
speed
(rpm)
1400 -
PreWash
Wash
Bleach
-
-
-
-
-
-
-
(kg)
Max. load
Fabric
softener
4 - - - 180’
7 53 2,21 78 170’
7 53 1,10 58 190’
7 53 0,99 82 185’
3 44 0,93 47 110’
3 44 0,57 46 95’
3 - - - 70’
3,5 53 0,81 40 60’
3 71 0,15 35 30’
7 - - - 125’
1,5 - - - 70’
1 - - - 80’
7 - - - 36’
Energy
Residual
dampness %
kWh
consumption
Total water lt
GB
tion
Cycle dura-
For all Test Institutes:
1) Test wash cycle in compliance with directive 1061/2010: set wash cycle 60°C (2nd press of the button); set wash cycle 40°C (3rd press of the button).
This cycle is designed for cotton loads with a normal soil level and is the most efficient in terms of both electricity and water consumption; it should be used for garments which can be
washed at 60°C and 40°C. The actual washing temperature may differ from the indicated value.
2) Long wash cycle for cottons: set wash cycle 40°C (3rd press of the button).
3) Short wash cycle for cottons: set wash cycle ; temperature of 40°C (press TEMPERATURE button).
4) Long wash cycle for synthetics: set wash cycle 60°C (1st press of the button); temperature of 40°C (press TEMPERATURE button).
Wash functions
Time Saver
If you select this option, the wash cycle duration will be reduced by up to 50%, depending on the selected cycle, thereby
guaranteeing simultaneous water and energy saving. Use this
cycle for lightly soiled garments.
! It cannot be used with the , “Fastwash 60’”, , , .
Easy Iron
By selecting this function, the wash and spin cycles will be
modified in order to reduce the formation of creases.
At the end of the cycle the washing machine will perform
slow rotations of the drum; the “Easy Iron” indicator light
will flash and the text “END OF CYCLE” will appear on the
display. To end the cycle, press the START/PAUSE button
or the “Easy Iron” button.
! It cannot be used with the , “Fastwash 30’”, , ,
“Fast spin Resistents” and “Pump out”.
Eco Wash
The Eco Wash function saves energy by not heating the
water used to wash your laundry – an advantage both to
the environment and to your energy bill. Instead, intensified
wash action and water optimisation ensure great wash
results in the same average time of a standard cycle.
For the best washing results we recommend the usage of
a liquid detergent.
! It cannot be used with the , (90°C), , , , .
7
Page 8
Detergents and laundry
M
AX
1
2
4
3
A
B
GB
Detergent dispenser drawer
Good washing results also depend on the correct dose of
detergent: adding too much detergent will not necessarily
result in a more efficient wash, and may in fact cause a
build up on the inside of your appliance and contribute to
environmental pollution.
! Use powder detergent for white cotton garments, for prewashing, and for washing at temperatures over 60°C.
! Follow the instructions given on the detergent packaging.
! Do not use hand washing detergents; they create too
much foam.
Open the detergent dispenser drawer and pour
in the detergent or washing
additive, as follows.
compartment 1: Pre-wash detergent (powder)
Before pouring in the detergent, make sure that extra compartment 4 has been removed.
compartment 2: Detergent for the wash cycle
(powder or liquid)
If liquid detergent is used, it is recommended that the
removable plastic partition A (supplied) be used for proper
dosage.
If powder detergent is used, place the partition into slot B.
compartment 3: Additives (fabric softeners, etc.)
The fabric softener should not overflow the grid.
extra compartment 4: Bleach
Preparing the laundry
• Divide the laundry according to:
- the type of fabric/the symbol on the label
- the colours: separate coloured garments from whites.
• Empty all garment pockets and check the buttons.
• Do not exceed the listed values, which refer to the weight
of the laundry when dry:
Durable fabrics: max. 7 kg
Synthetic fabrics: max. 3 kg
Wool: max. 1,5 kg
Silk: max. 1 kg
How much does your laundry weigh?
Special wash cycles
Anti Stain : this programme is suitable to heavily-soiled
garments with resistant colours. It ensures a washing
class that is higher than the standard class (A class). When
running the programme, do not mix garments of different
colours. We recommend the use of powder detergent.
Pre-treatment with special additives is recommended if
there are obstinate stains.
Bed & Bath: use programme to wash bed linen and
towels in one single cycle: it optimises softener performance and helps you save time and energy. We recommend
the use of powder detergent.
Wool: the wool wash cycle on this Hotpoint-Ariston
machine has been tested and approved by The Woolmark
Company for washing wool garments labelled as hand
washable provided that the garments are washed
according to the instructions on the garment label and
those issued by the manufacturer of this washing machine.
Hotpoint-Ariston is the first washing machine brand to be
approved by The Woolmark Company for Apparel CarePlatinum for its washing performance and consumption of
energy and water. (M1126)
Utradelicates: use programme to wash very delicate
garments having strasses or sequins.
To wash Silk garments and Curtains select the cycle
and set the “Delicate” level from option .
We recommend turning the garments inside out before
washing and placing small items into the special bag
for washing delicates. Use liquid detergent on delicate
garments for best results.
Load balancing system
Before every spin cycle, to avoid excessive vibrations and
to distribute the load in a uniform manner, the drum rotates
continuously at a speed which is slightly greater than the
washing rotation speed. If, after several attempts, the load
is not balanced correctly, the machine spins at a reduced
spin speed. If the load is excessively unbalanced, the
washing machine performs the distribution process instead
of spinning. To encourage improved load distribution and
balance, we recommend small and large garments are
mixed in the load.
1 sheet 400-500 g
1 pillow case 150-200 g
1 tablecloth 400-500 g
1 bathrobe 900-1200 g
1 towel 150-250 g
8
Page 9
Precautions and tips
20
! This washing machine was designed and constructed in
accordance with international safety regulations. The following information is provided for safety reasons and must
therefore be read carefully.
General safety
• This appliance was designed for domestic use only.
• This appliance is not intended for use by persons (including children) with reduced physical, sensory or mental
capabilities, or lack of experience and knowledge, unless
they have been given supervision or instruction concerning use of the appliance by a person responsible for
their safety. Children should be supervised to ensure that
they do not play with the appliance.
• Do not touch the machine when barefoot or with wet or
damp hands or feet.
• Do not pull on the power supply cable when unplugging
the appliance from the electricity socket. Hold the plug
and pull.
• Do not open the detergent dispenser drawer while the
machine is in operation.
• Do not touch the drained water as it may reach extremely high temperatures.
• Never force the porthole door. This could damage the safety
lock mechanism designed to prevent accidental opening.
• If the appliance breaks down, do not under any circumstances access the internal mechanisms in an attempt
to repair it yourself.
• Always keep children well away from the appliance while
it is operating.
• The door can become quite hot during the wash cycle.
• If the appliance has to be moved, work in a group of two
or three people and handle it with the utmost care. Never
try to do this alone, because the appliance is very heavy.
• Before loading laundry into the washing machine, make
sure the drum is empty.
Disposal
• Disposing of the packaging materials: observe local regu-
lations so that the packaging may be re-used.
• The European Directive 2002/96/EC on Waste Electrical
and Electronic Equipment, requires that old household
electrical appliances must not be disposed of in the normal
unsorted municipal waste stream. Old appliances must be
collected separately in order to optimise the recovery and
recycling of the materials they contain and reduce the impact on human health and the environment. The crossed
out “wheeled bin” symbol on the product reminds you of
your obligation, that when you dispose of the appliance it
must be separately collected. Consumers should contact
their local authority or retailer for information concerning the
correct disposal of their old appliance.
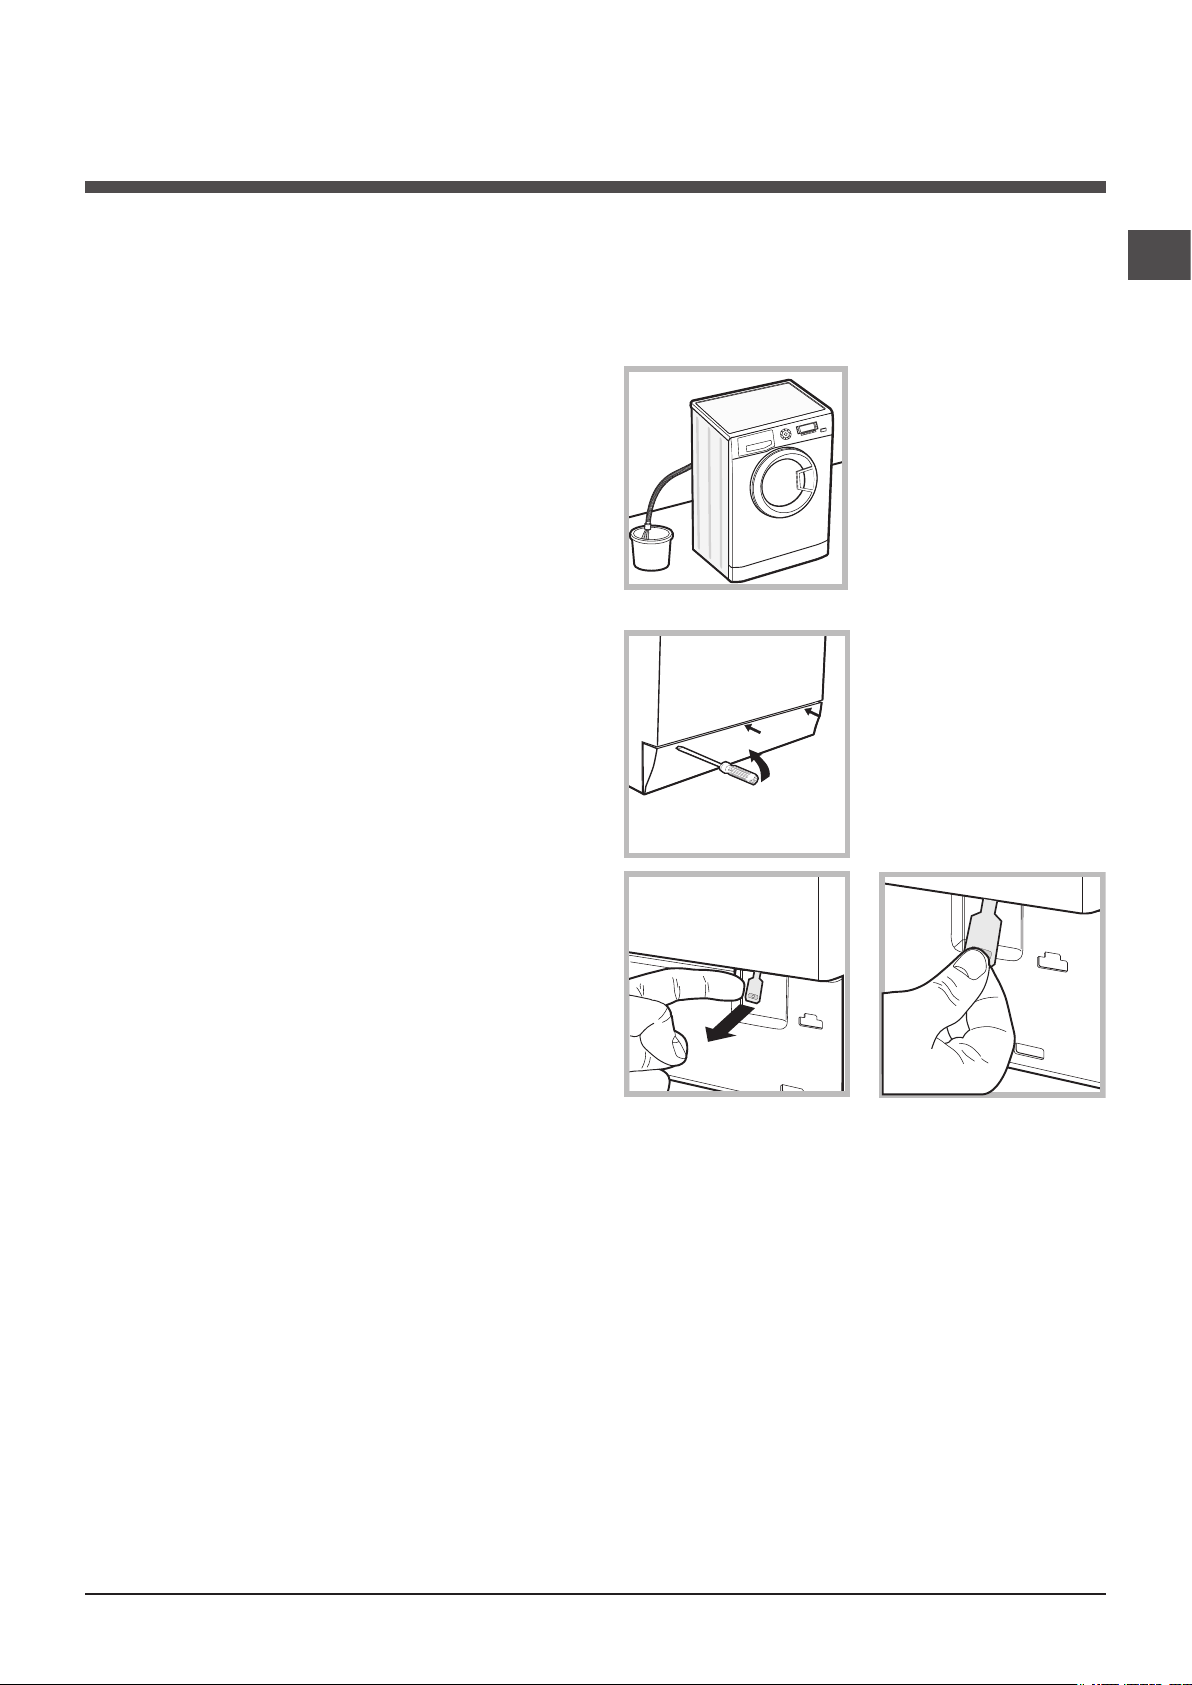
Opening the porthole door manually
In the event that it is not possible to open the porthole
door due to a powercut, and if you wish to remove the
laundry, proceed as follows:
1. remove the plug from the
electrical socket.
2. make sure the water level
inside the machine is lower
than the door opening; if it
is not, remove excess water
using the drain hose, collecting it in a bucket as indicated
in the figure.
3. using a screwdriver, remove the cover panel on the lower front part of the washing
machine (see figure).
4. pull outwards using the tab as indicated in the figure,
until the plastic tie-rod is freed from its stop position; pull
downwards and open the door at the same time.
5. reposition the panel, making sure the hooks are securely
in place before you push it onto the appliance.
GB
9
Page 10
Care and maintenance
1
2
A
B
GB
Cutting off the water and electricity
supplies
• Turn off the water tap after every wash cycle. This will limit
wear on the hydraulic system inside the washing machine
and help to prevent leaks.
• Unplug the washing machine when cleaning it and during all maintenance work.
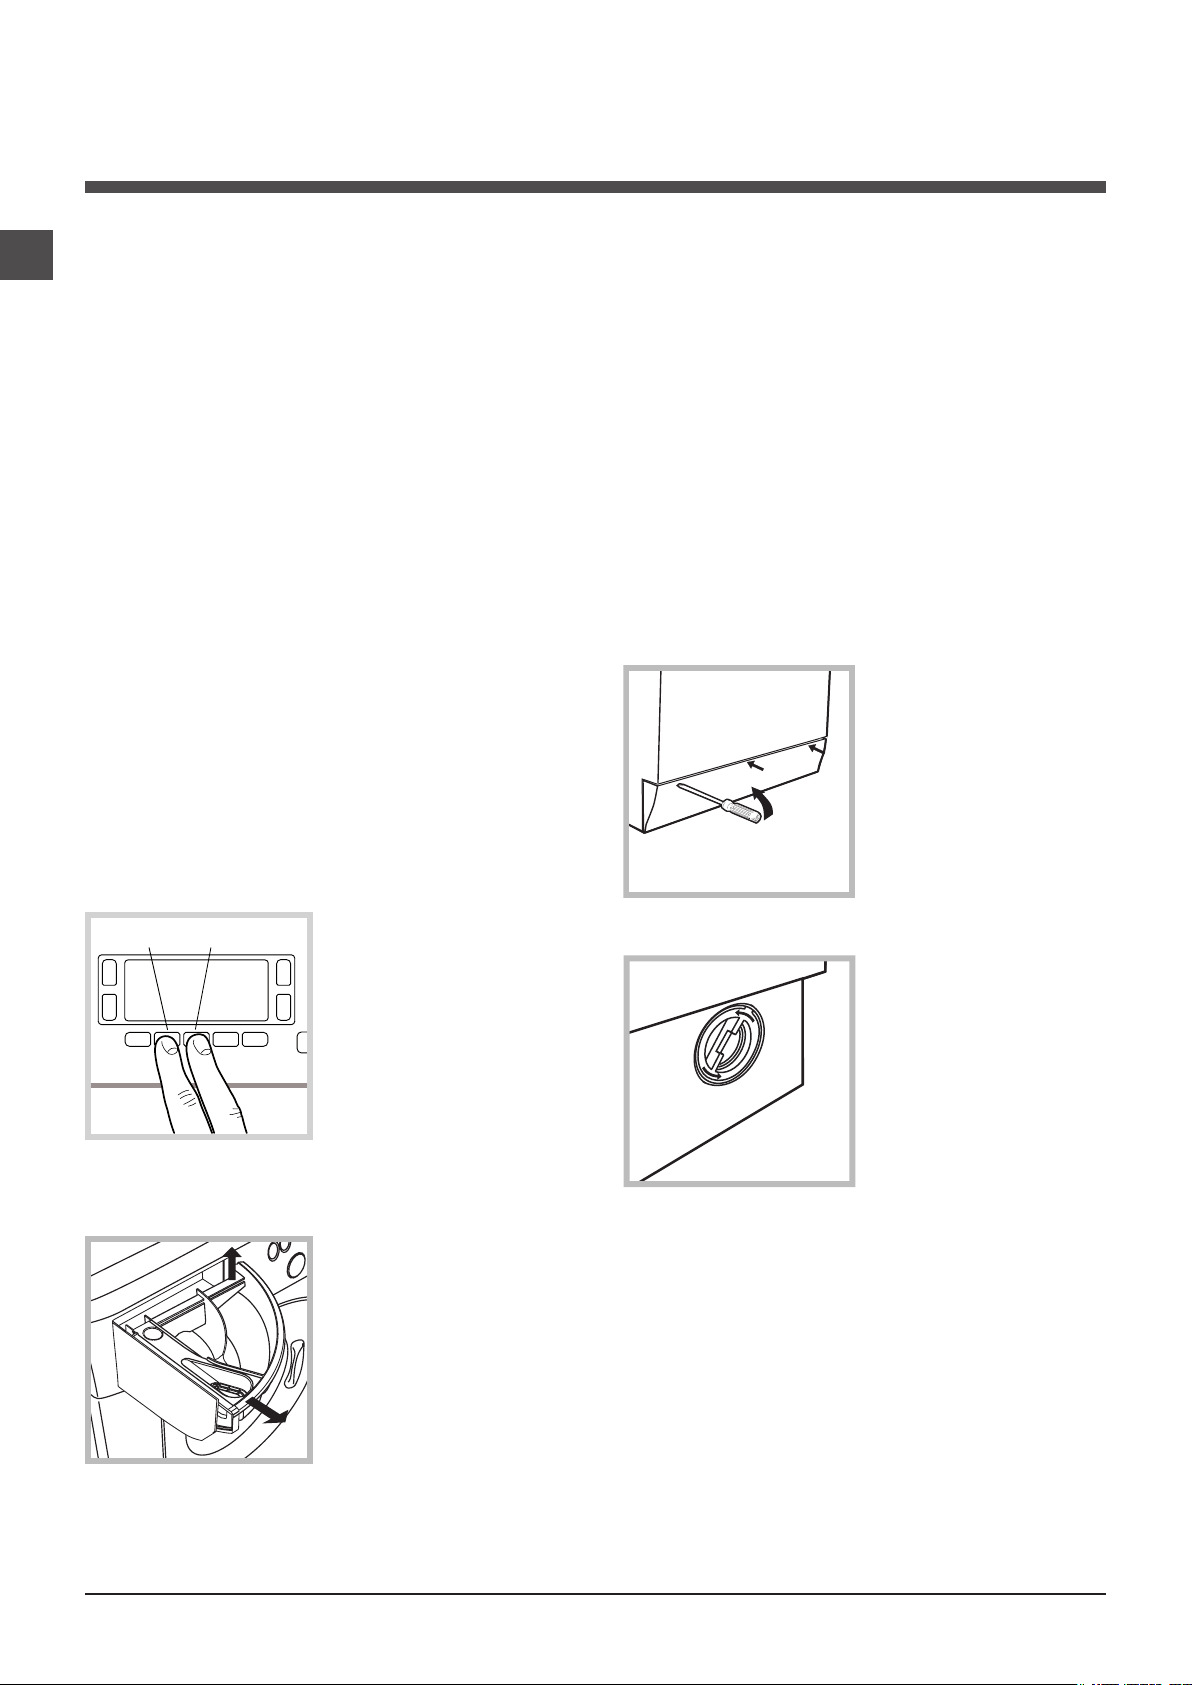
Cleaning the washing machine
• The outer parts and rubber components of the applian-
ce can be cleaned using a soft cloth soaked in lukewarm
soapy water. Do not use solvents or abrasives.
• The washing machine has a “Auto Clean” programme
for its internal parts that must be run with no load in the
drum.
For maximum performance you may want to use either
the detergent (i.e. a quantity 10% the quantity specified
for lightly-soiled garments) or special additives to clean
the washing machine. We recommend running a cleaning
programme every 40 wash cycles.
To start the programme press buttons A and B simultaneously for 5 seconds (see figure).
The programme will start automatically and will last approximately 70 minutes. To stop the cycle press the START/
PAUSE button.
Caring for the door and drum of your
appliance
• Always leave the porthole door ajar in order to prevent
unpleasant odours from forming.
Cleaning the pump
The washing machine is fitted with a self-cleaning pump
which does not require any maintenance. Sometimes, small
items (such as coins or buttons) may fall into the pre-chamber which protects the pump, situated in its bottom part.
! Make sure the wash cycle has finished and unplug the
appliance.
To access the pre-chamber:
1. using a screwdriver,
remove the cover panel
on the lower front part of
the washing machine (see
figure);
Cleaning the detergent dispenser drawer
Remove the dispenser by
raising it and pulling it out
(see figure).
Wash it under running water; this operation should be
repeated frequently.
2. unscrew the lid by rotating it anti-clockwise (see
figure): a little water may
trickle out. This is perfectly
normal;
3. clean the inside thoroughly;
4. screw the lid back on;
5. reposition the panel, making sure the hooks are securely
in place before you push it onto the appliance.
Checking the water inlet hose
Check the inlet hose at least once a year. If there are any
cracks, it should be replaced immediately: during the wash
cycles, water pressure is very strong and a cracked hose
could easily split open.
! Never use second-hand hoses.
10
Page 11

Troubleshooting
Your washing machine could fail to work. Before contacting the Technical Assistance Centre (see “Assistance”), make sure
that the problem cannot be not solved easily using the following list.
Problem:
The washing machine does not
switch on.
The wash cycle does not start.
The washing machine does not
take in water (the text “NO WATER,
CHECK SUPPLY” appears on the
display).
The washing machine continuously
takes in and
drains water.
Possible causes / Solutions:
• The appliance is not plugged into the socket fully, or is not making contact.
• There is no power in the house.
• The washing machine door is not closed properly.
• The ON/OFF button has not been pressed.
• The START/PAUSE button has not been pressed.
• The water tap has not been opened.
• A delayed start has been set (see “Running a wash cycle”).
• The water inlet hose is not connected to the tap.
• The hose is bent.
• The water tap has not been opened.
• There is no water supply in the house.
• The pressure is too low.
• The START/PAUSE button has not been pressed.
• The drain hose is not fitted at a height between 65 and 100 cm from the floor
(see “Installation”).
• The free end of the hose is under water (see “Installation”).
• The wall drainage system is not fitted with a breather pipe.
If the problem persists even after these checks, turn off the water tap, switch
the appliance off and contact the Assistance Service. If the dwelling is on one of
the upper floors of a building, there may be problems relating to water drainage,
causing the washing machine to fill with water and drain continuously. Special
anti-draining valves are available in shops and help to avoid this inconvenience.
GB
The washing machine does not
drain or spin.
The washing machine vibrates a lot
during the spin cycle.
The washing machine leaks.
The machine is locked and the display
flashes, indicating an
error code (e.g. F-01, F-..).
There is too much foam.
• The wash cycle does not include draining: some wash cycles require the drain
phase to be started manually (see “Wash cycles and functions”).
• The EASY IRON function has been activated: To complete the wash cycle,
press the START/PAUSE button (see “Wash cycles and functions”).
• The drain hose is bent (see “Installation”).
• The drainage duct is clogged.
• The drum was not unlocked correctly during installation (see “Installation”).
• The washing machine is not level (see “Installation”).
• The washing machine is trapped between cabinets and walls (see “Installation”).
• The water inlet hose is not screwed on properly (see “Installation”).
• The detergent dispenser drawer is blocked (for cleaning instructions, see “Care
and maintenance”).
• The drain hose is not fixed properly (see “Installation”).
• Switch off the machine and unplug it, wait for approximately 1 minute and then
switch it back on again.
If the problem persists, contact the Technical Assistance Service.
• The detergent is not suitable for machine washing (it should display the text
“for washing machines” or “hand and machine wash”, or the like).
• Too much detergent was used.
11
Page 12

Service
GB
Before calling for Assistance:
• Check whether you can solve the problem alone (see “Troubleshooting”);
• Restart the programme to check whether the problem has been solved;
• If this is not the case, contact an authorised Technical Assistance Centre using the telephone number provided on the
guarantee certificate.
! Always request the assistance of authorised technicians.
Have the following information to hand:
• the type of problem;
• the appliance model (Mod.);
• the serial number (S/N).
This information can be found on the data plate applied to the rear of the washing machine, and can also be found on the
front of the appliance by opening the door.
12
Page 13

Mode d’emploi
LAVE-LINGE
FR
Français
WMD 742
Sommaire
Installation, 14-15
Déballage et mise à niveau
Raccordements eau et électricité
Premier cycle de lavage
Caractéristiques techniques
Description du lave-linge, 16-17
Bandeau de commandes
Écran
Comment faire un cycle de lavage, 18
Programmes et fonctions, 19
Tableau des programmes
Fonctions de lavage
Produits lessiviels et linge, 20
Tiroir à produits lessiviels
Triage du linge
Programmes spéciaux
Système d’équilibrage de la charge
Précautions et conseils, 21
Sécurité générale
Mise au rebut
Ouverture manuelle de la porte hublot
FR
Entretien et soin, 22
Coupure de l’arrivée d’eau et du courant
Nettoyage du lave-linge
Nettoyage du tiroir à produits lessiviels.
Entretien du hublot et du tambour
Nettoyage de la pompe
Contrôle du tuyau d’arrivée de l’eau
Anomalies et remèdes, 23
Assistance, 24
13
Page 14
Installation
FR
! Conserver ce mode d’emploi pour pouvoir le consulter à
tout moment. En cas de vente, de cession ou de déménagement, veiller à ce qu’il suive toujours le lave-linge pour
que son nouveau propriétaire soit informé sur son mode
de fonctionnement et puisse profiter des conseils correspondants.
! Lire attentivement les instructions: elles fournissent des
conseils importants sur l’installation, l’utilisation et la sécurité de l’appareil.
Déballage et mise à niveau
Déballage
1. Déballer le lave-linge.
2. Contrôler que le lave-linge n’a pas été endommagé
pendant le transport. S’il est abîmé, ne pas le raccorder et
contacter le vendeur.
3. Enlever les 4 vis de
protection servant au transport, le caoutchouc et la
cale, placés dans la partie
arrière (voir figure).
Une bonne mise à niveau garantit la stabilité de l’appareil
et évite qu’il y ait des vibrations, du bruit et des déplacements en cours de fonctionnement. Si la machine est
posée sur de la moquette ou un tapis, régler les pieds de
manière à ce qu’il y ait suffisamment d’espace pour assurer une bonne ventilation.
Raccordements eau et électricité
Raccordement du tuyau d’arrivée de l’eau
1. Reliez le tuyau d’alimentation en le vissant à un robinet
d’eau froide à embout fileté
3/4 gaz (voir figure).
Faire couler l’eau jusqu’à ce
qu’elle soit limpide et sans
impuretés avant de raccorder.
2. Raccorder le tuyau
d’arrivée de l’eau au lavelinge en le vissant à la prise
d’eau prévue, dans la partie
arrière en haut à droite (voir
figure).
4. Boucher les trous à l’aide des bouchons plastique
fournis.
5. Conserver toutes ces pièces: il faudra les remonter en
cas de transport du lave-linge.
! Les pièces d’emballage ne sont pas des jouets pour
enfants.
Mise à niveau
1. Installer le lave-linge sur un sol plat et rigide, sans l’ap-
puyer contre des murs, des meubles ou autre.
2. Si le sol n’est pas parfaitement horizontal, visser ou
dévisser les pieds de réglage avant (voir figure) pour
niveler l’appareil; son angle
d’inclinaison, mesuré sur le
plan de travail, ne doit pas
dépasser 2°.
3. Attention à ce que le tuyau ne soit pas plié ou écrasé.
! La pression de l’eau doit être comprise entre les valeurs
indiquées dans le tableau des Caractéristiques techniques
(voir page ci-contre).
! Si la longueur du tuyau d’alimentation ne suffit pas,
s’adresser à un magasin spécialisé ou à un technicien
agréé.
! N’utiliser que des tuyaux neufs.
! Utiliser ceux qui sont fournis avec l’appareil.
14
Page 15

65 - 100 cm
Raccordement du tuyau de vidange
Raccorder le tuyau d’évacuation, sans le plier, à un
conduit d’évacuation ou
à une évacuation murale
placés à une distance du
sol comprise entre 65 et
100 cm;
! N’utiliser ni rallonges ni prises multiples.
! Le câble ne doit être ni plié ni trop écrasé.
! Le câble d’alimentation ne doit être remplacé que par
des techniciens agréés.
Attention! Nous déclinons toute responsabilité en cas de
non-respect des normes énumérées ci-dessus.
Premier cycle de lavage
FR
ou bien l’accrocher à un
évier ou à une baignoire, dans ce cas, fixer le
support en plastique fourni
avec l’appareil au robinet
(voir figure). L’extrémité
libre du tuyau d’évacuation
ne doit pas être plongée
dans l’eau.
! L’utilisation d’un tuyau de rallonge est absolument
déconseillée mais si on ne peut faire autrement, il faut
absolument qu’il ait le même diamètre que le tuyau original
et sa longueur ne doit pas dépasser 150 cm.
Branchement électrique
Avant de brancher la fiche dans la prise de courant, s’assurer que:
• la prise est bien reliée à la terre et est conforme aux
réglementations en vigueur;
Avant la première mise en service de l’appareil, effectuer
un cycle de lavage avec un produit lessiviel mais sans linge
et sélectionner le programme «AUTO NETTOYANT» (voir
“Nettoyage du lave-linge”).
Caractéristiques techniques
Modèle
Dimensions
Capacité
Raccordements
électriques
WMD 742
largeur 59,5 cm
hauteur 85 cm
profondeur 54 cm
de 1 à 7 kg
Voir la plaque signalétique appliquée sur la
machine
• la prise est bien apte à supporter la puissance maximale
de l’appareil indiquée dans le tableau des Caractéristiques techniques (voir ci-contre);
• la tension d’alimentation est bien comprise entre les
valeurs figurant dans le tableau des Caractéristiques
techniques (voir ci-contre);
• la prise est bien compatible avec la fiche du lave-linge.
Autrement, remplacer la prise ou la fiche.
! Le lave-linge ne doit pas être installé dehors, même à
l’abri, car il est très dangereux de le laisser exposé à la
pluie et aux orages.
! Après installation du lave-linge, la prise de courant doit
être facilement accessible.
Raccordements
hydrauliques
Vitesse d'essorage
Programmes de
contrôle selon
les directives
1061/2010 et
1015/2010
pression maximale 1 MPa (10 bar) pression minimale 0,05 MPa (0,5 bar) capacité
du tambour 52 litres
jusqu'à 1400 tours minute
programme
température 60°C
température 40°C
Cet appareil est conforme aux Directives
Communautaires suivantes:
- 2004/108/CE (Compatibilité électromagnétique)
- 2002/96/CE
- 2006/95/CE (Basse Tension)
;
(2° pression de la touche);
(3° pression de la touche).
15
Page 16

Description du lave-linge
FR
Bandeau de commandes
Touche
ON/OFF
Tiroir à produits lessiviels
Tiroir à produits lessiviels: pour charger les produits
lessiviels et les additifs (voir “Produits lessiviels et linge”).
SÉLECTEUR
PROGRAMMES
Touches
Touche
MY CYCLE
Touche
INTENSITE
DE LAVAGE
Écran
Touches
FONCTION
Touche
ANTI-
ALLERGIES
Touche TEMPERATURE : appuyer pour diminuer la tem-
pérature : la valeur correspondante est affichée à l’écran.
Touche
DÉPART
DIFFÉRÉ
Touche
ESSORAGE
Touche avec voyant
START/PAUSE
Touche
TEMPÉRATURE
Touche
VERROUILLAGE
TOUCHES
Touche ON/OFF : appuyer brièvement sur la touche
pour allumer ou éteindre l’appareil. Le voyant vert START/
PAUSE clignotant lentement indique que la machine est
allumée. Pour éteindre le lave-linge en cours de lavage, appuyer sur la touche pendant au moins 3 secondes de suite
; une pression brève ou accidentelle n’entraîne pas l’arrêt
de l’appareil. L’arrêt de l’appareil pendant un lavage annule
le lavage en cours.
Touches SÉLECTEUR PROGRAMMES: pour sélectionner le programme désiré (voir “Tableau des programmes”).
Touche
mémoriser un cycle et les personnalisations préférées.
Pour retourner à un cycle précédemment mémorisé, appuyer sur la touche
Touches FONCTION: appuyer sur la touche pour sélectionner la fonction désirée. Le voyant correspondant
s’affiche à l’écran.
Touche
sélectionner l’intensité de lavage désirée.
Touche
tionner le type de rinçage désiré.
Touche ESSORAGE : appuyer sur cette touche pour
diminuer la vitesse de l’essorage ou pour le supprimer
complètement - la valeur correspondante s’affiche à
l’écran.
MY CYCLE
INTENSITE DE LAVAGE
ANTI-ALLERGIES
: maintenir la touche enfoncée pour
MY CYCLE
.
: appuyer pour
: appuyer pour sélec-
Touche VERROUILLAGE TOUCHES : pour activer
le verrouillage des commandes, garder la touche enfoncée
pendant environ 2 secondes. Le symbole allumé
indique que le bandeau de commandes est verrouillé.
Ceci permet d’éviter toute modification involontaire des
programmes, surtout s’il y a des enfants à la maison.
Pour désactiver le verrouillage des commandes, garder la
touche enfoncée pendant environ 2 secondes.
Touche DÉPART DIFFÉRÉ : appuyer sur cette touche
pour sélectionner un départ différé pour le programme
choisi. Le retard est affiché à l’écran.
Touche avec voyant START/PAUSE: quand le voyant vert
clignote lentement, appuyer sur la touche pour démarrer un lavage. Une fois le cycle lancé, le voyant passe à
l’allumage fixe. Pour activer une pause de lavage, appuyer
à nouveau sur la touche ; le voyant passe à l’orange et se
met à clignoter. Si le symbole n’est pas allumé, il est
possible d’ouvrir le hublot. Pour faire redémarrer le lavage
exactement à l’endroit de l’arrêt, appuyer une nouvelle fois
sur la touche.
Stand-by
Ce lave-linge, conformément aux nouvelles normes en
vigueur dans le domaine de l’économie d’énergie, est
équipée d’un système d’extinction automatique (veille)
activé après 30 minutes environ d’inutilisation. Appuyez
brièvement sur la touche ON/OFF et attendre que la machine soit réactivée.
Consommation en off-mode : 1 W
Consommation en Left-on : 1 W
16
Page 17

Écran
FR
Z
B
A
X
D
C
E
Y
F
L’écran est utile pour programmer la machine et fournit de multiples renseignements.
Les deux chaînes supérieures A et B affichent : le programme de lavage sélectionné, la phase de lavage en cours et toutes
les indications relatives au déroulement du programme.
La chaîne C affiche le temps restant à la fin du cycle de lavage en cours et si un DÉPART DIFFÉRÉ a été sélectionné, le temps restant avant le démarrage du programme sélectionné.
La chaîne D affiche la valeur maximum de la vitesse d’essorage que la machine peut effectuer en fonction du programme
sélectionné ; si le programme ne prévoit pas d’essorage, la chaîne reste éteinte.
La chaîne E affiche la valeur maximale de la température qui peut être sélectionnée en fonction du programme choisi ; si le
programme ne prévoit pas la sélection de la température, la chaîne reste éteinte.
Les voyants F correspondent aux fonctions et s’allument quand la fonction programmée est compatible avec le programme
sélectionné.
Symbole verrouillage hublot
Le symbole allumé indique que le hublot est verrouillé pour éviter toute ouverture accidentelle. Pour éviter d’abîmer l’appareil,
attendre que le symbole s’éteigne avant d’ouvrir le hublot.
N.B.: si la fonction DÉPART DIFFÉRÉ est active, le hublot reste verrouillé, pour l’ouvrir mettre la machine en pause en appuyant sur la touche START/PAUSE.
! À la première mise en service, un message s’affiche demandant de sélectionner la langue et l’écran entre automatiquement
dans le menu de sélection de la langue.
Pour choisir la langue désirée, appuyer sur les touches X et Y; pour confirmer la sélection, appuyer sur la touche Z.
Pour changer de langue, éteindre l’appareil, appuyer simultanément sur les touches X, Y et Z jusqu’au signal sonore, le
menu de sélection de la langue s’affichera à nouveau
17
Page 18

Comment faire un cycle de lavage
FR
1. METTRE L’APPAREIL SOUS TENSION. Appuyer sur la
touche , l’inscription BONJOUR s’affiche à l’écran ; le voyant
de START/PAUSE passe au vert et clignote lentement.
2. CHARGER LE LINGE. Ouvrir la porte hublot. Charger le linge
en faisant attention à ne pas dépasser la quantité indiquée dans
le tableau des programmes de la page suivante.
3. DOSER LE PRODUIT LESSIVIEL. Sortir le tiroir et
placer le produit lessiviel dans les bacs correspondants
comme indiqué au paragraphe “Detersifs et linge”.
4. FERMER LE HUBLOT.
5. CHOISIR LE PROGRAMME. Appuyer sur l’une
des touches du SÉLECTEUR PROGRAMMES pour
sélectionner le programme désiré ; le nom du programme
est affiché à l’écran avec attribution d’une température et
d’une vitesse d’essorage qui peuvent être modifiées. La
durée du cycle s’affiche sur l’écran.
6. PERSONNALISER LE CYCLE DE LAVAGE. Appuyer
sur les touches correspondantes :
Modifier la température et/ou la vitesse
d’essorage. L’appareil sélectionne automatiquement la
température et la vitesse d’essorage maximales prévues pour
le programme sélectionné qui ne peuvent par conséquent
pas être augmentées. Par pression sur la touche on peut
diminuer progressivement la température de lavage jusqu’à
un lavage à froid “OFF”. Par pression sur la touche on
peut diminuer progressivement la vitesse d’essorage jusqu’à
sa suppression totale “OFF”. Une autre pression sur les
touches ramènera les valeurs aux maximales prévues.
! Exception: lors de la sélection du programme
(60°C) (2° pression de la touche) la température peut être
augmentée jusqu’à 90°.
Sélectionner un départ différé.
Pour programmer le départ différé d’un programme
sélectionné, appuyer sur la touche correspondante
jusqu’à ce que le retard désiré soit atteint. Quand cette
option est active, le symbole s’affiche à l’écran. Pour
annuler le départ différé, appuyer sur la touche jusqu’à
ce que l’inscription OFF s’affiche à l’écran.
Programmer l’intensité de lavage désirée.
L’option permet d’optimiser le lavage selon le degré
de salissure des tissus et l’intensité de lavage désirée.
Sélectionner le programme de lavage, le cycle se place
automatiquement sur le niveau «Normal» optimisé
pour du linge moyennement sale, (cette sélection
n’est pas acceptée pour le cycle «Laine», qui se règle
automatiquement sur le niveau «Délicat»).
Pour du linge très sale, appuyer sur la touche jusqu’à ce
que le niveau «Super Lavage» soit atteint. Ce niveau permet
d’obtenir un lavage très performant car l’utilisation d’une plus
grande quantité d’eau au cours de la phase initiale du cycle
et un brassage mécanique plus intense permettent d’éliminer
les taches les plus difficiles; possibilité d’utilisation avec ou
sans eau de Javel.
Pour traiter le linge avec de l’eau de Javel, ajouter le bac
supplémentaire 4 fourni avec l’appareil à l’intérieur du bac
1. Au moment de verser l’eau de Javel, attention à ne pas
dépasser le niveau «max» indiqué sur le pivot central
(voir figure page 20).
Pour du linge peu sale ou pour un traitement plus délicat
des tissus, appuyer sur la touche jusqu’à ce que le
niveau «Délicat» soit atteint. Ce cycle réduira le brassage
mécanique pour assurer des résultats de lavage parfaits du
linge délicat. S’il n’est pas possible de sélectionner ou de
modifier le réglage existant, le message «INACTIF» s’affiche.
Programmer le type de rinçage.
L’option permet de sélectionner le type de rinçage
désiré pour un maximum de protection des peaux
sensibles. Une première pression sur la touche programme
le niveau «Extra Rinçage» qui permet d’ajouter un
rinçage supplémentaire à ceux normalement prévus par
le cycle de manière à éliminer toute trace de lessive. Une
deuxième pression sur la touche programme le niveau
«Peaux sensibles» qui permet d’ajouter deux rinçages
supplémentaires à ceux normalement prévus par le cycle,
il est conseillé pour les peaux extrêmement sensibles.
Une troisième pression sur la touche programme le
niveau «Anti-allergies» qui permet d’ajouter trois rinçages
supplémentaires à ceux normalement prévus par le cycle,
pour éliminer les principaux allergènes tels que pollens,
acariens, poils de chien ou de chat. Appuyer une nouvelle
fois pour retourner au type de rinçage «Rinçage Normal».
S’il n’est pas possible de sélectionner ou de modifier le
réglage existant, le message «INACTIF» s’affiche.
Modifier les caractéristiques du cycle.
• Appuyer sur la touche pour activer la fonction; le
voyant correspondant à la touche s’allume.
• Appuyer de nouveau sur la touche pour désactiver la
fonction ; le voyant s’éteint.
! Si la fonction sélectionnée est incompatible avec le
programme sélectionné, le voyant se met à clignoter et la
fonction n’est pas activée.
! Si la fonction sélectionnée est incompatible avec une
autre fonction précédemment sélectionnée, le voyant
correspondant à la première fonction se met à clignoter
et seule la deuxième fonction est activée alors que le
voyant de la fonction activée s’allume.
! Les fonctions permettent de modifier le chargement
conseillé et/ou la durée du cycle de lavage.
7. DEMARRER LE PROGRAMME. Appuyer sur la
touche START/PAUSE. Le voyant correspondant
s’allume en vert fixe et le hublot est verrouillé (symbole
HUBLOT VERROUILLÉ allumé). Pendant le lavage,
le nom de la phase en cours s’affiche à l’écran. Pour
modifier un programme lorsqu’un cycle est en cours,
mettre le lave-linge en pause en appuyant sur la
touche START/PAUSE (le voyant START/PAUSE passe
à l’orange et clignote lentement) ; sélectionner le cycle
désiré et appuyer de nouveau sur la touche START/
PAUSE. Pour ouvrir la porte tandis qu’un cycle est
en cours, appuyer sur la touche START/PAUSE ; si le
symbole HUBLOT VERROUILLÉ est éteint, on peut
ouvrir le hublot. Pour faire redémarrer le programme
exactement à l’endroit de l’arrêt, appuyer une nouvelle
fois sur la touche START/PAUSE.
8. FIN DU PROGRAMME. Elle est signalée par l’inscription
“FIN DE CYCLE” qui s’affiche à l’écran; quand le symbole
HUBLOT VERROUILLÉ s’éteint, on peut ouvrir le hublot.
Ouvrir le hublot, vider le lave-linge et éteindre l’appareil.
! Une pression prolongée sur la touche permet d’annuler un
cycle déjà lancé. Le cycle est interrompu et la machine s’éteint.
18
Page 19

Programmes et fonctions
Tableau des programmes
Produits lessiviels
Description du Programme
Programmes
Anti-taches
Coton Prelavage (1° pression de la touche): blancs extrêmement sales.
Coton Blanc (1) (2° pression de la touche): blancs et couleurs rési-
stantes très sales.
Coton Couleur (1-2) (3° pression de la touche): blancs et couleurs
délicates peu sales.
Synthétique Intensif (1° pression de la touche): couleurs résistantes
très sales.
Synthétique Intensif (4) (1° pression de la touche): couleurs résistan-
tes très sales.
Synthétique Delicat (2° pression de la touche): couleurs résistantes
peu sales.
Rapide 60' (1° pression de la touche): pour rafraîchir rapidement du
linge normalement sale (ne convient pas pour la laine, la soie et le linge
à laver à la main).
Rapide 30' (2° pression de la touche): pour rafraîchir rapidement du
linge peu sale (ne convient pas pour la laine, la soie et le linge à laver à
la main).
My Cycle (Memo): permet de mémoriser un cycle de lavage quelconque.
M
Lit et Bain (3): pour le linge de lit et le linge de toilette.
Woolmark Platinum (Laine): pour laine, cachemire, etc.
Ultra Délicat
Essorage Rapide (1° pression de la touche).
Rinçage Resistant (2° pression de la touche).
Vidange (3° pression de la touche).
La durée du cycle indiquée sur l’écran ou dans la notice représente une estimation calculée dans des conditions standard. Le temps effectif peut varier en fonction de nombreux facteurs tels que :
température et pression de l’eau en entrée, température ambiante, quantité de lessive, quantité et type de charge, équilibrage de la charge, options supplémentaires sélectionnées.
Pour tous les instituts qui effectuent ces tests :
1) Programme de contrôle selon la directive 1061/2010: sélectionner le programme à 60°C (2° pression de la touche); sélectionner le programme à 40°C
(3° pression de la touche).
Ce cycle convient au lavage d’une charge de coton normalement sale et c’est le plus performant en termes de consommation d’eau et d’énergie, l’utiliser pour du linge lavable à 60°C et 40°C. La
température effective de lavage peut différer de la température indiquée.
2) Programme coton long : sélectionner le programme à 40°C (3° pression de la touche).
3) Programme coton court : sélectionner le programme ; température de 40°C (appuyer sur la touche TEMPÉRATURE).
4) Programme Synthétique long : sélectionner le programme à 60°C (1° pression de la touche); température de 40°C (appuyer sur la touche TEMPÉRATURE).
Temp. maxi.
(°C)
40° 1400 90° 1400
60°
(Max. 90°C)
40° 1400 -
60° 800 -
40° 800 -
40° 800 -
60° 1400 -
30° 800 -
60° 1400 40° 800 30° 0 -
Vitesse
maxi
(tours
minute)
1400 -
- 1400 - - - - 7 - - - 16’
- 1400 - - -
- 0 - - - - 7 - - - 2’
Lavage
Prelavage
Javel
-
-
-
-
-
-
-
(Kg)
sant
Assouplis-
3,5 53 0,81 40 60’
1,5 - - - 70’
duelle %
Charge maxi
4 - - - 180’
7 53 2,21 78 170’
7 53 1,10 58 190’
7 53 0,99 82 185’
3 44 0,93 47 110’
3 44 0,57 46 95’
3 - - - 70’
3 71 0,15 35 30’
7 - - - 125’
1 - - - 80’
7 - - - 36’
Consomma-
tion d’énergie
Humidité rési-
kWh
Eau totale lt
FR
Durée cycle
Fonctions de lavage
Rapide
La sélection de cette option permet de réduire jusqu’à 50 %
la durée de lavage du cycle choisi et de faire des économies
d’eau et d’énergie. Utiliser ce programme pour les vêtements modérément sales.
! Cette fonction n’est pas activable avec les programmes
, “Rapide 60’”, , , .
Repassage facile
En cas de sélection de cette fonction, le lavage et
l’essorage seront dûment modifiés pour réduire la
formation de plis. À la fin du cycle de lavage, le lave-linge
fait tourner le tambour lentement; le voyant de la fonction
REPASSAGE FACILE et celui de START/PAUSE se mettent
à clignoter (orange), l’inscription “FIN DE CYCLE” s’affiche
à l’écran. Pour compléter le cycle, il faut appuyer sur la
touche START/PAUSE ou sur la touche REPASSAGE
FACILE.
! Cette option n’est pas activable avec les programmes
, “Rapide 30’”, , , “Essorage Rapide” et “Vidange”.
Eco Wash
La fonction Eco Wash permet d’économiser l’énergie
puisque l’eau utilisée pour la lessive n’est pas réchauffée
: un plus pour l’environnement et pour votre facture
d’électricité. L’action renforcée et l’optimisation de la
consommation de l’eau garantissent d’excellents résultats
pour une durée moyenne identique à celle d’un cycle
standard. Pour de meilleurs résultats en matière de lavage,
utilisez une lessive liquide.
! Cette fonction n’est pas activable avec les programmes
, (90°C), , , , .
19
Page 20

Produits lessiviels et linge
M
AX
1
2
4
3
A
B
FR
Tiroir à produits lessiviels
Un bon résultat de lavage dépend aussi d’un bon dosage
de produit lessiviel: un excès de lessive ne lave pas mieux,
il incruste l’intérieur du lave-linge et pollue l’environnement.
! Utiliser des lessives en poudre pour du linge en coton
blanc et en cas de prélavage et de lavages à une température supérieure à 60°C.
! Respecter les indications figurant sur le paquet de lessive.
! Ne pas utiliser de lessives pour lavage à la main, elles
moussent trop.
Sortir le tiroir à produits
lessiviels et verser la lessive
ou l’additif comme suit.
bac 1: Lessive prélavage (en poudre)
Avant d’introduire la lessive, s’assurer que le bac supplémentaire 4 n’est pas présent.
bac 2: Lessive lavage (en poudre ou liquide)
En cas d’utilisation de lessive liquide, nous conseillons
d’introduire le séparateur A fourni avec le lave-linge pour
mieux déterminer la dose correcte.
En cas d’utilisation de lessive en poudre, placer le séparateur dans le bac B.
bac 3: Additifs (assouplissant, etc.)
L’assouplissant ne doit pas déborder de la grille.
bac supplémentaire 4: Produit javelisé
Triage du linge
• Trier correctement le linge d’après:
- le type de textile / le symbole sur l’étiquette.
- les couleurs: séparer le linge coloré du blanc.
• Vider les poches et contrôler les boutons.
• Ne pas dépasser les valeurs indiquées correspondant au
poids de linge sec :
Textiles résistants: 7 kg max.
Textiles synthétiques: 3 kg max.
Laine: 1,5 kg max.
Soie: 1 kg max.
Combien pèse le linge ?
1 drap 400-500 g
1 taie d’oreiller 150-200 g
1 nappe 400-500 g
1 peignoir 900-1200 g
1 serviette éponge 150-250 g
Programmes spéciaux
Anti-taches: ce programme est idéal pour le lavage
de linge très sale, aux couleurs résistantes. Il assure une
classe de lavage supérieure à la classe standard (classe
A). Ce programme ne permet pas de mélanger du linge de
couleurs différentes. Nous conseillons d’utiliser de la lessive en poudre. En cas de taches tenaces, nous conseillons
un prétraitement avec des additifs spéciaux.
Lit et Bain : pour laver le linge de toilette et de lit en un
seul cycle, utiliser le programme qui optimise l’utilisation de l’assouplissant et permet de faire des économies
de temps et d’électricité. Nous conseillons d’utiliser de la
lessive en poudre.
Laine: Le cycle de lavage « Laine » de ce lave-linge
Hotpoint-Ariston a été testé et approuvé par la société
Woolmark Company pour le lavage d’articles en laine
classés comme « lavables à la main », à condition que
le lavage soit effectué conformément aux instructions
indiquées sur l’étiquette du vêtement et aux indications
fournies par le fabricant de l’électroménager. HotpointAriston est la première marque de lave-linge à avoir obtenu
la certification Woolmark Apparel Care - Platinum délivrée
par la société Woolmark Company pour ses performances
de lavage et pour sa consommation d’eau et d’énergie.
(M1126)
Ultra Délicat: utiliser le programme pour le lavage
d’articles particulièrement délicats avec applications de
strass ou de paillettes.
Pour le lavage d’articles en soie et de rideaux,
sélectionner le cycle et programmer le niveau «Délicat»
de l’option .
Il est recommandé de mettre le linge à l’envers avant le
lavage et d’introduire les articles plus petits dans le sachet
prévu pour le lavage des articles délicats.
Pour obtenir de meilleurs résultats, nous conseillons
d’utiliser de la lessive liquide spéciale textiles délicats.
Système d’équilibrage de la charge
Avant tout essorage, pour éviter toute vibration excessive et répartir le linge de façon uniforme, le lave-linge fait
tourner le tambour à une vitesse légèrement supérieure
à la vitesse de lavage. Si au bout de plusieurs tentatives,
la charge n’est toujours pas correctement équilibrée,
l’appareil procède à un essorage à une vitesse inférieure
à la vitesse normalement prévue. En cas de déséquilibre
excessif, le lave-linge préfère procéder à la répartition du
linge plutôt qu’à son essorage. Pour une meilleure répartition de la charge et un bon équilibrage, nous conseillons
de mélanger de grandes et petites pièces de linge.
20
Page 21

Précautions et conseils
20
! Ce lave-linge a été conçu et fabriqué conformément aux
normes internationales de sécurité. Ces consignes sont
fournies pour des raisons de sécurité, il faut les lire attentivement.
Sécurité générale
• Cet appareil n’est pas destiné à être utilisé par des personnes (enfants compris) dont les capacités physiques,
sensorielles ou mentales sont réduites ou qui ne disposent pas des connaissances ou de l’expérience nécessaires, à moins qu’elles n’aient été formées et encadrées pour l’utilisation de cet appareil par une personne
responsable de leur sécurité. Surveiller les enfants pour
s’assurer qu’ils ne jouent pas avec l’appareil.
• Cet appareil est conçu pour un usage domestique.
• Ne jamais toucher l’appareil si l’on est pieds nus et si les
mains sont mouillées ou humides.
• Ne jamais tirer sur le câble pour débrancher la fiche de la
prise de courant.
• Ne pas ouvrir le tiroir à produits lessiviels si la machine
est branchée.
• Ne pas toucher à l’eau de vidange, elle peut atteindre
des températures très élevées.
• Ne pas forcer pour ouvrir le hublot: le verrouillage de
sécurité qui protège contre les ouvertures accidentelles
pourrait s’endommager.
• En cas de panne, éviter à tout prix d’accéder aux mécanismes internes pour tenter une réparation.
• Veiller à ce que les enfants ne s’approchent pas de l’appareil pendant son fonctionnement.
• Pendant le lavage, le hublot a tendance à se réchauffer.
• Deux ou trois personnes sont nécessaires pour déplacer
l’appareil avec toutes les précautions nécessaires. Ne jamais
le déplacer tout seul car il est très lourd.
• Avant d’introduire le linge, s’assurer que le tambour est
bien vide.
Le symbole de la ‘’poubelle barrée’’ est apposée sur
tous les produits pour rappeler les obligations de collecte
séparée. Les consommateurs devront contacter les autorités locales ou leur revendeur concernant la démarche
à suivre pour l’enlèvement de leur vieil appareil.
Ouverture manuelle du hublot
A défaut de pouvoir ouvrir la porte hublot à cause d’une
panne de courant pour étendre le linge, procéder comme
suit :
1. débrancher la fiche de la
prise de courant.
2. s’assurer que le niveau de
l’eau à l’intérieur de l’appareil
se trouve bien au-dessous de
l’ouverture du hublot, si ce
n’est pas le cas vider l’eau en
excès à travers le tuyau de vidange dans un seau comme
illustré voir figure.
3. démonter le panneau situé
à l’avant du lave-linge à l’aide
d’un tournevis (voir figure).
FR
Mise au rebut
• Mise au rebut du matériel d’emballage: se conformer aux
réglementations locales de manière à ce que les emballages puissent être recyclés.
• La Directive Européenne 2002/96/EC sur les Déchets
des Equipements Electriques et Electroniques, exige que
les appareils ménagers usagés ne soient pas jetés dans
le flux normal des déchets municipaux. Les appareils
usagés doivent être collectés séparément afin d’optimiser le taux de récupération et le recyclage des matériaux
qui les composent et réduire l’impact sur la santé humaine et l’environnement.
4. se servir de la languette indiquée, tirer vers soi jusqu’à
ce que le tirant en plastique se dégage de son cran d’arrêt;
tirer ensuite vers le bas et ouvrir l’hublot en même temps.
5. remonter le panneau en veillant à bien enfiler les crochets dans les fentes prévues avant de le pousser contre
l’appareil.
21
Page 22

Entretien et soin
1
2
A
B
FR
Coupure de l’arrivée d’eau et du courant
• Fermer le robinet de l’eau après chaque lavage. Cela
réduit l’usure de l’installation hydraulique du lave-linge et
évite tout danger de fuites.
• Débrancher la fiche de la prise de courant lors de tout
nettoyage du lave-linge et pendant tous les travaux d’entretien.
Nettoyage du lave-linge
• Pour nettoyer l’extérieur et les parties en caoutchouc,
utiliser un chiffon imbibé d’eau tiède et de savon. N’utiliser
ni solvants ni abrasifs.
• Ce lave-linge est équipé d’un programme «AUTO NET-
TOYANT» des parties internes qui doit être effectué tam-
bour complètement vide.
La lessive (dans une quantité égale à 10% de celle conseillée pour du linge peu sale) ou les additifs spéciaux pour
le nettoyage du lave-linge, pourront être utilisés comme
adjuvants dans le programme de lavage. Il est conseillé
d’effectuer le programme de nettoyage tous les 40 cycles
de lavage.
Pour activer le programme, appuyer simultanément sur les
touches A et B pendant 5 secondes (voir figure).
Le programme démarrera automatiquement et durera
environ 70 minutes. Pour stopper le cycle, appuyer sur la
touche START/PAUSE.
Entretien du hublot et du tambour
• Il faut toujours laisser le hublot entrouvert pour éviter la
formation de mauvaise odeurs.
Nettoyage de la pompe
Le lave-linge est équipé d’une pompe autonettoyante
qui n’exige aucune opération d’entretien. Il peut toutefois
arriver que de menus objets (pièces de monnaie, boutons)
tombent dans la préchambre qui protège la pompe, placée
en bas de cette dernière.
! S’assurer que le cycle de lavage est bien terminé et
débrancher la fiche.
Pour accéder à cette préchambre:
1. démonter le panneau
situé à l’avant du lave-linge
à l’aide d’un tournevis (voir
figure);
Nettoyage du tiroir à produits lessiviels.
Soulever le tiroir et le tirer
vers soi pour le sortir de son
logement (voir figure).
Le laver à l’eau courante;
effectuer cette opération
assez souvent.
2. dévisser le couvercle en
le tournant dans le sens
inverse des aiguilles d’une
montre (voir figure): il est
normal qu’un peu d’eau
s’écoule;
3. nettoyer soigneusement l’intérieur;
4. revisser le couvercle;
5. remonter le panneau en veillant à bien enfiler les cro-
chets dans les fentes prévues avant de le pousser contre
l’appareil.
Contrôle du tuyau d’arrivée de l’eau
Contrôler le tuyau d’alimentation au moins une fois par an.
Procéder à son remplacement en cas de craquèlements
et de fissures: car les fortes pressions subies pendant le
lavage pourraient provoquer des cassures.
22
! N’utiliser que des tuyaux neufs.
Page 23

Anomalies et remèdes
Il peut arriver que le lave-linge ne fonctionne pas bien. Avant d’appeler le Service de dépannage (voir “Assistance”), contrôler
s’il ne s’agit pas par hasard d’un problème facile à résoudre à l’aide de la liste suivante.
Anomalies:
Le lave-linge ne s’allume pas.
Le cycle de lavage ne démarre pas.
Il n’y a pas d’arrivée d’eau (le message “Pas d’eau, ouvrir robinet”
s’affiche à l’écran).
Le lave-linge prend l’eau et vidange
continuellement.
Causes / Solutions possibles:
• La fiche n’est pas branchée dans la prise de courant ou mal branchée.
• Il y a une panne de courant.
• Le hublot n’est pas bien fermé.
• La touche ON/OFF n’a pas été enfoncée.
• La touche START/PAUSE n’a pas été enfoncée.
• Le robinet de l’eau n’est pas ouvert.
• Un départ différé a été sélectionné (voir “Comment faire un cycle de lavage”).
• Le tuyau d’arrivée de l’eau n’est pas raccordé au robinet.
• Le tuyau est plié.
• Le robinet de l’eau n’est pas ouvert.
• Il y a une coupure d’eau.
• La pression n’est pas suffisante.
• La touche START/PAUSE n’a pas été enfoncée.
• Le tuyau de vidange n’est pas installé à une distance du sol comprise entre 65
et 100 cm (voir “Installation”).
• L’extrémité du tuyau de vidange est plongée dans l’eau (voir “Installation”).
• L’évacuation murale n’a pas d’évent.
Si après ces vérifications, le problème persiste, fermer le robinet de l’eau,
éteindre la machine et appeler le service Assistance. Si l’appartement est situé
en étage dans un immeuble, il peut y avoir des phénomènes de siphonnage qui
font que le lave-linge prend et évacue l’eau continuellement. Pour supprimer
cet inconvénient, on trouve dans le commerce des soupapes spéciales antisiphonnage.
FR
Le lave-linge ne vidange pas et
n’essore pas.
Le lave-linge vibre beaucoup pendant l’essorage.
Le lave-linge a des fuites.
L’appareil est bloqué, l’écran clignote
et affiche un code d’anomalie (par ex. :
F-01, F-…).
Il y a un excès de mousse.
• Le programme ne prévoit pas de vidange: pour certains programmes, il faut la
faire partir manuellement (“Programmes et fonctions”).
• La fonction REPASSAGE FACILE est activée: pour compléter le programme,
appuyer sur la touche START/PAUSE (“Programmes et fonctions”).
• Le tuyau de vidange est plié (voir “Installation ”).
• La conduite d’évacuation est bouchée.
• Le tambour n’a pas été débloqué comme il faut lors de l’installation du lavelinge (voir “Installation”).
• Le lave-linge n’est pas posé à plat (voir “Installation”).
• Le lave-linge est coincé entre des meubles et le mur (voir “Installation”).
• Le tuyau d’arrivée de l’eau n’est pas bien vissé (voir “Installation”).
• Le tiroir à produits lessiviels est bouché (pour le nettoyer voir “Entretien et soin”).
• Le tuyau de vidange n’est pas bien fixé (voir “Installation”).
• Eteindre l’appareil et débrancher la fiche de la prise de courant, attendre 1
minute environ avant de rallumer.
Si l’anomalie persiste, appeler le service d’assistance.
• Le produit de lavage utilisé n’est pas une lessive spéciale machine (il faut qu’il
y ait l’inscription “pour lave-linge”, “main et machine”, ou autre semblable).
• La quantité utilisée est excessive.
23
Page 24

Assistance
FR
Avant d’appeler le service après-vente:
• Vérifier si on ne peut pas résoudre l’anomalie par ses propres moyens (voir “Anomalies et Remèdes”);
• Remettre le programme en marche pour contrôler si l’inconvénient a disparu;
• Autrement, contacter le Centre d’Assistance technique agréé au numéro de téléphone indiqué sur le certificat de garantie.
! Ne jamais s’adresser à des techniciens non agréés.
Communiquer:
• le type de panne;
• le modèle de l’appareil (Mod.);
• son numéro de série (S/N).
Ces informations se trouvent sur la plaque signalétique apposée à l’arrière du lave-linge et à l’avant quand on ouvre la porte hublot.
24
Page 25

Bedienungsanleitungen
WASCHVOLLAUTOMAT
DE
Deutsch
WMD 742
INHALTSVERZEICHNIS
Installation, 26-27
Auspacken und Aufstellen
Wasser- und Elektroanschlüsse
Erster Waschgang
Technische Daten
Beschreibung Ihres Waschvollautomaten, 28-29
Bedienblende
Display
Durchführung eines Waschprogramms, 30
Programme und Funktionen, 31
Programmtabelle
Waschfunktionen
Waschmittel und Wäsche, 32
Waschmittelschublade
Vorsortieren der Wäsche
Sonderprogramme
Unwuchtkontrollsystem
Vorsichtsmaßregeln und Hinweise, 33
Allgemeine Sicherheit
Entsorgung
Manuelles Öffnen der Gerätetür
DE
Reinigung und Pflege, 34
Abstellen der Wasser- und Stromversorgung
Reinigung des Gerätes
Reinigung der Waschmittelschublade
Pflege der Gerätetür und Trommel
Reinigung der Pumpe
Kontrolle des Wasserzulaufschlauchs
Störungen und Abhilfe, 35
Kundendienst, 36
25
Page 26

Installation
DE
! Es ist äußerst wichtig, diese Bedienungsanleitung sorg-
fältig aufzubewahren, um sie jederzeit zu Rate ziehen zu
können. Sorgen Sie dafür, dass sie im Falle eines Umzugs
oder einer Übergabe an einen anderen Benutzer das Gerät
stets begleitet, damit auch der neue Inhaber die Möglichkeit hat, diese zu Rate zu ziehen.
! Lesen Sie die Hinweise bitte aufmerksam durch, sie lie-
fern wichtige Informationen hinsichtlich der Installation, des
Gebrauchs und der Sicherheit.
Auspacken und Aufstellen
Auspacken
1. Gerät auspacken.
2. Sicherstellen, dass der Waschvollautomat keine Transportschäden erlitten hat. Im Falle einer Beschädigung
Gerät bitte nicht anschließen, sondern den Kundendienst
anfordern.
3. Die 4 Transportschutzschrauben herausschrauben und die an der
Geräterückwand befindlichen Distanzstücke aus
Gummi entfernen (siehe
Abbildung).
verleiht dem Gerät die erforderliche Stabilität, durch die
Vibrationen, Betriebsgeräusche und ein Verrücken des
Gerätes vermieden werden. Bei Teppichböden müssen
die Stellfüße so reguliert werden, dass ein ausreichender
Freiraum zur Belüftung unter dem Waschvollautomaten
gewährleistet ist.
Wasser- und Elektroanschlüsse
Anschluss des Zulaufschlauches
1. Schrauben Sie den
Wasserschlauch an einen
Kaltwasserhahn mit ¾-ZollGewindeanschluss an (siehe
Abbildung).
Lassen Sie das Wasser vor
dem Anschluss so lange
auslaufen, bis klares Wasser
austritt.
2. Das andere Ende des
Schlauches an den oben
rechts am Rückteil des
Waschvollautomaten befindlichen Wasseranschluss
anschließen (siehe Abbil-
dung).
4. Die Öffnungen mittels der mitgelieferten Abdeckungen
verschliessen.
5. Sämtliche Teile aufbewahren: Sollte der Waschautomat
erneut transportiert werden, müssen diese Teile wieder
eingesetzt werden.
! Verpackungsmaterial ist kein Spielzeug für Kinder.
Nivellierung
1. Der Waschvollautomat muss auf einem ebenen, festen,
schwingungsfreien Untergrund aufgestellt werden ohne diesen
an Wände, Möbel etc. direkt anzulehnen.
2. Sollte der Boden nicht
perfekt eben sein, müssen
die Unebenheiten durch Anbzw. Ausdrehen der vorderen Stellfüße ausgeglichen
werden (siehe Abbildung),
der auf der Arbeitsfläche zu
ermittelnde Neigungsgrad
darf 2° nicht überschreiten.
Eine präzise Nivellierung
3. Der Schlauch darf hierbei nicht eingeklemmt oder abgeknickt werden.
! Der Wasserdruck muss innerhalb der Werte liegen, die in
der Tabelle der technischen Daten angegeben sind (siehe
nebenstehende Seite).
! Sollte der Zulaufschlauch nicht lang genug sein, dann
wenden Sie sich bitte an einen Fachhändler oder an einen
autorisierten Fachmann.
! Verwenden Sie niemals bereits gebrauchte Schläuche.
! Verwenden Sie die Schläuche, die mit dem Gerät geliefert
wurden.
26
Page 27

65 - 100 cm
Anschluss des Ablaufschlauches
Schließen Sie den Ablaufschlauch ohne ihn dabei
abzuknicken an einen
geeigneten Abfluss an. Die
Mindestablaufhöhe beträgt 65
- 100 cm (gemessen vom
Boden), oder hängen Sie
diesen mittels des Schlauchhalters gesichert in ein
Becken oder Wanne ein;
! Verwenden Sie bitte keine Verlängerungen oder Mehrfa-
chstecker.
! Das Netzkabel darf nicht gebogen bzw. eingeklemmt
werden.
! Das Versorgungskabel darf nur durch autorisierte Fa-
chkräfte ausgetauscht werden.
Achtung! Der Hersteller übernimmt keinerlei Haftung, sollten diese Vorschriften nicht genau beachtet werden.
DE
Befestigen Sie diesen
mittels des mitgelieferten
Schlauchhalters z.B. an
einen Wasserhahn (siehe
Abbildung). Das freie Ablaufschlauchende darf nicht
unter Wasser positioniert
werden.
! Verlängerungsschläuche sollten nicht eingesetzt werden.
Sollte dies unvermeidlich sein, muss die Verlängerung denselben Durchmesser des Originalschlauchs aufweisen und
darf eine Länge von 150 cm nicht überschreiten.
Stromanschluss
Vor Einfügen des Netzsteckers in die Steckdose ist sicherzustellen, dass:
• die Steckdose über eine normgerechte Erdung verfügt;
• die Steckdose die in den Technischen Daten
angegebenen Höchstlast des Gerätes trägt (siehe
nebenstehende Tabelle);
• die Stromspannung den in den Technischen Daten
angegebenen Werten entspricht (siehe
nebenstehende Tabelle);
Erster Waschgang
Lassen Sie nach der Installation bzw. vor erstmaligem Gebrauch erst einen Waschgang (mit Waschmittel) ohne Wäsche durchlaufen. Stellen Sie hierzu das Waschprogramm
„AUTO REINIGEN“ ein (siehe „Reinigung des Gerätes“).
Technische Daten
Modell
Abmessungen
Fassungsvermögen
Elektroanschlüsse
Wasseranschlüsse
Schleudertouren
WMD 742
Breite 59,5 cm
Höhe 85 cm
Tiefe 54 cm
1 bis 7 kg
Siehe das am Gerät befindliche
Typenschild.
Höchstdruck 1 MPa (10 bar)
Mindestdruck 0,05 MPa (0,5 bar)
Trommelvolumen 52 Liter
bis zu 1400 U/min.
• die Steckdose mit dem Netzstecker des
Waschvollautomaten kompatibel ist. Andernfalls
muss der Netzstecker (oder die Steckdose) ersetzt
werden.
! Der Waschvollautomat darf nicht im Freien installiert
werden, auch nicht, wenn es sich um einen geschützten
Platz handelt. Es ist gefährlich, das Gerät Gewittern und
Unwettern auszusetzen.
! Die Steckdose sollte nach installiertem Gerät leicht
zugänglich sein.
Prüfprogramme gemäß der
Richtlinien
1061/2010 und
1015/2010
Programm ;
Temperatur 60°C (zweiter tastendruck);
Temperatur 40°C
Dieses Gerät entspricht den folgenden EG-Richtlinien:
- 2004/108/CE (elektromagnetische
Verträglichkeit)
- 2006/95/CE (Niederspannung)
- 2002/96/CE
(dritter tastendruck).
27
Page 28

Beschreibung Ihres
Waschvollautomaten
DE
Bedienblende
PROGRAMMWAHL
Waschmittelschublade
Waschmittelschublade: für Waschmittel und Zusätze
(siehe „Waschmittel und Wäsche“).
Taste ON/OFF : Drücken Sie kurz auf die Taste, um das
Gerät ein- bzw. auszuschalten. Die Kontrollleuchte START/
PAUSE, die langsam grün blinkt, zeigt an, dass das Gerät
eingeschaltet ist. Um den Waschvollautomaten während eines Waschgangs auszuschalten, muss die Taste etwas länger gedrückt werden (ca. 3 Sekunden); ein kurzer oder ein
ungewollter Druck bewirkt kein Ausschalten des Gerätes.
Das Ausschalten des Gerätes während eines laufenden
Waschprogramms löscht den gesamten Waschzyklus.
Taste ON/OFF
Tasten
SPÜLINTENSITÄT
STARTZEITVORWAHL
Taste
WASCHINTENSITÄT
DISPLAY
Taste
MY
CYCLE
Taste
Taste
Taste TEMPERATUR : Drücken Sie die Taste, um die
Temperatur herabzusetzen: Der Wert wird auf dem Display
angezeigt.
Taste TASTENSPERRE : Zur Aktivierung der Sperre
der Bedienblende halten Sie die Taste ca. 2 Sekunden
lang gedrückt. Das eingeschaltete Symbol zeigt an,
dass die Bedienblende gesperrt ist. Auf diese Weise wird
verhindert, dass ein Programm aus Versehen geändert
wird, vor allem, wenn kleine Kinder im Hause sind. Zur
Deaktivierung der Sperre der Bedienblende halten Sie die
Taste ca. 2 Sekunden lang gedrückt.
Tasten
FUNKTIONEN
Taste
SCHLEUDERN
Taste mit
Kontrollleuchte
START/PAUSE
Taste
TEMPERATUR
Taste
TASTENSPERRE
Tasten PROGRAMMWAHL: zur Einstellung des gewün-
schten Programms (siehe “Programmtabelle”).
Taste MY CYCLE: Halten Sie die Taste gedrückt, um einen Waschzyklus und die gewünschten Individualisierungseinstellungen zu speichern. Um einen bereits gespeicherten Zyklus abzurufen, drücken Sie die Taste MY CYCLE.
Tasten FUNKTIONEN: Drücken Sie die Taste, um die
gewünschte Funktion auszuwählen. Auf dem Display
schaltet sich die entsprechende Kontrollleuchte ein.
Taste
WASCHINTENSITÄT
Taste, um die gewünschte Waschintensität zu wählen.
Taste
SPÜLINTENSITÄT
um die gewünschte Spülung auszuwählen.
Taste SCHLEUDERN : Drücken Sie die Taste, um
die Schleudergeschwindigkeit herabzusetzen oder das
Schleudern ganz auszuschließen. Der Wert wird auf dem
Display angezeigt.
: Drücken Sie diese
: Drücken Sie diese Taste,
Taste STARTZEITVORWAHL : Zur Vorwahl der Start-
zeit des gewählten Programms drücken Sie bitte diese
Taste. Die Zeitverzögerung wird auf dem Display angezeigt.
Taste mit Kontrollleuchte START/PAUSE: Sobald die grü-
ne Kontrollleuchte auf langsames Blinklicht schaltet, drücken Sie die Taste, um den Waschgang zu starten. Nach
Ingangsetzung des Programms schaltet die Kontrollleuchte
auf Dauerlicht. Um den Waschgang zu unterbrechen,
drücken Sie erneut die Taste; die Kontrollleuchte schaltet
auf orangefarbenes Blinklicht. Wenn das Symbol nicht
leuchtet, kann die Gerätetür geöffnet werden. Um das
Programm an der Stelle, an der es unterbrochen wurde,
wieder in Gang zu setzen, drücken Sie die Taste erneut.
Funktion Standby
Zur Erfüllung der neuen Richtlinien zum Energieverbrauch
ist diese Waschmaschine mit einem automatischen Ausschaltsystem (Standby) ausgestattet, das nach 30 Minuten
des Nichtgebrauchs in Funktion tritt. Drücken Sie kurz
die Taste ON/OFF und warten Sie, bis sich die Maschine
wieder einschaltet.
Verbrauch in Off-Betrieb: 1 W
Verbrauch in Left-On: 1 W
28
Page 29

Display
Z
B
A
DE
X
D
C
E
Y
F
Das Display dient nicht nur zur Programmierung des Gerätes, sondern liefert auch zahlreiche Informationen.
In den beiden oberen Zeilenreihen A und B werden das ausgewählte Waschprogramm, die laufende Waschphase und alle
Angaben zum Programmfortschritt angezeigt.
In der Zeilenreihe C werden die Restzeit bis zum Ende des laufenden Waschvorgangs und bei Einstellung einer STARTZEITVORWAHL die bis zum Start des ausgewählten Programms verbleibende Zeit angezeigt.
In der Zeilenreihe D wird der Höchstwert der Schleudergeschwindigkeit angezeigt, die das Gerät für das eingestellte Programm zulässt; wenn das Programm keinen Schleudervorgang vorsieht, bleibt die Zeilenreihe ausgeschaltet.
In der Zeilenreihe E wird der Höchstwert der Temperatur angezeigt, der für das eingestellte Programm ausgewählt werden
kann; wenn das Programm keine Temperatureinstellung vorsieht, bleibt die Zeilenreihe ausgeschaltet.
Die Kontrollleuchten F sind den Funktionen zugeordnet und leuchten, wenn die ausgewählte Funktion mit dem eingestellten
Programm kompatibel ist.
Symbol Gerätetür gesperrt
Durch Leuchten des Symbols meldet das Gerät, dass die Gerätetür gesperrt ist, um ein versehentliches Öffnen zu vermeiden. Zur Vermeidung einer evtl. Beschädigung warten Sie bis das Symbol erlischt, bevor Sie die Gerätetür öffnen.
NB: Wenn die Funktion STARTZEITVORWAHL aktiviert ist, kann die Gerätetür nicht geöffnet werden. Zum Öffnen schalten
Sie das Gerät mittels der Taste START/PAUSE auf Pause.
! Vor dem ersten Einschalten werden Sie zur Auswahl der Sprache aufgefordert, und das Display blendet automatisch das
Menü zur Sprachauswahl ein.
Wählen Sie die gewünschte Sprache mittels der Tasten X und Y aus und drücken Sie dann zum Bestätigen der Auswahl auf
die Taste Z.
Um die Sprache zu ändern, schalten Sie das Gerät aus und drücken gleichzeitig die in der Abbildung mit X, Y und Z
gekennzeichneten Tasten. Nach dem ertönen eines akustischen Signals wird das Menü der Sprachauswahl angezeigt
29
Page 30

Durchführung eines
Waschprogramms
DE
1. EINSCHALTEN DES GERÄTES. Drücken Sie auf die
Taste , woraufhin auf dem Display die Meldung POWER
EIN erscheint; die Kontrollleuchte START/PAUSE blinkt
langsam grün.
2. EINFÜLLEN DER WÄSCHE. Öffnen Sie die Gerätetür.
Füllen Sie die Wäsche ein. Achten Sie hierbei bitte darauf,
die in der Programmtabelle (auf der nächsten Seite)
angegebene Wäschemenge nicht zu überschreiten.
3. DOSIERUNG DES WASCHMITTELS. Ziehen Sie
die Waschmittelschublade heraus und füllen Sie das
Waschmittel in die entsprechenden Kammern (siehe
“Waschmittel und Wäsche”).
4. SCHLIESSEN SIE DIE GERÄTETÜR.
5. WAHL DES WASCHPROGRAMMS. Wählen
Sie das gewünschte Programm mittels einer der
PROGRAMMWAHL-Tasten aus; die Bezeichnung des
Programms wird auf dem Display angezeigt; dem Programm
sind eine Temperatur und eine Schleudergeschwindigkeit
zugeordnet, die jedoch geändert werden können. Auf dem
Display wird die Programmdauer angezeigt.
6. INDIVIDUALISIERUNG DES WASCHGANGS.
Verwenden Sie hierzu die entsprechenden Tasten:
Änderung der Temperatur und/oder Schleudern.
Das Gerät wählt automatisch die für das eingestellte
Programm vorgesehene maximale Temperatur sowie
die maximale Schleudergeschwindigkeit. Diese können
demnach nicht erhöht werden. Durch Drücken der
Taste kann die Temperatur bis auf Kaltwäsche “OFF”
herabgesetzt werden. Durch Drücken der Taste kann
die Schleudergeschwindigkeit herabgesetzt oder der
Schleudervorgang auf “OFF” ausgeschlossen werden. Ein
weiterer Druck auf die Tasten bewirkt die Einstellung der
möglichen Maximalwerte.
! Ausnahme: Wird das Waschprogramm (60 °C) (zweiter
Tastendruck) eingestellt, kann die Temperatur bis auf 90°
erhöht werden.
Startzeitvorwahl.
Zur Vorwahl der Startzeit des eingestellten Programms
drücken Sie die entsprechende Taste bis die gewünschte
Zeitverschiebung angezeigt wird. Sobald diese
Zusatzfunktion aktiviert wird, leuchtet auf dem Display
das Symbol auf. Um die Startzeitvorwahl wieder zu
deaktivieren, drücken Sie die Taste bis auf dem Display der
Schriftzug “OFF” eingeblendet wird.
Einstellen der gewünschten Waschintensität.
Die Option ermöglicht Ihnen die optimale Einstellung
des Waschgangs auf Grundlage des Verschmutzungsgrades
der Kleidung und der gewünschten Waschintensität.
Wählen Sie das Spülprogramm. Der Zyklus wird
automatisch auf „Normal“ eingestellt, was optimal
für durchschnittlich verschmutzte Kleidung ist (diese
Einstellung ist nicht geeignet für den Zyklus „Wolle“, der
automatisch auf „Feines“ gestellt wird).
Für stark verschmutzte Kleidung drücken Sie die Taste
, bis Sie die Einstellung „Super Wash“ erreicht haben.
Diese Einstellung gewährleistet dank der Verwendung
einer größeren Menge Wasser zu Beginn des Zyklus
sowie dank einer größeren mechanischen Bewegung
einen leistungsstarken Waschgang und ermöglicht die
Entfernung der widerstandsfähigsten Flecken. Es ist eine
Verwendung mit oder ohne Bleichmittel möglich.
Wenn Sie Bleichmittel verwenden möchten, setzen Sie
die mitgelieferte zusätzliche Kammer 4 in Kammer 1 ein.
Bei der Dosierung des Bleichmittels darf der auf dem
Zentralstift mit „max“ gekennzeichnete Höchststand (siehe
Abb. auf Seite 32) nicht überschritten werden.
Für gering verschmutzte Kleidung oder für eine schonende
Behandlung der Kleidung drücken Sie die Taste , bis
Sie die Einstellung „Feines“ erreicht haben. Der Zyklus
verringert die mechanische Bewegung und sorgt somit für
einen idealen Waschgang für Feinwäsche. Wenn es nicht
möglich ist, die bestehende Einstellung zu ändern, wird auf
dem Display „Nicht Gültig“ angezeigt.
Einstellen des Spülgangs.
Die Option ermöglicht die Auswahl des gewünschten
Spülgangs, um sensible Haut so gut wie möglich zu
schonen. Beim ersten Tastendruck wird die Einstellung
„Extraspülen“ ausgewählt, die die Auswahl eines
zusätzlichen Spülgangs ermöglicht, um alle Spuren des
Waschmittels zu beseitigen. Beim zweiten Tastendruck
wird die Einstellung „Empfindliche Haut“ ausgewählt, die
die Auswahl von zwei zusätzlichen Spülgängen ermöglicht.
Diese Einstellung wird für eine äußerst sensible Haut
empfohlen. Beim dritten Tastendruck wird die Einstellung
„Anti Allergie Spülen“ ausgewählt, die die Auswahl von
drei zusätzlichen Spülgängen ermöglicht, um die wichtigsten
Allergene, wie etwa Pollen, Milben oder Katzen- und
Hundehaare, zu entfernen. Drücken Sie die Taste erneut, um
zur Spülgangeinstellung „Spülen“ zurückzukehren. Wenn es
nicht möglich ist, die bestehende Einstellung zu ändern, wird
auf dem Display „Nicht Gültig“ angezeigt.
Änderung der Eigenschaften des
Waschgangs.
• Drücken Sie die Taste zum Aktivieren der Funktion; die der
Taste entsprechende Kontrollleuchte schaltet sich dabei ein.
• Durch erneutes Drücken der Taste kann die Funktion
wieder ausgeschaltet werden; die Kontrollleuchte erlischt.
! Ist die gewählte Funktion nicht vereinbar mit dem
eingestellten Programm, schaltet die Kontrollleuchte auf
Blinklicht und die Funktion wird nicht aktiviert.
! Ist die gewählte Funktion mit einer anderen bereits
eingestellten nicht kompatibel, schaltet die der ersten
Funktion entsprechende Kontrollleuchte auf Blinklicht und
nur die zweite Funktion wird aktiviert, die Kontrollleuchte
der aktivierten Funktion schaltet auf Dauerlicht.
! Die Funktionen können eine Änderung der empfohlenen
Beladungsmenge und/oder der Waschzeit bewirken.
7. STARTEN DES PROGRAMMS. Drücken Sie die Taste
START/PAUSE. Die zugehörige Kontrollleuchte schaltet auf
grünes Dauerlicht und die Gerätetür wird gesperrt (Symbol
GERÄTETÜR GESPERRT leuchtet) Während des
Programmablaufs erscheint auf dem Display die Bezeichnung
der laufenden Programmphase. Um ein Programm während
eines laufenden Waschgangs zu ändern, schalten Sie den
Waschvollautomat mittels der Taste START/PAUSE auf
Pause (die Kontrollleuchte START/PAUSE blinkt nun langsam
orangefarben); wählen Sie daraufhin das gewünschte
Programm aus und drücken Sie erneut auf die Taste START/
PAUSE. Um während eines laufenden Programms die
Gerätetür zu öffnen, drücken Sie die Taste START/PAUSE;
wenn das Symbol GERÄTETÜR GESPERRT erloschen
ist, kann die Gerätetür geöffnet werden. Drücken Sie die Taste
START/PAUSE erneut, um das Programm an der Stelle an
der es unterbrochen wurde, wieder in Gang zu setzen.
8. ENDE DES PROGRAMMS. Das Programmende wird
durch die Anzeige “PROGRAMMENDE” auf dem Display
angezeigt. Wenn das Symbol GERÄTETÜR GESPERRT
erlischt, kann die Gerätetür geöffnet werden. Öffnen
Sie die Gerätetür, nehmen Sie die Wäsche heraus und
schalten Sie das Gerät aus.
! Möchten Sie ein bereits in Gang gesetztes Waschprogramm
löschen, drücken Sie die Taste etwas länger. Der Waschgang
wird unterbrochen und das Gerät schaltet sich aus.
30
Page 31

Programme und Funktionen
Programmtabelle
Max.
Beschreibung des Programms
Wasch-
programme
Flecken
Baumwolle + Vorwäsche (erster Tastendruck): stark verschmutzte
Kochwäsche.
Baumwolle Weiss (1) (zweiter Tastendruck): stark verschmutzte
Weiß- und farbechte Buntwäsche.
Baumwolle Bunt (1-2) (dritter Tastendruck): leicht verschmutzte
Weißwäsche und empfindliche Buntwäsche.
Synthetik Robust (erster Tastendruck): stark verschmutzte, far-
bechte Buntwäsche.
Synthetik Robust (4) (erster Tastendruck): stark verschmutzte, far-
bechte Buntwäsche.
Synthetik Fein (zweiter Tastendruck): leicht verschmutzte farbechte
Buntwäsche.
Schnell 60' (erster Tastendruck): zum kurzen Auffrischen versch-
mutzter Wäsche (nicht geeignet für Wolle, Seide und Handwäsche).
Schnell 30' (zweiter Tastendruck): zum kurzen Auffrischen leicht
verschmutzter Wäsche (nicht geeignet für Wolle, Seide und Handwäsche).
MY CYCLE (Speicher): hiermit kann jede beliebige Art von Waschgang gespeichert werden
M
Bett & Bad (3):
WOOLMARK PLATIN (Wolle): wolle, Kaschmir usw.
Ultra Fein
Hauptschleudern (erster Tastendruck)
Spülen Intensiv (zweiter Tastendruck)
Abpumpen (dritter Tastendruck)
Die auf dem Display und in der Bedienungsanleitung genannte Zyklusdauer wird ausgehend von Standardbedingungen berechnet. Die effektiv benötigte Zeit kann aufgrund zahlreicher Faktoren wie
Temperatur und Druck des Zulaufwassers, Raumtemperatur, Waschmittelmenge, Art, Menge und Verteilung der Waschladung sowie der gewählten Zusatzfunktionen variieren.
Für alle Testinstitute:
1) Prüfprogramm gemäß 1061/2010: Wählen Sie das Programm bei 60 °C (zweiter Tastendruck); wählen Sie das Programm bei 40 °C (dritter Tastendruck).
Dieser Zyklus ist für den Waschvorgang von normal schmutziger Baumwollwäsche geeignet; es ist der wirksamste in Bezug auf den kombinierten Energie-Wasser-Verbrauch; für bei 60°C und 40°C.
zu waschende Wäsche zu verwenden. Die effektive Waschtemperatur kann von der angegebenen abweichen.
2) Langes Baumwollprogramm: wählen Sie das Programm bei 40 °C (dritter Tastendruck).
3) Kurzes Baumwollprogramm: wählen Sie das Programm ; Temperatur von 40 °C (drücken Sie die Taste TEMPERATUR).
4) Langes Kunstfaserprogramm: wählen Sie das Programm bei 60 °C (erster Tastendruck); Temperatur von 40 °C (drücken Sie die Taste TEMPERATUR).
bettwäsche Bade- und Handtücher.
Max.
Temperatur
(°C)
40° 1400 90° 1400
60°
(Max. 90°C)
40° 1400 -
60° 800 -
40° 800 -
40° 800 -
60° 1400 -
30° 800 -
60° 1400 40° 800 30° 0 -
Schleu-
derGe-
schwin-
digkeit
(U/min)
1400 -
- 1400 - - - - 7 - - - 16’
- 1400 - - -
- 0 - - - - 7 - - - 2’
Waschmittel
Vor-
wäsche
Hauptwä-
sche
Bleichmit-
-
-
-
-
-
-
-
tel
Max.
spüler
Weich-
menge (kg)
Beladungs-
4 - - - 180’
7 53 2,21 78 170’
7 53 1,10 58 190’
7 53 0,99 82 185’
3 44 0,93 47 110’
3 44 0,57 46 95’
3 - - - 70’
3,5 53 0,81 40 60’
3 71 0,15 35 30’
7 - - - 125’
1,5 - - - 70’
1 - - - 80’
7 - - - 36’
gkeit %
Energiever-
brauch kWh
Restfeuchti-
samt lt
Wasser ge-
Programm-
DE
dauer
Waschfunktionen
Kurz
Mit Auswahl dieser Option verkürzt sich die Programmdauer
um bis zu 50 % je nach gewähltem Programm, wodurch
Wasser und Energie gespart werden. Verwenden Sie dieses
Programm für leicht verschmutzte Wäsche.
! Diese Funktion kann zu den Programmen , “Schnell
60’”, , , nicht zugeschaltet werden.
Bügelleicht
Bei Einstellung dieser Funktion wird zur Vermeidung
einer Knitterbildung der Wasch- und Schleudergang
entsprechend geändert. Am Ende des Waschgangs
erfolgen langsame Umdrehungen der Trommel; die
Kontrollleuchte der Funktion BÜGELLEICHT und die der
Taste START/PAUSE blinken (orange) und auf dem Display
wird “PROGRAMMENDE” angezeigt. Um den Waschgang
abzuschließen, drücken Sie die Taste START/PAUSE oder
die Taste BÜGELLEICHT.
! Diese Funktion kann zu den Programmen , “Schnell
30’”, , , “Hauptschleudern” und “Abpumpen” nicht
zugeschaltet werden.
Eco Wash
Die Funktion Eco Wash trägt dazu bei, Energie zu sparen,
indem das Wasser für die Wäsche nicht aufgeheizt
wird - ein Vorteil sowohl für die Umwelt als auch für
die Stromrechnung. Tatsächlich sichern die verstärkte
Waschaktion und der optimierte Wasserverbrauch
hervorragende Ergebnisse bei gleicher durchschnittlicher
Dauer eines Standardzyklusses zu. Für maximale
Waschergebnisse empfehlen wir den Einsatz eines
Flüssigwaschmittels.
! Diese Funktion kann zu den Programmen , (90°C),
, , , nicht zugeschaltet werden.
31
Page 32

Waschmittel und Wäsche
M
AX
1
2
4
3
A
B
DE
Waschmittel und Wäsche
Ein gutes Waschergebnis hängt auch von einer korrekten Waschmitteldosierung ab: Eine zu hohe Dosierung bedeutet nicht
unbedingt reinere Wäsche, sie trägt nur dazu bei, die Maschineninnenteile zu verkrusten und die Umwelt zu belasten.
! Waschmittel in Pulverform für Baumwollweißwäsche, für
die Vorwäsche und für Waschprogramme bei Temperaturen
über 60°C verwenden.
! Bitte befolgen Sie den auf der Waschmittelverpackung
angegebenen Anweisungen.
! Verwenden Sie keine Handwaschmittel, sie verursachen
eine zu hohe Schaumbildung.
Schublade herausziehen
und Waschmittel oder Zusätze wie folgt einfüllen:
Kammer 1: Waschpulver für die Vorwäsche (Waschpulver)
Vergewissern Sie sich vor Einfüllen des Waschmittels, dass
die Zusatzkammer 4 nicht eingesetzt wurde.
Kammer 2: Waschmittel für die Hauptwäsche (Waschpulver oder Flüssigwaschmittel)
Falls Sie ein Flüssigwaschmittel verwenden, wird empfohlen, die mitgelieferte Trennwand A zu benutzen, um
eine korrekte Dosierung zu gewährleisten. Wenn Sie ein
Pulverwaschmittel verwenden, geben Sie die Trennwand in
die Kammer B.
Kammer 3: Zusätze (Weichspüler usw.)
Der Weichspüler darf das Gitter nicht übersteigen.
Zusätzliche Kammer 4: Bleichmittel
Vorsortieren der Wäsche
• Sortieren Sie die Wäsche nach:
- Gewebeart / Waschetikettensymbol.
- und Farben: Buntwäsche von Weißwäsche trennen.
• Entleeren Sie alle Taschen.
• Das angegebene Gewicht, das sich auf die maximale
Ladung an Trockenwäsche bezieht, sollte nicht überschritten werden:
Widerstandsfähige Gewebe: max 7 kg
Kunstfasergewebe: max 3 kg
Wolle: max 1,5 kg
Seide: max 1 kg
Wie schwer ist Wäsche?
1 Betttuch 400-500 gr
1 Kissenbezug 150-200 gr
1 Tischdecke 400-500 gr
1 Bademantel 900-1.200 gr
1 Handtuch 150-250 gr
Sonderprogramme
Flecken: Das Programm ist für die Reinigung stark
verschmutzter Kleidung mit widerstandsfähigen Farben
geeignet. Das Programm gewährleistet einen Waschgang,
der besser als der Standard (Klasse A) ist. Mischen Sie
bei diesem Programm keine Kleidungsstücke mit unterschiedlicher Farbe. Es empfiehlt sich die Verwendung von
Pulverwaschmittel. Bei hartnäckigen Flecken empfiehlt sich
die Vorbehandlung mit spezifischen Zusatzstoffen.
Bett & Bad: Um Ihre Handtücher- und Bettwäsche in
einem einzigen Waschgang zu waschen, verwenden Sie
das -Programm, das die Verwendung von Weichspülern
optimiert. Dadurch sparen Sie zusätzlich Zeit und Energie.
Es empfiehlt sich die Verwendung von Pulverwaschmittel.
Wolle: Das Waschprogramm „Wolle” dieser Waschmaschine Hotpoint-Ariston wurde von der Woolmark
Company für die Wäsche von mit „Handwäsche“ gekennzeichneten Wollkleidungsstücken getestet und anerkannt,
vorausgesetzt die Wäsche erfolgt gemäß der Anweisungen
auf Etikett des Kleidungsstück und den Angaben des Herstellers des Haushaltsgeräts. Hotpoint-Ariston ist die erste
Waschmaschinenmarke, die von der Woolmark Company
die Zertifizierung Woolmark Apparel Care - Platinum für
ihre Waschleistungen und den Verbrauch von Wasser und
Energie erhalten hat. (M1126)
Ultra Fein: Verwenden Sie das Programm für die
Reinigung von Feinwäsche, die Applikationen wie Strass
oder Pailletten aufweist.
Wählen Sie für die Reinigung von Kleidungsstücken aus
Seide und Vorhänge den Zyklus und wählen Sie bei
der Option die Einstellung „Feines“.
Es wird empfohlen, die Kleidungsstücke vor der Reinigung
umzudrehen und kleinere Kleidungsstücke in den
entsprechenden Reinigungsbeutel für Feinwäsche zu
geben.
Um bessere Ergebnisse zu erzielen, wird für die Reinigung
von Feinwäsche die Verwendung von Flüssigwaschmittel
empfohlen.
Unwuchtkontrollsystem
Um starke Vibrationen oder eine Unwucht beim Schleudern zu vermeiden, verfügt das Gerät über ein Schleuderunwuchtsystem. Die Waschladung wird durch eine
erhöhte Rotation der Trommel als die des WAschgangs ausbalanciert. Sollte die Wäscheladung nach Ablauf mehrerer
Versuche immer noch nicht korrekt verteilt sein, schleudert
das Gerät die Wäsche bei einer niedrigeren Geschwindigkeit als die der vorgesehenen Schleudergeschwindigkeit.
Sollte die Wäsche extrem ungleichmäßig verteilt sein, führt
das Gerät anstelle des Schleudergangs einen Wäscheverteilungs-Zyklus durch. Um eine optimale Verteilung der
Wäscheladung und somit eine korrekte Auswuchtung zu
fördern, sollten große und kleine Wäscheteile gemischt
eingefüllt werden.
32
Page 33

Vorsichtsmaßregeln und
20
Hinweise
! Der Waschvollautomat wurde nach den strengsten interna-
tionalen Sicherheitsvorschriften entworfen und gebaut. Nachstehende Hinweise werden aus Sicherheitsgründen geliefert
und sollten aufmerksam gelesen werden.
Allgemeine Sicherheit
• Dieses Gerät wurde ausschließlich für den Einsatz im priva-
ten Haushalt konzipiert.
• Dieses Gerät ist nicht zur Verwendung durch Personen
(einschließlich Kinder) mit eingeschränkten körperlichen,
geistigen oder sensorialen Fähigkeiten oder ohne ausreichende Erfarhung und Kenntnis geeignet, es sei denn,
sie werden durch eine für ihre Sicherheit verantwortliche
Person beaufsichtigt und eingewiesen. Kinder müssen
beaufsichtigt werden, um sicherzustellen, dass sie nicht mit
dem Gerät spielen.
• Der Waschvollautomat darf nur von Erwachsenen und
gemäß den Anleitungen dieses Handbuchs bedient werden.
• Berühren Sie das Gerät nicht, wenn Sie barfuß sind, und
auch nicht mit nassen oder feuchten Händen oder Füßen.
• Ziehen Sie den Gerätestecker nicht am Kabel aus der
Steckdose, sondern nur am Netzstecker selbst.
• Öffnen Sie die Waschmittelschublade nicht, wenn das Gerät
in Betrieb ist.
• Berühren Sie nicht das Ablaufwasser, es könnte sehr heiß
sein.
• Öffnen Sie die Gerätetür nicht mit Gewalt: Der Sicherheits-
Schließmechanismus könnte hierdurch beschädigt werden.
• Bei etwaigen Störungen versuchen Sie bitte nicht, Innenteile
selbst zu reparieren.
• Halten Sie Kinder stets von dem in Betrieb befindlichen
Gerät fern.
• Während des Waschgangs kann die Gerätetür sehr heiß
werden.
• Muss das Gerät versetzt werden, sollten hierfür zwei oder
drei Personen verfügbar sein. Versetzen Sie es niemals
allein, das Gerät ist äußerst schwer.
• Bevor Sie die Wäsche einfüllen, stellen Sie bitte sicher, dass
die Wäschetrommel leer ist.
Das Symbol „durchgestrichene Mülltonne“ auf jedem
Produkt erinnert Sie an Ihre Verpflichtung, dass Elektrohaushaltsgeräte gesondert entsorgt werden müssen. Endverbraucher können sich an Abfallämter der Gemeinden wenden, um mehr Informationen über die korrekte Entsorgung
ihrer Elektrohaushaltsgeräte zu erhalten.
Manuelles Öffnen der Gerätetür
Sollte die Gerätetür aufgrund eines Stromausfalls nicht geöffnet werden können, gehen Sie wie folgt vor, um die Wäsche
entnehmen und somit aufhängen zu können:
1. Ziehen Sie den Netzstecker
aus der Steckdose.
2. Stellen Sie sicher, dass der
Wasserstand im Innern des
Gerätes die Gerätetür nicht
übersteigt, andernfalls lassen
Sie das überschüssige Wasser, so wie auf der Abbildung
veranschaulicht, durch den
Ablaufschlauch in einen Eimer
ablaufen.
3. Nehmen Sie die Abdeckung
(befindlich an der Gerätefront)
mit Hilfe eines Schraubenziehers ab (siehe Abbildung).
DE
Entsorgung
• Entsorgung des Verpackungsmaterials: Befolgen Sie die
lokalen Vorschriften, Verpackungsmaterial kann wiederverwertet werden.
• Gemäß der Europäischen Richtlinie 2002/96/EC über
Elektro- und Elektronik-Altgeräte dürfen ElektrohaushaltsAltgeräte nicht über den herkömmlichen Haushaltsmüllkreislauf entsorgt werden. Altgeräte müssen separat gesammelt
werden, um die Wiederverwertung und das Recycling der
beinhalteten Materialien zu optimieren und die Einflüsse auf
die Umwelt und die Gesundheit zu reduzieren.
4. Befreien Sie mithilfe der auf der Abbildung veranschaulichten Zunge (nach vorne ziehen) die Kunststoff-Spannvorrichtung aus der Arretierung; ziehen Sie letztere dann nach
unten und öffnen Sie gleichzeitig die Gerätetür.
5. Bringen Sie die Abdeckung wieder an. Stellen Sie hierbei
sicher, dass die Haken in die Schlitze eingreifen, bevor Sie die
Abdeckung fest andrücken.
33
Page 34

Reinigung und Pflege
1
2
A
B
DE
Abstellen der Wasser- und Stromversorgung
• Drehen Sie den Wasserhahn nach jedem Waschvorgang
zu. Hierdurch wird der Verschleiß der Wasseranlage
verringert und Wasserlecks vorgebeugt.
• Ziehen Sie den Netzstecker aus der Steckdose, bevor
Sie Ihren Waschvollautomaten reinigen.
Reinigung des Gerätes
• Die Gehäuseteile und die Teile aus Gummi können mit
einem mit warmer Spülmittellauge angefeuchteten Tuch
gereinigt werden. Vermeiden Sie Löse- und Scheuermittel.
• Die Waschmaschine verfügt über ein „AUTO
REINIGEN“-Programm der inneren Teile, das gänzlich
ohne Wäsche durchgeführt werden muss.
Als Hilfsmittel können bei diesem Waschgang Waschmittel
(10 % von der für gering verschmutzte Kleidungsstücke
empfohlenen Menge) oder spezifische Zusatzstoffe für die
Reinigung von Waschmaschinen verwendet werden. Es
wird empfohlen, das Reinigungsprogramm alle 40 Waschgänge durchzuführen.
Um das Programm zu aktivieren, drücken Sie fünf Sekunden lang gleichzeitig die Tasten A und B (siehe abb.).
Das Programm startet automatisch und dauert etwa 70
Minuten. Um den Zyklus anzuhalten, drücken Sie die Taste
START/PAUSE.
Reinigung der Pumpe
Ihr Gerät ist mit einer selbstreinigenden Pumpe ausgerüstet, eine Wartung ist demnach nicht erforderlich. Es könnte jedoch vorkommen, dass kleine Gegenstände (Münzen,
Knöpfe) in die zum Schutz der Pumpe dienende Vorkammer (befindlich unter der Pumpe) fallen.
! Vergewissern Sie sich, dass der Waschgang abgeschlos-
sen ist und ziehen Sie den Netzstecker heraus.
Zugang zur Vorkammer:
1. Nehmen Sie die Abdeckung (befindlich an der
Gerätefront) mit Hilfe eines
Schraubenziehers ab (siehe
Abbildung);
2. Drehen Sie den Deckel
gegen den Uhrzeigersinn ab
(siehe Abbildung): es ist ganz
normal, wenn etwas Wasser
austritt;
Reinigung der Waschmittelschublade
Heben Sie die Schublade
leicht an und ziehen Sie
sie nach vorne hin heraus
(siehe Abbildung).
Spülen Sie sie regelmäßig
unter fließendem Wasser
gründlich aus.
Pflege der Gerätetür und Trommel
• Lassen Sie die Gerätetür stets leicht offen stehen, um die
Bildung unangenehmer Gerüche zu vermeiden.
34
3. Reinigen Sie das Innere gründlich;
4. Schrauben Sie den Deckel wieder auf;
5. Bringen Sie die Abdeckung wieder an. Stellen Sie hierbei sicher, dass die Haken in die Schlitze eingreifen, bevor
Sie die Abdeckung fest andrücken.
Kontrolle des Wasserzulaufschlauchs
Kontrollieren Sie den Zulaufschlauch mindestens einmal im
Jahr. Weist er Risse bzw. Brüche auf, muss er ausgetauscht werden. Der starke Druck während des Waschprogramms könnte zu plötzlichem Platzen führen.
! Verwenden Sie niemals bereits gebrauchte Schläuche.
Page 35

Störungen und Abhilfe
Bei Funktionsstörung: Bevor Sie sich an den Technischen Kundendienst wenden (siehe „Kundendienst“), vergewissern Sie sich zuerst,
ob es sich nicht um eine Kleinigkeit handelt, die Sie selbst beheben können. Ziehen Sie hierzu nachstehendes Verzeichnis zu Rate.
Störungen:
Der Waschvollautomat schaltet sich
nicht ein.
Der Waschgang startet nicht.
Mögliche Ursachen / Lösungen:
• Der Stecker steckt nicht in der Steckdose, oder nicht so, dass der Kontakt hergestellt wird.
• Der Strom ist ausgefallen.
• Die Gerätetür wurde nicht vorschriftsmäßig geschlossen.
• Die ON/OFF-Taste wurde nicht gedrückt.
• Die Taste START/PAUSE wurde nicht gedrückt.
• Der Wasserhahn ist nicht aufgedreht.
• Es wurde ein verzögerter Start gewählt (siehe „Durchführung eines Waschpro-
gramms“).
Der Waschvollautomat lädt kein
Wasser (auf dem Display wird die
Meldung “WASSERZULAUF PRÜFEN” eingeblendet).
Der Waschvollautomat lädt laufend
Wasser und pumpt es laufend ab.
• Der Zufuhrschlauch ist nicht am Wasserhahn angeschlossen.
• Der Schlauch ist geknickt.
• Der Wasserhahn ist nicht aufgedreht.
• Es ist kein Wasser da.
• Der Druck ist unzureichend.
• Die Taste START/PAUSE wurde nicht gedrückt.
• Der Ablaufschlauch befindet sich nicht auf der vorgeschriebenen Höhe, d.h. 65 –
100 cm vom Boden (siehe „Installation“).
• Das Schlauchende liegt unter Wasser (siehe „Installation”).
• Der Abfluss der Hausinstallation wurde nicht mit einer Entlüftungsöffnung versehen.
Konnte die Störung durch diese Kontrollen nicht behoben werden, dann drehen Sie den
Wasserhahn zu, schalten das Gerät aus und fordern den Kundendienst an. Falls Sie in
einer der obersten Etagen eines Gebäudes wohnen, kann es vorkommen, dass sich
im Syphon ein Vakuum bildet, und der Waschvollautomat ständig Wasser ansaugt und
wieder abpumpt. Zur Lösung dieser Probleme bietet der Handel spezielle Syphonventile.
DE
Der Waschvollautomat pumpt nicht
ab und schleudert nicht.
Der Waschvollautomat vibriert zu
stark während des Schleuderns.
Der Waschvollautomat ist undicht.
Das Gerät ist blockiert, das Display
blinkt und zeigt einen Fehlercode
an (zum Beispiel: F-01, F-..).
Es bildet sich zu viel Schaum.
• Das Programm siehe kein Abpumpen vor: Bei einigen Programmen muss es von
Hand eingestellt werden (siehe „Programme und Funktionen“).
• Die Funktion “BÜGELLEICHT” wurde aktiviert: zur Beendung des Programms Taste
START/PAUSE drücken (siehe „Programme und Funktionen“).
• Der Ablaufschlauch ist geknickt (siehe „Installation“).
• Die Ablaufleitung ist verstopft.
• Die Trommel wurde bei der Installation nicht korrekt befreit (siehe „Installation“).
• Der Waschvollautomat steht nicht eben (siehe „Installation“).
• Der Waschvollautomat steht zu eng zwischen der Wand und einem Möbel (siehe
„Installation“).
• Der Zulaufschlauch wurde nicht ordnungsgemäß aufgeschraubt (siehe „Installation“).
• Die Waschmittelschublade ist verstopft (zur Reinigung siehe „Wartung und Pflege“).
• Der Ablaufschlauch ist nicht korrekt befestigt (siehe „Installation“).
• Schalten Sie das Gerät aus und ziehen Sie den Netzstecker; warten Sie daraufhin
ca. 1 Minute und schalten Sie es wieder ein.
Bleibt die Störung bestehen, kontaktieren Sie bitte den Kundendienst.
• Das Waschmittel ist für Waschmaschinen nicht geeignet (es muss mit der Aufschrift
„Für Waschmaschinen“, „Für Handwäsche und Waschmaschinen“ usw. versehen sein.
• Es wurde zu hoch dosiert.
35
Page 36

Kundendienst
DE
Bevor Sie sich an den Kundendienst wenden:
• Sollten einige Kontrollen vorab selbst durchgeführt werden (siehe „Störungen und Abhilfe“);
• Starten Sie daraufhin das Programm erneut, um sicherzustellen, dass die Störung auch wirklich behoben wurde;
• Ist dies nicht der Fall, dann kontaktieren Sie den autorisierten Kundendienst unter der auf dem Garantieschein befindlichen
Telefonnummer.
! Wenden Sie sich auf keinen Fall an nicht autorisierte Techniker.
Geben Sie bitte Folgendes an:
• die Art der Störung;
• das Maschinenmodell (Mod.);
• die Seriennummer (S/N).
Diese Daten entnehmen Sie bitte dem auf der Rückseite des Waschvollautomaten und auf der Vorderseite (Gerätetür öffnen)
befindlichen Typenschild.
36
Page 37

Gebruiksaanwijzing
WASAUTOMAAT
NL
Nederlands
WMD 742
Inhoud
Installatie, 38-39
Uitpakken en waterpas zetten
Hydraulische en elektrische aansluitingen
Eerste wascyclus
Technische gegevens
Beschrijving van de wasautomaat, 40-41
Bedieningspaneel
Controlelampjes
Een programma starten
Het uitvoeren van een wascyclus, 42
Programma’s en functies, 43
Programmatabel
Wasfuncties
Wasmiddelen en wasgoed, 44
Wasmiddelbakje
Voorbereiden van het wasgoed
Speciale programma’s
Balanceersysteem van de lading
NL
Voorzorgsmaatregelen en advies, 45
Algemene veiligheid
Afvalverwijdering
Handmatige opening van de deur
Onderhoud en verzorging, 46
Afsluiten van water en stroom
Reinigen van de wasautomaat
Reinigen van het wasmiddelbakje
Onderhoud van deur en trommel
Reinigen van de pomp
Controleren van de buis van de watertoevoer
Storingen en oplossingen, 47
Service, 48
37
Page 38

Installatie
NL
! Het is belangrijk deze handleiding te bewaren voor latere
raadpleging. In het geval u het apparaat verkoopt, of u
verhuist, moet het boekje bij de wasautomaat blijven zodat
de nieuwe gebruiker de functies en betreffende raadgevingen kan doornemen.
! Lees de instructies aandachtig door: u vindt er belangrij-
ke informatie betreffende installatie, gebruik en veiligheid.
Uitpakken en waterpas zetten
Uitpakken
1. De wasautomaat uitpakken.
2. Controleer of de wasautomaat geen schade heeft gele-
den gedurende het vervoer. Indien dit wel het geval is moet
hij niet worden aangesloten en moet u contact opnemen
met de handelaar.
3. Verwijder de 4 schroeven
die het apparaat beschermen tijdens het vervoer
en de rubberen ring met
bijbehorende afstandsleider
die zich aan de achterkant
bevinden (zie afbeelding).
4. Sluit de openingen af met de bijgeleverde plastic dop-
pen.
5. Bewaar alle onderdelen: mocht de wasautomaat ooit
worden vervoerd, dan moeten deze weer worden aangebracht.
! Het verpakkingsmateriaal is geen speelgoed voor kinde-
ren.
Waterpas zetten
Een correcte nivellering geeft de machine stabiliteit en
voorkomt trillingen, lawaai en het zich verplaatsen van de
automaat tijdens de werking. In het geval van vloerbedekking of een tapijt regelt u de stelvoetjes zodanig dat onder
de wasmachine genoeg plaats is voor ventilatie.
Hydraulische en elektrische aansluitingen
Aansluiting van de watertoevoerbuis
1. Sluit de toevoerbuis aan
op de koudwaterkraan met
een mondstuk met schroefdraad van 3/4 gas (zie
afbeelding). Voordat u de
wasautomaat aansluit moet
u het water laten lopen
totdat het helder is.
2. Verbind de watertoevoerbuis aan de wasautomaat
door hem op de betreffende
watertoevoer te schroeven,
rechtsboven aan de achterkant (zie afbeelding).
3. Let erop dat er geen knellingen of kronkels in de buis zijn.
! De waterdruk van de kraan moet zich binnen de waarden
van de tabel Technische Gegevens bevinden (zie bladzijde
hiernaast).
1. Installeer de wasautomaat op een rechte en stevige
vloer en laat hem niet steunen tegen een muur, meubel of
dergelijke.
2. Als de vloer niet volledig
horizontaal is kunt u de
onregelmatigheid opheffen
door de stelvoetjes aan de
voorkant losser of vaster te
schroeven (zie afbeelding);
de inclinatiehoek, gemeten ten opzichte van het
werkvlak, mag de 2° niet
overschrijden.
38
! Als de toevoerbuis niet lang genoeg is moet u zich
wenden tot een gespecialiseerde winkel of een bevoegde
installateur.
! Gebruik nooit tweedehands buizen.
! Gebruik de buizen die bij het apparaat worden geleverd.
Page 39

65 - 100 cm
Aansluiting van de afvoerbuis
Verbind de buis, zonder
hem te buigen, aan een
afvoerleiding of aan een
afvoer in de muur tussen de
65 en 100 cm van de grond
! Gebruik geen verlengsnoeren of dubbelstekkers.
! Het snoer mag niet gebogen of samengedrukt worden.
! De voedingskabel mag alleen door een bevoegde instal-
lateur worden vervangen.
Belangrijk! De fabrikant kan niet aansprakelijk worden gesteld wanneer deze normen niet worden nageleefd.
Eerste wascyclus
NL
af of hang hem aan de
rand van een wasbak of
badkuip, en bind de bijgeleverde steun aan de kraan
(zie afbeelding). Het uiteinde van de afvoerslang mag
niet onder water hangen.
! Gebruik nooit verlengstukken voor de buis; indien dit niet
te vermijden is moet het verlengstuk dezelfde doorsnede
hebben als de oorspronkelijke buis en mag hij niet langer
zijn dan 150 cm.
Elektrische aansluiting
Voordat u de stekker in het stopcontact steekt moet u zich
ervan verzekeren dat:
• het stopcontact geaard is en voldoet aan de
geldende normen;
• het stopcontact het maximum vermogen van de
wasautomaat kan dragen, zoals aangegeven in de
tabel Technische Gegevens (zie hiernaast);
• de spanning zich bevindt tussen de waarden die
zijn aangegeven in de tabel Technische Gegevens
(zie hiernaast);
• de contactdoos geschikt is voor de stekker van de
wasautomaat. Indien dit niet zo is moet de stekker
of het stopcontact vervangen worden.
Na de installatie en voor u de wasautomaat in gebruik
neemt, dient u een wascyclus uit te voeren met wasmiddel
maar zonder wasgoed, op het programma “WASMACHINE REINIGEN” (zie “Reinigen van de wasautomaat”).
Technische gegevens
Model
Afmetingen
Laadcapaciteit
Elektrische
aansluitingen
Hydraulische
aansluitingen
Centrifugetoerental
Controleprogram-
ma’s volgens
de richtlijnen
1061/2010 en
1015/2010
WMD 742
breedte 59,5 cm
hoogte 85 cm
diepte 54 cm
van 1 tot 7 kg
zie het typeplaatje met de technische
eigenschappen dat op het apparaat is
bevestigd
maximale druk 1 MPa (10 bar)
minimale druk 0,05 MPa (0,5 bar)
inhoud trommel 52 liter
tot 1400 toeren per minuut
programma ;
temperatuur 60°C (2
temperatuur 40°C (3
e
druk op de toets);
e
druk op de toets).
! De machine mag alleen binnenshuis op een vorstvrije en
droge plek worden geïnstalleerd om elektronische schade
door bevriezing of condensatie te voorkomen.
! Als de wasautomaat is geïnstalleerd moet het stopcon
tact gemakkelijk te bereiken zijn.
Deze apparatuur voldoet aan de volgende CE voorschriften:
- 2004/108/CE (Elektromagnetische
compatiabiliteit)
- 2002/96/CE
- 2006/95/CE (Laagspanning)
39
Page 40

Beschrijving van de wasautomaat
NL
Bedieningspaneel
ON/OFF
toets
Wasmiddelbakje
Wasmiddelbakje: voor wasmiddelen en wasversterkers
(zie “Wasmiddelen en wasgoed”).
Toets ON/OFF : druk even op de toets om de wasautomaat aan of uit te zetten. Het groene START/PAUSE
controlelampje dat langzaam knippert geeft aan dat de
wasautomaat aanstaat. Om de wasautomaat tijdens de
wascyclus uit te zetten moet u de toets iets langer, circa 3
seconden, ingedrukt te houden. Als u de toets kort, of per
ongeluk indrukt zal de wasautomaat niet uitgaan. Als u de
wasautomaat tijdens de wascyclus uitdoet wordt de cyclus
automatisch geannuleerd.
Toetsen PROGRAMMAKEUZE: voor het instellen van het
gewenste programma (zie “Programmatabel”).
Toets MY CYCLE: druk op deze toets om de wascyclus
en uw persoonlijke instellingen op te slaan. Om een
voorheen opgeslagen wascyclus te starten drukt u op de
toets MY CYCLE.
FUNCTIETOETSEN: druk op de toets om de gewenste
functie te selecteren. Op het display gaat het bijbehorende
controlelampje aan.
Toets
SCHOONMAAK ACTIE
om de gewenste wasintensiteit te kiezen.
Toets
SOORT SPOELING
de gewenste spoeling te kiezen.
Toets CENTRIFUGE : druk hierop om het centrifugetoerental te verminderen of om de centrifuge in zijn geheel uit
te sluiten - de waarde wordt op het display aangegeven.
PROGRAMMAKEUZE
: druk op deze toets
: druk op deze toets om
Toetsen
SCHOONMAAK
ACTIE
toets
DISPLAY
MY CYCLE
toets
SOORT
SPOELING
toets
UITGESTELDE
START
toets
Toets TEMPERATUUR : druk hierop om de temperatu-
ur te verlagen: de waarde wordt op het display aangegeven.
Toets TOETSBLOKKERING : om de blokkering
van het bedieningspaneel te activeren dient u de
toets circa 2 seconden lang ingedrukt te houden. Het
ontstoken symbool geeft aan dat het bedieningspaneel
geblokkeerd is. Op deze manier kunt u voorkomen
dat er ongewilde wijzigingen aan de programma’s
worden aangebracht, bijvoorbeeld bij aanwezigheid van
kinderen. Om de blokkering van het bedieningspaneel
te deactiveren dient u de toets circa 2 seconden lang
ingedrukt te houden.
Toets UITGESTELDE START : druk hierop om een
uitgestelde start van het gekozen programma in te stellen.
De vertraging wordt door het display aangegeven.
Toets met controlelampje START/PAUSE: als het groene
controlelampje langzaam knippert, moet u op de toets drukken om de wascyclus te starten. Als de cyclus is gestart
blijft het controlelampje vast aanstaan. Als u de wascyclus
wilt PAUSEren drukt u nogmaals op de toets; het controlelampje wordt oranje en gaat knipperen. Als het symbool
niet aan is kunt u de deur openen. Om het programma
te hervatten drukt u opnieuw op de toets.
Stand- by modus
Deze wasdroogmachine beschikt, in overeenkomst met
de nieuwe normen betreffende de energiebesparing, over
een systeem wat het apparaat automatisch na 30 minuten
uitschakelt (stand-by) indien men het niet gebruikt. Druk
kort op de ON/OFF toets en wacht tot de wasdroogmachine weer aangaat.
Gebruik in off-mode: 1 W
Gebruik in Left-on: 1 W
FUNCTIETOETSEN
CENTRIFUGE
toets
Toets met
controlelampje
START/PAUSE
TEMPERATUUR
toets
TOETSBLOKKERING
toets
40
Page 41

Display
Z
B
A
NL
X
D
C
E
Y
F
Het display is nodig om de wasautomaat te programmeren en geeft meerdere soorten informatie.
In de twee bovenste vakken A en B verschijnen het geselecteerde wasprogramma, de lopende wasfase en alle aanwijzingen
met betrekking tot het verloop van het wasprogramma.
In het vak C verschijnt de resterende tijd tot het einde van de wascyclus. Indien een UITGESTELDE START is geselecteerd
verschijnt de resterende tijd tot aan de start van het geselecteerde wasprogramma.
In het vak D verschijnt het maximale centrifugetoerental dat het apparaat kan uitvoeren bij het ingestelde programma. Als het
programma geen centrifuge voorziet dan zal er in dit vak niets verschijnen.
In het vak E verschijnt de maximale temperatuur die u kunt selecteren bij het ingestelde programma. Als het programma
geen instelling van de temperatuur voorziet dan zal er in dit vak niets verschijnen.
De controlelampjes F hebben betrekking tot de functies en zullen aangaan als de geselecteerde functie compatibel is met het
ingestelde programma.
Symbool Deur geblokkeerd
Het symbool geeft aan dat de deur is geblokkeerd om ongewild openen te vermijden. Om schade te voorkomen moet u
wachten tot het symbool uitgaat voordat u de deur van de wasautomaat opent.
N.B.: als de functie UITGESTELDE START actief is kunt u de deur niet openen. Om hem toch te openen zet u het apparaat
op PAUSE door middel van de START/PAUSE toets.
! Wanneer u het apparaat voor het eerst aanzet kunt u een taal selecteren en zal op het display automatisch het menu taal
selecteren verschijnen.
Om de gewenste taal te selecteren drukt u op de toetsen X en Y. Om uw keuze te bevestigen drukt u op de toets Z.
Als u van taal wilt veranderen, schakelt u de wasautomaat uit en drukt u tegelijkertijd op de toetsen X, Y, Z, totdat u een
geluidssignaal hoort. Nu zal opnieuw het menu voor de taalselectie verschijnen.
41
Page 42

Het uitvoeren van een wascyclus
NL
1. DE WASAUTOMAAT AANZETTEN. Druk op de toets
, op het display verschijnt de tekst AANZETTEN. Het groene
controlelampje START/PAUSE zal langzaam knipperen.
2. HET WASGOED INLADEN. Open de deur. Laad het
wasgoed in en zorg ervoor nooit de laadhoeveelheid te
overschrijden aangegeven in de programmatabel op de
volgende bladzijde.
3. WASMIDDEL DOSEREN. Trek het bakje naar buiten
en doe het wasmiddel in de speciale bakjes, zoals
aangegeven in “Wasmiddelen en wasgoed”.
4. SLUIT DE DEUR.
5. KIES HET PROGRAMMA. Druk op een van de
toetsen van de PROGRAMMAKEUZE om het gewenste
programma te selecteren. De naam van het programma
verschijnt op het display; hieraan worden automatisch
een temperatuur en een centrifugesnelheid gekoppeld
die naderhand kunnen worden gewijzigd. Op het display
verschijnt de duur van de cyclus.
6. DE WASCYCLUS AANPASSEN. Druk op de speciale toetsen:
Wijzigen van de temperatuur en/of de
centrifuge. De wasautomaat selecteert automatisch de
maximale temperatuur en centrifuge die voor het ingestelde
programma gelden. Deze maximum waarden kunnen niet
worden overschreden. Door op de toets te drukken
kunt u de temperatuur langzaamaan verlagen, tot aan de
koude wascyclus “OFF”. Door op de toets te drukken
kunt u het toerental van de centrifuge langzaamaan
verlagen, tot aan de complete uitsluiting “OFF”. Als u
nogmaals op de toetsen drukt zult u op de maximaal
toegestane waarden terugkeren.
! Uitzondering: als u het programma (60°C) (2
toets) selecteert kunt u de temperatuur tot op 90° instellen.
Een uitgestelde start instellen.
Om de uitgestelde start van het gekozen programma
in te stellen drukt u op de betreffende toets totdat u
de gewenste vertraging heeft bereikt. Als deze optie is
geactiveerd verschijnt op het display het symbool . Om
de uitgestelde start te annuleren drukt u net zolang op de
toets tot op het display de tekst OFF verschijnt.
De gewenste wasintensiteit te kiezen.
Met de optie kunt u het wasprogramma optimaliseren
op basis van de vuilgraad van het wasgoed en de
gewenste wasintensiteit.
Selecteer het wasprogramma, de cyclus wordt
automatisch ingesteld op het niveau “Normaal”, dat
geoptimaliseerd is voor middelmatig vuile was (deze
instelling geldt niet voor de cyclus “Wol” die automatisch
wordt ingesteld op het niveau “Delicaat”).
Voor zeer vuile was drukt u op de toets totdat u het
niveau “Super Wash” bereikt. Dit niveau garandeert een
kwalitatief zeer hoog wasresultaat dankzij het gebruik van een
grotere hoeveelheid water in de beginfase van de cyclus, en
een grotere mechanische beweging van de trommel. Hierdoor
worden zelfs de hardnekkigste vlekken verwijderd. Kan met of
zonder bleekmiddel gebruikt worden.
Als u bleekmideel wil toevoegen plaatst u het bijgeleverde
bakje 4 in vakje 1. Schenk het bleekmiddel en zorg ervoor
nooit het “max” niveau, aangegeven op de centrale spil, te
overschrijden (zie fig. op pag. 44).
e
druk op de
Voor niet zo vuile was of voor een voorzichtigere
behandeling van het wasgoed drukt u op de toets
totdat u het niveau “Delicaat” bereikt. Deze cyclus zorgt
voor een beperktere mechanische beweging waardoor fijne
was perfect kan worden gewassen. Indien het niet mogelijk
is de bestaande afregeling in te stellen of te wijzigen,
verschijnt op het display de tekst “Niet Actief”.
Het soort spoeling instellen.
Met de optie kunt u het type spoeling selecteren voor
een maximale zorg van de gevoelige huid. De eerste keer dat
u op de toets drukt selecteert u het niveau “Extra spoelen”
waarmee een extra spoelcyclus wordt ingesteld om alle
sporen van wasmiddel te verwijderen. De tweede keer dat u
op de toets drukt selecteert u het niveau “Gevoelige Huid”
waarmee u twee extra spoelcycli instelt. Dit wordt aangeraden
voor de gevoeligere huid. De derde keer dat u op de toets
drukt wordt het niveau “Anti-allergie” ingesteld waarmee
u drie extra spoelcycli selecteert, teneinde de voornaamste
allergenen zoals stuifmeel, mijten, katten- en hondenhaar te
verwijderen. Druk nogmaals op deze toets om terug te keren
naar het type “Normaal spoelen” spoeling. Indien het niet
mogelijk is de bestaande afregeling in te stellen of te wijzigen,
verschijnt op het display de tekst “Niet Actief”.
De eigenschappen van de cyclus wijzigen.
• Druk op de toets om de functie te activeren. Het
controlelampje dat bij de toets hoort gaat aan.
• Druk nogmaals op de toets om de functie te
deactiveren. Het controlelampje gaat uit.
! Als de gekozen functie niet geschikt is voor het ingestelde
programma gaat het controlelampje knipperen en zal de
functie niet worden geactiveerd.
! Als de geselecteerde functie niet compatibel is met een
optie die daarvòòr is ingesteld, zal het controlelampje
van de eerder geselecteerde functie gaan knipperen en
zal alleen de tweede functie worden geactiveerd; het
controlelampje van de geactiveerde functie zal aangaan.
! De functies kunnen van invloed zijn op de aanbevolen
washoeveelheid en/of de duur van de cyclus.
7. HET PROGRAMMA STARTEN. Druk op de toets START/
PAUSE. Het betreffende controlelampje zal aangaan met
een groen licht en de deur wordt geblokkeerd (het symool
DEUR GEBLOKKEERD is aan). Tijdens het wassen zal
op het display de naam van de lopende wasfase verschijnen.
Om een programma te wijzigen terwijl de cyclus bezig is
moet u de wasautomaat pauzeren door middel van de toets
START/PAUSE (het controlelampje START/PAUSE gaat
langzaam knipperen met een oranje licht); selecteer daarna
de gewenste cyclus en druk opnieuw op de toets START/
PAUSE. Om de deur te openen terwijl de cyclus bezig is,
drukt u op de START/PAUSE toets. Als het symbool DEUR
GEBLOKKEERD uit is kunt u de deur openen. Druk
nogmaals op de START/PAUSE toets om het programma te
hervatten vanaf het punt dat het werd onderbroken.
8. EINDE VAN HET PROGRAMMA. De tekst “EINDE
CYCLUS” verschijnt op het display. Als het symbool DEUR
GEBLOKKEERD uitgaat kunt u de deur openen. Open
het deurtje, laad het wasgoed uit en schakel het apparaat uit.
! Als u een reeds gestarte cyclus wilt annuleren drukt u
langere tijd op de toets . De cyclus wordt onderbroken en
het apparaat gaat uit.
42
Page 43

Programma’s en functies
Programmatabel
Maxi-
Beschrijving van het Programma
Programma’s
Vlekkenverwijdering
Katoen Voorwas (1e druk op de toets): zeer vuile witte was. 90° 1400
Wit Katoen (1) (2e druk op de toets): zeer vuile wit en kleurecht bont wasgoed.
Bont Katoen (1-2) (3e druk op de toets): niet zo vuile witte en bonte fijne was. 40° 1400 -
Synthetisch Resistent (1e druk op de toets): zeer vuile kleurvaste bonte was. 60° 800 -
Synthetisch Resistent (4) (1e druk op de toets): zeer vuile kleurvaste bonte was. 40° 800 -
Fijn Synthetisch (2e druk op de toets): niet zo vuile kleurvaste bonte was. 40° 800 -
Snelle 60’ (1e druk op de toets): voor het snel opfrissen van vuil wasgoed
(niet geschikt voor wol, zijde en handwas).
Snelle 30’ (2e druk op de toets): voor het snel opfrissen van niet zo vuil
wasgoed (niet geschikt voor wol, zijde en handwas).
My Cycle (Geheugen): maakt het memoriseren van ieder soort wassen mogelijk.
M
Bed & Bath Cyclus (3): voor handdoeken en beddengoed. 60° 1400 -
Woolmark Platinum (Wol): voor wol, kasjmier, etc. 40° 800 -
Extra Delicaat
Centrifuge Normaal (1e druk op de toets). - 1400 - - - - 7 - - - 16’
Spoelen Normaal (2e druk op de toets). - 1400 - - -
Waterafvoer (3e druk op de toets). - 0 - - - - 7 - - - 2’
De duur van de cyclus die wordt aangegeven op het display of op de gebruiksaanwijzing is een geschatte waarde die wordt gecalculeerd bij standaard omstandigheden. De effectieve tijd kan variëren aan de hand van talloze factoren zoals temperatuur en druk van de watertoevoer, de kamertemperatuur, de hoeveelheid wasmiddel, de hoeveelheid en type lading, de balancering van de was en
de geselecteerde aanvullende opties.
Voor alle Test Institutes:
1) Controleprogramma volgens de norm 1061/2010: stel het programma in op 60°C (2e druk op de toets); stel het programma in op 40°C (3e druk op de toets).
Dit is de geschiktste cyclus voor het wassen van een middelmatig vuile lading katoenen wasgoed. Het is ook de efficiëntste cyclus v.w.b. het gecombineerde verbruik van energie en water, voor
wasgoed dat op 60°C en 40°C kan worden gewassen. De effectieve wastemperatuur kan verschillen van de temperatuur die wordt aangegeven.
2) Programma katoen lang: stel het programma in op 40°C (3e druk op de toets).
3) Programma katoen kort: stel het programma in op 40°C (druk op de toets TEMPERATUUR).
4) Programma syntetisch lang: stel het programma in op 60°C (1e druk op de toets); temperatuur 40°C (druk op de toets TEMPERATUUR).
Maximale
Temp
(Max. 90°C)
maal to-
erental
(°C)
40° 1400 -
60°
60° 1400 -
30° 800 -
30° 0 -
(toeren
per
minuut)
1400 -
Wasmiddel
Voorwas
Wassen
Bleek-
middel
-
-
-
-
-
-
-
ik %
Maximale
lading (kg)
zachter
Wasver-
Energieverbru-
4 - - - 180’
7 53 2,21 78 170’
7 53 1,10 58 190’
7 53 0,99 82 185’
3 44 0,93 47 110’
3 44 0,57 46 95’
3 - - - 70’
3,5 53 0,81 40 60’
3 71 0,15 35 30’
7 - - - 125’
1,5 - - - 70’
1 - - - 80’
7 - - - 36’
ik kWh
Totaal water lt
Energieverbru-
NL
Duur cyclus
Wasfuncties
Snelle was
Als u deze optie selecteert verkort u de duur van het programma tot aan 50%, aan de hand van de gekozen cyclus,
en zorgt u als gevolg voor een aanzienlijke water- en energiebesparing. Gebruik deze cyclus voor niet zo vuil wasgoed.
! Deze functie is niet activeerbaar bij de programma’s ,
“Snelle 60’”, , , .
Makkelijk Strijken
Als u deze functie selecteert zullen het wassen en de
centrifuge dusdanig worden aangepast dat er minder
kreuken worden gevormd. Aan het einde van de
wascyclus zal de wasautomaat de trommel langzaam laten
ronddraaien;
het controlelampje van de functie MAKKELIJK STRIJKEN
en die van START/PAUSE gaan knipperen (oranje) en de
tekst “EINDE CYCLUS” verschijnt op het display. Om de
cyclus te beëindigen drukt u op de START/PAUSE toets of
op de toets MAKKELIJK STRIJKEN.
! Deze optie kan niet worden geactiveerd bij de
programma’s , Snelle 30’, , , “Centrifuge Normaal”
en “Waterafvoer”.
Eco Wash
De functie Eco Wash draagt bij aan energiebesparing door
het voor het wassen van het wasgoed niet te verwarmen:
een voordeel voor zowel het milieu als de energierekening.
De versterkte werking en het geoptimaliseerde
waterverbruik garanderen uitstekende resultaten met een
gelijke gemiddelde tijdsduur als een standaardcyclus. Om
betere wasresultaten te verkrijgen, wordt het gebruik van
een vloeibaar wasmiddel aanbevolen.
! Deze optie kan niet worden geactiveerd bij de
programma’s , (90°C), , , , .
43
Page 44

Wasmiddelen en wasgoed
M
AX
1
2
4
3
A
B
NL
Wasmiddelbakje
Een goed wasresultaat hangt ook af van de juiste dosis
wasmiddel: te veel wasmiddel maakt het wassen niet beter. Het wasmiddel blijft aan de binnenzijde van de wasautomaat zitten en zorgt voor het vervuilen van het milieu.
! Gebruik waspoeder voor witte katoenen was, voor de
voorwas en voor het wassen op temperaturen van meer
dan 60°C.
! Volg de aanwijzingen op de wasmiddelverpakking.
! Gebruik nooit wasmiddelen voor handwas aangezien die
te veel schuim vormen.
Trek het laatje naar voren
en giet het wasmiddel of de
wasversterker er als volgt
in:
Vak 1: Wasmiddel voor voorwas (poeder)
Voordat u het middel erin strooit moet u controleren of het
aanvullende bakje 4 er niet in zit.
Vak 2: Wasmiddel voor hoofdwas (poeder of vloeibaar)
Als u een vloeibaar wasmiddel gebruikt raden we u aan
het bijgeleverde schotje A te gebruiken voor een correcte
dosering. Voor het gebruik van poederwasmiddel doet u
het schotje terug in de opening B.
Vak 3: Wasversterkers (wasverzachter, enz.)
De wasverzachter mag niet boven het roostertje uitkomen.
Extra bakje 4: Bleekmiddel
Voorbereiden van het wasgoed
Speciale programma’s
Vlekkenverwijdering: dit programma is geschikt voor
het wassen van zeer vuil kleurvast wasgoed. Het programma garandeert een hogere wasklasse dan de standaard
klasse (klasse A). Meng tijdens dit programma nooit kleding van verschillende kleuren. We raden u aan waspoeder
te gebruiken. We raden u aan hardnekkige vlekken voor te
behandelen met wasversterkers.
Bed & Bath Cyclus: u kunt al uw handdoeken en beddengoed in een enkele cyclus wassen met het programma . Dit programma optimaliseert het gebruik van de
wasverzachter en bespaart tijd en energie. We raden u aan
waspoeder te gebruiken.
Wol: het “Wol” wasprogramma van deze Hotpoint-Ariston
wasmachine is door The Woolmark Company getest en
goedgekeurd voor het wassen van wollen kleding die als
handwas geclassificeerd is, op voorwaarde dat de aanwijzingen worden opgevolgd die op het etiket van het kledingstuk vermeld staan en de instructies van de fabrikant
van de wasmachine. Hotpoint-Ariston is het eerste wasmachinemerk dat voor zijn wasprestaties en het verbruik
van water en energie van The Woolmark Company de
certificering Woolmark Apparel Care – Platinum verkregen
heeft. (M1126)
Extra Delicaat: gebruik het programma voor het
wassen van zeer fijne was met stras of pailetten.
Voor het wassen van zijden kleding of gordijnen
selecteert u de cyclus en stelt u het niveau “Delicaat”
in van de optie .
We raden u aan de kleding binnenstebuiten te draaien voor
u hem wast en om kleine kledingstukken in het speciale
zakje voor fijne was te stoppen.
Voor een beter resultaat raden we u aan voor de fijne was
een vloeibaar wasmiddel te gebruiken.
• Verdeel het wasgoed volgens:
- het soort stof / het symbool op het etiket.
- de kleuren: scheid de bonte was van de witte was.
• Leeg de zakken en controleer de knopen.
• Overschrijd het aangegeven gewicht, berekend voor
droog wasgoed, nooit:
Kleurechte stoffen: max 7 kg
Synthetische stoffen: max 3 kg
Wol: max 1,5 kg
Zijde: max 1 kg
Hoeveel weegt wasgoed?
1 laken 400-500 g.
1 sloop 150-200 g.
1 tafelkleed 400-500 g.
1 badjas 900-1200 g.
1 handdoek 150-250 g.
44
Balanceersysteem van de lading
Om overmatige trillingen te vermijden verdeelt de automaat
de lading voor het centrifugeren op een gelijkmatige
manier. Dit gebeurt door de trommel te laten draaien op
een snelheid die iets hoger ligt dan de wassnelheid. Als na
herhaaldelijke pogingen de lading nog steeds niet goed is
gebalanceerd, zal de wasautomaat de centrifuge op een
lagere snelheid uitvoeren dan die voorzien was. Als de
lading zeer uit balans is zal de wasautomaat een verdeling
uitvoeren in plaats van een centrifuge. Teneinde een betere
distributie van de waslading en een juiste balancering te
bereiken raden wij u aan kleine en grote kledingstukken te
mengen.
Page 45

Voorzorgsmaatregelen
20
en advies
! De wasmachine is ontworpen en geproduceerd volgens
de internationale veiligheidsnormen. Deze aanwijzingen zijn
voor uw eigen veiligheid geschreven en moeten aandachtig
worden doorgenomen.
Algemene veiligheid
• Het apparaat mag niet worden gebruikt door personen (kinderen inbegrepen), met beperkte lichamelijke,
sensorische of mentale vermogens of met onvoldoende
ervaring en kennis, tenzij het gebruik plaatsvindt onder
het toezicht of volgens de instructies van een persoon
die verantwoordelijk is voor hun veiligheid. Kinderen
moeten in de gaten worden gehouden om te verzekeren
dat ze niet met het apparaat spelen.
• Dit apparaat is uitsluitend ontworpen voor huishoudelijk
niet-professioneel gebruik.
• Raak de machine niet aan als u blootsvoets bent of met
natte of vochtige handen of voeten.
• Trek de stekker nooit uit het stopcontact door aan het
snoer te trekken, maar altijd door de stekker zelf beet te
pakken.
• Open het wasmiddelbakje niet terwijl de machine in
werking is.
• Raak het afvoerwater niet aan aangezien het zeer heet
kan zijn.
• Forceer de deur nooit: het veiligheidsmechanisme dat
een ongewild openen van de deur voorkomt, kan beschadigd worden.
• Probeer in geval van storingen nooit zelf de interne mechanismen van de wasautomaat te repareren.
• Zorg ervoor dat kleine kinderen niet te dicht bij de machine komen als deze in werking is.
• De deur kan tijdens het wassen zeer heet worden.
• Als de machine verplaatst moet worden, doe dit dan met
twee of drie personen tegelijk en zeer voorzichtig. Doe dit
nooit alleen, want het apparaat is erg zwaar.
• Voordat u het wasgoed in de automaat laadt, moet u
controleren of hij leeg is.
Het symbool op het product van de “afvalcontainer met
een kruis erdoor” herinnert u aan uw verplichting, dat
wanneer u het apparaat vernietigt, het apparaat apart
moet worden ingezameld.Consumenten moeten contact
opnemen met de locale autoriteiten voor informatie over
de juiste wijze van vernietiging van hun oude apparaat.
Handmatige opening van de deur
Mocht er in het huis geen stroom aanwezig zijn en u wilt
het deurtje openen om de was op te hangen, dan dient u
het volgende te doen:
1. haal de stekker uit het
stopcontact.
2. controleer dat het waterniveau in de automaat lager
is dan het deurtje; als dat
niet het geval is kunt het
water weg laten lopen door
middel van de afvoerbuis en
dit opvangen in een emmer,
zoals aangegeven in de
afbeelding.
3. verwijder het afdekpaneel aan de voorkant van de
wasautomaat met behulp
van een schroevendraaier (zie
afbeelding).
NL
Afvalverwijdering
• Het wegdoen van het verpakkingsmateriaal: houdt u aan
de plaatselijke normen zodat het materiaal hergebruikt
kan worden.
• De Europese Richtlijn 2002/96/EC over Vernieti
ging van Electrische en Electronische Apparatuur,
vereist dat oude huishoudelijke electrische appa
raten niet mogen vernietigd via de normale
ongesorteerde afvalstroom. Oude apparaten
moeten apart worden ingezameld om zo het
hergebruik van de gebruikte materialen te optima
liseren en de negatieve invloed op de gezondheid en het
milieu te reduceren.
4. trek het lipje dat wordt aangegeven in de afbeelding
naar voren totdat het plastic bandje loskomt; trek hem
daarna naar beneden en open tegelijkertijd de deur.
5. monteer het paneel weer, met de haakjes goed bevestigd in de juiste openingen, voordat u het paneel tegen de
machine aandrukt.
45
Page 46

Onderhoud en verzorging
1
2
A
B
NL
Afsluiten van water en stroom
• Sluit na iedere wasbeurt de kraan af. Hiermee beperkt
u slijtage van de waterinstallatie van de wasmachine en
voorkomt u lekkage.
• Sluit altijd eerst de stroom af voordat u de wasautomaat
gaat schoonmaken en gedurende onderhoudswerkzaamheden.
Reinigen van de wasautomaat
• De buitenkant en de rubberen onderdelen kunnen met
een spons en een lauw sopje worden schoongemaakt.
Gebruik nooit schuurmiddelen of oplosmiddelen.
• De wasautomaat beschikt over een programma “WA-
SMACHINE REINIGEN” voor het reinigen van de binnenkant van de automaat. Dit moet worden uitgevoerd als de
automaat volledig leeg is.
Het wasmiddel (circa 10% van de hoeveelheid die wordt
aanbevolen voor een niet zo vuile was) of de speciale reinigingsmiddelen voor wasautomaten kunnen worden gebruikt
als hulpmiddelen tijdens dit wasprogramma. We raden u
aan dit reinigingsprogramma elke 40 wascycli uit te voeren.
Om dit programma te activeren drukt u tegelijkertijd 5 sec.
op de toetsen A en B (zie afb.).
Het programma start automatisch en heeft een duur van
circa 70 minuten. Om de cyclus te beëindigen drukt u op
de toets START/PAUSE.
Reinigen van de pomp
De wasautomaat is voorzien van een zelfreinigende pomp
en hoeft dus niet te worden onderhouden. Het kan echter
gebeuren dat kleine voorwerpen (muntjes, knopen) in het
voorvakje dat de pomp beschermt en zich aan de onderkant ervan bevindt, terechtkomen.
! Verzeker u ervan dat de wascyclus klaar is en haal de
stekker uit het stopcontact.
Toegang tot het voorvakje:
1. verwijder het afdekpaneel aan de voorkant van de
wasautomaat met behulp
van een schroevendraaier
(zie afbeelding);
2. draai het deksel eraf,
tegen de klok in (zie afbeel-
ding): het is normaal dat er
een beetje water uit komt;
Reinigen van het wasmiddelbakje
Verwijder het bakje door het
op te lichten en naar voren
te trekken (zie afbeelding).
Was het onder stromend
water. Dit moet u regelmatig
doen.
Onderhoud van deur en trommel
• Laat de deur altijd op een kier staan om nare luchtjes te
vermijden.
46
3. maak de binnenkant goed schoon;
4. schroef het deksel er weer op;
5. monteer het paneel weer, met de haakjes goed bevestigd in de juiste openingen, voordat u het paneel tegen de
machine aandrukt.
Controleren van de buis van de watertoevoer
Controleer minstens eenmaal per jaar de slang van de
watertoevoer. Als er barstjes of scheuren in zitten moet hij
vervangen worden: gedurende het wassen kan de hoge
waterdruk onverwachts breuken veroorzaken.
! Gebruik nooit tweedehands buizen.
Page 47

Storingen en oplossingen
Het kan gebeuren dat de wasautomaat niet werkt. Voor u contact opneemt met de Servicedienst (zie “Service”) moet u controle-
ren of het niet een storing betreft die u zelf makkelijk kunt verhelpen met behulp van de volgende lijst.
Storingen:
De wasautomaat gaat niet aan.
De wascyclus start niet.
De wasautomaat heeft geen watertoevoer (Op het display verschijnt
de tekst “GEEN WATER, CONTROLEER TOEVOER”).
De wasautomaat blijft water aanen afvoeren.
Mogelijke oorzaken / Oplossing:
• De stekker zit niet in het stopcontact of niet ver genoeg om contact te maken.
• Het hele huis zit zonder stroom.
• De deur zit niet goed dicht.
• De ON/OFF toets is niet ingedrukt.
• De START/PAUSE toets is niet ingedrukt.
• De waterkraan is niet open.
• De uitgestelde start is ingesteld (zie “Het uitvoeren van een wascyclus”).
• De watertoevoerbuis is niet aangesloten op de kraan.
• De buis is gebogen.
• De waterkraan is niet open.
• Het hele huis zit zonder water.
• Er is onvoldoende druk.
• De START/PAUSE toets is niet ingedrukt.
• De afvoerbuis is niet op 65 tot 100 cm afstand van de grond af geïnstalleerd
(zie “Installatie”).
• Het uiteinde van de afvoerbuis ligt onder water (zie “Installatie”).
• De afvoer in de muur heeft geen ontluchting.
Als na deze controles het probleem niet is opgelost, moet u de waterkraan
dichtdraaien, de wasautomaat uitzetten en de Servicedienst inschakelen. Als u
op een van de hoogste verdiepingen van een flatgebouw woont kan zich een
hevelingsprobleem voordoen, waarbij de wasautomaat voortdurend water aanen afvoert. Om deze storing te verhelpen zijn er in de handel speciale beluchters
te koop.
NL
De wasautomaat voert het water
niet af of centrifugeert niet.
De machine trilt erg tijdens het
centrifugeren.
De wasautomaat lekt.
Het apparaat is geblokkeerd, het
display knippert en er verschijnt
een storingscode (bv.: F-01, F-..).
Er ontstaat teveel schuim.
• Het programma voorziet geen afvoer: bij enkele programma’s moet dit met de
hand worden gestart (zie “Programma’s en functies”).
• De functie MAKKELIJKER STRIJKEN is ingeschakeld: voor het beëindigen van
het programma drukt u op de START/PAUSE toets (“Programma’s en functies“).
• De afvoerbuis is gebogen (zie “Installatie”).
• De afvoerleiding is verstopt.
• De trommel is bij het installeren niet op de juiste wijze gedeblokkeerd (zie “In-
stallatie”).
• De wasautomaat staat niet goed recht (zie “Installatie”).
• De wasautomaat staat te krap tussen meubels en muur (zie “Installatie”).
• De buis van de watertoevoer is niet goed aangeschroefd (zie “Installatie”).
• Het wasmiddelbakje is verstopt (voor reiniging zie “Onderhoud en verzorging”).
• De afvoerbuis is niet goed aangesloten (zie “Installatie”).
• Doe de wasautomaat uit en haal de stekker uit het stopcontact. Wacht circa 1
minuut en doe hem daarna weer aan.
Als de storing voortzet, dient u de Servicedienst in te schakelen.
• Het wasmiddel is niet bedoeld voor wasautomaten (er moet “voor wasautomaat”, “handwas en machinewas”, of dergelijke op staan).
• U heeft teveel wasmiddel gebruikt.
47
Page 48

Service
195091168.04
01/2012 - Xerox Fabriano
NL
Voordat u de Servicedienst inschakelt:
• Controleer eerst of u het probleem zelf kunt oplossen (zie “Storingen en oplossingen”).
• Start het programma opnieuw om te controleren of de storing is verholpen;
• Als dit niet het geval is moet u contact opnemen met de erkende Technische Servicedienst via het telefoonnummer dat op
het garantiebewijs staat.
! Wendt u nooit tot een niet erkende installateur.
Vermeld:
• het type storing;
• het model van de machine (Mod.);
• het serienummer (S/N).
Deze informatie vindt u op het typeplaatje aan de achterkant van de wasautomaat en aan de voorzijde als u het deurtje opendoet.
48
 Loading...