

Page 1

Instructions for use
WASHING MACHINE
GB
English,1
CZ
Česky,37
WMD 702
RO
Română,13
UA
Українська,25
Contents
Installation, 2-3
Unpacking and levelling
Connecting the electricity and water supplies
The first wash cycle
Technical data
Description of the washing machine, 4-5
Control panel
Display
Running a wash cycle, 6
Wash cycles and functions, 7
Table of wash cycles
Wash functions
Detergents and laundry, 8
Detergent dispenser drawer
Preparing the laundry
Special wash cycles
Load balancing system
Precautions and tips, 9
General safety
Disposal
Opening the porthole door manually
GB
Care and maintenance, 10
Cutting off the water or electricity supply
Cleaning the washing machine
Cleaning the detergent dispenser drawer
Caring for the door and drum of your appliance
Cleaning the pump
Checking the water inlet hose
Troubleshooting, 11
Service, 12
1
Page 2

Installation
GB
! This instruction manual should be kept in a safe place for
future reference. If the washing machine is sold, transferred
or moved, make sure that the instruction manual remains
with the machine so that the new owner is able to familiarise himself/herself with its operation and features.
! Read these instructions carefully: they contain vital infor-
mation relating to the safe installation and operation of the
appliance.
Unpacking and levelling
Unpacking
1. Remove the washing machine from its packaging.
2. Make sure that the washing machine has not been
damaged during the transportation process. If it has been
damaged, contact the retailer and do not proceed any
further with the installation process.
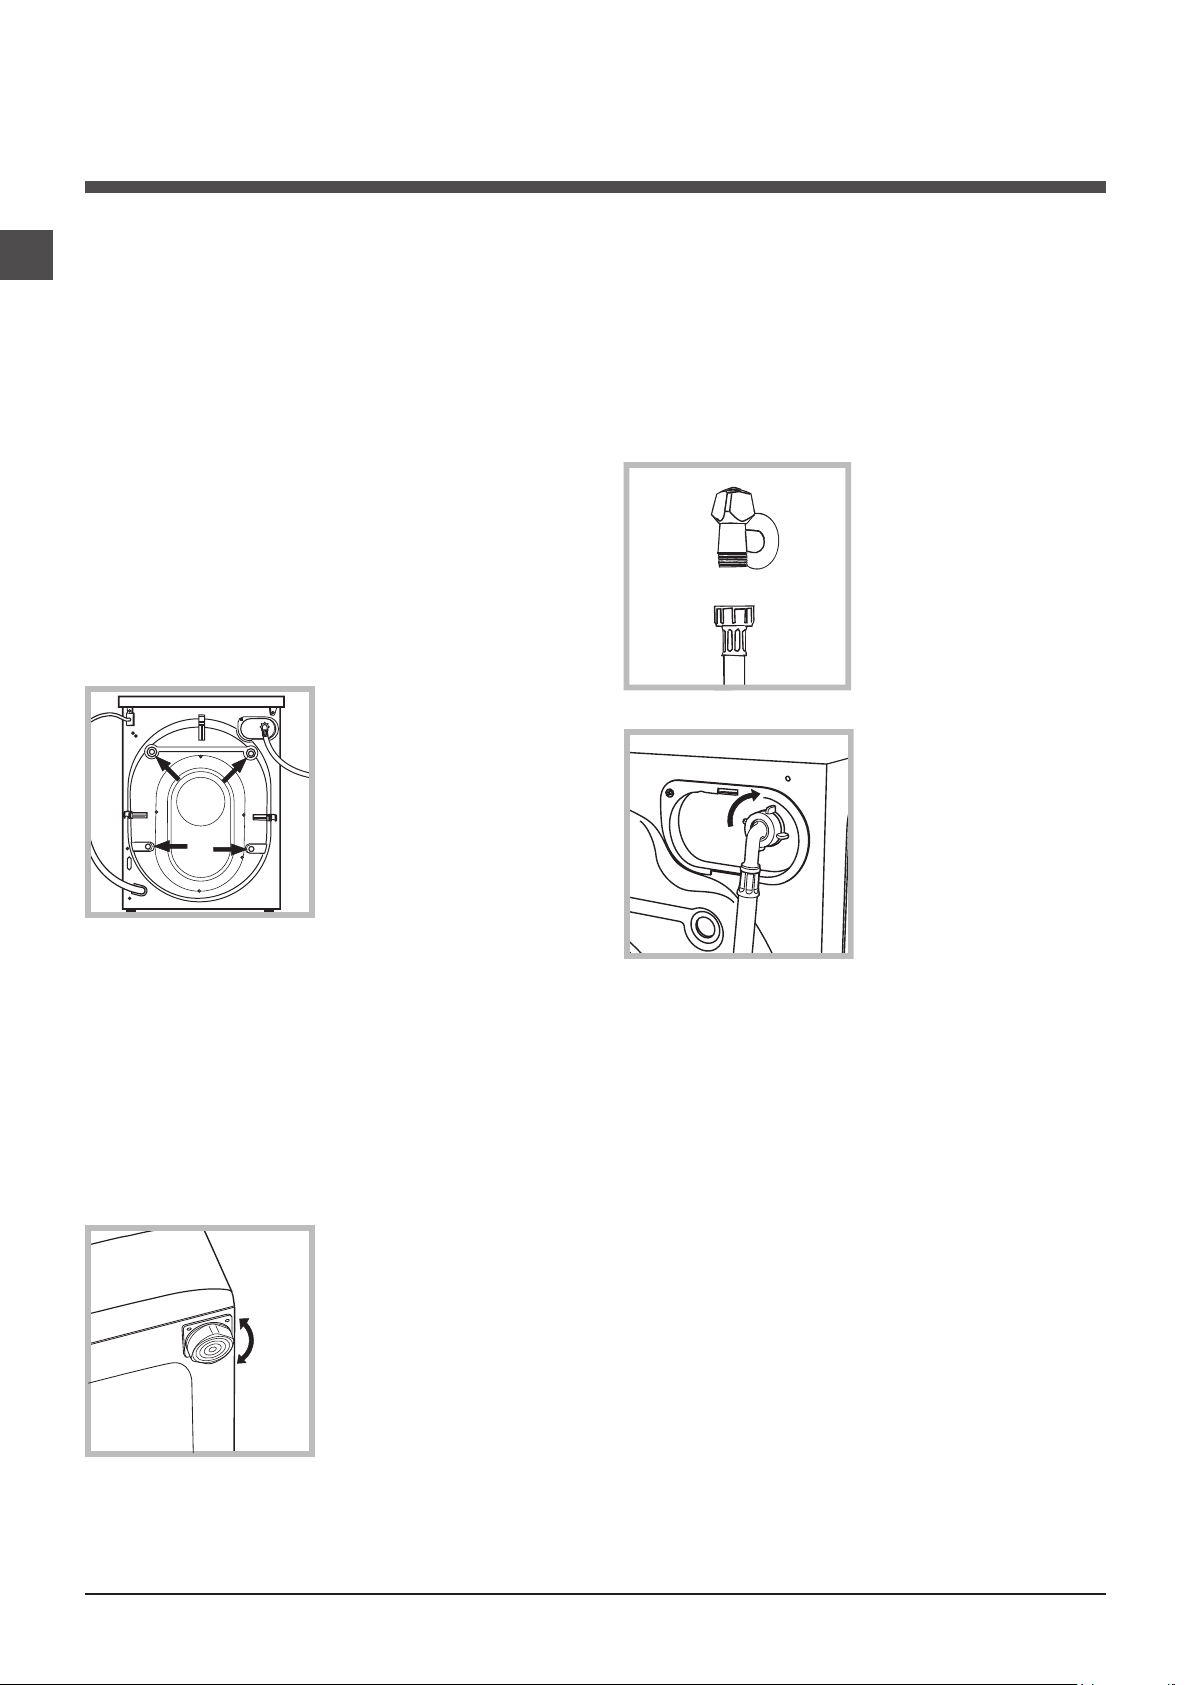
3. Remove the 4 protective
screws (used during transportation) and the rubber
washer with the corresponding spacer, located on the
rear part of the appliance
(see figure).
Levelling the machine correctly will provide it with stability,
help to avoid vibrations and excessive noise and prevent it
from shifting while it is operating. If it is placed on carpet or
a rug, adjust the feet in such a way as to allow a sufficient
ventilation space underneath the washing machine.
Connecting the electricity and water
supplies
Connecting the water inlet hose
1. Connect the supply pipe
by screwing it to a cold
water tap using a ¾ gas
threaded connection (see
figure).
Before performing the connection, allow the water to
run freely until it is perfectly
clear.
2. Connect the inlet hose
to the washing machine by
screwing it onto the corresponding water inlet of the
appliance, which is situated on the top right-hand
side of the rear part of the
appliance (see figure).
4. Close off the holes using the plastic plugs provided.
5. Keep all the parts in a safe place: you will need them
again if the washing machine needs to be moved to another location.
! Packaging materials should not be used as toys for
children.
Levelling
1. Install the washing machine on a flat sturdy floor, without
resting it up against walls, furniture cabinets or anything
else.
2. If the floor is not perfectly
level, compensate for any
unevenness by tightening
or loosening the adjustable front feet (see figure);
the angle of inclination,
measured in relation to the
worktop, must not exceed
2°.
3. Make sure that the hose is not folded over or bent.
! The water pressure at the tap must fall within the values
indicated in the Technical details table (see page 3).
! If the inlet hose is not long enough, contact a specialised
shop or an authorised technician.
! Never use second-hand hoses.
! Use the ones supplied with the machine.
2
Page 3

65 - 100 cm
Connecting the drain hose
- 2004/108/EC (Electromagnetic Compatibility)
Connect the drain hose,
without bending it, to a drainage duct or a wall drain
located at a height between
65 and 100 cm from the
floor;
! Do not use extension cords or multiple sockets.
! The cable should not be bent or compressed.
! The power supply cable must only be replaced by autho-
rised technicians.
Warning! The company shall not be held responsible in the
event that these regulations are not respected.
The first wash cycle
GB
alternatively, rest it on
the side of a washbasin
or bathtub, fastening the
duct supplied to the tap
(see figure). The free end
of the hose should not be
underwater.
! We advise against the use of hose extensions; if it is
absolutely necessary, the extension must have the same
diameter as the original hose and must not exceed 150 cm
in length.
Electrical connections
Before plugging the appliance into the electricity socket,
make sure that:
• thesocketisearthedandcomplieswithallapplicable
laws;
• thesocketisabletowithstandthemaximumpowerload
of the appliance as indicated on the Technical Data Plate
fixed on the machine;
• thepowersupplyvoltagefallswithinthevaluesindicated
on the Technical Data Plate fixed on the machine;
Once the appliance has been installed, and before you use
it for the first time, run a wash cycle with detergent and no
laundry, using the wash cycle (60°C).
Technical data
Model
Dimensions
Capacity
Electrical
connections
Water connections
Spin speed
WMD 702
width 59.5 cm
height 85 cm
depth 54 cm
from 1 to 7 kg
please refer to the technical data plate
fixed to the machine
maximum pressure 1 MPa (10 bar)
minimum pressure 0.05 MPa (0.5 bar)
drum capacity 52 litres
up to 1000 rotations per minute
• thesocketiscompatiblewiththeplugofthewashing
machine. If this is not the case, replace the socket or the
plug.
! The washing machine must not be installed outdoors,
even in covered areas. It is extremely dangerous to leave
the appliance exposed to rain, storms and other weather
conditions.
! When the washing machine has been installed, the elec-
tricity socket must be within easy reach.
Test Program-
mes according to
2010/1061
programme
temperature 60°C (2nd press of the button);
temperature 40°C (3rd press of the button).
This appliance conforms to the following
EC Directives:
- 2006/95/EC (Low Voltage)
- 2002/96/EC
;
3
Page 4
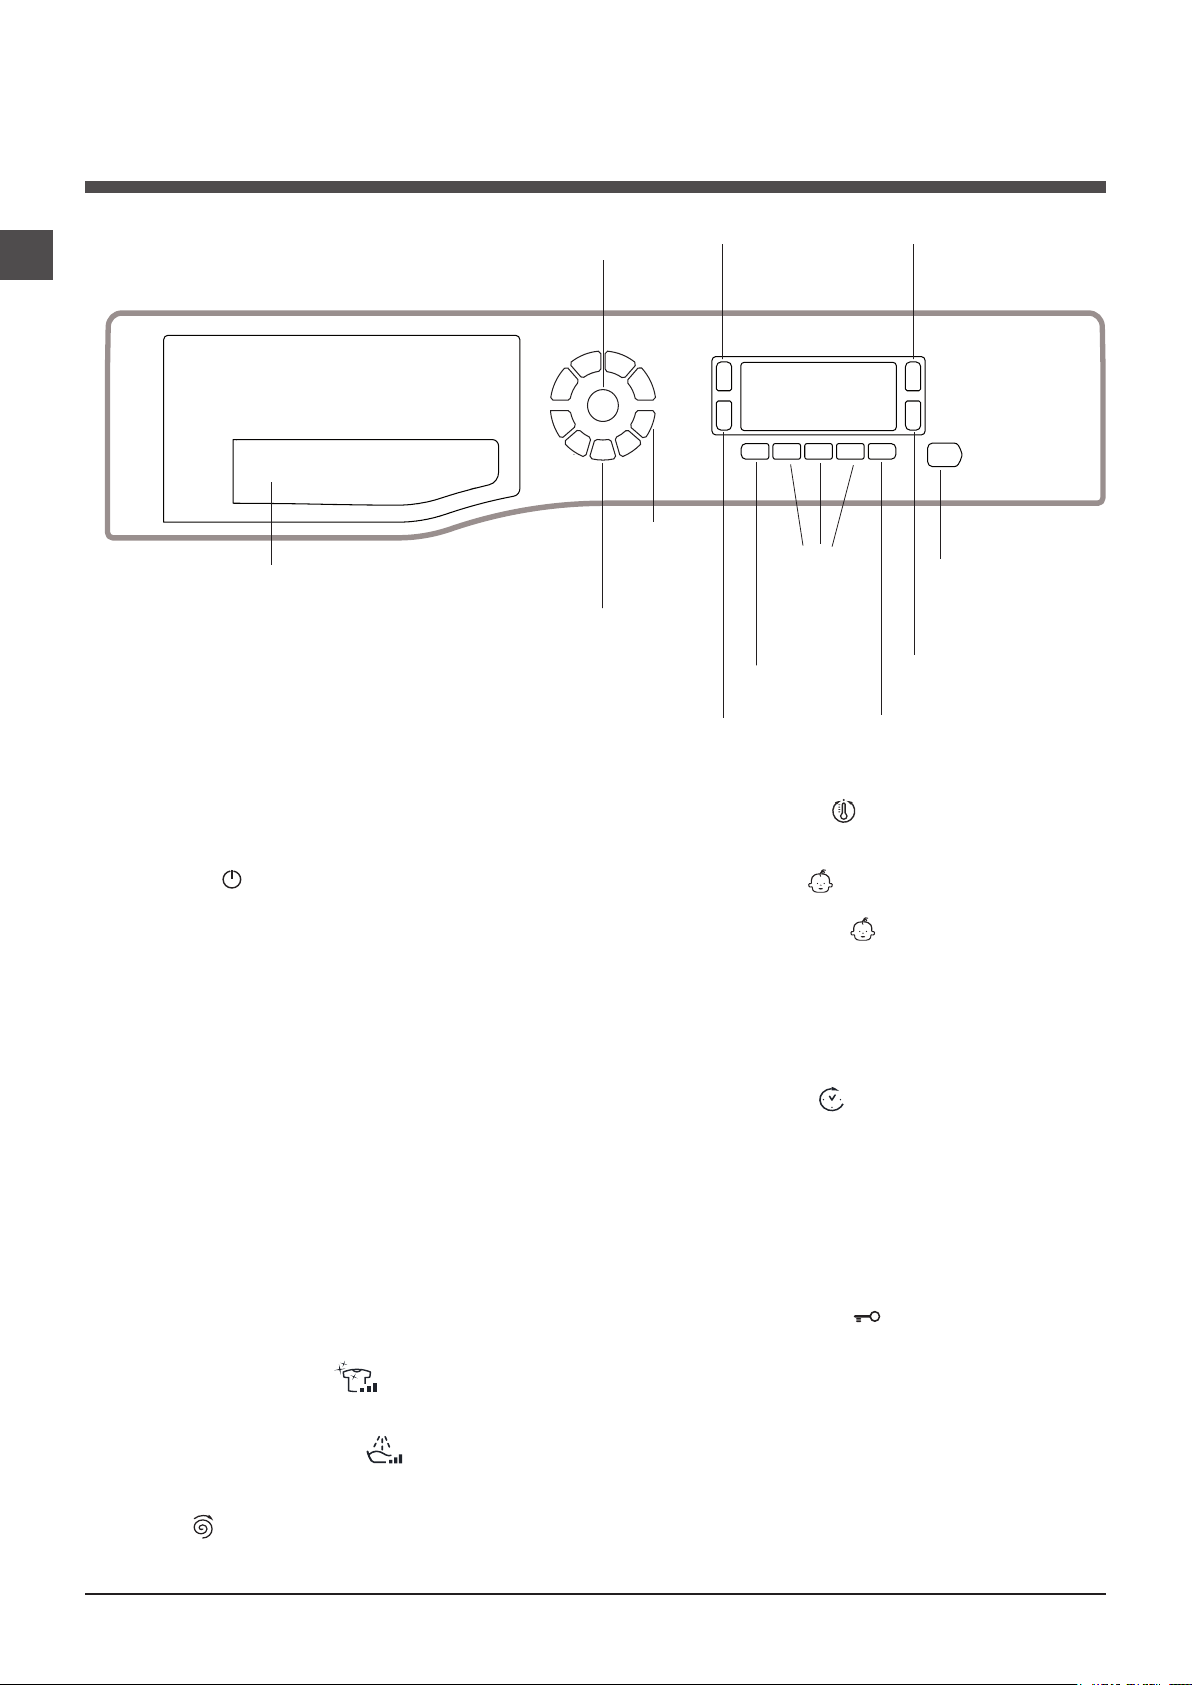
Description of the washing machine
GB
Control panel
ON/OFF
WASH
Detergent dispenser drawer
Detergent dispenser drawer: used to dispense deter-
gents and washing additives (see “Detergents and laundry”).
CYCLE
SELECTOR
buttons
button
CLEANING
ACTION
button
DISPLAY
MY
CYCLE
button
ANTI
ALLERGY
RINSE
button
TEMPERATURE button : press to decrease the tem-
perature: the value will be shown on the display.
FUNCTION
buttons
DELAY
TIMER
button
SPIN SPEED
button
START/PAUSE
button with
indicator light
TEMPERATURE
button
CHILD LOCK
button
ON/OFF button : press this briefly to switch the machine on or off. The START/PAUSE indicator light, which
flashes slowly in a green colour shows that the machine is
switched on. To switch off the washing machine during the
wash cycle, press and hold the button for approximately 3
seconds; if the button is pressed briefly or accidentally the
machine will not switch off. If the machine is switched off
during a wash cycle, this wash cycle will be cancelled.
WASH CYCLE SELECTOR buttons: used to set the
desired wash cycle (see “Table of wash cycles”).
MY CYCLE button: press and hold the button to store a
cycle with your own set of preferences in the memory of
the machine. To recall a previously stored cycle, press the
MY CYCLE button.
FUNCTION buttons: press the button to select the
desired function. The corresponding indicator light on the
display will switch on.
CLEANING ACTION
wash intensity.
ANTI ALLERGY RINSE
the desired rinse type.
SPIN button : press to reduce or completely exclude
the spin cycle - the value is indicated on the display.
button : to select the desired
button : press to select
CHILD LOCK button : to activate the control panel
lock, press and hold the button for approximately 2
seconds. When the symbol is illuminated, the control
panel is locked. This means it is possible to prevent wash
cycles from being modified accidentally, especially where
there are children in the home. To deactivate the control
panel lock, press and hold the button for approximately 2
seconds.
DELAY TIMER button : press to set a delayed start
time for the selected wash cycle. The delay time will be
shown on the display.
START/PAUSE button with indicator light: when the green indicator light flashes slowly, press the button to start a
wash cycle. Once the cycle has started the indicator light
will remain lit in a fixed manner. To pause the wash cycle,
press the button again; the indicator light will flash in an
orange colour. If the symbol is not illuminated, the door
may be opened. To start the wash cycle from the point at
which it was interrupted, press the button again.
Standby mode
This washing machine, in compliance with new energy saving regulations, is fitted with an automatic standby system
which is enabled after about 30 minutes if no activity is
detected. Press the ON-OFF button briefly and wait for the
machine to start up again.
4
Page 5
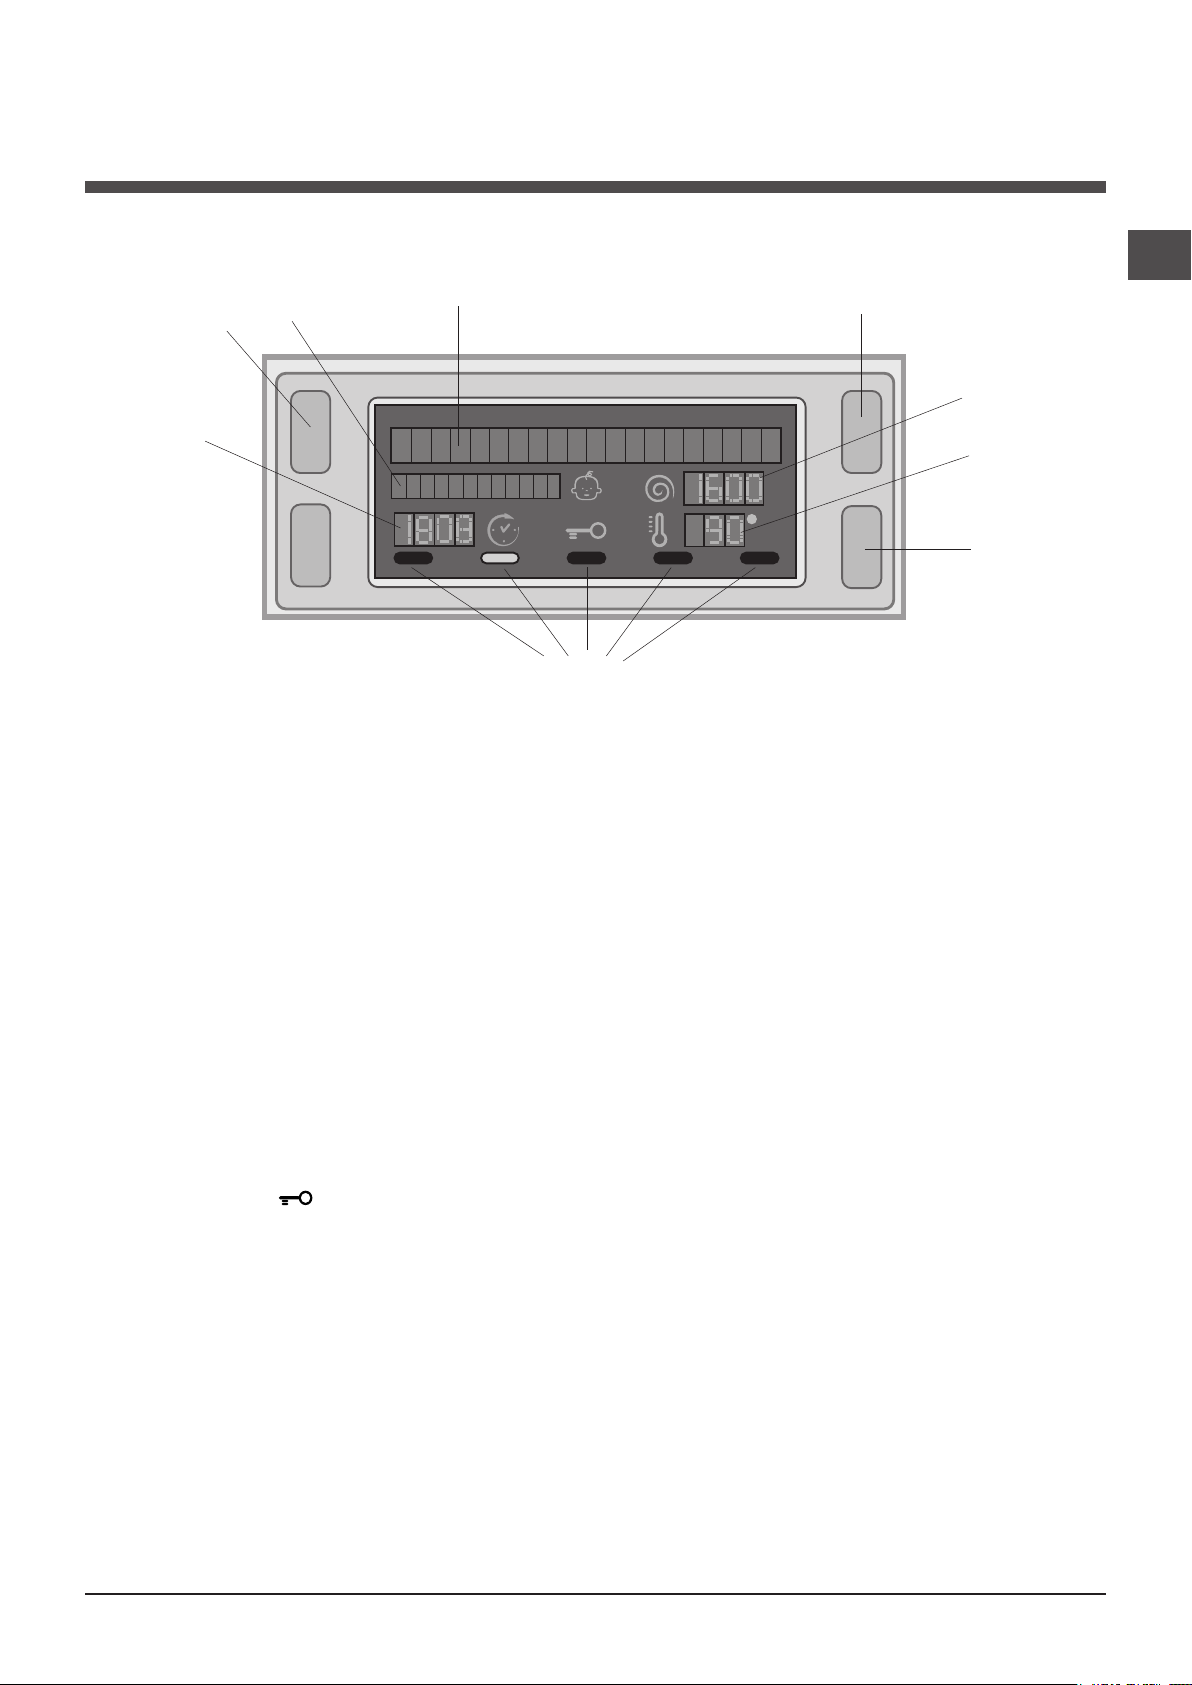
Display
GB
Z
B
A
X
D
C
E
Y
F
The display is useful when programming the machine and provides a great deal of information.
The two upper strings A and B provide details of the wash cycle selected, the wash cycle phase in progress and all information relating to the progress status of the wash cycle.
String C shows the time remaining until the end of the wash cycle in progress and, if a DELAYED START has been set, the
time remaining until the start of the selected wash cycle.
String D shows the maximum spin speed value (this depends on the selected wash cycle); if the wash cycle does not include
a spin cycle, the string remains unused.
String E shows the maximum temperature value which may be selected (this depends on the wash cycle used); if the temperature of the wash cycle cannot be modified, the string remains unused.
Indicator lights F correspond to the functions and light up when the selected function is compatible with the set wash cycle.
Door locked symbol
If the symbol is lit, this indicates that the washing machine door is blocked to prevent it from being opened accidentally. To
prevent any damage from occurring, wait for the symbol to switch itself off before opening the appliance door.
N.B.: if the DELAYE TIMER function has been activated, the door cannot be opened; pauses the machine by pressing the
START/PAUSE button if you wish to open it.
! The first time the machine is switched on, you will be asked to select the language and the display will automatically show
the language selection menu.
To select the desired language press the X and Y buttons; to confirm the selection press the Z button.
To change the language switch off the machine and press buttons X, Y, Z simultaneously until an alarm is heard: the
language-selection menu will be displayed again.
5
Page 6
Running a wash cycle
GB
1. SWITCH THE MACHINE ON. Press the On/Off
button ; the text POWER ON will appear on the
display and the START/PAUSE indicator light will flash
slowly in a green colour.
2. LOAD THE LAUNDRY. Open the porthole door.
Load the laundry, making sure you do not exceed
the maximum load value indicated in the table of
programmes on the following page.
3. MEASURE OUT THE DETERGENT. Open the
detergent dispenser drawer and pour the detergent into
the relevant compartments as described in “Detergents
and laundry”.
4. CLOSE THE DOOR.
5. SELECT THE WASH CYCLE. Press one of the WASH
CYCLE SELECTOR buttons to select the required wash
cycle; the name of the wash cycle will appear on the
display. A temperature and spin speed is set for each
wash cycle; these may be adjusted. The duration of the
cycle will appear on the display.
6. CUSTOMISE THE WASH CYCLE. Use the relevant
buttons:
Modifying the temperature and/or spin
speed. The machine automatically selects the
maximum temperature and spin speed set for the
selected wash cycle; these values cannot therefore
be increased. The temperature can be decreased by
pressing the button, until the cold wash “OFF”
setting is reached. The spin speed may be progressively
reduced by pressing the button, until it is completely
excluded (the “OFF” setting). If these buttons are
pressed again, the maximum values are restored.
Setting a delayed start.
To set a delayed start for the selected programme,
press the corresponding button repeatedly until the
required delay period has been reached. When this
option is enabled, the symbol lights up on the
display. To remove the delayed start function press the
button until the text “OFF” appears on the display.
Set the desired wash intensity.
Option makes it possible to optimise washing
based on the level of soil in the fabrics and on desired
wash cycle intensity.
Select the wash programme: the cycle will be
automatically set to “Normal” as optimised for garments
with an average level of soil (this setting is not applicable to
the “Wool” cycle, which is automatically set to “Delicate”).
For heavily-soiled garments press button until
the “Super Wash” level is reached. This level ensures
a high-performance wash due to a larger quantity of
water used in the initial phase of the cycle and due to
increased drum rotation. It is useful when removing the
most stubborn stains.
It can be used with or without bleach. If you wish to
bleach the items insert the additional compartment
(4) into compartment 1. When pouring the bleach, be
careful not to exceed the “max” level marked on the
central pivot (see figure pag. 8).
For lightly-soiled garments or a more delicate treatment
of the fabrics, press button until the “Delicate” level
is reached.
The cycle will reduce the drum rotation to ensure
washing results are perfect for delicate garments. If the
current selection can be neither set nor changed, the
display will show “Not allowed”.
Set the rinse type.
Option makes it possible to select the desired rinse
type for sensitive skin. Press the button once for the
“Extra Rinse” level, which makes it possible to select
an additional rinse after the standard cycle rinse and
remove all traces of detergent. Press the button again
for the “Sensitive Skin” level, which makes it possible to
select two additional rinses to the standard cycle rinses; it
is recommended for very sensitive skin. Press the button
for the third time for the “Anti allergy Rinse” level, which
makes it possible to select three additional rinses to the
standard cycle rinses and remove major allergens such as
pollen, mites, cat and dog hair. Press the button again to
go back to the “Normal Rinse” rinse type. If the current
adjustment can be neither set nor changed, the display will
show “Not allowed”.
Modifying the cycle settings.
• Press the button to enable the function; the indicator
light corresponding to the button will switch on.
• Press the button again to disable the function; the
indicator light will switch off.
! If the selected function is not compatible with the
programmed wash cycle, the indicator light will flash
and the function will not be activated.
! If the selected function is not compatible with
another function which has been selected previously,
the indicator light corresponding to the first function
selected will flash and only the second function will
be activated; the indicator light corresponding to the
enabled function will remain lit.
! The functions may affect the recommended load value
and/or the duration of the cycle.
7. START THE PROGRAMME. Press the START/PAUSE
button. The corresponding indicator light will become
green, remaining lit in a fixed manner, and the door will be
locked (the DOOR LOCKED symbol will be on). During
the wash cycle, the name of the phase in progress will
appear on the display. To change a wash cycle while
it is in progress, pause the washing machine using the
START/PAUSE button (the START/PAUSE indicator light
will flash slowly in an orange colour); then select the
desired cycle and press the START/PAUSE button again.
To open the door while a cycle is in progress, press
the START/PAUSE button; if the DOOR LOCKED
symbol is switched off the door may be opened. Press
the START/PAUSE button again to restart the wash cycle
from the point at which it was interrupted.
8. THE END OF THE WASH CYCLE. This will be
indicated by the text “END OF CYCLE” on the display;
when the DOOR LOCKED symbol switches off
the door may be opened. Open the door, unload the
laundry and switch off the machine.
! If you wish to cancel a cycle which has already begun,
press and hold the button. The cycle will be stopped
and the machine will switch off.
6
Page 7

Wash cycles and functions
Table of wash cycles
Max. load
(kg)
Nor-
Eco
mal
Wash
4 -
7 -
7 7
7 7
3 3
3 3
3 3
3.5 3
3 3
7 -
1.5 -
1 -
7 -
Cycle
duration
The duration of the wash cycles can be checked on the display.
Max.
Description of the wash cycle
Wash
cycles
Anti Stain
Cotton Prewash (1st press of the button): extremely soiled whites
and resistant colours.
White Cottons (1) (2nd press of the button): heavily soiled whites
and delicate colours.
Cottons Coloured (1-2) (3rd press of the button): lightly soiled whi-
tes and delicate colours.
Synthetics Resistent (1st press of the button): heavily soiled resi-
stant colours.
Synthetics Resistent (4) (1st press of the button): heavily soiled
resistant colours.
Synthetics Delicate (2nd press of the button): lightly soiled resistant
colours.
Fastwash 60' (1st press of the button): to refresh normal soiled
garments quickly (not suitable for wool, silk and clothes which
require washing by hand).
Fastwash 30' (2nd press of the button): to refresh lightly soiled
garments quickly (not suitable for wool, silk and clothes which
require washing by hand).
M
My Cycle: allows for any wash cycle to be stored.
7 Days (3): washes bathroom laundry and bedlinen. 60° 1000 -
Woolmark Platinum (Wool): for wool, cashmere, etc. 40° 800 -
Ultradelicates
Fast spin Resistents (1st press of the button) - 1000 - - - - 7 -
Rinse Cottons (2nd press of the button) - 1000 - - -
Pump out (3rd press of the button) - 0 - - - - 7 -
The length of cycle shown on the display or in this booklet is an estimation only and is calculated assuming standard working conditions. The actual duration can
vary according to factors such as water temperature and pressure, the amount of detergent used, the amount and type of load inserted, load balancing and any
wash options selected.
Max.
temp.
speed
(°C)
(rpm)
40° 1000 -
90° 1000
60° 1000 -
40° 1000 -
60° 800 -
40° 800 -
40° 800 -
60° 1000 -
30° 800 -
30° 0 -
Pre-
Wash
Detergents
Wash Bleach
Fabric
softener
-
-
-
-
-
-
-
GB
For all Test Institutes:
1) Test wash cycle in compliance with regulation 2010/1061: set wash cycle 60°C (2nd press of the button); set wash cycle 40°C (3rd press of the button).
2) Long wash cycle for cottons: set wash cycle 40°C (3rd press of the button).
3) Short wash cycle for cottons: set wash cycle ; temperature of 40°C (press TEMPERATURE button).
4) Long wash cycle for synthetics: set wash cycle 60°C (1st press of the button); temperature of 40°C (press TEMPERATURE button).
Wash functions
Timer Saver
If you select this option, the wash cycle duration will be reduced by up to 50%, depending on the selected cycle, thereby
guaranteeing simultaneous water and energy saving. Use this
cycle for lightly soiled garments.
! It cannot be used with the , “Fastwash 60’”, , , .
Easy Iron
By selecting this function, the wash and spin cycles will be
modified in order to reduce the formation of creases.
At the end of the cycle the washing machine will perform
slow rotations of the drum; the “Easy Iron” indicator light
will flash and the text “END OF CYCLE” will appear on the
display. To end the cycle, press the START/PAUSE button
or the “Easy Iron” button.
! It cannot be used with the , “Fastwash 30’”, , ,
“Fast spin Resistents” and “Pump out”.
Eco Wash
The Eco Wash function saves energy by not heating the
water used to wash your laundry – an advantage both to
the environment and to your energy bill. Instead, intensified
wash action and water optimisation ensure great wash
results in the same average time of a standard cycle.
For the best washing results we recommend the usage of
a liquid detergent.
! It cannot be used with the , (90°C), , , , .
7
Page 8

M
AX
1
2
4
3
A
B
Detergents and laundry
GB
Detergent dispenser drawer
Good washing results also depend on the correct dose of
detergent: adding too much detergent will not necessarily
result in a more efficient wash, and may in fact cause a
build up on the inside of your appliance and contribute to
environmental pollution.
! Do not use hand washing detergents because these
create too much foam.
Open the detergent dispenser drawer and pour
in the detergent or washing
additive, as follows.
compartment 1: Pre-wash detergent (powder)
Before pouring in the detergent, make sure that extra compartment 4 has been removed.
compartment 2: Detergent for the wash cycle
(powder or liquid)
If liquid detergent is used, it is recommended that the
removable plastic partition A (supplied) be used for proper
dosage.
If powder detergent is used, place the partition into slot B.
compartment 3: Additives (fabric softeners, etc.)
The fabric softener should not overflow the grid.
extra compartment 4: Bleach
Preparing the laundry
•Dividethelaundryaccordingto:
- the type of fabric/the symbol on the label
- the colours: separate coloured garments from whites.
•Emptyallgarmentpocketsandcheckthebuttons.
•Donotexceedthelistedvalues,whichrefertotheweight
of the laundry when dry:
Durable fabrics: max. 7 kg
Synthetic fabrics: max. 3 kg
Delicate fabrics: max. 2 kg
Wool: max. 1,5 kg
Silk: max. 1 kg
Special wash cycles
Anti Stain : this programme is suitable to heavily-soiled
garments with resistant colours. It ensures a washing
class that is higher than the standard class (A class). When
running the programme, do not mix garments of different
colours. We recommend the use of powder detergent.
Pre-treatment with special additives is recommended if
there are obstinate stains.
7 Days: use programme to wash bed linen and towels
in one single cycle: it optimises softener performance and
helps you save time and energy. We recommend the use
of powder detergent.
Wool: the “wool” wash cycle on this Hotpoint-Ariston
machine has been tested and approved by The Woolmark
Company for washing wool garments labelled as hand washable provided that the garments are washed according
to the instructions on the garment label and those issued
by the manufacturer of this washing machine. HotpointAriston is the first washing machine brand to be approved
by The Woolmark Company for Apparel Care- Platinum for
its washing performance and consumption of energy and
water. (M1126)
Ultradelicates: use programme to wash very delicate
garments having strasses or sequins.
To wash silk garments and curtains select the cycle
and set the “Delicate” level from option .
We recommend turning the garments inside out before
washing and placing small items into the special bag
for washing delicates. Use liquid detergent on delicate
garments for best results.
Load balancing system
Before every spin cycle, to avoid excessive vibrations and
to distribute the load in a uniform manner, the drum rotates
continuously at a speed which is slightly greater than the
washing rotation speed. If, after several attempts, the load
is not balanced correctly, the machine spins at a reduced
spin speed. If the load is excessively unbalanced, the
washing machine performs the distribution process instead
of spinning. To encourage improved load distribution and
balance, we recommend small and large garments are
mixed in the load.
How much does your laundry weigh?
1 sheet 400-500 g
1 pillow case 150-200 g
1 tablecloth 400-500 g
1 bathrobe 900-1200 g
1 towel 150-250 g
8
Page 9

Precautions and tips
20
! This washing machine was designed and constructed in
accordance with international safety regulations. The following information is provided for safety reasons and must
therefore be read carefully.
General safety
• Thisappliancewasdesignedfordomesticuseonly.
• Thisapplianceisnotintendedforusebypersons(inclu-
ding children) with reduced physical, sensory or mental
capabilities, or lack of experience and knowledge, unless
they have been given supervision or instruction concer-
ning use of the appliance by a person responsible for
their safety. Children should be supervised to ensure that
they do not play with the appliance.
• Donottouchthemachinewhenbarefootorwithwetor
damp hands or feet.
• Donotpullonthepowersupplycablewhenunplugging
the appliance from the electricity socket. Hold the plug
and pull.
• Donotopenthedetergentdispenserdrawerwhilethe
machine is in operation.
• Donottouchthedrainedwaterasitmayreachextreme-
ly high temperatures.
• Neverforcetheportholedoor.Thiscoulddamagethesafety
lock mechanism designed to prevent accidental opening.
• Iftheappliancebreaksdown,donotunderanycircum-
stances access the internal mechanisms in an attempt
to repair it yourself.
• Alwayskeepchildrenwellawayfromtheappliancewhile
it is operating.
• Thedoorcanbecomequitehotduringthewashcycle.
• Iftheappliancehastobemoved,workinagroupoftwo
or three people and handle it with the utmost care. Never
try to do this alone, because the appliance is very heavy.
• Beforeloadinglaundryintothewashingmachine,make
sure the drum is empty.
Disposal
•Disposingofthepackagingmaterials:observelocalregu-
lations so that the packaging may be re-used.
•TheEuropeanDirective2002/96/EConWasteElectrical
and Electronic Equipment, requires that old household
electrical appliances must not be disposed of in the normal
unsorted municipal waste stream. Old appliances must be
collected separately in order to optimise the recovery and
recycling of the materials they contain and reduce the impact on human health and the environment. The crossed
out “wheeled bin” symbol on the product reminds you of
your obligation, that when you dispose of the appliance it
must be separately collected. Consumers should contact
their local authority or retailer for information concerning the
correct disposal of their old appliance.
Opening the porthole door manually
In the event that it is not possible to open the porthole
door due to a powercut, and if you wish to remove the
laundry, proceed as follows:
1. remove the plug from the
electrical socket.
2. make sure the water level
inside the machine is lower
than the door opening; if it
is not, remove excess water
using the drain hose, collecting it in a bucket as indicated
in the figure.
3. using a screwdriver, remove the cover panel on the lower front part of the washing
machine (see figure).
4. pull outwards using the tab as indicated in the figure,
until the plastic tie-rod is freed from its stop position; pull
downwards and open the door at the same time.
5. reposition the panel, making sure the hooks are securely
in place before you push it onto the appliance.
GB
9
Page 10

Care and maintenance
1
2
A
B
GB
Cutting off the water and electricity
supplies
• Turnoffthewatertapaftereverywashcycle.Thiswilllimit
wear on the hydraulic system inside the washing machine
and help to prevent leaks.
• Unplugthewashingmachinewhencleaningitanddu-
ring all maintenance work.
Cleaning the washing machine
•Theouterpartsandrubbercomponentsoftheappliance can be cleaned using a soft cloth soaked in lukewarm
soapy water. Do not use solvents or abrasives.
•Thewashingmachinehasa“AutoClean”programme
for its internal parts that must be run with no load in the
drum.
For maximum performance you may want to use either
the detergent (i.e. a quantity 10% the quantity specified
for lightly-soiled garments) or special additives to clean
the washing machine. We recommend running a cleaning
programme every 40 wash cycles.
To start the programme press buttons A and B simultaneously for 5 seconds (see figure).
The programme will start automatically and will last approximately 70 minutes. To stop the cycle press the START/
PAUSE button.
Caring for the door and drum of your
appliance
• Alwaysleavetheportholedoorajarinordertoprevent
unpleasant odours from forming.
Cleaning the pump
The washing machine is fitted with a self-cleaning pump
which does not require any maintenance. Sometimes, small
items (such as coins or buttons) may fall into the pre-chamber which protects the pump, situated in its bottom part.
! Make sure the wash cycle has finished and unplug the
appliance.
To access the pre-chamber:
1. using a screwdriver,
remove the cover panel
on the lower front part of
the washing machine (see
figure);
Cleaning the detergent dispenser drawer
Remove the dispenser by
raising it and pulling it out
(see figure).
Wash it under running water; this operation should be
repeated frequently.
2. unscrew the lid by rotating it anti-clockwise (see
figure): a little water may
trickle out. This is perfectly
normal;
3. clean the inside thoroughly;
4. screw the lid back on;
5. reposition the panel, making sure the hooks are securely
in place before you push it onto the appliance.
Checking the water inlet hose
Check the inlet hose at least once a year. If there are any
cracks, it should be replaced immediately: during the wash
cycles, water pressure is very strong and a cracked hose
could easily split open.
! Never use second-hand hoses.
10
Page 11

Troubleshooting
Your washing machine could fail to work. Before contacting the Technical Assistance Centre (see “Assistance”), make sure
that the problem cannot be not solved easily using the following list.
Problem:
The washing machine does not
switch on.
The wash cycle does not start.
The washing machine does not
take in water (the text “NO WATER,
CHECK SUPPLY” appears on the
display).
The washing machine continuously
takes in and
drains water.
Possible causes / Solutions:
• Theapplianceisnotpluggedintothesocketfully,orisnotmakingcontact.
• Thereisnopowerinthehouse.
• Thewashingmachinedoorisnotclosedproperly.
• TheON/OFFbuttonhasnotbeenpressed.
• TheSTART/PAUSEbuttonhasnotbeenpressed.
• Thewatertaphasnotbeenopened.
• Adelayedstarthasbeenset(see “Running a wash cycle”).
• Thewaterinlethoseisnotconnectedtothetap.
• Thehoseisbent.
• Thewatertaphasnotbeenopened.
• Thereisnowatersupplyinthehouse.
• Thepressureistoolow.
• TheSTART/PAUSEbuttonhasnotbeenpressed.
• Thedrainhoseisnotfittedataheightbetween65and100cmfromthefloor
(see “Installation”).
• Thefreeendofthehoseisunderwater(see “Installation”).
• Thewalldrainagesystemisnotfittedwithabreatherpipe.
If the problem persists even after these checks, turn off the water tap, switch
the appliance off and contact the Assistance Service. If the dwelling is on one of
the upper floors of a building, there may be problems relating to water drainage,
causing the washing machine to fill with water and drain continuously. Special
anti-draining valves are available in shops and help to avoid this inconvenience.
GB
The washing machine does not
drain or spin.
The washing machine vibrates a lot
during the spin cycle.
The washing machine leaks.
The machine is locked and the display
flashes, indicating an
error code (e.g. F-01, F-..).
There is too much foam.
• Thewashcycledoesnotincludedraining:somewashcyclesrequirethedrain
phase to be started manually (see “Wash cycles and functions”).
• TheEASYIRONfunctionhasbeenactivated:Tocompletethewashcycle,
press the START/PAUSE button (see “Wash cycles and functions”).
• Thedrainhoseisbent(see “Installation”).
• Thedrainageductisclogged.
• Thedrumwasnotunlockedcorrectlyduringinstallation(see “Installation”).
• Thewashingmachineisnotlevel(see “Installation”).
• Thewashingmachineistrappedbetweencabinetsandwalls(see “Installation”).
• Thewaterinlethoseisnotscrewedonproperly(see “Installation”).
• Thedetergentdispenserdrawerisblocked(forcleaninginstructions,see “Care
and maintenance”).
• Thedrainhoseisnotfixedproperly(see “Installation”).
• Switchoffthemachineandunplugit,waitforapproximately1minuteandthen
switch it back on again.
If the problem persists, contact the Technical Assistance Service.
• Thedetergentisnotsuitableformachinewashing(itshoulddisplaythetext
“for washing machines” or “hand and machine wash”, or the like).
• Toomuchdetergentwasused.
11
Page 12

Service
GB
Before calling for Assistance:
• Check whether you can solve the problem alone (see “Troubleshooting”);
• Restarttheprogrammetocheckwhethertheproblemhasbeensolved;
• Ifthisisnotthecase,contactanauthorisedTechnicalAssistanceCentreusingthetelephonenumberprovidedonthe
guarantee certificate.
! Always request the assistance of authorised technicians.
Have the following information to hand:
• thetypeofproblem;
• theappliancemodel(Mod.);
• theserialnumber(S/N).
This information can be found on the data plate applied to the rear of the washing machine, and can also be found on the
front of the appliance by opening the door.
12
Page 13

Instrucţiuni de folosire
MAŞINĂ DE SPĂLAT RUFE
RO
Română
WMD 702
Sumar
Instalare, 14-15
Despachetare şi punere la nivel
Racorduri hidraulice şi electrice
Primul ciclu de spălare
Date tehnice
Descrierea maşinii de spălat, 16-17
Panoul de control
Display
Cum se desfăşoară un ciclu de spălare, 18
Programe şi funcţii, 19
Tabel de programe
Funcţii de spălare
Detergenţi şi rufe albe, 20
Compartimentul pentru detergenţi
Pregătirea rufelor
Programe optionale
Sistemul de echilibrare a încărcăturii
Precauţii şi sfaturi, 21
Norme de protecţie şi siguranţă generale
Aruncarea reziduurilor
Deschiderea manuală a uşii
RO
Întreţinere şi curăţare, 22
Întreruperea alimentării cu apă şi curent electric
Curăţarea maşinii de spălat
Curăţarea compartimentului pentru detergent
Îngrijirea uşii şi a tamburului
Curăţarea pompei
Controlarea furtunului de alimentare cu apă
Anomalii şi remedii, 23
Asistenţă, 24
13
Page 14
Instalare
RO
! Este important să păstraţi acest manual pentru a-l
putea consulta în orice moment. În caz de vânzare, de
cesiune sau de schimbare a locuinţei, acesta trebuie să
rămână împreună cu maşina de spălat pentru a informa
noul proprietar cu privire la funcţionare şi la respectivele
avertismente.
! Citiţi cu atenţie instrucţiunile: veţi găsi informaţii impor-
tante cu privire la instalare, la folosire şi la siguranţă.
Despachetare şi punere la nivel
Despachetare
1. Scoaterea din ambalaj a maşinii de spălat.
2. Controlaţi ca maşina de spălat să nu fost deteriorată
în timpul transportului. Dacă este deteriorată nu o
conectaţi şi luaţi legătura cu vânzătorul.
3. Scoateţi cele 4 şuruburi
de protecţie pentru transport şi cauciucul cu respectivul distanţier, situate
în partea posterioară
(a se vedea gura).
O nivelare precisă conferă stabilitate maşinii şi evită
vibraţii, zgomote şi deplasări pe timpul funcţionării. În
cazul mochetelor sau a unui covor, reglaţi picioruşele
astfel încât să menţineţi sub maşina de spălat un spaţiu
sucient pentru ventilare.
Racorduri hidraulice şi electrice
Racordarea furtunului de alimentare cu apă
1. Conectaţi furtunul de
alimentare, înşurubându-l
la un robinet de apă rece
cu gura letată de ¾ gaz
(a se vedea gura).
Înainte de conectare, lăsaţi
apa să curgă până când nu
a devenit limpede.
2. Conectaţi tubul de
alimentare la maşina de
spălat, înşurubându-l la
sursa de apă respectivă,
amplasată în partea
posterioară, sus în dreapta
(a se vedea gura).
4. Închideţi oriciile cu dopurile din plastic aate în dotare.
5. Păstraţi toate piesele: pentru cazul în care maşina
de spălat va trebui să e transportată, piesele vor trebui
montante din nou.
! Ambalajele nu sunt jucării pentru copii!
Punere la nivel
1. Instalaţi maşina de spălat pe o suprafaţă plană şi
rigidă, fără a o sprijini de ziduri, mobilă sau altceva.
2. Dacă podeaua nu
este perfect orizontală,
compensaţi neregularităţile
deşurubând sau înşurubând
picioruşele anterioare (a
se vedea gura); unghiul
de înclinare, măsurat pe
planul de lucru, nu trebuie
să depăşească 2°.
3. Fiţi atenţi ca furtunul să nu e nici pliat nici îndoit.
! Presiunea apei de la robinet trebuie să e cuprinsă
în valorile din tabelul Date tehnice (a se vedea pagina
alăturată).
! Dacă lungimea furtunului de alimentare nu este
sucientă, adresaţi-vă unui magazin specializat sau unui
instalator autorizat.
! Nu folosiţi niciodată tuburi folosite deja.
! Utilizaţi tuburile furnizate împreună cu maşina.
14
Page 15

Conectarea furtunului de golire
65 - 100 cm
Conectaţi furtunul de golire
- fără a-l îndoi - la canalizare sau la racordul de
golire prevăzut pe perete,
la o înălţime de 65 - 100
cm de sol;
Sprijiniţi-l de marginea
căzii sau chiuvetei şi
racordaţi şina de ghidare
din dotare la robinet (a
se vedea gura). Capătul
liber al furtunului de golire
nu trebuie să rămână
cufundat în apă.
! Cablul de alimentare trebuie să e înlocuit doar de
tehnicieni autorizaţi ai centrului de service ce apare scris
pe certicatul de garantie emis de producator.
Atenţie! Producătorul îşi declină orice responsabilitate în
cazul în care aceste norme nu se respectă.
Primul ciclu de spălare
După instalare, înainte de folosire, efectuaţi un ciclu de
spălare cu detergent şi fără rufe, selectând programul
(60°C).
RO
! Nu se recomandă folosirea furtunurilor prelungitoa-
re; dacă este indispensabil, acestea trebuie să aibă
acelaşi diametru ca şi furtunul original şi nu trebuie să
depăşească 150 cm lungime.
Racordarea electrică
Înainte de a introduce stecherul în priză, asiguraţi-vă ca:
• priza să e cu împământare şi conform prevederilor
legale;
• priza să poată suporta sarcina maximă de putere a
maşinii, indicată în tabelul Date Tehnice
(a se vedea alături);
• tensiunea de alimentare să e cuprinsă în valorile indi-
cate în tabelul Date Tehnice (a se vedea alături);
• priza să e compatibilă cu stecherul maşinii de spălat.
În caz contrar înlocuiţi stecherul.
! Maşina de spălat nu trebuie instalată afară, nici chiar în
cazul în care spaţiul este adăpostit, deoarece este foarte
periculoasă expunerea maşinii la ploi şi furtuni.
! După instalarea maşinii de spălat, priza de curent tre-
buie să e uşor accesibilă.
! Nu folosiţi prelungitoare şi prize multiple.
Date tehnice
Model WMD 702
Dimensiuni
Capacitate De la 1 la 7 kg pentru spãlare
Legãturi electrice
Legãturi hidrice
Turaþia de centrifugare
Programe de
control în baza
normei
2010/1061
lãrgime: 59,5 cm
înãlþime: 85 cm
profunzime: 54 cm
vezi eticheta cu caracteristicile tehnice,
aplicatã pe maºinã
presiune maximã: 1 MPa (10 bari)
presiune minimã: 0,05 MPa (0,5 bari)
capacitatea cuvei: 52 litri
pânã la 1000 de rotaþii pe minut
programul
temperatura 60°C (a doua apăsare a
butonului);
temperatura 40°C (a treia apăsare a
butonului).
Acest aparat este conform cu urmãtoarele Directive Comunitare:e
- 2004/108/CE (Compatibilitate Electromagneticã)
- 2002/96/CE
- 2006/95/CE (Tensiuni Joase)
;
! Cablul nu trebuie să e îndoit sau comprimat.
15
Page 16

Descrierea maşinii de spălat
RO
Panoul de control
Tastă
ON/OFF
Sertarul detergenţilor
Sertarul detergenţilor: pentru a introduce detergenţi sau
aditivi (a se vedea “Detergenţi şi rufe albe”).
SELECTARE
PROGRAME
Taste
Tastă
ACŢIUNE
CURĂŢARE
DISPLAY
Tastă
MY CYCLE
Tastă
TIP
CLĂTIRE
Tastă
PORNIRE
ÎNTÂRZIATĂ
Tastă TEMPERATURĂ : apăsaţi pentru a micşora
temperatura; valoarea va indicată pe display.
Taste
FUNCŢII
Tastă
CENTRIFUGARE
Tastă cu led
START/PAUSE
Tastă
TEMPERATURĂ
Tastă
BLOCARE
TASTE
Tastă ON/OFF : apăsaţi scurt tasta pentru a porni
sau opri maşina de spălat. Indicatorul START/PAUSE
emite un semnal intermitent de culoare verde, ceea ce
vă conrmă pornirea maşinii. Pentru a opri funcţionarea
maşinii de spălat în timpul spălării, este necesar să
ţineţi apăsată tasta circa 3 secunde; o apăsare de
scurtă durată sau accidentală nu va opri maşina. Oprirea
maşinii de spălat în timpul executării unui ciclu va anula
programul în curs de desfăşurare.
Taste SELECTARE PROGRAME: pentru a alege pro-
gramul dorit (a se vedea “Tabel de programe”).
Tastă MY CYCLE: tţineţi apăsată tasta pentru a introduce în memorie un ciclu personalizat după preferinţă.
Pentru a activa un ciclu memorat anterior, apăsaţi tasta
MY CYCLE.
Taste FUNCŢII: apăsaţi tasta pentru a alege funcţia
dorită. Pe display veţi observa aprinderea indicatorului
luminos.
Tastă
ACŢIUNE CURĂŢARE
selecta intensitatea dorită de spălare.
Tastă
TIP CLĂTIRE
dorit de clătire.
: apăsaţi pentru a selecta tipul
: apăsaţi pentru a
Tastă BLOCARE TASTE : pentru a bloca panoul de
comandă, ţineţi apăsată tasta timp de 2 secunde. Dacă
ledul corespunzător este aprins, atunci panoul de
comenzi este blocat. În acest fel, se evită modicarea
accidentală a unui program, în special de către copii.
Pentru a debloca panoul de comandă, ţineţi apăsată
tasta timp de 2 secunde.
Tastă PORNIRE ÎNTÂRZIATĂ : apăsaţi pentru a pro-
grama pornirea maşinii la o anumită oră. Întârzierea va
indicată pe display.
Tastă cu led START/PAUSE: când ledul verde emite
un semnal intermitent, apăsaţi tasta pentru a porni ciclul
de spălare. După activarea ciclului, ledul rămâne aprins.
Pentru a introduce o pauză în timpul spălării, apăsaţi
din nou tasta: ledul va emite o lumină intermitentă, de
culoare portocalie. După stingerea indicatorului luminos
, puteţi deschide uşa. Pentru a continua spălarea, de
unde a fost întreruptă, apăsaţi din nou tasta.
Modalitatea de stand by
Această maşină de spălat rufe, conform noilor norme
legate de economia de curent electric, este dotată cu
un sistem de oprire automat (stand-by) care intră în
funcţiune după 30 minute de neutilizare. Apăsaţi scurt tasta ON/OFF şi aşteptaţi repunerea în funcţiune a maşinii.
Tastă CENTRIFUGARE : apăsaţi tasta pentru a reduce numărul de rotaţii sau a opri storcerea; numărul de
turaţii se poate vedea pe display.
16
Page 17

Display
Z
B
A
RO
X
D
C
E
Y
F
Ecranul este util pentru a programa maşina şi a furniza numeroase informaţii.
Pe cele două rânduri de sus, A şi B, apar programul de spălare ales, faza de spălare în curs de desfăşurare şi toate
indicaţiile cu privire la stadiul de avansare a programului.
Rândul C este dedicat timpului restant până la încheierea ciclului de spălare sau – dacă aţi programat pornirea maşinii la
o anumită oră (PORNIRE ÎNTÂRZIATĂ) – timpul restant până la iniţierea spălării.
Pe rândul D apare viteza maximă a storcătorului -admisă de maşină -în funcţie de programul ales; dacă programul nu
include o fază de centrifugare, atunci rândul este întunecat.
Pe rândul E apare temperatura maximă care poate selectată în funcţie de programul ales; dacă programul prevede
spălarea la rece, atunci rândul este întunecat.
Indicatoarele F se referă la funcţii şi se aprind când funcţia selectată este compatibilă cu programul ales.
Indicator Uşă blocată
Simbolul aprins indică faptul că uşa este blocată, pentru a împiedica deschiderea accidentală. Pentru a evita daune este
necesar să se aştepte ca simbolul să se stingă înainte de a deschide uşa.
N.B.: dacă funcţia PORNIRE ÎNTÂRZIATĂ este activă, uşa nu se poate deschide; pentru a o deschide, apăsaţi tasta
START/PAUSE pentru a întrerupe momentan programarea.
! La punerea în funcţiune a maşinii (prima dată) vi se va cere să selectaţi limba; ecranul va aşa direct meniul de alegere
limbă.
Pentru a alege limba dorită, apăsaţi tastele X şi Y iar pentru a conrma alegerea, apăsaţi tasta Z.
Dacă doriţi să schimbaţi limba, opriţi maşina, apăsaţi în acelaşi timp pe butoanele X, Y, Z până când auziţi un semnal
acustic, va aşat din nou meniul de selectare a limbii.
17
Page 18

Cum se desfăşoară un ciclu de
spălare
RO
1. PUNEREA ÎN FUNCŢIUNE A MAŞINII. Apăsaţi
tasta ; pe ecran va apărea mesajul PORNIRE ÎN
CURS. Indicatorul START/PAUSE va emite un semnal
intermitent de culoare verde.
2. INTRODUCEREA RUFELOR. Deschideţi uşa. Introduceţi
rufele în maşină, ind atenţi să nu depăşiţi cantitatea
indicată în tabelul de programe (vezi pagina următoare).
3. DOZAREA DETERGENTULUI. Extrageţi sertarul şi
turnaţi detergent în compartimentele respective, după
indicaţiile din cap. „Detergenţi şi rufe albe”.
4. ÎNCHIDEŢI UŞA.
5. ALEGEREA PROGRAMULUI. Apăsaţi una din
tastele de SELECTARE PROGRAME pentru a alege
programul dorit; numele programului va aşat pe
ecran, împreună cu temperatura de spălare şi viteza
storcătorului, acestea din urmă putând modicate. Pe
ecran va apărea şi durata ciclului.
6. PERSONALIZAREA CICLULUI DE SPĂLARE.
Apăsaţi tastele respective.
Modicare temperaturii şi/sau a vitezei de stoarcere.
Maşina selectează automat temperatura şi viteza de
stoarcere maxime, din cele prevăzute pentru programul
ales; aceste valori nu pot mărite. Apăsând tasta se
poate reduce progresiv temperatura până la excluderea
completă a încălzirii apei, “OFF”, care corespunde cu
spălarea la rece. Apăsând tasta puteţi micşora treptat
viteza de stoarcere, până la zero, anulând complet
centrifuga “OFF”. Din acest moment, apăsarea ulterioară
a tastelor va aduce valorile de temperatură şi viteză de
stoarcere la cele maxime prevăzute.
Congurarea pornirii întârziate.
Pentru a programa pornirea întârziată a maşinii, apăsaţi
tasta respectivă pentru a alege timpul de întârziere
dorit. Când opţiunea este activă, pe ecran se va aprinde
simbolul . Pentru a anula pornirea întârziată, apăsaţi
tasta până când pe ecran veţi vedea mesajul OFF.
Reglaţi intensitatea dorită de spălare.
Opţiunea permite optimizarea spălării în funcţie de
gradul de murdarie al ţesăturilor şi de intensitatea dorită
a spălării.
Selectaţi programul de spălare, ciclul este reglat
automat la nivelul „NORMAL”, optimizat pentru rufe
cu grad normal de murdărie (această reglare nu este
valabilă pentru ciclul „Lână”, care se reglează automat
la nivelul „DELICATE”).
Pentru rufe foarte murdare apăsaţi butonul până se
ajunge la nivelul „EXTRA SPĂLARE”. Datorită utilizării
unei cantităţi mai mari de apă în faza iniţială a ciclului
şi a unei mişcări mecanice mai mari, această opţiune
garantează o spălare de mare performanţă şi este utilă
pentru eliminarea petelor rezistente. Poate utilizată
cu sau fără înălbitor.
Dacă doriţi să efectuaţi albirea, introduceţi tăviţa
suplimentară 4, din dotare, în tăviţa 1. Când dozaţi
înălbitorul, nu depăşiţi nivelul „max” indicat pe pivotul
central (a se vedea gura de la pag. 20).
Pentru rufe puţin murdare sau pentru un tratament
mai delicat al ţesăturilor, apăsaţi butonul până
se ajunge la nivelul “DELICATE”. Ciclul va reduce
mişcarea mecanică pentru a asigura rezultate perfecte
de spălare pentru rufele delicate. Dacă nu se poate
regla sau modica reglarea existentă, pe ecran se va
vizualiza „INACTIV”.
Reglaţi tipul de clătire.
Opţiunea vă permite să selectaţi tipul de clătire dorit
pentru îngrijirea maximă a pielii sensibile. Prima apăsare
a butonului stabileşte nivelul „EXTRA LIMPEZIRE” care
vă permite să selectaţi o clătire suplimentară faţă de cele
standard ale ciclului, pentru a elimina toate urmele de
detergent. A doua apăsare a butonului stabileşte nivelul
„PIELE SENSIBILE” care vă permite să selectaţi două
clătiri suplimentare faţă de cele standard ale ciclului
şi este recomandat pentru pielea foarte sensibilă. A
treia apăsare a butonului stabileşte nivelul „CLĂTIRE
ANTIALERGIE” care vă permite să selectaţi trei clătiri
suplimentare faţă de cele standard ale ciclului, pentru
a elimina principalii alergeni, cum ar polenul, acarienii
din praf, părul de pisică şi de câine. Apăsaţi butonul
din nou pentru a reveni la tipul de clătire „LIMPEZIRE
NORMALĂ”. Dacă nu se poate regla sau modica
reglarea existentă, pe ecran se va vizualiza „INACTIV”.
Modicarea caracteristicilor unui ciclu.
• Apăsaţi tasta pentru a activa funcţia; ledul
corespunzător butonului se va aprinde.
• Apăsaţi din nou tasta pentru a dezactiva funcţia;
indicatorul luminos se va stinge.
! Dacă funcţia selectată nu este compatibilă cu
programul ales, ledul corespunzător se va aprinde
intermitent iar funcţia nu se va activa.
! Dacă funcţia aleasă nu este compatibilă cu o funcţie
selectată anterior, indicatorul care corespunde primei
funcţii va emite un semnal intermitent iar indicatorul
celei de a doua se va aprinde: acest lucru înseamnă că
se va activa numai a doua funcţie (ultima aleasă).
! Cantitatea de rufe admisă precum şi durata ciclului
pot varia în funcţie de funcţia aleasă.
7. ACTIVAREA UNUI PROGRAM. Apăsaţi tasta START/
PAUSE. Indicatorul luminos se va aprinde (culoarea
verde) şi uşa se va bloca (simbolul UŞĂ BLOCATĂ
se va aprinde). În timpul spălării, pe ecran va apărea
numele fazei în curs de desfăşurare. Pentru a modica
un program în timpul executării unui ciclu, apăsaţi tasta
START/PAUSE pentru a întrerupe momentan ciclul;
indicatorul corespunzător tastei START/PAUSE se va
aprinde intermitent (culoarea portocalie). Alegeţi noul ciclul
dorit şi apăsaţi din nou tasta START/PAUSE. Pentru a
deschide uşa în timpul executării unui ciclu, apăsaţi tasta
START/PAUSE; când simbolul UŞĂ BLOCATĂ se
stinge, puteţi deschide uşa. Apăsaţi din nou tasta START/
PAUSE pentru a relua programul de unde era oprit.
8. TERMINAREA PROGRAMULUI. La încheierea
ciclului, pe ecran va apărea mesajul “SFÂRŞITUL
PROGRAMULUI”; când simbolul UŞĂ BLOCATĂ
se stinge, puteţi deschide uşa. Deschideţi uşa, scoateţi
rufele şi opriţi maşina de spălat.
! Dacă doriţi să anulaţi un ciclu deja demarat,ţineţi
apăsată tasta câteva secunde. Ciclul va înceta denitiv
iar maşina se va opri.
18
Page 19

Programe şi funcţii
Tabel de programe
Viteza
Descrierea Programului
Programe
ANTIPATĂ 40° 1000 -
PRESPĂLARE BUMBAC (prima apăsare a butonului): albe
extrem de murdare (cearceafuri, feþe de masã, etc.).
ALBE BUMBAC (1)
albe si colorate rezistente foarte murdare.
COLORATE BUMBAC (1-2)
colorate delicate putin murdare.
SINTETICE REZISTENTE (prima apăsare a butonului): colora-
te rezistente foarte murdare.
SINTETICE REZISTENTE (4) (prima apăsare a butonului):
colorate rezistente foarte murdare.
SINTETICE DELICATE
rezistente putin murdare.
SPĂLARE RAPIDĂ 60' (prima apăsare a butonului): pentru a
spala rapid articolele foarte murdare (nu este indicat
pentru lâna, matase si articole de spalat cu mâna).
SPĂLARE RAPIDĂ 30'
a spala rapid articolele putin murdare (nu este indicat
pentru lâna, matase si articole de spalat cu mâna).
M
MY CYCLE (MEMO): permite memorarea oricãrui tip de spãlare.
LENJERIE,PROSOAPE (3): pentru prosoape ºi cearceafuri. 60° 1000
Woolmark Platinum (LÂNĂ): pentru articole din lâna, casmir. 40° 800
ULTRA DELICATE 30° 0
CENTRIFUGARE (prima apăsare a butonului) - 1000
CLĂTIRE ENERGICĂ
EVACUARE
(a doua apăsare a butonului)
(a treia apăsare a butonului)
(a doua apăsare a butonului)
(a doua apăsare a butonului)
(a doua apăsare a butonului)
(a treia apăsare a butonului)
:
: colorate
: pentru
Temp.
max.
(°C)
:
max.
(rotaþii
pe minut)
90° 1000
60° 1000
40° 1000
60° 800
40° 800
40° 800
60° 1000
30° 800
- 1000
- 0
Detergenþi
Prespã-
lare
-
-
-
-
-
-
-
-
-
-
Spãlare
Decolorant
-
-
-
-
-
-
-
- - - -
- - -
- - - -
Balsam
rufe
Sarcina Max.
(Kg)
Normal
Eco
Wash
4 -
7 -
7 7
7 7
3 3
3 3
3 3
3,5 3
3 3
7 -
1,5 -
1 -
7 -
7 -
7 -
RO
Durata
ciclului
de
spalare
Puteþi vizualiza durata programelor de spãlare pe display.
Durata ciclului indicată pe display sau în carte este calculată în baza unor condiţii standard. Timpul efectiv poate varia în baza a numeroşi factori, precum temperatura
şi presiunea apei la intrare, temperatura mediului, cantitatea de detergent, cantitatea şi tipul încărcăturii, echilibrarea încărcăturii, opţiunile suplimentare selectate.
Pentru toate Instituţiile de Testare:
(1) Programul de control conform normei 2010/1061: reglaţi programul la 60°C (a doua apăsare a butonului); reglaţi programul la 40°C (a treia
apăsare a butonului).
(2) Program pentru bumbac, prelungit:
(3) Program bumbac, rapid: reglaţi programul ; temperatura de 40° C (apăsaţi tasta TEMPERATURĂ).
(4) Program sintetic lung: reglaţi programul la 60°C (prima apăsare a butonului); temperatura de 40° C (apăsaţi tasta TEMPERATURĂ).
reglaţi programul la 40°C (a treia apăsare a butonului).
Funcţii de spălare
Rapid
Prin selectarea acestei opţiuni, se reduce durata programului cu până la 50% în funcţie de ciclul ales, asigurând
în acelaşi timp o economie de apă şi de energie. Folosiţi
acest ciclu pentru rufe care nu sunt excesiv de murdare.
! Nu poate activată pe programele , “SPĂLARE
RAPIDĂ 60’”, , , .
Călcare Uşoară
Selectând această opţiune, spălarea şi centrifuga vor
modicate în mod oportun, pentru a reduce plierea rufelor.
La încheierea ciclului, maşina de spălat va efectua o rotaţie
lentă a coşului, indicatorul funcţiei CĂLCARE USOARA
vor emite semnale intermitente iar pe display va apărea
mesajul “SFÂRŞITUL PROGRAMULUI”. Pentru a termina
ciclul, apăsaţi tasta START/PAUSE sau tasta CĂLCARE
USOARA.
! Nu se poate activa cu programele , “SPĂLARE
RAPIDĂ 30’”, , , “Centrifugare” şi “Evacuare”.
Eco Wash
Funcţia Eco Wash contribuie la economia de energie,
neîncălzind apa folosită pentru spălarea rufelor – un avantaj atât pentru mediul înconjurător, cât şi pentru factura
de curent electric. Într-adevăr, acţiunea mai puternică şi
consumul optimizat de apă garantează rezultate optime în
aceeaşi durată medie a unui ciclu standard. Pentru a obţine
rezultate mai bune ale spălării, se recomandă folosirea unui
detergent lichid.
! Nu poate activată pe programele , (90°C), ,
, , .
19
Page 20

Detergenţi şi rufe albe
M
AX
1
2
4
3
A
B
RO
Compartimentul pentru detergenţi
Un rezultat bun la spălare depinde şi de dozarea corectă
a detergentului: excesul de detergent nu garantează o
spălare mai ecientă, ci contribuie la deteriorarea părţilor
interne ale maşinii de spălat şi la poluarea mediului
înconjurător.
! Nu introduceţi în maşină detergenţii pentru spălarea
manuală deoarece formează prea multă spumă.
Deschideţi compartimentul pentru detergenţi şi
introduceţi detergentul
sau aditivul după cum
urmează:
compartiment 1: Detergent pentru prespălare (sub
formă de praf)
Înainte de a adăuga detergentul vericaţi ca sertarul
adiţional 4 să nu e introdus.
compartiment 2: Detergent pentru spălare
(sub formă de praf sau lichid)
Când utilizaţi detergent lichid este recomandat să folosiţi
peretele despărţitor A prevăzut pentru dozarea corectă.
Pentru utilizarea de detergent praf puneţi peretele
despărţitor în cavitatea B.
compartiment 3: Aditivi (soluţie de înmuiat, balsam
rufe etc.)
Soluţia de înmuiat nu trebuie să iasă deasupra grătarului.
compartiment adiþional 4: Decolorant (Inãlbitor)
Programe optionale
ANTIPATĂ: Programul este potrivit pentru rufe foarte
murdare, cu culori rezistente. Programul asigură o clasă
de spălare superioară faţă de clasa standard (clasa A).
Nu efectuaţi programul amestecând rufe de culori diferite. Se recomandă folosirea unui detergent praf. Pentru
petele dicile se recomandă pre-tratamentul cu aditivi
specici.
LENJERIE,PROSOAPE: pentru spălarea tuturor prosoapelor de baie şi cearceafurilor de pat într-un singur ciclu,
folosiţi programul , care optimizează utilizarea balsamului şi vă permite să realizaţi o mare economie de timp
şi de energie. Se recomandă folosirea unui detergent
praf.
LÂNĂ: Ciclul de spălare “Lână” al acestei maşini de
spălat Hotpoint-Ariston a fost testat şi aprobat de Woolmark Company pentru spălarea articolelor de lână
clasicate ca ind lavabile de mână, cu condiţia ca
spălarea să se efectueze în conformitate cu instrucţiunile
specicate pe eticheta articolului şi cu indicaţiile furnizate
de producătorul aparatului. Hotpoint-Ariston este prima
marcă de maşini de spălat care a obţinut de la Woolmark
Company certicarea Woolmark Apparel Care - Platinum
pentru performanţele sale de spălare şi consumul de apă
şi energie. (M1126)
ULTRA DELICATE: folosiţi programul pentru spălarea
rufelor foarte delicate, care au aplicaţii, cum ar strass
sau paiete.
Pentru a spăla articole din mătase şi perdele, selectaţi
ciclul şi reglaţi nivelul „DELICATE” al opţiunii .
Se recomandă să întoarceţi pe dos rufele înainte de
spălare şi să introduceţi articolele mici într-un sac special
pentru spălarea rufelor delicate.
Pentru cele mai bune rezultate, vă recomandăm
utilizarea unui detergent lichid pentru rufe delicate.
Pregătirea rufelor
• Sortaţi rufele în funcţie de:
- tipul de material / simbolul de pe etichetă.
- culori: separaţi rufele colorate de cele albe.
• Goliţi buzunarele şi controlaţi nasturii.
• Nu depăşiţi valorile indicate, referitoare la greutatea
rufelor uscate:
Ţesături rezistente: max 7 kg
Materiale sintetice: max 3 kg
Ţesături delicate: max 2 kg
Lână: max 1,5 kg
Mătase: max 1 kg
Cât cântăresc rufele?
1 cearceaf 400-500 g.
1 faţă de pernă 150-200 g.
1 faţă de masă 400-500 g.
1 halat de baie 900-1.200 g.
1 prosop 150-250 g.
20
Sistemul de echilibrare a încărcăturii
Pentru a evita trepidaţiile excesive, înainte de stoarcere, cuva maşinii va distribui cantitatea de rufe în mod
uniform, centrifuga efectuând câteva rotaţii la o viteză
mai mare decât viteza de spălare. Dacă, după numeroase încercări, maşina nu reuşeşte să echilibreze
greutatea, stoarcerea rufelor se va face la o viteză mai
mică decât cea prevăzută în program. Dacă instabilitatea
este prea mare, maşina va distribui greutatea în locul
centrifugei. Pentru a favoriza o mai bună repartizare a
rufelor şi echilibrarea corectă a maşinii, se recomandă să
introduceţi în maşină atât articole mari cât şi mici.
Page 21

Precauţii şi sfaturi
20
! Maşina de spălat a fost proiectată şi construită conform
normelor internaţionale de protecţie. Aceste avertizări
sunt furnizate din motive de siguranţă şi trebuie să e
citite cu atenţie.
Norme de protecţie şi siguranţă generale
• Acest aparat a fost conceput exclusiv pentru utilizarea
în locuinţe unifamiliale.
• Aparatul nu trebuie utilizat de către persoane (inclusiv
copii) cu capacităţi zice, senzoriale sau mentale reduse şi cu experienţă sau cunoştinţe insuciente, exceptînd cazul în care această utilizare are loc sub supravegherea sau instrucţiunile unei persoane responsabile
cu securitatea lor. Copiii trebuie supravegheaţi pentru a
vă asigura că nu se joacă cu aparatul.
• Nu atingeţi maşina când sunteţi desculţi sau cu mâinile
sau picioarele ude sau umede.
• Nu scoateţi stecherul din priză trăgând de cablu.
• Nu deschideţi compartimentul pentru detergent în timp
ce maşina se aă în funcţiune.
• Nu atingeţi apa golită din maşină: poate avea o
temperatură ridicată.
• Nu forţaţi în nici un caz uşa: s-ar putea deteriora
mecanismul de siguranţă care evită deschiderea
accidentală.
• În caz de defecţiune, nu umblaţi în nici un caz la mecanismele din interior şi nu încercaţi să o reparaţi singuri.
• Controlaţi mereu ca în apropierea maşinii aate în
funcţiune, să nu se ae copii.
• Pe durata spălării uşa se poate încălzi.
• Dacă trebuie să deplasaţi maşina, cereţi ajutor unei
alte (sau 2) persoane şi ţi foarte atenţi. Niciodată nu
deplasaţi maşina singuri deoarece aceasta este foarte
grea.
• Înainte de a introduce rufele, controlaţi cuva să e
goală.
Pentru informaţii suplimentare cu privire la scoaterea din uz
a electrocasnicelor, deţinătorii acestora pot apela la centrele
de colectare a deşeurilor sau la vânzătorii de la care au
achiziţionat produsele respective.
Deschiderea manuală a uşii
Dacă nu este posibil să deschideţi uşa din cauza întreruperii curentului electric şi doriţi totuşi să întindeţi rufele,
procedaţi după cum urmează:
1. scoateţi stecherul din
priză.
2. vericaţi ca nivelul de
apă din maşină să e sub
marginea uşii; în caz contrar,
scoateţi apa în exces cu
ajutorul furtunului de golire,
punând-o într-un vas, după
indicaţiile din gura.
3. scoateţi panoul de acoperire din partea din faţă a
maşinii de spălat folosind o
şurubelniţă
(a se vedea gura).
RO
Aruncarea reziduurilor
• Eliminarea ambalajelor: respectaţi normele locale, în
acest fel ambalajele vor putea utilizate din nou.
• Directiva Europeană 2002/96/CE cu privire la deşeurile care
provin de la aparatura electrică sau electronică prevede ca
aparatele electrocasnice să nu e colectate împreună cu
deşeurile urbane solide, obişnuite. Aparatele scoase din uz
trebuie să e colectate separat atât pentru a optimiza rata de
recuperare şi de reciclare a materialelor componente cât şi
pentru a evita pericolele care pot duce la dăunarea sănătăţii
omului sau poluarea mediului înconjurător. Simbolul tomberonului tăiat care apare pe toate produsele vă aminteşte
tocmai obligaţia de a le colecta separat.
4. utilizând dispozitivul indicat în gură, trageţi spre
dumneavoastră până când eliberaţi tirantul de plastic din
opritor; trageţi apoi în jos şi, în acelaşi timp, deschideţi
uşa.
5. montaţi din nou panoul vericând, înainte de a-l împinge spre maşină, de a introdus cârligele în oriciile
respective.
21
Page 22

Întreţinere şi curăţare
1
2
A
B
RO
Întreruperea alimentării cu apă şi curent
electric
• Închideţi robinetul de apă după ecare spălare. Se
limitează astfel uzura instalaţiei hidraulice a maşinii de
spălat şi se elimină pericolul scurgerilor.
• Scoateţi stecherul din priza de curent atunci când
curăţaţi maşina de spălat şi când se efectuează lucrări
de întreţinere.
Curăţarea maşinii de spălat
• Partea externă şi părţile din cauciuc pot curăţate cu
o lavetă înmuiată în apă călduţă şi săpun. Nu folosiţi
solvenţi sau substanţe abrazive.
• Maşina de spălat este prevăzută cu un program de
„AUTOCURĂŢARE” a pieselor interne care trebuie realizat fără niciun fel de încărcătură în cuvă.
Detergentul (în cantitate de 10% din cea recomandată
pentru rufe puţin murdare) sau aditivii specici pentru
curăţarea maşinii de spălat pot folosite ca mijloace
auxiliare în programul de spălare. Se recomandă efectuarea programului de curăţare la ecare 40 de cicluri de
spălare.
Pentru a activa programul, apăsaţi butoanele A şi B în
acelaşi timp pentru 5 secunde (a se vedea gura).
Programul porneşte automat şi durează aproximativ
70 de minute. Pentru a termina ciclul, apăsaţi butonul
START/PAUSE.
Îngrijirea uşii şi a tamburului
• Lăsaţi mereu uşa întredeschisă pentru a evita formarea de mirosuri neplăcute.
Curăţarea pompei
Maşina de spălat este dotată cu o pompă de
autocurăţare care nu are nevoie de întreţinere. Se poate
întâmpla însă ca unele obiecte mici (monede, nasturi)
să cadă în anticamera care protejează pompa, situată în
partea inferioară a acesteia.
! Vericaţi ca ciclul de spălare să e încheiat şi scoateţi
stecherul din priză.
Pentru a avea acces la anticameră:
1. scoateţi panoul de acoperire din partea din faţă a
maşinii de spălat folosind
o şurubelniţă
(a se vedea gura);
2. deşurubaţi capacul
rotindu-l în sens invers
acelor de ceasornic (a se
vedea gura). Este normal
să iasă puţină apă;
Curăţarea compartimentului pentru detergent
Trageti afara compatimentul ridicându-l si tragându-l
spre exterior (a se vedea
gura).
Spălaţi-l sub un jet de apă;
această operaţie trebuie
efectuată cât mai des
posibil.
22
3. curăţaţi cu grijă interiorul;
4. înşurubaţi la loc capacul;
5. montaţi din nou panoul vericând, înainte de a-l îm-
pinge spre maşină, de a introdus cârligele în oriciile
respective.
Controlarea furtunului de alimentare cu apă
Controlaţi tubul de alimentare cel puţin o dată pe an.
Dacă prezintă crăpături sau suri trebuie înlocuit: pe parcursul spălărilor, presiunea puternică ar putea provoca
crăpături neaşteptate.
! Nu folosiţi niciodată tuburi folosite deja.
Page 23

Anomalii şi remedii
Se poate întâmpla ca maşina de spălat să nu funcţioneze. Înainte de a apela serviciul de Service (a se vedea Asistenţă”),
vericaţi dacă nu este vorba de o problemă uşor de rezolvat:
Anomalii:
Maşina de spălat nu porneşte.
Ciclul de spălare nu porneşte.
Maşina de spălat nu se alimentează
cu apă (Pe display va apărea mesajul
“NU SE ALIMENTEAZĂ, DESCHIDEŢI
ROBINETUL”).
Maşina de spălat încarcă şi descarcă
apă continuu.
Cauze posibile / Rezolvare:
• Stecherul nu este introdus în priza de curent, sau nu face contact.
• Aveţi o pană de curent la domiciliu.
• Uşa nu este bine închisă.
• Tasta ON/OFF nu a fost apăsată.
• Tasta START/PAUSE nu a fost apăsată.
• Robinetul de apă nu este deschis.
• A fost xată o întârziere de pornire (a se vedea “Cum se desfăşoară un ciclu
de spălare”).
• Furtunul de alimentare cu apă nu este racordat la robinet.
• Furtunul este îndoit.
• Robinetul de apă nu este deschis
• Apa la domiciliul dumneavoastră.
• Apa nu are presiune sucientă.
• Tasta START/PAUSE nu a fost apăsată.
• Furtunul de golire nu a fost instalat la o înălţime cuprinsă între 65 şi 100 cm
de pământ (a se vedea “Instalare”).
• Capătul furtunului de evacuare este cufundat în apă (a se vedea “Instalare”).
• Evacuarea din perete nu are răsuare pentru aer.
Dacă după aceste vericări problema nu se rezolvă, închideţi robinetul de apă,
opriţi maşina de spălat şi chemaţi Service-ul. Dacă locuinţa se aă la ultimele
etaje ale unui ediciu, este posibil să aibă loc fenomene de sifonare, motiv
pentru care maşina de spălat încarcă şi descarcă apă încontinuu. Pentru a
elimina acest inconvenient, se găsesc în comerţ supape anti-sifonare.
RO
Maşina de spălat nu se goleşte sau
nu stoarce.
Maşina de spălat vibrează foarte mult
în timpul stoarcerii.
Maşina de spălat pierde apă.
Maşina este blocată iar ecranul se va
aprinde intermitent semnalând un cod de
anomalie (de ex., F-01, F-..).
Se formează prea multă spumă.
• Programul nu prevede golirea apei: în cazul anumitor programe, este
necesară activarea manuală (a se vedea “Programe şi funcţii”).
• Funcţia CĂLCARE UŞOARĂ este activă: pentru a încheia programul,
apăsaţi tasta START/PAUSE (a se vedea “Programe şi funcţii”).
• Furtunul de golire este îndoit (a se vedea “Instalare”).
• Conducta de descărcare este înfundată.
• Cuva, în momentul instalării, nu a fost deblocată în mod corespunzător (a se
vedea “Instalare”).
• Maşina de spălat este în pantă (a se vedea “Instalare”).
• Maşina de spălat este prea aproape de pereţi şi mobilier (a se vedea “Instalare”).
• Furtunul de alimentare cu apă nu este bine înşurubat (a se vedea “Instalare”).
• Compartimentul de detergenţi este înfundat (pentru a-l curăţa a se vedea
“Întreţinere şi curăţare”).
• Furtunul de golire nu este bine xat (a se vedea “Instalare”).
• Opriţi maşina şi scoateţi stecherul din priză; aşteptaţi aproximativ 1 minut
înainte de a o reaprinde. Dacă nu obţineţi nici un rezultat, apelaţi Centrul de
service pentru asistenţă.
• Detergentul nu este compatibil cu maşina de spălat (trebuie să e scris
„pentru maşina de spălat”, „de mână sau în maşina de spălat”, sau ceva
asemănător).
• Dozajul a fost excesiv.
23
Page 24

Asistenţă
RO
Înainte de a lua legătura cu Service-ul:
• Vericaţi dacă puteţi rezolva singuri problema (a se vedea “Anomalii şi remedii”);
• Porniţi din nou programul pentru a controla dacă inconvenientul a fost eliminat;
• În caz negativ, luaţi legătura cu asistenţa tehnică autorizată la numărul telefonic indicat pe certicatul de garanţie.
! Nu apelaţi niciodată la persoane neautorizate.
Comunicaţi:
• tipul de anomalie;
• modelul maşinii (Mod.);
• numărul de serie (S/N).
Aceste informaţii sunt specicate pe plăcuţa cu date tehnice, lipită în partea din spate a maşinii de spălat precum şi în
partea anterioară, după ce deschideţi uşa.
Atenţionãri în conformitate cu legislaţia în vigoare
• Conform prevederilor legislaţiei privind gestionarea deşeurilor, este interzisã eliminarea deşeurilor de echipamente
electrice şi electronice (DEEE) alãturi de deşeurile municipale nesortate. Ele trebuie predate la punctele municipale de
colectare, societãţile autorizate de colectare/reciclare sau distribuitori (în cazul în care se achiziţioneazã echipamente noi
de acelaşi tip).
• Autoritãţile locale trebuie sã asigure spaţiile necesare pentru colectarea selectivã a deşeurilor precum şi funcţionalitatea
acestora. Contactaţi societatea de salubrizare sau compartimentul specializat din cadrul primãriei pentru informaţii detaliate.
• Deşeurile de echipamente electrice şi electronice pot predate şi distribuitorilor, la achiziţionarea de echipamente noi
de acelaşi tip (schimb 1 la 1).
• Predarea, de cãtre utilizatori, a deşeurilor de echipamente electrice şi electronice, la punctele de colectare municipale, societãţile autorizate de colectare/reciclare sau distribuitori (în cazul în care se achiziţioneazã echipamente noi de
acelaşi tip) faciliteazã refolosirea, reciclarea sau alte forme de valoricare a acestora.
• Deşeurile de echipamente electrice şi electronice pot conţine substanţe periculoase care pot avea un impact negativ
asupra mediului şi sãnãtãţii umane în cazul în care DEEE nu sunt colectate selectiv şi gestionate conform prevederilor
legale.
• Simbolul alãturat (o pubela cu roţi, barata cu douã linii în forma de X), aplicat pe un echipament electric sau electronic, semnicã faptul cã acesta face obiectul unei colectãri separate şi nu poate eliminat împreunã cu deşeurile
municipale nesortate.
24
Page 25

Iнструкцiї з експлуатацiї
ПРАЛЬНА МАШИНА
UA
Українська
WMD 702
Зміст
Встановлення, 26-27
Розпакування і вирівнювання
Підключення води та електроенергії
Перший цикл прання
Технiчнi данi
Опис пральної машини, 28-29
Панель керування
Дисплей
Як здійснювати цикл прання, 30
Програми та функції, 31
Таблиця програм
Функції прання
Миючі засоби і білизна, 32
Касета з миючим засобом
Підготовка білизни
Особливi програми
Система балансування завантаження
UA
Запобіжні заходи та поради, 33
Загальна безпека
Утилізація
Ручне відкривання дверцят люку
Технічне обслуговування та догляд, 34
Відключення води й електричного живлення
Очищення пральної машини
Чистка касети для миючих засобів
Догляд за люком та барабаном
Миття насосу
Контроль шланга для подачі води
Несправності та засоби їх усунення, 35
Допомога, 36
25
Page 26

Встановлення
UA
! Необхідно зберігати дану брошуру, щоб мати
мати нагоду звернутися до неї у будь-який момент.
У раз продажу, передачі іншій особі або переїзду
переконайтеся, що інструкція перебуває разом
із пральною машиною й новий власник може
ознайомитися з її принципами роботи й відповідними
запобіжний заходами.
! Уважно вивчіть інструкцію: в ній міститься важлива
інформація про встановлення, використання та
безпеку.
Розпакування і вирівнювання
Розпакування
1. Розпакування пральної машини.
2. Вдоскональтеся, що машина не зазнала ушкоджень
пiд час транспортування. Якщо такі є, не виконуйте
нiяких пiдключень та негайно зверніться до
постачальника.
3. Видаліть 4
запобіжнi гвинти для
транспортування та
прокладку з відповідною
розпірною деталлю, якi
знаходяться позаду (див.
малюнок).
Належне вирiвнювання забезпечить стабiльнiсть
машинi та запобiжить вiбрацiям, шуму та
пересуванням пiд час роботи. У випадку
встановлення машини на килимовому покритті або
килимах, ніжки необхідно відрегулювати таким чином,
щоб гарантувати під пральною машиною необхідний
простір для вентиляції.
Підключення води й електроенергії
Пiд’єднання шланга для подачі води
1. Підключити живлячий
трубопровід, прикрутивши
його до крану холодної
води за допомогою
штуцеру з газовою
різьбою 3/4 (див.
малюнок).
Перед пiдключенням
спустiть воду, доки вона
не стане прозорою.
2. Підключіть шланг
подачі води до пральної
машини, під’єднавши
його до водорозбiрного
крану, який знаходиться
угорі праворуч на
задньому боцi машини
(див. малюнок).
4. Закрийте отвори пластмасовими пробками з
комплекту постачання.
5. Зберiгайте всi компоненти: у разi транспортування
пральної машини їх потрiбно повернути на мiсце.
! Забороняйте дiтям гратися з упаковками.
Вирівнювання
1. Встановіть пральну машину на плоскій та твердій
підлозі, не притуляючи її до стін, меблів, тощо.
2. Якщо пiдлога не
iдеально горизонтальна,
компенсуйте нерiвностi
за допомогою переднiх
нiжок (див. малюнок)
– розкручуючи чи
закручуючи їх; кут
нахилу вiдносно робочої
поверхнi не повинен
перевищувати 2°.
3. Зверніть увагу, щоб шланг не мав згинів та утисків.
! Тиск води в крані має відповідати значенням у
таблиці Технічних даних (див. сторінку поруч).
! Якщо довжини шланга для води не вистачає,
зверніться у спеціалізовану крамницю або до
уповноваженого фахівця.
! Не користуйтеся шлангами, якi були вже у вживаннi.
! Використовуйте шланги з комплекту постачання.
26
Page 27

Підключення шланга для зливу води
65 - 100 cm
Пiдключiть шланг для
зливу води, не згинаючи
його, до вiдводячого
трубопроводу або до
стiнного зливу, якi мають
знаходитись на вiдстанi
65 -100 см вiд пiдлоги;
або розташуйте його
на краю вмивальника
чи ванної, приєднавши
направляючу з
комплекту до крану (див.
малюнок). Не залишайте
вільний кінець зливного
шланга зануреним у
воду.
! Кабель не повинен мати згинів або утисків.
UA
! Проводити замiну кабелю живлення можуть тiльки
вповноваженi фахiвцi.
Увага! Підприємство знімає з себе відповідальність за
умови недотримання вказаних норм.
Перший цикл прання
Пiсля встановлення та перш нiж розпочати
використання м ашини, виконайте цикл прання з
миючим засобом але не завантажуючи бiлизну,
встановивши програму (60°C).
! Використання подовжувача шланга не
рекомендоване. В разi необхiдностi використання
подовжувача шланга, переконайтеся у тому, що він
має той самий діаметр та його довжина не перевищує
150 см.
Електричні підключення
Перш нiж увiмкнути вилку в електричну розетку,
переконайтеся, що:
• розетка має заземлення у відповідності до
встановлених норм;
• розетка розрахована на максимальне навантаження
у межах потужності машини, зазначене у таблиці
Технічних даних (див. малюнок поруч);
• напруга живлення перебуває у межах, зазначених у
таблиці Технічних даних (див. малюнок поруч);
• розетка підходить до вилки пральної машини. В
іншому випадку замініть розетку або вилку.
! Машину не можна встановлювати поза
приміщенням, навіть в захищених мiсцях, тому що
дуже небезпечно піддавати її впливу дощу і грози.
! Коли машину вже встановлено, забезпечте вільний
доступ до електричної розетки.
Технiчнi данi
Модель WMD 702
ширина 59,5 см
Розмiри
Кiлькiсть бiлизни вiд 1 до 7 кг
Електричні
підключення
Водопровднi
пiдключення
Швидкiсть
центрифуги
Програма
випробувань
відповідно до
Директиви
EN 60456
висота 85 см
глибина 54 см
див. шильдік з технiчними даними на
машинi
максимальний тиск 1 мПа (10 бар)
мiнiмальний тиск 0,05 мПа (0,5 бар)
об’єм баку – 52 лiтри
до 1000 обертiв на хвилину
програма
(шляхом другого натискання на
кнопку);
виконується з завантаженням 7 кг.
Цей прилад вiдповiдає таким
європейським директивам:
- 2004/108/CE (Електромагнітна
сумiснiсть)
- 2002/96/CE
- 2006/95/CE (Низька напруга)
; температура 60°C
! Не використовуйте подовжувачі й трійники.
27
Page 28

Опис пральної машини
UA
Панель керування
Кнопка ON/OFF
Касета з миючим засобом
ПЕРЕМИКАЧА
Касета з миючим засобом: для завантаження миючих
засобiв та присадок (див. “Миючi засоби та бiлизна”).
Кнопка ON/OFF : швидко натисніть і відпустіть кнопку
для увiмкнення або вимикання машини. Iндикаторна
лампа START/PAUSE блимає зеленим свiтлом з
повільними інтервалами, вказуючи на те, що машину
ввiмкнено. Для вимикання пральної машини під час
прання необхідно утримувати кнопку натиснутою
приблизно більш ніж 3 сек.; короткочасне або випадкове
натискання не дозволить вимкнути машину. Вимикання
машини під час циклу прання вiдмiнює це прання.
Кнопки
ПРОГРАМ
ПРОТИАЛЕРГІЙНОГО
ОПОЛІСКУВАННЯ
Кнопка
ТИП
ПРАННЯ
Дисплей
Кнопка
MY CYCLE
Кнопка
Кнопка
ВIДСТРОЧЕНИЙ
ПУСК
Кнопка ТЕМПЕРАТУРА : натискання викликає
зменшення температури: значення вiдображається на
дисплеї.
Кнопка БЛОКУВАННЯ КНОПОК : щоб активувати
блокування панелі управління натиснiть та утримуйте
кнопку впродовж 2 секунд. Ввімкнена позначка
показує, що панель управління заблоковано. У цей
спосіб перешкоджають випадковій зміні програм,
передусім, якщо у домі є діти. Для вiдключення
блокування панелi управління натиснiть та утримуйте
кнопку впродовж 2 секунд.
Кнопки
ФУНКЦIЯ
Кнопка
ВIДЖИМУ
Кнопка з ін дикаторною
лампою
START/PAUSE
Кнопка
ТЕМПЕРАТУРА
Кнопка
БЛОКУВАННЯ
КНОПОК
Кнопки ПЕРЕМИКАЧА ПРОГРАМ: використовуються
для вибору бажаної програми для задання бажаної
програми (див.“Таблиця програм”).
Кнопка MY CYCLE: утримуйте кнопку натиснутою,
щоб внести у пам’ять цикл та власнi налаштування.
Щоб викликати цикл, попередньо внесений у пам’ять,
натиснiть на кнопку MY CYCLE.
Кнопки ФУНКЦIЯ: для вибору бажаної функції
натиснiтьна кнопку. На дисплеї запалиться спалахує
вiдповiдна iндикаторна лампа.
Кнопка
бажаної інтенсивності прання.
Кнопка
натиснути для вибору бажаного типу ополіскування.
Кнопка ВIДЖИМУ : натискання викликає
зменшення або виключення режиму вiджиму взагалi;
значення вiдображається на дисплеї.
ТИП ПРАННЯ
ПРОТИАЛЕРГІЙНОГО ОПОЛІСКУВАННЯ
: натиснути для вибору
:
Кнопка ВIДСТРОЧЕНИЙ ПУСК : натиснiть для
того, що б задати режим вiдстроченого пуску обраної
програми. Вiдстрочення вiдображатиметься на дисплеї.
Кнопка з індикаторною лампою START/PAUSE: коли
зелена індикаторна лампа блимає з повільними
інтервалами, натисніть на кнопку для запуску прання.
Якщо цикл розпочався, індикаторна лампа горить
постійно. Щоб увійти в режим паузи під час прання,
знову натисніть на кнопку; індикаторна лампа почне
горіти померанцевим кольором. Якщо позначка не
свiтиться, ви можете вiдкрити люк. Щоб продовжити
прання з місця, де воно було перерване, знову
натисніть на кнопку.
Режим очiкування
Вiдповiдно до норм, пов’язаних з заощадження
енергiї, цю пральну машину оснащено системою
автовимкнення (stand by), яка активується через 30
секунд вiдсутностi роботи з боку машини. Швидко
натиснiть кнопку ON/OFF та зачекайте вiдновлення
роботи машини.
28
Page 29

Дисплей
Z
B
A
UA
X
D
C
E
Y
F
Дисплей є зручним для програмування машини; вiн надає рiзноманiтну iнформацiю.
У перших двох рядках А та В вiдображається обрана програма прання, поточна фаза прання, а також усi вказiвки
щодо стану встановленої програми.
У рядку С вiдображається час, який залишився до завершення поточного циклу прання, та в разi заданого
ВIДСТРОЧЕНОГО ПУСКУ – час до запуску обраної програми.
В рядку D вiдображається максимальне значення швидкостi вiджиму, який машина виконує згiдно з встановленою
програмою; якщо у програмi не передбачений вiджим, рядок залишається вимкненим.
В рядку E вiдображається максимальне значення температури, яку можна вибрати згiдно з встановленою
програмою; якщо у програмi не передбачене встановлення температури, рядок залишається вимкненим.
Iндикаторнi лампи F пов’язанi з функцiями: вони світяться запалюються, якщо обрана функцiя є сумiсною із
встановленою програмою.
Позначка Люк заблоковано
Увiмкнена позначка вказує на те, що люк заблоковано, щоб запобiгти його випадковому вiдкриттю. З метою
запобiгання ушкоджень, перш нiж вiдкрити люк, переконайтеся вдоскональтеся, що позначка не горить.
Увага: при активованiй функцiї ВIДСТРОЧЕНОГО ПУСКУ забороняється вiдкривати люк, для вiдкриття люку
встановiть машину в режим паузи, натиснувшни на кнопку START/PAUSE.
! При першому ввiмкненнi з’являється запит щодо вибору мови, дисплей автоматично ввiйде в меню вибору мови.
Для вибору бажаної мови натиснiть на кнопки X та Y, щоб пiдтвердити зроблений вибiр, натиснiть на кнопку Z.
Для зміни однієї мови на іншу вимкніть прилад, натисніть одночасно на кнопки X, Y, Z і зачекайте на звукову
сигналізацію, яка сповіщає про появу меню для вибору мови.
29
Page 30

Як здійснювати цикл прання
UA
1. УВІМКНЕННЯ МАШИНИ. Натиснiтьна кнопку : на
дисплеї з’явиться WELCOME; iндикаторна лампа
START/PAUSE блиматиме зеленим свiтлом з
повiльними iнтервалами.
2. ЗАВАНТАЖЕННЯ БІЛИЗНИ. Відкрийте дверцята
люку. Завантажте білизну, звертаючи увагу, щоб не
перевищити кількість білизни, зазначену в таблиці
програм на наступній сторінці.
3. ДОДАННЯ МИЮЧОГО ЗАСОБУ. Витягніть касету
і додайте миючий засіб у відповідні ванночки, як
вказано в роздiлi “Миючі засоби і білизна”.
4. ЗАКРИЙТЕ ЛЮК.
5. ВИБІР ПРОГРАМИ. Для вибору бажаної програми
натиснiть на одну з кнопок ПЕРЕМИКАЧА ПРОГРАМ;
назва програми з’явиться на дисплеї; ви можете
змiнювати пов’язанi з програмою значення
температури та швидкостi вiджиму. На дисплеї
з’явиться тривалiсть циклу.
6. НАЛАШТУВАННЯ ЦИКЛУ ПРАННЯ ПIД ВЛАСНI
ПОТРЕБИ. Використайте вiдповiднi кнопки:
Зміна температури та/або швидкостi
віджиму. Машина автоматично вибирає максимальну
температуру і швидкість віджиму, передбачені для
даної програми, тому неможливо їх збільшити.
Натискаючи на кнопку , поступово зменшують
температуру прання аж до прання у холодній воді
“OFF”. Натискаючи на кнопку поступово зменшують
швидкість віджиму, аж до його відключення “OFF”.
Наступне натискання на кнопки призводить до
повернення до максимальних значень.
Встановiть вiдстрочений пуск.
Для встановлення вiдстроченого пуску обраної
програми натискайте на вiдповiдну кнопку, доки не
з’явиться необхiдний час вiдстрочки. Якщо цю опцiю
активовано, на дисплеї запалюється позначка . Щоб
скасувати вiдстрочений пуск натискайте на кнопку, доки
на дисплеї не з’явиться OFF.
Як задати бажану інтенсивність прання.
За допомогою кнопки можна оптимізувати прання
залежно від ступеню забруднення речей і від бажаної
інтенсивності прання.
Виберіть програму прання, автоматично задається
цикл “Normal” (Нормального) прання, який
передбачає прання речей з середнім ступенем
забруднення (цей параметр не буде дійсним для
циклу «Вовна», під час якого автоматично задається
“Delicate” (Делікатне) прання).
Для дуже забруднених речей слід натиснути кнопку
і вибрати “Super Wash” (Інтенсивне). На цьому
рівні гарантується високоефективне прання завдяки
використанню більшої кількості води на початку циклу
і значнішої механічної роботи; рекомендується для
видалення стійких плям. Може використовуватися з
вибілювачем або без.
Щоб відбілити речі, вставте додаткову ванночку 4 з
комплекту постачання у ванночку 1. Пiд час дозування
вiдбiлювача не перевищуйте максимальний рiвень
«max» на центральному стрижнi (див.малюнок на
стор. 32).
Якщо речі не дуже забруднені або потребується
делікатне поводження з тканинами, натисніть на
кнопку , щоб обрати “Delicate” (Делікатне).
У цьому циклі механічна робота зменшується, щоб
гарантувати оптимальні результати прання для
делікатних речей. Якщо неможливо задати або
змінити існуючі параметри, на дисплеї з’явиться напис
“Not allowed” (Не дозволено).
Як задати тип ополіскування.
За допомогою опції можна вибрати тип
ополіскування, спеціально передбачений для чутливої
шкіри. При першому натисканні на кнопку задається
“Extra Rinse” (Додаткове полоскання) на додаток до
стандартного, щоб видалити усі залишки прального
засобу. При другому натисканні на кнопку задається
опція “Sensitive Skin” (Чутлива шкіра), яка дозволяє
обрати два додаткових полоскання на додаток до
стандартного; рекомендується для осіб з підвищеною
чутливістю шкіри. При третьому натисканні на кнопку
задається “Anti allergy Rinse” (Протиалергійне
полоскання), яке дозволяє обрати три додаткових
полоскання на додаток до стандартного, щоб видалити
основні алергени, такі як пилок, кліщи, котяча і собача
шерсть. Ще раз натисніть кнопку, щоб повернутися до
“Normal Rinse” (Нормального) ополіскування. Якщо
неможливо задати або змінити існуючі параметри, на
дисплеї з’явиться напис “Not allowed” (Не дозволено).
Модифiкацiя характеристик циклу.
• Натиснiть на кнопку для активацiї функцiї;
увiмкнеться вiдповiдна iндикаторна лампа.
• Натисніть знову на кнопку, щоб вiдминити функцiю;
індикаторна лампа згасне.
! При виборі обраннi функції, несумісної з заданою
програмою, індикаторна лампа почне блимати й цю
функцiю не буде активовано.
! Якщо вибрана функція не є сумісною з іншою,
раніше вибраною, індикаторна лампа попередньої
функції почне блимати, при цьому буде активовано
тільки останню функцiю, запалиться індикаторна
лампа активованої функцiї.
! Функцiї можуть змiнювати рекомендоване
завантаження та/або тривалiсть циклу.
7. ЗАПУСК ПРОГРАМИ. Натисніть кнопку START/
PAUSE. Вiдповiдна iндикаторна лампа засвiтиться
зеленим свiтлом, при цьому люк буде заблоковано
(свiтитиметься позначка ЛЮК ЗАБЛОКОВАНО )
Пiд час прання на дисплеї з’являється назва поточної
фази. Для змiни програми пiд час виконання циклу
виведiть машину в режим паузи, натиснувши на START/
PAUSE (iндикаторна кнопка START/PAUSE блиматиме
померанцевим кольором з повiльними iнтервалами);
виберiть бажаний цикл та знову натиснiть кнопку START/
PAUSE . Щоб відкрити дверцята люку під час виконання
циклу натисніть на кнопку START/PAUSE; якщо
індикаторна лампа ЛЮК ЗАБЛОКОВАНО згасне,
це означає, що люк можна відкрити. Знову натисніть на
кнопку START/PAUSE, щоб запустити програму з того
мiсця, де її було перервано.
8. ЗАВЕРШЕННЯ ПРОГРАМИ. На це вказує надпис “END
OF CYCLE” на дисплеї; коли згасне позначка ЛЮК
ЗАБЛОКОВАНО , люк можна вiдкрити. Відкрийте
люк, витягніть білизну й вимкніть машину.
! Для вiдмiни вже працюючого циклу натиснiть кнопку ,
утримуючи її, й цикл буде перервано, пiсля чого машина
вимкнеться.
30
Page 31

Програми та функції
Таблиця програм
Опис програми
Програми
Антикорозійний 40° 1000
Бавовна з попереднiм пранням (шляхом одного натискання на
кнопку)
: вкрай забруднен бiл.
Бiла бавовна (1) (шляхом другого натискання на кнопку): дуже
забрудненi стiйкi бiлi та кольоровi тканини.
Бавовна (2) (шляхом третього натискання на кнопку): Злегка
забрудненi делiкатнi бiлi та кольоровi тканини.
Синтетичнi (шляхом одного натискання на кнопку): дуже
забрудненi кольоровi стiйкi тканини.
Синтетичнi (4) (шляхом одного натискання на кнопку): дуже
забрудненi кольоровi стiйкi тканини.
Синтетичнi (шляхом другого натискання на кнопку): Злегка
забрудненi кольоровi стiйкi тканини.
Mix 60’ (шляхом одного натискання на кнопку): Для швидого
освiження забруднених речей (не рекомендоване для
вовняних, шовкових речей або речей для ручного прання).
Mix 30’ (шляхом другого натискання на кнопку): Для швидого
освiження злегка забруднених речей (не рекомендоване для
вовняних, шовкових речей або речей для ручного прання).
My Cycle: утримуйте кнопку натиснутою, щоб внести у пам’ять цикл та власнi налаштування
M
Білизна за тиждень (3): для постільної білизни і банного
приладдя.
Вовна: для речей з вовни, кашемiру, тощо. 40° 800 -
Делікатне 30° 0 -
Вiджим (шляхом другого натискання на кнопку) - 1000 - - - - 7 -
ополіскування (шляхом одного натискання на кнопку) - 1000 - - -
Злив (шляхом третього натискання на кнопку) - 0 - - - - 7 -
Тривалість циклу, вказана на дисплеї або в керівництві, разрахована на основі стандартних умов роботи. Фактичний час може залежати від чисельних факторів, таких як температура і
тиск подаваної води, температура у приміщенні, кількість миючого засобу, кількість і тип завантаженої білизни, зрівноваження завантаженої білизни, додаткові обрані опції.
Для всiх Установ з проведення випробувань:
1) Програма керування згiдно до норми EN 60456: задайте програму при 60°C (шляхом другого натискання на кнопку).
2) Довга програма бавовна: задайте програму при 40°C (шляхом третього натискання на кнопку).
3) Коротка програма бавовна: задайте програму ; температуру 40°C (натисніть на кнопку ТЕМПЕРАТУРИ).
4) Програма тривалого прання синтетичних речей: задайте програму на 60°C (шляхом одного натискання на кнопку); температуру 40°C
(натисніть на кнопку ТЕМПЕРАТУРИ).
Макс.
темп.
(обертiв
(єС)
90° 1000
60° 1000 -
40° 1000 -
60° 800 -
40° 800 -
40° 800 -
60° 1000 -
30° 800 -
60° 1000 -
за
хвилину)
Макс.
швидкiсть
Попереднє
прання
-
Миючий зас³б
Пра-
Відбіл-
ння
ювач
-
-
-
-
-
-
-
Пом’
якшувач
Макс.завант-
аження (кг)
Normal
4
7
7 7
7 7
3 3
3 3
3 3
3,5 3
3 3
7 -
1,5 -
1 -
7 -
Eco
Wash
-
-
Трива-
лiсть
циклу
Тривалiсть програм вiдображується на дисплеї.
UA
Функції прання
Швидке
Завдяки цiєї опцiї тривалiсть програми зменшується
до 50% залежно вiд вибраного циклу, заощаджуючи
воду та електричну енергiю. Цей цикл призначений
для не дуже забруднених речей.
! Не активується у програмах , “Mix 60’”, , , .
Полегшене прасування
При виборі даної функції режими прання і віджиму
будуть відповідно змінені для зменшення утворення
складок. Наприкiнцi циклу пральна машина виконає
повiльнi оберти барабану; Iндикаторнi лампи функцiй
ПОЛЕГШЕНОГО ПРАННЯ блиматимуть, а на дисплеї
з’явиться надпис “END OF CYCLE”. Для завершення
циклу натиснiть на кнопку START/PAUSE або на
кнопку ПОЛЕГШЕНОГО ПРАСУВАННЯ.
! Не активується на програмах , “Mix 30’”, , ,
“Вiджим”, “Злив”.
Eco wash
Функція Eco Wash сприяє енергозбереженню,
тому що не відбувається нагрівання води для
прання – користь для довкілля і для користувача
завдяки зменшеному рахунку за електроенергію.
Дійсно, посилена дія й оптимізоване споживання
води гарантують добрі результати, при цьому
тривалість дорівнюватиме часу стандартного
циклу. Щоб отримати найкращі результати прання,
рекомендується вживати рідкий засіб.
! Не активується у програмах , (90°C), , , , .
31
Page 32

Миючі засоби і білизна
M
AX
1
2
4
3
A
B
UA
Касета з миючим засобом
Добрий результат прання залежить також вiд
правильного дозування миючого засобу: надлишок
миючого засобу приведе до неефективного прання
та сприятиме утворенню накипу всереденi пральної
машини, а також забрудненню довкiлля.
! Не використовуйте миючі засоби для ручного
прання, тому що вони утворюють надто багато піни.
Виймiть касету для
миючих засобiв та
додайте миючi засоби
або присадки, як вказано
нижче.
ванночка 1: Засiб для попереднього прання
(порошковий)
Перш нiж додати пральний засіб, перевірте, щоб не
була вставлена додаткова ванночка 4.
ванночка 2: Засiб для прання
(порошковий чи рiдкий)
Якщо використовується рідкий пральний засіб,
рекомендується застосовувати вимірювальний
компонент A з комплекту постачання для правильного
дозування. При використанні порошкового прального
засобу вставьте цей компонент у нішу B.
ванночка 3: Засоби з догляду
(пом’якшувач, тощо)
Пом’якшувач не має витікати з решітки.
додаткова ванночка 4: Відбілювач
Підготовка білизни
• Роздiлiть бiлизну, враховуючи:
- тип тканини / позначку на етикетцi.
- кольори: вiдокремте кольоровi речi вiд бiлих.
• Перевірте кишені й ґудзики.
• Не перевищуйте вказанi значення щодо ваги сухої
бiлизни:
Стiйкi тканини: макс. 7 кг
Синтетичнi тканини: макс. 3 кг
Делiкатнi тканини: макс. 2 кг
Вовна: макс. 1,5 кг
Шовк: макс. 1 кг
Скільки важить білизна?
1 простирадло 400-500 г
1 наволочка 150-200 г
1 скатертина 400-500 г
1 махровий халат 900-1 200 г
1 рушник 150-250 г
Особливi програми
Антикорозійний: Програма призначена
для прання дуже забруднених речей зі стійким
фарбуванням. Програма гарантує вищий у порівнянні
зі стандартним клас прання (клас A). Не застосовуйте
у цій програмі речі різних кольорів. Рекомендується
використання миючих засобів у порошку. Стійкі плями
краще обробити попередньо спеціальними засобами.
Білизна для ванної і постільна білизна: ця пральна
машина дозволяє випрати білизну для ванної і
постільну білизну за допомогою єдиної програми
«Bed & Bath” (Білизна за тиждень)», що оптимізує
використання пом’якшувача й заощаджує час і
енергію. Рекомендується використання порошкових
миючих засобів.
Вовна: Цикл прання “Вовна” у цій пральній машині
Hotpoint-Ariston протестований і підтверджений
компанією Woolmark для прання вовняних виробів,
класифікованих для ручного прання, за умови
дотримання інструкцій на етикетці виробу та вказівок
від виробника пральної машини. Hotpoint-Ariston
- перша марка пральної машии, яка отримала від
компанії Woolmark сертифікацію Woolmark Apparel
Care - Platinum за власні показники прання і витрати
води й електроенергії. (M1126)
Делікатне: використовуйте програму для прання
дуже делікатних речей, наприклад, зі стразами або
іншими оздобленнями.
Для прання шовкових речей або портьєр оберіть
“Delicate” (Делікатне) прання в опції .
Перш ніж запускати прання, рекомендується
вивернути речі навиворіт і вкласти дрібні речі в
спеціальний мішечок для прання делікатних речей.
Кращі результати досягаються при використанні
рідкого прального засобу для делікатних речей.
Система балансування завантаженнÿ
Перед кожним віджимом, для запобігання
надмірній вібрації та для рівномірного розподілу
навантаження, барабан здійснює оберти на дещо
більшій швидкості, ніж швидкість прання. Якщо по
закінченні декількох спроб завантажені речі ще не
були правильно відбалансовані, машина здійснює
віджим на швидкості, нижчій від передбаченої. У
випадку надмірної незбалансованості пральна
машина здійснює розподіл замість віджиму. З
метою оптимального розподілу завантаження та
його правильного балансування рекомендується
одночасне прання великих і малих речей.
32
Page 33

Запобіжні заходи та
20
поради
! Машину була спроектовано і вироблено у
відповідності з міжнародними нормами безпеки. Дані
попередження складені для забезпечення безпеки і
тому їх треба уважно прочитати.
Загальна безпека
• Дане обладнання було розроблене виключно для
побутового використання.
• Цей апарат не має використовуватися дітьми або
особами з обмеженими фізичними, сенсорними чи
розумовими можливостями, або якщо їм бракує
досвіду та необхідних знань. Винятки складають
ситуації, коли користування відбувається під
наглядом або за вказівками осіб, відповідальних за
їхню безпеку. Дорослі мають стежити, щоб діти не
гралися з апаратом.
• Машина має використовуватися тільки повнолітніми
особами і згідно з інструкціями, наведеними у даній
брошурі.
• Не торкайтеся до машини голими ногами або
мокрими чи вологими руками й ногами.
• Не виймайте штепсель з електричної розетки,
витягуючи його за провід, тримайтеся тільки за
самий штепсель.
• Не вiдкривайте касету з миючими засобами пiд час
роботи машини.
• Будьте обережні: вода, що зливається, може мати
високу температуру.
• У жодному випадку не застосовуйте силу до люку:
це може ушкодити запобiжний механiзм проти
випадкових вiдкривань.
• Якщо машина не працює у разi поломки, у жодному
випадку не намагайтеся дiстатися внутрiшнiх
механiзмiв з метою самостійного ремонту.
• Слiдкуйте, щоб дiти не наближалися до працюючої
машини.
• Пiд час прання люк нагрiватиметься.
• Пересування машини має здiйснюватися двома або
трьома особами за умови максимальної уваги. Нi в
якому разi - однiєю особою, тому що машина дуже
важка.
• Перш ніж завантажити білизну, перевірте, щоб
барабан був порожній.
усунення потенційної шкоди для здоров’я та
навколишнього середовища. Символ закресленої
корзини, зображений на всіх виробах, нагадує про
необхідність окремої утилізації. Для подальшої
інформації про правильне зняття з експлуатації
побутових електроприладів, їхні власники можутьз
вернутися у відповідну муницiпальну службу або до
продавця приладу.
Ручне відкривання дверцят люку
У випадку, якщо неможливо відкрити дверцята люку
із-за відсутності електроенергії і ви хотіли б розвісити
речі, треба діяти таким чином:
1. витягніть штепсель з
електричної розетки.
2. перевірте, щоб рівень
води усередині машини
був нижчим за рівень
отвору люку; якщо це не
так, злийте надлишок
води через зливний шланг,
збираючи її у відрі, як
показано на малюнку.
3. зніміть декоративну
панель на лицевому
боці пральної машини за
допомогою викрутки (див.
малюнок).
UA
Утилізація
• Утилізація пакувального матеріалу: додержуйтесь
місцевих норм, так як пакування може бути
використане повторно.
• Європейська директива 2002/96/CE з відходів
від електричної й електронної апаратури
передбачає, що побутові електроприлади не
можуть перероблятися у звичайному порядку
для твердих міських відходів. Зняті з експлуатації
побутові прилади мають бути зібрані окремо для
оптимізації ступеню відновлення й рециклювання
матеріалів, що входять до їхнього складу, і з метою
4. За допомогою вказаного на малюнку язичка тягнiть
пластмасову тягу з упору назовнi, аж доки її не буде
звiльнено; потiм протягнiть її донизу, одночасно
вiдкриваючи дверцята.
5. встановіть панель на місце, пересвідчіться у тому,
що крюки були вставлені у спеціальні петлі, пiсля чого
притиснiть її до машини.
33
Page 34

Технічне обслуговування та
1
2
A
B
догляд
UA
Відключення води й електричного
живлення
• Закривайте водопровідний кран після кожного
прання. У такий спосіб зменшується знос
гідравлічної частини машини й усувається
небезпека витоку.
• Виймайте штепсель з розетки під час миття машини
та під час робіт з технічного обслуговування.
Очищення пральної машини
• Зовнішня частина і гумові деталі можуть бути
вимиті тканиною, змоченою у теплій воді й милі. Не
використовуйте розчинники або абразиви.
• Пральна машина оснащена програмою
«Самоочищення» внутрішніх частин, яку слід
запускати без будь-яких речей всередині
барабану.
Пральний засіб (його кількість має складати 10% від
рекомендованої для злегка забруднених речей) або
спеціальні засоби для очищення пральної машини
можна використовувати як допоміжні у программі
прання. Рекомендується виконувати програму
очищення через кожні 40 циклів прання.
Для пуску програми слід одночасно натиснути на
кнопки A і B впродовж 5 сек. (див. малюнок).
Програма запускається автоматично і триває
приблизно 70 хвилин. Для припинення циклу
натиснiть на кнопку START/PAUSE.
Догляд за люком та барабаном
• Завжди залишайте відкритими дверцята люку, тоді
не утворюватимуться неприємні запахи.
Миття насосу
Пральну машину обладнано насосом з автоматичною
чисткою, який не вимагає технічного обслуговування.
Може трапитися так, що малі предмети (монети,
ґудзики) потраплять до форкамери, що захищає
насос, розташований у її нижній частині.
! Переконайтеся у тому, що цикл прання закінчено, і
витягніть штепсель з розетки.
Щоб потрапити до форкамери:
1. зніміть декоративну
панель на лицевому
боці пральної машини за
допомогою викрутки (див.
малюнок);
2. відкрутіть кришку,
обертаючи її проти
годинникової стрілки
(див. малюнок): виток
незначної кiлькостi води
є нормальним;
Чистка касети для миючих засобів
Виймiть касету, пiднявши
її та витягнувши назовнi
(див. малюнок).
Промийте під проточною
водою; ця процедура має
проводитися регулярно.
34
3. акуратно очистіть внутрішню частину;
4. накрутіть кришку;
5. встановіть панель на місце, пересвідчіться у тому,
що крюки були вставлені у спеціальні петлі, пiсля чого
притиснiть її до машини.
Контроль шланга для подачі води
Перевіряйте шланг для подачі води не менше одного
разу на рік. Якщо на ньому є тріщини, він підлягає
заміні: під час прання високий тиск може призвести
до розірвання.
! Не користуйтеся шлангами, якi були вже у вживаннi.
Page 35

Несправності та засоби
їх усунення
Може трапитися так, що пральна машина не буде працювати. До того як зателефонувати у Сервiсний центр (див.
“Допомога”), перевірте, чи не є дана несправність проблемою, що легко вирішується, звернувшись до списку нижче.
Несправності:
Пральна машина не вмикається.
Цикл прання не розпочинається.
Пральна машина не завантажує
воду (На дисплеї з’явиться надпис
““No water, check supply”).
Машина безперервно завантажує і
зливає воду.
Можливі причини/Рішення:
• Штепсель не вставлений в електричну розетку або вставлений не до кiнця.
• У будинку немає електроенергії.
• Погано закритий люк.
• Кнопку ON/OFF не було натиснуто.
• Кнопку START/PAUSE не було натиснуто.
• Водопровідний кран закритий.
• Якщо вiдстрочення задане на час запуску (див. “Як здійснювати цикл прання”).
• Шланг подачі води не підключено до водопровiдного крану.
• Перегин у шлангу.
• Водопровідний кран закритий.
• У водопроводі немає води.
• Недостатній тиск.
• Кнопку START/PAUSE не було натиснуто.
• Зливний шланг не знаходиться на відстані від 65 до 100 см від підлоги
(див. “Встановлення”).
• Кінець зливного шланга занурений у воду (див. “Встановлення”).
• Стiнний каналiзацiйний злив не має віддушини для виходу повiтря.
Якщо після таких перевірок проблема залишається, закрийте
водопровідний кран, вимкніть машину і зателефонуйте у Сервiсний
центр. Якщо квартира знаходиться на верхніх поверхах будинку,
можливо, відбувається сифонний ефект, при якому машина безперервно
завантажує й зливає воду. Щоб його ліквідувати, існують спеціальні
антисифонні клапани, які можна придбати у торговельній мережі.
UA
Пральна машина не зливає воду чи
не вiджимає.
Пральна машина дуже вiбрує пiд
час вiджиму.
Пральна машина пропускає воду.
Машину заблоковано, дисплей
блимає та вказує код неполадки
(напр.: F-01, F-..).
Утворюється занадто багато піни.
• Програма не передбачає зливання: у деяких програмах його потрібно
вмикати вручну (див. “Програми та функції”).
• Активовано функцiю ПОЛЕГШЕНОГО ПРАСУВАННЯ для завершення
програми натиснiть на кнопку START/PAUSE (“Програми та функції”).
• Перегин зливного шланга (див. “Встановлення”).
• Засмітився зливний шланг.
• Барабан, у момент встановлення, не був правильно розблокований
(див. “Встановлення”).
• Машина стоїть не на плоскій поверхні (див. “Встановлення”).
• Машину затиснуто між меблями і стіною (див. “Встановлення”).
• Погано пригвинчений шланг подачі води (див. “Встановлення”).
• Забруднена касета для миючих засобів (як вимитидив. “Технічне
обслуговування і догляд”).
• Погано закріплений зливний шланг (див. “Встановлення”).
• Вимкніть машину й витягніть штепсель з розетки, зачекайте близько 1
хвилини й увімкніть її повторно.
Якщо несправність не усунено, зателефонуйте у Сервiсний центр.
• Миючий засіб не підходить для пральної машини (має бути напис “для
машинного прання”, “для ручного й машинного прання”, або подібний).
• Перевищена доза миючого засобу.
35
Page 36

Допомога
UA
Перш ніж телефонувати у Сервiсний центр:
• Перевірте, чи можна самостійно вирішити проблему (див. “Несправності і засоби їх усунення”);
• Запустіть програму повторно, щоб перевірити чи усунено несправність;
• Якщо нi, зв’яжiться з авторизованим Сервiсним Центром, зателефонувавши за номером, вказаним у
гарантiйному свiдоцтвi.
! Звертайтеся виключно до уповноважених фахівців.
Повідомити:
• тип несправності;
• модель машини (Мод.);
• серійний номер (С/Н).
Цю iнформацiю ви знайдете на заводськiй табличцi позаду пральної машини та в її переднiй частинi, якщо ви
вiдкриєте люк.
36
Page 37

Návod k použití
PRAČKA
CZ
Česky
WMD 702
Obsah
Instalace, 38-39
Rozbalení a vyrovnání do vodorovné polohy
Připojení k elektrické a k vodovodní síti
První prací cyklus
Technické údaje
Popis pračky, 40-41
Ovládací panel
Displej
Jak provést prací cyklus, 42
Programy a funkce, 43
Tabulka pracích programů
Funkce praní
Prací prostředky a prádlo, 44
Dávkovač pracích prostředků
Příprava prádla
Speciální programy
Systém automatického vyvážení náplně
Opatření a rady, 45
Základní bezpečnostní pokyny
Likvidace
Manuální otevření dvířek
CZ
Údržba a péče, 46
Uzavření přívodu vody a vypnutí elektrického napájení
Čištění pračky
Čištění dávkovače pracích prostředků
Péče o dvířka a buben
Čištění čerpadla
Kontrola přítokové hadice na vodu
Poruchy a způsob jejich odstranění, 47
Servisní služba, 48
37
Page 38

Instalace
CZ
! Je důležité uschovat tento návod tak, abyste jej mohli
kdykoli konzultovat. V případě prodeje, darování nebo
přestěhování pračky se ujistěte, že zůstane uložen
v blízkosti pračky, aby mohl posloužit novému majiteli při
seznámení s její činností a s příslušnými upozorněními.
! Pozorně si přečtěte uvedené pokyny: obsahují důležité in-
formace týkající se instalace, použití a bezpečnosti při práci.
Rozbalení a vyrovnání do vodorovné
polohy
Rozbalení
1. Rozbalte pračku.
2. Zkontrolujte, zda během přepravy nedošlo k jejímu
poškození. V případě, že je poškozena, ji nezapojujte a
obraťte se na prodejce.
3. Odstraňte 4 šrouby
chránící před poškozením
během přepravy a gumovou podložku s příslušnou
rozpěrkou, které se
nacházejí v zadní části (viz
obrázek).
Dokonalé vyrovnání do vodorovné polohy zabezpečí
stabilitu zařízení a zamezí vzniku vibrací a hluku během
činnosti. V případě instalace na podlahovou krytinu nebo
na koberec nastavte nožky tak, aby pod pračkou zůstal
dostatečný volný prostor pro ventilaci.
Připojení k elektrické a k vodovodní síti
Připojení přítokové hadice vody
1. Připojte přívodní hadici
jejím zašroubováním ke
kohoutku studené vody
s hrdlem se závitem 3/4“
(viz obrázek).
Před připojením hadice
nechte vodu odtékat, dokud nebude čirá.
2. Připojte přítokovou hadici k pračce prostřednictvím
příslušné přípojky na vodu,
umístěné vpravo nahoře
(viz obrázek).
4. Uzavřete otvory po šroubech plastovými krytkami z
příslušenství.
5. Uschovejte všechny díly: v případě opětovné přepravy
pračky je bude třeba namontovat zpět.
! Obaly nejsou hračky pro děti!
Vyrovnání do vodorovné polohy
1. Pračku je třeba umístit na rovnou a pevnou podlahu,
aniž by se opírala o stěnu, nábytek či něco jiného.
2. V případě, že podlaha
není dokonale vodorovná, mohou být případné
rozdíly vykompenzovány
šroubováním předních
nožek (viz obrázek); Úhel
sklonu, naměřený na
pracovní ploše, nesmí
přesáhnout 2°.
3. Dbejte na to, aby hadice nebyla příliš ohnutá ani
stlačená.
! Tlak v rozvodu vody se musí pohybovat v rozmezí hod-
not uvedených v tabulce s technickými údaji
(viz vedlejší strana).
! V případě, že délka přítokové hadice nebude
dostatečná, obraťte se na specializovanou prodejnu
nebo na autorizovaný technický personál.
! Nikdy nepoužívejte již použité hadice.
! Používejte hadice z příslušenství zařízení.
38
Page 39

65 - 100 cm
Připojení vypouštěcí hadice
Připojte vypouštěcí hadici, aniž byste ji ohýbali,
k odpadovému potrubí
nebo k odpadu ve stěně,
který se nachází od 65 do
100 cm nad zemí;
! Nepoužívejte prodlužovací kabely a rozvodky.
! Kabel nesmí být ohnutý ani stlačený.
! Výměna kabelu musí být svěřena výhradně autorizo-
vanému technickému personálu.
Upozornění! Výrobce neponese žádnou odpovědnost za
následky nerespektování uvedených předpisů.
První prací cyklus
CZ
nebo ji uchyťte k okraji umývadla či vany a
připevněte vodicí držák
z příslušenství ke kohoutu
(viz obrázek). Volný konec
vypouštěcí hadice nesmí
zůstat ponořený do vody.
! Použití prodlužovacích hadic se nedoporučuje; je-li
však nezbytné, prodlužovací hadice musí mít stejný
průměr jako originální hadice a její délka nesmí
přesáhnout 150 cm.
Připojení k elektrické síti
Před zasunutím zástrčky do zásuvky se ujistěte, že:
• Je zásuvka uzemněna a že vyhovuje normám;
• je zásuvka schopna snést maximální zátěž odpovídající jmenovitému příkonu zařízení, uvedenému v tabulce s technickými údaji
(viz vedle);
• hodnota napájecího napětí odpovídá údajům uvedeným v tabulce s technickými údaji
(viz vedle);
• je zásuvka kompatibilní se zástrčkou pračky.
V opačném případě je třeba vyměnit zásuvku nebo
zástrčku.
! Pračka nesmí být umístěna venku – pod širým nebem,
a to ani v případě, že by se jednalo o místo chráněné
před nepřízní počasí, protože je velmi nebezpečné vystavit ji působení deště a bouří.
Po instalaci zařízení je třeba ještě předtím, než je
použijete na praní prádla, provést jeden zkušební cyklus
s pracím prostředkem a bez náplně prádla nastavením
pracího programu (60°C).
Technické údaje
Model WMD 702
šíøka 59,5 cm
Rozmìry
Kapacita od 1 do 7 kg
Napájení
Pøipojení k
rozvodu vody
Rychlost
odstøeïování
Zkušební program
podle směrnice
2010/1061
výška 85 cm
hloubka 54 cm
Viz štítek s technickými údaji, aplikovaný na zarízení.
maximální tlak 1 MPa (10 bar)
minimální tlak 0.05 MPa (0.5 bar)
kapacita bubnu 52 litrù
a¡z do 1000 otáèek za minutu
program
teplota 60° (2. stisknutí tlačítka);
teplota 40° (3. stisknutí tlačítka).
Toto zaøízení odpovídá následujícím
normám Evropské unie:
- 2004/108/CE (Elektromagnetická
kompatibilita)
- 2006/95/CE (Nízké napìtí)
- 2002/96/CE
;
! Po denitivní instalaci pračky musí zásuvka zůstat
snadno přístupná.
Hluènost
(dB(A) re 1 pW)
Praní: 55
Odstøeïování: 70
39
Page 40

Popis pračky
CZ
Ovládací panel
Tlačítko
ON/OFF
Tlačítka
VOLBY
Dávkovač pracích prostředků
Dávkovač pracích prostředků: slouží k dávkování
pracích prostředků a přídavných prostředků (viz „Prací
prostředky a prádlo“).
Tlačítko ON/OFF : zapněte nebo vypněte pračku
krátkým stisknutím tlačítka. Kontrolka START/PAUSE
pomalu blikající zeleným světlem poukazuje na to, že je
stroj zapnutý. Za účelem vypnutí pračky během praní je
třeba držet tlačítko stisknuté déle, přibližně 3 sek.; krátké
nebo náhodné stisknutí neumožní vypnutí pračky. Vypnutí zařízení během praní způsobí zrušení probíhajícího
pracího programu.
PROGRAMŮ
Tlačítko
TYP PRANÍ
Displej
Tlačítko
PAMĚŤ
Tlačítko
TYP
MÁCHÁNÍ
Tlačítko
ODLOŽENÉHO
STARTU
Tlačítko TEPLOTY : stiskněte za účelem snížení teploty: Příslušná hodnota bude zobrazena na displeji.
Tlačítko ZABLOKOVÁNÍ TLAČÍTEK : aktivace
zablokování ovládacího panelu se provádí tak, že
podržíte stisknuté tlačítko přibližně na 2 sekundy.
Rozsvícená kontrolka poukazuje na to, že je
ovládací panel zablokován. Tímto způsobem se zamezí
náhodným změnám programů, zejména když jsou
v domácnosti děti. Zrušení zablokování ovládacího
panelu se provádí tak, že podržíte stisknuté tlačítko
přibližně na 2 sekundy.
FUNKČNÍ
tlačítka
Tlačítko
ODSTŘEĎOVÁNÍ
Tlačítko s kontrolkou
START/PAUSE
Tlačítko
TEPLOTY
Tlačítko
ZABLOKOVÁNÍ
TLAČÍTEK
Tlačítka VOLBY PROGRAMŮ: slouží k nastavení
požadovaného programu (viz “Tabulka pracích programů”).
Tlačítko PAMĚŤ: držte stisknuté toto tlačítko za účelem
uložení cyklu do paměti spolu s vlastními uživatelskými
nastaveními. Pro vyvolání cyklu, který byl předem
uložen do paměti, stiskněte tlačítko PAMĚŤ.
FUNKČNÍ tlačítka: stiskněte tlačítko kvůli volbě
požadované funkce. Na displeji se rozsvítí příslušná
kontrolka.
Tlačítko
vést volbu požadované intenzity praní.
Tlačítko
provést volbu požadovaného máchání.
Tlačítko ODSTŘEĎOVÁNÍ : stiskněte za účelem
snížení nebo úplného vyloučení odstřeďování - hodnota
bude uvedena na displeji.
40
TYP PRANÍ
TYP MÁCHÁNÍ
: jeho stisknutím můžete pro-
: jeho stisknutím můžete
Tlačítko ODLOŽENÉHO STARTU : stiskněte za
účelem nastavení odloženého startu zvoleného programu. Doba, o kterou bude start odložen, bude zobrazena
na displeji.
Tlačítko s kontrolkou START/PAUSE: když zelená
kontrolka začne pomalu blikat, stiskněte toto tlačítko pro
zahájení praní. Po zahájení cyklu se kontrolka rozsvítí
stálým světlem. Přejete-li si přerušit praní, opětovně
stiskněte tlačítko; kontrolka bude blikat oranžovým
světlem. Když symbol není rozsvícen, je možné
otevřít dvířka. Za účelem opětovného zahájení cyklu
z místa, v němž byl přerušen, opětovně stiskněte tlačítko.
Pohotovostní režim
Za účelem shody s novými předpisy souvisejícími s
energetickou úsporou je tato pračka vybavena systémem
automatického vypnutí (přechodu do pohotovostního
režimu – standby), který je aktivován po uplynutí 30 minut, když se pračka nepoužívá. Krátce stiskněte tlačítko
ON/OFF a vyčkejte na obnovení činnosti zařízení.
Page 41

Displej
Z
B
A
CZ
X
D
C
E
Y
F
Displej slouží k naprogramování zařízení a poskytuje četné informace.
Ve dvou horních řetězcích A a B je zobrazen zvolený prací program, probíhající fáze praní a všechny informace o postupu programu.
V řetězci C je zobrazena doba zbývající do konce probíhajícího pracího cyklu a v případě nastavení ODLOŽENÉHO
STARTU také doba chybějící do zahájení zvoleného programu.
V řetězci D je zobrazena maximální hodnota rychlosti odstřeďování, které zařízení může dosáhnout na základě zvoleného programu; když není odstřeďování součástí zvoleného programu, tento řetězec zůstane zhasnutý.
V řetězci E je zobrazena maximální hodnota teploty, kterou lze zvolit na základě zvoleného programu; když není nastavení teploty součástí zvoleného programu, tento řetězec zůstane zhasnutý.
Kontrolky F se týkají funkcí a jsou rozsvícené, když je zvolená funkce kompatibilní s nastaveným programem.
Symbol Zablokovaných dvířek
Rozsvícení uvedeného symbolu poukazuje na zablokování dvířek kvůli zabránění jejich náhodnému otevření. Aby se
předešlo poškození, před otevřením dvířek je třeba vyčkat na zhasnutí uvedeného symbolu.
POZN.: Když je aktivována funkce ODLOŽENÉHO STARTU, nebude možné otevřít dvířka a pro jejich otevření bude
třeba přerušit činnost zařízení stisknutím tlačítka START/PAUSE.
! Při prvním zapnutí budete vyzváni, abyste provedli volbu jazyka, a poté bude na displeji automaticky zvoleno menu
volby jazyka.
Za účelem volby požadovaného jazyka stiskněte tlačítka X a Y a potvrďte voblu stisknutím tlačítka Z.
Když si přejete provést změnu jazyka, vypněte zařízení, stiskněte současně tlačítka X, Y, Z a držte je stisknutá, dokud
neuslyšíte akustický signál a neobjeví se menu pro volbu jazyka.
41
Page 42

Jak provést prací cyklus
CZ
1. ZAPNUTÍ ZAŘÍZENÍ. Stiskněte tlačítko a na displeji
se zobrazí nápis ZAPNUTO; kontrolka START/PAUSE
bude pomalu blikat zelenou barvou.
2. NAPLŇTE PRAČKU PRÁDLEM. Otevřete dvířka.
Naplňte pračku prádlem a dbejte přitom, aby nedošlo
k překročení množství náplně, uvedeného v tabulce
programů na následující straně.
3. DÁVKOVÁNÍ PRACÍHO PROSTŘEDKU. Vytáhněte
dávkovač pracích prostředků a naplňte prací prostředek
do příslušných přihrádek způsobem vysvětleným v části
„Prací prostředky a prádlo“.
4. ZAVŘETE DVÍŘKA.
5. ZVOLTE PRACÍ PROGRAM. Stiskněte jedno z tlačítek
VOLBY PROGRAMŮ za účelem volby požadovaného
programu; název programu bude zobrazen na displeji;
ke zvolenému programu je přiřazena teplota a rychlost
odstřeďování, které se dají měnit. Na displeji bude
zobrazena doba trvání cyklu.
6. PROVEĎTE UŽIVATELSKÁ NASTAVENÍ PRACÍHO
CYKLU. Použijte příslušná tlačítka:
Změňte teplotu a/nebo odstřeďování.
Zařízení automaticky zvolí teplotu a maximální rychlost
odstřeďování přednastavené pro zvolený program;
tyto hodnoty se nesmí zvyšovat. Stisknutím tlačítka
je možné postupně snížit teplotu až po praní ve
studené vodě „OFF“. Stisknutím tlačítka je možné
postupně snížit rychlost odstřeďování až po jeho úplné
vyloučení „OFF“. Další stisknutí tlačítek obnoví nastavení
maximálních přednastavených hodnot.
Nastavte odložený start.
Pro nastavení odloženého startu zvoleného programu
stiskněte příslušné tlačítko až do dosažení požadované
doby odložení. Po zvolení této volitelné funkce se
zobrazí symbol . Zrušení odloženého startu se
provádí stisknutím tlačítka až do zobrazení nápisu OFF.
Nastavte požadovanou intenzitu praní.
Tlačítko umožňuje provést optimalizaci praní na
základě stupně znečištění tkanin a požadované intenzity
praní.
Zvolte program praní; cyklus bude automaticky
nastaven na úroveň „NORMÁLNÍ“ a bude provedena
jeho optimalizace pro středně znečištěné prádlo
(toto nastavení neplatí pro cyklus „Vlna“, který se
automaticky nastaví na úroveň „JEMNÉ“).
Pro značně znečištěné prádlo stiskněte tlačítko
, dokud nebude nastavena úroveň „SUPER
WASH“. Tato úroveň zaručuje dokonalé praní díky
použití většího množství vody v počáteční fázi cyklu a
větší mechanický pohyb a je užitečná pro odstranění
nejodolnějších skvrn.
Může se používat s bělicím prostředkem nebo bez něj.
Když si přejete provést bělení, vložte přídavnou nádobku
4 z příslušenství do přihrádky 1. Při dávkovaní bělicího
prostředku nepřekračujte úroveň „max“, vyznačenou na
středovém čepu (viz obrázek na str. 44).
Pro mírně znečištěné prádlo nebo pro choulostivější
zacházení s látkami stiskněte tlačítko až po
dosažení úrovně „JEMNÉ“. Cyklus omezí mechanický
pohyb pro zajištění dokonalých výsledků praní u
choulostivého prádla. Když není možné provést
požadované nastavení nebo změnit existující nastavení,
na displeji se zobrazí „NEDOSTUPNÉ“.
Nastavte druh máchání.
Volitelná funkce umožňuje zvolit požadovaný druh
máchání pro maximální péči o citlivé druhy pokožky. Při
prvním stisknutí tlačítka bude nastavena úroveň „EXTRA
MÁCHÁNÍ“, která umožní provést volbu přídavného
máchání ve srovnání se standardním mácháním cyklu,
aby se odstranily všechny stopy po pracím prostředku.
Při druhém stisknutí tlačítka bude nastavena úroveň
„MÁCHÁNÍ CITLIVÁ PLEŤ“, která umožňuje provést volbu
dvou přídavných máchání ve srovnání se standardním
mácháním cyklu a doporučuje se pro citlivější pokožky.
Při třetím stisknutí tlačítka bude nastavena úroveň
„ANTIALERG. MÁCHÁNÍ“, která umožňuje provést
volbu tří přídavných máchání ve srovnání se standardním
cylkem máchání, aby se odstranily hlavní alergeny, jako
jsou pyl, roztoči, kočičí a psí chlupy. Opětovným stisknutím
tohoto tlačítko se můžete vrátit na úroveň máchání
„NORMÁLNÍ MÁCHÁNÍ“. Když není možné provést
požadované nastavení nebo změnit existující nastavení,
na displeji se zobrazí „NEDOSTUPNÉ“.
Změňte vlastnosti cyklu.
• Stiskněte tlačítka aktivace funkce; dojde k rozsvícení
odpovídající kontrolky tlačítka.
• Opětovným stisknutím můžete zvolenou funkci zrušit;
příslušná kontrola zhasne.
! V případě, že zvolená funkce není kompatibilní
s nastaveným pracím programem, příslušná kontrolka
začne blikat a funkce nebude aktivována.
! V případě, že zvolená funkce není kompatibilní s jinou
předem zvolenou funkcí, kontrolka první funkce bude
blikat a bude aktivována pouze druhá, přičemž kontrolka
zvolené funkce se rozsvítí stálým světlem.
! Funkce mohou změnit doporučenou náplň a/nebo
dobu trvání cyklu.
7. SPUSŤTE PROGRAM. Stiskněte tlačítko START/
PAUSE. Příslušná kontrolka se rozsvítí stálým zeleným
světlem a dojde k zablokování dvířek (rozsvícený symbol
ZABLOKOVANÝCH DVÍŘEK ). Během praní se na
displeji zobrazí název probíhající fáze. Za účelem změny
programu během probíhajícího cyklu přerušte činnost
pračky stiknutím tlačítka START/PAUSE (kontrolka
START/PAUSE bude pomalu blikat oranžovým světlem);
zvolte požadovaný cyklus a opětovně stiskněte tlačítko
START/PAUSE. Za účelem otevření dvířek v průběhu
pracího cyklu stiskněte tlačítko START/PAUSE; když
bude symbol ZABLOKOVANÝCH DVÍŘEK zhasnutý,
bude možné otevřít dvířka. Opětovným stisknutím tlačítka
START/PAUSE znovu uveďte do činnosti prací program
z bodu, ve kterém byl přerušen.
8. UKONČENÍ PROGRAMU. Bude oznámeno zobrazením
nápisu „KONEC CYKLU“ na displeji. Po zhasnutí
symbolu ZABLOKOVANÝCH DVÍŘEK bude možné
otevřít dvířka. Otevřete dvířka, vyložte prádlo a vypněte
zařízení.
! Přejete-li si zrušit již zahájený cyklus, znovu dlouze
stiskněte tlačítko . Cyklus bude přerušen a dojde k
automatickému vypnutí zařízení.
42
Page 43

Programy a funkce
Tabulka pracích programů
Aviváž
Max. náplň
(kg)
Nor-
Eco
mal
wash
4 7 7 7
7 7
3 3
3 3
3 3
3.5 3
3 3
7 -
1,5 -
1 -
7 -
Doba
trvání
cyklu
Je možné kontrolovat dobu trvání pracích programù na displeji.
Max.
Max.
Popis programu
Programy
ODSTRAŇOVÁNÍ SKVRN
rychlost
teplot
(otácky
(°C)
za
minutu)
40° 1000 -
BAVLNA S PŘEDPÍR. (1° stisknutí tlacítka): mimořádně znečištěné bílé prádlo. 90° 1000
BAVLNA BÍLÁ (1) (2° stisknutí tlacítka): mimořádně znečištěné bílé prádlo. 60° 1000 BAVLNA BAREVNÁ (1-2) (3° stisknutí tlacítka): částečně znečišteně bare-
vné prádlo z odolných tkanin.
SYNTETIKA ODOLNÁ (1° stisknutí tlacítka): velmi znečištěné barevné
prádlo z odolných tkanin
.
SYNTETIKA ODOLNÁ (4) (1° stisknutí tlacítka): velmi znečištěné barevné
prádlo z odolných tkanin
SYNTETIKA JEMNÁ (2° stisknutí tlacítka): částečně znečištěné barevné
prádlo z odolných tkanin
RYCHLÉ PRANÍ 60' (1° stisknutí tlacítka): k rychlému oživení znečištěného
prádla (nedoporučuje se pro vlnu, hedvábí a prádlo určené pro ruční praní).
RYCHLÉ PRANÍ 30' (2° stisknutí tlacítka): k rychlému oživení mírně znečištěného
prádla (nedoporučuje se pro vlnu, hedvábí a prádlo určené pro ruční praní).
PAMĔŤ: Slouží k uložení libovolného způsobu praní do paměti.
M
.
POVLEČENÍ, RUČNÍKY (3):
VLNA A KAŠMÍR: pro vlnu, kašmír apod.
JEMNÉ PRÁDLO
SILNÉ ODSTŘEĎOVÁNÍ (1° stisknutí tlacítka)
MÁCHÁNÍ BAVLNA (2° stisknutí tlacítka)
VYPOUŠTĚNÍ VODY (3° stisknutí tlacítka)
Doba trvání cyklu uvedená na displeji nebo v návodu představuje odhad vypočítaný na základě standardních podmínek. Skutečná doba se může měnit v závislosti na četných faktorech, jako je
např. teplota a tlak vody na vstupu, teplota prostředí, množství pracího prostředku, množství a druh náplně, vyvážení náplně a zvolené volitelné funkce.
40° 1000 -
60° 800 -
40° 800 -
40° 800 -
60° 1000 -
30° 800 -
60° 1000 40° 800 30° 0 -
- 1000 - - - - 7 -
- 1000 - - -
- 0 - - - - 7 -
Prací prostředky
Před-
Praní
pírka
Bělicí
prostředek
-
-
-
-
-
-
-
CZ
Pro všechny Kontrolní ústavy:
(1) Kontrolní program podle normy 2010/1061: nastavte program
(2)
Dlouhý program pro praní bavlny
(3)
Krátký program pro praní bavlny:
(4) Dlouhý program pro syntetiku:
: nastavte program 40°C
nastavte program
60°C (1. stisknutí tlačítka); teplota 40°C (Stisknutím tlacítka TEPLOTY).
; teplota 40°C (Stisknutím tlacítka TEPLOTY).
60°C (2. stisknutí tlačítka);
(3. stisknutí tlačítka).
Funkce praní
Rychlé praní
Při volbě této volitelné funkce dojde ke zkrácení doby
trvání programu až o 50% v závislosti na zvoleném cyklu
a současně bude zaručena úspora vody a energie. Tento
cyklus použijte na nepříliš znečištěné kusy prádla.
! Není možné ji aktivovat u programů , “RYCHLÉ
PRANÍ 60’”, , , .
Snadné žehlení
Volbou této funkce budou praní a odstřeďování náležitě
změněny za účelem snížení tvorby záhybů. Na konci cyklu
pračka provede pomalá otáčení bubnu; kontrolka funkce
SNADNÉ ŽEHLENÍ a kontrolka START/PAUSE budou
blikat (oranžově) a na displeji se zobrazí nápis „KONEC
CYKLU“. K ukončení cyklu je třeba stisknout tlačítko
START/PAUSE nebo tlačítko SNADNÉ ŽEHLENÍ.
! Není možné ji aktivovat u programů , “RYCHLÉ
PRANÍ 30’”, , , “SILNÉ ODSTŘEĎOVÁNÍ” a
“VYPOUŠTĚNÍ VODY”.
nastavte program
40°C (3. stisknutí tlačítka).
Eco wash
Funkce Eco Wash přispívá k energetické úspoře tím,
že neohřívá vodu použitou pro praní prádla – jedná se
o výhodu pro životní prostředí i pro účet za elektrickou
energii. Zesílený účinek a optimalizovaná spotřeba
vody vskutku zaručují optimální výsledky během stejné
průměrné doby odpovídající standardnímu cyklu. Pro
dosažení lepších výsledků praní se doporučuje použít
tekutý prací prostředek.
! Není možné ji aktivovat u programů , (90°C), ,
, , .
43
Page 44

Prací prostředky a prádlo
M
AX
1
2
4
3
A
B
CZ
Dávkovač pracích prostředků
Dobrý výsledek praní závisí také na správném dávkování
pracího prostředku: použití jeho nadměrného množství
snižuje efektivitu praní a napomáhá tvorbě vodního
kamene na vnitřních částech pračky a zvyšuje znečištění
životního prostředí.
! Nepoužívejte prací prostředky určené pro ruční praní,
protože způsobují tvorbu nadměrného množství pěny.
Při vytahování dávkovače
pracích prostředků a při
jeho plnění pracími nebo
přídavnými prostředky
postupujte následovně.
Přihrádka 1: Prací prostředek (práškový) pro
předpírku
Před naplněním přihrádky pracím prostředkem se ujistěte,
že v dávkovači není vložena přídavná přihrádka 4.
Přihrádka 2: Prací prostředek (v prášku nebo tekutý)
V případě použití tekutého pracího prostředku se
doporučuje použít pro správné dávkování malou
přepážku A z příslušenství. Pro použití práškového
pracího prostředku vložte malou přepážku do prohloubeniny B.
Přihrádka 3: Přídavné prostředky (aviváž atd.)
Aviváž nesmí vytékat z mřížky.
přídavná přihrádka 4: Bělicí prostředek
Příprava prádla
• Roztřiďte prádlo podle:
- druhu tkaniny / symbolu na visačce.
- barvy: oddělte barevné prádlo od bílého.
• Vyprázdněte kapsy a zkontrolujte knoíky.
• Nepřekračujte povolenou náplň, vztahující se na hmotnost suchého prádla:
Odolné tkaniny: max. 7 kg
Syntetické tkaniny: max. 3 kg
Choulostivé tkaniny: max. 2 kg
Vlna: max. 1,5 kg
Hedvábí: max. 1 kg
Kolik váží prádlo?
1 prostěradlo 400-500 g
1 povlak na polštář 150-200 g
1 ubrus 400-500 g
1 župan 900-1.200 g
1 ručník 150-250 g
Speciální programy
Odstraňování Skvrn: cyklus vhodný pro praní
značně znečištěného prádla s odolnými barvami. Tento
program zaručuje vyšší třídu praní než standardní třída
(třída A). Při použití tohoto programu nemíchejte spolu
prádlo různých barev. Doporučuje se použití práškového
pracího prostředku. Pro odolné skvrny se doporučuje
provést předošetření specickými přídavnými prostředky.
POVLEČENÍ, RUČNÍKY: pro praní ložního a koupelnového prádla v jediném cyklu použijte program , který
optimalizuje použití aviváže a umožňuje uspořit čas
a energii. Doporučuje se použití práškového pracího
prostředku.
Vlna: Prací cyklus „VLNA A KAŠMÍR“ této pračky Hotpoint-
Ariston byl testován a schválen společností Woolmark
Company pro praní prádla z vlny klasikovaného
jako prádlo určené pro ruční praní za podmínky, že
bude praní provedeno v souladu s pokyny uvedenými na visačce oblečení a pokyny dodanými výrobcem
elektrického spotřebiče. Hotpoint-Ariston je první
značkou praček, která získala od společnosti Woolmark
Company certikát Woolmark Apparel Care - Platinum
za svou výkonnost při praní a spotřebu vody a energie.
(M1126)
JEMNÉ PRÁDLO: pro praní velmi choulostivého prádla,
které obsahuje aplikace, jako je štras nebo pajetky,
použijte program .
Pro praní hedvábného prádla a záclon zvolte cyklus a
nastavte úroveň “Jemné” volitelné funkce .
Doporučuje se prádlo před praním převrátit naruby a
vložit malé kusy prádla do příslušného sáčku pro praní
choulostivého prádla.
Pro dosažení nejlepších výsledků se doporučuje použít
tekutý prací prostředek pro choulostivé prádlo.
Systém automatického vyvážení náplně
Před každým odstřeďováním buben provede otáčení rychlostí lehce převyšující rychlost praní, aby se odstranily
vibrace a aby se náplň rovnoměrně rozložila. V případě,
že po několikanásobných pokusech o vyvážení prádlo
ještě nebude správně vyváženo, zařízení provede
odstřeďování nižší rychlostí, než je přednastavená
rychlost. Za přítomnosti nadměrného nevyvážení pračka
provede namísto odstřeďování vyvážení. Za účelem
dosažení rovnoměrnějšího rozložení náplně a jejího
správného vyvážení se doporučuje míchat velké a malé
kusy prádla.
44
Page 45

Opatření a rady
20
! Pračka byla navržena a vyrobena v souladu s platnými
mezinárodními bezpečnostním předpisy. Tato upozornění
jsou uváděna z bezpečnostních důvodů a je třeba si je
pozorně přečíst.
Základní bezpečnostní pokyny
• Toto zařízení bylo navrženo výhradně pro použití v
domácnosti.
• Zařízení nesmí být používáno osobami (včetně dětí)
se sníženými fyzickými, senzorickými nebo mentálními
schopnostmi a s nedostatečnými zkušenostmi a znalostmi, s výjimkou případu, kdy toto použití probíhá pod
dozorem nebo na základě pokynů osoby zodpovědné
za jejich bezpečnost. Děti musí být pod dohledem, aby
se zajistilo, že si nebudou se zařízením hrát.
• Pračku mohou používat pouze dospělé osoby podle
pokynů uvedených v tomto návodu.
• Nedotýkejte se zařízení bosí nebo v případě, že máte
mokré ruce či nohy.
• Nevytahujte zástrčku ze zásuvky tahem za kabel, ale
uchopením za zástrčku.
• Neotvírejte dávkovač pracích prostředků během
činnosti zařízení.
• Nedotýkejte se odčerpávané vody, protože může mít
velmi vysokou teplotu.
• Nepokoušejte se o násilné otevření dvířek: mohlo
by dojít k poškození bezpečnostního uzávěru, který
zabraňuje náhodnému otevření.
• Při výskytu poruchy se v žádném případě nepokoušejte
o opravu vnitřních částí zařízení.
• Vždy mějte pod kontrolou děti a zabraňte tomu, aby se
přibližovaly k zařízení během pracího cyklu.
• Během pracího cyklu mají dvířka tendenci ohřát se.
• V případě potřeby přemísťujte pračku ve dvou nebo
ve třech a věnujte celé operaci maximální pozornost.
Nikdy se nepokoušejte zařízení přemísťovat sami, je
totiž velmi těžké.
• Před zahájením vkládání prádla zkontrolujte, zda je
buben prázdný.
Spotřebitelé by měli kontaktovat příslušné místní
úřady nebo svého prodejce ohledně informací týkajících se správné likvidace starého zařízení.
Manuální otevření dvířek
V případě, že není možné otevřít dvířka s průzorem
z důvodu výpadku elektrické energie a hodláte pověsit
prádlo, postupujte následovně:
1. vytáhněte zástrčku ze
zásuvky elektrické sítě.
2. Zkontrolujte, zda je
hladina vody uvnitř zařízení
nižší, než je úroveň otevření
dvířek; v opačném případě
vypusťte přebytečnou
vodu vypouštěcí hadicí a
zachyťte ji do vědra, jak je
znázorněno na obrázku.
3. pomocí šroubováku
odstraňte krycí panel nacházející se v přední části
pračky (viz obrázek).
CZ
Likvidace
• Likvidace obalových materiálů: při jejich odstranění
postupujte v souladu s místním předpisy a dbejte na
možnou recyklaci.
• Evropská směrnice 2002/96/EC o odpadních
elektrických a elektronických zařízeních stanovuje, že
staré domácí elektrické spotřebiče nesmí být odkládány do běžného netříděného domovního odpadu.
Staré spotřebiče musí být odevzdány do odděleného
sběru, a to za účelem recyklace a optimálního využití
materiálů, které obsahují, a z důvodu předcházení
negativním dopadům na lidské zdraví a životní
prostředí. Symbol “přeškrtnuté popelnice” na výrobku
vás upozorňuje na povinnost odevzdat zařízení po
skončení jeho životnosti do odděleného sběru.
4. s použitím jazýčku označeného na obrázku potáhněte
směrem ven z dorazu plastové táhlo až do jeho uvolnění;
následně jej potáhněte směrem dolů a současně
otevřete dvířka.
5. namontujte zpět panel, přičemž se před jeho
přisunutím k zařízení ujistěte, že došlo ke správnému
zachycení háčků do příslušných podélných otvorů.
45
Page 46

Údržba a péče
1
2
CZ
Uzavření přívodu vody a vypnutí
elektrického napájení
• Po každém praní uzavřete přívod vody. Tímto
způsobem dochází k omezení opotřebení pračky a ke
snížení nebezpečí úniku vody.
• Před zahájením čištění pračky a během operací údržby
vytáhněte zástrčku napájecího kabelu z elektrické
zásuvky.
Čištění pračky
• Vnější části a části z gumy se mohou čistit hadrem
navlhčeným ve vlažné vodě a saponátu. Nepoužívejte
rozpouštědla ani abrazivní látky.
• Pračka je vybavena programem „SAMOČIŠTĚNÍ“
vnitřních částí, který musí být proveden bez jakéhokoli
druhu náplně v bubnu.
Prací prostředek (množství rovnající se 10% množství
doporučeného pro částečně znečištěné prádlo) nebo
specické přídavné prostředky pro čištění pračky budou
moci být použity jako pomocné prostředky v pracím
programu. Doporučuje se provést samočisticí program
každých 40 cyklů praní.
Pro aktivaci programu stiskněte současně tlačítka A a B
na dobu 5 sekund (viz obrázek).
Program bude zahájen automaticky a bude trvat přibližně
70 minut. Cyklus je možné ukončit stisknutím tlačítka
START/PAUSE.
A
B
Čištění čerpadla
Součástí pračky je samočisticí čerpadlo, které
nevyžaduje údržbu. Může se však stát, že se v jeho
vstupní části, určené k jeho ochraně a nacházející se
v jeho spodní části, zachytí drobné předměty (mince,
knoíky).
! Ujistěte se, že byl prací cyklus ukončen, a vytáhněte
zástrčku ze zásuvky.
Přístup ke vstupní části čerpadla:
1. pomocí šroubováku
odstraňte krycí panel nacházející se v přední části
pračky (viz obrázek);
2. Odšroubujte víko jeho
otáčením proti směru
hodinových ručiček (viz
obrázek): vytečení malého
množství vody je zcela
běžným jevem;
Čištění dávkovače pracích prostředků
Vytáhněte dávkovač jeho
nadzvednutím a vytažením
směrem ven (viz obrázek).
Umyjte jej pod proudem vody; tento druh
vyčištění je třeba provádět
pravidelně.
Péče o dvířka a buben
• Dvířka ponechte pokaždé pootevřená, aby se zabránilo
tvorbě nepříjemných zápachů.
46
3. dokonale vyčistěte vnitřek;
4. zašroubujte zpět víko;
5. namontujte zpět panel, přičemž se před jeho
přisunutím k zařízení ujistěte, že došlo ke správnému
zachycení háčků do příslušných podélných otvorů.
Kontrola přítokové hadice na vodu
Stav přítokové hadice je třeba zkontrolovat alespoň jednou ročně. Jsou-li na ní viditelné praskliny nebo trhliny,
je třeba ji vyměnit: silný tlak působící na hadici během
pracího cyklu by mohl způsobit její náhlé roztržení.
! Nikdy nepoužívejte již použité hadice.
Page 47

Poruchy a způsob jejich
odstranění
Může se stát, že pračka nebude fungovat. Dříve, než zatelefonujete na Servisní službu (viz „Servisní služba“), zkontrolujte, zda se nejedná o problém, který lze snadno vyřešit s pomocí následujícího seznamu.
Poruchy:
Pračku nelze zapnout.
Nedochází k zahájení pracího cyklu.
Pračka nenapouští vodu (Na displeji
se zobrazí nápis „CHYBÍ VODA,
OVĚŘ ZDROJ“).
Dochází k nepřetržitému napouštění a
odčerpávání vody.
Možné příčiny / Způsob jejich odstranění:
• Zástrčka není zasunuta v zásuvce nebo není zasunuta natolik, aby došlo ke
spojení kontaktů.
• V celém domě je vypnutý proud.
• Nejsou řádně zavřená dvířka.
• Nebylo stisknuto tlačítko ON/OFF.
• Nebylo stisknuto tlačítko START/PAUSE.
• Nebyl otevřen kohout přívodu vody.
• Byl nastaven odložený start (viz „Jak provést prací cyklus“).
• Přívodní hadice není připojena k vodovodnímu kohoutu.
• Hadice je příliš ohnutá.
• Nebyl otevřen kohout přívodu vody.
• V celém domě je uzavřený přívod vody.
• V rozvodu vody není dostatečný tlak.
• Nebylo stisknuto tlačítko START/PAUSE.
• Vypouštěcí hadice se nachází mimo určené rozmezí od 65 do 100 cm nad
zemí (viz „Instalace“).
• Koncová část vypouštěcí hadice je ponořena ve vodě (viz „Instalace“).
• Odpad ve stěně není vybaven odvzdušňovacím otvorem.
Když ani po uvedených kontrolách nedojde k odstranění problému, uzavřete
přívod vody, vypněte pračku a přivolejte Servisní službu. V případě, že se byt
nachází na jednom z nejvyšších poschodí, je možné, že dochází k sifonovému
efektu, jehož následkem pračka nepřetržitě napouští a odčerpává vodu. Pro
odstranění uvedeného efektu jsou v prodeji běžně dostupné speciální protisifonové ventily.
CZ
Nedochází k vyčerpání vody nebo
k odstřeďování.
Během odstřeďování je možné pozorovat silné vibrace pračky.
Dochází k úniku vody z pračky.
Stroj je zablokován, displej bliká a
signalizuje poruchový kód (např.:
F-01, F-..).
Dochází k tvorbě nadměrného
množství pěny.
• Odčerpání vody netvoří součást nastaveného programu: u některých
programů je třeba jej aktivovat manuálně (viz „Programy a funkce“).
• Je aktivní funkce SNADNÉ ŽEHLENÍ: na dokončení programu stiskněte
tlačítko START/PAUSE („Programy a funkce”).
• Vypouštěcí hadice je ohnutá (viz „Instalace“).
• Odpadové potrubí je ucpáno.
• Během instalace nebyl buben odjištěn předepsaným způsobem
(viz „Instalace“).
• Pračka není dokonale vyrovnána do vodorovné polohy (viz „Instalace“).
• Pračka je stlačena mezi nábytkem a stěnou (viz „Instalace“).
• Přítoková hadice není správně zašroubována (viz „Instalace“).
• Dávkovač pracích prostředků je ucpán (způsob jeho vyčištění je uveden v
části „Údržba a péče“).
• Vypouštěcí hadice není upevněna předepsaným způsobem (viz „Instalace“).
• Vypněte zařízení a vytáhněte zástrčku ze zásuvky, vyčkejte přibližně 1 minutu a opětovně jej zapněte.
Když porucha přetrvává, obraťte se na Servisní službu.
• Použitý prací prostředek není vhodný pro použití v automatické pračce
(musí obsahovat označení „pro praní v pračce“, „pro ruční praní nebo pro
praní v pračce“ nebo podobné označení).
• Bylo použito jeho nadměrné množství.
47
Page 48

Servisní služba
195095885.00
09/2011 - Xerox Fabriano
CZ
Před přivoláním Servisní služby:
• Zkontrolujte, zda nejste schopni poruchu odstranit sami (viz „Poruchy a způsob jejich odstranění“);
• Opětovně uveďte do chodu prací program, abyste ověřili, zda byla porucha odstraněna;
• V opačném případě se obraťte na Centrum servisní služby na telefonním čísle uvedeném na záručním listu.
! Nikdy se neobracejte s žádostí o pomoc na techniky, kteří nejsou k výkonu této činnosti oprávněni.
Při hlášení poruchy uveďte:
• druh poruchy;
• model zařízení (Mod.);
• výrobní číslo (S/N).
Tyto informace jsou uvedeny na štítku aplikovaném na zadní částí pračky a v její přední části, dostupné po otevření
dvířek.
48
 Loading...