

Page 1
FREEZER - MODELS
Your freezer is now
working.
If after 24 hours your
freezer is not operating as
you want, refer to the
TROUBLESHOOTING
section.
RZAA 1 (TK)
INSTRUCTIONS FOR INSTALLATION & USE
GETTING STARTED:
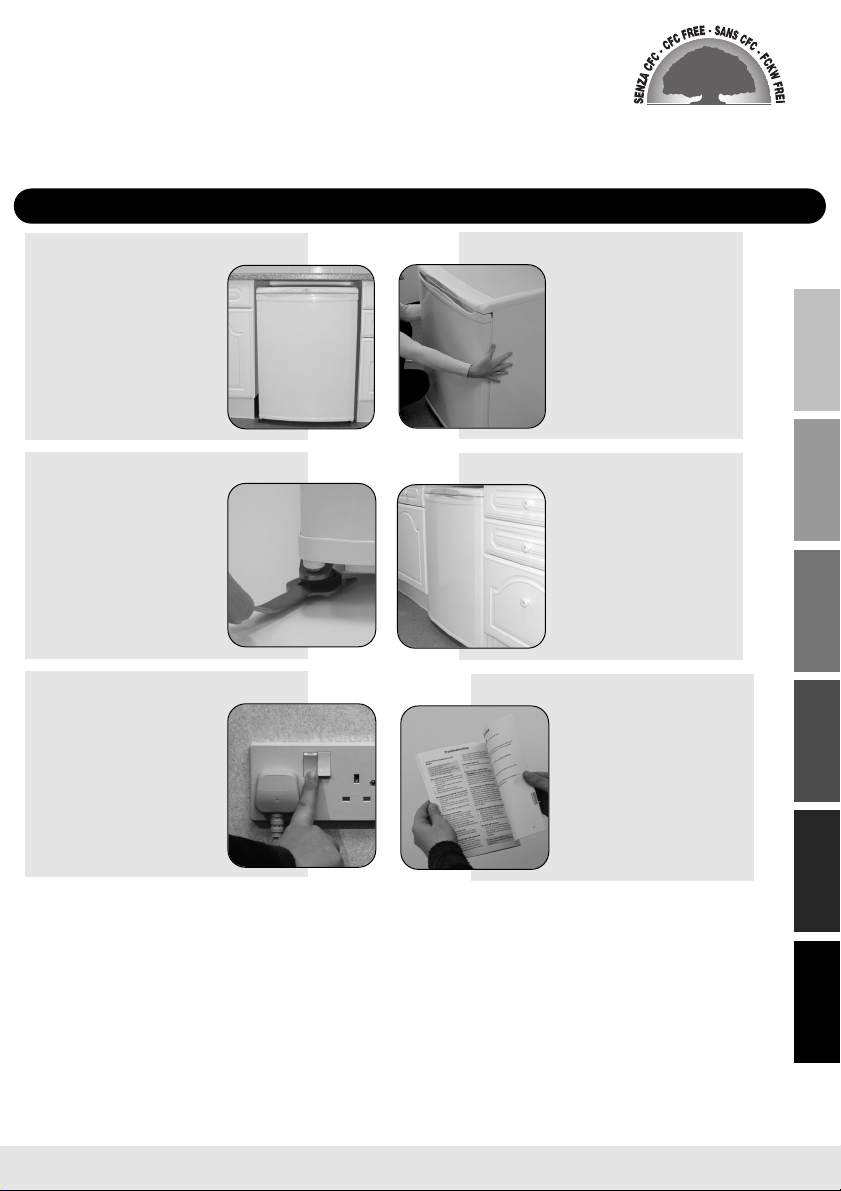
STEP 1
Choose a location for your
freezer,away from any
heat sources and
allow adequate
ventilation - 30mm
1
/4 inch) gap above.
(1
To ensure that your freezer runs reliably and efficiently follow these steps.
STEP 2
STEP 3 STEP 4
Level the freezer by
adjusting the front feet.
This will stop rocking or
vibration and keep the
STEP 5
Allow the freezer to cool
light will stay on until the
freezer has cooled down.
door aligned.
Plug in and switch on.
before placing food
inside.
The high temperature
All food in the freezer
should be covered.
STEP 6
Move the freezer into
position, using the sides
of the cabinet. Take care
to avoid damaging the
refrigerant circuit pipe
work on the rear.
Before plugging in and
switching on, leave the
freezer in its final
location for at least 15
minutes to allow it to
settle.
INSTALLATION CONTROLS USEFUL ADVICE
SAFETY &
MAINTENANCE
CLEANING &
TROUBLESHOOTING
Read the rest of these instructions to get the best from your appliance
and remember to fill in your guarantee registration.
Keep this Book in a safe place for quick reference.
GUARANTEE
SERVICE &
Page 2

For Your Safety
For your safety, read the following advice:
The freezer cooling system contains a small amount of gas which is environmentally
friendly but flammable. To avoid any risk :-
● Install the freezer following the installation instructions and ensure that
ventilation openings are kept clear of obstruction.
● Take care when installing or moving the freezer to avoid damaging the pipes
on the rear.
● If you suspect a leak, do not switch on the freezer,but open the windows and
doors to ventilate the room.
● Do not use any electrical devices inside the freezer, for instance for
SAFETY &
INSTALLATION
● Do not use any mechanical devices for defrosting other than any which may
● Only use this freezer for storing domestic foodstuffs.
When installing your freezer :-
● Ensure that the mains cable is not trapped underneath or behind the freezer
● Do not stack any other appliance on top of this freezer as they may
defrosting.
have been supplied with the freezer as they may cause damage.
when you install or move it.
damage the freezer or become unstable.
When using your freezer :-
● Do not sit or stand on top of your freezer.
● Do not store poisonous, flammable or dangerous substances in your freezer.
● Do not use aerosol sprays for defrosting or cleaning your freezer.
If you sell the freezer, pass on this booklet to the new owner.
2
Page 3

Installation
Location & Air Circulation
30mm (11/4 inch)
Locate your freezer away from sources of heat e.g.
Cookers, Radiators,Direct Sunlight as extreme
temperature will affect its performance.
Allow a minimum 30mm (11/4 inch) between the top of
the freezer and the underside of the worktop.
Providing you follow the recommended ventilation requirements you will :-
● Prolong the life of the freezer.
● Minimise the risk of condensation on the outside of the freezer.
● Minimise the running costs.
● Minimise operating sounds caused by vibration.
Minimum space required to open door
The freezer needs a space of 600mm (24 inches) in front to allow the door to
open.
When positioning the freezer next to a unit, a gap of 30mm (1
1
/4inch) can be left
at the hinge side of the door to allow the easy removal of furniture.If preferred
the freezer can be positioned so that a gap is not left.This will restrict how far the
door can be opened but the furniture can still be removed (see diagram below).
The door hinge side can be changed to make it easier to open (see ‘Door Reversal’
in the CLEANING & MAINTENANCE section).
INSTALLATION
SAFETY &
600mm
TOP VIEW
30mm or more
TOP VIEW
600mm
less than 30mm
3
Page 4

Installation
Levelling:
Level the freezer when it is in its final location by adjusting the front feet, until firm
contact is made with the floor. This will stop rocking or vibration and keep the door
aligned which helps the freezer run reliably and efficiently.
Before plugging in and switching on, leave the freezer standing in its final location for
at least 15 minutes to allow it to settle.
Fitting a Freezer under a Work Top
To minimise running costs Hotpoint recommend fitting a vent to the rear of your
SAFETY &
worktop,which is available from Hotpoint Genuine Parts & Accessories Mail Order
INSTALLATION
Hotline (see KEY CONTACTS,back page).
WARNING:If there is less than 30mm clearance above the freezer,a vent must be
fitted to provide adequate ventilation above your freezer.
4
Page 5

Installation
Electrical Supply
WARNING:This appliance must be earthed.
The freezer must be positioned so that the plug is accessible after installation.
Fuses
Your appliance comes fitted with a plug and a 13A fuse. If you need to replace the
fuse, only use those rated at 13A and ASTA approved to BS1362.
Changing the Plug
Cut off and dispose of the supplied plug if it does not fit your socket.
WARNING:To avoid a shock hazard do not insert the discarded plug into a socket
anywhere else.
IMPORTANT WIRES IN THE MAINS LEAD ARE COLOURED IN ACCORDANCE WITH THE
FOLLOWING CODE :
Green/Yellow - Earth
INSTALLATION
SAFETY &
Blue - Neutral Brown - Live
If you change the plug, the colour of wires in the mains lead may not correspond with
the colour of the markings identifying terminals in the plug. You should therefore
wire it as shown above.
Changing the Mains Lead
This freezer is fitted with a special mains lead. If you need to replace the mains lead
due to damage, one can be bought from Hotpoint Service (see KEY CONTACTS,back
page). It is strongly advised that this work is carried out by a qualified electrician.
CE Marking certifies that this appliance conforms to the following EEC
directives : Low Voltage Equipment - 72/23/EEC & 93/68 EEC
Electromagnetic Compatibility 89/336/EEC, 92/31/EEC & 93/68/EEC
5
Page 6

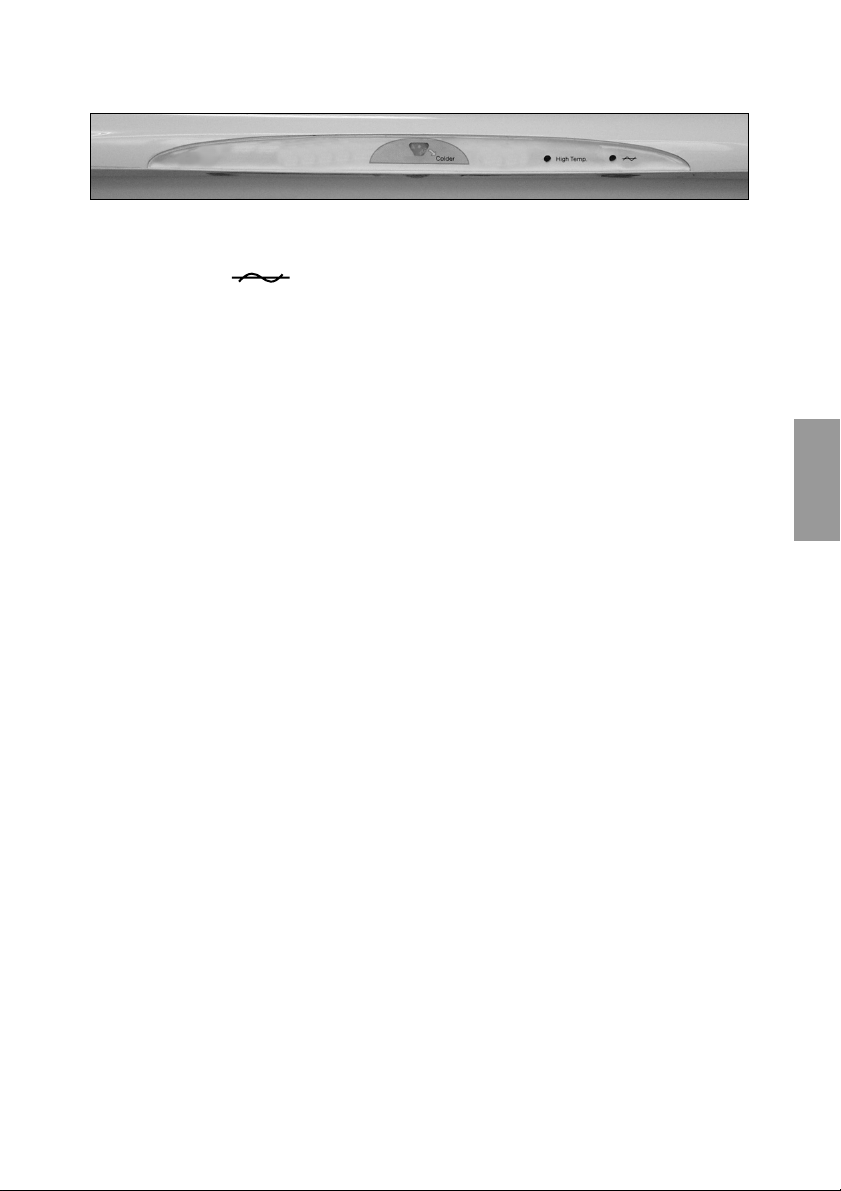
Controls
Controlling the Temperature of the Freezer Compartment
The control wheel on the front of the worktop adjusts the internal freezer
temperature. Your food should be maintained at -18˚C or colder for long term
storage.
The setting of the control wheel will depend on the location of the freezer, the room
temperature and how often the door is opened. The normal set point (marked by a 3
and N on the dial) is usually suitable. If you need to adjust the temperature turn the
control wheel:
Clockwise (higher number) - Colder
Anti-clockwise (lower number) - Warmer
CONTROLS
You can check the temperature of the freezer compartment by using a Fridge Freezer
Thermometer available from Hotpoint Genuine Parts and Accessories Mail Order
Hotline (see KEY CONTACTS back page).
WARNING: Do not use a mercury filled thermometer,as breakage would cause a
health hazard.
Your freezer must NOT be placed in a room where the temperature goes below 2˚C or
above 38˚C for prolonged periods,as the internal freezer temperature will not be
maintained.
6
Page 7
Controls
Red High Temperature Warning Light
The red temperature warning light will come on when the freezer is first switched on
or when the temperature inside the compartment rises above the correct storage
temperature. Check the TROUBLESHOOTING section before calling for advice. The
red light may come on for a short period when opening the freezer door to load or
unload food,in this case storage times will not be affected.
Indicator Lights
Green Mains Light
The green mains light will stay on as long as the electricity supply is not interrupted.
CONTROLS
7
Page 8

Useful Advice
USEFUL ADVICE
Note:
The Rating Plate,which lists the appliance Model Number and Serial
Number can be found near the bottom of the left hand internal wall.
Frozen food storage capacity 33kg
Maximum freezing capacity in 24 hours 15kg
Maximum conservation time from failure 18 hours
Making the best use of your Freezer
Note : Always use the handle provided to open the freezer door.
To ensure that your freezer operates as efficiently as possible :
● Follow food packaging “best before/use by”instructions or your suppliers
advice on a suitable maximum storage time.
● Keep foods tightly covered to retain moisture and prevent flavour/odour
transference. Plastic bags, aluminium foil,plastic stretch wrap and containers
with lids are ideal.
● Select chilled and frozen food last when shopping,transport in a ‘cool bag’
and place in freezer as soon as possible after arriving home.
● Avoid opening the door unnecessarily or for longer than needed.
● Allow hot or warm food to cool down in covered containers before placing in
freezer, as placing hot food inside reduces efficiency.
● Prepare fresh foods for freezing in small quantities to ensure that the food
freezes quickly and so that its quality does not deteriorate.
● Ensure that packets/containers of food are dry before freezing otherwise
they may freeze together.
8
Page 9

Useful Advice
● Do not allow fresh food to come into contact with food already frozen, the
frozen food could start to defrost.
● Once thawed,food should be cooked and eaten within 24 hours or cooked
and refrozen.
● Fully defrost your freezer when the ice is between 3-5mm thick (1/4inch) (see
CLEANING & MAINTENANCE section).
Note : A thick layer of ice will increase the running costs of your freezer.
USEFUL ADVICE
Storing Food in a Freezer
● Freeze and store either fresh food or long term commercially frozen foods.
● Generally speaking long term storage means up to 3 months but this can
vary,so always follow your supplier’s recommendations otherwise refer to
the pictorial guide on the door liner (see below).
● Place frozen food in the freezer compartment as soon as possible after
buying it.
● Liquid-filled bottles or sealed fizzy drinks must not be stored in freezer,as
they may burst.
● Lollipops and water ices should not be given to children directly from the
freezer the low temperature may cause ‘freezer burns’.
● Store ice cream towards the top front of the freezer and remove from freezer
● Ensure food is labelled and dated before placing in freezer.
15-30 minutes before serving.
9
Page 10

Useful Advice
Note : Empty,wash and refill the ice tray periodically to ensure freshness.
Advice on Using Freezer Drawers
This freezer can be used with or without the drawers. However, the bottom drawer
needs to remain in position at all times (to maintain the correct storage temperature).
It is generally more convenient to use the drawers but if a lot of food is to be stored
the drawers can be taken out and food placed directly onto the grids.
Ensure that packets/containers of food are thoroughly dry before placing onto the
grids.
The storage drawers can be easily removed. Pull the drawer towards you until it
reaches it’s stop position. Hold securely on both sides, lift the front of the drawer to
release and remove.
For cleaning advice see CLEANING & MAINTENANCE section.
When using the frozen food storage drawers, ensure that they are pushed fully back
before closing the door.
Food can be separated into different storage drawers for easy identification.
When lifting or removing the large deep drawer it is important to hold the side
USEFUL ADVICE
handles and not the front handle.
WARNING: The freezer drawers can become heavy when fully loaded with food.
Care must be taken if attempting to lift or carry a full freezer drawer. It is
recommended to remove the required food, rather than the whole freezer drawer.
Note : It is important not to touch or move any of the freezer drawers/parts
with wet hands as it may cause freezer burn or discomfort.
Ice Tray
When making ice, use the tray provided. Take care not to overfill with water.
Uncovered food should not be placed near the ice tray as it can affect the flavour of
the ice.
10
Page 11

Defrosting
CLEANING &
MAINTENANCE
Defrosting
Regular use of your appliance causes ice to gradually build up on internal surfaces
increasing the running costs of your appliance. When the ice is between 3-5mm (
inch) Hotpoint recommend ‘fully defrosting your freezer’.
Fully defrosting your freezer.
WARNING: Switch off the electricity supply and pull out the mains plug.
1. Remove frozen food, wrap or cover and store in a cool place.
2. Remove the storage drawers
3. A defrost tube is stored in the floor of the freezer. Insert the tube into the
groove situated in the floor at the front of the freezer. Place a container
beneath the tube to collect the defrost water.
4. As the frost begins to melt, use the supplied plastic scraper to remove frost.
Never use sharp metal tools to remove frost as they may damage your
freezer beyond repair.
5. Sponge out excess defrost water which collects at the bottom of the freezer.
NOTE : When defrosting is complete,clean the interior thoroughly,
see CLEANING & MAINTENANCE section.
6. Replace storage drawers.
7. Replace mains plug and switch on. Unwrap food and replace.
1
4
/
11
Page 12

Cleaning
CLEANING &
MAINTENANCE
Cleaning
WARNING:Switch off electrical supply and pull out mains plug before cleaning.
Interior
1. Remove food and wrap or cover to keep it frozen.
2. Remove drawers from each compartment and wash in warm water and
washing up liquid using a soft cloth, dry thoroughly.
Note : It is important to ensure that cleaned baskets are thoroughly dried
before refitting to the freezer compartment.
3. Wipe interior and fittings with a clean cloth wrung out in a solution of either
one teaspoon of bicarbonate of soda to one pint of water or Milton™
sterilising fluid, diluted according to the manufacturer’s instructions.
4. Dry interior thoroughly with a clean cloth before replacing fittings and food.
Exterior
Use a clean soft cloth wrung out in warm water and washing up liquid to wipe the
exterior surface, dry thoroughly.
WARNING: Do not use abrasive powder, household cleaner, bleach or wax polish
to clean your freezer, they leave a smell in the freezer and can damage the
exterior.
Use a soft brush or vacuum cleaner to remove dust from underneath the freezer and
from the compressor and condenser situated at the back of the freezer.
WARNING: Do not damage the pipework.
Door Seal
Use warm water and a clean soft cloth to wipe along and in between the creases of
the door seal, dry thoroughly. Take care not to damage the seal and avoid using
sharp objects.
WARNING: Do not use detergent,it will damage the seal.
Going Away
If you are going away and don’t want to use your freezer, switch off electricity supply
and pull out the mains plug. Remove food and follow the defrosting and cleaning
instructions above.
Note : Leave the door ajar to prevent an accumulation of odours.
12
Page 13

Maintenance
You will need a selection of small hand tools, screwdrivers, spanners etc. to carry out
this procedure.
Our Service Department can arrange for an Engineer to do the conversion for you but
a charge will be made.
Door Reversal
WARNING:Switch off electrical supply and pull out the mains plug.
Remove loose items/fittings from inside the fridge and place food into insulated
containers whilst carrying out this operation.
1. Open the door as wide as possible.
Note : You may require assistance to do this:
2. Support the door and using a screwdriver,remove the screw
securing the top hinge.
3. Carefully tilt the door to remove the hinge from the cabinet
and lift the door off the bottom hinge.
4. Remove the spacing washers from the bottom hinge.
Note : You may require assistance to do this:
5. Using the packaging from the appliance or a suitable substitute to support
the back of the appliance. Lay the appliance on it’s back ensuring the
pipework at the back is not damaged or bent. Be careful that the appliance
does not run away from you when the wheels touch the floor.
6. Unscrew the foot plate and hinge bracket fitted to the bottom right hand
side of the appliance. Unscrew the foot and footplate fitted to the bottom
left hand side of the appliance.
7. Refit the hinge bracket and the footplate to the opposite sides of the
appliance. Screw in the feet until there is approximately 35mm projecting
from the bottom front edge of the appliance.
8. Lift the appliance onto it’s feet.You may require assistance to do this:
Lift the appliance from the rear of the tabletop and stand it on it’s feet and
wheels. Be careful that the appliance does not run away from you when
the wheels touch the floor.
9. Using a thin blunt instrument, remove the hinge
bush cap from the top left of the door and refit on
the top right.
10. If applicable - using a screwdriver, remove the door
stop from the bottom right of the door and refit on
the bottom left.
Note : You may require assistance to do this:
11. Replace the top hinge onto the door, slide the door onto the bottom hinge
pin and support the door whilst screwing the top hinge into position. Ensure
that the top hinge bracket is positioned correctly.
12. Adjust the front feet (see ‘Levelling’ SAFETY & INSTALLATION section).
door stop
CLEANING &
MAINTENANCE
Note : Let the appliance stand upright in it’s final location for at least 15
minutes before plugging in and switching on the electricity supply.
13
Page 14

Troubleshooting
There has been a power failure
WARNING:Do not open the freezer
compartment door.
If power failure lasts longer than the
maximum conservation time (18 hrs),
food should either be cooked and eaten
with 24 hours or cooked and refrozen.
The freezer door is difficult to open
A well sealed freezer door can be difficult
to open. This is partly due to the
difference in temperature between the
room and internal freezer compartment.
If you have just closed the freezer door, it
maybe particularly difficult to open again
immediately. Wait 5 minutes for the
internal and external pressure to equalise
and try again.
Ice builds up rapidly inside the freezer
1. Check that nothing is stopping the
door from closing properly.
2. Check that foods and liquids are
covered to avoid the build up of
moisture inside.
3. See ‘Defrosting’ in the CLEANING &
MAINTENANCE section for advice.
The door will not close
1. Check to see if the appliance has a
build up of ice which is stopping the
door closing. If this is the case refer to
‘Defrosting’in the CLEANING &
MAINTENANCE section and defrost
the appliance.
If there is still a problem contact
Hotpoint Service (see KEY CONTACTS
back cover).
TROUBLESHOOTING
IS THE FREEZER WORKING AS YOU
WANT?
Have you read through the
instruction book ?
If you still have a problem,before
calling our service organisation see if
any of the tips below help.
The appliance will not work
1. Check plug is firmly positioned in the
socket outlet and the power supply is
switched on.
2. Check power supply with another
appliance.
3. Check fuse/circuit breaker.
4. Check the door is closed properly.
The appliance is making a lot of noise
1. Check that the rear pipe work is clear
of the wall, skirting board and other
obstacles.
2. Check that all four feet/wheels are
firmly in contact with the floor and
level.
3. See ‘Operating Sounds’ overleaf.
The freezer is too warm
1. Turn the control wheel to a higher
number. See CONTROLS section.
2. If the appliance is close to a heat
source,move it to another location.
3. Check that there is enough
ventilation around the appliance.
4. Check door has been closed properly.
The freezer is too cold
1. Turn the control wheel to a lower
number. See CONTROLS section.
The red warning light will not go out
1. Has the appliance just been
installed? (This is normal and the
light will go out when the correct
temperature has been reached).
2. Has the appliance just been loaded
with a large quantity of food. (The
light will go out once all the food has
reached the correct temperature).
3. Check door has been closed properly.
14
Page 15

Troubleshooting
TROUBLESHOOTING
OPERATING SOUNDS OF A FRIDGE FREEZER
These are the normal types of sound that your freezer will make.
●
●
●
●
The motor (compressor) makes a buzzing or humming sound when it is
running. This can be louder when it first switches on. This sound will
reduce over the first few months.
Gases flowing through the pipes can produce gurgling,bubbling,
roaring or humming noises.
The temperature control can make a clicking noise when it turns the
motor on and off.
Expansion and contraction of parts inside the freezer can produce a
cracking noise as they rapidly change temperature.
15
Page 16

DONDURUCU - FZAA 1 (TK)
MODELLERİ
BAŞLARKEN :
GÜVENLİK VE
KURULUM
KONTROL FAYDALI BİLGİLER
TEMİZLEME VE
BAKIM İŞLEMİ
SORUN GİDERME
SERVİS VE
GARANTİ
Dondurucunuzun güvenli ve verimli bir şekilde çalışmasını istiyorsanız, aşağıdaki adımlara uyun.
1. ADIM:
Dondurucunuzu, ısı
kaynaklarından uzak ve
havalandırması yeterli bir
yere koyun – yukarıdan
boşluk 30 mm (11/4 inch)
2. ADIM:
3. ADIM: 4. ADIM:
Ön ayağını ayarlayarak
dondurucuyu dengeleyin.
Bu sallantı ve titreşimi
önlemekle birlikte
kapının düzgün bir
şekilde açılmasını sağlar.
5. ADIM:
Fişe takın ve açın.
Yiyecekleri yerleştirmeden
önce, dondurucunun
soğumasını bekleyin.
Yüksek sıcaklık ışığı,
dondurucu soğuyana
kadar açık kalır.
Dondurucudaki tüm
yiyeceklerin üzeri
kapatılmalıdır.
6. ADIM:
Dondurucuyu yanlarından
tutarak yerine yerleştirin.
Arka tarafta bulunan
soğutma devresi
borusuna hasar
vermemeye özen gösterin.
Fişe takmadan ve
çalıştırmadan önce,
dondurucunun yerine
iyice oturması için 15
dakika bekleyin.
Artık dondurucunuz
çalışmaya hazır. 24 saat
sonunda, dondurucunuz
istediğiniz şekilde
çalışmazsa, SORUN
GİDERME bölümüne bakın.
Cihazınızdan en iyi şekilde yararlanmak için kalan talimatları da okuyun ve
garanti kayıt formunu doldurmayı unutmayın.
Bu Kılavuzu, çabuk erişebileceğiniz güvenli bir yerde tutun.
Page 17

Güvenliğiniz İçin
Güvenliğiniz için, aşağıdaki tavsiyelere uyun:
Dondurucunun soğutma sisteminde, az miktarda çevre dostu ancak yanıcı gaz bulunur.
Riskleri önlemek için:
Dondurucuyu aşağıdaki kurulum talimatlarından yararlanarak kurun ve
havalandırma deliklerini tıkanmamaları için temiz tutun.
Dondurucuyu kurarken veya hareket ettirirken, arka tarafta bulunan boruların
hasar görmemesine özen gösterin.
Sızıntı olduğundan şüphelenirseniz, dondurucuyu çalıştırmayın. Odayı
havalandırmak için pencereleri ve kapıları açın.
Dondurucunun içinde, buz çözmek gibi işlemler için elektrikli cihaz
kullanmayın.
Buz çözme işlemi için dondurucu ile birlikte verilenler dışında hiçbir mekanik
cihaz kullanmayın, aksi takdirde dondurucu hasar görebilir.
Bu dondurucuyu sadece evde yapılan yiyecekler için kullanın.
Dondurucuyu kurarken:
Dondurucuyu kurduğunuzda veya hareket ettirdiğinizde, şebeke kablosunun
dondurucunun altında veya arkasında sıkışmasını engelleyin.
Dondurucunun üzerine cihaz koymayın. Dondurucuya hasar verebilir veya
dondurucunun üzerinden düşebilir.
KURULUM
GÜVENLİK VE
Dondurucuyu kullanırken:
Dondurucuya oturmayın veya yaslanmayın.
Dondurucunuzda zehirli, yanıcı veya tehlikeli maddeleri saklamayın.
Dondurucunuzun buzunu çözerken veya temizlerken sprey kullanmayın.
Dondurucuyu sattığınız takdirde, bu kılavuzu da yeni sahibine vermeyi unutmayın.
17
Page 18

Kurulum
GÜVENLİK VE
KURULUM
Konum ve Hava Sirkülasyonu
30mm (11/4 inç)
Aşırı ısı dondurucunuzun performansını etkileyeceğinden,
dondurucunuzu Ocak, Radyatör, Direkt Gün Işığı gibi ısı
kaynaklarından uzak bir yere yerleştirin.
Dondurucunun üst kısmı ve tezgahın alt kısmı arasında
en az 30 mm (11/4 inç) boşluk bırakın.
Havalandırma tavsiyelerine uyduğunuz takdirde:
Dondurucunuzun ömrünü uzatırsınız.
Dondurucunun dışında oluşabilecek buğulanma riskini azaltırsınız..
Kullanım masraflarını azaltırsınız.
Çalışma sonucu titreşimden kaynaklanan sesleri azaltır.
Kapıyı açmak için gereken minimum boşluk
Dondurucunun kapısının açılması için ön tarafta gereken boşluk 60 mm’dir (24 inç).
Dondurucuyu bir ünitenin yanına yerleştirirken, mobilyanın rahatça çıkarılabilmesi için
kapının menteşe tarafından 30 mm (11/4 inç) boşluk bırakılabilir. Tercih edilirse,
dondurucu boşluk bırakılmadan yerleştirilebilir. Bu kapının açılma açısını etkiler, ancak
mobilya yine de yerinden çıkarılabilir (bkz. aşağıdaki tablo). Kapının menteşe tarafı,
daha rahat açılmasını sağlamak amacıyla değiştirilebilir (bkz. TEMİZLEME ve BAKIM
bölümünde ‘Kapının Ters Tarafa Açılması’ konu başlığı).
18
ÜSTTEN GÖRÜNÜM
600mm
30mm veya daha fazla
ÜSTTEN GÖRÜNÜM
600mm
30 mm’den daha az
Page 19

Kurulum
Dengeleme:
Dondurucu iyice yerleştirildikten sonra, yere sıkı bir şekilde temas edene kadar ön ayaklarını
ayarlayarak dengede durmasını sağlayın. Bu sallantı ve titreşimi önleyerek ve kapının
hizalanmasını sağlayarak, dondurucunun güvenli ve verimli bir şekilde çalışmasını sağlar.
Fişe takmadan ve çalıştırmadan önce, dondurucunun yerine iyice oturması için 15 dakika
bekleyin.
Dondurucunun tezgahın altına yerleştirilmesi
Kullanım masraflarını en aza indirilmesi için Hotpoint tezgahın arka tarafına bir
havalandırma takılmasını önerir. Bu havalandırmayı Orijinal Parçalar ve Aksesuarlar Posta
ile Sipariş Yardım Hattı’ndan (bkz. ÖNEMLİ İRTİBATLAR, arka sayfa) edinebilirsiniz.
UYARI: Dondurucunun üzerinde 30 mm’den az bir boşluk varsa, dondurucunuzun
üzerine yeterli havalandırma sağlayacak bir havalandırma takılmalıdır.
KURULUM
GÜVENLİK VE
19
Page 20

GÜVENLİK VE
KURULUM
Kurulum
Güç Kaynağı
UYARI: Cihaz mutlaka topraklanmalıdır.
Dondurucu, kurulumdan sonra da prize erişebilecek şekilde yerleştirilmelidir.
Sigortalar
Cihazınızda, bir fiş ve 13A’lık bir sigorta bulunmaktadır. Sigortayı değiştirmeniz
gerekirse, sadece 13A'lık ve BS1362 onaylı ASTA kullanın.
Fişin Değiştirilmesi
Prizinize uymadığı takdirde, cihazla birlikte verilen fişi kesin ve atın.
UYARI: Elektrik çarpmasını engellemek için, atılan fişi başka yerdeki soketlere de
takmayın.
GÜÇ KABLOSUNDAKİ ÖNEMLİ TELLER, AŞAĞIDA VERİLEN KODLARA GÖRE
RENKLENDİRİLMİŞTİR:
Yeşil/Sarı - Topraklı
Mavi - Nötr Kahverengi - Canlı
Fişi değiştirmeniz durumunda, güç kablosundaki teller fişteki bağlantı uçlarını tanımlayan
işaretlerin rengine karşılık gelmeyebilir. Bu nedenle, kabloları yukarıda gösterildiği
şekilde bağlamanız gerekir.
Güç Kablosunun Değiştirilmesi
Bu dondurucuda özel bir güç kablosu takılıdır. Gördüğü hasar nedeniyle değiştirilmesi
gereken güç kablosunu Hotpoint Servis’ten (bkz. ÖNEMLİ İRTİBATLAR, arka sayfa)
temin edebilirsiniz. Değiştirme işleminin, işi bilen bir elektrik teknisyeni tarafından
yapılması önemle tavsiye edilir.
CE İşareti, cihazın aşağıdaki EEC direktiflerine uygun olduğunu göstermektedir:
Alçak Gerilim Ekipmanları - 72/23/EEC ve 93/68 EEC Elektromanyetik
Uyumluluk - 89/336/EEC, 92/31/EEC ve 93/68/EEC
-AtýkElektrikliveElektronikEþyalarýn(AEEE)Kontrolü
Yönetmeliðineuygundur.
20
Page 21

Kumandalar
Dondurucu Bölmesi Sıcaklığının Kontrol Edilmesi
Tezgahın ön tarafında bulunan kumanda volanı ile dondurucunun iç sıcaklığı ayarlanır.
Uzun süre muhafaza etmek için yiyeceklerinizi -18˚C veya daha düşük sıcaklıklarda
tutmalısınız.
Kumanda volanının ayarı, dondurucunun bulunduğu yere, oda sıcaklığına ve kapının
ne sıklıkta açıldığına bağlıdır. Normal ayar noktası (kadranda 3 ve N ile işaretlidir), genellikle
uygundur. Sıcaklığı ayarlamanız gerektiğinde, kumanda volanını çevirin:
Saat yönüne (daha büyük numara) - Soğuk
Saat yönünün tersine (daha küçük numara) - Sıcak
KONTROL
Dondurucu bölmesinin sıcaklığını, Orijinal Parçalar ve Aksesuarlar Posta ile Sipariş Yardım
Hattı’ndan (bkz. ÖNEMLİ İRTİBATLAR, arka sayfa) temin edebileceğiniz bir Buzdolabı
Termometresi ile kontrol edebilirsiniz.
UYARI: Kırılması durumunda sağlık açısından zararlı olabilecek cıvalı termometreler
kullanmayın.
Dondurucunuzu, oda sıcaklığının uzun süre 2˚C altında ve 38˚C üzerinde olan yerlere
KOYMAYIN. Aksi takdirde, dondurucunun iç sıcaklığı sabit tutulamaz.
21
Page 22

KONTROL
Kumandalar
Gösterge Işıkları
Yeşil Güç Kablosu Işığı
Yeşil renkli güç kablosu ışığı, elektrik bağlantısı kesilmediği sürece yanar.
Kırmızı Yüksek Sıcaklık Uyarı Işığı
Kırmızı renkli sıcaklık uyarı ışığı, dondurucu ilk çalıştırıldığında ve bölmenin içindeki
sıcaklık doğru saklama sıcaklığının üzerine çıktığında yanar. Yardım istemeden önce
SORUN GİDERME bölümüne bakın. Kırmızı ışık, dondurucunun kapısı yiyecek almak
veya yerleştirmek üzere kısa süreliğine açıldığında yanabilir. Ancak, saklama süreleri
bu durumdan etkilenmez.
22
Page 23

Faydalı Bilgiler
Not:
Cihazın Model Numarasının ve Seri Numarasının bulunduğu Anma Değeri
Plakası sol taraftaki iç duvarın alt tarafına yakın bir yerde yer almaktadır.
Dondurulmuş gıdaları saklama kapasitesi 33kg
24 saat içindeki Maksimum dondurma kapasitesi 15kg
Arızadan sonraki muhafaza etme süresi 18 saat
FAYDALI BİLGİLER
Dondurucunuzdan en iyi şekilde faydalanmanın yolları
Not: Dondurucunun kapısını daima üzerinde bulunan tutacak ile açın.
Dondurucunuzun mümkün olan en verimli şekilde çalıştığından emin olmak için: :
Gıda ambalajının üzerindeki “tarihine kadar tüketilmesi önerilir” talimatlarına veya
tedarikçinizden edindiğiniz uygun saklama süresine uygun hareket edin.
Nemi korumak ve tat/kokunun dağılmasını önlemek için yiyecekleri sıkıca kapatın.
Plastik poşetler, alüminyum folyo, streç film ve kapaklı kaplar yiyeceklerin
saklanması için idealdir.
Alışveriş yaparken soğutulmuş ve dondurulmuş gıdaları en son alın, ‘soğuk torbada’
taşıyın ve eve gelince hemen dondurucuya yerleştirin.
Kapıyı gereksiz ve ihtiyaç duyulandan uzun süre açık bırakmayın.
Sıcak veya ılık yiyeceklerin, dondurucuya koymadan önce kapalı kaplarda
soğumasını bekleyin. Sıcak yiyeceklerin dondurucuya yerleştirilmesi içerideki
etkiyi azaltır.
Dondurulacak taze gıdaları, hızlı bir şekilde donması ve kalitesini kaybetmemesi
için küçük miktarlar halinde hazırlayın.
Yiyecek paketlerinin/kaplarının kuru olduğundan emin olun, aksi takdirde
yiyecekle birlikte donabilir.
23
Page 24

Dondurucuda Yiyecek Saklanması
Taze gıdaları veya satın alınan uzun süreli dondurulmuş gıdaları dondurun
veya saklayın.
Genellikle, uzun süreli saklama en fazla 3 ay demektir ama bu durum farklılık
gösterebilir. Bu nedenle, daima tedarikçinizin önerilerine uyun ya da kapı üzerinde
bulunan resimli açıklamalara bakın (aşağıya bakın).
Dondurulmuş gıdaları aldıktan hemen sonra dondurucu bölmesine yerleştirin.
Suyla dolu şişeler veya kapalı gazlı içecekler, patlama riski taşıdığından
dondurucuda saklanmamalıdır.
Dondurucudan alınan lolipop veya buzlu içecekler hemen çocuklara
verilmemelidir. Aksi takdirde düşük sıcaklık soğuk yanıklarına neden olabilir.
Dondurmaları, dondurucunun üst ve ön tarafında saklayın ve servis etmeden
FAYDALI BİLGİLER
15-30 dakika önce dondurucudan çıkarın.
Dondurucuya yerleştirmeden önce, yiyecekleri mutlaka etiketleyin ve üzerilerine
tarih yazın.
Taze yiyeceklerin, daha önceden dondurulmuş yiyeceklerle temas etmesine izin
vermeyin, aksi takdirde dondurulmuş yiyecek çözülmeye başlayabilir.
Bir kez buzu çözülen yiyeceklerin, 24 saat içinde pişirilmesi ve yenmesi veya
pişirilmesi ve tekrar dondurulması gerekir.
Buz kalınlığı 3-5 mm (1/4 inç) olduğunda, dondurucunuzdaki buzları tamamen
eritin (bkz. TEMİZLEME ve BAKIM bölümü).
Faydalı Bilgiler
Not: Kalın bir buz tabakası dondurucunuzun çalışma masraflarını arttırmaktadır.
24
Page 25

Faydalı Bilgiler
Dondurucu Çekmecelerinin Kullanılmasına İlişkin Tavsiyeler
Bu dondurucu, hem çekmeceli hem de çekmecesiz olarak kullanılabilmektedir. Ancak, alt
çekmecenin her zaman yerinde kalması gerekir (doğru saklama sıcaklığını muhafaza
etmek için).
Genellikle çekmecelerin kullanılması işinizi kolaylaştırır, ama saklanacak yiyecek miktarı çok
olduğunda çekmeceler çıkarılıp yiyecekler doğrudan ızgaraların üzerine yerleştirilebilir.
Izgaraya yerleştirmeden önce, paketlerin/kapların tamamen kuru olduğundan emin olun.
Saklama çekmeceleri kolayca çıkarılabilir. Çekmeceyi, durma konumuna gelene kadar
kendinize doğru çekin. Her iki taraftan da sıkıca tutun, çekmecenin ön tarafını kaldırarak
serbest bırakın ve çekmeceyi çıkarın.
Temizleme tavsiyeleri için, TEMİZLEME ve BAKIM bölümüne bakın.
Dondurulmuş gıda saklama çekmecelerini kullanırken, kapıyı kapatmadan arkaya kadar
iyice itilip itilmediklerini kontrol edin.
Yiyecekler, kolayca ayırt edilmek üzere, ayrı saklama çekmecelerine konulabilir.
Büyük, derin çekmeceyi kaldırırken veya çıkarırken, ön tutacak değil yan tutacaklar
tutulmalıdır.
UYARI: Dondurucunun çekmecelerinde yiyecek olduğunda, çekmeceler ağırlaşabilir.
Dolu bir dondurucu çekmecesini kaldırırken veya taşırken dikkatli olunmalıdır.
Dondurucu çekmecesini tamamen çıkarmak yerine sadece istenen yiyeceğin
çıkarılması önerilir.
FAYDALI BİLGİLER
Not: Soğuk yanıklarına veya rahatsızlıklara neden olabileceğinden, dondurucu
çekmecelerine/parçalarına ıslak elle dokunulmaması gerekir.
Buz Tepsisi
Buz elde etmek için, ürün ile birlikte verilen tepsiyi kullanın. Suyu aşırı doldurmamaya
dikkat edin.
Açık yiyecekler, buzun tadını etkileyebileceğinden buz tepsisinin yanına yerleştirilmemelidir.
Not: Tazeliğini sağlamak üzere buz tepsisini belirli aralıklarla boşaltın, yıkayın ve
yeniden doldurun.
25
Page 26

Buz Çözme
Buz Çözme
Cihazınızın düzenli olarak kullanılması, iç yüzeylerde yavaş yavaş buzlanma olmasına ve
dolayısıyla da cihazınızın kullanım masraflarının artmasına neden olur. Buz kalınlığı 3-5 mm
(1/4 inç) olduğunda, Hotpoint ‘dondurucunuzdaki buzları tamamen eritmenizi’ tavsiye eder.
Dondurucunuzun buzunun tamamen eritilmesi.
UYARI: Elektrik bağlantısını kesin ve güç kablosunu çıkarın.
1. Dondurulmuş yiyecekleri çıkarın, sarın veya kapalı bir kaba yerleştirin ve soğuk
bir yerde saklayın.
2. Saklama çekmecelerini çıkarın.
3. Dondurucunuz en alt kısmında bir buz çözdürme borusu bulunur. Boruyu,
dondurucunuzun ön kısmında en altta bulunan oluğa yerleştirin. Çözülen suyu
toplamak amacıyla borunun altına bir kap yerleştirin.
4. Buz erimeye başlayınca, buzu çıkarmak için cihazla birlikte verilen plastik kazıyıcıyı
kullanın. Buzu çıkarmak için asla keskin metal araçlar kullanmayın, çünkü bunlar
dondurucunuza onarılmayacak şekilde hasar verebilir.
5. Dondurucunun alt kısmında toplanan çözülmüş suyu bir süngerle silin.
NOT: Buz çözme işlemi tamamlanınca, TEMİZLEME ve BAKIM bölümüne
bakarak dondurucunun iç kısmını iyice temizleyin.
6. Saklama çekmecelerini yerine takın.
7. Güç kablosunu takın ve dondurucuyu çalıştırın. Yiyecekleri açın ve dondurucuya
yerleştirin.
BAKIM İŞLEMİ
TEMİZLEME VE
26
Page 27

Temizleme
Temizleme
UYARI: Temizleme işleminden önce, elektrik bağlantısını kesin ve güç kablosunu çıkarın.
İç Kısım
1. Yiyecekleri çıkarın ve çözülmemesi için sarın veya kapalı bir kaba koyun.
2. Her bölmedeki çekmeceyi çıkarın, ılık su ve bulaşık sıvısı kullanarak yumuşak bir
bezle yıkayın ve ardından iyice kurulayın.
Not: Temizlenen çekmecelerin, dondurucu bölmesine takılmadan önce iyice
kurutulması gerekir.
3. İç kısmı ve bağlantı elemanlarını, ya yarım litre suya eklenmiş bir çay kaşığı
sodyum bikarbonat çözeltisine veya üreticinin talimatları doğrultusunda uygun
miktarda su ile seyreltilmiş Milton™ sterilizasyon sıvısına batırılıp sıkılmış temiz
bir bez ile silin.
4. Bağlantı elemanlarını ve yiyecekleri yerleştirmeden önce iç kısmı temiz bir bez
ile iyice kurulayın.
Dış Kısım
Dış kısmı silmek için yıkama bulaşık sıvısı eklenmiş ılık suya batırılmış ve sıkılmış temiz
yumuşak bir bez kullanın ve ardından iyice kurulayın.
UYARI: Aşındırıcı toz, ev temizliğinde kullanılan temizleyici maddeler, çamaşır suyu veya
pasta cila kullanarak dondurucunuzu temizlemeyin. Bu maddeler, dondurucunuzda
koku bırakır ve dış kısma hasar verebilir.
Dondurucunun altındaki, dondurucunun arka kısmında bulunan kompresör ve
kondansatördeki tozları yumuşak bir fırça veya elektrik süpürgesi kullanarak temizleyin.
UYARI: Boru tesisatına hasar vermeyin.
Kapı Fitili
Kapı fitilini ve kıvrımlarının arasını ılık su ve temiz, yumuşak bir bez kullanarak silin ve
ardından iyice kurulayın. Fitile hasar vermemeye özen gösterin ve keskin cisimler
kullanmaktan kaçının.
UYARI: Deterjan kullanmayın, aksi takdirde fitil hasar görür.
Siz Evde Yokken
Uzun süre evde bulunmayacaksanız veya dondurucuyu kullanmak istemiyorsanız,
elektrik bağlantısını kesin ve güç kablosunun fişini çekin. Yiyecekleri çıkarın ve yukarıda
açıklanan buz çözme ve temizleme işlemlerini gerçekleştirin.
Not: Koku oluşmasını engellemek için kapıyı aralık bırakın.
27
TEMİZLEME VE
BAKIM İŞLEMİ
Page 28

Bakım
Bu işlemi gerçekleştirmek için, tornavida, İngiliz anahtarı gibi küçük el aletleri gerekir.
Servis Departmanımız döndürme işlemini gerçekleştirmek üzere bir Mühendis gönderebilir
ancak bu hizmet ücretlidir.
Kapının Açılma Yönünün Değiştirilmesi
UYARI: Elektrik bağlantısını kesin ve güç kablosunu çıkarın.
Gevşek öğeleri/bağlantı elemanlarını dondurucunun içinden çıkarın ve işlemi
gerçekleştirirken yiyecekleri ısı geçirmeyen kaplara koyun.
1. Kapıyı, olabildiğince çok açın.
Not: Bunun için yardıma ihtiyaç duyabilirsiniz:
2. Tornavida kullanarak kapıyı destekleyin, üst menteşeyi iyice
tutarak vidayı çıkarın.
3. Menteşeyi dondurucudan çıkarmak için kapıyı dikkatli bir
şekilde eğin ve kapıyı alt menteşeden yukarı doğru kaldırın.
4. Boşluk ayar pullarını alt menteşeden çıkarın.
Not: Bunun için yardıma ihtiyaç duyabilirsiniz:
5. Cihazın arkasını desteklemek için ürün ambalajını veya benzeri bir şey kullanın.
Cihazı, arkasındaki boru tesisatı hasar görmeyecek veya bükülmeyecek şekilde
arkası üzerine yerleştirin. Tekerlekleri yere değdiğinde cihazın elinizden
kaçmamasına özen gösterin.
6. Cihazın sağ alt tarafında takılı olan ayak plakası ve menteşe dirseğini sökün.
Cihazın sol alt tarafında takılı olan ayak ve ayak plakasını sökün.
7. Menteşe dirseğini ve ayak plakasını cihazda daha önceki yerlerinin karşısına
gelecek şekilde yerine takın. Cihazın ön alt ucu ile ayak arasında yaklaşık 35 mm
çıkıntı olana kadar, ayağı sıkın sıkın.
8. Cihazı ayakları üzerinde duracak şekilde kaldırın. Bunun için yardıma ihtiyaç
duyabilirsiniz:
Cihazı arkasından destekleyerek ve ayakları ve tekerlekleri üzerinde duracak şekilde
BAKIM İŞLEMİ
TEMİZLEME VE
kaldırın. Tekerlekleri yere değdiğinde cihazın elinizden kaçmamasına özen
gösterin.
9. İnce, keskin olmayan bir alet kullanarak, menteşenin
burç kapağını kapının sol üst tarafından çıkarıp,
sağ üst tarafa takın.
10. Varsa, bir tornavida kullanarak kapı tamponunu
kapının sağ alt tarafından çıkarıp, sol alt tarafına
takın.
Not: Bunun için yardıma ihtiyaç duyabilirsiniz:
11. Üst menteşeyi kapıya takın, kapıyı alt menteşe pimine geçirin ve üst menteşeyi
sıkarken kapıyı destekleyin. Üst menteşe dirseğinin doğru takılıp takılmadığını
kontrol edin.
12. Ön ayakları ayarlayın (bkz. GÜVENLİK ve KURULUM bölümü, ‘Dengeleme’
konu başlığı)
Not: Cihazın fişini takmadan ve çalıştırmadan, yerinde dik bir şekilde en azından
15 dakika durmasını bekleyin.
28
kapı tamponu
Page 29

Sorun Giderme
DONDURUCU İSTEDİĞİNİZ GİBİ
ÇALIŞIYOR MU?
Kullanma kılavuzunu okudunuz mu?
Hala sorun yaşıyorsanız, servisi
çağırmadan önce, aşağıda yer alan
ipuçlarının yardımcı olup olmayacağını
kontrol edin.
Cihaz çalışmıyor
1. Fişin prize iyice oturup oturmadığını
ve elektrik bağlantısının olup
olmadığını kontrol edin.
2. Elektrik bağlantısını başka bir cihaz
kullanarak kontrol edin.
3. Sigortayı/devre kesiciyi kontrol edin.
4. Kapının düzgünce kapatılıp
kapatılmadığını kontrol edin.
Cihaz çok gürültülü çalışıyor
1. Arkadaki boru tesisatının duvara,
süpürgeliğe ve başka engellere takılıp
takılmadığını kontrol edin.
2. Dört ayak/tekerleğin de yerle iyice
temas ettiğinden ve dengede
durduğundan emin olun.
3. Arka sayfadaki ‘Çalışma Sesleri’
konusuna bakın.
Dondurucu çok sıcak
1. Kumanda volanını daha büyük bir
numaraya getirin. KUMANDALAR
bölümüne bakın.
2. Cihaz, ısı kaynağına yakınsa, başka bir
yere taşıyın.
3. Cihazın etrafının yeterince
havalandırılıp havalandırılmadığını
kontrol edin.
4. Kapının düzgün bir şekilde kapatılıp
kapatılmadığını kontrol edin.
Dondurucu çok soğuk
1. Kumanda volanını daha küçük bir
numaraya getirin. KUMANDALAR
bölümüne bakın.
Kırmızı uyarı ışığı sönmüyor
1. Cihaz kuruldu mu? (Bu durum normaldir
ve ışık, doğru sıcaklığa erişildiğinde
söner).
2. Cihaza çok fazla miktarda mı yiyecek
yerleştirildi? (Işık, tüm yiyecekler doğru
sıcaklığa ulaştığında söner).
3. Kapının düzgün bir şekilde kapatılıp
kapatılmadığını kontrol edin.
Elektrik kesildi
UYARI: Dondurucu bölme kapısını açmayın.
Kesinti, maksimum muhafaza etme süresini
(18 saat) aştığı takdirde, yiyeceklerin 24 saat
içinde pişirilmesi ve yenmesi veya pişirilmesi
ve tekrar dondurulması gerekir.
Dondurucunun kapısı zor açılıyor
Çok sağlam bir kapı fitiline sahip dondurucu
zor açılır. Bu kısmen, odadaki ve dondurucu
bölmesindeki sıcaklık garkından
kaynaklanmaktadır. Dondurucu kapısını yeni
kapattıysanız, yeniden açmakta zorlanabilirsiniz.
İç ve dış basıncı dengelenmesi için 5 dakika
bekleyip, yeniden deneyin.
Dondurucu içinde hızlı bir şekilde
buzlanma oluyor
1. Kapının düzgün bir şekilde kapanmasını
engelleyen bir şey olup olmadığını kontrol
edin.
2. İçerdeki nemin artmasını önlemek amacıyla
yiyecekleri ve sıvıları kapalı kaplarda saklayın.
3. Tavsiye için TEMİZLEME ve BAKIM
bölümünde ‘Buz Çözme’ konu başlığına
bakın.
Kapı kapanmıyor
1. Cihazda, kapının kapanmasını
engelleyecek şekilde buzlanma olup
olmadığını kontrol edin. Buzlanma
söz konusu ise TEMİZLEME ve BAKIM
bölümünde ‘Buz Çözme’ konu
başlığına bakarak cihazın buzlarını
çözün.
Sorunun devam etmesi durumunda
Hotpoint Servis (bkz. ÖNEMLİ İRTİBATLAR,
arka sayfa) ile irtibat kurun.
SORUN GİDERME
29
Page 30

Sorun Giderme
DONDURUCUNUN ÇALIŞIRKEN ÇIKARDIĞI SESLER
Bunlar, dondurucunuzun çalışırken çıkaracağı normal seslerdir.
Motor (kompresör) çalışırken, vızıltı veya uğultu sesi çıkarır. İlk açıldığında
bu ses daha yüksek gelebilir. Bu ses, ilk birkaç ay içinde azalır.
Borulardan geçen gazlar, gürültü, fokurdama, uğultu veya kükreme
sesleri çıkarabilir.
Sıcaklık kumandası, motoru açarken veya kapatırken tıkırtı sesi çıkarabilir.
Dondurucunun içinde genişleyen ve büzülen parçalar, sıcaklıkları değiştikçe
çatlama sesi çıkarabilir.
INDESIT COMPANY BEYAZ EÞYA PAZARLAMA
A.Þ.
KarahasanSok.No:11Balmumcu34349
Beþiktaþ/Ýstanbul
TEL:(+90)2123555300
FAKS:(+90)2122129559
SORUN GİDERME
WEB: www.indesit.com.tr
INDESIT COMPANY BEYAZ EÞYA SANAYÝ VE
TÝCARET A.Þ.
OrganizeSanayiBölgesi45030/MANÝSA
TEL:(+90)2362331905–2331820
FAKS:(+90)2362331652
30
Page 31

31
Page 32

19511546102
10/2013
32
 Loading...