

Page 1
PCN 642 IX/HA EE
PCN 641 T/IX/HA EE
Українська
Інструкція по використанню
ВАРИЛЬНА ПОВЕРХНЯ
Зміст
Інструкція по використанню,1
Запобіжні заходи,3
Допомога,4
Опис приладу,5
Установка,18
Ввімкнення і використання,22
Запобіжні заходи та поради,22
Обслуговування та догляд,23
Усунення несправностей,23
English
Operating Instructions
HOB
Contents
Operating Instructions,1
Warnings,2
Assistance,4
Description of the appliance,5
Installation,6
Start-up and use,10
Precautions and tips,10
Maintenance and care,11
Troubleshooting,11
Română
Instrucţiuni de utilizare
PLITA
Sumar
Instrucţiuni de utilizare,1
Avertizări,2
Asistenţă ,4
Descrierea aparatului,5
Instalarea,12
Pornirea şi folosirea,16
Precauţii şi sfaturi,16
Întreţinere,17
Anomalii şi remedii,17
Page 2
Warnings
Avertizări
WARNING: The appliance and its accessible parts
become hot during use. Care should be taken to
avoid touching heating elements. Children less than 8
years of age shall be kept away unless continuously
supervised. This appliance can be used by children
aged from 8 years and above and persons with
reduced physical, sensory or mental capabilities or
lack of experience and knowledge if they have been
given supervision or instruction concerning use of the
appliance in a safe way and understand the hazards
involved. Children shall not play with the appliance.
Cleaning and user maintenance shall not be made
by children without supervision.
WARNING: Unattended cooking on a hob with fat or
oil can be dangerous and may result in re. NEVER
try to extinguish a re with water, but switch off the
appliance and then cover ame e.g. with a lid or a
re blanket.
WARNING: Danger of re: do not store items on the
cooking surfaces.
Never use steam cleaners or pressure cleaners on
the appliance.
Remove any liquid from the lid before opening it. Do
not close the glass cover (if present) when the gas
burners or electric hotplates are still hot.
The appliance is not intended to be operated by
means of an external timer or separate remote
control system.
CAUTION: the use of inappropriate hob guards can
cause accidents.
ATENŢIE: Acest aparat şi părţile sale accesibile devin
foarte calde în timpul folosirii. Trebuie să ţi atenţi şi
să nu atingeţi elementele de încălzire. Îndepărtaţi
copiii sub 8 ani dacă nu sunt supravegheaţi continuu.
Acest aparat poate utilizat de copiii de peste 8 ani
şi de persoane cu capacităţi zice, senzoriale sau
mentale reduse sau fără experienţă şi cunoştinţe
dacă se aă sub o supraveghere corespunzătoare
sau dacă au fost instruiţi cu privire la folosirea
aparatului în mod sigur şi dacă îşi dau seama de
pericolele corelate. Copiii nu trebuie să se joace cu
aparatul. Operaţiunile de curăţare şi de întreţinere nu
trebuie să e efectuate de copii fără supraveghere.
ATENŢIE: Lăsarea unui aragaz nesupravegheat cu
grăsimi şi uleiuri poate periculoasă şi poate provoca
un incendiu.
Nu trebuie NICIODATĂ să încercaţi să stingeţi o
acără/incendiu cu apă, ci trebuie să stingeţi aparatul
şi să acoperiţi acăra, de exemplu cu un capac sau
cu o pătură ignifugă.
ATENŢIE: Risc de incendiu: nu lăsaţi obiecte pe
suprafeţele de gătit.
Nu folosiţi niciodată aparate cu aburi sau sub
presiune pentru a curăţa aparatul.
Eliminaţi eventualele reziduuri de lichid de pe capac,
înainte de a-l deschide. Nu închideţi capacul din sticlă
(dacă este prezent) cu arzătoarele de gaz sau plita
electrică încă calde.
Aparatul nu trebuie pus în funcţiune prin intermediul
unui temporizator extern sau al unui sistem separat
de comandă la distanţă.
ATENŢIE: folosirea unor protecţii necorespunzătoare
ale plitei poate provoca accidente.
2
Page 3

Запобіжні заходи
УВАГА: Під час роботи цей прилад, а також
його доступні частини нагріваються до високих
температур. Слід бути особливо обережними,
щоб не торкатися нагрівальних елементів. Діти
віком до 8 років мають знаходитися на небезпечній
відстані від приладу, якщо неможливо забезпечити
постійний контроль над ними. Дозволяється
користування цим приладом дітьми віком від 8
років, а також особами з обмеженими фізичними,
сенсорними або розумовими можливостями або
особами без належного досвіду і знань, якщо
вони перебувають під постійним контролем або
проінструктовані щодо правил з небезпечного
користування приладу і усвідомлюють ступені
ризику. Не дозволяйте дітям гратися з приладом.
Операції з очищення і догляду не повинні
виконуватися дітьми без належного контролю.
УВАГА: Небезпечно залишати без нагляду плити
з жиром або олією, тому що це може призвести
до пожежі. НІ В ЯКОМУ РАЗІ не слід намагатися
погасити полум’я/пожежу водою. Необхідно
вимкнути прилад і накрити полум’я, наприклад,
кришкою або вогнетривким покривалом.
УВАГА: Небезпека пожежі: не залишайте речі на
варильних поверхнях.
Забороняється використання апаратів для
очищення парою або високим тиском.
Витріть насухо всі наявні на кришці рідини, перш
ніж відкрити її. Не закривайте скляну кришку
(якщо вона наявна), якщо газові пальники або
електричні конфорки залишаються нагрітими.
Не передбачено увімкнення приладу за допомогою
зовнішнього таймеру або окремої системи
дистанційного керування.
УВАГА: використання невідповідних захисних
пристроїв варильної поверхні може призвести до
нещасних випадків.
3
Page 4
Assistance
! Never use the services of an unauthorised technician.
Communicating:
• type of trouble
• appliance model (Mod.)
• serial number (S/N)
This information is found on the data plate located on the appliance and/or
on the packaging.
Asistenţă
! Nu apelaţi niciodată la personal tehnic neautorizat.
Comunicaţi:
• tipul de anomalie;
• modelul maşinii (Mod.);
• numărul de serie (S/N).
Aceste informaţii se găsesc pe plăcuţa de caracteristici din frigider, în partea
de jos, în stânga.
Допомога
! Не звертайтеся по допомогу до не уповноваженого персоналу.
Повідомити:
• тип несправності;
• модель приладу (Mod.)
• cерійний номер (S/N)
Ці дані знаходяться на табличці з даними на самому приладі.
4
Page 5
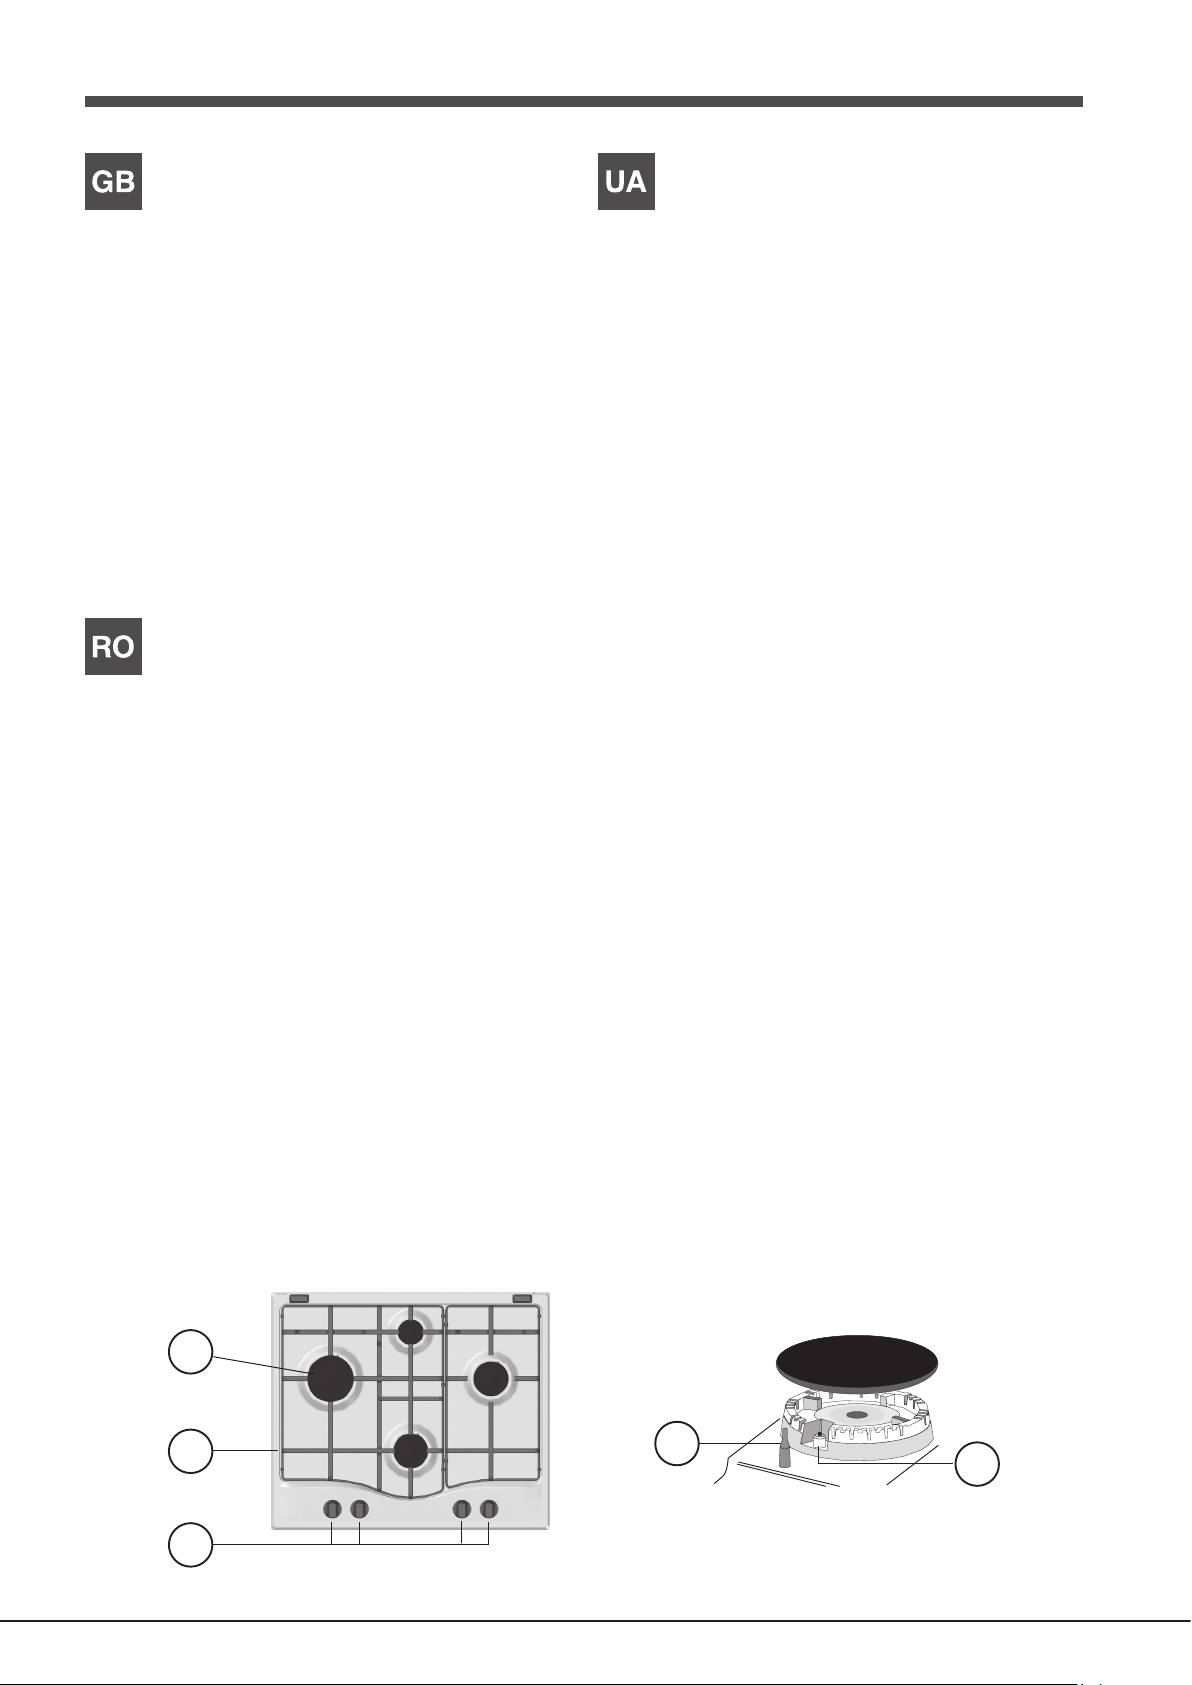
Description of the appliance
1
2
3
5
Опис приладу
Overall view
1. Support Grid for COOKWARE
2. GAS BURNERS
3. Control Knobs for GAS BURNERS
4. Ignition for GAS BURNERS
5. SAFETY DEVICES
• GAS BURNERS differ in size and power. Use the diameter of the cookware
to choose the most appropriate burner to cook with.
• Control Knobs for GAS BURNERS adjust the size of the ame.
• GAS BURNER IGNITION enables a specic burner to be lit automatically.
• SAFETY DEVICE stops the gas flow if the flame is accidentally
extinguished.
Descrierea aparatului
Vedere de ansamblu
1. Grătare de sprijin pentru RECIPIENTELE DE COACERE
2. ARZĂTOARE PE GAZ
3. Selectoare de comandă ale ARZĂTOARELOR PE GAZ
4. Dispozitiv de aprindere al ARZĂTOARELOR PE GAZ
5. DISPOZITIV DE SIGURANŢĂ
Загальний вигляд
1. Підтримуюча Решітка для ПОСУДУ
2. ГАЗОВІ ПАЛЬНИКИ
3. Ручки управління ГАЗОВИХ ПАЛЬНИКІВ
4. Запалювання для ГАЗОВИХ ПАЛЬНИКІВ
5. ПРИСТРОЇ БЕЗПЕКИ
• ГАЗОВІ ПАЛЬНИКИ відрізняються за розмірами тапотужністю.
Використовуйте для приготування їжі посудз діаметром у відповідності
до розміру найбільшпідходящого пальника.
• ГАЗОВИMИ ПАЛЬНИКAMИ
полум’я
• Запалювання для ГАЗОВИХ ПАЛЬНИКІВ дозволяють, привключенні,
запалювати конкретні пальники автоматично.
• ПРИСТРІЙ БЕЗПЕКИ зупиняє потік газу, якщо полум’явипадково
гасне.
• ARZĂTOARELE PE GAZ sunt de diferite dimensiunişi puteri. Alegeţi-le
pe cele adecvate diametruluirecipientului utilizat.
• Selectoarele de comandă ale ARZĂTOARELOR PEGAZ şi sunt folosite
pentrureglarea ăcării.
• Dispozitivul de aprindere al ARZĂTOARELOR PEGAZ permite aprinderea
automată a arzătoaruluiprestabilit.
• DISPOZITIVUL DE SIGURANŢĂ este utilizat încazul stingerii accidentale
a ăcării, împiedicândscurgerile de gaz.
4
5
Page 6
Installation
555 mm
55 mm
475 mm
GB
! Before operating your new appliance please read this instruction booklet
carefully. It contains important information for safe use, installation and care
of the appliance.
! Please keep these operating instructions for future reference. Pass them on
to possible new owners of the appliance.
Positioning
! Keep packaging material out of the reach of children. It can become a choking
or suffocation hazard (see Precautions and tips).
! The appliance must be installed by a qualied professional according to the
instructions provided. Incorrect installation may cause harm to people and
animals or may damage property.
! This unit may be installed and used only in permanently ventilated rooms
in accordance with current national regulations. The following requirements
must be observed:
• The room must be equipped with an air extraction system that expels
any combustion fumes. This may consist of a hood or an electric fan that
automatically starts each time the appliance is switched on.
Fitting the appliance
The following precautions must be taken when installing the hob:
• Kitchen cabinets adjacent to the appliance and taller than the top of the
hob must be at least 200 mm from the edge of the hob.
• Hoods must be installed according to their relative installation instruction
manuals and at a minimum distance of 650 mm from the hob (see gure).
• Place the wall cabinets adjacent to the hood at a minimum height of 420
mm from the hob (see gure).
If the hob is installed beneath a wall cabinet,
the latter must be situated at a minimum of 700
600mm min.
650mm min.
mm above the hob.
420mm min.
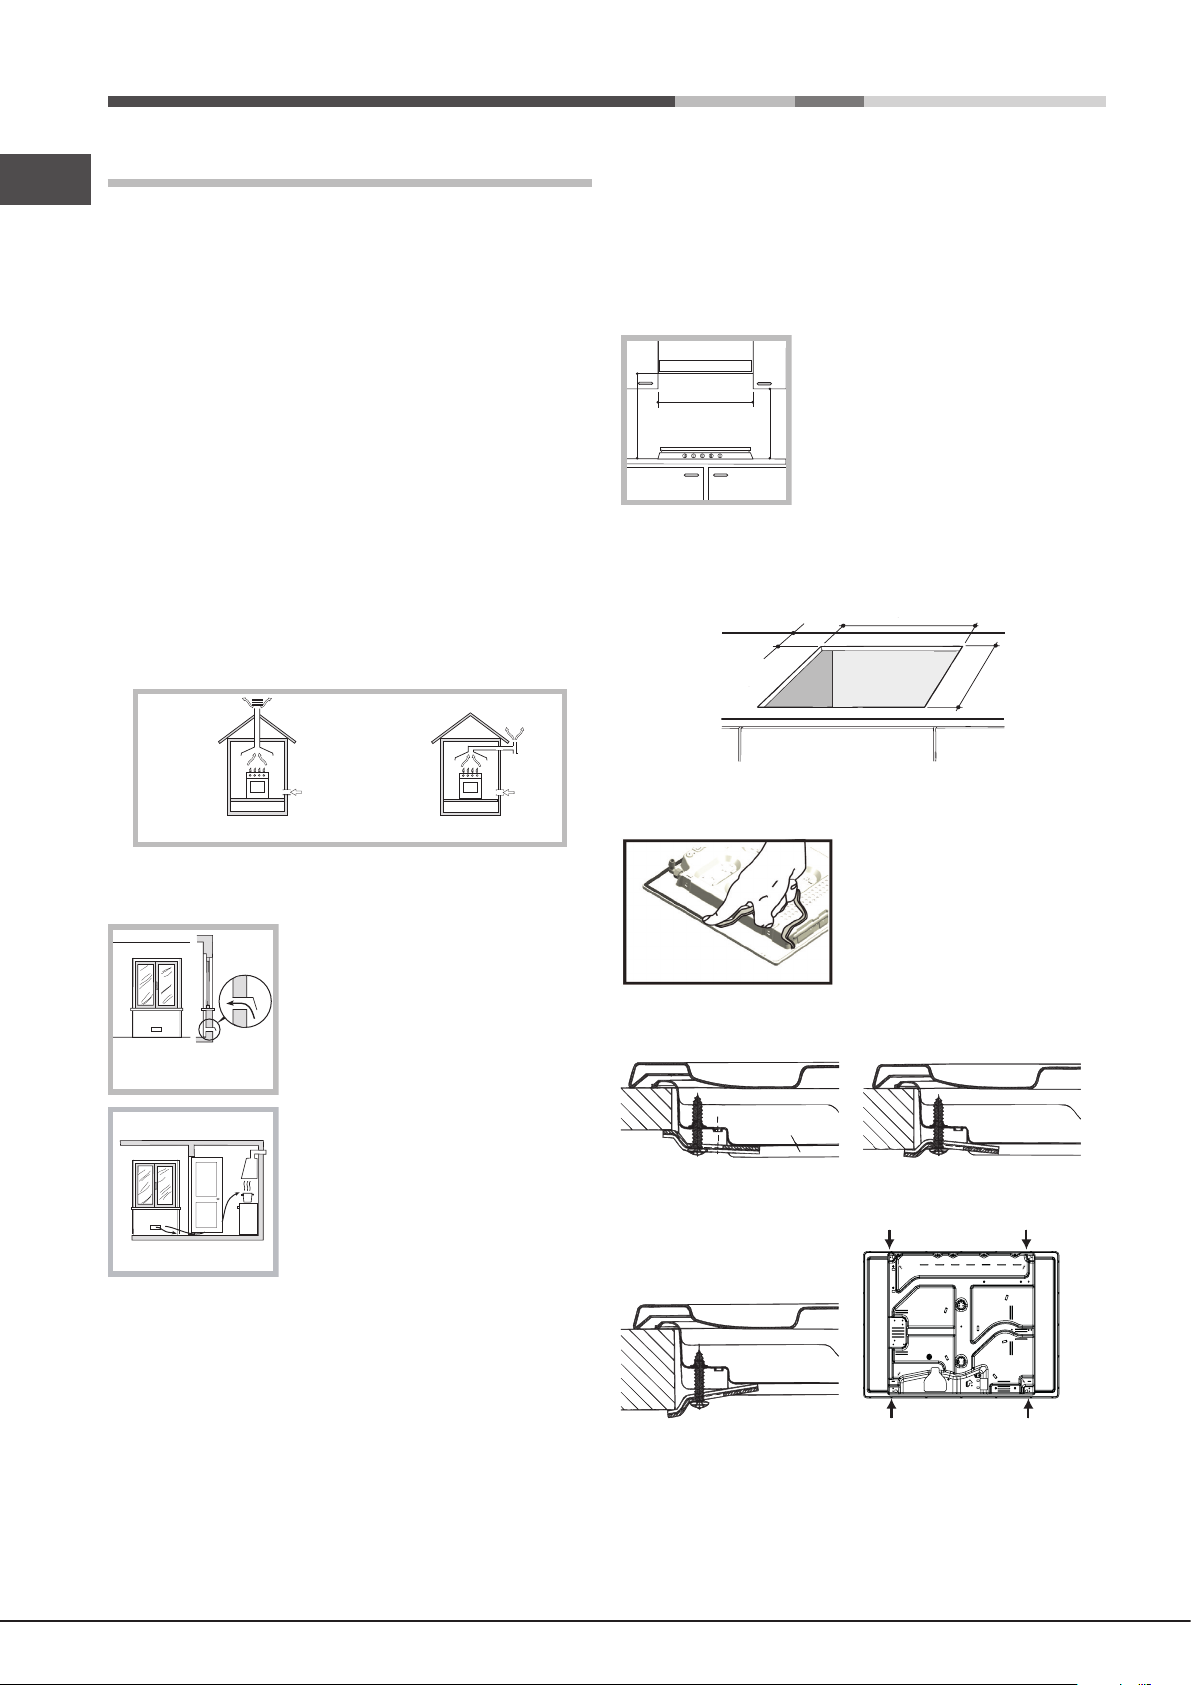
• The installation cavity should have the dimensions indicated in the gure.
Fastening hooks are provided, allowing you to fasten the hob to tops that
are between 20 and 40 mm thick. To ensure the hob is securely fastened
to the top, we recommend you use all the hooks provided.
In a chimney stack or branched flue.
(exclusively for cooking appliances)
Directly to
the Outside
• The room must also allow proper air circulation, as air is needed for
combustion to occur normally. The ow of air must not be less than 2 m3/h
per kW of installed power.
The air circulation system may take air directly
from the outside by means of a pipe with an
inner cross section of at least 100 cm
2
; the
opening must not be vulnerable to any type
Examples of
ventilation holes
for comburant air.
Adjacent
Room
A
Room to be
Vented
of blockages.
The system can also provide the air needed for
combustion indirectly, i.e. from adjacent rooms
tted with air circulation tubes as described
above. However, these rooms must not be
communal rooms, bedrooms or rooms that
may present a re hazard.
Enlarging the ventilation slot
between window and floor.
• Intensive and prolonged use of the appliance may necessitate
supplemental ventilation, e.g. opening a window or increasing the power
of the air intake system (if present).
• Liquid petroleum gas sinks to the oor as it is heavier than air. Therefore,
rooms containing LPG cylinders must also be equipped with vents to allow
gas to escape in the event of a leak. As a result LPG cylinders, whether
partially or completely full, must not be installed or stored in rooms or
storage areas that are below ground level (cellars, etc.). It is advisable to
keep only the cylinder being used in the room, positioned so that it is not
subject to heat produced by external sources (ovens, replaces, stoves,
etc. ) which could raise the temperature of the cylinder above 50°C.
6
Before the installation remove the grids and burners from the hob and turn it
upside down, making sure you don’t damage the thermocouples and spark
plugs.
Apply the seals that come with the
appliance along the outer edges of
the hob to prevent any passage of air,
humidity and water (see Figure).
For proper application make sure the
surfaces to be sealed are clean, dry and
free of any grease/oil.
Hook fastening diagram
Hooking position for top H=20mm Hooking position for top H=30mm
Front
Hooking position for top H=40mm Back
! Use the hooks contained in the “accessory pack”.
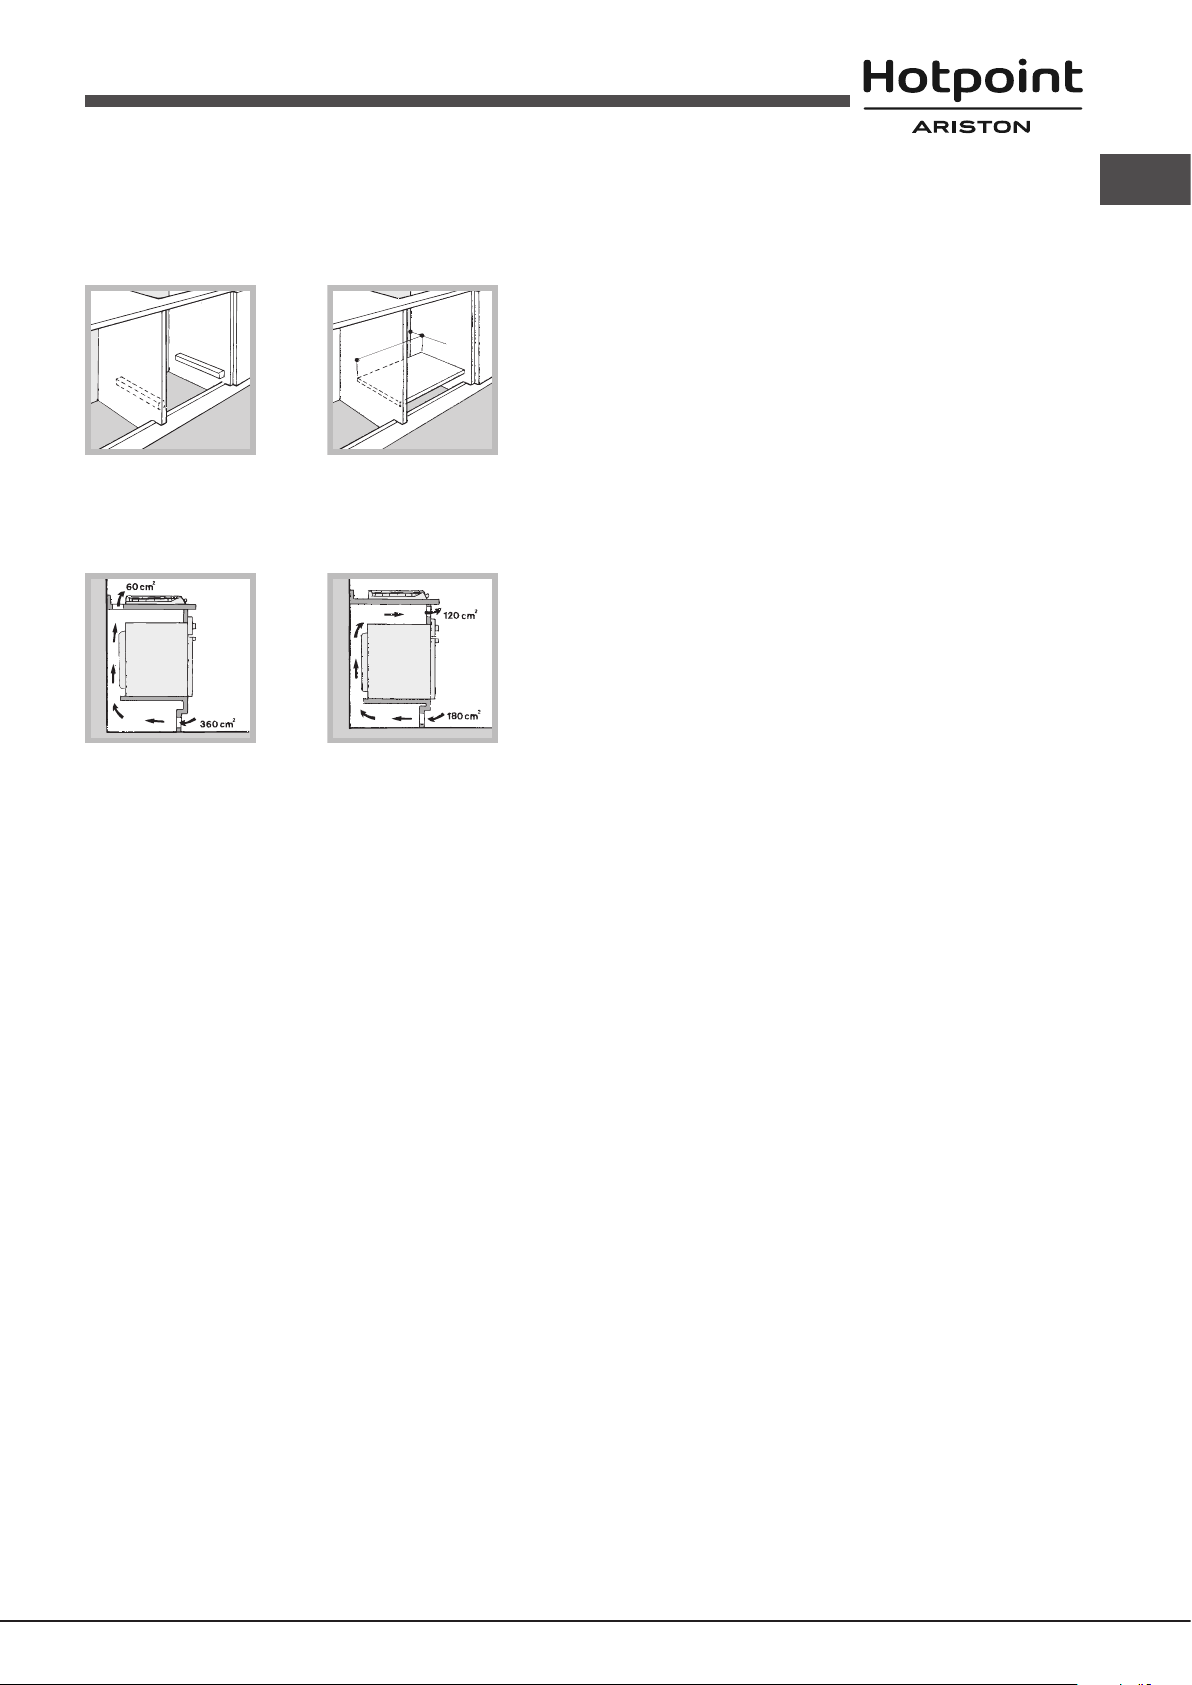
• Where the hob is not installed over a built-in oven, a wooden panel must
be installed as insulation. This must be placed at a minimum distance of
20 mm from the lower part of the hob.
Page 7
Ventilation
! The cable must not be bent or compressed.
To ensure adequate ventilation, the back panel of the cabinet must be
removed. It is advisable to install the oven so that it rests on two strips of
wood, or on a completely at surface with an opening of at least 45 x 560
! The cable must be checked regularly and replaced by authorised technicians
only (see Assistance).
mm (see diagrams).
! The manufacturer declines any liability should these safety measures not
be observed.
45 mm.
560 mm.
Gas connection
The appliance should be connected to the main gas supply or to a gas
cylinder in compliance with current national regulations. Before carrying out
the connection, make sure the cooker is compatible with the gas supply you
Where a hob is installed above an oven without a forced ventilation cooling
system, adequate ventilation must be provided inside the cabinet by means
of air holes through which air can pass (see gure).
wish to use. If this is not the case, follow the instructions indicated in the
paragraph “Adapting to different types of gas.”
When using liquid gas from a cylinder, install a pressure regulator which
complies with current national regulations.
! Check that the pressure of the gas supply is consistent with the values
indicated in Table 1 (“Burner and nozzle specications”). This will ensure the
safe operation and longevity of your appliance while maintaining efcient
energy consumption.
Connection with a rigid pipe (copper or steel)
! Connection to the gas system must be carried out in such a way as not to
place any strain of any kind on the appliance.
There is an adjustable L-shaped pipe tting on the appliance supply ramp
and this is tted with a seal in order to prevent leaks. The seal must always
Electrical connection
Hobs equipped with a three-pole power supply cable are designed to operate
be replaced after rotating the pipe tting (seal provided with appliance). The
gas supply pipe tting is a threaded 1/2 gas cylindrical male attachment.
with alternating current at the voltage and frequency indicated on the data
plate (this is located on the lower part of the appliance). The earth wire in the
cable has a green and yellow cover. If the appliance is to be installed above
a built-in electric oven, the electrical connection of the hob and the oven must
be carried out separately, both for electrical safety purposes and to make
extracting the oven easier.
Connecting a flexible jointless stainless steel pipe to a threaded
attachment
The gas supply pipe tting is a threaded 1/2 gas cylindrical male attachment.
These pipes must be installed so that they are never longer than 2000 mm
when fully extended. Once connection has been carried out, make sure that
the exible metal pipe does not touch any moving parts and is not compressed.
Connecting the supply cable to the mains
Install a standardised plug corresponding to the load indicated on the data
! Only use pipes and seals that comply with current national regulations.
plate.
The appliance must be directly connected to the mains using an omnipolar
circuit-breaker with a minimum contact opening of 3 mm installed between
the appliance and the mains.
Checking the tightness of the connection
! When the installation process is complete, check the pipe ttings for leaks
using a soapy solution. Never use a ame.
The circuit-breaker must be suitable for the charge indicated and must comply
with current electrical regulations (the earthing wire must not be interrupted
by the circuit-breaker). The supply cable must not come into contact with
surfaces with temperatures higher than 50°C.
Adapting to different types of gas
To adapt the hob to a different type of gas other than default type (indicated
on the rating plate at the base of the hob or on the packaging), the burner
nozzles should be replaced as follows:
! The installer must ensure that the correct electrical connection has been
made and that it is compliant with safety regulations.
1. Remove the hob grids and slide the burners off their seats.
2. Unscrew the nozzles using a 7 mm socket spanner, and replace them
with nozzles for the new type of gas (see table 1 “Burner and nozzle
Before connecting to the power supply, make sure that:
• the appliance is earthed and the plug is compliant with the law.
• the socket can withstand the maximum power of the appliance, which is
indicated on the data plate.
• the voltage is in the range between the values indicated on the data plate.
characteristics”).
3. Reassemble the parts following the above procedure in the reverse order.
4. Once this procedure is nished, replace the old rating sticker with one
indicating the new type of gas used. Sticker are available from any of our
Service Centres.
• the socket is compatible with the plug of the appliance. If the socket is
incompatible with the plug, ask an authorised technician to replace it. Do
not use extension cords or multiple sockets.
Replacing the Triple ring burner nozzles
1. Remove the pan supports and lift the burners out of their housing. The
burner consists of two separate parts (see pictures).
! Once the appliance has been installed, the power supply cable and the
electrical socket must be easily accessible.
2. Unscrew the nozzles using a 7 mm socket spanner. Replace the nozzles
with models that are congured for use with the new type of gas (see Table
1). The two nozzles have the same hole diameter.
GB
7
Page 8
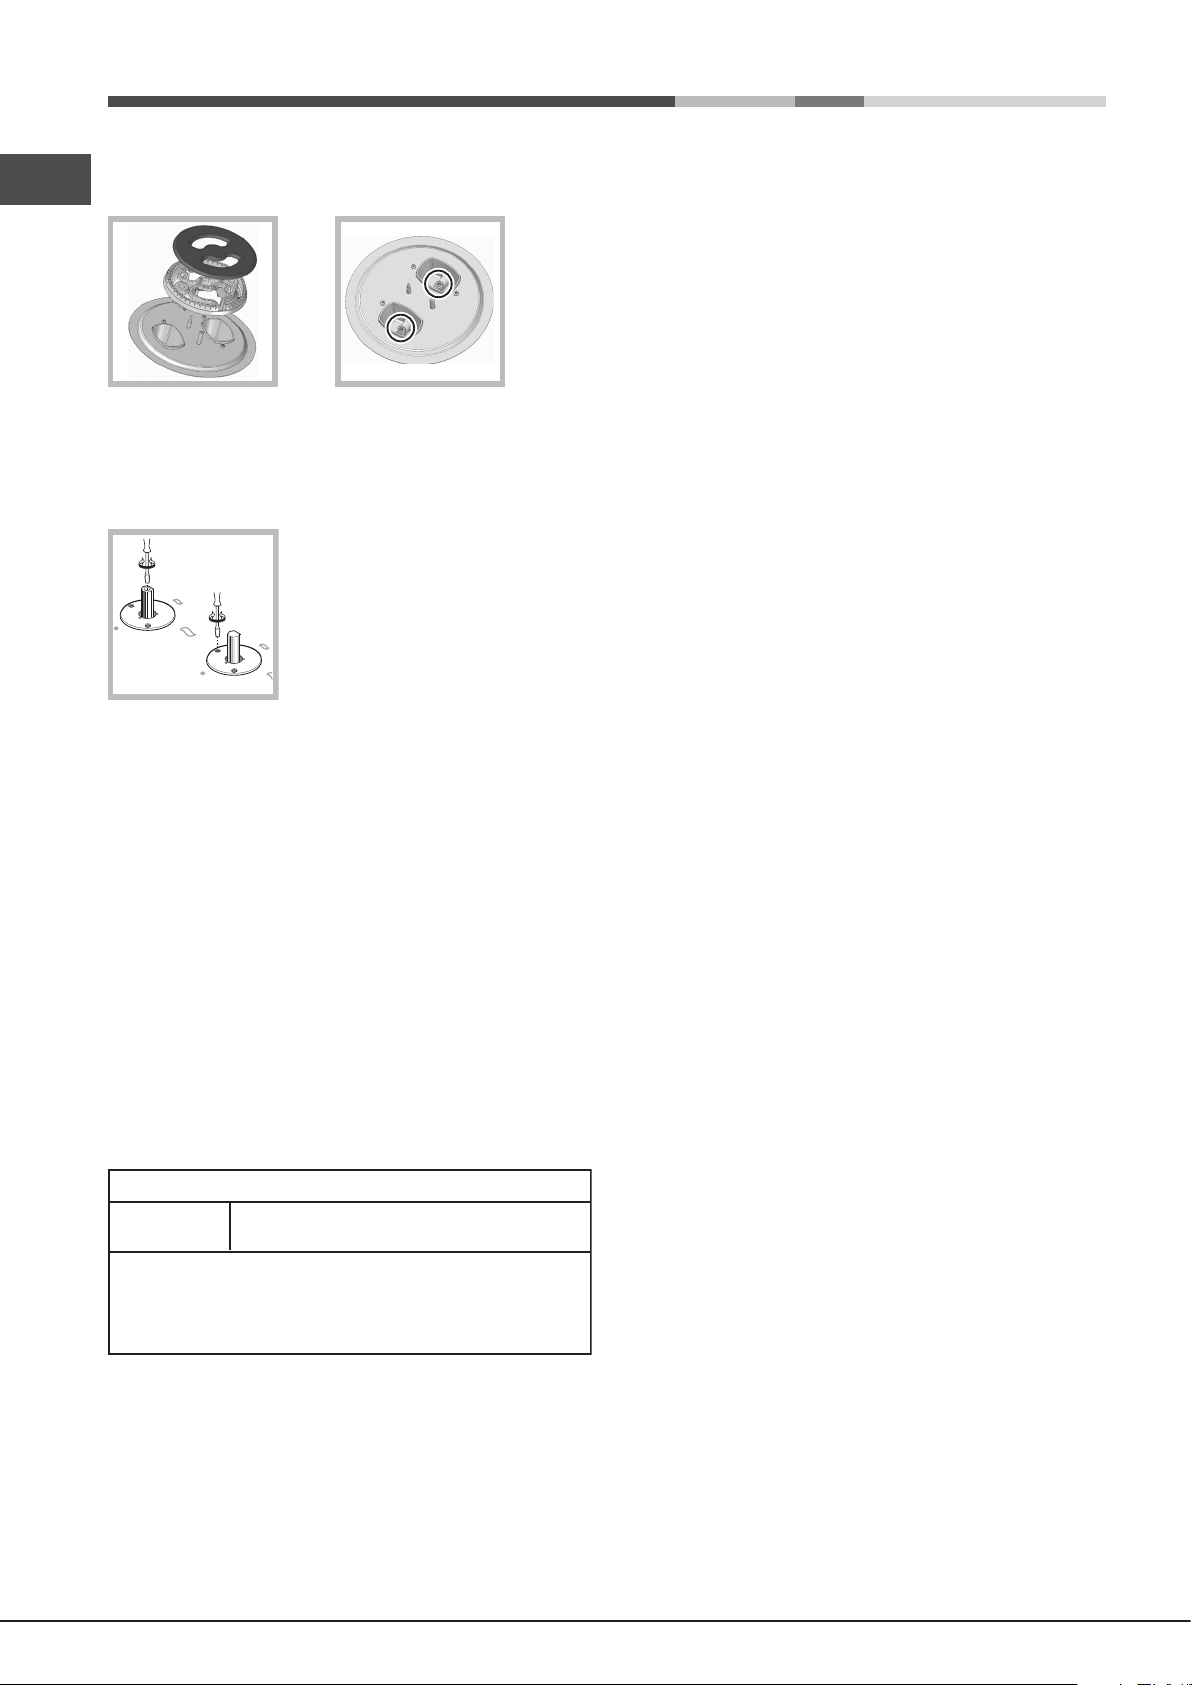
3. Replace all the components by completing the above operations in reverse
GB
order.
• Adjusting the burners’ primary air
Does not require adjusting.
• Setting the burners to minimum
1. Turn the tap to the low ame position.
2. Remove the knob and adjust the adjustment
screw, which is positioned in or next to the tap
pin, until the ame is small but steady.
3. Having adjusted the ame to the required low setting, while the burner is
alight, quickly change the position of the knob from minimum to maximum
and vice versa several times, checking that the ame does not go out.
4. Some appliances have a safety device (thermocouple) tted. If the device
fails to work when the burners are set to the low ame setting, increase
this low ame setting using the adjusting screw.
5. Once the adjustment has been made, replace the seals on the by-passes
using sealing wax or a similar substance.
! If the appliance is connected to liquid gas, the regulation screw must be
fastened as tightly as possible.
! Once this procedure is nished, replace the old rating sticker with one
indicating the new type of gas used. Stickers are available from any of our
Service Centres.
! Should the gas pressure used be different (or vary slightly) from the
recommended pressure, a suitable pressure regulator must be tted to the
inlet pipe (in order to comply with current national regulations).
DATA PLATE
Electrical
connections
see data plate
ECODESIGN
This appliance conforms to the EU Regulation no. 66/2014
implementing Directive 2009/125/EC.
standard EN 30-2-1
8
Page 9

Burner and nozzle specifications
*
**
***
Ta
ble 1 Liquid Gas Natural Gas
GB
Burner
Fast (R)
Reduced Fast (RR)
Semi Fast (S)
Auxiliary (A)
Triple Crown (TC)
Supply pressures
At 15°C and 1013,25 mbar - dry gas
Propane P.C.S. = 50.37 MJ/Kg
Butane P.C.S. = 49.47 MJ/Kg
Natural P.C.S. = 37.78 MJ/m³
A
R
Diameter
(mm)
100
100
75
55
130
S
Thermal
Power
kW (p.c.s.*)
0.70
0.70
0.40
0.40
1.50
Thermal
Power
kW (p.c.s.*)
NominalReduced
3.00
2.60
1.65
1.00
3.30
Nominal (mbar)
Minimum (mbar)
Maximum (mbar)
By-pass
A
RR
1/100
(mm)
39
39
28
28
61
TC
Nozzle
1/100
(mm)
86
80
64
50
65x2
***
218
189
120
73
240
28-30
20
35
Flow*
g/h
**
214
186
118
71
236
37
25
45
Thermal
Power
kW (p.c.s.*)
Nominal
3.00
2.60
1.65
1.00
3.60
Nozzle
1/100
(mm)
132 (H)
122 (H)
96 (Z)
79 (6)
103x2
20
17
25
Flow*
l/h
286
248
157
95
343
S
PCN 642 IX/HA EE
S
PCN 641 T/IX/HA EE
9
Page 10

Start-up and use
GB
Precautions and tips
! The position of the corresponding gas burner is shown on every knob.
! This appliance has been designed and manufactured in compliance with
international safety standards. The following warnings are provided for safety
Gas burners
reasons and must be read carefully.
Each burner can be adjusted to one of the following settings using the
corresponding control knob:
General safety
• This is a class 3 built-in appliance.
● Off
Maximum
Minimum
• Gas appliances require regular air exchange to maintain efcient
operation. When installing the hob, follow the instructions provided
in the paragraph on “Positioning” the appliance.
• These instructions are only valid for the countries whose symbols
appear in the manual and on the serial number plate.
To light one of the burners, hold a lit match or lighter near the burner and, at
the same time, press down and turn the corresponding knob anti-clockwise
to the maximum setting.
Since the burner is tted with a safety device, the knob should be pressed
for approximately 2-3 seconds to allow the automatic device keeping the
ame alight to heat up.
Models are equipped with an ignition button incorporated into the control
knob. If this is the case, the ignitor is present, but not the button.To light a
burner, simply press the corresponding knob all the way in and then turn it
in the counter-clockwise direction to the “High” setting, keeping it pressed
in until the burner lights.
• The appliance was designed for domestic use inside the home and is
not intended for commercial or industrial use.
• The appliance must not be installed outdoors, even in covered areas. It is
extremely dangerous to leave the appliance exposed to rain and storms.
• Do not touch the appliance with bare feet or with wet or damp hands and
feet.
• The appliance must be used by adults only for the preparation of food,
in accordance with the instructions outlined in this booklet. Any other
use of the appliance (e.g. for heating the room) constitutes improper
use and is dangerous. The manufacturer may not be held liable for
any damage resulting from improper, incorrect and unreasonable
use of the appliance.
! If a ame is accidentally extinguished, turn off the control knob and wait for
at least 1 minute before trying to relight it.
• The openings used for ventilation and dispersion of heat must never be
covered.
• Always make sure the knobs are in the “●”/“○” position when the appliance
To switch off the burner, turn the knob in a clockwise direction until it stops
(when reaches the “●” position).
is not in use.
• When unplugging the appliance always pull the plug from the mains socket,
do not pull on the cable.
Practical advice on using the burners
To ensure the burners operate efciently:
• Use appropriate cookware for each burner (see table) so that the ames
do not extend beyond the bottom of the cookware.
• Always use cookware with a at base and a cover.
• When the contents of the pan reach boiling point, turn the knob to minimum.
Burner
Rapid (R)
Reduced Rapid (RR)
Semi Rapid (S)
Auxiliary (A)
Triple Crown (TC)
To identify the type of burner, refer to the designs in the section entitled, “Burner
and Nozzle Specications”.
Ø Cookware Diameter (cm)
24 - 26
24 - 26
16 - 20
10 - 14
24 - 26
• Never carry out any cleaning or maintenance work without having detached
the plug from the mains.
• In case of malfunction, under no circumstances should you attempt to repair
the appliance yourself. Repairs carried out by inexperienced persons may
cause injury or further malfunctioning of the appliance. Contact a Service
Centre (see Assistance).
• Do not close the glass cover (if present) when the gas burners or electric
hotplates are still hot.
• The appliance should not be operated by people (including children)
with reduced physical, sensory or mental capacities, by inexperienced
individuals or by anyone who is not familiar with the product. These
individuals should, at the very least, be supervised by someone who
assumes responsibility for their safety or receive preliminary instructions
relating to the operation of the appliance.
• Do not let children play with the appliance.
• The appliance is not intended to be operated by means of an external
timer or separate remote-control system.
• For maximum stability, always make sure that the pan supports are
correctly tted and that each pan is placed centrally over the burner.
• Pan handles should be positioned in line with one of the support bars on
the pan support grid.
• Pan handle should be positioned so not to protrude beyond the front edge
of the hob.
The more variable aspect in terms of pan
stability can often be the pan itself, (or
the positioning of that pan during use).
Well balanced pans, with at bases that
are placed centrally over the burner,
with the pan handles aligned with one
of the support ngers obviously offer the
greatest stability.
Disposal
• When disposing of packaging material: observe local legislation so that
the packaging may be reused.
• The European Directive 2012/19/EU on Waste Electrical and Electronic
Equipment (WEEE), requires that old household electrical appliances must
not be disposed of in the normal unsorted municipal waste stream. Old
appliances must be collected separately in order to optimise the recovery
and recycling of the materials they contain and reduce the impact on
human health and the environment.The crossed out “wheeled bin” symbol
on the product reminds you of your obligation, that when you dispose of
the appliance it must be separately collected.
Consumers should contact their local authority or retailer for information
concerning the correct disposal of their old appliance.
10
Page 11

Respecting and conserving the environment
• Cook your food in closed pots or pans with well-tting lids and use as little
water as possible. Cooking with the lid off will greatly increase energy
consumption.
• Use purely at pots and pans.
• If you are cooking something that takes a long time, it’s worth using a
pressure cooker, which is twice as fast and saves a third of the energy.
Maintenance and care
Switching the appliance off
Disconnect your appliance from the electricity supply before carrying out
any work on it.
Cleaning the hob surface
• All the enamelled and glass parts should be cleaned with warm water and
neutral solution.
• Stainless steel surfaces may be stained by calcareous water or aggressive
detergents if left in contact for too long. Any food spills (water, sauce, coffee,
etc.) should be wiped away before they dry.
• Clean with warm water and neutral detergent, and then dry with a soft
cloth or chamois. Remove baked-on dirt with specic cleaners for stainless
steel surfaces.
• Clean stainless steel only with soft cloth or sponge.
• Do not use abrasive or corrosive products, chlorine-based cleaners or pan
scourers.
• Do not use steam cleaning appliances.
• Do not use ammable products.
• Do not leave acid or alkaline substances, such as vinegar, mustard, salt,
sugar or lemon juice on the hob.
Troubleshooting
It may happen that the appliance does not function properly or at all. Before
calling the service centre for assistance, check if anything can be done. First,
check to see that there are no interruptions in the gas and electrical supplies,
and, in particular, that the gas valves for the mains are open.
The burner does not light or the ame is not even around the burner.
Check whether:
• The gas holes on the burner are clogged.
• All the movable parts that make up the burner are mounted correctly.
• There are draughts near the appliance.
The ame dies in models with a safety device.
Check to make sure that:
• You pressed the knob all the way in.
• You keep the knob pressed in long enough to activate the safety device.
• The gas holes are not blocked in the area corresponding to the safety
device.
The burner does not remain lit when set to minimum.
Check to make sure that:
• The gas holes are not blocked.
• There are no draughts near the appliance.
• The minimum setting has been adjusted properly.
The cookware is unstable.
Check to make sure that:
• The bottom of the cookware is perfectly at.
• The cookware is positioned correctly at the centre of the burner.
• The pan support grids have been positioned correctly.
GB
Cleaning the hob parts
• Clean the enamelled and glass parts only with soft cloth or sponge.
• Grids, burner caps and burners can be removed to be cleaned.
• Clean them by hand with warm water and non-abrasive detergent,
removing any food residues and checking that none of the burner openings
is clogged.
• Rinse and dry.
• Ret burners and burner caps correctly in the respective housings.
• When replacing the grids, make sure that the panstand area is aligned
with the burner.
• Models equipped with electrical ignition plugs and safety device require
thorough cleaning of the plug end in order to ensure correct operation.
Check these items frequently, and if necessary, clean them with a damp
cloth. Any baked-on food should be removed with a toothpick or needle.
! To avoid damaging the electric ignition device, do not use it when the
burners are not in their housing.
Gas tap maintenance
Over time, the taps may become jammed or difcult to turn. If this happens,
the tap must be replaced.
! This procedure must be performed by a qualied technician authorised
by the manufacturer.
11
Page 12

Instalarea
555 mm
55 mm
475 mm
RO
sub acţiunea directă a surselor de căldură (cuptoare, şeminee, sobe, etc.)
ce ar determina creşterea temperaturii peste 50°C.
! Înainte de a pune în funcţiune noul dumneavoastră aparat, vă rugăm să
citiţi cu atenţie această carte. Conţine informaţii importante pentru folosirea
în condiţii de siguranţă, instalarea şi îngrijirea aparatului.
! Vă rugăm să păstraţi aceste instrucţiuni de folosire pentru a consultate în
viitor. Transmiteţi-le noilor proprietari posibili ai aparatului.
Amplasarea
! Nu lăsaţi materialul ambalajului la îndemâna copiilor. Acesta poate deveni
un pericol de sufocare (a se vedea Precauţii şi sfaturi).
! Aparatul trebuie să e instalat de un profesionist calicat în conformitate
cu instrucţiunile furnizate. Instalarea incorectă poate provoca vătămarea
persoanelor şi animalelor şi poate aduce daune proprietăţii.
! Acest aparat poate instalat şi utilizat numai în încăperi ventilate permanent,
în conformitate cu reglementările locale în vigoareTrebuie îndeplinite
următoarele cerinţe:
• Camera trebuie să e echipată cu un sistem de extracţie a aerului care
evacuează orice gaze de combustie. Acesta poate consta dintr-o hotă sau
un ventilator electric care porneşte automat de ecare dată când aparatul
este pornit.
Încastrare în mobilier
Pentru instalarea corectă a plitei trebuie respectate următoarele indicaţii:
• Mobilele adiacente a căror înălţime depăşeşte planul de lucru trebuie
situate la cel puţin 200 mm distanţă în raport cu capătul planului de lucru.
• Hota trebuie instalată în conformitate cu instrucţiunile cuprinse în manualul
de instalare a hotei; oricum, nu la mai puţin de 650 mm deasupra plitei (a
se vedea gura).
• Poziţionaţi corpurile de mobilier suspendate la o înălţime de cel puţin
420 mm în raport cu hota (a se vedea gura).
Dacă plita este instalată sub un element de
mobilier suspendat, acesta din urmă trebuie
600mm min.
să păstreze o distanţă de cel puţin 700 mm
faţă de planul de lucru.
650mm min.
420mm min.
• Nişa rezervată plitei trebuie să aibă dimensiunile indicate în gura de mai
jos. Clemele de xare sunt prevăzute pentru amplasarea plitei deasupra
unei mobile având grosimea blatului cuprinsă între 20 - 40 mm. Se
recomandă folosirea tuturor clemelor pentru o xare corespunzătoare a
aparatului.
În cazul şemineelor sau coşurilor de fum ramificate
(special pentru plită)
Direct în exterior
• Camera trebuie să permită, de asemenea, circulatia corespunzătoare a
aerului, aerul ind necesar pentru ca arderea să aibă loc în mod normal.
Debitul de aer nu trebuie să e de mic de 2 m3/h pe kW de putere instalată.
Sistemul de aerisire poate realizat prelevând
direct aerul din exterior cu ajutorul unei ţevi de
cel puţin 100 cm2 secţiune interioară utilă şi
ferită de orice eventuală opturare accidentală.
A
Exemple de orificii de
ventilație pentru aerul
comburant.
Încăpere
adiacentă
Camera ce
trebuie ventilată
Un alt mod de aerisire este preluarea indirectă
a aerului, prin intermediul unor încăperi
adiacente prevăzute cu un sistem de aerisire
spre exterior, de tipul celui prezentat mai sus,
cu condiţia ca acestea să nu e părţi comune
ale imobilului, camere cu risc de incendiu sau
Mărirea distanţei
între uşă şi podea
dormitoare.
• O utilizare intensivă şi prelungită a aparatului poate avea nevoie de o
aerisire suplimentară, de exemplu deschiderea unei ferestre, sau o aerisire
suplimentară mai ecace, mărind puterea de aspiraţie mecanică, dacă
acesta există deja.
• Gazele de petrol licheate, mai grele decât aerul, se depun şi stagnează
în partea de jos. De aceea, încăperile în care se depozitează butelii cu
GPL trebuie prevăzute cu oricii de aerisire situate în partea de jos, pentru
a permite evacuarea eventualelor scăpări de gaz. Buteliile de GPL, goale
sau parţial umplute nu trebuie instalate sau depozitate în încăperi situate
sub nivelul solului (pivniţe, etc.). Se recomandă să păstraţi în încăpere
doar butelia din care consumaţi momentan, plasată astfel încât să nu intre
Înainte de instalare, scoateţi grătarele şi arzătoarele plitei şi răsturnaţi-o, ind
atenţi să nu deterioraţi termocuplele şi bujiile.
Aplicaţi garniturile din dotarea aparatului
pe marginile externe ale plitei, pentru a
împiedica trecerea aerului, umidităţii şi
a apei (vezi gura). Pentru o aplicare
corectă, asiguraţi-vă că suprafeţele
care urmează să e sigilate sunt curate,
uscate şi fără unsori/uleiuri.
Schema de xare a cârligelor
Poziţia clemei pentru sus H=20mm Poziţia clemei pentru sus H=30mm
Faţă
Poziţia clemei pentru sus H=40mm Spate
12
Page 13

! Folosiţi cârligele din „pachetul de accesorii“.
• În cazul în care plita nu este instalată deasupra unui cuptor încorporat,
trebuie instalat un panou de lemn ca izolaţie. Acesta trebuie plasat la o
distanţă minimă de 20 mm faţă de partea de jos a plitei.
Ventilare
Pentru a garanta o bună ventilare este necesar să eliminaţi peretele din
spatele nişei. Este preferabil să instalaţi cuptorul astfel încât acesta să se
sprijine pe 2 suporturi din lemn. Dacă, în caz contrar exista un plan de sprijin
continuu, acesta trebuie să aibă o deschidere de cel puţin 45 x 560 mm (a
se vedea gurile).
45 mm.
560 mm.
! După instalare, cablul electric şi priza de curent trebuie să e uşor accesibile.
RO
! Cablul nu trebuie să e îndoit sau zgâriat.
! Cablul trebuie vericat periodic şi înlocuit doar de către tehnicieni autorizaţi
(a se vedea cap. Asistenţă).
! Producătorul îşi declină orice responsabilitate dacă aceste indicaţii nu sunt
respectate.
Conectarea la gaz
Conectarea aparatului la butelie sau la reţeaua de gaz conform Normelor
naţionale în vigoare trebuie executată de un instalator autorizat care va şti
dacă aparatul este reglat pentru tipul de gaz ce va utilizat. În caz contrar,
se vor consulta instrucţiunile de la cap. “Adaptarea la diferite tipuri de gaz”.
Dacă plita este conectată la butelie, utilizaţi numai regulatoare de presiune în
conformitate cu standardele Normei naţionale aferente în vigoare
În cazul instalării deasupra unui cuptor încorporabil, fără ventilare forţată
de răcire, pentru a permite o ventilare adecvată în interiorul mobilei trebuie
prevăzute oricii de pătrundere şi evacuare a aerului (a se vedea gurile)
Conexiunea electrică
Plitele prevăzute cu cablu de alimentare tripolar sunt predispuse la funcţionarea
cu curent alternativ, la tensiunea şi frecvenţa de alimentare indicate pe eticheta
aparatului (situată pe partea inferioră a plitei). Conductorul este de culoare
galben-verzui. În cazul instalării deasupra unui cuptor încorporabil, conexiunea
electrică a plitei şi a cuptorului trebuie realizată separat, atât din motive de
siguranţă electrică cât şi pentru a facilita scoaterea eventuală a cuptorului.
Branşamentul cablului de alimentare la reţeaua electrică
Montaţi pe cablu un ştecher corespunzător sarcinii înscrise pe eticheta cu
caracteristici a produsului.
În cazul branşamentului direct pe linia electrică, intercalaţi între aparat şi
linia electrică un întrerupător omnipolar cu deschiderea de minim 3 mm între
contacte, dimensionat la sarcină şi în conformitate cu normele în vigoare (rul
de împământare galben-verzui să nu e întrerupt de întrerupător). Cablul
de alimentare este astfel plasat încât să nu atingă în nici un punct al său o
temperatură depăşind-o pe cea ambientală cu 50°C.
! Instalatorul este responsabil de corectitudinea branşamentului şi de
efectuarea acestuia în conformitate cu normele de siguranţă.
Înaintea efectuării branşamentului, vericaţi ca:
• priza să e cu împământare şi conform normelor legale;
• priza să e în măsură de a suporta sarcina maximă de putere a aparatului,
indicată pe eticheta cu caracteristici;
• tensiunea de alimentare să e cuprinsă în valorile indicate pe eticheta cu
caracteristici;
• priza să e compatibilă cu ştecherul aparatului. În caz contrar, înlocuiţi
priza sau ştecherul; nu folosiţi prelungitoare.
! Pentru o funcţionare sigură, pentru o utilizare adecvată a energiei şi pentru
prelungirea duratei aparatului, vericaţi ca presiunea de alimentare să respecte
valorile indicate în tabelul 1 “Caracteristici ale arzătoarelor şi injectoarelor”.
Racordarea tubului rigid (cupru sau oţel)
! Racordarea la reţeaua de gaz trebuie efectuată astfel încât aparatul sau
diferite părţi ale acestuia să nu e obstrucţionate.
Rampa de alimentare este prevăzută cu un racord în formă de “L” orientabilă
cu manşon de etanşeitate. Dacă este necesar ca acest racord să e rotit,
trebuie neapărat înlocuit manşonul de etanşeitate (livrat o dată cu aparatul).
Racordul de intrare a gazului în aparat este un conector letat, G 1/2 tarod
cilindric.
Racordarea furtunului exibil din oţel
Racordul de intrare a gazului în aparat este un conector letat G 1/2 tarod
cilindric. Utilizaţi numai ţevi/tuburi/furtunuri şi manşoane de etanşeitate
conform codurilor curente de producţie. Instalarea acestor ţevi trebuie
efectuată astfel încât lungimea acestora să e de maximum 2000 mm. O
dată încheiată conectarea, vericaţi ca tubul metalic să nu e strivit sau să
nu atingă părţi mobile.
! Utilizaţi exclusiv tuburi în conformitate cu Norma naţională aferentă în vigoare
şi garnituri de susţinere în conformitate cu Normele Naţionale în vigoare.
Vericarea etanşeităţii
! La încheierea instalării, vericaţi etanşeitatea tuturor racordurilor folosind o
soluţie de apă cu săpun, niciodată acără.
Adaptarea la diferite tipuri de gaz
Pentru a adapta plita la diferite tipuri de gaz diferite de cel pentru care aceasta
a fost concepută (indicat pe eticheta xată pe partea interioară a plitei sau pe
ambalaj), este necesară înlocuirea injectoarelor tuturor arzătoarelor, astfel:
1. Ridicaţi grătarul plitei şi scoateţi arzătoarele din locaşurile acestora.
2. Deşurubaţi injectoarele cu o cheie tubulară de 7 mm şi înlocuiţi-le cu
injectoare potrivite noului tip de gaz (a se vedea tabelul 1 “Caracteristici
ale arzătoarelor şi injectoarelor”).
3. Remontaţi piesele în ordine inversă.
4. La încheierea operaţiei, înlocuiţi vechea etichetă cu eticheta
corespunzătoare noului tip de gaz.
Înlocuirea duzelor pe arzătoare Triplă Coronă
1. Îndepărtaţi grătarele plitei şi scoateţi arzătoarele din locaşurile lor. Arzătorul
este format din două părţi separate (vezi poze).
2. Deşurubati duzele folosind o cheie tubulară de 7 mm şi înlocuiţi-le cu duze
pentru noul tip de gaz (a se vedea tabelul 1 „Caracteristicile arzătorului şi
duzelor“). Cele două duze au acelaşi diametru găurii.
13
Page 14

3. Reasamblaţi piesele urmând procedura de mai sus în ordine inversă.
RO
• Reglarea aerului primar al arzătoarelor:
Arzătoarele nu necesită nici o reglare a aerului primar.
• Reglarea minimelor
1. Poziţionaţi robinetul de gaz pe poziţia minim;
2. Scoateţi butonul corespunzător arzătorului
vizat şi manevraţi şurubul (situat în interiorul
ştuţului sau lateral tijei robinetului) până obţineţi
o acără mică şi uniformă.
3. Vericaţi dacă, rotind rapid butonul de la maxim la minim, acăra nu se
stinge.
4. La aparatele echipate cu dispozitiv de siguranţă (termocuplu), dacă
dispozitivul nu funcţionează corect când arzătoarele sunt pe minim, măriţi
debitul minimelor manevrând şurubul de reglaj.
5. La încheierea operaţiei, aplicaţi ceara de sigiliu (sau un înlocuitor) pe by-
pass.
! În cazul utilizării gazului lichid, şurubul de reglare trebuie împins la refuz.
! Dacă presiunea gazului utilizat este diferită (sau variabilă) faţă de cea
prevăzută, trebuie instalat, pe canalul de aducţiune un regulator de presiune
corespunzător şi conform normelor naţionale în vigoare privind reţelele de gaz.
PLĂCUŢA CU DATELE TEHNICE
Conexiuni
electrice
ECODESIGN
Regulamentul UE nr. 66/2014 de integrare a Directivei
2009/125/CE.
regulamentul EN 30-2-1
a se vedea plăcuţa cu datele tehnice
14
Page 15

Tabelul 1 Gaz lichid Gaz natural (G20)
Specificaţiile arzătorului şi duzei
RO
Arzător
Rapid (R)
Redus rapid (RR)
Semirapid (S)
Auxiliar (A)
Triplă Coronă (TC)
Presiuni de furnizare
* La 15°C şi 1013,25 mbar - gaze uscate
** Propan (G31) P.C.S. = 50.37 MJ/Kg
*** Butan (G30) P.C.S. = 49.47 MJ/Kg
Natural (G20) P.C.S. = 37.78 MJ/m
Model
Diametru
(mm)
100
100
75
55
130
Putere termică
Nomin. Redus.
3.10
2.70
1.75
1.05
3.50
kW (p.c.s.*)
0.80
0.80
0.45
0.45
1.65
Nominală (mbar)
Minimă (mbar)
Maximă (mbar)
3
Secțiune de gaz
Putere nominală (kW)Categorie
By-pass
1/100
(mm)
39
39
28
28
61
Duză
1/100
(mm) ***(G30)
86
80
64
50
65x2
(1)
225
196
127
76
254
Tensiune și frecvență
Debit*
g/h
**(G31)
221
193
125
75
250
30
20
35
Secțiune electrice
132(H3)
122(H3)
103x2
Duză
1/100
(mm)
96(Z)
79(6)
Debit*
g/h
295
257
167
100
333
20
17
25
Putere (W)
PCN 642 IX/HA EE
(1)
Valorile în g/h se referă la capacităţile cu Gaz Lichid (Butan, Propan).
II2H3B/P
II2H3B/P 7,65 (556 g/h - G30) (546 g/h - G31)
A
R
S
S
PCN 642 IX/HA EE
9,00 (654 g/h - G30) (643 g/h - G31)
A
RR
TC
S
PCN 641 T/IX/HA EE
220-240V~ 50/60Hz
220-240V~ 50/60Hz
0,6
0,6PCN 642 IX/HA EE
15
Page 16

Pornirea şi folosirea
RO
! Pe ecare selector este indicată poziţia arzătoruluipe gaz corespunzătoare.
Arzătoarele de gaze
Fiecare arzător poate reglat pentru una din următoarele setări folosind
butonul de control corespunzător:
● Off
Aspectul cel mai variabil din punct de
vedere al stabilităţii oalelor poate de
multe ori oala propriu-zisă (sau amplasarea
acesteia în timpul utilizării). Oalele bine
echilibrate, cu fundul plat, aşezate central
pe aragaz, cu torţile poziţionate la nivel
cu una dintre razele grilei oferă, în mod
evident, stabilitate maximă.
Maxim
Minim
Pentru a aprinde un arzător, ţineţi un chibrit aprins sau o brichetă aproape
de arzător şi, în acelaşi timp, apăsaţi şi rotiţi butonul corespunzător în sens
antiorar la valoarea maximă.
Având în vedere că arzătorul este echipat cu un dispozitiv de siguranţă, butonul
trebuie apăsat pentru aproximativ 2-3 secunde pentru a permite dispozitivului
automat care ţine acăra aprinsă să se încălzească.
Modele sunt echipate cu un buton de aprindere încorporat în butonul de
control. Dacă acesta este cazul, este prezent aprinzătorul, dar nu butonul.
Pentru a aprinde un arzător, apăsaţi pur şi simplu butonul corespunzător
până la capăt şi apoi rotiţi-l în sens antiorar la setarea „Mare", menţinându-l
apăsat până când se aprinde arzătorul.
! În cazul în care acăra este stinsă accidental, opriţi butonul de control şi
aşteptaţi cel puţin 1 minut înainte de a încerca să îl reaprindeţi.
Pentru a stinge arzătorul, rotiţi butonul în sensul acelor de ceasornic până
când se opreşte (atunci când ajunge la poziţia “●”).
Sfaturi practice pentru utilizarea arzătoarelor
Pentru a obţine randamentul maxim trebuie să luaţi în considerare următoarele
indicaţii:
• Utilizaţi recipiente adecvate ecărui arzător (a se vedea tabelul) pentru a
evita ca acăra să depăşească suprafaţa recipientelor;
• Utilizaţi întotdeauna recipiente cu fundul plat şi prevăzute cu capac;
• În momentul atingerii punctului de erbere, rotiţi selectorul până ajungeţi
în dreptul poziţiei minime.
Arzător
Rapid (R)
Rapid Redus (RR)
Semi Rapid (S)
Auxiliar (A)
Triplă Coronă (TC)
Pentru identicarea tipului arzătorului, consultaţi gurile prezente în paragraful
“Caracteristici ale arzătoarelor şi injectoarelor”.
• Pentru stabilitate maximă, asiguraţi-vă că suporţii pentru recipientele de
coacere sunt poziţionaţi corect şi ecare recipient se aă în poziţie centrală
pe arzător.
• Asiguraţi-vă că mânerele recipientelor de coacere sunt aliniate cu una
dintre barele de sprijin ale suporţilor recipientelor.
• Poziţionaţi mânerele recipientelor de coacere astfel încât să nu iasă în
afară faţă de latura anterioară a planului de coacere.
Ø Diametru Recipiente (cm)
24 - 26
24 - 26
16 - 20
10 - 14
24 - 26
Precauţii şi sfaturi
! Aparatul a fost proiectat şi construit în conformitate cu normele internaţionale
de siguranţă. Aceste avertismente sunt furnizate din măsuri de siguranţă şi
trebuie citite cu atenţie.
Siguranţă generală
• Acest aparat face parte din clasa aparatelor încorporabile din clasa
3.
• Aparatele pe gaz necesită, pentru o corectă funcţionare, un regulator
de presiune. Vericaţi ca instalarea acestora să respecte indicaţiile
prevăzute în paragraful aferent capitolului “Poziţionare”.
• Instrucţiunile se adresează doar ţărilor a căror destinaţie şi simboluri
apar pe manualul de instrucţiuni şi pe eticheta aparatului.
• Aparatul a fost conceput pentru utilizarea de tip non-profesional, în interiorul
locuinţelor.
• Aparatul nu va instalat afară, chiar dacă spaţiul este protejat de un
acoperiş, deoarece este foarte periculoasă expunerea acestuia la ploi şi
la intemperii.
• Nu funcţionează la temperaturi mai mici de 16 grade C.
• Nu atingeţi aparatul dacă aveţi mâinile sau picioarele ude sau umede.
• Aparatul trebuie sa e utilizat numai pentru coacerea alimentelor
si numai de persoane adulte, conform instructiunilor din manual.
Orice alta utilizare (de exemplu: încalzirea locuintei) este considerata
improprie si deci periculoasa. Fabricantul nu va putea considerat
responsabil pentru eventuale daune provenite din utilizarea
improprie, gresita sau irationala a aparatului.
• Evitaţi contactul cablului de alimentare al altor aparate electrocasnice cu
părţile calde ale acestui aparat.
• Nu obstrucţionaţi oriciile de ventilare şi de propagare a căldurii.
• Vericaţi întotdeauna ca selectoarele să se ae în dreptul poziţiei “●”/“○”
în momentul neutilizării aparatului.
• Nu trageţi ştecherul din priza de curent, trăgând de cablu, ci de ştecher.
• Nu efectuaţi nici o operaţie de curăţare sau întreţinere fără a deconectat
mai întâi aparatul.
• În cazul apariţiei defecţiunilor, nu interveniţi în mecanismele interne ale
acestuia în vederea reparaţiei. Apelaţi Service-ul autorizat (a se vedea
cap. Asistenţă).
• Nu închideţi capacul de sticlă (dacă este prezent) în cazul în care
arzătoarele pe gaz sau plitele electrice sunt calde încă.
• Nu lăsaţi copiii să se joace cu aparatul.
• Este interzisă utilizarea aparatului de persoanele (inclusiv copiii) care
au o redusă capacitate zică sau senzorială sau mentală, precum şi de
cele fără experienţă sau care nu s-au familiarizat cu produsul, dacă nu
sunt supravegheate de un responsabil sau dacă nu au primit în prealabil
instrucţiuni asupra modului de folosire a aparaturii.
• Aparatul nu trebuie pus în funcţiune prin intermediul unui temporizator
extern sau al unui sistem separat de comandă la distanţă.
16
Page 17

Eliminarea deşeurilor
• Eliminarea ambalajelor: respectaţi reglementările locale; astfel, ambalajele
ar putea reutilizate.
• Directiva Europeană 2012/19/EU cu privire la deşeurile care provin de
la aparatura electrică sau electronică (RAEE) prevede ca aparatele
electrocasnice să nu e colectate împreună cu deşeurile urbane solide,
obişnuite. Aparatele scoase din uz trebuie să e colectate separat atât pentru
a optimiza rata de recuperare şi de reciclare a materialelor componente, cât
şi pentru a evita pericolele care pot duce la dăunarea sănătăţii omului sau
poluarea mediului înconjurător. Simbolul tomberonului tăiat care apare pe
toate produsele vă aminteşte tocmai obligaţia de a le colecta separat.
Pentru informaţii suplimentare cu privire la scoaterea din uz a aparatelor
electrocasnice, deţinătorii acestora se vor putea adresa serviciului public
respectiv sau agenţilor de vânzare.
• Când puneţi la loc grătarele, asiguraţi-vă că zona pe care se aşează oalele
este aliniată cu arzătorul.
• Modelele echipate cu şe pentru aprindere electrică şi cu dispozitiv de
siguranţă necesită o curăţare atentă a capătului şei pentru a asigura
funcţionarea corectă. Verificaţi frecvent aceste piese şi, dacă este
necesar, curăţaţi-le cu o cârpă umedă. Resturile arse de mâncare trebuie
îndepărtate cu o scobitoare sau cu un ac.
! Pentru a evita deteriorarea dispozitivului de aprindere electrică, nu-l
folosiţi atunci când arzătoarele nu sunt în locaşurile lor.
Întreţinerea robinetelor de gaz
Vericaţi starea acestora, iar în cazul blocărilor sau a dicultăţilor de rotire,
va necesară înlocuirea robinetului însuşi.
RO
Protejarea şi respectarea mediului înconjurător
• Gătiţi alimentele în oale sau tigăi închise cu capace potrivite şi folosiţi cât
mai puţină apă este posibil. Gătitul fără capac va creşte cu mult consumul
energetic.
• Folosiţi oale şi tigăi cu bază plată.
• Dacă gătiţi ceva ce ia mult timp, merită să utilizaţi o oală sub presiune, care
este de două ori mai rapidă şi care economiseşte o treime din energie.
Întreţinere
Întreruperea alimentării cu energie electrică
Scoateţi ştecherul din priza de curent atunci când se efectuează lucrări de
întreţinere.
Curăţarea suprafeţei plitei
• Toate piesele emailate şi de sticlă trebuie curăţate cu o soluţie de apă
caldă şi detergent neutru.
• Suprafeţele din oţel inoxidabil se pot păta din cauza apei calcaroase sau
a detergenţilor agresivi, dacă rămân în contact cu acestea prea mult timp.
Resturile de mâncare căzute pe suprafaţă (apă, sos, cafea etc.) trebuie
şterse înainte de a se usca.
• Curăţaţi cu apă caldă şi detergent neutru, apoi uscaţi cu o cârpă moale
sau cu piele de căprioară. Îndepărtaţi resturile arse de mâncare cu ajutorul
unor produse de curăţare speciale pentru suprafeţe din oţel inoxidabil.
• Curăţaţi oţelul inoxidabil numai cu o cârpă sau un burete moale.
• Nu utilizaţi produse abrazive sau corozive, produse pe bază de clor sau
bureţi de sârmă pentru vase.
• Nu utilizaţi aparate de curăţat cu aburi.
• Nu folosiţi produse inamabile.
• Nu lăsaţi pe plită substanţe acide sau alcaline, cum ar oţet, muştar, sare,
zahăr sau suc de lămâie.
Curăţarea componentelor plitei
• Curăţaţi piesele emailate şi de sticlă numai cu o cârpă sau un burete
moale.
• Grătarele, capacele arzătoarelor şi arzătoarele pot scoase pentru a
curăţate.
• Curăţaţi-le manual, cu apă caldă şi detergent neabraziv, înlăturând cu grijă
toate resturile de mâncare şi vericând ca niciun oriciu al arzătorului să
nu e înfundat.
• Clătiţi şi uscaţi.
• Puneţi la loc arzătoarele şi capacele arzătoarelor, în mod corect, în
locaşurile respective.
! Această operaţie trebuie efectuată de către Service-ul autorizat.
Anomalii şi remedii
Se poate întâmpla ca plita să nu funcţioneze sau să funcţioneze defectuos.
Înainte de a apela Service-ul, consultaţi capitolul de mai jos.Înaintea efectuării
oricărei operaţii, vericaţi dacă nu există întreruperi din partea reţelei de
alimentare cu gaz sau electrice, şi, în particular dacă robinetele de gaz au
fost deschise.
Arzătorul nu se aprinde sau acăra nu este uniformă.
Aţi controlat dacă:
• Au fost obstrucţionate oriciile de evacuare a gazului arzătorului;
• Nu au fost montate corect părţile mobile ce intră în componenţa arzătorului;
• Există curenţi de aer în apropierea plitei.
Flacăra nu rămâne aprinsă în cazul modelelor echipate cu dispozitiv de
siguranţă.
Aţi controlat dacă:
• Nu aţi apăsat până la capăt selectorul;
• Nu aţi menţinut apăsat până la capăt selectorul sucient pentru a activa
dispozitivul de siguranţă;
• Au fost obstrucţionate oriciile de evacuare a gazului corespunzătoare
dispozitivului de siguranţă.
Arzătorul, în poziţia minimă nu rămâne aprins.
Aţi controlat dacă:
• Au fost obstrucţionate oriciile de evacuare a gazului;
• Există curenţi de aer în apropierea plitei.
• Reglarea minimelor nu este corectă.
Recipientele sunt instabile.
Aţi controlat dacă:
• Fundul recipientelor nu este perfect plat;
• Recipientul nu este centrat pe arzător sau pe plita electrică;
• Grătarele nu au fost inversate.
17
Page 18

Установка
555 mm
55 mm
475 mm
UA
! Перед початком експлуатації Вашої нової плити, будьласка, прочитайте
уважно цю інструкцію повикористанню. Вона містить важливу інформацію
з безпечної експлуатації, монтажу та догляду за плитою.
! Будь ласка, зберігайте цю інструкцію доступною для подальших
консультацій в майбутньому. У разі передачі плити новим власникам,
необхідно також передати їм цю інструкцію.
Встановлення
! Тримайте пакувальні матеріали в недоступному для дітей місці. Це
може призвести до удушення (дивіться Запобіжні заходи та поради).
! Прилад повинен бути встановлений кваліфікованим фахівцем
відповідно до інструкцій. Неправильна установка може завдати шкоди
людям і тваринам або може призвести до пошкодження майна.
! Ця плита може бути встановлена і використовуватися тільки в постійно
провітрюваних приміщеннях відповідно до чинних національних норм.
Вимоги, які повинні дотримуватися:
• Приміщення має бути обладнане системою витяжної вентиляції,
що вилучає будь-які продукти згоряння. Це може бути витяжка або
електричний вентилятор, який автоматично запускається кожного
разу, коли плиту увімкнено.
В димохід або відвід системи димоходів
(тільки для кухонних приладів)
• В приміщенні також повинна бути забезпечена правильна циркуляція
повітря, при цьому продукти горіння повинні вилучатися своє часно.
Швидкість потоку повітря повинна бути не менше 2м3/год за кВт
встановленої потужності.
Система циркуляції повітря може
отримувати повітря безпосередньо з
навколишнього середовища за допомогою
труб з внутрішнім перерізом не менше
A
Приклади вентиляційних
отворів для відводу повітря з
продуктами горіння.
Сусіднє
приміщення
Приміщення, що
має вентилюватися
100см2;отвори не повинні бути уразливі до
будь-якого блокування.
Система може також забезпечити
необхідний повітрообмін для не місцевого
згоряння, у випадку коли забруднене
повітря надходить з сусідніх кімнат, які
мають витяжні труби з циркуляцією повітря,
як описано вище. Однак, ці кімнати не
Збільшений вентиляційний
отвір між вікном і підлогою
повинні бути комунальними,спальними
або кімнатами, які можуть представляти
небезпеку пожежі.
Безпосередньо
назовні
газ у разівитоку. Внаслідок цього балони, які містять зрідженийгаз,
частково чи повністю заповнені, не повинні бутивстановлені
або зберігатися у приміщеннях абосховищах, які знаходяться
нижче рівня землі (підвалитощо). Балон, який використовується
і зберігається вкімнаті доцільно розташовувати у місці, де він не
будепід впливом тепла від зовнішніх джерел (духовки,каміни, печі і
т.д.), які можуть підвищити температурубалону вище 50°С.
Встановлення плити
Наступні запобіжні заходи, які необхідно дотримуватися при встановленні
плити:
• Кухонні шафи, прилеглі до плити і над нею повинні бути розташовані
на відстані не менше 200 мм від краю плити.
• Витяжки повинні бути встановлені відповідно до їх інструкцій з
експлуатації та установки і на відстані неменше 650 мм від плити
(дивіться малюнок).
• Розташування настінних шаф поруч з витяжкою має бути на висоті
не менше 420 мм від поверхні (дивіться малюнок).
Якщо плита встановлюється під шафою,
тоді відстань між шафою і плитою має бути
600mm min.
650mm min.
мінімум 700 мм.
420mm min.
• Місце для встановлення плити повинно відповідати розмірам, які
вказані на малюнку.
Кріплення для плити, які надаються в комплекті дозволяють Вам
закріпити плиту до стільниці, яка маєт овщину від 20 до 40 мм. Для
забезпечення надійної фіксації плити до стільниці, ми рекомендуємо
Вам використовувати всі кріплення.
Перед встановленням зніміть решітки і пальники з варильної поверхні і
перегорніть її, стежачи, щоб не ушкодити термопари і свічки.
Встановіть прокладки (з комплекту
постачання до приладу) на зовнішні
краї варильної поверхні, щоб
унеможливити надходження повітря,
вологості і води (див. малюнок).
Для правильного встановлення
переконайтеся в тому, що поверхні,
що підлягають герметичному закупорюванню, є сухими і знежиреними.
Діаграма фіксації кріплень
• Пiд чаc інтенсивного і тривалого використання пристрою може
знадобитися додаткова вентиляція, (для підвищення механічної
потужності всмоктування, якщо він вже існує) наприклад відкриття
вікнa або більш ефективнa вентиляція.
• Зріджений газ осідає на підлогу, так як він важчий заповітря. Таким
чином, приміщення, де знаходятьсябалони зі зрідженим газом,
повинні бути обладнанівентиляційними отворами, щоб вилучити
18
Розташування кріплення Розташування кріплення
до стільниці H=20mm до стільниці H=30mm
Page 19

Спереду
Розташування кріплення Ззадудля
до стільниці H=40mm
! Використовуйте гачки з “комплекту аксесуарів”
• Якщо поверхня не встановлюється над вбудованою духовкою, для
ізоляції необхідно використовувати дерев’яну панель. Така панель
має розміщуватися на відстані не менше 20 мм від нижньої частини
варильної поверхні.
Вентиляція
Для забезпечення достатньої вентиляції, необхідно зняти задню панель
шафи. Бажано встановити духовку таким чином, щоб вона спиралася на
дві підставки з дерева, або на абсолютно плоску поверхню з розмірами
не менше 45х 560 мм(дивіться малюнки).
в разі прямого підключення до електричної мережі. Вимикач повинен
бути придатним для підключення домережі і повинен відповідати діючим
правилам електробезпеки (провід заземлення не повинен перериватися
вимикачем). Кабель живлення не повинні контактувати з поверхнею, яка
має температуру вище 50°С.
! Монтажник повинен переконатися у правильності електричних з’єднань,
які були під’єднані і що вони відповідають правилам техніки безпеки
Перед підключенням до джерела живлення,переконайтеся у тому, що:
• плита заземлена і відповідає діючим нормам;
• pозетка повинна бути розрахована на максимальну споживану потужність
плити, яка вказана в таблиці;
• напруга відповідає діапазону значень, зазначеного в таблиці;
• pозетка повинна бути сумісна з вилкою плити. Якщо розетка несумісна
з вилкою, запитайте фахівців зтехнічної підтримки, щоб замінити її.
Не використовуйте подовжувачі та трійники.
! Кабель живлення і розетки повинні бути легко доступні,після
встановлення плити.
! Кабель не повинен бути зігнутим або затиснутим.
! Кабель повинен регулярно перевірятися і підлягати заміні тільки
уповноваженими техніками (дивіться Підтримку).
UA
45 mm.
560 mm.
Якщо плита встановлюється над піччю без примусової вентиляції та
охолодження системи, для необхідного повітро обміну всередині шафи
повинні бути забезпечені повітряні отвори, через які повітря може пройти
(дивіться малюнок).
Електричне підключення
Плита обладнана триполюсним кабелем живлення призначеним для
роботи зі змінним струмом при напрузі і частоті зазначених на табличці
(вона розташована в нижній частині приладу). Заземлюючий дріт в кабелі
має зелений і жовтий колір. Якщо разом з плитою має бути встановлена
електрична вбудована духовка, то їх електричні підключення повинні
бути встановлені окремо, як для електробезпеки так і для більш зручного
вилучення духовки.
Підключення кабелю живлення до мережі
Встановити стандартизований штепсель відповідно до навантаження,
вказаного на табличці.Багатополюсний вимикач з мінімальною відстанню
3 мм між контактами, відповідно до електричного навантаження і
місцевими стандартами, має бути розміщений між плитою і мережею
! У випадку недотримання вище вказаних заходів безпеки, виробник не
несе ніякої відповідальності.
Підключення газу
Плита повинна бути підключена до основного місця постачання газу або
газового балона у відповідності з чинним національним законодавством.
Перед виконанням з’єднання, переконайтеся, що плита сумісна з газом,
який Ви хочете використовувати. Якщо це не так, дотримуйтесь інструкцій,
зазначених у пункті “Адаптаціядо різних типів газу”. При використанні
зрідженого газу з балона, необхідно встановити регулятор тиску, який
відповідає чинному національному законодавству.
! Переконайтеся, що тиск газу відповідає значенням,зазначеним у
таблиці 1 (“пальники і насадки”). Це дозволить забезпечити надійну
роботу і довговічність Вашої плити при збереженні ефективного
споживання енергії.
Зв’язок з твердими трубами (мідь чи сталь)
! Підключення до газової системи повинні здійснюватися таким чином,
щоб не призвести до будь-яких деформаційна плиті.
Існу є регульовані труби L-форми на рампі живлення плити, які фіксуються
прокладками, для того щоб запобігти витік газу. Прокладки необхідно
замінити після повороту труби (за умови фіксації з плитою). Вхід подачі
газу на плиту здійснюється через циліндричну різьбову1/2 вхідну частину
охоплюваного з’єднання.
Підключення гнучкої безшовної труби з нержавіючоїсталі з
різьбовим кріпленням
Вхід подачі газу на плиту здійснюється через циліндричну різьбу 1/2
вхідну частину охоплюваного з’єднання. Ці труби мають бути з’єднані
так, щоб їх довжина в розгорнутому стані не перевищувала 2000 мм. Як
тільки зв’язок був проведений, переконайтеся, що металічна труба не
стискається і не контактує з рухомими частинами.
! Використовуйте тільки ті труби та прокладки, які відповідають чинним
національним нормам.
19
Page 20

Перевірка герметичності з’єднання
UA
! Коли процес установки завершиться, перевірте фіксацію труб за
допомогою мильної рідини. Ніколи не використовуйте горючі речовини.
Адаптація до різних типів газу
Для адаптації плити до будь-якого іншого виду газу, крім вказаного виду
(це зазначено на наклейці з характеристиками на корпусі плити або на
упаковці),насадки повинні бути замінені наступним чином:
1. Зніміть решітку з плити і витягніть пальники зі своїх місць.
2. Відкрутіть насадки за допомогою 7 мм гайкового ключа і замініть їх
на насадки, які підходять для нового виду газу (дивіться таблицю 1
‘’пальники і насадки).
3. Замініть всі компоненти, дотримуючись інструкції,зазначеної вище в
зворотному порядку.
4. Після налаштування плити, вона може бути використана з будьякими видами газу, замініть старі наклейки з характеристиками на
нові, відповідно до нового виду газу (ці наклейки можна отримати в
авторизованих центрах технічної підтримки).
Заміна форсунок на конфорках з трьома кільцями
1. Зніміть підставки для посуду й вийміть конфорки з гнізд. Конфорка
складається з двох окремих частин (див. малюнок).
2. Встановіть на місце форсунки за допомогою торцевого ключа 7 мм.
Замініть форсунку на іншу, модель якої відповідає новому типу газу
(див. таблицю 1). Дві форсунки мають однаковий діаметр отвору.
3. Встановіть на місце всі компоненти, виконуючи описані кроки в
зворотньому порядку.
! У разі рідкого газу, регулювальний гвинт повинен бути початий в нижній
частині.
! Як тільки ця процедура закінчиться, замініть старі наклейки з
характеристиками на нові, відповідно донового виду газу (ці наклейки
можна отримати в авторизованих центрах технічної підтримки).
! Якщо використовуються різні тиски газу (або вони не дуже відрізняються)
від рекомендованого тиску, повинен бути встановлений відповідний
регулятор тиску на вході шланга (відповідно до чинних національних
норм).
• Регулювання повітря для розпилення в конфорці:
Пальник плити не вимагає регулювання для первинної прогонки повітря.
• Регулювання пальника плити при мінімальних заданихзначеннях:
1. Поверніть кран в мінімальне відхилення.
2. Зніміть ручку і відрегулюйте гвинт,
який знаходиться всередині або поруч з
краном пальника, поки полум’я невелике і
стабільне.
3. Поки пальник горить, швидко прокрутити ручку від мінімуму до
максимуму і назад кілька разів,переконавшись, що полум’я не згасло.
4. Деякі плити мають встановлені пристрої безпеки (термоелемент).
Якщо плита не працює, коли пальники відрегульовані на невелике
полум’я, то підвищити це полум’я можна за допомогою регулюючого
гвинта.
5. Після коригування параметрів, необхідно замінити прокладки
використовуючи сургуч або аналогічну речовину.
20
Page 21

Таблиця 1
Характеристики пальників і форсунок
Зріджений Газ
UA
Природній Газ
Пальник
потужність потужність
кВт кВт 1/100 кВт
(mm) Доп. Номін. (mm) (mm) *** ** Номін (mm)
Швидкий
Зменшена швидка
(RR)
Напівшвидкий
Допоміжний
Потрійний
Встановлення
тиску
* При 15°C і 1013,25 мбар сухий газ
** Пропан P.C.S. = 50,37 МДж/кг.
*** Бутан P.C.S. = 49,47 МДж/кг.
Природний газ P.C.S. = 37,78 МДж/м
Діаметр Теплова Теплова Вхідний Насадка Потік* Теплова Насадка Потік*
отвір
(R)
(TC)
(A)
A
(S)
1/100 (
(тепл.згор.*) (тепл.згор.*) (тепл.згор.*)
100
100
75
55
130
0.70
0.70
0.40
0.40
1.50
3.00
2.60
1.65
1.00
3.30
39
39
28
28
61
86
80
64
50
65x2
Номінальний (мбар)
Мінімальний (мбар)
Максимальний (мбар)
3
A
галл/год.
218
189
120
73
240
28-30
20
35
) потужність 1/100 (
214
186
118
71
236
37
25
45
3.00
2.60
1.65
1.00
3.60
132 (H)
122 (H)
96 (Z)
79 (6)
103x2
20
17
25
л/год.
286
248
157
95
343
)
R
S
RR
S
PCN 642 IX/HA EE
PCN 641 T/IX/HA EE
TC
S
21
Page 22

Ввімкнення і використання
UA
! Розміщення відповідної газової конфорки позначене на кожній ручці.
Газові пальники
Кожну конфорку можна налаштувати на одне з наступних значень за
допомогою відповідної ручки управління:
● Виключений
Максимальний
Мінімальний
Щоб запалити один з пальників, підведіть запалений сірник або
запальничку близько до пальника і, в той жечас, натисніть і прокрутіть
відповідну ручку проти годинникової стрілки до максимального
значення. Так як пальник забезпечений захисним пристроєм, ручка
повинна бути натиснута протягом приблизно 2-3 секунди,щоб дозволити
автоматичному пристрою підтримати полум’я до запалення пальника.
На моделях функція кнопка підпалення суміщена з ручкою регулювання.
Якщо у Вас така варильна поверхня то ви можете бачити підпалювач,
але не кнопку. Для того щоб запалити конфорку натисніть відповідну
ручку та поверніть її проти годинникової стрілки до положення “Велике”,
продовжуйте тримати ручку натиснутою, доки полум’я не займеться.
! Якщо полум’я випадково гасне, вимкніть ручку управління і почекайте
1 хвилину, перш ніж намагатися запалити знову.
Щоб вимкнути конфорку, поверніть ручку за годинниковою стрілкою до
упору (в положення “●”).
Практичні поради по експлуатації пальника
Для забезпечення ефективної роботи пальників:
• Використовуйте відповідний посуд для кожногопальника (дивіться
таблицю), так щоб полум’я невиходило за межі нижньої частини
посуду.
• Завжди використовуйте посуд з плоским дном ікришкою.
• Коли вміст каструлі досягає точки кипіння, повернітьручку до мінімуму.
Конфорка
Швидка
(R)
Зменшена швидка (RR)
Напівшвидка
Допоміжна
Потрійна
(S)
(A)
(TC)
Для визначення типу конфорки дивіться схеми, наведені в параграфі
“Характеристики конфорок і форсунок”.
• Для забезпечення максимальної стабільності посуду під час
приготування їжі переконатися в тому, що він встановлений вірно,
по центру горілки.
• Перевірити, щоб ручки посуду для приготування були вирівняні за
однією з опорних рейок для підтримки посуду.
• Повернути посуд таким чином, щоб не виступав за передній край
варильної поверхні.
Ø Діаметр посуду (cm)
24 - 26
24 - 26
16 - 20
10 - 14
24 - 26
Змінним фактором для забезпечення
стабільності посуду на варильній
поверхні є він сам (або його
розташування під час використання).
Очевидно, що максимальну
стабільність гарантують добре
врівноважені каструлі з пласким дном,
встановлені по центру горілки; їх ручки слід направити по одній лінії з
рейками решітки.
Запобіжні заходи та поради
! Ця плита була розроблена і виготовлена відповідно до міжнародних
стандартів безпеки. З метою Вашої безпеки повинні бути ретельно
прочитані наступні попередження.
Загальні вимоги до безпеки
• Дана вбудована плита відноситься до класу 3.
• Газові плити вимагають регулярного повітрообміну для
підтримки її ефективної роботи. При установці плити,
дотримуйтесь інструкцій у пункті ”Встановлення” плити.
• Ці інструкції дійсні тільки для країн, символи яких вказані в
таблиці з серійним номером.
• Це обладнання розроблене для побутового використання в домашніх
умовах і не призначене для застосування на підприємствах
промисловості та торгівлі.
• Не допускається установка приладу поза приміщенням, навіть під
укриттям. Надзвичайно небезпечно піддавати пристрій дії дощу і вітру.
• Не торкайтеся до плити з оголеними ногами або з мокрими або
вологими руками і ногами.
• Прилад повинен використовуватися тільки повнолітніми особами,
для приготування їжі відповідно до інструкцій, наведених в
дійсному посібнику. Будь-яке інше використання пристрою
(напр. для обігрівання кімнати) є невідповідним та небезпечним.
Виробник не несе відповідальності за будь-яке пошкодження,
викликане невідповідним та неправильним використанням
пристрою.
• Прилад повинен використовуватися тільки дорослими,для
приготування їжі відповідно до інструкцій у цьому посібнику.
• Переконайтеся, що кабелі живлення інших електричних приладів, не
вступають в контакт з гарячою частиною плити.
• Отвори, що використовуються для вентиляції і відведення тепла
ніколи не повинні бути закриті.
• Завжди переконуйтесь у тому, що ручки перебувають у “●”/“○”
положенні, коли плита не використовується.
• При відключенні плити завжди витягуйте вилку зрозетки, але не тягніть
за кабель.
• Ніколи не проводьте очистку або технічне обслуговування, поки Ви
не витягнули вилку з розетки.
• У випадку несправності, ні за яких обставин ненамагайтеся
ремонтувати прилад самостійно. Ремонт здійснений недосвідченими
особами може призвести до травми або більшої несправності
приладу. Контакти сервісного центру (дивіться Підтримка).
• Не закривайте скляну кришку (якщо є в наявності),коли газові пальники
або електричні плити все ще гарячі.
• Не залишайте електричні плити увімкненими безпосуду, покладеного
на них.
• Люди з обмеженими фізичними і розумовими здібностями
(включаючи дітей) та недосвідчені особи, тахто не знайомий з
правилами користування плитою неповинні нею користуватися. Ці
особи повинні,принаймні, бути під контролем тих, хто бере на себе
відповідальність за їх безпеку або отримати попередні інструкції,
що стосуються роботи цієї плити.
• Не дозволяйте дітям гратися з плитою.
22
Page 23

Утилізація
Інде
Іт
47, Віале Ар
Європейська Директива 2012/19/EU з утилізації електричного та
електронного обладнання (WEEE) вимагає, щоб старі електропобутові
прилади викидали разом із звичайним міським сміттям. Старі прилади
мають бути зібрані окремо для оптимізації їх утилізації та переробки
їх матеріалів і зменшення впливу на здоров’я людини і навколишнє
середовище. Символ закресленого “сміттєвого контейнера” на
приладі нагадує Вам про Ваші зобов’язання, щодо його окремної
утилізації. Споживачі повинні звернутися до місцевих органів або
продавця для отримання інформац.
Охорона і дбайливе відношення до довкілля
• Готуйте їжу в закритих каструлях так сковорідках з кришками, що
добре прилягають. Використовуйте якомога менше води. Готування
без кришки значно збільшить споживання енергії.
• Використовуйте каструлі і сковорідки з рівним плоским дном.
• Якщо ви готуєте страву, що потребує багато часу, варто використовувати
скороварку, яка в готує два рази швидше і зберігає третину енергії.
• Належним чином встановіть пальники і кришки пальників на місця.
• Встановлюючи решітки на місце, подбайте про те, щоб зона, на яку
ставиться каструля, знаходилася над пальником.
• Моделі, оснащені механізмом підпалювання пальників та запобіжним
пристроєм, потребують ретельного чищення кінця електрода, щоб
забезпечити правильну роботу. Регулярно перевіряйте ці деталі і при
необхідності чистьте їх вологою ганчіркою. Пригорілі рештки страв
необхідно видаляти зубочисткою або голкою.
! Щоб уникнути пошкодження електричного запалювального
пристрою, не користуйтеся ним, Коли пальники не встановлені
на своє місце.
Обслуговування газового крану
З часом, кран може застрягти або важко повертатися.Якщо це
станеться, кран необхідно замінити.
! Ця процедура повинна виконуватися кваліфікованим фахівцем,
рекомендованим самимвиробником.
UA
Обслуговування та догляд
Відключення електроживлення
Відключіть плиту від мережі електроживлення передпроведенням будьяких робіт з нею.
Чищення поверхні варильної панелі
• Усі емальовані і скляні частини слід очищати теплою водою і
нейтральним розчином.
• На поверхнях із нержавіючої сталі можуть залишатися плями від води
з високим вмістом кальцію або агресивних розчинників унаслідок
тривалого контактування з ними. Будь-які бризки страв (вода, соус,
кава тощо) необхідно видаляти, перш ніж вони засохнуть.
• Промийте теплою водою з нейтральним засобом для чищення,
а потім витріть насухо м’якою тканиною або замшею. Видаляйте
забруднення, що запеклися, спеціальними засобами для чищення
поверхонь із нержавіючої сталі.
• Деталі з нержавіючої сталі слід мити лише м’якою ганчіркою або
губкою.
• Не користуйтеся абразивними чи їдкими засобами, засобами для
чищення на основі хлору і металевими мочалками.
• Не застосовуйте прилади для очищення парою.
• Не користуйтеся легкозаймистими речовинами.
• Не залишайте на варильній поверхні речовини, що містять кислоти
або основи, такі як оцет, гірчиця, сіль, цукор або лимонний сік.
Чищення деталей варильної панелі
• Емальовані і скляні частини слід мити лише м’якою ганчіркою або
губкою.
• Для полегшення чищення решітки кришки пальників і пальники можна
знімати.
• Чистіть їх вручну теплою водою з неабразивним мийним засобом,
видаляючи залишки їжі та перевіряючи, чи не забилися отвори
пальників.
• Сполосніть і витріть насухо.
Усунення несправностей
Може трапитися так, що прилад не працює належним чином або взагалі
не працює. Перш ніж звертатися до сервісного центру за допомогою,
перевірте все, що Ви можете. По-перше, переконайтеся, що немає ніяких
перерв у газі таперевірте електротехнічне обладнання, і, зокрема, чи
відкриті газові клапани у мережі.
Конфорка не запалюється або полум’я нерівномірне по периметру
конфорки.
Перевірити:
• Чи не засмічені отвори для газу на конфорky.
• Чи всі знімні деталі конфорки правильно встановлені.
• Чи немає поблизу приладу протягів.
Полум’я згасає на моделях із захисним пристроєм.
Перевірити й переконатися:
• Що, натиснувши ручку, Ви не відпускаєте її, коли запалюєте конфорку.
• Що Ви втримуйте ручку натиснутою достатньо довго, щоб активувати
захисний пристрій.
• Що отвори для газу поряд із захисним пристроєм не заблоковані.
Конфорка не гасне, коли ручка повернута до мінімуму.
Перевірити й переконатися:
• Що отвори для газу не заблоковані.
• Що поблизу приладу немає протягів.
• Що мінімальне полум’я на конфорці було налаштовано правильно.
Нестійкий посуд для готування.
Перевірити й переконатися:
• Що дно посуду для готування абсолютно пласке.
• Що посуд правильно розміщений посередині конфорки.
• Що Ви правильно встановили решітку для посуду.
зіт Компані СпА - єдиний учасник, Імпортер:
алія, 60044 Фабріано, ТОВ "Індезіт Україна"
тісайд Мерлоні 01001, Київ
пров. Музейний,4
23
Page 24

UA
Indesit Company S.p.A.
V
60044 Fabriano (AN)
www.hotpoint.eu
195145323.00
05/2016 - XEROX FABRIANO
iale Aristide Merloni,47
24
 Loading...