


2
Contents
Safety and warning information
Control panel ______________5
Description of the appliance
First use and installation________8
Daily use
n
_______________ 12
This appliance is in accordance with the following EU guidelines:
2006/95/EC and 2004/108/EC and 2009/125/EC and EC.643/2009.
____2
______7
Safety and warning information
Before using the appliance, read these
safety instructions. Keep them nearby
for future reference. These instructions
and the appliance itself provide important
safety warnings, to be observed at all
times. The manufacturer declines any
liability for failure to observe these safety
instructions, for inappropriate use of the
appliance or incorrect setting of controls.
Very young children (0-3 years) should
be kept away from the appliance. Young
children (3-8 years) should be kept away
from the appliance unless continuously
supervised. Children from 8 years old and
above and persons with reduced physical,
sensory or mental capabilities or lack of
experience and knowledge can use this
appliance only if they are supervised or
have been given instructions on safe use
and understand the hazards involved.
Children must not play with the appliance.
Cleaning and user maintenance must
not be carried out by children without
supervision.
PERMITTED USE
CAUTION: The appliance is not
intended to be operated by means of an
external switching device, such as a timer,
or separate remote controlled system.
This appliance is intended to be used
in household and similar applications
such as: staff kitchen areas in shops,
Helpful hints and tips _________ 13
Cleaning and care __________ 14
What to do if
Disposal of the appliance
ofces and other working environments;
farm houses; by clients in hotels, motels,
bed & breakfast and other residential
environments.
This appliance is not for professional
use. Do not use the appliance outdoors.
The appliance is designed for operation
in places where the ambient temperature
comes within the following ranges,
according to the climatic class given on
the rating plate. The appliance may not
work properly if it is left for a long time at a
temperature outside the specied range.
Climatic Class Amb. T. (°C)
SN: Da 10 a 32 °C
ST: Da 16 a 38 °C
N: Da 16 a 32 °C
T: Da 16 a 43 °C
This appliance does not contain
CFCs. The refrigerant circuit contains
R600a (HC). Appliances with Isobutane
(R600a): isobutane is a natural gas without
environmental impact, but is ammable.
Therefore, make sure the refrigerant
circuit pipes are not damaged, especially
when emptying the refrigerant circuit.
WARNING: Do not damage the
appliance refrigerant circuit pipes.
WARNING: Keep ventilation openings,
in the appliance enclosure or in the built-in
structure, clear of obstruction.
_____________ 14
______ 16

3
WARNING: Do not use mechanical,
electric or chemical means other than
those recommended by the Manufacturer
to speed up the defrost process.
WARNING: Do not use or place
electrical devices inside the appliance
compartments if they are not of the type
expressly authorised by the Manufacturer.
WARNING: Ice makers and/or water
dispensers not directly connected to the
water supply must be lled with potable
water only.
WARNING: Automatic ice-makers and/
or water dispensers must be connected to
a water supply that delivers potable water
only, with mains water pressure between
0.17 and 0.81 MPa (1.7 and 8.1 bar).
Do not store explosive substances
such as aerosol cans with a ammable
propellant in this appliance.
Do not swallow the contents (nontoxic) of the ice packs (provided with some
models). Do not eat ice cubes or ice lollies
immediately after taking them out of the
freezer since they may cause cold burns.
For products designed to use an air
lter inside an accessible fan cover, the
lter must always be in position when the
refrigerator is in function.
Do not store glass containers with
liquids in the freezer compartment since
they may break.
Do not obstruct the fan (if included)
with food items.
After placing the food check that the door
of the compartments closes properly,
especially the freezer door.
Damaged gaskets must be replaced
as soon as possible.
Use the refrigerator compartment
only for storing fresh food and the freezer
compartment only for storing frozen food,
freezing fresh food and making ice cubes.
Avoid storing unwrapped food in
direct contact with internal surfaces of
the refrigerator or freezer compartments.
Appliances could have special
compartments (Fresh Food Compartment,
Zero Degree Box, etc.). Unless specied
in the specic booklet of product, they
can be removed, maintaining equivalent
performances.
C-Pentane is used as blowing agent in
the insulation foam and it is a ammable
gas.
INSTALLATION
The appliance must be handled and
installed by two or more persons - risk of
injury. Use protective gloves to unpack
and install - risk of cuts.
Installation, including water supply
(if any) and electrical connections, and
repairs must be carried out by a qualied
technician. Do not repair or replace any
part of the appliance unless specically
stated in the user manual. Keep children
away from the installation site. After
unpacking the appliance, make sure that
it has not been damaged during transport.
In the event of problems, contact the
dealer or your nearest After-sales Service.
Once installed, packaging waste (plastic,
styrofoam parts etc.) must be stored out
of reach of children - risk of suffocation.
The appliance must be disconnected from
the power supply before any installation
operation - risk of electric shock. During
installation, make sure the appliance does
not damage the power cable - risk of re or
electric shock. Only activate the appliance
when the installation has been completed.
Be careful not to damage the oors
(e.g. parquet) when moving the appliance.
Install the appliance on a oor or support
strong enough to take its weight and in a
place suitable for its size and use. Make
sure the appliance is not near a heat
source and that the four feet are stable
and resting on the oor, adjusting them
as required, and check that the appliance
is perfectly level using a spirit level. Wait
at least two hours before switching the
appliance on, to ensure that the refrigerant
circuit is fully efcient.
WARNING: To avoid a hazard due
to instability, positioning or xing of the

4
appliance must be done in accordance
with the manufacturer instructions. It is
forbidden to place the refrigerator in such
way that the metal hose of gas stove,
metal gas or water pipes, or electrical
wires are in contact with the refrigerator
back wall (condenser coil). All dimensions
and spacing needed for installation of the
appliance are in the Installation instruction
booklet.
ELECTRICAL WARNINGS
It must be possible to disconnect
the appliance from the power supply by
unplugging it if plug is accessible, or by
a multi-pole switch installed upstream of
the socket in accordance with the wiring
rules and the appliance must be earthed
in conformity with national electrical safety
standards.
Do not use extension leads, multiple
sockets or adapters. The electrical
components must not be accessible to
the user after installation. Do not use the
appliance when you are wet or barefoot.
Do not operate this appliance if it has a
damaged power cable or plug, if it is not
working properly, or if it has been damaged
or dropped.
If the supply cord is damaged, it must
be replaced with an identical one by the
manufacturer, its service agent or similarly
qualied persons in order to avoid a
hazard - risk of electric shock.
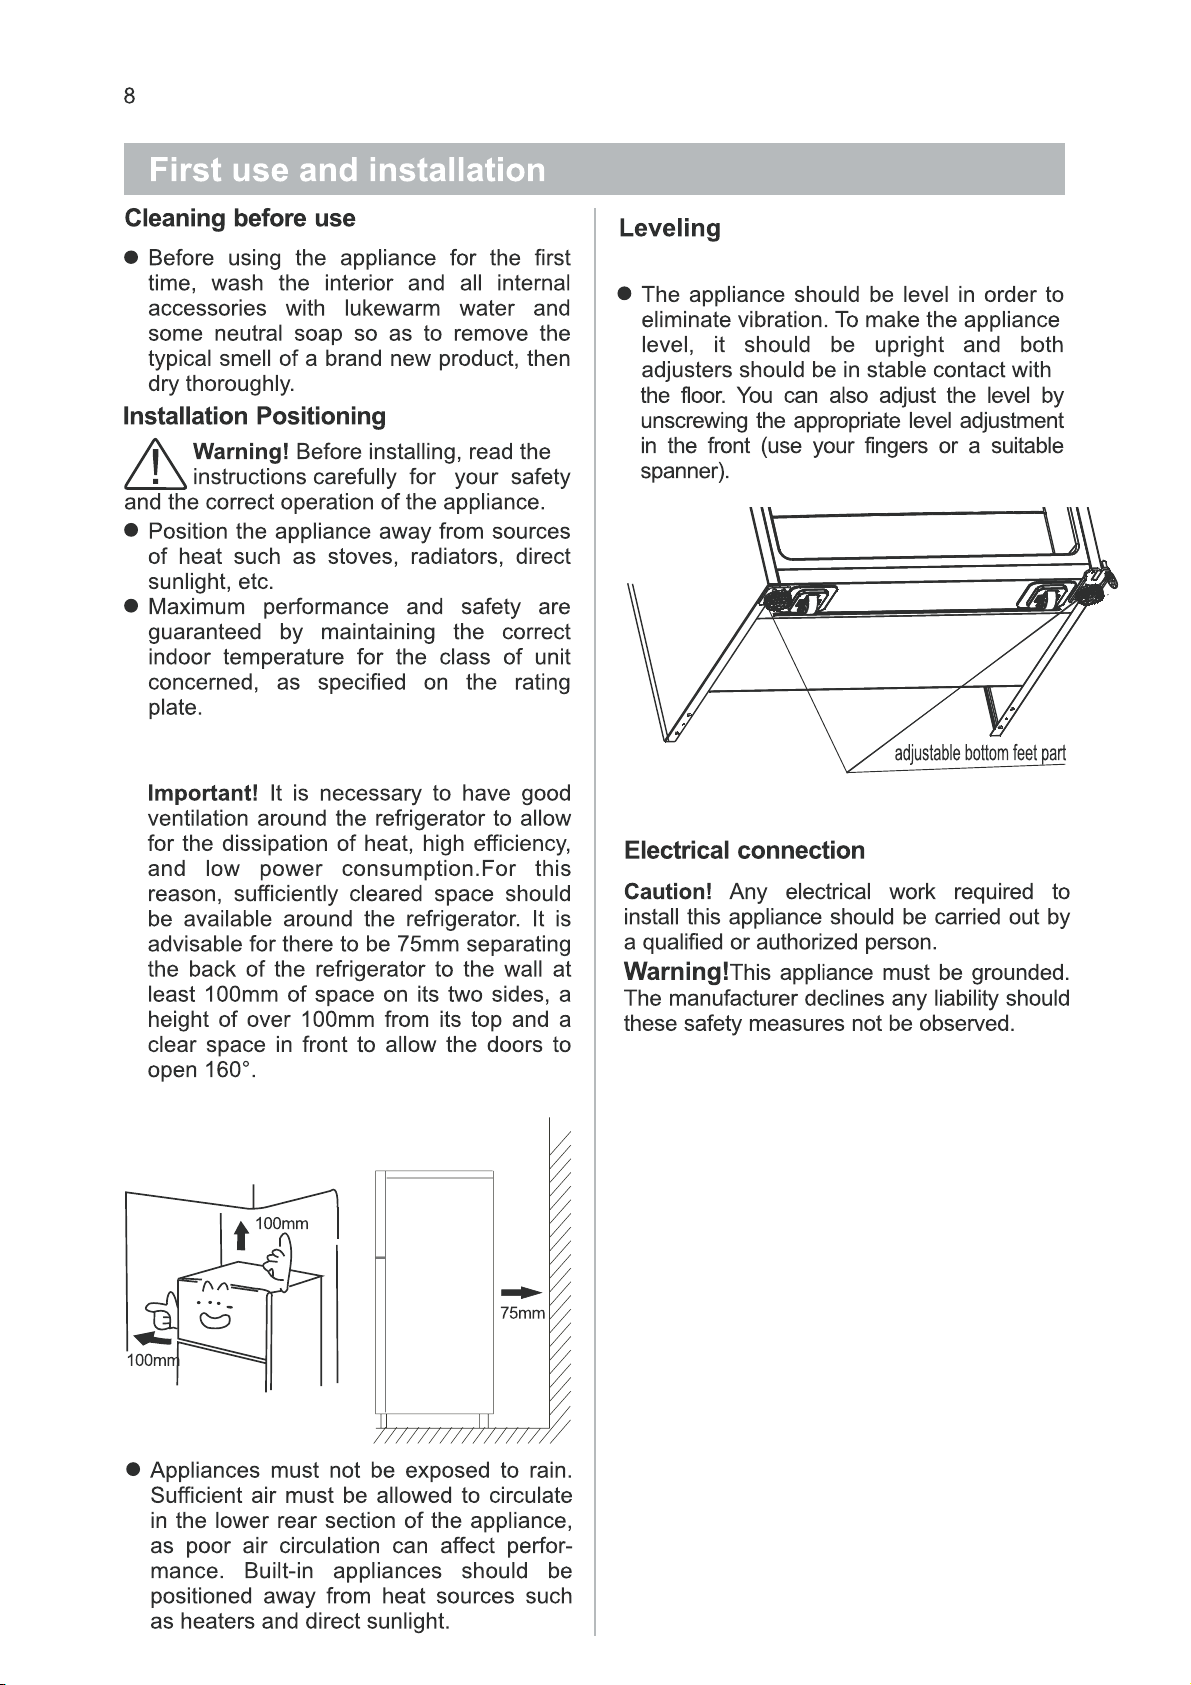
Control panel
5
The temperature control panel is located in
the refrigerator chamber, on the right side
wall. you can adjust the refrigerator and
freezer temperature by press the button on
the panel.
Freezer Temperature Setting
When the machine is not in the temperature
setting mode, If you want to set the
temperature inside the freezer , you can follow
the two steps below:
1. Press “select” button, until the freezer light
is on, and the LED indicator will indicate the
current temperature setting in freezer.
2. Then you can set the temperature from 14°C to -22°C by pressing and , press the
button once, the temperature will increase or
Fridge
cold
colder
Temperature
Setting
Freezer
Temperature
Setting
indicator-1
indicator-2
indicator-3
indicator-4
indicator-5
9°C 8°C 7°C 6°C 5°C 4°C 3°C 2°C 1°C
-14°C -15°C -16°C -17°C -18°C -19°C -20°C -21°C
half
light
full
light
full
light
half
light
full
light
full
light
decrease 1°C, and the LED indicator will turn
down or turn up between “cold” and “colder”,
until the required temperature is displayed.
There is a corresponding relationship
between temperature setting and indicator
lights, you can find it out in the table below:
fast
freeze
full
light
full
light
full
light
full
light
full
light
full
light
full
light
half
light
full
light
full
light
full
light
full
light
full
light
full
light
half
light
full
light
full
light
full
light
full
light
-22°C
full
light
full
light
full
light
full
light
half
light
6
Fast Freeze
The freezer compartment consist of 2
sections. One is the 4-star section and the
other one is the 2-star section.
The temperature for 2-star section is
always below -12°C, where the
temperature for 4-star section is
always below -18°C.
If you need the temperature inside the freezer
to drop rapidly, press the FAST FREEZE button,
all the LED indicator are full light, the freezer
compartment will operate in FAST FREEZE mode
for 24 hours, and the setting temperature is -23
If you change the temperature setting, the fridge
will exit FAST FREEZE mode.
°C.
Changing the light bulb
Warning! If the LED light bulb is
damaged, DO NOT CHANG IT BY
THE USER!
Before changing the light bulb, either the
refrigerator or disconnect the electricity
leading into the refrigerator at the main
power supply. Failure to do so could result in
electrical shock or personal injury.
1. Remove the light cover .
2. Use the cross screw driver to take the
screw out.
3. Pull out the joint cable, and take down
the old LED light.
4. Replace with a new LED light that is
same to the origin, screw the screw in.
FRIDGE TEMPERATURE
When the machine is not in the temperature
setting mode, If you want to set the temperature
inside the fridge , you can follow the two steps
below:
1. Press “select” button, until the fridge light is on,
and the LED indicator will indicate the current
temperature setting in fridge.
2. Then you can set the temperature from 1 to
9 by pressing and , press the button once, the
°C
temperature will increase or decrease 1 ,and
the LED indicator will turn down or turn up
between “cold”and “colder”, until the required
temperature is displayed. There is a
corresponding relationship between temperature
setting and indicator lights, you can find it out in
the same table upper.
ATTENTION:
temperature on “Mid”position.A colder setting on the
temperature regulator means more energy will be
consumed. In FAST FREEZE mode the compressor
will run continuously or even non-stop!
Normally we advise you setting the
°C
°C
Changing the light bulb carry out by
inexperienced persons may cause injury or
serious malfunctioning.it must be replaced
by a qualified persons in order to avoid a
hazard. Contact your local Service Force
Center for help.
Before changing the light bulb, switch off
the appliance and unplug it, or pull the
fuse or the circuit breaker.
To switch off the appliance.
Unplug the mains plug.
Press the bulb in the center with finger.
Description of the appliance
7
View of the appliance
()NMTZH 821 FT/NTMTZH 822 FT
1. Light cover
2. LED light (inside)
3. Screw hole cover
4. Wind channel part in freezer chamber
5. Shelf part
6. Ice tray part
7. Ice box
8. Light cover
9. LED light (inside)
10. Wind channel part in refrigerator chamber
11. Shelf part
12. Shelves assembly
13. Multifunctional drawer
14. Shelves assembly
15. Crisper box part
16. Roll wheel
17. Adjustable bottom feet part
18. Upper hinge cover
19. Door switch
20. Freezer door rack
21. Gasket part
22. Middle hinge part
23. Shelf cover
24. Egg tray
25. Small shelf
26. Door switch
27. Refrigerator door rack(middle)
28. Gasket part
29. Refrigerator door rack(lower)
FREEZER
REFRIGERATOR
1
2
3
4
5
6
7
8
9
10
11
12
13
14
15
16
17
18 19 20
21
22
23
24
25
26
27
28
29
Note: Due to unceasing modification of our products your refrigerator may be slightly different
from this Instruction Manual, but its functions and using methods remain the same.
2
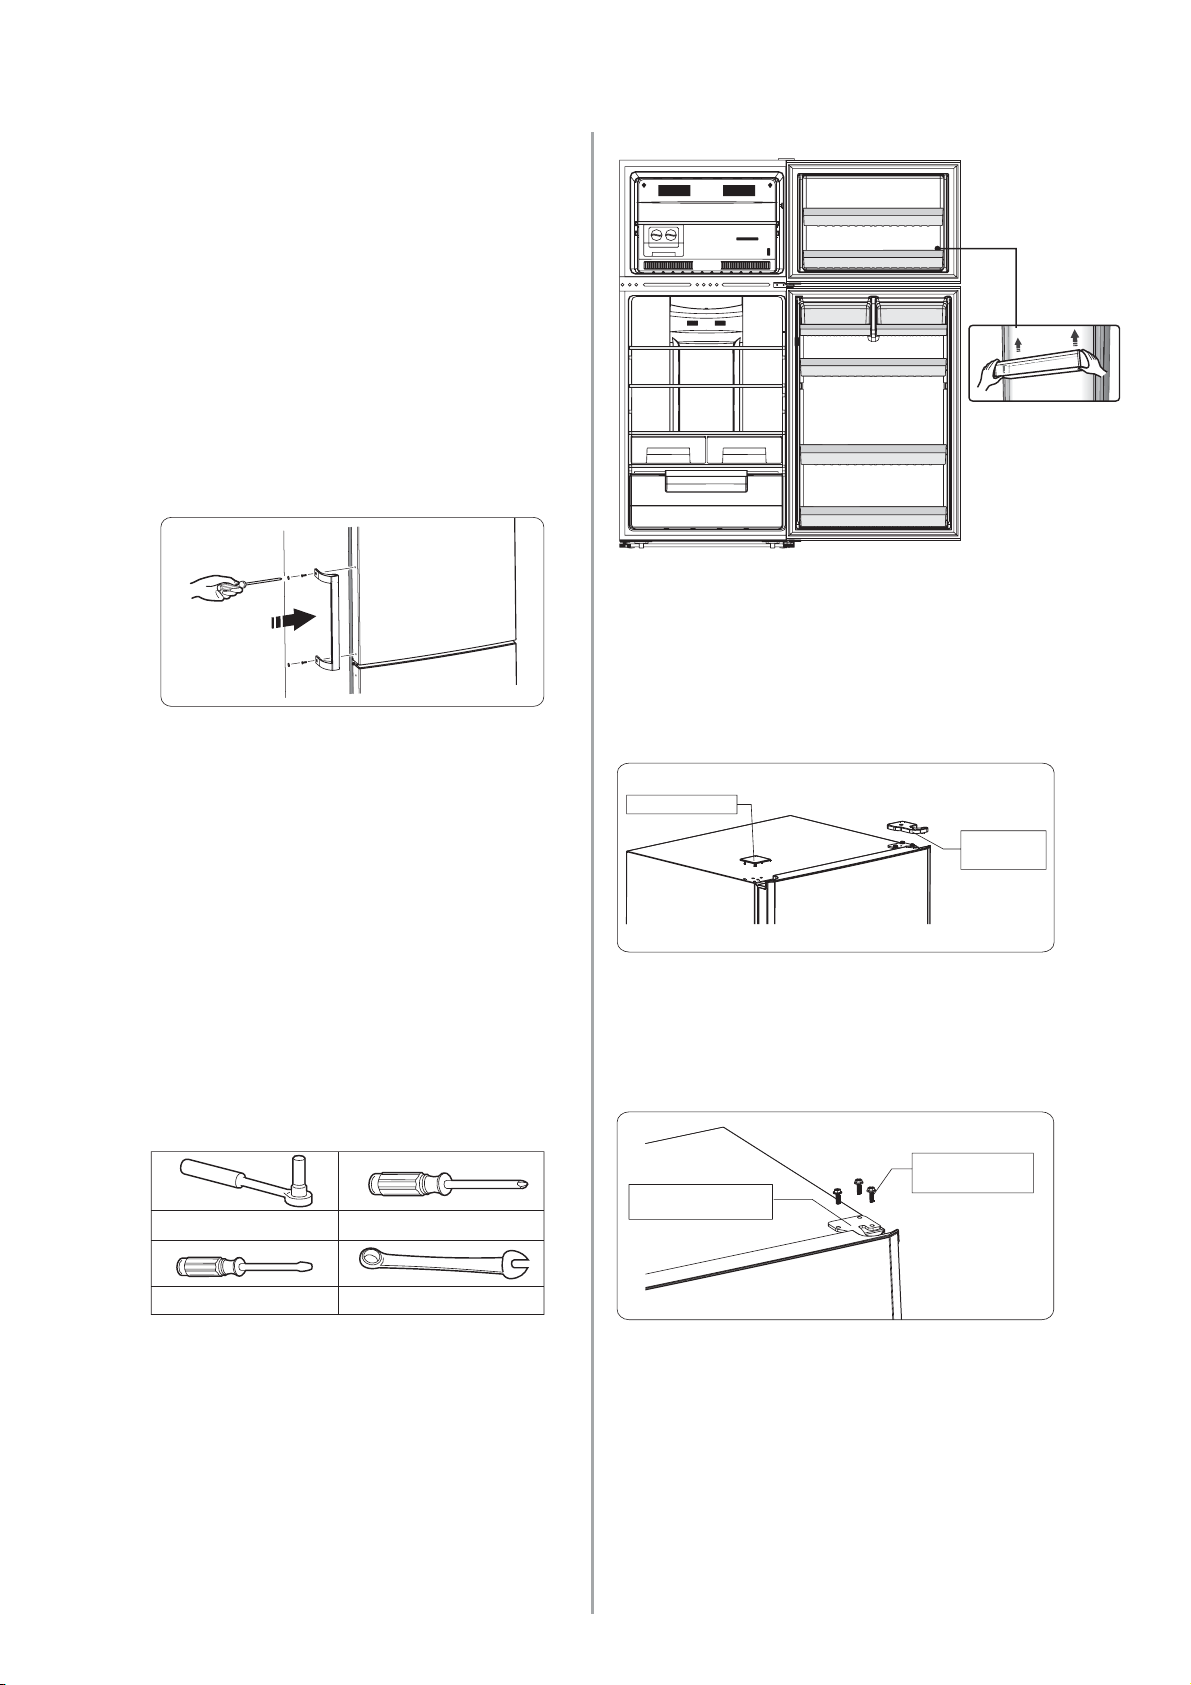
Installing the door handles
For the convenience of transportation, the
door handles are separately provided in a
plastic bag, you can install the door handles
as follows.
1. Lever screw covers on the left side of the
door, and then put them back to the plastic
bag.
2. Match the handle on the left side of the
door, keeping axes of screw holes in the
handle and the door in a line, as the picture
shows.
3. Fix the handle with the special screws
provided in the plastic bag. And then install
the handle covers.
Reversing the door
The side at which the door opens can be
changed, from the right side (as supplied) to
the left side, if the installation site requires.
Warning! When reversing the door, the
appliance must not be connected to the
mains. Ensure that the plug is removed
from the mains socket..
Tools you will need
9
Door racks
2. Use a putty knife or thin-blade
screwdriver to prize the screw hole cover
which is at the top left corner of the
refrigerator, and Unscrew the upper hinge
cover which is at the top right corner of
the refrigerator.
screw hole cover
upper hinge
cover (right)
3.Unscrew the special flange self-tapping
screws which are used for fixing the right
upper hinge part by a 8mm socket driver or
a spanner(please support the upper door
with your hand when doing it ).
8mm socket wrench
Thin-blade screwdriver
Note: Before you start lay the refrigerator
its back in order to it on soft foam
Cross-shaped screwdriver
8mm wrench
on
packaging or similar material to avoid
damaging the backboard of the refrigerator.
To reverse the door, the following steps
are generally recommended.
1. Stand the refrigerator upright. Open
the upper door to take out all door racks
(to avoid racks damaged) and then close
the door.
special flange
selftapping screws
right upper hinge part
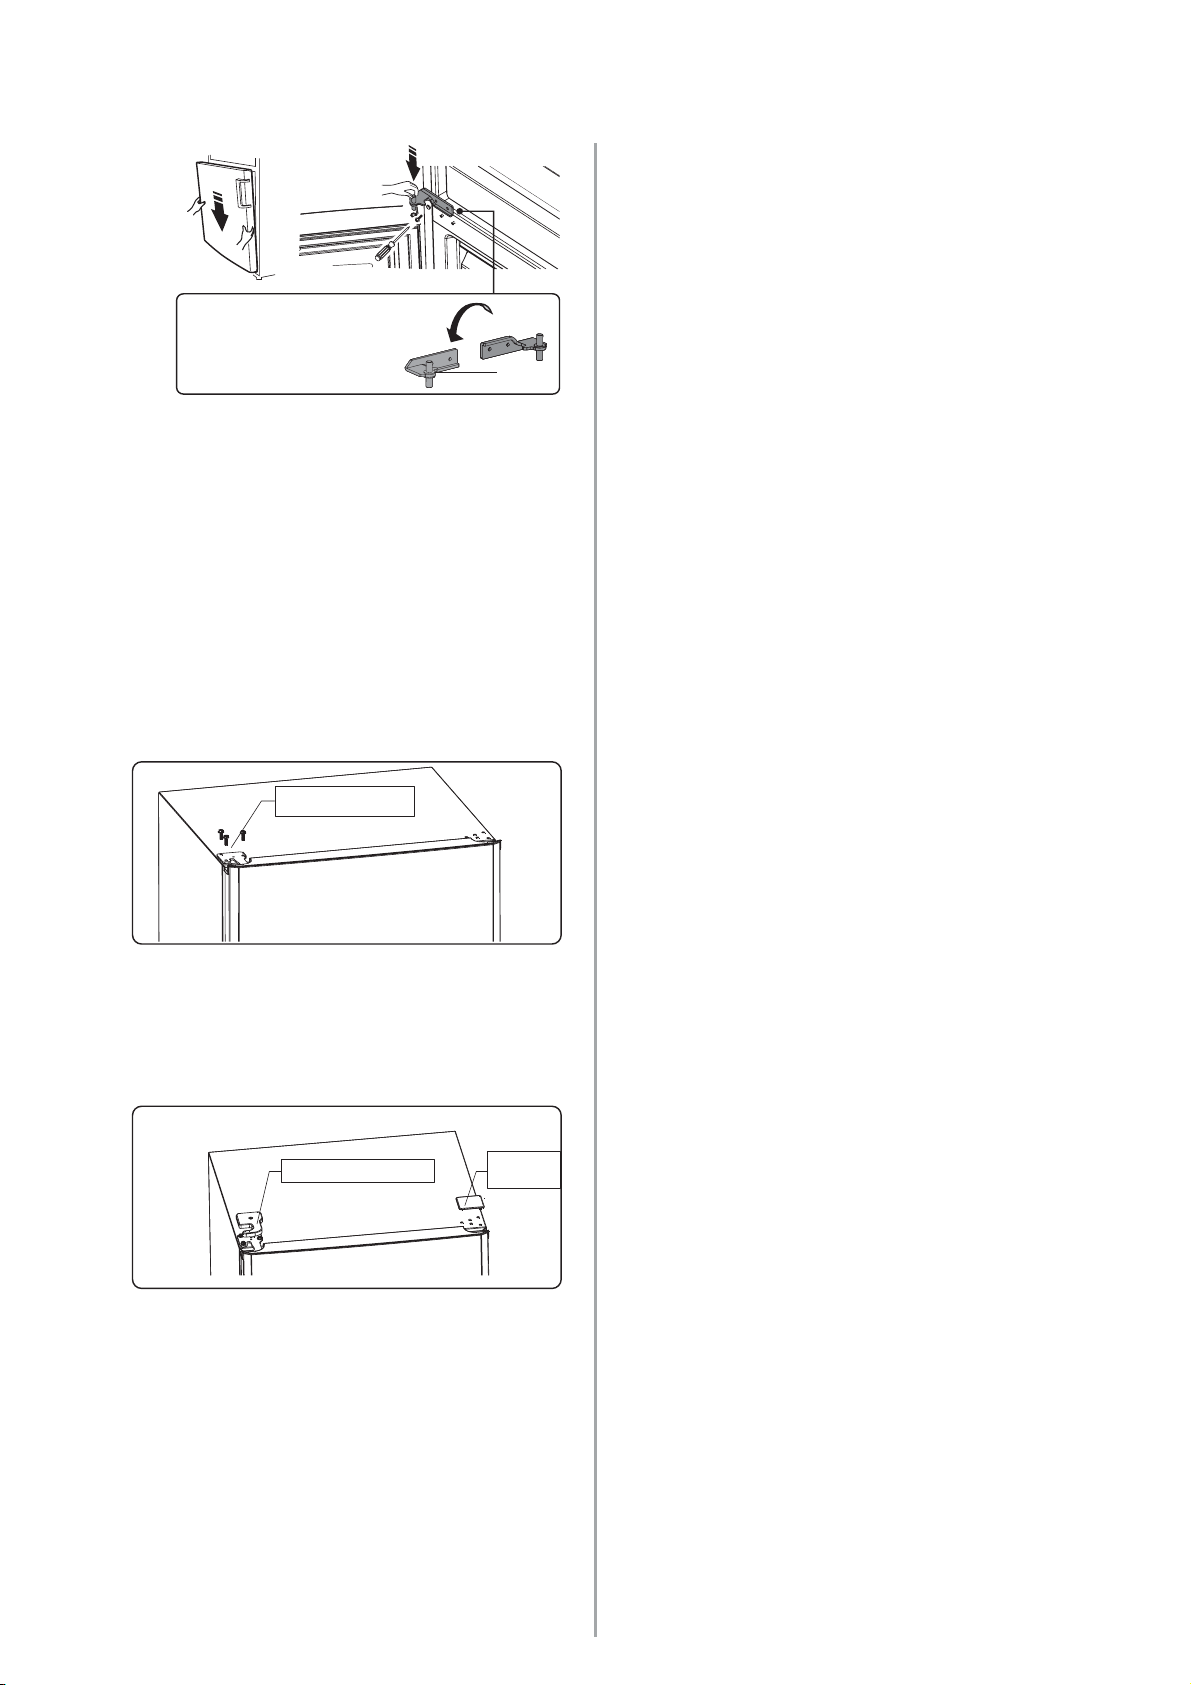
4. Remove the upper door and place it
on a smooth surface with its panel
upwards. Lever part①and part④ then
,
loose screws② , as shown in the
picture. Change handle③ to the right
side, then install screws②, part① and
part④ in turn. Loose screws⑥, detach
part⑤ then install part⑤to the left side
with screws⑥.
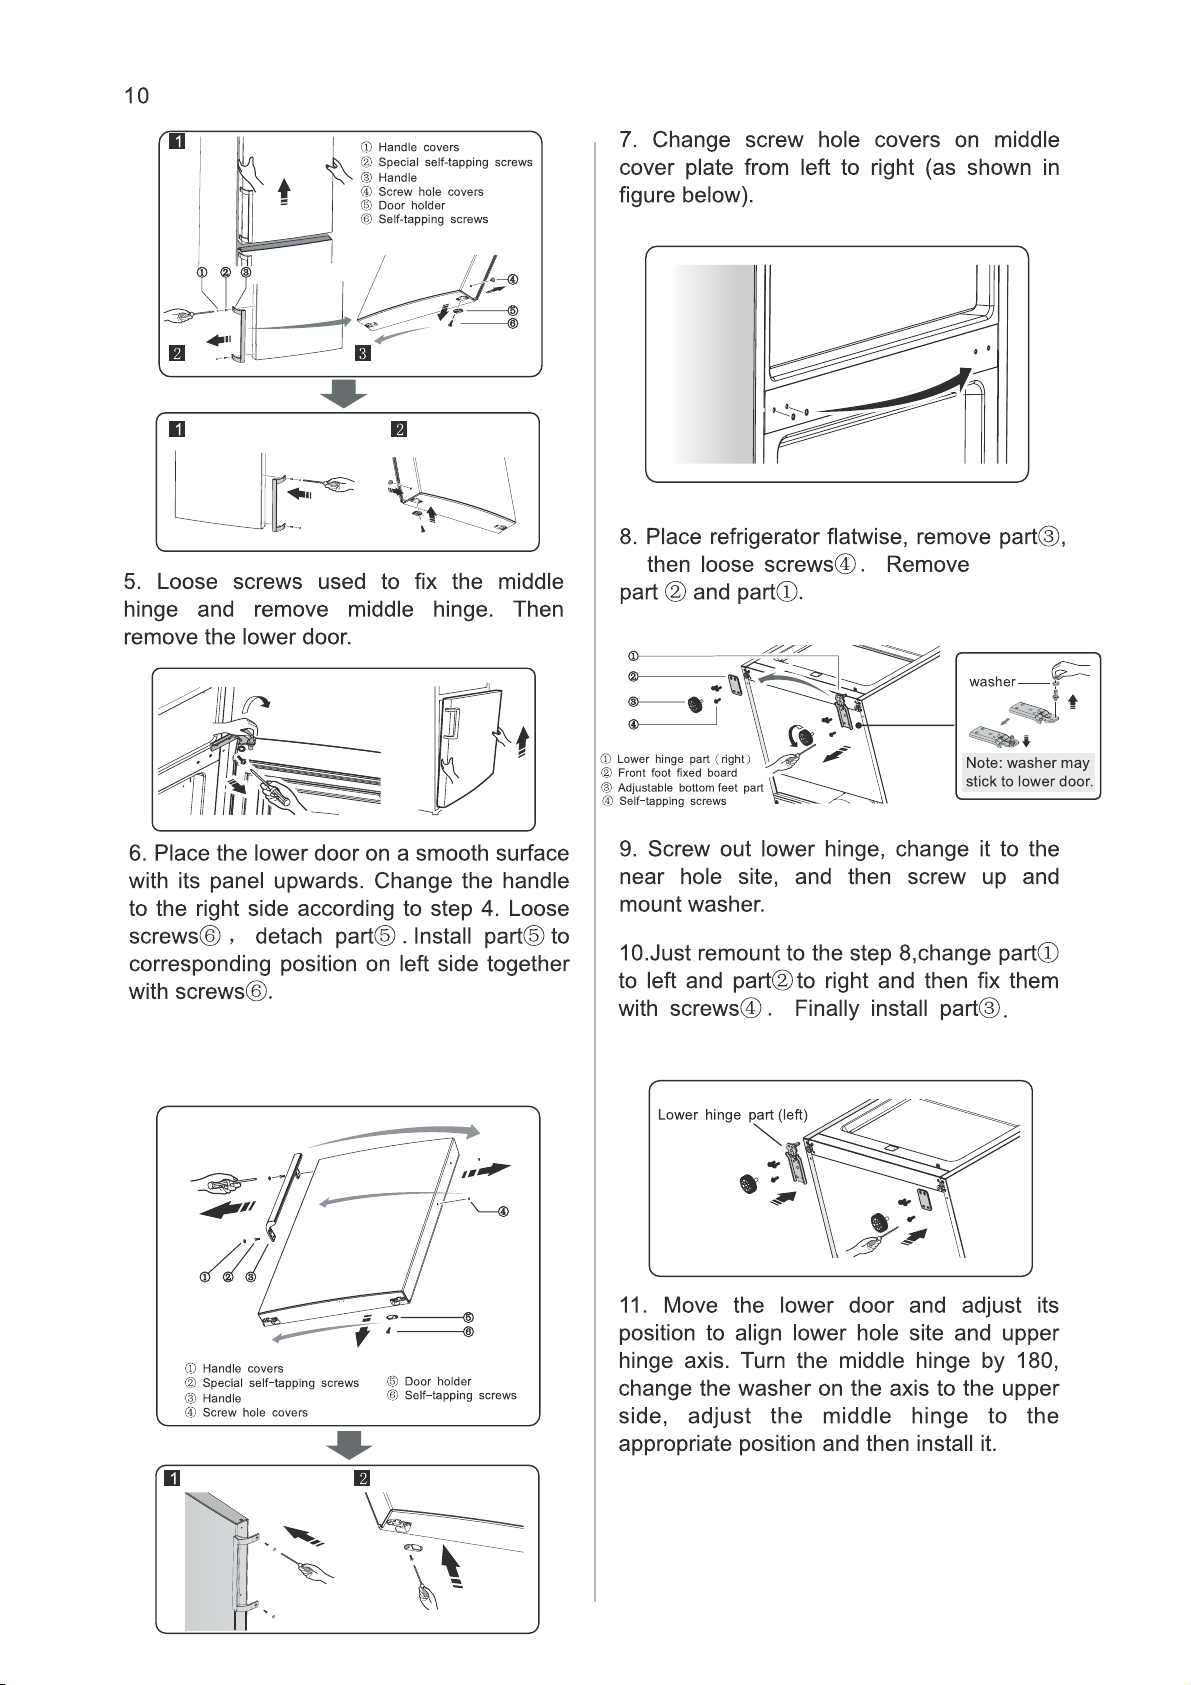
Note: washer may
Note: washer may
Note: washer may
Note: washer may
stick to lower door.
stick to lower door.
stick to lower door.
stick to lower door.
Washe r
Washe r
Washe r
Washe r
12.Transfer the upper door to the
appropriate position. Secure the door's level;
make the middle hinge axis into the lower
hole of the upper door.
13. Transfer the upper hinge part
the plastic bag)
and make the upper hinge
(which is in
axis into the upper hole of the upper
door,and adjust the position of the upper
door(please support the upper door with
your hand when doing it),fixing the upper
hinge part with the special flange selftapping screws.
11
upper hinge part( )left
14. Install the screw hole cover on the top
right corner of the refrigerator. Install the
upper hinge cover (which is in the plastic
bag) on the left corner and screw it.Put the
other upper hinge cover into the plastic bag.
upper hinge cover (left)
screw hole
cover
15. Open the upper door and install the door
shelves, then close it.
Warning!
When changing the side at which the door
opens, the appliance must not be connected
to the mains. Remove plug from the mains
beforehand.
12
Daily use
Accessories 1)
Movable shelves/trays
Various glass, plastic storage shelves or
wire trays are included with your appliance.
The walls of the refrigerator are equipped
with a series of runners so that the
shelves can be positioned as desired.
Positioning the door shelves
To permit storage of food packages of
various sizes, the middle door shelves can
be placed at different heights.
Vegetable Drawer
For storing fruit and vegetables.
Refrigerator compartment
For storing the food which needs not
being frozen and different part suitable for
different kind of food.
Freezer food compartment 2)
For freezing fresh food and storing frozen
and deep-frozen food for a long time.
Thawing food 2)
In the refrigerator compartment.
At room temperature.
In a microwave oven.
In a conventional or fan oven.
Food once thawed should be re-frozen
only in exceptional cases.
1) If the appliance contains related accessories
and functions.
2) If the appliance contains a freezer compartment.
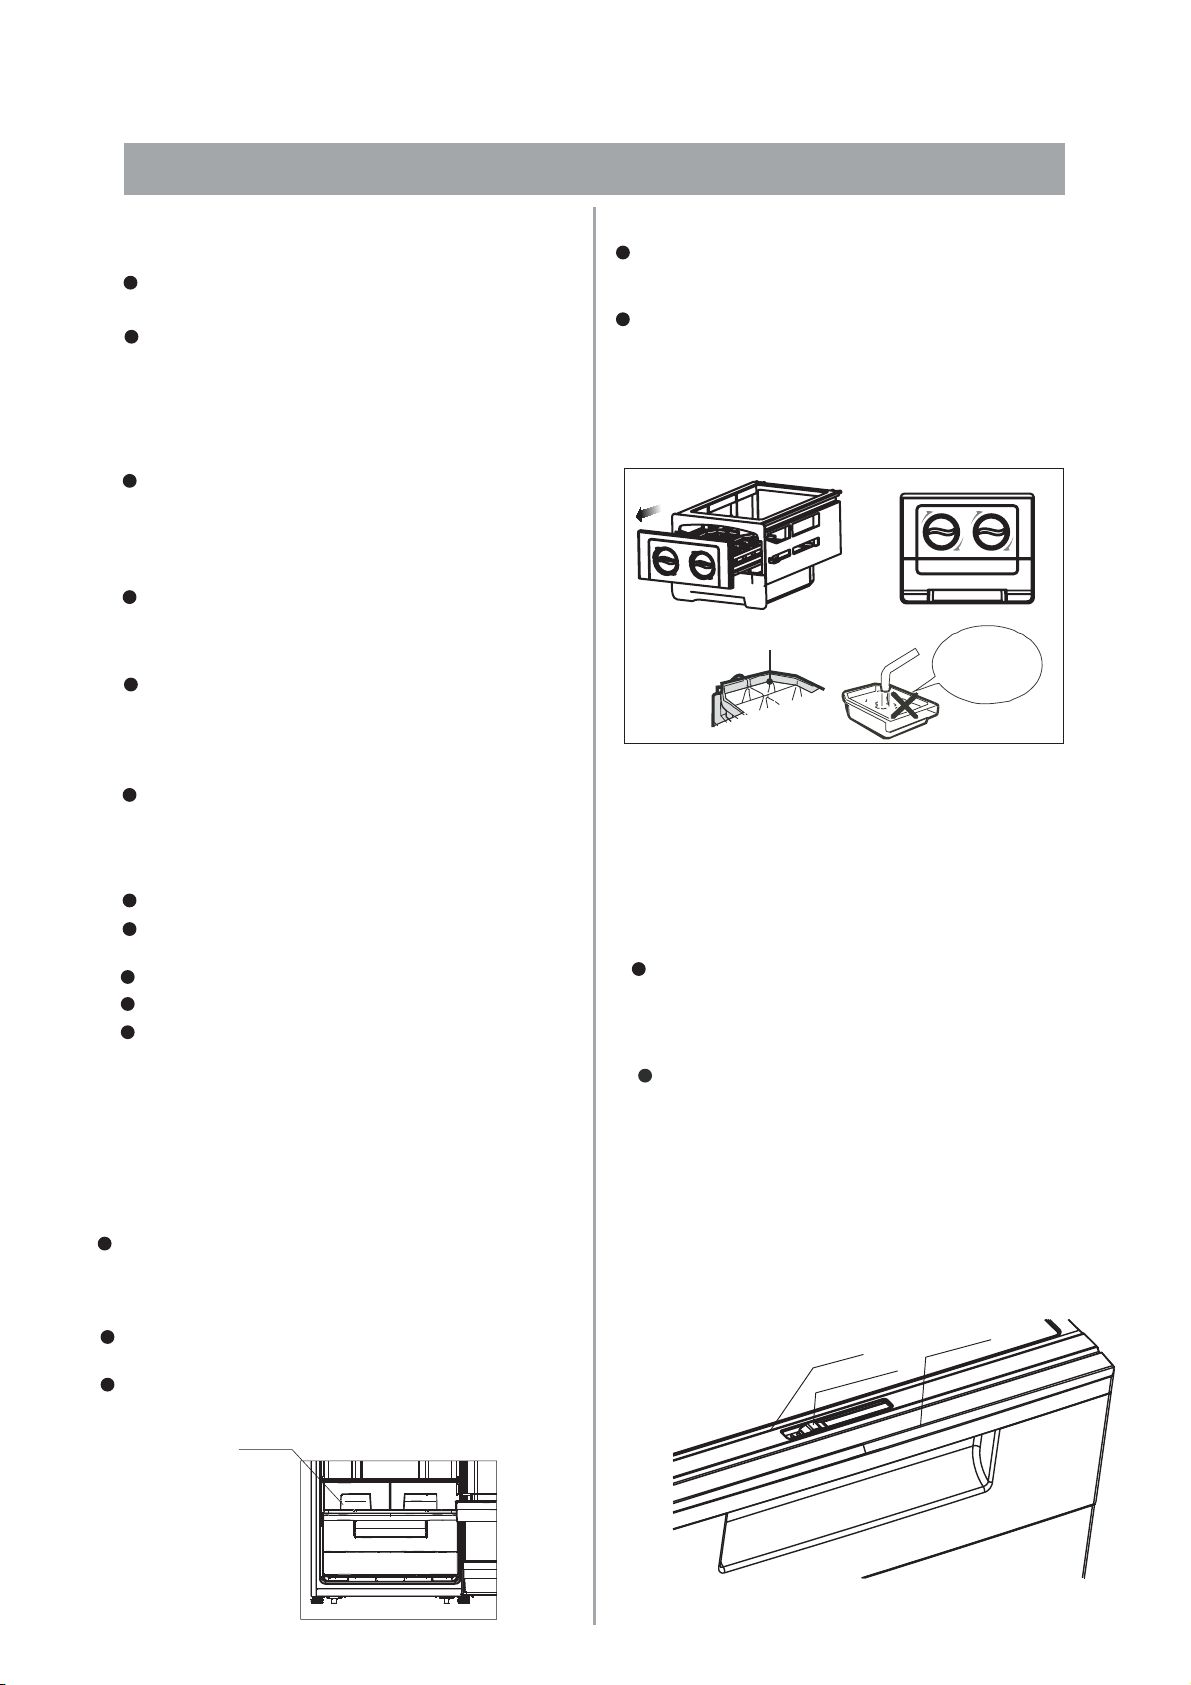
Multifunctional Drawer
In multifunctional drawer the temperature is
Lower than the refrigerator compartment,
sometimes the temperature even can be less
than 0℃.
For storing fish, meat and sausage for a shortterm fresh.
Don’t store food that easily be frostbited , such
as vegetable, fruits.
Multifunctional
drawer
Ice-cube tray
For making ice and storing ice-cubes.
Ice Maker:Twist ice
Take out the ice making tray.
Fill the water in level of line.
Place the ice making tray in its original position.
When ice cubes are formed, clockwise twist the
knob to drop off ice cubes into the icebox.
water level
Ice box is
inadvisable
to make i ce
Notice:
Ice box is inadvisable to be used to make ice,
otherwise it may crack.
If it takes a long time to make ice, please do not
hold the ice tray directly to avoid the ice tray
sticking and hurting your hands.
Humidity Conditioning
Deferent vegetable and fruits need deferent
humidity, you can condition humidity in the
crisper box.
Adjust the humidity conditioning slide block
The humidity conditioning slide block is on the
crisper box cover part.
Slide the block right or left, the size of the exit
from which the air escape out will become
larger or smaller.
Larger size of the exit means lower humidity in
the crisper box. smaller size of the exit means
higher humidity in the crisper box.
art
p
crisp
er box c
hum
sli
over part
idity conditioning
lock
b
de
crisper b
ox
Helpful hints and tips
13
Noises during operation
Clicks- Whenever the compressor switches
on or off, a click can be heard.
Humming- As soon as the compressor is in
operation, you can hear it humming.
Bubbling- When refrigerant flows into thin
tubes, you can hear bubbling or splashing
noises.
Splashing- Even after the compressor has
been switched off, this noise can be heard
for a short time.
Energy saving tips
Do not install the appliance near stoves,
radiators or other sources of warmth.
keep the time the appliance is open to a
minimum.
Do not set the temperature colder than
necessary.
Make sure the side plates and back plate
of the appliance are at some distance
from the wall, and follow the instructions
relevant to installation.
If the diagram shows the correct
combination for the drawers, crisper and
shelves, do not adjust the combination
it would produce effect on energy
consumption.
as
Hints for fresh food refrigeration
Do not store warm foods or evaporating
liquids in the appliance.
Do cover or wrap the food, particularly if it
has a strong flavor.
Position food so that air can circulate
freely around it.
Hints for refrigeration
Meat (all types): wrap in
(plastic)
above the vegetable drawer. For safety,
store in this way only one or two days at
the most.
Cooked foods, cold dishes, etc…: these
should be covered and may be placed on
any shelf.
line down.
Fruit and vegetables: these should be
thoroughly cleaned and placed in the
special provided.drawer
bags and place on the glass shelf
Add bullet and move to the next
polyethylene
Butter and cheese: these should be
placed in aluminum foil or
(plastic) removing
possible.Milk bottles: these should have a
cap and should be stored in the bottle
rack on the door.
bags as much air as
polyethylene
Hints for freezing
When first starting-up or after a period out
of use. Before putting the food in the
compartment let the appliance run at least
2 hours on the higher settings.
Prepare food in small portions to enable it
to be rapidly and completely frozen and to
make it possible to subsequently thaw
only the quantity required.
Wrap up the food in aluminum foil or
polyethylene (plastic) and make sure that
packages are airtight.
Do not allow fresh, unfrozen food to touch
food that is already frozen, thus avoiding
a rise in temperature of the latter.
Iced products, if consumed immediately
after removal from the freezer compartment,
can possibly cause skin to become freezer
burnt.
It is recommended to label and date each
frozen package in order to keep track of
the storage time.
Hints for the storage of frozen food
Make sure that the commercially frozen
food was stored by the retailer.
Once defrosted, foods deteriorate rapidly
and can not be re-frozen.
Do not exceed the storage period
indicated by the food manufacturer.
Note: If the appliance contains related
accessories and function.
14
Cleaning and Care
Cleaning and care
For hygienic reasons, the appliance interior,
including interior accessories, should be
cleaned regularly.
The appliance should be cleaned and
maintained at least every two months.
Warning! Danger of electrical shock!
The appliance should not be connected to
main power supply
the during cleaning.
Before cleaning, switch the appliance off
and remove the plug from the
supply, shut off
breaker or fuse.
switch off, or the circuit
main power
Notice!
Remove the food from the appliance
before cleaning. Store them in a cool
place well covered.
and keep
Never clean the appliance with a steam
cleaner. Moisture could accumulate in
electrical components.
Hot vapor can lead to the damage of
plastic parts.
Ethereal oils and organic solvents can
attack plastic parts, e.g. lemon juice or the
juice from an orange peel, butyric acid,or
cleansers that contain acetic acid. Do not
allow such substances to come into
contact with appliance parts.
Do not use any abrasive cleansers.
Clean the appliance and the interior
accessories with a cloth and lukewarm
water. Commercially available dish
washing detergents may also be used.
After cleaning, wipe with fresh water and
a clean dish cloth.
Accumulation of dust at the condenser
increases energy consumption; clean the
condenser at the back of the appliance
once a year with a soft brush or a vacuum
cleaner.(Only for the outside-condenser
product)
Check the water drain hole on the rear
wall of the refrigerator compartment.
Clear a blocked drain hole with the aid of
something like soft green peg, an be
careful not to any damage to the
cabinet by sharp
After everything is dry, the appliance back
into service.
create
objects.
Taking the appliance out of service
Empty the appliance.
Pull out the power plug.
Clean thoroughly (see section: Cleaning
and Care).
Leave the door open to prevent odour.
What to do if…
Warning! Before trouble-shooting,
disconnect the power supply. Only a
qualified electrician of competent
person must carry out the trouble-shooting
that is not in the manual.
Problem Possible cause Solution
Appliance is not switched on.
Main plug is not plugged in or
is loose.
Appliance does not
work.
Fuse has blown or is defective.
Outlet is defective.
Important!
Repairs to the appliance may only be
performed by competent service engineers.
Improper repairs can give rise to significant
hazards for the user. If your appliance
needs repairing, please contact your
specialist dealer or your local
Service
Center.
Switch on the appliance.
Plug the appliance into the
electrical socket.
Check fuse, replace if necessary.
Defective parts need
repaired
Customer
to be
by an electrician.

15
Appliance cools too
much.
The food is too warm.
Interior lighting does
not work.
Heavy build-up of
frost, possibly also on
the door seal.
Temperature is set too cold.
Temperature is not properly
adjusted.
Door was open for an
extended period.
A large quantity of warm food
was placed in the appliance
within the last 24 hours.
The appliance is near a heat
source.
Light bulb is defective.
Door seal is not air-tight
(possibly after reversing the
door).
Turn the temperature regulator to
a warmer setting temporarily.
Please the “Initial Start Up”
section.
Open the door only as long as
necessary.
Turn the
to a colder setting temporarily.
Please the “Installation
location” section.
Please look in the “changing the
Light Bulb “section.
Carefully warm the leaking
sections of the door seal with a
hair dryer (on a cool setting). At
the same time, shape the warmed
door seal by hand so that it sits
correctly.
refer to
control panel
refer to
Unusual noises.
The compressor does
not start immediately
after changing the
temperature setting.
Appliance is not level.
The appliance is touching the
wall or other objects.
A component, e.g. a pipe, on
the rear of the appliance is
touching another part of the
appliance or the wall.
This is normal, no error has
occurred.
Readjust the feet.
Move the appliance slightly.
If necessary, carefully bend the
component out of the way.
The compressor starts after a
period of time.
 Loading...