

Page 1
English
Operating Instructions
OVEN
Français
Mode d’emploi
FOUR
Español
Manual de instrucciones
HORNO
Italiano
Istruzioni per l’uso
FORNO
Portuges
Instruções para a utilização
FORNO
Sommario
Istruzioni per l’uso,1
Avvertenze,3
Assistenza,8
Descrizione dell’apparecchio,10
Descrizione dell’apparecchio,12
Installazione,14
Avvio e utilizzo,16
Programmi,16
Precauzioni e consigli,18
Manutenzione e cura,18
Contents
Operating Instructions,1
Warnings,3
Assistance,8
Description of the appliance,10
Description of the appliance,12
Installation,20
Start-up and use,22
Modes,22
Precautions and tips,24
Maintenance and care,24
Sommaire
Mode d’emploi,1
Avertissements,3
Assistance,8
Description de l’appareil,10
Description de l’appareil,12
Installation,26
Mise en marche et utilisation,28
Programmes,28
Précautions et conseils,30
Nettoyage et entretien,30
Sumario
Manual de instrucciones,1
Advertencias,4
Asistencia,8
Descripción del aparato,10
Descripción del aparato,12
Instalación,32
Puesta en funcionamiento y uso,34
Programas,34
Precauciones y consejos,36
Mantenimiento y cuidados,36
Índice
Instruções para a utilização,1
Advertências,4
Assistência,9
Descrição do aparelho,10
Descrição do aparelho,12
Instalação,38
Início e utilização,40
Programas,40
Precauções e conselhos,42
Manutenção e cuidados,42
FK 61 (AN)/HA S
FKQ 61 (K)/HA S
FKS 610 X/HA S
Page 2
Ελληνικά
Οδηγίες χρήσης
ΦΟΎΡΝΟΣ
Περιεχόμενα
Οδηγίες χρήσης,2
Προειδοποίηση,5
Τεχνική υποστήριξη,9
Περιγραφή της συσκευής,11
Περιγραφή της συσκευής,13
Εγκατάσταση,56
Εκκίνηση και χρήση,58
ΠΡΟΓΡΑΜΜΑΤΑ,58
Προφυλάξεις και συμβουλές,60
Συντήρηση και φροντίδα,60
Nederlands
Gebruiksaanwijzing
OVEN
Deutsch
Bedienungsanleitung
BACKOFEN
Türkçe
Kullanım talimatları
FIRIN
Polski
Instrukcja obsługi
PIEKARNIK
Română
Instrucţiuni de folosire
CUPTOR
Inhaltsverzeichnis
Bedienungsanleitung,2
Hinweise,5
Kundendienst,9
Beschreibung Ihres Gerätes,10
Beschreibung Ihres Gerätes,12
Installation,44
Inbetriebsetzung und Gebrauch,46
Programme,46
Vorsichtsmaßregeln und Hinweise,48
Reinigung und Pege,48
Inhoud
Gebruiksaanwijzing,2
Belangrijk,5
Service,9
Beschrijving van het apparaat,11
Beschrijving van het apparaat,12
Het installeren,50
Starten en gebruik,52
Programma’s,52
Voorzorgsmaatregelen en advies,54
Onderhoud en verzorging,54
İçindekiler
Kullanım talimatları,2
Uyarı,6
Teknik Servis,9
Cihazın tanıtımı,11
Cihazın tanıtımı,13
Montaj,62
Başlatma ve kullanım,64
Programlar,64
Önlemler ve tavsiyeler,66
Servis ve bakım,66
Spis treści
Instrukcja obsługi,2
Ostrzezenia,6
Serwis Techniczny,9
Opis urządzenia,11
Opis urządzenia,13
Instalacja,68
Uruchomienie i użytkowanie,70
Programy,70
Zalecenia i środki ostrożności,72
Konserwacja i utrzymanie,72
Sumar
Instrucţiuni de folosire,2
Avertizări,7
Asistenţă,9
Descrierea aparatului,11
Descrierea aparatului,13
Instalare,74
Pornire şi utilizare,76
Programe,76
Măsuri de precauţie şi recomandări,78
Întreţinerea şi îngrijirea aparatului,78
Page 3
3
Avvertenze
ATTENZIONE: Questo apparecchio e le sue parti
accessibili diventano molto caldi durante l’uso.
Bisogna fare attenzione ed evitare di toccare gli
elementi riscaldanti. Tenere lontani i bambini inferiori
agli 8 anni se non continuamente sorvegliati. Il
presente apparecchio può essere utilizzato dai
bambini a partire dagli 8 anni e da persone con
ridotte capacità siche, sensoriali o mentali oppure
con mancanza di esperienza e di conoscenza se
si trovano sotto adeguata sorveglianza oppure se
sono stati istruiti circa l’uso dell’apparecchio in modo
sicuro e se si rendono conto dei pericoli correlati. I
bambini non devono giocare con l’apparecchio. Le
operazioni di pulizia e di manutenzione non devono
essere effettuate dai bambini senza sorveglianza.
Non utilizzare prodotti abrasivi né spatole di
metallo taglienti per pulire lo sportello in vetro del
forno in quanto potrebbero grafare la supercie,
provocando, così, la frantumazione del vetro.
Non utilizzare mai pulitori a vapore o ad alta pressione
per la pulizia dell’apparecchio.
ATTENZIONE: Assicurarsi che l’apparecchio sia
spento prima di sostituire la lampada per evitare la
possibilità di scosse elettriche.
! Quando si inserisce la griglia assicurarsi che il
fermo sia rivolto verso l’alto e nella parte posteriore
della cavità.
Warnings
WARNING: The appliance and its accessible parts
become hot during use. Care should be taken to
avoid touching heating elements. Children less than 8
years of age shall be kept away unless continuously
supervised. This appliance can be used by children
aged from 8 years and above and persons with
reduced physical, sensory or mental capabilities or
lack of experience and knowledge if they have been
given supervision or instruction concerning use of the
appliance in a safe way and understand the hazards
involved. Children shall not play with the appliance.
Cleaning and user maintenance shall not be made
by children without supervision.
Do not use harsh abrasive cleaners or sharp metal
scrapers to clean the oven door glass since they can
scratch the surface, which may result in shattering of
the glass.
Never use steam cleaners or pressure cleaners on
the appliance.
WARNING: Ensure that the appliance is switched
off before replacing the lamp to avoid the possibility
of electric shock.
! When you place the rack inside, make sure that the
stop is directed upwards and in the back of the cavity.
Avertissements
ATTENTION : Cet appareil ainsi que ses parties
accessibles deviennent très chauds pendant leur
fonctionnement. Il faut faire attention à ne pas toucher
les éléments chauffants. Ne pas faire approcher les
enfants de moins de 8 ans à moins qu’ils ne soient
sous surveillance constante. Le présent appareil peut
être utilisé par des enfants de plus de 8 ans et par
des personnes présentant des capacités physiques,
sensorielles ou mentales réduites ou n’ayant pas
l’expérience ou les connaissances indispensables,
à condition qu’ils soient sous bonne surveillance ou
qu’ils aient reçu les instructions nécessaires pour une
utilisation de l’appareil en toute sécurité et à condition
qu’ils se rendent compte des dangers encourus. Les
enfants ne doivent pas jouer avec l’appareil. Les
opérations de nettoyage et d’entretien ne doivent
pas être effectuées par des enfants non surveillés.
Ne pas utiliser de produits abrasifs ni de spatules
métalliques coupantes pour nettoyer la porte du four
Page 4
4
en verre, sous peine d’éraer la surface et de briser
le verre.
Ne jamais nettoyer l’appareil avec des nettoyeurs
vapeur ou haute pression.
ATTENTION : s’assurer que l’appareil est éteint
avant de procéder au remplacement de l’ampoule,
an d’éviter tout risque d’électrocution.
! Lors de l’introduction de la grille, s’assurer que
l’arrêt est bien tourné vers le haut et se trouve dans
la partie arrière de l’enceinte.
Advertencias
ATENCIÓN: Este aparato y sus partes accesibles se
vuelven muy calientes durante el uso. Por lo tanto, es
importante evitar tocar los elementos calentadores.
Mantenga alejados a los niños menores de 8 años si
no son continuamente vigilados. El presente aparato
puede ser utilizado por niños mayores de 8 años y
por personas con capacidades físicas, sensoriales
o mentales disminuidas o sin experiencia ni
conocimientos, si se encuentran bajo una adecuada
vigilancia o si han sido instruidos sobre el uso del
aparato de modo seguro y comprenden los peligros
relacionados con el mismo. Los niños no deben
jugar con el aparato. Las operaciones de limpieza y
de mantenimiento no deben ser realizadas por niños
sin vigilancia.
No utilice productos abrasivos ni espátulas de metal
cortantes para limpiar la puerta de cristal del horno
ya que podrían rayar la supercie y quebrar el cristal.
No utilice nunca limpiadores a vapor o de alta presión
para la limpieza del aparato.
ATENCIÓN: Antes de sustituir la lámpara controle
que el aparato esté apagado para evitar la posibilidad
de choques eléctricos.
! Cuando introduzca la parrilla, controle que el tope
esté dirigido hacia arriba y en la parte posterior de
la cavidad.
Advertências
ATENÇÃO: Este aparelho e as suas partes
acessíveis aquecem muito durante a utilização.
É preciso ter atenção e evitar tocar os elementos
que aquecem. Manter afastadas as crianças com
menos de 8 anos, caso não estejam a ser vigiadas.
O presente aparelho pode ser utilizado por crianças
com mais de 8 anos e por pessoas com capacidades
físicas, sensoriais ou mentais reduzidas ou com
pouca experiência e conhecimentos, caso sejam
adequadamente vigiadas ou caso tenham recebido
instruções em relação ao uso do aparelho de
forma segura e tenham conhecimento dos perigos
associados. As crianças não devem brincar com o
aparelho. As operações de limpeza e manutenção
não devem ser efectuadas por crianças sem
vigilância.
Não utilizar produtos abrasivos nem espátulas de
metal cortantes para limpar a porta em vidro do forno,
uma vez que pode riscar a superfície, provocando
a ruptura do vidro.
Nunca utilize equipamento de limpeza a vapor ou
de alta pressão para limpar o aparelho.
ATENÇÃO: Assegure-se de que o aparelho esteja
desligado antes de substituir a lâmpada, para evitar
a possibilidade de choques eléctricos.
! Quando inserir a grelha, assegure-se de que o
bloqueio esteja voltado para cima e na parte posterior
da cavidade.
Hinweise
ZUR BEACHTUNG: Bei Gebrauch wird dieses
Gerät und alle zugänglichen Teile sehr heiß.
Es ist darauf zu achten, dass die Heizelemente
Page 5
5
nicht berührt werden. Kinder unter 8 Jahren, die
nicht ständig beaufsichtigt sind, von dem Gerät
fernhalten. Das Gerät darf von Kindern ab 8 Jahren
und Personen mit eingeschränkten körperlichen,
geistigen oder Wahrnehmungsfähigkeiten oder
aber ohne ausreichende Erfahrung und Kenntnis
verwendet werden, vorausgesetzt sie werden
ausreichend überwacht oder sie wurden in den
sicheren Gebrauch des Geräts eingewiesen und
haben eine ausreichende Wahrnehmung der mit
dem Gebrauch des Geräts verbundenen Gefahren.
Erlauben Sie Kindern nicht, mit dem Gerät zu spielen.
Reinigungs- und Wartungsarbeiten dürfen nicht von
unbewachten Kindern ausgeführt werden.
Verwenden Sie zur Reinigung der Glastür des
Backofens keine Scheuermittel oder scharfkantige
Metallspachtel, um die Oberäche nicht zu zerkratzen
und so das Zerspringen des Glases zu verursachen.
Verwenden Sie zur Reinigung des Kochfeldes keine
Dampf- oder Hochdruckreinigungsgeräte.
ZUR BEACHTUNG: Versichern Sie sich, dass
das Gerät ausgeschaltet ist, bevor Sie die Lampe
austauschen. Stromschlaggefahr.
! Beim Einsetzen des Rosts darauf achten, dass die
Arretierung nach oben zeigt und sich im hinteren
Bereich bendet.
Belangrijk
PAS OP: Dit apparaat en zijn bereikbare onderdelen
worden tijdens gebruik zeer heet. Zorg ervoor de
verwarmende elementen niet aan te raken. Zorg
ervoor dat kinderen die kleiner dan 8 jaar oud zijn
niet dichtbij het apparaat kunnen komen, tenzij onder
constant toezicht. Het huidige apparaat mag alleen
door kinderen van 8 jaar en ouder en door personen
met een beperkt lichamelijk, sensorieel of geestelijk
vermogen, of zonder ervaring en kennis worden
gebruikt, mits ze onder adequaat toezicht zijn, of
mits ze zijn onderricht m.b.t. het veilige gebruik van
het apparaat en zich bewust zijn van de betreffende
gevaren. Voorkom dat kinderen met het apparaat
spelen. De reinigings- en onderhoudshandelingen
mogen niet door kinderen worden uitgevoerd, tenzij
onder toezicht.
Gebruik geen schurende producten, noch snijdende
metalen spatels om de glazen deur van de oven
te reinigen, aangezien deze het oppervlak zouden
kunnen krassen, en als gevolg het glas doen
verbrijzelen.
Gebruik nooit huishoudapparaten met stoom of hoge
druk voor het reinigen van de kookplaat.
PAS OP: Controleer of het apparaat uit staat voor
u de lamp vervangt, om te voorkomen dat u een
elektrische schok krijgt.
! Bij het inbrengen van de grill erop letten dat de
bevestigingsklem omhoog gericht is en zich achterin
de oven bevindt.
Προειδοποίηση
ΠΡΟΣΟΧΉ: Η συσκευή αυτή και τα προσβάσιμα
μέρη της καθίστανται πολύ θερμά κατά τη χρήση.
Θα πρέπει να προσέχετε και να αποφεύγετε να
αγγίζετε τα θερμαντικά στοιχεία.Κρατάτε μακριά
τα παιδιά ηλικίας μικρότερης των 8 ετών ή να τα
επιτηρείτε συνεχώς.Η παρούσα συσκευή μπορεί να
χρησιμοποιηθεί από παιδιά μεγαλύτερα των 8 ετών
και από άτομα με μειωμένες φυσικές, αισθητηριακές
ή νοητικές ικανότητες ή χωρίς εμπειρία και γνώση
αν βρίσκονται υπό κατάλληλη επιτήρηση ή αν έχουν
εκπαιδευτεί στη χρήση της συσκευής με τρόπο
ασφαλή και αν αντιλαμβάνονται τους σχετικούς
κινδύνους. Τα παιδιά δεν πρέπει να παίζουν με τη
συσκευή. Οι ενέργειες καθαρισμού και συντήρησης
δεν πρέπει να διενεργούνται από τα παιδιά χωρίς
επιτήρηση.
Μη χρησιμοποιείτε προϊόντα αποξυστικά κι ούτε
σπάτουλες μεταλλικές κοφτερές για να καθαρίσετε
τη γυάλινη πόρτα του φούρνου επειδή μπορεί
Page 6
6
να προξενηθούν ξυσίματα στην επιφάνεια,
προκαλώντας, έτσι, τη θραύση του γυαλιού.
Μη χρησιμοποιείτε ποτέ ατμοκαθαριστές ή
μηχανήματα καθαρισμού σε υψηλή πίεση για τον
καθαρισμό της συσκευής.
ΠΡΟΣΟΧΉ: Βεβαιωθείτε ότι η συσκευή είναι σβηστή
πριν αντικαταστήστε τη λυχνία για να αποφευχθεί
ενδεχόμενο ηλεκτροπληξίας.
! Όταν εισάγεται το πλέγμα βεβαιωθείτε ότι το στοπ
είναι στραμμένο προς τα πάνω και στο πίσω μέρος
της κοιλότητας.
Uyarı
DİKKAT: Bu cihaz ve erişilebilen bölümleri, kullanım
sırasında çok sıcak olur.Dikkat etmek ve ısıtılan
parçalara dokunmaktan kaçınmak gerekir.Eğer
sürekli olarak gözetim altında değiller ise, 8 yaşından
küçük çocukları uzak tutunuz.Bu cihaz, eğer uygun
şekilde gözetim altında bulunuyorlar ise veya güvenli
şekilde cihazın kullanımı hakkında eğitim almışlar
ise ve ilişkin tehlikeler göz önünde bulundurulur ise,
8 yaşından itibaren çocuklar ve ziksel, duyusal
veya mental kapasitelerden yoksun veya tecrübe ve
bilgi sahibi olmayan kişiler tarafından kullanılabilir.
Çocuklar, cihaz ile oynamamalıdır. Temizlik ve bakım
işlemleri, denetimsiz olarak çocuklar tarafından
gerçekleştirilmemelidir.
Camın parçalanmasına neden olarak yüzeyi
çizebileceğinden, fırının cam kapağını temizlemek
için aşındırıcı ürünler ve kesici metal spatulalar
kullanmayınız.
Cihazı temizlerken asla buharlı yada yüksek basınçlı
temizleyiciler kullanmayınız.
DİKKAT: Muhtemel elektrik çarpmalarının önüne
geçmek için lambayı yenisi ile değiştirmeden önce,
cihazın sönük olduğundan emin olunuz.
! Izgara takıldığı zaman, kilidin yukarı doğru dönük
ve yuvanın arka tarafında olduğundan emin olunuz.
Ostrzezenia
UWAGA: To urządzenie oraz jego dostępne części
silnie się rozgrzewają podczas użytkowania.Należy
uważać, aby nie dotknąć elementów grzejnych.
Nie pozwalać, aby dzieci poniżej 8 roku życia
zbliżały się do urządzenia, jeśli nie są pod stałym
nadzorem dorosłych.Z niniejszego urządzenia mogą
korzystać dzieci powyżej 8 roku życia i osoby o
ograniczonych zdolnościach zycznych, zmysłowych
bądź umysłowych, jak również osoby nieposiadające
doświadczenia lub znajomości urządzenia, jeśli
znajdują się one pod nadzorem innych osób lub jeśli
zostały pouczone na temat bezpiecznego sposobu
użycia urządzenia oraz zdają sobie sprawę ze
związanych z nim zagrożeń. Dzieci nie powinny bawić
się urządzeniem. Prace związane z czyszczeniem i
konserwacją nie mogą być wykonywane przez dzieci,
jeśli nie są one nadzorowane.
Nie stosować środków ściernych ani ostrych
łopatek metalowych do czyszczenia szklanych
drzwiczek piekarnika, ponieważ mogłyby porysować
powierzchnię i spowodować pęknięcie szyby.
Nie stosować nigdy oczyszczaczy parowych lub
ciśnieniowych do czyszczenia urządzenia.
UWAGA: Przed wymianą żarówki, należy się
upewnić, że urządzenie jest wyłączone, aby uniknąć
ryzyka porażenia prądem.
! Wsuwając ruszt, należy się upewnić, że ogranicznik
jest skierowany ku górze i znajduje się on w tylnej
części komory.
Page 7

7
Avertizări
ATENŢIE: Acest aparat şi părţile sale accesibile devin
foarte calde în timpul folosirii.Trebuie să ţi atenţi şi să
nu atingeţi elementele de încălzire.Îndepărtaţi copiii
sub 8 ani dacă nu sunt supravegheaţi continuu.Acest
aparat poate utilizat de copiii de peste 8 ani şi de
persoane cu capacităţi zice, senzoriale sau mentale
reduse sau fără experienţă şi cunoştinţe dacă se
află sub o supraveghere corespunzătoare sau
dacă au fost instruiţi cu privire la folosirea aparatului
în mod sigur şi dacă îşi dau seama de pericolele
corelate. Copiii nu trebuie să se joace cu aparatul.
Operaţiunile de curăţare şi de întreţinere nu trebuie
să e efectuate de copii fără supraveghere.
Nu folosiţi produse abrazive, nici perii de metal
tăioase pentru a curăţa uşa de sticlă a cuptorului,
deoarece ar putea zgâria suprafaţa, provocând astfel
spargerea geamului.
Nu folosiţi niciodată aparate cu aburi sau sub
presiune pentru a curăţa aparatul.
ATENŢIE: Asiguraţi-vă că aparatul este stins înainte
de a înlocui lampa pentru a evita posibilitatea
electrocutărilor.
! Când introduceţi grătarul, asiguraţi-vă că opritorul
este îndreptat în sus şi în partea din spate a cavităţii.
Page 8
8
Assistenza
! Non ricorrere mai a tecnici non autorizzati.
Comunicare:
• il tipo di anomalia;
• il modello della macchina (Mod.)
• il numero di serie (S/N)
Queste ultime informazioni si trovano sulla targhetta caratteristiche posta
sull’apparecchio
Assistenza Attiva 7 giorni su 7
Se nasce il bisogno di assistenza o manutenzione basta chiamare il Numero
Unico Nazionale 199.199.199* per essere messi subito in contatto con il Centro
Assistenza Tecnica più vicino al luogo da cui si chiama.
È attivo 7 giorni su 7, sabato e domenica compresi, e non lascia mai inascoltata
una richiesta.
Estensione di garanzia Airbag
Airbag è il servizio esclusivo creato da Ariston che integra e prolunga nel
tempo i contenuti della garanzia standard: con una modica cifra protegge
il cliente da ogni imprevisto riguardante l’assistenza e la manutenzione
dell’elettrodomestico. Per i 5 anni successivi alla data di acquisto il cliente
che aderisce al programma Airbag avrà diritto gratuitamente a:
• l’intervento entro 48 ore dalla chiamata;
• il contributo per spese di trasferta del Tecnico (diritto di chiamata);
• la manodopera;
• le parti di ricambio originali;
• il trasporto dell’elettrodomestico non riparabile in loco.
Inoltre, qualora l’elettrodomestico non sia riparabile la garanzia prevede
la sostituzione a prezzo agevolato in funzione dell’anzianità del prodotto.
* Al costo di 14,25 centesimi di Euro al minuto (iva inclusa) dal Lun. al Ven.
dalle 08:00 alle 18:30, il Sab. dalle 08:00 alle 13:00 e di 5,58 centesimi di
Euro al minuto (iva inclusa) dal Lun. al Ven. dalle 18:30 alle 08:00, il Sab. dalle
13:00 alle 08:00 e i giorni festivi, per chi chiama dal telefono sso.
Per chi chiama da radiomobile le tariffe sono legate al piano tariffario
dell’operatore telefonico utilizzato.
Le suddette tariffe potrebbero essere soggette a variazione da parte
dell’operatore telefonico; per maggiori informazioni consultare il sito www.
indesit.com.
Assistance
! Never use the services of an unauthorised technician.
Please have the following information to hand:
• the type of problem encountered.
• the appliance model (Mod.).
• the serial number (S/N).
The latter two pieces of information can be found on the data plate located
on the appliance.
Assistance
! Ne jamais faire appel à des techniciens non agréés.
Indiquer :
• le type d’anomalie;
• le modèle de l’appareil (Mod.);
• son numéro de série (S/N).
Ces informations gurent sur la plaque signalétique apposée sur l’appareil
Asistencia
! Nunca solicite la asistencia de técnicos no autorizados.
Comunique:
• el tipo de anomalía;
• el modelo del aparato (Mod.)
• el número de serie (S/N)
Esta información se encuentra en la placa de características colocada en
el aparato.
La siguiente información es válida solo para España.
Para otros países de habla hispana consulte a su vendedor.
Ampliación de garantía
Llame al 902.363.539 y le informaremos sobre el fantástico plan de ampliación
de garantía hasta 5 años.
Consiga una cobertura total adicional de
• piezas y componentes
• mano de obra de los técnicos
• desplazamiento a su domicilio de los técnicos
Y NO PAGUE AVERIAS NUNCA MAS
Servicio de asistencia técnica (SAT)
Llame al 902.133.133 y nuestros técnicos intervendrán con rapidez y
ecacia, devolviendo el electrodoméstico a sus condiciones óptimas de
funcionamiento.
En el SAT encontrará recambios, accesorios y productos especícos para
la limpieza y mantenimiento de su electrodoméstico a precios competitivos.
ESTAMOS A SU SERVICIO
Page 9

9
Assistência
! Nunca recorra a técnicos não autorizados.
Comunique:
• o tipo de avaria;
• o modelo da máquina (Mod.)
• o número de série (S/N).
Estas últimas informações encontram-se na placa de identicação situada
no aparelho.
Kundendienst
! Wenden Sie sich nur an autorisierte Techniker.
Geben Sie bitte Folgendes an:
• die genaue Beschreibung des Fehlers
• das Gerätemodell (Mod.)
• die Seriennummer (S/N).
Letztere Informationen können dem Typenschild, das sich auf dem Gerät
bendet, entnommen werden.
Service
! Wendt u nooit tot niet erkende monteurs.
Dit dient u door te geven:
• het soort storing;
• het model apparaat (Mod.)
• het serienummer (S/N)
Deze informatie bevindt zich op het typeplaatje op het apparaat.
Τεχνική υποστήριξη
! Μην προσφεύγετε ποτέ σε τεχνικούς μη εξουσιοδοτημένους.
Γνωστοποιήστε:
• τον τύπο της ανωμαλίας
• το μοντέλο της μηχανής (Mod.)
• τον αριθμό σειράς (S/N)
Αυτές οι τελευταίες πληροφορίες βρίσκονται στην ταμπελίτσα χαρακτηριστικών
που βρίσκεται στη συσκευή
Teknik Servis
! Yetkili olmayan teknisyenlerden asla yardım almayınız.
Bu durumda şu bilgileri veriniz:
• arıza tipi
• cihazın modeli (Mod.)
• seri numarası (S/N)
Bu bilgiler, soğutucu bölmesi içinde aşağıda solda bulunan teknik veriler etiketi
üzerinde bulunmaktadır.
-
Serwis Techniczny
! Należy zwracać się wyłącznie do autoryzowanych techników.
Podać:
• rodzaj usterki;
• model urządzenia (Mod.)
• numer seryjny (S/N)
Te ostatnie informacje można znaleźć na tabliczce znamionowej umieszczonej
na urządzeniu.
Asistenţă
! Nu apelaţi niciodată la personal tehnic neautorizat.
Comunicaţi:
• tipul de anomalie;
• modelul aparatului (Mod.)
• numărul de serie (S/N)
Aceste informaţii se găsesc pe tăbliţa cu caracteristici lipită de aparat.
Page 10
10
Descrizione dell’apparecchio
Vista d’insieme
1 POSIZIONE 1
2 POSIZIONE 2
3 POSIZIONE 3
4 POSIZIONE 4
5 POSIZIONE 5
6 GUIDE di scorrimento dei ripiani
7 Ripiano LECCARDA
8 Ripiano GRIGLIA
9 Pannello di controllo
Description of the appliance
Overall view
1 POSITION 1
2 POSITION 2
3 POSITION 3
4 POSITION 4
5 POSITION 5
6 GUIDES for the sliding racks
7 DRIPPING PAN
8 GRILL
9 Control panel
Description de l’appareil
Vue d’ensemble
1 NIVEAU 1
2 NIVEAU 2
3 NIVEAU 3
4 NIVEAU 4
5 NIVEAU 5
6 GLISSIERES de coulissement
7 Support LECHEFRITE
8 Support GRILLE
9 Tableau de bord
Descripción del aparato
Vista en conjunto
1 POSICIÓN 1
2 POSICIÓN 2
3 POSICIÓN 3
7
8
9 6
1
2
3
4
5
4 POSICIÓN 4
5 POSICIÓN 5
6 GUÍAS de deslizamiento de las bandejas
7 Bandeja GRASERA
8 Bandeja PARRILLA
9 Panel de control
Descrição do aparelho
Vista de conjunto
1 POSIÇÃO 1
2 POSIÇÃO 2
3 POSIÇÃO 3
4 POSIÇÃO 4
5 POSIÇÃO 5
6 GUIAS de escorrimento das prateleiras
7 Prateleira BANDEJA PINGADEIRA
8 Prateleira GRADE
9 Painel de comandos
Beschreibung Ihres Gerätes
Geräteansicht
1 EINSCHUBHÖHE 1
2 EINSCHUBHÖHE 2
3 EINSCHUBHÖHE 3
4 EINSCHUBHÖHE 4
5 EINSCHUBHÖHE 5
6 GLEITFÜHRUNGEN für die Einschübe
7 Einschub FETTPFANNE
8 Einschub BACKOFENROST
9 Bedienfeld
Page 11

11
7
8
9 6
1
2
3
4
5
Beschrijving van het apparaat
Algemeen aanzicht
1 POSITIE 1
2 POSITIE 2
3 POSITIE 3
4 POSITIE 4
5 POSITIE 5
6 GLEUVEN om roosters in te schuiven
7 Rooster LEKPLAAT
8 Rooster GRILL
9 Bedieningspaneel
Περιγραφή της συσκευής
Συνολική άποψη
1 ΘΕΣΗ 1
2 ΘΕΣΗ 2
3 ΘΕΣΗ 3
4 ΘΕΣΗ 4
5 ΘΕΣΗ 5
6 ΟΔΗΓΟΙ ολίσθησης των επιπέδων
7 Επίπεδο ΛΙΠΟΣΥΛΛΈΚΤΗ
8 Επίπεδο ΓΚΡΙΛ
9 Πίνακας ελέγχου
Cihazın tanıtımı
Genel görünüm
1 KONUM 1
2 KONUM 2
3 KONUM 3
4 KONUM 4
5 KONUM 5
6 Açılır kapanır raf KILAVUZLARı
7 YAĞ DAMLAMA TENCERESi
8 IZGARA
9 Kontrol Paneli
Opis urządzenia
Widok ogólny
1 POZIOM 1
2 POZIOM 2
3 POZIOM 3
4 POZIOM 4
5 POZIOM 5
6 PROWADNICE boczne
7 Poziom BLACHA UNIWERSALNA
8 Poziom RUSZT
9 Panel sterowania
Descrierea aparatului
Vedere de ansamblu
1 POZITIA 1
2 POZITIA 2
3 POZITIA 3
4 POZITIA 4
5 POZITIA 5
6 GHIDAJE culisare rafturi
7 Raft TAVĂ
8 Raft GRĂTAR
9 Panou de control
Page 12
12
Descrizione dell’apparecchio
Pannello di controllo
1 Manopola PROGRAMMI
2 Spia TERMOSTATO
3 Manopola TERMOSTATO
4 Manopola CONTAMINUTI
Description of the appliance
Control panel
1 SELECTOR knob
2 THERMOSTAT indicator light
3 THERMOSTAT knob
4 TIMER knob
Description de l’appareil
Tableau de bord
1 Bouton PROGRAMMES
2 Voyant THERMOSTAT
3 Bouton THERMOSTAT
4 Bouton MINUTEUR
Descripción del aparato
Panel de control
1 Mando de PROGRAMAS
2 Piloto TERMOSTATO
3 Mando del TERMOSTATO
4 Mando del CONTADOR DE MINUTOS
1
2
4
3
Descrição do aparelho
Painel de comandos
1 Selector PROGRAMAS
2 Indicador luminoso do TERMOSTATO
3 Selector do TERMOSTATO
4 Selector do CONTADOR DE MINUTOS
Beschreibung Ihres Gerätes
Bedienfeld
1 Reglerknopf PROGRAMME
2 Kontrollleuchte THERMOSTAT
3 Reglerknopf THERMOSTAT
4 Reglerknopf KURZZEITWECKER
Beschrijving van het apparaat
Bedieningspaneel
1 PROGRAMMAKNOP
2 Controlelampje THERMOSTAAT
3 THERMOSTAATKNOP
4 Knop TIMER
Page 13
13
Περιγραφή της συσκευής
Πίνακας ελέγχου
1 Επιλογέας ΠΡΟΓΡΑΜΜΑΤΩΝ
2 Ενδεικτικό φωτάκι ΘΕΡΜΟΣΤΑΤΗ
3 Επιλογέας ΘΕΡΜΟΣΤΑΤΗ
4 Επιλογέας ΧΡΟΝΟΜΕΤΡΟΥ
Cihazın tanıtımı
Kontrol Paneli
1 PROGRAMLAR düğmesi
2 Uyarı ışığı TERMOSTAT
3 TERMOSTAT düğmesi
4 DAKİKA SAYACI düğmesi
Opis urządzenia
Panel sterowania
1 Pokrętło PROGRAMY
2 Kontrolka TERMOSTATU
3 Pokrętło TERMOSTATU
4 Pokrętło MINUTNIKA
Descrierea aparatului
Panoul de control
1 Selector PROGRAME
2 Indicator TERMOSTAT
3 Selector TERMOSTAT
4 Selector TIMER
1
2
4
3
Page 14
14
IT
Installazione
! È importante conservare questo libretto per poterlo consultare in ogni
momento. In caso di vendita, di cessione o di trasloco, assicurarsi che resti
insieme all’apparecchio per informare il nuovo proprietario sul funzionamento
e sui relativi avvertimenti.
! Leggere attentamente le istruzioni: ci sono importanti informazioni
sull’installazione, sull’uso e sulla sicurezza.
Posizionamento
! Gli imballaggi non sono giocattoli per bambini e vanno eliminati secondo le
norme per la raccolta differenziata (vedi Precauzioni e consigli).
! L’installazione va effettuata secondo queste istruzioni e da personale
professionalmente qualicato. Una errata installazione può causare danni a
persone, animali o cose.
Incasso
Per garantire un buon funzionamento dell’apparecchio è necessario che il
mobile abbia le caratteristiche adatte:
• i pannelli adiacenti il forno devono essere di materiale resistente al calore;
• nel caso di mobili in legno impiallacciato, le colle devono essere resistenti
alla temperatura di 100°C;
• per l’incasso del forno, sia nel caso di inserimento sottotavolo (vedi gura)
che a colonna, il mobile deve avere le seguenti dimensioni:
590 mm.
595 mm.
22,5 mm.*
20,5 mm.
550 mm.
570 mm.
20 mm.
575-585 mm.
45 mm.
560 mm.
550 mm.
min.
! Una volta incassato l’apparecchio non debbono essere possibili contatti
con le parti elettriche.
Le dichiarazioni di consumo indicate in targhetta caratteristiche sono state
misurate con questo tipo di installazione.
Aerazione
Per garantire una buona aerazione è necessario eliminare la parete posteriore
del vano. È preferibile installare il forno in modo che appoggi su due listelli
in legno oppure su un piano continuo che abbia un’apertura di almeno 45 x
560 mm (vedi gure).
560 mm.
45 mm.
Centraggio e ssaggio
Per ssare l’apparecchio al mobile:
• aprire la porta del forno;
• togliere i 2 gommini che coprono i fori di ssaggio posti sulla cornice
perimetrale;
• ssare il forno al mobile utilizzando 2 viti a legno;
• riposizionare i gommini coprifori.
! Tutte le parti che assicurano la protezione debbono essere ssate in modo
tale da non poter essere tolte senza l’aiuto di qualche utensile.
Collegamento elettrico
I forni dotati di cavo di alimentazione tripolare, sono predisposti per
il funzionamento con corrente alternata alla tensione e frequenza di
alimentazione indicate nella targhetta caratteristiche posta sull’apparecchio
(vedi sotto).
Montaggio del cavo di alimentazione
1. Aprire la morsettiera facendo leva con
un cacciavite sulle linguette laterali del
coperchio: tirare e aprire il coperchio
(vedi gura).
2. Mettere in opera il cavo di alimentazione:
svitare la vite del serracavo e le tre viti dei
contatti L-N-
e poi ssare i cavetti
sotto le teste delle viti rispettando i colori
Blu (N) Marrone (L) Giallo-Verde
(vedi gura).
3. Fissare il cavo nell’apposito fermacavo.
4. Chiudere il coperchio della morsettiera.
Allacciamento del cavo di alimentazione alla rete
Montare sul cavo una spina normalizzata per il carico indicato nella targhetta
caratteristiche (vedi a anco).
In caso di collegamento diretto alla rete è necessario interporre tra
l’apparecchio e la rete un interruttore onnipolare con apertura minima fra i
contatti di 3 mm dimensionato al carico e rispondente alle norme in vigore (il
lo di terra non deve essere interrotto dall’interruttore). Il cavo di alimentazione
deve essere posizionato in modo tale che in nessun punto superi di 50°C la
temperatura ambiente (per esempio lo schienale del forno).
! L’installatore è responsabile del corretto collegamento elettrico e
dell’osservanza delle norme di sicurezza.
Prima di effettuare l’allacciamento accertarsi che:
• la presa abbia la messa a terra e sia a norma di legge;
• la presa sia in grado di sopportare il carico massimo di potenza della
macchina, indicato nella targhetta caratteristiche (vedi sotto);
L
N
N
L
Page 15
IT
15
• la tensione di alimentazione sia compresa nei valori nella targhetta
caratteristiche (vedi sotto);
• la presa sia compatibile con la spina dell’apparecchio. In caso contrario
sostituire la presa o la spina; non usare prolunghe e multiple.
! Ad apparecchio installato, il cavo elettrico e la presa della corrente devono
essere facilmente raggiungibili.
! Il cavo non deve subire piegature o compressioni.
! Il cavo deve essere controllato periodicamente e sostituito solo da tecnici
autorizzati (vedi Assistenza).
! L’azienda declina ogni responsabilità qualora queste norme non
vengano rispettate.
* Solo per modelli con guide imbutite.
** Solo per modelli con guide in filo.
Questa apparecchiatura è
conforme alle seguenti Direttive
Comunitarie: 2006/95/CE del
12/12/06 (Bassa Tensione) e
successive modificazioni
- 2004/108/CE del15/12/04
(Compatibilità Elettromagnetica) e
successive modificazioni
- 93/68/CEE del 22/07/93 e
successive modificazioni.
- 2012/19/UE e successive
modificazioni.
-
1275/2008 standby/off mode
Energy
Label e
Ecodesign
Regolamento (EU) No 65/2014
che integra la Direttiva 2010/30/EU.
Regolamento (EU) No 66/2014
che integra la Direttiva 2009/125/EC.
Norma EN 60350-1
Norma EN 50564
Consumo energia convezione
Naturale – funzione di
riscaldamento: Tradizionale;
Consumo energia dichiarazione
Classe convezione Forzata funzione di riscaldamento:
Pasticceria.
Dimensioni*
larghezza cm 43,5
altezza cm 32,4
profondità cm 41,5
Volume* lt. 59
Dimensioni**
larghezza cm 45,5
altezza cm 32,4
profondità cm 41,5
Volume** lt. 62
Collegamenti
elettrici
tensione a 220-240V~ 50/60Hz
(vedi targhetta caratteristiche)
potenza massima assorbita
2800W
TARGHETTA CARATTERISTICHE
Page 16

16
IT
Avvio e utilizzo
ATTENZIONE! Il forno è dotato di
un sistema di arresto griglie che
consente di estrarle senza che
queste fuoriescano dal forno. (1)
Per estrarre completamente le
griglie è sufciente, come indicato
sul disegno, alzarle, prendendole
dalla parte anteriore e tirarle. (2)
! Alla prima accensione fare funzionare il forno a vuoto per almeno un’ora
con il termostato al massimo e a porta chiusa. Poi spegnere, aprire la porta
del forno e aerare il locale. L’odore che si avverte è dovuto all’evaporazione
delle sostanze usate per proteggere il forno.
Avviare il forno
1. Selezionare il programma di cottura desiderato ruotando la manopola
PROGRAMMI.
2. Scegliere la temperatura ruotando la manopola TERMOSTATO. Una lista
con le cotture e le relative temperature consigliate è consultabile nella Tabella
cottura (vedi Programmi).
3. La spia TERMOSTATO accesa indica la fase di riscaldamento no alla
temperatura impostata.
4. Durante la cottura è sempre possibile:
- modicare il programma di cottura agendo sulla manopola PROGRAMMI;
- modicare la temperatura agendo sulla manopola TERMOSTATO;
- interrompere la cottura riportando la manopola PROGRAMMI in posizione
“0”.
! Non appoggiare mai oggetti sul fondo del forno perché si rischiano danni
allo smalto.
! Porre sempre i recipienti di cottura sulla griglia in dotazione.
Ventilazione di raffreddamento
Per ottenere una riduzione delle temperature esterne, una ventola di
raffreddamento genera un getto d’aria che esce tra il pannello di controllo,
porta del forno ed anche nella parte inferiore della porta forno.
! A ne cottura la ventola rimane attiva nché il forno non è sufcientemente
freddo.
Luce del forno
Si accende selezionando
con la manopola PROGRAMMI. Rimane
accesa quando si seleziona un programma di cottura.
Utilizzare il contaminuti
1. Occorre anzitutto caricare la suoneria, ruotando la manopola CONTAMINUTI
di un giro quasi completo in senso orario.
2. Tornando indietro in senso antiorario, impostare il tempo desiderato facendo
coincidere l’indice della manopola CONTAMINUTI con il tempo indicato sul
pannello di controllo.
3. Il contaminuti a tempo scaduto emette un segnale acustico.
! Il contaminuti non controlla l’accensione e lo spegnimento del forno.
Programmi
! Per tutti i programmi è impostabile una temperatura tra 60°C e MAX, tranne:
• GRILL (si consiglia di impostare solo su MAX);
• GRATIN (si consiglia di non superare la temperatura di 200°C).
Programma FORNO TRADIZIONALE
Si attivano i due elementi riscaldanti inferiore e superiore. Con questa cottura
tradizionale è meglio utilizzare un solo ripiano: con più ripiani si ha una cattiva
distribuzione della temperatura.
Programma MULTICOTTURA
Si attivano tutti gli elementi riscaldanti (superiore, inferiore e circolare) ed entra
in funzione la ventola. Poiché il calore è costante in tutto il forno, l’aria cuoce
e rosola il cibo in modo uniforme. È possibile utilizzare no a un massimo di
due ripiani contemporaneamente.
Programma FORNO PIZZA
Si attivano gli elementi riscaldanti inferiore e circolare ed entra in funzione la
ventola. Questa combinazione consente un rapido riscaldamento del forno, con
un forte apporto di calore in prevalenza dal basso. Nel caso si utilizzi più di un
ripiano alla volta, è necessario cambiarli di posizione tra loro a metà cottura.
Programma GRILL
Si attiva l’elemento riscaldante superiore ed entra in funzione il girarrosto
(ove presente). La temperatura elevata e diretta del grill è consigliata per
gli alimenti che necessitano di un’alta temperatura superciale. Effettuare le
cotture con la porta del forno chiusa.
Programma GRATIN
Si attiva l’elemento riscaldante superiore ed entrano in funzione la ventola e
il girarrosto (ove presente). Unisce all’irradiazione termica unidirezionale, la
circolazione forzata dell’aria all’interno del forno. Ciò impedisce la bruciatura
superciale degli alimenti aumentando il potere di penetrazione del calore.
Effettuare le cotture con la porta del forno chiusa.
Programma FORNO PASTICCERIA
Si attiva l’elemento riscaldante posteriore ed entra in funzione la
ventola, garantendo un calore delicato e uniforme all’interno del forno.
Questo programma è indicato per la cottura dei cibi delicati (ad es. dolci
che necessitano di lievitazione) e preparazioni “mignon” su tre ripiani
contemporaneamente.
Consigli pratici di cottura
! Nelle cotture ventilate non utilizzare le posizioni dei ripiani 1 e 5: sono investite
direttamente dall’aria calda, che potrebbe provocare bruciature sui cibi delicati.
! Nelle cotture GRILL e GRATIN, disporre la leccarda in posizione 1 per
raccogliere i residui di cottura (sughi e/o grassi).
MULTICOTTURA
• Utilizzare le posizioni dei ripiani 2 e 4, mettendo alla 2 i cibi che richiedono
maggior calore.
• Disporre la leccarda in basso e la griglia in alto.
Page 17
IT
17
GRILL
• Inserire la griglia in posizione 3 o 4, disponendo gli alimenti al centro della
griglia.
• Si consiglia di impostare il livello di energia al massimo. Non allarmarsi
se la resistenza superiore non resta costantemente accesa: il suo
funzionamento è controllato da un termostato.
FORNO PIZZA
• Utilizzare una teglia in alluminio leggero, appoggiandola sulla griglia in
dotazione.
Con la leccarda si allungano i tempi di cottura e difcilmente si ottiene una
pizza croccante.
• Nel caso di pizze molto farcite è consigliabile inserire la mozzarella a metà
cottura.
ProgrammiAlimenti
Peso
(Kg)
Posizione
dei ripiani
Preriscaldamento
(minuti)
Temperatura
consigliata
Durata
cottura
(minuti)
Tradizionale
Anatra
Arrosto di vitello o manzo
Arrosto di maiale
Biscotti (di frolla)
Crostate
1
1
1
1
3
3
3
3
3
15
15
15
15
15
200
200
200
180
180
65-75
70-75
70-80
15-20
30-35
Multicottura
Pizza (su 2 ripiani)
Lasagne
Agnello
Pollo arrosto + patate
Sgombro
Plum-cake
Bignè (su 2 ripiani)
Biscotti(su 2 ripiani)
Pan di spagna (su 1 ripiano)
Pan di spagna (su 2 ripiani)
Torte salate
1
1
1
1+1
1
1
0.5
0.5
0.5
1
1.5
2 e 4
3
2
2 e 4
2
2
2 e 4
2 e 4
2
2 e 4
3
15
10
10
15
10
10
10
10
10
10
15
230
180
180
200
180
170-180
190
180
170
170
200
15-20
30-35
40-45
60-70
30-35
40-50
20-25
10-15
15-20
20-25
30-40
Pizza
Pizza 0.53 15 220 15-20
Focacce 12 o 310200 15-20
Grill
Sogliole
Spiedini di calamari e gamberi
Filetto di merluzzo
Verdure alla griglia
Bistecca di vitello
Cotolette
Hamburger
Sgombri
Toast
1
1
1
1
1
1
1
1
n.
4
4
4
4
3 o 4
4
4
4
4
4
5
5
5
5
5
5
5
5
5
MAX
MAX
MAX
MAX
MAX
MAX
MAX
MAX
MAX
8-10
6-8
10
10-15
15-20
15-20
7-10
15-20
2-3
Con girarrosto (ove presente)
Vitello allo spiedo
Pollo allo spiedo
Agnello allo spiedo
1.0
1.5
1.0
-
-
-
-
-
-
100%
100%
100%
80-90
70-80
70-80
Gratin
Pollo alla griglia
Seppie
1.5
1.5
2
2
5
5
200
200
55-60
30-35
Con girarrosto (ove presente)
Vitello allo spiedo
Agnello allo spiedo
Pollo (allo spiedo) +
patate (sulla leccarda)
1.5
1.5
1.5
-
-
-
-
2
10
10
10
10
200
200
200
200
70-80
70-80
70-75
70-75
Pasticceria
Crostate
Torta di frutta
Plum-cake
Pan di spagna
Crêpes farcite (su 2 ripiani)
Cake piccoli (su 2 ripiani)
Salatini di sfoglia al formaggio (su 2
ripiani)
Bignè (su 3 ripiani)
Biscotti (su 3 ripiani)
Meringhe (su 3 ripiani)
0.5
1
0.7
0.5
1.2
0.6
0.4
0.7
0.7
0.5
3
2 o 3
3
3
2 e 4
2 e 4
2 e 4
1 e 3 e 5
1 e 3 e 5
1 e 3 e 5
15
15
15
15
15
15
15
15
15
15
180
180
180
160
200
180-190
200-210
180
180
90
20-30
40-45
40-50
25-35
30-35
20-25
15-20
20-25
20-25
180
! I tempi di cottura sono indicativi e possono essere modificati in base ai proprio gusti personali.
Tabella cottura
Page 18
18
IT
Precauzioni e consigli
! L’apparecchio è stato progettato e costruito in conformità alle norme
internazionali di sicurezza.
Queste avvertenze sono fornite per ragioni di sicurezza e devono essere
lette attentamente.
Sicurezza generale
• L’apparecchio è stato concepito per un uso di tipo non professionale
all’interno dell’abitazione.
• L’apparecchio non va installato all’aperto, nemmeno se lo spazio è riparato,
perché è molto pericoloso lasciarlo esposto a pioggia e temporali.
• Per movimentare l’apparecchio servirsi sempre delle apposite maniglie
poste sui anchi del forno.
• Non toccare l’apparecchio a piedi nudi o le mani o i piedi bagnati o umidi.
• L’apparecchio deve essere usato per cuocere alimenti, solo da
persone adulte e secondo le istruzioni riportate in questo libretto.
Ogni altro uso (ad esempio: riscaldamento di ambienti) è da
considerarsi improprio e quindi pericoloso. Il costruttore non può
essere considerato responsabile per eventuali danni derivanti da
usi impropri, erronei ed irragionevoli.
• Durante l’uso dell’apparecchio gli elementi riscaldanti e alcune
parti della porta forno diventano molto calde. Fare attenzione a non
toccarle e tenere i bambimi a distanza.
• Evitare che il cavo di alimentazione di altri elettrodomestici entri in contatto
con parti calde del forno.
• Non ostruire le aperture di ventilazione e di smaltimento di calore.
• Impugnare la maniglia di apertura della porta al centro: ai lati potrebbe
essere calda.
• Utilizzare sempre guanti da forno per inserire o estrarre recipienti.
• Non rivestire il fondo del forno con fogli di alluminio.
• Non riporre materiale inammabile nel forno: se l’apparecchio viene messo
inavvertitamente in funzione potrebbe incendiarsi.
• Non staccare la spina dalla presa della corrente tirando il cavo, bensì
afferrando la spina.
• Non fare pulizia o manutenzione senza aver prima staccato la spina dalla
rete elettrica.
• In caso di guasto, in nessun caso accedere ai meccanismi interni per
tentare una riparazione. Contattare l’Assistenza (vedi Assistenza).
• Non appoggiare oggetti sulla porta del forno aperta.
• Evitare che i bambini giochino con l’apparecchio.
• Non è previsto che l’apparecchio venga utilizzato da persone (bambini
compresi) con ridotte capacità siche, sensoriali o mentali, da persone
inesperte o che non abbiano familiarità con il prodotto, a meno che non
vengano sorvegliate da una persona responsabile della loro sicurezza o
non abbiano ricevuto istruzioni preliminari sull’uso dell’apparecchio.
• L’apparecchio non è destinato a essere messo in funzione per
mezzo di un temporizzatore esterno oppure di un sistema di
comando a distanza separato.
Smaltimento
• Smaltimento del materiale di imballaggio: attenersi alle norme locali,
così gli imballaggi potranno essere riutilizzati.
• La direttiva Europea 2012/19/UE sui riuti di apparecchiature elettriche ed
elettroniche (RAEE), prevede che gli elettrodomestici non debbano essere
smaltiti nel normale usso dei riuti solidi urbani. Gli apparecchi dismessi
devono essere raccolti separatamente per ottimizzare il tasso di recupero e
riciclaggio dei materiali che li compongono ed impedire potenziali danni per la
salute e l’ambiente. Il simbolo del cestino barrato è riportato su tutti i prodotti
per ricordare gli obblighi di raccolta separata. Per ulteriori informazioni, sulla
corretta dismissione degli elettrodomestici, i detentori potranno rivolgersi al
servizio pubblico preposto o ai rivenditori.
Risparmiare e rispettare l’ambiente
• Ove possibile, evitare di pre-riscaldare il forno e cercare sempre di
riempirlo. Aprire la porta del forno quanto necessario, perché vi sono
dispersioni di calore ogni volta che viene aperta. Per risparmiare molta
energia sarà sufciente spegnere il forno dai 5 ai 10 minuti prima della
ne del tempo di cottura pianicato, e servirsi del calore che il forno
continua a generare.
• I programmi automatici si basano su prodotti alimentari standard.
• Tenere le guarnizioni pulite e in ordine, per evitare eventuali dispersioni
di energia.
• Se si dispone di un contratto di energia elettrica a tariffa oraria, il
programma “cottura ritardata” renderà più semplice il risparmio
spostando l’avvio del programma negli orari a tariffa ridotta.
! Questo prodotto soddisfa i requisiti imposti dalla nuova Direttiva Europea
sulla limitazione dei consumi energetici in standby.
Manutenzione e cura
Escludere la corrente elettrica
Prima di ogni operazione isolare l’apparecchio dalla rete di alimentazione
elettrica.
Pulire l’apparecchio
• Lievi differenze di colore sul lato anteriore del forno sono dovute a diversi
materiali quali vetro, plastica o metallo.
• Eventuali ombreggiature sul vetro della porta, simili a striature, sono dovute
al riesso della luce della lampada del forno.
• A temperature molto elevate lo smalto viene marcato a fuoco. Durante
questo processo potrebbero generersi variazioni cromatiche. Questo
è normale e non inuisce in alcun modo sul funzionamento. I bordi
delle lamiere sottili non possono essere smaltati integralmente e
possono pertanto apparire grezzi. Questo non pregiudica la protezione
anticorrosione.
• Le parti esterne smaltate o inox e le guarnizioni in gomma possono essere
pulite con una spugnetta imbevuta di acqua tiepida, e sapone neutro. Se
le macchie sono difcili da asportare usare prodotti specici. Si consiglia
di sciacquare abbondantemente e di asciugare dopo la pulizia. Non usare
polveri abrasive o sostanze corrosive.
• L’interno del forno va pulito preferibilmente ogni volta dopo l’uso, quando
è ancora tiepido. Usare acqua calda e detersivo, risciaquare e asciugare
con un panno morbido. Evitare gli abrasivi.
• Gli accessori possono essere lavati come normali stoviglie, anche in
lavastoviglie ad eccezione delle guide scorrevoli.
• Si consiglia di non spruzzare detergenti direttamente sulla zona comandi
ma di utilizzare una spugnetta.
! Non utilizzare mai pulitori a vapore o ad alta pressione per la pulizia
dell’apparecchio.
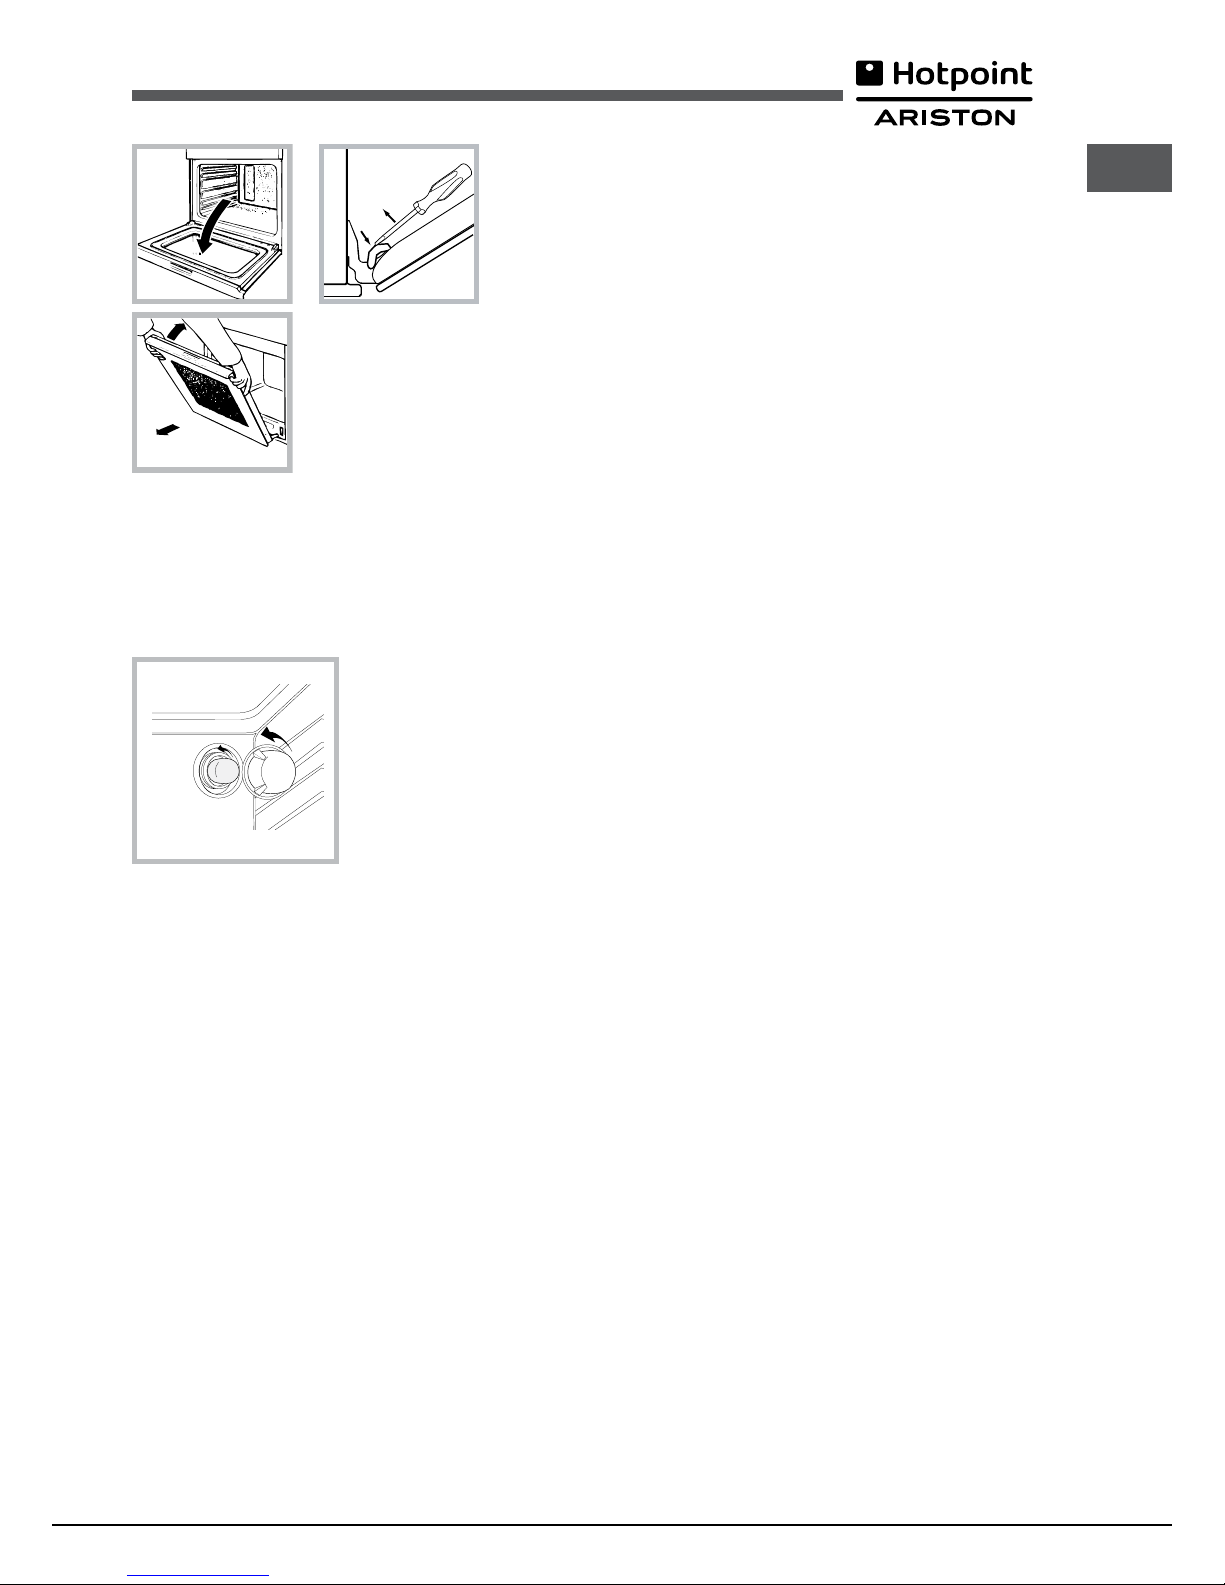
Pulire la porta
Pulire il vetro della porta con spugne e prodotti non abrasivi e asciugare con
un panno morbido; non usare materiali ruvidi abrasivi o raschietti metallici
aflati che possono grafare la supercie e causare la frantumazione del vetro.
Per una pulizia più accurata è possibile smontare
la porta del forno:
1. Aprire completamente la porta (vedi gura);
2. Servendosi di un cacciavite, alzare e ruotare le levette F poste sulle due
cerniere (vedi gura);
Page 19
IT
19
F
3. Afferrare la porta ai due lati esterni,
richiudendola lentamente ma non del tutto.
Poi tirare la porta verso di sé estraendola
dalla sua sede (vedi gura). Rimontare la porta
seguendo il procedimento in senso contrario.
Controllare le guarnizioni
Controllare periodicamente lo stato della guarnizione attorno alla porta del
forno. In caso risulti danneggiata rivolgersi al Centro Assistenza più vicino (vedi
Assistenza). È consigliabile non usare il forno no all’avvenuta riparazione.
Sostituire la lampadina
Per sostituire la lampadina di
illuminazione del forno
1. Svitare il coperchio in vetro del
portalampada.
2. Svitare la lampadina e sostituirla
con una analoga: potenza 25 W,
attacco E 14.
3. Rimontare il coperchio (vedi gura)
! Non utilizzare la lampada forno per e come illuminazione di ambienti.
Page 20
20
GB
Installation
! Please keep this instruction booklet in a safe place for future reference. If
the appliance is sold, given away or moved, please make sure the booklet is
also passed on to the new owners so that they may benet from the advice
contained within it.
! Please read this instruction manual carefully: it contains important information
concerning the safe operation, installation and maintenance of the appliance.
Positioning
! Do not let children play with the packaging material; it should be disposed
of in accordance with local separated waste collection standards (see
Precautions and tips).
! The appliance must be installed by a qualied professional in accordance
with the instructions provided. Incorrect installation may damage property or
cause harm to people or animals.
Built-in appliances
Use an appropriate cabinet to ensure that the appliance operates properly:
• the panels adjacent to the oven must be made of heat-resistant material.
• cabinets with a veneer exterior must be assembled with glues which can
withstand temperatures of up to 100°C.
• to install the oven under the counter (see diagram) or in a kitchen unit,
the cabinet must have the following dimensions:
590 mm.
595 mm.
22,5 mm.*
20,5 mm.
550 mm.
570 mm.
20 mm.
575-585 mm.
45 mm.
560 mm.
550 mm.
min.
! The appliance must not come into contact with electrical parts once it has
been installed. The indications for consumption given on the data plate have
been calculated for this type of installation.
Ventilation
To ensure adequate ventilation, the back panel of the cabinet must be
removed. It is advisable to install the oven so that it rests on two strips of
wood, or on a completely at surface with an opening of at least 45 x 560
mm (see diagrams).
560 mm.
45 mm.
Centring and xing
Secure the appliance to the cabinet:
• open the oven door.
• remove the 2 rubber plugs covering the xing holes on the perimeter frame.
• x the oven to the cabinet using the 2 wood screws.
• replace the rubber plugs.
! All parts which ensure the safe operation of the appliance must not be
removable without the aid of a tool.
Electrical connection
Ovens equipped with a three-pole power supply cable are designed to operate
with alternating current at the voltage and frequency indicated on the data
plate located on the appliance (see below).
Fitting the power supply cable
1. Open the terminal board by inserting a
screwdriver into the side tabs of the cover.
Use the screwdriver as a lever by pushing
it down to open the cover (see diagram).
2. Install the power supply cable by
loosening the cable clamp screw
and the three wire contact screws
L-N- .
Connect the wires to the corresponding
terminals: the Blue wire to the terminal
marked (N), the Brown wire to the terminal
marked (L) and the Yellow/Green wire to
the terminal marked
(see diagram).
3. Secure the cable by fastening the
clamp screw.
4. Close the cover of the terminal board.
Connecting the supply cable to the mains
Install a standardised plug corresponding to the load indicated on the data
plate (see table).
The appliance must be directly connected to the mains using an omnipolar
switch with a minimum contact opening of 3 mm installed between the
appliance and the mains. The switch must be suitable for the charge indicated
and must comply with current electrical regulations (the earthing wire must not
be interrupted by the switch). The supply cable must be positioned so that it
does not come into contact with temperatures higher than 50°C at any point
(the back panel of the oven, for example).
! The installer must ensure that the correct electrical connection has been
performed and that it is fully compliant with safety regulations.
L
N
N
L
Page 21
GB
21
Before connecting the appliance to the power supply, make sure that
• the appliance is earthed and the plug is compliant with the law.
• the socket can withstand the maximum power of the appliance, which is
indicated on the data plate.
• the voltage is in the range between the values indicated on the data plate.
• the socket is compatible with the plug of the appliance. If the socket is
incompatible with the plug, ask an authorised technician to replace it. Do
not use extension cords or multiple sockets.
! Once the appliance has been installed, the power supply cable and the
electrical socket must be easily accessible.
! The cable must not be bent or compressed.
! The cable must be checked regularly and replaced by authorised technicians
only (see Assistance).
! The manufacturer declines any liability should these safety measures
not be observed.
APPLIANCE SPECIFICATIONS
Dimensions*
width 43.5 cm
height 32,4 cm
depth 41.5 cm
Volume*
59 l
Dimensions**
width 45.5 cm
height 32,4 cm
depth 41.5 cm
Volume**
62 l
Electrical
connections
voltage: 220-240V~ 50/60Hz
(see data plate) maximum power
absorbed 2800 W
* Only for models with drawn rails.
** Only for models with wire rails.
Energy
Label e
Ecodesign
Energy consumption for Natural
convection – heating mode:
Traditional mode
Declared energy consumption for
Forced convection Class
mode: Baking
This appliance conforms to the
following European Economic
Community directives:
- 2006/95/EC dated 12/12/06 (Low
Voltage) and subsequent amendments.
- 2004/108/EC dated 03/05/89
(Electromagnetic Compatibility) and
subsequent amendments.
- 93/68/EEC dated 22/07/93 and
subsequent amendments.
- 2012/19/EU and subsequent
amendments.
- 1275/2008 standby/off mode.
EU Directive no 65/2014
supplementing Directive 2010/30/EU.
EU Regulation no 66/2014
implementing Directive 2009/125/EC.
Standard EN 60350-1
Standard EN 50564
Page 22

22
GB
Start-up and use
WARNING! The oven is provided
with a stop system to extract the
racks and prevent them from
coming out of the oven (1).
As shown in the drawing, to extract
them completely, simply lift the
racks, holding them on the front
part, and pull (2).
! The rst time you use your appliance, heat the empty oven with its door closed
at its maximum temperature for at least half an hour. Make sure that the room
is well ventilated before switching the oven off and opening the oven door. The
appliance may emit a slightly unpleasant odour caused by protective substances
used during the manufacturing process burning away.
Starting the oven
1. Select the desired cooking mode by turning the SELECTOR knob.
2. Select the desired temperature using the THERMOSTAT knob. A list
detailing cooking modes and suggested cooking temperatures can be found
in the Cooking advice table (see Cooking modes).
3. The THERMOSTAT indicator light indicates that the oven is heating up to
the temperature set.
4. During cooking it is always possible to:
- change the cooking mode by turning the SELECTOR knob;
- adjust the temperature by turning the THERMOSTAT knob;
- stop cooking by turning the SELECTOR knob to the “0” position.
! Never put objects directly on the bottom of the oven; this will prevent the
enamel coating from being damaged.
! Always place cookware on the rack(s) provided.
Cooling ventilation
In order to cool down the external temperature of the oven, a cooling fan
blows a stream of air between the control panel and the oven door, as well
as towards the bottom of the oven door.
! Once cooking has been completed, the cooling fan continues to operate
until the oven has cooled down sufciently.
Oven light
When selecting
with the SELECTOR knob the oven light goes on. It
remains lit when a cooking mode is selected.
How to use the minute minder
1. To set the buzzer, turn the MINUTE MINDER knob clockwise almost one
complete revolution.
2. Turn the knob anticlockwise to set the desired time: align the minutes
shown on the MINUTE MINDER knob with the indicator on the control panel.
3. The minute minder when the selected time has elapsed, a buzzer will sound.
! The minute minder does not turn the oven on or off.
Modes
! A temperature value between 60°C and MAX can be set for all cooking
modes except the following:
• GRILL (recommended: set only to MAX power level)
• GRATIN (recommended: do not exceed 200°C).
TRADITIONAL OVEN mode
Both the top and bottom heating elements will come on. When using this
traditional cooking mode, it is best to use one cooking rack only. If more than
one rack is used, the heat will be distributed unevenly.
MULTILEVEL mode
All the heating elements (top, bottom and circular) switch on and the fan
begins to operate. Since the heat remains constant throughout the oven, the
air cooks and browns food in a uniform manner. A maximum of two racks may
be used at the same time.
PIZZA OVEN mode
The circular heating elements and the elements at the bottom of the oven are
switched on and the fan is activated. This combination heats the oven rapidly
by producing a considerable amount of heat, particularly from the element
at the bottom. If you use more than one rack at a time, switch the position of
the dishes halfway through the cooking process.
GRILL mode
The top heating element and the rotisserie (where present) come on.
The high and direct temperature of the grill is recommended for food which
requires a high surface temperature. Always cook in this mode with the oven
door closed.
GRATIN mode
The top heating element and the rotisserie (where present) are activated
and the fan begins to operate. This combination of features increases the
effectiveness of the unidirectional thermal radiation provided by the heating
elements through forced circulation of the air throughout the oven. This helps
prevent food from burning on the surface and allows the heat to penetrate right
into the food. Always cook in this mode with the oven door closed.
BAKING mode
The rear heating element and the fan are switched on, thus guaranteeing the
distribution of heat in a delicate and uniform manner throughout the entire
oven. This mode is ideal for baking temperature sensitive foods (such as
cakes, which need to rise) and for the preparation of “bitesize pastries” on 3
shelves simultaneously.
Practical cooking advice
! Do not place racks in position 1 or 5 during fan-assisted cooking. Excessive
direct heat can burn temperature sensitive foods.
! In the GRILL and GRATIN cooking modes, place the dripping pan in position
1 to collect cooking residues (sauce and/or grease).
MULTILEVEL
• Use positions 2 and 4, placing the food which requires more heat on the
rack in position 2.
• Place the dripping pan on the bottom and the rack on top.
Page 23

GB
23
GRILL
• Place the rack in position 3 or 4. Make sure the food is in the centre of the
rack.
• We recommend that the power level is set to maximum. The top heating
element is regulated by a thermostat and may not always operate
constantly.
PIZZA OVEN MODE
• Use a lightweight aluminium pizza pan. Place it on the rack provided.
For a crispy crust, do not use the dripping pan as this extends the total
cooking duration and prevents the crust from forming.
• If the pizza has a lot of toppings, we recommend adding the mozzarella
cheese to the top of the pizza halfway through the cooking process.
Modes Foods
Weight
(in kg)
Rack
position
Preheating time
(minutes)
Recommended
temperature
Cooking
duration
(minutes)
Traditional
Duck
Roast veal or beef
Roast pork
Biscuits (shortcrust pastry)
Tarts
1
1
1
1
3
3
3
3
3
15
15
15
15
15
200
200
200
180
180
65-75
70-75
70-80
15-20
30-35
Multilevel
Pizza (on 2 racks)
Lasagne
Lamb
Roast chicken + potatoes
Mackerel
Sponge cake made with yoghurt
Cream puffs (on 2 racks)
Biscuits (on 2 racks)
Sponge cake (on 1 rack)
Sponge cake (on 2 racks)
Savoury pies
1
1
1
1+1
1
1
0.5
0.5
0.5
1
1.5
2 and 4
3
2
2 and 4
2
2
2 and 4
2 and 4
2
2 and 4
3
15
10
10
15
10
10
10
10
10
10
15
230
180
180
200
170-180
170
190
180
170
170
200
15-20
30-35
40-45
60-70
30-35
40-50
20-25
10-15
15-20
20-25
30-40
Pizza
Pizza
Focaccia bread
0.5
1
3
2 or 3
15
10
220
200
15-20
15-20
Grill
Sole
Squid and prawn kebabs
Cod fillet
Grilled vegetables
Veal steak
Cutlets
Hamburgers
Mackerel
Toast
1
1
1
1
1
1
1
1
no. 4
4
4
4
3 or 4
4
4
4
4
4
5
5
5
5
5
5
5
5
5
MAX
MAX
MAX
MAX
MAX
MAX
MAX
MAX
MAX
8-10
6-8
10
10-15
15-20
15-20
7-10
15-20
2-3
With rotisserie spit (where present)
Spit-roast veal
Spit-roast chicken
Spit-roast lamb
1.0
1.5
1.0
-
-
-
-
-
-
100%
100%
100%
80-90
70-80
70-80
Gratin
Grilled chicken
Cuttlefish
1.5
1.5
2
2
5
5
200
200
55-60
30-35
With rotisserie spit (where present)
Spit-roast veal
Spit-roast lamb
Chicken (on the spit) + potatoes (on
the dripping pan)
1.5
1.5
1.5
-
-
-
2
10
10
10
10
200
200
200
200
70-80
70-80
70-75
70-75
Baking
Tarts
Fruit cakes
Sponge cake made with yoghurt
Sponge cake
Stuffed pancakes (on 2 racks)
Small cakes (on 2 racks)
Cheese puffs (on 2 racks)
Cream puffs (on 3 racks)
Biscuits (on 3 racks)
Meringues (on 3 racks)
0.5
1
0.7
0.5
1.2
0.6
0.4
0.7
0.7
0.5
3
2 or
3
3
3
2 and 4
2 and 4
2 and 4
1, 3 and 5
1, 3 and 5
1, 3 and 5
15
15
15
15
15
15
15
15
15
15
180
180
180
160
200
180-190
200-210
180
180
90
20-30
40-45
40-50
25-35
30-35
20-25
15-20
20-25
20-25
180
! The cooking times listed above are intended as guidelines only and may be modified according to personal tastes.
Cooking advice table
Page 24
24
GB
Precautions and tips
! This appliance has been designed and manufactured in compliance with
international safety standards. The following warnings are provided for safety
reasons and must be read carefully.
General safety
• The appliance was designed for domestic use inside the home and is
not intended for commercial or industrial use.
• The appliance must not be installed outdoors, even in covered areas. It is
extremely dangerous to leave the appliance exposed to rain and storms.
• When moving or positioning the appliance, always use the handles
provided on the sides of the oven.
• Do not touch the appliance while barefoot or with wet or damp hands and
feet.
• The appliance must be used by adults only for the preparation of
food, in accordance with the instructions provided in this booklet.
Any other use of the appliance (e.g. for heating the room) constitutes
improper use and is dangerous. The manufacturer may not be held
responsible for any damage caused as a result of improper, incorrect
and unreasonable use of the appliance.
• Do not touch the heating elements or certain parts of the oven door
when the appliance is in use; these parts become extremely hot.
Keep children well away from the appliance.
• Make sure that the power supply cables of other electrical appliances do
not come into contact with the hot parts of the oven.
• The ventilation and heat dispersal openings must never be obstructed.
• Always grip the oven door handle in the centre: the ends may be hot.
• Always use oven gloves when placing cookware in the oven or when
removing it.
• Do not use aluminium foil to line the bottom of the oven.
• Do not place ammable materials in the oven: if the appliance is switched
on accidentally, the materials could catch re.
• When unplugging the appliance, always pull the plug from the mains
socket; do not pull on the cable.
• Do not perform any cleaning or maintenance work without having
disconnected the appliance from the electricity mains.
• If the event of malfunctions, under no circumstances should you attempt
to perform the repairs yourself. Contact an authorised Service Centre (see
Assistance).
• Do not rest objects on the open oven door.
• Do not let children play with the appliance.
• The appliance should not be operated by people (including children)
with reduced physical, sensory or mental capacities, by inexperienced
individuals or by anyone who is not familiar with the product. These
individuals should, at the very least, be supervised by someone who
assumes responsibility for their safety or receive preliminary instructions
relating to the operation of the appliance.
• The appliance is not intended to be operated by means of an external
timer or separate remote-control system.
Disposal
• When disposing of packaging material: observe local legislation so that
the packaging may be reused.
• The European Directive 2012/19/EU on Waste Electrical and
Electronic Equipment (WEEE), requires that old household electrical
appliances must not be disposed of in the normal unsorted municipal
waste stream. Old appliances must be collected separately in order
to optimise the recovery and recycling of the materials they contain
and reduce the impact on human health and the environment.
The crossed out “wheeled bin” symbol on the product reminds you of your
obligation, that when you dispose of the appliance it must be separately
collected.
Consumers should contact their local authority or retailer for information
concerning the correct disposal of their old appliance.
Respecting and conserving the environment
• Whenever possible, avoid pre-heating the oven and always try to ll it.
Open the oven door as little as possible because heat is lost every time
it is opened. To save a substantial amount of energy, simply switch off
the oven 5 to 10 minutes before the end of your planned cooking time
and use the heat the oven continues to generate.
• Automatic programmes are based on standard food product.
• Keep gaskets clean and tidy to prevent any door energy losses
• If you have a timed tariff electricity contract, the “delay cooking” option
will make it easier to save money by moving operation to cheaper time
periods.
! This product complies with the requirements of the latest European Directive
on the limitation of power consumption of the standby mode.
Maintenance and care
Switching the appliance off
Disconnect your appliance from the electricity supply before carrying out
any work on it.
Cleaning the appliance
• Slight differences in colour on the front of the oven are due to the different
materials used, i.e. glass, plastic or metal.
• Any shady areas resembling grooves on the oven door glass are caused
by reections from the oven light.
• The enamel is branded at very high temperatures. This process may cause
colour variations. This is normal and will not affect appliance operation in
any way. The thin edges of the sheet metal cannot be entirely enamelled
and may therefore appear to be unnished. This will not affect the rust
protection.
• The stainless steel or enamel-coated external parts and the rubber seals
may be cleaned using a sponge that has been soaked in lukewarm water
and neutral soap. Use specialised products for the removal of stubborn
stains. After cleaning, rinse and dry thoroughly. Do not use abrasive
powders or corrosive substances.
• The inside of the oven should ideally be cleaned after each use, while it is
still lukewarm. Use hot water and detergent, then rinse well and dry with
a soft cloth. Do not use abrasive products.
• All accessories - with the exception of the sliding racks - can be washed
like everyday crockery, and are even dishwasher safe.
• We recommend that detergents are not sprayed directly onto the control
panel, but that a sponge is used instead.
! Never use steam cleaners or pressure cleaners on the appliance.
Cleaning the oven door
Clean the glass part of the oven door using a sponge and a non-abrasive
cleaning product, then dry thoroughly with a soft cloth. Do not use rough
abrasive material or sharp metal scrapers as these could scratch the surface
and cause the glass to crack.
For more thorough cleaning purposes, the oven door may be removed:
1. Open the oven door fully (see diagram).
2. Use a screwdriver to lift up and turn the small levers F located on the two
hinges (see diagram).
Page 25

GB
25
F
3. Grip the door on the two outer sides and
close it approximately half way. Pull the
door towards you, lifting it out of its slot (see
diagram). To replace the door, reverse this
sequence.
Inspecting the seals
Check the door seals around the oven regularly. If the seals are damaged,
please contact your nearest Service Centre (see Assistance). We recommend
that the oven is not used until the seals have been replaced.
Replacing the light bulb
To replace the oven light bulb:
1. Remove the glass cover of the
lamp-holder.
2. Remove the light bulb and replace
it with a similar one: Wattage 25 W,
cap E 14.
3. Replace the glass cover (see
diagram).
! Do not use the oven lamp as/for ambient lighting.
Page 26

26
FR
Installation
! Conservez ce mode d’emploi pour pouvoir le consulter à tout moment.
En cas de vente, de cession ou de déménagement, veillez à ce qu’il suive
l’appareil pour informer le nouveau propriétaire sur son fonctionnement et lui
fournir les conseils correspondants.
! Lisez attentivement les instructions : elles contiennent des conseils
importants sur l’installation, l’utilisation et la sécurité de votre appareil.
Positionnement
! Les emballages ne sont pas des jouets pour enfants, il faut les mettre au
rebut en respectant la réglementation sur le tri sélectif des déchets (voir
Précautions et conseils).
! L’installation doit être effectuée par un professionnel du secteur
conformément aux instructions du fabricant. Une mauvaise installation peut
causer des dommages à des personnes, des animaux ou des biens.
Encastrement
Pour garantir le bon fonctionnement de l’appareil, il faut que le meuble possède
des caractéristiques bien précises:
• les panneaux adjacents doivent être fabriqués dans un matériau résistant
à la chaleur;
• dans le cas de meubles en plaqués bois, les colles doivent pouvoir résister
à une température de 100 °C;
• la cavité du meuble pour encastrement du four, tant sous plan (voir gure)
qu’en colonne , doit avoir les dimensions suivantes:
590 mm.
595 mm.
22,5 mm.*
20,5 mm.
550 mm.
570 mm.
20 mm.
575-585 mm.
45 mm.
560 mm.
550 mm.
min.
! Après encastrement de l’appareil, il ne doit plus y avoir possibilité de contact
avec les parties électriées. Les déclarations de consommation indiquées sur
la plaque signalétique ont été mesurées pour ce type d’installation.
Aération
Pour garantir une bonne aération, la cavité d’encastrement doit être dépourvue
de paroi arrière. Il est conseillé d’installer le four de manière à ce qu’il repose
sur deux cales en bois ou bien sur un plan d’appui continu qui ait une découpe
d’au moins 45 x 560 mm (voir gures).
560 mm.
45 mm.
Centrage et xation
Pour xer l’appareil au meuble:
• ouvrir la porte du four;
• retirer les 2 caoutchoucs qui couvrent les trous de xation situés sur le
cadre;
• xer le four au meuble en utilisant 2 vis à bois
• repositionner les caoutchoucs couvre-trous.
! Toutes les parties qui servent de protection doivent être xées de manière
à ne pouvoir être enlevées qu’avec l’aide d’un outil.
Raccordement électrique
Les fours munis d’un câble d’alimentation tripolaire sont prévus pour un
fonctionnement au courant alternatif à la tension et à la fréquence indiquées
sur la plaque signalétique apposée sur l’appareil (voir ci-dessous).
Montage du câble d’alimentation
1. Pour ouvrir le bornier, faire
pression à l’aide d’un tournevis sur
les languettes latérales du couvercle
: tirer et ouvrir le couvercle (voir
gure).
2. Montage du câble d’alimentation
: dévisser la vis du serre-câble ainsi
que les trois vis des contacts L-N-
puis xer les ls sous les têtes
de vis en respectant les couleurs
Bleu (N) Marron (L) Jaune-Vert
(voir gure).
3. Fixer le câble dans le serre-câble
prévu.
4. Fermer le couvercle du bornier.
Branchement du câble d’alimentation au réseau électrique
Montez sur le câble une prise normalisée adaptée à la charge indiquée sur
l’étiquette des caractéristiques.
En cas de raccordement direct au réseau, il faut intercaler entre l’appareil
et le réseau un interrupteur à coupure omnipolaire ayant au moins 3 mm
d’écartement entre les contacts, dimensionné à la charge et conforme aux
normes en vigueur (le l de terre ne doit pas être interrompu par l’interrupteur).
Le câble d’alimentation ne doit atteindre, en aucun point, des températures
dépassant de 50°C la température ambiante.
! L’installateur est responsable du bon raccordement électrique de l’appareil
et du respect des normes de sécurité.
L
N
N
L
Page 27

27
FR
Avant de procéder au branchement, assurez-vous que :
• la prise est bien munie d’une terre conforme à la loi;
• la prise est bien apte à supporter la puissance maximale de l’appareil,
indiquée sur la plaquette signalétique;
• la tension d’alimentation est bien comprise entre les valeurs indiquées sur
la plaquette signalétique;
• la prise est bien compatible avec la che de l’appareil. Si ce n’est pas le
cas, remplacez la prise ou la che, n’utilisez ni rallonges ni prises multiples.
! Après installation de l’appareil, le câble électrique et la prise de courant
doivent être facilement accessibles
! Le câble ne doit être ni plié ni excessivement écrasé.
! Il doit être contrôlé périodiquement et ne peut être remplacé que par un
technicien agréé (voir Assistance).
! Nous déclinons toute responsabilité en cas de non respect des normes
énumérées ci-dessus.
* Uniquement pour les modèles avec glissières embouties.
** Uniquement pour les modèles avec glissières en fil.
Consommation énergie convection
Naturelle – fonction four :
Traditionnel ;
Déclaration de consommation
énergétique Classe convention
Forçée fonction four Pâtisserie.
Cet appareil est Conforme aux
Directives suivantes
Communautaires : 2006/95/CE du
12/12/06 (Basse tension) et
modifications successives 2004/108/CE du15/12/04
(Compatibilité Électromagnétique)
et modifications successives 93/68/CEE du 22/07/93 et
modifications successives 2012/19/UE et modifications
successives.
1275/2008 standby/off mode.
PLAQUE SIGNALETIQUE
Dimensions*
largeur 43,5 cm
hauteur 32,4 cm
profondeur 41,5 cm
Volume* L. 59
Dimensions**
largeur 43,5 cm
hauteur 32,4 cm
profondeur 41,5 cm
Volume** L. 62
Raccordements
électriques
tension 220-240V~ 50/60Hz
(voir plaque signalétique)
puissance maximum absorbée
2800W
Etiquette
Energie e
Écoconception
Règlement (UE) n ° 65/2014
complétant la directive 2010/30/UE.
Règlement (UE) n ° 66/2014
de compléter la directive 2009/125/CE.
la norme EN 60350-1
la norme EN 50564
Page 28

28
FR
Mise en marche et utilisation
ATTENTION! Le four est équipé
d’un système d’arrêts de grilles
qui permet de les retirer sans que
ces dernières sortent entièrement
du four (1).
Pour sortir complètement les grilles
il suffit, comme illustré, de les
soulever en les saisissant par
l’avant et de les tirer (2).
! Lors de son premier allumage, faire fonctionner le four à vide, porte fermée,
pendant au moins une heure en réglant le thermostat sur le maximum. Puis
éteindre le four, ouvrir la porte et aérer la pièce. L’odeur qui se dégage est
due à l’évaporation des produits utilisés pour protéger le four.
Mise en marche du four
1. Pour sélectionner le programme de cuisson souhaité, tourner le bouton
PROGRAMMES.
2. Pour choisir la température, tourner le bouton THERMOSTAT. Un
tableau de cuisson sert de guide sur les cuissons et indique notamment
les températures conseillées pour plusieurs préparations culinaires (voir
Programmes).
3. Le voyant THERMOSTAT reste allumé pendant la durée de montée en
température.
4. En cours de cuisson, il est possible à tout moment de :
- modier le programme de cuisson à l’aide du bouton PROGRAMMES;
- modier la température à l’aide du bouton THERMOSTAT ;
- stopper la cuisson en ramenant le bouton PROGRAMMES sur 0 ;
! Ne jamais poser d’objets à même la sole du four, l’émail risque de s’abîmer.
! Il faut toujours enfourner les plats sur la grille fournie avec l’appareil.
Ventilation de refroidissement
Pour obtenir un abaissement des températures extérieures, un système de
refroidissement soufe de l’air à l’extérieur par une fente située entre le tableau
de bord, la porte du four et la partie basse de la porte du four.
! Le ventilateur continue à tourner après l’arrêt du four jusqu’à ce que ce
dernier se soit sufsamment refroidi.
Eclairage du four
Pour l’allumer, sélectionnez
à l’aide du bouton PROGRAMMES La lampe
reste allumée en cas de sélection d’un programme de cuisson.
Utiliser le minuteur
1. Il faut avant tout remonter la sonnerie en faisant faire un tour presque
complet au bouton MINUTEUR dans le sens des aiguilles d’une montre.
2. Puis en faisant marche arrière, sélectionner le temps désiré en amenant
les minutes indiquées sur le bouton MINUTEUR en face du repère xe du
tableau de bord.
3. Le minuteur est un indicateur sonore de fonctionnement:une fois le temps
écoulé, il émet un signal sonore.
! Le minuteur ne contrôle pas l’allumage et l’arrêt du four.
Programmes
! Pour tous les programmes, une température comprise entre 60°C et MAX.
peut être sélectionnée, sauf pour :
• GRIL (il est conseillé dans ce cas de sélectionner MAX.);
• GRATIN (il est conseillé de ne pas dépasser 200°C).
Programme FOUR TRADITION
Mise en marche des résistances de voûte et de sole. Pour cette cuisson
traditionnelle, mieux vaut cuire sur un seul niveau : la cuisson sur plusieurs
niveaux entraînerait une mauvaise distribution de la chaleur.
Programme MULTICUISSON
Mise en marche de toutes les résistances (sole, voûte et circulaire) ainsi que
du ventilateur. La chaleur est constante et bien répartie à l’intérieur du four,
l’air cuit et dore de façon uniforme en tous points. Possibilité de cuire au
maximum sur deux niveaux en même temps.
Programme FOUR PIZZA
Mise en marche de la résistance de sole et de la résistance circulaire ainsi que
du ventilateur. Cette combinaison permet une montée en température rapide
avec un fort apport de chaleur provenant surtout de la sole. En cas de cuisson
sur plusieurs niveaux, ne pas oublier de les changer de place à mi-cuisson.
Programme GRIL
Mise en marche de la résistance de voûte et du tournebroche (si l’appareil
en est équipé).
La température élevée et directe du gril est conseillée pour tous les aliments
qui exigent une haute température en surface. Cuisson porte du four fermée.
Programme GRATIN
Mise en marche de la résistance de voûte, de la turbine et du tournebroche (si
l’appareil en est équipé). L’irradiation thermique unidirectionnelle s’ajoute au
brassage de l’air pour une répartition uniforme de la chaleur dans l’enceinte
du four. Plus de risque de brûler les aliments en surface et plus grande
pénétration de la chaleur. Cuisson porte du four fermée.
Programme FOUR PATISSERIE
Mise en marche de la résistance arrière et du ventilateur pour obtenir
une chaleur douce et uniforme à l’intérieur du four. Ce programme est
particulièrement indiqué pour la cuisson de mets délicats (comme des gâteaux
levés par ex.) et certains petits-fours sur trois niveaux en même temps.
Conseils de cuisson
! Pour les cuissons ventilées ne pas utiliser les gradins 1et 5 : ils sont
directement frappés par l’air chaud qui pourrait brûler les préparations
délicates.
! En cas de cuisson en mode GRIL ou GRATIN, placez la lèchefrite au gradin
1 pour récupérer les jus de cuisson.
MULTICUISSON
• Utiliser les gradins 2 et 4 et placer au 2 les plats qui exigent davantage
de chaleur.
• Placer la lèchefrite en bas et la grille en haut.
Page 29

29
FR
GRIL
• Placer la grille au gradin 3 ou 4, enfourner les plats au milieu de la grille.
• Nous conseillons de sélectionner le niveau d’énergie maximum. Ne pas
s’inquiéter si la résistance de voûte n’est pas allumée en permanence :
son fonctionnement est contrôlé par un thermostat.
FOUR PIZZA
• Utiliser un plat en aluminium léger et l’enfourner sur la grille du four.
En cas d’utilisation du plateau émaillé, le temps de cuisson sera plus long
et la pizza beaucoup moins croustillante.
• Si les pizzas sont bien garnies, n’ajouter la mozzarelle qu’à mi-cuisson.
Programmes Aliments
Poids
(kg)
Niveau
enfournement
Préchauffage
(minutes)
Température
préconisée
Durée
cuisson
(minutes)
Traditionnel
Canard
Rôti de veau ou de bœuf
Rôti de porc
Biscuits (pâte brisée)
Tartes
1
1
1
1
3
3
3
3
3
15
15
15
15
15
200
200
200
180
180
65-75
70-75
70-80
15-20
30-35
Multicuisson
Pizza (sur 2 niveaux)
Lasagnes
Agneau
Poulet rôti + pommes de terre
Maquereau
Cake aux fruits
Choux (sur 2 niveaux)
Biscuits (sur 2 niveaux)
Génoise (sur 1 niveau)
Génoise (sur 2 niveaux)
Tartes salées
1
1
1
1+1
1
1
0.5
0.5
0.5
1
1.5
2 et 4
3
2
2 et 4
2
2
2 et 4
2 et 4
2
2 et 4
3
15
10
10
15
10
10
10
10
10
10
15
230
180
180
200
180
180-170
190
180
170
170
200
15-20
30-35
40-45
60-70
30-35
40-50
20-25
10-15
15-20
20-25
30-40
Pizza
Pizza
Fougasses
0.5
1
3
2 ou 3
15
10
220
200
15-20
15-20
Grill
Soles
Brochettes de calmars et crevettes
Tranches de colin
Légumes grillés
Côte de veau
Côtelettes
Hamburgers
Maquereaux
Croque-monsieur
1
1
1
1
1
1
1
1
n. 4
4
4
4
3 ou 4
4
4
4
4
4
5
5
5
5
5
5
5
5
5
MAX
MAX
MAX
MAX
MAX
MAX
MAX
MAX
MAX
8-10
6-8
10
10-15
15-20
15-20
7-10
15-20
2-3
Avec tournebroche (si présent)
Veau à la broche
Poulet à la broche
Agneau à la broche
1.0
1.5
1.0
-
-
-
-
-
-
100%
100%
100%
80-90
70-80
70-80
Gratin
Poulet grillé
Seiches
1.5
1.5
2
2
5
5
200
200
55-60
30-35
Avec tournebroche (si présent)
Veau à la broche
Agneau à la broche
Poulet (à la broche) + pommes de terre
(dans lèchefrite)
1.5
1.5
1.5
-
-
-
-
2
10
10
10
10
200
200
200
200
70-80
70-80
70-75
70-75
Pâtisserie
Tartes
Tarte aux fruits
Cake aux fruits
Génoise
Crêpes farcies (sur 2 niveaux)
Petits gâteaux (sur 2 niveaux)
Friands au fromage (sur 2 niveaux)
Choux (sur 3 niveaux)
Biscuits (sur 3 niveaux)
Meringues (sur 3 niveaux)
0.5
1
0.7
0.5
1.2
0.6
0.4
0.7
0.7
0.5
3
2 ou 3
3
3
2 et 4
2 et 4
2 et 4
1, 3 et 5
1, 3 et 5
1, 3 et 5
15
15
15
15
15
15
15
15
15
15
180
180
180
160
200
180-190
200-210
180
180
90
20-30
40-45
40-50
25-35
30-35
20-25
15-20
20-25
20-25
180
! Les temps de cuisson sont purement indicatifs et peuvent être modifiés selon les goûts de chacun.
Tableau de cuisson
Page 30

30
FR
Précautions et conseils
! Cet appareil a été conçu et fabriqué conformément aux normes
internationales de sécurité. Ces conseils sont fournis pour des raisons de
sécurité et doivent être lus attentivement.
Sécurité générale
• Cet appareil a été conçu pour un usage familial, de type non professionnel.
• Cet appareil ne doit pas être installé en extérieur, même dans un endroit
à l’abri, il est en effet très dangereux de le laisser exposé à la pluie et aux
orages.
• Pour déplacer le four, se servir des poignées prévues à cet effet sur les
côtés de l’appareil.
• Ne pas toucher à l’appareil si l’on est pieds nus ou si l’on a les mains ou
les pieds mouillés ou humides.
• Cet appareil qui sert à cuire des aliments ne doit être utilisé que par des
adultes conformément aux instructions du mode d’emploi. Toute autre
utilisation (comme par exemple le chauffage d’une pièce) est impropre
et donc dangereux. Le fabricant décline toute responsabilité en cas de
dommages provoqués par un usage impropre ou erroné.
• En cours de fonctionnement, les éléments chauffants et certaines parties de la
porte peuvent devenir très chauds. Attention à ne pas les toucher et à garder
les enfants à distance.
• Éviter que le cordon d’alimentation d’autres électroménagers touche à
des parties chaudes du four.
• Les orices ou les fentes d’aération ou d’évacuation de la chaleur ne
doivent pas être bouchés
• Toujours saisir la poignée en son milieu: elle risque d’être très chaude à
ses extrémités.
• Utiliser toujours des gants de protection pour enfourner ou sortir les plats
du four.
• Ne jamais tapisser la sole du four de papier aluminium.
• Ne pas ranger de matériel inammable à l’intérieur du four: si l’appareil
était par inadvertance mis en marche, il pourrait prendre feu.
• Ne pas tirer sur le cordon de l’appareil pour débrancher la che de la prise
de courant.
• N’effectuer aucune opération de nettoyage ou d’entretien sans avoir
auparavant débranché la che de la prise de courant.
• En cas de panne, n’essayer en aucun cas d’accéder aux mécanismes
internes pour tenter de réparer l’appareil. Contacter le service d’Assistance
(voir Assistance).
• Ne pas poser d’objets sur la porte du four ouverte.
• Éviter que les enfants ne jouent avec l’appareil.
• Il n’est pas prévu que cet appareil soit utilisé par des personnes (enfants
compris) présentant des capacités physiques, sensorielles ou mentales
réduites ou n’ayant pas l’expérience ou les connaissances indispensables,
à moins qu’elles ne le fassent sous la surveillance de quelqu’un
responsable de leur sécurité ou qu’elles aient été dûment formées sur
l’utilisation de l’appareil.
• Le dispositif n’est pas destiné à être mis en œuvre par une minuterie
externe ou un système de télécommande séparée.
Mise au rebut
• Mise au rebut du matériel d’emballage : conformez-vous aux
réglementations locales, les emballages pourront ainsi être recyclés.
• La Directive Européenne 2012/19/UE sur les Déchets des Equipements
Electriques et Electroniques (DEEE), exige que les appareils ménagers
usagés ne soient pas jetés dans le ux normal des déchets municipaux.
Les appareils usagés doivent être collectés séparément an d’optimiser
le taux de récupération et le recyclage des matériaux qui les composent
et réduire l’impact sur la santé humaine et l’environnement. Le symbole
de la ‘‘poubelle barrée’’ est apposée sur tous les produits pour rappeler
les obligations de collecte séparée.
Les consommateurs pourront coner leur appareil usagé au service de collecte
des collectivités locales ou de leurs groupements, ou si la législation nationale
le permet, le rendre au revendeur lors de l’achat d’un nouvel appareil similaire.
Tous les principaux fabricants d’appareils ménagers travaillent activement
dans la création et la gestion de systèmes de collecte et d’enlèvement
des appareils usagés.
Economies et respect de l’environnement
• Évitez, dans la mesure du possible, de préchauffer le four et veuillez
toujours le remplir. Ouvrez le moins possible la porte de votre four, car
chaque ouverture laisse échapper la chaleur. Pour faire des économies
considérables d’énergie, éteignez le four cinq à dix minutes avant la n
du temps de cuisson programmé et utilisez la chaleur dégagée par le
four.
• Les programmes automatiques sont élaborés sur la base des produits
alimentaires de qualité.
• Gardez les joints propres et bien rangés an d’éviter toute perte d’énergie
par la porte.
• Si vous avez souscrit un plan tarifaire particulier auprès de la compagnie
d’électricité, vous pouvez économiser en faisant fonctionner votre
appareil lorsque l’énergie vous revient moins chère.
! Ce produit est conforme à la nouvelle Directive européenne sur la réduction
de la consommation d’énergie en mode standby.
Nettoyage et entretien
Mise hors tension
Avant toute opération de nettoyage ou d’entretien coupez l’alimentation
électrique de l’appareil.
Nettoyage de l’appareil
• De légères différences de couleur à l’avant du four sont dues aux différents
matériaux utilisés à savoir verre, plastique ou métal.
• Des ombres éventuelles sur la vitre du four, semblables à des stries, sont
dues au reet de la lumière de la lampe du four.
• L’émail grand feu est traité à des températures très élevées. Pendant
ce processus, des modications chromatiques pourraient se produire.
C’est tout à fait normal et cela n’inuence en aucune manière sur
le fonctionnement. Les bords des tôles minces ne peuvent pas être
intégralement émaillés et peuvent par conséquent sembler bruts. Ceci
ne compromet en aucun cas la protection anticorrosion.
• Nettoyer l’extérieur émaillé ou inox et les joints en caoutchouc à l’aide d’une
éponge imbibée d’eau tiède additionnée de savon neutre Si les taches
sont difciles à enlever, utiliser des produits spéciaux. Il est conseillé de
rincer abondamment et d’essuyer après le nettoyage. Ne pas utiliser de
poudres abrasives ni de produits corrosifs.
• Nettoyer l’enceinte après toute utilisation, quand le four est encore tiède.
Utiliser de l’eau chaude et du détergent, rincer et essuyer avec un chiffon
doux. Eviter tout produit abrasif.
• Tous les accessoires peuvent être lavés normalement comme de la
vaisselle courante et passent au lave-vaisselle, sauf les glissières
coulissantes.
• Nous conseillons de ne pas vaporiser le produit de nettoyage directement
sur le bandeau de commandes mais de se servir d’une éponge.
! Ne nettoyez jamais l’appareil avec des nettoyeurs vapeur ou haute pression.
Page 31

31
FR
Nettoyage de la porte
Nettoyer la vitre de la porte à l’aide d’éponges et de produits non abrasifs;
essuyer ensuite avec un chiffon doux. Ne pas utiliser de matériaux abrasifs ou
de racloirs métalliques pointus qui risquent de rayer la surface et de briser le
verre. Pour nettoyer plus à fond, il est possible de démonter la porte du four:
1. Ouvrir la porte complètement (voir gure);
2. À l’aide d’un tournevis, soulever et faire pivoter les leviers F situés sur les
deux charnières (voir gure);
F
3. Saisir la porte par les côtés, la refermer
lentement mais pas complètement. Tirer
ensuite la porte vers soi en la dégageant
de son logement (voir gure). Remonter la
porte en refaisant en sens inverse les mêmes
opérations.
Contrôle des joints
Contrôler périodiquement l’état du joint autour de la porte du four. S’il est
abîmé, s’adresser au service après-vente le plus proche de son domicile
(voir Assistance). Mieux vaut ne pas utiliser le four tant qu’il n’est pas réparé.
Remplacement de l’ampoule d’éclairage
Pour changer l’ampoule d’éclairage
du four:
1. Dévissez le couvercle en verre du
boîtier de la lampe.
2. Dévissez l’ampoule et remplacez-la
par une autre de même type : puissance
25 W, culot E 14.
3. Remontez le couvercle à sa place
(voir gure).
! Ne pas utiliser la lampe du four comme éclairage de la pièce.
Page 32

32
ES
Instalación
! Es importante conservar este manual para poder consultarlo en todo
momento. En caso de venta, de cesión o de mudanza, verifique que
permanezca junto al aparato para informar al nuevo propietario sobre su
funcionamiento y sobre las advertencias correspondientes.
! Lea atentamente las instrucciones: contienen importante información sobre
la instalación, el uso y la seguridad.
Colocación
! Los embalajes no son juguetes para niños y se deben eliminar respetando
las normas para la recolección de residuos (ver Precauciones y consejos).
! La instalación se debe realizar siguiendo estas instrucciones y por personal
profesionalmente calicado. Una instalación incorrecta puede producir daños
a personas, animales o cosas.
Empotramiento
Para garantizar un buen funcionamiento del aparato es necesario que el
mueble tenga las características adecuadas:
• los paneles adyacentes al horno deben ser de materiales resistentes al
calor
• en el caso de muebles de madera chapeada, las colas deben ser
resistentes a una temperatura de 100°C
• para empotrar el horno, ya sea cuando se instala bajo encimera (ver la
gura) o en columna, el mueble debe tener las siguientes dimensiones:
590 mm.
595 mm.
22,5 mm.*
20,5 mm.
550 mm.
570 mm.
20 mm.
575-585 mm.
45 mm.
560 mm.
550 mm.
min.
! Una vez empotrado el aparato no se deben permitir contactos con las
partes eléctricas.El consumo declarado en la placa de características ha
sido medido en una instalación de este tipo.
Aireación
Para garantizar una buena aireación es necesario eliminar la pared posterior
del hueco para el horno. Es preferible instalar el horno apoyado sobre dos
listeles de madera o sobre una supercie continua que tenga una abertura
de 45 x 560 mm. como mínimo (ver las guras).
560 mm.
45 mm.
Centrado y jación
Para jar el aparato al mueble:
• abra la puerta del horno;
• extraiga los 2 tapones de goma que cubren los oricios de jación ubicados
en el marco;
• je el horno al mueble utilizando los 2 tornillos para madera;
• vuelva a colocar los tapones de goma que cubren los oricios.
! Todas las partes que garantizan la protección se deben jar de modo tal
que no puedan ser quitadas sin la ayuda de una herramienta.
Conexión eléctrica
Los hornos que poseen cable de alimentación tripolar, son fabricados para
funcionar con corriente alterna a la tensión y frecuencia indicadas en la
placa de características que se encuentra en el aparato (ver más adelante).
Montaje del cable de alimentación eléctrica
1. Abrir el panel de bornes haciendo
palanca con un destornillador sobre las
lengüetas laterales de la tapa: tirar y abrir
(ver la gura).
2. Instalar el cable de alimentación
eléctrica: Aojar el tornillo de la mordaza
de terminal de cable y los tres tornillos
de los contactos L-N-
y luego jar
los cables debajo de las cabezas de
los tornillos respetando los colores Azul
(N), Marrón (L) y Amarillo-Verde
(ver la gura).
3. Fijar el cable en el correspondiente
sujetacable.
4. Cerrar la tapa del panel de bornes.
Conexión del cable de alimentación eléctrica a la red
Instale en el cable un enchufe normalizado para la carga indicada en la placa
de características (ver al costado).
En el caso de conexión directa a la red, es necesario interponer entre el
aparato y la red, un interruptor omnipolar con una distancia mínima entre
los contactos de 3 mm., dimensionado para esa carga y que responda a las
normas vigentes (el cable a tierra no debe ser interrumpido por el interruptor).
El cable de alimentación eléctrica se debe colocar de modo tal que no
alcance en ningún punto una temperatura que supere en 50°C la temperatura
ambiente (por ejemplo, la parte posterior del horno).
! El instalador es responsable de la correcta conexión eléctrica y del
cumplimiento de las normas de seguridad.
L
N
N
L
Page 33

ES
33
Antes de efectuar la conexión verique que:
• la toma tenga conexión a tierra y que sea conforme con la ley;
• la toma sea capaz de soportar la carga máxima de potencia de la máquina
indicada en la placa de características;
• la tensión de alimentación eléctrica esté comprendida dentro de los valores
indicados en la placa de características;
• la toma sea compatible con el enchufe del aparato. Si no es así, sustituya
la toma o el enchufe; no utilice prolongaciones ni conexiones múltiples.
! Una vez instalado el aparato, el cable eléctrico y la toma de corriente deben
ser fácilmente accesibles.
! El cable no debe sufrir pliegues ni compresiones.
! El cable debe ser revisado periódicamente y sustituido sólo por técnicos
autorizados (ver Asistencia).
! La empresa declina toda responsabilidad cuando estas normas no
sean respetadas.
* Sólo para modelos con guías embutidas.
** Sólo para modelos con guías a ras.
Consumo de energía por
convección Natural –función de
calentamiento: Tradicional;
Clase consumo de energía
Clase convección Forzada - función
calentamiento: Pastelería.
Este aparato es conforme con las
siguientes Directivas: Comunitarias:
2006/95/CE del 12/12/06 (Baja
tensión) y posteriores
modificaciones - 2004/108/CE
del 15/12/04 (Compatibilidad
Electromagnética) y sucesivas
modificaciones - 93/68/CEE del
22/07/93 y sucesivas
modificaciones. 2012/19/UE
y posteriores modificaciones.
1275/2008 standby/off mode.
PLACA DE CARACTERÍSTICAS
Dimensiones*
ancho 43,5 cm.
altura 32,4 cm.
profundidad 41,5 cm.
Volumen* litros 59
Dimensiones**
ancho 45,5 cm.
altura 32,4 cm.
profundidad 41,5 cm.
Volumen** litros 62
voltaje 220-240V~ 50/60Hz (ver la
placa de características)
potencia máxima absorbida
2800W
Conexiones
eléctricas
Etiqueta
de Energía
y Ecodiseño
Reglamento (UE) nº 65/2014, por el
que se aplica la Directiva 2010/30/CE.
Reglamento (UE) nº 66/2014, por el
que se aplica la Directiva 2009/125/CE.
Reglamento EN 60350-1,
Reglamento EN 50564
Page 34

34
ES
Puesta en funcionamiento y uso
ATENCIÓN! El horno está dotado
de un sistema de bloqueo de las
parrillas que permite quitarlas sin
que sobresalgan del horno (1).
Para quitar completamente las
parrillas, como se indica en el
dibujo, es suficiente levantarlas
cogiéndolas de la parte delantera
y tirar (2).
! La primera vez que encienda el horno, hágalo funcionar vacío, durante una
hora aproximadamente, con el termostato al máximo y con la puerta cerrada.
Luego apáguelo, abra la puerta y airee el ambiente en el que se encuentra.
El olor que se advierte se debe a la evaporación de las sustancias utilizadas
para proteger el horno.
Poner en funcionamiento el horno
1. Seleccione el programa de cocción deseado girando el mando
PROGRAMAS.
2. Elija la temperatura girando el mando TERMOSTATO. La Tabla de cocción
(ver Programas) contiene una lista con las cocciones y las correspondientes
temperaturas aconsejadas.
3. El piloto TERMOSTATO encendido indica la fase de calentamiento hasta
la temperatura seleccionada
4. Durante la cocción es posible:
- modicar el programa de cocción con el mando PROGRAMAS;
- modicar la temperatura con el mando TERMOSTATO;
- interrumpir la cocción llevando el mando PROGRAMAS hasta la posición “0”.
! No apoye nunca objetos en el fondo del horno porque se puede dañar el
esmalte.
! Coloque siempre los recipientes de cocción sobre la parrilla suministrada
con el aparato.
Ventilación de enfriamiento
Para lograr una disminución de la temperatura externa, un ventilador de
enfriamiento genera un chorro de aire que sale entre el panel de control y la
puerta del horno y también de la parte inferior de la puerta.
! Al nal de la cocción, el ventilador permanece en funcionamiento hasta
que el horno esté sucientemente frío.
Luz del horno
Se enciende seleccionando
con el mando PROGRAMAS. Permanece
encendida cuando se selecciona un programa de cocción.
Utilizar el cuentaminutos
1. Antes que nada es necesario cargar el timbre girando el mando
CUENTAMINUTOS un giro casi completo en sentido horario.
2. Volviendo hacia atrás en sentido antihorario, je el tiempo deseado haciendo
coincidir el indicador del mando CUENTAMINUTOS con el tiempo indicado
en el panel de control.
3. El cuentaminutos cuando se cumple el tiempo, emite una señal sonora.
! El cuentaminutos no controla ni el encendido ni el apagado del horno.
Programas
! En todos los programas se puede jar una temperatura entre 60°C y MAX,
excepto en:
• GRILL (se aconseja elegir sólo MAX);
• GRATIN (se aconseja no superar una temperatura de 200ºC).
Programa HORNO TRADICIONAL
Se encienden los dos elementos calentadores inferior y superior. Con esta
cocción tradicional es mejor utilizar un solo nivel: si se utilizan varias bandejas
se produce una mala distribución de la temperatura.
Programa MULTICOCCIÓN
Se encienden todos los elementos calentadores (superior, inferior y circular)
y se pone en funcionamiento el ventilador. Debido a que el calor es constante
en todo el horno, el aire cocina y dora la comida de modo uniforme. Es posible
utilizar hasta un máximo de dos niveles simultáneamente.
Programa HORNO PIZZA
Se encienden los elementos calentadores inferior y circular y se pone
en funcionamiento el ventilador. Esta combinación permite un rápido
calentamiento del horno, con un fuerte aporte de calor preferentemente desde
abajo. Cuando utilice más de un nivel a la vez, en la mitad de la cocción es
necesario intercambiar sus posiciones.
Programa GRILL
Se enciende el elemento calentador superior y se pone en funcionamiento
el asador automático (cuando existe).
La temperatura elevada y directa del grill es aconsejada para los alimentos
que necesitan una temperatura supercial alta. Utilice el horno con la puerta
cerrada.
Programa GRATIN
Se enciende el elemento calentador superior y se ponen en funcionamiento
el ventilador y el asador automático (cuando existe). A la irradiación térmica
unidireccional, le agrega la circulación forzada del aire en el interior del horno.
Esto impide que se quemen supercialmente los alimentos aumentando el
poder de penetración del calor. Utilice el horno con la puerta cerrada.
Programa HORNO PASTELERÍA
Se enciende el elemento calentador posterior y se pone en funcionamiento
el ventilador garantizando un calor suave y uniforme en el interior del horno.
Este programa es aconsejable para la cocción de alimentos delicados (por
ej. las tortas que necesitan leudado) y algunas preparaciones “mignon” en 3
bandejas simultáneamente.
Consejos prácticos para cocinar
! En las cocciones ventiladas no utilice las posiciones 1 y 5: son las que reciben
directamente el aire caliente que podría quemar las comidas delicadas.
! En las cocciones GRILL y GRATIN, coloque la grasera en la posición 1 para
recoger los residuos de cocción (jugos y/o grasas).
MULTICOCCIÓN
• Utilice las posiciones 2 y 4 colocando en la 2 los alimentos que requieren
mayor calor.
• Coloque la grasera abajo y la parrilla arriba.
Page 35

ES
35
GRILL
• Introduzca la parrilla en la posición 3 o en la 4 y coloque los alimentos en
el centro de la misma.
• Se aconseja jar el nivel de energía en el valor máximo. No se alarme
si la resistencia superior no permanece constantemente encendida: su
funcionamiento es controlado por un termostato.
HORNO PIZZA
• Utilice una bandeja para pizza de aluminio liviano apoyándola sobre la
parrilla suministrada con el horno.
Utilizando la grasera aumenta el tiempo de cocción y difícilmente se
obtiene una pizza crocante.
• En el caso de pizzas muy condimentadas, es aconsejable colocar la
mozzarella (queso típico de Italia) en la mitad de la cocción.
Programas Alimentos
Peso
(Kg)
Posiciones Precalentamiento
(minutos)
Temperatura
aconsejada
Duración de
la cocción
(minutos)
Tradicional
Pato
Asado de ternera o de vaca
Asado de cerdo
Bizcochos (de pastaflora)
Tartas
1
1
1
1
3
3
3
3
3
15
15
15
15
15
200
200
200
180
180
65-75
70-75
70-80
15-20
30-35
Multicocción
Pizza (en 2 niveles)
Lasañas
Cordero
Pollo asado + patatas
Caballa
Plum-cake
Hojaldre relleno con crema (en 2 niveles)
Bizcochos (en 2 niveles)
Bizcocho (en 1 nivel)
Bizcocho (en 2 niveles)
Tortas saladas
1
1
1
1+1
1
1
0.5
0.5
0.5
1
1.5
2 y 4
3
2
2 y 4
2
2
2 y 4
2 y 4
2
2 y 4
3
15
10
10
15
10
10
10
10
10
10
15
230
180
180
200
180
170-180
190
180
170
170
200
15-20
30-35
40-45
60-70
30-35
40-50
20-25
10-15
15-20
20-25
30-40
Pizza
Pizza
Hogazas
0.5
1
3
2 o 3
15
10
220
200
15-20
15-20
Grill
Lenguados
Broquetas de calamares y cangrejos
Filete de merluza
Verduras a la parrilla
Bistec de ternera
Chuletas
Hamburguesas
Caballa
Tostadas
1
1
1
1
1
1
1
1
n. 4
4
4
4
3 o 4
4
4
4
4
4
5
5
5
5
5
5
5
5
5
MAX
MAX
MAX
MAX
MAX
MAX
MAX
MAX
MAX
8-10
6-8
10
10-15
15-20
15-20
7-10
15-20
2-3
Con asador automático (cuando existe)
Asado de ternera
Pollo asado
Cordero asado
1.0
1.5
1.0
-
-
-
-
-
-
100%
100%
100%
80-90
70-80
70-80
Gratinado
Pollo a la parrilla
Sepias
1.5
1.5
2
2
5
5
200
200
55-60
30-35
Con asador automático (cuando existe)
Asado de ternera
Cordero asado
Pollo (asado) +
patatas (en la bandeja)
1.5
1.5
1.5
-
-
-
-
2
10
10
10
10
200
200
200
200
70-80
70-80
70-75
70-75
Pastelería
Tartas
Torta de fruta
Plum-cake
Bizcocho
Creps rellenos (en 2 niveles)
Tortas pequeñas (en 2 niveles)
Bizcochitos salados de hojaldre y
queso (en 2 niveles)
Hojaldre relleno con crema (en 3 niveles)
Bizcochos (en 3 niveles)
Merengue (en 3 niveles)
0.5
1
0.7
0.5
1.2
0.6
0.4
0.7
0.7
0.5
3
2 o 3
3
3
2 y 4
2 y 4
2 y 4
1 y 3 y 5
1 y 3 y 5
1 y 3 y 5
15
15
15
15
15
15
15
15
15
15
180
180
180
160
200
180-190
200-210
180
180
90
20-30
40-45
40-50
25-35
30-35
20-25
15-20
20-25
20-25
180
! Los tiempos de cocción son indicativos y se pueden modificar en base a sus gustos personales.
Tabla de cocción
Page 36

36
ES
Precauciones y consejos
! El aparato ha sido proyectado y fabricado en conformidad con las normas
internacionales de seguridad.
Estas advertencias se suministran por razones de seguridad y deben ser
leídas atentamente.
Seguridad general
• El aparato ha sido fabricado para un uso de tipo no profesional en el
interior de una vivienda.
• El aparato no se debe instalar al aire libre, tampoco si el espacio está
protegido porque es muy peligroso dejarlo expuesto a la lluvia y a las
tormentas.
• Para mover el aparato utilice siempre las manijas correspondientes
ubicadas en los costados del horno.
• No toque el aparato descalzo o con las manos y pies mojados o húmedos.
• El aparato debe ser utilizado para cocinar alimentos, sólo por personas
adultas y siguiendo las instrucciones contenidas en este manual. Cualquier
otro uso (como por ejemplo: calefacción de ambientes) se debe considerar
impropio y, por lo tanto, peligroso. El fabricante no puede ser considerado
responsable por eventuales daños derivados de usos impropios, erróneos
e irracionales.
• Mientras se utiliza el aparato, los elementos calentadores y algunas partes
de la puerta del horno se calientan mucho. Tenga cuidado de no tocarlos
y mantenga a los niños alejados de ellos.
• Evite que el cable de alimentación eléctrica de otros electrodomésticos
entre en contacto con partes calientes del horno.
• No obstruya las aberturas de ventilación y de eliminación del calor.
• Tome la manija de apertura de la puerta en el centro: en los costados
podría estar caliente.
• Utilice siempre guantes para horno para introducir o extraer recipientes.
• No cubra el fondo del horno con hojas de aluminio.
• No coloque materiales inamables en el horno: si el aparato se pone en
funcionamiento inadvertidamente, podría incendiarse.
• Cuando el aparato no se utiliza, controle siempre que los mandos estén
en la posición “●”/“○”.
• No desconecte el aparato de la toma de corriente tirando del cable sino
sujetando el enchufe.
• No realice la limpieza o el mantenimiento sin haber desconectado primero
el aparato de la red eléctrica.
• En caso de avería, no acceda nunca a los mecanismos internos para
intentar una reparación. Llame al Servicio de Asistencia Técnica (ver
Asistencia).
• No apoye objetos sobre la puerta del horno abierta.
• Evite que los niños jueguen con el aparato.
• No está previsto que el aparato sea utilizado por personas (incluidos los
niños) con capacidades físicas, sensoriales o mentales disminuidas, por
personas inexpertas o que no tengan familiaridad con el producto, salvo
que estén vigiladas por una persona responsable de su seguridad, o que
hayan recibido instrucciones preliminares sobre el uso del aparato.
• El aparato no se debe poner en funcionamiento a través de un
temporizador externo o de un sistema de mando a distancia.
Eliminación
• Eliminación del material de embalaje: respete las normas locales, de esta
manera los embalajes podrán ser reutilizados.
• En base a la Norma europea 2012/19/UE de Residuos de aparatos
Eléctricos y Electrónicos (RAEE), los electrodomésticos viejos no pueden
ser arrojados en los contenedores municipales habituales; tienen que ser
recogidos selectivamente para optimizar la recuperación y reciclado de
los componentes y materiales que los constituyen, y reducir el impacto
en la salud humana y el medioambiente. El símbolo del cubo de basura
tachado se marca sobre todos los productos para recordar al consumidor
la obligación de separarlos para la recogida selectiva.
El consumidor debe contactar con la autoridad local o con el vendedor para
informarse en relación a la correcta eleminación de su electrodoméstico
viejo.
Ahorrar y respetar el medioambiente
• Siempre que sea posible, evite el precalentamiento del horno y siempre
trate de llenarlo. Abra la puerta del horno tan poco como sea posible
porque el calor se pierde cada vez que se abre. Para ahorrar una cantidad
sustancial de energía, solo apague el interruptor del horno entre 5 a 10
minutos antes de terminar su tiempo de cocción previsto y aproveche el
calor que el horno continúa generando.
• Los programas automáticos están basados en productos alimenticios
regulares.
• Mantenga los empaques limpios y ordenados para prevenir pérdidas de
energía a través de la puerta
• Si tiene una tarifa eléctrica regulada según la hora del día, la opción de
“cocción diferida” le ayudará a ahorrar al retrasar la operación de cocción
a un momento del día en que la tarifa eléctrica sea más barata
! Este producto satisface los requisitos impuestos por la nueva Directiva
Europea sobre la limitación del consumo de energía en modo de espera
o stand by.
Mantenimiento y cuidados
Cortar la corriente eléctrica
Antes de realizar cualquier operación, desconecte el aparato de la red de
alimentación eléctrica.
Limpiar el aparato
• Las partes externas esmaltadas o de acero inoxidable y las juntas de
goma se pueden limpiar con una esponja empapada en agua tibia y jabón
neutro. Si las manchas son difíciles de eliminar use productos especícos.
Se aconseja enjuagar abundantemente y secar después de la limpieza.
No utilice polvos abrasivos ni sustancias corrosivas.
• El interior del horno se debe limpiar preferentemente cada vez que se
utiliza, cuando todavía está tibio. Utilice agua caliente y detergente,
enjuague y seque con un paño suave. Evite el uso de productos abrasivos.
• Los accesorios se pueden lavar como cualquier vajilla, incluso en lavavajillas,
con excepción de las guías deslizables.
! No utilice nunca limpiadores a vapor o de alta presión para la limpieza del
aparato.
Limpiar la puerta
Limpie el vidrio de la puerta con esponjas y productos no abrasivos y séquelo
con un paño suave; no utilice materiales ásperos abrasivos o raederas
metálicas aladas que puedan rayar la supercie y quebrar el vidrio. Para
realizar una limpieza más profunda es posible extraer la puerta del horno:
1. Para ello, abra completamente la puerta (ver la gura);
2. Utilizando un destornillador, levante y gire las palancas F ubicadas en las
dos bisagras (ver la gura);
Page 37

ES
37
F
3. Sujete la puerta de los costados y ciérrela
lenta pero no completamente. Luego tire la
puerta hacia sí, extrayéndola de su lugar
(ver la figura). Vuelva a colocar la puerta
siguiendo el mismo procedimiento pero en
sentido contrario.
Controlar las juntas
Controle periódicamente el estado de la junta que rodea la puerta del horno. Si
se encontrara dañada llame al Centro de Asistencia Técnica más cercano (ver
Asistencia). Es aconsejable no usar el horno hasta que no haya sido reparada.
Sustituir la bombilla
Para sustituir la bombilla de iluminación
del horno:
1. Desenrosque la tapa de vidrio del
portalámpara.
2. Extraiga la bombilla y sustitúyala
con una análoga: potencia de 25 W,
casquillo E 14.
3. Vuelva a colocar la tapa (ver la
gura).
! No utilice la lámpara del horno para iluminar ambientes.
Page 38

38
PT
Instalação
! É importante guardar este folheto para poder consultá-lo a qualquer
momento. No caso de venda, cessão ou mudança, assegure-se que o
mesmo permanece com o aparelho para informar o novo proprietário sobre
o funcionamento e sobre as respectivas advertências.
! Leia com atenção as instruções: há informações importantes sobre a
instalação, a utilização e a segurança.
Posicionamento
! As embalagens não são brinquedos para as crianças e devem ser eliminadas
em conformidade com as regras de colecta diferenciada (veja em Precauções
e Conselhos).
! A instalação deve ser realizada segundo estas instruções e por pessoal
prossional qualicado. Uma instalação errada pode causar danos a pessoas,
animais ou objectos.
Encaixe
Para garantir um bom funcionamento do aparelho é necessário que o móvel
seja de características adequadas:
• os painéis adjacentes ao forno devem ser de material resistente ao calor;
• no caso de móveis de madeira contraplacada, as colas devem ser resistentes
à temperatura de 100°C.
• para encaixar o forno, quer no caso de instalação sob uma banca (veja
a gura) quer em coluna, o móvel deve ter as seguintes medidas:
590 mm.
595 mm.
22,5 mm.*
20,5 mm.
550 mm.
570 mm.
20 mm.
575-585 mm.
45 mm.
560 mm.
550 mm.
min.
! Depois de ter encaixado o aparelho, não deve ser possível contacto com
as partes eléctricas. As declarações de consumo indicadas na placa das
características foram medidas com este tipo de instalação.
Ventilação
Para garantir uma boa ventilação é necessário eliminar a parede traseira do
vão. É preferível instalar o forno de maneira que apoie-se sobre duas ripas
de madeira, ou sobre uma tábua com uma abertura de pelo menos 45 x 560
mm. (veja as guras).
560 mm.
45 mm.
Colocar no centro e prender
Para prender o aparelho no móvel:
• abra a porta do forno;
• tire as 2 borrachas que cobrem os furos de xação colocados na moldura
perimetral;
• xe o forno ao móvel utilizando os 2 parafusos para madeira;
• posicione novamente as borrachas para cobrir os furos.
! Todos os componentes de garantia da protecção precisam estar presos
de modo que não possam ser tirados sem o emprego de uma ferramenta.
Ligação eléctrica
Os fornos equipados com cabo de fornecimento com três pólo, são
preparados para funcionar com corrente alternada na tensão e frequência
de fornecimento indicadas na placa de identicação situada no aparelho
(veja a seguir).
Montagem do cabo de fornecimento
1. Para abrir a caixa de terminais faça
alavanca com uma chave de parafuso
nas linguetas aos lados da tampa: puxe
e abra a tampa (veja a gura).
2. Instale o cabo de alimentação:
desatarraxe o parafuso do grampo do
cabo e os três parafusos dos contactos
L-N-
e, em seguida, prenda os os
embaixo das cabeças dos parafusos a
obedecer as cores: Azul (N) Castanho
(L) Amarelo-Verde
(veja a gura).
3. Prenda o cabo no respectivo grampo.
4. Feche a tampa da caixa dos terminais.
Ligação do cabo de fornecimento à rede eléctrica
Monte no cabo uma cha em conformidade com as normas para a carga
indicada na placa de identicação (veja ao lado).
No caso de uma ligação directa à rede, será necessário interpor, entre o
aparelho e a rede, um interruptor omnipolar com abertura mínima entre os
contactos de 3 mm. na dimensão certa para a carga e em conformidade
com as normas em vigor (a ligação à terra não deve ser interrompida pelo
interruptor). O cabo de alimentação deve ser colocado de maneira que em
nenhum ponto ultrapasse de 50°C a temperatura do ambiente (por exemplo,
a parte traseira do forno).
! O técnico instalador é responsável pela realização certa da ligação eléctrica
e da obediência das regras de segurança.
L
N
N
L
Page 39

39
PT
Antes de efectuar a ligação, certique-se que:
• a tomada tenha uma ligação à terra e seja em conformidade com a
legislação;
• a tomada tenha a capacidade de suportar a carga máxima de potência
da máquina, indicada na placa de identicação;
• a tensão de alimentação seja entre os valores da placa de identicação;
• a tomada seja compatível com a cha do aparelho. Em caso contrário,
substitua a tomada ou a cha; não empregue extensões nem tomadas
múltiplas.
! Depois de ter instalado o aparelho, o acesso ao cabo eléctrico e à tomada
da corrente deve ser fácil.
! O cabo não deve ser dobrado nem comprimido.
! O cabo deve ser vericado periodicamente e substituído somente por
técnicos autorizados (veja a Assistência Técnica).
! A empresa exime-se de qualquer responsabilidade se estas regras
não forem obedecidas.
* Apenas para modelos com guias integradas.
** Apenas para modelos com guias em fio.
PLACA DAS CARACTERÍSTICAS
Medidas*
largura 43,5 cm
altura 32,4 cm
profundidade 41,5 cm
Volume* Litros 59
Medidas**
largura 45,5 cm
altura 32,4 cm
profundidade 41,5 cm
Volume** Litros 62
Tensão de 220/240 V~ 50/60 Hz
(ver quadro das características)
potência máxima absorvida 2800W
Ligações
eléctricas
Directiva EU no 65/2014 integrando
a Directiva 2010/30/EU.
Regulamento EU no 66/2014
integrando a Directiva 2009/125/EC.
Regulamento EN 60350-1
Regulamento EN 50564
Consumo de energia
com convecção Natural –
função de
aquecimento: Tradicional;
Consumo energia declaração
Classe com convecção Forçada função de
aquecimento: Pastéis.
Este aparelho está
em conformidade com as seguintes
Directivas da Comunidade Europeia:
2006/95/CE de 12/12/06 (Baixa Tensão)
e posteriores modificações -
2004/108/CE de 15/12/04
(Compatibilidade Electromagnética)
e posteriores modificações -
93/68/CEE de 22/07/93 e
posteriores modificações.
2012/19/UE e posteriores modificações.
1275/2008 standby/off mode.
Rótulo
Energético
e Concepção
Ecológica
Page 40

40
PT
Início e utilização
ATENÇÃO! O forno está equipado
com um sistema de bloqueio das
grelhas que permite retirá-las sem
que estas ressaiam do forno (1).
Para retirar completamente as
grelhas, tal como indicado no
desenho, basta levantá-las,
segurando-as pela parte da frente,
e puxá-las (2).
! Quando o acender pela primeira vez, aconselhamos de fazer funcionar
o forno vazio pelo menos durante uma hora, com o termóstato posto à
temperatura máxima e a porta fechada. Em seguida, pode apagar, abrir a
porta do forno e ventilar a sala. O odor que se sente deve-se à evaporação
das substâncias empregadas para proteger o forno.
Início do forno
1. Para seleccionar o programa de cozedura que desejar, rode o selector
dos PROGRAMAS.
2. Para escolher a temperatura rode o selector do TERMÓSTATO. Uma lista
com as cozeduras e as respectivas temperaturas aconselhadas pode ser
consultada na Tabela de cozedura (veja os Programas).
3. O indicador luminoso do TERMÓSTATO aceso indica a fase de
aquecimento até a temperatura denida.
4. Durante a cozedura é sempre possível:
- modicar o programa de cozedura mediante o selector dos PROGRAMAS;
- modicar a temperatura mediante o selector do TERMOSTATO;
- interromper a cozedura se recolocar o selector dos PROGRAMAS na
posição “0”.
! Nunca encoste objectos no fundo do forno, para evitar riscos de danos
ao esmalte.
! Coloque sempre os recipientes de cozedura sobre a grelha fornecida.
Ventilação de arrefecimento
Para obter uma redução das temperaturas externas, uma ventoinha de
arrefecimento gera um jacto de ar que sai entre o painel de comandos, a
porta do forno e a parte inferior da porta do forno.
! No nal da cozedura, a ventoinha continua a funcionar até o forno arrefecer
sucientemente.
Luz do forno
Acende-se se for seleccionado
mediante o selector dos PROGRAMAS.
Permanece acesa quando se seleccionar um programa de cozedura.
Utilizar o contador de minutos
1. Antes de mais nada, para dar corda na campainha é necessário rodar o
selector do CONTADOR DE MINUTOS uma volta quase inteira na direcção
dos ponteiros do relógio.
2. Volte na direcção contrária aos ponteiros do relógio, congure o tempo
que desejar, fazendo coincidir o selector CONTADOR DE MINUTOS com o
tempo indicado no painel de comandos.
3. O contador de minutos quando tiver passado o tempo, toca um sinal
acústico.
! O contador de minutos não comanda o forno para acender-se ou apagar-se
Programas
! Para todos os programas pode ser regulada uma temperatura entre 60°C
e MÁX., excepto:
• GRILL (é aconselhável congurar somente em MÁX.);
• GRATIN (é aconselhável não ultrapassar a temperatura de 200°C).
Programa de FORNO TRADICIONAL
Activam-se os dois elementos aquecedores inferior e superior. Com esta
cozedura tradicional é melhor utilizar uma única prateleira: com mais de um
tabuleiro haverá má distribuição da temperatura.
Programa de COZEDURA MÚLTIPLA
Activam-se todos os elementos aquecedores (superior, inferior e circular) e
entra em funcionamento a ventoinha. Como o calor é constante e uniforme em
todo o forno, o ar coze e cora os alimentos de maneira uniforme. É possível
utilizar simultaneamente dois tabuleiros no máximo.
Programa do FORNO PARA PIZZA
Activam-se os elementos aquecedores inferior e circular e entra em
funcionamento a ventoinha. Esta combinação possibilita um aquecimento
rápido do forno, com um grande uxo de calor principalmente por baixo. Se
utilizar mais de uma prateleira de cada vez, será necessário trocar a posição
das mesmas na metade da cozedura.
Programa de GRILL
Activa-se o elemento aquecedor superior e começa a funcionar o espeto
rotatório (se houver).
Uma temperatura alta e directa do grill é aconselhada para os alimentos
que necessitarem de uma alta temperatura supercial. Coza com a porta
do forno fechada.
Programa de GRATIN
Activa-se o elemento aquecedor superior e começam a funcionar a
ventoinha e o espeto rotatório (se houver). Une a irradiação térmica
unidireccional com a circulação forçada do ar no interior do forno. Deste
modo, impede-se a queimadura da superfície dos alimentos ao aumentarse o poder de penetração do calor. Coza com a porta do forno fechada.
Programa do FORNO PARA PASTÉIS
Liga-se o elemento aquecedor traseiro e entra em funcionamento a ventoinha
para garantir um calor suave e uniforme no interior do forno. Esta função
é indicada para a cozedura de comidas delicadas, (especialmente doces
que necessitarem de levedação) e algumas preparações “mignon” em 3
prateleiras simultaneamente.
Conselhos práticos para cozedura
! Nas cozeduras ventiladas não utilize as posições das prateleiras 1 e 5:
estes recebem directamente ar quente que poderia provocar queimaduras
em alimentos delicados.
! Nas cozeduras de GRILL e GRATIN, coloque a bandeja pingadeira na
posição 1 para recolher os resíduos de cozedura (molhos e/ou gordura).
COZEDURA MÚLTIPLA
• Utilize as posições 2 e 4 dos tabuleiros, coloque na 2 os alimentos que
necessitarem de mais calor.
• Coloque a bandeja pingadeira em baixo e a grade em cima.
Page 41

41
PT
GRILL
• Coloque a grade na posição 3 ou 4, disponha os alimentos no centro da
grade.
• É aconselhável congurar o nível de energia no máximo. Não se alarme
se a resistência superior não permanecer constantemente acesa: o seu
funcionamento é controlado por um termóstato.
FORNO PARA PIZZA
• Utilize uma forma de alumínio leve, apoie-a na grelha do forno.
Se utilizar o tabuleiro de recolha aumentará os tempos de cozedura e
dicilmente será obtida uma pizza crocante.
• No caso de pizzas com muita cobertura é aconselhável colocar o queijo
mozzarella na metade da cozedura.
ProgramasAlimentos
Peso
(Kg)
Posição
das
prateleiras
Pré aquecimento
(minutos)
Temperatura
aconselhada
Duração da
cozedura
(minutos)
Tradicional
Pato
Carne de vitela ou vaca assada
Carne de porco assada
Biscoitos (de massa tenra)
Tartes
1
1
1
1
3
3
3
3
3
15
15
15
15
15
200
200
200
180
180
65-75
70-75
70-80
15-20
30-35
Cozedura
Múltipla
Pizza (em 2 prateleiras)
Lasanha
Cordeiro
Frango assado com batatas
Cavala
Plum cake
Bignés (em 2 prateleiras)
Biscoitos (em 2 prateleiras)
Pão-de-ló (em 1 prateleira)
Pão-de-ló (em 2 prateleiras)
Tortas salgadas
1
1
1
1+1
1
1
0.5
0.5
0.5
1
1.5
2 e 4
3
2
2 e 4
2
2
2 e 4
2 e 4
2
2 e 4
3
15
10
10
15
10
10
10
10
10
10
15
230
180
180
200
180
170-180
190
180
170
170
200
15-20
30-35
40-45
60-70
30-35
40-50
20-25
10-15
15-20
20-25
30-40
Pizza
Pizza
Fogaça
0.5
1
3
2 ou 3
15
10
220
200
15-20
15-20
Grelhador
Linguado
Espetinhos de calamares e camarão
Filé de bacalhau
Verduras na grelha
Bife de vitela
Costeletas
Hambúrgueres
Cavala
Tostas
1
1
1
1
1
1
1
1
n. 4
4
4
4
3 ou 4
4
4
4
4
4
5
5
5
5
5
5
5
5
5
MAX
MAX
MAX
MAX
MAX
MAX
MAX
MAX
MAX
8-10
6-8
10
10-15
15-20
15-20
7-10
15-20
2-3
Com espeto giratório (se houver)
Vitela no espeto
Frango no espeto
Cordeiro no espeto
1.0
1.5
1.0
-
-
-
-
-
-
100%
100%
100%
80-90
70-80
70-80
Gratin
Frango na grelha
Chocas
1.5
1.5
2
2
5
5
200
200
55-60
30-35
Com espeto giratório (se houver)
Vitela no espeto
Cordeiro no espeto
Frango (no espeto) com batatas (na
bandeja pingadeira)
1.5
1.5
1.5
-
-
-
-
2
10
10
10
10
200
200
200
200
70-80
70-80
70-75
70-75
Pastéis
Tartes
Torta de fruta
Plum cake
Pão-de-ló
Crêpes recheadas (em 2 prateleiras)
Queques pequenos (em 2 prateleiras)
Salgadinhos folhados como queijo
(em 2 prateleiras)
Bignés (em 3 prateleiras)
Biscoitos (em 3 prateleiras)
Merengues (em 3 prateleiras)
0.5
1
0.7
0.5
1.2
0.6
0.4
0.7
0.7
0.5
3
2 ou 3
3
3
2 e 4
2 e 4
2 e 4
1 e 3 e 5
1 e 3 e 5
1 e 3 e 5
15
15
15
15
15
15
15
15
15
15
180
180
180
160
200
180-190
200-210
180
180
90
20-30
40-45
40-50
25-35
30-35
20-25
15-20
20-25
20-25
180
! Os tempos de cozedura são indicativos e podem ser modificados em função dos próprios gostos pessoais.
Tabela de cozedura
Page 42

42
PT
Precauções e conselhos
! Este aparelho foi projectado e fabricado em conformidade com as normas
internacionais de segurança. Estas advertências são fornecidas por razões
de segurança e devem ser lidas com atenção.
Segurança geral
• Este aparelho foi concebido para utilização de tipo não prossional no
âmbito de moradas.
• Este aparelho não deve ser instalado ao ar livre, mesmo num sítio
protegido, porque é muito perigoso deixá-lo exposto a chuva e temporais.
• Para deslocar o aparelho pegue-o sempre pelos especícos manípulos,
situados aos lados do forno.
• Não toque no aparelho se estiver descalço, ou com as mãos ou os pés
molhados ou húmidos.
• Este aparelho deve ser empregado para cozer alimentos, somente por
pessoas adultas e segundo as instruções apresentadas neste folheto.
Qualquer outro uso (como por exemplo, aquecedor de ambientes) deve
ser considerado impróprio e portanto perigoso. O fabricante não poderá
ser considerado responsável pelos danos que houver derivantes de usos
impróprios, errados ou irracionais.
• Durante o uso deste aparelho, os elementos aquecedores e algumas das
partes da porta do forno esquentam-se muito. Tome cuidado para não
tocar nos mesmos e mantenha as crianças afastadas.
• Evite que o cabo de alimentação de outros electrodomésticos encoste-se
em partes quentes do forno.
• Não tape as aberturas de ventilação e de eliminação de calor.
• Pegue pelo centro a maçaneta de abertura da porta: os lados podem
estar quentes.
• Utilize luvas de forno para colocar e tirar recipientes.
• Não forre o fundo do forno com folhas de alumínio.
• Não guarde material inamável no forno: se o aparelho for inadvertidamente
colocado a funcionar, poderia incendiar-se.
• Assegure-se sempre que os selectores estejam na posição “●”/“○” quando
não estiver a utilizar o aparelho.
• Não puxe pelo cabo para desligar a cha da tomada eléctrica, pegue pela
cha.
• Não realize limpeza nem manutenção sem antes ter desligado a cha da
rede eléctrica.
• Se houver avarias, em nenhum caso mexa nos mecanismos internos
para tentar repará-las. Contacte a Assistência Técnica (veja a Assistência
técnica).
• Não coloque objectos sobre a porta do forno aberta.
• Evite que as crianças brinquem com o aparelho.
• Não é previsto que este aparelho seja utilizado por pessoas (incluso
crianças) com reduzidas capacidades físicas, sensoriais ou mentais, por
pessoas inexperientes ou que não tenham familiaridade com o produto,
a não ser que seja vigiadas por uma pessoa responsável pela sua
segurança ou que tenham recebido instruções preliminares sobre o uso
do aparelho.
• O aparelho não é destinado a ser colocado em funcionamento por
meio de um temporizador externo ou por um sistema de comando
à distância separado.
Eliminação
• Eliminação do material de embalagem: obedeça as regras locais, de
maneira que as embalagens possam ser reutilizadas.
• A directiva Europeia 2012/19/UE relativa aos resíduos de equipamentos
eléctricos e electrónicos (REEE) prevê que os electrodomésticos não
devem ser eliminados no normal uxo dos resíduos sólidos urbanos.
Os aparelhos não mais utilizados devem ser recolhidos separadamente
para optimizar a taxa de recuperação e reciclagem dos materiais que os
compõem e impedir potenciais danos à saúde e ao meio ambiente. O
símbolo da lixeira cancelada está indicado em todos os produtos para
lembrar o dever de colecta selectiva.
Para maiores informações sobre a correcta eliminação dos
electrodomésticos, os proprietários poderão contactar o serviço de
colecta público ou os revendedores.
Economia e respeito do meio ambiente
• Sempre que possível, evitar pré-aquecer o forno e tentar sempre enchê-lo.
Abrir a porta do forno tão pouco quanto possível porque o calor perde-se
de cada vez que é aberta. Para economizar uma quantidade signicativa
de energia, desligue simplesmente o forno 5 a 10 minutos antes do m
do seu tempo planeado de cozedura e use o calor que o forno continua
a produzir.
• Os programas automáticos são baseados em produtos alimentares
normais.
• Manter as vedações limpas e sem sujidade para prevenir perdas de
energia da porta
• Se você tem um contrato de eletricidade tarifa programada, a opção
“atraso cozinhar”, será mais fácil de poupar dinheiro movendo operação
para períodos de tempo mais baratos.
! Este produto satisfaz os requisitos impostos pela nova Directiva Europeia
sobre a limitação dos consumos energéticos em stand-by.
Manutenção e cuidados
Desligar a corrente eléctrica
Antes de realizar qualquer operação, desligue o aparelho da alimentação
eléctrica.
Limpeza do aparelho
• As partes externas esmaltadas ou inoxidáveis e as guarnições de borracha
podem ser limpas com uma esponja molhada com água morna e sabão
neutro. Se for difícil remover as manchas, empregue produtos especícos.
É aconselhado enxaguar com água abundante e enxugar depois da
limpeza. Não empregue pós abrasivos nem substâncias corrosivas.
• O interior do forno deve ser sempre limpo de preferência depois de cada
utilização, enquanto ainda estiver morno. Utilize água quente e detergente,
enxagúe e enxugue com um pano macio. Evite abrasivos.
• Os acessórios podem ser lavados como quaisquer utensílios, inclusive
numa máquina de lavar loiça, excepto as guias corrediças.
! Nunca utilize equipamento de limpeza a vapor ou de alta pressão para
limpar a aparelhagem.
Limpeza da porta
Limpe o vidro da porta com esponjas e produtos não abrasivos e enxugue com
um pano macio; não use materiais ásperos, abrasivos ou espátulas metálicas
aadas que podem arranhar a superfície e quebrar o vidro.
Para uma limpeza mais cuidadosa, é possível retirar a porta do forno.
1. Abra a porta inteiramente (veja a gura);
2. Utilizando uma chave de fendas, levante e rode as alavancas F situadas
nas duas dobradiças (veja a gura);
Page 43

43
PT
F
3. Segure a porta dos dois lados exteriores
e feche-a novamente devagar mas não
inteiramente; Em seguida puxe a porta para
a frente e retire-a do seu lugar (veja a gura).
Para montar novamente a porta realize, na
ordem contrária, as mesmas operações.
Vericação das guarnições
Verique periodicamente o estado da guarnição ao redor da porta do forno.
Se houver danos, contacte o Centro de Assistência Técnica mais próximo
(veja a Assistência técnica). É aconselhável não usar o forno antes do mesmo
ter sido reparado.
Substituição da lâmpada
Para substituir a lâmpada de
iluminação do forno:
1. Desatarraxe a tampa em vidro do
bocal da lâmpada.
2. Desenrosque a lâmpada e troque-a
por outra análoga: potência 25 W,
engate E 14.
3. Retire a tampa (veja a gura).
! Não utilizar a lâmpada do forno como iluminação de ambientes.
Page 44

44
DE
Installation
! Bewahren Sie diese Bedienungsanleitung bitte sorgfältig auf, damit Sie sie
jederzeit zu Rate ziehen können. Sorgen Sie dafür, dass sie im Falle eines
Verkaufs, eines Umzugs oder einer Übergabe an einen anderen Benutzer
das Gerät stets begleitet, damit auch der Nachbesitzer die Möglichkeit hat,
darin nachschlagen zu können.
! Lesen Sie bitte folgende Hinweise aufmerksam durch, sie liefern wichtige
Informationen hinsichtlich der Installation, dem Gebrauch und der Sicherheit.
Aufstellung
! Verpackungsmaterial ist kein Spielzeug für Kinder.Es ist entsprechend
den Vorschriften zur getrennten Müllsammlung zu entsorgen (siehe
Vorsichtsmaßregeln und Hinweise).
! Die Installation ist gemäß den vorliegenden Anweisungen von Fachpersonal
durchzuführen. Jede unsachgemäße Installation kann Menschen und Tiere
gefährden oder Sachschaden verursachen.
Einbau
Um eine einwandfreie Betriebsweise des Gerätes zu gewährleisten, muss
der Umbauschrank folgende Eigenschaften aufweisen:
• die an den Backofen angrenzenden Schrankwände müssen aus
hitzebeständigem Material gefertigt sein.
• bei Möbeln aus Furnierholz muss der verwendete Leim eine
Hitzebeständigkeit von 100 °C aufweisen.
• für den Einbau des Backofens in einen Unterschrank (siehe Abbildung)
oder in einen Hochschrank, muss das entsprechende Möbel über
folgende Abmessungen verfügen:
590 mm.
595 mm.
22,5 mm.*
20,5 mm.
550 mm.
570 mm.
20 mm.
575-585 mm.
45 mm.
560 mm.
550 mm.
min.
! Nach erfolgtem Einbau des Gerätes muss die Möglichkeit einer Berührung
mit Strom führenden Teilen ausgeschlossen sein.Die auf dem Typenschild
enthaltenen Verbrauchsangaben wurden bei dieser Art der Installation
ermittelt.
Belüftung
Zur Gewährleistung einer einwandfreien Belüftung die Rückwand des
Schrankumbaus entfernen. Der Backofen sollte möglichst so installiert
werden, dass er auf zwei Holzleisten oder aber auf einer durchgehenden
Fläche auiegt, die über einen Ausschnitt von mindestens 45 x 560 mm
verfügt (siehe Abbildungen).
560 mm.
45 mm.
Zentrieren und Befestigen
Zur Befestigung des Geräts an den Umbauschrank:
• die Backofentür öffnen;
• die 2 Stopfen in den Befestigungsbohrungen des Rahmens herausziehen;
• den Ofen am Umbauschrank mit den 2 Holzschrauben befestigen;
• die Bohrungsabdeckungen wieder anbringen.
! Alle zum Schutz dienenden Teile müssen so befestigt werden, dass ein
Entfernen derselben ohne Zuhilfenahme eines Werkzeugs nicht möglich ist.
Elektroanschluss
Die mit einem Dreileiterkabel ausgerüsteten Backöfen sind für den Betrieb
mit Wechselstrom bei der auf dem Typenschild (bendlich auf dem Gerät)
angegebenen Spannung und Frequenz ausgelegt (siehe unten).
Anschluss des Netzkabels
1. Das Klemmengehäuse öffnen, indem
die seitlichen Zungen des Deckels mithilfe
eines Schraubenziehers angehoben
werden. Deckel abziehen (siehe
Abbildung).
2. Installation des Netzkabels: Schrauben
Sie die Schraube der Kabelklemme
sowie die drei Schrauben der Kontakte
L-N-
heraus. Befestigen Sie die
Drähte dann unter Beachtung der
entsprechenden Farben unter den
Schraubenköpfen: Blau (N), Braun (L),
Gelb/Grün
(siehe Abbildung).
3. Befestigen Sie das Kabel in der
entsprechenden Kabelklemme.
4. Schließen Sie den Deckel des
Klemmengehäuses.
Anschluss des Versorgungskabels an das Stromnetz
Versehen Sie das Netzkabel mit einem Normstecker für die auf dem
Typenschild angegebene Belastung (siehe nebenstehende Tabelle).
Wird das Gerät direkt an das Stromnetz angeschlossen, ist zwischen
Stromnetz und Gerät ein allpoliger, der Last und den einschlägigen
Vorschriften entsprechender Schalter mit einer Mindestöffnung der Kontakte
von 3 mm zwischenzuschalten. (Der Erdleiter darf vom Schalter nicht
unterbrochen werden.) Das Versorgungskabel muss so verlegt werden,
dass es an keiner Stelle einer Temperatur ausgesetzt wird, die 50°C über
der Raumtemperatur liegt.
! Der Installateur ist für den ordnungsgemäßen elektrischen Anschluss sowie
die Einhaltung der Sicherheitsvorschriften verantwortlich.
L
N
N
L
Page 45

45
DE
Vor dem Anschluss stellen Sie bitte sicher, dass:
• die Steckdose geerdet ist und den gesetzlichen Bestimmungen entspricht;
• die Netzsteckdose für die auf dem Typenschild angegebene maximale
Leistungsaufnahme des Gerätes ausgelegt ist;
• die Netzspannung im Bereich der auf dem Typenschild angegebenen
Werte liegt;
• die Netzsteckdose mit dem Netzstecker kompatibel ist. Sollte dies nicht
der Fall sein, wechseln Sie bitte die Netzsteckdose oder den Netzstecker
aus; verwenden Sie keine Verlängerungen und Mehrfachsteckdosen.
! Netzkabel und Steckdose müssen bei installiertem Gerät leicht zugänglich
sein.
! Das Netzkabel darf nicht gebogen oder eingeklemmt werden.
! Das Kabel muss regelmäßig kontrolliert werden und darf nur durch
autorisiertes Fachpersonal ausgetauscht werden (siehe Kundendienst).
! Der Hersteller lehnt jede Verantwortung ab, falls diese Vorschriften
nicht eingehalten werden sollten.
TYPENSCHILD
Abmessungen*
Breite 43,5 cm
Höhe 32,4 cm
Tiefe 41,5 cm
Nutzvolumen*
Liter 59
Elektrischer
Anschluss
Spannung 220-240V~ 50/60Hz (siehe
Typenschild)
maximale Leistungsaufnahme 2800W
Abmessungen**
Breite 45,5 cm
Höhe 32,4 cm
Tiefe 41,5 cm
Nutzvolumen**
Liter 62
EU-Richtlinienr. 65/2014 ergänzend zu
Richtlinie 2010/30/EU.
EU-Richtlinienr. 66/2014 ergänzend zu
Richtlinie 2009/125/EU.
EN 60350-1 Richtlinien,
EN 50564 Richtlinien
Energieverbrauch natürliche
Konvektion – Heizfunktion:
Ober/Unterhitze
Deklarierte Energieverbrauchsklasse
Erzwungene Konvektion -
Heizfunktion:
Backen
* Nur für Modelle mit eingelassenen Führungen.
** Nur für Modelle mit Drahtführungen.
Dieses Gerät entspricht den
folgenden EG-Richtlinien:
2006/95/EG vom 12.12.2006
(Niederspannung) und
nachfolgende Änderungen –
2004/108/EG vom 15.12.04
(Elektromagnetische Verträglichkeit)
und nachfolgende Änderungen –
93/68/EWG vom 22.07.93 und
nachfolgende Änderungen.
- 2012/19/EU und nachfolgenden
Änderungen.
- 1275/2008 Standby/Off-Mode
NERGIELABEL
und
ECODESIGN
Page 46

46
DE
Inbetriebsetzung und Gebrauch
ACHTUNG! Der Ofen ist mit einem
Arretierungssystem der Roste
ausgestattet. Damit lassen diese
sich ausziehen, ohne aus dem Ofen
hervorzustehen (1).
Um die Roste komplett auszuziehen,
braucht man sie nur, wie auf der
Zeichnung zu sehen, vorne zu
greifen und zu ziehen (2).
! Bei erstmaliger Inbetriebnahme sollte der leere Backofen für etwa eine
Stunde bei Höchsttemperatur und geschlossener Backofentür in Betrieb
genommen werden. Das Gerät danach ausschalten, die Backofentür öffnen
und die Küche lüften. Der bei diesem Vorgang erzeugte Geruch entsteht
durch die Verüchtigung der zum Schutz des Backofens aufgetragenen Stoffe.
Backofen in Betrieb setzen
1. Das gewünschte Garprogramm über den Drehschalter PROGRAMME
auswählen.
2. Die Temperatur durch Drehen des Knopfes THERMOSTAT einstellen. Eine
Liste von Garprogrammen nebst der empfohlenen Temperaturen kann in der
Back-/Brat-Tabelle eingesehen werden (siehe Programme).
3. Die Kontrollleuchte des THERMOSTATEN bleibt während der Aufheizphase
bis zum Erreichen der Temperatur eingeschaltet.
4. Während des Garvorgangs sind folgende Einstellungen jederzeit möglich:
- Ändern des Garprogramms über den Drehschalter PROGRAMME;
- Ändern der Temperatur über den Drehschalter THERMOSTAT;
- Unterbrechen des Garvorgangs durch das Drehen des Drehschalters
PROGRAMME auf Position „0“.
! Zur Vermeidung einer Beschädigung der Beschichtung nie Kochgeschirr
auf dem Backofenboden positionieren.
! Das Kochgeschirr stets auf dem mit dem Gerät gelieferten Backofenrost
abstellen.
Kühlluftgebläse
Um die Temperaturen an den äußeren Teilen des Backofens abzusenken,
wird mit Hilfe eines Kühlluftgebläses ein Luftstrahl erzeugt, der zwischen dem
Bedienfeld, der Backofentür und auch im unteren Teil der Ofentür austritt.
! Nach Abschluss eines Garvorgangs bleibt das Gebläse solange in Betrieb,
bis der Backofen ausreichend abgekühlt ist.
Backofenbeleuchtung
Um dieses einzuschalten, drehen Sie den Knopf PROGRAMME auf
. Es
bleibt eingeschaltet, wenn ein Garprogramm eingestellt wird.
Kurzzeitwecker verwenden
1. In erster Linie muss das Läutewerk durch eine fast komplette Umdrehung
(nach rechts) des Knopfes KURZZEITWECKER aufgezogen werden.
2. Um die gewünschte Zeit einzustellen drehen Sie den Knopf (nach links)
wieder zurück, bis die auf dem Knopf KURZZEITWECKER angegebenen
Minuten mit dem auf dem Bedienfeld befindlichen Bezugszeichen
übereinstimmen.
3. Die Kurzzeitwecker vergangen, ertönt ein Signal.
! Der Kurzzeitwecker steuert nicht das Ein- und Ausschalten des Backofens..
Programme
! Für alle Programme kann eine Gartemperatur von 60° bis MAX. eingestellt
werden, mit Ausnahme der Programme:
• GRILL (hier empehlt sich die Einstellung MAX.);
• ÜBERBACKEN (es wird empfohlen, die Temperatur von 200°C nicht zu
überschreiten).
Programm OBER-UNTERHITZE
Die beiden Heizelemente, das untere und das obere, werden in Betrieb
gesetzt. Bei dieser traditionellen Garart wird empfohlen, nur einen
Backofenrost zu verwenden, da ansonsten keine gleichmäßige Hitzeverteilung
gewährleistet werden kann.
Programm ECHTE HEISSLUFT
Es schalten sich alle Heizelemente (oberes, unteres und rundes Heizelement)
ein, und das Gebläse wird in Betrieb genommen. Da die Hitze im gesamten
Backofen konstant ist, werden die Speisen sehr gleichmäßig gegart und
gebräunt. Es ist möglich, maximal zwei Backofenroste gleichzeitig zu
verwenden.
Programm PIZZA
Das untere und das runde Heizelement schalten sich ein und das Gebläse
wird in Betrieb genommen. Durch diese Kombination wird der Backofen mit
einer hauptsächlich von unten aufsteigenden, starken Hitzezufuhr sehr schnell
erhitzt. Wenn mehrere Backofenroste gleichzeitig verwendet werden, die
jeweilige Position nach dem halben Garvorgang umtauschen.
Programm GRILL
Das obere Heizelement schaltet sich ein, und der Drehspieß (falls vorhanden)
wird in Betrieb gesetzt.
Die sehr hohe Temperatur und die direkt auf das Grillgut gerichtete Hitze
empehlt sich für Lebensmittel, die zur optimalen Garung einer hohen
Temperatur an der Außenäche bedürfen. Diese Garart bei geschlossener
Backofentür durchführen.
Programm ÜBERBACKEN
Das obere Heizelement schaltet sich ein, und das Gebläse sowie der
Drehspieß (falls vorhanden) werden in Betrieb gesetzt. Zusätzlich zu der
einseitigen Strahlungshitze zirkuliert Heißluft im Innern des Backofens.
Hierdurch wird ein Verbrennen der Speiseoberächen verhindert und die Hitze
dringt tiefer in die Speisen ein. Diese Garart bei geschlossener Backofentür
durchführen.
Programm BACKEN
Das hintere Heizelement schaltet sich ein, und das Gebläse wird in Betrieb
genommen, wodurch eine äußerst schonende, im Backofen gleichmäßig
verteilte Wärme gewährleistet wird. Dieses Programm eignet sich zum
Garen empndlicher Speisen (z.B. zum Backen von Hefeteigen) sowie zur
Zubereitung von Kleingebäck auf drei Ebenen gleichzeitig.
Praktische Back-/Brathinweise
! Verwenden Sie beim Heißluftgaren nicht die Einschubhöhen 1 und 5: Sie
sind zu direkt der Heißluft ausgesetzt, wodurch empndliche Gerichte leicht
verbrennen könnten.
! Setzen Sie beim Garen mit den Programmen GRILL und GRATIN die
Fettpfanne zum Auffangen von abtropfendem Fett oder Fleischsaft auf
Einschubhöhe 1 ein.
Page 47

47
DE
ECHTE HEISSLUFT
• Verwenden Sie die Einschubhöhen 2 und 4, wobei die 2. Ebene für die
Speisen verwendet werden sollte, die mehr Hitze verlangen.
• Die Fettpfanne in die untere und den Rost in die obere Führung einführen.
GRILL
• Schieben Sie den Grillrost in die Führung 3 oder 4 ein, und legen Sie die
zu garenden Speisen auf die Mitte des Grillrostes.
• Es empehlt sich, die höchste Energiestufe zu verwenden. Im Übrigen ist
es bei dieser Funktion völlig normal, dass das obere Heizelement nicht
ständig rot glüht: Es wird Die Fettpfanne verlängert die Garzeit. Deren
Verwendung vermeiden, wenn knusprige Pizzas erzielt werden sollen.
PIZZA
• Eine Leichtmetallform verwenden und diese direkt auf dem mitgelieferten
Rost positionieren.
Die Fettpfanne verlängert die Garzeit. Deren Verwendung vermeiden,
wenn knusprige Pizzas erzielt werden sollen.
• Bei reich belegten Pizzas ist es empfehlenswert, den Mozzarella-Käse
erst nach halber Backzeit hinzuzugeben.
Programme Lebensmittel
Gew.
(Kg)
Einschubhöhe Vorheizzeit
(Minuten)
Empfohlene
Temperatur
Garzeit
(Minuten)
OberUnterhitze
Ente
Kalbs- oder Rinderbraten
Schweinebraten
Mürbeteiggebäck
Kuchen
1
1
1
1
3
3
3
3
3
15
15
15
15
15
200
200
200
180
180
65-75
70-75
70-80
15-20
30-35
Echte Heißluft
Pizza (auf 2 Ebenen)
Lasagne
Lamm
Brathähnchen + Kartoffeln
Makrelen
Plum Cake
Windbeutel (auf 2 Ebenen)
Gebäck (auf 2 Ebenen)
Biskuitböden (auf 1 Ebene)
Biskuitböden (auf 2 Ebenen)
Quiche
1
1
1
1+1
1
1
0.5
0.5
0.5
1
1.5
2 und 4
3
2
2 und 4
2
2
2 und 4
2 und 4
2
2 und 4
3
15
10
10
15
10
10
10
10
10
10
15
230
180
180
200
180
170-180
190
180
170
170
200
15-20
30-35
40-45
60-70
30-35
40-50
20-25
10-15
15-20
20-25
30-40
Pizza
Pizza
Fladen
0.5
1
3
2 oder 3
15
10
220
200
15-20
15-20
Grill
Seezungen
Tintenfisch- und Krebsspieße
Kabeljaufilet
Grillgemüse
Kalbssteaks
Koteletts
Hamburger
Makrelen
Toast
1
1
1
1
1
1
1
1
n. 4
4
4
4
3 oder 4
4
4
4
4
4
5
5
5
5
5
5
5
5
5
MAX
MAX
MAX
MAX
MAX
MAX
MAX
MAX
MAX
8-10
6-8
10
10-15
15-20
15-20
7-10
15-20
2-3
Mit Drehspieß (falls vorhanden)
Kalbfleisch am Spieß
Hähnchen am Spieß
Lamm am Spieß
1.0
1.5
1.0
-
-
-
-
-
-
100%
100%
100%
80-90
70-80
70-80
Gratin
Gegrilltes Hähnchen
Tintenfisch
1.5
1.5
2
2
5
5
200
200
55-60
30-35
Mit Drehspieß (falls vorhanden)
Kalbfleisch am Spieß
Lamm am Spieß
Hähnchen (am Spieß) +
Ofenkartoffeln (auf dem Backblech)
1.5
1.5
1.5
-
-
-
-
2
10
10
10
10
200
200
200
200
70-80
70-80
70-75
70-75
Gebäck
Kuchen
Obstkuchen
Plum Cake
Biskuitböden
Gefüllte Crêpes (auf 2 Ebenen)
Kleingebäck (auf 2 Ebenen)
Mit Käse gefülltes Blätterteiggebäck
(auf 2 Ebenen)
Windbeutel (auf 3 Ebenen)
Gebäck (auf 3 Ebenen)
Baisers (auf 3 Ebenen)
0.5
1
0.7
0.5
1.2
0.6
0.4
0.7
0.7
0.5
3
2 oder 3
3
3
2 und 4
2 und 4
2
und 4
1, 3 und 5
1, 3 und 5
1, 3 und 5
15
15
15
15
15
15
15
15
15
15
180
180
180
160
200
180-190
200-210
180
180
90
20-30
40-45
40-50
25-35
30-35
20-25
15-20
20-25
20-25
180
! Bei den angegebenen Garzeiten handelt es sich um Richtwerte, die je nach Geschmack geändert werden können.
Tabelle der Garzeiten
Page 48

48
DE
Vorsichtsmaßregeln und Hinweise
! Das Gerät wurde entsprechend den strengsten internationalen
Sicherheitsvorschriften entworfen und gebaut. Nachstehende Hinweise
werden aus Sicherheitsgründen geliefert und sollten aufmerksam gelesen
werden.
Allgemeine Sicherheit
• Dieses Gerät ist für den nicht professionellen Einsatz in privaten
Haushalten bestimmt.
• Das Gerät darf nicht im Freien aufgestellt werden, auch nicht, wenn es
sich um einen geschützten Platz handelt. Es ist hoch gefährlich, das Gerät
Regen und Gewittern auszusetzen.
• Benutzen Sie zum Handling des Gerätes stets die sich seitlich am Backofen
bendlichen Gerätegriffe.
• Berühren Sie das Gerät nicht mit nassen oder feuchten Händen oder
Füßen und auch nicht, wenn Sie barfuß sind.
• Das Gerät darf nur von Erwachsenen und gemäß den Hinweisen
der vorliegenden Bedienungsanleitung zur Zubereitung von
Lebensmitteln verwendet werden. Jeder andere Einsatz (zum
Beispiel: zum Beheizen von Räumen) ist als unsachgemäß und
gefährlich anzusehen. Der Hersteller haftet nicht für eventuelle,
durch unsachgemäßen, falschen oder unangemessenen Gebrauch
verursachte Schäden.
• Wenn das Gerät in Betrieb ist, werden die Heizelemente und einige
Ofentürteile sehr heiß. Berühren Sie sie nicht und halten Sie Kinder
vom Ofen fern.
• Vermeiden Sie, dass die Netzkabel anderer Elektrogeräte in Kontakt mit
heißen Backofenteilen gelangen.
• Die zur Belüftung und Wärmeableitung vorgesehenen Öffnungen dürfen
nicht zugestellt bzw. abgedeckt werden.
• Fassen Sie den Griff zur Türöffnung stets in der Mitte an. An den Seiten
könnte er heiß sein.
• Verwenden Sie stets Backofenhandschuhe.
• Kleiden Sie den Boden des Backofens nicht mit Aluminiumfolie aus.
• Legen Sie keine entzündbaren Materialien in den Backofen: Sie könnten
entammen, wenn das Gerät versehentlich eingeschaltet wird.
• Vergewissern Sie sich stets, dass sich die Reglerknöpfe auf der Position
“●”/“○” benden, wenn das Gerät nicht in Betrieb ist.
• Ziehen Sie den Netzstecker nicht am Netzkabel aus der Steckdose,
sondern nur am Netzstecker selbst.
• Ziehen Sie vor der Reinigung oder vor Wartungsmaßnahmen stets den
Netzstecker aus der Steckdose.
• Versuchen Sie bei etwaigen Störungen bitte keinesfalls, Innenteile selbst
zu reparieren. Setzen Sie sich mit dem Kundendienst (siehe Kundendienst)
in Verbindung.
• Stellen Sie bitte keine Gegenstände auf der geöffneten Backofentür ab.
• Dieses Gerät ist kein Spielzeug für Kinder.
• Das Gerät ist nicht zur Verwendung durch Personen (einschließlich
Kinder) mit eingeschränkten körperlichen oder geistigen Fähigkeiten oder
Wahrnehmungsstörungen oder aber ohne ausreichende Erfahrung und
Produktkenntnis geeignet, sofern sie nicht durch eine für ihre Sicherheit
verantwortliche Person beaufsichtigt werden oder zuvor Anleitungen zum
Gerätegebrauch erhalten haben.
• Dieses Gerät kann nicht mit einem externen Timer oder einem
getrennten Fernsteuerungssystem betrieben werden.
Entsorgung
• Entsorgung des Verpackungsmaterials: Befolgen Sie die lokalen
Vorschriften; Verpackungsmaterial kann wiederverwertet werden.
• Gemäß der Europäischen Richtlinie 2012/19/EU über Elektro- und
Elektronik-Altgeräte (WEEE) dürfen Elektrohaushalts-Altgeräte nicht
über den herkömmlichen Haushaltsmüllkreislauf entsorgt werden.
Altgeräte müssen separat gesammelt werden, um die Wiederverwertung
und das Recycling der beinhalteten Materialien zu optimieren und die
Einüsse auf die Umwelt und die Gesundheit zu reduzieren. Das Symbol
„durchgestrichene Mülltonne“ auf jedem Produkt erinnert Sie an Ihre
Verpichtung, dass Elektrohaushaltsgeräte gesondert entsorgt werden
müssen.
Endverbraucher können sich an Abfallämter der Gemeinden
wenden, um mehr Informationen über die korrekte Entsorgung ihrer
Elektrohaushaltsgeräte zu erhalten.
Energie sparen und Umwelt schonen
• Falls möglich, Vorwärmen des Backofens vermeiden und immer versuchen
es zu füllen. Öffnen Sie die Tür des Backofens etwas, da die Hitze bei
jedem Öffnen verloren geht. Um eine erhebliche Menge an Energie zu
sparen, schalten Sie den Backofen 5 bis 10 Minuten vor dem geplanten
Ende der Backzeit aus und nutzen Sie die Hitze im Backofen herzustellen.
• Automatische Programme basieren auf Standard Nahrungsprodukte.
• Halten Sie die Türdichtungen sauber und ordentlich um Energieverluste
zu vermeiden.
• Wenn Sie einen zeitabhängigen Stromtarif haben, dann macht die Option
“verzögertes Kochen“ es einfacher, Geld durch Vorgänge in günstigeren
Zeiträumen einstellen.
! Verwenden Sie zur Reinigung der Kochmulde keine Dampf- oder
Hochdruckreinigungsgeräte.
Reinigung und Pege
Abschalten Ihres Gerätes vom Stromnetz
Vor jeder Reinigung und Pege ist das Gerät vom Stromnetz zu trennen.
Reinigung Ihres Gerätes
• Die emaillierten oder aus Edelstahl gefertigten Außenteile des Gerätes
sowie die Gummidichtungen können mit einem mit lauwarmem Wasser
und einem neutralen Reinigungsmittel getränkten Schwamm gereinigt
werden. Sollten die Flecken nur schwer zu entfernen sein, verwenden Sie
spezielle Reinigungsmittel. Es ist ratsam, die Teile nach der Reinigung
gut nachzuspülen und trockenzureiben. Benutzen Sie auf keinen Fall
Scheuermittel oder sonstige scharfe Reiniger.
• Der Backofen sollte möglichst nach jedem Gebrauch, solange er noch
leicht warm ist, gereinigt werden. Verwenden Sie hierzu warmes Wasser
und ein Reinigungsmittel, spülen Sie mit Wasser nach und reiben Sie den
Backofen mit einem weichen Tuch trocken. Vermeiden Sie Scheuermittel.
• Das Zubehör lässt sich wie normales Geschirr reinigen (auch im
Geschirrspüler).
! Verwenden Sie zur Reinigung der Kochmulde keine Dampf- oder
Hochdruckreinigungsgeräte.
Backofentür reinigen
Die Backofentür aus Glas nur mit einem weichen Schwamm und mildem
Reinigungsmittel reinigen. Das Gerät danach mit einem weichen Tuch trocknen.
Keine rauen, scheuernden Materialien oder scharfkantige, metallische Schaber
verwenden, da sie die Oberäche zerkratzen oder das Glas beschädigen
können.
Zur einfachen und gründlichen Reinigung kann die Backofentür abgenommen
werden.
1. Hierzu die Tür vollständig öffnen (siehe Abbildung).
2. Mit einem Schraubenzieher die an den beiden Scharnieren bendlichen
Hebel F anheben und drehen (siehe Abbildung);
Page 49

49
DE
F
3. Die Tür an den beiden äußeren Seiten
langsam und nicht vollständig schließen.
Die Tür danach nach außen aus ihrer
Lagerung herausziehen (siehe Abbildung). In
umgekehrter Reihenfolge wird die Backofentür
wieder angebracht.
Dichtungen prüfen
Den Zustand der Dichtung an der Backofentür in regelmäßigen Abständen
prüfen. Sich im Falle einer beschädigten Dichtung an die nächstgelegene
Kundendienststelle (siehe Kundendienst) wenden. Es empehlt sich, den
Backofen bis zur erfolgten Reparatur nicht zu verwenden.
Lampenaustausch
Verfahren Sie zum Austausch der
Backofenlampe wie folgt:
1. Drehen Sie die Glasabdeckung der
Lampenhalterung heraus.
2. Die Lampe ausschrauben und durch
eine neue Lampe desselben Typs
ersetzen: Leistung 25 W, Sockel E 14.
3. Bringen Sie die Glasabdeckung
wieder an (siehe Abbildung).
! Die Offenlampe darf nicht als Raumlampe verwendet werden.
Page 50

50
NL
Het installeren
! Bewaar dit boekje zorgvuldig voor eventuele verdere raadpleging. Wanneer
u het product weggeeft, verkoopt, of wanneer u verhuist, dient u dit boekje
bij het apparaat te bewaren zodat alle nodige informatie voorhanden blijft.
! Lees de gebruiksaanwijzingen zorgvuldig door: er staat belangrijke
informatie in over installatie, gebruik en veiligheid.
Plaatsing
! Het verpakkingsmateriaal is niet bestemd voor kinderen en dient daarom
te worden weggegooid volgens de geldende normen voor gescheiden
afvalverzameling ( zie Voorzorgsmaatregelen en advies).
! De installatie moet worden uitgevoerd door een bevoegde installateur en
volgens de instructies van de fabrikant. Een verkeerde installatie kan schade
berokkenen aan personen, dieren of dingen.
Inbouw
Voor een goede werking van het apparaat moet het keukenmeubel de juiste
kenmerken hebben:
• de zijkanten van de kastjes die aan de oven grenzen moeten hittebestendig
zijn;
• in het bijzonder moet, in geval van meubels met neer, de lijm bestand
zijn tegen temperaturen van 100°C;
• voor het inbouwen van de oven, zowelonder het aanrecht (zie guur)
alsin stapelbouw, dient het meubel de volgende afmetingen te hebben:n
stapelbouw, dient het meubel de volgende afmetingen te hebben:
590 mm.
595 mm.
22,5 mm.*
20,5 mm.
550 mm.
570 mm.
20 mm.
575-585 mm.
45 mm.
560 mm.
550 mm.
min.
! Nadat het apparaat is ingebouwd, mag er geen contact meer mogelijk zijn
met de elektrische onderdelen. Het energieverbruik dat staat aangegeven op
het typeplaatje is gebaseerd op dit soort installatie.
Ventilatie
Om een goede ventilatie te kunnen garanderen is het noodzakelijk de
achterkant van het meubel te verwijderen. Het verdient de voorkeur de oven
op twee houten balken te plaatsen, of eventueel op een enkele plank die een
opening heeft van tenminste 45 x 560 mm (zie afbeeldingen).
560 mm.
45 mm.
Centreren en bevestigen
Om het apparaat aan het keukenkastje te bevestigen:
• open de ovendeur;
• verwijder de 2 leertjes die de bevestigingsopeningen bedekken op de
zijrand;
• bevestig de oven aan het meubel met behulp van de 2 houtschroeven;
• doe de leertjes die de openingen bedekken weer op hun plaats.
! Alle beschermende onderdelen moeten zodanig worden bevestigd dat ze
niet kunnen worden verwijderd zonder gereedschap te gebruiken.
Elektrische aansluiting
De ovens met driepolige voedingskabel functioneren met de wisselstroom,
spanning en frequentie die aangegeven staan op het typeplaatje op het
apparaat ( zie onder).
Monteren voedingskabel
1. Licht de lipjes aan de zijkant van het
deksel van het klemmenbord op met een
schroevendraaier: trek het deksel van
het klemmenbord open (zie afb.).
2. De voedingskabel in werking stellen:
draai de schroef van de kabelklem en de
drie schroeven van de contacten L-N-
los, en bevestig de draden onder
de schroeven met inachtneming van de
kleuren: Blauw (N) Bruin (L) Geel-Groen
(zie afbeelding).
3. Maak de kabel vast aan de daarvoor
bestemde kabelklem.
4. Sluit het deksel van het klemmenbord.
Het aansluiten van de voedingskabel aan het elektrische net
Gebruik voor de voedingskabel een stekker die genormaliseerd is voor de
lading aangegeven op het typeplaatje.
Wanneer het apparaat rechtstreeks op het net wordt aangesloten moet u
tussen het apparaat en het net een meerpolige schakelaar aanbrengen met
een afstand tussen de contacten van minstens 3mm, aangepast aan het
elektrische vermogen en voldoend aan de geldende normen (de aarding
mag niet worden onderbroken door de schakelaar). De voedingskabel moet
zodanig worden geplaatst dat hij nergens een temperatuur bereikt van 50°C
hoger dan de kamertemperatuur.
! De installateur is verantwoordelijk voor een correcte elektrische aansluiting
en het in acht nemen van de veiligheidsnormen.
L
N
N
L
Page 51

51
NL
Voor het aansluiten moet u controleren dat:
• het stopcontact geaard is en voldoet aan de geldende normen;
• het stopcontact in staat is het maximale vermogen van het apparaat te
dragen, zoals aangegeven op het typeplaatje;
• de spanning zich bevindt tussen de waarden die staan aangegeven op
het typeplaatje;
• het stopcontact en de stekker overeenkomen. Als dat niet zo is, dient
u ofwel de stekker ofwel het stopcontact te vervangen; gebruik geen
verlengsnoeren of dubbelstekkers.
! Wanneer het apparaat geïnstalleerd is moeten het snoer en het stopcontact
gemakkelijk te bereiken zijn.
! De kabel mag niet worden gebogen of samengedrukt.
! De kabel moet van tijd tot tijd worden gecontroleerd en mag alleen door
erkende monteurs worden vervangen (zie Service).
! De fabrikant kan nergens aansprakelijk voor worden gesteld als deze normen
niet worden nageleefd.
* Alleen voor modellen met diepgetrokken geleiders.
** Alleen voor modellen met uitstekende geleiders.
TYPEPLAATJE
Afmetingen*
breedte 43,5 cm
hoogte 32,4 cm
diepte 41,5 cm
Inhoud*
liter 59
Elektrische
aansluitingen
spanning 220-240V ~ 50/60 Hz (zie
typeplaatje)
maximaal opgenomen vermogen 2800W
Afmetingen**
breedte 43,5 cm
hoogte 32,4 cm
diepte 41,5 cm
Inhoud** liter 62
EU richtlijn nr. 65/2014 met integratie
van richtlijn 2010/30/EU.
EU reglement nr. 66/2014 met integratie
van richtlijn 2009/125/EC.
EN 60350-1 reglement,
EN 50564 reglement
Energieverbruik convectie Natuurlijk
verwarmingsfunctie: Traditioneel;
Verklaring energieverbruik
Klasse convectie hetelucht verwarmingsfunctie: Gebak.
ENERGIE LABEL
en
ECODESIGN
Deze apparatuur voldoet aan de
volgende EU voorschriften:
- 2006/95/EG van 12/12/06
(Laagspanning) en daaropvolgende
wijzigingen
- 2004/108/EG van 15.12.04
(Elektromagnetische Compatibiliteit)
en daaropvolgende wijzigingen
- 93/68/EEG van 22/07/93 en
daaropvolgende wijzigingen.
-2012/19/EU en daaropvolgende
wijzigingen.
- 1275/2008 standby/off mode
Page 52

52
NL
Starten en gebruik
BELANGRIJK! De oven is uitgerust
met een blokkeringssysteem voor
de grill dat het mogelijk maakt om
de gril naar buiten te trekken zonder
dat deze buiten de oven komt (1).
Om de grill volledig te verwijderen,
de grill aan de voorkant optillen en
naar buiten trekken, zoals op de
tekening afgebeeld is (2).
! Wij raden u aan bij het eerste gebruik de oven minstens een uur leeg te
laten functioneren, op maximum temperatuur en met de deur dicht. Nadat
u de oven heeft uitgeschakeld, opent u de ovendeur en lucht u het vertrek.
De lucht die u ruikt komt door het verdampen van de middelen die worden
gebruikt om de oven te beschermen.
De oven starten
1. Selecteer het gewenste kookprogramma door aan de PROGRAMMAKNOP
te draaien.
2. Kies de temperatuur door aan de THERMOSTAATKNOP te draaien. Een
lijst met kooktijden en aanbevolen kooktemperaturen kunt u terugvinden in
de Kooktabel (zie Programma’s).3. La spia TERMOSTATO
Als het controlelampje van de THERMOSTAAT aan is betekent het dat de
verwarmingsfase bezig is totdat de ingestelde temperatuur bereikt is
4. Tijdens het koken kunt u nog altijd:
- het kookprogramma veranderen met behulp van de PROGRAMMAKNOP;
- de temperatuur veranderen met behulp van de THERMOSTAATKNOP;
- het koken onderbreken door de PROGRAMMAKNOP weer op stand “0”
te zetten.
! Zet nooit voorwerpen op de bodem van de oven; u riskeert hiermee het
email te beschadigen.
! Plaats de ovenschalen altijd op bijgeleverde roosters.
Ventilator
Om de oven van buiten niet te heet te laten worden, brengt een
verkoelingsventilator een luchtstroom teweeg die tussen het bedieningspaneel
en de ovendeur naar buiten komt, alsmede aan de onderzijde van de
ovendeur.
! Aan het einde van de kooktijd blijft de ventilator draaien totdat de oven
voldoende is afgekoeld.
Ovenverlichting
Deze gaat werken door de PROGRAMMAKNOP op
te draaien. De
verlichting blijft aan wanneer u een kookprogramma selecteert.
Gebruik van de timer
1. U dient in eerste instantie het geluidssignaal op te laden door de knop
TIMER bijna 360° met de klok mee te draaien.
2. Draai de knop weer tegen de klok in en stel de gekozen tijd in. Zorg ervoor
dat de minuten die zijn aangegeven op de knop TIMER overeenkomen met
de vaste aanwijzer op het bedieningspaneel.
3. De kookwekker als de tijd verstreken is, hoort u een geluidssignaal.
! De timer heeft niets te maken met het functioneren van de oven.
Programma’s
! U kunt voor alle programma’s een temperatuur van tussen de 60°C en MAX
instellen, behalve bij:
• GRILL (hierbij is het aanbevolen alleen MAX te gebruiken);
• GRATINEREN (hierbij is het aanbevolen niet meer dan 200°C in te stellen).
Programma TRADITIONELE OVEN
De onderste en bovenste verwarmingselementen gaan aan. Met deze
traditionele kookwijze is het beter een enkel rooster te gebruiken: met
meerdere roosters riskeert u een slechte temperatuursverspreiding.
Programma MULTIOVEN
Alle verwarmingselementen gaan aan (onder, boven en cirkelvormig) en de
ventilator gaat draaien. Aangezien de warmte in de hele oven constant is,
zorgt de lucht dat de gerechten op gelijkmatige wijze gekookt en gebakken
worden. Het is mogelijk maximaal twee roosters tegelijk te gebruiken.
Programma PIZZA OVEN
De onderste en cirkelvormige verwarmingselementen gaan aan en de
ventilator gaat draaien. Met deze combinatie wordt de oven snel warm
dankzij het aanzienlijke vermogen dat voornamelijk van onderaf komt. Indien
u meerdere roosters gebruikt moet u de gerechten halverwege de kooktijd
omwisselen.
Programma GRILL
Het bovenste verwarmingselement gaat aan en het braadspit (waar aanwezig)
gaat draaien.
Het koken onder de grill is vooral aan te raden voor gerechten die een
hoge en directe temperatuur aan de buitenkant nodig hebben. Kook met de
ovendeur dicht.
Programma GRATINEREN
Het bovenste verwarmingselement gaat aan en de ventilator en het braadspit
(waar aanwezig) gaan draaien. Hiermee wordt de rechtstreekse bovenhitte
van de grill gecombineerd met de circulatie van de lucht in de oven.
Eventueel verbranden van de buitenkant wordt zo vermeden; de warmte
dringt gemakkelijker door naar de binnenkant. Kook met de ovendeur dicht.
Programma GEBAK OVEN
Het achterste verwarmingselement gaat aan en de ventilator gaat werken
zodat een gelijkmatige, zachte warmte wordt gecreëerd. Deze functie is
aanbevolen voor het bakken van jne gerechten (bijvoorbeeld taarten die
moeten rijzen) en kleine gerechten die u op 3 roosters tegelijkertijd wilt koken.
Praktische kooktips
! Gebruik voor het koken met de heteluchtoven nooit de standen 1 en 5: de
hete lucht zou jne gerechten kunnen verbranden.
! Bij de functies GRILL of GRATINEREN raden wij u aan de lekplaat op stand
1 te zetten om eventueel vet of jus op te vangen.
MULTIKOKEN
• Gebruik de roosterstanden 2 en 4, en plaats de gerechten die de meeste
warmte nodig hebben op stand 2.
• Plaats de lekplaat op de onderste stand en het rooster op de hoogste.
Page 53

53
NL
GRILL
• Plaats de grill op stand 3 of 4, plaats de gerechten op het midden van de
grill.
• We raden u aan het vermogen op de maximale stand te zetten. Het is
normaal dat het bovenste verwarmingselement niet constant aan blijft:
zijn werking wordt geregeld door een thermostaat.
PIZZA OVEN
• Gebruik een lichte aluminium ovenschaal en zet hem op het bijgeleverde
ovenrooster.
Bij gebruik van de lekplaat is de bereidingstijd langer en krijgt u
waarschijnlijk geen krokante pizza.
• Bij zeer gevulde pizza’s raden wij aan de mozzarella of andere kaas pas
halverwege de kooktijd toe te voegen.
Programma's Gerechten
Gewicht
(kg)
Roosterstanden Voorverwarming
(minuten)
Aanbevolen
temperatuur
Duur
bereiding
(minuten)
Traditionele
Eend
Gebraden kalfs- of rundvlees
Gebraden varkensvlees
Koekjes (kruimeldeeg)
Vruchtentaarten
1
1
1
1
3
3
3
3
3
15
15
15
15
15
200
200
200
180
180
65-75
70-75
70-80
15-20
30-35
Multikoken
Pizza (op 2 roosters)
Lasagne
Lamsvlees
Gebraden kip + aardappels
Makreel
Plumcake
Soesjes (op 2 roosters)
Koekjes (op 2 roosters)
Cake (op 1 rooster)
Cake (op 2 roosters)
Hartige taarten
1
1
1
1+1
1
1
0.5
0.5
0.5
1
1.5
2 en 4
3
2
2 en 4
2
2
2 en 4
2 en 4
2
2 en 4
3
15
10
10
15
10
10
10
10
10
10
15
230
180
180
200
180
170-180
190
180
170
170
200
15-20
30-35
40-45
60-70
30-35
40-50
20-25
10-15
15-20
20-25
30-40
Pizza
Pizza
Focaccia-brood
0.5
1
3
2 o 3
15
10
220
200
15-20
15-20
Grill
Tong
Calamari- en garnalenspiesjes
Kabeljauwfilet
Gegrilde groenten
Kalfsbiefstuk
Koteletten
Hamburgers
Makreel
Tosti’s
1
1
1
1
1
1
1
1
n. 4
4
4
4
3 of 4
4
4
4
4
4
5
5
5
5
5
5
5
5
5
MAX
MAX
MAX
MAX
MAX
MAX
MAX
MAX
MAX
8-10
6-8
10
10-15
15-20
15-20
7-10
15-20
2-3
Met braadspit (waar aanwezig)
Kalfsvlees aan het spit
Kip aan het spit
Lamsvlees aan het spit
1.0
1.5
1.0
-
-
-
-
-
-
100%
100%
100%
80-90
70-80
70-80
Gratineren
Gegrilde kip
Inktvis
1.5
1.5
2
2
5
5
200
200
55-60
30-35
Met braadspit (waar aanwezig)
Kalfsvlees aan het spit
Lamsvlees aan het spit
Kip (aan het spit) + aardappelen
(op de lekplaat)
1.5
1.5
1.5
-
-
-
2
10
10
10
10
200
200
200
200
70-80
70-80
70-75
70-75
Gebak
Vruchtentaarten
Vruchtentaart
Plumcake
Cake
Gevulde flensjes (op 2 roosters)
Kleine cakejes (op 2 roosters)
Kaaskoekjes (op 2 roosters)
Soesjes (op 3 roosters)
Koekjes (op 3 roosters)
Meringues (op 3 roosters)
0.5
1
0.7
0.5
1.2
0.6
0.4
0.7
0.7
0.5
3
2 of 3
3
3
2 en 4
2 en 4
2 en 4
1, 3 en 5
1, 3 en 5
1, 3 en 5
15
15
15
15
15
15
15
15
15
15
180
180
180
160
200
180-190
200-210
180
180
90
20-30
40-45
40-50
25-35
30-35
20-25
15-20
20-25
20-25
180
! De kooktijden dienen slechts als indicatie en kunnen naar eigen smaak worden aangepast.
Kooktabel
Page 54

54
NL
Voorzorgsmaatregelen en advies
! Dit apparaat is ontworpen en vervaardigd volgens de geldende internationale
veiligheidsvoorschriften. Deze aanwijzingen zijn geschreven voor uw veiligheid
en u dient ze derhalve goed door te nemen.
Algemene veiligheidsmaatregelen
• Dit apparaat is vervaardigd voor niet-professioneel gebruik binnenshuis.
• Het apparaat dient niet buitenshuis te worden geplaatst, ook niet in
overdekte toestand. Het is erg gevaarlijk als het in aanraking komt met
regen of als het onweert.
• Maak gebruik van de handgrepen aan de zijkant van de oven om het
apparaat te verplaatsen.
• Raak het apparaat niet aan als u blootsvoets bent of met natte of vochtige
handen of voeten.
• Het apparaat dient om gerechten te koken. Het mag uitsluitend door
volwassenen worden gebruikt en alleen volgens de instructies die
beschreven staan in deze handleiding. Ieder ander gebruik (b.v.:
verwarming van de vertrekken) is niet aangewezen en dus gevaarlijk.
De fabrikant kan niet aansprakelijk worden gesteld voor eventuele
schade die te wijten is aan onjuist, verkeerd en onredelijk gebruik.
• Tijdens het gebruik van de oven worden de verwarmingselementen
en enkele delen van de ovendeur zeer heet. Raak ze niet aan en houd
kinderen op een afstand.
• Voorkom dat elektrische snoeren van andere kleine keukenapparaten op
warme delen van de oven terechtkomen.
• Laat de ventilatieopeningen en warmteafvoer vrij.
• Pak het handvat van de ovendeur alleen in het midden vast: aan de zijkant
zou het heet kunnen zijn.
• Gebruik altijd ovenwanten om gerechten in de oven te zetten en eruit te
halen.
• Plaats geen aluminiumfolie op de bodem van de oven.
• Plaats geen brandbaar materiaal in de oven: als de oven plotseling aan
zou worden gezet zou dit materiaal vlam kunnen vatten.
• Controleer altijd dat de knoppen in de stand “●”/“○” staan als het apparaat
niet wordt gebruikt.
• Trek nooit de stekker aan het snoer uit het stopcontact, maar pak altijd de
stekker direct beet.
• Maak het apparaat niet schoon of voer geen onderhoud uit als de stekker
nog in het stopcontact zit.
• Probeer in geval van storingen nooit zelf de interne mechanismen van het
apparaat te repareren. Neem contact op met de Technische Dienst (zie
Service).
• Plaats geen voorwerpen op de open ovendeur.
• Voorkom dat kinderen met het apparaat spelen.
• Dit apparaat mag niet worden gebruikt door personen (kinderen
inbegrepen) met een beperkt lichamelijk, sensorieel of geestelijk vermogen
of personen die niet de nodige ervaring of kennis hebben met het apparaat,
tenzij onder toezicht van een persoon die verantwoordelijk is voor hun
veiligheid of nadat hun is uitgelegd hoe het apparaat werkt.
• Het apparaat is niet geschikt om te worden ingeschakeld m.b.v. een
externe timer ofwel door een gescheiden afstandsbedieningssysteem.
Afvalverwijdering
• Verwijdering van het verpakkingsmateriaal: houd u aan de plaatselijke
normen, zodat het verpakkingsmateriaal hergebruikt kan worden.
• De Europese Richtlijn 2012/19/EU over Vernietiging van Electrische
en Electronische Apparatuur (WEEE), vereist dat oude huishoudelijke
electrische apparaten niet mogen vernietigd via de normale ongesorteerde
afvalstroom. Oude apparaten moeten apart worden ingezameld om zo
het hergebruik van de gebruikte materialen te optimaliseren en de
negatieve invloed op de gezondheid en het milieu te reduceren. Het
symbool op het product van de “afvalcontainer met een kruis erdoor”
herinnert u aan uw verplichting, dat wanneer u het apparaat vernietigt,
het apparaat apart moet worden ingezameld.
Consumenten moeten contact opnemen met de locale autoriteiten voor
informatie over de juiste wijze van vernietiging van hun oude apparaat.
Energiebesparing en milieubehoud
• Indien mogelijk, vermijd het voorverwarmen van de oven en probeer de
oven altijd op te vullen. Open de ovendeur zo weinig mogelijk omdat er
warmte verloren gaat iedere maal ze wordt geopend. Om een aanzienlijke
hoeveelheid energie te sparen, schakelt u de oven 5 tot 10 minuten voor
het einde van uw geplande bereidingsduur uit en gebruikt u de warmte
die de oven blijft genereren.
• Automatische programma’s zijn gebaseerd op standaard etenswaren.
• Houd de pakkingen zuiver en schoon om energieverlies te vermijden .
• Als u een elektriciteitscontract hebt met dal- en piekuren kan de “uitgesteld
koken” optie helpen geld te besparen door de bereidingen te verplaatsen
naar de goedkopere daluren.
! Dit product voldoet aan de eisen die gesteld worden door de nieuwe
Europese Richtlijn voor energiebesparing voor apparaten in de standby-stand.
Onderhoud en verzorging
De elektrische stroom afsluiten
Sluit altijd eerst de stroom af voordat u tot enige handeling overgaat.
Schoonmaken van het apparaat
• De buitenkant, dus zowel het email en het roestvrij staal als de rubberen
afdichtingen, kunnen met een spons en een neutrale zeep worden
afgenomen. Als de vlekken moeilijk te verwijderen zijn, kunt u een speciaal
reinigingsmiddel gebruiken. Na het reinigen dient u alles goed af te spoelen
en te drogen. Gebruik geen schuurmiddelen of bijtende producten.
• De binnenkant van de oven kunt u het beste direct na gebruik
schoonmaken, als hij nog lauw is. Gebruik warm water en een
schoonmaakmiddel, spoel vervolgens af en droog met een zachte doek.
Gebruik geen schuurmiddelen.
• De accessoires kunnen gewoon worden afgewassen (eventueel ook in
de vaatwasser), met uitzondering van de geleiders.
• We raden u aan de schoonmaakmiddelen niet direct op het bedieningspaneel
te spuiten maar een sponsje te gebruiken.
! Gebruik nooit stoom- of hogedrukreinigers voor het reinigen van het apparaat.
nooit stoom- of hogedrukreinigers voor het reinigen van het apparaat.
De ovendeur reinigen
Reinig het glas van de deur met een spons en niet schurende producten.
Droog met een zachte doek. Gebruik geen ruwe schurende materialen of
scherpe schrapertjes die het oppervlak zouden kunnen krassen waardoor
als gevolg het glas zou kunnen barsten.
U kunt voor een grondige reiniging de ovendeur verwijderen:
1. Open de deur volledig (zie afbeelding).
2. Til de hendeltjes F die zich aan de twee scharnieren bevinden, op met
behulp van een schroevendraaier en draai ze (zie afbeelding);
Page 55

55
NL
F
3. Pak de deur aan de zijkanten beet en sluit
hem langzaam, maar niet helemaal. Trek dan
de deur naar u toe en haal hem uit zijn voegen
(zie afbeelding). Zet de deur weer op zijn
plaats door deze handelingen in omgekeerde
volgorde uit te voeren.
Het controleren van de afdichtingen
Controleer regelmatig de staat van de afdichtingen rondom de ovendeur. In
het geval de afdichtingen beschadigd zijn, dient u zich tot de dichtstbijzijnde
Technische Dienst te wenden ( zie Service). Gebruik de oven niet voordat
de reparatie is uitgevoerd.
Vervangen van het lampje
Voor het vervangen van het
ovenlampje:
1. Schroef het glazen lampenkapje los.
2. Schroef het lampje los en vervang
het met eenzelfde soort lampje:
vermogen 25 W, tting E 14.
3. Plaats het deksel er weer op ( zie
afb.).
! Gebruik de ovenlamp nooit om een vertrek te verlichten.
Page 56

56
GR
Εγκατάσταση
! Είναι σημαντικό να διατηρείτε το εγχειρίδιο αυτό για να μπορείτε να
το συμβουλεύεστε οποιαδήποτε στιγμή. Σε περίπτωση πώλησης,
παραχώρησης ή μετακόμισης, βεβαιωθείτε ότι παραμένει μαζί με τη συσκευή
για πληροφόρηση του νέου ιδιοκτήτη για τη λειτουργία και τις σχετικές
προειδοποιήσεις.
! Διαβάστε προσεκτικά τις οδηγίες: υπάρχουν σημαντικές πληροφορίες για
την εγκατάσταση, τη χρήση και την ασφάλεια.
Τοποθέτηση
! Οι συσκευασίες δεν είναι παιχνίδια για παιδιά και απομακρύνονται σύμφωνα
με τους κανόνες για τη διαφοροποιημένη συλλογή (βλέπε Προφυλάξεις και
συμβουλές).
! Η εγκατάσταση διενεργείται σύμφωνα με τις οδηγίες αυτές και από
προσωπικό επαγγελματικά ειδικευμένο. Μια εσφαλμένη εγκατάσταση μπορεί
να προκαλέσει ζημιές σε άτομα, ζώα ή αντικείμενα.
Εντοιχισμός
Για τη διασφάλιση μιας καλής λειτουργίας της συσκευής είναι απαραίτητο το
έπιπλο να έχει τα κατάλληλα χαρακτηριστικά:
• τα γειτονικά πάνελ του φούρνου πρέπει να είναι από υλικό ανθεκτικό στη
θερμότητα.
• στην περίπτωση επίπλων από μοριοσανίδα, οι κόλλες πρέπει να είναι
ανθεκτικές σε θερμοκρασία 100°C.
• για τον εντοιχισμό του φούρνου, τόσο στην περίπτωση εισαγωγής κάτω
από τον πάγκο (βλέπε εικόνα) όσο και σε στήλη, το έπιπλο πρέπει να έχει
τις ακόλουθες διαστάσεις:
590 mm.
595 mm.
22,5 mm.*
20,5 mm.
550 mm.
570 mm.
20 mm.
575-585 mm.
45 mm.
560 mm.
550 mm.
min.
! Αφού εντοιχιστεί η συσκευή δεν πρέπει να υφίστανται επαφές με τα
ηλεκτρικά μέρη. Οι δηλώσεις κατανάλωσης που αναφέρονται στην ταμπελίτσα
χαρακτηριστικών μετρήθηκαν για αυτόν τον τύπο εγκατάστασης.
Αερισμός
Για τη διασφάλιση καλού αερισμού θα πρέπει να αφαιρέσετε το πίσω τοίχωμα
του διαμερίσματος. Είναι προτιμότερο να εγκαταστήσετε το φούρνο έτσι που
να στηρίζεται σε δύο ξύλα ή σε έναν συνεχή πάγκο που να έχει άνοιγμα
τουλάχιστον 45 x 560 mm (βλέπε εικόνες ).
560 mm.
45 mm.
Κεντράρισμα και στερέωση
Για να στερεώσετε τη συσκευή στο έπιπλο:
• ανοίξτε την πόρτα του φούρνου
• αφαιρέστε τα 2 λαστιχάκια που καλύπτουν τις οπές στερέωσης επί του
περιμετρικού πλαισίου
• στερεώστε το φούρνο στο έπιπλο χρησιμοποιώντας 2 βίδες ξύλου
• επανατοποθετήστε τα λαστιχάκια κάλυψης οπών.
! Όλα τα μέρη που εξασφαλίζουν την προστασία πρέπει να είναι στερεωμένα
με τέτοιο τρόπο που να μην μπορούν να αφαιρεθούν χωρίς τη βοήθεια
κάποιου εργαλείου.
Ηλεκτρική σύνδεση
! Οι φούρνοι που διαθέτουν τριπολικό καλώδιο τροφοδοσίας είναι έτοιμοι για τη
λειτουργία με εναλλασσόμενο ρεύμα, με τάση και συχνότητα που αναφέρονται
στην ταμπελίτσα χαρακτηριστικών που βρίσκεται επί της συσκευής (βλέπε
παρακάτω).
Συναρμολόγηση καλωδίου τροφοδοσίας
1. Ανοίξτε το κουτί ακροδεκτών
χρησιμοποιώντας ως μοχλό ένα
κατσαβίδι στις πλευρικές γλωσσίτσες
του καπακιού: τραβήξτε και ανοίξτε το
καπάκι (βλέπε εικόνα).
2. Χρησιμοποιήστε το καλώδιο
τροφοδοσίας: ξεβιδώστε τη βίδα
ασφάλισης καλωδίου και τις τρεις βίδες
των επαφών L-N-
και κατόπιν
στερεώστε τα καλώδια κάτω από τις
κεφαλές των βιδών με βάση τα χρώματα
Μπλε (N) Καφέ (L) Κιτρινο-πράσινο
(βλέπε εικόνα).
3. Στερεώστε το καλώδιο στο αντίστοιχο
στοπ.
4. Κλείστε το καπάκι του κουτιού
ακροδεκτών.
Σύνδεση του καλωδίου τροφοδοσίας στο δίκτυο
Μοντάρετε στο καλώδιο ένα κανονικοποιημένο βύσμα για το φορτίο που
αναφέρεται στην ταμπελίτσα χαρακτηριστικών (βλέπε δίπλα). Σε περίπτωση
άμεσης σύνδεσης στο δίκτυο πρέπει να παρεμβάλλετε μεταξύ της συσκευής και
του δικτύου έναν πολυπολικό διακόπτη με ελάχιστο άνοιγμα μεταξύ των επαφών
3 mm κατάλληλο για το φορτίο και σύμφωνο με τους ισχύοντες κανονισμούς (το
σύρμα της γείωσης δεν πρέπει να διακόπτεται από τον διακόπτη). Το καλώδιο
τροφοδοσίας πρέπει να είναι τοποθετημένο έτσι που σε κανένα σημείο να μην
ξεπερνάει κατά 50°C τη θερμοκρασία του περιβάλλοντος.
! Ο τεχνικός εγκατάστασης είναι υπεύθυνος για τη σωστή ηλεκτρική σύνδεση
και για την τήρηση των κανόνων ασφαλείας.
L
N
N
L
Page 57

57
GR
Πριν διενεργήσετε τη σύνδεση βεβαιωθείτε ότι:
• Η πρίζα να διαθέτει γείωση και να είναι σύμφωνη με το νόμο.
• Η πρίζα να είναι σε θέση να υφίσταται το μέγιστο φορτίο ισχύος της
μηχανής, όπως αναφέρεται στην ταμπελίτσα χαρακτηριστικών (βλέπε
παρακάτω);
• η τάση τροφοδοσίας να περιλαμβάνεται στις τιμές της ταμπελίτσας
χαρακτηριστικών (βλέπε παρακάτω);
• η πρίζα να είναι συμβατή με το βύσμα της συσκευής. Σε αντίθετη περίπτωση
αντικαταστήστε την πρίζα. Μη χρησιμοποιείτε προεκτάσεις και πολύπριζα.
! Αφού εγκατασταθεί η συσκευή, το ηλεκτρικό καλώδιο και η ηλεκτρική πρίζα
πρέπει να είναι εύκολα προσβάσιμα.
! Το καλώδιο δεν πρέπει να διπλώνει ή να συμπιέζεται.
! Το καλώδιο πρέπει να ελέγχεται περιοδικά και να αντικαθίσταται μόνο από
εξουσιοδοτημένους τεχνικούς (βλέπε Τεχνική Υποστήριξη).
! Η επιχείρηση αποποιείται κάθε ευθύνης όταν οι κανόνες αυτοί δεν
τηρούνται.
Ηλεκτρικέσ
συνδέσεισ
τάση σε 220-240V~ 50/60Hz
μέγιστη απορροφούμενη ισχύσ
2800W (βλέπε πινακίδα
χαρακτηριστικών)
Κανονισμόσ αρ. 65/2014 τησ ΕΕ
που συμπληρώνει την Οδηγία
2010/30/ΕΕ.
Κανονισμόσ αρ. 66/2014 τησ ΕΕ
που συμπληρώνει την Οδηγία
2009/125/ΕΚ.
Κανονισμόσ EN 60350-1,
Κανονισμόσ EN 50564
ΠΙΝΑΚΊΔΑ ΧΑΡΑΚΤΗΡΙΣΤΙΚΏΝ
Διαστάσεισ*
πλάτοσ cm 43,5
ύψοσ cm 32,4
βάθοσ cm 41,5
Διαστάσεισ**
πλάτοσ cm 45,5
ύψοσ cm 32,4
βάθοσ cm 41,5
Όγκοσ*
lt. 59
Όγκοσ**
lt. 62
* Μόνο για μοντέλα με οδηγούσ κοιλιασμένουσ..
** Μόνο για μοντέλα με οδηγούσ ίσιουσ.
Κατανάλωση ενέργειασ
Φυσική επαγωγή –
λειτουργία θέρμανσησ:
Παραδοσιακόσ, Κατανάλωση
ενέργειασ δήλωση Κατηγορίασ
Δυναμικήσ αγωγιμότητασ λειτουργία θέρμανσησ:
Ζαχαροπλαστική.
Η συσκευή αυτή είναι σύμφωνη με
τισ ακόλουθεσ Κοινοτικέσ Οδηγίεσ:
- 2006/95/ΕΚ τησ 12/12/06
(Χαμηλή Τάση) και μεταγενέστερεσ
τροποποιήσεισ
- 2004/108/ΕΚ τησ 15/12/04
(Ηλεκτρομαγνητική Συμβατότητα)
και μεταγενέστερεσ τροποποιήσεισ
- 93/68/ΕΟΚ τησ 22/07/93 και
μεταγενέστερεσ τροποποιήσεισ.
- 2012/19/ΕE και μεταγενέστερεσ
τροποποιήσεισ.
- 1275/2008 stand-by/off mode
ΕΝΕΡΓΕΙΑΚΗ
ΣΗΜΑΝΣΗ και
ΟΙΚΟΛΟΓΙΚΟΣ
ΣΧΕΔΙΑΣΜΟΣ
Page 58

58
GR
Εκκίνηση και χρήση
ΠΡΟΣΟΧΗ! Ο φούρνος διαθέτει
ένα σύστημα ακινητοποίησης
πλεγμάτων που επιτρέπει να τα
βγάζετε χωρίς αυτά να προεξέχουν
από το φούρνο (1).
Για να βγάλετε τελείως τα πλέγματα
αρκεί, όπως φαίνεται στο σχέδιο,
να τα ανασηκώσετε, παίρνοντάς
τα από το πρόσθιο μέρος και
τραβήξτε τα (2).
! Στο πρώτο άναμμα λειτουργήστε το φούρνο άδειο για τουλάχιστον μια ώρα με
το θερμοστάτη στο μέγιστο και με την πόρτα κλειστή. Μετά σβήστε, ανοίξτε την
πόρτα του φούρνου και αερίστε το χώρο. Η οσμή που αναδύεται οφείλεται στην
εξάτμιση των ουσιών που χρησιμοποιήθηκαν για την προστασία του φούρνου.
Εκκίνηση του φούρνου
1. Επιλέξτε το επιθυμητό πρόγραμμα μαγειρέματος στρέφοντας τον επιλογέα
των ΠΡΟΓΡΑΜΜΑΤΩΝ.
2. Επιλέξτε τη θερμοκρασία στρέφοντας τον επιλογέα του ΘΕΡΜΟΣΤΑΤΗ.
Μια λίστα με τα ψησίματα και τις σχετικές προτεινόμενες θερμοκρασίες είναι
διαθέσιμη στον Πίνακα ψησίματος (βλέπε Προγράμματα).
3. Το ενδεικτικό φωτάκι ΘΕΡΜΟΣΤΑΤΗ αναμμένο δείχνει τη φάση
προθέρμανσης μέχρι την τεθείσα θερμοκρασία.
4. Κατά το μαγείρεμα μπορείτε πάντα:
- να αλλάξετε το πρόγραμμα μαγειρέματος ενεργώντας στον επιλογέα
ΠΡΟΓΡΑΜΜΑΤΩΝ
- να αλλάξετε τη θερμοκρασία ενεργώντας στον επιλογέα ΘΕΡΜΟΣΤΑΤΗ
- να διακόπτετε το μαγείρεμα φέρνοντας τον επιλογέα ΠΡΟΓΡΑΜΜΑΤΩΝ
στη θέση “0”.
! Μην αποθέτετε ποτέ αντικείμενα στη βάση του φούρνου διότι μπορεί να
προκληθούν ζημιές στο σμάλτο.
! Να θέτετε πάντα τα σκεύη μαγειρέματος στο παρεχόμενο πλέγμα.
Αερισμός ψύξης
Για να επιτευχθεί μια μείωση των εξωτερικών θερμοκρασιών, ορισμένα
μοντέλα διαθέτουν έναν ανεμιστήρα ψύξης. Αυτός παράγει ρεύμα αέρα που
εξέρχεται μεταξύ του πίνακα ελέγχου και της πόρτας του φούρνου.
! Στο τέλος του μαγειρέματος ο ανεμιστήρας παραμένει ενεργός μέχρις ότου
ο φούρνος ψυχθεί ικανοποιητικά.
Φως του φούρνου
Ανάβει επιλέγοντας
με τον επιλογέα ΠΡΟΓΡΑΜΜΑΤΩΝ. Παραμένει
αναμμένο όταν επιλέγεται ένα πρόγραμμα ψησίματος.
Χρήση του χρονομετρο
1. Κατ’ αρχήν πρέπει να κουρντίσετε το ξυπνητήρι, στρέφοντας τον επιλογέα
ΧΡΟΝΟΜΕΤΡΟ κατά μία σχεδόν πλήρη στροφή δεξιόστροφα.
2. Γυρίζοντας πίσω αριστερόστροφα, θέστε τον επιθυμητό χρόνο κάνοντας
να συμπέσουν τα λεπτά επί του επιλογέα ΧΡΟΝΟΜΕΤΡΟ με τη σταθερή
ένδειξη στον πίνακα ελέγχου.
3. Το χρονόμετρο με τη λήξη του χρόνου εκπέμπει ένα ηχητικό σήμα.
! Το χρονομετρο δεν ελέγχει το άναμμα και το σβήσιμο του φούρνου.
ΠΡΟΓΡΑΜΜΑΤΑ
! Για όλα τα προγράμματα μπορεί να τεθεί μια θερμοκρασία μεταξύ 60°C
και MAX, εκτός:
• GRILL (συνιστάται να θέσετε μόνο στο MAX)
• GRATIN (συνιστάται να μην ξεπερνάτε τη θερμοκρασία των 200°C).
Πρόγραμμα ΠΑΡΑΔΟΣΙΑΚΟΣ ΦΟΥΡΝΟΣ
Ενεργοποιούνται τα δύο θερμαντικά στοιχεία, το κάτω και το επάνω. Με το
παραδοσιακό μαγείρεμα είναι καλύτερα να χρησιμοποιείτε μόνο ένα επίπεδο:
με περισσότερα επίπεδα υπάρχει κακή κατανομή της θερμοκρασίας.
Πρόγραμμα ΠΟΛΥ-ΜΑΓΕΙΡΕΜΑ
Ενεργοποιούνται όλα τα θερμαντικά στοιχεία (κάτω, επάνω και κυκλικό) και
τίθεται σε λειτουργία ο ανεμιστήρας. Επειδή η θερμότητα είναι σταθερή σε
όλο το φούρνο, ο αέρας ψήνει και ροδοκοκκινίζει το φαγητό ομοιόμορφα.
Μπορείτε να χρησιμοποιείτε το πολύ δύο επίπεδα ταυτόχρονα.
Πρόγραμμα ΦΟΥΡΝΟΣ ΠΙΤΣΑΣ
Ενεργοποιούνται το κάτω και το κυκλικό θερμαντικά στοιχεία και τίθεται σε
λειτουργία ο ανεμιστήρας. Ο συνδυασμός αυτός επιτρέπει γρήγορη θέρμανση
του φούρνου, με ισχυρή διοχέτευση θερμότητας κυρίως από κάτω. Στην
περίπτωση που χρησιμοποιείτε περισσότερα από ένα επίπεδα τη φορά, πρέπει
να αλλάζετε θέση μεταξύ τους στη μέση του μαγειρέματος.
Πρόγραμμα GRILL
Ενεργοποιείται το επάνω κεντρικό θερμαντικό στοιχείο και τίθεται σε λειτουργία
η σούβλα (όπου υπάρχει).
Η υψηλή και άμεση θερμοκρασία του γκριλ συνιστάται για τα τρόφιμα που
απαιτούν υψηλή επιφανειακή θερμοκρασία. Διενεργείτε τα μαγειρέματα με
την πόρτα του φούρνου κλειστή.
Πρόγραμμα GRATIN
Ενεργοποιείται το επάνω θερμαντικό στοιχείο και τίθενται σε λειτουργία ο
ανεμιστήρας και η σούβλα (όπου υπάρχει). Συνδυάζει τη θερμική ακτινοβολία
μιας κατεύθυνσης με τη δυναμική κυκλοφορία του αέρα στο εσωτερικό
του φούρνου. Αυτό παρεμποδίζει το επιφανειακό κάψιμο των τροφίμων
αυξάνοντας την ισχύ διείσδυσης της θερμότητας. Διενεργείτε τα μαγειρέματα
με την πόρτα του φούρνου κλειστή.
Πρόγραμμα ΦΟΥΡΝΟΣ ΖΑΧΑΡΟΠΛΑΣΤΙΚΗΣ
Ενεργοποιείται το πίσω θερμαντικό στοιχείο και τίθεται σε λειτουργία ο
ανεμιστήρας, εξασφαλίζοντας μια απαλή και ομοιόμορφη θερμότητα στο
εσωτερικό του φούρνου. Το πρόγραμμα αυτό ενδείκνυται για το ψήσιμο
ευαίσθητων τροφίμων (π.χ. γλυκών που απαιτούν ζύμωση) και ορισμένων
σκευασμάτων “mignon” σε τρία επίπεδα ταυτόχρονα.
Πρακτικές συμβουλές ψησίματος
! Στα μαγειρέματα με αέρα μη χρησιμοποιείτε τις θέσεις 1 και 5: δέχονται
απ’ ευθείας το θερμό αέρα που θα μπορούσε να προκαλέσει καψίματα στα
ευαίσθητα τρόφιμα.
! Στα μαγειρέματα GRILL και GRATIN, να τοποθετείτε τον λιποσυλλέκτη στη
θέση 1 για τη συλλογή των υπολειμμάτων μαγειρέματος (ζουμιά ή/και λίπη).
ΠΟΛΥ-ΜΑΓΕΊΡΕΜΑ
• να χρησιμοποιείτε τις θέσεις 2 και 4, θέτοντας στη 2 τα τρόφιμα που
απαιτούν περισσότερη θερμότητα.
• Να τοποθετείτε το λιποσυλλέκτη χαμηλά και το πλέγμα ψηλά.
Page 59

59
GR
GRILL
• Τοποθετείτε το πλέγμα στη θέση 3 ή 4, διευθετώντας τα τρόφιμα στο κέντρο
του πλέγματος.
• Συνιστάται να θέτετε τη στάθμη ενέργειας στο μέγιστο. Μην ξαφνιάζεστε
αν η επάνω αντίσταση δεν είναι συνεχώς αναμμένη: η λειτουργία της
ελέγχεται από ένα θερμοστάτη.
ΦΟΥΡΝΟΣ ΠΙΤΣΑΣ
• Χρησιμοποιήστε ένα ταψί ελαφρού αλουμινίου τοποθετώντας το στο
πλέγμα που σας παρέχεται.
Με τον λιποσυλλέκτη αυξάνουν οι χρόνοι ψησίματος και δύσκολα
πετυχαίνετε μια πίτσα τραγανή.
• Σε περίπτωση με πίτσες με πλούσια γέμιση συνιστάται να εισάγετε τη
μοτσαρέλα στη μέση του ψησίματος.
ΠΡΟΓΡΑΜΜΑΤΑ Τρόφιμα
Βάροσ
(Kg)
Θέση των
επιπέδων
Προθέρμανση
(λεπτά)
Προτεινόμενη
θερμοκρασία
Διάρκεια
Μαγειρέματοσ
(λεπτά)
Παραδοσιακόσ
Πάπια
Ψητό μοσχαρίσιο ή βοδινό
Ψητό χοιρινό
Μπισκότα (φρόλασ)
Κροστάτεσ
1
1
1
1
3
3
3
3
3
15
15
15
15
15
200
200
200
180
180
65-75
70-75
70-80
15-20
30-35
ΠΟΛΥΜΑΓΕΊΡΕΜΑ
Πίτσα (σε 2 επίπεδα)
Λαζάνια
Αρνί
Κοτόπουλο ψητό + πατάτεσ
Σκουμπρί
Plum-cake
Μπινιέ (σε 2 θέσεισ)
Μπισκότα (σε 2 θέσεισ)
Παντεσπάνι (σε 1 θέση)
Παντεσπάνι (σε 2 θέσεισ)
Αλμυρά κέικ
1
1
1
1+1
1
1
0.5
0.5
0.5
1
1.5
2 και 4
3
2
2 και 4
2
2
2 και 4
2 και 4
2
2 και 4
3
15
10
10
15
10
10
10
10
10
10
15
230
180
180
200
180
170-180
190
180
170
170
200
15-20
30-35
40-45
60-70
30-35
40-50
20-25
10-15
15-20
20-25
30-40
ΠΊΤΣΑ
ΠΊΤΣΑ
Φοκάτσεσ
0.5
1
3
2 o 3
15
10
220
200
15-20
15-20
GRILL
Γλώσσεσ
Σουβλάκια από καλαμάρια και γαρίδεσ
Φιλέτο μπακαλιάρου
Λαχανικά στο πλέγμα
Μπριζόλεσ μοσχαρίσιεσ
Κοτολέτεσ
Hamburger
Σκουμπρί
Τοστ
1
1
1
1
1
1
1
1
n. 4
4
4
4
3 ή 4
4
4
4
4
4
5
5
5
5
5
5
5
5
5
MAX
MAX
MAX
MAX
MAX
MAX
MAX
MAX
MAX
8-10
6-8
10
10-15
15-20
15-20
7-10
15-20
2-3
Με σούβλα (όπου υπάρχει)
Μοσχαράκι στη σούβλα
Κοτόπουλο στη σούβλα
Αρνάκι στη σούβλα
1.0
1.5
1.0
-
-
-
-
-
-
100%
100%
100%
80-90
70-80
70-80
GRATIN
Κοτόπουλο στο γκριλ
Σουπιέσ
1.5
1.5
2
2
5
5
200
200
55-60
30-35
Με σούβλα (όπου υπάρχει)
Μοσχαράκι στη σούβλα
Αρνάκι στη σούβλα
Κοτόπουλο (στη σούβλα) +
πατάτεσ (στο λιποσυλλέκτη)
1.5
1.5
1.5
-
-
-
-
2
10
10
10
10
200
200
200
200
70-80
70-80
70-75
70-75
Ζαχαροπλαστικήσ
Κροστάτεσ
Κέικ φρούτων
Plum-cake
Παντεσπάνι
Κρέπεσ με γέμιση (σε 2 θέσεισ)
Μικρά κέικ (σε 2 επίπεδα)
Αλμυρά ζύμησ με τυρί (σε 2 θέσεισ)
Μπινιέ (σε 3 θέσεισ)
Μπισκότα (σε 3 θέσεισ)
Μαρέγκεσ (σε 3 θέσεισ)
0.5
1
0.7
0.5
1.2
0.6
0.4
0.7
0.7
0.5
3
2 ή 3
3
3
2 και
4
2 και 4
2 και 4
1, 3 και 5
1, 3 και 5
1, 3 και 5
15
15
15
15
15
15
15
15
15
15
180
180
180
160
200
180-190
200-210
180
180
90
20-30
40-45
40-50
25-35
30-35
20-25
15-20
20-25
20-25
180
! Οι χρόνοι ψησίματοσ είναι ενδεικτικοί και μπορούν να μεταβάλλονται με βάση τισ προσωπικέσ προτιμήσεισ.
Page 60

60
GR
Προφυλάξεις και συμβουλές
! Η συσκευή σχεδιάστηκε και κατασκευάστηκε σύμφωνα με τους διεθνείς
κανόνες ασφαλείας. Οι προειδοποιήσεις αυτές παρέχονται για λόγους
ασφαλείας και πρέπει να διαβαστούν προσεκτικά.
Γενική ασφάλεια
• Η συσκευή σχεδιάστηκε για μη επαγγελματική χρήση στο εσωτερικό
κατοικίας.
• Η συσκευή δεν εγκαθίσταται σε εξωτερικό χώρο, κι ούτε αν ο χώρος
σκεπάζεται, διότι είναι πολύ επικίνδυνο να την αφήσετε εκτεθειμένη σε
βροχή και κακοκαιρία.
• Για να μετακινήσετε τη συσκευή να χρησιμοποιείτε πάντα τις αντίστοιχες
λαβές που βρίσκονται στα πλαϊνά του φούρνου.
• Μην αγγίζετε τη μηχανή με πόδια γυμνά ή με τα χέρια ή τα πόδια βρεγμένα.
• Η συσκευή πρέπει να χρησιμοποιείται για το μαγείρεμα τροφίμων,
μόνο από άτομα ενήλικα και σύμφωνα με τις οδηγίες που
αναφέρονται στο παρόν εγχειρίδιο. Κάθε άλλη χρήση (για
παράδειγμα: θέρμανση χώρων) είναι ακατάλληλη και συνεπώς
επικίνδυνη. Ο κατασκευαστής δεν μπορεί να θεωρηθεί υπεύθυνος
για ενδεχόμενες ζημιές προκαλούμενες από χρήσεις ακατάλληλες,
εσφαλμένες και ανορθόδοξες.
• Κατά τη χρήση της συσκευής τα θερμαντικά στοιχεία και ορισμένα
μέρη της πόρτας του φούρνου καθίστανται πολύ θερμά. Προσέχετε
να μην τα αγγίζετε και κρατάτε τα παιδιά μακριά.
• Αποφεύγετε το καλώδιο τροφοδοσίας άλλων οικιακών συσκευών να αγγίζει
τα θερμά μέρη του φούρνου.
• Μη βουλώνετε τα ανοίγματα αερισμού και απαγωγής της θερμότητας.
• Να πιάνετε τη λαβή ανοίγματος της πόρτας στο κέντρο: στα πλαϊνά μπορεί
να είναι ζεστή.
• Χρησιμοποιείτε πάντα γάντια φούρνου για να βάζετε ή να βγάζετε σκεύη.
• Μην καλύπτετε τη βάση του φούρνου με αλουμινόχαρτο.
• Μην τοποθετείτε εύφλεκτο υλικό στο φούρνο: αν η συσκευή τεθεί ξαφνικά
σε λειτουργία θα μπορούσε να πάρει φωτιά.
• Να βεβαιώνεστε πάντα ότι οι επιλογείς είναι στη θέση “●”/“○” όταν η
συσκευή δεν χρησιμοποιείται.
• Μη βγάζετε το βύσμα από την ηλεκτρική πρίζα τραβώντας το καλώδιο,
αλλά πιάνοντας το βύσμα.
• Μην κάνετε καθαρισμό ή συντήρηση χωρίς προηγουμένως να έχετε βγάλει
το βύσμα από την ηλεκτρική πρίζα.
• Σε περίπτωση βλάβης, μη επεμβαίνετε σε καμία περίπτωση στους
εσωτερικούς μηχανισμούς για να επιχειρήσετε την επισκευή. Επικοινωνήστε
με την Τεχνική Υποστήριξη (βλέπε Υποστήριξη).
• Μην αποθέτετε βαριά αντικείμενα στην ανοιχτή πόρτα του φούρνου.
• Δεν προβλέπεται η χρήση της συσκευής από άτομα (συμπεριλαμβανομένων
των παιδιών) με μειωμένες φυσικές, αισθητικές ή νοητικές ικανότητες,
από άτομα μη έμπειρα ή χωρίς εξοικείωση με το προϊόν, εκτός κι αν
εποπτεύονται από άτομο υπεύθυνο για την ασφάλειά τους ή έχουν δεχτεί
προκαταρκτικές οδηγίες για τη χρήση της συσκευής.
• Αποφεύγετε να παίζουν τα παιδιά με τη συσκευή.
Διάθεση
• Διάθεση του υλικού συσκευασίας: να εφαρμόζετε τους τοπικούς
κανονισμούς, ώστε οι συσκευασίες να μπορούν να επαναχρησιμοποιηθούν.
• Η Ευρωπαϊκή Οδηγία 2012/19/EE για τα απορρίμματα ηλεκτρικών και
ηλεκτρονικών συσκευών (RAEE), προβλέπει ότι οι οικιακές ηλεκτρικές
συσκευές δεν πρέπει να διατίθενται στην κανονική ροή των στερεών
αστικών απορριμμάτων. Οι διατεθείσες συσκευές πρέπει να συλλέγονται
χωριστά για να βελτιστοποιείται το ποσοστό ανάκτησης και ανακύκλωσης
των υλικών που τις συνθέτουν και να αποφεύγονται δυνητικές ζημιές στην
υγεία και στο περιβάλλον. Το σύμβολο του διαγραμμένου καλαθιού φέρεται
σε όλα τα προϊόντα για να θυμίζει τις υποχρεώσεις χωριστής συλλογής.
Για περαιτέρω πληροφορίες, για τη σωστή απομάκρυνση των οικιακών
ηλεκτρικών συσκευών, οι κάτοχοι μπορούν να απευθύνονται στην αρμόδια
δημόσια υπηρεσία ή στους μεταπωλητές.
Εξοικονόμηση ενέργειας και σεβασμός στο περιβάλλον
• Θέτοντας σε λειτουργία το φούρνο στα ωράρια που κυμαίνονται από αργά
το απόγευμα μέχρι τις πρώτες πρωινές ώρες, συμβάλλετε στην μείωση
του φορτίου απορρόφησης των επιχειρήσεων ηλεκτρικού. Οι δυνατότητες
προγραμματισμού των λειτουργιών, ειδικότερα το “ψήσιμο με υστέρηση”
(βλέπε Προγράμματα) και ο “αυτόματος εκ των υστέρων καθαρισμός”
(βλέπε Συντήρηση και φροντίδα), επιτρέπουν να οργανωθείτε σχετικά.
• Συστήνεται να διενεργείτε πάντα τα μαγειρέματα BARBECUE και GRATIN
με την πόρτα κλειστή: τόσο για να πετύχετε καλύτερα αποτελέσματα όσο
και για μια αισθητή εξοικονόμηση ενέργειας (10% περίπου).
• Να διατηρείτε αποτελεσματικές και καθαρές τις τσιμούχες, έτσι ώστε να
εφαρμόζουν καλά στην πόρτα και να μην προκαλούνται απώλειες θερμότητας.
! Αυτό το προϊόν πληροί τις απαιτήσεις της νέας ευρωπαϊκής οδηγίας για τον
περιορισμό της κατανάλωσης ενέργειας σε κατάσταση αναμονής.
Συντήρηση και φροντίδα
Αποκλεισμός του ηλεκτρικού ρεύματος
Πριν από κάθε εργασία να απομονώνετε τη συσκευή από το δίκτυο ηλεκτρικής
τροφοδοσίας.
Καθαρισμός της συσκευής
• Τα εξωτερικά επισμαλτωμένα μέρη ή τα ανοξείδωτα και οι λαστιχένιες
τσιμούχες μπορούν να καθαρίζονται με ένα σφουγγαράκι βρεγμένο με
χλιαρό νερό και ουδέτερο σαπούνι. Αν οι λεκέδες είναι δύσκολοι για να
φύγουν χρησιμοποιήστε προϊόντα ειδικά. Προτείνεται να ξεπλένετε με
άφθονο νερό και να στεγνώνετε μετά τον καθαρισμό. Μη χρησιμοποιείτε
αποξυστικές σκόνες ή διαβρωτικές ουσίες.
• Το εσωτερικό του φούρνου καθαρίζεται κατά προτίμηση κάθε φορά
μετά τη χρήση, όσο είναι ακόμη χλιαρό. Να χρησιμοποιείτε ζεστό νερό
και απορρυπαντικό, να ξεπλένετε και να στεγνώνετε με μαλακό πανί.
Αποφεύγετε τα αποξυστικά.
• Τα αξεσουάρ μπορούν να πλένονται σαν κανονικά σκεύη, ακόμη και σε
πλυντήριο πιάτων πλην των συρόμενων οδηγών.
! Μη χρησιμοποιείτε ποτέ σκούπες ατμού ή σε υψηλή πίεση για τον καθαρισμό
της συσκευής.
Καθαρισμός της πόρτας
Καθαρίστε το γυαλί της πόρτας με σφουγγάρια και μη αποξυστικά προϊόντα
και στεγνώστε με ένα πανί μαλακό. Μη χρησιμοποιείτε υλικά τραχιά ή ξέστρα
ακονισμένα γιατί θα μπορούσαν να γρατσουνίσουν την επιφάνεια και να
προκαλέσουν θραύση του γυαλιού.
Για έναν πιο επιμελή καθαρισμό μπορείτε να αποσυναρμολογήσετε την
πόρτα του φούρνου:
1. ανοίξτε τελείως την πόρτα (βλέπε εικόνα).
2. χρησιμοποιώντας ένα κατσαβίδι, σηκώστε και στρέψτε τους μοχλούς F που
βρίσκονται στους δύο μεντεσέδες (βλέπε εικόνα).
Page 61

61
GR
F
3. πιάστε την πόρτα στα δύο εξωτερικά
πλευρά, κλείνοντάς την αργά όχι όμως
πλήρως. Μετά τραβήξτε την πόρτα προς
εσάς βγάζοντάς την από τους μεντεσέδες
(βλέπε εικόνα).
Ξαναμοντάρετε την πόρτα ακολουθώντας με
αντίστροφη σειρά την διαδικασία.
Ελέγξτε τις τσιμούχες
Να ελέγχετε περιοδικά την κατάσταση της τσιμούχας γύρω από την πόρτα του
φούρνου. Σε περίπτωση που πάθει ζημιά να απευθυνθείτε στο πλησιέστερο
Κέντρο Τεχνικής Υποστήριξης (βλέπε Τεχνική Υποστήριξη). Συνιστάται να μη
χρησιμοποιείτε το φούρνο μέχρι να επισκευαστεί.
Αντικατάσταση της λυχνίας
Για την αντικατάσταση της λυχνίας
φωτισμού του φούρνου:
1. Ξεβιδώστε το γυάλινο καπάκι από
τη λυχνία.
2. Ξεβιδώστε τη λυχνία και
αντικαταστήστε την με μια ανάλογη:
ισχύς 25 W, σύνδεση E 14.
3. ξαναμοντάρετε το καπάκι (βλέπε
εικόνα).
! Μη χρησιμοποιείτε τη λυχνία φούρνου για το φωτισμό χώρων.
Page 62

62
TR
Montaj
! Her gerektiğinde başvurulabilmesi için bu el kitapçığının muhafaza edilmesi
önemlidir. Cihazın satılması, başkasına verilmesi ya da taşınması durumunda
yeni kullanıcının işleyiş ve ilişkin uyarılar hakkında bilgi edinmesi için el
kitapçığının cihazla birlikte verildiğinden emin olunuz.
! Talimatları dikkatli bir şekilde okuyunuz: kurulum, kullanım ve emniyet
hakkında önemli bilgiler içermektedir.
Yerleştirme
! Ambalajlar çocukların oyuncağı değildir ve ayrıştırılmış çöp için belirlenen
kurallara uygun olarak imha edilmelidirler (bakınız Önlem ve tavsiyeler).
! Kurulum işlemi bu talimatlar doğrultusunda ve profesyonel olarak kaliye
personel tarafından yapılmalıdır. Hatalı yapılan bir kurulum, insan ve hayvan
sağlığına ya da mala zarar verebilir.
Yuvaya oturtma
Cihazın düzgün bir şekilde çalışması için fırın yuvasının yer aldığı dolabın
uygun özellikleri taşıması gerekir:
• fırına yapışık konumdaki paneller ısıya dayanıklı malzemeden olmalıdır;
• ahşap kaplama dolapların söz konusu olduğu durumlarda, kullanılan tutkal
100°C ısıya dayanıklı olmalıdır;
• fırının yuvasına yerleştirilmesi durumunda, işlem ister masa altında (şekle
bakınız) ister kolon üzerinde yapılacak olsun, dolapların ebatları şöyle
olmalıdır:
590 mm.
595 mm.
22,5 mm.*
20,5 mm.
550 mm.
570 mm.
20 mm.
575-585 mm.
45 mm.
560 mm.
550 mm.
min.
! Cihaz yuvasına yerleştirildikten sonra elektrikli bölümler ile hiçbir şekilde
temas etmemelidir. Özellikler etiketinde belirtilmiş olan tüketime ilişkin bilgiler
bu kurulum tipine göre ölçülmüştür.
Havalandırma
İyi bir havalandırma sağlanması için yuvanın arka duvarının çıkarılması
gerekir. Fırının kurulumun iki ahşap pervaz üzerine ya da en az 45 x 560
mm ebatlarında bir açıklığı olan bir zemine yaslanacak şekilde yapılması
tercih edilir (şekillere bakınız).
560 mm.
45 mm.
Ortalama ve sabitleme
Cihazı dolaba sabitlemek için:
• fırının kapağını açınız;
• dış çerçeve üzerinde yer alan tespit deliklerini kapatan 2 lastiği çıkartınız;
• 2 tahta vida kullanarak fırını dolaba sabitleyiniz;
• delikleri kapatan lastikleri yeniden yerleştiriniz.
! Cihazın korunmasını sağlayan tüm bölümler, bir alet yardımı olmadan
çıkarılamayacak şekilde sabitlenmelidir.
Elektrik bağlantısı
Üç kutuplu besleme kablosuyla donatılmış fırınlar, cihazın üzerindeki özellikler
etiketinde belirtilmiş olan gerilim ve frekans değerlerinde dalgalı akımla
çalışacak şekilde üretilmiştir (aşağıya bakınız).
Besleme kablosu montajı
1. Bir tornavida yardımıyla, kapağın yan
uzantılarını kaldırıp terminal kutu kapağını
açınız: kapağı çekiniz ve açınız (şekle
bakınız);
2. Besleme kablosunu şu şekilde devreye
alınız: Kablo bağlama vidası ile L-N-
üç adet temas vidasını sökünüz, daha
sonra Mavi (N), Kahverengi (L), Sarı-Yeşil
kablolarını (renk tablosuna bakarak)
vida kafaları altına sabitleyiniz (bkz. şekil).
3. Kabloyu kablo bağlayıcısına
sabitleyiniz.
4. Terminal kapağını kapatınız.
Besleme kablosunun şebekeye bağlantısı
Kablo üzerine özellikler etiketi üzerinde belirtilen yüke uygun bir ş monte
ediniz (yana bakınız).
Şebekeye doğrudan bağlantı yapılması halinde, cihaz ile şebeke arasına
minimum temas aralığı 3 mm olan ve yürürlükteki normlara uygun nitelikte çok
kutuplu bir anahtar takmak gerekmektedir (toprak kablosu elektrik anahtarı
tarafından kesintiye uğratılmamalıdır). Besleme kablosu, hiçbir aşamada ortam
ısısını 50°C geçmeyecek şekilde yerleştirilmelidir (örneğin fırının arka tarafı).
! Elektrik bağlantısının doğru yapılmasından ve güvenlik kurallarına
uyulmasından kurulumu yapan kişi sorumludur.
L
N
N
L
Page 63

63
TR
Şebekeye bağlamadan önce aşağıdaki durumları kontrol ediniz:
• prizin topraklamasının yürürlükteki normlara uygun olduğunu;
• prizin, cihazın özellikler etiketi üzerinde belirtilen maksimum güç miktarını
destekleyecek şekilde olduğunu;
• besleme geriliminin özellikler etiketi üzerinde belirtilmiş olan değerler
arasında olduğunu;
• cihaz şinin prizle uyumlu olduğunu. Aksi hallerde prizi ya da şi değiştiriniz;
uzatma kabloları ya da çoklu prizler kullanmayınız.
! Cihaz monte edildikten sonra elektrik kablosu ve priz kolay erişilebilecek
yerlerde olmalıdır.
! Kablo kıvrılmalara, bükülmelere veya ezilmelere maruz kalmamalıdır.
! Kablo periyodik olarak kontrol edilmeli ve sadece yetkili teknik personel
tarafından değiştirilmelidir (Destek bölümüne bakınız).
! Bu kurallara uyulmaması halinde rma hiç bir sorumluluk kabul etmez.
* Sadece çekilen
kılavuzlara sahip modeller için.
** Sadece
sıralı kılavuzlara sahip modeller için.
ÖZELLİKLER ETİKETİ
Ebatlar*
genişlik 43,5 cm
yükseklik 32,4 cm
derinlik 41,5 cm
Hacim*
lt. 59
Elektrik
bağlantıları
220-240V~ 50/60Hz gerilimde (özellikler
etiketine bakınız)
emilen maksimum güç 2800W
Ebatlar**
genişlik 45,5 cm
yükseklik 32,4 cm
derinlik 41,5 cm
Hacim**
lt. 62
ENERGY LABEL
ve
ECODESIGN
AB Yönetmelik No. 65/2014 tümleyici
Yönetmelik 2010/30/EU.
AB Yönetmelik No. 66/2014 tümleyici
Yönetmelik 2009/125/EC.
EN 60350-1 standardı,
EN 50564 standardı
Klasik enerji tüketimi Doğal –
ısıtma fonksiyonu: Geleneksel;
Enerji tüketimi beyanı Klasik
sınıf Güçlü - ısıtma
fonksiyonu: Pasta fonksiyonu.
AEEE Yönetmeliğine uygundur
Bu cihaz Avrupa Birliği
düzenlemelerine uygundur:
12/12/2006 tarihli (Alçak Basınç)
2006/95/CE ve üzerinde yapılan
değişiklikler - 15/12/04 tarihli
(Elektromanyetik Uyum)
2004/108/CE ve üzerinde yapılan
değişiklikler - 22/07/93 tarihli
93/68/CEE ve üzerinde yapılan
değişiklikler.
- 2012/19/UE ve üzerinde yapılan
değişiklikler.
- 1275/2008 standby/off modu
Page 64

64
TR
Başlatma ve kullanım
DİKKAT! Fırın, ızgaraları durdurma
sistemi ile donatılmıştır, bu sistem
ızgaralar fırından dışarı çıkmadan
bunları çıkarmayı sağlar (1).
Izgaraları tamamen çıkarmak için,
çizimde belirtildiği gibi, bunları ön
taraftan alarak yukarı kaldırmak ve
çekmek yeterlidir (2).
! Fırını ilk kez kullandığınızda, içi boşken termostatı maksimuma getirerek
kapağı kapalı vaziyette en az bir saat çalıştırınız. Sonra fırını kapatıp kapağını
açınız ve mekanı havalandırınız. Duyulan koku, fırını korumak için kullanılan
maddelerin buharlaşmasına bağlı olarak ortaya çıkmaktadır.
Fırının yakılması
1. PROGRAM düğmesini döndürerek istenilen pişirme programını seçiniz.
2. TERMOSTAT düğmesini döndürerek istenilen ısıyı seçiniz. Pişirilecek
yemek türleri ile bunlar için önerilen sıcaklıklar listesi, pişirme Tablosunda
mevcuttur (bakınız Programlar).
3. TERMOSTAT uyarı lambasının yanık olması, ayarlanan sıcaklığa kadarki
ısınma aşamasını gösterir.
4. Pişirme sırasında aşağıdaki işlemleri yerine getirmek mümkündür:
- PROGRAM düğmesini döndürerek pişirme programını değiştirmek;
- TERMOSTAT düğmesini döndürerek ısıyı değiştirmek;
- PROGRAM düğmesini “0” pozisyonuna getirerek pişirme sürecini durdurmak.
! Fırın tabanına asla herhangi bir cisim koymayınız, emayesine zarar
verebilirsiniz.
! Pişirme kaplarını daima teçhizattaki ızgara üzerine koyunuz.
Soğutma fanı
Harici sıcaklık derecesinin düşürülmesi için bir soğutma fanı tarafından atılan
hava, kontrol paneli ve fırın kapağı arasından ve aynı zamanda fırın kapağının
alt tarafından çıkar.
! Pişirme sonunda fırın yeterince soğuyana kadar bu fan çalışır durumda kalır.
Fırın lambası
PROGRAMLAR düğmesi ile
seçilerek yakılır. Bir pişirme programı
seçildiğinde yanık kalır.
Sayıları dakika kullanımı
1. DAKİKA SAYACI düğmesini saat yönünde hemen hemen bir tam tur
döndürerek önce zili kurmak gerekir.
2. Saat yönü aksine geri dönerek, DAKİKA SAYACI düğmesi üzerindeki
dakikaları kontrol panelindeki sabit referans noktası ile çakıştırmak suretiyle
istenilen zamanı ayarlayınız.
3. Timer dakikaları sayan bir sayaçtır: vakit dolduğunda sesli bir uyarı sinyali
verir.
! Dakika sayaci fırının yakılması yada söndürülmesini kontrol etmez.
Programlar
! Tüm programlar için 60°C ile MAX arasında bir ısı ayarlanabilir, tek bunun
dışında kalan:
• IZGARA (Yalnız MAX’a ayarlanması tavsiye edilir);
• GRATEN (200°C ısının üzerine çıkılmaması tavsiye olunur).
Program GELENEKSEL FIRIN
Alt ve üst ısıtma elemanları devreye girer. Bu geleneksel pişirme konumu ile bir
tek pişirme rafının kullanılması daha uygundur: birden fazla kat kullanıldığında
ısı dağılımı kötü olur.
ÇOKLU PİŞİRME programı
Tüm ısıtma elemanları (alt, üst ve yuvarlak ısıtma) devreye girer, fan da
çalışmaya başlar. Tüm fırında ısı sabit olduğundan, hava yemeği eşit bir
şekilde pişirir ve kızartır. Aynı anda en fazla iki pişirme rafını kullanmak
mümkündür.
Program PİZZA FIRINI
Alt ve yuvarlak ısıtma elemanı devreye girer, fan da çalışmaya başlar. Bu
kombinasyonda fırın hızla ısınırken özellikle aşağıdan ciddi bir ısı yansıması
olur. Her seferinde bir tek raf kullanıldığı durumlarda pişirme işleminin ortasında
pozisyon değiştirilmesi gerekir.
IZGARA programı
Üst ısıtma elemanı devreye girer ve çevirme (şiş) kısmı da (varsa) çalışmaya
başlar.
Izgaranın yüksek ve doğrudan ısısı, yüksek yüzey ısısı gerektiren besinler için
tavsiye edilir. Pişirme esnasında fırınınızın kapağını kapalı olarak muhafaza
ediniz.
GRATEN programı
Üst ısıtma elemanı devreye girer ve fan ile çevirme (şiş) kısmı da (varsa)
çalışmaya başlar. Tek yönlü termik yansımayla birlikte fırın içindeki havanın
güçlendirilmiş sirkülasyonu başlar. Bu ısının iç kısımlara işleme gücünü
artırarak gıda yüzeylerinin yanmasını önler. Pişirme esnasında fırınınızın
kapağını kapalı olarak muhafaza ediniz.
Program PASTA FIRINI
Arka ısıtma elemanı ile birlikte fan devreye girerek ısının fırının her yerine
eşit dağılmasını sağlar. Bu program hassas yemeklerin ve aynı anda üç
rafta “kurabiyelerin” hazırlanması (ör. mayalanmaya ihtiyaç duyan tatlılar)
için tavsiye edilir.
Pratik pişirme önerileri
! Fan çalışırken yapılan pişirmelerde 1 ve 5. raf konumlarını kullanmayınız:
bunlar doğrudan sıcak hava verdiklerinden, hassas gıdaların üstlerinde
yanmaya neden olabilir.
! IZGARA ve GRATEN pişirmelerde, pişirmeden çıkan atıkları (su ve/veya
yağ) toplaması için yağ toplama tepsisini 1 no’lu pozisyona getiriniz.
ÇOKLU PİŞİRME
• 2 ve 4. raf pozisyonlarını kullanınız ve daha fazla ısı gerektiren yemekleri
2. rafta pişiriniz.
• Yağ toplama tepsisini en alta, ızgarayı ise üste koyunuz.
Page 65

65
TR
IZGARA
• Pişirilecek gıdaları ızgaranın ortasına yerleştirerek ızgarayı 3 veya 4
konumuna yerleştiriniz.
• Enerji seviyesinin maksimuma ayarlanması tavsiye edilir. Üst rezistans
sürekli olarak yanık kalmazsa endişelenmeyiniz: Bu parçanın çalışması
bir termostat tarafından kontrol edilir.
PİZZA FIRINI
• Haf alüminyum bir tepsiyi cihazınızla birlikte verilmiş olan ızgaraya
yerleştiriniz.
Yağ toplama tepsisi ile pişirme süresi uzar ve pizzanız çıtır çıtır olmaz.
• Çok malzemeli pizzalarda mozzarella peynirinin pişirme işleminin tam
ortasında eklenmesi tavsiye edilir.
Programlar Yemekler
Ağırlık
(Kg)
Rafların
pozisyonu
Ön ısıtma
(dakika)
Tavsiye edilen
sıcaklık
derecesi
Pişirme
süresi
(dakika)
Geleneksel
Ördek
Dana veya sığır rosto
Domuz rosto
Bisküvi (ev yapımı)
Turtalar
1
1
1
1
3
3
3
3
3
15
15
15
15
15
200
200
200
180
180
65-75
70-75
70-80
15-20
30-35
Çoklu Pişirme
Pizza (2 raf üzerinde)
Lazanya
Kuzu
Kızarmış tavuk + patates
Uskumru
Plum-cake
Kurabiye (2 raf üzerinde)
Bisküvi (2 raf üzerinde)
Pandispanya (1 raf üzerinde)
Pandispanya (2 raf üzerinde)
Tuzlu tartlar
1
1
1
1+1
1
1
0.5
0.5
0.5
1
1.5
2 ve 4
3
2
2 ve 4
2
2
2 ve 4
2 ve 4
2
2 ve 4
3
15
10
10
15
10
10
10
10
10
10
15
230
180
180
200
180
170-180
190
180
170
170
200
15-20
30-35
40-45
60-70
30-35
40-50
20-25
10-15
15-20
20-25
30-40
Pizza
Pizza
Börekler
0.5
1
3
2 veya 3
15
10
220
200
15-20
15-20
Izgara
Dil balığı
Kalamar ve karides şiş
Morina fileto
Izgara sebze
Dana biftek
Pirzola
Hamburger
Uskumru
Tost
1
1
1
1
1
1
1
1
n. 4
4
4
4
3 veya 4
4
4
4
4
4
5
5
5
5
5
5
5
5
5
MAX
MAX
MAX
MAX
MAX
MAX
MAX
MAX
MAX
8-10
6-8
10
10-15
15-20
15-20
7-10
15-20
2-3
Rosto çevirme aparatı ile (varsa)
Dana şiş
Tavuk şiş
Kuzu şiş
1.0
1.5
1.0
-
-
-
-
-
-
100%
100%
100%
80-90
70-80
70-80
Graten
Izgara tavuk
Ahtapot
1.5
1.5
2
2
5
5
200
200
55-60
30-35
Rosto çevirme aparatı ile (varsa)
Dana şiş
Kuzu şiş
Tavuk (şiş) +
patates (yağ toplama tepsisinde)
1.5
1.5
1.5
-
-
-
-
2
10
10
10
10
200
200
200
200
70-80
70-80
70-75
70-75
Pasta
Turtalar
Meyveli turta
Plum-cake
Pandispanya
Doldurulmuş krepler (2 raf üzerinde)
Küçük kekler (2 raf üzerinde)
Peynirli tuzlu çörekler (2 raf üzerinde)
Kurabiye (3 raf üzerinde)
Bisküvi (3 raf üzerinde)
Yalancı krema (3 raf üzerinde)
0.5
1
0.7
0.5
1.2
0.6
0.4
0.7
0.7
0.5
3
2 o 3
3
3
2 ve 4
2 ve 4
2 ve 4
1, 3 ve 5
1, 3 ve 5
1, 3 ve 5
15
15
15
15
15
15
15
15
15
15
180
180
180
160
200
180-190
200-210
180
180
90
20-30
40-45
40-50
25-35
30-35
20-25
15-20
20-25
20-25
180
! Pişirme süreleri bilgi amaçlı olup kişisel zevke göre değiştirilebilir.
Pişirme tablosu
Page 66

66
TR
Önlemler ve tavsiyeler
! Cihaz uluslararası emniyet mevzuatlarına uygun olarak projelendirilmiş ve
üretilmiştir. Bu uyarılar güvenlik amaçlı olup dikkatlice okunmalıdır.
Genel emniyet
• Cihaz, meskenlerde kullanılmak üzere tasarlanmış olup profesyonel
kullanım amaçlı değildir.
• Yağmur ve fırtınaya maruz kalması son derece tehlikeli olduğundan cihaz,
üzeri kapalı bile olsa açık alanlara monte edilemez.
• Cihazı yerinden hareket ettirirken daima fırının yan taraarında bulunan
tutma kulplarından yararlanınız.
• Cihaza ayaklarınız çıplakken ya da elleriniz veya ayaklarınız ıslak ya da
nemliyken dokunmayınız.
• Cihaz, sadece yetişkin kişiler tarafından ve bu kitapçıkta aktarılan
talimatlara göre, yemek pişirmek amaçlı kullanılmalıdır. Her
türlü diğer kullanımlar (örneğin: ortam ısıtması) uygunsuz ve bu
nedenle tehlikeli bulunur. Üretici rma uygunsuz, hatalı ve mantık
dışı kullanımlardan kaynaklanan muhtemel zararlardan sorumlu
tutulamaz.
• Cihazın kullanımı sırasında ısıtma elemanları ile fırının bazı kısımları
çok sıcak duruma gelir. Bunlara dokunmamaya dikkat ediniz ve
çocukları uzak tutunuz.
• Diğer beyaz eşyalara ait kabloların fırının sıcak kısımlarına temas etmesini
önleyiniz.
• Havalandırma ve ısı dağılma noktalarını tıkamayınız.
• Fırın kapağını açma kulpunu tam ortasından tutunuz: yan taraarı sıcak
olabilir.
• Kapları fırına sürerken veya fırından çıkartırken daima fırın eldiveni
kullanınız.
• Fırının alt kısmını alüminyum folyo ile örtmeyiniz.
• Tutuşabilen maddeleri fırın içinde bulundurmayınız: bunlar fırın yanlışlıkla
çalıştırılacak olursa alev alabilirler.
• Fişi prizden çekerken kablosundan değil şin kendisinden tutarak çekiniz.
• Fişi elektrik şebekesinden çekmeden, temizlik veya bakım müdahalelerinde
bulunmayınız.
• Arıza halinde onarmak amacıyla iç mekanizmaları kurcalamayınız. Teknik
servis ile irtibata geçiniz (Teknik servis bölümüne bakınız).
• Fırının kapağı açıkken kapak üzerine ağır cisimler koymayınız.
• Çocukların cihaz ile oynamasını önleyiniz.
• Cihaz; (çocuklar dahil) ziki, duyusal ya da zihinsel kapasiteleri kısıtlı kişiler
tarafından kullanılamayacağı gibi, güvenliklerinden sorumlu bir kişinin
gözetimi altında bulunmadıkça veya cihazın kullanımı hakkında ön bilgiler
almış olmadıkça, deneyimsiz ve ürüne fazla bir alışkanlığı bulunmayan
kimseler tarafından da kullanılmamalıdır.
• Cihaz harici bir otomatik zaman ayarı veya ayrı bir uzaktan kumanda
sistemi ile çalıştırılacak şekilde tasarlanmamıştır.
İmha
• Ambalaj malzemelerinin imha edilmesi: ambalajların geri dönüşümünü
sağlayan yerel düzenlemelere uyunuz.
• Elektrik ve elektronik cihazların atıklarını değerlendirme konusunu
düzenleyen 2012/19/UE sayılı Avrupa Birliği mevzuatında; beyaz eşyaların
kentsel katı atık genel yöntemi ile imha edilmemesi öngörülmüştür.
Kullanılmayan cihazlar, madde geri kazanım ve geri dönüşüm oranını
en yüksek seviyeye yükseltmek, çevre ve insan sağlığına olası zararları
engellemek için ayrı ayrı toplanması gerekir. Tüm ürünlerin üzerinde;
ayrıştırılmış atık hükümlerini hatırlatmak amacıyla üstünde çarpı işareti
olan sepet sembolü yer almaktadır.
Kullanılmayan beyaz eşyalar belediye atık toplama servisine teslim
edilebilecektir, bunları belediyenin bunun için özel olarak belirlediği yerlere
ya da konuyla ilgili ulusal düzenlemelerin mevcut olduğu durumlarda,
benzer tipte yeni bir ürün aldığınız satıcılara verebilirsiniz.
Belli başlı tüm beyaz eşya üreticileri kullanılmayan cihazların toplanması
ve imha edilmesi için öngörülen sistemlerin oluşturulması ve idaresi
konusunda faaliyet göstermektedir.
Tasarruf ve çevreye saygı
• Mümkün olan yerlerse, fırının önceden ısıtılmasından kaçının ve her zaman
fırının dolu olmasına çalışın. Fırının kapağını mümkün olduğunca az açın,
kapak her açıldığında ısı kaybı olacaktır. Önemli oranda enerji tasarrufu
sağlamak için, sadece fırını planlanan pişirme süresinden 5 ila 10 dakika
öncesinde kapatın ve fırının içindeki sıcaklığı kullanın.
• Otomatik programlar standart yiyecekler baz alınarak oluşturulmuştur.
• Kapa ktan dolayı enerji kayıpları yaşamamak için cıntaları temiz ve düzenli
tutun.
• Eğer zaman tarifeli bir elektrik sözleşmeniz varsa, elektriğin daha ucuz
saatlerde pişirim yapmak için “gecikmeli pişirme” seçeneğini kullanabilir
ve kolaylıkla tasarruf sağlayabilirsiniz.
! Bu ürün, standby konumda enerji tüketiminin sınırlanması hakkındaki yeni
Avrupa Direkti tarafından belirlenmiş gereklilikleri karşılamaktadır.
Servis ve bakım
Elektrik akımının devre dışı bırakılması
Herhangi bir işlem yapmadan önce cihazın elektrik şebekesine bağlantısını
kesiniz.
Cihazın temizlenmesi
• Fırının ön tarafındaki farklı renk seviyeleri cam, plastik veya metal gibi
farklı malzemelere uygundur.
• Kapağın camı üzerindeki olası gölgelendirmeler, çizgilere benzer, fırın
lambasının ışığının yansıması için gereklidir.
• Çok yüksek sıcaklıklarda emaye ateşte kızar. Bu işlem sırasında kromatik
varyasyonlar oluşabilir. Bu normaldir ve hiçbir şekilde işleyişe etki etmez.
Ince sac kenarları, tamamen emayelenemezler ve bu nedenle pürüzlü
görünebilirler. Bu, korozyon önleyici muhafazaya zarar vermez.
• Emayeli veya inox dış kısımlar ile lastik contalar ılık su ve nötr sabunla
ıslatılmış bir sünger yardımıyla temizlenebilir. Lekeler çok zor çıkan
türdense özel ürünler kullanınız. Bol su ile durulayıp temizlikten
sonra kurulamanız tavsiye edilir. Çizici tozlar ve aşındırıcı maddeler
kullanmayınız.
• Fırının içi mümkünse her kullanımdan sonra, daha henüz ılıkken
temizlenmelidir. Sıcak su ile deterjan kullanınız, durulayınız ve yumuşak
bir bezle kurulayınız. Çizici maddelerden kaçınınız.
• Sürgülü kızaklar hariç aksesuarlar normal bulaşık yıkama sistemiyle ve
bulaşık makinasında da yıkanabilirler.
• Kumanda bölgesi üzerine doğrudan deterjanları püskürtmemeniz ancak
bir nemli sünger kullanmanız tavsiye edilir.
! Cihazın temizliği için asla buharlı ya da yüksek basınçlı temizleyiciler
kullanmayınız.
Kapağın temizliği
Kapağın cam olan kısmı aşındırıcı olmayan ürün ve sünger kullanılarak
temizlenmeli ve yumuşak bir bezle kurutulmalıdır; yüzeyi çizebilecek ya da
camın kırılmasına neden olabilecek aşındırıcı pürüzlü malzeme veya keskin
madeni kazıyıcı kullanılmamalıdır.
Daha özenli bir temizlik için fırın kapağını sökmek mümkündür:
1. Kapağı tamamen açınız (şekle bakınız);
2. Bir tornavida yardımıyla, iki adet menteşe üzerinde yer alan kolları F yukarı
kaldırarak döndürünüz (şekle bakınız);
Page 67

67
TR
F
3. Kapağı iki dış yanından tutarak, aralık
kalacak şekilde yavaşça kapatınız. Sonra
kapağı kendinize doğru çekip yuvasından
çıkartınız (şekle bakınız). Kapağı aynı işlemleri
tersten uygulayarakyerine monte ediniz.
Contaların kontrolü
Fırın kapağını çevreleyen contanın durumunu periyodik olarak kontrol ediniz.
Hasarlı olması halinde en yakın Teknik Servise başvurunuz (bakınız Teknik
Servis). Bu durumda onarım yapılıncaya kadar fırını kullanmamanız tavsiye
edilir.
Ampulün yenisi ile değiştirilmesi
Fırının aydınlatma lambasını
değiştirmek için:
1. Lamba tutucusunun cam kapağını
gevşetip çıkarınız.
2. Ampulü sökünüz ve aynı özelliklere
sahip bir ampul ile değiştiriniz: güç 25
W, bağlantı E 14.
3. Kapağı yerine takınız (şekle bakınız);
! Ortamı aydınlatmak amacıyla fırın lambasını kullanmayınız.
İthalatçı Firma:
Indesit Company Beyaz Eşya PAZARLAMA A.Ş.
Balmumcu Cad. Karahasan Sok.
No: 11, 34349 – Balmumcu Beşiktaş – İstanbul
Tel: (0212) 355 53 00
Üretici Firma:
Indesit Company Spa
Viale Aristide Merloni, 47
60044 Fabriano Italy
Tel: +39 0732 66 11
Page 68

68
PL
Instalacja
! Ważnym jest, aby zachować niniejszą książeczkę instrukcji dla przyszłych
konsultacji. W razie sprzedaży, odsprzedania, czy przeniesienia, należy
upewnić się, czy znajduje się ona wraz z urządzeniem i odpowiednimi
uwagami, aby poinformować nowego właściciela o jego funkcjonowaniu.
! Należy uważnie przeczytać instrukcję: zawieraja ona ważne informacje
dotyczące instalacji, użytkowania i bezpieczeństwa.
Ustawienie
! Opakowania nie są zabawkami dla dzieci i należy je usunąć zgodnie z
normami zbierania odpadów (patrz Środki ostrożności i zalecenia).
! Instalacja powinna zostać wykonana zgodnie z niniejszymi instrukcjami i
przez personel zawodowo do tego przygotowany. Błędna instalacja może
skutkować powstaniem szkód wobec osób, zwierząt lub rzeczy.
Zabudowa
W celu zagwarantowania poprawnego działania urządzenia koniecznym jest,
aby mebel posiadał odpowiednie parametry:
• panele przylegające do piekarnika powinny być wykonane z materiałów
odpornych na ciepło;
• w przypadku mebli z okładziną z forniru, użyty klej musi być odporny na
temperaturę 100°C;
• dla zabudowy piekarnika, zarówno w przypadku zabudowy szeregowej
pod blatem ( patrz rysunek ), jak i w słupkowej, mebel powinien posiadać
następujące wymiary
590 mm.
595 mm.
22,5 mm.*
20,5 mm.
550 mm.
570 mm.
20 mm.
575-585 mm.
45 mm.
560 mm.
550 mm.
min.
! Po zabudowaniu piekarnika należy upewnić się, czy uniemożliwiony jest
kontakt z jego częściami elektrycznymi. Informacje dotyczące zużycia prądu
wskazane na tabliczce znamionowej oparte są na pomiarach wykonanych
dla tego typu instalacji.
Obieg powietrza
W celu zapewnienia dobrego obiegu powietrza koniecznym jest usunięcie
tylnej ścianki komory. Najlepiej zainstalować piekarnik w taki sposób, aby
wspierał się na dwóch listwach drewnianych lub na drewnianej desce z
prześwitem przynajmniej 45 x 560 mm (patrz ilustracje).
560 mm.
45 mm.
Wyśrodkowanie i zamocowanie
Aby przymocować urządzenie do mebla:
• otworzyć całkowicie drzwiczki piekarnika;
• wyjąć 2 zatyczki gumowe, które zakrywają otwory mocowania w ramie
obwodowej;
• zamocować piekarnik do mebla przy użyciu 2 śrub do drewna;
• założyć z powrotem zatyczki gumowe.
! Wszystkie części, które mają zapewnić bezpieczeństwo powinny być
zamocowane w taki sposób, aby nie można ich było usunąć bez użycia
narzędzia.
Podłączenie do sieci elektrycznej
Piekarniki wyposażone w trójbiegunowy przewód zasilający dostosowane są
do funkcjonowania na prąd zmienny, przy napięciu i częstotliwości wskazanych
na tabliczce znamionowej umieszczonej na urządzeniu (patrz poniżej ).
Montaż przewodu zasilającego
1. Otworzyć skrzynkę zaciskową
podważając śrubokrętem boczne
zatrzaski pokrywy: pociągnąć i otworzyć
pokrywę (patrz rysunek).
2. Zamontować przewód zasilający:
odkręcić śrubę zacisku kabla oraz trzy
śruby styków L-N-
, a następnie
zamocować pojedyncze przewody pod
głowicami śrub, zachowując kolejność
kolorów niebieski (N) brązowy (L) żółto-
zielony
(patrz rysunek).
3. Zamocować przewód w odpowiednim
zacisku.
4. Zamknąć pokrywę skrzynki zaciskowej.
Podłączenie przewodu zasilającego do sieci
Zamocować na przewodzie znormalizowaną wtyczkę do obciążeń
wskazanych na tabliczce znamionowej (patrz obok).
W przypadku bezpośredniego podłączenia do sieci koniecznym jest
zainstalowanie pomiędzy urządzeniem a siecią wyłącznika wielobiegunowego
z otwarciem minimalnym pomiędzy stykami 3 mm przeznaczonego do
obciążeń i odpowiadającego obowiązującym normom (przewód uziemienia
nie powinien być przerywany przez wyłącznik). Przewód zasilania powinien
być umieszczony tak, aby w żadnym punkcie nie był narażony na temperaturę
otoczenia przekraczającą 50° C (np. tylna ścianka piekarnika).
L
N
N
L
Page 69

69
PL
! Osoba instalująca urządzenie jest odpowiedzialna za jego właściwe
podłączenie do prądu i zachowanie norm bezpieczeństwa.
Przed podłączeniem urządzenia należy upewnić się, czy:
• gniazdko ma właściwe uziemienie i odpowiada obowiązującym przepisom;
• gniazdko jest w stanie wytrzymać obciążenie maksymalnej mocy
urządzenia wskazane na tabliczce znamionowej (patrz poniżej);
• napięcie zasilania odpowiada wartościom podanym na tabliczce
znamionowej (patrz poniżej );
• gniazdko jest kompatybilne z wtyczką urządzenia. W przeciwnym
wypadku wymienić gniazdko lub wtyczkę; nie stosować przedłużaczy ani
rozgałęziaczy.
! Po zainstalowaniu urządzenia przewód elektryczny i gniazdko powinny być
łatwo dostępne.
! Kabel nie powinien być zginany ani ściskany.
! Przewód elektryczny musi być okresowo sprawdzany i wymieniany jedynie
przez autoryzowanych techników (patrz Serwis Techniczny).
! Producent nie ponosi żadnej odpowiedzialności w przypadku
nieprzestrzegania powyższych zaleceń.
Podłączenia
elektryczne
napięcie 220-240V~ 50/60Hz
(patrz tabliczka znamionowa)
maksymalna moc pobierana 2800W
TABLICZKA ZNAMIONOWA
Wymiary
*
szerokość (cm)
43,5
wysokość (cm)
32,4
głębokość (cm)
41,5
Wymiary
**
szerokość (cm)
45,5
wysokość (cm)
32,4
głębokość (cm)
41,5
Objętość
*
(l) 59
Objętość
**
(l) 62
*
Tylko dla modeli z wytłaczanymi prowadnicami.
**
Tylko dla modeli z drucianymi prowadnicami.
Dyrektywa UE nr 65/2014, integrująca
dyrektywę 2010/30/EU.
Rozporządzenie UE nr 66/2014,
integrujące dyrektywę 2009/125/KE.
Rozporządzenie EN 60350-1
Rozporządzenie EN 50564
Zużycie energii konwekcja naturalna funkcja ogrzewania: Tradycyjna;
Zużycie energii deklaracja Klasa
konwekcji wymuszona - funkcja
ogrzewania:
Do wypieku ciast.
ETYKIETA
EFEKTYWNOŚCI
ENERGETYCZNEJ
i ECODESIGN
Niniejsze urządzenie zostało
wyprodukowane zgodnie z
następującymi dyrektywami
unijnymi:
- 2006/95/WE z dnia 12/12/06
(Niskie napięcie) wraz z późniejszymi
zmianami
- 2004/108/WE z dnia 15/12/04
(Kompatybilność elektromagnetyczna)
wraz z późniejszymi zmianami
- 93/68/EWG z dnia 22/07/93 wraz z
późniejszymi zmianami.
- 2012/19/UE wraz z późniejszymi
zmianami.
- 1275/2008 Stand-by/off mode
Page 70

70
PL
Uruchomienie i użytkowanie
UWAGA! Piekarnik jest wyposażony
w system blokowania rusztu,
który umożliwia jego wysuwanie
bez całkowitego wyjmowania z
piekarnika (1).
W celu całkowitego wyjęcia rusztu
wystarczy go unieść w sposób
przedstawiony na rysunku,
chwytając za przednią część i
pociągnąć do siebie (2).
! Podczas pierwszego uruchomienia należy włączyć pusty piekarnik na
przynajmniej jedną godzinę, z termostatem ustawionym na maksimum i
zamkniętymi drzwiczkami. Następnie wyłączyć, otworzyć drzwiczki piekarnika i
wywietrzyć pomieszczenie. Zapach, jaki się wytworzy jest skutkiem parowania
substancji stosowanych w celu zabezpieczenia piekarnika.
Włączanie piekarnika
1. Wybrać program pieczenia, przekręcając pokrętło PROGRAMY.
2. Wybrać temperaturę, przekręcając pokrętło TERMOSTAT. Wykaz potraw
z zalecanymi dla nich temperaturami znajduje się w Tabeli pieczenia (zob.
Programy).
3. Świecąca kontrolka TERMOSTAT wskazuje fazę nagrzewania do
nastawionej temperatury.
4. Podczas pracy piekarnika można zawsze:
- zmienić program pieczenia za pomocą pokrętła PROGRAMY;
- zmienić temperaturę za pomocą pokrętła TERMOSTAT;
- przerwać pieczenie przez ustawienie pokrętła PROGRAMY w pozycji „0”.
! Nigdy nie należy stawiać żadnych przedmiotów na dnie piekarnika, gdyż
grozi to uszkodzeniem emalii.
! Naczynia do pieczenia stawiać zawsze na ruszcie znajdującym się w
wyposażeniu piekarnika.
Chłodzenie poprzez wentylację
W celu zmniejszenia temperatury zewnętrznej wentylator chłodzący wytwarza
strumień powietrza, który wychodzi między panelem sterowania a drzwiczkami
piekarnika, a także w ich części dolnej.
! Po zakończeniu pieczenia wentylator pracuje dopóki piekarnik wystarczająco
się nie ochłodzi.
Oświetlenie piekarnika
Światło w piekarniku włącza się przez wybranie
za pomocą pokrętła
PROGRAMY. Pozostaje ono włączone przy wyborze programu pieczenia.
Korzystanie z minutnika
1. Najpierw należy ustawić dzwonek, przekręcając o prawie jeden pełny obrót
pokrętło TIMERA zgodnie z ruchem wskazówek zegara.
2. Przekręcając je z powrotem w kierunku przeciwnym, ustawić żądany czas
poprzez dopasowanie wskaźnika pokrętła TIMERA do czasu wskazanego
na panelu sterowania.
3. Timer działa jak minutnik: po upływie określonego czasu wydaje sygnał
dźwiękowy.
! Timer nie kontroluje włączenia i wyłączenia piekarnika.
Programy
! Dla wszystkich programów pieczenia można ustawić temperaturę w zakresie
od 60°C do MAX, z wyjątkiem:
• GRILL (zaleca się ustawienie tylko na MAX);
• ZAPIEKANIE (zaleca się nie przekraczać temperatury 200°C).
Program PIEKARNIK TRADYCYJNY
Włączają się obydwa grzejniki: górny i dolny. Przy pieczeniu tradycyjnym
najlepiej używać tylko jednego poziomu: wykorzystanie większej liczby
poziomów prowadzi do nierównomiernego rozkładu temperatury.
Program MULTIPIECZENIE
Włączają się wszystkie grzejniki (górny, dolny i termoobiegu) oraz wentylator.
Ponieważ temperatura jest stała w całym piekarniku, powietrze piecze i rumieni
żywność w sposób równomierny. Można używać jednocześnie dwie półki .
Program PIEKARNIK DO PIZZY
Włączają się dolny i obwodowy element grzejny oraz uruchamia się
wentylator. Takie połączenie umożliwia szybkie nagrzanie piekarnika i
zapewnia wysoką temperaturę, a zwłaszcza mocne nagrzewanie od dołu.
W przypadku, gdy stosuje się więcej niż jedną półkę na raz koniecznym
jest zamienianie ich miejscami w połowie wypiekania.
Program GRILL
Włącza się grzejnik górny oraz rożen (jeśli jest).
Wysoka temperatura jest skierowana na grill i zalecana dla potraw
wymagających wysokiej temperatury na powierzchni. Podczas pieczenia
należy zamykać drzwiczki piekarnika.
Program ZAPIEKANIE
Włącza się grzejnik górny oraz wentylator i rożen (jeśli jest). Łączy
wymuszoną cyrkulację powietrza wewnątrz piekarnika z jednokierunkowym
promieniowaniem cieplnym. Zapobiega to przypaleniu powierzchni potraw,
zwiększając moc penetracji cieplnej. Podczas pieczenia należy zamykać
drzwiczki piekarnika.
Program PIEKARNIK DO WYPIEKU CIAST
Włącza się grzejnik tylny oraz wentylator, zapewniając delikatne i równomierne
rozprowadzanie ciepła wewnątrz piekarnika. Jest to program wskazany
do przygotowywania potraw delikatnych (np. ciast wymagających fazy
wyrastania) i pieczenia potraw drobnych (np. ciasteczek) na trzech poziomach
jednocześnie.
Praktyczne porady dotyczące pieczenia
! Do pieczenia z wentylacją nie używać poziomów 1 i 5: podlegają one
bezpośredniemu działaniu gorącego powietrza, co mogłoby spowodować
przypalenie delikatnych potraw.
! W programach GRILL i ZAPIEKANIE na poziomie 1 umieścić znajdującą się
w wyposażeniu blachę uniwersalną, na której zbierać się będą pozostałości
po pieczeniu (soki lub tłuszcze).
MULTIPIECZENIE
• Używać poziomów 2 i 4, wykorzystując poziom 2 do potraw, które
wymagają wyższej temperatury.
• Blachę umieścić na dole, a ruszt na górze.
Page 71

71
PL
GRILL
• Włożyć ruszt na poziom 3 lub 4, umieszczając potrawę na środku rusztu.
• Zaleca się nastawienie maksymalnego poboru energii. Nie należy się
niepokoić, jeśli górny grzejnik nie będzie stale włączony: jego działanie
kontroluje termostat.
PIEKARNIK DO PIZZY
• Użyć lekkiej blachy aluminiowej, stawiając ją na ruszcie znajdującym się
w wyposażeniu piekarnika.
Zastosowanie blachy uniwersalnej powoduje wydłużenie czasu pieczenia,
przez co trudno jest przygotować chrupiącą pizzę.
• W przypadku pizzy z dużą ilością dodatków zaleca się dodanie mozzarelli
dopiero w połowie pieczenia.
Programy Potrawy
Waga
(Kg)
PoziomyWcześniejsze
nagrzanie (min)
Zalecana
temperatura
Czas
pieczenia
(min)
Tradycyjny
Kaczka
Pieczeń cielęca lub wołowa
Pieczeń wieprzowa
Kruche ciastka
Ciasta kruche
1
1
1
1
3
3
3
3
3
15
15
15
15
15
200
200
200
180
180
65-75
70-75
70-80
15-20
30-35
Multicooking
Pizza (na 2 poziomach)
Lasagne
Jagnięcina
Pieczony kurczak + ziemniaki
Makrele
Keksy
Ptysie (na 2 poziomach)
Ciastka (na 2 poziomach)
Biszkopt (na 1 poziomie)
Biszkopt (na 2 poziomach)
Słone ciasta
1
1
1
1+1
1
1
0.5
0.5
0.5
1
1.5
2 i 4
3
2
2 i 4
2
2
2 i 4
2 i 4
2
2 i 4
3
15
10
10
15
10
10
10
10
10
10
15
230
180
180
200
180
170-180
190
180
170
170
200
15-20
30-35
40-45
60-70
30-35
40-50
20-25
10-15
15-20
20-25
30-40
Pizza
Pizza 0.5
1
3
2 lub 3
15
10
220
200
15-20
15-20
Grill
Flądry
Szaszłyki z kalmarów i krewetek
Filet z dorsza
Grillowane warzywa
Befsztyk cielęcy
Kotlety
Hamburgery
Makrele
Tosty
1
1
1
1
1
1
1
1
n. 4
4
4
4
3 lub 4
4
4
4
4
4
5
5
5
5
5
5
5
5
5
MAX
MAX
MAX
MAX
MAX
MAX
MAX
MAX
MAX
8-10
6-8
10
10-15
15-20
15-20
7-10
15-20
2-3
Na rożnie (jeśli jest)
Cielęcina z rożna
Kurczak z rożna
Jagnięcina z rożna
1.0
1.5
1.0
-
-
-
-
-
-
100%
100%
100%
80-90
70-80
70-80
Zapiekanie
Kurczak z rusztu
Mątwy
1.5
1.5
2
2
5
5
200
200
55-60
30-35
Na rożnie (jeśli jest)
Cielęcina z rożna
Jagnięcina z rożna
Kurczak (z rożna) + ziemniaki
(na brytfannie)
1.5
1.5
1.5
-
-
-
-
2
10
10
10
10
200
200
200
200
70-80
70-80
70-75
70-75
Wypieki
cukiernicze
Ciasta kruche
Ciasta z owocami
Keksy
Biszkopt
Naleśniki z nadzieniem (na 2 poziomach)
Babeczki (na 2 poziomach)
Słone ciastka francuskie z serem
(na 2 poziomach)
Ptysie (na 3 poziomach)
Ciastka (na 3 poziomach)
Bezy (na 3 poziomach)
0.5
1
0.7
0.5
1.2
0.6
0.4
0.7
0.7
0.5
3
2
lub 3
3
3
2 i 4
2 i 4
2 i 4
1 i 3 i 5
1 i 3 i 5
1 i 3 i 5
15
15
15
15
15
15
15
15
15
15
180
180
180
160
200
180-190
200-210
180
180
90
20-30
40-45
40-50
25-35
30-35
20-25
15-20
20-25
20-25
180
! Wskazany czas trwania pieczenia ma charakter orientacyjny i może być zmieniany według osobistych upodobań.
Tabela pieczenia
Page 72

72
PL
Zalecenia i środki ostrożności
! Urządzenie zostało zaprojektowane i wyprodukowane zgodnie z
międzynarodowymi przepisami bezpieczeństwa. Mając na względzie Wasze
bezpieczeństwo podajemy Wam poniższe zalecenia, które należy uważnie
przeczytać.
Ogólne zasady bezpieczeństwa
• Niniejsze urządzenie przeznaczone jest do nieprofesjonalnych zastosowań
domowych.
• Nie należy instalować urządzenia poza domem, nawet, jeśli miejsce to jest
chronione daszkiem, gdyż wystawienie urządzenia na działanie deszczu i burz
jest bardzo niebezpieczne.
• Przenosząc urządzenie należy zawsze korzystać z odpowiednich uchwytów
umocowanych po bokach piekarnika.
• Nie dotykać urządzenia, jeśli jest się na boso ani też mokrymi lub
wilgotnymi rękami lub stopami.
• Urządzenie powinno być używane do celów kulinarnych wyłącznie
przez osoby dorosłe i zgodnie z niniejszymi instrukcjami.
Wykorzystywanie go do innych celów (np. do ogrzewania
pomieszczeń) uznaje się za niewłaściwe, a tym samym niebezpieczne.
Producent nie ponosi odpowiedzialności za ewentualne szkody
poniesione w wyniku niewłaściwego, błędnego lub nierozsądnego
użytkowania.
• Podczas użytkowania urządzenia grzejniki i niektóre części drzwiczek
piekarnika stają się bardzo gorące. Nie wolno ich dotykać, a dzieci należy
trzymać z dala od urządzenia.
• Uważać, aby kable zasilające innych urządzeń AGD nie dotykały
rozgrzanych części piekarnika.
• Nie zatykać otworów wentylacyjnych i odprowadzających ciepło.
• Przy otwieraniu drzwiczek należy trzymać za środkową część uchwytu:
po bokach może być gorący.
• Do wstawiania i wyjmowania naczyń z piekarnika używać zawsze rękawic
ochronnych.
• Nie przykrywać dna piekarnika folią aluminiową.
• Nie wkładać do piekarnika materiałów łatwopalnych: jeśli urządzenie
zostanie przez nieuwagę uruchomione, mogłyby one się zapalić.
• Nie należy wyjmować wtyczki z gniazdka ciągnąc za kabel: zaleca się
trzymanie za wtyczkę.
• Przed przystąpieniem do czyszczenia lub konserwacji odłączyć najpierw
wtyczkę od sieci elektrycznej.
• W razie uszkodzenia w żadnym wypadku nie ingerować w wewnętrzne
mechanizmy urządzenia i nie próbować go samodzielnie naprawiać.
Należy skontaktować się z Serwisem (patrz Serwis Techniczny).
• Nie stawiać przedmiotów na otwartych drzwiczkach piekarnika.
• Dopilnować, aby dzieci nie bawiły się urządzeniem.
• Urządzenie to nie jest przystosowane do obsługi przez osoby (w tym dzieci)
o ograniczonych zdolnościach zycznych, zmysłowych bądź umysłowych,
przez osoby bez doświadczenia lub bez znajomości urządzenia - chyba że
pod nadzorem osoby odpowiedzialnej za ich bezpieczeństwo -, jak również
przez osoby, które nie otrzymały instrukcji wstępnych na temat eksploatacji
urządzenia.
• Urządzenie nie jest przeznaczone do tego, aby było włączane przy
użyciu zewnętrznego przekaźnika czasowego lub osobnego systemu
sterowania zdalnego.
Utylizacja
• Utylizacja materiałów opakowaniowych: zastosować się do obowiązujących
norm lokalnych, dzięki czemu opakowania będzie można ponownie
wykorzystać.
• Dyrektywa wspólnotowa 2012/19/UE w sprawie zużytego sprzętu
elektrycznego i elektronicznego (WEEE) przewiduje, że sprzęt
gospodarstwa domowego nie powinien być usuwany jako nieposortowane
odpady komunalne. Zużyte urządzenia powinny być zbierane oddzielnie w
celu optymalizacji stopnia odzysku i recyrkulacji ich materiałów składowych
oraz aby zapobiec potencjalnym szkodom dla zdrowia i środowiska.
Symbol przekreślonego kosza na śmieci jest umieszczony na wszystkich
produktach, aby przypominać o obowiązku selektywnej zbiórki.
W celu uzyskania bliższych informacji na temat prawidłowego złomowania
elektrycznych urządzeń gospodarstwa domowego, ich właściciele mogą
się zwracać do właściwych służb publicznych lub do sprzedawców tych
urządzeń.
Oszczędność i ochrona środowiska
Kiedy to tylko możliwe, unikaj wstępnego nagrzewania piekarnika i zawsze
próbuj go zapełnić. Otwieraj drzwiczki piekarnika tak rzadko, jak tylko to
możliwe, gdyż za każdym razem ucieka z niego ciepło. Aby oszczędzić
znaczną ilość energii, wyłącz po prostu piekarnik 5 - 10 minut przed
końcem zaplanowanego czasu pieczenia i wykorzystaj ciepło, które
piekarnik nadal wydziela.
• Programy automatyczne oparte są na standardowych produktach
żywieniowych
• Utrzymuj uszczelki w czystości, aby zapobiec jakimkolwiek stratom energii
poprzez drzwiczki.
• Jeżeli korzystasz z rozliczenia strefowego energii, możesz zaoszczędzić
energię używając opcji “opóźnione pieczenie”, która uruchomi urządzenie
w godzinach taniej taryfy.
! Ten produkt spełnia wymogi dyrektywy wspólnotowej dotyczącej ograniczenia
zużycia energii w trybie czuwania.
Konserwacja i utrzymanie
Odłączenie prądu elektrycznego
Przed naprawą odłączyć urządzenie od sieci zasilania elektrycznego.
Czyszczenie urządzenia
• Lekkie różnice koloru przedniej strony piekarnika są spowodowane
zastosowaniem różnego rodzaju materiałów: szkła, plastiku lub metalu.
• Ewentualne cienie na szybce drzwiczek, podobne do prążków, są
spowodowane odbiciem światła żarówki piekarnika.
• W bardzo wysokich temperaturach emalia zostaje wypalona. Podczas
tego procesu może dojść do zmian chromatycznych. Jest to normalne
zjawisko, nie mające wpływu na działanie piekarnika. Krawędzie cienkich
blach nie mogą być całkowicie pokryte emalią i dlatego mogą wyglądać
jak w stanie surowym. Nie ingeruje to w żaden sposób w zabezpieczenie
antykorozyjne.
• Części zewnętrzne emaliowane lub ze stali inox oraz uszczelki gumowe
mogą być czyszczone przy pomocy gąbki nasączonej letnią wodą i
neutralnym mydłem. Jeśli plamy trudno usunąć, zastosować specjalne
produkty do czyszczenia. Po zakończeniu czyszczenia zaleca się
dokładne spłukanie wodą i wysuszenie. Nie używać proszków ściernych
ani substancji korodujących.
• Wnętrze piekarnika powinno być czyszczone po każdym użyciu, gdy jest
jeszcze letnie. Użyć ciepłej wody i środka czyszczącego, spłukać i wytrzeć
miękką ściereczką. Unikać środków ściernych.
• Akcesoria można myć jak zwykłe naczynia, także w zmywarce, z wyjątkiem
prowadnic przesuwnych.
• Zaleca się nie spryskiwać bezpośrednio panelu sterowania środkami
czyszczącymi, lecz myć go nasączoną nimi gąbką
! Nigdy nie stosować oczyszczaczy parowych lub ciśnieniowych do
czyszczenia urządzenia.
Page 73

73
PL
Czyszczenie drzwiczek
Szybę drzwiczek wyczyścić przy użyciu gąbki i środków nierysujących, a
następnie wytrzeć miękką ściereczką; nie używać szorstkich materiałów
ścierających czy ostrych, metalowych skrobaków, które mogą porysować
powierzchnię i doprowadzić do pęknięcia szyby.
Aby dokładniej wyczyścić piekarnik, można zdemontować drzwiczki:
1. Całkowicie otworzyć drzwiczki (zob. rysunek);
2. Przy użyciu śrubokręta podważyć i przekręcić dźwignie F umieszczone na
obu zawiasach (zob. rysunek);
F
3. Chwycić drzwiczki za obie zewnętrzne
krawędzie, przymykając je powoli, lecz nie
całkowicie. Następnie pociągnąć drzwiczki do
siebie i wyjąć je z zawiasów (patrz rysunek).
Zamontować ponownie drzwiczki wykonując
czynności w odwrotnej kolejności.
Sprawdzanie uszczelek
Co pewien czas należy sprawdzać stan uszczelek wokół drzwiczek piekarnika.
Gdyby okazało się, ze uszczelka jest uszkodzona należy zwrócić się do
najbliższego punktu serwisowego ( patrz Serwis Techniczny ). Zaleca się nie
używać piekarnika do czasu wykonania naprawy.
Wymiana żarówki
Aby wymienić żarówkę oświetlającą
piekarnik:
1. Odkręcić szklaną pokrywę obudowy
żarówki.
2. Wyjąć żarówkę i wymienić ją na
podobną: moc 25W, gwint E14.
3. Ponownie założyć szklaną osłonę
(patrz rysunek).
! Nie używać żarówki piekarnika do oświetlania pomieszczeń.
Page 74

74
RO
Instalare
! Este importantă păstrarea acestui manual pentru a putea consultat în orice
moment. În caz de vânzare, de închiriere sau de schimbare a locuinţei, acesta
trebuie să e înmânat împreună cu cuptorul, pentru a informa noul proprietar
cu privire la funcţionare şi la respectivele avertismente.
! Citiţi cu atenţie instrucţiunile: ele conţin informaţii importante privind
instalarea, utilizarea şi siguranţa.
Amplasare
! Ambalajele nu sunt jucării pentru copii; eliminarea lor se va face conform
normelor privind colectarea separată a deşeurilor (vezi Măsuri de precauţie
şi recomandări).
! Instalarea se va face conform prezentelor instrucţiuni, numai de persoane
calicate. Instalarea greşită a aparatului poate cauza daune persoanelor,
animalelor sau bunurilor.
Montarea în mobilier
Pentru a garanta buna funcţionare a aparatului este necesar ca mobilierul să
aibă caracteristicile adecvate:
• panourile de lângă cuptor trebuie să e dintr-un material rezistent la
căldură;
• dacă mobilierul este din lemn îmbrăcat în furnir, cleiurile utilizate trebuie
să reziste la temperatura de 100°C;
• pentru încastrarea cuptorului, atât în cazul montării sub blat (vezi gura) cât
şi al montării pe coloană, mobilierul trebuie să aibă următoarele dimensiuni:
590 mm.
595 mm.
22,5 mm.*
20,5 mm.
550 mm.
570 mm.
20 mm.
575-585 mm.
45 mm.
560 mm.
550 mm.
min.
! După montarea încastrată a aparatului, persoanele nu trebuie să intre în
contact cu componentele electrice. Declaraţiile de consum indicate pe plăcuţa
de caracteristici au fost măsurate cu acest tip de montaj.
Aerisire
Pentru a garanta o mai bună aerisire, este necesar să îndepărtaţi peretele din
spate al compartimentului. Se recomandă instalarea cuptorului astfel încât
acesta să se sprijine pe două bare de lemn sau pe un blat cu deschiderea de
cel puţin 45 x 560 mm (vezi guri).
560 mm.
45 mm.
Centrare şi xare
Pentru a xa aparatul pe mobilier:
• deschideţi uşa cuptorului;
• scoateţi cele 2 piese de cauciuc care acoperă găurile de xare de pe rama
perimetrală;
• xaţi cuptorul de mobilă folosind 2 şuruburi pentru lemn;
• repoziţionaţi piesele de cauciuc care acoperă găurile.
! Toate componentele care asigură protecţia aparatului trebuie să e xate
în aşa fel încât să nu poată scoase cu mâna liberă.
Branşamentul electric
Cuptoarele dotate cu un cablu de alimentare tripolar sunt predispuse pentru
funcţionarea în curent alternativ; tensiunea şi frecvenţa sunt indicate pe
plăcuţa de caracteristici de pe aparat (vezi mai jos).
Montarea cablului de alimentare
1. Deschideţi cutia de borne cu o
şurubelniţă, apăsând pe proeminenţele
laterale ale capacului: trageţi şi deschideţi
capacul (vezi gura).
2. Punerea în funcţiune a cablului de
alimentare: deşurubaţi şurubul presetupei
şi cele 3 şuruburi corespunzătoare
contactelor L-N-
, apoi xaţi cablurile
sub capul şuruburilor, ind atenţi la culori -
Albastru (N) Maro (L) Galben-Verde
(vezi gura).
3. Fixaţi cablul în presetupa specială.
4. Închideţi capacul cutiei cu borne.
Racordarea cablului de alimentare la reţea
Montaţi pe cablu un ştecher normalizat pentru sarcinile indicate pe plăcuţa de
caracteristici (vezi alături). În cazul branşamentului direct la reţea, este necesar să
se monteze între aparat şi reţea un întrerupător omnipolar cu deschiderea minimă
a contactelor de 3 mm, dimensionat la sarcină, conform normelor în vigoare (rul
de împământare nu trebuie să e întrerupt de întrerupător). Cablul de alimentare
trebuie să e poziţionat astfel încât să nu atingă în nici un punct o temperatură cu
50°C peste temperatura mediului ambiant.
! Singurul responsabil pentru corectitudinea executării branşamentului electric
şi pentru respectarea normelor de siguranţă este instalatorul.
Înainte de a efectua branşamentul, asiguraţi-vă că:
• priza are împământare şi corespunde prevederilor legale în vigoare;
• priza poate suporta sarcina maximă de putere a aparatului, indicată pe
plăcuţa de caracteristici (vezi mai jos);
L
N
N
L
Page 75

75
RO
• tensiunea de alimentare este cuprinsă în valorile indicate pe plăcuţa cu
caracteristici (vezi mai jos);
• priza este compatibilă cu ştecherul aparatului. În caz contrar, înlocuiţi
priza sau ştecherul; nu folosiţi prelungitoare sau prize multiple.
! După instalarea aparatului, cablul de alimentare şi priza de curent trebuie
să e uşor accesibile.
! Cablul nu trebuie să e îndoit sau comprimat.
! Cablul trebuie să e controlat periodic şi înlocuit de electricieni autorizaţi
(vezi Asistenţa).
! Producătorul îşi declină orice responsabilitate în cazul nerespectării
acestor norme.
Conexiuni
electrice
tensiune la 220-240V~ 50/60Hz
putere maximă absorbită 2800W
(vezi plăcuţa cu caracteristici)
Directiva UE nr. 65/2014 de integrare
a Directivei 2010/30/UE.
Regulamentul UE nr. 66/2014
de integrare a Directivei 2009/125/CE.
Regulamentul EN 60350-1,
Regulamentul EN 50564
Consum energie convecţie
Naturală – funcţie de încălzire:
Tradiţională;
Consum de energie declaraţie
Clasă convecţie forţată - funcţia
de încălzire:
Patiserie.
PLĂCUŢA DE CARACTERISTICI
Dimensiuni*
lăţime cm 43,5
înălţime cm 32,4
adâncime cm 41,5
Dimensiuni**
lăţime cm 45,5
înălţime cm 32,4
adâncime cm 41,5
Volum*
litri 59
Volum**
litri 62
* Numai pentru modelele cu şine matriţate
.
** Numai pentru modelele cu şine de sârmă.
Acest aparat este conform cu
următoarele Directive Comunitare:
- 2006/95/CE din 12/12/06
(Tensiune Joasă) cu modificările
ulterioare
- 2004/108/CE din 15/12/04
(Compatibilitate Electromagnetică)
cu modificările ulterioare
- 93/68/CEE din 22/07/93 cu
modificările ulterioare.
- 2012/19/UE cu modificările ulterioare.
- 1275/2008 stand-by/off mode
ETICHETĂ
ENERGETICĂ
şi ECODESIGN
Page 76

76
RO
Pornire şi utilizare
ATENŢIE! Cuptorul este prevăzut
cu un sistem de oprire a grătarelor
care permite extragerea acestora
fără ca ele să iasă din cuptor (1).
Pentru a extrage complet grătarele
este sucient, astfel cum se arată în
desen, să le ridicaţi, prinzându-le din
partea din faţă şi să le trageţi (2).
! La prima aprindere, vă recomandăm să lăsaţi cuptorul să funcţioneze în gol
timp de aproximativ o oră, cu termostatul la maxim şi uşa închisă. Stingeţi
apoi cuptorul, deschideţi uşa şi aerisiţi camera. Mirosul care se degajă este
datorat evaporării substanţelor folosite pentru realizarea protecţiei cuptorului.
Pornirea cuptorului
1. Selectaţi programul de coacere dorit rotind butonul PROGRAME.
2. Alegeţi temperatura rotind butonul TERMOSTAT. O listă cu tipurile de
coacere şi temperaturile corespunzătoare recomandate poate consultată
în Tabelul coacere (vezi Programe).
3. Indicatorul TERMOSTAT aprins arată faza de încălzire până la temperatura
stabilită.
4. În timpul procesului de coacere, puteţi oricând să:
- modicaţi programul de coacere acţionând butonul PROGRAME;
- modicaţi temperatura acţionând butonul TERMOSTAT;
- întrerupeţi coacerea aducând butonul PROGRAME în poziţia “0” .
! Nu aşezaţi niciodată obiecte pe fundul cuptorului, pentru că riscaţi să
deterioraţi smalţul.
! Aşezaţi întotdeauna vasele cu mâncare pe grătarul din dotare.
Ventilator de răcire
Pentru a reduce temperatura externă, anumite ventilatoare sunt dotate cu un
ventilator de răcire. Acesta generează un curent de aer rece care iese printre
panoul de control şi uşa cuptorului.
! La terminarea perioadei de coacere, ventilatorul rămâne în funcţiune până
când cuptorul este aproape rece.
Lumina din cuptor
Se aprinde selectând
cu butonul PROGRAME. Rămâne aprins când
se selectează un program de coacere.
Folosirea contorul de minute
1. Este necesar în primul rând ca alarma să e încărcată: de aceea, rotiţi
butonul CONTORUL DE MINUTE cu o tură, în sens orar.
2. Rotind butonul în sens contrar acelor de ceasornic, reglaţi timpul de coacere
astfel încât minutele dorite indicate pe butonul CONTORUL DE MINUTE să
e în dreptul reperului x de pe panoul de control.
3. Contorul de minute după expirarea timpului reglat, emite un semnal acustic.
! Contorul de minutenu comandă aprinderea sau stingerea cuptorului.
Programe
! La toate programele se poate xa o temperatură între 60°C şi MAX, cu
excepţia:
• BARBECUE (se recomandă reglarea numai pe MAX);
• GRATIN (se recomandă să nu depăşiţi temperatura de 200°C).
Program CUPTOR TRADIŢIONAL
Se activează cele două elemente de încălzire inferior şi superior. Cu această
coacere tradiţională este bine să folosiţi un singur raft: dacă se folosesc mai
multe rafturi, temperatura nu se distribuie corespunzător.
Program MAI MULTE RAFTURI
Se activează toate elementele de încălzire (superior, inferior şi circular) şi intră
în funcţiune ventilatorul. Întrucât căldura este constantă în tot cuptorul, aerul
coace şi pătrunde alimentele în mod uniform. Este posibil să se folosească
maxim două rafturi în acelaşi timp.
Program CUPTOR PIZZA
Se activează elementele de încălzire inferior şi circular şi intră în funcţiune
ventilatorul. Această combinaţie permite o încălzire rapidă a cuptorului, cu
un mare aport de căldură îndeosebi de jos în sus. În cazul în care folosiţi mai
mult de un raft deodată, trebuie să le schimbaţi poziţia între ele la jumătatea
coacerii.
Program BARBECUE
Intră în funcţiune elementul de încălzire superior.
Temperatura ridicată şi directă a grătarului este recomandată pentru alimentele
care necesită o temperatură ridicată la suprafaţă. Coacerea trebuie să aibă
loc cu uşa cuptorului închisă.
Program GRATIN
Intră în funcţiune elementul de încălzire superior precum şi ventilatorul.
Uneşte la radiaţia termică unidirecţională circulaţia forţată a aerului în interiorul
cuptorului. Acest lucru nu permite arderile de la suprafaţa alimentelor, mărind
puterea de pătrundere a căldurii. Coacerea trebuie să aibă loc cu uşa
cuptorului închisă.
Program CUPTOR PATISERIE
Se activează elementul de încălzire posterior şi intră în funcţiune ventilatorul,
asigurând o căldură delicată şi uniformă în interiorul cuptorului. Acest program
este indicat pentru coacerea mâncărurilor delicate (de ex. prăjituri care
necesită dospire) şi preparate “mignon” pe trei rafturi în acelaşi timp.
Sfaturi practice pentru coacere
! Pentru coacerile ventilate, nu utilizaţi poziţiile 1 şi 5: aerul cald ar putea
provoca arderi alimentelor delicate.
! La coacerile BARBECUE şi GRATIN, în special dacă folosiţi rotisorul,
aşezaţi tava cuptorului în poziţia 1 pentru a colecta reziduurile de coacere
(sucuri şi/sau grăsimi).
COACERE PE MAI MULTE RAFTURI
• Folosiţi poziţiile 2 şi 4, rezervând poziţia 2 alimentelor care necesită un
aport mai mare de căldură.
• Puneţi tava jos şi grătarul sus.
Page 77

77
RO
BARBECUE
• Introduceţi grătarul în cuptor în poziţia 3 sau 4, amplasând alimentele în
centrul grătarului.
• Se recomandă alegerea nivelului maxim de energie. Nu vă alarmaţi dacă
rezistenţa de sus nu rămâne permanent aprinsă: funcţionarea sa este
comandată de un termostat.
CUPTOR PIZZA
• Utilizaţi o tavă uşoară din aluminiu, şi sprijiniţi-o pe grătarul din dotare.
Tava de colectare prelungeşte timpul de coacere şi în acest fel pizza nu
va crocantă.
• Dacă vă plac pizzele foarte garnisite, vă recomandăm să introduceţi
mozzarella la jumătatea timpului de coacere.
ProgrameAlimente
Greutate
(Kg)
Poziţia
rafturilor
Preîncălzire
(minute)
Temperatura
recomandată
Durata
coacerii
(minute)
Tradiţional
Raţă
Friptură de viţel sau vită
Friptură de porc
Biscuiţi (din aluat fraged)
Tarte
1
1
1
1
3
3
3
3
3
15
15
15
15
15
200
200
200
180
180
65-75
70-75
70-80
15-20
30-35
Coacere pe
mai
multe rafturi
Pizza (pe 2 rafturi)
Lasagne
Miel
Pui fript + cartofi
Scrumbie
Prăjitură cu prune
Bignè (pe 2 rafturi)
Biscuiţi (pe 2 rafturi)
Pandişpan (pe 1 raft)
Pandişpan (pe 2 rafturi)
Tarte sărate
1
1
1
1+1
1
1
0.5
0.5
0.5
1
1.5
2 şi 4
3
2
2 şi 4
2
2
2 şi 4
2 şi 4
2
2 şi 4
3
15
10
10
15
10
10
10
10
10
10
15
230
180
180
200
180
170-180
190
180
170
170
200
15-20
30-35
40-45
60-70
30-35
40-50
20-25
10-15
15-20
20-25
30-40
Pizza
Pizza
Plăcinte
0.53 15 220 15-20
12 sau 310 200 15-20
Grill
Solă
Rotisor cu calamari şi creveţi
Filet de cod
Legume la grătar
Cotlet de viţel
Şniţele
Hamburgeri
Scrumbie
Toast
1
1
1
1
1
1
1
1
n. 4
4
4
4
3 sau 4
4
4
4
4
4
5
5
5
5
5
5
5
5
5
MAX
MAX
MAX
MAX
MAX
MAX
MAX
MAX
MAX
8-10
6-8
10
10-15
15-20
15-20
7-10
15-20
2-3
Cu rotisor (dacă este în dotare)
Viţel la frigare
Pui la frigare
Miel la frigare
1.0
1.5
1.0
-
-
-
-
-
-
100%
100%
100%
80-90
70-80
70-80
Gratin
Pui la grătar
Sepie
1.5
1.5
2
2
5
5
200
200
55-60
30-35
Cu rotisor (dacă este în dotare)
Viţel la frigare
Miel la frigare
Pui (la frigare) +
cartofi (la tavă)
1.5
1.5
1.5
-
-
-
2
10
10
10
10
200
200
200
200
70-80
70-80
70-75
70-75
Patiserie
Tarte
Tort de fructe
Prăjitură cu prune
Pandişpan
Clătite umplute (pe 2 etaje)
Prăjituri mici (pe 2 etaje)
Saleuri din foietaj cu brânză (pe 2 etaje)
Bignè (pe 3 rafturi)
Biscuiţi (pe 3 rafturi)
Bezele (pe 3 etaje)
0.5
1
0.7
0.5
1.2
0.6
0.4
0.7
0.7
0.5
3
2 sau 3
3
3
2 şi 4
2 şi 4
2 şi 4
1 şi 3 şi 5
1 şi 3 şi 5
1 şi 3 şi 5
15
15
15
15
15
15
15
15
15
15
180
180
180
160
200
180-190
200-210
180
180
90
20-30
40-45
40-50
25-35
30-35
20-25
15-20
20-25
20-25
180
! Timpul de coacere este orientativ şi poate fi modificat în funcţie de cerinţele personale.
Tabel coacere
Page 78

78
RO
Măsuri de precauţie şi recomandări
! Aparatul a fost proiectat şi construit în conformitate cu normele internaţionale
de siguranţă. Recomandările sunt furnizate pentru siguranţa dvs. şi vă
recomandăm să le citiţi cu atenţie.
Siguranţă generală
• Aparatul a fost creat pentru a destinat utilizării neprofesionale, în mediul
casnic.
• Aparatul nu se va instala niciodată în aer liber, nici măcar în cazul în
care spaţiul se aă la adăpostul unui acoperiş; de asemenea, este foarte
periculos să îl lăsaţi expus la ploi sau intemperii.
• Pentru a mişca aparatul, folosiţi mânerele aplicate pe părţile laterale ale
cuptorului.
• Nu atingeţi aparatul când sunteţi desculţi sau cu mâinile sau picioarele
ude sau umede.
• Aparatul trebuie sa e utilizat numai pentru coacerea alimentelor
si numai de persoane adulte, conform instructiunilor din manual.
Orice alta utilizare (de exemplu: încalzirea locuintei) este considerata
improprie si deci periculoasa. Fabricantul nu va putea considerat
responsabil pentru eventuale daune provenite din utilizarea
improprie, gresita sau irationala a aparatului.
• În timpul folosirii aparatului, elementele de încălzire şi unele zone
ale uşii cuptorului devin foarte calde. Fiţi atenţi să nu le atingeţi;
îndepărtaţi copiii de aragaz.
• Evitaţi ca şi cablurile de alimentare ale altor aparate electrocasnice să
atingă părţile încălzite ale cuptorului.
• Nu astupaţi fantele de aerisire sau de ieşire a căldurii.
• Pentru a deschide usa cuptorului, prindeti mânerul de mijloc: spre margini,
mânerul poate prea cald.
• Utilizaţi întotdeauna mănuşi speciale pentru a introduce sau scoate
recipientele din cuptor.
• Nu puneţi folie de aluminiu pe fundul cuptorului.
• Nu aşezaţi materiale inamabile în cuptor: dacă cuptorul se aprinde din
greşeală, materialele depozitate pot lua foc.
• Asiguraţi-vă întotdeauna că butoanele sunt în poziţia “●”/“○” atunci când
nu utilizaţi aparatul.
• Nu scoateţi ştecherul din priză trăgând de cablu.
• Nu executaţi nici o operaţie de curăţire sau întreţinere înainte să scos
ştecherul din priză.
• În caz de defecţiune, nu interveniţi în niciun caz la mecanismele din
interiorul aparatului şi nu încercaţi să îl reparaţi singuri. Apelaţi Centrul
de Asistenţă (vezi Asistenţa).
• Nu aşezaţi obiecte grele pe uşa cuptorului, când este deschisă.
• Este interzisă utilizarea aparatului de persoanele (inclusiv copiii) care
au o redusă capacitate zică, senzorială sau mentală, precum şi de
cele fără experienţă sau care nu s-au familiarizat cu produsul, dacă nu
sunt supravegheate de un responsabil sau dacă nu au primit în prealabil
instrucţiuni asupra modului de folosire a aparatului.
• Nu lăsaţi copiii să se joace cu aparatul.
Eliminarea deşeurilor
• Eliminarea ambalajelor: respectaţi reglementările locale; astfel, ambalajele
ar putea reutilizate.
• Directiva Europeană 2012/19/UE cu privire la deşeurile care provin de
la aparatura electrică sau electronică (RAEE) prevede ca aparatele
electrocasnice să nu e colectate împreună cu deşeurile urbane solide,
obişnuite. Aparatele scoase din uz trebuie să e colectate separat atât pentru
a optimiza rata de recuperare şi de reciclare a materialelor componente, cât
şi pentru a evita pericolele care pot duce la dăunarea sănătăţii omului sau
poluarea mediului înconjurător. Simbolul tomberonului tăiat care apare pe
toate produsele vă aminteşte tocmai obligaţia de a le colecta separat.
Pentru informaţii suplimentare cu privire la scoaterea din uz a aparatelor
electrocasnice, deţinătorii acestora se vor putea adresa serviciului public
respectiv sau agenţilor de vânzare.
Protejarea şi respectarea mediului înconjurător
• Oricând este posibil, evitaţi pre-încălzirea cuptorului şi încercaţi să îl
umpleţi de ecare dată. Deschideţi uşa cuptorului cât de rar este posibil
deoarece se pierde căldură la ecare deschidere. Pentru a salva o cantitate
substanţială de energie, opriţi cuptorul la 5-10 minute înainte de nalizarea
timpului de gătit planicat şi folosiţi căldura generată în continuare de
cuptor.
• Programele automate sunt bazate pe produse alimentar standard.
• Păstraţi garniturile curate şi îngrijite pentru a preveni pierderea de energie
din zona uşii.
• Dacă aveţi un contract pentru electricitate cu tarif per timp, opţiunea de
„temporizare pentru gătit” vă va ajuta să reduceţi costurile alegând să
utilizaţi echipamentul în intervale de timp mai ieftine.
! Acest produs este în conformitate cu cerinţele din cea mai recentă directivă
europeană privind limitarea consumului de energie din modul de aşteptare.
Întreţinerea şi îngrijirea aparatului
Debranşarea de la reţeaua electrică
Înainte de orice operaţie, debranşaţi aparatul de la reţeaua de alimentare
cu curent electric.
Curăţarea aparatului
• Părţile externe, smălţuite sau din inox, precum şi garniturile din cauciuc
pot curăţate cu un burete îmbibat în apă călduţă şi săpun neutru. Dacă
petele sunt persistente, folosiţi produse speciale. După ecare spălare,
se recomandă să clătiţi bine şi să ştergeţi. Nu folosiţi prafuri abrazive sau
substanţe corozive.
• Interiorul cuptorului se va spăla, de preferinţă, după ecare utilizare, când
este călduţ. Folosiţi apă caldă şi detergent; clătiţi bine şi ştergeţi cu o cârpă
moale. Evitaţi substanţele abrazive.
• Accesoriile pot spălate ca orice alt vas, chiar şi în maşina de spălat vase,
cu excepţia glisierelor.
! Nu folosiţi niciodată aparate cu aburi sau sub presiune, pentru a curăţa
aparatul.
Curăţarea uşii
Curăţaţi geamul uşii cu un burete şi produse neabrazive şi ştergeţi-l cu o cârpă
moale; nu folosiţi materiale aspre, abrazive sau raclete metalice, ascuţite, care
pot zgâria suprafaţa sau cauza crăparea geamului.
Pentru curăţarea minuţioasă a cuptorului, demontaţi uşa acestuia:
1. Deschideţi uşa la maxim (vezi gura);
2. Cu ajutorul unei şurubelniţe, ridicaţi şi rotiţi levierele F amplasate pe cele
două balamale (vezi gura);
F
Page 79

79
RO
3. Apucaţi bine uşa de părţile laterale şi
apropiaţi-o fără a o închide complet. Trageţi
apoi uşa spre voi, extrăgând-o din balamale
(vezi gura).
Montaţi la loc uşa, urmând acelaşi procedeuîn
sens invers.
Controlarea garniturilor
Controlaţi periodic garnitura din jurul uşii cuptorului. Dacă este deteriorată,
adresaţi-vă celui mai apropiat Centru de Asistenţă (vezi Asistenţa). Se
recomandă să nu folosiţi cuptorul până la înlocuirea garniturii.
Înlocuirea becului
Pentru a înlocui becul cuptorului:
1. Deşurubaţi capacul din sticlă care
acoperă becul.
2. Desurubati becul si înlocuiti-l cu unul
similar: putere 25 W, dulie E 14.
3. Montaţi la loc capacul (gura).
! Nu folosiţi lampa cuptorului pentru şi ca iluminare a încăperilor.
Page 80

80
GR
195123121.01
07/2014 - XEROX FABRIANO
Indesit Company S.p.A.
V
iale Aristide Merloni,47
60044 Fabriano (AN)
www.hotpoint.eu
 Loading...