

Page 1
ENTLH 18xxx F (TK)
English English
English
English English
Operating Instructions
2-DOOR FRIDGE
Contents
Operating Instructions, 1
Assistance, 2
Description of the appliance, 3
Description of the appliance, 4
Reversible doors, 5
Installation, 6
Start-up and use, 7
Maintenance and care, 8
Precautions and tips, 8
Troubleshooting, 9
Türkçe Türkçe
Türkçe
Türkçe Türkçe
Kullaným talimatlarýKullaným talimatlarý
Kullaným talimatlarý
Kullaným talimatlarýKullaným talimatlarý
2 KAPILI SOÐUTUCU
2 KAPILI SOÐUTUCU
2 KAPILI SOÐUTUCU
2 KAPILI SOÐUTUCU
2 KAPILI SOÐUTUCU
ÝçindekilerÝçindekiler
Ýçindekiler
ÝçindekilerÝçindekiler
Kullaným talimatlarý,1
Teknik Servis, 2
Cihazýn tanýmý, 3
Cihazýn tanýmý, 4
Kapýlarýn açýlýþ yönünün deðiþtirilmesi, 5
Montaj,10
Çalýþtýrma ve kullanma10
Bakým ve temizlik, 11
Önlemler ve öneriler, 11
Arýza ve onarým,12
Page 2

Assistance
Before calling for Assistance:
• Check if the malfunction can be solved on your own (see
Troubleshooting).
• If after all the checks, the appliance still does not operate or the
problem persists, call the nearest Service Centre
TT
eknik Serviseknik Servis
T
eknik Servis
TT
eknik Serviseknik Servis
TT
eknik Servis ile irtibata geçmeden önce:eknik Servis ile irtibata geçmeden önce:
T
eknik Servis ile irtibata geçmeden önce:
TT
eknik Servis ile irtibata geçmeden önce:eknik Servis ile irtibata geçmeden önce:
• Servise baþvurmadan çözülebilecek bir arýza olup olmadýðýný
kontrol ediniz (
• Sonucun olumsuz olmasý durumunda, en yakýn Teknik Servis ile
irtibata geçiniz.
Arýza ve Onarým bölümüne bakýnýz
).
Communicating:
• type of malfunction
• appliance model (Mod.)
• serial number (S/N)
This information can be found on the data plate located on the bottom
left side of the refrigerator compartment.
Never call on unauthorized technicians and always refuse spare
parts which are not originals.
Aþaðýdaki bilgileri bildiriniz:Aþaðýdaki bilgileri bildiriniz:
Aþaðýdaki bilgileri bildiriniz:
Aþaðýdaki bilgileri bildiriniz:Aþaðýdaki bilgileri bildiriniz:
• arýza tipi
• cihazýn modeli (Mod.)
• seri numarasý (S/N)
Bu bilgiler, soðutucu bölmesi içinde aþaðýda solda bulunan teknik veriler
etiketi üzerinde bulunmaktadýr.
Kesinlikle sadece yetkili teknik elemanlara baþvurunuz veKesinlikle sadece yetkili teknik elemanlara baþvurunuz ve
Kesinlikle sadece yetkili teknik elemanlara baþvurunuz ve
Kesinlikle sadece yetkili teknik elemanlara baþvurunuz veKesinlikle sadece yetkili teknik elemanlara baþvurunuz ve
her zaman orijinal yedek parçalarý kullanýnýz.her zaman orijinal yedek parçalarý kullanýnýz.
her zaman orijinal yedek parçalarý kullanýnýz.
her zaman orijinal yedek parçalarý kullanýnýz.her zaman orijinal yedek parçalarý kullanýnýz.
Cihazýn ömrü 10 yýldýrCihazýn ömrü 10 yýldýr
Cihazýn ömrü 10 yýldýr
Cihazýn ömrü 10 yýldýrCihazýn ömrü 10 yýldýr
getirebilmesi için gerekli yedek parça bulundurmagetirebilmesi için gerekli yedek parça bulundurma
getirebilmesi için gerekli yedek parça bulundurma
getirebilmesi için gerekli yedek parça bulundurmagetirebilmesi için gerekli yedek parça bulundurma
süresi).süresi).
süresi).
süresi).süresi).
. (Ürünün fonksiyonunu yerine. (Ürünün fonksiyonunu yerine
. (Ürünün fonksiyonunu yerine
. (Ürünün fonksiyonunu yerine. (Ürünün fonksiyonunu yerine
- model
- model
Üretici Firma:
Indesit Company Beyaz Eşya Sanayi ve Ticaret A.Ş.
Organize Sanayi Bölgesi
45030 / Manisa
Tel: (0236) 233 22 00
Faks: (0236) 233 16 52
Türkiye Genel Dağıtıcısı:
Indesit Company Beyaz Eşya PAZARLAMA A.Ş.
Balmumcu Cad. Karahasan Sok.
No: 11, 34349 – Balmumcu Beşiktaş – İstanbul
Tel: (0212) 355 53 00
Faks: (0212) 212 95 59
- serial number
seri numarasýseri numarasý
-
seri numarasý
seri numarasýseri numarasý
2
Page 3

Description of the appliance
5
Control Panel
1.1.
1.REFRIGERATOR OPERATION Knob
1.1.
to regulate the temperature of the refrigerator
compartment.
is the optimal temperature for energy saving
levels.
Maintenance and care
OFF switches the refrigerator off.
2.2.
SUPER COOLSUPER COOL
2.
SUPER COOL
SUPER COOLSUPER COOL
2.2.
of the refrigerator compartment rapidly. When it is
pressed, the
illuminates (
3.3.
3.
SUPER COOL Yellow indicator light (rapid cooling)
3.3.
illuminates when the
pressed.
4.4.
4.
POWER Indicator light illuminates when the
4.4.
appliance is connected to the electricity network.
5.5.
5. SUPER FREEZE button (rapid freezing) to freeze fresh food.
5.5.
When it is pressed, the SUPER FREEZE indicator light illuminates
(
see Start-up and use
66
6.SUPER FREEZE Yellow indicator light (rapid freezing)
66
illuminates when the
pressed.
7.7.
7.
FREEZER OPERATION Knob
7.7.
to regulate the temperature of the freezer
compartment.
levels.
refrigerator.
is the holiday function (
).
(quick cool) to lower the temperature
SUPER COOLSUPER COOL
SUPER COOL
SUPER COOLSUPER COOL
indicator light
see Start-up and use
SUPER COOLSUPER COOL
SUPER COOL button is
SUPER COOLSUPER COOL
).
SUPER FREEZE button is
is the optimal temperature for energy saving
switches the appliance off, including the
see
).
Cihazýn tanýmýCihazýn tanýmý
Cihazýn tanýmý
Cihazýn tanýmýCihazýn tanýmý
Kontrol Paneli
SOÐUTUCU KONTROLSOÐUTUCU KONTROL
1.
SOÐUTUCU KONTROL ayar düðmesi ile soðutucu
SOÐUTUCU KONTROLSOÐUTUCU KONTROL
bölmesindeki ýsý derecesi ayarlanýr.
düþük tüketim için optimal ýsý derecesidir.
holiday fonksiyonudur (Bakým ve onarým bölümüne
bakýnýz).
OFF soðutucu bölmesini kapatýr.
..
SUPER COOL SUPER COOL
22
2
.
SUPER COOL (hýzlý soðutma) tuþu ile soðutucu bölmesi
22
..
SUPER COOL SUPER COOL
içerisindeki ýsý derecesi hýzlý bir þekilde düþürmek için
kullanýlýr. Bu tuþa basýldýðýnda
lambasý hemen yanar (
bakýnýz).
3.3.
3.Sarý
3.3.
4.4.
4.Yeþil
4.4.
5.5.
5.
5.5.
6.6.
6.Sarý
6.6.
7.7.
7.
7.7.
SUPER COOLSUPER COOL
SUPER COOL (hýzlý soðutma) lambasý:
SUPER COOLSUPER COOL
COOLCOOL
COOL tuþuna basýldýðýnda yanar.
COOLCOOL
BESLEME BESLEME
BESLEME lambasý: cihaz elektrik þebekesine baðlý
BESLEME BESLEME
olduðu sürece yanar.
SUPER FREEZESUPER FREEZE
SUPER FREEZE (hýzlý dondurma) tuþu ile taze gýdalar
SUPER FREEZESUPER FREEZE
dondurulur. Bu tuþa basýldýðýnda
lambasý hemen yanar (
bakýnýz).
SUPER FREEZESUPER FREEZE
SUPER FREEZE (hýzlý dondurma) lambasý:
SUPER FREEZESUPER FREEZE
SUPER FREEZESUPER FREEZE
SUPER FREEZE tuþuna basýldýðýnda yanar.
SUPER FREEZESUPER FREEZE
DONDURUCU KONTROLDONDURUCU KONTROL
DONDURUCU KONTROL ayarý ile dondurucu
DONDURUCU KONTROLDONDURUCU KONTROL
bölmesindeki ýsý derecesi ayarlanýr.
düþük tüketim için optimal ýsý derecesidir.
soðutucu dahil olmak üzere cihazý kapatýr.
Çalýþtýrma ve kullaným
Çalýþtýrma ve kullaným
SUPER COOLSUPER COOL
SUPER COOL uyarý
SUPER COOLSUPER COOL
bölümüne
SUPERSUPER
SUPER
SUPERSUPER
SUPER FREEZESUPER FREEZE
SUPER FREEZE uyarý
SUPER FREEZESUPER FREEZE
bölümüne
! The indicator lights are also used to indicate an unusual temperature
increase in the freezer compartment (
see Troubleshooting
).
! Uyarý lambalarý dondurucu bölmesinde ýsýnýn anormal bir
þekilde arttýðýný belirtmek için kullanýlýr (
bölümüne bakýnýz).
Ariza ve onarým
4
1
2
3
6
7
3
Page 4
Description of the appliance
Cihazýn tanýmýCihazýn tanýmý
Cihazýn tanýmý
Cihazýn tanýmýCihazýn tanýmý
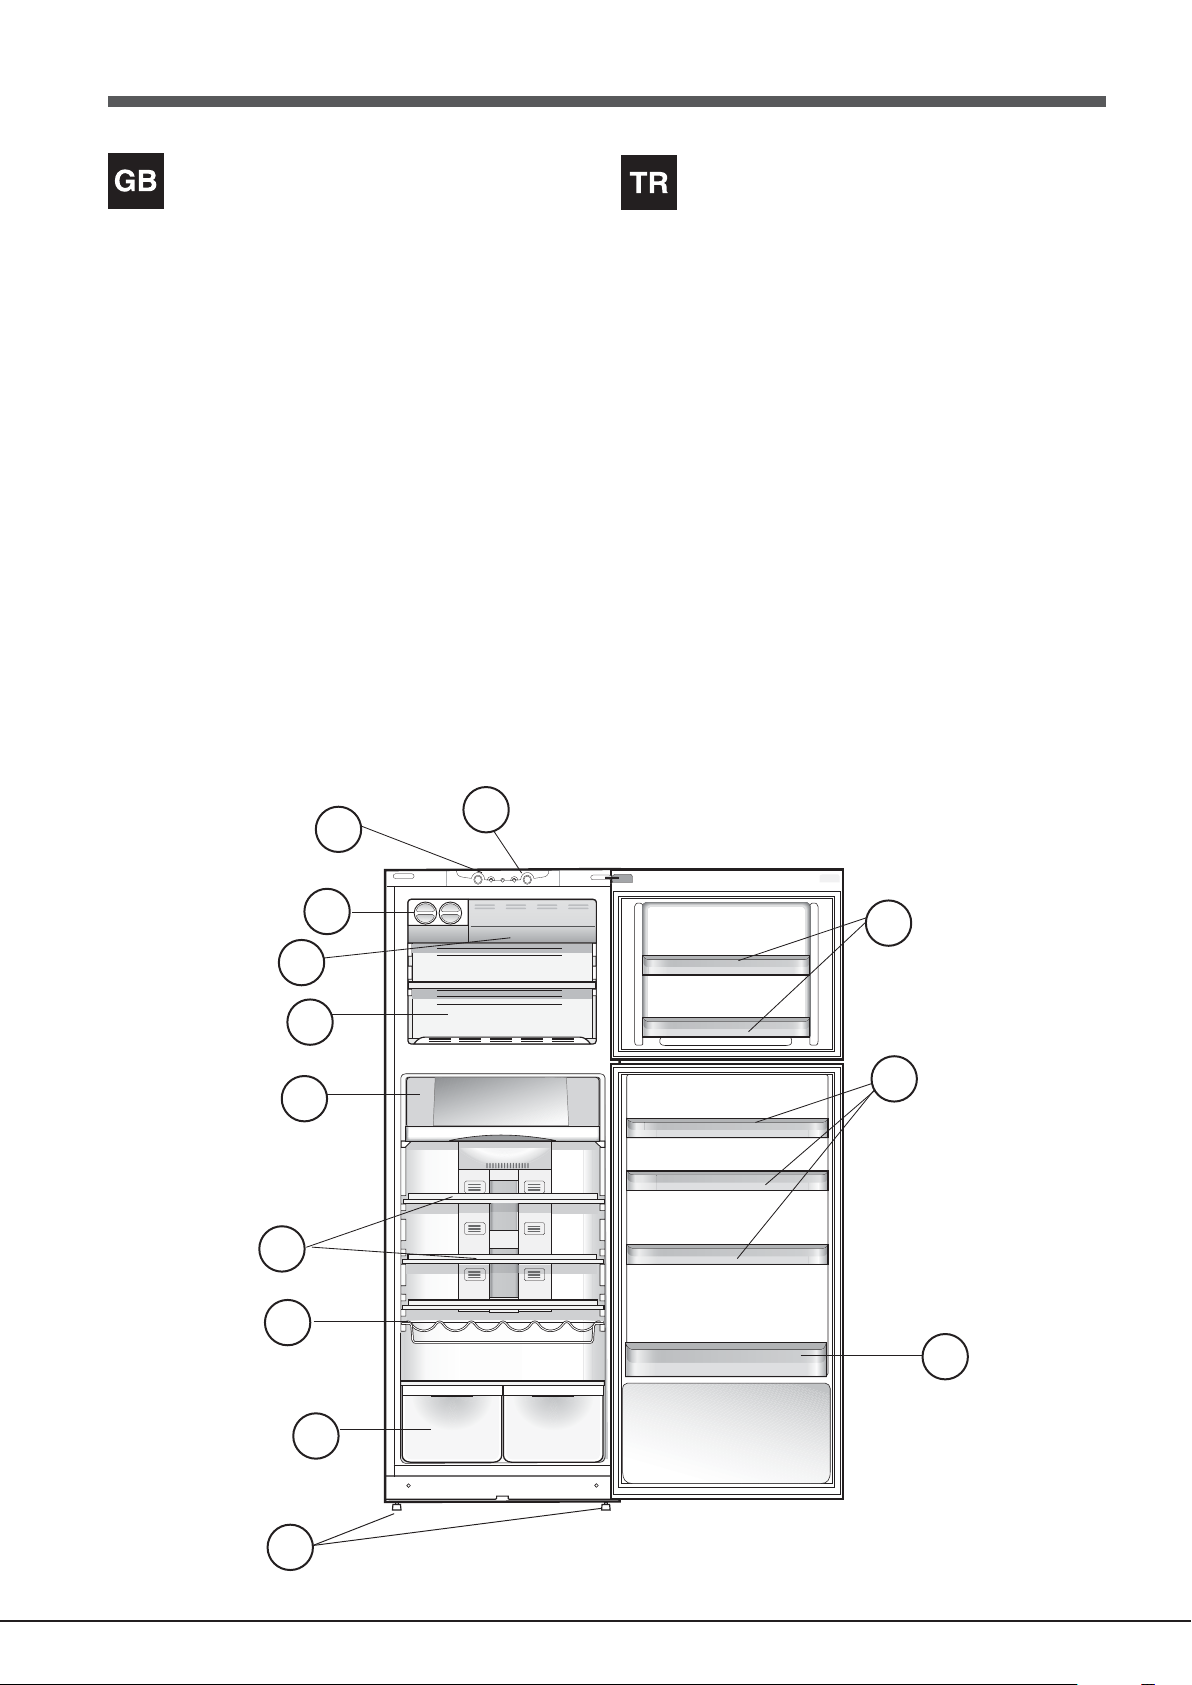
Overall view
The instructions contained in this manual are applicable to different
model refrigerators. The diagrams may not directly represent the
appliance purchased. For more complex features, consult the following
pages.
1 Levelling FEET
2 FRUIT and VEGETABLE bin *
3 WINE RACK *
4 SHELVES *
5 Food Care Zone 0°C*
6 FREEZER and STORAGE compartment
7 FAST FREEZER
8 ICE DEVICE
9 9
9 REFRIGATOR OPERATION Knob
9 9
10 FREEZER OPERATION Knob
11 Removable multipurpose SHELVES *
12 BOTTLE shelf
* Varies by number and/or position, available only on certain models.
10
9
Genel görünümGenel görünüm
Genel görünüm
Genel görünümGenel görünüm
Kullaným talimatlarý birkaç model için geçerli olduðu için þekil satýn
aldýðýnýz cihazda olmayandeðiþik ayrýntýlarý gösterebilir. Sonraki
sayfalarda en karýþýk cisimler açýklanmýþtýr.
11
1 Ayarlanabilir
11
22
MEYVEMEYVE
2
MEYVE ve
22
MEYVEMEYVE
33
3 WINE RACK * (Þaraplýk)
33
44
RAFRAF
4
RAF*
44
RAFRAF
Food Care Zone 0°C*Food Care Zone 0°C*
5
Food Care Zone 0°C*(0°C Besin Koruma Bölgesi)
Food Care Zone 0°C*Food Care Zone 0°C*
66
DONDURMA ve SAKLAMA DONDURMA ve SAKLAMA
6
DONDURMA ve SAKLAMA bölmesi
66
DONDURMA ve SAKLAMA DONDURMA ve SAKLAMA
FF
ASTAST
7
F
AST
FF
ASTAST
8 ICE DEVICE 8 ICE DEVICE
8 ICE DEVICE (Buzluk)
8 ICE DEVICE 8 ICE DEVICE
9 SOÐUTUCU KONTROL9 SOÐUTUCU KONTROL
9 SOÐUTUCU KONTROL ayar düðmesi
9 SOÐUTUCU KONTROL9 SOÐUTUCU KONTROL
10 DONDURUCU KONTROL10 DONDURUCU KONTROL
10 DONDURUCU KONTROL ayar düðmesi
10 DONDURUCU KONTROL10 DONDURUCU KONTROL
11
11
Çýkarýlabilen
1
1
11
11
ÞÝÞE ÞÝÞE
12
ÞÝÞE Rafý
ÞÝÞE ÞÝÞE
AA
YY
AKAK
A
Y
AK
AA
YY
AKAK
SEBZESEBZE
SEBZE çekmecesi*
SEBZESEBZE
FREEZER FREEZER
FREEZER (Hýzlý Dondurucu Bölümü)
FREEZER FREEZER
KAPI RAFIKAPI RAFI
KAPI RAFI*
KAPI RAFIKAPI RAFI
*Sayýsý ve/veya pozisyonu deðiþebilir. Sadece bazý modellerde
mevcuttur.
8
11
7
6
11
5
4
3
12
2
1
4
Page 5

Reversible doors
If it is necessary to change the direction in which the doors open,
please contact the Technical Assistance Centre.
Kapýlarýn açýlýþ yönününKapýlarýn açýlýþ yönünün
Kapýlarýn açýlýþ yönünün
Kapýlarýn açýlýþ yönününKapýlarýn açýlýþ yönünün
deðiþtirilmesideðiþtirilmesi
deðiþtirilmesi
deðiþtirilmesideðiþtirilmesi
Kapýlarýn açýlýþ yönünün deðiþtirilmesi gerekirse Teknik Servise
baþvurunuz.
5
Page 6

Installation
GB
! Before placing your new appliance into operation please read these
operating instructions carefully. They contain important information for
safe use, for installation and for care of the appliance.
! Please keep these operating instructions for future reference. Pass
them on to possible new owners of the appliance.
Positioning and connection
Positioning
1. Place the appliance in a well-ventilated humidity-free room.
2. Do not obstruct the rear fan grills. The compressor and condenser
give off heat and require good ventilation to operate correctly and
save energy.
3. Leave a space of at least 10 cm between the top part of the
appliance and any furniture above it, and at least 5 cm between
the sides and any furniture/side walls.
4. Ensure the appliance is away from any sources of heat (direct
sunlight, electric stove, etc.).
5. In order to maintain the correct distance between the appliance
and the wall behind it, fit the spacers supplied in the installation kit,
following the instructions provided.
Levelling
1. Install the appliance on a level and rigid floor.
2. If the floor is not perfectly horizontal, adjust the refrigerator by
tightening or loosening the front feet.
Electrical connections
After the appliance has been transported, carefully place it vertically
and wait at least 3 hours before connecting it to the electricity mains.
Before inserting the plug into the electrical socket ensure the following:
• The appliance is earthed and the plug is compliant with the law.
• The socket can withstand the maximum power of the appliance,
which is indicated on the data plate located on the bottom left side
of the fridge (e.g. 150 W).
• The voltage must be in the range between the values indicated on
the data plate located on the bottom left side (e.g. 220-240V).
• The socket is compatible with the plug of the appliance. If the
socket is incompatible with the plug, ask an authorised technician
to replace it (see Assistance). Do not use extension cords or
multiple sockets.
2. Turn the FREEZER OPERATION knob and REFRIGERATOR
OPERATION knob to an average value. After a few hours you will
be able to put food in the refrigerator.
Setting the temperature
The temperature inside the refrigerator compartment automatically
adjusts itself according to the position of the thermostat knob.
is the holiday function
MAX = coldest
is the optimal temperature for energy saving levels.
OFF switches the appliance off, including the refrigerator.
We recommend, however, a medium position.
The No Frost system circulates cold air continuously to collect humidity
and prevent ice and frost formation. The system maintains an optimal
humidity level in the compartment, preserving the original quality of
the food, preventing the food from sticking together and making
defrosting a thing of the past. Do not block the aeration cells by
placing food or containers in direct contact with the refrigerating back
panel. Close bottles and wrap food tightly.
FRUIT and VEGETABLE bin*
The salad crispers fitted inside the fridge have been specially
designed for the purpose of keeping fruit and vegetables fresh and
crisp. Open the humidity regulator (position B) if you want to store
food in a less humid environment, or close it (position A) to store food
in a more humid environment.
The easy-to-open lids (all you have to do is pull the crisper out) make
it easy to put food in and take it out.
! Once the appliance has been installed, the power supply cable and
the electrical socket must be easily accessible.
! The cable must not be bent or compressed.
! The cable must be checked regularly and replaced by authorised
technicians only (see Assistance).
The manufacturer declines any liability should these The manufacturer declines any liability should these
!
The manufacturer declines any liability should these
The manufacturer declines any liability should these The manufacturer declines any liability should these
safety measures not be observed.safety measures not be observed.
safety measures not be observed.
safety measures not be observed.safety measures not be observed.
Start-up and use
Starting the appliance
! Before starting the appliance, follow the installation instructions
(see Installation).
! Before connecting the appliance, clean the compartments and
accessories well with lukewarm water and bicarbonate.
! The appliance comes with a motor protection control system which
makes the compressor start approximately 8 minutes after being
switched on. The compressor also starts each time the power supply
is cut off whether voluntarily or involuntarily (blackout).
1. Insert the plug into the socket and ensure that the internal light
illuminates ( the FREEZER OPERATION knob must not be on the
position OFF) .
6
ICE DEVICE*
After pouring water in the special ice cups, place them in their places
in the ice device. After about 2 hours, the ice cubes will be ready. In
order to get the ice cubes, it will be sufficient to turn the two buttons to
the right. The ice cubes will fall in to the tray below, ready to be used.
Page 7

Food Care Zone 0°C*
and fish freshness.Due to the compartment’s low temperature (-2/
+3) food can be stored for even up to one week. It can also be used
for “cold meals.” Not suitable for fruit, vegetables and salads.
::
: A compartment designed to keep meat
::
Using the refrigerator to its full potential
• Place only cold or lukewarm foods in the compartment, never hot
foods (see Precautions and tips).
• Remember that cooked foods do not last longer than raw foods.
• Do not store liquids in open containers: they will increase the level
of humidity in the refrigerator and cause condensation to form.
SHELVES*:
Due to the special guides the shelves are removable and the height is
adjustable (see diagram), allowing easy storage of large containers
and food. Height can be adjusted without complete removal of the
shelf.
This will help maintain the temperature inside the freezer, ensuring
that foods are conserved for at least 9 -14 hours.
! To avoid blocking the air circulation inside the freezer, it is advisable
not to obstruct the ventilation holes with food or containers.
Maintenance and care
Switching the appliance off
During cleaning and maintenance it is necessary to disconnect the
appliance from the electricity supply:
1. set the FREEZER OPERATION knob on OFF;
2. pull the plug out of the socket
Cleaning the appliance
• The external and internal parts, as well as the rubber seals may be
cleaned using a sponge that has been soaked in lukewarm water
and bicarbonate of soda or neutral soap. Do not use solvents,
abrasive products, bleach or ammonia.
• The removable accessories may be soaked in warm water and
soap or dishwashing liquid. Rinse and dry them carefully.
• The back of the appliance may collect dust which can be removed
by delicately using the hose of a vacuum cleaner set on medium
power. The appliance must be switched off and the plug must be
pulled out before cleaning the appliance.
GB
Using the freezer to its full potential
The temperature inside the freezer compartment automatically adjusts
itself according to the position of the FREEZER OPERATION Knob.
MIN = warmest
MAX = coldest
We recommend, however, a medium position.
is the optimal temperature for energy saving levels.
switches the appliance off, including the refrigerator.
• Do not re-freeze food that is defrosting or that has already been
defrosted. These foods must be cooked and eaten (within 24
hours).
• Fresh food that needs to be frozen must not come into contact with
food that has already been defrosted.
• Do not place glass bottles which contain liquids, and which are
corked or hermetically sealed in the freezer because they could
break.
• The maximum quantity of food that may be frozen daily is indicated
on the plate containing the technical properties located on the
bottom left side of the refrigerator compartment (for example: Kg/
24h: 4)
! Do not open the door during freezing.
! If there is a power cut or malfunction, do not open the freezer door.
* Varies by number and/or position, available only on certain models.
Avoiding mould and unpleasant odours
• The appliance is manufactured with hygienic materials which are
odour free. In order to maintain an odour free refrigerator and to
prevent the formation of stains, food must always be covered or
sealed properly.
• If you want to switch the appliance off for an extended period of
time, clean the inside and leave the doors open.
Replacing the light bulb *
To replace the light bulb in the refrigerator compartment, pull out the
plug from the electrical socket. Follow the instructions below.
Access the light bulb by removing the cover as indicated in the
diagram. Replace it with a similar light bulb within the power range
indicated on the cover.
Precautions and tips
! The appliance was designed and manufactured in compliance with
international safety standards. The following warnings are provided
for safety reasons and must be read carefully.
This appliance complies with the following Community Directives:
- 73/23/EEC of 19/02/73 (Low Voltage) and subsequent amendments;
-89/336/EEC of 03.05.89 (Electromagnetic Compatibility) and
subsequent amendments;
- 2002/96/CE.
7
Page 8

General safety
GB
• The appliance was designed for domestic use inside the home
and is not intended for commercial or industrial use.
• The appliance must be used to store and freeze food products by
adults only and according to the instructions in this manual.
• The appliance must not be installed outdoors, even in covered
areas. It is extremely dangerous to leave the appliance exposed
to rain and storms.
• Do not touch the appliance with bare feet or with wet or moist
hands and feet.
• Do not touch the internal cooling elements: this could cause skin
abrasions or frost/freezer burns.
• When unplugging the appliance always pull the plug from the
mains socket, do not pull on the cable.
• Before cleaning and maintenance, always switch off the appliance
and disconnect it from the electrical supply. It is not sufficient to set
the TEMPERATURE ADJUSTMENT knobs on OFF (appliance off)
to eliminate all electrical contact.
• In the case of a malfunction, under no circumstances should you
attempt to repair the appliance yourself. Repairs carried out by
inexperienced persons may cause injury or further malfunctioning
of the appliance.
• Do not use any sharp or pointed utensils or electrical equipment other than the type recommended by the manufacturer - inside the
frozen food storage compartments.
• Do not put ice cubes taken directly from the freezer into your
mouth.
• This appliance is not intended for use by persons (including
children) with reduced physical, sensory or lack of experience
and knowledge unless they have been given supervision or
instruction concerning use of the appliance by a person
responsible for their safety. Children should be supervised to
ensure that they do not play with the appliance.
• Keep packaging material out of the reach of children! It can become
a choking or suffocation hazard.
Disposal
• Observe local environmental standards when disposing packaging
material for recycling purposes.
• The European Directive 2002/96/EC on Waste Electrical and
Electronic Equipment (WEEE), requires that old household electrical
appliances must not be disposed of in the normal unsorted municipal
waste stream. Old appliances must be collected separately in
order to optimise the recovery and recycling of the materials they
contain and reduce the impact on human health and the
environment. The crossed out “wheeled bin” symbol on the product
reminds you of your obligation, that when you dispose of the
appliance it must be separately collected. Consumers should
contact their local authority or retailer for information concerning
the correct disposal of their old appliance.
Respecting and conserving the environment
• Install the appliance in a fresh and well-ventilated room. Ensure
that it is protected from direct sunlight and do not place it near heat
sources.
• Try to avoid keeping the door open for long periods or opening the
door too frequently in order to conserve energy.
• Do not fill the appliance with too much food: cold air must circulate
freely for food to be preserved properly. If circulation is impeded,
the compressor will work continuously.
• Do not place hot food directly into the refrigerator. The internal
temperature will increase and force the compressor to work harder
and will consume more energy.
• Defrost the appliance if ice forms (see Maintenance). A thick layer
of ice makes cold transference to food products more difficult and
results in increased energy consumption.
* Varies by number and/or position, available only on certain models.
Troubleshooting
If the appliance does not work, before calling for Assistance (see
Assistance), check for a solution from the following list.
The green POWER indicator light does not illuminate.
• The plug has not been inserted into the electrical socket, or not far
enough to make contact, or there is no power in the house.
The motor does not start.
• The appliance comes with a motor protection control (
).
use
The indicator lights are on but the light is dim.
•
Pull out and reverse the plug before putting it back in the socket.
a) The alarm sounds.
a) The refrigerator door has remained open for more than two
minutes (the buzzer will stop sounding when you shut the door)
or the correct switching-off procedure was not followed (
Maintenance
b) The alarm sounds and the two yellow indicator lights
flash.
b) The temperature in the freezer is too high. Check the quality of
the food products and dispose if necessary.
c) The alarm sounds and the two yellow indicator lights as
well as the green one flash.
c) The temperature in the freezer has reached a dangerous level.
The food must be disposed immediately.
+ buzzer
+ buzzer
b/c)
In both these cases the freezer will maintain a temperature of
about 0°C so that the food does not re-freeze. To turn off the
acoustic signal open and close the refrigerator door. To
restore normal operation bring the FREEZER OPERATION
knob setting to
The green POWER indicator light flashes.
The appliance is not operating correctly. Contact the Technical
Assistance Centre.
The refrigerator and the freezer do not cool well.
• The doors do not close properly or the seals are damaged.
• The doors are opened too frequently.
• The OPERATION knobs are not on the correct setting (
Description
• The refrigerator or the freezer have been over-filled.
The food inside the refrigerator is beginning to freeze.
• The REFRIGERATOR OPERATION knob is not on the correct
setting (
• The food is in contact with the back inside wall of the
refrigerator.
The motor runs continuously.
• The SUPER FREEZE button has been pressed (rapid freezing): the
yellow SUPER FREEZE light is on or flashing (
• The door is not closed properly or is continuously opened.
• The outside ambient temperature is very high.
• The thickness of the frost exceeds 2-3 mm (
).
).
see Description
Heating is excessiveHeating is excessive
Heating is excessive
Heating is excessiveHeating is excessive
Heating is dangerHeating is danger
Heating is danger
Heating is dangerHeating is danger
(off) and turn the appliance on again.
).
see Start-up and
see
see
see Description
see Maintenance
).
).
8
Page 9

The appliance makes a lot of noise.
• The appliance has not been installed on a level surface (
)
Installation
• The appliance has been installed between cabinets that
vibrate and make noise.
• The internal refrigerant makes a slight noise even when the
compressor is off. This is not a defect, it is normal.
The back wall of the refrigerator unit is covered in frost or
droplets of water
• This shows the appliance is operating normally.
.
see
GB
9
Page 10

MontajMontaj
Montaj
MontajMontaj
TR
!! Bu kitapçýðý gerektiði her an danýþabilmeniz için özenle saklayýnýz.
Satýþ, devir yada taþýnma halinde, çalýþma sistemi ve bununla ilgili
uyarýlar konusunda yeni sahibinin bilgilenmesi için cihazla birlikte
kalmasýný saðlamanýz gerekmektedir.
!
Talimatlarý dikkatlice okuyunuz: montaj, kullaným ve güvenliðe iliþkin
önemli bilgiler içermektedir.
Cihazýn yerleþtirilmesi ve baðlanmasýCihazýn yerleþtirilmesi ve baðlanmasý
Cihazýn yerleþtirilmesi ve baðlanmasý
Cihazýn yerleþtirilmesi ve baðlanmasýCihazýn yerleþtirilmesi ve baðlanmasý
KonumlandýrmaKonumlandýrma
Konumlandýrma
KonumlandýrmaKonumlandýrma
1. Cihazý nemsiz ve havadar bir yere yerleþtiriniz.
2. Arkadaki havalandýrma ýzgaralarýný kapatmayýnýz: kompresör ve
kondenser sýcak yapar, bu yüzden cihazýn iyi çalýþmasýný ve
tüketiminin azalmasýný saðlamak için bunlarýn duvara dayanmamasý
gerekir.
3. Cihazýn üst kýsmý ile üstüne konacak mobilya arasýnda en azýndan
10 cm, mobilya/duvar yanýna yerleþtirilmesi durumunda ise en az 5
cm açýklýk býrakýnýnz
4. Cihazэ эsэ kayaklarэndan uzak tutunuz (цr. direkt gьneю эюэрэ, elektrik
ocak).
5. Ürünün arka kýsmýyla duvar arasýndaki mesafeyi saðlamak için
kullaným talimatlarýna uygun olarak monte etme kitinde mevcut olan
uzaklaþtýrýcý çubuklarý monte ediniz.
Cihazýn ayný seviyeye getirilmesiCihazýn ayný seviyeye getirilmesi
Cihazýn ayný seviyeye getirilmesi
Cihazýn ayný seviyeye getirilmesiCihazýn ayný seviyeye getirilmesi
1. Buzdolabýnýzý düz ve sert bir zemine yerleþtiriniz.
2. Zemin düz olmamasý durumunda ayarlanabilir ayaklarý gevþeterek
veya sýkarak cihazýn tamamen zemine oturmasýný saðlayýnýz.
Elektrik baðlantýsýElektrik baðlantýsý
Elektrik baðlantýsý
Elektrik baðlantýsýElektrik baðlantýsý
Taþýnmadan sonra cihazý dik olarak yerleþtiriniz ve elektrik tesisatýna
baðlamak için en az 3 saat bekleyiniz. Fiþi prize takmadan evvel
aþaðýdaki hususlara dikkat ediniz:
• Prizin topraklamasýnýn yürürlükteki normlara uygun olmasý;
• Elektrik prizi, soðutucu bölmesinin sol tarafýnýn aþaðýsýnda bulunan
özellik etikentinde belirtilen maksimum yükü taþýyabilmelidir;Buz
dolabýnýn etiketinde belirtilen plakanýn maksimum güç yükünü
çekebilmektedir.. ( ör : 150W)
• besleme gerilimi soðutucu bölmesinin sol tarafýnýn aþaðýsýnda
bulunan özellik etiketinde belirtilen deðer sýnýrý kapsamýnda olmalýdý
(ör. 220-240 V);
• Cihazýn fiþinin prizle uyumlu olmasý. Aksi takdirde cihazýn fiþinin
deðiþtirilmesi için yetkili Servise (
baþvurmanýz gerekir, uzatma kablosu ya da çoklu priz
kullanmayýnýz.
Teknik Servis bölümüne bakýnýz
Isýnýn ayarlanmasýIsýnýn ayarlanmasý
Isýnýn ayarlanmasý
Isýnýn ayarlanmasýIsýnýn ayarlanmasý
Soðutucu bölmesinin içindeki ýsý, otomatik olarak termostat düðmesinin
konumuna göre ayarlanýr.
holiday(tatil fonksiyonudur)
maxmax
max = daha çok soðuk
maxmax
düþük tüketim için optimal ýsý derecesidir.
OFF
soðutucu dahil olmak üzere cihazý kapatý
Orta bir deðere ayarlanmasý tavsiye edilir.
No frost sistemi ile devamlý soðuk hava dolaþýmý saðlanýr. Böylece nem toplanýr,
buz ve çiy oluþmasý engellenir: soðutucu bölmesinde gerekli olan nem oraný
saðlanýr ve çiy oluþmasýný engellediði için gýdalarýn besin özelliklerinin korunmasý
saðlanýr; dondurucu bölmesinde ise buz çözme iþlemine gerek kalmadan ve
gýdalarýn birbiriyle yapýþmamasý saðlanarak buz oluþmasý engellenir.
kap arka soðutma duvarý ile direk temasa geçmemelidir. Havalandýrma delikleri
kapatýlmasý kondens suyu oluþmasýna sebep olur.
Þiþeleri kapatýnýnz ve gýdalarý sarýnýz.
RAFLARRAFLAR
RAFLAR*: tepsi veya telli.
RAFLARRAFLAR
Büyük kaplar veya fazla yer kaplayan gýdalarýn yerleþtirilmesi için
mevcut olan kýlavuzlar sayesinde çýkarýlabilir ve yüksekliði ayarlanabilir
(
þekle bakýnýz
gerekmez.
)
). Yüksekliði ayarlamak için, rafý tamamen çýkarmak
Gýda veya
! Cihaz monte edildikten sonra elektrik kablosu ve priz kolay eriþilebilecek
yerlerde olmalýdýrlar.
! Kablo kývrýlmalara, bükülmelere ve ezilmelere maruz kalmamalýdýr.
! Kablo periyodik olarak kontrol edilmeli ve sadece yetkili personel
tarafýndan deðiþtirilmelidir.(
! Bu kurallara uyulmamasý halinde firma hiç bir sorumluluk kabul
etmemektedir.
Çalýþtýrma ve kullanýmÇalýþtýrma ve kullaným
Çalýþtýrma ve kullaným
Çalýþtýrma ve kullanýmÇalýþtýrma ve kullaným
Cihazýn çalýþtýrýlmasýCihazýn çalýþtýrýlmasý
Cihazýn çalýþtýrýlmasý
Cihazýn çalýþtýrýlmasýCihazýn çalýþtýrýlmasý
! Cihazý çalýþtýrmadan önce, montaj hakkýnda verilen! Cihazý çalýþtýrmadan önce, montaj hakkýnda verilen
! Cihazý çalýþtýrmadan önce, montaj hakkýnda verilen
! Cihazý çalýþtýrmadan önce, montaj hakkýnda verilen! Cihazý çalýþtýrmadan önce, montaj hakkýnda verilen
talimatlarý uygulayýnýz (Montaj bölümüne bakýnýz).talimatlarý uygulayýnýz (Montaj bölümüne bakýnýz).
talimatlarý uygulayýnýz (Montaj bölümüne bakýnýz).
talimatlarý uygulayýnýz (Montaj bölümüne bakýnýz).talimatlarý uygulayýnýz (Montaj bölümüne bakýnýz).
! Cihazý elektrik þebekesine baðlamadan önce, tüm bölmeleri ve
aksesuarlarý bikarbonat kullanarak ýlýk su ile iyice temizleyiniz.
1. Cihazýn fiþini bir elektrik prizine takýnýz ve yeþil BESLEME lambasýnýn
yanmasýný saðlayýnýz.
2. SOÐUTUCU KONTROL ayar düðmesini orta bir deðere
ayarlayýnýz. Birkaç saat geçtikten sonra buzdolabýnýza gýdalar
yerleþtirilebilir.
10
bkz. Teknik Servis
)
Buzdolabýnýn en iyi þekilde kullanýlmasýBuzdolabýnýn en iyi þekilde kullanýlmasý
Buzdolabýnýn en iyi þekilde kullanýlmasý
Buzdolabýnýn en iyi þekilde kullanýlmasýBuzdolabýnýn en iyi þekilde kullanýlmasý
• Sadece soðuk, ýlýk ve sýcak olmayan gýda yerleþtirilebilir (
ve öneriler bölümüne bakýnýz
• Piþmiþ gýda çið gýdadan daha uzun süre saklanmaz.
• Sývý kapaksýz kaplara dökülmemelidir: nem oraný yükselir ve
kondens suyu oluþur.
MEYVE VE SEBZEMEYVE VE SEBZE
MEYVE VE SEBZE çekmecesi*
MEYVE VE SEBZEMEYVE VE SEBZE
Buzdolabýnda mevcut olan meyve ve sebze çekmeceleri içerde
saklanan meyve ve sebzeleri taze ve kokulu saklamak üzere
tasarlanmýþtýr. Gýdalarý daha az nemli bir ortamda saklamak için nem
ayarýný B konumuna getiriniz, daha nemli bir ortam için ise A konumuna
getiriniz. Kapaklarýn kolay açýlmasý (dýþarýya doðru çekilir) gýdalarýn
yerleþtirilmesi ve çýkarýlmasýný kolaylaþtýrýr.
).
Önlemler
Page 11

ICE DEVICE
Mevcut olan havuzlarý alýp su ile doldurduktan sonra Ýcedevice bölgesine
tekrar yerleþtiriniz. Yaklaþýk 2 saat sonra buz küplarý hazýr olur. Buzu
alabilmek için mevcut olan iki kollarý saða doðru çevirmeniz yeterdir:
buz küplarý altaki kaba düþer ve hizmete hazýr olur.
Food Care Zone 0°C* (0°C Besin Koruma Bölgesi)taze et ve balýk
saðlamak için tasarlanmýþtýr. Bu bölme; içerdeki soðukluk deceresi (buzdolabýn
en soðuk bölmesidir) ve oksidasyon ve kararma proseslerini engelleyen
þeffaf kapaðý sayesinde gýdalarýn uzun süre, bir haftaya kadar, saklamasýný
saðlar Ayrýca ‘Soðuk tabaklar’ için kullanýlabilir.
ha yüksek konuma ayarlamak için en az 10 saat bekleyiniz.
Dondurucunun en iyiþekildekullanýlmasýDondurucunun en iyiþekildekullanýlmasý
Dondurucunun en iyiþekildekullanýlmasý
Dondurucunun en iyiþekildekullanýlmasýDondurucunun en iyiþekildekullanýlmasý
! Dýþ ortam sýcaklýðý uzun süre 14°Cden soðuk olmasý durumunda
dondurucu bölmesi uzun süre saklamak için gerekli ýsý derecesine
ulaþmaz ve böylece saklama süresi kýsalmýþ olur.
Bakým ve ÖzenBakým ve Özen
Bakým ve Özen
Bakým ve ÖzenBakým ve Özen
Elektrik þebekesinin devre dýþýElektrik þebekesinin devre dýþý
Elektrik þebekesinin devre dýþý
Elektrik þebekesinin devre dýþýElektrik þebekesinin devre dýþý
býrakýlmasýbýrakýlmasý
býrakýlmasý
býrakýlmasýbýrakýlmasý
Temizlik ve bakým iþlemi sýrasýnda cihazýn fiþini prizden çýkararak elektrik
baðlantýsýný kesiniz.
1. Ürünü kapatmak için, DONDURUCU AYAR Düðmesi ne basýlý
tutup kapatýn.
2. Fiþi prizden çekiniz
Cihazýn temizlenmesiCihazýn temizlenmesi
Cihazýn temizlenmesi
Cihazýn temizlenmesiCihazýn temizlenmesi
• Buzdolabýnýn dýþ, iç duvarlarýný ve contalarýný karbonat (yemek sodasý) veya
nötr sabun eklenmiþ ýlýk su ile ýslatýlmýþ yumuþak bir sünger ile temizleyiniz.
Aþýndýrýcý maddeler ve çözücü, amonyak, beyazlatýcý türü maddeleri kesinlikle
kullanmayýnýz.
• Sökülebilen aksesuarlarý deterjan veya sabun eklenmiþ ýlýk su içine batýrýnýz.
Çalkalayýnýz ve dikkatlice kurulayýnýz.
• Buzdolabýnýzýn arkasý toz dolu ise, cihazý kapatýp elektrik baðlantýsýný kestikten
sonra elektrik süpürgesini orta watt’a ayarlayarak uzun ucu ile arkasýndaki
tozlarý iyice alýnýz.
Ýstenmeyen kokularýn ve küfünÝstenmeyen kokularýn ve küfün
Ýstenmeyen kokularýn ve küfün
Ýstenmeyen kokularýn ve küfünÝstenmeyen kokularýn ve küfün
önlenmesiönlenmesi
önlenmesi
önlenmesiönlenmesi
• Cihaz kokularý önleyici hijyenik malzemelerle üretilmiþtir. Bu özelliði
kaybetmemek için gýdalarýn iyice sarýlýp kapatýlmasý gerekir. Böylece
leke oluþmasý engellenecektir.
• Cihazýn uzun süre devre dýþý býrakýlmasý durumunda içini iyice
temizleyiniz ve kapaðý açýk býrakýnýz.
Ampulün degiþtirilmesiAmpulün degiþtirilmesi
Ampulün degiþtirilmesi
Ampulün degiþtirilmesiAmpulün degiþtirilmesi
Sogutucu bölmesinin ampulünü degistirmeden önce buzdolabýnýn fisini
prizden çýkarýnýnz. Asagýdaki talimlatlari özenle uygulayýnýz.
Sekilde gösterildigi gibi koruma zarýný çýkartýktan sonra ampulü
açýnýz.Koruma zarýnda belirtildigi (10 W veya 15 W) gücü esit olan bir
yenisi ile degistiriniz.
TR
DONDURUCU KONTROLDONDURUCU KONTROL
DONDURUCU KONTROL ayarý ile dondurucu bölmesindeki ýsý
DONDURUCU KONTROLDONDURUCU KONTROL
derecesi ayarlanýr.
mýn= daha az soðuk
maxmax
max = daha çok soðuk
maxmax
Orta bir deðere ayarlanmasý tavsiye edilir.
düþük tüketim için optimal ýsý derecesidir.
soðutucu dahil olmak üzere cihazý kapatýr.
• Erimiþ veya erimek üzere olan yiyecekleri bir daha dondurmayýnýz,
bu gýdalar (24 saat içinde) tuketilmesi için piþirilmelidir.
• Dondurulacak taze gýdalar, daha önce donmuþ olanlarla temas
etmemelidir. Bu taze gýdalar dondurucunun üst bolümündeki rafa
iç duvarlarý ile (yan ve arka duvarý) temasa geçecek þekilde
yerleþtirilmelidir, burada ýsý derecesi 18°cnin altýna inerek hýzlý bir
dondurma iþlemini garanti eder
• Dondurucu içinde sývý olan kapaðý kapatýlmýþ þiþe koymayýnýz,
patlayabilir.
• Günlük en fazla yiyecek dondurma miktarý soðutucu içinde aþaðýda
saðda bulunan teknik veriler etiketi üzerinde yazýlýdýrlar (örneðin: Kg/
24h 4).
UYARI : Enerji tasarrufu amacýyla bu fonksiyonun 24 saat sonra kapalý
hale getirildiðinden emin olunuz.
! Dondurma iþlemi sýrasýnda kapaðý acmamaya özen gösteriniz.
! Elektrik kesintisi veya ariza durumunda kapaðý açmayýnýz:
dondurulmuþ gýdalar 9-14 saate kadar, hiç bir degisikliðe uðramadan
korunurlar.
Önlemler ve önerilerÖnlemler ve öneriler
Önlemler ve öneriler
Önlemler ve önerilerÖnlemler ve öneriler
! Cihaz, uluslararasý güvenlik normlarýna uygun olarak tasarlanýp
üretilmiþtir. Aþaðýdaki bilgiler, güvenliði saðlamak amacýyla verilmiþtir.
Bu yüzden dikkatlice okunmasý gerekir.
Bu cihaz aþaðýdaki Avrupa Birliði Yönergeleri ile uyumludur:
-2006/95/AT Belirli gerilim sýnýrlarý dahilinde
Kullanýlmak üzere tasarlanmýþ elektrikli teçhizat
ile ilgili yönerge -2004/108/AT Elektromanyetik uyumluluk yönergesi
-96/57/AT Ev tipi elektrikli soðutucular, dondurucular
11
Page 12

19510386202
06/2014
ve kombinasyonlarýnýn enerji verimlilik þartlarý ile
ilgili yönerge
TR
Yönetmeliðine uygundur.)
Genel güvenlik uyarýlarýGenel güvenlik uyarýlarý
Genel güvenlik uyarýlarý
Genel güvenlik uyarýlarýGenel güvenlik uyarýlarý
• Cihaz, meskenlerde kullanýlmak üzere tasarlanmýþ olup profesyonel
kullaným amaçlý deðildir.
• Cihaz, sadece yetiþkin kiþiler tarafýndan ve bu kitapçýkta aktarýlan
talimatlara göre, gýdalarý saklamak ve dondurmak için
kullanýlmalýdýr.
• Cihaz, üzeri kapalý bile olsa açýk alanlara monte edilmemelidir, çünkü
yaðmur ve fýrtýnaya maruz kalmasý son derece tehlikelidir.
• Dikkat: soðutma sistemine zarar vermeyiniz
• Cihaza ayaklarýnýz çýplakken yada elleriniz veya ayaklarýnýz ýslak
yada nemliyken dokunmayýnýz.
• Buzdolabýnýn soðutma yapan iç kýsýmlarýna dokunmayýnýz: yanma
veya yaralanma tehlikesi vardýr.
• Fiþi prizden çekerken kablosundan deðil fiþin kendisinden tutarak
çekiniz.
• Temizlik ve bakým iþlemlerini gerçekleþtirmeden önce fiþ elektrik
þebekesinden çýkarýlmalýdýr. Buzdolabýnýn tüm elektrik baðlantýlarýný
kesmek için ISI AYAR DÜÐMESÝNÝ
getirmek yeterli deðildir.
• Arýza halinde, onarmak amacýyla iç mekanizmalarý hiçbir þekilde
kurcalamayýnýz.
• Dondurulmuþ gýda saklama bölmelerinde üretici tarafýndan tavsiye
edilen tip hariç ucu sivri ve keskin aletleri veya elektrikli cihazlarý
kullanmayýnýz.
• Buz küplerini dondurucu bölmesinden çýkarýr çýkarmaz aðzýnýza
sokmayýnýz.
• Bu cihaz fiziksel, duyumsal veya mental kapasite eksikliðine sahip,
veya tecrübe ve bilinçten yoksun kiþilerin (çocuklar dahil) kullanýmý
için uygun deðildir, emniyetlerinden sorumlu bir kiþi tarafýndan cihazýn
kullanýmý konusunda eðitim almamýþ kiþiler tarafýndan da kullanýma
uygun olarak amaçlanmamýþtýr. Çocuklar, cihaz ile oynamamalarý
saðlanarak, denetlenmelidirler.
• Ambalajlar çocuklar için oyuncak degildir.
Atýklarýn tasfiye edilmesiAtýklarýn tasfiye edilmesi
Atýklarýn tasfiye edilmesi
Atýklarýn tasfiye edilmesiAtýklarýn tasfiye edilmesi
• Ambalaj malzemelerinin tasfiye edilmesi: yerel normlara uygun olarak
tasfiye ediniz, böylece tasfiye edilen malzemelerin geri dönüþümü
saðlanmýþ olacaktýr.
• Elektrik ve elektronik cihazlarýn atýklarýný deðerlendirme 2002/96/
CE sayýlý Avrupa Konseyi direktifinde; beyaz eþyalarýn kentsel katý
atýk genel yöntemi ile tasfiye edilmemesi öngörülmüþtür.
Kullanýlmayan cihazlarýn, madde geri kazaným ve geri dönüþüm
oranýný en yüksek seviyeye yükseltmek, çevre ve insan saðlýðýna
olasý zararlarý engellemek için ayrý ayrý toplanmasý gerekir. Tüm
ürünlerin üzerinde; ayrý toplama hükümlerini hatýrlatmak amacýyla
üstünde çarpý iþareti olan sepet sembolü verilmiþtir. Cihazlarýn tasfiye
edilmesi konusunda daha geniþ bilgi almak için cihaz sahiplerinin
mevcut müþteri hizmetine veya satýþ noktalarýna baþvurulmasý
gerekir.
Enerji tasarrufu ve çevre korumasýEnerji tasarrufu ve çevre korumasý
Enerji tasarrufu ve çevre korumasý
Enerji tasarrufu ve çevre korumasýEnerji tasarrufu ve çevre korumasý
• Soрutucu doрrudan gьneю эюэрэna maruz kalmayacak, serin ve
havadar uygun bir yere yerleþtiriniz. Ayrýca, ýsý kaynaklarýndan
uzakta olmalýdýr.
• Gýdalarý almak ya da yerleþtirmek için cihazýn kapaðýný mümkün
olduðu kadar az açýk tutunuz. Soðutucunun kapaðý her açýldýðýnda
enerji tüketilir.
• Cihazý fazla gýda ile doldurmayýnýz: gýdalarýn iyi saklanmasý için
soðuk hava dolaþýmýnýn saðlanmasý gerekir. Hava dolaþýmýnýn
engellenmesi durumunda kompresör devamlý çalýþmak zorunda
kalacaktýr.
• Soðutucunun içine sýcak gýda koymayýnýz: ýsý derecesi yükselir,
kompresör yoðun çalýþmak zorunda kalýr ve enerji büyük miktarda
tüketilir.
• Buz oluþmasý durumunda eritme yapýnýz (
kalýn bir buz tabakasý soðutmayý engeller ve enerji tüketimini yükseltir
Atýk Elektrikli ve Elektronik Eþyalarýn (AEEE) Kontrolü
konumuna (cihaz kapalý)
Bakým bölümüne bakýnýz
AA
rýza ve Onarýmlarrýza ve Onarýmlar
A
rýza ve Onarýmlar
AA
rýza ve Onarýmlarrýza ve Onarýmlar
Buzdolabýnýz bazen size sorun çýkarabilir yada çalýþmayabilir. Teknik
Servis ile irtibata geçmeden önce (
aþaðýdaki liste yardýmýyla kolaylýkla çözülebilecek bir problem olup
olmadýðýný kontrol ediniz.
YY
ee
il BESLEME lambasý yanmýyoril BESLEME lambasý yanmýyor
Y
eþ
il BESLEME lambasý yanmýyor
YY
ee
il BESLEME lambasý yanmýyoril BESLEME lambasý yanmýyor
• Fiþ prize takýlý deðil veya kontaða girecek kadar yeterli deðil, veya
evdeki elektrik akýmý kesik.
Motor çalýþmaya baþlamýyorMotor çalýþmaya baþlamýyor
Motor çalýþmaya baþlamýyor
Motor çalýþmaya baþlamýyorMotor çalýþmaya baþlamýyor
• Cihaz motor kurtarma aygýtýna sahiptir (Çalýþtýrma ve kullanma
bölümüne bakýnýz).
Uyarý lambalarý hafifçe yanýyorUyarý lambalarý hafifçe yanýyor
Uyarý lambalarý hafifçe yanýyor
Uyarý lambalarý hafifçe yanýyorUyarý lambalarý hafifçe yanýyor
Teknik Servis bölümüne bakýnýz
..
.
..
..
.
..
..
.
..
• Fiþi prizden çekiniz ve tersine çevirip tekrar prize takýnýz.
a) a)
Alarm çalýyorAlarm çalýyor
a)
Alarm çalýyor
a) a)
Alarm çalýyorAlarm çalýyor
a)Soðutucu kapaðý iki dakikdan fazla açýk kalmýþ.
Kapak katýldýðýnda alarm biter
uygulanmamýþ (
b) b)
Alarm çalýyor ve 2 adet sarý uyarý lambasý yanýp söniyorAlarm çalýyor ve 2 adet sarý uyarý lambasý yanýp söniyor
b)
Alarm çalýyor ve 2 adet sarý uyarý lambasý yanýp söniyor
b) b)
Alarm çalýyor ve 2 adet sarý uyarý lambasý yanýp söniyorAlarm çalýyor ve 2 adet sarý uyarý lambasý yanýp söniyor
b)Cihaz dondurucunun fazla ýsýnmýþ olduðunu belirtir:Gýdalarýn
durumunun kontrol edilmesi tavsiye edilir: çöpe atmanýz gerekebilir
c)
c)
Alarm çalýyor ve sarý ve yeþil uyarý lambasý yanýpAlarm çalýyor ve sarý ve yeþil uyarý lambasý yanýp
c)
Alarm çalýyor ve sarý ve yeþil uyarý lambasý yanýp
c) c)
Alarm çalýyor ve sarý ve yeþil uyarý lambasý yanýpAlarm çalýyor ve sarý ve yeþil uyarý lambasý yanýp
söniyorsöniyor
söniyor
söniyorsöniyor
c)Cihaz dondurucunun tehlikeli olacak þekilde fazlasýyla ýsýnmýþ
olduðunu belirtir: gýdalar atýlmalýdýr
+ sesli sinyal
+ sesli sinyal
b/c)Bu iki durumda gýdalarý tekrar dondurmamak için dondurucu
bölmesi içerisinde ýsý derecesi 0°C civarýnda olacaktýr.
Sesli sinyali kapatmak için: buzdolabýnýn kapaðýný açýp kapatýnýz.
Cihazýn normal çalýþmasýný saðlamak için: DONDURUCU
KONTROL ayar düðmesini
(cihaz kapalýdýr) tekrar çalýþtýrnýz.
YY
Y
YY
• Cihaz gerektiði gibi çalýþmýyor. Teknik servisine baþvurunuz.
Soðutucu az soðutma yapýyorSoðutucu az soðutma yapýyor
Soðutucu az soðutma yapýyor
Soðutucu az soðutma yapýyorSoðutucu az soðutma yapýyor
•
• Kapak sýk sýk açýlýyor
• ISININ AYAR düðmesi doðru konumda deðil.
• Soðutucu veya dondurucu fazla doldurulmuþ.
Soðutucu bölmesinde gýdalar donuyorSoðutucu bölmesinde gýdalar donuyor
Soðutucu bölmesinde gýdalar donuyor
Soðutucu bölmesinde gýdalar donuyorSoðutucu bölmesinde gýdalar donuyor
• ISININ AYAR düðmesi doðru konumda deðil.
• Gýdalar, arka duvar ile temas edecek þekilde yerleþtirilmiþ.
Motor devamlý çalýþýyorMotor devamlý çalýþýyor
Motor devamlý çalýþýyor
Motor devamlý çalýþýyorMotor devamlý çalýþýyor
• Kapý tam kapalý deðil veya sürekli olarak açýlýyor.
• Dýþ ortam sýcaklýðý çok yüksek.
Cihaz çok ses yapýyorCihaz çok ses yapýyor
Cihaz çok ses yapýyor
Cihaz çok ses yapýyorCihaz çok ses yapýyor
• Cihazýn kurulumu tamamen düz bir zemine yapýlmamýþ (
);
• Cihaz sarsýntý yapan ve gürültü çýkaran mobilya veya eþyalar
• Dahili soðutucu gaz, kompresör çalýþmadýðý zaman bile, hafif bir
..
.
..
eþil BESLEME lambasý yanýp sönüyoreþil BESLEME lambasý yanýp sönüyor
eþil BESLEME lambasý yanýp sönüyor
eþil BESLEME lambasý yanýp sönüyoreþil BESLEME lambasý yanýp sönüyor
Kapýlar tamamen kapanmýyor veya contalar bozuk.
bölümüne bakýnýz
arasýna yerleþtirilmiþ.
ses çýkarýyor: bu bir arýza deðildir, normaldir.
..
.
..
Bakým
bölümüne bakýnýz).
.
)
.
.
Veya doðru kapama prosedürü
.
Aþýrý ýsýnmaAþýrý ýsýnma
Aþýrý ýsýnma
Aþýrý ýsýnmaAþýrý ýsýnma
TT
ehlikeli ýsýnmaehlikeli ýsýnma
T
ehlikeli ýsýnma
TT
ehlikeli ýsýnmaehlikeli ýsýnma
konumuna getirdikten sonra
..
.
..
..
.
..
..
.
..
..
.
..
..
.
..
Montaj
),
..
.
..
.
12
 Loading...