

Page 1

Instructions for use
WASHER DRYER
GB
English,1
HU
Magyar,13
I
Italiano,37
ARMXXD 1290
PL
Polski,25
This symbol reminds you to read this instruction manual.
Contents
Installation, 2-3
Unpacking and levelling
Connecting the electricity and water supplies
The first wash cycle
Technical data
Description of the washer dryer, 4-5
Control panel
Display
How to run a wash cycle or a drying cycle, 6
Wash cycles and functions, 7
Table of wash cycles
Wash functions
GB
Detergents and laundry, 8
Detergent dispenser drawer
Preparing the laundry
Special wash cycles
Load balancing system
Precautions and tips, 9
General safety
Disposal
Opening the porthole door manually
Care and maintenance, 10
Cutting off the water or electricity supply
Cleaning the washer dryer
Cleaning the detergent dispenser drawer
Caring for the door and drum of your appliance
Cleaning the pump
Checking the water inlet hose
Troubleshooting, 11
Service, 12
1
Page 2
Installation
GB
This instruction manual should be kept in a safe
place for future reference. If the washer-dryer is sold,
transferred or moved, make sure that the instruction
manual remains with the machine so that the new
owner is able to familiarise himself/herself with its
operation and features.
Read these instructions carefully: they contain vital
information relating to the safe installation and
operation of the appliance.
Unpacking and levelling
Unpacking
1. Remove the washer-dryer from its packaging.
2. Make sure that the washer-dryer has not been
damaged during the transportation process. If it has
been damaged, contact the retailer and do not
proceed any further with the installation process.
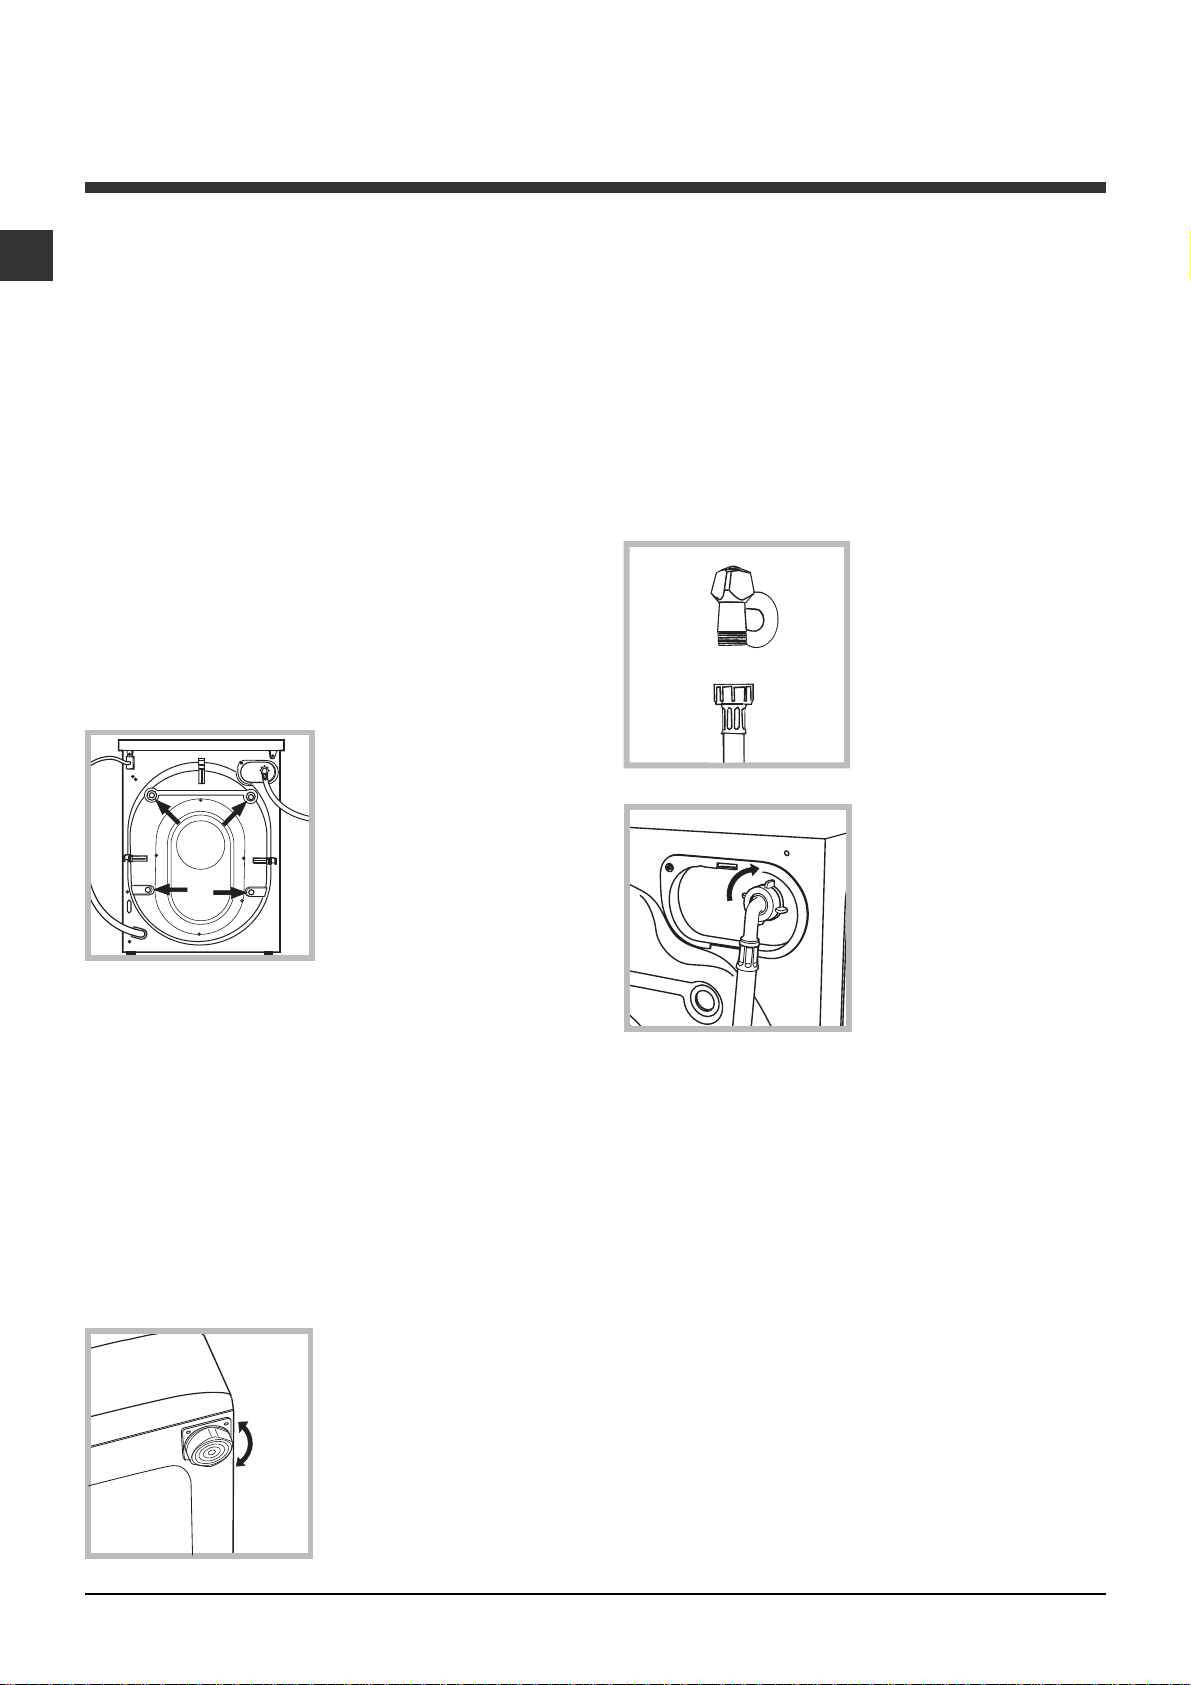
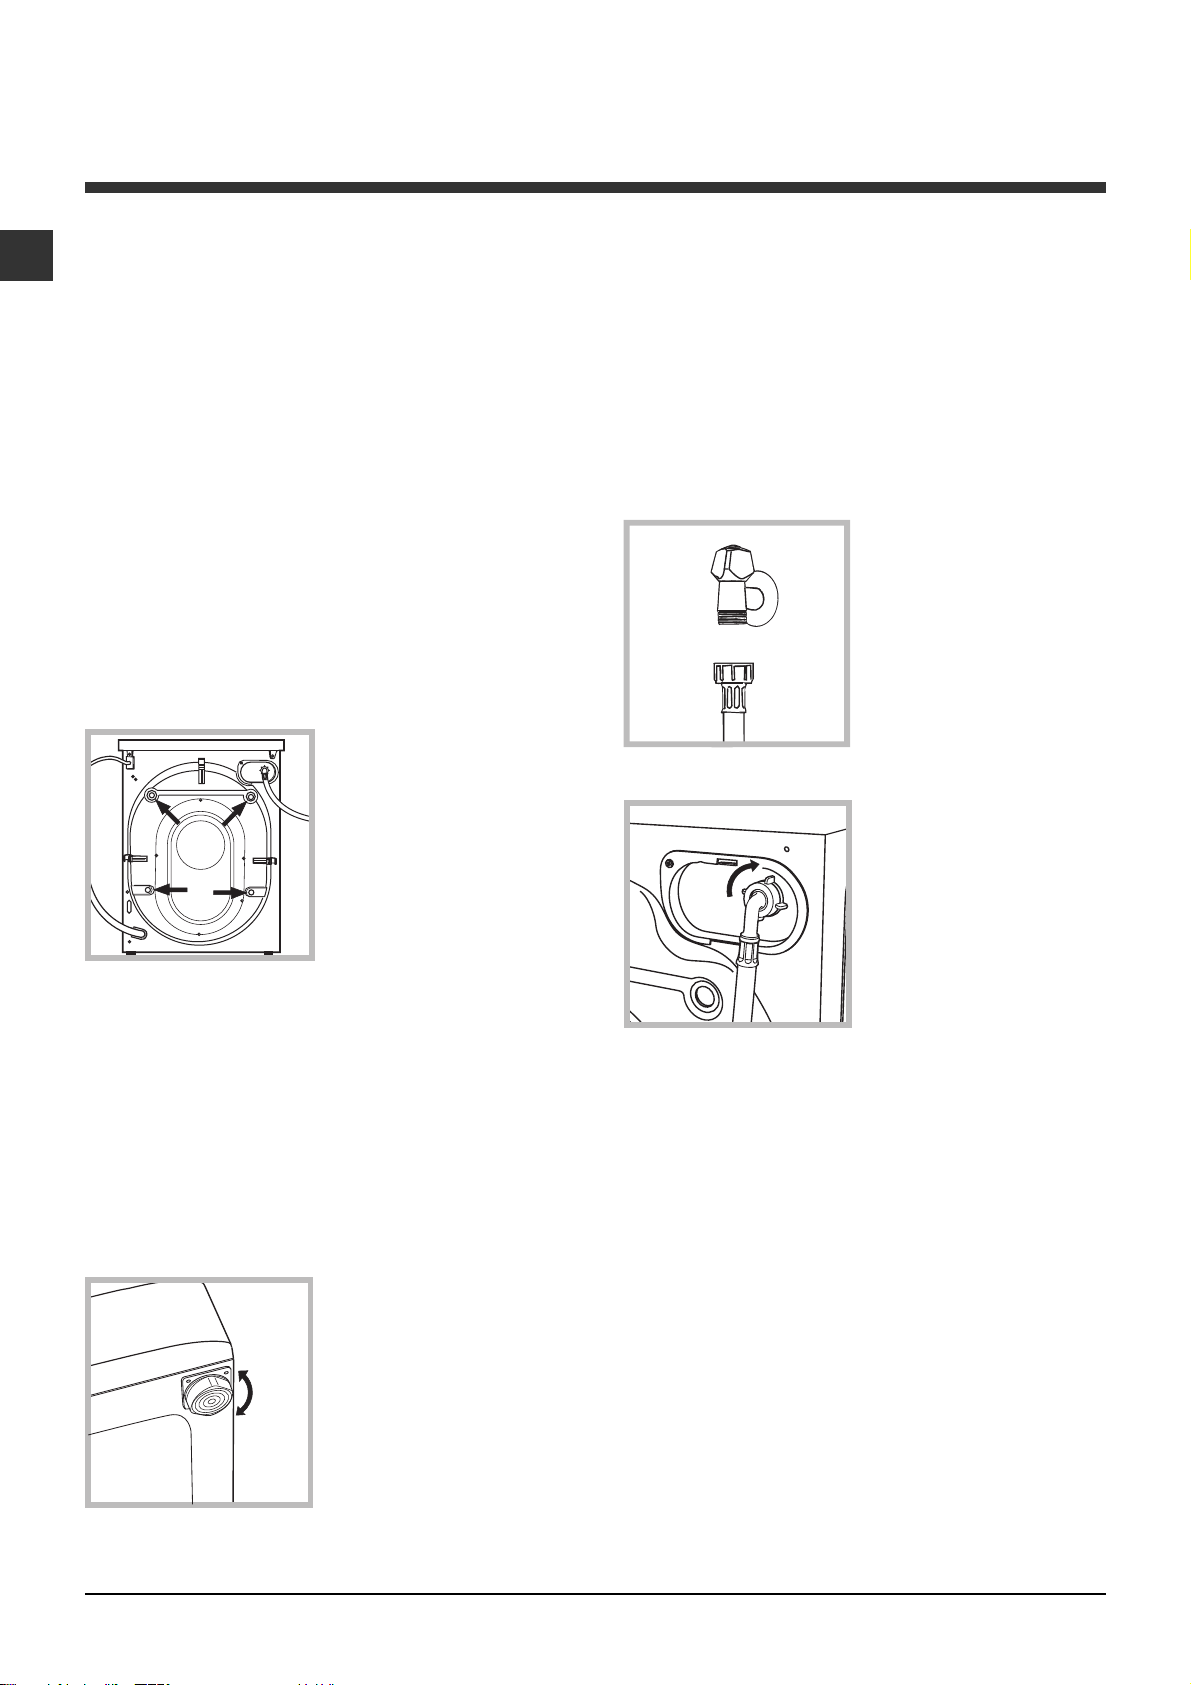
3. Remove the 4
protective screws (used
during transportation) and
the rubber washer with
the corresponding
spacer, located on the
rear part of the appliance
(see figure).
4. Close off the holes using the plastic plugs provided.
5. Keep all the parts in a safe place: you will need
them again if the washer-dryer needs to be moved to
another location.
Levelling the machine correctly will provide it with
stability, help to avoid vibrations and excessive noise
and prevent it from shifting while it is operating. If it is
placed on carpet or a rug, adjust the feet in such a
way as to allow a sufficient ventilation space
underneath the washer-dryer.
Connecting the electricity and water
supplies
Connecting the water inlet hose
1. Connect the supply
pipe by screwing it to a
cold water tab using a ¾
gas threaded connection
(see figure).
Before performing the
connection, allow the
water to run freely until it
is perfectly clear.
2. Connect the inlet hose
to the washer-dryer by
screwing it onto the
corresponding water inlet
of the appliance, which is
situated on the top righthand side of the rear part
of the appliance (see
figure).
3. Make sure that the hose is not folded over or bent.
Packaging materials should not be used as toys for
children.
Levelling
1. Install the washer-dryer on a flat sturdy floor,
without resting it up against walls, furniture cabinets
or anything else.
2. If the floor is not
perfectly level, compensate for any unevenness
by tightening or loosening
the adjustable front feet
(see figure); the angle of
inclination, measured in
relation to the worktop,
must not exceed 2°.
2
The water pressure at the tap must fall within the
values indicated in the Technical details table (see
next page).
If the inlet hose is not long enough, contact a
specialised shop or an authorised technician.
Never use second-hand hoses.
Use the ones supplied with the machine.
Page 3

Connecting the drain hose
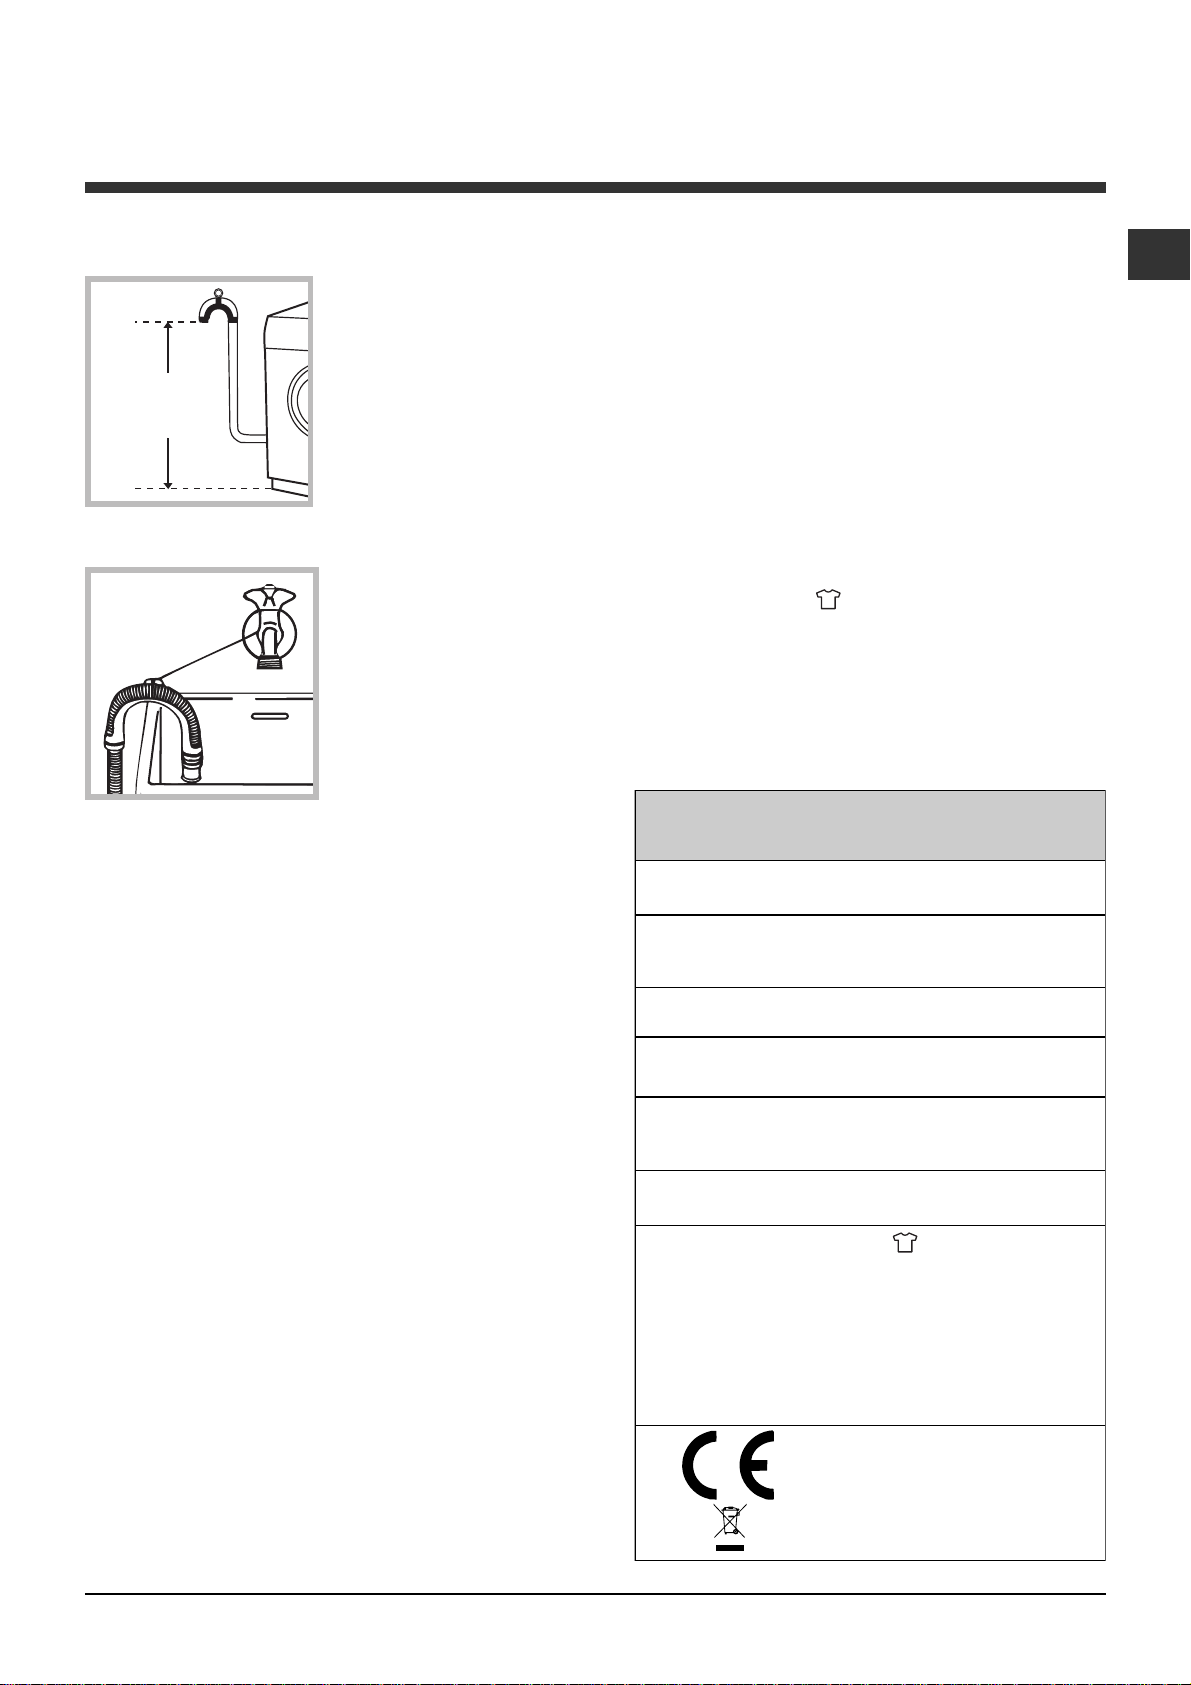
65 - 100 cm
Connect the drain hose,
without bending it, to a
drainage duct or a wall
drain located at a height
between 65 and 100 cm
from the floor;
Do not use extension cords or multiple sockets.
GB
The cable should not be bent or compressed.
The power supply cable must only be replaced by
authorised technicians.
Warning! The company shall not be held responsible
in the event that these regulations are not respected.
The first wash cycle
alternatively, rest it on
the side of a washbasin
or bathtub, fastening the
duct supplied to the tap
(see figure). The free end
of the hose should not
be underwater.
We advise against the use of hose extensions; if it is
absolutely necessary, the extension must have the
same diameter as the original hose and must not
exceed 150 cm in length.
Electrical connections
Before plugging the appliance into the electricity
socket, make sure that:
the socket is earthed and complies with all
applicable laws;
the socket is able to withstand the maximum power
load of the appliance as indicated in the Technical
data table (see opposite);
the power supply voltage falls within the values
indicated in the Technical data table (see opposite);
the socket is compatible with the plug of the
washer dryer. If this is not the case, replace the
socket or the plug.
The washer dryer must not be installed outdoors,
even in covered areas. It is extremely dangerous to
leave the appliance exposed to rain, storms and other
weather conditions.
When the washer dryer has been installed, the
electricity socket must be within easy reach.
Once the appliance has been installed, and before
you use it for the first time, run a wash cycle with
detergent and no laundry, using the wash cycle
Te ch n ic al da ta
Model
Dimensions
Capacity
Electrical
connections
Wat e r
connections
Spin speed
Energy rated
programmes
according to
regulation
EN 50229
ARMXXD 1290
width 59.5 cm
height 85 cm
depth 53,5 cm
from 1 to 7 kg for the wash programme;
from 1 to 4 kg for the drying programme
please refer to the technical data plate
fixed to the machine
maximum pressure 1 MPa (10 bar)
minimum pressure 0.05 MPa (0.5 bar)
drum capacity 52 litres
up to 1200 rotations per minute
Was h: programme (1
button); temperature 60°C;
using a load of 7 kg.
Drying:
first drying cycle performed with a
3 kg load, by selecting the "IRON DRY"
dryness level;
The second drying cycle is performed
with a 4 kg load, by selecting the
"CUPBORD DRY" dryness level.
This appliance conforms to the following
EC Directives:
- 2004/108/EC (Electromagnetic
Compatibility)
- 2006/95/EC (Low Voltage)
- 2002/96/EC
st
press of the
.
3
Page 4

Description of the washer dryer
GB
Control panel
ON/OFF
button
Detergent dispenser
drawer
Detergent dispenser drawer: used to dispense
detergents and washing additives (see Detergents
and laundry).
ON/OFF button
machine on or off. The START/PAUSE indicator light,
which flashes slowly in a green colour shows that the
machine is switched on. To switch off the washer
dryer during the wash cycle, press and hold the
button for approximately 2 seconds; if the button is
pressed briefly or accidentally the machine will not
switch off. If the machine is switched off during a
wash cycle, this wash cycle will be cancelled.
WASH CYCLE SELECTOR buttons: used to set the
desired wash cycle (see "Table of wash cycles").
MEMORY button: press and hold the button to store
a cycle with your own set of preferences in the
memory of the machine. To recall a previously stored
cycle, press the MEMO button.
FUNCTION buttons: press the button to select the
desired function. The corresponding indicator light on
the display will switch on.
SPIN button
exclude the spin cycle - the value is indicated on the
display.
TEMPERATURE button
temperature: the value will be shown on the display.
: press this briefly to switch the
: press to reduce or completely
: press to decrease the
WASH
CYCLE
SELECTOR
Buttons
CONTROL PANEL
LOCK
DRYING
Button
MEMORY
Button
DELAYED
START
CONTROL PANEL LOCK button
control panel lock, press and hold the button for
approximately 2 seconds. When the symbol
illuminated, the control panel is locked. This means it
is possible to prevent wash cycles from being modified
accidentally, especially where there are children in the
home. To deactivate the control panel lock, press
and hold the button for approximately 2 seconds.
DELAYED START button
start time for the selected wash cycle. The delay time
will be shown on the display.
DRYING button
START/PAUSE button with indicator light: when the
green indicator light flashes slowly, press the button to
start a wash cycle. Once the cycle has begun the
indicator light will remain lit in a fixed manner. To
pause the wash cycle, press the button again; the
indicator light will flash in an orange colour. If the
symbol
opened. To start the wash cycle from the point at
which it was interrupted, press the button again.
Standby mode
This washing machine, in compliance with new
energy saving regulations, is fitted with an automatic
standby system which is enabled after about 30
minutes if no activity is detected. Press the ON-OFF
button briefly and wait for the machine to start up
again.
Button
is not illuminated, the door may be
button
SPIN SPEED
Button
DISPLAY
START/
FUNCTION
buttons
: press to set a delayed
: press to set a drying cycle.
PAUSE
button with
indicator light
TEMPERATURE
Button
: to activate the
is
4
Page 5

Display
GB
F
X
Z
B
A
D
C
E
Y
F
F
L
The display is useful when programming the machine and provides a great deal of information.
The upper two strings A and B are used to display the selected wash cycle or the type of drying selected, the
current wash cycle phase (the selected dryness level or drying time) and all the indications relating to the progress
status of the cycle.
String C shows the time remaining until the end of the wash cycle in progress and, if a DELAYED START has been
set, the time remaining until the start of the selected wash cycle.
String D shows the maximum spin speed value (this depends on the selected wash cycle); if the wash cycle does
not include a spin cycle, the string remains unused.
String E shows the maximum temperature value which may be selected (this depends on the wash cycle used); if
the temperature of the wash cycle cannot be modified, the string remains unused.
Indicator lights F correspond to the functions and light up when the selected function is compatible with the set
wash cycle.
Door locked symbol
If the symbol is lit, this indicates that the washer dryer door is blocked to prevent it from being opened
accidentally. To prevent any damage from occurring, wait for the symbol to switch itself off before opening the
appliance door.
N.B.: if the DELAYED START function has been activated, the door cannot be opened; pauses the machine by
pressing the START/PAUSE button if you wish to open it.
The first time the machine is switched on, you will be asked to select the language and the display will
automatically show the language selection menu.
To select the desired language press the X and Y buttons; to confirm the selection press the Z button.
If you wish to change the selected language, simultaneously press and hold all the three buttons marked with an L
in the figure, until you hear a beep. Switch the machine on again; the language selection menu will be displayed.
5
Page 6
How to run a wash cycle or a
drying cycle
GB
1. SWITCH THE MACHINE ON.Press the button; the
text WELCOME will appear on the display and the START/
PAUSE indicator light will flash slowly in a green colour.
2. LOAD THE LAUNDRY. Open the porthole door. Load
the laundry, making sure you do not exceed the
maximum load value indicated in the table of
programmes on the following page.
3. MEASURE OUT THE DETERGENT. Pull out the
detergent dispenser drawer and pour the detergent into
the relevant compartments as described in "Detergents
and laundry".
4. CLOSE THE DOOR.
5. SELECT THE WASH CYCLE. Press one of the WASH
CYCLE SELECTOR buttons to select the required wash
cycle; the name of the wash cycle will appear on the
display. A temperature and spin speed is set for each
wash cycle; these may be adjusted. The duration of the
cycle will appear on the display.
6. CUSTOMISE THE WASH CYCLE. Use the relevant
buttons:
Modifying the temperature and/or spin
speed.The machine automatically selects the maximum
temperature and spin speed set for the selected wash
cycle; these values cannot therefore be increased. The
temperature can be decreased by pressing the
button, until the cold wash "OFF" setting is reached. The
spin speed may be progressively reduced by pressing
button, until it is completely excluded (the "OFF"
the
setting). If these buttons are pressed again, the
maximum values are restored.
Setting a delayed start.
To set a delayed start for the selected programme,
press the corresponding button repeatedly until the
required delay period has been reached. When this
option is enabled, the
display. To remove the delayed start function press the
button until the text "OFF" appears on the display.
Setting the drying cycle.
The desired drying cycle type may be set by pressing
the DRYING button once or several times. Two options
are available:
A - Based on the how damp the clothes are once they
have been dried:
Iron dry: slightly damp clothes, easy to iron.
Hanger dry: dry clothes to put away.
Cupboard dry: very dry clothes, recommended for
towelling and bathrobes.
B - Based on time: from 40 minutes to 180.
To exclude the drying phase press the relevant button
until the text OFF appears on the display.
If your laundry load to be washed and dried is much
greater than the maximum stated load (see adjacent
table), perform the wash cycle, and when the cycle is
complete, divide the garments into groups and put some
of them back in the drum. At this point, follow the
instructions provided for a "Drying only" cycle. Repeat
this procedure for the remainder of the load.
N.B: a cooling-down period is always added to the end
of each drying cycle.
symbol lights up on the
Drying only
Select a drying setting (
CYCLE selector in accordance with the type of fabric, then
select the desired drying type using the DRYING button.
Table of Drying times (guideline values)
Fabr ic
type
Cotton Clothing of different
Synthetics
Wool Knitwear, Pullovers, etc.
Load type Max.
sizes, Terry towels
Sheets, Shirts, Pyjamas,
socks, etc.
Modifying the cycle settings.
Press the button to enable the function; the indicator
light corresponding to the button will switch on.
Press the button again to disable the function; the
indicator light will switch off.
- - ) using the WASH
Cupboard
load
dry
(kg)
4 120 110 100
3 140 120 100
1,5 150 140 120
Henger
dry
If the selected function is not compatible with the
programmed wash cycle, the indicator light will flash and
the function will not be activated.
If the selected function is not compatible with another
function which has been selected previously, the indicator
light corresponding to the first function selected will flash
and only the second function will be activated; the indicator
light corresponding to the enabled function will remain lit.
The functions may affect the recommended load value
and/or the duration of the cycle.
7. START THE PROGRAMME. Press the START/
PAUSE button. The corresponding indicator light will
become green, remaining lit in a fixed manner, and the
door will be locked (the DOOR LOCKED symbol
be on). During the wash cycle, the name of the phase in
progress will appear on the display. To change a wash
cycle while it is in progress, pause the washer dryer
using the START/PAUSE button (the START/PAUSE
indicator light will flash slowly in an orange colour); then
select the desired cycle and press the START/PAUSE
button again.
To open the door while a cycle is in progress, press the
START/PAUSE button; if the DOOR LOCKED
symbol is switched off the door may be opened. Press
the START/PAUSE button again to restart the wash
cycle from the point at which it was interrupted.
8. THE END OF THE WASH CYCLE.This will be
indicated by the text "END OF CYCLE" on the display;
when the DOOR LOCKED
door may be opened. Open the door, unload the laundry
and switch off the machine.
symbol switches off the
If you wish to cancel a cycle which has already begun,
press and hold the
and the machine will switch off.
button. The cycle will be stopped
Iron
dry
will
6
Page 7
Wash cycles and functions
Table of wash cycles
.
Max
Description of the wash cycle
Wash cycles
Everyday wash cycl es (Dail y)
Cottons (*)
Cottons
Cottons
Synthetics
Synthetics
Mix 30'
(not suitable for wool, silk and clothes which require washing by hand).
Mix 15'
suitable for wool, silk and clothes which require washing by hand).
Silk/Cur tains:
Memory:
M
Wool:
Drying programmes
Cotton dry
Synthetics dry
Wool dry
Partial wash cycles
Spin - 1200
Rinse
Pump out
For all Test Institutes:
* Test wash cycle in compliance with regulation EN 50229: set wash cycle with a temperature of 60°C.
(1st press of the button)
(2nd press of the button)
(3rd press of the button)
(1st press of the button)
(2nd press of the button)
(1st press of the button)
(2nd press of the button)
for garments in silk and viscose, lingerie.
allows for any wash cycle to be stored.
for wool, cashmere, etc.
(1st press of the button)
(2st press of the button)
(3st press of the button)
(1st press of the button)
(2nd press of the button)
:
extremely soiled whites.
:
heavily soiled whites and resistant colours.
:
heavily soiled whites and delicate colours.
:
heavily soiled resistant colours.
:
lightly soiled resistant colours.
:
to refresh lightly soiled garments quickly
:
to refresh lightly soiled garments quickly (not
Max.
temp.
speed
(°C)
90° 1200
60° 1200
40° 1200
60° 800
40° 800
30° 800
30° 800
30° 0 - -
40° 800
- -
- -
- -
- 1200
- 0 - - - - 7 -
Drying
(rpm)
De tergents Max. load (kg)
Bleach Wash
llll
llll
llll
llll
llll
l
l
l
l
l
l
l
ll
-
-
-
- - - 4 -
- - - 3 -
- - - 1,5 -
- - - 7 -
Fabric
softener
ll
ll
ll
ll
-
Normal
l
Mini
Load
73
73
73
31,5
31,5
3 -
1,5 -
11
1,5 1
73
GB
Cycle
duration
The duration of the wash cycles can be checked on the display.
Wash functions
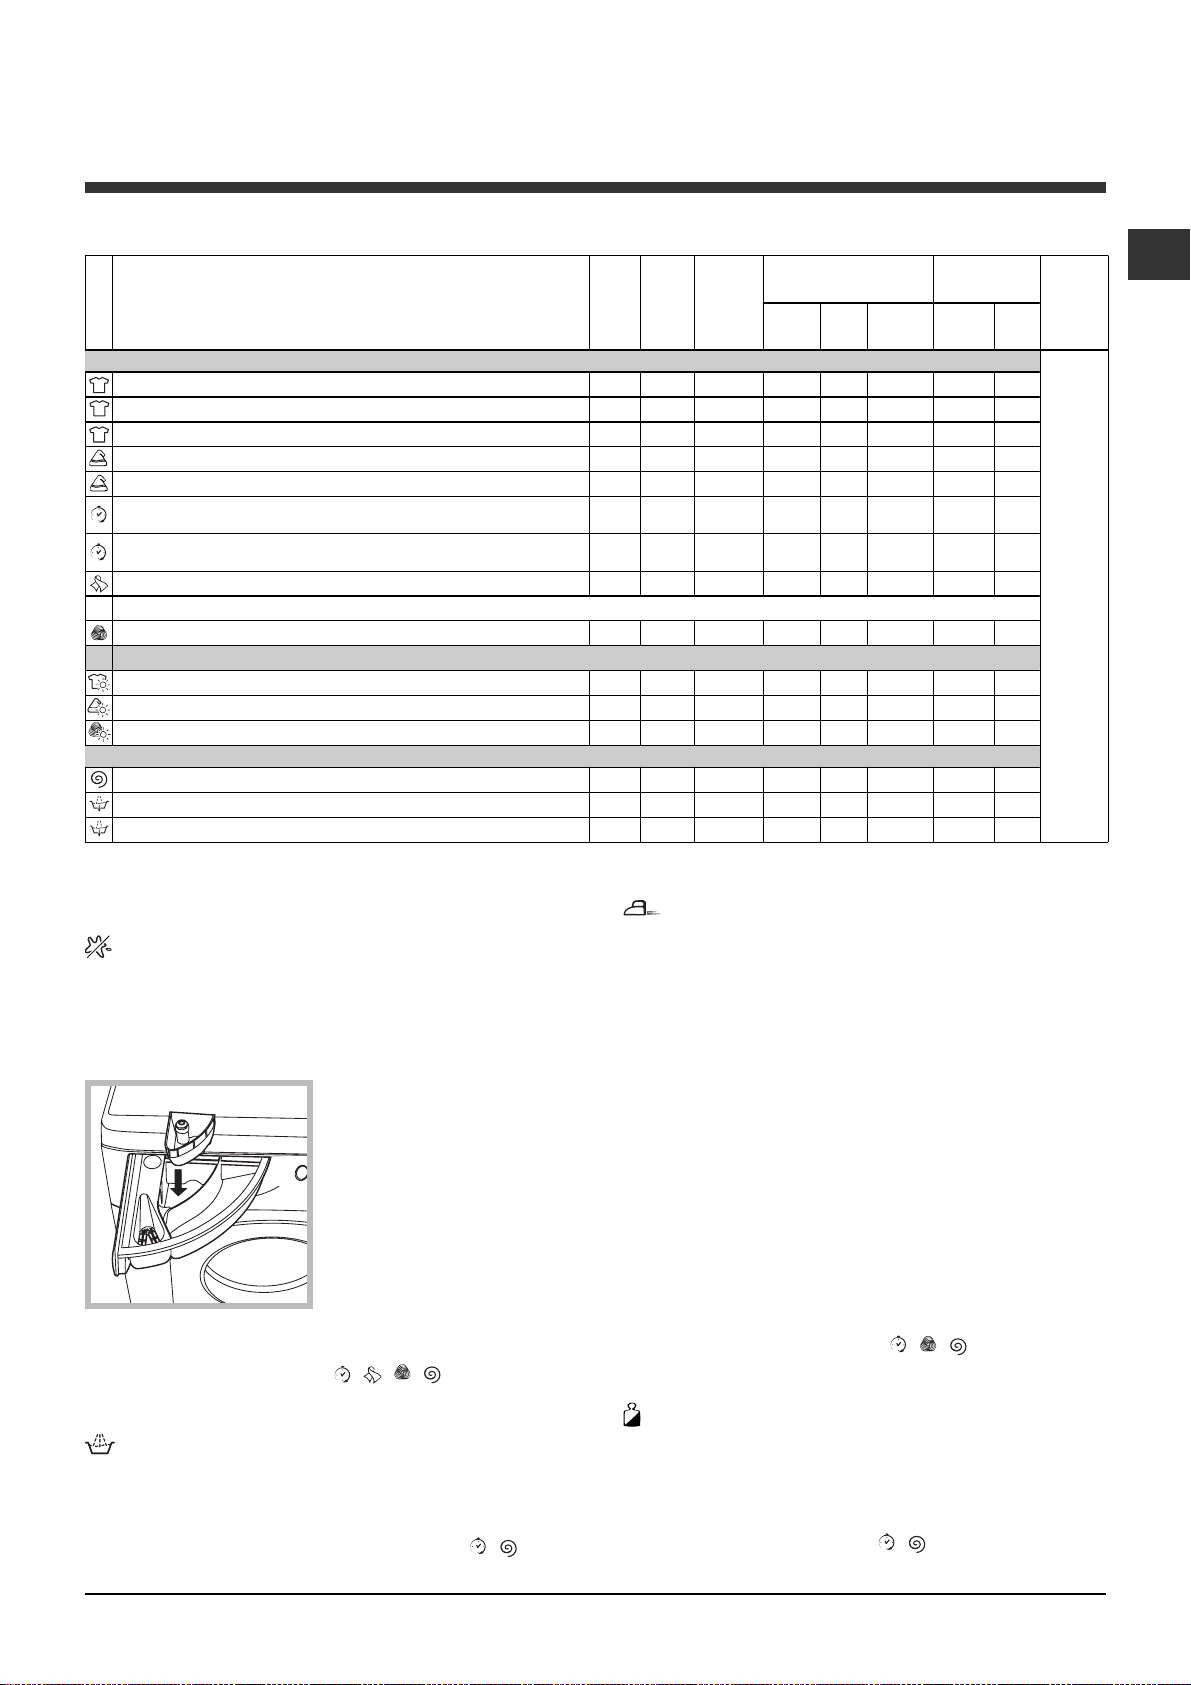
Stain removal
This function is particularly useful for the removal of
stubborn stains. Place extra compartment 3 (supplied)
into compartment 1. When pouring in the bleach, be
careful not to exceed the "max" level marked on the
central pivot (see figure).
To run the bleach cycle on
3
MAX
2
1
cycle and enable the "Stain removal" function.
It cannot be used with the , , , , Pump out
and Drying programmes.
Extra rinse
By selecting this option, the efficiency of the rinse is
increased and optimal detergent removal is
guaranteed. It is particularly useful for sensitive skin.
It cannot be used in conjunction with the , ,
Pump out and Drying programmes.
its own, pour the bleach
into extra compartment 3,
set the "Rinse"
programme and activate
the "Stain removal"
programme. To bleach
during a wash cycle, pour
in the detergent and any
fabric softener you wish to
use, set the desired wash
Easy iron
By selecting this function, the wash and spin cycles
will be modified in order to reduce the formation of
creases. At the end of the cycle the washer dryer will
perform slow rotations of the drum; the EASY IRON
indicator light will switch on, the START/PAUSE
indicator light will flash in an orange colour and the
text "END OF CYCLE" will appear on the display. To
end the cycle, press the START/PAUSE button or the
EASY IRON button.
For the Silk/Curtains cycle, the machine will end the
cycle while the laundry is soaking; the EASY IRON
indicator light will switch on, the START/PAUSE
indicator light will flash in an orange colour and the
text "STOP WITH WATER" will appear on the display.
To drain the water so that the laundry may be
removed, press the START/PAUSE button or the
EASY IRON button.
It may not be used with the , , , Pump out
and Drying programmes.
Mini load
This function is recommended for when the load of
laundry is equal to half, or less than half, of the
maximum recommended load (see Table of wash
cycles).
It cannot be used with the , , Pump out and
Drying programmes.
7
Page 8
Detergents and laundry
GB
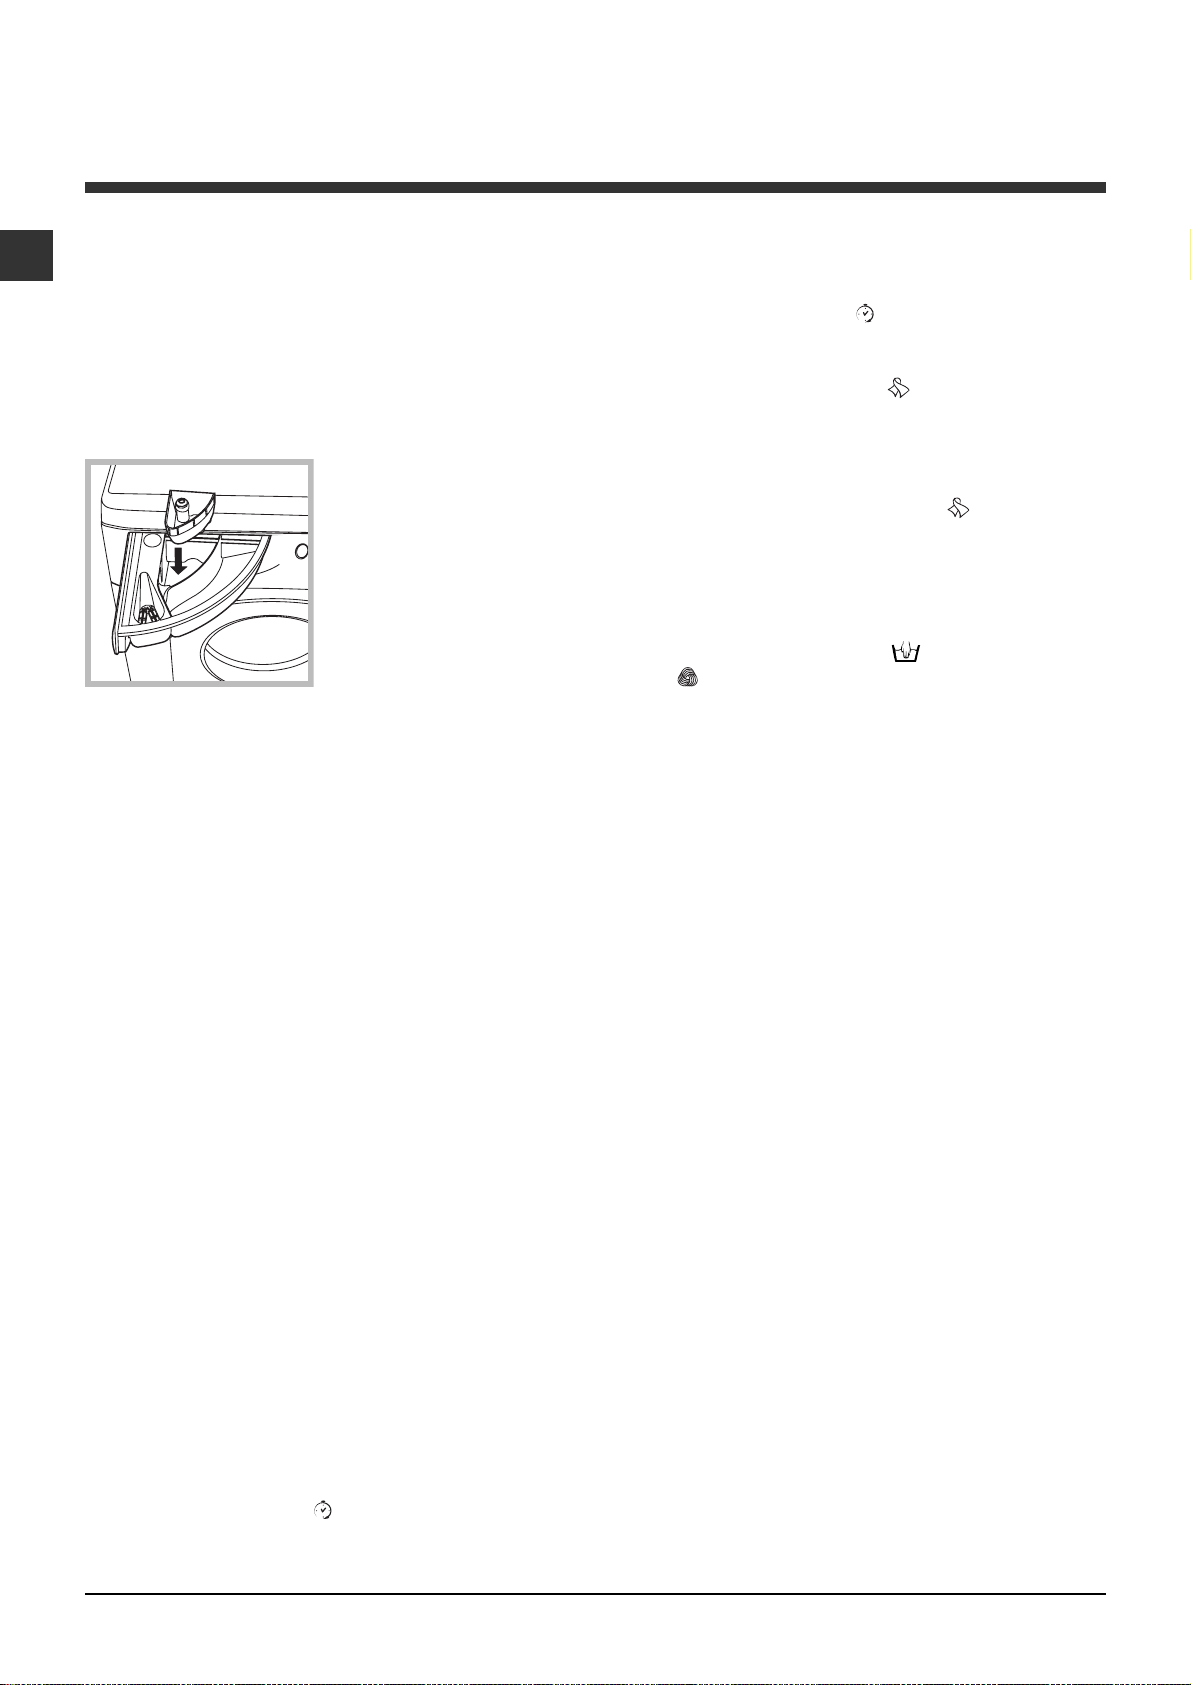
Detergent dispenser drawer
Good washing results also depend on the correct
dose of detergent: adding too much detergent will not
necessarily result in a more efficient wash, and may in
fact cause build up on the inside of your appliance
and contribute to environmental pollution.
Do not use hand washing detergents because these
create too much foam.
Open the detergent
3
MAX
2
compartment 1: Detergent for the wash cycle
(powder or liquid)
Liquid detergent should only be poured in immediately
prior to the start of the wash cycle.
compartment 2: Additives (fabric softeners, etc.)
The fabric softener should not overflow the grid.
extra compartment 3: Bleach
1
dispenser drawer and
pour in the detergent or
washing additive, as
follows.
Preparing the laundry
Divide the laundry according to:
- the type of fabric/the symbol on the label
- the colours: separate coloured garments from whites
Empty all garment pockets and check the buttons.
Do not exceed the listed values, which refer to the
weight of the laundry when dry:
Durable fabrics: max. 7 kg
Synthetic fabrics: max. 3 kg
Delicate fabrics: max. 2 kg
Wool: max. 1.5 kg
Silk: max. 1 kg
How much does your laundry weigh?
Mix 15: this wash cycle was designed to wash
lightly soiled garments quickly: it lasts just 15 minutes
and therefore saves both energy and time. By
selecting this wash cycle (
wash different fabrics together (except for wool and
silk items), with a maximum load of 1.5 kg.
Silk: use special wash cycle
garments. We recommend the use of special
detergent which has been designed to wash delicate
clothes.
Curtains: fold curtains and place them in a pillow
case or mesh bag. Use wash cycle
Wool: is the only washer dryer manufacturer to have
been awarded the prestigious Woolmark Platinum
Care endorsement (M.0508) by the Woolmark
Company, which means that all woollen garments
may be washed in the washer dryer, even those
which state hand wash only
cycle
when washing woollen garments in the washer dryer
(max. load 1.5 kg) and guarantees optimal performance.
therefore offers complete peace of mind
at 30°C), it is possible to
to wash all silk
.
on the label. Wash
Load balancing system
Before every spin cycle, to avoid excessive vibrations
and to distribute the load in a uniform manner, the
drum rotates continuously at a speed which is slightly
greater than the washing rotation speed. If, after
several attempts, the load is not balanced correctly,
the machine spins at a reduced spin speed. If the
load is excessively unbalanced, the washer dryer
performs the distribution process instead of spinning.
To encourage improved load distribution and balance,
we recommend small and large garments are mixed
in the load.
1 sheet 400-500 g
1 pillow case 150-200 g
1 tablecloth 400-500 g
1 bathrobe 900-1200 g
1 towel 150-250 g
Special wash cycles
Mix 30: this wash cycle was designed to wash
lightly soiled garments quickly: it lasts just 30 minutes
and therefore saves both energy and time. By
selecting this wash cycle (
wash different fabrics together (except for wool and
silk items), with a maximum load of 3 kg.
8
at 30°C), it is possible to
Page 9
Precautions and tips
This Washer-dryer was designed and constructed in
accordance with international safety regulations. The
following information is provided for safety reasons
and must therefore be read carefully.
General safety
This appliance is not intended for use by persons
(including children) with reduced physical, sensory or
mental capabilities, or lack of experience and
knowledge, unless they have been given supervision or
instruction concerning use of the appliance by a person
responsible for their safety. Children should be
supervised to ensure that they do not play with the
appliance.
- Do not dry unwashed items in the tumble dryer.
- Items that have been soiled with substances such
as cooking oil, acetone, alcohol, petrol, kerosene,
spot removers, turpentine, waxes and wax removers
should be washed in hot water with an extra
amount of detergent before being dried in the
tumble dryer.
- Items such as foam rubber (latex foam), shower
caps, waterproof textiles, rubber backed articles
and clothes or pillows fitted with foam rubber pads
should not be dried in the tumble dryer.
- Fabric softeners, or similar products, should be used
as specified by the fabric softener instructions.
- The final part of a tumble dryer cycle occurs without heat (cool
down cycle) to ensure that the items are left at a temperature
that ensures that the items will not be damaged.
WARNING: Never stop a tumble dryer before the end
of the drying cycle unless all items are quickly removed
and spread out so that the heat is dissipated.
This appliance was designed for domestic use only.
Do not touch the machine when barefoot or with
wet or damp hands or feet.
Do not pull on the power supply cable when
unplugging the appliance from the electricity
socket. Hold the plug and pull.
Do not open the detergent dispenser drawer while
the machine is in operation.
Do not touch the drained water as it may reach
extremely high temperatures.
Never force the porthole door. This could damage
the safety lock mechanism designed to prevent
accidental opening.
If the appliance breaks down, do not under any
circumstances access the internal mechanisms in
an attempt to repair it yourself.
Always keep children well away from the appliance
while it is operating.
The door can become quite hot during the wash cycle.
If the appliance has to be moved, work in a group
of two or three people and handle it with the utmost
care. Never try to do this alone, because the
appliance is very heavy.
Before loading laundry into the Washer-dryer, make
sure the drum is empty.
During the drying phase, the door tends to get quite hot.
Do not use the appliance to dry clothes that have
been washed with flammable solvents (e.g.
trichlorethylene).
Do not use the appliance to dry foam rubber or
similar elastomers.
Make sure that the water tap is turned on during
the drying cycles.
Disposal
Disposing of the packaging materials: observe local
regulations so that the packaging may be re-used.
The European Directive 2002/96/EC on Waste
Electrical and Electronic Equipment, requires
that old household electrical appliances must not
be disposed of in the normal unsorted municipal
waste stream. Old appliances must be collected
separately in order to optimise the recovery and
recycling of the materials they contain and reduce
the impact on human health and the environment.
The crossed out "wheeled bin" symbol on the
product reminds you of your obligation, that when
you dispose of the appliance it must be separately
collected. Consumers should contact their local
authority or retailer for information concerning
the correct disposal of their old appliance.
Opening the porthole door manually
In the event that it is not possible to open the
porthole door due to a powercut, and if you wish to
remove the laundry, proceed as follows:
1. remove the plug from the electrical socket.
20
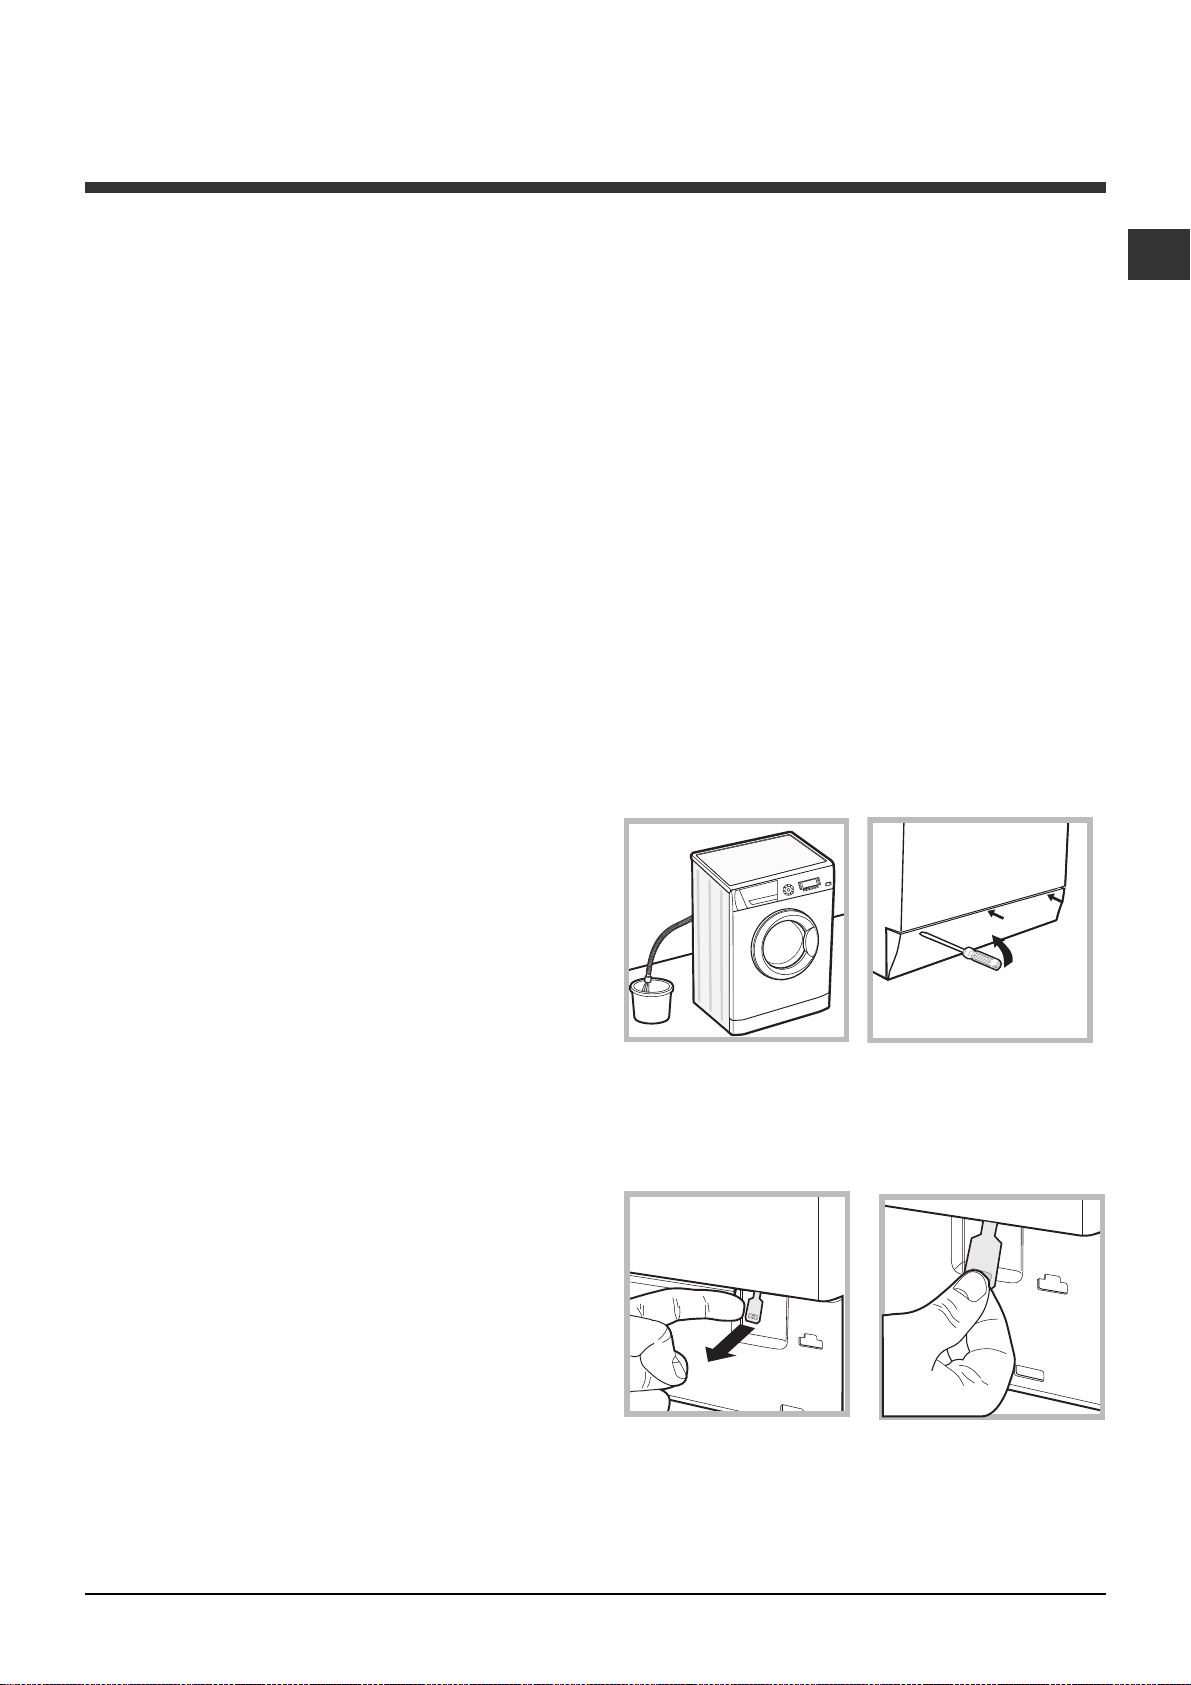
2. make sure the water level inside the machine is
lower than the door opening; if it is not, remove
excess water using the drain hose, collecting it in a
bucket as indicated in the figure.
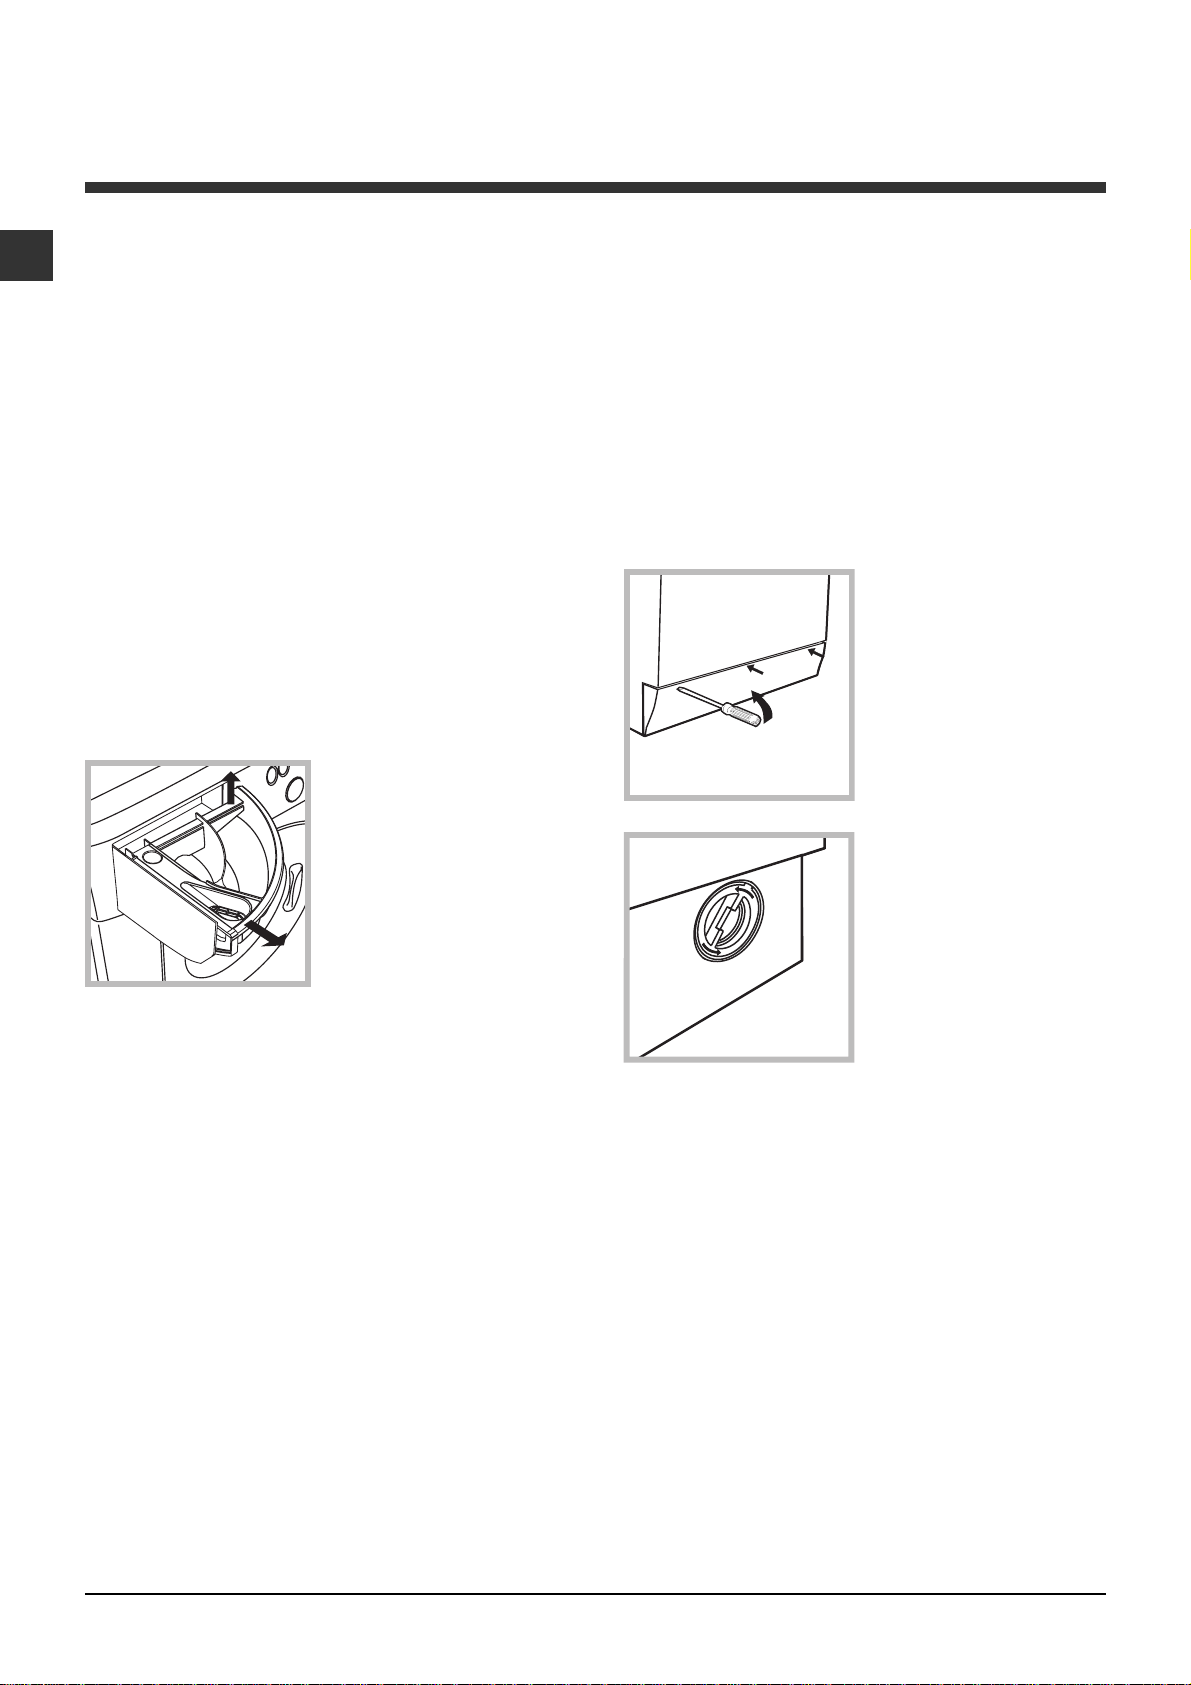
3. using a screwdriver, remove the cover panel on the
lower front part of the washing machine (see figure).
4. pull outwards using the tab as indicated in the
figure, until the plastic tie-rod is freed from its stop
position; pull downwards and open the door at the
same time.
5. reposition the panel, making sure the hooks are
securely in place before you push it onto the
appliance.
GB
9
Page 10
Care and maintenance
GB
Cutting off the water and electricity
supplies
Turn off the water tap after every wash cycle. This
will limit wear on the hydraulic system inside the
washer dryer and help to prevent leaks.
Unplug the washer dryer when cleaning it and
during all maintenance work.
Cleaning the washer dryer
The outer parts and rubber components of the
appliance can be cleaned using a soft cloth soaked
in lukewarm soapy water. Do not use solvents or
abrasives.
Cleaning the detergent dispenser
drawer
1
Remove the dispenser
by raising it and pulling it
out (see figure).
Wash it under running
water; this operation
should be repeated
frequently.
2
Cleaning the pump
The washer dryer is fitted with a self-cleaning pump
which does not require any maintenance. Sometimes,
small items (such as coins or buttons) may fall into the
pre-chamber which protects the pump, situated in its
bottom part.
Make sure the wash cycle has finished and unplug
the appliance.
To access the pre-chamber:
1. using a screwdriver,
remove the cover panel
on the lower front part of
the washer dryer (see
figure);
2. unscrew the lid by
rotating it anti-clockwise
(see figure): a little water
may trickle out. This is
perfectly normal;
Caring for the door and drum of your
appliance
Always leave the porthole door ajar in order to
prevent unpleasant odours from forming.
3. clean the inside thoroughly;
4. screw the lid back on;
5. reposition the panel, making sure the hooks are
securely in place before you push it onto the
appliance.
Checking the water inlet hose
Check the inlet hose at least once a year. If there are
any cracks, it should be replaced immediately: during
the wash cycles, water pressure is very strong and a
cracked hose could easily split open.
Never use second-hand hoses.
10
Page 11

Troubleshooting
Your washer dryer could fail to work. Before contacting the Technical Assistance Centre (see Assistance), make
sure that the problem cannot be not solved easily using the following list.
Problem:
The washer dryer does not
switch on.
The wash cycle does not start.
The washer dryer does not take
in water (the text "NO WATER,
CHECK SUPPLY" appears
on the display).
The washer dryer continuously
takes in and
drains water.
Possible causes / Solutions:
The appliance is not plugged into the socket fully, or is not making contact.
There is no power in the house.
The washer dryer door is not closed properly.
The ON/OFF button has not been pressed.
The START/PAUSE button has not been pressed.
The water tap has not been opened.
A delayed start has been set (see How to run a wash cycle or a drying cycle).
The water inlet hose is not connected to the tap.
The hose is bent.
The water tap has not been opened.
There is no water supply in the house.
The pressure is too low.
The START/PAUSE button has not been pressed.
The drain hose is not fitted at a height between 65 and 100 cm from
the floor (see Installation).
The free end of the hose is under water (see Installation).
The wall drainage system is not fitted with a breather pipe.
If the problem persists even after these checks, turn off the water tap,
switch the appliance off and contact the Assistance Service. If the
dwelling is on one of the upper floors of a building, there may be problems
relating to water drainage, causing the washer dryer to fill with water and
drain continuously. Special anti-draining valves are available in shops and
help to avoid this inconvenience.
GB
The washer dryer does not drain
or spin.
The washer dryer vibrates a lot
during the spin cycle.
The washer dryer leaks.
The machine is locked and the
display flashes, indicating an
error code (e.g. F-01, F-..).
There is too much foam.
The washer-dryer does not dry.
The wash cycle does not include draining: some wash cycles require the
drain phase to be started manually (see Wash cycles and functions).
The EASY IRON function has been activated: To complete the wash
cycle, press the START/PAUSE button (see Wash cycles and functions).
The drain hose is bent (see Installation).
The drainage duct is clogged.
The drum was not unlocked correctly during installation (see Installation).
The washer dryer is not level (see Installation).
The washer dryer is trapped between cabinets and walls (see Installation).
The water inlet hose is not screwed on properly (see Installation).
The detergent dispenser drawer is blocked (for cleaning instructions, see Care
and maintenance).
The drain hose is not fixed properly (see Installation).
Switch off the machine and unplug it, wait for approximately 1 minute
and then switch it back on again.
If the problem persists, contact the Technical Assistance Service.
The detergent is not suitable for machine washing (it should display the
text for washer dryers or hand and machine wash, or the like).
Too much detergent was used.
The appliance is not plugged into the socket, or not enough to make contact.
There has been a power failure.
The appliance door is not shut properly.
A delayed start has been set.
DRYING is in the OFF position.
11
Page 12

Service
GB
Before calling for Assistance:
Check whether you can solve the problem alone (see Troubleshooting);
Restart the programme to check whether the problem has been solved;
If this is not the case, contact an authorised Technical Assistance Centre using the telephone number
provided on the guarantee certificate.
Always request the assistance of authorised technicians.
Have the following information to hand:
the type of problem;
the appliance model (Mod.);
the serial number (S/N).
This information can be found on the data plate applied to the rear of the washer dryer, and can also be
found on the front of the appliance by opening the door.
12
Page 13

Használati utasítás
MOSÓGÉP
HU
Magyar
ARMXXD1290
Ez a szimbólum arra figyelmeztet, hogy olvassa el ezt a
használati utasítást.
Összefoglalás
Üzembe helyezés, 1415
Kicsomagolás és vízszintbe állítás
Víz- és elektromos csatlakozás
Elsõ mosási ciklus
Mûszaki adatok
A mosógép leírása, 16-17
Kezelõpanel
Kijelzõ
A mosási ciklusok, illetve a szárítás
végrehajtása, 18
Programok és funkciók, 19
Programtáblázat
Mosási funkciók
HU
Mosószerek és mosandók, 20
Mosószer-adagoló fiók
A mosandó ruhák elõkészítése
Különleges programok
A bepakolt ruhák kiegyensúlyozására szolgáló
rendszer
Óvintézkedések és tanácsok, 21
Általános biztonság
Hulladékelhelyezés
Az ajtó kézi nyitása
Karbantartás és ápolás, 22
A víz elzárása és az elektromos áram kikapcsolása
A mosógép tisztítása
A mosószer-adagoló fiók tisztítása
Az ajtó és a forgódob ápolása
A szivattyú tisztítása
A vízbevezetõ csõ ellenõrzése
Rendellenességek és elhárításuk, 23
Szerviz, 24
13
Page 14
Üzembe helyezés
HU
Fontos, hogy megõrizze ezt a kézikönyvet, hogy
mindig kéznél legyen. Ha a mosógépet eladná,
átadná vagy másnál helyezné el, gondoskodjon
arról, hogy e kézikönyv a mosógéppel együtt
maradjon, hogy az új tulajdonos is megismerhesse
a készülék funkcióit és az ezekre vonatkozó
figyelmeztetéseket.
Figyelmesen olvassa el az utasításokat: fontos
információkat tartalmaznak az üzembe helyezésrõl,
a használatról és a biztonságról.
Kicsomagolás és vízszintbe állítás
Kicsomagolás
1. Csomagolja ki a mosógépet.
2. Ellenõrizze, hogy a mosógép nem sérült-e meg a
szállítás során. Ha a gépen sérülést talál, ne
csatlakoztassa, és forduljon a viszonteladóhoz.
3. Csavarozza ki a gép
hátsó részén található, a
szállításhoz szükséges
4 védõcsavart, és
távolítsa el a gumibakot
(lásd ábra).
A pontos vízszintezés biztosítja a gép stabilitását,
így az a mûködés során nem fog rezegni, zajt
okozni, illetve elmozdulni. Szõnyegpadló vagy
szõnyeg esetén a lábakat úgy állítsa be, hogy a
mosógép alatt elegendõ hely maradjon a
szellõzésre.
Víz- és elektromos csatlakozás
Vízbevezetõ csõ csatlakoztatása
1. A vízbevezetõ csõ
csatlakoztatásához
csavarozza fel a csövet
egy 3/4-os külsõ
menettel rendelkezõ
hidegvíz csapra (lásd
ábra).
A csatlakoztatás elõtt
eressze meg a csapot
addig, amíg a víz teljesen
átlátszóvá nem válik.
2. A vízbevezetõ csõ
csatlakoztatásához
csavarozza a csövet a
mosógép hátoldalán
jobbra fent található
vízbemeneti csonkra
(lásd ábra)!
4. Zárja le a furatokat a mellékelt mûanyag
dugókkal.
5. Minden darabot õrizzen meg: ha a mosógépet
szállítani kell, elõtte ezeket vissza kell szerelni.
A csomagolóanyag nem gyermekjáték!
Vízszintbe állítás
1. A mosógépet sík és kemény padlóra állítsa, úgy,
hogy ne érjen falhoz, bútorhoz vagy máshoz.
2. Ha a padló nem
tökéletesen vízszintes,
azt az elsõ lábak be-,
illetve kicsavarásával
kompenzálhatja (lásd
ábra). A gép felsõ
burkolatán mért dõlés
nem haladhatja meg a
2°-ot.
3. Ügyeljen arra, hogy a csövön ne legyen törés
vagy szûkület!
A csap víznyomásának a mûszaki adatok
táblázatában szereplõ határértékek között kell
lennie (lásd a szemben lévõ oldalt).
Amennyiben a vízbevezetõ csõ nem elég hosszú,
forduljon szaküzlethez vagy engedéllyel rendelkezõ
szakemberhez.
Soha ne használjon korábban már használt
csöveket.
Használja a készülékhez mellékelteket.
14
Page 15
A leeresztõcsõ csatlakoztatása
Csatlakoztassa a
leeresztõcsövet a
lefolyóhoz vagy a
padlótól 65 és 100cm
közötti magasságban
65 - 100 cm
lévõ fali szifonhoz
anélkül, hogy megtörné;
! Ne használjon hosszabbítót vagy elosztót.
HU
! A kábel ne legyen se megtörve, se összenyomva.
! A tápkábelt csak engedéllyel rendelkezõ
szakember cserélheti.
Figyelem! A fenti elõírások figyelmen kívül hagyása
esetén a gyártó elhárít minden felelõsséget.
Elsõ mosási ciklus
illetve akassza a mosdó
vagy a kád szélére úgy,
hogy a mellékelt
csõvezetõ ívet a csaphoz
erõsíti (lásd ábra). A
leeresztõcsõ szabad
végének nem szabad
vízbe merülnie.
! Toldások használata nem javasolt. Amennyiben
feltétlenül szükséges, a toldás átmérõje egyezzen
meg az eredeti csõével és semmiképpen se legyen
150cm-nél hosszabb.
Elektromos csatlakoztatás
Mielõtt a csatlakozódugót az aljzatba dugná,
bizonyosodjon meg arról, hogy:
az aljzat földelése megfelel a törvény által
elõírtnak;
az aljzat képes elviselni a készülék mûszaki
adatait tartalmazó táblázatban megadott maximális
teljesítményfelvételt (lásd szemben);
a hálózat feszültsége a mûszaki adatokat
tartalmazó táblázatban szereplõ értékek közé esik
(lásd szemben);
az aljzat kompatibilis a mosógép
csatlakozódugójával. Ellenkezõ esetben cserélje ki
az aljzatot vagy a csatlakozódugót!
! A mosógép nem állítható fel nyílt téren, még akkor
sem, ha tetõ van fölötte, mivel nagyon veszélyes, ha
a gép esõnek vagy zivataroknak van kitéve.
! A csatlakozódugónak a mosógép üzembe helyezett
állapotában is könnyen elérhetõ helyen kell lennie.
Üzembe helyezés után mielõtt a mosógépet
használni kezdené mosószerrel, mosandó ruha
nélkül futtassa le az
-es mosási programot.
Mûszaki adatok
Modell
Méretek
Ruhatöltet:
Elektromos
csatlakozás
Vízcsatlakozások
Centrifuga
fordulatszám
EN 50229 szabvány
Szerinti
vezérlõprogramok
ARMXXD 1290
szélesség 59,5 cm
magasság 85 cm
mélység 53,5 cm
mosáshoz 1 és 7 kg között;
szárításhoz 1 és 4 kg között
lásd a készüléken található, muszaki
jellemzoket tartalmazó adattáblát!
maximális nyomás 1 MPa (10 bar)
minimális nyomás 0,05 MPa (0,5 bar)
dob ûrtartalma 52 liter
1200 fordulat/perc-ig
mosáshoz:
megnyomása)
ruhatöltettel végezve.
szárítás:
ruhatöltettel végezze el és válassza ki
az "
második szárítást 4 kg ruhanemûvel
végezze el, és válassza ki a z
"
Szekrénykész
Ez a berendezés megfelel a következõ
Uniós Elõírásoknak:
- 2004/108/CE (Elektromágneses
összeférhetõség)
- 2002/96/CE
- 2006/95/CE (Alacsony feszültség)
-as program
; hõmérséklet 60°
az elsõ szárítást 3 kg
Vasaláskész
" szárítási szintet; a
" szárítási szintet.
(
A gomb elsõ
7 kg
C;
15
Page 16

A mosógép leírása
HU
Kezelõpanel
BEKAPCSOLÁS/
KIKAPCSOLÁS
Mosószer-adagoló fiók
PROGRAMVÁLASZTÓ
Mosószer-adagoló fiók: a mosószerek és
adalékanyagok betöltésére szolgál (lásd
Mosószerek és mosandók).
BEKAPCSOLÁS/KIKAPCSOLÁS gomb
készülék be-, vagy kikapcsolásához nyomja meg
röviden ezt a gombot. Amennyiben az ELINDÍTÁS/
SZÜNETELTETÉS lámpa zöld fénnyel lassan villog,
a készülék be van kapcsolva. A mosógép mosás
közben történõ leállításához hosszan, kb. 2
másodpercig tartsa lenyomva a nyomógombot a
gomb rövid, vagy véletlen megnyomása nem
kapcsolja le a készüléket. A mosógép mosás
közben történõ leállítása magát a mosás programot
is törli. A kívánt programot újból be kell állítani.
PROGRAMVÁLASZTÓ gombok: a kívánt program
beállítására szolgálnak (lásd Programtáblázat).
MEMÓRIA gomb: az egyéni igényeknek megfelelõen
beállított program tárolásához tartsa lenyomva ezt a
gombot. A korábban eltárolt programokat a
MEMÓRIA gomb megnyomásával lehet elõhívni.
FUNKCIÓ gombok: a kívánt funkció kiválasztásához
nyomja meg ezt a gombot. A kijelzõn világít a
megfelelõ jelzõlámpa.
CENTRIFUGÁLÁS
sebességének csökkentéséhez, vagy annak teljes
kikapcsolásához nyomja meg ezt a gombot az
érték megjelenik a kijelzõn.
HÕMÉRSÉKLET
csökkentéséhez nyomja meg ezt a gombot az
érték megjelenik a kijelzõn.
gomb: a centrifugálás
gomb: A hõmérséklet
gomb
gombok
: a
GYEREKZÁR
gomb
SZÁRÍTÁS
gomb
Kijelzõ
MEMÓRIA
gomb
KÉSLELTETETT
INDÍTÁS
gomb
GYEREKZÁR
nagyjából 2 másodpercig tartsa lenyomva ezt a
gombot. Ha a szimbólum
hogy a gyerekzár aktiválva van. Ez a funkció
megakadályozza a programok véletlen átállítását,
fõképp, ha gyerekek is vannak a lakásban. A
kezelõpanel letiltásának kikapcsolásához nagyjából
2 másodpercig tartsa lenyomva ezt a gombot.
KÉSLELTETETT INDÍTÁS
program késleltetett elindításához nyomja meg ezt a
gombot. A késleltetés értéke megjelenik a kijelzõn.
SZÁRÍTÁS
módosításához nyomja meg ezt a gombot a
szárítási szint, illetve szárítási idõ kiválasztott
értéke megjelenik a kijelzõn.
ELINDÍTÁS/SZÜNETELTETÉS jelzolámpás gomb: ha a
zöld jelzõlámpa lassan villog, a mosás indításához
nyomja meg ezt a gombot. A ciklus elindításával a
jelzõlámpa állandó fénnyel kezd világítani. A mosás
szüneteltetéséhez ismételten nyomja meg ezt a gombot;
a jelzõlámpa narancssárga fénnyel kezd el villogni.
Amennyiben a
lehet nyitni. A mosásnak a megszakítás idõpontjától való
folytatásához nyomja meg ismét ezt a gombot.
Készenléti üzemmód
Ez a mosógép az energiatakarékosságra
vonatkozó legújabb elõírásoknak megfelelõen
automatikus kikapcsolási (készenléti) rendszerrel
van ellátva, mely a használat 30 percnyi
szüneteltetése esetén bekapcsol. Nyomja meg
röviden a BEKAPCSOLÁS/KIKAPCSOLÁS gombot,
és várjon, amíg a készülék újrabekapcsol.
FUNKCIÓ
gombok
gomb: a kezelõpanel letiltásához
gomb: a szárítási beállítások
szimbólum nem világít, az ajtót ki
CENTRIFUGÁLÁS
gomb
ELINDÍTÁS/
SZÜNETELTETÉS
jelzõlámpás gomb
HÕMÉRSÉKLET
gomb
világít, az azt jelenti,
gomb: a kiválasztott
16
Page 17

Kijelzõ
HU
F
X
Z
B
A
D
C
E
Y
F
F
L
A kijelzõ a készülék programozásához nyújt segítséget, és számos információt szolgáltat.
A felsõ két feliratmezõ (A és B) a kiválasztott mosási programot, illetve szárítási típust, a folyamatban lévõ
mosási fázist (a kiválasztott szárítási szintet vagy szárítási idõt), valamint a program elõrehaladásával
kapcsolatos információkat jeleníti meg.
A C feliratmezõ a folyamatban lévõ mosási ciklus végéig hátralévõ maradékidõt, illetve KÉSLELTETETT
INDÍTÁS beállítása esetén a kiválasztott program elindulásáig hátralévõ idõt jeleníti meg.
A D feliratmezõ a beállított programhoz választható centrifugasebesség maximális értékét jeleníti meg
amennyiben a program nem tartalmaz centrifugálást, a feliratmezõ üres marad.
Az E feliratmezõ a beállított programhoz választható hõmérséklet maximális értékét jeleníti meg amennyiben
a programhoz nem kell beállítani a hõmérsékletet, a feliratmezõ üres marad.
Az F jelzõlámpák a funkciókhoz tartoznak, és akkor kapcsolnak be, ha a kiválasztott funkció kompatibilis a
beállított programmal.
Ajtózár szimbólum
A világító jelzõlámpa azt jelenti, hogy az ajtó a véletlen kinyitás megakadályozása érdekében be van zárva. A
károk elkerülése érdekében az ajtó kinyitása elõtt meg kell várni, hogy a jelzõlámpa kialudjon.
Megjegyzés: Amennyiben a KÉSLELTETETT INDÍTÁS funkció be van kapcsolva, az ajtót nem lehet kinyitni.
Az ajtó kinyitásához az ELINDÍTÁS/SZÜNETELTETÉS gomb megnyomásával szüneteltesse le a készülék
mûködését.
! Az elsõ bekapcsoláskor a készülék kérni fogja a nyelv kiválasztását, és a kijelzõ automatikusan belép a
nyelvválasztás menübe.
A kívánt nyelv kiválasztásához nyomja meg a X és a Y gombokat, a kiválasztás jóváhagyásához pedig a Z gombot.
Amennyiben módosítani szeretné a nyelvet, kapcsolja ki a készüléket, és tartsa egyszerre lenyomva az ábrán L
szimbólummal jelölt gombokat a hangjelzésig. Ha ezután visszakapcsolja a készüléket, a kijelzõn megjelenik a
nyelvválasztás menü.
17
Page 18

A mosási ciklusok, illetve a
szárítás végrehajtása
HU
1. A KÉSZÜLÉK BEKAPCSOLÁSA. Nyomja meg a
gombot a kijelzõn megjelenik az ÜDVÖZLET felirat,
az ELINDÍTÁS/SZÜNETELTETÉS lámpa pedig
lassan, zöld fénnyel villogni kezd.
2. A MOSANDÓ RUHÁK BEPAKOLÁSA. Nyissa ki az ajtót!
Tegye be a mosandó ruhákat, ügyelve arra, hogy ne
lépje túl a következõ oldalon található
programtáblázatban feltüntetett ruhatöltet-mennyiséget.
3. A MOSÓSZER ADAGOLÁSA. Vegye ki a fiókot, és a
Mosószerek és mosandók fejezetben leírtak szerint
öntse a mosószert a megfelelõ tégelybe.
4. CSUKJA BE AZ AJTÓT.
5. A PROGRAM KIVÁLASZTÁSA. A kívánt program
kiválasztásához nyomja meg az egyik PROGRAMVÁLASZTÓ
gombot a program neve megjelenik a kijelzõn. Mindegyik
programhoz tartozik egy hõmérséklet és egy
centrifugasebesség, melyek megváltoztatható értékek. A
kijelzõn megjelenik a ciklusidõ.
6. A MOSÁSI CIKLUS EGYÉNI BEÁLLÍTÁSAI. Használja
a megfelelõ gombokat:
A hõmérséklet és/vagy a centrifugasebesség
megváltoztatása. A készülék automatikusan kiválasztja az
elindított programhoz tartozó legmagasabb hõmérsékletet és
centrifugasebességet. Ezen értékek további növelése nem
lehetséges. A
gomb nyomogatásával a hõmérséklet
fokozatosan csökkenthetõ egészen a hidegmosásig OFF. A
gomb nyomogatásával a centrifugasebesség
fokozatosan csökkenthetõ egészen annak kikapcsolásáig
OFF. A gomb legalsó értéken történõ megnyomásával
visszatérhet a maximális értékekhez.
Késleltetett indítás beállítása.
A kiválasztott program késleltetett indításához
nyomogassa a megfelelõ gombot addig, míg a
késleltetés kívánt értékét el nem éri. Ha a funkció be van
kapcsolva, a kijelzõn világít a szimbólum. A késleltetett
indítás törléséhez nyomogassa a gombot mindaddig,
míg a kijelzõn meg nem jelenik az OFF felirat.
A szárítás beállítása
A SZÁRÍTÁS gomb egyszeri vagy többszöri
megnyomásával beállítható a kívánt szárítási típus.
Két lehetõség közül választhat:
A- Beállítás a megszárított ruhadarabok
nedvességtartalma alapján:
Vasaláskész: enyhén nedves, könnyen vasalható
ruhadarabok.
Fogaskész: elteendõ, megszáradt ruhadarabok.
Szekrénykész: nagyon száraz ruhanemûk,
frottírtörülközõkhöz és fürdõköpenyekhez ajánlott.
B - az ido alapján: 40 - 180 percig.
A szárítás kikapcsolásához nyomogassa a vonatkozó
gombot mindaddig, míg a kijelzõn a OFF felirat meg
nem jelenik.
Ha a mosni és szárítani kívánt ruhanemû mennyisége
jóval több, mint a megengedett (lásd az oldalsó
táblázatot), végezze el a mosást, és a program
végeztével válasssza szét a ruhanemût és egy részét
tegye vissza a dobba. Ezután kövesse a Csak
szárítás végrehajtásához megadott instrukciókat.
Ismételje meg ugyanezt a maradék ruhanemûvel is.
Megjegyzés: A szárítás végét mindig hûtési folyamat
követi.
Csak szárítás
Forgassa a PROGRAMOK tekerõgombot a kelme
típusának megfelelõ szárítási beállításra (
), azaz válassza ki a kívánt szárítási típust a
SZÁRÍTÁS tekerõgomb segítségével.
Szárítási hõmérseklet táblázat
Anyagtípu s
Pamut Különbözo méretu
Szinte-
tikus
Gyapju
Töltet Max.
ruhanemuk, Frottír
törülközok
Ágynemuk, ingek,
Pizsamák, zoknik stb.
töltet
(kg)
4 120 110 100
3 140 120 100
1,5 150 140 120
Szekrén-
kész
ys
Foga
kész
A program tulajdonságainak módosítása.
A funkció bekapcsolásához nyomja meg ezt a
gombot a gombon található jelzõlámpa világít.
A funkció kikapcsolásához ismételten nyomja
meg a gombot a lámpa kialszik.
! Ha a kiválasztott funkció a beállított programmal
nem kompatibilis, a jelzõlámpa villogni kezd, és a
funkció nem lesz bekapcsolva.
! Ha a kiválasztott funkció egy korábban beállított
programmal nem kompatibilis, az elsõként
kiválasztott funkció lámpája villogni kezd, és csak a
második funkció lesz bekapcsolva, a bekapcsolt
funkció lámpája folyamatosan világít.
! A funkciók megváltoztathatják az ajánlott ruhatöltetmennyiséget és/vagy a ciklusidõt.
7. A PROGRAM INDÍTÁSA. Nyomja meg az ELINDÍTÁS/
SZÜNETELTETÉS gombot. A megfelelõ jelzõlámpa állandó
zöld fénnyel világítani kezd, és az ajtózár bekapcsol (az
AJTÓZÁR szimbólum világítani kezd). A mosás ideje alatt a
kijelzõn a folyamatban lévõ mosási fázis neve látható. A
program menet közben történõ megváltoztatásához az
ELINDÍTÁS/SZÜNETELTETÉS gomb megnyomásával
szüneteltesse le a készülék mûködését az ELINDÍTÁS/
SZÜNETELTETÉS lámpa narancssárga fénnyel lassan
villogni kezd. Ezután válassza ki a kívánt programot, és
nyomja meg újból az ELINDÍTÁS/SZÜNETELTETÉS gombot.
Az ajtó menet közbeni kinyitásához nyomja meg az
ELINDÍTÁS/SZÜNETELTETÉS gombot ha az
szimbólum kialudt, kinyithatja az ajtót. A mosásnak a
megszakítás idõpontjától való folytatásához nyomja meg
ismét az ELINDÍTÁS/SZÜNETELTETÉS gombot.
8. A PROGRAM VÉGE. Ezt a kijelzõn megjelenõ CIKLUS
VÉGE felirat jelzi. Ha az AJTÓZÁR
szimbólum
kialszik, ki lehet nyitni az ajtót. Nyissa ki az ajtót, szedje
ki a mosott ruhákat, és kapcsolja ki a készüléket.
! Amennyiben nullázni szeretne egy már elindított
programot, tartsa hosszan lenyomva a gombot. A
program megszakad, és a készülék kikapcsol.
- -
Vasalá-
s-
kész
s
AJTÓZÁR
18
Page 19

Programok és funkciók
Programtáblázat
Max.
õ
h
Programleírás
Programok
Hétköznapi programok
PAMUT
PAMUT
hõmérsékleten mosható színes ruhák.
PAMUT
színes ruhák.
SZINTETIKUS
hõmérsékleten mosható színes ruhák.
SZINTETIKUS
magasabb homérsékleten mosható színes ruhák.
MIX 30'
átöblítésére (nem javasolt gyapjú, selyem és kézzel mosandó ruhanemûkhöz).
15' FRISSÍTO MOSÁS
szennyezett ruhadarabok gyors átöblítésére (nem javasolt gyapjú, selyem és
kézzel mosandó ruhanemûkhöz).
SELYEM/FÜGGÖNY
fehérnemûkhöz.
M
MEMÓRIA
GYAPJÚ
Szárítás programok
Pamut
Szintetikus
Gyapjú
Részleges programok
NEM KÉNYES CENTRIFUGÁLÁS
ÖBLÍTÉS
SZIVATTYÚZÁS
A viszgálószervek számára:
* EN 50229 szabvány szerinti vezérlõprogramok: állítsa be a Pamut programot 60°C-ra.
(
(*)
A gomb elsõ megnyomása)
(
A gom b második megnyom ása)
(
A gom b harmadik m egnyomása)
(
A gomb elsõ megnyomása)
(
A gom b második megnyom ása)
(
A gomb elsõ megnyomása)
(
A gom b második megnyom ása)
: selyem ruh anemûkhöz, viszkózus anyago kh oz,
: bármilyen mosási típus memorizálását engedélyezi.
: Gyapjú, kasmír stb. ruhanemûk mosásához.
(
A gomb elsõ megnyomása)
(
A gom b második megnyom ása)
: e
rõsen szennyezett fehér ruhák.
: erõsen szennyezett fehér és magasabb
: erõsen szennyezett kényes fehér és
: erõsen szennyezett, magasabb
: enyhén szennyezett,
: az enyhén szennyezett ruhadarabok gyors
: az enyhén
(
A gomb elsõ megnyomása)
.
.
.
m.
°C
)
(°
90° 1200 llll
60° 1200 llll
40° 1200 llll
60° 800 llll
40° 800 llll
30° 800 l
30° 800 l
30° 0
40° 800 l
--
--
--
-
-
-
Max.
sebesség
(ford./
Szárítás
perc)
-
l
l
l
1200 l
1200 ll
0
----7 -
Mosószerek
Fehérít-
õ
szer
-
-
-
-
---4 -
---3 -
---1,5 -
---7 -
Mo sás Öblít
ll
ll
ll
ll
l
-
ruhamenny-
iség (kg)
Nor-
õ
mál
73
73
73
31,5
31,5
3 -
1,5 -
11
1,5 1
73
Max.
Kis
töltet
HU
Progra-
mido
A mosási programok mosási ideje leolvasható a kijelzõrõl.
Mosási funkciók
Folteltávolítás
Ez a funkció a legmakacsabb foltok eltávolítására
szolgál.
Tegye be a 3-es
3
MAX
2
1
fehérítõt a 3-es berakható rekeszbe, állítsa be a Öblítés
programot, és kapcsolja be a Folteltávolítás funkciót.
Ha mosás közben szeretne fehéríteni, tegye be a
mosóport és az adalékanyagokat, állítsa be a kívánt
programot, és kapcsolja be a Folteltávolítás funkciót.
! Ez a funkció nem használható a
, Szivattyúzás programoknál.
Extra öblítés
Ezen opció alkalmazásával nõ az öblítés, valamint a
végsõ mosószereltávolítás hatékonysága. Használata a
különösen érzékeny bõrû embereknél ajánlott.
! Ez a funkció nem használható a , , , , ,
Szivattyúzás programoknál.
berakható tartályt az 1-es
rekeszbe.
A fehérítõszer betöltése
közben vigyázzon arra,
hogy az a központi csapon
jelzett max szintet ne
lépje túl (lásd ábra).
Amennyiben csak
fehérítést szeretne
végezni, töltse be a
, , , , , ,
Vasaláskönnyítés
Ez a funkció a gyûrõdések keletkezésének csökkentése
érdekében a megfelelõ idõben módosítja a mosási
beállításokat és a centrifugasebességet. A
VASALÁSKÖNNYÍTÉS lámpa és az ELINDÍTÁS/
SZÜNETELTETÉS lámpa narancssárga fénnyel villogni
kezd, a kijelzõn pedig megjelenik a CIKLUS VÉGE
felirat. A program befejezéséhez nyomja meg az
ELINDÍTÁS/SZÜNETELTETÉS gombot vagy a
VASALÁSKÖNNYÍTÉS gombot. A Selyem programnál a
készülék a mosandó ruhák áztatásánál leáll, a
VASALÁSKÖNNYÍTÉS lámpa és az ELINDÍTÁS/
SZÜNETELTETÉS lámpa narancssárga fénnyel villogni
kezd, a kijelzõn pedig megjelenik az VÍZBEN ÁLLÁS
felirat. Az öblítõvíz leeresztéséhez és a mosott ruhák
kiszedéséhez meg kell nyomni az ELINDÍTÁS/
SZÜNETELTETÉS gombot, vagy a VASALÁSKÖNNYÍTÉS
gombot.
! Ez a funkció nem használható a
, , , , , ,
Szivattyúzás programoknál.
Kis töltet
Ezt a funkciót akkor használja, ha a mosandó ruha a
maximálisan javasolt mennyiség fele, vagy annál
kevesebb (lásd Programtáblázat).
! Nem kapcsolható be a , , , , , Szivattyúzás
programoknál.
19
Page 20

Mosószerek és mosandók
HU
Mosószer-adagoló fiók
A mosás eredményessége függ a mosószer helyes
adagolásától is: ha túl sokat adagol belõle, a mosás
nem lesz hatékonyabb, de hozzájárul ahhoz, hogy
lerakódás képzõdjön a mosógépben, valamint a
környezetet is jobban szennyezi.
! Ne használjon kézi mosószert, mert túlzottan sok
hab képzõdik.
Húzza ki a mosószer-
3
MAX
2
1-es rekesz: Mosószer mosáshoz (por vagy folyadék)
A folyékony mosószert csak az indítás elõtt lehet
betölteni.
2-as rekesz: Adalékok (öblítõk stb.)
Az öblítõ ne érjen a rács fölé.
3-es berakható rekesz: Fehérítõszer
1
adagoló fiókot, és a
következõk szerint tegye
bele a mosószert, illetve
az adalékot.
A mosandó ruhák elõkészítése
Osztályozza a mosandókat a következõk szerint:
- Szövet típusa / címkén lévõ szimbólum.
- Színek Válogassa külön a színes és fehér ruhákat.
Ürítse ki a zsebeket, és vizsgálja meg a gombokat.
Ne lépje túl a mosandók száraz súlyára
vonatkozóan megadott értékeket:
Magasabb hõmérsékleten mosható anyagok: max. 7kg
Mûszálas anyagok: max. 3kg
Kényes anyagok: max. 2kg
Gyapjú: max. 1,5kg
Selyem: max. 1kg
15' Fríssitõ mosás: ez a program enyhén koszos
ruhadarabok rövid idõ alatt történõ kimosására lett
kifejlesztve mindössze 15percig tart, így energiát
és idõt takarít meg. Az
beállítva különbözõ jellegû anyagokat együttesen is
lehet mosni (kivéve gyapjút és selymet) maximum
1,5kg ruhatöltet-mennyiségig.
Selyem: az összes selyem ruhadarab mosásához
használja az ehhez való, -es programot! A
kényesebb ruhanemûkhöz tanácsos speciálisan
rájuk kifejlesztett mosószert használni.
Függönyök: hajtogatva tegye párnahuzatba
(vászonzsákba) vagy hálós zacskóba. Használja a
-es programot.
Gyapjú: az egyedüli mosógép, mely a Woolmark
Companytõl megkapta a rangos Woolmark Platinum
Care ismertetõjelet (M.0508), ami tanúsítja, hogy az
összes gyapjú ruhadarab mosható a mosógépben,
még azok is, melyek címkéjén a kézzel mosandó
megjelölés
nyugalommal moshatja mosógépben az összes
gyapjú ruhadarabot (max. 1,5kg), garantáltan a
legjobb hatásfokon.
szerepel. A -es programmal teljes
-ös programot 30°C-ra
A bepakolt ruhák kiegyensúlyozására
szolgáló rendszer
A túlzott zajhatás megelõzésére, valamint a
mosandók egyenletes eloszlása érdekében a
forgódob a centrifugafázis elõtt a mosási
centrifugasebességnél kicsit nagyobb sebességre
kapcsol. Amennyiben a töltet kiegyensúlyozására
irányuló próbálkozások nem vezetnek eredményre, a
készülék az elméleti centrifugasebességnél lassabb
centrifugálásra kapcsol. Jelentõs
kiegyensúlyozatlanság esetén a mosógép,
centrifugálás elõtt megpróbálja a töltetet
megfelelõen eloszlatni. A töltet megfelelõ
eloszlásának biztosítása érdekében ajánlatos a
nagy ruhanemûket a kicsikkel összekeverni.
Milyen nehezek a mosandó ruhák?
1 lepedõ: 400500g
1 párnahuzat: 150200g
1 asztalterítõ: 400500g
1 fürdõköpeny: 9001200g
1 törölközõ: 150250g
Különleges programok
Mix 30: ez a program enyhén koszos ruhadarabok
rövid idõ alatt történõ kimosására lett kifejlesztve
mindössze 30percig tart, így energiát és idõt takarít
meg. Az
különbözõ jellegû anyagokat együttesen is lehet
mosni (kivéve gyapjút és selymet) maximum 3kg
ruhatöltet-mennyiségig.
20
-ös programot 30°C-ra beállítva
Page 21

Óvintézkedések és
tanácsok
A mosógép a nemzetközi biztonsági szabványoknak
megfelelõen lett tervezve és gyártva. Ezeket a
figyelmeztetéseket biztonsági okokból írjuk le, kérjük,
olvassa el õket figyelmesen!
Általános biztonság
Ez a készüléket háztartási használatra lett tervezve.
A készüléket mûködtetésre alkalmatlan személyek (a
gyerekeket is beleértve) nem használhatják, kivéve,
amennyiben ezeket a személyeket egy, a
biztonságukért felelõs személy felügyeli, illetve a
készülék használatát nekik elmagyarázza. Ne hagyja
a gyerekeket felügyelet nélkül, és gyõzõdjön meg
arról, hogy nem játszanak a készülékkel.
Ne szárítson nem mosott holmikat.
A fõzõolajjal, acetonnal, alkohollal, benzinnel,
kerozinnal, folttisztítóval terpentinnel, viasszal és az
azok eltávolítására használt anyagokkal
bekoszolódott ruhadarabokat a szárítógépben való
szárításuk elõtt meleg vízben kell mosni, sok
mosószerrel.
Az olyan anyagokat, mint a habszivacs (polifoam
szivacsok), a fürdõsapka, a vízálló szövetek, az egy
oldalon gumival bevont ruhanemûk, valamint a
habszivacs részekkel rendelkezõ ruhadarabok, nem
szabad szárítógépben szárítani.
Az öblítõket és hasonló termékeket a gyártó által
megadott utasításoknak megfelelõen kell használni.
A szárítógép ciklusainak a befejezõ részén nincs
hõközlés (hûtési ciklus), hogy a ruhanemûket a
rendszer ne károsítsa.
FIGYELEM: Soha ne állítsa le a szárítógépet a
szárítási program vége elõtt. Ilyen esetben gyorsan
vegyen ki minden ruhadarabot, és teregesse ki õket,
hogy gyorsan kihûlhessenek.
Ne érjen a géphez mezítláb, illetve vizes vagy nedves
kézzel vagy lábbal!
A csatlakozódugót az aljzatból ne a kábelnél, hanem a
csatlakozónál fogva húzza ki!
Mûködés közben ne nyissa ki a mosószer-adagoló
fiókot.
Ne nyúljon a leeresztett vízbe, mert forró lehet!
Semmiképpen ne feszegesse az ajtót: megsérülhet a
véletlen nyitást megakadályozó biztonsági retesz.
Hiba esetén semmiképpen se nyúljon a gép belsõ
részeihez, és ne próbálja megjavítani!
Mindig ügyeljen arra, hogy gyermekek ne
mehessenek a mûködõ gép közelébe.
A mosás során az ajtó meleg lehet.
Amennyiben a gépet át kell helyezni, az áthelyezést két
vagy három személy végezze, maximális
odafigyeléssel. Soha ne próbálja egyedül elmozdítani,
mert a készülék nagyon nehéz.
A mosandó berakása elõtt ellenõrizze, hogy a
forgódob üres-e.
A szárítási folyamat közben a készülék ajtaja
felmelegszik.
A készüléket ne használja olyan ruhanemûk szárítására,
melyek elõzetesen nyúlékony adalékokkal lettek kezelve
(például triklór-etilén, benzin).
A mosószárítógépben tilos habszivacsot vagy
gumírozott anyagokat szárítani.
Ellenõrízze, hogy a szárítási programnál a
vízcsap nyitva van-e.
Hulladékelhelyezés
A csomagolóanyag megsemmisítése: tartsa be a
helyi elõírásokat, így a csomagolás
újrahasznosítható.
Az elektromos készülékek megsemmisítésérõl szóló
európai direktíva 2002/96/EC elõírja, hogy a régi
háztartási gépeket nem szabad a normál nem
szelektív hulladékgyûjtési folyamat során
összegyûjteni. A régi gépeket szelektíven kell
összegyûjteni, hogy optimalizálni lehessen a bennük
lévõ anyagok újrahasznosítását és csökkenteni
lehessen az emberi egészségre és környezetre
gyakorolt hatásukat. Az áthúzott szemeteskuka jele
emlékezteti Önt arra, hogy kötelessége ezeket a
termékeket szelektíven összegyûjteni.
A fogyasztóknak a helyi hatóságot vagy kereskedõt
kell felkeresniük a régi háztartási gépek helyes
elhelyezését illetõen.
Az ajtó kézi nyitása
Amennyiben ki akarja teregetni a mosott ruhanemût, de
áramhiány miatt nem tudja kinyitni a mosógép ajtaját,
tegye a következõket:
1. Húzza ki a dugót a konnektorból.
20
2. Gyõzõdjön meg arról, hogy a készülékben maradt víz
szintje az ajtószint alatt van ellenkezõ esetben eressze
le a fölösleges vizet a leeresztõcsövön keresztül egy
vödörbe, ahogy azt az ábra is mutatja.
3. Egy csavarhúzó segítségével távolítsa el a
burkolópanelt a mosógép elejérõl (lásd ábra).
4. Az ábrán látható fülecske kihúzásával szabadítsa ki a
mûanyag húzókát; húzogassa lefelé, és ezzel
egyidejûleg nyissa ki az ajtót.
5. Szerelje vissza a panelt mielõtt a gép felé nyomná,
gyõzõdjön meg arról, hogy a horgok a hozzájuk tartozó
furatokba illeszkednek.
HU
21
Page 22

Karbantartás és ápolás
HU
A víz elzárása és az elektromos áram
kikapcsolása
Minden mosás után zárja el a vízcsapot. Így
kíméli a mosógép vízrendszerét és megszünteti
a vízszivárgás kockázatát.
A mosógép tisztításakor, illetve karbantartásakor
húzza ki a hálózati csatlakozódugót az aljzatból.
A mosógép tisztítása
A külsõ részeket és a gumirészeket langyos,
szappanos vizes ronggyal tisztíthatja. Ne
használjon oldószert vagy súrolószert!
A mosószer-adagoló fiók tisztítása
1
A fiók felemelésével és
kifelé húzásával vegye
ki a fiókot (lásd ábra).
Folyó víz alatt mossa
ki! Ezt a tisztítást
gyakran el kell végezni.
2
Az ajtó és a forgódob ápolása
A szivattyú tisztítása
A mosógép öntisztító szivattyúval van felszerelve,
melynek nincs szüksége tisztítási és karbantartási
mûveletekre. Elõfordulhat azonban, hogy apró
tárgyak (aprópénz, gomb) esnek a szivattyú alsó
részén található szivattyúvédõ elõkamrába.
! Gyõzõdjön meg róla, hogy a mosóprogram véget
ért, és húzza ki a hálózati csatlakozót.
Az elõkamrához való hozzáférés érdekében tegye a
következõket:
1. Egy csavarhúzó
segítségével távolítsa el
a burkolópanelt a
készülék elejérõl (lásd
ábra);
2. Órairánnyal
ellentétesen forgatva
csavarja le a fedelet
(lásd ábra).
Természetes, hogy egy
kevés víz kifolyik;
Az ajtót hagyja mindig résre nyitva, nehogy rossz
szagok keletkezzenek.
3. Gondosan tisztítsa ki az üreg belsejét;
4. Csavarja vissza a fedelet;
5. Szerelje vissza a panelt mielõtt a gép felé
nyomná, gyõzõdjön meg arról, hogy a horgok a
hozzájuk tartozó furatokba illeszkednek.
A vízbevezetõ csõ ellenõrzése
Évente legalább egyszer ellenõrizze a vízbevezetõ
csövet. Ha repedezett vagy hasadozott, ki kell
cserélni a mosás során a nagy nyomás hirtelen
szakadást okozhat.
! Soha ne használjon korábban már használt
csöveket.
22
Page 23

Rendellenességek és
elhárításuk
Elõfordulhat, hogy a mosógép nem mûködik. Mielõtt felhívná a szervizt (lásd Szerviz), ellenõrizze, hogy nem
olyan problémáról van-e szó, amely a következõ lista segítségével egyszerûen megoldható!
Rendellenességek:
A mosógép nem kapcsol be.
A mosási ciklus nem indul el.
A mosógép nem kap vizet (a
kijelzon megjelenik a "VÍZHIÁNY,
ELLENÕRIZZE!felirat).
A mosógép folytonosan szívja, és
üríti a vizet.
A mosógép nem üríti le a vizet,
vagy nem centrifugál.
A mosógép nagyon rázkódik a
centrifugálás alatt.
A mosógépbõl elfolyik a víz.
Lehetséges okok / megoldás:
A hálózati csatlakozódugó nincs bedugva az aljzatba, vagy nem
eléggé ahhoz, hogy jól érintkezzen.
Nincs áram a lakásban.
A mosógép ajtaja nincs jól bezárva.
Nem nyomta meg a BEKAPCSOLÁS/KIKAPCSOLÁS gombot.
Nem nyomta meg az ELINDÍTÁS/SZÜNETELTETÉS gombot.
A vízcsap nincs nyitva.
Az indítás idõjelzõjén késletetés lett beállítva késleltetésidõzítõ.
A vízbevezetõ csõ nincs csatlakoztatva a csaphoz.
A csõ meg van törve.
A vízcsap nincs nyitva.
A lakásban nincs víz.
Nincs elegendõ nyomás.
Nem nyomta meg az ELINDÍTÁS/SZÜNETELTETÉS gombot.
A leeresztõcsõ nem a padlószinttõl 65 és 100cm közötti
magasságban van felszerelve (lásd Üzembe helyezés).
A leeresztõcsõ vége vízbe merül (lásd Üzembe helyezés).
A fali szifonnak nincs szellõzése.
Ha ezen vizsgálatok után a probléma nem oldódik meg, zárja el a
vízcsapot, kapcsolja ki a mosógépet, és hívja ki a szervizszolgálatot.
Ha a lakás egy épület legfelsõbb emeleteinek egyikén található,
lehetséges, hogy a csatornaszellõzõ eltömõdésének jelensége
(szivornyahatás) lépett fel, ezért a mosógép folytonosan szívja, és
leereszti a vizet. E kellemetlenség elkerülésére a kereskedelmi
forgalomban rendelkezésre állnak csatornaszellõzõ-szelepek.
A program nem ereszti le a vizet: néhány programnál a vizet kézileg
kell leereszteni (lásd Programok és funkciók).
A VASALÁSKÖNNYÍTÉS funkció be lett kapcsolva a program
befejezéséhez nyomja meg az ELINDÍTÁS/SZÜNETELTETÉS gombot
(lásd Programok és funkciók).
A leeresztõcsõ meg van törve (lásd Üzembe helyezés).
A lefolyó el van dugulva.
Az üzembe helyezéskor a forgódob rögzítése nem lett eltávolítva (lásd
Üzembe helyezés).
A készülék nincs vízszintben (lásd Üzembe helyezés).
A mosógép bútorok és falak közé van szorítva (lásd Üzembe helyezés).
A vízbevezetõ csõ nincs jól felcsavarva (lásd Üzembe helyezés).
A mosószer-adagoló fiók eltömõdött (tisztításához lásd Karbantartás és ápolás).
A leeresztõcsõ nincs szorosan rögzítve (lásd Üzembe helyezés).
HU
A készülék lezár a kijelzõ
villogni kezd, és a hiba kódját
mutatja (pl.: F-01, F-..).
Sok hab képzõdik.
A Mosó-szárítógép nem szárít.
Kapcsolja ki a készüléket, és húzza ki a dugót a konnektorból, várjon
körülbelül 1percet, majd indítsa újra!
Ha a hiba továbbra is fennáll, forduljon a szervizhez!
A mosószer nem mosógépekhez való (kell, hogy szerepeljen rajta,
hogy gépi, kézi vagy gépi mosáshoz, vagy hasonló).
Túl sok mosószert használt.
A hálózati csatlakozódugó nincs bedugva az aljzatba, vagy nem
eléggé ahhoz, hogy jól érintkezzen.
Nincs áram a lakásban.
Az ajtó nincs jól becsukva.
Az indítás késletetése van beállítva.
A SZÁRÍTÁS a OFF helyzetben van.
23
Page 24

Szerviz
HU
Mielõtt a szervizhez fordulna:
Gyõzõdjön meg arról, hogy a hibát nem tudja saját maga is elhárítani (lásd Rendellenességek és
elhárításuk);
Indítsa újra a programot, hogy lássa, elhárította-e a hibát;
Ellenkezõ esetben forduljon az engedéllyel rendelkezõ szakszervizhez a garanciajegyen található
telefonszámon.
! Soha ne forduljon engedéllyel nem rendelkezõ szerelõhöz!
Közölje:
a meghibásodás jellegét;
a mosógép típusát (Mod.);
a gyártási számot (S/N).
Ezek az adatok a mosógép hátoldalán, illetve az elülsõ oldalon az ajtó belsején elhelyezett adattáblán
találhatók.
24
Page 25

Instrukcja obs³ugi
PRALKA-SUSZARKA
PL
Polski
ARMXXD 1290
Ten symbol przypomina o obowi¹zku zapoznania siê z
niniejsz¹ instrukcj¹ obs³ugi.
Spis treci
Instalacja, 26-27
Rozpakowanie i wypoziomowanie
Pod³¹czenia hydrauliczne i elektryczne
Pierwszy cykl prania
Dane techniczne
Opis pralki, 28-29
Panel sterowania
Wywietlacz
Jak wykonaæ cykl prania lub suszenie, 30
Programy i funkcje, 31
Tabela programów
Funkcje prania
rodki pior¹ce i bielizna, 32
Szufladka na rodki pior¹ce
Przygotowanie bielizny
Programy specjalne
System równowa¿enia ³adunku
PL
Zalecenia i rodki ostro¿noci, 33
Ogólne zasady bezpieczeñstwa
Utylizacja
Rêczne otwieranie okr¹g³ych drzwiczek
Utrzymanie i konserwacja, 34
Od³¹czenie wody i pr¹du elektrycznego
Czyszczenie pralki
Czyszczenie szufladki na rodki pior¹ce
Konserwacja okr¹g³ych drzwiczek i bêbna
Czyszczenie pompy
Kontrola przewodu doprowadzaj¹cego wodê
Nieprawid³owoci w dzia³aniu i sposoby
ich usuwania, 35
Serwis Techniczny, 36
25
Page 26

Instalacja
PL
Nale¿y zachowaæ niniejsz¹ ksi¹¿eczkê, aby móc z
niej skorzystaæ w ka¿dej chwili. W przypadku
sprzeda¿y, odst¹pienia lub przeniesienia pralki w inne
miejsce nale¿y zadbaæ o przekazanie instrukcji wraz z
maszyn¹, aby nowy w³aciciel móg³ zapoznaæ siê z
dzia³aniem urz¹dzenia i z dotycz¹cymi go
ostrze¿eniami.
Nale¿y uwa¿nie przeczytaæ instrukcjê obs³ugi:
zawiera ona wa¿ne informacje dotycz¹ce instalacji oraz
w³aciwego i bezpiecznego u¿ytkowania pralki.
Rozpakowanie i wypoziomowanie
Rozpakowanie
1. Rozpakowaæ pralkê.
2. Sprawdziæ, czy nie dozna³a ona uszkodzeñ w czasie
transportu. W przypadku stwierdzenia uszkodzeñ nie
pod³¹czaæ jej i skontaktowaæ siê ze sprzedawc¹.
3. Odkrêciæ 4 ruby
zabezpieczaj¹ce
maszynê na czas
transportu oraz zdj¹æ
gumowy element z
podk³adk¹, znajduj¹cy siê
w tylnej czêci pralki
(patrz rysunek).
4. Zatkaæ otwory przy pomocy plastikowych zalepek,
znajduj¹cych siê w wyposa¿eniu maszyny.
5. Zachowaæ wszystkie czêci: w razie koniecznoci
przewiezienia pralki w inne miejsce, powinny one
zostaæ ponownie zamontowane.
Staranne wypoziomowanie pralki zapewnia jej
stabilnoæ i zapobiega wibracjom, ha³asowi oraz
przesuwaniu siê maszyny w czasie pracy. W razie
ustawienia na dywanie lub wyk³adzinie dywanowej
nale¿y tak wyregulowaæ nó¿ki, aby pod pralk¹
pozostawa³a wolna przestrzeñ niezbêdna dla
wentylacji.
Pod³¹czenia hydrauliczne i elektryczne
Pod³¹czenie przewodu doprowadzaj¹cego wodê
1. Podùàczyã przewód
zasilajàcy poprzez
przykræcenie do zaworu
wody zimnej z koñcówkà
gwintowanà ¾ gas (patrz
rysunek).
Przed pod³¹czeniem
spuszczaæ wodê do
momentu, a¿ stanie siê
ona ca³kowicie
przezroczysta.
2. Pod³¹czyæ do maszyny
przewód doprowadzaj¹cy
wodê, przykrêcaj¹c go do
odpowiedniego otworu
dop³ywowego,
znajduj¹cego siê w tylnej
czêci pralki, z prawej
strony u góry
(patrz rysunek).
3. Zwróciæ uwagê, aby na przewodzie nie by³o zagiêæ
ani zwê¿eñ.
Czêci opakowania nie s¹ zabawkami dla dzieci.
Poziomowanie
1. Ustawiæ pralkê na p³askiej i twardej pod³odze, nie
opieraj¹c jej o ciany, meble itp.
2. Jeli pod³oga nie jest
idealnie pozioma, nale¿y
skompensowaæ
nierównoci, odkrêcaj¹c
lub dokrêcaj¹c przednie
nó¿ki (patrz rysunek); k¹t
nachylenia, zmierzony na
górnym blacie pralki nie
powinien przekraczaæ 2°.
26
Cinienie wody w kurku powinno mieciæ siê w
przedziale podanym w tabeli Danych technicznych
(patrz strona obok).
Jeli d³ugoæ przewodu doprowadzaj¹cego wodê jest
niewystarczaj¹ca, nale¿y zwróciæ siê do
specjalistycznego sklepu lub do autoryzowanego
technika.
Nigdy nie instalowaæ ju¿ u¿ywanych przewodów.
Stosowaæ przewody znajduj¹ce siê w wyposa¿eniu
maszyny.
Page 27

Pod³¹czenie przewodu odp³ywowego
Pod³¹czyæ przewód
odp³ywowy, nie zginaj¹c
go, do rury ciekowej lub
do otworu odp³ywowego w
cianie, które powinny
65 - 100 cm
znajdowaæ siê na
wysokoci od 65 do 100
cm od pod³ogi;
Nie u¿ywaæ przed³u¿aczy ani rozga³êników.
PL
Przewód nie powinien byæ pozginany ani
przygnieciony.
Przewód zasilania elektrycznego mo¿e byæ
wymieniany wy³¹cznie przez autoryzowanych
techników.
Uwaga! Producent nie ponosi ¿adnej odpowiedzialnoci
w przypadku nieprzestrzegania powy¿szych zasad.
ewentualnie oprzeæ go na
brzegu zlewu lub wanny,
przymocowuj¹c do kranu
prowadnik, znajduj¹cy siê
w wyposa¿eniu (patrz
rysunek). Wolny koniec
przewodu odp³ywowego
nie powinien byæ
zanurzony w wodzie.
Odradza siê stosowanie przewodów przed³u¿aj¹cych;
jeli to konieczne, przewód przed³u¿aj¹cy powinien
mieæ tak¹ sam¹ rednicê jak oryginalny, a jego d³ugoæ
nie mo¿e przekraczaæ 150 cm.
Pod³¹czenie elektryczne
Przed w³o¿eniem wtyczki do gniazdka elektrycznego
nale¿y siê upewniæ, czy:
gniazdko posiada uziemienie i jest zgodne z
obowi¹zuj¹cymi przepisami;
gniazdko jest w stanie wytrzymaæ maksymalne
obci¹¿enie mocy maszyny, wskazane w tabeli
Danych technicznych (patrz obok);
Pierwszy cykl prania
Po zainstalowaniu pralki, przed przyst¹pieniem do jej
u¿ytkowania, nale¿y wykonaæ jeden cykl prania ze
rodkiem pior¹cym, ale bez wsadu, nastawiaj¹c
program
.
Dane techniczne
Model
Wymiary
Pojemnoæ
Dane pr¹du
elektrycznego
Dane sieci
wodoci¹gowej
Szybkoæ wirowania
ARMXXD 1290
szerokoæ cm 59,5
wysokoæ cm 85
g³êbokoæ cm 53,5
od 1 do 7 kg dla prania
od 1 do 4 kg dla suszenia
dane techniczne umieszczone s¹ na
tabliczce na maszynie
Maksymalne cinienie 1 MPa (10 barów)
cinienie minimalne 0,05 MPa (0,5 barów)
pojemnoæ bêbna 52 litrów
do 1200 obrotów na minutê
napiêcie zasilania mieci siê w wartociach
wskazanych w tabeli Danych technicznych
(patrz obok);
gniazdko pasuje do wtyczki pralki. W przeciwnym
razie nale¿y wymieniæ gniazdko lub wtyczkê.
Nie nale¿y instalowaæ pralki na otwartym powietrzu,
nawet w os³oniêtym miejscu, gdy¿ wystawienie
urz¹dzenia na dzia³anie deszczu i burz jest bardzo
niebezpieczne.
Po zainstalowaniu pralki gniazdko elektryczne
powinno byæ ³atwo dostêpne.
Programy kontrolne
zgodnie z przepisami
EN 50229
program (1°° naciniêcie
pranie:
przycisku); temperatura 60°C; wykonane
przy 7 kg za³adowanej bielizny.
pierwsze suszenie wykonane przy
uszenie:
ladunku 3 kg z ustawieniem poziomu
suszenia "PRASOWANIE";
drugie suszenie wykonane przy
ladunku 4 kg z ustawieniem poziomu
suszenia "SZAFA".
Urz¹dzenie to zosta³o wyprodukowane
zgodnie z nastêpuj¹cymi przepisami EWG:
- 2004/108/CE (o Kompatybilnoci
Elektromagnetycznej)
- 2006/95/CE (o Niskim Napiêciu)
- 2002/96/CE
27
Page 28

PL
Opis pralki
Panel sterowania
Przycisk
W£¥CZANIA/
WY£¥CZANIA
Przycisk
SUSZENIE
Przycisk
BLOKADA
PRZYCISKÓW
Przycisk
WIROWANIA
Wywietlacz
Szufladka na rodki pior¹ce
PRZE£¥CZNIKA
PROGRAMÓW
Szufladka na rodki pior¹ce: do dozowania
rodków pior¹cych i dodatków (patrz rodki pior¹ce
i bielizna).
Przycisk W£¥CZANIA/WY£¥CZANIA
krótko przycisk w celu w³¹czenia lub wy³¹czenia
maszyny. Kontrolka START/PAUZA, która pulsuje
powoli w kolorze zielonym wskazuje, ¿e maszyna
jest w³¹czona. W celu wy³¹czenia pralki podczas
prania konieczne jest d³u¿sze przytrzymanie
naciniêtego przycisku, przez oko³o 2 sek.; krótkie
lub przypadkowe naciniêcie wystarczy do
wy³¹czenia maszyny. Wy³¹czenie maszyny podczas
trwaj¹cego prania anuluje program prania.
Przyciski PRZE£¥CZNIKA PROGRAMÓW: w celu
wybrania potrzebnego programu (patrz Tabela
programów).
Przyciski
: nacisn¹æ
Przycisk
PAMIÊÆ
Przycisk
URUCHOMIENIE
OPÓNIONE
Przycisk BLOKADA PRZYCISKÓW
uruchomienia lub wylaczenia blokady panelu
sterowania nalezy przytrzymac nacisniety przycisk
przez okolo 2 sekundy. Podswietlony symbol
wskazuje, ze panel sterowania zostal zablokowany.
W ten sposób uniemozliwia sie dokonywanie
przypadkowych zmian w programach, zwlaszcza,
jesli w domu obecne sa dzieci. W celu wylaczenia
blokady panelu sterowania nalezy przytrzymac
nacisniety przycisk przez okolo 2 sekundy.
Przycisk URUCHOMIENIE OPÓZNIONE
nacisnac w celu ustawienia opóznionego
uruchomienia wybranego programu. Opóznienie
wyswietlone zostanie na ekranie.
Przycisk SUSZENIE
ustawienia cyklu suszenia.
Przyciski
FUNKCJI
: nacisn¹æ w celu
Przycisk z
kontrolk¹
START/PAUZA
Przycisk
TEMPERATURY
: w celu
:
Przycisk PAMIÊÆ: przytrzymaæ naciniêty przycisk
w celu zapisania w pamiêci cyklu oraz w³asnych
preferowanych personalizacji. W celu przywo³ania
cyklu zapisanego uprzednio nale¿y nacisn¹æ
przycisk MEMO.
Przyciski FUNKCJI: nacisn¹æ przycisk w celu
wybrania potrzebnej funkcji. Na wywietlaczu
zawieci siê odpowiednia kontrolka.
Przycisk WIROWANIA
zmniejszenia lub ca³kowitego wy³¹czenia wirówki
wartoæ ukazana zostanie na wywietlaczu.
Przycisk TEMPERATURY
zmniejszenia temperatury: wartoæ zostaje
wywietlona na ekranie.
28
: nacisn¹æ w celu
: nacisn¹æ w celu
Przycisk z kontrolk¹ START/PAUZA: kiedy zielona
kontrolka pulsuje powoli, nacisn¹æ przycisk w celu
uruchomienia prania. Po uruchomieniu cyklu kontrolka
wieci w sposób ci¹g³y. W celu wybrania pauzy w praniu
nale¿y nacisn¹æ ponownie przycisk, kontrolka zacznie
pulsowaæ w kolorze pomarañczowym. Jeli symbol
nie wieci siê, mo¿na otworzyæ drzwiczki. W celu
ponownego uruchomienia prania od miejsca, w którym
zosta³o przerwane, nale¿y ponownie nacisn¹æ przycisk.
Funkcja stand by
Pralka ta, w myl nowych norm europejskich
zwi¹zanych z oszczêdnoci¹ elektryczn¹, posiada
system auto wy³¹czenia (stand by), który w³¹cza siê
po 30 minutach nie u¿ytkowania. Ponownie lekko
wcisn¹æ przycisk W£¥CZANIA/WY£¥CZANIA i
poczekaæ, a¿ pralka ponownie w³¹czy siê.
Page 29

Wywietlacz
PL
F
X
Z
B
A
D
C
E
Y
F
F
L
Wywietlacz potrzebny jest w celu programowania maszyny i dostarcza wielu informacji.
W dwóch górnych wierszach A i B wywietlane s¹ wybrany program prania lub rodzaj suszenia, faza aktualnie
wykonywanego prania (poziom suszenia lub wybrany czas suszenia) oraz wszystkie informacje zwi¹zane ze
stanem zaawansowania programu.
W wierszu C wywietlany jest czas pozosta³y do koñca cyklu prania bie¿¹cego oraz, jeli zaprogramowano
URUCHOMIENIE OPÓNIONE, czas brakuj¹cy do uruchomienia wybranego programu.
W wierszu D wywietlana jest maksymalna wartoæ szybkoci wirówki, jak¹ maszyna mo¿e uzyskaæ w
przypadku wybranego programu; jeli program nie przewiduje wirowania wiersz pozostaje wygaszony.
W wierszu E wywietlana jest maksymalna wartoæ temperatury, jak¹ mo¿na wybraæ w przypadku wybranego
programu, jeli program nie przewiduje ustawiania temperatury, wiersz pozostaje wygaszony.
Kontrolki F zwi¹zane s¹ z funkcjami i w³¹czaj¹ siê, kiedy wybrana funkcja zgodna jest z wybranym
programem.
Symbol zablokowanych drzwiczek
Zapalony symbol oznacza, ¿e okr¹g³e drzwiczki pralki s¹ zablokowane, aby zapobiec przypadkowemu ich
otworzeniu. Aby unikn¹æ uszkodzenia pralki, nale¿y odczekaæ, a¿ symbol ten zganie, zanim przyst¹pi siê do
otwierania drzwiczek pralki.
Uwaga: jeli aktywna jest funkcja URUCHOMIENIE OPÓNIONE drzwiczek nie mo¿na otworzyæ. W celu ich
otwarcia nale¿y ustawiæ maszynê w pauzie poprzez naciniêcie przycisku START/PAUZA.
Podczas pierwszego uruchomienia wymagane bêdzie dokonanie wyboru jêzyka a wywietlacz ustawi siê
automatycznie na menu wyboru jêzyka.
W celu wybrania ¿¹danego jêzyka nacisn¹æ przyciski X i Y, dla potwierdzenia wyboru nacisn¹æ przycisk Z.
Aby zmieniæ jêzyk, wy³¹czyæ urz¹dzenie, nacisn¹æ równoczenie przyciski wskazane na rysunku z oznaczeniem
L, a¿ do us³yszenia sygna³u dwiêkowego, ponownie w³¹czyæ urz¹dzenie, wywietli siê menu wyboru jêzyka.
29
Page 30

Jak wykonaæ cykl prania lub
suszenie
PL
1. W£¥CZENIE MASZYNY. Nacisn¹æ przycisk , na
wywietlaczu pojawi siê napis WITAMY, kontrolka START/
PAUZA zacznie powoli pulsowaæ w kolorze zielonym.
2. WK£ADANIE BIELIZNY. Otworzyæ szklane drzwiczki.
W³o¿yæ bieliznê uwa¿aj¹c, aby nie przekroczyæ
wielkoci wsadu wskazanej w tabeli programów na
nastêpnej stronie.
3. DOZOWANIE RODKA PIOR¥CEGO. Wysun¹æ
szufladkê i wsypaæ detergent do odpowiednich komór
w sposób wyjaniony w rodki pior¹ce i bielizna.
4. ZAMKN¥Æ DRZWICZKI.
5. WYBÓR PROGRAMU. Nacisn¹æ jeden z przycisków
PRZE£¥CZNIKA PROGRAMÓW w celu wybrania
potrzebnego programu, nazwa programu pojawi siê na
wywietlaczu; z nim powi¹zana jest temperatura oraz
prêdkoæ wirowania, które mog¹ zostaæ zmienione. Na
wywietlaczu pojawi siê czas trwania cyklu.
6. PERSONALIZACJA CYKLU PRANIA.
Przy pomocy odpowiednich przycisków:
Zmieniæ temperaturê i/lub wirówkê. Maszyna
wybierze automatycznie temperaturê oraz wirówkê
maksymalne przewidziane dla danego programu, dlatego
nie mog¹ one byæ zwiêkszane. Poprzez naciskanie
przycisku
prania w zimnej wodzie OFF. Naciskaj¹c przycisk
stopniowo zmniejsza siê wirówkê a¿ do jej wy³¹czenia
OFF. Dodatkowe naciniêcie przycisków przywróci
maksymalne wartoci przewidywane.
Ustawienie opónionego rozpoczêcia.
W celu ustawienia opónionego rozpoczêcia wybranego
programu nale¿y naciskaæ odpowiedni przycisk a¿ do
osi¹gniêcia ¿¹danego czasu opónienia. Kiedy opcja ta
jest aktywna, na wywietlaczu pojawia siê symbol
celu usuniêcia opónionego uruchomienia nale¿y
naciskaæ przycisk a¿ do pojawienia siê napisu OFF.
Ustawianie suszenia.
Naciskaj¹c jeden raz lub kilka razy przycisk
SUSZENIE, ustawia siê ¿¹dany rodzaj suszenia.
Przewidziane s¹ dwie mo¿liwoci:
A - Zale¿nie od stopnia wilgotnoci suszonej bielizny:
Prasowanie: bielizna lekko wilgotna, ³atwa do prasowania.
Wieszanie: bielizna wysuszona, gotowa do
schowania.
Szafa: bielizna mocno wysuszona, tryb zalecany do
rêczników frotowych i szlafroków.
B - Zale¿nie od czasu: Od 40 do 180 minut.
Aby wy³¹czyæ suszenie, nale¿y przytrzymaæ wciniêty
odpowiedni przycisk a¿ do pojawienia siê na
wywietlaczu napisu OFF.
Jeli wyj¹tkowo iloæ bielizny do prania i suszenia
przewy¿sza maksymalny przewidziany ³adunek (patrz
tabela obok), nale¿y wykonaæ pranie, a po
zakoñczeniu programu podzieliæ ³adunek i w³o¿yæ do
bêbna tylko jego czêæ. Dalej postêpowaæ wed³ug
instrukcji dotycz¹cych opcji Tylko suszenie.
Powtórzyæ te same czynnoci dla pozosta³ej czêci
bielizny.
N.B: zawsze po zakoñczeniu suszenia wykonywane
jest krótkie ch³odzenie bielizny.
stopniowo zmniejsza siê temperaturê a¿ do
. W
Tylko suszenie
Wybraæ za pomoc¹ prze³¹cznika PROGRAMY
suszenie
tkaniny, nastêpnie ustawiæ rodzaj ¿¹danego suszenia
przyciskiem SUSZENIE.
( - - ) w zale¿noci od rodzaju
Tabelaczasówsuszenia (wartoci orientacyjne)
Rodzaj
tkaniny
Bawelna Bielizna róznych
Sintetików Przescieradla, koszule,
³
Welna Koszulki, swetry itp. 1,5 150 140 120
Naciskaæ przycisk w celu uruchomienia funkcji;
zawieci siê kontrolka odpowiadaj¹ca przyciskowi.
Nacisn¹æ ponownie przycisk w celu wy³¹czenia
funkcji, kontrolka zganie.
Ro dzaj zala dunku Zala dunek
ro zmiar ów, Re cznik i fro tt é
Pizamy, skarpetki itp.
Zmiana charakterystyki cyklu.
maksymalny
(kg)
Szafa Wies zanie Prasowanie
4 120 110 100
3 140 120 100
Jeli wybrana funkcja nie jest zgodna z wybranym
programem, kontrolka bêdzie pulsowaæ, a funkcja
nie zostanie uruchomiona.
Jeli wybrana funkcja nie jest zgodna z inn¹,
ustawion¹ uprzednio, kontrolka odpowiadaj¹ca
pierwszej funkcji bêdzie pulsowa³a i uruchomiona
zostanie jedynie druga funkcja a kontrolka
uruchomionej funkcji zawieci siê.
Funkcje mog¹ zmieniaæ zalecane obci¹¿enie i/lub
czas trwania cyklu.
7. URUCHOMIENIE PROGRAMU. Nacisn¹æ przycisk
START/PAUZA. Odpowiednia kontrolka zawieci siê
kolorem zielonym i drzwiczki zostan¹ zablokowane
(symbol ZABLOKOWANYCH DRZWICZEK
siê). Podczas prania na wywietlaczu pojawi siê nazwa
bie¿¹cej fazy. W celu zmiany programu w czasie trwania
cyklu nale¿y ustawiæ pralkê w pauzie naciskaj¹c
przycisk START/PAUZA (kontrolka START/PAUZA
zacznie powoli pulsowaæ w kolorze pomarañczowym);
nastêpnie wybraæ potrzebny cykl i ponownie nacisn¹æ
przycisk START/PAUZA.
W celu otwarcia drzwiczek w trakcie wykonywania cyklu
nale¿y nacisn¹æ przycisk START/PAUZA; jeli symbol
ZABLOKOWANYCH DRZWICZEK
mo¿liwe bêdzie otwarcie drzwiczek Nacisn¹æ ponownie
przycisk START/PAUZA, aby uruchomiæ program od
punktu, w którym zosta³ przerwany.
8. KONIEC PROGRAMU. Wskazywany jest napisem
KONIEC CYKLU na wywietlaczu, kiedy symbol
ZABLOKOWANYCH DRZWICZEK
mo¿liwe bêdzie otwarcie drzwiczek. Otworzyæ
drzwiczki, wyj¹æ bieliznê i wy³¹czyæ maszynê.
Jeli zamierza siê anulowaæ uruchomiony juz cykl,
przytrzymaæ d³u¿ej naciniêty przycisk
przerwany i maszyna wy³¹czy siê.
jest wy³¹czony
wy³¹czy siê,
wieci
. Cykl zostanie
30
Page 31

Programy i funkcje
Tabela programów
Opis programu
Programy
Programy codzienne
(*)
BAWE£NA
BAWE£NA
wytrzyma³e, mocno zabrudzone.
BAWE£NA
delikatne, mocno zabrudzone.
TKANINY SYNTETYCZNE
kolorowe, wytrzyma³e, mocno zabrudzone.
TKANINY SYNTETYCZNE
kolorowe, wytrzyma³e, lekko zabrudzone.
Mix 30'
zabrudzonych tkanin (niewskazany dla we³ny, jedwabiu i tkanin
przeznaczonych do prania rêcznego).
Mix 15'
zabrudzonych tkanin (niewskazany dla we³ny, jedwabiu i tkanin
przeznaczonych do prania rêcznego).
JEDWA B/FIRANY:
Ê
PAMIE Æ:
M
WE£NA:
Pro
gramy
SUSZENIE BAWE£NY
SUSZENIE SYNTETIKÓW
SUSZENIE WE£NY
Program y czêciowe
Wirowanie
P³ukanie
Wydalanie wody
Dla wszystkich Instytucji homologacyjnych:
(1°° naciniêcie przycisku)
(2°° naciniêcie przycisku)
(3°° naciniêcie przycisku)
(1°° naciniêcie przycisku)
(2°° naciniêcie przycisku)
pozwala na zmemoryzowanie ka¿dego typu prania.
do we³ny, kaszmiru, itp.
Suszenia
(1°° naciniêcie przycisku).
do jedw abiu, wiskozy, bielizny.
(1°° naciniêcie przycisku).
(3°° naciniêcie przycisku).
(2°° naciniêcie przycisku).
: b ielizn a b ia³a silnie za brud zo na.
: tkaniny bia³e i kolorowe,
: tkaniny bia³e i kolorowe,
(1°° naciniêcie przycisku)
(2°° naciniêcie przycisku)
: w celu szybkiego odwie¿enia lekko
: w celu szybkiego odwie¿enia lekko
(2°° naciniêcie przycisku).
: tk an iny
: tk an iny
Prêdkoæ
Tem p.
(ob rotów
max.
(°C)
minutê)
90° 1200
60° 1200
40° 1200
60° 800
40° 800
30° 800
30° 800
30° 0
40° 800
- -
- -
- -
-
-
-
max
na
1200
1200
0
Suszenie
lll l
lll l
lll l
lll l
lll l
l
l
- -
l
l
l
l
l
ll
- - - -
rodki pior¹ce
Wybielacz Prani
-
-
-
- - -
- - -
- - -
- - -
* Program kontrolny zgodny z norm¹ EN 50229: wprowadziæ program bawe³ny z temperatur¹ 60°C.
rodek
e
zmiêkczaj¹cy
ll
ll
ll
ll
-
l
£adunek max
(kg)
Wsad
Norm-
minim-
alny
alny
73
73
73
31,5
31,5
3
-
1,5
1,5 1
1,5
-
11
4
-
3
-
-
7
-
73
7
-
Czas
trw ania
cyklu
Mo¿liwa jest kontrola czasu trwania programów
na wywietlaczu.
PL
Funkcje prania
Odplamianie
Funkcja ta przydatna jest w celu usuwania bardziej
opornych plam. Wstawiæ dodatkowy pojemniczek 3, na
wyposa¿eniu, do przegródki 1.
Przy dozowaniu
3
MAX
2
1
P³ukanie i uruchomiæ funkcjê Odplamianie. Aby
przeprowadziæ wybielanie w trakcie prania, nale¿y wlaæ i
wsypaæ odpowiednie rodki pior¹ce i dodatkowe,
nastawiæ ¿¹dany program i uruchomiæ funkcjê
Odplamianie.
Nie mo¿na go uruchomiæ przy programach , , ,
, Wydalanie wody i Programy suszenia.
P³ukanie dodatkowe
Wybieraj¹c tê opcjê zwiêksza siê skutecznoæ p³ukania
i zapewnia siê maksymalne usuwanie rodka
pior¹cego. Jest przydatne dla w³ókien szczególnie
wra¿liwych.
Nie mo¿na jej uruchomiæ w programach , ,
Wydalanie wody i Programy suszenia.
wybielacza nie przekroczyæ
poziomu max
wskazanego na
rodkowej oce (patrz
rysunek).
Aby wykonaæ tylko
wybielanie, nale¿y wlaæ
wybielacz do
dodatkowego pojemnika 3
i nastawiæ program
£atwe prasowanie
Po wybraniu tej funkcji, pranie oraz wirówka zostan¹
odpowiednio zmienione w celu ograniczenia
powstawania zgnieceñ. Po zakoñczeniu cyklu pralka
wykona powolne obroty bêbna, kontrolka funkcji £ATWE
PRASOWANIE zawieci siê, a kontrolka START/PAUZA
bêdzie pulsowa³a powoli w kolorze pomarañczowym a
napis KONIEC CYKLU ukaze sie na wyswietlaczu. W
celu zakoñczenia cyklu nale¿y nacisn¹æ przycisk START/
PAUZA lub przycisk £ATWE PRASOWANIE.
W programie Jedwab/Firany maszyna zakoñczy cykl z
bielizn¹ nieodwirowan¹, kontrolka funkcji £ATWE
PRASOWANIE zawieci siê, a kontrolka START/PAUZA
bêdzie pulsowa³a powoli w kolorze pomarañczowym a
napis ZATRZYMANIE WODY ukaze sie na
wyswietlaczu. W celu odprowadzenia wody i aby mo¿na
by³o móc wyj¹c pranie koniecznym jest naciniêcie
przycisku START/PAUZA lub przycisku £ATWE
PRASOWANIE.
Nie mo¿na go uruchomiæ w programach , , ,
Wydalanie wody i Programy suszenia.
Wsad minimalny
Zaleca siê wykorzystanie tej funkcji, jeli iloæ bielizny
jest równa po³owie zalecanego wsadu maksymalnego
lub mniejsza (patrz Tabela programów).
Nie mo¿na jej uruchomiæ w programach
wody i Programy suszenia.
, , Wydalanie
31
Page 32

rodki pior¹ce i bielizna
PL
Szufladka na rodki pior¹ce
Dobry rezultat prania zale¿y równie¿ od prawid³owego
dozowania rodka pior¹cego: u¿ycie jego nadmiernej
iloci nie poprawia skutecznoci prania, lecz
przyczynia siê do powstawania nalotów na
wewnêtrznych czêciach pralki i do zanieczyszczania
rodowiska.
Nie stosowaæ rodków do prania rêcznego, poniewa¿
tworz¹ one za du¿o piany.
Wysun¹æ szufladkê i
3
MAX
2
przegródka 1: rodek pior¹cy do prania
w³aciwego (w proszku lub w p³ynie)
P³ynny rodek do prania nale¿y wlaæ dopiero przed
samym uruchomieniem programu.
przegródka 2: rodki dodatkowe
(zmiêkczaj¹ce, itp.)
rodek zmiêkczaj¹cy nie powinien wyp³ywaæ poza
kratkê.
dodatkowa przegródka 3: Wybielacz
1
umieciæ w niej rodek
pior¹cy lub dodatkowy w
nastêpuj¹cy sposób.
Programy specjalne
Mix 30': to program przeznaczony do prania lekko
zabrudzonej bielizny w krótkim czasie: trwa on tylko
30 minut i pozwala dziêki temu na zaoszczêdzenie
energii i czasu. Ustawiaj¹c program
w temperaturze 30°C) mo¿na razem wypraæ
(
ró¿nego rodzaju tkaniny (z wyj¹tkiem we³ny i
jedwabiu), przy maksymalnym ³adunku 3 kg.
Mix 15': to program przeznaczony do prania lekko
zabrudzonej bielizny w krótkim czasie: trwa on tylko
15 minut i pozwala dziêki temu na zaoszczêdzenie
energii i czasu. Ustawiaj¹c program (
temperaturze 30°C) mo¿na razem wypraæ ró¿nego
rodzaju tkaniny (z wyj¹tkiem we³ny i jedwabiu), przy
maksymalnym ³adunku 1,5 kg.
Jedwab: stosowaæ odpowiedni program
prania wszelkiego rodzaju wyrobów z jedwabiu.
Zaleca siê stosowanie specjalnego rodka pior¹cego
do tkanin delikatnych.
Firany: w³o¿yæ je z³o¿one do poszewki lub do
siatkowatego worka. Stosowaæ program
We³na: to jedyna pralka, która uzyska³a presti¿owe
oznaczenie Woolmark Platinum Care (M.0508) od
The Woolmark Company, które certyfikuje pranie w
pralce wszystkich wyrobów we³nianych, tak¿e tych
z etykiet¹ tylko pranie rêczne
programu
pralce wszystkie tkaniny we³niane (maks. 1,5 kg) z
gwarancj¹ uzyskania najlepszych rezultatów.
mo¿na wiêc w pe³ni bezpiecznie praæ w
w
do
.
. Korzystaj¹c z
Przygotowanie bielizny
Podzieliæ bieliznê do prania wed³ug:
- rodzaju tkaniny / symbolu na etykietce.
- kolorów: oddzieliæ tkaniny kolorowe od bia³ych.
Opró¿niæ kieszenie i sprawdziæ guziki.
Nie przekraczaæ wskazanego ciê¿aru suchej
bielizny:
Tkaniny wytrzyma³e: max 7 kg
Tkaniny syntetyczne: max 3 kg
Tkaniny delikatne: max 2 kg
We³na: max 1,5 kg
Jedwab: max 1 kg
Ile wa¿y bielizna?
1 przecierad³o 400-500 gr.
1 poszewka 150-200 gr.
1 obrus 400-500 gr.
1 szlafrok 900-1.200 gr.
1 rêcznik 150-250 gr.
System równowa¿enia ³adunku
Przed ka¿dym wirowaniem, aby unikn¹æ
nadmiernych drgañ oraz jednorodnie roz³o¿yæ wsad,
bêben wykonuje obroty z prêdkoci¹ nieco wiêksz¹
ni¿ podczas prania. Jeli pomimo kolejnych prób
wsad nie zostanie równomiernie roz³o¿ony, maszyna
wykona wirowanie z prêdkoci¹ mniejsz¹ od
przewidzianej. W przypadku nadmiernego
niezrównowa¿enia pralka wykona roz³o¿enie wsadu
zamiast wirowania. Aby zapewniæ lepsze roz³o¿enie
wsadu oraz jego w³aciwe zrównowa¿enie, zaleca
siê wymieszanie du¿ych i ma³ych sztuk bielizny.
32
Page 33

Zalecenia i rodki
ostro¿noci
Pralka zosta³a zaprojektowana i wyprodukowana zgodnie z
miêdzynarodowymi normami bezpieczeñstwa. Niniejsze
ostrze¿enia zosta³y tu zamieszczone ze wzglêdów
bezpieczeñstwa i nale¿y je uwa¿nie przeczytaæ.
Ogólne zasady bezpieczeñstwa
Urz¹dzenie to zosta³o zaprojektowane wy³¹cznie do
u¿ytkowania w warunkach domowych.
Urz¹dzenie to nie jest przeznaczone do u¿ytkowania przez
osoby (w tym dzieci) o ograniczonej sprawnoci fizycznej,
zmys³owej lub umys³owej oraz nieposiadaj¹ce
odpowiedniego dowiadczenia i wiedzy, chyba ¿e u¿ywaj¹
go pod nadzorem lub po otrzymaniu wskazówek od osoby
odpowiedzialnej za ich bezpieczeñstwo. Nale¿y pilnowaæ,
aby dzieci nie bawi³y siê urz¹dzeniem.
Nie suszyæ ubrañ niewypranych.
Odzie¿, która zosta³a zabrudzona takimi substancjami, jak
olej jadalny, aceton, alkohol, benzyna, kerosen,
odplamiacze, terpentyna, woski i rodki usuwaj¹ce wosk,
powinna przed rozpoczêciem suszenia zostaæ wyprana w
gor¹cej wodzie z du¿¹ iloci¹ detergentów.
Zabronione jest suszenie w suszarce takich rzeczy, jak
guma piankowa (pianka lateksowa), czepki prysznicowe,
materia³y wodoodporne, ubrania podgumowane oraz
ubrania i poduszki z wk³adkami z gumy piankowej.
rodki zmiêkczaj¹ce tkaniny i podobne produkty nale¿y
stosowaæ zgodnie z instrukcjami producenta.
Koñcowa czêæ cyklu suszenia jest przeprowadzana bez
ogrzewania (cykl ch³odzenia), co gwarantuje, ¿e suszone
ubrania nie ulegn¹ zniszczeniu.
UWAGA: Nie nale¿y wy³¹czaæ suszarki przed zakoñczeniem
programu suszenia. Jeli do tego dojdzie, nale¿y szybko
wyj¹æ wszystkie ubrania i rozwiesiæ je, tak aby mog³y szybko
siê och³odziæ.
Nie dotykaæ pralki, stoj¹c przy niej boso lub maj¹c mokre
lub wilgotne rêce albo stopy.
Nie wyjmowaæ wtyczki z gniazdka, ci¹gn¹c za kabel, lecz
trzymaj¹c za wtyczkê.
W trakcie pracy maszyny nie otwieraæ szufladki na rodki
pior¹ce.
Nie dotykaæ odprowadzanej wody, gdy¿ mo¿e ona osi¹gaæ
wysokie temperatury.
W ¿adnym wypadku nie otwieraæ okr¹g³ych drzwiczek pralki na
si³ê: grozi to uszkodzeniem mechanizmu zabezpieczaj¹cego
drzwiczki przed przypadkowym otwarciem.
W razie wyst¹pienia usterki nie nale¿y w ¿adnym wypadku
próbowaæ dostaæ siê do wewnêtrznych czêci pralki z
zamiarem samodzielnego dokonania naprawy.
Zawsze uwa¿aæ, aby dzieci nie zbli¿a³y siê do pracuj¹cej
pralki.
W czasie prania okr¹g³e drzwiczki pralki nagrzewaj¹ siê.
Jeli trzeba przenieæ pralkê w inne miejsce, nale¿y to
robiæ bardzo ostro¿nie, w dwie lub trzy osoby. Nigdy nie
przenosiæ pralki samodzielnie, gdy¿ jest ona bardzo ciê¿ka.
Przed w³o¿eniem bielizny sprawdziæ, czy bêben jest pusty.
W trakcie suszenia drzwiczki nagrzewaj¹ siê.
Nie suszyæ bielizny czyszczonej przy pomocy
³atwopalnych rozpuszczalników (np.trichloroetylen).
Nie suszyæ gumy g¹bczastej ani podobnych
elastomerów.
Upewniæ siê, by w trakcie suszenia kurek wody by³
odkrêcony.
Utylizacja
Utylizacja opakowania: stosowaæ siê do lokalnych
przepisów, dziêki temu opakowanie bêdzie mog³o
zostaæ ponownie wykorzystane.
Europejska Dyrektywa 2002/96/EC dotycz¹ca Zu¿ytych
Elektrycznych i Elektronicznych Urz¹dzeñ zak³ada zakaz
pozbywania siê starych urz¹dzeñ domowego u¿ytku
jako nieposortowanych mieci komunalnych. Zu¿yte
urz¹dzenia musz¹ byæ osobno zbierane i sortowane w
celu zoptymalizowania odzyskania oraz ponownego
przetworzenia pewnych komponentów i materia³ów.
Pozwala to ograniczyæ zanieczyszczenie rodowiska i
pozytywnie wp³ywa na ludzkie zdrowie. Przekrelony
symbol kosza umieszczony na produkcie przypomina
klientowi o obowi¹zku specjalnego sortowania.
Konsumenci powinni kontaktowaæ siê z w³adzami
lokalnymi lub sprzedawc¹ w celu uzyskania informacji
dotycz¹cych postêpowania z ich zu¿ytymi urz¹dzeniami
gospodarstwa domowego.
Rêczne otwieranie okr¹g³ych drzwiczek
Jeli z powodu przerwy w dostawie energii elektrycznej nie
jest mo¿liwe otwarcie okr¹g³ych drzwiczek, w celu wyjêcia i
rozwieszenia prania nale¿y wykonaæ nastêpuj¹ce
czynnoci:
1. wyj¹æ wtyczkê z gniazdka elektrycznego.
20
2. sprawdziæ, czy poziom wody wewn¹trz maszyny znajduje siê
poni¿ej poziomu otwarcia drzwiczek; w przeciwnym wypadku
usun¹æ nadmiar wody przez przewód odp³ywowy, zbieraj¹c j¹ do
wiaderka w sposób wskazany na rysunku.
3. zdj¹æ panel pokrywy z przedniej strony pralki przy pomocy
rubokrêtu (patrz rysunek).
4. poci¹gn¹æ na zewn¹trz klapkê wskazan¹ na rysunku,
a¿ do wyzwolenia siê z zacisku plastikowego zaczepu;
nastêpnie poci¹gn¹æ go w dó³ i równoczenie otworzyæ
drzwiczki.
5. ponownie za³o¿yæ panel upewniwszy siê, przed
dociniêciem go do maszyny, czy zatrzaski zosta³y
umieszczone w odpowiednich otworach.
PL
33
Page 34

Utrzymanie i konserwacja
PL
Od³¹czenie wody i pr¹du
elektrycznego
Zamkn¹æ kurek dop³ywu wody po ka¿dym praniu.
W ten sposób zmniejsza siê zu¿ycie instalacji
hydraulicznej pralki oraz eliminuje siê
niebezpieczeñstwo wycieków.
Przed przyst¹pieniem do czyszczenia pralki oraz
do czynnoci konserwacyjnych wyj¹æ wtyczkê z
gniazdka.
Czyszczenie pralki
Obudowê zewnêtrzn¹ i gumowe czêci pralki mo¿na
myæ ciereczk¹ zmoczon¹ w letniej wodzie z
myd³em. Nie stosowaæ rozpuszczalników ani
ciernych rodków czyszcz¹cych.
Czyszczenie szufladki na rodki pior¹ce
1
Wysun¹æ szufladkê,
unosz¹c j¹ lekko ku
górze i wyci¹gaj¹c na
zewn¹trz (patrz
rysunek).
Wyp³ukaæ szufladkê pod
bie¿¹c¹ wod¹.
Czynnoæ tê nale¿y
2
wykonywaæ stosunkowo
czêsto.
Czyszczenie pompy
Pralka wyposa¿ona jest w pompê samoczyszcz¹c¹,
która nie wymaga zabiegów konserwacyjnych. Mo¿e
siê jednak zdarzyæ, ¿e drobne przedmioty (monety,
guziki) wpadn¹ do komory wstêpnej zabezpieczaj¹cej
pompê, która znajduje siê w jej dolnej czêci.
Nale¿y siê upewniæ, ¿e cykl prania zosta³
zakoñczony i wyj¹æ wtyczkê z gniazdka.
Aby dostaæ siê do komory wstêpnej:
1. zdj¹æ panel pokrywy z
przedniej strony pralki
przy pomocy rubokrêtu
(patrz rysunek);
2. odkrêciæ pokrywê,
obracaj¹c j¹ w kierunku
przeciwnym do ruchu
wskazówek zegara (patrz
rysunek): wyp³yniêcie
niewielkiej iloci wody
jest normalnym
zjawiskiem;
Konserwacja okr¹g³ych drzwiczek i
bêbna
Drzwiczki pralki nale¿y zawsze pozostawiaæ
uchylone, aby zapobiec tworzeniu siê
nieprzyjemnych zapachów.
34
3. dok³adnie wyczyciæ wnêtrze;
4. ponownie przykrêciæ pokrywê;
5. ponownie za³o¿yæ panel upewniwszy siê, przed
dociniêciem go do maszyny, czy zatrzaski zosta³y
umieszczone w odpowiednich otworach.
Kontrola przewodu doprowadzaj¹cego
wodê
Przynajmniej raz w roku nale¿y sprawdziæ przewód
doprowadzaj¹cy wodê. Jeli widoczne s¹ na nim
pêkniêcia i rysy, nale¿y go wymieniæ: w trakcie prania
du¿e cinienie mo¿e bowiem spowodowaæ jego nag³e
rozerwanie.
Nigdy nie instalowaæ ju¿ u¿ywanych przewodów.
Page 35

Nieprawid³owoci w dzia³aniu
i sposoby ich usuwania
Mo¿e siê zdarzyæ, ¿e pralka nie dzia³a. Przed wezwaniem Serwisu Technicznego (patrz Serwis Techniczny)
nale¿y sprawdziæ, czy problemu nie da siê ³atwo rozwi¹zaæ przy pomocy poni¿szego wykazu.
Nieprawid³owoci w dzia³aniu:
Pralka nie w³¹cza siê.
Cykl prania nie rozpoczyna siê.
Pralka nie pobiera wody (na
wywietlaczu pojawi siê napis
BRAK WODY, SPRAWD DOP£YW
WODY).
Pralka ca³y czas pobiera i
odprowadza wodê.
Pralka nie odprowadza wody i nie
odwirowuje prania.
Pralka mocno wibruje w fazie
wirowania.
Z pralki wycieka woda.
Maszyna jest zablokowana,
wywietlacz pulsuje i sygnalizuje
kod anomalii (np.: F-01, F-..).
Tworzy siê zbyt du¿a iloæ piany.
Pralka nie suszy.
Mo¿liwe przyczyny / Rozwi¹zania:
Wtyczka nie jest w³¹czona do gniazdka lub jest wsuniêta za s³abo, tak ¿e
nie ma styku.
W domu nast¹pi³a przerwa w dostawie pr¹du.
Drzwiczki pralki nie s¹ dobrze zamkniête.
Nie zosta³ wciniêty przycisk W£¥CZANIA/WY£¥CZANIA.
Nie zosta³ wciniêty przycisk START/PAUZA.
Kurek dop³ywu wody jest zamkniêty.
Zosta³o nastawione opónienie startu (patrz Jak wykonaæ cykl prania
lub suszenie).
Przewód doprowadzaj¹cy wodê nie jest pod³¹czony do kurka.
Przewód jest zgiêty.
Kurek dop³ywu wody jest zamkniêty.
W domu nast¹pi³a przerwa w dostawie wody.
Cinienie wody nie jest wystarczaj¹ce.
Nie zosta³ wciniêty przycisk START/PAUZA.
Przewód odp³ywowy nie zosta³ zainstalowany na wysokoci miêdzy 65 a
100 cm od pod³ogi (patrz Instalacja).
Koñcówka przewodu odp³ywowego jest zanurzona w wodzie (patrz Instalacja).
Otwór odp³ywowy w cianie nie posiada odpowietrznika.
Jeli po sprawdzeniu tych mo¿liwoci problem nie zostanie rozwi¹zany,
nale¿y zamkn¹æ kurek dop³ywu wody, wy³¹czyæ pralkê i wezwaæ Serwis
Techniczny. Jeli mieszkanie znajduje siê na najwy¿szych piêtrach
budynku, mo¿e wyst¹piæ efekt syfonu, w wyniku którego pralka ca³y czas
pobiera i odprowadza wodê. W celu wyeliminowania tej niedogodnoci
nale¿y zakupiæ specjalny zawór, zapobiegaj¹cy powstawaniu efektu syfonu.
Program nie przewiduje odprowadzania wody: w przypadku niektórych
programów nale¿y uruchomiæ je rêcznie (patrz Programy i funkcje).
W³¹czona jest funkcja £ATWE PRASOWANIE: aby zakoñczyæ program,
nale¿y nacisn¹æ przycisk START/PAUZA (Programy i funkcje).
Przewód odp³ywowy jest zgiêty (patrz Instalacja).
Instalacja odp³ywowa jest zatkana.
Podczas instalacji pralki bêben nie zosta³ prawid³owo odblokowany (patrz Instalacja).
Pralka nie jest w³aciwie wypoziomowana (patrz Instalacja).
Pralka, zainstalowana pomiêdzy meblami a cian¹, ma za ma³o miejsca
(patrz Instalacja).
Przewód doprowadzaj¹cy wodê nie jest dobrze przykrêcony (patrz Instalacja).
Szufladka na rodki pior¹ce jest zatkana (w celu jej oczyszczenia patrz
Utrzymanie i konserwacja).
Przewód odp³ywowy nie jest dobrze zamocowany(patrz Instalacja).
Wy³¹czyæ maszynê i wyj¹æ wtyczkê z gniazdka, odczekaæ oko³o 1
minuty, nastêpnie w³¹czyæ j¹ ponownie.
Jeli problem nie ustêpuje, nale¿y wezwaæ Serwis Techniczny.
rodek pior¹cy nie jest odpowiedni do pralek automatycznych (na
opakowaniu musi byæ umieszczony napis: do pralek, do prania
rêcznego i w pralce lub podobny).
U¿yto za du¿o rodka pior¹cego.
Wtyczka nie jest w³¹czona do gniazdka, lub jest wsuniêta niedostatecznie,
tak ¿e nie ma kontaktu.
W domu brak jest pr¹du.
Drzwiczki nie s¹ dobrze zamkniête.
Nastawione zosta³o opónione uruchomienie.
SUSZENIE jest w pozycji OFF.
PL
35
Page 36

Serwis Techniczny
PL
Przed skontaktowaniem siê z Serwisem Technicznym:
Sprawdziæ, czy problemu nie mo¿na rozwi¹zaæ samodzielnie (patrzNieprawid³owoci w dzia³aniu i
sposoby ich usuwania);
Ponownie uruchomiæ program i sprawdziæ, czy problem nie znikn¹³;
Jeli nie, zwróciæ siê do autoryzowanego Serwisu Technicznego, dzwoni¹c pod numer podany w karcie
gwarancyjnej.
Nigdy nie wzywaæ nieautoryzowanych techników.
Nale¿y podaæ:
rodzaj nieprawid³owoci;
model maszyny (Mod.);
numer seryjny (S/N).
Informacje te znajduj¹ siê na tabliczce umieszczonej w tylnej czêci pralki oraz widocznej z przodu po
otwarciu drzwiczek.
36
Page 37

Istruzioni per luso
LAVASCIUGA
I
Italiano
ARMXXD 1290
! Questo simbolo ti ricorda di leggere questo libretto istruzioni.
I
Sommario
Installazione, 38-39
Disimballo e livellamento
Collegamenti idraulici ed elettrici
Primo ciclo di lavaggio
Dati tecnici
Descrizione della lavasciuga, 40-41
Pannello di controllo
Display
Come effettuare un ciclo di lavaggio o
unasciugatura, 42
Programmi e funzioni, 43
Tabella dei programmi
Funzioni di lavaggio
Detersivi e biancheria, 44
Cassetto dei detersivi
Preparare la biancheria
Programmi particolari
Sistema bilanciamento del carico
Precauzioni e consigli, 45
Sicurezza generale
Smaltimento
Apertura manuale della porta oblò
Manutenzione e cura, 46
Escludere acqua e corrente elettrica
Pulire la lavasciuga
Pulire il cassetto dei detersivi
Curare oblò e cestello
Pulire la pompa
Controllare il tubo di alimentazione dellacqua
Anomalie e rimedi, 47
Assistenza, 48
Assistenza Attiva 7 giorni su 7
37
Page 38

Installazione
È importante conservare questo libretto per poterlo
I
consultare in ogni momento. In caso di vendita, di
cessione o di trasloco, assicurarsi che resti insieme
alla lavasciuga per informare il nuovo proprietario sul
funzionamento e sui relativi avvertimenti.
Leggere attentamente le istruzioni: ci sono
importanti informazioni sullinstallazione, sulluso
e sulla sicurezza.
Disimballo e livellamento
Disimballo
1. Disimballare la lavasciuga.
2. Controllare che la lavasciuga non abbia
subìto danni nel trasporto. Se fosse danneggiata
non collegarla e contattare il rivenditore.
3. Rimuovere le 4 viti di
protezione per il trasporto e il gommino con il
relativo distanziale, posti
nella parte posteriore
(vedi figura).
Un accurato livellamento dà stabilità alla macchina
ed evita vibrazioni, rumori e spostamenti durante il
funzionamento. In caso di moquette o di un tappeto,
regolare i piedini in modo da conservare sotto la
lavasciuga uno spazio sufficiente per la ventilazione.
Collegamenti idraulici ed elettrici
Collegamento del tubo di alimentazione
dellacqua
1.Collegare il tubo di
alimentazione avvitandolo a un rubinetto d'acqua fredda con bocca
filettata da
3/4 gas (vedi figura).
Prima di allacciare, far
scorrere lacqua finché
non sia limpida.
2. Collegare il tubo di
alimentazione alla
lavasciuga
avvitandolo allapposita
presa dacqua, nella
parte posteriore in alto
a destra (vedi figura).
4. Chiudere i fori con i tappi di plastica in dotazione.
5. Conservare tutti i pezzi: qualora la lavasciuga
debba essere trasportata, dovranno essere
rimontati.
Gli imballaggi non sono giocattoli per bambini.
Livellamento
1. Installare la lavasciuga su un pavimento piano e
rigido, senza appoggiarla a muri, mobili o altro.
2. Se il pavimento non
fosse perfettamente
orizzontale, compensare
le irregolarità svitando o
avvitando i piedini
anteriori (vedi figura);
langolo di inclinazione,
misurato sul piano di
lavoro, non deve superare i 2°.
3. Fare attenzione che nel tubo non ci siano né
pieghe né strozzature.
La pressione idrica del rubinetto deve essere
compresa nei valori della tabella Dati tecnici
(vedi pagina a fianco).
Se la lunghezza del tubo di alimentazione non
fosse sufficiente, rivolgersi a un negozio specializzato
o a un tecnico autorizzato.
Non utilizzare mai tubi già usati.
Utilizzare quelli in dotazione alla macchina.
38
Page 39

Collegamento del tubo di scarico
Collegare il tubo di
scarico, senza piegarlo,
a una conduttura di
scarico o a uno scarico
a muro posti tra 65 e
65 - 100 cm
100 cm da terra;
Non usare prolunghe e multiple.
I
Il cavo non deve subire piegature o compressioni.
Il cavo di alimentazione deve essere sostituito solo
da tecnici autorizzati.
Attenzione! Lazienda declina ogni responsabilità
qualora queste norme non vengano rispettate.
Primo ciclo di lavaggio
oppure appoggiarlo al
bordo di un lavandino o
di una vasca, legando
la guida in dotazione al
rubinetto (vedi figura).
Lestremità libera del
tubo di scarico non
deve rimanere immersa
nellacqua.
È sconsigliato usare tubi di prolunga; se indispen-
sabile, la prolunga deve avere lo stesso diametro del
tubo originale e non superare i 150 cm.
Collegamento elettrico
Prima di inserire la spina nella presa della corrente,
accertarsi che:
la presa abbia la messa a terra e sia a norma
di legge;
la presa sia in grado di sopportare il carico
massimo di potenza della macchina, indicato nella
tabella Dati tecnici (vedi a fianco);
la tensione di alimentazione sia compresa nei
valori indicati nella tabella Dati tecnici (vedi a
fianco);
la presa sia compatibile con la spina della
lavasciuga. In caso contrario sostituire la
presa o la spina.
La lavasciuga non va installata allaperto, nemme-
no se lo spazio è riparato, perché è molto pericoloso
lasciarla esposta a pioggia e temporali.
A lavasciuga installata, la presa della corrente deve
essere facilmente raggiungibile.
Dopo linstallazione, prima delluso, effettuare un
ciclo di lavaggio con detersivo e senza biancheria
impostando il programma
.
Dati tecnici
Modello
Dimensioni
Capacità
Collegamenti
elettrici
Collegamenti
idrici
Velo cit à d i
centrifuga
Programmi di
contr ollo secondo
la norma EN
EN 50229
ARMXXD 1290
larghezza cm 59,5
altezza cm 85
profondità cm 53,5
da 1 a 7 kg per il lavaggio
da 1 a 4 kg per l'asciugatura
vedi la targhetta caratteristiche
tecniche applicata sulla macchina
pressione massima 1 MPa (10 bar)
pressione minima 0,05 MPa (0,5 bar)
capacità del cesto 52 litri
sino a 1200 giri al minuto
lavaggio: programma
del tasto)
; temperatura 60°C;
effettuato con 7 kg di carico.
asciugatura: prima asciugatura
effettuata con 3 kg di carico
selezionando "STIRARE";
seconda asciugatura effettuata con
4 kg di carico selezionando il livello
di asciugatura "RIPIEGARE".
Questa apparecchiatura è conforme
alle seguenti Direttive Comunitarie:
- 2004/108/CE (Compatibilità
Elettromagnetica)
- 2002/96/CE
- 2006/95/CE (Bassa Tensione)
(1°pressione
39
Page 40

Descrizione della lavasciuga
Pannello di controllo
I
ACCENSIONE/
SPEGNIMENTO
SELETTORE
Cassetto dei detersivi
Cassetto dei detersivi: per caricare detersivi e
additivi (vedi Detersivi e biancheria).
Tasto ACCENSIONE/SPEGNIMENTO
brevemente il tasto per accendere o spegnere la
macchina. La spia AVVIO/PAUSA che lampeggia
lentamente di colore verde indica che la macchina è
accesa. Per spegnere la lavasciuga durante il
lavaggio è necessario tenere premuto il tasto più a
lungo, circa 2 sec.; una pressione breve o accidentale non permetterà lo spegnimento della macchina.
Lo spegnimento della macchina durante un lavaggio
in corso annulla il lavaggio stesso.
Tasti SELETTORE PROGRAMMI: per impostare il
programma desiderato (vedi Tabella dei programmi).
Tasto MEMO: tenere premuto il tasto per memorizzare un ciclo e le proprie personalizzazioni preferite.
Per richiamare un ciclo precedentemente memorizzato premere il tasto MEMO.
Tasti FUNZIONE: premere il tasto per selezionare la
funzione desiderata. Sul display si illuminerà la spia
relativa.
Tasto CENTRIFUGA
escludere del tutto la centrifuga - il valore viene
indicato nel display.
Tasto TEMPERATURA
temperatura: il valore viene indicato nel display.
: premere per ridurre o
: premere per ridurre la
PROGRAMMI
Tasto
Tasti
: premere
Tasto
Tasto
ASCIUGATURA
Tasto
MEMO
Tasto
PARTENZA
RITARDATA
Tasto BLOCCO TASTI : per attivare il blocco del
pannello di controllo, tenere premuto il tasto per circa
2 secondi. Il simbolo
di controllo è bloccato. In questo modo si
impediscono modifiche accidentali dei programmi,
soprattutto se in casa ci sono dei bambini.
Per disattivare il blocco del pannello di controllo,
tenere premuto il tasto per circa 2 secondi.
Tasto PARTENZA RITARDATA
impostare una partenza ritardata del programma
prescelto. Il ritardo verrà indicato nel display.
Tasto ASCIUGATURA
un ciclo di asciugatura.
Tasto con spia AVVIO/PAUSA: quando la spia verde
lampeggia lentamente, premere il tasto per avviare
un lavaggio. A ciclo avviato la spia diventa fissa. Per
mettere in pausa il lavaggio, premere nuovamente il
tasto; la spia lampeggerà con colore arancione. Se il
simbolo
Per far ripartire il lavaggio dal punto in cui è stato
interrotto, premere nuovamente il tasto.
Modalità di stand by
Questa lavatrice, in conformità alle nuove normative
legate al risparmio energetico, è dotata di un
sistema di autospegnimento (stand by) che entra in
funzione dopo circa 30 minuti nel caso di non
utilizzo. Premere brevemente il tasto ACCENSIONE/
SPEGNIMENTO e attendere che la macchina si
riattivi.
BLOCCO
TASTI
DISPLAY
Tasti
FUNZIONE
Tasto
TEMPERATURA
acceso indica che il pannello
non è illuminato, si potrà aprire loblò.
Tasto
CENTRIFUGA
Tasto con spia
AVVIO/
PAUSA
: premere per
: premere per impostare
40
Page 41

Display
I
F
X
Z
B
A
D
C
E
Y
F
F
L
Il display è utile per programmare la macchina e fornisce molteplici informazioni.
Nelle due stringhe superiori A e B vengono visualizzati il programma di lavaggio o il tipo di asciugatura selezionata,
la fase di lavaggio in corso (il livello di asciugatura o il tempo di asciugatura selezionato) e tutte le indicazioni relative
allo stato davanzamento del programma.
Nella stringa C viene visualizzato il tempo residuo alla fine del ciclo di lavaggio in corso e nel caso fosse stata
impostata una PARTENZA RITARDATA, il tempo mancante allavvio del programma selezionato.
Nella stringa D viene visualizzato il valore massimo della velocità della centrifuga che la macchina può effettuare in
base al programma impostato; se il programma non prevede la centrifuga la stringa resta spenta.
Nella stringa E viene visualizzato il valore massimo della temperatura che si può selezionare in base al programma
impostato; se il programma non prevede limpostazione della temperatura la stringa resta spenta.
Le spie F sono relative alle funzioni e si accendono quando la funzione selezionata è compatibile con il programma
impostato.
Simbolo Oblò bloccato
Il simbolo acceso indica che loblò è bloccato per impedire aperture accidentali. Per evitare danni è necessario
attendere che il simbolo si spenga prima di aprire loblò.
N.B.: se è attiva la funzione PARTENZA RITARDATA loblo non si può aprire, per aprirlo mettere la macchina in
pausa premendo il tasto AVVIO/PAUSA.
Alla prima accensione verrà richiesto di selezionare la lingua ed il display entrerà automaticamente nel menu di
selezione lingua.
Per scegliere la lingua desiderata premere i tasti X e Y, per confermare la scelta premere il tasto Z.
Se si vuole cambiare lingua, spegnere la macchina, premere contemporaneamente i tre tasti indicati nella figura
con il riferimemto L fino a sentire un segnale acustico, riaccendere la macchina, verrà visualizzato il menu di
selezione lingua.
41
Page 42

Come effettuare un ciclo di
lavaggio o unasciugatura
1. ACCENDERE LA MACCHINA. Premere il tasto , sul
I
display comparirà la scritta OK; la spia AVVIO/PAUSA
lampeggerà lentamente di colore verde.
2. CARICARE LA BIANCHERIA. Aprire la porta oblò.
Caricare la biancheria facendo attenzione a non superare
la quantità di carico indicata nella tabella programmi
della pagina seguente.
3. DOSARE IL DETERSIVO. Estrarre il cassetto e
versare il detersivo nelle apposite vaschette come
spiegato in Detersivi e biancheria.
4. CHIUDERE LOBLO.
5. SCEGLIERE IL PROGRAMMA. Premere uno dei tasti
del SELETTORE PROGRAMMI per selezionare il
programma desiderato; il nome del programma comparirà
sul display; ad esso è associata una temperatura e una
velocità di centrifuga che possono essere modificate. Sul
display comparirà la durata del ciclo.
6. PERSONALIZZARE IL CICLO DI LAVAGGIO. Agire
sugli appositi tasti:
Modificare la temperatura e/o la centrifuga.
La macchina seleziona automaticamente la
temperatura e la centrifuga massime previste per il
programma impostato e non possono pertanto essere
aumentate. Premendo il pulsante
si riduce
progressivamente la temperatura sino al lavaggio a
freddo OFF. Premendo il tasto
si riduce
progressivamente la centrifuga sino alla sua esclusione
OFF. Unulteriore pressione dei tasti riporterà i valori
a quelli massimi previsti.
Impostare una partenza ritardata.
Per impostare la partenza ritardata del programma
prescelto, premere il tasto relativo fino a raggiungere il
tempo di ritardo desiderato. Quando tale opzione è
attiva, sul display si illumina il simbolo . Per
rimuovere la partenza ritardata premere il tasto fino a
che sul display compare la scritta OFF.
Impostare lasciugatura.
Premendo una o più volte il tasto ASCIUGATURA si
imposta il tipo di asciugatura desiderato. Sono
previste due possibilità:
A - In base al livello di umidità dei capi asciugati:
Stirare: capi leggermente umidi, facili da stirare.
Appendere: capi asciutti da riporre.
Ripiegare: capi molto asciutti, consigliato per spugne e
accappatoi.
B - In base al tempo: da 40 a 180 minuti.
Per escludere lasciugatura premere il tasto relativo fino
a far apparire sul display la scritta OFF.
Se eccezionalmente il carico di biancheria da lavare ed
asciugare è superiore al massimo previsto (vedi tabella
accanto), effettuare il lavaggio, e a programma
ultimato, dividere il carico e rimetterne una parte nel
cestello. Seguire a questo punto le istruzioni per
effettuare Solo lasciugatura. Ripeti le stesse
operazioni per il carico rimanente.
N.B: alla fine dell'asciugatura viene effettuato sempre
un periodo di raffreddamento.
Solo asciugatura
Selezionare con il selettore dei PROGRAMMI
un'asciugatura (
- - ) in base al tipo di tessuto,
quindi impostare il tipo di asciugatura desiderata con il
tasto ASCIUGATURA.
Tabella tempi di asciugatura (valori indicativi)
Tipo di
tessuto
Cotone Biancheria di diverse
Sintetici Lenzuola, Camice,
Lana Maglie, maglioni, etc. 1,5 150 140 120
Tipo di carico Carico
dimensioni, Asciugamani
in spugna
Pigiami, calzini, ecc.
max (Kg)
Ripie-
Appende-reStira -
gare
4 120 110 100
3 140 120 100
re
Modificare le caratteristiche del ciclo.
Premere il tasto per attivare la funzione; la spia
corrispondente al pulsante si accenderà.
Premere nuovamente il tasto per disattivare la
funzione; la spia si spegnerà.
Se la funzione selezionata non è compatibile con il
programma impostato, la spia lampeggerà e la
funzione non verrà attivata.
Se la funzione selezionata non è compatibile con
unaltra precedentemente impostata, la spia relativa
alla prima funzione selezionata lampeggerà e verrà
attivata solo la seconda, la spia della funzione attivata
si illuminerà.
Le funzioni possono variare il carico raccomandato e/o
la durata del ciclo.
7. AVVIARE IL PROGRAMMA. Premere il tasto AVVIO/
PAUSA. La spia relativa si illuminerà di colore verde
fisso e loblò si bloccherà (simbolo OBLOBLOCCATO
acceso). Durante il lavaggio, sul display comparirà
il nome della fase in corso. Per cambiare un
programma mentre un ciclo è in corso, mettere la
lavasciuga in pausa premendo il tasto AVVIO/PAUSA
(la spia AVVIO/PAUSA lampeggerà lentamente di
colore arancione); selezionare quindi il ciclo desiderato
e premere nuovamente il tasto AVVIO/PAUSA.
Per aprire la porta mentre un ciclo è in corso premere il
tasto AVVIO/PAUSA; se il simbolo OBLOBLOCCATO
è spenta sarà possibile aprire loblò. Premere
nuovamente il tasto AVVIO/PAUSA per far ripartire il
programma dal punto in cui era stato interrotto.
8. FINE DEL PROGRAMMA. Viene indicata dalla scritta
FINE CICLO sul display, quando il simbolo
OBLOBLOCCATO
si spegnerà sarà possibile
aprire loblò. Aprire loblò, scaricare la biancheria e
spegnere la macchina.
Se si desidera annullare un ciclo già avviato, premere a
lungo il tasto
. Il ciclo verrà interrotto e la macchina si
spegnerà.
42
Page 43

Programmi e funzioni
Tabella dei programmi
l
Carico max.
-
Norm-
ale
73
73
73
31,5
31,5
3 -
1,5 -
11
1,5 1
73
Descrizione del Programma
Programmi
Programm i
Cotone (*)
Cotone
Cotone
Sintetici
Sintetici
Mix 30'
sporchi (non indicato per lana, seta e capi da lavare a mano).
Mix 15'
sporchi (non indicato per lana, seta e capi da lavare a mano).
Seta/Tende:
Memo:
M
Lana:
Programm i Asciugatura
Asciugatura Cotone
Asciugatura Sintetici
Asciugatura Lana
Pro gram m i Parz iali
Centrifuga - 1200
Risciacquo
Scarico
Per tutti Test Institutes:
(1° pressione del tasto)
(2° pressione del tasto)
(3° pressione del tasto)
(1° pressione del tasto)
(2° pressione del tasto)
(1° pressione del tasto)
(2° pressione del tasto)
per capi in seta, viscosa, lingerie.
permette di memorizzare un qualsiasi ciclo di lavaggio.
per lana, cachemire, ecc.
(3° pressione del tasto).
(1° pressione del tasto).
(2° pressione del tasto).
:
bianch i estremamente sporchi.
:
bianchi e colorati resistenti molto sporchi.
:
bianchi e colorati delicati molto sporchi.
:
colori resistenti molto spo rchi.
:
colori resistenti poco sporchi.
per rinfrescare rapidamente capi poco
:
:
per rinfrescare rapidamente capi poco
(1° pressione del tasto).
(2° pressione del tasto).
Te m p .
max.
(°C )
90° 1200
60° 1200
40° 1200
60° 800
40° 800
30° 800
30° 800
30° 0 - -
40° 800
- -
- -
- -
- 1200
- 0 - - - - 7 -
Velo cità
max.
(gir i al
minuto)
Asciugatura
Candeg
lll l
lll l
lll l
lll l
lll l
l
l
l
l
l
l
l
ll
Detersivi
-
-
Lavag
gina
-
-
-
- - - 4 -
- - - 3 -
- - - 1,5 -
- - - 7 -
Amm orbi
gio
dente
ll
ll
ll
ll
-
* Programma di controllo secondo la norma EN 50229: impostare il programma cotone con una temperaura di 60°C.
(Kg )
Con
Mini
carico
Durata
ciclo
lavaggio sul display.
I
E' possibile controllare la durata dei programmi di
Funzioni di lavaggio
Antimacchia
Questa funzione è utile per eliminare le macchie più
resistenti.
Inserire la vaschetta
3
MAX
2
1
Antimacchia.
Per candeggiare durante il lavaggio versare il detersivo e gli
additivi, impostare il programma desiderato e attivare la
funzione Antimacchia.
Non è attivabile sui programmi , , , Scarico e
Programmi asciugatura.
Extra Risciacquo
Selezionando questa opzione si aumenta lefficacia
del risciacquo, e si assicura la massima rimozione del
detersivo. E utile per pelli particolarmente sensibili.
Non è attivabile sui programmi , , Scarico e
Programmi asciugatura.
aggiuntiva 3, in dotazione.
Nel dosare la candeggina
non superare il livello max
indicato sul perno centrale
(vedi figura). Per effettuare
solo il candeggio versare la
candeggina nella vaschetta
aggiuntiva 3, impostare il
programma Risciacquo e
attivare la funzione
Stira facile
Selezionando questa funzione, il lavaggio e la
centrifuga saranno opportunamente modificati per
ridurre la formazione di pieghe. Al temine del ciclo la
lavabiancheria effettuerà delle lente rotazioni del
cestello; lla spia della funzione STIRA FACILE e quella
di AVVIO/PAUSA lampeggeranno (arancione) e la
scritta "FINE CICLO" apparirà su display. Per
terminare il ciclo si dovrà premere il tasto AVVIO/
PAUSA o il tasto STIRA FACILE.
Nel programma "Seta" la macchina terminerà il ciclo
con la biancheria in ammollo, la spia della funzione
STIRA FACILE e quella di AVVIO/PAUSA
lampeggeranno (arancione) e la scritta "IDROSTOP"
apparirà su display. Per scaricare lacqua e poter
rimuovere il bucato sarà necessario premere il tasto
START/PAUSE o il tasto STIRA FACILE.
Non è attivabile sui programmi , , , Scarico e
Programmi asciugatura.
Mini carico
Si consiglia di usare questa funzione quando la
biancheria da lavare è pari od inferiore alla metà del
carico massimo consigliato (vedi Tabella dei programmi).
Non è attivabile sui programmi , , Scarico e
Programmi asciugatura.
43
Page 44

Detersivi e biancheria
Cassetto dei detersivi
I
Il buon risultato del lavaggio dipende anche dal
corretto dosaggio del detersivo: eccedendo non si
lava in modo più efficace e si contribuisce a incrostare le parti interne della lavasciuga e a inquinare
lambiente.
Non usare detersivi per il lavaggio a mano, perché
formano troppa schiuma.
Estrarre il cassetto dei
3
AX
M
2
vaschetta 1: Detersivo per lavaggio
(in polvere o liquido)
Il detersivo liquido va versato solo prima dellavvio.
vaschetta 2: Additivi (ammorbidente, ecc.)
Lammorbidente non deve fuoriuscire dalla griglia.
vaschetta aggiuntiva 3: Candeggina
1
detersivi e inserire il
detersivo o ladditivo
come segue.
Preparare la biancheria
Suddividere la biancheria secondo:
- il tipo di tessuto / il simbolo sulletichetta.
- i colori: separare i capi colorati da quelli bianchi.
Vuotare le tasche e controllare i bottoni.
Non superare i valori indicati, riferiti al peso della
biancheria asciutta:
Tessuti resistenti: max 7 kg
Tessuti sintetici: max 3 kg
Tessuti delicati: max 2 kg
Lana: max 1,5 kg
Seta: max 1 kg
Quanto pesa la biancheria?
Mix 15': è studiato per lavare capi leggermente
sporchi in poco tempo: dura solo 15 minuti e fa così
risparmiare energia e tempo. Impostando il program-
a 30°C) è possibile lavare insieme tessuti di
ma (
diversa natura (esclusi lana e seta) con un carico
massimo di 1,5 kg.
Seta: utilizzare lapposito programma per lavare
tutti i capi in seta. Si consiglia lutilizzo di un
detersivo specifico per capi delicati.
Tende: si raccomanda di piegarle e sistemarle
dentro una federa o un sacchetto a rete. Utilizzare il
programma
Lana: è lunica lavasciuga ad aver ottenuto il
prestigioso riconoscimento Woolmark Platinum Care
(M.0508) da parte di The Woolmark Company, che
certifica il lavaggio in lavatrice di tutti i capi in lana,
anche quelli recanti letichetta solo lavaggio a mano
. Con il programma si ha quindi lassoluta
tranquillità di lavare in lavatrice tutti i capi in lana
(max. 1,5 kg) con la garanzia delle migliori
performance.
.
Sistema bilanciamento del carico
Prima di ogni centrifuga, per evitare vibrazioni
eccessive e per distribuire il carico in modo uniforme,
il cestello effettua delle rotazioni ad una velocità
leggermente superiore a quella del lavaggio. Se al
termine di ripetuti tentativi il carico non fosse ancora
correttamente bilanciato la macchina effettua la
centrifuga ad una velocità inferiore a quella prevista.
In presenza di eccessivo sbilanciamento la
lavasciuga effettua la distribuzione anzichè la
centrifuga. Per favorire una migliore distribuzione del
carico e il suo corretto bilanciamento si consiglia di
mescolare capi grandi e piccoli.
1 lenzuolo 400-500 gr.
1 federa 150-200 gr.
1 tovaglia 400-500 gr.
1 accappatoio 900-1.200 gr.
1 asciugamano 150-250 gr.
Programmi particolari
Mix 30': è studiato per lavare capi leggermente
sporchi in poco tempo: dura solo 30 minuti e fa così
risparmiare energia e tempo. Impostando il program-
a 30°C) è possibile lavare insieme tessuti di
ma (
diversa natura (esclusi lana e seta) con un carico
massimo di 3 kg.
44
Page 45

Precauzioni e consigli
La lavabiancheria è stata progettata e costruita in
conformità alle norme internazionali di sicurezza.
Queste avvertenze sono fornite per ragioni di
sicurezza e devono essere lette attentamente.
Sicurezza generale
Questo apparecchio è stato concepito esclusiva-
mente per un uso di tipo domestico.
L'apparecchio non deve essere utilizzato da
persone (bambini compresi) con capacità fisiche,
sensoriali o mentali ridotte e con esperienze e
conoscenze insufficienti, a meno che tale utilizzo
non avvenga sotto la supervisione o le istruzioni di
una persona responsabile della loro sicurezza.
I bambini devono essere sorvegliati per garantire
che non giochino con l'apparecchio.
- Non asciugare capi non lavati.
- I capi sporchi di sostanze quali l'olio di cottura,
l'acetone, l'alcol, la benzina, il cherosene, gli
smacchiatori, la trementina, la cera e le sostanze
per rimuoverla devono essere lavati in acqua
calda con una quantità maggiore di detergente
prima di asciugarli nell'asciugabiancheria.
- Oggetti come la gomma espansa (schiuma di
lattice), le cuffie per la doccia, i materiali tessili
impermeabili, gli articoli con un lato di gomma e i
vestiti o i cuscini che hanno delle parti in schiuma
di lattice non devono essere asciugati
nell'asciugabiancheria.
- Ammorbidenti o prodotti simili devono essere
usati conformemente alle istruzioni del produttore.
- La parte finale di un ciclo dell'asciugabiancheria
avviene senza calore (ciclo di raffreddamento) per
garantire che gli articoli non vengano danneggiati.
ATTENZIONE: Non arrestare mai
un'asciugabiancheria prima del termine del
programma di asciugatura. In questo caso prele
vare rapidamente tutti i capi di biancheria e
stenderli per farli raffreddare rapidamente.
Non toccare la macchina a piedi nudi o con le
mani o i piedi bagnati o umidi.
Non staccare la spina dalla presa della corrente
tirando il cavo, bensì afferrando la spina.
Non aprire il cassetto dei detersivi mentre la
macchina è in funzione.
Non toccare lacqua di scarico, che può
raggiungere temperature elevate.
Non forzare in nessun caso loblò: potrebbe
danneggiarsi il meccanismo di sicurezza che
protegge da aperture accidentali.
In caso di guasto, in nessun caso accedere ai
meccanismi interni per tentare una riparazione.
Controllare sempre che i bambini non si avvicinino
alla macchina in funzione.
Durante il lavaggio loblò tende a scaldarsi.
Se devessere spostata, lavorare in due o tre
persone con la massima attenzione. Mai da soli
perché la macchina è molto pesante.
Prima di introdurre la biancheria controlla che il
cestello sia vuoto.
Smaltimento
Smaltimento del materiale di imballaggio:
attenersi alle norme locali, così gli imballaggi
potranno essere riutilizzati.
La direttiva Europea 2002/96/CE sui rifiuti di
apparecchiature elettriche ed elettroniche, prevede
che gli elettrodomestici non debbano essere
smaltiti nel normale flusso dei rifiuti solidi urbani. Gli
apparecchi dismessi devono essere raccolti
separatamente per ottimizzare il tasso di recupero
e riciclaggio dei materiali che li compongono ed
impedire potenziali danni per la salute e l'ambiente.
Il simbolo del cestino barrato è riportato su tutti i
prodotti per ricordare gli obblighi di raccolta separata.
Per ulteriori informazioni, sulla corretta dismissione
degli elettrodomestici, i detentori potranno rivolgersi
al servizio pubblico preposto o ai rivenditori.
Apertura manuale delloblò
Nel caso non sia possibile aprire loblò a causa della
mancanza di energia elettrica e volete stendere il
bucato, procedere come segue:
1. togliere la spina dalla presa di corrente.
20
2. verificate che il livello dellacqua allinterno della
macchina sia inferiore rispetto allapertura delloblò; in
caso contrario togliere lacqua in eccedenza attraverso
il tubo di scarico raccogliendola in un secchio.
3. rimuovere il pannello di copertura sul lato
anteriore della lavabiancheria con lausilio di un
giravite (vedi figura).
4. utilizzando la linguetta indicata in figura tirare
verso lesterno fino a liberare il tirante in plastica dal
fermo; tirarlo successivamente verso il basso e
contemporaneamente aprire la porta.
5. rimontare il pannello assicurandosi, prima di
spingerlo verso la macchina, di aver inserito i ganci
nelle apposite asole.
I
45
Page 46

Manutenzione e cura
Escludere acqua e corrente elettrica
I
Chiudere il rubinetto dellacqua dopo ogni
lavaggio. Si limita così lusura dellimpianto
idraulico della lavabiancheria e si elimina il pericolo
di perdite.
Staccare la spina della corrente quando si
pulisce la lavabiancheria e durante i lavori di
manutenzione.
Pulire la lavabiancheria
La parte esterna e le parti in gomma possono
essere puliti con un panno imbevuto di acqua tiepida
e sapone. Non usare solventi o abrasivi.
Pulire il cassetto dei detersivi
1
Sfilare il cassetto sollevandolo e tirandolo
verso lesterno (vedi
figura).
Lavarlo sotto lacqua
corrente; questa pulizia
va effettuata
frequentemente.
2
Pulire la pompa
La lavabiancheria è dotata di una pompa
autopulente che non ha bisogno di manutenzione.
Può però succedere che piccoli oggetti (monete,
bottoni) cadano nella precamera che protegge la
pompa, situata nella parte inferiore di essa.
Assicurarsi che il ciclo di lavaggio sia terminato e
staccare la spina.
Per accedere alla precamera:
1. rimuovere il pannello
di copertura sul lato
anteriore della
lavabiancheria con
lausilio di un giravite
(vedi figura);
2. svitare il coperchio
ruotandolo in senso
antiorario (vedi figura): è
normale che fuoriesca
un po dacqua;
Curare oblò e cestello
Lasciare sempre socchiuso loblò per evitare che
si formino cattivi odori.
3. pulire accuratamente linterno;
4. riavvitare il coperchio;
5. rimontare il pannello assicurandosi, prima di
spingerlo verso la macchina, di aver inserito i ganci
nelle apposite asole.
Controllare il tubo di alimentazione
dellacqua
Controllare il tubo di alimentazione almeno una volta
allanno. Se presenta screpolature e fessure va
sostituito: durante i lavaggi le forti pressioni potrebbero provocare improvvise spaccature.
Non utilizzare mai tubi già usati.
46
Page 47

Anomalie e rimedi
Può accadere che la lavasciuga non funzioni. Prima di telefonare allAssistenza (vedi Assistenza), controllare che
non si tratti di un problema facilmente risolvibile aiutandosi con il seguente elenco.
Anomalie:
La lavasciuga
non si accende.
Il ciclo di lavaggio
non inizia.
La lavasciuga non carica acqua
(nel display apparirà la sctitta
Manca lacqua, apri il rubinetto).
La lavasciuga carica e scarica
acqua di continuo.
Possibili cause / Soluzione:
La spina non è inserita nella presa della corrente, o non abbastanza
da fare contatto.
In casa non cè corrente.
Loblò non è ben chiuso
Il tasto ACCENSIONE/SPEGNIMENTO non è stato premuto.
Il tasto AVVIO/PAUSA non è stato premuto.
Il rubinetto dellacqua non è aperto.
Si è impostato un ritardo sullora di avvio (PARTENZA RITARDATA,
vedi Come effettuare un ciclo di lavaggio).
Il tubo di alimentazione dellacqua non è collegato al rubinetto.
Il tubo è piegato.
Il rubinetto dellacqua non è aperto.
In casa manca lacqua.
Non cè sufficiente pressione.
Il tasto AVVIO/PAUSA non è stato premuto.
Il tubo di scarico non è installato fra 65 e 100 cm da terra (vedi Installazione).
Lestremità del tubo di scarico è immersa nellacqua (vedi Installazione).
Lo scarico a muro non ha lo sfiato daria.
Se dopo queste verifiche il problema non si risolve, chiudere il rubinetto dellacqua, spegnere la lavasciuga e chiamare lAssistenza. Se labitazione si trova agli
ultimi piani di un edificio, è possibile che si verifichino fenomeni di sifonaggio, per
cui la lavasciuga carica e scarica acqua di continuo. Per eliminare linconveniente sono disponibili in commercio apposite valvole anti-sifonaggio.
I
La lavasciuga non scarica
o non centrifuga.
La lavasciuga vibra
molto durante la centrifuga.
La lavasciuga perde acqua.
La macchina è bloccata, il display
lampeggia e segnala un codice di
anomalia (es.: F-01, F-..).
Si forma troppa schiuma.
La Lavasciuga non asciuga.
Il programma non prevede lo scarico: con alcuni programmi occorre
avviarlo manualmente (vedi Programmi e funzioni).
È attiva la funzione STIRAMENO: per completare il programma
premere il tasto AVVIO/PAUSA (Programmi e funzioni).
Il tubo di scarico è piegato (vedi Installazione).
La conduttura di scarico è ostruita.
Il cestello, al momento dellinstallazione, non è stato sbloccato
correttamente (vedi Installazione).
La lavasciuga non è in piano (vedi Installazione).
La lavasciuga è stretta tra mobili e muro (vedi Installazione).
Il tubo di alimentazione dellacqua non è ben avvitato (vedi Installazione).
Il cassetto dei detersivi è intasato (per pulirlo vedi Manutenzione e cura).
Il tubo di scarico non è fissato bene (vedi Installazione).
Spegnere la macchina e togliere la spina dalla presa, attendere circa 1
minuto quindi riaccenderla.
Se lanomalia persiste, chiamare lAssistenza.
Il detersivo non è specifico per lavasciuga (deve esserci la
dicitura per lavatrice, a mano e in lavatrice, o simili).
Il dosaggio è stato eccessivo.
La spina non è inserita nella presa della corrente, o non abbastanza
da fare contatto.
In casa non cè corrente.
Loblò non è ben chiuso.
Si è impostato un ritardo sullora di avvio.
L ASCIUGATURA è nella posizione OFF.
47
Page 48

Assistenza
195085891.03
10 /2012 - Xerox Fabriano
I
Prima di contattare lAssistenza:
Verificare se lanomalia può essere risolta da soli (vedi Anomalie e rimedi).
Riavviare il programma per controllare se linconveniente è stato ovviato;
In caso negativo, contattare il Numero Unico 199.199.199*.
Non ricorrere mai a tecnici non autorizzati.
Comunicare:
il tipo di anomalia;
il modello della macchina (Mod.);
il numero di serie (S/N).
Queste informazioni si trovano sulla targhetta applicata nella parte posteriore della lavasciuga e nella
parte anteriore aprendo l'oblò.
*
Assistenza Attiva 7 giorni su 7
In caso di necessità dintervento chiamare il Numero Unico Nazionale 199.199.199*.
Un operatore sarà a completa disposizione per fissare un appuntamento con il Centro Assistenza Tecnico
Autorizzato più vicino al luogo da cui si chiama.
È attivo 7 giorni su 7, sabato e domenica compresi, e non lascia mai inascoltata una richiesta.
48
* Al costo di 14,25 centesimi di Euro al minuto (iva inclusa) dal Lun. al Ven. dalle 08:00 alle 18:30, il Sab. dalle 08:00 alle
13:00 e di 5,58 centesimi di Euro al minuto (iva inclusa) dal Lun. al Ven. dalle 18:30 alle 08:00, il Sab. dalle 13:00 alle 08:00
e i giorni festivi, per chi chiama da telefono fisso.
Per chi chiama da radiomobile le tariffe sono legate al piano tariffario delloperatore telefonico utilizzato.
Le suddette tariffe potrebbero essere soggette a variazione da parte delloperatore telefonico; per maggiori informazioni
consultare il sito www.aristonchannel.com.
 Loading...