

Page 1

Instruction booklet
WASHING MACHINE
GB
English,1
Français,13
NL
Nederlands,37
ЕЛЛЗНЙКБ,49
AQUALTIS
AQXGF 169
F
GR
PT
Português,25
Contents
GB
Installation, 2-3
Unpacking and levelling
Connecting the cold water and electricity supplies
Technical data
Description of the machine, 4-5
Control panel
Running a wash cycle, 6
Programmes and options, 7
Table of Programmes
Wash options
Detergents and laundry, 8
Detergent
Preparing the laundry
Washing advice
Load-balancing system
Precautions and tips, 9
General safety
Disposal
Opening the door manually
Care and maintenance, 10
Turning off the water and electricity supplies
Cleaning the machine
Cleaning the detergent dispenser
Drum maintenance
Cleaning the pump
Checking the water inlet hose
Troubleshooting, 11
Assistance, 12
1
Page 2
Installation
Keep this instruction manual in a safe place for
GB
future reference. If the appliance is sold, given away
or moved, please ensure the manual remains with the
machine so that the new owner may benefit from the
advice contained within it.
Please read this instruction manual carefully it
contains important information regarding the safe
installation, use and maintenance of the appliance.
You will find the guarantee and other details relating to
the installation process in the bag containing this booklet.
Unpacking and levelling
Unpacking
1. Once the washing machine has been removed
from the packaging, check that it has not been
damaged during transportation.
If it has been damaged, contact the retailer and do
not proceed any further with the installation process.
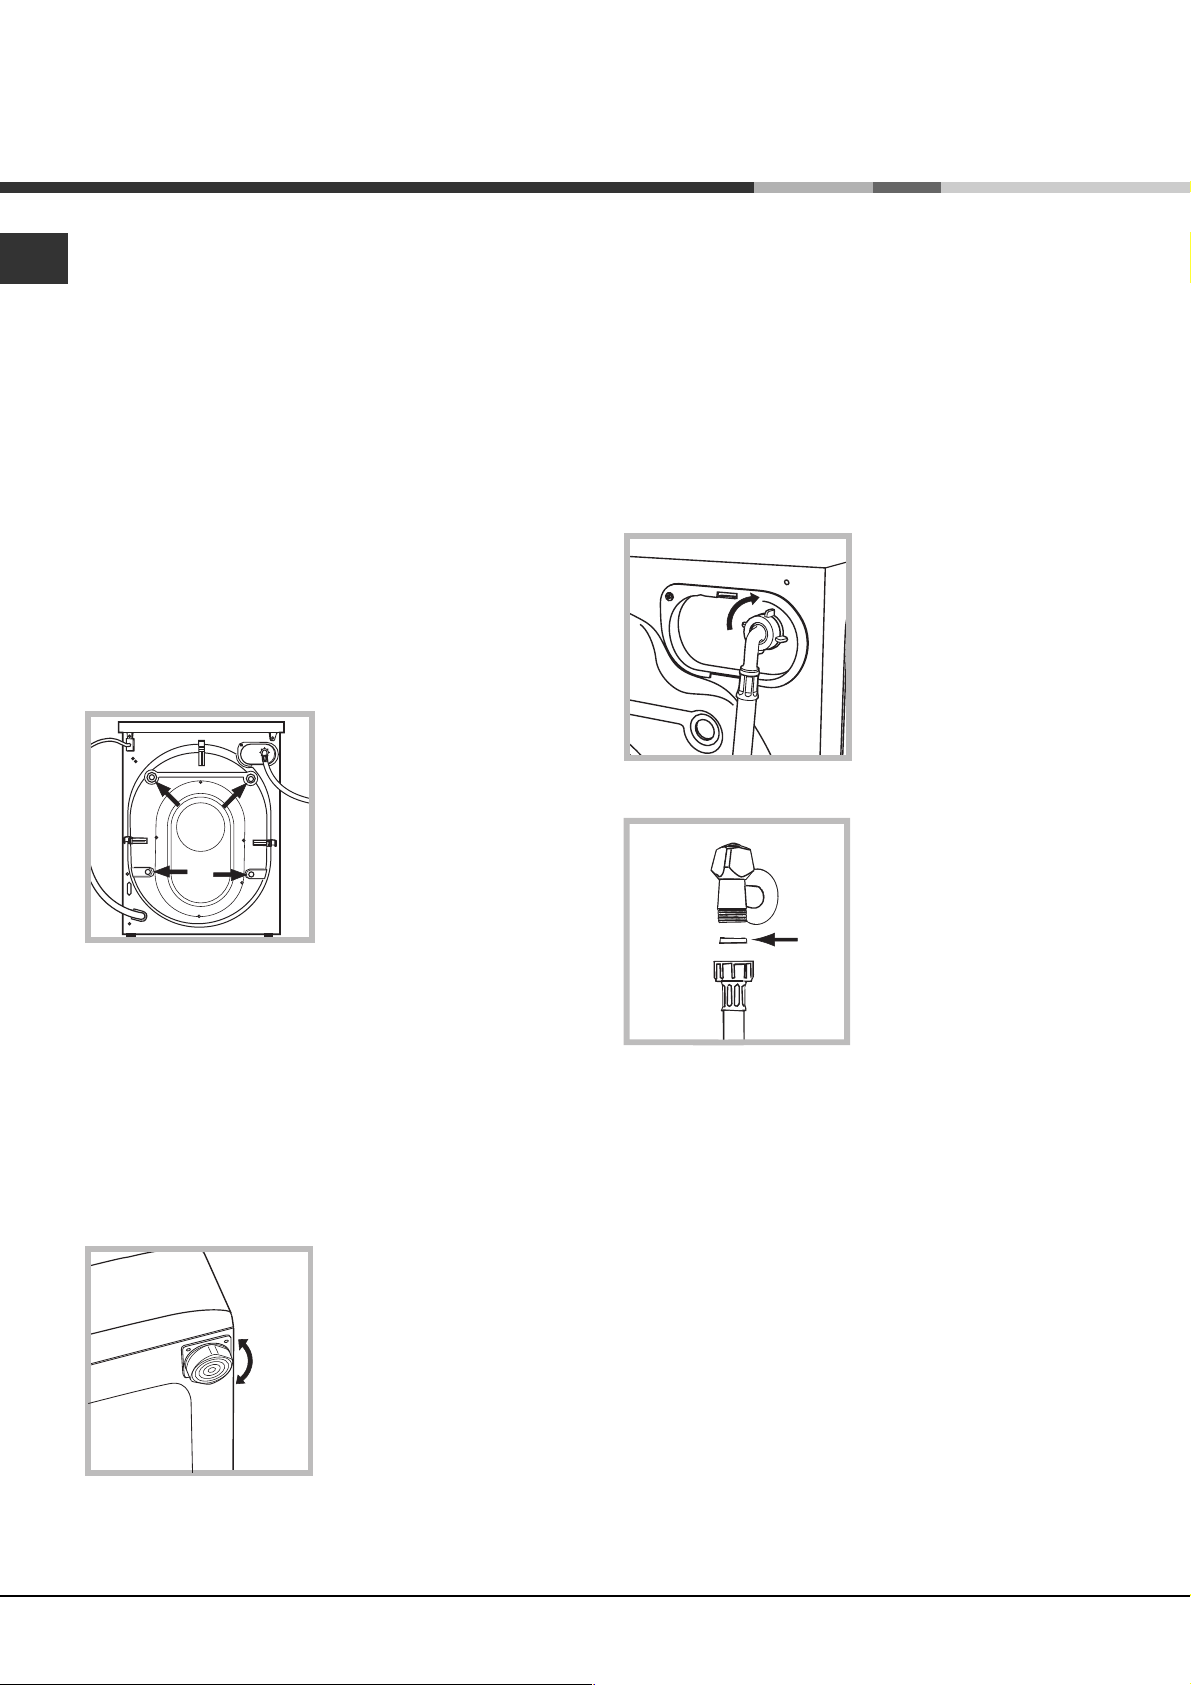
2. Remove the 4 transit
bolts used during
transportation and the
corresponding spacers
on the back of the
machine (see figure).
3. Having removed the 4 bolts use the 4 plastic
blanking plates to cover the 4 holes.
4. Keep all the pieces; if the washing machine is
transported in future, the transit bolts and spacers will
have to be replaced in order to avoid damaging the
inside of the machine.
Packaging materials should not be used as toys by children.
Levelling
If positioned on a fitted carpet or a rug, adjust the
feet in such a way as to allow room for air to circulate
and provide ventilation beneath the washing machine.
Connecting the cold water and
electricity supplies
Connecting the water inlet hose
Before connecting the inlet hose to the cold water supply,
allow the water to flow from the tap until it runs clear.
1. Connect the end of
the water inlet hose to
the washing machine,
screwing it onto the
appliance's cold water
inlet, situated on the top
right-hand side on the
rear of the appliance
(see figure).
2. Place the seal A
(provided in the bag) on
the end of the inlet hose
and screw it to a cold
A
3. Make sure there are no kinks or bends in the inlet hose.
The water pressure at the tap must fall within the values
indicated in the Technical data table (see next page).
water tap with a 3/4 gas
threaded connection (see
figure).
1. Position the washing machine on a level and sturdy
floor, without resting it against walls or cabinets.
2. If the floor is uneven,
the feet of the appliance
may be adjusted until it
reaches a perfectly
horizontal position (the
angle of inclination must
not exceed 2 degrees).
If the appliance is levelled correctly it will be more
stable and much less likely to cause vibrations and
noise during the spin cycle.
2
If the water inlet hose is not long enough, contact a
specialist store or an authorised technician.
Always use the new water inlet hoses supplied with
the machine.
Page 3
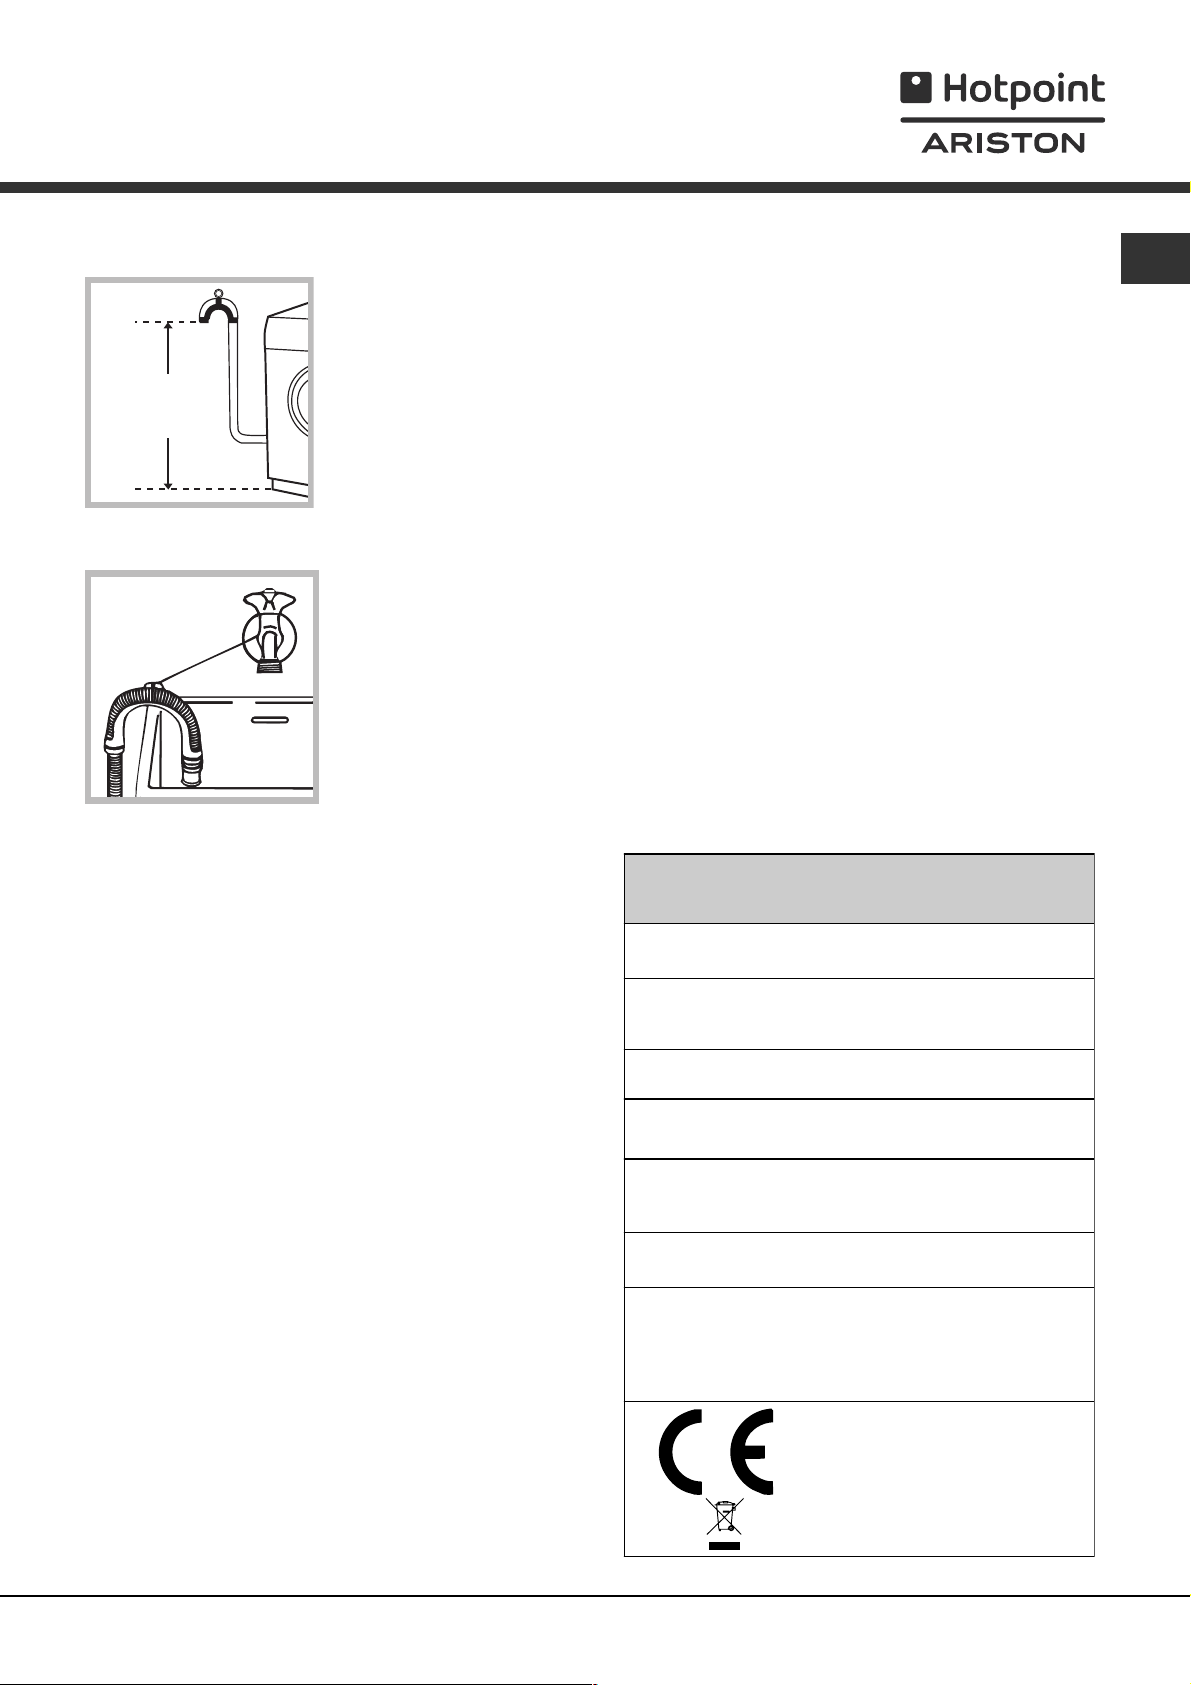
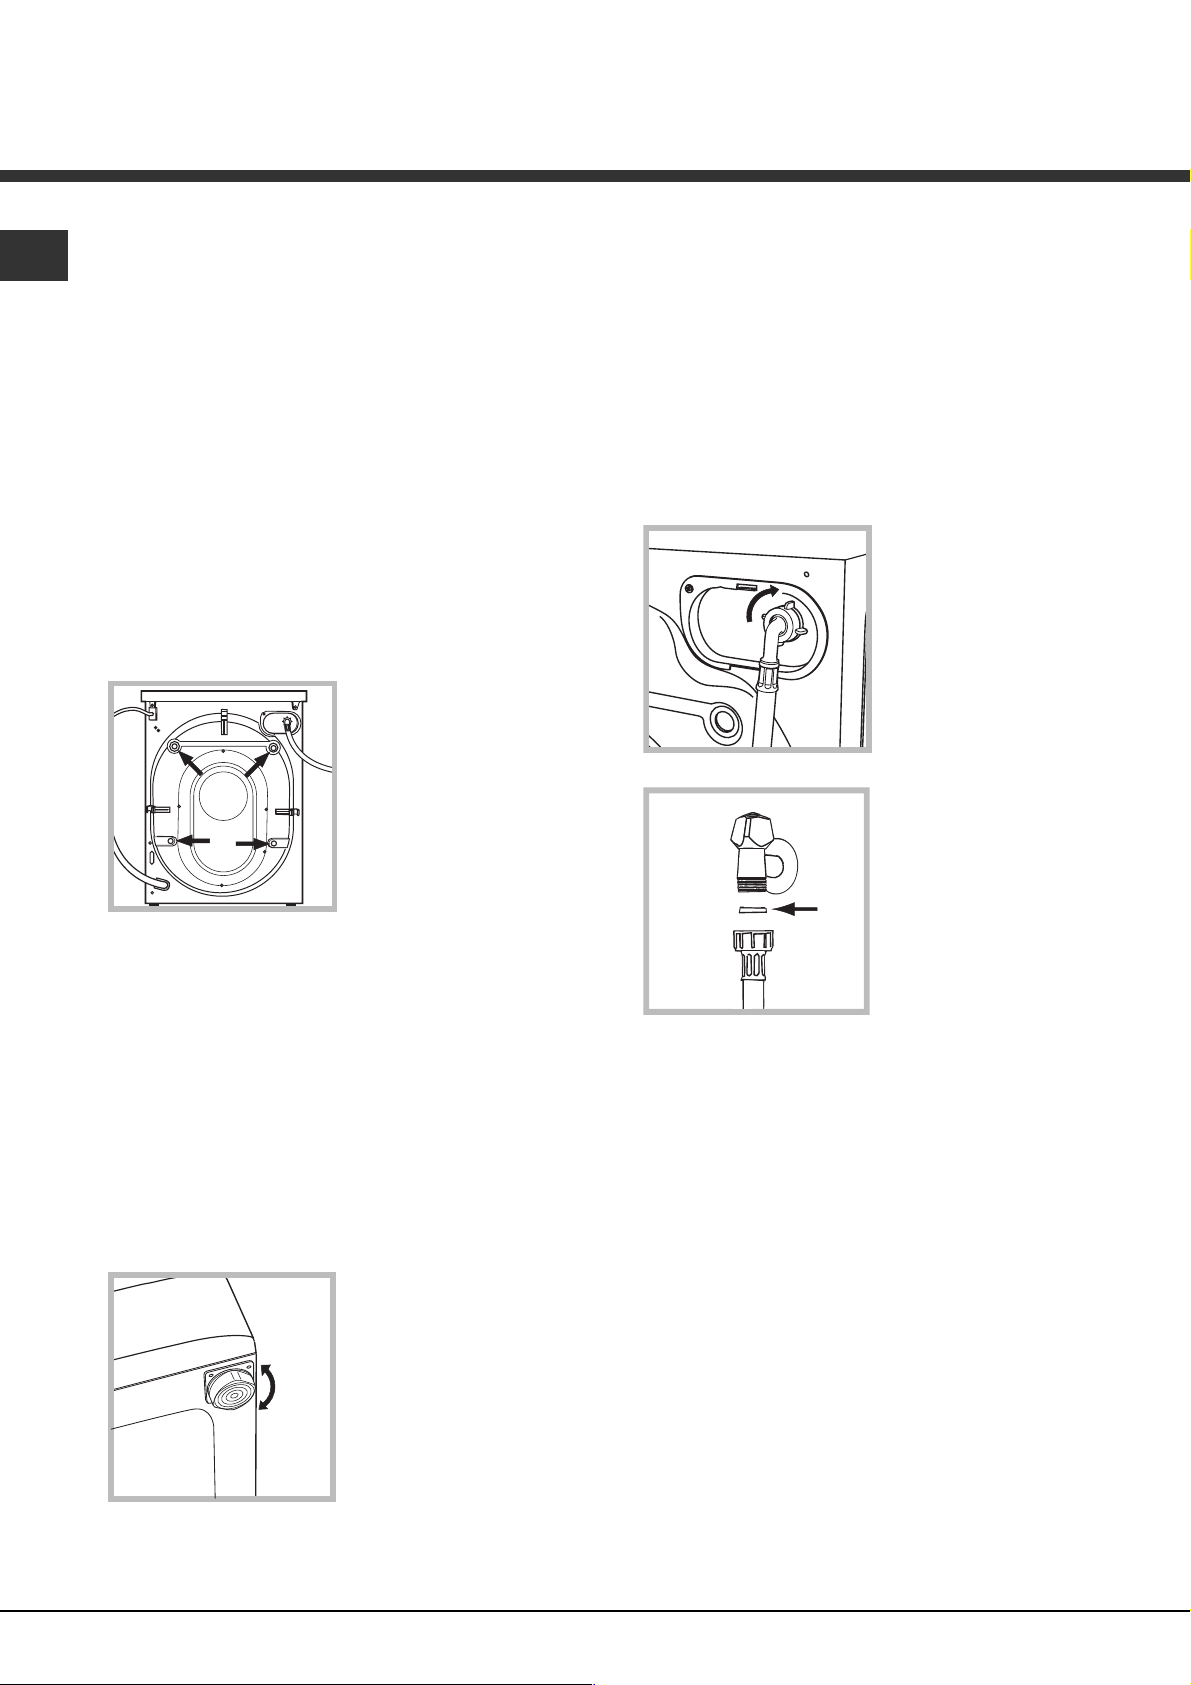
Drainage Connection
65 - 100 cm
Connect the outlet hose
to a draining duct or a
stand pipe at a height
between 65 and 100 cm
from the floor. Do not
bend it under any
circumstances.
Alternatively, place the
end of the hose over the
edge of a washbasin or
tub, fastening the hose
supplied to the tap (see
figure).
The free end of the hose
should not remain
immersed in water.
Do not use extension cables or multiple sockets.
GB
The cable should not be bent or compressed.
The cable should be replaced only by authorised
technicians.
Warning! The company shall not be held responsible
for any incidents that occur if these regulations are
not observed.
We advise against the use of hose extensions; if
absolutely necessary, the length of the extension
must not exceed 150 cm and its diameter must be
the same as the original hose.
Electrical connection
Before inserting the plug into the electrical socket,
make sure that:
the socket is earthed and complies with current
regulations;
the socket can withstand the maximum load of the
appliance, which is indicated in the Technical data
table (see opposite);
the power supply voltage falls within the values
indicated in the Technical data table (see opposite);
the socket is compatible with the plug of the
appliance. If this is not the case, either the socket
or the plug must be replaced.
The machine must not be installed outdoors, even in
covered areas. It is extremely dangerous to leave the
appliance exposed to rain, storms and other weather
conditions.
Once the machine has been installed, the electricity
socket should be easily accessible.
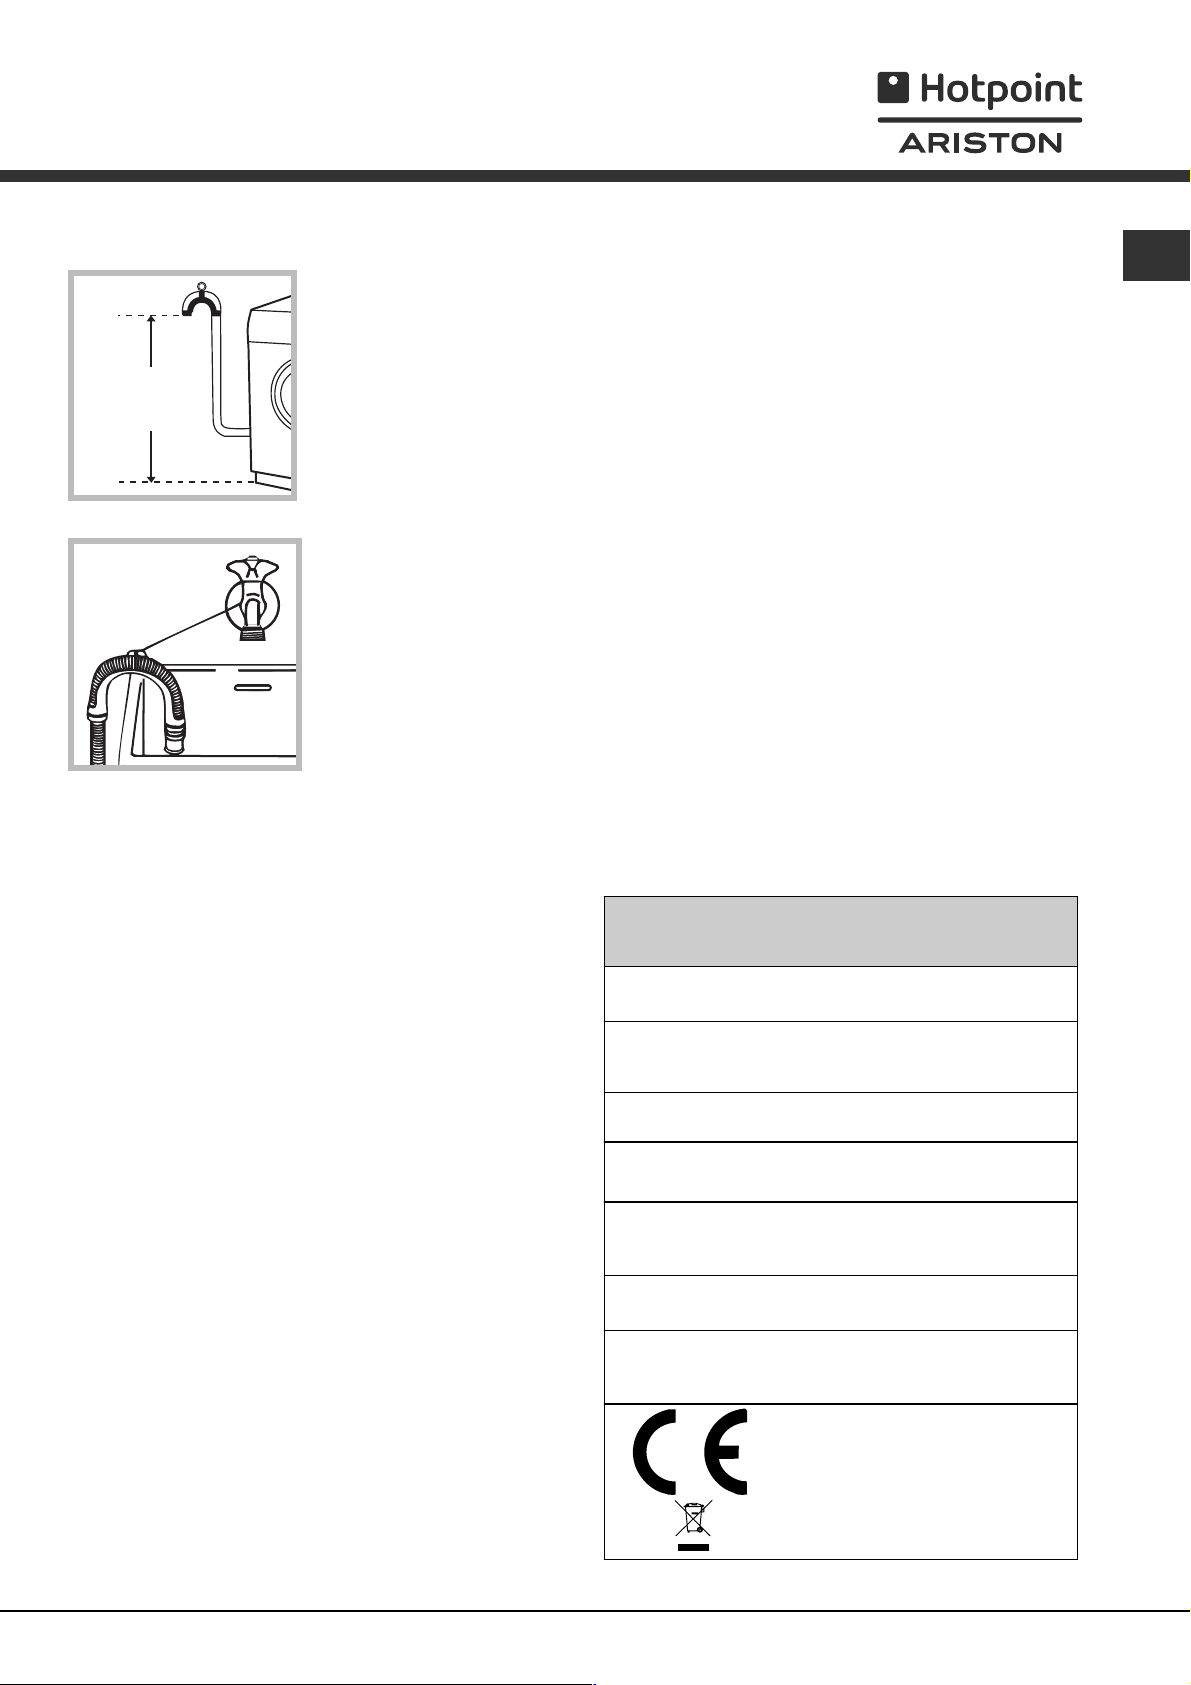
Technical data
Model
Dimensions
Capacity
Electrical
connections
Water connections
Spin speed
Energy rated
programmes
according to
regulation
EN 60456
AQXGF 169
width 59.5 cm
height 85 cm
depth 64.5 cm
from 1 to 9 kg
please refer to the techni cal data
plate fixed to the mach ine
maximum press ure 1 MPa (10 bar)
minimum pressure 0.05 MPa (0.5 bar)
drum capacity 62 litres
up to 1600 rotations per minute
WHITE COTTON programme;
temperature 60°C;
using a load of 9 kg.
This appliance conforms to the
following EC Directives:
- 89/336/EEC dated 03/05/89
(Electromagnetic Compatibility) and
subsequ ent modifications
- 2002/96/CE
- 2006/95/CE (Low Voltage)
3
Page 4
Description of the machine
GB
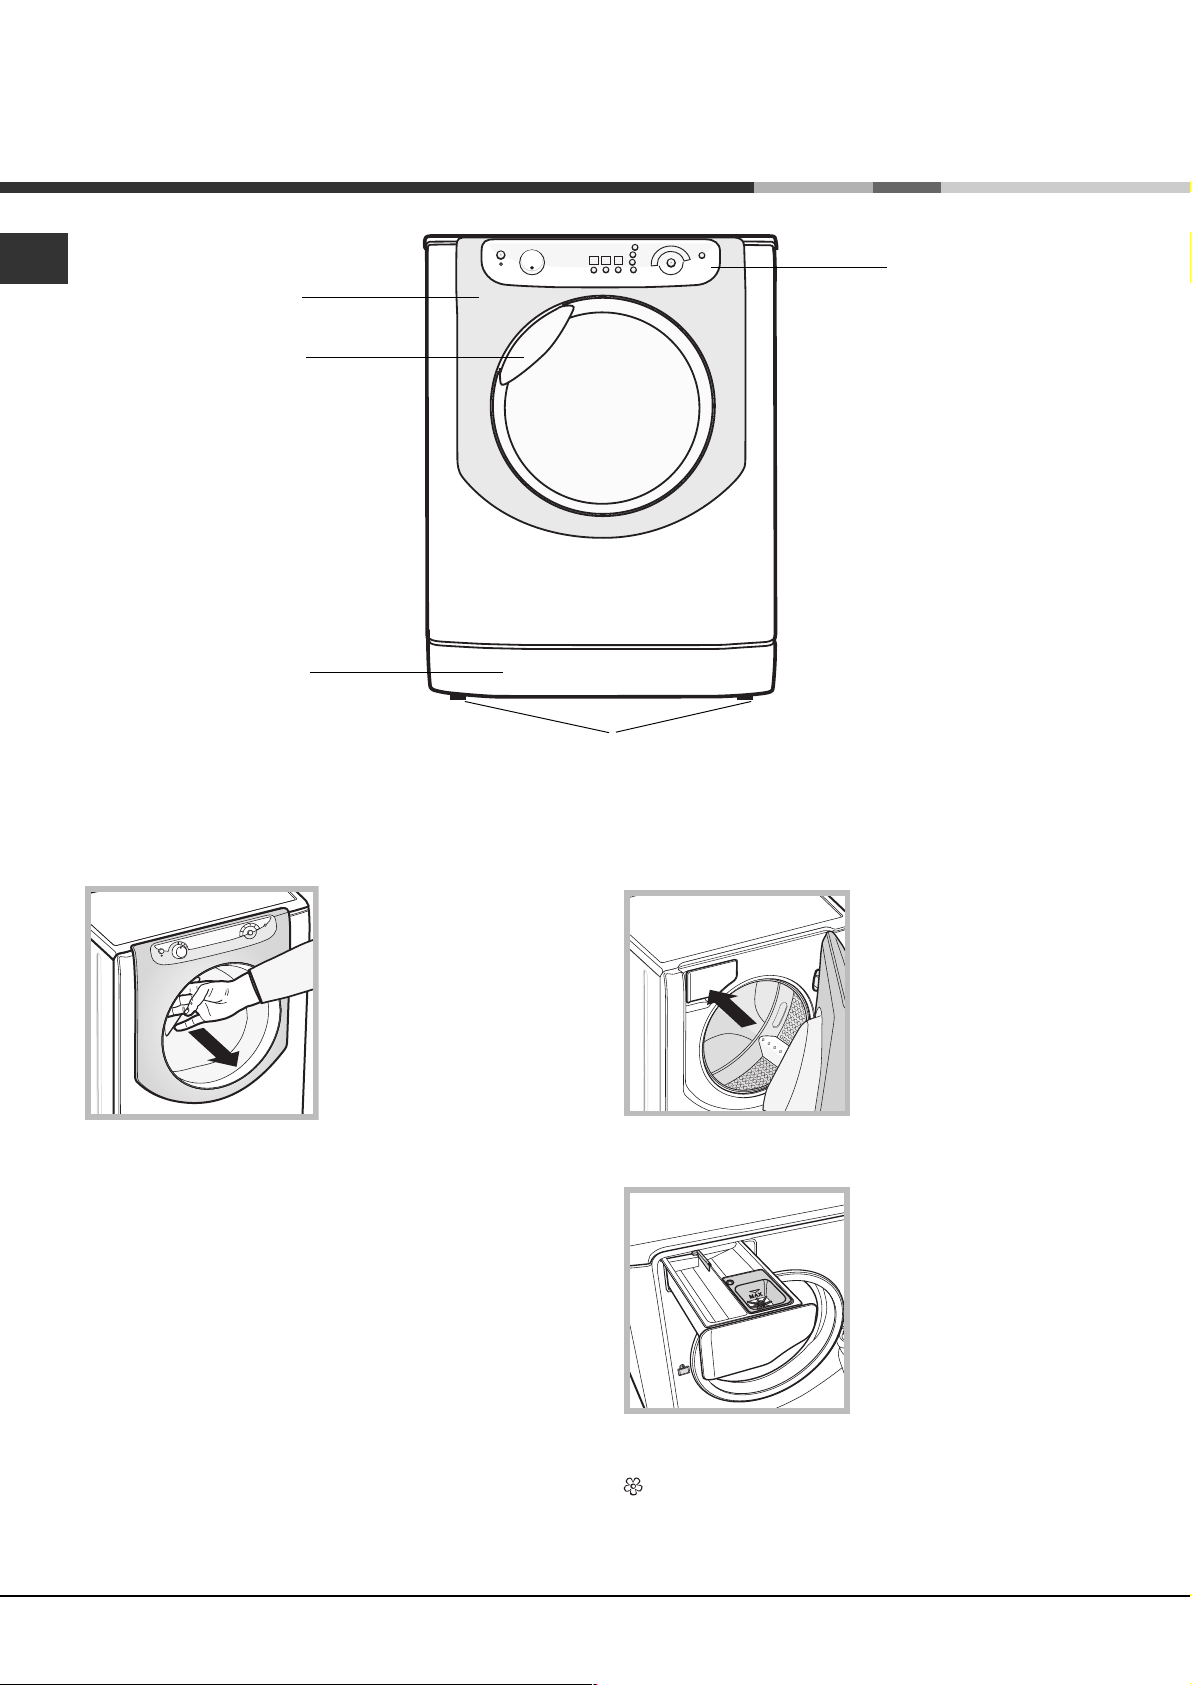
DOOR
DOOR
HANDLE
TOE-KICK
CONTROL
PANEL
ADJUSTABLE FEET
DOOR
DETERGENT DISPENSER:
Always use the handle to
open the door (see
figure).
20
1
2
compartment immediately before the wash cycle is
started.
compartment for additives: for fabric softener or
other liquid washing additives. Do not exceed the
maximum level indicated by the grille, and dilute
concentrated fabric softeners.
This is inside the machine
and may be accessed by
opening the door.
For information relating to
detergents, please refer
to the chapter entitled
Detergents and laundry.
1. pre-wash
compartment: use
powder detergent.
2. main wash
compartment: use
powder or liquid
detergent. If you intend to
use liquid detergent, we
recommend that it is
poured into the
4
Page 5
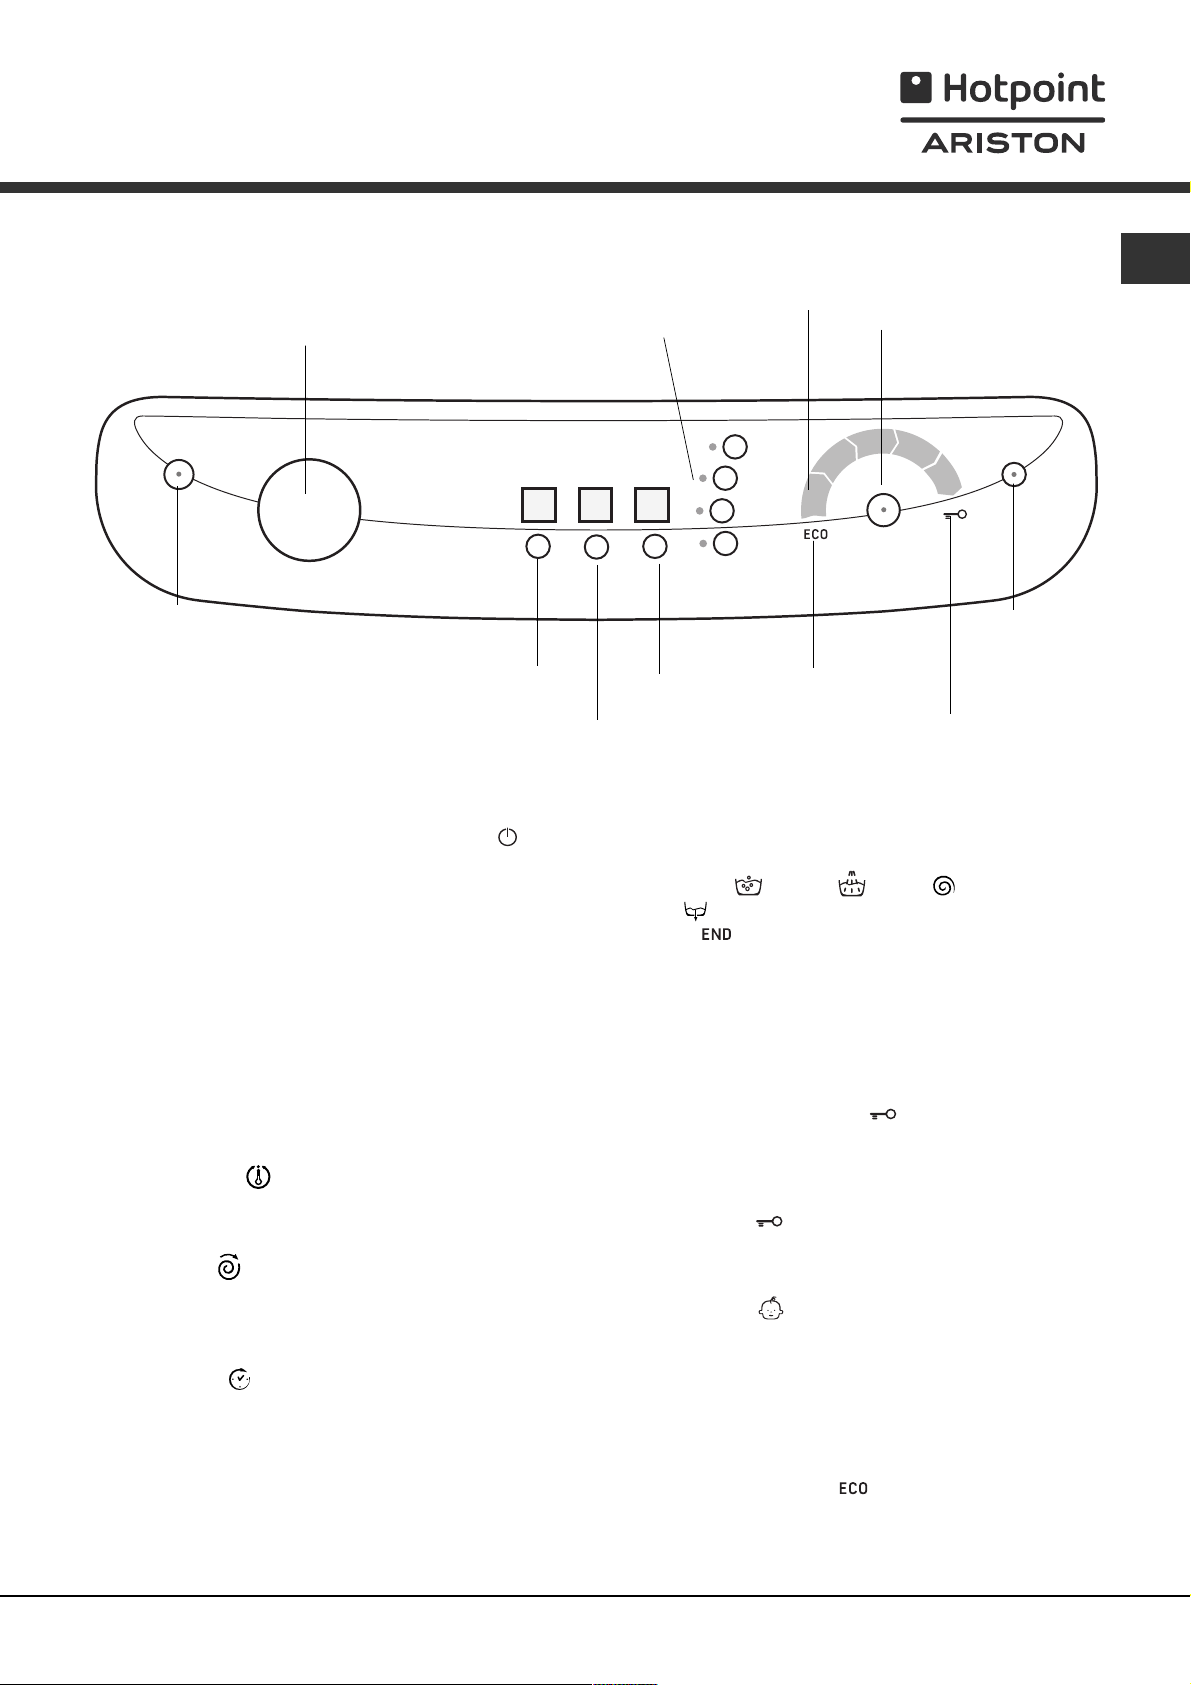
Control panel
GB
PROGRAMME
knob
ON-OFF/CANCEL
button with indicator light
TEMPERATURE
button
SPIN SPEED
ON-OFF/CANCEL button with indicator light :
press the button briefly to switch the machine on or
off. The green indicator light shows that the machine
is switched on. To switch the washing machine off
during a wash cycle, press and hold the button for
approximately 2 seconds; pressing the button quickly
or accidentally will not switch the machine off.
If the machine is switched off during a wash cycle,
the programme will be cancelled.
PROGRAMME knob: this can be rotated in both
directions. To set a more suitable programme, please
refer to the Table of Programmes.
The knob is locked into position during the wash cycle.
TEMPERATURE
button: press this button to
adjust the temperature; the value will be identified by
the display above (see Running a wash cycle).
SPIN SPEED
button: press this button to adjust
the spin value or to exclude this part of the
programme; the value will be identified by the display
above (see Running a wash cycle).
DELAY TIMER
button: press to set a delayed start
time for the selected programme; the delay time will
be identified by the display above (see Running a wash
cycle).
OPTION buttons and indicator lights: may be used to
select any of the available options. The indicator light
corresponding to the selected option will remain lit
(see Running a wash cycle).
OPTION
buttons and
indicator lights
button
WASH CYCLE PHASE icons: these light up to
provide an indication of the progress of the wash
cycle (Wash
phase
The text
START/PAUSE button with indicator light: when the
green indicator light flashes slowly, press the button to
start the wash cycle. When the cycle has started, the
indicator light is illuminated in a fixed manner. To
pause the wash cycle, press the button again; the
indicator light will turn orange and begin to flash
again. If the Door Locked
the porthole door may be opened.
To restart the wash cycle from the point at which it
was interrupted, press the button again.
DOOR LOCK
the porthole door is locked. To open the door, pause
the wash cycle (see following page).
CHILD LOCK
used to enable or disable the Child lock function, by
pressing the button for approximately 2 seconds.
When the indicator light is illuminated, the control
panel is locked. This avoids accidental changes being
made to the wash cycles, especially where children
are at home.
ECO indicator light: the
electricity saving reaches at least 10% (this can be
achieved by adjusting the wash cycle settings).
DELAY
TIMER
button
).
WASH
CYCLE
PHASE
icons
ECO
indicator
light
START/PAUSE
button with indicator light
CHILD LOCK
button and indicator
DOOR
light
LOCK
indicator light
- Rinse - Spin - Final draining
lights up when the cycle has finished.
indicator light is off,
indicator light: this indicates that
button and indicator light: this is
icon lights up when the
5
Page 6

Running a wash cycle
NOTE: the first time you use the washing machine,
GB
add detergent and run an empty 90°C cotton wash
cycle without the pre-wash phase.
1. SWITCH ON THE MACHINE. Press the
button. All the indicator lights will illuminate for 1
second, after which the light corresponding to the
button will remain lit constantly, while the
START/PAUSE indicator light will flash slowly.
2. LOAD THE LAUNDRY. Open the porthole door.
Load the laundry, making sure that the maximum
load quantity indicated in the table of programmes
(below) is not exceeded.
3. MEASURE OUT THE DETERGENT. Pull out the
drawer and pour the detergent into the relevant
compartments as described in Description of the
machine.
4. CLOSE THE PORTHOLE DOOR.
5. CHOOSE THE PROGRAMME. Turn the
PROGRAMME knob left or right to select the
required programme, to which a set temperature
and spin speed are linked (these values may all be
modified).
6. PERSONALISE THE WASH CYCLE. Use the
relevant buttons on the control panel:
Modify the temperature and/or the
spin speed. The machine automatically selects
the temperature and the maximum spin speed for
the programme set and these values may not be
increased. By pressing the
rature can be progressively reduced or even set to
cold wash (
spin speed can be progressively reduced or even
eliminated altogether (
pressed again the maximum values are restored.
). By pressing the button, the
button, the tempe-
). If the buttons are
Exception: if the WITHE COTTON programme is
selected, the temperature can be increased up to
a value of 90°C.
Setting a delayed start.
To set a delayed start for the selected programme,
press the button repeatedly until the desired delay
time is displayed (this may be between 1 hour and
24 hours).
To disable the function press the button until the
text
N.B.: Once the button START/PAUSE has been
pressed, the delay time may only be decreased.
is displayed.
Modify the cycle caracteristics.
Press the OPTION buttons to personalise the wash
cycle according to your own requirements.
Press the button to activate the option; the
corresponding indicator light will illuminate.
Press the button again to deactivate the option;
the indicator light will switch off.
If the selected option is not compatible with the
set programme, the indicator light will flash and the
option will not be activated.
If the selected option is not compatible with
another previously selected option, the indicator
light corresponding to the first option will flash and
only the second option will be activated (the
corresponding indicator light will remain lit in a fixed
manner).
7. START THE PROGRAMME. Press the START/
PAUSE button. The corresponding indicator light
remains lit in a fixed manner and the porthole door
locks (the DOOR LOCK indicator light illuminates).
The icons corresponding to the different wash
phases will light up during the cycle, indicating the
progress. To change a programme while a cycle is
in progress, pause the washing machine by
pressing the START/PAUSE button; then select the
desired cycle and press the START/PAUSE button
again.
To open the door while a cycle is in progress press
the START/PAUSE button; if the DOOR LOCK
indicator light switches off it is possible to open the
door. Press the START/PAUSE button again to
restart the programme from the point at which it
was interrupted.
8. PROGRAMME END. The text END lights up to
indicate that the programme has ended. The
porthole door may be opened immediately. If the
START/PAUSE button flashes, press the button to
end the cycle. open the door, unload the laundry
and switch off the machine.
If you wish to cancel a cycle that has already
begun, press and hold the button. The cycle will be
stopped and the machine will switch off.
BAG FOR QUILTS, CURTAINS AND DELICATE
GARMENTS
Hotpoint/Ariston has made it easier for you to wash
even the most valuable and delicate garments in
complete confidence thanks to the special bag which
protects the laundry (this is supplied with the
machine).
We recommend that the bag is used every time you
wash quilts and padded items with an outer layer
made using synthetic material.
6
Page 7
Programmes and options
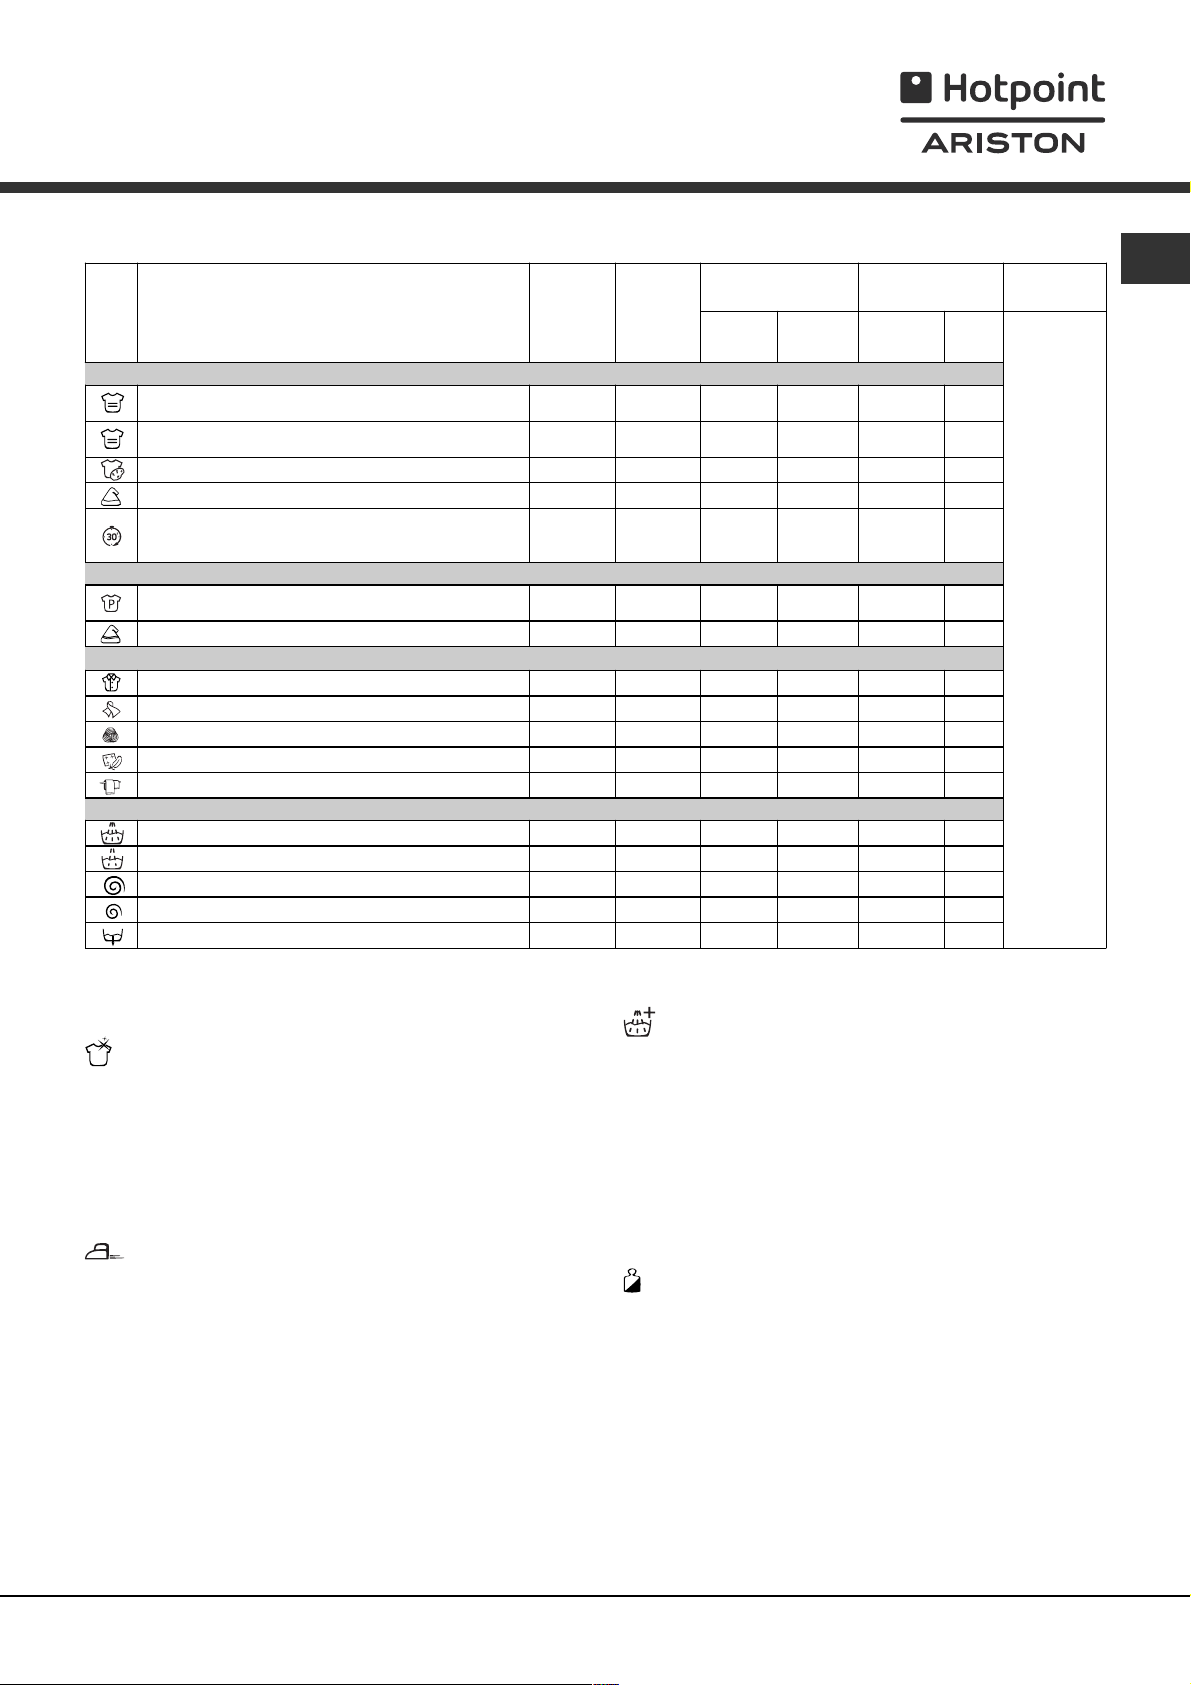
Table of Programmes
l
l
Maximum load
Normal
94
94
94
42
3.5 1.5
94
42
21
21
21
31, 5
94
94
42
Icon Programme description
Everyday programmes
WHITE COTTON
WHITE COTTON:
colours
.
COLOURED COTTON
DELICATE SYNTH ETICS
MIX 30': Refreshes lightly soiled garments quickly (not
recommended for wool, silk or clothes that should be
washed by hand).
Vigorous programmes
PRE-WASH: Removes stubborn stains.
(Add detergent to the relevant compartment).
DURABLE SYNTH ETICS
Special programmes
SHIRTS
SILK: Washes silk and garments and lingerie.
WOOL: Washes wool, cas hmere, etc.
DUVETS: Washes garments filled with goose down.
WEEKLY WASH: Washes bathroom laundry and bedlinen.
Partial programmes
Durable rinse - 1600 -
Delicate rinse - 800 -
Durable spin - 1600 - - 94
Delicate spin - 800 - - 42
Drain - 0 - - 94
Heavily soiled whites and delicate
Max.
tempera-
ture (°C)
60°
(Max 90°)
40° 1600
40° 1600
40° 800
30° 800
90° 1600
60° 800
40° 600
30° 0
40° 600
30° 1200
60° 1600
Max.
spin
speed
(r.p.m.)
1600
Detergent
Was hing
Fabric
softener
ll
ll
ll
ll
ll
ll
ll
ll
ll
ll
ll
ll
The information contained in the table is purely indicative.
(kg)
Using
Mini
load
Cycle
GB
duration
The wash cycle duration can be viewed on the display.
Wash options
Super Wash
This option guarantees a high-performance wash,
thanks to the use of a greater quantity of water
during the initial phase of the cycle and a longer
overall duration of the programme.
It is not compatible with the MIX 30, Silk,
Wool, Duvets and Partial programmes.
Easy Iron
If this option is selected, the wash and spin phases
will be adjusted accordingly so that fabric creasing is
reduced. At the end of the cycle the drum of the
washing machine will spin slowly; the Easy Iron and
START/PAUSE indicator lights will flash. To end the
cycle, press the START/PAUSE button or the Easy
Iron button.
When using the Silk programme, the machine will
end the cycle while the laundry is soaking and the
Easy Iron indicator light will flash. To drain the water
so that the laundry can be removed, press the
START/PAUSE button or the Easy Iron button.
This option is not compatible with the Wool, Durable
Spin, Delicate Spin and Draining programmes.
Extra Rinse
This programme increases the efficiency of the rinse
phase and ensures that a greater amount of detergent
is removed. It is particularly recommended for skin types
that are sensitive to detergents. We recommend this
programme is used when the washing machine is full or
when a large amount of detergent has been used.
This option is not compatible with the MIX 30,
Durable Spin, Delicate Spin and Draining
programmes.
Mini load
This function should be used when the amount of
laundry is half, or less than half, of the maximum
recommended load (see Table of Programmes).
This option is not compatible with the Durable
Spin, Delicate Spin and Draining programmes.
7
Page 8
Detergents and laundry
Detergent
GB
The type and quantity of detergent used depends on
the type of fabric (cotton, wool, silk...), its colour, the
temperature of the wash, the level of soiling and the
hardness of the water in the area.
Measuring out the detergent carefully will avoid
accidental spills and help to protect the environment:
although they may be biodegradable, detergents
contain elements that alter the balance of nature.
We recommend:
the use of powder detergents for white cotton
garments and for pre-wash phases;
the use of liquid detergents for delicate cotton
garments and for all programmes which run at a
low temperature;
the use of liquid detergents for wool and silk.
Do not use detergents when washing garments by
hand, because they create too much foam.
The detergent must be measured out into the relevant
compartment, or into the detergent dosing ball which will be
placed directly into the drum of the machine. In this case
the Cotton cycle with pre-wash phase may not be selected.
Wool: Hotpoint/Ariston is the only washing machine to
have obtained the prestigious Woolmark Platinum Care
mark of recognition (M.0508) from The Woolmark
Company, which certifies the machine washing of all
woollen garments, even those whose label states hand
wash only
you complete peace of mind when washing all woollen
garments, with great performance guaranteed every time.
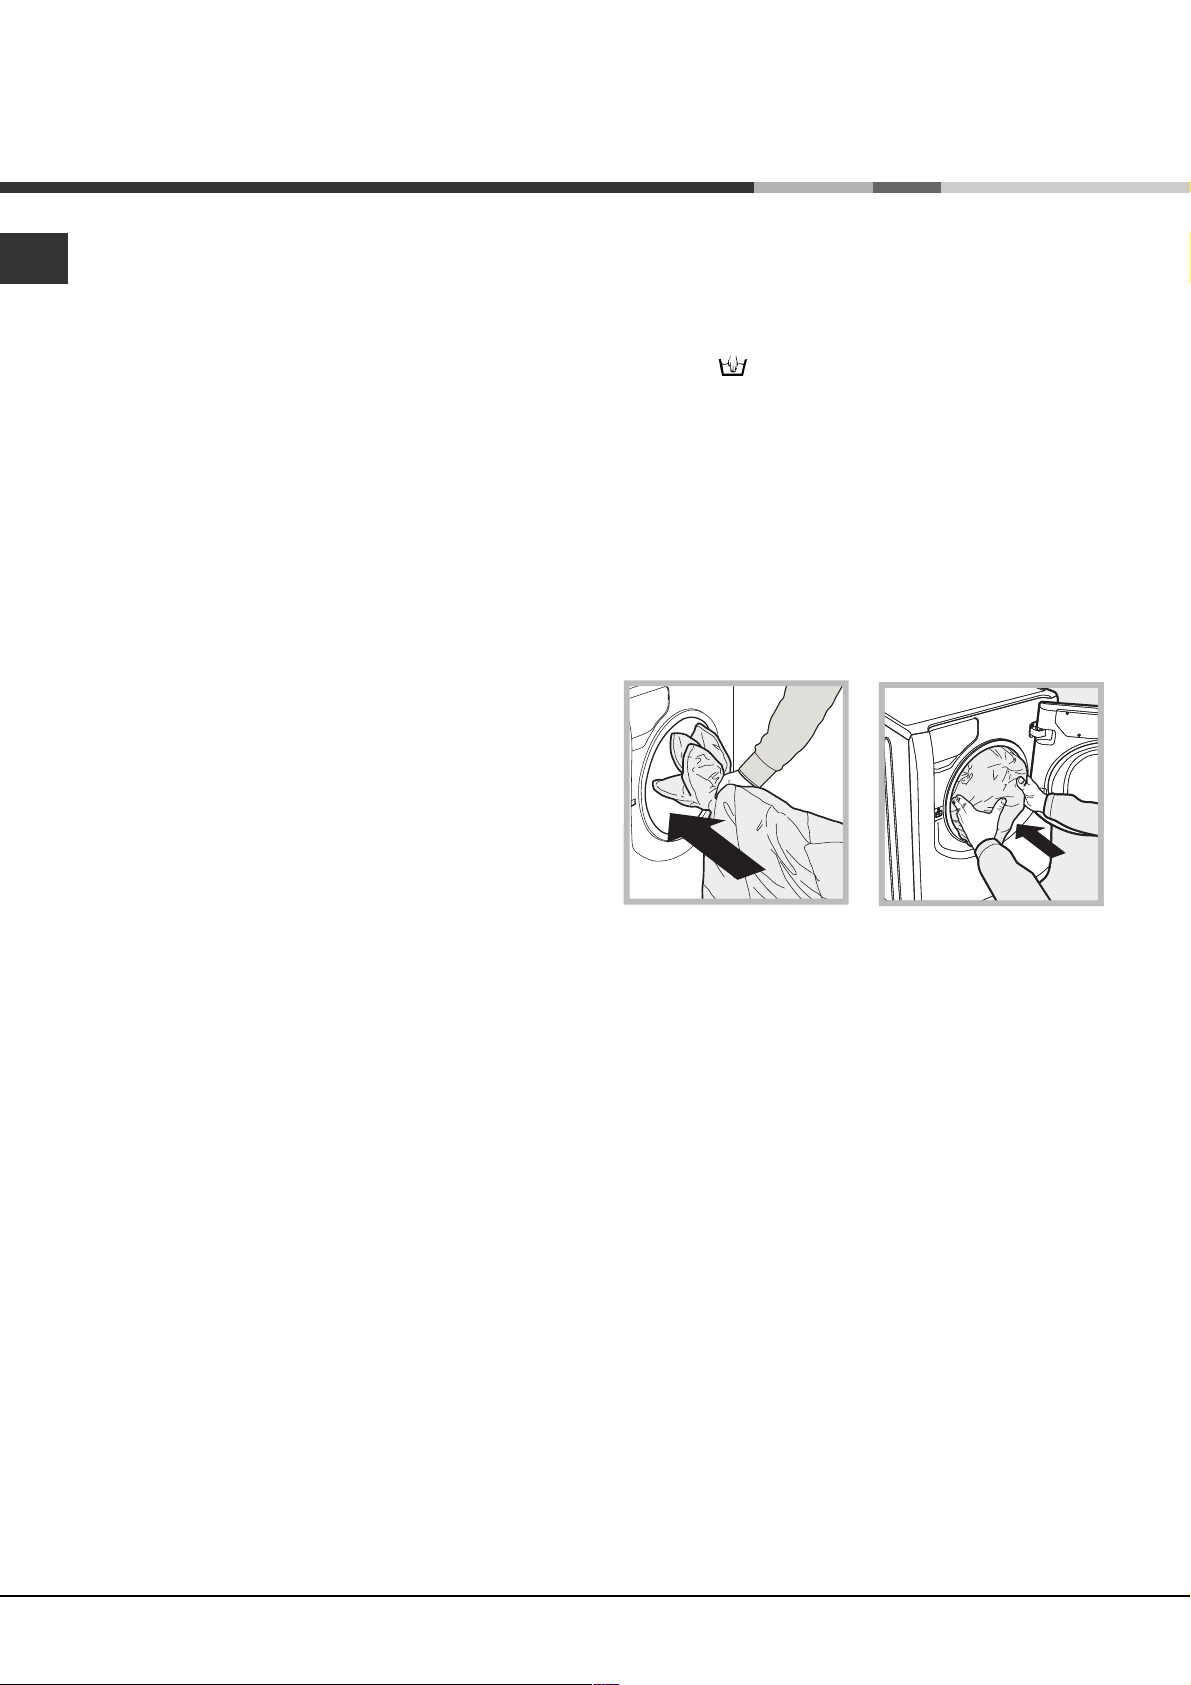
Duvets: to wash double or single duvets (the weight of
which should not exceed 3 kg), cushions or clothes
padded with goose down such as puffa jackets, use the
special "Duvets" programme. We recommend that
duvets are placed in the drum with their edges folded
inwards (see figure) and that no more than ¾ of the
total volume of the drum is used.
To achieve the best results, we recommend that a
liquid detergent is used in conjunction with the
detergent dispenser drawer.
. The Wool programme therefore offers
Preparing the laundry
Unfold all items of laundry before placing them in the
machine.
Divide the laundry according to type of material (the
symbol on the garment label) and colour, making sure
that whites are separated from coloured garments.
Empty all pockets and check for loose buttons.
Do not exceed the values indicated in the Table of
Programmes, which refer to the weight of the
laundry items when they are dry.
How much does your laundry weigh?
1 sheet 400 - 500 g
1 pillowcase 150 - 200 g
1 tablecloth 400 - 500 g
1 bathrobe 900 - 1200 g
1 towel 150 - 250 g
1 pair of jeans 400 - 500 g
1 shirt 150 - 200 g
Washing advice
Shirts: use a suitable programme to wash shirts made
from different fabrics and in different colours. This will
guarantee that these garments are looked after properly.
Silk: use the relevant programme designed for all silk
garments. We recommend the use of a special
detergent for delicate garments.
Curtains: these should be folded and placed inside
the bag provided. Use the "Silk" programme.
Quilts: to wash quilts with a synthetic outer layer,
use the bag provided and set the programme to
"Duvets".
Bathroom laundry and bedlinen: this washing
machine can be used to wash any domestic laundry
in a single cycle called Bed & Bath that optimises
the use of fabric softener while saving both time and
electricity. We recommend that you use a powder
detergent.
Stubborn stains: stubborn stains should be treated
with solid soap before the garment is washed (use the
Cotton programme with pre-wash phase).
Load-balancing system
Before every spin cycle, to avoid excessive vibrations
and to distribute the load in a uniform manner, the
drum rotates continuously at a speed which is slightly
faster than the normal washing speed. If, after several
attempts, the load is still not evenly distributed, the
machine spins at a lower speed than the set
frequency. If the load is excessively unbalanced, the
washing machine continues at distribution speed only
instead of the full spin speed.In order to achieve
better load distribution and balance, we recommend
that large and small garments are mixed when placing
the laundry in the machine.
8
Page 9
Precautions and tips
This machine was designed and manufactured in
compliance with cuurent international safety
standards. The following advice is provided for safety
reasons and should be read carefully.
General safety
This appliance was designed for domestic use
inside the home and is not intended for commercial
or industrial use.
The washing machine must be used by adults only,
in accordance with the instructions provided in this
booklet.
Do not touch the machine when barefoot or with
wet or damp hands or feet.
When unplugging the appliance, always pull the
plug from the mains socket; do not pull on the
cable.
Do not touch the drained water as it may reach
extremely high temperatures.
Never force the porthole door: doing so may
damage the safety lock mechanism designed to
prevent the door being opened accidentally.
If the appliance breaks down, under no
circumatances must you attempt to carry out the
repairs yourself.
Keep children well away from the machine while it
is in operation.
If the machine must be moved, work in a group of
two or three people and handle it very carefully.
Never attempt to move the appliance without the
help of another person, because it is extremely
heavy.
Make sure that the drum is empty before loading
laundry into the appliance.
Disposal
Opening the door manually
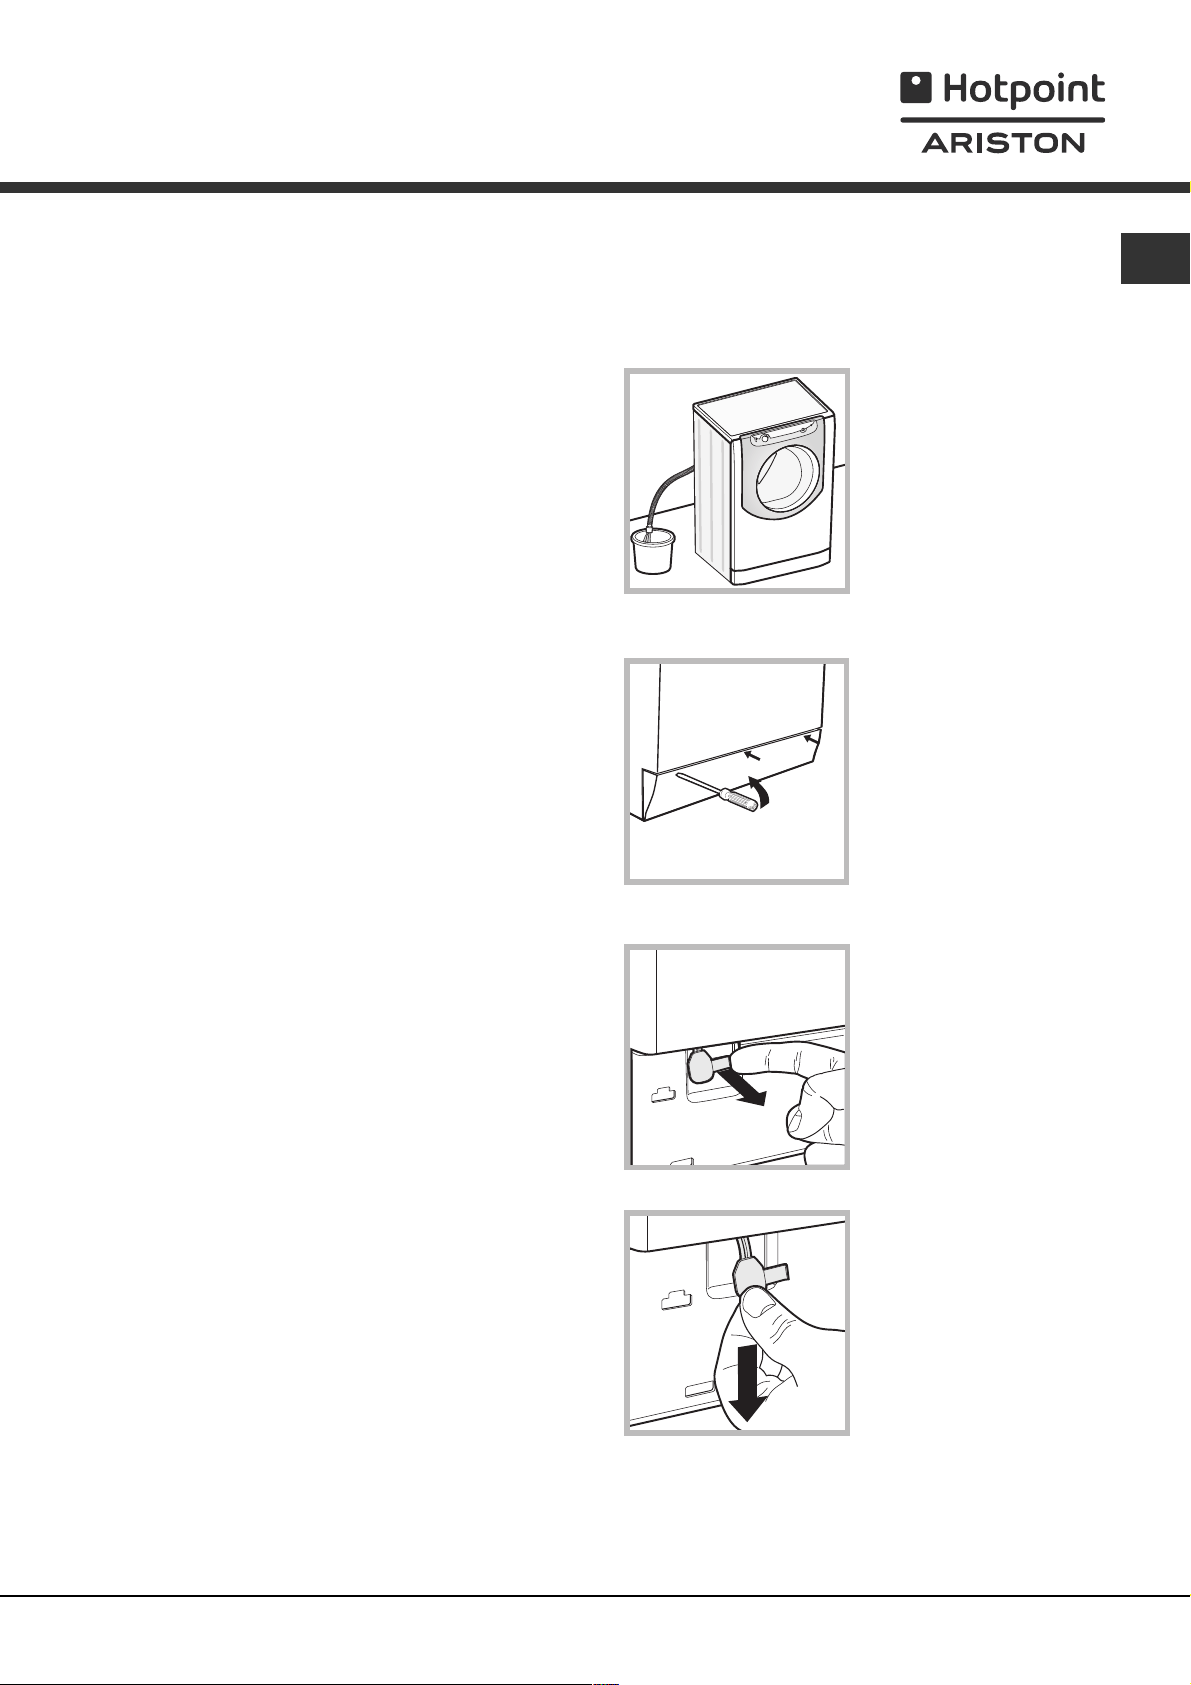
If it is not possible to open the porthole door due to a
powercut and you wish to hang out the laundry,
proceed as follows:
1. Remove the plug from
the electricity socket;
2. Make sure that the
water level inside the
20
machine is lower than the
door opening; if this is not
the case remove excess
water using the water
outlet hose, collecting it in
a bucket as shown in the
figure;
3. Remove the covering
panel on the front of the
washing machine using a
screwdriver (see figure);
4. Using the tab shown in
the figure, pull outwards
until the plastic brace
comes away; pull it
downwards until you hear
a click, which indicates
that the door is unlocked;
GB
When disposing of the packaging material: observe
local legislation so that the packaging may be reused.
The European Directive 2002/96/EC relating to
Waste Electrical and Electronic Equipment states
that household appliances should not be disposed
of using the normal solid urban waste cycle.
Exhausted appliances should be collected
separately in order to optimise the cost of re-using
and recycling the materials inside the machine,
while preventing potential damage to the
atmosphere and to public health. The crossed-out
dustbin is marked on all products to remind the
owner of their obligations regarding separated
waste collection.
For more information relating to the correct
disposal of household appliances, owners should
contact their local authorities or appliance dealer.
5. Open the door; if this is
still not possible, repeat
the process;
6. Replace the kick strip, making sure that the hooks
are positioned in the right slots before pushing the
panel towards the machine.
9
Page 10
Care and maintenance
Turning off the water and electricity
GB
supplies
Turn off the water tap after every wash. This limits
wear and tear on the machines water supply and
prevents leaks.
Disconnect the appliance from the electricity supply
before cleaning it and before performing any
maintenance work on it.
Cleaning the machine
The exterior of the appliance and all rubber parts may
be cleaned using a cloth soaked in warm soapy
water. Do not use solvents or abrasive products.
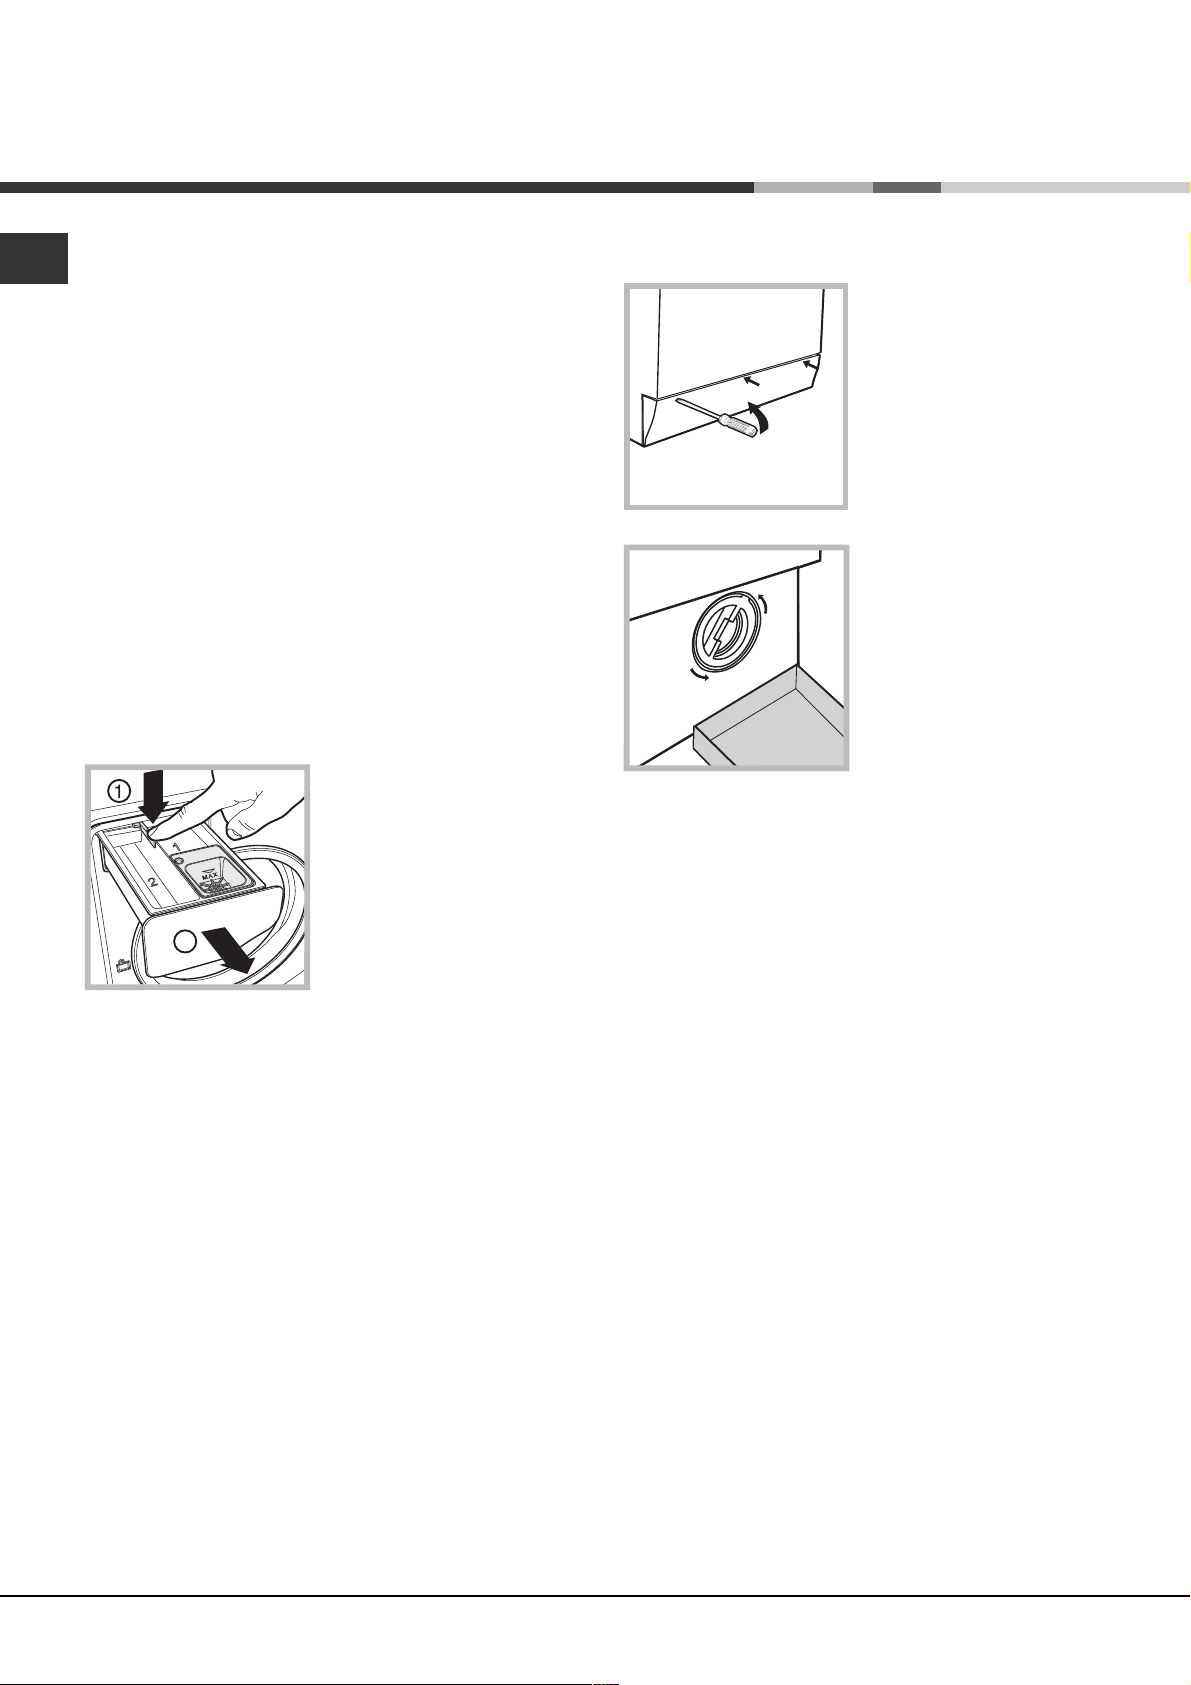
Cleaning the detergent dispenser
drawer
To remove the drawer,
press the lever (1) and pull
it outwards (2) (see
figure).
Wash the drawer under
running water; this should
be done regularly.
To access the pre-chamber:
1. Remove the kick strip
on the front of the
machine using a
screwdriver (see figure);
2. Position a container
collecting the drained
water (approximately 1.5 l)
correctly (see figure);
3. Unscrew the cover,
turning it in an
anticlockwise direction
(see figure);
4. Clean the inside thoroughly;
5. Screw the cover back on;
6. Replace the kick strip, making sure that the hooks
are positioned in the right slots before pushing the
panel towards the machine.
Drum maintenance
Always leave the porthole door ajar to prevent
unpleasant odours from forming.
Cleaning the pump
The washing machine is fitted with a self-cleaning
pump which does not require regular maintenance.
However, it may be that small objects (coins, buttons,
etc.) fall into the pre-chamber that protects the pump
(the pump is located in the lower part of this prechamber).
Make sure that the wash cycle has finished and
remove the plug from the socket.
Checking the water inlet hose
Check the water inlet hose at least once a year. If
there are any cracks, replace it immediately: the high
water pressure used by the wash cycles could cause
a cracked hose to split open.
10
Page 11

Troubleshooting
From time to time your machine may not operate as it should. Before calling for Assistance (see Assistance),
make sure that the problem cannot be resolved easily using the following list.
Malfunction:
The washing machine
will not switch on.
The wash cycle
does not begin.
The washing machines fails to
fill with water.
The machine continuously fills
and drains water.
Possible causes / Solutions:
The plug has not been inserted into the electrical socket, or it has not
been inserted far enough to make contact.
There is no power in the house.
The porthole door has not been shut properly.
The START/PAUSE button has not been pressed.
The water tap has not been turned on.
The water inlet hose is not connected to the tap.
The hose is kinked.
The water tap has not been turned on.
There is no water in the house.
The water pressure is insufficient.
The START/PAUSE button has not been pressed.
The end of the outlet hose has not been fitted at a height between 65
and 100 cm from the floor (see Installation).
The free end of the hose is underwater (see Installation).
If If the dwelling is on one of the upper floors of a building, there may be
problems relating to water drainage, causing the washing machine to
load and drain water continuously. Special anti-draining valves are
available in shops and help to avoid this inconvenience.
The water drainage systemis not fitted with a breather pipe.
GB
The machine does not drain
or spin.
The washing machine vibrates
too much during the spin cycle.
The washing machine leaks.
The icons corresponding to the
Phase in progress flash
rapidly at the same time as the
ON/OFF indicator light.
There is too much foam.
The programme does not include a draining phase: some programmes
require manual draining (see Programmes and options).
The Easy Iron option is enabled: to complete the programme, press the
START/PAUSE button (see Programmes and options).
The outlet hose is bent (see Installation).
The drainage duct is clogged.
The drum was not unlocked properly when the appliance was installed
(see Installation).
The washing machine is not level (see Installation).
The washing machine is trapped between cabinets and a wall (see Installation).
The load is not balanced properly (see Description of the machine).
The water inlet hose is not screwed on to the tap correctly (see Installation).
The detergent dispenser drawer is blocked (for instructions on how to
clean it, see Care and maintenance).
The outlet hose has not been secured properly (see Installation).
Switch off the machine and unplug the appliance; wait for approximately
1 minute then switch it on again.
If the problem persists, contact Assistance.
The detergent is not designed for machine washing (the packaging
should state that the product is for washing by machine, for washing
by hand or machine or similar).
Too much detergent was used.
The washing machine door
remains locked.
Follow the manual unlocking procedure (see Precautions and tips).
If the problem persists after the above checks have been carried out, shut
off the water tap, switch off the machine and contact Assistance.
11
Page 12

Assistance
Before contacting Assistance:
GB
Check whether you can resolve the problem on your own (see Troubleshooting);
Restart the programme to check whether the problem has been overcome;
If this is not the case, contact the Authorised Technical Assistance Centre.
If the machine has been installed or used incorrectly, you may be charged for the maintenance callout service.
Never use the services of an unauthorised technician.
Have the following information ready:
The type of problem experienced;
The appliance model (Mod.);
The serial number (S/N).
This information can be found on the appliance data plate.
12
Page 13

Mode demploi
LAVE-LINGE
F
Français
AQUALTIS
AQXGF 169
Sommaire
Installation, 14-15
Déballage et mise à niveau
Raccordements eau et électricité
Caractéristiques techniques
Description de lappareil, 16-17
Tableau de bord
Comment faire un cycle de lavage, 18
Programmes et options, 19
Tableau des programmes
Les options de lavage
Produits lessiviels et linge, 20
Lessive
Triage du linge
Conseils de lavage
Système déquilibrage de la charge
Précautions et conseils, 21
Sécurité générale
Mise au rebut
Ouverture manuelle de la porte hublot
F
Entretien et soin, 22
Coupure de larrivée deau et de courant
Nettoyage de lappareil
Nettoyage du tiroir à produits lessiviels
Entretien du tambour
Nettoyage de la pompe
Contrôle du tuyau darrivée de leau
Anomalies et remèdes, 23
Assistance, 24
13
Page 14
Installation
Conserver ce mode demploi pour pouvoir le
F
consulter à tout moment. En cas de vente, de
cession ou de déménagement, veiller à ce quil
accompagne toujours le lave-linge.
Lire attentivement les instructions: elles fournissent
des conseils importants sur linstallation, lutilisation et
la sécurité de lappareil.
Cette notice, la garantie et les pièces servant à
linstallation sont réunies dans un sachet.
Déballage et mise à niveau
Déballage
1. Sitôt le lave-linge déballé, sassurer quil na pas
été endommagé pendant son transport.
Sil est abîmé, ne pas le raccorder et contacter
aussitôt le vendeur.
2. Enlever les quatre vis
de protection pour le
transport et la cale,
placés dans la partie
arrière (voir figure).
3. Boucher les trous à laide des bouchons plastique
fournis dans le sachet.
4. Ces pièces sont à conserver car il faut les
remonter en cas de déplacement du lave-linge pour
éviter dendommager lintérieur de lappareil pendant
le transport.
Si lappareil est posé sur de la moquette ou un
tapis, agir sur les pieds de réglage de manière à ce
quil y ait suffisamment de place pour assurer une
bonne ventilation.
Raccordements eau et électricité
Raccordement du tuyau darrivée de leau
Avant de raccorder le tuyau darrivée de leau, laisser couler
leau jusquà ce quelle soit limpide.
1. Raccorder le tuyau
darrivée de leau à
lappareil en le vissant à
la prise deau prévue,
dans la partie arrière en
haut à droite (voir figure).
2. Monter le joint A,
fourni dans le sachet, sur
lextrémité du tuyau
darrivée de leau et le
A
3. Attention à ce que le tuyau ne soit pas plié ou écrasé.
visser à un robinet deau
froide à embout fileté 3/4
gaz (voir figure).
Les emballages ne sont pas des jouets pour enfants.
Mise à niveau
1. Poser le lave-linge sur un sol plat et rigide, sans
ladosser à un mur ou à un meuble.
2. Pour compenser les
irrégularités du sol, visser
ou dévisser les pieds de
réglage jusquà ce que
lappareil soit
parfaitement à
lhorizontale (il ne doit
pas être incliné de plus
de 2 degrés).
Une mise à niveau minutieuse garantit une bonne
stabilité de lappareil et évite toute vibration et bruit
surtout pendant lessorage.
14
La pression de leau doit être comprise entre les
valeurs indiquées dans le tableau des
Caractéristiques techniques (voir page ci-contre).
Si la longueur du tuyau dalimentation ne suffit pas,
sadresser à un magasin spécialisé ou à un
technicien agréé.
Ne jamais utiliser de tuyaux darrivée usés mais
uniquement ceux fournis avec lappareil.
Page 15
Raccordement du tuyau de vidange
Raccorder le tuyau de
vidange à un conduit
dévacuation ou à une
évacuation murale
placés à une distance du
65 - 100 cm
sol comprise entre 65 et
100 cm en évitant à
tout prix de le plier.
Autrement, accrocher le
tuyau de vidange à un
évier ou à une baignoire,
dans ce cas, fixer le
support plastique fourni
avec lappareil au
robinet (voir figure).
Lextrémité libre du tuyau
de vidange ne doit pas
être plongée dans leau.
Lutilisation dun tuyau de rallonge est absolument
déconseillée mais si on ne peut faire autrement, il
faut absolument quil ait le même diamètre que le
tuyau original et sa longueur ne doit pas dépasser
150 cm.
Branchement électrique
Nutiliser ni rallonges ni prises multiples.
Le câble ne doit être ni plié ni trop écrasé.
Le câble dalimentation et la fiche ne doivent être
remplacés que par des techniciens agréés.
Attention! Nous déclinons toute responsabilité en cas
de non-respect des normes énumérées ci-dessus.
Caractéristiques techniques
F
Avant de brancher la fiche dans la prise de courant,
contrôler que:
la prise est bien reliée à la terre et est conforme
aux normes;
la prise est bien apte à supporter la puissance
maximale de lappareil indiquée dans le tableau des
Caractéristiques techniques (voir ci-contre);
la tension dalimentation est bien comprise entre
les valeurs figurant dans le tableau des
Caractéristiques techniques (voir ci-contre);
la prise est bien compatible avec la fiche de
lappareil. Autrement, remplacer la prise ou la
fiche.
Cet appareil ne doit pas être installé à lextérieur,
même à labri, car il est très dangereux de le laisser
exposé à la pluie et aux orages.
Après installation de lappareil, la prise de courant
doit être facilement accessible.
Modèle
Dimensions
Capacité
Raccordements
électriques
Raccordements
hydrauliques
Vitesse
d'essorage
Programmes de
contrôle selon la
norme EN 60456
AQXGF 169
largeur 59,5 cm
hauteur 85 cm
profondeur 64,5 cm
de 1 à 9 kg
voir la plaque signalétique appliquée
sur la machine
pression maximale 1 MPa (10 bar)
pression minimale 0,05 MPa (0,5 bar)
capacité du tambour 62 litres
jusqu'à 1600 tours minute
programme Coton Blanc;
température 60°C;
effectué avec une charge de 9 kg.
Cet appareil est conforme aux
Directives Communautaires suivantes:
- 89/336/CEE du 03/05/89
(Compatibilité électromagnétique) et
modifications suivantes
- 2002/96/CE
- 2006/95/CE (Basse Tension)
15
Page 16

Description de lappareil
F
PORTE HUBLOT
POIGNEE PORTE
HUBLOT
SOCLE
PIEDS REGLABLES
TABLEAU DE
BORD
PORTE HUBLOT
20
Pour ouvrir la porte, se
servir de la poignée
prévue (voir figure).
TIROIR A PRODUITS LESSIVIELS
Il est situé à lintérieur de
lappareil et il faut ouvrir la
porte pour y accéder.
Pour le dosage des
produits lessiviels, consulter
le chapitre Produits
lessiviels et linge.
1. bac à produit de
prélavage: utiliser de la
lessive en poudre.
1
2
bac à additifs: pour assouplissant ou additifs
liquides. Il est recommandé de ne jamais dépasser le
niveau maximal indiqué par la grille et de diluer des
assouplissants concentrés.
2. bac à produit de lavage:
utiliser de la lessive en
poudre ou liquide. Dans ce
dernier cas, il est
recommandé de le verser
juste avant de démarrer le
lavage.
16
Page 17

Tableau de bord
F
Touches et Voyants
Bouton
PROGRAMMES
Touche avec voyant
MARCHE/ARRET et
ANNULATION
TEMPÉRATURE
Bouton
Touche
ESSORAGE
Touche avec voyant MARCHE ARRET et
ANNULATION: appuyer brièvement sur la touche
pour allumer ou éteindre lappareil. Le témoin vert
indique que lappareil est sous tension. Pour éteindre
le lave-linge en cours de lavage, appuyer sur la
touche pendant au moins 2 secondes de suite; une
pression brève ou accidentelle nentraîne pas larrêt
de lappareil.
Larrêt de lappareil pendant un lavage annule le
lavage en cours.
Bouton PROGRAMMES: il peut tourner dans les
deux sens. Pour sélectionner le programme plus
adapté, consulter le Tableau des programmes.
Pendant le lavage, le bouton reste fixe.
Icônes
OPTIONS
DE LAVAGE
Touche
DÉPART
DIFFÉRÉ
PHASES
Voyant
ECO
VERROUILLEE
Touche avec voyant
MISE EN MARCHE/
PAUSE
Voyant
PORTE
Icônes PHASES DE LAVAGE: elles sallument pour
indiquer le stade davancement du cycle (Lavage
- Rinçage - Essorage Vidange finale ).
Linscription sallume quand le cycle est terminé.
Touche avec voyant MISE EN MARCHE/PAUSE:
quand le voyant vert clignote lentement, appuyer sur la
touche pour démarrer un lavage. Une fois le cycle
lancé, le voyant passe à lallumage fixe. Pour activer
une pause de lavage, appuyer à nouveau sur la
touche; le voyant passe à lorange et se met à
clignoter. Si le voyant Porte verrouillée
on peut ouvrir la porte.
Pour faire redémarrer le lavage exactement à lendroit
de larrêt, appuyer une nouvelle fois sur la touche.
Touche et voyant
VERROUILLAGE
DES COMMANDES
est éteint,
Touche
TEMPÉRATURE: appuyer sur la touche
pour modifier la température; la valeur correspondante
est affichée à l'écran (voir Comment faire un cycle de
lavage).
Touche
ESSORAGE: appuyer sur la touche pour
régler ou supprimer lessorage; la valeur
correspondante est affichée à l'écran (voir Comment
faire un cycle de lavage).
Touche
DÉPART DIFFÉRÉ: appuyer sur la
touche pour sélectionner un départ différé du
programme choisi; le retard programmé est affichée à
l'écran (voir Comment faire un cycle de lavage).
Touches et Voyants OPTIONS: pour sélectionner les
options disponibles. Le voyant correspondant à
loption sélectionnée reste allumé (voir Comment
faire un cycle de lavage).
Voyant
PORTE VERROUILLEE: il indique que la
porte hublot est verrouillée. Pour pouvoir ouvrir la porte,
il faut activer une pause du cycle (voir page suivante).
Touche et voyant
VERROUILLAGE DES
COMMANDES: pour activer ou désactiver le
verrouillage des commandes, garder la touche
enfoncée pendant environ 2 secondes. Le voyant
allumé indique que le tableau de bord est verrouillé.
Ceci permet déviter toute modification involontaire des
programmes, surtout sil y a des enfants à la maison.
Voyant ECO: licône
sallume quand la
modification des paramètres de lavage permet
datteindre au moins 10% déconomie délectricité.
17
Page 18

Comment faire un cycle de
lavage
REMARQUE: lors de la première mise en service du
F
lave-linge, lancer un cycle de lavage à vide mais avec
du produit lessiviel en sélectionnant un programme
coton 90° sans prélavage.
1. METTRE LAPPAREIL SOUS TENSION.
Appuyer sur la touche
sallument pendant 1 seconde, après quoi le voyant
de la touche
MARCHE/PAUSE se mettra à clignoter lentement.
2. CHARGER LE LINGE. Ouvrir la porte hublot.
Charger le linge en faisant attention à ne pas
dépasser la quantité indiquée dans le tableau des
programmes de la page suivante.
3. DOSER LE PRODUIT LESSIVIEL. Sortir le tiroir
et placer le produit lessiviel dans les bacs
correspondants comme indiqué au paragraphe
Description de lappareil.
4. FERMER LA PORTE HUBLOT.
5. CHOISIR LE PROGRAMME. Tourner le
BOUTON PROGRAMMES vers la droite ou vers la
gauche pour sélectionner le programme désiré; il y
a attribution dune température et dune vitesse
dessorage qui peuvent être modifiées.
6. PERSONNALISER LE CYCLE DE LAVAGE. Agir
sur les touches correspondantes du tableau de bord:
Modifier la température et/ou lessorage.
Lappareil sélectionne automatiquement la
température et lessorage maximaux prévus pour
le programme sélectionné qui ne peuvent par
conséquent pas être augmentés. Par pression sur
la touche
température de lavage jusquà un lavage à froid
). Par pression sur la touche on peut diminuer
(
progressivement la vitesse dessorage jusquà sa
suppression totale (
touches ramènera les valeurs aux maximums prévus.
restera allumé au fixe et le voyant
on peut diminuer progressivement la
. Tous les voyants
). Une autre pression sur les
Exception: lors de la sélection du programme
Coton Blanc la température peut être augmentée
jusquà 90°.
Sélectionner un départ différé.
Pour programmer un départ différé du programme
sélectionné, appuyer plusieurs fois de suite sur la
touche jusqu'à ce que le retard désiré (de 1 à 24 h)
soit affiché.
Pour désactiver cette fonction, appuyer sur la
touche jusqu'à affichage du message
N.B.: Après pression sur la touche MISE EN
MARCHE/PAUSE le départ programmé ne peut être
modifié que pour être écourté.
Modifier les caractéristiques du cycle.
Appuyer sur les touches OPTIONS pour
personnaliser le lavage selon ses besoins.
Appuyer sur la touche pour activer loption; le
voyant correspondant sallume.
Appuyer une nouvelle fois sur la touche pour
désactiver loption; le voyant séteint.
Si loption sélectionnée est incompatible avec le
programme sélectionné, le croissant de lune se
met à clignoter et loption nest pas activée.
Si loption sélectionnée est incompatible avec
une autre option précédemment sélectionnée, le
voyant correspondant à la première option se met
à clignoter et seule la deuxième option est
activée, le voyant de la touche sallume au fixe.
7. DEMARRER LE PROGRAMME. Appuyer sur la
touche MISE EN MARCHE/PAUSE. Le voyant
correspondant sallume au fixe et la porte hublot
est verrouillée (voyant PORTE VERROUILLEE
allumé). Les icônes correspondant aux phases de
lavage sallument pendant le cycle pour indiquer la
phase en cours. Pour changer un programme
tandis quun cycle est en cours, activer une
pause du lave-linge par pression sur la touche
MISE EN MARCHE/PAUSE; sélectionner enfin le
cycle désiré et appuyer à nouveau sur la touche
MISE EN MARCHE/PAUSE.
Pour ouvrir la porte tandis quun cycle est en
cours, appuyer sur la touche MISE EN MARCHE/
PAUSE; si le voyant PORTE VERROUILLEE
est éteint, on peut ouvrir la porte. Pour faire
redémarrer le programme exactement à lendroit
de larrêt, appuyer une nouvelle fois sur la touche
MISE EN MARCHE/PAUSE.
8. FIN DU PROGRAMME. Elle est signalée par
linscription END allumée. La porte hublot peut
alors être ouverte aussitôt. Si le voyant MISE EN
MARCHE/PAUSE clignote, appuyer sur la touche
pour terminer le cycle. Ouvrir la porte, vider le
lave-linge et éteindre lappareil.
Une pression prolongée sur la touche permet
dannuler un cycle déjà lancé. Le cycle est
interrompu et lappareil séteint.
.
SACHET POUR EDREDONS, RIDEAUX ET
VETEMENTS DELICATS
Grâce au sachet spécial fourni avec l'appareil,
Hotpoint/Ariston vous permet de laver à la machine
même vos vêtements plus délicats et précieux en
assurant au maximum leur protection.
18
Nous recommandons en tout cas d'utiliser le sachet
pour le lavage d'édredons et de couettes avec
housse réalisée dans un matériau synthétique.
Page 19

Programmes et options
Tableau des programmes
Icône Description du Programme
Programmes pour tous les jours
COTON BLANC
COTON BLANC:
COTON COULEUR
SYNTHETIQUE DÉLICAT
MIX 30':
convient pas pour la laine, la soie et le linge à laver à la main).
Programmes énergiques
PRÉLAVAGE :
(Ajouter le produit lessiviel dans le bac prévu).
SYNTHETIQUE RÉSISTANT
Programmes spéciaux
CHEMISES
pour linge en soie, viscose, lingerie.
SOIE:
LAINE:
pour laine, cachemire, etc.
DUVETS:
LIT ET BAIN 7JOURS:
Programmes partiaux
Rinçage textiles résistants - 1600 Rinçage textiles délicats - 800 Essorage textiles résistants - 1600 - - 94
Essorage textiles délicats - 800 - - 42
Vidange - 0 - - 94
Blancs et couleurs délicates très sales.
pour rafraîchir rapidement du linge peu sale (ne
pour enlever les taches tenaces.
pour linge et vêtements en duvet d'oie.
pour le linge de lit et le linge de toilette.
Te m p .
maxi
(Maxi 90°)
Vitesse
maxI
(°C)
(tours
minute)
60°
40° 1600
40° 1600
40° 800
30° 800
90° 1600
60° 800
40° 600
30° 0
40° 600
30° 1200
60° 1600
1600
Produits
lessiviels
Lavage
Adoucis-
sant
ll
ll
ll
ll
ll
ll
ll
ll
ll
ll
ll
ll
l
l
Les données dans le tableau sont reprises à titre indicatif.
Charge maxi
Normal
94
94
94
42
3,5 1, 5
94
42
21
21
21
31, 5
94
94
42
(Kg)
Avec
charge
mini
F
Durée cycle
La durée du cycle de lavage peut être visualisée sur le display.
Options de lavage
Super Lavage
Grâce à lutilisation dune plus grande quantité deau
au cours de la phase initiale du cycle et à une durée
prolongée de ce dernier, cette option permet
dobtenir un lavage très performant.
Cette option nest pas activable avec les programmes
Mix 30, Soie, Laine, Duvets et Programmes partiaux.
Repassage facile
En cas de sélection de cette option, le lavage et
lessorage seront dûment modifiés pour réduire la
formation de plis. A la fin du cycle de lavage, le lavelinge fait tourner le tambour lentement; les voyants
Repassage facile et MISE EN MARCHE/PAUSE se
mettent à clignoter. Pour finir le cycle, appuyer sur la
touche MISE EN MARCHE/PAUSE ou sur la touche
Repassage facile.
Pour le programme Soie lappareil arrive au bout du
cycle en laissant le linge tremper, le voyant Repassage
facile clignote. Pour vidanger leau et pouvoir sortir le
linge, il faut appuyer sur la touche MISE EN MARCHE/
PAUSE ou sur la touche Repassage facile.
Cette option nest pas activable avec les
programmes Laine, Essorage textiles résistants,
Essorage textiles délicats et Vidange.
Rinçage Plus
La sélection de cette option permet daugmenter
lefficacité du rinçage et éliminer totalement toute
trace de lessive. Elle est très utile pour les personnes
particulièrement sensibles aux produits lessiviels. Son
utilisation est conseillée en cas de pleine charge ou
de doses élevées de produit lessiviel.
Cette option nest pas activable avec les
programmes Mix 30, Essorage textiles résistants,
Essorage textiles délicats et Vidange.
Charge mini
Cette fonction est conseillée quand la charge de linge
est inférieure ou égale à la moitié de la charge maxi.
conseillée (voir Tableau des programmes).
Cette option nest pas activable avec les
programmes Essorage textiles résistants, Essorage
textiles délicats et Vidange.
19
Page 20

Produits lessiviels et linge
Lessive
F
Le choix et la quantité de lessive dépendent du type
de textile (coton, laine, soie...), de la couleur, de la
température de lavage, du degré de salissure et de la
dureté de leau.
Bien doser la quantité de produit lessiviel évite des
gaspillages et protège lenvironnement: bien que
biodégradables, les produits lessiviels contiennent des
éléments qui altèrent léquilibre de la nature.
Il est conseillé de:
utiliser des lessives en poudre pour le linge en
coton blanc et pour le prélavage.
utiliser des lessives liquides pour linge délicat en coton
et pour tous les programmes basse température.
utiliser des lessives liquides délicates pour la laine et la soie.
Ne pas utiliser de lessives pour lavage à la main,
elles génèrent trop de mousse.
Le produit lessiviel doit être versé juste avant le démarrage
du lavage dans le bac prévu à cet effet ou dans la boule
doseuse directement dans le tambour. Dans ce cas, le
cycle Coton avec prélavage nest pas sélectionnable.
Laine: Hotpoint/Ariston est le seul lave-linge à avoir obtenu
le prestigieux label Woolmark Platinum Care (M.0508) délivré
par The Woolmark Company qui garantit le lavage à la
machine de tous les vêtements en laine, y compris ceux qui
portent létiquette lavage à la main uniquement
Grâce au programme Laine on peut donc laver à la
machine, en toute tranquillité, tous les vêtements en laine
avec des performances de lavage garanties.
Duvets: pour laver des articles avec garnissage en
duvet d'oie comme par exemple des couettes deux
places ou une place (poids maximal à ne pas
dépasser 3 kg), oreillers, anoraks, utiliser le
programme spécial "Duvets". Pour introduire les
duvets dans le tambour, nous recommandons de
replier les bords en dedans (voir figures) et de ne pas
occuper plus de ¾ du volume du tambour.
Pour un lavage optimal, nous recommandons
d'utiliser une lessive liquide à doser dans le tiroir à
produits lessiviels.
.
Triage du linge
Bien déplier le linge avant de l'introduire dans la
machine.
Trier le linge selon le type de textile (symbole sur
létiquette du vêtement) et la couleur en veillant à
bien séparer le linge couleur du linge blanc;
Vider les poches et contrôler les boutons;
Ne pas dépasser les valeurs indiquées dans le Tableau
des Programmes correspondant au poids de linge sec.
Combien le linge pèse-t-il ?
1 drap 400-500 g
1 taie doreiller 150-200 g
1 nappe 400-500 g
1 peignoir 900-1200 g
1 serviette de toilette 150-250 g
1 jeans 400-500 g
1 chemise 150-200 g
Conseils de lavage
Chemises: sélectionner le programme approprié au
lavage de chemises de textile et couleur différents. Il
en prendra le plus grand soin.
Soie: sélectionner le programme de lavage spécial
vêtements en soie. Il est conseillé dutiliser une
lessive spéciale pour linge délicat.
Rideaux: nous recommandons de les plier et de les
mettre dans le sachet fourni avec la machine. Utilisez le
programme "Soie".
Edredons: pour laver les édredons avec housse
synthétique, utilisez le sachet spécial fourni avec la
machine et sélectionnez le programme "Duvets".
Linge de toilette et de lit: ce lave-linge permet de
laver tout le linge de maison de la semaine en un seul
cycle Lit et Bain qui optimise lutilisation de
lassouplissant et permet de faire des économies de
temps et délectricité. Nous conseillons dutiliser de la
lessive en poudre.
Taches tenaces: mieux vaut traiter les taches tenaces
avec du savon solide avant le lavage et sélectionner
ensuite le programme Coton avec Prélavage.
Système déquilibrage de la charge
Avant tout essorage, pour éviter toute vibration excessive
et répartir le linge de façon uniforme, le lave-linge fait
tourner le tambour à une vitesse légèrement supérieure à
la vitesse de lavage. Si au bout de plusieurs tentatives, la
charge nest toujours pas correctement équilibrée,
lappareil procède à un essorage à une vitesse inférieure
à la vitesse normalement prévue.
En cas de déséquilibre excessif, le lave-linge préfère
procéder à la répartition du linge plutôt quà son
essorage.
Pour aider à une meilleure répartition de la charge et à
un bon équilibrage, nous conseillons de mélanger de
grandes et petites pièces de linge.
20
Page 21

Précautions et conseils
Cet appareil a été conçu et fabriqué conformément
aux normes internationales de sécurité. Ces
avertissements sont fournis pour des raisons de
sécurité, il faut les lire attentivement.
Sécurité générale
Cet appareil est conçu pour un usage domestique.
Cet appareil ne doit être utilisé que par des adultes
qui devront se conformer aux instructions du mode
demploi.
Ne jamais toucher lappareil si lon est pieds nus et
si les mains sont mouillées ou humides.
Ne jamais tirer sur le câble pour débrancher la
fiche de la prise de courant.
Ne pas toucher à leau de vidange, elle peut
atteindre des températures très élevées.
Ne pas forcer pour ouvrir la porte hublot: le
verrouillage de sécurité qui protège contre les
ouvertures accidentelles pourrait sendommager.
En cas de panne, éviter à tout prix daccéder aux
mécanismes internes pour tenter une réparation.
Ouverture manuelle de la porte hublot
Si on désire étendre son linge et que la porte hublot
ne souvre pas à cause dune panne de courant,
procéder comme suit:
1. débrancher la fiche de
la prise de courant.
2. sassurer que le niveau
de leau à lintérieur de
20
lappareil se trouve bien
au-dessous de louverture
du hublot, si ce nest pas
le cas vider leau en excès
à travers le tuyau de
vidange dans un seau
comme illustré voir figure.
3. démonter le panneau
situé à lavant du lavelinge à laide dun
tournevis (voir figure).
F
Veiller à ce que les enfants ne sapprochent pas de
lappareil pendant son fonctionnement.
Deux ou trois personnes sont nécessaires pour le
déplacer en faisant très attention. Ne jamais
déplacer lappareil tout seul car il est très lourd.
Avant dintroduire le linge, sassurer que le
tambour est bien vide.
Mise au rebut
Mise au rebut du matériel demballage: se
conformer aux réglementations locales de manière
à ce que les emballages puissent être recyclés.
La Directive Européenne 2002/96/EC sur les
Déchets des Equipements Electriques et Electroniques, exige que les appareils ménagers usagés ne
soient pas jetés dans le flux normal des déchets
municipaux. Les appareils usagés doivent être
collectés séparément afin d'optimiser le taux de
récupération et le recyclage des matériaux qui les
composent et réduire l'impact sur la santé
humaine et l'environnement. Le symbole de la
''poubelle barrée'' est apposée sur tous les
produits pour rappeler les obligations de collecte
séparée.
Les consommateurs devront contacter les autorités
locales ou leur revendeur concernant la démarche à
suivre pour l'enlèvement de leur vieil appareil.
4. se servir de la languette
indiquée, tirer vers soi
jusquà ce que le tirant en
plastique se dégage de
son cran darrêt; tirer
ensuite vers le bas jusquà
ce quun click indique
que la porte est
déverrouillée.
5. ouvrir la porte; si elle est
encore verrouillée, refaire
la même opération.
6. remonter le panneau en veillant à bien enfiler les
crochets dans les fentes prévues avant de le pousser
contre lappareil.
21
Page 22

Entretien et soin
Coupure de larrivée deau et de
F
courant
Fermer le robinet de leau après chaque lavage.
Cela réduit lusure de linstallation hydraulique de
lappareil et évite tout danger de fuites.
Débrancher la fiche de la prise de courant lors de
toute opération de nettoyage et de travaux
dentretien.
Nettoyage de lappareil
Pour nettoyer lextérieur et les parties en
caoutchouc, utiliser un chiffon imbibé deau tiède et
de savon. Nutiliser ni solvants ni abrasifs.
Nettoyage du tiroir à produits lessiviels
Pour sortir le tiroir, appuyer
sur le levier (1) et tirer vers
soi (2) (voir figure).
Le laver à leau courante;
effectuer cette opération
assez souvent.
Pour accéder à la préchambre:
1. démonter le panneau
situé à lavant du lavelinge à laide dun
tournevis (voir figure);
2. placer un récipient pour
recueillir leau qui sécoule
(1,5 l environ) (voir figure);
3. dévisser le couvercle en
le faisant tourner dans le
sens inverse des aiguilles
dune montre (voir figure);
4. nettoyer soigneusement lintérieur;
5. revisser le couvercle;
6. remonter le panneau en veillant à bien enfiler les
crochets dans les fentes prévues avant de le pousser
contre lappareil.
Entretien du tambour
Laisser toujours la porte hublot entrouverte pour
éviter la formation de mauvaises odeurs.
Nettoyage de la pompe
Lappareil est équipé dune pompe autonettoyante
qui nexige aucune opération dentretien. Il peut
toutefois arriver que de menus objets (pièces de
monnaie, boutons) tombent dans la préchambre qui
protège la pompe, placée en bas de cette dernière.
Sassurer que le cycle de lavage est bien terminé et
débrancher la fiche.
Contrôle du tuyau darrivée de leau
Contrôler le tuyau dalimentation au moins une fois
par an. Procéder à son remplacement en cas de
craquèlements et de fissures: car les fortes pressions
subies pendant le lavage pourraient provoquer des
cassures.
22
Page 23

Anomalies et remèdes
Il peut arriver que lappareil ne fonctionne pas bien. Avant dappeler le Service de dépannage (voir Assistance),
contrôler sil ne sagit pas par hasard dun problème facile à résoudre à laide de la liste suivante.
Anomalies:
Lappareil ne sallume pas.
Le cycle de lavage
ne démarre pas.
Il ny a pas darrivée deau.
Lappareil prend leau et vidange
continuellement.
Causes / Solutions possibles:
La fiche nest pas branchée dans la prise de courant ou pas
suffisamment enfoncée pour quil y ait contact.
Il y a une panne de courant.
La porte hublot nest pas bien fermée.
La touche MISE EN MARCHE/PAUSE na pas été enfoncée.
Le robinet de leau nest pas ouvert.
Le tuyau darrivée de leau nest pas raccordé au robinet.
Le tuyau est plié.
Le robinet de leau nest pas ouvert.
Il y a une coupure deau.
La pression nest pas suffisante.
La touche MISE EN MARCHE/PAUSE na pas été enfoncée.
Le tuyau de vidange nest pas installé à une distance du sol comprise
entre 65 et 100 cm (voir Installation).
Lextrémité du tuyau de vidange est plongée dans leau (voir Installation).
Si lappartement est situé en étage dans un immeuble, il peut y avoir
des phénomènes de siphonnement qui font que le lave-linge prend et
évacue leau continuellement. Pour supprimer cet inconvénient, on
trouve dans le commerce des valves spéciales anti-siphonnement.
Lévacuation murale na pas dévent.
F
Lappareil ne vidange pas
ou nessore pas.
Lappareil vibre beaucoup
pendant lessorage.
Lappareil fuit.
Les icônes correspondant à la
Phase en cours clignotent
rapidement en même temps que
le voyant MARCHE/ARRET.
Il y a un excès de mousse.
Le programme ne prévoit pas de vidange: pour certains programmes, il
faut la faire partir manuellement (voir Programmes et options).
Loption Repassage facile est activée: pour compléter le programme, appuyer
sur la touche MISE EN MARCHE/PAUSE (voir Programmes et options).
Le tuyau dévacuation est plié (voir Installation).
La conduite de linstallation de vidage est bouchée.
Le tambour na pas été débloqué comme il faut lors de linstallation de
lappareil (voir Installation).
Lappareil nest pas posé à plat (voir Installation).
Lappareil est coincé entre des meubles et le mur (voir Installation).
La charge est déséquilibrée (voir Description de lappareil).
Le tuyau darrivée de leau nest pas bien vissé (voir Installation).
Le tiroir à produits lessiviels est bouché (pour le nettoyer voir Entretien et soin).
Le tuyau de vidange nest pas bien fixé (voir Installation).
Eteindre lappareil et débrancher la fiche de la prise de courant,
attendre 1 minute environ avant de rallumer.
Si lanomalie persiste, appeler le service dassistance.
Le produit de lavage utilisé nest pas une lessive spéciale machine (il faut quil
y ait linscription pour lave-linge, main et machine, ou autre semblable).
La quantité utilisée est excessive.
La porte de lappareil reste
verrouillée.
Procéder au déverrouillage manuel (voir Précautions et conseils).
Si après ces vérifications, le problème persiste, fermer le robinet de leau,
éteindre lappareil et appeler le service Assistance.
23
Page 24

Assistance
Avant dappeler le service de dépannage:
F
Vérifier si l'anomali ne peut être résolue par soi-même (voir Anomalie set Remèdes);
Remettre le programme en marche pour contrôler si l'inconvénient a disparu;
Si ce n'est pas le cas, contacter le Service-après-vente de votre revendeur ou Indesit Company 0 825 33 66 66.
En cas dinstallation erronée ou dutilisation incorrecte, lintervention est à la charge de lutilisateur.
Ne jamais sadresser à des techniciens non agréés.
Communiquer:
le type de panne;
le modèle de lappareil (Mod.);
son numéro de série (S/N).
Ces renseignements se trouvent sur la plaquette signalétique de lappareil.
24
Page 25

Instruções para utilização
MÁQUINA DE LAVAR ROUPA
PT
Português
AQUALTIS
AQXGF 169
Sumário
Instalação, 26-27
Desembalar e nivelar
Ligações hidráulicas e eléctricas
Dados técnicos
Descrição da máquina, 28-29
Painel de comandos
Como efectuar um ciclo de lavagem, 30
Programas e opções, 31
Tabela dos Programas
Opções de Lavagem
Detergentes e roupa, 32
Detergente
Preparar a roupa
Conselhos de lavagem
Sistema de equelíbrio da carga
Precauções e conselhos, 33
Segurança geral
Eliminação
Abertura manual da porta de vidro
PT
Manutenção e cuidados, 34
Interromper a alimentação de água e de corrente eléctrica
Limpar a máquina,
Limpar a gaveta dos detergentes
Cuidados com o tambor,
Limpar a bomba
Verificar o tubo de alimentação de água
Anomalias e soluções, 35
Assistência, 36
25
Page 26

Instalação
PT
É importante guardar este livro para poder
consultá-lo a qualquer momento. Se a máquina for
vendida, cedida ou transferida, certifique-se que este
livro permaneça com a máquina.
Leia com atenção estas instruções: há importantes
informações acerca da instalação, da utilização e da
segurança.
No envelope que contém este livro encontrará,
além da garantia, também algumas peças que
servirão para a instalação.
Desembalar e nivelar
Desembalar
1. Uma vez desembalada a máquina de lavar roupa,
verifique que a mesma não tenha sofrido danos
durante o transporte.
Se estiver danificada não efectue a sua ligação e
contacte o revendedor.
2. Tire os 4 parafusos de
protecção para o transporte e o respectivo
calço, situados na parte
traseira (veja a figura).
Se a máquina for posicionada sobre um tapete ou
alcatifa, regule os pés de modo a que por baixo da
máquina de lavar roupa haja espaço suficiente para a
ventilação.
Ligações hidráulicas e eléctricas
Ligação do tubo de alimentação da água
Antes de ligar o tubo de alimentação à rede hídrica,
deixe a água escorrer até que seja límpida.
1. Ligue o tubo de
alimentação na máquina
de lavar roupa
atarraxado-o no local
específico situado na
parte traseira, em cima à
direita (veja a figura).
2. Coloque a guarnição A
contida no envelope na
ponta do tubo de alimentação e atarraxe-o numa
A
torneira de água fria com
bocal de rosca de 3/4
gás (veja a figura).
3. Tape os furos com as tampas em plástico contidas
no envelope.
4. Conserve todas as peças; se for necessário
transportar a máquina de lavar roupa, terão de ser
montadas outra vez para evitar danos internos.
Embalagens não são brinquedos para as crianças!
Nivelamento
1. Posicione a máquina de lavar roupa sobre um
pavimento plano e rígido, sem encostá-la às paredes
ou móveis.
2. Compense as irregularidades desatarraxando
ou atarraxando os pés
até que a máquina
esteja nivelada horizontalmente (não deve ter
uma inclinação superior
a 2 graus).
Um cuidadoso nivelamento dá estabilidade e evita
vibrações e ruídos sobretudo na fase de centrifugação.
3. Tome cuidado para o tubo não ser dobrado nem
esmagado.
A pressão hídrica da torneira deve ser entre os
valores da tabela dos Dados técnicas (veja a página
ao lado).
Se o comprimento do tubo de alimentação não for
suficiente, contacte uma oficina especializada ou um
técnico autorizado.
Nunca utilize tubos de alimentação de água velhos
ou usados, mas sim aqueles fornecidos em dotação
com a máquina.
26
Page 27

Ligação do tubo de descarga
Ligue o tubo de descarga, sem dobrá-lo, a uma
conduta de descarga ou
a uma descarga na
parede situada entre 65
65 - 100 cm
e 100 cm. de altura do
chão.
Em alternativa, coloque
na beira de um lavabo
ou de uma banheira,
prendendo na torneira a
guia fornecida em
dotação (veja a figura).
A ponta solta do tubo de
descarga não deve
permanecer imersa na
água.
É desaconselhado empregar tubos de extensão;
mas se for indispensável, a extensão deve ter o
mesmo diâmetro do tubo original e não medir mais
de 150 cm de comprimento.
Não empregue extensões nem fichas múltiplas.
O cabo não deve ser dobrado nem apertado.
O cabo de alimentação e a ficha devem ser substi-
tuídos somente por técnicos autorizados.
Atenção! O fabricante declina toda a responsabilidade se estas regras não forem respeitadas.
PT
Ligação eléctrica
Antes de ligar a ficha na tomada eléctrica, certifiquese que:
a tomada tenha uma ligação à terra e esteja de
acordo com os termos da legislaçãoem vigor;
a tomada tenha a capacidade para suportar a
carga máxima de potência da máquina, indicada
na tabela do dados técnicos (veja ao lado);
a tensão de alimentação seja entre os valores
indicados na tabela de Dados técnicos (veja ao
lado);
a tomada seja compatível com a ficha da máquina.
Se não for, substitua a tomada ou a ficha.
Esta máquina de lavar roupa não deve ser instalada
em local aberto, nem mesmo abrigada, porque é
muito perigoso deixá-la exposta à chuva e às tempestades.
Depois de ter instalado a máquina de lavar roupa, o
acesso à tomada eléctrica deve ser fácil.
Dados técnicos
Modelo
Medidas
Capacidade
Ligações
eléctricas
Ligações hídricas
Velocidade da
centrifugação
Programas de
controlo segundo
a norma EN 60456
AQXGF 169
largura 59,5 cm.
altura 85 cm.
profundidade 64,5 cm.
de 1 a 9 kg.
veja a placa das características
técnicas colocada na máquina
pressão máxima 1 MPa (10 bars)
pressão mínima 0,05 MPa (0,5 bar)
capacidade do tambor 62 litros
até 1.600 rotações por minuto
programa ALGODÕES BRANCOS;
temperatura 60°C;
realizado com carga de 9 kg.
Esta aparelhagem é em
conformidade com as seguintes
Directivas Comunitárias:
- 89/336/CEE dl 03/05/89
(Compatibilidade Electromagnética) e
posteriores modificações.
- 2002/96/CE
- 2006/95/CE (Baixa Tensão)
27
Page 28

Descrição da máquina
PT
PORTA DE VIDRO
PEGA DA
PORTA DE
VIDRO
BASE
PAINEL DE
COMANDOS
PÉS REGULÁVEIS
PORTA DE VIDRO
20
Para abrir a porta de vidro
use sempre a sua pega
(ver figura).
GAVETA DOS DETERGENTES
Encontra-se no interior da
máquina e para se ter
acesso deve-se abrir a porta.
Para a dosagem dos detergentes consulte o capítulo
Detergentes e roupa.
1. recipiente para a prélavagem: use detergente
1
2
em pó.
2. recipiente para a lava-
gem: use detergente em pó
ou líquido. Neste último
caso, recomenda-se deitá-lo
imediatamente antes do
início do ciclo de lavagem.
28
recipiente para os aditivos: para amaciador ou
aditivos líquidos. Recomenda-se não superar o nível
máximo indicado pela grelha e diluir os amaciadores
concentrados.
Page 29

Painel de comandos
Selector de
PROGRAMAS
Botões e Indicadores
luminosos OPÇÕES
Ícone FASES DE
LAVAGEM
PT
Botão com indicador
luminoso START/
PAUSE
Botão com indicador
luminoso LIGA
DESLIGA e
ANULAÇÃO
TEMPERATURA
Botão
Botão
CENTRIFUGAÇÃO
Botão com indicador luminoso LIGA DESLIGA e
ANULAÇÃO: carregue brevemente no botão para ligar
ou desligar a máquina. O indicador luminoso verde
indica que a máquina está ligada. Para desligar a
máquina de lavar roupa durante a lavagem, é necessário manter pressionado o botão por mais tempo,
aproximadamente 2 segundos; uma pressão breve ou
acidental não permitirá o desligamento da máquina.
O desligamento da máquina durante uma lavagem em
curso anula a própria lavagem.
Selector de
PROGRAMAS: pode ser girado em
ambas as direcções. Para estabelecer o programa
mais correcto, veja a Tabela dos Programas.
Durante a lavagem o selector permanece parado.
Botão
DELAY
TIMER
Ícone
FASES DE LAVAGEM: acendem-se para indicar o
Indicador
luminoso
ECO
Indicador luminoso
PORTA
BLOQUEADA
estado de avanço do ciclo (Lavagem
Botão e
indicador
luminoso
BLOQUEIO
COMANDOS
- Enxaguamento
- Centrifugação Descarga final ).
A escrita
Botão com indicador luminoso
acende-se quanto o ciclo tiver terminado.
START/PAUSE:
quando o indicador luminoso verde estiver aceso com
intermitência lenta, pressionar o botão para iniciar uma
lavagem. Quando o ciclo iniciar, o indicador permanecerá
aceso fixo. Para colocar em pausa a lavagem, pressionar
novamente o botão; o indicador ficará intermitente com
uma luz laranja. Se o indicador Porta bloqueada
estiver apagado, será possível abrir a porta de vidro.
Para reiniciar a lavagem no ponto em que foi interrompida, pressionar novamente o botão.
Botão
TEMPERATURA: pressionar para modificar
a temperatura; o valor é indicado no display
(ver Como efectuar um ciclo de lavagem).
Botão
CENTRIFUGAÇÃO: pressionar para modifi-
car ou excluir a centrifugação; o valor é indicado no
display (ver Como efectuar um ciclo de lavagem).
Botão
DELAY TIMER: pressionar para configurar um
início retardado do programa escolhido; o valor é
indicado no display (ver Como efectuar um ciclo de
lavagem).
Botões e indicadores luminosos
OPÇÕES: para
seleccionar as opções disponíveis. O indicador
luminoso relativo à opção seleccionada ficará aceso
(ver Como efectuar um ciclo de lavagem).
Indicador luminoso
PORTA BLOQUEADA: indica que
a porta de vidro está bloqueada. Para abrir a porta é
necessário colocar o ciclo em pausa (ver apágina seguinte).
Botão e indicador luminoso
BLOQUEIO COMANDOS:
para activar ou desactivar o bloqueio do painel de
comandos, manter pressionado o botão por aproximadamente 2 segundos. O indicador luminoso aceso indica
que o painel de comandos está bloqueado. Deste modo,
impedem-se modificações acidentais dos programas,
sobretudo se houver crianças em casa.
Indicador luminoso
ECO: o ícone acender-se-à quando,
modificando os parâmetros de lavagem, se obtém uma
economia de energia eléctrica de pelo menos 10%.
29
Page 30

Como efectuar um ciclo de
lavagem
PT
OBSERVAÇÃO: a primeira vez que utilizar a máqui-
na de lavar roupa, efectue um ciclo de lavagem sem
roupa mas com detergente, usando o programa
algodão 90º sem pré-lavagem.
1. LIGAR A MÁQUINA. Carregar no botão
Todos os indicadores se acenderão por 1 segundo
e logo em seguida permanecerá aceso o indicador
do botão
começará a piscar lentamente.
2. COLOCAR A ROUPA. Abrir a porta de vidro.
Colocar a roupa dentro da máquina prestando
atenção para não superar a carga máxima
indicada na tabela dos programas na página
seguinte.
3. DOSAGEM DO DETERGENTE. Extrair a gaveta e
deitar o detergente nos específicos recipientes como
explicado no parágrafo Descrição da máquina.
4. FECHAR A PORTA DE VIDRO.
5. ESCOLHA DE PROGRAMA. Girar o selector de
PROGRAMAS para a direita ou para a esquerda
até seleccionar o programa desejado; será associada uma temperatura e uma velocidade de
centrifugação que podem ser modificadas.
6. PERSONALIZAR O CICLO DE LAVAGEM.
Utilizar os específicos botões no painel de comandos:
Modificar a temperatura e/ou a centrifugação.
A máquina selecciona automaticamente a temperatura e a centrifugação máximas para o programa
seleccionado e portanto não podem ser aumentadas. Carregando no botão
temperatura progressivamente até a lavagem a frio
(
). Carregando no botão pode-se reduzir a
centrifugação progressivamente até a sua exclusão (
rá os valore novamente aos máximos previstos.
, o indicador luminoso START/PAUSE
pode-se reduzir a
). Uma ulterior pressão dos botões coloca-
.
Excepção: seleccionando o programa ALGO-
DÕES BRANCOS a temperatura pode ser aumentada até a 90º.
Programar um início retardado.
Para programar o início retardado do programa
escolhido, carregue várias vezes no botão até
visualizar o tempo desejado (de 1 a 24 h).
Para desactivar a função, pressionar o botão até
visualizar a escrita
Obs.: Uma vez pressionado o botão START/PAUSE
o valor do atraso poderá ser modificado somente
diminuindo-o.
.
Modificar as características do ciclo.
Carregar nos botões OPÇÕES para personalizar a
lavagem conforme as próprias exigências.
Carregar no botão para activar a opção;
o respectivo indicador luminoso acender-se-à.
Carregar no botão para desactivar a opção;
o respectivo indicador luminoso apagar-se-à.
Se a opção seleccionada não for compatível com
o programa definido, o indicador luminoso correspondente acender-se-à intermitentemente por
algum tempo, e a opção não será activada.
Se a opção seleccionada não for compatível
com uma outra programada anteriormente, o
respectivo indicador luminoso irá piscar e será
activada somente a segunda, o indicador luminoso do botão ficará aceso fixo.
7. INICIAR O PROGRAMA. Carregar no botão
START/PAUSE. O indicador luminoso ficará aceso
fixo e a porta irá bloquear-se (indicador luminoso
PORTA BLOQUEADA aceso). Os ícones relativos
às fases de lavagem acendem-se durante o ciclo
para indicar a fase em curso. Para modificar um
programa durante a realização do ciclo, colocar
a máquina de lavar roupa em pausa carregando
no botão START/PAUSE; seleccionar o ciclo
desejado e carregar novamente no botão START/
PAUSE.
Para abrir a porta durante a realização de um
ciclo, carregar no botão START/PAUSE; se o
indicador luminoso PORTA BLOQUEADA
estiver apagado será possível abrir a porta.
Carregar novamente no botão START/PAUSE
para fazer iniciar o programa do ponto em que foi
interrompido.
8. FIM DO PROGRAMA. É indicado pela escrita
END acesa. A porta de vidro poderá ser aberta
imediatamente. Se o indicador luminoso START/
PAUSE piscar, carregar no botão para terminar o
ciclo. Abrir a porta, retirar a roupa e desligar a
máquina.
Se desejar anular um ciclo já iniciado, carregar por
alguns segundos o botão
do e a máquina irá desligar-se.
SAQUINHO PARA ACOLCHOADOS, CORTINAS
E PEÇAS DELICADAS
Graças ao especial saquinho fornecido com o
produto, a Hotpoint/Ariston consente lavar também
as suas peças mais preciosas e delicadas garantido
a máxima protecção.
Recomenda-se o uso do saquinho para a lavagem
de acolchoados e edredões com forro externo
realizado em material sintético.
. O ciclo será interrompi-
30
Page 31

Programas e opções
Tabela dos Programas
Ícone Descrição do Programa
Programas para todos os dias
ALGODÕES BRANCOS
ALGODÕES BRANCOS: Brancos e coloridos delicados muito
sujos.
ALGODÕES COLORIDOS
SINTÉTICOS DELICADOS
MIX 30': Para refrescar rapidamente roupas levemente sujas (não
indicado para lã, seda e roupas que devem ser lavadas à mão).
Programas enérgicos
PRÉ-LAVAGEM:
(Acrescentar o detergente no específico compartimento).
SINTÉTICOS RESISTENTES
Programas especiais
CAMISAS
SEDA: Para roupas de seda, viscosa, lingerie.
LÃ:
Para lã, caxemira, etc.
EDREDÕES: Para peças com enchimento em penas de ganso.
ROUPAS 7 DIAS: Roupa de banho e de cama.
Programas parciais
Enxaguamento Resistentes - 1600 Enxaguamento Delicados - 800 Centrifugação Resistentes - 1600 - - 94
Centrifugação Delicados - 800 - - 42
Descarga - 0 - - 94
Para a remoção de manchas resiostentes.
Te m p .
max.
(Max 90°)
Veloci tà
max.
(rotações
(°C)
60°
40° 1600
40° 1600
40° 800
30° 800
90° 1600
60° 800
40° 600
30° 0
40° 600
30° 1200
60° 1600
por
minuto)
1600
Detergentes
Lava-
Amacia-
gem
dor
ll
ll
ll
ll
ll
ll
ll
ll
ll
ll
ll
ll
l
l
Carga max.
Normal
94
94
94
42
3,5 1, 5
94
42
21
21
21
31, 5
94
94
42
(Kg)
Com
Mini
Carga
PT
Duração ciclo
É possível visualizar a duração do programa de lavagem no visor.
Os dados apresentados na tabela têm valor indicativo.
Opções de Lavagem
Super Lavagem
Graças ao uso de uma maior quantidade de água na
fase inicial do ciclo e a uma maior duração, esta
opção garante uma lavagem com altas prestações.
Não pode ser activada com os programas Mix 30,
Seda, Lã, Edredões e Programas Parciais.
Engomar Fácil
Seleccionando esta opção, a lavagem e a
centrifugação serão oportunamente modificados para
reduzir a formação de rugas. No fim do ciclo a máquina
de lavar roupa efectuará lentas rotações do tambor; os
indicadores luminosos Engomar Fácil e START/PAUSE
irão piscar. Para terminar o ciclo, carregar no botão
START/PAUSE ou no botão Engomar Fácil.
No programa Seda a máquina terminará o ciclo com
a roupa de molho e o indicador luminoso Engomar
Fácil irá piscar. Para descarregar a água e poder
retirar a roupa é necessário carregar no botão
START/PAUSE ou no botão Engomar Fácil.
Esta opção não pode ser activada com os progra-
mas Lã, Centrifugação resistentes, Centrifugação
delicados e Descarga.
Enxaguamento Extra
Seleccionando esta opção aumenta-se a eficácia do
enxaguamento, e garante-se a máxima remoção do
detergente. É útil para quem tem a pele particularmente sensível aos detergentes. Aconselha-se o uso
com a máquina de lavar roupa com a carga total ou
com grandes doses de detergente.
Esta opção não pode ser activada com os progra-
mas Mix 30, Centrifugação resistentes,
Centrifugação delicados e Descarga.
Mini carga
Aconselha-se usar esta função quando a roupa a ser
lavada é igual ou inferior à metade da carga máxima.
aconselhada (veja a Tabela dos programas).
Esta opção não pode ser activada com os progra-
mas Centrifugação resistentes, Centrifugação delicados e Descarga.
31
Page 32

Detergentes e roupa
PT
Detergente
A escolha e a quantidade de detergente dependem do
tipo de tecido (algodão, lã, seda...), da cor, da temperatura de lavagem, do grau de sujidade e da dureza da água.
Uma correcta dosagem de detergente evita desperdícios e protege o meio ambiente: mesmo os detergentes biodegradáveis contêm componentes que
alteram o equilíbrio da natureza.
Aconselha-se:
usar detergente em pó para as peças de algodão
brancas e para a pré-lavagem.
usar detergente líquido para peças delicadas de
algodão e para todos os programas com baixas
temperaturas.
usar detergente líquido delicado para lã e seda.
Não use detergentes para lavagem à mão, porque
formam espuma em excesso.
O detergente deve ser deitado antes do início da lava-
gem no específico recipiente ou no doseador que deve
ser colocado directamente no tambor. Neste caso, não
é possível seleccionar o ciclo Algodão com pré-lavagem.
Lã: a Hotpoint/Ariston é a única máquina de lavar roupa
que obteve o prestigioso reconhecimento Woolmark
Platinum Care (M.0508) por parte da The Woolmark
Company, que certifica a lavagem à máquina de todas as
roupas de lã, mesmo daquelas com etiqueta lavar somente à mão
absoluta tranquilidade de lavar à máquina todas as peças
de lã com a garantia das melhores performances.
Edredões: para lavar peças com enchimento de penas
de ganso de casal ou de solteiro (com peso inferior a 3
kg), travesseiros, jaquetas, utilizar o programa específico
"Edredões". Recomenda-se colocar as peças no tambor
dobrando as suas pontas para dentro (veja as figuras) e
de não superar os ¾ do volume do próprio tambor.
Para obter óptimos resultados de lavagem recomenda-se utilizar o detergente líquido dosado na gaveta
dos detergentes.
. Com o programa Lã teremos portanto a
Preparar a roupa
Desdobrar bem as roupas antes de carregá-las na
máquina.
Divida a roupa em função do tipo de tecido (símbo-
lo na etiqueta da roupa) e a da cor, prestando
atenção para separar as peças coloridas das
peças brancas;
Esvazie as algibeiras e verifique se há botões soltos;
Não ultrapasse os valores indicados na Tabela
Programas que se referem ao peso da roupa
seca.
Quanto pesa a roupa?
1 lençol 400-500 gr.
1 fronha 150-200 gr.
1 toalha 400-500 gr.
1 roupão 900-1200 gr.
1 toalha de rosto 150-250 gr.
1 calça de ganga 400-500 gr.
1 camisa 150-200 gr.
Conselhos de lavagem
Camisas: utilize o programa específico para lavar
camisas de vários tipos de tecido e cores. Assegura
os máximos cuidados.
Seda: utilize o programa específico para lavar todas
as roupas de seda. Aconselha-se o uso de um
detergente específico para tecidos delicados.
Cortinas: dobre-as e coloque-as dentro do saqui-
nho fornecido com o produto. Use o programa
"Seda".
Acolchoados: para lavar os acolchoados com forro
sintético, use o específico saquinho fornecido com o
produto e o programa "Edredões".
Roupa de banho e de cama: esta máquina de
lavar roupa consente a lavagem de toda a roupa de
casa com um único ciclo, chamado Roupas 7 dias
que optimiza o uso do amaciador e consente uma
economia de tempo e energia. Aconselhamos a
utilização de detergente em pó.
Manchas resistentes: tratar as manchas mais
resistentes com um sabão sólido antes da lavagem e
utilizar o programa Algodão com pré-lavagem.
Sistema de equelíbrio da carga
Antes de cada centrigfugação, para evitar vibrações
excessivas e para distribuir a carga em modo uniforme, o tambor efectua algumas rotações a uma
velocidade levemente superior àquela de lavagem.
Se no fim de repetidas tentativas a carga ainda não
estiver correctamente equelibrada, a máquina efectuará a centrifugação com uma velocidade inferior
àquela prevista.
No caso de um excessivo desequelíbrio, a máquina
de lavar roupa efectuará a distribuição ao invés da
centrifugação.
Para favorecer uma melhor distribuição da carga e o
seu correcto equelíbrio, aconselha-se misturar peças
grandes com peças pequenas.
32
Page 33

Precauções e conselhos
Esta máquina de lavar roupa foi projectada e fabricada
em conformidade com os regulamentos internacionais de
segurança. Estas advertências são fornecidas por razões
de segurança e devem ser lidas com atenção.
Segurança geral
Este aparelho foi projectado exclusivamente para
um uso doméstico.
Esta máquina de lavar roupa deve ser utilizada
somente por pessoas adultas e conforme as
instruções apresentadas neste livro.
Não toque na máquina com os pés descalços nem
com as mãos ou os pés molhados ou húmidos.
Não puxe o cabo eléctrico para tirar a ficha da
tomada, pegue na ficha e retire-a.
Não toque na água de descarga, que poderá
chegar a temperaturas altas.
Em nenhum caso force a porta para abri-la:
poderá danificar o mecanismo de segurança
que a protege contra aberturas acidentais.
Se houver avarias, em nenhum caso mexa nos
mecanismos internos para tentar reparar.
Abertura manual da porta de vidro
Caso não seja possível abrir a porta de vidro por falta
de energia eléctrica e queira pendurar a roupa
lavada, proceda da seguinte maneira:
1. tire a ficha da tomada
de corrente.
2. verifique que o nível de
água no interior da máqui-
20
na seja inferior relativamente à abertura da porta de
vidro; caso contrário, tirar a
água em excesso através
do tubo de descarga
recolhendo-a num balde
como indicado na figura.
3. tire o painel de inferior
cobertura da parte dianteira da máquina de lavar
roupa com ajuda de uma
chave de fendas (veja a
figura).
PT
Verifique sempre que as crianças não se aproxi-
mem com a máquina a funcionar.
Se for preciso deslocar a máquina, são precisas pelo
menos duas ou três pessoas, com a máxima atenção.
Nunca sozinho porque a máquina é muito pesada.
Antes de colocar a roupa certefique-se que o
tambor esteja vazio.
Eliminação
Elimine a embalagem obedecendo aos regulamen-
tos locais, de maneira a que as embalagens
possam ser reutilizadas.
A directiva Europeia 2002/96/CE referente à gestão
de resíduos de aparelhos eléctricos e electrónicos,
prevê que os electrodomésticos não devem ser
escoados no fluxo normal dos resíduos sólidos
urbanos. Os aparelhos desactualizados devem ser
recolhidos separadamente para optimizar a taxa de
recuperação e reciclagem dos materiais que os
compõem e impedir potenciais danos para a saúde
humana e para o ambiente. O símbolo constituído
por um contentor de lixo barrado com uma cruz
deve ser colocado em todos os produtos por forma
a recordar a obrigatoriedade de recolha separada.
Os consumidores devem contactar as autoridades
locais ou os pontos de venda para solicitar informação referente ao local apropriado onde devem
depositar os electrodomésticos velhos.
4. utilizando a lingueta
indicada na figura, puxe
para o exterior até libertar
o tirante de plástico do
fecho; puxá-lo sucessivamente para baixo até ouvir
um "clique" que indica que
a porta está
desbloqueada.
5. abra a porta; se ainda
não conseguir, repita a
operação.
6. monte outra vez o painel, certifique-se, antes de
empurrá-lo na máquina, que os ganchos foram
colocados nas respectivas ranhuras.
33
Page 34

Manutenção e cuidados
PT
Interromper a alimentação de água e
de corrente eléctrica
Feche a torneira da água depois de cada lavagem.
Desta maneira diminuiu-se o desgaste do sistema
hidráulico da máquina de lavar roupa e elimina-se
o risco de vazamento.
Tire a ficha da tomada eléctrica quando for limpar
a máquina de lavar roupa e durante os trabalhos
de manutenção.
Limpar a máquina
A parte externa e as peças em borracha podem ser
limpas com um pano molhado com água morna e
sabão. Não empregue solventes nem abrasivos.
Limpar a gaveta dos detergentes
Para extrair a gaveta,
pressione a lingueta (1) e
puxe para fora (2) (veja a
figura).
Lave-a com água corrente; esta limpeza deve ser
efectuada frequentemente.
Para obter acesso à pré-câmara:
1. tire o painel de cobertura da parte dianteira da
máquina de lavar roupa
com ajuda de uma chave
de fendas (veja a figura);
2. posicione um recipiente
para recolher a água que
sairá (aproximadamente
1,5 l) (ver figura);
3. para desenroscar a
tampa gire-a na direcção
contrária aos ponteiros do
relógio (veja a figura);
4. limpe o interior com cuidado;
5. enrosque outra vez a tampa;
6. monte outra vez o painel, certifique-se, antes de
empurrá-la na máquina, que os ganchos foram
colocados nas respectivas ranhuras.
Cuidados com o tambor
Deixe a porta sempre entreaberta para evitar que
se formem odores desagradáveis.
Limpar a bomba
Esta máquina de lavar roupa é equipada com uma
bomba com limpeza automática que não precisa de
operações de manutenção. Entretanto pode acontecer que pequenos objectos (moedinhas, botões)
caiam na pré-câmara que protege a bomba, situada
na parte inferior da mesma.
Certifique-se que o ciclo de lavagem tenha termina-
do e tire a ficha da tomada.
Verificar o tubo de alimentação de
água
Verifique o tubo de alimentação pelo menos uma vez
por ano. Se houver rachaduras ou fendas, será
necessário substitui-lo: durante as lavagens as fortes
pressões podem provocar repentinas quebras.
34
Page 35

Anomalias e soluções
Pode acontecer que a máquina não funcione. Antes de telefonar para a Assistência Técnica (veja Assistência),
verifique se não se trata de um problema fácil de resolver com ajuda da seguinte lista.
Anomalias:
A máquina
não liga.
O ciclo de lavagem
não inicia.
A máquina não mete água.
A máquina mete e
despeja água
continuamente.
Possíveis causas / Solução:
A ficha não está colocada na tomada eléctrica, ou não o suficiente
para haver contacto.
Em casa não há corrente.
A porta de vidro não está bem fechada.
O botão START/PAUSE não foi pressionado.
A torneira da água não está aberta.
O tubo de alimentação de água não está ligado na torneira.
O tubo está dobrado.
A torneira da água não está aberta.
Está a faltar água em casa.
Não há suficiente pressão.
O botão START/PAUSE não foi pressionado.
O tubo de descarga não está instalado entre 65 e 100 cm. de altura do
chão (veja Instalação).
A ponta do tubo de descarga está imersa na água (veja Instalação).
Se a habitação se encontrar nos últimos andares de um edifício, é possível
que aconteçam fenómenos de sifão por causa dos quais a máquina de lavar
roupa mete e despeja água continuamente. Para eliminar este inconveniente,
há a disposição no comércio apropriadas válvulas contra o efeito sifão.
Da descarga na parede não foi sangrado o ar.
PT
A máquina não despeja
ou não realiza a centrifugação.
A máquina vibra muito
durante a centrifugação.
A máquina está a perder água.
Os ícones relativos à Fase em
curso piscam rapidamente
contemporaneamente ao indicador luminoso LIGA/DESLIGA.
Está a formar-se demasiada
espuma.
No programa não há descarga: com alguns programas será necessário
iniciar a descarga manualmente (veja Programas e opções).
Está activada a opção Engomar Fácil: para completar o programa,
carregue no botão START/PAUSE (veja Programas e opções).
O tubo de descarga está dobrado (veja Instalação).
A conduta de descarga está entupida.
O tambor, no momento da instalação, não foi destravado
correctamente (veja Instalação).
A máquina não está nivelada (veja Instalação).
A máquina está apertada entre móveis e parede (veja Instalação).
A carga está desequelibrada (veja Descrição da máquina).
O tubo de alimentação da água não está bem enroscado (veja Instalação).
O gaveta dos detergentes está entupida (para limpá-la veja Manutenção e cuidados).
O tubo de descarga não está bem fixado (veja Instalação).
Desligue a máquina e tire a ficha da tomada, aguarde aproximadamente
1 minuto e volte a ligá-la.
Se a anomalia persistir, contacte a Assistência Técnica.
O detergente não é específico para máquina de lavar roupa (deve haver a
escrita para máquina de lavar, à mão e para máquina de lavar ou similares).
A dose foi excessiva.
A porta da máquina está
bloqueada.
Efectue o procedimento de desbloqueio manual (veja Precauções e
conselhos).
Se depois destas verificações o problema não for resolvido, feche a torneira da
água, desligue a máquina de lavar roupa e chame a Assistência Técnica.
35
Page 36

Assistência
PT
Antes de contactar a Assistência Técnica:
Verifique se consegue resolver a anomalia sozinho (veja Anomalias e soluções);
Reinicie o programa para verificar se o inconveniente foi resolvido;
Em caso negativo, contacte a Assistência Técnica autorizada.
No caso de uma errada instalação ou de um uso não correcto, o pagamento do técnico poderia ficar por conta do cliente.
Nunca recorra a técnicos não autorizados.
Comunique:
o tipo de anomalia;
o modelo da máquina (Mod.);
o número de série (S/N).
Estas informações encontram-se na placa de identificação colocada no aparelho.
36
Page 37

Gebruiksaanwijzingen
WASAUTOMAAT
NL
Nederlands
AQUALTIS
AQXGF 169
Inhoud
Installatie, 38-39
Uitpakken en waterpas zetten
Hydraulische en elektrische aansluitingen
Technische gegevens
Beschrijving van de wasautomaat, 40-41
Bedieningspaneel
Het uitvoeren van een wascyclus, 42
Programmas en opties, 43
Programmatabel
Wasopties
Wasmiddel en wasgoed, 44
Wasmiddel
Voorbereiden van het wasgoed
Wastips
Balanceersysteem van de lading
Voorzorgsmaatregelen en advies, 45
Algemene veiligheid
Afvalverwijdering
Handmatige opening van het deurtje
NL
Onderhoud en verzorging, 46
Afsluiten van water en stroom
Reinigen van de wasautomaat
Reinigen van het wasmiddelbakje
Verzorging van de trommel
Reinigen van de pomp
Controleer de slang van de watertoevoer
Storingen en oplossingen, 47
Service, 48
37
Page 38

Installatie
NL
Het is belangrijk dit boekje te bewaren, zodat u het
op ieder gewenst moment kunt raadplegen. In het
geval u de wasautomaat verkoopt of u verhuist, moet
u de handleiding bij het apparaat bewaren.
Lees de instructies aandachtig door: u vindt er
belangrijke informatie betreffende installatie, gebruik
en veiligheid.
In de envelop vindt u samen met deze gebruiksaan-
wijzing, de garantie en instructies die nodig zijn voor
de installatie.
Uitpakken en waterpas zetten
Uitpakken
1. Zodra u de wasautomaat uitgepakt heeft, dient u te
controleren of hij niet beschadigd is tijdens het transport.
Indien dit wel het geval is moet u hem niet aansluiten
maar direct contact opnemen met de verkoper.
2. Verwijder de 4
beschermschroeven voor
het transport en de
bijbehorende afstandsleider die zich aan de
achterkant bevinden (zie
afbeelding).
3. Sluit de gaten af met de in de envelop bijgeleverde
plastic doppen.
4. Bewaar alle onderdelen; mocht de wasautomaat ooit
nog worden vervoerd, dan moeten deze weer worden
aangebracht om interne schade te voorkomen.
Een correcte nivellering geeft de machine stabiliteit en
vermijdt, vooral tijdens de centrifuge, vibraties en lawaai.
In het geval de wasautomaat op vloerbedekking of
tapijt staat regelt u de stelvoetjes zodanig dat onder
de automaat genoeg ruimte is voor ventilatie.
Hydraulische en elektrische aansluitingen
Aansluiting van de watertoevoerbuis
Voordat u watertoevoerbuis aansluit op het waternet
moet u het water laten lopen totdat het helder is
1. Verbindt de watertoevoerbuis aan de
wasautomaat door hem
op de betreffende watertoevoer te schroeven,
rechtsboven aan de
achterkant (zie afbeel-
ding).
2. Plaats de pakking A
die zich in de envelop
bevindt op het uiteinde
van de toevoerbuis en
A
schroef hem op een
koudwaterkraan met een
mondstuk met schroefdraad van 3/4 gas (zie
afbeelding).
.
Het verpakkingsmateriaal is geen speelgoed voor
kinderen.
Waterpas zetten
1. Installeer de wasautomaat op een rechte en stevige
vloer en laat hem niet tegen muren of meubels leunen.
2. Compenseer eventuele oneffenheden door
de stelvoetjes vast of los
te draaien totdat de
automaat volledig horizontaal staat (hij mag
niet meer dan 2 graden
hellen).
38
3. Let erop dat er geen knellingen of kronkels in de
slang zijn.
De waterdruk van de kraan moet zich binnen de
waarden van de tabel Technische Gegevens bevinden (zie bladzijde hiernaast).
Als de toevoerbuis niet lang genoeg is moet u zich
wenden tot een gespecialiseerde winkel of een
bevoegde installateur.
Gebruik nooit tweedehands of oude slangen, maar
alleen die slangen die bij het apparaat worden geleverd.
Page 39

Aansluiting van de afvoerbuis
Verbindt de afvoerbuis,
zonder hem te buigen,
aan een afvoerleiding of
aan een afvoer in de
muur tussen de 65 en
65 - 100 cm
100 cm van de grond af.
Als alternatief kunt u de
afvoerbuis aan de rand
van een wasbak of
badkuip hangen nadat u
hem met de steun aan
de kraan heeft bevestigd
(zie afbeelding).
Het uiteinde van de
afvoerbuis mag nooit
onder water liggen.
Gebruik nooit verlengstukken voor de slang; indien
dit niet te vermijden is moet het verlengstuk dezelfde
doorsnede hebben als de oorspronkelijke slang en
mag hij niet langer zijn dan 150 cm.
Gebruik geen verlengsnoeren of dubbelstekkers.
Het snoer mag niet gebogen of samengedrukt
worden.
De voedingskabel en de stekker mogen alleen door
een bevoegde installateur worden vervangen.
Belangrijk! De fabrikant kan niet aansprakelijk worden
gesteld wanneer deze normen niet worden nageleefd.
NL
Elektrische aansluiting
Voordat u de stekker in het stopcontact steekt moet
u zich ervan verzekeren dat:
het stopcontact geaard is en voldoet aan de
geldende normen;
het stopcontact het maximum vermogen van de
wasautomaat kan dragen, zoals aangegeven in de
tabel Technische Gegevens (zie hiernaast);
de spanning zich bevindt tussen de waarden die
zijn aangegeven in de tabel Technische Gegevens
(zie hiernaast);
de contactdoos geschikt is voor de stekker van de
automaat. Indien dit niet zo is moet of de stekker
of het stopcontact vervangen worden.
De wasautomaat mag niet buitenshuis worden
geïnstalleerd, ook niet op een beschutte plaats,
aangezien het gevaarlijk is hem aan regen en onweer
bloot te stellen.
Als de wasautomaat is geïnstalleerd moet het
stopcontact gemakkelijk te bereiken zijn.
Technische gegevens
Model
Afmetingen
Vermogen
Elektrische
aansluitingen
Aansluiting
waterleiding
Snelheid
centrifuge
Controle-programma's volgens de
norm EN 60456
AQXGF 169
breedte cm 59,5
hoogte cm 85
diepte cm 64,5
van 1 tot 9 kg
zie het typeplaatje met de technische
eigenschappen dat op het apparaat
is bevestigd
max. druk 1 MPa (10 bar)
min. druk 0,05 MPa (0,5 bar)
Inhoud trommel 62 liters
tot 1600 toeren per minuut
programma Wit katoen;
temperatuur 60°C;
uitgevoerd met 9 kg lading.
Deze apparatuur voldoet aan de
volgende EEC voorschriften:
-89/336/EEC van 03/05/89
(Elektromagnetische compatiabiliteit)
en successievelijke modificaties
- 2002/96/CE
- 2006/95/CE (Laagspanning)
39
Page 40

Beschrijving van de wasautomaat
NL
DEUR
WASAUTOMAAT
HANDVAT
DEUR
WASAUTOMAAT
PLINT
BEDIENINGSPANEEL
STELVOETJES
DEUR GEBLOKKEERD
20
Om de deur van de
wasautomaat te openen
dient u altijd het speciale
handvat te gebruiken (zie
afbeelding).
WASMIDDELBAKJE
Bevindt zich aan de
binnenkant van de automaat en verschijnt als u de
deur opent.
Voor de dosering van
wasmiddelen zie het
hoofdstuk Wasmiddelen
en wasgoed.
1. bakje wasmiddel voorwas:
voor waspoeder.
1
2
bakje additieven: zoals bijvoorbeeld wasverzachter of
vloeibare wasversterkers. We raden u aan om nooit het
maximaal aangegeven niveau te overschrijden (aangegeven door rooster) en om geconcentreerde
wasverzachters aan te lengen.
2. bakje wasmiddel hoofd-
was: voor waspoeder of
vloeibaar wasmiddel. In dit
laatste geval raden wij u aan
het wasmiddel direct
voordat u de wasautomaat
start te schenken in het
40
Page 41

Bedieningspaneel
Knop
WASPROGRAMMAS
Toetsen en
Controlelampjes
OPTIES
Symbolen
WASFASES
NL
Toets met controlelampje
START/PAUSE
Toets met controlelampje
AAN/UIT en
ANNULEREN
TEMPERATUUR
Toets
CENTRIFUGE
Toets met controlelampje AAN-/UIT en ANNU-
LEREN: druk even op de toets om de wasautomaat
aan of uit te zetten. Het groene controlelampje geeft
aan dat de wasautomaat aanstaat. Om de wasautomaat tijdens de wascyclus uit te zetten moet u
de toets langer, circa 2 sec., ingedrukt houden; als u
de toets kort, of per ongeluk indrukt zal de wasautomaat niet uitgaan.
Als de wasautomaat tijdens de wascyclus uitgaat
wordt deze automatisch geannuleerd.
Knop WASPROGRAMMAS: kan beide richtingen op
draaien. Voor de juiste programmakeuze kunt u de
Programmatabel raadplegen.
Gedurende het programma blijft de knop stilstaan.
Toets
TEMPERATUUR: druk hierop om de
temperatuur te wijzigen; de waarde wordt door het
bovenstaande display aangegeven (zie Het uitvoeren
van een wascyclus).
Toets
CENTRIFUGE: druk hierop om de
centrifuge te wijzigen of uit te sluiten; de waarde
wordt door het bovenstaande display aangegeven
(zie Het uitvoeren van een wascyclus).
Toets
UITGESTELDE START: druk hierop om
een uitgestelde start van het gekozen programma uit
te voeren; de waarde wordt door het bovenstaande
display aangegeven (zie Het uitvoeren van een
wascyclus).
Toetsen en Controlelampjes OPTIES: om de beschikbare opties te selecteren. Het controlelampje dat
overeenkomt met de geselecteerde optie blijft aan
(zie Het uitvoeren van een wascyclus).
Toets
Toets
UITGESTELDE
START
Controlelampje
ECO
Controlelampje
DEUR
GEBLOKKEERD
Toets en
controlelampje
TOETSBLOKKERING
Symbolen WASFASES: gaan aan om weer te geven
in welke fase van de cyclus de automaat zich bevindt
(Wassen
afvoer
De tekst
- Spoelen - Centrifuge - Water-
).
wordt verlicht als de wascyclus is beëindigd.
Toets met controlelampje START/PAUSE: als het
groene controlelampje langzaam knippert, drukt u op
de toets om de wascyclus te starten. Als de cyclus is
gestart blijft het controlelampje aanstaan. Als u de
wascyclus wilt pauzeren drukt u nogmaals op de
toets; het controlelampje wordt oranje en gaat
knipperen. Als het controlelampje Deur Geblokkeerd
uit is, kunt u het deurtje openen.
Om het programma te hervatten drukt u opnieuw op
de toets.
Controlelampje
DEUR GEBLOKKEERD: geeft
aan dat de deur geblokkeerd is. Om de deur te
openen moet u de wascyclus pauzeren (zie volgende
pagina).
Toets en controlelampje
TOETSBLOKKERING:
om de blokkering van het bedieningspaneel in of uit
te schakelen dient u de toets circa 2 seconden lang
ingedrukt te houden. Het brandend controlelampje
geeft aan dat het bedieningspaneel geblokkeerd is.
Op deze manier kunt u voorkomen dat er ongewilde
wijzigingen aan de programmas worden aangebracht, bijvoorbeeld bij aanwezigheid van kinderen.
Controlelampje ECO: het symbool
gaat aan als,
wanneer u de wasparameters heeft gewijzigd, u een
energiebesparing van minstens 10% heeft bereikt.
41
Page 42

Het uitvoeren van een wascyclus
NL
N.B.: voordat u de wasautomaat gaat gebruiken
moet u hem met wasmiddel maar zonder wasgoed
een wascyclus laten uitvoeren. Kies het programma
van 90° zonder voorwas.
1. DE WASAUTOMAAT AANZETTEN. Druk op de
toets
aan, waarna het controlelampje van de toets
aanblijft; het controlelampje START/PAUSE zal
langzaam gaan knipperen.
2. HET WASGOED INLADEN. Open de deur. Laadt
het wasgoed in en zorg ervoor nooit de laadhoeveelheid te overschrijden die wordt aangegeven
in de programmatabel op de volgende bladzijde.
3. WASMIDDEL DOSEREN. Haal het bakje naar
voren en doe het wasmiddel in de speciale vakjes
zoals beschreven in Beschrijving van de was-
automaat.
4. DE DEUR SLUITEN.
5. KIES HET PROGRAMMA. Draai de WASPROGRAMMAKNOP naar rechts of naar links
totdat u het gewenste programma heeft geselecteerd; er wordt automatisch een temperatuur en
een centrifugesnelheid, die naderhand kunnen
worden gewijzigd.
6. DE WASCYCLUS AANPASSEN. Dit gebeurt met
behulp van de toetsen op het bedieningspaneel:
De wasautomaat selecteert automatisch de maximale temperatuur en centrifuge die voor het ingestelde programma gelden. Deze maximum waarden
kunnen niet worden overschreden. Door op de
toets
langzaamaan verlagen, tot aan de koude wascyclus
(
toerental van de centrifuge langzaamaan verlagen,
tot aan een complete uitsluiting van de centrifuge
(
wederom op de maximale waarden terugkeren.
. Alle controlelampjes gaan 1 seconde lang
Wijzig de temperatuur en/of de centrifuge.
te drukken kunt u de temperatuur
). Door op de toets te drukken kunt u het
). Als u nogmaals op de toetsen drukt zult u
Uitzondering: als u het programma Wit Katoen
selecteert kunt u de temperatuur tot op 90° instellen.
Een uitgestelde start programmeren.
Om de uitgestelde start van het gekozen
programma in te stellen drukt u een paar keer op
de betreffende toets totdat de gewenste vertraging
verschijnt (van 1 tot 24 h).
Om de functie te desactiveren drukt u op de toets
totdat de tekst verschijnt
N.B.: Op het moment dat u de toets START/
PAUSE indrukt zal de waarde van de vertraging
alleen kunnen worden verminderd.
.
De eigenschappen van de
wascyclus wijzigen.
Druk op de toetsen OPTIES om de wascyclus
naar wens aan te passen.
Druk op de toets om de optie te activeren;
desbetreffend controlelampje gaat aan.
Druk nogmaals op de toets om de optie te
deactiveren; desbetreffend controlelampje gaat uit.
Als de geselecteerde optie niet compatibel is
met het ingestelde programma gaat het controlelampje knipperen en zal de optie niet worden
geactiveerd.
Als de geselecteerde optie niet compatibel is
met een optie die daarvòòr is ingesteld, zal het
controlelampje van de eerst geselecteerde optie
gaan knipperen en zal alleen de tweede optie
worden geactiveerd; het controlelampje van de
betreffende toets zal aanblijven.
7. HET PROGRAMMA STARTEN. Druk op de
toets START/PAUSE. Het betreffende controlelampje zal aanblijven en de deur zal worden
geblokkeerd (het controlelampje DEUR GEBLOKKEERD blijft aanstaan). De symbolen die horen bij
de verschillende wasfases worden tijdens de
cyclus verlicht om aan te geven welke fase bezig
is. Om een programma te wijzigen van een reeds
gestarte wascyclus doet u de wasautomaat op
pauze met behulp van de toets START/PAUSE;
selecteer daarna de gewenste cyclus en druk
nogmaals op de toets START/PAUSE.
Om de deur te openen tijdens de wascyclus drukt
u op de toets START/PAUSE; als het controlelampje DEUR GEBLOKKEERD
deurtje openen. Om het programma te hervatten
drukt u opnieuw op de toets START/PAUSE.
8. EINDE VAN HET PROGRAMMA. Wordt aangegeven door de tekst END (verlicht). De deur kan
gelijk worden geopend. Als het controlelampje
START/PAUSE knippert, kunt u op de toets
drukken om de wascyclus te beëindigen. Open de
deur, laadt het wasgoed uit en schakel de wasautomaat uit.
uit is, kunt u het
Als u een reeds gestarte wascyclus wilt annuleren
moet u enkele seconden de toets
houden. De cyclus zal worden onderbroken en de
wasautomaat gaat uit.
ZAK VOOR DEKENS, GORDIJNEN EN FIJNE WAS
Dankzij de speciale bijgeleverde zak kunt u met
Hotpoint/Ariston zelfs uw waardevolste en fijnste
kledingstukken met de machine wassen en zeker
zijn van een optimale bescherming.
We raden u ten stelligste aan om de zak te
gebruiken voor het wassen van dekens en donzen
wasgoed met een synthetische bekleding.
ingedrukt
42
Page 43

Programmas en opties
Programmatabel
Sym-
Beschrijving van het Programma
bool
Programma's voor iedere dag
WIT KATOEN
WIT KATOEN:
BONT KATOEN
FIJN SYNTH ETISC H
MIX 30':
wasgoed (niet geschikt voor wol, zijde en handwas).
Krachtige programma's
KATOEN MET VOORWAS:
moeilijke vlekken
NORMAAL SYNTHETISCH
Speciale programma's
OVERHEMDEN
ZIJDE:
WOL:
DONS:
7-DAGEN LINNENGOED:
Gedeeltelijke programma's
Spoelen normale was - 1600 Spoelen fijne was - 800 Centrifuge normale was - 1600 - - 94
Centrifuge fijne was - 800 - - 42
Waterafvoer - 0 - - 94
Zeer vuile witte en gekleurde fijne was.
Voor het snel opfrissen van niet zo vuil
Voor het verwijderen van
(Doe het wasmiddel in het speciale vakje).
Voor zijde, viscose, lingerie.
Voor wol, kasjmier, etc.
Voor kledingstukken/beddengoed gevuld met dons.
Voor handdoeken en beddengoed.
Maximale
Tijdsduur
(Max 90°)
Maximale
snelheid
(°C)
60°
40° 1600
40° 1600
40° 800
30° 800
90° 1600
60° 800
40° 600
30° 0
40° 600
30° 1200
60° 1600
(toeren
per
minuut)
1600
Wasmi ddel
Wassen
Wasve rzac-
hter
ll
ll
ll
ll
ll
ll
ll
ll
ll
ll
ll
ll
l
l
De gegevens in de tabel geven slechts geschatte waarden weer.
Maximale lading
Normaal
94
94
94
42
3,5 1, 5
94
42
21
21
21
31, 5
94
94
42
(Kg)
Met
mini
lading
NL
Duur cyclus
De duur van het wasprogramma kan op het scherm
worden afgelezen.
Wasopties
Super Wash
Dankzij het gebruik van een grotere hoeveelheid
water in de beginfase van de cyclus en de langere
tijdsduur ervan, garandeert deze optie een zeer
effectief wasresultaat.
Deze optie kan niet worden geactiveerd tijdens de
programmas Mix 30', Zijde, Wol, Dons en Gedeeltelijke Programmas.
Gemakkelijker strijken
Als u deze optie selecteert zullen het wassen en de
centrifuge dusdanig worden aangepast dat er minder
kreuken worden gevormd. Aan het einde van de
wascyclus zal de wasautomaat de trommel langzaam
laten ronddraaien; de controlelampjes Gemakkelijker
strijken en START/PAUSE gaan knipperen. Om de
cyclus te beëindigen drukt u op de toets START/PAUSE
of op de toets Gemakkelijker strijken.
Bij het programma Zijde beëindigt de wasautomaat de
cyclus door het wasgoed in de week te laten staan.
Het controlelampje Gemakkelijker strijken gaat
knipperen. Om het water af te voeren en de was uit de
automaat te halen moet u op de toets START/PAUSE
drukken of op de toets Gemakkelijker strijken.
Extra Spoelen
Door deze optie te selecteren verhoogt u het spoelresultaat en zorgt u ervoor dat elk spoor van wasmiddel verdwijnt. Deze optie is vooral nuttig bij personen
wiens huid gevoelig is voor wasmiddelen. We raden
deze optie aan wanneer een volle lading moet worden gewassen of wanneer zeer veel wasmiddel wordt
gebruikt.
Deze optie kan niet worden geactiveerd tijdens de
programmas Mix 30', Centrifuge normale was,
Centrifuge fijne was en Waterafvoer.
Mini lading
Gebruik deze functie als de lading wasgoed de helft
of minder is dan de maximaal aangeraden waslading
(zie Programmatabel).
Deze optie kan niet worden geactiveerd tijdens de
programmas Centrifuge normale was, Centrifuge
fijne was en Waterafvoer.
Deze optie kan niet worden geactiveerd tijdens de
programmas Wol, Centrifuge normale was,
Centrifuge fijne was en Waterafvoer.
43
Page 44

Wasmiddel en wasgoed
NL
Wasmiddel
De keuze en de hoeveelheid wasmiddel hangen af
van het type stof (katoen, wol, zijde), van de kleur
van het wasgoed, de wastemperatuur, de vuilgraad
en de hardheid van het water.
Een juiste dosering van het wasmiddel voorkomt
verspillingen en beschermt het milieu: ook al zijn
wasmiddelen biologisch afbreekbaar, toch bevatten ze
elementen die het evenwicht in de natuur verstoren.
We raden u aan:
waspoeder te gebruiken voor de witte katoenen
was en voor de voorwas.
vloeibaar wasmiddel te gebruiken voor fijne katoenen
was en voor alle programmas op lage temperatuur.
speciale wasmiddelen te gebruiken voor de fijne
was: bv. voor wol en zijde.
Gebruik nooit wasmiddelen voor handwas aange-
zien die te veel schuim vormen.
Het wasmiddel kan voor het starten van het pro-
gramma in het speciale bakje worden gedaan, of in
de wasbol die direct in de trommel wordt geplaatst.
Als u een wasbol gebruikt kunt u het programma
Katoen met voorwas niet gebruiken.
Wol: Hotpoint/Ariston is het enige bedrijf dat een
wasautomaat heeft ontwikkeld die de prestigieuze
Woolmark Platinum Care (M.0508) onderscheiding
heeft gekregen van The Woolmark Company. Dit
garandeert dat u alle wollen kledingstukken in de
automaat kunt wassen, ook wasgoed met het etiket
alleen handwas
kunt u dus rustig al uw wollen wasgoed in de automaat wassen, met gegarandeerd het beste resultaat.
Dons: voor het wassen van stukken die met dons
zijn opgevuld zoals donsdekens voor een
eenpersoons- of tweepersoonsbed (niet meer dan 3
kg wegend), kussens of windjakken moet u het
speciale programma "Dons" gebruiken. Wij raden aan
de donsdekens in te laden met de zijkanten naar
binnen gevouwen (zie afb.) en niet meer dan ¾ van
het volume van de trommel in beslag te nemen.
Voor het beste resultaat raden wij aan vloeibaar
wasmiddel in het doseerbakje te gieten.
. Met het programma Wol
Voorbereiden van het wasgoed
Vouw beddengoed open voordat u het in de
machine laadt.
Scheidt het wasgoed volgens het type stof (sym-
bool op het etiket van het kledingstuk) en de kleur.
Let er goed op dat u de bonte was scheidt van de
witte was;
Leeg de zakken en controleer de knopen;
Overschrijdt nooit het gewicht dat wordt aangegeven in
de Programmatabel wat geldt voor droog wasgoed.
Hoeveel weegt het wasgoed?
1 laken 400-500 g.
1 kussensloop 150-200 g.
1 tafellaken 400-500 g.
1 badjas 900-1200 g.
1 handdoek 150-250 g.
1 spijkerbroek 400-500 g.
1 overhemd/blouse 150-200 g.
Wastips
Overhemden/blouses: gebruik dit programma om
overhemden/blouses van verschillende soorten stof en kleur
te wassen. Dit programma is hier speciaal voor ontwikkeld.
Zijde: gebruik het speciale programma om alle zijden
kledingstukken te wassen. We raden u aan een
speciaal wasmiddel voor fijne was te gebruiken.
Gordijnen: vouw de gordijnen en doe ze in de bij-
geleverde zak. Gebruik het programma "Zijde".
Gestikte dekens: om dekens met een synthetische
bekleding te wassen moet u de bijgeleverde zak
gebruiken en het programma "Dons" instellen.
Handdoeken en beddengoed: met deze wasautomaat
kunt u al uw linnengoed in een enkele cyclus wassen:
7-dagen linnengoed. Dit programma optimaliseert het
gebruik van de wasverzachter en bespaart tijd en energie.
Het beste is om hierbij waspoeder te gebruiken.
Moeilijke vlekken: het beste kunt u moeilijke vlekken
voorbehandelen met een stuk zeep voor u ze in de
wasautomaat doet en het programma Katoen met
voorwas gebruiken.
Balanceersysteem van de lading
Om overmatige trillingen te vermijden verdeelt de
automaat de lading voor het centrifugeren op een
gelijkmatige manier. Dit gebeurt door de trommel te
laten draaien op een snelheid die iets hoger ligt dan
de wassnelheid. Als, na herhaaldelijke pogingen, de
lading nog steeds niet goed is gebalanceerd, zal de
wasautomaat de centrifuge op een lagere snelheid
uitvoeren dan die voorzien was.
Als de lading zeer uit balans is zal de wasautomaat
een verdeling uitvoeren in plaats van een centrifuge.
Teneinde een betere distributie van de waslading en
een juiste balancering te bereiken raden wij u aan
kleine en grote kledingstukken te mengen.
44
Page 45

Voorzorgsmaatregelen
en advies
Deze wasautomaat is ontworpen en uitgevoerd
volgens de internationale veiligheidsnormen. Deze
aanwijzingen zijn om veiligheidsredenen geschreven
en moeten aandachtig worden doorgenomen.
Algemene veiligheid
Dit apparaat is uitsluitend ontworpen voor huishou-
delijk niet-professioneel gebruik.
De wasautomaat mag alleen door volwassenen
worden gebruikt en volgens de instructies in deze
handleiding.
Raak de machine niet aan als u blootsvoets bent
of met natte of vochtige handen of voeten.
Trek de stekker nooit uit het stopcontact door aan
het snoer te trekken, maar altijd door de stekker
beet te pakken.
Raak het afvoerwater niet aan aangezien het zeer
heet kan zijn.
Forceer nooit de deur van de wasautomaat: het
veiligheidsmechanisme dat een ongewild openen
ervan voorkomt, zou kunnen worden beschadigd.
Probeer in geval van storingen nooit zelf interne
mechanismen van de automaat te repareren.
Zorg ervoor dat kleine kinderen niet te dicht bij de
automaat komen als deze in werking is.
Als het apparaat verplaatst moet worden doe dit
dan met twee of drie personen tegelijk en heel
voorzichtig. Doe dit nooit alleen want het apparaat
is erg zwaar.
Voordat u het wasgoed in de wasautomaat laadt,
moet u controleren of hij leeg is.
Afvalverwijdering
Het afvoeren van het verpakkingsmateriaal:
houd u zich aan de plaatselijke normen zodat het
materiaal gerecycled kan worden.
Handmatige opening van het deurtje
Mocht er in het huis geen stroom aanwezig zijn en u
wilt het deurtje openen om de was op te hangen,
dan dient u het volgende te doen:
1. haal de stekker uit het
stopcontact.
2. controleer dat het
waterniveau in de auto-
20
maat lager is dan het
deurtje; als dat niet het
geval is kunt het water
weg laten lopen door
middel van de afvoerbuis
en dit opvangen in een
emmer, zoals aangegeven
in de afbeelding.
3. verwijder het afdekpaneel aan de voorkant
van de wasautomaat met
behulp van een
schroevendraaier (zie
afbeelding).
4. trek het lipje dat wordt
aangegeven in de afbeelding naar voren totdat het
plastic bandje loskomt;
trek hem daarna naar
beneden totdat u klik
hoort, wat aangeeft dat de
deur is geopend.
NL
De Europese Richtlijn 2002/96/EC over Vernieti
ging van Electrische en Electronische Apparatuur,
vereist dat oude huishoudelijke electrische appa
raten niet mogen vernietigd via de normale
ongesorteerde afvalstroom. Oude apparaten
moeten apart worden ingezameld om zo het
hergebruik van de gebruikte materialen te optima
liseren en de negatieve invloed op de gezondheid
en het milieu te reduceren. Het symbool op het
product van de afvalcontainer met een kruis
erdoor herinnert u aan uw verplichting, dat
wanneer u het apparaat vernietigt, het apparaat
apart moet worden ingezameld.
Consumenten moeten contact opnemen met de
locale autoriteiten voor informatie over de juiste
wijze van vernietiging van hun oude apparaat.
5. open de deur; als dat
niet lukt moet u de handeling herhalen.
6. monteer het paneel weer; zorg dat de haakjes in
de juiste openingen zitten voordat u het paneel tegen
de automaat aandrukt.
45
Page 46

Onderhoud en verzorging
NL
Afsluiten van water en stroom
Sluit na iedere wasbeurt de kraan af. Hiermee
beperkt u slijtage van de waterinstallatie van de
wasautomaat alsmede lekkagegevaar.
Sluit altijd eerst de stroom af voordat u de was-
automaat schoonmaakt en gedurende
onderhoudswerkzaamheden.
Reinigen van de wasautomaat
De buitenkant en de rubberen onderdelen kunnen
met een spons en een lauw sopje worden schoongemaakt. Gebruik nooit oplosmiddelen of schuurmiddelen.
Reinigen van het wasmiddelbakje
Verwijder het laatje door op
het hendeltje (1) te drukken en het naar voren te
trekken (2) (zie afbeelding).
Was het onder stromend
water: dit moet u regelmatig doen.
Toegang tot het voorvakje:
1. verwijder het afdekpaneel aan de voorkant
van de wasautomaat met
behulp van een schroevendraaier (zie afbeelding);
2. plaats een bakje om het
water op te vangen dat
eruit zal lopen (circa 1,5 l)
(zie afbeelding);
3. Draai het deksel eraf,
tegen de klok in (zie
afbeelding);
4. maak de binnenkant goed schoon;
5. schroef het deksel er weer op;
6. monteer het paneel weer, met de haakjes goed
bevestigd in de juiste openingen voordat u het paneel
tegen de machine aandrukt.
Verzorging van de trommel
Laat de deur van de wasautomaat altijd op een
kier staan om te voorkomen dat er nare luchtjes
worden gevormd.
Reinigen van de pomp
De wasautomaat is voorzien van een zelfreinigende
pomp en hoeft dus niet te worden onderhouden. Het
kan echter gebeuren dat kleine voorwerpen (muntjes,
knopen) in het voorvakje, dat de pomp beschermt en
zich aan de onderkant ervan bevindt, terechtkomen.
Verzekert u zich ervan dat de wascyclus klaar is en
haal de stekker uit het stopcontact.
Controleren van de watertoevoerbuis
Controleer minstens een keer per jaar de watertoevoerbuis. Als er barstjes of scheuren in zitten moet
hij vervangen worden: gedurende het wassen kan de
hoge waterdruk onverwachts breuken veroorzaken.
46
Page 47

Storingen en oplossingen
Het kan gebeuren dat het apparaat niet werkt. Voor u contact opneemt met de Servicedienst (zie Service) moet u
controleren of het niet een storing betreft die uzelf makkelijk kunt verhelpen met behulp van de volgende lijst.
Storingen:
De wasautomaat
gaat niet aan.
De wascyclus
start niet.
De wasautomaat heeft geen
watertoevoer.
De wasautomaat blijft water
aan- en afvoeren.
Mogelijke oorzaken / Oplossing:
De stekker zit niet in het stopcontact of niet diep genoeg
om contact te maken.
Er is in het hele huis geen stroom.
De deur is niet goed dicht.
De START/PAUSE toets is niet ingedrukt.
De waterkraan is niet open.
De watertoevoerbuis is niet aangesloten op de kraan.
De slang is gebogen.
De waterkraan is niet open.
In huis is geen water.
Er is onvoldoende druk.
De START/PAUSE toets is niet ingedrukt.
De afvoerbuis is niet op 65 tot 100 cm afstand van de grond af geïnstalleerd
(zie Installatie).
Het uiteinde van de afvoerbuis ligt onder water (zie Installatie).
Als u op een van de hoogste verdiepingen van een flatgebouw woont kan
zich een hevelingsprobleem voordoen, waarbij de wasautomaat voortdu-
rend water aan- en afvoert. Om deze storing te verhelpen zijn er in de
handel speciale beluchters te koop.
De afvoer in de muur heeft geen ontluchting.
NL
De wasautomaat voert geen
water af of centrifugeert niet.
De wasautomaat trilt
erg tijdens de centrifuge.
De wasautomaat lekt.
De symbolen van Fase in voortgang knipperen snel, tegelijk met
het controlelampje AAN/UIT.
Er ontstaat teveel schuim.
De deur van het apparaat is
geblokkeerd.
Het programma voorziet geen afvoer: bij enkele programmas moet dit met
de hand worden gestart (zie Programmas en opties).
De optie Gemakkelijker strijken is actief: voor het beëindigen van het pro-
gramma drukt u op de toets START/PAUSE (zie Programmas en opties).
De afvoerbuis is gebogen (zie Installatie).
De afvoerleiding is verstopt.
De trommel is bij het installeren niet goed gedeblokkeerd (zie Installatie).
De automaat staat niet goed recht (zie Installatie).
De automaat staat te krap tussen meubels en muur (zie Installatie).
De waslading is niet gebalanceerd (zie Beschrijving van de wasautomaat).
De slang van de watertoevoer is niet goed aangeschroefd (zie Installatie).
Het wasmiddelbakje is verstopt (voor reiniging zie Onderhoud en verzorging).
De afvoerbuis is niet goed aangesloten (zie Installatie).
Doe de automaat uit en haal de stekker uit het stopcontact. Wacht circa 1
minuut en doe hem weer aan.
Als de storing voortzet, dient u de Servicedienst in te schakelen.
Het wasmiddel is niet bedoeld voor wasautomaten (er moet voor was-
automaat, handwas en machinewas, of dergelijke op staan).
U heeft teveel wasmiddel gebruikt.
Voer een handmatige deblokkering uit (zie Voorzorgsmaatregelen en advies).
Als na deze controles het probleem nog niet is opgelost, moet u de waterkraan afsluiten, de wasautomaat uitdoen en de Servicedienst bellen.
47
Page 48

Service
NL
Voordat u Servicedienst inschakelt:
Controleer eerst of u het probleem zelf kunt oplossen (zie Storingen en oplossingen);
Start het programma opnieuw om te controleren of de storing is verholpen;
Als dit niet het geval is, kunt u contact opnemen met de erkende Servicedienst.
In het geval de automaat verkeerd is geïnstalleerd of u hem niet correct heeft gebruikt zal u gevraagd worden de
reparatiekosten te betalen.
Wendt u nooit tot een niet erkende installateur.
Vermeld:
het type storing;
het model van de machine (Mod.);
het serienummer (S/N).
Deze laatste gegevens vindt u op het typeplaats op het apparaat.
48
Page 49

ПдзгЯет чсЮузт
РЛХНФЗСЙП СПХЧЩН
GR
ЕллзнйкЬ
AQUALTIS
AQXGF 169
Ресйечьменб
ЕгкбфЬуфбуз, 50-51
БрпухукехбуЯб кбй псйжпнфЯщуз
ХдсбхлйкЭт кбй злекфсйкЭт ухндЭуейт
ФечнйкЬ уфпйчеЯб
РесйгсбцЮ фзт рлхнфЮсйп, 52-53
РЯнбкбт елЭгчпх
Рщт дйенесгеЯфбй Энбт кэклпт рлхуЯмбфпт, 54
РспгсЬммбфб кбй дхнбфьфзфет, 55
РЯнбкбт РспгсбммЬфщн
Дхнбфьфзфет рлхуЯмбфпт
БрпссхрбнфйкЬ кбй мрпхгЬдб, 56
Брпссхрбнфйкь
РспефпймбуЯб фзт мрпхгЬдбт
УхмвпхлЭт рлхуЯмбфпт
Уэуфзмб йупуфЬимйузт фпх цпсфЯпх
РспцхлЬоейт кбй ухмвпхлЭт, 57
ГенйкЮ буцЬлейб
ДйЬиеуз
Чейспнбкфйкь Ьнпйгмб фзт рьсфбт
GR
УхнфЮсзуз кбй цспнфЯдб, 58
Брпклейумьт неспэ кбй злекфсйкпэ сеэмбфпт
Кбибсйумьт фзт рлхнфЮсйп
Кбибсйумьт фпх ухсфбсйпэ брпссхрбнфйкюн
ЦспнфЯдб фпх кЬдпх
Кбибсйумьт фзт бнфлЯбт
¸легчпт фпх ущлЮнб фспцпдпуЯбт фпх неспэ
БнщмблЯет кбй лэуейт, 59
ХрпуфЮсйоз, 60
49
Page 50

ЕгкбфЬуфбуз
GR
ЕЯнбй узмбнфйкь нб дйбфзсЮуефе фп егчейсЯдйп бхфь гйб
нб мрпсеЯфе нб фп ухмвпхлеэеуфе прпйбдЮрпфе уфйгмЮ.
Уе ресЯрфщуз рюлзузт, рбсбчюсзузт Ю мефбкьмйузт,
вевбйщиеЯфе ьфй рбсбмЭней мбжЯ ме фп рлхнфЮсйп.
ДйбвЬуфе рспуекфйкЬ фйт пдзгЯет: хрЬсчпхн
узмбнфйкЭт рлзспцпсЯет гйб фзн егкбфЬуфбуз, фз
чсЮуз кбй фзн буцЬлейб.
Уфз убкпхлЯфуб рпх ресйЭчей фп егчейсЯдйп бхфь
иб всеЯфе, екфьт фзт еггэзузт, хлйкЬ рпх
чсзуймеэпхн гйб фзн егкбфЬуфбуз.
БрпухукехбуЯб кбй псйжпнфЯщуз
БрпухукехбуЯб
1. Бцпэ брпухукехбуфеЯ фп рлхнфЮсйп, елЭгофе бн
Эчей хрпуфеЯ жзмйЭт кбфЬ фз мефбцпсЬ.
Бн Эчей хрпуфеЯ жзмйЭт мзн фп ухндЭефе кбй
ерйкпйнщнЮуфе ме фпн мефбрщлзфЮ.
2. БцбйсЭуфе фйт 4
рспуфбфехфйкЭт вЯдет
гйб фз мефбцпсЬ кбй фпн
учефйкь брпуфЬфз рпх
всЯукпнфбй уфп рЯущ
мЭспт(влЭре ейкьнб).
Уе ресЯрфщуз мпкЭфбт Ю фЬрзфб, схимЯуфе фб
рпдбсЬкйб Эфуй юуфе нб хцЯуфбфбй кЬфщ брь фп
рлхнфЮсйп бскефьт чюспт гйб фпн бесйумь.
ХдсбхлйкЭт кбй злекфсйкЭт ухндЭуейт
Уэндеуз фпх ущлЮнб фспцпдпуЯбт фпх неспэ
Рсйн ухндЭуефе фп ущлЮнб фспцпдпуЯбт уфп дЯкфхп
эдсехузт, бцЮуфе нб фсЭоей фп несь мЭчсй нб вгей дйбхгЭт.
1. УхндЭуфе фп ущлЮнб
фспцпдпуЯбт уфп
рлхнфЮсйп вйдюнпнфЬт
фпн уфзн бнфЯуфпйчз
еЯупдп неспэ, уфп рЯущ
мЭспт ерЬнщ деойЬ
(влЭре ейкьнб).
2. ЕйуЬгефе фзн фуймпэчб
A рпх ресйЭчефбй уфз
убкпхлЯфуб уфп Ьксп
фпх ущлЮнб фспцпдпуЯбт
кбй вйдюуфе фз уе Энб
A
кспхнь ксэпх неспэ ме
уфьмйп урейсюмбфпт 3/4
gas (влЭре ейкьнб).
3. КлеЯуфе фйт прЭт ме фб рлбуфйкЬ рюмбфб рпх
ресйЭчпнфбй уфз убкпхлЯфуб.
4. ЦхлЬофе ьлб фб кпммЬфйб. Бн фп рлхнфЮсйп чсейбуфеЯ
нб мефбцесиеЯ, иб рсЭрей нб обнбмпнфбсйуфпэн гйб фзн
брпцхгЮ еущфесйкюн влбвюн.
Пй ухукехбуЯет ден еЯнбй рбйчнЯдйб гйб мйксЬ рбйдйЬ!
ЕхихгсЬммйуз рлхнфзсЯпх
1. ФпрпиефЮуфе фп рлхнфЮсйп уе Энб дЬредп
ерЯредп кбй бниекфйкь, чщсЯт нб фп бкпхмрЮуефе уе
фпЯчпхт Ю Эрйрлб.
2. БнфйуфбимЯуфе фйт
бнщмблЯет оевйдюнпнфбт Ю
вйдюнпнфбт фб рпдбсЬкйб
Эщт ьфпх з рлхнфЮсйп
блцбдйбуфеЯ (ден рсЭрей
нб клЯней ресйууьфесп брь
2 мпЯсет).
¸нб ерймелЭт блцЬдйбумб дЯней уфбиесьфзфб кбй
брпупвеЯ дпнЮуейт кбй ипсхвьфзфб кхсЯщт уфз цЬуз
уфхшЯмбфпт.
3. РспуЭофе юуфе уфп ущлЮнб нб мзн хрЬсчпхн пэфе
рфхчюуейт кбй пэфе уфенюуейт.
З рЯеуз неспэ фпх кспхнпэ рсЭрей нб кхмбЯнефбй
мефбоэ фщн фймюн фпх рЯнбкб ФечнйкЬ уфпйчеЯб (влЭре
уелЯдб дЯрлб).
Бн фп мЮкпт фпх ущлЮнб фспцпдпуЯбт ден ербскеЯ,
брехихниеЯфе уе Энб ейдйкехмЭнп кбфЬуфзмб Ю уе
еопхуйпдпфзмЭнп фечнйкь.
Мз чсзуймпрпйеЯфе рпфЭ чсзуймпрпйзмЭнпхт Ю
рблйпэт ущлЮнет фспцпдпуЯбт, бллЬ екеЯнпхт рпх
рбсЭчпнфбй ме фз рлхнфЮсйп.
50
Page 51

Уэндеуз фпх ущлЮнб бдейЬумбфпт
УхндЭуфе фп ущлЮнб
бдейЬумбфпт уе мйб
ущлЮнщуз бдейЬумбфпт
Ю уе мйб ерйфпЯчйб
рбспчЭфехуз уе эшпт
65 - 100 cm
брь фп Эдбцпт мефбоэ
65 кбй 100 cm кбй
брпцеэгпнфбт сзфЬ нб
фпн дйрлюуефе.
ЕнбллбкфйкЬ, уфзсЯофе
фп ущлЮнб бдейЬумбфпт
уфп чеЯлпт еньт нйрфЮсб
Ю мйбт лекЬнзт, дЭнпнфбт
фпн пдзгь рпх убт
рбсЭчефбй уфпн кспхнь
(влЭре ейкьнб).
Фп елеэиесп Ьксп фпх
ущлЮнб бдейЬумбфпт ден
рсЭрей нб рбсбмЭней
вхийумЭнп уфп несь.
Мз чсзуймпрпйеЯфе рспекфЬуейт кбй рплэрсйжб.
Фп кблюдйп ден рсЭрей нб цЭсей рфхчЭт Ю нб еЯнбй
ухмрйеумЭнп.
Фп кблюдйп фспцпдпуЯбт кбй фп вэумб рсЭрей нб
бнфйкбиЯуфбнфбй мьнп брь еопхуйпдпфзмЭнпхт
фечнйкпэт.
РспупчЮ! З ерйчеЯсзуз брпрпйеЯфбй кЬие ехиэнзт
уе ресЯрфщуз рпх ден фзспэнфбй бхфпЯ пй кбньнет.
GR
Ден ухнйуфЬфбй з чсЮуз рспекфЬуещн ущлЮнщн. Бн
брбйфеЯфбй, з рспЭкфбуз рсЭрей нб Эчей фзн Ядйб
дйЬмефсп фпх бсчйкпэ ущлЮнб кбй нб мзн оереснЬей
фб 150 cm.
ЗлекфсйкЮ уэндеуз
Рсйн ейуЬгефе фп вэумб уфзн злекфсйкЮ рсЯжб,
вевбйщиеЯфе ьфй:
з рсЯжб дйбиЭфей геЯщуз кбй фзсеЯ фйт ек фпх ньмпх
рспдйбгсбцЭт;
З рсЯжб нб еЯнбй уе иЭуз нб хрпцЭсей фп мЭгйуфп
цпсфЯп йучэпт фпх мзчбнЮмбфпт, рпх бнбцЭсефбй
уфпн рЯнбкб Фечнйкюн уфпйчеЯщн (влЭре дЯрлб);
З фЬуз фспцпдпуЯбт нб кхмбЯнефбй мефбоэ фщн
фймюн рпх бнбцЭспнфбй уфпн рЯнбкб Фечнйкюн
уфпйчеЯщн (влЭре дЯрлб);
З рсЯжб нб еЯнбй ухмвбфЮ ме фп вэумб фпх
рлхнфзсЯпх. Уе бнфЯиефз ресЯрфщуз,
бнфйкбфбуфЮуфе фзн рсЯжб Ю фп вэумб.
Фп рлхнфЮсйп ден егкбиЯуфбфбй уе бнпйчфь чюсп,
бкьмз кбй бн п чюспт еЯнбй кблхммЭнпт, дйьфй еЯнбй
рплэ ерйкЯндхнп нб фп бцЮнефе екфеиеймЭнп уе вспчЮ
кбй кбкпкбйсЯб.
Ме фзн егкбфЬуфбуз фпх рлхнфзсЯпх, з рсЯжб
сеэмбфпт рсЭрей нб еЯнбй еэкплб рспувЬуймз.
ФечнйкЬ уфпйчеЯб
МпнфЭлп
ДйбуфЬуейт
Чщсзфйкьфзфб
ЗлекфсйкЭт
ухндЭуейт
УхндЭуейт неспэ
Фбчэфзфб
уфхшЯмбфпт
РспгсЬммбфб
елЭгчпх уэмцщнб
ме фпн кбнпнйумь
EN 60456
AQXGF 169
рлЬфпт cm 59,5
эшпт cm 85
вЬипт cm 64,5
áðü 1 Ýùò 9 kg
ВлЭре фзн рйнбкЯдб
чбсбкфзсйуфйкюн ерЯ фзт мзчбнЮт
мЭгйуфз рЯеуз 1 MPa (10 bar)
ЕлЬчйуфз рЯеуз 0,05 MPa (0,5 bar)
чщсзфйкьфзфб фпх кЬдпх 62 лЯфсб
мЭчсй 1600 уфспцЭт фп лерфь
рсьгсбммб
иесмпксбуЯб 60°C;
екфелпэменп ме 9 kg мрпхгЬдбт.
З ухукехЮ бхфЮ еЯнбй уэмцщнз
ме фйт бкьлпхиет пйнпфйкЭт
ПдзгЯет:
- 89/336/CEE фзт 03/05/89
(ЗлекфспмбгнзфйкЮ Ухмвбфьфзфб)
кбй мефбгенЭуфесет фспрпрпйЮуейт
- 2002/96/CE
- 2006/95/CE (ЧбмзлЮ ФЬуз)
ВБМВБKЕСБ ЛЕХKБ;
51
Page 52

РесйгсбцЮ фзт рлхнфЮсйп
GR
РПСФБ
ЛБВЗ РПСФБУ
РЕЛМБ
РЙНБКБУ
ЕЛЕГЧПХ
СХИМЙЖПМЕНБ
РПДБСБКЙБ
РПСФБ
ИЗКЗ БРПССХРБНФЙКЩН
Гйб нб бнпЯоефе фзн рьсфб
чсзуймпрпйеЯфе рЬнфб фз
учефйкЮ лбвЮ (влЭре
ейкьнб).
20
1
2
лекбнЯфуб гйб рсьуиефб: гйб мблбкфйкь Ю хгсЬ
рсьуиефб. УхуфЮнефбй нб мзн оереснЬфе рпфЭ фз
мЭгйуфз уфЬимз рпх хрпдейкнэефбй брь фз учЬсб
кбй нб бсбйюнефе ухмрхкнщмЭнб мблбкфйкЬ.
ВсЯукефбй уфп еущфесйкь
фзт рлхнфЮсйп кбй Эчефе
рсьувбуз бнпЯгпнфбт фзн
рьсфб.
Гйб фз дпуплпгЯб фщн
брпссхрбнфйкюн влЭре фп
кецЬлбйп БрпссхрбнфйкЬ
кбй мрпхгЬдб.
1. лекбнЯфуб гйб фзн
рсьрлхуз: чсзуймпрпйеЯфе
брпссхрбнфйкь уе укьнз.
2. лекбнЯфуб гйб фп рлэуймп:
чсзуймпрпйеЯфе
брпссхрбнфйкь уе укьнз Ю
хгсь. Уфзн фелехфбЯб
ресЯрфщуз рспфеЯнефбй нб
фп чэнефе бмЭущт мефЬ фзн
еккЯнзуз фпх рлхнфзсЯпх.
52
Page 53

РЯнбкбт елЭгчпх
ЕрйлпгЭбт
РСПГСБММБФЩН
КпхмрйЬ кбй ЕндейкфйкЭт
ЛхчнЯет ДХНБФПФЗФЕУ
ЕйкпнЯдйб
ЦБУЕЙУ
РЛХУЙМБФПУ
GR
КпхмрЯ ме ендейкфйкь
цщфЬкй START/
PAUSE
КпхмрЯ ме ендейкфйкь
цщфЬкй БНБММБ/
УВЗУЙМП кбй
БКХСЩУЗ
КпхмрЯ ме ендейкфйкь цщфЬкй БНБММБ УВЗУЙМП кбй
БКХСЩУЗ: рйЭуфе уфйгмйбЯб фп кпхмрЯ гйб нб бнЬшей Ю нб
увЮуей з рлхнфЮсйп. Фп рсЬуйнп ендейкфйкь цщфЬкй деЯчней
ьфй з рлхнфЮсйп еЯнбй бнбммЭнз. Гйб нб увЮуефе фп
рлхнфЮсйп кбфЬ фп рлэуймп рсЭрей нб ксбфЬфербфзмЭнп
фп кпхмрЯ рйп рплэ, ресЯрпх 2 sec. УфйгмйбЯп Ю фхчбЯп
рЬфзмб ден ерйфсЭрей фп увЮуймп фзт рлхнфЮсйп.
Фп увЮуймп фзт рлхнфЮсйп кбфЬ фп рлэуймп уе еоЭлйоз
бкхсюней фп Ядйп фп рлэуймп.
ЕрйлпгЭбт РСПГСБММБФЩН: мрпсеЯ нб уфсбцеЯ уе
бмцьфесет фйт кбфехиэнуейт. Гйб нб иЭуефе фп рлЭпн
ущуфь рсьгсбммб влЭре фпн РЯнбкб рспгсбммЬфщн.
КбфЬ фп рлэуймп п ерйлпгЭбт рбсбмЭней бкЯнзфпт.
РлЮкфсп
иесмпксбуЯб. З фймЮ емцбнЯжефбй брь фзн ерйкеЯменз
пиьнз (влЭре Рщт дйенесгеЯфбй Энбт кэклпт
рлхуЯмбфпт).
ИЕСМПКСБУЙБ: рбфЮуфе гйб нб бллЬоефе фз
РлЮкфсп
ИЕСМПКСБУЙБ
КпхмрЯ
УФХШЙМБФПУ
КпхмрЯ
ЕККЙНЗУЗ МЕ
ХУФЕСЗУЗ
ЕйкпнЯдйб ЦБУЕЙУ РЛХУЙМБФПУ: цщфЯжпнфбй деЯчнпнфбт
фзн рспюизуз фпх кэклпх (Рлэуймп
- Уфэшймп Фелйкь Ьдейбумб ).
З Эндейоз
КпхмрЯ ме ендейкфйкь цщфЬкй START/PAUSE: üôáí ôï
ендейкфйкь рсЬуйнп цщфЬкй бнбвпувЮней бсгЬ, рбфЮуфе фп
кпхмрЯ гйб фзн еккЯнзуз рлхуЯмбфпт. Ме фзн еккЯнзуз фпх
кэклпх фп ендейкфйкь цщфЬкй уфбиеспрпйеЯфбй. Гйб нб
иЭуефе мйб рбэуз уфп рлэуймп, рбфЮуфе ек нЭпх фп кпхмрЯ.
Фп ендейкфйкь цщфЬкй иб бнбвпувЮней ме рпсфпкблЯ
чсюмб. Бн фп ендейкфйкь цщфЬкй Рьсфб БуцблйумЭнз
еЯнбй увзуфь, мрпсеЯфе нб бнпЯоефе фзн рьсфб.
Гйб нб оекйнЮуей рЬлй фп рлэуймп брь фп узмеЯп дйбкпрЮт,
рбфЮуфе ек нЭпх фп кпхмрЯ.
Ендейкфйкь цщфЬкй
рьсфб еЯнбй буцблйумЭнз. Гйб нб бнпЯоефе фзн рьсфб рсЭрей
нб иЭуефе фпн кэклп уе рбэуз (влЭре ерьменз уелЯдб).
цщфЯжефбй ьфбн п кэклпт фелейюуей.
Ендейкфйкь
цщфЬкй ECO
Ендейкфйкь цщфЬкй
РПСФБ
БУЦБЛЙУМЕНЗ
РПСФБ БУЦБЛЙУМЕНЗ: деЯчней ьфй з
КпхмрЯ кбй
ендейкфйкь
цщфЬкй
БУЦБЛЙУЗУ
ЧЕЙСЙУФЗСЙЩН
- ОЭвгблмб
КпхмрЯ УФХШЙМП: рбфЮуфе гйб нб бллЬоефе Ю нб
брпклеЯуефе фп уфэшймп. З фймЮ емцбнЯжефбй брь фзн
ерйкеЯменз пиьнз (влЭреРщт дйенесгеЯфбй Энбт кэклпт
рлхуЯмбфпт).
КпхмрЯ
мйб еккЯнзуз ме хуфЭсзуз фпх рсперйлегмЭнпх
рспгсЬммбфпт. З фймЮ емцбнЯжефбй брь фзн ерйкеЯменз
пиьнз (влЭреРщт дйенесгеЯфбй Энбт кэклпт рлхуЯмбфпт).
КпхмрйЬ кбй ЕндейкфйкЬ цщфЬкйб ДХНБФПФЗФЕУI: гйб нб
ерйлЭоефе фйт дйбиЭуймет дхнбфьфзфет. Фп ендейкфйкь цщфЬкй фп
учефйкь ме фзн ерйлегмЭнз дхнбфьфзфб иб рбсбмеЯней
бнбммЭнп (влЭре Рщт дйенесгеЯфбй Энбт кэклпт
рлхуЯмбфпт).
ЕККЙНЗУЗ МЕ ХУФЕСЗУЗ: рбфЮуфе гйб нб иЭуефе
КпхмрЯ кбй ендейкфйкь цщфЬкй БУЦБЛЙУЗУ
ЧЕЙСЙУФЗСЙЩН: гйб фзн енесгпрпЯзуз Ю бренесгпрпЯзуз
фпх мрлпк фпх рЯнбкб елЭгчпх, ксбфЮуфе рбфзмЭнп фп
кпхмрЯ гйб ресЯрпх 2 дехфесьлерфб. Фп бнбммЭнп
ендейкфйкь цщфЬкй деЯчней ьфй п рЯнбкбт елЭгчпх еЯнбй
буцблйумЭнпт. Ме фпн фсьрп бхфьн рбсемрпдЯжпнфбй
фхчбЯет фспрпрпйЮуейт фщн рспгсбммЬфщн, кхсЯщт бн
уфп урЯфй хрЬсчпхн рбйдйЬ.
Ендейкфйкь цщфЬкй ECO: фп ейкпнЯдйп
бллЬжпнфбт фйт рбсбмЭфспхт рлхуЯмбфпт, ерйфехчиеЯ мйб
еопйкпньмзуз злекфсйкЮт енЭсгейбт фпхлЬчйуфпн 10%.
иб бнЬшей ьфбн,
53
Page 54

Рщт дйенесгеЯфбй Энбт кэклпт
рлхуЯмбфпт
GR
РБСБФЗСЗУЗ: фзн рсюфз цпсЬ рпх чсзуймпрпйеЯфе фп
рлхнфЮсйп, дйенесгЮуфе Энб кэклп рлхуЯмбфпт чщсЯт
спэчб бллЬ ме брпссхрбнфйкь, иЭфпнфбт фп рсьгсбммб
вбмвбкесюн 90° чщсЯт рсьрлхуз.
1. БНБШФЕ ФЗ РЛХНФЗСЙП. РбфЮуфе фп кпхмрЯ
фб ендейкфйкЬ цщфЬкйб иб бнЬшпхн гйб 1 дехфесьлерфп
мефЬ фп прпЯп иб рбсбмеЯней бнбммЭнп ухнечют мьнп
фп ендейкфйкь цщфЬкй фпх кпхмрйпэ
цщфЬкй START/PAUSE иб бнбвпувЮней бсгЬ.
2. ЦПСФЩУЗ СПХЧЩН. БнпЯофе фзн рьсфб. Цпсфюуфе фб
спэчб, рспуЭчпнфбт нб мзн оересЬуефе фзн рпуьфзфб
цпсфЯпх рпх хрпдейкнэефбй уфпн рЯнбкб
рспгсбммЬфщн фзт ерьмензт уелЯдбт.
3. ДПУПЛПГЙБ ФПХ БРПССХРБНФЙКПХ. ВгЬлфе фп ухсфЬсй
кбй чэуфе фп брпссхрбнфйкь уфйт бнфЯуфпйчет лекбнЯфует
ьрщт еозгеЯфбй уфзн РесйгсбцЮ фзт рлхнфЮсйп.
4. КЛЕЙУФЕ ФЗН РПСФБ.
5. ЕРЙЛЕОФЕ ФП РСПГСБММБ. УфсЭшфе фпн ЕРЙЛПГЕБ
РСПГСБММБФЩН рспт фб деойЬ Ю рспт фб бсйуфесЬ
мЭчсй нб ерйлЭоефе фп ерйихмзфь рсьгсбммб.
БнфйуфпйчЯжефбй мйб иесмпксбуЯб, мйб фбчэфзфб
уфхшЯмбфпт кбй мйб Энфбуз рлхуЯмбфпт рпх мрпспэн
нб фспрпрпйзипэн.
6. ЕОБФПМЙКЕХУЗ ФПХ КХКЛПХ РЛХУЙМБФПУ.
ЕнесгЮуфе уфб бнфЯуфпйчб кпхмрйЬ фпх рЯнбкб елЭгчпх:
, фп ендейкфйкь
. ¼ëá
ФспрпрпйЮуфе фз иесмпксбуЯб Ю/кбй фп уфэшймп. З
мзчбнЮ ерйлЭгей бхфьмбфб фйт мЭгйуфет рспвлерьменет
фймЭт иесмпксбуЯбт кбй уфхшЯмбфпт гйб фп феиЭн
рсьгсбммб кбй ухнерют ден мрпспэн нб бхозипэн.
Рбфюнфбт фп кпхмрЯ
иесмпксбуЯб мЭчсй фп рлэуймп уе ксэп несь ( ).
Рбфюнфбт фп кпхмрЯ мейюнефбй рсппдехфйкЬ фп
уфэшймп мЭчсй фпн брпклейумь фпх ( ). РесбйфЭсщ
рЬфзмб фщн кпхмрйюн ербнбцЭсей фйт фймЭт уфйт
мЭгйуфет рспвлерьменет.
мейюнефбй рсппдехфйкЬ з
ЕобЯсеуз: ерйлЭгпнфбт фп рсьгсбммб ВБМВБКЕСБ
ЛЕХКБ з иесмпксбуЯб мрпсеЯ нб бхозиеЯ мЭчсй 90°.
ИЭуфе мйб еккЯнзуз ме хуфЭсзуз.
Гйб нб иЭуефе фзн еккЯнзуз ме хуфЭсзуз фпх
рсперйлегмЭнпх рспгсЬммбфпт, рбфЮуфе рпллЭт
цпсЭт фп кпхмрЯ мЭчсй нб бнЬшей фп ендейкфйкь
цщфЬкй фп учефйкь ме фзн ерйихмзфЮ хуфЭсзуз
(брь1 Эщт 24 h).
Гйб фзн бренесгпрпЯзуз фзт лейфпхсгЯбт рбфЮуфе фп
кпхмрЯ мЭчсй нб емцбнйуфеЯ з Эндейоз
РБСБФЗСЗУЗ: Бцпэ рбфзиеЯ фп кпхмрЯ START/PAUSE
з фймЮ фзт хуфЭсзузт иб мрпсеЯ нб фспрпрпйзиеЯ мьнп
мейюнпнфЬт фзн.
.
ФспрпрпйЮуфе фб чбсбкфзсйуфйкЬ
фпх кэклпх.
РбфЮуфе фб кпхмрйЬ ДХНБФПФЗФЕУ гйб фзн
еобфпмЯкехуз фпх рлхуЯмбфпт бнЬлпгб ме фйт
рспущрйкЭт убт бнЬгкет.
РбфЮуфе фп кпхмрЯ гйб фзн енесгпрпЯзуз фзт
дхнбфьфзфбт Иб бнЬшей фп учефйкь ендейкфйкь цщфЬкй.
РбфЮуфе ек нЭпх фп кпхмрЯ гйб фзн
бренесгпрпЯзуз фзт дхнбфьфзфбт. Фп ендейкфйкь
цщфЬкй иб увЮуей.
Бн з ерйлегмЭнз дхнбфьфзфб ден еЯнбй ухмвбфЮ ме фп
феиЭн рсьгсбммб, фп ендейкфйкь цщфЬкй иб
бнбвпувЮней кбй з дхнбфьфзфб ден иб енесгпрпйзиеЯ.
Бн з ерйлегмЭнз дхнбфьфзфб ден еЯнбй ухмвбфЮ ме мйб
Ьллз рпх ерелЭгз рспзгпхмЭнщт, фп учефйкь цщфЬкй
фзт рсюфзт ерйлегмЭнзт дхнбфьфзфбт иб бнбвпувЮней
кбй иб енесгпрпйзиеЯ мьнп з деэфесз, фп ендейкфйкь
цщфЬкй фпх кпхмрйпэ иб уфбиеспрпйзиеЯ.
7. ЕККЙНЗУЗ ФПХ РСПГСБММБФПУ. РбфЮуфе фп
кпхмрЯ START/PAUSE. Фп учефйкь ендейкфйкь цщфЬкй
иб уфбиеспрпйзиеЯ кбй з рьсфб иб буцблйуфеЯ
(ендейкфйкь цщфЬкй РПСФБУ БУЦБЛЙУМЕНЗУ
бнбммЭнп). Фб ейкпнЯдйб фб учефйкЬ ме фйт цЬуейт
рлхуЯмбфпт иб цщфйуфпэн кбфЬ фпн кэклп деЯчнпнфбт
фзн уе еоЭлйоз цЬуз. Гйб нб бллЬоефе Энб рсьгсбммб
енюеЯнбй уе еоЭлйоз Энбт кэклпт, иЭуфе фп рлхнфЮсйп уе
рбэуз рйЭжпнфбт фп кпхмрЯ START/PAUSE. Кбфьрйн
ерйлЭофе фпн ерйихмзфь кэклп кбй рбфЮуфе ек нЭпх фп
кпхмрЯ START/PAUSE.
Гйб нб бнпЯоефе фзн рьсфб еню еЯнбй уе еоЭлйоз Энбт
кэклпт рбфЮуфе фп кпхмрЯ START/PAUSE. Бн фп
ендейкфйкь цщфЬкй РПСФБУ БУЦБЛЙУМЕНЗУ
увзуфь иб мрпсеЯфе нб бнпЯоефе фзн рьсфб. РбфЮуфе
ек нЭпх фп кпхмрЯ START/PAUSE гйб нб оекйнЮуей рЬлй
фп рсьгсбммб брь фп узмеЯп дйбкпрЮт.
8. ФЕЛПУ ФПХ РСПГСБММБФПУ. Хрпдейкнэефбй брь
фзн Эндейоз END бнбммЭнз. З рьсфб иб мрпсеЯ нб
бнпЯоей бмЭущт. Бн фп ендейкфйкь цщфЬкй START/
PAUSE бнбвпувЮней, рбфЮуфе фп кпхмрЯ гйб нб
фелейюуей п кэклпт. БнпЯофе фзн рьсфб, бдейЬуфе фб
спэчб кбй увЮуфе фз рлхнфЮсйп.
еЯнбй
Бн ерйихмеЯфе бн бкхсюуефе Энбн Юдз феиЭнфб кэклп,
рбфЮуфе ерЯ мбксьн фп кпхмрЯ
дйбкпреЯ кбй з мзчбнЮ иб увЮуей.
УБКЙДЙП ГЙБ РБРЛЩМБФБ, КПХСФЙНЕУ КБЙ
ЕХБЙУИЗФБ СПХЧБ
ЧЬсз уфп ейдйкь убкЯдйп рпх рбсЭчефбй, з Hotpoint/Ariston
упх дЯней фз дхнбфьфзфб нб рлЭнейт бкьмз кбй фб ехбЯуизфб
кбй бксйвЬ спэчб дйбуцблЯжпнфЬт фпхт фз мЭгйуфз
рспуфбуЯб.
УхуфЮнефбй нб чсзуймпрпйеЯфе уе кЬие ресЯрфщуз фп убкЯдйп
гйб фп рлэуймп рбрлщмЬфщн ме Ю чщсЯт рпэрпхлб ме
еощфесйкЮ ерЭндхуз брь ухниефйкь хлйкь.
. П кэклпт иб
54
Page 55

РспгсЬммбфб кбй
дхнбфьфзфет
РЯнбкбт рспгсбммЬфщн
Åéêï-
РесйгсбцЮ фпх РспгсЬммбфпт
нЯдйп
РспгсЬммбфб гйб ьлет фйт мЭсет
ВБМВБKЕСБ ЛЕХKБ
ВБМВБKЕСБ ЛЕХKБ:
ехбЯуизфб, рплэ лесщмЭнб.
ВБМВБKЕСБ ЧСЩМБФЙУФБ
УХНИЕФЙKБ ЕХБЙУИЗФБ
MIX 30':
елб цсЬ ле сщмЭнщн (ден ендеЯкнхфб й гйб мЬллйнб,
мефбощфЬ кбй спэчб рпх рлЭнпнфбй уфп чЭ сй).
ЕнесгзфйкЬ рспгсЬммбфб
РСПРЛХУЗ:
ЕйдйкЬ РспгсЬммбфб
РПХKБМЙУБ
МЕФБОЩФБ:
МБЛЛЙНБ:
РБРЛЩМБФБ:
êñå âá ôéïý êá é ìðÜ íéïõ.
ЕрЯ мЭспхт рспгсЬммбфб
ОЭвгблмб Бниекфйкюн
ОЭвгблмб ЕхбЯуизфщн
Гйб фп гсЮгпсп цсеукЬ сйумб спэчщн
лекЭдщн. (РспуиЭуфе фп брпссхрбнфйкь уфп
бнфЯуфпйчп дйбмЭсйумб).
ÓÕÍ ÈÅÔÉKÁ ÁÍÈ ÅKÔÉKÁ
рпэрпхлщн чЮнбт.
БУРСПСПХЧБ 7 ЗМЕСЩН:
Уфэшймп Бниекфйкюн
Уфэшймп ЕхбЯуизфщн
¢дейбумб
Гйб фзн бцбЯсеуз ерЯмпнщн
Гйб мефбощфЬ с пэчб, вйукьжз, лйнЬ.
Гйб мЬллйнб , cachemire, клр.
Гйб спэчб ме еущфесйкЮ ерЭндхуз
ЛехкЬ кбй чсщмбфйуфЬ
Гйб бурсьспхчб
МЭгйуфз
иесмпкс.
(°C )
60°
(Max 90°)
40° 1600
40° 1600
40° 800
30° 800
90° 1600
60° 800
40° 600
30° 0
40° 600
30° 1200
60° 1600
-
-
-
-
-
МЭгйуфз
фбчэфзфб
(óô ñïö Ý-
ò áíÜ
лерфь).
1600
1600
800
1600
800
0
БрпссхрбнфйкЬ
Рлэуймп Мблбкфйкь KбнпнйкьМемЯнй
ll
ll
ll
ll
ll
ll
ll
ll
ll
ll
ll
ll
-
-
--
--
--
МЭгйуфп ЦпсфЯп
l
l
(Kg)
цпсфЯп
94
94
94
42
3,5 1, 5
94
42
21
21
21
31, 5
94
94
42
94
42
94
ДйЬскейб
кэклпх
З дйЬскейб фпх кэклпх рлхуЯмбфпт еЯнбй емцбнЮт
уфзн шзцйбкЮ пиьнз.
GR
Фб уфпйчеЯб рпх бнбцЭспнфбй уфпн рЯнбкб еЯнбй ендейкфйкЬ.
Дхнбфьфзфет рлхуЯмбфпт
Super Wash
ЧЬсз уфз чсЮуз мегблэфесзт рпуьфзфбт неспэ уфзн
бсчйкЮ цЬуз фпх кэклпх кбй уфз чсЮуз ресйууьфеспх
чсьнп, з дхнбфьфзфб бхфЮ еобуцблЯжей Энб рлэуймп
хшзлюн ерйдьуещн.
Ден еЯнбй дйбиЭуймз уфб рспгсЬммбфб Mix 30,
МефбощфЬ, МЬллйнб, Рбрлюмбфб кбй ЕрЯ мЭспхт
рспгсЬммбфб.
Лйгьфесп УйдЭсщмб
ЕрйлЭгпнфбт фз дхнбфьфзфб бхфЮ, фп рлэуймп кбй фп
уфэшймп иб фспрпрпйзипэн кбфЬллзлб гйб фз меЯщуз
учзмбфйумпэ фублбкщмЬфщн. Уфп фЭлпт фпх кэклпх фп
рлхнфЮсйп иб дйенесгеЯ бсгЭт ресйуфспцЭт фпх кЬдпх.
Фб ендейкфйкЬ цщфЬкйб Лйгьфесп УйдЭсщмб кбй START/
PAUSE иб бнбвпувЮнпхн. Гйб фп рЭсбт фпх кэклпх
рбфЮуфе фп кпхмрЯ START/PAUSE Ю фп кпхмрЯ Лйгьфесп
УйдЭсщмб.
Уфп рсьгсбммб МефбощфЬ з рлхнфЮсйп иб фелейюуей фпн
кэклп ме фзн мрпхгЬдб уе мпэлйбумб кбй фп ендейкфйкь
цщфЬкй Лйгьфесп УйдЭсщмб иб бнбвпувЮней. Гйб нб
бдейЬуефе фп несь кбй нб мрпсеЯфе нб вгЬлефе фзн
мрпхгЬдб рсЭрей нб рбфЮуефе фп кпхмрЯ START/PAUSE
Ю фп кпхмрЯ Лйгьфесп УйдЭсщмб.
Ден еЯнбй дйбиЭуймз уфб рспгсЬммбфб МЬллйнб, Уфэшймп
бниекфйкюн, Уфэшймп ехбЯуизфщн кбй ¢дейбумб.
Extra ОЭвгблмб
ЕрйлЭгпнфбт фз дхнбфьфзфб бхфЮ бхоЬнефбй з
брпфелеумбфйкьфзфб фпх оевгЬлмбфпт кбй еобуцблЯжефбй
з мЭгйуфз брпмЬксхнуз фпх брпссхрбнфйкпэ. ЕЯнбй
чсЮуймп гйб ерйдесмЯдет йдйбЯфесб ехбЯуизфет уфб
брпссхрбнфйкЬ. УхнйуфЬфбй з чсЮуз фпх ме фп
рлхнфЮсйп уе рлЮсет цпсфЯп Ю ме фз чсЮуз хшзлюн
дьуещн брпссхрбнфйкпэ.
Ден еЯнбй дйбиЭуймп уфб рспгсЬммбфб Mix 30, Уфэшймп
бниекфйкюн, Уфэшймп ехбЯуизфщн кбй ¢дейбумб.
Mini цпсфЯп
УхнйуфЬфбй нб чсзуймпрпйеЯфе фз лейфпхсгЯб бхфЮ ьфбн фб
бурсьспхчб гйб рлэуймп еЯнбй Яуб Ю лйгьфесб брь фп
мйуь фпх мЭгйуфпх рспфейньменпх цпсфЯпх (влЭре РЯнбкб
рспгсбммЬфщн).
Ден еЯнбй дйбиЭуймп уфб рспгсЬммбфб, Уфэшймп
бниекфйкюн, Уфэшймп ехбЯуизфщн кбй ¢дейбумб.
55
Page 56

БрпссхрбнфйкЬ кбй мрпхгЬдб
GR
Брпссхрбнфйкь
З ерйлпгЮ кбй з рпуьфзфб фпх брпссхрбнфйкпэ еобсфюнфбй
брь фпн фэрп хцЬумбфпт (вбмвбкесЬ, мЬллйнб, мефбощфЬ...),
брь фп чсюмб, брь фз иесмпксбуЯб рлхуЯмбфпт, брь фп
вбимь всщмйЬт кбй брь фзн уклзсьфзфб фпх неспэ.
З кблЮ дпуплпгЯб фпх брпссхрбнфйкпэ брпупвеЯ
урбфЬлет кбй рспуфбфеэей фп ресйвЬллпн: бн кбй
вйпдйбурюменб, фб брпссхрбнфйкЬ ресйЭчпхн
уфпйчеЯб рпх бллпйюнпхн фзн йупсспрЯб уфз цэуз.
УхнйуфЬфбй:
з чсЮуз брпссхрбнфйкюн уе укьнз гйб спэчб
лехкЬ вбмвбкесЬ кбй гйб фзн рсьрлхуз.
нб чсзуймпрпйеЯфе хгсЬ брпссхрбнфйкЬ гйб
ехбЯуизфб спэчб вбмвбкесЬ кбй гйб ьлб фб
рспгсЬммбфб уе чбмзлЮ иесмпксбуЯб.
нб чсзуймпрпйеЯфе хгсЬ брпссхрбнфйкЬ брблЬ
гйб мЬллйнб кбй мефбощфЬ.
Мз чсзуймпрпйеЯфе брпссхрбнфйкЬ гйб фп рлэуймп
уфп чЭсй, дйьфй рбсЬгпхн рплэ бцсь.
Фп брпссхрбнфйкь рсЭрей нб чэнефбй рсйн фзн Энбсоз фпх
рлхуЯмбфпт уфзн бнфЯуфпйчз лекбнЯфуб, Ю нб фп вЬжефе
брехиеЯбт уфпн кЬдп. Уфзн ресЯрфщуз бхфЮ ден мрпсеЯфе
нб ерйлЭоефе фпн кэклп ВбмвбкесЬ ме рсьрлхуз.
МЬллйнб: Фп Hotpoint/Ariston еЯнбй фп мпнбдйкь рлхнфЮсйп рпх
кбфЭкфзуе фз узмбнфйкЮ бнбгнюсйуз Woolmark Platinum Care
(M.0508) ек мЭспхт фзт The Woolmark Company, рпх
рйуфпрпйеЯ фп рлэуймп уфп рлхнфЮсйп ьлщн фщн мЬллйнщн
спэчщн кбиют кбй екеЯнщн рпх цЭспхн фзн ефйкЭфб мьнп
рлэуймп уфп чЭсй
ухнерют фзн брьлхфз зсемЯб ьфй рлЭнефе уфп рлхнфЮсйп ьлб
фб мЬллйнб спэчб ме фзн еггэзуз фщн кблэфесщн ерйдьуещн.
Рбрлюмбфб: гйб нб рлэнефе спэчб ме гЭмйуз брь
рпэрпхлб чЮнбт ьрщт рбрлюмбфб «дйрлЬ» Ю мпнЬ (рпх
ден хресвбЯнпхн фб 3 кйлЬ вЬспхт), мбойлЬсйб, мрпхцЬн,
чсзуймпрпйЮуфе фп ухгкексймЭнп рсьгсбммб
«Рбрлюмбфб». УхуфЮнефбй нб вЬжефе фб рпхрпхлЭнйб уфпн
кЬдп дйрлюнпнфЬт фйт Ьксет рспт фб мЭуб (влЭре ейкьнет)
кбй нб мзн оереснЬфе фб ¾ фпх ьгкпх фпх Ядйпх фпх кЬдпх.
Гйб Энб вЭлфйуфп рлэуймп ухуфЮнефбй нб чсзуймпрпйеЯфе
хгсь брпссхрбнфйкь рпх иб фп дпуплпгеЯфе уфз иЮкз
брпссхрбнфйкпэ.
. Ме фп рсьгсбммб МЬллйнб Эчефе
РспефпймбуЯб фзт мрпхгЬдбт
Оедйрлюуфе кблЬ фб спэчб рсйн фб цпсфюуефе уфз мзчбнЮ.
ЧщсЯуфе фзн мрпхгЬдб бнЬлппгб ме фпн фэрп фпх хцЬумбфпт
(уэмвплп уфзн ефйкЭфб фпх спэчпх) кбй фп чсюмб рспуЭчпнфбт
нб чщсЯуефе фб чсщмбфйуфЬ спэчб брь фб лехкЬ;
Еккенюуфе фйт фуЭрет кбй елЭгофе фб кпхмрйЬ;
Мзн оереснЬфе фйт хрпдейкнхьменет фймЭт уфпн РЯнбкб
РспгсбммЬфщн уе учЭуз ме фп вЬспт фзт уфегнЮт мрпхгЬдбт.
Рьуп жхгЯжей з мрпхгЬдб;
1 уенфьнй 400-500 gr.
1 мбойлбспиЮкз 150-200 gr.
1 фсбрежпмЬнфзлп 400-500 gr.
1 мрпхснпэжй 900-1200 gr.
1 рефуЭфб 150-250 gr.
1 jeans 400-500 gr.
1 рпхкЬмйуп 150-200 gr.
УхмвпхлЭт рлхуЯмбфпт
РпхкЬмйуб: чсзуймпрпйЮуфе фп бнфЯуфпйчп рсьгсбммб
гйб нб рлэнефе рпхкЬмйуб дйбцьсщн ейдюн хцЬумбфпт
кбй чсюмбфпт. ЕобуцблЯжей фз мЭгйуфз цспнфЯдб.
МефбощфЬ: чсзуймпрпйЮуфе фп бнфЯуфпйчп рсьгсбммб гйб
нб рлэнефе ьлб фб мефбощфЬ спэчб. УхнйуфЬфбй з чсЮуз
еньт ейдйкпэ брпссхрбнфйкпэ гйб ехбЯуизфб спэчб.
КпхсфЯнет: рспфеЯнефбй нб фйт дйрлюнефе кбй нб фйт
вЬжефе уфпб рбсечьменп убкЯдйп. ЧсзуймпрпйЮуфе
фп рсьгсбммб МефбощфЬ.
РпхрпхлЭнйб: гйб нб рлэнефе рбрлюмбфб ме ухниефйкЮ
ерЭндхуз, чсзуймпрпйЮуфе фп рбсечьменп убкЯдйп кбй
иЭуфе фп рсьгсбммб Рбрлюмбфб.
Бурсьспхчб мрЬнйпх кбй эрнпх: фп рлхнфЮсйп
бхфь ерйфсЭрей фп рлэуймп фщн бурсьспхчщн ьлпх
фпх урйфйпэ уе Энб мпнбдйкь кэклп Бурсьспхчб 7
змесюн рпх велфйуфпрпйеЯ фз чсЮуз мблбкфйкпэ кбй
упх ерйфсЭрей еопйкпньмзуз чсьнпх кбй енЭсгейбт.
УхнйуфЬфбй з чсЮуз брпссхрбнфйкпэ уе укьнз.
ЛекЭдет рпх ерймЭнпхн: еЯнбй кбль нб реснЬфе
фпхт бниекфйкпэт лекЭдет ме хгсь убрпэнй рсйн фп
рлэуймп кбй нб чсзуймпрпйеЯфе фп рсьгсбммб
Вбмвбкесюн ме рсьрлхуз.
Уэуфзмб йупуфЬимйузт фпх цпсфЯпх
Рсйн брь кЬие уфэшймп, гйб нб брпцэгефе дпнЮуейт
хресвплйкЭт кбй гйб нб кбфбнеЯмефе пмпйьмпсцб фп
цпсфЯп, п кЬдпт дйенесгеЯ ресйуфспцЭт уе мйб фбчэфзфб
елбцсЬ бнюфесз екеЯнзт фпх рлхуЯмбфпт. Бн уфп фЭлпт
фщн дйбдпчйкюн рспурбиейюн фп цпсфЯп ден Эчей бкьмз
еойупсспрзиеЯ ущуфЬ з рлхнфЮсйп дйенесгеЯ фп уфэшймп
уе мйб фбчэфзфб чбмзльфесз фзт рспвлерьмензт.
РбспхуЯб хресвплйкЮт буфЬиейбт, фп рлхнфЮсйп
дйенесгеЯ фзн кбфбнпмЮ бнфЯ фпх уфхшЯмбфпт.
Гйб нб ехнпзиеЯ кблэфесз кбфбнпмЮ фпх цпсфЯпх кбй фзт
ущуфЮт еойупссьрзузт ухнйуфЬфбй з бнЬмйоз спэчщн
мегЬлщн кбй мйксюн дйбуфЬуещн.
56
Page 57

РспцхлЬоейт кбй
ухмвпхлЭт
Фп рлхнфЮсйп учедйЬуфзке кбй кбфбукехЬуфзке
уэмцщнб ме фпхт дйеинеЯт кбньнет буцблеЯбт.
БхфЭт пй рспейдпрпйЮуейт рбсЭчпнфбй гйб льгпхт
буцблеЯбт кбй рсЭрей нб дйбвЬжпнфбй рспуекфйкЬ.
ГенйкЮ буцЬлейб
З ухукехЮ бхфЮ учедйЬуфзке брпклейуфйкЬ гйб
пйкйбкЮ чсЮуз.
Фп рлхнфЮсйп рсЭрей нб чсзуймпрпйеЯфбй мьнп
брь енЮлйкб Ьфпмб кбй уэмцщнб ме фйт пдзгЯет
рпх бнбцЭспнфбй уфп рбсьн егчейсЯдйп.
Мзн бггЯжефе фп мзчЬнзмб ме гхмнЬ рьдйб Ю ме
фб чЭсйб Ю фб рьдйб всегмЭнб.
Мзн вгЬжефе фп вэумб брь фзн злекфсйкЮ рсЯжб
фсбвюнфбт фп кблюдйп, бллЬ нб рйЬнефе фзн рсЯжб.
Мзн бггЯжефе фп несь бдейЬумбфпт, бцпэ мрпсеЯ
нб цфЬуей уе хшзлЭт иесмпксбуЯет.
Мзн жпсЯжефе уе кбмЯб ресЯрфщуз фзн рьсфб: иб
мрпспэуе нб чблЬуей п мзчбнйумьт буцблеЯбт
рпх рспуфбфеэей фб фхчбЯб бнпЯгмбфб.
Уе ресЯрфщуз влЬвзт, уе кбмЯб ресЯрфщуз нб
мзн еремвбЯнефе уфпхт еущфесйкпэт мзчбнйумпэт
рспурбиюнфбт нб фзн ерйукехЬуефе.
Нб елЭгчефе рЬнфб фб рбйдйЬ юуфе нб мзн
рлзуйЬжпхн фз рлхнфЮсйп уе лейфпхсгЯб.
Бн рсЭрей нб мефбфпрйуфеЯ, ухнесгбуфеЯфе дэп Ю
фсЯб Ьфпмб ме фз мЭгйуфз рспупчЮ. РпфЭ мьнпй
убт гйбфЯ фп мзчЬнзмб еЯнбй рплэ вбсэ.
Рсйн ейуЬгефе фз мрпхгЬдб елЭгофе бн п кЬдпт
еЯнбй Ьдейпт.
ДйЬиеуз
ДйЬиеуз фпх хлйкпэ ухукехбуЯбт:
фзсеЯуфе фпхт фпрйкпэт кбнпнйумпэт, юуфе пй
ухукехбуЯет нб мрпспэн нб ербнбчсзуймпрпйзипэн.
З ехсщрбъкЮ пдзгЯб 2002/96/EK гйб фб Брьвлзфб
Злекфсйкпэ кбй Злекфспнйкпэ Еопрлйумпэ, брбйфеЯ
ьфй пй рблбйЭт пйкйбкЭт злекфсйкЭт ухукехЭт ден
рсЭрей нб брпвЬлпнфбй мбжЯ ме фб хрьлпйрб
брьвлзфб фпх дзмпфйкпэ дйкфэпх. Пй рблбйЭт
ухукехЭт рсЭрей нб ухллечипэн чщсйуфЬ
рспкеймЭнпх нб велфйуфпрпйзипэн з брпкбфЬуфбуз
кбй з бнбкэклщуз фщн хлйкюн рпх ресйЭчпхн кбй ме
укпрь фз меЯщуз фщн влбвесюн ерйрфюуещн уфзн
бнисюрйнз хгеЯб кбй фп ресйвЬллпн. Фп уэмвплп ме
фп дйегсбммЭнп дпчеЯп брпвлЮфщн уфп рспъьн
хренихмЯжей уе убт фзн хрпчсЭщуЮ убт, рщт ьфбн
ерйихмеЯфе нб рефЬоефе фз ухукехЮ ,рсЭрей нб
ухллечиеЯ чщсйуфЬ.
Пй кбфбнблщфЭт иб рсЭрей нб брехиэнпнфбй уфйт
фпрйкЭт бсчЭт Ю уфб кбфбуфЮмбфб лйбнйкЮт гйб
рлзспцпсЯет рпх бцпспэн фз ущуфЮ дйЬиеуз фщн
рблбйюн злекфсйкюн ухукехюн.
Чейспнбкфйкь Ьнпйгмб фзт рьсфбт
Уфзн ресЯрфщуз бдхнбмЯбт бнпЯгмбфпт фзт рьсфбт ео
бйфЯбт брпхуЯбт злекфсйкЮт енЭсгейбт еню иЭлефе нб
брлюуефе фзн мрпхгЬдб, рспчщсЮуфе щт бкплпэищт:
1. вгЬлфе фп вэумб брь
фзн злекфсйкЮ рсЯжб.
2. вевбйщиеЯфе ьфй з
уфЬимз фпх неспэ уфп
20
фпх ущлЮнб бдейЬумбфпт ухллЭгпнфЬт фп уе Энб
кпхвЬ ьрщт цбЯнефбй уфзнейкьнб.
6. обнбмпнфЬсефе фп рЬнел ьнфбт уЯгпхспй, рсйн фп
урсюоефе рспт фз рлхнфЮсйп, ьфй Эчефе ейуЬгей фб
гбнфжЬкйб уфйт бнфЯуфпйчет еупчЭт.
еущфесйкь фзт мзчбнЮт
еЯнбй чбмзльфесз уе
учЭуз ме фп Ьнпйгмб фзт
рьсфбт. Уе бнфЯиефз
ресЯрфщуз бцбйсЭуфе фп
уе ресЯууейб несь мЭущ
3. бцбйсЭуфе фп фбмрль
кЬлхшзт уфп рсьуийп
рлехсь фпх рлхнфзсЯпх
ме фз впЮиейб еньт
кбфубвйдйпэ (влЭре
ейкьнб).
4. чсзуймпрпйюнфбт фз
глщууЯфуб рпх цбЯнефбй
уфзн ейкьнб фсбвЮофе
рспт фЬ Эощ мЭчсй нб
елехиесюуефе фп
рлбуфйкь брь фп уфпр.
ФсбвЮофе фп бкплпэищт
рспт фб кЬфщ мЭчсй нб
бкпэуефе фп клйк рпх
деЯчней ьфй з рьсфб еЯнбй
буцблйумЭнз.
5. бнпрЯофе фзн рьсфб.
Уфзн ресЯрфщуз рпх
бкьмз еЯнбй дхнбфьн
ербнблЬвефе фз
дйесгбуЯб.
GR
57
Page 58

УхнфЮсзуз кбй цспнфЯдб
GR
Брпклейумьт неспэ кбй злекфсйкпэ
сеэмбфпт
КлеЯуфе фпн кспхнь фпх неспэ мефЬ брь кЬие
рлэуймп. ¸фуй ресйпсЯжефбй з ципсЬ фзт
хдсбхлйкЮт егкбфЬуфбузт фпх рлхнфзсЯпх кбй
брпупвеЯфбй п кЯндхнпт брщлейюн.
ВгЬлфе фп вэумб брь фп сеэмб ьфбн кбибсЯжефе
фп рлхнфЮсйп кбй кбфЬ фйт есгбуЯет ухнфЮсзузт.
Кбибсйумьт фзт рлхнфЮсйп
Фп еощфесйкь мЭспт кбй фб лбуфйчЭнйб мЭсз мрпспэн
нб кбибсЯжпнфбй ме Энб рбнЯ всегмЭнп ме члйбсь
несь кбй убрпэнй. Мз чсзуймпрпйеЯфе дйблэфет Ю
брпохуфйкЬ.
Кбибсйумьт фпх ухсфбсйпэ
брпссхрбнфйкюн
Гйб нб вгЬлефе фп ухсфЬсй
рбфЮуфе фп мпчль (1) кбй
фсбвЮофе фп рспт фб Эощ
(2) (влЭре ейкьнб).
РлЭнефЭ фп кЬфщ брь
фсечпэменп несь. П
кбибсйумьт бхфьт
дйенесгеЯфбй ухчнЬ.
Гйб нб Эчефе рсьувбуз уфпн рспиЬлбмп:
1. бцбйсЭуфе фп фбмрль
кЬлхшзт уфп рсьуийп
рлехсь фпх рлхнфзсЯпх ме
фз впЮиейб еньт
кбфубвйдйпэ (влЭре
ейкьнб);
2. фпрпиефЮуфе Энб
дпчеЯп гйб фз ухллпгЮ фпх
неспэ рпх иб вгей
(ресЯрпх 1,5 lt) (влЭре
ейкьнб);
3. оевйдюуфе фп кбрЬкй
уфсЭцпнфЬт фп
бсйуфесьуфспцб (влЭре
ейкьнб);
4. кбибсЯуфе ерймелют фп еущфесйкь;
5. обнбвйдюуфе фп кбрЬкй;
6. обнбмпнфЬсефе фп рЬнел ьнфбт уЯгпхспй, рсйн фп
урсюоефе рспт фз рлхнфЮсйп, ьфй Эчефе ейуЬгей фб
гбнфжЬкйб уфйт бнфЯуфпйчет еупчЭт.
ЦспнфЯдб фпх кЬдпх
Нб бцЮнефе рЬнфб мйуьклейуфз фзн рьсфб гйб нб
мзн рбсЬгпнфбй дхупумЯет.
Кбибсйумьт фзт бнфлЯбт
Фп рлхнфЮсйп дйбиЭфей мйб бхфпкбибсйжьменз бнфлЯб
рпх ден чсейЬжефбй ухнфЮсзуз. МрпсеЯ ьмщт нб
фэчей нб рЭупхн мйксЬ бнфйкеЯменб (кЭсмбфб,
кпхмрйЬ) уфпн рспиЬлбмп рпх рспуфбфеэей фзн
бнфлЯб, рпх всЯукефбй уфп кЬфщ мЭспт бхфЮт.
ВевбйщиеЯфе ьфй п кэклпт рлхуЯмбфпт Эчей
фелейюуей кбй вгЬлфе фп вэумб.
¸легчпт фпх ущлЮнб фспцпдпуЯбт фпх
неспэ
ЕлЭгчефе фп ущлЮнб фспцпдпуЯбт фпхлЬчйуфпн мйб
цпсЬ ефзуЯщт. Бн рбспхуйЬжей укбуЯмбфб кбй
учйумЭт бнфйкбиЯуфбфбй: кбфЬ фб рлхуЯмбфб пй
йучхсЭт рйЭуейт иб мрпспэубн нб рспкблЭупхн
бнбрЬнфечб урбуЯмбфб.
58
Page 59

БнщмблЯет кбй лэуейт
МрпсеЯ нб ухмвеЯ фп рлхнфЮсйп нб мз лейфпхсгеЯ. Рсйн фзлецщнЮуефе уфзн ХрпуфЮсйоз (влЭре ХрпуфЮсйоз), елЭгофе бн ден
рськейфбй гйб рсьвлзмб рпх ерйлэефбй еэкплб ме фз впЮиейб фпх бкьлпхипх кбфбльгпх.
БнщмблЯет:
З рлхнфЮсйп
ден бнЬвей.
П кэклпт рлхуЯмбфпт
ден бсчЯжей.
Фп рлхнфЮсйп ден гемЯжей несь.
Фп рлхнфЮсйп цпсфюней кбй бдейЬжей
несь ухнечют.
ДхнбфЬ бЯфйб / Лэуз:
Фп вэумб ден Эчей ейубчиеЯ уфзн злекфсйкЮ рсЯжб, Ю фпхлЬчйуфпн ьчй бскефЬ гйб
нб кЬней ербцЮ.
Уфп урЯфй ден хрЬсчей сеэмб.
З рьсфб ден еЯнбй кблЬ клейумЭнз.
Фп кпхмрЯ START/PAUSE ден рбфЮизке.
З всэуз ден еЯнбй бнпйчфЮ.
П ущлЮнбт фспцпдпуЯбт фпх неспэ ден еЯнбй ухндедемЭнпт уфпн кспхнь.
П ущлЮнбт еЯнбй дйрлщмЭнпт.
З всэуз ден еЯнбй бнпйчфЮ.
Уфп урЯфй леЯрей фп несь.
Ден хрЬсчей бскефЮ рЯеуз.
Фп кпхмрЯ START/PAUSE ден рбфЮизке.
П ущлЮнбт бдейЬумбфпт ден Эчей егкбфбуфбиеЯ мефбоэ 65 кбй 100 cm брь фп
Эдбцпт (влЭре «ЕгкбфЬуфбуз»).
Фп Ьксп фпх ущлЮнб бдейЬумбфпт еЯнбй вхийумЭнп уфп несь (влЭре «ЕгкбфЬуфбуз»).
Бн з кбфпйкЯб всЯукефбй уфпхт фелехфбЯпхт псьцпхт еньт кфйсЯпх, мрпсеЯ нб
дйбрйуфщипэн цбйньменб уйцщнйумпэ, прьфе фп рлхнфЮсйп цпсфюней кбй
бдейЬжей несь ухнечют. Гйб фзн бнфймефюрйуз фпх рспвлЮмбфпт дйбфЯиенфбй уфп
емрьсйп кбфЬллзлет вблвЯдет бнфй-уйцщнйумпэ.
Фп ерйфпЯчйп Ьдейбумб ден Эчей брбЭсщуз.
GR
З рлхнфЮсйп ден бдейЬжей
Ю ден уфэвей.
З рлхнфЮсйп дпнеЯфбй
рплэ кбфЬ фп уфэшймп.
Фп рлхнфЮсйп чЬней несь.
Фб ейкпнЯдйб фб учефйкЬ ме фз ЦЬуз уе
еоЭлйоз бнбвпувЮнпхн гсЮгпсб
фбхфьчспнб уфп ендейкфйкь цщфЬкй
БНБММБ/УВЗУЙМП.
УчзмбфЯжефбй рплэт бцсьт.
Фп рсьгсбммб ден рспвлЭрей фп Ьдейбумб: ме псйумЭнб рспгсЬммбфб рсЭрей нб
фп еккйнЮуефе чейспнбкфйкЬ (влЭре РспгсЬммбфб кбй дхнбфьфзфет).
ЕЯнбй енесгЮ з дхнбфьфзфб «Лйгьфесп УйдЭсщмб»: гйб нб плпклзсюуефе фп
рсьгсбммб, рбфЮуфе фп рлЮкфсп START/PAUSE (влЭре «РспгсЬммбфб кбй
дхнбфьфзфет»).
П ущлЮнбт бдейЬумбфпт еЯнбй дйрлщмЭнпт (влЭре «ЕгкбфЬуфбуз»).
П бгщгьт бдейЬумбфпт еЯнбй впхлщмЭнпт.
П кЬдпт, фз уфйгмЮ фзт егкбфЬуфбузт, ден брбуцблЯуфзке
ущуфЬ (влЭре ЕгкбфЬуфбуз).
З рлхнфЮсйп ден еЯнбй ерйредщмЭнз (влЭре ЕгкбфЬуфбуз).
Фп рлхнфЮсйп еЯнбй уфенЬ мефбоэ ерЯрлщн кбй фпЯчпх (влЭре ЕгкбфЬуфбуз).
Фп цпсфЯп еЯнбй бнйуьсспрп (влЭре РесйгсбцЮ фзт мзчбнЮт).
П ущлЮнбт фспцпдпуЯбт фпх неспэ ден еЯнбй кблЬ вйдщмЭнпт (влЭре ЕгкбфЬуфбуз).
З иЮкз фщн брпссхрбнфйкюн еЯнбй впхлщмЭнз (гйб нб фзн кбибсЯуефе влЭре
УхнфЮсзуз кбй цспнфЯдб).
П ущлЮнбт бдейЬумбфпт ден еЯнбй ущуфЬ уфесещмЭнпт (влЭре ЕгкбфЬуфбуз).
УвЮуфе фз рлхнфЮсйп кбй вгЬлфе фп вэумб брь фзн рсЯжб, ресймЭнефе ресЯрпх 1
лерфь мефЬ обнбнЬшфе фз.
Бн з бнщмблЯб ерймЭней, кблЭуфе фзн ХрпуфЮсйоз.
Фп брпссхрбнфйкь ден еЯнбй ейдйкь гйб рлхнфЮсйп (рсЭрей нб хрЬсчей з Эндейоз гйб
рлхнфЮсйп, гйб рлэуймп уфп чЭсй кбй уфп рлхнфЮсйп, Ю рбсьмпйб).
З дпуплпгЯб хрЮсое хресвплйкЮ.
З рьсфб фзт рлхнфЮсйп рбсбмЭней
буцблйумЭнз.
ЕкфелЭуфе фз дйбдйкбуЯб чейспнбкфйкЮт брбуцЬлйузт (влЭре РспцхлЬоейт кбй
ухмвпхлЭт).
Бн мефЬ брь бхфпэт фпхт елЭгчпхт фп рсьвлзмб ерймЭней, клеЯуфе фпн кспхнь фпх
неспэ, увЮуфе фп рлхнфЮсйп кбй кблЭуфе фзн ХрпуфЮсйоз.
59
Page 60

ХрпуфЮсйоз
195070249.01
06/2008 - Xerox Business Services
GR
Рсйн ерйкпйнщнЮуефе ме фзн ХрпуфЮсйоз:
ЕлЭгофе бн з бнщмблЯб мрпсеЯ нб бнфймефщрйуфеЯ бхфьнпмб (влЭре «БнщмблЯет кбй Лэуейт»);
ЕрбнеккйнЮуфе фп рсьгсбммб гйб нб елЭгоефе бн фп рсьвлзмб бнфймефщрЯуфзке;
Уе бснзфйкЮ ресЯрфщуз, ерйкпйнщнЮуфе ме фзн ЕопхуйпдпфзмЭнз ХрзсеуЯб ФечнйкЮт ХрпуфЮсйозт.
Уе ресЯрфщуз еуцблмЭнзт егкбфЬуфбузт Ю мз ущуфЮт чсЮузт мрпсеЯ нб клзиеЯфе нб рлзсюуефе фзн ерЭмвбуз.
Мзн кбфбцеэгефе рпфЭ уе мз еопхуйпдпфзмЭнпхт фечнйкпэт.
ГнщуфпрпйЮуфе:
фп еЯдпт фзт бнщмблЯбт;
фп мпнфЭлп фпх рлхнфЮсйп (Mod.);
фпн бсйимь уейсЬт (S/N).
БхфЭт пй фелехфбЯет рлзспцпсЯет всЯукпнфбй уфзн рйнбкЯдб чбсбкфзсйуфйкюн ерЯ фзт ухукехЮт.
60
 Loading...