

Page 1

Instructions for
installation and use
Contents
Installation, 2-3
EN
English,1
DE
Deutsch,13ESEspañol,25
AQUALTIS
Unpacking and levelling
Connecting the electricity and water supplies
Technical data
Description of the machine, 4-5
Control panel
Running a wash cycle, 6
Wash cycles and options, 7
Table of wash cycles
Wash options
Detergents and laundry, 8
Detergent
Preparing the laundry
Washing recommendations
Load balancing system
WASHING MACHINE
EN
AQ7L 25 U
Precautions and advice, 9
General safety
Disposal
Opening the porthole door manually
Care and maintenance, 10
Cutting off the water and electricity supplies
Cleaning the machine
Cleaning the detergent dispenser drawer
Caring for your appliance drum
Cleaning the pump
Checking the water inlet hose
Trouble shooting, 11
Assistance, 12
1
Page 2
Installation
EN
This instruction manual should be kept in a safe place
for future reference. If the washing machine is sold,
given away or moved, please ensure the manual is kept
with the machine, so that the new owner may benefit
from the advice contained within it.
Read these instructions carefully: they contain vital
information relating to the safe installation and operation
of the appliance.
Inside the pack containing this manual, you will also
find the guarantee and all the details necessary for
installation.
Unpacking and levelling
Unpacking
1. Once you have removed all the packaging from the
washing machine, make sure it has not been damaged
during transportation.
If it has been damaged, contact the retailer and do not
proceed any further with the installation process.
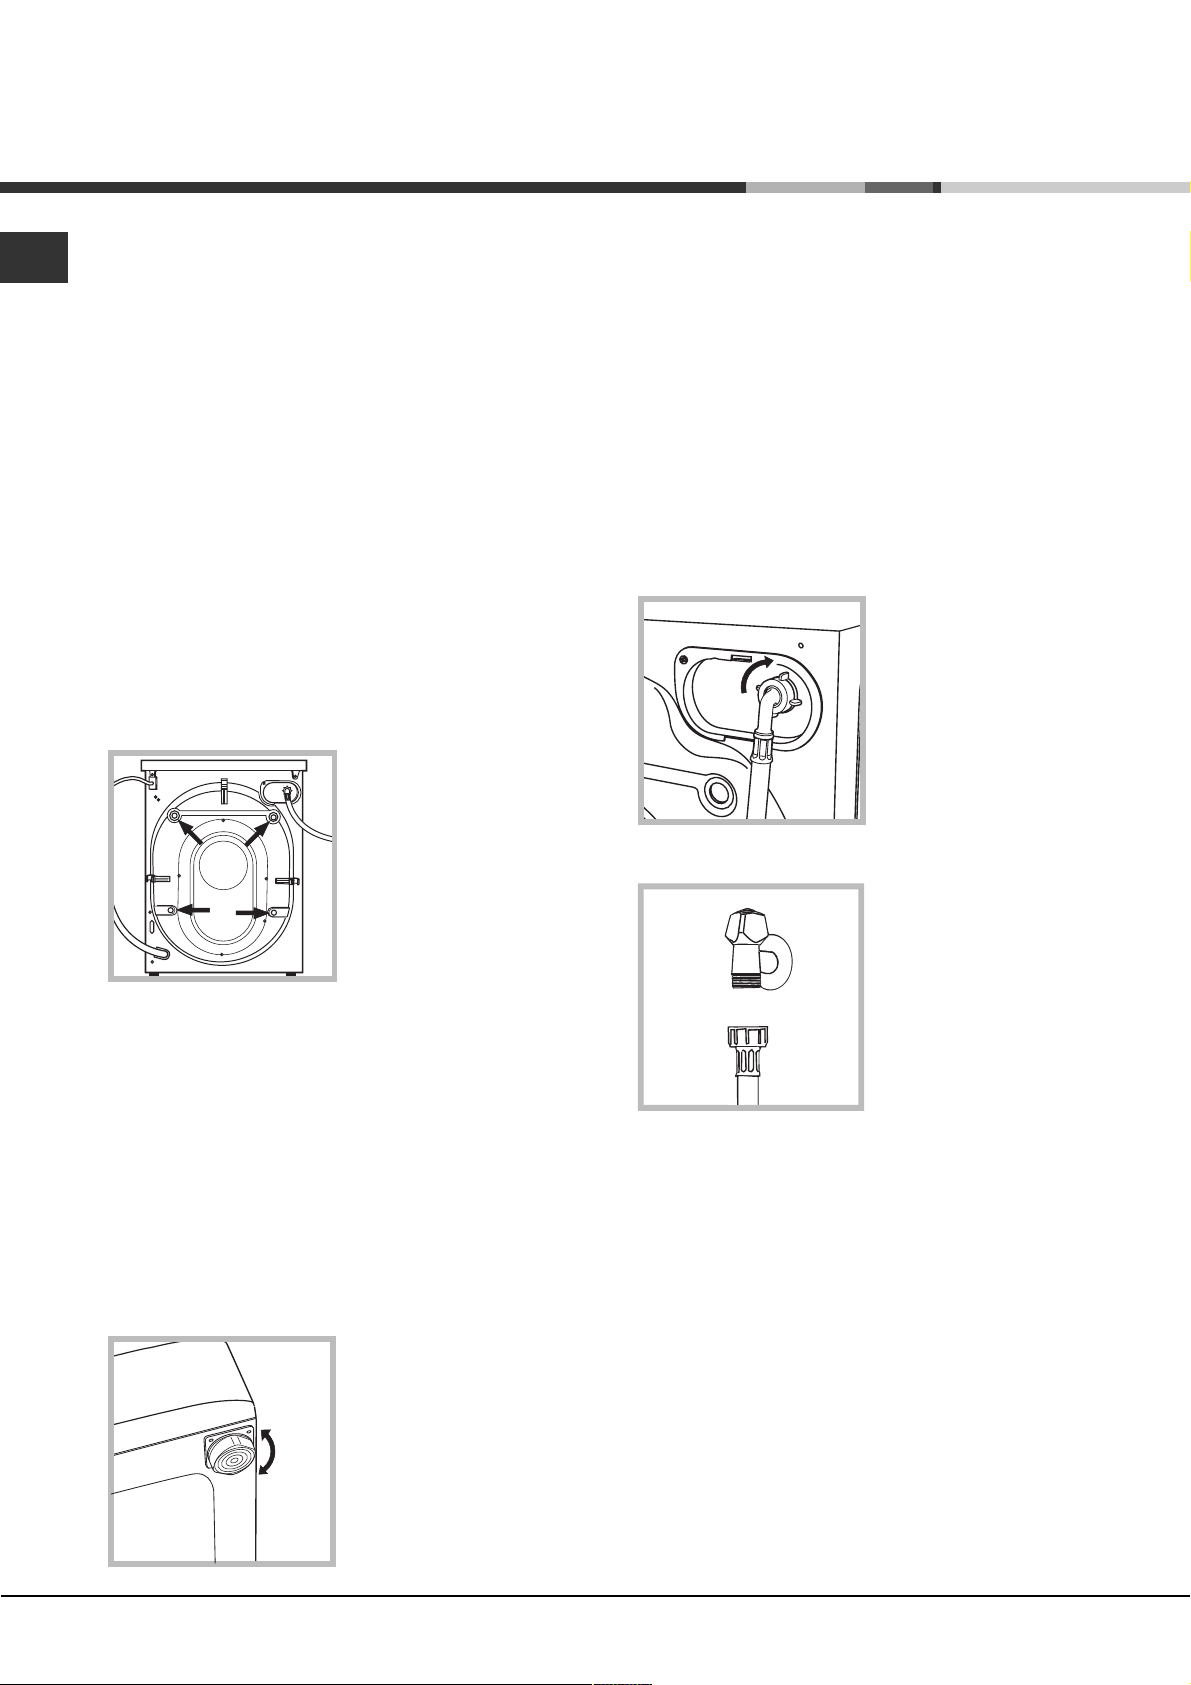
2. Remove the 4
protective screws (used
during transportation) and
the corresponding spacer,
located on the rear part of
the appliance (see figure).
If the appliance is levelled correctly, it will be more
stable and much less likely to cause vibrations and noise
while it is operating, particularly during the spin cycle.
If it is placed on carpet or a rug, adjust the feet in such
a way as to allow a sufficient ventilation space
underneath the washing machine.
Connecting the electricity and water
supplies
Connecting the water inlet hose
Before connecting the inlet hose to the water supply,
run the water until it is perfectly clear.
1. Connect the inlet hose
to the machine by
screwing it onto the cold
water inlet of the
appliance, which is
situated on the top righthand side of the rear part
of the appliance (see
figure).
2. Connect the inlet hose
by screwing it to a cold
water tab using a 3/4 gas
threaded connection (see
figure).
3. Close off the holes using the plastic plugs supplied in
the pack.
4. Keep all the parts in a safe place; they will be needed
again if the washing machine is moved to another
location, to prevent the inside of the appliance being
damaged.
Packaging materials should not be used as toys for
children.
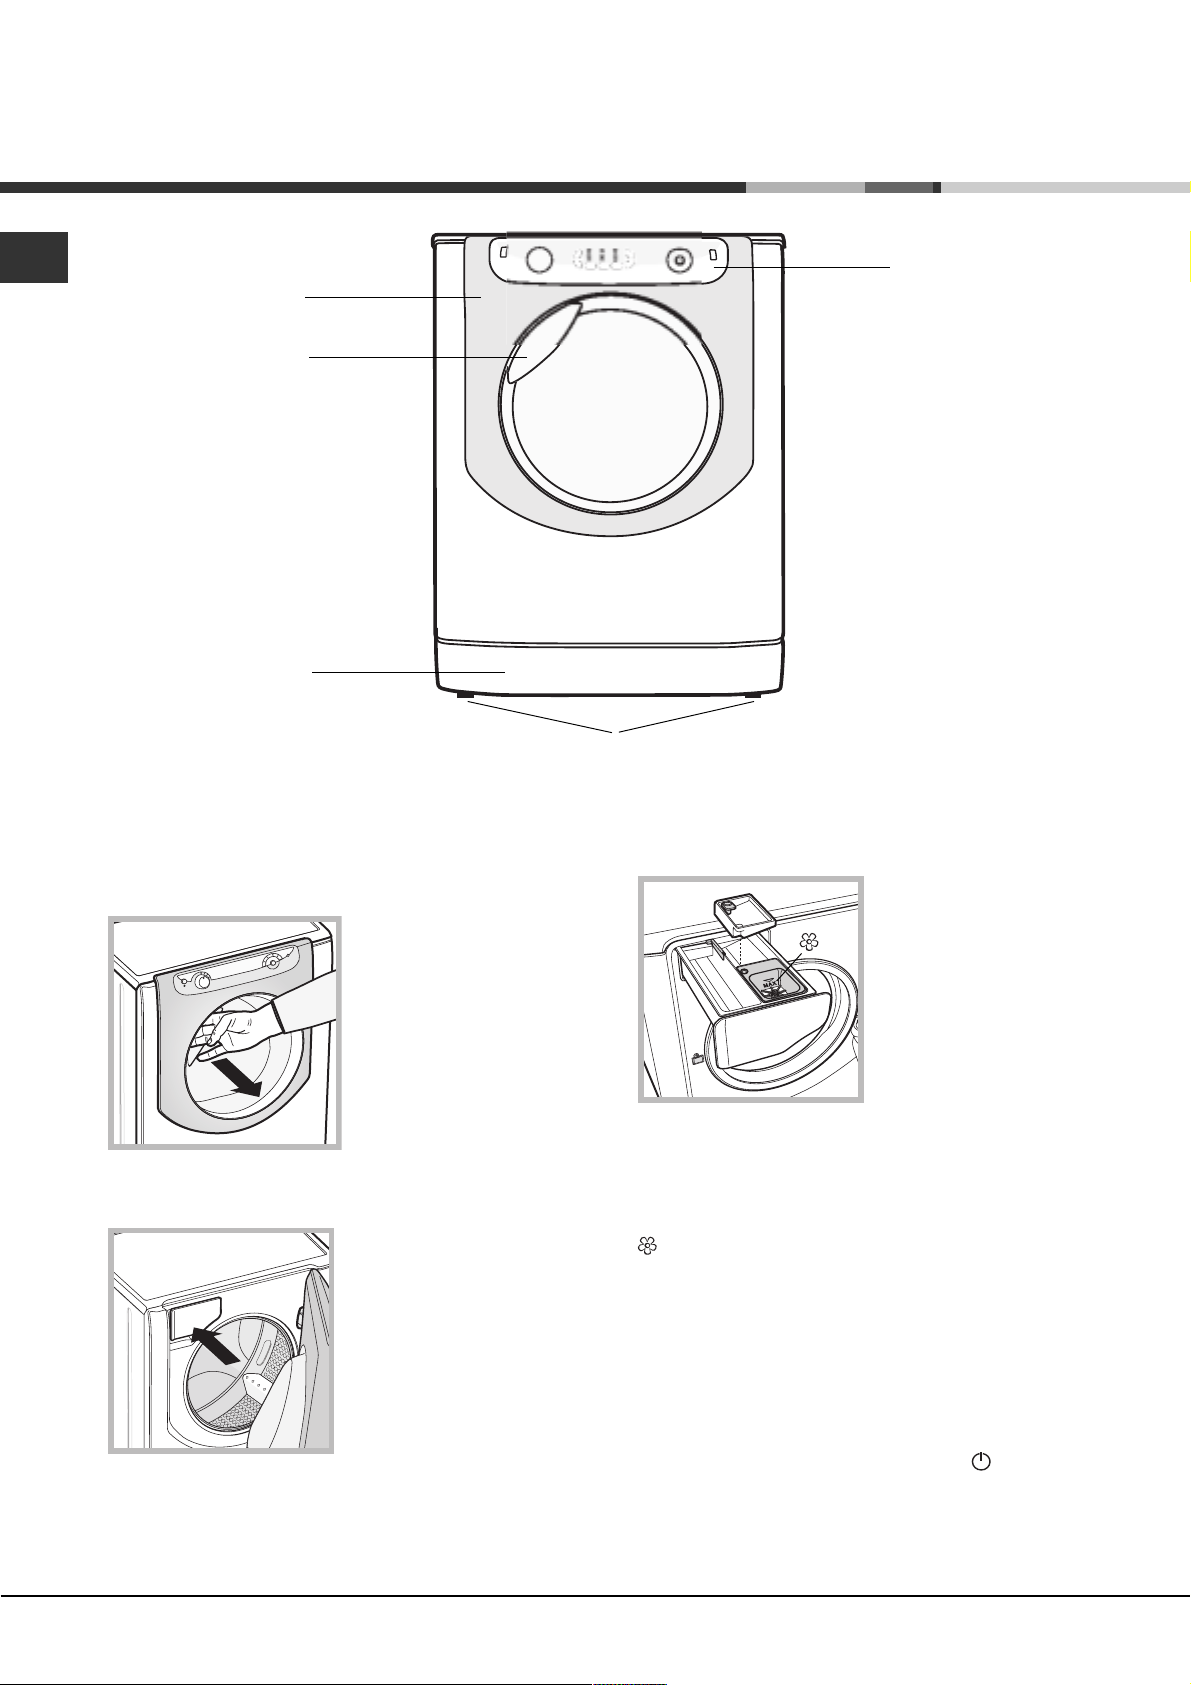
Levelling
1. Place the washing machine on a flat sturdy floor,
without resting it up against walls or cabinets.
2. If the floor is uneven,
the front feet of the
machine may be adjusted
until it reaches a horizontal
position (the angle of
inclination must not
exceed 2 degrees).
3. Make sure that the hose is not folded over or bent.
The water pressure at the tap must fall within the
values indicated in the Technical data table (see next
page).
If the inlet hose is not long enough, contact a
specialised shop or an authorised technician.
Never use second-hand or old inlet hoses; use the
products supplied with the machine.
2
Page 3
Connecting the drain hose
65 - 100 cm
Connect the drain hose to
drain duct piping or a wall
drain located between 65
and 100 cm above the
floor, making sure it is not
bent at all.
Alternatively, rest the drain
hose on the side of a
washbasin or bathtub,
fastening the duct
supplied to the tap (see
figure).
The free end of the hose
should not be underwater.
Do not use extension cords or multiple sockets.
EN
The cable should not be bent or compressed.
The power supply cable and plug must only be
replaced by authorised technicians.
Warning! The company shall not be held responsible in
the event that these regulations are not respected.
We advise against the use of hose extensions; if it is
absolutely necessary, the extension must have the same
diameter as the original hose and must not exceed 150
cm in length.
Electrical connections
Before plugging the appliance into the electricity socket,
make sure that:
the socket is earthed and complies with all applicable
laws;
the socket is able to withstand the maximum power
load of the appliance as indicated in the Technical
data table (see opposite);
the power supply voltage falls within the values
indicated in the Technical data table (see opposite);
the socket is compatible with the plug of the
appliance. If this is not the case, have the socket or
the plug replaced.
The machine must not be installed outdoors, even in
covered areas. It is extremely dangerous to leave the
appliance exposed to rain, storms and other weather
conditions.
The mains socket must remain within easy reach after
the washing machine has been installed.
Technical data
Model
Dimensions
Capacity
Electrical
connections
Water connections
Spin speed
Energy rated
programmes
according to
regulation
EN 60456
AQ7L 25 U
width 59.5 cm
height 85 cm
depth 58 cm
from 1 to 7 kg
please refer to the technical data
plate fixed to the machine
maximum pressure 1 MPa (10 bar)
minimum pressure 0.05 MPa (0.5 bar)
drum capacity 52 litres
up to 1200 rotations per minute
programme ; temperature 60°C;
using a load of 7 kg.
This appliance conforms to the
following EC Directives:
- 89/336/EEC dated 03/05/89
(Electromagnetic Compatibility) and
subsequent modifications
- 2006/95/EC (Low Voltage)
- 2002/96/EC
3
Page 4
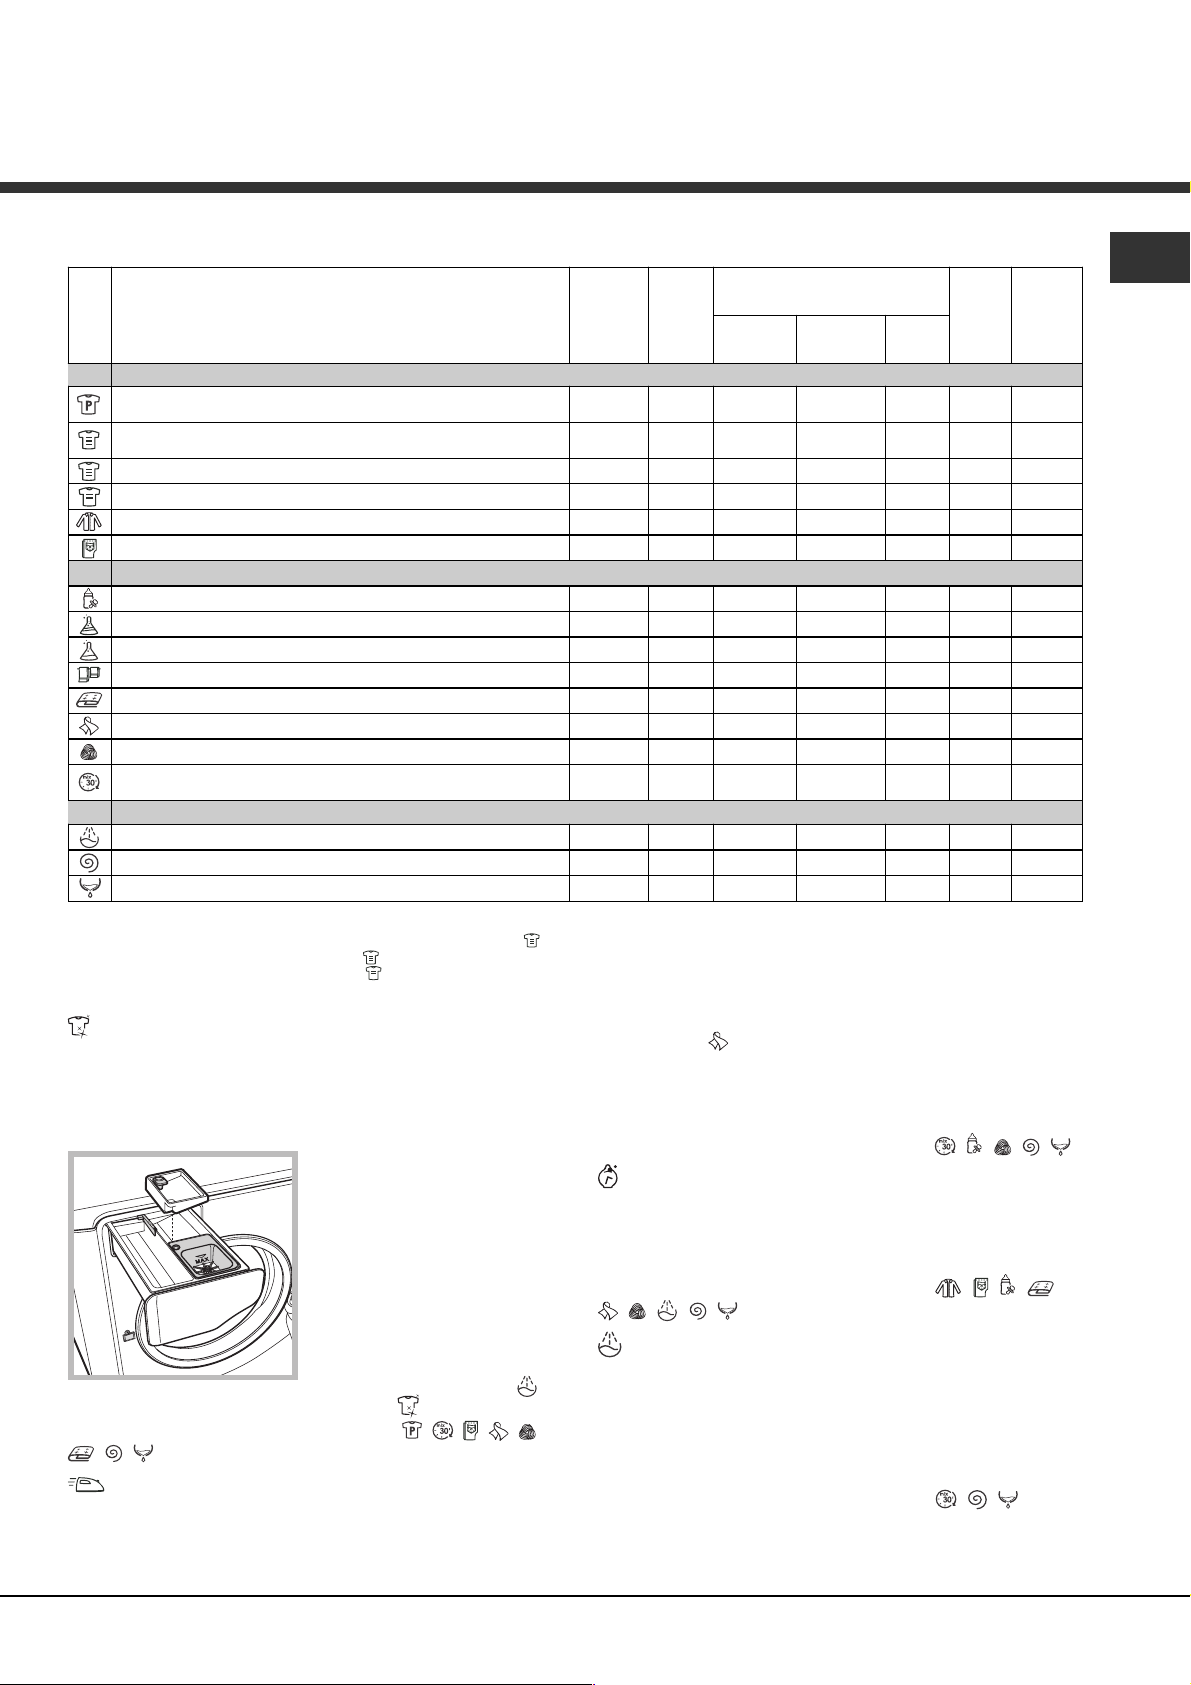
Description of the machine
EN
PORTHOLE DOOR
PORTHOLE DOOR
HANDLE
KICK STRIP
CONTROL
PANEL
ADJUSTABLE FEET
PORTHOLE DOOR
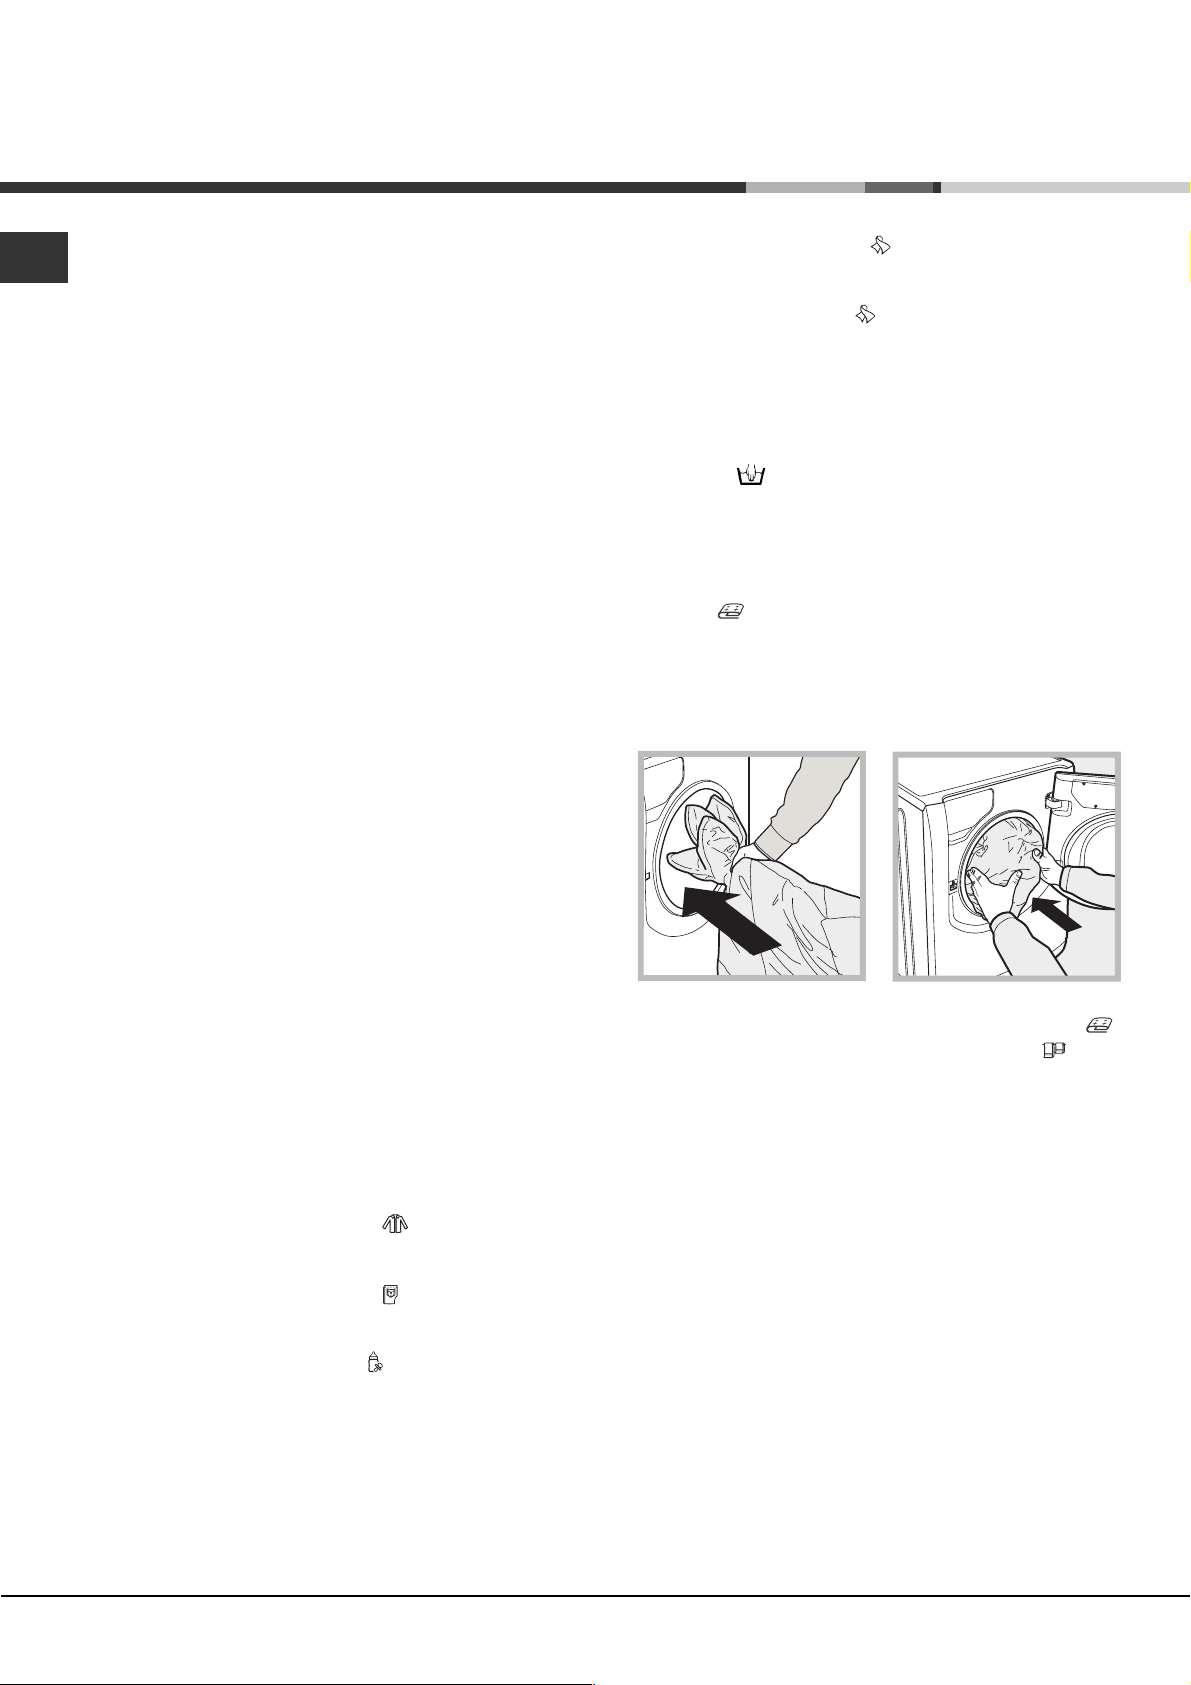
Always use the handle to
open the porthole door (see
figure).
DETERGENT DISPENSER DRAWER
The detergent dispenser
drawer is located inside the
machine and can be
accessed by opening the
door.
For more information on
detergent measures, please
refer to the chapter entitled
Detergents and laundry.
Note: stick the label showing
the wash cycle descriptions and options on the front of
the detergent dispenser drawer. You will find the sticker
in the pack containing this manual.
1. pre-wash compartment:
3
1
2
recommend it is poured into the drawer immediately
before you start the washing machine.
3. extra compartment: Bleach
The use of extra compartment 3 excludes the prewash function.
washing additives compartment: for fabric softener or
liquid additives. We recommend that the maximum level
indicated by the grille is not exceeded, and that
concentrated fabric softeners are diluted.
Standby mode
This washing machine, in compliance with new energy
saving regulations, is fitted with an automatic standby
system which is enabled after about 30 minutes if no
activity is detected. Press the ON-OFF
and wait for the machine to start up again.
use powder detergent.
Before pouring in the
detergent, make sure that
extra compartment 3 has
been removed.
2. main wash compartment:
use powder or liquid
detergent. If using the latter
type of detergent, we
button briefly
4
Page 5

Control panel
WASH CYCLE
SELECTOR knob
TEMPERATURE
indicator lights
OPTION buttons with
indicator lights
SPIN
indicator lights
DELAYED START
indicator lights
ECO indicator light
OPTION buttons with
indicator lights
EN
WASH
CYCLE
PHASE
icons
START/PAUSE
button with indicator
light
Button withON/OFF
indicator light
TEMPERATURE button
SPIN button
Button with ON/OFF indicator light: press this briefly
to switch the machine on or off. The green indicator light
indicates that the machine is switched on. To switch off
the washing machine during the wash cycle, press and
hold the button for approximately 3 seconds; if the
button is pressed briefly or accidentally the machine will
not switch off. If the machine is switched off during a
wash cycle, this wash cycle will be cancelled.
WASH CYCLE SELECTOR knob: may be turned in
either direction. To select the most suitable wash cycle,
please refer to the Table of wash cycles.
The knob will not move during the wash cycle.
TEMPERATURE
button: press to modify or exclude
the temperature setting; the value will be identified by
the indicator lights above it (see Running a wash
cycle).
SPIN CYCLE
button: press to modify or exclude the
spin cycle; the value will be identified by the indicator
lights above it (see Running a wash cycle).
DELAYED START
button: press to set a delayed
start for the selected wash cycle; the delay time will be
identified by the indicator lights above (see Running a
wash cycle).
OPTION buttons with indicator lights: press to select the
available options. The indicator light corresponding to the
selected option will remain lit (see Running a wash
cycle).
DELAYED
START
button
DOOR LOCKED
indicator light
CONTROL PANEL
LOCK button with
indicator light
WASH CYCLE PHASE icons: these illuminate to
indicate the progress of the wash cycle (Wash
Rinse
The text
Spin Drain ).
lights up when the cycle is complete.
START/PAUSE button with indicator light: when the
green indicator light flashes slowly, press the button to
start a wash cycle. Once the cycle has begun the
indicator light will remain lit in a fixed manner. To pause
the wash cycle, press the button again; the indicator
light will flash in an orange colour. If the Door locked
indicator light is switched off, the door may be
opened. To start the wash cycle from the point at which
it was interrupted, press the button again.
DOOR LOCKED
indicator light: indicates that the
porthole door is locked. To open the door, pause the
wash cycle (see Running a wash cycle).
CONTROL PANEL LOCK
button with indicator
light: to activate or deactivate the control panel lock,
press and hold the button for approximately 2 seconds.
when the indicator light is illuminated, the control panel is
locked. This means it is possible to prevent wash cycles
from being modified accidentally, especially where there
are children in the home.
ECO indicator light: the
icon lights up when, after
altering the washing parameters, an energy saving of at
least 10% is made. Furthermore, before the machine
enters Standby mode, the icon will light up for a few
seconds; when the machine is switched off the
estimated energy saving will be around the 80% mark.
5
Page 6

Running a wash cycle
EN
WARNING: before you use the washing machine for
the first time, run a wash cycle with detergent and no
laundry, using the 90° cottons cycle without pre-wash.
1. SWITCH THE MACHINE ON. Press the
All the indicator lights will illuminate for 1 second; the
indicator light corresponding to the
remain lit in a fixed manner and the START/PAUSE
indicator light will flash slowly.
2. LOAD THE LAUNDRY. Open the porthole door.
Load the laundry, making sure you do not exceed the
maximum load value indicated in the table of wash
cycles on the following page.
3. MEASURE OUT THE DETERGENT. Pull out the
detergent dispenser drawer and pour the detergent
into the relevant compartments as described in
Description of the machine.
4. CLOSE THE PORTHOLE DOOR.
5. SELECT THE PROGRAMME. Turn the WASH
CYCLE SELECTOR KNOB right or left, until you have
selected the desired wash cycle. A temperature and
spin speed is set for each wash cycle; these may be
adjusted.
6. CUSTOMISE THE WASH CYCLE. Use the
relevant buttons on the control panel:
Modify the temperature and/or spin
speed.
The machine automatically displays the maximum
temperature and spin speed values set for the
selected cycle, or the most recently-used settings if
they are compatible with the selected cycle. The
temperature can be decreased by pressing the
button, until the cold wash ( ) setting is reached. The
spin speed may be progressively reduced by pressing
the
button, until it is completely excluded ( ). If
these buttons are pressed again, the maximum
values are restored.
button will then
button.
Exception: if the Cottons programme is selected,
the temperature can be increased up to a value of
90°C.
Set a delayed start.
To set the "delayed start" option for the program you
have selected, press the button until the indicator light
for the desired delay time is illuminated.
The sixth time the button is pressed, the function will
be disabled.
N.B.: once the START/PAUSE button is pressed the
"delayed start" indicator light will flash
(the time delay value may only be changed by
decreasing the time).
Press the button again to disable the option; the
indicator light will switch off.
If the selected option is not compatible with the
selected wash cycle, this incompatibility will be
signalled by the flashing of the indicator light and a
sound alert (3 beeps); the option will not be activated.
If the selected option is not compatible with another
option that has been selected previously, the indicator
light corresponding to the first option selected will flash
and only the second option will be activated; the
indicator light corresponding to the button will remain
lit in a constant manner.
7. START THE PROGRAMME. Press the START/
PAUSE button. The corresponding indicator light
remains lit in a fixed manner and the porthole door
locks (the
illuminates). The icons corresponding to the wash
cycle phases will light up during the cycle to indicate
which phase is currently in progress.
To change a wash cycle once it has already started,
pause the washing machine by pressing the START/
PAUSE button; then select the desired cycle and
press the START/PAUSE button again.
To open the door during a wash cycle, press the
START/PAUSE button; if the DOOR LOCKED
indicator light is switched off you may open the door.
Press the START/PAUSE button again to restart the
wash cycle from the point at which it was interrupted.
8. THE END OF THE WASH CYCLE. This is indicated
by the illuminated text END. The porthole door may
be opened immediately. If the START/PAUSE indicator
light is flashing, press the button to end the cycle.
Open the door, unload the laundry and switch off the
machine.
If you wish to cancel a cycle which has already begun,
press and hold the
the machine switches off.
Bag for quilts, curtains and delicate garments
The Aqualtis washing machine makes it easier for you to
wash even the most valuable and delicate garments in
complete confidence thanks to the special bag which
protects the laundry (this is supplied with the machine).
We recommend that the bag is used every time you
wash quilts and padded items with an outer layer made
using synthetic material.
DOOR LOCKED indicator light
button until the cycle stops and
Modify the cycle settings.
Press the OPTION buttons to customise the wash
cycle in accordance with your own requirements.
Press the button to activate the option; the
corresponding indicator light will switch on.
6
Page 7
Wash cycles and options
Table of wash cycles
Icon Description of the wash cycle
Cottons wash cycles
Cottons with pre-wash
(Add detergent to the relevant compartment).
Cottons (1): heavily soiled whites and resistant colours.
Cottons (2): heavily soiled whites and delicate colours.
Coloured Cottons (3) 40° 1200
Shir ts
Jeans
Special programmes
Baby: heavily soiled delicate colours
Synthetics
Durable
Delicate Synthetics 40° 800
"Bed & Bath" for bedlinen and towels.
Duvets: for down-stuffed garments.
Silk: for garments in silk and viscose, lingerie.
Wool: for wool, cashmere, etc.
Mix 30': to refresh lightly soiled garments quickly (not suitable for
wool, silk and clothes which require washing by hand)
Partials wash cycles
Rinse - 1200 Spin - 1200 - - - 716
Drain - 0 - - - 72
Max.
temp.
(°C)
90° 1200
60°
(Max. 90°)
40° 1200
40° 600
40° 800
40° 800
60° 800
60° 1200
30° 1000
30° 0
40° 600
30° 800
Max.
speed
(rpm)
1200
Detergent and additives
Detergent
for wash
ll
lll
lll
lll
lll
ll
lll
lll
lll
lll
ll
ll
ll
ll
Fabric
softener
Bleach
- 7174
- 3,5 80
- 294
- 155
- 1,5 55
- 330
ll
Max.
load
(kg)
7153
7148
792
269
3118
385
374
795
736
EN
Cycle
duration
For all Test Institutes:
1) Test wash cycle in compliance with regulation EN 60456: set wash cycle
2) Long wash cycle for cottons: set wash cycle
3) Short wash cycle for cottons: set wash cycle
with a temperature of 40°C.
with a temperature of 40°C.
Wash options
Super Wash
This option offers a high-performance wash due to the
greater quantity of water used in the initial phase of the
cycle, and due to the increased wash cycle duration, is
particularly useful for the removal of stubborn stains. It
can be used with or without bleach. If you desire
bleaching, insert the extra
3
1
2
and activate the "Super Wash" option .
It cannot be used in conjunction with
, , .
Easy Iron
By selecting this option, the wash and spin cycles will be
modified in order to reduce the formation of creases.
At the end of the cycle the washing machine
drum will rotate slowly; the Easy Iron and START/
tray compartment (3) into
compartment 1. When
pouring in the bleach, be
careful not to exceed the
max level marked on the
central pivot (see figure).
To bleach laundry without
carrying out a full wash
cycle, pour the bleach into
the extra compartment 3,
select the "Rinse" cycle
, , , , ,
with a temperature of 60°C.
PAUSE indicator lights will flash. To end the cycle press
the START/PAUSE button or the Easy Iron button.
For the Silk
wash cycle, the machine will end the
cycle while the laundry is soaking and the Easy
Iron indicator light will flash. To drain the water so that
the laundry may be removed, press the START/PAUSE
button or the Easy Iron button.
It cannot be used in conjunction with
Time Saver
If you select this option, the wash cycle duration will be
reduced by 30%-50%, depending on the selected cycle,
thereby guaranteeing simultaneous water and energy
saving. Use this cycle for lightly soiled garments.
It cannot be used in conjunction with
, , , , .
Extra rinse
By selecting this option, the efficiency of the rinse is
increased and optimal residual detergent removal is
guaranteed. It is particularly useful for skin which is
sensitive to detergents. We recommend this option is
used with a full load of washing, or when a large amount
of detergent is required.
It cannot be used in conjunction with
, , , , .
, , , ,
, , .
7
Page 8
Detergents and laundry
EN
Detergent
The type and quantity of detergent required depend on
the type of fabric you are washing (cotton, wool, silk,
etc.), as well as its colour, the washing temperature, the
level of soiling and the hardness of the water in the area.
Measuring out the detergent carefully will avoid wastage
and help to protect the environment: although they are
biodegradable, detergents still contain ingredients which
alter the balance of nature.
We recommend the following:
use powder detergents for white cotton garments and
pre-washing.
use liquid detergents for delicate cotton garments and
for all low-temperature wash cycles.
use gentle liquid detergents for wool and silk
garments.
The detergent should be poured into the relevant
compartment - or the dispenser placed directly inside
the drum - before the wash cycle begins. In the latter
case, it will not be possible to select the Cottons with
pre-wash cycle.
Do not use hand washing detergents because these
create too much foam.
Preparing the laundry
Shake out the garments before loading them into the
machine.
Divide the laundry according fabric type (symbol on the
washing instruction label) and colour, making sure you
separate the coloured garments from the white ones;
Empty all pockets and check the buttons;
Do not exceed the values listed in the Table of wash
cycles, which refer to the weight of the laundry when dry.
Silk: use the special Silk
garments. We recommend the use of special detergent
which has been designed to wash delicate clothes.
Curtains: use the Silk
be folded and placed inside the bag provided.
Wool: is the only washing machine brand to have been
awarded the prestigious Woolmark Platinum Care
endorsement (M.0508) by the Woolmark Company,
which means that all woollen garments may be washed
in the washing machine, even those which state hand
wash only
be used to wash all woollen garments in the washing
machine while guaranteeing optimum performance.
Duvets: to wash single duvets (the weight of which
should not exceed 2 kg), cushions or clothes padded
with goose down such as puffa jackets, use the special
Duvets
are placed in the drum with their edges folded inwards
(see figure) and that no more than ¾ of the total volume
of the drum is used. To achieve the best results, we
recommend that a liquid detergent is used and placed
inside the detergent dispenser drawer.
on the label. The Wool wash cycle can
wash cycle. We recommend that duvets
wash cycle to wash all silk
wash cycle. These should
How much does your laundry weigh?
1 sheet 400-500 g
1 pillowcase 150-200 g
1 tablecloth 400-500 g
1 bathrobe 900-1200 g
1 towel 150-250 g
1 pair of jeans 400-500 g
1 shirt 150-200 g
Washing recommendations
Shirts: use the special Shirts wash cycle to wash
shirts in different fabrics and colours to guarantee they
receive the best possible care.
Jeans: use the special Jeans
denim garments; turn inside out before washing and use
a liquid detergent.
Baby: use the special Baby
the remove the soiling typically caused by babies, while
removing all traces of detergent from nappies in order to
prevent the delicate skin of babies from suffering allergic
reactions. The cycle has been designed to reduce the
amount of bacteria by using a greater quantity of water
and optimising the effect of special disinfecting additives
added to the detergent. At the end of the wash cycle,
the machine will slowly rotate the drum; to end the cycle
press the START/PAUSE button.
wash cycle for all
wash cycle to remove
Quilts: to wash quilts with a synthetic outer layer, use
the bag provided and set the wash cycle to Duvets
Bedlinen and towels: use the Bed & Bath
to wash laundry from all over the house; this optimises
fabric softener performance and helps you save time and
energy. We recommend the use of powder detergent.
Stubborn stains: it is wise to treat stubborn stains with
solid soap before washing, and to use the Cottons with
pre-wash cycle.
cycle
Load balancing system
Before every spin cycle, to avoid excessive vibrations
before every spin and to distribute the load in a uniform
manner, the drum rotates continuously at a speed which
is slightly greater than the washing rotation speed. If,
after several attempts, the load is not balanced
correctly, the machine spins at a reduced spin speed. If
the load is excessively unbalanced, the washing
machine performs the distribution process instead of
spinning. To encourage improved load distribution and
balance, we recommend small and large garments are
mixed in the load.
.
8
Page 9

Precautions and tips
The machine was designed and constructed in
accordance with international safety regulations. The
following information is provided for safety reasons and
must therefore be read carefully.
General safety
This appliance is not intended for use by persons
(including children) with reduced physical, sensory or
mental capabilities, or lack of experience and
knowledge, unless they have been given supervision
or instruction concerning use of the appliance by a
person responsible for their safety. Children should be
supervised to ensure that they do not play with the
appliance.
This appliance was designed for domestic use only.
Do not touch the machine when barefoot or with wet
or damp hands or feet.
Do not pull on the power supply cable when
unplugging the appliance from the electricity socket.
Hold the plug and pull.
Do not open the detergent dispenser drawer while the
machine is in operation.
Do not touch the drained water as it may reach
extremely high temperatures.
Never force the porthole door. This could damage the
safety lock mechanism designed to prevent accidental
opening.
If the appliance breaks down, do not under any
circumstances access the internal mechanisms in an
attempt to repair it yourself.
Always keep children well away from the appliance
while it is operating.
The door can become quite hot during the wash cycle.
If the appliance has to be moved, work in a group of
two or three people and handle it with the utmost
care. Never try to do this alone, because the
appliance is very heavy.
Before loading laundry into the Washer, make sure the
drum is empty.
Opening the porthole door manually
In the event of a powercut, the door may be opened in
order to remove the laundry from the machine. Proceed
as follows:
1. Remove the plug from the
electrical socket.
2. To prevent water from
escaping when the door is
opened, make sure that the
level of the water is lower
than the seal around the
porthole door; if this is not
the case, remove any
excess water using the drain
hose (see figure).
3. Insert the key supplied with the appliance into the
groove at the side, as illustrated in the figure.
4. Press down on the key while pulling the handle
outwards to open the door.
EN
Disposal
Disposing of the packaging materials: observe local
regulations so that the packaging may be re-used.
The European Directive 2002/96/EC relating to Waste
Electrical and Electronic Equipment (WEEE) states
that household appliances should not be disposed of
using the normal solid urban waste cycle. Exhausted
appliances should be collected separately in order to
optimise the cost of re-using and recycling the
materials inside the machine, while preventing
potential damage to the atmosphere and to public
health. The crossed-out dustbin is marked on all
products to remind the owner of their obligations
regarding separated waste collection.
For more information relating to the correct disposal of
household appliances, owners should contact their
local authorities or appliance dealer.
9
Page 10
Care and maintenance
EN
Cutting off the water and electricity
supplies
Turn off the water tap after every wash cycle. This will
limit wear on the hydraulic system in the machine and
help to prevent leaks.
Unplug the appliance when cleaning it and during all
maintenance work.
Cleaning the machine
The outer parts and rubber components of the appliance
can be cleaned using a soft cloth soaked in lukewarm
soapy water. Do not use solvents or abrasives.
Cleaning the detergent dispenser
drawer
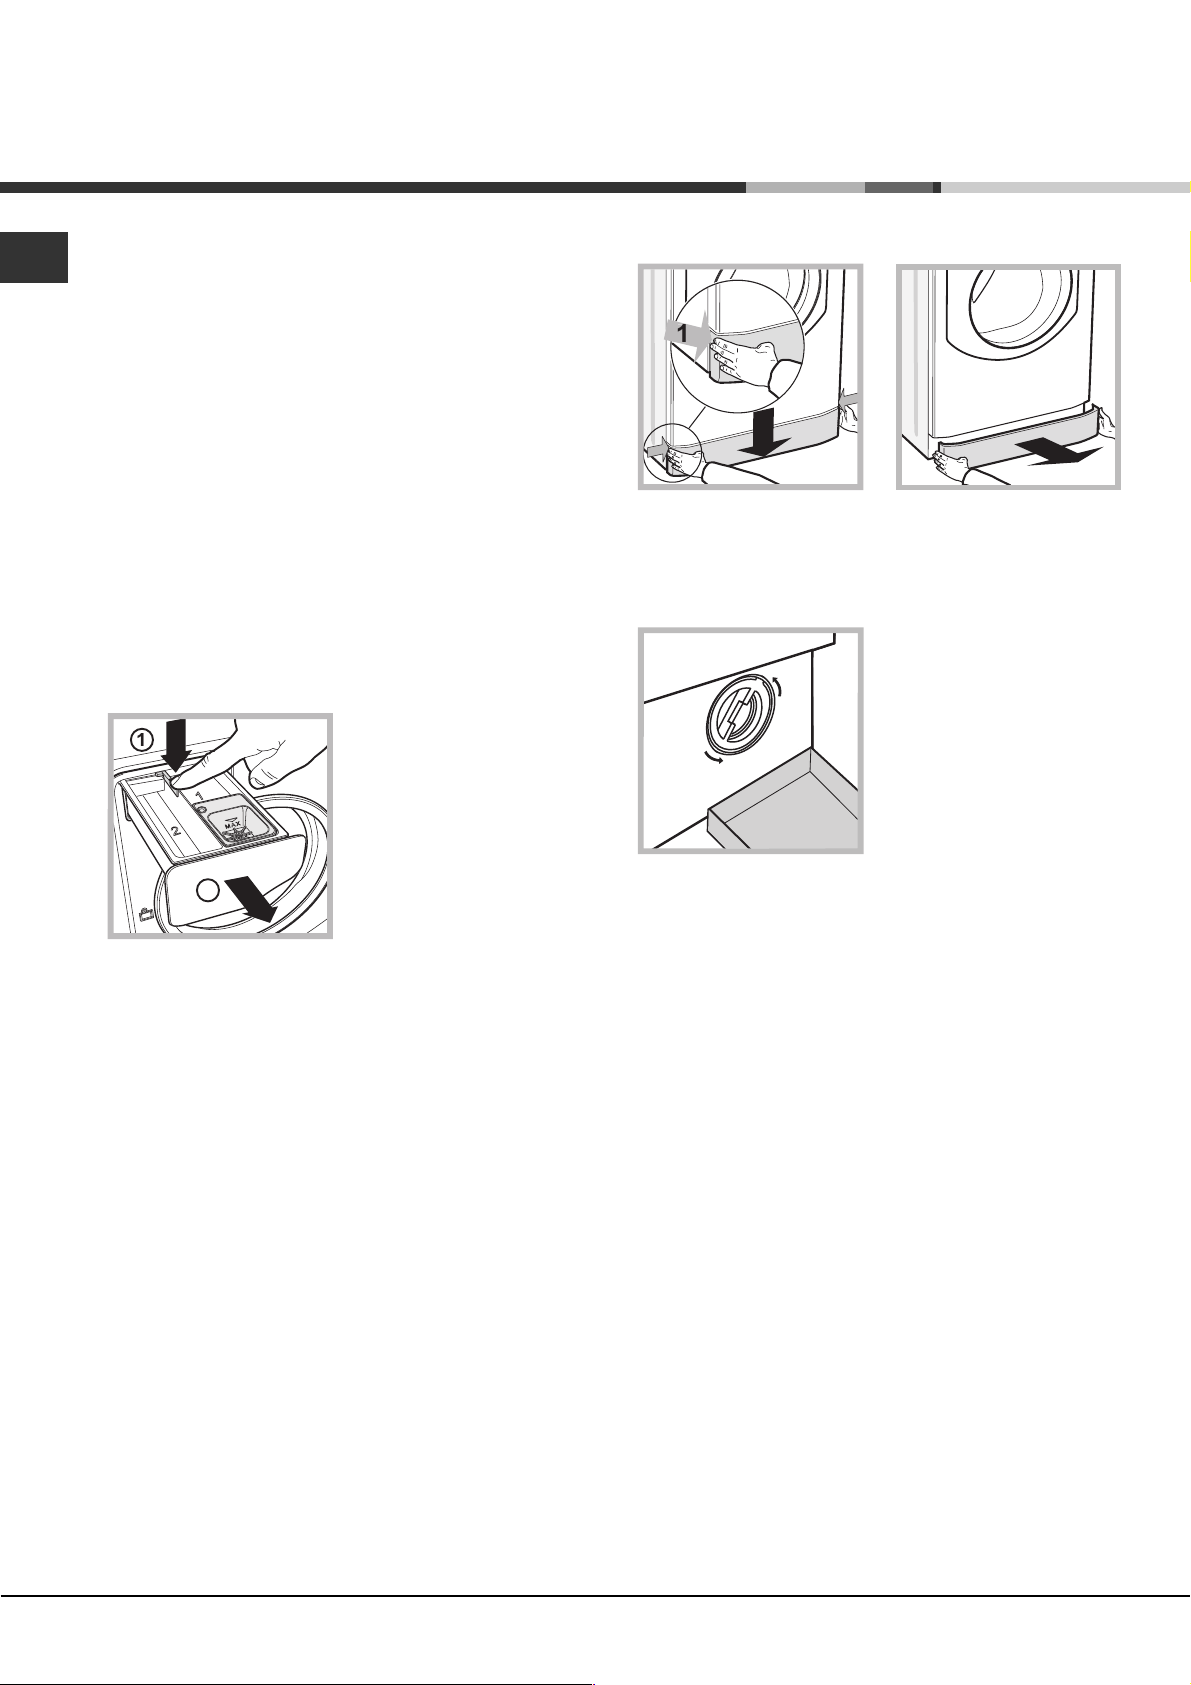
To remove the drawer, press
lever (1) and pull the drawer
outwards (2) (see figure).
Wash it under running
water; this procedure should
be repeated frequently.
To access the pre-chamber:
2
1. take off the cover panel on the front of the machine
by first pressing it in the centre and then pushing
downwards on both sides until you can remove it (see
figures);
2. position a container so
that it will collect the water
which flows out
(approximately 1.5 l) (see
figure);
3. unscrew the lid by
rotating it in an anticlockwise direction (see
figure);
Caring for your appliance drum
Always leave the door ajar to prevent unpleasant
odours from forming.
Cleaning the pump
The washing machine is fitted with a self-cleaning pump
which does not require any maintenance. Sometimes,
small items (such as coins or buttons) may fall into the
protective pre-chamber at the base of the pump.
Make sure the wash cycle has finished and unplug the
appliance.
4. clean the inside thoroughly;
5. screw the lid back on;
6. reposition the panel, making sure the hooks are
securely in place before you push it onto the appliance.
Checking the water inlet hose
Check the inlet hose at least once a year. If there are
any cracks, it should be replaced immediately: during
the wash cycles, water pressure is very strong and a
cracked hose could easily split open.
10
Page 11

Trouble shooting
Your washing machine could occasionally fail to work. Before contacting the Technical Assistance Centre
(see Assistance), make sure that the problem cannot be not solved easily using the following list.
Problem:
The washing machine does not
switch on.
The wash cycle does not start.
The washing machine does not fill
with water.
The washing machine door
remains locked.
The machine continuously fills
with water and drains.
The washing machine does not
drain or spin.
The machine vibrates a lot during
the spin cycle.
The washing machine leaks.
The icons corresponding to the
Phase in progress flash rapidly
at the same time as the ON/OFF
Possible causes / Solutions:
The appliance is not plugged into the socket fully, or not enough to make
contact.
There is no power in the house.
The door is not closed properly.
The START/PAUSE button has not been pressed.
The water tap has not been opened.
A delayed start has been set.
The water inlet hose is not connected to the tap.
The hose is bent.
The water tap has not been opened.
There is no water supply in the house.
The pressure is too low.
The START/PAUSE button has not been pressed.
If you have selected the Baby
the wash cycle has finished the machine will slowly rotate the drum; to end
the cycle press the START/PAUSE button or the Easy iron
you have selected the Silk
while the laundry is soaking; to drain the water so that the laundry may be
removed, press the START/PAUSE button or the Easy iron
The drain hose is not fitted at a height between 65 and 100 cm from the
floor (see Installation).
The free end of the hose is under water (see Installation).
If the dwelling is on one of the upper floors of a building, there may be
problems relating to water drainage, causing the washing machine to fill
with water and drain continuously. Special anti-draining valves are available
in shops and help to prevent this inconvenience.
The wall drainage system is not fitted with a breather pipe.
The wash cycle does not include draining: Some wash cycles require the
drain phase to be started manually (see Wash cycles and options).
The Easy iron option is enabled: to complete the wash cycle, press the
START/PAUSE button (Wash cycles and options).
The drain hose is bent (see Installation).
The drainage duct is clogged.
The drum was not unlocked correctly during installation (see Installation).
The machine is not level (see Installation ).
The machine is trapped between cabinets and walls (see Installation).
The load is unbalanced (see Detergents and laundry).
The water inlet hose is not screwed on properly (see Installation).
The detergent dispenser is blocked (to clean it, see Care and
maintenance).
The drain hose is not fixed in place properly (see Installation).
Switch off the machine and unplug it, wait for approximately 1 minute and
then switch it back on again. If the problem persists, contact the Technical
Assistance Service.
cycle or the Easy iron option, when
wash cycle, the machine will end the cycle
indicator light.
There is too much foam.
The washing machine door
The detergent is not suitable for machine washing (it should display the text
for washing machines or hand and machine wash, or the like).
Too much detergent was used.
Perform the manual unlocking procedure (see Precautions and tips).
remains locked.
EN
button. If
button.
11
Page 12

Assistance
EN
Before calling for Assistance:
Check whether you can solve the problem by yourself (see Trouble shooting);
Restart the wash cycle to check whether the problem has been solved;
If it has not, contact the Authorised Technical Assistance Service.
If the washing machine has been installed or used incorrectly, you will have to pay for the call-out service.
Always request the assistance of authorised technicians.
Please have the following information to hand:
the type of problem;
the appliance model (Mod.);
the serial number (S/N).
The above information can be found on the data plate located on the appliance itself.
12
Page 13

Installations- und
Bedienungsanleitungen
INHALTSVERZEICHNIS
Aufstellung, 14-15
DE
Deutsch
AQUALTIS
Auspacken und Aufstellen
Wasser- und Elektroanschlüsse
Technische Daten
Beschreibung Ihres Gerätes, 16-17
Bedienblende
Durchführung eines Waschprogramms, 18
Programme und Zusatzfunktionen, 19
Programmtabelle
Zusatzfunktionen
Waschmittel und Wäsche, 20
Waschmittel
Vorsortieren der Wäsche
Waschhinweise
System zur Auswuchtung der Wäscheladung
WASCHVOLLAUTOMAT
DE
AQ7L 25 U
Vorsichtsmaßregeln und Hinweise, 21
Allgemeine Sicherheit
Entsorgung
Manuelles Öffnen der Gerätetür
Reinigung und Pflege, 22
Abstellen der Wasser- und Stromversorgung
Reinigung des Gerätes
Reinigung der Waschmittelschublade
Pflege der Wäschetrommel
Reinigung der Pumpe
Kontrolle des Wasserzulaufschlauchs
Störungen und Abhilfe, 23
Kundendienst, 24
13
Page 14

Aufstellung
DE
Es ist äußerst wichtig, diese Bedienungsanleitung
sorgfältig aufzubewahren, um sie jederzeit zu Rate
ziehen zu können. Sorgen Sie dafür, dass sie im Falle
eines Umzugs oder Übergabe an einen anderen
Benutzer das Gerät stets begleitet.
Lesen Sie bitte folgende Hinweise aufmerksam durch:
sie liefern wichtige Informationen hinsichtlich der
Installation, des Gebrauchs und der Sicherheit.
In der Plastikhülle dieser Bedienungsanleitung befinden
sich, außer dem Garantieschein, auch Kleinteile zur
Installation.
Auspacken und Aufstellen
Auspacken
1. Nach Entfernen der Verpackung überzeugen Sie sich
bitte davon, dass das Gerät während des Transportes
nicht beschädigt wurde.
Schließen Sie das Gerät im Falle einer Beschädigung
bitte nicht an und kontaktieren Sie Ihren Händler.
2. Schrauben Sie die 4
Transportschutzschrauben
aus und nehmen Sie das
entsprechende an der
Rückwand befindliche
Distanzstück ab (siehe
Abbildung).
3. Schließen Sie die Löcher mittels der in der Plastikhülle
befindlichen Kunststoffstöpsel.
4. Bewahren Sie bitte sämtliche Teile auf. Im Falle eines
erneuten Transportes des Gerätes sind alle Teile wieder
einzusetzen, um Schäden im Geräteinnern zu
vermeiden.
Verpackungsmaterial ist kein Spielzeug für Kinder.
Nivellierung
1. Der Waschvollautomat muss auf einem ebenen,
festen Untergrund aufgestellt werden, ohne ihn an
Wände oder Möbelteile anzulehnen.
2. Eventuelle
Unebenheiten durch Anbzw. Ausdrehen der
vorderen Stellfüße
ausgleichen, (der
Neigungsgrad darf 2° nicht
überschreiten).
Eine präzise Nivellierung verleiht dem Gerät die
erforderliche Stabilität, durch die Vibrationen und
Betriebsgeräusche, vor allem während des Schleuderns,
vermieden werden.
Bei Teppichböden müssen die Stellfüße so reguliert
werden, dass ein ausreichender Freiraum zur Belüftung
unter dem Waschvollautomaten gewährleistet ist.
Wasser- und Elektroanschlüsse
Anschluss des Zulaufschlauches
Lassen Sie das Wasser vor dem Anschluss so lange
auslaufen, bis klares Wasser austritt.
1. Schließen Sie das
andere Ende des
Schlauches an den oben
rechts am Rückteil des
Gerätes befindlichen
Wasseranschluss an (siehe
Abbildung).
2. Schrauben Sie den
Wasserschlauch an einen
Kaltwasserhahn mit ¾-
GAS-Gewindeanschluss an
(siehe Abbildung).
3. Der Schlauch darf nicht eingeklemmt oder abgeknickt
werden.
Der Wasserdruck muss innerhalb der Werte liegen, die
in der Tabelle der Technischen Daten angegeben sind
(siehe nebenstehende Seite).
Sollte der Zulaufschlauch nicht lang genug sein, dann
wenden Sie sich bitte an einen Fachhändler oder an
einen autorisierten Fachmann.
Verwenden Sie bitte niemals alte oder gebrauchte
Zulaufschläuche, sondern nur die, die Sie mit dem Gerät
erhalten haben.
14
Page 15

Anschluss des Ablaufschlauches
Schließen Sie den
Ablaufschlauch, ohne ihn
dabei zu krümmen, an
eine Ablaufleitung, oder an
einen in der Wand (in einer
65 - 100 cm
Mindesthöhe von 65 100
cm) angelegten Ablauf an,
oder hängen Sie ihn in ein
Becken oder eine Wanne
ein; befestigen Sie ihn in
diesem Falle mittels der
mitgelieferten Führung an
dem Wasserhahn (siehe
Abbildung).
Das freie
Ablaufschlauchende darf
nicht unter Wasser
bleiben.
Die Steckdose sollte nach installiertem Gerät leicht
zugänglich sein.
Verwenden Sie bitte keine Verlängerungen oder
Mehrfachstecker.
Das Netzkabel darf nicht gebogen bzw. eingeklemmt
werden.
Das Versorgungskabel darf nur durch autorisierte
Fachkräfte ausgetauscht werden.
Achtung! Der Hersteller übernimmt keinerlei Haftung,
sollten diese Vorschriften nicht genau beachtet werden.
DE
Verlängerungsschläuche sollten nicht eingesetzt
werden, sollte dies jedoch absolut unvermeidlich sein,
muss die Verlängerung denselben Durchmesser des
Originalschlauchs aufweisen und darf eine Länge von
150 cm nicht überschreiten.
Elektroanschluss
Vor Einfügen des Netzsteckers in die Steckdose ist
sicherzustellen, dass:
die Steckdose über eine normgerechte Erdung
verfügt;
die Steckdose die in den Technischen Daten
angegebenen Höchstlast des Gerätes trägt (siehe
nebenstehende Tabelle);
die Stromspannung den in den Technischen Daten
angegebenen Werten entspricht (siehe
nebenstehende Tabelle);
der Netzstecker mit der Steckdose übereinstimmt.
Lassen Sie den Netzstecker oder die Steckdose
andernfalls ersetzen.
Technische Daten
Modell
Abmessungen
Fassungsvermögen
Elektroanschlüsse
Wasseranschlüsse
Schleudertouren
Prüfprogramme
gemäß EN 60456
AQ7L 25 U
Breite 59,5 cm
Höhe 85 cm
Tiefe 58 cm
1 bis 7 kg
siehe das am Gerät befindliche
Typenschild
Höchstdruck 1 MPa (10 bar)
Mindestdruck 0,05 MPa (0,5 bar)
Trommelvolumen 52 Liter
bis zu 1200 U/min.
Programm ; Temperatur 60°C;
bei einer Lademenge von 7 kg.
Das Gerät darf nicht im Freien installiert werden, auch
nicht, wenn es sich um einen geschützten Platz handelt.
Es ist gefährlich, Ihren Vollwaschautomaten Gewittern
und Unwettern auszusetzen.
Dieses Gerät entspricht den
folgenden EG-Richtlinien:
- 89/336/EWG vom 03.05.89
(elektromagnetische Verträglichkeit)
und nachfolgenden Änderungen
- 2002/96/CE
- 2006/95/CE (Niederspannung)
15
Page 16

Beschreibung Ihres Gerätes
DE
BEDIENBLENDE
GERÄTETÜR
GRIFF
SOCKEL
REGULIERBARE
STELLFÜSSE
GERÄTETÜR
Öffnen Sie die Gerätetür
bitte stets nur am
entsprechenden Griff (siehe
Abbildung ).
WASCHMITTELBEHÄLTER
Der Waschmittelbehälter
befindet sich im Innern des
Gerätes, um ihn zu
erreichen, muss die
Gerätetür geöffnet werden.
Hinsichtlich der Dosierung
des Waschmittels verweisen
wir auf den Absatz
Waschmittel und Wäsche .
Hinweis: befestigen Sie den
Aufkleber mit der
Beschreibung der Programme und der Optionen am
Waschmittelbehälter. Der Aufkleber befindet sich in der
Plastikhülle dieser Bedienungsanleitung.
1. Waschmittelkammer für
3
1
2
Verwendung von Flüssigwaschmittel empfehlen wir,
dieses erst dann einzufüllen, wenn der Waschgang
gestartet wird.
3. Zusatzkammer:Bleichmittel
den Vorwaschgang: für
Waschpulver.
Vergewissern Sie sich vor
Einfüllen des Waschmittels,
dass die Zusatzkammer 3
nicht eingesetzt wurde.
2. Waschmittelkammer für
den Hauptwaschgang: für
Waschpulver oder
Flüssigwaschmittel. Bei
Die Verwendung der zusätzlichen Kammer 3
schließt die Vorwäsche aus.
Kammer für Zusätze: für Weichspüler oder flüssige
Zusätze. Bitte achten Sie darauf, dass der maximale auf
dem Gitter angezeigte Stand nicht überschritten wird.
Konzentrierte Weichspüler müssen verdünnt werden.
Funktion Standby
Zur Erfüllung der neuen Richtlinien zum
Energieverbrauch ist diese Waschmaschine mit einem
automatischen Ausschaltsystem (Standby) ausgestattet,
das nach 30 Minuten des Nichtgebrauchs in Funktion
tritt. Drücken Sie kurz die Taste ON/OFF
Sie, bis sich die Maschine wieder einschaltet.
und warten
16
Page 17

Bedienblende
Wählschalter
PROGRAMME
Kontrollleuchten
TEMPERATUR
Tasten mit Kontrollleuchten
ZUSATZFUNKTIONEN
Kontrollleuchten
SCHLEUDER
Kontrollleuchten
STARTZEITVORWAHL
Tasten mit
Kontrollleuchten
ZUSATZFUNKTIONEN
Kontrollleuchte ECO
Taste mit Kontrollleuchte
START/PAUSE
Symbole
PROGRAMMABLAUF
DE
Taste mit Kontrollleuchte
ON/OFF
Taste TEMPERATUR
Taste SCHLEUDERGANG
Taste mit Kontrollleuchte ON/OFF: Drücken Sie kurz
auf die Taste, um das Gerät ein- bzw. auszuschalten.
Die grüne Kontrollleuchte zeigt an, dass das Gerät
eingeschaltet ist. Um den Waschvollautomaten während
eines Waschgangs auszuschalten, muss die Taste
etwas länger gedrückt werden (ca. 3 Sekunden); ein
kurzer oder ein ungewollter Druck bewirkt kein
Ausschalten des Gerätes. Das Ausschalten des Gerätes
während eines laufenden Waschprogramms löscht den
gesamten Waschzyklus.
Wählschalter PROGRAMME: Der Schalter kann in
beide Richtungen gedreht werden. Um sicher zu sein,
das am besten geeignete Waschprogramm gewählt zu
haben, raten wir die Programmtabelle zu Rate zu
ziehen. Während des Programmablaufs bleibt der
Schalter feststehend.
Taste
TEMPERATUR: Taste drücken, wenn Sie die
Temperatur ändern oder ausschalten möchten, der Wert
wird durch die darüber befindlichen Kontrollleuchten
angezeigt (siehe Durchführung eines
Waschprogramms).
Taste
SCHLEUDERGANG: Taste drücken, wenn
Sie die Schleuderdrehzahl ändern oder nicht schleudern
möchten; der Wert wird durch die darüber befindlichen
Kontrollleuchten angezeigt (siehe Durchführung eines
Waschprogramms).
Taste STARTZEIT-
VORWAHL
Kontrollleuchte
TÜRSPERRE
Taste mit Kontrollleuchte
TASTENSPERRE
Symbole PROGRAMMABLAUF: Die Symbole zeigen
die jeweilige Programmphase (Hauptwäsche
Spülen
anzuzeigen). Die Anzeige
Schleudern Abpumpen )
leuchtet auf, wenn der
Zyklus abgelaufen ist.
Taste mit Kontrollleuchte START/PAUSE: Sobald die
grüne Kontrollleuchte auf langsames Blinklicht schaltet,
drücken Sie die Taste, um den Waschgang zu starten.
Nach Start des Programms ist die Kontrollleuchte
dauerhaft an. Um den Waschgang zu unterbrechen,
drücken Sie erneut die Taste die Kontrollleuchte blinkt
orangefarben. Sobald die Kontrollleuchte Türsperre
erlischt, kann die Gerätetür geöffnet werden. Um das
Programm an der Stelle, an der es unterbrochen wurde,
wieder in zu starten, drücken Sie die Taste erneut.
Kontrollleuchte
TÜRSPERRE: Diese zeigt an, dass
die Gerätetür nicht geöffnet werden kann. Um die
Gerätetür zu öffnen, muss der Waschzyklus auf Pause
geschaltet werden (siehe Durchführung eines
Waschprogramms).
Taste mit Kontrollleuchte
TASTENSPERRE: Zur
Sperre bzw. Freigabe der Schaltelemente halten Sie die
Taste ca. 2 Sekunden lang gedrückt. Die eingeschaltete
Kontrollleuchte zeigt an, dass die Bedienblende gesperrt
ist. Auf diese Weise wird verhindert, dass ein Programm
aus Versehen geändert wird, (eventuell durch Kinder).
Taste
STARTZEITVORWAHL: Taste drücken, um
den verzögerten Start des gewünschten Programms zu
programmieren. Die entsprechende Zeitverschiebung
wird durch die darüber befindlichen Kontrollleuchten
angezeigt (siehe Durchführung eines
Waschprogramms).
Tasten mit Kontrollleuchten ZUSATZFUNKTIONEN: Die
Taste zur Einstellung der verfügbaren Zusatzfunktionen
drücken. Die entsprechende Kontrollleuchte leuchtet
(siehe Durchführung eines Waschprogramms).
Kontrollleuchte ECO: das Symbol
wird angezeigt,
sobald bei Änderung der Waschoptionen den
Energiebverbrauch um mindestens 10% reduziert.
Außerdem leuchtet die Ikone, bevor das Gerät in
Standby-Modus übergeht, für wenige Sekunden auf. Bei
ausgeschaltetem Gerät liegt die geschätzte
Energierückgewinnung bei etwa 80%.
17
Page 18

Durchführung eines
Waschprogramms
DE
ANMERKUNG: Lassen Sie vor erstmaligem Gebrauch
des Waschvollautomaten erst einen Waschgang ohne
Wäsche, jedoch mit Waschmittel durchlaufen. Stellen Sie
hierzu das 90°C-Waschprogramm ohne Vorwäsche ein.
1. EINSCHALTEN DES GERÄTES. Drücken Sie die
Taste
Sekunde auf; im Anschluss daran leuchtet die
Kontrollleuchte der Taste
Kontrollleuchte START/PAUSE blinkt.
2. EINFÜLLEN DER WÄSCHE. Öffnen Sie die
Gerätetür. Füllen Sie die Wäsche ein. Beachten Sie
die maximale Füllmenge laut Programmtabelle.
3. DOSIERUNG DES WASCHMITTELS. Ziehen Sie
die Waschmittelschublade heraus und füllen Sie das
Waschmittel in die entsprechenden Kammern (siehe
Beschreibung Ihres Gerätes).
4. SCHLIESSEN SIE DIE GERÄTETÜR.
5. WAHL DES WASCHPROGRAMMS. Drehen Sie
den WÄHLSCHALTER PROGRAMME nach rechts
oder nach links auf das gewünschte Programm; die
dem Programm entsprechende Temperatur und
Schleudergeschwindigkeit werden automatisch
zugeschaltet, können jedoch geändert werden.
6. INDIVIDUALISIERUNG DES WASCHGANGS.
Dies erwirken Sie über die auf dem Bedienfeld
befindlichen Tasten:
Schleuderdrehzahl.
Das Gerät zeigt automatisch die für das eingestellte
Programm vorgesehene maximale Temperatur sowie die
maximale Schleudergeschwindigkeit, wenn sie
kompatibel mit dem eingestellten Programm sind. Durch
Drücken der Taste
Schritt herabgesetzt werden, bis auf Kaltwäsche (
Durch Drücken der Taste
Schleudergeschwindigkeit Schritt für Schritt
herabgesetzt werden, bis auf die Abwahl des
Schleudergangs (
setzt die Einstellungen wieder auf die maximalen Werte.
. Sämtliche Kontrolllampen leuchten für 1
dauerhaft und die
Änderung der Temperatur und/
kann die Temperatur Schritt für
).
kann die
). Ein weiterer Druck auf die Tasten
Ausnahme: Wird das Waschprogramm BAUMWOLLE
eingestellt, kann die Temperatur bis auf 90° erhöht werden.
Die Startzeitvorwahl einstellen.
Zur Vorwahl der Startzeit des eingestellten Programms
drücken Sie mehrmals die Taste, bis die Kontrollleuchte
der gewünschten Zeitverschiebung aufleuchtet.
Beim sechsten Tastendruck wird die Funktion
deaktiviert.
Wurde die Taste START/PAUSE einmal gedrückt,
kann die Restzeit bis zum Start nur verringert werden.
Zur Aktivierung der Zusatzfunktion drücken Sie die
Taste; die entsprechende Kontrolllampe leuchtet auf.
Durch erneutes Drücken der Taste kann die
Zusatzfunktion wieder ausgeschaltet werden; die
entsprechende Kontrollleuchte erlischt.
Lässt sich eine Waschoption nicht mit dem
gewählten Programm kombinieren, blinkt die
entsprechnde Anzeige, es ertönt ein akustisches
Signal (3 Signaltöne) und die Funktion wird nicht
aktiviert.
Ist die gewählte Zusatzfunktion mit einer anderen,
bereits eingestellten nicht kompatibel, blinkt die
Anzeige der ersten Option, wird deaktiviert und nur
die zweite Funktion wird aktiviert.
7. STARTEN DES PROGRAMMS. Drücken Sie die
Taste START/PAUSE. Die Kontrollanzeige leuchtet und
die Gerätetür wird gesperrt (Kontrollleuchte
TÜRSPERRE
Programmablaufs leuchten die entsprechenden
Symbole auf, um die jeweils erreichte Phase
anzuzeigen. Um ein bereits laufendes Programm zu
ändern, schalten Sie das Gerät auf Pause , drücken
Sie hierzu die Taste START/PAUSE, wählen Sie
daraufhin das gewünschte Programm und drücken
Sie erneut die Taste START/PAUSE.
Zum Öffnen der Gerätetür während eines Zyklusses
drücken Sie die Taste START/PAUSE; ist die
Kontrollleuchte TÜRSPERRE
die Gerätetür geöffnet werden. Drücken Sie die Taste
START/PAUSE erneut, um das Programm an der
Stelle, an der es unterbrochen wurde, wieder in Gang
zu setzen.
8. ENDE DES PROGRAMMS. Dieses wird durch die
Leuchtanzeige END angezeigt. Die Gerätetür kann
geöffnet werden. Blinkt die Kontrollleuchte START/
PAUSE, muss die Taste gedrückt werden, um den
Waschgang abzuschließen. Öffnen Sie die Gerätetür,
nehmen Sie die Wäsche heraus und schalten Sie das
Gerät aus.
Möchten Sie ein bereits in Gang gesetztes
Waschprogramm löschen, halten Sie die Taste
gedrückt, bis der Zyklus unterbrochen wird und sich das
Gerät ausschaltet.
eingeschaltet). Während des
ausgeschaltet, kann
Sack für Steppdecken, Vorhänge und Feinwäsche
Dank des speziellen mitgelieferten Sacks können Sie im
Waschvollautomaten Aqualtis auch ihre kostbarsten und
empfindlichsten Wäschestücke bei maximalem Schutz
waschen. Es empfiehlt sich, diesen Sack in jedem Fall
für die Wäsche wie z.B. (Stepp- und Daunendecken
mit Synthetikbezug zu verwenden).
Änderung der Eigenschaften des
Waschgangs.
Drücken Sie die Taste ZUSATZFUNKTIONEN, um
einen Waschgang gemäß Ihren persönlichen
Wünschen zu ändern.
18
Page 19

Programme und
Zusatzfunktionen
Programmtabelle
Sym-
Beschreibung des Programms
bole
Pr ogram me Baum wolle
Baumwolle mit Vorwäsche
(Füllen Sie das Waschpulver in die ent sprechende Kammer ein).
Baumwolle (1):
Buntwäsche.
Baumwolle (2):
Buntwäsche.
Buntwäsche
Hemden
Jeans
Spezialprogramme
stark verschmutzte empfindliche Buntwäsche.
Baby:
Kunstfaser
Kunstfaser
7-Tage:
Daunen:
Seide:
Wolle:
Mix 30':
(nicht geeignet für Wolle, Seide und Handwäsche).
Teilprogramme
Spülen - 1200 Schleudern - 1200 - - - 716
Abpumpen - 0 - - - 72
stark verschmutzte Weiß- und farbechte
stark verschmutzte Weiß- und empfindliche
aus Baumwolle
widerstandsfähige
zarte
bettwäsche Bade- und Handtücher.
wäsche- bzw. Kleidungsstücke mit Daunenfüllung.
kleidungsstücke aus Seide, Viskose und Feinwäsche.
wolle, Kaschmir usw.
zum kurzen Auffrischen leicht verschmutzter Wäsche
(3)
Max.
Te m p .
(°C)
90° 1200
60°
(Max. 90°)
40° 1200
40° 1200
40° 600
40° 800
40° 800
60° 800
40° 800
60° 1200
30° 1000
30° 0
40° 600
30° 800
Max.
Schle uder
Geschwindig-
keit (U/min)
1200
Waschmittel und
Zusätze
Wasc h-
Weich-
mittel
ll
lll
lll
lll
lll
ll
lll
lll
lll
lll
ll
ll
ll
ll
Bleich-
spüle r
mittel
ll
Max.
Beladungsme nge
(kg)
- 7174
7153
7148
792
269
- 3,5 80
3118
385
374
795
- 294
- 155
- 1,5 55
- 330
736
DE
Pr ogram -
mdauer
Für alle Testinstitute:
1) Prüfprogramm gemäß EN 60456: Programm
2) Langes Baumwollprogramm: Programm
3) Kurzes Baumwollprogramm: Programm
und eine Temperatur von 60°C einstellen.
und eine Temperatur von 40°C einstellen.
und eine Temperatur von 40°C einstellen.
Zusatzfunktionen
Super Wash
3
1
2
werden.
Möchten Sie auch Bleichen, dann setzen Sie die
mitgelieferte, zusätzliche Kammer 3 in Kammer 1 ein. Bei
der Dosierung des Bleichmittels darf der auf dem
Zentralstift mit max gekennzeichnete Höchststand
(siehe Abbildung) nicht überschritten werden. Wenn Sie
nur bleichen möchten, ohne einen kompletten
Waschgang durchzuführen, dann geben Sie das
Bleichmittel in die Zusatzkammer 3, stellen Sie das
Programm Spülgang
Funktion Super Wash
Diese Funktion kann zu den Programmen
, , , .
Bügelleicht
Wird diese Zusatzfunktion eingestellt, werden
Waschgang und Schleudergang entsprechend geändert,
Diese Zusatzfunktion
verbessert die
Waschergebnisse durch eine
erhöhte Wassermenge am
Anfang des Programms und
eine verlängerte
Programmlaufzeit.
Diese Funktion ermöglicht
das Entfernen selbst der
hartnäckigsten Flecken.
Kann mit oder ohne
Bleichmittel verwendet
ein und aktivieren Sie die
.
, , , ,
um Knitterbildung zu vermindern. Am Ende des
Waschgangs erfolgt eine sanfte Umdrehung der
Trommel; die Kontrollleuchten Bügelleicht und START/
PAUSE blinken. Drücken Sie die Taste START/PAUSE
oder Bügelleicht, um den Waschgang abzuschließen.
Wird das Programm Seide
eingestellt, unterbricht Ihr
Gerät das Programm, ohne das Wasser abzupumpen.
Ihre Wäsche bleibt so im letzen Spülwasser liegen, und
die Kontrollleuchte Bügelleicht blinkt. Zum Abpumpen
des Wassers zu muss die Taste START/PAUSE oder die
Taste Bügelleicht gedrückt werden.
Diese Funktion kann zu den Programmen
, , , , .
Schnell
Wird diese Option gewählt, wird die Programmdauer um
30%-50% reduziert, wodurch Wasser und Energie
gespart werden können. Verwenden Sie diesen Zyklus
leicht verschmutzte Wäsche.
Diese Funktion kann zu den Programmen
, , ,
, , , , , .
Extra Spülen
Wählen Sie diese Zusatzfunktion, wird die Spülwirkung
verbessert und somit ein optimales Ausspülen von
Waschmittelresten garantiert. Dies ist besonders
empfehlenswert bei sehr empfindlicher Haut bzw.
Waschmittelallergien. Es empfiehlt sich, diese Funktion
bei voller Wäschebeladung oder bei hohen
Waschmitteldosierungen zuzuschalten.
Diese Funktion kann zu den Programmen
, , .
19
Page 20

Waschmittel und Wäsche
DE
Waschmittel
Die Wahl des Waschmittels und der Waschmittelmenge hängt von
der Gewebeart (Baumwolle, Wolle, Seide ...), der Farbe, der
Waschtemperatur, der Stärke der Verschmutzung und der
Wasserhärte ab. Dosieren Sie das Waschmittel gemäß
Herstellerangaben exakt, um Verschwendung zu vermeiden und
die Umwelt zu schonen: obwohl sie biologisch abbaubar sind,
beinhalten Sie dennoch Stoffe, die die Umwelt belasten.
Es empfiehlt sich:
Waschmittel in Pulverform für Weißwäsche und für die
Vorwäsche zu verwenden,
flüssige Waschmittel für empfindliche Baumwollwäsche und
für alle Waschprogramme bei Niedrigtemperaturen,
und flüssige Feinwaschmittel für Wolle und Seide.
Flüssigwaschmittel dürfen erst unmittelbar vor dem Start des
Programms in die entsprechende Kammer, oder in eine
Dosierkugel, eingefüllt werden. Bei der Benutzung von
Flüssigwaschmitteln sollte kein Programm mit Vorwäsche
verwendet werden.
Verwenden Sie keine Handwaschmittel, diese verursachen
eine zu hohe Schaumbildung.
Vorsortieren der Wäsche
Falten Sie die Wäsche auseinander, bevor Sie sie in die
Trommel legen.
Trennen Sie die Wäsche je nach Gewebeart (siehe
Waschetikettensymbol) und Farbe. Weißwäsche ist immer
getrennt zu waschen.
Entleeren Sie alle Taschen und kontrollieren Sie die Knöpfe.
Das in der Programmtabelle angegebene Gewicht,
beschreibt die maximale Ladung Trockenwäsche und darf
nicht überschritten werden.
Wie schwer ist Wäsche?
1 Betttuch 400-500 g
1 Kopfkissenbezug 150-200 g.
1 Tischdecke 400-500 g
1 Bademantel 900-1200 g
1 Handtuch 150-250 g
1 Jeanshose 400-500 g
1 Oberhemd 150-200 g.
Waschhinweise
Hemden: wählen Sie das Spezialprogramm Hemden
zum schonenden Waschen von Oberhemden jeglicher
Gewebeart und Farbe.
Jeans: wählen Sie das Spezialprogramm Jeans für alle
Wäschestücke aus Denimstoff; wenden Sie die
Wäschestücke auf links und verwenden Sie ein
Flüssigwaschmittel.
Baby: wählen Sie das Spezialprogramm Baby
durch Kinder verursachten, typischen Flecken zu beseitigen
und die Waschmittel optimal auszuspülen auch um Allergien an
der empfindlichen Kinderhaut zu vermeiden. Dieser Zyklus
reduziert das Bakterienaufkommen durch eine Erhöhunh der
Wassermenge und wurde optimiert für die Verwendung von
speziellen desinfizierenden Waschmittelzusätzen.
Am Ende des Waschgangs erfolgen einige langsame und
sanfte Trommelumdrehungen. Drücken Sie abschließend die
Taste START/PAUSE.
Seide: Wählen Sie das Spezialprogramm Seide
Waschen aller Kleidungs- bzw. Wäschestücke aus Seide. Es
empfiehlt sich der Einsatz von Feinwaschmittel.
um die
zum
Gardinen: Verwenden Sie das Programm Seide
sollten zusammengelegt und in den mitgelieferten Beutel
gesteckt werden.
Wolle: Der Waschvollautomat ist der einzige, der mit dem
Woolmark Platinum Care-Siegel (M.0508) von The
Woolmark Company ausgezeichnet wurde. Dieses Siegel
zertifiziert diese Waschmaschine als Gerät für eine besonders
schonende Maschinenwäsche aller Kleidungsstücke aus Wolle,
auch solcher, die das Etikett nur Handwäsche
Mit dem Programm Wolle lassen sich sämtliche Wollwäsche
bedenkenlos waschen, wobei beste Waschergebnisse erreicht
werden.
Daunen: Zum Waschen von Wäschestücken mit
Daunenfüllung wie Federbetten für "Ehe-" oder Einzelbetten (die
ein Gewicht von 2 kg nicht überschreiten), Kissen oder Anoraks
wählen Sie das Spezialprogramm Daunen
die Federbetten mit nach innen gefalteten Ecken (siehe
Abbildung) in die Wäschetrommel zu füllen und ¾ des
Fassungsvermögens der Trommel nicht zu überschreiten.
Für optimale Waschergebnisse empfiehlt es sich,
Flüssigwaschmittel zu verwenden und dieses in die
Waschmittelkammer einzufüllen.
Steppdecken: Benutzen Sie zum Waschen von Steppdecken
mit Synthetikbezug den mitgelieferten Sack und stellen Sie das
Programm Daunen
Badezimmer- und Bettwäsche: Ihr Waschvollautomat
bietet Ihnen die Möglichkeit, Ihre gesamte Wäsche in einem
einzigen Waschgang, dem 7-Tage-Programm
waschen. Weichspüler kommt hier optimiert zum Einsatz und
Sie sparen zusätzlich Zeit und Energie. Es empfiehlt sich die
Verwendung von Waschmittel in Pulverform.
Hartnäckige Flecken: Diese sollten vor dem Waschen
vorbehandelt werden. Verwenden Sie das Programm für
Baumwolle mit Vorwäsche.
ein.
. Wie empfehlen,
. Sie
tragen.
zu
System zur Auswuchtung der
Wäscheladung
Um starke Vibrationen zu vermeiden, wird die Wäsche vor
dem Schleudern durch spezielle Trommelbewegungen
gleichmäßig verteilt. Sollte die Wäscheladung nach Ablauf
mehrerer Versuche immer noch nicht korrekt verteilt sein,
schleudert das Gerät die Wäsche bei einer niedrigeren
Schleudergeschwindigkeit. Sollte die Wäsche extrem
ungleichmäßig verteilt sein, führt das Gerät anstelle des
Schleudergangs einen Wäscheverteilungs-Zyklus durch. Um
eine optimale Verteilung der Wäscheladung und somit eine
korrekte Auswuchtung zu ermöglichen, sollten große und
kleine Wäscheteile gemischt eingefüllt werden.
20
Page 21

Vorsichtsmaßregeln und
Hinweise
Der Waschvollautomat wurde nach den strengsten
internationalen Sicherheitsvorschriften entworfen und
gebaut. Nachstehende Hinweise werden aus
Sicherheitsgründen genannt und sollten aufmerksam
gelesen werden
Allgemeine Sicherheit
Dieses Gerät wurde ausschließlich für den Einsatz im
privaten Haushalt konzipiert.
Dieses Gerät ist nicht zur Verwendung durch Personen
(einschließlich Kinder) mit eingeschränkten körperlichen,
geistigen oder sensorialen Fähigkeiten oder ohne
ausreichende Erfarhung und Kenntnis geeignet, es sei
denn, sie werden durch eine für ihre Sicherheit
verantwortliche Person beaufsichtigt und eingewiesen.
Kinder müssen beaufsichtigt werden, um
sicherzustellen, dass sie nicht mit dem Gerät spielen.
Berühren Sie das Gerät nicht, wenn Sie barfuß sind,
und auch nicht mit nassen oder feuchten Händen
oder Füßen.
Ziehen Sie den Netzstecker nicht am Netzkabel aus
der Steckdose, sondern nur am Netzstecker selbst.
Berühren Sie nicht das Ablaufwasser, es könnte sehr
heiß sein.
Öffnen Sie die Gerätetür nicht mit Gewalt: Der
Sicherheits-Schließmechanismus könnte hierdurch
beschädigt werden.
Bei etwaigen Störungen versuchen Sie bitte nicht,
Innenteile selbst zu reparieren.
Halten Sie Kinder stets von dem in Betrieb
befindlichen Gerät fern.
Sollte es erforderlich sein, das Gerät zu versetzen,
sollten hierfür 2 oder 3 Personen verfügbar sein.
(Vorsichtig vorgehen). Versetzen Sie es niemals allein,
das Gerät ist äußerst schwer.
Bevor Sie die Wäsche einfüllen, stellen Sie bitte sicher,
dass die Wäschetrommel leer ist.
Manuelles Öffnen der Gerätetür
DE
Bei Stromausfall kann die Gerätetür zum Herausnehmen
der Wäsche wie folgt geöffnet werden:
1. Ziehen Sie den
Netzstecker aus der
Steckdose.
2. Prüfen Sie vor dem
Öffnen der Gerätetür, dass
der Wasserstand unterhalb
der Türdichtung liegt. Sollte
das nicht der Fall sein, dann
lassen Sie das Wasser über
den Ablaufschlauch ablaufen
(siehe Abbildung).
3. Schieben Sie den mitgelieferten Schlüssel in den
seitlichen Schlitz, wie in der Abbildung gezeigt.
4. Drucken Sie den Schlüssel an und ziehen Sie
gleichzeitig den Griff zu sich, um die Gerätetür zu öffnen.
Entsorgung
Entsorgung des Verpackungsmaterials: Bitte befolgen
Sie die lokalen Richtlinien zur Entsorgung und
Wiederverwertung des Verpackungsmaterials.
Die europäische Richtlinie 2002/96/EG über Elektro-
und Elektronik-Altgeräte schreibt vor, dass
Hauhaltsgeräte nicht mit dem normalen Müll zu
entsorgen sind. Altgeräte sind zwecks Optimierung
der Rückgewinnungs- und Recyclingrate der
Gerätematerialien einer gesonderten Sammelstelle
zuzuführen, um Schäden für die Gesundheit und die
Umwelt zu vermeiden. Das durchgestrichene
Abfalleimersymbol, weist darauf hin, dass eine
getrennte Entsorgung vorgeschrieben ist.
Für weitere Informationen hinsichtlich der
ordnungsgemäßen Entsorgung von Haushaltsgeräten
wenden Sie sich bitte an Ihren Händler oder an die
zuständige kommunale Stelle.
21
Page 22

Reinigung und Pflege
DE
Abstellen der Wasser- und
Stromversorgung
Drehen Sie den Wasserhahn nach jedem
Waschvorgang zu. Hierdurch wird der Verschleiß der
Wasseranlage verringert und Wasseraustritte
vermieden.
Ziehen Sie den Netzstecker aus der Steckdose, bevor
Sie Ihr Gerät reinigen.
Reinigung des Gerätes
Die Gehäuseteile und die Teile aus Gummi können mit
einem, mit warmer Spülmittellauge angefeuchteten Tuch
gereinigt werden. Vermeiden Sie den Einsatz von Löseund Scheuermitteln.
Reinigung der Waschmittelschublade
Drücken Sie auf den
Arretierhebel (1) und ziehen
Sie die
Waschmittelschublade nach
vorne heraus (2) (siehe
Abbildung).
Spülen Sie diese regelmäßig
unter fließendem Wasser
gründlich aus.
Zugang zur Fremdkörperfalle:
2
1. Nehmen Sie die Abdeckung an der Gerätefront ab,
indem Sie zur Mitte hin drücken, dann drücken Sie beide
Seiten nach unten und ziehen sie heraus (siehe
Abbildungen).
2. Nehmen Sie einen
Behälter zum Auffangen des
auslaufenden Wassers (ca.
1,5 Liter) zur Hand (siehe
Abbildung);
3. Drehen Sie den Deckel
gegen den Uhrzeigersinn ab
(siehe Abbildung);
4. Reinigen Sie das Innere gründlich;
5. Schrauben Sie den Deckel wieder auf.
6. Bringen Sie die Abdeckung wieder an. Stellen Sie
hierbei sicher, dass die Haken in die Schlitze eingreifen,
bevor Sie die Abdeckung fest andrücken.
Pflege der Wäschetrommel
Lassen Sie die Gerätetür stets leicht offen stehen, um
die Bildung unangenehmer Gerüche zu vermeiden.
Reinigung der Pumpe
Ihr Gerät ist mit einer selbstreinigenden Pumpe
ausgerüstet, eine Wartung ist demnach nicht
erforderlich. Es könnte jedoch vorkommen, dass kleine
Gegenstände (Münzen, Knöpfe) in die Fremdkörperfalle
geraten.
Vergewissern Sie sich, dass der Waschgang
abgeschlossen ist und ziehen Sie den Netzstecker
heraus.
22
Kontrolle des Wasserzulaufschlauchs
Kontrollieren Sie den Zulaufschlauch mindestens einmal
im Jahr. Weist er Risse bzw. Brüche auf, muss er
ausgetauscht werden. Der starke Druck während des
Waschprogramms könnte zu plötzlichem Platzen führen.
Page 23

Störungen und Abhilfe
Bei Funktionsstörung: Bevor Sie sich an den Technischen Kundendienst wenden (siehe Kundendienst), vergewissern
Sie sich zuerst, ob es sich nicht um eine Kleinigkeit handelt, die Sie selbst beheben können. Ziehen Sie hierzu
nachstehendes Verzeichnis zu Rate.
Störungen:
Das Gerät schaltet sich nicht
ein.
Der Waschgang startet nicht.
Das Gerät zieht kein Wasser.
Die Gerätetür bleibt gesperrt.
Das Gerät zieht laufend Wasser
und pumpt es laufend ab.
Das Gerät pumpt nicht ab und
schleudert nicht.
Das Gerät vibriert zu stark
während des Schleuderns.
Das Gerät ist undicht.
Mögliche Ursachen / Lösungen:
Der Stecker steckt nicht in der Steckdose, oder nicht so, dass der Kontakt
hergestellt wird.
Der Strom ist ausgefallen.
Die Gerätetür ist nicht ganz geschlossen.
Die Taste START/PAUSE wurde nicht gedrückt.
Der Wasserhahn ist nicht aufgedreht.
Es wurde ein verzögerter Start gewählt.
Der Zufuhrschlauch ist nicht am Wasserhahn angeschlossen.
Der Schlauch ist geknickt.
Der Wasserhahn ist nicht aufgedreht.
Es ist kein Wasser da.
Der Druck ist unzureichend.
Die Taste START/PAUSE wurde nicht gedrückt.
Durch Auswahl des Programmzyklus Baby
führt der Waschvollautomat am Ende des Zyklus langsame Drehungen
der Trommel aus; um den Zyklus zu beenden drücken Sie die Taste START/
PAUSE oder die Taste Bügelleicht
beendet das Gerät den Zyklus ohne das Wasser abzupumpen. Zum
Abpumpen des Wassers und um die Wäsche herausnehmen zu können muss
die Taste START/PAUSE oder die Taste Bügelleicht
Der Ablaufschlauch befindet sich nicht auf der vorgeschriebenen Höhe, d.h. 65
100 cm vom Boden (siehe Installation).
Das Schlauchende liegt unter Wasser (siehe Installation).
Falls Sie in einer der obersten Etagen eines Gebäudes wohnen, kann es
vorkommen, dass sich im Syphon ein Vakuum bildet, und dadurch ständig
Wasser ansaugt und wieder abpumpt wird. Zur Lösung dieser Probleme bietet
der Handel spezielle Syphonventilean.
Der Abfluss der Hausinstallation wurde nicht mit einer Entlüftungsöffnung
versehen.
Das Programm sieht kein Abpumpen vor: Bei einigen Programmen muss es
von Hand eingestellt werden (siehe Programme und Zusatzfunktionen).
Die Zusatzfunktion Bügelleicht wurde zugeschaltet: zur Beendung des Programms
Taste START/PAUSE drücken (siehe Programme und Zusatzfunktionen).
Der Ablaufschlauch ist geknickt (siehe Installation).
Die Ablaufleitung ist verstopft.
Die Transportsicherungen wurden nicht entfernt (siehe Installation).
Das Gerät steht nicht eben (siehe Installation).
Das Gerät steht zu eng zwischen der Wand und einem Möbel (siehe Installation).
Das Gerät wurde nicht gleichmäßig beladen (siehe Waschmittel und Wäsche).
Der Zulaufschlauch wurde nicht ordnungsgemäß aufgeschraubt (siehe Installation).
Die Waschmittelschublade ist verstopft (zur Reinigung siehe Wartung und Pflege).
Der Ablaufschlauch ist nicht korrekt befestigt (siehe Installation).
oder der Option Bügelleicht
. Durch Auswahl des Zyklus Seide
gedrückt werden.
DE
Die Symbole des
Programmablaufs blinken
gemeinsam mit der ON/OFF
Kontrollleuchte in kurzen
Abständen.
Es bildet sich zu viel Schaum.
Die Gerätetür bleibt gesperrt.
Schalten Sie das Gerät aus und ziehen Sie den Netzstecker; warten Sie
daraufhin ca. 1 Minute und schalten Sie es wieder ein. Bleibt die Störung
bestehen, kontaktieren Sie bitte den Kundendienst.
Das Waschmittel ist für Waschmaschinen nicht geeignet (es muss mit der
Aufschrift Für Waschmaschinen, Für Handwäsche und Waschmaschinen
usw. versehen sein.
Es wurde zu hoch dosiert.
Entsperren Sie die Gerätetür von Hand (siehe Vorsichtsmaßregeln und Hinweise).
23
Page 24

Kundendienst
DE
Bevor Sie den Kundendienst anfordern:
Prüfen Sie, ob einige Kontrollen vorab selbst durchgeführt werden (siehe Störungen und Abhilfe);
Starten Sie daraufhin das Programm erneut, um sicherzustellen, dass die Störung auch wirklich behoben wurde;
Ist dies nicht der Fall, wenden Sie sich bitte an den autorisierten Kundendienst.
Im Falle einer fehlerhaften Installation oder eines unkorrekten Gebrauchs wird der Einsatz eventuell in Rechnung gestellt.
Beauftragen Sie bitte niemals unbefugtes Personal.
Geben Sie bitte Folgendes an:
die Art der Störung;
das Gerätemodell (Mod.);
die Seriennummer (S/N).
Diese Angaben ersehen Sie auf dem am Gerät befindlichen Typenschild.
24
Page 25

Instrucciones para la
instalación y el uso
Sumario
Instalación, 26-27
ES
Español
AQUALTIS
Desembalaje y nivelación
Conexiones hidráulicas y eléctricas
Datos técnicos
Descripción de la máquina, 28-29
Panel de control
Cómo efectuar un ciclo de lavado, 30
Programas y opciones, 31
Tabla de Programas
Opciones de lavado
Detergentes y ropa, 32
Detergente
Preparar la ropa
Consejos sobre el lavado
Sistema de equilibrado de la carga
LAVADORA
ES
AQ7L 25 U
Precauciones y consejos, 33
Seguridad general
Eliminación
Apertura manual de la puerta
Mantenimiento y cuidados, 34
Interrumpir el agua y la corriente eléctrica
Limpiar la máquina
Limpiar el contenedor de detergentes
Cuidar el cesto
Limpiar la bomba
Controlar el tubo de alimentación de agua
Anomalías y soluciones, 35
Asistencia, 36
25
Page 26

Instalación
ES
Es importante conservar este manual para poder
consultarlo en cualquier momento. En el caso de venta,
cesión o traslado, controle que permanezca junto con la
lavadora.
Lea atentamente las instrucciones: ellas contienen
importante información sobre la instalación, el uso y la
seguridad.
En el sobre que contiene este manual encontrará,
además de la garantía, piezas que servirán para la
instalación.
Desembalaje y nivelación
Desembalaje
1. Una vez desembalada la lavadora, controle que no
haya sufrido daños durante el traslado.
Si estuviera dañada no la conecte y llame al revendedor.
2. Quite los 4 tornillos de
protección para el
transporte y el
correspondiente
distanciador, ubicados en
la parte posterior (ver la
figura).
Cuando se instala sobre moquetas o alfombras, regule
las patas para que, debajo de la lavadora, quede un
espacio suficiente para la ventilación.
Conexiones hidráulicas y eléctricas
Conexión del tubo de alimentación de agua
Antes de conectar el tubo de alimentación a la red
hídrica, haga correr agua hasta que sea límpida.
1. Conecte el tubo de
alimentación a la máquina
enroscándolo en la toma
de agua correspondiente
ubicada en la parte
posterior derecha (arriba)
(ver la figura).
2. Conecte el tubo de
alimentación enroscándolo
a un grifo de agua fría con
la boca roscada de 3/4 gas
(ver la figura).
3. Cierre los orificios con los tapones de plástico
contenidos en el sobre.
4. Conserve todas las piezas porque si la lavadora
tuviera que ser trasladada nuevamente, se deberían
volver a colocar para evitar daños internos.
Los embalajes no son juguetes para los niños.
Nivelación
1. Instale la lavadora sobre un piso plano y rígido, sin
apoyarla en las paredes ni en los muebles.
2. Compense las
irregularidades
desenroscando o
enroscando las patas
hasta que la máquina
quede en posición
horizontal (no debe estar
inclinada más de 2
grados).
Una cuidadosa nivelación brinda estabilidad y evita
vibraciones y ruidos, sobre todo durante el centrifugado.
3. Controle que en el tubo no hayan pliegues ni
estrangulaciones.
La presión de agua del grifo debe estar comprendida
dentro de los valores contenidos en la tabla de Datos
técnicos (ver la página correspondiente).
Si la longitud del tubo de alimentación no es la
suficiente, diríjase a un negocio especializado o a un
técnico autorizado.
No utilice nunca tubos de carga usados o viejos, utilice
siempre los suministrados con la máquina.
26
Page 27

Conexión del tubo de descarga
Conecte el tubo de
descarga a una tubería de
descarga o a una
descarga de pared
ubicadas a una distancia
65 - 100 cm
del piso comprendida entre
65 y 100 cm., evitando
siempre plegarlo.
Una alternativa es apoyar
el tubo de descarga en el
borde de un lavamanos o
de una bañera, uniendo la
guía suministrada con el
aparato, al grifo (ver la
figura).
El extremo libre del tubo
de descarga no debe
permanecer sumergido en
el agua.
El cable no debe estar plegado ni sufrir compresiones.
ES
El cable de alimentación y el enchufe deben ser
sustituidos sólo por técnicos autorizados.
¡Atención! La empresa fabricante declina toda
responsabilidad en caso de que estas normas no sean
respetadas.
No se aconseja utilizar tubos de prolongación, si fuera
indispensable hacerlo, la prolongación debe tener el
mismo diámetro del tubo original y no superar los 150
cm.
Conexión eléctrica
Antes de enchufar el aparato, verifique que:
la toma tenga la conexión a tierra y haya sido hecha
según las normas legales;
la toma sea capaz de soportar la carga máxima de
potencia de la máquina indicada en la tabla de Datos
técnicos (ver al costado);
la tensión de alimentación esté comprendida dentro
de los valores indicados en la tabla de Datos técnicos
(ver al costado);
la toma sea compatible con el enchufe de la
máquina. Si no es así, sustituya la toma o el enchufe.
La máquina no debe ser instalada al aire libre, ni
siquiera si el lugar está protegido, ya que es muy
peligroso dejarla expuesta a la lluvia o a las tormentas.
Una vez instalada la máquina, la toma de corriente
debe ser fácilmente accesible.
No utilice prolongaciones ni conexiones múltiples.
Datos técnicos
Modelo
Dimensiones
Capacidad
Conexiones
eléctricas
Conexiones
hídricas
Velocidad de
centrifugado
Programas de
control según la
norma EN 60456
AQ7L 25U
ancho 59,5 cm.
altura 85 cm.
profundidad 58 cm.
de 1 a 7 kg.
ver la placa de características
técnicas aplicada en la máquina
presión máxima 1 MPa (10 bar)
presión mínima 0,05 MPa (0,5 bar)
capacidad del cesto 52 litros
máxima 1200 r.p.m.
programa ; temperatura 60ºC;
efectuado con 7 kg. de carga.
Esta máquina cumple con lo
establecido por las siguientes
Directivas de la Comunidad:
- 89/336/CEE del 03/05/89
(Compatibilidad Electromagnética) y
sucesivas modificaciones
- 2002/96/CE
- 2006/95/CE (Baja Tensión)
27
Page 28

Descripción de la máquina
ES
PUERTA
MANIJA DE
LA PUERTA
ZÓCALO
PANEL DE
CONTROL
PATAS REGULABLES
PUERTA
Para abrir la puerta utilice
siempre la manija
correspondiente (ver la
figura).
CONTENEDOR DE DETERGENTE
El contenedor de
detergentes se encuentra
en el interior de la máquina y
se accede a él abriendo la
puerta.
Para la dosificación de
detergente, ver el capítulo
Detergentes y ropa.
Nota: adhiera al contenedor
de detergente el adhesivo
con la descripción de los
programas y las opciones. El adhesivo se encuentra en
el sobre que contiene este manual.
1. cubeta para el prelavado:
3
1
2
en marcha de la lavadora.
3. cubeta adicional: Blanqueador
utilice detergente en polvo.
Antes de verter el
detergente, verifique que no
esté colocada la cubeta
adicional 3.
2. cubeta para el lavado:
utilice detergente en polvo o
líquido. En este último caso
se recomienda verterlo un
instante antes de la puesta
El uso de la cubeta adicional 3 excluye el
prelavado.
cubeta para aditivos: para suavizante o aditivos
líquidos. Se recomienda no superar nunca el nivel
máximo indicado por la rejilla y diluir los suavizantes
concentrados.
Modalidad de stand by
Esta lavadora está en conformidad con las nuevas
normativas vinculadas al ahorro energético. Está dotada
de un sistema de auto-apagado (stand by) que, en caso
de no funcionamiento, se activa pasados
aproximadamente 30 minutos. Presionar brevemente el
botón ON/OFF
y esperar que la máquina se active.
28
Page 29

Panel de control
Pilotos COMIENZO RETRASADO
ES
Pilotos TEMPERATURA
Mando de
PROGRAMAS
Botón con piloto
ON/OFF
Botón con piloto ON/OFF: presione brevemente el
botón para encender o apagar la máquina. El piloto
verde indica que la máquina está encendida. Para
apagar la lavadora durante el lavado, es necesario
mantener presionado el botón durante más tiempo,
aproximadamente 3 seg.; si se presiona en forma más
breve o accidental, la máquina no se apagará. Si la
máquina se apaga durante un lavado en curso, dicho
lavado se anulará.
Mando de PROGRAMAS: se puede girar en ambas
direcciones. Para elegir el programa más apropiado,
consulte la Tabla de programas.
Durante el lavado, el mando no se mueve.
Botón
excluir la temperatura; el valor está indicado por los
pilotos que se encuentran encima (ver Cómo realizar un
ciclo de lavado).
Botón
o excluir la centrifugación; el valor está indicado por los
pilotos que se encuentran encima (ver Cómo realizar un
ciclo de lavado).
Botón
fijar el comienzo retrasado del programa elegido; el valor
del retraso está indicado por los pilotos que se
encuentran encima (ver Cómo efectuar un ciclo de
lavado).
Botones con Pilotos OPCIONES: presiónelos para
seleccionar las opciones disponibles. El piloto
correspondiente a la opción seleccionada permanecerá
encendido (ver Cómo efectuar un ciclo de lavado).
TEMPERATURA: presiónelo para modificar o
CENTRIFUGADO: presiónelo para modificar
COMIENZO RETRASADO: presiónelo para
Botones con Pilotos
OPCIONES
Botón TEMPERATURA
Botón CENTRIFUGADO
Pilotos
CENTRI-
FUGACIÓN
Botón con piloto
Botones con
Pilotos
OPCIONES
Botón COMIENZO
RETRASADO
Piloto BLOQUEO
Piloto
ECO
START/PAUSE
Iconos FASES
DE LAVADO
Botón con piloto
BLOQUEO DE
BOTONES
DE LA PUERTA
Iconos FASES DE LAVADO: se iluminan para indicar el
avance del ciclo (Lavado
Centrifugado
El mensaje
Botón con piloto START/PAUSE: cuando el piloto verde
centellea lentamente, presione el botón para que
comience el lavado. Una vez que el ciclo ha
comenzado, el piloto se mantiene fijo. Para poner en
pausa el lavado, presione nuevamente el botón; el piloto
centelleará con un color anaranjado. Si el piloto
Bloqueo de la puerta
la puerta.
Para que el lavado se reanude a partir del momento en
el cual fue interrumpido, presione nuevamente el botón.
Piloto
puerta está bloqueada. Para abrir la puerta es necesario
poner el ciclo en pausa (ver Cómo efectuar un ciclo de
lavado).
Botón con piloto
activar o desactivar el bloqueo del panel de control,
mantenga presionado el botón durante 2 segundos
aproximadamente. El piloto encendido indica que el
panel de control está bloqueado. De este modo, se
evitan modificaciones accidentales de los programas,
sobre todo si en la casa hay niños.
Piloto ECO: el ícono
modificando los parámetros de lavado, se obtenga un
ahorro de energía del 10% como mínimo. Además,
antes que la máquina entre en la modalidad "Stand by",
el icono se encenderá unos pocos segundos; con la
máquina apagada la recuperación energética estimada
será de aprox. el 80%.
Desaguado ).
se ilumina cuando ha finalizado el ciclo.
BLOQUEO DE LA PUERTA: indica que la
BLOQUEO DE BOTONES: para
Enjuague
está apagado, se podrá abrir
se encenderá cuando,
29
Page 30

Cómo efectuar un ciclo de lavado
ES
NOTA: la primera vez que se utiliza la lavadora, realice
un ciclo de lavado sin ropa pero con detergente,
seleccionando el programa algodón 90º sin prelavado.
1. ENCENDER LA MÁQUINA. Presione el botón
Todos los pilotos se encenderán durante 1 segundo y
luego permanecerá encendido en forma fija el piloto
del botón
lentamente.
2. CARGAR LA ROPA. Abra la puerta. Cargue la ropa,
cuidando no superar la cantidad de carga indicada en
la tabla de programas de la página siguiente.
3. DOSIFICAR EL DETERGENTE. Extraiga el
contenedor y vierta el detergente en las cubetas
correspondientes como se explica en Descripción de
la máquina.
4. CERRAR LA PUERTA.
5. ELEGIR EL PROGRAMA. Gire el MANDO DE
PROGRAMAS hacia la derecha o hacia la izquierda
hasta seleccionar el programa deseado; se asociarán
al mismo, una temperatura y una velocidad de
centrifugado que luego se pueden modificar.
6. PERSONALIZAR EL CICLO DE LAVADO. Utilice
los botones correspondientes del panel de control:
Modifique la temperatura y/o el
centrifugado.
La máquina muestra automáticamente la temperatura
y la centrífuga máximas previstas para el programa
fijado o las últimas seleccionadas si son compatibles
con el programa elegido. Presionando el botón
disminuye progresivamente la temperatura hasta llegar
al lavado en frío (
disminuye progresivamente el centrifugado hasta su
exclusión (
botones, se volverá a los valores máximos previstos.
, el piloto START/PAUSE centelleará
). Presionando el botón se
). Si se presionan una vez más los
.
se
Excepción: cuando se selecciona el programa
ALGODÓN, la temperatura se puede aumentar hasta
90°.
Seleccionar el comienzo retrasado.
Para seleccionar el inicio diferido del programa
elegido, presione varias veces el botón hasta que se
encienda el piloto correspondiente al retraso deseado.
La sexta vez que se presione el botón, la función se
desactivará.
Nota: Una vez presionado el botón START/PAUSE el
piloto correspondiente al retraso fijado centelleará (el
valor del retraso se podrá modificar sólo
disminuyéndolo).
Presione nuevamente el botón para desactivar la
opción; el piloto se apagará.
Si la opción seleccionada no es compatible con el
programa elegido, la incompatibilidad se indicará con
el centelleo del piloto y una señal sonora (3 sonidos) y
la opción no se activará.
Si la opción elegida no es compatible con otra
seleccionada precedentemente, el piloto
correspondiente a la primera opción seleccionada
centelleará y quedará activada sólo la segunda, el
piloto del botón permanecerá fijo.
7. PONER EN MARCHA EL PROGRAMA. Presione el
botón START/PAUSE. El piloto correspondiente
quedará fijo y la puerta se bloqueará (piloto
BLOQUEO DE LA PUERTA
iconos correspondientes a las fases de lavado se
iluminarán durante el ciclo para indicar la fase en
curso. Para cambiar un programa mientras un ciclo
se está ejecutando, ponga la lavadora en pausa
presionando el botón START/PAUSE; luego
seleccione el ciclo deseado y presione nuevamente el
botón START/PAUSE.
Para abrir la puerta mientras un ciclo se está
ejecutando, presione el botón START/PAUSE; si el
piloto BLOQUEO DE LA PUERTA
será posible abrir la puerta. Presione nuevamente el
botón START/PAUSE para reanudar el programa a
partir del momento en el que se había interrumpido.
8. FIN DEL PROGRAMA. Se indica con la palabra
END encendida. La puerta se podrá abrir
inmediatamente. Si el piloto START/PAUSE centellea,
presione el botón para terminar el ciclo. Abra la
puerta, descargue la ropa y apague la máquina.
Si desea anular un ciclo que ya ha comenzado,
mantenga presionado el botón
interrumpa y la máquina se apague.
encendido). Los
está apagado,
hasta que el ciclo se
Bolsa para mantas acolchadas, cortinas y
prendas delicadas
Gracias a la bolsa especial suministrada, la lavadora
Aqualtis le permite lavar también sus prendas más
valiosas y delicadas garantizándole su máxima
protección. Se recomienda utilizar siempre la bolsa
cuando lave mantas acolchadas y edredones con funda
externa de material sintético.
Modificar las características del
ciclo.
Presione los botones OPCIONES para personalizar el
lavado según sus exigencias.
Presione el botón para activar la opción; se
encenderá el piloto correspondiente.
30
Page 31

Programas y opciones
Tabla de programas
Icono Descripción del Programa
Programas Algodón
Algodón
(Agregue el detergente en el compartimento correspondiente).
Algodón (1)
Algodón (2):
Algodón de color (3)
Camisas
Vaqueros
Programas especiales
Baby:
Sintético resisten te s
Sintético
Ropa "7 días":
Anorak:
Seda:
Lana:
Mix 30':
aconseja utilizarlo para lana, seda y prendas para lavar a mano).
Programas parciales
Enjuague - 1200 Centrifugado - 1200 - - - 716
Desaguado - 0 - - - 72
con prelavado
: blancos y colores resistentes muy sucios.
blancos y colores delicados muy sucios.
colores delicados muy sucios.
delicados
lencería de cama, toallas, albornoz.
para prendas rellenas con plumas de ánsar.
para prendas de seda, viscosa, lencería.
para lana, cachemira, etc.
para refrescar rápidamente prendas poco sucias (no se
Te m p .
(Max. 90°)
Velocid ad
max.
(°C)
90° 1200
60°
40° 1200
40° 1200
40° 600
40° 800
40° 800
60° 800
40° 800
60° 1200
30° 1000
30° 0
40° 600
30° 800
máx.
(r.p.m.)
1200
Detergentes y aditivos
Lavado Suavizante Blanqueador
ll
ll l
ll l
ll l
ll l
ll
ll l
ll l
ll l
ll l
ll
ll
ll
ll
ll
- 7174
- 3,5 80
- 294
- 155
- 1,5 55
- 330
Carga
max.
Dura-
ción
del
(Kg)
ciclo
7153
7148
792
269
3118
385
374
795
736
ES
Para todos los Test Institutes:
1) Programa de control según la norma EN 60456: seleccione el programa
2) Programa algodón largo: seleccione el programa
3) Programa algodón corto: seleccione el programa
con una temperatura de 40ºC.
con una temperatura de 40ºC.
Opciones de lavado
Super Wash
Gracias al uso de una
3
1
2
introducir la cubeta adicional 3 en dotación, en la cubeta
1. Al dosificar el blanqueador, no supere el nivel max
indicado en el perno central (ver la figura). Para realizar
sólo el blanqueo, sin realizar un lavado completo,
verter el blanqueador en la cubeta adicional 3,
seleccionar el programa "Enjuague"
opción "Super Wash"
No se puede activar con los programas
, , , .
Plancha fácil
Cuando se selecciona esta opción, el lavado y el
centrifugado se modificarán oportunamente para
disminuir la formación de arrugas. Al finalizar el ciclo, la
mayor cantidad de agua en
la fase inicial del ciclo y a la
mayor duración del
programa, esta opción
garantiza un lavado con
óptimos resultados, es útil
para eliminar las manchas
más resistentes.
Puede emplearse con o sin
lejía. Si se desea efectuar
también el blanqueado
y activar la
.
, , , ,
con una temperatura de 60ºC.
lavadora realizará giros lentos del cesto; los pilotos
Plancha fácil y START/PAUSE centellearán. Para
terminar el ciclo, presione el botón START/PAUSE o el
botón Plancha fácil.
En el programa Seda
la máquina terminará el ciclo
dejando la ropa en remojo y el piloto Plancha fácil
centelleará. Para descargar el agua y poder sacar la
ropa, es necesario presionar el botón START/PAUSE o el
botón Plancha fácil.
No se puede activar con los programas
, , , , .
Ahorro de Tiempo
Seleccionando esta opción se disminuye la duración del
programa en un 30%-50% en base al ciclo elegido,
garantizando al mismo tiempo un ahorro de agua y
energía. Utilice este ciclo para prendas no
excesivamente sucias.
No se puede activar con los programas
, , , , .
Enjuague Extra
Al elegir esta opción aumentará la eficacia del aclarado y
se asegurará la máxima eliminación de los residuos de
detergente. Es útil para pieles particularmente sensibles
a los detergentes. Se aconseja el uso de esta opción
cuando la lavadora funciona a plena carga o utilizando
elevadas dosis de detergente.
No se puede activar con los programas
, , , ,
, , .
31
Page 32

Detergentes y ropa
ES
Detergente
El tipo y la cantidad de detergente dependen del tipo de
tejido (algodón, lana, seda...), del color, de la
temperatura de lavado, del grado de suciedad y de la
dureza del agua.
Dosificar bien el detergente evita derroches y protege el
medio ambiente: aún siendo biodegradables, los
detergentes contienen elementos que alteran el equilibrio
de la naturaleza.
Se aconseja:
usar detergentes en polvo para prendas de algodón
blancas y para el prelavado.
usar detergentes líquidos para prendas delicadas de
algodón y para todos los programas a baja
temperatura.
usar detergentes líquidos delicados para lana y seda.
El detergente se debe verter antes del comienzo del
lavado en la cubeta correspondiente, o en el dosificador
que se coloca directamente en el cesto. En este último
caso, no se puede seleccionar el ciclo Algodón con
prelavado.
No use detergentes para lavar a mano porque
producen demasiada espuma.
Preparar la ropa
Abra bien las prendas antes de cargarlas.
Divida la ropa según el tipo de tejido (símbolo en la
etiqueta de la prenda) y el color, separando las
prendas de color de las blancas;
Vacíe los bolsillos y controle los botones;
No supere los valores indicados en la Tabla de
Programas referidos al peso de la ropa seca.
Seda: utilice el programa correspondiente Seda
para lavar todas las prendas de seda. Se aconseja el
uso de un detergente específico para prendas delicadas.
Cortinas: utilice el programa Seda
plegarlas e introducirlas en la bolsa suministrada.
Lana: es la única lavadora que ha obtenido el prestigioso
reconocimiento Woolmark Platinum Care (M.0508)
otorgado por The Woolmark Company que certifica el
lavado en lavadora de todas las prendas de lana, incluidas
aquellas que contienen la etiqueta sólo lavado a mano
. Con el programa Lana, se pueden lavar en
lavadora todas las prendas de lana con la garantía de
obtener los mejores resultados.
Anorak: para lavar prendas con relleno de pluma de
ganso como edredones para camas individuales (que no
excedan los 2 kg. de peso), cojines y anoraks, utilice el
programa Anorak
edredones en el cesto doblando sus bordes hacia dentro
(ver las figuras) y no superar los ¾ del volumen de dicho
cesto.
Para lograr un lavado óptimo, se recomienda utilizar
detergente líquido introduciéndolo en el contenedor de
detergente.
. Se recomienda cargar los
. Se recomienda
¿Cuánto pesa la ropa?
1 sábana 400-500 gr.
1 funda 150-200 gr.
1 mantel 400-500 gr.
1 albornoz 900-1200 gr.
1 toalla 150-250 gr.
1 jeans 400-500 gr.
1 camisa 150-200 gr.
Consejos sobre el lavado
Camisas: utilice el programa correspondiente
Camisas
tejido y color, garantizando su máximo cuidado.
Vaqueros: utilice el programa correspondiente
Vaqueros
voltee las prendas antes del lavado y utilice un
detergente líquido.
Baby: utilice el programa correspondiente Baby
quitar la suciedad típica de los niños y eliminar el
detergente de las prendas evitando reacciones alérgicas
en la piel delicada de los mismos. Este ciclo ha sido
estudiado para disminuir la carga bacteriana utilizando
una mayor cantidad de agua y optimizando el efecto de
aditivos específicos higienizantes agregados al detergente.
Al finalizar el lavado, la máquina realizará lentas
rotaciones del cesto; para terminar el ciclo, presione el
botón START/PAUSE.
para lavar camisas de distintos tipos de
para todas las prendas de tejido Denim;
para
Mantas acolchadas: para lavar mantas acolchadas
con funda sintética, utilice la bolsa suministrada y elija el
programa Anorak
Lencería de cama, toallas, albornoz: para lavar la
ropa de toda la casa en un único ciclo utilice el
programa 7 Días
y permite ahorrar tiempo y energía. Se aconseja el uso
de detergente en polvo.
Manchas difíciles: es una buena costumbre tratar las
manchas difíciles con jabón sólido antes del lavado y
utilizar el programa Algodón con prelavado.
.
que optimiza el uso de suavizante
Sistema de equilibrado de la carga
Antes de cada centrifugado, para evitar vibraciones
excesivas y para distribuir la carga de modo uniforme, el
cesto realiza rotaciones a una velocidad ligeramente
superior a la del lavado. Si después de varios intentos, la
carga todavía no está correctamente equilibrada, la
máquina realiza el centrifugado a una velocidad inferior a
la prevista. Cuando existe un excesivo desequilibrio, la
lavadora realiza la distribución antes que el centrifugado.
Para obtener una mejor distribución de la carga y su
correcto equilibrado, se aconseja mezclar prendas
grandes y pequeñas.
32
Page 33

Precauciones y consejos
La máquina fue proyectada y fabricada en conformidad
con las normas internacionales de seguridad. Estas
advertencias se suministran por razones de seguridad y
deben ser leídas atentamente.
Seguridad general
Este aparato ha sido fabricado para un uso de tipo
doméstico exclusivamente.
El aparato no debe ser empleado por personas (niños
incluidos) con capacidades físicas, sensoriales o
mentales reducidas y con experiencias y
conocimientos insuficientes, a menos que dicho uso
no se realice bajo la supervisión o las instrucciones de
una persona responsable de su seguridad. Los niños
deben ser vigilados para asegurarse que no jueguen
con el aparato.
No toque la máquina con los pies desnudos ni con las
manos o los pies mojados o húmedos.
No desenchufe la máquina tirando el cable, sino
tomando el enchufe.
No toque el agua de descarga porque puede alcanzar
temperaturas elevadas.
Para mayor información sobre la correcta eliminación
de los electrodomésticos, los poseedores de los
mismos podrán dirigirse al servicio público responsable
o a los revendedores.
Apertura manual de la puerta
Si falta la energía eléctrica es posible abrir la puerta para
descargar la ropa del siguiente modo:
1. Desenchufe la máquina.
2. Para evitar la salida de
agua, cuando se abre la
puerta comprobar que el
nivel esté por debajo de la
guarnición de la portilla, de lo
contrario quitar el agua
excedente por medio del
tubo de descarga (ver
figura).
3. Introducir la llave en dotación en la ranura lateral,
como lo indica la figura.
ES
Nunca fuerce la puerta: podría dañarse el mecanismo
de seguridad que la protege de aperturas
accidentales.
En caso de avería, no acceda nunca a los
mecanismos internos para intentar una reparación.
Controle siempre que los niños no se acerquen a la
máquina cuando está en funcionamiento.
Si debe ser trasladada, deberán intervenir dos o más
personas, procediendo con el máximo cuidado. La
máquina no debe ser desplazada nunca por una sola
persona ya que es muy pesada.
Antes de introducir la ropa controle que el cesto esté
vacío.
Eliminación
Eliminación del material de embalaje: respete las
normas locales, de ese modo, los embalajes podrán
volver a ser utilizados.
La norma Europea 2002/96/CE sobre la eliminación
de aparatos eléctricos y electrónicos, indica que los
electrodomésticos no deben ser eliminados de la
misma manera que los desechos sólidos urbanos. Los
aparatos en desuso se deben recoger
separadamente para optimizar el porcentaje de
recuperación y reciclaje de los materiales que los
componen e impedir potenciales daños para la salud
y el medio ambiente. El símbolo de la papelera
tachada se encuentra en todos los productos para
recordar la obligación de recolección separada.
4. Presionar sobre la llave y tirar al mismo tiempo la
manija hacia afuera para abrir la puerta.
33
Page 34

Mantenimiento y cuidados
ES
Interrumpir el agua y la corriente
eléctrica
Cierre el grifo de agua después de cada lavado. De
este modo se limita el desgaste de la instalación
hidráulica de la máquina y se elimina el peligro de
pérdidas.
Desenchufe la máquina cuando la debe limpiar y
durante los trabajos de mantenimiento.
Limpiar la máquina
La parte externa y las partes de goma se pueden limpiar
con un paño empapado en agua tibia y jabón. No use
solventes ni productos abrasivos.
Limpiar el contenedor de detergentes
Para extraer el contenedor,
presione la palanca (1) y tire
hacia afuera (2) (ver la
figura).
Lávelo debajo del agua
corriente, esta limpieza se
debe realizar
frecuentemente.
Cuidar el cesto
Para acceder a la precámara:
2
1. quite el panel de cobertura delantero de la máquina
presionando hacia el centro, luego empuje hacia abajo
desde ambos costados y extráigalo (ver las figuras).
2. coloque un recipiente
para recoger el agua que se
verterá (aproximadamente
1,5 lt.) (ver la figura);
3. desenrosque la tapa
girándola en sentido
antihorario (ver la figura);
4. limpie con cuidado el interior;
5. vuelva a enroscar la tapa;
6. vuelva a montar el panel verificando, antes de
empujarlo hacia la máquina, que los ganchos se hayan
introducido en las correspondientes ranuras.
Deje siempre semicerrada la puerta para evitar que se
formen malos olores.
Limpiar la bomba
La máquina posee una bomba autolimpiante que no
necesita mantenimiento. Pero puede suceder que
objetos pequeños (monedas, botones) caigan en la
precámara que protege la bomba, situada en la parte
inferior de la misma.
Verifique que el ciclo de lavado haya terminado y
desenchufe la máquina.
34
Controlar el tubo de alimentación de
agua
Controle el tubo de alimentación al menos una vez al
año. Si presenta grietas o rajaduras debe ser sustituido:
durante los lavados, las fuertes presiones podrían
provocar roturas imprevistas.
Page 35

Anomalías y soluciones
Puede suceder que la máquina no funcione. Antes de llamar al Servicio de Asistencia Técnica (ver Asistencia
Técnica), controle que no se trate de un problema de fácil solución utilizando la siguiente lista.
Anomalías:
La máquina no se enciende.
El ciclo de lavado no comienza.
La máquina no carga agua.
La puerta de la máquina
permanece bloqueada.
La máquina carga y descarga
agua continuamente.
La máquina no descarga o no
centrífuga.
La máquina vibra mucho durante
la centrifugación.
La máquina pierde agua.
Los iconos correspondientes a
la Fase en curso centellean
velozmente junto con el piloto
Posibles causas / Solución:
El enchufe no está introducido en la toma de corriente, o no hace contacto.
En la casa no hay corriente.
La puerta no está bien cerrada.
El botón START/PAUSE no fue presionado.
El grifo de agua no está abierto.
Se fijó un retraso de la hora de puesta en funcionamiento.
El tubo de alimentación de agua no está conectado al grifo.
El tubo está plegado.
El grifo de agua no está abierto.
En la casa no hay agua.
No hay suficiente presión.
El botón START/PAUSE no fue presionado.
Seleccionando el ciclo Baby
ciclo, la lavadora realizará lentas rotaciones del cesto; para terminar el ciclo,
presione el botón START/PAUSE o el botón Plancha fácil
el ciclo Seda
descargar el agua y poder quitar la ropa, es necesario presionar el botón
START/PAUSE o el botón Plancha fácil
El tubo de descarga no está instalado entre los 65 y 100 cm. del suelo (ver
Instalación).
El extremo del tubo de descarga está sumergido en el agua (ver Instalación).
Si la vivienda se encuentra en uno de los últimos pisos de un edificio, es posible
que se verifiquen fenómenos de sifonaje, por ello la máquina carga y descarga
agua de modo continuo. Para eliminar este inconveniente se encuentran
disponibles en el comercio válvulas especiales que permiten evitar el sifonaje.
La descarga de pared no posee un respiradero.
El programa no prevé la descarga: con algunos programas es necesario
ponerla en marcha manualmente (ver Programas y opciones).
La opción Plancha fácil está activa: para completar el programa, presione el
botón START/PAUSE (ver Programas y opciones).
El tubo de descarga está plegado (ver Instalación).
El conducto de descarga está obstruido.
El cesto, en el momento de la instalación, no fue desbloqueado correctamente
(ver Instalación).
La máquina no está instalada en un lugar plano (ver Instalación).
Existe muy poco espacio entre la máquina, los muebles y la pared (ver Instalación).
La carga está desequilibrada (ver Detergentes y ropa).
El tubo de alimentación de agua no está bien enroscado (ver Instalación).
El contenedor de detergentes está obstruido (para ver Mantenimiento y cuidados).
El tubo de descarga no está bien fijado (ver Instalación).
Apague la máquina y desenchúfela, espere aproximadamente 1 minuto y
luego vuelva a encenderla. Si la anomalía persiste, llame al Servicio de
Asistencia Técnica.
la máquina terminará el ciclo con la ropa en remojo; para
o la opción Plancha fácil , al finalizar el
. Seleccionando
.
ON/OFF.
ES
Se forma demasiada espuma.
La puerta de la máquina
permanece bloqueada.
El detergente no es específico para la lavadora (debe contener algunas de las
frases para lavadora, a mano o en lavadora o similares).
La dosificación fue excesiva.
Realice el procedimiento de desbloqueo manual (ver Precauciones y consejos).
35
Page 36

Asistencia
195080614.00
12/2009 - Xerox Fabriano
ES
Antes de llamar al Servicio de Asistencia Técnica:
Verifique si la anomalía la puede resolver Ud. solo (ver Anomalías y Soluciones);
Vuelva a poner en marcha el programa para controlar si el inconveniente fue resuelto;
Si no es así, llame al Servicio de Asistencia Técnica Autorizado.
En el caso de una instalación errónea o un uso incorrecto de la lavadora, la intervención de asistencia técnica
deberá ser pagada.
No recurra nunca a técnicos no autorizados.
Comunique:
el tipo de anomalía;
el modelo de la máquina (Mod.);
el número de serie (S/N ).
Esta última información se encuentra en la placa de características colocada en el aparato.
La siguiente información es válida solo para España.
Para otros países de habla hispana consulte a su vendedor.
Ampliación de garantía
Llame al 902.363.539 y le informaremos sobre el fantástico plan de ampliación de garantía hasta 5 años.
Consiga una cobertura total adicional de
Piezas y componentes
Mano de obra de los técnicos
Desplazamiento a su domicilio de los técnicos
Y NO PAGUE AVERIAS NUNCA MAS
Servicio de asistencia técnica (SAT)
Llame al 902.133.133 y nuestros técnicos intervendrán con rapidez y eficacia, devolviendo el electrodoméstico a
sus condiciones óptimas de funcionamiento.
En el SAT encontrará recambios, accesorios y productos específicos para la limpieza y mantenimiento de su
electrodoméstico a precios competitivos.
ESTAMOS A SU SERVICIO
36
 Loading...