

Hotpoint XF 995.3 User Manual
XF 905.3
XF 995.3
XF 996.3
Maxiforno da incasso
Istruzioni per l'installazione e l'uso
Built-in Maxioven
Instructions for installation and use
Maxifour à encastrer
Instruction pour l'installation et l'emploi
Maxihorno empotrable
Instrucciones para la instalación y uso
Maxiforno de encastrar
Instruções para a instalação e o uso
"Maxiforno" Einbaubackofen
Informationen für installation un gebrauch
Maxi-oven voor inbouw
Gebruiksaanwijzingen voor de plaatsing en gebruik
La ringraziamo per aver scelto un prodotto Ariston, sicuro e davvero facile da usare. Per conoscerlo, utilizzarlo al
meglio e a lungo, le consigliamo di leggere questo manuale. Grazie.
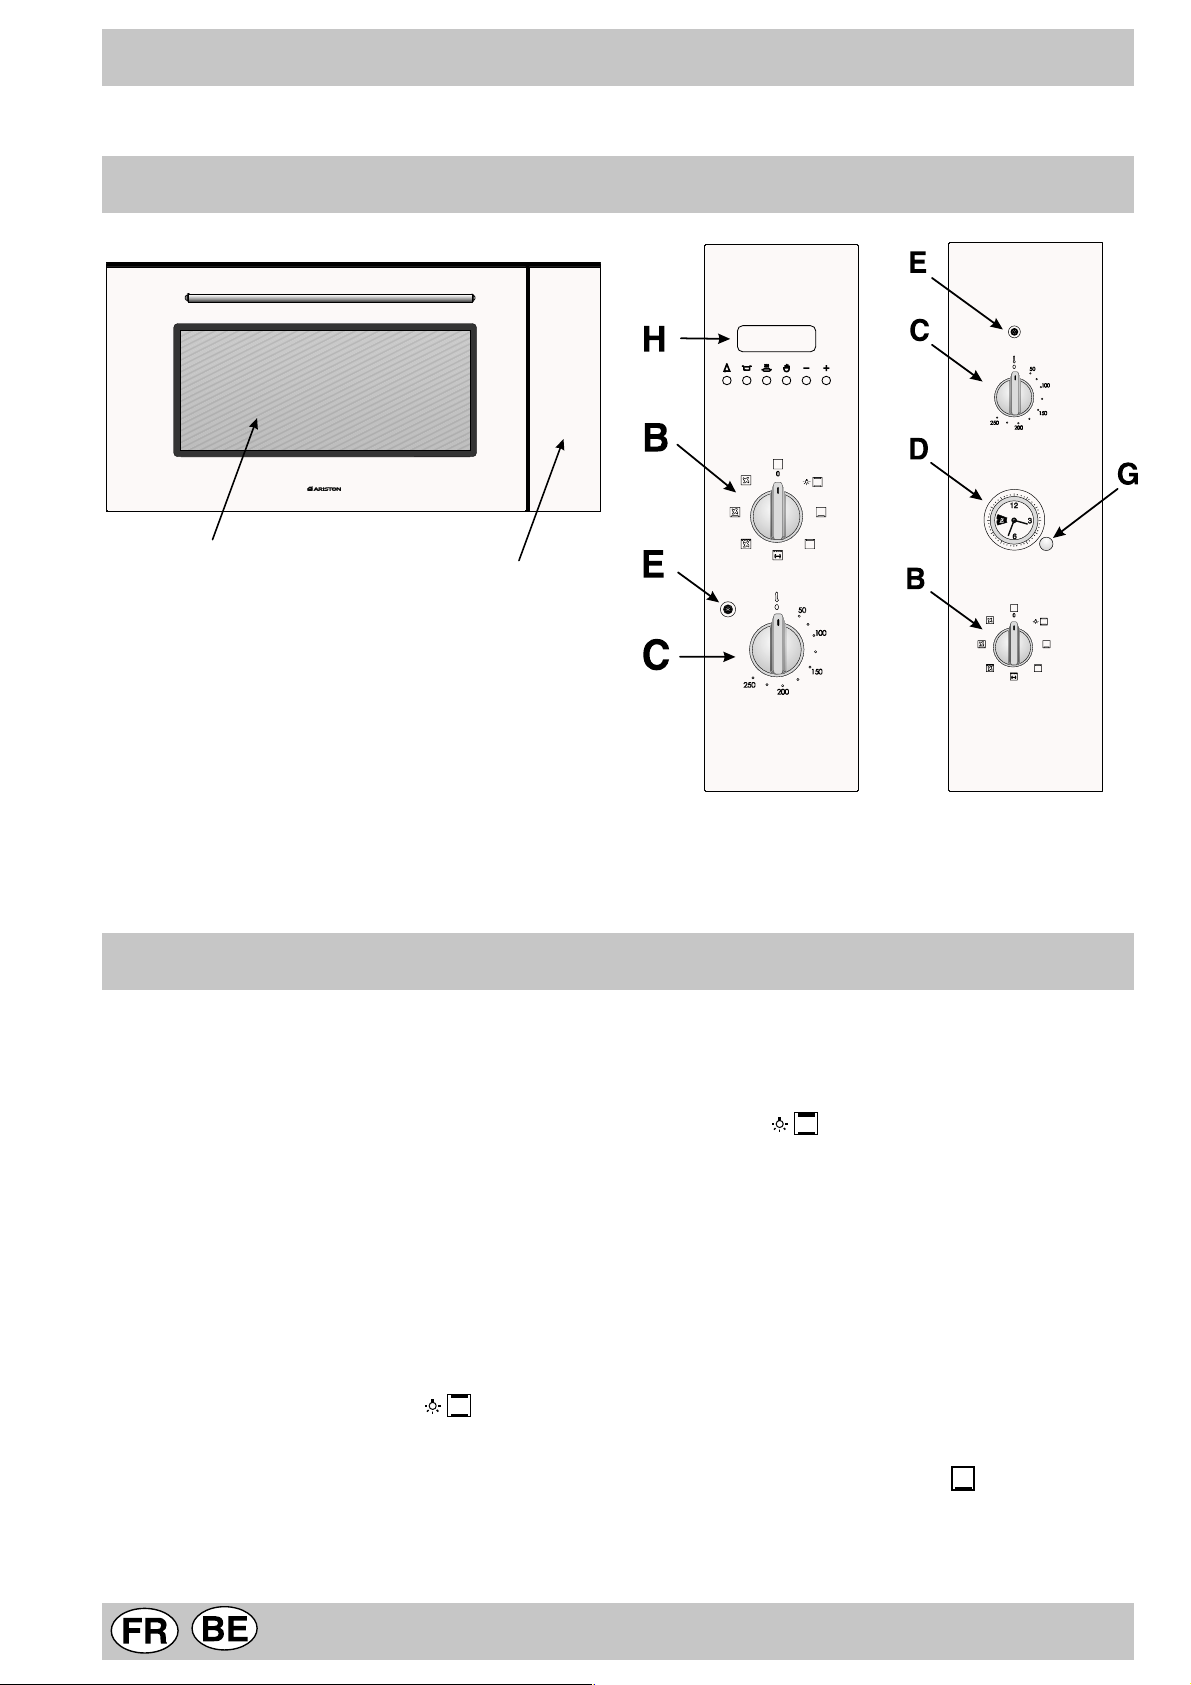
Visto da vicino
F
A. Cruscotto comandi
B. Manopola di selezione funzioni di cottura
C. Manopola per la temperatura di cottura
D. Programmatore analogico inizio/fine cottura
E. Spia di funzionamento del forno - Se accesa indica
la fase di riscaldamento fino alla temperatura impostata
F. Vetro porta forno
G. Manopola del programmatore
H. Timer
A
Come utilizzarlo
Il "Maxiforno" Ariston riunisce in un unico apparecchio i
pregi dei tradizionali forni a convezione naturale, “statici”,
a quelli dei moderni forni a convezione forzata, “ventilati”.
E' un apparecchio estremamente versatile che permette
di scegliere in modo facile e sicuro fra 7 diversi metodi di
cottura. La selezione delle diverse funzioni si ottiene regolando il programmatore in posizione manuale o impostando un programma inizio/fine cottura (vedi capitolo specifico a pag.4) e poi agendo sulle manopole di selezione
"B" e del termostato "C" presenti sul cruscotto.
Illuminazione forno
Per qualsiasi posizione della manopola di selezione, diversa da quella di riposo contrassegnata dallo " ", si ha
l'accensione della luce forno.
N.B: per accendere la luce del forno senza attivare alcun
elemento riscaldante, è necessario, impostare la manopola di selezione "B" sulla posizione contrassegnata dal
simbolo , quindi la manopola del termostato "C" a
zero contrassegnata dal simbolo " ".
XF 905.3 - XF 995.3XF 996.3
stato al massimo, quindi aprite la porta del forno ed aerare
il locale. L’odore che talvolta si avverte durante questa
operazione è dovuto all’evaporazione delle sostanze usate
per proteggere il forno durante l’intervallo di tempo che
intercorre tra la produzione e l’installazione del prodotto.
Forno Statico
Posizione manopola termostato “C”: Tra 50°C e 250°C.
Si accendono i due elementi riscaldanti inferiore e superiore esterno. Il calore viene distribuito uniformemente dal
basso e dall’alto. Lo statico è consigliato nella preparazione di piatti a base di carni di manzo o vitello che necessitano di cottura lenta con costante aggiunta di liquidi.
Resta il sistema migliore per la cottura della biscotteria
secca, nonchè per la frutta in generale. Nella cottura al
forno statico utilizzate una sola leccarda o griglia alla volta, altrimenti si avrebbe una cattiva distribuzione della temperatura. Se la cottura necessita di maggior calore dal
basso o dall'alto, utilizzate i ripiani superiori o inferiori.
Attenzione: Alla prima accensione consigliamo di far funzionare il forno a vuoto per circa mezz’ora con il termo-
La "resistenza inferiore"
Posizione manopola termostato “C”: T r a 50°C e 250°C.
Entra in funzione l'elemento riscaldante inferiore.
2

Come utilizzarlo
Questa posizione è consigliata per ritoccare la cottura dei
cibi (posti in teglie) che risultino già ben cotti in superficie
ma siano ancora mollicci internamente, o per dolci con
ricopertura di frutta o marmellata, che richiedono un moderato calore superficiale.
La "resistenza superiore"
Posizione manopola termostato “C”: Tra 50°C e 250°C.
Si accende la luce del forno, entra in funzione l'elemento
riscaldante superiore. Questa posizione è consigliata per
ritoccare la cottura dei cibi (posti in teglie) che risultino
già ben cotti internamente ma siano ancora mollicci superficialmente.
Grill
Importante: posizionare la manopola "C" su una tempe-
ratura non superiore a 175°C ed eseguire la cottura con
la porta del forno chiusa.
Si accende l’elemento riscaldante centrale del grill. La
cottura è prodotta dall’irradiazione termica dall’alto verso
il basso di una resistenza elettrica incandescente. La temperatura assai elevata e diretta del grill consente la immediata rosolatura superficiale delle carni che ostacolando la fuoriuscita dei liquidi le mantiene più tenere.
Grill Ventilato
Importante: posizionare la manopola "C" su una tempe-
ratura non superiore a 175°C ed eseguire la cottura con
la porta del forno chiusa.
Si accende l’elemento riscaldante centrale del grill e si
mette in rotazione la ventola. Unisce all’irradiazione termica la circolazione forzata dell’aria all’interno del forno.
Ciò impedisce la bruciatura superficiale degli alimenti aumentando il potere di penetrazione del calore.
cinati con pochissima aggiunta di condimenti, mantenendo così inalterato l'aspetto e il sapore. La funzione ventilato può anche essere usata per scongelare carne bianca o rossa, pesce, pane, impostando una temperatura di
80°-100°C. Per scongelare cibi più delicati potete impostare 60°C o usare la sola circolazione di aria fredda impostando la manopola termostato a 0°C.
La spia di funzionamento del forno (E)
Indica la fase di riscaldamento dello stesso, il suo spegnimento segnala il raggiungimento all'interno del forno della temperatura impostata con la manopola. A questo punto l'alternativo accendersi e spegnersi di questa spia indica che il termostato sta lavorando correttamente per mantenere costante la temperatura del forno.
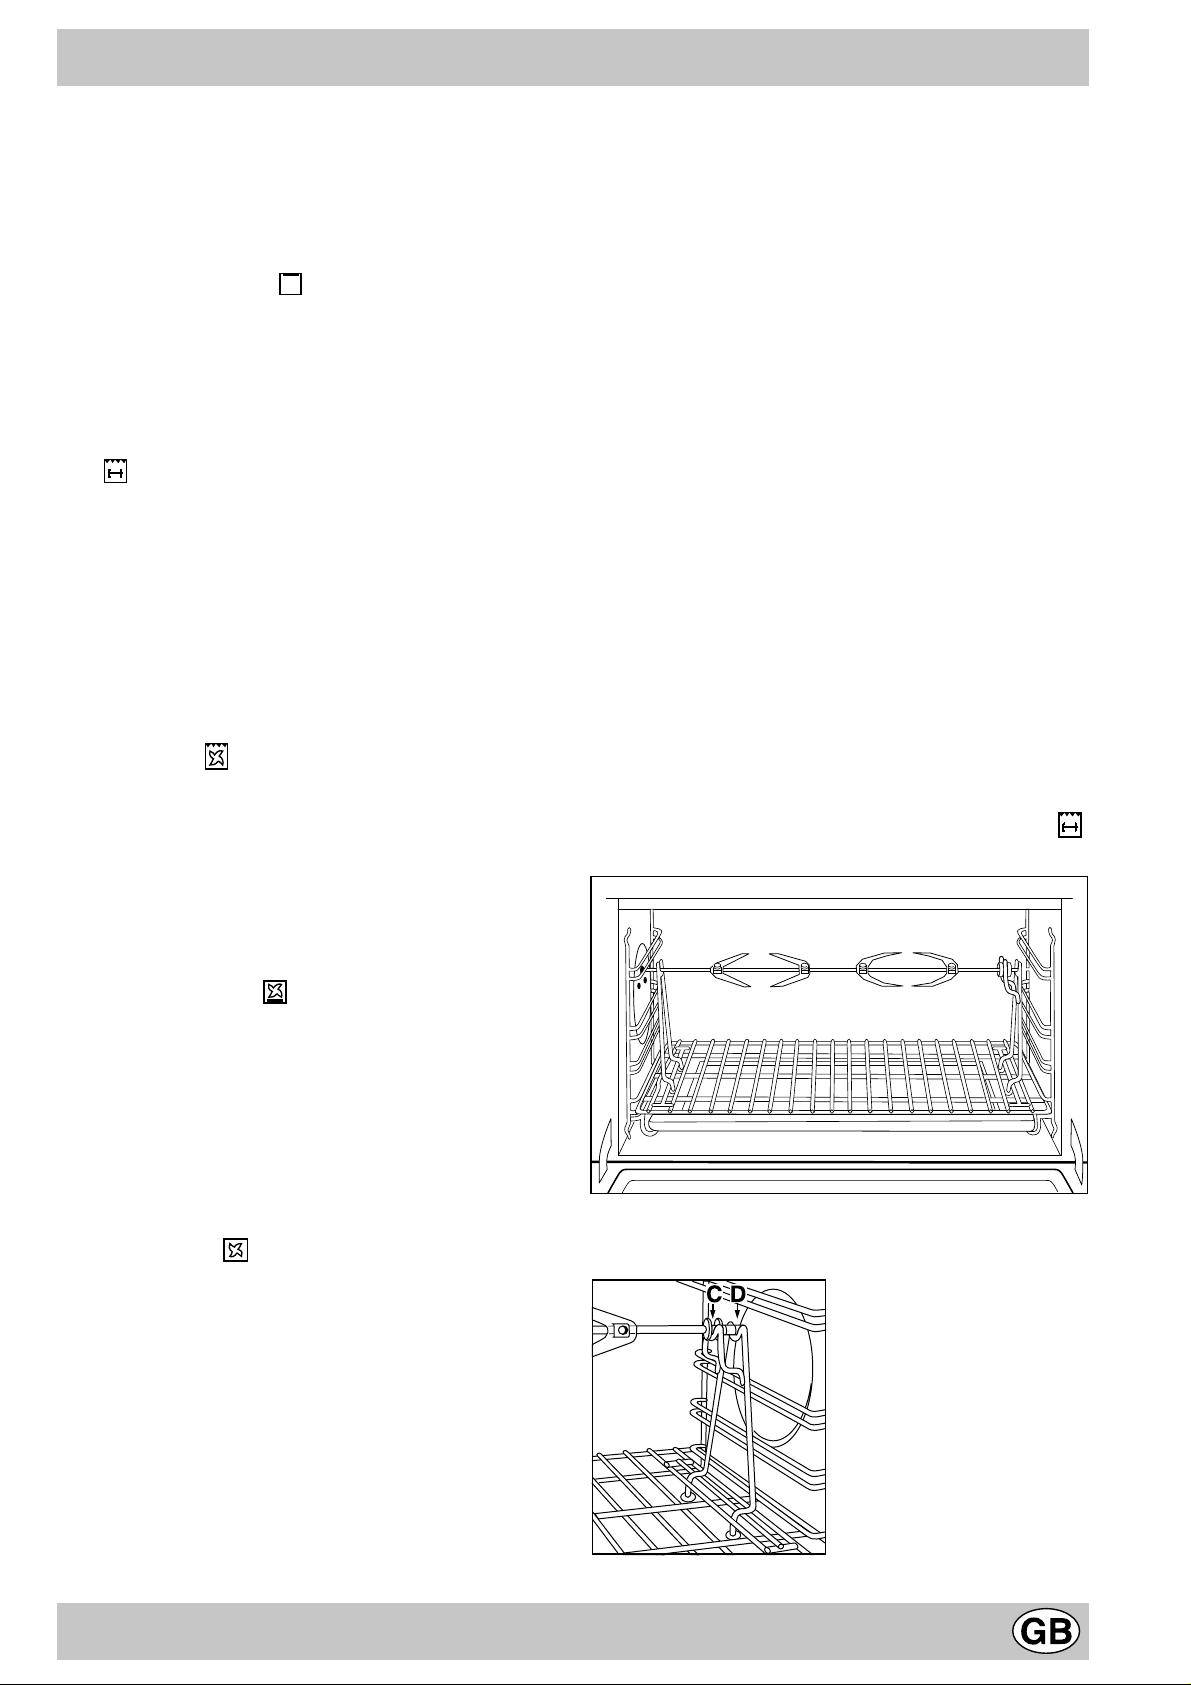
Multispiedo
I Maxi Forno sono dotati di un multispiedo trasversale
estraibile (Fig. A). Infilare le carni da cuocere nel senso
della lunghezza, bloccandole con le apposite forchette
regolabili. Nel caso di spiedini, infilare le carni da cuocere
negli schidioni in dotazione e posizionarli sugli appositi
supporti. Infilare i supporti A e B (Fig. A) sui f ori predispo-
sti sulla leccarda, appoggiare la gola dell'asta sulla sede
D e infilare la griglia sulla prima guida del forno (Fig. B);
infilare l'asta nel forno dell'albero motore, ponendo la gola
sulla sede C. Avviare il motor ino ruotando la manopola
del selettore nella posizione grill .
Forno Dolce
Posizione manopola termostato “C”: T ra 50°C e 250°C.
Entra in funzione l'elemento riscaldante inferiore e si mette in rotazione la ventola. Questa funzione è indicata per
la cottura di cibi delicati, in particolare i dolci che necessitano di lievitazione, in quanto viene facilitata dal calore
proveniente dal basso . Viene f atto notare che le temperature più elevate vengono raggiunte in tempi piuttosto lunghi, pertanto in questi casi è consigliabile utilizzare la funzione "Forno Statico".
Forno Ventilato
Posizione manopola termostato “C”: T ra 50°C e 250°C.
Si attivano gli elementi riscaldanti ed entra in funzione la
ventola. Poichè il calore è costante ed uniforme in tutto il
forno, l’aria cuoce e rosola il cibo in modo uniforme in tutti
i punti. Potete cuocere contemporaneamente anche pietanze diverse tra loro, purchè le temperature di cottura
siano simili. E’ possibile utilizzare fino ad un massimo di 2
ripiani contemporaneamente seguendo le avvertenze riportate nel paragrafo “Cottura contemporanea su più ripiani”. Ottimi risultati si ottengono con i piatti che necessitano di gratinatura e cottura abbastanza lunga. Negli arrosti di carne la migliore distribuzione del calore consente
di utilizzare temperature più basse che riducono la dispersione degli umori mantenendoli così più morbidi e riducendo il calo di peso. Il ventilato è particolarmente apprezzato per la cottura dei pesci che possono essere cu-
AB
Fig. A
Fig. B
3
Timer elettronico (XF 966.3)
Il programmatore elettronico ha la funzione di inserire automaticamente il forno ad un’ora prestabilita e disinserirlo
alla fine del tempo di cottura impostato. Il display luminoso a 4 cifre indica l’ora del giorno ed i tempi di programmazione, inoltre visualizza lo stato del forno per mezzo
dei seguenti simboli:
-Forno in funzione
-Contaminuti
-Programma automatico AUTO
-Punto • (divide l’ora dai minuti nel display)
Tutte le funzioni possono essere programmate per un to-
tale di 23 ore e 59 min.
La durata massima della cottura può essere 10 ore.
Regolazione dell'orologio
(all’atto dell’installazione, per mancanza di corrente, per
anticipi o ritardi)
Selezionare la funzione manuale premendo il tasto e
regolare l’ora con i tasti - e + .
Funzionamento manuale del forno (Programmazione
esclusa)
Premere il tasto ; l’alimentazione elettrica viene
riattivata, si spegne il simbolo AUTO e si accende il sim-
bolo (forno in funzione) Questa operazione cancella
l’eventuale programma inserito.
Funzionamento semiautomatico del forno
1° caso: inizio cottura manuale - tempo di cottura programmato.
· Introdurre nel forno i cibi da cuocere.
· Premere il tasto (durata) e regolare la durata della
cottura con i tasti - e + : il forno si inserisce elettrica-
mente, si illuminano i simboli AUTO e .
· Ruotare le manopole del selettore e del termostato rispettivamente sulla funzione e sulla temperatura desiderata per iniziare la cottura.
· Alla fine della cottura il forno si disinserirà elettricamente, il simbolo (forno in funzione) si spegnerà e il simbolo AUTO lampeggerà; entrerà in funzione il segnale
acustico.
2° caso: inizio cottura manuale - fine cottura programmata.
· Mettere nel forno i cibi da cuocere.
· Premere il tasto (fine cottura) e regolare l’ora di fine
cottura con i tasti - e + ; il forno si inserisce elettrica-
mente, si illuminano il simboli AUTO e
· Ruotare le manopole del selettore e del termostato rispettivamente sulla funzione e sulla temperatura desiderata per iniziare la cottura.
· Alla fine della cottura il forno si disinserirà elettricamente, il simbolo si spegnerà e il simbolo AUTO lampeggerà; entrerà in funzione il segnale acustico.
Funzionamento automatico del forno (Durata e fine cottura programmate)
· Mettere nel forno i cibi da cuocere.
· Premere il tasto (durata) e regolare la durata della
cottura con i tasti - e + : il forno si inserisce elettrica-
mente, si illuminano i simboli AUTO e .
· Premere il tasto (fine cottura) e regolare l’ora di fine
cottura con i tasti - e + ; il forno si disinserisce elettrica-
mente e si spegne il simbolo .
· Il programmatore imposta automaticamente l’ora di inizio della cottura, che viene visualizzata dall’accensione
del simbolo (forno in funzione). Trascorso il tempo di
cottura l’alimentazione elettrica verrà interrotta, il simbolo si spegnerà e il simbolo AUTO lampeggerà; entrerà in funzione il segnale acustico.
Contaminuti
Premere il tasto (contaminuti) e regolare il tempo desiderato con i tasti - e +. Alla fine del programma entrerà
in funzione un segnale acustico.
Segnale acustico
Il segnale acustico suona per 7 minuti dopo la fine del
programma prescelto e può essere disinserito premendo
un tasto funzione qualsiasi.
Sono disponibili 3 tipi di segnale acustico con toni diversi.
Premendo il tasto - è possibile sentire quello attualmente
impostato. Se entro 7 secondi viene premuto ancora il
tasto - si può scegliere un altro segnale acustico.
Controllo del programma
Premere il tasto per conoscere il tempo rimanente, il
tasto per verificare l’ora di fine cottura.
Cancellazione del programma
Il programma si cancella automaticamente una volta eseguito, oppure premendo il tasto (manuale).
4
Il programmatore analogico inizio / fine cottura (XF 905.3 - XF 995.3)
Con la manopola di selezione del forno scegliere il programma di cottura desiderato. Per spegnere il forno riportare la
stessa in posizione "0".
Programmazione cottura con inizio immediato
INDICE
MOBILE
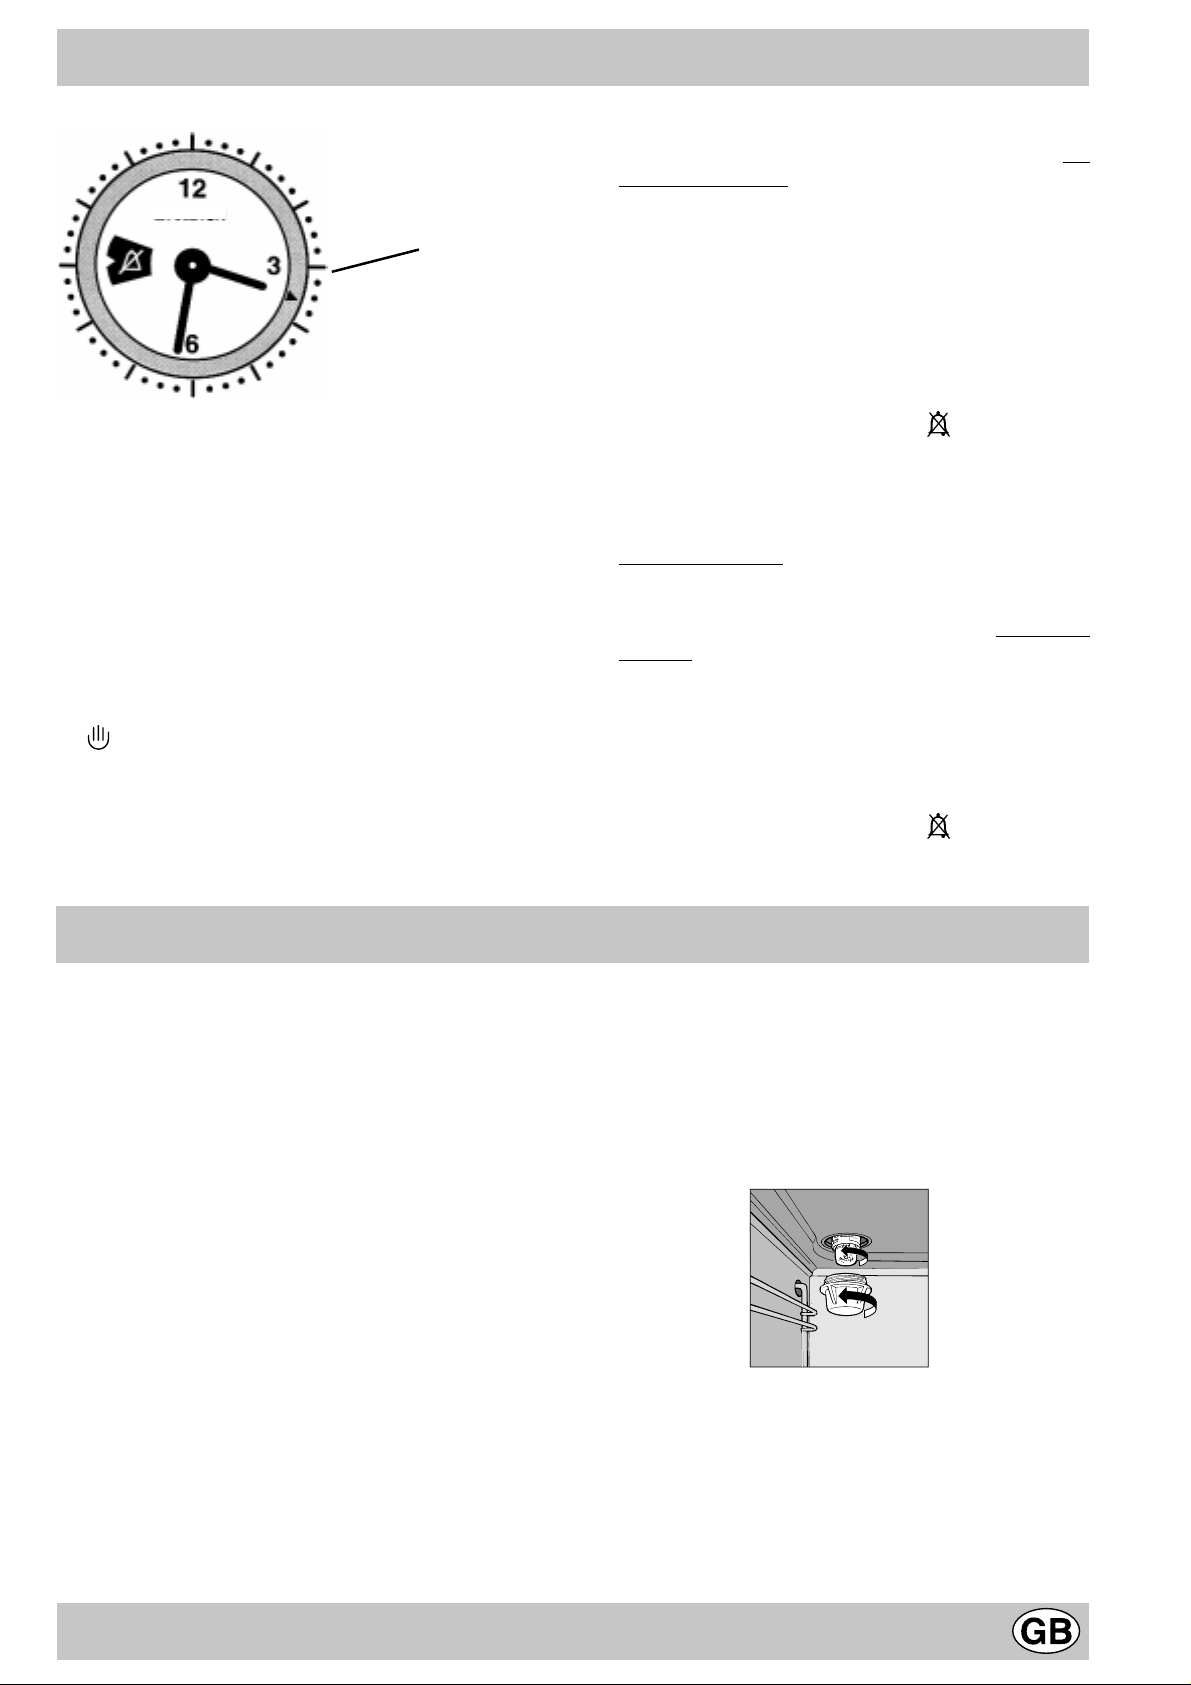
Come rimettere l’ora corrente
Il forno deve essere collegato elettricamente.
Premere la manopola e ruotarla in senso anti-orario fino ad
impostare l’ora esatta.
N.B.: Il programmatore funziona elettricamente, quindi in
caso di mancanza di corrente si fermerà per tutta la durata
della mancanza stessa. Dopodiché sarà necessario ripetere l’operazione di impostazione dell’ora corrente.
Funzionamento manuale
N.B.: Da utilizzarsi in tutti i casi dove non necessitano cotture programmate.
1 Ruotare la manopola in senso antiorario fino a far com-
parire sulla finestrella il simbolo
2 Tirare la manopola e ruotarla in senso antiorario fino a
portare l'indice mobile in corrispondenza dell'ora corrente. Uno scatto indicherà la fine dell'operazione.
1 Ruotare la manopola in senso antiorario fino a visualizzare
sulla finestrella il tempo di durata cottura desiderato.
2 Tirare la manopola e ruotarla in senso antiorario fino a
portare l'indice mobile in corrispondenza dell'ora corren-
te. Uno scatto indicherà la fine dell'operazione.
Con la manopola di selezione del forno scegliere il programma di cottura desiderato.
Il forno si accende immediatamente e funziona per tutto il
tempo di durata cottura impostato. Un segnale acustico avvertirà dello spegnimento del forno.
Per interromperlo ruotare la manopola in senso antiorario
fino a far comparire, sulla finestrella, il simbolo
Programmazione cottura con inizio ritardato
1 Durata cottura:
Ruotare la manopola in senso antiorario fino a visualizzare
sulla finestrella il tempo di durata cottura desiderato.
2 Inizio cottura:
Tirare la manopola e ruotarla in senso antiorario fino a
far corrispondere l'indice mobile con l'ora di inizio cottura
desiderata.
Con la manopola di selezione del forno scegliere il programma di cottura desiderato.
Il forno si accenderà all'ora di inizio cottura e funzionerà per
tutto il tempo di durata impostato. Un segnale acustico avvertirà dello spegnimento del forno.
Per interromperlo ruotare la manopola in senso antiorario
fino a far comparire, sulla finestrella, il simbolo
Come tenerlo in forma
Prima di ogni operazione disconnettere l'apparecchio dall'
alimentazione elettrica.
Per una lunga durata del forno è indispensabile eseguire frequentemente una accurata pulizia generale, tenendo presente che:
• le parti smaltate e i pannelli autopulenti (se presenti) vanno
lavate con acqua tiepida senza usare polveri abrasive e
sostanze corrosive che potrebbero rovinarle;
• l’interno del forno va pulito, preferibilmente ogni volta dopo
l’uso, quando è ancora tiepido usando acqua calda e
detersivo, risciaquando e asciugando poi accuratamente;
• l’acciaio inox può rimanere macchiato se rimane a contatto per lungo tempo con acqua fortemente calcarea o
con detergenti aggressivi (contenenti fosforo). Si consiglia di sciacquare abbondantemente ed asciugare dopo
la pulizia. E’ inoltre opportuno asciugare eventuali trabocchi d’acqua.
• non rivesta mai il fondo forno con fogli di alluminio, poichè
l'accumulo di calore conseguente comprometterebbe la
cottura danneggiando anche lo smalto.
Sostituzione della lampada nel vano forno
• Togliere l’alimentazione al forno tramite l’interruttore
omnipolare utilizzato per il collegamento del forno all’impianto elettrico, o scollegare la spina, se accessibile;
• Svitare il coperchio in vetro del portalampada;
• Svitare la lampada e sostituirla con una resistente ad
alta temperatura (300°C) con
queste caratteristiche:
- Tensione 230/240 V
- Potenza 15W
- Attacco E14
• Rimontare il coperchio in vetro e
ridate alimentazione al forno.
5
Consigli pratici per la cottura
Preriscaldamento
Nel caso in cui sia necessario preriscaldare il forno, in linea
di massima tutte le volte in cui si cuocciano cibi lievitati, è
possibile utilizzare la funzione “ventilato” che consente
di raggiungere la temperatura desiderata in breve tempo e
con consumi ridotti. Una volta infornato si può passare alla
funzione di cottura più indicata.
Utilizzo del grill
La posizione “grill” consente una perfetta grigliatura di
cibi tradizionali (come toast, wustell etc...)
La posizione “grill ventilato” è utilissima per grigliature
veloci, si distribuisce il calore emesso dal grill consentendo
contemporaneamente alla doratura superficiale anche una
cottura nella parte inferiore.
Potete anche usarla nella parte finale della cottura dei cibi
che abbiano bisogno di doratura superficiale, ad esempio è
l’ideale per dorare la pasta al forno a fine cottura.
Importante: effettuare la cottura al grill con porta del
forno chiusa, ciò per ottenere unitamente ai migliori risultati
un sensibile risparmio di energia (10% circa).
Desiderando eseguire cotture al grill, si consiglia di regolare
la manopola del termostato al massimo consentito (175°C)
perchè questa è la condizione di rendimento ottimale, che si
basa sull’azzione dei raggi infrarossi; la griglia va disposta
sui ripiani più alti (vedi tabella cottura) e, per raccogliere i
grassi ed evitare la formazione di fumo, disponete la
leccarda nel primo ripiano in basso.
Cottura dei dolci
Nella cottura dei dolci infornate sempre a forno caldo, attendete la fine di preriscaldamento, indicata dallo spegnimento
della spia rossa “E”. Non aprite la porta durante la cottura,
per evitare un abbassamento del dolce.
Gli impasti sbattuti non devono essere troppo fluidi, per non
prolungare troppo i tempi di cottura. In generale:
Dolce troppo s ecco
La prossima volta impostate una temperatura di10°C
superiore e ri ducete i l t empo di cottura.
Dolce si abbassa
Usate meno liquido o abbassate la temperatura di 10°C.
Buona cott ur a ester na, ma interno colloso
Usate meno liquido, riducete la temperatura, aumentate
il tempo di cottura.
Dolce non si s tacca dal lo stampo
Ungete bene lo stampo e cospargetelo anche con un
pò di farina.
Ho cotto s u più ri piani e non tutti sono allo stesso
a vanz amento di cott ur a
Impostate una temperatura inferiore.
Non necessariamente ripi ani i nser iti
contemporaneamente debbono essere tolti insieme.
Cottura della pizza
Per una buona cottura della pizza utilizzate la funzione
“ventilato”:
• Preriscaldare il forno per almeno 10 minuti
• Utilizzare una teglia in alluminio leggero appoggiandola
sulla griglia in dotazione. Utilizzando la leccarda si allungano i tempi di cottura e difficilmente si ottiene una pizza
croccante
• Non aprite frequentemente il forno durante la cottura
• Nel caso di pizze molto farcite (capricciosa, quattro sta-
gioni) è consigliabile inserire la mozzarella a metà cottu-
ra.
Cottura del pesce e della carne
La carne deve pesare almeno 1 Kg. per evitare che si asciughi troppo. Per le carni bianche, i volatili ed il pesce utilizzate
temperature basse (150°C-200°C).
Per le carni rosse che si vuole siano ben cotte all’esterno
conservando all’interno il sugo, è bene iniziare con una temperatura iniziale alta (200°C-220°C) per breve tempo, per
poi diminuirla successivamente.
In generale, più grosso è l’arrosto, più bassa dovrà essere
la temperatura e più lungo il tempo di cottura. Ponete la carne da cuocere al centro della griglia ed inserite sotto la griglia la leccarda per raccogliere i grassi. Inserite la griglia in
modo che il cibo si trovi al centro del forno.
Se volete più calore da sotto, utilizzate i ripiani più bassi. Per
ottenere arrosti saporiti (in particolare anitra e selvaggina)
bardate la carne con lardo o pancetta e posizionatela in modo
che sia nella parte superiore.
Dolce scuro super iormente
Inseritelo ad al tezza inferi ore, impostate una
temperatura più bassa e prolungate la cottura.
6
COTTURE AL FORNO
Tipo di pietanza
Pasticceria
Tor ta di fr utta 130 60 - 70 Tacchino (4-8 kg.) 160 3 - 4 1/2
Meringhe 130 30 - 40 Oca (4-5 kg.) 160 4 - 4 1/2
Pan di spagna 150 20 - 30 Anatra (2-4 kg.) 170 1 1/2 - 2 1/2
Tor ta dell'angelo 160 40 - 50 Cappone (2 1/2 - 3 kg.) 170 2 - 2 1/2
Torta m ar g herita 160 40 - 5 0 Bue bras. (1 - 1/ 2 k g.) 160 3 - 3 1/2
Tor ta di cioccolato 170 30 - 40 Cosciotto di agnello 160 1 - 1 1/2
Focaccia 170 40 - 50 Lepre arr. (2 kg.) 160 1 - 1 1/2
Bignè 200 15 - 20 Fagiano arrosto 160 1 - 1 1/2
Biscotti di sfoglia 200 15 - 20 Pollo (1 -1 1/2 kg.) 170 1 - 1 1/2
Millefoglie 200 15 - 20
Pasta frolla 200 15 - 20
Temperatura Tempo di cottura
(°C) minuti
Tipo di pietanza
Carni
Pesce 200
Temperatura Tempo di cottura
(°C) ore
(minuti)
15 - 25
COTTURE AL GRILL
Tipo di pie tanz a
Braciole (0,5 kg.) min. 25 3
Salsicce min. 15 2
Pollo alla griglia (kg. 1) min. 60 1
Arrosto di vi tel lo a l lo s pi e do ( k g. 0,6) min. 60 Pollo allo spiedo (kg. 1) min. 60 -
Tempo
di cottura
Posizione
della grigli a
a
guida
a
guida
a
guida
I tempi di cottura possono variare secondo la natura delle vivande, la loro omogeneità e il loro volume. Alla prima
cottura, scegliere pertanto i valori del tempo di cottura più bassi tra quelli indicati e successivamente aumentarli se
necessario.
Per la 1a guida s’intende quella in posizione più bassa.
La sicurezza una buona abitudine
• L'apparecchio è concepito per uso non professionale
nelle abitazioni e le sue caratteristiche non vanno modificate.
• Le istruzioni sono valide solo per i paesi di destinazione i cui simboli figurano sul libretto e sulla targa matricola.
• La sicurezza elettrica di questo apparecchio è assicurata soltanto quando lo stesso è correttamente collegato ad un efficiente impianto di messa a terra come
previsto dalle vigenti norme di sicurezza.
• Il costruttore non può essere considerato responsabile per eventuali danni derivanti da: errata installazione, usi impropri, erronei ed irragionevoli.
• Non utilizzare macchine a vapore per la pulizia dell'apparecchio
T rattandosi di fonti di pericolo, evitare che bambini e
incapaci abbiano contatti con:
- i comandi e l'apparecchio in genere;
- gli imballaggi (sacchetti, polistirolo, chiodi ecc.);
- l'apparecchio, durante e subito dopo il funzionamento
del forno e del grill, visto il surriscaldamento;
- l'apparecchio inutilizzato (in questo caso vanno rese
innocue le parti che potrebbero essere pericolose).
Vanno e vitate le seguenti operazioni:
- toccare l'apparecchio con parti del corpo umide;
- l'uso quando si è a piedi nudi;
- tirare l'apparecchio o il cavo di alimentazione per staccarli dalla presa di corrente;
- operazioni improprie e pericolose;
- ostruire le aperture di ventilazione o smaltimento calol'impiego di adattatori, prese multiple e/o prolunghe;
che il cavo di alimentazione di piccoli elettrodomestici
finisca su parti calde dell'apparecchio;
- l'esposizione ad agenti atmosferici (pioggia, sole);
- l'utilizzo del forno come ripostiglio;
- l'utilizzo di liquidi infiammabili nei pressi;- tentativi di
installazione o riparazione senza l'intervento di personale qualificato.
- l'impiego di adattatori, prese multiple e/o prolunghe;
- tentativi di installazione o riparazione senza l'intervento di personale qualificato.
Occorre assolutamente rivolgersi a personale
qualificato nei seguenti casi:
- installazione (secondo le istruzioni del costruttore);
- quando si hanno dubbi sul funzionamento;
- sostituzione della presa in caso di incompatibilità con
la spina dell'apparecchio.
Occorre rivolgersi a centri di assistenza autorizzati
dal costruttore nei seguenti casi:
- in caso di dubbio sull'integrità dell'apparecchio dopo
aver tolto l'imballaggio;
- danneggiamento o sostituzione del cavo di alimentazione;
- in caso di guasto o cattivo funzionamento, richiedendo i ricambi originali.
7
È opportuno effettuare le seguenti operazioni:
- solo la cottura dei cibi evitando altre operazioni;
- verificare l'integrità dopo aver tolto l'imballaggio;
- disconnettere l'apparecchio dalla rete di alimentazione elettrica in caso di cattivo funzionamento e prima di
qualsiasi operazione di pulizia o manutenzione;
- quando inutilizzato, disinserire l'apparecchio dalla rete
elettrica e chiudere il rubinetto del gas (se previsto);
- utilizzare guanti da forno per inserire o estrarre recipienti;
Installazione
Importante: qualsiasi intervento di regolazione, manu-
tenzione etc. deve essere eseguito con il forno elettricamente disinserito.
- impugnare sempre la maniglia della porta al centro,
dato che all'estremità potrebbe essere più calda a causa di eventuali uscite d'aria;
- controllare sempre che le manopole siano nella posizione “•”/”o” quando l'apparecchio non è utilizzato;
- tagliare il cavo di alimentazione dopo averlo
disconnesso dalla rete elettrica quando si decide di
non utilizzare più l'apparecchio.
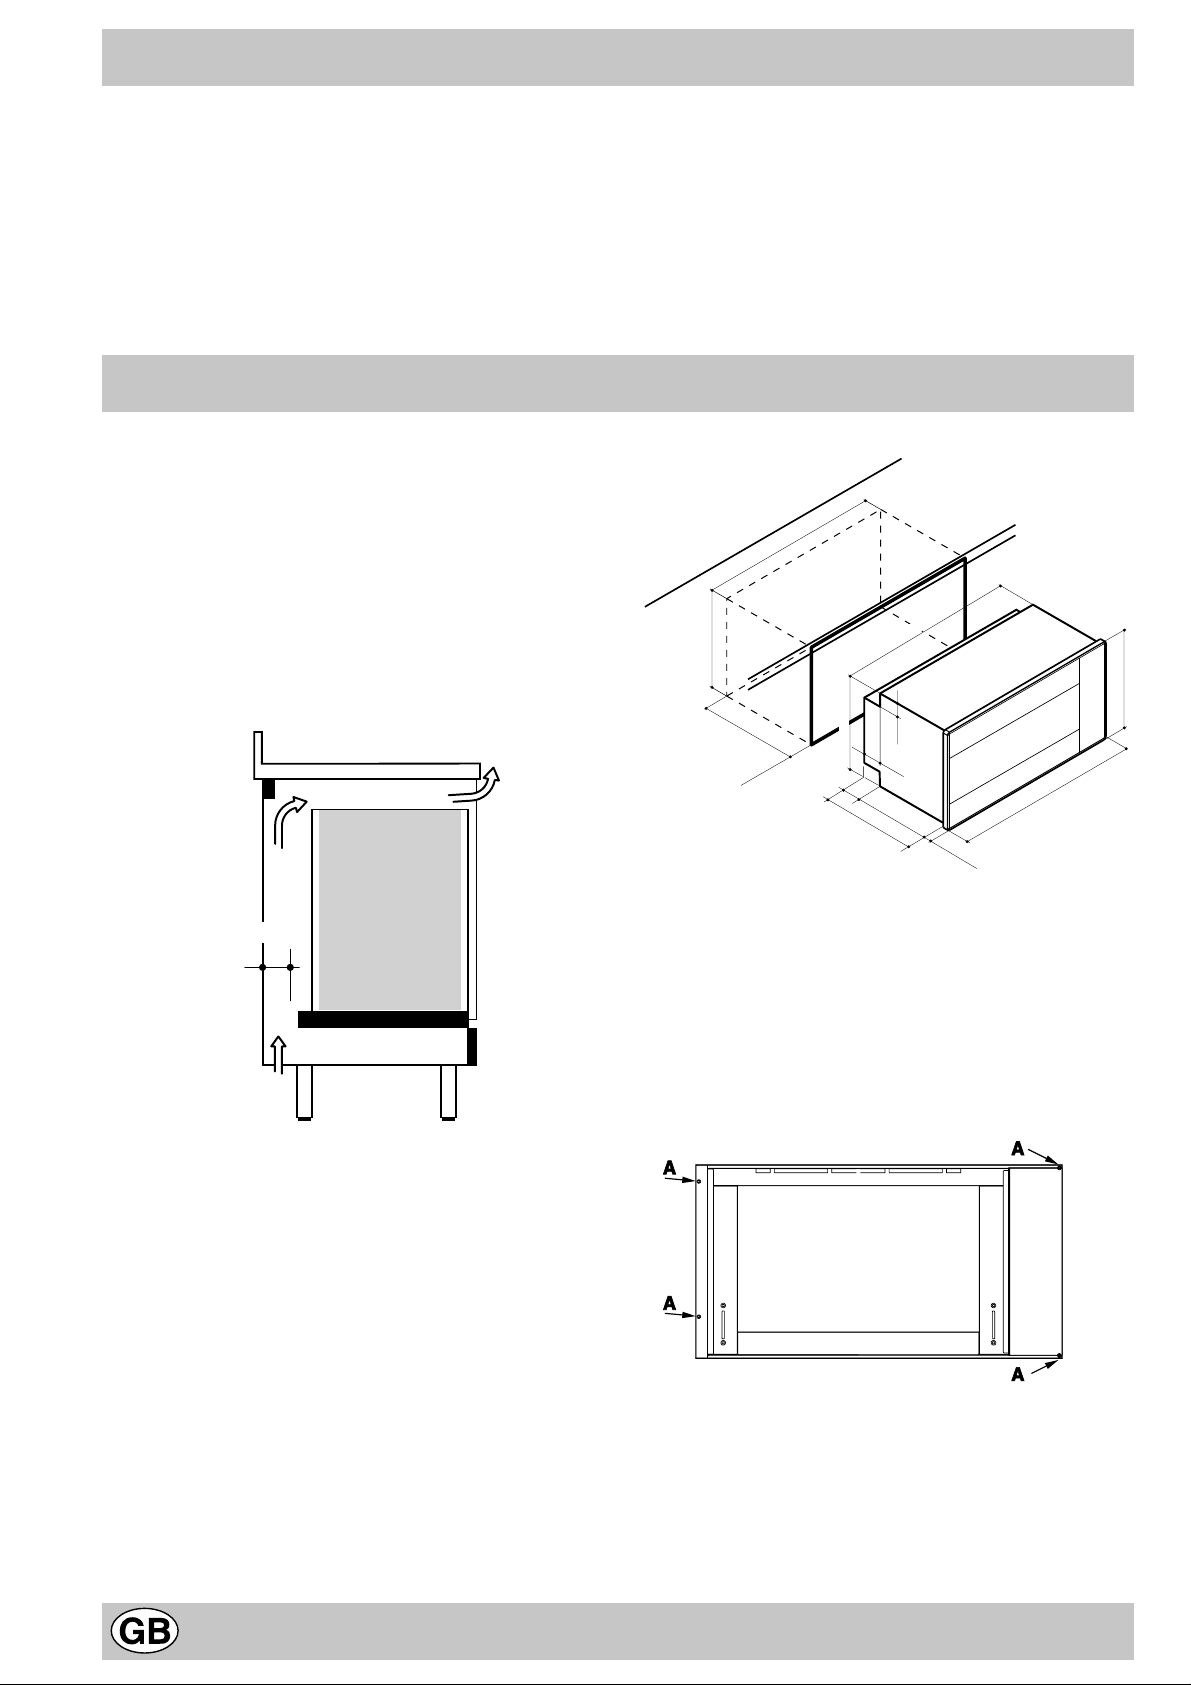
Installazione dei forni da incasso
Per garantire un buon funzionamento dell'apparecchio da
incasso è necessario che il mobile sia di caratteristiche
adatte. Nella figura vengono riportate le dimensioni del
vano del mobile nell'inserimento sottotavolo.
min. 45 mm.
m
m
860
m
m
840
472 mm
min.
550
mm
469 mm
78
525 mm
52
78
447 mm
m
m
895
29
m
m
475 mm
Fissaggio
Inserire l’apparecchiatura nel vano; aprire la porta del forno e fissarlo al mobile con le 4 viti in dotazione "A", ponendo tra i fori e le viti gli appositi distanziatori in dotazione.
Per consentire una efficace aerazione, sulla parte anteriore inferiore e sulla parte superiore del mobile, dovranno essere previste delle opportune prese d'aria, (entrata
dal basso di almeno 200 cm², una uscita dalla parte superiore di almeno 90 cm²).
I pannelli dei mobili adiacenti il forno dovranno essere in
materiale resistente al calore. In particolare nel caso di
mobili in legno impiallacciato le colle dovranno essere
resistenti alla temperatura di 120 °C.
In conformità alle norme di sicurezza, una volta incassato
l'apparecchio, non debbono essere possibili eventuali contatti con le pareti elettriche.
T utte le parti che assicurano la protezione debbono essere fissate in modo tale da non poter essere tolta senza
l'aiuto di qualche utensile.
8
Collegamento elettrico
I forni dotati di cavo di alimentazione tripolare, sono predisposti per il funzionamento con corrente alternata alla
tensione e frequenza di alimentazione indicate sulla
targhetta caratteristiche (posta sull'apparecchio) e sul libretto istruzioni. Il conduttore di terra del cavo è
contraddistinto dai colori giallo-verde.
Allacciamento del cavo di alimentazione alla rete
L’apparecchio deve essere collegato direttamente alla rete
interponendo tra l’apparecchio e la rete un interruttore
omnipolare con apertura minima fra i contatti di 3 mm.
dimensionato al carico e rispondente alle norme in vigore
(il filo di terra non deve essere interrotto dall’interruttore).
Il cavo di alimentazione deve essere posizionato in modo
che non raggiunga in nessun punto una temperatura su-
Caratteristiche tecniche
Dimensioni utili del forno:
larghezza cm. 54
profondità cm. 38
altezza cm. 33
Potenze:
- Statico W 2350
- Resistenza Inferiore W 1300
- Resistenza Superiore W 1050
- Grill W 2000
- Grill Ventilato W 2000
- Forno Dolce W 1300
- V entilato W 2350
Volume utile del Maxiforno: L. 68
Tensione e frequenza di alimentazione:
230 V / 50-60 Hz
Potenza Max: 2400 W
periore di 50°C a quella ambiente.
Prima di effettuare l’allacciamento accertarsi che:
• la valvola limitatrice e l’impianto domestico possano
sopportare il carico dell’apparecchiatura (vedi targhetta
caratteristiche);
• l’impianto di alimentazione sia munito di efficace collegamento di terra secondo le norme e le disposizioni di
legge;
• la presa o l’interruttore omnipolare siano facilmente
raggiungibili con il forno installato.
N.B: non utilizzare riduzioni, adattatori o derivatori in quanto essi potrebbero provocare riscaldamenti o bruciature.
Questa apparecchiatura è conforme alle seguenti
Direttive Comunitarie:
- 73/23/CEE del 19/02/73 (Bassa Tensione) e successive modificazioni;
- 89/336/CEE del 03/05/89 (Compatibilità Elettromagnetica) e successive modificazioni;
- 93/68/CEE del 22/07/93 e successive modificazioni.
ENERGY LABEL
Direttiva 2002/40/CE sull'etichetta dei forni elettrici
Norma EN 50304
Consumo energia convezione Naturale
funzione di riscaldamento: Statico
Consumo energia dichiarazione Classe convezione Forzata
funzione di riscaldamento: Ventilato
9

Congratulations on choosing an Ariston appliance, which you will find is dependable and easy to use . W e recommend
that you read this manual for best performance and to extend the life of your appliance. Thank you.
Close-up View
F
A. Control Panel
B. Knob for selecting the cooking features.
C. Knob for adjusting the cooking temperature.
D. Analogue programmer for Start/End cooking time
E. Oven pilot light - When the light is on, it indicates
that the oven is heating. It will turn off when the temperature setting has been reached.
F. Glass oven door
G. Programmer knob
H. Timer
A
How To Use Your Appliance
The "Maxioven" Ariston oven combines in a single
appliance the advantages of traditional convection ovens
with those of modern forced air ventilation ovens. It is an
extremely versatile appliance that allows you to easily and
safely choose between 7 different cooking modes.The
various features can be accessed by manually moving
the programmer or by selecting from the start/end cooking
time program (see the item specified on page 4) and
adjusting the selector knobs “B” and the thermostat “C”
on the control panel.
Oven light
When the selector knob is in any position other than the " "
position, the oven light comes on.
NOTE: to turn the oven light on without activating any of the
heating elements, the selection knob "B" must be turned to
the setting indicated by the symbol and the thermostat
knob "C" must be set to zero indicated by the " " symbol.
Attention: The first time y ou use the oven we recommend
that you set the thermostat on the hightest setting and
leave the oven on for about a half of an hour with nothing
in it. Then, open the oven door and let the room air. The
XF 905.3 - XF 995.3XF 996.3
odour that is often detected during this initial use is due to
the evaporation of substances used to protect the oven
during storage and until it is installed.
Convection Mode
Set the termostat knob (C) between 50°C and 250°C.
The outer heating elements at both the top and the bottom
of the oven will come on. The heat is distributed uniformly
from the top to the bottom. The convection mode is
recommended for preparing meat-based dishes featuring
beef or veal which require slow cooking with the addition
of liquids. It still remains the best cooking mode for dry
pastries and fruit in general. When cooking in convection
mode, only use one dripping-pan or cooking rack at a time,
otherwise the the heat distribution with be uneven. Select
from among the various rack heights based on the whether
the dish needs more or less heat from the top or bottom.
Lower heating element
Set the termostat knob (C) between 50°C and 250°C.
By turning the knob to this position, the oven light and
lower heating element come on.
10
This position is recommended for finishing off the cooking
of food (in baking trays) which is already superficially wellcooked but still soft inside.
Note that when using this position, the thermostat is
automatically set at the maximum temperature which
cannot be regulated.
Upper heating element
Set the termostat knob (C) between 50°C and 250°C.
By turning the knob to this position, the oven light and
upper heathing element come on.
This position is recommended for finishing off the cooking
of food (in baking trays) which is already inside well-cooked
but still soft superficially.
Grill
Important: do not set the thermostat knob "C" to over
175°C. During grilling, keep the oven door closed.
Food is cooked in the grill by the downward thermal rays
produced by an incandescent electric heating element.
The high, direct grill temperature immediately browns
meat, thus stopping juice dispersion and keeping meat
more tender. The grill is particularly recommended for
cooking dishes requiring a high superficial temperature:
beef and veal steaks, entrecote, fillet steaks, hamburgers
etc...
Ventilated Grill
Important: do not set the thermostat knob "C" to over
175°C. During grilling, keep the oven door closed.
The heating element of the grill are activated, as well as
the fan. This combination of features increases the
effectiveness of the thermal radiation of the heating
elements through forced air circulation of the air throughout
the oven. This helps prevents foods from burning on the
surface, allowing the heat to penetrate into the food.
results in less loss of juices, meat which is more tender
and a decrease in the loss of weight for the roast.
The ventilated mode is especially suited for cooking fish,
which can be prepared with the addition of a limited amount
of condiments, thus maintaining their flavor and
appearance. The ventilated mode can also be used to
thaw white or red meat, fish and bread by setting the temperature to 80°-100°C. To thaw more delicate foods, set
the termostat to 60°C or use only the cold air circulation
feature by setting the thermostat to 0°C.
The thermostat light (E)
This indicates that the oven is heating up. When the light
goes out, the required temperature has been reached.
When the light alternately comes on and goes out, it means
that the thermostat is working properly to maintain the
oven temperature.
Multi-Skewer Rotisserie
The Maxiovens are equipped with a removable multiple
skewer rotisserie positioned parallel to the back of the
oven fig. A). Slide the meat to be cooked onto the spit
lengthwise, keeping it in place with the adjustable forks.
With kebabs, slide the meat to be cooked onto the skewers
provided and place them on the appropriate holders.
Slide the holders, "A" and "B" in Fig. A, into the appropriate
holes in the dripping-pan, rest the groove end of the rod
on the guide "D" and slide the rack onto the bottom guide
(Fig. B). Then slid the rod into the hole for the motor shaft
and place the grooved end of the rod on the guide "C."
Start the motor by turning the knob to the grill setting .
"Gentle pastry oven"
Set the termostat knob (C) between 50°C and 250°C.
The lower heating element and the fan come on.
This setting is ideal when cooking delicate foods,
especially pastries that need to raise, because the heat
rising from the bottom facilitates leavening. Please note
that with this feature it takes a rather long time to reach
higher temperatures in the oven. Therefore, if high
temperatures are needed, we recommend that you use
the "Conventional" setting.
Ventilation Mode
Set the thermostat knob (C) between 50°C and 250°C.
Both the heating elements and the fan will come on. Since
the heat remains constant and uniform throughout the
oven, the air cooks and browns food uniformly over its
entire surface. With this mode, you can also cook various
dishes at the same time, as long as their respective
cooking temperatures are the same. A maximum of 2 rac k
levels can be used at the same time, following the
instructions in the section entitled, "Cooking On More Than
One Rack". This cooking mode is ideal f or au gratin dishes
or those which require an extended cooking time.
Moreover , the excellent heat distrib ution makes it possible
to use lower temperatures when cooking roasts. This
AB
Fig. A
Fig. B
11
THE ELECTRONIC PROGRAMMER (XF 966.3)
The electronic programmer has the function of
automatically switching on the oven (at the required time)
and switching it off at the end of the set cooking time. The
4 figure luminous display showing the actual time and the
programming times, also shows the current state of the
oven by means of the following symbols:
Oven on
Minute minder
Automatic programme AUTO
Point • (this divides the hour from the minutes on the
display)
All the functions may be programmed for a total of 23 h
and 59 min. Maximum cooking time is 10 hours.
Adjusting the clock
(At installation, after power failures, clock in advance or
behind).
Select manual mode by pressing key , adjust the hour
and minutes using the -and + keys.
Manual oven mode (Programming excluded)
Press the key ; and the o v en is s witched on, the AUTO
symbol goes out and the (oven on) symbol comes on.
This operation erases any set programme.
Semi-automatic oven mode
1st example: start in manual cooking mode - programmed
cooking time.
• Put the food to be cooked in the oven.
• Press the key (duration) and adjust the cooking
time using the -and + keys: the oven switches on, the
AUTO and (oven on) symbols light up.
• Turn the selector and the thermostat knobs onto the
required function and temperature respectively.
• At the end of the set cooking time, the oven is
automatically switched off, the symbol (oven on)
goes out and the AUTO symbol blinks; an acoustic
signal sounds.
2nd example: start with manual cooking mode - end with
programmed cooking mode.
• Put the food to be cooked in the oven.
• Press the key (end of cooking) and adjust the end
of cooking time using the - and + keys: the oven
switches on, the AUTO and symbols light up.
• Turn the selector and the thermostat knobs onto the
required function and temperature respectively.
• At the end of cooking, the oven is automatically
switched off, the symbol (oven on) goes out and
the AUTO symbol blinks; an acoustic signal sounds.
Automatic oven mode (programmed cooking duration
and end)
• Put the food to be cooked in the oven.
• Press the key (Duration) and adjust the cooking
time using the - and + keys: the AUTO and (oven
on) symbols light up (the oven switches on).
• Press the key (end of cooking) and adjust the end
of cooking time using the - and + keys: the symbol
goes out (the oven switches off).
• Turn the selector and the thermostat knobs onto the
required function and temperature respectively.
• The programmer automatically sets the start of cooking
time, which is shown by the symbol (oven on)
coming on. When the cooking time has elapsed, the
oven is automatically switched off, the (oven on)
symbol goes out and the AUTO symbol blinks; an
acoustic signal sounds.
Minute minder
Press the key (minute minder) and set the time required
using the - and + keys. An acoustic signal sounds at the
end of the programme.
Buzzer
The buzzer emits a sound for 7 minutes after the end of
the selected programme; it may be stopped by pressing
any function key. It is possib le to choose 3 different types
of acoustic signal. By pressing the - key the actual signal
tone appears. Now , within 7 seconds, e very further press
of the - key changes the signal tone.
Program control
Press the key for the remaining time to be displayed,
and the key to check the end of cooking time.
Erasing programs
Once a programme has been carried out, it is
automatically erased; it can also be cancelled by pressing
the key (manual).
12
Analogue Programmer for Start/End Cooking Time (XF 905.3 - XF 995.3)
Programmed Cooking Time - Immediate Start
1 Turn the knob in the counter-cloc kwise direction until the
Total Cooking Time desired appears in the small time
display.
ADJUSTABLE
POINTER
How to Reset the Current Time
The oven must be connected to the po wer supply.
Press the knob and turn it in the counter-clockwise direction
until the correct time appears.
NB: The programmer runs on electricity. Therefore, it will
stop during a power outage for the entire length of time that
the power is off . After the po wer comes back on, the current
time will have to be set again.
Manual Operation
NB: This mode should be used when the cooking time
does not need to be programmed.
1 T urn the knob in the counter-clockwise direction until the
symbol appears in the small window .
2 Pull the knob and turn it in the counter-clockwise direc-
tion until the marker is aligned with the current time. A
click indicates that the procedure has been completed.
Use the oven knob to select the desired cooking program.
To turn the oven off , turn the knob to the "0" setting.
2 Pull the knob and turn it in the counter-clockwise direc-
tion until the marker is aligned with the current time. A
click indicates that the procedure has been completed.
Use the oven knob to select the desired cooking program.
The oven will turn on immediately and stay on for the entire
length of the programmed cooking time. The oven will buzz
to indicate that it has automatically turned off.
To interrupt the programmed cooking time, turn the knob in
the counter-clockwise direction until the symbol appears
in the small window.
Programmed Cooking Time - Delayed Start
1 Total Cooking Time:
T urn the knob in the counter-clockwise direction until the
Total Cooking Time desired appears in the time display.
2 Start Cooking Time:
Pull the knob and turn it in the counter-clockwise direc-
tion until the marker is aligned with the desired Start Cook-
ing Time.
Use the oven knob to select the desired cooking program.
The oven will turn on at the time set for the Start Cooking
Time and will stay on for the entire length of time prog rammed.
The oven will buzz to indicate that it has automatically turned
off.
To interrupt the programmed cooking time, turn the knob in
the counter-clockwise direction until the symbol appears
in the small window.
How to Keep Your Oven in Shape
Before cleaning your oven, or performing
maintenance, disconnect it from the power supply.
To extend the life of your oven, it must be cleaned
frequently, keeping in mind that:
• The self-cleaning panels (if present) and the enameled
parts should be washed with warm water - abrasive
powders and corrosive substances should be avoided;
• The inside of the oven should be cleaned immediately
after use with warm water and soap; the soap should
be rinsed away and the interior dried thoroughly;
• Stainless steel can be stained if it remains in contact
with agressive detergents (containing phosphorus) or
water with a high lime content. We recommend that
you rinse these parts thoroughly and dry them well
after cleaning. It is also a good idea to dry any water
spills;
• Never line the bottom of the oven with aluminium foil
because the buildup of heat will not only impede the
cooking process, but could also damage the enamel.
Replacing the Lamp in the Oven
• Cutoff the supply of power to the oven by turning off
the omni-polar switch connecting it to the mains, or by
removing the plug if it is accessible;
• Unscrew the glass cover attached to the lamp holder;
• Unscrew the lamp and replace it with another high-
temperature lamp (300°C) with the following
characteristics:
- Voltage: 230/240 V
- Wattage: 15W
- Socket: E14
• Remount the glass cover and reconnect the appliance
to the power supply.
13

Practical Cooking Advice
Preheating
If the oven must be preheated (generally this is the case
when cooking leavened foods) the “ventilation” mode
can be used to reach the desired temperaure as quickly
as possible in order to save on energy.
Once the food has been placed in the oven, the most
appropriate cooking mode can then be selected.
Cooked well on t he inside but s tic ky on the outside
Use less liquid, lower the temperature, and incr ease the
cooking time.
Using the Grill
The “grill” setting perfectly grills traditional foods
(such as toasted sandwiches, hotdogs, etc).
The “Ventilated Grill” is extremely useful for grilling
foods rapidly, as the distribution of heat makes it possible
not only to brown the surface, but also to cook the bottom
part.
This mode can also be used for browning foods at the
end of the cooking process.
Important: always use the grill with the oven door
closed. This will allow you both to attain e xcellent results
and to save energy (10% circa).
For the best results when cooking on the grill, it is recommended to use the highest setting of the thermostat
(175°C), which utilizes infrared rays. The gr ill should be
placed on the higher racks (see the cooking chart). To
catch fat and prevent smoke, place a dripping pan beneath the rack used for grilling.
Baking Pastries
When baking pastries, always place them in the oven after
it has been preheated. Make sure you wait until the oven
has been preheated thoroughly (the red "E" light will turn
off). Do not open the door while the pastry is cooking in
order to prevent it from dropping.
Batters must not be too runny, as this will result in
prolonged cooking times. In general:
Pastry is too dry
Increase the temperature by 10°C and reduce the
cooking time.
Pastry dropped
Use less liquid or lower the the temperatur e by 10°C.
Pastry is too dark on top
Th e pastry sti cks t o the pan
Grease the pan well and sprinkle i t with a dust ing of
flour.
I used more than one level and they are not all at the
same cooking point
Use a lower temperature setting. It is not necessary to
remove the food from all the racks at the same time.
Cooking Pizza
For best results when cooking pizza use the "ventilation
mode" :
• Preheat the oven for at least 10 minutes;
• Use a light aluminum pizza pan, placing it on the broiler
supplied with the oven. If the dripping-pan is used, this
will extend the cooking time, making it difficult to get a
crispy crust;
• Do not open the oven door frequently while the pizza
is cooking;
• If the pizza has a lot of toppings (three of four), it is
recommended that the mozzarella cheese be placed
on top halfway through the cooking process;
Cooking Fish and Meat
Meat must weigh at least 1 Kg in order to prevent it from
drying out. When cooking white meat, fowl and fish, use
low temperature settings (150°C-200°C). For red meat
that should be well done on the outside while tender and
juicy in the inside, it is a good idea to start with a high
temperature setting (200°C-220°C) for a short time, then
turn the oven down afterwards. In general, the larger the
roast, the lower the temperature setting. Place the meat
on the centre of the rack and place the dripping pan
beneath it to catch the fat.
Make sure that the rack is inserted so that it is in the centre
of the oven. If you would like to increase the amount of
heat from below, use the low rack heights. For savory
roasts (especially duck and wild game), dress the meat
with lard or bacon on the top.
Place it on a lower rack, lower the temperature, and
increase the cooking t ime.
14
STATIC OVEN COOKING
Type of dish
Pastries and cakes
Fruit pie 130 60 - 70 Turkey (4-8 kg) 160 3 - 4 1/2
Meringues 130 30 - 40 Goose (4-5 kg) 160 4 - 4 1/2
Sponge cake 150 20 - 30 Duck (2-4 kg) 170 1 1/2 - 2 1/2
Angel cake 160 40 - 50 Capon (2 1/2 - 3 kg) 170 2 - 2 1/2
Madeira cake 160 40 - 50 Braised beef (1 - 1 1/2 kg) 160 3 - 3 1/2
Chocolate cake 170 30 - 40 Leg of lamb 160 1 - 1 1/2
Flat sweet loaf 170 40 - 50 Roast hare (2 kg) 160 1 - 1 1/2
Puffs 200 15 - 20 Roast pheasant 160 1 - 1 1/2
Flaky pastr y bisc uit s 200 15 - 20 C hicken (1 - 1 1/ 2 kg ) 170 1 - 1 1/2
Mille feuilles 200 15 - 20
Short past r y 200 15 - 20
Temperature Cooking time
(°C) minutes
Type of dish
Meat
Fish 200
Temperature Cooking time
(°C) hours
minutes
15 - 25
GRILLING
Type of dish
Chops (0.5 kg) min. 25 3
Sausages min. 15 2
Grilled chicken (1 kg) min. 60 1
Veal on the spit (0 .6 kg ) min. 60 Chicken on the spit (1 kg) min. 60 -
Cooking time
(minutes)
Position
of shell
rd
guide rail
nd
guide rail
st
guide rail
Cooking times may vary according to the nature of the foods, their homogeneity and their volume. When cooking a
certain food for the first time, it is advisable to choose the lowest values in the cooking time range given in the table and
then increase them if necessary. The 1
st
guide rail is understood as being the lowest position.
Safety Is A Good Habit To Get Into
• This appliance is designed for non-professional,
household use and its functions must not be changed.
• These instructions are only valid for the countries
whose symbols appear on the manual and the serial
number plate.
• The electrical system of this appliance may be used
safely only when it is correctly connected to an efficient
earthing system in complaince with the safety
standards currently in effect.
• The manufacturer will not be held liable for any
damages that might arise out of incorrect installation
or improper, incorrect or unreasonable use of the
appliance.
• Do not use steam cleaners to clean your oven
The following items are potentially dangerous, and,
therefore, appropriate measures must be taken to
prevent children and the disabled from coming into
contact with them:
- Controls and the appliance in general;
- Packaging (bags, polystyrene, nails, etc.);
- The appliance immediately after use of the oven or
grill due to the heat generated;
- The appliance when no longer in use (potentially
dangerous parts must be made safe).
Avoid the following:
- Touching the appliance with wet parts of the body;
- Using the appliance when barefoot;
- Pulling on the appliance or the supply cord to unplug it
from the electrical outlet;
- Obstructing the ventilation or heat dissipation slots;
- Allowing power supply cords for small appliances to
come into contact with the hot parts of the appliance;
- Exposing the appliance to atmospheric agents (rain,
sun);
- Using the oven for storage purposes;
- Using flammable liquids near the appliance;
- Using adaptors, multiple sockets and/or extension
cords;
- Attempting to install or repair the appliance without the
assistance of qualified personnel.
Qualified personnel must be contacted in the
following cases:
- Installation (following the manufacturer's instructions);
- When in doubt about operating the appliance;
- Replacing the electrical outlet when it is not compatible
with the plug for the appliance.
Service Centres authorized by the manufacturer
must be contacted in the following cases:
- If in doubt about the soundness of the appliance after
removing it from the packaging;
- If the power supply cord has been damaged or needs
to be replaced;
- If the appliance breaks down or functions poorly; ask
for original spare parts.
15
It is a good idea to do the following:
- Only use the appliance to cook food, nothing else;
- Check the soundness of the appliance after it has been
unpacked;
- disconnect the appliance from the electrical mains if it
is not functioning properly and before cleaning or
performing maintenance;
- When the appliance is not used for an extended period
of time, cut off the supply of power and close the gas
cock (if present);
Installation
Important: The power supply to the appliance must be
cut off before any adjustments or maintenance work is
done on it.
Installation of Built-in Ovens
To ensure the proper working order of the built-in
appliance, the kitchen unit must be of a suitable size.
The sizes of the unit for installing the cooker under a
worktop or in a column unit are shown in figure.
- Use cooking gloves to place cookware in the oven or
when removing it;
- Always grasp the oven door in the centre because the
ends may be hot due to the escape of hot air;
- Make sure that the control knobs are on the “•”/”o”
setting when the appliance is not in use;
- Cut the power supply chord after disconnecting it from
the mains when you decide not to use the appliance
any longer .
860 mm
840 mm
472 mm
min. 45 mm.
T o provide adequate v entilation, there must be appropriate
ventilation openings in the front bottom and the top part of
the cabinet (an intake opening on the bottom of at least
200 cm2, and an exhaust opening of at least 90 cm2).
The unit panels ne xt to the cooker must be heat resistant.
In the case of veneered wood units, glues must be resistant
to a temperature of 120 °C.
In accordance with safety standards, once the appliance
has been mounted, there must be no possible contact
with electrical parts. Any protective parts must be secured
so that they can only be removed with the use of tools.
min. 550 mm
52
469 mm
78
78
525
447
mm
mm
29 mm
895 mm
Fastening the oven
Insert the appliance into the compartment; open the
oven door and fasten the oven to the cabinet using
the four screws “A”, remembering to place the special
spacers provided between the hole and the screw
itself.
475 mm
16
Electric connection
Cookers with a three-pole power supply cable are
designed to operate with alternated current at the supply
frequency and voltage indicated on the data plate (at the
bottom of the oven dashboard). The earthing conductor
of the cable is the yellow-green conductor.
Connecting the power supply cable to the mains
The appliance must be directly connected to the mains
using an omnipolar circuit-breaker with a minimum contact
opening of 3 mm installed between the appliance and the
mains, suitable for the load indicated and complying with
current directives (the earthing wire must not be interrupted
by the circuit-breaker).
Technical Specifications
Oven size
width cm. 54
depth cm. 38
Height cm. 33
Powers supply:
- Static oven: W 2350
- Lower heating element: W 1300
- Upper heating element: W 1050
- Grill: W 2000
- V entilated grill: W 2000
- Gentle pastry oven: W 1300
- Ventilated oven: W 2350
Electric oven size: L. 68
Voltage end frequency:
230 V / 50-60 Hz
Power supply Max: 2400 W
The power supply cable must be positioned so that it does
not exceed 50°C more than room temperature at any point
of its length.
Before making the connection check that:
l the limiter valve and the home system can support the
appliance load (see data plate);
l the power supply system has an efficient earthing
connection which complies with the provisions of
current regulations;
l the socket or omnipoar circuit-breaker is easily
accessible once the cooker has been installed.
NOTE: do not use reducers, adaptors or shunts as they
could cause overheating and burns.
This appliance conforms with the following European
Economic Community directives:
- 73/23/EEC of 19/02/73 (Low V oltage) and subsequent
modifications;
- 89/336/EEC of 03/05/89 (Electromagnetic
Compatibility) and subsequent modifications;
- 93/68/EEC of 22/07/93 and subsequent modifications.
ENERGY LABEL
Directive 2002/40/EC on the label of electric ovens
Norm EN 50304
Energy consumption for Natural convection
heating mode: Convection
Declared energy consumption for Forced convection Class
heating mode: Fan assisted
17
Merci d'avoir choisi un produit Ariston, fiable et facile à utiliser. Pour mieux le connaître et l'utiliser le plus longtemps
possible, nous vous conseillons de lire attentivement ce livret. Merci.
Vu de près
F
A. Bandeau de commandes
B. Manette de sélection des fonctions de cuisson
C. Manette pour la température de cuisson
D. Programmateur analogique début/fin de cuisson
E. Voyant de fonctionnement du four (présent
uniquement sur certains modèles) - Il est allumé
pendant la phase de préchauffage et jusqu'à ce que la
température sélectionnée soit atteinte.
F. Vitre porte du four
G. Manette du programmateur
H. Timer
A
Comment l'utiliser
Le "Maxifour" Ariston réunit en un seul appareil les
avantages des fours traditionnels à convection naturelle:
“statiques” à ceux des fours modernes à convection
forcée: “ventilés”. C'est un appareil extrêmement complet
offrant le choix entre 7 modes de cuisson différents .
Pour sélectionner les différentes f onctions, réglez d’abord
le programmateur en position manuelle ou sur un programme de début/fin de cuisson (voir chapitre correspondant page 4) puis agissez sur les manettes de sélection
“B” et du thermostat “C” situées sur le tableau de bord.
Éclairage du four
La lumière du four s'allume lorsque le bouton de sélection
se trouve sur n'importe quelle position autre que la position
d'arrêt "●".
REMARQUE: pour éclairer le four sans brancher aucun
élément réchauffant, il faut positionner la manette de
sélection "B" en face du symbole , et déplacer
ensuite la manette du thermostat "C" jusqu'au symbole
"●" correspondant à zéro.
Attention: Lors du premier allumage, nous vous
conseillons de faire f onctionner votre four , à vide, pendant
une demi-heure environ, le thermostat étant réglé au
maximum. Ouvrez ensuite la porte du four et aérez la
XF 905.3 - XF 995.3XF 996.3
pièce. L’odeur qui se dégage parfois au cours de cette
opération est due à l'évaporation des substances utilisées
pour protéger le four pendant le laps de temps qui s'écoule
entre la production et l'installation du produit.
Four Statique
Position manette du thermostat “C”: Entre 50°C et 250°C.
Les deux éléments chauffants du haut et du bas, e xternes
s'allument. La chaleur est distribuée de façon homogène
par le bas et par le haut. La fonction statique est conseillée
lors de la préparation de plats de viande de boeuf ou de
veau devant être constamment arrosée de jus et cuite
lentement. C'est l'idéal pour la cuisson des biscuits secs
et des fruits en général. Lorsque vous cuisez au four
statique, n'utilisez qu'une seule lèche-fritte ou grille à la
fois, vous risqueriez autrement d'avoir une mauvaise
distribution de la température. Si la cuisson exige plus de
chaleur par le bas ou par le haut, utilisez les gradins
d'enfournement du haut ou du bas.
Position résistance sole du four
Position manette du thermostat “C”: Entre 50°C et 250°C.
En tournant le bouton sur cette position, la lampe du four
s'allume et la résistance du bas se met en marche.
18
 Loading...