

Page 1

Instructions for use
WASHING MACHINE
GB
English,1
Українська,37
WML 6081
GR
ΕΛΛΗΝΙΚΑ,13
SBUK
Cрпски,49
BG
Български,25
Contents
Installation, 2-3
Unpacking and levelling
Connecting the electricity and water supplies
The first wash cycle
Technical data
Description of the washing machine
and starting a wash cycle, 4-5
Control panel
Indicator lights
Starting a wash cycle
Wash cycles, 6
Table of wash cycles
Personalisation, 7
Setting the temperature
Setting the spin speed
Functions
Detergents and laundry, 8
Detergent dispenser drawer
Preparing the laundry
Garments requiring special care
Load balancing system
GB
Precautions and tips, 9
General safety
Disposal
Opening the porthole door manually
Care and maintenance, 10
Cutting off the water or electricity supply
Cleaning the washing machine
Cleaning the detergent dispenser drawer
Caring for the door and drum of your appliance
Cleaning the pump
Checking the water inlet hose
Troubleshooting, 11
Service, 12
1
Page 2
Installation
GB
! This instruction manual should be kept in a safe place for
future reference. If the washing machine is sold, transferred
or moved, make sure that the instruction manual remains
with the machine so that the new owner is able to familiarise himself/herself with its operation and features.
! Read these instructions carefully: they contain vital infor-
mation relating to the safe installation and operation of the
appliance.
Unpacking and levelling
Unpacking
1. Remove the washing machine from its packaging.
2. Make sure that the washing machine has not been
damaged during the transportation process. If it has been
damaged, contact the retailer and do not proceed any
further with the installation process.
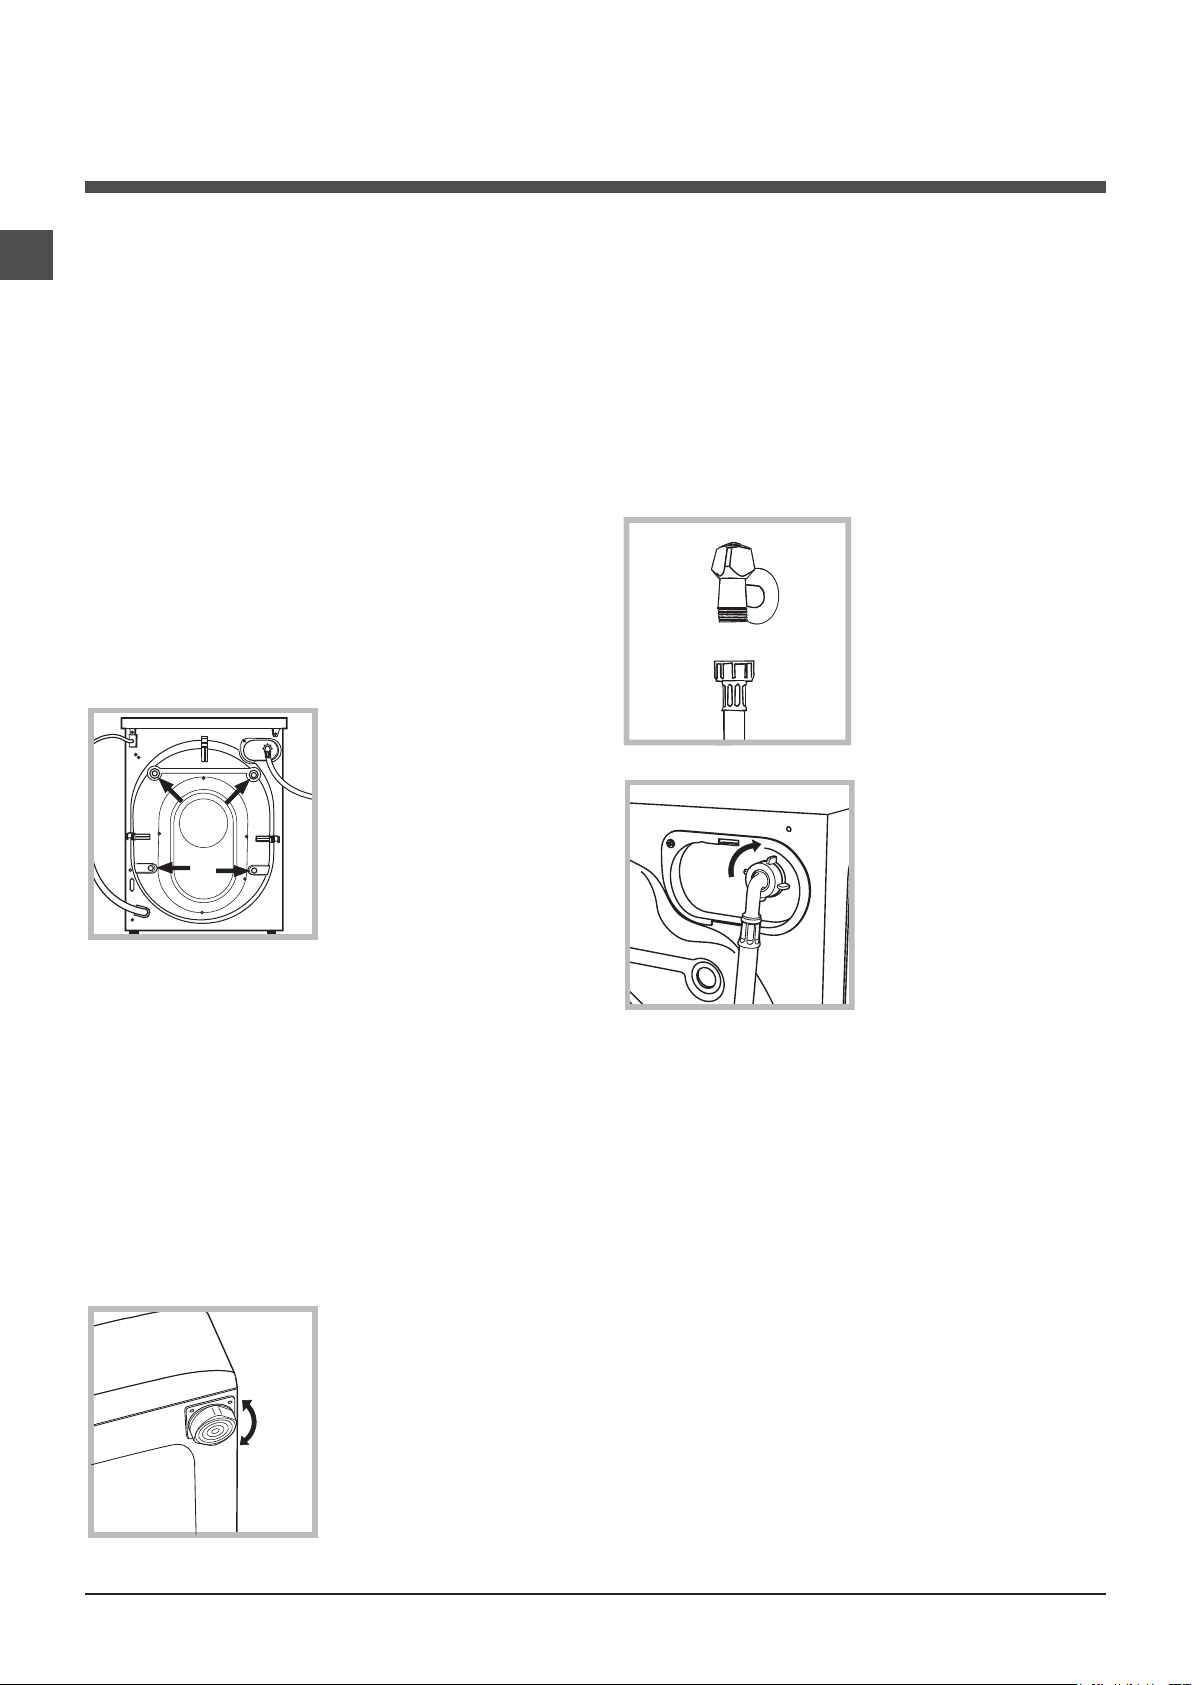
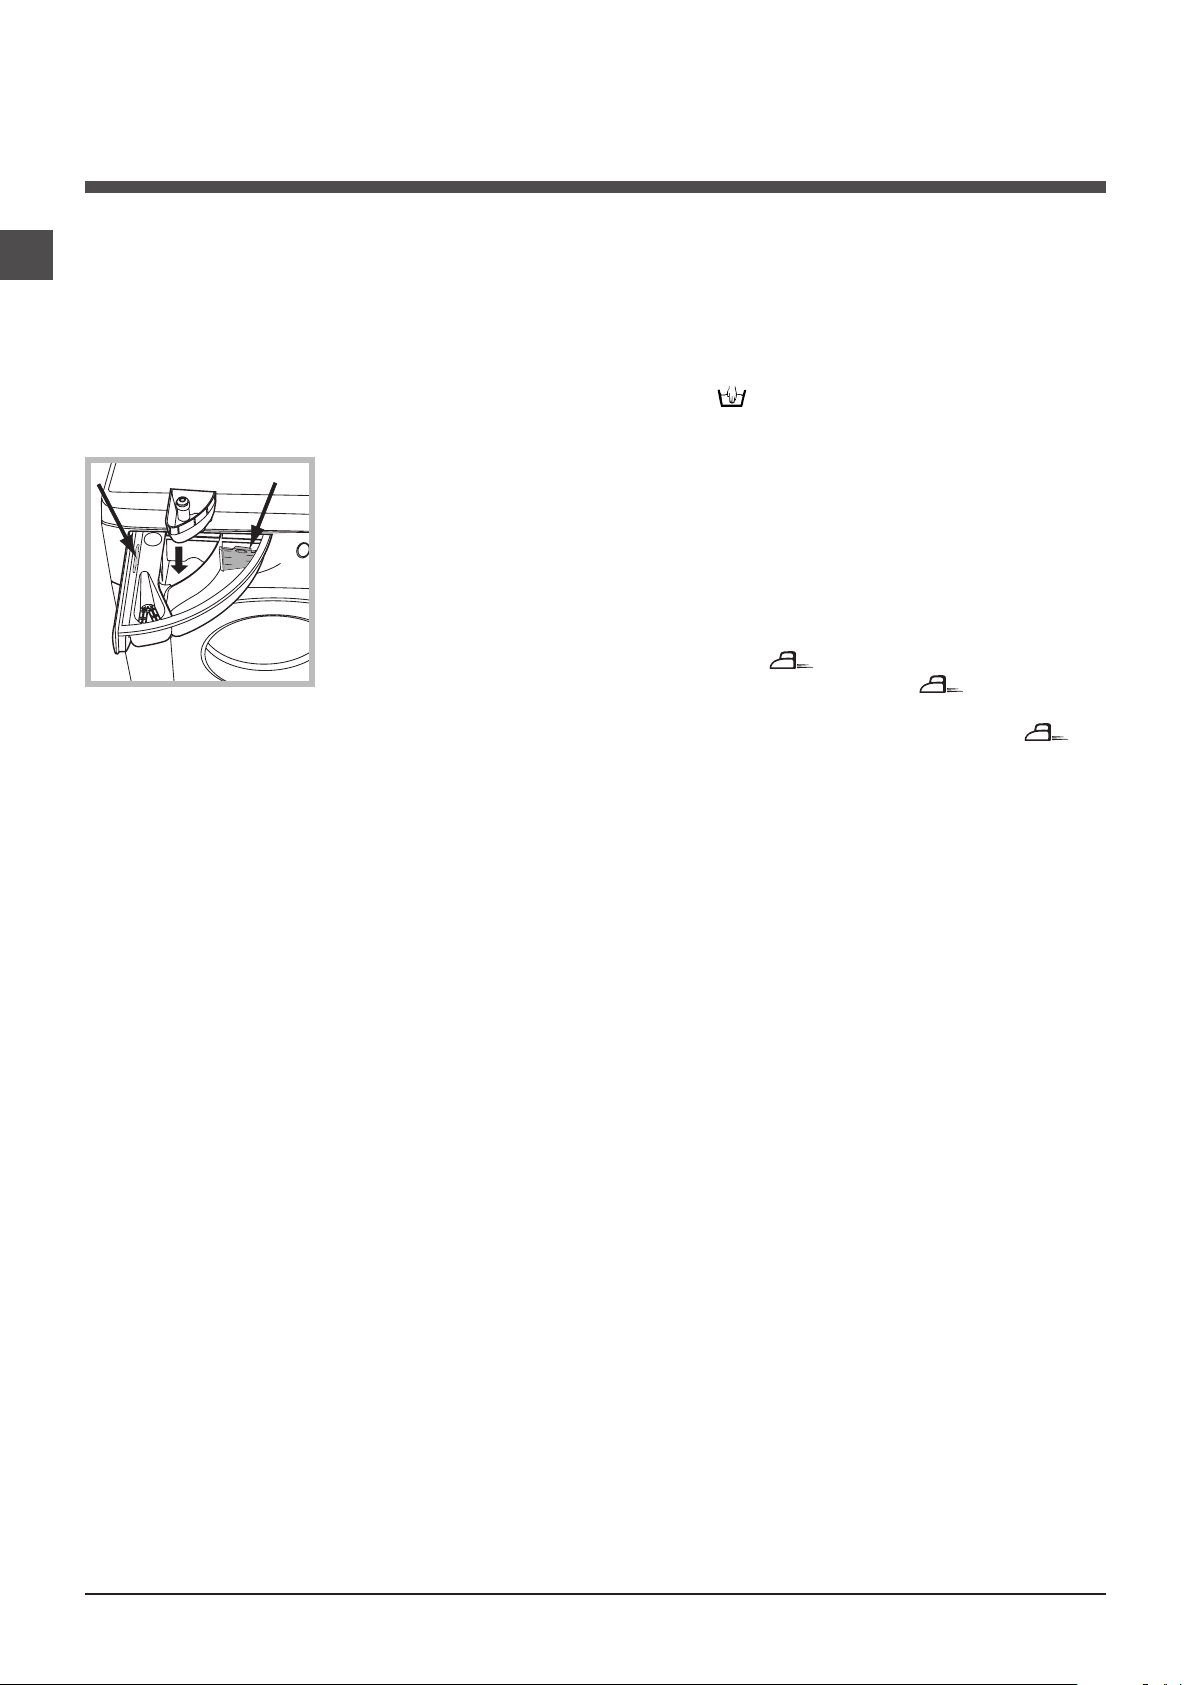
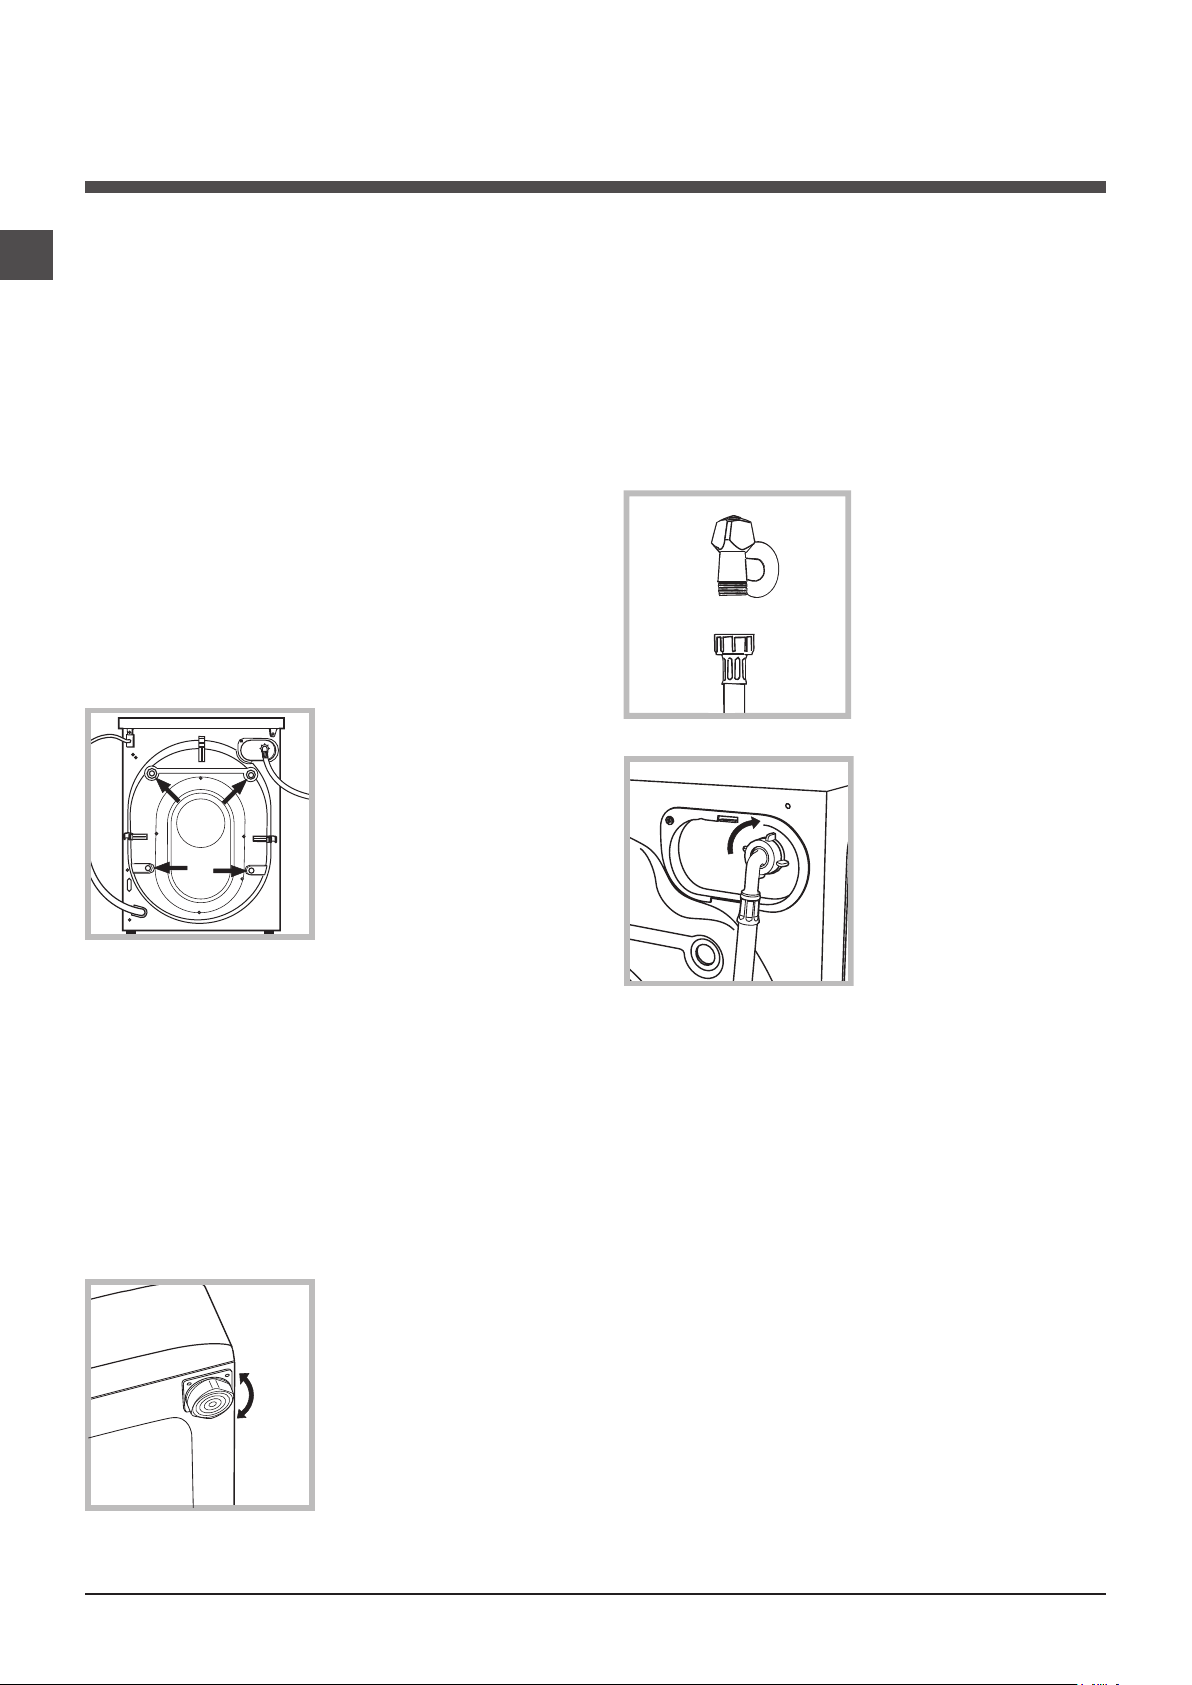
3. Remove the 4 protective
screws (used during transportation) and the rubber
washer with the corresponding spacer, located on the
rear part of the appliance
(see figure).
4. Close off the holes using the plastic plugs provided.
5. Keep all the parts in a safe place: you will need them
again if the washing machine needs to be moved to another location.
Levelling the machine correctly will provide it with stability,
help to avoid vibrations and excessive noise and prevent it
from shifting while it is operating. If it is placed on carpet or
a rug, adjust the feet in such a way as to allow a sufficient
ventilation space underneath the washing machine.
Connecting the electricity and water
supplies
Connecting the water inlet hose
1. Connect the supply pipe
by screwing it to a cold
water tap using a ¾ gas
threaded connection (see
figure).
Before performing the connection, allow the water to
run freely until it is perfectly
clear.
2. Connect the inlet hose
to the washing machine by
screwing it onto the corresponding water inlet of the
appliance, which is situated on the top right-hand
side of the rear part of the
appliance (see figure).
3. Make sure that the hose is not folded over or bent.
! Packaging materials should not be used as toys for
children.
Levelling
1. Install the washing machine on a flat sturdy floor, without
resting it up against walls, furniture cabinets or anything
else.
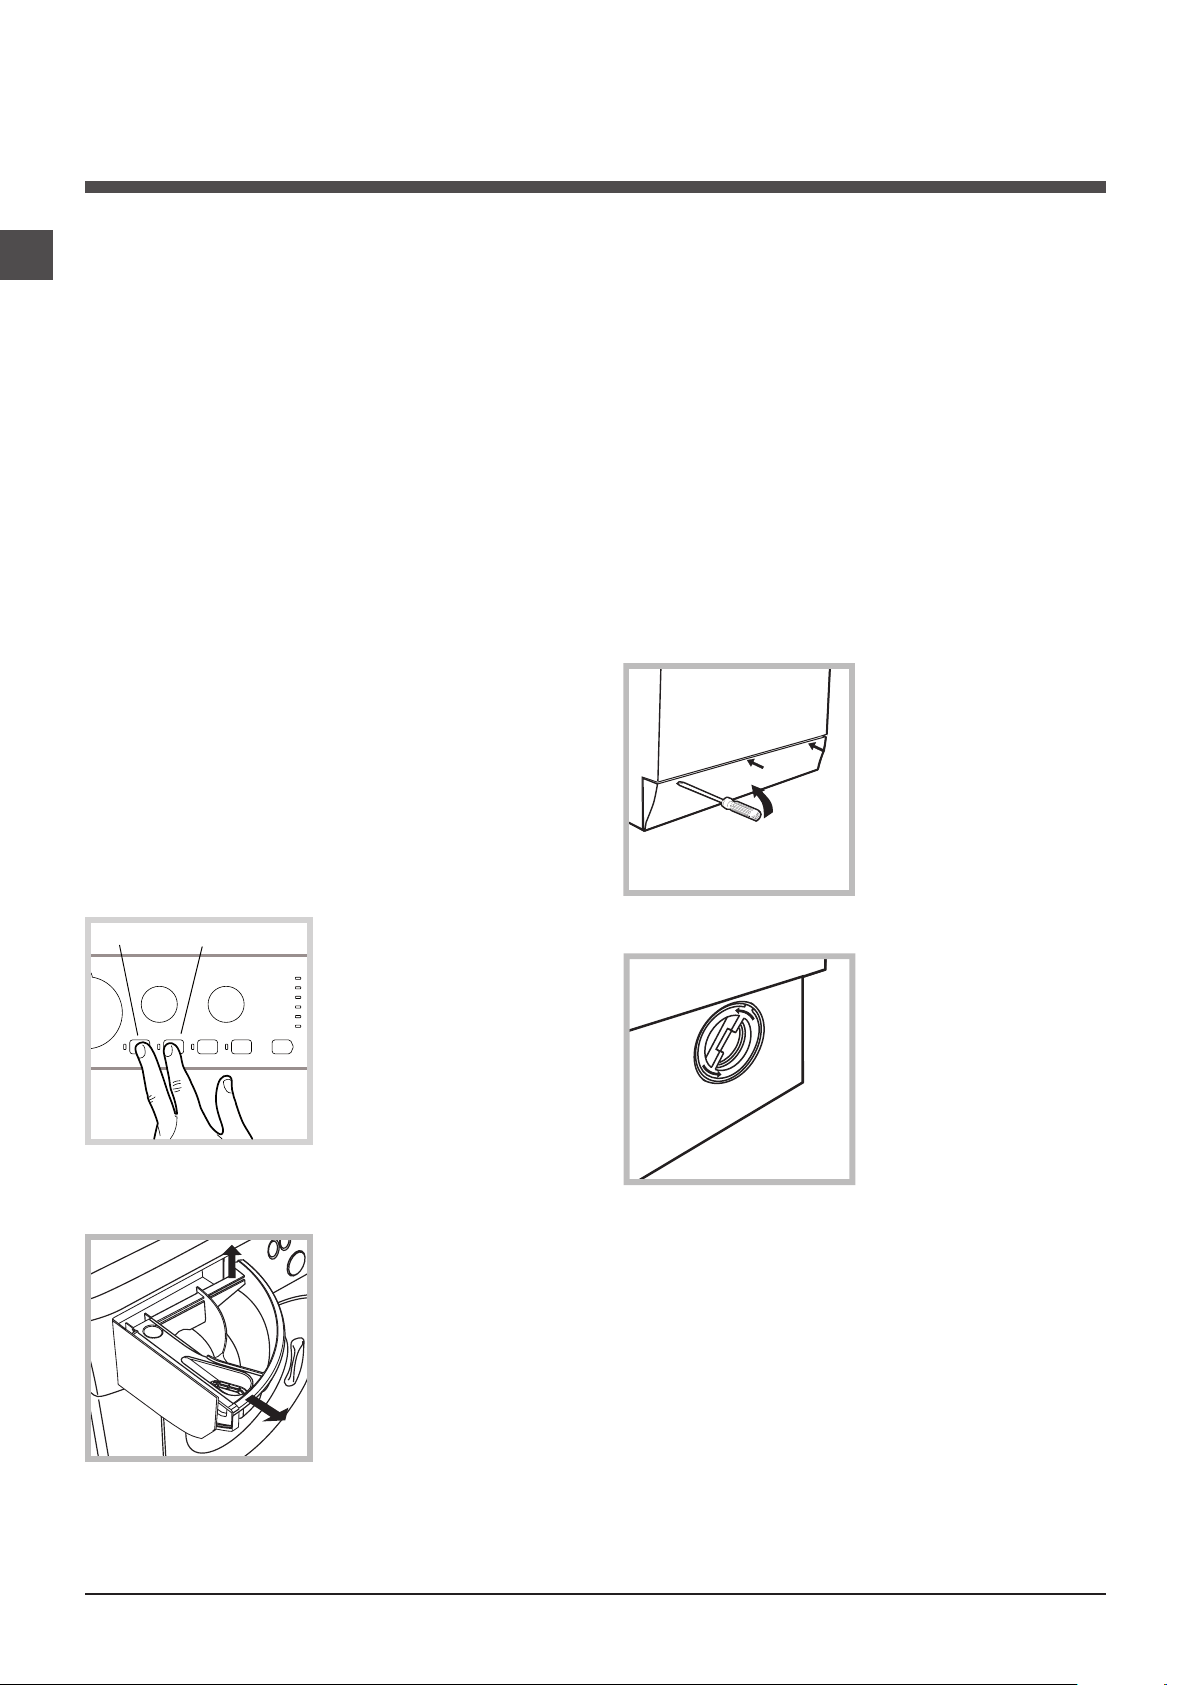
2. If the floor is not perfectly
level, compensate for any
unevenness by tightening
or loosening the adjustable front feet (see figure);
the angle of inclination,
measured in relation to the
worktop, must not exceed
2°.
2
! The water pressure at the tap must fall within the values
indicated in the Technical details table (see next page).
! If the inlet hose is not long enough, contact a specialised
shop or an authorised technician.
! Never use second-hand hoses.
! Use the ones supplied with the machine.
Page 3

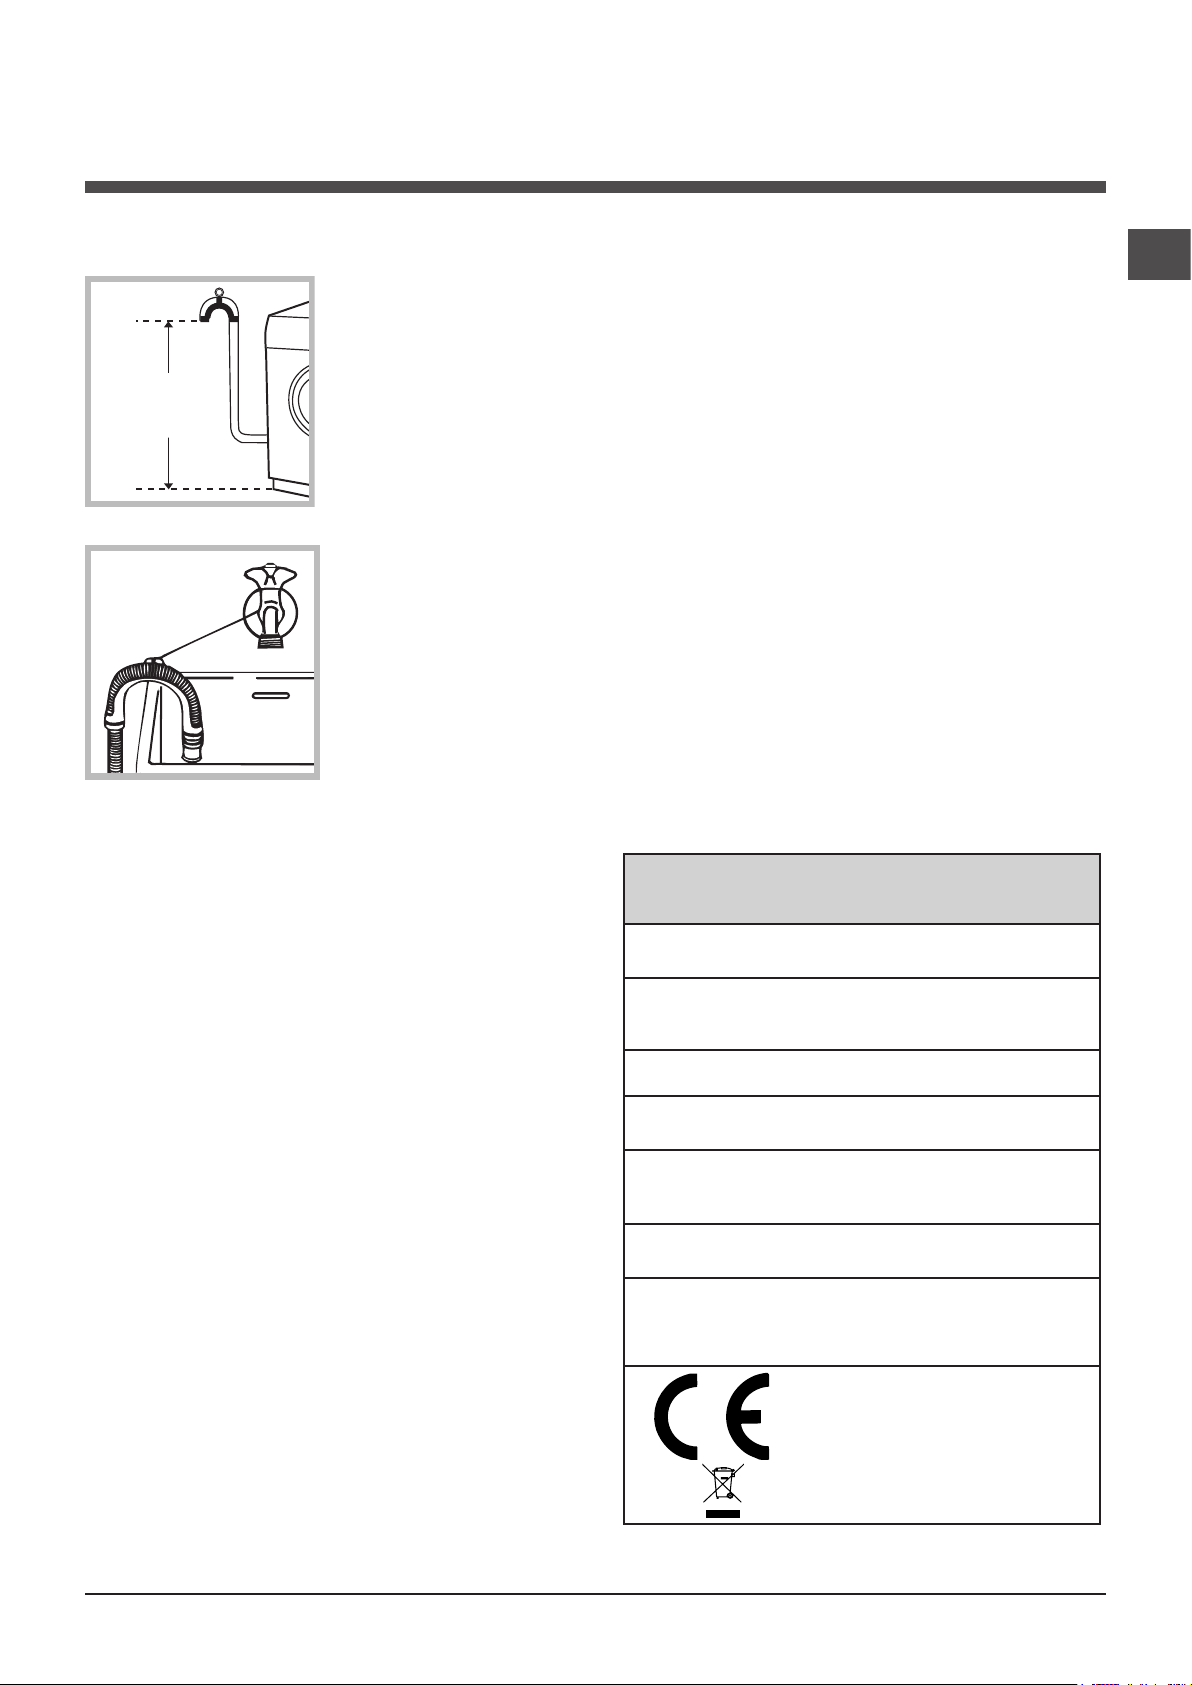
65 - 100 cm
Connecting the drain hose
- 2004/108/EC (Electromagnetic Compatibility)
Connect the drain hose,
without bending it, to a drainage duct or a wall drain
located at a height between
65 and 100 cm from the
floor;
! Do not use extension cords or multiple sockets.
! The cable should not be bent or compressed.
! The power supply cable must only be replaced by autho-
rised technicians.
Warning! The company shall not be held responsible in the
event that these regulations are not respected.
The first wash cycle
GB
alternatively, rest it on
the side of a washbasin
or bathtub, fastening the
duct supplied to the tap
(see figure). The free end
of the hose should not be
underwater.
! We advise against the use of hose extensions; if it is
absolutely necessary, the extension must have the same
diameter as the original hose and must not exceed 150 cm
in length.
Electrical connections
Before plugging the appliance into the electricity socket,
make sure that:
• thesocketisearthedandcomplieswithallapplicable
laws;
• thesocketisabletowithstandthemaximumpowerload
of the appliance as indicated in the Technical data table
(see opposite);
Once the appliance has been installed, and before you use
it for the first time, run a wash cycle with detergent and no
laundry, using the wash cycle 2.
Technical data
Model
Dimensions
Capacity
Electrical
connections
Water connections
WML 6081
width 59.5 cm
height 85 cm
depth 54 cm
from 1 to 6 kg
please refer to the technical data plate
fixed to the machine
maximum pressure 1 MPa (10 bar)
minimum pressure 0.05 MPa (0.5 bar)
drum capacity 52 litres
• thepowersupplyvoltagefallswithinthevaluesindicated
in the Technical data table (see opposite);
• thesocketiscompatiblewiththeplugofthewashing
machine. If this is not the case, replace the socket or the
plug.
! The washing machine must not be installed outdoors,
even in covered areas. It is extremely dangerous to leave
the appliance exposed to rain, storms and other weather
conditions.
! When the washing machine has been installed, the elec-
tricity socket must be within easy reach.
Spin speed
Test Program-
mes according to
2010/1061
up to 800 rotations per minute
programme 4; temperature 60°C.
programme 5; temperature 40°C.
This appliance conforms to the following
EC Directives:
- 2006/95/EC (Low Voltage)
- 2002/96/EC
3
Page 4

Description of the washing
machine and starting a wash cycle
GB
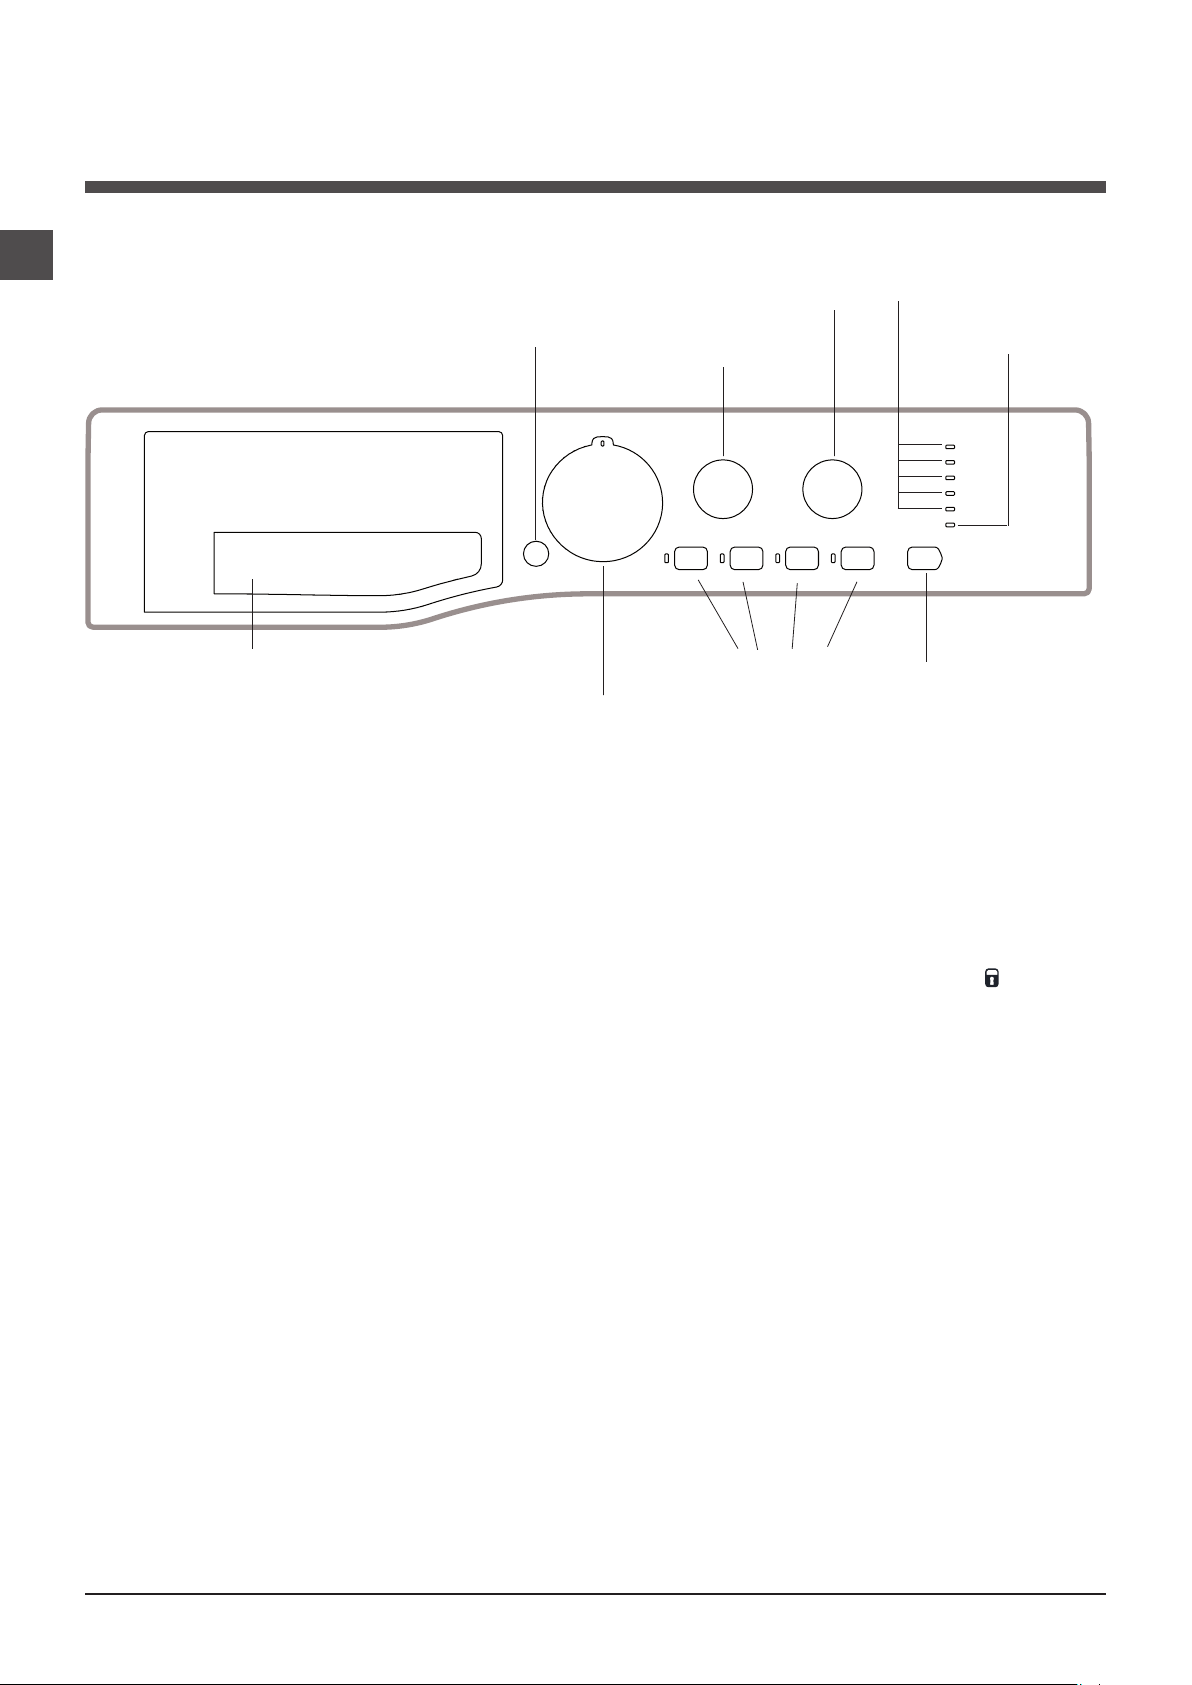
Control panel
Detergent dispenser drawer
ON/OFF
button
TEMPERATURE
WASH CYCLE
knob
SPIN SPEED
knob
FUNCTION
buttons with
indicator lights
WASH CYCLE PROGRESS/
DELAY TIMER indicator lights
knob
START/PAUSE
button with indicator
light
DOOR
LOCKED
indicator light
Detergent dispenser drawer: used to dispense
detergents and washing additives (see “Detergents and
laundry”).
ON/OFF button: switches the washing machine on and off.
WASH CYCLE knob: programmes the wash cycles. Du-
ring the wash cycle, the knob does not move.
FUNCTION buttons with indicator light: used to select the
available functions. The indicator light corresponding to the
selected function will remain lit.
TEMPERATURE knob: sets the temperature or the cold
wash cycle (see “Personalisation”).
SPIN SPEED knob: sets the spin speed or exclude the
spin cycle completely (see “Personalisation”).
WASH CYCLE PROGRESS/DELAY TIMER
light
s: used to monitor the progress of the wash cycle.
The illuminated indicator light shows which phase is in
progress.
If the Delay Timer function has been set, the time remaining
until the wash cycle starts will be indicated (see next page).
indicator
START/PAUSE button with indicator light: starts or temporarily interrupts the wash cycles.
N.B. To pause the wash cycle in progress, press this
button; the corresponding indicator light will flash orange,
while the indicator light for the current wash cycle phase
will remain lit in a fixed manner. If the DOOR LOCKED
indicator light is switched off, the door may be opened.
To start the wash cycle from the point at which it was interrupted, press this button again.
Standby mode
This washing machine, in compliance with new energy saving regulations, is fitted with an automatic standby system
which is enabled after about 30 minutes if no activity is
detected. Press the ON-OFF button briefly and wait for the
machine to start up again.
DOOR LOCKED indicator light: indicates whether the
door may be opened or not (see next page).
4
Page 5
Indicator lights
END
The indicator lights provide important information.
This is what they can tell you:
Wash cycle phase indicator lights
Once the desired wash cycle has been selected and has
begun, the indicator lights switch on one by one to indicate
which phase of the cycle is currently in progress.
GB
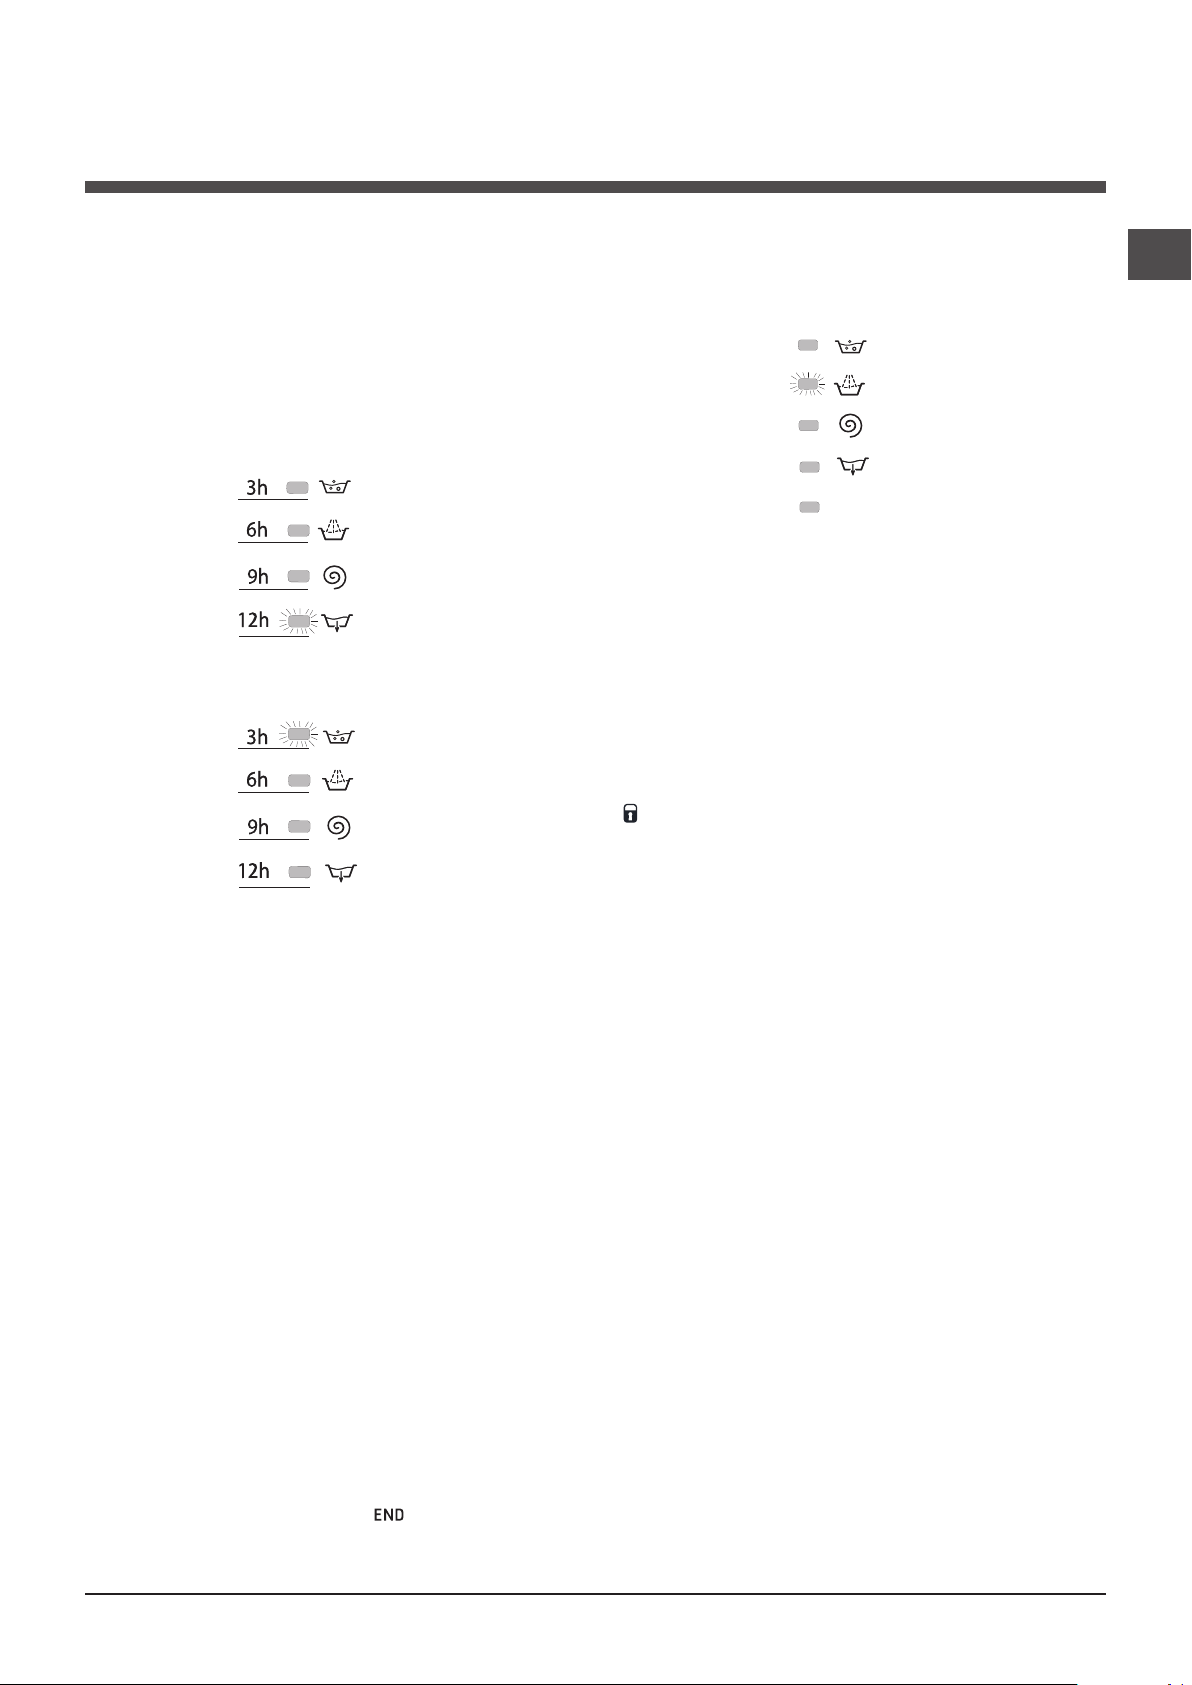
Delayed start
If the DELAY TIMER function has been activated (see “Personalisation”), after the wash cycle has been started the
indicator light corresponding to the selected delay period
will begin to flash:
As time passes, the remaining delay will be displayed and
the corresponding indicator light will flash:
Once the set delay has elapsed, the flashing indicator light
will switch off and the selected wash cycle will begin.
Wash
Rinse
Spin
Pump out
End of wash cycle
Function buttons and corresponding indicator lights
When a function is selected, the corresponding indicator
light will illuminate.
If the selected function is not compatible with the programmed wash cycle, the corresponding indicator light will
flash and a sound alert (3 beeps); the function will not be
activated.
If a function which is incompatible with another function
selected previously, only the most recent selection will
remain active.
Door locked indicator light
If this indicator light is on, the appliance door is locked to
prevent it from being opened accidentally; to avoid any
damage, wait for the indicator light to switch off before you
open the appliance door.
N.B. If the DELAY TIMER function is activated, the door
cannot be opened; pause the machine by pressing the
START/PAUSE button if you wish to open it.
! If the START/PAUSE indicator light (orange) flashes
rapidly at the same time as the function indicator light, this
indicates a problem has occurred (see “Troubleshooting”).
Starting a wash cycle
1. Turn the washing machine on by pressing the ON/OFF button. All the indicator lights will turn on for a few seconds, then only
the indicator lights relative to the selected programme settings will remain lit and the START/PAUSE indicator light will flash.
2. Load the laundry and close the door.
3. Set the WASH CYCLE knob to the desired programme.
4. Set the washing temperature (see “Personalisation”).
5. Set the spin speed (see “Personalisation”).
6. Measure out the detergent and washing additives (see “Detergents and laundry”).
7. Select the desired functions.
8. Start the wash cycle by pressing the START/PAUSE button and the corresponding indicator light will remain lit in a fixed
manner, in green.
To cancel the set wash cycle, pause the machine by pressing the START/PAUSE button and select a new cycle.
9. At the end of the wash cycle the indicator light will switch on. The DOOR LOCKED indicator light will switch off, indicating that the door may be opened. Take out your laundry and leave the appliance door ajar to make sure the drum dries
completely. Switch the washing machine off by pressing the ON/OFF button.
5
Page 6
Wash cycles
GB
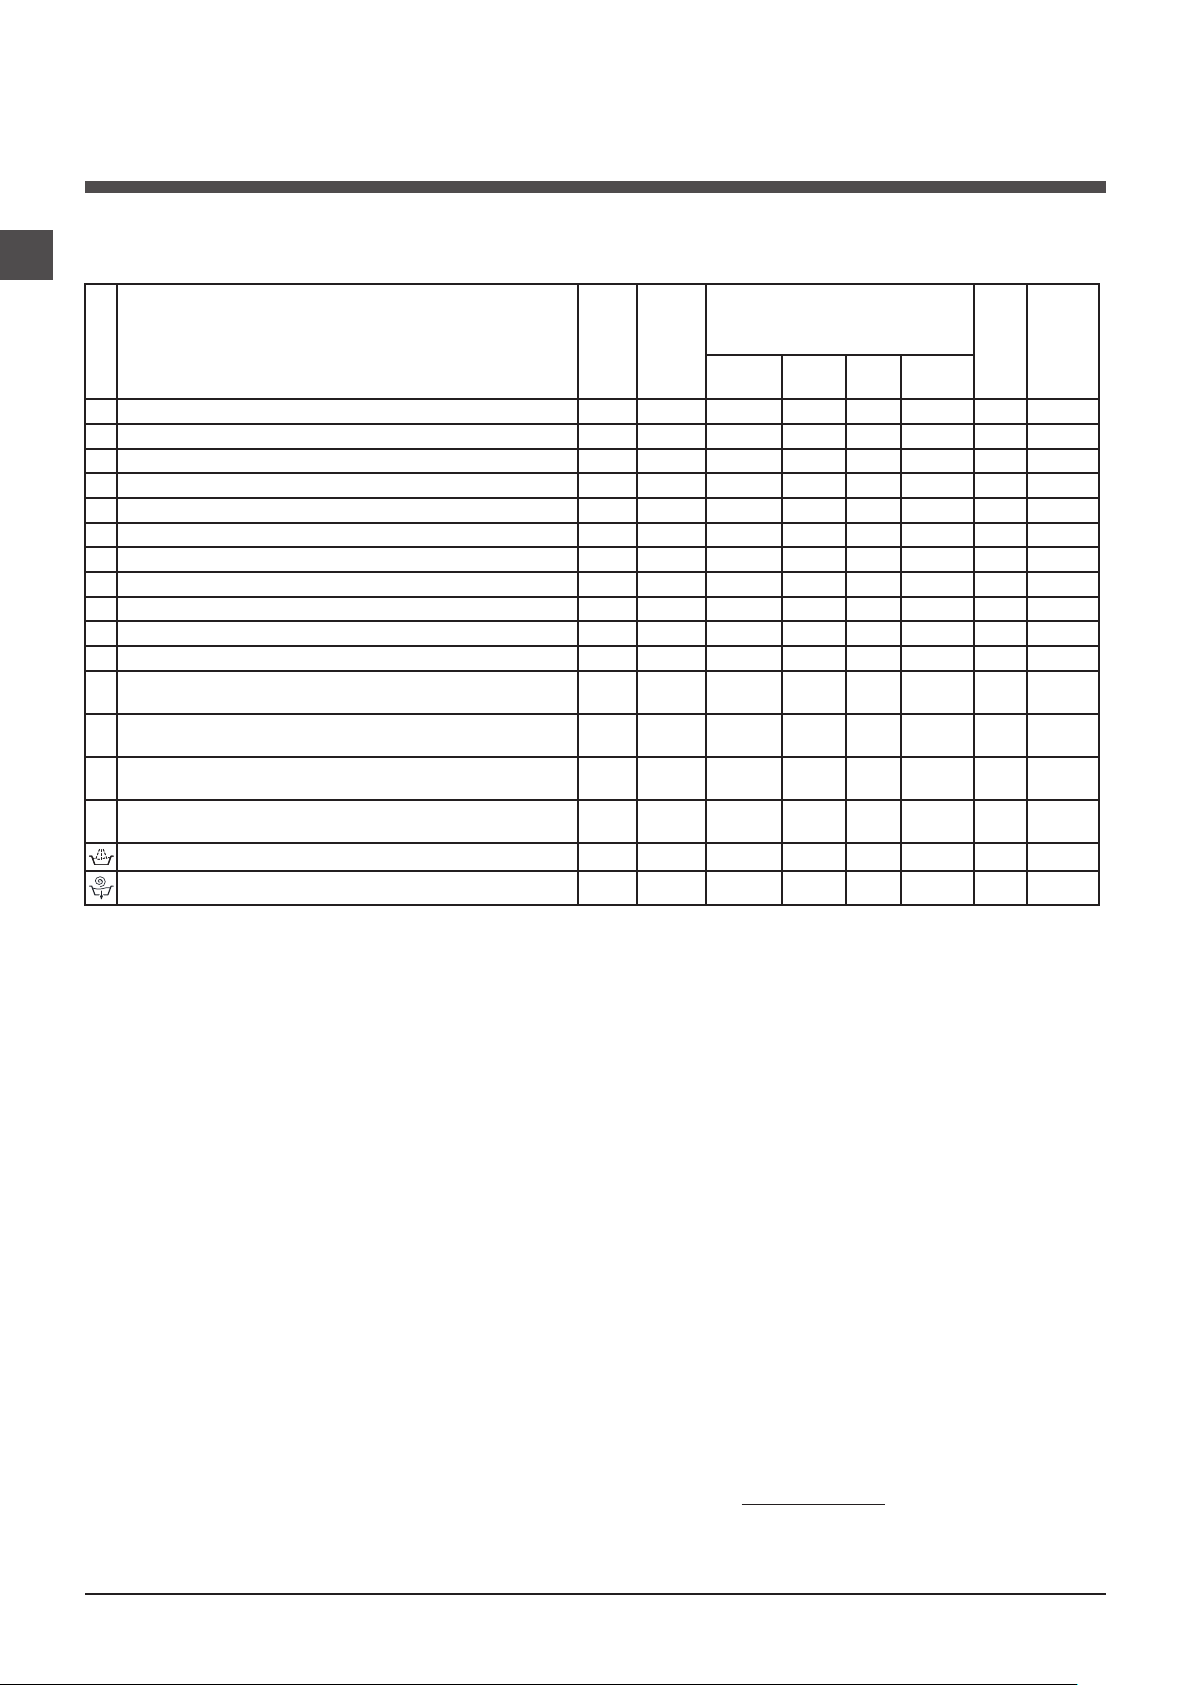
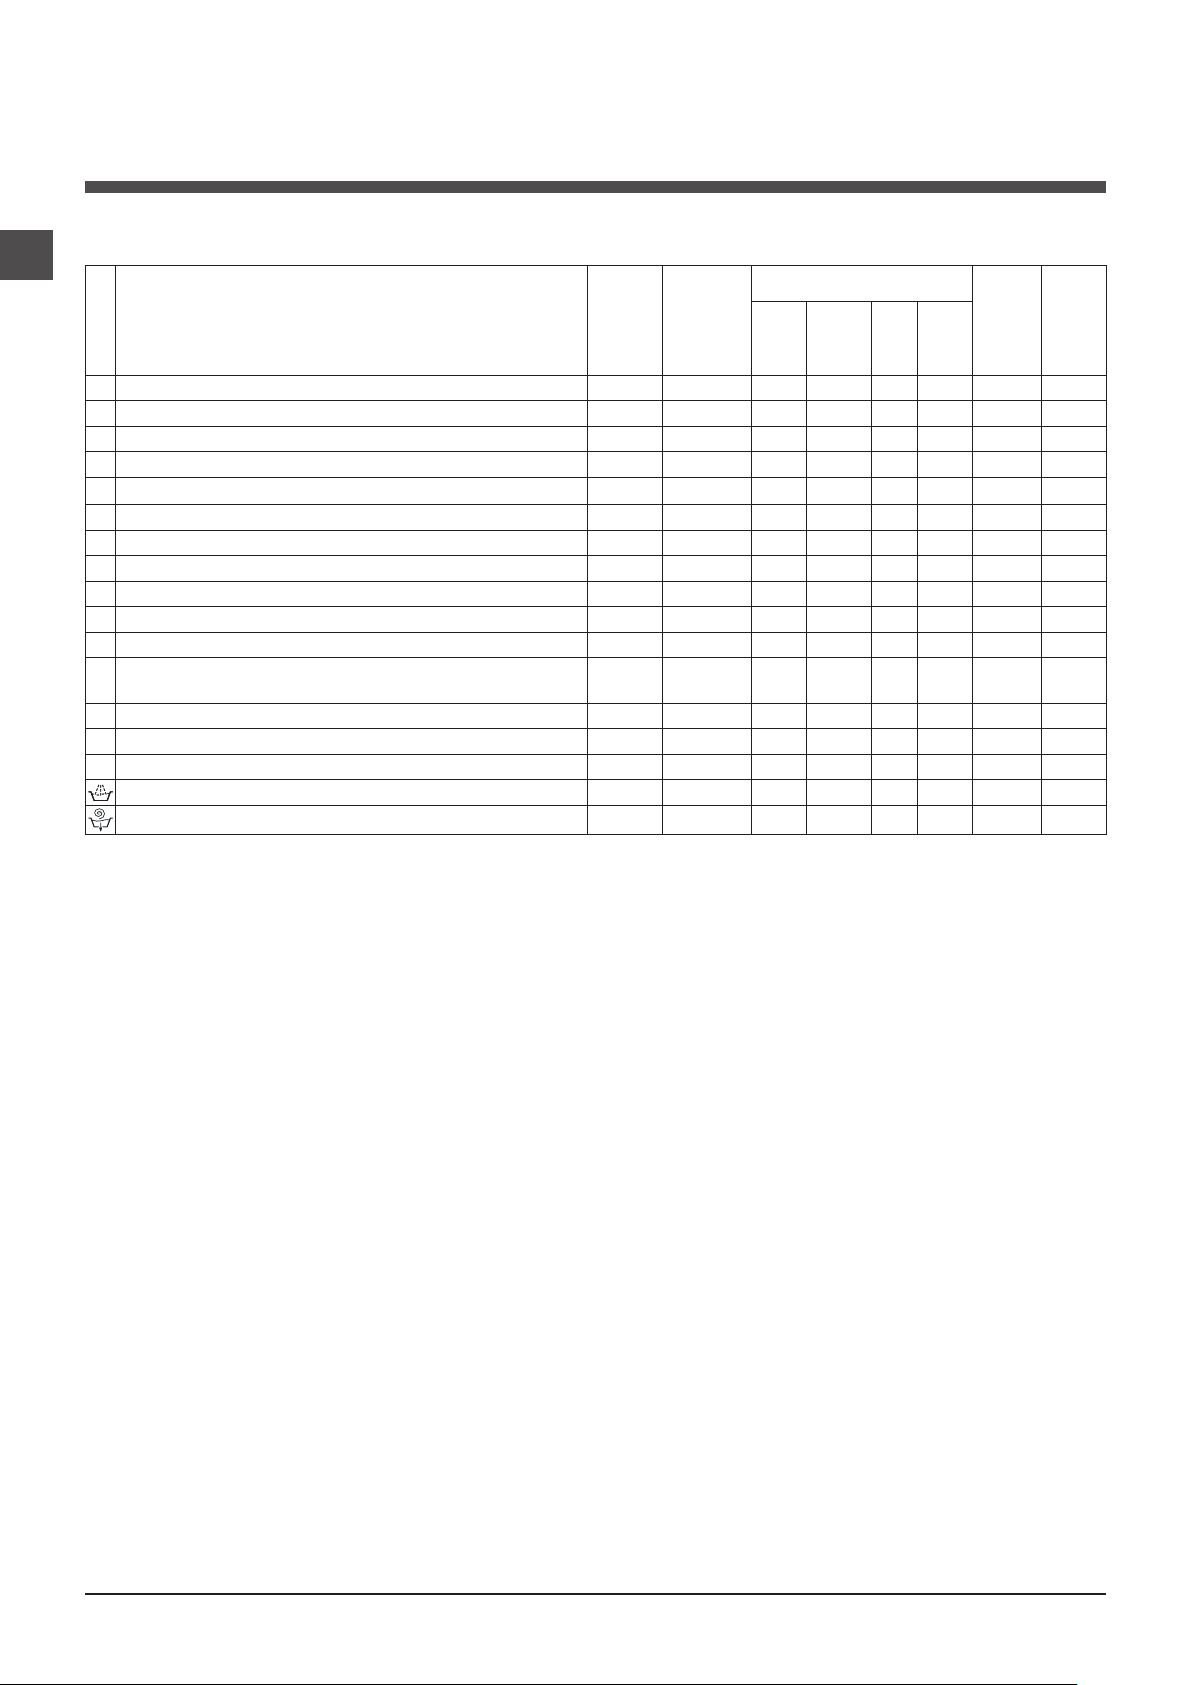
Table of wash cycles
Description of the wash cycle
Wash cycles
Anti Stain
1
Whites
2
Cotton + Prewash: extremely soiled whites.
3
Cotton (1): heavily soiled whites and resistant colours.
4
Cotton (2-3): lightly soiled resistant colours.
5
Synthetics: heavily soiled resistant colours.
6
Synthetics (4): heavily soiled resistant colours.
6
Anti allergy
7
Baby
8
Wool: for wool, cashmere, etc.
9
Delicates
10
Mix 60’: to refresh normal soiled garments quickly (not suitable for
11
wool, silk and clothes which require washing by hand).
12
Cottons
13
Synthetics
14
Fast Wash
Rinse - 800 -
Spin and Pump out - 800 - - - -
Max.
temp.
Cold
Water
Cold
Water
Cold
Water
Max.
speed
(°C)
(rpm)
Prewash Bleach Wash
40° 800 -
60° 800 - -
90° 800
60° 800 -
40° 800 -
60° 800 -
40° 800 -
60° 800 - -
40° 800 -
40° 800 - -
30° 0 - -
60° 800 - -
800 - -
800 - -
800 - -
Detergents
-
Fabric
softener
-
Max.
Cycle
load
duration
(kg)
4 180’
4 180’
6 175’
6 190’
6 185’
2,5 110’
2,5 95’
4 195’
4 150’
1,5 75’
1 80’
3,5 60’
6 85’
3 60’
3 30’
6 40’
6 20’
The length of cycle shown on the display or in this booklet is an estimation only and is calculated assuming standard working conditions. The actual duration can vary according to factors such as water temperature and pressure, the amount of detergent used, the amount and type of load inserted, load balancing and any wash options selected.
For all Test Institutes:
1) Test wash cycle in compliance with regulation 2010/1061: set wash cycle 4 with a temperature of 60°C.
2) Test wash cycle in compliance with regulation 2010/1061: set wash cycle 5 with a temperature of 40°C.
3) Long wash cycle for cottons: set wash cycle 5 with a temperature of 40°C.
4) Long wash cycle for synthetics: set wash cycle 6 with a temperature of 40°C.
Anti Stain: the programme 1 is suitable to heavily-soiled garments with resistant colours. It ensures a washing class that is
higher than the standard class (A class). When running the programme, do not mix garments of different colours. We recommend the use of powder detergent. Pre-treatment with special additives is recommended if there are obstinate stains.
Whites: use this cycle 2 to wash white clothes. The programme is designed to maintain the brightness of white clothes over
time. Use powder detergent for best results.
Anti allergy: use programme 7 to remove major allergens such as pollen, mites, cat’s and dog’s hair.
Baby: use the special wash cycle 8 to remove the remove the soiling typically caused by babies, while removing all traces
of detergent from nappies in order to prevent the delicate skin of babies from suffering allergic reactions. The cycle has been
designed to reduce the amount of bacteria by using a greater quantity of water and optimising the effect of special disinfecting additives added to the detergent.
Eco cycles
The Eco Cycles assure energy saving by eliminating the need of heating water and it’s an advantage both to your
energy bill and the environment! These innovative Eco programmes (Cottons, Synthetics and Fast Wash) are available
for various fabrics and different quantity of garment; they have been designed to guarantee a high cleaning action even
at low temperature and can be used for lightly to medium soiled loads. Eco Cycles give the best results thanks to an
intensified wash action, water optimization and are carried out in the same average time of a standard cycle.
For the best washing results with Eco Cycles we recommend the usage of a liquid detergent.
6
Page 7
Personalisation
Setting the temperature
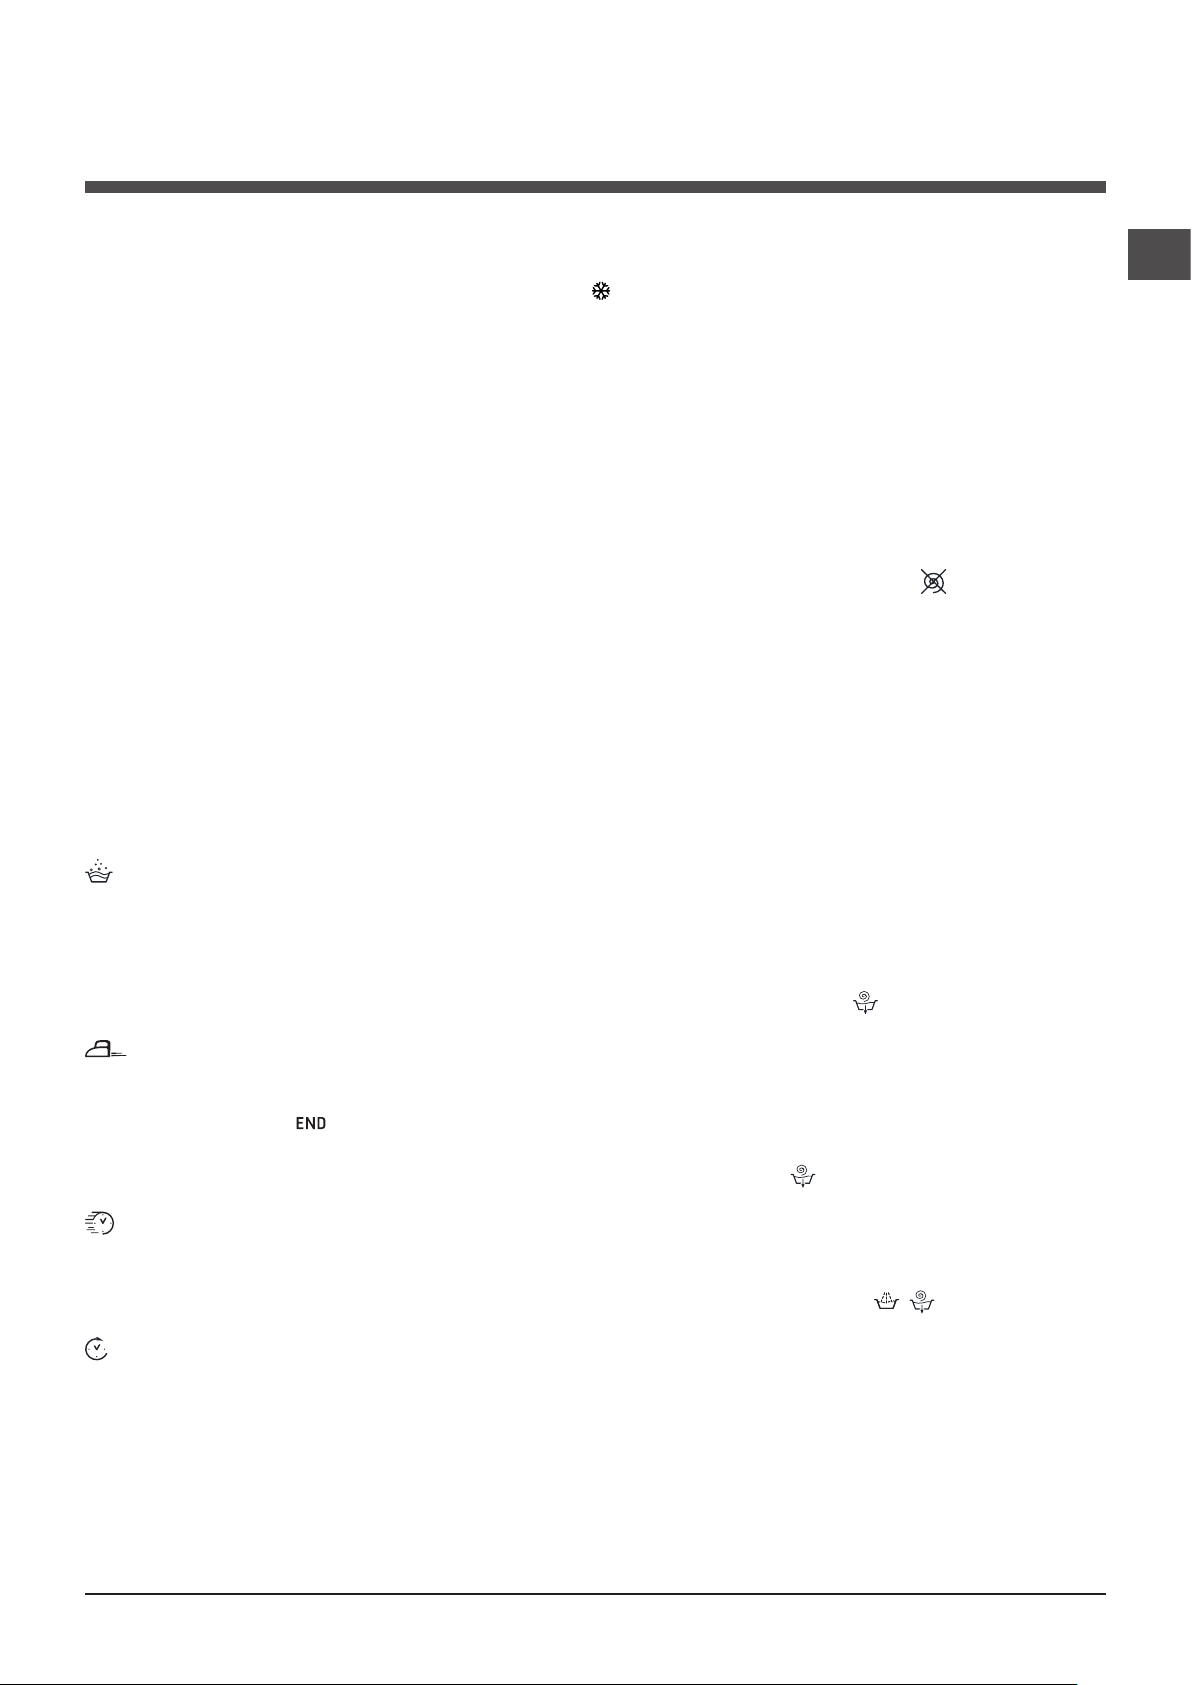
Turn the TEMPERATURE knob to set the wash temperature (see Table of wash cycles).
The temperature may be lowered, or even set to a cold wash ( ).
The washing machine will automatically prevent you from selecting a temperature which is higher than the maximum value
set for each wash cycle.
Setting the spin speed
Turn the SPIN SPEED knob to set the spin speed for the selected wash cycle.
The maximum spin speeds available for each wash cycle are as follows:
Wash cycles Maximum spin speed
Cottons 800 rpm
Synthetics 800 rpm
Wool 800 rpm
Silk drain only
The spin speed may be lowered, or the spin cycle can be excluded altogether by selecting the symbol .
The washing machine will automatically prevent you from selecting a spin speed which is higher than the maximum speed
set for each wash cycle.
Functions
The various wash functions available with this washing machine will help to achieve the desired results, every time.
To activate the functions:
1. Press the button corresponding to the desired function;
2. the function is enabled when the corresponding indicator light is illuminated.
Note: If the indicator light flashes rapidly, this signals that this particular function may not be selected in conjunction with the
selected wash cycle.
GB
Super Wash
This option offers a high-performance wash due to the greater quantity of water used in the initial phase of the cycle, and due
to the increased wash cycle duration, is particularly useful for the removal of stubborn stains. It can be used with or without
bleach. If you desire bleaching, insert the extra tray compartment (4) into compartment 1. When pouring in the bleach, be
careful not to exceed the “max” level marked on the central pivot (see figure pag. 8).
! This function may not be used in conjunction with wash cycles 2, 3, 7, 9, 10, 11, 12, 13, 14, .
Easy iron
By selecting this function, the wash and spin cycles will be modified in order to reduce the formation of creases. At the end
of the cycle the washing machine will perform slow rotations of the drum; the EASY IRON and START/PAUSE indicator lights
will flash (orange) and the phase will remain lit in a fixed manner. To end the cycle, press the START/PAUSE button or the
EASY IRON button.
! This function may not be used in conjunction with wash cycles 1, 2, 7, 9, 12, 13, 14, .
Timer Saver
If you select this option, the wash cycle duration will be reduced by up to 50%, depending on the selected cycle, thereby guaranteeing simultaneous water and energy saving. Use this cycle for lightly soiled garments.
! This function may not be used in conjunction with wash cycles 1, 2, 7, 8, 9, 10, 11, 12, 13, 14, , .
Delay timer
This timer delays the start time of the wash cycle by up to 12 hours.
Press the button repeatedly until the indicator light corresponding to the desired delay time switches on. The fifth time the button
is pressed, the function will be disabled.
N.B. Once you have pressed the START/PAUSE button, the delay time may only be decreased if you wish to modify it.
! This option is enabled with all programmes.
7
Page 8
Detergents and laundry
M
AX
1
2
4
3
A
B
GB
Detergent dispenser drawer
Good washing results also depend on the correct dose of
detergent: adding too much detergent will not necessarily result in a more efficient wash, and may in fact cause
build up on the inside of your appliance and contribute to
environmental pollution.
! Do not use hand washing detergents because these
create too much foam.
Open the detergent dispenser drawer and pour
in the detergent or washing
additive, as follows.
compartment 1: Pre-wash detergent (powder)
Before pouring in the detergent, make sure that extra compartment 4 has been removed.
compartment 2: Detergent for the wash cycle
(powder or liquid)
If liquid detergent is used, it is recommended that the
removable plastic partition A (supplied) be used for proper
dosage.
If powder detergent is used, place the partition into slot B.
compartment 3: Additives (fabric softeners, etc.)
The fabric softener should not overflow the grid.
extra compartment 4: Bleach
Preparing the laundry
•Dividethelaundryaccordingto:
- the type of fabric/the symbol on the label
- the colours: separate coloured garments from whites.
•Emptyallgarmentpocketsandcheckthebuttons.
•Donotexceedthelistedvalues,whichrefertotheweight
of the laundry when dry:
Durable fabrics: max. 6 kg
Synthetic fabrics: max. 2,5 kg
Delicate fabrics: max. 2 kg
Wool: max. 1,5 kg
Silk: max. 1 kg
How much does your laundry weigh?
Garments requiring special care
Wool: is the only washing machine manufacturer to
have been awarded the prestigious Woolmark Platinum
Care endorsement (M.0508) by the Woolmark Company,
which means that all woollen garments may be washed
in the washing machine, even those which state “hand
wash only” on the label. Wash cycle 9 therefore offers
complete peace of mind when washing woollen garments
in the washing machine (max. load 1,5 kg) and guarantees
optimal performance.
Delicates: use programme 10 to wash very delicate
garments having strasses or sequins.
We recommend turning the garments inside out before
washing and placing small items into the special bag for
washing delicates.
Use liquid detergent on delicate garments for best results.
To wash silk garments and curtains select cycle 10
and then function ; the machine will end the cycle
while the laundry is soaking and the indicator light
will flash. To drain the water so that the laundry may be
removed, press the START/PAUSE button or the
button
Load balancing system
Before every spin cycle, to avoid excessive vibrations and
to distribute the load in a uniform manner, the drum rotates
continuously at a speed which is slightly greater than the
washing rotation speed. If, after several attempts, the load
is not balanced correctly, the machine spins at a reduced
spin speed. If the load is excessively unbalanced, the
washing machine performs the distribution process instead
of spinning. To encourage improved load distribution and
balance, we recommend small and large garments are
mixed in the load.
1 sheet 400-500 g
1 pillow case 150-200 g
1 tablecloth 400-500 g
1 bathrobe 900-1200 g
1 towel 150-250 g
8
Page 9

Precautions and tips
20
! This washing machine was designed and constructed in
accordance with international safety regulations. The following information is provided for safety reasons and must
therefore be read carefully.
General safety
• Thisapplianceisnotintendedforusebypersons(inclu-
ding children) with reduced physical, sensory or mental
capabilities, or lack of experience and knowledge, unless
they have been given supervision or instruction concer-
ning use of the appliance by a person responsible for
their safety. Children should be supervised to ensure that
they do not play with the appliance.
• Thisappliancewasdesignedfordomesticuseonly.
• Donottouchthemachinewhenbarefootorwithwetor
damp hands or feet.
• Donotpullonthepowersupplycablewhenunplugging
the appliance from the electricity socket. Hold the plug
and pull.
• Donotopenthedetergentdispenserdrawerwhilethe
machine is in operation.
• Donottouchthedrainedwaterasitmayreachextreme-
ly high temperatures.
• Neverforcetheportholedoor.Thiscoulddamagethe
safety lock mechanism designed to prevent accidental
opening.
• Iftheappliancebreaksdown,donotunderanycircum-
stances access the internal mechanisms in an attempt
to repair it yourself.
• Alwayskeepchildrenwellawayfromtheappliancewhile
it is operating.
• Thedoorcanbecomequitehotduringthewashcycle.
• Iftheappliancehastobemoved,workinagroupoftwo
or three people and handle it with the utmost care. Never
try to do this alone, because the appliance is very heavy.
• Beforeloadinglaundryintothewashingmachine,make
sure the drum is empty.
Consumers should contact their local authority or retailer
for information concerning the correct disposal of their
old appliance.
Opening the porthole door manually
In the event that it is not possible to open the porthole
door due to a powercut, and if you wish to remove the
laundry, proceed as follows:
1. remove the plug from the
electrical socket.
2. make sure the water level
inside the machine is lower
than the door opening; if it
is not, remove excess water
using the drain hose, collecting it in a bucket as indicated
in the figure.
3. using a screwdriver, remove the cover panel on the lower front part of the washing
machine (see figure).
GB
Disposal
• Disposingofthepackagingmaterials:observelocal
regulations so that the packaging may be re-used.
• TheEuropeanDirective2002/96/EConWasteElectrical
and Electronic Equipment, requires that old household
electrical appliances must not be disposed of in the
normal unsorted municipal waste stream. Old applian-
ces must be collected separately in order to optimise
the recovery and recycling of the materials they contain
and reduce the impact on human health and the envi-
ronment. The crossed out “wheeled bin” symbol on the
product reminds you of your obligation, that when you
dispose of the appliance it must be separately collected.
4. pull outwards using the tab as indicated in the figure,
until the plastic tie-rod is freed from its stop position; pull
downwards and open the door at the same time.
5. reposition the panel, making sure the hooks are securely
in place before you push it onto the appliance.
9
Page 10
Care and maintenance
1
2
A
B
GB
Cutting off the water and electricity
supplies
• Turnoffthewatertapaftereverywashcycle.Thiswilllimit
wear on the hydraulic system inside the washing machine
and help to prevent leaks.
• Unplugthewashingmachinewhencleaningitanddu-
ring all maintenance work.
Cleaning the washing machine
•Theouterpartsandrubbercomponentsoftheappliance can be cleaned using a soft cloth soaked in lukewarm
soapy water. Do not use solvents or abrasives.
•Thewashingmachinehasa“AutoClean”programme
for its internal parts that must be run with no load in the
drum.
For maximum performance you may want to use either the
detergent (i.e. a quantity 10% the quantity specified for lightlysoiled garments) or special additives to clean the washing
machine. We recommend running a cleaning programme
every 40 wash cycles.
To start the programme press buttons A and B simultaneously for 5 seconds (see figure).
The programme will start automatically and will last approximately 70 minutes. To stop the cycle press the START/PAUSE button. To stop the cycle press the START/PAUSE button.
Caring for the door and drum of your
appliance
• Alwaysleavetheportholedoorajarinordertoprevent
unpleasant odours from forming.
Cleaning the pump
The washing machine is fitted with a self-cleaning pump
which does not require any maintenance. Sometimes, small
items (such as coins or buttons) may fall into the pre-chamber which protects the pump, situated in its bottom part.
! Make sure the wash cycle has finished and unplug the
appliance.
To access the pre-chamber:
1. using a screwdriver,
remove the cover panel
on the lower front part of
the washing machine (see
figure);
Cleaning the detergent dispenser drawer
Remove the dispenser by
raising it and pulling it out
(see figure).
Wash it under running water; this operation should be
repeated frequently.
2. unscrew the lid by rotating it anti-clockwise (see
figure): a little water may
trickle out. This is perfectly
normal;
3. clean the inside thoroughly;
4. screw the lid back on;
5. reposition the panel, making sure the hooks are securely
in place before you push it onto the appliance.
Checking the water inlet hose
Check the inlet hose at least once a year. If there are any
cracks, it should be replaced immediately: during the wash
cycles, water pressure is very strong and a cracked hose
could easily split open.
! Never use second-hand hoses.
10
Page 11

Troubleshooting
Your washing machine could fail to work. Before contacting the Technical Assistance Centre (see “Assistance”), make sure
that the problem cannot be not solved easily using the following list.
Problem:
The washing machine does not
switch on.
The wash cycle does not start.
The washing machine does not
take in water (the indicator light for
the first wash cycle stage flashes
rapidly).
The washing machine continuously
takes in and drains water.
Possible causes / Solutions:
• Theapplianceisnotpluggedintothesocketfully,orisnotmakingcontact.
• Thereisnopowerinthehouse.
• Thewashingmachinedoorisnotclosedproperly.
• TheON/OFFbuttonhasnotbeenpressed.
• TheSTART/PAUSEbuttonhasnotbeenpressed.
• Thewatertaphasnotbeenopened.
• Adelayedstarthasbeenset(see “Personalisation”).
• Thewaterinlethoseisnotconnectedtothetap.
• Thehoseisbent.
• Thewatertaphasnotbeenopened.
• Thereisnowatersupplyinthehouse.
• Thepressureistoolow.
• TheSTART/PAUSEbuttonhasnotbeenpressed.
• Thedrainhoseisnotfittedataheightbetween65and100cmfromthefloor
(see “Installation”).
• Thefreeendofthehoseisunderwater(see “Installation”).
• Thewalldrainagesystemisnotfittedwithabreatherpipe.
If the problem persists even after these checks, turn off the water tap, switch
the appliance off and contact the Assistance Service. If the dwelling is on one of
the upper floors of a building, there may be problems relating to water drainage,
causing the washing machine to fill with water and drain continuously. Special
anti-draining valves are available in shops and help to avoid this inconvenience.
GB
The washing machine does not
drain or spin.
The washing machine vibrates a lot
during the spin cycle.
The washing machine leaks.
The START/PAUSE indicator light
(orange) and the function indicator
lights flash rapidly.
There is too much foam.
• Thewashcycledoesnotincludedraining:somewashcyclesrequirethedrain
phase to be started manually.
• TheEASYIRONfunctionhasbeenactivated:Tocompletethewashcycle,
press the START/PAUSE button (“Personalisation”).
• Thedrainhoseisbent(see “Installation”).
• Thedrainageductisclogged.
• Thedrumwasnotunlockedcorrectlyduringinstallation(see “Installation”).
• Thewashingmachineisnotlevel(see “Installation”).
• Thewashingmachineistrappedbetweencabinetsandwalls(see “Installation”).
• Thewaterinlethoseisnotscrewedonproperly(see “Installation”).
• Thedetergentdispenserdrawerisblocked(forcleaninginstructions,see
“Care and maintenance”).
• Thedrainhoseisnotfixedproperly(see “Installation”).
• Switchoffthemachineandunplugit,waitforapproximately1minuteand
then switch it back on again.
If the problem persists, contact the Technical Assistance Service.
• Thedetergentisnotsuitableformachinewashing(itshoulddisplaythetext
“for washing machines” or “hand and machine wash”, or the like).
• Toomuchdetergentwasused.
11
Page 12

Service
GB
Before calling for Assistance:
• Check whether you can solve the problem alone (see “Troubleshooting”);
• Restarttheprogrammetocheckwhethertheproblemhasbeensolved;
• Ifthisisnotthecase,contactanauthorisedTechnicalAssistanceCentreusingthetelephonenumberprovidedonthe
guarantee certificate.
! Always request the assistance of authorised technicians.
Have the following information to hand:
• thetypeofproblem;
• theappliancemodel(Mod.);
• theserialnumber(S/N).
This information can be found on the data plate applied to the rear of the washing machine, and can also be found on the
front of the appliance by opening the door.
12
Page 13

Οδηγίες χρήσης
ΠΛΥΝΤΗΡΙΟ ΡΟΥΧΩΝ
GR
Ελληνικά,
WML 6081
Περιεχόμενα
Εγκατάσταση, 14-15
Αποσυσκευασία και οριζοντίωση
Υδραυλικές και ηλεκτρικές συνδέσεις
Πρώτος κύκλος πλυσίματος
Τεχνικά στοιχεία
Περιγραφή του πλυντηρίου και εκκίνηση
ενός προγράμματος, 16-17
Πίνακας ελέγχου
Ενδεικτικά φωτάκια
Εκκίνηση ενός προγράμματος
Προγράμματα, 18
Πίνακας των Προγραμμάτων
Εξατομικεύσεις, 19
Θέστε τη θερμοκρασία
Θέστε το στύψιμο
Λειτουργίες
Απορρυπαντικά και μπουγάδα, 20
Θήκη απορρυπαντικών
Προετοιμασία της μπουγάδας
Ειδικά ρούχα
Σύστημα ισοστάθμισης του φορτίου
GR
Προφυλάξεις και συμβουλές, 21
Γενική ασφάλεια
Διάθεση
Χειρονακτικό άνοιγμα της πόρτας
Συντήρηση και φροντίδα, 22
Αποκλεισμός νερού και ηλεκτρικού ρεύματος
Καθαρισμός του πλυντηρίου
Καθαρισμός του συρταριού απορρυπαντικών
Φροντίδα της πόρτας και του κάδου
Καθαρισμός της αντλίας
Έλεγχος του σωλήνα τροφοδοσίας του νερού
Ανωμαλίες και λύσεις, 23
Υποστήριξη, 24
13
Page 14
Εγκατάσταση
GR
! Είναι σημαντικό να διατηρήσετε το εγχειρίδιο αυτό για
να μπορείτε να το συμβουλεύεστε οποιαδήποτε στιγμή.
Σε περίπτωση πώλησης, παραχώρησης ή μετακόμισης,
βεβαιωθείτε ότι παραμένει μαζί με το πλυντήριο για να
πληροφορεί τον νέο ιδιοκτήτη για τη λειτουργία και τις
σχετικές προειδοποιήσεις.
! Διαβάστε προσεκτικά τις οδηγίες: υπάρχουν σημαντικές
πληροφορίες για την εγκατάσταση, τη χρήση και την
ασφάλεια.
Αποσυσκευασία και οριζοντίωση
Αποσυσκευασία
1. Αποσυσκευάστε το πλυντήριο.
2. Ελέγξτε αν το πλυντήριο έχει υποστεί ζημιές κατά τη
μεταφορά. Αν έχει υποστεί ζημιές μην το συνδέετε και
επικοινωνήστε με τον μεταπωλητή.
3. Αφαιρέστε τις 4 βίδες
προστασίας για τη
μεταφορά και το λαστιχάκι
με το σχετικό διαχωριστικό,
που βρίσκονται στο πίσω
μέρος (βλέπε εικόνα).
Μια φροντισμένη οριζοντίωση προσδίδει σταθερότητα
στη μηχανή και αποσοβεί δονήσεις, θορύβους και
μετατοπίσεις κατά τη λειτουργία. Σε περίπτωση μοκέτας
ή τάπητα, ρυθμίστε τα ποδαράκια έτσι ώστε να υφίσταται
κάτω από το πλυντήριο αρκετός χώρος για τον αερισμό.
Υδραυλικές και ηλεκτρικές συνδέσεις
Σύνδεση του σωλήνα τροφοδοσίας του νερού
1. Συνδέστε το σωλήνα
τροφοδοσίας βιδώνοντάς
τον σε ένα κρουνό
κρύου νερού με στόμιο
σπειρώματος 3/4 gas
(βλέπε εικόνα).
Πριν τη σύνδεση, αφήστε
να τρέξει το νερό μέχρι να
γίνει διαυγές.
2. Συνδέστε το σωλήνα
τροφοδοσίας στο
πλυντήριο βιδώνοντάς τον
στην αντίστοιχη είσοδο
νερού, στο πίσω μέρος
επάνω δεξιά (βλέπε
εικόνα).
4. Κλείστε τις οπές με τα πλαστικά πώματα που σας
παρέχονται.
5. Διατηρείστε και τα τρία τεμάχια: αν το
πλυντήριο χρειαστεί να μεταφερθεί, θα πρέπει να
ξαναμονταριστούν.
! Οι συσκευασίες δεν είναι παιχνίδια για μικρά παιδιά.
Ευθυγράμμιση
1. Εγκαταστήστε το πλυντήριο σε ένα δάπεδο επίπεδο
και ανθεκτικό, χωρίς να το ακουμπήσετε σε τοίχους,
έπιπλα ή άλλο.
2. Αν το δάπεδο δεν είναι
απόλυτα οριζοντιωμένο,
αντισταθμίστε τις
ανωμαλίες βιδώνοντας ή
ξεβιδώνοντας τα πρόσθια
ποδαράκια (βλέπε εικόνα).
Η γωνία κλίσης, μετρημένη
στην επιφάνεια εργασίας,
δεν πρέπει να ξεπερνάει
τις 2°.
3. Προσέξτε ώστε στο σωλήνα να μην υπάρχουν ούτε
πτυχώσεις, ούτε στενώσεις.
! Η πίεση νερού του κρουνού πρέπει να κυμαίνεται
μεταξύ των τιμών του πίνακα Τεχνικά στοιχεία (βλέπε
σελίδα δίπλα).
! Αν το μήκος του σωλήνα τροφοδοσίας δεν επαρκεί,
απευθυνθείτε σε ένα ειδικευμένο κατάστημα ή σε ένα
εξουσιοδοτημένο τεχνικό.
! Μη χρησιμοποιείτε ποτέ χρησιμοποιημένους σωλήνες.
! Χρησιμοποιείτε εκείνους που σας παρέχονται με τη
μηχανή.
14
Page 15
65 - 100 cm
Σύνδεση του σωλήνα αδειάσματος
Συνδέστε αδειάσματος,
χωρίς να τον διπλώσετε,
σε έναν αγωγό εκκένωσης
ή σε μια επιτοίχια
αποχέτευση σε απόσταση
από 65 έως 100 cm από το
έδαφος.
! Μη χρησιμοποιείτε προεκτάσεις και πολύπριζα.
! Το καλώδιο δεν πρέπει να φέρει πτυχές ή να είναι
συμπιεσμένο.
! Το καλώδιο τροφοδοσίας πρέπει να αντικαθίσταται μόνο
από εξουσιοδοτημένους τεχνικούς.
Προσοχή! Η επιχείρηση αποποιείται κάθε ευθύνης σε
περίπτωση που δεν τηρούνται αυτοί οι κανόνες.
GR
Διαφορετικά αποθέστε
τον στο χείλος ενός
νιπτήρα ή μιας λεκάνης,
δένοντας τον οδηγό
που σας παρέχεται
στονκρουνό (βλέπε
εικόνα). Το ελεύθερο άκρο
του σωλήνα αδειάσματος
δεν πρέπει να παραμένει
βυθισμένο στο νερό.
! Δεν συνιστάται η χρήση προεκτάσεων σωλήνων. Αν
απαιτείται, η προέκταση πρέπει να έχει την ίδια διάμετρο
του αρχικού σωλήνα και να μην ξεπερνάει τα 150 cm.
Ηλεκτρική σύνδεση
Πριν εισάγετε το βύσμα στην ηλεκτρική πρίζα,
βεβαιωθείτε ότι:
• η πρίζα διαθέτει γείωση και τηρεί τις εκ του νόμου
προδιαγραφές.
• Η πρίζα να είναι σε θέση να υποφέρει το μέγιστο
φορτίο ισχύος της μηχανής, που αναφέρεται στον
πίνακα Τεχνικών στοιχείων (βλέπε δίπλα).
• Η τάση τροφοδοσίας να κυμαίνεται μεταξύ των τιμών
που αναφέρονται στον πίνακα Τεχνικών στοιχείων
(βλέπε δίπλα).
• Η πρίζα να είναι συμβατή με το βύσμα του πλυντηρίου.
Σε αντίθετη περίπτωση, αντικαταστήστε την πρίζα ή το
βύσμα.
! Το πλυντήριο δεν εγκαθίσταται σε ανοιχτό χώρο,
ακόμη και αν ο χώρος είναι καλυμμένος, διότι είναι πολύ
επικίνδυνο να το αφήνετε εκτεθειμένο σε βροχή και
κακοκαιρία.
! Με την εγκατάσταση του πλυντηρίου, η πρίζα ρεύματος
πρέπει να είναι εύκολα προσβάσιμη.
Πρώτος κύκλος πλυσίματος
Μετά την εγκατάσταση, πριν τη χρήση, διενεργήστε ένα
κύκλο πλυσίματος με απορρυπαντικό και χωρίς ρούχα
θέτοντας το πρόγραμμα 2.
ФечнйкЬ уфпйчеЯб
МпнфЭлп WML 6081
ДйбуфЬуейт
Чщсзфйкьфзфб áðü 1 Ýùò 6 kg
ЗлекфсйкЭт
ухндЭуейт
УхндЭуейт неспэ
Фбчэфзфб
уфхшЯмбфпт
РспгсЬммбфб
елЭгчпх уэмцщнб
ме фпн кбнпнйумь
2010/1061
рлЬфпт cm 59,5
эшпт cm 85
вЬипт cm 54
ВлЭре фзн рйнбкЯдб
чбсбкфзсйуфйкюн ерЯ фзт мзчбнЮт
мЭгйуфз рЯеуз 1 MPa (10 bar)
ЕлЬчйуфз рЯеуз 0,05 MPa (0,5 bar)
чщсзфйкьфзфб фпх кЬдпх 52 лЯфсб
мЭчсй 800 уфспцЭт фп лерфь
рсьгсбммб 4; иесмпксбуЯб 60°C;
рсьгсбммб 5; иесмпксбуЯб 40°C.
З ухукехЮ бхфЮ еЯнбй уэмцщнз ме
фйт бкьлпхиет КпйнпфйкЭт ПдзгЯет:
- 2004/108/CE
(ЗлекфспмбгнзфйкЮ Ухмвбфьфзфб)
- 2002/96/CE
- 2006/95/CE (ЧбмзлЮ ФЬуз)
15
Page 16
Περιγραφή του πλυντηρίου και
εκκίνηση ενός προγράμματος
GR
Πίνακας ελέγχου
Κουμπί ON/OFF
Θήκη απορρυπαντικών
ΠΡΟΓΡΑΜΜΑΤΩΝ
Θήκη απορρυπαντικών: για την προσθήκη
απορρυπαντικών και πρόσθετων (βλέπε «Απορρυπαντικά
και μπουγάδα»).
Κουμπί ON/OFF: Για να ανάψετε ή να σβήσετε το
πλυντήριο.
Επιλογέας ΠΡΟΓΡΑΜΜΑΤΩΝ: για να θέσετε τα
προγράμματα. Κατά τη διάρκεια του προγράμματος ο
επιλογέας παραμένει ακίνητος.
Κουμπι ά με ενδεικτικά φωτάκια ΛΕΙΤΟΥΡΓΙΑΣ: για να
επιλέξετε τις διαθέσιμες λειτουργίες. Το σχετικό με την
επιλεγείσα λειτουργία ενδεικτικό φωτάκι θα παραμείνει
αναμμένο.
Επιλογέας ΣΤΥΨΙΜΑΤΟΣ: για να θέσετε το στύψιμο ή να
το αποκλείσετε (βλέπε “Εξατομικεύσεις”).
Επιλογέας ΘΕΡΜΟΚΡΑΣΙΑ: για να θέσετε τη θερμοκρασία
ή το πλύσιμο σε κρύο νερό (βλέπε «Εξατομικεύσεις»).
Επιλογέας
ΕΝΔΕΙΚΤΙΚΑ ΦΩΤΑΚΙΑ
ΠΡΟΩΘΗΣΗΣ ΚΥΚΛΟΥ/
ΚΑΘΥΣΤΕΡΗΜΕΝΗΣ
ΕΚΚΙΝΗΣΗΣ
Επιλογέας
ΣΤΥΨΙΜΑΤΟΣ
Επιλογέας
ΘΕΡΜΟΚΡΑΣΙΑ
Κουμπι ά με ενδεικτικά
φωτάκια ΛΕΙΤΟΥΡΓΙΑΣ
Κουμπί με ενδεικτικό φωτάκι START/PAUSE: για την
εκκίνηση των προγραμμάτων ή την προσωρινή διακοπή
τους.
ΣΗΜΕΙΩΣΗ: για να θέσετε σε παύση το σε εξέλιξη
πλύσιμο, πιέστε το κουμπί αυτό, το σχετικό ενδεικτικό
φωτάκι θα ανάψει με πορτοκαλί χρώμα ενώ εκείνο της
σε εξέλιξης φάσης θα είναι συνεχώς αναμμένο. Αν το
ενδεικτικό φωτάκι ΠΟΡΤΑ ΑΣΦΑΛΙΣΜΕΝΗ σβήσει,
μπορείτε να ανοίξετε την πόρτα.
Για να ξεκινήσει πάλι το πλύσιμο από το σημείο
διακοπής, πατήστε εκ νέου το κουμπί αυτό.
Τρόπος stand by
Το πλυντήριο αυτό, σύμφωνα με τις νέες διατάξεις για
την εξοικονόμηση ενέργειας, διαθέτει ένα σύστημα
αυτόματου σβησίματος (stand by) που τίθεται σε
λειτουργία εντός 30 λεπτών στην περίπτωση μη χρήσης.
Πιέστε στιγμιαία το κουμπί ON/OFF και περιμένετε να
ενεργοποιηθεί εκ νέου η μηχανή.
Ενδεικτικό
φωτάκι ΠΟΡΤΑ
ΑΣΦΑΛΙΣΜΕΝΗ
Κουμπί με
ενδεικτικό φωτάκι
START/PAUSE
ΕΝΔΕΙΚΤΙΚΑ ΦΩΤΑΚΙΑ ΠΡΟΩΘΗΣΗΣ ΚΥΚΛΟΥ/
ΚΑΘΥΣΤΕΡΗΜΕΝΗΣ ΕΚΚΙΝΗΣΗΣ: για να ακολουθείτε
την κατάσταση προόδου του προγράμματος πλυσίματος.
Το αναμμένο ενδεικτικό φωτάκι δείχνει την σε εξέλιξη
φάση. Αν τέθηκε η λειτουργία “Καθυστερημένη εκκίνηση”,
θα δείχνουν τον χρόνο που υπολείπεται για την έναρξη
του προγράμματος (βλέπε σελίδα δίπλα).
Ενδεικτικό φωτάκι ΠΟΡΤΑ ΑΣΦΑΛΙΣΜΕΝΗ: για να
καταλάβετε αν η πόρτα ανοίγει (βλέπε σελίδα δίπλα).
16
Page 17

Ενδεικτικά φωτάκια
END
Τα ενδεικτικά φωτάκια παρέχουν σημαντικές πληροφορίες.
Να τι μας λένε:
Ενδεικτικά φωτάκι φάσης σε εξέλιξη
Κατά τον επιθυμητό κύκλο πλυσίματος, τα ενδεικτικά
φωτάκια θα ανάψουν προοδευτικά για να δείξουν την
κατάσταση προώθησης:
GR
Καθυστερημένη εκκίνηση
Αν ενεργοποιήθηκε η λειτουργία “Καθυστερημένη εκκίνηση”
(βλέπε “Εξατομικεύσεις”), αφού εκκινήσετε το πρόγραμμα,
θα αρχίσει να αναβοσβήνει το ενδεικτικό φωτάκι το σχετικό
με την επιλεγμένη καθυστέρηση:
Με το πέρασμα του χρόνου θα απεικονίζεται η υπολειπόμενη
καθυ στέρηση, με το σχετικό ε νδεικτικό φωτάκι να
αναβοσβήνει.
Αφού διανυθεί η επιλεγείσα καθυστέρηση το ενδεικτικό
φωτάκι που αναβοσβήνει θα σβήσει και θα αρχίσει το τεθέν
πρόγραμμα.
Πλύσιμο
Ξέβγαλμα
Στύψιμο
Άδειασμα
Τέλος Πλυσίματος
Κουμπιά λειτουργίας και σχετικά ενδεικτικά φωτάκια
Επιλέγοντας μια λειτουργία το σχετικό ενδεικτικό φωτάκι
θα φωτιστεί.
Αν η επιλεγμένη λειτουργία δεν είναι συμβατή με το τεθέν
πρόγραμμα το σχετικό ενδεικτικό φωτάκι θα αναβοσβήνει
και η λειτουργία δεν θα ενεργοποιηθεί.
Στην περίπτωση που τεθεί μια λειτουργία μη συμβατή με
μια άλλη που επιλέχθηκε προηγουμένως θα παραμείνει
ενεργή μόνο η τελευταία επιλογή.
Ενδεικτικό φωτάκι ασφαλισμένης πόρτας
Το αναμμένο ενδεικτικό φωτάκι δείχνει ότι η πόρτα είναι
ασφαλισμένη για την παρεμπόδιση τυχαίων ανοιγμάτων.
Για την αποφυγή ζημιών πρέπει να περιμένετε να σβήσει
το ενδεικτικό φωτάκι πριν το άνοιγμα της πόρτας.
ΣΗΜΕΙΩΣΗ: αν είναι ενεργή η λειτουργία “Καθυστερημένη
εκκίνηση” η πόρτα δεν μπορεί να ανοίξει, για να την ανοίξετε
θέστε τη μηχανή σε παύση πιέζοντας το κουμπί START/
PAUSE.
! Το ταχύ αναβοσβήσιμο του φωτός START/PAUSE
(πορτοκαλί) ταυτόχρονα με εκε ίνο των λειτουργιών
επισημαίνει μια ανωμαλία (βλέπε “Ανωμαλίες και λύσεις”).
Εκκίνηση ενός προγράμματος
1. Ανάβει το πλυντήριο πιέζοντας το κουμπί ON/OFF. Όλα τα ενδεικτικά φωτάκια θα ανάψουν για μερικά δευτερόλεπτα,
μετά θα παραμείνουν αναμμένα τα ενδεικτικά φωτάκια τα σχετικά με τις ρυθμίσεις του επιλεγμένου προγράμματος και θα
πάλλεται το ενδεικτικό φωτάκι START/PAUSE.
2. Φορτώστε τη μπουγάδα και κλείστε την πόρτα.
3. Θέστε με τον επιλογέα ΠΡΟΓΡΑΜΜΑΤΩΝ το επιθυμητό πρόγραμμα.
4. Θέστε τη θερμοκρασία πλυσίματος (βλέπε «Εξατομικεύσεις»).
5. Θέστε την ταχύτητα στυψίματος (βλέπε «Εξατομικεύσεις»).
6. Χύστε απορρυπαντικό και πρόσθετα (βλέπε «Απορρυπαντικά και μπουγάδα»).
7. Επιλέξετε τις διαθέσιμες λειτουργίες.
8. Εκκινήστε το πρόγραμμα πιέζοντας το κουμπί START/PAUSE και το σχετικό ενδεικτικό φωτάκι θα παραμείνει αναμμένο
συνεχώς με πράσινο χρώμα.
Για να ακυρώσετε τον τεθέντα κύκλο θέστε τη μηχανή σε παύση πιέζοντας το κουμπί START/PAUSE και επιλέξτε ένα νέο
κύκλο.
9. Στο τέλος του προγράμματος θα φωτιστεί το ενδεικτικό φωτάκι . Το ενδεικτικό φωτάκι ΠΟΡΤΑ ΑΣΦΑΛΙΣΜΕΝΗ
θα σβήσει δείχνοντας ότι η πόρτα μπορεί να ανοίξει. Βγάλτε τη μπουγάδα και αφήστε την πόρτα μισόκλειστη για να
στεγνώσει ο κάδος. Σβήστε το πλυντήριο πιέζοντας το κουμπί ON/OFF.
17
Page 18
Προγράμματα
GR
Πίνακας των Προγραμμάτων
ðñüð-
ëõóç
БрпссхрбнфйкЬ
Лехкб-
-
-
МЭгйуфз
фбчэфзфб
(уфспцЭт
бнЬ лерфь)
0 - -
800 -
800 - - - - 6
РесйгсбцЮ фпх РспгсЬµµбфпт
Προγράμματα
1 Εíτατιkό 40° 800 -
2 Λευκά 60° 800 - -
3 ВбмвбkесЬ+Рспрлхуз: ЛехкЬ еобйсефйкЬ лесщмЭнб. 90° 800
4 ВбмвбkесЬ (1): ЛехкЬ кбй чсщµбфйуфЬ бниекфйкЬ, рплэ лесщµЭнб. 60° 800 -
5 ВбмвбkесЬ (2-3): ЛехкЬ лЯгп лесщµЭнб кбй ехбЯуизфб чсюµбфб. 40° 800 -
6 УхниефйkЬ: ЧсщµбфйуфЬ бниекфйкЬ, рплэ лесщµЭнб. 60° 800 -
6 УхниефйkЬ (4): ЧсщµбфйуфЬ бниекфйкЬ, рплэ лесщµЭнб. 40° 800 -
7 Αντι-αλλεργικό 60° 800 - -
8 Μωρουδιακά 40° 800 -
9 МЬллйнб: Гйб µЬллйнб, cachemire, клр. 40° 800 - -
10 Ευαίσθητα
ÃρÞãïñï 60’: Гйб фп гсЮгпсп цсеукЬсйуµб спэчщн елбцсЬ
лесщµЭнщн (ден ендеЯкнхфбй гйб µЬллйнб, µефбощфЬ кбй спэчб рпх
11
рлЭнпнфбй уфп ч Эсй).
12 ВбмвбкесЬ ¢дейбмб 800 - -
13 УхниефйкЬ ¢дейбмб 800 - -
14ÖñεσêÜñéσµá 30’ ¢дейбмб 800 - -
ОЭвгблмб
Уфэшймп + ¢нфлзпз
МЭгйуфз
èåñµïêñ.
(°C)
30°
60° 800 - -
Ðëý-
нфйкь
óéµï
-
-
Ìáëá-
кфйкь
МЭгйуфп
ЦпсфЯп.
(Kg)
4
4
6
6
6
2,5
2,5
4
4
1,5
1
3,5
6
3
3
6
ÄéÜñ-
êåéá
кэклпх
180’
180’
175’
190’
185’
110’
95’
195’
150’
75’
80’
60’
85’
60’
30’
40’
20’
Η διάρκεια του κύκλου που φαίνεται στην οθόνη ή στο εγχειρίδιο αποτελεί μια εκτίμηση υπολογισμένη με βάση τις στάνταρ συνθήκες. Ο πραγματικός χρόνος μπορεί να
ποικίλει με βάση πολυάριθμους παράγοντες όπως θερμοκρασία και πίεση του εισερχόμενου νερού, θερμοκρασία περιβάλλοντος, ποσότητα απορρυπαντικού, ποσότητα
και τύπος φορτίου, ισοστάθμιση του φορτίου, πρόσθετες επιλεγμένες δυνατότητες.
Για όλα τα Test Institutes:
1) Πρόγραμμα ελέγχου σύμφωνα με την προδιαγραφή 2010/1061: θέστε το πρόγραμμα 4 σε μια θερμοκρασία 60°C.
2) Πρόγραμμα ελέγχου σύμφωνα με την προδιαγραφή 2010/1061: θέστε το πρόγραμμα 5 σε μια θερμοκρασία 40°C.
3) Πρόγραμμα βαμβακερών μακρύ: θέστε το πρόγραμμα 5 σε μια θερμοκρασία 40°C.
4)
Πρόγραμμα УХНИЕФЙKБ μακρύ
: θέστε το πρόγραμμα 6 σε μια θερμοκρασία 40°C.
Εντατιkό: το πρόγραμμα 1 είναι κατάλληλο για το πλύσιμο ρούχων πολύ λερωμένων, με χρώματα ανθεκτικά. Το
πρόγραμμα εγγυάται μια κλάση πλυσίματος ανώτερη της κλάσης στάνταρ (κλάση A). Μην εκτελείτε το πρόγραμμα
αναμιγνύοντας ρούχα διαφορετικού χρώματος. Συνιστάται η χρήση απορρυπαντικού σε σκόνη. Για λεκέδες δύσκολους
συνιστάται η προκαταρκτική περιποίηση με ειδικά πρόσθετα.
Λευκά: χρησιμοποιήστε τον κύκλο για 2 το πλύσιμο των λευκών ρούχων. Το πρόγραμμα μελετήθηκε για τη διατήρηση της
λαμπρότητας του λευκού στο χρόνο. Για καλύτερα αποτελέσματα συστήνεται η χρήση απορρυπαντικού σε σκόνη.
Αντι-αλλεργικό: χρησιμοποιήστε το πρόγραμμα 7 για την απομάκρυνση των κυριότερων αλλεργιογόνων όπως γύρη, άκαρι,
τρίχες γάτας και σκύλου.
Μωρουδιακά: χρησιμοποιήστε το αντίστοιχο πρόγραμμα 8 για να αφαιρέσετε τους τυπικούς λεκέδες των παιδιών και να
απομακρύνετε το απορρυπαντικό από τα ρούχα για να μην υπάρξουν αλλεργικές αντιδράσεις στο ευαίσθητο δέρμα των
παιδιών. Ο κύκλος αυτό μελετήθηκε για να μειώνει το βακτηριδιακό φορτίο χρησιμοποιώντας μεγαλύτερη ποσότητα νερού
και βελτιστοποιώντας την επίδραση των ειδικών εξυγιαντικών πρόσθετων στο απορρυπαντικό.
Προγηράμματα Eco
Τα προγράμματα Eco προσφέρουν καλές επιδόσεις πλυσίματος σε χαμηλές θερμοκρασίες επιτρέποντας λιγότερη
χρήση ηλεκτρικής ενέργειας με ωφέλεια για το περιβάλλον και εξοικονόμηση χρημάτων.
Τα προγράμμα Eco (Βαμβακερά, Συνθετικά και Ö
ñεσêÜñéσµá
30’) δημιουργήθηκαν για διαφόρους τύπους
υφασμάτων και για ρούχα λίγο λερωμένα. Για τη διασφάλιση ενός βέλτιστου αποτελέσματος συστήνεται η χρήση
υγρού απορρυπαντικού. Προτείνεται η πρόπλυση των γιακάδων, των μανικετιών και των λεκέδων.
18
Page 19

Εξατομικεύσεις
Θέστε τη θερμοκρασία
Στρέφοντας τον επιλογέα ΘΕΡΜΟΚΡΑΣΙΑ τίθεται η θερμοκρασία πλυσίματος (βλέπε Πίνακα προγραμμάτων).
Η θερμοκρασία μπορεί να μειωθεί μέχρι το πλύσιμο σε κρύο νερό ( ).
Το μηχάνημα θα παρεμποδίσει αυτόματα τη θέση θερμοκρασίας μεγαλύτερης της μέγιστης προβλεπόμενης για κάθε
πρόγραμμα.
Θέστε το στύψιμο
Στρέφοντας τον επιλογέα ΣΤΥΨΙΜΟ τίθεται η ταχύτητα στυψίματος του επιλεγμένου προγράμματος.
Οι μέγιστες προβλεπόμενες ταχύτητες για τα προγράμματα είναι:
Προγράμματα Μέγιστη ταχύτητα
Βαμβακερά 800 στροφές ανά λεπτό
Συνθετικά 800 στροφές ανά λεπτό
Μάλλινα 800 στροφές ανά λεπτό
Μεταξωτά μόνο άδειασμα
Η ταχύτητα στυψίματος μπορεί να ελαττωθεί ή να αποκλειστεί επιλέγοντας το σύμβολο .
Το μηχάνημα θα παρεμποδίσει αυτόματα τη διενέργεια στυψίματος μεγαλύτερου του μέγιστου προβλεπόμενου για κάθε
πρόγραμμα.
Λειτουργίες
Οι διάφορες λειτουργίες πλυσίματος που προβλέπονται από το πλυντήριο επιτρέπουν την επίτευξη του καθαρισμού και
του λευκού που επιθυμείτε.
Για την ενεργοποίηση των λειτουργιών:
1. πιέστε το πλήκτρο το σχετικό με την επιλεγμένη λειτουργία.
2. Το άναμμα του ενδεικτικού φωτός επισημαίνει ότι η λειτουργία είναι ενεργή.
Παρατήρηση: Το γρήγορο αναβοσβήσιμο του ενδεικτικού φωτός δείχνει ότι η σχετική λειτουργία δεν μπορεί να επιλεγεί
για το τεθέν πρόγραμμα.
GR
Super Wash
Η δυνατότητα αυτή εξασφαλίζει ένα πλύσιμο υψηλών επιδόσεων χάρη στη χρήση μεγαλύτερης ποσότητας νερού
στην αρχική φάση του κύκλου και στη μεγαλύτερη διάρκεια του προγράμματος. Μπορεί να χρησιμοποιείται με ή χωρίς
λευκαντικό. Αν επιθυμείτε να διενεργήσετε και τη λεύκανση εισάγετε την πρόσθετη λεκανίτσα 4, που παρέχεται, στη
λεκανίτσα 1 (βλέπε σελίδα 20).
! Δεν είναι ενεργό στα προγράμματα 2, 3, 7, 9, 10, 11, 12, 13, 14, .
Εύκολο σιδέρωμα
Επιλέγοντας τη λειτουργία αυτή, το πλύσιμο και το στύψιμο θα τροποποιηθούν κατάλληλα για τη μείωση σχηματισμού
τσαλακωμάτων. Στο τέλος του κύκλου πλύσης θα γίνουν αργές περιστροφές του κάδου. Το ενδεικτικό φωτάκι της
λειτουργίας ΕΥΚΟΛΟ ΣΙΔΕΡΩΜΑ και της START/PAUSE θα αναβοσβήνουν (πορτοκαλί) και η φάση θα παραμείνει
συνεχώς αναμμένη. Για το πέρας του κύκλου πατήστε το κουμπί START/PAUSE ή το κουμπί ΕΥΚΟΛΟ ΣΙΔΕΡΩΜΑ.
! Δεν είναι ενεργό στα προγράμματα 1, 2, 7, 9, 12, 13, 14, .
Εξοικονόμηση Χρόνου
Επιλέγοντας τη δυνατότητα αυτή μειώνεται η διάρκεια του προγράμματος μέχρι 50% με βάση τον επιλεγμένο κύκλο,
εξασφαλίζοντας ταυτόχρονα μια εξοικονόμηση νερού και ενέργειας. Χρησιμοποιείτε τον κύκλο αυτόν για ρούχα όχι
υπερβολικά λερωμένα.
! Δεν είναι ενεργό στα προγράμματα 1, 2, 7, 8, 9, 10, 11, 12, 13, 14, , .
Καθυστερημένη εκκίνηση
Καθυστερεί την εκκίνηση του μηχανήματος μέχρι 12 ώρες.
Πιέστε πολλές φορές το πλήκτρο μέχρι να ανάψει το ενδεικτικό φωτάκι το σχετικό με την επιθυμητή καθυστέρηση. Στην
πέμπτη φορά που θα πιέσετε το κουμπί η λειτουργία θα απενεργοποιηθεί.
ΣΗΜΕΙΩΣΗ: Αφού πατηθεί το πλήκτρο START/PAUSE, μπορείτε να αλλάξετε την τιμή καθυστέρησης μόνο μειώνοντάς την.
! Είναι ενεργό με όλα τα προγράμματα.
19
Page 20

Απορρυπαντικά και μπουγάδα
M
AX
1
2
4
3
A
B
GR
Θήκη απορρυπαντικών
Το καλό αποτέλεσμα του πλυσίματος εξαρτάται επίσης
και από τη σωστή δοσολογία του απορρυπαντικού:
υπερβάλλοντας δεν πλένουμε αποτελεσματικότερα
και συντελούμε στη δημιουργία κρούστας στα
εσωτερικά μέρη του πλυντηρίου και στη μόλυνση του
περιβάλλοντος.
! Μη χρησιμοποιείτε απορρυπαντικά για πλύσιμο στο
χέρι, διότι παράγουν πολύ αφρό.
Βγάλτε τη θήκη
απορρυπαντικών και
εισάγετε το απορρυπαντικό
ή το πρόσθετο ως εξής.
θήκη 1: Απορρυπαντικό για πρόπλυση
(σε σκόνη)
Πριν χύσετε το απορρυπαντικό ελέγξτε αν έχει εισαχθεί η
πρόσθετη λεκανίτσα 4.
θήκη 2: Απορρυπαντικό για πλύσιμο (σε σκόνη ή υγρό)
Σε περίπτωση χρήσης υγρού απορρυπαντικού,
συστήνεται να χρησιμοποιείτε το δοσομετρητή Α που σας
παρέχεται για σωστή δοσολογία.
Για τη χρησιμοποίηση του απορρυπαντικού σε σκόνη
αποθέστε το δοσομετρητή στην κοιλότητα B.
θήκη 3: Πρόσθετα (μαλακτικό, κλπ.)
θήκη πρόσθετη 4: Λευκαντικό
Προετοιμασία της μπουγάδας
• Χωρίστε τη μπουγάδα ανάλογα:
- με το είδος του υφάσματος/ το σύμβολο της ετικέτας.
- τα χρώματα: χωρίστε τα χρωματιστά ρούχα από τα
λευκά.
• Εκκενώστε τις τσέπες και ελέγξτε τα κουμπιά.
• Μην ξεπερνάτε τις υποδεικνυόμενες τιμές, σε σχέση με
το βάρος της στεγνής μπουγάδας:
Ανθεκτικά υφάσματα: max 6 kg
Συνθετικά υφάσματα: max 2,5 kg
Ευαίσθητα υφάσματα: max 2 kg
Μάλλινα: max 1,5 kg
Μεταξωτά: max 1 kg
Πόσο ζυγίζει η μπουγάδα;
Ειδικά ρούχα
Μάλλινα: Το είναι το μοναδικό πλυντήριο που κατέκτησε
τη σημαντική αναγνώριση Woolmark Platinum Care
(M.0508) εκ μέρους της The Woolmark Company,
που πιστοποιεί το πλύσιμο στο πλυντήριο όλων των
μάλλινων ρούχων καθώς και εκείνων που φέρουν την
ετικέτα “μόνο πλύσιμο στο χέρι” . Με το πρόγραμμα
9 έχετε συνεπώς απόλυτη βεβαιότητα να πλένετε στο
πλυντήριο όλα τα μάλλινα ρούχα (max. 1,5 kg) με την
εγγύηση των καλύτερων επιδόσεων.
Ευαίσθητα: χρησιμοποιήστε το πρόγραμμα 10 για
το πλύσιμο ρούχων πολύ ευαίσθητων που φέρουν
πρόσθετα όπως στρας ή παγέτες.
Συνιστάται να γυρίζετε από την ανάποδη τα ρούχα πριν
το πλύσιμο και να βάζετε τα μικρά ρούχα στο ειδικό
σακίδιο για το πλύσιμο των ευαίσθητων ρούχων.
Για καλύτερα αποτελέσματα συνιστάται η χρήση υγρού
απορρυπαντικού για ευαίσθητα ρούχα.
Για το πλύσιμο μεταξωτών ρούχων και κουρτινών,
επιλέξτε τον κύκλο 10 και ενεργοποιήστε τη
δυνατότητα ; η μηχανή θα περατώσει τον κύκλο με
την μπουγάδα σε μούλιασμα και το ενδεικτικό φωτάκι
θα αναβοσβήνει. Για το άδειασμα του νερού και για
να μπορείτε να απομακρύνετε την μπουγάδα χρειάζεται
να πατήσετε το κουμπί START/PAUSE ή το κουμπί .
Σύστημα ισοστάθμισης του φορτίου
Πριν από κάθε στύψιμο, για να αποφύγετε δονήσεις
υπερβολικές και για να κατανείμετε ομοιόμορφα το
φορτίο, ο κάδος διενεργεί περιστροφές σε μια ταχύτητα
ελαφρά ανώτερη εκείνης του πλυσίματος. Αν στο τέλος
των διαδοχικών προσπαθειών το φορτίο δεν έχει ακόμη
εξισορροπηθεί σωστά η μηχανή διενεργεί το στύψιμο σε
μια ταχύτητα χαμηλότερη της προβλεπόμενης. Παρουσία
υπερβολικής αστάθειας, το πλυντήριο διενεργεί την
κατανομή αντί του στυψίματος. Για να ευνοηθεί καλύτερη
κατανομή του φορτίου και της σωστής εξισορρόπησης
συνιστάται η ανάμιξη ρούχων μεγάλων και μικρών
διαστάσεων.
1 σεντόνι 400-500 gr.
1 μαξιλαροθήκη 150-200 gr.
1 τραπεζομάντιλο 400-500 gr.
1 μπουρνούζι 900-1.200 gr.
1 πετσέτα 150-250 gr.
20
Page 21

Προφυλάξεις και
20
συμβουλές
! Το πλυντήριο σχεδιάστηκε και κατασκευάστηκε σύμφωνα με
τους διεθνείς κανόνες ασφαλείας. Αυτές οι προειδοποιήσεις
παρέχονται για λόγους ασφαλείας και πρέπει να διαβάζονται
προσεκτικά.
Γενική ασφάλεια
• Η συσκευή δεν πρέπει να χρησιμοποιείται από άτομα
(συμπεριλαμβανομένων των παιδιών) με φυσικές,
αισθητηριακές ή νοητικές ικανότητες και με εμπειρίες και
γνώσεις ανεπαρκείς, εκτός κι αν η χρήση αυτή γίνεται
υπό την επίβλεψη ή τις οδηγίες ενός ατόμου υπεύθυνου
για την ασφάλειά τους.Τα παιδιά πρέπει να επιτηρούνται
για να εξασφαλιστεί ότι δεν θα παίξουν με τη συσκευή.
• Η συσκευή αυτή σχεδιάστηκε αποκλειστικά για οικιακή
χρήση.
• Μην αγγίζετε το μηχάνημα με γυμνά πόδια ή με τα χέρια
ή τα πόδια βρεγμένα.
• Μην βγάζετε το βύσμα από την ηλεκτρική πρί ζα
τραβώντας το καλώδιο, αλλά να πιάνετε την πρίζα.
• Μην ανοίγετε το συρταράκι απορρυπαντικών ενώ το
μηχάνημα είναι σε λειτουργία.
• Μην αγγίζετε το νερό αδειάσματος, αφού μπορεί να
φτάσει σε υψηλές θερμοκρασίες.
• Μην ζορίζετε σε καμία περίπτωση την πόρτα: θα
μπορούσε να χαλάσει ο μηχανισμός ασφαλείας που
προστατεύει από τυχαία ανοίγματα.
• Σε περίπτωσ η β λάβης , σ ε καμ ία περί πτωση να
μην επεμβαίνετε στους εσωτερικούς μηχανισμούς
προσπαθώντας να την επισκευάσετε.
• Να ελέγχετε πάντα τα παιδιά να μην πλησιάζουν στο
μηχάνημα σε λειτουργία.
• Κατά το πλύσιμο η πόρτα τείνει να θερμαίνεται.
• Αν πρέπει να μετατοπιστεί, συνεργαστείτε δύο ή τρία
άτομα με τη μέγιστη προσοχή. Ποτέ μόνοι σας γιατί το
μηχάνημα είναι πολύ βαρύ.
• Πριν εισάγετε τη μπουγάδα ελέγξτε αν ο κάδος είναι
άδειος.
Οι καταναλωτές θα πρέπει να απευθύνονται στις τοπικές
αρχές ή στα καταστήματα λιανικής για πληροφορίες που
αφορούν τη σωστή διάθεση των παλαιών ηλεκτρικών
συσκευών.
Χειρονακτικό άνοιγμα της πόρτας
Στην περίπτωση αδυναμίας ανοίγματος της πόρτας εξ αιτίας
απουσίας ηλεκτρικής ενέργειας ενώ θέλετε να απλώσετε
την μπουγάδα, προχωρήστε ως ακολούθως:
1. βγάλτε το βύσμα από την
ηλεκτρική πρίζα.
2. βεβαιωθείτε ότι η στάθμη του
νερού στο εσωτερικό της μηχανής
είναι χαμηλότερη σε σχέση με το
άνοιγμα της πόρτας. Σε αντίθετη
περίπτωση αφαιρέστε το σε
περίσσεια νερό μέσω του σωλήνα
αδειάσματος συλλέγοντάς το
σε ένα κουβά όπως φαίνεται
στηνεικόνα.
3. αφαιρέστε το ταμπλό κάλυψης
στο πρόσθιο πλευρό του
πλυντηρίου με τη βοήθεια ενός
κατσαβιδιού (βλέπε εικόνα).
GR
Διάθεση
• Διάθεση του υλικού συσκευασίας: τηρείτε τους τοπικούς
κανονισμούς, ώστε οι συσκευασίες να μπορούν να
επαναχρησιμοποιηθούν.
• Η ευρωπαϊκή οδηγία 2002/96/EK για τα Απόβλητα
Ηλεκτρικού και Ηλεκτρονικού Εξοπλισμού, απαιτεί ότι
οι παλαιές οικιακές ηλεκτρικές συσκευές δεν πρέπει
να αποβάλονται μαζί με τα υπόλοιπα απόβλητα του
δημοτικού δικτύου. Οι παλαιές συσκευές πρέπει να
συλλεχθούν χωριστά προκειμένου να βελτιστοποιηθούν
η αποκατάσταση και η ανακύκλωση των υλικών που
περιέχουν και με σκοπό τη μείωση των βλαβερών
επιπτώσεων στην ανθρώπινη υγεία και το περιβάλλον.
Το σύμβολο με το διεγραμμένο “δοχείο αποβλήτων” στο
προϊόν υπενθυμίζει σε σας την υποχρέωσή σας, πως
όταν επιθυμείτε να πετάξετε τη συσκευή ,πρέπει να
συλλεχθεί χωριστά.
4. χρησιμοποιώντας τη γλωσσίτσα που φαίνεται στην εικόνα
τραβήξτε προς τα έξω μέχρι να ελευθερώσετε το πλαστικό
από το στοπ. Τραβήξτε το ακολούθως προς τα κάτω και
ταυτόχρονα ανοίξτε την πόρτα.
5. ξαναμοντάρετε το πάνελ όντας σίγουροι, πριν το
σπρώξετε προς τη μηχανή, ότι έχετε εισάγει τα γαντζάκια
στις αντίστοιχες εσοχές.
21
Page 22

Συντήρηση και φροντίδα
1
2
A
B
GR
Αποκλεισμός νερού και ηλεκτρικού ρεύματος
• Κλείνετε τον κρουνό του νερού μετά από κάθε
πλύσιμο. Έτσι περιορίζεται η φθορά της υδραυλικής
εγκατάστασης του πλυντηρίου και αποσοβείται ο
κίνδυνος απωλειών.
• Να βγάζετε το βύσμα από το ρεύμα όταν καθαρίζετε το
μηχάνημα και κατά τις εργασίες συντήρησης.
Καθαρισμός του πλυντηρίου
• Το εξωτερικό μέρος και τα λαστιχένια μέρη μπορούν να
καθαρίζονται με ένα πανί βρεγμένο με χλιαρό νερό και
σαπούνι. Μη χρησιμοποιείτε διαλύτες ή αποξυστικά.
• Το πλυντήριο διαθέτει ένα πρόγραμμα “Αυτό-
καθαρισμού” των εσωτερικών μερών που πρέπει να
διενεργείται χωρίς κανένα τύπο φορτίου στον κάδο.
Το απορρυπαντικό (σε ποσότητα ίση με το 10% της
προτεινόμενης για ρούχα λίγο λερωμένα) ή πρόσθετα
ειδικά για τον καθαρισμό του πλυντηρίου, μπορούν να
χρησιμοποιηθούν ως ενισχυτικά στο πρόγραμμα πλύσης.
Συνιστάται να διενεργείτε το πρόγραμμα καθαρισμού
κάθε 40 κύκλους πλυσίματος.
Για την ενεργοποίηση του προγράμματος πατήστε
ταυτόχρονα τα κουμπιά Α και Β για 5 δευτερόλεπτα (βλέπε
Εικόνα).
Το πρόγραμμα θα ξεκινήσει αυτόματα και θα έχει
διάρκεια περίπου 70 λεπτών. Για να σταματήσετε τον
κύκλο πατήστε το κουμπί START/PAUSE.
Φροντίδα της πόρτας και του κάδου
• Να αφήνετε πάντα μισόκλειστη την πόρτα για να μην
παράγονται δυσοσμίες.
Καθαρισμός της αντλίας
Το πλυντήριο διαθέτει μια αντλία αυτοκαθαριζόμενη
που δεν χρειάζεται συντήρηση. Μπορεί, όμως, να τύχει
να πέσουν μικρά αντικείμενα (κέρματα, κουμπιά) στον
προθάλαμο που προστατεύει την αντλία, που βρίσκεται
στο κάτω μέρος αυτής.
! Βεβαιωθείτε ότι ο κύκλος πλυσίματος έχει τελειώσει και
βγάλτε το βύσμα.
Για να έχετε πρόσβαση στον προθάλαμο:
1. αφαιρέστε το ταμπλό
κάλυψης στο πρόσθιο
πλευρό του πλυντηρίου
με τη βοήθεια ενός
κατσαβιδιού
(βλέπε εικόνα).
2. Ξεβιδώστε το
καπάκι στρέφοντάς το
αριστερόστροφα
(βλέπε εικόνα): είναι
φυσικό να βγαίνει λίγο
νερό.
Καθαρισμός του συρταριού
απορρυπαντικών
22
Τραβήξτε το συρτάρι
ανασηκώνοντάς το και
τραβώντας το προς τα έξω
(βλέπε εικόνα).
Πλένετέ το κάτω από
τρεχούμενο νερό. Ο
καθαρισμός αυτός
διενεργείται συχνά.
3. καθαρίστε επιμελώς το εσωτερικό.
4. ξαναβιδώστε το καπάκι.
5. ξαναμοντάρετε το πάνελ όντας σίγουροι, πριν το
σπρώξετε προς τη μηχανή, ότι έχετε εισάγει τα γαντζάκια
στις αντίστοιχες εσοχές.
Έλεγχος του σωλήνα τροφοδοσίας του
νερού
Ελέγχετε το σωλήνα τροφοδοσίας τουλάχιστον μια
φορά ετησίως. Αν παρουσιάζει σκασίματα και σχισμές
αντικαθίσταται: κατά τα πλυσίματα οι ισχυρές πιέσεις θα
μπορούσαν να προκαλέσουν αναπάντεχα σπασίματα.
! Μη χρησιμοποιείτε ποτέ χρησιμοποιημένους σωλήνες.
Page 23

Ανωμαλίες και λύσεις
Μπορεί να συμβεί το πλυντήριο να μη λειτουργεί. Πριν τηλεφωνήσετε στην Υποστήριξη (βλέπε “Υποστήριξη”), ελέγξτε αν
δεν πρόκειται για πρόβλημα που επιλύεται εύκολα με τη βοήθεια του ακόλουθου καταλόγου.
Ανωμαλίες:
Το πλυντήριο δεν ανάβει.
Ο κύκλος πλυσίματος δεν ξεκινάει.
Το πλυντήριο δεν φορτώνει νερό
(αναβοσβήνει γρήγορα το ενδεικτικό
φωτάκι της πρώτης φάσης πλύσης).
Το πλυντήριο φορτώνει και αδειάζει
νερό συνεχώς.
Δυνατά αίτια / Λύση:
• Το βύσμα δεν έχει εισαχθεί στην ηλεκτρική πρίζα ή τουλάχιστον όχι αρκετά για
να κάνει επαφή.
• Στο σπίτι δεν υπάρχει ρεύμα.
• Η πόρτα δεν κλείνει καλά.
• Το κουμπί ON/OFF δεν πατήθηκε.
• Το κουμπί START/PAUSE δεν πατήθηκε.
• Η βρύση του νερού δεν είναι ανοιχτή.
• Τέθηκε μια καθυστέρηση στον χρόνο εκκίνησης (βλέπε «Εξατομικεύσεις»).
• Ο σωλήνας τροφοδοσίας του νερού δεν είναι συνδεδεμένος στον κρουνό.
• Ο σωλήνας είναι διπλωμένος.
• Η βρύση του νερού δεν είναι ανοιχτή.
• Στο σπίτι λείπει το νερό.
• Δεν υπάρχει αρκετή πίεση.
• Το κουμπί START/PAUSE δεν πατήθηκε.
• Ο σωλήνας αδειάσματος δεν έχει εγκατασταθεί μεταξύ 65 και 100 cm από το
έδαφος (βλέπε «Εγκατάσταση»).
• Το άκρο του σωλήνα αδειάσματος είναι βυθισμένο στο νερό (βλέπε
“Εγκατάσταση”).
• Το επιτοίχιο άδειασμα δεν έχει απαέρωση.
Αν μετά από αυτούς τους ελέγχους το πρόβλημα δεν λύνεται, κλείστε τη βρύση
του νερού, σβήστε το πλυντήριο και καλέστε την υποστήριξη. Αν η κατοικία
βρίσκεται στους τελευταίους ορόφους ενός κτιρίου, μπορεί να διαπιστωθούν
φαινόμενα σιφωνισμού, οπότε το πλυντήριο φορτώνει και αδειάζει νερό συνεχώς.
Για την αντιμετώπιση του προβλήματος διατίθενται στο εμπόριο κατάλληλες
βαλβίδες αντι-σιφωνισμού.
GR
Το πλυντήριο δεν φορτώνει ή δεν στύβει.
Το πλυντήριο δονείται πολύ κατά το
στύψιμο.
Το πλυντήριο χάνει νερό.
Το ενδεικτικό φωτάκι START/PAUSE
(πορτοκαλί) και τα ενδεικτικά φωτάκια
αναβοσβήνουν γρήγορα.
Σχηματίζεται πολύς αφρός.
• Το πρόγραμμα δεν προβλέπει το άδειασμα: με ορισμένα προγράμματα πρέπει
να το εκκινήσετε χειρονακτικά.
• Είναι ενεργή η λειτουργία ΕΥΚΟΛΟ ΣΙΔΕΡΩΜΑ: για την ολοκλήρωση του
προγράμματος πιέστε το κουμπί START/PAUSE («Εξατομικεύσεις»).
• Ο σωλήνας αδειάσματος είναι διπλωμένος (βλέπε «Εγκατάσταση»).
• Ο αγωγός εκκένωσης είναι βουλωμένος.
• Ο κάδος, τη στιγμή της εγκατάστασης, δεν ξεμπλόκαρε σωστά (βλέπε
“Εγκατάσταση”).
• Το πλυντήριο δεν είναι οριζοντιωμένο (βλέπε “Εγκατάσταση”).
• Το πλυντήριο είναι πολύ στενά μεταξύ τοίχου και επίπλων (βλέπε
“Εγκατάσταση”).
• Ο σωλήνας τροφοδοσίας του νερού δεν είναι καλά βιδωμένος (βλέπε
“Εγκατάσταση”).
• Η θήκη των απορρυπαντικών είναι βουλωμένη (για να την καθαρίσετε βλέπε
“Συντήρηση και φροντίδα”).
• Ο σωλήνας αδειάσματος δεν έχει στερεωθεί καλά (βλέπε «Εγκατάσταση»).
• Σβήστε τη μηχανή και βγάλτε το βύσμα από την πρίζα, περιμένετε περίπου
1 λεπτό μετά ξανανάψτε τη.
Αν η ανωμαλία επιμένει, καλέστε την Υποστήριξη.
• Το απορρυπαντικό δεν είναι ειδικό για πλυντήριο (πρέπει να υπάρχει η ένδειξη
“για πλυντήριο”, “για πλύσιμο στο χέρι και στο πλυντήριο”, ή παρόμοια).
• Η δοσολογία υπήρξε υπερβολική.
23
Page 24

Υποστήριξη
GR
Πριν επικοινωνήσετε με την Υποστήριξη:
• Ελέγξτε αν η ανωμαλία μπορείτε να την αντιμετωπίσετε μόνοι σας (βλέπε “Ανωμαλίες και λύσεις”);
• Επανεκκινήστε το πρόγραμμα για να ελέγξετε αν το πρόβλημα αντιμετωπίστηκε;
• Σε αρνητική περίπτωση, επικοινωνήστε με την εξουσιοδοτημένη Τεχνική Υποστήριξη στον τηλεφωνικό αριθμό που
υπάρχει στο πιστοποιητικό εγγύησης.
! Μην καταφεύγετε ποτέ σε μη εξουσιοδοτημένους τεχνικούς.
Γνωστοποιήστε:
• το είδος της ανωμαλίας;
• το μοντέλο του μηχανήματος (Mod.);
• τον αριθμό σειράς (S/N).
Οι πληροφορίες αυτές βρίσκονται στην ταμπελίτσα που υπάρχει στο πίσω μέρος του πλυντηρίου και στο πρόσθιο μέρος
ανοίγοντας την πόρτα.
24
Page 25

Инструкции за ползване
ПЕРАЛНА МАШИНА
BG
Български
WML 6081
Съдържание
Монтиране, 26-27
Разопаковане и нивелиране
Хидравлични и електрически връзки
Първо пране
Технически данни
Описание на пералната машина и
пускането на дадена програма, 28-29
Табло за управление
Светлинни индикатори
Включване на програма
Програми, 30
Таблица с програмите
Персонализирания, 31
Задаване на температурата
Задаване на центрофугата
Функции
Перилни препарати и дрехи за пране, 32
Чекмедже за перилните препарати
Подготвяне на прането
Специфично пране
Система за измерване на товара
BG
Мерки за безопасност и препоръки, 33
Общи предохранителни мерки
Рециклиране
Ръчно отваряне на люка
Поддръжка и почистване, 34
Спиране на водата и изключване на
електрозахранването
Почистване на пералната машина
Почистване на чекмеджето за перилни препарати
Поддръжка на люка и на барабана
Почистване на помпата
Проверка на маркуча за студена вода
Проблеми и мерки за отстраняването им,35
Сервизно обслужване, 36
25
Page 26

Монтиране
BG
! Важно е да съхранявате инструкциите, за да можете
да правите допълнителни справки по всяко време. В
случай че пералната машина се продаде, преотстъпи
или премести, трябва да се погрижите инструкциите
винаги да я придружават, за да се предостави
информация на новия собственик за работата и
съответните предупреждения.
! Прочетете внимателно инструкциите: защото
съдържат важна информация за монтажа,
използването и безопасността.
Разопаковане и нивелиране
Разопаковане
1. Разопаковайте пералната машина.
2. Проверете дали пералната машина не е повредена
при транспортирането. Ако е повредена, не я
свързвайте, а се обърнете към продавача.
3. Свалете 4-те винта
за предпазване при
транспорт и гумичката
със съответната втулка,
поставени от задната
страна (виж показаното
на фигурата).
Точното нивелиране позволява машината да бъде
стабилна и да се избягват вибрациите, шумът
и преместването й по време на работа. Когато
настилката е мокет или килим, регулирайте така
крачетата, че под пералната машина да остане
достатъчно място за вентилация.
Хидравлични и електрически връзки
Свързване на маркуча към водопроводната мрежа
1. Свържете захранващия
маркуч, като го завиете
към крана за студената
вода с накрайник с
газова резба 3/4 (вижте
фигурата).
Преди да го свържете,
източете водата, докато
се избистри.
2. Свържете маркуча
за студената вода към
пералната машина,
като го завиете към
специалния щуцер,
разположен от задната
страна, горе вдясно (âèæ
фигурата).
4. Затворете отворите с предоставените пластмасови
капачки.
5. Съхранете всички части: за да се монтират отново
при необходимост пералната машина да бъде
транспортирана.
! Опаковъчният материал не е детска играчка.
Нивелиране
1. Монтирайте пералната машина на равен и твърд
под, без да я опирате в стени, мебели и др.
2. Ако подът не е
идеално хоризонтален,
компенсирайте
неравностите, като
отвиете или завиете
предните крачета (âèæ
фигурата); ъгълът на
наклона, измерен върху
работната повърхност, не
трябва да надвишава 2°.
3. Внимавайте маркуча да не се прегъва и притиска.
! Налягането по водопроводната мрежа трябва да
бъде в границите, указани в таблицата „Технически
данни” (вж. следващата страница).
! Ако дължината на захранващия маркуч не е
достатъчна, се обърнете към специализиран магазин
или към оторизиран техник.
! Никога не използвайте вече употребяван маркуч.
! Използвайте тези, което са доставени с пералната
машина.
26
Page 27

Свързване на маркуча за мръсната вода
65 - 100 cm
максимално налягане 1 МРа (10 bar)
минимално налягане 0,05 МРа (0,5 bar)
Свържете маркуча за
мръсната вода, без
да го прегъвате, към
канализационната тръба
или към тръбата за
отвеждане в стената,
разположени на височина
между 65 и 100 см от
пода, или го подпрете
на ръба на мивката или
ваната,
свързвайки доставения
водач към крана (âæ.
фигурата). Свободният
край на маркуча за
мръсната вода не трябва
да бъде потопен във
водата.
! Не използвайте удължители или разклонители.
! Кабелът не трябва да бъде огънат или сплескан.
! Захранващият кабел трябва да се подменя само от
оторизирани техници.
Внимание! Фирмата отхвърля всякаква отговорност в
случаите, в които тези норми не се спазват.
Първо пране
След инсталиране и преди употреба включете един
цикъл на изпиране с перилен препарат, но без дрехи,
задавайки програма 2.
BG
! Не се препоръчва използването на удължителни
маркучи. Ако е необходимо, удължителят трябва
да има същия диаметър като оригиналния и да не
надвишава 150 см.
Свързване към електрическата мрежа
Преди да свържете щепсела в контакта, проверете
дали:
• контактът е заземен съгласно действащите
стандарти;
• контактът може да поеме максималната мощност
на натоварване на машината, указана в таблицата
с техническите данни (виж следващата страница);
• захранващото напрежение е в границите на
указаното в таблицата с техническите данни (âèæ
следващата страница);
• контактът отговаря на щепсела на пералната
машина. В противен случай заменете щепсела или
контакта.
! Пералната машина не се монтира на открито, дори
под навес, защото е много опасно да се остави на
влиянието на атмосферните условия.
! За монтираната перална машина електрическият
контакт трябва да бъде лесно достъпен.
Технически данни
Модел WML 6081
Размери
Вместимост îò 1 äî 6 êã.
Електрическо
захранване
Захранване с
вода
Скорост на
центрофугата
Изпитвателни
програми
съгласно
Директива
2010/1061
ширина 59,5 см
височина 85 см
дълбочина 54 см
Виж табелката с характеристиките,
поставена на машината
обем на казана 52 литра
до 800 оборота/минута
програма 4; температура 60°;
програма 5; температура 40°.
Пералната машина съответства на
следните Европейски директиви:
- 2004/108/СЕ (за електромагнитна
съвместимост)
- 2002/96/CE
- 2006/95/CE (за ниско напрежение)
27
Page 28

Описание на пералната машина и
пускането на дадена програма
BG
Табло за управление
Бутон ON/OFF
Чекмедже за перилните
препарати
Чекмедже за перилните препарати: за дозиране
на перилните препарати и добавките (âæ. “Перилни
препарати и дрехи за пране”).
Програматор
ПРОГРАМИ
Светлинни ИНДИКАТОРИ ЗА ХОД НА
ЦИКЪЛ/ЗАБАВЕНО ВКЛЮЧВАНЕ
Програматор
ЦЕНТРОФУГА
Програматор
ТЕМПЕРАТУРА
Бутони със светлинни
индикатори ФУНКЦИЯ
Светлинен индикатор БЛОКИРАН ЛЮК: за да
се разбере дали люкът може да се отвори (âæ.
съседната страница).
Светлинен
индикатор
БЛОКИРАН
ЛЮК
Бутон със светлинен
индикатор
START/PAUSE
Бутон ON/OFF: за включване и изключване на
пералнята.
Програматор ПРОГРАМИ: за задаване на
програмите. По време на изпълнение на програмата
ключът остава неподвижен.
Бутони със светлинни индикатори ФУНКЦИЯ: за
селектиране на възможните функции. Светлинният
индикатор за избраната функция ще продължи да
свети.
Програматор ЦЕНТРОФУГА: за задаване
на центрофуга или за изключването й (âæ.
“Персонализирания”).
Програматор ТЕМПЕРАТУРА: за задаване на
температура или пране със студена вода (âæ.
“Персонализирания”).
Светлинни ИНДИКАТОРИ ЗА ХОД НА ЦИКЪЛ/
ЗАБАВЕНО ВКЛЮЧВАНЕ: за да следвате хода на
изпълнение на програмата за пране.
Включеният светлинен индикатор показва, че се
извършва определена фаза от цикъла.
Ако е зададена функцията “Забавено включване”, ще
се посочва времето, оставащо до стартирането на
програмата (вж. съседната страница).
Бутон със светлинен индикатор START/PAUSE:
за стартиране на програмите или временното им
прекъсване.
Забележка: за задаване на пауза в прането
натиснете отново бутона - индикаторът ще
мига с оранжева светлина, докато светлинният
индикатор, указващ изпълнение на фаза, ще
свети непрекъснато. Ако светлинният индикатор
БЛОКИРАН ЛЮК е угаснал, ще може да се отвори
вратата на люка.
За продължаване на цикъла пране от мястото, в
което е бил прекъснат, натиснете отново този бутон.
Режим на stand by
В съответствие с новите нормативи за пестене
на енергия тази перална машина е снабдена със
система за автоматично изключване (stand by), която
се задейства след 30 минути в случай, че машината
не се използва. Натиснете за кратко бутон
изчакайте машината да се задейства отново.
ON/OFF
и
28
Page 29

Светлинни индикатори
END
Следящите светлинни индикатори дават важна
информация.
Ето какво казват:
Светлинни индикатори за текущите фази
След като е избран и стартиран желаният цикъл на
пране, светлинните индикатори ще светват един след
друг, за да указват хода на цикъла:
Пране
BG
Отложен старт
Ако е активирана функцията “Забавено включване” (âæ.
“Персонализирания”), след пускане на програмата ще
светне индикаторът за избраното забавяне:
В течение на времето ще се визуализира оставащото
забавяне чрез мигане на съответния светлинен
индикатор:
След като изтече времето за отлагане на
изпълнението, примигващият светлинен индикатор
ще угасне и избраната програма ще се стартира.
Изплакване
Центрофуга
Източване на водата
Край на прането
Бутони за функция и съответни светлинни
индикатори
При избор на функция съответният светлинен
индикатор ще светне.
Ако избраната опция не е съвместима със
зададената програма, тази несъвместимост ще се
сигнализира от звуков сигнал (трикратно) и опцията
няма да се активира.
В случай на задаване на функция, несъвместима с
друга, зададена преди нея функция, остава активен
само последният избор.
Светлинен индикатор блокиран люк
Светещият индикатор показва, че люкът е блокиран,
за да се предотвратят случайни отваряния; за
избягване на щети е необходимо да се изчака
изгасването на светлинния индикатор, преди да се
отвори люкът.
! Бързото мигане на светлинния индикатор START/
PAUSE (оранжев) заедно с индикатора за функциите
е сигнал за неизправност (âæ. “Неизправности и
отстраняването им”).
Включване на програма
1. Включете пералната машина, като натиснете бутона
светят в продължение на няколко секунди, след което ще продължат да светят тези на зададената програма, а
индикаторът за START/PAUSE ще свети с пулсираща светлина.
2. Заредете дрехите за пране и затворете люка.
3. Задайте желаната програма с ключа ПРОГРАМИ.
4. Задайте температурата на пране (âæ. “Персонализирания”).
5. Задайте скоростта на центрофугиране (âæ. “Персонализирания”).
6. Поставете перилен препарат и добавки âæ. “Перилни препарати и дрехи за пране”.
7. Избиране на желаните функции.
8. Включете програмата, като натиснете бутона START/PAUSE, съответният светлинен индикатор ще свети
постоянно в зелен цвят.
За да отмените зададения цикъл, поставете машината в пауза, като натиснете бутона START/PAUSE, и изберете
новия цикъл.
9. Когато програмата свърши, ще светне индикаторът . Светлинният индикатор за БЛОКИРАН ЛЮК ще
угасне, указвайки, че люкът може да бъде отварян. Извадете прането и оставете люка притворен, за да изсъхне
барабанът. Изключете пералнята, като натиснете бутона ON/OFF.
ON/OFF
. Всички индикатори ще се включат и ще
29
Page 30

Програми
BG
Таблица с програмите
Описание на програмата
Програми
БЕЗ ПЕТНА
1
БЕЛИ
2
ПАМУК ПРЕДПРАНЕ: Бели изключително
3
замърсени (чаршафи, покривки и др.).
ПАМУК (1): Бели и цветни, устойчиви, силно
4
замърсени.
ПАМУК (2-3): Цветни, устойчиви, много замърсени.
5
СИНТЕТИЧНИ: Цветни, устойчиви, силно
6
замърсени.
СИНТЕТИЧНИ (4): Цветни, устойчиви, силно
6
замърсени.
Противоалергично действие
7
8
Áåáå
Вълнени тъкани: за вълна, кашмир и т.н.
9
Фини тъкани
10
БЪРЗО ПРАНЕ 60: За бързо освежаване на не
много замърсени дрехи (не се препоръчва за вълна,
11
коприна и дрехи, които трябва да се перат на ръка).
Памук
12
Синтетика
13
Бърза 30’
14
Изплакване - 800 - -
Центрофуга и Източване на водата
Продължителността на цикъла, показана на дисплея или посочена в ръководството, е приблизително изчислена въз основа на стандартните условия. Реалното времетраене
може да варира в зависимост от множество фактори като температура и налягане на водата при пълнене, температура на въздуха в помещението, количество перилен препарат,
количество, вид и тегло на прането, допълнително избрани опции.
За всички Test Institutes:
1) Програма за проверка съгласно стандарт 2010/1061: задайте програма 4 с температура 60 °C.
2) Програма за проверка съгласно стандарт 2010/1061: задайте програма 5 с температура 40 °C.
3) Дълга програма за памук; задайте програма 5 с температура 40 °C.
4) Дълга програма за синтетични; задайте програма 6 с температура 40 °C.
Макс.
температура (°C)
40° 800 -
60° 800 -
90° 800
60° 800 -
40° 800 -
60° 800 -
40° 800 -
60° 800 -
40° 800 -
40° 800 -
30° 0 -
60° 800 -
студена
вода
студена
вода
студена
вода
- 800 - - - - 6
Ìàêñ.
скорост
(обороти
â
минута)
800 -
800 -
800 -
Перилни препарати
Ïредп-
Основно
ране
пране
Белина
-
-
-
-
-
-
-
-
-
Омеко-
тител
Зареждане
ìêñ (êã)
4
4
6
6
6
2,5
2,5
4
4
1,5
1
3,5
6
3
3
6
Продълж-
ителност
íà
цикъла
180’
180’
175’
190’
185’
110’
95’
195’
150’
75’
80’
60’
85’
60’
30’
40’
20’
Специални програми
БЕЗ ПЕТНА: програмата 1 е подходяща за изпирането на силно замърсено пране с устойчиви цветове.
Програмата осигурява по-висок клас изпиране от стандартния (клас A). Не активирайте програмата при
разноцветно пране. Препоръчва се използването на прахообразен перилен препарат. Срещу упорити петна се
препоръчва предварителна обработка със специални допълнителни препарати.
Бели: Използвайте този цикъл за 2 изпиране на бели тъкани. Програмата е разработена с цел продължителното
запазване на искрящия бал цвят на тъканите. За по-добри резултати се препоръчва използването на прах за
пране. използвайте цикъла за прането в светли цветове. Програмата е разработена с цел продължителното
запазване на тъмните цветове на тъканите.
Противоалергично действие: използвайте програмата 7 за отстраняване на основните алергени като полени,
акари, кучешки и котешки косми.
Бебе: използвайте специалната програма 8, за да отстраните типичното замърсяване на детските дрехи и
премахнете перилния препарат, за да се избегнат алергични реакции на деликатната детска кожа. Цикълът е
създаден за елиминиране на бактериите чрез използване на по-голямо количество вода и оптимизиране на
ефекта от специфичните хигиенизиращи добавки към перилния препарат.
Програми „Еко“
Програмите „Еко“ предлагат добър резултат от изпирането при ниска температура, позволявайки по-ниско
потребление на електроенергия, като с това допринасят за опазването на околната среда и икономическата
ефективност. Програмите „Еко“ (12 Памук, 13 Синтетика и 14 Бърза 30’) са създадени за различни видове тъкани
и слабо замърсени дрехи. За да бъдат гарантирани оптимални резултати, препоръчваме да използвате течен
перилен препарат; добре е да обработите предварително маншетите, яките и петната.
30
Page 31

Персонализирания
Задаване на температурата
Завъртайки ключа ТЕМПЕРАТУРА, се задава температурата на пране (вж. Таблица на програмите).
Температурата може да се понижи до пране със студена вода ( ).
Пералнята автоматично ще попречи да се зададе температура, която е по-висока от максималната температура,
предвидена за всяка програма.
Задаване на центрофугата
Завъртайки ключа ЦЕНТРОФУГА, се задава скоростта на центрофугиране за избраната програма.
Максималните предвидени скорости за програмите са:
Програми Максимална скорост
Памучни 800 оборота в минута
Синтетични тъкани 800 оборота в минута
Вълна 800 оборота в минута
Коприна, само източване
Скоростта на центрофугиране може да се намали или да се изключи, като се избере символът .
Пералнята автоматично ще попречи да се центрофугира със скорост, по-висока от максимално предвидената за
всяка програма.
Функции
Допълните функции за пране, предвидени в пералната машина, дават възможност за постигане на желаното бяло
и чисто пране:
За активиране на възможните функции;
1. натиснете бутона, съответстващ на желаната функция;
2. светването на съответния индикатор показва, че функцията е избрана.
Бележка: Бързото мигане на индикатора показва, че съответната функцията не може да бъде избрана за
зададената програма.
BG
Супер изпиране
Благодарение на използването на по-голямо количество вода в началната фаза на цикъла и на по-дългото време
на пране, тази опция гарантира висококачествено изпиране.
Може да се използва с или без белина. Ако желаете избелване, поставете допълнителната ваничка 4, комплект
с доставката във ваничка 1. При дозиране на белина не надвишавайте максималното ниво „max“, указано на
централната ос (вижте фигурата на стр. 32).
! Не може да се активира с програмите 2, 3, 7, 9, 10, 11, 12, 13, 14, .
Лесно гладене
При избор на тази функция прането и центрофугирането ще се изменят целесъобразно, така че да се намали
образуването на гънки. При завършване на цикъла пералнята прави бавни завъртания на барабана, следящият
светлинен индикатор на функцията ЛЕСНО ГЛАДЕНЕ и на START/PAUSE ще светят с мигаща светлина (в
оранжев цвят) и следящият индикатор ще светне. За завършване на цикъла трябва да се натисне бутон
START/PAUSE или бутон ЛЕСНО ГЛАДЕНЕ.
! Не може да се активира с програмите 1, 2, 7, 9, 12, 13, 14, .
Бързо пране
При избор на тази опция времетраенето на програмата намалява с до 50% в зависимост от избрания цикъл, като
същевременно се гарантира пестене на вода и енергия. Използвайте тази опция за не много замърсени дрехи.
! Не може да се активира с програмите 1, 2, 7, 8, 9, 10, 11, 12, 13, 14, , .
Отложен Старт
Забавя пускането на машината до 12 часа.
Натиснете многократно бутона, докато светне индикаторът, съответстващ на желаната стойност за време на
забавяне. При петото натискане на бутона функцията няма да е активна.
Забележка: След натискане на бутона START/PAUSE стойността на забавянето може да се променя само като се
намалява.
! Валидна с всички програми.
31
Page 32

Перилни препарати и
M
AX
1
2
4
3
A
B
дрехи за пране
BG
Чекмедже за перилните препарати
Добрият резултат от прането зависи и от правилното
дозиране на перилните препарати. с предозиране
не се пере по-ефикасно, а това води до отлагане на
налепи по вътрешната страна на пералната машина
и до замърсяване на околната среда.
! Не използвайте препарати за ръчно пране, защото
образуват много пяна.
Изтеглете чекмеджето за
перилните препарати и
изсипете праха за пране
и допълните препарати
по следния начин.
Отделение 1: Препарат за предпране (на прах)
Преди да изсипете препарата, проверете дали не е
поставена допълнителната ваничка 4.
Отделение 2: Препарат за пране (на прах или
течен)
При употребата на течен препарат за пране се
препоръчва да се използва разделителят от
комплекта A с цел правилно дозиране. В случай на
употреба на прах за пране върнете разделителя в
отделение B.
Отделение 3: Допълнителни препарати (омекотител и
др.)
Омекотителят не трябва да изтича извън решетката.
допълнителна ваничка 4: Белина
Подготвяне на прането
• Разпределете прането съобразно:
- типа на тъканите/символа върху етикета.
- цветовете: отделете цветните от белите дрехи.
• Изпразнете джобовете и проверете копчетата.
• Не надвишавайте указните стойности за теглото на
сухото пране:
Устойчиви тъкани: максимално 6 кг
Синтетични тъкани: максимално 2,5 кг
Фини тъкани: максимално 2 кг
Вълнени тъкани: максимално 1,5 кг
Коприна: максимално 1 кг
Колко тежат дрехите за пране?
Специфично пране
Âúëí: е единствената пералня, получила
престижното признание P
(.0508) от компанията , която дава
сертификат за пране на всички вълнени дрехи, дори
носещите етикет само ръчно пране . Така че с
програмата 9 може абсолютно спокойно да се перат в
пералня всички вълнени дрехи (1,5 кг) с гаранция за
най-добро изпълнение.
Фини тъкани: използвайте програмата 10 за
изпиране на много фини тъкани с апликации от рода
на страс или пайети.
Препоръчва се обръщането на дрехите наопаки
преди прането и слагането на малките дрехи в
торбичката за фино пране. За по-добри резултати се
препоръчва използването на течен препарат за пране
за фини тъкани.
За изпиране на копринени тъкани и пердета
изберете цикъл 10 и включете опция ; пералнята
ще завърши цикъла с накиснатото пране и ще
започне да мига светлинният индикатор . За да
се източи водата и да може да се извади прането, е
необходимо да се натисне бутон START/PAUSE или
бутон .
Система за измерване на товара
Преди всяко центрофугиране, с цел избягване
на прекалени вибрации и за равномерно
разпределяне на товара, барабанът се завърта
с малко по-висока от тази при прането скорост.
Ако след направените последователни опити
товарът все още не е перфектно разпределен,
машината извършва центрофугиране при скорост,
по-ниска от предвидената. При наличие на
прекален дебалансиране пералнята извършва
разпределението вместо центрофугата. За
улесняване на по-доброто разпределение на товара
и правилното му балансиране се препоръчва да се
смесват дрехи за пране с големи и малки размери.
1 чаршаф 400-500 г
1 калъфка 150-200 г
1 покривка 400-500 г
1 хавлия 900-1200 г
1 кърпа 150-250 г
32
Page 33

Мерки за безопасност и
20
препоръки
! Пералната машина е проектирана и произведена
в съответствие с международните норми за
безопасност. Предупрежденията тук са продиктувани
по причини за безопасност и трябва да се четат
внимателно.
Общи предохранителни мерки
• Този уред е предназначен изключително за
домашна употреба.
• Уредът не трябва да се използва от лица (включително
деца) с ограничени физически, сетивни или умствени
способности и недостатъчен опит, освен ако това не
става под наблюдението или по указанията на лице,
отговарящо за тяхната безопасност. Наблюдавайте
децата, за да се уверите, че не си играят с уреда.
• Не докосвайте машината, когато сте боси или с
мокри или влажни ръце или крака.
• Изключвайте от контакта, като хващате за щепсела,
а не като дърпате кабела.
• Не отваряйте чекмеджето с перилните препарати,
докато пералната машина работи.
• Не докосвайте маркуча за мръсната вода, защото
може да достигне високи температури.
• Никога не отваряйте люка със сила, защото може
да се повреди механизма за безопасност, който
предпазва от случайно отваряне.
• В случай на повреда по никакъв повод не
достигайте до вътрешните механизми в опити за
ремонт.
• Винаги контролирайте децата да не се доближават
до работещата машина.
• По време на изпирането люкът се нагрява.
• Преместването да се извършва внимателно от
двама или трима души. Никога от сам човек,
защото пералната машина тежи много.
• Преди да заредите машината, проверете дали
барабанът е празен.
За допълнителна информация относно правилното
изваждане от употреба на домакинските
електроуреди, интересуващите се могат да се
обърнат към службата за събиране на отпадъци
или към дистрибуторите.
Ръчно отваряне на люка
В случай че е невъзможно да се отвори вратата на
люка поради прекъсване на електрическата енергия
и искате да прострете прането, процедирайте по
следния начин:
1. извадете щепсела от
контакта за електрически
ток.
2. уверете се, че нивото
на водата в пералнята
е по-ниско от отвора на
люка; в противен случай
отстранете излишната
вода чрез маркуча за
мръсна вода, като я
съберете в кофа, както е
посочено нафигура.
3. свалете долния панел
в предната част на
пералната машина с
помощта на отвертка (âæ.
фигура).
BG
Рециклиране
• Унищожаване на опаковъчния материал: спазвайте
местните норми – по този начин опаковъчният
материал може да се рециклира.
• Европеиската директива 2002/96/CE за отпадъците
от електрическо и електронно оборудване предвижда
домакинските електроуреди да не се изхвърлят заедно
с обичайните твърди градски отпадъци. Извадените
от употреба уреди трябва да бъдат събирани отделно
с цел да бъде увеличен делът на подлежащите на
повторна употреба и рециклиране материали, от които
са направени, както и да бъдат избегнати евентуални
вреди за здравето и околната среда. Символът
“зачеркнато кошче” е поставен върху всички продукти,
за да напомня за задължителното разделно събиране.
4. като използвате езичето, посочено на фигурата,
дръпнете навън до освобождаване на пластмасовия
изтегляч от неподвижно положение; след това го
издърпайте надолу и едновременно с това отворете
вратата.
5. затворете отново панела, като, преди да го
избутате към пералнята, се уверите, че сте поставили
правилно закрепващите куки в специалните водачи.
33
Page 34

Поддръжка и почистване
1
2
A
B
BG
Спиране на водата и изключване на
електрозахранването
Затваряйте крана за вода след всяко изпиране.
По този начин се ограничава износването на
хидравличната инсталация на пералната машина и
се ограничава опасността от течове.
Изключвайте щепсела от електрическото
захранване, когато почиствате пералната машина и
по време на работи по поддръжката.
Почистване на пералната машина
• Външната част и гумените части могат да се
почистват с кърпа с хладка вода и сапун. Не
използвайте разтворители или абразивни препарати.
• Пералнята разполага с програма за „Автоматично
почистване“ на вътрешните части, което трябва да се
извършва при абсолютно празен барабан.
Прахът за пране (10% от препоръчваното количество
за слабо замърсено пране) или специални
допълнителни препарати за почистване на пералнята
може да се ползват в добавка към програмата за
изпиране. Препоръчва се пускането на програмата за
почистване на всеки 40 изпирания.
За да задействате програмата, натиснете едновременно
бутони A и B за 5 сек (вижте фигурата).
Програмата ще се активира автоматично и ще
продължи около 70 минути. За да спрете цикъла,
натиснете бутона START/PAUSE.
Поддръжка на люка и на барабана
Оставяйте люка винаги открехнат за избягване
образуването на неприятни миризми.
Почистване на помпата
Пералната машина е окомплектована със
самопочистваща се помпа, която няма нужда от
поддръжка. Възможно е обаче малки предмети
(монети, копчета) да попаднат във филтъра, който
предпазва помпата и се намира в долната й част.
! Уверете се, че цикълът на пране е завършил, и
изключете щепсела от контакта.
За достъп до филтъра:
1. свалете панела
в предната част на
пералната машина с
помощта на отвертка
(вж. фигура);
2. отвийте капачката,
като я завъртите в
посока, обратна на
часовниковата стрелка
(виж фигура) нормално
е да изтече малко вода;
Почистване на чекмеджето за
перилните препарати
34
Извадете чекмеджето с
повдигане и изтегляне
навън (виж фигурата).
Измийте го под течаща
вода. Това почистване
трябва да се извършва
често.
3. почистете внимателно отвътре;
4. завийте отново капачката;
5. затворете отново панела, като, преди да го
избутате към пералнята, се уверите, че сте поставили
правилно закрепващите куки в специалните водачи.
Проверка на маркуча за студената вода
Проверявайте маркуча за студената вода поне
веднъж годишно. Да се замени, ако е напукан и
нацепен, защото по време на изпиране голямото
налягане може да предизвика внезапно спукване.
! Никога не използвайте вече употребяван маркуч.
Page 35

Проблеми и мерки за
отстраняването им
Възможно е пералната машина да откаже да работи. Преди да се обадите в сервиза за техническа поддръжка и
ремонт (âæ. “Сервизно обслужване”), проверете дали не става въпрос за лесно решим проблем, като си помогнете
със следващия списък.
Проблеми:
Пералната машина не се включва.
Цикълът на изпиране не започва.
Пералната машина не се пълни
с вода (бързо мига светлинният
индикатор за първата фаза на
пране).
Пералнята непрекъснато се пълни
и източва.
Възможни причини / Мерки за отстраняването им:
• Щепселът не е включен към електрически контакт или не е добре
включен, за да прави контакт.
• Нямате ток вкъщи.
• Люкът не е затворен добре.
• Бутонът ON/OFF не е бил натиснат.
• Бутонът START/PAUSE не е бил натиснат.
• Кранът за вода не е отворен.
• Зададено е забавяне, което се е насложило върху времето за пускане
(âæ. “Персонализирания”).
• Маркучът за студената вода не е свързан към крана.
• Маркучът е прегънат.
• Кранът за вода не е отворен.
• Няма вода по водопроводната мрежа.
• Налягането е недостатъчно.
• Бутонът START/PAUSE не е бил натиснат.
• Маркучът за мръсната вода не е монтиран между 65 и 100 см от земята (âæ.
“Монтиране”).
• Краят на маркуча за мръсната вода е потопен във вода (âæ. “Монтиране”).
• Канализационната тръба в стената няма отдушник.
Ако след тези проверки проблемът не се реши, затворете крана за
водата, изключете пералната машина и позвънете в сервиза. Ако
жилището ви се намира на последните етажи на сградата, налягането
на студената вода може да е ниско, поради което пералната машина
непрекъснато се пълни и източва. За избягване на това неудобство в
търговската мрежа се предлагат подходящи възвратни клапани.
BG
Пералната не се източва или не
центрофугира.
Пералната вибрира много по време
на центрофугиране.
Пералната има теч.
Светлинният индикатор START/
PAUSE (оранжев) и светлинните
индикатори за функции мигат бързо.
Образува се твърде много пяна.
• Програмата не предвижда източване: с някои програми трябва да се
извършва ръчно.
• Включена е функцията ЛЕСНО ГЛАДЕНЕ: за завършване на програмата се
натиска бутон START/PAUSE (âæ. “Персонализирания”).
• Маркучът за мръсната вода е притиснат (âæ. “Монтиране”).
• Канализационната тръба е запушена.
• При монтажа барабанът не е бил отблокиран правилно (âæ. “Монтиране”).
• Пералната машина не е нивелирана (âæ. “Монтиране”).
• Пералната машина е притисната между мебели и стена (âæ.
“Монтиране”).
• Маркучът за студената вода не е добре свързан (âæ. “Монтиране”).
• Чекмеджето за перилните препарати е запушено (за почистването му
âæ. “Поддръжка и почистване”).
• Маркучът за мръсната вода не е фиксиран добре (âæ. “Монтиране”).
• Изключете машината и извадете щепсела от контакта, изчакайте около
1 минута и я включете отново.
Ако неизправността не може да се отстрани, потърсете услугите на
Сервиза.
• Перилният препарат не е за автоматична перална (трябва да има
надпис “за автоматична перална”, “за пране на ръка и за автоматична
перална” или подобен надпис).
• Дозирането е било твърде голямо.
35
Page 36

Сервизно обслужване
BG
Преди да се свържете с техническия сервиз:
• Проверете дали можете да решите сами проблема (âæ. “Проблеми и мерки за отстраняването им”);
• Включете отново програмата, за да проверите дали неизправността е отстранена;
• В противен случай се обърнете към оторизирания технически сервиз на телефонния номер, указан на
гаранционната карта.
! Никога не ползвайте услугите на неоторизирани техници.
Съобщете:
• типа на проблема;
• модела на машината (d.);
• серийния номер (S/N).
Тази информация се намира на фабричната табелка, разположена на задната страна на пералната машина и в
предната част, след като се отвори люкът.
36
Page 37

Iнструкцiї з експлуатацiї
Зміст
Встановлення, 38-39
UK
Українська
WML 6081
Розпакування і вирівнювання
Підключення води та електроенергії
Перший цикл прання
Технiчнi данi
Опис пральної машини та запуску програм, 40-41
Панель керування
Iндикаторнi лампи
Як запустити програму
Програми, 42
Таблиця програм
Налаштування пiд власнi потреби, 43
Встановлення темепратури
Встановлення вiджиму
Функцiї
ПРАЛЬНА МАШИНА
UK
Миючі засоби і білизна, 44
Касета з миючим засобом
Підготовка білизни
Особливi речi
Система балансування завантаження
Запобіжні заходи та поради, 45
Загальна безпека
Утилізація
Ручне відкривання дверцят люку
Технічне обслуговування та догляд, 46
Відключення води й електричного живлення
Очищення пральної машини
Чистка касети для миючих засобів
Догляд за люком та барабаном
Миття насосу
Контроль шланга для подачі води
Несправності та засоби їх усунення, 47
Допомога, 48
37
Page 38

Встановлення
UK
! Необхідно зберігати дану брошуру, щоб мати
мати нагоду звернутися до неї у будь-який момент.
У раз продажу, передачі іншій особі або переїзду
переконайтеся, що інструкція перебуває разом
із пральною машиною й новий власник може
ознайомитися з її принципами роботи й відповідними
запобіжний заходами.
! Уважно вивчіть інструкцію: в ній міститься важлива
інформація про встановлення, використання та
безпеку.
Розпакування і вирівнювання
Розпакування
1. Розпакування пральної машини.
2. Вдоскональтеся, що машина не зазнала ушкоджень
пiд час транспортування. Якщо такі є, не виконуйте
нiяких пiдключень та негайно зверніться до
постачальника.
3. Видаліть 4
запобіжнi гвинти для
транспортування та
прокладку з відповідною
розпірною деталлю, якi
знаходяться позаду (див.
малюнок).
Належне вирiвнювання забезпечить стабiльнiсть
машинi та запобiжить вiбрацiям, шуму та
пересуванням пiд час роботи. У випадку
встановлення машини на килимовому покритті або
килимах, ніжки необхідно відрегулювати таким чином,
щоб гарантувати під пральною машиною необхідний
простір для вентиляції.
Підключення води й електроенергії
Пiд’єднання шланга для подачі води
1. Підключити трубу
подачi, прикрутивши її
до крану холодної води
за допомогою штуцеру з
газовою різьбою 3/4(див.
малюнок).
Перед пiдключенням
спустiть воду, доки вона
не стане прозорою.
2. Підключіть шланг
подачі води до пральної
машини, під’єднавши
його до водорозбiрного
крану, який знаходиться
угорі праворуч на
задньому боцi машини
(див. малюнок).
4. Закрийте отвори пластмасовими пробками з
комплекту постачання.
5. Зберiгайте всi компоненти: у разi транспортування
пральної машини їх потрiбно повернути на мiсце.
! Забороняйте дiтям гратися з упаковками.
Вирівнювання
1. Встановіть пральну машину на плоскій та твердій
підлозі, не притуляючи її до стін, меблів, тощо.
2. Якщо пiдлога не
iдеально горизонтальна,
компенсуйте нерiвностi
за допомогою переднiх
нiжок (див. малюнок)
– розкручуючи чи
закручуючи їх; кут
нахилу вiдносно робочої
поверхнi не повинен
перевищувати 2°.
3. Зверніть увагу, щоб шланг не мав згинів та утисків.
! Тиск води в крані має відповідати значенням у
таблиці Технічних даних (див. сторінку поруч).
! Якщо довжини шланга для води не вистачає,
зверніться у спеціалізовану крамницю або до
уповноваженого фахівця.
! Не користуйтеся шлангами, якi були вже у вживаннi.
! Використовуйте шланги з комплекту постачання.
38
Page 39

65 - 100 cm
Підключення шланга для зливу води
Пiдключiть шланг для
зливу води, не згинаючи
його, до вiдводячого
трубопроводу або до
стiнного зливу, якi мають
знаходитись на вiдстанi
65 -100 см вiд пiдлоги;
! Не використовуйте подовжувачі й трійники.
UK
! Кабель не повинен мати згинів або утисків.
! Проводити замiну кабелю живлення можуть тiльки
вповноваженi фахiвцi.
Увага! Підприємство знімає з себе відповідальність за
умови недотримання вказаних норм.
Перший цикл прання
або розташуйте його
на краю вмивальника
чи ванної, приєднавши
направляючу з
комплекту до крану (див.
малюнок). Не залишайте
вільний кінець зливного
шланга зануреним у
воду.
! Використання подовжувача шланга не
рекомендоване. В разi необхiдностi використання
подовжувача шланга, переконайтеся у тому, що він
має той самий діаметр та його довжина не перевищує
150 см.
Електричні підключення
Перш нiж увiмкнути вилку в електричну розетку,
переконайтеся, що:
• розетка має заземлення у відповідності до
встановлених норм;
• розетка розрахована на максимальне навантаження
у межах потужності машини, зазначене у таблиці
Технічних даних (див. малюнок поруч);
• напруга живлення перебуває у межах, зазначених у
таблиці Технічних даних (див. малюнок поруч);
• розетка підходить до вилки пральної машини. В
іншому випадку замініть розетку або вилку.
Пiсля встановлення та перш нiж розпочати
використання м ашини, виконайте цикл прання з
миючим засобом але не завантажуючи бiлизну,
встановивши програму 2.
Технiчнi данi
Модель WML 6081
ширина 59,5 см
Розмiри
Кiлькiсть бiлизни вiд 1 до 6 кг
Електричні
підключення
Водопровднi
пiдключення
Швидкiсть
центрифуги
Програма
випробувань
відповідно до
Директиви
EN 60456
висота 85 см
глибина 54 см
див. шильдік з технiчними даними на
машинi
максимальний тиск 1 мПа (10 бар)
мiнiмальний тиск 0,05 мПа (0,5 бар)
об’єм баку – 52 лiтри
до 800 обертiв на хвилину
програма 4; температура 60°C;
виконується з завантаженням 6 кг.
! Машину не можна встановлювати поза
приміщенням, навіть в захищених мiсцях, тому що
дуже небезпечно піддавати її впливу дощу і грози.
! Коли машину вже встановлено, забезпечте вільний
доступ до електричної розетки.
Цей прилад вiдповiдає таким
європейським директивам:
- 2004/108/CE (Електромагнітна
сумiснiсть)
- 2002/96/CE
- 2006/95/CE (Низька напруга)
39
Page 40

Опис пральної машини та
процедури iз запуску програм
UK
Панель керування
Кнопка ON/OFF
Касета з миючим засобом
Касета з миючим засобом: для завантаження
миючих засобiв та присадок
(див. “Миючi засоби та бiлизна”).
Кнопка ON/OFF: для увiмкнення й вимкнення
пральної машини
Ручка ПРОГРАМИ: для задання бажаних програм. Під
час програми ручка залишається нерухомою.
Кнопки з iндикаторними лампами ФУНКЦIЯ: для
вибору наявних функцій. Iндикаторна лампа обраної
функцї залишається увiмкненою.
Ручка ВIДЖИМУ: для установки в або для вимкнення
його (див. “Налаштування п”).
Ручка ТЕМПЕРАТУРА: для установки температури
або холодного прання (див. “Налаштування п”).
Ручка
ВIДЖИМУ
Індикаторнi лампи
ЦИКЛУ/ ВIДСТРОЧЕНОГО
ЗАПУСКУ
Ручка
ВIДЖИМУ
Ручка
ТЕМПЕРАТУРА
Кнопки з iндикаторними
лампами
ФУНКЦIЯ
Кнопка з індикаторною лампою START/PAUSE: для
запуску програм або для їх тимчасового переривання.
Увага: щоб установити в режим паузи поточне
прання, натиснiть на цю кнопку, вiдповiдна кнопка
почне блимати померанцевим кольором, в той час
як iндикаторна лампа поточної фази свiтитиметься
постiйним свiтлом. Якщо індикаторна лампа “ЛЮК
ЗАБЛОКОВАНО ” погасне, можна відкривати люк
для завантаження білизни.
Щоб продовжити прання з місця, де воно було
перервано, знову натисніть на цю кнопку.
Режим очiкування
Вiдповiдно до норм, пов’язаних з заощадження
енергiї, цю пральну машину оснащено системою
автовимкнення (stand by), яка активується через 30
секунд вiдсутностi роботи з боку машини. Швидко
натиснiть кнопку ON/OFF та зачекайте вiдновлення
роботи машини.
УВIМКНЕННЯ
Iндикаторна лампа
ЛЮК
ЗАБЛОКОВАНО
Кнопка з
індикаторною
лампою
START/PAUSE
Індикаторнi лампи УВIМКНЕННЯ ЦИКЛУ/
ВIДСТРОЧЕНОГО ПУСКУ: для спостереження за
станом програми прання.
Увiмкнена iндикаторна лампа вказує на активовану
фазу.
При заданнi функцiї “Вiдстрочений запуск”
вiдображається час вiдстрочення запуску програми
(див. сторiнку поруч).
Iндикаторна лампа ЛЮК ЗАБЛОКОВАНО: для
перевiрки того, чи люк може вiдкриватись
(див. сторiнку поруч).
40
Page 41

Індикаторнi лампи
END
Індикаторнi лампи надають важливу iнформацiю
От на що вони вказують:
Iндикаторнi лампи поточних операцiй
Пiсля обрання та запуску бажаного циклу прання
iндикаторнi лампи вмикаються по черзi, щоб вказати
на стан програми:
UK
Вiдстрочений запуск
Якщо активовано функцiю “Вiдстрочений запуск” (див.
“Налаштування пiд власнi потреби”), тодi пiсля
запуску програми розпочне блимати iндикаторна
лампа, пов’язана з вiдстрочкою, яку було задано:
Протягом усього часу шляхом блимання вiдповiдної
iндикаторної лампи вiдображається час вiдстрочення,
який залишився:
По закiнченнi обраного часу вiдстрочення згасне
iндикаторна лампа, яка блимала, й запуститься
задана програма.
Прання
Полоскання
Вiджим
Злив
Кiнець прання
Кнопки функцiй та вiдповiднi iндикаторнi лампи
Пiсля вибору функцiї вiдповiдна iндикаторна лампа
починає свiтитися.
Якщо вибрано опцiю, несумiсною з заданою
програмою, надається сигнализацiя через блимання
iндикаторної лампи та звуковий сигнал (тричi); опцiя
не активується.
У разi задання функцiї, несумiсної з iншою
попередньо обраною, активується останнiй вибiр.
Iндикаторна лампа заблокованого люку
Запалена iндикаторна лампа вказує на те, що люк
заблоковано з метою запобiгання випадкового
вiдкриття; щоб уникнути ушкоджень, перш нiж
вiдкрити люк, зачекайте вимикання iндикаторної
лампи.
! Швидке блимання iндикаторної лампи START/PAU-
SE (померанцевий) разом iз iндикаторною лампою
функцiй вказує на неполадку (див. “Несправностi та
засоби їх лiквiдацiї”).
Як запустити програму
1. Увiмкнiть пральну машину, натиснувши на кнопку ON/OFF. Усi iндикаторнi лампи увiмкнуться на декiлька
секунд, потiм згаснуть та почне блимати iндикаторна лампа START/PAUSE.
2. Завантажте бiлизну й закрийте люк.
3. Встановiть за допомогою ручки ПРОГРАМ бажану програму.
4. Встановiть температуру прання (див. “Налаштування пiд власнi потреби”).
5. Встановiть швидкiсть вiджиму (див. “Налаштування пiд власнi потреби”).
6. Додайте миюч засоби та присадки (див. “Миючi засоби та бiлизна”).
7. Виберiть бажанi функцiї.
8. Запустiть програму, натиснувши кнопку START/PAUSE й вiдповiдна iндикаторна лампа загориться зеленим
свiтлом.
Для скасування заданого циклу встановiть машину в режим паузи, натиснувши кнопку START/PAUSE, та оберiть
новий цикл.
9. Наприкiнцi програми почне свiтитися iндикаторна лампа . iдкрити. Виймiть бiлизну та залиште люк
напiввiдкритим, щоб висушити барабан. Вимкнiть пральну машину, натиснувши на кнопку ON/OFF.
41
Page 42

Програми
UK
Таблиця програм
Опис програми
програми
Антикорозійний
1
Білі речі
2
Бавовна з попереднiм пранням: вкрай забруднен бiл.
3
Бiла бавовна (1): дуже забрудненi стiйкi бiлi та кольоровi
4
тканини.
Бавовна (2): дуже забрудненi делiкатнi бiлi та кольоровi
5
тканини.
Синтетичнi: Злегка забрудненi кольоровi стiйкi тканини
6
Синтетичнi (3): Злегка забрудненi кольоровi стiйкi тканини
6
Протиалергійне прання
7
Дитина
8
Шовк/Портьєри: для речей з шовку, вiскози, для нижньої
9
бiлизни.
Делікатне
10
Mix 60’:
(не рекомендоване для вовняних, шовкових речей або
11
речей для ручного прання)
Бавовна
12
Синтетичнi
13
Швидке прання 30’
14
Ополiскування
Вiджим + Злив
Тривалість циклу, вказана на дисплеї або в керівництві, разрахована на основі стандартних умов роботи. Фактичний час може залежати від чисельних факторів, таких як температура і
тиск подаваної води, температура у приміщенні, кількість миючого засобу, кількість і тип завантаженої білизни, зрівноваження завантаженої білизни, додаткові обрані опції.
Для всiх Установ з проведення випробувань:
1) Програма керування згiдно до норми EN 60456: встановити програму 4 з температурою 60°C.
2) Довга програма бавовна: встановити програму 5 з температурою 40°C.
3) Програма тривалого прання синтетичних речей: встановити програму 6 з температурою 40°C.
Для швидого освiження злегка забруднених речей
Макс.
темп.
(єС)
40° 800 -
60° 800 -
90° 800
60° 800 -
40° 800 -
60° 800 -
40° 800 -
60° 800 -
40° 800 -
40° 800 -
30° 0 -
60° 800 -
холодна
вода
холодна
вода
холодна
вода
- 800 - -
- 800 - - - -
Макс.
швидкiсть
(обертiв
за хвилину)
800 -
800 -
800 -
Пральнi засоби та додатковi
Попе-
реднє
прання
засоби
Пра-
Відбіл-
ння
ювач
якшувач
-
-
-
-
-
-
-
-
-
Пом’
Макс.
завант-
аження (кг)
4 180’
4 180’
6 175’
6 190’
6 185’
2,5 110’
2,5 95’
4 195’
4 150’
1,5 75’
1 80’
3,5 60’
6 85’
3 60’
3 30’
6 40’
6 20’
Трива-
лiсть
циклу
Особливi програми
Антикорозійний: Програма 1 призначена для прання дуже забруднених речей зі стійким фарбуванням. Програма
гарантує вищий у порівнянні зі стандартним клас прання (клас A). Не застосовуйте у цій програмі речі різних
кольорів. Рекомендується використання миючих засобів у порошку. Стійкі плями краще обробити попередньо
спеціальними засобами.
Білі речі: цей цикл 2 використовується для прання білих речей. Завдяки цій програмі забезпечується тривале
зберігання сяючого білого кольору.
Кращі результати отримуються при використанні порошкового миючого засобу.
Протиалергійне прання: використовуйте програму 7 для видалення основних алергенів, таких як пилок, кліщі,
котяча і собача шерсть.
Дитина: використовуйте спецiальну програму 8 для видалення забруднень, типових для дiтей, а також для
видалення прального засобу з речей з метою запобiгання алергiчним реакцiям тендiтної шкiри малюкiв. Цикл
розраховано для зменшення бактерiологiчного потенцiалу, за допомогою бiльшої кiлькостi води та оптимiзуючи
ефект спецiальних гiгiєнiзуючих присадок у миючому засобi.
Програми Eco
Програми Eco пропонують добру якість прання при низьких температурах із заощадженням електричної енергії, що
позитивно впливає на довкілля і забезпечує економічну вигоду користувачеві.
Програми Eco (Бавовна 12, Синтетика 13 і Швидке прання 30’ 14) призначені для різних типів тканин і для речей
з легкими забрудненнями Для гарантованого оптимального результату рекомендується використовувати рідкий
пральний засіб; краще зробити попередню обробку манжетів, коміру і плям.
42
Page 43

Налаштування пiд
власнi потреби
Встановлення темепратури
Обертаючи ручку ТЕМПЕРАТУРИ ви можете задати температуру прання (див. Таблицю програм).
Ви можете знижувати температуру аж до прання в холоднiй водi ( ).
Машина перешкоджатиме встановленню температури, яка перевищує максимально дозволену для кожної
конкретної програми.
Встановлення вiджиму
Обертаючи ручку ВIДЖИМУ ви можете задати швидкiсть вiджиму обраної програми.
Максимальнi значення швидкостi, передбаченi для програм:
Програми Максимальна швидкiсть
Бавовна 800 обертiв за хвилину
Синтетичнi тканини 800 обертiв за хвилину
Вовна 800 обертiв за хвилину
Шовк лише злив
Швидкiсть вiджиму можна зменшити чи виключити; оберiть для цього позначку .
Машина автоматично перешкоджатиме вiджиму, який перевищує максимально дозволенi значення для кожної
конкретної програми.
Функцiї
Рiзноманiтнi функцiї прання, передбаченi у пральнiй машинi, дозволяють отримати бажану чистоту та бiлизну
ваших речей.
Для активацiї функцiй:
1. натиснiть на кнопку бажаної функцiї;
2. запалення вiдповiдної iндикаторної лампи вказує не те, що функцiю активовано.
Примiтка: Швидке блимання iндикаторної лампи вказує на те, що вiдповiдну функцiю не можна обрати для заданої
програми.
UK
Супер-прання
Завдяки використанню більшої кількості води на початку циклу та бiльшiй тривалостi програми, така опція
гарантує високоякісне прання. Може використовуватися з або без відбілювача.
При необхiдностi виконати також відбілювання вставте додаткову ванночку 4, що входить до комплекту
постачання, у ванночку 1.
Пiд час дозування вiдбiлювача не перевищуйте максимальний рiвень “max” на центральному стрижнi (див.
малюнок на стор. 44).
! Не активується у програмах 2, 3, 7, 9, 10, 11, 12, 13, 14, .
Полегшене прасування
З обранням такої функцiї прання та вiджим будуть вiдповiдно змiненi, щоб запобiгти утворенню складок.
Наприкiнцi циклу пральна машина виконає повiльнi оберти барабану;
iндикаторнi лампи функцiй ПОЛЕГШЕНОГО ПРАСУВАННЯ та START/PAUSE блиматимуть (помаранчевим
кольором), а на дисплеї запалиться надпис “ ”. Для завершення циклу натиснiть на кнопку START/PAUSE або на
кнопку ПОЛЕГШЕНОГО ПРАСУВАННЯ.
! Не активується у програмах 1, 2, 7, 9, 12, 13, 14, .
Швидке
Завдяки цiєї опцiї тривалiсть програми зменшується до 50% залежно вiд вибраного циклу, заощаджуючи воду та
електричну енергiю. Цей цикл призначений для не дуже забруднених речей.
! Не активується у програмах 1, 2, 7, 8, 9, 10, 11, 12, 13, 14, , .
Вiдстрочений запуск
Вiдстрочує запуск машини до 12 годин включно.
Натиснiть декiлька разiв на кнопку, доки на запалиться iндикаторна лампа бажаного вiдстрочення. При п’ятому
натисканнi на кнопку функцiя скасовується.
Увага: Пiсля натискання кнопки START/PAUSE ви можете змiняти значення вiдстрочення тiльки зменшуючи його.
! Є активним iз усiма програмами.
43
Page 44

Миючі засоби і білизна
M
AX
1
2
4
3
A
B
UK
Касета з миючим засобом
Добрий результат прання залежить також вiд
правильного дозування миючого засобу: надлишок
миючого засобу приведе до неефективного прання
та сприятиме утворенню накипу всереденi пральної
машини, а також забрудненню довкiлля.
! Не використовуйте миючі засоби для ручного
прання, тому що вони утворюють надто багато піни.
Виймiть касету для
миючих засобiв та
додайте миючi засоби
або присадки, як вказано
нижче.
ванночка 1: Засiб для попереднього прання
(порошковий)
Перш нiж додати пральний засіб, перевірте, щоб не
була вставлена додаткова ванночка 4.
ванночка 2: Засiб для прання
(порошковий чи рiдкий)
Якщо використовується рідкий пральний засіб,
рекомендується застосовувати вимірювальний
компонент A з комплекту постачання для правильного
дозування. При використанні порошкового прального
засобу вставьте цей компонент у нішу B.
ванночка 3: Засоби з догляду
(пом’якшувач, тощо)
Пом’якшувач не має витікати з решітки.
додаткова ванночка 4: Відбілювач
Підготовка білизни
• Роздiлiть бiлизну, враховуючи:
- тип тканини / позначку на етикетцi.
- кольори: вiдокремте кольоровi речi вiд бiлих.
• Перевірте кишені й ґудзики.
• Не перевищуйте вказанi значення щодо ваги сухої
бiлизни:
Стiйкi тканини: макс. 6 кг
Синтетичнi тканини: макс. 2,5 кг
Делiкатнi тканини: макс. 2 кг
Вовна: макс. 1,5 кг
Шовк: макс. 1 кг
Особливi речi
Вовна: єдина пральна машина, що отримала
престижний знак Woolmark Platinum Care (M. 0508)
від компанії The Woolmark Company, що посвідчує
якість прання у пральній машині усіх виробів з вовни,
включаючи виробів з етикеткою “тільки для ручного
прання” . За допомогою програми 9 ви можете
спокiйно випрати у пральнiй машинi всi вовнянi речi
(макс. 1,5 кг) з найкращими результатами.
Делікатне: використовуйте програму 10 для прання
дуже делікатних речей, наприклад, зі стразами або
іншими оздобленнями.
Перш ніж запускати прання, рекомендується
вивернути речі навиворіт і вкласти дрібні речі в
спеціальний мішечок для прання делікатних речей.
Кращі результати досягаються при використанні
рідкого прального засобу для делікатних речей.
Для прання шовкових речей або портьєр виберіть
цикл 10 і активуйте опцію ; Машина закінчить
цикл із замоченою білизною й блиманням відповідної
індикаторної лампи . Щоб злити воду й отримати
можливість витягнути білизну, натисніть на кнопку
START/PAUSE або кнопку .
Система балансування завантаженнÿ
Перед кожним віджимом, для запобігання
надмірній вібрації та для рівномірного розподілу
навантаження, барабан здійснює оберти на дещо
більшій швидкості, ніж швидкість прання. Якщо по
закінченні декількох спроб завантажені речі ще не
були правильно відбалансовані, машина здійснює
віджим на швидкості, нижчій від передбаченої. У
випадку надмірної незбалансованості пральна
машина здійснює розподіл замість віджиму. З
метою оптимального розподілу завантаження та
його правильного балансування рекомендується
одночасне прання великих і малих речей.
Скільки важить білизна?
1 простирадло 400-500 г
1 наволочка 150-200 г
1 скатертина 400-500 г
1 махровий халат 900-1 200 г
1 рушник 150-250 г
44
Page 45

Запобіжні заходи та
20
поради
! Машину була спроектовано і вироблено у
відповідності з міжнародними нормами безпеки. Дані
попередження складені для забезпечення безпеки і
тому їх треба уважно прочитати.
Загальна безпека
• Після використання пральної машини обов‘ язково
від’ єднайте її від електромережі та перекрийте
водопровідний кран.
• Дане обладнання було розроблене виключно для
побутового використання.
• Цей апарат не має використовуватися дітьми або
особами з обмеженими фізичними, сенсорними чи
розумовими можливостями, або якщо їм бракує
досвіду та необхідних знань. Винятки складають
ситуації, коли користування відбувається під наглядом
або за вказівками осіб, відповідальних за їхню
безпеку. Дорослі мають стежити, щоб діти не гралися
з апаратом.
• Машина має використовуватися тільки повнолітніми
особами і згідно з інструкціями, наведеними у даній
брошурі.
• Не торкайтеся до машини голими ногами або
мокрими чи вологими руками й ногами.
• Не виймайте штепсель з електричної розетки,
витягуючи його за провід, тримайтеся тільки за самий
штепсель.
• Не вiдкривайте касету з миючими засобами пiд час
роботи машини.
• Будьте обережні: вода, що зливається, може мати
високу температуру.
• У жодному випадку не застосовуйте силу до люку:
це може ушкодити запобiжний механiзм проти
випадкових вiдкривань.
• Якщо машина не працює у разi поломки, у жодному
ви падку не н амагайтес я д iстатися вн ут рiшнi х
механiзмiв з метою самостійного ремонту.
• Слiдкуйте, щоб дiти не наближалися до працюючої
машини.
• Пiд час прання люк нагрiватиметься.
• Пересування машини має здiйснюватися двома або
трьома особами за умови максимальної уваги. Нi в якому
разi - однiєю особою, тому що машина дуже важка.
• Перш ніж завантажити білизну, перевірте, щоб
барабан був порожній.
й рециклювання матеріалів, що входять до їхнього
ск ла ду, і з м етою усунення потенційної шкоди
для здо ров ’я та навк ол ишн ього се редов ища.
Си мв ол з акресленої к орзи ни, зображе ни й на
всіх виробах, нагадує про необхідність окремої
утилізації. Для подальшої інформації про правильне
зняття з експлуатації побутових електроприладів,
їхні власники можутьз вер нутися у відповідну
муницiпальну службу або до продавця приладу.
Ручне відкривання дверцят люку
У випадку, якщо неможливо відкрити дверцята люку
із-за відсутності електроенергії і ви хотіли б розвісити
речі, треба діяти таким чином:
1. витя гн іт ь штепсель з
електричної розетки.
2. перевірте, щоб рівень води
усередині машини був нижчим
за рівень отвору люку; якщо
це не так, злийте надлишок
води через зливний шланг,
збираючи її у відрі, як показано
на малюнку.
3. зніміть декоративну
панель на лицевому
боці пральної машини за
допомогою викрутки (див.
малюнок).
UK
Утилізація
• Утилізація пакувального матеріалу: додержуйтесь
місцевих норм, так як пакування може бути використане
повторно.
• Європейська директива 2002/96/CE з відходів від
електричної й електронної апаратури передбачає, що
побутові електроприлади не можуть перероблятися
у звичайному порядку для твердих міських відходів.
Зняті з експлуатації побутові прилади мають бути
зібрані окремо для оптимізації ступеню відновлення
4. За допомогою вказаного на малюнку язичка тягнiть
пластмасову тягу з упору назовнi, аж доки її не буде
звiльнено ; потiм протягнiть її донизу, одночасн о
вiдкриваючи дверцята.
5. встановіть панель на місце, пересвідчіться у тому,
що крюки були вставлені у спеціальні петлі, пiсля чого
притиснiть її до машини.
45
Page 46

Технічне обслуговування та
1
2
A
B
догляд
UK
Відключення води й електричного
живлення
• Закривайте водопровідний кран після кожного
прання. У такий спосіб зменшується знос
гідравлічної частини машини й усувається
небезпека витоку.
• Виймайте штепсель з розетки під час миття машини
та під час робіт з технічного обслуговування.
Очищення пральної машини
• Зовнішня частина і гумові деталі можуть бути
вимиті тканиною, змоченою у теплій воді й милі. Не
використовуйте розчинники або абразиви.
• Пральна машина оснащена програмою
«Самоочищення» внутрішніх частин, яку слід
запускати без будь-яких речей всередині
барабану.
Пральний засіб (його кількість має складати 10% від
рекомендованої для злегка забруднених речей) або
спеціальні засоби для очищення пральної машини
можна використовувати як допоміжні у программі
прання. Рекомендується виконувати програму
очищення через кожні 40 циклів прання.
Для пуску програми слід одночасно натиснути на
кнопки A і B впродовж 5 сек. (див. малюнок).
Програма запускається автоматично і триває
приблизно 70 хвилин. Для припинення циклу
натиснiть на кнопку START/PAUSE.
Догляд за люком та барабаном
• Завжди залишайте відкритими дверцята люку, тоді
не утворюватимуться неприємні запахи.
Миття насосу
Пральну машину обладнано насосом з автоматичною
чисткою, який не вимагає технічного обслуговування.
Може трапитися так, що малі предмети (монети,
ґудзики) потраплять до форкамери, що захищає
насос, розташований у її нижній частині.
! Переконайтеся у тому, що цикл прання закінчено, і
витягніть штепсель з розетки.
Щоб потрапити до форкамери:
1. зніміть декоративну
панель на лицевому
боці пральної машини за
допомогою викрутки (див.
малюнок);
2. відкрутіть кришку,
обертаючи її проти
годинникової стрілки
(див. малюнок): виток
незначної кiлькостi води
є нормальним;
Чистка касети для миючих засобів
Виймiть касету, пiднявши
її та витягнувши назовнi
(див. малюнок).
Промийте під проточною
водою; ця процедура має
проводитися регулярно.
46
3. акуратно очистіть внутрішню частину;
4. накрутіть кришку;
5. встановіть панель на місце, пересвідчіться у тому,
що крюки були вставлені у спеціальні петлі, пiсля чого
притиснiть її до машини.
Контроль шланга для подачі води
Перевіряйте шланг для подачі води не менше одного
разу на рік. Якщо на ньому є тріщини, він підлягає
заміні: під час прання високий тиск може призвести
до розірвання.
! Не користуйтеся шлангами, якi були вже у вживаннi.
Page 47

Несправності та засоби
їх усунення
Може трапитися так, що пральна машина не буде працювати. До того як зателефонувати у Сервiсний центр (див.
“Допомога”), перевірте, чи не є дана несправність проблемою, що легко вирішується, звернувшись до списку нижче.
UK
Несправності:
Пральна машина не вмикається.
Цикл прання не розпочинається.
Пральна машина не завантажує
воду (швидко блимає iндикаторна
лампа першої фази прання).
Машина безперервно завантажує і
зливає воду.
Можливі причини/Рішення:
• Штепсель не вставлений в електричну розетку або вставлений не до кiнця.
• У будинку немає електроенергії.
• Погано закритий люк.
• Кнопку ON/OFF не було натиснуто.
• Кнопку START/PAUSE не було натиснуто.
• Водопровідний кран закритий.
• Якщо вiдстрочення задане на час запуску (див. “Налаштування пiд
власнi потреби”).
• Шланг подачі води не підключено до водопровiдного крану.
• Перегин у шлангу.
• Водопровідний кран закритий.
• У водопроводі немає води.
• Недостатній тиск.
• Кнопку START/PAUSE не було натиснуто.
• Зливний шланг не знаходиться на відстані від 65 до 100 см від підлоги
(див. “Встановлення”).
• Кінець зливного шланга занурений у воду (див. “Встановлення”).
• Стiнний каналiзацiйний злив не має віддушини для виходу повiтря.
Якщо після таких перевірок проблема залишається, закрийте водопровідний
кран, вимкніть машину і зателефонуйте у Сервiсний центр. Якщо квартира
знаходиться на верхніх поверхах будинку, можливо, відбувається сифонний
ефект, при якому машина безперервно завантажує й зливає воду. Щоб його
ліквідувати, існують спеціальні антисифонні клапани, які можна придбати у
торговельній мережі.
Пральна машина не зливає воду чи
не вiджимає.
Пральна машина дуже вiбрує пiд
час вiджиму.
Пральна машина пропускає воду.
Iндикаторна лампа START/PAUSE
(померанцева) та iндикаторнi лампи
рiзних функцiй швидко блимають.
Утворюється занадто багато піни.
• Програма не передбачає зливання: у деяких програмах його потрібно
вмикати вручну (див. “Як запустити програму”).
• Активовано функцiю “Полегшене прасування” для завершення
програми натиснiть на кнопку START/PAUSE (“Налаштування пiд власнi
потреби”).
• Перегин зливного шланга (див. “Встановлення”).
• Засмітився зливний шланг.
• Барабан, у момент встановлення, не був правильно розблокований
(див. “Встановлення”).
• Машина стоїть не на плоскій поверхні (див. “Встановлення”).
• Машину затиснуто між меблями і стіною (див. “Встановлення”).
• Погано пригвинчений шланг подачі води (див. “Встановлення”).
• Забруднена касета для миючих засобів (як вимитидив. “Технічне
обслуговування і догляд”).
• Погано закріплений зливний шланг (див. “Встановлення”).
• Вимкніть машину й витягніть штепсель з розетки, зачекайте близько 1
хвилини й увімкніть її повторно.
Якщо несправність не усунено, зателефонуйте у Сервiсний центр.
• Миючий засіб не підходить для пральної машини (має бути напис “для
машинного прання”, “для ручного й машинного прання”, або подібний).
• Перевищена доза миючого засобу.
47
Page 48

UK
Допомога
Перш ніж телефонувати у Сервiсний центр:
• Перевірте, чи можна самостійно вирішити проблему
(див. “Несправності і засоби їх усунення”);
• Запустіть програму повторно, щоб перевірити чи усунено несправність.
• Якщо нi, зв’яжiться з авторизованим Сервiсним Центром, зателефонувавши за номером, вказаним у
гарантiйному свiдоцтвi.
! Звертайтеся виключно до уповноважених фахівців.
Повідомити:
• тип несправності;
• модель машини (Мод.);
• серійний номер (С/Н).
Цю iнформацiю ви знайдете на заводськiй табличцi позаду пральної машини та в її переднiй частинi, якщо ви
вiдкриєте люк.
48
Page 49

Упутство за употребу
МАШИНА ЗА ПРАЊЕ РУБЉА
SR
Cрпски
WML 6081
Садржај
Постављање, 50-51
Распакивање и нивелисање
Повезивање на водоводну и електричну мреж
Први циклус прања
Технички подаци
Опис машине за прање веша и покретање
програма, 52-53
Командна табла
Контролне лампице
Покретање програма
Програми, 54
Табела програма
Посебна подешавања, 55
Задавање температуре
Задавање центрифуге
Функције
Детерџенти и веш, 56
Посуда за детерџент
Припрема веша
Посебни програми
Систем за балансирање терета
SR
Упозорења и савети, 57
Општа сигурност
Одлагање на отпад
Ручно отварање врата
Одржавање и чување, 58
Искључивање воде и електричне енергије
Чишћење машине за прање веша
Чишћење посуде за детерџент
Нега врата и бубња
Чишћење пумпе
Провера црева за напајање водом
Неправилности и решења, 59
Помоћ, 60
49
Page 50

Постављање
SR
! Важно је сачувати ову књижицу како бисте је могли
консултовати у сваком тренутку. У случају продаје,
уступања или селидбе, обезбедите да остане уз
машину за прање веша како би нови власник могао да
се обавести о раду и одговарајућим упозорењима.
! Пажљиво прочитати упутства: садрже важне
информације о постављању, употреби и безбедности.
Распакивање и нивелисање
Распакивање
1. Распакивање машине за веш.
2. Проверити да машина није претрпела оштећења
при транспорту. Уколико је оштећена, немојте је
повезивати и обратите се продавцу.
3. Скините 4 завртња
постављена као заштита
при транспорту и гумицу
са одговарајућим
одбојником, постављене
на задњем делу машине
(погледајте слику).
4. Затворити отворе приложеним пластичним
затварачима.
5. Сачувати све делове: уколико машину треба
транспортовати, биће потребно поново их поставити.
Прецизно нивелисање даје стабилност и спречава
вибрације, буку и померање током рада машине. У
случају да машину постављате на итисон или тепих,
подесите стопице тако да испод машине оставите
довољно простора за вентилацију.
Повезивање на водоводну и
електричну мрежу
Повезивање црева за напајање водом
1. Повежите црево за
напајање са славином за
хладну воду са навојем
на излазном отвору од ¾
цола (погледајте слику).
Пре повезивања пустите
воду да тече све док не
постане чиста.
2. Повежите доводно
црево са машином
заврћући га на
одговарајући прикључак
за воду, на задњем делу
машине, горе десно
(погледајте слику).
! Амбалажа није играчка за децу.
Нивелисање
1. Поставити машину на равну и чврсту површину, не
наслањати је на зид, намештај или друге површине.
2. Уколико под
није савршено
раван, надокнадите
неправилност
отпуштањем или
затезањем предњих
стопица (погледајте
слику); угао нагиба,
измерен на радној
површини не сме
прелазити 2°.
50
3. Обратите пажњу да црево не буде преломљено
или пригњечено.
! Притисак воде у славини треба да се креће у
границама вредности датим у табели са Техничким
подацима (погледајте страницу поред).
! Уколико дужина доводног црева није довољна,
обратите се специјализованој продавници или
овлашћеном сервисеру.
! Никада не користите већ коришћена црева.
! Користите црева испоручена уз машину.
Page 51

65 - 100 cm
Повезивање одводног црева
Повезати одводно
црево, без савијања, са
сливником или испустом
у зиду постављеним
између 65 и 100 цм изнад
земље;
! Не користите продужне каблове и вишеструке
утичнице.
! Кабл не сме да буде савијен и притиснут.
! Замену енергетског кабла треба да обавља само
овлаштени сервисер.
Пажња! Произвођач се ограђује од сваке
одговорности у случају непоштовања ових норми.
SR
или га ослонити на
умиваоник или каду,
везујући га вођицом из
паковања за славину
(види слику). Слободни
крај одводног црева не
сме остати потопљен у
воду.
! Не препоручује се употреба продужних црева; ако је
неопходно, продужетак мора имати исти пречник као
и оригинално црево и не сме премашити 150 цм.
Повезивање на електричну мрежу
Пре уметања утикача у утичницу, уверите се:
• да утичница има уземљење и да је у складу са
законским прописима;
• да утичница може да издржи максимално
оптерећење снаге машине, дато у табели са
Техничким подацима (види поред);
• напон напајања треба да се креће у границама
вредности датих у табели са Техничким подацима
(види поред);
• да је утичница компатибилна са утикачем машине.
У случају да не одговара, променити утичницу или
утикач.
! Машину немојте инсталирати на отвореном
простору, чак иако је простор наткривен, пошто је
изузетно опасно да буде изложена киши и променама
времена.
! Код инсталирања машине утичница мора да буде
лако доступна.
Први циклус прања
Након постављања, пре употребе, извршите циклус
прања са детерџентом и без веша задајући програм 2.
Технички подаци
Модел WML 6081
ширина 59,5 цм
Димензије
Капацитет од 1 до 6 кг
Електрично
повезивање
Повезивање
на водоводну
мрежу
Брзина
центрифуге
Пробни
програми
према
директиви
2010/1061
висина 85 цм
дубина 54 цм
Погледајте налепницу са техничким
карактеристикама која се налази на
машини
максималан притисак 1 MPa (10 бара)
минималан притисак 0,05 MPa (0,5 бара)
капацитет бубња 52 литра
до 800 обртаја у минути
програм 4, температура 60°C;
програм 5, температура 40°C.
Ова опрема је усклађена са следећим
Директивама заједнице:
- 2004/108/CE (електромагнетна
компатибилност)
- 2006/95/CЕ (Ниски напон)
- 2002/96/CE
51
Page 52

Опис машине за прање веша и
покретање програма
SR
Командна табла
Посуда за детерџент
Тастер
ON/OFF
ПРОГРАМИ
ТЕМПЕРАТУРА
Дугме
ЦЕНТРИФУГА
Дугме
Дугме
Тастер са лампицама
ФУНКЦИЈА
Контролне лампице
НАПРЕДОВАЊА ЦИКЛУСА/
ЗАДРШКЕ ПОЧЕТКА
Контролна
лампица ВРАТА
БЛОКИРАНА
Тастер с а
лампицом
START/PAUSE
Посуда за детерџент: за сипање детерџената и
адитива (види «Детерџенти и веш»).
Дугме ON/OFF: притисните га за укључивање или
искључивање машине.
Дугме ПРОГРАМИ: за задавање програма. Током
трајања програма дугме се не помера.
Тастер са лампицама ФУНКЦИЈА: за избор функција
које су на располагању. Контролна лампица која
одговара одабраној функцији остаће упаљена.
Дугме ЦЕНТРИФУГА: за задавање или искључивање
центрифуге (види «Посебна подешавања»).
Дугме ТЕМПЕРАТУРА: за задавање температуре или
прање на хладно (види «Посебна подешавања»).
Контролне лампице НАПРЕДОВАЊА ЦИКЛУСА/
ЗАДРШКЕ ПОЧЕТКА: за праћење статуса
напредовања програма прања.
Упаљена контролна лампица показује фазу у току.
Ако је активирана функција “пауза почетка”,
показиваће време преостало до покретања програма
(види страну поред).
Тастер са лампицом START/PAUSE: за покретање
или моментално прекидање програма.
НАПОМЕНА: за покретање паузе прања које је у
току, притиснути овај тастер, одговарајућа контролна
лампица ће треперити наранџастом бојом а лампица
фазе у току ће светлети константно. Када се
контролна лампица
врата је могуће отворити.
За повратак прања на део у којем је прекинуто
притиснути поново овај тастер.
Статус stand by
Ова машина за прање испуњава све нове стандарде
везане за уштеду електричне енергије и опремљена
је системом за аутоматско гашење (stand by) који се
активира након око 30 минута у случају да се машина
не користи. Накратко притисните тастер ON/OFF и
машина ће се поново активирати.
ВРАТА БЛОКИРАНА
угаси,
Контролна лампица ВРАТА БЛОКИРАНА: за
обавештавање да ли се врата могу отворити (види
страну поред).
52
Page 53

Контролне лампице
END
Контролне лампице пружају важне информације.
Ево шта оне значе:
Контролне лампице фазе у току
По избору и покретању жељеног циклуса прања,
лампице ће се прогресивно палити указујући на
статус напредовања:
SR
Пауза почетка
Ако је активирана функција “пауза почетка” (види
«Посебна подешавања»), после покретања програма,
почеће да трепери контролна лампица одабране
задршке:
Како време протиче треперењем одговарајуће
контролне лампице очитаваће се преостало време
задршке:
Када истекне одабрано време задршке лампица која
трепери ће се угасити и задати програм ће започети.
Прање
Испирање
Центрифуга
Пражњење
Крај прања
Тастери функција и одговарајуће контролне лампице
Избором функције одговарајућа лампица ће се
упалити.
Ако одабрана опција не одговара задатом програму,
ову неусклађеност ће сигнализирати треперење
лампице и звучни сигнал (3 кратка звучна сигнала), а
опција се неће активирати.
У случају да се зада функцију која не одговара некој
претходно одабраној функцији, остаће активна само
она која је последња одабрана.
Лампица блокаде врата:
Упаљена лампица указује да су врата блокирана како
би се спречило случајно отварање; да би се избегле
штете пре отварања врата треба сачекати да се
сијалица угаси.
! Брзо трептање лампице START/PAUSE (наранџасто)
истовремено са лампицом функције указује на
неправилност (види “Неправилности и решења”).
Покретање програма
1. Укључити машину притиском на тастер ON/OFF. Све контролне лампице ће се укључити на неколико секунди,
затим ће се угасити а наставиће да пулсира лампица START/PAUSE.
2. Убаците рубље и затворите врата.
3. На дугмету ПРОГРАМИ одаберите жељени програм.
4. Задати температуру прања (види «Посебна подешавања»).
5. Задати брзину центрифуге (види «Посебна подешавања»).
6. Сипати детерџент и адитиве (види «Детерџенти и веш»).
7. Одабрати жељене функције.
8. Покренути програм притиском на тастер START/PAUSE и одговарајућа лампица ће остати да светли константно
зеленом бојом. За поништавање задатог циклуса укључити паузу машине притиском на тастер START/PAUSE и
одабрати нови циклус.
9. По завршетку програма упалиће се лампица . Лампица ВРАТА БЛОКИРАНА ће се угасити указујући да је
могуће отворити врата. Извући веш и оставити врата одшкринута да би се осушио бубањ.
Искључити машину притиском на тастер ON/OFF.
53
Page 54

Програми
Трајање
SR
Табела програма
Опис програма
Програми
1 Против мрља 40° 800 -
2 Бело рубље 60° 800 - -
3 Памук + Претпрање: Јако прљав бели веш. 90° 800
Памук (1): Веома запрљан бели и шарени веш
4
постојаних боја.
Памук (2-3): Мало запрљан бели и осетљиви
5
шарени веш.
6 Синтетика: Веома прљав отпоран шарени веш. 60° 800 -
6 Синтетика (4): Веома прљав отпоран шарени веш. 40° 800 -
7 Антиалергијско 60° 800 - -
8 Беби 40° 800 -
9 Вуна: За вуну, кашмир, итд. 40° 800 - -
10 Осетљиво 30° 0 - -
Брзо 60 минута: За брзо освежавање прљавог
11
веша (није за вуну, свилу и веш који се пере ручно).
12 Памук
13 Синтетика
14 Брзо 30 минута
Испирање - 800 -
Центрифуга + Пражњење - 800 - - - - 6 20’
Макс.
темп.
Хладна
вода
Хладна
вода
Хладна
вода
Брзина
макс.
(обртаја у
(°C)
минути)
60° 800 -
40° 800 -
60° 800 - -
Претп-
рање
800 - -
800 - -
800 - -
Детерџенти
Избељ-
Прање
ивач
-
-
Омекш-
ивач
Оптерећење
макс.
(кг)
4 180’
4 180’
6 175’
6 190’
6 185’
2,5 110’
2,5 95’
4 195’
4 150’
1,5 75’
1 80’
3,5 60’
6 85’
3 60’
3 30’
6 40’
циклуса
Трајање циклуса приказано на екрану или наведено у упутству је процена заснована на стандардним условима. Стварно време може да зависи
од више бројних фактора, као што су температура и притисак воде на улазу, температура околине, количина детерџента, количина и тип
рубља, уравнотеженост рубља, додатне изабране опције.
За све Тест институте:
1) Контролни програм према норми 2010/1061: задајте програм 4 са температуром од 60°C.
2) Контролни програм према норми 2010/1061: задајте програм 5 са температуром од 40°C.
3) Дуги програм за памук: задајте програм 5 са температуром од 40°C.
4) Дуги програм за синтетику: задајте програм 6 са температуром од 40°C.
Посебни програми
Против мрља: oвај програм 1 је прилагођен прању много запрљаног рубља са отпорним бојама. Овај програм
гарантује супериорнију класу прања од стандардне (класа А). Не користите овај програм ако сте помешали
рубље различитих боја. Препоручујемо употребу детерџента у праху. За упорне мрље препоручујемо претходно
третирање са посебним адитивима.
Бело рубље: употребљавајте циклус 2 за прање белог рубља. Програм је намењен очувању светле боје белог
рубља током времена. За најбоље резултате се препоручује коришћење детерџента у праху.
Антиалергијско: Користите програм 7 за уклањање главних изазивача алергија попут полена, гриња, псећих или
мачећих длака.
Беби: користите програм 8 за скидање прљавштине типичне за децу и скидање детерџента са крпа како бисте
избегли алергијске реакције осетљиве дечије коже. Циклус је осмишљен тако да смањи количину бактерија
употребом веће количине воде и оптимизирањем ефекта специфичних хигијенских адитива додатих детерџенту.
Еко програми
Еко програми нуде добре перформансе прања на основу ниске температуре са малим утрошком енергије ради
заштите животне средине и уштеде. Еко програми (
12
Памук,
13
Синтетика и
14
Брзо 30 минута) направљени
су за разне врсте тканина и за мало прљав веш. За оптималан резултат препоручујемо коришћење течног
детерџента; саветујемо претходно третирање манжетни, оковратника и мрља.
54
Page 55

Посебна подешавања
Задавање температуре
Окретањем дугмета ТЕМПЕРАТУРА задаје се температура прања (види Табелу програма).
Температура се може смањити све до хладног прања ( ).
Машина аутоматски спречава задавање температуре веће од предвиђеног максимума за сваки програм.
Задавање центрифуге
Окретањем дугмета ЦЕНТРИФУГА задаје се брзина центрифуге одабраног програма.
Максималне предвиђене брзине за програме су:
Програми Максимална брзина
Памук 800 обртаја у минути
Синтетика 800 обртаја у минути
Вуна 800 обртаја у минути
Свила само пуњење
Брзина центрифуге се може смањити или искључити избором симбола .
Машина аутоматски спречава центрифугу јачу од максимума предвиђеног за сваки програм.
Функције
Различите предвиђене функције прања омогућују постизање жељене чистоће и белине.
За активирање функција:
1. притиснути тастер који одговара жељеној функцији;
2. паљење одговарајуће лампице показује да је функција активна.
Напомена: Брзо треперење контролне лампице показује да није могуће одабрати одређену функцију за задати
програм.
SR
Супер прање
Ова опција гарантује прање високог учинка захваљујући употреби веће количине воде у почетној фази циклуса и
дужем трајању програма и користан је за уклањање најупорнијих флека.
Може се користити са избељивачем или без њега.
Ако желите да обавите избељивање, убаците испоручену додатну кадицу 4, у кадицу 1. При дозирању
избељивача не прелазите ниво „max“ обележен на централном делу (погледајте слику на стр. 56).
! Не може се активирати у програмима 2, 3, 7, 9, 10, 11, 12, 13, 14, .
Лако пеглање
Избором ове функције, прање и центрифуга ће бити на одговарајући начин измењени тако да се смањи гужвање.
На крају циклуса машина ће извести лагано окретање бубња;
упалиће се лампица функције ЛАКО ПЕГЛАЊЕ, а лампица START/PAUSE трепериће (наранџасто) и фаза END
остаје упаљена. За завршетак циклуса треба притиснути тастер START/PAUSE или тастер ЛАКО ПЕГЛАЊЕ.
! Не може се активирати у програмима 1, 2, 7, 9, 12, 13, 14, .
Уштеда времена
Избором ове опције скраћује се време програма до 50%, зависно од одабраног циклуса, истовремено гарантујући
уштеду воде и енергије. Овај циклус употребљавајте за рубље које није превише запрљано.
! Не може се активирати у програмима 1, 2, 7, 8, 9, 10, 11, 12, 13, 14, , .
Задршка почетка
Одлаже време почетка рада машине до 12 часова.
Притискати тастер све док се не упали лампица која одговара жељеном времену задршке. На пети притисак
дугмета функција се деактивира.
НAПОМЕНА: После притиска на тастер START/PAUSE, време задршке је могуће само смањити.
! Активна је са свим програмима.
55
Page 56

Детерџенти и веш
M
AX
1
2
4
3
A
B
SR
Посуда за детерџент
Добар резултат прања зависи чак и од исправног
дозирања детерџента: повећаном дозом прање није
ефикасније а доприноси се стварању наслага на
унутрашњим деловима машине и загађењу животне
средине.
! Не користите детерџенте за ручно прање, пошто
стварају много пене.
Извуците посуду за
детерџенте и сипајте
детерџент или адитив
прању на следећи начин.
кадица 1: Детерџент за претпрање (у праху)
Пре сипања детерџента проверите да није убачена
додатна кадица 4.
кадица 2: Детерџент за прање
(у праху или течан)
У случају да користите течан детерџент, препоручује
се коришћење приложеног зида А за исправно
дозирање. За употребу детерџента у праху користите
зид у отвору B.
кадица 3: Адитиви (омекшивач, итд.)
Омекшивач не сме да цури кроз решетку.
додатна кадица 4: Избељивач
Припрема веша
• Веш поделите према:
- врсти тканине/ симболу на етикети.
-бојама: одвојите шарени од белог веша.
• Испразните џепове и проверите дугмад.
• Не прелазите наведене вредности, које се односе
на суво рубље:
Отпорне тканине: макс. 6 кг
Cинтетичке тканине: макс. 2,5 кг
Осетљиве тканине: макс 2 кг
Вуна: макс.1,5 кг
Свила: макс.1 кг
Посебни програми
Вуна: је једина машина за прање која је добила
престижно признање «Woolmark Platinum Care»
(M.0508) од стране „The Woolmark Company“, који
дозвољава прање у машини свих врста вуне, чак и
оних које на етикети носе ознаку „само ручно прање“
. Са програмом 9, у потпуности сте мирни при
машинском прању вуненог веша (макс. 1,5 кг) уз
загарантоване одличне резултате.
Осетљиво: користите програм 10 за прање веома
осетљивог рубља, које има апликације од штраса или
перлица.
Препоручујемо да преврнете одећу пре прања и
ставите мале делове у одговарајућу врећицу за
прање осетљиве одеће. За најбоље резултате
се препоручује коришћење течног детерџента за
осетљиву одећу.
За прање одеће од свиле и завеса изаберите
циклус 10 и активирајте опцију ; машина ће
завршити циклус са влажним вешом, а лампица
ће треперити. Да бисте избацили воду и извадили
влажан веш, потребно је да притиснете тастер
START/PAUSE или тастер .
Систем балансирања терета
Пре сваке центрифуге, да би се избегле претеране
вибрације и терет равномерно распоредио, бубањ
се окреће брзином мало већом од оне током прања.
Ако се после неколико поновљених покушаја
терет још увек није равномерно распоредио,
машина ће извршити центрифугу брзином мањом
од предвиђене. У случају великог дисбаланса,
распоређивање врши машина уместо центрифуге. Да
би се побољшало распоређивање терета и правилно
балансирање, препоручује се мешање великих и
малих комада веша.
Колико је тежак веш?
1 чаршав 400-500 гр.
1 јастучница 150-200 гр.
1 столњак 400-500 гр.
1 баде-мантил 900-1200 гр.
1 пешкир 150-250 гр.
56
Page 57

Упозорења и савети
20
! Машина је пројектована и направљена да задовољи све
међународне безбедносне норме. Ова упозорења су дата
из безбедносних разлога и треба их пажљиво прочитати.
Општа сигурност
• Уређај не смеју да користе особе (укључујући децу)
са смањеним физичким, сензорним или менталним
способностима и недовољним искуством и знањем,
осим ако коришћење не надгледа или њиме не управља
особа која је одговорна за њихову безбедност. Децу
треба надгледати како би се обезбедило да се не играју
са уређајем.
• Овај уређај је направљен искључиво за кућну употребу.
• Машину не додирујте босим ногама или влажних руку
или ногу.
• Утикач из утичнице не извлачите повлачењем за кабл,
него чврсто ухватите утикач.
• Не отварајте посуду за детерџенте док машина ради.
• Не додирујте воду која се испушта, јер може достићи
високу температуру.
• Ни у ком случају не отварати врата силом: могао би
се оштетити сигурносни механизам који спречава
случајно отварање.
• У случају квара, нипошто не пролазити унутрашњим
механизмима у покушају поправљања.
• Проверавајте стално да се деца не приближавају
машини док ради.
• Током прања врата машине могу се могу загрејати.
• Уколико треба померити машину, то треба да раде
две или три особе уз максималну пажњу. Ово немојте
никада радити сами, јер је машина веома тешка.
• Пре убацивања веша проверите да ли је бубањ празан.
Ручно отварање врата
У случају да не можете да отворите врата због
недостатка струје, а желите да прострете влажан
веш, урадите следеће:
1. Извуците утикач из
утичнице.
2. проверите да ли је ниво
воде унутар машине испод
нивоа отвора; у супротном
извуците вишак воде кроз
испусно црево сакупљајући
је у кофу као што је
показано на слици.
3. уклоните плочу на
предњем делу машине
помоћу одвијача
(погледајте слику).
SR
Одлагање на отпад
• Одлагање амбалаже на отпад:
придржавајте се локалних прописа, тако да
амбалажа може бити поново употребљена.
• Европска директива 2002/96/CE о отпаду електричних
и електронских уређаја, прописује да кућни уређаји
не смеју бити одлагани у редовном промету чврстог
градског отпада. Одбачене уређаје треба посебно
сакупити чиме се побољшава стопа прикупљања
корисног отпада и рециклаже материјала од којих
су сачињени и спречава потенцијално нарушавање
здравља и животне средине.
Симбол прецртане канте за отпатке налази се на свим
производима да би подсетио на обавезу одвојеног
сакупљања.
За детаљније информације о правилном одлагању
кућних уређаја власници се могу обратити
предвиђеној јавној служби или продавцима.
4. помоћу језичка приказаног на слици извлачити
према напоље све док се не покрене пластични
потезач; затим повући према доле и истовремено
отворити врата.
5. вратите плочу, водећи рачуна да су шарке убачене
у одговарајуће осовине, пре него што га притиснете
према машини.
57
Page 58

Одржавање и чување
1
2
SR
Искључивање воде и електричне
енергије
• Затворите славину за воду после сваког прања.
Овим се спречава хабање водоводних инсталација
машине и уклања опасност од цурења.
• Електрични кабл уклоните када чистите машину и
током поправки.
Чишћење машине за прање веша
• Спољашњи и гумени делови се могу чистити меком
крпом наквашеном млаком водом и сапуницом. Не
користите растворе или абразивна средства.
• Машина за прање рубља има програм
„Самочишћење“ за унутрашње делове који треба
обавити без икакве одеће у бубњу.
Детерџент (количина одговара 10% од оне која се
препоручује за мало запрљану одећу) или посебни
адитиви за чишћење машине за прање рубља могу
се користити као додатак у току програма прања.
Препоручује се програм чишћења на сваких 40
циклуса прања.
Да бисте активирали програм, истовремено
притисните тастере A и B на 5 секунди. (погледајте
слику). Програм почиње аутоматски и траје око 70
минута. Да бисте зауставили циклус, притисните
тастер START/PAUSE.
A
B
Чишћење пумпе
Машина је опремљена пумпом која се сама чисти и
није јој потребно одржавање. Ипак, може се десити
да мали предмети (метални новац, дугмад) упадну
у предкомору која штити пумпу, а која се налази у
њеном доњем делу.
! Уверите се да је циклус прања завршен и извуците
утикач.
За приступ преткомори:
1. скинути плочу на
предњем делу машине
помоћу одвијача
(погледајте слику);
2. одврните поклопац
окрећући га у супротно
од смера кретања
казаљке на сату
(погледајте слику):
излазак воде је
нормалан;
Чишћење посуде за детерџент
Ослободите фиоку
тако што ћете је подићи
и повући према себи
(погледајте слику).
Исперите је под млазом
воде; ово треба често
радити.
Нега врата и бубња
• Врата увек остављајте одшкринута да би се
избегло стварање непријатних мириса.
58
3. очистите унутрашњост пажљиво;
4. вратите поклопац;
5. вратите плочу, водећи рачуна да су шарке убачене
у одговарајуће осовине, пре него што га притиснете
према машини.
Провера црева за напајање водом
Црево за довод воде проверите барем једном
годишње. Уколико има напрслина и пукотина треба
га заменити: јаки притисци током прања могли би
изазвати изненадна пуцања.
! Никада не користите већ коришћена црева.
Page 59

Неправилности и решења
Може се догодити да машина не ради. Пре позивања Техничке службе (види “Помоћ”), проверите да се не ради о
проблему лако решивом уз помоћ следећег списка.
Неправилности:
Машина се не укључује.
Циклус прања не почиње.
Машина не убацује воду
(лампица прве фазе прања
трепће брзо).
Машина константно убацује
и испушта воду.
Могући узроци / Решење:
• Утикач није увучен у утичницу или није увучен довољно да би имао контакт.
• Нема струје у кући.
• Врата нису добро затворена.
• Тастер ON/OFF није притиснут.
• Тастер START/PAUSE није притиснут.
• Славина за воду није отворена.
• Задата пауза на време покретања (Тајмер задршке), види «Посебна
подешавања»).
• Црево за довод воде није повезано са славином.
• Црево је савијено.
• Славина за воду није отворена.
• У кући нема воде.
• Нема довољног притиска.
• Тастер START/PAUSE није притиснут.
• Одводно црево није постављено између 65 и 100 цм од земље (види
“Постављање”).
• Крај одводног црева је потопљен у воду (види “Постављање”).
• Цев у зиду пропушта ваздух.
Ако се и после ових провера проблем не реши, затворите славину за воду,
искључите машину и позовите Техничку службу. Ако се стан налази на последњим
спратовима зграде, могуће је да се јавља феномен сифона, због чега машина
стално убацује и избацује воду. За решавање овог проблема у продаји су доступни
одговарајући неповратни вентили.
SR
Машина не испушта воду или
не центрифугира.
Машина јако вибрира током
центрифуге.
Машина губи воду.
Брзо трепери лампица START/
PAUSE и лампице функција.
Ствара се много пене.
• Програмом није предвиђено избацивање: код неких програма потребно је ручно
га покренути (види “Покретање програма”).
• Активирана функција ЛАКО ПЕГЛАЊЕ: за завршетак програма притиснути
тастер START/PAUSE (“Посебна подешавања”).
• Одводно црево је савијено (види “Постављање”).
• Вод за пражњење је запушен.
• Бубањ у тренутку инсталације није био правилно деблокиран (види
“Постављање”).
• Машина не стоји равно (види “Постављање”).
• Машина је притиснута између намештаја и зида (види “Постављање”).
• Црево за довод воде није добро затегнуто (види “Постављање”).
• Посуда за детерџенте је загушена (за чишћење види “Одржавање и чување”).
• Одводно црево није добро причвршћено (види “Постављање”).
• Искључите машину и извуците утикач из утичнице, сачекајте око 1 минут, а
затим је поново укључите.
Уколико неправилност остане, позвати Техничку службу.
• Детерџент не одговара машини (треба да носи натпис “за машинско прање”, “за
ручно и машинско прање” или слично).
• Доза је превелика.
59
Page 60

Помоћ
195095404.00
07/2011 - Xerox Fabriano
SR
Пре него што позовете Техничку службу:
• Проверите да ли неправилност можете решити сами (види “Неправилности и решења”);
• Поново започните програм да видите да ли је проблем отклоњен;
• У супротном контактирајте овлаштени Центар техничке службе на број телефона назначен на гарантном листу.
! Никада не користите неовлашћене сервисе.
Јавите:
• врсту неисправности;
• модел машине (Мо.);
• серијски број (S/N).
Ове информације се налазе на плочици постављеној на задњем делу машине и у предњем делу отвора.
60
 Loading...