

Page 1

Instructions for use
WASHING MACHINE
GB
English,1
SR
Cрпски,37
WML 601
IT
Italiano,13
BG
Български,49
CZ
Česky,25
Contents
Installation, 2-3
Unpacking and levelling
Connecting the electricity and water supplies
The first wash cycle
Technical data
Care and maintenance, 4
Cutting off the water or electricity supply
Cleaning the washing machine
Cleaning the detergent dispenser drawer
Caring for the door and drum of your appliance
Cleaning the pump
Checking the water inlet hose
Precautions and tips, 5
General safety
Disposal
Description of the washing machine
and starting a wash cycle, 6-7
Control panel
Indicator lights
Starting a wash cycle
GB
Wash cycles, 8
Table of wash cycles
Personalisation, 9
Setting the temperature
Setting the spin speed
Functions
Detergents and laundry, 10
Detergent dispenser drawer
Preparing the laundry
Garments requiring special care
Load balancing system
Troubleshooting, 11
Service, 12
1
Page 2
Installation
GB
! This instruction manual should be kept in a
safe place for future reference. If the washing
machine is sold, transferred or moved, make
sure that the instruction manual remains with
the machine so that the new owner is able to
familiarise himself/herself with its operation
and features.
! Read these instructions carefully: they contain vital information relating to the safe installation and operation of the appliance.
Unpacking and levelling
Unpacking
1. Remove the washing machine from its
packaging.
2. Make sure that the washing machine has
not been damaged during the transportation
process. If it has been damaged, contact the
retailer and do not proceed any further with
the installation process.
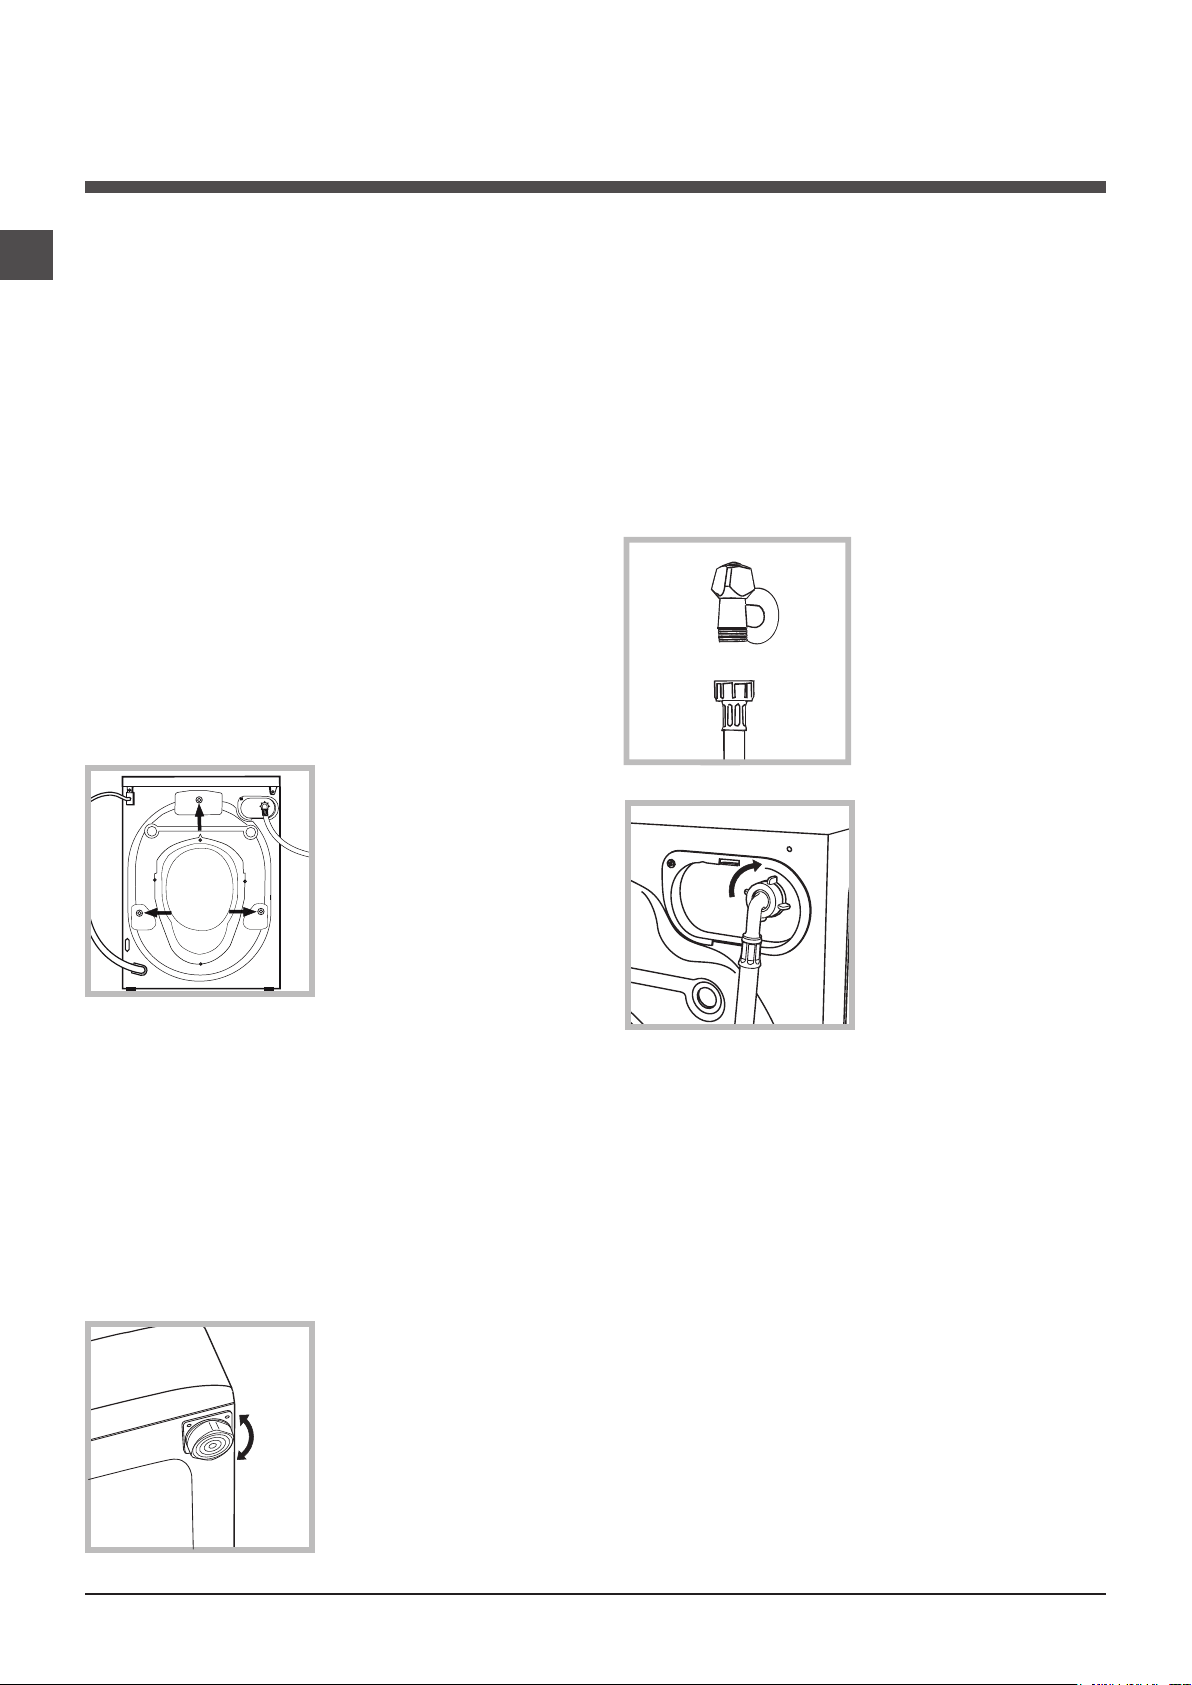
3. Remove the 3
protective screws
(used during transportation) and the rubber
washer with the corresponding spacer,
located on the rear
part of the appliance
(see figure).
4. Close off the holes using the plastic plugs
provided.
5. Keep all the parts in a safe place: you will
need them again if the washing machine needs to be moved to another location.
! Packaging materials should not be used as
toys for children.
Levelling
1. Install the washing machine on a flat sturdy
floor, without resting it up against walls, furniture cabinets or anything else.
2. If the floor is not
perfectly level, compensate for any unevenness by tightening
or loosening the
adjustable front feet
(see figure); the angle
of inclination, measured in relation to the
worktop, must not
exceed 2°.
Levelling the machine correctly will provide
it with stability, help to avoid vibrations and
excessive noise and prevent it from shifting
while it is operating. If it is placed on carpet or
a rug, adjust the feet in such a way as to allow
a sufficient ventilation space underneath the
washing machine.
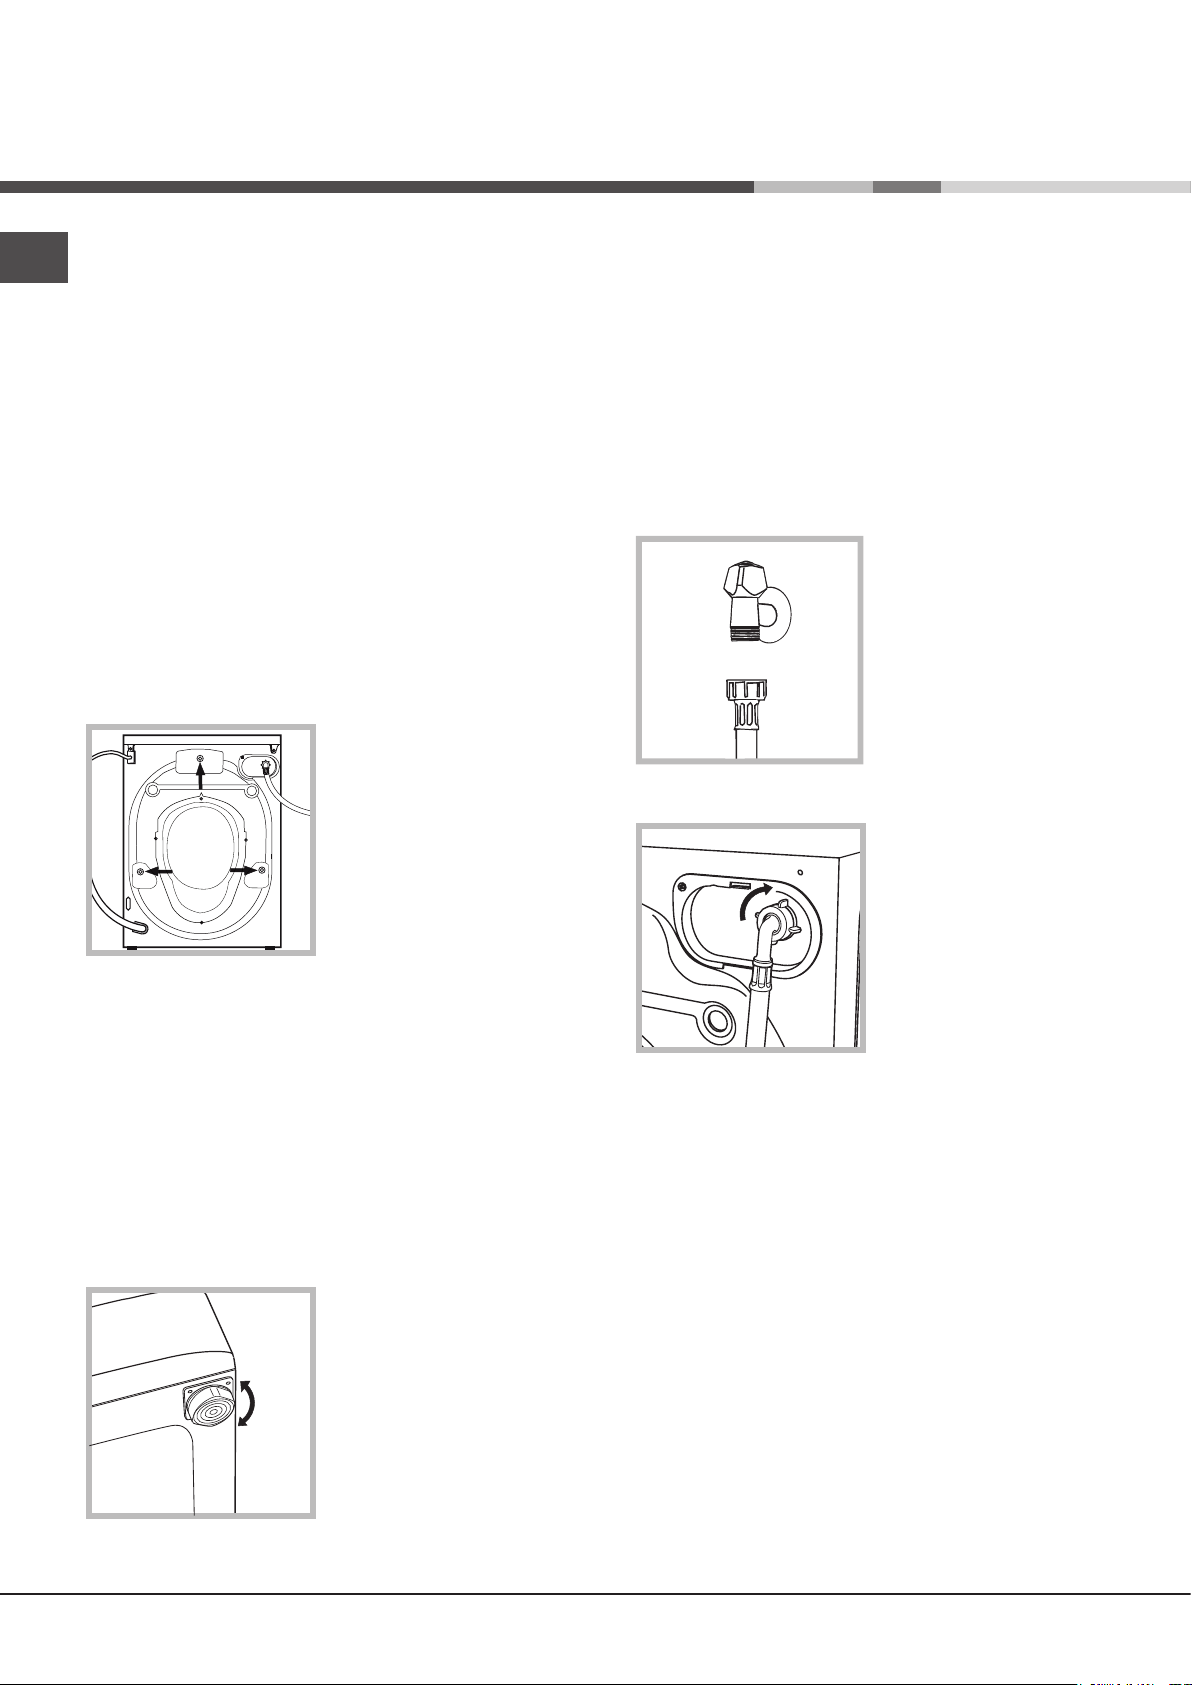
Connecting the electricity and
water supplies
Connecting the water inlet hose
1. Connect the inlet
hose by screwing it to
a cold water tap using
a 3/4 gas threaded
connection (see figu-
re).
Before performing the
connection, allow the
water to run freely until
it is perfectly clear.
2. Connect the inlet
hose to the washing
machine by screwing
it onto the corresponding water inlet of the
appliance, which is
situated on the top
right-hand side of the
rear part of the appliance (see figure).
3. Make sure that the hose is not folded over
or bent.
! The water pressure at the tap must fall within
the range of values indicated in the Technical
data table (see next page).
! If the inlet hose is not long enough, contact a
specialised shop or an authorised technician.
! Never use second-hand hoses.
! Use the ones supplied with the machine.
2
Page 3
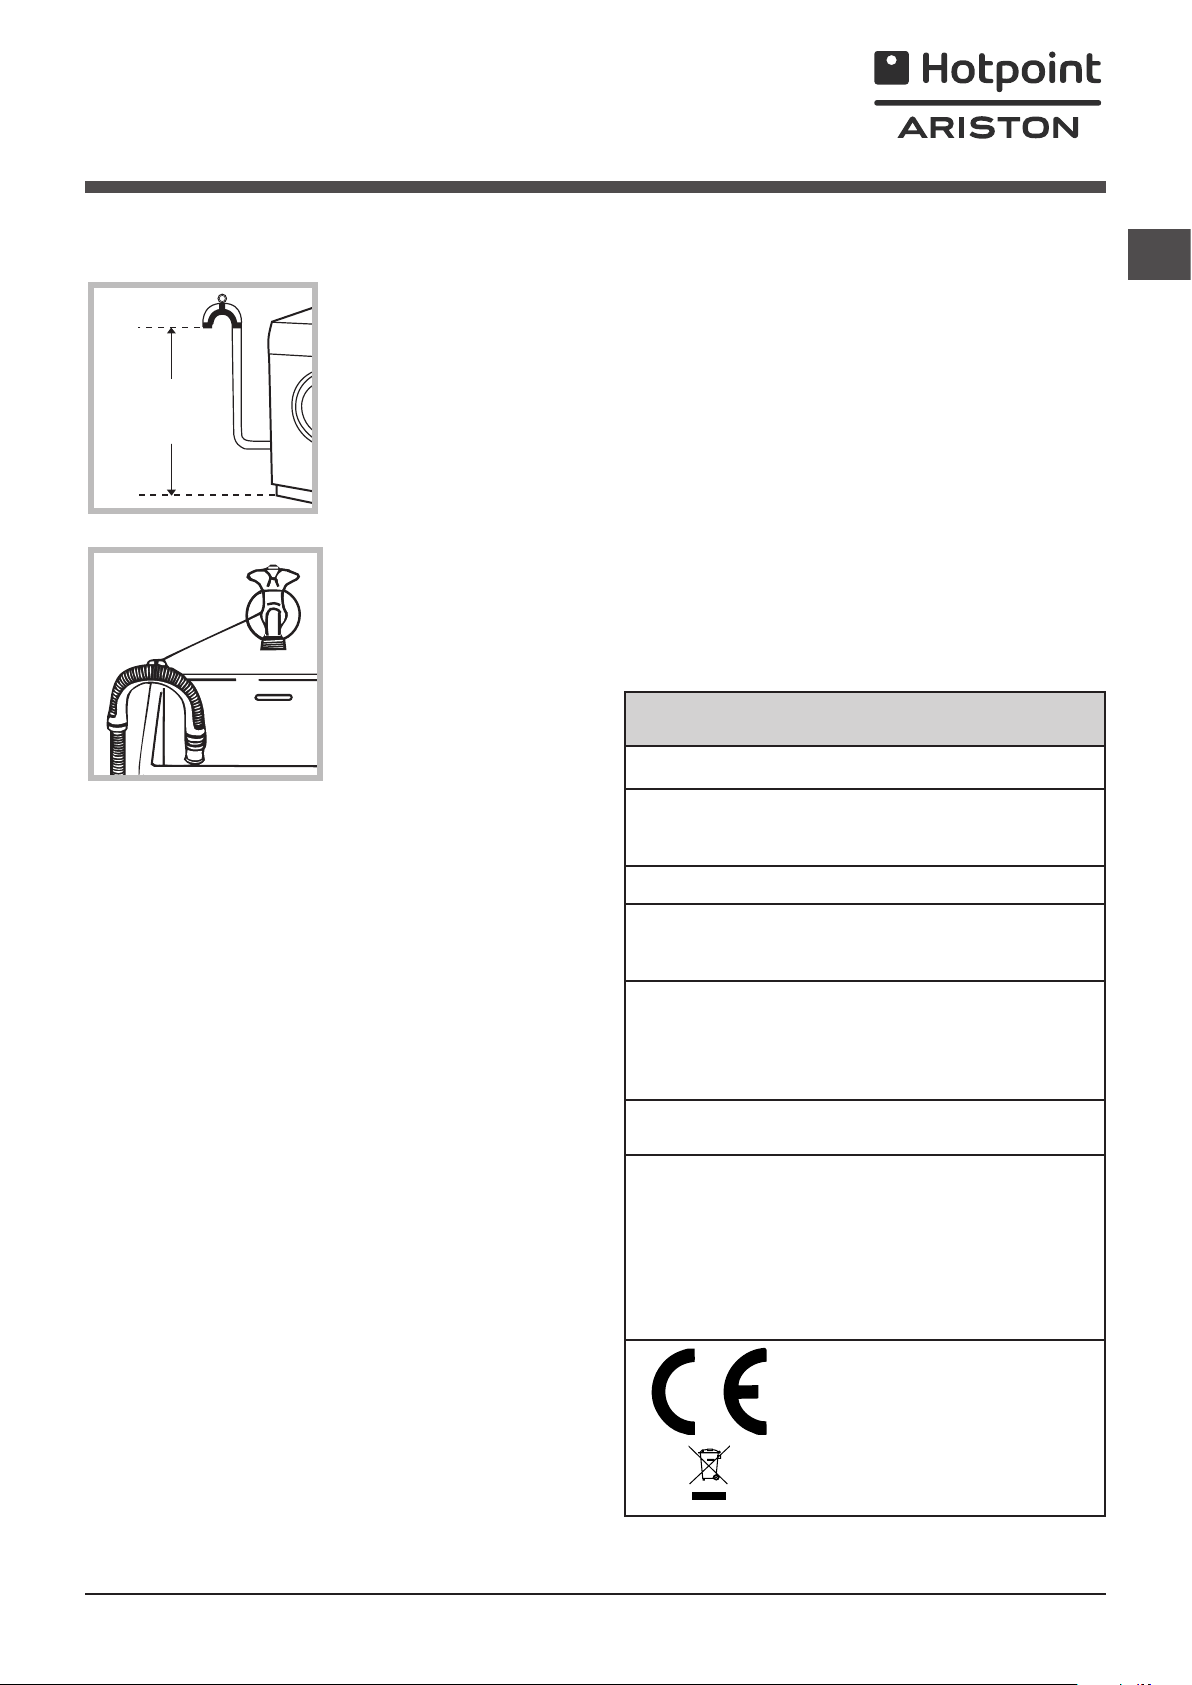
Connecting the drain hose
65 - 100 cm
Connect the drain
hose, without bending
it, to a drain duct or
a wall drain situated
between 65 and 100
cm from the floor;
alternatively, placed
it over the edge of a
basin, sink or tub, fastening the duct supplied to the tap (see
figure). The free end
of the hose should
not be underwater.
! Do not use extension cords or multiple sockets.
! The cable should not be bent or compressed.
! The power supply cable must only be replaced by authorised technicians.
Warning! The company shall not be held responsible in the event that these standards are
not observed.
The first wash cycle
Once the appliance has been installed, and
before you use it for the first time, run a wash
cycle with detergent and no laundry, using
wash cycle number “Auto Clean” (see “Clea-
ning the washing machine”).
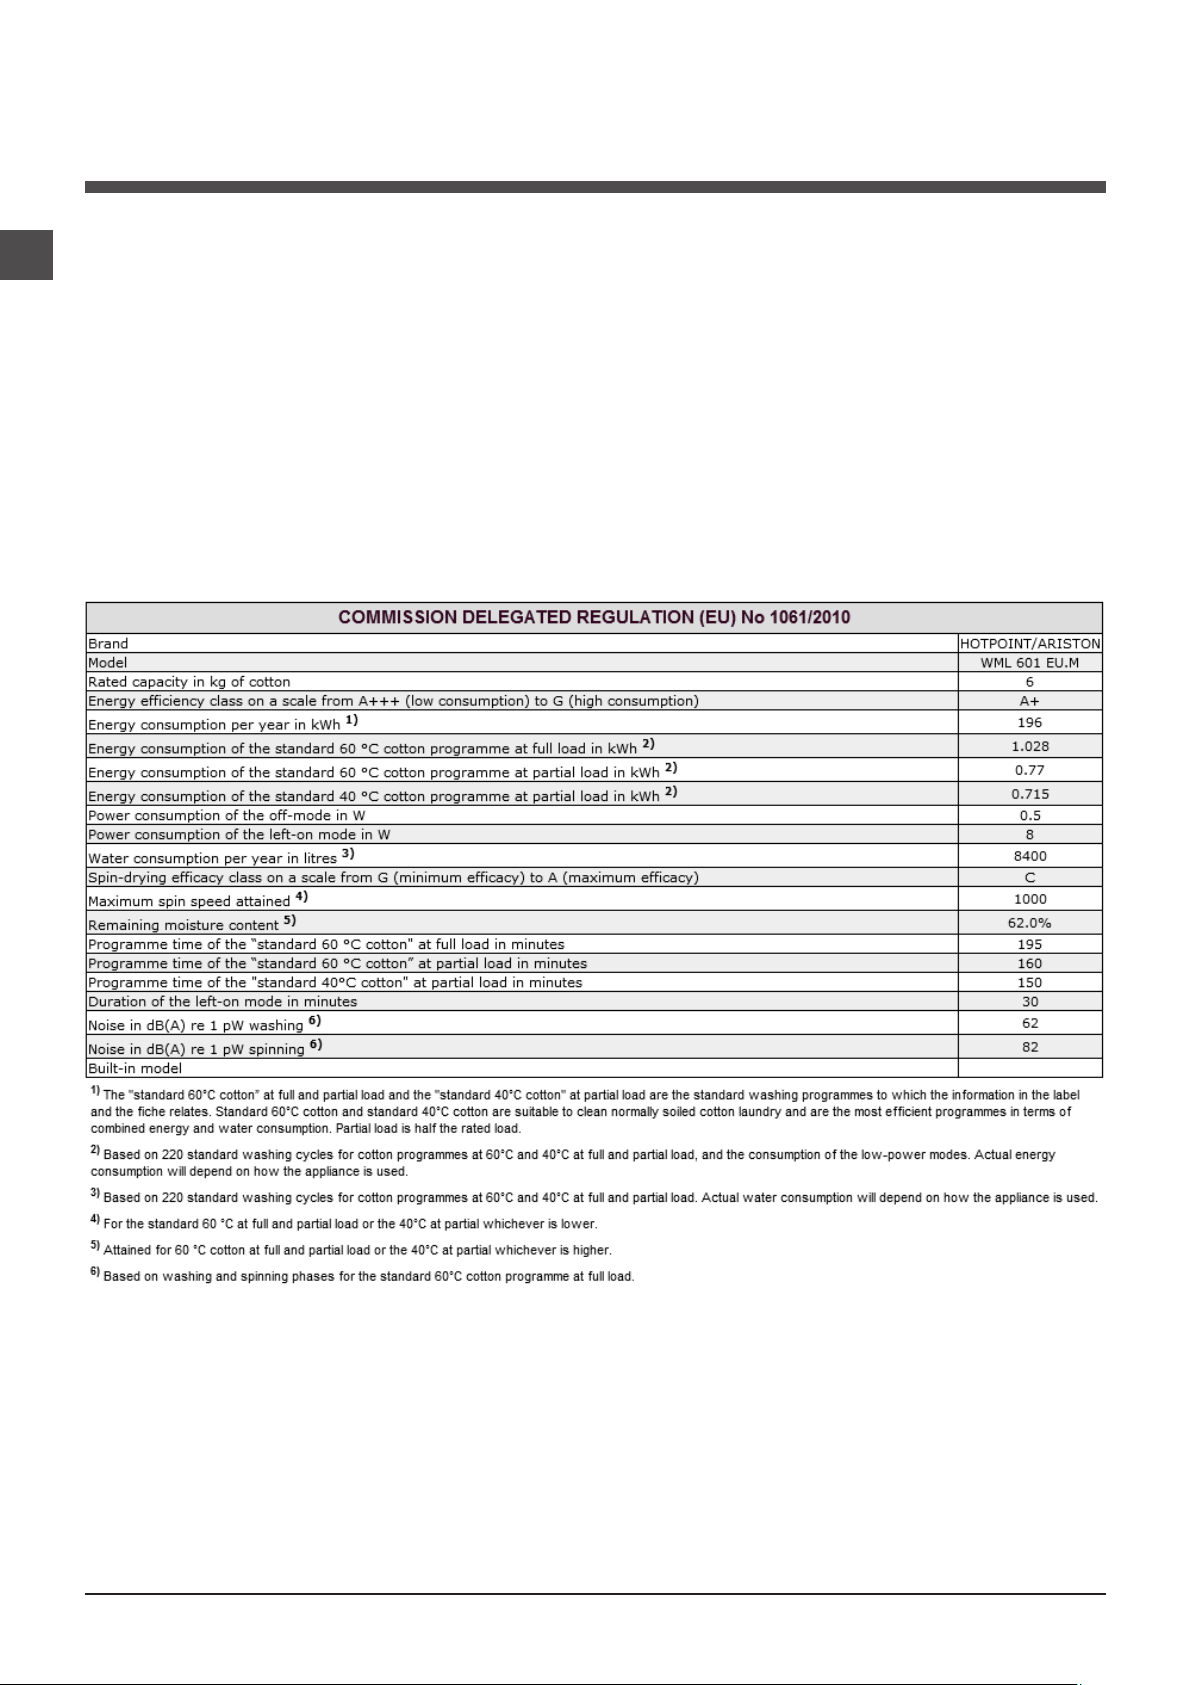
Technical data
GB
! We advise against the use of hose extensions;
if it is absolutely necessary, the extension must
have the same diameter as the original hose
and must not exceed 150 cm in length.
Electrical connections
Before plugging the appliance into the electricity socket, make sure that:
• thesocketisearthedandcomplieswithall
applicable laws;
• thesocketisabletowithstandthemaximum power load of the appliance as indicated
in the Technical data table (see opposite);
• thepowersupplyvoltagefallswithinthevalues indicated in the Technical data table (see
opposite);
• thesocketiscompatiblewiththeplugofthe
washing machine. If this is not the case, replace the socket or the plug.
! The washing machine must not be installed
outdoors, even in covered areas. It is extremely dangerous to leave the appliance exposed
to rain, storms and other weather conditions.
Model
Dimensions
Capacity
Electrical
connections
Water connections
Spin speed
Test wash
cycles in
accordance
with regulations
1061/2010
1015/2010
WML 601
width 59.5 cm
height 85 cm
depth 51,7 cm
from 1 to 6 kg
please refer to the technical
data plate fixed to the machine
maximum pressure
1 MPa (10 bar)
minimum pressure
0.05 MPa (0.5 bar)
drum capacity 46 litres
up to 1000 rotations per
minute
programme 4;
Eco Cotton 60°C.
programme 4;
Eco Cotton 40°C.
This appliance conforms to
the following EC Directives:
- 2004/108/EC (Electromagnetic Compatibility)
- 2006/95/EC (Low Voltage)
- 2012/19/EU - WEEE
! When the washing machine has been installed, the electricity socket must remain within
easy reach.
3
Page 4
Care and maintenance
1
2
GB
Cutting off the water and electricity supplies
•Turnoffthewatertapaftereverywashcycle.
This will limit wear on the hydraulic system inside the washing machine and help to prevent
leaks.
•Unplugthewashingmachinewhencleaning
it and during all maintenance work.
Cleaning the washing machine
•Theouterpartsandrubbercomponents
of the appliance can be cleaned using a soft
cloth soaked in lukewarm soapy water. Do not
use solvents or abrasives.
•Thewashingmachinehasa“AutoClean”
programme for its internal parts that must be
run with no load in the drum.
To help the wash cycle you may want to use
either the detergent (i.e. a quantity 10% the
quantity specified for lightly-soiled garments)
or special additives to clean the washing
machine. We recommend running a cleaning
programme every 40 wash cycles.
A
B
To start the programme
press buttons A and
B simultaneously for 5
seconds (see figure).
The programme will
start automatically and
will run for about 70
minutes. To stop the
cycle press the START/
PAUSE button.
Caring for the door and drum of
your appliance
•Alwaysleavetheportholedoorajarinorder
to prevent unpleasant odours from forming.
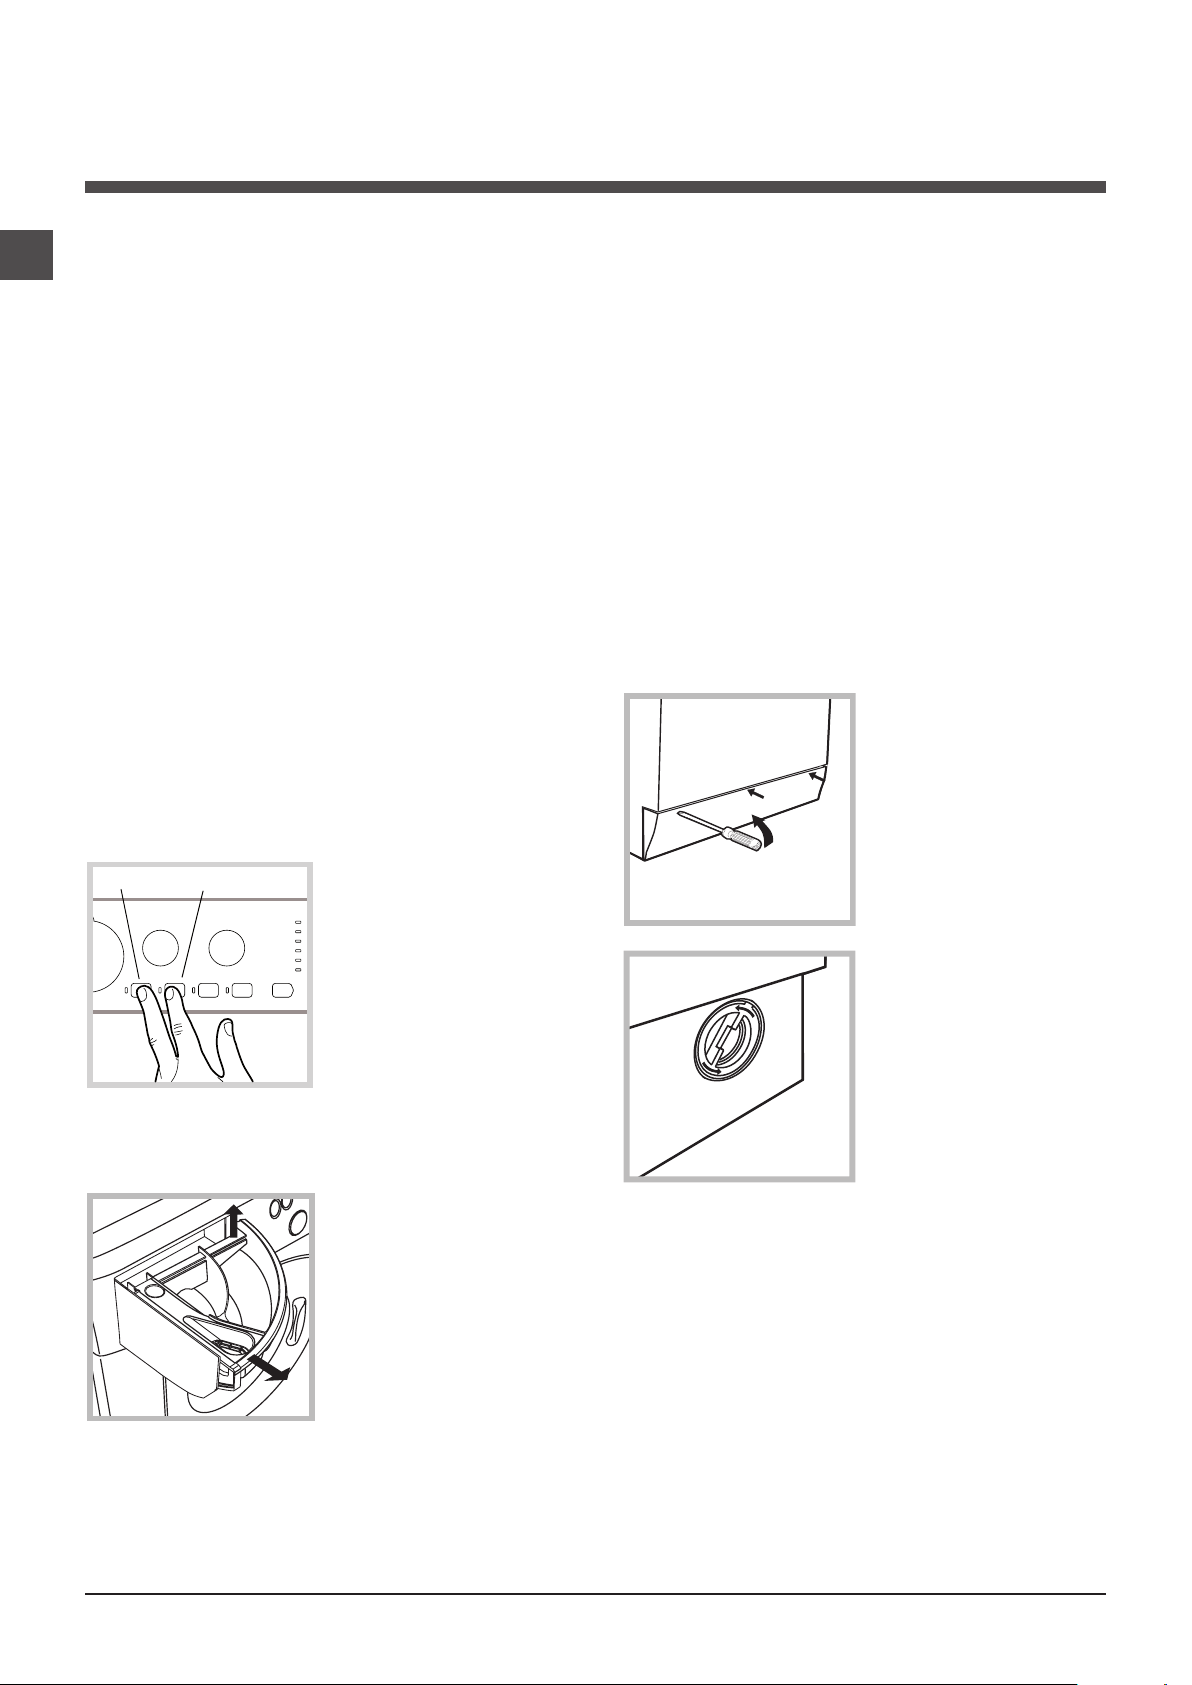
Cleaning the pump
The washing machine is fitted with a self-cleaning pump which does not require any maintenance. Sometimes, small items (such as coins
or buttons) may fall into the pre-chamber which
protects the pump, situated in its bottom part.
! Make sure the wash cycle has finished and
unplug the appliance.
To access the pre-chamber:
1. using a screwdriver, remove the cover
panel on the lower
front part of the washing machine (see
figure);
2. unscrew the lid
by rotating it anticlockwise (see figu-
re): a little water may
trickle out. This is
perfectly normal;
Cleaning the detergent dispenser
drawer
Remove the dispenser by raising it and
pulling it out (see
figure).
Wash it under running
water; this operation
should be repeated
frequently.
4
3. clean the inside thoroughly;
4. screw the lid back on;
5. reposition the panel, making sure the hooks
are securely in place before you push it onto
the appliance.
Checking the water inlet hose
Check the inlet hose at least once a year. If
there are any cracks, it should be replaced
immediately: during the wash cycles, water
pressure is very strong and a cracked hose
could easily split open.
! Never use second-hand hoses.
Page 5

Precautions and tips
! This washing machine was designed and constructed in
accordance with international safety regulations. The following information is provided for safety reasons and must
therefore be read carefully.
General safety
•Thisappliancewasdesignedfordomesticuseonly.
• This appliance can be used by children aged
from 8 years and above and persons with
reduced physical, sensory or mental capabilities or lack of experience and knowledge if
they have been given supervision or instruction concerning use of the appliance in a
safe way and understand the hazards involved. Children shall not play with the appliance. Cleaning and user maintenance shall not
be made by children without supervision..
•Donottouchthemachinewhenbarefootorwithwetor
damp hands or feet.
•Donotpullonthepowersupplycablewhenunplugging
the appliance from the electricity socket. Hold the plug
and pull.
•Donotopenthedetergentdispenserdrawerwhilethe
machine is in operation.
•Donottouchthedrainedwaterasitmayreachextremely high temperatures.
•Neverforcetheportholedoor.Thiscoulddamagethesafety
lock mechanism designed to prevent accidental opening.
•Iftheappliancebreaksdown,donotunderanycircumstances access the internal mechanisms in an attempt
to repair it yourself.
•Alwayskeepchildrenwellawayfromtheappliancewhile
it is operating.
•Thedoorcanbecomequitehotduringthewashcycle.
•Iftheappliancehastobemoved,workinagroupoftwo
or three people and handle it with the utmost care. Never
try to do this alone, because the appliance is very heavy.
•Beforeloadinglaundryintothewashingmachine,make
sure the drum is empty.
GB
Disposal
•Disposingofthepackagingmaterials:observelocalregu-
lations so that the packaging may be re-used.
•TheEuropeanDirective2012/19/EU-WEEEonWaste
Electrical and Electronic Equipment, requires that old
household electrical appliances must not be disposed of in
the normal unsorted municipal waste stream. Old appliances must be collected separately in order to optimise the
recovery and recycling of the materials they contain and
reduce the impact on human health and the environment.
The crossed out “wheeled bin” symbol on the product
reminds you of your obligation, that when you dispose of
the appliance it must be separately collected. Consumers
should contact their local authority or retailer for information
concerning the correct disposal of their old appliance.
5
Page 6
Description of the washing
machine and starting a wash cycle
GB
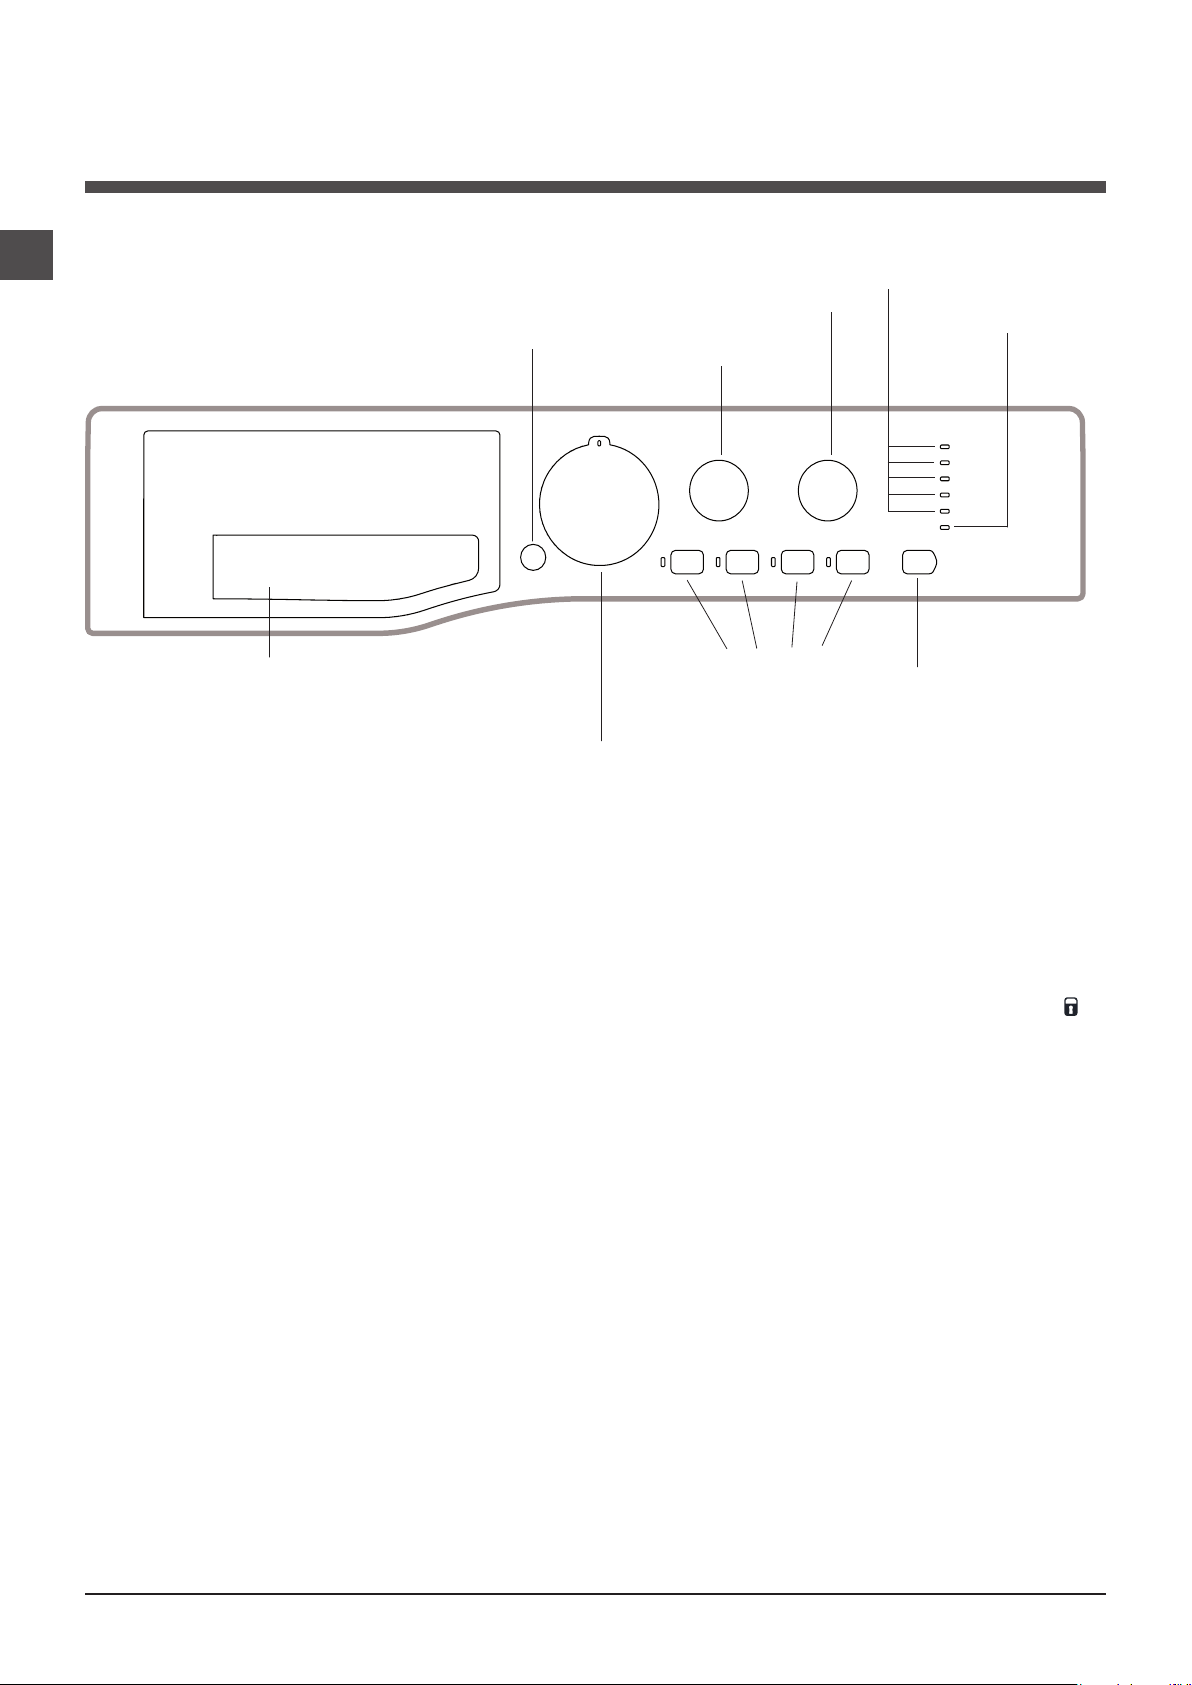
Control panel
Detergent dispenser drawer
ON/OFF
button
TEMPERATURE
WASH CYCLE
knob
SPIN SPEED
knob
FUNCTION
buttons with
indicator lights
WASH CYCLE PROGRESS/
DELAY TIMER indicator lights
knob
START/PAUSE
button with indicator
light
DOOR
LOCKED
indicator light
Detergent dispenser drawer: used to dispense
detergents and washing additives (see “Detergents and
laundry”).
ON/OFF button: switches the washing machine on and off.
WASH CYCLE knob: programmes the wash cycles. Du-
ring the wash cycle, the knob does not move.
FUNCTION buttons with indicator light: used to select the
available functions. The indicator light corresponding to the
selected function will remain lit.
TEMPERATURE knob: sets the temperature or the cold
wash cycle (see “Personalisation”).
SPIN SPEED knob: sets the spin speed or exclude the
spin cycle completely (see “Personalisation”).
WASH CYCLE PROGRESS/DELAY TIMER
light
s: used to monitor the progress of the wash cycle.
The illuminated indicator light shows which phase is in
progress.
If the Delay Timer function has been set, the time remaining
until the wash cycle starts will be indicated (see next page).
indicator
START/PAUSE button with indicator light: starts or temporarily interrupts the wash cycles.
N.B. To pause the wash cycle in progress, press this
button; the corresponding indicator light will flash orange,
while the indicator light for the current wash cycle phase
will remain lit in a fixed manner. If the DOOR LOCKED
indicator light is switched off, the door may be opened
(wait approximately 3 minutes).
To start the wash cycle from the point at which it was interrupted, press this button again.
Standby mode
This washing machine, in compliance with new energy saving regulations, is fitted with an automatic standby system
which is enabled after about 30 minutes if no activity is
detected. Press the ON-OFF button briefly and wait for the
machine to start up again.
DOOR LOCKED indicator light: indicates whether the
door may be opened or not (see next page).
6
Page 7
Indicator lights
END
The indicator lights provide important information.
This is what they can tell you:
Wash cycle phase indicator lights
Once the desired wash cycle has been selected and has
begun, the indicator lights switch on one by one to indicate
which phase of the cycle is currently in progress.
GB
Delayed start
If the DELAY TIMER function has been activated (see “Personalisation”), after the wash cycle has been started the
indicator light corresponding to the selected delay period
will begin to flash:
As time passes, the remaining delay will be displayed and
the corresponding indicator light will flash:
Once the set delay has elapsed, the flashing indicator light
will switch off and the selected wash cycle will begin.
Wash
Rinse
Spin
Pump out
End of wash cycle
Function buttons and corresponding indicator lights
When a function is selected, the corresponding indicator
light will illuminate.
If the selected function is not compatible with the programmed wash cycle, the corresponding indicator light will
flash and a sound alert (3 beeps); the function will not be
activated.
If a function which is incompatible with another function
selected previously, only the most recent selection will
remain active.
Door locked indicator light
If this indicator light is on, the appliance door is locked to
prevent it from being opened accidentally; to avoid any
damage, wait for the indicator light to switch off before you
open the appliance door (wait approximately 3 minutes).
N.B. If the DELAY TIMER function is activated, the door
cannot be opened; pause the machine by pressing the
START/PAUSE button if you wish to open it.
! If the START/PAUSE indicator light (orange) flashes
rapidly at the same time as the function indicator light, this
indicates a problem has occurred (see “Troubleshooting”).
Starting a wash cycle
1. Turn the washing machine on by pressing the ON/OFF button. All the indicator lights will turn on for a few seconds, then only
the indicator lights relative to the selected programme settings will remain lit and the START/PAUSE indicator light will flash.
2. Load the laundry and close the door.
3. Set the WASH CYCLE knob to the desired programme.
4. Set the washing temperature (see “Personalisation”).
5. Set the spin speed (see “Personalisation”).
6. Measure out the detergent and washing additives (see “Detergents and laundry”).
7. Select the desired functions.
8. Start the wash cycle by pressing the START/PAUSE button and the corresponding indicator light will remain lit in a fixed
manner, in green.
To cancel the set wash cycle, pause the machine by pressing the START/PAUSE button and select a new cycle.
9. At the end of the wash cycle the indicator light will switch on. The DOOR LOCKED indicator light will switch off, indi-
cating that the door may be opened (wait approximately 3 minutes). Take out your laundry and leave the appliance door ajar
to make sure the drum dries completely. Switch the washing machine off by pressing the ON/OFF button.
7
Page 8
GB
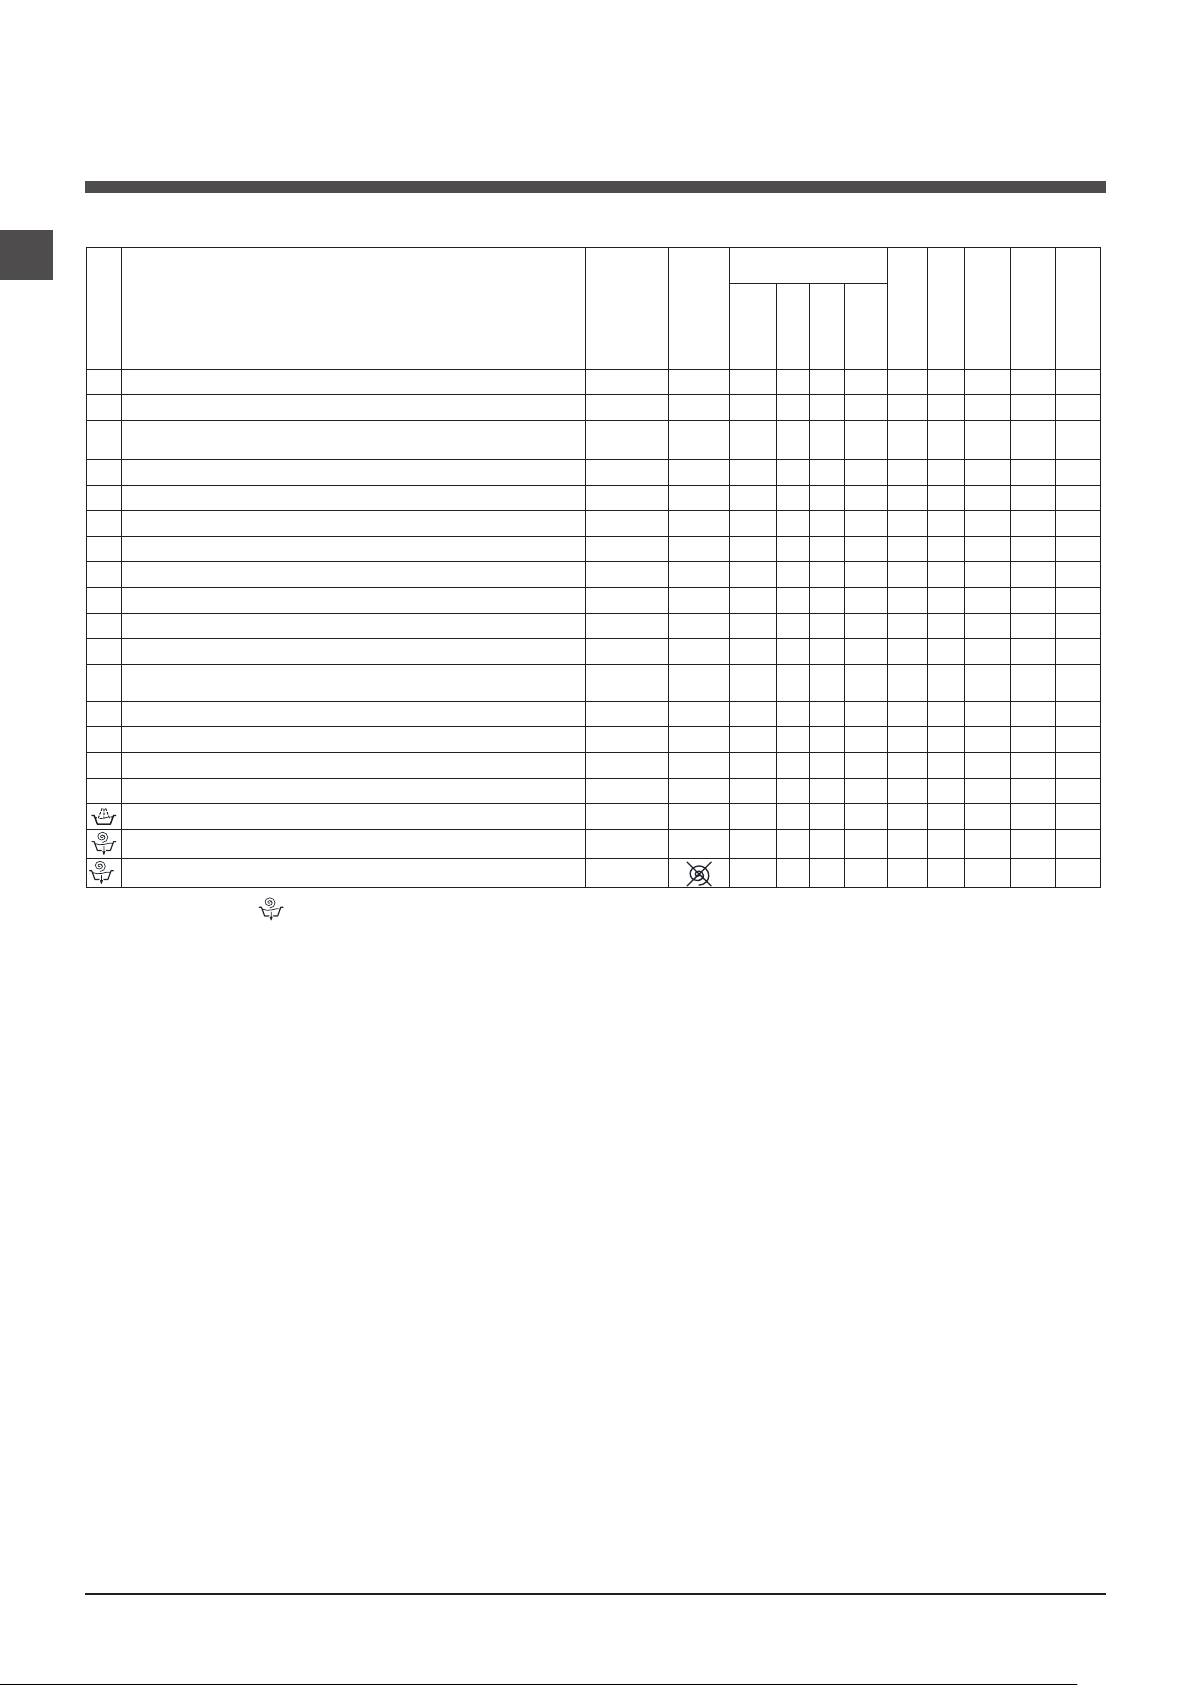
Wash cycles
Table of wash cycles
Description of the wash cycle
Wash cycles
Anti Stain
1
Whites
2
Cotton: lightly soiled resistant and delicate colours.
3
4
Eco Cotton 60° (1): heavily soiled whites and resistant colours.
Eco Cotton 40° (2): lightly soiled resistant and delicate colours.
4
Synthetics: heavily soiled resistant colours.
5
Synthetics (3): lightly soiled resistant colours.
5
Anti allergy
6
Baby
7
Wool: for wool, cashmere, etc.
8
Delicates
9
Fast Wash 60’: to refresh normal soiled garments quickly (not
10
suitable for wool, silk and clothes which require washing by hand).
Cotton 20°: lightly soiled resistant and delicate colours.
11
Eco Cottons
12
Eco Synthetics
13
Eco Fast 30’
14
Rinse
Spin and Pump out
Pump out only *
Detergents
Max.
temp.
(°C)
40° 1000
60° 1000
40°
(Max. 90°)
60° 1000 40° 1000 60° 1000
40° 1000
60° 1000 40° 1000
40° 800 30° 0 -
60° 1000 -
20° 1000 -
Cold Water
Cold Water
Cold Water
Max.
speed
(rpm)
1000
1000 1000 -
800 -
- 1000 - -
- 1000 - - - - 6 - - - 10’
- - - - - 6 - - - 3’
Wash
Prewash
Bleach
-
-
-
-
-
-
-
-
-
-
Fabric
softener
1,5 - - - 80’
3,5 62 0,68 30 60’
pness%
Energy con-
Max. load (kg)
4 - - - 180’
4 - - - 180’
6 - - - 115’
6 62 1,02 49,8 195’
6 62 0,86 76 185’
3 44 0,78 33 120’
3 - - - 110’
4 - - - 200’
3 - - - 150’
1 - - - 75’
6 - - - 175’
6 - - - 100’
3 - - - 75’
3 70 0,05 36 30’
6 - - - 49’
sumptionkWh
Residual dam-
Total water lt
Cycle duration
* If you select programme and exclude the spin cycle, the machine will drain only.
The length of cycle shown on the display or in this booklet is an estimation only and is calculated assuming standard working conditions. The actual duration can vary according to factors such as water temperature and pressure, the amount of detergent used, the amount and type of load inserted, load balancing and any wash options selected.
1) Test wash cycle in compliance with regulation 1061/2010: set wash cycle 4 with a temperature of 60°C.
This cycle is designed for cotton loads with a normal soil level and is the most efficient in terms of both electricity and water consumption; it should be used for garments which can be
washed at 60°C . The actual washing temperature may differ from the indicated value.
2) Test wash cycle in compliance with regulation 1061/2010: set wash cycle 4 with a temperature of 40°C.
This cycle is designed for cotton loads with a normal soil level and is the most efficient in terms of both electricity and water consumption; it should be used for garments which can be
washed at 40°C . The actual washing temperature may differ from the indicated value.
For all Test Institutes:
2) Long wash cycle for cottons: set wash cycle 4 with a temperature of 40°C.
3) Long wash cycle for synthetics: set wash cycle 5 with a temperature of 40°C.
Anti Stain: the programme 1 is suitable to heavily-soiled garments with resistant colours. It ensures a washing class that is
higher than the standard class (A class). When running the programme, do not mix garments of different colours. We recommend the use of powder detergent. Pre-treatment with special additives is recommended if there are obstinate stains.
Whites: use this cycle 2 to wash white clothes. The programme is designed to maintain the brightness of white clothes over
time. Use powder detergent for best results.
Anti allergy: use programme 6 to remove major allergens such as pollen, mites, cat’s and dog’s hair.
Baby: use the special wash cycle 7 to remove the remove the soiling typically caused by babies, while removing all traces
of detergent from nappies in order to prevent the delicate skin of babies from suffering allergic reactions. The cycle has been
designed to reduce the amount of bacteria by using a greater quantity of water and optimising the effect of special disinfecting additives added to the detergent.
Eco cycles
The Eco Cycles assure energy saving by eliminating the need of heating water and it’s an advantage both to your
energy bill and the environment! These innovative Eco programmes (
12
Eco Cottons,
13
Eco Synthetics and
14
Eco
Fast 30’) are available for various fabrics and different quantity of garment; they have been designed to guarantee a
high cleaning action even at low temperature and can be used for lightly to medium soiled loads. Eco Cycles give the
best results thanks to an intensified wash action, water optimization and are carried out in the same average time of a
standard cycle. For the best washing results with Eco Cycles we recommend the usage of a liquid detergent.
Cotton 20°: the programme 11 ideal for lightly soiled cotton loads. The effective performance levels achieved at cold
temperatures, which are comparable to washing at 40°, are guaranteed by a mechanical action which operates at varying
speed, with repeated and frequent peaks.
8
Page 9
Personalisation
Setting the temperature
Turn the TEMPERATURE knob to set the wash temperature (see Table of wash cycles).
The temperature may be lowered, or even set to a cold wash ( ).
The washing machine will automatically prevent you from selecting a temperature which is higher than the maximum value
set for each wash cycle.
! Exception: if the
3
programme is selected, the temperature can be increased up to a value of 90°C.
Setting the spin speed
Turn the SPIN SPEED knob to set the spin speed for the selected wash cycle.
The maximum spin speeds available for each wash cycle are as follows:
Wash cycles Maximum spin speed
Cottons 1000 rpm
Synthetics 1000 rpm
Wool 800 rpm
Silk drain only
The spin speed may be lowered, or the spin cycle can be excluded altogether by selecting the symbol .
The washing machine will automatically prevent you from selecting a spin speed which is higher than the maximum speed
set for each wash cycle.
Functions
The various wash functions available with this washing machine will help to achieve the desired results, every time.
To activate the functions:
1. Press the button corresponding to the desired function;
2. the function is enabled when the corresponding indicator light is illuminated.
Note:
- If the selected function is not compatible with the programmed wash cycle, the corresponding indicator light will flash and
a sound alert (3 beeps); the function will not be activated.
- If a function which is incompatible with another function selected previously, only the most recent selection will remain
active.
GB
Super Wash
This option offers a high-performance wash due to the greater quantity of water used in the initial phase of the cycle, and due
to the increased wash cycle duration, is particularly useful for the removal of stubborn stains. It can be used with or without
bleach. If you desire bleaching, insert the extra tray compartment (4) into compartment 1. When pouring in the bleach, be
careful not to exceed the “max” level marked on the central pivot (see figure pag. 10).
Easy iron
By selecting this function, the wash and spin cycles will be modified in order to reduce the formation of creases. At the end
of the cycle the washing machine will perform slow rotations of the drum; the EASY IRON indicator light will flash and the
phase will remain lit in a fixed manner. To end the cycle, press the START/PAUSE button or the EASY IRON button.
Prewash
If this function is selected, the pre-wash cycle will run; this is useful for removing stubborn stains.
N.B.: Put the detergent in the relevant compartment.
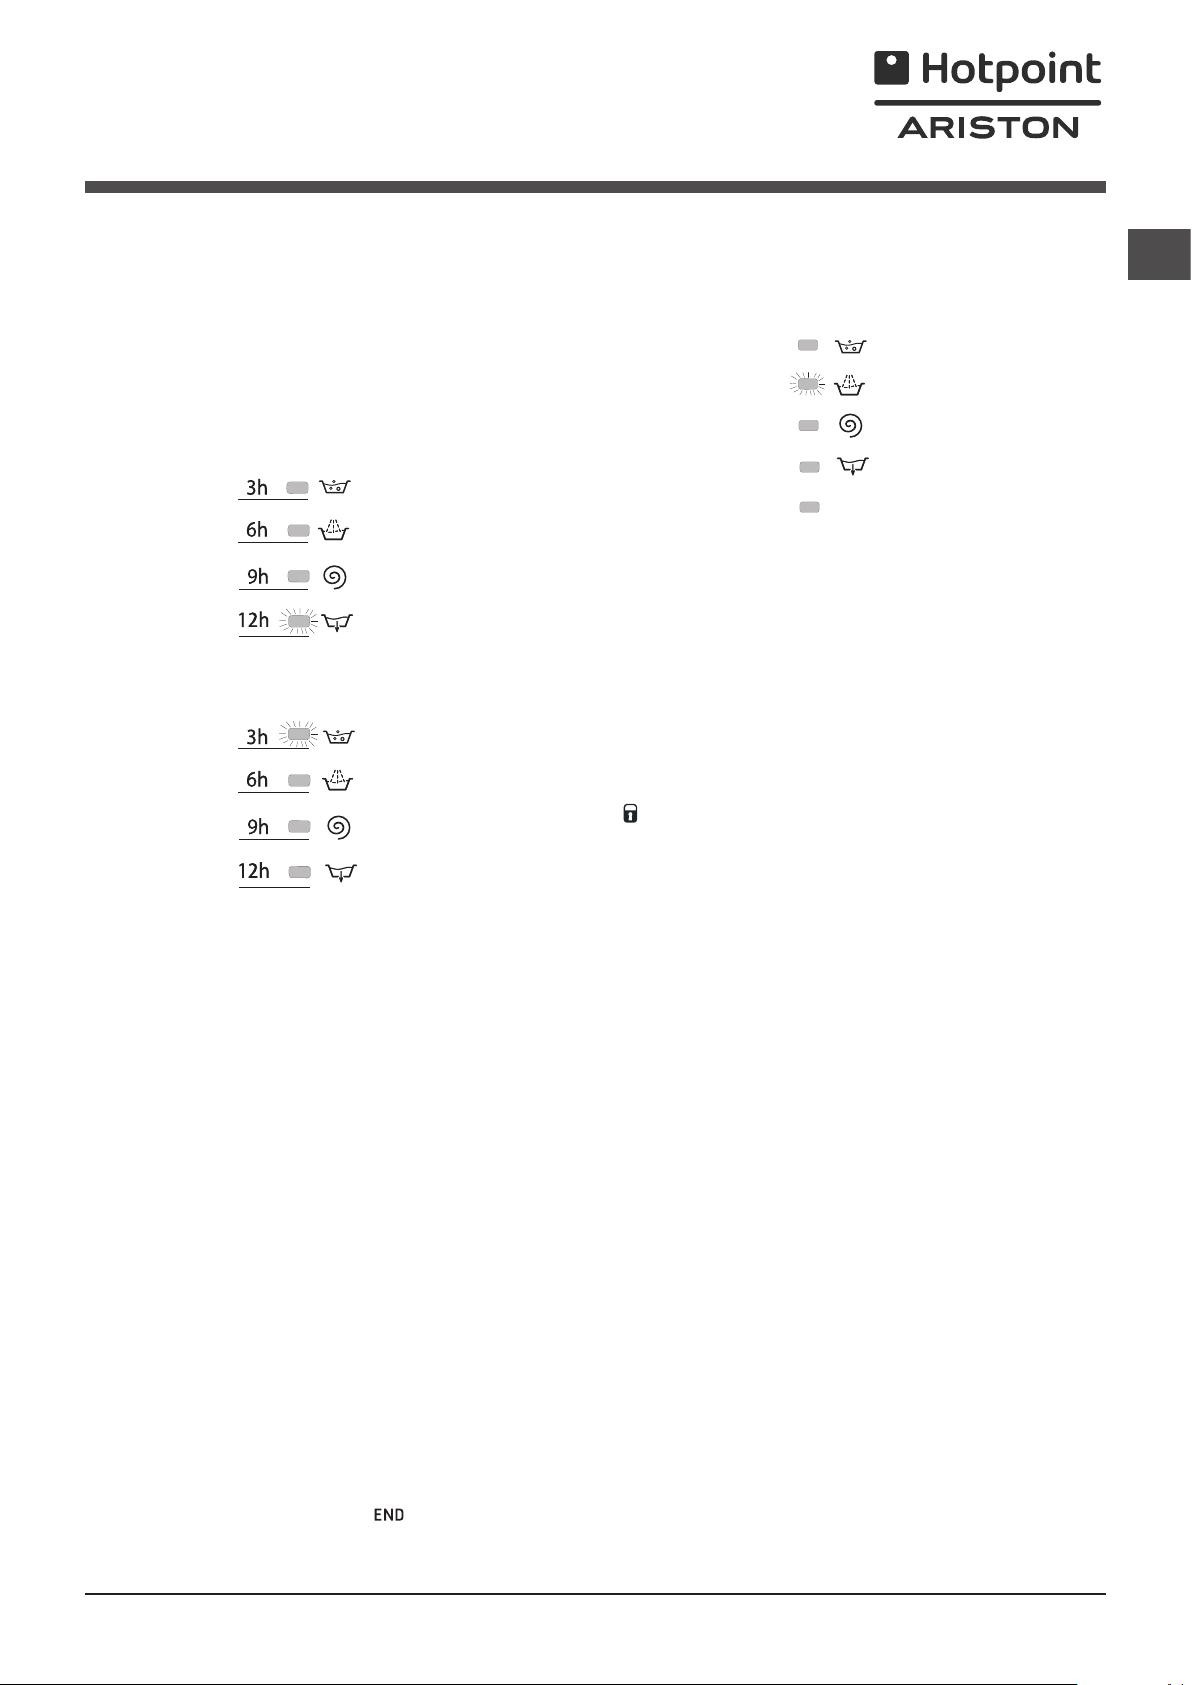
Delay timer
This timer delays the start time of the wash cycle by up to 12 hours.
Press the button repeatedly until the indicator light corresponding to the desired delay time switches on. The fifth time the button
is pressed, the function will be disabled.
N.B. Once you have pressed the START/PAUSE button, the delay time may only be decreased if you wish to modify it.
9
Page 10
Detergents and laundry
M
AX
1
2
4
3
A
B
GB
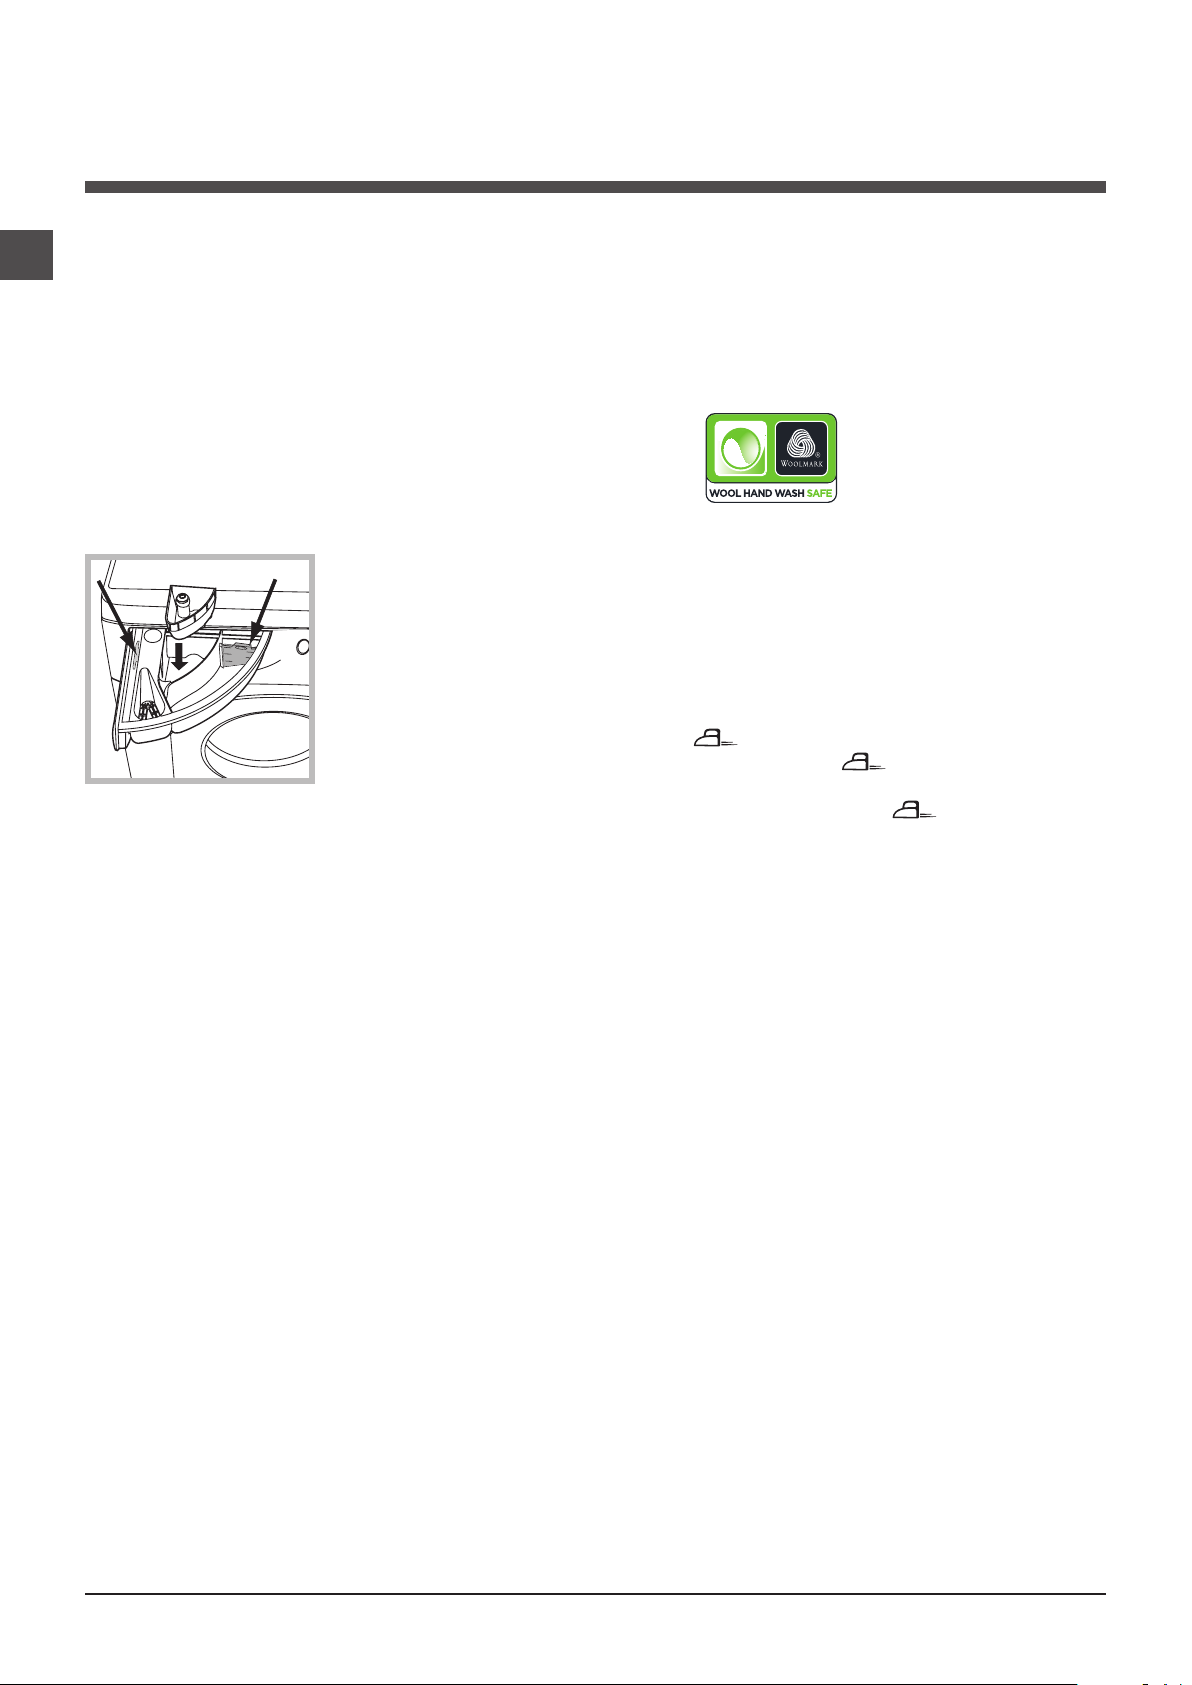
Detergent dispenser drawer
Good washing results also depend on the correct dose of
detergent: adding too much detergent will not necessarily result in a more efficient wash, and may in fact cause
build up on the inside of your appliance and contribute to
environmental pollution.
! Use powder detergent for white cotton garments, for
pre-washing, and for washing at temperatures over 60°C.
! Follow the instructions given on the detergent packaging.
! Do not use hand washing detergents because these
create too much foam.
Open the detergent dispenser drawer and pour
in the detergent or washing
additive, as follows.
compartment 1: Pre-wash detergent (powder)
Before pouring in the detergent, make sure that extra compartment 4 has been removed.
compartment 2: Detergent for the wash cycle
(powder or liquid)
If liquid detergent is used, it is recommended that the
removable plastic partition A (supplied) be used for proper
dosage.
If powder detergent is used, place the partition into slot B.
compartment 3: Additives (fabric softeners, etc.)
The fabric softener should not overflow the grid.
extra compartment 4: Bleach
Preparing the laundry
Garments requiring special care
Wool - Woolmark Apparel Care - Green:
the wool wash cycle of this machine has been approved
by The Woolmark Company for the washing of wool garments labelled as “hand wash” provided that the products
are washed according to the instructions on the garment
label and those issued by the manufacturer of this washing
machine.
In UK, Eire, Hong Kong and India the Woolmark trade
mark is a Certification trade mark.
Delicates: use programme 9 to wash very delicate gar-
ments having strasses or sequins.
We recommend turning the garments inside out before
washing and placing small items into the special bag for
washing delicates.
Use liquid detergent on delicate garments for best results.
To wash silk garments and curtains select cycle 9 and then
function ; the machine will end the cycle while the
laundry is soaking and the indicator light will flash. To
drain the water so that the laundry may be removed, press
the START/PAUSE button or the button.
Load balancing system
Before every spin cycle, to avoid excessive vibrations and
to distribute the load in a uniform manner, the drum rotates
continuously at a speed which is slightly greater than the
washing rotation speed. If, after several attempts, the load
is not balanced correctly, the machine spins at a reduced
spin speed. If the load is excessively unbalanced, the
washing machine performs the distribution process instead
of spinning. To encourage improved load distribution and
balance, we recommend small and large garments are
mixed in the load.
•Dividethelaundryaccordingto:
- the type of fabric/the symbol on the label
- the colours: separate coloured garments from whites.
•Emptyallgarmentpocketsandcheckthebuttons.
• Donotexceedthelistedvalues,whichrefertothe
weight of the laundry when dry: see “Table of wash
cycles”.
How much does your laundry weigh?
1 sheet 400-500 g
1 pillow case 150-200 g
1 tablecloth 400-500 g
1 bathrobe 900-1200 g
1 towel 150-250 g
10
Page 11

Troubleshooting
Your washing machine could fail to work. Before contacting the Technical Assistance Centre (see “Assistance”), make sure
that the problem cannot be solved easily using the following list.
Problem:
The washing machine does not
switch on.
The wash cycle does not start.
The washing machine does not
take in water (the indicator light for
the first wash cycle stage flashes
rapidly).
The washing machine continuously
takes in and drains water.
Possible causes / Solutions:
•Theapplianceisnotpluggedintothesocketfully,orisnotmakingcontact.
•Thereisnopowerinthehouse.
•Thewashingmachinedoorisnotclosedproperly.
•TheON/OFFbuttonhasnotbeenpressed.
•TheSTART/PAUSEbuttonhasnotbeenpressed.
•Thewatertaphasnotbeenopened.
•Adelayedstarthasbeenset(see “Personalisation”).
•Thewaterinlethoseisnotconnectedtothetap.
•Thehoseisbent.
•Thewatertaphasnotbeenopened.
•Thereisnowatersupplyinthehouse.
•Thepressureistoolow.
•TheSTART/PAUSEbuttonhasnotbeenpressed.
•Thedrainhoseisnotfittedataheightbetween65and100cmfromthefloor
(see “Installation”).
•Thefreeendofthehoseisunderwater(see “Installation”).
•Thewalldrainagesystemisnotfittedwithabreatherpipe.
If the problem persists even after these checks, turn off the water tap, switch
the appliance off and contact the Assistance Service. If the dwelling is on one of
the upper floors of a building, there may be problems relating to water drainage,
causing the washing machine to fill with water and drain continuously. Special
anti-draining valves are available in shops and help to avoid this inconvenience.
GB
The washing machine does not
drain or spin.
The washing machine vibrates a lot
during the spin cycle.
The washing machine leaks.
The START/PAUSE indicator light
(orange) and the function indicator
lights flash rapidly.
There is too much foam.
•Thewashcycledoesnotincludedraining:somewashcyclesrequirethedrain
phase to be started manually.
•TheEASYIRONfunctionhasbeenactivated:Tocompletethewashcycle,
press the START/PAUSE button (“Personalisation”).
•Thedrainhoseisbent(see “Installation”).
•Thedrainageductisclogged.
•Thedrumwasnotunlockedcorrectlyduringinstallation(see “Installation”).
•Thewashingmachineisnotlevel(see “Installation”).
•Thewashingmachineistrappedbetweencabinetsandwalls(see “Installation”).
•Thewaterinlethoseisnotscrewedonproperly(see “Installation”).
•Thedetergentdispenserdrawerisblocked(forcleaninginstructions,see
“Care and maintenance”).
•Thedrainhoseisnotfixedproperly(see “Installation”).
•Switchoffthemachineandunplugit,waitforapproximately1minuteand
then switch it back on again.
If the problem persists, contact the Technical Assistance Service.
•Thedetergentisnotsuitableformachinewashing(itshoulddisplaythetext
“for washing machines” or “hand and machine wash”, or the like).
•Toomuchdetergentwasused.
11
Page 12
Service
GB
Before calling for Assistance:
• Check whether you can solve the problem alone (see “Troubleshooting”);
•Restarttheprogrammetocheckwhethertheproblemhasbeensolved;
•Ifthisisnotthecase,contactanauthorisedTechnicalAssistanceCentreusingthetelephonenumberprovidedonthe
guarantee certificate.
! Always request the assistance of authorised technicians.
Have the following information to hand:
• thetypeofproblem;
• theappliancemodel(Mod.);
• theserialnumber(S/N).
This information can be found on the data plate applied to the rear of the washing machine, and can also be found on the
front of the appliance by opening the door.
12
Page 13

Istruzioni per l’uso
LAVABIANCHERIA
IT
Italiano
WML 601
Sommario
Installazione, 14-15
Disimballo e livellamento
Collegamenti idraulici ed elettrici
Primo ciclo di lavaggio
Dati tecnici
Manutenzione e cura, 16
Escludere acqua e corrente elettrica
Pulire la lavabiancheria
Pulire il cassetto dei detersivi
Curare oblò e cestello
Pulire la pompa
Controllare il tubo di alimentazione dell’acqua
Precauzioni e consigli, 17
Sicurezza generale
Smaltimento
Descrizione della lavabiancheria e
avviare un programma, 18-19
Pannello di controllo
Spie
Avviare un programma
IT
Programmi, 20
Tabella dei programmi
Personalizzazioni, 21
Impostare la temperatura
Impostare la centrifuga
Funzioni
Detersivi e biancheria, 22
Cassetto dei detersivi
Preparare la biancheria
Capi particolari
Sistema bilanciamento del carico
Anomalie e rimedi, 23
Assistenza, 24
Assistenza Attiva 7 giorni su 7
13
Page 14
Installazione
IT
! È importante conservare questo libretto per
poterlo consultare in ogni momento. In caso di
vendita, di cessione o di trasloco, assicurarsi
che resti insieme alla lavabiancheria per informare il nuovo proprietario sul funzionamento e
sui relativi avvertimenti.
! Leggere attentamente le istruzioni: ci sono
importanti informazioni sull’installazione,
sull’uso e sulla sicurezza.
Disimballo e livellamento
Disimballo
1. Disimballare la lavabiancheria.
2. Controllare che la lavabiancheria non abbia
subìto danni nel trasporto. Se fosse danneggiata non collegarla e contattare il rivenditore.
3. Rimuovere le 3 viti
di protezione per il
trasporto e il gommino
con il relativo distanziale, posti nella parte
posteriore (vedi figura).
4. Chiudere i fori con i tappi di plastica in dotazione.
5. Conservare tutti i pezzi: qualora la lavabiancheria debba essere trasportata, dovranno
essere rimontati.
! Gli imballaggi non sono giocattoli per bambini.
Un accurato livellamento dà stabilità alla
macchina ed evita vibrazioni, rumori e spostamenti durante il funzionamento. In caso di
moquette o di un tappeto, regolare i piedini in
modo da conservare sotto la lavabiancheria
uno spazio sufficiente per la ventilazione.
Collegamenti idraulici ed elettrici
Collegamento del tubo di alimentazione
dell’acqua
1. Collegare il tubo
di alimentazione
avvitandolo a un
rubinetto d’acqua
fredda con bocca
filettata da 3/4 gas
(vedi figura).
Prima di allacciare,
far scorrere l’acqua
finché non sia limpida.
2. Collegare il tubo
di alimentazione alla
lavabiancheria
avvitandolo all’apposita presa d’acqua,
nella parte posteriore
in alto a destra (vedi
figura).
3. Fare attenzione che nel tubo non ci siano
né pieghe né strozzature.
Livellamento
1. Installare la lavabiancheria su un pavimento
piano e rigido, senza appoggiarla a muri, mobili
o altro.
2. Se il pavimento non
fosse perfettamente
orizzontale, compensare le irregolarità
svitando o avvitando
i piedini anteriori (vedi
figura); l’angolo di
inclinazione, misurato
sul piano di lavoro, non
deve superare i 2°.
14
! La pressione idrica del rubinetto deve essere compresa nei valori della tabella Dati tecnici (vedi pagina a fianco).
! Se la lunghezza del tubo di alimentazione
non fosse sufficiente, rivolgersi a un negozio
specializzato o a un tecnico autorizzato.
! Non utilizzare mai tubi già usati.
! Utilizzare quelli in dotazione alla macchina.
Page 15
Collegamento del tubo di scarico
65 - 100 cm
Collegare il tubo di
scarico, senza piegarlo, a una conduttura di scarico o a
uno scarico a muro
posti tra 65 e 100
cm da terra;
oppure appoggiarlo
al bordo di un lavandino o di una vasca,
legando la guida in
dotazione al
rubinetto (vedi figu-
ra). L’estremità libera
del tubo di scarico
non deve rimanere
immersa nell’acqua.
! È sconsigliato usare tubi di prolunga; se indispensabile, la prolunga deve avere lo stesso diametro del tubo originale e non superare
i 150 cm.
! Il cavo di alimentazione deve essere sostituito
solo da tecnici autorizzati.
Attenzione! L’azienda declina ogni responsabilità qualora queste norme non vengano rispettate.
Primo ciclo di lavaggio
Dopo l’installazione, prima dell’uso, effettuare
un ciclo di lavaggio con detersivo e senza biancheria impostando il programma “Auto Pulizia”
(vedi “Pulire la lavabiancheria”).
Dati tecnici
Modello
Dimensioni
Capacità
Collega-
menti elettrici
WML 601
larghezza cm 59,5
altezza cm 85
profondità cm 51,7
da 1 a 6 kg
vedi la targhetta caratteristiche tecniche applicata sulla
macchina
IT
Collegamento elettrico
Prima di inserire la spina nella presa della
corrente, accertarsi che:
• la presa abbia la messa a terra e sia a norma di legge;
• la presa sia in grado di sopportare il carico
massimo di potenza della macchina, indicato
nella tabella Dati tecnici (vedi a fianco);
• la tensione di alimentazione sia compresa
nei valori indicati nella tabella Dati tecnici (vedi
a fianco);
• la presa sia compatibile con la spina della
lavabiancheria. In caso contrario sostituire la
presa o la spina.
! La lavabiancheria non va installata all’aperto, nemmeno se lo spazio è riparato, perché
è molto pericoloso lasciarla esposta a pioggia
e temporali.
! A lavabiancheria installata, la presa della
corrente deve essere facilmente raggiungibile.
! Non usare prolunghe e multiple.
! Il cavo non deve subire piegature o com-
pressioni.
Collegamenti idrici
Velocità di
centrifuga
Programmi
di controllo
secondo i
regolamenti
1061/2010
1015/2010
pressione massima
1 MPa (10 bar)
pressione minima
0,05 MPa (0,5 bar)
capacità del cesto 46 litri
sino a 1000 giri al minuto
programma 4;
Eco Cotone 60°C.
programma 4;
Eco Cotone 40°C.
Questa apparecchiatura è
conforme alle seguenti Direttive Comunitarie:
- 2004/108/CE (Compatibilità
Elettromagnetica)
- 2012/19/EU
- 2006/95/CE (Bassa Tensione)
15
Page 16

Manutenzione e cura
1
2
IT
Escludere acqua e corrente elettrica
• Chiudere il rubinetto dell’acqua dopo ogni lavaggio. Si limita così l’usura dell’impianto idraulico della lavabiancheria e si elimina il pericolo di
perdite.
• Staccare la spina della corrente quando si
pulisce la lavabiancheria e durante i lavori di
manutenzione.
Pulire la lavabiancheria
• La parte esterna e le parti in gomma possono essere puliti con un panno imbevuto di
acqua tiepida e sapone. Non usare solventi o
abrasivi.
• La lavabiancheria è dotata di un programma
di “Auto Pulizia” delle parti interne che deve
essere effettuato senza alcun tipo di carico
nel cesto.
Il detersivo (nella quantità pari al 10% di quella
consigliata per capi poco sporchi) o additivi specifici per la pulizia della lavabiancheria,
potranno essere utilizzati come coadiuvanti nel
programma di lavaggio. Si consiglia di effettuare
il programma di pulizia ogni 40 cicli di lavaggio.
A
B
Per attivare il programma premere contemporaneamente il tasto
A e B per 5 sec. (vedi
figura).
Il programma partirà
automaticamente ed
avrà una durata di circa
70 minuti. Per fermare
il ciclo premere il tasto
START/PAUSE.
Pulire il cassetto dei detersivi
Sfilare il cassetto sollevandolo e tirandolo
verso l’esterno (vedi
figura).
Lavarlo sotto l’acqua
corrente; questa pulizia
va effettuata
frequentemente.
Pulire la pompa
La macchina è dotata di una pompa autopulente che non ha bisogno di manutenzione. Può però succedere che piccoli oggetti
(monete, bottoni) cadano nella precamera
che protegge la pompa, situata nella parte
inferiore di essa.
! Assicurarsi che il ciclo di lavaggio sia terminato e staccare la spina.
Per accedere alla precamera:
1. rimuovere il pannello di copertura sul
lato anteriore della
macchina con l’ausilio di un giravite (vedi
figura);
2. svitare il coperchio ruotandolo in
senso antiorario
(vedi figura): è normale che fuoriesca
un po’ d’acqua;
3. pulire accuratamente l’interno;
4. riavvitare il coperchio;
5. rimontare il pannello assicurandosi, prima
di spingerlo verso la macchina, di aver inserito i ganci nelle apposite asole.
Controllare il tubo di alimentazione dell’acqua
Controllare il tubo di alimentazione almeno
una volta all’anno. Se presenta screpolature e
fessure va sostituito: durante i lavaggi le forti
pressioni potrebbero provocare improvvise
spaccature.
Curare oblò e cestello
• Lasciare sempre socchiuso l’oblò per evitare
che si formino cattivi odori.
16
! Non utilizzare mai tubi già usati.
Page 17

Precauzioni e consigli
! La lavabiancheria è stata progettata e costruita in
conformità alle norme internazionali di sicurezza. Queste
avvertenze sono fornite per ragioni di
sicurezza e devono essere lette attentamente.
Sicurezza generale
• Questo apparecchio è stato concepito esclusivamente
per un uso di tipo domestico.
•Questo apparecchio può essere usato da
bambini da 8 anni in su e da persone con
capacità fisiche, sensoriali o mentali ridotte
o con esperienza e conoscenze insufficienti
se sono supervisionati o se hanno ricevuto
adeguata formazione in merito all’uso dell’apparecchio in modo sicuro e capendo i pericoli
connessi. I bambini non devono giocare con
l’apparecchio. Manutenzione e pulizia non
devono essere effettuati dai bambini senza
supervisione.
• Non toccare la macchina a piedi nudi o con le mani o i
piedi bagnati o umidi.
• Non staccare la spina dalla presa della corrente tirando il
cavo, bensì afferrando la spina.
• Non aprire il cassetto dei detersivi mentre la macchina è
in funzione.
• Non toccare l’acqua di scarico, che può raggiungere
temperature elevate.
• Non forzare in nessun caso l’oblò: potrebbe danneggiarsi
il meccanismo di sicurezza che protegge da aperture
accidentali.
• In caso di guasto, in nessun caso accedere ai meccanismi
interni per tentare una riparazione.
• Controllare sempre che i bambini non si avvicinino alla
macchina in funzione.
• Durante il lavaggio l’oblò tende a scaldarsi.
• Se dev’essere spostata, lavorare in due o tre persone con
la massima attenzione. Mai da soli perché la macchina è
molto pesante.
• Prima di introdurre la biancheria controlla che il cestello
sia vuoto.
Il simbolo del cestino barrato è riportato su tutti i prodotti per
ricordare gli obblighi di raccolta separata.
Per ulteriori informazioni, sulla corretta dismissione degli
elettrodomestici, i detentori potranno rivolgersi al servizio
pubblico preposto o ai rivenditori.
IT
Smaltimento
• Smaltimento del materiale di imballaggio:
attenersi alle norme locali, così gli imballaggi potranno
essere riutilizzati.
• La direttiva Europea 2012/19/EU sui rifiuti di apparecchia-
ture elettriche ed elettroniche, prevede che gli elettrodomestici non debbano essere smaltiti nel normale flusso dei
rifiuti solidi urbani. Gli apparecchi dismessi devono essere
raccolti separatamente per ottimizzare il tasso di recupero
e riciclaggio dei materiali che li compongono ed impedire
potenziali danni per la salute e l’ambiente.
17
Page 18
Descrizione della lavabiancheria e
avviare un programma
IT
Pannello di controllo
Cassetto dei detersivi
Tasto ON/OFF
PROGRAMMI
TEMPERATURA
Manopola
CENTRIFUGA
Manopola
Manopola
Tasti con spie
FUNZIONE
SPIE AVANZAMENTO
CICLO/PARTENZA
RITARDATA
Spia
OBLÒ
BLOCCATO
Tasto con spia
START/
PAUSE
Cassetto dei detersivi: per caricare detersivi e additivi
(vedi “Detersivi e biancheria”).
Tasto ON/OFF: per accendere e spegnere la lavabiancheria.
Manopola PROGRAMMI: per impostare i programmi. Durante il programma la manopola resterà ferma.
Tasti FUNZIONE: per selezionare le funzioni disponibili. La
spia relativa alla funzione selezionata rimarrà accesa.
Manopola CENTRIFUGA: per impostare la centrifuga o
escluderla (vedi “Personalizzazioni”).
Manopola TEMPERATURA: per impostare la temperatura
o il lavaggio a freddo (vedi “Personalizzazioni”).
SPIE AVANZAMENTO CICLO/PARTENZA RITARDATA:
per seguire lo stato di avanzamento del programma di lavaggio.
La spia accesa indica la fase in corso.
Se è stata impostata la funzione “Partenza Ritardata”, indicheranno il tempo mancante all’avvio del programma (vedi
pagina a fianco).
Spia OBLÒ BLOCCATO: per capire se l’oblò è apribile
(vedi pagina a fianco).
Tasto START/PAUSE: per avviare i programmi o inter-
romperli momentaneamente.
N.B.: mettere in pausa il lavaggio in corso premere
questo tasto, la spia relativa lampeggerà con colore
arancione mentre quella della fase in corso sarà accesa
fissa. Se la spia OBLÒ BLOCCATO sarà spenta, si
potrà aprire l’oblò (attendere 3 minuti circa).
Per far ripartire il lavaggio dal punto in cui è stato
interrotto, premere nuovamente questo tasto.
Modalità di stand by
Questa lavatrice, in conformità alle nuove normative
legate al risparmio energetico, è dotata di un sistema
di autospegnimento (stand by) che entra in funzione
dopo circa 30 minuti nel caso di non utilizzo. Premere
brevemente il tasto ON/OFF e attendere che la macchina
si riattivi.
18
Page 19

Spie
END
Le spie forniscono informazioni importanti.
Ecco che cosa dicono:
Spie fase in corso
Una volta selezionato e avviato il ciclo di lavaggio desiderato, le spie si accenderanno progressivamente per indicarne
lo stato di avanzamento:
IT
Partenza ritardata
Se è stata attivata la funzione “Partenza ritardata” (vedi
“Personalizzazioni”), dopo avere avviato il programma, ini-
zierà a lampeggiare la spia relativa al ritardo selezionato:
Col trascorrere del tempo verrà visualizzato il ritardo
residuo con il lampeggio della spia relativa:
Trascorso il ritardo selezionato la spia lampeggiante si
spengnerà e avrà inizio il programma impostato.
Lavaggio
Risciacquo
Centrifuga
Scarico
Fine lavaggio
Tasti funzione e relative spie
Selezionando una funzione la spia relativa si illuminerà.
Se la funzione selezionata non è compatibile con il programma impostato la spia relativa lampeggerà, verranno emessi
“3 beep” e la funzione non verrà attivata.
Nel caso venga impostata una funzione incompatibile con
un’altra precedentemente selezionata rimarrà attiva solo
l’ultima scelta.
Spia oblò bloccato
La spia accesa indica che l’oblò è bloccato per impedire
aperture accidentali; per evitare danni è necessario attendere che la spia si spenga prima di aprire l’oblò (attendere 3
minuti circa).
! Il lampeggio veloce della spia START/PAUSE (arancione)
contemporaneo a quello delle funzioni segnala un’anomalia
(vedi “Anomalie e rimedi”).
Avviare un programma
1. Accendere la lavabiancheria premendo il tasto ON/OFF. Tutte le spie si accenderanno per qualche secondo, poi rimarranno
accese le spie ralative alle impostazioni del programma selezionato e pulserà la spia START/PAUSE.
2. Caricare la biancheria e chiudere l’oblò.
3. Impostare con la manopola PROGRAMMI il programma desiderato.
4. Impostare la temperatura di lavaggio (vedi “Personalizzazioni”).
5. Impostare la velocità di centrifuga (vedi “Personalizzazioni”).
6. Versare detersivo e additivi (vedi “Detersivi e biancheria”).
7. Selezionare le funzioni desiderate.
8. Avviare il programma premendo il tasto START/PAUSE e la spia relativa rimarrà accesa fissa di colore verde.
Per annullare il ciclo impostato mettere la macchina in pausa premendo il tasto START/PAUSE e scegliere un nuovo ciclo.
9. Al termine del programma si illuminerà la spia END. La spia OBLÒ BLOCCATO si spegnerà indicando che l’oblò è apribile
(attendere 3 minuti circa). Estrarre la biancheria e lasciare l’oblò socchiuso per far asciugare il cestello. Spegnere la lavabiancheria premendo il tasto ON/OFF.
19
Page 20

IT
Programmi
Tabella dei programmi
Descrizione del Programma
Programmi
1
Antimacchia
2
Bianchi
3
Cotone: Bianchi e colorati delicati poco sporchi.
4
Eco Cotone 60°
4
Eco Cotone 40° (2): Bianchi e colorati delicati poco sporchi. 40° 1000 -
5
Sintetici: Colori resistenti molto sporchi. 60° 1000
5
Sintetici (3): Colori resistenti poco sporchi. 40° 1000
6
Anti Allergy
7
Baby
8
Lana: Per lana, cachemire, ecc. 40° 800 -
9
Delicati
Rapido 60': Per rinfrescare rapidamente capi sporchi
10
(non indicato per lana, seta e capi da lavare a mano).
11
Cotone 20°: Bianchi e colorati delicati poco sporchi
12
Eco Cotone
13
Eco Sintetici
14
Eco Rapido 30'
Risciacquo
Centrifuga + Scarico
(1): Bianchi e colorati resistenti molto sporchi. 60° 1000 -
. 20° 1000 -
Temp.
max.
(°C)
40° 1000
60° 1000
40°
(Max. 90°)
60° 1000 40° 1000
30° 0 -
60° 1000 -
Acqua
fredda
Acqua
fredda
Acqua
fredda
- 1000 - -
- 1000 - - - - 6 - - - 10’
Velocità
max.
(giri al
minuto)
1000
1000 -
1000 -
800 -
Detersivi
gina
Prelaggio
Candeg-
Lavaggio
-
-
-
-
-
-
-
-
-
-
%
(Kg)
dente
Carico max.
Ammorbi-
4 - - - 180’
4 - - - 180’
6 - - - 115’
6 62 1,02 49,8 195’
6 62 0,86 76 185’
3 44 0,78 33 120’
3 - - - 110’
4 - - - 200’
3 - - - 150’
1,5 - - - 80’
1 - - - 75’
3,5 62 0,68 30 60’
6 - - - 175’
6 - - - 100’
3 - - - 75’
3 70 0,05 36 30’
6 - - - 49’
Umidità residua
Consumo ener-
gia kWh
Acqua totale lt
Durata ciclo
Solo scarico *
* Selezionando il programma ed escludendo la centrifuga la macchina effettuerà solo lo scarico.
La durata del ciclo indicata sul display o sul libretto è una stima calcolata in base a condizioni standard. Il tempo effettivo può variare in base a numerosi fattori
quali la temperatura e la pressione dell’acqua in ingresso, la temperatura ambiente, la quantità di detersivo, la quantità ed il tipo di carico, il bilanciamento del
carico, le opzioni aggiuntive selezionate.
1) Programma di controllo secondo
Questo ciclo è adatto per pulire un carico di cotone normalmente sporco ed è il più efficiente in termini di consumo combinato di energia e di acqua, da usare su
capi lavabili a 60 °C. La temperatura effettiva di lavaggio può differire da quella indicata.
2) Programma di controllo secondo
Questo ciclo è adatto per pulire un carico di cotone normalmente sporco ed è il più efficiente in termini di consumo combinato di energia e di acqua, da usare su
capi lavabili a 40°C. La temperatura effettiva di lavaggio può differire da quella indicata.
Per tutti Test Institutes:
2) Programma cotone lungo: impostare il programma 4 con una temperatura di 40°C.
3) Programma sintetico lungo: impostare il programma 5 con una temperatura di 40°C.
il regolamento
il regolamento
1061/2010: impostare il programma 4 con una temperaura di 60°C.
1061/2010: impostare il programma 4 con una temperatura di 40°C.
-
- - - - 6 - - - 3’
Antimacchia: il programma 1 è adatto al lavaggio di capi molto sporchi, con colori resistenti. Il programma garantisce una
classe di lavaggio superiore alla classe standard (classe A). Non eseguire il programma mescolando capi di colore diverso. Si
consiglia l’utilizzo di detersivo in polvere. Per macchie ostinate è consigliato il pretrattamento con additivi specifici.
Bianchi: utilizzare il ciclo 2 per il lavaggio dei capi bianchi. Il programma è studiato per il mantenimento della brillantezza del
bianco nel tempo. Per risultati migliori si raccomanda l’utilizzo del detersivo in polvere.
Anti Allergy: utilizzare il programma 6 per la rimozione dei principali allergeni come polline, acari, peli del gatto e cane.
Baby: utilizzare l’apposito programma 7 per asportare lo sporco tipico dei bambini e rimuovere il detersivo dai panni onde
evitare reazioni allergiche alla pelle delicata dei bambini. Questo ciclo è stato studiato per ridurre la carica batterica utilizzando
una maggior quantità di acqua e ottimizzando l’effetto di additivi specifici igenizzanti aggiunti al detersivo.
Programmi Eco
I programmi Eco offrono buone performance di lavaggio a basse temperature consentendo un minore utilizzo di energia
elettrica con un beneficio per l’ambiente e un risparmio economico. I programmi Eco (
12
Eco Cotone,
13
Eco Sintetici e
14
Eco Rapido 30’) sono stati creati per diversi tipi di tessuto e per capi poco sporchi. Per garantire un risultato ottimale raccomandiamo l’uso di un detergente liquido; si consiglia di pretrattare polsini, colli e macchie.
Cotone 20°: il programma 11 per carichi in cotone sporchi. Le buone performance anche a freddo, comparabili con un lavag-
gio a 40°, sono garantite da un’azione meccanica che lavora con variazione di velocità a picchi ripetuti e ravvicinati.
20
Page 21

Personalizzazioni
Impostare la temperatura
Ruotando la manopola TEMPERATURA si imposta la temperatura di lavaggio (vedi Tabella programmi).
La temperatura si può ridurre sino al lavaggio a freddo ( ).
La macchina impedirà automaticamente di impostare una temperatura maggiore a quella massima prevista per ogni programma.
! Eccezione: selezionando il programma 3 la temperatura può essere portata sino a 90°.
Impostare la centrifuga
Ruotando la manopola CENTRIFUGA si imposta la velocità di centrifuga del programma selezionato.
Le velocità massime previste per i programmi sono:
Programmi Velocità massima
Cotone 1000 giri al minuto
Sintetici 1000 giri al minuto
Lana 800 giri al minuto
Seta solo scarico
La velocità di centrifuga può essere ridotta, oppure esclusa selezionando il simbolo .
La macchina impedirà automaticamente di effettuare una centrifuga maggiore a quella massima prevista per ogni programma.
Funzioni
Le varie funzioni di lavaggio previste dalla lavabiancheria permettono di ottenere la pulizia e il bianco desiderati.
Per attivare le funzioni:
1. premere il tasto relativo alla funzione desiderata;
2. l’accensione della spia relativa segnala che la funzione è attiva.
Nota:
- Se la funzione selezionata non è compatibile con il programma impostato la spia relativa lampeggerà, verranno emessi “3
beep” e la funzione non verrà attivata.
- Nel caso venga impostata una funzione incompatibile con un’altra precedentemente selezionata rimarrà attiva solo l’ultima scelta.
IT
Super Lavaggio
Questa opzione garantisce un lavaggio di alte prestazioni grazie all’utilizzo di una maggior quantità d’ acqua nella fase iniziale
del ciclo e alla maggior durata del programma ed è utile per eliminare le macchie più resistenti.
Può essere utilizzata con o senza candeggina.
Se si desidera effettuare il candeggio inserire la vaschetta aggiuntiva 4, in dotazione, nella vaschetta 1. Nel dosare la
candeggina non superare il livello “max” indicato sul perno centrale (vedi figura a pag 22).
Stira Facile
Selezionando questa funzione, il lavaggio e la centrifuga saranno opportunamente modificati per ridurre la formazione di
pieghe. Al temine del ciclo la lavabiancheria effettuerà delle lente rotazioni del cestello;
la spia della funzione STIRA FACILE e quella di START/PAUSE lampeggeranno (arancione) e la fase END rimarrà accesa
fissa. Per terminare il ciclo si dovrà premere il tasto START/PAUSE o il tasto STIRA FACILE.
Prelavaggio
Selezionando questa funzione si effettua il prelavaggio, utile per rimuovere macchie ostinate.
N.B.: Aggiungere il detersivo nell’apposito scomparto.
Partenza Ritardata
Ritarda l’avvio della macchina sino a 12 ore.
Premere più volte il tasto fino a far accendere la spia relativa al ritardo desiderato. Alla quinta pressione del tasto la funzione si
disattiverà.
N.B.: Una volta premuto il tasto START/PAUSE, si può modificare il valore del ritardo solo diminuendolo.
21
Page 22

Detersivi e biancheria
M
AX
1
2
4
3
A
B
IT
Cassetto dei detersivi
Il buon risultato del lavaggio dipende anche dal corretto
dosaggio del detersivo: eccedendo non si lava in modo più
efficace e si contribuisce a incrostare le parti interne della
lavabiancheria e a inquinare l’ambiente.
! Usare detersivi in polvere per capi in cotone bianchi e per il
prelavaggio e per lavaggi con temperatura superiore a 60°C.
! Seguire le indicazioni riportate sulla confezione di detersivo.
! Non usare detersivi per il lavaggio a mano, perché formano
troppa schiuma.
Estrarre il cassetto dei detersivi e inserire il detersivo o
l’additivo come segue.
vaschetta 1: Detersivo per prelavaggio
(in polvere)
Prima di versare il detersivo verificare che non sia inserita la
veschetta aggiuntiva 4.
vaschetta 2: Detersivo per lavaggio
(in polvere o liquido)
Nel caso di utilizzo di detersivo liquido si consiglia di utilizzare la paretina A in dotazione per un corretto dosaggio.
Per l’utilizzo del detersivo in polvere riporre la paretina nella
cavità B.
vaschetta 3: Additivi (ammorbidente, ecc.)
L’ammorbidente non deve fuoriuscire dalla griglia.
vaschetta aggiuntiva 4: Candeggina
Preparare la biancheria
• Suddividere la biancheria secondo:
- il tipo di tessuto / il simbolo sull’etichetta.
- i colori: separare i capi colorati da quelli bianchi.
• Vuotare le tasche e controllare i bottoni.
• Non superare i valori indicati, riferiti al peso della
biancheria asciutta: vedi “Tabella dei programmi”.
Quanto pesa la biancheria?
Capi particolari
L a n a - W o o l m a r k A p p a rel Care - G r e e n :
Il ciclo di lavaggio “Lana” di questa lavatrice è stato approvato
dalla Woolmark Company per il lavaggio di capi di lana
classificati come “lavabili a mano”, purché il lavaggio venga
eseguito nel rispetto delle istruzioni riportate sull’etichetta
dell’indumento e delle indicazioni fornite dal produttore di
questa lavatrice.
Delicati: utilizzare il programma 9 per il lavaggio dei capi
molto delicati, che presentano applicazioni quali strass o
paillettes.
Si raccomanda di rovesciare i capi prima del lavaggio e di
inserire gli indumenti piccoli nell’apposito sacchetto per il
lavaggio dei capi delicati.
Per risultati migliori si raccomanda l’utilizzo del detersivo
liquido per capi delicati.
Per il lavaggio dei capi in seta e tende, selezionare il
ciclo 9 e attivare la funzione ; la macchina terminerà
il ciclo con la biancheria in ammollo e la spia della
funzione lampeggeraà. Per scaricare l’acqua e
poter rimuovere il bucato sarà necessario premere il tasto
START/PAUSE o il tasto .
Sistema bilanciamento del carico
Prima di ogni centrifuga, per evitare vibrazioni eccessive
e per distribuire il carico in modo uniforme, il cestello
effettua delle rotazioni ad una velocità leggermente
superiore a quella del lavaggio. Se al termine di ripetuti
tentativi il carico non fosse ancora correttamente
bilanciato la macchina effettua la centrifuga ad una
velocità inferiore a quella prevista.
In presenza di eccessivo sbilanciamento la lavabiancheria
effettua la distribuzione anzichè la centrifuga. Per favorire
una migliore distribuzione del carico e il suo corretto
bilanciamento si consiglia di mescolare capi grandi e
piccoli.
1 lenzuolo 400-500 gr.
1 federa 150-200 gr.
1 tovaglia 400-500 gr.
1 accappatoio 900-1200 gr.
1 asciugamano 150-250 gr.
22
Page 23

Anomalie e rimedi
Può accadere che la lavabiancheria non funzioni. Prima di telefonare all’Assistenza (vedi “Assistenza”), controllare che non si
tratti di un problema facilmente risolvibile aiutandosi con il seguente elenco.
Anomalie:
La lavabiancheria
non si accende.
Il ciclo di lavaggio
non inizia.
La lavabiancheria non carica
acqua (lampeggia velocemente la
spia della prima fase di lavaggio).
La lavabiancheria carica e scarica
acqua di continuo.
Possibili cause / Soluzione:
• La spina non è inserita nella presa della corrente, o non abbastanza
da fare contatto.
• In casa non c’è corrente.
• L’oblò non è ben chiuso
• Il tasto ON/OFF non è stato premuto.
• Il tasto START/PAUSE non è stato premuto.
• Il rubinetto dell’acqua non è aperto.
• Si è impostato un ritardo sull’ora di avvio (PARTENZA RITARDATA,
vedi “Personalizzazioni”).
• Il tubo di alimentazione dell’acqua non è collegato al rubinetto.
• Il tubo è piegato.
• Il rubinetto dell’acqua non è aperto.
• In casa manca l’acqua.
• Non c’è sufficiente pressione.
• Il tasto START/PAUSE non è stato premuto.
• Il tubo di scarico non è installato fra 65 e 100 cm da terra (vedi “Installazione”).
• L’estremità del tubo di scarico è immersa nell’acqua (vedi “Installazione”).
• Lo scarico a muro non ha lo sfiato d’aria.
Se dopo queste verifiche il problema non si risolve, chiudere il rubinetto dell’acqua, spegnere la lavabiancheria e chiamare l’Assistenza. Se l’abitazione si trova
agli ultimi piani di un edificio, è possibile che si verifichino fenomeni di sifonaggio, per cui la lavabiancheria carica e scarica acqua di continuo. Per eliminare
l’inconveniente sono disponibili in commercio apposite valvole anti-sifonaggio.
IT
La lavabiancheria non scarica
o non centrifuga.
La lavabiancheria vibra
molto durante la centrifuga.
La lavabiancheria perde acqua.
La spia START/PAUSE (arancione)
e le spie delle funzioni lampeggiano velocemente.
Si forma troppa schiuma.
• Il programma non prevede lo scarico: con alcuni programmi occorre
avviarlo manualmente.
• È attiva la funzione STIRA FACILE: per completare il programma
premere il tasto START/PAUSE (“Personalizzazioni”).
• Il tubo di scarico è piegato (vedi “Installazione”).
• La conduttura di scarico è ostruita.
• Il cestello, al momento dell’installazione, non è stato sbloccato
correttamente (vedi “Installazione”).
• La lavabiancheria non è in piano (vedi “Installazione”).
• La lavabiancheria è stretta tra mobili e muro (vedi “Installazione”).
• Il tubo di alimentazione dell’acqua non è ben avvitato (vedi “Installazione”).
• Il cassetto dei detersivi è intasato (per pulirlo vedi “Manutenzione e cura”).
• Il tubo di scarico non è fissato bene (vedi “Installazione”).
• Spegnere la macchina e togliere la spina dalla presa, attendere circa
1 minuto quindi riaccenderla.
Se l’anomalia persiste, chiamare l’Assistenza.
• Il detersivo non è specifico per lavabiancheria (deve esserci la
dicitura “per lavatrice”, “a mano e in lavatrice”, o simili).
• Il dosaggio è stato eccessivo.
23
Page 24

Assistenza
IT
Prima di contattare l’Assistenza:
• Verificare se l’anomalia può essere risolta da soli (vedi “Anomalie e rimedi”);
• Riavviare il programma per controllare se l’inconveniente è stato ovviato;
• In caso negativo, contattare il Numero Unico 199.199.199*.
! Non ricorrere mai a tecnici non autorizzati.
Comunicare:
• il tipo di anomalia;
• il modello della macchina (Mod.);
• il numero di serie (S/N).
Queste informazioni si trovano sulla targhetta applicata nella parte posteriore della lavabiancheria e nella parte anteriore
aprendo l’oblò.
Assistenza Attiva 7 giorni su 7
In caso di necessità d’intervento chiamare il Numero Unico Nazionale 199.199.199*.
Un operatore sarà a completa disposizione per fissare un appuntamento con il Centro Assistenza Tecnico
Autorizzato più vicino al luogo da cui si chiama.
È attivo 7 giorni su 7, sabato e domenica compresi, e non lascia mai inascoltata una richiesta.
* Al costo di 14,25 centesimi di Euro al minuto (iva inclusa) dal Lun. al Ven. dalle 08:00 alle 18:30, il Sab. dalle 08:00 alle 13:00 e di 5,58 centesimi di
Euro al minuto (iva inclusa) dal Lun. al Ven. dalle 18:30 alle 08:00, il Sab. dalle 13:00 alle 08:00 e i giorni festivi, per chi chiama da telefono fisso.
Per chi chiama da radiomobile le tariffe sono legate al piano tariffario dell’operatore telefonico utilizzato.
Le suddette tariffe potrebbero essere soggette a variazione da parte dell’operatore telefonico; per maggiori informazioni consultare il sito
http://www.hotpoint.eu/hotpoint/
*
24
Page 25

Návod k použití
PRAČKA
CZ
Česky
WML 601
Obsah
Instalace, 26-27
Rozbalení a vyrovnání do vodorovné polohy
Připojení k elektrické a k vodovodní síti
První prací cyklus
Technické údaje
Údržba a péče, 28
Uzavření přívodu vody a vypnutí elektrického napájení
Čištění pračky
Čištění dávkovače pracích prostředků
Péče o dvířka a buben
Čištění čerpadla
Kontrola přítokové hadice na vodu
Opatření a rady, 29
Základní bezpečnostní pokyny
Likvidace
Popis pračky a zahájení pracího programu, 30-31
Ovládací panel
Kontrolky
Zahájení pracího programu
CZ
Prací programy, 32
Tabulka pracích programů
Uživatelská nastavení, 33
Nastavení teploty
Nastavení rychlosti odstřeďování
Funkce
Prací prostředky a prádlo, 34
Dávkovač pracích prostředků
Příprava prádla
Oděvy vyžadující zvláštní péči
Systém automatického vyvážení náplně
Poruchy a způsob jejich odstranění, 35
Servisní služba, 36
25
Page 26

Instalace
CZ
! Je důležité uschovat tento návod tak, abyste jej mohli kdykoli konzultovat. V případě
prodeje, darování nebo přestěhování pračky
se ujistěte, že zůstane uložen v blízkosti
pračky, aby mohl posloužit novému majiteli
při seznámení s její činností a s příslušnými
upozorněními.
! Pozorně si přečtěte uvedené pokyny: Obsahují důležité informace týkající se instalace, použití a bezpečnosti při práci.
Rozbalení a vyrovnání do vodorovné polohy
Rozbalení
1. Rozbalte pračku.
2. Zkontrolujte, zda během přepravy
nedošlo k jejímu poškození. V případě, že
je poškozena, ji nezapojujte a obraťte se na
prodejce.
3. Odstraňte 3
šrouby chránící
před poškozením
během přepravy a
gumovou podložku
s příslušnou
rozpěrkou, které se
nacházejí v zadní
části (viz obrázek).
Dokonalé vyrovnání do vodorovné polohy
zabezpečí stabilitu zařízení a zamezí vzniku
vibrací a hluku během činnosti. V případě
instalace na podlahovou krytinu nebo na
koberec nastavte nožky tak, aby pod pračkou
zůstal dostatečný volný prostor pro ventilaci.
Připojení k elektrické a k vodovodní
síti
Připojení přítokové hadice vody
1. Připojte přívodní
hadici jejím
zašroubováním ke
kohoutku studené
vody s hrdlem se
závitem 3/4” (viz
obrázek).
Před připojením
hadice nechte vodu
odtékat, dokud nebude čirá.
2. Připojte přítokovou
hadici k pračce
prostřednictvím
příslušné přípojky
na vodu, umístěné
vpravo nahoře (viz
obrázek).
4. Uzavřete otvory po šroubech plastovými
krytkami z příslušenství.
5. Uschovejte všechny díly: v případě
opětovné přepravy pračky je bude třeba namontovat zpět.
! Obaly nejsou hračky pro děti!
Vyrovnání do vodorovné polohy
1. Pračku je třeba umístit na rovnou a pevnou podlahu, aniž by se opírala o stěnu,
nábytek či něco jiného.
2. V případě, že
podlaha není do-
konale vodorovná,
mohou být případné
rozdíly vykompenzovány šroubováním
předních nožek (viz
obrázek); Úhel sklonu, naměřený na pracovní ploše, nesmí
přesáhnout 2°.
3. Dbejte na to, aby hadice nebyla příliš ohnutá ani stlačená.
! Tlak v rozvodu vody se musí pohybovat
v rozmezí hodnot uvedených v tabulce s
technickými údaji (viz vedlejší strana).
! V případě, že délka přítokové hadice nebude dostatečná, se obraťte na specializovanou prodejnu nebo na autorizovaný technický personál.
! Nikdy nepoužívejte již použité hadice.
! Používejte hadice z příslušenství zařízení.
26
Page 27

Připojení vypouštěcí hadice
65 - 100 cm
Připojte vypouštěcí
hadici k odpadovému potrubí nebo
k odpadu ve stěně,
který se nachází od
65 do 100 cm nad
zemí; zamezte jejímu
ohybu
! Po denitivní instalaci pračky musí zásuvka
zůstat snadno přístupná.
! Nepoužívejte prodlužovací kabely a rozvodky.
! Kabel nesmí být ohnutý ani stlačený.
! Výměna kabelu musí být svěřena výhradně
autorizovanému technickému personálu.
Upozornění! Výrobce neponese žádnou
odpovědnost za následky nerespektování
uvedených předpisů.
CZ
nebo ji uchyťte k
okraji umývadla či
vany a připevněte
ji ke kohoutu
prostřednictvím
držáku
z příslušenství (viz
obrázek). Volný
konec vypouštěcí
hadice nesmí zůstat
ponořený do vody.
! Použití prodlužovacích hadic se
nedoporučuje; je-li však nezbytné,
prodlužovací hadice musí mít stejný průměr
jako originální hadice a její délka nesmí
přesáhnout 150 cm.
Připojení k elektrické síti
Před zasunutím zástrčky do zásuvky se
ujistěte, že:
• Je zásuvka uzemněna a že vyhovuje nor-
mám;
• je zásuvka schopna snést maximální zátěž
odpovídající jmenovitému příkonu zařízení,
uvedenému v tabulce s technickými údaji
(viz vedle);
• hodnota napájecího napětí odpovídá údajům
uvedeným v tabulce s technickými údaji (viz
vedle);
• je zásuvka kompatibilní se zástrčkou pračky.
V opačném případě je třeba vyměnit zásuvku
nebo zástrčku.
! Pračka nesmí být umístěna venku – pod
širým nebem, a to ani v případě, že by se
jednalo o místo chráněné před nepřízní
počasí, protože je velmi nebezpečné vystavit
ji působení deště a bouří.
První prací cyklus
Po instalaci zařízení je třeba ještě předtím,
než je použijete na praní prádla, provést jeden
zkušební cyklus s pracím prostředkem a bez
náplně prádla nastavením pracího programu
„Samočištění“ (viz “Čištění pračky”).
Technické údaje
Model WML 601
šířka 59,5 cm
Rozměry
Kapacita od 1 do 6 kg
Napájení
Připojení k
rozvodu vody
Rychlost
odstřeďování
Kontrolní
programy podle předpisy
1061/2010 a
1015/2010
výška 85 cm
hloubka 51,7 cm
Viz štítek s technickými údaji, aplikovaný na zařízení.
maximální tlak
1 MPa (10 bar)
minimální tlak
0.05 MPa (0.5 bar)
kapacita bubnu 46 litrů
až do 1000 otáček za minutu
program 4; Eco bavlnu 60°C.
program 4; Eco bavlnu 40°C.
Toto zařízení odpovídá následujícím normám Evropské unie:
- 2004/108/CE (Elektromagnetická kompatibilita)
- 2006/95/CE (Nízké napětí)
- 2012/19/EU - WEEE
27
Page 28

Údržba a péče
1
2
CZ
Uzavření přívodu vody a vypnutí
elektrického napájení
• Po každém praní uzavřete přívod vody.
Tímto způsobem dochází k omezení
opotřebení pračky a ke snížení nebezpečí
úniku vody.
• Před zahájením čištění pračky a během
operací údržby vytáhněte zástrčku
napájecího kabelu z elektrické zásuvky.
Čištění pračky
• Vnější části a části z gumy se mohou
čistit hadrem navlhčeným ve vlažné vodě a
saponátu. Nepoužívejte rozpouštědla ani
abrazivní látky.
• Pračka je vybavena programem
„Samočištění“ vnitřních částí, který musí být
proveden bez jakéhokoli druhu náplně v
bubnu.
A
prostředky v pracím programu. Doporučuje
se provést samočisticí program každých 40
cyklů praní. Pro aktivaci programu stiskněte
současně tlačítka A a B na dobu 5 sekund
(viz obrázek).
Program bude zahájen automaticky a bude
trvat přibližně 70 minut. Cyklus je možné
ukončit stisknutím tlačítka START/PAUSE.
B
Prací prostředek
(množství rovnající
se 10% množství
doporučeného pro
částečně znečištěné
prádlo) nebo specické přídavné
prostředky pro čištění
pračky budou moci být
použity jako pomocné
Čištění dávkovače pracích
prostředků
Čištění čerpadla
Součástí pračky je samočisticí čerpadlo,
které nevyžaduje údržbu. Může se však stát,
že se v jeho vstupní části, určené k jeho
ochraně a nacházející se v jeho spodní části,
zachytí drobné předměty (mince, knoíky).
! Ujistěte se, že byl prací cyklus ukončen, a
vytáhněte zástrčku ze zásuvky.
Přístup ke vstupní části čerpadla:
1. pomocí šroubováku
odstraňte krycí panel nacházející se v
přední části pračky
(viz obrázek);
2. Odšroubujte víko
jeho otáčením proti
směru hodinových
ručiček (viz obrázek):
vytečení malého
množství vody je
zcela běžným jevem;
3. dokonale vyčistěte vnitřek;
4. zašroubujte zpět víko;
5. namontujte zpět panel, přičemž se před
jeho přisunutím k zařízení ujistěte, že
došlo ke správnému zachycení háčků do
příslušných podélných otvorů.
Vytáhněte dávkovač
jeho nadzvednutím
a vytažením směrem
ven (viz obrázek).
Umyjte jej pod proudem vody; tento druh
vyčištění je třeba
provádět pravidelně.
Péče o dvířka a buben
• Dvířka ponechte pokaždé pootevřená, aby
se zabránilo tvorbě nepříjemných zápachů.
28
Kontrola přítokové hadice na vodu
Stav přítokové hadice je třeba zkontrolovat
alespoň jednou ročně. Jsou-li na ní viditelné praskliny nebo trhliny, je třeba ji vyměnit:
silný tlak působící na hadici během pracího
cyklu by mohl způsobit její náhlé roztržení.
! Nikdy nepoužívejte již použité hadice.
Page 29

Opatření a rady
! Pračka byla navržena a vyrobena v souladu s platnými
mezinárodními bezpečnostním předpisy. Tato upozornění
jsou uváděna z bezpečnostních důvodů a je třeba si je
pozorně přečíst.
Základní bezpečnostní pokyny
• Toto zařízení bylo navrženo výhradně pro použití v
domácnosti.
• Toto zařízení mohou používat děti od 8 let a
osoby se sníženými fyzickými, senzorickými
nebo duševními schopnostmi nebo osoby s
nedostatečnými zkušenostmi a znalostmi,
když se nacházejí pod náležitým dohledem
nebo když byly náležitě vyškoleny ohledně
bezpečného použití zařízení a uvědomují
si související nebezpečí. Děti si nesmí hrát
se zařízením. Děti nesmí provádět operace
údržby a čištění bez dohledu.
• Pračku mohou používat pouze dospělé osoby podle
pokynů uvedených v tomto návodu.
• Nedotýkejte se zařízení bosí nebo v případě, že máte
mokré nebo vlhké ruce či nohy.
• Nevytahujte zástrčku ze zásuvky tahem za kabel, ale
uchopením za zástrčku.
• Neotvírejte dávkovač pracích prostředků během
činnosti zařízení.
• Nedotýkejte se odčerpávané vody, protože může mít
velmi vysokou teplotu.
• Nepokoušejte se o násilné otevření dvířek: mohlo by dojít
k poškození bezpečnostního uzávěru, který zabraňuje
náhodnému otevření.
• Při výskytu poruchy se v žádném případě
nepokoušejte o opravu vnitřních částí zařízení.
• Vždy mějte pod kontrolou děti a zabraňte tomu, aby se
přibližovaly k zařízení během pracího cyklu.
• Během pracího cyklu mají dvířka tendenci ohřát se.
• V případě potřeby přemísťujte pračku ve dvou nebo
ve třech a věnujte celé operaci maximální pozornost.
Nikdy se nepokoušejte zařízení přemísťovat sami, je
totiž velmi těžké.
• Před zahájením vkládání prádla zkontrolujte, zda je
buben prázdný.
na všech výrobcích s cílem připomenout povinnosti spojené
se separovaným sběrem. Podrobnější informace týkající se
správného způsobu vyřazení elektrospotřebičů z provozu
mohou jejich držitelé získat tak, že se obrátí na navrženou
veřejnou instituci nebo na prodejce.
CZ
Likvidace
• Likvidace obalových materiálů:
při jejich odstranění postupujte v souladu s místním
předpisy a dbejte na možnou recyklaci.
• Evropská směrnice 2012/19/EU o odpadu tvořeném
elektrickými a elektronickými zařízeními nařizuje, že
elektrospotřebiče nesmí být likvidovány v rámci běžného
pevného městského odpadu. Vyřazená zařízení musí být
shromážděna zvlášť za účelem zvýšení počtu recyklovaných a znovupoužitých materiálů, z nichž jsou složena, a
z důvodu zabránění možných ublížení na zdraví a škod na
životním prostředí. Symbolem je přeškrtnutý koš, uvedený
29
Page 30

Popis pračky a zahájení
pracího programu
CZ
Ovládací panel
Tlačítko
ON/OFF
Dávkovač pracích prostředků
Otočný ovladač
PROGRAMŮ
Dávkovač pracích prostředků: slouží k dávkování
pracích prostředků a přídavných prostředků (viz „Prací
prostředky a prádlo“).
Uvnitř dávkovače pracích prostředků je umístěn funkční
popis, jehož prostřednictvím je možné kdykoli konzultovat stručný přehled pracích programů.
Tlačítko ON/OFF: slouží k zapnutí a vypnutí pračky.
Otočný ovladač PROGRAMŮ: pro nastavení pracích
programů. Během pracího programu zůstane ve stejné
poloze.
FUNKČNÍ tlačítka s kontrolkami: slouží k volbě jednotlivých dostupných funkcí. Kontrolka zvolené funkce
zůstane rozsvícena.
Otočný ovladač ODSTŘEĎOVÁNÍ: slouží k nastavení
odstřeďování nebo k jeho vyloučení (viz „Uživatelská
nastavení“).
Otočný ovladač TEPLOTY: slouží k nastavení teploty
praní nebo praní ve studené vodě (viz „Uživatelská
nastavení“).
Kontrolky PRŮBĚHU PRACÍHO
CYKLU/ODLOŽENÉHO
STARTU
Otočný ovladač
ODSTŘEĎOVÁNÍ
Otočný ovladač
TEPLOTY
Tlačítko s kontrolkou
FUNKČNÍ
tlačítka s kontrolkami
Kontrolka ZABLOKOVANÁ DVÍŘKA: informuje o tom,
zda je možné otevřít dvířka (viz vedlejší strana).
Tlačítko s kontrolkou START/PAUSE: Slouží ke spuštění
nebo dočasnému přerušení programů.
POZN.: Stisknutí tohoto tlačítka slouží k přerušení
probíhajícího praní; příslušná kontrolka bude blikat
oranžovým světlem, zatímco kontrolka probíhající fáze
zůstane rozsvícena stálým světlem. Když bude kontrolka ZABLOKOVANÁ DVÍŘKA zhasnuta, bude možné
otevřít dvířka (vyčkejte přibližně 3 minuty).
Za účelem opětovného zahájení praní z bodu, ve kterém
bylo přerušeno, znovu stiskněte toto tlačítko.
Pohotovostní režim
Za účelem shody s novými předpisy souvisejícími s
energetickou úsporou je tato pračka vybavena systémem automatického vypnutí (přechodu do pohotovostního režimu – standby), který je aktivován po uplynutí
přibližně 30 minut, když se pračka nepoužívá. Krátce
stiskněte tlačítko ON/OFF a vyčkejte na obnovení
činnosti zařízení.
START/PAUSE
Kontrolka
ZABLOKOVANÁ
DVÍŘKA
Kontrolky
ODLOŽENÉHO STARTU: slouží ke kontrole průběhu
pracího programu.
Rozsvícená
V případě, že byla nastavena funkce „Odloženého
startu“, budou informovat o čase zbývajícím do zahájení
pracího programu (viz vedlejší strana).
30
PRŮBĚHU PRACÍHO CYKLU/
kontrolka
poukazuje na probíhající fázi.
Page 31

Kontrolky
END
Kontrolky jsou zdrojem důležitých informací.
Informují nás o následujících skutečnostech:
Kontrolka aktuální fáze pracího programu:
Po zvolení a zahájení požadovaného pracího cyklu dojde
k postupnému rozsvícení kontrolek informujících o jeho
průběhu.
CZ
Odložený start
Když byla aktivována funkce „Odloženého startu“ (viz
„Uživatelská nastavení“), po zahájení pracího programu
začne blikat příslušná kontrolka zvoleného odložení:
Průběžně bude zobrazován čas zbývající do startu a zobrazování bude provázeno blikáním příslušné kontrolky:
Po uplynutí zvolené doby odložení kontrolka zhasne a
bude zahájen nastavený prací program.
Praní
Máchání
Odstřeďování
Odčerpání vody
Ukončení praní
Funkční tlačítka a příslušné kontrolky
Po zvolení konkrétní funkce dojde k rozsvícení příslušné
kontrolky.
Když zvolená volitelná funkce není kompatibilní s nastaveným programem, tato nekompatibilita bude signalizována blikáním kontrolky a akustickým signálem (3 pípnutí)
a volitelná funkce nebude aktivována.
V případě, že bude zvolena funkce, která není kompatibilní s některou z předem zvolených funkcí, zůstane
aktivována pouze poslední zvolená funkce.
Kontrolka zablokovaných dvířek
Rozsvícení této kontrolky poukazuje na to, že dvířka jsou
zablokována kvůli zamezení náhodnému otevření; aby se
zabránilo poškození dvířek, před jejich otevřením je třeba
vyčkat, dokud uvedená kontrolka nezhasne (vyčkejte
přibližně 3 minuty).
! Rychlé blikání kontrolky START/PAUSE (oranžové)
současně s blikáním funkcí poukazuje na přítomnost
poruchy (viz „Poruchy a způsob jejich odstranění“).
Zahájení pracího programu
1. Zapněte pračku stisknutím tlačítka ON/OFF. Všechny kontrolky se rozsvítí na několik sekund a poté zůstanou svítit ty
kontrolky, které se týkají nastavení zvoleného programu, a bude blikat kontrolka START/PAUSE.
2. Naplňte pračku a zavřete dvířka.
3. Otočným ovladačem PROGRAMŮ nastavte požadovaný prací program.
4. Nastavte teplotu praní (viz „Uživatelská nastavení“).
5. Nastavte rychlost odstřeďování (viz „Uživatelská nastavení“).
6. Nadávkujte prací prostředek a přídavné prostředky (viz „Prací prostředky a prádlo“).
7. Zvolte požadované funkce.
8. Zahajte prací program stisknutím tlačítka START/PAUSE a příslušná kontrolka zůstane rozsvícena stálým světlem ze-
lené barvy. Zrušení nastaveného pracího cyklu se provádí přerušením činnosti zařízení stisknutím tlačítka START/PATA a
volbou nového cyklu.
9. Po ukončení pracího programu se rozsvítí kontrolka . Dojde ke zhasnutí kontrolky ZABLOKOVANÁ DVÍŘKA s cílem
informovat o možnosti otevření dvířek (vyčkejte přibližně 3 minuty). Vytáhněte prádlo a nechte dvířka pootevřená, aby
bylo umožněno vysušení bubnu. Vypněte pračku stisknutím tlačítka ON/OFF.
31
Page 32

CZ
Prací programy
Tabulka pracích programů
Prací prostředky a
Max. ry-
Popis programu
Programy
Odstraòování Skvrn
1
Bílé prádlo
2
Bavlnu: Málo znečištěné bílé a barevné prádlo z odolných tkanin.
3
Eco bavlnu 60°(1): Silně znečištěné bílé a barevné prádlo z
4
odolných tkanin.
Eco bavlnu 40°(2): Málo znečištěné bílé a barevné prádlo z
4
odolných tkanin.
Syntetické:Velmi znečištěné barevné prádlo z odolných tkanin.
5
Syntetické (3): Málo znečištěné barevné prádlo z odolných tkanin.
5
Protialergické
6
Dìtské Prádlo
7
Vlna: Pro vlnu, kašmír apod.
8
Choulostivé prádlo
9
Rychlé Praní 60’: K rychlému oživení mírně znečištěného prádla
10
(nedoporučuje se pro vlnu, hedvábí a prádlo určené pro ruční praní).
Bavlnu 20°: Málo znečištěné bílé a barevné prádlo z odolných
11
tkanin.
Bavlna
12
Syntetické
13
Rychlé Praní 30’
14
Máchání
Odstřeďování + Odčerpání vody
Samostatné odčerpání vody *
* V případě volby programu a vyloučení odstřeďování zařízení provede pouze odčerpání vody.
Doba trvání cyklu uvedená na displeji nebo v návodu představuje odhad vypočítaný na základě standardních podmínek. Skutečná doba se může měnit v závislosti
na četných faktorech, jako je např. teplota a tlak vody na vstupu, teplota prostředí, množství pracího prostředku, množství a druh náplně, vyvážení náplně a zvolené
volitelné funkce.
1) Kontrolní program podle předpisy 1061/2010: nastavte program 4 s teplotou 60°C.
Tento cyklus je vhodný pro praní běžně znečištěné bavlny a jedná se o nejúčinnější cyklus z hlediska kombinované spotřeby energie a vody určený pro prádlo, které lze prát při teplotě do
60 °C. Skutečná teplota praní se může lišit od uvedené.
2) Kontrolní program podle předpisy 1061/2010: nastavte program 4 s teplotou 40°C.
Tento cyklus je vhodný pro praní běžně znečištěné bavlny a jedná se o nejúčinnější cyklus z hlediska kombinované spotřeby energie a vody určený pro prádlo, které lze prát při teplotě do
40 °C. Skutečná teplota praní se může lišit od uvedené.
Pro všechny Test Institutes:
2) Dlouhý program pro praní bavlny: nastavte program 4 s teplotou 40°C.
3) Dlouhý program pro syntetiku: nastavte program 5 s teplotou 40°C.
Max. teplo-
ta (°C)
40° 1000
60° 1000
40°
(Max. 90°)
60° 1000 -
40° 1000 -
60° 1000
40° 1000
60° 1000 40° 1000
40° 800 30° 0 -
60° 1000 -
20° 1000 -
Studená
voda
Studená
voda
Studená
voda
- 1000 - -
- 1000 - - - - 6 - - - 10’
- - - - - 6 - - - 3’
chlost
(otáčky
za mi-
nutu)
1000
1000 -
1000 -
přídavné prostředky
Před-
800 -
pírka
Praní
Bělicí
prostředek
-
-
-
-
-
-
-
-
-
-
hkost %
Aviváž
Max. náplň (kg)
gie kWh
Zbytková vl-
Spotřeba ener-
4 - - - 180’
4 - - - 180’
6 - - - 115’
6 62 1,02 49,8 195’
6 62 0,86 76 185’
3 44 0,78 33 120’
3 - - - 110’
4 - - - 200’
3 - - - 150’
1,5 - - - 80’
1 - - - 75’
3,5 62 0,68 30 60’
6 - - - 175’
6 - - - 100’
3 - - - 75’
3 70 0,05 36 30’
6 - - - 49’
Doba
Celkové
množství vody lt
trvání cyklu
Odstraňování Skvrn: cyklus 1 vhodný pro praní značně znečištěného prádla s odolnými barvami. Tento program zaručuje vyšší třídu
praní než standardní třída (třída A). Při použití tohoto programu nemíchejte spolu prádlo různých barev. Doporučuje se použití práškového
pracího prostředku. Pro odolné skvrny se doporučuje provést předošetření specickými přídavnými prostředky.
Bílé prádlo: použijte cyklus 2 pro praní bílého prádla. Program je navržen pro dlouhodobé zachování zářivosti bílé barvy.
Pro dosažení nejlepších výsledků se doporučuje použít práškový prací prostředek.
Protialergické: použijte program 6 pro odstranění hlavních alargenů, jako jsou pyl, roztoči a kočičí a psí chlupy.
Dìtské Prádlo: na odstranění typické špíny dětského oblečení použijte příslušný program 7 a řádně odstraňte prací
prostředek z prádla, abyste předešli alergickým reakcím jemné dětské pokožky. Tento prací cyklus byl navržen pro snížení
množství bakterií s použitím vyššího množství vody a pro optimalizaci účunku specických hygienických přísad, přidaných
k pracímu prostředku.
Eko programy
Programy Eko nabízejí dobrou výkonnost praní při nízkých teplotách, přičemž umožňují nižší použití elektrické energie
s výhodami pro životní prostředí i pro nanční úsporu.
Programy Eco (12 Bavlna, 13 Syntetické a 14 Rychlé praní 30’) byly vytvořeny pro různé druhy tkanin a pro mírně
znečištěné prádlo. Pro zajištění optimálního výsledku doporučujeme použít tekutý prací prostředek; doporučuje se
předběžně ošetřit manžety, límce a skvrny.
Bavlnu 20°
(11) ideální pro náplně ze znečištěné bavlny. Dobrá výkonnost i za studena, srovnatelná s praním při 40
°C, je zaručena mechanickým působením, které je založeno na změně rychlosti v krátkých nebo dlouhých intervalech.
32
Page 33

Uživatelská nastavení
Nastavení teploty
Otáčením otočného ovladače TEPLOTY se nastavuje teplota praní (viz Tabulka programů).
Teplota může být postupně snižována až po praní ve studené vodě ( ).
Zařízení automaticky zabrání nastavení vyšší teploty, než je maximální teplota pro každý prací program.
! Výjimka: při volbě programu 3 bude možné zvýšit teplotu až na 90°C.
Nastavení odstřeďování
Otáčením otočného ovladače ODSTŘEĎOVÁNÍ se nastavuje rychlost odstřeďování zvoleného pracího programu.
Maximální rychlosti pro jednotlivé prací programy jsou:
Programy Maximální rychlost
Bavlna 1000 otáček za minutu
Syntetika 1000 otáček za minutu
Vlna 800 otáček za minutu
Hedvábí pouze odčerpání vody
Rychlost odstřeďování může být snížena nebo může být odstřeďování vyloučeno volbou symbolu .
Zařízení automaticky zabrání odstřeďování vyšší rychlostí, než je maximální rychlost pro každý prací program.
Funkce
Jednotlivé funkce, kterými pračka disponuje, umožňují dosáhnout požadovaného stupně čistoty a bělosti praného prádla.
Způsob aktivace jednotlivých funkcí:
1. stiskněte příslušné tlačítko požadované funkce;
2. rozsvícení příslušné kontrolky signalizuje, že došlo k aktivaci zvolené funkce.
Poznámka:
- Když zvolená volitelná funkce není kompatibilní s nastaveným programem, tato nekompatibilita bude signalizována
blikáním kontrolky a akustickým signálem (3 pípnutí) a volitelná funkce nebude aktivována.
- V případě, že bude zvolena funkce, která není kompatibilní s některou z předem zvolených funkcí, zůstane aktivována pouze poslední zvolená funkce.
CZ
Super wash
Díky použití většího množství vody v počáteční fázi cyklu a díky použití delší doby tato volitelná funkce zaručuje praní vysoké kvality. Může se používat s bělicím prostředkem nebo bez něj. Když si přejete provést také bělení, vložte přídavnou
nádobku 4 z příslušenství do nádobky 1. Při dávkování bělícího prostředku nepřekračujte úroveň „max“ vyznačenou na
středové přihrádce (viz obrázek 34).
Snadné žehlení
Volbou této funkce budou praní a odstřeďování náležitě změněny za účelem snížení tvorby záhybů. Na konci cyklu
pračka provede pomalá otáčení bubnu; kontrolka funkce SNADNÉ ŽEHLENÍ a kontrolka START/PAUSE budou blikat
(oranžově) a kontrolka fáze zůstane rozsvícena stálým světlem. K ukončení cyklu je třeba stisknout tlačítko START/
PAUSE nebo tlačítko SNADNÉ ŽEHLENÍ.
Předpírka
Volbou této funkce dojde k provedení předpírky, užitečné pro odstranění odolných skvrn.
POZN.: Přidejte prací prostředek do příslušné přihrádky.
Odložený start
Slouží k odložení zahájení pracího cyklu až o 12 hodin.
Opakovaně stiskněte tlačítko až do rozsvícení kontrolky označující požadovanou dobu odložení. Po pátém stisknutí tlačítka
dojde k vyloučení uvedené funkce.
POZN.: Po stisknutí tlačítka START/PAUSE je možné změnit hodnotu odložení pouze ve smyslu jejího snížení.
! Je aktivní u všech pracích programů.
33
Page 34

Prací prostředky a prádlo
M
AX
1
2
4
3
A
B
CZ
Dávkovač pracích prostředků
Dobrý výsledek praní závisí také na správném dávkování
pracího prostředku: použití jeho nadměrného množství
snižuje efektivitu praní a napomáhá tvorbě vodního
kamene na vnitřních částech pračky a zvyšuje znečištění
životního prostředí.
! Pro předpírku a praní při teplotě vyšší než 60 °C
používejte práškové prací prostředky pro bílé bavlněné
prádlo.
! Dodržujte pokyny uvedené na obalu pracího
prostředku.
! Nepoužívejte prací prostředky určené pro ruční praní,
protože způsobují tvorbu nadměrného množství pěny.
Při vytahování dávkovače
pracích prostředků a při
jeho plnění pracími nebo
přídavnými prostředky postupujte následovně.
Přihrádka 1: Prací prostředek (práškový) pro
předpírku
Před naplněním přihrádky pracím prostředkem se
ujistěte, že v dávkovači není vložena přídavná přihrádka
4.
Přihrádka 2: Prací prostředek (v prášku nebo tekutý)
V případě použití tekutého pracího prostředku se
doporučuje použít pro správné dávkování malou
přepážku A z příslušenství. Pro použití práškového
pracího prostředku vložte malou přepážku do prohloubeniny B.
Přihrádka 3: Přídavné prostředky (aviváž atd.)
Aviváž nesmí vytékat z mřížky.
Přídavná přihrádka 4: Bělicí prostředek
Speciální programy
Vlna - Woolmark Apparel Care - Green:
prací cyklus „Vlna“ této pračky byl schválen společností
Woolmark Company pro praní prádla z vlny, které je klasikováno jako „prádlo určené pro ruční praní“, za podmínky,
že bude praní provedeno v souladu s pokyny uvedenými
na visačce oblečení a pokyny dodanými výrobcem této
pračky.
Choulostivé prádlo: pro praní velmi choulostivého prádla, které obsahuje aplikace, jako je štras nebo pajetky,
použijte program 9.
Doporučuje se prádlo před praním převrátit naruby a
vložit malé kusy prádla do příslušného sáčku pro praní
choulostivého prádla.
Pro dosažení nejlepších výsledků se doporučuje použít
tekutý prací prostředek pro choulostivé prádlo.
Pro praní hedvábného prádla a záclon zvolte cyklus 9 a
aktivujte volitelnou funkci ; zařízení ukončí cyklus
s prádlem namočeným ve vodě a s blikající kontrolkou
. Za účelem odčerpání vody a vyjmutí prádla z
pračky je třeba stisknout tlačítko START/PAUSE nebo
tlačítko .
Systém automatického vyvážení náplně
Před každým odstřeďováním buben provede otáčení rychlostí lehce převyšující rychlost praní, aby se odstranily
vibrace a aby se náplň rovnoměrně rozložila. V případě,
že po několikanásobných pokusech o vyvážení prádlo
ještě nebude správně vyváženo, zařízení provede
odstřeďování nižší rychlostí, než je přednastavená rychlost. Při nadměrném nevyvážení pračka provede namísto
odstřeďování vyvážení. Pro dosažení rovnoměrnějšího
rozložení náplně a jejího správného vyvážení se doporučuje
míchat velké a malé kusy prádla.
Příprava prádla
• Roztřiďte prádlo podle:
- druhu tkaniny / symbolu na visačce.
- barvy: oddělte barevné prádlo od bílého.
• Vyprázdněte kapsy a zkontrolujte knoíky.
• Nepřekračujte povolenou náplň, vztahující se na hmotnost suchého prádla: viz “Tabulka programů“.
Kolik váží prádlo?
1 prostěradlo 400-500 g
1 povlak na polštář 150-200 g
1 ubrus 400-500 g
1 župan 900-1.200 g
1 ručník 150-250 g
34
Page 35

Poruchy a způsob jejich
odstranění
Může se stát, že pračka nebude fungovat. Dříve, než zatelefonujete na Servisní službu (viz „Servisní služba“), zkontrolujte, zda se nejedná o problém, který lze snadno vyřešit s pomocí následujícího seznamu.
Poruchy:
Pračku nelze zapnout.
Nedochází k zahájení pracího cyklu.
Pračka nenapouští vodu (rychle bliká
kontrolka první fáze praní).
Dochází k nepřetržitému napouštění a
odčerpávání vody.
Možné příčiny / Způsob jejich odstranění:
• Zástrčka není zasunuta v zásuvce nebo není zasunuta natolik, aby došlo ke
spojení kontaktů.
• V celém domě je vypnutý proud.
• Nejsou řádně zavřená dvířka.
• Nebylo stisknuto tlačítko ON/OFF.
• Nebylo stisknuto tlačítko START/PAUSE.
• Nebyl otevřen kohout přívodu vody.
• Byl nastaven odložený start (viz „Uživatelská nastavení“).
• Přívodní hadice není připojena k vodovodnímu kohoutu.
• Hadice je příliš ohnutá.
• Nebyl otevřen kohout přívodu vody.
• V celém domě je uzavřený přívod vody.
• V rozvodu vody není dostatečný tlak.
• Nebylo stisknuto tlačítko START/PAUSE.
• Vypouštěcí hadice se nachází mimo určené rozmezí od 65 do 100 cm nad
zemí (viz „Instalace“).
• Koncová část vypouštěcí hadice je ponořena ve vodě (viz „Instalace“).
• Odpad ve stěně není vybaven odvzdušňovacím otvorem.
Když ani po uvedených kontrolách nedojde k odstranění problému, uzavřete
přívod vody, vypněte pračku a přivolejte Servisní službu. V případě, že se byt
nachází na jednom z nejvyšších poschodí, je možné, že dochází k sifonovému
efektu, jehož následkem pračka nepřetržitě napouští a odčerpává vodu. Pro
odstranění uvedeného efektu jsou v prodeji běžně dostupné speciální protisifonové ventily.
CZ
Nedochází k vyčerpání vody nebo
k odstřeďování.
Během odstřeďování je možné pozorovat silné vibrace pračky.
Dochází k úniku vody z pračky.
Kontrola START/PAUSE (oranžová)
a kontrolky funkcí rychle blikají.
Dochází k tvorbě nadměrného
množství pěny.
• Odčerpání vody netvoří součást nastaveného programu: u některých
programů je třeba jej aktivovat manuálně.
• Je aktivní funkce SNADNÉ ŽEHLENÍ: na dokončení programu stiskněte
tlačítko START/PAUSE („Uživatelská nastavení”).
• Vypouštěcí hadice je ohnutá (viz „Instalace“).
• Odpadové potrubí je ucpáno.
• Během instalace nebyl buben odjištěn předepsaným způsobem
(viz „Instalace“).
• Pračka není dokonale vyrovnána do vodorovné polohy (viz „Instalace“).
• Pračka je stlačena mezi nábytkem a stěnou (viz „Instalace“).
• Přítoková hadice není správně zašroubována (viz „Instalace“).
• Dávkovač pracích prostředků je ucpán (způsob jeho vyčištění je uveden v
části „Údržba a péče“).
• Vypouštěcí hadice není upevněna předepsaným způsobem (viz „Instalace“).
• Vypněte zařízení a vytáhněte zástrčku ze zásuvky, vyčkejte přibližně 1 minutu a opětovně jej zapněte.
Když porucha přetrvává, obraťte se na Servisní službu.
• Použitý prací prostředek není vhodný pro použití v automatické pračce
(musí obsahovat označení „pro praní v pračce“, „pro ruční praní nebo pro
praní v pračce“ nebo podobné označení).
• Bylo použito jeho nadměrné množství.
35
Page 36

Servisní služba
CZ
Před přivoláním Servisní služby:
• Zkontrolujte, zda nejste schopni poruchu odstranit sami (viz „Poruchy a způsob jejich odstranění“);
• Opětovně uveďte do chodu prací program, abyste ověřili, zda byla porucha odstraněna;
• V opačném případě se obraťte na Centrum servisní služby na telefonním čísle uvedeném na záručním listu.
! Nikdy se neobracejte s žádostí o pomoc na techniky, kteří nejsou k výkonu této činnosti oprávněni.
Při hlášení poruchy uveďte:
• druh poruchy;
• model zařízení (Mod.);
• výrobní číslo (S/N).
Tyto informace jsou uvedeny na štítku aplikovaném na zadní částí pračky a v její přední části, dostupné po otevření dvířek.
36
Page 37

Упутство за употребу
МАШИНА ЗА ПРАЊЕ РУБЉА
SR
Cрпски
WML 601
Садржај
Постављање, 38-39
Распакивање и нивелисање
Повезивање на водоводну и електричну мреж
Први циклус прања
Технички подаци
Одржавање и чување, 40
Искључивање воде и електричне енергије
Чишћење машине за прање веша
Чишћење посуде за детерџент
Нега врата и бубња
Чишћење пумпе
Провера црева за напајање водом
Упозорења и савети, 41
Општа сигурност
Одлагање на отпад
Ручно отварање врата
Опис машине за прање веша и покретање
програма, 42-43
Командна табла
Контролне лампице
Покретање програма
SR
Програми, 44
Табела програма
Посебна подешавања, 45
Задавање температуре
Задавање центрифуге
Функције
Детерџенти и веш, 46
Посуда за детерџент
Припрема веша
Посебни програми
Систем за балансирање терета
Неправилности и решења, 47
Помоћ, 48
37
Page 38

Постављање
SR
! Важно је сачувати ову књижицу како
бисте је могли консултовати у сваком
тренутку. У случају продаје, уступања или
селидбе, обезбедите да остане уз машину
за прање веша како би нови власник могао
да се обавести о раду и одговарајућим
упозорењима.
! Пажљиво прочитати упутства: садрже
важне информације о постављању,
употреби и безбедности.
Распакивање и нивелисање
Распакивање
1. Распакивање машине за веш.
2. Проверити да машина није претрпела
оштећења при транспорту. Уколико
је оштећена, немојте је повезивати и
обратите се продавцу.
3. Скините 3
завртња постављена
као заштита при
транспорту и гумицу
са одговарајућим
одбојником,
постављене на
задњем делу
машине (погледајте
слику).
4. Затворити отворе приложеним
пластичним затварачима.
5. Сачувати све делове: уколико машину
треба транспортовати, биће потребно
поново их поставити.
! Амбалажа није играчка за децу.
Нивелисање
1. Поставити машину на равну и чврсту
површину, не наслањати је на зид,
намештај или друге површине.
2. Уколико под
није савршено
раван, надокнадите
неправилност
отпуштањем или
затезањем предњих
стопица (погледајте
слику); угао нагиба,
измерен на радној
површини не сме
прелазити 2°.
Прецизно нивелисање даје стабилност
и спречава вибрације, буку и померање
током рада машине. У случају да машину
постављате на итисон или тепих, подесите
стопице тако да испод машине оставите
довољно простора за вентилацију.
Повезивање на водоводну и
електричну мрежу
Повезивање црева за напајање водом
1. Повежите црево
за напајање са
славином за хладну
воду са навојем на
излазном отвору од
¾ цола (погледајте
слику).
Пре повезивања
пустите воду да тече
све док не постане
чиста.
2. Повежите
доводно црево са
машином заврћући
га на одговарајући
прикључак за воду,
на задњем делу
машине, горе десно
(погледајте слику).
3. Обратите пажњу да црево не буде
преломљено или пригњечено.
! Притисак воде у славини треба да се
креће у границама вредности датим
у табели са Техничким подацима
(погледајте страницу поред).
! Уколико дужина доводног црева није
довољна, обратите се специјализованој
продавници или овлашћеном сервисеру.
! Никада не користите већ коришћена
црева.
! Користите црева испоручена уз машину.
38
Page 39

Повезивање одводног црева
65 - 100 cm
Повежите
одводно црево,
без савијања, на
одводну цев или
на одвод у зиду
постављене на
65 до 100 цм од
земље;
можете га
пребацити преко
ивице умиваоника
или каде, али
га морате
причврстити
за славину
(погледајте
слику). Слободни
крај одводног
црева не сме да
буде уроњен у воду.
! Не препоручујемо употребу продужних
црева; ако је неопходно, продужетак треба
да буде истог пречника као и оригинално
црево и да не прелази 150 цм.
Повезивање на електричну мрежу
Пре него што гурнете утикач у утичницу,
проверите да ли:
• је утичница повезана са уземљења
изведеним у складу са прописима;
• је утичница у могућности да издржи
максимално оптерећење снаге машине,
наведено у табели са Техничким
подацима (погледајте поред);
• се напон напајања креће у границама
вредности наведених у табели са
Техничким подацима (погледајте поред);
• је утичница компатибилна са утикачем
машине. У случају да не одговара,
променити утичницу или утикач.
! Не постављајте машину на отворено,
чак ни ако је простор преправљен, јер
је веома опасно остављати је изложену
киши и временским непогодама.
! Код инсталирања машине утичница
мора да буде лако доступна.
! Не употребљавајте продужне каблове и
разделнике.
! Кабл не сме да буде изложен савијању
или притискању.
! Замену напојног кабла треба да обавља
само овлашћени сервисер.
Пажња! Произвођач се ограђује од сваке
одговорности у случају непоштовања ових
норми.
Први циклус прања
Након постављања, пре употребе,
извршите циклус прања са детерџентом
и без веша задајући програм
„Самочишћење“(погледајте „Чишћење
машине за прање веша").
Технички подаци
Модел WML 601
ширина 59,5 цм
Димензије
Капацитет од 1 до 6 кг
Електрично
повезивање
Повезивање
на
водоводну
мрежу
Брзина
центрифуге
Контролни
програми
према
директиви
1061/2010
1015/2010
висина 85 цм
дубина 51,7 цм
Погледајте налепницу
са техничким
карактеристикама која се
налази на машини
максималан притисак
1 MPa (10 бара)
минималан притисак
0,05 MPa (0,5 бара)
капацитет бубња 46 литра
до 1000 обртаја у минути
програм 4; Еко памук
60°C.
програм 4; Еко памук
40°C.
Ова опрема је усклађена
са следећим Директивама
заједнице:
- 2004/108/CE
(електромагнетна
компатибилност)
- 2006/95/CЕ (Ниски напон)
- 2012/19/EU (WEEE)
SR
39
Page 40

Одржавање и чување
1
2
SR
Искључивање воде и електричне
енергије
• Затворите славину за воду после сваког
прања. Овим се спречава хабање
водоводних инсталација машине и
уклања опасност од цурења.
• Електрични кабл уклоните када чистите
машину и током поправки.
Чишћење машине за прање веша
• Спољашњи и гумени делови се могу
чистити меком крпом наквашеном млаком
водом и сапуницом. Не користите растворе
или абразивна средства.
• Машина за прање рубља има програм
„Самочишћење“ за унутрашње делове
који треба обавити без икакве одеће у
бубњу.
A
Препоручује се програм чишћења на сваких
40 циклуса прања.
Да бисте активирали програм, истовремено
притисните тастере A и B на 5 секунди.
(погледајте слику). Програм почиње
аутоматски и траје око 70 минута. Да бисте
зауставили циклус, притисните тастер
START/PAUSE.
B
Детерџент (количина
одговара 10% од оне
која се препоручује за
мало запрљану одећу)
или посебни адитиви
за чишћење машине
за прање рубља
могу се користити
као додатак у току
програма прања.
Чишћење посуде за детерџент
Ослободите
фиоку тако што
ћете је подићи и
повући према себи
(погледајте слику).
Исперите је под
млазом воде; ово
треба често радити.
Нега врата и бубња
• Врата увек остављајте одшкринута да би
се избегло стварање непријатних мириса.
Чишћење пумпе
Машина је опремљена пумпом која се
сама чисти и није јој потребно одржавање.
Ипак, може се десити да мали предмети
(метални новац, дугмад) упадну у
предкомору која штити пумпу, а која се
налази у њеном доњем делу.
! Уверите се да је циклус прања завршен и
извуците утикач.
За приступ преткомори:
1. скинути плочу
на предњем
делу машине
помоћу одвијача
(погледајте слику);
2. одврните
поклопац окрећући
га у супротно од
смера кретања
казаљке на сату
(погледајте слику):
излазак воде је
нормалан;
3. очистите унутрашњост пажљиво;
4. вратите поклопац;
5. вратите плочу, водећи рачуна да су
шарке убачене у одговарајуће осовине,
пре него што га притиснете према
машини.
Провера црева за напајање водом
Црево за довод воде проверите барем
једном годишње. Уколико има напрслина и
пукотина треба га заменити: јаки притисци
током прања могли би изазвати изненадна
пуцања.
! Никада не користите већ коришћена
црева.
40
Page 41

Упозорења и савети
! Машина је пројектована и направљена да задовољи све
међународне безбедносне норме. Ова упозорења су дата
из безбедносних разлога и треба их пажљиво прочитати.
Општа сигурност
• Овај уређај је направљен искључиво за кућну
употребу.
• Овај уређај могу да користе деца од 8
година старости и особе са смањеним
физичким, сензорним и менталним
могућностима и са недовољним искуством
и знањем ако их неко надгледа или ако су
добили адектватне информације у вези
са коришћењем уређаја на сигуран начин
и разумели опасне спојеве. Деца не смеју
да се играју са уређајем. Одржавање и
чишћење не смеју да обављају деца без
надгледања.
• Машину не додирујте босим ногама или влажних
руку или ногу.
• Утикач из утичнице не извлачите повлачењем за
кабл, него чврсто ухватите утикач.
• Не отварајте посуду за детерџенте док машина ради.
• Не додирујте воду која се испушта, јер може достићи
високу температуру.
• Ни у ком случају не отварати врата силом: могао би
се оштетити сигурносни механизам који спречава
случајно отварање.
• У случају квара, нипошто не пролазити унутрашњим
механизмима у покушају поправљања.
• Проверавајте стално да се деца не приближавају
машини док ради.
• Током прања врата машине могу се могу загрејати.
• Уколико треба померити машину, то треба да раде
две или три особе уз максималну пажњу. Ово немојте
никада радити сами, јер је машина веома тешка.
• Пре убацивања веша проверите да ли је бубањ
празан.
За детаљније информације о правилном одлагању
кућних уређаја власници се могу обратити
предвиђеној јавној служби или продавцима.
SR
Одлагање на отпад
• Одлагање амбалаже на отпад:
придржавајте се локалних прописа, тако да
амбалажа може бити поново употребљена.
• Европска директива 2012/19/EU о отпаду електричних
и електронских уређаја, прописује да кућни уређаји
не смеју бити одлагани у редовном промету чврстог
градског отпада. Одбачене уређаје треба посебно
сакупити чиме се побољшава стопа прикупљања
корисног отпада и рециклаже материјала од којих
су сачињени и спречава потенцијално нарушавање
здравља и животне средине.
Симбол прецртане канте за отпатке налази се
на свим производима да би подсетио на обавезу
одвојеног сакупљања.
41
Page 42

Опис машине за прање веша и
покретање програма
SR
Командна табла
Посуда за детерџент
Тастер
ON/OFF
ПРОГРАМИ
ТЕМПЕРАТУРА
Дугме
ЦЕНТРИФУГА
Дугме
Дугме
Тастер са лампицама
ФУНКЦИЈА
Контролне лампице
НАПРЕДОВАЊА ЦИКЛУСА/
ЗАДРШКЕ ПОЧЕТКА
Контролна
лампица ВРАТА
БЛОКИРАНА
Тастер са
лампицом
START/PAUSE
Посуда за детерџент: за сипање детерџената и
адитива (види «Детерџенти и веш»).
Дугме ON/OFF: притисните га за укључивање или
искључивање машине.
Дугме ПРОГРАМИ: за задавање програма. Током
трајања програма дугме се не помера.
Тастер са лампицама ФУНКЦИЈА: за избор функција
које су на располагању. Контролна лампица која
одговара одабраној функцији остаће упаљена.
Дугме ЦЕНТРИФУГА: за задавање или искључивање
центрифуге (види «Посебна подешавања»).
Дугме ТЕМПЕРАТУРА: за задавање температуре или
прање на хладно (види «Посебна подешавања»).
Контролне лампице НАПРЕДОВАЊА ЦИКЛУСА/
ЗАДРШКЕ ПОЧЕТКА: за праћење статуса
напредовања програма прања.
Упаљена контролна лампица показује фазу у току.
Ако је активирана функција “пауза почетка”,
показиваће време преостало до покретања програма
(види страну поред).
Тастер са лампицом START/PAUSE: за покретање
или моментално прекидање програма.
НАПОМЕНА: за покретање паузе прања које је у
току, притиснути овај тастер, одговарајућа контролна
лампица ће треперити наранџастом бојом а лампица
фазе у току ће светлети константно. Када се
контролна лампица
врата је могуће отворити (Сачекајте око 3 минута).
За повратак прања на део у којем је прекинуто
притиснути поново овај тастер.
Статус stand by
Ова машина за прање испуњава све нове стандарде
везане за уштеду електричне енергије и опремљена
је системом за аутоматско гашење (stand by) који се
активира након око 30 минута у случају да се машина
не користи. Накратко притисните тастер ON/OFF и
машина ће се поново активирати.
ВРАТА БЛОКИРАНА
угаси,
Контролна лампица ВРАТА БЛОКИРАНА: за
обавештавање да ли се врата могу отворити (види
страну поред).
42
Page 43

Контролне лампице
END
Контролне лампице пружају важне информације.
Ево шта оне значе:
Контролне лампице фазе у току
По избору и покретању жељеног циклуса прања,
лампице ће се прогресивно палити указујући на
статус напредовања:
SR
Пауза почетка
Ако је активирана функција “пауза почетка” (види
«Посебна подешавања»), после покретања програма,
почеће да трепери контролна лампица одабране
задршке:
Како време протиче треперењем одговарајуће
контролне лампице очитаваће се преостало време
задршке:
Када истекне одабрано време задршке лампица која
трепери ће се угасити и задати програм ће започети.
Прање
Испирање
Центрифуга
Пражњење
Крај прања
Тастери функција и одговарајуће контролне лампице
Избором функције одговарајућа лампица ће се
упалити.
Ако одабрана опција не одговара задатом програму,
ову неусклађеност ће сигнализирати треперење
лампице и звучни сигнал (3 кратка звучна сигнала), а
опција се неће активирати.
У случају да се зада функцију која не одговара некој
претходно одабраној функцији, остаће активна само
она која је последња одабрана.
Лампица блокаде врата:
Упаљена лампица указује да су врата блокирана како
би се спречило случајно отварање; да би се избегле
штете пре отварања врата треба сачекати да се
сијалица угаси (Сачекајте око 3 минута).
! Брзо трептање лампице START/PAUSE (наранџасто)
истовремено са лампицом функције указује на
неправилност (види “Неправилности и решења”).
Покретање програма
1. Укључити машину притиском на тастер ON/OFF. Све контролне лампице ће се укључити на неколико секунди,
затим ће се угасити а наставиће да пулсира лампица START/PAUSE.
2. Убаците рубље и затворите врата.
3. На дугмету ПРОГРАМИ одаберите жељени програм.
4. Задати температуру прања (види «Посебна подешавања»).
5. Задати брзину центрифуге (види «Посебна подешавања»).
6. Сипати детерџент и адитиве (види «Детерџенти и веш»).
7. Одабрати жељене функције.
8. Покренути програм притиском на тастер START/PAUSE и одговарајућа лампица ће остати да светли константно
зеленом бојом. За поништавање задатог циклуса укључити паузу машине притиском на тастер START/PAUSE и
одабрати нови циклус.
9. По завршетку програма упалиће се лампица . Лампица ВРАТА БЛОКИРАНА ће се угасити указујући да
је могуће отворити врата. Извући веш и оставити врата одшкринута да би се осушио бубањ (Сачекајте око 3
минута). Искључити машину притиском на тастер ON/OFF.
43
Page 44

SR
Програми
Табела програма
Детерџенти
Опис програма
Програми
Против мрља
1
Бело рубље
2
Памук: Мало запрљан бели и осетљиви шарени веш
3
постојаних боја.
Еко Памук 60° (1): Веома запрљан бели и шарени веш
4
постојаних боја.
Еко Памук 40° (2): Мало запрљан бели и осетљиви
4
шарени веш постојаних боја.
Синтетика: Веома прљав отпоран шарени веш
5
Синтетика (3): Мало прљав отпоран шарени веш.
5
Антиалергијско
6
Беби
7
Вуна: За вуну, кашмир, итд.
8
Осетљиво
9
Брзо 60 минута: За брзо освежавање прљавог
10
веша (није за вуну, свилу и веш који се пере ручно).
Памук 20°: Мало запрљан бели и осетљиви шарени веш
11
постојаних боја.
Памук
12
Синтетика
13
Брзо 30 минута
14
Испирање
Центрифуга + Пражњење
Само Пражњење воде *
* Избором програма и искључивањем циклуса центрифуге, машина ћити само пражњење.
Трајање циклуса приказано на екрану или наведено у упутству је процена заснована на стандардним условима. Стварно време може да зависи
од више бројних фактора, као што су температура и притисак воде на улазу, температура околине, количина детерџента, количина и тип
рубља, уравнотеженост рубља, додатне изабране опције.
1) Контролни програм према норми 1061/2010: задајте програм 4 са температуром од 60°C.
Овај циклус је погодан за прање памучног рубља које је уобичајено запрљано и најефикаснији је у погледу комбиноване потрошње струје и воде
за рубље које може да се пере на 60°C. Ефективна температура прања може да се разликује од оне која је назначена.
2) Контролни програм према норми 1061/2010: задајте програм 4 са температуром од 40°C.
Овај циклус је погодан за прање памучног рубља које је уобичајено запрљано и најефикаснији је у погледу комбиноване потрошње струје и воде
за рубље које може да се пере на 40°C. Ефективна температура прања може да се разликује од оне која је назначена.
За све Тест институте:
2) Дуги програм за памук: задајте програм 4 са температуром од 40°C.
3) Дуги програм за синтетику: задајте програм 5 са температуром од 40°C.
Макс.
темп.
(°C)
40° 1000
60° 1000
40°
(Max. 90°)
60° 1000 -
40° 1000 60° 1000
40° 1000
60° 1000 40° 1000
40° 800 30° 0 -
60° 1000 -
20° 1000 -
Хладна
вода
Хладна
вода
Хладна
вода
Брзина
макс.
(обртаја
у
минути)
Претпрање
1000
1000 -
1000 -
800 -
- 1000 - -
Прање
Избељивач
-
-
-
-
-
-
-
-
-
-
(кг)
струје kWh
Омекшивач
Оптерећење макс.
Преостала влага %
4 - - - 180’
4 - - - 180’
6 - - - 115’
6 62 1,02 49,8 195’
6 62 0,86 76 185’
3 44 0,78 33 120’
3 - - - 110’
4 - - - 200’
3 - - - 150’
1,5 - - - 80’
1 - - - 75’
3,5 62 0,68 30 60’
6 - - - 175’
6 - - - 100’
3 - - - 75’
3 70 0,05 36 30’
6 - - - 49’
воде lt
Укупна потрошња
- 1000 - - - - 6 - - - 10’
- - - - - 6 - - - 3’
Трајање циклуса
Против мрља: oвај програм 1 је прилагођен прању много запрљаног рубља са отпорним бојама. Овај програм
гарантује супериорнију класу прања од стандардне (класа А). Не користите овај програм ако сте помешали рубље
различитих боја. Препоручујемо употребу детерџента у праху. За упорне мрље препоручујемо претходно третирање
са посебним адитивима.
Бело рубље: употребљавајте циклус 2 за прање белог рубља. Програм је намењен очувању светле боје белог
рубља током времена. За најбоље резултате се препоручује коришћење детерџента у праху.
Антиалергијско: Користите програм 6 за уклањање главних изазивача алергија попут полена, гриња, псећих или
мачећих длака.
Беби: користите програм 7 за скидање прљавштине типичне за децу и скидање детерџента са крпа како бисте избегли
алергијске реакције осетљиве дечије коже. Циклус је осмишљен тако да смањи количину бактерија употребом веће
количине воде и оптимизирањем ефекта специфичних хигијенских адитива додатих детерџенту.
Еко програми
Еко програми нуде добре перформансе прања на основу ниске температуре са малим утрошком енергије ради
заштите животне средине и уштеде. Еко програми (
12
Памук,
13
Синтетика и
14
Брзо 30 минута) направљени су за
разне врсте тканина и за мало прљав веш. За оптималан резултат препоручујемо коришћење течног детерџента;
саветујемо претходно третирање манжетни, оковратника и мрља.
Памук 20°: програм 11 стандард је идеалан за прљав памучни веш. Добре перформансе, такође са хладном водом,
упоредне са прањем на 40°, гарантоване су механичком радњом која функционише варирањем брзине поновљеним
и приближеним ударцима.
44
Page 45

Посебна подешавања
Задавање температуре
Окретањем дугмета ТЕМПЕРАТУРА задаје се температура прања (види Табелу програма).
Температура се може смањити све до хладног прања ( ).
Машина аутоматски спречава задавање температуре веће од предвиђеног максимума за сваки програм.
! Избором програма 3 температуру можете повећати све до 90°.
Задавање центрифуге
Окретањем дугмета ЦЕНТРИФУГА задаје се брзина центрифуге одабраног програма.
Максималне предвиђене брзине за програме су:
Програми Максимална брзина
Памук 1000 обртаја у минути
Синтетика 1000 обртаја у минути
Вуна 800 обртаја у минути
Свила само пуњење
Брзина центрифуге се може смањити или искључити избором симбола .
Машина аутоматски спречава центрифугу јачу од максимума предвиђеног за сваки програм.
Функције
Различите предвиђене функције прања омогућују постизање жељене чистоће и белине.
За активирање функција:
1. притиснути тастер који одговара жељеној функцији;
2. паљење одговарајуће лампице показује да је функција активна.
Напомена:
- Ако одабрана опција не одговара задатом програму, ову неусклађеност ће сигнализирати треперење лампице
и звучни сигнал (3 кратка звучна сигнала), а опција се неће активирати.
- У случају да се зада функцију која не одговара некој претходно одабраној функцији, остаће активна само она
која је последња одабрана.
SR
Супер прање
Ова опција гарантује прање високог учинка захваљујући употреби веће количине воде у почетној фази циклуса и
дужем трајању програма и користан је за уклањање најупорнијих флека.
Може се користити са избељивачем или без њега.
Ако желите да обавите избељивање, убаците испоручену додатну кадицу 4, у кадицу 1. При дозирању
избељивача не прелазите ниво „max“ обележен на централном делу (погледајте слику на стр. 46).
Лако пеглање
Избором ове функције, прање и центрифуга ће бити на одговарајући начин измењени тако да се смањи гужвање.
На крају циклуса машина ће извести лагано окретање бубња;
упалиће се лампица функције ЛАКО ПЕГЛАЊЕ трепериће и фаза END остаје упаљена. За завршетак циклуса
треба притиснути тастер START/PAUSE или тастер ЛАКО ПЕГЛАЊЕ.
Предпрање
Избором ове функције реализује се предпрање, корисно при скидању тврдокорних мрља.
НАПОМЕНА: Додати детерџент у одговарајућу кадицу.
Задршка почетка
Одлаже време почетка рада машине до 12 часова.
Притискати тастер све док се не упали лампица која одговара жељеном времену задршке. На пети притисак
дугмета функција се деактивира.
НAПОМЕНА: После притиска на тастер START/PAUSE, време задршке је могуће само смањити.
! Активна је са свим програмима.
45
Page 46

Детерџенти и веш
M
AX
1
2
4
3
A
B
SR
Посуда за детерџент
Добар резултат прања зависи чак и од исправног
дозирања детерџента: повећаном дозом прање није
ефикасније а доприноси се стварању наслага на
унутрашњим деловима машине и загађењу животне
средине.
! Користите детерџент у праху за бело памучно
рубље и за претпрање или за прање рубља на
температури већој од 60°C.
! Пратите упутства на паковању детерџента.
! Не користите детерџенте за ручно прање, пошто
стварају много пене.
Извуците посуду за
детерџенте и сипајте
детерџент или адитив
прању на следећи начин.
кадица 1: Детерџент за претпрање (у праху)
Пре сипања детерџента проверите да није убачена
додатна кадица 4.
кадица 2: Детерџент за прање
(у праху или течан)
У случају да користите течан детерџент, препоручује
се коришћење приложеног зида А за исправно
дозирање. За употребу детерџента у праху користите
зид у отвору B.
кадица 3: Адитиви (омекшивач, итд.)
Омекшивач не сме да цури кроз решетку.
додатна кадица 4: Избељивач
Припрема веша
• Веш поделите према:
- врсти тканине/ симболу на етикети.
-бојама: одвојите шарени од белог веша.
• Испразните џепове и проверите дугмад.
• Не прелазите наведене вредности, које се односе
на суво рубље: погледајте „Табелу програма“.
Посебни програми
Вуна - Woolmark Apparel Care - Green:
Циклус прања „Вуна“ ове машине за прање веша је
одобрен од стране Woolmark Company за прање одеће
од вуне класификоване за „ручно прање“, под условом да
се прање извршава у складу са упутствима наведеним
на етикети одеће и напоменама произвођача машине за
прање веша.
Осетљиво: користите програм 9 за прање веома
осетљивог рубља, које има апликације од штраса или
перлица.
Препоручујемо да преврнете одећу пре прања и
ставите мале делове у одговарајућу врећицу за
прање осетљиве одеће. За најбоље резултате
се препоручује коришћење течног детерџента за
осетљиву одећу.
За прање одеће од свиле и завеса изаберите
циклус 9 и активирајте опцију ; машина ће
завршити циклус са влажним вешом, а лампица
ће треперити. Да бисте избацили воду и извадили
влажан веш, потребно је да притиснете тастер
START/PAUSE или тастер .
Систем балансирања терета
Пре сваке центрифуге, да би се избегле претеране
вибрације и терет равномерно распоредио, бубањ
се окреће брзином мало већом од оне током прања.
Ако се после неколико поновљених покушаја
терет још увек није равномерно распоредио,
машина ће извршити центрифугу брзином мањом
од предвиђене. У случају великог дисбаланса,
распоређивање врши машина уместо центрифуге. Да
би се побољшало распоређивање терета и правилно
балансирање, препоручује се мешање великих и
малих комада веша.
Колико је тежак веш?
1 чаршав 400-500 гр.
1 јастучница 150-200 гр.
1 столњак 400-500 гр.
1 баде-мантил 900-1200 гр.
1 пешкир 150-250 гр.
46
Page 47

Неправилности и решења
Може се догодити да машина не ради. Пре позивања Техничке службе (види “Помоћ”), проверите да се не ради о
проблему лако решивом уз помоћ следећег списка.
Неправилности:
Машина се не укључује.
Циклус прања не почиње.
Машина не убацује воду
(лампица прве фазе прања
трепће брзо).
Машина константно убацује
и испушта воду.
Могући узроци / Решење:
• Утикач није увучен у утичницу или није увучен довољно да би имао контакт.
• Нема струје у кући.
• Врата нису добро затворена.
• Тастер ON/OFF није притиснут.
• Тастер START/PAUSE није притиснут.
• Славина за воду није отворена.
• Задата пауза на време покретања (Тајмер задршке), види «Посебна
подешавања»).
• Црево за довод воде није повезано са славином.
• Црево је савијено.
• Славина за воду није отворена.
• У кући нема воде.
• Нема довољног притиска.
• Тастер START/PAUSE није притиснут.
• Одводно црево није постављено између 65 и 100 цм од земље (види
“Постављање”).
• Крај одводног црева је потопљен у воду (види “Постављање”).
• Цев у зиду пропушта ваздух.
Ако се и после ових провера проблем не реши, затворите славину за воду,
искључите машину и позовите Техничку службу. Ако се стан налази на последњим
спратовима зграде, могуће је да се јавља феномен сифона, због чега машина
стално убацује и избацује воду. За решавање овог проблема у продаји су доступни
одговарајући неповратни вентили.
SR
Машина не испушта воду или
не центрифугира.
Машина јако вибрира током
центрифуге.
Машина губи воду.
Брзо трепери лампица START/
PAUSE и лампице функција.
Ствара се много пене.
• Програмом није предвиђено избацивање: код неких програма потребно је ручно
га покренути (види “Покретање програма”).
• Активирана функција ЛАКО ПЕГЛАЊЕ: за завршетак програма притиснути
тастер START/PAUSE (“Посебна подешавања”).
• Одводно црево је савијено (види “Постављање”).
• Вод за пражњење је запушен.
• Бубањ у тренутку инсталације није био правилно деблокиран (види
“Постављање”).
• Машина не стоји равно (види “Постављање”).
• Машина је притиснута између намештаја и зида (види “Постављање”).
• Црево за довод воде није добро затегнуто (види “Постављање”).
• Посуда за детерџенте је загушена (за чишћење види “Одржавање и чување”).
• Одводно црево није добро причвршћено (види “Постављање”).
• Искључите машину и извуците утикач из утичнице, сачекајте око 1 минут, а
затим је поново укључите.
Уколико неправилност остане, позвати Техничку службу.
• Детерџент не одговара машини (треба да носи натпис “за машинско прање”, “за
ручно и машинско прање” или слично).
• Доза је превелика.
47
Page 48

Помоћ
SR
Пре него што позовете Техничку службу:
• Проверите да ли неправилност можете решити сами (види “Неправилности и решења”);
• Поново започните програм да видите да ли је проблем отклоњен;
• У супротном контактирајте овлаштени Центар техничке службе на број телефона назначен на гарантном листу.
! Никада не користите неовлашћене сервисе.
Јавите:
• врсту неисправности;
• модел машине (Мо.);
• серијски број (S/N).
Ове информације се налазе на плочици постављеној на задњем делу машине и у предњем делу отвора.
48
Page 49

Инструкции за ползване
ПЕРАЛНА МАШИНА
BG
Български
WML 601
Съдържание
Монтиране, 50-51
Разопаковане и нивелиране
Хидравлични и електрически връзки
Първо пране
Технически данни
Поддръжка и почистване, 52
Спиране на водата и изключване на електрозахранването
Почистване на пералната машина
Почистване на чекмеджето за перилни препарати
Поддръжка на люка и на барабана
Почистване на помпата
Проверка на маркуча за студена вода
Мерки за безопасност и препоръки, 53
Общи предохранителни мерки
Рециклиране
Описание на пералната машина и пускането
на дадена програма, 54-55
Табло за управление
Светлинни индикатори
Включване на програма
BG
Програми, 56
Таблица с програмите
Персонализирания, 57
Задаване на температурата
Задаване на центрофугата
Функции
Перилни препарати и дрехи за пране, 58
Чекмедже за перилните препарати
Подготвяне на прането
Специфично пране
Система за измерване на товара
Проблеми и мерки за отстраняването им, 59
Сервизно обслужване, 60
49
Page 50

Монтиране
BG
! Важно е да съхранявате инструкциите,
за да можете да правите допълнителни
справки по всяко време. В случай
че пералната машина се продаде,
преотстъпи или премести, трябва да
се погрижите инструкциите винаги да
я придружават, за да се предостави
информация на новия собственик за
работата и съответните предупреждения.
! Прочетете внимателно инструкциите:
защото съдържат важна информация за
монтажа, използването и безопасността.
Разопаковане и нивелиране
Разопаковане
1. Разопаковайте пералната машина.
2. Проверете дали пералната машина не
е повредена при транспортирането. Ако е
повредена, не я свързвайте, а се обърнете
към продавача.
3. Свалете
3-те винта за
предпазване
при транспорт
и гумичката със
съответната
втулка, поставени
от задната страна
(виж показаното на
фигурата).
4. Затворете отворите с предоставените
пластмасови капачки.
5. Съхранете всички части: за да се
монтират отново при необходимост
пералната машина да бъде
транспортирана.
! Опаковъчният материал не е детска играчка.
Нивелиране
1. Монтирайте пералната машина на
равен и твърд под, без да я опирате в
стени, мебели и др.
2. Ако подът
не е идеално
хоризонтален,
компенсирайте
неравностите, като
отвиете или завиете
предните крачета
(виж фигурата);
ъгълът на наклона,
измерен върху работната повърхност, не
трябва да надвишава 2°.
Точното нивелиране позволява машината
да бъде стабилна и да се избягват
вибрациите, шумът и преместването й
по време на работа. Когато настилката
е мокет или килим, регулирайте така
крачетата, че под пералната машина да
остане достатъчно място за вентилация.
Хидравлични и електрически
връзки
Свързване на маркуча към
водопроводната мрежа
1. Свържете
захранващия
маркуч, като го
завиете към крана
за студената вода с
накрайник с газова
резба 3/4 (вижте
фигурата).
Преди да го
свържете, източете
водата, докато се избистри.
2. Свържете
маркуча за
студената вода към
пералната машина,
като го завиете
към специалния
щуцер, разположен
от задната страна,
горе вдясно (âèæ
фигурата).
3. Внимавайте маркуча да не се прегъва и
притиска.
! Налягането по водопроводната мрежа
трябва да бъде в границите, указани
в таблицата „Технически данни” (âæ.
следващата страница).
! Ако дължината на захранващия
маркуч не е достатъчна, се обърнете
към специализиран магазин или към
оторизиран техник.
! Никога не използвайте вече употребяван
маркуч.
! Използвайте тези, което са доставени с
пералната машина.
50
Page 51

Свързване на маркуча за мръсната вода
65 - 100 cm
Свържете маркуча
за мръсната
вода, без да го
прегъвате, към
канализационната
тръба или
към тръбата
за отвеждане
в стената,
разположени на
височина между 65
и 100 см от пода, или го подпрете на ръба
на мивката или ваната,
свързвайки
доставения
водач към крана
(вж. фигурата).
Свободният край
на маркуча за
мръсната вода
не трябва да
бъде потопен във
водата.
! Не се препоръчва използването на
удължителни маркучи. Ако е необходимо,
удължителят трябва да има същия
диаметър като оригиналния и да не
надвишава 150 см.
! Не използвайте удължители или
разклонители.
! Кабелът не трябва да бъде огънат или
сплескан.
! Захранващият кабел трябва да се
подменя само от оторизирани техници.
Внимание! Фирмата отхвърля всякаква
отговорност в случаите, в които тези
норми не се спазват.
Първо пране
След инсталиране и преди употреба
включете един цикъл на изпиране с
перилен препарат, но без дрехи, задавайки
програма „Автоматично почистване“ (вижте
Почистване на пералната машина).
Технически данни
Модел WML 601
ширина 59,5 см
Размери
Вместимост îò 1 äî 6 êã.
Електрическо
захранване
височина 85 см
дълбочина 51,7 см
Виж табелката с
характеристиките,
поставена на машината
BG
Свързване към електрическата мрежа
Преди да свържете щепсела в контакта,
проверете дали:
• контактът е заземен съгласно
действащите стандарти;
• контактът може да поеме максималната
мощност на натоварване на машината,
указана в таблицата с техническите
данни (виж следващата страница);
• захранващото напрежение е в границите
на указаното в таблицата с техническите
данни (виж следващата страница);
• контактът отговаря на щепсела на
пералната машина. В противен случай
заменете щепсела или контакта.
! Пералната машина не се монтира на
открито, дори под навес, защото е много
опасно да се остави на влиянието на
атмосферните условия.
! За монтираната перална машина
електрическият контакт трябва да бъде
лесно достъпен.
Захранване с
вода
Скорост на
центрофугата
Програми
за проверка
съгласно
Регламенти №
1061/2010 и №
1015/2010 на
Комисията.
максимално налягане
1 МРа (10 bar)
минимално налягане
0,05 МРа (0,5 bar)
обем на казана 46 литра
до 1000 оборота/
минута
програма 4; Еко памук
60 C°.
програма 4; Еко памук
40 C°.
Пералната машина
съответства на
следните Европейски
директиви:
- 2004/108/СЕ (за
електромагнитна
съвместимост)
- 2012/19/EU (WEEE)
- 2006/95/CE (за ниско
напрежение)
51
Page 52

Поддръжка и почистване
1
2
A
B
BG
Спиране на водата и изклчване
на електрозахранването
Затваряйте крана за вода след всяко
изпиране. По този начин се ограничава
износването на хидравличната
инсталация на пералната машина и се
ограничава опасността от течове.
Изключвайте щепсела от електрическото
захранване, когато почиствате пералната
машина и по време на работи по
поддръжката.
Почистване на пералната машина
• Външната част и гумените части могат
да се почистват с кърпа с хладка вода и
сапун. Не използвайте разтворители или
абразивни препарати.
• Пералнята разполага с програма за
„Автоматично почистване“ на вътрешните
части, което трябва да се извършва при
абсолютно празен барабан.
Прахът за пране (10% от препоръчваното
количество за слабо замърсено пране)
или специални допълнителни препарати
за почистване на пералнята може да се
ползват в добавка към програмата за
изпиране. Препоръчва се пускането на
програмата за почистване на всеки 40
изпирания.
За да задействате
програмата,
натиснете
едновременно
бутони A и B за 5 сек
(вижте фигурата).
Програмата ще
се активира
автоматично и ще
продължи около 70
минути. За да спрете цикъла, натиснете
бутона START/PAUSE.
Почистване на чекмеджето за
перилните препарати
Извадете
чекмеджето с
повдигане и
изтегляне навън
(виж фигурата).
Измийте го под
течаща вода. Това
почистване трябва
да се извършва
често.
Поддръжка на лка и на барабана
Оставяйте люка винаги открехнат за
избягване образуването на неприятни
миризми.
Почистване на помпата
Пералната машина е окомплектована със
самопочистваща се помпа, която няма
нужда от поддръжка. Възможно е обаче
малки предмети (монети, копчета) да
попаднат във филтъра, който предпазва
помпата и се намира в долната й част.
! верете се, че цикълът на пране е
завършил, и изключете щепсела от
контакта.
За достъп до филтъра:
1. свалете панела
в предната част
на пералната
машина с помощта
на отвертка (âæ.
фигура);
2. отвийте
капачката, като
я завъртите в
посока, обратна
на часовниковата
стрелка (âèæ
фигура нормално
е да изтече малко
вода;
3. почистете внимателно отвътре;
4. завийте отново капачката;
5. затворете отново панела, като, преди
да го избутате към пералнята, се уверите,
че сте поставили правилно закрепващите
куки в специалните водачи.
Проверка на маркуча за студената
вода
Проверявайте маркуча за студената вода
поне веднъж годишно. а се замени, ако
е напукан и нацепен, защото по време
на изпиране голямото налягане може да
предизвика внезапно спукване.
! Никога не използвайте вече употребяван
маркуч.
52
Page 53

Мерки за безопасност и
препоръки
! Пералната машина е проектирана и произведена в
съответствие с международните норми за безопасност.
Предупрежденията тук са продиктувани от съображения
за безопасност и трябва да се четат внимателно.
Общи мерки за безопасност
• Този уред е предназначен изключително за домашна
употреба.
Този уред може да бъде използван от деца над 8
години и лица с ограничени физически, сетивни
или умствени способности, или с недостатъчен
опит и познания, ако те са наблюдавани или
инструктирани относно използването на уреда
от лице, отговорно за тяхната безопасност и
разбират опасностите, свързани с употребата
на уреда. Децата не трябва да си играят с уреда.
Поддръжката и почистването не трябва да се
извършват от деца без надзор.
• Пералната машина трябва да се използва само от
възрастни хора съгласно инструкциите, предоставени в
тази книжка.
• Не докосвайте машината, когато сте боси, с мокри или
влажни ръце или крака.
• Не изключвайте щепсела от контакта за електрически
ток, като дърпате кабела, а като хващате щепсела.
• Не отваряйте чекмеджето с перилни препарати, докато
пералната машина работи.
• Не докосвайте маркуча за мръсната вода, защото
може да е достигнал високи температури.
• Никога не отваряйте люка със сила, защото може да се
повреди обезопасителния механизъм, който предпазва
от случайно отваряне.
• В случай на повреда по никакъв повод не достигайте
до вътрешните механизми в опити за ремонт.
• Винаги контролирайте децата да не се доближават до
работещата машина.
• По време на изпиране люкът се нагрява.
• Преместването да се извършва внимателно от
двама или трима души. Никога от сам човек, защото
пералната машина тежи много.
• Преди да заредите машината, проверете дали
барабанът е празен.
относно правилното извеждане от употреба на
домакинските електроуреди се обърнете към
предназначената за това обществена служба или
към дистрибуторите.
BG
Рециклиране
• Унищожаване на опаковъчния материал:
спазвайте местните норми – по този начин
опаковъчният материал може да се рециклира.
• Европейската директива 2012/19/EU за отпадъците
от електрическо и електронно оборудване
предвижда домакинските електроуреди да не се
изхвърлят заедно с обичайните твърди градски
отпадъци. Извадените от употреба уреди трябва да
бъдат събирани отделно с цел да бъде увеличен
делът на подлежащите на повторна употреба и
рециклиране материали, от които са направени,
както и да бъдат избегнати евентуални вреди за
здравето и околната среда. Символът със
зачеркнатия контейнер е поставен върху всички
продукти, за да напомня за задължителното
разделно събиране. За по-нататъшна информация
53
Page 54

Описание на пералната машина и
пускането на дадена програма
BG
Табло за управление
Бутон ON/OFF
Чекмедже за перилните
препарати
Чекмедже за перилните препарати: за дозиране
на перилните препарати и добавките (âæ. “Перилни
препарати и дрехи за пране”).
Програматор
ПРОГРАМИ
Светлинни ИНДИКАТОРИ ЗА ХОД НА
ЦИКЪЛ/ЗАБАВЕНО ВКЛЮЧВАНЕ
Програматор
ЦЕНТРОФУГА
Програматор
ТЕМПЕРАТУРА
Бутони със светлинни
индикатори ФУНКЦИЯ
Светлинен индикатор БЛОКИРАН ЛЮК: за да
се разбере дали люкът може да се отвори (âæ.
съседната страница).
Светлинен
индикатор
БЛОКИРАН
ЛЮК
Бутон със светлинен
индикатор
START/PAUSE
Бутон ON/OFF: за включване и изключване на
пералнята.
Програматор ПРОГРАМИ: за задаване на
програмите. По време на изпълнение на програмата
ключът остава неподвижен.
Бутони със светлинни индикатори ФУНКЦИЯ: за
селектиране на възможните функции. Светлинният
индикатор за избраната функция ще продължи да
свети.
Програматор ЦЕНТРОФУГА: за задаване
на центрофуга или за изключването й (âæ.
“Персонализирания”).
Програматор ТЕМПЕРАТУРА: за задаване на
температура или пране със студена вода (âæ.
“Персонализирания”).
Светлинни ИНДИКАТОРИ ЗА ХОД НА ЦИКЪЛ/
ЗАБАВЕНО ВКЛЮЧВАНЕ: за да следвате хода на
изпълнение на програмата за пране.
Включеният светлинен индикатор показва, че се
извършва определена фаза от цикъла.
Ако е зададена функцията “Забавено включване”, ще
се посочва времето, оставащо до стартирането на
програмата (вж. съседната страница).
Бутон със светлинен индикатор START/PAUSE:
за стартиране на програмите или временното им
прекъсване.
Забележка: за задаване на пауза в прането
натиснете отново бутона - индикаторът ще
мига с оранжева светлина, докато светлинният
индикатор, указващ изпълнение на фаза, ще
свети непрекъснато. Ако светлинният индикатор
БЛОКИРАН ЛЮК е угаснал, ще може да се отвори
вратата на люка (изчакайте около 3 минути).
За продължаване на цикъла пране от мястото, в
което е бил прекъснат, натиснете отново този бутон.
Режим на stand by
В съответствие с новите нормативи за пестене
на енергия тази перална машина е снабдена със
система за автоматично изключване (stand by), която
се задейства след 30 минути в случай, че машината
не се използва. Натиснете за кратко бутон
изчакайте машината да се задейства отново.
ON/OFF
и
54
Page 55

Светлинни индикатори
END
Следящите светлинни индикатори дават важна
информация.
Ето какво казват:
Светлинни индикатори за текущите фази
След като е избран и стартиран желаният цикъл на
пране, светлинните индикатори ще светват един след
друг, за да указват хода на цикъла:
Пране
BG
Отложен старт
Ако е активирана функцията “Забавено включване” (âæ.
“Персонализирания”), след пускане на програмата ще
светне индикаторът за избраното забавяне:
В течение на времето ще се визуализира оставащото
забавяне чрез мигане на съответния светлинен
индикатор:
След като изтече времето за отлагане на
изпълнението, примигващият светлинен индикатор
ще угасне и избраната програма ще се стартира.
Изплакване
Центрофуга
Източване на водата
Край на прането
Бутони за функция и съответни светлинни
индикатори
При избор на функция съответният светлинен
индикатор ще светне.
Ако избраната опция не е съвместима със
зададената програма, тази несъвместимост ще се
сигнализира от звуков сигнал (трикратно) и опцията
няма да се активира.
В случай на задаване на функция, несъвместима с
друга, зададена преди нея функция, остава активен
само последният избор.
Светлинен индикатор блокиран лк
Светещият индикатор показва, че люкът е блокиран,
за да се предотвратят случайни отваряния; за
избягване на щети е необходимо да се изчака
изгасването на светлинния индикатор, преди да се
отвори люкът (изчакайте около 3 минути).
! Бързото мигане на светлинния индикатор START/
PAUSE (оранжев) заедно с индикатора за функциите
е сигнал за неизправност (âæ. “Неизправности и
отстраняването им”).
Вклчване на програма
1. Включете пералната машина, като натиснете бутона
светят в продължение на няколко секунди, след което ще продължат да светят тези на зададената програма, а
индикаторът за START/PAUSE ще свети с пулсираща светлина.
2. Заредете дрехите за пране и затворете люка.
3. Задайте желаната програма с ключа ПРОГРАМИ.
4. Задайте температурата на пране (âæ. “Персонализирания”).
5. Задайте скоростта на центрофугиране (âæ. “Персонализирания”).
6. Поставете перилен препарат и добавки âæ. “Перилни препарати и дрехи за пране”.
7. Избиране на желаните функции.
8. Включете програмата, като натиснете бутона START/PAUSE, съответният светлинен индикатор ще свети
постоянно в зелен цвят.
За да отмените зададения цикъл, поставете машината в пауза, като натиснете бутона START/PAUSE, и изберете
новия цикъл.
9. Когато програмата свърши, ще светне индикаторът . Светлинният индикатор за БЛОКИРАН ЛЮК ще угасне,
указвайки, че люкът може да бъде отварян (изчакайте около 3 минути).
Извадете прането и оставете люка притворен, за да изсъхне барабанът. Изключете пералнята, като натиснете
бутона ON/OFF.
ON/OFF
. Всички индикатори ще се включат и ще
55
Page 56

Програми
Таблица с програмите
BG
Описание на програмата
Програми
Без Петна
1
Бели
2
3
Памук:
Бели и цветни, деликатни,
Еко памук 60° (1):
4
4
Еко памук 40° (2):
Синтетични: Цветни, устойчиви, силно замърсени.
5
Синтетични
5
Противоалергично действие
6
7
Áåáå
Âúëí: за вълна, кашмир и т.н.
8
Фини тъкани
9
Бързо Пране 60: За бързо освежаване на не много замърсени
дрехи (не се препоръчва за вълна, коприна и дрехи, които трябва
10
да се перат на ръка).
11
Памук 20°:
Памук
12
Синтетика
13
Бърза 30’
14
Изплакване
Центрофуга и Източване на водата
Само източване на водата *
Бели и цветни, устойчиви, силно замърсени
Бели и цветни, деликатни,
(3):
Цветни, устойчиви, много
Бели и цветни, деликатни,
много
много
замърсени.
много
замърсени.
замърсени.
замърсени.
Макс.
температура ()
40° 1000
60° 1000
40°
(Max. 90°)
.
60° 1000 40° 1000 60° 1000
40° 1000
60° 1000 40° 1000
40° 800 30° 0 -
60° 1000 -
20° 1000 -
студена
вода
студена
вода
студена
вода
- 1000 - -
- 1000 - - - - 6 - - - 10’
- - - - - 6 - - - 3’
(обороти
в минута)
Макс. скорост
1000
1000 -
1000 -
800 -
Перилни препарати
ране
пране
Ïредп-
Белина
Основно
-
-
-
-
-
-
-
-
-
-
%
)
ìêñ (êã
Остатъчна
Зареждане
тител
Омеко-
Разход на
влажност
4 - - - 180’
4 - - - 180’
6 - - - 115’
6 62 1,02 49,8 195’
6 62 0,86 76 185’
3 44 0,78 33 120’
3 - - - 110’
4 - - - 200’
3 - - - 150’
1,5 - - - 80’
1 - - - 75’
3,5 62 0,68 30 60’
6 - - - 175’
6 - - - 100’
3 - - - 75’
3 70 0,05 36 30’
6 - - - 49’
енергия kWh
Общ разход на
вода lt
цикъла
Продълж-
ителност на
* С избирането на програма и изключването на центрофугата пералнята само ще източи водата
Продължителността на цикъла, показана на дисплея или посочена в ръководството, е приблизително изчислена въз основа на стандартните условия.
Реалното времетраене може да варира в зависимост от множество фактори като температура и налягане на водата при пълнене, температура на въздуха
в помещението, количество перилен препарат, количество, вид и тегло на прането, допълнително избрани опции.
1) Програма за проверка съгласно стандарт 1061/2010: задайте програма 4 с температура 60°C.
Този цикъл е подходящ за пране на памучни, нормално замърсени тъкани и е най-ефективен от гледна точка на комбиниран разход на енергия и вода, подходящ е за дрехи,
които могат да се перат на 60°C. Действителната температура на пране може да се различава от указаната.
2) Програма за проверка съгласно стандарт 1061/2010: задайте програма 4 с температура 40°C.
Този цикъл е подходящ за пране на памучни, нормално замърсени тъкани и е най-ефективен от гледна точка на комбиниран разход на енергия и вода, подходящ е за дрехи,
които могат да се перат на 40°C. Действителната температура на пране може да се различава от указаната.
За всички институции, извършващи изпитания:
2) Продължителна програма за памук: задайте програма 4; с температура 40° C.
3) Дълга програма за синтетични тъкани: задайте програма 5 с температура 40° C.
БЕЗ ПЕТНА: програмата 1 е подходяща за изпирането на силно замърсено пране с устойчиви цветове. Програмата
осигурява по-висок клас изпиране от стандартния (клас A). Не активирайте програмата при разноцветно пране. Препоръчва
се използването на прахообразен перилен препарат. Срещу упорити петна се препоръчва предварителна обработка със
специални допълнителни препарати.
Бели: Използвайте този цикъл за 2 изпиране на бели тъкани. Програмата е разработена с цел продължителното запазване
на искрящия бал цвят на тъканите. За по-добри резултати се препоръчва използването на прах за пране. използвайте цикъла
за прането в светли цветове. Програмата е разработена с цел продължителното запазване на тъмните цветове на тъканите.
Противоалергично действие: използвайте програмата 6 за отстраняване на основните алергени като полени, акари,
кучешки и котешки косми.
Бебе: използвайте специалната програма 7, за да отстраните типичното замърсяване на детските дрехи и премахнете
перилния препарат, за да се избегнат алергични реакции на деликатната детска кожа. Цикълът е създаден за елиминиране
на бактериите чрез използване на по-голямо количество вода и оптимизиране на ефекта от специфичните хигиенизиращи
добавки към перилния препарат.
Програми „Еко“
Програмите „Еко“ предлагат добър резултат от изпирането при ниска температура, позволявайки по-ниско потребление
на електроенергия, като с това допринасят за опазването на околната среда и икономическата ефективност. Програмите
„Еко“ (12 Памук, 13 Синтетика и 14 Бърза 30’) са създадени за различни видове тъкани и слабо замърсени дрехи. За да
бъдат гарантирани оптимални резултати, препоръчваме да използвате течен перилен препарат; добре е да обработите
предварително маншетите, яките и петната.
Памук 20 C°: програмата 11 е идеална за замърсено пране от памучна тъкан. Добрите резултати включително при изпиране със
студена вода, в сравнение с тези след пране при 40°, са гарантирани от механичното действие с промяна на скоростта, многократно
и често достигащо до пикови стойности.
56
Page 57

Персонализирания
Задаване на температурата
Завъртайки ключа ТЕМПЕРАТРА, се задава температурата на пране (вж. Таблица на програмите).
Температурата може да се понижи до пране със студена вода ( ).
Пералнята автоматично ще попречи да се зададе температура, която е по-висока от максималната температура,
предвидена за всяка програма.
! Изключение: с избиране на програма 3 температурата може да се повиши до 90°.
Задаване на центрофугата
Завъртайки ключа ЦЕНТРОФГА, се задава скоростта на центрофугиране за избраната програма.
Максималните предвидени скорости за програмите са:
Програми Максимална скорост
Памучни 1000 оборота в минута
Синтетични тъкани 1000 оборота в минута
Вълна 800 оборота в минута
Коприна, само източване
Скоростта на центрофугиране може да се намали или да се изключи, като се избере символът .
Пералнята автоматично ще попречи да се центрофугира със скорост, по-висока от максимално предвидената за
всяка програма.
Функции
опълните функции за пране, предвидени в пералната машина, дават възможност за постигане на желаното бяло
и чисто пране:
За активиране на възможните функции;
1. натиснете бутона, съответстващ на желаната функция;
2. светването на съответния индикатор показва, че функцията е избрана.
Бележка:
- Ако избраната опция не е съвместима със зададената програма, тази несъвместимост ще се сигнализира от
звуков сигнал (трикратно) и опцията няма да се активирa.
- В случай на задаване на функция, несъвместима с друга, зададена преди нея функция, остава активен само
последният избор.
BG
Супер изпиране
Благодарение на използването на по-голямо количество вода в началната фаза на цикъла и на по-дългото време
на пране, тази опция гарантира висококачествено изпиране.
Може да се използва с или без белина. Ако желаете избелване, поставете допълнителната ваничка 4, комплект
с доставката във ваничка 1. При дозиране на белина не надвишавайте максималното ниво „max“, указано на
централната ос (вижте фигурата на стр. 58).
Лесно гладене
При избор на тази функция прането и центрофугирането ще се изменят целесъобразно, така че да се намали
образуването на гънки. При завършване на цикъла пералнята прави бавни завъртания на барабана, следящият
светлинен индикатор на функцията ЛЕСНО ГЛАЕНЕ ще светят с мигаща светлина и следящият индикатор
ще светне. За завършване на цикъла трябва да се натисне бутон START/PAUSE или бутон ЛЕСНО ГЛАЕНЕ.
Предпране
С избора на тази функция се извършва предпране, полезно за отстраняване на трудно почистващи се петна.
Забележка: Добавете перилен препарат в предназначеното за това отделение.
Отложен Старт
Забавя пускането на машината до 12 часа.
Натиснете многократно бутона, докато светне индикаторът, съответстващ на желаната стойност за време на
забавяне. При петото натискане на бутона функцията няма да е активна.
Забележка: След натискане на бутона START/PAUSE стойността на забавянето може да се променя само като се
намалява.
! Валидна с всички програми.
57
Page 58

Перилни препарати и
M
AX
1
2
4
3
A
B
дрехи за пране
BG
Чекмедже за перилните препарати
обрият резултат от прането зависи и от правилното
дозиране на перилните препарати. с предозиране
не се пере по-ефикасно, а това води до отлагане на
налепи по вътрешната страна на пералната машина
и до замърсяване на околната среда.
! Използвайте прахообразни перилни препарати за
бели памучни тъкани за предпране и за пране при
температура над 60°C.
! Уверете се, че следвате указанията, посочени върху
опаковката на перилния препарат.
! Не използвайте препарати за ръчно пране, защото
образуват много пяна.
Изтеглете чекмеджето за
перилните препарати и
изсипете праха за пране
и допълните препарати
по следния начин.
Отделение 1: Препарат за предпране (на прах)
Преди да изсипете препарата, проверете дали не е
поставена допълнителната ваничка 4.
Отделение 2: Препарат за пране (на прах или
течен)
При употребата на течен препарат за пране се
препоръчва да се използва разделителят от
комплекта A с цел правилно дозиране. В случай на
употреба на прах за пране върнете разделителя в
отделение B.
Отделение 3: Допълнителни препарати
(омекотител и др.)
Омекотителят не трябва да изтича извън решетката.
допълнителна ваничка 4: Белина
Подготвяне на прането
• Разпределете прането съобразно:
- типа на тъканите/символа върху етикета.
- цветовете: отделете цветните от белите дрехи.
• Изпразнете джобовете и проверете копчетата.
• Не надвишавайте указните стойности за теглото на
сухото пране: вижте “Таблица с програмите”.
Специфично пране
Âúëí: Цикълът на изпиране „Вълна“ на тази
пералня е тестван и одобрен от компанията Woolmark за пране на вълнени тъкани, определени
като „подходящи за изпиране на ръка“, при условие
че се спазват инструкциите от етикета на дрехата
и указанията на производителя на пералнята.
Фини тъкани: използвайте програмата 9 за изпиране
на много фини тъкани с апликации от рода на страс
или пайети.
Препоръчва се обръщането на дрехите наопаки
преди прането и слагането на малките дрехи в
торбичката за фино пране. За по-добри резултати се
препоръчва използването на течен препарат за пране
за фини тъкани.
За изпиране на копринени тъкани и пердета
изберете цикъл 9 и включете опция ; пералнята
ще завърши цикъла с накиснатото пране и ще
започне да мига светлинният индикатор . За да
се източи водата и да може да се извади прането, е
необходимо да се натисне бутон START/PAUSE или
бутон .
Система за измерване на товара
Преди всяко центрофугиране, с цел избягване
на прекалени вибрации и за равномерно
разпределяне на товара, барабанът се завърта
с малко по-висока от тази при прането скорост.
Ако след направените последователни опити
товарът все още не е перфектно разпределен,
машината извършва центрофугиране при скорост,
по-ниска от предвидената. При наличие на
прекален дебалансиране пералнята извършва
разпределението вместо центрофугата. За
улесняване на по-доброто разпределение на товара
и правилното му балансиране се препоръчва да се
смесват дрехи за пране с големи и малки размери.
Колко тежат дрехите за пране?
1 чаршаф 400-500 г
1 калъфка 150-200 г
1 покривка 400-500 г
1 хавлия 900-1200 г
1 кърпа 150-250 г
58
Page 59

Проблеми и мерки за
отстраняването им
Възможно е пералната машина да откаже да работи. Преди да се обадите в сервиза за техническа поддръжка и
ремонт (âæ. “Сервизно обслужване”), проверете дали не става въпрос за лесно решим проблем, като си помогнете
със следващия списък.
Проблеми:
Пералната машина не се вклчва.
Цикълът на изпиране не започва.
Пералната машина не се пълни
с вода (бързо мига светлинният
индикатор за първата фаза на
пране).
Пералнята непрекъснато се пълни
и източва.
Възможни причини / Мерки за отстраняването им:
• Щепселът не е включен към електрически контакт или не е добре
включен, за да прави контакт.
• Нямате ток вкъщи.
• Люкът не е затворен добре.
• Бутонът ON/OFF не е бил натиснат.
• Бутонът START/PAUSE не е бил натиснат.
• Кранът за вода не е отворен.
• Зададено е забавяне, което се е насложило върху времето за пускане
(âæ. “Персонализирания”).
• Маркучът за студената вода не е свързан към крана.
• Маркучът е прегънат.
• Кранът за вода не е отворен.
• Няма вода по водопроводната мрежа.
• Налягането е недостатъчно.
• Бутонът START/PAUSE не е бил натиснат.
• Маркучът за мръсната вода не е монтиран между 65 и 100 см от земята
(âæ. “Монтиране”).
• Краят на маркуча за мръсната вода е потопен във вода (âæ. “Монтиране”.
• Канализационната тръба в стената няма отдушник.
Ако след тези проверки проблемът не се реши, затворете крана за
водата, изключете пералната машина и позвънете в сервиза. Ако
жилището ви се намира на последните етажи на сградата, налягането
на студената вода може да е ниско, поради което пералната машина
непрекъснато се пълни и източва. За избягване на това неудобство в
търговската мрежа се предлагат подходящи възвратни клапани.
BG
Пералната не се източва или не
центрофугира.
Пералната вибрира много по време
на центрофугиране.
Пералната има теч.
Светлинният индикатор START/
PAUSE (оранжев) и светлинните
индикатори за функции мигат бързо.
Образува се твърде много пяна.
• Програмата не предвижда източване: с някои програми трябва да се
извършва ръчно.
• Включена е функцията ЛЕСНО ГЛАЕНЕ: за завършване на програмата се
натиска бутон START/PAUSE (âæ. “Персонализирания”).
• Маркучът за мръсната вода е притиснат (âæ. “Монтиране”.
• Канализационната тръба е запушена.
• При монтажа барабанът не е бил отблокиран правилно (âæ. “Монтиране”.
• Пералната машина не е нивелирана (âæ. “Монтиране”.
• Пералната машина е притисната между мебели и стена (âæ.
“Монтиране”.
• Маркучът за студената вода не е добре свързан (âæ. “Монтиране”.
• Чекмеджето за перилните препарати е запушено (за почистването му
âæ. “Поддръжка и почистване”).
• Маркучът за мръсната вода не е фиксиран добре (âæ. “Монтиране”.
• Изключете машината и извадете щепсела от контакта, изчакайте около
1 минута и я включете отново.
Ако неизправността не може да се отстрани, потърсете услугите на
Сервиза.
• Перилният препарат не е за автоматична перална (трябва да има
надпис “за автоматична перална”, “за пране на ръка и за автоматична
перална” или подобен надпис).
• озирането е било твърде голямо.
59
Page 60

Сервизно обслужване
195136214.00
07/2015
BG
Преди да се свържете с техническия сервиз:
• Проверете дали можете да решите сами проблема (вж. “Проблеми и мерки за отстраняването им”);
• Включете отново програмата, за да проверите дали неизправността е отстранена;
• В противен случай се обърнете към оторизирания технически сервиз на телефонния номер, указан на
гаранционната карта.
! Никога не ползвайте услугите на неоторизирани техници.
Съобщете:
• типа на проблема;
• модела на машината (Mod.);
• серийния номер (S/N).
Тази информация се намира на фабричната табелка, разположена на задната страна на пералната машина и в
предната част, след като се отвори люкът.
Üretici Firma:
Indesit Company Beyaz Eşya PAZARLAMA A.Ş.
Balmumcu Cad. Karahasan Sok.
No: 11, 34349– Balmumcu Beşiktaş – İstanbul
Tel: (0212) 355 53 00
60
 Loading...