

Hotpoint WLW3750B Use And Care Manual
How to
get
the best from
YourWasher
Contents
Agitator
26
Use
and Care of
Appliance Registration
2
Bleach Dispenser
8
model
Care and Cleaning
26
WLW3750B
Controls Setting Guide
6,7
Cycle Settings
5
Detergents and
Other Additives
13-17
Energy-Saving Tips
10
Fabric Softener
DisDenser
8
Handwash”
System
9
Hard Water
16
Limestone Deposits
14
Loading
4, 12
Model and Serial Numbers
2
O~eratin~
the Washer
4,5
Pre-Treating
7, 11, 17
Problem Solver
20-25
Repair Service
27
Safety
Instructions
3,4
Sorting Clothes
11
Stains
18
Stiin
Removal Guide
19
Storage
& Vacation
TiDs
26
User Maintenance Instructions 26
Warranty
Back Cover
GE Answer
Center@
800.626.2000
Help us
help you...
Before using your washer,
read this book carefully.
It is intended to help you operate
and maintain your new washer
properly.
Keep it handy for answers to your
questions.
If you don’t understand something
or need more help, write (include
your phone number):
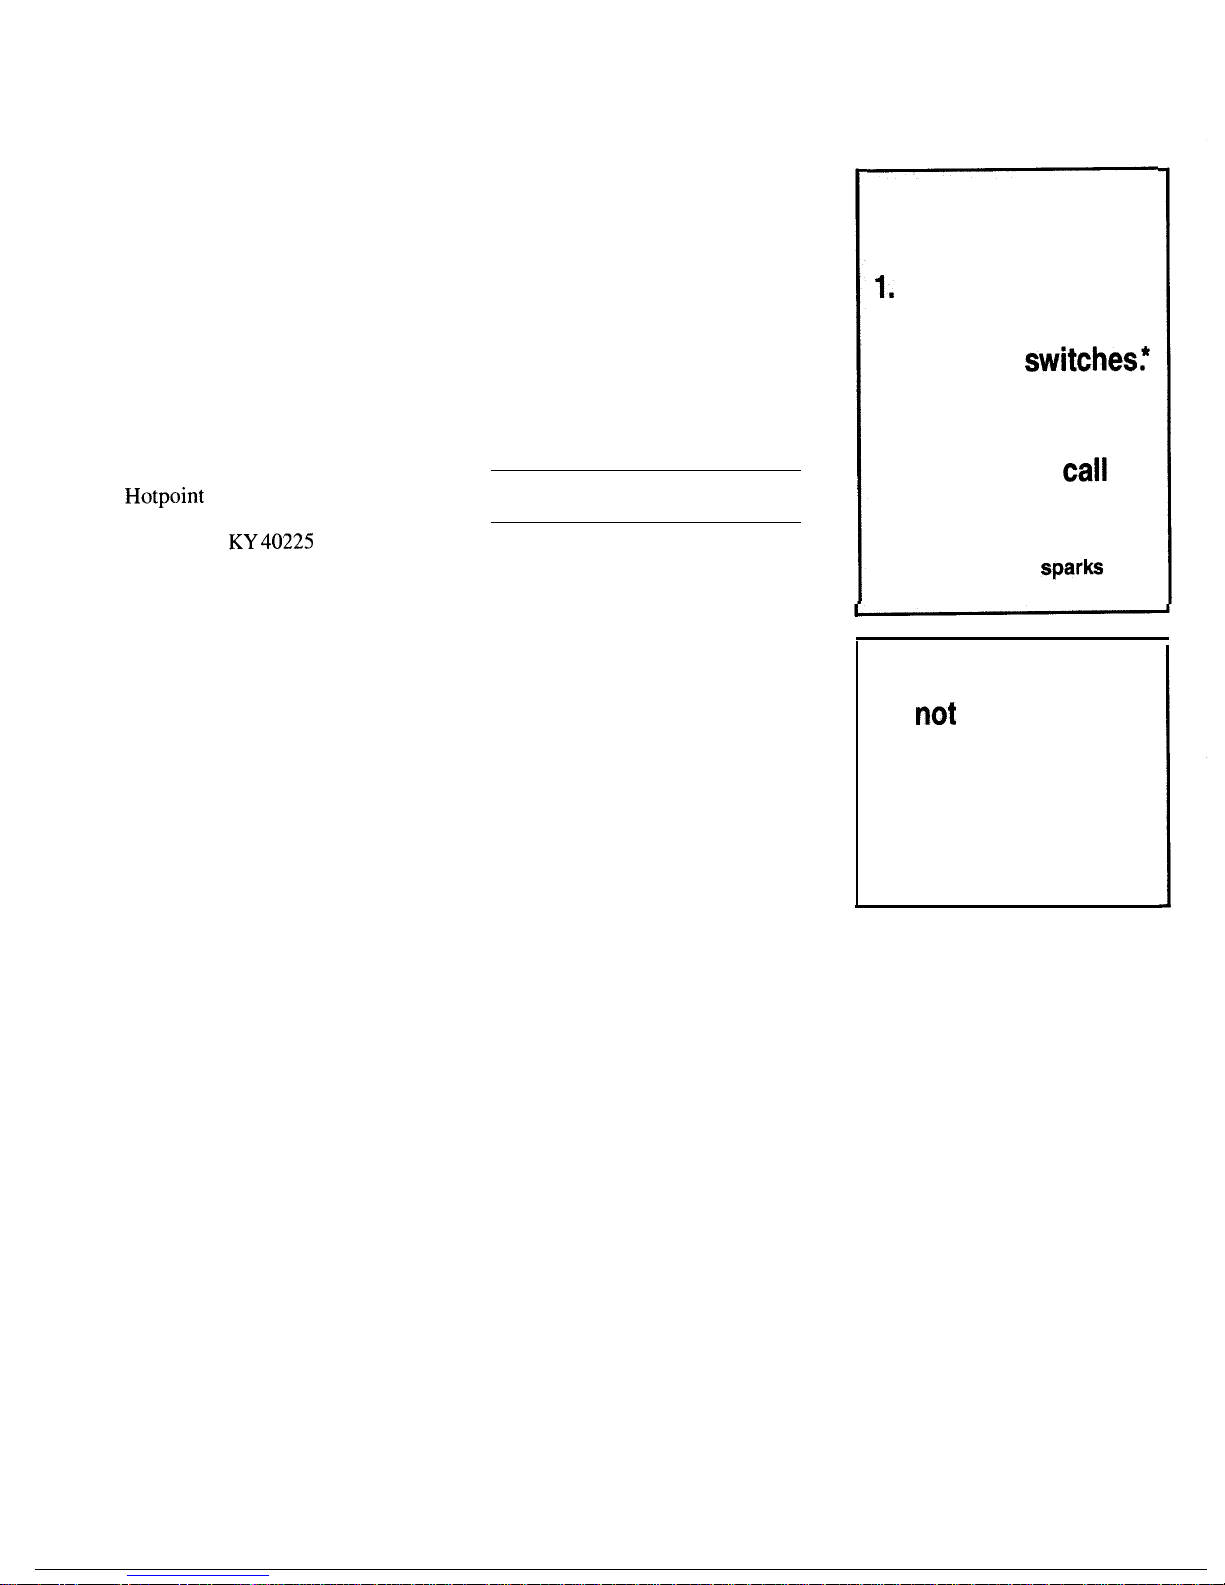
Consumer Affairs
Hotpoint
Appliance Park
Louisville,
KY40225
Write down the model
and serial numbers.
You’ll find them on a label on the
lower left side near the front.
These numbers are also on the
Consumer Product Ownership
Registration Card that came with
your washer. Before sending in this
card, please write these numbers
here:
Model Number
Serial Number
Use these numbers in any
correspondence or service calls
concerning your washer.
FOR YOUR SAFETY
If you smell gas:
1.
Open windows.
2. Don’t touch
electrical
switches:
3. Extinguish any
open flame.
4. Immediately
call
your gas supplier.
●
Don’t turn electric switches
on or off because
spark
may
ignite the gas.
If you received a
damaged washer...
Immediately contact the dealer
(or builder) that sold you the
washer.
Save time and money.
Before you request service . . .
check the Problem Solver on
pages 20-25. It lists causes of minor
operating problems that you can
correct yourself.
All washing instruction terms in this book conform to the Care Labeling
Rule established by the Federal Trade Commission, January 1984.
2
FOR YOUR SAFETY
Do
not
store or use
gasoline or other
flammable vapors and
liquids in the vicinity
of this or any other
appliance.
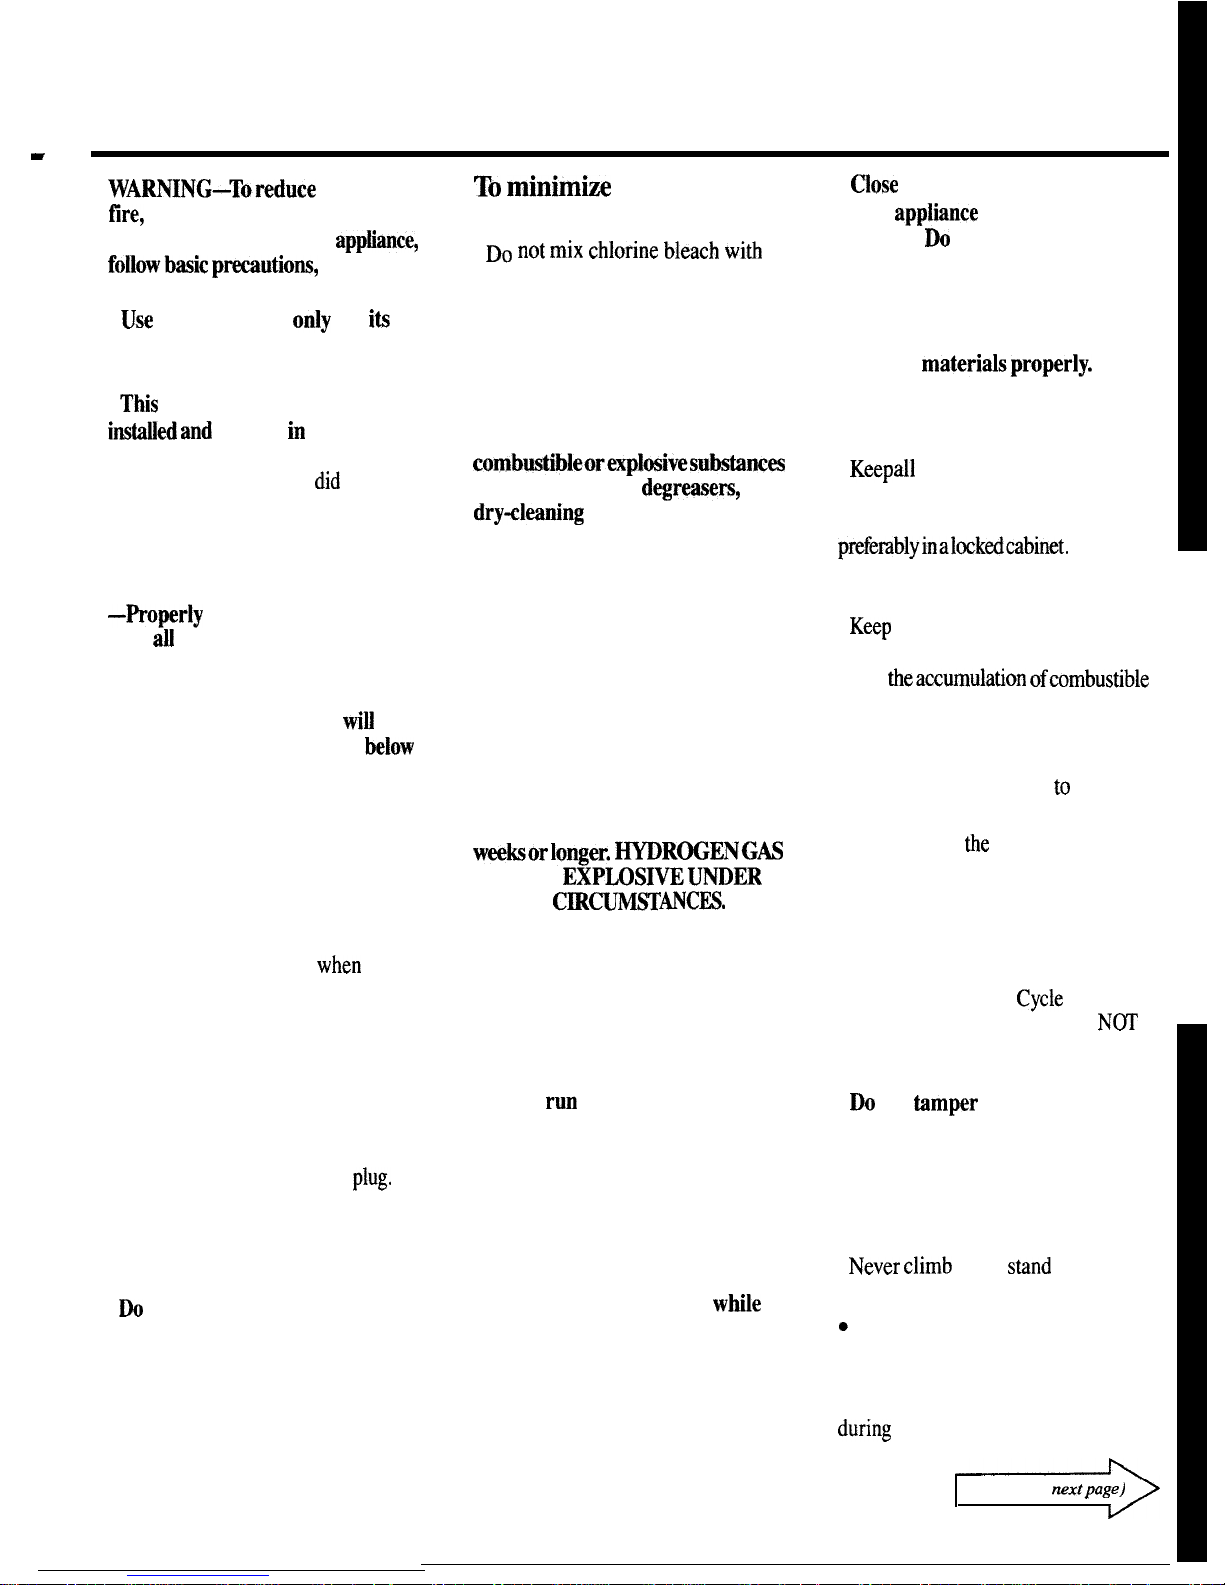
IMPORTANT SAFETY INSTRUCTIONS
Read all instructions before using this appliance.
w
WARNING–Toreduce
the risk of
fire,
electric shock, or injury to
persons when using your
appBance,
foilowbasic pmutions,
including
the following:
●
Use
this appliance
only
for
itS
intended purpose
as described in
this Use and Care Book.
.
This
washer must be properly
instiled
and
located in accordance
with the Instillation Instructions
before it is used.
If you
did
not
receive an Installation Instructions
sheet with your washer, you can
obtain one by contacting the service
location nearest you.
–Roperly
ground to conform
with d] governing codes and
ordinances. Follow details in
Installation Instructions.
–Install or store where it
wi~
not
be exposed to temperatures
below
freezing or exposed to the weather.
–Connect to a properly rated,
protected and sized power supply
circuit to avoid electrical overload.
–Connect to adequate plumbing
and drain facilities as described in
the Installation Instructions.
. Turn off water faucets
when
the washer is not in use to relieve
pressure on hoses and valves, and to
minimize leakage if a hose or valve
should break or rupture.
●
When disconnecting this
appliance pull by the plug rather
than the cord to avoid damage to the
cord or junction of cord and
plug.
Make sure that the cord is located so
that it will not be stepped on, tripped
over or otherwise subjected to
damage or stress.
.
DO
not repair or replace
any
part
of the appliance or attempt any
servicing unless specifically
recommended in this Use and Care
Book or in published user-repair
instructions that you understand
and have the skills to carry out.
~ minimh
the possibility
of injury:
●
Do not mix chlorine bleach Witi
ammonia or acids such as vinegar
and/or rust remover. Mixing can
produce a toxic gas which may
cause death.
●
Do not wash or dry articles
that have been cleaned in, washed
in, soaked in, or spotted with
combustibleorexplosivesubstancm
(such as gasoline,
degreasers,
dry+leaning
solvents, kerosene,
etc.) which may give off vapors
that could ignite or explode.
Do not add these substances to the
wash water, and do not use these
substances around your washer
and/or dryer during operation.
. HYDROGEN GAS is produced
by the chemical action within
your water heater and the gas can
accumulate in the water heater
and/or water pipes if hot water has
not been used for a period of two
weeksorlonger. ~ROGENGAS
CAN BE
EXP~SIWUNDER
THESE
~~
ANCES.
so to
prevent the possibility of damage
or injury, if you have not used hot
water for two weeks or more, or
move into a residence in which the
hot water system may not have
been used for sometime, turn on
all hot water faucets and allow
them to
run
for several minutes
before using any electrical
appliance which is connected to
the hot water system. This will
allow any hydrogen gas to escape.
Since the gas is flammable, do not
smoke or use an open flame or
appliance during this process.
. Never reach into washer
while
it is moving. Before loading,
unloading or adding clothes, push
in the Cycle Selector knob to
“STOP” position, then wait until
the machine has completely
stopped before opening the lid.
3
●
~ose
supervision is necessary
if this
appiiance
is used by or near
children.
M
not allow children
to play inside, on or with this
appliance or any discarded
appliance. Dispose of discarded
appliances and shipping or
packing
materidsproperly.
Before discarding a washer, or
removing from service, remove
the washer lid.
.
Keep all
laundry aids (such as
detergents, bleaches, fabric softeners,
etc.) out of the reach of children,
prefemblyinalockedcabinet.
Observe
all warnings on container labels to
avoid personal injury.
●
Keep
the area around and
underneath your appliances free
from
theaccumulation ofcombustible
materials, such as lint, paper, rags,
chemicals, etc.
●
Keep the floor around your
appliances clean and dry
to
reduce
the possibility of slipping.
●
To minimize
the
possibility
of electric shock, unplug this
appliance from the power supply
before attempting any maintenance
or cleaning (except the removal and
cleaning of the lint filter).
NOTE:
Turning the
Cycle
Selector
knob to an OFF position does
NOT
disconnect the appliance from the
power supply.
●
Do
not
tamper
with controls.
.
Do not operate this appliance
if it is damaged, malfunctioning,
partially disassembled, or has
missing or broken parts, including
a damaged cord or plug.
.
Never climb
on or
s~nd
on the
washer top.
m
Do not wash fiberglass articles in
your washer. Skin irritation could
result from the remaining particles
that may be picked up by clothing
during
subsequent washer use.
(continued
nextpage)
Important
Safety Imtructiom
(continued)
●
The laundry process can
reduce
For washer operation
the flame
retardancy
of fabrics. To
SAVE THESE
●
Do not
Ieave
washer lid up
avoid such a result, the garment
during cycle. This will stop the
~STRUCTIONS
manufacturer’s care instructions
wash and spin
action
and prevent
should be followed very carefully.
completion of the cycle.
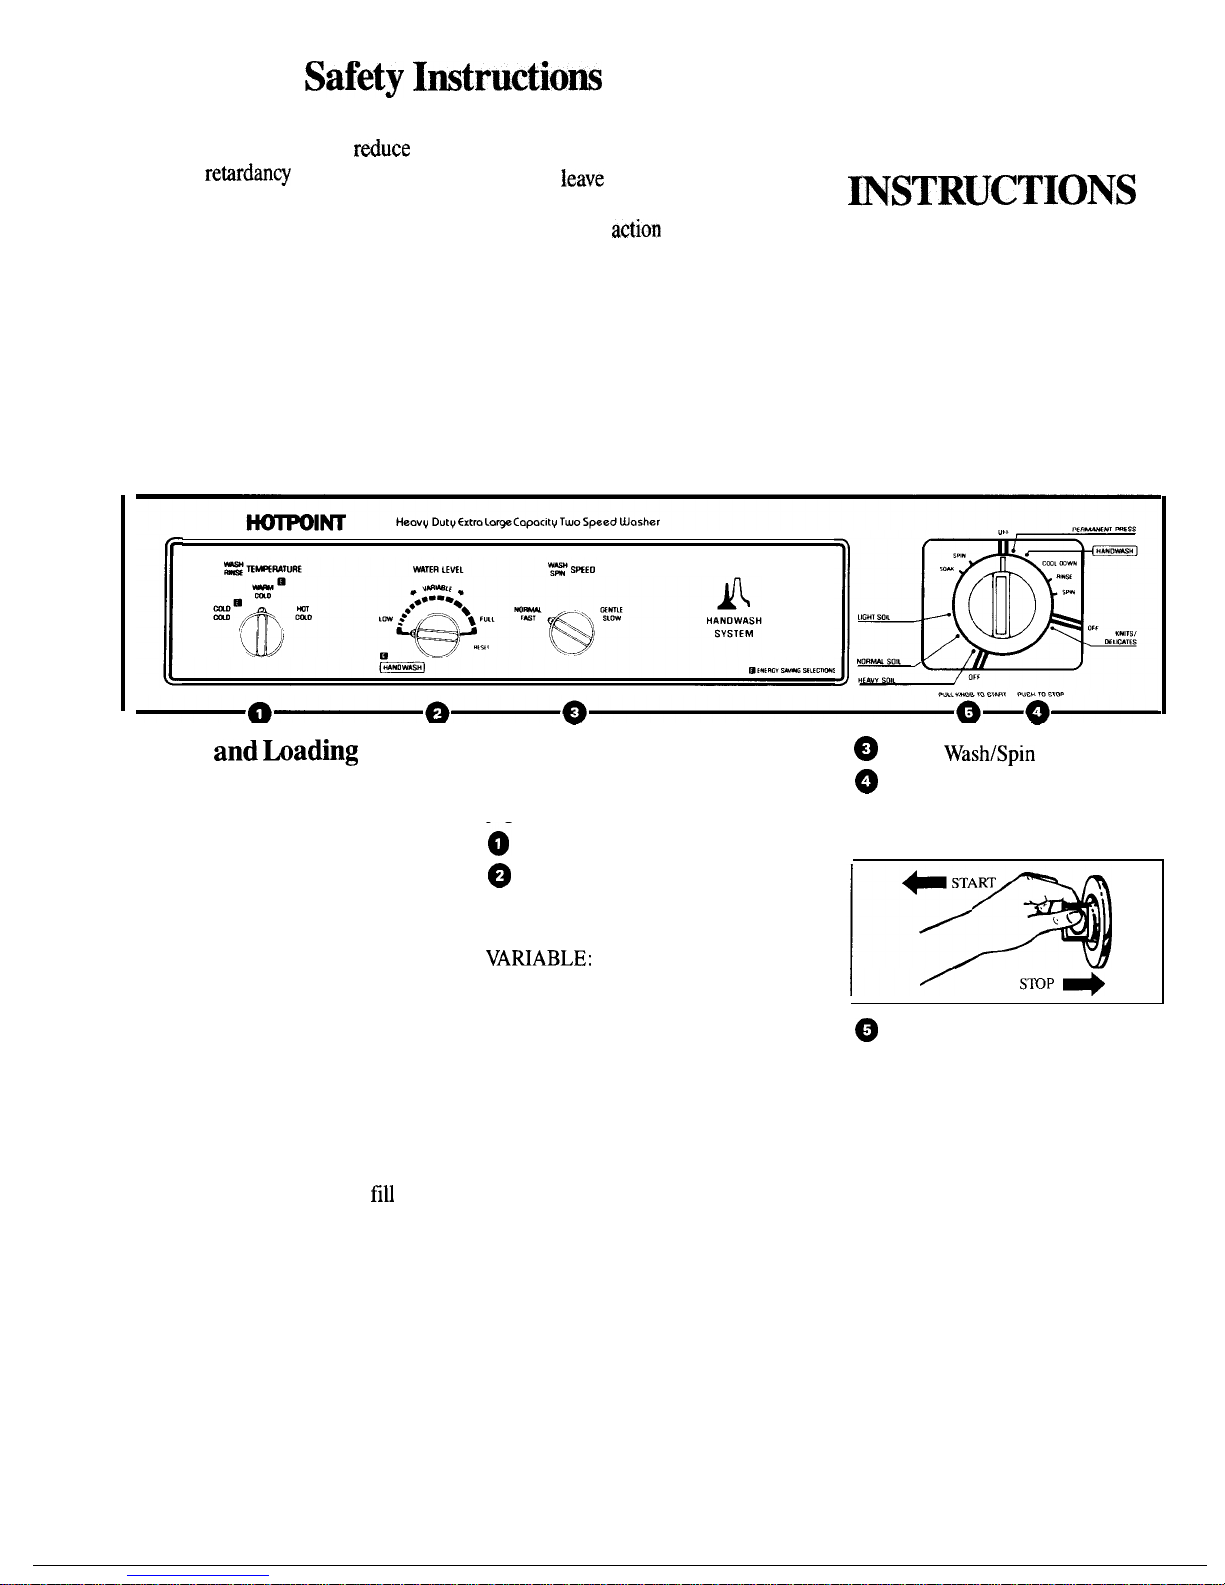
How to operate your clothes washer
WARNING—To reduce the risk of fire, electric shock, or injury to persons,
read the IMPORTANT SAFETY INSTRUCTIONS before operating this appliance.
—
—
Sorting
andhading
●
Sort clothes carefully by fabric
type, weight, color and amount of
soil according to instructions on
page 11.
●
Add measured detergent to wash
basket. See pages 13 through 17 for
information on detergents and
other laundry additives.
●
Load clothes into the wash basket
being careful not to overload. See
page 12 for loading information.
●
See page 8 for Bleach Dispenser
and Fabric Softener Dispenser
instructions. For information on
bleaches and fabric softeners, see
page 17.
●
Close the lid. Washer will
fill
but
not agitate or spin with the lid open.
Setting the controls.
~
Select
WashlSpin
Speed.
See the Controls Setting Guide on
O
Push Cycle Selector Knob in
pages 6 and 7.
and turn clockwise to your selected
‘~- Select Wash/Rinse Temperature.
~
Select Water Level.
LOW: Washer is less than 1/3 full
of clothes.
VAMABLE:
Any level of fill
between Low and Full.
FULL: Washer is more than 2/3
full of clothes.
RESET: To increase level, turn
knob to “RESET” and then to
new level.
HANDWASH: See
page 9.
wash setting.
1=
smP
+
~
Pull Cycle Selector Knob out
to start the washer. If you wish to
change setting after washer has
started, push Cycle Selector Knob
in to stop the washer and reset to
the new position. Setting can be
changed at any time.
4
~ps
to Help You
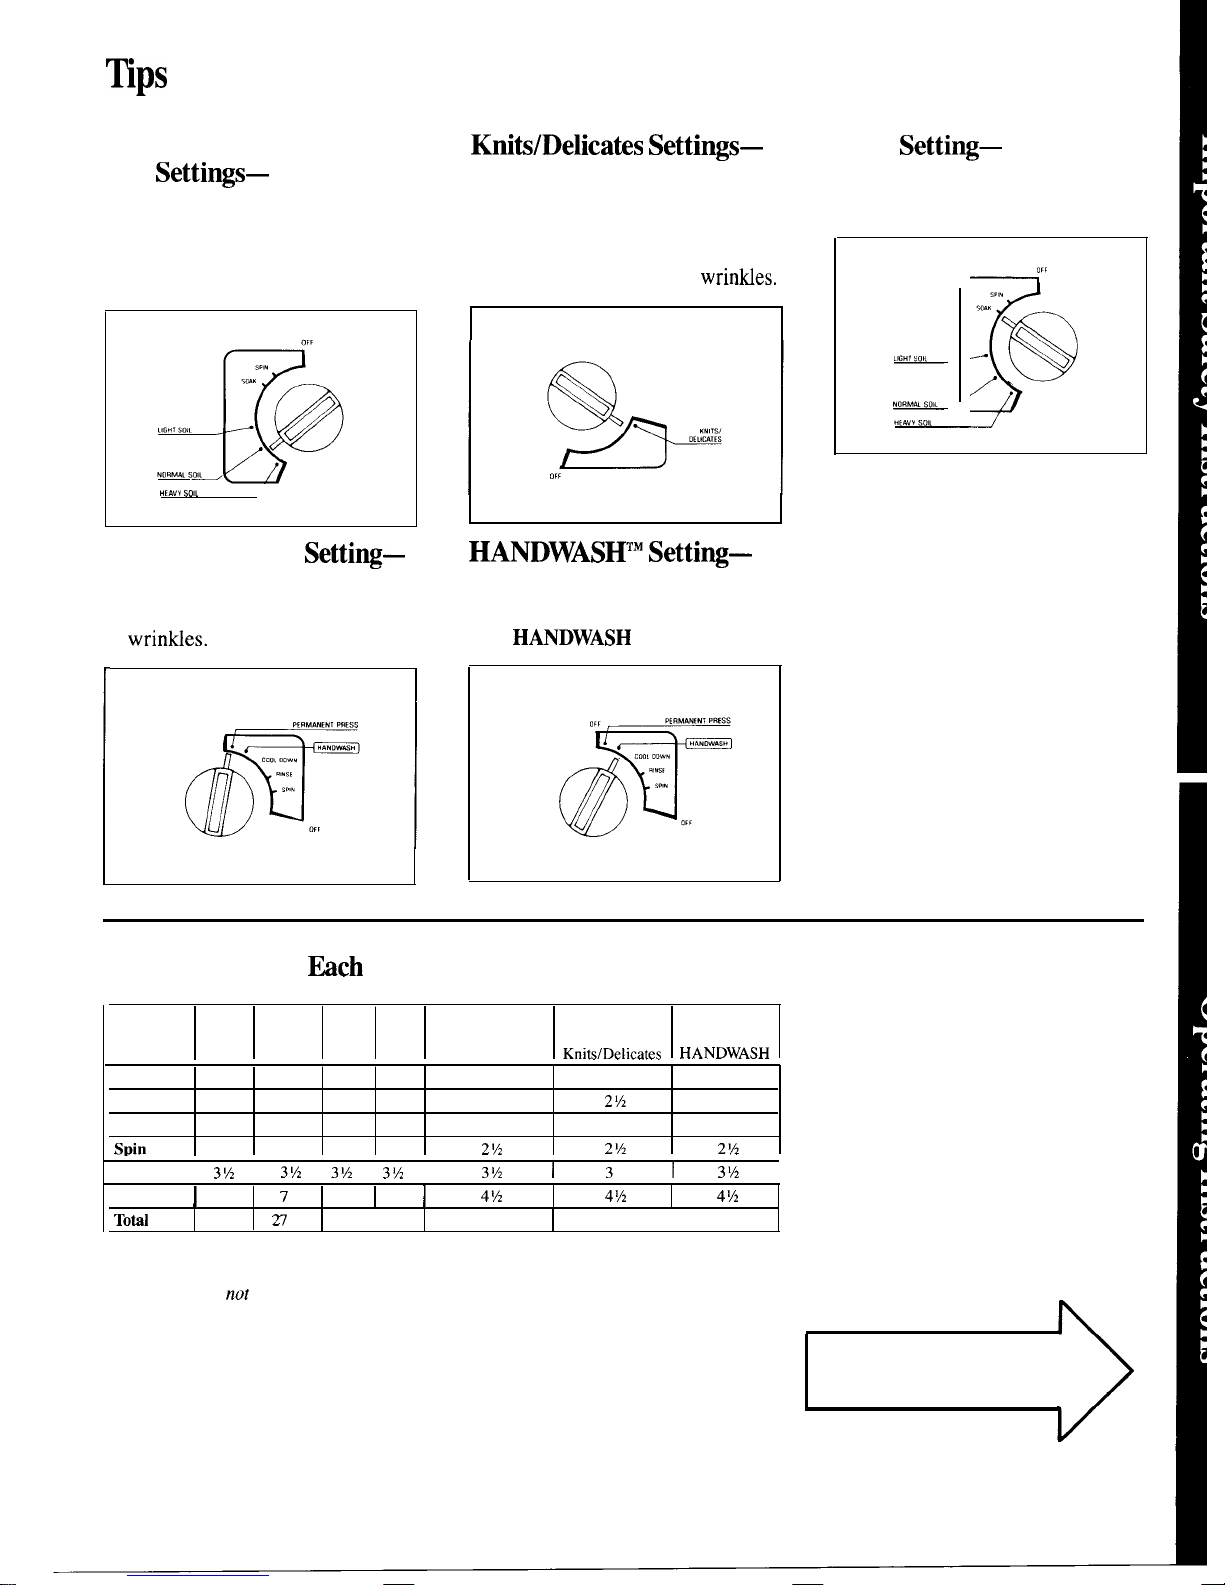
Select Settings
Heavy, Normal and Light
Soil
Settings—
For most cottons, linens, work and
play clothes. Three soil level settings
are provided, but you can set the
-
selector in-between, if desired.
Knifi/Delicates
Settings—
A combination of agitation and
soak for more effective polyester
knits laundering. Plus an extended
cool-down spray rinse is provided
to minimize the setting of
wrin~es.
HEAV, SO,L
/
Permanent Press
Setting—
An extended cool-down spray rinse
is provided to minimize the setting
of
wrinties.
[
HANDWASHTM Setting—
For those articles that would
normally be washed by hand. Use
with
HANDWASH
agitator only.
Soak
Setting—
Use with most soaking aids to
loosen embedded soils and stains.
What Happens in Wch Setting (Approximate Minutes)
Cycle
Selector
Heavy Normal Light
Settings
Soil
Soil Soil
Soak
Permanent Press
KnitslDelicates
HANDWASH
Wash
4
Soak
2%
Wash
18
10
4
8
2
5
SDin
3
3
3
2%
2%
2%
Rinse
I 3% I
3%
I 3M I 3% I
3%
131
3’h
I
Spin
I
7
7 7 7
I
4%
4~2 4~2
Totil
Time
35
n
21 11
22
22
I
19
NOTES:
●
Total time includes pauses between each phase of the cycles.
●
Total time does not include water fill times. Fill times vary depending
on household water pressure and your selected water level.
TURN THE PAGE
for Controls Setting Guide
5
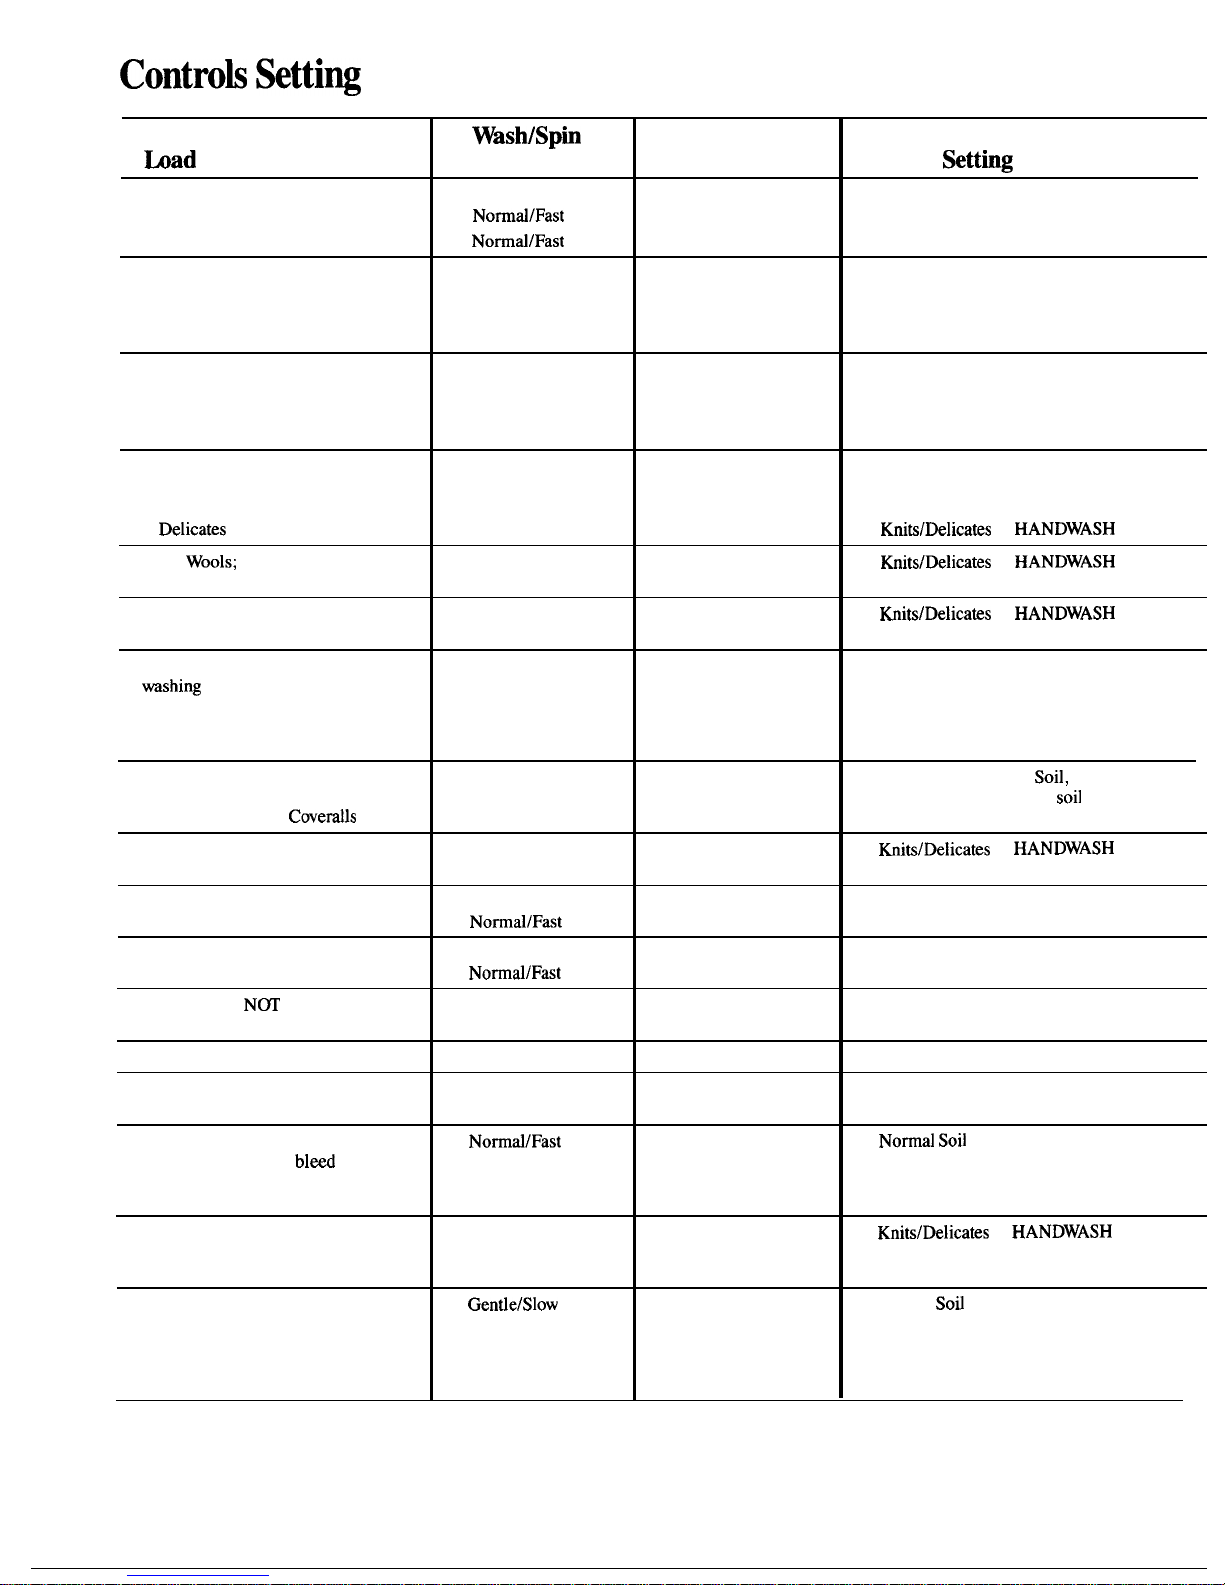
Controk Setti~
Guide for different fabrics and loads
Wash/Spti
Wash Water
—
had
speed
Temperature
Cycle
Sett@
Cottons and Linens
White/Colorfast
Norrnrd/Fast
Hot or Warm Normal Soil or Light Soil
Bright/Non-colorfast
Norrnd/Fast
Warm or Cold
Normal Soil or Light Soil
Work Clothes
Heavy soil
Normal/Fast
Hot
Normal Soil for small
loads,
Heavy Soil for all other loads
Average soil
Normal/Fast
Hot or Warm
Normal Soil
Permanent Press, Treated Cottons,
Blends with Cottons
Heavy or oily soil
Normal/Fast
Hot
Permanent Press
Average or light soil Gentle/Slow Warm
Permanent Press
Synthetics-Polyester, Nylon,
Acrylic Knits and Woven Fabrics
Sturdy
Normal/Fast
Warm
Permanent Press
Delicates
Gentle/Slow Warm
Knits/Delicates or
HANDWASH
Silks, Wools; Blends of Silk
Gentle/Slow
Warm
Knits/Delicates or
HANDWASH
and Wool
Rayon and Acetate Gentle/Slow
Warm
Knits/Delicates or
HANDWASH
Down-filled garments, if machine
Gentle/Slow
Warm
Permanent Press
wshing
is recommended
Baby Clothes—Sturdy, such as Diapers,
Normal/Fast
Hot
Normal Soil or Light
Soil,
Nightgowns, Shirts, Pads, Sheets,
depending on amount of
soil
Receiving Blankets,
Covedls
Baby Clothes—Delicate Gentle/Slow Warm
Knits/Delicates or
HANDWASH
Blankets-Wool, Part-Wool, Cotton
5 min. soak then
Warm Light Soil
Normrd/Fast
Blankets—Synthetic, Electric 5 min. soak then
Warm Light Soil
Norrnd/Fast
Curtains-DO
N~
MACHINE
Gentle/Slow Hot or Warm
Permanent Press
WASH FIBERGLASS
Chenille Bedspreads, Robes*
Gentle/Slow
Hot or Warm
Permanent Press
Slipcovers, Draperies, Bath Mats Normal/Fast
Hot or Warm
Normal Soil
and Rugs*
Denims (especially Indigo Blue Jeans)
Norrnd/Fast
Cold or Warm
Normal
Soil
and other fabrics that
bl=d
Rubber-coated Items, Laminated
Gentle/Slow Warm
Knits/Delicates or
HANDWASH
Fabrics, Vinyl, Plastics and
Articles with Plastic
Trim
Pillows
Gende/Slow
Warm
Normal Soti or Light Soil,
depending on amount of soil
—
*Check size. Some slipcovers, draperies and bedspreads may be too large for automatic home-size washer.
6

Refer to Garment Manufacturers’ Care
Labeh
I
Bleach
Liquid chlorine type.
Only non-chlorine type
bleach when
needd.
White or colorfast, liquid chlorine type.
Non-colorfast, only non-chlorine bleach
when needed.
White or colorfast, liquid chlorine type.
Non-colorfast, only non-chlorine bleach
when needed.
White or colorfast, liquid chlorine type.
Non-colorfast, only non-chlorine bleach
when needed.
No bleach
I
Seldom
needed. If needed, use only
non-chlorine bleach.
No bleach
I
White or colorfast, liquid chlorine type.
Only non-chlorine bleach when needed.
I
No bleach
I
No bleach
I
White or colorfast, liquid chlorine type.
White or colorfast,
liquid
chlorine type.
White or colorfast, liquid chlorine type.
No bleach
I
No bleach
No
bleach
SWcial
Instructions
If colorfast is unusually soiled, use hot water. Use maximum detergent recommended on
page 15.
Use maximum detergent recommended in guide on page 15.
Small
loads reduce wrinkling. Use maximum detergent recommended in guide on page 15.
If unusually soiled, use hot water. Use maximum detergent recommended in guide on
page 15. Small loads
rduce
wrinUing.
Wash
only
if recommended by the garment manufacturer. Follow instructions carefully.
Wash in your washer
only
if recommended by the garment manufacturer.
Wash frequently to fluff up the down and retain the garment’s warmth. Wash separately. Wet
down gives off an odor which maybe absorbed by other garments. Odor disappears when
garment is dry. Treat heavily soiled areas with liquid detergent or paste made of water and
granular detergent. Close zippers. Wash 2 or 3 at a time or add towels to balance.
GARMENT MUST BE TUMBLE
DMED.
You may prefer to use a mild type detergent. Do baby clothes separately. Pretreat spots.
Rinse diapers, nightgowns, pads and sheets after use. Keep diapers in a covered pail of cold
water and conditioning agent
like
Borateem brand.
You may prefer to use a mild type detergent. Do hand-knit garments by hand or by
HANDWASH control system. See page 9.
Fill washer, add detergent, allow to dissolve before adding blanket. Do one blanket at a time.
Pretreat heavily
soiled
spots with
liquid
detergent.
On electric blanket, sew a strong piece of cloth over plug to protect blanket and washer from
damage. Do one blanket at a time. Pretreat heavily soiled spots with liquid detergent.
Vacuum out loose dirt before washing.
If unusually soiled, use Normal/Fast Wash/Spin Speed.
Wash only 2 or 3 rugs or mats at one time. Shake before washing to remove excess dirt.
For new “indigo blue” jeans, wash at least 3 times in very
small
loads with
full
water fill.
Jeans need ample room to move to avoid white lines at creases. May discolor plastic washer
parts. Subsequent washings will reduce discolorations, but will probably never eliminate it.
The stained parts will not discolor subsequent washing loads.
Tumble on FLUFF (No Heat).
Pillows are made of different
materials—dacron, fiber, foam, polyester, natural feathers and
down. Many pillows can be machine washed, but
manufacturers’ care labels must be followed
carefilly. If washing is recommended, check pillows for weak seams or
holes
and mend to
prevent escape of feathers or filling.
Fill
washer, add detergent and agitate for several minutes
to dissolve detergent. Add two pillows at a time to balance
load, use full water level.
For more information on care labeling, send for “What’s New About CARE
LABELS:’
For sale by the Superintendent of Documents, U.S. Government Printing Office, Washington,
D.C. 2W02.
7
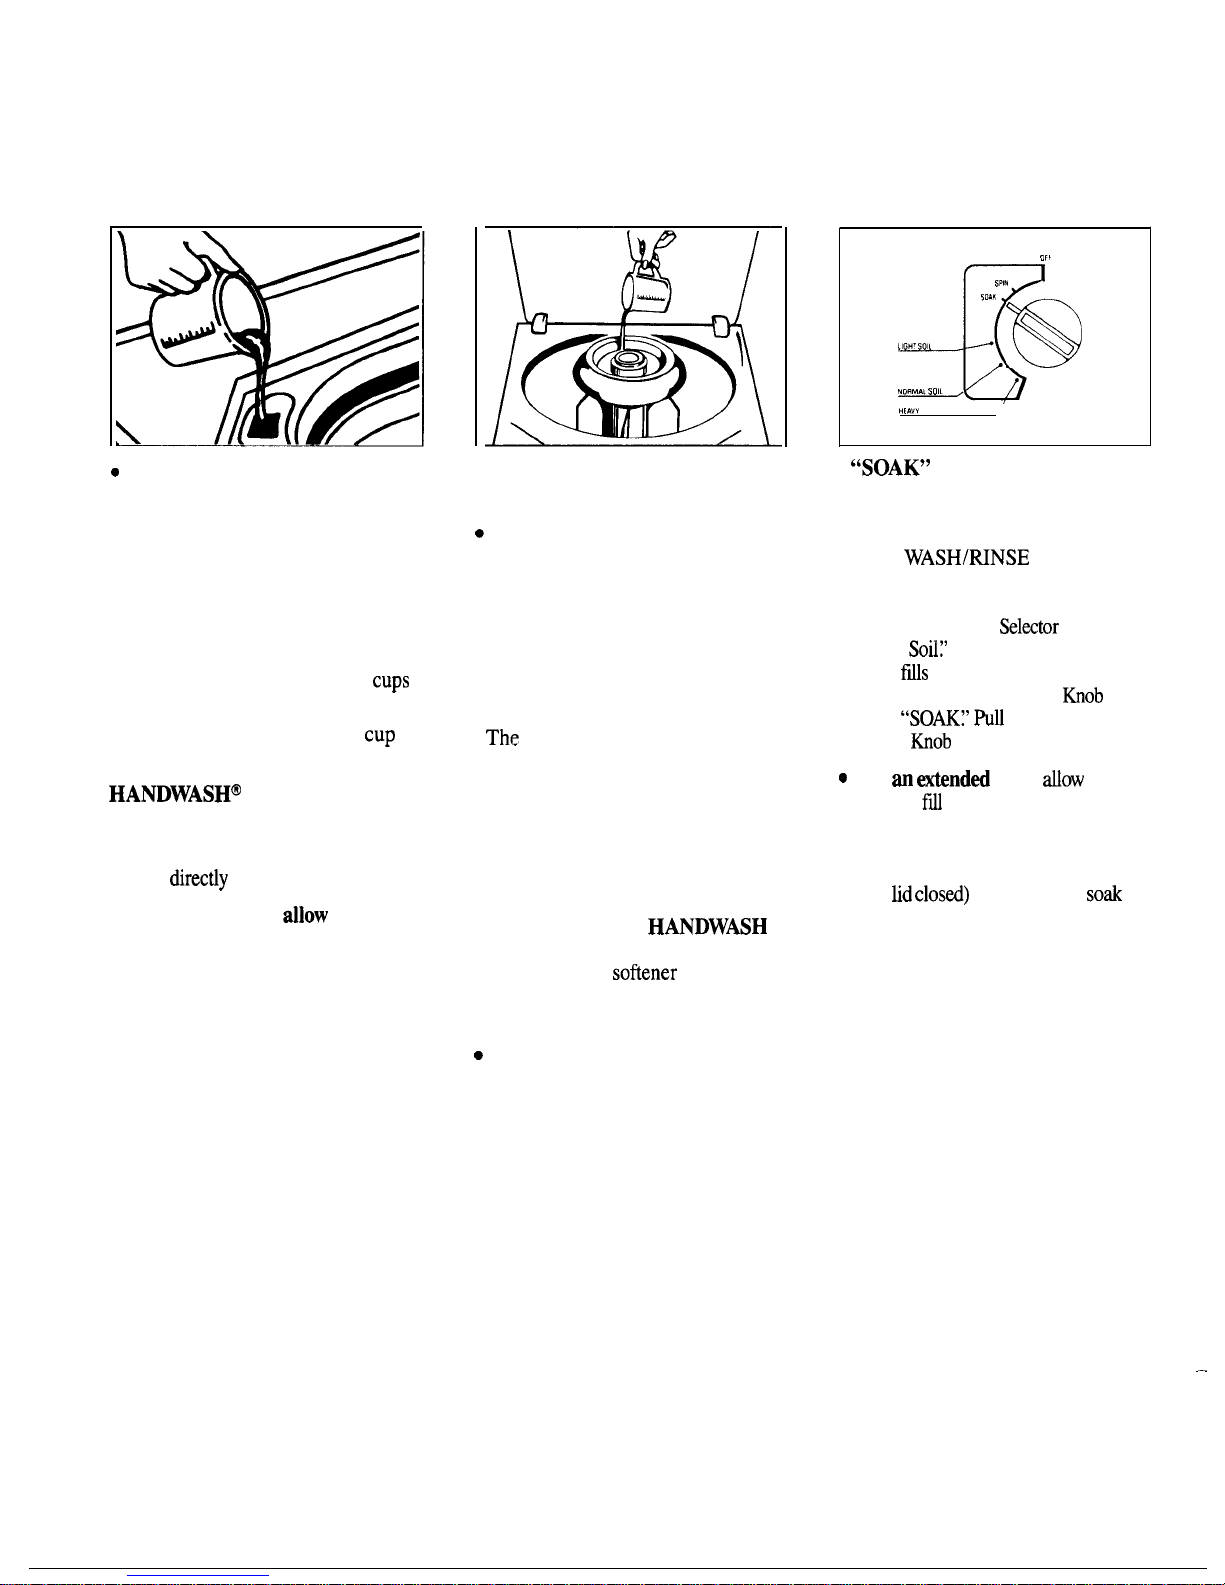
How tome the
Bleach Dispenser
How tome the
Fabric Softener
Dispenser
How to Use the
Soak setting
c
Use this dispenser with liquid
bleach only. If you prefer to use
powdered bleach, pour it into the
wash basket along with your
detergent. Do not put powdered
bleach into the bleach dispenser.
●
Measure bleach carefully. Here
are some recommended amounts:
FULL WATER LEVEL—1%
CUPS
(310 ml) liquid
LOW WATER LEVEL–2/3
CUP
(170 ml) liquid
HANDWASH@
system–1/4 cup
(60 ml) liquid
●
Pour measured amount of liquid
bleach
direcdy
into bleach dispenser.
●
Do
not overfill or
allow
dispenser
to overflow.
Avoid splashing.
Undiluted bleach can cause fabric
damage.
●
Never pour undiluted liquid
bleach directly onto clothes or
into the wash basket.
●
Position the Fabric Softener
Dispenser on the agitator.
c
Pour manufacturer’s recommended
amount of fabric softener into a
standard measuring cup.
. Add enough water to fill the cup
1/2 full.
●
Pour the diluted softener into the
dispenser.
●
The
fabric softener will
automatically be dispensed at the
proper time.
●
Do not stop the washer during
the first spin.
This will cause the
dispenser to empty too soon.
When using Fabric Softener
Dispenser with the
HANDWASH
system, use one (1) teaspoon (5 ml)
of concentrated
sofiener
or one (1)
tablespoon (15 ml) of diluted
softener.
c
Do not use the Fabric Softener
Dispenser with the Soak Setting.
.,,
“..
x
SPIN
,0.K
IIGH,
SOI<
s
ND, MA,
SO,L
HE.”Y
SOIL
/
.
~~SOAKJ’
setting temperature
will automatically be cold.
●
If a hot or warm soak is desired,
set the
WASH/MNSE
TEMPERATURE switch to
“HOT/COLD” or “W*/COLD”
and turn the Cycle
Selmtor
Knob to
“Heavy
Soflt’
Start the washer. After
washer
fls
and begins to agitate,
push in the Cycle Selector
fiob
and
turn to
“SOAK:’ RU
out the Cycle
Selector
fiob
to complete the cycle.
—
c
For an
-nded
soak
Wow
the
washer to
fti
and agitate for a few
minutes to dissolve the soaking
agent. Then push in the Cycle
Selector Knob to stop the washer
(keep
hd
closed)
and allow to
SO*
for as long as desired. After desired
soak period, pull out the Cycle
Selector Knob to complete the cycle.
—
8
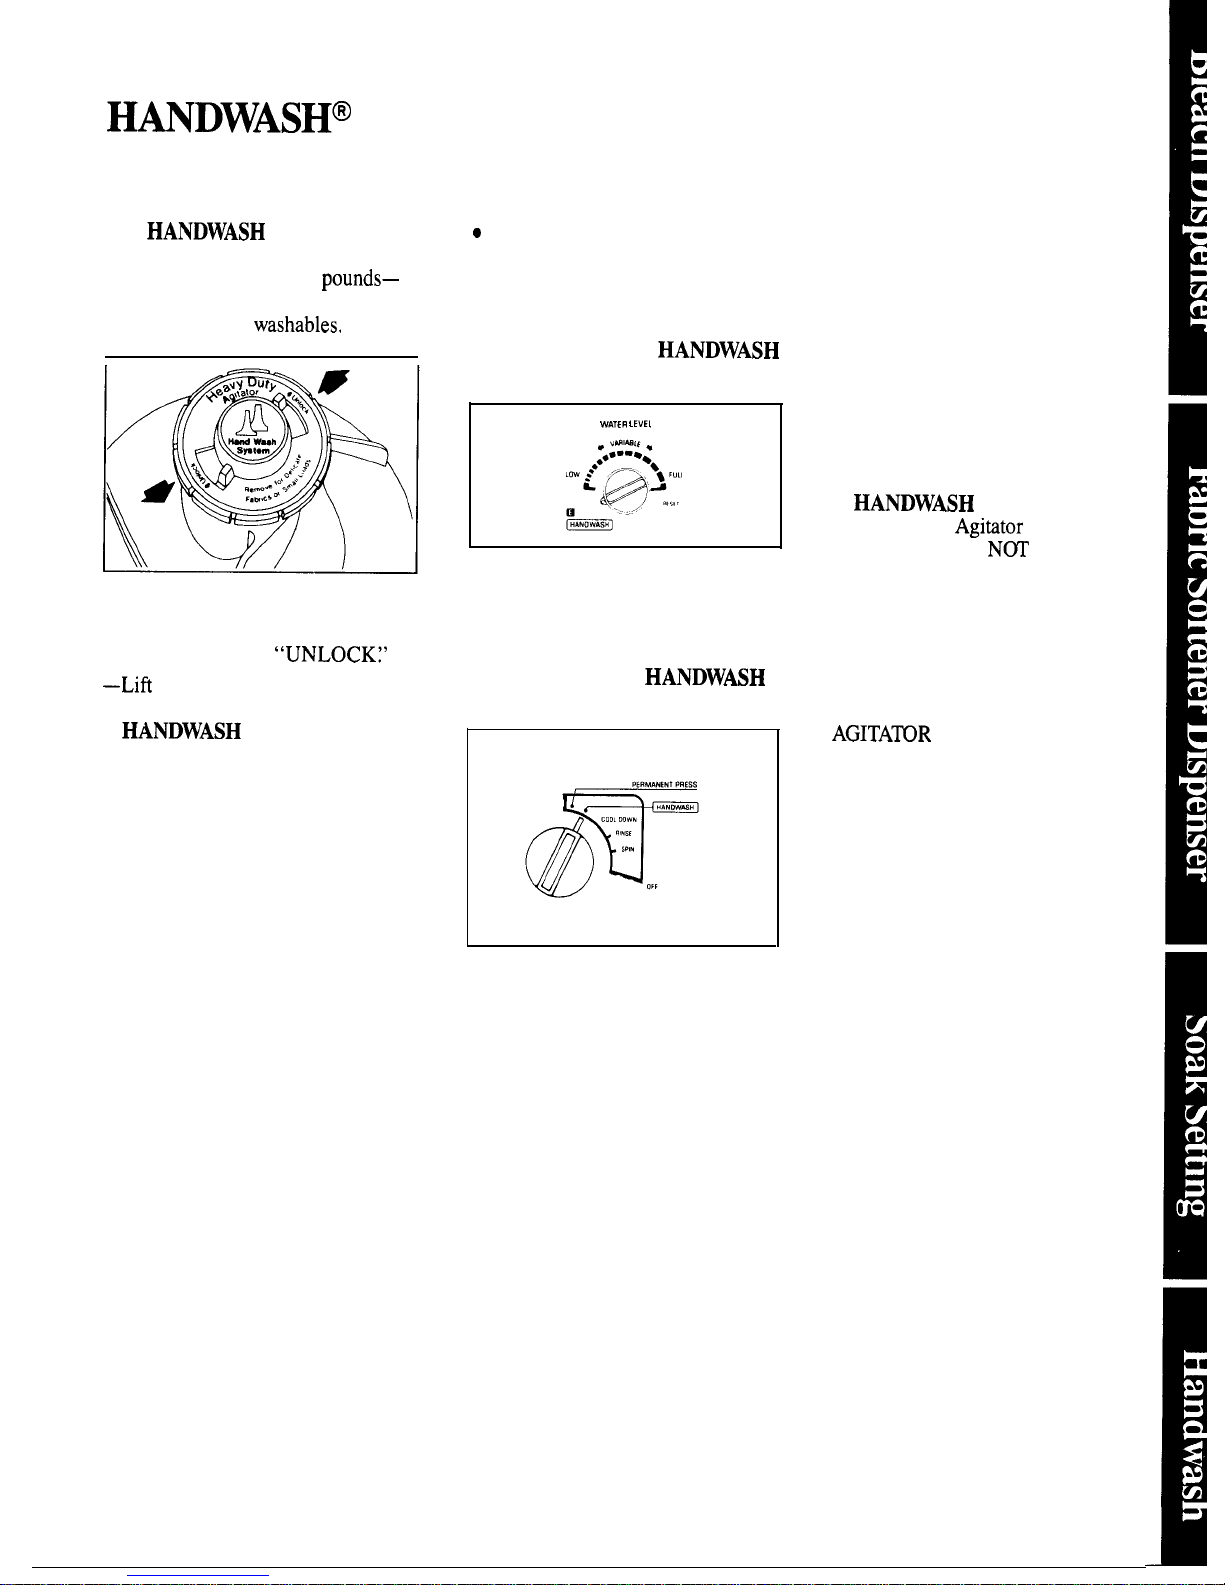
How to Use the
H~DWASH@
system
The
HANDWASH
system can be
used to handle small loads of
regular fabrics—up to 2
pounds—
or for easy and economical washing
of delicate hand
washables.
●
Remove HEAVY DUTY Agitator
as follows:
–Push switches to
“UNLOCK:’
–Lifi
out HEAVY DUTY
Agitator leaving smaller
HANDWASH
Agitator in place.
. Put 1/4 to 1/3 cup (60 to 80 ml)
detergent in the wash basket.
●
Load clothes in the wash basket,
See page 12 for loading
information,
c
To use Bleach and Fabric
Softener Dispensers, see page 8.
●
Close lid and set controls as
follows:
–Set Water Level to
HANDWASH
position.
WATER
LEVE1
—Select speed and temperature
according to the fabrics you are
washing.
—Push Cycle Selector Knob and
turn clockwise to
HANDWASH
setting.
—Pull out Cycle Selector Knob to
start washer.
●
When washing stockings, panty
hose and other easily tangled items,
always handle separately. To
minimize tangling, the use of a net
laundry bag is recommended.
. To replace HEAVY DUTY
Agitator:
—Position outer Agitator over
HANDWASH
Agitator and
rotate until
Agititor
falls easily
into place. DO
N~
FORCE.
–Press gently on HEAVY DUTY
Agitator until it is seated
securely.
—Push switches to lock Agitator in
place.
BE SURE HEAVY DUTY
AGITA~R
IS SECURELY IN
PLACE BEFORE WASHING
REGULAR LOADS OF
CLOTHES.
9
 Loading...