

Page 1
User Guide
EN
English, 1
WL 36/HP
WINE CELLAR
Contents
Features, 2
Notices
Data Sheet
Installation, 3-4
Positioning and connection
Product Description, 5
Interior Parts
Control Panel
Using the Wine Cellar 6-7
Bottle ageing compartment
Manual temperature control
Taking out the wooden shelves
Table of ideal wine temperatures
Stocking the wine bottles, 8-9
How to stock the bottles
FORNO
EN
Maintenance and troubleshooting, 10
Care and Maintenance
Troubleshooting
Assistance, 11
Guarantee, 12
After Sales Service, 13
Page 2
Features
EN
Notices
! Remember to keep this booklet so you can refer to it
at any time. In case of sale, transfer or should you
move, remember to keep it together with the device.
! Read the instructions carefully: there is important
information about installation, use and safety.
! To prevent danger stemming from instability of the
device, you must fasten it in place, following the
assembly instructions strictly.
! Whenever moving or transporting the device, keep it
in a vertical position.
! The beverage centre must not be used by children or
invalids, without supervision by an adult or a tutor, in
order to prevent the cellar from being used improperly.
! Children may use the beverage centre only if
supervised by an adult, in order to prevent them from
playing with the cellar.
! After installing the device, the power cable and
socket must be easy to reach.
! Keep the ventilation openings on the casing of the
device free.
! The cable must be checked on a routine basis and
replaced only by authorised technicians.
! The power supply cable is of a Y type. Contact the
after sales service to replace it.
! Do not use electrical equipment inside the food
compartments, unless they are of a kind suggested by
the manufacturer.
! The Manufacturer shall not be liable if any of the
above rules are not complied with.
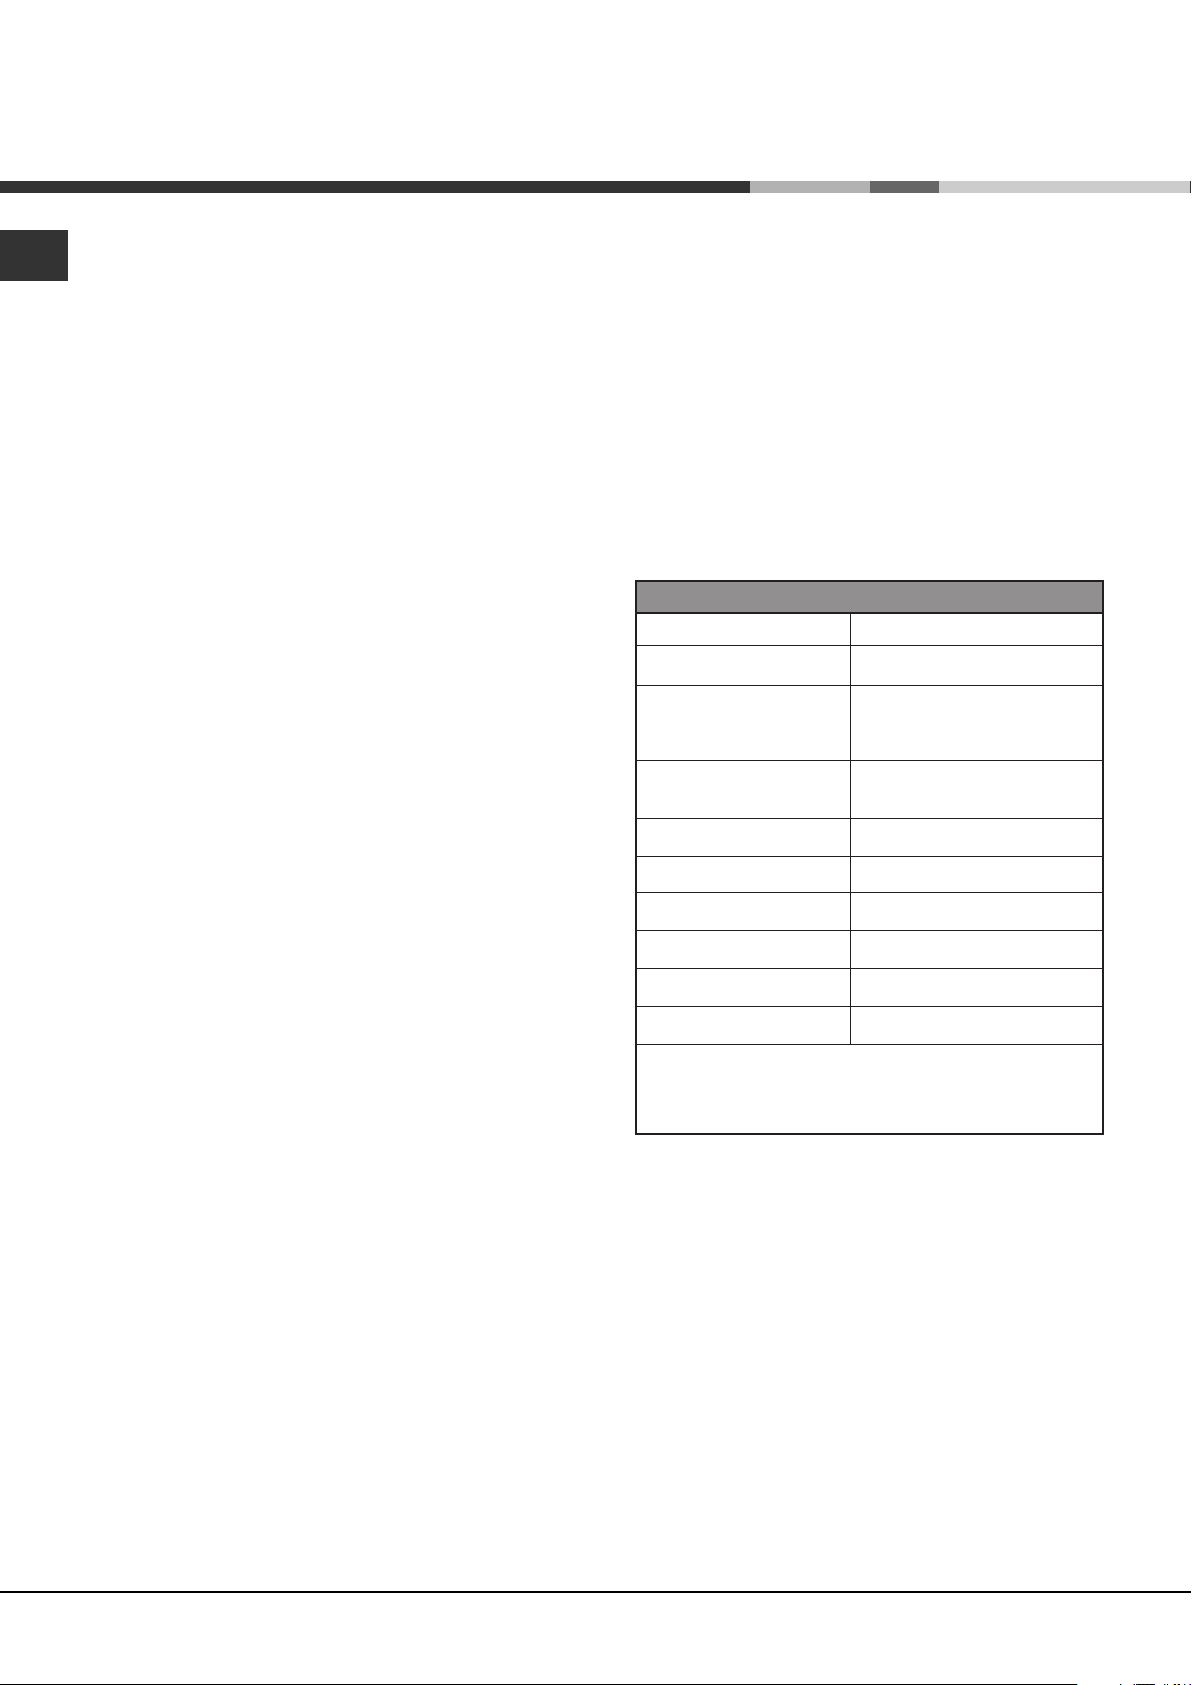
DATA SHEET
Model
Temperatures
Dimensions
Weight**
Weight
Power
Current
WL 36/HP
1 Zone
width cm 56
length cm 68
depth cm 55
76 Kg
97 Kg
100 W
0,54 A
! Do not use mechanical devices, or any means not
suggested by the manufacturer, to speed up
defrosting.
! Do not damage the coolant circuit.
! Contact the after sales service to replace the neon.
! The cable must not be bent or crushed.
Lamp
Consumption
Voltage*
Frequency Hz*
* These values may change in different countries.
In order to find the specific features of your device,
check the product features plate.
** When the device is empty.
1 x 6 W
0,9 kWh / 24h
220 V
50
This appliance is intended to be used exclusively for the storage of wine.
2
Page 3
Installation
Positioning and connection
Unpacking
1 Unpack the device immediately and make sure it
has not been damaged during transport. Should it
be damaged, do not connect, and get in touch
with the Dealer.
2 Carefully remove the protections and the
adhesives, open the door and make sure all the
components are present.
3 Take out the power supply cable.
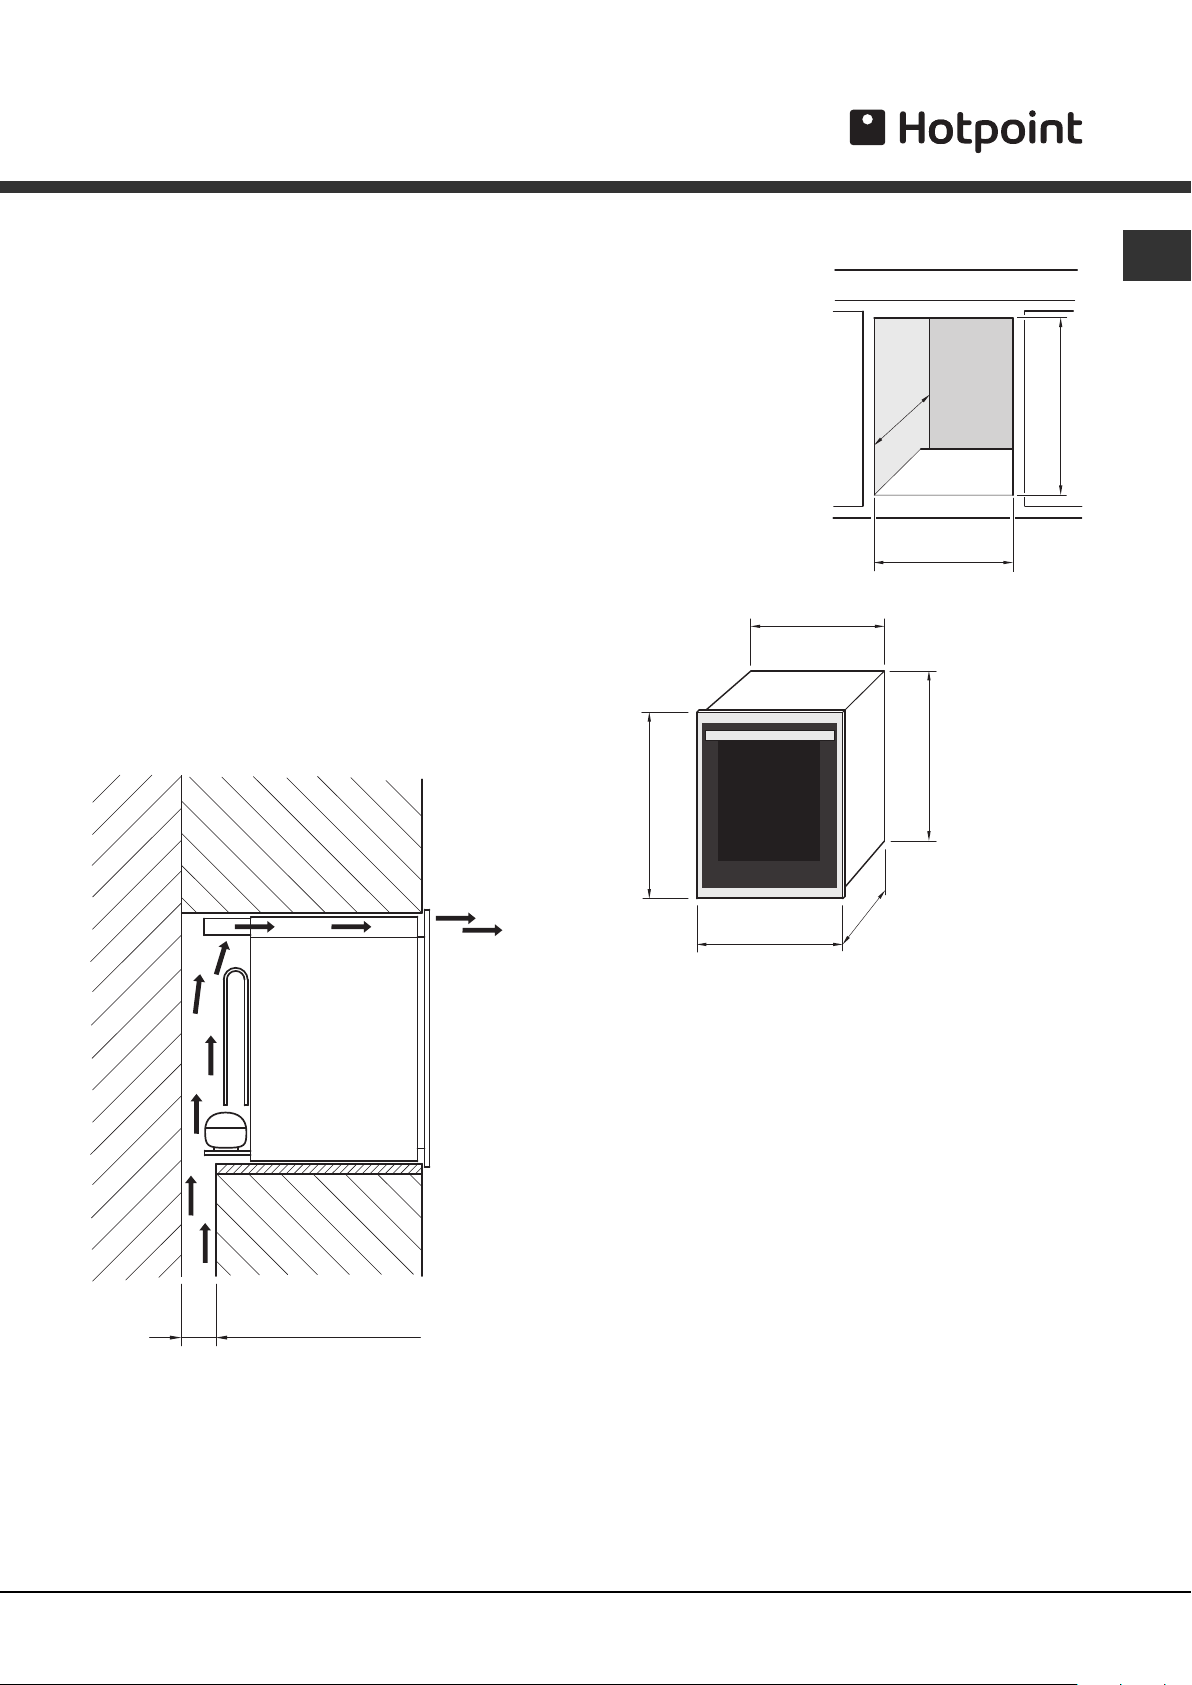
Positioning
1 Position the device in a well ventilated area, not
damp and free (avoid cabinets with closed walls).
2 Keep the device away from heat sources.
3 Make sure the minimum distances between the
device and the walls of the room where it is placed
are kept, in order to ensure perfect ventilation of
the device.
Dimensions
of the
compartment
560
EN
560
min.
680 min.
560 min.
See figure.
Ventilation space:
at least 50 mm
Dimensions
680
of the cellar
715
Furniture
588
Electrical connections
After the appliance has been transported, carefully
place it vertically and wait at least 3 hours before
connecting it to the electricity mains. Before
inserting the plug into the electrical socket ensure
the following:
• The appliance is earthed and the plug is compliant
with the law.
• The socket can withstand the maximum power of
the appliance, which is indicated on the data plate
located on the right side of the horizontal surface in
the top compartment, under the thermostat (e.g.
150 W).
• The voltage is within the range of values indicated
on the data plate located on the right side of the
horizontal surface in the top compartment, under
the thermostat (e.g. 220-240V).
• The socket is compatible with the plug of the
appliance.
If the socket is incompatible with the plug, ask an
authorised technician to replace it (
Do not use extension cords or multiple sockets.
550
side area
see Assistance
).
3
Page 4
EN
! Once the appliance has been installed, the power
supply cable and the electrical socket must be
easily accessible.
! The cable must not be bent or compressed.
! The cable must be checked regularly and replaced
by authorised technicians only (see Assistance).
! The manufacturer declines any liability should
these safety measures not be observed.
Your appliance is supplied with a 13amp fused plug
that can be plugged into a 13amp socket for
immediate use. Before using the appliance please
read the instructions below.
WARNING:
THIS APPLIANCE MUST BE EARTHED.
WARNING:
To avoid a shock hazard do not insert the
discarded plug into a socket anywhere else.
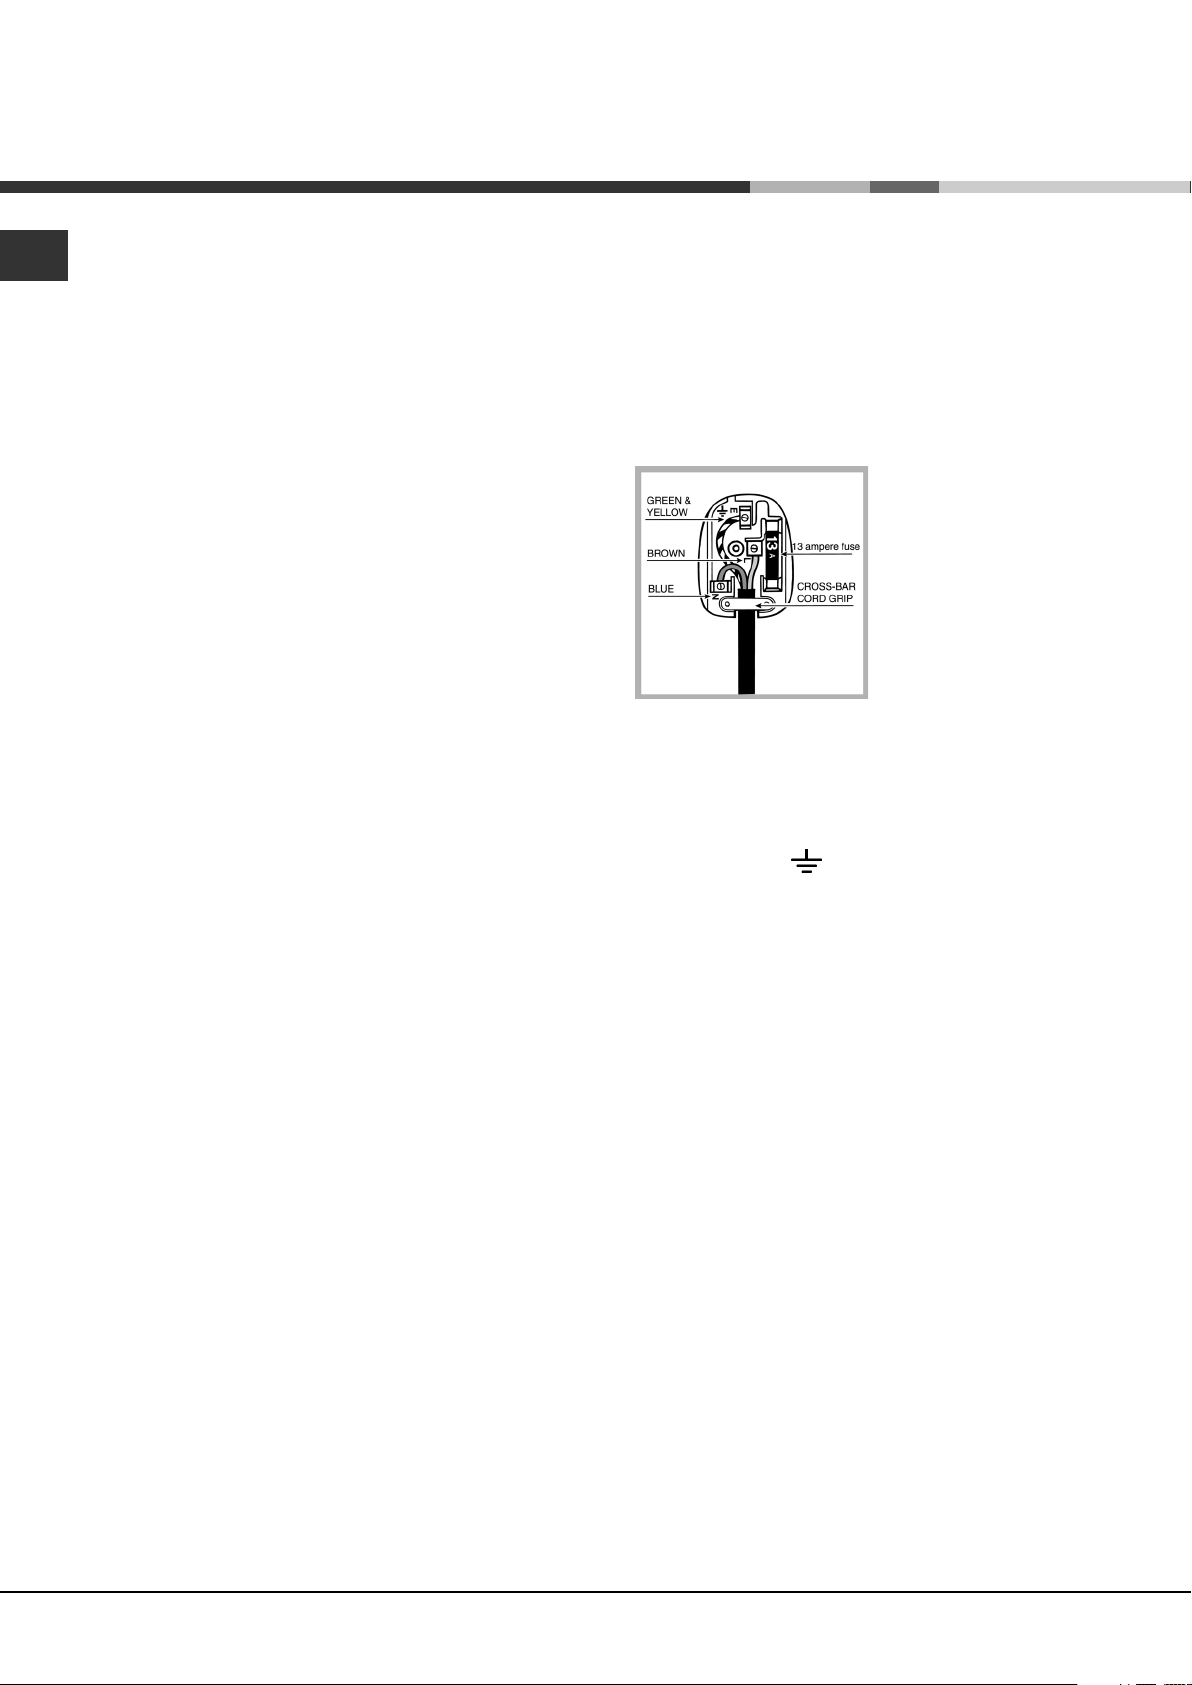
Fitting a new plug
IMPORTANT
WIRES IN THE MAINS LEAD ARE COLOURED IN
ACCORDANCE WITH THE FOLLOWING CODE...
::
:
::
Green and Yellow - Earth
Blue - Neutral
Replacing fuse covers:
When replacing a faulty fuse, a 13amp ASTA
approved fuse to BS 1362 should always be used
and the fuse cover re-fitted.
If the fuse cover is lost, the plug must not be used
until a replacement is obtained.
Replacement fuse covers:
If a replacement fuse cover is fitted, it must be of
the correct colour as indicated by the coloured
marking or the colour that is embossed in words on
the base of the plug.
Changing the plug:
Removing the plug
If your appliance has a non-rewireable moulded plug
and you should wish to remove it to add a longer
cable or to re-route the mains cable through
partitions, units etc. please ensure that either:
- The plug is replaced by a fused 13amp re-wireable
plug bearing the BSI mark of approval.
or
- The mains cable is wired directly into a 13amp
cable outlet, controlled by a switch (in compliance
with BS 5733) which is accessible without moving
the appliance.
Disposing of the plug
Cut off and dispose of the supplied plug if it does
not fit your socket. The cable should be cut as close
as possible to the moulded plug.
Remove the fuse.
Brown - Live
As the colours of the wires in the mains lead may
not correspond with the coloured markings
identifying the terminals in your plug, proceed as
follows:
- Connect Green and Yellow wire to terminal
marked 'E' or
- Connect Brown wire to terminal marked 'L' or
coloured red or brown.
- Connect Blue wire to terminal marked 'N' or
coloured Black or Blue.
If a 13amp plug (BS 1363) is used it must be
fitted with a 13amp fuse. A 15amp plug must be
protected by a 15amp fuse, either in the plug or
adaptor or at the distribution board.
If you are in any doubt about the electrical supply
to your machine, consult a qualified electrician
before use.
CE Marking certifies that this appliance conforms to
the following EEC directives :
Low Voltage Equipment - 73/23/EEC & 93/68 EEC
Electromagnetic Compatibility 89/336/EEC, 92/31/
EEC & 93/68/EEC
or coloured Green and Yellow.
4
Page 5
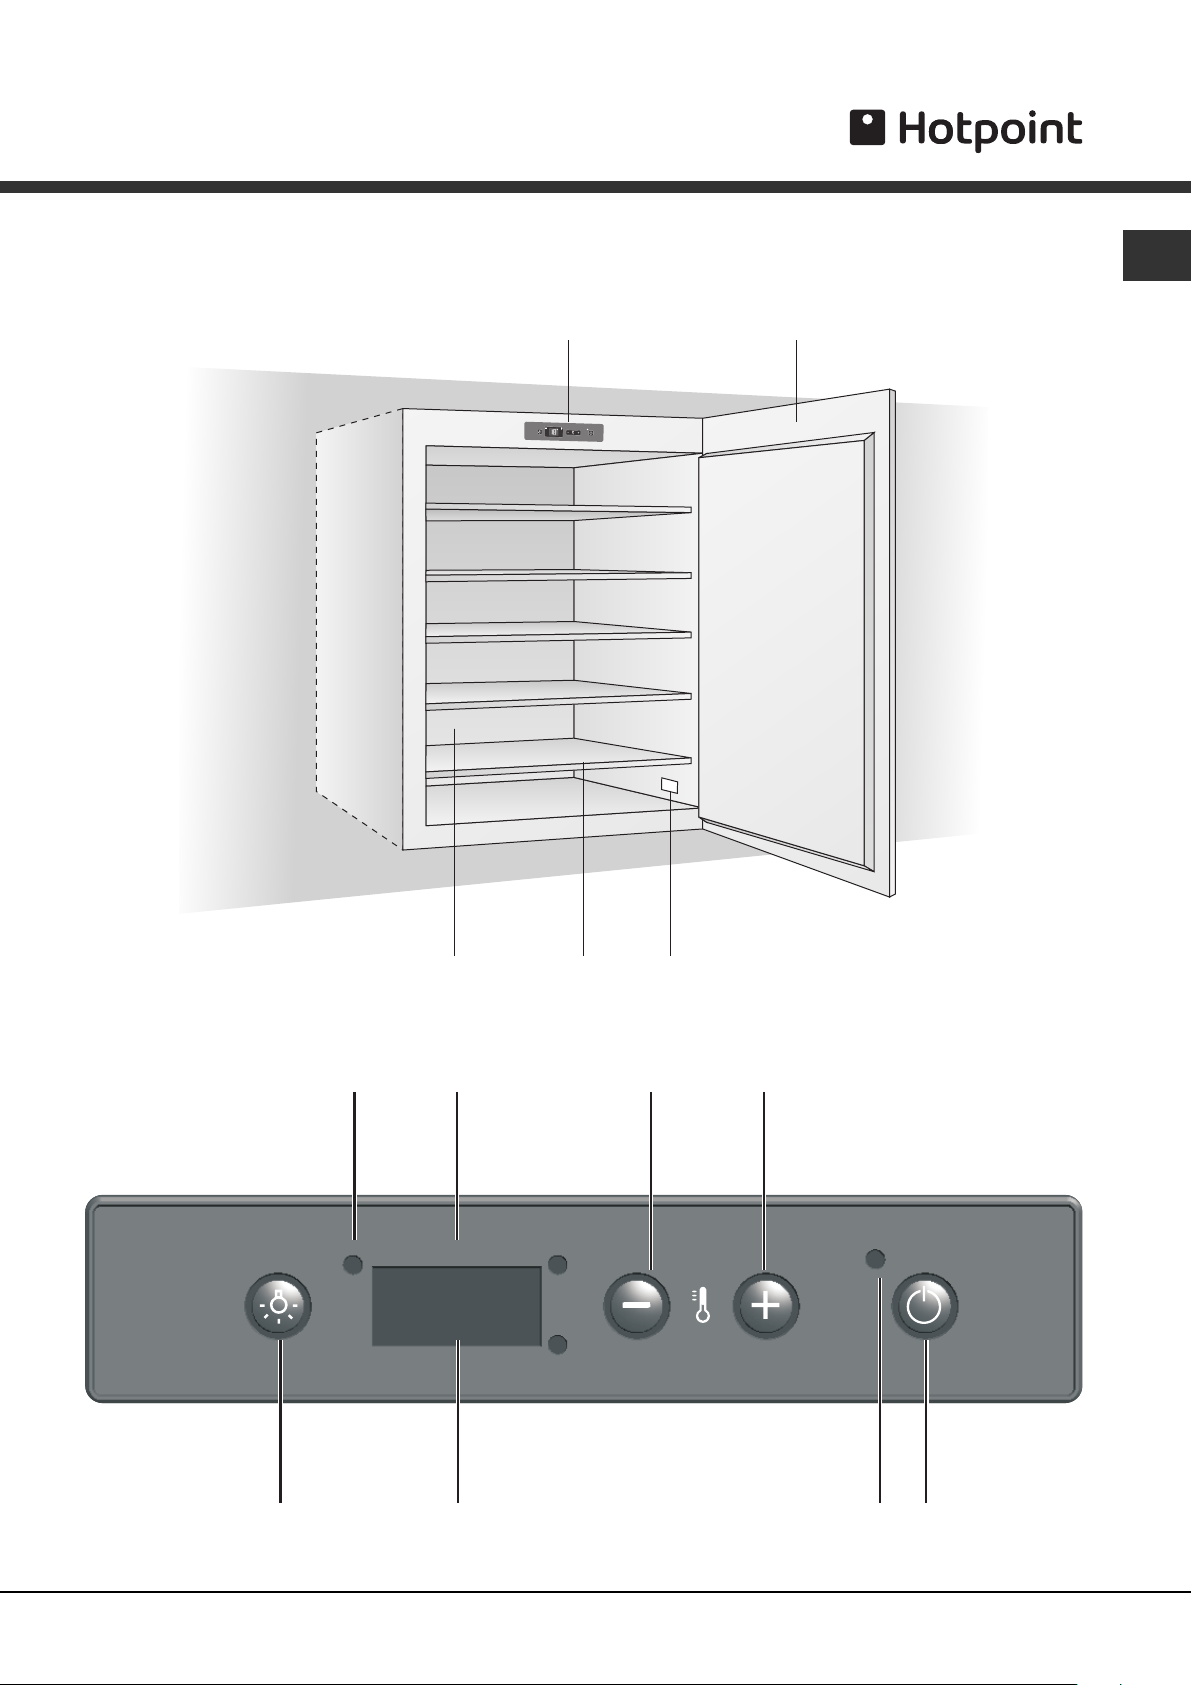
Product Description
Interior Parts
CONTROL
PANEL
EN
DOOR
Control Panel
LIGHT
BOTTLE AGEING
COMPARTMENT
ON LIGHT
TEMPERATURE
DISPLAY
CURRENT
SHELVES
REDUCE
TEMPERATURE
DATA
PLATE
INCREASE
TEMPERATURE
POWER
CONNECTION
LIGHT
ON/OFF
BUTTON
5
Page 6

Using the wine cellar
EN
Bottle ageing compartment
The ageing compartment's main function is that of
guaranteeing that your wines are preserved in optimal
conditions.
The temperature has been set in the factory at a
temperature held to be excellent in most cases and is
15°C in the upper compartment.
Wine has a complex nature and it derives from a long
and slow process. In order to best express its
attributes, very specific conditions are necessary.
All wines are preserved at the same temperature, but,
depending on their different characteristics, wines are
served and tasted at very different temperatures (see
the Table of ideal wine temperatures).
Therefore, just as for manufacturers' wine cellars, for
your new appliance, the absolute temperature value is
not important for preserving your wine. Rather, the
constant temperature through time is important. Wine
preservation is ideal at any temperature, as long as
that temperature does not vary.
Manual temperature control
When you plug in your wine cellar, the display shows
the temperature inside the cellar: it has been set to
reach 15 ° C and become steady on it. Should you
need to adjust it, follow the instructions below:
1. When you plug in your wine cellar, the display
shows the temperature that has been set
2. Press the
Control Panel). The temperature will begin to blink.
3. Press the
desired temperature.
4. Wait 5 seconds for the temperature to stop
blinking.
5. Wait until the wine cellar reaches its temperature
before you place the wine bottles inside.
The inside light does not go on (or it goes off
temporarily) when the inside temperature goes over
24° C. This allows you to reach the pre-set
temperature more quickly.
button for one second (see the
or buttons until you reach the
6
Page 7

Table of ideal wine temperatures
This table indicates the approximate temperatures at which wine should be served. Should one of your wines
need to be served at a temperature that is greater than the temperature inside your wine cellar, we suggest that
you leave it wine out for the time that is necessary before you serve it.
EN
Amarone
Barbaresco
Barolo
Beaujolais
White liquered Bordeaux
Dry White Bordeaux
Red Bordeaux
White Bourgogne
Red Bourgogne
17°C
17°C
17°C
13°C
6°C
8°C
17°C
11°C
18°C
6°C
Dry and Sweet Sparkling Wines
Verdicchio di Matelica e dei Castelli di Jesi
White wines from Trentino Alto Adige
Franciacorta White Wines
Dry aromatic white wines
Dry, young, and fruity white wines
White wines from Friuli Venezia Giulia
Rodano wines
Dry white wines from the Loire
8°C
11°C
11°C
10°C
8°C
11°C
15°C
10°C
Brunello
Champagne
Chianti Classico
Languedoc-Roussillon
Passito di Pantelleria
Rosé Provence
17°C
6°C
16°C
13°C
6°C
12°C
Liquered wines from the Loire
Red wines from the Loire
Liquered Passito wines
Rosè Wines, New Wines
Light red wines with mild tannic
Red, rather tannic wines with medium structure
7°C
14°C
8-18°C
12°C
14°C
16°C
7
Page 8

Stocking the wine bottles
EN
Standard 36-bottle stock
The 36-bottle stock (for standard, mixed, and renana
bottles) is recommended for wines that need to be
visible and easily removed.
STANDARD
36 Bottles
(100% lying down)
5 shelves
Position each bottle into the slots on the 5 wooden shelves.
6 bottles can be placed on the bottom of the wine cellar.
! The wooden shelves have a special blocking system
so that your bottles do not accidentally fall and break.
We suggest you place the Renana bottles onto the lower
shelf and the bottom of the wine cellar because they have
been specially designed to hold larger bottles.
Some stocking configurations
PRESERVATION
44 Bottles
(100% lying down)
1 shelf
SERVICE
42 Bottles (50% lying
down, 50% standing)
3 shelves
4 rows
! The wooden shelf can
safely hold up to 22
bottles.
Champagne bottle stock
Champagne bottles are larger than standard bottles.
They must be placed onto the base of the wine
cellar, which can hold up to 5.
If you want to stock
more than 5
Champagne bottles in
your wine cellar, remove
the 5th shelf and stock
the bottles in two rows
(placing the bottles in
the second row
between those on the
bottom row). This will
hold up to 9 bottles.
MAXIMUM STOCK
46 Bottles (48% lying
down, 52% standing)
1 shelf
4 rows
8
Page 9

Removing the wooden shelves
Follow the instructions below to remove the wooden
shelves:
1. Hold the front part of the shelf with one hand.
2. Slowly remove the shelf by pulling it toward you.
Pull out the shelf by 1/3 of the way if you need to
remove or replace bottles.
3. Remove or replace the bottles you need and push
the shelf back, making sure it locks into place.
4. Make sure the shelf is in place by trying to pull it
out once again. If it moves, push it back in again
until it is securely in place.
To completely remove the shelf, follow step 1 and 2
and remove all bottles that on the shelf. Slowly pull
the shelf toward you until you remove it from its
slots.
! Do not, under any circumstances, remove more
than one shelf at a time.
For a small number of bottles
EN
If you do not need to store enough bottles to fill the
entire wine cellar, we suggest that you divide them
up between the available shelves and that you do
not place them all on top or on the bottom.
Place the bottles in the centre of the shelves to see
them better from the outside.
9
Page 10

EN
Maintenance and
troubleshooting
Care and maintenance
Disconnecting the wine cellar
During cleaning and maintenance, it is imperative that you unplug the wine cellar
Troubleshooting
If you notice that your wine cellar is not working properly, check with the following list before you call your
Service Centre.
Problem
The compressor does not work
The compressor never stops
! Any work that is done to the wine cellar should be performed by your authorized local Service Centre.
! Short term faults, such as power failure, will not compromise the wines. It is only when working faults are left
unsettled for a long time that the wine may suffer.
! The appliance was designed and manufactured in
compliance with international safety standards. The
following warnings are provided for safety reasons
and must be read carefully.
Possible causes/solutions
• The plug is not plugged into the wall-outlet or not
enough to make contact. Or, there could be a
power failure in your home.
• The wall-outlet is not in working order. Plug the wine
cellar into another wall-outlet to check.
• Contact the Service Centre
Disposal
This appliance complies with the following
Community Directives:
- 73/23/EEC of 19/02/73 (Low Voltage) and
subsequent amendments;
- 89/336/EEC of 03.05.89 (Electromagnetic
Compatibility) and subsequent amendments;
- 2002/96/CE.
10
• Observe local environmental standards when
disposing packaging material for recycling
purposes.
• The European Directive 2002/96/EC on Waste
Electrical and Electronic Equipment (WEEE),
requires that old household electrical appliances
must not be disposed of in the normal unsorted
municipal waste stream. Old appliances must be
collected separately in order to optimise the
recovery and recycling of the materials they contain
and reduce the impact on human health and the
environment. The crossed out “wheeled bin”
symbol on the product reminds you of your
obligation, that when you dispose of the appliance
it must be separately collected.
Consumers should contact their local authority or
retailer for information concerning the correct
disposal of their old appliance.
Page 11

Assistance
Before calling for Assistance:
• Check if the malfunction can be solved on your own (see Troubleshooting).
• If after all the checks, the appliance still does not operate or the problem persists, call the nearest Service
Centre
model serial number
Communicating:
• type of malfunction
Gross
Bruto
Brut
TI
75
Test
P.S-I.
• appliance model (Mod.)
• serial number (S/N)
This information can be found on the data
plate located on the bottom left side of the
refrigerator compartment.
RG 2330
Mod.
220 - 240 V- 50 Hz 150 W
340
Total
Gross
Bruto
Brut
Compr.
R 134 a
Syst.
kg 0,090
Kompr.
Made in Italy 13918
Never call on unauthorized technicians and always refuse spare parts which are not originals.
93139180000 S/N 704211801
Net
Util
Utile
Pressure
HIGH-235
LOW 140
Cod.
Gross
Bruto
Brut
Fuse
W
A
Freez. Capac
Poder de Cong
4,0
kg/24 h
Max 15 w
Class
Clase
Classe
N
EN
11
Page 12

EN
Guarantee
12 Months Parts and Labour Guarantee
Your appliance has the benefit of our manufacturer’s guarantee, which covers the cost of breakdown
repairs for twelve months from the date of purchase.
This gives you the reassurance that if, within that time, your appliance is proven to be defective
because of either workmanship or materials, we will, at our discretion, either repair or replace the
appliance at no cost to you.
This guarantee is subject to the following conditions:
-
The appliance has been installed and operated correctly and in accordance with our
operating and maintenance instructions.
-
The appliance is used only on the electricity or gas supply printed on the rating plate.
-
The appliance has been used for normal domestic purposes only.
-
The appliance has not been altered, serviced, maintained, dismantled, or otherwise
interfered with by any person not authorised by us.
-
Any repair work must be undertaken by us or our appointed agent.
-
Any parts removed during repair work or any appliance that is replaced become our property.
-
The appliance is used in the United Kingdom or Republic of Ireland.
The guarantee does not cover:
-
Damage resulting from transportation, improper use, neglect or interference or as a result
of improper installation.
-
Replacement of any consumable item or accessory . These include but are not limited to: plugs,
cables, batteries, light bulbs, fluorescent tubes and starters, covers and filters.
-
Replacement of any removable parts made of glass or plastic.
THIS GUARANTEE WILL NOT APPLY IF THE APPLIANCE HAS BEEN USED IN COMMERCIAL
OR NON-DOMESTIC PREMISES.
5 Year Parts Guarantee
Hotpoint also offers you a free 5 year parts guarantee. This additional guarantee is conditional on you
registering your appliance with us and the parts being fitted by one of our authorised engineers. There
will be a charge for our engineer's time. To activate the extra parts warranty on your appliance, simply
call our registration line on 0870 6092094 (ROI 01 230 0800).
Extended Guarantees
We offer a selection of repair protection plans that enable you to fully cover yourself against the
expense of repair bills for the life of your policy. To find the ideal plan for you please call our advice line
on 08709 088 088 (ROI 01 230 0233).
Free Helpdesk Service
We have a dedicated team who can provide free advice and assistance with your appliance if you
experience any technical difficulties within the first 90 days of ownership. Simply call our Hotpoint
Service Hotline on 08709 066 066 (ROI 0818 313 413) for telephone assistance, or, where necessary,
to arrange for an engineer to call. If we cannot resolve the technical problem we will replace your
machine or, if you prefer, give you your money back.
12
Page 13

After Sales Service
No one is better placed to care for your Hotpoint appliance during the course of its working life than us
- the manufacturer.
Essential Contact Information
Hotpoint Service
We are the largest service team in Europe offering you access to 400 skilled telephone advisors and
1100 fully qualified engineers on call to ensure you receive fast, reliable, local service.
UK: 08709 066 066
Republic of Ireland: 0818 313 413
www.hotpointservice.co.uk
Please note: Our advisors will require the following information:
Model number:
Serial number:
Parts and Accessories
EN
We supply a full range of genuine replacement parts as well as accessory products that protect and
hygienically clean your appliance to keep it looking good and functioning efficiently throughout its life.
UK: 08709 077 077
Republic of Ireland: 0818 313 413
www.hotpointservice.co.uk
Appliance Registration
We want to give you additional benefits of Hotpoint ownership. To activate your free 5 year parts
guarantee you must register your appliance with us.
UK: 0870 6092094
Republic of Ireland: 01 230 0800
www.hotpointservice.co.uk
Indesit Company UK Ltd. Morley Way, Peterborough, PE2 9JB
Indesit Company Unit 49 Airways Industrial Estate,Dublin 17
Recycling & Disposal Information
As part of Hotpoint's continued commitment to helping the environment, Hotpoint reserves the right to use
quality, recycled components to keep down customer costs and minimise material wastage.
Please dispose of packaging and old appliances carefully. To minimise the risk of injury to children, remove
the door, plug and cut the mains cable off flush with the appliance. Dispose of these parts separately to
ensure that the appliance can no longer be plugged into a mains socket, and the door cannot be locked
shut.
13
Page 14

EN
14
Page 15

EN
15
Page 16

EN
195095634.00
07/2011
16
 Loading...