

Page 1

Installation and Troubleshooting Guide
Page 2
GB
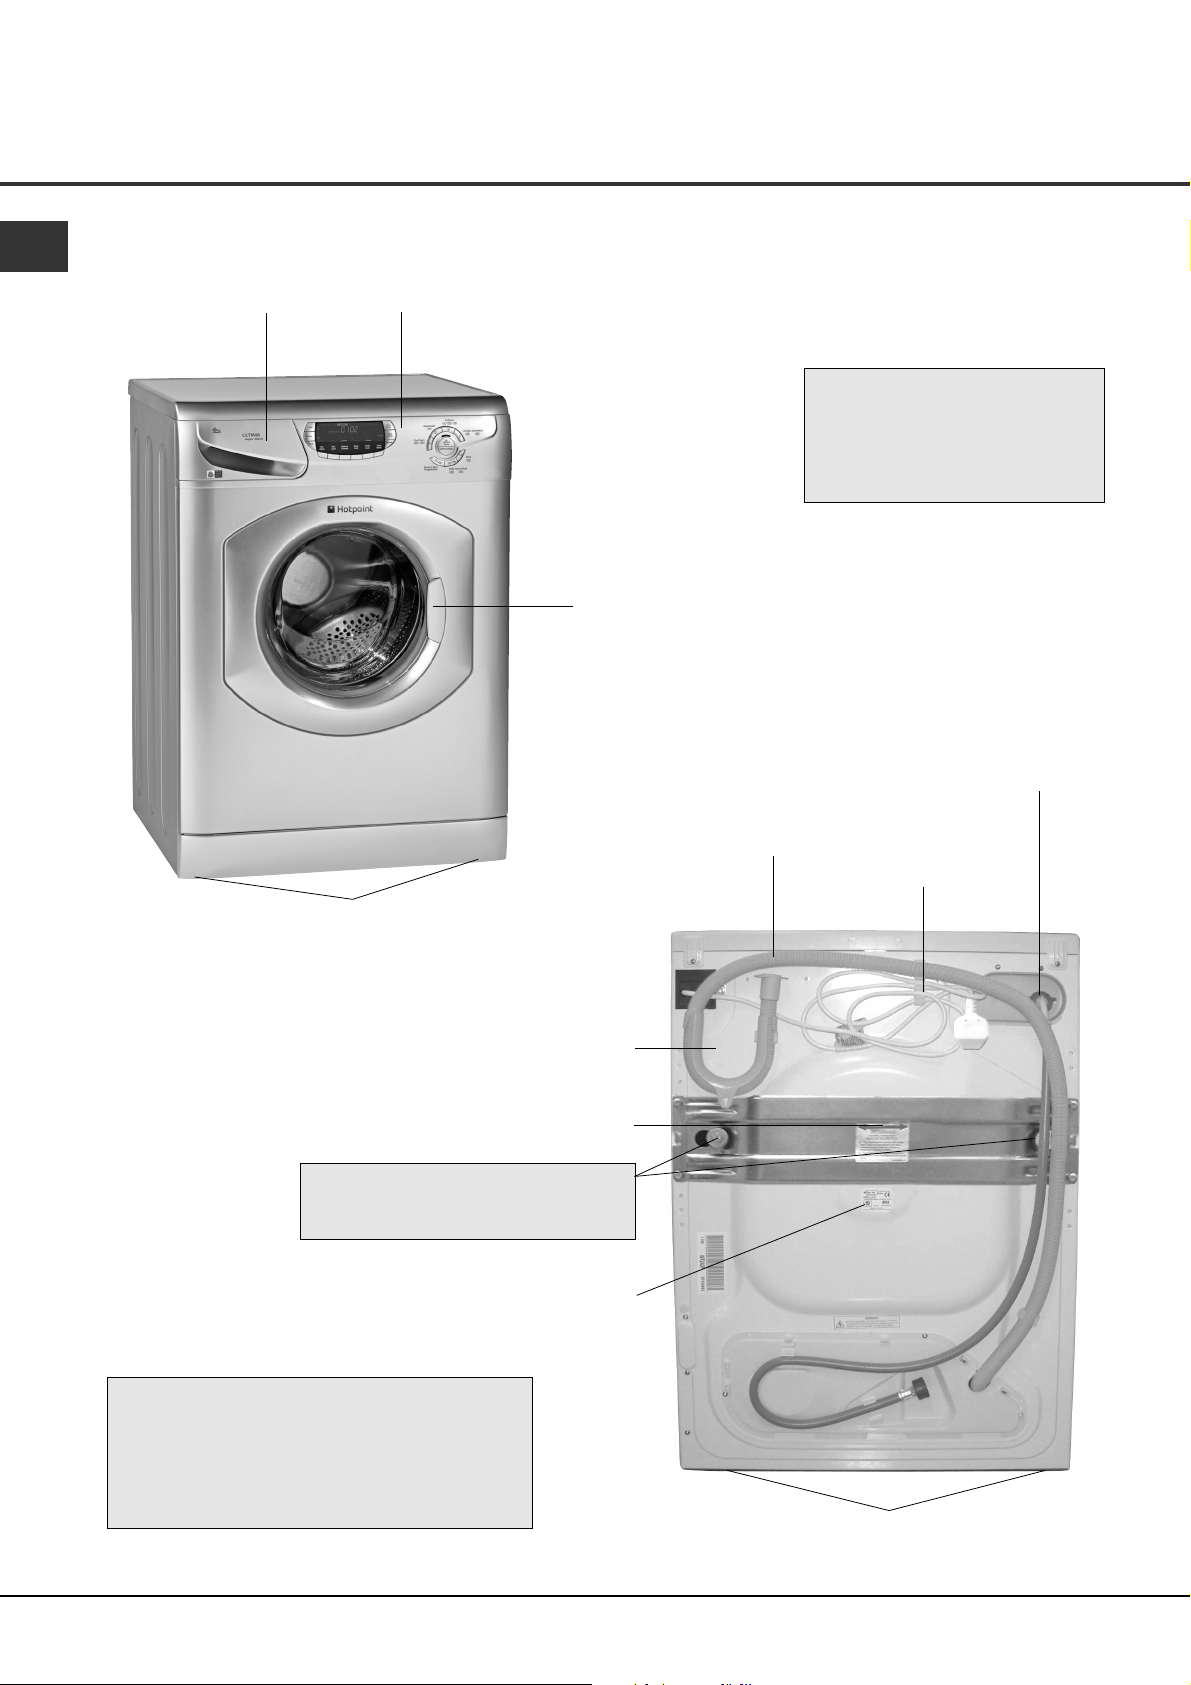
Description
Dispenser drawer Control panel
●
Varies by Model)
(
Interlocking door and
release lever.
●
Please record the Model
number and Serial number
of your machine on the back
cover of this book for future
reference.
Front adjustable feet
Hooked end support
Plumbing indicator line
Two transit fixings
! BOTH must be removed BEFORE
you use your machine (see page 5).
Rating plate
Cold water inlet point
and attached fill hose
(blue connector)
Drainage hose
Mains cable
! The machine was designed and built in
compliance with the applicable international
safety regulations.
The following information is provided for
your safety and should consequently be read
carefully.
2
Back feet
Page 3
Contents
GB
Description, 2
Installation, 4-7
Unpacking
Remove the transit fixings
Location
Levelling
Water connection
Drainage connection
Electrical connection
Before you start using your machine
Detergents and Laundry, 8
Detergent dispenser
Washcare tips
Preparing your laundry
Precautions and Advice, 9
General safety
Saving energy and respecting the environment
Disposal
Care and Maintenance, 10
Cleaning your machine
Fuses
Changing the plug
Cleaning the pump
Troubleshooting, 11
Service, 12
Before calling for assistance
Spare parts
Key Contacts
Description
Contents Installation
Detergents and
Laundry
Precautions and
Advice
3
Maintenance Troubleshooting Service
Care and
Page 4

Installation
GB
! Keep this instruction book on hand in order to refer to it
when necessary. Take it with you when you move, and
should you sell this appliance or pass it on to another
party, make sure that this booklet is supplied along
with the appliance so that the new owner may be
informed about warnings and suggestions on how the
machine works.
Unpacking
1. Using scissors, cut
carefully along one corner
post to remove the film.
2. Open the door and
check inside the drum.
Remove the transit tube (if
applicable - not all models).
! Retain all packaging
material until installation
is complete.
5. Remove the
polystyrene base.
! IMPORTANT check
when unpacking your
machine:
! This is a part of the
polystyrene base and
should have stayed intact
when you removed the
base.
●
If it has broken off and is still in the machine...
emove it
r
side on the top cap.
... while the machine is still laying on its
6. Cut out the perforated
shape in the transit tube
you removed from the
drum (if applicable - see
Step 2). Follow instructions
listed on the cut out to fit it
to the base of the machine.
When fitted this panel aids
noise reduction.
3. Lift off the polystyrene
top cap and remove the
four corner posts.
4. Carefully lay the left
side of the machine down
onto the top cap.
! We recommend that a
second person helps to
raise and lower the
machine.
7. Stand the machine
upright.
! We recommend that a
second person helps to
raise and lower the
machine.
! Protect the environment - please dispose of the
packaging material carefully and considerately.
! Continue to read the
rest of these instructions
carefully; the following
pages contain important
information on installation
and troubleshooting.
4
Page 5
Installation
Remove the transit fixings
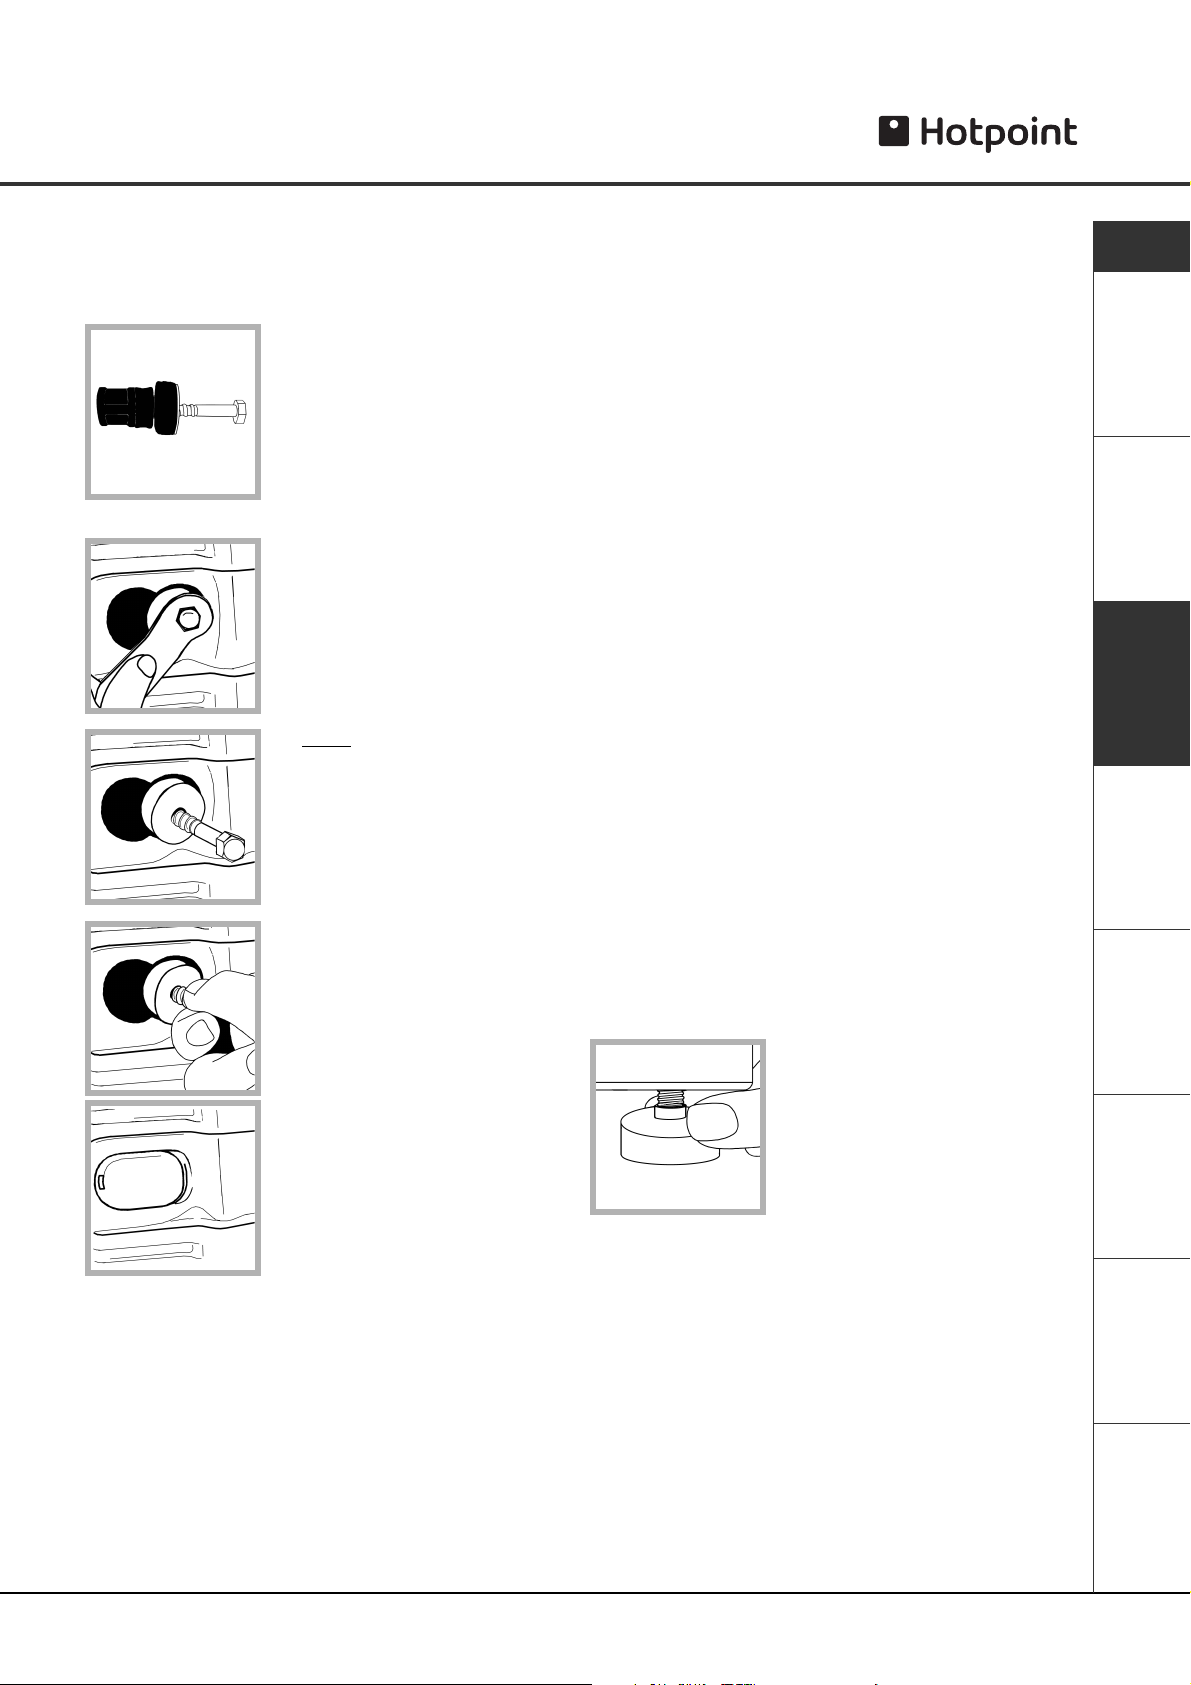
IMPORTANT: Follow these instructions to remove the
TWO transit fixings (see Description for location).
Situated one either side of the
rear panel, BOTH transit bolts
MUST be removed before use.
! Failure to do so may cause
damage to your machine.
It is important the transit bolt
and spacer (see pic) come out
intact.
1. Unscrew the bolt using a
13mm spanner.
2. STOP
be seen.
when 3 threads can
! Packaging materials are not children's toys.
Location
Where you install your machine will affect its
performance:
! For your safety and to comply with electrical
regulations, seek professional advice if you want to
install your machine in a bath or shower room.
●
Make sure that the electrical socket and water
taps are easily accessible. You should switch off
the machine’s electrical and water supplies when
you are not using it for extended periods.
●
Make sure that you allow enough space for the
machine. Select a space at least 60cm wide,
60cm deep and 85cm high. Also leave enough
space to open the door fully, so that you can load
and unload it easily.
●
Where possible, the machine should be positioned
on a solid floor to minimise vibration.
! Take care when you move the machine not to rip
any floor coverings. The weight of the machine may
cause indentations in some floor coverings.
GB
Description
Contents Installation
Detergents and
Laundry
Levelling
Your machine will be noisy if the two front feet are not
3. Hold, slide sideways and pull
to remove.
4. For safety, insert one of the
the plastic covers (supplied
with your machine) over the
hole.
! Repeat steps 1 to 4 to remove the second transit
bolt.
adjusted so that the machine stands firm and level.
! The machine should be levelled from side to side
and from front to back.
1. Move your machine into its final location.
- Take care not to trap or kink the hoses.
2. Turn one or both front feet
anti-clockwise by hand until the
feet cannot be turned any more.
When adjusting the feet, use a
spirit level to check the machine
stands level, from side to side
and from front to back.
- The spring on each foot will
stop them coming loose.
! If it is placed on a fitted or loose carpet, adjust the
feet in such a way as to allow enough room for
ventilation beneath the machine.
Did you know?...
●
...the transit fixings are fitted to ensure that your machine is undamaged during delivery.
●
...both of the transit fixings must be removed before using the machine, not doing so will lead to
excessive vibration, movement of the machine and could eventually lead to internal damage.
●
...the majority of problems with noisy machines are due to the transit fixings not being removed,
closely followed by the feet not being adjusted correctly to level the machine.
●
...you will be charged for a service engineers visit if a problem with your machine is caused by incorrect
installation or misuse.
Precautions and
Advice
Maintenance Troubleshooting Service
Care and
5
Page 6
Installation
GB
Water Connection
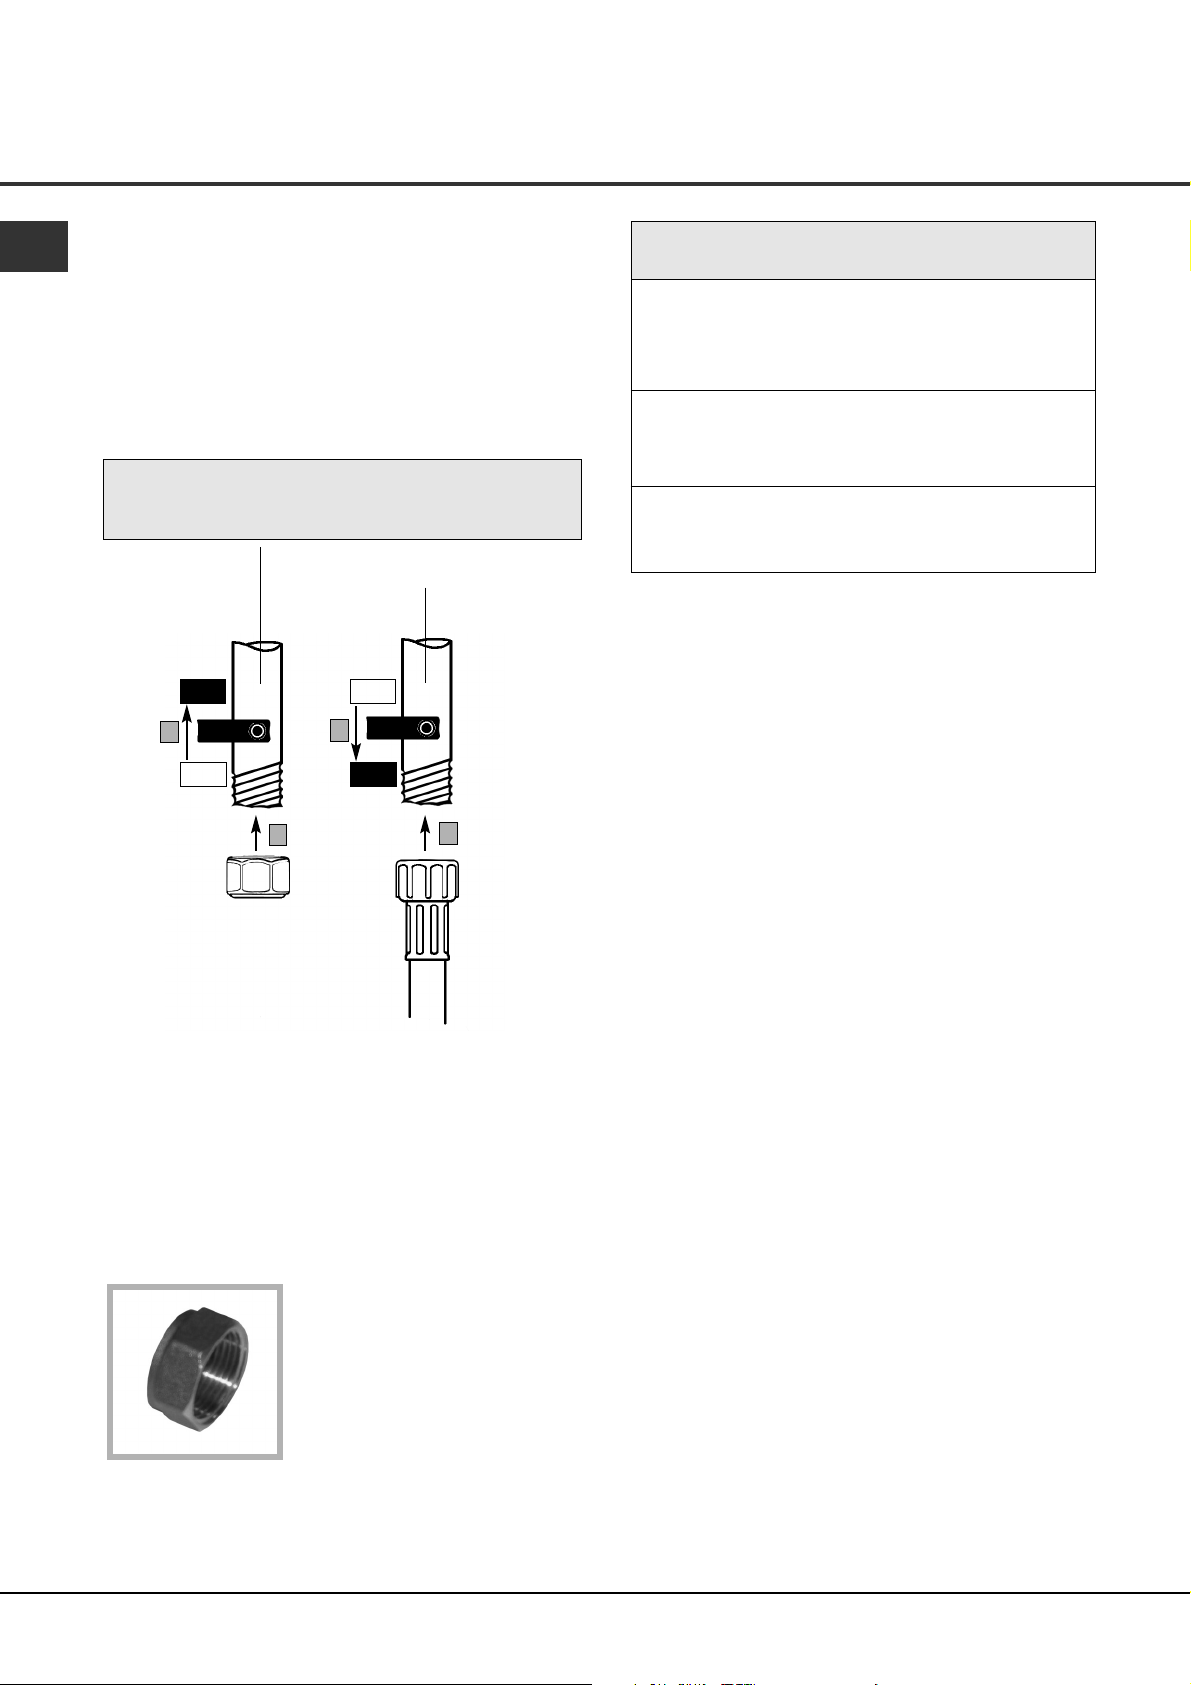
Connecting the cold water inlet hose
! Remember: please use the new hose supplied,
fitted to the machine. Old hoses may cause leaks due
to worn out washers or may be split due to water
pressure.
! Before making connections to the cold water supply,
allow the water to run freely from the supply tap until it
is perfectly clear.
HOT WATER SUPPLY
(if present)
WATER
SUPPLY
3
OFF
4
ON
/4" Sealing
2
WATER
SUPPLY
OFF
3
ON
Cap (not
supplied)
1. Screw the cold water fill hose (blue connector) onto
the cold water supply until tight.
3
2. Fit a
/4" sealing cap to the hot water supply, to
prevent unused supply leaking.
3. Turn on the cold water supply and check for leaks,
tighten if necessary.
4. Leave the unused hot water supply turned off.
! We recommend fitting a 3/4"
sealing cap to the hot water
supply tap (if present), to ensure
there are no leaks. Sealing caps
can be purchased from Hotpoint
Service on 08709 077 077 or all
good DIY and Plumbing outlets.
COLD WATER
SUPPLY
1
Cold water fill
hose (Blue
Connector)
Technical Details
Dimensions 59.5cm wide
85cm high
60cm deep
Electric voltage: 220/240 Volts 50Hz
connections maximum absorbed power:
1700W-2100W
Water maximum pressure 1 MPa (10 bar)
connections minimum pressure 0.05 MPa (0.5 bar)
Benefits of cold fill
●
Modern detergents are designed to give the best
cleaning results at low temperatures. Biological
detergents contain enzymes which are active
between 30˚C and 53˚C, giving greater results at
lower temperatures.
●
Cold water relaxes fabrics, whilst hot water can
seal in stains.
●
Improved stain removal with cold water.
●
The most commonly used programme at present is
40˚C, which will take on cold water even if hot and
cold were available.
●
You can heat the water required to finish the wash
cycle, which makes it more economical than taking
water heated in a tank by an immersion heater or
gas boiler.
Hints and tips
! Make sure there are no kinks or bends in the hose.
! The water pressure at the supply tap must be within
the values indicated in the Technical details table (see
above).
! If the water inlet hose is not long enough, you can
purchase an extended hose from Hotpoint Service on
08709 077 077.
! Always use a new inlet hose.
! Check the water inlet hose at least once a year,
replace if cracked as worn hoses could split under
water pressure.
6
Page 7
Installation
Drainage Connection
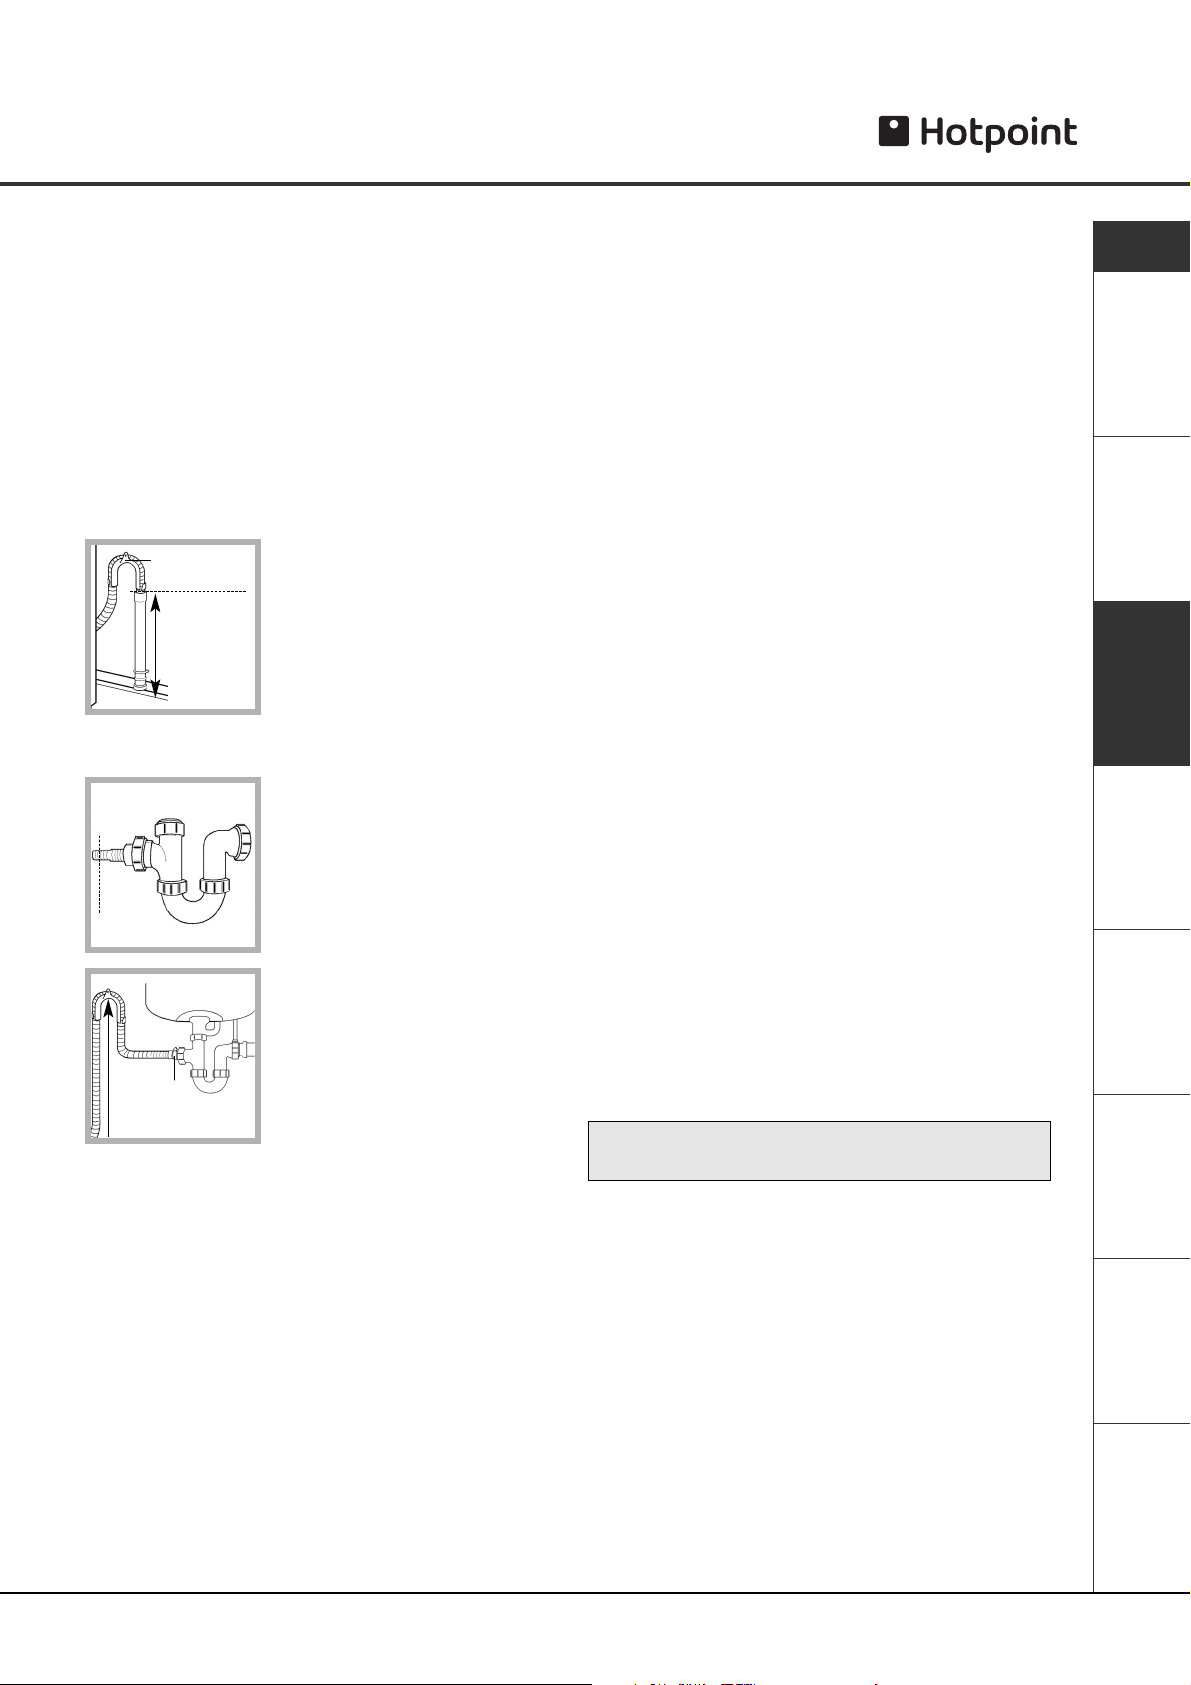
! Although you may need to move the hooked end
support along the grey drainage hose, DO NOT
remove it.
! Whichever drainage method you use, make sure
that the hooked end support is fixed level to, or
above the ‘Plumbing Indicator Line’ (see Description).
We recommend one of the following:
Standpipe method:
Hooked end
support
minimum:
500mm
Under sink method:
1. Make sure the standpipe
height is a minimum 500mm
from the floor.
2. Insert the drainage hose
approximately 100mm into the
standpipe.
1. Cut off the blocked end of
the under sink drainage unit.
Electrical connections
Before plugging the appliance into the mains socket,
make sure that:
●
the socket is earthed and in compliance with the
applicable law.
●
the socket is able to sustain the appliances
maximum power load indicated in the Technical
Details table (see page 6).
●
the supply voltage is included within the values
indicated in the Technical Details table (see page 6).
●
the socket is compatible with the machines plug.
If this is not the case, replace the socket or the
plug.
! The machine should not be installed in an outdoor
environment, not even when the area is sheltered,
because it may be very dangerous to leave it exposed
to rain and thunderstorms.
! When the machine is installed, the mains socket
must be within easy reach and should be connected
to a suitable electrical supply.
! Do not use extensions or multiple sockets.
! The power supply cable must never be bent or
dangerously compressed.
! The power supply cable must only be replaced by
an authorised serviceman.
! The company denies all liability if and when these
standards are not respected.
GB
Description
Contents Installation
Detergents and
Laundry
Before you start using your machine
2. Fix the hooked end support
a minimum of 800mm from the
The first wash cycle
floor.
Once the appliance has been installed and before
Hose clip
minimum:
800mm
from floor
3. Use a hose clip (eg. a
jubilee clip) to securely attach
the grey drainage hose end to
the under sink drainage unit
using a hose.
you use it for the first time, run a wash cycle
without detergent and no laundry.
Run the 95˚ White Cotton programme, without laundry
and without detergent.
Did you know?...
●
...it is very important to ensure that your hoses or cables are not kinked or squashed as this can lead
to your machine failing to fill or empty the water.
●
...it is very important to respect the dimensions given within the drainage connection methods (see
above).
●
...the most common cause of problems with water connection is that the customer has not turned the
supply tap on!
●
...you will be charged for a service engineers visit if a problem with your machine is caused by incorrect
installation or misuse.
Precautions and
Advice
Maintenance Troubleshooting Service
Care and
7
Page 8
Detergents and Laundry
GB
Detergent dispenser
! Do not put any items into the drawer, other than
detergents designed to be released from the drawer,
as they may cause damage or blockage.
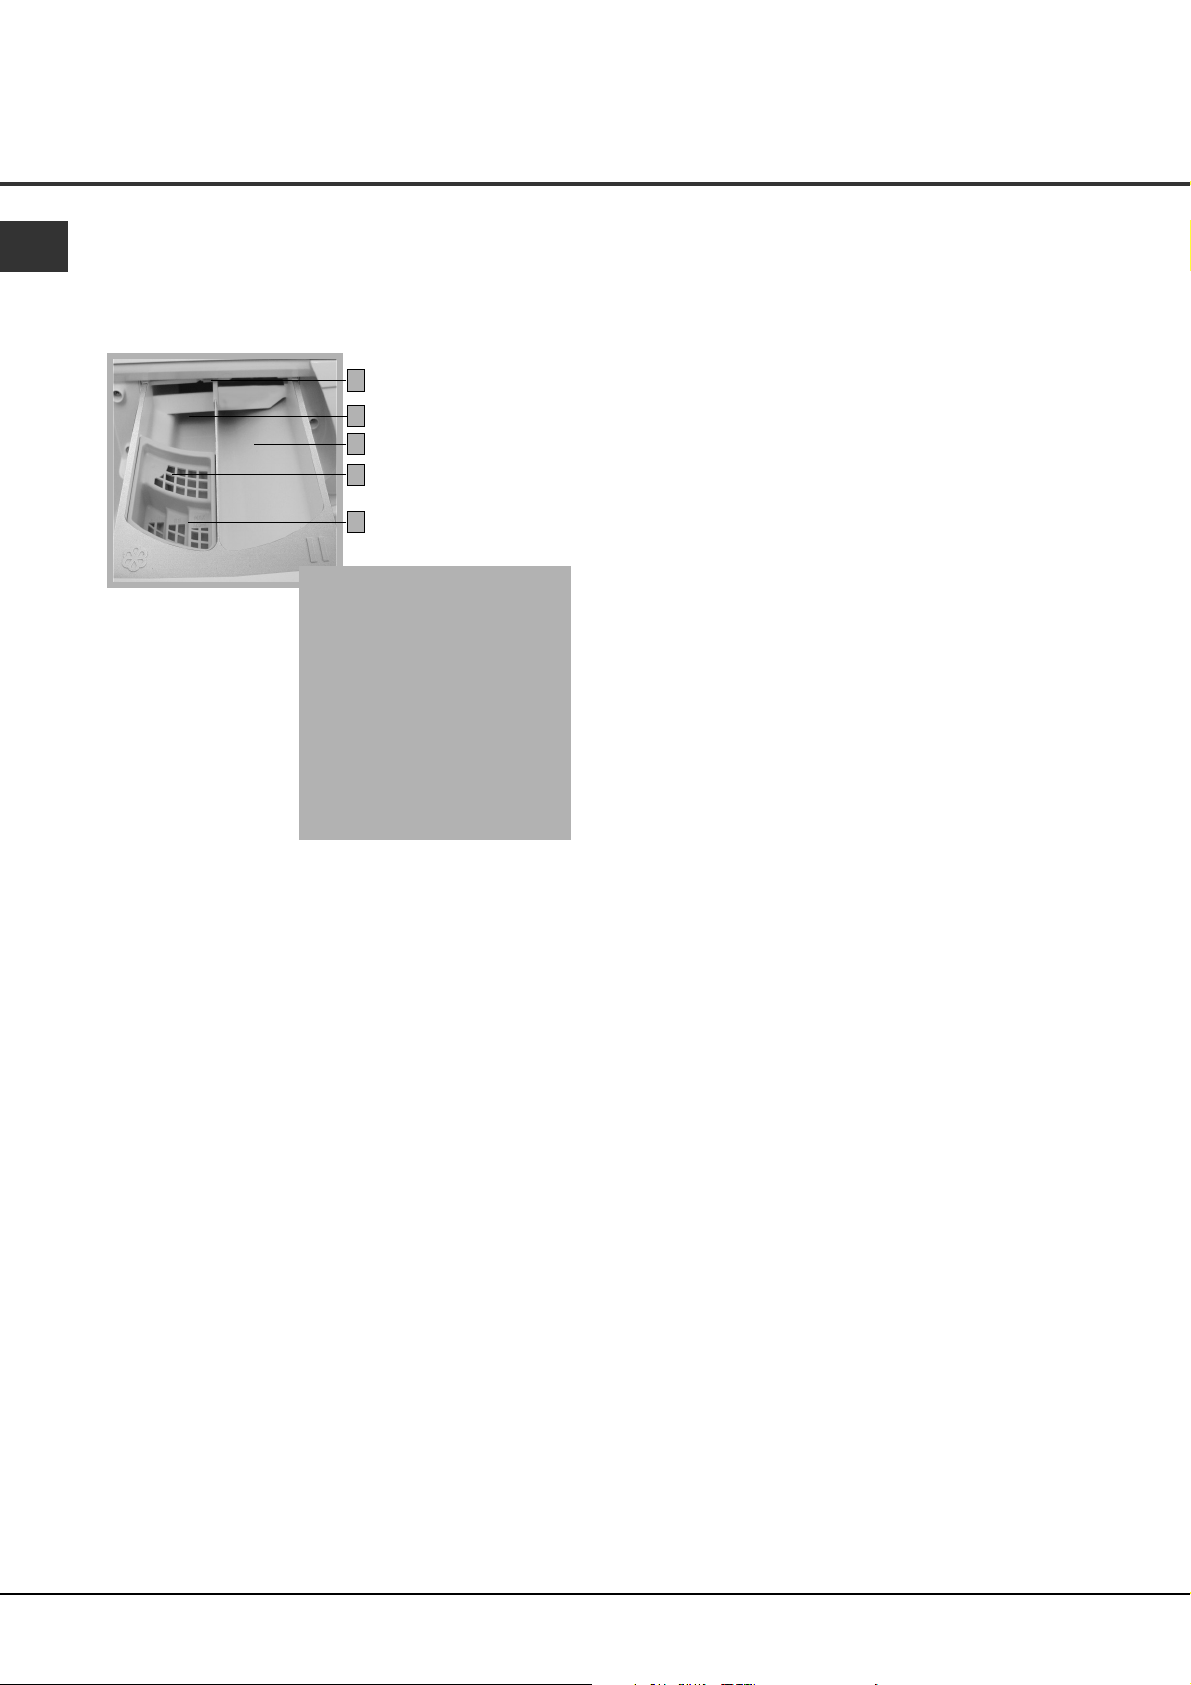
1
2
3
4
5
1 Drawer release catch.
2 Pre-wash detergent compartment:
Maximum 200ml powder or
100ml liquid
3 Main wash detergent compartment:
Maximum 400ml powder
or 200ml liquid
4 Grate
5 Fabric conditioner compartment:
Maximum 120ml
Dispensing powder detergent
To achieve the best wash results the manufacturer’s
recommended amount of detergent should be
measured and added to the main detergent
compartment.
Dispensing liquid detergent
We recommend the use of a detergent dosing ball, as
provided by your detergent manufacturer.
Adding fabric conditioner
Pour the recommended amount of fabric conditioner
into the compartment. Do not exceed the maximum fill
line.
Pre-Wash
When selecting prewash, add detergent to both the
pre-wash and the main wash compartments.
Dispensing tablets
Tablets can be dispensed via the machine drum or via
the dispenser drawer.
! Please check the detergent pack for dispensing
instructions.
! Incorrect use can damage your laundry.
How much does your laundry weigh?
1 sheet 400-500g
1 pillow case 150-200g
1 tablecloth 400-500g
1 bathrobe 900-1200g
1 towel 150-250g
Washcare Tips
●
Do not overload or underload the machine (see
your Programme Guide for maximum load), in
addition to reducing the quality of the wash this
may also damage your laundry and the machine,
whilst causing the machine to become unstable
and noisy.
●
We strongly recommend that you do not wash
underwired bras in this machine. Should the wires
become detached it could cause damage to your
laundry and the machine. If the washcare label
states that the bra is machine washable, then we
advise placing it in a sealed pillow case or a
similar washbag.
Remember you will be charged for a service
!
engineers visit resulting from a detached bra wire.
●
Do not use the machine if the item to be washed
does not have a wash label.
Before washing laundry we recommend you:
●
Pre-treat awkward stains with washable treatments.
Do not wash any items that have previously been
treated with solvents.
●
Close zips, fasten belts, tie strings and close
press studs to prevent tangling.
●
Empty all objects from pockets as they may
damage the laundry and the machine.
Remember you will be charged for a service
!
engineers visit to rectify malfunction resulting from
objects such as coins, pens, hair grips etc. falling
from pockets.
●
Limit the size of absorbent loads ie. towels, to half
loads to give good washing and rinsing results.
●
Place small items in a wash bag.
●
Always follow the care label on items when
choosing the wash programme.
●
Wash non-colourfast items or really dirty items
separately as they may affect other laundry.
8
Page 9
Precautions and advice
General safety
●
Unplug your appliance when cleaning it and during
all maintenance operations.
●
This machine should only be used by adults and
in accordance with the instructions.
●
Do not overload or underload the machine.
In
addition to reducing the quality of the wash, this
may also damage your laundry and the
machine.
●
Do not pull on the power supply cable to unplug
the appliance from the electricity socket. Pull the
plug out.
●
Do not open the machine door while the
appliance is in operation.
●
Do not open the detergent dispenser while the
appliance is in operation.
●
Never force the machine door: this could damage
the safety lock mechanism designed to prevent
any accidental opening.
●
Turn off the water tap after every wash. This will
limit the wear of your appliances water system and
also prevent leaks.
●
In the event of a malfunction, do not under any
circumstances touch internal parts in order to
attempt repairs.
●
Always keep children well away from the
appliance while in operation. Do not let children
play with the machine or tamper with the controls.
●
The appliance door tends to get quite hot during
the cycle.
●
Should it have to be moved, proceed with the
help of two or three people and handle it with the
utmost care. Never try to do this alone, because
the appliance is very heavy.
●
Before loading your laundry into the machine,
make sure the drum is empty.
●
Check the water fill hose at least once a year. If
you see any cracks, replace it immediately:
during the wash cycles, high water pressure could
cause a cracked hose to split open.
! Never use hoses that have already been used.
●
In the unlikely event of something not working see the Troubleshooting section.
Saving energy and respecting the
environment
Environmentally-friendly technology
If you only see a little water through your appliance
door, this is because thanks to the latest Hotpoint
technology, your machine only needs less than half
the amount of water to get the best results: an
objective reached to respect the environment.
Saving on detergent, water, energy and time
●
To avoid wasting resources, the machine should
be used with a full load. A full load instead of two
half loads allows you to save up to 50% on energy.
●
The pre-wash cycle is only necessary on
extremely soiled garments. Avoiding it will save
on detergent, time, water and between 5 and
15% energy.
●
Treating stains with a stain remover or leaving
them to soak before washing will cut down the
need to wash them at high temperatures.
A programme at 60˚C instead of 90˚C or one at
40˚C instead of 60˚C will save up to 50% on
energy.
●
Use the correct quantity of detergent, depending
on the water hardness, how soiled the garments
are and the amount of laundry you have, to avoid
wastage and to protect the environment: despite
being biodegradable, detergents do contain
ingredients that alter the natural balance of the
environment. In addition, avoid using fabric
softener as much as possible.
●
If you use your machine between late in the
afternoon and the early hours of the morning, you
will help reduce the electricity board’s peak load.
Recycling and Disposal information
As part of Hotpoint’s continued commitment to helping
the environment, Hotpoint reserve the right to use
quality recycled components to keep down customer
costs and minimise material wastage.
●
Please dispose of packaging and old appliances
carefully.
●
To minimise risk of injury to children, remove the
door and plug - then cut off mains cable,flush with
the appliance. Dispose of these parts separately
to ensure that the appliance can no longer be
plugged into a mains socket, and the door cannot
be locked shut.
Disposal of old electrical appliances
The European Directive 2002/96/EC on Waste Electrical
and Electronic Equipment (WEEE), requires that old
household electrical appliances must not be disposed
of in the normal unsorted municipal waste stream.
Old appliances must be collected separately in order
to optimise the recovery and recycling of the materials
they contain and reduce the impact on human health
and the environment.
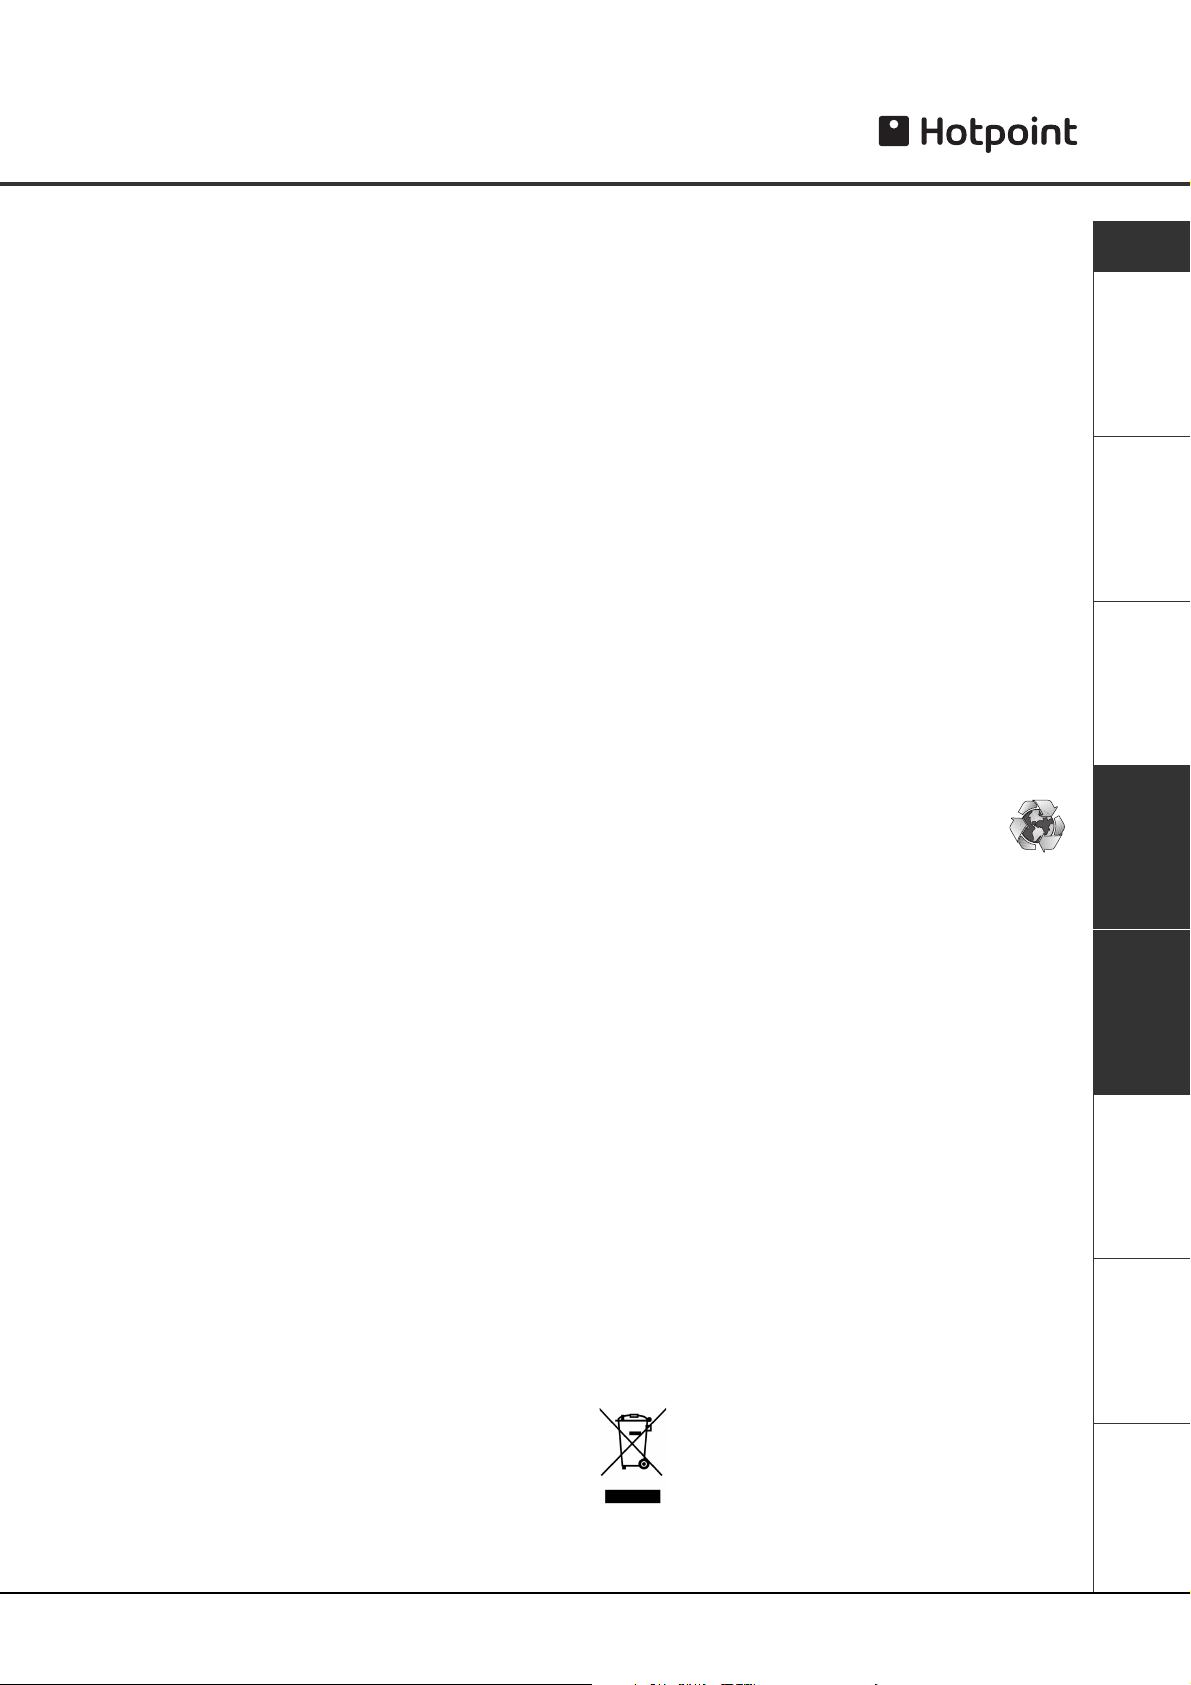
The crossed out “wheeled bin” symbol on
the product reminds you of your obligation,
that when you dispose of the appliance it
must be separately collected.
Consumers should contact their local authority or
retailer for information concerning the correct disposal
of their old appliance.
GB
Description
Contents Installation
Detergents and
Laundry
Precautions and
Advice
Maintenance Troubleshooting Service
Care and
9
Page 10
Care and maintenance
GB
Cleaning
! Do not clean any part of the machine with abrasive
cleaners, scouring agents, acids, any bleach or metal
polish as they may cause damage.
●
Use a damp cloth or silicon polish to clean the
exterior surfaces of the appliance.
●
Clean the internal surface of the door bowl regularly
with a soft cloth. A build up of soap powder and
water hardness residue may result in water leaking
from the door.
●
Always leave the appliance door ajar to prevent
unpleasant odours from forming.
Cleaning the dispenser drawer and compartments
It is advisable to clean the dispenser drawer regularly.
! Do not try to clean any part of the dispenser drawer
while the machine is running.
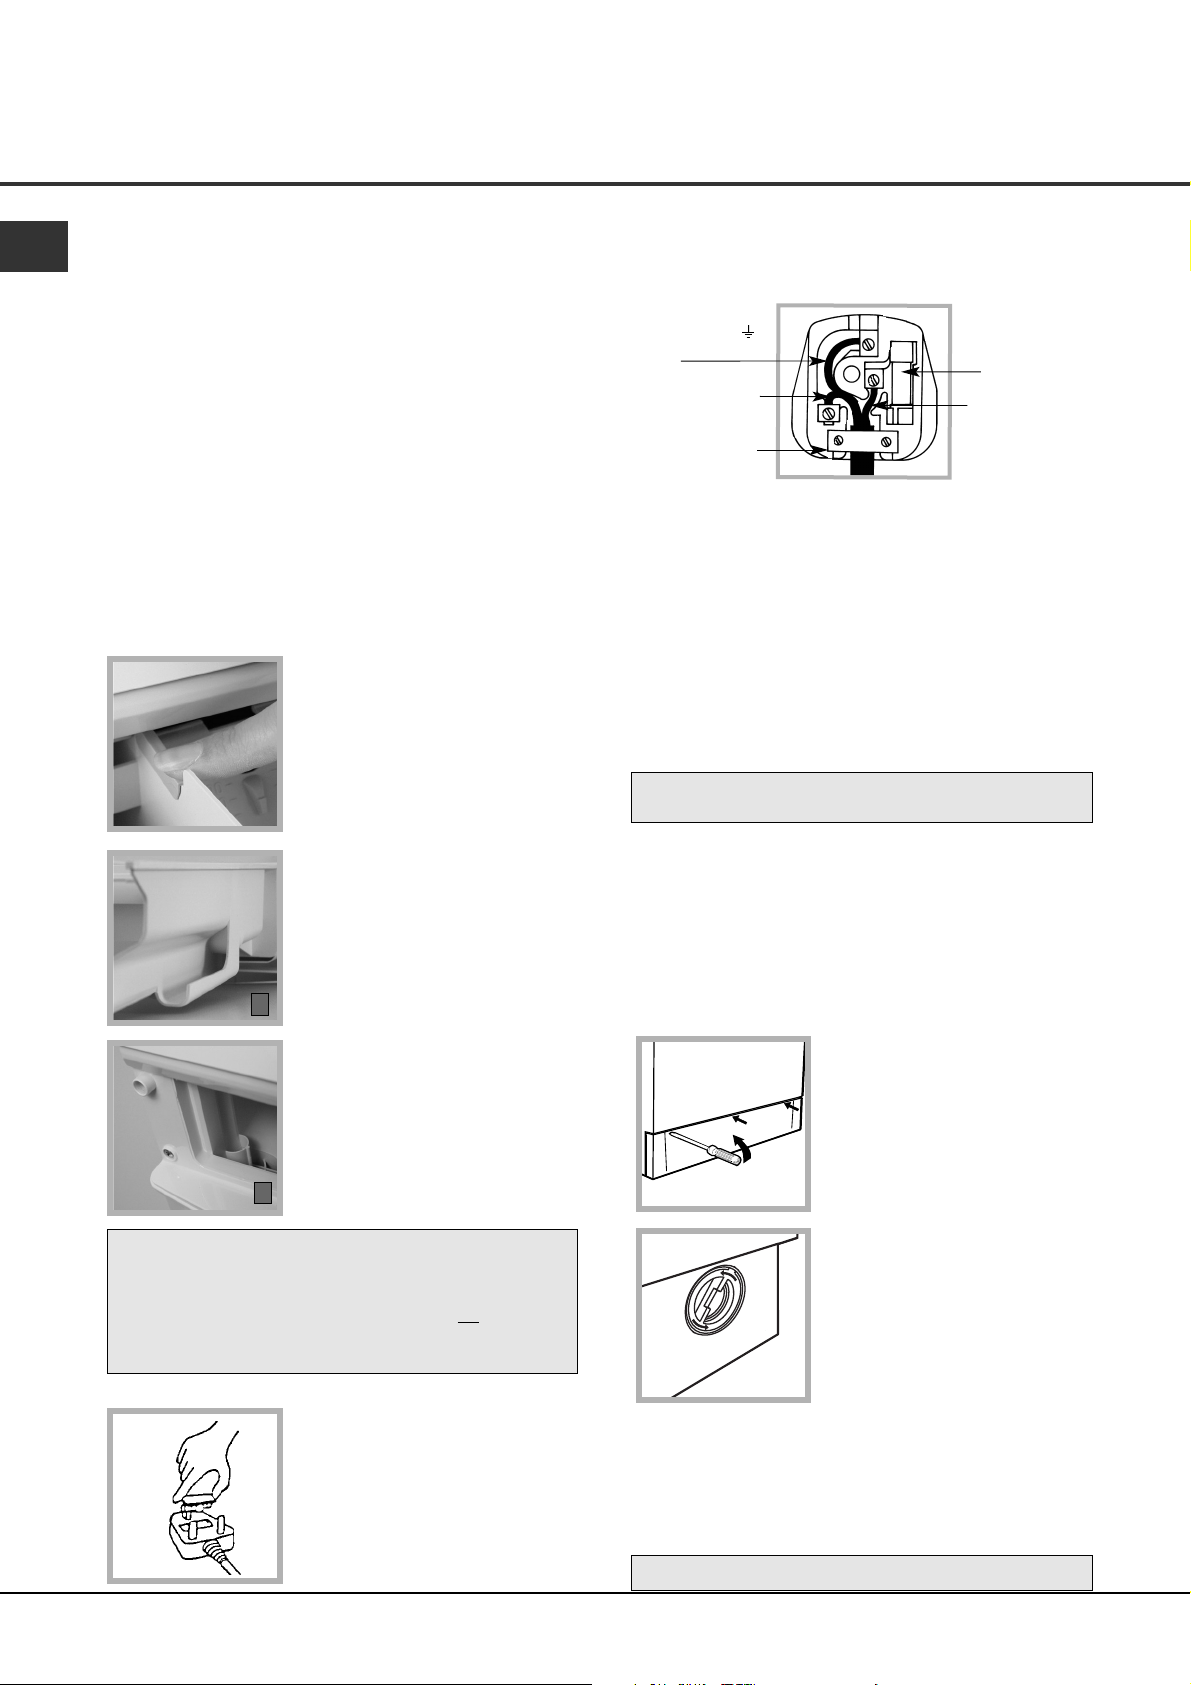
1. Pull out the drawer until it
reaches its stop.
2. Press the drawer release
button to remove the dispenser
drawer (see pic).
Changing the plug
The wires in the power cord are coloured in accordance
with the following:
Green and Yellow
(Earth) wire to terminal
marked ‘E’, symbol ,
or coloured green and
yellow.
Blue (Neutral) wire to
terminal marked ‘N’ or
coloured black.
Cord clamp
! If the plug being replaced is a non-rewirable type,
then the cut-off plug must be disposed of safely.
DO NOT leave it where it can be inserted into a socket
and create a shock hazard.
! The power supply cord should be checked periodically
and replaced by a cord specially prepared for this
machine and fitted only by authorised technicians (see
Service). Replacement power cords can be purchased,
at an extra cost from our Genuine Parts and
Accessories department or authorised dealers.
! The manufacturer denies any responsibility should
any of these rules not be followed.
! If in doubt about any of the above consult a
qualified electrician.
13A ASTA approved
fuse to BS1362.
Brown (Live) wire to
terminal marked ‘L’ or
coloured red.
3. Clean and dry the dispenser
drawer, syphons, grate and
fabric conditioner exit channel
(A), ensuring any build up of
detergent and fabric conditioner is
fully removed. Failure to do so
A
may lead to the machine leaking
from the dispenser drawer.
Also regularly clean the
outlet pipe area (B).
4. Relocate the dispenser drawer
B
and push it firmly back into place.
! We recommend a maintenance wash 2 or 3 times a
year, to avoid a build up of greasy deposits and water
hardness residue. Run the 95˚ White Cotton programme,
with the normal amount of detergent but no
●
(Washer Dryer only) Where the drying only option is
laundry.
regularly used, do this on a monthly basis.
Moulded plug
! The plug must not be used without
the fuse cover in place.
If a replacement fuse holder/cover
is required, it must be of the
same colour coding or wording as
shown on the base of the plug.
Replacements are available from
authorised dealers.
Cleaning the pump (
●
Varies by Model*)
This appliance is fitted with a self-cleaning pump that
does not require any maintenance.
Sometimes, small items (such as coins or buttons) may
fall into the pre-chamber that protects the pump.
! Make sure the wash cycle has ended and unplug the
appliance.
To access the chamber:
1. Using a screwdriver, remove
the kickstrip on the lower front of
the appliance (see figure).
2. Unscrew the pump filter by
rotating it anti-clockwise, until it
can be removed (see figure).
A little water may leak from the
pump: this is perfectly normal.
3. Clean the interior thoroughly, removing any visible debris.
4. Refit by screwing the filter into place until it reaches
its ‘stop’ position.
5. Refit the kickstrip, making sure that the hooks are
securely in place before you push it onto the appliance.
* NOT ALL MODELS HAVE THIS FEATURE.
10
Page 11

Troubleshooting
If your machine seems not to be working, go through the following troubleshooting suggestions before you call
your Service Centre (see Service).
Problem:
The machine won’t start.
Possible causes / Solution:
●
Check the appliance is fully plugged into the socket and switched on.
●
Is the socket ok? Try another appliance in the socket to check.
●
Is the fuse in the plug ok? If not, replace it (see Care and Maintenance).
●
There has been a power failure.
GB
Description
The wash cycle won’t
start.
The machine fails to fill
with water.
The machine does not
drain or spin.
The machine makes a
noise or vibrates too
much during the spin
cycle.
The machine leaks.
●
The appliance door is not shut properly.
●
The ON/OFF button has not been pressed.
●
The Start/Cancel button has not been pressed, for at least 3 seconds.
●
The water supply taps are not turned on.
●
The cold water inlet hose is not connected to the tap (see Installation).
●
The hose is kinked - This can happen when moving the machine.
●
The cold water supply tap is not turned on (see Installation).
●
There is a water shortage.
●
The water pressure is insufficient (see Technical Details Chart).
●
The Start/Cancel button has not been pressed, for at least 2 seconds.
●
There has been an unbalanced load and the load could not spin (see the
Programme Guide).
●
Has the drain hose been installed correctly (see Installation).
●
Are the drain hose, standpipe or undersink connections blocked?
●
Has ‘Rinse Hold’ option been selected? If so press the Rinse Hold button.
●
The transit fixings were not removed correctly (see Installation).
●
The machine is not level (see Installation).
●
The machine is closed in, between furniture cabinets and the wall (see Installation).
●
Check all loose items, such as coins were removed from the laundry.
●
The cold water inlet hose is not connected correctly (see Installation).
●
Is your water pressure within limits (see Technical Details Chart).
●
The detergent dispenser is obstructed, clean it (see Care and Maintenance).
●
The drain hose is not secured properly, or is blocked (see Installation).
Contents Installation
Detergents and
Laundry
Precautions and
Advice
The laundry is not dry
after using the dry
programme (Washer
Dryer only).
Steam is coming from
the dispenser drawer.
There is too much foam.
The dispenser drawer
will not close, or is
collecting water.
Not all the detergent has
been flushed away.
The clothes are warm at
the end of the programme.
●
The cold water inlet hose is not connected correctly (see Installation).
●
Is your water pressure within limits (see Technical Details Chart).
●
The detergent dispenser is obstructed, clean it (see Care and Maintenance).
●
The drain hose is not secured properly, or is blocked (see Installation).
●
This is not a fault. We have designed the machine to release steam from the dispenser
drawer during hot washes. It may also vent (Washer Dryer only) during drying.
●
The detergent is not suitable for machine washing. If you have used the wrong
detergent, select a Rinse only programme to flush out your machine.
●
You used too much detergent. Refer to the manufacturer’s recommendations.
●
Check the drawer is properly aligned.
●
Clean the dispenser drawer (see Care and Maintenance).
●
Check the cold water supply tap is turned on fully (see Installation).
●
Check the cold water inlet hose is not kinked.
●
Is your water pressure too low? (see Technical Details Chart).
●
Check the water inlet hose is connected to the cold water supply tap and not the
hot (see Installation, ‘Connections’).
11
Maintenance Troubleshooting Service
Care and
Page 12
Service
195049532.03
01/2006 - SIMLEX . Four Ashes, Wolverhampton
GB
Before calling the Service Centre:
●
Use the troubleshooting guide to see if you can
solve the problem yourself (see Troubleshooting).
●
If not, turn off the machine and call the Service
Centre closest to you.
! You will be charged for a service engineers visit if a
problem with your machine is caused by incorrect
installation or misuse.
Key Contacts
After Sales Service
Over 1100 trained specialists, directly employed by us, ensure that you can have
complete confidence in both the appliances and services we offer.
Repair Service and Information Help Desk
UK: 08709 066 066
Monday to Friday, 8am to 7.30pm
Saturday, 8.30am to 5.30pm
Sunday, 9.30am to 3.30pm
www.hotpoint
Spare Parts
This is a complex machine. Repairing it yourself or
having a non-authorised person try to repair it could
cause harm to one or more persons, could damage
the machine and could invalidate the spare parts
warranty.
Call an authorised technician if you experience problems
while using the machine.
The spare parts have been designed exclusively for
this appliance and not for other uses.
service.co.uk
Republic of Ireland: 1850 302 200
Note: Our operators will require the following information:
Model number
Serial number
Date of purchase
Model number and Serial number can be found on the inside of the door.
Extended Warranties
UK: 08709 088 088
Monday to Sunday, 8am to 8pm
www
.hotpointser
vice
.co.uk
Republic of Ireland: 1850 502 200
Genuine Parts and Accessories
UK: 08709 077 077
Monday to Friday, 8.30am to 5pm
Saturday, 8.30am to 12noon
www.hotpointservice.co.uk
Republic of Ireland: (01) 842 6836
www
.hotpoint.co.uk
Indesit Company UK Limited, Morley Way, Peterborough, PE2 9JB
 Loading...