

Page 1
User Guide
WINE CELLAR
GB
English
WE26
Contents
Installation, 2
Location and power connection
Technical information
Product Description, 3
Interior Parts
Using the Wine Cellar 4
Bottle ageing compartment
Manual temperature control
Table of ideal wine temperatures
Stocking the wine bottles, 6
How to stock the bottles
Maintenance and troubleshooting, 8
Care and Maintenance
Troubleshooting
GB
1
Page 2
Installation
GB
! It is important that you keep this user guide handy so
that you can refer to it at any time. Should you sell,
give away, or move the wine cellar, please make sure
that this user guide is with it.
! Read this user guide thoroughly. It contains important
information about how to use this wine cellar, how to
install it, and how to operate it safely.
! Should you need to move the wine cellar, keep it in a
vertical position.
Location and Power Connection
Remove packaging
1. Immediately remove the packaging and check to
make sure your wine cellar has not been damaged
during transportation. If it is damaged, contact your
Retailer immediately.
2. Carefully remove the packaging and stickers that
protect the product. Open the door and check the
components to make sure they are not damaged.
3. Take out the power cable.
Location
1. The wine cellar should be located in a well-ventilated,
non-humid open area (do not place it in closets).
2. Place the wine cellar far away from any heat sources.
Power Connection
• the wall-outlet should be compatible with the wine
cellar's plug. If not, replace the outlet or the plug.
Do not use extension cords or power strips.
! Once installed, the power cord and the plug must be
easy to access.
! The power cable should never be crushed or bent.
! The power cord should be regularly checked and, if
necessary, replaced only by a qualified technician.
! The manufacturer cannot be held responsible if these
procedures are not followed.
TECHNICAL INFORMATION
Model WE26
Temperature 1 Zone
Width cm 59
Measurements Height cm 68
Depth cm 56,2
Weight** 76 Kg
Weight 97 kg
After transportation, let the wine cellar stand in its
intended location for at least 3 hours before you plug it
in. Before the power is connected, make sure of the
following:
• the wall-outlet should be grounded (earthed) and it
must meet the local electric code;
• the wall-outlet should be sufficiently rated to supply
the wine cellar's maximum power consumption,
indicated in the Technical Information on the right or
on the wine cellar's data plate on the bottom right
see Product Description
(
);
• the voltage should be as indicated in the
Technical Information or on the wine cellar's
data plate on the bottom right (
Description
);
2
see Product
Wattage 120 W
Energy Consumption 0,9 kWh / 24h
Voltage* 220 V
Frequency* 50 Hz
* These values will vary for each country. For
specific product characteristics, check the wine
cellar's data plate.
** When empty.
Page 3

Product Description
CONTROL
PANEL
DOOR
SHELVES BOTTLE AGEING
COMPARTMENT
DATA PLATE
Interior Parts
GB
Control Panel
ON LIGHT
CURRENT
LIGHT
TEMPERATURE
DISPLAY REDUCE
TEMPERATURE
COOLING LIGHT
INDICATOR LIGHT
CONNECTION
INCREASE
TEMPERATURE
POWER
LIGHT
ON/OFF
BUTTON
3
Page 4
Using the wine cellar
GB
Bottle ageing compartment
The ageing compartment's main function is that of
guaranteeing that your wines are preserved in optimal
conditions.
The wine cellar's temperature was factory pre-set at
15° C, a temperature that is considered optimal for
most wines.
Wine has a complex nature and it derives from a long
and slow process. In order to best express its
attributes, very specific conditions are necessary.
All wines are preserved at the same temperature, but,
depending on their different characteristics, wines are
served and tasted at very different temperatures (
the Table of ideal wine temperatures
Therefore, just as for manufacturers' wine cellars, for
your new appliance, the absolute temperature value is
not important for preserving your wine. Rather, the
constant temperature through time is important. Wine
preservation is ideal at any temperature, as long as
that temperature does not vary.
).
see
Manual temperature control
Should you need to adjust the temperature inside the
wine cellar, follow the instructions below:
1. When you plug in your wine cellar, the display
shows the temperature that has been set
2. Press the UP button (
second. The temperature will begin to blink.
3. Press the + or – buttons until you reach the desired
temperature.
4. Wait 5 seconds for the temperature to stop blinking.
5. Wait until the wine cellar reaches its temperature
before you place the wine bottles inside.
The inside light does not go on (or it goes off
temporarily) when the inside temperature goes over
24° C. This allows you to reach the pre-set
temperature more quickly.
see Control Panel
) for one
4
Page 5
Table of ideal wine temperatures
This table indicates the approximate temperatures at which wine should be served. Should one of your wines need
to be served at a temperature that is greater than the temperature inside your wine cellar, we suggest that you leave
it wine out for the time that is necessary before you serve it.
GB
Amarone della Valpolicella 17°C
Barbaresco 17°C
Barolo 17°C
Beaujolais 13°C
White liquered Bordeaux 6°C
Dry White Bordeaux 8°C
Red Bordeaux 17°C
White Bourgogne 11°C
Red Bourgogne 18°C
Dry and Sweet Sparkling Wines 6°C
Verdicchio di Matelica e dei Castelli di Jesi 8°C
White wines from Trentino Alto Adige 11°C
Franciacorta White Wines 11°C
Dry aromatic white wines 10°C
Dry, young, and fruity white wines 8°C
White wines from Friuli Venezia Giulia 11°C
Rodano wines 15°C
Dry white wines from the Loire 10°C
Brunello 17°C
Champagne 6°C
Chianti Classico 16°C
Languedoc-Roussillon 13°C
Passito di Pantelleria 6°C
Rosé Provence 12°C
Liquered wines from the Loire 7°C
Red wines from the Loire 14°C
Liquered Passito wines 8-18°C
Rosè Wines, New Wines 12°C
Light red wines with mild tannic 14°C
Red, rather tannic wines with medium
structure 16°C
5
Page 6
Stocking the wine bottles
GB
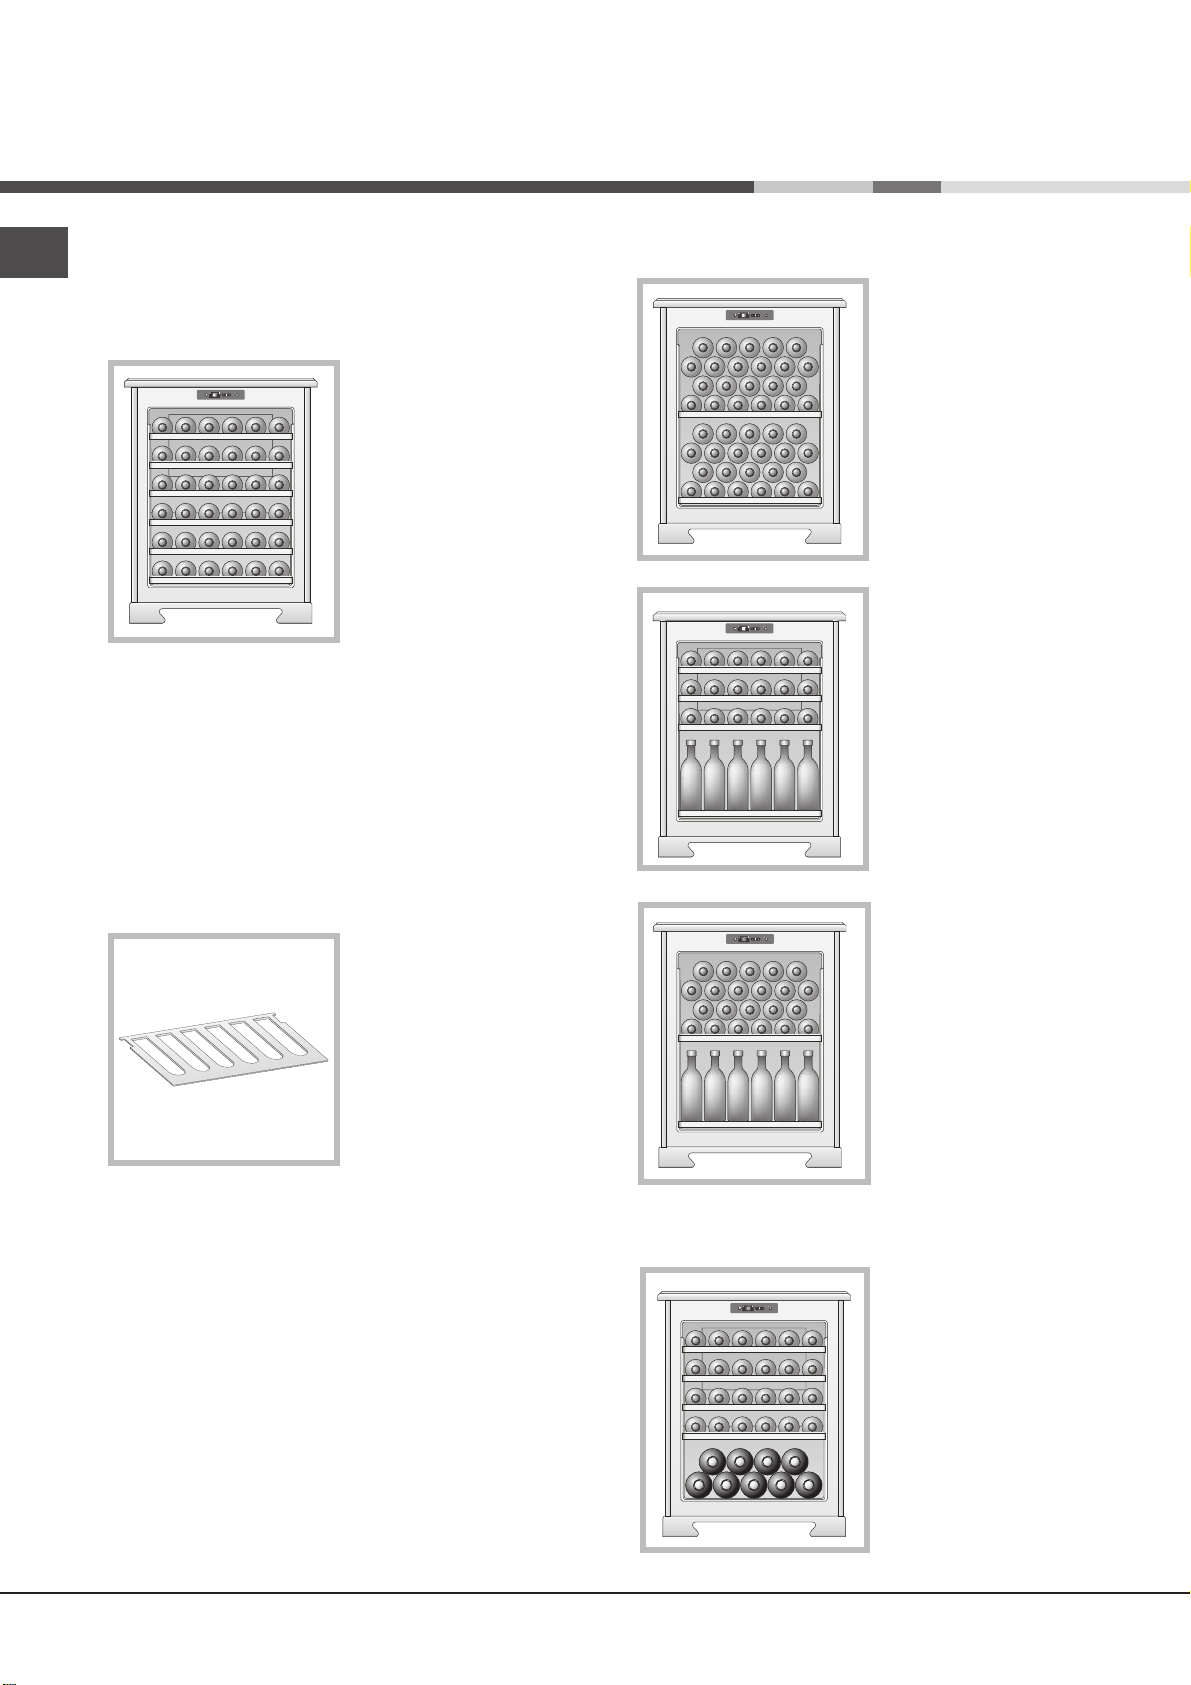
Standard 36-bottle stock
The 36-bottle stock (for standard, mixed, and renana
bottles) is recommended for wines that need to be
visible and easily removed.
STANDARD
36 Bottles
(100% lying down)
5 shelves
Position each bottle into the slots on the 5 wooden
shelves. 6 bottles can be placed on the bottom of the
wine cellar.
! The wooden shelves have a special blocking system
so that your bottles do not accidentally fall and break.
Some stocking configurations
PRESERVATION
44 Bottles
(100% lying down)
1 shelf
SERVICE
42 Bottles (50% lying
down, 50% standing)
3 shelves
4 rows
}
We suggest you place the Renana bottles onto the
lower shelf and the bottom of the wine cellar because
they have been specially designed to hold larger
bottles.
! The wooden shelf can
safely hold up to 22
bottles.
Champagne bottle stock
Champagne bottles are larger than standard bottles.
They must be placed onto the base of the wine cellar,
which can hold up to 5.
MAXIMUM STOCK
46 Bottles (48% lying
down, 52% standing)
1 shelf
4 rows
}
If you want to stock more than 5 Champagne bottles in
your wine cellar, remove the 5th shelf and stock the
bottles in two rows (placing the bottles in the second
row between those on the bottom row). This will hold
up to 9 bottles.
6
Page 7
Removing the wooden shelves
Follow the instructions below to remove the wooden
shelves:
1. Hold the front part of the shelf with one hand.
2. With the other hand push the back of the shelf
upward.
3. Slowly remove the shelf by pulling it toward you. Pull
out the shelf by 1/3 of the way if you need to remove
or replace bottles.
4. Remove or replace the bottles you need and push
the shelf back, making sure it locks into place.
5. Make sure the shelf is in place by trying to pull it out
once again. If it moves, push it back in again until it is
securely in place.
To completely remove the shelf, follow step 1 and 2
and remove all bottles that on the shelf. Slowly pull the
shelf toward you until you remove it from its slots.
! Do not, under any circumstances, remove more than
one shelf at a time.
GB
For a small number of bottles
If you do not need to store enough bottles to fill the
entire wine cellar, we suggest that you divide them up
between the available shelves and that you do not
place them all on top or on the bottom.
Place the bottles in the centre of the shelves to see
them better from the outside.
7
Page 8
Maintenance and troubleshooting
GB
Care and maintenance
Disconnecting the wine cellar
During cleaning and maintenance, it is imperative that you unplug the wine cellar
Troubleshooting
If you notice that your wine cellar is not working properly, check with the following list before you call your
Service Centre.
Problem
The compressor does not work
The compressor never stops
Possible causes/solutions
• The plug is not plugged into the wall-outlet or not enough to make contact.
Or, there could be a power failure in your home.
• The wall-outlet is not in working order. Plug the wine cellar into another
wall-outlet to check.
• Contact the Service Centre
! For a longer life of the product, check your wine cellar regularly so that any problems can be caught in time.
! Any work that is done to the wine cellar should be performed by your authorized local Service Centre.
! Brief power shortages do not affect wine preservation. Damage to wine will occur only when operational or
hygrometry problems are left unchecked for a long time.
8
 Loading...