

Page 1
User Guide
GB
English, 1
WE 24
Contents
Features, 2
Notices
Data Sheet
Installation, 3
Location and power connection
Technical information
Product Description, 4
Interior Parts
Control Panel
Using the Wine Cellar 5-6
Bottle ageing compartment
Manual temperature control
Taking out the wooden shelves
Table of ideal wine temperatures
Stocking the wine bottles, 7
How to stock the bottles
WINE CELLAR
FORNO
GB
Maintenance and troubleshooting, 8
Care and Maintenance
Troubleshooting
Page 2
Features
GB
Notices
! Remember to keep this booklet so you can refer to it
at any time. In case of sale, transfer or should you
move, remember to keep it together with the device.
! Read the instructions carefully: there is important
information about installation, use and safety.
! To prevent danger stemming from instability of the
device, you must fasten it in place, following the
assembly instructions strictly.
! Whenever moving or transporting the device, keep it
in a vertical position.
! The beverage centre must not be used by children or
invalids, without supervision by an adult or a tutor, in
order to prevent the cellar from being used improperly.
! Children may use the beverage centre only if
supervised by an adult, in order to prevent them from
playing with the cellar.
! After installing the device, the power cable and
socket must be easy to reach.
! Keep the ventilation openings on the casing of the
device free.
! Do not use mechanical devices, or any means not
suggested by the manufacturer, to speed up
defrosting.
! Do not damage the coolant circuit.
! Contact the after sales service to replace the neon.
! The cable must not be bent or crushed.
! The cable must be checked on a routine basis and
replaced only by authorised technicians.
! The power supply cable is of a Y type. Contact the
after sales service to replace it.
! Do not use electrical equipment inside the food
compartments, unless they are of a kind suggested by
the manufacturer.
! The Manufacturer shall not be liable if any of the
above rules are not complied with.
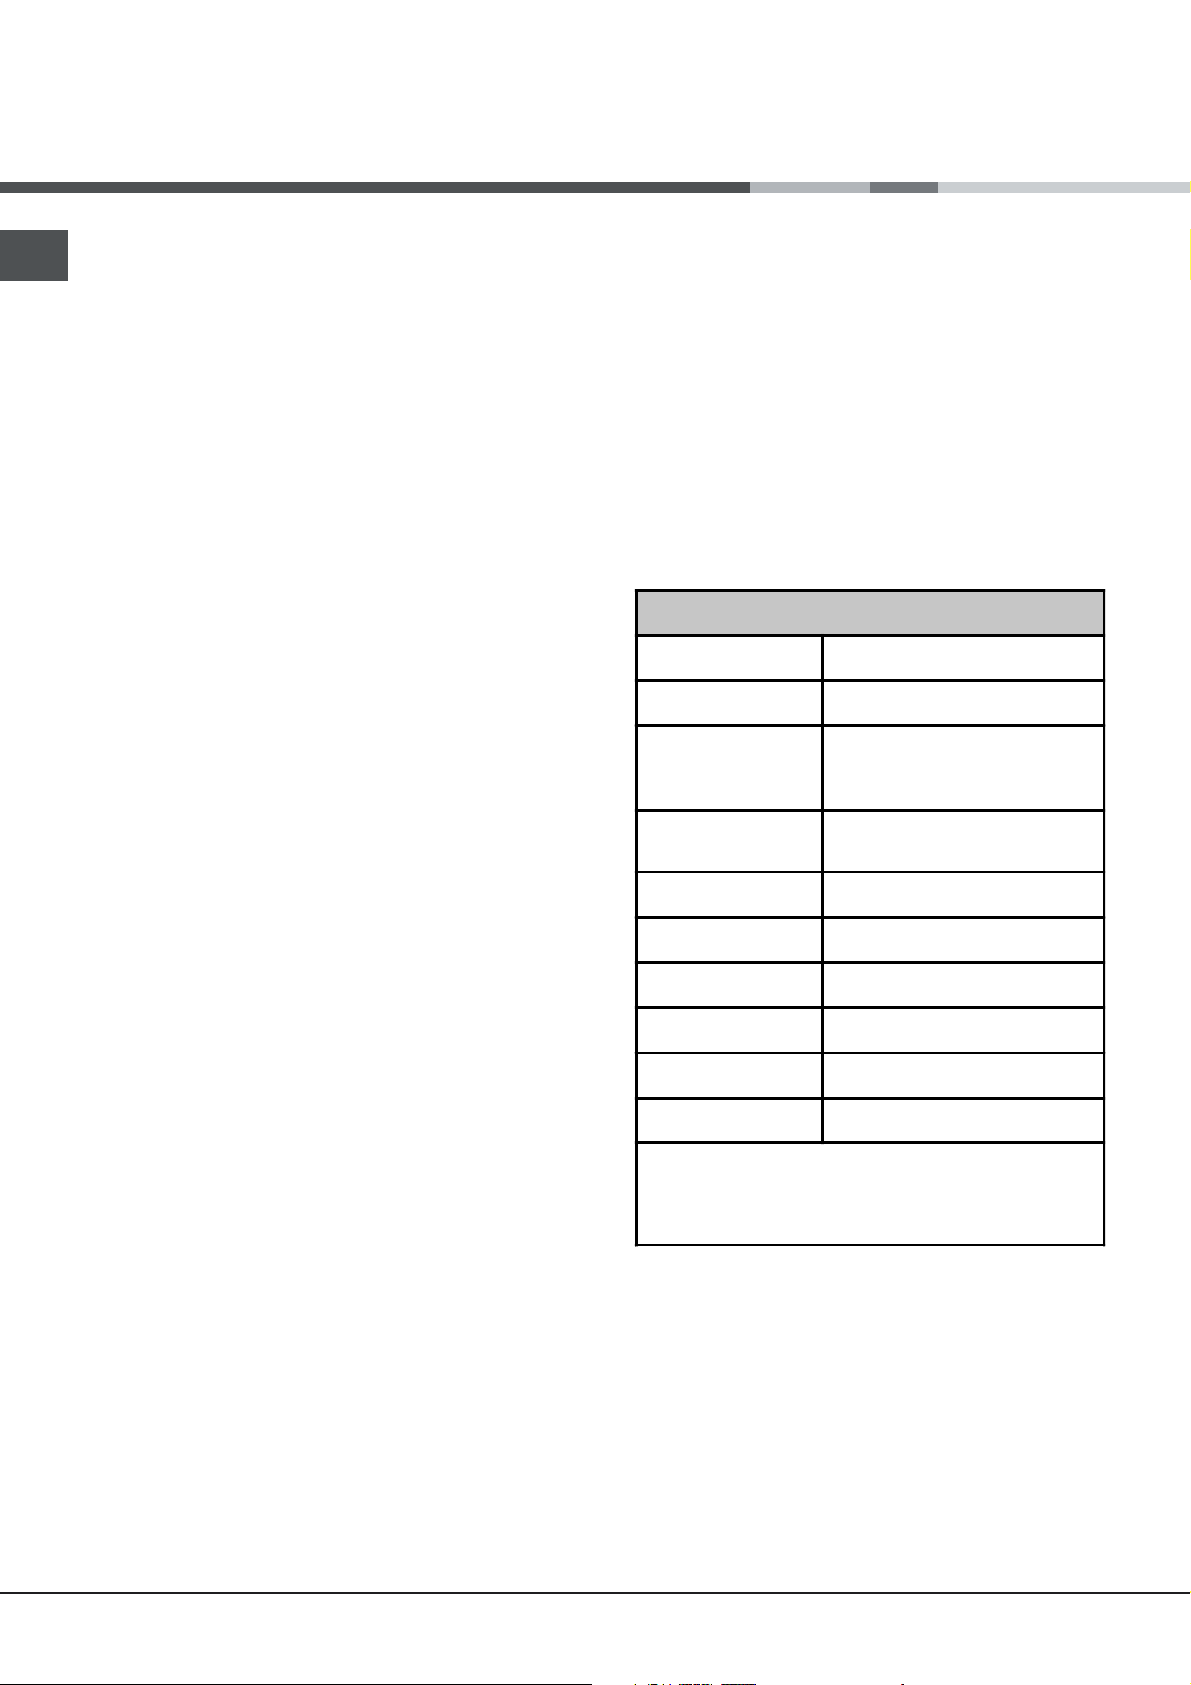
DATA SHEET
Model
Tempera tures
Dimensions
Weight**
Weight
Power
Current
Lamp
Consumption
Voltage*
Frequency Hz*
WE 24
1 Zone
width cm 60
length cm 44,8
depth cm 55
30,5 Kg
35,5 Kg
120 W
0,54 A
1 x 6 W
0,9 kWh / 24h
115 - 220 V
50 - 60
* These values may change in different countries.
In order to find the specific features of your device,
check the product features plate.
** When the device is empty.
2
Page 3
Installation
Positioning and connection
Unpacking
1 Unpack the device immediately and make sure it
has not been damaged during transport. Should it
be damaged, do not connect, and get in touch with
the Dealer.
2 Carefully remove the protections and the adhesives,
open the door and make sure all the components
are present.
3 Take out the power supply cable.
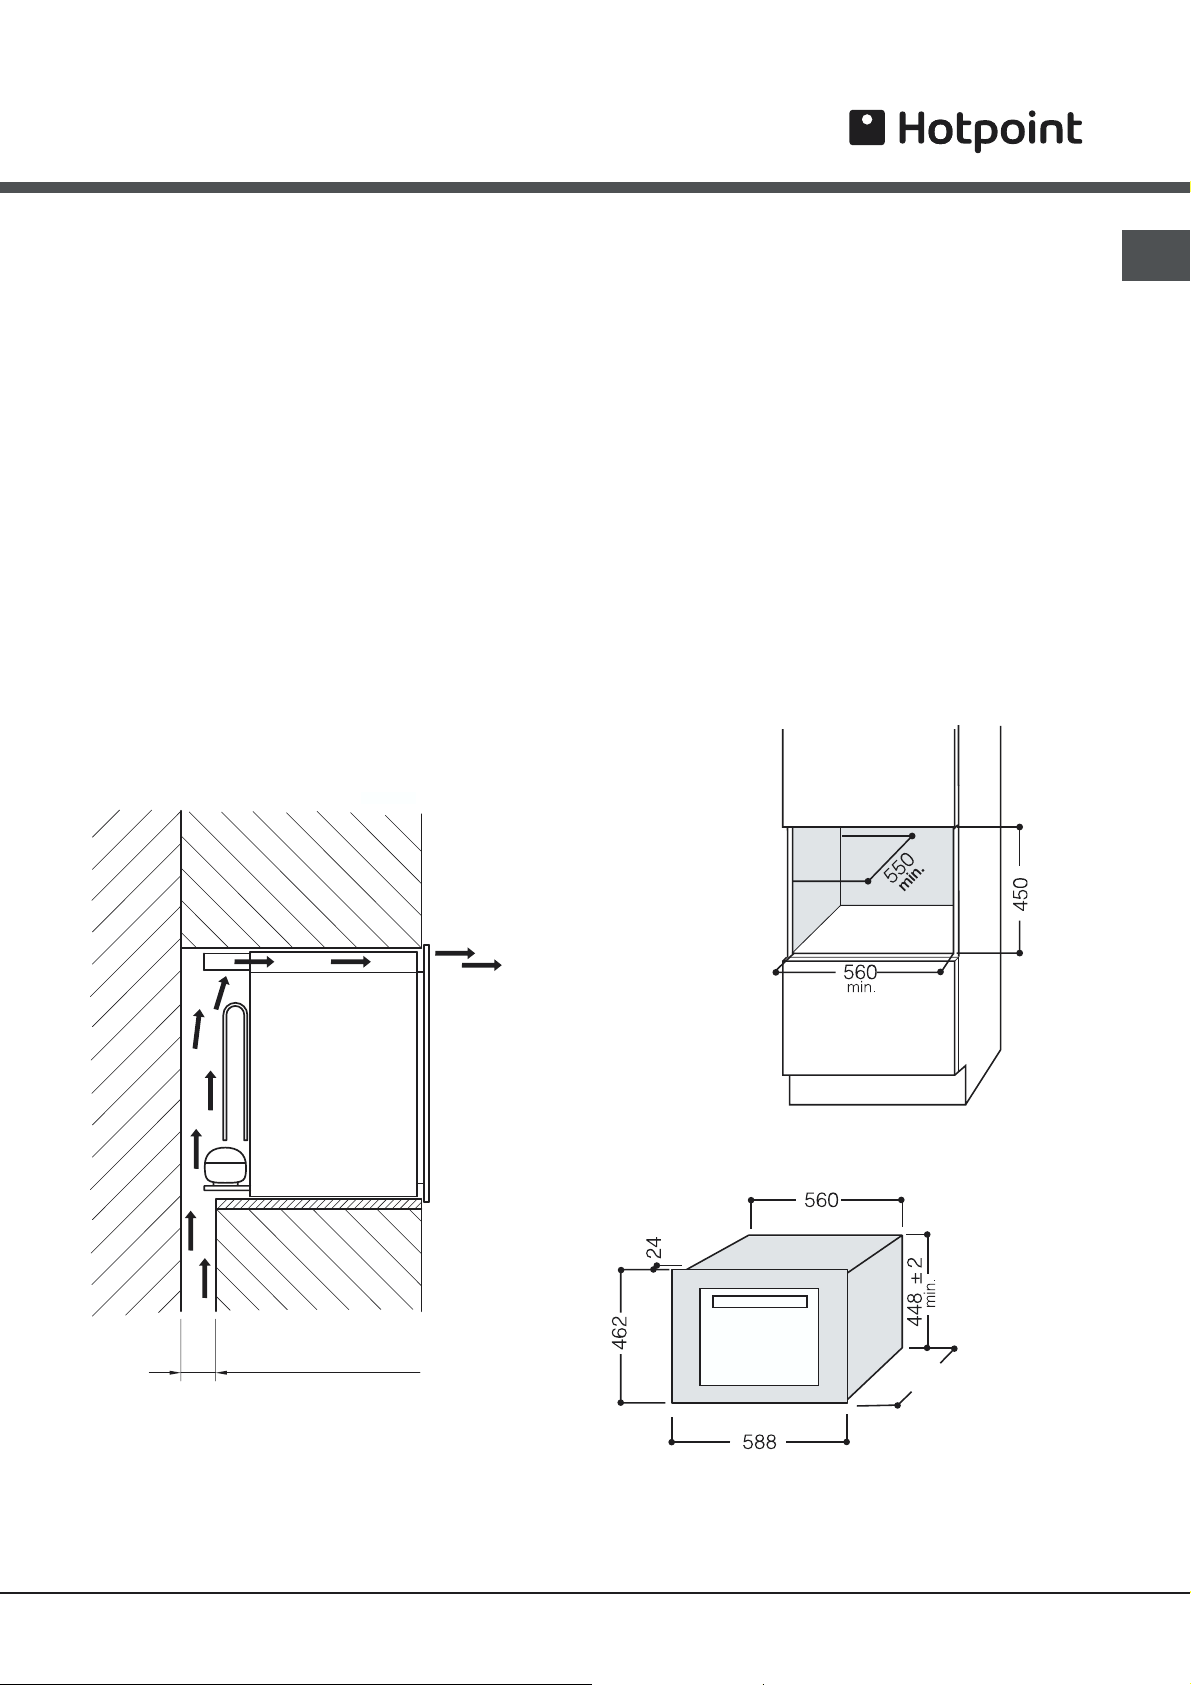
Positioning
1 Position the device in a well ventilated area, not
damp and free (avoid cabinets with closed walls).
2 Keep the device away from heat sources.
3 Make sure the minimum distances between the
device and the walls of the room where it is placed
are kept, in order to ensure perfect ventilation of the
device.
See figure.
Wiring connection
After transport, stand the device vertically, and wait for
at least 3 hours before connecting it to the wiring
system. Before putting the plug into the power socket,
make sure that:
• the socket is earthed and according to legal
regulations;
• the socket is able to hold up to the maximum power
load of the machine, indicated on the Data Sheet
table or on the feature plate to the bottom right (see
Description of the device);
• the power supply voltage falls within the range
indicated on the Data Sheet table or on the feature
plate to the bottom right (see Description of the
device);
• the power socket is compatible with the plug of the
device. Otherwise, replace the socket or the plug; do
not use extensions or multiple sockets.
GB
Ventilation space:
at least 50 mm
Dimensions
of the
compartment
540
Furniture
side area
Dimensions
of the cellar
3
Page 4

Product Description
GB
Interior Parts
BOTTLE AGEING
COMPARTMENT
CONTROL
PANEL
SHELVES DATA PLATE
DOOR
Control Panel
PILOT
LAMP LIT
COOLING
PILOT LAMP
DISPLAY
POWER
CONNECTION
LIGHT
ON
LIGHT
REDUCE
TEMPERATURE
INCREASE
TEMPERATURE
ON/OFF
BUTTON
4
Page 5

Using the wine cellar
Bottle ageing compartment
The ageing compartment's main function is that of
guaranteeing that your wines are preserved in optimal
conditions.
The temperature has been set in the factory at a
temperature held to be excellent in most cases and is
15°C in the upper compartment.
Wine has a complex nature and it derives from a long
and slow process. In order to best express its
attributes, very specific conditions are necessary.
All wines are preserved at the same temperature, but,
depending on their different characteristics, wines are
served and tasted at very different temperatures (see
the Table of ideal wine temperatures).
Therefore, just as for manufacturers' wine cellars, for
your new appliance, the absolute temperature value is
not important for preserving your wine. Rather, the
constant temperature through time is important. Wine
preservation is ideal at any temperature, as long as
that temperature does not vary.
Manual temperature control
When you plug in your wine cellar, the display shows
the temperature inside the cellar: it has been set to
reach 15° C and become steady on it. Should you
need to adjust it, follow the instructions below:
1. When you plug in your wine cellar, the display shows
the temperature that has been set
2. Press the
Control Panel). The temperature will begin to blink.
3. Press the
desired temperature.
4. Wait 5 seconds for the temperature to stop
blinking.
5. Wait until the wine cellar reaches its temperature
before you place the wine bottles inside.
The inside light does not go on (or it goes off
temporarily) when the inside temperature goes over
24° C. This allows you to reach the pre-set
temperature more quickly.
button for one second (see the
or buttons until you reach the
Taking out the wooden shelves
GB
WARNING:
The wooden shelves are not sliding. Do not take
them out when loaded with bottles, to prevent the
risk of the bottles breaking.
You can take the shelves out for cleaning only when
they are not loaded with any bottles.
5
Page 6

GB
Table of ideal wine temperatures
This table indicates the approximate temperatures at which wine should be served. Should one of your wines
need to be served at a temperature that is greater than the temperature inside your wine cellar, we suggest that
you leave it wine out for the time that is necessary before you serve it.
Amarone
Barbaresco
Barolo
Beaujolais
White liquered Bordeaux
Dry White Bordeaux
Red Bordeaux
White Bourgogne
Red Bourgogne
17°C
17°C
17°C
13°C
6°C
8°C
17°C
11°C
18°C
Dry and Sweet Sparkling Wines
Verdicchio di Matelica e dei Castelli di Jesi
White wines from Trentino Alto Adige
Franciacorta White Wines
Dry aromatic white wines
Dry, young, and fruity white wines
White wines from Friuli Venezia Giulia
Rodano wines
Dry white wines from the Loire
6°C
8°C
11°C
11°C
10°C
8°C
11°C
15°C
10°C
Brunello
Champagne
Chianti Classico
Languedoc-Roussillon
Passito di Pantelleria
Rosé Provence
6
17°C
6°C
16°C
13°C
6°C
12°C
Liquered wines from the Loire
Red wines from the Loire
Liquered Passito wines
Rosè Wines, New Wines
Light red wines with mild tannic
Red, rather tannic wines with medium
structure
7°C
14°C
8-18°C
12°C
14°C
16°C
Page 7

Stocking the wine bottles
Standard 24-bottle stock
The 24-bottle stock (for standard, mixed, and renana
bottles) is recommended for wines that need to be
visible and easily removed.
STANDARD
24 Bottles (100% lying down)
3 shelves
Position each bottle into the slots on the 3 wooden
shelves. 6 bottles can be placed on the bottom of the
wine cellar.
We suggest you place the Renana bottles onto the
lower shelf and the bottom of the wine cellar because
they have been specially designed to hold larger
bottles.
Champagne bottle stock
GB
Champagne bottles are larger than standard bottles.
They must be placed onto the base of the wine cellar,
which can hold up to 5.
If you want to stock more than 5 Champagne bottles in
your wine cellar, remove the 3th shelf and stock the
bottles in two rows (placing the bottles in the second
row between those on the bottom row). This will hold
up to 9 bottles.
Some stocking configurations
! The wooden shelf can safely hold up to 22 bottles.
PRESERVATION
28 Bottles (100% lying down)
7
Page 8

Maintenance and
GB
troubleshooting
07/2008 - 195072411.00
XEROX BUSINESS SERVICES
Care and maintenance
Disconnecting the wine cellar
During cleaning and maintenance, it is imperative that you unplug the wine cellar
Troubleshooting
If you notice that your wine cellar is not working properly, check with the following list before you call your Service
Centre.
Problem
The compressor does not work
Possible causes/solutions
• The plug is not plugged into the wall-outlet or not
enough to make contact. Or, there could be a power
failure in your home.
• The wall-outlet is not in working order. Plug the wine
cellar into another wall-outlet to check.
The compressor never stops
! Any work that is done to the wine cellar should be performed by your authorized local Service Centre.
! Short term faults, such as power failure, will not compromise the wines. It is only when working faults are left
unsettled for a long time that the wine may suffer.
• Contact the Service Centre
8
 Loading...