

HOTPOINT TCUD 93B 6G/Z (UK) User Manual

Instruction booklet
TUMBLE DRYER
GB
English
! Keep this instruction booklet on hand in order to refer to it when necessary. Take it with you when you move, and
should you sell this appliance or pass it on to another party, make sure that this booklet is supplied along with the
dryer so that the new owner may be informed about warnings and suggestions on how the appliance works.
! Read these instructions carefully; the following pages contain important information on installation and suggestions
on how the appliance works.
This symbol reminds you to read this booklet.
1
Contents
TCUD 93B
First time you turn on your dryer
you must select your preferred
language see page 6
Important information, 2-3
Installation, 4
Where to put your dryer
Ventilation
Water Drain
Electrical connection
Before you start using your dryer
Dryer description, 5
The features
Control panel
The Display, 6-8
Start and programmes, 8-11
Choosing a programme
Special programmes
Programme option modifiers
Table of programmes
The controls
Laundry, 12-13
Sorting your laundry
Wash care labels
Special clothing items
Drying times
Warnings and Suggestions, 14
General safety
Saving energy and respecting the environment
Maintenance and Care, 15
Switching off the electricity
Cleaning the filter after each cycle
Empty the water container after each cycle
Check the drum after each cycle
Cleaning the condenser unit
Cleaning the dryer
Troubleshooting, 16
Service, 17
Disposal
Hotpoint Guarantee, 19
Hotpoint After Sales Service, 20
GB
Important
Information Installation Description The Display
Start and
Programmes Laundry
Warnings and
Suggestions Troubleshooting Service
Maintenance
and Care
2
GB
Important Information
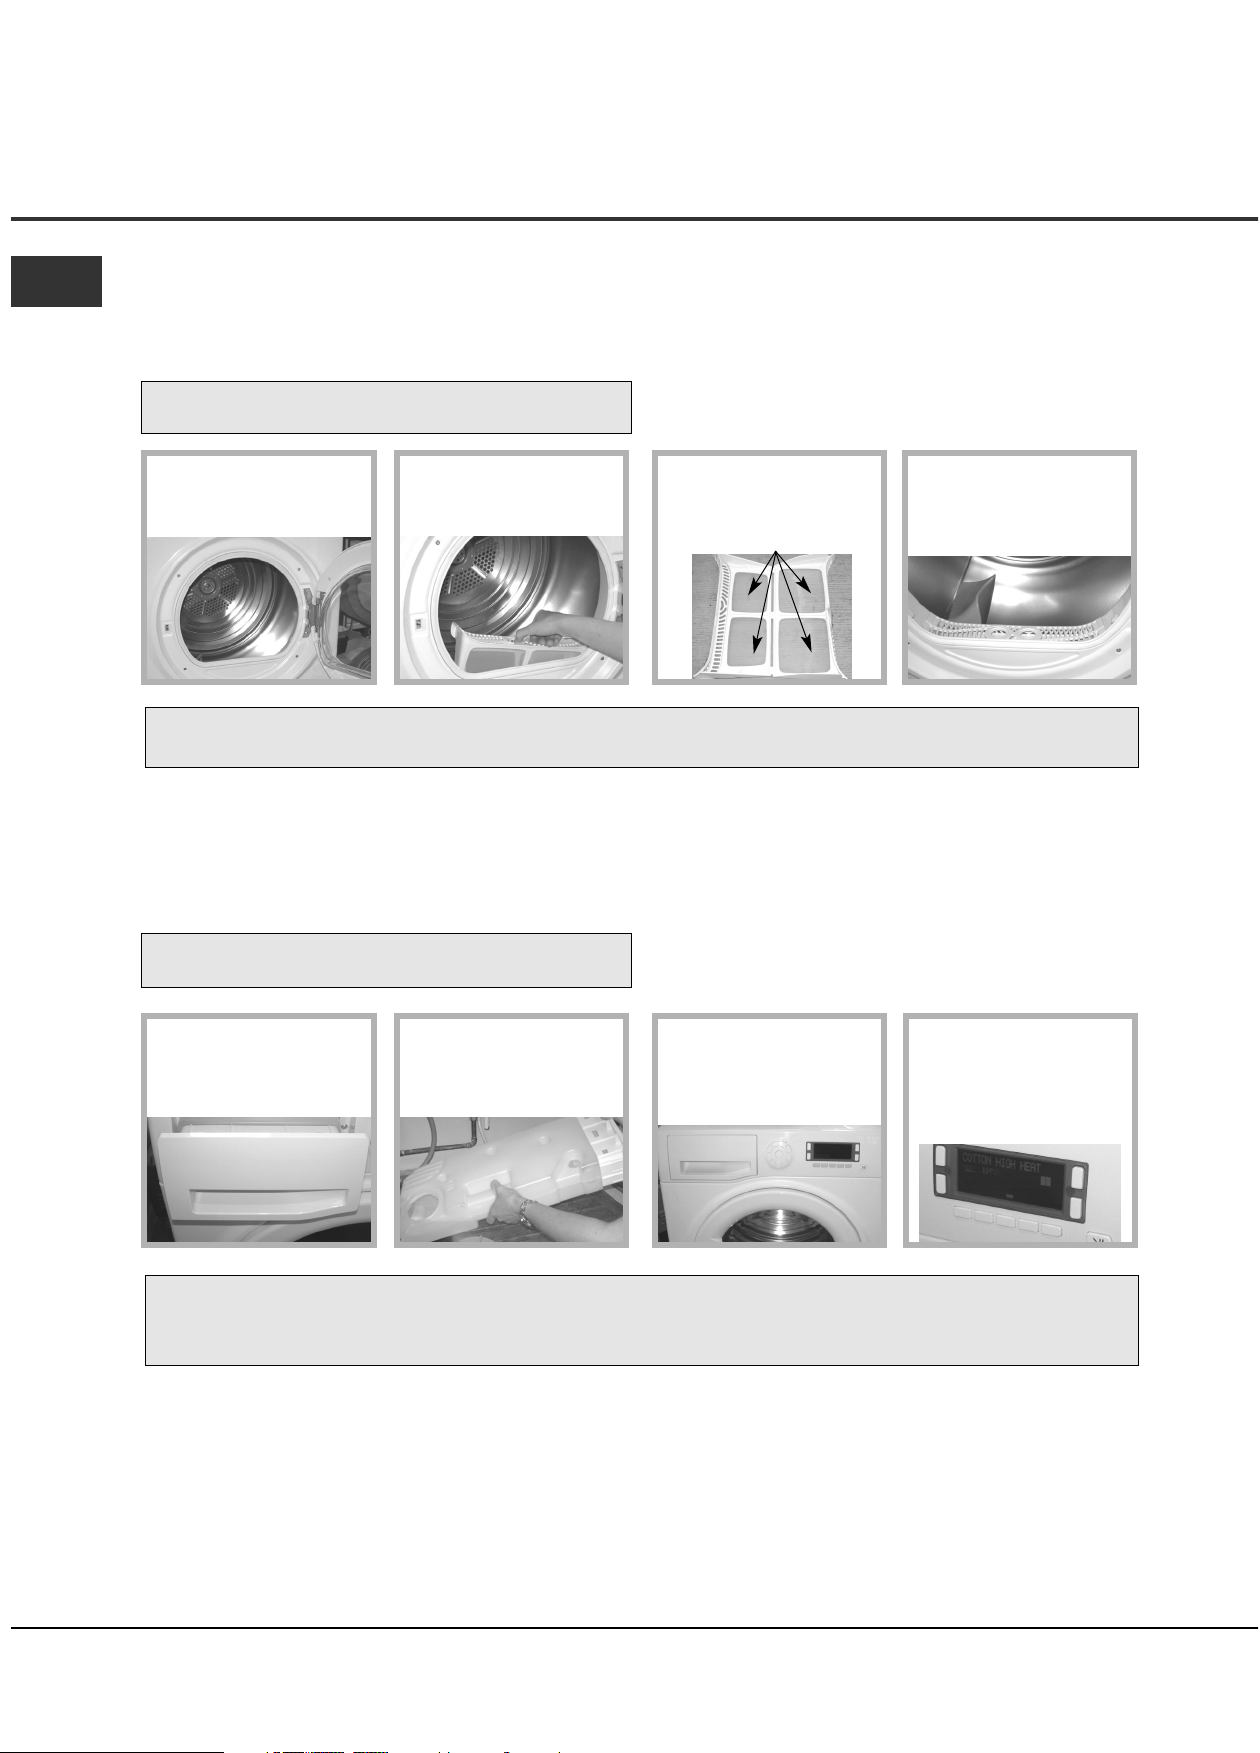
! You MUST clean the fluff filter after EVERY drying
cycle.
Fluff Filter...
! Failure to clean the filter after EVERY drying cycle will affect the drying performance of your machine.
- It will take longer to dry and as a result will use more electricity during drying.
! You MUST empty the water container after EVERY
drying cycle.
Water Container...
Priming the Water Collection System
When your dryer is new, the water container will not collect water until the system is primed... this will take 1 or 2 drying
cycles. Once primed it will collect water during every drying cycle.
STEP 1.
Open the door of your
dryer.
STEP 2.
Remove the filter.
STEP 3.
Open the filter and clean
any fluff deposits from
the filter mesh.
STEP 4.
Refit the filter - NEVER
run the dryer without the
filter in position.
For your Condenser dryer to operate efficiently, you must follow the regular maintenance schedule shown below:
STEP 1.
Pull the water container
towards you and remove
it fully from the dryer.
STEP 2.
Remove either the small or
large cap and empty the
water from the container.
! Failure to empty the water container will result in:
- The machine will stop heating (so the load may still be wet at the end of the drying cycle).
- The ‘Empty Water’ message will tell you that the water container is full.
STEP 3.
Refit the water container,
ensuring that it is pushed
fully back into position.
! The ‘Empty Water’
message reminds you to
empty the water container
at the start and at the
end of each programme.
3
Important Information
GB
Important
Information Installation Description The Display
Start and
Programmes Laundry
Warnings and
Suggestions Troubleshooting Service
Maintenance
and Care
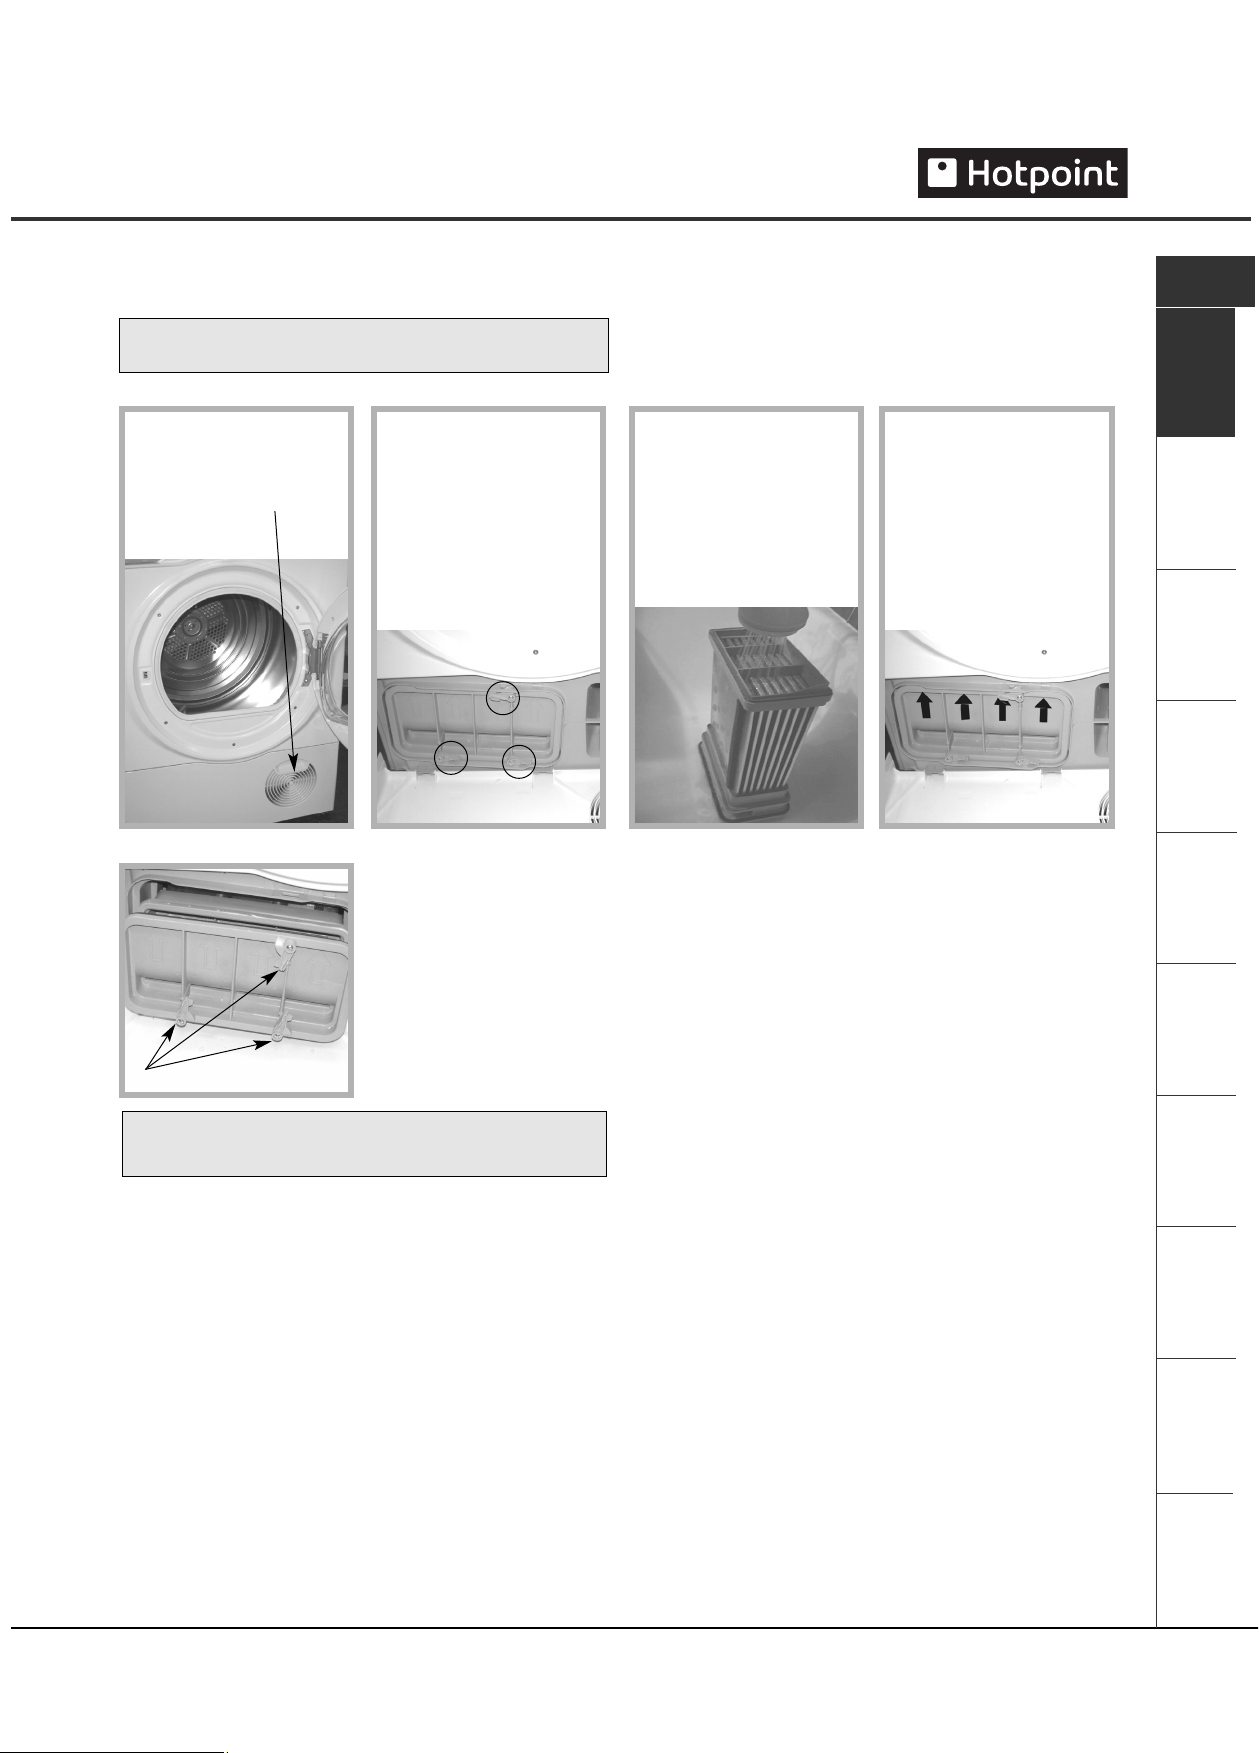
Condenser Unit...
! You MUST clean the fluff from the condenser EVERY
month.
! Failure to clean the condenser could cause premature
failure of your dryer.
●
Check that:
- The positioning arrows are pointing upwards.
- The 3 clips are re-secured back into their ‘lock’ position.
STEP 3.
Flush the condenser, from
the rear with water, to
remove any fluff deposits.
STEP 4.
Refit the condenser unit
- ensure that the unit is
pushed in fully, all 3 clips
are re-secured and the
positiong arrows on the
front of the condenser are
pointing upwards.
Rotate 3 clips
STEP 1.
Open the condenser cover
- hold the handle and
pull towards you.
STEP 2.
Remove the condenser by
rotating the 3 clips then
pulling the condenser
towards you.
(There may be some water
in the tubes, this is normal).
4
GB
Installation
Moulded plug
! The plug must not be used
without the fuse cover in place.
If a replacement fuse
holder/cover is required, it must
be of the same colour coding or
wording as shown on the base of
the plug.
Replacements are available from
authorised dealers.
Changing the plug
The wires in the power cord are coloured in
accordance with the following:
! If the plug being replaced is a non-rewirable type,
then the cut-off plug must be disposed of safely. DO
NOT leave it where it can be inserted into a socket and
create a shock hazard.
! The power supply cord should be checked periodically
and replaced by a cord specially prepared for this dryer
and fitted only by authorised technicians (see Service).
New or longer power cords are supplied at an extra
charge by authorised dealers.
! The manufacturer denies any responsibility should
any of these rules not be followed.
! If in doubt about any of the above consult a
qualified electrician.
Before you start using your dryer
Once you have installed your dryer and before you
use it, clean the inside of the drum to remove any dust
that could have accumulated during transport.
Where to put your dryer
●
Place your dryer at a distance from gas ranges,
stoves, heaters, or cook tops because flames can
damage the appliance.
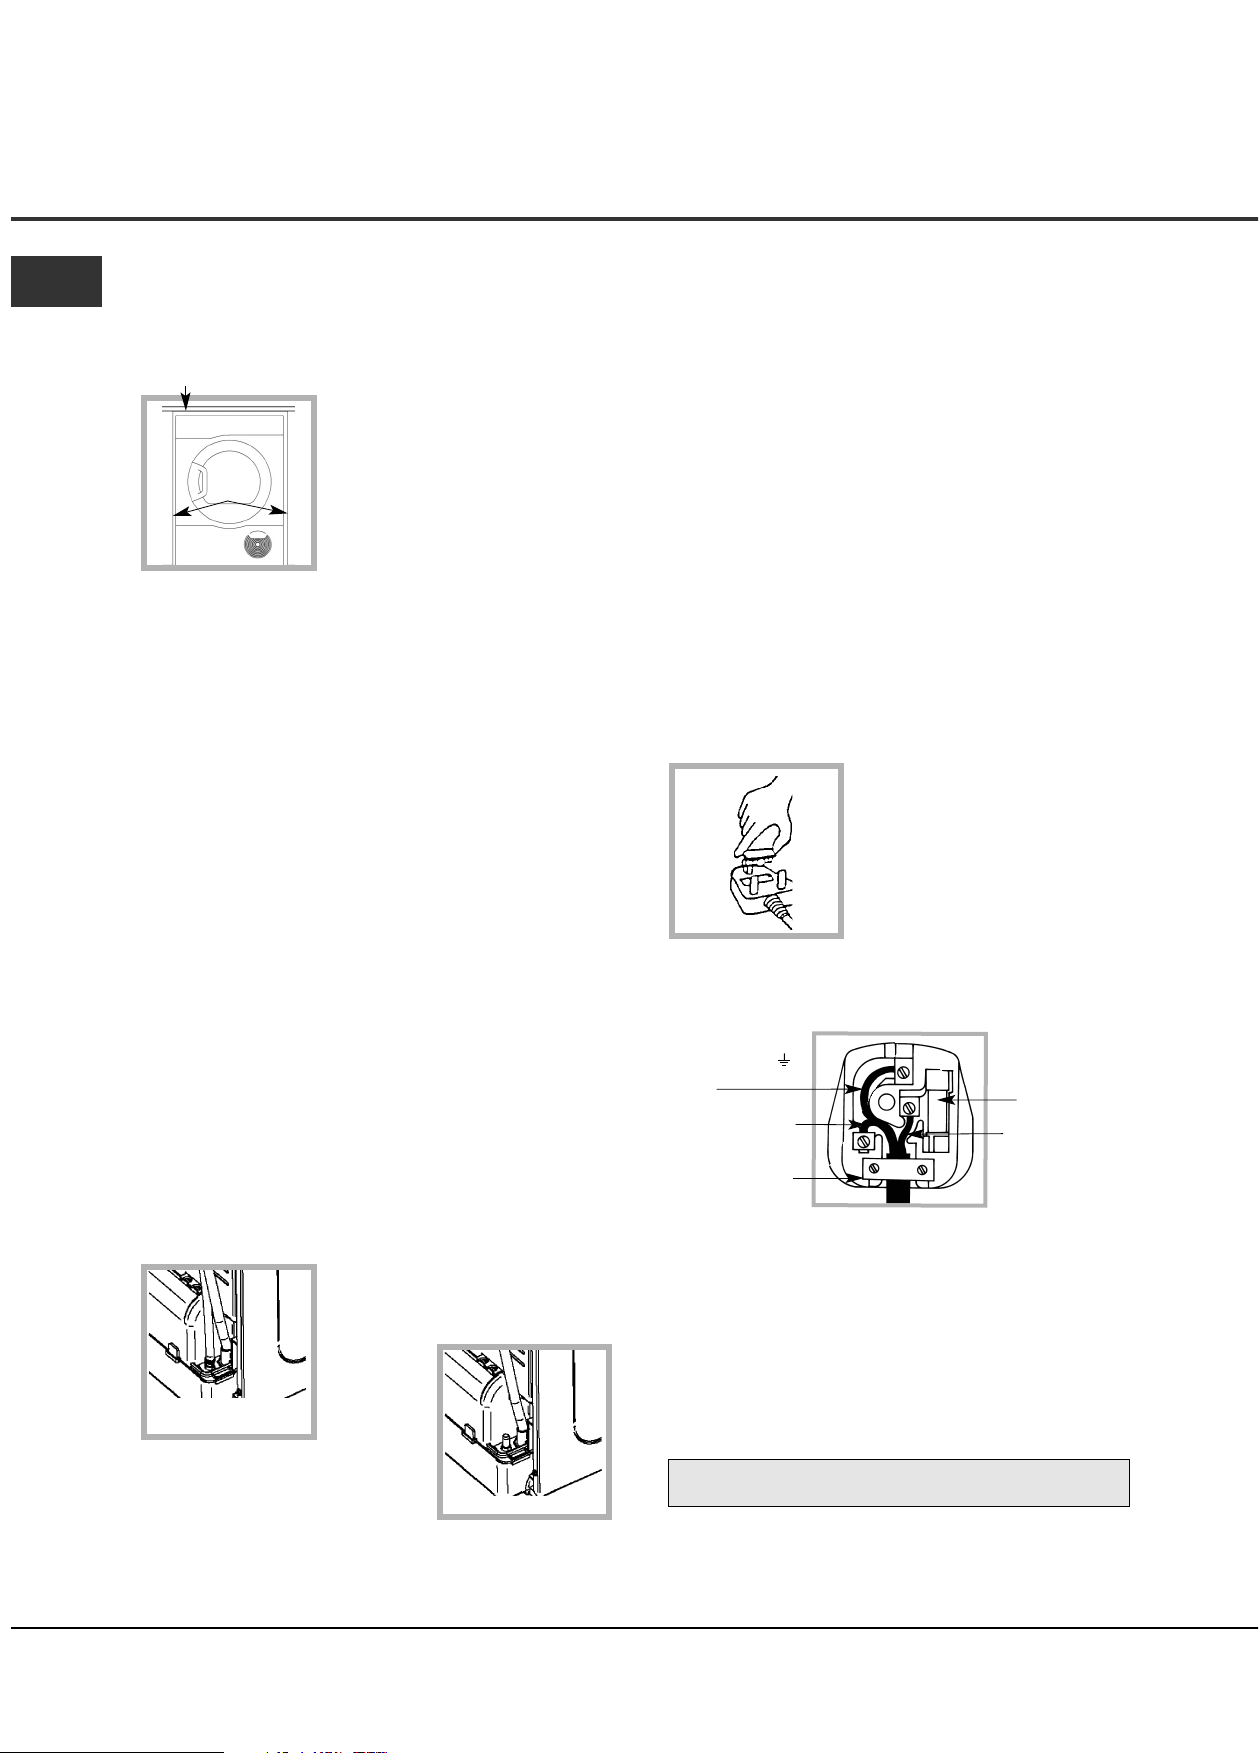
●
If you are going to install the
appliance under a work
counter, be sure to leave a
10mm space between the
top and any other objects
on or above the machine and
a 15mm space between the
sides and lateral furnishings
or walls.
This is to ensure proper air circulation.
Ventilation
When the dryer is in use, there has to be adequate
ventilation. Make sure you put your dryer in an
environment that is not damp and has proper air
circulation throughout. Airflow around the dryer is
essential to condense the water produced during the
washing, the dryer will not operate efficiently in an
enclosed space or cupboard.
! If using the dryer in a small or cold room some
condensation could be experienced.
! We do not recommend that the dryer is installed in a
cupboard but the dryer must never be installed
behind a lockable door, a sliding door or a door with a
hinge on the opposite side to that of the dryer door.
Water drain
If your dryer is installed next to a drain the water can be
plumbed into this drain. This does away with the need to
empty the water container. If the dryer is stacked onto or
installed next to a washing machine it can share the same
drain. The height of the drain must be less than 3' (1m)
from the bottom of the dryer.
Remove hose from position shown
(see diagram).
Fit a suitable length of hose to the
new location shown (see diagram).
! Make sure that the hose is not squashed or kinked when
the dryer is in its final location.
Electrical connections
Make sure of the following before you insert the plug
into the the electrical socket:
●
Ensure your hands are dry.
●
The socket must be grounded.
●
The socket must be able to sustain the machines
maximum power, which is indicated on the rating label
(see Dryer Description).
●
Power voltage must be within the values indicated on
the rating label (see Dryer Description).
●
The socket must be compatible with the dryers plug.
Should this not be the case, replace the plug or the socket.
! Do not use extension cords.
! The dryer must not be installed outdoors, even if the space is
sheltered. It can be very dangerous if it is exposed to rain or
storms.
! Once installed, the dryers electrical wire and plug must be
within easy reach.
! The power cord must not be bent or squashed.
! The power cord supplied is fitted with a BS1363 plug and a 13
amp BS1362 fuse. If you need to replace the fuse, use only
those rated at 13 amp (13A) and ASTA approved to BS1362.
Green and Yellow
(Earth) wire to terminal
marked ‘E’, symbol ,
or coloured green and
yellow.
13A ASTA approved
fuse to BS1362.
Brown (Live) wire to
terminal marked ‘L’ or
coloured red.
Blue (Neutral) wire to
terminal marked ‘N’ or
coloured black.
Cord clamp
Minimum gap 10mm
Minimum gaps
15mm
Remove hose from
here...
...fit new hose here.
5
Dryer Description
GB
Important
Information Installation Description The Display
Start and
Programmes Laundry
Warnings and
Suggestions Troubleshooting Service
Maintenance
and Care
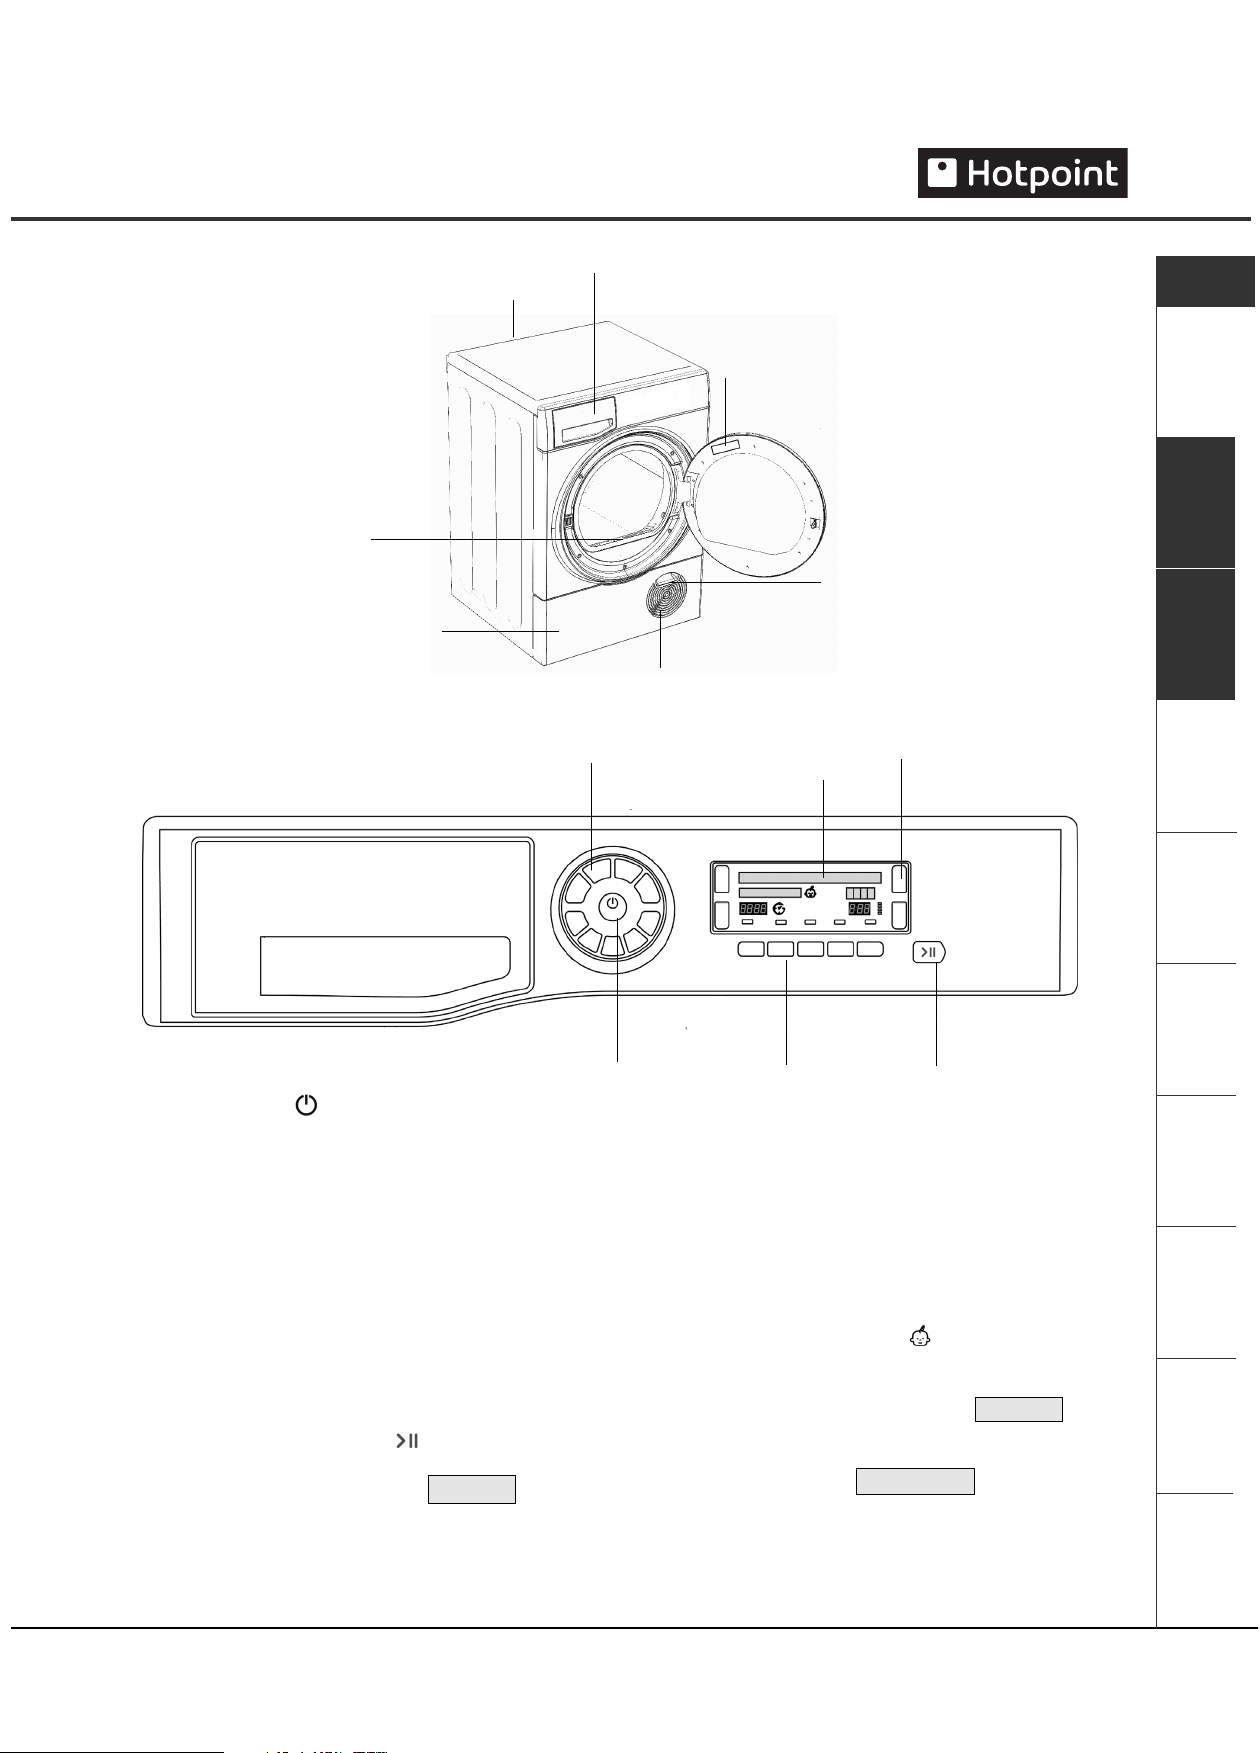
Control panel
PROGRAMME
Selection Buttons
Display Unit
START/PAUSE
Button & Light
CHILD LOCK
Button
ON/OFF
Button
OPTION
Buttons & Light
The features
Water container
Filter
Condenser cover
The ON/OFF button : If the dryer is running and
this button is pressed, the dryer is turned off.
Press again, the dryer restarts.
The PROGRAMME selection buttons set the programme:
press the button corresponding to the programme you
want to select (see Start and Programmes).
The OPTION buttons/indicators: these buttons select
available options for your selected programme (see
The Controls). The indicators on the display unit next
to the bottom buttons light to show that the option has
been selected.
The START/PAUSE button/light starts a selected
programme. When you press this button there will be
one beep and the display will show PAUSED . When
a programme is running, holding this button in pauses
the programme and stops the dryer.
The light is green when the programme is running,
flashing amber if the programme has been paused or
flashing green if on standby waiting to start a programme
(see Start and Programmes).
Note: This light also flashes amber during the Heat &
Enjoy programme and during the Post Care phase of
a programme.
The Display Unit gives warnings and information
about the programme selected and its progress (see
next page).
The CHILD LOCK button/icon : Press and hold this
button after selecting your programme and any options,
this prevents the programme settings from being
changed, the display will briefly show LOCKED .
When the icon is lit, the other buttons are disabled.
Hold the button to cancel and the icon will go out, the
display will briefly show UNLOCKED .
Note: This tumble dryer, in compliance with new energy
saving regulations, is fitted with an automatic standby
system which is enabled after about 30 minutes if no
activity is detected. Press the ON-OFF button briefly
and wait for the machine to start up again.
Rating plate
Model & Serial numbers
Condenser cover handle
(Pull to open)
Air intake grille
6
GB
The Display
Selecting your language
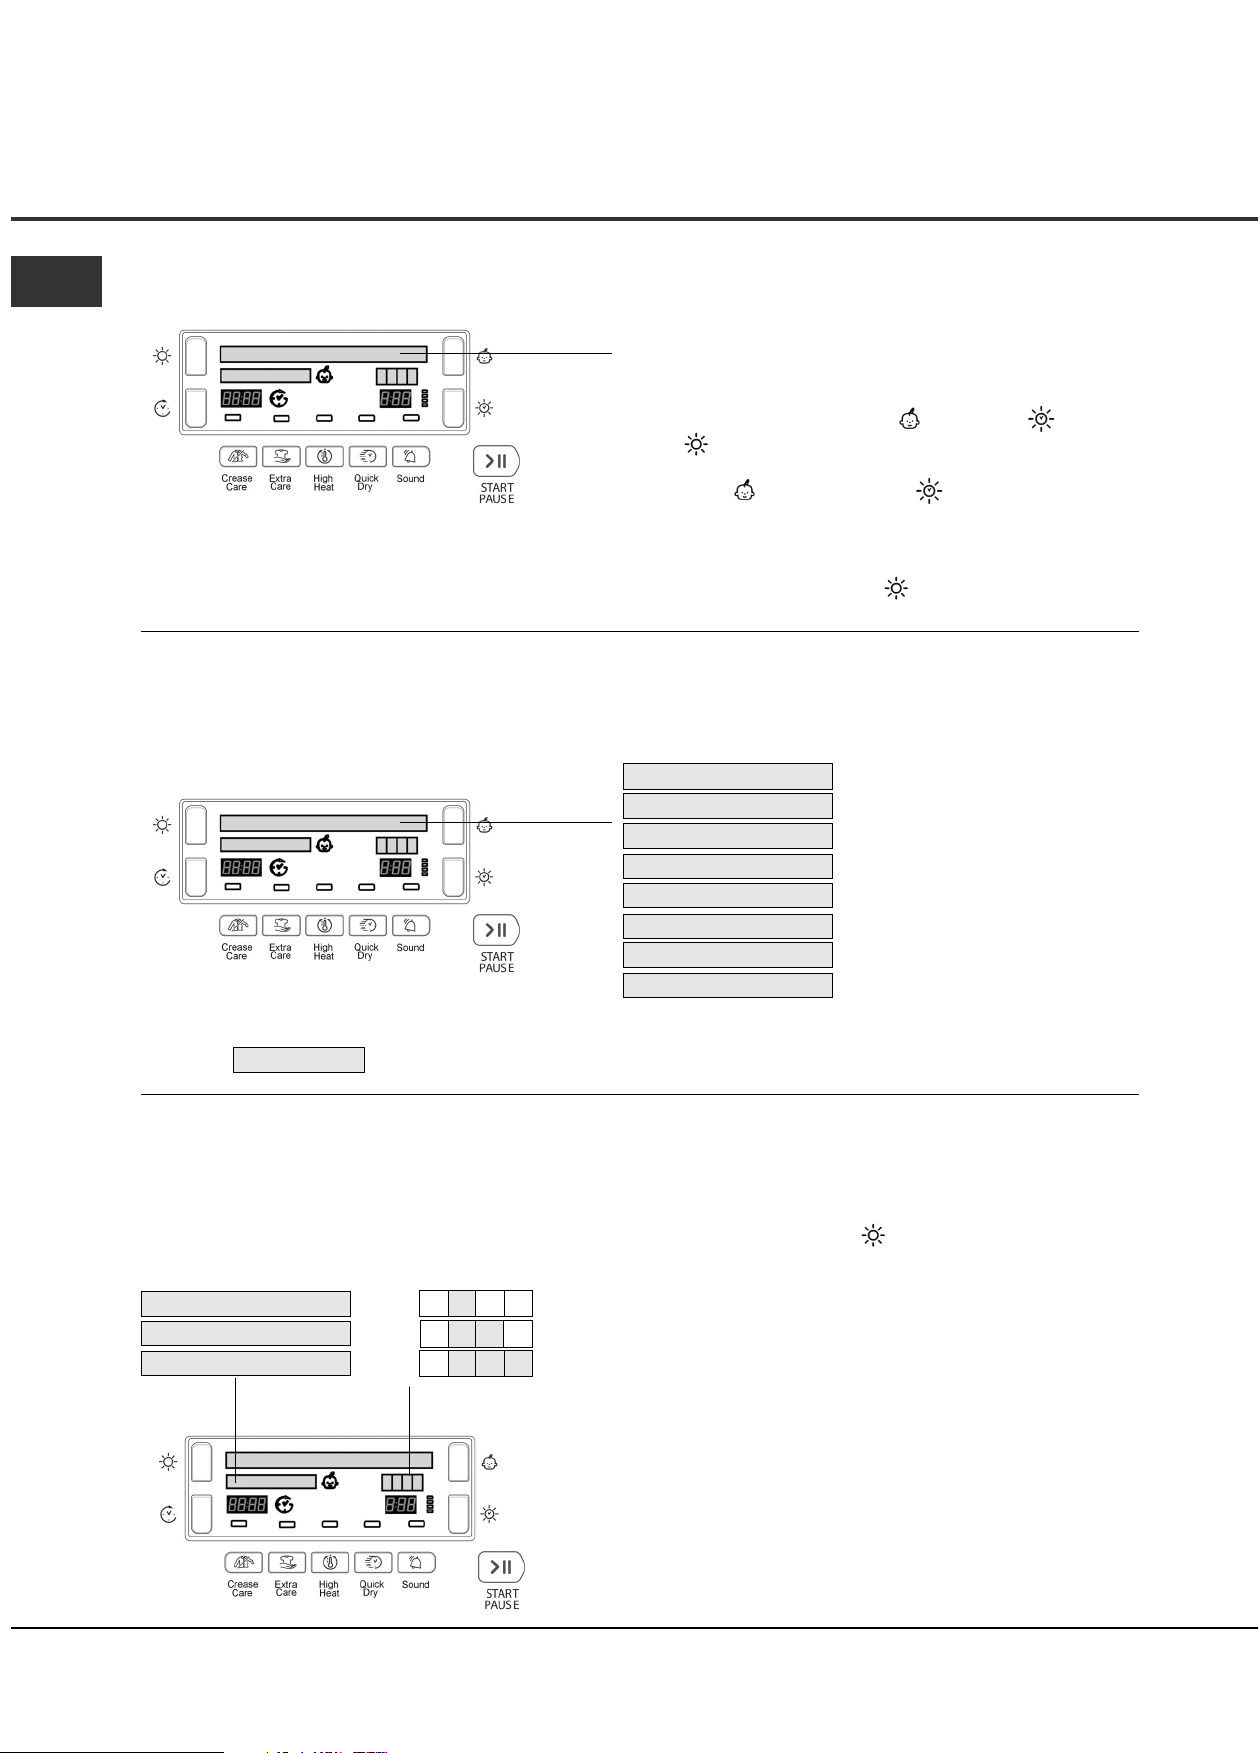
Understanding the display
Programme selection and display
The selected programme is shown on the first line of the display when you select the corresponding button, this
message is shown while the programme is running.
My Cycle When you select the My Cycle button the Display will show your selected programme with ‘M’ before its
name. ie. M COTTONS (see Start and Programmes).
Dryness levels
During programme selection for an automatic programme that has different dryness levels available (see
Programmes Table).
The second line of the display shows the dryness level you require, for each press of the Dryness Level button the next
option from the list below is selected and displayed.
COTTONS
ANTI ALLERGY
SYNTHETICS
WOOL
BABY DELICATE
CUDDLY TOYS
EASY IRON
REFRESH
The first time you turn on your dryer you should select your preferred language from the available list.
To change: the language current selection must flash, on
the first line of the display.
- Press and hold all 3 buttons: Child Lock, Timed Dry
and Dryness Level for 5 seconds.
- Press the Child Lock or the Timed Dry button to
scroll up or down through the list.
- When your required language is flashing on the top line
of the display, pressing the Dryness Level button will
select your choice.
IRON DRY
CUPBOARD DRY
EXTRA DRY
Iron Dry: Dries your clothes ready for ironing.
Cupboard Dry: Dries your clothes ready for putting away.
Extra Dry: Dries your clothes ready for wearing.
The display also shows: one, two or three blocks, depending on your selection.
These are displayed during the programmes progress.
 Loading...