

Page 1

Instruction booklet
TUMBLE DRYER
GB
English, 1
TCL G31B
E
Español, 15
Contents
Important information, 2-3
Installation, 4
Where to put your dryer
Ventilation
Door reversal instructions
Water drain
Electrical connection
Before you start using your dryer
Dryer description, 5
To open the door
The features
Control panel
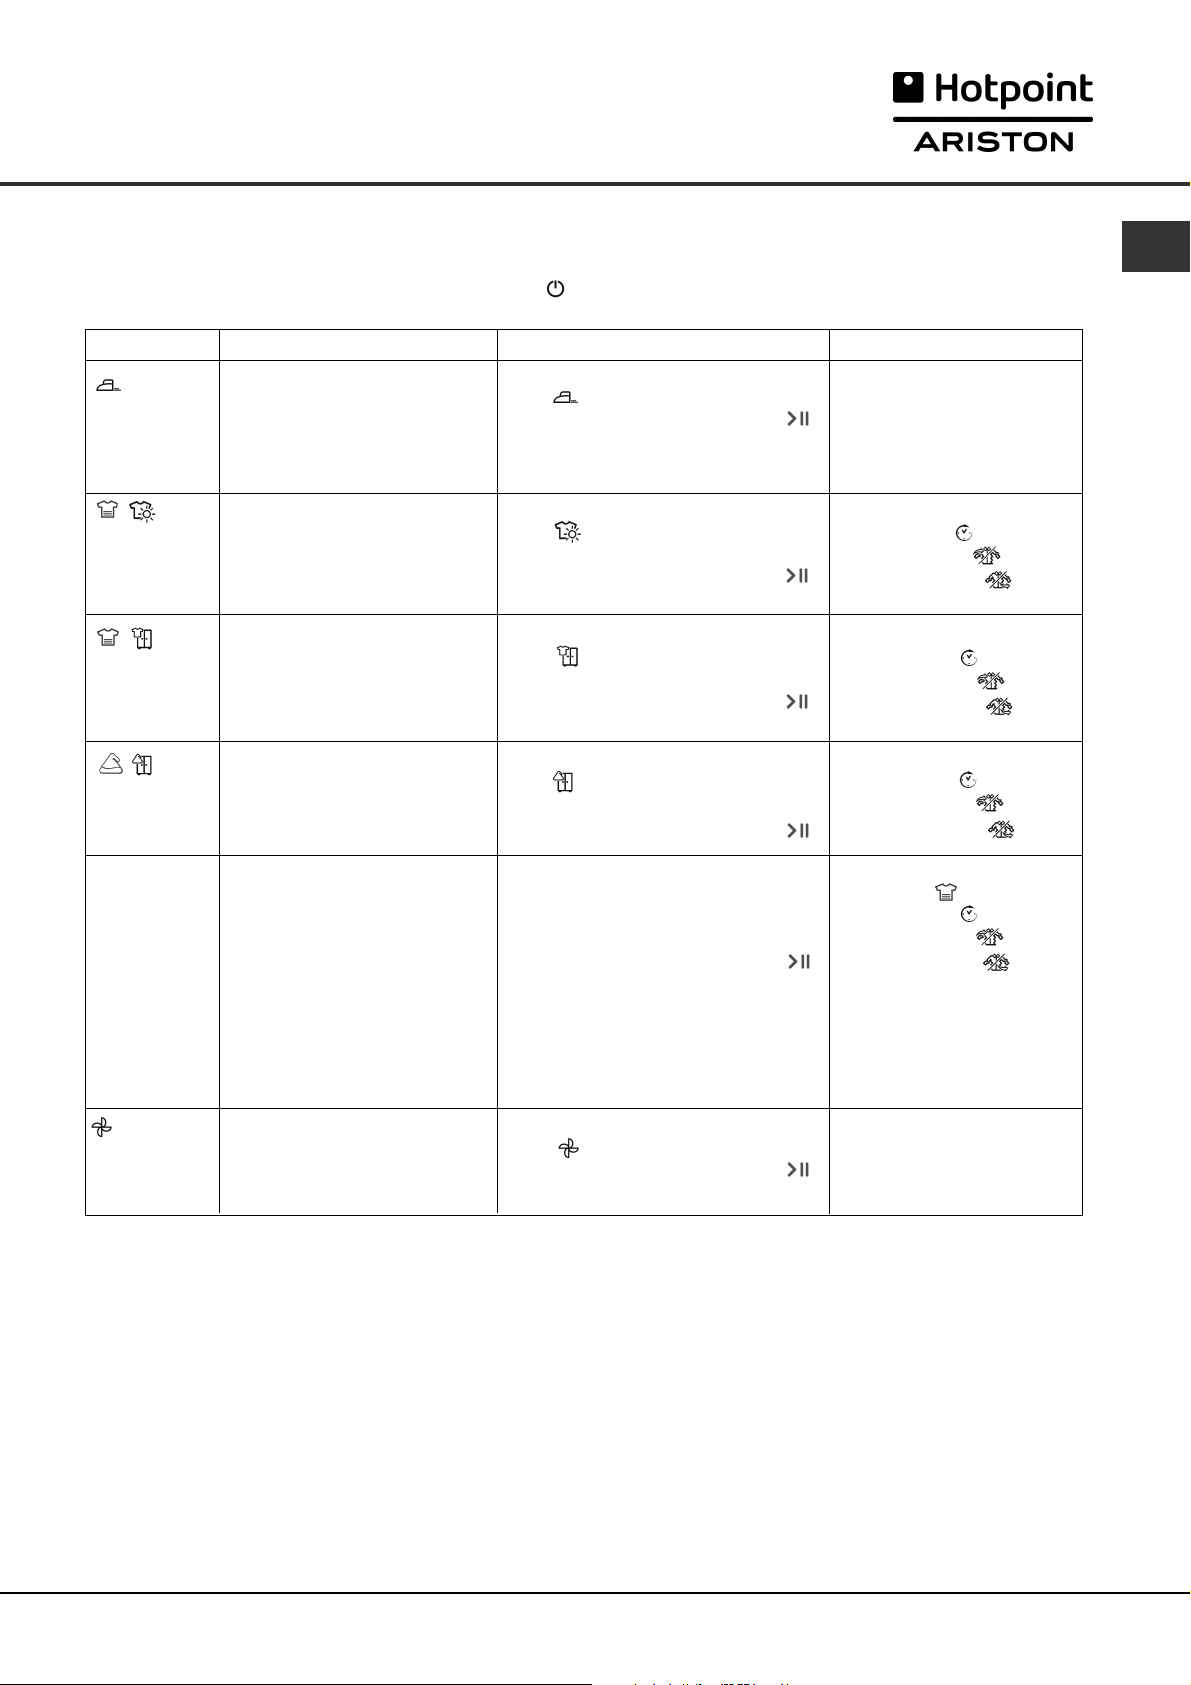
Start and programmes, 6-8
Choosing a programme
Table of programmes
The controls
Laundry, 9-10
Sorting your laundry
Wash care labels
Special clothing items
Drying times
GB
Warnings and Suggestions, 11
General safety
Disposal
Saving energy and respecting the environment
Maintenance and Care, 12
Switching off the electricity
Cleaning the filter after each cycle
Empty the water container after each cycle
Check the drum after each cycle
Cleaning the condenser unit
Cleaning the dryer
Troubleshooting, 13
Service, 14
Spare parts
! Keep this instruction booklet on hand in order to refer to it when necessary. Take it with you when you move, and
should you sell this appliance or pass it on to another party, make sure that this booklet is supplied along with the
dryer so that the new owner may be informed about warnings and suggestions on how the appliance works.
! Read these instructions carefully; the following pages contain important information on installation and suggestions
on how the appliance works.
1
Page 2
Important Information
GB
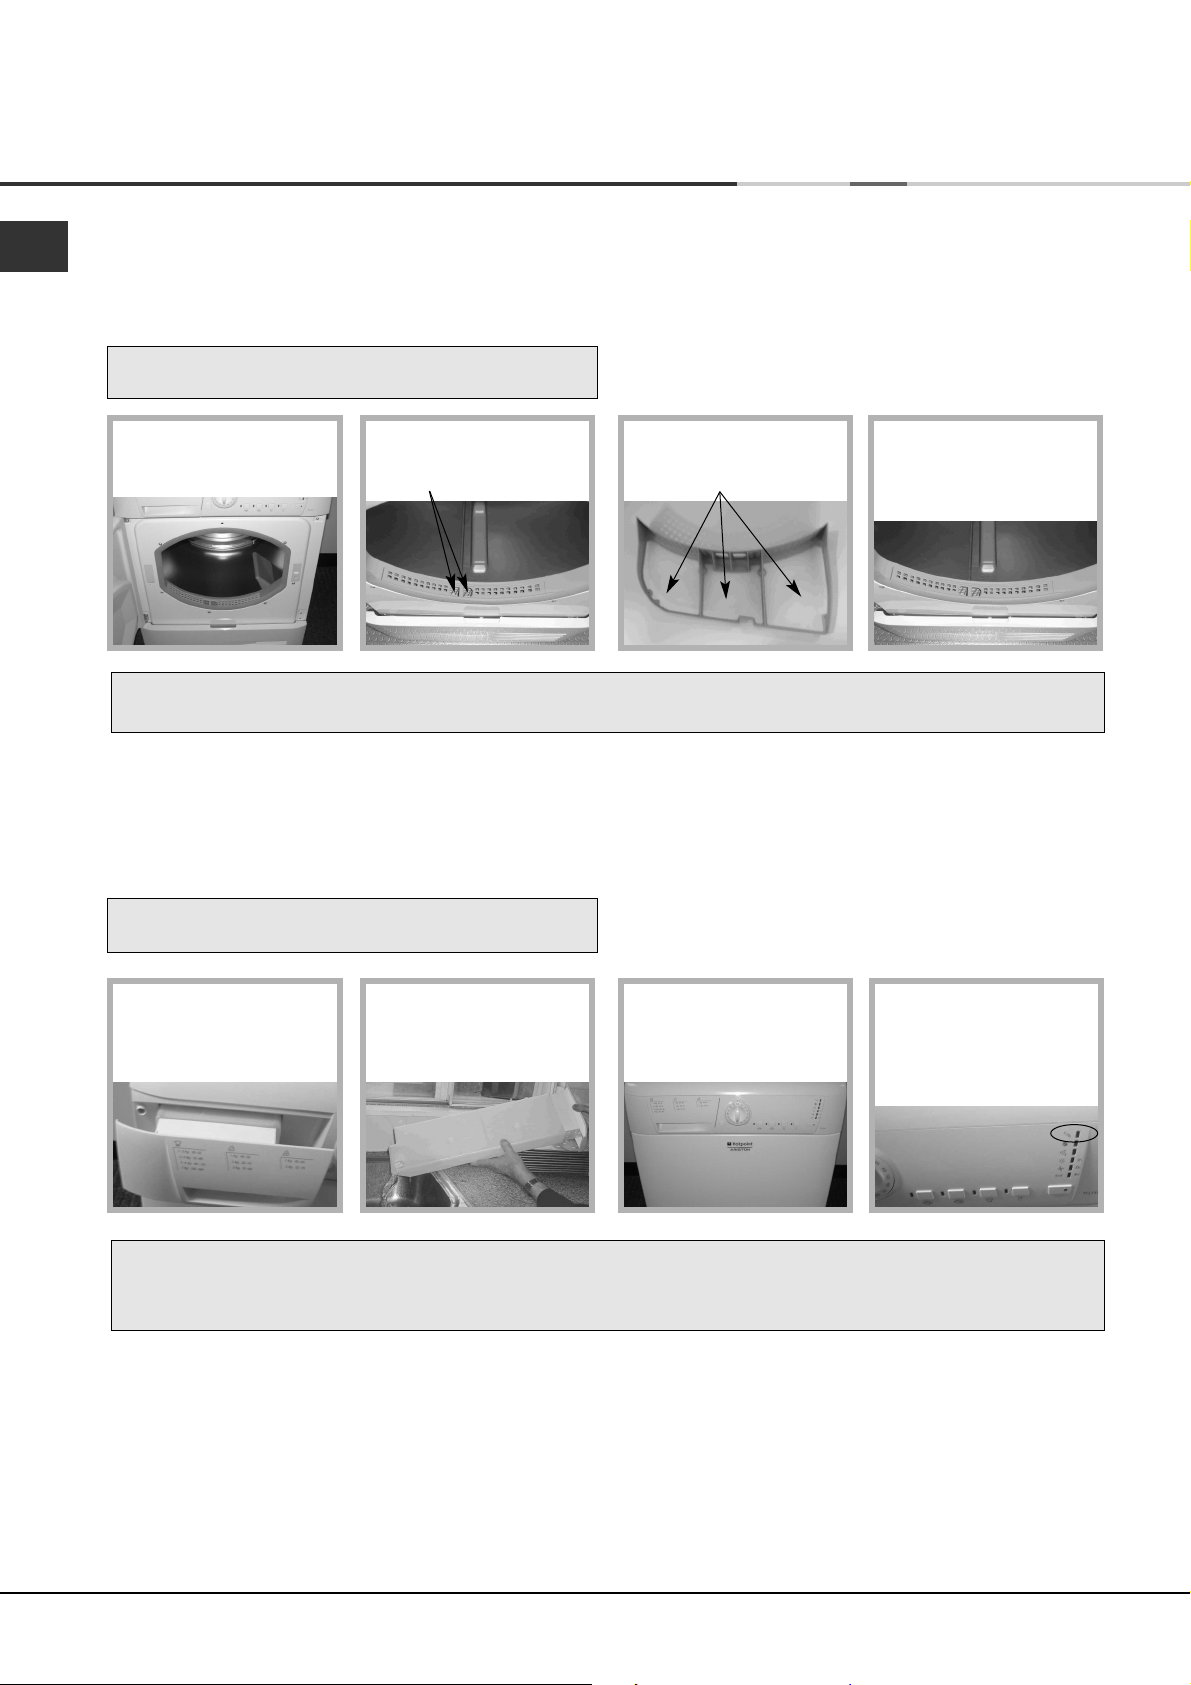
For your Condenser dryer to operate efficiently, you must follow the regular maintenance schedule shown below:
Fluff Filter...
! You MUST clean the fluff filter after EVERY drying
cycle.
STEP 1.
Open the door of your
dryer.
! Failure to clean the filter after EVERY drying cycle will affect the drying performance of your machine.
- It will take longer to dry and as a result will use more electricity during drying.
STEP 2.
Pull out the filter (using
the two finger grips).
STEP 3.
Clean any fluff deposits
from the filter mesh.
STEP 4.
Refit the filter - NEVER
run the dryer without the
filter in position.
Water Container...
! You MUST empty the water container after EVERY
drying cycle.
STEP 1.
Pull the water container
towards you and remove
it fully from the dryer.
! Failure to empty the water container will result in:
- The machine will stop heating (so the load may still be wet at the end of the drying cycle).
- The ‘Empty Water’ light will flash to tell you that the water container is full.
STEP 2.
Empty all the water
collected in the water
container.
STEP 3.
Refit the water container,
ensuring that it is pushed
fully back into position.
Priming the Water Collection System
When your dryer is new, the water container will not collect water until the system is primed... this will take 1 or 2 drying
cycles. Once primed it will collect water during every drying cycle.
! The ‘Empty Water’ light
stays on - To remind you to
empty the water container
at the start and at the
end of each programme.
2
Page 3
Important Information
Condenser Unit...
! You MUST clean the fluff from the condenser EVERY
month.
STEP 1.
Open the condenser cover
- hold the handle and
pull towards you.
STEP 2.
Remove the condenser by
rotating the 3 clips then
pulling the condenser
towards you.
(There may be some water
in the tubes, this is normal).
STEP 3.
Flush the condenser, from
the rear with water, to
remove any fluff deposits.
GB
STEP 4.
Refit the condenser unit
- ensure that the unit is
pushed in fully, all 3 clips
are re-secured and the
positiong arrows on the
front of the condenser are
pointing upwards.
●
Check that:
- The positioning arrows are pointing upwards.
- The 3 clips are re-secured back into their ‘lock’ position.
Rotate 3 clips
! Failure to clean the condenser could cause premature
failure of your dryer.
3
Page 4
Installation
GB
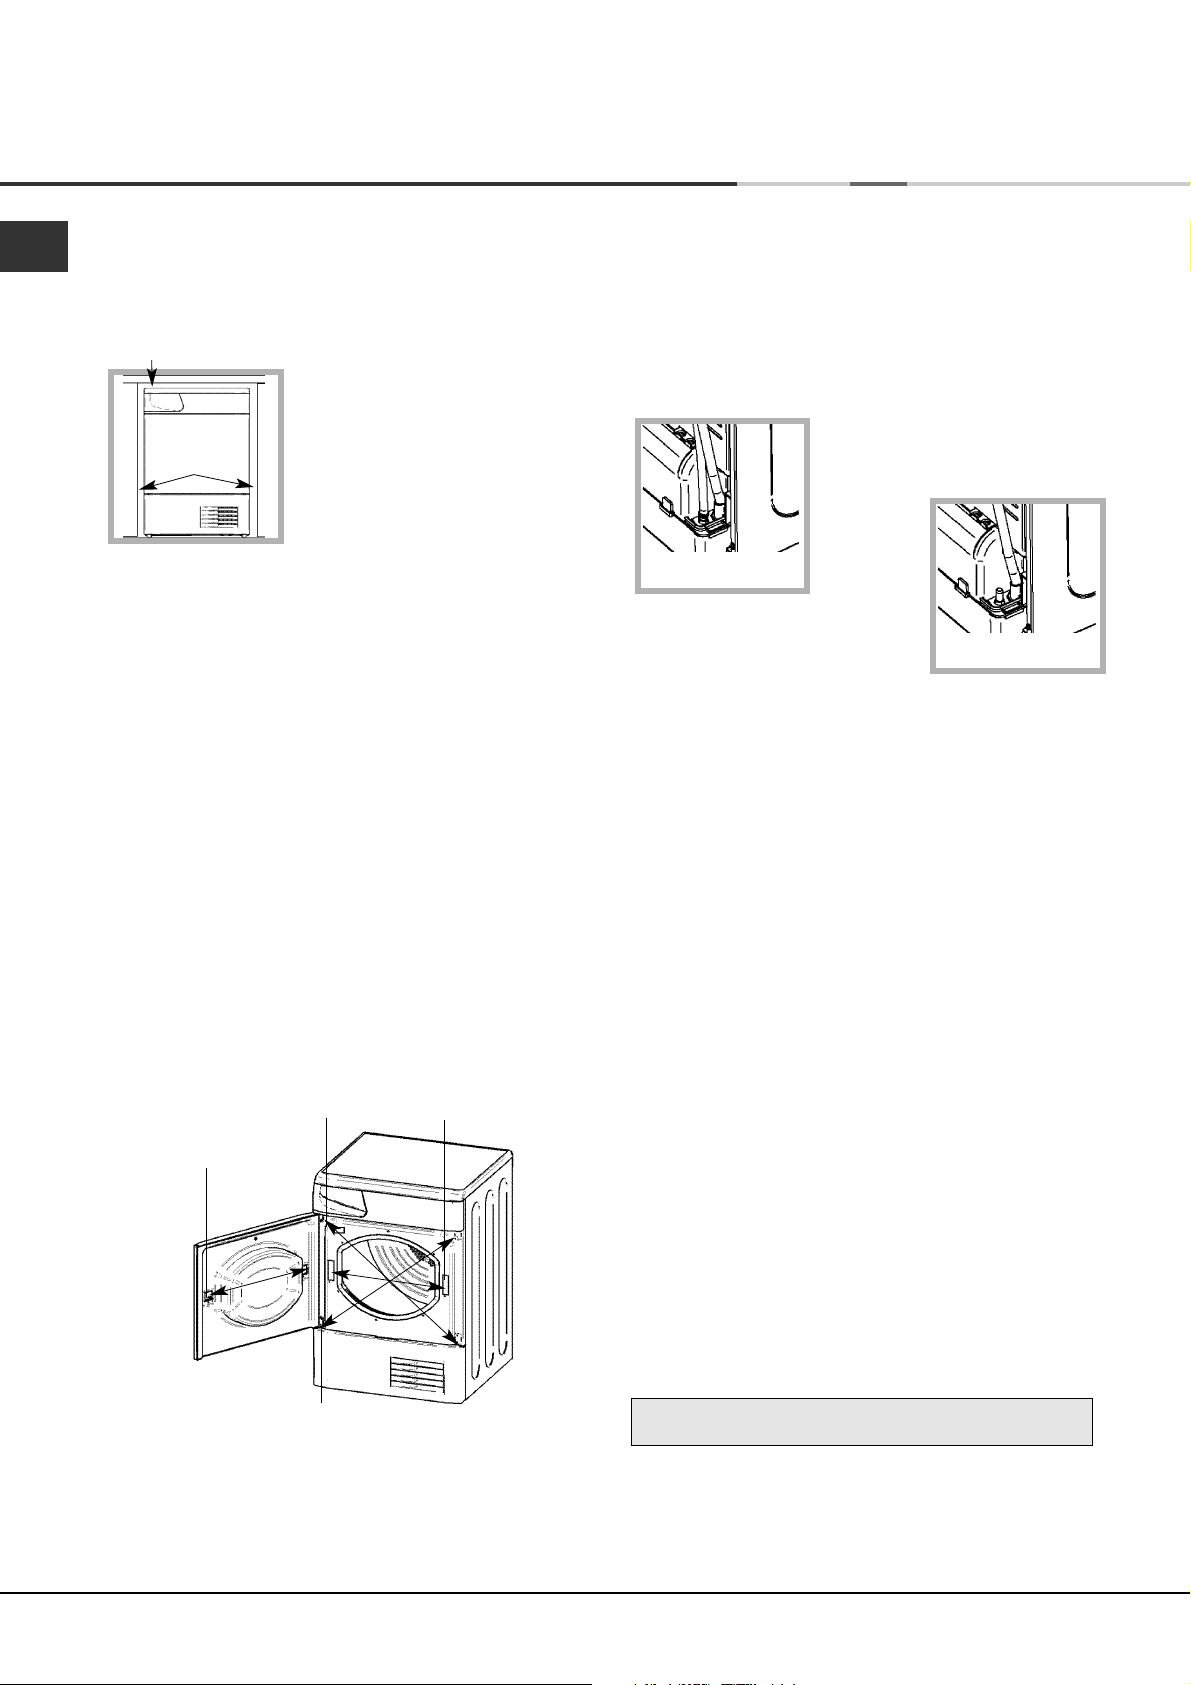
Where to put your dryer
●
Place your dryer at a distance from gas ranges,
stoves, heaters, or cook tops because flames can
damage the appliance.
Minimum gap 10mm
●
If you are going to install
the appliance under a work
counter, be sure to leave a
10mm space between the
Minimum gaps
15mm
top and any other objects
on or above the machine and
a 15mm space between the
sides and lateral furnishings
or walls. This is to ensure
proper air circulation. Make sure that the back vents
are not obstructed.
Ventilation
When the dryer is in use, there has to be adequate
ventilation. Make sure you put your dryer in an
environment that is not damp and has proper air
circulation throughout. Airflow around the dryer is
essential to condense the water produced during the
washing, the dryer will not operate efficiently in an
enclosed space or cupboard.
! We do not recommend that the dryer is installed in a
cupboard but the dryer must never be installed
behind a lockable door, a sliding door or a door with a
hinge on the opposite side to that of the dryer door.
! If using the dryer in a small or cold room some
condensation could be experienced.
Door Reversal Instructions
Hinge
Door latch
Hinge
The door of your dryer is reversible and can easily be
changed. Exchange diagonally hinge brackets and
blanking screws. Exchange door latch and catch with
their opposite blanking plates (see diagram above).
Door catch
Water drain
If your dryer is installed next to a drain the water can be
plumbed into this drain. This does away with the need to
empty the water container. If the dryer is stacked onto or
installed next to a washing machine it can share the same
drain. The height of the drain must be less than 3' (1m)
from the bottom of the dryer.
Remove the existing clip and hose
from position shown (see diagram).
Remove clip and hose
from here...
Fit a suitable length of hose to the
new location shown (see diagram)
and refit clip.
...fit new hose and refit
clip here.
! Make sure that the hose is not squashed or kinked when
the dryer is in its final location.
Electrical connections
Make sure of the following before you insert the plug
into the the electrical socket:
●
The socket must be grounded.
●
The socket must be able to sustain the machines
maximum power, which is indicated on the rating
label (see Dryer Description).
●
Power voltage must be within the values indicated
on the rating label (see Dryer Description).
●
The socket must be compatible with the dryers plug.
Should this not be the case, replace the plug or the
socket.
! The dryer must not be installed outdoors, even if the
space is sheltered. It can be very dangerous if it is
exposed to rain or storms.
! Once installed, the dryers electrical wire and plug
must be within easy reach.
! Do not use extension cords.
! The power cord must not be bent or squashed.
! The power cord supplied should be checked
periodically and replaced by a cord specially prepared
for this dryer and fitted only by authorised technicians
(see Service). New or longer power cords are supplied
at an extra charge by authorised dealers.
! The manufacturer denies any responsibility should any
of these rules not be followed.
! If in doubt about any of the above consult a qualified
electrician.
Before you start using your dryer
Once you have installed your dryer and before you
use it, clean the inside of the drum to remove any dust
that could have accumulated during transport.
4
Page 5
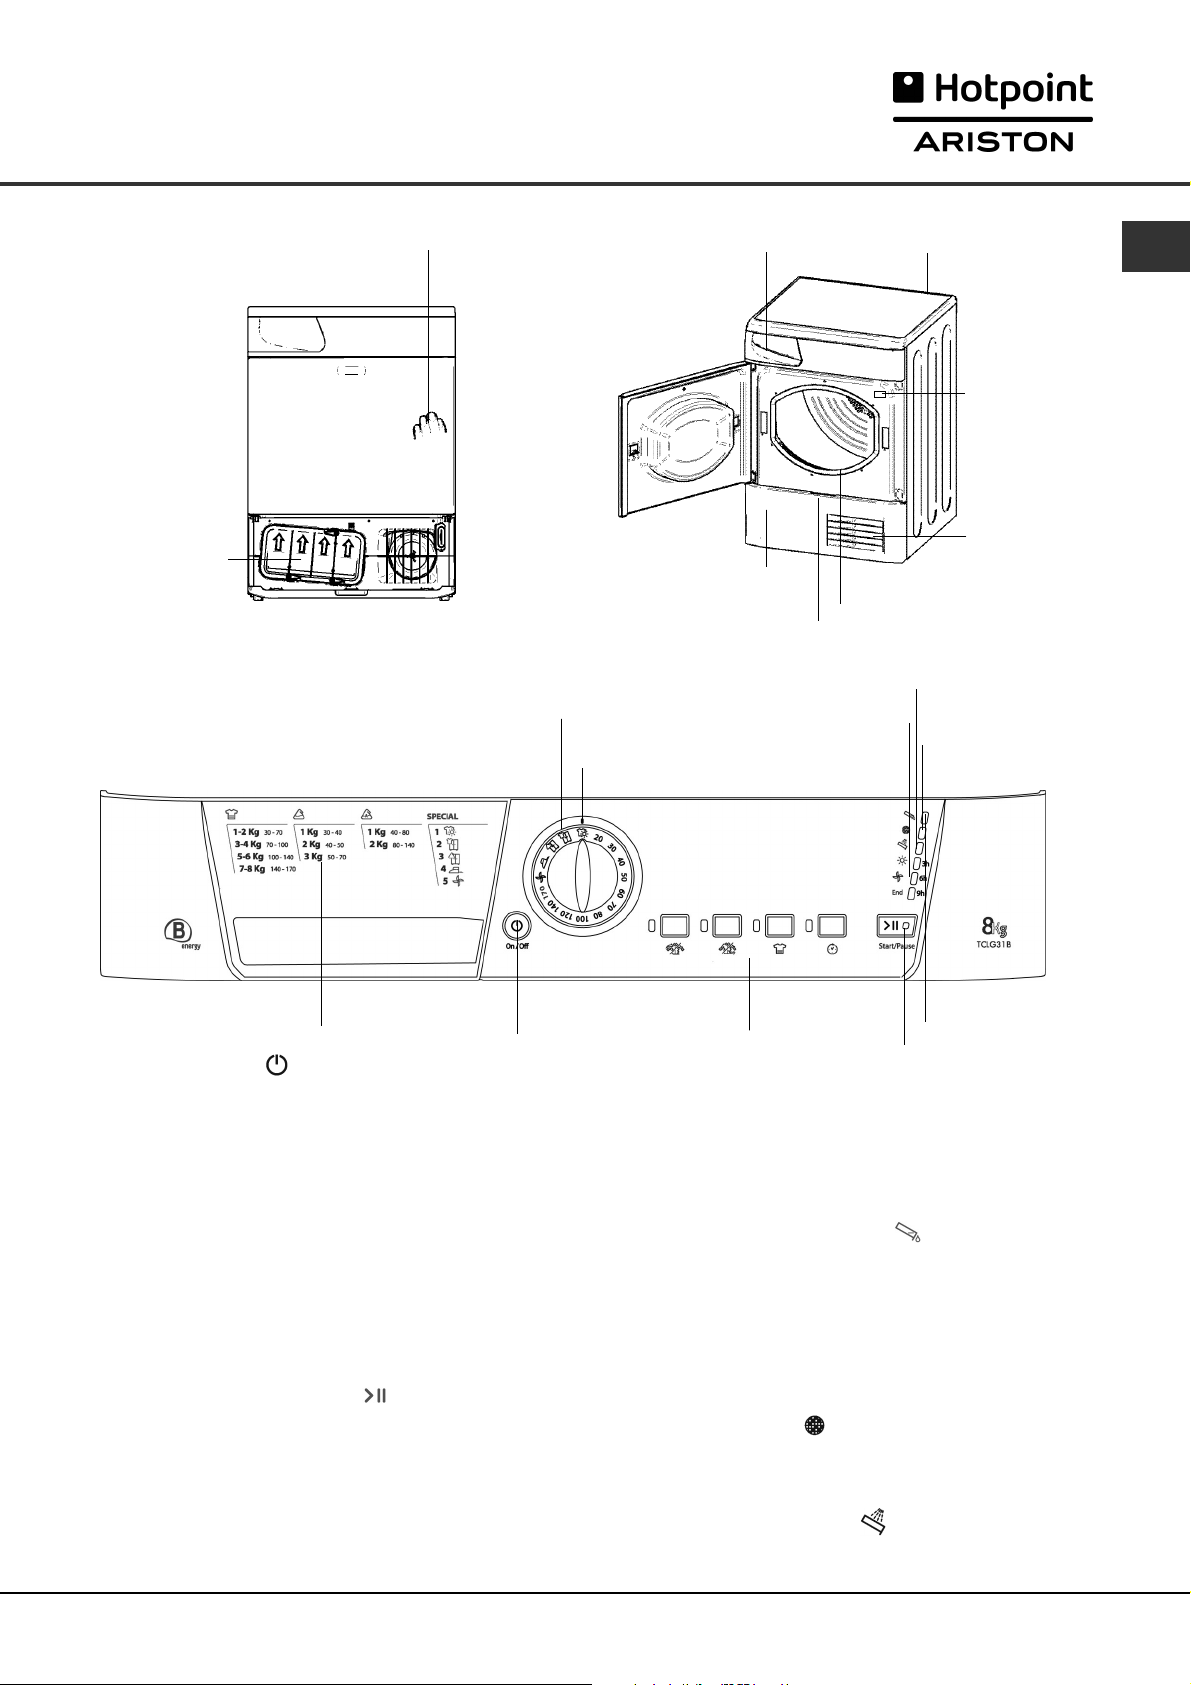
Dryer Description
To open the door The features
Press and release the front
panel in position shown
Condenser unit
(Cover open)
Condenser cover
Condenser cover handle
(Pull to open)
Control panel
PROGRAMMES
Knob
Indicator
Water container
Filter
Progress or Delay
Lights
Rating plate
GB
Model &
Serial
numbers
Air intake
grille
Clean Condenser
Light
Clean Filter
Light
Drying Guide
The ON/OFF button : If the dryer is running and
this button is pressed, the dryer stops. Press again,
the dryer restarts.
The Drying Guide allows you to consult a user friendly
table of fabric types and load capacities.
The PROGRAMMES knob sets the programme: rotate
it until the indicator is pointing to the programme you want
to select (see Start and Programmes).
The OPTION buttons/lights select available options for
your selected programme. The lights indicate that the
option has been selected (see Start and Programmes).
The START/PAUSE button/light starts a selected
programme. When you press this button there will be
one beep and the progress lights will flash to confirm
the action. When a programme is running, holding this
button in pauses the programme and stops the dryer.
The light is green when programme is running, flashing
amber if the programme has been paused or flashing
green if on standby waiting to start a programme (see
Start and Programmes).
ON/OFF
Button
OPTION
Buttons & Lights
The Progress or Delay lights show you the status of
the programme, or the delay time when they flash.
During a delayed start the lights flash to show the
delay selected. When (not flashing) they show each
stage of the programme by the corresponding light
turning on (see Start and Programmes).
The Empty Water indicator light signals that the
water container should be emptied. The light will take
a few seconds to go out after replacing the empty water
container, the dryer must be running for this to happen
(see The Controls).
Note: If the water bottle fills the indicator light flashes, the
heat is turned off and your clothes will not dry.
The Clean Filter light gives you a reminder before
every programme that it is essential to clean the filter
every time the dryer is used (see Maintenance and Care).
The Clean Condenser light gives you a reminder
that it is essential to clean the condenser at regular
intervals (see Maintenance and Care).
START/PAUSE
Button & Light
Empty Water
Light
5
Page 6

Start and Programmes
GB
Choosing a programme
1. Plug the dryer into the electrical socket.
2. Sort your laundry according to fabric type (see
Laundry).
3. Open the door and make sure the filter is clean
and in place and the water container is empty
and in place (see Maintenance).
4. Load the machine and make sure items are not in
the way of the door seal. Close the door.
5. If none of the lights are on: Press the ON/OFF
button .
6. Choose a programme by checking the Programmes
Guide (see Programmes) as well as the indications
for each type of fabric (see Laundry).
- Select a programme by rotating the
PROGRAMMES knob.
7. Set a delay time and other options if necessary.
8. The START/PAUSE light is flashing green:
- press the START/PAUSE button to begin. The
green light stops flashing.
During the drying programme, you can check on
your laundry and take out items that are dry
while others continue drying. When you close
the door again, press the START/PAUSE button in
order to resume drying.
(When the door is opened the START/PAUSE light
will flash Amber, after the door is closed and the
START/PAUSE button pressed, the START/PAUSE
light will stop flashing and show green.)
9. When the programme is complete. The buzzer
will sound. Open the door, take the laundry out,
clean the filter and replace it. Empty the water
container and replace it (see Maintenance).
If the Post Creasecare option has been selected
and you do not remove the laundry immediately,
the dryer will tumble occasionally for 10 hours or
until you open the door.
10. Unplug the dryer.
Easy Iron Programme
‘Easy Iron’ is a short 10 minute programme (8 minutes of heat followed by a 2 minute cool tumble period) which
fluffs the fibres of clothing that have been left in the same position/location for an extended period of time. The
cycle relaxes the fibres and makes them easier to iron and fold.
! ‘Easy Iron’ is not a drying programme and should not be used for wet articles of clothing.
For best results:
1. Do not load more than the maximum capacity.
These numbers refer to the dry weight:
Fabric Maximum load
Cotton and Cotton mixtures 2.5kg
Synthetics 2kg
Denim 2kg
2. Unload the dryer immediately after the end of the programme, hang, fold or iron the articles and put
them away in the closet. Should this not be possible repeat the programme.
The ‘Easy Iron’ effect varies from one fabric to the next. It works well on traditional fabrics like Cotton or Cotton
mix, and less well on acrylic fibres and on materials such as Tencel®.
6
Page 7
Start and Programmes
Programmes
! If none of the lights are lit; Press the ON/OFF button and then select programme.
Programme
Easy Iron
Cottons
Extra
dry
Cottons
Cupboard
dry
Synthetics
Cupboard
dry
Timed Drying
(170, 140, 120,
100, 80, 70, 60,
50, 40,30 or 20
minutes)
What it does... How to set it...
Brief programme (approximately
10 minutes) that softens fibres of
clothing that is ready for ironing.
Dries your clothes on High Heat
setting, ready for wearing.
Dries your clothes on High Heat
setting, ready for putting away.
Dries your clothes on Low Heat
setting, ready for putting away.
Dries wet clothing that you wish
to dry on Low Heat or small
loads (less than 1kg).
Can be used with High Heat
option if you prefer to use a
timed programme.
1. Position the PROGRAMMES knob
on .
2. Press the START/PAUSE button .
1. Position the PROGRAMMES knob
on .
2. Select any options if required.
3. Press the START/PAUSE button .
1. Position the PROGRAMMES knob
on .
2. Select any options if required.
3. Press the START/PAUSE button .
1. Position the PROGRAMMES knob
on .
2. Select any options if required.
3. Press the START/PAUSE button .
1. Position the PROGRAMMES knob
on the desired time: 170, 140, 120,
100, 80, 70, 60, 50, 40, 30 or 20.
2. Select any options if required.
3. Press the START/PAUSE button .
GB
Note:
! This is not a drying
programme (see previous
page).
Options available:
None
Options available:
Delayed Start
Pre-Creasecare
Post Creasecare
Options available:
Delayed Start
Pre-Creasecare
Post Creasecare
Options available:
Delayed Start
Pre-Creasecare
Post Creasecare
Options available:
High Heat
Delayed Start
Pre-Creasecare
Post Creasecare
Consult ‘suggested drying
times’ (see Laundry).
Cool Tumble
Brief programme (approximately
10 minutes) that cools fibres of
clothing.
1. Position the PROGRAMMES knob
on .
2. Press the START/PAUSE button .
The last 10 minutes of these
programmes is the Cool
Tumble phase, see below.
Options available:
None
7
Page 8
GB
Start and Programmes
The Controls
●
PROGRAMMES knob
! Warning, if after pressing the START/PAUSE button
, the programmes knob position has changed, the
new position will NOT change the programme selected.
To change a selected programme, press the
START/PAUSE button ,the light flashes Amber to
indicate the programme is paused. Select the new
programme and any options required, the light will
then flash green. Press the START/PAUSE button
again and the new programme will start.
●
OPTION buttons / lights
These buttons are used to customise the selected
programme to your requirements. Not all options are
available for all programmes (see Start and
Programmes). If an option is not available and you
press the button, the buzzer will beep three times. If
the option is available there will be one beep and the
option light next to the button lights to confirm the
selection.
Progress ( Drying, Cool Tumble, ) /
Delay (3hr, 6hr, 9hr) Lights
When the light next to the delay button is on, these lights
flash to indicate the delay time selected. During other
programmes they indicate the progress of the dryer,
each one comes on as the corresponding phase starts.
Time Delay
The start of some programmes (see Start and
Programmes) can be delayed for up to 9 hours in 3hr
steps. Ensure the water bottle is emptied before setting
a delayed start.
When a delayed start is in progress the light next to the
delay button will be on and the selected delay period
light will flash (after the start button has been pressed).
To set a delayed start, press the Time Delay button,
and the light next to the button will come on together
with the 3hr delay light. Pressing the button again will
advance the delay setting to 6hr, the 3hr light goes
out and the 6hr light is on. Each time you press the
button the delay setting advances 3 hours, as indicated
by the corresponding light. If the 9hr light is on,
pressing the button again will cancel the delay.
Holding in the On/Off button will also cancel.
Pre Creasecare
When a delayed start and this option have been
selected the clothes are tumbled occasionally during
the delayed period to help prevent creases developing.
High Heat
Available for Time Drying Programmes. Press this button
and a high heat setting is selected and the light next to
the button comes on. Timed programmes have a
default of low heat, if the light alongside the button is
on then pressing the button selects a low heat setting
and the light goes out.
Post Creasecare
When selected, the clothes are occasionally tumbled
after the end of the drying and cool tumble cycles, to
help prevent creases developing should you not be
available to remove the load immediately the programme
is complete. The light is on during this phase.
Empty Water Light / Container
(If you have plumbed your dryer to a drain this light
can be ignored, as there is no need to empty the water
container).
When this light is on (not flashing) it reminds you to
empty the water container.
If the water container fills during a programme, the
heater turns off and the dryer does a period of Cool
Tumble then the light flashes and the buzzer sounds.
You must empty the water container and restart the
dryer or the clothes will not dry. After re-starting the
dryer, the light will take a few seconds to go out.
To avoid this always empty the water container each
time you use the dryer (see Maintenance).
●
Door Opening
Opening the door (or pressing the START/PAUSE
button ) during a programme will stop the dryer
and have the following effects:
●
The START/PAUSE light flashes Amber.
●
During a delay phase the delay will continue to
count down. The start/pause button must be
pressed to resume the delay programme.
One of the delay lights will flash to show the
current delay setting.
●
The start/pause button must be pressed to
resume the programme. The progress lights will
change to show the current status and the
START/PAUSE light will stop flashing and turn green.
●
During the post creasecare phase of a drying
programme, the programme will finish. Pressing
the start/pause button will re-start a new
programme at the beginning.
●
Changing the programmes knob will select a new
programme and the START/PAUSE light will flash
green. You can use this to select the Cool Tumble
programme to cool the clothes, if you find them
dry enough. Press the START/PAUSE button to
begin a new programme.
●
Note
If you have a power cut, switch off the power or
remove the plug. When power is restored, press the
START/PAUSE button and the programme will
resume.
8
Page 9
Laundry
Sorting your laundry
●
Check symbols on clothing labels to make sure
that the articles can be tumble dried.
●
Sort laundry by fabric type.
●
Empty pockets and check buttons.
●
Close zippers and hooks and tie loose belts and
strings.
●
Wring out each item in order to eliminate as much
excess water as possible.
! Do not load dripping wet clothes into the dryer.
Maximum load size
Do not load more than maximum capacity.
These numbers refer to dry weight:
Natural fibres: 8kg max (18lb)
Synthetic fibres: 3kg max (6.6lb)
! DO NOT overload the dryer as this could result in
reduced drying performance.
Typical weights
Note: 1kg = 1000g (1lb = 16oz)
Clothes
Blouse Cotton 150g (5oz)
Other 100g (3oz)
Dress Cotton 500g (1lb 2oz)
Other 350g (12oz)
Jeans 700g (1lb 6oz)
10 nappies 1000g (2lb 3oz)
Shirt Cotton 300g (10oz)
Other 200g (7oz)
T-Shirt 125g (4oz)
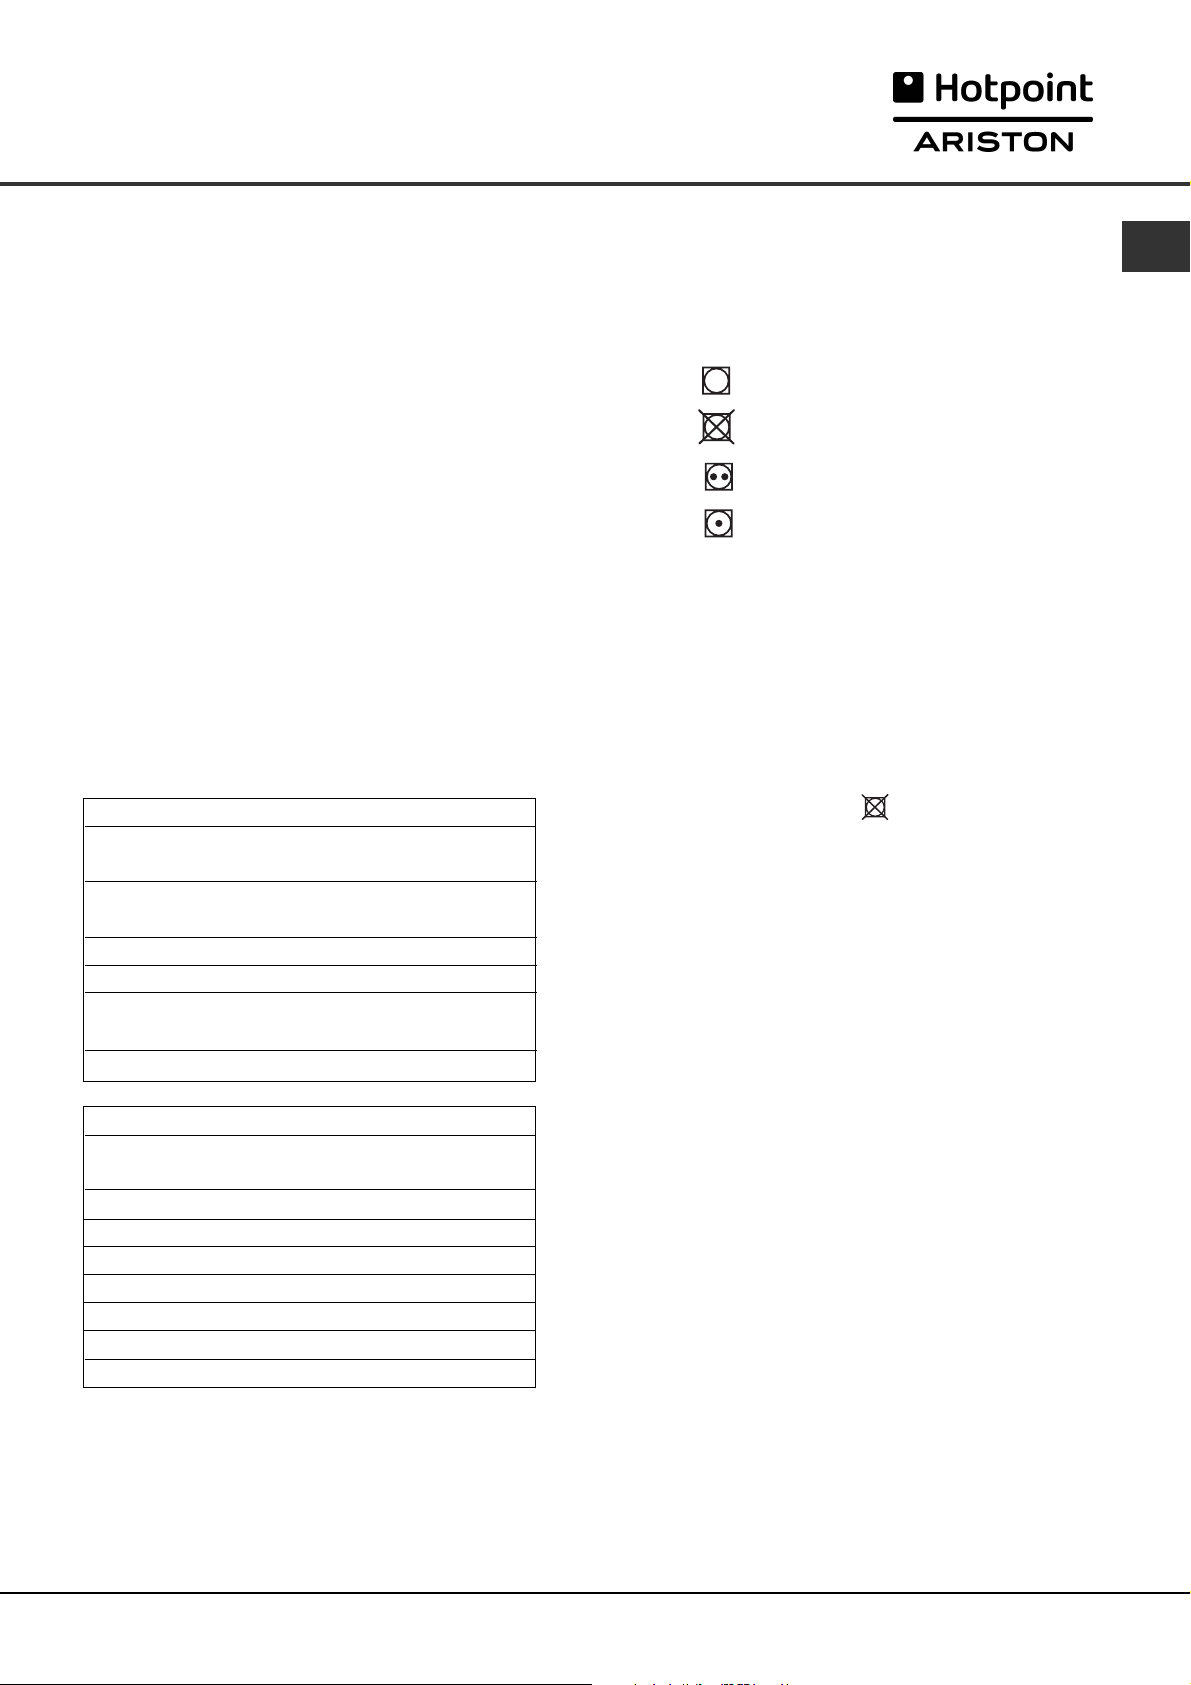
Wash Care Labels
Look at the labels on your garments, especially when
tumble drying for the first time. The following symbols
are the most common:
May be tumble dried
Do not tumble dry
Tumble dry at high heat setting
Tumble dry at low heat setting
Items not suitable for tumble drying
●
Articles that containing rubber or rubber-like
materials or plastic film (pillows, cushions, or PVC
rainwear), any other flammable articles or objects
that contain flammable substances (towels soiled
with hair spray).
●
Glass fibres (certain types of draperies)
●
Items which have been dry cleaned
●
Items with the ITCL Code (see Special
clothing items). These can be cleaned with special
at-home dry cleaning products. Follow instructions
carefully.
●
Large bulky items (quilts, sleeping bags, pillows,
cushions, large bedspreads etc). These expand
when drying and would prevent airflow through
the dryer.
GB
Household Items
Duvet cover Cotton 1500g (3lb 5oz)
(Double) Other 1000g (2lb 3oz)
Large Tablecloth 700g (1lb 6oz)
Small Tablecloth 250g (9oz)
Tea Towel 100g (3oz)
Bath Towel 700g (1lb 6oz)
Hand Towel 350g (12oz)
Double Sheet 500g (1lb 2oz)
Single Sheet 350g (12oz)
At the end of a drying cycle, cottons could still be
damp if you grouped cottons and synthetics together.
If this happens simply give them an additional short
period of drying.
●
Note: The last 10 minutes of any time set is the
Cool Tumble, so allow for this when setting the time,
as this period will not dry your laundry.
9
Page 10

Laundry
GB
Special clothing items
Blankets and Bedspreads: acrylic items (Acilan,
Courtelle, Orion, Dralon) must be dried with special
care on LOW heat setting. Avoid drying for a long
period of time.
Pleated or creased garments: read the manufacturer’s
drying instructions on the garment.
Starched articles: do not dry these with non-starched
items. Make sure that as much of the starch solution is
removed from the load as possible before placing it in
the dryer. Do not over-dry: the starch will become
powdery and leave your clothing limp, which defeats
the purpose of starch.
Drying times
The table (see below) presents APPROXIMATE drying
times in Minutes. Weights refer to dry garments.
Times are approximate and can vary depending
upon:
●
Fabrics: items that are the same type of fabric but
different textures and thicknesses may not have
the same drying time.
●
Quantity of laundry: single items or small loads
may take longer to dry.
●
Dryness: If you are going to iron some of your
clothes, they can be taken out while still a bit
damp. Others can be left longer if you need them
to be completely dry.
●
Heat setting.
●
Room temperature: if the room where the dryer is
located is cold, it will take longer for the dryer to
dry your clothes.
●
Bulk: some bulky items can be tumble dried with
care. We suggest that you remove these items
several times, shake them out, and return them to
the dryer until finished.
! Do not over-dry your clothes.
All fabrics contain a little natural moisture, which
keeps them soft and fluffy.
●
Amount of water retained in clothes after spin
cycle: towels and delicates retain a lot of water.
Cottons
High Heat
(Intensif)
Synthetics
Gentle/Low
Heat
(Délicat)
Delicates
(Acrylics)
Drying times 800-1000 rpm in washing machine.
1 kg
30 - 50
Drying times on reduced spin in washing machine.
2 kg
50 - 70
1 kg
30 - 40
Drying times on reduced spin in washing machine.
Half Load
Gentle/Low
Heat
(Délicat)
1 kg
40 - 80 80 - 140
Half Load
3 kg
70 - 80
4 kg
80 - 100
100 - 120
Half Load
2 kg
40 - 50
5 kg
6 kg
120 - 140
140 - 160
Full Load
2 kg
7 kg
Full Load
3 kg
50 - 70
Full Load
8 kg
150 - 170
10
Page 11

Warnings and Suggestions
●
! The appliance has been designed and built according
to international safety standards.
These warnings are given for safety reasons and must
be followed carefully.
General safety
●
This tumble dryer is not intended for use by
persons (including children) with reduced physical,
sensory or mental capabilities, or lack of experience
and knowledge, unless they have been given
supervision or instruction concerning use of the
appliance by a person responsible for their safety.
●
This tumble dryer has been designed for home,
and not professional use.
●
Do not touch the appliance while barefoot or with
wet hands or feet.
●
Unplug the machine by pulling on the plug, not
the cord.
●
Children must not be in proximity of the dryer
when in use. After using the dryer, turn it off and
unplug it. Keep the door closed to make sure that
children do not use it as a toy.
●
Children should be supervised to ensure that they
do not play with the dryer.
●
The appliance must be installed correctly and
have proper ventilation. The air intake at the front
of the dryer and rear vent behind the dryer should
never be obstructed (see Installation).
●
Never use the dryer on carpeting where the pile
height would prevent air from entering the dryer
from the base.
●
Check to see if the dryer is empty before loading it.
●
●
●
●
●
●
●
●
●
●
The back of the dryer could become very
hot. Never touch it while in use.
Do not use the dryer unless the filter, water
container and condenser are securely in place
(see Maintenance).
Do not use liquid fabric softeners in the dryer, add
it to the final rinse of your wash.
Do not overload the dryer (see Laundry for
maximum loads).
Do not load items that are dripping wet.
Tumble dry items only if they have been washed
with detergent and water, rinsed and been through
the spin cycle. It is a fire hazard to dry items that
HAVE NOT been washed with water.
Carefully check all instructions on clothing labels
(see Laundry).
Do not dry garments that have been treated with
chemical products.
Never dry articles that are contaminated with
flammable substances (cooking oil, acetone, alcohol,
petrol, kerosene, spot removers, turpentine, waxes,
wax removers and hair sprays), unless washed in
hot water with an extra amount of detergent.
Do not tumble dry rubber, rubber backed articles and
clothes, pillows fitted with foam rubber pads, foam
(latex foam), rubber, plastic, shower caps, waterproof
textiles, nappy pants or liners, polythene or paper.
Do not tumble dry large, very bulky items.
●
Do not tumble dry acrylic fibres at high temperatures.
●
Remove all objects from pockets, especially
lighters (risk of explosion).
●
Complete each programme with its Cool Tumble Phase.
●
Do not turn off the dryer when there are still warm
items inside.
●
Clean the filter after each use (see Maintenance).
●
Empty the water container after each use (see
Maintenance).
●
Clean the condenser unit at regular intervals
(see Maintenance).
●
Do not allow lint to collect around the dryer.
●
Never climb on top of the dryer. It could result in damage.
●
Always follow electrical standards and requirements
(see Installation).
●
Always buy original spare parts and accessories
(see Service).
! WARNING: Never stop the dryer before the end of the
drying cycle unless all items are quickly removed and
spread out so that the heat is dissipated.
Recycling and disposal information
As part of our continued commitment to helping the
environment, we reserve the right to use quality recycled
components to keep down customer costs and minimise
material wastage.
●
Disposing of the packaging material: follow local
regulations, so the packaging can be recycled.
●
To minimise risk of injury to children, remove the
door and plug - then cut off mains cable, flush
with the appliance. Dispose of these parts separately
to ensure that the appliance can no longer be
plugged into a mains socket.
Disposal of old electrical appliances
The European Directive 2002/96/EC on Waste Electrical
and Electronic Equipment (WEEE), requires that old
household electrical appliances must not be disposed
of in the normal unsorted municipal waste stream. Old
appliances must be collected separately in order to
optimise the recovery and recycling of the materials
they contain and reduce the impact on human health
and the environment.
The crossed out “wheeled bin” symbol on
the product reminds you of your obligation,
that when you dispose of the appliance it
must be separately collected.
Consumers should contact their local authority or
retailer for information concerning the correct disposal
of their old appliance.
Saving energy and respecting the
environment
●
Wring out items to eliminate excess water before
tumble drying (if you use a washing machine first,
select a high spin cycle). Doing this will save time
and energy during drying.
●
Always dry full loads - you save energy: single
items or small loads take longer to dry.
●
Clean the filter after each use to contain energy
consumption costs (see Maintenance).
GB
11
Page 12

Maintenance and Care
GB
Switching off the electricity
! Unplug your dryer when not using it, when cleaning
it and during all maintenance operations.
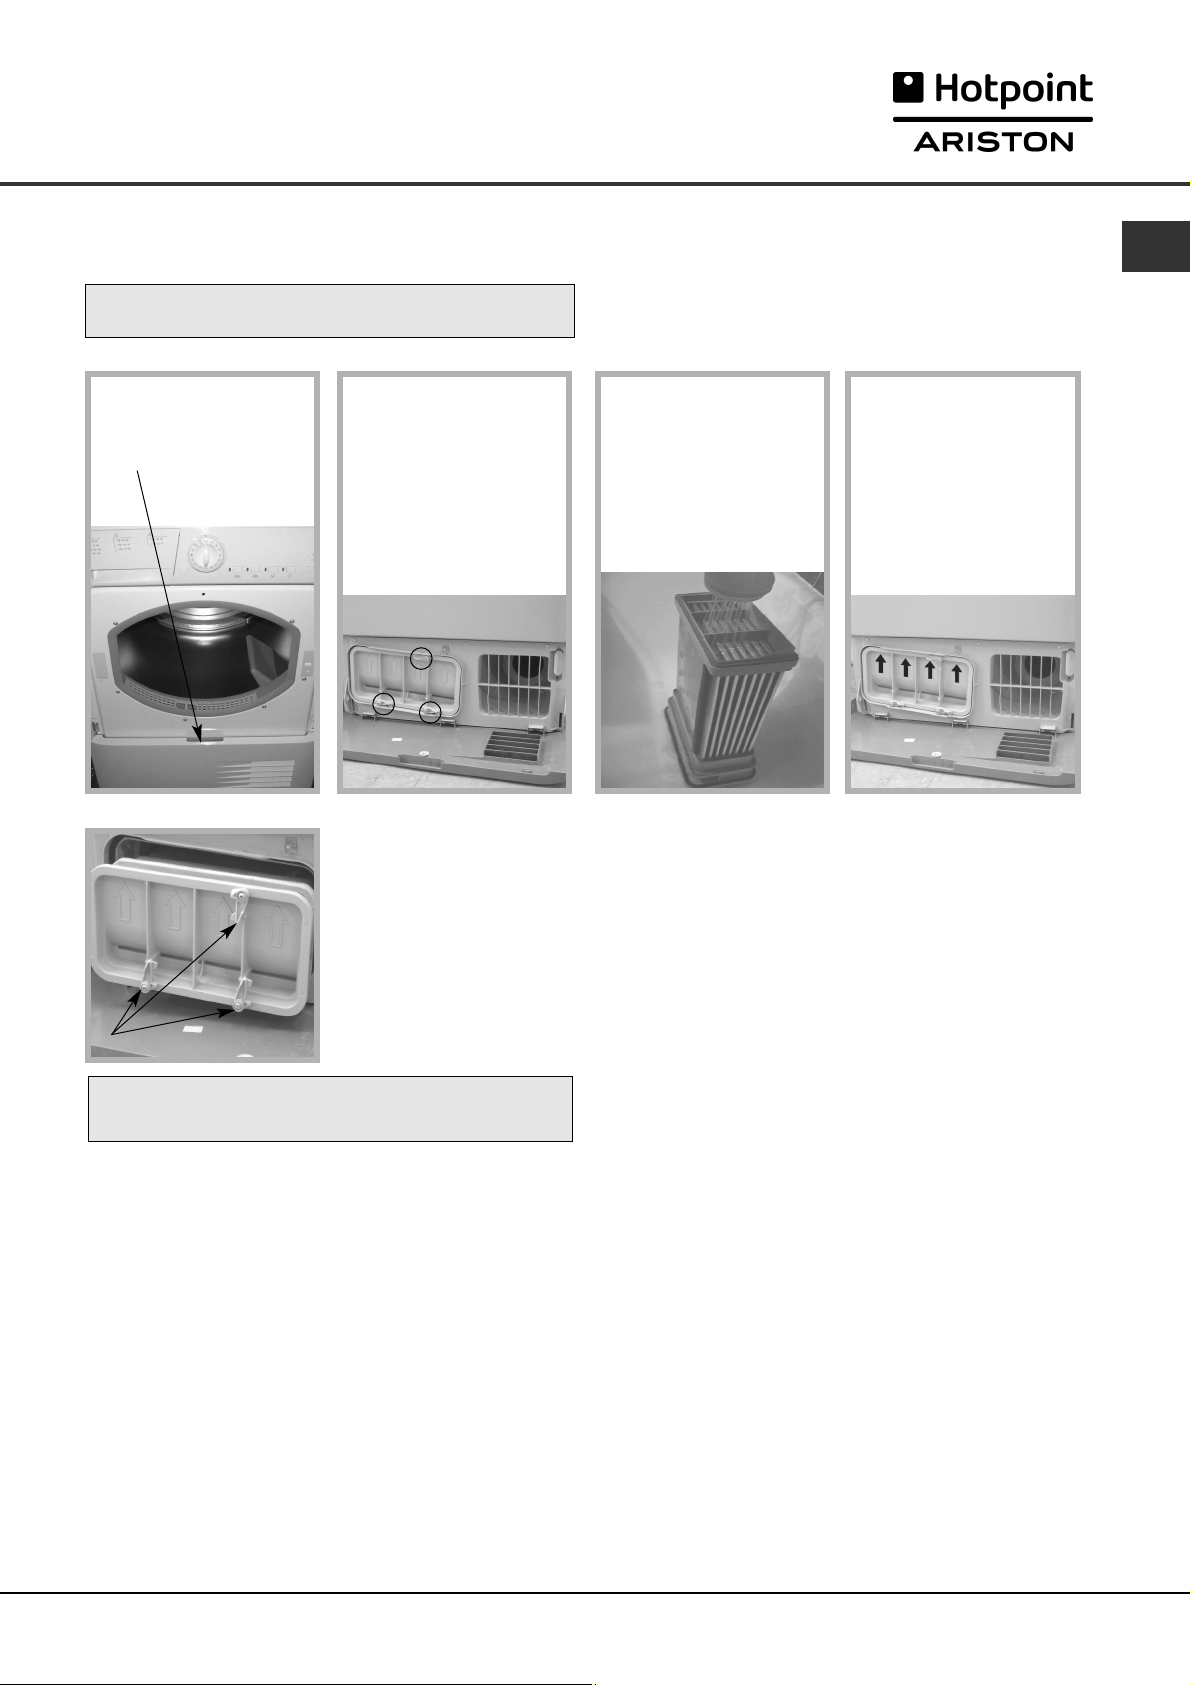
Clean the filter after each cycle
The filter is an important part of your dryer:
it accumulates lint and fluff that is formed while drying.
When finished drying, clean the filter by rinsing it
under running water or with your vacuum cleaner.
Should the filter become clogged up, the airflow inside
the dryer will be seriously compromised: drying times
lengthen and you will consume more energy. It may
also damage your dryer.
The filter is found in front of the dryer trim (see diagram).
Removing the filter:
1. Pull the plastic grip of the filter upwards (see diagram).
2. Clean the filter and replace it correctly.
Ensure the filter is fully located flush into the tumble
dryer trim.
! Do not use the dryer without replacing the filter.
Empty the water container after each
cycle
Cleaning the drum
! Do not use abrasives, steel wool or stainless steel
cleaning agents to clean the drum.
A coloured film may start to appear on the stainless
steel drum, this may be caused by a combination of
water and, or cleaning agents such as fabric conditioner
from the wash. This coloured film will not affect the
dryer performance.
Cleaning the condenser unit
Periodically (every month) remove the condenser unit
and clean any build up of fluff from between the plates
by rinsing it under the tap with cold water.
This should be done with cold water from the rear of
the condenser.
Removing the condenser:
1. Unplug the dryer and open the door.
2. Pull open the condenser cover (see diagram).
Release the three catches by turning 90˚ counterclockwise then pull on the grip and remove from
the dryer.
3. Clean the surface of the seals and replace, making
sure that the catches have been secured.
Pull the container out of the dryer and empty it into a
sink or other suitable drain.
Replace the water container securely.
Always check and empty the container before you
start a new drying programme.
Check the drum after each cycle
Turn the drum manually in order to remove small items
(handkerchiefs) that could have been left behind.
Water container
Condenser unit
Condenser cover
Filter
Air intake
Cleaning the dryer
●
External parts in metal or plastic and rubber parts
can be cleaned with a damp cloth.
●
Periodically (every 6 months) vacuum the front air
intake grille and vents at the rear of the dryer, to
remove any build up of fluff, lint or dust. Also to
remove accumulation of fluff from the front of the
condenser and filter areas, clean occasionally with
a vacuum cleaner.
! Do not use solvents or abrasives.
! Your dryer uses special bearing components which
do not need lubrication.
! Have your dryer checked regularly by authorised
technicians to ensure electrical and mechanical safety
(see Service).
Ta p
Rear
Front
Condenser unit
12
Catches
Handle
Page 13

Troubleshooting
One day your dryer seems not to be working. Before you call your Service Centre (see Service), go through the
following troubleshooting suggestions:
Problem:
The tumble dryer won’t start.
Possible causes / Solution:
●
The plug is not plugged into the socket, or not making contact.
●
There has been a power failure.
●
The fuse has blown. Try to plug another appliance into the socket.
●
You are using an extension cord? Try to plug the dryer’s power cord
directly into the socket.
●
The door is not closed securely?
●
The PROGRAMMES knob has not been set properly (see Start and
Programmes).
●
The START/PAUSE button has not been pressed (see Start and Programmes).
●
Drying cycle will not begin.
Its taking a long time to dry.
You have set a delayed time (see Start and Programmes).
●
The filter has not been cleaned (see Maintenance).
●
The water container needs emptying? The empty water light is flashing?
(see Maintenance).
●
The condenser needs cleaning? (see Maintenance).
●
The temperature setting is not ideal for the type of fabric you are drying
(see Start and Programmes, and see Laundry).
●
The correct drying time has not been selected for the load (see Laundry).
●
The air intake grille or rear vents are obstructed (see Installation, and see
Maintenance).
●
The items were too wet (see Laundry).
●
The dryer was overloaded (see Laundry).
GB
Empty water light is flashing
but the dryer has only been
running for a short period.
Empty water light is on and
the water container is not full.
The OPTION lights and the
START/PAUSE light Flash
amber.
Programme finishes and
clothes are damper than
expected.
●
The water container was probably not emptied at the start of the
programme. Do not wait for the empty water signal, always check and
empty the container before starting a new drying programme (see
Maintenance).
●
This is normal, the light flashes when the container is full. If the light is on
but not flashing it is just a reminder to empty the container (see Start and
Programmes).
●
If the Option lights and the START/PAUSE light flash together with the
Clean Condenser and Cool Tumble lights; Or the Progress lights and
START/PAUSE light flash together with the Clean Filter, Clean Condenser,
Cool Tumble and END lights on, then:
- Turn off and remove the plug. Clean the filter and the condenser
(see Maintenance). Then replace the plug, turn on and start another
programme. If the same combination of lights still flash contact the
Service Centre (see Service).
●
If the Option lights and the START/PAUSE light flash with any other
combination of lights on: Note down the lights that are on and contact the
Service Centre (see Service).
! For safety the dryer has a maximum programme time of 4 hours. If an
automatic programme has not sensed the required final moisture in this time
the dryer will complete the programme and stop. Check the above points
and run the programme again, if the results are still damp, contact the
Service Centre (see Service).
13
Page 14

Service
GB
Before calling the Service Centre:
●
Use the troubleshooting guide to see if you can
solve the problem yourself (see Troubleshooting).
●
If not, turn off the dryer and call the Service Centre
closest to you.
What to tell the Service Centre:
●
name, address and post code.
●
telephone number.
●
the type of problem.
●
the date of purchase.
●
the appliance model (Mod.).
●
the serial number (S/N).
This information can be found on the data label inside
the door of the machine.
Spare Parts
This dryer is a complex machine. Repairing it yourself
or having a non-authorised person try to repair it could
cause harm to one or more persons, could damage
the machine and could invalidate the spare parts
warranty.
Call an authorised technician if you experience problems
while using the machine.
The spare parts have been designed exclusively for
this appliance and not for other uses.
Comparative Programmes
●
Programmes recommended for comparative test to EN61121
Programme Programme to select Load size
(EN61121)
Dry Cotton Cottons - Cupboard Dry 2 8 kg
Iron Dry Cotton Timed Dry High Heat (120 Minutes) 8 kg
Easy-care textile Synthetics - Cupboard Dry 3 3 kg
! Note: This is not a full list of programme options (see Start and Programmes).
14
This appliance conforms to the following EC Directives:
- 2006/95/EC (Low Voltage Equipment)
- 89/336/EEC, 92/31/EEC and 93/68/EEC (Electromagnetic Compatibility)
Page 15

Folleto de instrucciones
SECADORA
GB
English, 1
TCL G31B
E
Español, 15
Índice de materias
Información importante, 16-17
Instalación, 18
Dónde instalar la secadora
Ventilación
Instrucciones para invertir la puerta
Evacuación del agua
Conexiones eléctrica
Antes de empezar a utilizar la secadora
Descripción de la secadora, 19
Para abrir la puerta
Características
El panel de control
Comienzo y programas, 20-22
Seleccionar un programa
Tabla de programas
Controles
La colada, 23-24
Clasificar la colada
Etiquetas de recomendaciones durante el lavado de la ropa
Prendas especiales
Tiempos de secado
E
Advertencias y recomendaciones, 25
Seguridad general
Disposición
Ahorro energético y respeto del medio ambiente
Mantenimiento y cuidados, 26
Desconectar la electricidad
Limpiar el filtro después de cada ciclo
Vaciar el recipiente de agua después de cada ciclo
Comprobar el tambor después de cada ciclo
Limpiar la unidad del condensador
Limpiar la secadora
Resolución de problemas, 27
Servicio, 28
Piezas de repuesto
¡Guarde este manual de instrucciones a mano a fin de consultarlo cuando sea necesario. Llévelo con usted
cuando se traslade, y, si vendiera este electrodoméstico o si lo pasa a terceros compruebe que este manual se
incluya con la secadora de forma que el nuevo propietario quede informado acerca de las advertencias y
recomendaciones, además del funcionamiento de la secadora.
¡Lea estas instrucciones detenidamente; las páginas que aparecen a continuación contienen información
importante sobre la instalación, además de recomendaciones sobre el funcionamiento del electrodoméstico.
15
Page 16

Información Importante
P
E
ara que la secadora por condensación funcione de forma eficaz, debe seguirse el plan de mantenimiento
regular siguiente:
Filtro
! DEBE limpiar el filtro de pelusas después de CADA
ciclo de secado.
PASO 1.
Abra la puerta de la
secadora.
! No limpiar el filtro después de CADA ciclo de secado afectará a la capacidad de secado de la máquina.
- Tardará más tiempo en secar la ropa y, como consecuencia, usará más electricidad durante el secado.
PASO 2.
Tire del filtro para sacarlo
(usando las sujeciones
para los dedos).
PASO 3.
Limpie toda acumulación
de pelusas de la rejilla
del filtro.
PASO 4.
Vuelva a colocar el filtro.
NUNCA ponga en marcha
la secadora si el filtro no
está en su sitio.
Recipiente de agua...
! DEBE vaciar el recipiente del agua después de
CADA ciclo de secado.
PASO 1.
Tire del recipiente del agua
para sacarlo completamente
de la secadora.
PASO 2.
Vacíe toda el agua
acumulada en el
recipiente.
PASO 3.
Vuelva a colocar el
recipiente, asegurándose
de que queda bien
encajado en su sitio.
! La luz "Vaciado de agua"
permanece encendida
para recordarle que debe
vaciar el recipiente de
agua al principio y al final
del programa.
! No vaciar el recipiente del agua puede ocasionar:
- que la máquina deje de calentar (por lo que la carga podría seguir húmeda al final del ciclo de secado).
- La luz "Vaciado de agua" se enciende para informarlo le de que el recipiente del agua está lleno.
Cebado del sistema de recogida de agua
Cuando la secadora es nueva, el recipiente del agua no recogerá agua hasta que el sistema esté cebado. Esto
llevará 1 o 2 ciclos de secado. Una vez cebado recogerá agua durante todos los ciclos de secado.
16
Page 17

Información Importante
Unidad del condensador...
! DEBE limpiar la acumulación de pelusas del
condensador CADA MES.
PASO 1.
Abra la cubierta del
condensador
- Tire del mango hacia
usted.
PASO 2.
Saque el condensador
girando los tres pestillos y
tirando del condensador.
(Es probable que haya
algo de agua en las
tuberías; esto es normal).
PASO 3.
Limpie el condensador
con agua desde la parte
trasera para eliminar las
pelusas acumuladas.
E
PASO 4.
Vuelva a colocar la
unidad del condensador.
Asegúrese de que la
unidad queda bien
encajada, de que los tres
pestillos quedan bien
sujetos y de que las
flechas de posición de la
parte delantera del
condensador apuntan
hacia arriba.
●
Compruebe que:
- Las flechas de posición apuntan hacia arriba.
- Los tres pestillos vuelven a afianzarse en la posición de bloqueo.
Gire los tres pestillos
! No limpiar el condensador podría causar el fallo
prematuro de la secadora.
17
Page 18

Instalación
E
Dónde instalar la secadora
●
Instale la secadora lejos de estufas, calentadores o
cocinas, ya que las llamas pueden dañar el
electrodoméstico.
●
espacio mínima 10 mm
Si va a instalar el
electrodoméstico debajo de
una encimera, asegúrese de
dejar un espacio de 10 mm
espacio mínima
15 mm
entre la parte superior y
cualquier otro objeto que
Evacuación del agua
Si la secadora está instalada cerca de un desagüe, el
agua puede evacuarse por este desagüe. Esto evita la
necesidad de vaciar el recipiente de agua. Si la secadora
se apila sobre una lavadora o se instala junto a ella puede
compartir el mismo desagüe. El desagüe debe estar
a menos de 1 m desde la parte inferior de la secadora.
Quite la sujeción y la manguera
de la posición indicada (véase
el diagrama).
vaya encima o sobre la
máquina y un espacio de
15 mm entre los costados y
el mobiliario lateral o paredes. Esto asegura la correcta
circulación de aire. Asegúrese que los respiraderos
traseros no estén obstruidos.
Ventilación
Quite la sujeción y la
manguera de aquí...
Coloque una manguera de la
longitud adecuada en la nueva
posición (véase el diagrama) y
vuelva a colocar la sujeción.
...coloque la nueva
manguera y vuelva a
poner la sujeción aquí
! Asegúrese de que la manguera no queda aplastada
o retorcida cuando la secadora esté en su ubicación final.
Cuando la secadora está en uso, debe haber una
ventilación adecuada. Asegúrese que coloca la
secadora en un lugar que no tenga humedad y con
una circulación de aire adecuada. El flujo de aire
alrededor de la secadora es esencial para condensar
el agua producida durante el lavado, la secadora no
funcionará eficazmente en un espacio cerrado armario.
Conexiones eléctricas
Compruebe lo siguiente antes de introducir el enchufe
en la toma eléctrica:
●
El enchufe debe llevar conexión a tierra.
●
El enchufe debe tener la capacidad suficiente para
soportar la máxima potencia de los electrodomésticos,
lo que se indica en la matrícula (véase Descripción
de la secadora).
! No es aconsejable instalar la secadora en un armario
y bajo ningún concepto debe instalarse detrás de una
puerta con un mecanismo de seguridad con bloqueo, una
puerta corredera o una puerta con una bisagra colocada
en el lado opuesto a la de la puerta de la secadora.
¡ Si utiliza la secadora en un cuarto pequeño o frío
podría experimentarse condensación.
Instrucciones para invertir la puerta
Cierre de la
Bisagra
Pestillo de
la puerta
puerta
●
El voltaje de potencia debe encontarse dentro de
los valores indicados en la matrícula (véase
Descripción de la secadora).
●
La toma debe ser compatible con el enchufe de la
secadora. Si este no es el caso, cambie el enchufe
o la toma.
¡La secadora no debe instalarse en el exterior, incluso
si el espacio destinado a estos efectos está resguardado.
Puede ser muy peligroso si está expuesta a la lluvia o
tormentas.
¡Una vez instalada, el cable eléctrico y el enchufe de
la secadora deben estar al alcance de la mano.
¡No utilice cables alargadores.
¡El cable de alimentación no debe estar ni doblado ni
torcido.
¡Debe comprobarse periódicamente el cable de la
fuente de alimientación y cambiarse con un cable
especialmente preparado para esta secadora e
instalarse únicamente por técnicos autorizados (véase
Servicio). Los cables de alimentación nuevos o más
largos pueden adquirirse adicionalmente de
distribuidores autorizados.
Bisagra
¡El fabricante declina toda responsabilidad en caso
de no seguirse alguna de estas normas.
¡En caso de cualquier duda consulte con un
La puerta de la secadora es reversible y puede
electricista cualificado.
cambiarse con suma facilidad. Cambie diagonalmente
los soportes con bisagras y los tornillos de sujeción.
Cambie el pestillo de la puerta con las placas de
sujeción contrarias (véase el diagrama a continuación).
Antes de empezar a utilizar la secadora
Una vez haya instalado la secadora y antes de
utilizarla, limpie el interior del tambor para retirar el polvo
que haya podido acumularse durante el transporte.
18
Page 19

Descripción de la secadora
Para abrir la puerta Características
Pulse y suelte el panel delantero en
la posición indicada
Unidad del
condensador
(cubierta abra)
Cubierta del condensador
Mango de la cubierta del
condensador
(Tirar para abrir)
Panel de control
PROGRAMADOR
Estado o Tiempo de Retardo
Indicador
Recipiente de agua
Filtro
Luz
Luces de
Limpiar condensador
E
Matrícula
Modelo y
número
de serie
Respiradero
de entrada
de aire
Luz
Filtro Limpio
Guía de secado
El botón de ENCENDIDO/APAGADO : Si la
secadora está funcionando y se pulsa este botón, la
secadora se parará. Al pulsarlo de nuevo, la
secadora se pone en marcha de nuevo.
La Guía de secado le permite consultar una tabla
fácil de usar de tipos de tejido y capacidades de carga.
El PROGRAMADOR configura el programa: gírelo
hasta que el indicador señale el programa que desea
usar(véase Comienzo y Programas).
Los botones y luces de OPCIÓN permitten seleccionar
las opciones disponibles del programa seleccionado.
Las luces indican que la opción has sido seleccionada
(véase Comienzo y Programas).
El botón y luz INICIO/PAUSA inicia un programa
seleccionado. Cuando pulse este botón, escuchará
un pitido electrónico y las luces de estado destellarán
para confirmar la acción. Cuando un programa está en
funcionamiento, manteniendo pulsado este botón se
pausa el programa y la secadora se para. La luz se
muestra en verde cuando el programa está en marcha,
parpadea en ámbar si el programa está en pausa o
parpadea en verde si está en modo de espera para
iniciar un programa (véase Comienzo y Programas).
ENCENDIDO/APAGADO
Botón de
Botones y Luces de
OPCIÓN
Las luces de Estado o Tiempo de Retardo indican
el estado del programa o el tiempo de retardo
cuando parpadean. Durante un arranque con
retardo, las luces parpadean para mostrar el retardo
seleccionado. Cuando no parpadean, indican cada
fase del programa encendiendo la luz
correspondienten (véase Comienzo y Programas).
La luz indicadora de Vaciar de agua indica que
debe vaciarse el depósito de agua. La luz tardará
unos segundos en apagarse después de reemplazar
el recipiente de agua vacío, la secadora debe estar
funcionando para que suceda esto (véase Controles).
Nota: Si se llena el recipiente de agua, la luz del
indicador parpadea, se apaga el calor y su ropa no
se secará.
La luz Filtro Limpio le recuerda antes de cada
programa que es esencial limpiar el filtro cada vez
que se use la secadora (véase Mantenimiento y
cuidados).
La luz Limpiar condensador es un recordatorio
de la importancia de limpiar el condensador
regularmente (véase Mantenimiento y cuidados).
Botón y Luz
INICIO/PAUSA
Luz
Vaciado de agua
19
Page 20

Comienzo y Programas
E
Seleccionar un programa
1. Enchufar la secadora a la toma eléctrica.
2. Clasifique la colada según la clase de tejido
(véase La colada).
3. Abra la puerta y asegúrese que el filtro está
limpio y en posición y que el recipiente de agua
está vacío e instalado (véase Mantenimiento).
4. Cargue la máquina y asegúrese que no haya
ninguna prenda atrapada en el cierre de la
puerta. Cierre la puerta.
5. Si no hay ninguna luz enciende:
Pulse el botón de Encendido/Apagado .
6. Seleccione un programa comprobando la Guía
de programas (véase Programas) además de las
indicaciones para cada tipo de tejido (véase La
colada).
- Seleccione un programa girando el
PROGRAMADOR.
7. Fije un tiempo de demora y otras opciones si
fuera necesario.
8. La luz INICIO/PAUSA parpadea de color verde:
- Pulse el botón INICIO/PAUSA para comenzar.
La luz verde deja de parpadear..
Durante el programa de secado, usted puede
comprobar la colada y sacar las prendas que ya
se han secado mientras el resto continúa
secándose. Cuando vuelva a cerrar la puerta,
pulse el botón de INICIO/PAUSE a fin de Empezar
a secar de nuevo.
(Cuando la puerta está abierta, la luz
INICIO/PAUSA parpadea de color ámbar. Al cerrarla
y pulsar el botón INICIO/PAUSA, la luz deja de
parpadear y se queda fija y de color verde.)
9. Una vez concluido el programa, el zumbador
sonará. Abra la puerta, saque la ropa, limpie el
filtro y vuelva a colocarlo. Vacíe el recipiente de
agua y vuelva a instalarlo (véase Mantenimiento).
Si se ha seleccionado la Opción Antiarrugas
después del secado y no saca la colada
inmediatamente, la secadora se pondrá en
funcionamiento ocasionalmente durante 10 horas
o hasta que se abra la puerta.
10. Desenchufe la secadora.
Programa de planchado fácil
“Planchado fácil” es un programa corto de 10 minutos (8 minutos de calor seguido de 2 minutos de secado en
frío) que ahueca las fibras de la ropa que se ha dejado en la misma posición/lugar durante un largo periodo de
tiempo. El ciclo relaja las fibras y facilita el planchado y el doblado de la ropa.
¡ “Planchado fácil” no es un programa de secado y no debe utilizarse para prendas mojadas.
Para obtener los mejores resultados:
1. No cargue más que la capacidad máxima.
Estos números se refieren al peso de la ropa en seco:
Tejido Carga máxima
Algodón y mezclas de algodón 2,5 kg
Sintéticos 2 kg
Dril de algodón 2 kg
2. Vacíe la secadora inmediatamente después de que haya finalizado el programa, cuelgue, doble o planche
las prendas y guárdelas en el armario. Si esto no es posible repita el programa.
El efecto de “planchado fácil” varía de un tejido a otro. Funciona bien con tejidos tradicionales como algodón o
mezclas de algodón, y menos bien con tejidos acrílicos y materiales como Tencel®.
20
Page 21

Comienzo y Programas
Programas
! Si no hay ninguna luz encendida; pulse el botón de ENCENDIDO/APAGADO y, a continuación, seleccione el
programa.
Programa
Planchado
fácil
Algodón
Secado extra
Algodón
Listas para usar
Sintéticos
Listas para usar
Qué hace... Qué programa...
Breve programa (unos 10
minutos) que ablanda las fibras
de las prendas y las deja listas
para planchar.
Seca la ropa con el ajuste
Mucho calor, ropa lista para
usar.
Seca la ropa con el ajuste
Mucho calor, dejándolas listas
para usar.
Seca la ropa con el ajuste Poco
calor, dejándolas listas para
usar.
1. Sitúe el PROGRAMADOR en
2. Pulse el botón de INICIO/PAUSE
1. Sitúe el PROGRAMADOR en
2. Seleccione cualquier opción, si
procede.
3. Pulse el botón de INICIO/PAUSE
1. Sitúe el PROGRAMADOR en
2. Seleccione cualquier opción, si
procede.
3. Pulse el botón de INICIO/PAUSE
1. Sitúe el PROGRAMADOR en
2. Seleccione cualquier opción, si
procede.
3. Pulse el botón de INICIO/PAUSE
Nota:
¡ No es un programa de
secado (véase la página
anterior) !
Opciones disponibles:
Ninguna
Opciones disponibles:
Inicio temporizado
Pre-Antiarrugas
Post-Antiarrugas
Opciones disponibles:
Inicio temporizado
Pre-Antiarrugas
Post-Antiarrugas
Opciones disponibles:
Inicio temporizado
Pre-Antiarrugas
Post-Antiarrugas
E
Secado
temporizado
(170, 140, 120,
100, 80, 70, 60,
50, 40,30 or 20
minutos)
Secado en
frío
Seca las prendas húmedas con
poco calor o en pequeñas
cargas (menos de 1 kg).
Puede utilizarse con la opción
Mucho calor si se prefiere un
programa temporizado.
Breve programa (unos 10
minutos) que enfría las fibras o
prendas.
1. Sitúe el PROGRAMADOR en el
tiempo de su preferencia: 170, 140,
120, 100, 80, 70, 60, 50, 40, 30 ó 20.
2. Seleccione cualquier opción, si
procede.
3. Pulse el botón de INICIO/PAUSE
1. Sitúe el PROGRAMADOR en
2. Pulse el botón de INICIO/PAUSE
Opciones disponibles:
Mucho calor
Inicio temporizado
Pre-Antiarrugas
Post-Antiarrugas
Consulte los tiempos de
secado recomendados (véase
La Colada).
Los últimos 10 minutos de
estos programas corresponden
al Secado en frío (véase abajo).
Opciones disponibles:
Ninguna
21
Page 22

Comienzo y Programas
Controles
●
E
PROGRAMADOR
! Advertencia: si tras pulsar el botón de
INICIO/PAUSA se cambia la posición del
programador, la nueva posición NO MODIFICARÁ el
programa seleccionado.
Para cambiar un programa seleccionado, pulse el
botón INICIO/PAUSA . La luz parpadea de color
ámbar para indicar que el programa está en pausa.
Seleccione el nuevo programa y las opciones que
desee. La luz parpadeará en verde
INICIO/PAUSA
otra vez para que empiece el
. Pulse el botón
nuevo programa.
●
Botones/luces de OPCIÓN
Estos botones se utilizan para ajustar el programa
seleccionado a sus necesidades. No todas las
opciones están disponibles para todos los programas
(véase Comienzo y Programas). Si una opción no está
disponible y pulsa el botón correspondiente, el zumbador
emitirá tres pitidos. Si la opción está disponible, se
oirá un pitido y se encenderá la luz de la opción
situada junto al botón para confirmar la selección.
Estado ( Secado, Secado en frío, ) /
Inicio Retardado (3hr, 6hr, 9hr) Luces
Cuando la luz junto al botón de retardo está encendida,
estas luces parpadean para indicar el tiempo de retardo
que está seleccionado. En otros programas, estas luces
indican el estado de la secadora, donde cada una se
sucede cuando comienza la fase correspondiente.
Temporización (Inicio Retardado)
El inicio de algunos programas (véase Comienzo y
Programas) se puede retrasar hasta
horas. Asegúrese de que el depósito de agua está vacío
antes de programar un arranque con retardo.
Cuando esté en curso un inicio retardado, se encenderá la
luz junto al botón de retardo y parpadeará la luz del
periodo de retardo seleccionado (después de pulsar el
botón de INICIO/PAUSA).
Para programar un inicio con retardo, pulse el botón
Tiempo de retardo, y se encenderá la luz al lado del
botón, así como la luz de retardo de 3 horas. Al pulsar el
botón de nuevo, se adelantará el ajuste del retardo hasta
6 horas, se apagará la luz de 3 horas y se encenderá la
de 6 horas. Cada vez que pulse el botón, el ajuste avanzará
3 horas, tal y como le indica la luz correspondiente. Si la luz
de
9 horas está encendida, al pulsar el botón de nuevo
se cancelará el retardo.
programa pulsando el botón de Encendido/Apagado
También puede cancelar el
9 horas en fases de 3
.
Pre-Antiarrugas
Cuando se ha seleccionado un inicio con retardado y la opción
‘Pre-Antiarrgas’, la ropa se gira de forma ocasional durante
el periodo de retardo para evitar que se produzcan arrugas.
Mucho calor
Disponible en los programas temporizados. Pulsando este
botón para seleccioná el adjuste mucho calor, con lo que se
enciendá la luz sitada junto al mismo. Los programas
temporizados tienen, de manera predeterminada, la opción
de. Si la luz situado junto al botón está encendida, al pulsar
el botón se seleccioná el ajuste poco calor y la luz se apagará.
Post-Antiarrugas
Cuando seleccione esta opción, la secadora moverá
las prendas ocasionalmente al final de los ciclos de
secado y secado en frío, con el objeto de evitar que se
arruguen en caso de que no sea posible retirarlas
inmediatamente después de concluido el programa.
La luz permanece endendida durante esta fase.
Luz de vaciado de agua / recipiente
(Si ha conectado los tubos de la secadora a un
desagüe, esta luz puede ignorarse, puesto que no es
necesario vaciar el depósito de agua).
Cuando esta luz está encendida (sin parpadear) le
recuerda que tiene que vaciar el depósito del agua.
Si el depósito del agua se llena durante un programa, el
calentador se apaga y la secadora realiza una fase de
Secado en frío y, finalmente, la luz parpadea y el
zumbador suena. Debe vaciar el depósito de agua y
reiniciar la secadora o la ropa no se secará. Tras reiniciar
la secadora, la luz tardará unos cuantos segundos en
apagarse. Para evitarlo, vacíe siempre el depósito de
agua cada vez que utilice la secadora (véase Resolución
de problemas).
●
Apertura de la puerta
Si se abre la puerta (o si se pulsa el botón INICIO/PAUSA
) durante un programa, la secadora parará y se
producirá lo siguiente:
●
La luz de INICIO/PAUSA parpadea de color ámbar.
●
Durante la fase de retardo, la temporización
continuará su cuenta regresiva. Para reanudar el
programa antes de que finalice la cuenta debe
pulsar el botón de INICIO/PAUSA .
Una de las luces de retardo parpadeará para
indicar el ajuste de retardo actual.
●
Para reanudar el programa debe pulsar el botón de
INICIO/PAUSA . Las luces indicadoras de
progreso cambiarán para indicar el estado actual y
la luz de inicio/pausa dejará de parpadear y se
quedará fija en verde.
●
Durante las fase de post-antiarrugas de un
programa de secado, el programa finalizará.
Pulsando el botón de INICIO/PAUSA se reiniciará
un nuevo programa desde el principio.
●
Si se cambia la posición del programador quedará
seleccionado un nuevo programa y la luz de
inicio/pausa parpadeará de color verde. Puede
utilizar esto para seleccionar el programa
Secado en frío para enfriar las prendas si
considera que están bastante secas. Pulse el botón
inicio/pausa para empezar un programa nuevo
●
Nota
En caso de producirse un corte de electricidad o de
haber apagado o desenchufado la secadora, Cuando
vuelva la electricidad, pulse el botón de INICIO/PAUSA
y el programa se reanudará.
22
Page 23

La colada
Clasificar la colada
• Compruebe los símbolos en las etiquetas de la
ropa a fin de asegurar que los artículos pueden
secarse con calor.
• Clasificar la colada por tipo de tejido.
• Vaciar los bolsillos y comprobar los botones.
• Cerrar las cremalleras y los corchetes y atar los
cinturones y cordones sueltos.
• Escurra las prendas a fin de eliminar la mayor
cantidad agua como sea posible.
¡ No meter ropas muy mojadas en la secadora.
Tamaño máximo de la carga
No cargue más que la capacidad máxima. Estos
números se refieren al peso de la ropa en seco:
Fibras naturales: 8 kg máx.
Fibras sintéticas: 3 kg máx.
¡ NO cargar demasiado la secadora ya que esto
podría dar como resultado un rendimiento de secado
reducido.
Carga típica
Nota: 1kg = 1000g
Ropa
Blusa de algodón 150 g
Otro 100 g
Vestido de algodón 500 g
Otro 350 g
Vaqueros 700 g
10 pañales 1000 g
Camisa de algodón 300 g
Otro 200 g
Camiseta 125 g
Etiquetas de recomendaciones durante el lavado de
la ropa
Lea siempre las etiquetas de la prenda, especialmente
cuando se sequen con calor por primera vez. Los
símbolos que aparecen a continuación son los más
comunes:
Puede secarse con calor
No secar con calor
Secar con calor a una temperatura alta
Secar con calor a una temperatura baja
Artículos que no son aptos para secarse con calor
• Artículos que contienen goma o materiales
similares a la goma o películas plásticas
(almohadas, cojines, o prendas impermeables de
PVC), cualquier otro artículo inflamable u objetos
que contengan sustancias inflamables (toallas
manchadas de laca para el cabello).
• Fibras de vidrio (ciertos tipos de cortinas).
• Artículos que se han limpiado en seco.
• Artículos con el código ITCL (véase Prendas
especiales). Éstas pueden limpiarse en casa con
productos especiales de limpieza en seco para
usar en casa. Siga las instrucciones
cuidadosamente.
• Artículos grandes y voluminosos (edredones,
sacos de dormir, almohadas, cojines, sobrecamas
grandes, etc). Éstos se agrandan cuando se están
secando y evitarán el flujo de aire por la secadora.
E
Artículos domésticos
Funda de duvet de algodón 1500 g
(Doble) Otro 1000 g
Mantel grande 700 g
Mantel pequeño 250 g
Paño de cocina 100 g
Toalla de baño 700 g
Toalla de mano 350 g
Sábana doble 500 g
Sábana individual 350 g
Al final de un ciclo de secado, es posible que las
prendas de algodón estén todavía húmedas si agrupó
algodones y sintéticos juntos. Si sucediese esto, dele
un tiempo corto de secado.
●
Nota: Los últimos 10 minutos del tiempo que se
haya fijado son para el secado en frío. Tenga esto
en cuenta, ya que esta fase no secará las prendas.
23
Page 24

La colada
E
Prendas especiales
Mantas y sobrecamas: Los artículos acrílicos (Acilan,
• Tejidos: las prendas del mismo tejido pero con
diferente textura y espesor es posible que no
tengan los mismos tiempos de secado.
Courtelle, Orion, Dralón) deben secarse teniendo
especial cuidado y en ajuste POCO calor. Evite
secarlos durante mucho tiempo.
• Cantidad de colada: las prendas sencillas o las
cargas pequeñas pueden tardar más tiempo en
secarse.
Prendas plisadas o arrugadas: lea las instrucciones
de secado del fabricante incluidas con la prenda.
• Sequedad: Si va a planchar algunas de las
prendas, puede sacarlas mientras están un poco
Artículos almidonados: no seque estos artículos con
otras prendas no almidonadas. Asegúrese que se
húmedas. Otras pueden dejarse más tiempo si
necesita que se sequen completamente.
retira la mayor cantidad posible de la solución de
almidón de la carga antes de introducir las prendas
• Ajuste de calor.
en la secadora. No secar demasiado:
El almidón puede tener una apariencia polvorienta y
dejar la ropa sin vida, lo que hace inútil utilizar almidón.
• Temperatura de la habitación: Si la habitación en
la que se ha instalado la secadora es fría, la
secadora tardará más tiempo en secar la ropa.
Tiempos de secado
• Volumen: algunos artículos voluminosos pueden
secarse con calor teniendo cuidado. Sugerimos
La tabla (véase abajo) indica el tiempo de secado
APROXIMADO en Minutos. Los pesos se refieren a
prendas secas:
que saque estos artículos varias veces, los
sacuda y los vuelva a meter en la secadora hasta
que finalice el programa.
Los tiempos son aproximados y pueden variar
dependiendo de:
• La cantidad de agua retenida en la ropa después
del ciclo de centrifugado: las toallas y las
prendas delicadas retienen mucha agua.
Algodón
Mucho
(máximo)
calor
Sintéticos
Poco
(suave)
calor
Delicados
(Acrílicos)
Poco
Tiempos de secado a 800-1000 rpm en la lavadora
1 kg
30 - 50
2 kg
50 - 70
3 kg
70 - 80
Tiempos de secado con centrifugado reducido en la lavadora
1 kg
30 - 40
Tiempos de secado con centrifugado reducido en la lavadora
Media carga
1 kg
(suave)
calor
40 - 80
Media carga
4 kg
80 - 100
Media carga
¡ No seque la ropa en exceso.
Todos los tejidos contienen una cantidad pequeña de
humedad natural, lo que los mantiene suaves y
huecos.
Carga entera
8 kg
150 - 170
2 kg
40 - 50
5 kg
100 - 120
6 kg
120 - 140
Carga entera
7 kg
140 - 160
Carga entera
3 kg
50 - 70
2 kg
80 - 140
24
Page 25

Advertencias y
recomendaciones
¡ El electrodoméstico ha sido diseñado y fabricado
según las normas internacionales de seguridad.
Por razones de seguridad le comunicamos las
siguientes advertencias. Por favor, léalas con atención.
Seguridad general
●
Esta secadora ha sido diseñada para uso doméstico
y no profesional.
●
No tocar el electrodoméstico con los pies descalzos
o con las manos o pies mojados.
●
Desenchufar la máquina tirando del enchufe, no
del cable.
●
Los niños no deben encontrarse cerca de la
secadora mientras se está utilizando. Después de
utilizar la secadora, desenchúfela. Mantenga la
puerta cerrada a fin de asegurar que los niños no
puedan utilizarla como un juguete.
●
El electrodoméstico debe instalarse correctamente
y disponer de la ventilación adecuada. La entrada
de aire en la parte delantera de la secadora y el
respiradero trasero, detrás de la secadora, nunca
deben estar obstruidos (véase Instalación).
●
Nunca utilice la secadora sobre alfombras en las
que la altura del pelo evitaría que el aire se introdujera
en la secadora por la base.
●
Compruebe que la secadora esté vacía antes de
cargar la colada.
●
●
●
●
●
●
●
●
●
●
●
●
●
La parte de atrás de la secadora puede
estar muy caliente. Nunca la toque mientras
está funcionando.
No utilice la secadora a menos que el filtro, el
recipiente de agua y el condensador estén
correctamente instalados (véase Mantenimiento).
No utilice suavizante en la secadora; añada el
suavizante al último aclarado de la lavadora.
No cargue la secadora demasiado (véase La colada
para las cargas máximas).
No cargue prendas que estén muy mojadas.
Seque las prendas únicamente si se han lavado con
detergente y agua, se han aclarado y centrifugado.
Existe el peligro de incendio si se secan artículos
que NO se han lavado con agua.
Compruebe detenidamente todas las instrucciones
que se ofrecen en las etiquetas de las prendas
(véase La colada).
No seque prendas que hayan sido tratadas con
productos químicos.
Nunca seque prendas que se hayan ensuciado con
sustancias inflamables (aceite de cocinar, acetona,
alcohol, petróleo, queroseno, quitamanchas, aguarrás,
ceras, decapantes de cera o sprays para el cabello),
a menos que las haya lavado en agua caliente con
una cantidad adicional de detergente.
No seque artículos ni prendas de goma o con
refuerzos de goma, almohadas con goma espuma,
espuma (espuma de látex), goma, plástico, gorros
de baño, tejidos impermeables, pañales tipo
braguita ni forros de pañales, polietileno ni papel.
No seque artículos grandes o muy voluminosos.
No seque fibras acrílicas a altas temperaturas.
Saque todos los objetos de los bolsillos, en especial
encendedores (riesgo de explosión).
●
Complete todos los programas con la fase de secado
en frío.
●
No desconecte la secadora cuando los artículos en
su interior están todavía calientes.
●
Limpie el filtro cada vez que use la secadora
(véase Mantenimiento).
●
Vacíe el recipiente de agua después de cada uso
(véase Mantenimiento).
●
Limpie la unidad del condensador después de
intervalos periódicos (véase Mantenimiento).
●
No permita que se acumulen pelusas cerca de la
secadora.
●
Nunca suba encima de la secadora ya que podría
ocasionar daños.
●
Siga siempre las normas y los requerimientos
eléctricos (véase Instalación).
●
Compre siempre piezas de repuesto y accesorios
originales (véase Servicio).
! ADVERTENCIA: Nunca pare la secadora antes de
terminar el ciclo de secado a menos que saque
inmediatamente todos los artículos y los extienda para
que se disipe el calor.
Información sobre reciclado y disposición
Como parte de nuestro compromiso continuo por ser
responsables con el medio ambiente, nos reservamos
el derecho de utilizar componentes reciclados de
calidad para mantener los costes de nuestros clientes
bajos y reducir el desperdicio de materiales.
●
Desechar el material de embalaje: siga las normativas
locales, de forma que el embalaje pueda reciclarse.
●
Para reducir al mínimo el riesgo de lesiones
personales a los niños, quite la puerta y el enchufe y
a continuación corte el cable de alimentación al ras
con el electrodoméstico. Deshágase de estas piezas
por separado a fin de asegurar que el electrodoméstico
no pueda volverse a enchufar al suministro.
Eliminación del electrodoméstico viejo
En base a la Norma europea 2002/96/CE de Residuos
de aparatos Eléctricos y Electrónicos (RAEE), los
electrodomésticos viejos no pueden ser arrojados en
los contenedores municipales habituales; tienen que
ser recogidos selectivamente para optimizar la
recuperación y reciclado de los componentes y
materiales que los constituyen, y reducir el impacto
en la salud humana y el medioambiente.
El símbolo del cubo de basura tachado se
marca sobre todos los productos para recordar al
consumidor la obligación de separarlos para la
recogida selectiva.
El consumidor debe contactar con la autoridad local o
con el vendedor para informarse en relación a la
correcta eleminación de su electrodoméstico viejo.
Ahorro energético y respeto del medio ambiente
●
Escurrir las prendas para eliminar el exceso de agua
antes de secar con calor (si utiliza una lavadora
primero, seleccione un ciclo de centrifugado alto). Hacer
esto ahorrará tiempo y energía durante el secado.
●
Seque siempre cargas completas – de esta forma
ahorrará energía: una sola prenda o las cargas
pequeñas tardan más tiempo en secarse.
●
Limpie el filtro cada vez que utilice la secadora a fin
de reducir el gasto energético (véase Mantenimiento).
E
25
Page 26

Mantenimiento y cuidados
E
Desconectar la electricidad
¡ Desenchufe la secadora mientras no la esté
utilizando, cuando la limpie y durante los trabajos de
mantenimiento.
Limpiar el filtro después de cada ciclo
El filtro es una pieza importante de la secadora:
acumula las pelusas y los hilos que se forman
mientras se seca la ropa. Las prendas pequeñas
también pueden quedar atrapadas en el filtro.
Cuando termine de secar, por lo tanto, limpie el filtro
aclarándolo debajo del grifo o con la aspiradora. Si el
filtro se obstruye, el flujo de aire en el interior de la
secadora se verá seriamente afectado: los tiempos de
secado se alargarán y consumirá más energía.
Asimismo, podría ocasionar daños a la secadora.
El filtro se encuentra delante del remate de la
secadora (véase el diagrama).
Quitar el filtro:
1. Tire del asa de plástico del filtro hacia arriba
(véase el diagrama).
2. Limpie el filtro y vuélvalo a colocar correctamente.
Asegúrese que el filtro se ha colocado
completamente a ras con el remate de la secadora.
¡ No utilice la secadora sin haber colocado el filtro.
Limpieza del tambor
¡ No utilice productos de limpieza abrasivos, lana de
acero o acero inoxidable para limpiar el tambor.
Es posible que comience a formarse una capa de
color en el tambor de acero inoxidable, esto puede
deberse a la combinación de agua y, o, productos de
limpieza como suavizante de ropa. Esta capa de color
no afecta el rendimiento de la secadora.
Limpiar la unidad del condensador
Periódicamente (cada mes) retire la unidad del
condensador y limpie la acumulación de pelusas de
entre las placas, aclarándolo debajo del grifo de agua
fría. Esto debe hacerse con agua fría desde la parte
trasera del condensador.
Quitar el condensador:
1. Desenchufe la secadora y abra la puerta.
2. Abra la cubierta del condensador (véase el
diagrama). Suelte los tres pestillos haciéndolos
girar 90° grados hacia la derecha y tirando del
mango para separarlo de la secadora.
3. Limpie la superficie de los cierres y vuélvalo a
instalar, asegurándose que los cierres estén
seguros.
Vaciar el recipiente de agua después de
cada ciclo
Limpieza
Extraiga el recipiente de la secadora y vacíelo en un
fregadero u otro desagüe apropiado.
Vuelva a colocar correctamente el recipiente de agua.
Compruebe siempre el contenedor y vacíelo antes de
iniciar un nuevo programa de secado.
Comprobar el tambor después de cada
ciclo
Girar el tambor manualmente para retirar las prendas
pequeñas (pañuelos) que pudieran dejarse atrás.
Filtro
Recipiente de agua
Unidad del condesador
Cubierta del condesador
Pestillos
Mango
Entrada
de aire
●
Las piezas externas de metal, plástico o goma
pueden limpiarse con un paño húmedo.
●
De forma periódica (cada 6 meses) se recomienda
pasar el aspirador por la entrada de aire frontal y
de ventilación trasera para eliminar cualquier
acumulación de pelusa o polvo. También es
aconsejable pasar el aspirador en la parte
delantera donde se ubica el condensador y los filtros
para eliminar cualquier acumulación de pelusas.
¡ No utilice disolventes ni abrasivos.
¡ La secadora utiliza cojinetes de componentes
especiales que no necesitan lubricarse.
¡ Revise la secadora periódicamente por técnicos
autorizados a fin de asegurar la seguridad eléctrica y
mecánica de la misma (véase Servicio).
grifo
trasera
delantera
Unidad del condesador
26
Page 27

Resolución de problemas
Si un día la secadora deja de funcionar. Antes de llamar al Centro de Servicio Técnico (véase Servicio), realice
las siguientes comprobaciones:
Problema:
La secadora no se pone en
marcha.
Posibles causas / Solución:
●
El enchufe no está enchufado en la toma, o no hace contacto.
●
Ha habido un fallo de potencia.
●
El fusible se ha fundido. Pruebe a enchufar otro electrodoméstico en la
toma.
●
¿Está utilizando un cable alargador? Pruebe enchufar el cable de
alimentación directamente en la toma.
●
¿Está la puerta bien cerrada?
●
El PROGRAMADOR no se ha ajustado correctamente (véase Comienzo y
Programas).
●
No se ha pulsado el botón de INICIO (véase Comienzo y Programas).
No comienza el ciclo de secado.
Tarda mucho tiempo en secar.
●
Ha ajustado un tiempo con demora (véase Comienzo y Programas).
●
No se ha limpiado el filtro (véase Mantenimiento).
●
¿Necesita vaciar el recipiente de agua? ¿Está parpadeando la luz de
vaciado de agua? (véase Mantenimiento).
●
¿Necesita limpiar el condensador? (véase Mantenimiento).
●
El ajuste de temperatura no es ideal para el tipo de tejido que está
secando (véase Comienzo y Programas, y véase La colada).
●
No se ha seleccionado el tiempo de secado correcto para la carga
(véase La colada).
●
La rejilla de la entrada de aire o los respiraderos traseros están obstruidos
(véase Instalación, y véase Mantenimiento).
●
Las prendas no estaban mojadas (véase La colada).
●
La secadora está demasiado cargada (véase La colada).
E
La luz de vaciado de agua
está parpadeando pero la
secadora sólo ha estado
funcionando durante un
breve periodo de tiempo.
La luz de vaciado de agua
está encendida y el depósito
de agua no está lleno.
Se enciende la luz OPCIÓN y
la luz INICIO/PAUSA parpadea
de color ámbar.
El programa termina y la ropa
está más húmeda de lo
esperado.
●
Probablemente, no se vació el depósito de agua al comienzo del programa.
No espere a la señal de vaciar el agua, compruebe siempre el contenedor
y vacíelo antes de iniciar un nuevo programa de secado (véase
Mantenimiento).
●
Esto es normal, la luz parpadea cuando el depósito está lleno. Si la luz
está encendida pero no parpadea, solamente le indica que debe vaciar
el depósito (véase Comienzo y Programas)
●
Si se enciende la luz de Opción y la luz de INICIO/PAUSA parpadea,
junto con las luces Limpiar Condensador y Secado en frío, o las luces de
Estado o Tiempo de Retardo y la luz de INICIO/PAUSA parpadea junto
con las luces Limpiar filtro, Limpiar Condensador, Secado en frío y fin:
- Apague la secadora y retire el enchufe. Limpie el filtro y el
condensador (véase Mantenimiento). Vuelva a poner el enchufe,
encienda y después inicie otro programa. Si sigue parpadeando la
misma combinación de luces, póngase en contacto con el Servicio
Técnico (véase Servicio).
●
Si se enciende la luz de OPCIÓN y la luz INICIO/PAUSA parpadea,
mientras se encienden otras luces: anote las luces que se encienden y
póngase en contacto con el Servicio Técnico (véase Servicio).
! Por seguridad, la secadora tiene una duración máxima de programa de 4
horas. Si no se ha detectado un programa automático, la humedad final
requerida en este tiempo, la secadora completará el programa y se parará.
Compruebe los puntos anteriores y vuelva a poner en marcha el programa,
si las prendas siguen estando húmedas, póngase en contacto con el
Centro de servicio (véase Servicio).
27
Page 28

Servicio
195079673.00 W
07/2009 - SIMLEX . Four Ashes, Wolverhampton
E
Antes de llamar al centro de servicio
técnico:
Piezas de repuesto
Esta secadora es una máquina compleja. Si intenta
●
Utilice la guía de resolución de problemas para ver
si puede resolver el problema usted mismo (véase
Resolución de problemas).
●
Si no es así, desconecte la secadora y llame al
Centro de servicio técnico más cercano.
repararla usted mismo o una persona no autorizada
puede ocasionar daños a la secadora, además de
invalidar la garantía de piezas de repuesto. Llame a
un técnico autorizado si experimenta algún problema
cuando utilice la máquina. Las piezas de repuesto
han sido exclusivamente diseñadas para este
electrodoméstico y no para ningún otro uso.
Qué información debe facilitar al centro de servicio
técnico:
●
nombre, dirección y código postal.
●
número de teléfono.
●
el problema.
●
la fecha de compra.
●
el modelo del electrodoméstico (Mod.).
●
el número de serie (N/S).
Esta información puede encontrarse en la placa
identificativa en el interior de la puerta de la máquina.
Comparación de Programas
●
Programas recomendados para la prueba de comparación del modelo EN61121
Programa Programa seleccionado Carga
(EN61121) máxima
Algodón seco Algodón - Listas para usar
Algodón seco para plancha Secado temporizado - Mucho calor (120 Minutos) 8 kg
Tejidos delicados Sintéticos - Listas para usar
! Nota: Esta no es una lista completa de opciones de programación.(véase Comienzo y Programas).
2 8 kg
3 3 kg
28
Este electrodoméstico cumple las siguientes directivas de la CEE:
- 2006/95/CEE (Equipos de bajo voltaje)
- 89/336/CEE, 92/31/CEE y 93/68/CEE (Compatibilidad electromagnética)
 Loading...