

Hotpoint TCF 97B 6HY User Manual
Instruction booklet
TUMBLE DRYER
GB
English, 1
F
Français, 18
E
Español, 52PPortuguês, 69
TCF 97B
D
Deutsch, 35
Contents
Installation, 2
Where to put your dryer
Ventilation
Water drain
Electrical connection
Before you start using your dryer
Warnings, 3-4
General safety
To minimise the risk of fire
Maintenance and Care, 5-6
Switching off the electricity
Cleaning the filter after each cycle
Check the drum after each cycle
Empty the water container after each cycle
Cleaning the condenser unit
Cleaning the dryer
Dryer description, 7
The features
Control panel
GB
This symbol reminds you to read this
This symbol reminds you to read this
booklet.
booklet.
! Keep this instruction booklet on hand in order to refer
! Keep this instruction booklet on hand in order to refer
to it when necessary. Take it with you when you
to it when necessary. Take it with you when you
move, and should you sell this appliance or pass it
move, and should you sell this appliance or pass it
on to another party, make sure that this booklet is
on to another party, make sure that this booklet is
supplied along with the dryer so that the new owner
supplied along with the dryer so that the new owner
may be informed about warnings and suggestions on
may be informed about warnings and suggestions on
how the appliance works.
how the appliance works.
! Read these instructions carefully; the following
! Read these instructions carefully; the following
pages contain important information on installation
pages contain important information on installation
and suggestions on how the appliance works.
and suggestions on how the appliance works.
The Display, 8
Start and programmes, 9-13
Choosing a programme
Programmes Table
The Controls
Laundry, 14
Sorting your laundry
Wash care labels
Drying times
Troubleshooting, 15
Service, 16
Spare Parts
Recycling and Disposal
Product data, 17
www.hotpoint.eu
1
Installation
GB
Where to put your dryer
●
Place your dryer at a distance from gas
ranges, stoves, heaters, or cook tops
because flames can damage the
appliance.
Minimum gap 10mm
●
If you are going to
install the appliance
under a work counter,
be sure to leave a
Minimum gaps
15mm
10mm space between
the top and any other
objects on or above
the machine and a
15mm space between
the sides and lateral furnishings or walls. This
is to ensure proper air circulation.
The appliance must be installed with the
rear surface placed against a wall.
Ventilation
When the dryer is in use, there has to be adequate
ventilation. Make sure you put your dryer in an
environment that is not damp and has proper air
circulation throughout. Airflow around the dryer is
essential to condense the water produced during the
washing, the dryer will not operate efficiently in an
enclosed space or cupboard.
! If using the dryer in a small or cold room some
condensation could be experienced.
! We do not recommend that the dryer is
installed in a cupboard but the dryer must
never be installed behind a lockable door,
a sliding door or a door with a hinge on
the opposite side to that of the dryer door.
Electrical connections
Make sure of the following before you
insert the plug into the the electrical socket:
●
Make sure your hands are dry.
●
The socket must have an earth connection.
●
The socket must be able to sustain the
machines maximum power, which is
indicated on the rating label (see Dryer
Description).
●
Power voltage must be within the values
indicated on the rating label (see Dryer
Description).
●
The socket must be compatible with the
dryers plug. Should this not be the case,
replace the plug or the socket.
! The dryer must not be installed outdoors,
even if the space is sheltered. It can be
very dangerous if it is exposed to rain or
storms.
! Once installed, the dryers electrical wire
and plug must be within easy reach.
! Do not use extension cords.
! The power cord must not be bent or
squashed.
! The power cord should be regularly
checked. If the supply cord is damaged, it
must be replaced by the manufacturer, its
service agent or similarly qualified
persons in order to avoid a hazard. New or
longer power cords are supplied at an extra
charge by authorised dealers.
! The manufacturer denies any responsibility
should any of these rules not be followed.
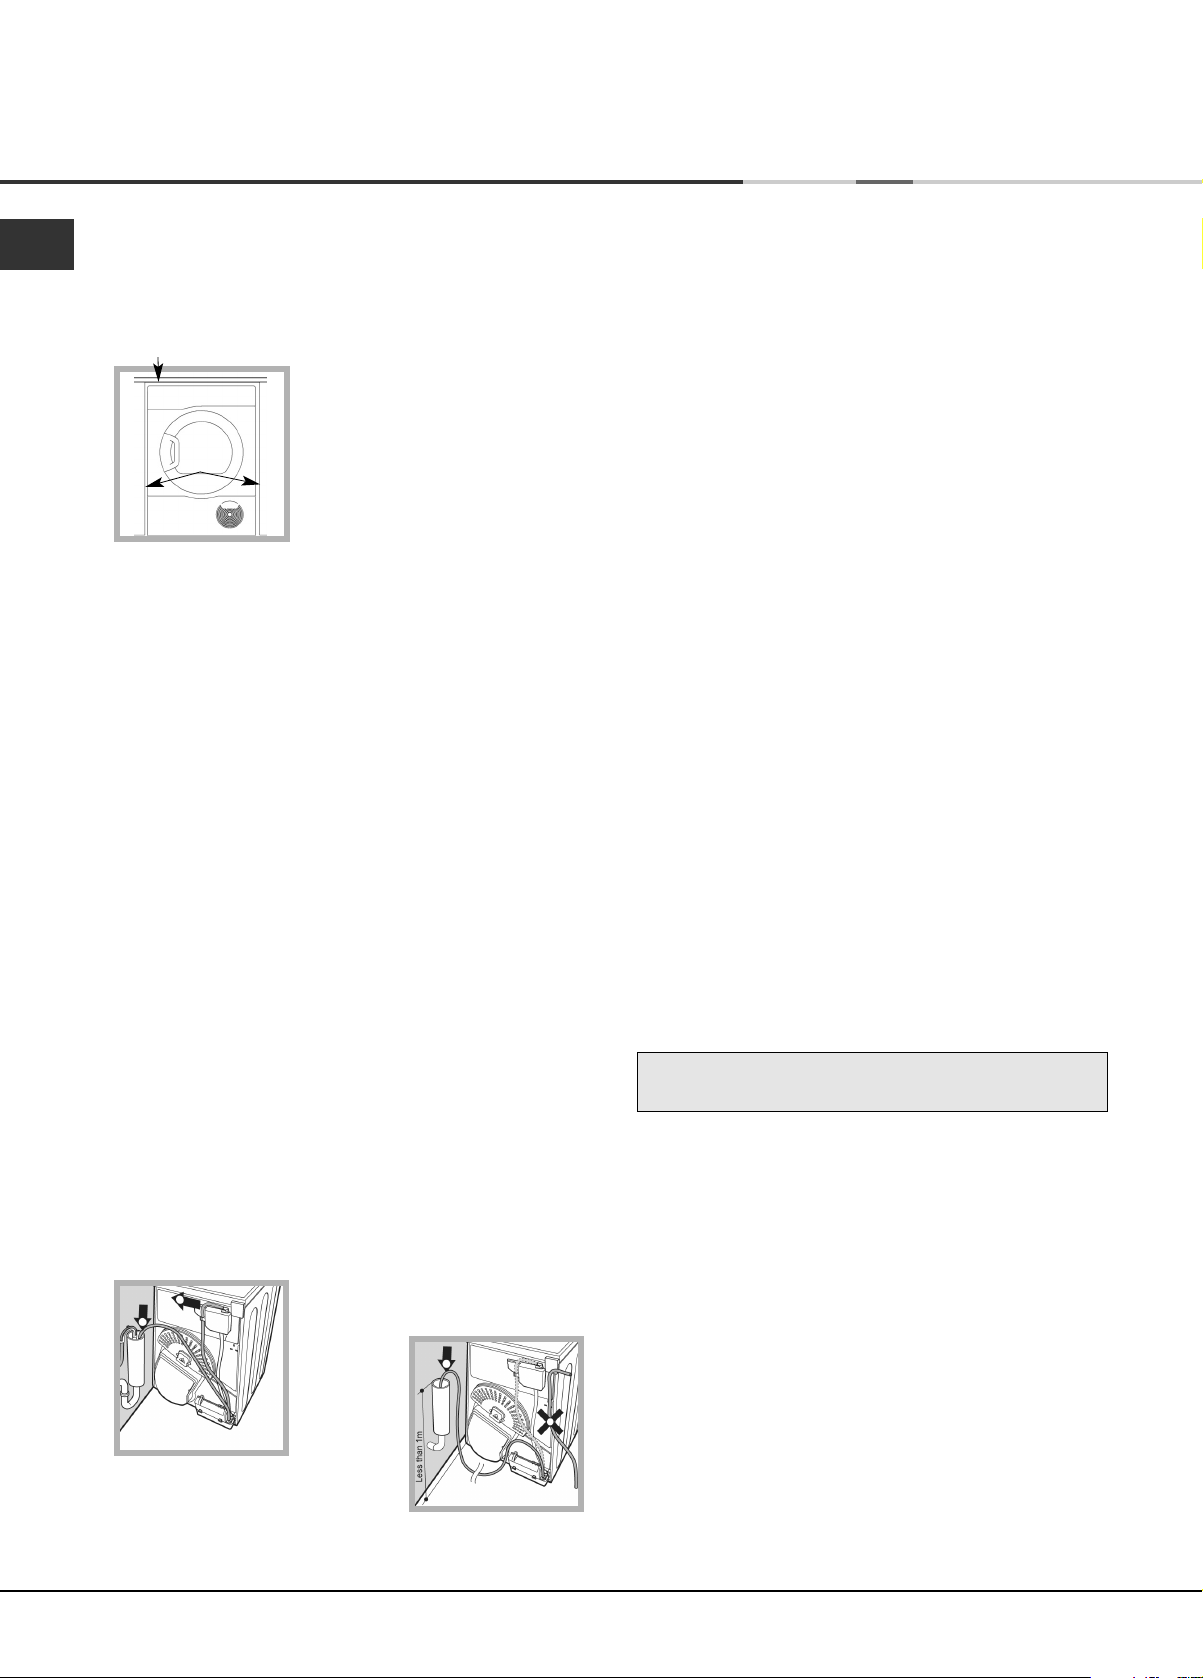
Water drain
If your dryer is installed next to a drain the water can be
plumbed into this drain. This does away with the need to
empty the water container. If the dryer is stacked onto or
installed next to a washing machine it can share the same
drain.
The height of the drain must be less than 3' (1m) from the
bottom of the dryer.
Remove the existing hose from
position shown in picture A.
picture A
Then fit a suitable length of hose to
position shown in picture B.
! Make sure that the hose is not squashed or kinked when
the dryer is in its final location.
2
picture B
! If in doubt about any of the above consult a
qualified electrician.
Before you start using your dryer
Once you have installed your dryer and before you
use it, clean the inside of the drum to remove any dust
that could have accumulated during transport.
Maximum load
Natural fibres : 9 kg

Warnings
! The appliance has been designed and
built according to international safety
standards.
These warnings are given for safety
reasons and must be followed carefully.
General safety
●
This appliance can be used by children
aged from 8 years and above and
persons with reduced physical, sensory
or mental capabilities, or lack of
knowledge if they are given supervision
or instruction concerning use of the
appliance in a safe way and understand
the hazards involved.
●
This tumble dryer has been designed for
home, and not professional use.
●
Do not touch the appliance while bare
foot or with wet hands or feet.
●
Unplug the machine by pulling on the
plug, not the cord.
●
After using the dryer, turn it off and
unplug it. Keep the door closed to make
sure that children do not use it as a toy.
●
Children should be supervised to ensure
that they do not play with the dryer.
●
Cleaning and user maintenance should
not be made by children without
supervision.
●
Children of less than 3 years should be
kept away from the appliance unless
continuously supervised.
●
The appliance must be installed
correctly and have proper ventilation.
The air intake at the front of the dryer
should never be obstructed (see
Installation).
●
Never use the dryer on carpeting where
the pile height would prevent air from
entering the dryer from the base.
●
Check to see if the dryer is empty before
loading it.
●
The back of the dryer could
become very hot. Never touch it
while in use.
●
Do not use the dryer unless the filter,
water container and condenser are
securely in place (see Maintenance).
●
Do not overload the dryer (see Laundry
for maximum loads).
●
Do not load items that are dripping wet.
●
Carefully check all instructions on
clothing labels (see Laundry).
●
Do not tumble dry large, very bulky
items.
●
Do not tumble dry acrylic fibres at high
temperatures.
●
Do not turn off the dryer when there are
still warm items inside.
●
Clean the filter after each use (see
Maintenance).
●
Empty the water container after each
use (see Maintenance).
●
Clean the condenser unit at regular
intervals (see Maintenance).
●
Do not allow lint to collect around the
dryer.
●
Never climb on top of the dryer. It could
result in damage.
●
Always follow electrical standards and
requirements (see Installation).
●
Always buy original spare parts and
accessories (see Service).
GB
3

Warnings
GB
To minimise the risk of fire in your
tumble dryer, the following should be
observed:
●
Tumble dry items only if they have been
washed with detergent and water, rinsed
and been through the spin cycle. It is a
fire hazard to dry items that HAVE NOT
been washed with water.
●
Do not dry garments that have been
treated with chemical products.
●
Do not tumble dry items that have been
spotted or soaked with vegetable or
cooking oils, this constitutes a fire hazard.
Oil-affected items can ignite spontaneously,
especially when exposed to heat sources
such as a tumble dryer. The items become
warm, causing an oxidisation reaction with
the oil, Oxidisation creates heat. If the heat
cannot escape, items can become hot
enough to catch fire. Piling, stacking or
storing oil-effected items can prevent heat
from escaping and so create a fire hazard.
If it is unavoidable that fabrics containing
vegetable or cooking oil or those that have
been contaminated with hair care products
be placed in a tumble dryer they should
first be washed with extra detergent - this
will reduce, but not eliminate the hazard.
They should not be removed from the dryer
and piled or stacked while hot.
●
Do not tumble dry items that have
previously been cleaned in or washed in,
soaked in or soiled with petrol/gasoline,
dry cleaning solvents or other flammable
or explosive substances. Highly flammable
substances commonly used in domestic
environments including cooking oil,
acetone, denatured alcohol, kerosene,
spot removers, turpentine, waxes and
wax removers. Ensure these items have
been washed in hot water with an extra
amount of detergent before being dried
in the tumble dryer.
●
Do not tumble dry items containing foam
rubber (also known as latex foam), or
similarly textured rubber like materials.
Foam rubber materials can, when
heated, produce fire by spontaneous
combustion.
●
Fabric softener or similar products
should not be used in a tumble dryer to
eliminate the effects of static electricity
unless the practice is specifically
recommended by the manufacturer of
the fabric softener product.
●
Do not tumble dry undergarments that
contain metal reinforcements eg. bras
with metal reinforcing wires. Damage to
the tumble dryer can result if the metal
reinforcements come loose during drying.
●
Do not tumble dry rubber, plastic articles
such as shower caps or babies water
proof covers, polythene or paper.
●
Do not tumble dry rubber backed
articles, clothes fitted with foam rubber
pads, pillows, galoshes and rubber
coated tennis shoes.
●
Remove all objects from pockets, such
as lighters and matches.
! WARNING: Never stop the dryer before the end of the drying cycle unless all items are
quickly removed and spread out so that the heat is dissipated.
4
Maintenance and Care
Switching off the electricity
! Unplug your dryer when not using it,
when cleaning it and during all
maintenance operations.
Clean the filter after each cycle
The filter is an important part of your dryer:
it accumulates lint and fluff that is formed
while drying.
When finished drying, clean the filter by
rinsing it under running water or with your
vacuum cleaner.
Should the filter become clogged up, the
airflow inside the dryer will be seriously
compromised: drying times lengthen and
you will consume more energy. It may also
damage your dryer.
The filter is found in front of the dryer trim
(see diagram on next page).
Removing the filter:
1. Pull the plastic grip of the filter upwards.
2. Open the filter and
clean the lint from the
inside.
3. Replace it correctly.
Ensure the filter is fully
located flush into the
tumble dryer trim.
4. Remove any lint that has built up on the
inside of the door and around the door
seal.
! Failure to empty the water container may cause
the following:
- The dryer will stop heating (so the load may still
be damp at the end of the drying cycle) (see The
Controls).
●
Priming the water collection system
When your dryer is new, the water container will not
collect water until the system is primed.
This will take 1 or 2 drying cycles. Once primed it will
collect water during every drying cycle.
Cleaning the condenser unit
Periodically (every month) remove the
condenser unit and clean any build up of
fluff from between the plates by rinsing it
under the tap with cold water.
This should be done with cold water from
the rear of the condenser.
Removing the condenser:
1.Unplug the dryer and open the door.
2.Pull open the condenser cover (see
diagram).
Release the three
catches by turning 90˚
counter-clockwise
then pull on the grip and
remove from the dryer.
Clean the surface of the seals and replace,
with the arrows pointing upwards making
sure that the catches have been secured.
GB
! Do not use the dryer without replacing
the filter.
Empty the water container after each
cycle
Pull the container out of the dryer
and remove either the small or
large cap and empty it into a
sink or other suitable drain.
Refit the cap and replace the
container securely.
! Always check and empty the container before you
start a new drying programme.
5

GB
Maintenance and Care
Water container
Filter
Condenser unit
Catches
Check the drum after each cycle
Turn the drum manually in order to remove small items
(handkerchiefs) that could have been left behind.
Cleaning the drum
! Do not use abrasives, steel wool or stainless steel
cleaning agents to clean the drum.
Ta p
Rear
Front
Air intake
Condenser cover
Condenser unit
Quick Tips
●
Remember to clean the door filter and
the condenser filter after each load.
●
Remember to empty the water container
after each load.
! Doing BOTH the above will keep your
appliance working at its BEST.
A coloured film may start to appear on the stainless
steel drum, this may be caused by a combination of
water and, or cleaning agents such as fabric conditioner
from the wash. This coloured film will not affect the
dryer performance.
Cleaning the dryer
●
External parts in metal or plastic and rubber parts
can be cleaned with a damp cloth.
●
Periodically (every 6 months) vacuum the front air
intake grille, to remove any build up of fluff, lint or
dust. Also to remove accumulation of fluff from the
front of the condenser and filter areas, clean
occasionally with a vacuum cleaner.
! Do not use solvents or abrasives.
! Your dryer uses special bearing components which
do not need lubrication.
! Have your dryer checked regularly by authorised
technicians to ensure electrical and mechanical safety
(see Service).
6
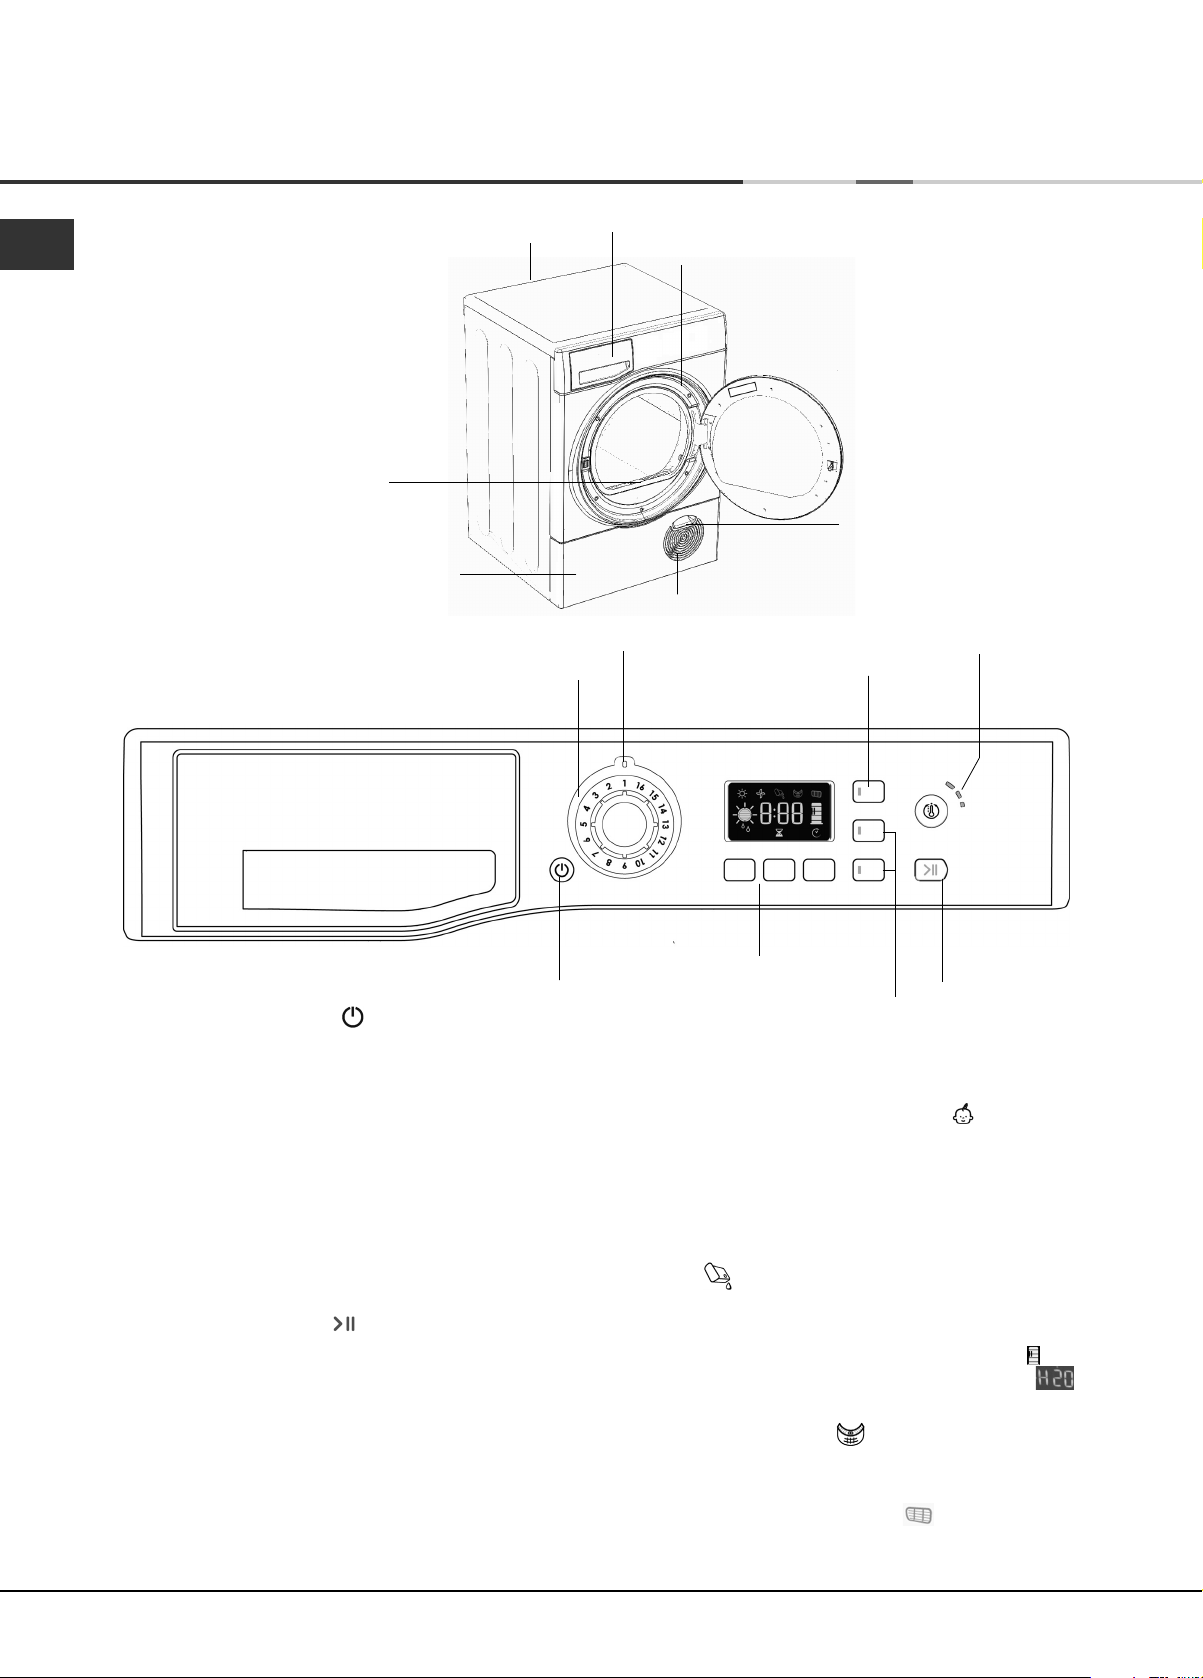
Dryer Description
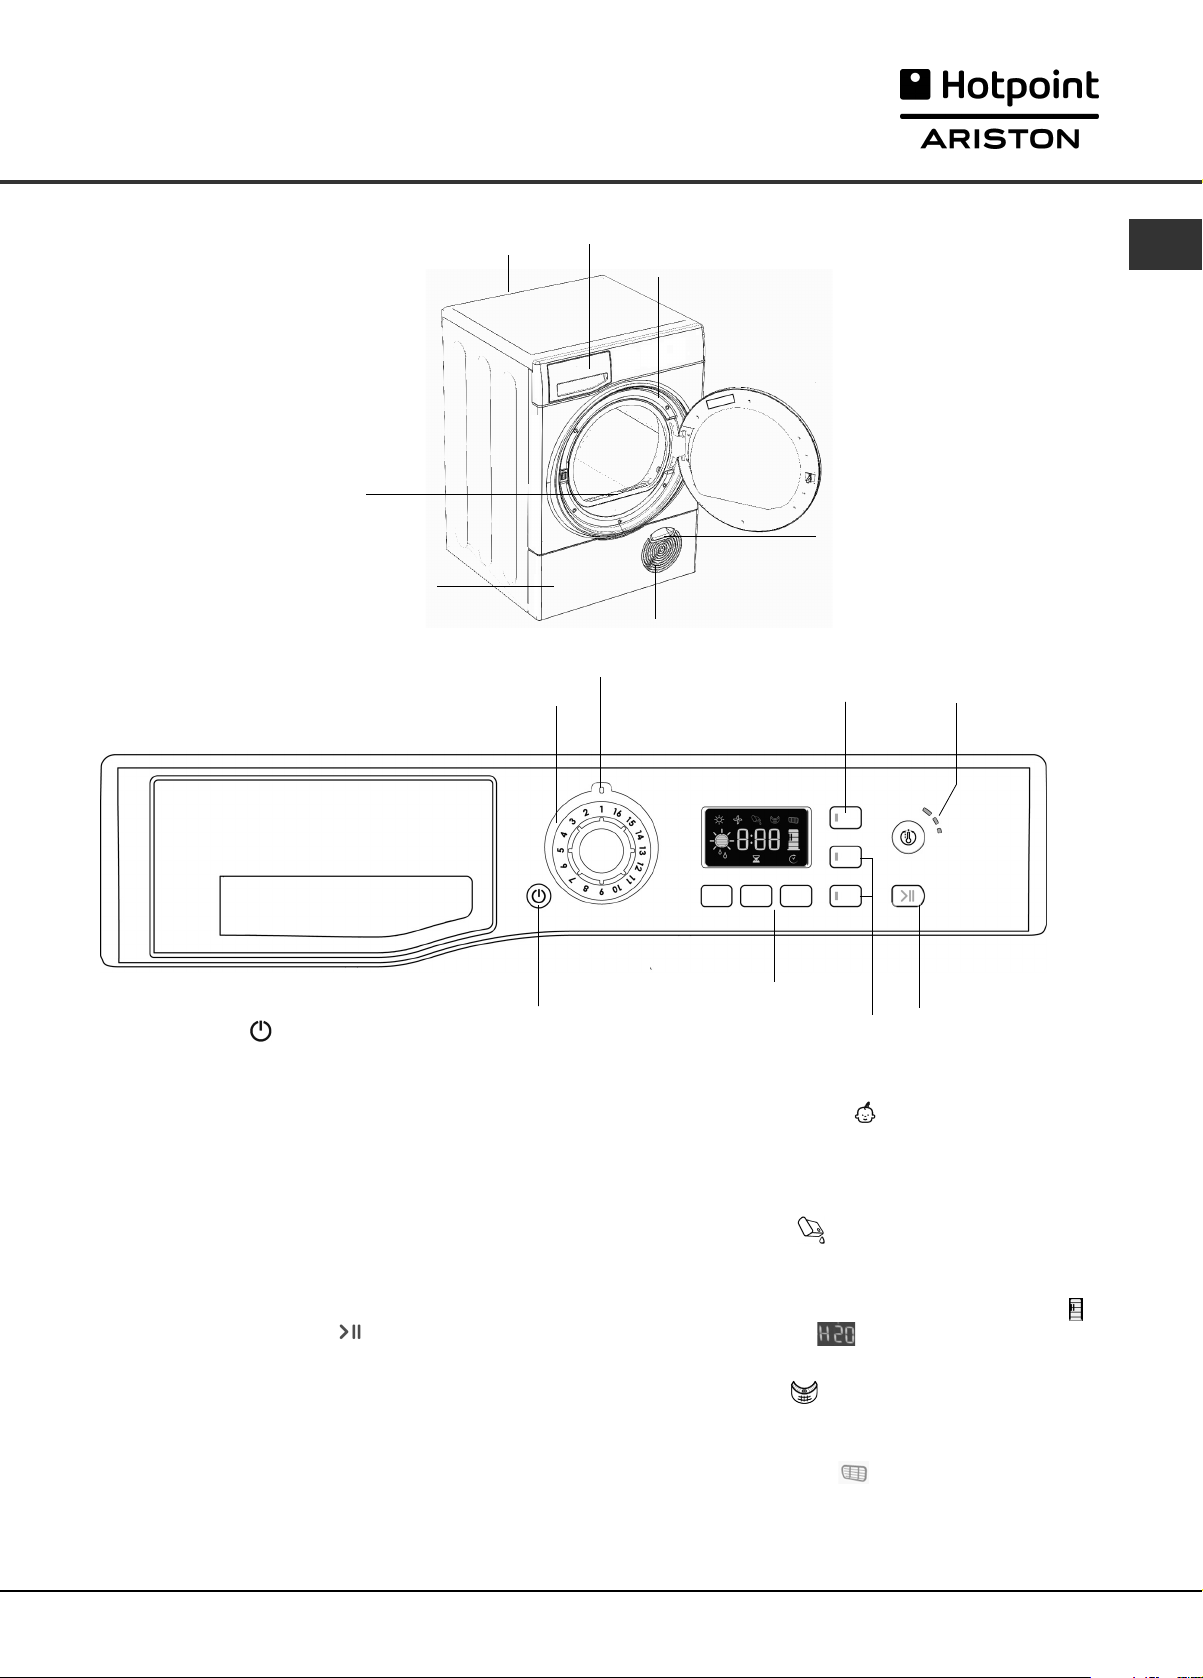
The features
Control panel
Rating plate
Filter
Condenser cover
Indicator
PROGRAMME
knob
Water container
Model & Serial numbers
Air intake grille
CHILD LOCK
Button & Light
GB
Condenser cover handle
(Pull to open)
HEAT LEVEL
Button & Lights
ON/OFF
Button
The ON/OFF button : If the dryer is running and this
button is pressed and held for more that 3 seconds the dryer
is turned off, it counts down 3, 2, 1, Off and the programme
is then cancelled.
Press and hold for more than 3 seconds and the dryer
reactivates.
The PROGRAMMES knob sets the programme: rotate it until
the indicator is pointing to the programme you want to select
(see Start and Programmes).
The OPTION buttons select available options for your
selected programme. The lights indicate that the option has
been selected (see Start and Programmes).
The START/PAUSE button/light starts a selected
programme. When you press this button there will be one
beep and the progress lights will flash to confirm the action.
When a programme is running, pressing this button in pauses
the programme and stops the dryer.
The light is green when programme is running, flashing amber
if the programme has been paused or flashing green if on
standby waiting to start a programme (see Start and
Programmes).
The Display Unit gives an indication of the drying or delay
time together with icons that light to give warning information
and show the status of your programmes progress.
Display Unit &
Selection Buttons
OPTION
Buttons & Lights
The three buttons below the display select ‘Automatic’ or
‘Timed Dry’ and if required a delayed start (see Start and
Programmes or The Display).
The CHILD LOCK button/light : Press and hold this
button after selecting your programme and any options, the
light turns on. This prevents the programme settings from
being changed. When the light is lit, the other buttons are
disabled. Hold the button to cancel and the light will go out.
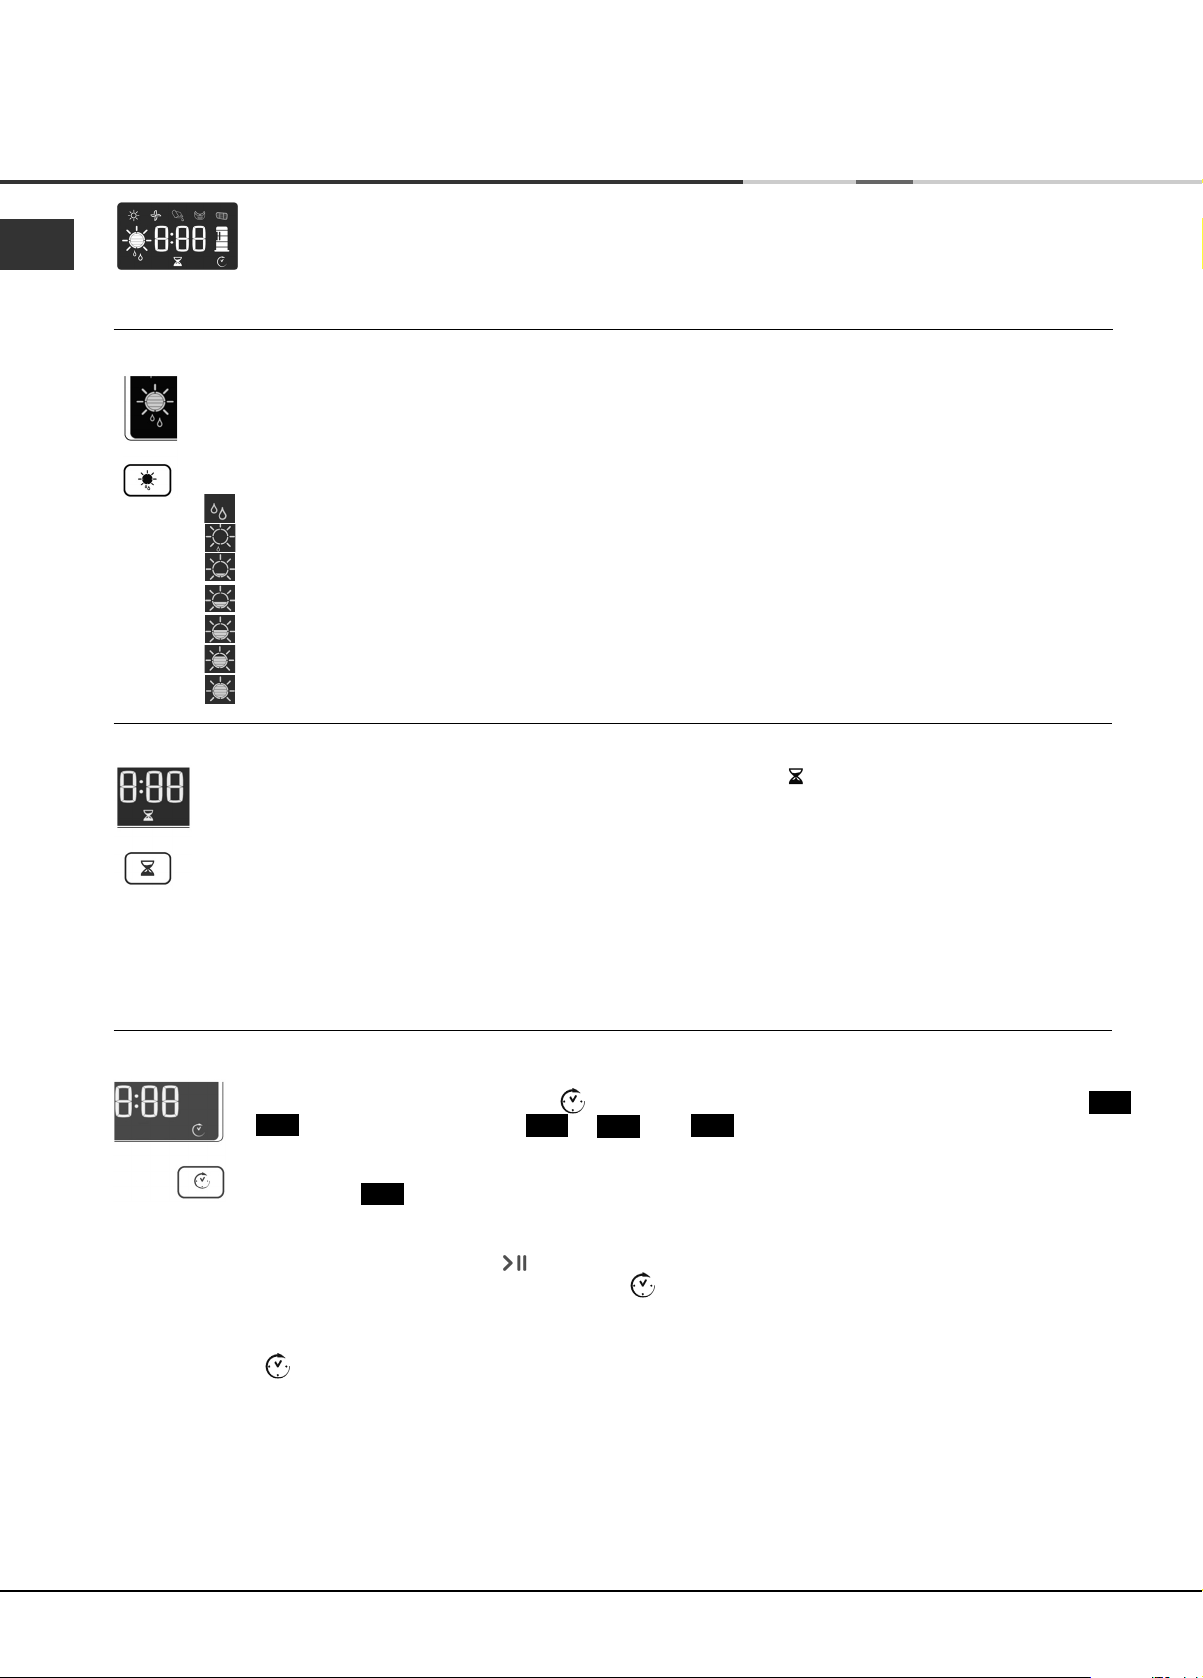
The Empty Water icon : signals that the water container
should be emptied. The display will take a few seconds to
update after replacing the empty water container, the dryer
must be running for this to happen (see The Controls).
Note: If the water container fills the ‘water container full ‘icon
flashes, the display shows , the heat is turned off and
your clothes will not dry.
The Clean Filter icon : gives a reminder before every
programme, that it is essential to clean the filter every time
the dryer is used (see Maintenance and Care).
The Clean Condenser icon : gives a reminder that it is
essential to clean the condenser at regular intervals (see
Maintenance and Care).
START/PAUSE
Button & Light
7
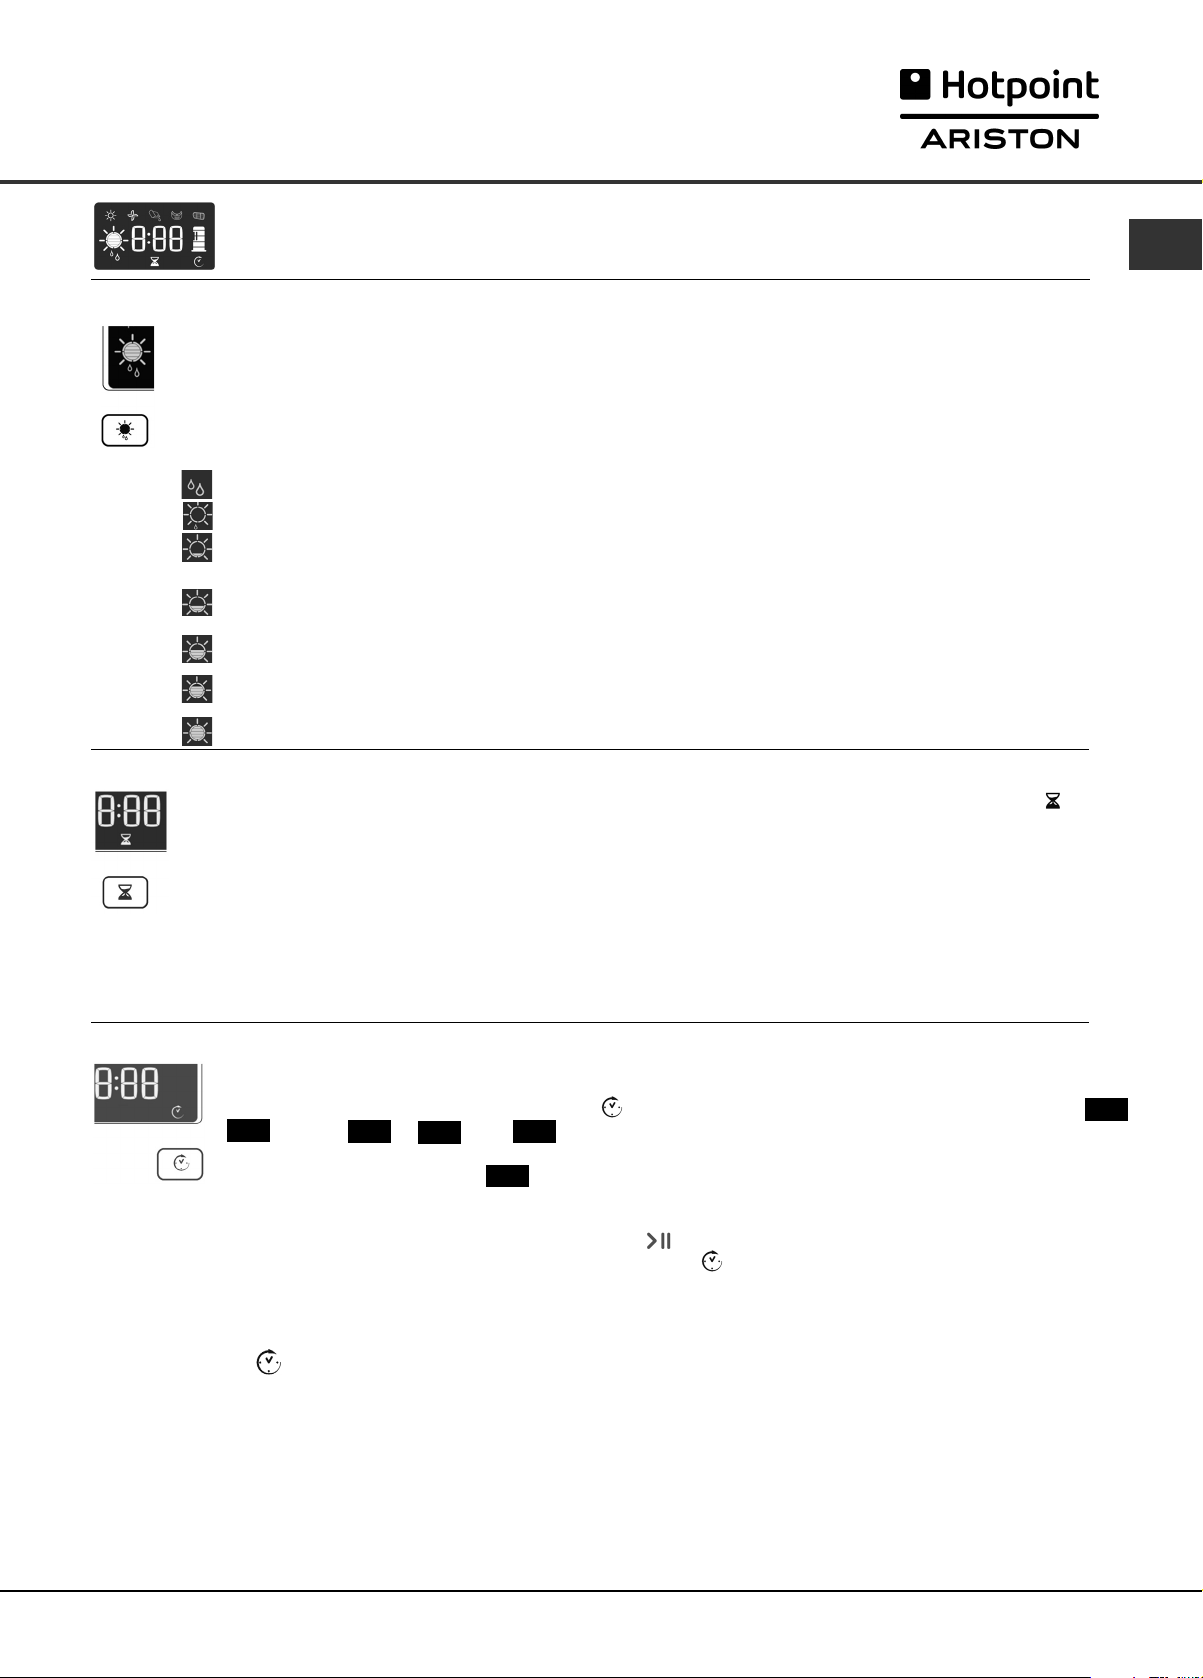
The Display
GB
The Display has three main functions, each with its corresponding button.
Dryness Sensing Levels
After selecting a programme that has a Sensor Dry option, press and release the button until the required
dryness sensing level is displayed. If the sensing option is not available with your selected programme, the
display will flash and the buzzer will beep three times.
! Some sensing programmes do not have all seven dryness level options available.
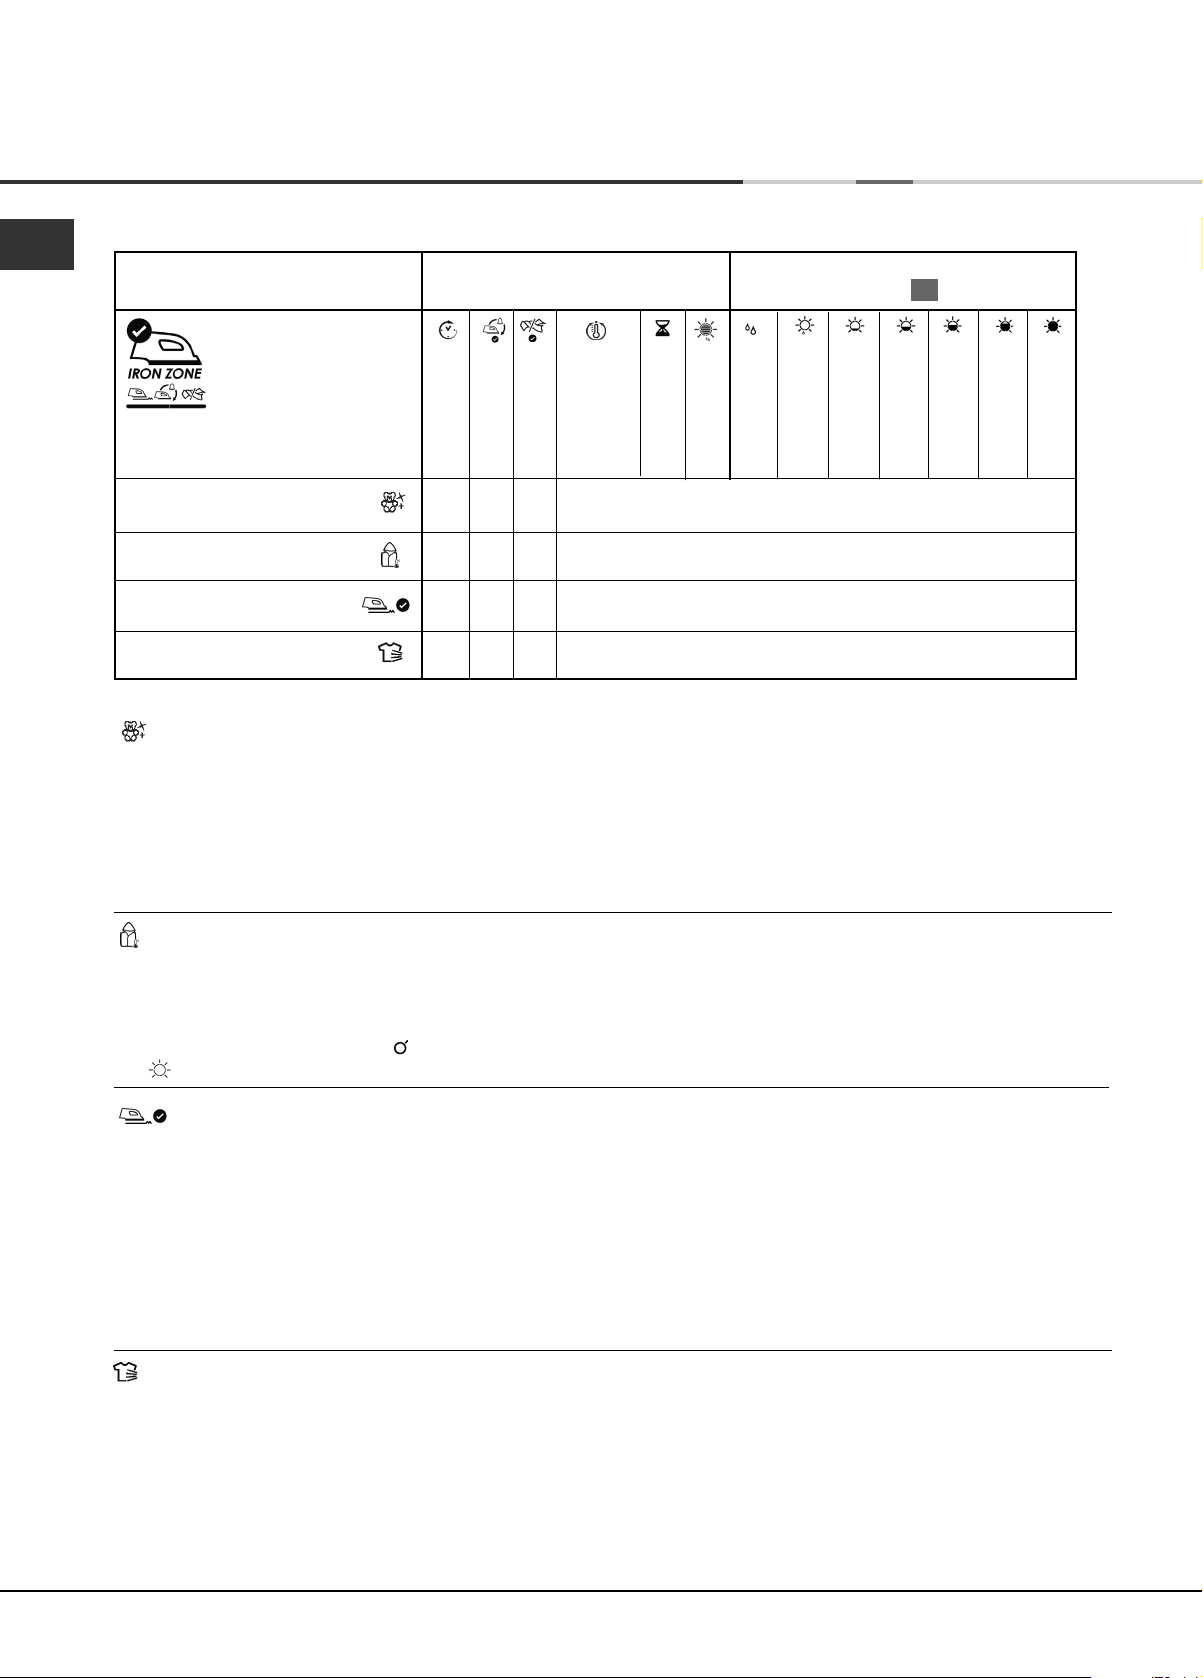
Dryness levels:
Damp Dry: Dries your items ready to be ironed using a machine or rotary ironer.
Iron Dry: Dries your items ready to be ironed with a hand iron.
Hanger Dry Plus: Dries your delicate items ready to be hanged for final drying.
Hanger Dry: Dries your items ready to be hanged for final drying.
Light Dry: Dries your delicate items ready to be put away.
Cupboard Dry: Dries your items ready to be put away.
Extra Dry: Dries your items ready to be worn.
Timed Dry
After selecting a programme that has a Timed Dry option, press the button and the Timed Dry icon will
light, the display will reduce the selected time each time you press and release this button (see Start and
Programmes). Each programme that has a timed option has different times available and the selection of
up to 11 drying times will also depend on the heat setting that your have selected.
Each press of the button decreases the drying time.
If you change your mind, press the Sensor Dry button and the sensing level options are available.
If the Timed Dry option is not available the display will flash and the buzzer will beep three times.
The selected time remains displayed after the programme starts and can be changed during the
programme if you wish.
Delay Timer
After selecting a programme that has a Delay Timer option, a delay start time can be selected.
Each press of the Delay Timer button advances the delay setting in 30 minutes increments from
to and then increments from to then and then after five seconds cancels the
9:30
delay.
For delays of 10 hours or more the display counts down the time in hours until 10 hours, then the
display shows and then continues to count down in minutes.
For delays 9 hours or less the display shows hours and minutes and then counts down in minutes for
all of the delay.
After the START/PAUSE button is pressed the delay time can be changed or cancelled.
When the delay period finishes the delay icon is off and the Time to End is displayed.
Note: During this period the clothes will tumble occasionally to prevent creases developing.
9.59
10h
24h
OFF
Time to End
If the delay icon is off the time displayed is the Time to End for the programme running.
When timed programmes are selected the time displayed throughout the cycle is the actual time remaining.
When Automatic programmes are selected the time displayed is an estimate of the time remaining: When the
programme is selected the display shows the time required to dry a full load. The time remaining is constantly
monitored during the drying cycle and is updated to show the best forecast.
The Time to End is displayed in hours and minutes and counts down each minute.
The colons between the hours and minutes in the display flash to show the time is counting down.
The display also shows if there is a problem with your dryer, if this occurs the display will show F followed by a fault
code number, the three option lights and the START/PAUSE light will also flash amber (see Troubleshooting).
0:30
8
Start and Programmes
Choosing a programme
1. Plug the dryer into the electrical socket.
2. Sort your laundry according to fabric type (see
Laundry).
3. Open the door and make sure the filter is clean
and in place and the water container is empty and
in place (see Maintenance).
4. Load the machine and make sure items are not
in the way of the door seal. Close the door.
5. If none of the lights are on: Press the ON/OFF
button .
6. Choose a programme by checking the Programmes
Guide (see Programmes) as well as the indications
for each type of fabric (see Laundry).
- Select a programme by rotating the
PROGRAMMES knob.
7. Choose Timed Drying or Dryness Levels option:
- If Timed Dry press and release the Timed
button until the required time is displayed.
or - To change from default dryness setting, press
and release the Sensor Dry button until the
required level is indicated (see The Display).
! For full details of selections available for each
programme see the Programme Tables.
Note: This tumble dryer, in compliance with new energy saving regulations, is fitted with an automatic standby
system which is enabled after about 30 minutes if no activity is detected.. Press and hold the ON/OFF button until
the dryer reactivates.
8. Set a delay time and other options if necessary.
9. The START/PAUSE light is flashing green:
- press the START/PAUSE button to begin.
The green light stops flashing.
During the drying programme, you can check on
your laundry and take out items that are dry
while others continue drying. When you close
the door again, press the START/PAUSE button in
order to resume drying.
(When the door is opened the START/PAUSE light
will flash Amber, after the door is closed and the
START/PAUSE button pressed, the START/PAUSE
light will stop flashing and show green.)
10. To let you know that your programme is complete
the buzzer will beep 3 times.
Open the door, take the laundry out, clean the filter
and replace it. Empty the water container and
replace it (see Maintenance).
11. Unplug the dryer.
GB
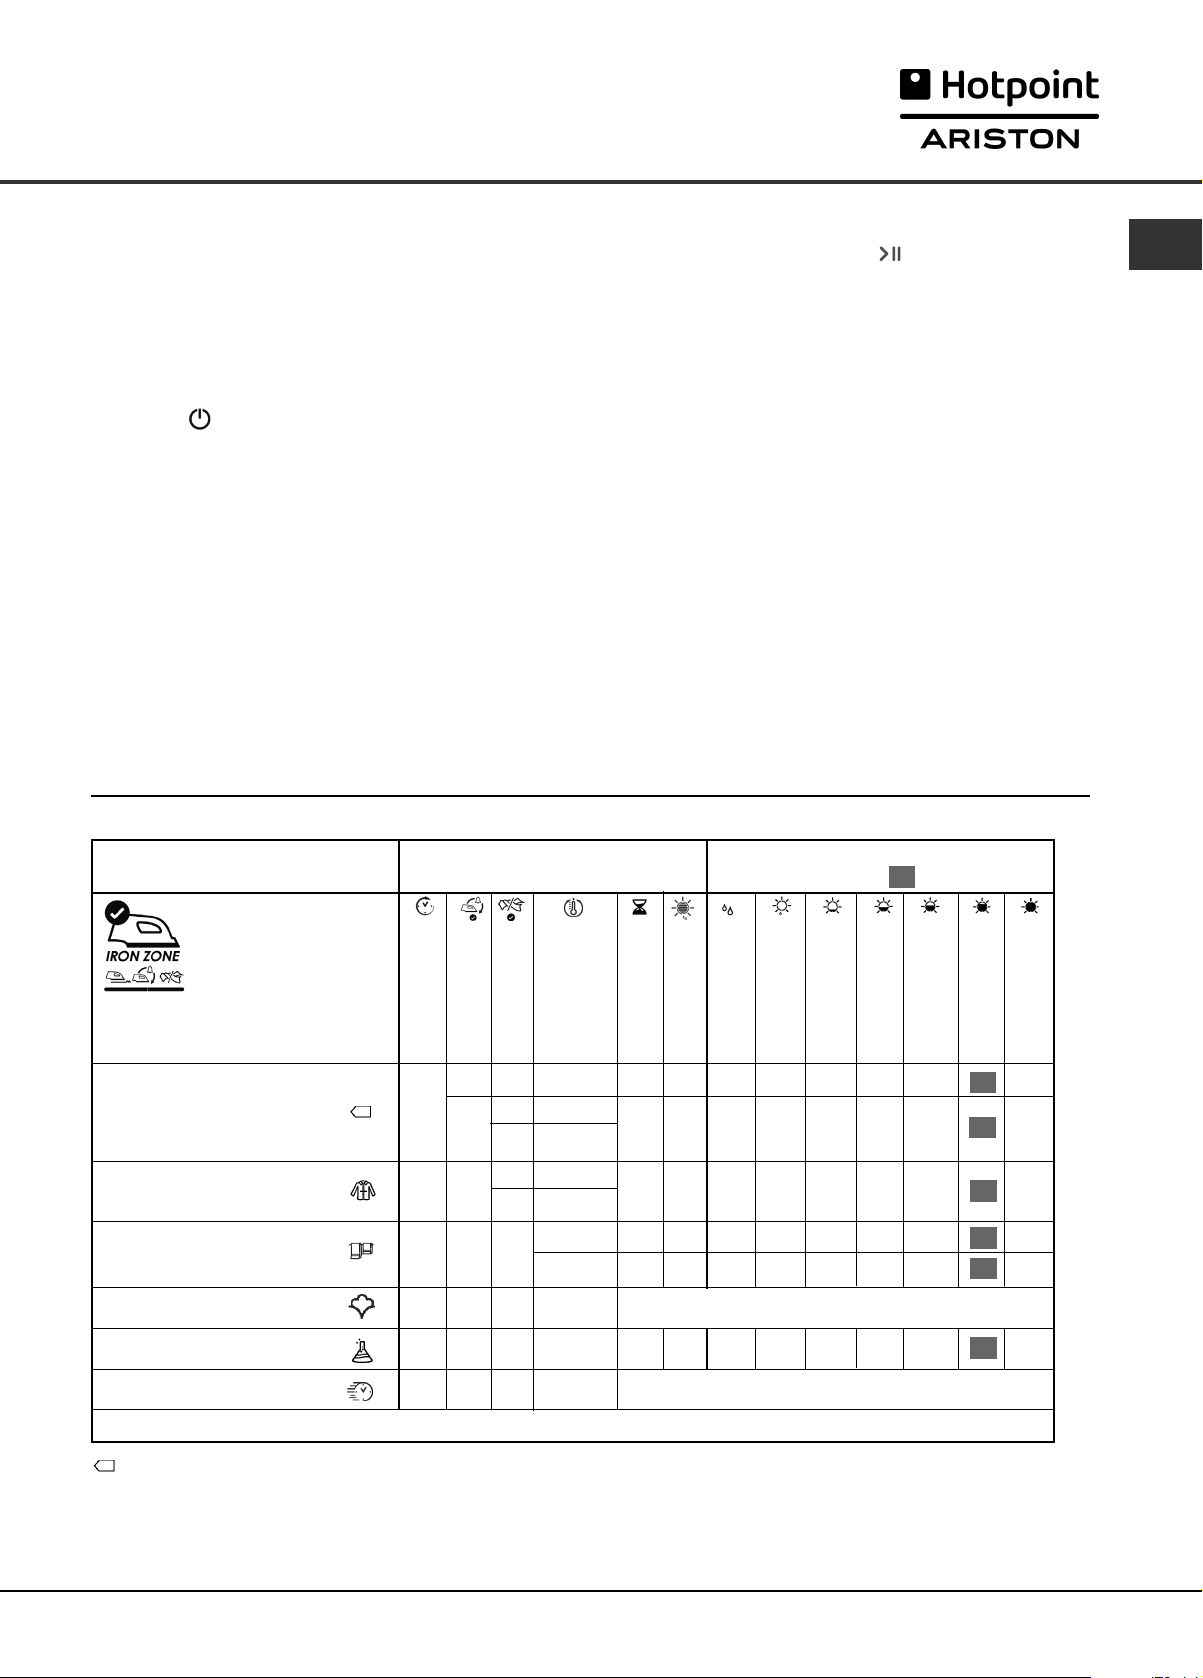
ESSENTIAL PROGRAMMES - Programmes Table
Programme Options available
Delay Timer
Ready to Iron*
Less tangled
✗
✓
1 Standard Cotton
✓
✓
✗
✓
✗
✗
✗ ✗
✗
✗
✓
✗
✓
✗
✗
2
Shirts
3 Bed & Bath
4 Anti Allergy
5 Synthetics
6 Quick Dry
*Note : This option is not available with Dryness Levels ‘Iron Dry’ and ‘Damp Dry’.
✓
✓
✓
✓
✓
Heat Level
- High
- High
- Medium
- Low
- High
- Medium
- High
- Medium
✗
- Medium
- Low
- High
- Medium
Timed Dry
✓
✓
✓
✗
✗
●
An Automatic programme
✓
●
An Automatic programme
Dryness Levels available
(default highlighted )
Sensor Dry
Damp Dry
✓
✓
✓
✓
✓
✓
✓
✓
✓
✓
✓
✓
✓
✓
✓
✓
✓
✓
✓
Iron Dry
Hanger Dry Plus
Hanger Dry
Light Dry
Cupboard Dry
Extra Dry
✓
✓
✓
✓
✓
✓
✓
✓
✓
✓
✓
✓
✓
✓
✓
✓
✓
✓
✓
✓
✓
✓
✓
✓
✓
✗
✗
✓
✗
✗
Standard Cotton
●
This is a programme for cotton items.
●
The duration of this programme will depend on the size of the load, the dryness setting selected and the spin
speed used in your washer (see Laundry).
●
The Standard Cotton programme to EU Regulation 392/2012 is Programme 1 selection with High Heat and
Dryness Level Cupboard Dry.
9
Start and Programmes
GB
Shirts
High heat option
●
This is a programme for shirts made from cotton.
●
It can be used for load sizes up to 3kg (approximately 10 shirts).
Medium heat option
●
This is a programme for shirts made from synthetic materials or a mixture of natural and synthetic materials, such
as polyester and cotton.
●
It can be used for load sizes up to 3kg (approximately 14 shirts).
The duration of this programme will depend on the size of the load, the dryness setting selected and the spin
speed used in your washer.
Loads dried using the Cupboard Dry setting are usually ready to wear, the edges or seams may be slightly damp. If
this is the case, try turning the shirts inside out and running the programme again for a short period.
Bed & Bath
●
This is a programme for cotton towels and sheets.
●
The duration of this programme will depend on the size of the load, the dryness setting selected and the spin
speed used in your washer (see Laundry).
●
Loads dried using the Extra Dry setting are usually ready to use, the edges or seams may be slightly damp
especially on large items. If this is the case, try opening them out and running the programme again for a short
period.
Anti Allergy Programme
This programme has the ‘Seal of Approval’ endorsement from Allergy UK, which reflects the effective reduction and
elimination of allergens from the clothes with the special Anti Allergy cycle. With this programme, thanks to the
achievement of constant temperature for an extended period of time, the effects of the most common allergens
(including House Mites and Pollen) are neutralised.
Can be used on a full size wet load to dry and treat, or on a 4kg dry load just to treat your laundry.
Synthetics
●
This is a programme for items of Synthetic or Synthetic/Cotton mixtures.
●
The duration of this programme will depend on the size of the load, the dryness setting selected and the spin
speed used in your washer (see Laundry).
Quick Dry
This programme is for small loads maximum 1kg. Note: can only be used with the Cupboard Dry setting.
Your drying time is very much reduced with a huge time saving up to 53% on cottons (with High Heat option) and
50% on synthetics (with Medium Heat option).
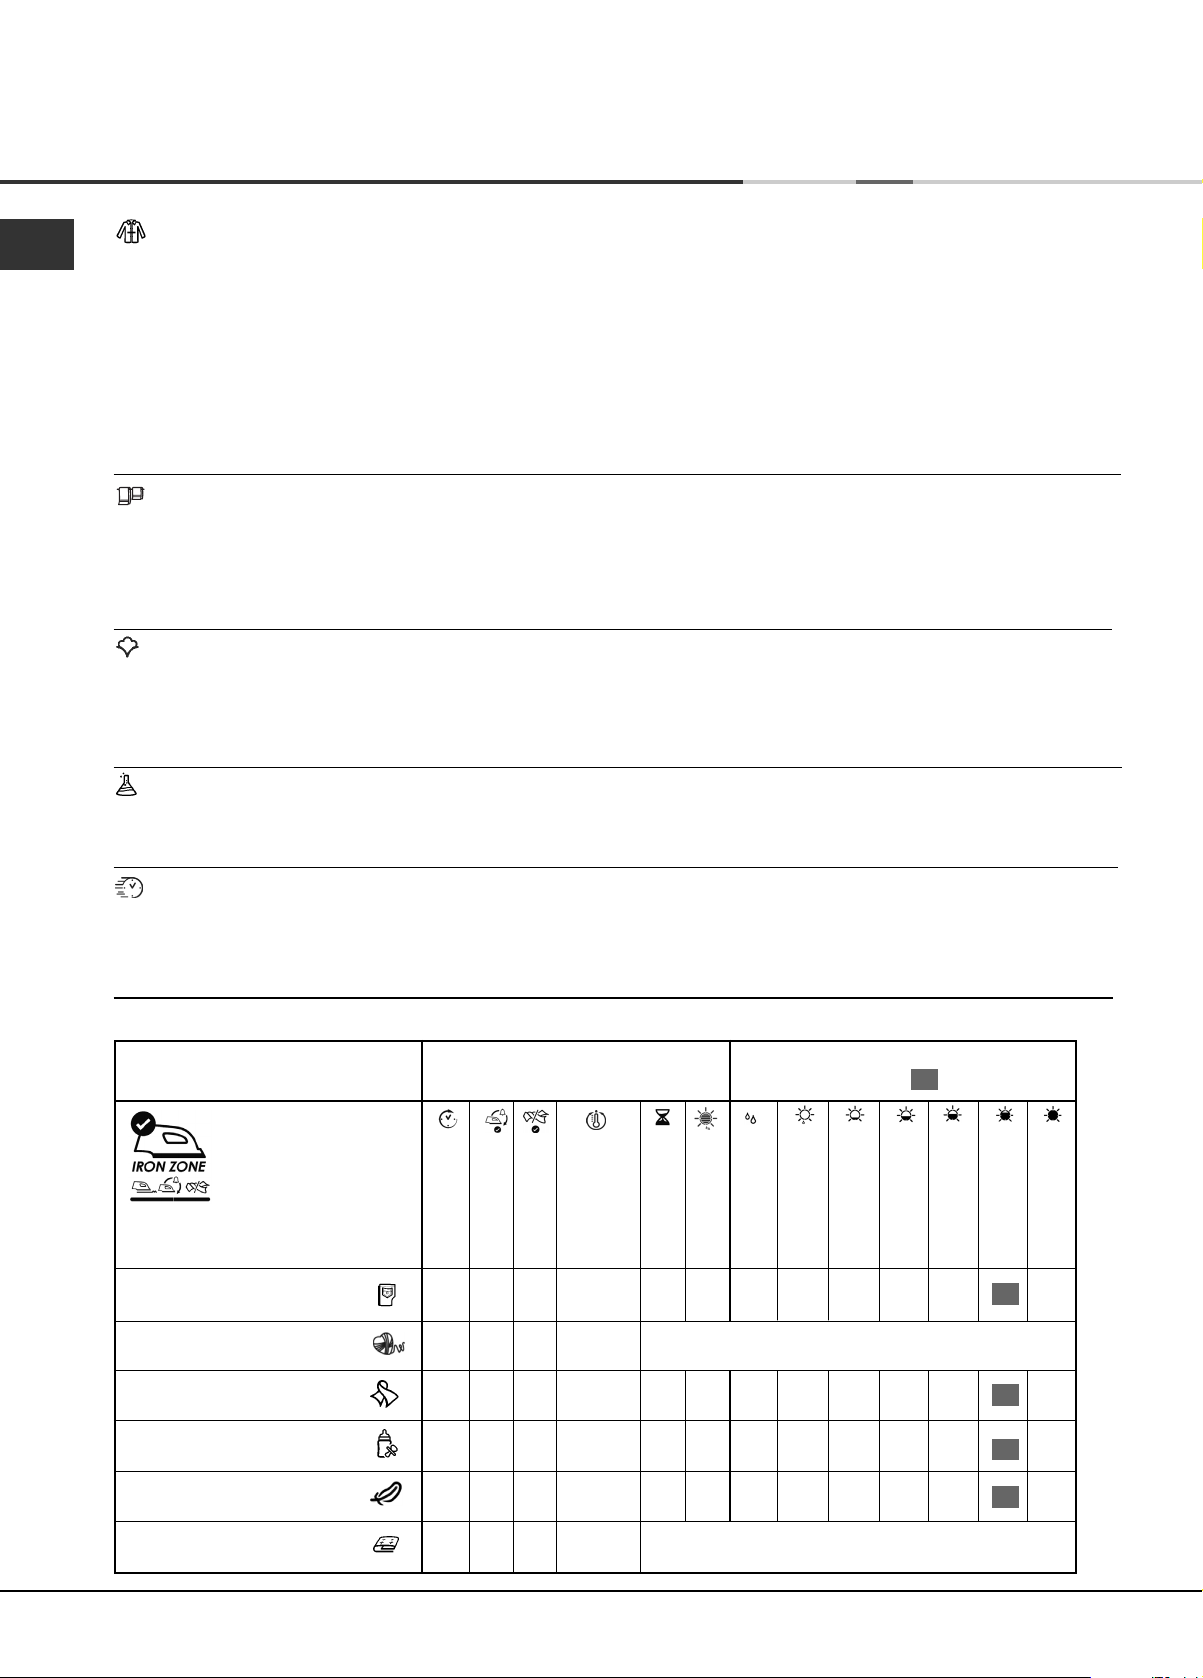
EXCLUSIVE PROGRAMMES - Programmes Table
Programme Options available
Delay Timer
Ready to Iron
Less tangled
7 Jeans
8
Wool
9 Silk
10 Baby cycle
✓
✗
✗
✓
✗
✗
✗
✗
✗
✗
✗
✗
Heat Level
✗
✗
✗
✗
Timed Dry
✗
●
An Automatic programme
✗
✗
Dryness Levels available
(default highlighted )
Sensor Dry
Damp Dry
Iron Dry
Hanger Dry Plus
✓
✓
✓
✓
✓
✓
✓
✓
✓
✓
✓
✓
✓
✓
✓
✓
Hanger Dry
Light Dry
Cupboard Dry
Extra Dry
✓
✓
✓
✓
✓
✓
✓
✗
✗
11 Delicates
12 Duvet
10
✓
✓
✓
✓
✗
✗
✗
✗
✗
- High
- Medium
✓
●
An Automatic programme
✓
✓
✓
✓
✓
✗
Start and Programmes
Jeans
●
This is a programme for jeans made from denim cotton. Before drying your jeans turn the front pockets inside out.
●
It can be used for load sizes up to 3kg (approximately 4 pairs).
●
Do not mix dark and light coloured items.
●
It can also be used on other garments made from the same material, such as jackets.
●
The duration of this programme will depend on the size of the load and the spin speed used in your washer.
●
Loads dried using this programme are usually ready to wear, the edges or seams may be slightly damp. If this is
the case, try turning the jeans inside out and running the programme again for a short period.
! We do not recommend that you use this programme if your jeans have elastic waist bands, studs or embroidery.
Wool Programme
●
This is a programme for tumble dryer safe garments marked with the symbol .
●
It can be used for load sizes up to 1kg (approximately 3 sweaters).
●
We recommend that garments are turned inside out before drying.
●
The duration of this programme will depend on the size and density of the load and the spin speed used in your
washer.
●
Loads dried using this programme are usually ready to wear, but on some heavier garments the edges may be
slightly damp. Allow these to dry naturally as over-drying could damage garments.
! Unlike other materials, the mechanism of wool shrinkage is irreversible; i.e. it will not stretch back to original size and
shape.
! This programme is not suitable for Acrylic garments.
Silk
●
This is a programme for drying your delicate silk.
●
It can be used for load sizes up to 0.5kg.
●
The duration of this programme will depend on the size and density of the load and the spin speed used in your
washer.
●
Loads dried using this programme are usually ready to use, but on some heavier garments the edges may be
slightly damp. If this is the case, remove the load and open them out and then run the programme again for a short
period.
GB
Delicates
●
This is a programme for drying your delicate clothes ie. Acrylics.
●
It can be used for load sizes up to 2kg.
●
The duration of this programme will depend on the size and density of the load and the spin speed used in your
washer.
●
Loads dried using this programme are usually ready to use, but on some garments the edges may be slightly
damp. If this is the case, try opening them out or turn items inside out and running the programme again for a short
period.
Duvet
! Take care with this programme DO NOT dry any items that are damaged which could result in the filling blocking
the filter and air vent resulting in a fire hazard.
●
Must only be used on single size duvets: NOT suitable for double or king size items.
●
Loads dried using this programme are usually ready to use, but may be slightly damp in places. If this is the case,
try opening them out and shaking them and running the programme again for a short period.
●
Also suitable for down filled jackets.
●
Select high heat for Cotton Duvets and medium heat for Synthetic duvets
●
The duration of this programme will depend on the size and density of the load and the spin speed used in your
washer.
Baby cycle
●
This is a programme for drying your baby’s small delicate items of clothing and bedding (Cotton and Chenille)
and for drying your delicate clothes.
●
DO NOT dry items such as bibs and nappy pants with plastic coverings.
●
It can be used for load sizes up to 2kg.
●
The duration of this programme will depend on the size and density of the load and the spin speed used in your
washer.
●
Loads dried using this programme are usually ready to use, but on some garments the edges may be slightly
damp. If this is the case, try opening them out or turn items inside out and running the programme again for a short
period.
11
Start and Programmes
GB
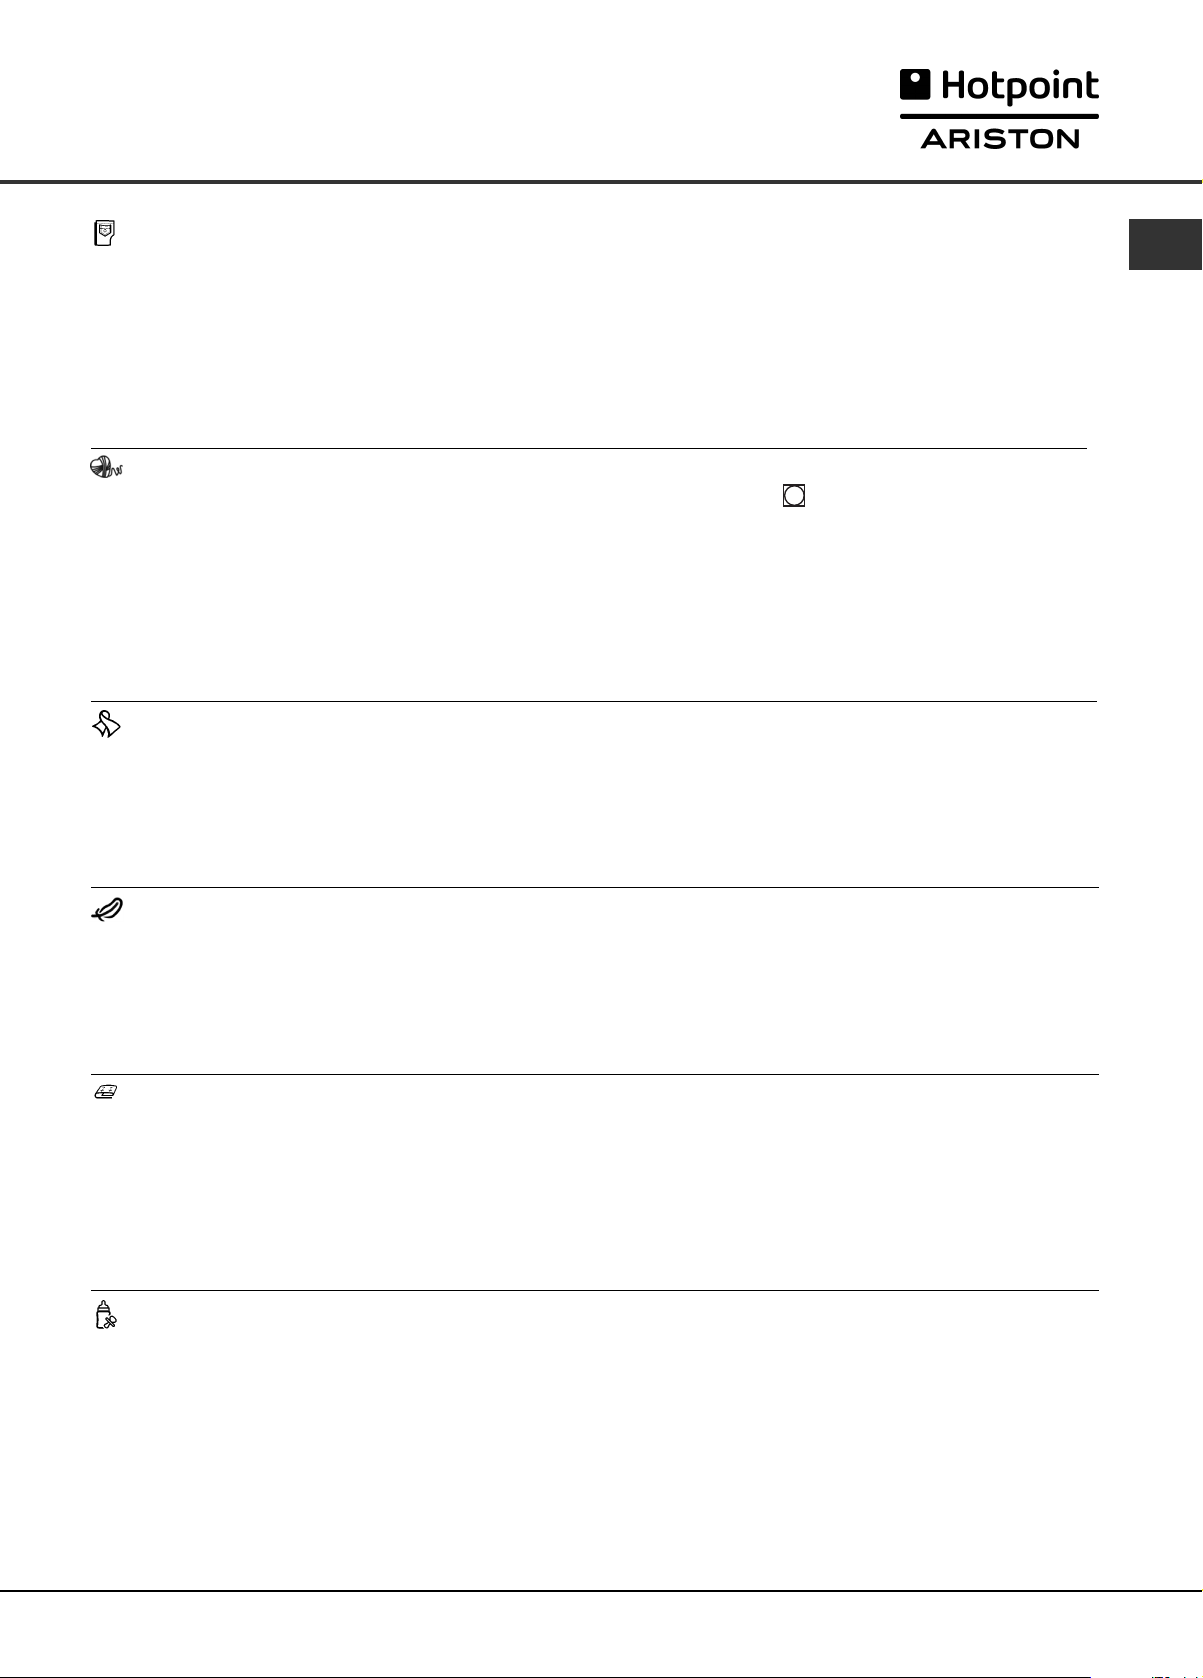
EXTRA PROGRAMMES - Programmes Table
Programme Options available
Delay Timer
Ready to Iron
Less Tangled
13 Cuddly Toys
14 Heat & Enjoy
15 Pre Iron
16 Refresh
Cuddly Toy Programme
With this programme you can remove dust easier and wash the cuddly toys more often because the drying time is
very much reduced compared to drying in the open air. It is a delicate drying cycle that dries at low temperature
and with soft mechanical action to maintain at best the original look and shine of the fur.
Note: For allergy protection, just freeze cuddly toys for 24 hours then wash and dry them. Repeat every 6 weeks.
Before drying remove accessories such as clothes, collars or sound boxes and protect plastic eyes with masking
tape after drying them with a cloth.
The programme time will vary dependant on the exact make up of the load.
The maximum load should not exceed 2.5kg and no individual item should be greater than 600g.
✓
✗
✗
✗
✗
✗
✗
✗
✗
✗
✗
✗
Heat Level
●
An Automatic programme
●
An Automatic programme
●
An Automatic programme
●
An Automatic programme
Timed Dry
Dryness Levels available
(default highlighted )
Sensor Dry
Damp Dry
Iron Dry
Hanger Dry Plus
✓
Hanger Dry
Light Dry
Cupboard Dry
Extra Dry
Heat & Enjoy
This programme helps to heat towels & bathrobes for a warm sensation after a bath or shower. It is also useful for
warming clothes before dressing during winter. The cycle heats clothes to 37°C (Body Temperature) and runs at this
temperature for a maximum of 4 hours or until you stop the cycle by opening the door.
Maximum load 3kg.
Note: During this programme a icon rotates in the display until the target temperature is reached, at which point
the icon flashes.
Pre Iron Programme
‘Pre Iron’ is a treatment cycle for use with dry clothes and reduces creases in order to facilitate ironing and folding,
it has a maximum duration of 15 minutes.
! ‘Pre Iron’ is not a drying programme and should not be used for wet articles of clothing.
For best results: 1. Do not load more than the maximum capacity.
Refresh
! ‘Refresh’ is not a drying programme and should not be used for wet articles of clothing.
●
It can be used on any load size but is more effective on smaller loads.
●
Do not overload your dryer (see Laundry).
●
This is a 20 minute programme that airs your clothes with cool air. Also use to cool warm clothes.
These numbers refer to the dry weight:
Fabric Maximum load
Cotton and Cotton mixtures 2.5kg
Denim 2kg
2. Unload the dryer immediately after the end of the programme, hang, fold or iron the articles
and put them away in the closet. Should this not be possible repeat the programme.
12
Start and Programmes
The Controls
●
Programmes knob
! Warning, if after pressing the START/PAUSE button
the programme knob position has changed, the new
position will NOT change the programme selected.
To change a selected programme, press the
START/PAUSE button , the light flashes Amber to
indicate the programme is paused. Select the new
programme and any options required, the light will then
flash green. Press the START/PAUSE button again
and the new programme will start.
●
OPTION buttons / lights
These buttons are used to customise the selected
programme to your requirements. A programme must
have been selected on the programme knob before an
option can be selected. Not all options are available for all
programmes (see Start and Programmes). If an option is
not available and you press the button, the buzzer will
beep three times. If the option is available the option light
in the button lights to confirm the selection.
Progress ( Drying, Cool Tumble) icons
These are part of the Display, they indicate the progress
of the dryer. Each icon comes on as the corresponding
phase starts.
Time Delay (Delay Timer)
The start of some programmes (see Start and
Programmes) can be delayed for up to 24 hours. Ensure
the water container is emptied before setting a delayed
start. During this period the clothes are occasionally
tumbled to help prevent creases developing.
Ready to Iron
This option allows you to dry loads where only some
of the items need ironing and you do not wish to fully
dry those items.
When Iron Dry level is reached, a buzzer sounds to let
you know that the items that need ironing can be
removed. The dryer then stops and the Start/Pause
light flashes orange. Remove the items you wish to
iron, close the door and press the Start/Pause button,
the dryer continues until the remaining items reach the
selected dryness level.
It can be used on load sizes up to 3kg.
Note: This option is not available with the ‘Iron Dry’ and
‘Damp Dry’ dryness levels.
Less Tangled
This option has the drum movement modified to give a
tumbling action that reduces tangling and knotting of your
clothes.
The Less Tangled option gives best results when used
with smaller loads.
Heat Level buttons and lights
Not all programmes allow you to change the heat level
and some programmes allow all three heat level options:
Low, Medium and High.
When the heat level options are available pressing this
button changes the heat level and the light corresponding
to the selection is lit.
●
DISPLAY
The display shows either the amount of time delay
remaining or an indication of the amount of time left for a
drying programme (see The Display).
The colons between the hours and minutes in the display
flash to show that the time is counting down.
When the programme finishes its cool tumble phase the
display will show ‘End’.
●
Empty Water Icon / Container
8:88
(If you have plumbed your dryer to a drain this icon can
be ignored, as there is no need to empty the water
container).
When this icon is on ( ) it reminds you to empty the
water container.
If the water container fills during a programme, the
heater turns off and the dryer does a period of Cool
Tumble then the buzzer sounds, the ‘water container
full’ icon flashes, the display shows and the
‘empty water’ icon is on.
You must empty the water container and restart the
dryer or the clothes will not dry. After re-starting the
dryer the display will take a few seconds to refresh.
To avoid this always empty the water container each
time you use the dryer (see Maintenance).
●
Door Opening
Opening the door (or pressing the Start/Pause button)
during a programme will stop the dryer and have the
following effects:
●
The START/PAUSE light flashes Amber.
●
During a delay phase the delay will continue to
count down. The START/PAUSE button must be
pressed to resume the delay programme.
●
The START/PAUSE button must be pressed to
resume programme. The progress lights will change
to show the current status and the Start/Pause light
will stop flashing and turn green.
●
Changing the programmes knob will select a new
programme and the START/PAUSE light will flash
green. You can use this to select the Refresh
programme to cool the clothes, if you find them
dry enough. Press the START/PAUSE button to
begin a new programme.
●
Note
If you have a power cut, switch off the power or remove
the plug. When power is restored, press and hold the
ON/OFF button until the dryer reactivates, then press the
Start/Pause button.
GB
13
Laundry
GB
Sorting your laundry
●
Check symbols on clothing labels to make sure
that the articles can be tumble dried.
●
Sort laundry by fabric type.
●
Empty pockets and check buttons.
●
Close zippers and hooks and tie loose belts and
strings.
●
Wring out each item in order to eliminate as much
excess water as possible.
! Do not load dripping wet clothes into the dryer.
Maximum load size
Do not load more than maximum capacity.
These numbers refer to dry weight:
Natural fibres: 9kg max (20lb)
Synthetic fibres: 3kg max (6.6lb)
! DO NOT overload the dryer as this could result in
reduced drying performance.
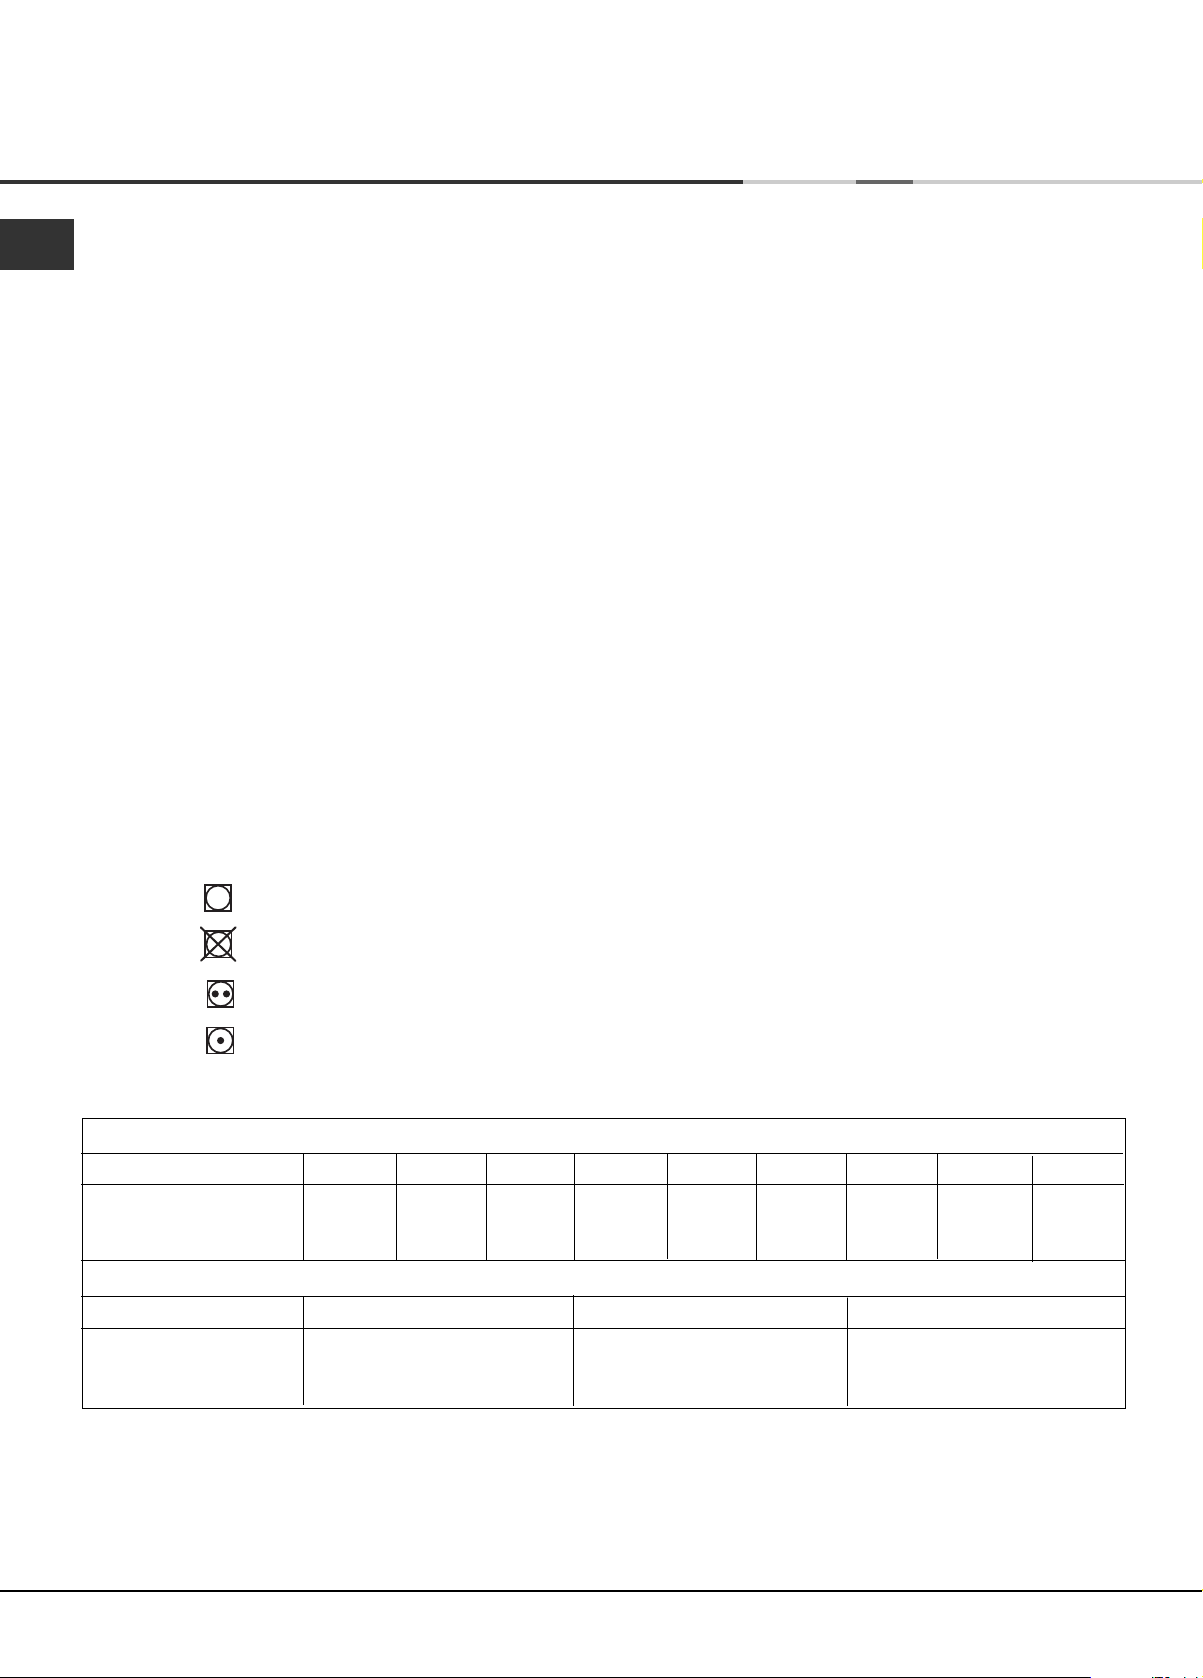
Wash Care Labels
Look at the labels on your garments, especially when
tumble drying for the first time. The following symbols
are the most common:
Drying times
The table (see below) presents APPROXIMATE drying
times in Minutes. Weights refer to dry garments.
Times are approximate and can vary depending
upon:
●
Amount of water retained in clothes after spin
cycle: towels and delicates retain a lot of water.
●
Fabrics: items that are the same type of fabric but
different textures and thicknesses may not have
the same drying time.
●
Quantity of laundry: single items or small loads
may take longer to dry.
●
Dryness: If you are going to iron some of your
clothes, they can be taken out while still a bit
damp. Others can be left longer if you need them
to be completely dry.
●
Heat setting.
●
Room temperature: if the room where the dryer is
located is cold, it will take longer for the dryer to
dry your clothes.
●
May be tumble dried
Bulk: some bulky items can be tumble dried with
care. We suggest that you remove these items
Do not tumble dry
several times, shake them out, and return them to
the dryer until finished.
Tumble dry at high heat setting
! Do not over-dry your clothes.
Tumble dry at low heat setting
All fabrics contain a little natural moisture, which
keeps them soft and fluffy.
Cottons
High/Full Heat
Load size
Drying times, in minutes
Synthetics
Gentle/Low Heat
Load size
Drying times, in minutes
●
Note: At the end of a drying cycle, cottons could still be damp if you grouped cottons and synthetics together. If
- spin speed 800-1000 rpm in washing machine.
1 kg
30 - 40
2 kg
40 - 55
3 kg
55 - 70
4 kg
70 - 80
- on reduced spin in washing machine.
1 kg
40 - 50
5 kg
80 - 90
2 kg
50 - 70
6 kg
95 - 120
7 kg
120 - 140
8 kg
130 - 160
3 kg
70 - 90
this is the case, simply give the damp cotton items an additional short period of drying.
9 kg
140 - 170
14
Troubleshooting
One day your dryer seems not to be working. Before you call your Service Centre (see Service), go through the
following troubleshooting suggestions:
Problem:
The tumble dryer won’t start.
Possible causes / Solution:
●
The plug is not plugged into the socket, or not making contact.
●
There has been a power failure.
●
The fuse has blown. Try to plug another appliance into the socket.
●
You are using an extension cord? Try to plug the dryer’s power cord
directly into the socket.
●
The door is not closed securely?
●
The PROGRAMMES knob has not been set properly (see Start and
Programmes).
●
The START/PAUSE button has not been pressed (see Start and Programmes).
●
Drying cycle will not begin.
Its taking a long time to dry.
You have set a delayed time (see Start and Programmes).
●
The filter has not been cleaned (see Maintenance).
●
The water container needs emptying... The ‘water container full’ icon
is flashing, the display shows and the ‘empty water’ icon is on
(see Maintenance).
●
The condenser needs cleaning? (see Maintenance).
●
The temperature setting is not ideal for the type of fabric you are drying
(see Start and Programmes, and see Laundry).
●
The correct drying time has not been selected for the load (see Laundry).
●
The air intake grille is obstructed (see Installation, and see
Maintenance).
●
The items were too wet (see Laundry).
●
The dryer was overloaded (see Laundry).
GB
The ‘water container full’ icon
is flashing and displayed
but the dryer has only been
running for a short period.
Empty water icon is on and
the water container is not full.
Programme finishes and
clothes are damper than
expected.
The display shows a fault
code F followed by one or two
numbers
●
The water container was probably not emptied at the start of the
programme. Do not wait for the empty water signal, always check and
empty the container before starting a new drying programme (see
Maintenance).
●
This is normal. If the icon is on it is just a reminder to empty the container
(see Start and Programmes).
! For safety the dryer has a maximum programme time of 5 hours. If an
automatic programme has not sensed the required final moisture in this time
the dryer will complete the programme and stop. Check the above points
and run the programme again, if the results are still damp, contact the
Service Centre (see Service).
●
If the display shows a fault:
- Turn off and remove the plug. Clean the filter and the condenser
unit (see Maintenance). Then replace the plug, turn on and start
another programme. If a fault is then displayed: Note down the
code and contact the Service Centre (see Service).
15

Service
GB
Before calling the Service Centre:
●
Use the troubleshooting guide to see if you can
solve the problem yourself (see Troubleshooting).
●
If not, turn off the dryer and call the Service Centre
closest to you.
Spare Parts
This dryer is a complex machine. Repairing it yourself
or having a non-authorised person try to repair it could
cause harm to one or more persons, could damage
the machine and could invalidate the spare parts
warranty.
What to tell the Service Centre:
●
name, address and post code.
●
telephone number.
●
the type of problem.
●
the date of purchase.
●
the appliance model (Mod.).
●
the serial number (S/N).
Call an authorised technician if you experience problems
while using the machine.
This information can be found on the data label inside
the door of the machine.
Save energy and respect the environment
●
Wring out items to eliminate excess water before tumble drying (if you use a washing machine first, select a high
spin cycle). Doing this will save time and energy during drying.
●
Always dry full loads - you save energy: single items or small loads take longer to dry.
●
Clean the filter after each use to contain energy consumption costs (see Maintenance).
Recycling and Disposal Information
As part of our continued commitment to helping
the environment, we reserve the right to use
quality recycled components to keep down customer
costs and minimise material wastage.
●
Disposing of the packaging material: follow local
regulations, so the packaging can be recycled.
●
To minimise risk of injury to children, remove the
door and plug - then cut off mains cable, flush
with the appliance. Dispose of these parts separately
to ensure that the appliance can no longer be
plugged into a mains socket.
Disposal of old electrical appliances
The European Directive 2012/19/EC on Waste Electrical
and Electronic Equipment (WEEE), requires that old
household electrical appliances must not be disposed
of in the normal unsorted municipal waste stream. Old
appliances must be collected separately in order to
optimise the recovery and recycling of the materials
they contain and reduce the impact on human health
and the environment.
The crossed out “wheeled bin” symbol on the
product reminds you of your obligation, that
when you dispose of the appliance it must be
separately collected.
Consumers should contact their local authority or
retailer for information concerning the correct disposal
of their old appliance.
16
Product Data... (EU Regulation 392/2012)
Brand Hotpoint Ariston Models TCF97B6HY
Rated capacity of Cotton laundry for the standard programme at full load 9 kg Energy efficiency class B
The weighted Annual Energy Consumption (AE
) 615.8 kWh
c
Consumption per year, based on 160 drying cycles of the standard cotton programme at full and partial load, and the
consumption of the low-power modes. Actual energy consumption per cycle will depend on how the appliance is used.
This household tumble dryer is an Automatic Condenser Dryer
Energy consumption : full load E
Power consumption : off-mode (P
5.20 kWh, partial load E
dry
) 0.14 W, left-on mode (Pl) 2.77 W
o
dry1/2
2.82 kWh
Duration of the ‘left-on mode’ for power management systems 30 minutes
The ‘standard cotton programme’ suitable for drying normal wet cotton laundry that is the most efficient programme in
terms of energy consumption for cotton used at full and partial load is Standard Cotton,High Heat, Cupboard Dry
Programme time (minutes) : weighted (T
) full & partial load 110, full load (T
t
) 147, partial load (T
dry
dry1/2
) 82
Condensation efficiency class B
Average condensation efficiency (%) : full load (C
) 83, partial load (C
dry
) 79, weighted (Ct) full & partial load 81
dry1/2
Airborne acoustical noise emissions 69 dB(A) re 1 pW
GB
* “consumer information in compliance with EU Regulation 932/2012”.
Typical energy used - Synthetics full load 1.38 kWh, partial load not applicable
Typical drying time - Synthetics full load 65 minutes, partial load not applicable
This appliance conforms to the following EC Directives:
- 2006/95/EC (Low Voltage Equipment)
- 2004/108/EC (Electromagnetic Compatibility)
Indesit Company, Viale Aristide Merloni 47, 60044 Fabriano (AN), Italy
17

Notice d’utilisation et installation
SÈCHE-LINGE
F
GB
English, 1
F
Français, 18
D
Deutsch, 35
E
Español, 52PPortuguês, 69
Table des Matières
Installation, 19
Où installer votre sèche-linge
Ventilation
Vidange de l’eau
Connexions électriques
Avant de commencer à utiliser votre sèche-linge
Avertissements, 20-21
Sécurité Générale
Pour minimiser les risques d'incendie
Entretien et Nettoyage, 22-23
Éteindre l’électricité
Nettoyer le filtre après chaque cycle
Videz le réservoir d’eau après chaque cycle
Nettoyage du groupe condenseur
TCF 97B
Vérifier le tambour après chaque cycle
Nettoyer le sèche-linge
Description du sèche-linge, 24
Caractéristiques
Panneau de commandes
! Conservez cette notice d’utilisation et d’installation
à portée de main de manière à pouvoir vous y
référer si nécessaire. Emmenez-la avec vous si vous
déménagez, et, si vous vendez cet appareil ou que
vous le donniez à un tiers, faites en sorte que cette
notice accompagne le sèche-linge de manière à ce
que le nouveau propriétaire soit informé des
avertissements et suggestions concernant le
fonctionnement de ce sèche-linge.
! Lisez attentivement ce mode d’emploi; les pages
suivantes contiennent des informations importantes
concernant l’installation et des suggestions relatives
au fonctionnement de cet appareil.
Ce symbole vous rappele de lire le
livret d’instructions.
L’affichage, 25
Démarrage et programmes, 26-30
Choisir un programme
Tableau des programmes
Les commandes
Linge, 31
Trier votre linge
Étiquettes d’entretien
Temps de séchage
Que faire en cas de panne, 32
Service Après-vente, 33
Pièces de Rechange
Recyclage et enlèvement
Données relatives au produit, 34
www.hotpoint.eu
18
Installation
Où installer votre sèche-linge
●
Placez votre sèche-linge à une certaine
distance des cuisinières, fourneaux,
radiateurs, ou plaques de cuisson à gaz,
car les flammes peuvent endommager
cet appareil.
minimale espace 10mm
●
Si vous installez cet
appareil sous un plan
de travail, faites en
sorte de laisser un
minimale
espace 15mm
espace de 10 mm
entre le dessus de
l’appareil et tout autre
objet sur ou au-dessus
de la machine, et un
espace de 15 mm entre les côtés et les
éléments d’ameublement ou les murs
latéraux. Ceci a pour objectif d’assurer
une ventilation convenable.
La surface arrière de l’appareil doit être
placée contre un mur.
Ventilation
Lorsque le sèche-linge est en marche, une aération
adéquate est nécessaire. Faites en sorte d’installer
votre sèche-linge dans un environnement qui n’est
pas humide et qui est doté d’une bonne circulation
d’air dans toute la pièce. La circulation d’air autour du
sèche linge est essentielle pour condenser l’eau
produite au cours du lavage, le sèche linge ne
fonctionnera pas efficacement dans un espace clos
ou dans un placard.
! Si l’on utilise le sèche linge dans une pièce froide ou
petite, on rencontrera un certain degré de condensation.
! Nous vous déconseillons d’installer votre
sèche-linge dans un placard. En revanche,
le sèche-linge ne doit en aucun cas être
placé derrière une porte fermant à clé, une
porte coulissante ou une porte montée sur
des gonds du côté opposé à la porte de
chargement du sèche-linge.
Vidange de l’eau
Si votre sèche-linge est installé à proximité d’une
évacuation, l’eau peut être vidangée dans ce tuyau.
Cela évite de vider le réservoir d’eau. Si vous installez
le sèche-linge au-dessus ou à côté d’un lave-linge, il
pourra partager la même vidange.
vidange doit être inférieure à
du sèche-linge.
Repérez la position du tuyau,
illustrée sur l'image A. Retirez le
tuyau.
image A
La hauteur de la
1 m en partant du bas
Assurez-vous que le tuyau n’est pas écrasé ou plié
!
une fois le sèche-linge placé dans sa position définitive
Connexions électriques
Assurez-vous des points suivants avant de
brancher la fiche de l’appareil dans la
prise de courant:
●
Assurez-vous que vos mains sont séches.
●
La prise de courant doit être reliée à la
terre.
●
La prise de courant doit pouvoir supporter
la puissance maximale de la machine,
qui est indiquée sur la plaque signalétique
de l’appareil (voir la Description du
Sèche-linge).
●
La tension électrique doit appartenir à la
gamme de valeurs indiquée sur la plaque
signalétique de l’appareil (voir la
Description du Sèche-linge).
●
La prise de courant doit être compatible
avec la fiche du sèche-linge. Si ce n’est
pas le cas, remplacez la fiche ou la
prise de courant.
! Le sèche-linge ne doit pas être utilisé à
l’extérieur, même si l’espace en question est
abrité. Cela peut être dangereux si l’appareil
est exposé à la pluie ou à des orages.
! Une fois installés, le cordon d’alimentation
et la fiche du sèche-linge doivent être
d’accès facile.
! N’utilisez pas de rallonges.
! Le cordon d’alimentation ne doit pas être
courbé ou écrasé.
! Le câble électrique doit être contrôlé
périodiquement. Si le câble est endommagé,
il faut le faire remplacer par le fabricant,
par son service après-vente ou par tout
autre personnel qualifié afin d’éviter tout
risque de danger. Des cordons d’alimentation
neufs ou plus longs sont fournis par les
revendeurs agréés contre un supplément.
! Le fabricant rejète toute responsabilité en
cas de non-respect de toutes ou partie de
ces règles.
! En cas de doute au sujet des points
precedents, consultez un electricien qualfie.
Avant de commencer à utiliser votre
sèche-linge
Une fois que vous avez installé votre sèche-linge, et
avant de l’utiliser, nettoyez l’intérieur du tambour pour
retirer les poussières qui pourraient s’y être
accumulées durant le transport.
.
F
Puis fixez un tuyau suffisamment
long selon la position illustrée sur
l'image B.
image B
Capacités maximales de chargement
Fibres naturelles : 9 kg
19

Avertissements
●
F
! Cet appareil a été conçu et construit
conformément à des normes de sécurité
internationales.
Ces avertissements sont donnés pour des
raisons de sécurité et doivent être suivis
attentivement.
Sécurité Générale
●
Ce sèche-linge peut étré utilisé par des
personnes (notamment des enfants de
plus 8 ans) présentant des capacités
physiques, motrices ou mentales réduites,
ou manquant d’expérience et de
connaissances, si elles sont placées sous
surveillance ou ont reçu les instructions
nécessaires à l’utlilisation de l’appareil
de la part d’une personne responsable
de leur sécurité.
●
Ce sèche-linge a été conçu pour un
usage domestique, et non professionnel.
●
Ne touchez pas cet appareil lorsque vous
êtes pieds nus ou avec des mains ou
des pieds humides.
●
Débranchez cette machine en tirant sur
la fiche et non sur le cordon.
●
Après avoir utilisé ce sèche-linge,
éteignez-le et débranchez-le. Tenez la
porte fermée pour assurer que les
enfants ne jouent pas avec.
●
Surveillez les enfants de façon à ne pas
les laisser jouer avec le sèche-linge.
●
Le nettoyage et l’entretien ne doivent pas
être effectués par des enfants non
surveillés.
●
Les enfants de moins de 3 ans doivent
être tenus à bonne distance du sèchelinge s’ils ne sont pas sous surveillance
constante.
●
Cet appareil doit être installé correctement
et avoir une ventilation convenable.
L’arrivée d’air sur le devant du sèchelinge ne doit jamais être obstruée (voir
Installation).
●
N’utilisez jamais le sèche-linge sur de la
moquette où la hauteur des poils
empêcherait l’air d’entrer dans la sèchelinge à partir de la base.
Vérifiez que le sèche-linge est bien vide
avant de le charger.
●
L’arrière du sèche-linge peut devenir
très chaud. Ne le touchez jamais en
cours d’utilisation.
●
N’utilisez pas le sèche-linge si le filtre, le
réservoir d’eau et le condenseur ne sont
pas bien en place (voir Entretien).
●
Ne surchargez pas le sèche-linge (voir
Linge pour les charges maximales).
●
Ne chargez pas d’articles qui dégouttent
d’eau.
●
Vérifiez avec soin toutes les instructions
sur les étiquettes des vêtements (voir
Linge).
●
Ne séchez pas d’articles de grande taille,
très volumineux.
●
Ne séchez pas de fibres acryliques à
hautes températures.
●
N’éteignez pas le sèche-linge s’il
contient encore des articles chauds.
●
Nettoyez le filtre après chaque utilisation
(voir Entretien).
●
Videz le réservoir d’eau après chaque
utilisation (voir Entretien).
●
Nettoyez le groupe condenseur à
intervalles réguliers (voir Entretien).
●
Ne laissez pas s’accumuler de peluches
autour du sèche-linge.
●
Ne montez jamais sur le sèche-linge.
Cela pourrait l’endommager.
●
Respectez toujours les normes et
exigences électriques (voir Installation).
●
Achetez toujours des pièces de
rechange et accessoires d’origine (voir
Service Après-vente).
20

Avertissements
Vous devez observer les consigne
suivantes pour réduire tout risque
d'incendie dans votre sèche-linge :
●
Ne séchez que des articles qui ont été
lavés avec de l’eau et un détergent,
rincés et essorés. Le fait de sécher des
articles qui N’ONT PAS été lavés avec
de l’eau constitue un danger d’incendie.
●
Ne séchez pas des vêtements qui ont
été traités avec des produits chimiques.
●
Ne placez pas d'articles tachés ou
imbibés d'huile végétale ou de cuisson,
ils risqueraient de provoquer un
incendie. Les articles contenant de
l'huile peuvent prendre feu spontanément,
particulièrement lorsqu'ils sont exposés
à des sources de chaleur comme un
sèche-linge. En chauffant, les articles
provoquent une réaction d'oxydation
avec l'huile générant alors de la chaleur.
Si la chaleur ainsi générée ne peut pas
être évacuée, les articles peuvent
devenir suffisamment chauds pour
prendre feu. Le fait d'empiler, de
superposer ou de stocker des articles
contenant de l'huile peut empêcher la
chaleur d'être évacuée et donc provoquer
un incendie.
Si vous ne pouvez pas faire autrement
que de placer des articles contenant de
l'huile végétale ou de l'huile de cuisson
ou ayant été en contact avec des
produits coiffants dans le sèche-linge, il
convient de les laver au préalable à
l'aide d'une dose supplémentaire de
détergent. Cette précaution minimise,
sans toutefois l'éliminer, le risque
d'incendie. Les articles ne doivent pas
être retirés du sèche-linge et empilés ou
superposés lorsqu'ils sont chauds.
●
Ne placez pas d'articles ayant été
préalablement nettoyés ou lavés,
imbibés ou tachés avec du pétrole/de
l'essence, des solvants de nettoyage à
sec ou d'autres substances
inflammables ou explosives. Les substances
hautement inflammables couramment
utilisées dans l'environnement
domestique sont notamment l'huile de
cuisson, l'acétone, l'alcool dénaturé, la
kérosène, les détachants, la térébenthine,
les cires et les produits permettant
d'éliminer la cire. Assurez-vous que ces
articles ont été lavés à l'eau chaude à
l'aide d'une dose supplémentaire de
détergent avant de les mettre à sécher
dans le sèche-linge.
●
Ne placez pas d'articles contenant du
caoutchouc mousse (également connu
sous l'appellation mousse de latex) ou
des matériaux similaires renfermant du
caoutchouc dans le sèche-linge. Les
matériaux contenant du caoutchouc
mousse peuvent, lorsqu'ils sont chauffés,
s'enflammer par combustion spontanée.
●
Les produits assouplissants ou les
produits similaires ne doivent pas être
utilisés dans un sèche-linge en vue
d'éliminer es effets de l'électricité
statique sauf si leur emploi est
spécifiquement recommandé par le
fabricant du produit assouplissant.
●
Ne placez pas de sous-vêtements
contenant des renforts en métal comme
les soutiens-gorge à armature dans le
sèche-linge. Si les renforts en métal
venaient à se détacher pendant le
séchage, ils pourraient endommager le
sèche-linge.
●
Ne placez pas d'articles en caoutchouc
ou en plastique dans le sèche-linge,
comme des bonnets de douche ou des
couvertures étanches pour bébé, des
articles en polyéthylène ou en papier.
●
Ne placez pas d'articles contenant des
pièces de caoutchouc plaquées, des
vêtements présentant des pièces en
mousse de caoutchouc, des oreillers,
des bottes en caoutchouc et des tennis
recouvertes de caoutchouc dans le
sèche-linge.
●
Enlever tous les objets des poches,
notamment les briquets et les allumettes.
F
! AVERTISSEMENT : N’arrêtez pas le sèche-linge avant la fin du cycle de séchage si vous
n’avez pas la possibilité de retirer rapidement tous les articles et de les étendre pour
évacuer la chaleur.
21
Entretien et Nettoyage
F
Éteignez l’électricité
! Débranchez votre sèche-linge lorsque
vous ne l’utilisez pas, lorsque vous le
nettoyez et durant toutes les opérations
d’entretien.
Nettoyez le filtre après chaque cycle
Le filtre est une pièce importante de votre
sèche-linge: il accumule des peluches qui
se forment durant le séchage.
Fois le séchage terminé, nettoyez le filtre
! Si le réservoir d’eau n’est pas vidé, les problèmes
suivants peuvent se vérifier:
- L’arrêt du chauffage de l’appareil (le linge pourrait
donc être encore humide à la fin du cycle de
séchage) (voir Les Commandes).
●
Amorçage du système de récupération d’eau
Sur un sèche-linge neuf, le réservoir d’eau ne
récupérera pas l’eau tant que le système n’aura
pas été amorcé... ceci nécessitera 1 ou 2 cycles de
séchage. Une fois amorcé, il récupérera l’eau à
chaque cycle de séchage.
en le rinçant sous l’eau courante ou avec
votre aspirateur.
Si le filtre devient bloqué, le flux d’air à
l’intérieur du sèche-linge est sérieusement
compromis : les temps de séchage sont
allongés et vous consommez davantage
d’énergie. Cela peut aussi endommager
votre sèche-linge.
Nettoyage du groupe condenseur
Périodiquement (chaque mois) retirez le
groupe condenseur et nettoyez toute
accumulation de peluche entre les
plaques en le rinçant sous le robinet à
l’eau froide. Ceci devrait être effectué avec
Le filtre se trouve devant la garniture du
l’eau froide de l’arrière du condenseur.
sèche-linge (voir schéma en page
suivante).
Pour retirer du groupe condenseur :
1. Débranchez le sèche-linge et ouvrezz
Pour retirer le filtre :
1. Tirez la poignée en plastique du filtre
vers le haut .
2. Ouvrez le filtre et
nettoyez les peluches
qui se seraient
déposées au fond.
3. Repositionnez-le
la porte.
2. Tirez sur le couvercle du condenseur
pour l’ouvrir (voir schéma). Dégagez les
trois loquets en tournant à 90° dans le
sens anti-horaire puis tirez
sur la poignée et retirez-le
du sèche-linge.
correctement.
Assurez-vous que le
filtre soit bien inséré à
fond dans la garniture
du sèche-linge.
4. Retirez toutes les peluches qui se sont
accumulées sur l'intérieur de la porte et
autour du joint de la porte.
! N’utilisez pas le sèche-linge sans avoir
remis le filtre en place.
Nettoyez la surface des joints et remettez
le condenseur en place : les flèches
doivent être orientées vers le haut.
Assurez-vous que les loquets sont bien
clipsés.
Videz le réservoir d’eau après chaque
cycle
Tirez le réservoir pour l'extraire
du sèche-linge et retirez le petit
capot ou le grand capot, videz-le
dans un évier ou autre, pour en
éliminer le contenu. Remettez en
place le capot et remettez le
réservoir bien en place.
! Toujours vérifier et vider le récipient avant de
commencer un nouveau programme de séchage.
22
Entretien et Nettoyage
F
Réservoir d’eau
Filtre
Groupe condenseur
Loquets
Vérifiez le tambour après chaque cycle
Tournez le tambour à la main afin de retirer les petits
articles (mouchoirs) qui pourraient y avoir été oubliés.
Nettoyage du tambour
! Pour nettoyer le tambour, ne pas utiliser d’abrasifs,
de laine d’acier ni de produits de nettoyage pour
acier inoxydable.
Robinet
l’arrière
avant
Grille d’entrée d’air
Couvercle de condenseur
Groupe condenseur
Conseils rapides
●
N’oubliez pas de nettoyer le filtre de la
porte et le filtre du condenseur après
chaque séchage.
●
N’oubliez pas de vider le réservoir
d’eau après chaque séchage.
! Vous obtiendrez ainsi, des performances
optimales.
Un film coloré peut parfois apparaître à la surface du
tambour en acier inoxydable. Il peut être dû à une
combinaison de l’eau et/ou des produits de nettoyage
(ex. adoucissant textile provenant du lavage). Ce film
coloré n’affecte pas la performance du sèche-linge.
Nettoyage
●
Les parties externes en métal ou en plastique et les
pièces en caoutchouc peuvent être nettoyées avec
un chiffon humide.
●
Périodiquement (tous les 6 mois), aspirez la grille
d’entrée d’air de devant, pour retirer toute
accumulation de peluche ou poussière. En outre,
pour retirer l’accumulation de peluche de l’avant du
condenseur et de la zone du filtre, nettoyez
occasionnellement avec un aspirateur.
! N’utilisez pas de solvants ou d’abrasifs.
! Votre sèche-linge utilise des roulements spéciaux qui
n’ont pas besoin d’être lubrifiés.
! Faites vérifier régulièrement votre sèche-linge par
des techniciens agréés pour assurer une sécurité
électrique et mécanique (voir Service d’Entretien).
23
Description du sèche-linge
F
Caractéristiques
Plaque
signalétique
Réservoir d’eau
Numéro du Modèle et
Numéro de Série
Filtre
Poignée de couvercle de condenseur
(Tirer ou ouvrir)
Couvercle de condenseur
Grille d’entrée d’air
Panneau de commandes
Indicateur
Bouton
PROGRAMMES
Bouton et Témoin
SÉCURITÉ ENFANTS
INTENSITÉ DE
CHALEUR
Bouton et Témoins
Bouton
MARCHE/ARRÊT
Le bouton MARCHE/ARRÊT : Lorsque le sèche-linge
fonctionne, si vous appuyez sur ce bouton et que vous le
maintenez enfoncé pendant plus de 3 secondes, le
sèche-linge s'arrête. Un décompte se déclenche : 3, 2, 1,
Arrêt et le programme est annulé. Appuyez sur ce bouton
et maintenez-le enfoncé pendant plus de 3 secondes pour
redémarrer le sèche-linge.
Le bouton PROGRAMMES permet de sélectionner un
programme : tournez-le jusqu’à ce que l’indicateur ce
positionne sur le programme que vous souhaitez
sélectionner (voir Démarrage et Programmes).
Les boutons OPTION sélectionnent les options disponibles
pour le programme choisi. Le témoin allumé indique que
l’option a été sélectionnée (voir Démarrage et Programmes).
Le bouton DÉPART/PAUSE commence un programme
sélectionné. Quand vous appuyez sur ce bouton, il y a un
bip et les témoins lumineux de progression clignotent pour
confirmer l’action. Quand un programme fonctionne, et que
l’on appuie sur ce bouton, le programme marque une pause
et le sèche-linge s’arrête
Le témoin est vert lorsque le programme fonctionne, orange
clignotant si le programme a été mis en pause ou vert
clignotant si le sèche-linge est en attente dulancement d’un
programme (voir Démarrage et Programmes).
L’Affichage L’Affichage indique le temps de séchage ou le
temps d'attente via des icônes qui s'allument. Elles
fournissent des informations d'avertissement et indiquent les
phases de déroulement de votre programme. Les trois
.
L’Affichage et
Boutons de sélection
Boutons et Témoins
boutons situés sous l'affichage permettent de sélectionner
"Automatique" ou "Séchage temporisé" et au besoin un
départ différé (voir Démarrage et Programmes ou voir
Affichage).
Bouton et témoin SÉCURITÉ ENFANTS : appuyez sur ce
bouton et maintenez-le enfoncé après avoir sélectionné
votre programme et les options éventuelles. Le témoin
s'allume. Cette fonction empêche que les paramètres du
programme ne soient modifiés. Lorsque le témoin est
allumé, les autres boutons sont désactivés. Maintenez ce
bouton enfoncé pour annuler et le témoin s'éteint.
L'icône Vider l'eau indique que le réservoir d'eau doit
être vidé. Après avoir vidé le réservoir d'eau et l'avoir remis
en place, l'Affichage met quelques secondes à s'actualiser.
Le sèche-linge doit être allumé (voir Les Commandes).
Remarque : si le réservoir d'eau est plein, l'icône
"Réservoir d'eau plein" clignote, l'Affichage indique , le
séchage est interrompu et vos habits ne seront pas séchés.
L’icône Nettoyer le filtre vous rappelle avant chaque
programme qu’il est essentiel de nettoyer le filtre à chaque
fois que l’on utilise le sèche-linge (voir Entretien et Nettoyage).
L’icône Nettoyer le condenseur vous rappelle qu'il
est essentiel de nettoyer régulièrement le
condenseur (voir Entretien et Nettoyage).
Bouton et Témoin
DÉPART/PAUSE
OPTION
24
Affichage
L'Affichage offre trois fonctions principales, chacune correspondant à un bouton.
Détection de niveaux de séchage
Après avoir sélectionné un programme associé à l'option Détection de niveaux de séchage, appuyez sur le
bouton et relâchez-le jusqu'à ce que le détection de niveau de séchage souhaité s'affiche. Si l'option de
détection n'est pas disponible avec le programme sélectionné, l'Affichage clignote et l’alarme émet trois bips
sonores.
! Certains programmes associés à l'option de détection ne proposent pas les cinq options de niveau de
séchage disponibles.
Niveaux de séchage:
Linge humide : sèche vos articles pour qu'ils soient prêts à être repassés à l'aide d'une
Sec pour repassage : sèche vos articles pour qu'ils soient prêts à être repassés à l'aide d'un fer.
Sec pour cintre Plus : sèche vos articles délicats pour qu'ils soient prêts à être mis sur cintre
Sec pour cintre : sèche vos vêtements pour qu'ils soient prêts à être mis sur cintre pour finir
Séchage léger : sèche vos articles délicats pour qu'ils soient prêts à être rangés.
Sec pour placard: sèche vos articles pour qu'ils soient prêts à être rangés.
(À Ranger)
Sec extra : sèche vos vêtements pour qu'ils soient prêts à être portés.
Temporisé
Après avoir sélectionné un programme associé à l'option Séchage temporisé, appuyez sur le bouton ,
l'icône Séchage temporisé s'allume. L'Affichage diminue le temps sélectionné à chaque fois que vous
appuyez et que vous relâchez ce bouton (
être associé à une option de temporisation, différentes durées sont disponibles. Jusqu'à 11 durées de
séchage peuvent être sélectionnées selon niveaux de séchage que vous avez choisie.
Chaque fois que vous appuyez sur le bouton, le temps de séchage est réduit.
Si vous changez d'avis, appuyez sur le bouton Détection de niveaux de séchage pour revenir aux options
de niveau de détection disponibles.
Si l'option Séchage temporisé n'est pas disponible, l'Affichage clignote et l'alarme émet trois bips sonores.
Le temps sélectionné reste affiché après le départ du programme et peut être modifié au cours du
programme si vous le souhaitez.
F
centrale ou d'une presse.
pour finir de sécher.
de sécher.
voir Démarrage et Programmes). Pour chaque programme pouvant
Départ Différé
Après avoir sélectionné un programme associé à une option de Départ différé, un horaire de départ
différé peut être sélectionné.
À chaque appui sur le bouton Départ différé , la durée d'attente est augmentée en 30 minutes de
à puis de à puis . Après cinq secondes, le temps d'attente est annulé.
9:30
Pour une attente de 10 heures ou plus, l'Affichage effectue un décompte de la durée en heures
jusqu'à 10 heures puis indique et poursuit le décompte en minutes.
Pour une attente de 9 heures ou moins, l'Affichage indique les heures et les minutes puis indique un
décompte en minutes pour toute la durée.
Après avoir appuyé sur le bouton DÉPART/PAUSE , le temps d'attente peut être modifié ou annulé.
Quand la durée d'attente s'est écoulée, l'icône d'attente s'éteint et Temps restant s'affiche.
Remarque : pendant cette période, le tambour tourne de temps à autre, afin d'éviter la formation de
plis.
10h
24h
OFF
9.59
Temps restant
Si l'icône d'attente est éteinte, la durée affichée correspond à le Temps restant du programme en cours.
Quand un programme temporisé est sélectionné, la durée affichée pendant le cycle correspond au temps effectif
restant.
Quand un programme Automatique est sélectionné, la durée affichée correspond à une estimation de la durée
restante. Quand un programme est sélectionné, l'Affichage indique la durée nécessaire au séchage d'une charge
pleine. Le temps restant est contrôlé constamment pendant le cycle de séchage et est modifié au fur et à mesure
pour afficher l’estimation la plus précise possible.
La Temp restant est affichée en heures et minutes et effectue un décompte de minute en minute.
Les deux points séparant les heures et les minutes, sur l'Affichage, clignotent. Ceci signifie que la durée est
décomptée.
L’affichage indique aussi si votre sèche-linge présente un problème ; si c’est le cas, l’affichage indique F suivi d’un
numéro de code d’erreur, les trois témoins des options et le témoin DÉPART/PAUSE clignotent également orange
(voir Que faire en cas de panne).
0:30
25
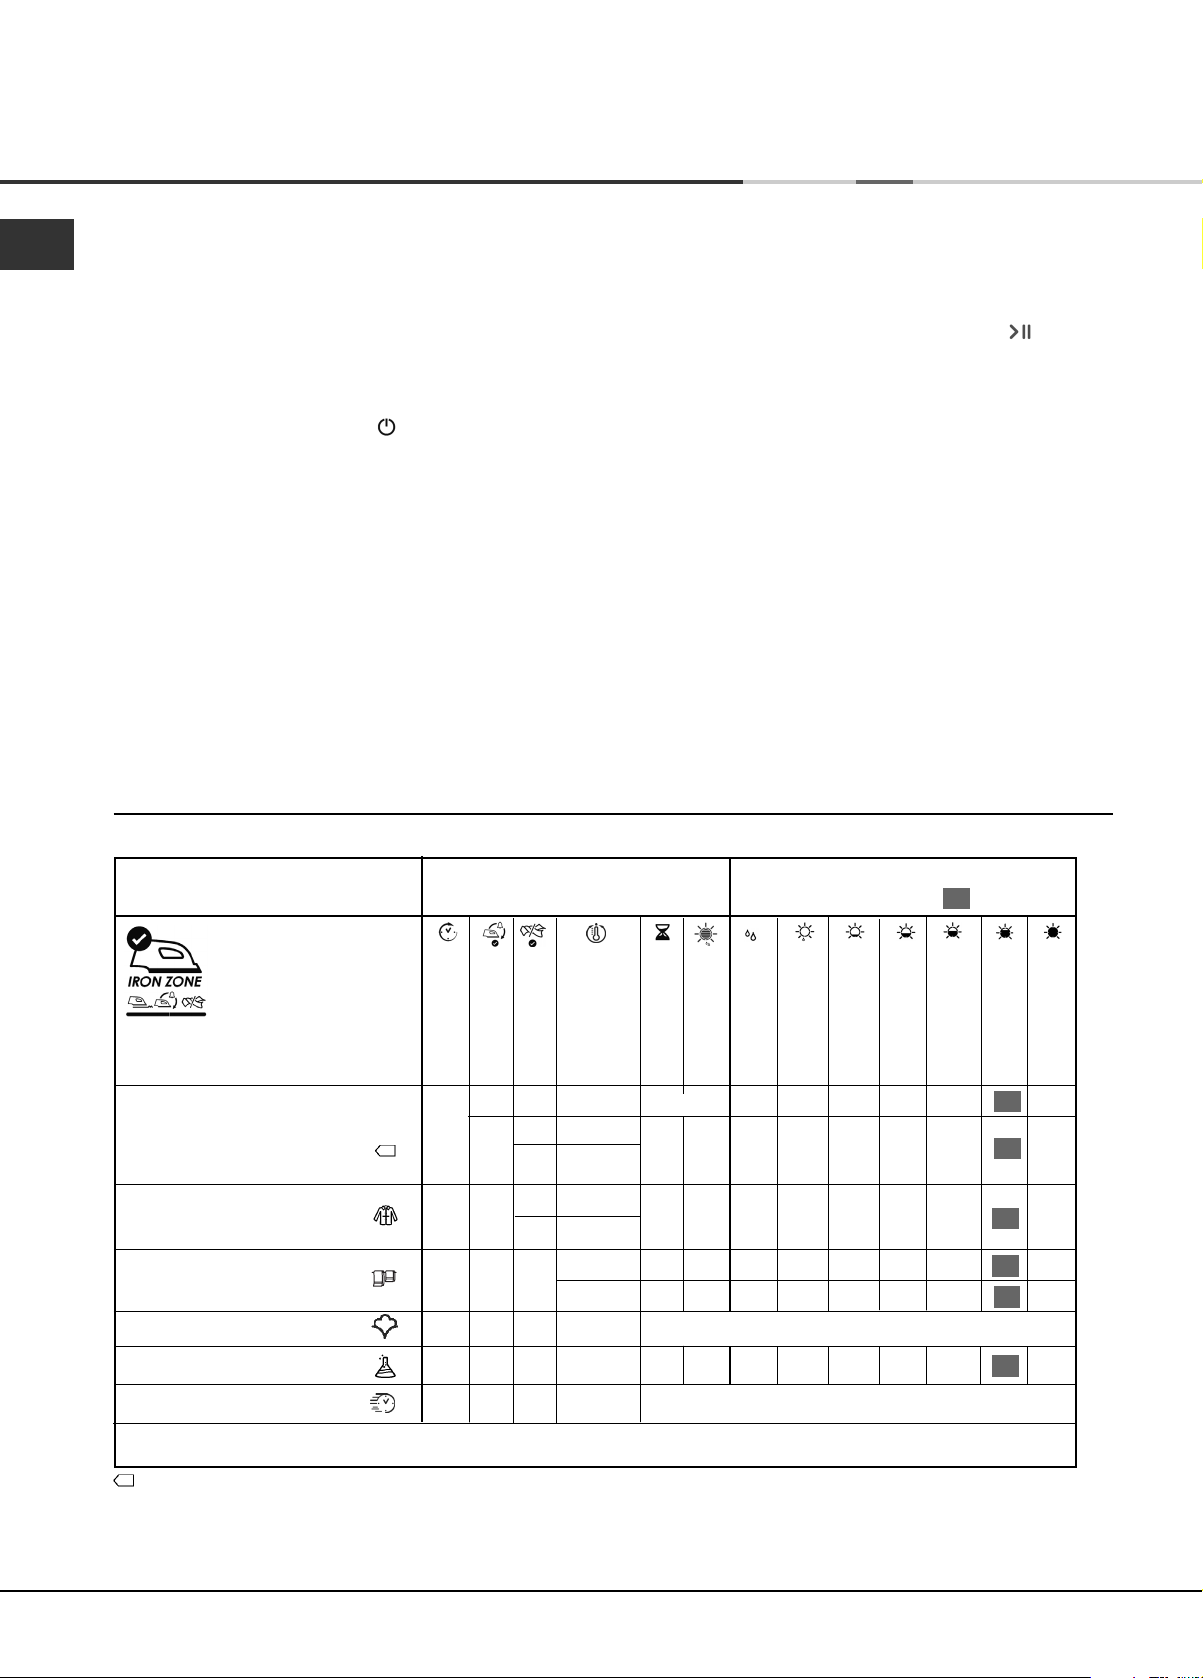
Démarrage et Programmes
Choisir un programme
F
1. Branchez la fiche du sèche-linge dans la prise
électrique.
2. Triez votre linge en fonction du type de textiles (voir
Linge).
3. Ouvrez la porte et en assurant-vous que le filtre soit
propre et en place et le réservoir d’eau est vide et en
place (voir Entretien).
4. Chargez la machine et assurez-vous que des articles
ne bloquent pas le joint de la porte. Fermez la porte.
5. Si aucan des voyanta n’est allumé : appuyez sur
le bouton MARCHE/ARRET
6. Choisissez un programme en vérifiant avec le guide
des programmes (voir Programmes) ainsi que les
indications pour chaque type de tissu (voir Linge).
- Sélectionnez un programme en tournant le bouton
PROGRAMMES.
7. Choisissez l'option Durée de séchage ou Intensité
de séchage.
- Pour l'option Durée de séchage, appuyez sur le
bouton Temporisé et relâchez-le jusqu'à faire
apparaître la durée de séchage souhaitée, ou…
- Pour sélectionner les paramètres de séchage
proposés par défaut, appuyez sur le bouton
Détection de niveaux de séchage et relâchez-le
jusqu'à faire apparaître l'intensité souhaitée (voir
Affichage).
Remarque: Ce sèche-linge, conformément aux nouvelles normes en vigeur dans le domaine de l’économie
d’énergie, est équipée d’un syst
Appuyez sur le bouton MARCHE/ARRÊT et maintenez-le enfoncé jusqu'à rallumer le sèche-linge.
ème d’extinction automatique (veille) activé après environ 30 minutes d’inutilisation.
! Pour obtenir toutes les précisions relatives aux
options disponibles pour chaque programme, voir
les Tableaux des programmes.
8. Réglez le depart différé de temporisation et d’autres
options si nécessaire.
9. Le témoin DÉPART/PAUSE clignote en vert :
- appuyez sur le bouton DÉPART/PAUSE pour
commencer.
En cours de programme de séchage, vous pouvez
vérifier votre linge et sortir les articles qui sont secs
pendant que les autres continuent à sécher. Lorsque
vous refermez la porte, appuyez sur le bouton
DÉPART/PAUSE afin de continuer le séchage.
(Lorsque la porte est ouverte, le témoin
DÉPART/PAUSE clignote en orange. Dès que vous
aurez fermé la porte et appuyé sur le bouton
DÉPART/PAUSE, le témoin DÉPART/PAUSE
cessera de clignoter et restera allumé en vert.)
10. L’alarme émet trois bips sonores pour indiquer que
votre programme est terminé.
Ouvrez la porte, sortez votre linge, nettoyez le filtre et
remettez-le en place. Videz le réservoir d’eau et
replacez-le (voir Entretien).
11. Débranchez le sèche-linge.
Le témoin vert cesse de clignoter.
PROGRAMMES BASIQUES - Tableau des programmes
Programme Options disponibles
Départ Différé
Repassage
optimisé*
Moins emmêlé
Intensité de
chaleur
Temporisé
✗
✓
1 Coton Standard
2 Chemises
3 Lit et Bain
4 Anti Allergique
5 Synthétiques
6 Séchage rapide
*Remarque : cette option n'est pas disponible avec les niveaux de séchage "Sec pour repassage" et "Linge humide".
✓
✓
✓
✓
✓
✓
✗
✗
✗
✗
✗
✗
✓
✓
✓
✗
✓
✗
✗
✗
- Élevée
- Élevée
- Moyenne
- Basse
- Élevée
- Moyenne
- Élevée
- Moyenne
✗
- Moyenne
- Basse
- Élevée
- Moyenne
✓
✓
✓
✗
✗
●
Un programme Automatique
✓
●
Un programme Automatique
Niveaux de séchage disponibles
(par défaut repérée par une )
L’option de
détection
Linge humide
Sec pour
repassage
Sec pour cintre
Plus
Sec pour cintre
✓
✓
✓
✓
✓
✓
✓
✓
✓
✓
✓
✓
✓
✓
✓
✓
✓
✓
✓
✓
✓
✓
✓
✓
✓
✓
✓
✓
✓
✓
✓
✓
✓
✓
✓
✓
✓
Séchage léger
✓
✓
✓
✓
✓
✓
Sec pour placard
Sec extra
✓
✗
✗
✓
✗
✗
Coton Standard
●
Ce programme est destiné aux articles en coton.
●
La durée de ce programme est fonction de la quantité de linge, de l'intensité de séchage sélectionnée et de la
vitesse d'essorage utilisée dans votre lave-linge (voir Linge).
●
Le programme Coton standard correspondant à la réglementation UE 392/2012 est le Programme 1 avec la
chaleur élevée et niveau de séchage Sec pour placard.
26
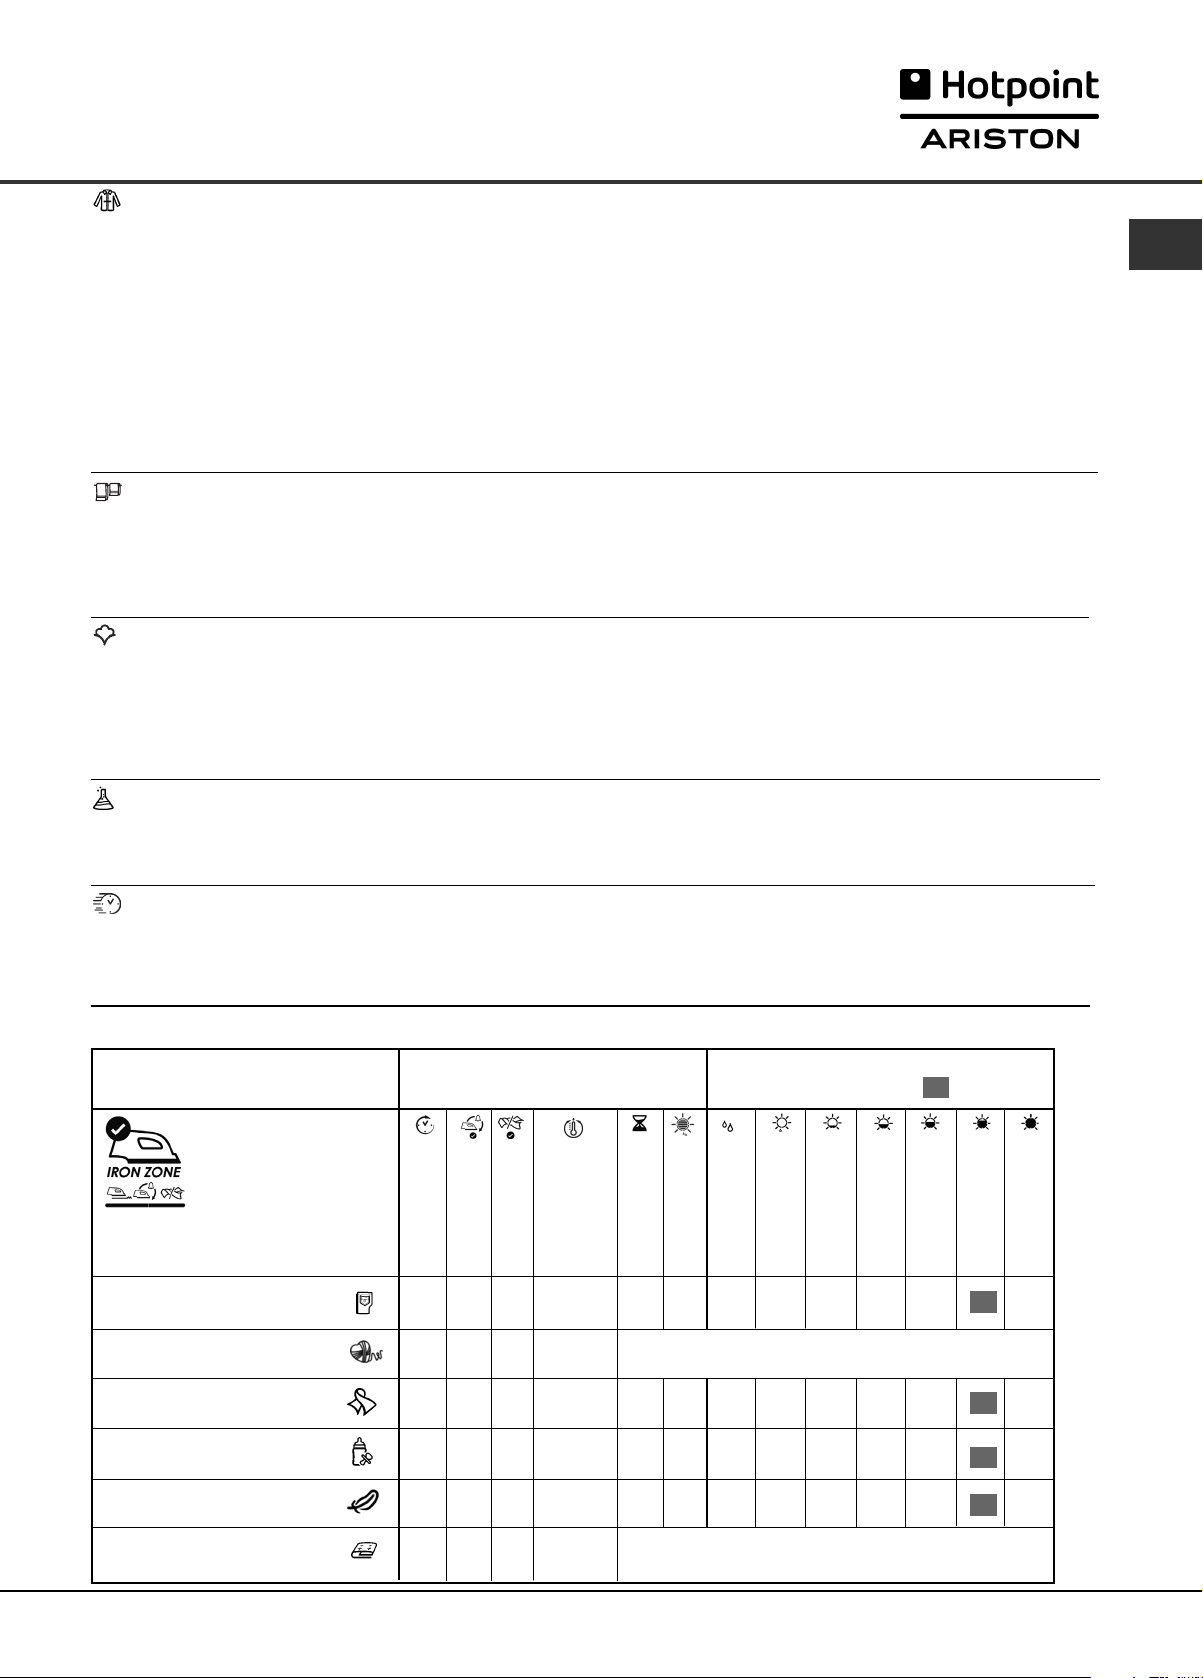
Démarrage et Programmes
Chemises
Option Température Élevée
●
Ce programme est particulièrement adapté aux chemises en coton.
●
Il peut être utilisé pour des charges jusqu'à 3 kg (environ 10 chemises).
Option Moyenne température
●
Ce programme est particulièrement adapté aux chemises en synthétique ou en fibres naturelles et synthétiques
mélangées, comme le polyester et le coton.
●
Il peut être utilisé pour des charges jusqu'à 3 kg (environ 14 chemises).
La durée de ce programme est fonction de la quantité de linge, de l'intensité de séchage sélectionnée et de la
vitesse d'essorage utilisée dans votre lave-linge.
Les charges séchées avec l'intensité Sec pour placard sont normalement prêtes à être portées. Mais les bords ou
les coutures peuvent être légèrement humides. Vous pouvez alors essayer de retourner les chemises, puis de
relancer le programme, pour une courte durée.
Lit et Bain
●
Ce programme est destiné aux serviettes et aux draps en coton.
●
La durée de ce programme est fonction de la quantité de linge, de l'intensité de séchage sélectionnée et de la
vitesse d'essorage utilisée dans votre lave-linge (voir Linge).
●
Les charges séchées avec Sec Extra sont généralement prêtes à être utilisées. Mais les bords ou les coutures
peuvent être légèrement humides notamment pour les grands articles. Vous pouvez alors essayer d'écarter les
articles, puis de relancer le programme pour une courte durée.
Programme Antiallergique
Ce programme bénéficie de l'homologation d'Allergy UK. Ce cycle spécial Antiallergique garantit la réduction et l'élimination
efficaces des allergènes dans les vêtements. Ce programme permet de neutraliser l'action des allergènes les plus
courants (notamment les acariens dermatophagoides) grâce au maintien d'une température constante pendant une durée
prolongée.
Ce programme peut être utilisé pour sécher et traiter une charge de linge humide pleine, ou simplement pour traiter une
charge de 4 kg de linge sec.
F
Synthétiques
●
Ce programme est destiné aux articles synthétiques ou aux fibres mélangées en synthétique et coton.
●
La durée de ce programme est fonction de la quantité de linge, de l'intensité de séchage sélectionnée et de la
vitesse d'essorage utilisée dans votre lave-linge (voir Linge).
Séchage rapide
Il peut être utilisé pour des charges jusqu'à 1 kg
Remarque : peut être utilisé uniquiquement avec le réglage ‘Sec pour placard’.
Le temps de séchage est fortement réduit, vous gagnez donc beaucoup de temps ; jusqu'à 53 % sur les articles en coton
(avec l'option Température Élevée) et jusqu'à 50% sur les articles en synthétique (avec l'option Moyenne Température).
PROGRAMMES SPÉCIAUX- Tableau des programmes
Programme Options disponibles
Départ Différé
Repassage
optimisé
Moins emmêlé
7 Jeans
Laine
8
✓
✗
✗
✗
✗
✗
Intensité de
chaleur
Temporisé
✗
✗
✗
●
Un programme Automatique
Niveaux de séchage disponibles
(par défaut repérée par une )
L’option de
détection
Linge humide
Sec pour
repassage
Sec pour cintre
Plus
Sec pour cintre
✓
✓
✓
✓
✓
✓
✓
Séchage léger
✓
Sec pour placard
Sec extra
✓
9 Soie
10 Bébé
11 Délicats
12 Couette
✗
✓
✓
✓
✓
✓
✓
✓
✓
✓
✓
✓
✓
✓
✓
✓
✓
✓
✓
✗
✗
✗
27
✗
✗
✗
✗
✗
✗
✗
✗
✗
✗
✗
- Élevée
- Moyenne
✗
✗
✓
●
Un programme Automatique
✓
✓
✓
✓
✓
✓
 Loading...