

Page 1

Instruction booklet
TUMBLE DRYER
GB
English, 1
P
Português, 52
F
Français, 18
NL
Nederlands, 69
E
Español, 35
TCD851B
First time you turn on your dryer
you must select your preferred
language see page 6
Contents
Important information, 2-3
Installation, 4
Where to put your dryer
Ventilation
Electrical connection
Before you start using your dryer
Dryer description, 5
To open the door
The features
Control panel
The Display, 6-8
Start and programmes, 8-11
Choosing a programme
Special programmes
Programme option modifiers
Table of programmes
The controls
Laundry, 12-13
Sorting your laundry
Wash care labels
Special clothing items
Drying times
GB
Warnings and Suggestions, 14
General safety
Disposal
Saving energy and respecting the environment
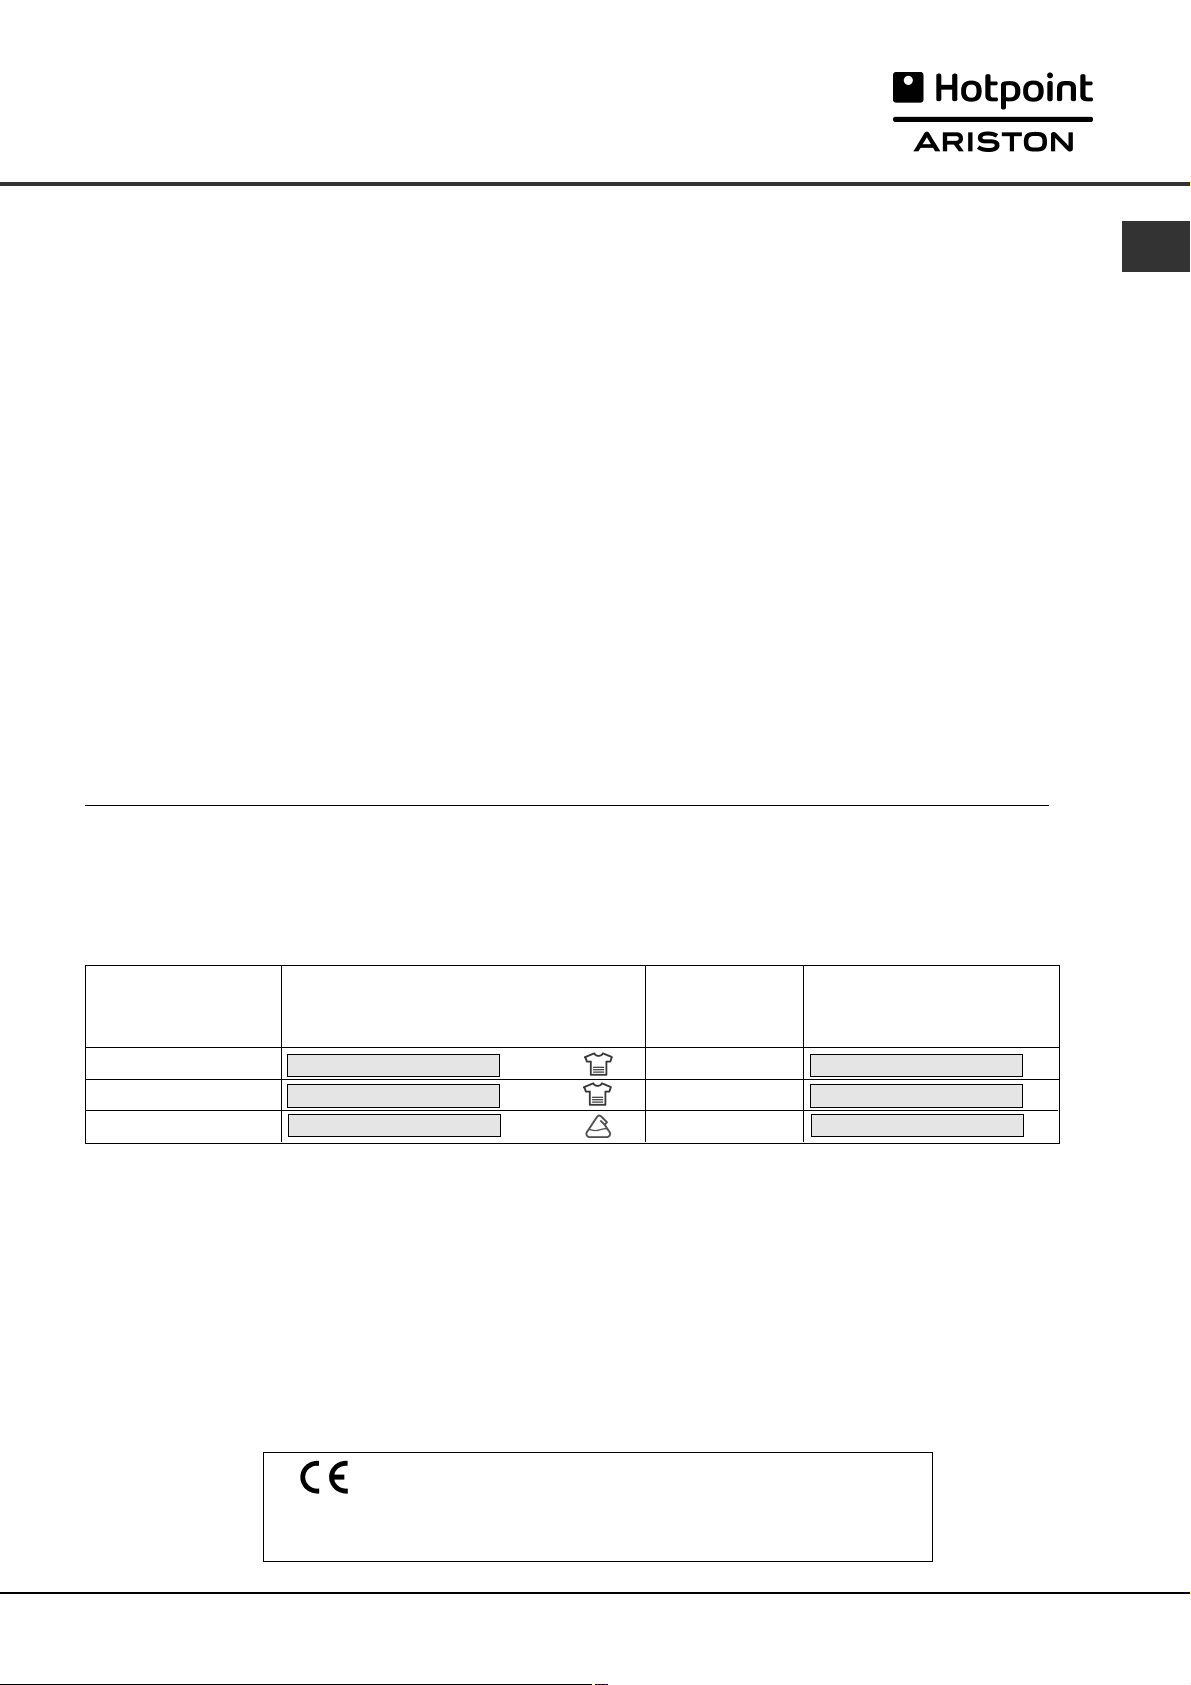
Maintenance and Care, 15
Switching off the electricity
Cleaning the filter after each cycle
Empty the water container after each cycle
Check the drum after each cycle
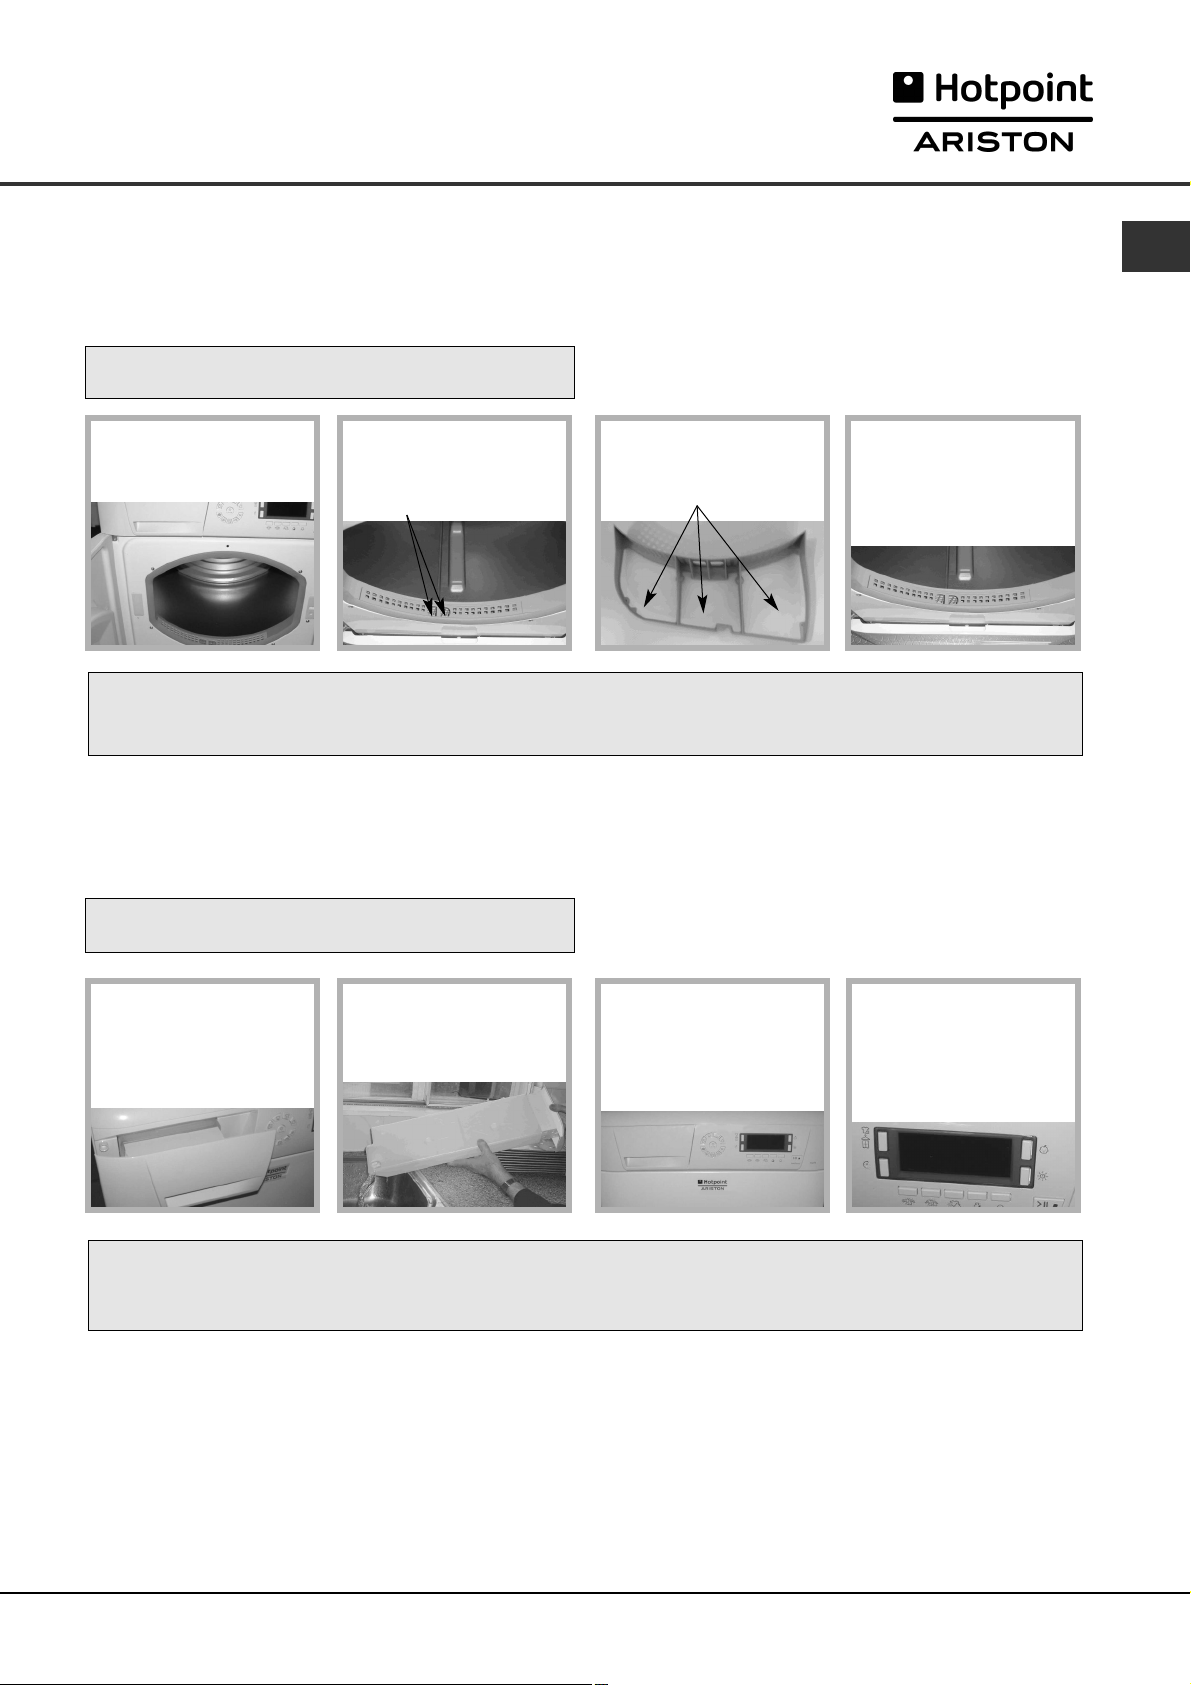
Cleaning the condenser unit
Cleaning the dryer
Troubleshooting, 16
Service, 17
Spare parts
! Keep this instruction booklet on hand in order to refer to it when necessary. Take it with you when you move, and
should you sell this appliance or pass it on to another party, make sure that this booklet is supplied along with the
dryer so that the new owner may be informed about warnings and suggestions on how the appliance works.
! Read these instructions carefully; the following pages contain important information on installation and suggestions
on how the appliance works.
1
Page 2
Important Information
GB
For your Condenser dryer to operate efficiently, you must follow the regular maintenance schedule shown below:
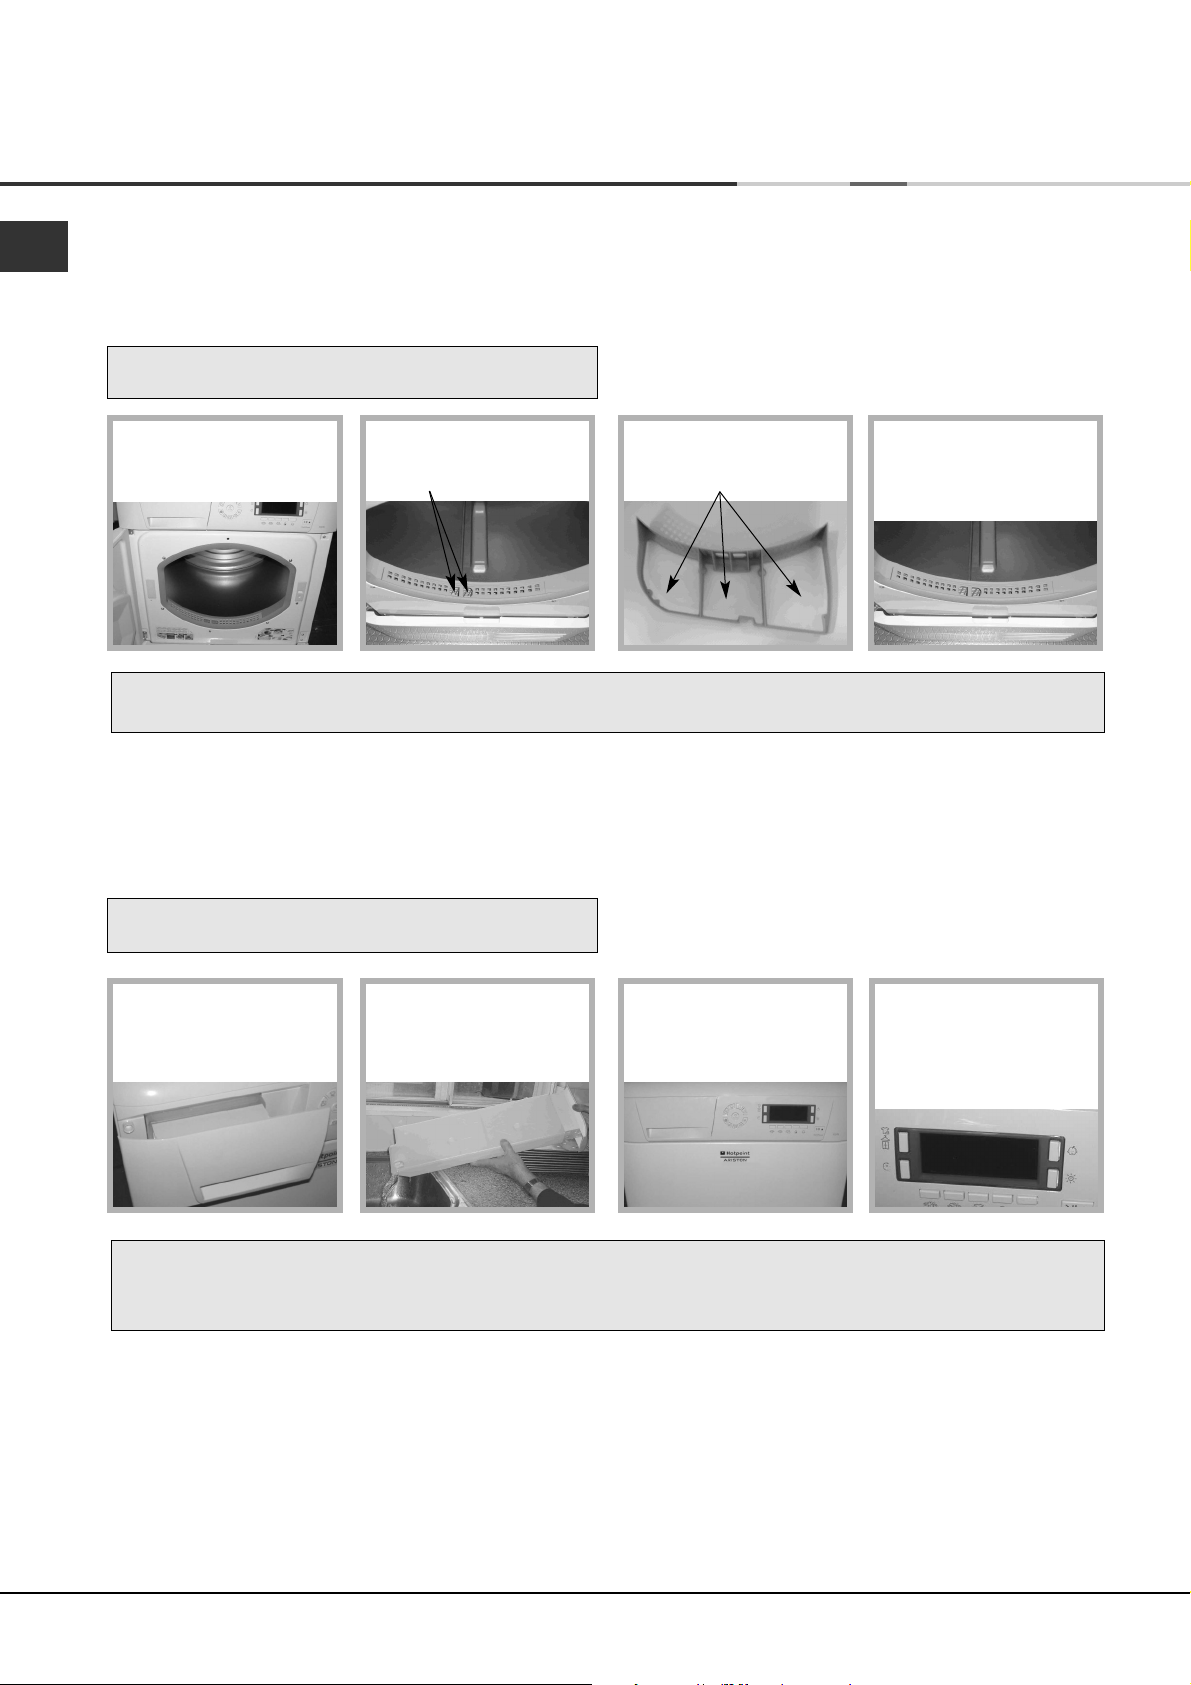
Fluff Filter...
! You MUST clean the fluff filter after EVERY drying
cycle.
STEP 1.
Open the door of your
dryer.
! Failure to clean the filter after EVERY drying cycle will affect the drying performance of your machine.
- It will take longer to dry and as a result will use more electricity during drying.
STEP 2.
Pull out the filter (using
the two finger grips).
STEP 3.
Clean any fluff deposits
from the filter mesh.
STEP 4.
Refit the filter - NEVER
run the dryer without the
filter in position.
Water Container...
! You MUST empty the water container after EVERY
drying cycle.
STEP 1.
Pull the water container
towards you and remove
it fully from the dryer.
! Failure to empty the water container will result in:
- The machine will stop heating (so the load may still be wet at the end of the drying cycle).
- The ‘Empty Water’ message will tell you that the water container is full.
STEP 2.
Empty all the water
collected in the water
container.
STEP 3.
Refit the water container,
ensuring that it is pushed
fully back into position.
Priming the Water Collection System
When your dryer is new, the water container will not collect water until the system is primed... this will take 1 or 2 drying
cycles. Once primed it will collect water during every drying cycle.
! The ‘Empty Water’
message reminds you to
empty the water container
at the start and at the
end of each programme.
2
Page 3
Important Information
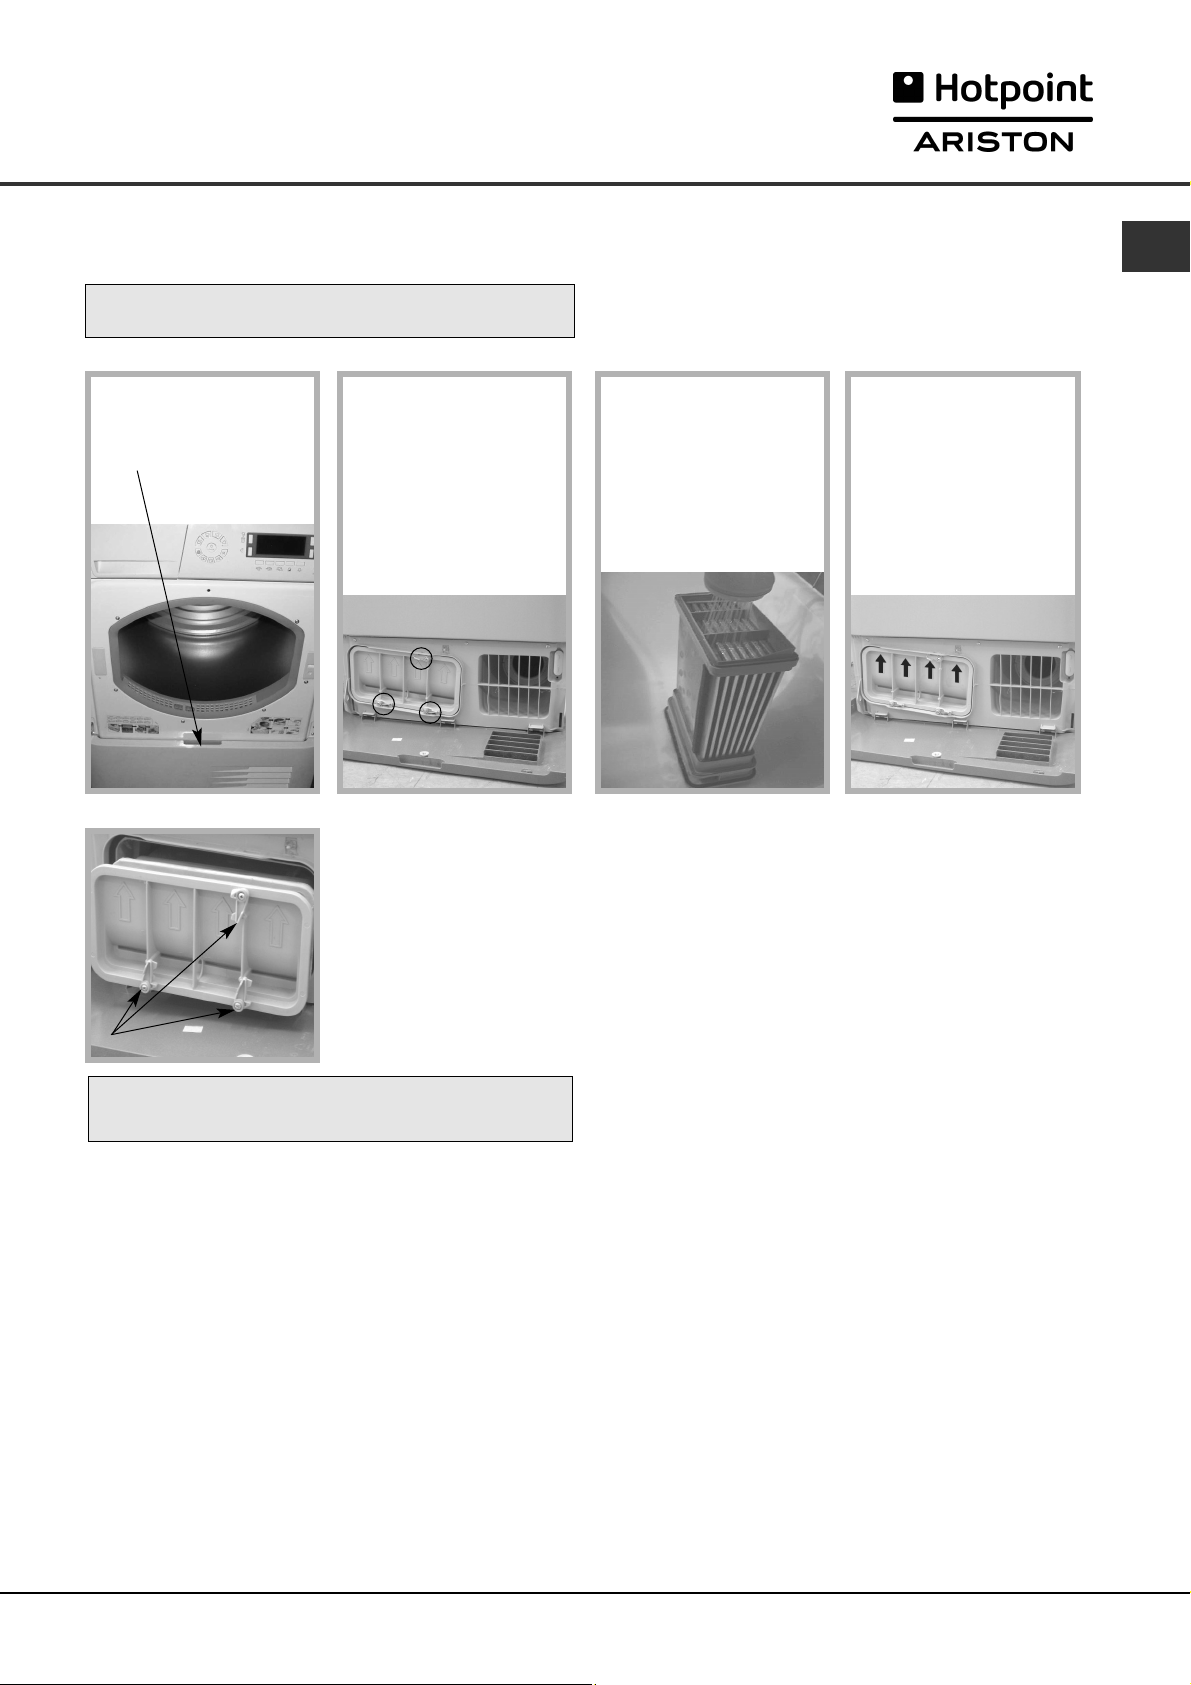
Condenser Unit...
! You MUST clean the fluff from the condenser EVERY
month.
STEP 1.
Open the condenser cover
- hold the handle and
pull towards you.
STEP 2.
Remove the condenser by
rotating the 3 clips then
pulling the condenser
towards you.
(There may be some water
in the tubes, this is normal).
STEP 3.
Flush the condenser, from
the rear with water, to
remove any fluff deposits.
GB
STEP 4.
Refit the condenser unit
- ensure that the unit is
pushed in fully, all 3 clips
are re-secured and the
positiong arrows on the
front of the condenser are
pointing upwards.
●
Check that:
- The positioning arrows are pointing upwards.
- The 3 clips are re-secured back into their ‘lock’ position.
Rotate 3 clips
! Failure to clean the condenser could cause premature
failure of your dryer.
3
Page 4
Installation
GB
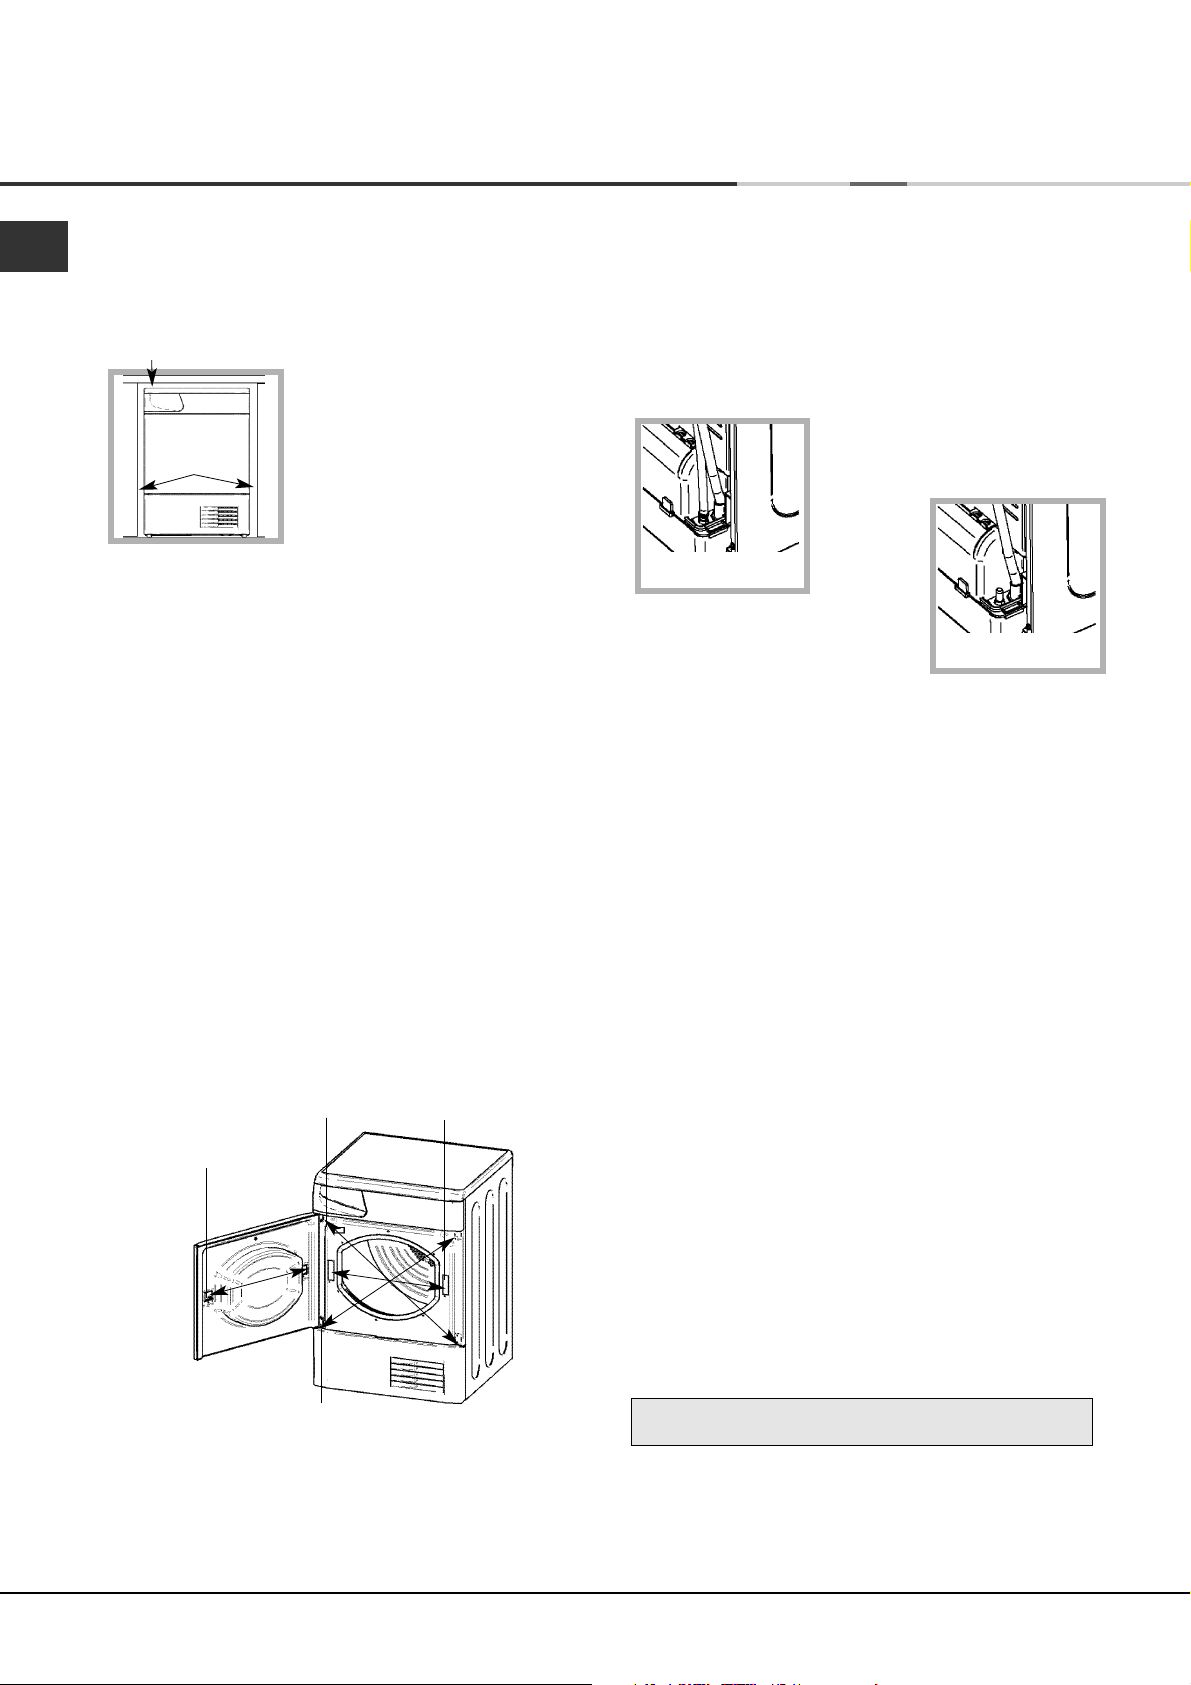
Where to put your dryer
●
Place your dryer at a distance from gas ranges,
stoves, heaters, or cook tops because flames can
damage the appliance.
Minimum gap 10mm
●
If you are going to install
the appliance under a work
counter, be sure to leave a
10mm space between the
Minimum gaps
15mm
top and any other objects
on or above the machine and
a 15mm space between the
sides and lateral furnishings
or walls. This is to ensure
proper air circulation. Make sure that the back vents
are not obstructed.
Ventilation
When the dryer is in use, there has to be adequate
ventilation. Make sure you put your dryer in an
environment that is not damp and has proper air
circulation throughout. Airflow around the dryer is
essential to condense the water produced during the
washing, the dryer will not operate efficiently in an
enclosed space or cupboard.
! We do not recommend that the dryer is installed in a
cupboard but the dryer must never be installed
behind a lockable door, a sliding door or a door with a
hinge on the opposite side to that of the dryer door.
! If using the dryer in a small or cold room some
condensation could be experienced.
Door Reversal Instructions
Hinge
Door latch
Hinge
The door of your dryer is reversible and can easily be
changed. Exchange diagonally hinge brackets and
blanking screws. Exchange door latch and catch with
their opposite blanking plates (see diagram above).
Door catch
Water drain
If your dryer is installed next to a drain the water can be
plumbed into this drain. This does away with the need to
empty the water container. If the dryer is stacked onto or
installed next to a washing machine it can share the same
drain. The height of the drain must be less than 3' (1m)
from the bottom of the dryer.
Remove the existing clip and hose
from position shown (see diagram).
Remove clip and hose
from here...
Fit a suitable length of hose to the
new location shown (see diagram)
and refit clip.
...fit new hose and refit
clip here.
! Make sure that the hose is not squashed or kinked when
the dryer is in its final location.
Electrical connections
Make sure of the following before you insert the plug
into the the electrical socket:
●
The socket must be grounded.
●
The socket must be able to sustain the machines
maximum power, which is indicated on the rating
label (see Dryer Description).
●
Power voltage must be within the values indicated
on the rating label (see Dryer Description).
●
The socket must be compatible with the dryers plug.
Should this not be the case, replace the plug or the
socket.
! The dryer must not be installed outdoors, even if the
space is sheltered. It can be very dangerous if it is
exposed to rain or storms.
! Once installed, the dryers electrical wire and plug
must be within easy reach.
! Do not use extension cords.
! The power cord must not be bent or squashed.
! The power cord supplied should be checked
periodically and replaced by a cord specially prepared
for this dryer and fitted only by authorised technicians
(see Service). New or longer power cords are supplied
at an extra charge by authorised dealers.
! The manufacturer denies any responsibility should any
of these rules not be followed.
! If in doubt about any of the above consult a qualified
electrician.
Before you start using your dryer
Once you have installed your dryer and before you
use it, clean the inside of the drum to remove any dust
that could have accumulated during transport.
4
Page 5
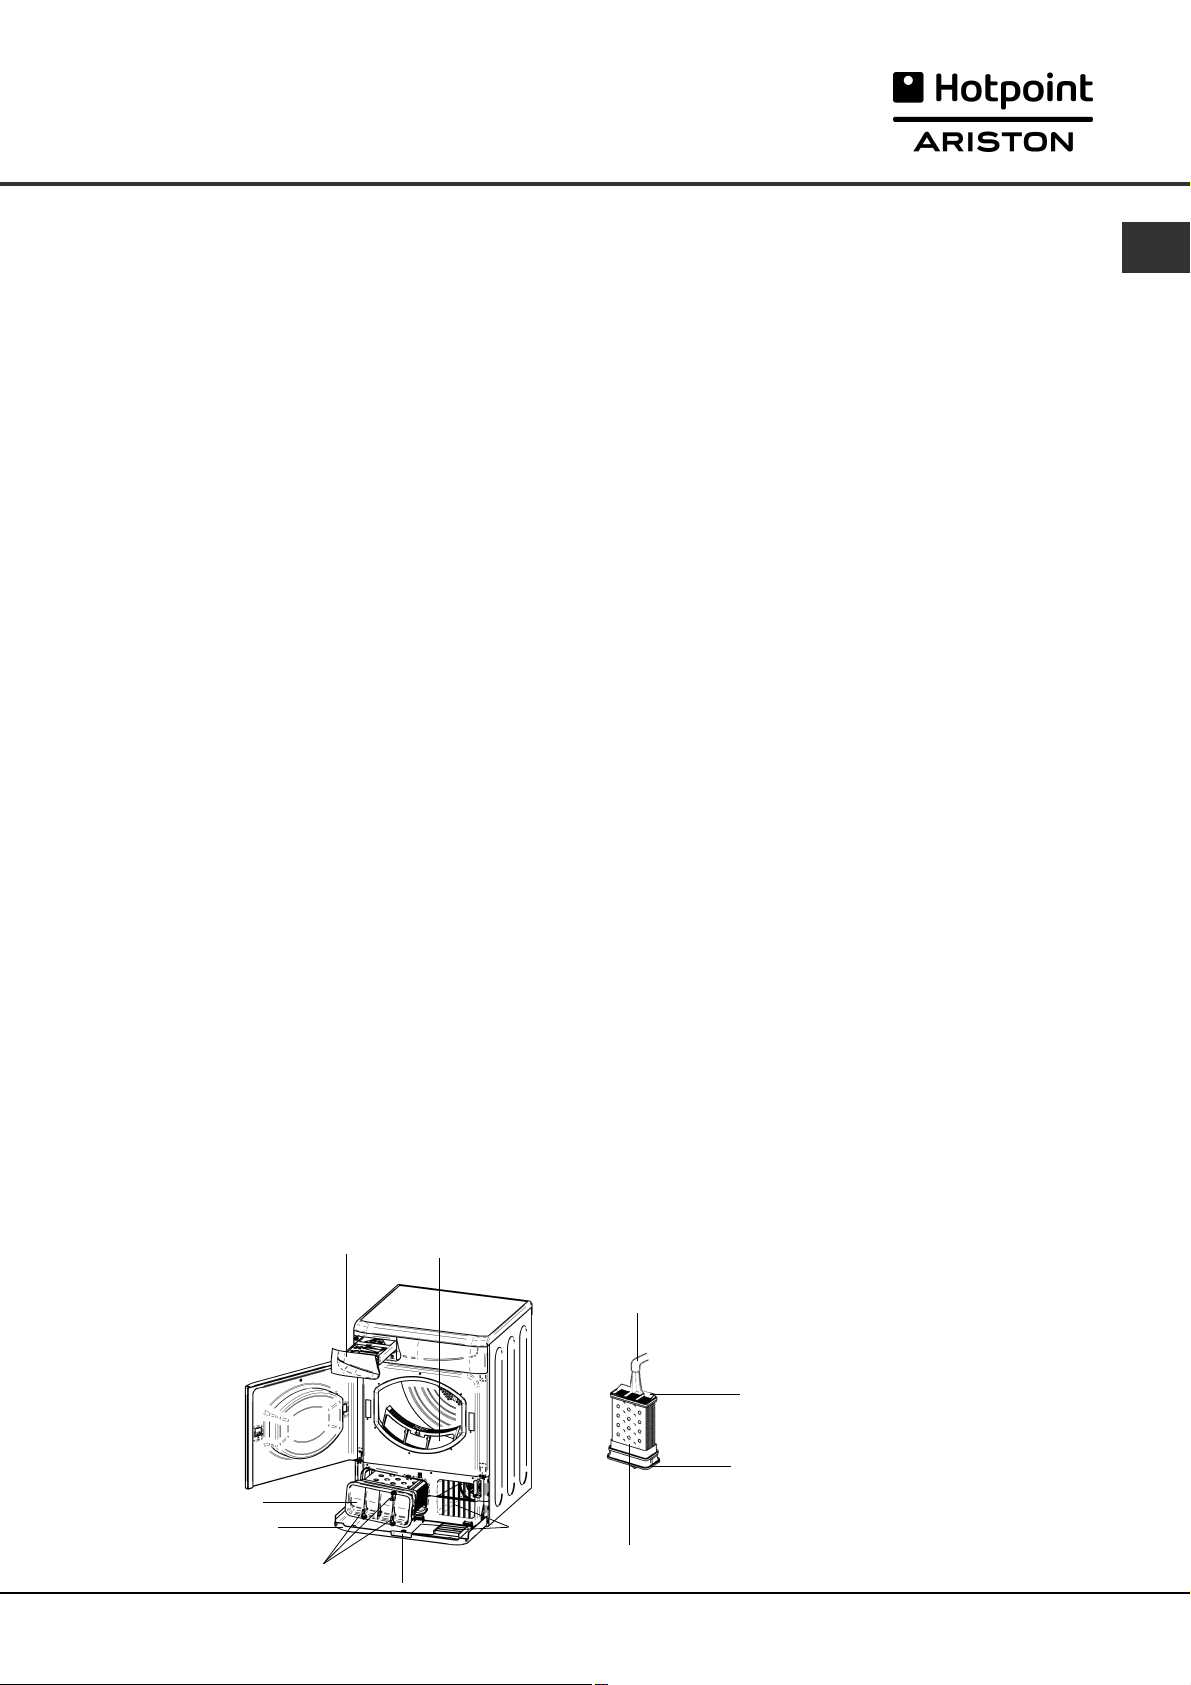
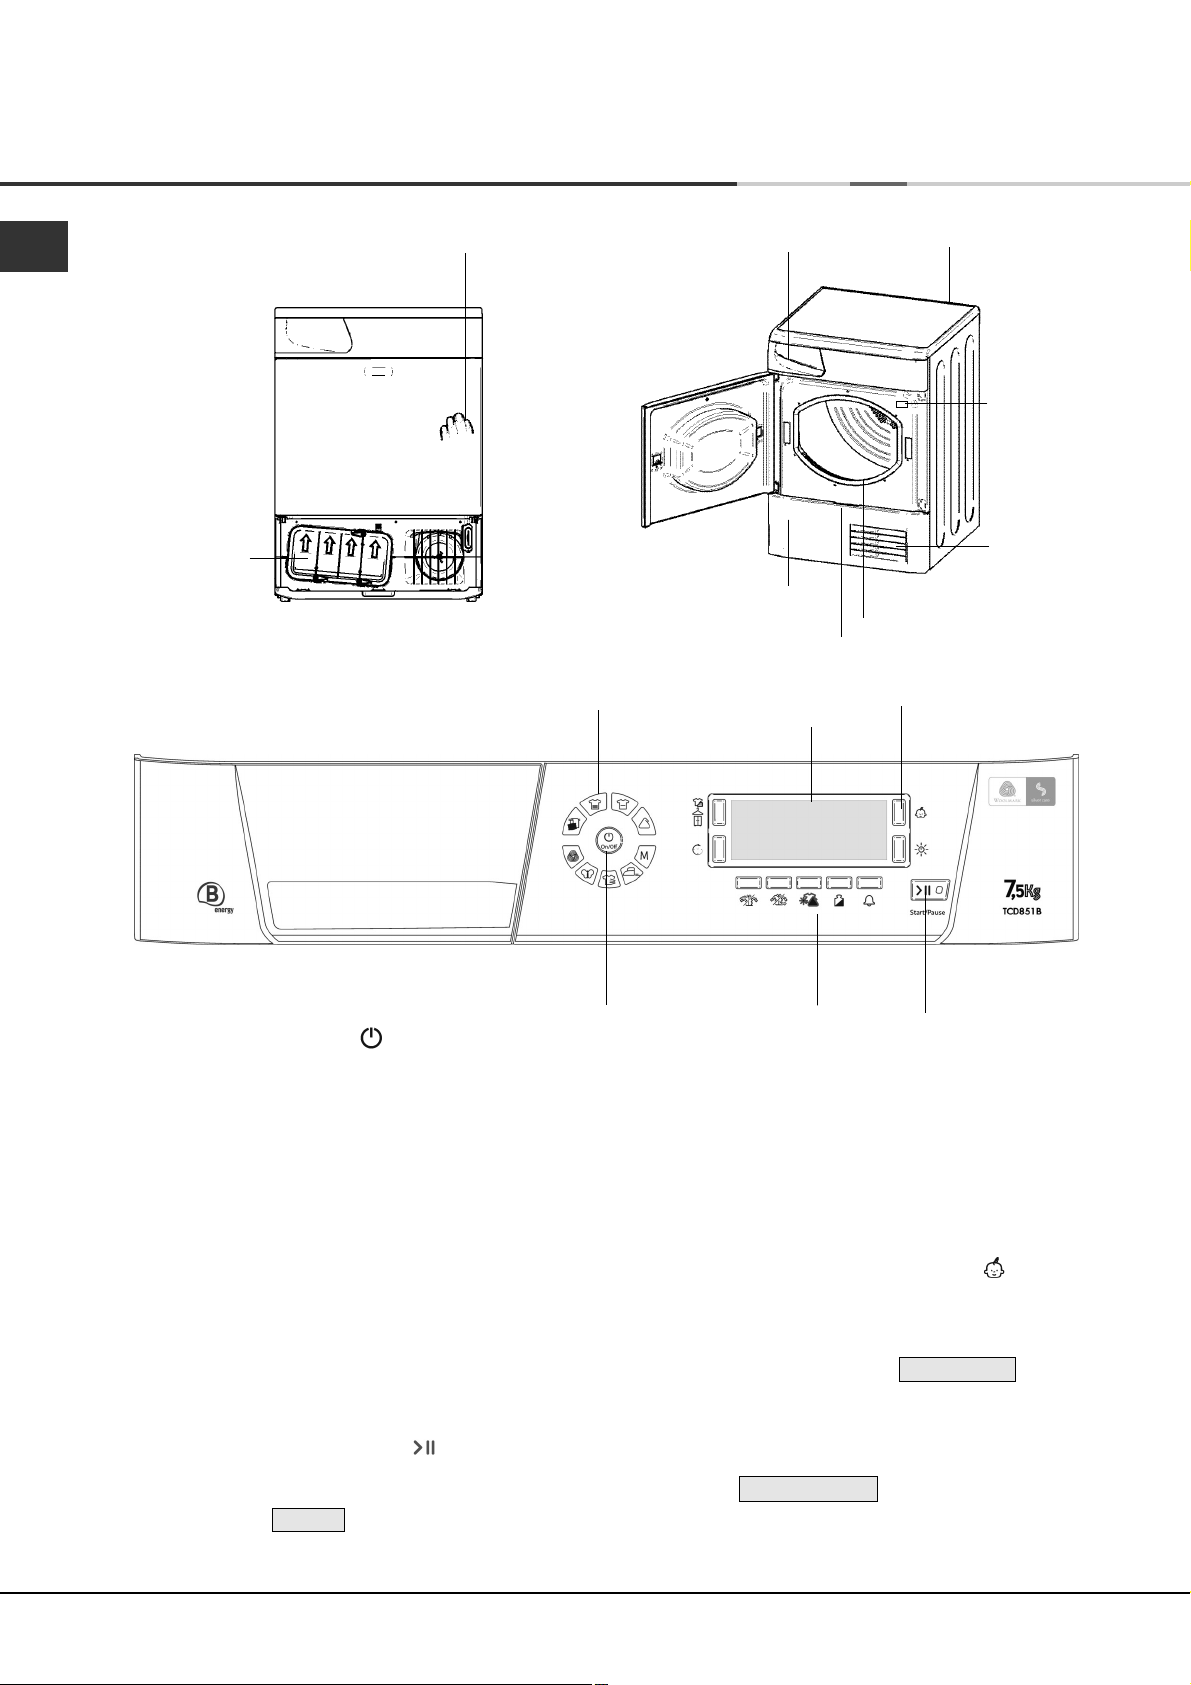
Dryer Description
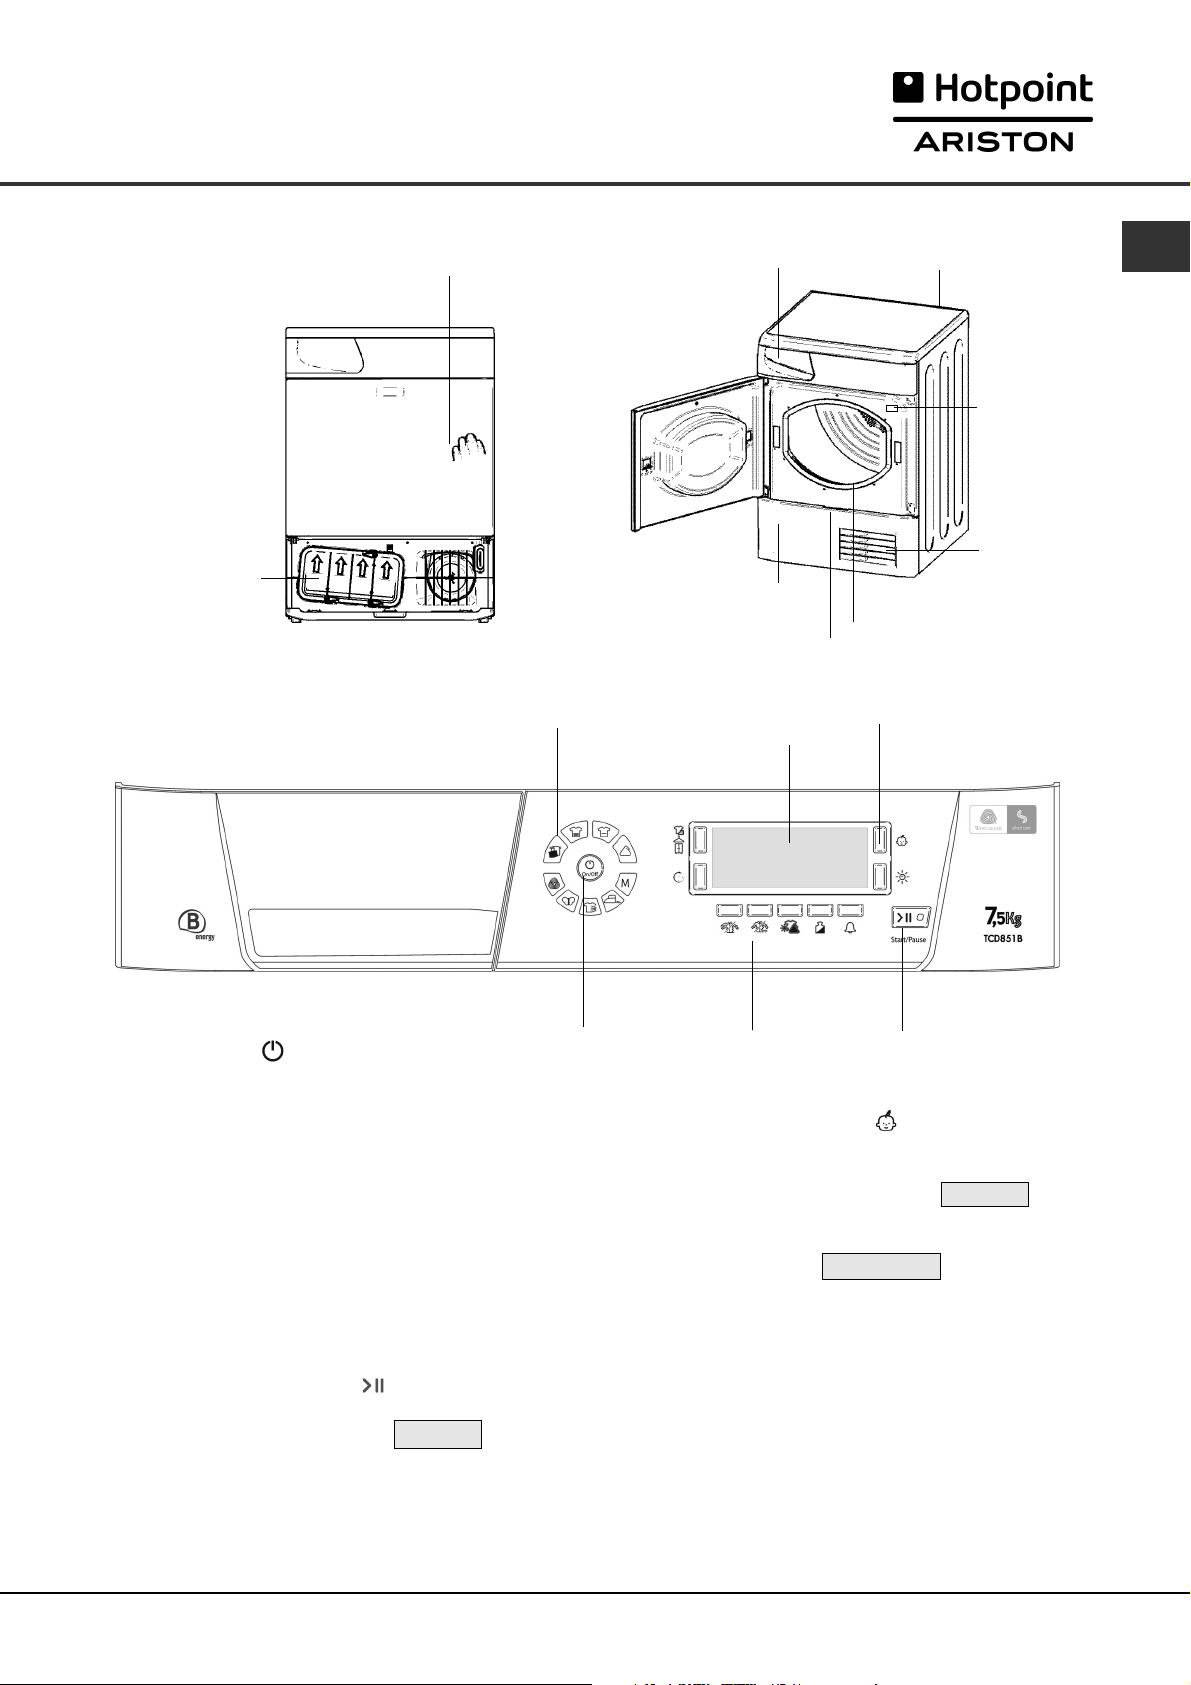
To open the door The features
Press and release the front
panel in position shown
Condenser Unit
(cover open)
Condenser cover
Condenser cover handle
Control panel
PROGRAMME
Selection Buttons
Display Unit
Water container
(Pull to open)
GB
Rating plate
Model &
Serial
numbers
Air intake
grille
Filter
CHILD LOCK
Button
ON/OFF
Button
The ON/OFF button : If the dryer is running and
this button is pressed, the dryer is turned off. Press
again, the dryer restarts.
The PROGRAMME selection buttons set the programme:
press the button corresponding to the programme you
want to select (see Start and Programmes).
The OPTION buttons/indicators: these buttons select
available options for your selected programme (see
The Controls). The indicators on the display unit next
to the bottom buttons light to show that the option has
been selected.
The START/PAUSE button/light starts a selected
programme. When you press this button there will be
one beep and the display will show PAUSED . When
a programme is running, holding this button in pauses
the programme and stops the dryer.
The light is green when the programme is running,
flashing amber if the programme has been paused or
flashing green if on standby waiting to start a programme
(see Start and Programmes).
OPTION
Buttons
The Display Unit gives warnings and information
about the programme (see next page).
The CHILD LOCK button/icon : Press and hold this
button after selecting your programme and any options,
this prevents the programme settings from being
changed, the display will briefly show LOCKED .
When the icon is lit, the other buttons are disabled.
Hold the button to cancel and the icon will go out, the
display will briefly show UNLOCKED .
START/PAUSE
Button & Light
5
Page 6
The Display
GB
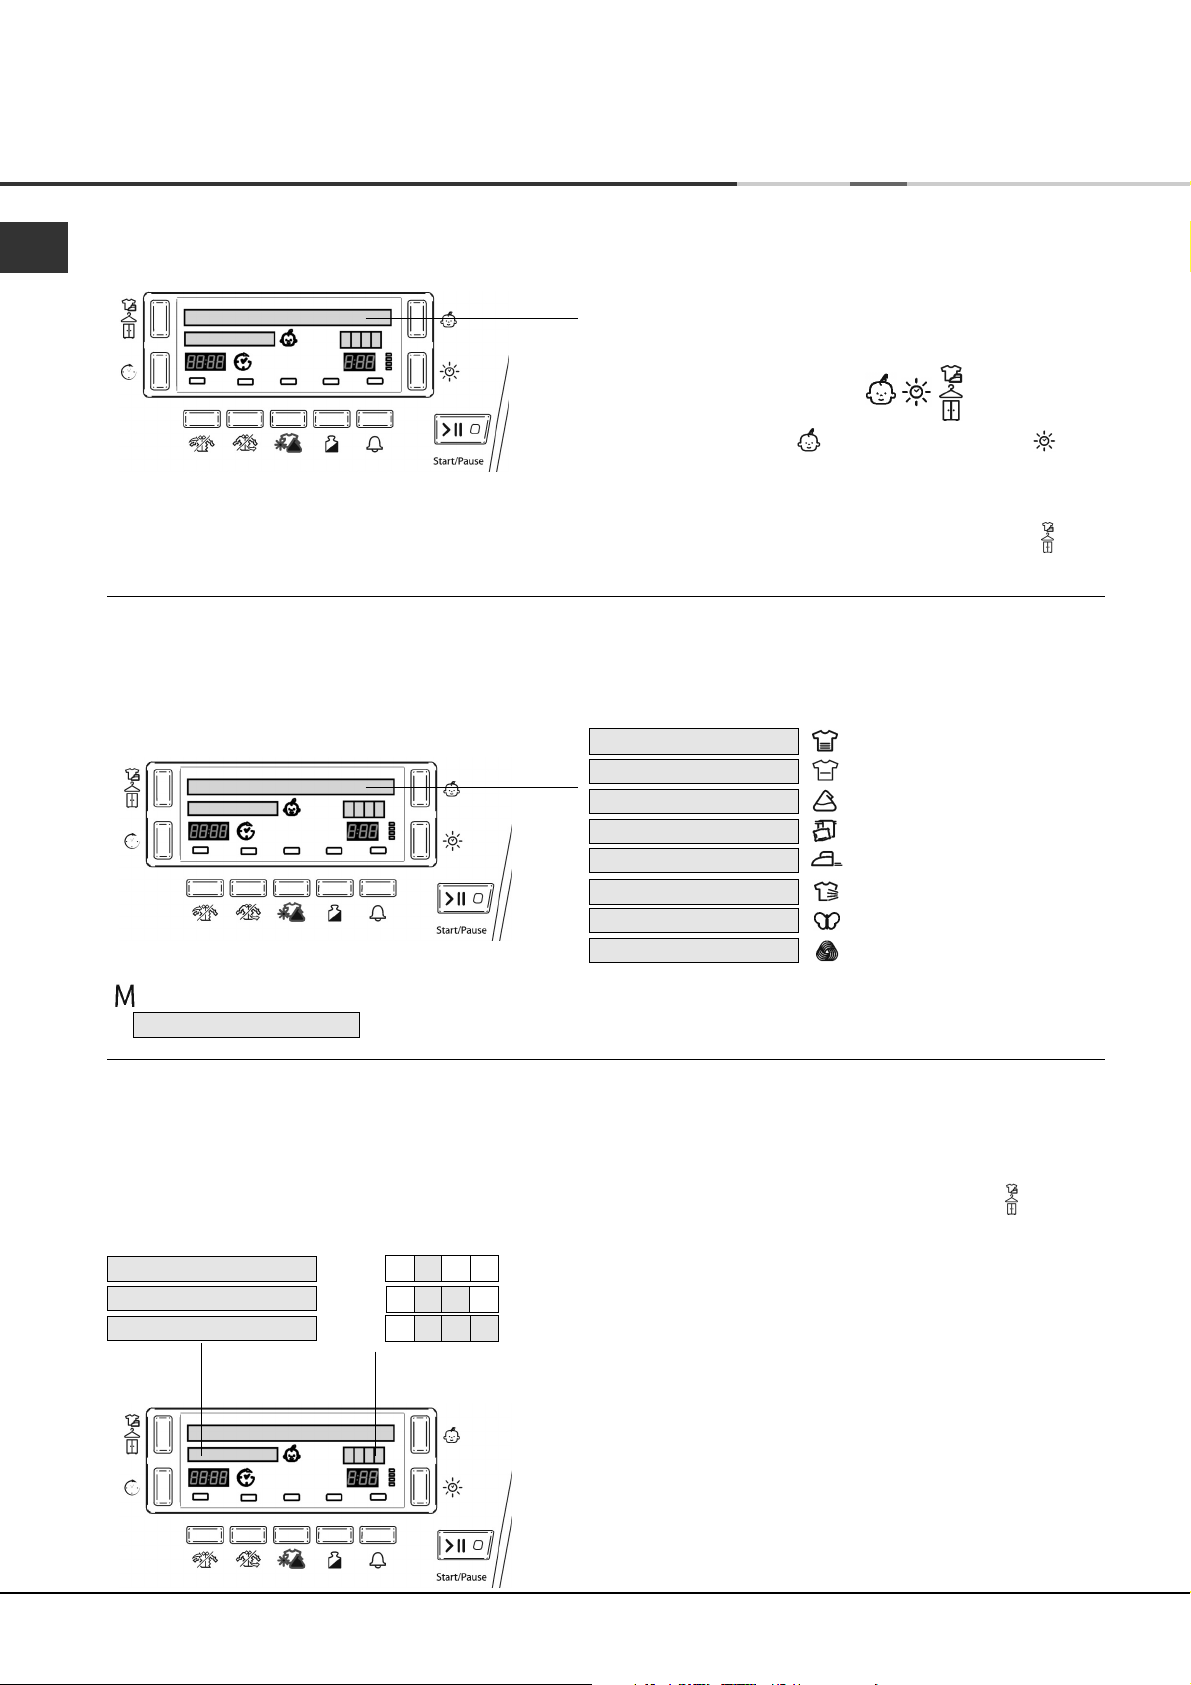
Selecting your language
The first time you turn on your dryer you should select your preferred language from the available list.
To change: the language current selection must flash, on
the first line of the display.
- Press and hold all 3 buttons: for 5 seconds.
- Press the Child Lock or the Timed Dry button to
scroll up or down through the list.
- When your required language is flashing on the top line
of the display, pressing the Dryness Level button will
select your choice.
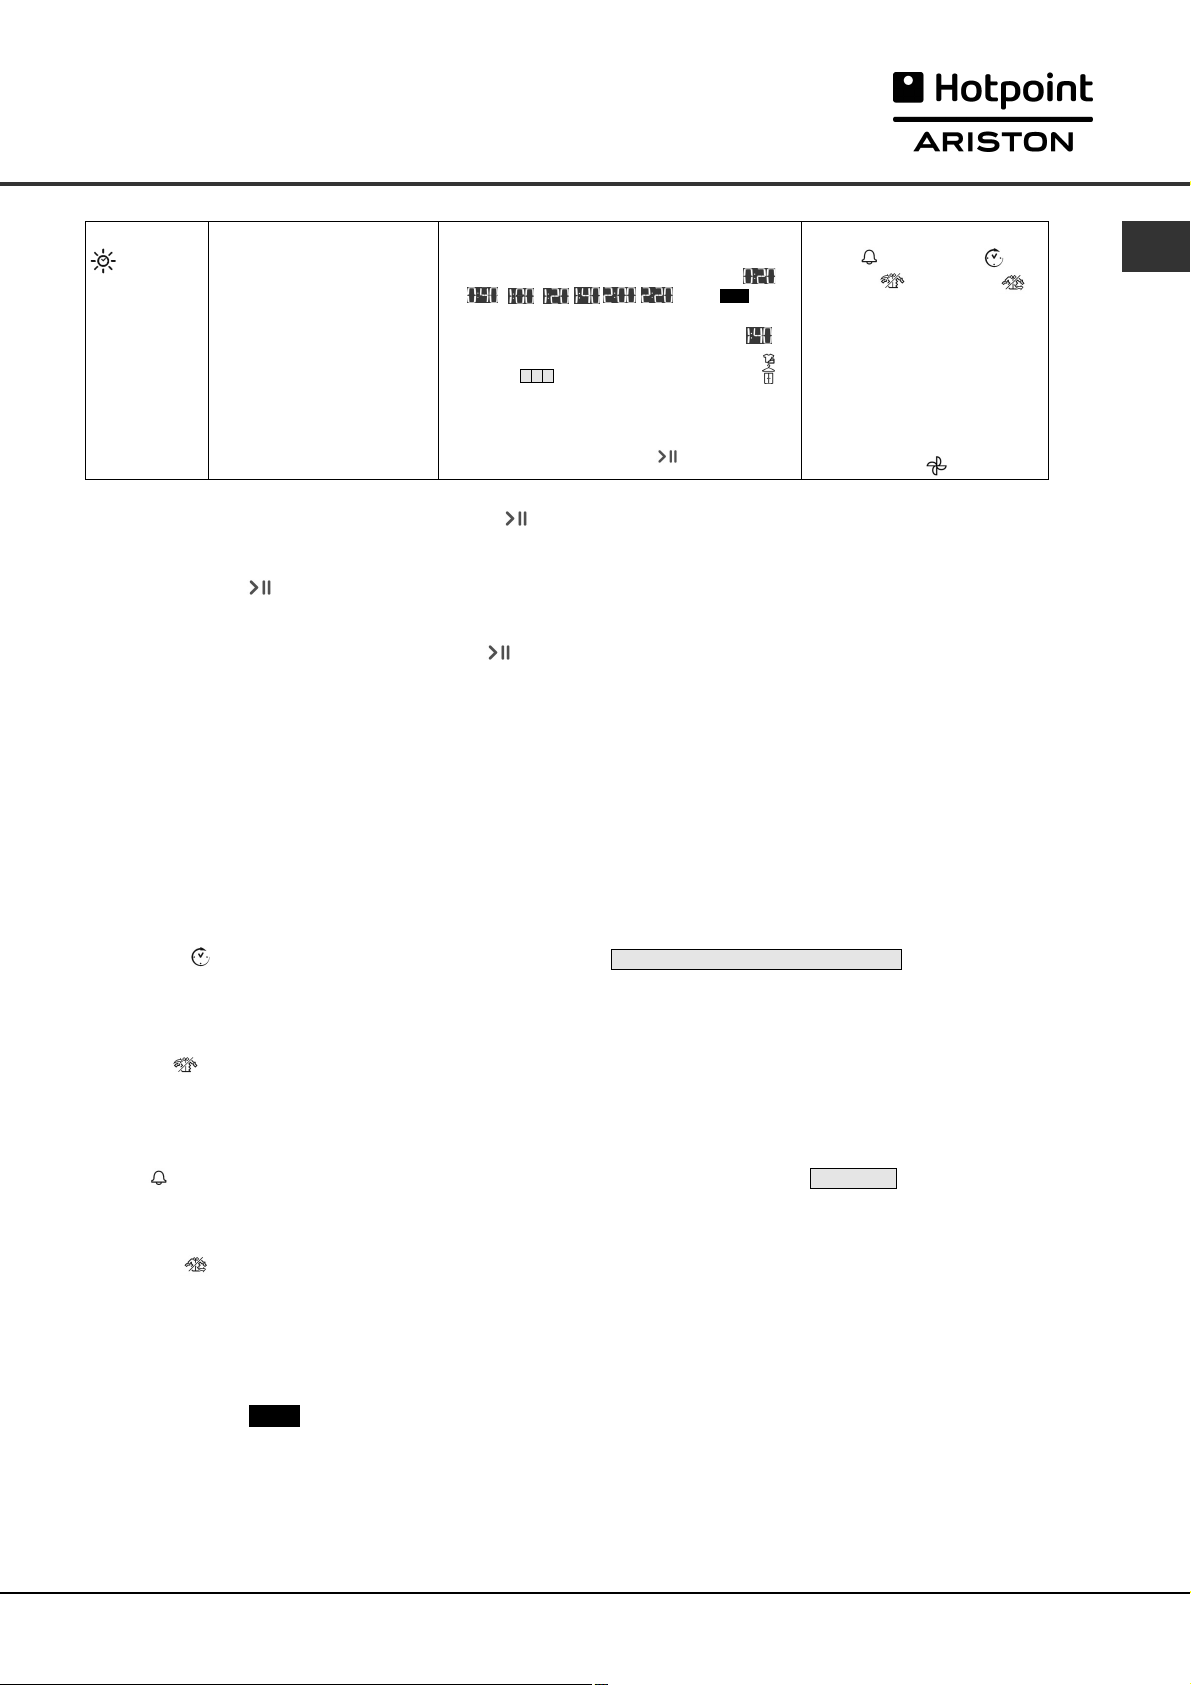
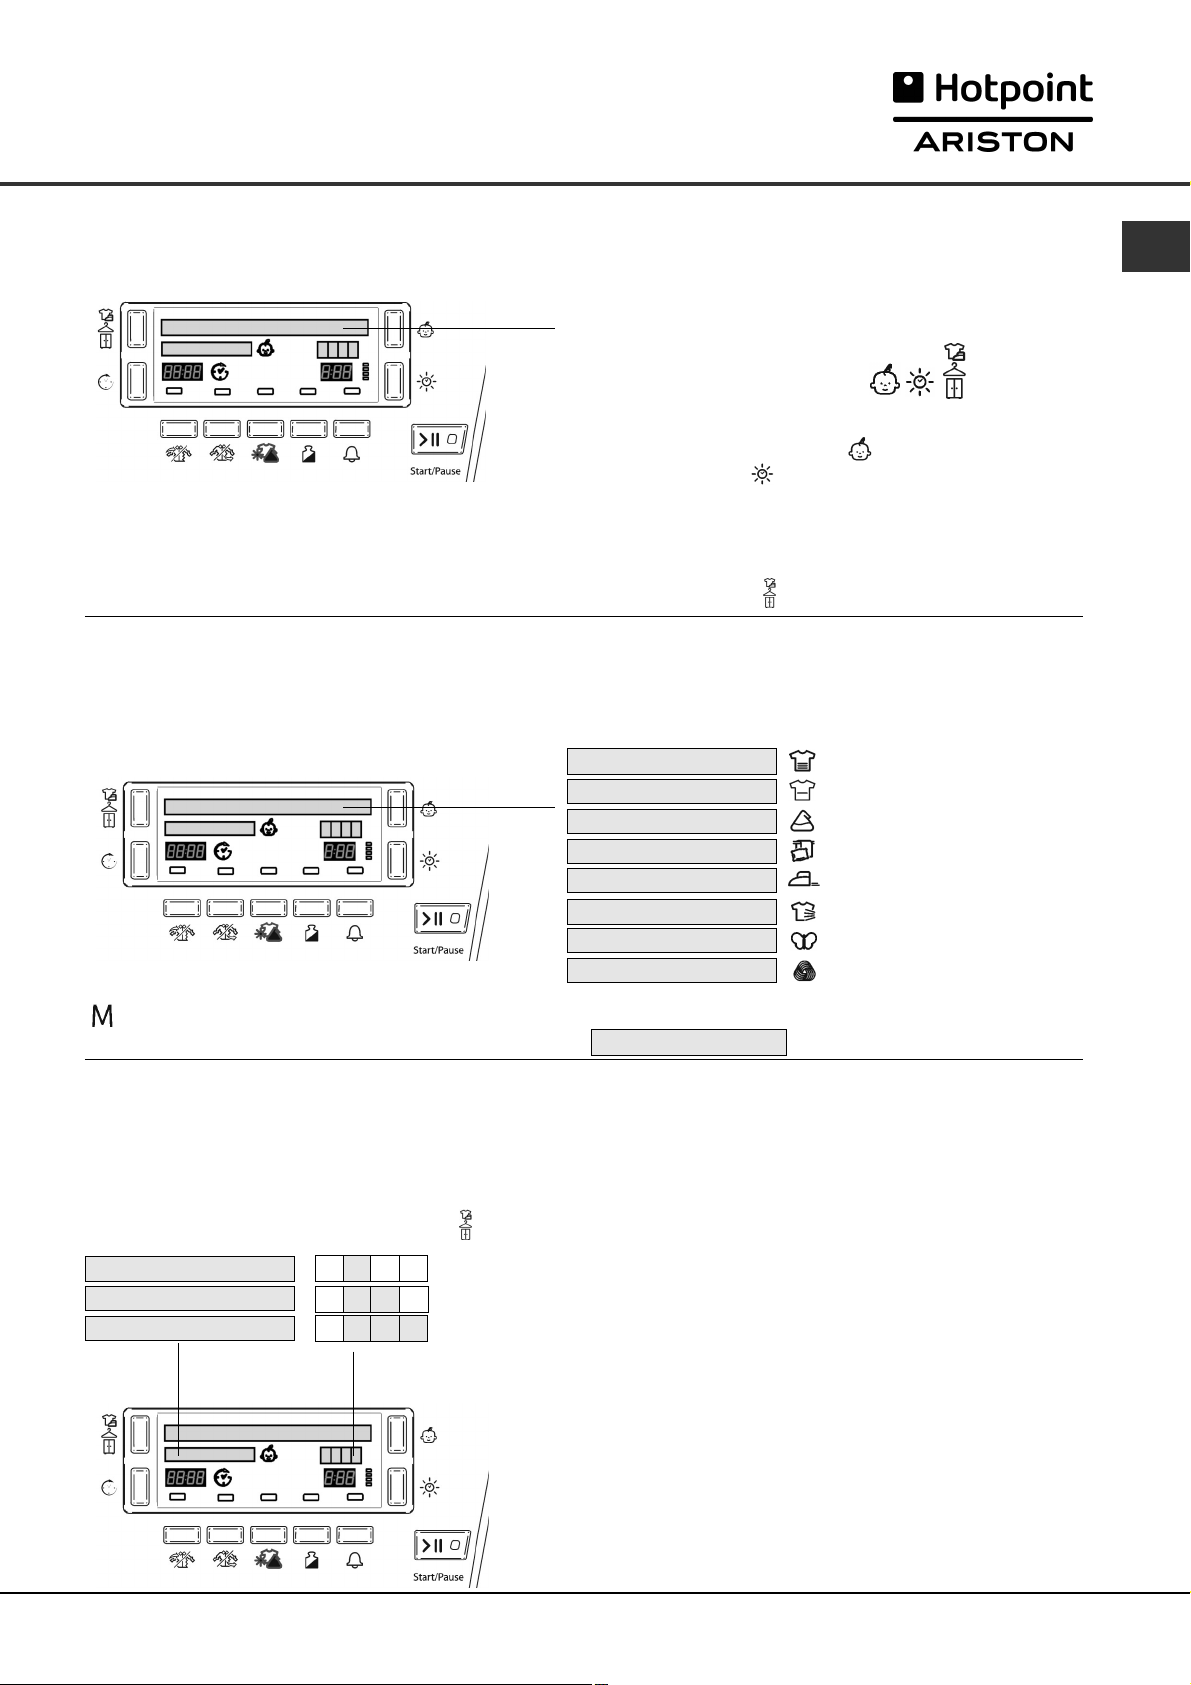
Understanding the display
Programme selection and display
The selected programme is shown on the first line of the display when you select the corresponding button, this
message is shown while the programme is running.
COTTON HIGH HEAT
COTTON LOW HEAT
SYNTHETICS
BED & BATH
EASY IRON
AIRING
DELICATES
WOOL
When you select the memory button the Display will show your selected programme with ‘M’ before its name.
ie. M COTTON HIGH HEAT (see Start and Programmes).
Dryness levels
During programme selection for an automatic programme that has different dryness levels available (see
Programmes Table).
The second line of the display shows the dryness level you require, for each press of the Dryness Level button the next
option from the list below is selected and displayed.
IRON DRY
HANGER DRY
CUPBOARD DRY
The display also shows: one, two or three blocks, depending on your selection.
These are displayed during the programmes progress.
Iron Dry: Dries your clothes ready for ironing.
Hanger Dry: Dries your clothes ready for hanging.
Cupboard Dry: Dries your clothes ready for wearing.
6
Page 7
The Display
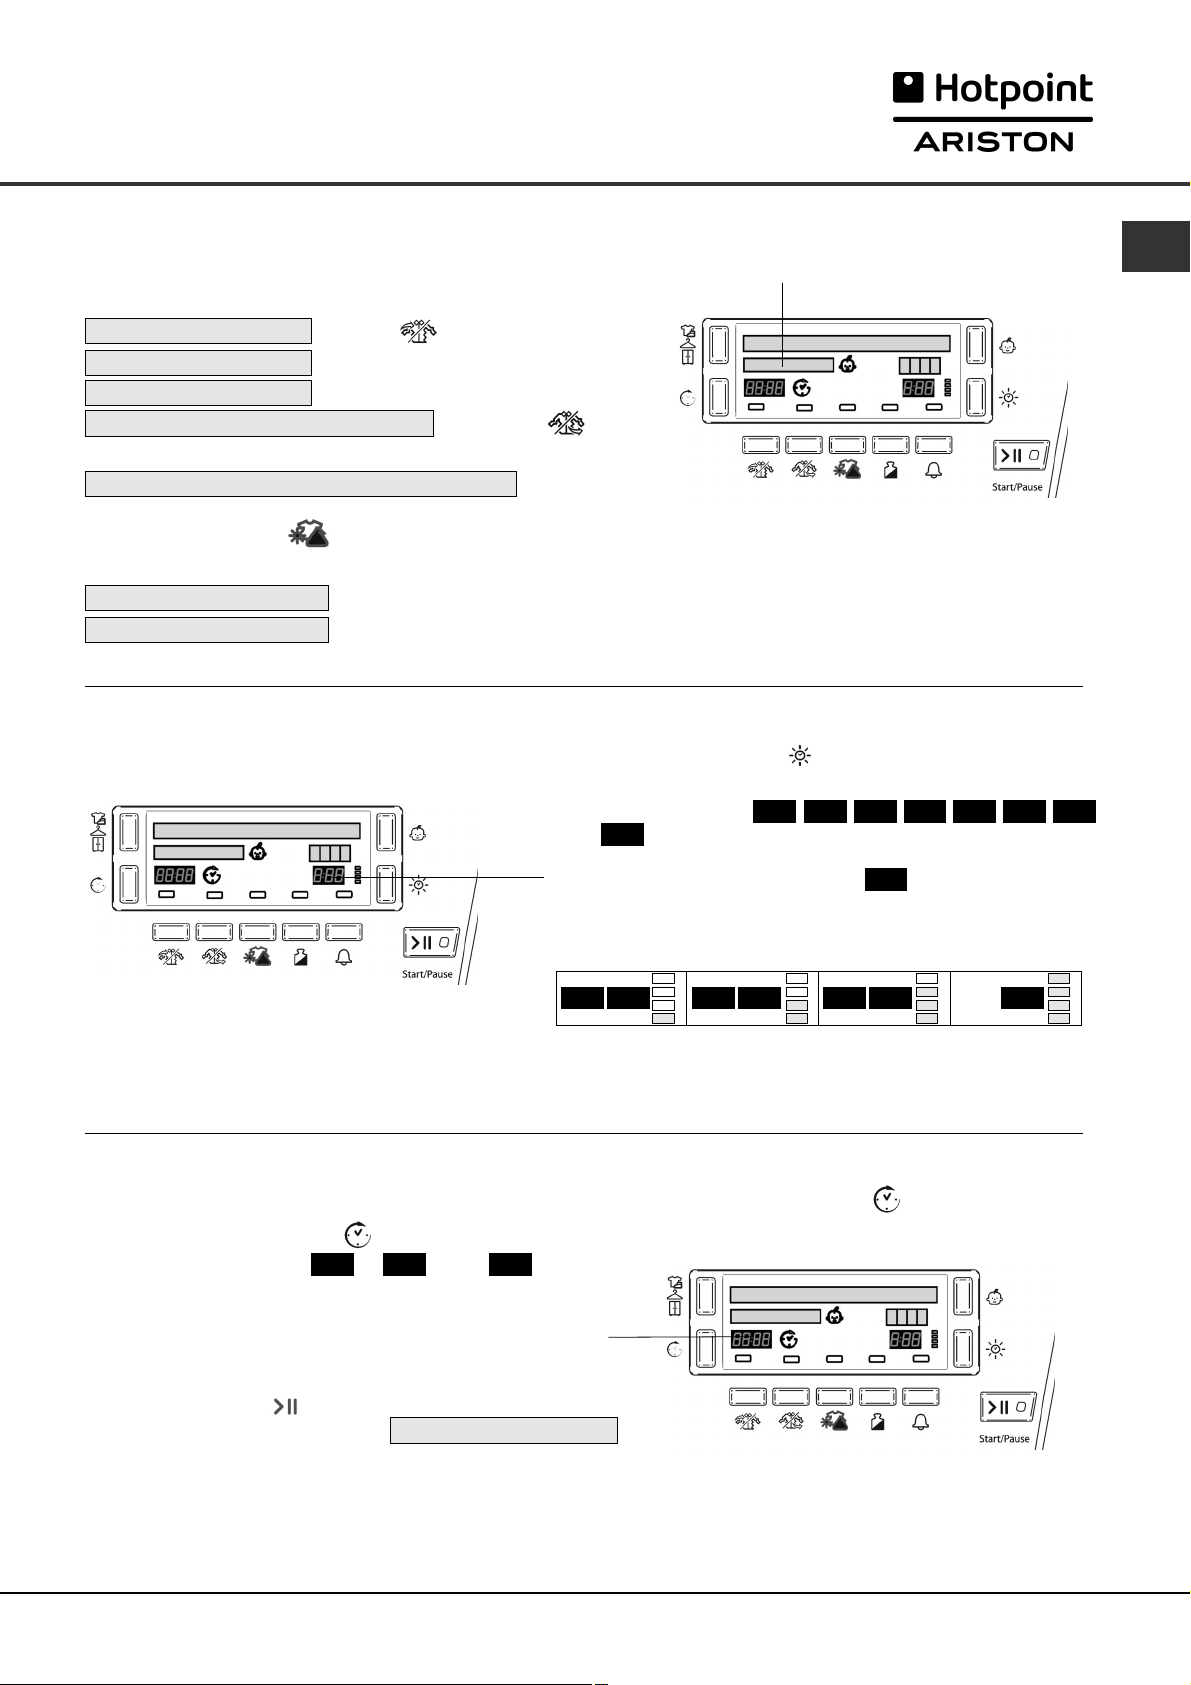
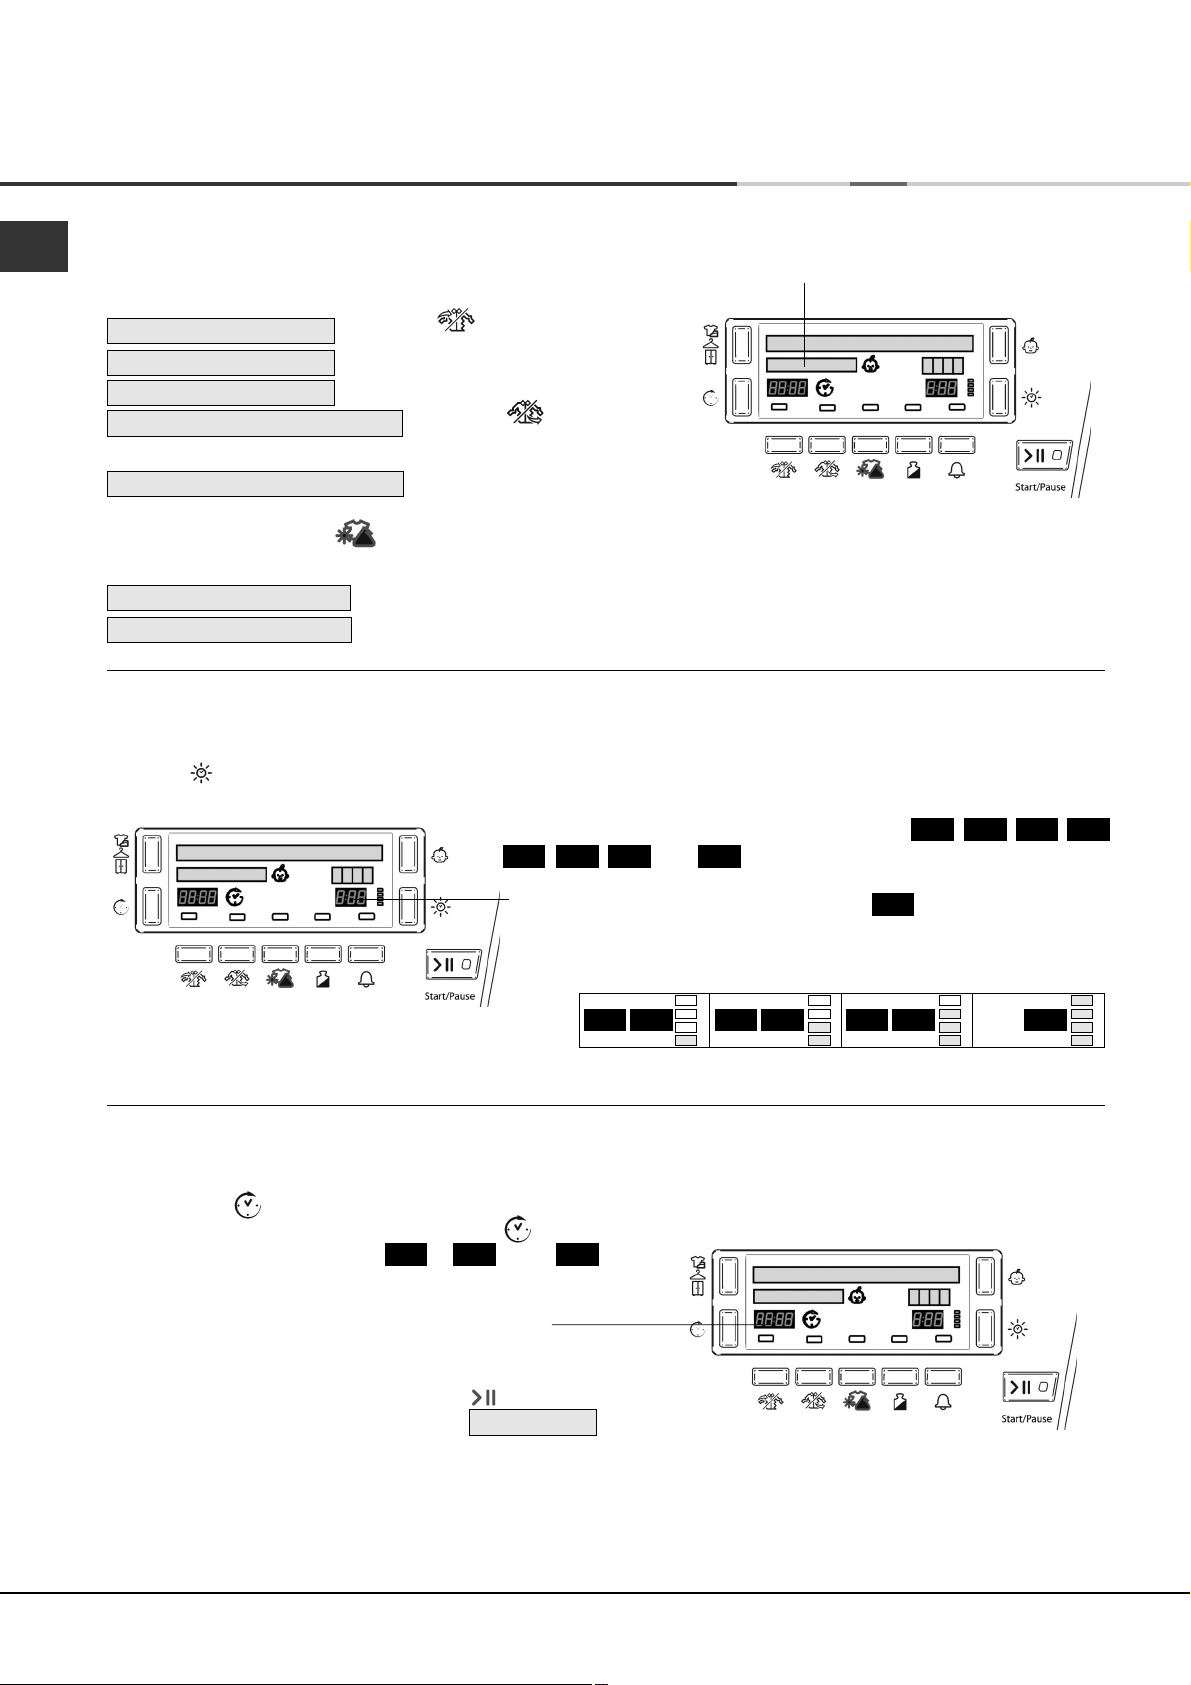
Programme progress
The second line of the display shows the status of the programme as it progresses:
(long messages scroll across the line)
PRE CARE
DRY
COOL TUMBLE
END OF CYCLE, POST CARE PHASE (if option available
END OF CYCLE, EMPTY THE WATER BOTTLE
If the Mixed Dry option is available and selected this line displays when the different dryness levels have
been reached:
IRON DRY REACHED
HANGER DRY REACHED
(if option available and selected).
and selected).
Timed drying
After selecting a programme that has a Timed Dry option, press the Timed button and the display will increment
the selected time, each time you press and release the button (see Start and Programmes).
Each press advances:
then , and then repeats.
0:20 0:40 1:00 1:20 1:40 2:00 2:20
GB
Delicates have a maximum time of:
The bars to the right of the time, light to give an indication of
the time duration selected:
o:20 0:40 1:00 1:20 1:40 2:00 2:20
The selected time remains displayed after the programme
starts.
1:40
Delay and Time to End
Some programmes can have a delated start (see Start and Programmes). Press the Delay button and the icon flashes.
Each press of the Delay button advances the delay setting
in 1 hour increments, from: to , then and
then after a couple of seconds cancels the delay.
The delay time is shown on the display next to the Delay button.
The display counts down the minutes of the delay period after
the Start/Pause button is pressed.
The second line of the display shows STARTS IN
1h 24h
OFF
After the delay period finishes (or for all of the programme if delay not selected): The estimated Time to End of the
programme for automatic programmes or the actual time remaining during the Timed programme is shown in this part of
the display.
7
Page 8

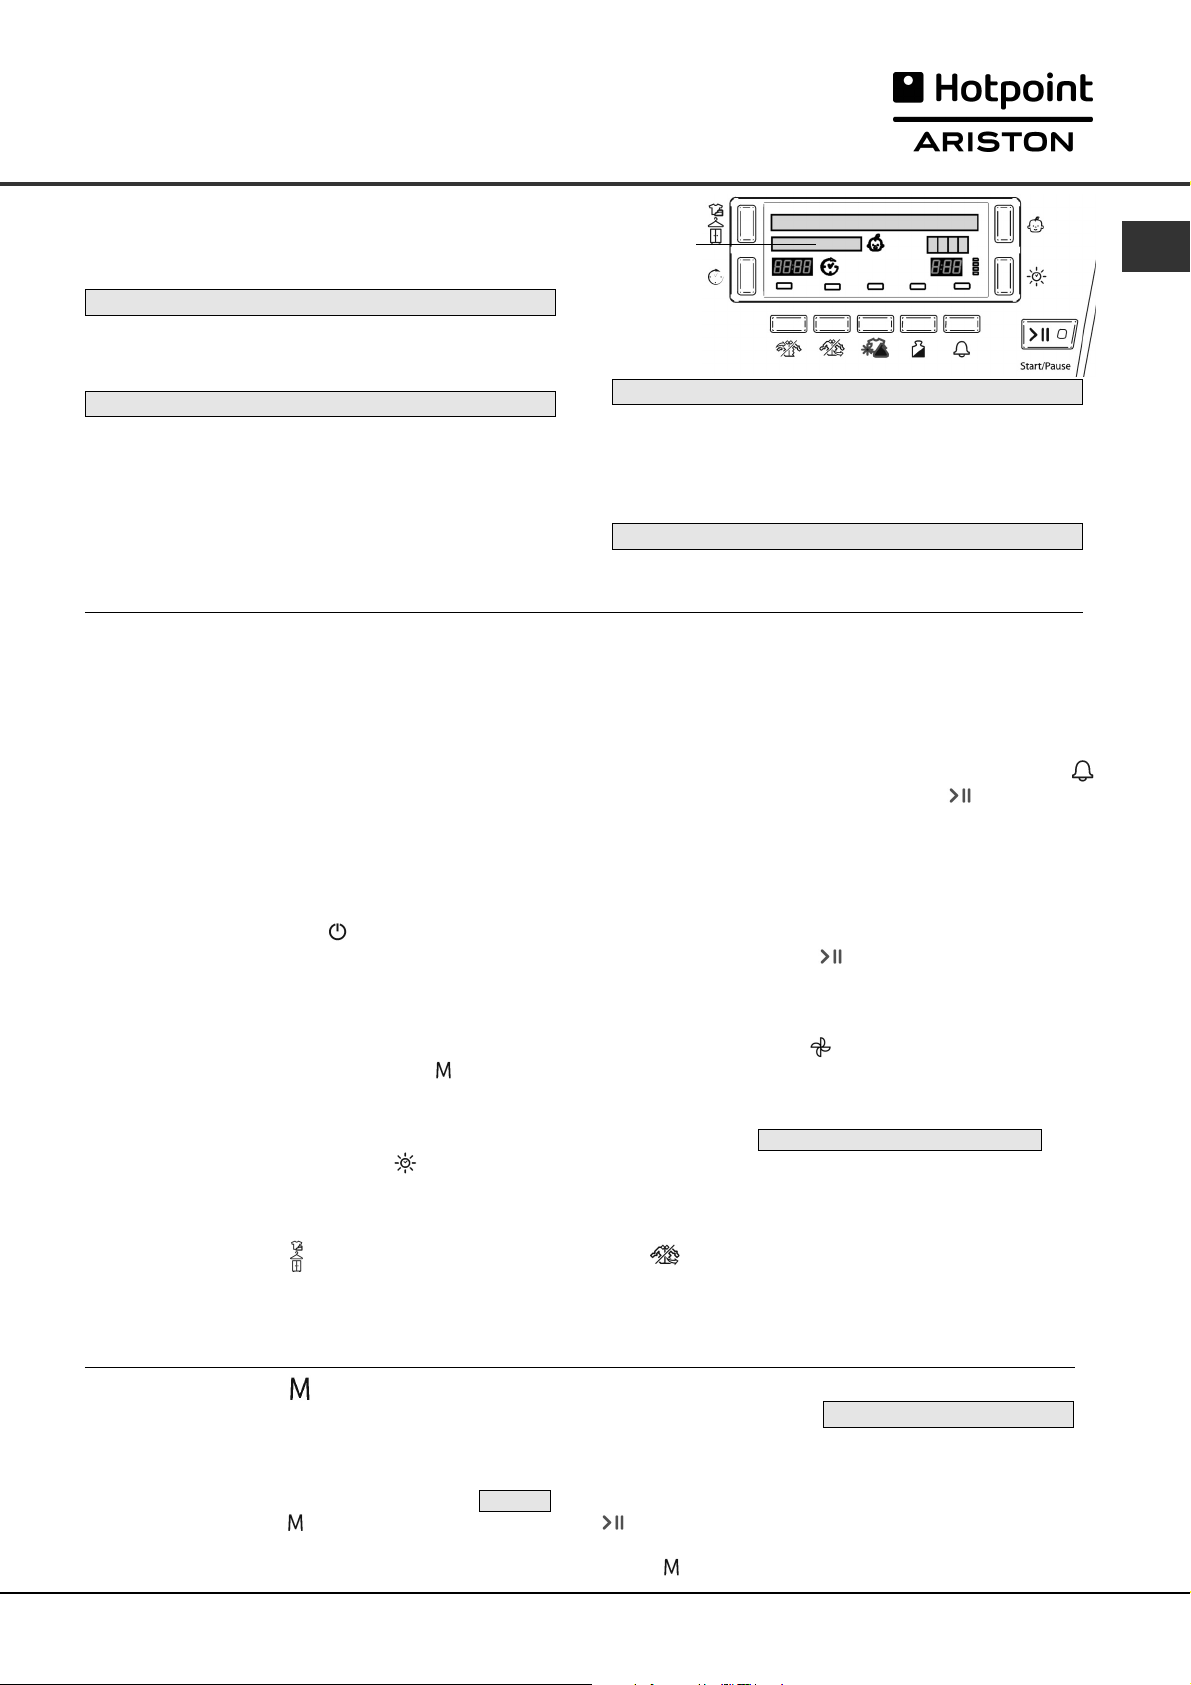
The Display
GB
Warnings
The second line of the display also gives warnings and reminders:
(reminders occur at the end of the programme)
END OF CYCLE, EMPTY THE WATER BOTTLE
●
Reminder that the water container should be
emptied every time you use the dryer (see
Maintenance).
EMPTY WATER BOTTLE
●
Indicates that the water container is full. The
message will take a few seconds to go out after
replacing the empty water container; the dryer
must be running for this to happen (see The
Controls).
Note: If the water container fills and this message
is displayed, the heat is turned off and your
clothes will not dry.
CLEAN CONDENSER
●
This message indicates that you must clean the
Condenser unit (see Maintenance) and will occur
at intervals depending how much you have used
the dryer. When you finish the next programme the
message is cancelled.
CLEAN FILTER
●
Reminds you to clean the Filter every time you use
the dryer (see Maintenance).
Start and Programmes
Choosing a programme
1. Plug the dryer into the electrical socket.
2. Sort your laundry according to fabric type (see
Laundry).
3. Open the door and make sure the filter is clean
and in place and the water container is empty and
in place (see Maintenance).
4. Load the machine and make sure items are not
in the way of the door seal. Close the door.
5. If the Display is not lit: Press the ON/OFF button
6. Press the Programmes Selection button that
corresponds with the type of fabric being dried by
checking the Programmes Table (see Programmes)
as well as the indications for each type of fabric (see
Laundry).
- If the button is selected; steps 7, 8 and 9 are not
required (see below).
7. Choose Timed Drying or Dryness Levels option:
- If Timed Drying press and release the Timed
button until the required time is displayed.
or - To change from default dryness setting, press
and release the Dryness Levels button until
required level is indicated.
! See Programmes Table, for more details.
8. Set a delay time and other options if necessary
(see The Display).
9. If you wish the buzzer to sound at the end of the
programme, press the ALARM button .
10. Press the Start/Pause button to begin.
The display will show the estimated time to end.
During the drying programme, you can check on
your laundry and take out items that are dry while
others continue drying. When you close the door
again, press the Start/Pause button in order to
resume drying.
11. During the last few minutes of Drying Programmes,
before the programme is completed, the final COOL
TUMBLE phase is entered (fabrics are cooled),
this phase should always be allowed to complete.
12. The buzzer (if option selected) will warn you when
the programme is complete and the Display
shows END OF CYCLE, POST CARE PHASE .
Open the door, take the laundry out, clean the filter
and replace it. Empty the Water Container and
replace it (see Maintenance).
If the Post Care Option has been selected and
you do not remove the laundry immediately, the
dryer will tumble occasionally for 10 hours or until
you open the door.
13. Unplug the dryer.
Memory button :
First time you press this button the second line of the display will show PRESS AND HOLD TO STORE
After selecting your favorite programme and options you can save these settings by pressing and holding in the
Memory button for at least 5 seconds, the buzzer will then beep and the second line of the display shows MEMORY
The next time you need this programme press the button, then the Start/Pause button and this programme will run.
If you wish, you can change your stored favorite, by selecting a new programme and/or options and press and hold
in the button (as above).
8
Page 9
Start and Programmes
Special Programmes
Easy Iron Programme
‘Easy Iron’ is a short 10 minute programme (8 minutes of heat followed by a 2 minute cool tumble period) which
fluffs the fibres of clothing that have been left in the same position/location for an extended period of time. The cycle
relaxes the fibres and makes them easier to iron and fold.
! ‘Easy Iron’ is not a drying programme and should not be used for wet articles of clothing.
For best results:
1. Do not load more than the maximum capacity. These numbers refer to the dry weight:
Fabric Maximum load
Cotton and Cotton mixtures 2.5kg
Synthetics 2kg
Denim 2kg
2. Unload the dryer immediately after the end of the programme, hang, fold or iron the articles and put
them away in the closet. Should this not be possible repeat the programme.
The ‘Easy Iron’ effect varies from one fabric to the next. It works well on traditional fabrics like Cotton or Cotton mix,
and less well on acrylic fibres and on materials such as Tencel®.
Wool Programme
●
This is a programme for tumble dryer safe garments marked with the symbol .
●
It can be used for load sizes up to 1kg (approximately 3 sweaters).
●
We recommend that garments are turned inside out before drying.
●
This programme will take about 60 minutes, but may take longer depending on the size and density of the load
and the spin speed used in your washer.
●
Loads dried using this programme are usually ready to wear, but on some heavier garments the edges may
be slightly damp. Allow these to dry naturally as over-drying could damage garments.
! Unlike other materials, the mechanism of wool shrinkage is irreversible; i.e. it will not stretch back to original size
and shape.
! This programme is not suitable for Acrylic garments.
GB
The wool drying cycle of this tumble dryer has been approved by The Woolmark Company for the drying of
Woolmark garments labelled as machine wash and tumble dry, provided that the garments are dried according to
instructions on the garment label and those issued by the manufacturer of this tumble dryer (M0616).
This is the first and only wool drying cycle approved by The Woolmark Company.
Programme option modifiers
Mixed Dry
Available with Cotton High Heat and Synthetic programmes.
This option used after selecting either a Cupboard Dry or Hanger Dry dryness level. This allows you to remove
items when they have reached Hanger Dry or Iron Dry.
When the dryer detects that the load has reached Iron Dry, the display shows: IRON DRY REACHED and the
buzzer sounds for 2 minutes, open the door and remove items that you need to iron.
Then close the door and press the Start/Pause button and the programme resumes.
! If you do not open the door during the 2 minute period, the dryer will resume drying without you pressing the
Start/Pause button.
Hanger Dry programme then continues and ends with END OF CYCLE. EMPTY THE WATER BOTTLE
Cupboard Dry programme continues until the dryer detects that the load has reached Hanger Dry, the display
shows: HANGER DRY REACHED and the buzzer sounds for 2 minutes, open the door and remove any items that
you need to hang up to finish drying.
Then close the door and press the Start/Pause button and the programme resumes.
! If you do not open the door during the 2 minute period, the dryer will resume drying without you pressing the
Start/Pause button.
When Cupboard Dry dryness level reached, the dryer completed the cool tumble (and, if selected, Post Care) and
ends with END OF CYCLE. EMPTY WATER BOTTLE
Mini Load
Available with Cotton High Heat and Synthetic programmes. Used for loads between 1 and 2kg.
This programme optimises Automatic programme for smaller loads and improves the Time to End estimation.
9
Page 10
Start and Programmes
GB
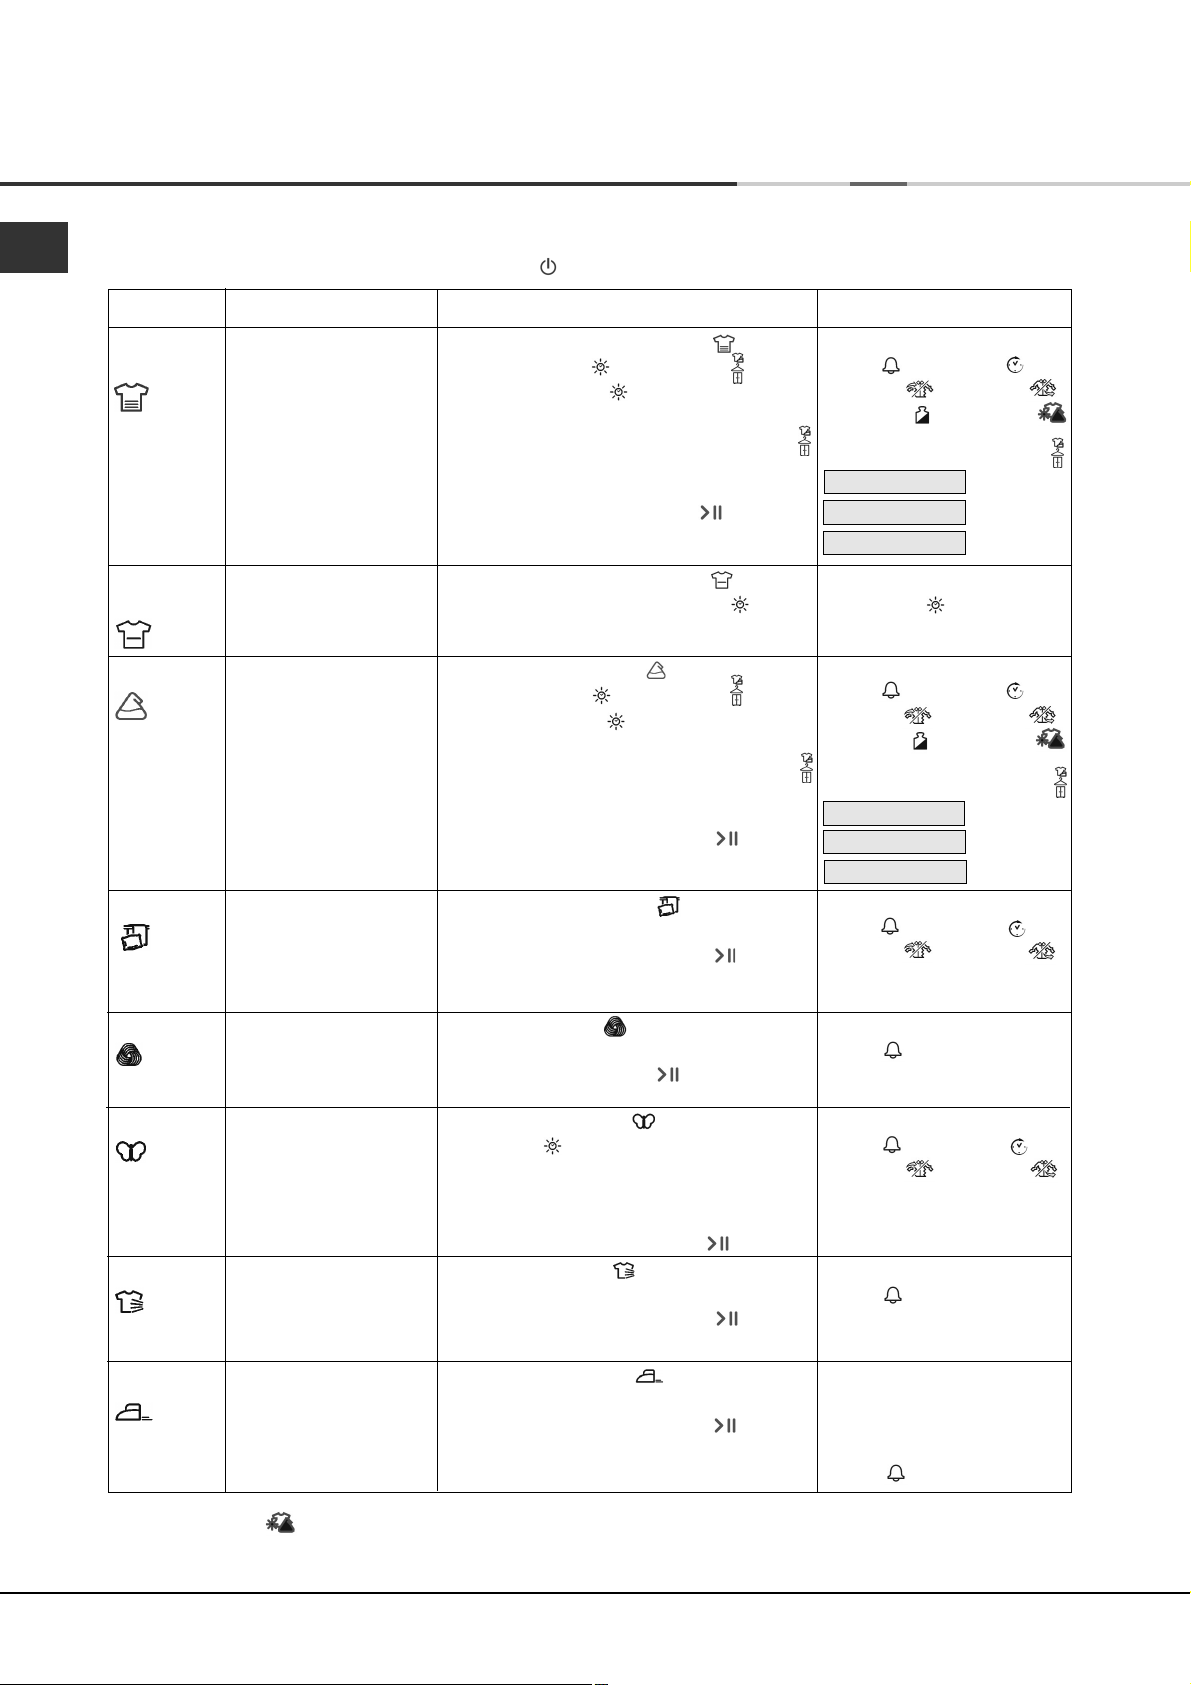
Programmes Table
! If the Display is not lit; Press the ON/OFF button and then select programme.
Programme
Cottons
High Heat
Cottons
Low Heat
Synthetics
Bed & Bath
What it does... How to set it... Note:
Dries your Cotton
clothes on High Heat.
Dries your Cotton
clothes on Low Heat.
Dries your Synthetic
clothes on High Heat.
1. Press the Cottons - High Heat button.
2. Choose Timed or Automatic option.
- If Timed Drying , see next page, or...
- To change from default dryness setting
press and release Dryness Levels button
until the required level is displayed.
3. Select any Options if required.
4. Press the Start/Pause button .
1. Press the Cottons - Low Heat button.
2. Select a drying time, see Timed , next
page.
1. Press the Synthetics button.
2. Choose Timed or Automatic option.
- If Timed Drying , see next page, or...
- To change from default dryness setting
press and release Dryness Levels button
until the required level is displayed.
3. Select any Options if required.
4. Press the Start/Pause button .
Dries your towels and
bedding on High Heat.
1. Press the Bed & Bath button.
2. Select any Options if required.
3. Press the Start/Pause button .
Options available:
Alarm , Time Delay ,
Pre Care , Post Care ,
Mini Load ,
Dryness options: Automatic
IRON DRY
HANGER DRY
CUPBOARD DRY
Options available:
See Timed , next page.
Options available:
Alarm , Time Delay ,
Pre Care , Post Care ,
Mini Load ,
Dryness options: Automatic
IRON DRY
HANGER DRY
CUPBOARD DRY
Options available:
Alarm , Time Delay ,
Pre Care , Post Care
*Mixed Dry
: default
*Mixed Dry
: default
●
An Automatic programme
Wool
Delicates
(e.g. Acrylics)
Airing
Easy Iron
Dries your Woollen
clothes, (see previous
page).
Dries your clothes on
Low heat setting, ready
to be worn.
20-minute programme
that airs your clothes
with cool air. Use also to
cool warm clothes.
Brief programme
(approximately 10
minutes) that softens
fibres of clothing that is
ready for ironing.
1. Press the Wool button.
2. Select Alarm option if required.
3. Press the Start button .
1. Press the Delicates button.
2. If Timed programme required (see
Timed next page).
Otherwise default is Automatic.
3. Select any Options, if required.
4. Press the Start/Pause button .
1. Press the Airing button.
2. Select Alarm option if required.
3. Press the Start/Pause button .
1. Press the Easy Iron button.
2. Select Alarm option if required.
3. Press the Start/Pause button .
Options available:
Alarm
●
An Automatic programme
Options available:
Alarm , Time Delay ,
Pre Care , Post Care .
●
The default is Automatic
Options available:
Alarm
! This is not a drying
programme (see previous
page).
Options available:
Alarm
Note: *Mixed Dry only available with Cupboard Dry and Hanger Dry (see Programme option modifiers).
10
Page 11
Start and Programmes
Timed programmes table: First select a programme (see Programmes Table).
Timed Drying
(0:20, 0:40,
1:00, 1:20, 1:40,
2:00 or 2:20
Hours:Minutes)
Always use Timed Drying
for loads less than 1kg, or
if you prefer a different
dryness result.
The heat setting depends
on the programme
(material option) selected.
The Controls
! Warning, after pressing the Start/Pause button ,
the programme cannot be changed.
To change a selected programme, press the
Start/Pause button , the light flashes Amber to
indicate the programme is paused. Select the new
programme and any options required, the light will
then flash green. Press the Start/Pause button
again and the new programme will start.
●
Option buttons / icons
These buttons are used to customise the selected
programme to your requirements. A programme must
have been selected, by pressing a programme selection
button, before an option can be selected. Not all
options are available for all programmes (see
Programmes Table). If an option is not available and
you press the button, the buzzer will beep 3 times. If
the option is available the indicator, on the display unit
next to the bottom buttons, lights to show that the
option has been selected.
Time Delay
The start of some programmes (see The Display and
Start and Programmes) can be delayed for up to 24
hours. Ensure the water container is emptied before
setting a delayed start.
Pre Care
This option is only available if a delayed start has
been selected. It tumbles the clothes occasionally
during the delayed period to help prevent creases
developing.
Alarm
Available on all programmes and allows the buzzer to
give a signal at the end of the drying cycle, to remind
you that the clothes are ready to be removed.
Post Care
When available and selected, the clothes are
occasionally tumbled after the end of the drying and
cool tumble cycles, to help prevent creases
developing should you not be available to remove the
load immediately the programme is complete.
●
TIME DISPLAY
The display shows either the amount of time delay
remaining or an indication of the amount of time left for
a drying programme (see The Display).
The delay or time to end is displayed in hours and
minutes and counts down each minute.
When timed programmes are selected the time
displayed throughout the cycle is the actual time
88:88
1. Press and release the Timed button
until the display shows the required
selection. Each press advances ,
, , , , , then and
then repeats.
●
Delicates have maximum time of .
●
When is displayed, Automatic
option is available if you change your
mind.
2. Select any Options if required.
3. Press the Start button .
remaining.
When an Automatic programme is selected, the time
displayed is an estimate of the time remaining. When
the programme is selected the display shows the time
required to dry a full load, after around 10 minutes the
controller calculates a better estimate of the cycle time.
The colons between the hours and minutes in the
display flash to show that the time is counting down.
The display also shows if there is a problem with your
dryer, if this occurs the display will show F followed by
a fault code number (see Troubleshooting).
●
Empty Water Container
(If you have plumbed your dryer to a drain this icon can
be ignored, as there is no need to empty the water
container).
Messages are displayed to reminds you to empty the
water container.
If the water container fills during a programme, the
heater turns off and the dryer does a period of Cool
Tumble. After this it stops and a message tells you to
EMPTY THE WATER CONTAINER .
You must empty the water container and restart the
dryer or the clothes will not dry. After re-starting the
dryer the message will take a few seconds to go out.
To avoid this always empty the water container each
time you use the dryer (see Maintenance).
●
Door Opening
Opening the door during a programme will stop the
dryer and have the following effects:
●
The display shows PAUSED .
●
During a delay phase the delay will continue to
count down. The Start/Pause button must be
pressed to resume the delay programme.
The display will change to show current status.
●
During the drying part of the programme, the
colons on the display stop flashing to show that
the time has stopped counting down.
The Start/Pause button must be pressed to
resume the programme. The display will change to
show the current status, the colons flash and count
down continues.
●
During the Post Care phase, the programme ends.
Pressing the Start/Pause button will restart a new
programme from the beginning.
●
Note
If you have a power cut, switch off the power or
remove the plug. When power is restored, press the
Start/Pause button and the programme will resume.
Options available:
Alarm , Time Delay ,
Pre Care , Post Care .
Consult suggested drying
times (see Laundry).
The last 10 minutes of these
programmes is the Cool
Tumble phase .
GB
11
Page 12
Laundry
GB
Sorting your laundry
●
Check symbols on clothing labels to make sure
that the articles can be tumble dried.
●
Sort laundry by fabric type.
●
Empty pockets and check buttons.
●
Close zippers and hooks and tie loose belts and
strings.
●
Wring out each item in order to eliminate as much
excess water as possible.
! Do not load dripping wet clothes into the dryer.
Maximum load size
Do not load more than maximum capacity.
These numbers refer to dry weight:
Natural fibres: 7.5kg max (16.5lb)
Synthetic fibres: 3kg max (6.6lb)
! DO NOT overload the dryer as this could result in
reduced drying performance.
Typical weights
Note: 1kg = 1000g (1lb = 16oz)
Clothes
Blouse Cotton 150g (5oz)
Other 100g (3oz)
Dress Cotton 500g (1lb 2oz)
Other 350g (12oz)
Jeans 700g (1lb 6oz)
10 nappies 1000g (2lb 3oz)
Shirt Cotton 300g (10oz)
Other 200g (7oz)
T-Shirt 125g (4oz)
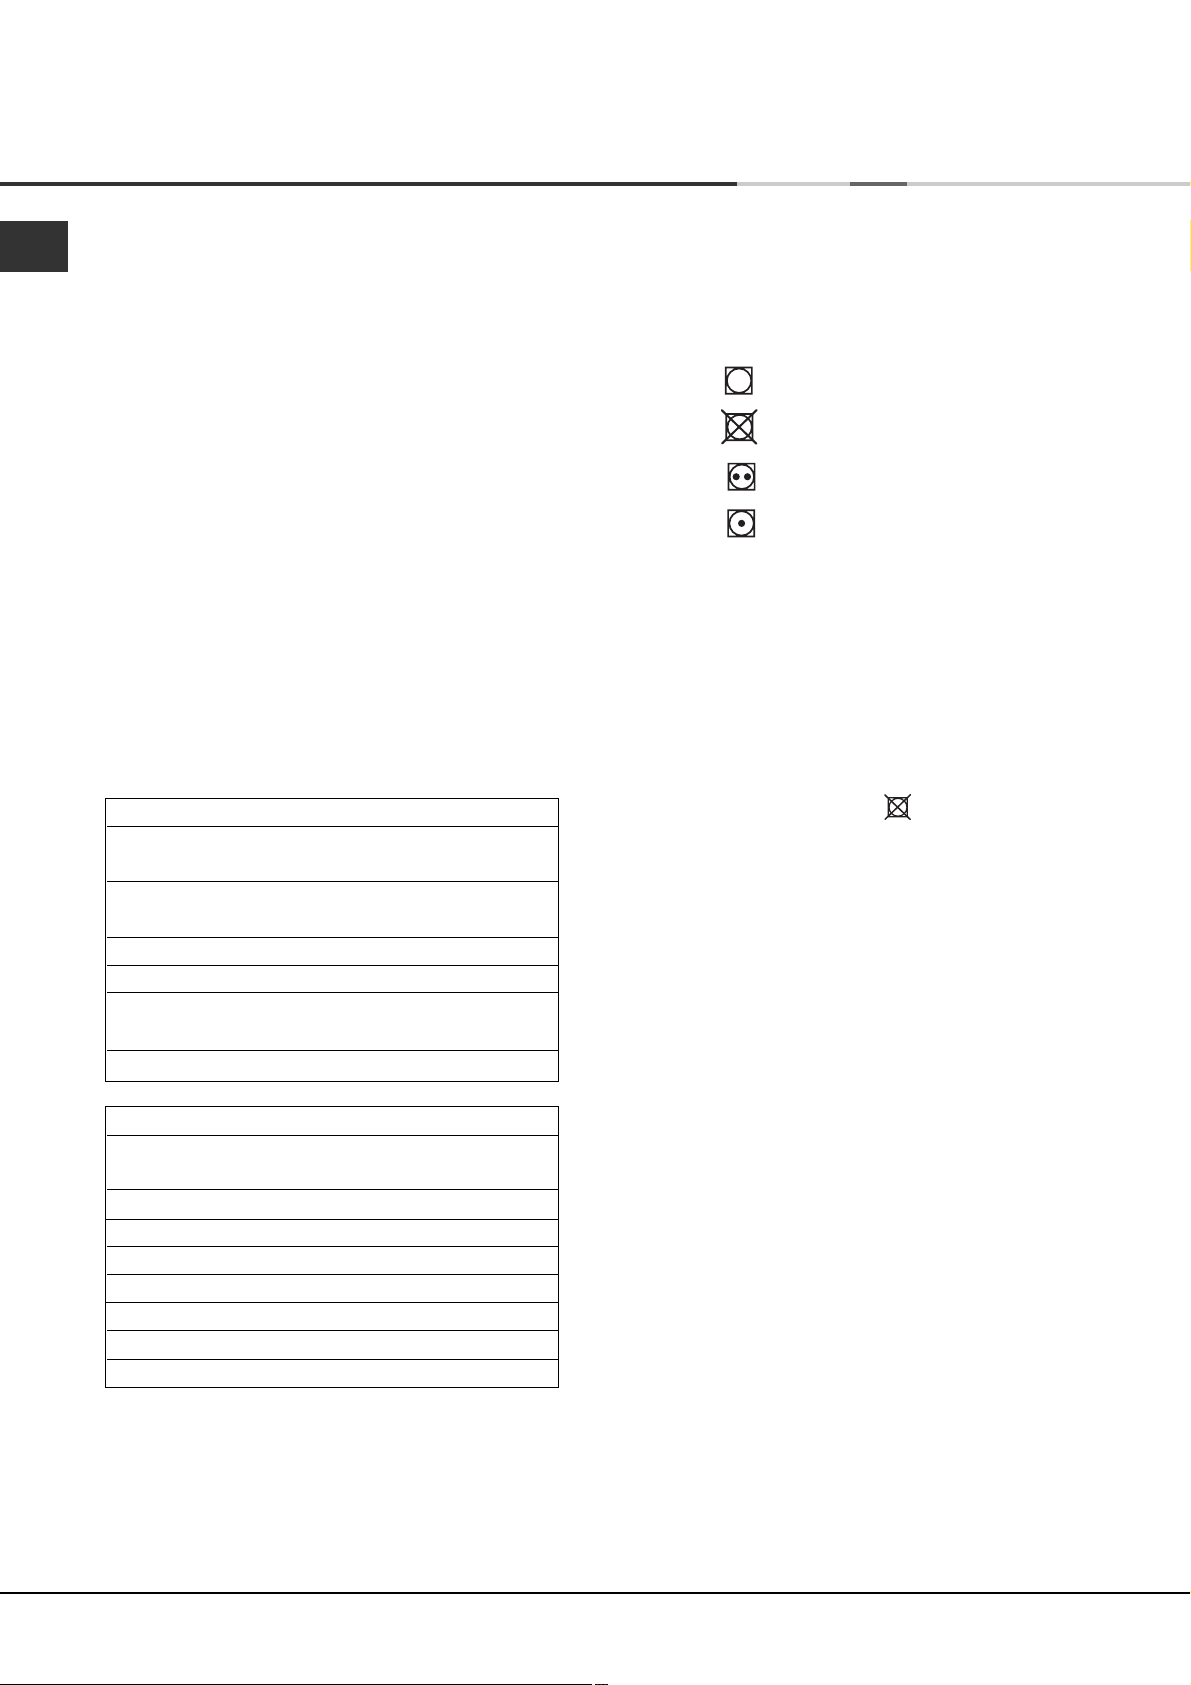
Wash Care Labels
Look at the labels on your garments, especially when
tumble drying for the first time. The following symbols
are the most common:
May be tumble dried
Do not tumble dry
Tumble dry at high heat setting
Tumble dry at low heat setting
Items not suitable for tumble drying
●
Articles that containing rubber or rubber-like
materials or plastic film (pillows, cushions, or PVC
rainwear), any other flammable articles or objects
that contain flammable substances (towels soiled
with hair spray).
●
Glass fibres (certain types of draperies)
●
Items which have been dry cleaned
●
Items with the ITCL Code (see Special
clothing items). These can be cleaned with special
at-home dry cleaning products. Follow instructions
carefully.
●
Large bulky items (quilts, sleeping bags, pillows,
cushions, large bedspreads etc). These expand
when drying and would prevent airflow through
the dryer.
Household Items
Duvet cover Cotton 1500g (3lb 5oz)
(Double) Other 1000g (2lb 3oz)
Large Tablecloth 700g (1lb 6oz)
Small Tablecloth 250g (9oz)
Tea Towel 100g (3oz)
Bath Towel 700g (1lb 6oz)
Hand Towel 350g (12oz)
Double Sheet 500g (1lb 2oz)
Single Sheet 350g (12oz)
At the end of a drying cycle, cottons could still be
damp if you grouped cottons and synthetics together.
If this happens simply give them an additional short
period of drying.
●
Note: The last 10 minutes of any time set is the
Cool Tumble, so allow for this when setting the time,
as this period will not dry your laundry.
12
Page 13
Laundry
Special clothing items
Blankets and Bedspreads: acrylic items (Acilan,
Courtelle, Orion, Dralon) must be dried with special
care on LOW heat setting. Avoid drying for a long
period of time.
Pleated or creased garments: read the manufacturer’s
drying instructions on the garment.
Starched articles: do not dry these with non-starched
items. Make sure that as much of the starch solution is
removed from the load as possible before placing it in
the dryer. Do not over-dry: the starch will become
powdery and leave your clothing limp, which defeats
the purpose of starch.
Drying times
Times are approximate and can vary depending
upon:
●
Amount of water retained in clothes after spin
cycle: towels and delicates retain a lot of water.
●
Fabrics: items that are the same type of fabric but
different textures and thicknesses may not have
the same drying time.
●
Dryness: If you are going to iron some of your
clothes, they can be taken out while still a bit
damp. Others can be left longer if you need them
to be completely dry.
●
Heat setting.
●
Room temperature: if the room where the dryer is
located is cold, it will take longer for the dryer to
dry your clothes.
●
Bulk: some bulky items can be tumble dried with
care. We suggest that you remove these items
several times, shake them out, and return them to
the dryer until finished.
! Do not over-dry your clothes.
All fabrics contain a little natural moisture, which
keeps them soft and fluffy.
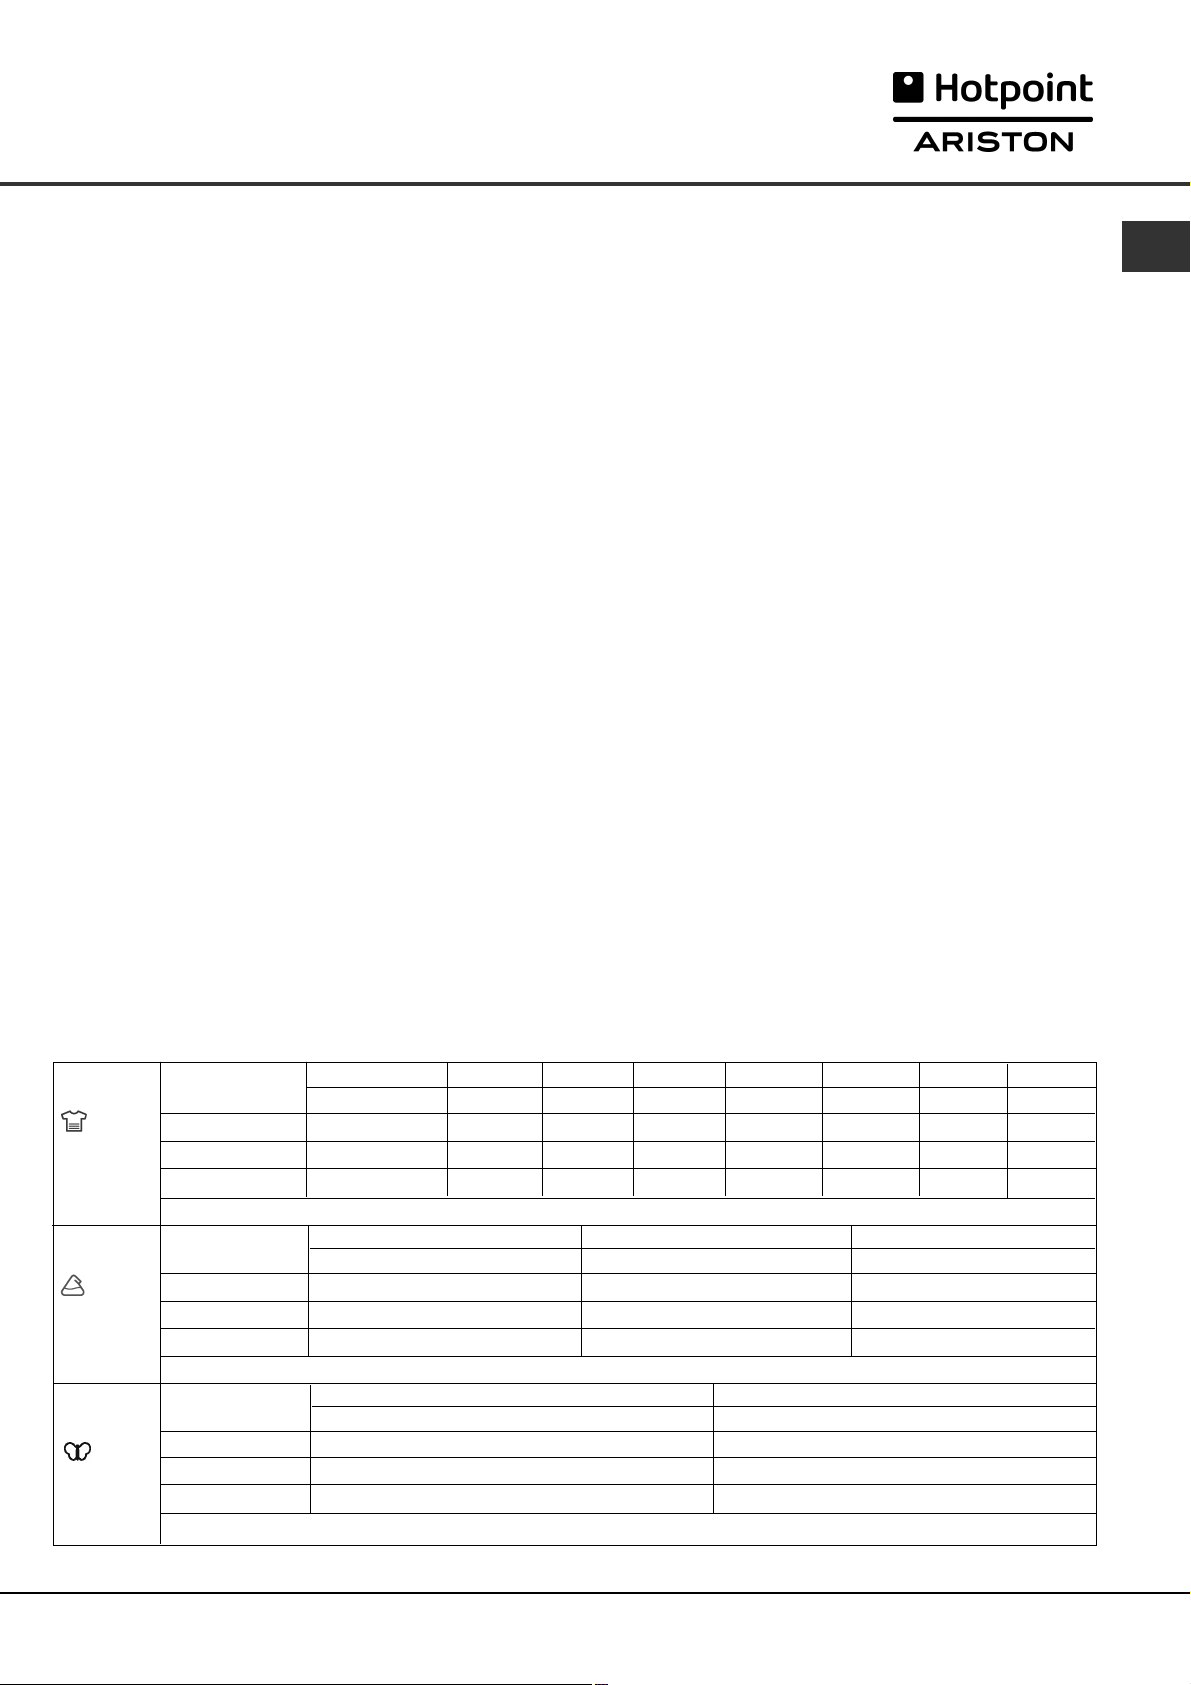
The table (see below) presents APPROXIMATE drying
times in Hours : Minutes, as you see them on the
display, the times are also shown in Minutes only for
reference.
The times given are for Cupboard Dry Automatic
programmes.
Timed Dry settings are also shown, to help you
choose a suitable time option.
GB
●
Quantity of laundry: single items or small loads
may take longer to dry.
Cottons
1 kg
High Heat
Automatic duration
Automatic minutes
Timed Dry setting
0:30 - 0:50
30 - 50
0:20 or 0:40 or 1:00
Drying times 800-1000 rpm in washing machine.
Synthetics
Automatic duration
High Heat
Automatic minutes
Timed Dry setting
0:40 or 1:00
Drying times on reduced spin in washing machine.
Delicates
(Acrylics)
Automatic duration
Automatic minutes
Low Heat
Timed Dry setting
Drying times on reduced spin in washing machine.
0:40 - 0:55
1:00 or 1:20
1 kg
0:30 - 0:40
30 - 40
0:40 or 1:00 or 1:20
2 kg
50 - 70
Half Load
1 kg
0:40 - 1:20
40 - 80
Half Load
3 kg
0:55 - 1:10
70 - 80
1:20
Weights refer to dry garments.
4 kg
1:10 - 1:20
80 - 100
1:20 or 1:40
5 kg
1:20 - 1:30
100 - 120
1:40 or 2:00
6 kg
1:40 - 2:20
120 - 140
2:00 or 2:20
Half Load
2 kg
0:40 - 0:50
40 - 50
0:40 or 1:00
1:20 or 1:40 or 2:00 or 2:20
7 kg
2:20 - 2:30
140 - 150
2:20
Full Load
3 kg
1:10 - 1:30
50 - 70
0:50 or 1:00 or 1:20
Full Load
2 kg
1:20 - 2:20
80 - 140
Full Load
7.5 kg
2:30 - 2:40
150 - 160
2:20
13
Page 14
GB
Warnings and Suggestions
●
! The appliance has been designed and built according
to international safety standards.
These warnings are given for safety reasons and must
be followed carefully.
General safety
●
This tumble dryer is not intended for use by
persons (including children) with reduced physical,
sensory or mental capabilities, or lack of experience
and knowledge, unless they have been given
supervision or instruction concerning use of the
appliance by a person responsible for their safety.
●
This tumble dryer has been designed for home,
and not professional use.
●
Do not touch the appliance while barefoot or with
wet hands or feet.
●
Unplug the machine by pulling on the plug, not
the cord.
●
Children must not be in proximity of the dryer
when in use. After using the dryer, turn it off and
unplug it. Keep the door closed to make sure that
children do not use it as a toy.
●
Children should be supervised to ensure that they
do not play with the dryer.
●
The appliance must be installed correctly and
have proper ventilation. The air intake at the front
of the dryer and rear vent behind the dryer should
never be obstructed (see Installation).
●
Never use the dryer on carpeting where the pile
height would prevent air from entering the dryer
from the base.
●
Check to see if the dryer is empty before loading it.
●
●
●
●
●
●
●
●
●
●
The back of the dryer could become very
hot. Never touch it while in use.
Do not use the dryer unless the filter, water
container and condenser are securely in place
(see Maintenance).
Do not use liquid fabric softeners in the dryer, add
it to the final rinse of your wash.
Do not overload the dryer (see Laundry for
maximum loads).
Do not load items that are dripping wet.
Tumble dry items only if they have been washed
with detergent and water, rinsed and been through
the spin cycle. It is a fire hazard to dry items that
HAVE NOT been washed with water.
Carefully check all instructions on clothing labels
(see Laundry).
Do not dry garments that have been treated with
chemical products.
Never dry articles that are contaminated with
flammable substances (cooking oil, acetone, alcohol,
petrol, kerosene, spot removers, turpentine, waxes,
wax removers and hair sprays), unless washed in
hot water with an extra amount of detergent.
Do not tumble dry rubber, rubber backed articles and
clothes, pillows fitted with foam rubber pads, foam
(latex foam), rubber, plastic, shower caps, waterproof
textiles, nappy pants or liners, polythene or paper.
Do not tumble dry large, very bulky items.
●
Do not tumble dry acrylic fibres at high temperatures.
●
Remove all objects from pockets, especially
lighters (risk of explosion).
●
Complete each programme with its Cool Tumble Phase.
●
Do not turn off the dryer when there are still warm
items inside.
●
Clean the filter after each use (see Maintenance).
●
Empty the water container after each use (see
Maintenance).
●
Clean the condenser unit at regular intervals
(see Maintenance).
●
Do not allow lint to collect around the dryer.
●
Never climb on top of the dryer. It could result in damage.
●
Always follow electrical standards and requirements
(see Installation).
●
Always buy original spare parts and accessories
(see Service).
! WARNING: Never stop the dryer before the end of the
drying cycle unless all items are quickly removed and
spread out so that the heat is dissipated.
Recycling and disposal information
As part of our continued commitment to helping the
environment, we reserve the right to use quality recycled
components to keep down customer costs and minimise
material wastage.
●
Disposing of the packaging material: follow local
regulations, so the packaging can be recycled.
●
To minimise risk of injury to children, remove the
door and plug - then cut off mains cable, flush
with the appliance. Dispose of these parts separately
to ensure that the appliance can no longer be
plugged into a mains socket.
Disposal of old electrical appliances
The European Directive 2002/96/EC on Waste Electrical
and Electronic Equipment (WEEE), requires that old
household electrical appliances must not be disposed
of in the normal unsorted municipal waste stream. Old
appliances must be collected separately in order to
optimise the recovery and recycling of the materials
they contain and reduce the impact on human health
and the environment.
The crossed out “wheeled bin” symbol on
the product reminds you of your obligation,
that when you dispose of the appliance it
must be separately collected.
Consumers should contact their local authority or
retailer for information concerning the correct disposal
of their old appliance.
Saving energy and respecting the
environment
●
Wring out items to eliminate excess water before
tumble drying (if you use a washing machine first,
select a high spin cycle). Doing this will save time
and energy during drying.
●
Always dry full loads - you save energy: single
items or small loads take longer to dry.
●
Clean the filter after each use to contain energy
consumption costs (see Maintenance).
14
Page 15
Maintenance and Care
Switching off the electricity
! Unplug your dryer when not using it, when cleaning
it and during all maintenance operations.
Clean the filter after each cycle
The filter is an important part of your dryer:
it accumulates lint and fluff that is formed while drying.
When finished drying, clean the filter by rinsing it
under running water or with your vacuum cleaner.
Should the filter become clogged up, the airflow inside
the dryer will be seriously compromised: drying times
lengthen and you will consume more energy. It may
also damage your dryer.
The filter is found in front of the dryer trim (see diagram).
Removing the filter:
1. Pull the plastic grip of the filter upwards (see diagram).
2. Clean the filter and replace it correctly.
Ensure the filter is fully located flush into the tumble
dryer trim.
! Do not use the dryer without replacing the filter.
Empty the water container after each
cycle
Cleaning the drum
! Do not use abrasives, steel wool or stainless steel
cleaning agents to clean the drum.
A coloured film may start to appear on the stainless
steel drum, this may be caused by a combination of
water and, or cleaning agents such as fabric conditioner
from the wash. This coloured film will not affect the
dryer performance.
Cleaning the condenser unit
Periodically (every month) remove the condenser unit
and clean any build up of fluff from between the plates
by rinsing it under the tap with cold water.
This should be done with cold water from the rear of
the condenser.
Removing the condenser:
1. Unplug the dryer and open the door.
2. Pull open the condenser cover (see diagram).
Release the three catches by turning 90˚ counterclockwise then pull on the grip and remove from
the dryer.
3. Clean the surface of the seals and replace, making
sure that the catches have been secured.
GB
Pull the container out of the dryer and empty it into a
sink or other suitable drain.
Replace the water container securely.
Always check and empty the container before you
start a new drying programme.
Check the drum after each cycle
Turn the drum manually in order to remove small items
(handkerchiefs) that could have been left behind.
Water container
Condenser unit
Condenser cover
Filter
Air intake
Cleaning the dryer
●
External parts in metal or plastic and rubber parts
can be cleaned with a damp cloth.
●
Periodically (every 6 months) vacuum the front air
intake grille and vents at the rear of the dryer, to
remove any build up of fluff, lint or dust. Also to
remove accumulation of fluff from the front of the
condenser and filter areas, clean occasionally with
a vacuum cleaner.
! Do not use solvents or abrasives.
! Your dryer uses special bearing components which
do not need lubrication.
! Have your dryer checked regularly by authorised
technicians to ensure electrical and mechanical safety
(see Service).
Ta p
Rear
Front
Condenser unit
Catches
Handle
15
Page 16

Troubleshooting
GB
One day your dryer seems not to be working. Before you call your Service Centre (see Service), go through the
following troubleshooting suggestions:
Problem:
The tumble dryer won’t start.
Possible causes / Solution:
●
The plug is not plugged into the socket, or not making contact.
●
There has been a power failure.
●
The fuse has blown. Try to plug another appliance into the socket.
●
You are using an extension cord? Try to plug the dryer’s power cord
directly into the socket.
●
The door is not closed securely?
●
The programme has not been set properly (see Start and Programmes).
●
The Start/Pause button has not been pressed (see Start and Programmes).
Drying cycle will not begin.
Its taking a long time to dry.
●
You have set a delayed time (see Start and Programmes).
●
The filter has not been cleaned (see Maintenance).
●
The water container needs emptying? The empty water message is
displayed? (see Maintenance).
●
The condenser needs cleaning? (see Maintenance).
●
The temperature setting is not ideal for the type of fabric you are drying
(see Start and Programmes, and see Laundry).
●
The correct drying time has not been selected for the load (see Laundry).
●
The air intake grille or rear vents are obstructed (see Installation, and see
Maintenance).
●
The items were too wet (see Laundry).
●
The dryer was overloaded (see Laundry).
Empty water message is
displayed but the dryer has
only been running for a short
period.
Empty water message is
displayed and the water
container is not full.
Programme finishes and
clothes are damper than
expected.
The display shows a fault
code F followed by one or two
numbers.
The display briefly shows
DEMO ON every 6 seconds.
●
The water container was probably not emptied at the start of the
programme. Do not wait for the empty water signal, always check and
empty the container before starting a new drying programme (see
Maintenance).
●
This is normal, the: END OF CYCLE, EMPTY THE WATER BOTTLE
message is shown as a reminder to empty the container (see The Display
and Start and Programmes).
! For safety the dryer has a maximum programme time of 3 hours. If an
automatic programme has not sensed the required final moisture in this time
the dryer will complete the programme and stop. Check the above points
and run the programme again, if the results are still damp, contact the
Service Centre (see Service).
●
If the display shows F10 or F15:
- Turn off and remove the plug. Clean the filter and the condenser
(see Maintenance). Then replace the plug, turn on and start another
programme. If F10 or F15 is still displayed contact the Service
Centre (see Service).
●
If any other number is shown: Note down the code and contact the
Service Centre (see Service).
●
The dryer is in ‘Demo’ mode. Press and hold both the On/Off and
Start/Pause buttons for 3 seconds. The display will show DEMO OFF for
3 seconds and then the dryer will resume normal operation.
16
Page 17
Service
Before calling the Service Centre:
●
Use the troubleshooting guide to see if you can
solve the problem yourself (see Troubleshooting).
●
If not, turn off the dryer and call the Service Centre
closest to you.
What to tell the Service Centre:
●
name, address and post code.
●
telephone number.
●
the type of problem.
●
the date of purchase.
●
the appliance model (Mod.).
●
the serial number (S/N).
This information can be found on the data label inside
the door of the machine.
Spare Parts
This dryer is a complex machine. Repairing it yourself
or having a non-authorised person try to repair it could
cause harm to one or more persons, could damage
the machine and could invalidate the spare parts
warranty.
Call an authorised technician if you experience problems
while using the machine.
The spare parts have been designed exclusively for
this appliance and not for other uses.
GB
Comparative Programmes
●
Programmes recommended for comparative test to EN61121
Programme Programme to select Load size Dryness Option
(EN61121)
Dry Cotton COTTONS HIGH HEAT 7.5 kg HANGER DRY
Iron Dry Cotton COTTONS HIGH HEAT 7.5 kg IRON DRY
Easy-care textile SYNTHETICS 3 kg CUPBOARD DRY
! Note: This is not a full list of programme options (see Start and Programmes).
This appliance conforms to the following EC Directives:
- 2006/95/EC (Low Voltage Equipment)
- 89/336/EEC, 92/31/EEC and 93/68/EEC (Electromagnetic Compatibility)
17
Page 18

Notice d’utilisation et installation
SÈCHE-LINGE
F
GB
English, 1
F
Français, 18
E
Español, 35
Table des Matières
Informations Importantes, 19-20
Installation, 21
P
Português, 52
NL
Nederlands, 69
Où installer votre sèche-linge
Ventilation
Connexions électrique
Avant de commencer à utiliser votre sèche-linge
Description du sèche-linge, 22
Pour ouvrir la porte
Caractéristiques
Panneau de commandes
L’affichage, 23-25
Démarrage et programmes, 25-28
Choisir un programme
Programmes spéciaux
TCD851B
La première fois que vous allumez
votre sèche-linge, vous devez
choisir la langue.
Voir page 23
Options de modifications des programmes
Tableau des programmes
Les commandes
Linge, 29-30
Trier votre linge
Étiquettes d’entretien
Vêtements spéciaux
Temps de séchage
Avertissements et Suggestions, 31
Sécurité générale
Élimination
Économiser de l’énergie et respecter l’environnement
Entretien et Nettoyage, 32
Éteindre l’électricité
Nettoyer le filtre après chaque cycle
Videz le réservoir d’eau après chaque cycle
Vérifier le tambour après chaque cycle
Nettoyage du groupe condenseur
Nettoyer le sèche-linge
Que faire en cas de panne, 33
Service Après-vente, 34
Pièces de rechange
! Conservez cette notice d’utilisation et d’installation à portée de main de manière à pouvoir vous y référer si
nécessaire. Emmenez-la avec vous si vous déménagez, et, si vous vendez cet appareil ou que vous le donniez à un tiers,
faites en sorte que cette notice accompagne le sèche-linge de manière à ce que le nouveau propriétaire soit informé
des avertissements et suggestions concernant le fonctionnement de ce sèche-linge.
! Lisez attentivement ce mode d’emploi; les pages suivantes contiennent des informations importantes concernant
l’installation et des suggestions relatives au fonctionnement de cet appareil.
18
Page 19
Informations Importantes
Pour que votre sèche-linge à condenseur fonctionne efficacement, vous devez suivre le programme d’entretien
courant décrit ci-dessous:
Filtre...
! Vous devez IMPERATIVEMENT nettoyer le filtre à
peluches A CHAQUE cycle de séchage.
ETAPE 1.
Ouvrez la porte du
sèche-linge.
! Négliger de nettoyer le filtre après CHAQUE cycle de séchage nuira aux performances de séchage de votre
machine.
- Le temps de séchage sera plus long et la consommation électrique sera en conséquence plus importante.
ETAPE 2.
Sortez le filtre (à l'aide
des deux encoches
passe-doigts)
ETAPE 3.
Enlevez les dépôts de
peluches des mailles du
filtre.
ETAPE 4.
Réinstallez le filtre - NE
faites JAMAIS fonctionner
le sèche-linge sans avoir
remis en place le filtre.
F
Réservoir d’eau...
! Vous devez IMPERATIVEMENT vider le réservoir
d’eau après CHAQUE cycle de séchage.
ETAPE 1.
Tirez le réservoir d’eau
vers vous et retirez-le
complètement du sèchelinge.
! Si vous négligez de vider le réservoir d’eau :
- la machine ne chauffe plus (la charge est alors encore humide à la fin du cycle).
- Le message ‘BAC PLEIN’ vous indique que le réservoir d’eau est plein.
ETAPE 2.
Videz toute l’eau
récupérée dans le
réservoir d’eau.
Amorçage du système de récupération d’eau
ETAPE 3.
Remettez en place le
réservoir d’eau, en
veillant à le renfoncer
correctement.
! Message ‘BAC PLEIN’
- pour vous rappeler de
vider le réservoir d’eau
au début et à la fin de
chaque programme.
Sur un sèche-linge neuf, le réservoir d’eau ne récupérera pas l’eau tant que le système n’aura pas été amorcé...
ceci nécessitera 1 ou 2 cycles de séchage. Une fois amorcé, il récupérera l’eau à chaque cycle de séchage.
19
Page 20
Informations Importantes
F
Groupe condenseur...
! Vous devez IMPERATIVEMENT enlever les peluches
du condenseur TOUS LES MOIS.
ETAPE 1.
Ouvrez le couvercle du
condenseur
- tenez la poignée et tirez
vers vous.
ETAPE 2.
Retirez le condenseur en
tournant les 3 agrafes et
en le tirant vers vous.
(Les tubes peuvent
contenir un peu d’eau ;
ceci est normal).
ETAPE 3.
Rincez le condenseur
par l’arrière avec de
l’eau pour enlever les
dépôts de peluches.
ETAPE 4.
Remontez le condenseur
- veillez à enfoncer le bloc
à fond, à rattacher
solidement les 3 agrafes
et à orienter les flèches
de positionnement à
l’avant du condenseur
vers le haut.
●
Vérifiez:
- que les flèches de positionnement sont orientées vers le haut.
- que les 3 agrafes sont refermées dans leur position de « verrouillage ».
Tournez les 3 agrafes
! Négliger de nettoyer le condenseur pourrait entraîner
une défaillance prématurée de votre sèche-linge.
20
Page 21

Installation
Où installer votre sèche-linge
●
Placez votre sèche-linge à une certaine distance
des cuisinières, fourneaux, radiateurs, ou plaques
de cuisson à gaz, car les flammes peuvent
endommager cet appareil.
●
minimale espace 10 mm
Si vous installez cet appareil
sous un plan de travail,
faites en sorte de laisser un
espace de 10 mm entre le
minimale
espace 15 mm
dessus de l’appareil et tout
autre objet sur ou
au-dessus de la machine, et
un espace de 15 mm entre
les côtés et les éléments
d’ameublement ou les murs latéraux. Ceci a pour
objectif d’assurer une ventilation convenable. Assurezvous que les orifices de ventilation situés à l’arrière ne
soient pas obstrués.
Ventilation
Lorsque le sèche-linge est en marche, une aération
adéquate est nécessaire. Faites en sorte d’installer
votre sèche-linge dans un environnement qui n’est
pas humide et qui est doté d’une bonne circulation
d’air dans toute la pièce. La circulation d’air autour du
sèche linge est essentielle pour condenser l’eau
produite au cours du lavage, le sèche linge ne
fonctionnera pas efficacement dans un espace clos
ou dans un placard.
! Nous vous déconseillons d’installer votre sèche-linge
dans un placard. En revanche, le sèche-linge ne doit
en aucun cas être placé derrière une porte fermant à
clé, une porte coulissante ou une porte montée sur
des gonds du côté opposé à la porte de chargement
du sèche-linge.
! Si l’on utilise le sèche linge dans une pièce froide ou
petite, on rencontrera un certain degré de condensation.
Instructions d’inversion de la porte
Charnière
Taquet de
la porte
Charnière
La porte de votre sèche-linge est réversible et les
charnières peuvent être facilement changées de côté.
Echangez diagonalement les supports de charnières
et les vis d’obturation. Echangez le taquet de la porte
et le loquet avec leur plaque d’obturation opposée
(voir schéma ci-dessus).
Loquet de la porte
Vidange de l’eau
Si votre sèche-linge est installé à proximité d’une
évacuation, l’eau peut être vidangée dans ce tuyau.
Cela évite de vider le réservoir d’eau. Si vous installez
le sèche-linge au-dessus ou à côté d’un lave-linge, il
pourra partager la même vidange.
vidange doit être inférieure à
La hauteur de la
1 m en partant du bas
du sèche-linge.
Retirer l’attache existante et le
tuyau de la position indiquée
(voir schéma).
Retirez l’attache et le
tuyau fixés ici...
Posez une longueur de tuyau
adaptée sur le nouvel
emplacement
(voir schéma) et
réinstallez l’attache.
Assurez-vous que le tuyau n’est pas écrasé ou plié
!
...posez le nouveau
tuyau et réinstallez
l’attache ici.
une fois le sèche-linge placé dans sa position définitive
Connexions électriques
Assurez-vous des points suivants avant de brancher
la fiche de l’appareil dans la prise de courant:
●
La prise de courant doit être reliée à la terre.
●
La prise de courant doit pouvoir supporter la
puissance maximale de la machine, qui est
indiquée sur la plaque signalétique de l’appareil
(voir la Description du Sèche-linge).
●
La tension électrique doit appartenir à la gamme
de valeurs indiquée sur la plaque signalétique de
l’appareil (voir la Description du Sèche-linge).
●
La prise de courant doit être compatible avec la
fiche du sèche-linge. Si ce n’est pas le cas,
remplacez la fiche ou la prise de courant.
! Le sèche-linge ne doit pas être utilisé à l’extérieur, même si
l’espace en question est abrité. Cela peut être dangereux
si l’appareil est exposé à la pluie ou à des orages.
! Une fois installés, le cordon d’alimentation et la fiche
du sèche-linge doivent être d’accès facile.
! N’utilisez pas de rallonges.
! Le cordon d’alimentation ne doit pas être courbé ou
écrasé.
! Le cordon d’alimentation électrique doit être vérifié
périodiquement et remplacé par un cordon préparé
spécialement pour ce sèche-linge, et installé uniquement
par des électriciens agréés (voir Service Après-vente).
Des cordons d’alimentation neufs ou plus longs sont
fournis par les revendeurs agréés contre un supplément.
! Le fabricant rejète toute responsabilité en cas de
non-respect de toutes ou partie de ces règles.
! En cas de doute au sujet des points precedents,
consultez un electricien qualfie.
Avant de commencer à utiliser votre
sèche-linge
Une fois que vous avez installé votre sèche-linge, et avant
de l’utiliser, nettoyez l’intérieur du tambour pour retirer les
poussières qui pourraient s’y être accumulées durant le
transport.
F
.
21
Page 22
Description du sèche-linge
F
Pour ouvrir la porte Caractéristiques
Groupe condenseur
(couvercle ouvrir)
Panneau de commandes
Appuyez et relâchez le panneau
avant dans la position indiquée
Boutons de Sélection
de PROGRAMME
Réservoir d’eau
Couvercle de condenseur
Poignée de couvercle de condenseur
(Tirer ou ouvrir)
L’Affichage
Plaque
signalétique
Numéro du
Modèle et
Numéro de
Série
Grille
d’entrée d’air
Filtre
SÉCURITÉ ENFANTS
Bouton et Témoin
Bouton
MARCHE/ARRÊT
Le bouton MARCHE/ARRÊT : si le sèche-linge
fonctionne et qu’on appuie sur ce bouton, le sèchelinge s’arrête. Appuyez de nouveau, le séche-linge
redémarre.
Les boutons de Sélection de PROGRAMME
permettent de choisir un programme : Appuyez sur
le bouton correspondant au programme que vous
souhaitez sélectionner (voir Démarrage et Programmes).
Les boutons/témoins OPTION : Ces boutons
sélectionnent les options disponibles pour votre
programme sélectionné (voir Les Commandes). Les
témoins situés à côté des boutons sur l’affichage
s’allument pour indiquer que l’option a été
sélectionnée.
Le bouton/témoin DÉPART/PAUSE démarre un
programme sélectionné. Lorsque vous appuyez une
nouvelle foi sur ce bouton, vous entendez un bip et
l’affichage indique PAUSE . Quand un programme
fonctionne, et que l’on maintient ce bouton appuyé, le
programme marque une pause et le sèche-linge s’arrête.
Boutons
d’Options
Le témoin est vert lorsque le programme fonctionne,
orange clignotant si le programme a été mis en pause
ou vert clignotant si le sèche-linge est en attente du
lancement d’un programme (voir Démarrage et
Programmes).
L’Affichage fournit des recommandations et des
renseignements sur le programme en cours et son
avancement (voir page suivante).
outon et témoin SÉCURITÉ ENFANTS : appuyez
B
sur ce bouton pendant quelques instants après avoir
sélectionné votre
Ceci empêche toute modification des réglages,
l’affichage indique brièvement VEROUILLE .
Lorsque le témoin est allumé, les autres boutons sont
désactivés.
Appuyez pendant quelques instants sur le bouton
pour annuler la sécurité enfants. L’affichage indique
brièvement DEVEROUILLE .
programme et d’éventuelles options.
Bouton et Témoin
DÉPART/ PAUSE
22
Page 23
Affichage
Choix de la langue
À la première mise en route de votre sèche-linge, vous allez devoir choisir la langue préférée dans la liste
proposée.
Pour changer : la langue actuellement sélectionnée doit
clignoter sur la première ligne de l’affichage.
- Appuyez sur les trois boutons : et
maintenez-les enfoncés pendant 5 secondes.
- Appuyez sur Sécurité enfants ou sur le bouton de
durée de séchage pour faire défiler la liste vers le
haut ou vers le bas.
- Lorsque la langue dont vous avez besoin clignote sur la
ligne du haut de l'affichage, appuyez sur le bouton de
niveau de séchage pour valider votre choix.
Comprendre l’affichage
Sélection et affichage des programmes
Le programme sélectionné est indiqué sur la première ligne de l’affichage lorsque vous appuyez sur le bouton
correspondant. Ce message reste visible tant que le programme est en cours.
COTON RESITANT
COTON DELICAT
SYNTHETIQUE
LIT ET BAIN
REPASSAGE FACILE
AIR FRAIS
DELICAT
LAINAGE
F
Si vous appuyez sur le bouton de mémorisation, l’affichage indique le programme que vous avez sélectionné en
plaçant la lettre ‘M’ devant le nom du programme. Exemple : M COTON RESITANT (voir Démarrage et Programmes).
Niveaux de séchage
Lorsque vous sélectionnez un programme automatique qui dispose de différents niveaux de séchage (voir Tableau
des programmes).
La deuxième ligne de l’affichage indique le niveau de séchage dont vous avez besoin. Chaque fois que vous
appuyez sur le bouton Niveau de séchage , l’option suivante de la liste ci-après est sélectionnée et s'affiche.
A REPASSER
SUR CEINTRE
A RANGER
L’affichage indique également : un, deux ou trois blocs, selon votre sélection.
Ces blocs s’affichent au fur et à mesure de l’avancement du programme.
Sec pour repassage : Sèche vos vêtements pour qu’ils soient prêts à repasser.
Sec pour cintres: Sèche vos vêtements pour qu’ils soient prêts à suspendre.
Sec pour placard: Sèche vos vêtements pour qu’ils soient prêts à porter.
23
Page 24
Affichage
F
Avancement du programme
La deuxième ligne de l’affichage indique l’état du programme au fur et à mesure qu’il avance :
(les messages longs défilent sur la ligne.)
DEFROISSAGE
SECHAGE
REFROIDISSEMENT
FIN DE CYCLE, DEFROISSAGE
FIN DE CYCLE, BAC PLEIN
Si l’option Séchage mixte est disponible et sélectionnée, cette ligne s'affiche lorsque les différents niveaux de
séchage sont atteints :
PRÊT À REPASSER
PRÊT À SUSPENDRE
(si l’option est
disponible et sélectionnée).
(si l’option est
disponible et sélectionnée).
Séchage minuté
Après avoir sélectionné un programme comportant une option Séchage minuté, appuyez sur le bouton de durée de
séchage : le temps sélectionné augmente sur l’affichage chaque fois que vous appuyez brièvement sur le
bouton (voir Démarrage et Programmes).
Chaque pression avance la durée d’un cran : , , ,
, ,
1:40 2:00 2:20
puis
, avant de répéter la séquence.
0:20 0:40 1:00 1:20
Les délicats ont un temps maximum de :
Les barres sur la droite du temps s’allument pour donner une
indication de la durée sélectionnée :
o:20 0:40 1:00 1:20 1:40 2:00 2:20
Le temps sélectionné reste affiché après le démarrage du programme.
1:40
Départ différé et Temps restant
Certains programmes peuvent avoir un départ différé (voir Démarrage et Programmes). Appuyez sur le bouton
Départ différé ; le témoin clignote alors.
Chaque pression sur le bouton Départ différé avance le
départ différé
d'annuler le départ différé après deux secondes.
Le retard s’affiche à côté du bouton Départ différé.
L’affichage décompte les minutes avant le départ une fois que
l’on a appuyé
La deuxième ligne de l’affichage indique DEMARRER
Une fois le temps de retard écoulé (ou pour tout le programme si aucun retard n’a été sélectionné) : le temps
restant estimé jusqu’à la fin du programme en ce qui concerne les programmes automatiques ou le temps restant
réel pour le programme minuté apparaît dans cette partie de l’affichage.
d’une heure, de : à
sur le bouton Départ/Pause
, puis
.
avant
OFF1h 24h
24
Page 25
Affichage
Recommandations
La deuxième ligne de l’affichage fournit également des recommandations
et des rappels : (les rappels interviennent en fin de programme)
FIN DE CYCLE, BAC PLEIN
●
Rappel : vous devez vider le réservoir d’eau
chaque fois que vous utilisez le sèche-linge (voir
Entretien).
BAC PLEIN
●
Indique que le réservoir d’eau est plein. Après avoir
remis en place le réservoir vidé, il faut quelques
secondes avant que le message ne disparaisse; le
sèche-linge doit fonctionner pour que ceci se
produise (voir Les Commandes).
Remarque: Si le réservoir d’eau se remplit et que
ce message s’affiche, le chauffage est désactivé
et vos vêtements ne sèchent pas.
NETTOYAGE CONDENSEUR
●
Ce message indique que vous devez nettoyer le
condenseur (voir Entretien) et il interviendra à
intervalles dépendant selon la fréquence d’utilisation
du sèche-linge. À la fin du programme suivant, le
message disparaît.
NETTOYAGE FILTRE
●
Rappel : vous devez nettoyer le filtre à chaque
utilisation du sèche-linge (voir Entretien).
Démarrage et Programmes
Choisir un programme
1. Branchez la fiche du sèche-linge dans la prise électrique.
2. Triez votre linge en fonction du type de textiles (voir
Linge).
3. Ouvrez la porte et en assurant-vous que le filtre soit
propre et en place et le réservoir d’eau est vide et en
place (voir Entretien).
4. Chargez la machine et assurez-vous que des articles
ne bloquent pas le joint de la porte. Fermez la porte.
5. Si l’affichage n’est pas allumé : appuyez sur le
bouton MARCHE/ARRET
6. Appuyez sur le bouton de sélection de programme
qui correspond au type de tissu que l’on sèche ;
après avoir vérifie le Tableau des Programmes
(voir Programmes) ainsi que les indications pour
chaque type de tissu (voir Linge).
Si vous avez appuyé sur le bouton ; les étapes
-
7, 8 et 9 ne sont pas nécessaires
7.
Choisissez l'option Durée de séchage ou
Intensité de séchage.
- Pour l'option Durée de séchage , appuyez sur le
bouton Durée de séchage et relâchez-le jusqu'à
faire apparaître la durée de séchage souhaitée, ou…
- Pour sélectionner les paramètres de séchage
proposés par défaut , appuyez sur le bouton
Intensité de séchage et relâchez-le jusqu'à faire
apparaître l'intensité souhaitée.
! Consultez le tableau des Programmes pour plus
de détails.
(voir ci-dessous).
8. Réglez le depart différé de temporisation et
d’autres options si nécessaire
9.
Si vous souhaitez que le buzzer sonne, à la fin du
programme, appuyez sur le bouton d’option ALARME
10. Appuyez sur le bouton Départ/Pause pour
commencer
jusqu’à la fin.
Au cours d’un programme de séchage, vous pouvez
vérifier votre linge et sortir les articles qui sont secs
pendant que les autres continuent à sécher.
Lorsque vous refermez la porte, appuyez sur le
bouton
11. Pendant les quelques dernières minutes des
programmes de séchage, avant de terminer le
programme, celui-ci entre dans la phase finale de
REFROIDISSEMENT (les textiles sont refroidis),
que vous devez toujours laisser se terminer.
12.
Le buzzer (si l’on a sélectionné l’option Alarme) vous
avertit quand le programme est terminé. L’affichage
indique alors
Ouvrez la porte, sortez votre linge, nettoyez le filtre et
remettez-le en place. Videz le réservoir d’eau et
replacez-le (voir Entretien).
Si vous avez sélectionné l’option d’Après Defroissage
immédiatement, le tambour tournera de temps à
autres pendant 10 heures ou jusqu’à ce que vous
ouvriez la porte.
13. Débranchez le sèche-linge.
. L’affichage indiquera le temps qu’il reste
Départ/Pause afin de continuer le séchage.
FIN DE CYCLE, DEFROISSAGE .
mais que vous ne retirez pas le linge
F
(voir Affichage).
Bouton Mémoire :
La première fois que vous appuyez sur ce bouton, la deuxième ligne de l’affichage indique : MÉMORISER : APPUYER 3S
Après avoir sélectionné votre programme favori et vos options, vous pouvez sauvegarder ces réglages en appuyant
sur le bouton Mémoire et en le maintenant enfoncé pendant au moins 5 secondes. L’alarme sonore émet alors un
bip et la deuxième ligne de l'affichage indique MEMO .
appuyez sur le bouton , puis sur le bouton Départ/Pause . Le sèche-linge exécutera alors ce programme
Si vous le souhaitez, vous pouvez modifier le programme mémoire en sélectionnant un nouveau programme ou de
nouvelles options puis en appuyant de façon continue sur le bouton (comme indiqué ci-dessus).
La prochaine fois que vous aurez besoin de ce programme,
.
25
Page 26
Démarrage et Programmes
F
Programmes spéciaux
Programme de Repassage Facile
Le ‘Repassage Facile’ est un programme court de 10 minutes (8 minutes de chauffage suivies d’une période de
refroidissement de 2 minutes) qui ‘ébouriffe’ les fibres de vêtements qui ont été laissés dans la même position/le
même endroit pendant une durée de temps prolongée. Ce cycle relâche les fibres et les rend plus faciles à
repasser et à plier.
! ‘Repassage Facile’ n’est pas un programme de séchage et ne doit pas être utilisé pour des vêtements mouillés.
Pour des résultats impeccables:
1. Ne chargez pas plus que la capacité maximum. Les chiffres suivants font référence au poids sec:
Textile Charge maximum
Coton et cotons mélangés 2,5 kg
Synthétiques 2 kg
Jeans 2 kg
2. Videz le sèche-linge aussitôt le programme terminé, suspendez, pliez ou repassez les articles
et rangez-les dans l’armoire. Si cela n’est pas possible, répétez le programme.
L’effet ‘Repassage Facile’ varie d’un textile à l’autre. Il fonctionne bien sur les textiles traditionnels comme le Coton
ou les Cotons mélangés, et moins bien sur les fibres acryliques et sur les matériaux comme le Tencel®.
Programme Lainage
●
Il s’agit d’un programme pour faire tourner les vêtements tolérant le sèche-linge et marqués du symbole .
●
Le programme peut être utilisé pour des charges jusqu’à 1kg (environ 3 pull-overs).
●
Nous recommandons de retourner les vêtements avant de les sécher.
●
Ce programme mettra environ 60 minutes, mais peut prendre plus longtemps en fonction de la taille et de la
densité de la charge et de la vitesse d’essorage utilisée dans votre lave-linge.
●
Les charges séchées dans ce programme sont normalement prêtes à porter, mais pour certains vêtements
plus lourds, les bords peuvent être légèrement humides. Laissez sécher naturellement car un séchage
excessif pourrait les endommager.
! Au contraire des autres matières, le mécanisme du rétrécissement de la laine est irréversible ; c’est-à-dire qu’elle
ne reviendra pas à sa taille et à sa forme d’origine.
! Ce programme ne convient pas pour les vêtements acryliques.
Le cycle séchage laine de ce sèche-linge a été approuvé par la Woolmark pour le séchage en tambour d'articles
Woolmark étiquetés lavables en machine et séchage en tambour, sous réserve que ces articles soient séchés
conformément aux instructions mentionnées sur l'étiquette de l'article et celles indiquées par le fabricant de ce
sèche-linge (M0616).
Ce cycle séchage laine est le premier et le seul approuvé par "The Woolmark Company.
Options de modification des programmes
Séchage mixte
Disponible avec les programmes Coton Resitant et Synthétiques.
Utilisez cette option après avoir sélectionné le niveau de séchage Sec pour cintres ou Sec placard.
Vous serez alors alerté de l’avancement du niveau de séchage.
Lorsque le sèche-linge détecte que la charge a atteint le niveau de séchage Sec pour repassage, l’affichage
indique : PRÊT À REPASSER et l’alarme sonore retentit pendant 2 minutes. Ouvrez la porte et retirez les articles
que vous voulez repasser.
Ensuite, refermez la porte et appuyez sur le bouton Départ/Pause . Le programme reprend.
! Si vous n’ouvrez pas la porte pendant ces 2 minutes, le sèche-linge reprend le séchage sans que vous ayez
appuyé sur le bouton Départ/Pause.
Le programme Sec pour cintres continue ensuite et s’arrête avec FIN DE CYCLE. BAC PLEIN
Le programme Sec pour placard continue jusqu’à ce que le sèche-linge détecte que la charge a atteint le niveau
de séchage Sec pour cintres. L’affichage indique : PRÊT À SUSPENDRE et l’alarme sonore retentit pendant 2
minutes. Ouvrez la porte et retirez les articles que vous voulez suspendre sur des cintres pour terminer le séchage.
Ensuite, refermez la porte et appuyez sur le bouton Départ/Pause . Le programme reprend.
! Si vous n’ouvrez pas la porte pendant ces 2 minutes, le sèche-linge reprend le séchage sans que vous ayez
appuyé sur le bouton Départ/Pause.
Lorsque le niveau de séchage Sec pour placard est atteint, le sèche-linge effectue le refroidissement (et l’aprèstraitement si vous l’avez sélectionné) et s’arrête avec FIN DE CYCLE. BAC PLEIN
Charge mini
Disponible avec les programmes Coton Température Élevée et Synthétiques. S’utilise pour les charges entre 1 et 2 kg.
Ce programme optimise le Programme automatique pour les charges réduites et améliore l’estimation de Temps restant.
26
Page 27
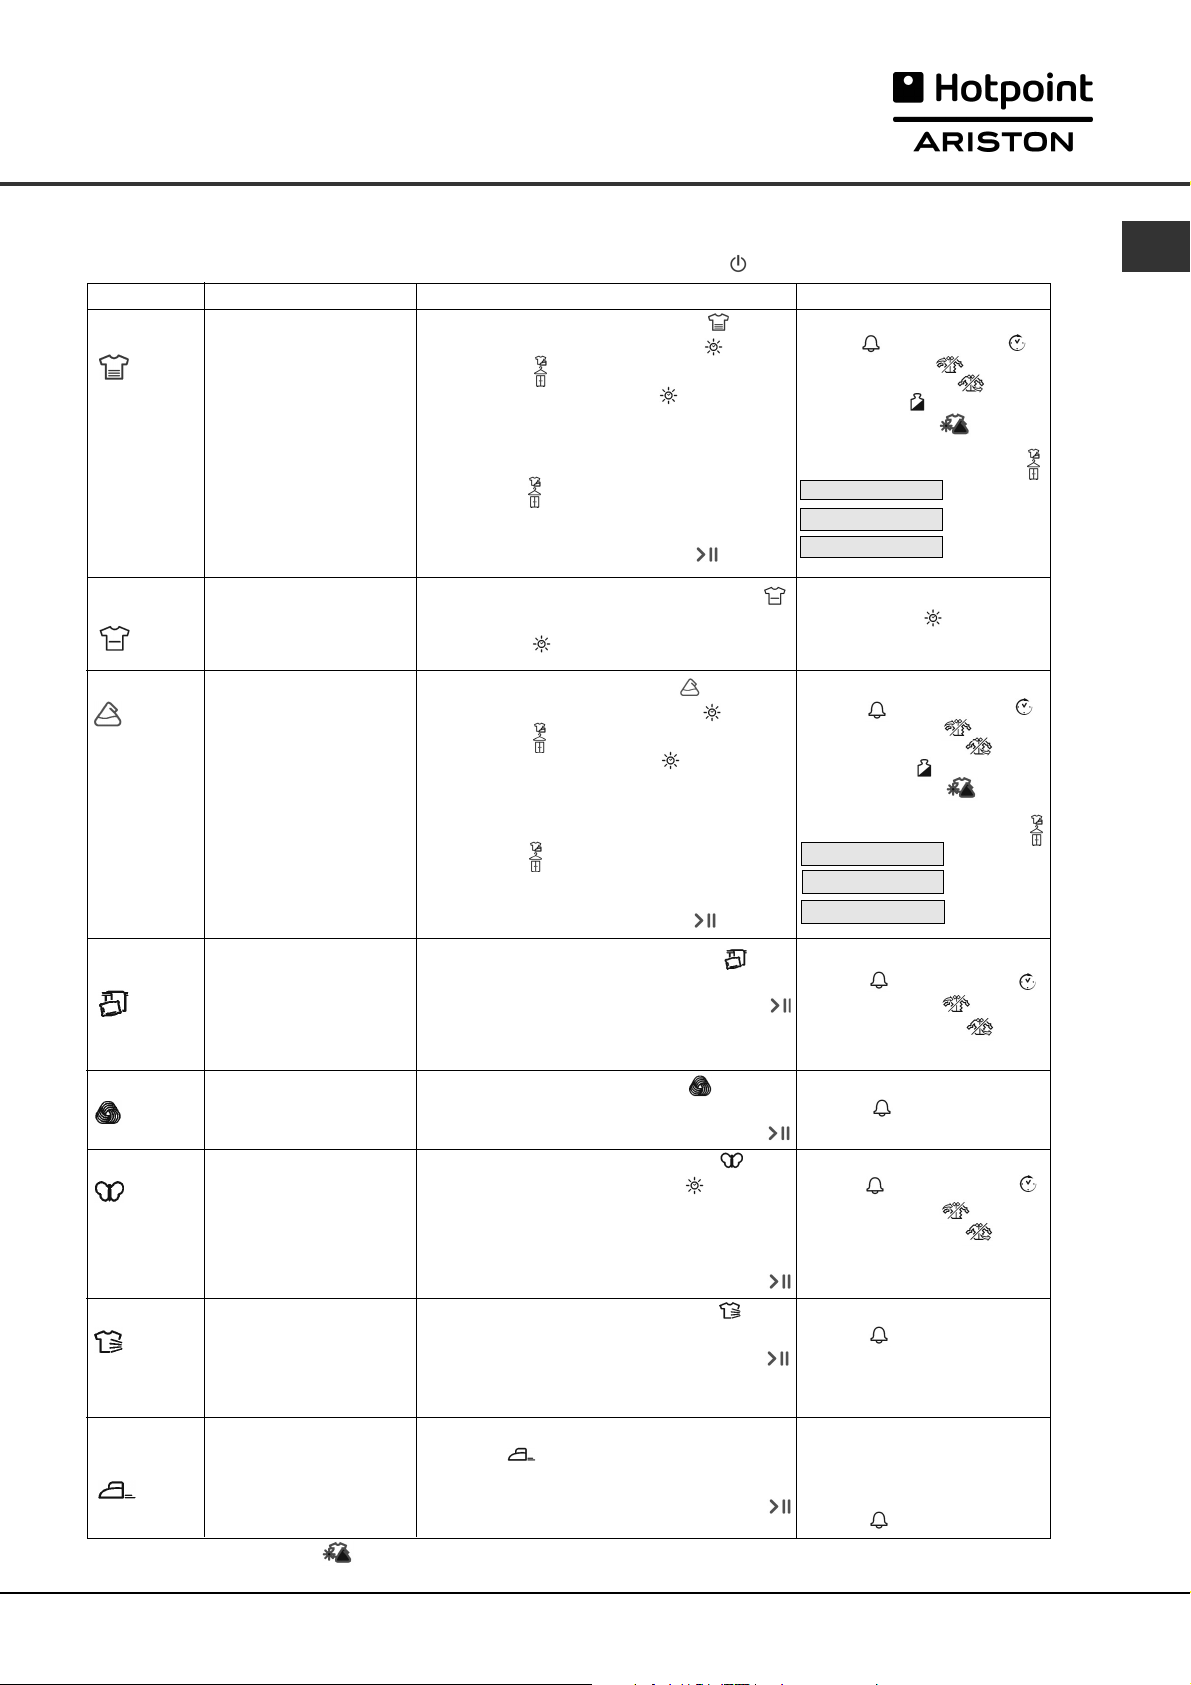
Démarrage et Programmes
Tableau des Programmes
! Si l’affichage n’est pas allumé ; appuyez sur le bouton MARCHE/ARRÊT et sélectionnez ensuite le programme.
Programme
Cotons
Resistant
Cotons
Delicat
Synthétiques
Ce qu’il fait... Comment le régler... Remarque:
Sèche vos vêtements
en coton sur
Température Élevée
Sèche vos vêtements
en Coton sur Basse
Température
Sèche vos vêtements
Synthétiques sur
Température Élevée
1. Appuyez sur le bouton Coton - Resistant
2. Sélectionnez l'option Durée de séchage ou
Automatique
- Pour l'option Durée de séchage , voir
‘Temporisé’, page suivante, ou...
- Pour sélectionner les paramètres de séchage
proposés par défaut, appuyez sur le bouton Intensité
de séchage et relâchez-le jusqu'à faire apparaître
l'intensité souhaitée.
3. Sélectionnez des Options, si nécessaire
4. Appuyez sur le bouton de Départ/Pause
1. Appuyez sur le bouton Coton – Delicat
2. Sélectionnez un temps de séchage,
Temporisé , page suivante.
1. Appuyez sur le bouton Synthétiques
2. Sélectionnez l'option Durée de séchage ou
Automatique
- Pour l'option Durée de séchage , voir
‘Temporisé’, page suivante, ou...
- Pour sélectionner les paramètres de séchage
proposés par défaut, appuyez sur le bouton Intensité
de séchage et relâchez-le jusqu'à faire apparaître
l'intensité souhaitée.
3. Sélectionnez des Options, si nécessaire
4. Appuyez sur le bouton de Départ/Pause
Options disponibles:
Alarme , Départ Différé
Pré-Defroissage
Après-Defroissage
Charge mini
*Séchage mixte
Options de Séchage:
A REPASSER
SUR CEINTRE
A RANGER
Options disponibles:
Voir
Voir Temporisé , page
suivante.
Options disponibles:
Alarme , Départ Différé
Pré-Defroissage
Après-Defroissage
Charge mini
*Séchage mixte
Options de Séchage:
A REPASSER
SUR CEINTRE
A RANGER
Automatique
: par défaut
Automatique
: par défaut
F
Lit et
Bain
Sèche vos draps et
serviettes sur le réglage
Température Élevée.
1. Appuyez sur le bouton Lit et Bain
2. Sélectionnez des Options, si nécessaire
Appuyez sur le bouton de Départ/Pause
3.
Options disponibles:
Alarme , Départ Différé
Pré-Defroissage
Après-Defroissage
●
Un programme Automatique
Lainage
Délicats
(par ex.
Acryliques)
Air Frais
Sèche vos vêtements
en Laine (voir la page
précédente).
Sèche vos vêtements
sur le réglage
Température Douce
prêts à être portés.
Programme de 20
minutes qui aère vos
vêtements avec de l’air
frais. Utilisez aussi pour
1. Appuyez sur le bouton Laine
2. Sélectionné l’option Alarme, si nécessaire
Appuyez sur le bouton de Départ/Pause
3.
1.
Appuyez sur le bouton Délicats
2. Si un programme Temporisé est requis
(voir Temporisé, page suivante). Sinon
l’option par défaut est Automatique
3. Sélectionnez des Options, si nécessaire
Appuyez sur le bouton de Départ/Pause
4.
1. Appuyez sur le bouton Air Frais
Sélectionné l’option Alarme, si nécessaire
2.
Appuyez sur le bouton de Départ/Pause
3.
Options disponibles:
Alarme
●
Un programme Automatique
Options disponibles:
Alarme , Départ Différé
Pré-Defroissage
Après-Defroissage
●
défaut est Automatique
Options disponibles:
Alarme
refroidir les vêtements
chauds.
Repassage
Facile
Programme court (10
minutes environ) qui
adoucit les fibres des
vêtements qui sont
prêts à être repassés.
1. Appuyez sur le bouton Repassage
Facile
Sélectionné l’option Alarme, si nécessaire
2.
Appuyez sur le bouton de Départ/Pause
3.
! Ceci n’est pas un programme
de séchage (voir la page
précédente).
Options disponibles:
Alarme
Remarque: *Charge mixte n’est disponible qu’avec Sec pour repassage et Sec pour cintres (voir Modificateurs
d’option des programmes).
27
Page 28

Démarrage et Programmes
Tableau des programmes minutés
F
Sélectionnez d’abord un programme (voir le
Séchage
Minuté
Utilisez toujours le
Séchage Temporisé pour
les charges inférieures à 1
kg, ou si vous préférez un
(
0:20, 0:40,
1:00, 1:20,
1:40, 2:00
ou 2:20
Heures:
Minutes)
résultat de séchage
différent.
Le réglage de température
dépend de l’option de
tissus sélectionnée.
Tableau des Programmes
1. Appuyez et relâchez le bouton Temporisé jusqu’à ce
que l’affichage indique la sélection requise. Chaque
pression avance d’un cran , , , ,
, , puis et se répète.
●
Les Délicats ont un temps maximum de .
●
Quand est affichée, l’option Automatique
est disponible si vous changez d’avis.
2. Sélectionnez des Options, si nécessaire
3. Appuyez sur le bouton de Départ/Pause .
Les commandes
! Attention, après avoir appuyé sur le bouton Départ/Pause
le programme ne peut pas être changé.
Pour modifier un programme sélectionné, appuyez sur le
bouton Départ/Pause .
indiquer que le programme e
Le témoin clignote en orange pour
st suspendu. Sélectionnez le
nouveau programme et les éventuelles options nécessaires. Le
témoin clignote alors en vert. Appuyez une nouvelle fois sur
le bouton Départ/Pause
démarre
●
.
Boutons OPTIONS
. Le nouveau programme
Ces boutons sont utilisés pour adapter le programme sélectionné
à vos besoins. Il faut sélectionner un programme en appuyant
sur un bouton de sélection de programme avant de pouvoir
sélectionner une option. Les options ne sont pas toutes
disponibles pour tous les programmes (voir Démarrage et
Programmes).Si une option n’est pas disponible et si vous
appuyez sur le bouton, l’avertisseur émet un bip sonore trois
fois. Si l’option est disponible, le témoin situé sur l’afficheur à
côté des boutons du bas s’allume pour indiquer que l’option
a été sélectionnée.
Départ Différé
Le départ de certains programmes (voir Affichage et voir
Démarrage et Programmes) peut être retardé d’un délai
pouvant aller jusqu’à 24heures. Assurez-vous que le réservoir
d’eau est vidé avant de régler le départ différé.
Pré-Defroissage
Cette option n’est disponible que si un départ retardé a été
sélectionné. Elle culbute les vêtements de temps à autre durant
la période de délai pour aider à éviter qu’ils ne se froissent.
Alarme
Option disponible sur tous les programmes, et permet à
l’indicateur sonore de retentir à la fin du cycle de séchage, pour
vous rappeler que les vêtements peuvent être retirés de la
machine.
Après-Defroissage
Lorsque cette option est disponible, et qu’elle est sélectionnée,
les vêtements sont basculés de temps à autre une fois les
cycles de séchage et de refroidissement achevés, pour aider
à éviter que les vêtements ne se froissent au cas où vous
ne pourriez pas les retirer de la machine immédiatement en
fin de programme.
●
AFFICHAGE DU TEMPS
L’affichage indique soit le temps restant pour les
programmes différés, ou bien la quantité de temps restant
pour un programme de séchage (voir Affichage).
Le retard ou le temps restant sont affichés en heures et en
minutes et décomptés minute par minute.
Lorsque les programmes minutés sont sélectionnés, le
temps affiché durant tout le cycle est le temps réel restant.
88:88
Quand on sélectionne un programme automatique, le temps
affiché est une évaluation du temps restant.
Lorsque le programme est sélectionné, l’afficheur indique le
temps requis pour sécher une charge totale, et après
environ 10 minutes, le contrôleur calcule une meilleure
estimation du temps de cycle.
Les deux points entre les heures et les minutes clignotent
pour indiquer que le temps est décompté.
L’affichage indique aussi si votre sèche-linge présente un
problème ; si c’est le cas, l’affichage indique F suivi d’un
numéro de code d’erreur (voir Que faire en cas de panne).
●
(Si vous avez raccordé votre sèche-linge à une vidange, ne
tenez pas compte de cette icône, car il n’est pas nécessaire
de vider le réservoir d’eau).
Ce message s’affiche pour vous rappeler de vider le
réservoir d’eau.
Si le réservoir d’eau se remplit pendant un programme, le
chauffage s’éteint et le sèche-linge entre dans une période
de Refroidissement. Ensuite, il s’arrête et un message vous
indique BAC PLEIN .
Vous devez vider le réservoir d’eau puis redémarrer le sèchelinge sinon le linge ne sèchera pas. Après le redémarrage
du sèche-linge le message prend quelque secondes avant
de s’effacer.
Pour éviter cela, videz le réservoir d’eau à chaque fois que
vous utilisez le sèche-linge (voir Entretien).
●
Le fait d’ouvrir la porte durant un programme arrête le
sèche-linge et a les effets suivants :
●
En cas de coupure de courant, éteignez l’appareil ou
débranchez-le. Une fois le courant rétabli, appuyez sur le
bouton Départ/Pause et le programme reprendra.
).
Options disponibles:
Alarme , Départ Différé
Pré-Defroissage
Après-Defroissage
Consultez les temps de séchage
suggérés (voir Linge).
Les 10 dernières minutes de ces
programmes correspondent à la
Phase de Refroidissement .
Vider le réservoir d’eau
Ouverture de la Porte
●
L’afficheur indique PAUSE .
●
Durant une phase de délai, celui-ci continue à être
décompté. Le bouton de Départ/Pause doit être appuyé
pour reprendre le programme concerné.
L’affichage change et indique l’état actuel de la machine.
●
Durant la phase de séchage du programme, les deuxpoints de l’afficheur s’arrêtent de clignoter pour montrer
que le compte à rebours est arrêté
.
Le bouton de Départ/Pause doit être appuyé pour
reprendre le programme
. L’affichage change et indique
l’état actuel de la machine, les deux-points clignotent et
le compte à rebours reprend.
●
Pendant la phase d’Après-Defroissage, le programme
se termine.
Le fait d’appuyer sur le bouton de Départ/Pause
redémarre un nouveau programme depuis le début.
Remarque
28
Page 29

Linge
Trier votre linge
●
Vérifiez les symboles sur les étiquettes des vêtements
pour vous assurer que les articles peuvent être
passés au sèche-linge.
●
Triez votre linge par type de textile.
●
Videz les poches et vérifiez les boutons.
●
Fermez les fermetures Éclair et les crochets et
attachez les ceintures et les cordons.
●
Essorez chaque article de manière à éliminer
autant d’eau que possible.
! Ne chargez pas de vêtements mouillés qui
dégouttent dans le sèche-linge.
Taille maximale de la charge
Ne chargez pas plus que la capacité maximale.
Les chiffres suivants font référence au poids sec :
Fibres naturelles : 7.5 kg max.
Fibres synthétiques : 3 kg max
! NE surchargez PAS le sèche-linge car cela pourrait
réduire ses performances de séchage.
Charge typique
Remarque: 1kg = 1000g
Vêtements
Chemisier en coton 150 g
Autre 100 g
Robe en coton 500 g
Autre 350 g
Jeans 700 g
10 couches lavables 1000 g
Chemise en coton 300 g
Autre 200 g
T-Shirt 125 g
Étiquettes d’Entretien
Regardez les étiquettes sur vos vêtements, en
particulier lorsque vous les séchez pour la première
fois au sèche-linge. Les symboles suivants sont les
plus courants:
Séchage en machine
Pas de séchage en machine
Séchage à température normale
Séchage à basse température
Articles ne convenant pas au séchage en machine
• Les article qui contiennent du caoutchouc ou des
matériaux similaires au caoutchouc ou ceux qui
contiennent un film plastique (oreillers, coussins, ou
vêtements de pluie en PVC), tous autres articles ou
objets inflammables ou contenant des substances
inflammables (serviettes éponge imprégnées de
laque à cheveux).
• Fibres de verre (certain types de tentures)
• Articles qui ont été nettoyés à sec
• Articles portant le Code ITCL (voir Vêtements
spéciaux). Ces derniers peuvent être nettoyés avec
des produits spéciaux de nettoyage à sec à
domicile. Suivez attentivement le mode d’emploi.
• Les gros articles volumineux (couettes, sacs de
couchage, oreillers, coussins, grands dessus de lits
etc.). Ceux-ci augmentent de volume lorsqu’ils
sèchent et cela empêcherait l’air de circuler à
travers le sèche-linge.
F
Linge de maison
Housse de couette en coton 1500 g
(Double) Autre 1000 g
Grande nappe 700 g
Petite nappe 250 g
Torchon 100 g
Drap de bainl 700 g
Serviette éponge 350 g
Draps doubles 500 g
Draps 1 personne 350 g
À la fin d’un cycle de séchage, il se peut que les cotons
soient toujours humides si vous les avez regroupés
avec les synthétiques. Si cela se produit, faites-leur
simplement subir une petite période de séchage
supplémentaire.
●
Remarque: les 10 dernières minutes de n’importe
quelle durée programmée correspondent au séchage
à froid. Vous devez donc en tenir compte en
programmant la durée de séchage, car votre linge
ne séchera pas pendant ce laps de temps.
29
Page 30

Linge
F
Coton
Température
Élevée
Synthétiques
Température
Élevée
Délicats
(Acrylics)
Basse
température
Vêtements spéciaux
Les Couvertures et Dessus de lits : articles en
acrylique (Acilan, Courtelle, Orion, Dralon) doivent
être séchés avec des précautions particulières, à
BASSE température. Évitez de les sécher pendant
une durée prolongée.
Vêtements plissés ou froissés : lisez les instructions
de séchage du fabricant figurant sur le vêtement.
Articles amidonnés : ne séchez pas ces derniers
avec des articles non amidonnés. Faites en sorte de
retirer autant de solution d’amidonnage que possible
de la charge avant de placer celle-ci dans le sèchelinge. Ne séchez pas de façon excessive : l’amidon
pourrait devenir poudreux et laisser vos vêtements
sans tenue, ce qui irait à l’encontre du but recherché.
Temps de séchage
Ces temps sont approximatifs et peuvent varier en
fonction des paramètres suivants :
• La quantité d’eau retenue dans les vêtements
après le cycle d’essorage : les serviettes éponge
et les textiles délicats retiennent une quantité
importante d’eau.
• Les textiles : des articles qui sont constitué par le
même type de textile mais qui ont des textures et
des épaisseurs différentes peuvent ne pas avoir le
même temps de séchage.
• La quantité de linge : les articles uniques ou les petites
charges peuvent prendre plus longtemps à sécher.
1 kg
Durée Automatique
Minutes Automatiques
SéchageTemporisé
0:30 - 0:50
30 - 50
0:20 ou 0:40 ou 1:00
Temps de séchage après 800-1000trs/mn dans la machine à laver
Durée Automatique
Minutes Automatiques
SéchageTemporisé
0:30 - 0:40
30 - 40
0:40
Temps de séchage après essorage réduit dans la machine à laver
Durée Automatique
Minutes Automatiques
SéchageTemporisé
Temps de séchage après essorage réduit dans la machine à laver
1:00
1 kg
ou 1:00
0:40
2 kg
0:40 - 0:55
50 - 70
ou 1:20
Demi-charge
1 kg
0:40 - 1:20
40 - 80
ou 1:00 ou 1:20
Demi-charge
3 kg
0:55 - 1:10
70 - 80
1:20
• La sécheresse : Si vous avez l’intention de repasser
certains de vos vêtements, vous pouvez les sortir de
la machine alors qu’ils sont encore un peu humides.
Les autres vêtements peuvent y rester plus longtemps
si vous voulez qu’ils en sortent entièrement secs.
• Le réglage de la température.
• La température ambiante : si la pièce dans laquelle
le sèche-linge est installé est froide, cela prendra plus
longtemps à l’appareil pour sécher vos vêtements.
• Le volume : certains articles volumineux peuvent
être séchés en machine avec quelques
précautions. Nous vous suggérons de retirer
plusieurs fois ces articles de la machine, de les
secouer et de les remettre dans le sèche-linge
jusqu’à ce que celui-ci ait terminé de les sécher.
! Ne séchez pas excessivement vos vêtements.
Tous les issus contiennent une certaine quantité
d’humidité naturelle, ce qui les rend doux et gonflants.
Le tableau (voir ci-dessous) présente les temps de
séchage APPROXIMATIFS en heures : minutes. Comme
on peut les voir sur l’affichage les temps sont également
indiqués en Minutes uniquement pour référence.
Les temps indiqués sont pour les programmes
automatiques de Séchage Armoire.
Les réglages de Séchage Temporisé sont
également indiqués, pour vous aider à choisir
l’option appropriée.
Les poids font référence aux vêtements secs.
Charge
complète
4 kg
1:10 - 1:20
80 - 100
ou 1:40
1:20
Demi-charge
0:40 - 0:50
40 - 50
0:40
2 kg
ou 1:00
5 kg
1:20 - 1:30
100 - 120
1:40
ou 2:00
6 kg
1:40 - 2:20
120 - 140
2:00
ou 2:20
Charge complète
7 kg
2:20 - 2:30
140 - 150
2:20
Charge complète
3 kg
1:10 - 1:30
50 - 70
ou 1:00 ou 1:20
0:50
7.5 kg
2:30 - 2:40
150 - 160
2:20
2 kg
1:20 - 2:20
80 - 140
ou 1:40 ou 2:00 ou 2:20
1:20
30
Page 31

Avertissements et
Suggestions
! Cet appareil a été conçu et construit conformément à
des normes de sécurité internationales.
Ces avertissements sont donnés pour des raisons de
sécurité et doivent être suivis attentivement.
Sécurité Générale
●
Ce sèche-linge n’est pas destiné à être utilisé par des
personnes (notamment des enfants) présentant des
capacités physiques, motrices ou mentales réduites, ou
manquant d’expérience et de connaissances, sans la
surveillance d'une personne responsable de leur sécurité
ou sans instructions concernant l’utilisation de l’appareil.
●
Ce sèche-linge a été conçu pour un usage domestique,
et non professionnel.
●
Ne touchez pas cet appareil lorsque vous êtes pieds nus
ou avec des mains ou des pieds humides.
●
Débranchez cette machine en tirant sur la fiche et non
sur le cordon.
●
Les enfants ne doivent pas se trouver à proximité du
sèche-linge lorsque celui-ci est en marche.
Après avoir utilisé ce sèche-linge, éteignez-le et
débranchez-le. Tenez la porte fermée pour assurer que
les enfants ne jouent pas avec.
●
Surveillez les enfants de façon à ne pas les laisser jouer
avec le sèche-linge.
●
Cet appareil doit être installé correctement et avoir une
ventilation convenable. L’arrivée d’air sur le devant du
sèche-linge et l’évent derrière le sèche-linge ne doivent
jamais être obstrués (voir Installation).
●
N’utilisez jamais le sèche-linge sur de la moquette où la
hauteur des poils empêcherait l’air d’entrer dans la
sèche-linge à partir de la base.
●
Vérifiez que le sèche-linge est bien vide avant de le charger.
●
●
●
●
●
●
●
●
●
●
●
●
L’arrière du sèche-linge peut devenir très chaud.
Ne le touchez jamais en cours d’utilisation.
N’utilisez pas le sèche-linge si le filtre, le réservoir d’eau
et le condenseur ne sont pas bien en place (voir Entretien).
N’utilisez pas de liquide assouplissant pour le linge dans le
sèche-linge ; ajoutez-le au rinçage final de votre lavage.
Ne surchargez pas le sèche-linge (voir Linge pour les
charges maximales).
Ne chargez pas d’articles qui dégouttent d’eau.
Ne séchez que des articles qui ont été lavés avec de
l’eau et un détergent, rincés et essorés. Le fait de sécher
des articles qui N’ONT PAS été lavés avec de l’eau
constitue un danger d’incendie.
Vérifiez avec soin toutes les instructions sur les étiquettes
des vêtements (voir Linge).
Ne séchez pas des vêtements qui ont été traités avec
des produits chimiques.
Ne séchez jamais des articles qui ont été contaminés
avec des substances inflammables (huiles de cuisson,
acétone, alcool, essence, kérosène, détachants, essence
de thérébenthine, cires, solvants pour cire et laque à
cheveux) sans les avoir lavé dans l’eau chaude avec une
dose supplémentaire de lessive.
Ne séchez pas de caoutchouc sec, d’articles ou
vêtements doublés de caoutchouc, d’oreillers garnis de
coupeaux de caoutchouc mousse, de mousse (mousse
de latex), de caoutchouc, de plastique, des bonnets de
douche, des textiles imperméables, des couches-culottes
ou doublures pour couches lavables, du polyéthylène ou
du papier.
Ne séchez pas d’articles de grande taille, très volumineux.
Ne séchez pas de fibres acryliques à hautes températures.
●
Videz les poches de tous les objets qu’elles contiennent,
notamment les briquets (risque d’explosion).
●
Terminez chaque programme avec sa Phase de
Refroidissement.
●
N’éteignez pas le sèche-linge s’il contient encore des
articles chauds.
●
Nettoyez le filtre après chaque utilisation (voir Entretien).
●
Videz le réservoir d’eau après chaque utilisation (voir
Entretien).
●
Nettoyez le groupe condenseur à intervalles réguliers
(voir Entretien).
●
Ne laissez pas s’accumuler de peluches autour du
sèche-linge.
●
Ne montez jamais sur le sèche-linge. Cela pourrait
l’endommager.
●
Respectez toujours les normes et exigences électriques
(voir Installation).
●
Achetez toujours des pièces de rechange et
accessoires d’origine (voir Service Après-vente).
! AVERTISSEMENT : N’arrêtez pas le sèche-linge avant la fin
du cycle de séchage si vous n’avez pas la possibilité de
retirer rapidement tous les articles et de les étendre pour
évacuer la chaleur.
Information recyclage et enlèvement
de nos produits
Dans le cadre de notre engagement envers la protection de
l’environnement, nous nous réservons le droit d’utiliser des
pièces recyclées de qualité afin de réduire les coûts pour notre
clientèle et de limiter les gaspillages de matières premières.
●
Élimination du matériau d’emballage: respectez les
réglementations locales, de manière à ce que ’emballage
puisse être recyclé.
●
Pour éviter que des enfants se blessent, ôtez la porte et la
prise et puis coupez le câble secteur au ras de l’appareil.
Jetez ces pièces séparément de sorte que l’appareil ne
puisse plus être branché sur une prise de secteur.
Enlèvement des appareils ménagers usagés
La Directive Européenne 2002/96/EC sur les Déchets des
Equipements Electriques et Electroniques (DEEE), exige que
les appareils ménagers usagés ne soient pas jetés dans le
flux normal des déchets municipaux. Les appareils usagés
doivent être collectés séparément afin d’optimiser le taux de
récupération et le recyclage des matériaux qui les composent
et réduire l’impact sur la santé humaine et l’environnement.
Le symbole de la ‘‘poubelle barrée’’ est apposée sur
tous les produits pour rappeler les obligations de
collecte séparée.
Les consommateurs devront contacter les autorités locales
ou leur revendeur concernant la démarche à suivre pour
l’enlèvement de leur vieil appareil.
Économiser de l’énergie et respecter
l’environnement
●
Essorez les articles pour éliminer l’eau en excès avant de
les passer au sèche-linge (si vous utilisez une machine
à laver, sélectionnez un cycle d’essorage à grande
vitesse). Ceci vous permettra d’économiser du temps et
de l’énergie durant le séchage.
●
Séchez toujours des charges complètes – vous
économiserez de l’énergie : les articles uniques ou les
petites charges prennent plus longtemps à sécher.
●
Nettoyez le filtre après chaque utilisation pour limiter les
coûts de consommation d’énergie (voir Entretien).
F
31
Page 32

Entretien et Nettoyage
F
Éteignez l’électricité
! Débranchez votre sèche-linge lorsque vous ne
l’utilisez pas, lorsque vous le nettoyez et durant toutes
les opérations d’entretien.
Nettoyez le filtre après chaque cycle
Le filtre est une pièce importante de votre sèche-linge:
il accumule des peluches qui se forment durant le
séchage. Des petits objets peuvent aussi être piégés
dans le filtre. Par conséquent, une fois le séchage
terminé, nettoyez le filtre en le rinçant sous l’eau
courante ou avec votre aspirateur. Si le filtre devient
bloqué, le flux d’air à l’intérieur du sèche-linge est
sérieusement compromis : les temps de séchage sont
allongés et vous consommez davantage d’énergie.
Cela peut aussi endommager votre sèche-linge.
Le filtre se trouve devant la garniture du sèche-linge
(voir le diagramme).
Pour retirer le filtre :
1. Tirez la poignée en plastique du filtre vers le haut
(voir le diagramme).
2. Nettoyez le filtre et remettez-le correctement en
place. Assurez-vous que le filtre soit bien inséré à
fond dans la garniture du sèche-linge.
! N’utilisez pas le sèche-linge sans avoir remis le filtre
en place.
Nettoyage du tambour
! Pour nettoyer le tambour, ne pas utiliser d’abrasifs,
de laine d’acier ni de produits de nettoyage pour
acier inoxydable.
Un film coloré peut parfois apparaître à la surface du
tambour en acier inoxydable. Il peut être dû à une
combinaison de l’eau et/ou des produits de nettoyage
(ex. adoucissant textile provenant du lavage). Ce film
coloré n’affecte pas la performance du sèche-linge.
Nettoyage du groupe condenseur
Périodiquement (chaque mois) retirez le groupe
condenseur et nettoyez toute accumulation de
peluche entre les plaques en le rinçant sous le robinet
à l’eau froide. Ceci devrait être effectué avec l’eau
froide de l’arrière du condenseur.
Pour retirer du groupe condenseur :
1. Débranchez le sèche-linge et ouvrezz la porte.
2. Tirez sur le couvercle du condenseur pour l’ouvrir
(voir schéma). Dégagez les trois loquets en tournant à
90° dans le sens anti-horaire puis tirez sur la
poignée et retirez-le du sèche-linge.
3. Nettoyez la surface des joints d’étanchéité et
replacez-les, en vous assurant que les loquets ont
été bien bloqués.
Nettoyage
Videz le réservoir d’eau après chaque
cycle
Faites sortir le réservoir du sèche-linge et videz-le
dans un évier ou autre évacuation appropriée.
Remettez le réservoir d’eau bien en place.
Toujours vérifier et vider le récipient avant de
commencer un nouveau programme de séchage.
Vérifiez le tambour après chaque cycle
Tournez le tambour à la main afin de retirer les petits
articles (mouchoirs) qui pourraient y avoir été oubliés.
Filtre
Réservoir d’eau
Groupe condenseur
Couvercle de condenseur
Loquets
Poignée
●
Les parties externes en métal ou en plastique et les
pièces en caoutchouc peuvent être nettoyées avec
un chiffon humide.
●
Périodiquement (tous les 6 mois), aspirez la grille
d’entrée d’air de devant, ainsi que les évents à l’arrière
du sèche-linge pour retirer toute accumulation de
peluche ou poussière. En outre, pour retirer
l’accumulation de peluche de l’avant du condenseur
et de la zone du filtre, nettoyez occasionnellement
avec un aspirateur.
! N’utilisez pas de solvants ou d’abrasifs.
! Votre sèche-linge utilise des roulements spéciaux qui
n’ont pas besoin d’être lubrifiés.
! Faites vérifier régulièrement votre sèche-linge par
des techniciens agréés pour assurer une sécurité
électrique et mécanique (voir Service d’Entretien).
Robinet
Groupe condenseur
Grille d’entrée d’air
l’arrière
avant
32
Page 33

Que faire en cas de panne
Votre sèche-linge semble ne pas fonctionner. Avant d’appeler votre Centre de Service d’Entretien (voir Service
d’Entretien), passez en revue les suggestions de dépannage suivantes :
Problème :
Le sèche-linge ne démarre
pas.
Causes possibles / Solution :
●
La fiche n’est pas branchée dans la prise de courant, ou ne fait pas contact.
●
Il y a eu une coupure de courant.
●
Le fusible a sauté. Essayez de brancher un autre appareil dans la prise
électrique.
●
Utilisez-vous une rallonge ? Essayez de brancher le cordon d’alimentation
du sèche-linge directement dans la prise.
●
La porte n’est pas bien fermée ?
●
Le PROGRAMME n’a pas été réglé convenablement (voir Démarrage et
Programmes).
●
Le bouton Départ/Pause n’est pas enfoncé (voir Démarrage et Programmes).
Le cycle de séchage ne
démarre pas.
L’appareil met longtemps à
sécher.
●
Vous avez réglé l’appareil sur un temps de délai (voir Démarrage et
Programmes).
●
Le filtre n’a pas été nettoyé (voir Entretien).
●
Le réservoir d’eau a-t-il besoin d’être vidé ? Le message ‘vider l’eau’ est-il
affiché ? (voir Entretien).
●
Le condenseur a-t-il besoin d’être nettoyé ? (voir Entretien).
●
La température choisie n’est pas idéale pour le type de textile que vous
séchez (voir Démarrage et Programmes, et voir Linge).
●
La durée de séchage correcte n’a pas été sélectionnée pour la charge
(voir Linge).
●
La grille d’entrée d’air ou les entrées d’air à l’arrière sont obstruées (voir
Installation, et voir Entretien).
●
Le linge était trop mouillé (voir Linge).
●
Le sèche-linge était surchargé (voir Linge).
F
Le message ‘vider l’eau’ est
affiché mais le séchoir n’a
fonctionné que pendant une
courte période.
Le message ‘vider l’eau’ est
affiché et le récipient d’eau
n’est pas plein.
Le programme se termine et le
linge est plus humide que la
normale
L’affichage indique un
disfonctionnement code F
suivi de un ou deux chiffres.
L’affichage indique brièvement
DEMO ON toutes les 6
secondes.
●
Le récipient d’eau n’a probablement pas été vidé au début du
programme. Ne pas attendre le signal de vidage d’eau, toujours vérifier
et vider le récipient avant de commencer un nouveau programme de
séchage (voir Entretien).
●
C’est normal, le message : FIN DE CYCLE, BAC PLEIN
s’affiche à titre de rappel de la nécessité de vider le récipient (voir
Affichage et voir Démarrage et Programmes).
! par mesure de sécurité, le sèche-linge a un temps maximum de
programme de 3 heures. Si le programme automatique n’a pas détecté
l’humidité finale requise dans le temps prévu, le sèche-linge terminera le
programme et s’arrêtera. Vérifiez les points ci-dessus et lancez le
programme à nouveau, si le linge est encore humide, contactez le Centre
de service après-vente (voir Service Après-vente).
●
Si l'écran affiche un code F10 ou F15:
- éteignez le sèche-linge et débranchez la prise électrique.
Nettoyez le filtre et le condenseur (voir Entretien). Rebranchez la
prise électrique, mettez le sèche-linge en marche puis lancez un
autre programme. Si un code F10 ou F15 s'affiche toujours,
contactez le service après-vente (voir Service Après- vente).
●
Si un autre code s’affiche : Notez le code et contactez le service
après-vente (voir Service Après- vente).
●
Le sèche-linge est en mode ‘Démo’. Appuyez sur les boutons
Marche/Arrêt et Départ/Pause simultanément et maintenez-les enfoncés
pendant 3 secondes. L’affichage indique DEMO OFF pendant 3 secon
des puis le sèche-linge repasse en fonctionnement normal.
33
Page 34

Service Après-Vente
F
Avant d’appeler le Centre de Service
Après-Vente :
Pièces de Rechange
Ce sèche-linge est une machine complexe. Le réparer
●
Utilisez le guide de dépannage pour voir si vous
pouvez résoudre le problème vous-même (voir Que
faire en cas de panne).
●
Si non, éteignez le sèche-linge et appelez le Centre
de Service Après-Vente le plus proche.
vous-même ou essayer de le faire réparer par une
personne non agréée pourrait entraîner des
dommages corporels pour une ou plusieurs
personnes, cela pourrait endommager la machine et
cela pourrait rendre invalide la garantie des pièces de
rechange.
Appelez un technicien agréé si vous avez des
problèmes lors de l’utilisation de ce sèche-linge.
Les pièces de rechange ont été conçues
Quelles informations donner au Centre de Service
Après-Vente :
●
Vos nom, adresse et code postal.
●
Votre numéro de téléphone.
●
Le type de problème.
●
La date d’achat.
●
Le modèle de l’appareil (Mod.).
●
Le numéro de série (S/N).
exclusivement pour cet appareil et pour aucune autre
utilisation.
Vous trouverez ces informations sur la fiche
signalétique située à l’intérieur de la porte de la
machine.
Programmes Comparatifs
●
Programmes recommandés pour effectuer des essais comparatifs selon la norme EN61121
Programme Programme à sélectionner Charge Options de Séchage
(EN61121)
Sec Cotons COTON RESITANT 7.5 kg SUR CEINTRE
Sec pour repassage Cotons COTON RESITANT 7.5 kg A REPASSER
Délicats SYNTHETIQUE 3 kg A RANGER
! Note : cette liste d'options de programme n'est pas exhaustive (voir Démarrage et Programmes).
34
Cet appareil est conforme aux Directives Européennes suivantes:
- 2006/95/EC (Équipement Basse Tension)
- 89/336/EEC, 92/31/EEC et 93/68/EEC (Compatibilité Électromagnétique)
Page 35

Folleto de instrucciones
SECADORA
GB
English, 1
P
Português, 52
F
Français, 18
NL
Nederlands, 69
E
Español, 35
TCD851B
Cuando encienda la secadora por
primera vez podrá elegir el idioma
que prefiere. Ver página 40
Índice de materias
Información Importante, 36-37
Instalación, 38
Dónde instalar la secadora
Ventilación
Conexiones eléctrica
Antes de empezar a utilizar la secadora
Descripción de la secadora, 39
Para abrir la puerta
Características
El panel de control
La pantalla, 40-42
Comienzo y programas, 42-45
Seleccionar un programa
Programas especiales
Modificadores de las opciones del programa
Tabla de programas
Controles
La colada, 46-47
Clasificar la colada
Etiquetas de recomendaciones durante el lavado de la ropa
Prendas especiales
Tiempos de secado
E
Advertencias y recomendaciones, 48
Seguridad general
Disposición
Ahorro energético y respeto del medio ambiente
Mantenimiento y cuidados, 49
Desconectar la electricidad
Limpiar el filtro después de cada ciclo
Vaciar el recipiente de agua después de cada ciclo
Comprobar el tambor después de cada ciclo
Limpiar la unidad del condensador
Limpiar la secadora
Resolución de problemas, 50
Servicio, 51
Piezas de repuesto
¡Guarde este manual de instrucciones a mano a fin de consultarlo cuando sea necesario. Llévelo con usted
cuando se traslade, y, si vendiera este electrodoméstico o si lo pasa a terceros compruebe que este manual se
incluya con la secadora de forma que el nuevo propietario quede informado acerca de las advertencias y
recomendaciones, además del funcionamiento de la secadora.
¡Lea estas instrucciones detenidamente; las páginas que aparecen a continuación contienen información
importante sobre la instalación, además de recomendaciones sobre el funcionamiento del electrodoméstico.
35
Page 36

Información Importante
P
E
ara que la secadora por condensación funcione de forma eficaz, debe seguirse el plan de mantenimiento
regular siguiente:
Filtro
! DEBE limpiar el filtro de pelusas después de CADA
ciclo de secado.
PASO 1.
Abra la puerta de la
secadora.
! No limpiar el filtro después de CADA ciclo de secado afectará a la capacidad de secado de la máquina.
- Tardará más tiempo en secar la ropa y, como consecuencia, usará más electricidad durante el secado.
PASO 2.
Tire del filtro para sacarlo
(usando las sujeciones
para los dedos).
PASO 3.
Limpie toda acumulación
de pelusas de la rejilla
del filtro.
PASO 4.
Vuelva a colocar el filtro.
NUNCA ponga en marcha
la secadora si el filtro no
está en su sitio.
Recipiente de agua...
! DEBE vaciar el recipiente del agua después de
CADA ciclo de secado.
PASO 1.
Tire del recipiente del agua
para sacarlo completamente
de la secadora.
PASO 2.
Vacíe toda el agua
acumulada en el
recipiente.
PASO 3.
Vuelva a colocar el
recipiente, asegurándose
de que queda bien
encajado en su sitio.
! Aparece el mensaje
‘VACIAR EL RECIPIENTE
DEL AGUA’, para recordarle
que debe vaciar el recipiente
de agua al principio y al
final del programa.
! No vaciar el recipiente del agua puede ocasionar:
- que la máquina deje de calentar (por lo que la carga podría seguir húmeda al final del ciclo de secado).
- El mensaje ‘VACIAR EL RECIPIENTE DEL AGUA’ le indica que el depósito está lleno.
Cebado del sistema de recogida de agua
Cuando la secadora es nueva, el recipiente del agua no recogerá agua hasta que el sistema esté cebado. Esto
llevará 1 o 2 ciclos de secado. Una vez cebado recogerá agua durante todos los ciclos de secado.
36
Page 37

Información Importante
Unidad del condensador...
! DEBE limpiar la acumulación de pelusas del
condensador CADA MES.
PASO 1.
Abra la cubierta del
condensador
- Tire del mango hacia
usted.
PASO 2.
Saque el condensador
girando los tres pestillos y
tirando del condensador.
(Es probable que haya
algo de agua en las
tuberías; esto es normal).
PASO 3.
Limpie el condensador
con agua desde la parte
trasera para eliminar las
pelusas acumuladas.
E
PASO 4.
Vuelva a colocar la
unidad del condensador.
Asegúrese de que la
unidad queda bien
encajada, de que los tres
pestillos quedan bien
sujetos y de que las
flechas de posición de la
parte delantera del
condensador apuntan
hacia arriba.
●
Compruebe que:
- Las flechas de posición apuntan hacia arriba.
- Los tres pestillos vuelven a afianzarse en la posición de bloqueo.
Gire los tres pestillos
! No limpiar el condensador podría causar el fallo
prematuro de la secadora.
37
Page 38

Instalación
E
Dónde instalar la secadora
●
Instale la secadora lejos de estufas, calentadores o
cocinas, ya que las llamas pueden dañar el
electrodoméstico.
●
espacio mínima 10 mm
Si va a instalar el
electrodoméstico debajo de
una encimera, asegúrese de
dejar un espacio de 10 mm
espacio mínima
15 mm
entre la parte superior y
cualquier otro objeto que
Evacuación del agua
Si la secadora está instalada cerca de un desagüe, el
agua puede evacuarse por este desagüe. Esto evita la
necesidad de vaciar el recipiente de agua. Si la secadora
se apila sobre una lavadora o se instala junto a ella puede
compartir el mismo desagüe. El desagüe debe estar
a menos de 1 m desde la parte inferior de la secadora.
Quite la sujeción y la manguera
de la posición indicada (véase
el diagrama).
vaya encima o sobre la
máquina y un espacio de
15 mm entre los costados y
el mobiliario lateral o paredes. Esto asegura la correcta
circulación de aire. Asegúrese que los respiraderos
traseros no estén obstruidos.
Ventilación
Quite la sujeción y la
manguera de aquí...
Coloque una manguera de la
longitud adecuada en la nueva
posición (véase el diagrama) y
vuelva a colocar la sujeción.
...coloque la nueva
manguera y vuelva a
poner la sujeción aquí
! Asegúrese de que la manguera no queda aplastada
o retorcida cuando la secadora esté en su ubicación final.
Cuando la secadora está en uso, debe haber una
ventilación adecuada. Asegúrese que coloca la
secadora en un lugar que no tenga humedad y con
una circulación de aire adecuada. El flujo de aire
alrededor de la secadora es esencial para condensar
el agua producida durante el lavado, la secadora no
funcionará eficazmente en un espacio cerrado armario.
Conexiones eléctricas
Compruebe lo siguiente antes de introducir el enchufe
en la toma eléctrica:
●
El enchufe debe llevar conexión a tierra.
●
El enchufe debe tener la capacidad suficiente para
soportar la máxima potencia de los electrodomésticos,
lo que se indica en la matrícula (véase Descripción
de la secadora).
! No es aconsejable instalar la secadora en un armario
y bajo ningún concepto debe instalarse detrás de una
puerta con un mecanismo de seguridad con bloqueo, una
puerta corredera o una puerta con una bisagra colocada
en el lado opuesto a la de la puerta de la secadora.
¡ Si utiliza la secadora en un cuarto pequeño o frío
podría experimentarse condensación.
Instrucciones para invertir la puerta
Cierre de la
Bisagra
Pestillo de
la puerta
puerta
●
El voltaje de potencia debe encontarse dentro de
los valores indicados en la matrícula (véase
Descripción de la secadora).
●
La toma debe ser compatible con el enchufe de la
secadora. Si este no es el caso, cambie el enchufe
o la toma.
¡La secadora no debe instalarse en el exterior, incluso
si el espacio destinado a estos efectos está resguardado.
Puede ser muy peligroso si está expuesta a la lluvia o
tormentas.
¡Una vez instalada, el cable eléctrico y el enchufe de
la secadora deben estar al alcance de la mano.
¡No utilice cables alargadores.
¡El cable de alimentación no debe estar ni doblado ni
torcido.
¡Debe comprobarse periódicamente el cable de la
fuente de alimientación y cambiarse con un cable
especialmente preparado para esta secadora e
instalarse únicamente por técnicos autorizados (véase
Servicio). Los cables de alimentación nuevos o más
largos pueden adquirirse adicionalmente de
distribuidores autorizados.
Bisagra
¡El fabricante declina toda responsabilidad en caso
de no seguirse alguna de estas normas.
¡En caso de cualquier duda consulte con un
La puerta de la secadora es reversible y puede
electricista cualificado.
cambiarse con suma facilidad. Cambie diagonalmente
los soportes con bisagras y los tornillos de sujeción.
Cambie el pestillo de la puerta con las placas de
sujeción contrarias (véase el diagrama a continuación).
Antes de empezar a utilizar la secadora
Una vez haya instalado la secadora y antes de
utilizarla, limpie el interior del tambor para retirar el polvo
que haya podido acumularse durante el transporte.
38
Page 39

Descripción de la secadora
Para abrir la puerta Características
Pulse y suelte el panel delantero en
la posición indicada
Unidad del
condensador
(cubierta abra)
Cubierta del condensador
Mango de la cubierta del
condensador
(Tirar para abrir)
Panel de control
Botones de
SELECCIÓN de PROGRAMAS
Pantalla de visualización
Recipiente de agua
Filtro
Botón de
BLOQUEO
E
Matrícula
Modelo y
número
de serie
Respiradero
de entrada
de aire
Botón de
ENCENDIDO/APAGADO
El botón de ENCENDIDO/APAGADO : Si la
secadora está funcionando y se pulsa este botón, la
secadora se parará. Al pulsarlo de nuevo, la secadora
se pone en marcha de nuevo.
Los botones de SELECCIÓN de PROGRAMAS
configuran el programa: pulse el botón correspondiente
al programa que desea seleccionar (véase
Comienzo y Programas).
Botones e indicadores de OPCIÓN: estos botones
permiten elegir las opciones disponibles del
programa seleccionado (véase Controles). Los
indicadores de la pantalla situada junto a los botones
se encienden para mostrar la opción seleccionada.
El botón/luz INICIO/PAUSA inicia un programa
seleccionado. Cuando pulse este botón escuchará un
pitido electrónico y la pantalla mostrará PAUSA .
Cuando un programa está en funcionamiento,
manteniendo pulsado este botón pauses el programa
y la secadora se para.
Botones de
OPCIÓN
La luz se muestra en verde cuando el programa está
en marcha, parpadea en ámbar si el programa está
en pausa o parpadea en verde si está en modo de
espera para iniciar un programa (véase Comienzo y
Programas).
La pantalla muestra mensajes de advertencia e
información sobre el programa (véase la página
siguiente).
Botón
pulsado este botón después de seleccionar el programa
y las opciones deseadas para evitar que otra persona
cambie el programa
durante unos instantes.
Cuando el icono esté encendido, los demás botones
se desactivarán.
Mantenga el botón pulsado para cancelar la opción.
El icono se apagará y en pantalla aparecerá brevemente
el mensaje DESBLOQUEADO .
de BLOQUEO : pulse y mantenga
/icono
. La pantalla mostrará CERRADO
Botón y Luz de
INICIO/PAUSA
39
Page 40

La pantalla
E
Selección de idioma
Cuando encienda por primera vez la secadora, elija el idioma que prefiere en la lista disponible.
Para cambiar el idioma: la selección del idioma actual
debe estar parpadeando en la primera línea de la pantalla.
- Pulse y mantenga pulsados los 3 botones:
durante 5 segundos.
- Pulse el botón Bloqueo o Secado temporizado
para desplazarse arriba o abajo por la lista.
- Cuando el idioma que busca empiece a parpadear en la
línea superior de la pantalla, pulse el botón Nivel de
secado para seleccionarlo.
Descripción de la pantalla
Selección de programa y pantalla
El programa seleccionado se muestra en la primera línea de la pantalla al seleccionar el botón correspondiente y el
mensaje aparece mientras el programa se está ejecutando.
ALGODÓN RESISTENTE
ALGODÓN DELICADO
SINTÉTICOS
COLADA Y DÍAS
FÁCIL PLANCHADO
AIREACIÓN
DELICADOS
LANA
Cuando seleccione el botón de memoria, en pantalla se mostrará el programa seleccionado con una «M»
delante del nombre: Por ejemplo M ALGODÓN RESISTENTE (véase Comienzo y Programas).
Niveles de secado
Durante la selección de un programa automático que tenga varios niveles de secado (véase La tabla Programas).
La segunda línea de la pantalla muestra el nivel de secado que se necesita. Cada vez que pulse el botón Nivel de
secado se mostrará la opción siguiente de la lista.
NO PLANCHA
PARA COLGAR
PARA DOBLAR
La pantalla también muestra: uno, dos o tres bloques, según la selección.
Estos bloques se muestran durante la ejecución del programa.
Secado para plancha: deja la ropa lista para planchar.
Listas para colgar: deja la ropa lista para colgar en el armario.
Listas para usar: deja la ropa lista para usar.
40
Page 41

La pantalla
Progreso del programa
La segunda línea de la pantalla muestra el estado del programa:
(los mensajes más largos se desplazan por la línea de texto)
ANTIARRUGAS
SECADO
ENFRIAMIENTO
FIN DEL CICLO, TRATAMIENTO ANTIARRUGAS
FIN DEL CICLO, VACIAR EL RECIPIENTE DEL AGUA
Si la opción Secado mixto está disponible y la selecciona, en la línea se muestra cuándo se alcanza cada
uno de los niveles de secado:
SECADO NO PLANCHA LISTO
LISTO PARA GUARDAR
(si la opción está
disponible y seleccionada).
(si la opción
está disponible y
seleccionada).
Secado temporizado
Después de seleccionar un programa con una opción de Secado temporizado, pulse el botón Temporizado .
Cada vez que lo pulse, en la pantalla se irá aumentando el tiempo seleccionado (véase Comienzo y Programas).
Con cada pulsación, el tiempo aumenta
, , , luego
1:20 1:40 2:00 2:20
: , , ,
0:20 0:40 1:00
, y luego la serie se repite.
E
La ropa delicada tiene un tiempo máximo de:
Las barras a la derecha del tiempo se iluminan para dar una
idea de la duración seleccionada:
o:20 0:40 1:00 1:20 1:40 2:00 2:20
El tiempo seleccionado se sigue mostrando después de que
empiece el programa.
1:40
Inicio temporizado y tiempo de finalización
Algunos programas pueden tener un comienzo retardado (véase Comienzo y Programas). Pulse el botón Inicio
temporizado El icono parpadea.
Con cada pulsación del botón Inicio temporizado el
valor del retardo aumenta
desde
: a , después
1h 24h
segundos, se anula el retardo.
El tiempo de retardo se muestra en la pantalla junto al botón
Inicio temporizado.
En pantalla se muestra una cuenta atrás de los minutos del
periodo de retardo después de
La segunda línea de la pantalla muestra COMIENZA EN
Cuando acaba el periodo de retardo (o todo el programa, cuando no se selecciona ningún retardo): el tiempo de
finalización calculado del programa, en el caso de los programas automáticos o el tiempo real que falta, en un
programa temporizado, se muestra en esta parte de la pantalla.
en incrementos de 1 hora,
OFF
y
luego, tras unos
pulsar el botón Inicio/Pausa
41
Page 42

La pantalla
E
Advertencias
La segunda línea de la pantalla también sirve para mostrar
advertencias y recordatorios:
(Los recordatorios se muestran al final del programa).
FIN DEL CICLO, VACIAR EL RECIPIENTE DEL AGUA
●
Recordatorio de que hay que vaciar el contenedor
de agua cada vez que se use la secadora (véase
Mantenimiento).
RECIPIENTE DE AGUA VACÍO
●
Indica que el contenedor de agua está lleno. El
mensaje tardará algunos segundos en desaparecer,
después de que se haya vaciado el contenedor
de agua. Es necesario que la secadora esté en
marcha para que esto ocurra (véase Controles).
Nota: Si el contenedor de agua se llena y se
muestra este mensaje, se desactiva el calor y la
ropa no se seca.
LIMPIAR CONDENSADOR
●
Este mensaje indica que hay que limpiar la
unidad de condensación (véase Mantenimiento) y
se emite en intervalos, según la frecuencia de uso
de la secadora. Cuando acabe el siguiente
programa, el mensaje se cancela.
LIMPIAR FILTRO
●
Le recuerda que debe limpiar el filtro cada vez
que use la secadora (véase Mantenimiento).
Comienzo y Programas
Seleccionar un programa
1. Enchufar la secadora a la toma eléctrica.
2. Clasifique la colada según la clase de tejido (véase
La colada).
3. Abra la puerta y asegúrese que el filtro está limpio y
en posición y que el recipiente de agua está vacío e
instalado (véase Mantenimiento).
4. Cargue la máquina y asegúrese que no haya
ninguna prenda atrapada en el cierre de la puerta.
Cierre la puerta.
5. Si la pantalla no está encendida:
Pulse el botón de Encendido/Apagado
6. Pulse el botón del Programa correspondiente al tipo
de tejido que vaya a secar. Consulte la tabla
Programas (véase Programas) y las indicaciones
para cada tipo de tejido (véase La colada).
- Si se selecciona el botón , los pasos 7, 8 y 9
no son necesarios (véase abajo).
7. Elija la opción Secado temporizado o Niveles de
secado:
- Si elije Secado Temporizado, pulse y suelte el
botón Temporizado hasta que aparezca en la
pantalla el tiempo deseado
o - Para cambiar la opción predeterminada de secado,
pulse y suelte el botón Niveles de Secado
hasta que se indique el nivel deseado.
! Si desea más información, consulte la tabla de
Programas
Botón Memoria
La primera vez que se pulsa el botón, la segunda línea de la pantalla muestra PULSAR PARA GUARDAR
.
:
.
8. Fije un tiempo de demora y otras opciones si
fuera necesario
9. Si desea seleccionar el sonido del zumbador, al
final del programa, pulse el botón Opción ALARMA
10.
Pulse el botón de INICIO/PAUSA para empezar.
La pantalla indicará el tiempo estimado hasta el final
del programa.
Durante el programa de secado, usted puede
comprobar la colada y sacar las prendas que ya
se han secado mientras el resto continúa secándose.
Cuando vuelva a cerrar la puerta, pulse el botón de
INICIO/PAUSA a fin de Empezar a secar de nuevo
Durante los últimos minutos de los Programas de
11.
secado, antes de completarse el programa, la
secadora realiza una secuencia de enfriamiento
(los tejidos se enfrían), que siempre debe dejar que
termine.
12.
El zumbador (si se ha seleccionado la Opción
Alarma) le avisará cuando se ha completado el
programa, en la pantalla aparecerá indicado
FIN DEL CICLO, TRATAMIENTO ANTIARRUGAS .
Abra la puerta, saque la ropa, limpie el filtro y
vuelva a colocarlo. Vacíe el recipiente de agua y
vuelva a instalarlo (véase Mantenimiento).
Si se ha seleccionado la Opción Post-Antiarrugas
del secado y no saca la colada inmediatamente,
la secadora se pondrá en funcionamiento
ocasionalmente durante 10 horas, o hasta que abra
la puerta.
Desenchufe la secadora.
13.
(véase La pantalla).
.
.
Después de seleccionar el programa y las opciones más usadas, puede guardarlos pulsando y manteniendo
pulsado el botón Memoria durante al menos 5 segundos. La alarma emitirá un pitido y en la segunda línea de la
pantalla se mostrará MEMORIA
botón Inicio/Pausa para ejecutar el programa
Si lo desea, puede cambiar el programa favorito, seleccionando otro programa y/u otras opciones y pulse y
mantenga pulsado el botón
42
. La próxima vez que desee usar el programa, pulse el botón y después el
.
(como se indica anteriormente).
Page 43

Comienzo y Programas
Programas especiales
Programa de planchado fácil
“Planchado fácil” es un programa corto de 10 minutos (8 minutos de calor seguido de 2 minutos de secado en frío)
que ahueca las fibras de la ropa que se ha dejado en la misma posición/lugar durante un largo periodo de tiempo.
El ciclo relaja las fibras y facilita el planchado y el doblado de la ropa.
¡ “Planchado fácil” no es un programa de secado y no debe utilizarse para prendas mojadas.
Para obtener los mejores resultados:
1. No cargue más que la capacidad máxima. Estos números se refieren al peso de la ropa en seco:
Tejido Carga máxima
Algodón y mezclas de algodón 2,5 kg
Sintéticos 2 kg
Dril de algodón 2 kg
2. Vacíe la secadora inmediatamente después de que haya finalizado el programa, cuelgue, doble o planche
las prendas y guárdelas en el armario. Si esto no es posible repita el programa.
El efecto de “planchado fácil” varía de un tejido a otro. Funciona bien con tejidos tradicionales como algodón o
mezclas de algodón, y menos bien con tejidos acrílicos y materiales como Tencel®.
Programa de lana
●
Éste es un programa para secar de forma segura las prendas que llevan el símbolo .
●
Puede utilizarse para cargas de hasta 1 kg (aproximadamente 3 chalecos).
●
Recomendamos que dé la vuelta a las prendas del revés antes de secarlas.
●
Este programa tardará de 60 minutos, sin embargo, puede tardar más tiempo dependiendo del tamaño y de
la densidad de la carga y de la velocidad de centrifugado de la lavadora.
●
Las cargas que se secan utilizando este programa, normalmente están listas para usarlas, sin embargo, con
algunas prendas de más peso es posible que los extremos estén húmedos. Deje que estas prendas terminen
de secarse naturalmente ya que si se secan demasiado pudri’an estropearse.
! A diferencia de otros materiales, el mecanismo del encogimiento de la lana es irreversible, es decir, no volverá a
estirarse a su tamaño y forma original.
! Este programa no es apto para prendas acrílicas.
E
El ciclo de secado para lana de esta secadora ha sido aprobado por The Woolmark Company para secar prendas
que lleven etiquetas Woolmark las cuales incluyan que se pueden lavar y secar a máquina, siempre que el secado
de las prendas se haga según las instrucciones de las etiquetas y las indicadas por el fabricante de esta secadora
(M0616).
Este es el primero y el único ciclo de secado para lana aprobado por The Woolmark Company.
Modificadores de las opciones del programa
Secado mixto
Disponible con Algodón Resistente y programas Sintéticos.
Esta opción se usa después de seleccionar un nivel de secado ‘Listas para usar’ o ‘Listas para colgar’. Esto permite
sacar algunas prendas cuando se haya llegado al punto de secado ‘Listas para colgar’ o ‘Secado plancha’.
Cuando la secadora detecta que la carga ha alcanzado el punto ‘Secado plancha’, la pantalla muestra:
SECADO NO PLANCHA LISTO y la alarma suena durante 2 minutos; en este momento puede abrir la puerta y
sacar las prendas que desea planchar.
Después, cierre la puerta y pulse el botón Inicio/Pausa para reanudar el programa.
! Si no abre la puerta en el plazo de 2 minutos, la secadora reanudará el secado sin necesidad de pulsar el botón
Inicio/Pausa.
El programa ‘Listas para colgar’ continúa y finaliza con FIN DEL CICLO. VACIAR EL RECIPIENTE DEL AGUA
El programa de secado ‘Listas para usar’ continúa hasta que la secadora detecta que la carga ha llegado al punto
‘Listas para colgar’ y la pantalla muestra: LISTO PARA GUARDAR y la alarma suena durante 2 minutos; en este
momento puede abrir la puerta y sacar las prendas que desea colgar para finalizar el secado.
Después, cierre la puerta y pulse el botón Inicio/Pausa para reanudar el programa
! Si no abre la puerta en el plazo de 2 minutos, la secadora reanudará el secado sin necesidad de pulsar e botón
Inicio/Pausa.
Cuando se alcanza el nivel de secado ‘Listas para usar’, la secadora ha finalizado el ciclo de secado (y, si se ha
seleccionado, el ciclo
FIN DEL CICLO. VACIAR EL RECIPIENTE DEL AGUA
Post-Antiarrugas) y termina con:
.
Mini carga
Disponible con Algodón Resistente y programas Sintéticos.
Para cargas de 1 a 2 kg.
Este programa optimiza el programa automático para cargas pequeñas y mejora el cálculo del tiempo de finalización.
43
Page 44

Comienzo y Programas
E
La tabla Programas
! Si la pantalla no está encendida; pulse el botón de ENCENDIDO/APAGADO y, a continuación, seleccione el
programa.
Programa
Algodón
Resistente
Algodón
Delicado
Sintéticos
Colado 7
Días
Qué hace... Qué programa... Nota:
Seca las prendas de
algodón con mucho
calor.
Seca las prendas de
algodón con poco
calor.
Seca las prendas
sintéticas con mucho
calor.
Seca la ropa de cama y
toallas con el ajuste
Mucho calor
1. Pulse el botón Algodón - Resistente
2. Seleccione la opción Temporizado o
Automático :
- Si elige la opción Secado Temporizado ,
véase la página siguiente, o…
- Para cambiar la opción predeterminada de
secado, pulse y suelte el botón de Niveles de
Secado hasta que aparezca en la pantalla
el nivel deseado.
3. Seleccione cualquier opción, si procede.
4. Pulse el botón de INICIO/PAUSA .
1. Pulse el botón Algodón - Delicado
2. Seleccione un tiempo de secado ,
véase Temporizado,
1. Pulse el botón Sintéticos
2. Seleccione la opción Temporizado o
Automático :
- Si elige la opción Secado Temporizado ,
véase la página siguiente, o…
la página siguiente.
- Para cambiar la opción predeterminada de
secado, pulse y suelte el botón de Niveles de
Secado hasta que aparezca en la pantalla
el nivel deseado.
3. Seleccione cualquier opción, si procede.
4. Pulse el botón de INICIO/PAUSA .
1. Pulse el botón Colada 7 Días
2. Seleccione cualquier opción, si procede
3. Pulse el botón de INICIO/PAUSA
Opciones disponibles:
Alarma , Inicio temporizado
Pre-Antiarrugas
Post-Antiarrugas
Mini carga
*Secado mixto
Opciones de secado
NO PLANCHA
PARA COLGAR
PARA DOBLAR
Opciones disponibles:
véase Temporizado ,
la página siguiente.
Opciones disponibles:
Alarma , Inicio temporizado
Pre-Antiarrugas
Post-Antiarrugas
Mini carga ,
*Secado mixto
Opciones de secado
NO PLANCHA
PARA COLGAR
PARA DOBLAR
Opciones disponibles:
Alarma , Inicio temporizado
Pre-Antiarrugas
Post-Antiarrugas
Automático
: predeterminada
Automático
: predeterminada
●
Un programa automático
Lana
Delicados
(por ejemplo,
fibras acrílicas)
Aireación
Seca las prendas de
lana (véase la página
anterior).
Seca la ropa con el
ajuste Poco calor,
dejándolas listas para
usar.
Programa de 20 minutos
que airea la ropa con
aire frío. Se utiliza
también para enfriar las
1. Pulse el botón Lana
2. Seleccione la Opción Alarma, si procede
3. Pulse el botón de INICIO/PAUSA
1. Pulse el botón Delicados
2. Si lo desea, seleccione un programa
Temporizado (véase Temporizado, la
página siguiente
). De lo contrario, la opción
predeterminada es Automático.
3. Seleccione cualquier opción, si procede
4. Pulse el botón de INICIO/PAUSA
1. Pulse el botón Aireación
2. Seleccione la Opción Alarma, si procede
3. Pulse el botón de INICIO/PAUSA
Opciones disponibles:
Alarma
●
Un programa automático
Opciones disponibles:
Alarma , Inicio temporizado
Pre-Antiarrugas
Post-Antiarrugas
●
La opción predeterminada
es Automático
Opciones disponibles:
Alarma
prendas calientes
Fácil
Planchado
Breve programa (unos
10 minutos) que
ablanda las fibras de las
prendas y las deja listas
para planchar.
1.
Pulse el botón Fácil Planchado
2. Seleccione la Opción Alarma, si procede
3. Pulse el botón de INICIO/PAUSA
¡ No es un programa de
secado (véase la página
anterior) !
Opciones disponibles:
Alarma
Nota: *Secado Mixto sólo disponible en el secado Listas para usar y secado Listas para colgar (véase
Modificadores de las opciones de programs).
44
Page 45

Comienzo y Programas
Tabla de programas temporizados: Seleccione primero un programa (véase La tabla Programas).
Secado
temporizado
(0:20, 0:40,
1:00, 1:20, 1:40,
2:00 ó 2:20
Horas: Minutos)
Utilice siempre la opción
de Secado temporizado
para cargas de menos de
1 kg, o bien si prefiere un
resultado de secado
diferente.
El ajuste de la temperatura
dependerá del tejido
seleccionado.
1.Pulse y suelte el botón Temporizado hasta
que en la pantalla aparezca la opción de
su preferencia. Cada vez que pulse
avanza , , , , , , y
a continuación, vuelve a repetirse.
●
La opción Delicadas tiene una duración
máxima de .
●
Si se muestra en , podrá
seleccionar la opción Automático en
caso de que cambie de opinión.
2. Seleccione cualquier opción, si procede.
3. Pulse el botón de INICIO/PAUSA .
The Controls
! Advertencia : tras pulsar el botón de INICIO/PAUSA , es
posible cambiar el programa.
Para cambiar un programa seleccionado, pulse el botón
INICIO/PAUSA . La luz parpadea de color ámbar para
indicar que el programa está en pausa. Seleccione el nuevo
programa y las opciones que desee. La luz parpadeará en
. Pulse el botón INICIO/PAUSA
verde
empiece el nuevo programa.
●
Botones de OPCIÓN
Estos botones se utilizan para ajustar el programa
seleccionado a sus necesidades. Antes de poder seleccionar
una opción, deberá previamente haber seleccionado un
programa utilizando un botó de selección de programa. No
todas las opciones están disponibles para todos los programas
(véase Comienzo y Programas). Si una opción no está
disponible y pulsa el botón correspondiente, el zumbador
emitirá 3 pitidos. Si la opción está disponible, el indicador
de la pantalla situado junto a los botones inferiores se
enciende para mostrar que se ha seleccionado la opción.
Temporización (Inicio Retardado)
El inicio de algunos programas (véase La pantalla y véase
Comienzo y Programas) puede retrasarse hasta un máximo
de 24 horas.Asegúrese de que el depósito de agua está vacío
antes de programar un inicio con retardo.
Pre-Antiarrugas
Esta opción sólo estará disponible si se ha seleccionado un
inicio temporizado. Este programa mueve las prendas cada
tanto, durante el período previo al inicio del secado, para
ayudar a impedir la formación de arrugas.
Alarma
Esta opción, disponible en todos los programas, permite que
el zumbador emita una señal al final del ciclo de secado,
que tiene por objeto recordarle que las prendas ya pueden
retirarse.
Post-Antiarrugas
Si esta opción está disponible, al seleccionarla la secadora
moverá las prendas ocasionalmente al final de los ciclos de
secado y secado en frío, con el objeto de evitar que se
arruguen en caso de que no sea posible retirarlas
inmediatamente después de concluido el programa.
●
PANTALLA
88:88
La pantalla indica cuánto tiempo falta para que se inicie un
programa (en el caso de un inicio temporizado), o bien cuánto
tiempo falta para que concluya un programa de secado
(véase La pantalla).
El retardo o el tiempo de finalización se muestran en horas y
minutos y la cuenta atrás se realiza en intervalos de 1 minuto.
Si se seleccionan programas temporizados, el tiempo
indicado es el tiempo real restante.
otra vez para que
Al seleccionar un programa automático, el tiempo indicado
es una estimación del tiempo restante. Al seleccionar el
programa, la pantalla mostrará el tiempo necesario para
secar una carga completa. Transcurridos unos 10 minutos,
el controlador hará una estimación más aproximada del tiempo
del ciclo. Los dos puntos situados entre horas y minutos
parpadearán para indicar la cuenta atrás.
Asimismo, la pantalla indica si existe algún problema con la
secadora. En tal caso mostrará una F, seguida del número
de código de fallo (véase Resolución de problemas).
●
Vaciar el recipiente de agua
(Si ha conectado los tubos de la secadora a un desagüe,
esta icono puede ignorarse, puesto que no es necesario
vaciar el depósito de agua).
Se muestran mensajes para recordarle que hay que
vaciar el contenedor de agua.
Si el depósito del agua se llena durante un programa, el
calentador se apaga y la secadora realiza una fase de
Secado en frío. Después, se detiene y un mensaje le indica
que hay que RECIPIENTE DE AGUA VACÍO .
Debe vaciar el depósito de agua y reiniciar la secadora o la
ropa no se secará. Tras reiniciar la secadora el mensaje
tardará unos segundos en desaparecer.
Para evitarlo, vacíe siempre el depósito de agua cada vez
que utilice la secadora (véase Mantenimiento).
●
Apertura de la puerta
Si se abre la puerta durante un programa, la secadora
parará y se producirá lo siguiente:
●
La pantalla muestra PAUSA .
●
Durante una fase temporizada, la temporización
continuará su cuenta regresiva. Para reanudar el
programa temporizado debe pulsar el botón de
Inicio/Pausa.
La pantalla cambia para mostrar el estado actual.
●
Durante la parte de secado del programa, los dos
puntos de la pantalla dejarán de parpadear para
indicar que se ha interrumpido la cuenta atrás. Para
reanudar el programa debe pulsar el botón Inicio/Pausa.
La pantalla cambia para mostrar el estado actual, los
dos puntos parpadean y se reanuda la cuenta atrás.
●
Durante la fase Post-Antiarrugas, el programa
finalizará.
Pulsando el botón de Inicio/Pausa se reiniciará un
nuevo programa desde el principio.
●
Nota
En caso de producirse un corte de electricidad o de haber
apagado o desenchufado la secadora. Cuando vuelva la
electricidad, pulse el botón de INICIO/PAUSA y el
programa se reanudará.
Opciones disponibles:
Alarma , Inicio temporizado
Pre-Antiarrugas
Post-Antiarrugas
Consulte los tiempos de secado
recomendados (véase La Colada).
Los últimos 10 minutos de estos
programas corresponden al
enfriamiento .
E
45
Page 46

La colada
E
Clasificar la colada
• Compruebe los símbolos en las etiquetas de la
ropa a fin de asegurar que los artículos pueden
secarse con calor.
• Clasificar la colada por tipo de tejido.
• Vaciar los bolsillos y comprobar los botones.
• Cerrar las cremalleras y los corchetes y atar los
cinturones y cordones sueltos.
• Escurra las prendas a fin de eliminar la mayor
cantidad agua como sea posible.
¡ No meter ropas muy mojadas en la secadora.
Tamaño máximo de la carga
No cargue más que la capacidad máxima. Estos
números se refieren al peso de la ropa en seco:
Fibras naturales: 7.5 kg máx.
Fibras sintéticas: 3 kg máx.
¡ NO cargar demasiado la secadora ya que esto
podría dar como resultado un rendimiento de secado
reducido.
Carga típica
Nota: 1kg = 1000g
Ropa
Blusa de algodón 150 g
Otro 100 g
Vestido de algodón 500 g
Otro 350 g
Vaqueros 700 g
10 pañales 1000 g
Camisa de algodón 300 g
Otro 200 g
Camiseta 125 g
Etiquetas de recomendaciones durante el lavado de
la ropa
Lea siempre las etiquetas de la prenda, especialmente
cuando se sequen con calor por primera vez. Los
símbolos que aparecen a continuación son los más
comunes:
Puede secarse con calor
No secar con calor
Secar con calor a una temperatura alta
Secar con calor a una temperatura baja
Artículos que no son aptos para secarse con calor
• Artículos que contienen goma o materiales
similares a la goma o películas plásticas
(almohadas, cojines, o prendas impermeables de
PVC), cualquier otro artículo inflamable u objetos
que contengan sustancias inflamables (toallas
manchadas de laca para el cabello).
• Fibras de vidrio (ciertos tipos de cortinas).
• Artículos que se han limpiado en seco.
• Artículos con el código ITCL (véase Prendas
especiales). Éstas pueden limpiarse en casa con
productos especiales de limpieza en seco para
usar en casa. Siga las instrucciones
cuidadosamente.
• Artículos grandes y voluminosos (edredones,
sacos de dormir, almohadas, cojines, sobrecamas
grandes, etc). Éstos se agrandan cuando se están
secando y evitarán el flujo de aire por la secadora.
Artículos domésticos
Funda de duvet de algodón 1500 g
(Doble) Otro 1000 g
Mantel grande 700 g
Mantel pequeño 250 g
Paño de cocina 100 g
Toalla de baño 700 g
Toalla de mano 350 g
Sábana doble 500 g
Sábana individual 350 g
Al final de un ciclo de secado, es posible que las
prendas de algodón estén todavía húmedas si agrupó
algodones y sintéticos juntos. Si sucediese esto, dele
un tiempo corto de secado.
●
Nota: Los últimos 10 minutos del tiempo que se
haya fijado son para el secado en frío. Tenga esto
en cuenta, ya que esta fase no secará las prendas.
46
Page 47

La colada
Prendas especiales
Mantas y sobrecamas: Los artículos acrílicos (Acilan,
Courtelle, Orion, Dralón) deben secarse teniendo
especial cuidado y en ajuste POCO calor. Evite
secarlos durante mucho tiempo.
Prendas plisadas o arrugadas: lea las instrucciones
de secado del fabricante incluidas con la prenda.
Artículos almidonados: no seque estos artículos con
otras prendas no almidonadas. Asegúrese que se
retira la mayor cantidad posible de la solución de
almidón de la carga antes de introducir las prendas
en la secadora. No secar demasiado:
El almidón puede tener una apariencia polvorienta y
dejar la ropa sin vida, lo que hace inútil utilizar almidón.
Tiempos de secado
Los tiempos son aproximados y pueden variar
dependiendo de:
• La cantidad de agua retenida en la ropa después
del ciclo de centrifugado: las toallas y las
prendas delicadas retienen mucha agua.
• Tejidos: las prendas del mismo tejido pero con
diferente textura y espesor es posible que no
tengan los mismos tiempos de secado.
• Cantidad de colada: las prendas sencillas o las
cargas pequeñas pueden tardar más tiempo en
secarse.
• Sequedad: Si va a planchar algunas de las
prendas, puede sacarlas mientras están un poco
húmedas. Otras pueden dejarse más tiempo si
necesita que se sequen completamente.
• Ajuste de calor.
• Temperatura de la habitación: Si la habitación en
la que se ha instalado la secadora es fría, la
secadora tardará más tiempo en secar la ropa.
• Volumen: algunos artículos voluminosos pueden
secarse con calor teniendo cuidado. Sugerimos
que saque estos artículos varias veces, los
sacuda y los vuelva a meter en la secadora hasta
que finalice el programa.
¡ No seque la ropa en exceso.
Todos los tejidos contienen una cantidad pequeña de
humedad natural, lo que los mantiene suaves y
huecos.
La tabla (véase abajo) indica el tiempo de secado
APROXIMADO en Horas : Minutos, tal y como pueden
verse en la pantalla. El tiempo también se indica en
Minutos sólo a efectos de referencia.
El tiempo indicado corresponde a los programas
Automático y Listas para usar.
También se muestran las opciones de Secado
temporizado, para facilitarle la selección de la opción
adecuada.
Los pesos se refieren a prendas secas:
E
Algodón
Mucho
calor
Sintéticos
Mucho
calor
Delicados
(Acrílicos)
Poco
calor
Media carga
Duración automática
Minutos automática
Ajuste de Secado
temporizado
0:30 - 0:50
30 - 50
0:20
ó 0:40 ó 1:00
1 kg
2 kg
0:40 - 0:55
50 - 70
1:00
ó 1:20
3 kg
0:55 - 1:10
70 - 80
1:20
Tiempos de secado a 800-1000 rpm en la lavadora
1 kg
Duración automática
Minutos automática
Ajuste de Secado
temporizado
0:30 - 0:40
30 - 40
0:40
ó1:00
Tiempos de secado con centrifugado reducido en la lavadora
Media carga
1 kg
Duración automática
Minutos automática
Ajuste de Secado
temporizado
0:40 - 1:20
40 - 80
ó 1:00 ó 1:20
0:40
Tiempos de secado con centrifugado reducido en la lavadora
4 kg
1:10 - 1:20
80 - 100
1:20 ó 1:40
Media carga
2 kg
0:40 - 0:50
40 - 50
0:40
1:20 - 1:30
100 - 120
1:40
ó 1:00
5 kg
ó 2:00
6 kg
1:40 - 2:20
120 - 140
2:00 ó 2:20
Carga entera
2 kg
1:20 - 2:20
80 - 140
ó 1:40 ó 2:00 ó 2:20
1:20
Carga entera
7 kg
2:20 - 2:30
140 - 150
2:20
Carga entera
2:30 - 2:40
150 - 160
3 kg
1:10 - 1:30
50 - 70
0:50 ó 1:00 ó 1:20
7.5 kg
2:20
47
Page 48

Advertencias y recomendaciones
●
E
¡ El electrodoméstico ha sido diseñado y fabricado
según las normas internacionales de seguridad.
Por razones de seguridad le comunicamos las
siguientes advertencias. Por favor, léalas con atención.
Seguridad general
●
Esta secadora ha sido diseñada para uso doméstico
y no profesional.
●
No tocar el electrodoméstico con los pies descalzos
o con las manos o pies mojados.
●
Desenchufar la máquina tirando del enchufe, no
del cable.
●
Los niños no deben encontrarse cerca de la
secadora mientras se está utilizando. Después de
utilizar la secadora, desenchúfela. Mantenga la
puerta cerrada a fin de asegurar que los niños no
puedan utilizarla como un juguete.
●
El electrodoméstico debe instalarse correctamente
y disponer de la ventilación adecuada. La entrada
de aire en la parte delantera de la secadora y el
respiradero trasero, detrás de la secadora, nunca
deben estar obstruidos (véase Instalación).
●
Nunca utilice la secadora sobre alfombras en las
que la altura del pelo evitaría que el aire se introdujera
en la secadora por la base.
●
Compruebe que la secadora esté vacía antes de
cargar la colada.
●
●
●
●
●
●
●
●
●
●
●
●
●
La parte de atrás de la secadora puede
estar muy caliente. Nunca la toque mientras
está funcionando.
No utilice la secadora a menos que el filtro, el
recipiente de agua y el condensador estén
correctamente instalados (véase Mantenimiento).
No utilice suavizante en la secadora; añada el
suavizante al último aclarado de la lavadora.
No cargue la secadora demasiado (véase La colada
para las cargas máximas).
No cargue prendas que estén muy mojadas.
Seque las prendas únicamente si se han lavado con
detergente y agua, se han aclarado y centrifugado.
Existe el peligro de incendio si se secan artículos
que NO se han lavado con agua.
Compruebe detenidamente todas las instrucciones
que se ofrecen en las etiquetas de las prendas
(véase La colada).
No seque prendas que hayan sido tratadas con
productos químicos.
Nunca seque prendas que se hayan ensuciado con
sustancias inflamables (aceite de cocinar, acetona,
alcohol, petróleo, queroseno, quitamanchas, aguarrás,
ceras, decapantes de cera o sprays para el cabello),
a menos que las haya lavado en agua caliente con
una cantidad adicional de detergente.
No seque artículos ni prendas de goma o con
refuerzos de goma, almohadas con goma espuma,
espuma (espuma de látex), goma, plástico, gorros
de baño, tejidos impermeables, pañales tipo
braguita ni forros de pañales, polietileno ni papel.
No seque artículos grandes o muy voluminosos.
No seque fibras acrílicas a altas temperaturas.
Saque todos los objetos de los bolsillos, en especial
encendedores (riesgo de explosión).
Complete todos los programas con la fase de secado
en frío.
●
No desconecte la secadora cuando los artículos en
su interior están todavía calientes.
●
Limpie el filtro cada vez que use la secadora
(véase Mantenimiento).
●
Vacíe el recipiente de agua después de cada uso
(véase Mantenimiento).
●
Limpie la unidad del condensador después de
intervalos periódicos (véase Mantenimiento).
●
No permita que se acumulen pelusas cerca de la
secadora.
●
Nunca suba encima de la secadora ya que podría
ocasionar daños.
●
Siga siempre las normas y los requerimientos
eléctricos (véase Instalación).
●
Compre siempre piezas de repuesto y accesorios
originales (véase Servicio).
! ADVERTENCIA: Nunca pare la secadora antes de
terminar el ciclo de secado a menos que saque
inmediatamente todos los artículos y los extienda para
que se disipe el calor.
Información sobre reciclado y disposición
Como parte de nuestro compromiso continuo por ser
responsables con el medio ambiente, nos reservamos
el derecho de utilizar componentes reciclados de
calidad para mantener los costes de nuestros clientes
bajos y reducir el desperdicio de materiales.
●
Desechar el material de embalaje: siga las normativas
locales, de forma que el embalaje pueda reciclarse.
●
Para reducir al mínimo el riesgo de lesiones
personales a los niños, quite la puerta y el enchufe y
a continuación corte el cable de alimentación al ras
con el electrodoméstico. Deshágase de estas piezas
por separado a fin de asegurar que el electrodoméstico
no pueda volverse a enchufar al suministro.
Eliminación del electrodoméstico viejo
En base a la Norma europea 2002/96/CE de Residuos
de aparatos Eléctricos y Electrónicos (RAEE), los
electrodomésticos viejos no pueden ser arrojados en
los contenedores municipales habituales; tienen que
ser recogidos selectivamente para optimizar la
recuperación y reciclado de los componentes y
materiales que los constituyen, y reducir el impacto
en la salud humana y el medioambiente.
El símbolo del cubo de basura tachado se
marca sobre todos los productos para recordar al
consumidor la obligación de separarlos para la
recogida selectiva.
El consumidor debe contactar con la autoridad local o
con el vendedor para informarse en relación a la
correcta eleminación de su electrodoméstico viejo.
Ahorro energético y respeto del medio ambiente
●
Escurrir las prendas para eliminar el exceso de agua
antes de secar con calor (si utiliza una lavadora
primero, seleccione un ciclo de centrifugado alto). Hacer
esto ahorrará tiempo y energía durante el secado.
●
Seque siempre cargas completas – de esta forma
ahorrará energía: una sola prenda o las cargas
pequeñas tardan más tiempo en secarse.
●
Limpie el filtro cada vez que utilice la secadora a fin
de reducir el gasto energético (véase Mantenimiento).
48
Page 49

Mantenimiento y cuidados
Desconectar la electricidad
¡ Desenchufe la secadora mientras no la esté
utilizando, cuando la limpie y durante los trabajos de
mantenimiento.
Limpiar el filtro después de cada ciclo
El filtro es una pieza importante de la secadora:
acumula las pelusas y los hilos que se forman
mientras se seca la ropa. Las prendas pequeñas
también pueden quedar atrapadas en el filtro.
Cuando termine de secar, por lo tanto, limpie el filtro
aclarándolo debajo del grifo o con la aspiradora. Si el
filtro se obstruye, el flujo de aire en el interior de la
secadora se verá seriamente afectado: los tiempos de
secado se alargarán y consumirá más energía.
Asimismo, podría ocasionar daños a la secadora.
El filtro se encuentra delante del remate de la
secadora (véase el diagrama).
Quitar el filtro:
1. Tire del asa de plástico del filtro hacia arriba
(véase el diagrama).
2. Limpie el filtro y vuélvalo a colocar correctamente.
Asegúrese que el filtro se ha colocado
completamente a ras con el remate de la secadora.
¡ No utilice la secadora sin haber colocado el filtro.
Vaciar el recipiente de agua después de
cada ciclo
Limpieza del tambor
¡ No utilice productos de limpieza abrasivos, lana de
acero o acero inoxidable para limpiar el tambor.
Es posible que comience a formarse una capa de
color en el tambor de acero inoxidable, esto puede
deberse a la combinación de agua y, o, productos de
limpieza como suavizante de ropa. Esta capa de color
no afecta el rendimiento de la secadora.
Limpiar la unidad del condensador
Periódicamente (cada mes) retire la unidad del
condensador y limpie la acumulación de pelusas de
entre las placas, aclarándolo debajo del grifo de agua
fría. Esto debe hacerse con agua fría desde la parte
trasera del condensador.
Quitar el condensador:
1. Desenchufe la secadora y abra la puerta.
2. Abra la cubierta del condensador (véase el
diagrama). Suelte los tres pestillos haciéndolos
girar 90° grados hacia la derecha y tirando del
mango para separarlo de la secadora.
3. Limpie la superficie de los cierres y vuélvalo a
instalar, asegurándose que los cierres estén
seguros.
Limpieza
E
Extraiga el recipiente de la secadora y vacíelo en un
fregadero u otro desagüe apropiado.
Vuelva a colocar correctamente el recipiente de agua.
Compruebe siempre el contenedor y vacíelo antes de
iniciar un nuevo programa de secado.
Comprobar el tambor después de cada
ciclo
Girar el tambor manualmente para retirar las prendas
pequeñas (pañuelos) que pudieran dejarse atrás.
Filtro
Recipiente de agua
Unidad del condesador
Cubierta del condesador
Pestillos
Mango
Entrada
de aire
●
Las piezas externas de metal, plástico o goma
pueden limpiarse con un paño húmedo.
●
De forma periódica (cada 6 meses) se recomienda
pasar el aspirador por la entrada de aire frontal y
de ventilación trasera para eliminar cualquier
acumulación de pelusa o polvo. También es
aconsejable pasar el aspirador en la parte
delantera donde se ubica el condensador y los filtros
para eliminar cualquier acumulación de pelusas.
¡ No utilice disolventes ni abrasivos.
¡ La secadora utiliza cojinetes de componentes
especiales que no necesitan lubricarse.
¡ Revise la secadora periódicamente por técnicos
autorizados a fin de asegurar la seguridad eléctrica y
mecánica de la misma (véase Servicio).
grifo
trasera
delantera
Unidad del condesador
49
Page 50

Resolución de problemas
E
Si un día la secadora deja de funcionar. Antes de llamar al Centro de Servicio Técnico (véase Servicio), realice
las siguientes comprobaciones:
Problema:
La secadora no se pone en
marcha.
Posibles causas / Solución:
●
El enchufe no está enchufado en la toma, o no hace contacto.
●
Ha habido un fallo de potencia.
●
El fusible se ha fundido. Pruebe a enchufar otro electrodoméstico en la
toma.
●
¿Está utilizando un cable alargador? Pruebe enchufar el cable de
alimentación directamente en la toma.
●
¿Está la puerta bien cerrada?
●
El PROGRAMA no se ha seleccionado correctamente (véase Comienzo y
Programas).
●
No se ha pulsado el botón de INICIO/PAUSA (véase Comienzo y Programas).
No comienza el ciclo de secado.
Tarda mucho tiempo en secar.
●
Ha ajustado un tiempo con demora (véase Comienzo y Programas).
●
No se ha limpiado el filtro (véase Mantenimiento).
●
¿Necesita vaciar el recipiente de agua? ¿Aparece el mensaje Vaciar
depósito de agua? (véase Mantenimiento).
●
¿Necesita limpiar el condensador? (véase Mantenimiento).
●
El ajuste de temperatura no es ideal para el tipo de tejido que está
secando (véase Comienzo y Programas, y véase La colada).
●
No se ha seleccionado el tiempo de secado correcto para la carga
(véase La colada).
●
La rejilla de la entrada de aire o los respiraderos traseros están obstruidos
(véase Instalación, y véase Mantenimiento).
●
Las prendas no estaban mojadas (véase La colada).
●
La secadora está demasiado cargada (véase La colada).
Se muestra el mensaje ‘Vaciar
depósito de agua’ pero la
secadora sólo ha estado
funcionando durante un breve
periodo de tiempo.
Se muestra el mensaje ‘Vaciar
depósito de agua’ y el
depósito de agua no está lleno.
El programa termina y la ropa
está más húmeda de lo
esperado.
La pantalla muestra el código
de avería F, seguido de uno o
dos números.
En pantalla aparece brevemente
el mensaje DEMO ACTIVADO
durante 6 segundos.
●
Probablemente, no se vació el recipiente de agua al comienzo del
programa. No espere a la señal de vaciar el agua, compruebe siempre el
contenedor y vacíelo antes de iniciar un nuevo programa de secado
(véase Mantenimiento).
●
Esto es normal, el mensaje:
FIN DEL CICLO, VACIAR EL RECIPIENTE DEL AGUA se muestra para
recordar que hay que vaciar el depósito (véase Comienzo y Programas).
! Por seguridad, la secadora tiene una duración máxima de programa de 3
horas. Si no se ha detectado un programa automático, la humedad final
requerida en este tiempo, la secadora completará el programa y se parará.
Compruebe los puntos anteriores y vuelva a poner en marcha el programa,
si las prendas siguen estando húmedas, póngase en contacto con el
Centro de servicio (véase Servicio).
●
Si la pantalla muestra F10 o F15:
- apague la secadora y retire el enchufe. Limpie el filtro y el
condensador (véase Mantenimiento). Vuelva a poner el enchufe,
encienda y después inicie otro programa. Si F10 o F15 siguen
apareciendo en la pantalla, póngase en contacto con el Centro de
Servicio (véase Servicio).
●
Si aparece cualquier otro número: Tome nota del código y póngase en
contacto con el Centro de servicio (véase Servicio).
●
La secadora está en modo «Demostración». Pulse y mantenga pulsados
simultáneamente los botones Encendido/apagado e Inicio/pausa durante
3 segundos. La pantalla mostrará el mensaje DEMO DESACTIVADO
durante 3 segundos y la secadora volverá a funcionar normalmente.
50
Page 51

Servicio
Antes de llamar al centro de servicio
técnico:
●
Utilice la guía de resolución de problemas para ver
si puede resolver el problema usted mismo (véase
Resolución de problemas).
●
Si no es así, desconecte la secadora y llame al
Centro de servicio técnico más cercano.
Qué información debe facilitar al centro de servicio
técnico:
●
nombre, dirección y código postal.
●
número de teléfono.
●
el problema.
●
la fecha de compra.
●
el modelo del electrodoméstico (Mod.).
●
el número de serie (N/S).
Esta información puede encontrarse en la placa
identificativa en el interior de la puerta de la máquina.
Piezas de repuesto
Esta secadora es una máquina compleja. Si intenta
repararla usted mismo o una persona no autorizada
puede ocasionar daños a la secadora, además de
invalidar la garantía de piezas de repuesto. Llame a
un técnico autorizado si experimenta algún problema
cuando utilice la máquina. Las piezas de repuesto
han sido exclusivamente diseñadas para este
electrodoméstico y no para ningún otro uso.
E
Comparación de Programas
●
Programas recomendados para la prueba de comparación del modelo EN61121
Programa Programa seleccionado Carga Opciones de secado
(EN61121) máxima
Algodón seco ALGODÓN RESISTENTE 7.5 kg PARA COLGAR
Algodón seco para plancha ALGODÓN RESISTENTE 7.5 kg NO PLANCHA
Tejidos delicados SINTÉTICOS 3 kg PARA DOBLAR
! Nota: Esta no es una lista completa de opciones de programación.(véase Comienzo y Programas).
Este electrodoméstico cumple las siguientes directivas de la CEE:
- 2006/95/CEE (Equipos de bajo voltaje)
- 89/336/CEE, 92/31/CEE y 93/68/CEE (Compatibilidad electromagnética)
51
Page 52

Folheto de instruções
MÁQUINA DE SECAR ROUPA
P
GB
English, 1
F
Français, 18
E
Español, 35
Índice
Informações Importantes, 53-54
Instalação, 55
P
Português, 52
NL
Nederlands, 69
Onde colocar a sua máquina de secar roupa
Ventilação
Ligação eléctricas
Antes de iniciar a utilização da sua máquina
de secar roupa
Descrição da máquina, 56
Para abrir a porta
Características
Painel de controlo
Visor, 57-59
Arranque e programas, 59-62
Escolher um programa
TCD851B
Programas especiais
Modificadores de opção de programa
Tabela de programas
Controlos
Quando utilizar o secador pela
primeira vez deverá seleccionar o
idioma preferido - consulte a
página 57
Roupa, 63-64
Escolher a sua roupa
Etiquetas de cuidado na lavagem
Peças delicadas
Tempos de secagem
Avisos e Sugestões, 65
Segurança geral
Eliminação
Poupança de energia e respeito pelo ambiente
Manutenção e cuidado, 66
Desligar a electricidade
Limpar o filtro depois de cada ciclo
Esvazie o recipiente de água após cada ciclo
Verificar o tambor depois de cada ciclo
Limpar a unidade do condensador
Limpar a máquina
Resolução de problemas, 67
Reparações, 68
Peças sobressalentes
! Tenha este folheto de instruções à mão para consultá-lo sempre que necessário. Leve-o consigo se mudar de
casa e, caso venda este aparelho, passe o folheto ao novo proprietário, de modo a certificar-se de que este folheto
permanece com o equipamento e de que o novo proprietário pode estar informado acerca dos avisos e sugestões
sobre o respectivo funcionamento.
! Leia cuidadosamente as instruções; as páginas que se seguem contêm informações importantes acerca da
instalação, bem como sugestões sobre o funcionamento da máquina.
52
Page 53

Informações Importantes
Para que a sua secadora de condensador funcione de forma eficaz, deve seguir o plano de manutenção
regular apresentado em baixo:
Filtro...
! TEM limpar o filtro de cotão a CADA ciclo de
secagem.
PASSO 1.
Abra a porta da
secadora.
! Não limpar o filtro a CADA ciclo de secagem afecta o desempenho da sua máquina.
- Demorará mais tempo a secar e, como resultado, utilizará mais electricidade durante a secagem.
PASSO 2.
Puxe o filtro para fora
(utilizando as reentrâncias
para os dedos).
PASSO 3.
Limpe os depósitos de
cotão da quadrícula do
filtro.
PASSO 4.
Instale novamente o filtro
– NUNCA utilize a
secadora sem o filtro
instalado.
P
Recipiente de água...
! TEM de esvaziar o recipiente da água após CADA
ciclo de secagem.
PASSO 1.
Puxe o recipiente da água
na sua direcção e retire-o
totalmente da secadora.
! Não esvaziar o recipiente da água pode resultar em:
- A máquina deixar de aquecer (pelo que a carga poderá estar ainda molhada no fim do ciclo de secagem).
- A mensagem ‘VAZAR O RECIPIENTE DA ÁGUA’ indica que o recipiente está cheio.
PASSO 2.
Esvazie toda a água
acumulada no recipiente
da água.
PASSO 3.
Instale novamente o
recipiente da água,
certificando-se de que
está bem encaixado na
respectiva posição.
Primeira Utilização do Sistema de Recolha de Água
Quando a sua secadora é nova, o recipiente de água não recolhe a água sem que seja devidamente preparado
para a primeira utilização; é um processo que demora 1 ou 2 ciclos de secagem. Depois de previamente
preparada, o recipiente recolhe água durante cada ciclo de secagem.
! A mensagem ‘VAZAR O
RECIPIENTE DA ÁGUA’ é
apresentada para Ihe
lembrar que deve despejar
o recipiente da água no início
e no fim de cada programa.
53
Page 54

Informações Importantes
P
Unidade do condensador...
! É NECESSÁRIO limpar o cotão TODOS os meses.
PASSO 1.
Abra a tampa do
condensador
- segure na pega e puxe
na sua direcção.
PASSO 2.
Retire o condensador,
rodando os 3 grampos e
puxando o condensador
na sua direcção.
(Pode existir alguma
água nos tubos, o que é
normal).
PASSO 3.
Lave o condensador, a
partir da parte posterior,
com água para retirar
quaisquer depósitos de
cotão.
PASSO 4.
Instale novamente a
unidade do condensador
- certifique-se de que a
unidade é totalmente
empurrada, que os 3
grampos são bem
apertados e que as setas
de direcção no painel
frontal do condensador
estão a apontar para cima.
●
Verifique se:
- As setas de posição estão a apontar para cima.
- Os 3 grampos são novamente afixados na posição de ‘bloqueio’.
Rodar os 3 grampos
! Não limpar o condensador pode provocar a falha
prematura da sua secadora
54
Page 55

Instalação
Onde colocar a sua máquina
●
Instale a sua máquina a alguma distância de
ligações de gás, fogões, aquecedores e placas de
cozinha, uma vez que as chamas podem danificar
o aparelho.
mínima espaço 10 mm
●
Se pretende instalar o aparelho
por baixo de uma bancada
ou de um balcão, não se
esqueça de deixar um
mínima espaço
15 mm
espaço de 10 mm entre a
bancada e quaisquer objectos
ou acima do tampo da
máquina e um espaço de
15 mm entre as partes
laterais da máquina e mobiliário ou paredes.
Assegura assim a correcta circulação do ar.
Certifique-se de que as ventilações posteriores não
ficam obstruídas.
Ventilação
Quando a secadora estiver em utilização, tem de
existir uma ventilação adequada. Certifique-se de que
coloca a sua máquina num ambiente que não seja
húmido e de que existe uma ventilação adequada. O
fluxo de ar em torno da secadora é essencial para
condensar a água produzida durante a lavagem; a
secadora não funciona em perfeitas condições se
encerrada no espaço fechado ou armário.
! Não recomendamos a instalação da secadora num
armário, mas o aparelho nunca deve ser instalado por
trás de uma porta que se possa trancar, uma porta
deslizante ou com uma dobradiça instalada no lado
oposto à porta da máquina.
! Se utilizar a secadora numa sala pequena e fria,
pode gerar-se alguma condensação.
Instruções de inversão da porta
Suporte da
Gancho
Trinco da
porta
Gancho
A porta da sua secadora é reversível e pode mudar-se
facilmente. Mude o suportes de trinco na diagonal e
os parafusos. Mude o trinco da porta e fechadura
com as placas de paragem opostas (ver diagrama
acima).
porta
Drenagem da água
Se a sua secadora estiver instalada junto a um ponto
de canalização, a água pode ser canalizada para este
sistema. Isto afasta a necessidade de esvaziar o
recipiente de água. Se a secadora estiver empilhada
sobre ou instalada junto à máquina de lavar roupa,
pode partilhar o mesmo ponto de canalização.
altura do cano deve ser inferior a 1m
A partir da parte
A
inferior da secadora.
Retire o grampo e o tubo da
posição mostrada (ver diagrama).
Retire o grampo e o
tubo deste ponto...
nstale um tubo com um
I
comprimento adequado no novo
local
(ver diagrama) e instale
novamente o grampo.
!
Certifique-se de que o tubo não fica obstruído ou
...instale o novo tubo e
monte o grampo aqui.
dobrado quando a secadora estiver na sua posição
final.
Ligações eléctricas
Certifique-se do seguinte antes de introduzir a ficha
numa tomada de corrente eléctrica:
●
A tomada tem de ter ligação à terra.
●
A tomada deve ter capacidade para suster a potência
máxima de máquinas, que está indicada na chapa
de classificação (ver Descrição da máquina de secar).
●
A tensão deve encontrar-se dentro dos valores
indicados na chapa de classificação (ver
Descrição da máquina de secar).
●
A tomada deve ser compatível com a ficha da
máquina. Se não for este o caso, substitua a ficha
ou a tomada.
! A secadora não deve ser instalada ao ar livre, mesmo
que seja num espaço abrigado. Pode ser extremamente
perigosa a exposição à chuva ou tempestades.
! Depois de instalada, a cablagem eléctrica e ficha da
máquina deve estar facilmente alcançável.
! Não utilize cabos de extensão.
! O cabo de alimentação não deve ser dobrado ou pisado.
! O fio de alimentação eléctrica deve ser verificado
periodicamente e substituído por um fio preparado
especialmente para esta secadora, apenas por técnicos
autorizados (ver Reparações). Fios de alimentação
novos ou mais longos são fornecidos sem custos
adicionais por representantes autorizados.
! O fabricante recusa qualquer responsabilidade caso
estas regras não seja seguidas.
! Se tiver dúvidas sobre o mencionado acima consulte
um electricista qualificado.
Antes de iniciar a utilização da sua
máquina de secar roupa
Depois de instalar a sua máquina e antes de iniciar a
sua utilização, limpe o interior do tambor para
remover qualquer pó que se tenha acumulado
durante o transporte.
P
55
Page 56

Descrição da máquina de secar
P
Para abrir a porta
Pressione e liberte o painel frontal na
posição apresentada
Unidade do
condensador
(tampa abra)
Características
Tampa do condensador
Pega da tampa do condensador
(Puxar para abrir)
Recipiente de
água
Chapa de
classificação
Números
de modelo
e de série
Entrada de ar
Filtro
Painel de controlo
Botões de
Selecção de PROGRAMA
Visor
Botão e luz
BLOQUEIO INFANTIL
LIGAR/DESLIGAR
O botão LIGAR/DESLIGAR : Se a secador estiver
a funcionar e se premir este botão, a secador pára.
Pressione novamente para reiniciar a secagem.
Os botões de Selecção de PROGRAMA definem o
programa: prima o botão correspondente ao
programa que pretende seleccionar (ver Arranque e
Programas).
Botões/indicadores de OPÇAO : estes botões
seleccionam opções disponíveis para o programa
escolhido (ver Controlos). Os indicadores no visor
juntos aos botões acendem-se para mostrar que a
opção foi seleccionada.
O botão INICIAR/PAUSA inicia um programa
seleccionado. Ao premir este botão, é emitido um
sinal sonoro (bip) e o visor mostra a indicação
PAUSA . Durante a execução de um programa, se
pressionar este botão secador pára.
Botão
Botões de
OPÇAO
A luz fica verde quando o programa está em
funcionamento, laranja e intermitente se o programa
estiver em pausa ou verde e intermitente se estiver á
espera para iniciar um programa (ver Arranque e
Programas).
O Visor mostra avisos e informações ácerca
do programa (ver a página seguinte).
Botão
mantenha sob pressão este botão depois de
seleccionar o seu programa e quaisquer opções;
impede desta forma que as definições do programa
sejam alteradas
a indicação BLOQUEIO DAS TECLAS . Quando o
indicador está aceso, os restantes botões estão
desactivados.
Mantenha o botão sob pressão para cancelar e o
indicador apaga-se; o visor mostra por alguns
momentos DESBLOQUEIO .
de Bloqueio Infantil : Prima e
/
ícone
, o visor mostra por breves momentos
Botão e Luz
INICIAR/PAUSA
56
Page 57

O Visor
Seleccionar o idioma
Da primeira vez que liga a sea secadora, deverá seleccionar o seu idioma favorito a partir da lista de idiomas
disponíveis.
Para mudar: a selecção do idioma actual deve estar
intermitente na primeira linha do visor.
- Prima e mantenha sob pressão os três botões:
durante 5 segundos.
- Prima o botão Bloqueio Infantil ou Secagem
Temporizada para percorrer a lista
- Quando o idioma que pretende estiver intermitente na
linha superior do visor, premir o botão Nível de Secagem
selecciona a sua opção.
Compreender o visor
Selecção e visualização do programa
O programa seleccionado é apresentado na primeira linha do visor ao seleccionar o botão correspondente; a
mensagem é apresentada durante a execução do programa.
ALGODÃO RESISTENTE
ALGODÃO DELICADO
SINTÉTICOS
ROUPA DE E DIAS
ENGOMAR FÁCIL
REFRESCA
DELICADOS
LÃ
P
Quando selecciona o botão de memória, o visor mostra o programa seleccionado com a indicação ‘M’ antes
do respectivo nome, por exemplo, M ALGODÃO RESISTENTE (ver Arranque e Programas).
Níveis de secagem
Durante a selecção de um programa para um programa automático que tenha diferentes níveis de secagem
disponíveis (ver Tabela Programas).
A segunda linha do visor mostra o nível de secagem que pretende, por cada pressão no botão de Nível de
Secagem a opção seguinte na lista em baixo é seleccionada e apresentada.
ENGOMAR
PENDURAR
ARMÁRIO
O visor também mostra: um, dois ou três blocos, dependendo da sua selecção.
São apresentados durante o decorrer dos programas.
Secagem de ferro: Seca as roupas para passar a ferro.
Secagem de cabide: Seca as suas roupas, que ficam prontas para
pendurar no cabide.
Secagem de armário: Seca as suas roupas, que ficam prontas a vestir.
57
Page 58

O Visor
P
Progresso do programa
A segunda linha do visor mostra o estado do programa e o seu progresso:
(mensagens longas ao longo da linha)
ANTI-RIUGAS
SECAGEM
ARREFECIMENTO
FIM DO CICLO, TRATAMENTO ANTI-RIUGAS
FIM DO CICLO, VAZAR O RECIPIENTE DA ÁGUA
Se a opção Secagem Mista estiver disponível e seleccionada, esta linha mostra os diferentes níveis de
secagem atingidos:
ENGOMAR FÁCIL ALCANÇADO
PRONTA PARA PENDURAR
(se a opção estiver
disponível e seleccionada).
(se a opção
estiver disponível
e seleccionada).
Secagem temporizada
Depois de seleccionar um programa que tenha a opção de secagem temporizada, prima o botão e o visor
aumenta o tempo seleccionado por cada vez que prima e solta o botão (ver Arranque e Programas).
Cada pressão avança
e e, em seguida, repete.
:
0:20 0:40 1:00 1:20 1:40 2:00 2:20
As peças delicadas têm um tempo máximo de:
As barras à direita do tempo acendem-se para darem a
indicação da duração de tempo seleccionado:
o:20 0:40 1:00 1:20 1:40 2:00 2:20
O tempo seleccionado permanece no visor depois do
programa iniciar.
1:40
Tempo de atraso e até ao fim
Alguns programas podem ter um início atrasado (ver Arranque e Programas). Prima o botão Atraso e o
indicador fica intermitente.
Cada pressão do botão Atraso avança a definição do
atraso em períodos de 1 hora, de: ao , em
em seguida, após alguns segundos cancela o atraso.
O tempo de atraso é apresentado no visor junto ao botão
Atraso.
O visor entra em contagem decrescente dos minutos
referentes ao período de atraso depois de premir o botão
Iniciar/Pausa .
A segunda linha do visor mostra PARTE ENTRE
1h 24h
OFF
Após a conclusão do período de atraso (ou caso não tenha sido seleccionado o início atrasado): o visor indica o
Tempo previsto para o fim do programa para programas automáticos. O tempo restante do actual Programa
seleccionado também é apresentado nesta parte do visor.
58
Page 59

O Visor
Avisos
A segunda linha do visor também mostra avisos e lembretes:
(os lembretes ocorrem no fim de um programa)
FIM DO CICLO, VAZAR O RECIPIENTE DA ÁGUA
●
Lembrete de que o recipiente de água deve ser
esvaziado sempre que se utilize a máquina de
secar (ver Manutenção).
VAZAR O RECIPIENTE DA ÁGUA
●
Indica que o recipiente de água está cheio. A
mensagem demora alguns segundos a desaparecer
depois de colocar novamente o recipiente de água;
a máquina de secar tem de estar em funcionamento
para que isto aconteça (ver Controlos).
Nota: Se o recipiente de água estiver cheio e esta
mensagem for apresentada, a temperatura é
desligada e a sua roupa não seca.
LIMPAR O CONDENSADOR
●
Esta mensagem indica que tem de limpar a
Unidade do condensador (ver Manutenção) e
ocorre regularmente, dependendo da frequência
com que utiliza a secadora. Ao concluir o programa
seguinte, a mensagem é cancelada.
LIMPAR O FILTRO
●
Lembra-o de limpar após cada utilização do
secadora (ver Manutenção).
Arranque e Programas
Escolher um programa
1. Ligue a secadora a uma tomada de corrente eléctrica.
2. Escolha a sua roupa de acordo com o tipo de
tecido (ver Roupa).
3. Abra a porta e certifique-se de que o filtro está
limpo e bem colocado e de que o recipiente da
água está vazio e na respectiva posição (ver
Manutenção).
4. Carregue a máquina e certifique-se de que
nenhuma peça fica presa no fecho da porta.
Feche a porta.
5. Se o Visor não estiver aceso: Pressione o botão
LIGAR/DESLIGAR
6. Prima o botão de selecção de Programa que
corresponde ao tipo de tecido a secar, verificando
a tabela de Programas (ver Programas) bem como
as indicações para cada tipo de tecido (ver Roupa).
Se o botão for seleccionado, não são
necess
7. Escolha as opções Secagem Temporizada ou
Níveis de Secagem:
- Se optar por Secagem Temporizada, prima e
solte o botão Temporizado até visualizar o
período de tempo pretendido.
ou - Para alterar a definição de secagem
predefinida, prima e solte o botão Níveis de
Secagem até ver indicado o nível pretendido.
! Consulte a tabela Programas para obter mais
detalhes.
os passos 7, 8 e 9
ários
ver em seguida).
(
8. Defina um tempo de atraso, bem como outras
opções, conforme necessário (ver O Visor).
9. Se pretender seleccionar um sinal sonoro no final
de um programa, pressione o botão de opção
ALARME .
10. Pressione o botão INICIAR/PAUSA para
começar. O visor mostra a hora prevista para terminar.
Durante o programa de secagem, pode verificar
a sua roupa e retirar peças que já estejam secas
enquanto as restantes continuam a secar.
Quando fechar novamente a porta, prima o
botão INICIAR/PAUSA de modo a retomar a
secagem.
11. Durante os últimos minutos dos Programas de
Secagem, antes do programa chegar ao fim,
entra na fase de Arrefecimento (os tecidos são
arrefecidos), que deve ser sempre concluída.
12. O sinal sonoro (se a opção Alarme tiver sido
seleccionada) soa quando o programa chegar
ao fim, o visor apresentará:
FIM DO CICLO TRATAMENTO ANTIRUGAS .
Abra a porta, retire a roupa, limpe o filtro e
coloque-o novamente. Esvazie o recipiente de água
e coloque-o novamente (ver Manutenção).
Se a opção Cuidado Pós-Antirugus tiver sido
seleccionada e não retirar a roupa imediatamente,
o secador roda ocasionalmente durante 10 horas
ou até abrir a porta.
13. Desligue a secadora.
P
Botão Memória
Da primeira vez que prime este botão, a segunda linha do visor mostra PRESSIONE PARA MEMORIZAR
Depois de seleccionar o seu programa e opções favoritas, pode guardar estas definições premindo e mantendo
sob pressão o botão Memória durante no mínimo 5 segundos; é então emitido um sinal sonoro e a segunda linha
do visor mostra a indicação MEMO
seguida, o botão Iniciar/Pausa e este programa é executado
Se pretender, pode alterar os seus programas memorizados, seleccionando um novo programa e/ou opções e
prima e mantenha sob pressão o botão (
:
Da próxima vez que necessitar deste programa, prima o botão , e, em
.
como acima
).
59
Page 60

Arranque e Programas
P
Programas especiais
Programa Engoma fácil
O ‘Engoma fácil’ é um programa breve de 10 minutos (8 minutos de calor, seguidos de 2 minutos de um período de
rotação a frio), que ventila as fibras das roupas que foram deixadas na mesma posição/Local durante um período
de tempo prolongado. O ciclo relaxa as fibras e facilita a passagem a ferro.
! O ‘Engoma fácil’ não é um programa de secagem e não deve ser utilizado com peças de roupa molhadas.
Para obter os melhores resultados:
1. Não carregue mais do que a capacidade máxima. Estes números referem-se ao peso em seco:
Tecido Carga máxima
Algodão e Misturas de algodão 2,5 kg
Sintéticos 2 kg
Gangas 2 kg
2. Descarregue a secadora imediatamente após o fim do programa, pendure, dobre ou engome as peças
de roupa e guarde-as no armário. Caso isto não seja possível, repita o programa.
O efeito ‘Engoma fácil’ varia de tecido para tecido. Funciona bem com tecidos tradicionais como algodão e
misturas de algodão e menos bem em fibras acrílicas e em materiais como Tencel®.
Programa de Lãs
●
Este programa destina-se a roupas delicadas que possam ser utilizadas na máquina de secar e que estejam
marcadas com o símbolo .
●
Pode ser utilizado em cargas máximas de 1kg (aproximadamente 3 camisolas).
●
Recomendamos que volte estas peças do avesso antes de colocar na máquina.
●
Este programa demora cerca de 60 minutos, mas pode demorar mais tempo, dependendo do volume e
densidade da carga e a velocidade de rotação utilizada na sua máquina.
●
As cargas secas através da utilização deste programa, normalmente, ficam prontas a vestir, mas em peças
mais pesadas, as pontas podem ficar húmidas. Permita que sequem naturalmente uma vez que a secagem
artificial em demasia pode danificar as peças.
! Ao contrário de outros materiais, o mecanismo de encolhimento da lã é irreversível, ou seja, não volta ao tamanho,
nem à forma original.
! Este programa não é adequado a roupas acrílicas.
O ciclo de secagem para lã desta máquina de secar foi aprovado pela The Woolmark Company para secar peças
que tenham etiquetas Woolmark que indiquem que elas se podem lavar e secar à máquina, desde que tais peças
sejam secas seguindo as instruções incluídas na etiqueta e também as indicadas pelo fabricante desta máquina
de secar (M0616).
Este é o primeiro e único ciclo de secagem para lã aprovado pela The Woolmark Company.
Modificadores de opção do programa
Secagem mista
Disponível com os programas Algodão Resistente e Sintéticos.
Esta opção é utilizada depois de seleccionar o nível de secagem Secagem de armário ou Secagem de cabide.
Desta forma, pode retirar as peças quando chegarem ao nível de Secagem de cabide ou Secagem de ferro.
Quando o secador detectar que atingiu a Secagem de ferro, o visor mostra a indicação:
ENGOMAR FÁCIL ALCANÇADO e é emitido um sinal durante cerca de 2 minutos; abra a porta e retire as peças
que precisa de passar a ferro.
Em seguida, feche a porta e prima o botão Iniciar/Pausa e o programa é retomado.
! Se não abrir a porta no período de 2 minutos, o secador retoma a secagem sem ter de premir o botão Iniciar/Pausa.
O programa Secagem de cabide e termina com FIM DO CICLO. VAZAR O RECIPIENTE DA ÁGUA
O programa Secagem de armário continua até que a secadora detecte que a carga chegou ao nível de Secagem
de cabide, o visor mostra: PRONTA PARA PENDURAR e é emitido um sinal sonoro durante 2 minutos; abra a
porta e retire as peças que tem de pendurar para concluir a secagem.
De seguida, feche a porta e prima o botão Iniciar/Pausa e o programa é retomado
! Se não abrir a porta no período de 2 minutos, o secador retoma a secagem sem ter de premir o botão Iniciar/Pausa.
Ao chegar ao nível Secagem de armário, a secadora concluiu a secagem a frio (e, se seleccionado, o
Pós-Cuidado) e termina com o FIM DO CICLO. VAZAR O RECIPIENTE DA ÁGUA
.
Mini-Carga
Disponível com os programas Algodão Resistente e Sintéticos.
Utilizado com cargas entre 1 e 2kg.
Este programa optimiza o programa Automático para carga mais pequenas e melhora a estimativa do Tempo até ao fim.
60
Page 61

Arranque e Programas
Tabela Programas
! Se o Visor não estiver aceso; Prima o botão LIGAR/DESLIGADO e, em seguida, seleccione o programa.
Programa
Algodão
Resistente
Algodão
Delicado
Sintéticos
Roupa de 7
Dias
O que faz... Como defini-lo... Nota:
Seca a roupa de
Algodão em Calor Alto
1. Prima o botão Algodão – Resistente
2. Seleccione a opção Temporizado ou
Automático .
- Se optar por Secagem Temporizada , consulte a
página seguinte, ou...
- Para alterar a definição de secagem predefinida,
prima e solte o botão Níveis de Secagem até ver
indicado o nível pretendido.
3. Seleccione qualquer Opção, caso requerido.
4. Prima o botão Iniciar/Pausa
Opções disponíveis:
Alarme , Início Atrasado
Cuidados Pré-Antiriugas ,
Cuidados Pós-Antirugas
Mini-Carga
*Secagem mista
Opções de secagem:
ENGOMAR
PENDURAR
ARMÁRIO
Seca a roupa de
Algodão em Baixo Calor
1. Prima o botão Algodão – Delicado
2. Seleccione um tempo de secagem, ver
Temporizado , consulte a página
Opções disponíveis:
ver Temporizado ,
consulte a página seguinte
seguinte.
Seca os Sintéticos em
Calor Alto
1. Prima o botão Sintéticos
2. Seleccione a opção Temporizado ou
Automático .
- Se optar por Secagem Temporizada , consulte a
página seguinte, ou...
- Para alterar a definição de secagem predefinida,
prima e solte o botão Níveis de Secagem até ver
indicado o nível pretendido.
3. Seleccione qualquer Opção, caso requerido.
4. Prima o botão Iniciar/Pausa
Opções disponíveis:
Alarme , Início Atrasado
Cuidados Pré-Antiriugas ,
Cuidados Pós-Antirugas
Mini-Carga
*Secagem mista
Opções de secagem:
ENGOMAR
PENDURAR
ARMÁRIO
Seca lençóis e toalhas
na definição Baixo
Calor
1. Prima o botão Roupa de 7 Dias
2. Seleccione qualquer Opção, caso requerido.
3. Prima o botão Iniciar/Pausa
Opções disponíveis:
Alarme , Início Atrasado
Cuidados Pré-Antiriugas ,
Cuidados Pós-Antirugas
Automático
: predefinição
Automático
: predefinição
P
●
Um programa Automático
Lã
Delicados
(ex. Acrílico)
Seca as peças de Lã,
(ver página anterior).
Seca a roupa na
definição Baixo Calor,
pronta a vestir.
1. Prima o botão Lã
2. Seleccione
3.
Prima o botão Iniciar/Pausa
Opção Alarme, caso requerido.
1. Prima o botão Delicados
2. Caso o programa Temporizado for
requerido (ver Temporizado, consulte a
página seguinte).
Caso contrário, a predefinição é Automatica
3. Seleccione qualquer Opção, caso requerido.
Opções disponíveis:
Alarme
●
Um programa Automático
Opções disponíveis:
Alarme , Início Atrasado
Cuidados Pré-Antiriugas ,
Cuidados Pós-Antirugas
●
a predefinição é Automatica
4. Prima o botão Iniciar/Pausa
Refresca
Programa de 20 minutos
que areja a roupa com
ar frio. Igualmente
utilizado para arrefecer
1. Prima o botão Refresca
2. Seleccione Opção Alarme, caso requerido.
3. Prima o botão Iniciar/Pausa
Opções disponíveis:
Alarme
roupa quente.
Engomar
fácil
Breve programa
(aproximadamente 10
minutos) que amacia as
1. Prima o botão Engomar Fácil
2. Seleccione
Opção Alarme, caso requerido.
3. Prima o botão Iniciar/Pausa
! Este não é um programa
de secagem (ver página
anterior).
fibras da roupa que está
pronta para ser
engomada.
Opções disponíveis:
Alarme
Nota: *Secagem Mista só disponível para a Secagem de armário e Secagem de cabide (consulte os
Modificadores de opção do programa).
61
Page 62

Arranque e Programas
Tabela de programas temporizados: Primeiro, seleccione um programa (consulte a Tabela de Programas).
P
Secagem
temporizada
Utilize sempre a Timed
Drying (Secagem
Temporizada) para cargas
com peso inferior a 1kg
(0:20, 0:40,
1:00, 1:20, 1:40,
2:00 or 2:20
Horas: Minutos)
ou, se preferir, um resultado
de secagem diferente.
A definição de calor
depende da opção de
material seleccionada.
Controlos
! Atencão, se o programa não pode ser alterado depois de
premido o botão INICIAR/PAUSA .
Para alterar um programa seleccionado, prima o botão
INICIAR/PAUSA ; a luz fica laranja e intermitente para
indicar que o programa está em pausa. Seleccione o novo
programa e quaisquer opções necessárias e, de seguida, a
luz ficará verde
e o novo programa é iniciado.
●
Botões de OPÇÃO
Estes botões são utilizados para personalizar o programa
seleccionado para os seus requisitos. Antes de poder
seleccionar uma opção, terá de seleccionar um programa,
premindo o respectivo botão
encontram-se disponíveis para todos os programas (ver
Arranque e Programas). Se uma opção não se encontra
disponível e caso prima o botão, o sinal sonoro será emitido
3 vezes. Se a opção estiver disponível, o indicador no visor,
junto aos botões inferiores, acende-se para mostrar que a
opção foi seleccionada.
Atraso de Tempo
O início de alguns programas (ver O Visor e ver Arranque e
Programas) pode ser atrasado num máximo de 24 horas.
Certifique-se de que o recipiente de água está esvaziada
antes de definir um início atrasado.
Cuidado Pré-Antiriugas
Esta opção apenas se encontra disponível caso seja
seleccionado um início atrasado. Por vezes, a roupa
entra num ciclo de rotação durante o período atrasado,
de modo a ajudar a prevenir a formação de vincos.
Alarme
Encontra-se disponível em todos os programas e permite a
emissão de um sinal sonoro no final do ciclo de secagem,
de modo a avisá-lo que a roupa já pode ser removida.
Cuidado Pós-Antirugas
Quando disponível e seleccionada, as peças entram, por
vezes, num ciclo de rotação após o final dos ciclos de
secagem e Rotação a Frio, de modo a ajudar a prevenir a
formação de vincos, caso não esteja disponível para remover a
carga imediatamente após a conclusão do programa.
●
VISOR
O visor apresenta a duração do tempo de atraso ainda por
decorrer ou uma indicação do tempo restante para um
programa de secagem (ver O Visor).
O atraso ou tempo restante é apresentado em horas e
minutos e em contagem decrescente.
Quando os programas temporizados são seleccionados, o
tempo apresentado ao longo do ciclo é o tempo restante.
Quando um programa Automático é seleccionado, o tempo
apresentado é uma estimativa do tempo restante.
. Prima novamente o botão INICIAR/PAUSA
. Nem todas as opções
88:88
1. Prima e solte o botão Temporizado até o
visor apresentar a selecção requerida.
Cada vez que premir avança ,
, , , ,
em seguida repete
●
Os delicados têm um tempo máximo de
em seguida e
.
.
●
Quando apresentada , a opção
Automático encontra-se disponível se
mudar de ideias
2. Seleccione qualquer Opção, caso requerido.
3. Prima o botão Iniciar/Pausa
.
Quando o programa é seleccionado, o visor apresenta o
tempo requerido para secar uma carga completa. Após
cerca de 10 minutos o controlador calcula uma estimativa
melhor do tempo de ciclo. Os sinais de dois pontos entre as
horas e os minutos no visor passam a intermitente para
indicar que o tempo entrou em contagem decrescente.
O visor apresenta igualmente qualquer eventual problema
com o secador. Caso tal se verifique, o visor apresentará
“F”, seguido de um número de código de falha (ver
Resolução de Problemas).
●
Esvazie o recipiente de água
(Se esvaziou o secador, este ícone poderá ser ignorada, uma
vez que não há necessidade de esvaziar o recipiente de água).
As mensagens são apresentadas para Ihe lembrar de
esvaziar o recipiente da água.
Se o recipiente de água encher durante um programa, o
aquecimento desliga-se e o secador executa um período
Arrefecimento. Em seguida, pára e uma mensagem indica
VAZAR O RECIPIENTE DA ÁGUA .
Deverá esvaziar o recipiente de água e reiniciar o secador,
caso contrário, a roupa não ficará seca. Depois de reiniciar
o secador a mensagem demorará alguns segundos a
desaparecer.
Para evitar este procedimento, esvazie sempre o recipiente
de água após cada utilização do secador (ver Manutenção).
●
Abertura da Porta
A abertura da porta durante um programa provoca a
interrupção do secador e os seguintes efeitos:
●
O visor mostra PAUSA .
●
Durante uma fase de atraso, o mesmo prosseguirá com
a contagem decrescente. O botão Iniciar/Pausa terá de
ser premido para retomar o programa de atraso.
O visor muda para mostrar o estado actual.
●
Durante a parte de secagem do programa, o sinal de
dois pontos no visor deixa de piscar para indicar que a
contagem decrescente foi interrompida.
O botão Iniciar/Pausa terá de ser premido para retomar
o programa. O visor muda para mostrar o estado actual,
os dois pontos ficam intermitentes e a contagem
decrescente continua.
●
Durante o Cuidado Pós-Antiriugas, o programa terminará.
Se premir o botão INICIAR/PAUSA, um novo programa
será reiniciado desde o princípio.
●
Nota
Em caso de corte de electricidade, desligue a alimentação
ou remova a ficha. Quando a electricidade for reposta, prima
o botão Iniciar/Pausa para retomar o programa.
Opções disponíveis:
Alarme , Início Atrasado
Cuidados Pré-Antiriugas ,
Cuidados Pós-Antirugas
Consulte os tempos de
secagem propostos (ver
Roupa).
Os últimos 10 minutos
destes programas é o
Arrefecimento .
62
Page 63

Roupa
Escolher a sua roupa
• Consulte os símbolos nas etiquetas das roupas,
de modo a certificar-se de que os artigos podem
ser utilizados na secadora.
• Escolha a roupa por tipo de tecido.
• Esvazie os bolsos e verifique os botões.
• Feche os fechos de correr e desaperte cintos e
correias.
• Torça cada peça de modo a eliminar o máximo de
água possível.
! Não carregue peças a pingar na secadora.
Carga máxima
Não carregue mais do que a capacidade máxima.
Estes números referem-se ao peso em seco:
Fibras naturais: 7.5 kg máx.
Fibras sintéticas: 3 kg máx.
! NÃO sobrecarregue a máquina, uma vez que pode
resultar num desempenho de secagem reduzido.
Carga típica
Nota: 1kg = 1000g
Roupas
Blusa de algodão 150 g
Outros 100 g
Vestido de algodão 500 g
Outros 350 g
Calças de ganga 700 g
10 fraldas 1000 g
Camisa de algodão 300 g
Outros 200 g
T-Shirt 125 g
Etiquetas de cuidado na lavagem
Observe as etiquetas nas suas peças de roupa,
especialmente se está a utilizar a secadora pela
primeira vez. Os símbolos que se seguem são os
mais comuns:
Pode ser seco na máquina
Não pode ser seco na máquina
Seque com a temperatura máxima
Seque com a temperatura mínima
Peças não adequadas para secagem na máquina
• Artigos que contenham borracha ou materiais tipo
borracha ou películas de plástico (almofadas ou
material em PVC), quaisquer artigos inflamáveis ou
objectos que contenham substâncias inflamáveis
(toalhas vaporizadas com laca de cabelo).
• Fibras de vidro (alguns tipos de reposteiros).
• Artigos que tenham sido limpos a seco.
• Itens com o código ITCL (ver Peças
delicadas). Podem ser limpos com produtos de
limpeza a seco domésticos. Siga as instruções
cuidadosamente.
• Peças volumosas (colchas, sacos-cama,
almofadas, cobertas grandes, etc). Estes artigos
expandem-se e podem impedir o fluxo de ar no
interior da secadora.
P
Peças domésticas
Capa de edredão em algodão 1500 g
(Duplo) Outros 1000 g
Toalha de mesa grande 700 g
Toalha de mesa pequena 250 g
Pano de cozinha 100 g
Toalhão de banho 700 g
Toalha de rosto 350 g
Lençol de banho 500 g
Lençol (solteiro) 350 g
No fim de um ciclo de secagem, os algodões ainda
devem estar húmidos caso tenha agrupado algodões
e sintéticos. Se isto acontecer, basta aplicar mais um
breve período de secagem.
●
Nota: Nos últimos 10 minutos de cada período de
tempo,procede-se à secagem a frio; tenha em
consideração esta função ao definir o tempo, uma
vez que este período não seca a sua roupa.
63
Page 64

Roupa
P
Peças delicadas
Cobertores e cobertas de cama: artigos em acrílico
(Acilan, Courtelle, Orion, Dralon) devem ser secos
com especial cuidado com um TEMPERATURA
• Secagem: Se pretender engomar algumas das
suas roupas, podem ser retiradas da máquina
ainda um pouco húmidas. As restantes poderão
ficar mais tempo, se precisar delas
completamente secas.
BAIXA. Evite secar por um longo período de tempo.
• Definição de temperatura.
Peças pregueadas ou enrugadas: leia as instruções
de secagem do fabricante da peça.
• Temperatura ambiente: se o espaço em que a
máquina está instalada estiver frio, poderá
Artigos com goma: não seque estes artigos com
demorar mais tempo a secar as suas roupas.
peças sem goma. Certifique-se de que retira o
máximo da solução de goma da carga antes de
colocá-la na secadora. Não seque em demasiado: a
goma transforma-se em pó e deixa a sua roupa mole,
eliminando o propósito da goma.
• Volumes: alguns artigos mais volumosos devem ser
secos na máquina com cuidado. Sugerimos que
remova estes artigos várias vezes, sacuda-os e
volte a colocá-los na máquina até que estejam
completamente secos.
Tempos de secagem
! Não seque em demasiado as suas roupas.
Todos os tecidos contêm um pouco de humidade
Estes tempos são aproximados e podem variar
natural, que os mantêm suaves e macios.
dependendo de:
A tabela (ver abaixo) apresenta tempos de secagem
• Quantidade de água mantida nas roupas após o
ciclo de centrifugação: as toalhas e peças
delicadas retêm muita água.
APROXIMADOS em Horas : Minutos, conforme
apresentados no visor, os tempos são igualmente
apresentados em minutos apenas para referência.
• Tecidos: artigos que sejam do mesmo tipo de
tecido, mas que sejam de texturas e espessuras
diferentes poderão não ter o mesmo tempo de
secagem.
• Quantidade de roupa: artigos únicos ou pequenas
cargas podem demorar mais tempo a secar.
Algodão
1 kg
0:40 - 0:55
1:00
Calor Alto
Duração automática
Minutos automáticos
Definição Secagem
Temporizada)
0:30 - 0:50
30 - 50
0:20 ou 0:40 ou 1:00
Tempos de secagem de 800-1000rpm na máquina de lavar
Sintéticos
1 kg
Calor Alto
Duração automática
Minutos automáticos
Definição Secagem
Temporizada)
0:30 - 0:40
30 - 40
0:40
ou 1:00
Tempos de secagem em centrifugação reduzida na máquina de lavar
Delicados
(Acrylics)
Baixo Calor
Duração automática
Minutos automáticos
Definição Secagem
Temporizada)
0:40
Tempos de secagem em centrifugação reduzida na máquina de lavar
Metade da carga
2 kg
0:55 - 1:10
50 - 70
ou 1:20
Metade da carga
1 kg
0:40 - 1:20
40 - 80
ou 1:00 ou 1:20
Os tempos apresentados destinam-se a programas
Secagam Automática na opção Armário.
As definições de Secagem Temporizada são igualmente
apresentadas para ajudá-lo a escolher a opção
adequada.
Os pesos referem-se a artigos secos.
3 kg
70 - 80
1:20
4 kg
1:10 - 1:20
80 - 100
1:20
ou 1:40
Metade da carga
2 kg
0:40 - 0:50
40 - 50
0:40
1:20 - 1:30
1:40
ou 1:00
5 kg
100 - 120
ou 2:00
6 kg
1:40 - 2:20
120 - 140
2:00
ou 2:20
Carga completa
7 kg
2:20 - 2:30
140 - 150
2:20
Carga completa
3 kg
1:10 - 1:30
50 - 70
ou 1:00 ou 1:20
0:50
2 kg
1:20 - 2:20
80 - 140
1:20
ou 1:40 ou 2:00 ou 2:20
Carga completa
7.5 kg
2:30 - 2:40
150 - 160
2:20
64
Page 65

Avisos e Sugestões
! O equipamento foi concebido e construído de
acordo com normas de segurança internacionais.
Estes avisos são apresentados por razões de
segurança e devem ser seguidos minuciosamente.
Segurança Geral
●
Esta secadora não se destina à utilização por pessoas
(incluindo crianças) com capacidades físicas,
sensoriais ou mentais reduzidas ou com falta de
experiência ou conhecimento, a menos que tenham
supervisão ou instruções quanto à utilização do
aparelho por parte de uma pessoa responsável
pela sua segurança.
●
Esta secadora foi concebida para utilização
doméstica e não utilização profissional.
●
Não toque no equipamento com os pés
descalços, nem com as mãos ou pés molhados.
●
Desligue a máquina retirando a ficha e não puxando
o fio.
●
As crianças não devem aproximar-se da secadora
durante a sua utilização. Depois da utilização da
secadora, desligue-a no botão e da corrente
eléctrica. Mantenha a porta fechada de modo que as
crianças não utilizem a máquina como um brinquedo.
●
As crianças não devem ser deixadas sozinhas
para se garantir que não brincam com a secadora.
●
O aparelho deve ser instalado correctamente com a
ventilação adequada. A entrada de ar no painel
frontal e a ventilação posterior por trás da secadora
nunca devem estar obstruídos (ver Instalação).
●
Nunca utilize a secadora em carpetes, cuja altura
impeça o ar de entrar na secadora a partir da base.
●
Verifique se a secadora está vazia antes de carregá-la.
●
●
●
●
●
●
●
●
●
●
●
●
O painel traseiro da secadora pode ficar
muito quente. Nunca toque neste painel
durante a utilização.
Não utilize a secadora sem que o filtro, o recipiente
de água e o condensador estejam seguramente
afixados nas respectivas posições (ver Manutenção).
Não utilize amaciador líquido na sua máquina de
secar; adicione-o ao enxaguamento final da sua
máquina de lavar.
Não sobrecarregue a secadora (ver Roupa para
além das cargas máximas).
Não carregue peças que estejam a pingar.
Seque apenas artigos que tenham sido lavados com
água e detergente, enxaguados e centrifugados.
Existe um risco de incêndio se secar peças que
NÃO tenham sido lavadas com água.
Verifique cuidadosamente todas as instruções nas
etiquetas das roupas (ver Roupa).
Não seque peças de vestuário que tenham sido
tratadas com produtos químicos.
Nunca secar artigos contaminados com substâncias
inflam
(óleo de culinária, acetona, álcool,
áveis
Gasolina, querosene, tira-nódoas, turpentina, ceras,
removedores de cera e lacas para o cabelo), a
menos que lavados com água quente e com uma
quantidade considerável de detergente extra.
Não secar borracha, artigos com partes em borracha
e peças de vestuário, almofadas com aplicações
em borracha, espuma (espuma de látex), borracha,
plástico, toucas de duche, têxteis impermeáveis,
fraldas ou pensos descartáveis, polietileno ou papel.
Não seque artigos grandes e muito volumosos.
Não seque fibras acrílicas a altas temperaturas.
●
Remova todos os objectos dos bolsos, em especial,
isqueiros (risco de explosão).
●
Complete cada programa com a respectiva Fase
de rotação a frio.
●
Não desligue a máquina quando ainda existirem
artigos quentes no interior.
●
Limpe o filtro após cada utilização (ver Manutenção).
●
Esvazie o recipiente de água e coloque-o
novamente (ver Manutenção).
●
Limpe a unidade do condensador após intervalos
regulares (ver Manutenção).
●
Não permita a acumulação de resíduos na secadora.
●
Nunca suba para cima da secadora. Pode
resultar em ferimentos.
●
Siga sempre as normas e requisitos eléctricos
(ver Instalação).
●
Compre sempre peças sobressalentes e acessórios
originais (ver Reparação).
! AVISO: Nunca parar a secadora antes do fim do
ciclo de secagem, a menos que todos os artigos
sejam rapidamente retirados e espalhados de modo a
dissipar o calor.
Informações Acerca de Reciclagem
e Eliminação de Resíduos
Como parte do nosso continuado empenho em ajudar
o ambiente, reservamo-nos o direito de utilizar
componentes de qualidade, de modo a manter os
custos baixos para os clientes e minimizar o
desperdício de material.
●
Eliminação do material da embalagem: siga os
regulamentos locais, de modo que a embalagem
possa ser reciclada.
●
De modo a minimizar o risco de lesões para crianças,
remova a porta e a ficha e corte o fio eléctrico do
aparelho. Elimine estas peças separadamente a
fim de assegurar que o aparelho não possa mais
ser ligado a uma tomada eléctrica.
Recolha dos electrodomésticos
A directiva Europeia 2002/96/CE referente à gestão de
resíduos de aparelhos eléctricos e electrónicos (RAEE),
prevê que os electrodomésticos não devem ser escoados
no fluxo normal dos resíduos sólidos urbanos. Os
aparelhos desactualizados devem ser recolhidos
separadamente para optimizar a taxa de recuperação e
reciclagem dos materiais que os compõem e impedir
potenciais danos para a saúde humana e para o ambiente.
O símbolo constituído por um contentor de lixo
barrado com uma cruz deve ser colocado em todos
os produtos por forma a recordar a obrigatoriedade
de recolha separada.
Os consumidores devem contactar as autoridades locais
ou os pontos de venda para solicitar informação
referente ao local apropriado onde devem depositar os
electrodomésticos velhos.
Poupar energia e respeitar o ambiente
●
Torça as peças de vestuário para eliminar o
excesso de água antes de colocá-las na máquina de
secar (se primeiro utilizar uma máquina de lavar,
seleccione um ciclo de centrifugação elevado). Ao
fazer isto, poupa tempo e energia durante a secagem.
●
Seque sempre com cargas completas – assim,
poupa energia: artigos únicos ou pequenas
cargas podem demorar mais tempo a secar.
●
Limpe o filtro após cada utilização para cortar nos
custos de consumo de energia (ver Manutenção).
P
65
Page 66

Manutenção e Cuidado
P
Desligar a electricidade
! Desligue a secadora quando não estiver em utilização,
durante tarefas de limpeza e durante todas as operações
de manutenção.
Limpar o filtro depois de cada ciclo
O filtro é uma parte importante da sua secadora:
acumula restos de fibras e resíduos que se formam
durante a secagem. Pequenos objectos também
podem ficar presos no filtro. Assim, após a secagem,
limpe o filtro, lavando-o debaixo de água corrente ou
limpe com o seu aspirador. Caso o filtro fique
entupido, o fluxo de ar no interior da secadora fica
seriamente comprometido: os tempos de secagem
prolongam-se e consome mais energia. Também
pode danificar a sua secadora.
O filtro encontra-se na grelha frontal da secadora (ver
diagrama).
Remoção do filtro:
1. Puxe a pega de plástico do filtro para cima (ver
diagrama).
2. Limpe o filtro e coloque-o novamente
correctamente.
Certifique-se de que o filtro está completamente
encaixado na grelha da máquina.
! Não utilize a máquina sem colocar novamente o filtro.
Esvazie o recipiente de água após cada
Limpar o tambor
! Não utilize agentes de limpeza de aço inoxidável ou
palha de aço, abrasivos, para limpar o tambor.
É possível que uma película colorida comece a
aparecer no tambor de aço inoxidável. Tal poderá ser
causado por uma combinação de água e/ou agentes
de limpeza como, por exemplo, amaciador de tecido
da lavagem. Esta película colorida não afectará o
desempenho do secador.
Limpar a unidade do condensador
Periodicamente (todos os meses), retire a unidade do
condensador e limpe qualquer acumulação de cotão
que se encontre entre as placas, enxaguando por
baixo de água corrente fria. Este procedimento deve
ser concluído com água fria a partir da parte traseira
do condensador.
Remoção do condensador:
1. Desligue a secadora e abra a porta.
2. Abra a tampa do condensador (ver diagrama).
Solte os três suportes, rodando-os da direita para
a esquerda a 90° e, em seguida, puxando a pega
para removê-los da secadora.
3. Limpe a superfície dos vedantes e coloque
novamente, certificando-se de que os suportes
estão bem fixos.
ciclo
Limpeza
Puxe o recipiente para fora da secadora e esvazie-o
num local adequado. Coloque novamente o recipiente
de água de forma segura.
Verifique sempre o recipiente de água e esvazie-o
antes de iniciar um programa de secagem novo.
Verificar o tambor depois de cada ciclo
Rode o tambor manualmente, de modo a remover
pequenos objectos (lenços) que podem ter ficado na
máquina.
Filtro
Recipiente de água
●
As partes externas de metal ou em plástico e
borracha podem ser limpas com um pano húmido.
●
Periodicamente (de 6 em 6 meses), aspire a grelha
da entrada de ar frontal e as ventilações da parte
posterior da secadora para retirar qualquer
acumulação de cotão, linho ou pó. Remova também
a acumulação de cotão da parte frontal do
condensador e áreas dos filtros e limpe
ocasionalmente com um aspirador.
! Não utilize solventes nem produtos abrasivos.
! A sua secadora utiliza componentes de rolamentos
especiais que não necessitam de lubrificação.
! Verifique a sua secadora regularmente por técnicos
autorizados, de modo a certificar-se da segurança
eléctrica e mecânica (ver Reparação).
Unidade do condensador
Tampa do condensador
66
Suportes
Pega
Entrada
de ar
Torneia
Traseira
Frente
Unidade do condensador
Page 67

Resolução de problemas
Um dia a sua máquina parece não querer funcionar. Antes de contactar o seu Centro de Serviços (ver
Reparação), analise as seguintes sugestões de resolução de problemas:
Problema:
A secadora não inicia.
Causas possíveis / Solução:
●
A ficha não está ligada à tomada, ou não está a fazer contacto.
●
Ocorreu uma falha de energia.
●
Há um fusível queimado. Experimente ligar outro aparelho à tomada.
●
Está a utilizar um cabo de extensão? Experimente ligar o fio de
alimentação da secadora directamente à tomada.
●
A porta está bem fechada?
●
O programa não foi seleccionado correctamente (ver Arranque
e Programas).
●
O botão INICIAR/PAUSA não foi posicionado correctamente (ver Arranque e
Programas).
●
O ciclo de secagem não inicia.
Demora muito tempo a secar.
Definiu um atraso do tempo (ver Arranque e Programas).
●
O filtro não foi limpo (ver Manutenção).
●
O recipiente de água tem de ser esvaziado? A mensagem de esvaziar água
é apresentada? (ver Manutenção).
●
O condensador tem de ser limpo? (ver Manutenção).
●
A definição de temperatura não é ideal para o tipo de tecido que está a
secar (ver Arranque e Programas, e ver Roupa).
●
O tempo de secagem correcto não foi seleccionado para a carga (ver
Roupa).
●
A grelha de entrada de ar ou as grelhas traseiras estão obstruídas (ver
Instalação, e ver Manutenção).
●
As peças estavam demasiado molhadas (ver Roupa).
●
A secadora foi sobrecarregada (ver Roupa).
P
A mensagem de esvaziar a
água é apresentada, mas o
secador está a funcionar há
pouco tempo.
A mensagem de esvaziar água
é apresentada, mas o
recipiente de água não está
cheio.
O programa acaba e as
roupas estão mais húmidas
do que deviam.
O visor mostra um código de
avaria F seguido de um ou
dois números.
O visor mostra por
breves momentos
DEMO ON a cada 6
segundos.
●
É provável que o recipiente de água não tenha sido esvaziado no início
do programa. Não espere pelo sinal esvaziar água. Verifique sempre o
recipiente e esvazie-o antes de iniciar um programa de secagem novo
(ver Manutenção).
●
Este procedimento é normal. A mensagem:
FIM DO CICLO, VAZAR O RECIPIENTE DA ÁGUA é apresentada para Ihe
lembrar de esvaziar o recipiente (ver O Visor e ver Arranque e Programas).
! Por razões de segurança, a secadora tem um tempo de programa máximo de 3
horas. Se um programa automático não detectar a humidade final necessária
durante este tempo, a secadora conclui o programa e pára. Verifique os pontos
anteriores e execute novamente o programa; se os resultados continuarem húmidos,
contacte o Centro de Serviço (ver Reparação).
●
Se o visor mostra F10 ou F15:
- desligue a máquina e desligue a ficha. Limpe o filtro e o
condensador (ver Manutenção). Ligue novamente a ficha, ligue a
máquina e, em seguida, inicie outro programa. Se F10 ou F15
ainda for visualizado, contacte o Centro de Serviço (ver Reparação).
●
Se for apresentado qualquer outro número: Anote o código e contacte o
Centro de Serviço (ver Reparação).
●
A máquina de secar está no modo ‘Demo’. Prima e mantenha sob pressão
os botões Ligar/Desligar e Iniciar/Pausa durante 3 segundos. O visor mostra
DEMO OFF durante 3 segundos e, em seguida, retoma o funcionamento
normal.
67
Page 68

Reparação
P
Antes de contactar o Centro de
Serviços:
Peças sobressalentes
Esta secadora é uma máquina complexa. Repará-la
●
Utilize o guia de resolução de problemas para ver
se consegue resolver o problema (ver Resolução
de problemas).
●
Caso contrário, desligue a secadora e contacte o
Centro de Serviço mais próximo.
sozinha ou através de um técnico não autorizado
pode provocar danos a uma ou mais pessoas, pode
danificar a máquina e pode invalidar a garantia das
peças sobressalentes. Contacte um técnico
autorizado se tiver problemas durante a utilização da
máquina. As peças sobressalentes foram concebidas
exclusivamente para este equipamento e não se
destinam a outras utilizações.
O que dizer ao Centro de Serviço:
●
nome, morada e código postal.
●
número de telefone.
●
o tipo de problema.
●
a data de compra.
●
o modelo do aparelho (Mod.).
●
o número de série (S/N).
Estas informações podem ser encontradas na
etiqueta de dados, no interior da porta da máquina.
Programas Comparativos
●
Programas recomendados para o teste comparativo em conformidade com a norma EN61121
Programa Programa a seleccionar Carga Opções de
(EN61121) secagem
Algodão seco ALGODÃO RESISTENTE 7.5 kg PENDURAR
Algodão de secagem a ferro ALGODÃO RESISTENTE 7.5 kg ENGOMAR
Têxteis delicados SINTÉTICOS 3 kg ARMÁRIO
! Nota: esta não é uma lista completa de opções do programa (ver Arranque e Programas).
68
Este equipamento está em conformidade com as seguintes directivas da UE:
- 2006/95/EC (Equipamento de Baixa Tensão)
- 89/336/EEC, 92/31/EEC e 93/68/EEC (Compatibilidade Electromagnética)
Page 69

Gebruiksaanwijzing
DROOGAUTOMAAT
GB
English, 1
P
Português, 52
F
Français, 18
NL
Nederlands, 69
E
Español, 35
TCD851B
De eerste keer dat u uw droger
gebruikt, dient u uw taal te kiezen,
zie pagina 74
Inhoud
Belangrijke informatie, 70-71
Installatie, 72
Het plaatsen van de droger
Ventilatie
Elektrische aansluitingen
Voor het eerste gebruik van de droger
Beschrijving van de droogautomaat, 73
Het openen van de deur
Kenmerken
Bedieningspaneel
De display, 74-76
Start en programma’s, 76-79
Een programma kiezen
Speciale programma’s
Wijzigen programmaopties
Programmatabel
De bedieningen
Wasgoed, 80-81
Het wasgoed sorteren
Droogsymbolen
Speciaal wasgoed
Droogtijden
NL
Veiligheidsinstructies en waarschuwingen, 82
Algemene veiligheidsinstructies
Afdanken van het apparaat
Energiebesparing en respect voor het milieu
Reiniging en onderhoud, 83
Haal de stekker uit het stopcontact
Reinig het pluizenfilter na elk gebruik
Leeg de waterbak na elk gebruik
Controleer de trommel na elk gebruik
Het reinigen van de condenseenheid
Het reinigen van de droger
Problemen oplossen, 84
Technische dienst, 85
Reserveonderdelen
! Bewaar deze gebruiksaanwijzing zodat u haar indien nodig kunt raadplegen. Neem de gebruiksaanwijzing mee als u
verhuist en mocht u dit apparaat verkopen of aan iemand anders geven, geef dit boekje er dan bij, zodat de volgende
eigenaar ook kennis kan nemen van de veiligheidsvoorschriften en aanbevelingen voor gebruik.
! Lees de instructies aandachtig door; op de volgende bladzijden vindt u belangrijke informatie over de
installatie en aanbevelingen voor het gebruik van het apparaat.
69
Page 70

Belangrijke informatie
NL
Voor een goede werking van uw condensdroger dient u de hierna beschreven reinigingen regelmatig uit te
voeren:
Pluizenfilter...
! U MOET de pluizenfilter na ELKE droogcyclus
reinigen.
STAP 1.
Open de deur van uw
droger.
! Als u de filter niet na ELKE droogcyclus reinigt, werkt uw machine minder goed.
- Het duurt langer om uw wasgoed droog te krijgen, waardoor u ook meer elektriciteit verbruikt.
STAP 2.
Trek de filter uit de houder
(aan de twee vingergrepen).
STAP 3.
Verwijder alle pluisjes
van het filtergaas.
STAP 4.
Zet de filter terug - laat
de droger NOOIT werken
zonder filter.
Waterbak...
! U MOET de waterbak na ELKE droogcyclus
leegmaken.
STAP 1.
Trek de waterbak naar u
toe en verwijder hem
volledig uit de droger.
! Als u de waterbak niet leegmaakt, heeft dit deze gevolgen:
- De machine verwarmt niet meer (het wasgoed is op het einde van de droogcyclus nog steeds nat).
-H
et bericht ‘Leeg de watertank’ geeft aan dat de waterbak vol is
STAP 2.
Verwijder al het water uit
de waterbak.
STAP 3.
Zet de waterbak terug en
zorg ervoor dat hij goed
op zijn plaats wordt
geduwd.
.
Waterinzamelsysteem voor het eerst vullen
Als uw droger nieuw is, kan er geen water in de waterbak worden opgevangen zolang het systeem niet voor het
eerst gevuld is... dit duurt 1 of 2 droogcycli. Zodra het systeem gevuld is, komt er tijdens elke droogcyclus water in
de waterbak terecht.
! Het bericht ‘Leeg de
watertank’ herinnert u
eraan de waterbak aan
het begin en einde van
elk programma te legen.
70
Page 71

Belangrijke informatie
Condenseenheid...
! U MOET de pluizen MAANDELIJKS van de
condenseenheid verwijderen.
STAP 1.
Open het deksel van de
condenseenheid
- hou de handgreep vast
en trek hem naar u toe.
STAP 2.
Verwijder de
condenseenheid door de
3 clips te draaien, en trek
de condenseenheid naar
u toe.
(Er kan een beetje water
in de buizen zitten, dit is
normaal).
STAP 3.
Spoel de condenseenheid
langs achter met water
om de pluisjes te
verwijderen.
NL
STAP 4.
Zet de condenseenheid
terug
- zorg ervoor dat de
eenheid volledig op haar
plaats zit, dat de 3 clips
goed vastgezet zijn en
dat de positiepijlen vooraan
op de condenseenheid
omhoog staan.
●
Ga na of:
- de positiepijlen omhoog staan.
- de 3 clips weer goed in de “vergrendelde” positie staan.
3 clips draaien
! Als de condenseenheid niet wordt gereinigd, kan uw
droger vroegtijd defect raken.
71
Page 72

Installatie
NL
Het plaatsen van de droogautomaat
●
Plaats de droogautomaat op voldoende afstand
van uw gasfornuis, kachel, verwarming of gasstel;
vlammen kunnen schade toebrengen aan het
apparaat.
Minimale spleet 10mm
●
Als u het apparaat onder een
werkblad wilt plaatsen, zorg er
dan voor dat er tussen de
onderkant van het werkblad
Minimale spleet
15mm
en eventuele andere
voorwerpen op of boven de
machine een spleet van
10 mm zit en laat minstens
15 mm ruimte vrij tussen de
zijkanten van de machine en zijwanden of muren. Zo
kan er voldoende lucht circuleren. Zorg dat er niets
voor de afvoeropeningen aan de achterkant zit.
Ventilatie
Als de droger in gebruik is, dient er voldoende ventilatie
te zijn. Plaats de droger niet in een vochtige ruimte en
zorg ervoor dat er voldoende lucht kan circuleren. Om
het water wat tijdens het wassen gebruikt wordt te
laten condenseren, is het zeer belangrijk dat er
voldoende luchtstroom is rondom de droger. In een
afgesloten ruimte of kast werkt de droger niet efficiënt.
! Het is niet aan te bevelen de droogautomaat te
installeren in een kast. De droogautomaat mag zeker
nooit worden geïnstalleerd achter een afsluitbare deur,
een schuifdeur of een deur met een scharnier aan de
tegenoverliggende zijde van de deurscharnier van de
droogautomaat.
! Als de droger in een kleine of koude ruimte geplaatst
wordt, kan er condensatie plaatsvinden.
Het omdraaien van de deur
Scharnier
deurklink
Scharnier
Het is eenvoudig om de deur van uw droger om te
draaien. Verplaats de scharnieren en afdekschroeven
diagonaal, zoals op de tekening aangegeven.
Verwissel het deurklink en het deurslot met de
afdekschroeven van de andere kant van de deur (zie
tekening).
deurslot
Waterafvoer
Als de droger naast een afvoer geplaatst wordt, kan
deze voor de afvoer van het water gebruikt worden. U
hoeft de waterbak dan niet te legen. Als de droger op
of naast een wasmachine wordt geïnstalleerd, kan
dezelfde afvoer worden gebruikt. De afvoer moet minder
dan 1 meter hoog zijn
vanaf de onderkant van de droger.
Verwijder de klem en slang uit
de aangegeven positie (zie
tekening).
Verwijder klem en
slang hier...
Plaats een slang van de juiste
lengte op de aangegeven plaats
(zie tekening) en zet de klem
...plaats nieuwe slang
en zet klem hier vast.
terug.
! Let op dat de slang niet gekneld of geknikt zit als
de
droger op zijn definitieve plaats staat.
Elektrische aansluitingen
Controleer de volgende punten voor u de stekker in
het stopcontact steekt.
●
Het stopcontact moet geaard zijn.
●
Het stopcontact moet geschikt zijn voor de
maximale stroom van het apparaat; deze wordt
aangegeven op het typeplaatje (zie Beschrijving
van de droogautomaat).
●
Het voltage moet zich binnen de waarden bevinden
die op het typeplaatje zijn vermeld (zie Beschrijving
van de droogautomaat).
●
Het stopcontact moet geschikt zijn voor de stekker
van de droogautomaat. Als dit niet het geval is, dient
de stekker of het stopcontact te worden vervangen.
! De droger mag niet buiten geplaatst worden, zelfs
niet als de plaats overdekt is. Het is zeer gevaarlijk
om het apparaat aan regen of storm bloot te stellen.
! De stroomkabel en de stekker moeten zich na de
installatie binnen handbereik bevinden.
! Gebruik geen verlengsnoeren.
! De stroomkabel mag niet worden gebogen of
platgedrukt.
! De stroomkabel dient periodiek gecontroleerd te
worden en mag alleen door erkende vakmensen worden
vervangen door een kabel die geschikt is voor deze
droger (zie Technische dienst). Nieuwe of langere
stroomkabels zijn tegen extra kosten verkrijgbaar bij
erkende dealers.
! De fabrikant stelt zich niet aansprakelijk als deze
regels niet worden nageleefd.
! Als u niet zeker bent over de hierbovenvermelde
informatie raden wij u aan contact op te nemen met
een bevoegd elektricien.
Voor het eerste gebruik
Na het installeren van de droger en voor het eerste
gebruik dient de binnenkant van de trommel te worden
schoongemaakt om eventueel stof dat door het transport
is ontstaan te verwijderen.
72
Page 73

Beschrijving van de
droogautomaat
Het openen van de deur Kenmerken
Druk op de aangegeven plaats op
het voorpaneel en laat los
Condenseenheid
(Condensplaat
openen)
Condensplaat
Handvat condensplaat
(Trekken om te openen)
Bedieningspaneel
Programma
toetsen
Waterbak
Display
NL
Typeplaatje
Model- en
serienummers
Luchtinvoeropening
Pluizenfilter
KINDERSLOT
toets
AAN/UIT
De toets AAN/UIT : Als de droogtrommel in werking
is en u op deze knop drukt, stopt de droogtrommel.
Drukt nogmaals op deze knop om de droogtrommel
opnieuw to starten.
Met de PROGRAMMA toetsen stelt u het
programma in: druk op de toets van het programma
dat u wilt selecteren (zie Start en programma’s).
De OPTIE toets/lampjes: met deze toetsen kunt u de
mogelijke voor het geselecteerde programma kiezen
geselecteerde programma (zie De Bedieningen). De
lampjes naast de toetsen worden verlicht op de
displayeenheid, om aan te geven dat de optie is
geselecteerd.
De START/PAUSE toets en lampje start een
gekozen programma. Als u op deze knop drukt,
hoort u één pieptoon en op de display wordt het
volgende weergegeven PAUSE . Als er een
programma bezig is en u deze knop ingedrukt
houdt, wordt het programma onderbroken en stopt
de droogtrommel.
toets
OPTIE
toets
Het lampje is groen wanneer het programma draait,
het lampje knippert oranje als het programma
onderbroken is of het knippert groen als het apparaat
klaar is om een programma te starten (zie Start en
programma’s).
De Displayeenheid geeft waarschuwingen en
informatie over het programma (zie volgende
pagina).
KINDERSLOT knop/pictogram
ingedrukt houden nadat u uw programma en
eventuele opties hebt geselecteerd. Uw
programmainstellingen blijven dan ongewijzigd; de
display zal kort
DEUR GEBLOKKEERD . Wanneer het pictogram is
verlicht, zijn de andere knoppen uitgeschakeld.
Houdt de knop ingedrukt om de functie te
annuleren. Het pictogram dooft en de display zal kort
het volgende weergeven DEUR OPEN
het volgende weergeven
START/PAUSE
toets en lampje
Blijf deze knop
:
73
Page 74

De display
NL
Uw taal selecteren
De eerste keer dat u uw droger aanzet, dient u uw taal te kiezen uit de talenlijst.
De taal wijzigen: de huidige taalselectie knippert op de eerste
regel van de display.
- Houd alle 3 de knoppen 5 secondenlang ingedrukt:
- Druk op de knop Kinderslot of de knop Drogen voor
een bepaalde tijd om in de taallijst te bladeren.
-
Wanneer de gewenste taal knippert op de bovenste
regel van de display
om uw keuze vast te leggen.
, drukt u op de knop Droogteniveau
De display begrijpen
Programmaselectie en display
Het geselecteerde programma wordt weergegeven op de eerste regel van de display wanneer u de bijbehorende
knop indrukt; dit bericht wordt weergegeven tijdens de duur van het programma.
KATOEN HOGE TEMP.
KATOEN LAGE TEMP.
SYNTHETISCH
BED & BATH CYCLUS
GEMAKKELIJK STRIJKEN
LUCHTEN
FIJNE WAS
WOOLMARK
Wanneer u de geheugenknop indrukt, zal de display het geselecteerde programma weergeven met een ‘M’
ervoor.
bijv. M KATOEN HOGE TEMP. (zie Start en programma’s).
Droogteniveaus
Bij de programmaselectie van een automatisch programma met diverse beschikbare droogteniveau’s (zie
Programmatabel).
De tweede regel van de display geeft het gewenste droogteniveau weer. Telkens als u op de knop Droogteniveau
drukt, wordt de volgende optie uit de lijst geselecteerd en weergegeven.
STRIJKDROOG
OPHANGDROOG
KASTDROOG
De display geeft tevens weer: een, twee of drie blokken, afhankelijk van uw keuzu.
Deze worden tijdens de voortgang van het programma weergegeven.
Strijkdroog: Uw kleren zijn droog genoeg om te strijken.
Ophangdroog: Uw kleren zijn droog genoeg om op te hangen.
Kastdroog: Uw kleren zijn droog genoeg om te dragen.
74
Page 75

De display
Programmavoortgang
De tweede regel van de display geeft de voortgang van het programma aan:
(een lange boodschap schuift over het scherm)
KREUKELS VOORKOMEN
DROGEN
KOUDE LUCHT
EINDE CYCLUS, KREUKELS HERSTELLEN
EINDE CYCLUS, LEEG DE WATERTANK
Als de optie Gemengd droog beschikbaar en geselecteerd is, geeft deze regel aan wanneer de verschillende
droogteniveau’s zijn bereikt:
STRIJKDROOG BEREIKT
OPHANGDROOG BEREIKT
(indien optie beschikbaar
en geselecteerd is).
(indien optie
beschikbaar en
geselecteerd is).
Drogen voor een bepaalde tijd
Nadat u een programma hebt geselecteerd met de optie Drogen voor een bepaalde tijd, drukt u op de Tijdsknop
en de display zal de geselecteerde tijd doen verhogen, telkens als u op de knop drukt en deze weer loslaat (zie
Start en programma’s).
Elke druk op de knop zet de tijd verder met:
0:20 0:40 1:00 1:20 1:40 2:00 2:20
en
,
herhaalt dit vervolgens
.
NL
Fijne was heeft een maximumtijd van:
De balken rechts van de tijd lichten op om een indicatie te
geven van de geselecteerde tijdsduur:
o:20 0:40 1:00 1:20 1:40 2:00 2:20
De geselecteerde tijd wordt ook weergegeven nadat het
programma is gestart.
1:40
Uitstel en Tijd tot einde
Sommige programma’s kunnen worden uitgesteld (zie Start en programma’s). Druk op de uitstelknop en het
pictogram zal gaan knipperen.
Met elke druk op de uitstelknop wordt het uitstel met 1
tot ,
uur verhoogd, van
na een paar seconden wordt het uitstel geannuleerd.
De uitsteltijd wordt weergegeven op de display naast de
uistelknop.
De display telt de minuten van de uitstelperiode af, nadat
Start/Pause knop is ingedrukt.
de
De tweede regel van de display geeft het volgende weer:
BEGINT NA
Nadat de uistelperiode is afgelopen (of bij programma’s die niet uitgesteld zijn): De geschatte Tijd tot Einde van het
programma voor automatische programma’s of de feitelijk resterende tijd tijdens het Drogen voor bepaalde tijd
wordt weergegeven in dit deel van de display.
1h 24h
en daarna :
OFF
en
75
Page 76

De display
NL
Waarschuwingen
De tweede regel van de display geeft tevens waarschuwingen en
herinneringen weer:
(herinneringen verschijnen aan het einde van het programma)
EINDE CYCLUS, LEEG DE WATERTANK
●
Herinnering om de waterbak na elk gebruik van
de droger te legen (zie Onderhoud).
LEEG DE WATERTANK
●
Geeft aan dat de waterbak vol is. Na het
terugplaatsen van de lege waterbak duurt het een
paar seconden voor het lampje uitgaat. De droger
moet hiervoor aan staan (zie De Bedieningen).
Opmerking: Als de waterbak vol loopt en dit
bericht wordt weergegeven, wordt de verwarming
uitgeschakeld en wordt uw wasgoed niet
gedroogd.
CONDENSER SCHOONMAKEN
●
Dit bericht geeft aan dat u de Condenseenheid
(zie Onderhoud) dient te reinigen en zal regelmatig
worden weergegeven, afhankelijk van hoe vaak u
de droger gebruikt. Wanneer u het volgende
programma beëindigd, wordt het bericht opgeheven.
FILTER SCHOONMAKEN
●
Herinnert u eraan de filter bij elk gebruik van de
droger te reinigen (zie Onderhoud).
Start en programma’s
Een programma kiezen
1. Steek de stekker van de droogtrommel in het
stopcontact.
2. Sorteer het wasgoed op stofsoort (zie Wasgoed).
3. Doe de deur open en zorg ervoor dat het
pluizenfilter schoon is en op zijn plaats zit en dat
de waterbak leeg is en op zijn plaats zit (zie
Reiniging en Onderhoud).
4. Vul de droogtrommel en zorg ervoor dat er geen
wasgoed tussen de deur zit. Sluit de deur.
5.
Als de display niet is verlicht:
Druk op de toets AAN/UIT
6. Raadpleeg de Programmatabel (zie Programma’s)
en de aanwijzingen voor elke stofsoort (zie Wasgoed)
en druk op de Programma toets voor het stoftype
dat u wilt drogen.
Als de knop geselecteerd is; zijn stappen 7, 8
-
en 9 niet noodzakelijk
7. Selecteer Drogen voor een bepaalde tijd of
Droogopties:
- Als u Drogen voor een bepaalde tijd
selecteert, houdt u de bijbehorende toets
ingedrukt tot de gewenste tijd verschijnt.
of - Om de standaard droogtegraad te wijzigen,
houdt u de toets Droogopties ingedrukt tot
het juiste niveau wordt aangegeven.
! Zie programmatabel voor meer details.
8. Stel een uitgestelde droogtijd en eventuele
andere opties in (zie De display).
(zie onder).
Geheugenknop :
De eerste keer dat u op deze knop drukt, zal de tweede regel van de display het volgende weergeven:
INDRUKKEN EN INGEDRUKT HOUDEN OM OP TE SLAAN
9. Als u wenst dat op het einde van het programma een
pieptoon weerklinkt, drukt u op de ALARM-optietoet.
10. Druk op de START/PAUSE toets om het drogen
te beginnen. Het display toont de geschatte eindtijd.
Tijdens het droogprogramma kunt u het wasgoed
controleren en was die al droog is eruit halen terwijl
u de rest van de was verder droogt in de machine.
Sluit de deur weer en druk op de START/PAUSE
toets om verder te gaan met drogen.
11. Tijdens de laatste minuten van droogprogramma’s,
voor het programma ten einde is, start de
KOUDE-LUCHTFASE (het wasgoed wordt
afgekoeld). Deze fase moet altijd worden
doorlopen.
12. De pieptoon (als de optie werd geselecteerd) geeft
aan dat het programma ten einde is, geeft het
display EINDE CYCLUS, KREUKELS HERSTELLEN
weer.
Doe de deur open, haal het wasgoed uit de droger,
reinig het pluizenfilter en plaats deze terug in de
houder. Leeg de waterbak en plaats hem terug in
de droger (zie Reiniging en Onderhoud).
Als de optie Kreukels herstellen geselecteerd
is en als u het wasgoed niet onmiddellijk uit de
machine haalt, werkt de droogtrommel nu en dan
gedurende 10 uur of tot u de deur opent.
13. Haal de stekker uit het stopcontact.
Nadat u uw favoriete programma en opties hebt ingesteld, kunt u deze instellingen opslaan door de geheugenknop
minstens 5 secondenlang ingedrukt te houden. De zoemer zal klinken en de tweede regel van de display zal het
volgende weergeven GEHEUGEN
daarna drukt u op de Start/Pause knop en dit programma zal gaan draaien
Desgewenst kunt u uw opgeslagen favoriete programma wijzigen door een nieuw programma en/of opties te
selecteren en de
76
knop ingedrukt te houden (zoals hierboven)
De volgende keer dat u dit programma nodig hebt, drukt u op de knop en
.
.
Page 77

Start en programma’s
Speciale programma’s
Programma Gemakkelijk strijken
‘Gemakkelijk strijken’ is een kort programma van 10 minuten (8 minuten warmte, gevolgd door 2 minuten koude
lucht) dat de vezels van kleding verzacht die langer op dezelfde plek heeft gelegen. De cyclus ontspant de vezels
waardoor ze gemakkelijker te strijken en op te vouwen zijn.
! ‘Gemakkelijk strijken’ is geen droogprogramma en dient niet gebruikt te worden voor natte kleding.
Voor het beste resultaat
1. Overschrijd de maximale beladingscapaciteit niet. Deze aantallen verwijzen naar het droge gewicht.
Stof Maximale belading
Katoen en katoenmengsels 2,5 kg
Synthetische stoffen 2 kg
Spijkerstof 2 kg
2. Haal de droger onmiddellijk na het einde van het programma leeg, hang het wasgoed op of vouw of
strijk het en berg het wasgoed op in de kast. Als dit niet mogelijk is het programma herhalen.
Het ‘Gemakkelijk strijken’ effect varieert per stof. Het werkt goed voor traditionele stoffen als katoen of
katoenmengsels en minder goed voor synthetische vezels en materialen als Tencel®.
Wolprogramma
●
Dit is een programma voor kledingstukken die in de droogtrommel mogen en die voorzien zijn van het symbool .
●
Met dit programma kunt u tot 1 kg wasgoed (ongeveer 3 truien) drogen.
●
Het is aan te bevelen de kledingstukken binnenstebuiten te keren voor u ze in de droogtrommel plaatst.
●
Dit programma duurt 60 minuten, of langer afhankelijk van de grootte en de densiteit van het wasgoed en het
centrifugetoerental van de wasmachine.
●
Wasgoed dat met dit programma werd gedroogd, is meestal klaar voor gebruik, maar bij sommige zwaardere
kledingstukken kunnen de randen nog lichtjes vochtig zijn.
! In tegenstelling tot andere stoffen is het krimpen van wol onomkeerbaar; wol keert dus niet terug naar de
oorspronkelijke grootte en vorm.
! Dit programma is niet geschikt voor acryl-kledingstukken.
NL
Het droogprogramma voor wollen producten van deze droogtrommel is goedgekeurd door The Woolmark Company
voor het drogen van Woolmark kleding met een etiket waarop vermeld is dat deze in de machine gewassen en in de
droogtrommel gedroogd kan worden en vooropgesteld dat de kleding gedroogd wordt overeenkomstig de instructies
op het kledingetiket dan wel de aanwijzingen welke door de fabrikant van deze droogtrommel zijn verstrekt M0616.
Dit is het eerste en enige programma voor het drogen van wollen producten dat is goedgekeurd door The
Woolmark Company.
Programmaoptie wijzigen
Gemengd droog
Beschikbaar met KATOEN HOGE TEMP. en SYNTHETISCH programma’s.
Deze optie kan worden gebruikt nadat u droogteniveau Kastdroog of Ophangdroog hebt geselecteerd. U kunt dan
wasgoed uit de machine halen zodra het Ophang- of Strijkdroog is.
Wanneer de droger voelt dat het wasgoed Strijkdroog is, zal de display het volgende weergeven:
en zal de zoemer 2 minutenlang klinken. Open de deur en haal het wasgoed dat u wilt strijken uit de droger.
Sluit de deur en druk op de Start/Pause knop om het programma te hervatten.
! Als u de deur niet opent tijdens de periode van 2 minuten, zal de droger het programma hervatten zonder dat u
op de Start/Pause knop hoeft te drukken.
Het programma Ophangdroog zal worden hervat en zal eindigen met
EINDE CYCLUS, LEEG DE WATERTANK
Het programma Kastdroog gaat verder totdat de droger voelt dat het wasgoed Ophangdroog is. De display geeft
het volgende weer: OPHANGDROOG BEREIKT en de zoemer klinkt 2 minutenlang. Open de deur en haal het
wasgoed dat u wilt ophangen om verder te laten drogen uit de droger.
Sluit de deur en druk op de Start/Pause knop om het programma te hervatten.
! Als u de deur niet opent tijdens de periode van 2 minuten, zal de droger het programma hervatten zonder dat u
op de Start/Pause knop hoeft te drukken.
Wanneer het wasgoed Kastdroog is en de droger de Koude-luchtfase heeft voltooid (en indien geselecteerd,
Kreukels herstellen), en zal eindigen met EINDE CYCLUS, LEEG DE WATERTANK
Kleine hoeveelheid
Beschikbaar met KATOEN HOGE TEMP. en SYNTHETISCH programma’s.
Gebruikt voor hoeveelheden wasgoed tussen 1 en 2 kg.
Het programma optimaliseert het Automatisch programma voor kleinere hoeveelheden en geeft een nauwkeurigere
schatting voor Tijd tot einde.
STRIJKDROOG BEREIKT
77
Page 78

Start en programma’s
NL
Programma’s
! Als de display niet is verlicht; Druk op de AAN/UIT toets en selecteer vervolgens het programma.
Programma
Katoen
Hoge
Temperatuur
Katoen
Lage
Temperatuur
Synthetisch
materiaal
Bed & Bath
Wol
Delicate
stoffen
(bijv. Acryl)
LUCHTEN
Gemakkelijk
strijken
Wat het doet... Hoe in te stellen... Opmerkingen
Droogt uw katoenen
kleding op hoge
temperatuur
Droogt uw katoenen
kleding op lage
temperatuur
Droogt uw Synthetische
kleding op hoge
temperatuur
Droogt uw handdoeken
en beddengoed op
Hoge temperatuur.
Droogt uw wollen kleding
(zie vorige pagina).
Droogt uw kleding op
lage temperatuur, zodat
ze daarna gedragen
kan worden.
1. Druk op de toets
2. Selecteer Drogen voor een bepaalde tijd
of Automatisch .
- Als u Drogen voor een bepaalde tijd
selecteert, zie volgende pagina, of...
- Om de standaard droogtegraad te wijzigen,
houdt u de toets Droogopties ingedrukt tot
het juiste niveau wordt aangegeven.
3. Selecteer opties indien nodig.
4. Druk op de START/PAUSE toets .
1. Druk op de toets
2. Selecteer een droogtijd, zie Drogen voor
een bepaalde tijd , zie volgende pagina.
1. Druk op de toets SYNTHETISCH
2. Selecteer Drogen voor een bepaalde tijd
of Automatisch .
- Als u Drogen voor een bepaalde tijd
selecteert, zie volgende pagina, of...
- Om de standaard droogtegraad te wijzigen,
houdt u de toets Droogopties ingedrukt tot
het juiste niveau wordt aangegeven.
3. Selecteer opties indien nodig.
4. Druk op de START/PAUSE toets .
KATOEN HOGE TEMP.
KATOEN LAGE TEMP.
1. Druk op de toets BED & BATH CYCLUS
2. Selecteer opties indien nodig.
3. Druk op de START/PAUSE toets .
1. Druk op de toets WOOLMARK
2. Selecteer alarmoptie indien gewenst.
3. Druk op de START/PAUSE toets .
1. Druk op de toets FIJNE WAS
2. Indien een programma voor een
bepaalde tijd gewenst is (zie Drogen
voor een bepaalde tijd, volgende pagina).
Standaard instelling is Automatisch.
3. Selecteer opties indien nodig.
Beschikbare opties:
zoemer , uitgestelde starttijd
kreukels voorkomen ,
kreukels herstellen ,
kleine hoeveelheid ,
gemengd droog
*
Droogopties: Automatisch
STRIJKDROOG
OPHANGDROOG
KASTDROOG
Beschikbare opties:
zie Drogen voor een bepaalde tijd
zie volgende pagina
Beschikbare opties:
zoemer , uitgestelde starttijd
kreukels voorkomen ,
kreukels herstellen ,
kleine hoeveelheid ,
gemengd droog
*
Droogopties: Automatisch
STRIJKDROOG
OPHANGDROOG
KASTDROOG
Beschikbare opties:
zoemer , uitgestelde starttijd
kreukels voorkomen ,
kreukels herstellen .
●
Een Automatisch programma
Beschikbare opties:
zoemer
●
Een Automatisch programma
Beschikbare opties:
zoemer , uitgestelde starttijd
kreukels voorkomen ,
kreukels herstellen .
●
Standaard instelling is
Automatisch
4. Druk op de START toets .
Programma van 20
minuten voor het luchten
van uw kleding met koude
lucht. Kan ook gebruikt
1. Druk op de toets LUCHTEN
2.Selecteer alarmoptie indien gewenst.
3. Druk op de START/PAUSE toets .
Beschikbare opties:
zoemer
worden om warme
kleding af te koelen.
Kort programma
(ongeveer 10 minuten)
dat de vezels verzacht
van kleding die
gestreken gaat worden.
1. Druk op de toets GEMAKKELIJK
STRIJKEN
2. Selecteer alarmoptie indien gewenst.
3. Druk op de START/PAUSE toets .
! Dit is geen droogprogramma
(zie vorige pagina).
Beschikbare opties:
zoemer
: standaard
: standaard
Opmerking: *Gemengd droog alleen beschikbaar met Kastdroog en Ophangdroog (zie Programmaoptie
wijzigen).
78
Page 79

Start en programma’s
Drogen voor een bepaalde tijd programma’s : First select a programme (zie Programma’s).
Drogen
gedurende
een bepaalde
tijd
(0:20, 0:40,
1:00, 1:20, 1:40,
2:00 of 2:20
Uur : Minuten)
Gebruik Drogen voor een
bepaalde tijd altijd voor
ladingen van minder dan
1 kg, of als u een ander
droogresultaat wenst.
De warmte-instelling
hangt af van het
geselecteerde programma
(materiaaloptie).
De Bedieningen
! Waarschuwing, het programma kan niet gewijzigd
worden na het indrukken van de START/PAUSE toets
Druk op de START/PAUSE toets om een
programma te wijzigen. Het lampje knippert oranje om
aan te geven dat het programma onderbroken is.
Selecteer het nieuwe programma en de gewenste
opties. Het lampje zal dan groen knipperen.
nogmaals op de START/PAUSE
programma zal worden gestart.
●
OPTIE toetsen / pictogrammen
Deze toetsen worden gebruikt om het geselecteerde
programma aan uw wensen aan te passen. U dient
eerst een programma te selecteren met de programma
toetsen voor u een optie kunt kiezen. Niet alle opties
zijn beschikbaar voor alle programma’s (zie Start en
Programma’s). Als de optie niet beschikbaar is en u
drukt op de toets, klinkt de zoemer drie keer. Als de
optie beschikbaar is, zal het indicatorlampje op de
displayeenheid naast de onderste knoppen oplichten
om aan te geven dat de optie is geselecteerd.
Programma uitstellen (uitgestelde starttijd)
Van enkele programma’s (zie De display en Start en
Programma’s) kunt u de starttijd maximaal 24 uur
uitstellen. Leeg eerst de waterbak voor u een
programma uitstelt.
Kreukels voorkomen
Deze optie is alleen beschikbaar wanneer het programma
is uitgesteld. Het wasgoed wordt tijdens de uitstelperiode
af en toe rondgedraaid om kreuken te voorkomen.
Zoemer
Beschikbaar op alle programma’s. Als deze optie
geselecteerd is hoort u een zoemer aan het einde van
de droogcyclus om u eraan te herinneren dat u het
wasgoed uit de droger kunt halen.
Kreukels herstellen
Indien beschikbaar en geselecteerd wordt het
wasgoed af en toe rondgedraaid na het einde van
het drogen en de koude-luchtfase om te voorkomen
dat het kreukt als u niet direct na het afsluiten van het
programma het wasgoed uit de machine haalt.
●
DISPLAY
88:88
Op het display ziet u ofwel de uitsteltijd of een indicatie
van de resterende droogtijd (zie De display).
De uitsteltijd of De tijd tot het einde wordt
weergegeven in uren en minuten en telt elke minuut af.
Wanneer drogen voor een bepaalde tijd wordt
geselecteerd is de weergegeven tijd tijdens de hele
cyclus de feitelijke resterende droogtijd.
Wanneer een Automatisch programma wordt
geselecteerd, is de weergegeven tijd een schatting
van de resterende droogtijd. Wanneer het programma
toets en het nieuwe
1. Druk op de toets Drogen voor bepaalde tijd
tot de display de gewenste selectie weergeeft.
Met elke druk op de toets loopt de
, , , , ,
herhaalt vervolgens.
●
Delicate stoffen hebben een maximumtijd
van:
●
Als wordt weergegeven, is Automatisch
drogen mogelijk als u van gedachten
verandert.
2. Selecteer opties indien nodig.
3. Druk op de START/PAUSE toets .
door en
is geselecteerd geeft het display de tijd aan die nodig
is voor het drogen van een hele belading, na ongeveer
geselecteerd
10 minuten geeft de machine een exactere schatting
van de droogtijd. De dubbele punt tussen de uren en
de minuten knippert om aan te geven dat de timer aftelt.
Het display geeft ook eventuele problemen met de
Druk
droger weer. Als dit het geval is, ziet u op het display F,
gevolgd door een foutnummer (zie Problemen oplossen).
●
Water legen / Waterbak
(Als u uw droger op een afvoer hebt aangesloten kunt
u dit bericht negeren, omdat de waterbak dan niet
geleegd hoeft te worden).
Deze berichten worden weergegeven om u eraan te
herinneren de waterbak te legen.
Als de waterbak tijdens een programma vult, wordt de
verwarming uitgeschakeld en gaat een Koude-luchtfase
van start.
Hierna stopt de droger en wordt het volgende bericht
weergegeven LEEG DE WATERTANK
U moet de waterbak legen en de droger opnieuw starten,
anders droogt het wasgoed niet. Wanneer u de droger
opnieuw start, duurt het enkele seconden voor het
bericht verdwijnt. Om dit te voorkomen, is het verstandig
om de waterbak na elk gebruik te legen (zie Reiniging
en Onderhoud).
●
Het openen van de deur
Als u tijdens een programma de deur opent, stopt het
droogprogramma en gebeurt er het volgende:
●
De display geeft het volgende weer PAUSE
●
Tijdens een uitstelfase blijft de tijd tot de start van het
programma aftellen. De START/PAUSE toets moet
ingedrukt worden om het uitstelprogramma te
hervatten. De display zal dan de huidige status
weergeven.
●
Tijdens de droogfase van het programma knippert
de dubbele punt op het display niet, om aan te
geven dat de tijd niet meer aftelt. De START/PAUSE
toets moet worden ingedrukt om het programma
voort te zetten. De display zal dan de huidige
status weergeven, de dubbele punt knippert en het
aftellen wordt voortgezet.
●
Tijdens het Kreukels herstellen fase eindigt het
programma.
Als u op de START/PAUSE toets drukt, begint een
nieuw programma vanaf het begin.
●
Opmerking
Als er een stroomstoring is, zet dan de stroom uit of
haal de stekker uit het stopcontact. Wanneer de
stroom weer aangaat, drukt u op de START/PAUSE
toets om het programma te hervatten.
Beschikbare opties:
zoemer , uitgestelde starttijd
,
kreukels voorkomen
kreukels herstellen
Raadpleeg de droogtabel
(zie Wasgoed).
De laatste 10 minuten van
deze programma’s is de
koude-luchtfase .
NL
79
Page 80

Wasgoed
NL
Het wasgoed sorteren
• Controleer de droogsymbolen om te zien of de
artikelen in de droogtrommel gedroogd kunnen
worden.
• Sorteer het wasgoed per stofsoort.
• Leeg de zakken en controleer de knopen.
• Sluit ritsen en haakjes en bind losse riemen en
ceinturen vast.
• Wring elk artikel uit om zoveel mogelijk water kwijt
te raken.
! Doe geen druipnatte kleding in de droogautomaat.
Maximale belading
Overschrijd de maximale beladingscapaciteit niet.
Deze aantallen verwijzen naar droog gewicht:
Natuurlijke vezels: max. 7.5 kg
Synthetische vezels: max. 3 kg
! Doe NIET te veel wasgoed in de droger; dit kan het
droogresultaat beïnvloeden.
Normale belading
Opmerking: 1kg = 1000g
Kleding
Blouse Katoen 150 g
Anders 100 g
Jurk Katoen 500 g
Anders 350 g
Spijkerbroek 700 g
10 luiers 1000 g
Overhemd Katoen 300 g
Anders 200 g
T-Shirt 125 g
Droogsymbolen
Controleer de labels in uw kleding, vooral als u ze
voor het eerst droogt. De volgende symbolen worden
het meest gebruikt.
Drogen in de droogtrommel
Niet drogen in de droogtrommel
Droog op hoge stand
Droog op lage stand
Artikelen die niet geschikt zijn voor de droogtrommel
• Artikelen die rubber, rubberachtig materiaal of
plastic film bevatten (kussens of regenkleding met
PVC) of andere vlambare artikelen of artikelen die
vlambare stoffen bevatten (bijv. handdoeken met
haarspray erop).
• Glasvezel (bepaalde soorten gordijnen).
• Artikelen die chemisch gereinigd zijn.
• Artikelen met code (zie Speciaal wasgoed).
Deze kunt u reinigen met speciale producten voor
chemisch reinigen met de droogautomaat. Volg de
instructies nauwkeurig op.
• Grote, dikke voorwerpen (quilts, slaapzakken,
kussens, grote dekbedden etc). Deze zetten uit bij
het drogen en zouden de circulatie van lucht in de
droger belemmeren.
Huishoudelijke artikelen
Dekbedovertrek Katoen 1500 g
(Tweepersoons) Anders 1000 g
Groot tafellaken 700 g
Klein tafellaken 250 g
Theedoek 100 g
Badlaken 700 g
Handdoek 350 g
Tweepersoonslaken 500 g
Eenpersoonslaken 350 g
Aan het einde van de droogcyclus kan katoen nog
vochtig zijn als het samen met synthetische stoffen is
gedroogd. Als dit gebeurt, laat het katoenen wasgoed
dan nog een korte periode drogen.
●
Opmerking: De laatste 10 minuten vormen de
afkoelperiode. Hou hiermee dus rekening wanneer
u de tijd instelt, want gedurende die 10 minuten
wordt uw wasgoed niet gedroogd.
80
Page 81

Wasgoed
Speciaal wasgoed
Dekens en spreien: artikelen van acryl (Acilan,
Courtelle, Orion, Dralen)
moeten voorzichtig gedroogd worden op LAGE.
Droog ze niet te lang.
Geplooide of rimpelde kleding: controleer de
droogsymbolen in de kleding.
Artikelen die met stijfsel zijn behandeld: droog
deze niet samen met artikelen die niet met stijfsel zijn
behandeld. Zorg ervoor dat zoveel mogelijk stijfsel is
opgelost voor u het wasgoed in de droger doet. Niet
te lang drogen: anders wordt het stijfsel poederachtig
en wordt uw kleding slap, wat het effect van het stijfsel
teniet doet.
Droogtijden
Deze tijden zijn richtlijnen en zijn afhankelijk van:
• Hoeveelheid water die zich na het centrifugeren
nog in de kleding bevindt: handdoeken en fijne
kleding houden veel water vast.
• Stof: artikelen van dezelfde soort stof maar met
verschillende textuur en dikte hebben mogelijk niet
dezelfde droogtijden.
• Hoeveelheid wasgoed: een kleine hoeveelheid
wasgoed of slechts een enkel kledingstuk heeft
vaak een langere droogtijd.
Katoen
Hoge
Temperatuur
Synthetisch
materiaal
Hoge
Temperatuur
Delicate
stoffen
(Acryl)
Lage
Temperatuur
Automatisch,
tijd in uren
Automatisch,
tijd in minuten
Instelling Drogen voor
een bepaalde tijd
Droogtijden bij centrifugetoerental van 800-1000 omw/min.
Automatisch,
tijd in uren
Automatisch,
tijd in minuten
Instelling Drogen voor
een bepaalde tijd
Droogtijden bij minder snelle centrifuge
Automatisch,
tijd in uren
Automatisch,
tijd in minuten
Instelling Drogen voor
een bepaalde tijd
Droogtijden bij minder snelle centrifuge
1 kg
0:30 - 0:50
30 - 50
0:20 of 0:40 of 1:00
1 kg
0:30 - 0:40
30 - 40
0:40 of 1:00
0:40 - 0:55
1:00 of 1:20
0:40 of 1:00 of 1:20
2 kg
50 - 70
Halve lading
1 kg
0:40 - 1:20
40 - 80
• Droogheid: als u kleding strijkt, kunt u het uit de
• Ingestelde warmte.
• Kamertemperatuur: als het koud is in de kamer
• Grote hoeveelheden: bepaalde dikke artikelen kunnen
! Droog uw kleding niet te lang.
Alle stoffen bevatten een klein beetje natuurlijk vocht
wat ze zacht en soepel houdt.
De tabel (zie onderstaand) geeft een RICHTLIJN van
de droogtijden in uren:minuten aan, zoals ze op de
display worden weergegeven. De tijden worden ter
referentie ook in minuten weergegeven.
De gegeven tijden gelden voor Kastdroog,
Automatische programma’s.
Om u te helpen bij het kiezen van een geschikte
optie worden tevens instellingen voor Drogen
voor een bepaalde tijd weergegeven.
De gewichten verwijzen naar droog wasgoed.
Halve lading
3 kg
0:55 - 1:10
70 - 80
1:20
droogtrommel halen als het nog een beetje vochtig
is. Ander wasgoed kunt u in de droger laten tot
het helemaal droog is.
waar de droger staat, duurt het langer voor uw
kleding droog is.
voorzichtig in de droogautomaat gedroogd worden.
We raden u aan deze artikelen regelmatig uit de
droogtrommel te halen, ze uit te schudden en
terug in de droger te doen tot ze droog zijn.
Hele lading
4 kg
1:10 - 1:20
80 - 100
1:20 of 1:40
Halve lading
2 kg
0:40 - 0:50
40 - 50
0:40 of 1:00
5 kg
1:20 - 1:30
100 - 120
1:40 of 2:00
6 kg
1:40 - 2:20
120 - 140
2:00 of 2:20
Hele lading
7 kg
2:20 - 2:30
140 - 150
2:20
Hele lading
7.5 kg
2:30 - 2:40
150 - 160
3 kg
1:10 - 1:30
50 - 70
0:50 of 1:00 of 1:20
2:20
2 kg
1:20 - 2:20
80 - 140
1:20 of 1:40 of 2:00 of 2:20
NL
81
Page 82

Veiligheidsinstructies en
waarschuwingen
NL
! Het apparaat voldoet aan internationale
veiligheidsvoorschriften.
Deze waarschuwingen zijn bedoeld voor uw veiligheid
en moeten strikt worden opgevolgd.
Algemene veiligheidsinstructies
●
Deze droger mag niet worden gebruikt door personen
(o.a. kinderen) met beperkte fysieke, geestelijke of
zintuiglijke mogelijkheden, of personen die over
onvoldoende ervaring en kennis beschikken, tenzij
ze door een veiligheidsverantwoordelijke de nodige
instructies en toezicht hebben gekregen.
●
Deze droogautomaat is ontworpen voor huishoudelijk
gebruik en niet voor professioneel gebruik.
●
Raak het apparaat niet aan als u geen schoeisel
draagt of natte handen of voeten hebt.
●
Wanneer u de stekker uit het stopcontact haalt, moet
u altijd aan de stekker te trekken, nooit aan het snoer.
●
Houd kinderen tijdens het drogen uit de buurt van
het apparaat. Zet het apparaat na gebruik uit en
haal de stekker uit het stopcontact. Houd de deur
gesloten om te voorkomen dat kinderen het apparaat
als speelgoed gebruiken.
●
Kinderen moeten onder toezicht worden gehouden,
zodat ze niet met de droger kunnen spelen.
●
Het apparaat moet correct geïnstalleerd worden en
voldoende geventileerd zijn. De luchtinvoeropeningen
aan de voor- en achterkant van de droger mogen
nooit worden afgedekt (zie Installatie).
●
Plaats de droger niet op tapijt als de poolhoogte
de luchtstroom onder het apparaat belemmert.
●
Controleer voor het vullen altijd eerst of de
droogautomaat leeg is.
●
●
●
●
●
●
●
●
●
●
●
●
De achterkant van de droger kan zeer heet
worden. U mag deze dan ook nooit aanraken
aan als de machine aanstaat.
Gebruik de droger alleen als de filter, de waterbak
en de condensplaat veilig op hun plaats zitten
(zie Reiniging en Onderhoud).
Gebruik geen vloeibare wasverzachter in de
droogautomaat; giet vloeibare wasverzachter in
uw wasmachine vóór de spoelbeurt.
Overschrijd de maximale beladingscapaciteit niet
(zie Wasgoed).
Doe geen artikelen in de droger die druipnat zijn.
Droog alleen artikelen in de droogautomaat die
gewassen zijn met wasmiddel en water en die
vervolgens zijn afgespoeld en gecentrifugeerd.
Het drogen van artikelen die NIET met water zijn
gewassen kan brandgevaar opleveren.
Controleer de textielbehandelingssymbolen
zorgvuldig (zie Wasgoed).
Droog geen kleding die behandeld is met
chemische middelen.
Droog nooit artikelen waarin brandbare stoffen
zitten (slaolie, aceton, alcohol, benzine, kerosine,
vlekverwijderaars, terpentine, vet, vetverwijderaars
en haarsprays), tenzij ze in heet water worden
gewassen met een extra dosis wasmiddel.
De volgende zaken mogen niet in de droger worden
gedroogd: rubber, met rubber beklede artikelen en
kleding, kussens voorzien van schuimrubber, schuim
(latexschuim), rubber, kunststof, douchekappen,
waterbestendig, textiel, luierbroekjes of inlegluiers,
polyethyleen of papier mogen niet in de droger worden
gedroogd.
Droog geen grote, zeer dikke artikelen in de droger.
Droog geen acrylvezel op hoge temperaturen.
●
Haal de zakken leeg, met name aanstekers zijn
gevaarlijk (explosiegevaar).
●
Laat na elk programma de koude-luchtfase doorlopen.
●
Zet de droogtrommel niet uit als er nog warm
wasgoed in zit.
●
Reinig het pluizenfilter na elk gebruik (zie Reiniging
en Onderhoud).
●
Leeg de waterbak na elk gebruik (zie Reiniging en
Onderhoud).
●
Reinig de condenseenheid regelmatig (zie
Reiniging en Onderhoud).
●
Zorg dat er geen pluis ophoopt rondom de droger.
●
Klim nooit op de droger. Dit kan schade tot gevolg
hebben.
●
Houd u altijd aan de elektrische vereisten (zie Installatie).
●
Koop altijd originele reserveonderdelen en
toebehoren (zie Technische dienst).
! WAARSCHUWING: Stop de droger nooit voor het
einde van de droogcyclus, tenzij u alle artikelen snel
uit de droger haalt en ze uitspreidt, zodat de warmte
wordt afgevoerd.
Informatie over recyclage en
verwijdering
Als onderdeel van onze voortdurende toewijding aan
de bevordering van het milieu, behouden we ons het
recht voor om gerecycleerde kwaliteitsonderdelen te
gebruiken om de klantenkosten zo laag mogelijk te
houden en materiaalverspilling te minimaliseren.
●
Verpakkingsmateriaal: houd u aan de regels die
gelden voor uw gemeente, zodat het verpakkings
materiaal gerecycled kan worden.
●
Om het risico op verwondingen bij kinderen zoveel
mogelijk te beperken, moet de deur verwijderd worden
en dient het zichtbare deel van het netsnoer te
worden afgeknipt. Gooi deze delen afzonderlijk weg
om ervoor te zorgen dat de stekker van het toestel
niet langer in het stopcontact gestoken kan worden.
Vernietiging van oude electrische
apparaten
De Europese Richtlijn 2002/96/EC over Vernietiging van
Electrische en Electronische Apparatuur (WEEE), vereist
dat oude huishoudelijke electrische apparaten niet
mogen vernietigd via de normale ongesorteerde
afvalstroom. Oude apparaten moeten apart worden
ingezameld om zo het hergebruik van de gebruikte
materialen te optimaliseren en de negatieve invloed op
de gezondheid en het milieu te reduceren.
Het symbool op het product van de “afvalcontainer
met een kruis erdoor” herinnert u aan uw
verplichting, dat wanneer u het apparaat vernietigt,
het apparaat apart moet worden ingezameld.
Consumenten moeten contact opnemen met de locale
autoriteiten voor informatie over de juiste wijze van
vernietiging van hun oude apparaat.
Energiebesparing en respect voor het milieu
●
Wring het wasgoed altijd eerst uit voor u het in de
droger doet (als u het wasgoed in een wasmachine
wast, centrifugeer het wasgoed dan op een hoog
toerental). Dit bespaart tijd en energie tijdens het drogen.
●
Droog altijd hele ladingen - dit bespaart energie:
kleine ladingen of slechts een enkel kledingstuk
hebben vaak een langere droogtijd.
●
Reinig het pluizenfilter na elk gebruik om de kosten
van energieverbruik te beperken (zie Reiniging en
Onderhoud).
82
Page 83

Reiniging en onderhoud
Haal de stekker uit het stopcontact
! Haal de stekker uit het stopcontact als u het apparaat
niet gebruikt, tijdens het schoonmaken ervan en tijdens
elk onderhoud.
Reinig het pluizenfilter na elk gebruik
Het pluizenfilter is een belangrijk onderdeel van uw
droger: het verzamelt pluis en stof dat ontstaat tijdens
het drogen. Daarnaast kunnen ook kleine voorwerpen
in het pluizenfilter terecht komen. Reinig het pluizenfilter
daarom na het drogen door hem af te spoelen onder
stromend water of met uw stofzuiger. Als het pluizenfilter
verstopt raakt, wordt de luchtstroom in de droger ernstig
gehinderd: droogtijden worden langer en u verbruikt
meer energie. Het kan uw droger ook schade
toebrengen.
Het pluizenfilter bevindt zich in de deuropening van
de droger (zie diagram).
Het pluizenfilter verwijderen:
1. Trek het plastic handvat van het pluizenfilter naar
boven (zie diagram).
2. Reinig het pluizenfilter en plaats het correct terug.
Zorg ervoor dat het filter helemaal naar
beneden in de houder wordt geschoven.
! Gebruik de droger niet zonder het pluizenfilter terug
te plaatsen.
Controleer de trommel na elk gebruik
Draai de droogtrommel met de hand rond om klein
wasgoed (zakdoeken) uit de droger te halen dat
anders in de trommel zou kunnen achterblijven.
Trommel reinigen
! Gebruik geen schuurmiddelen, staalwol of
reinigingsmiddelen voor roestvrij staal om de trommel
te reinigen.
De roestvrij stalen trommel kan verkleuren. Dit kan
veroorzaakt worden door een combinatie van water
en/of reinigingsmiddelen zoals wasverzachters.
Deze verkleuring heeft geen invloed op het
droogresultaat.
Het reinigen van de condenseenheid
Haal de condenseenheid regelmatig (een keer per
maand) uit de droger en verwijder het stof door de
eenheid onder de kraan af te spoelen met koud water.
Doe dit met koud water en richt de achterkant van de
condenser naar de waterstraal.
De condenser verwijderen:
1. Haal de stekker uit het stopcontact en doe de deur
open.
2. Verwijder de condensplaat door de drie slotgaten
90° tegen de klok in te draaien en daarna aan het
handvat te trekken (zie tekening).
3. Reinig het oppervlak van de afdekrubbers en
plaats de eenheid terug in de droger. Zorg ervoor
dat de slotgaten goed vast zitten.
NL
Leeg de waterbak na elk gebruik
Haal de bak uit de droger en giet het water weg in de
gootsteen of andere waterafvoer.
Plaats de bak terug in de droger.
Controleer de waterbak altijd en leeg deze indien
nodig voordat u een nieuw droogprogramma start.
Waterbak
Condenseenheid
Condensplaat
Slotgaten
Pluizenfilter
Luchtinvoer
Handvat
Het reinigen van de droger
●
Externe onderdelen van metaal of plastic en rubber
onderdelen kunnen worden schoongemaakt met
een vochtige doek.
●
Verwijder stof en pluis regelmatig (elke 6 maanden)
van het rooster aan de voorkant en de
luchtafvoeropeningen aan de achterkant met de
stofzuiger. Stofzuig ook af en toe de voorkant van
de condenser en rondom het pluizenfilter.
! Gebruik geen oplosmiddelen of schuurmiddelen.
! Uw droger gebruikt speciale lagercomponenten die
niet gesmeerd hoeven te worden.
! Laat uw droger regelmatig controleren door erkende
vakmensen om elektrische en mechanische veiligheid
te waarborgen (zie Technische dienst).
Kraan
Achterkant
Voorkant
Condenseenheid
83
Page 84

Problemen oplossen
NL
Mocht u problemen ondervinden met uw droger controleer dan eerst het volgende voor u de technische dienst
belt (zie Technische dienst):
Probleem:
Droger start niet.
Mogelijke oorzaken / Oplossing
●
De stekker zit niet in het stopcontact of maakt geen contact.
●
Er is een stroomstoring geweest.
●
De stop is gesprongen. Steek de stekker van een ander apparaat in het
stopcontact.
●
Gebruikt u een verlengsnoer? Probeer de stekker van de droger
rechtstreeks in het stopcontact te steken.
●
Is de deur niet helemaal afgesloten?
●
De PROGRAMMA is niet helemaal juist ingesteld (zie Start en programma’s).
●
De START/PAUSE toets is niet ingedrukt (zie Start en programma’s).
●
Droogcyclus start niet.
Het duurt lang voor het
wasgoed droog is.
U hebt een latere starttijd ingesteld (zie Start en programma’s).
●
Het pluizenfilter is niet gereinigd (zie Reiniging en Onderhoud).
●
Dient de waterbak geleegd te worden? Pictogram Water legen knippert?
(zie Reiniging en Onderhoud).
●
Moet de condenser te worden schoongemaakt? (zie Reiniging en Onderhoud).
●
De temperatuurinstelling is niet ideaal voor het soort stof dat u droogt (zie
Start en programma’s, en zie Wasgoed)).
●
U hebt niet de juiste droogtijd ingesteld (zie Wasgoed).
●
Het Luchtinvoeropening of de afvoeropeningen zijn afgedekt (zie
Installatie en zie Reiniging en Onderhoud).
●
Het wasgoed is te nat (zie Wasgoed).
●
De droger is te vol (zie Wasgoed).
Bericht Waterbak legen wordt
weergegeven maar het
droogprogramma is nog
maar korte bezig.
Bericht Waterbak legen wordt
weergegeven en de waterbak
is niet vol.
Het programma is afgewerkt
en de kledingstukken zijn
vochtiger dan voorzien.
Op het display staat een
foutcode F gevolgd door één
of twee cijfers.
De display geeft elke 6
seconden kort DEMO ON
weer.
●
De waterbak was waarschijnlijk niet geleegd voor het begin van het
programma. Wacht niet op het signaal waterbak legen, controleer de
waterbak altijd en leeg deze indien nodig voor u een nieuw droogprogramma
start (zie Reiniging en Onderhoud).
●
Dit is normaal, het: EINDE CYCLUS, LEEG DE WATERTANK
bericht wordt weergegeven om u eraan te herinneren om de waterbak te
legen (zie De display en Start en programma’s).
! Om veiligheidsredenen werkt de droogtrommel maximaal 3 uur. Als een
automatisch programma in die tijd niet de vereiste eindvochtigheid heeft
gedetecteerd, voert de droogtrommel het programma volledig uit en stopt.
Controleer bovenstaande punten en voer het programma opnieuw uit; als
de kledingstukken nog steeds vochtig zijn, dient u contact op te nemen met
de technische dienst (zie Technische dienst).
●
Als het display F10 of F15 aangeeft, schakelt u het toestel uit en trekt u de
stekker uit. Reinig de filter en de condensor (zie Reiniging en Onderhoud).
Steek de stekker weer in het stopcontact, schakel het toestel in en start
dan een ander programma. Als F10 of F15 nog steeds wordt weergegeven,
neemt u contact op met de technische dienst (zie Technische dienst).
●
Als een andere code wordt weergegeven: Noteer de code en verwittig de
technische dienst (zie Technische dienst).
●
De droger functioneert in demonstratiemodus. Houd de Aan/Uit knop en
de Start/Pause knop 3 secondenlang ingedrukt. De display zal 3
secondenlang DEMO OFF weergeven en daarna zal de droger de
normale bediening hervatten.
84
Page 85

Technische dienst
Voor u de technische dienst belt:
●
gebruik de tabel van het onderdeel problemen
oplossen om te zien of u het probleem zelf kunt
verhelpen (zie Problemen oplossen).
●
Zo niet, zet de droger uit en bel de dichtstbijzijnde
technische dienst.
Informatie die de technische dienst nodig heeft:
●
uw naam, adres en postcode.
●
uw telefoonnummer.
●
het soort probleem.
●
de datum van aankoop.
●
het model van het apparaat (Mod.).
●
het serienummer (S/N).
Deze informatie vindt u op het etiket aan de binnenkant
van de deur van de machine
Reserveonderdelen
Deze droger is een gecompliceerd apparaat. Pogingen
dit apparaat zelf te repareren of onderhoud door hiervoor
niet erkende personen kan letsel toebrengen aan een
of meerdere personen, kan schade toebrengen aan de
machine en kan de garantie op reserveonderdelen
doen vervallen. Bel een erkende vakman als u problemen
ondervindt bij het gebruik van deze machine.
De reserveonderdelen zijn speciaal voor dit apparaat
ontworpen en zijn niet geschikt voor enig ander
gebruik.
NL
Vergelijkende programma’s
●
Aanbevolen programma’s voor vergelijkende test overeenkomstig EN61121
Programma Te kiezen programma Inhoud Droogopties
(EN61121)
Droog katoen KATOEN HOGE TEMP. 7.5 kg OPHANGDROOG
Strijkdroog katoen KATOEN HOGE TEMP. 7.5 kg STRIJKDROOG
Gemakkelijk strijken SYNTHETISCH 3 kg KASTDROOG
! Opmerking: Dit is geen volledige lijst van de mogelijke programma’s (zie Start en programma’s).
Dit apparaat voldoet aan de volgende EC richtlijnen:
- 2006/95/EC (Richtlijn voor Lage Voltages)
- 89/336/EEC, 92/31/EEC en 93/68/EEC (Electromagnetische compatibiliteit)
85
Page 86

86
Page 87

87
Page 88

195070458.00 W
07/2008 - SIMLEX . Four Ashes, Wolverhampton
 Loading...