

Page 1
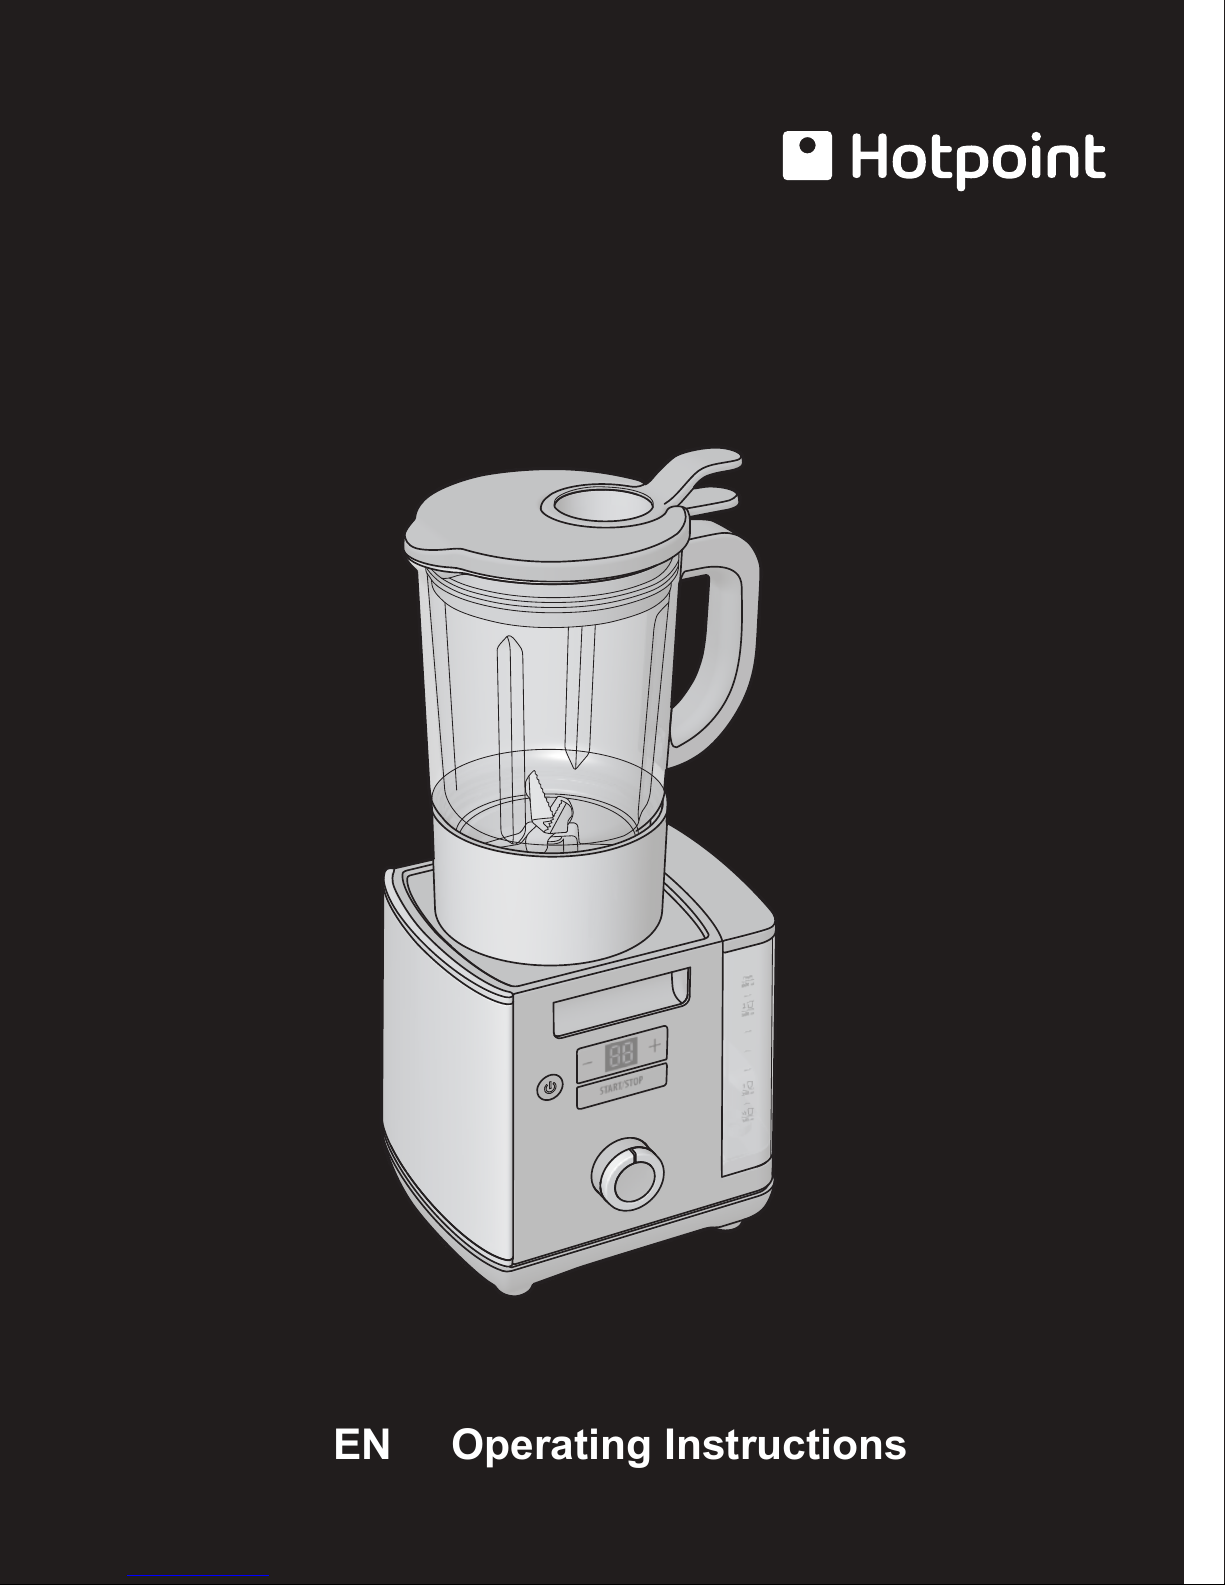
EN Operating Instructions
Page 2
7e
8
7d
7
7c
7b
6a
2
TB 060 UK
7a
1a
4
6
6b
3
3a
5
1
Page 3
Page 4

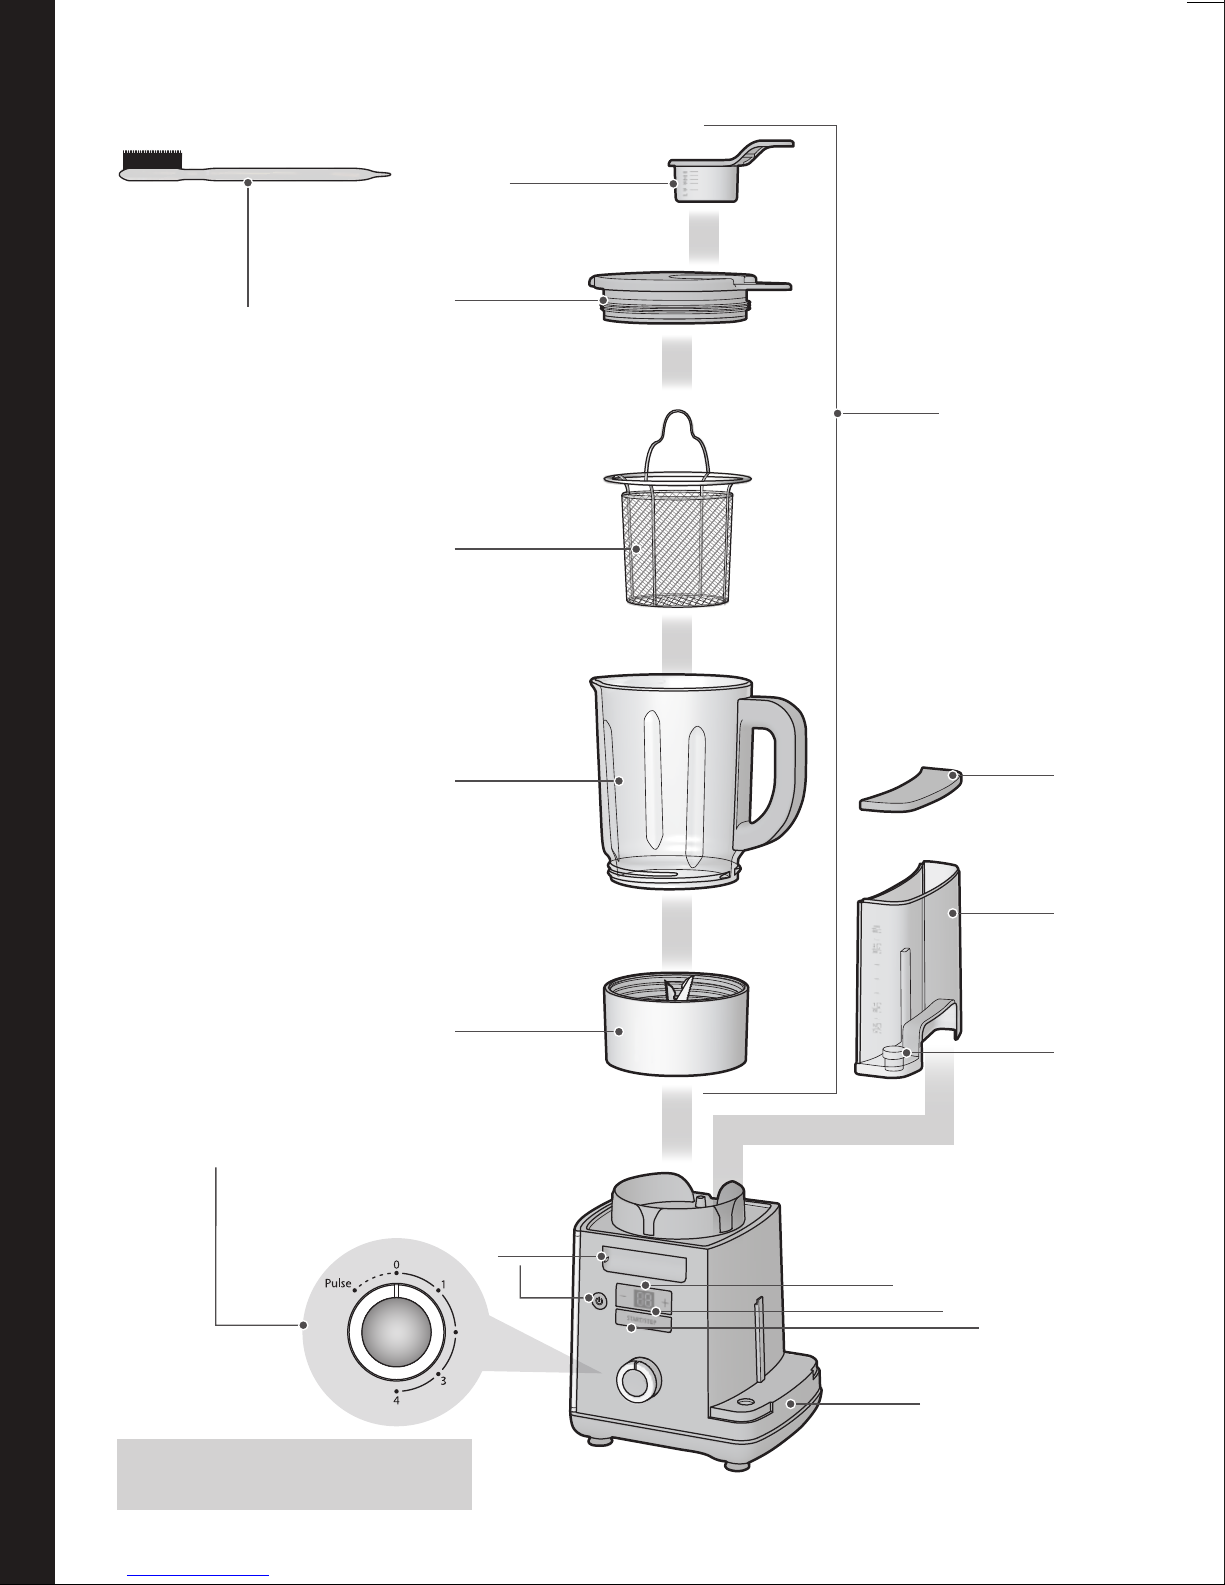
PARTS AND FEATURES
1. Motor base
1a. Motor base handles
2. Control knob
3. Display
3a. +/- button
4. On/Off button
5. Start/Stop button
6. Water tank
6a. Water tank lid
6b. Water tank handle
7. Glass jar assembly
7a. Blade unit
7b. Jar
7c. Basket (only on some models)
7d. Lid
7e. Measuring cup
8. Scrubbing brush
en
INTRODUCTION
Thank you for purchasing our product. In doing so, you have opted for an effective, high performing
appliance.
If the instructions for correct use of this appliance are not observed, the manufacturer’s liability for any
resulting damage will be excluded. Operating instructions may describe different models, any difference
is clearly identied.
5
Page 5

en
IMPORTANT INFORMATION
FOR YOUR SAFETY
When using electrical appliances, basic safety
prevent should always be followed, including the
following.
• This appliance must be used only as described within this instruction book.
• Connect and operate the appliance only in
accordance with the specications on the
rating plate.
• Read all instructions. Keep these instructions for future use.
• Do not leave the appliance unattended when
blending.
• Ensure all packaging materials and any promotional labels or stickers are removed from
the Steam blender before rst use.
• Always inspect the appliance before use for
noticeable signs of damage. Do not operate
any appliance with a damaged cord or plug
or after the appliance malfunc¬tions or has
been damaged in any manner. Return the
appliance to an authorized service facility for
examination, repair, or electrical or mechanical adjustment.
• To prevent injury, repairs such as replacing a
damaged cord should only be carried out by
our customer service.
• The use of attachments not recommended
or sold by the appliance manufacturer may
cause re, electric shock, or injury.
• Whilst in use the surfaces will become extre-
mely hot. Do not touch hot surfaces. Always
use handles.
• Unplug from the mains when not in use and
before cleaning. Allow to cool before cleaning the appliance. To disconnect, press On/
Off button and then remove the plug from the
mains.
• Keep hands and utensils away from moving
blades or Discs while processing food to prevent the possibility of severe personal injury
or damage to the food processor. A scraper
may be used but must be used only when
the food processor is not running.
• Blades are sharp. Handle the blade unit carefully.
• This appliance is not intended for use by persons (including children) with reduced physical, sensory or mental capabilities, or lack
of experience and knowledge, unless they
have been given supervision or instruction
concerning use of the appliance by a person
responsible for their safety.
• Children should always be supervised to ensure that they do not play with this product.
• To protect against re, electric shock or personal injury, do not immerse cord, plug or
unit in water or other liquids.
• Do not leave the cable hanging over the
edge of a kitchen table or worktop. Avoid
contact between the cable and hot surfaces.
• For indoor use only.
• This appliance is intended for household use
only, not for commercial or industrial use.
Use for anything other than intended will
void the warranty.
• Make sure motor and steam generator have
stopped completely before removing the lid.
• Do not operate this appliance in the presen-
ce of explosive and/or ammable fumes.
• To reduce the risk of electric shock, do not at-
tempt to open the motor base. There are no
user serviceable parts inside. Repair should
be done only by authorized personnel.
• Be sure the Base is on a at, dry and clean
surface before you begin processing.
• This appliance should be used only for preparation of drinks/food as described within
the instructions for use that accompany it.
• Always ensure that your hands are dry before removing the plug from the mains socket.
Never pull the plug out of the mains socket
by its lead.
• To avoid injury or possible re, do not cover
the appliance when in use.
• Do not connect this appliance to an external
timer or remote control system.
• To move the appliance, use only the motor
base handles. Never lift the appliance by the
water tank handle.
• Periodically check all parts before reassembly. If any part is damaged or jar is chipped
or cracked, do not use the Steam blender.
• Never submerge the motor base in water or
other liquid, or place in a dishwasher.
• Never wrap the cord around the outside of
6
Page 6

en
the Steam blender.
• Never immerse the plug, lead or housing in
water or any other liquid.
• Never immerse the glass jar in water straight
after heating; allow it to cool down rst.
BEFORE THE FIRST USE
When unpacking the product and removing packing material, handle the blades
carefully; they are very sharp.
Wash all parts except the motor base in hot,
soapy water. Rinse them dry. Do not immerse the
supply cord part of this appliance in water or any
other liquids. Clean the glass jar thoroughly. Be
sure to read this manual, paying special attention
to the sections on “Use your steam blender” and
“Care and Cleaning” to learn the correct methods
for taking the unit apart and cleaning.
USE YOUR STEAM BLENDER
Blades are very sharp, handle with care.
In case of power failure, when the power returns
the product goes into standby mode.
To use the blender function it is necessary to turn
the control knob to “0”, press the ‘on / off’ button and then turn the control knob to the desired
speed.
protrusion on the lid).
3. Place the water tank by sliding along the rail
on the motor base until it engages.
Place the water tank lid to protect the
water from dust, insects and other fo-
reign matter.
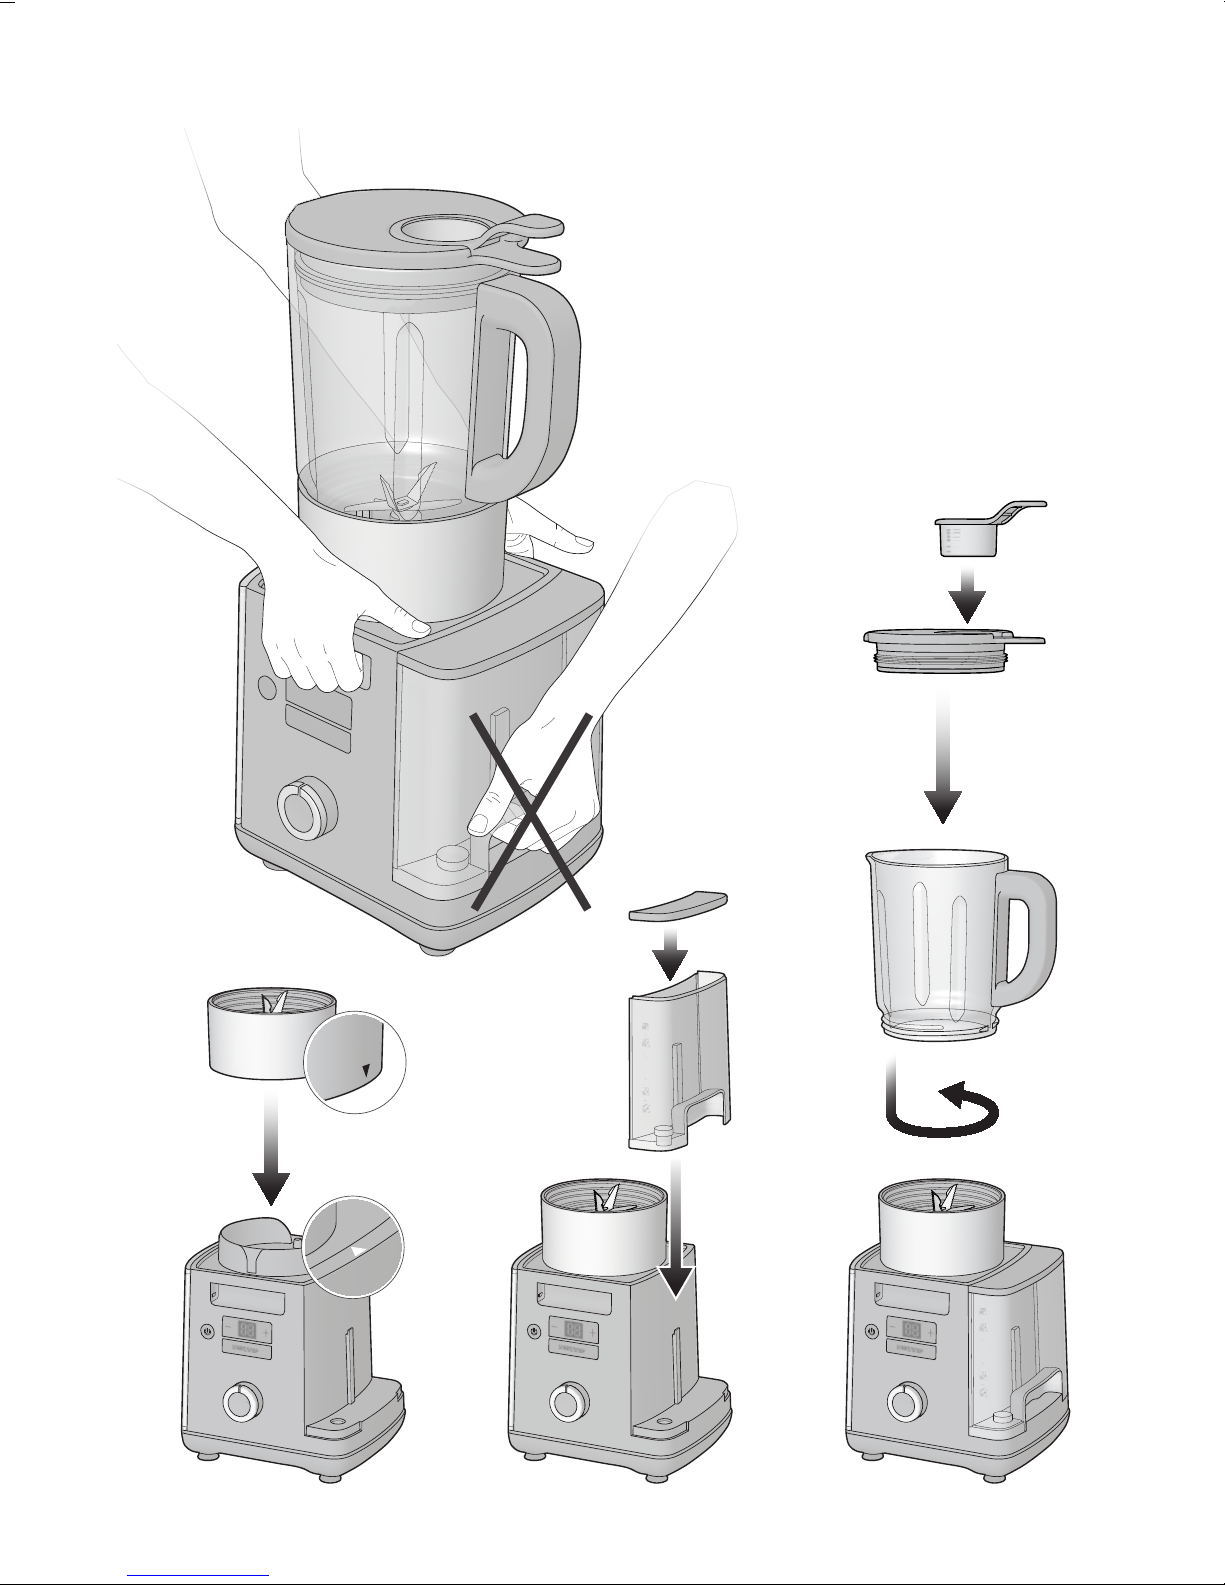
Disassembling
1. Switch the Steam blender off and unplug
from the mains socket. Lift the Glass Jar up
and away from the motor base.
Holding the handle only. Do not twist the
jar.
The heating element is hot when the Steam blender is in heat mode, do not touch
the underside of the collar.
2. To remove the lid from the glass jar, grip the
handle of the lid rmly with one hand and lift
upwards.
3. To remove the measuring cup from the lid, lift
up and away. To position the measuring cup
over the lid, aligning with the corresponding
grooves in the lid.
Steam will escape around the measuring
cup when the Steam blender is in heat
mode, this is normal, but handle with care –
steam can burn.
Assembling (A)
1. To t the Glass Jar Assembly to the base of
the Steam blender, position jar unit on the
motor base so that the arrow on the jar collar
is aligned to the arrow on the base. Push the
jar down into place.
Take care when placing the glass jar on
the motor base as incorrect positions
may damage the interlock switch and could
prevent the unit from running.
2. When you have added the required ingre-
dients to the jar, place the lid on jar before
heating or blending. Simply position the lid
over the jar and press down rmly (ensure
the pouring spout on the jar is covered by the
Always ensure the lid and measuring cup
are positioned before blending.
Making Soup
Always cook food before blending.
1. Place the base on a level and sturdy surface.
2. Put the food into the glass jar.
Cut ingredients into small pieces (max
2-3 cm).
3. Close the glass jar lid.
4. Place the glass jar on the base and plug the
unit into an appropriate mains socket.
5. Fill the water in the water tank, then ensure
7
Page 7

en
the water tank lid is closed.
6. Press the ‘on/off’ button to put the unit into
‘stand-by’ mode.
7. Set the cooking time, by pushing + or - buttons. The cooking time can be changed at
any time during the cycle.
8. Press the Start/Stop button to start cooking.
9. When the cooking time has elapsed, the unit
will beep.
10. Turn control knob to blend the soup.
Due to unavoidable condensation, and
to natural amount of water contained in
any ingredients, in some situations to discharge a certain amount of liquid before blending
is recommended.
If you want to steam without the foods
come in contact with the condensation
water, you can use the basket (available on
certain models only).
The maximum ll for hot ingredients is
1400 ml.
When cooking or blending hot liquid it is
essential the glass jar lid and measuring
cup are left on the blender to prevent harm.
Blending Cold Ingredients
The blender can also be used as a regular blender to blend cold ingredients and crush ice.
5. Unplug the appliance immediately after use.
Do not store food or liquid in the glass
jar.
Empty and clean thoroughly after use.
Do not overload the Steam blender. If the
motor stalls, turn the Steam blender off
immediately, unplug the unit and carefully remove a portion of the food, then continue.
CARE AND CLEANING
Blade is very sharp Handle with care.
1. Always unplug the appliance from the mains
socket before cleaning.
2. Before rst use and after every use, clean
each part thoroughly.
3. To clean the anti-stick base we recommend
the use of the scrubbing brush which makes
it easy to clean underneath the blades.
4. To clean the glass jar lid and measuring cup,
wash in hot soapy water.
5. Wipe the motor base clean with a damp cloth
to remove any residue, and dry thoroughly.
6. Do not use abrasive cleaners on the housing
base. Apply any cleaning agent on the cloth,
not directly the base.
7. Make sure all the parts are clean and dry
before storing.
1. Place the motor base onto a at, sturdy surface.
2. Position the Glass jar assembly on the base
and plug into a suitable mains socket.
3. Add all necessary ingredients into the glass
jar and put the lid. You may add more ingredients during blending by removing the measuring cup and dropping ingredients through
the opening in the lid. If adding more liquid,
we recommend pausing blending, adding
the liquid and replacing the measuring cup
to prevent liquid escaping.
The maximum ll for cold ingredients is
1750 ml.
4. Turn the control knob to your desired speed
or use the pulse function. Turn the control
knob to ‘Off’ when the desired consistency
is reached.
For a better cleaning of the valve is re-
commended, after use, the use of the
residual water in the tank for a rapid cycle of
about 3 minutes of steaming. Adding about 25
cl of citric acid or of vinegar, this operation
will also be useful to prevent the accumulation
of limescale.
DESCALING
Please follow these instructions every 15 cycles
of steam cooking:
1. Put 500ml of a solution of water and anti-
scale (proportions according to what is spe-
cied on anti-scale product’s packaging) into
the water tank.
Standard anti-scale products (e.g. for
coffee machines) are suitable.
8
Page 8

en
2. Run a 20 minutes cycle of steam cooking without any food into the jar.
3. Rinse the water circuit with another 20 minutes cycle by using 500ml of pure water.
TROUBLESHOOTING
The product is designed in order to give the user a clear feedback about any problem or usage mistake.
Please refer to this table to discover the meaning of error messages on the display.
Error description
The glass jar is incorrectly
assembled on the blade
unit.
The power is off.
Error
message
E1
E1
Solutions
Check that the jar is correctly assembled; it must
be screwed till lock position; the jar handle must
be on the right, aligned over the water tank
Reactivate power; push on/off button to get the
product start working. Set time for steam cooking
and press start. When blending, come back to off
position and then re-set desired speed.
Water amount into the tank
is lower than minimum
quantity.
The water tank is not in working position.
The valve is
clogged.
In case of E1 message, please disconnect and reconnect the power cord. If the problem
persists, please call the service.
E2
E2
E1
Add water into the tank.
Control that water tank is in position.
Follow descaling procedure described below;
control that no piece of food is completely clogging
the steam ow.
9
Page 9

en
FOOD PREPARATION GUIDE
FOOD QUANTITY COOKING TIME BLENDING SPEED
POTATOES
MIXED FRUIT
(bananas, ap-
ples, pears)
CHICKEN
BREASTS
BEEF
MIXED
LEGUMES
MIXED
VEGETABLES
(potatoes,
courgette,
carrots)
500gr 15' 2
800gr 15-20’ PULSE, 1
400gr 20-25’ PULSE
400gr 20-25’ 1-2
300gr 20-25’ 4
1kg 20' 4
10
Page 10

en
RECIPE BOOK
Soup “in pieces”
SOUP WITH PESTO
Time: 40 minutes
Ingredients for 4 people
150 g rice, 2 potatoes, 2 courgettes, 2 leeks, 2 carrots, 1 stick celery, 1 onion, 100 g tomatoes, 100
g endives, 100 g borage, 150 g precooked cannellini beans, grated Grana cheese, Genoa pesto,
vegetable stock, extra-virgin olive oil, salt and pepper.
Make a cut in the shape of a cross at the bottom of the tomatoes, boil them for 3 minutes in hot water
and then place in a bowl lled with ice and water. Peel and dice. Wash and dice the potatoes and
courgettes. Wash and cut the leeks, carrots, celery and onion into discs. Wash and cut the endives
and borage into sticks. Put all the vegetables into the cup, add the rice, season with salt and pepper
to taste and steam cook for 20 minutes. Pour the mixture into a soup tureen, add the cannellini beans
and 2 spoonfuls of pesto and cover with boiling stock. Serve the soup with a drizzle of oil and with
grated Grana and sheep’s cheese.
GUACAMOLE
Time: 15 minutes
Ingredients for 4 people
3 ripe avocados, 1 lemon, 2 tomatoes, 1 small onion, 1 fresh hot chilli pepper, 1 spring of coriander
leaves
Halves the avocado, remove the stone, take the pulp out and place it in the cup, immediately adding
the lemon juice to prevent it from going black. Boil the tomatoes, peel them, remove the pips and
add to the avocado. Add the diced fresh chilli pepper and onion and a sprig of coriander leaves. Salt
to taste. Liquidise until it becomes a dense, irregular cream; it should not be as smooth as a purée.
GAZPACHO
Time: 25 minutes
Ingredients for 4 people
800 g tomatoes, 200 g bread, 4 cloves of garlic, 1 cucumber, 1 green pepper, cider vinegar, extravirgin olive oil, salt and pepper.
Make a cut in the shape of a cross at the bottom of the tomatoes, boil them for 3 minutes in hot
water and then place in a bowl lled with ice and water. Peel and dice. Place half the cubes into the
cup. Break the bread into pieces. Place 150 g into the cup with the tomato and add olive oil. Peel
and crush the garlic and mix all together. Dust with a large pinch of dried cumin. Peel the cucumber.
11
Page 11

en
Cube one third and put the rest in the cup. Clean the peppers. Cube one third and put the rest in
the liquidiser. Cook for 10 minutes and then liquidise. Add 2 spoonfuls of vinegar to the mixture and
salt to taste. Put the gazpacho in the refrigerator for at least 1 hour. Serve with dry bread and the
remaining cubed vegetables.
Baby food
HAZELNUT-FLAVOURED CHICKEN BABY FOOD
Time: 20 minutes
Ingredients to make approximately 400 g baby food.
120 g seasonal vegetables, 40 g chicken breast, 20 g tapioca cream preparation, 250 g vegetable
broth, hazelnut oil.
Clean and peel the vegetables and then cube. Cube the chicken too and place it all in the cup. Add
the stock and cook for 12 minutes. Once cooked, add the tapioca and liquidise. When serving, add
a spoonful of oil.
SOLE BABY FOOD
Time: 20 minutes
Ingredients to make approximately 600 g baby food.
100 g carrots, 50 g potatoes, 60 g sole llets, 20 g instant wheat semolina, 400 g vegetable stock,
pumpkin seed oil.
Clean and peel the vegetables and then cube. Cut the sh into pieces too and place it all in the cup.
Add the stock and cook for 12 minutes. When cooked, liquidise to obtain a homogeneous mixture
and add the semolina. Mix gently and when serving, add a spoonful of oil.
12
Page 12

en
GUARANTEE
12 months Parts and Labour Guarantee
This certicate of guarantee represents the guarantee (“Guarantee” hereinafter) offered by In-
desit Company UK Limited with registered ofce
at Peterborough PE2 9JB in relation to products
purchased in the United Kingdom and Indesit
Ireland Limited with registered ofce in Dublin 9,
Ireland for products purchased in the Republic of
Ireland. This Guarantee does not affect your statutory rights.
Your product has the benet of our manufacturer’s Guarantee, which covers the product for
twelve months from the date of purchase.
This gives you the reassurance that if, within that
time, your product is proven to be defective because of either workmanship or materials, we will,
at our discretion, either repair or replace the product at no cost to you.
This Guarantee is subject to the following conditions:
• Documentary proof of original purchase date
is provided.
• Cosmetic damage must be reported within
14 days from the date of purchase.
• The product has been installed and operated
correctly and in accordance with our operating and maintenance instructions.
• The product is used only on the electricity
supply printed on the rating plate.
• The product has been used for normal domestic purposes only.
• The product has not been altered, serviced,
maintained, dismantled, or otherwise interfered with by any person not authorised by us.
• Any repair work must be undertaken by us or
our appointed agent.
• Any parts removed during repair work or any
product that is replaced become our property.
• The product is used in the United Kingdom
or Republic of Ireland.
The Guarantee does not cover:
• Damage resulting from transportation, improper use, neglect or interference or as a
result of improper installation.
• Accidental damage, this includes but is not
limited to, damage which occurs as a result
of an external action.
• Replacement of any consumable item or accessory. These include but are not limited to:
• plugs, cables, light bulbs, hoses, brushes,
covers and lters.
• Replacement of any removable parts made
of glass or plastic.
After Sales Service
No one is better placed to care for your Hotpoint
product during the course of its working life than
us – the manufacturer.
Essential Contact Information
Advice Line
We have a dedicated team who can provide free
advice and assistance with your product if you
experience any technical difculties. Simply call
our Hotpoint Service Hotline on 08448 240 055
(Republic of Ireland 0818 904 041) for telephone
assistance.
Please note:
Our advisors will require the following information:
Model number:
Serial number:
Consumables and Accessories
We supply a full range of consumables and accessories to keep your product functioning efciently throughout its life.
UK: 08448 225 225
Republic of Ireland: 0818 313 413
www.hotpoint.co.uk
Recycling and Disposal Information
As part of Hotpoint’s continued commitment to
helping the environment, Hotpoint reserves the
right to use quality, recycled components to keep
down customer costs and minimise material wa-
13
Page 13

en
stage.
Please dispose of packaging and old products
carefully.
Register your new product and get a second
year FREE!
We want to give you additional benets of ownership of your product and offer you an additional
free 1 year guarantee when you register your
product with Hotpoint within 28 days of purchase.
If you do not register your product with Hotpoint
within 28 days, your product is guaranteed for 1
year only.
To activate your 2 year guarantee register with
us online at www.hotpoint.co.uk. Please note that
the 2 year guarantee is only available in UK and
Ireland and is subject to the same conditions as
the 1 year Guarantee. Please refer to the certicate of guarantee for more information.
DISPOSAL OF OLD
ELECTRICAL APPLIANCES
The European Directive 2002/96/EC on
Waste Electrical and Electronic
Equipment (WEEE), requires that old
household electrical appliances must
not be disposed of in the normal unsorted municipal waste stream.
Old appliances must be collected separately in order to optimise the recovery and
recycling of the materials they contain and reduce
the impact on human health and the environment.
The crossed out “wheeled bin” symbol on the
product reminds you of your obligation, that when
you dispose of the appliance it must be separately
collected. Consumers should contact their local
authority or retailer for information concerning the
correct disposal of their old appliance.
14
Page 14

Indesit Company UK Ltd
Morley Way,
Peterborough PE2 9JB
www.indesitcompany.com
TB 060 UK
02/2013 - ver.1.1
 Loading...