

Page 1

Instructions for Installation and Use
Electric Oven
Model: SY86P
T o the Installer
Before installation fill in the product details on the back cover of this book.
The information can be found on the rating plate.
T o the User
You must read the instructions prior to installing and using the appliance and
then retain them for future reference.
Page 2

CONTENTS
Introduction
Close-up view
How to use your appliance
Programming the cooking mode
Automatic cleaning with the fast clean function
Do not worry if
Fast clean programming
How to Keep Your Oven in Shape
Replacing the oven lamp
Practical Cooking Advice
Safety Is A Good Habit To Get Into
Instalation
Electrical connection
Technical Specifications
After sales services
Hotpoint Guarantee
Key Contacts
3
4
5-6
7
8
8
9
10
10
11-12-13
14
15
16
17
18
19
Back Cover
Retention of this Instruction Book
This Instruction Book must be kept handy for ref erence as it contains important details on the safe and proper use of
the appliance.
If you sell or pass the appliance to someone else, or move house and leave it behind, make sure this Book is also
provided so the new owner can become familiar with the appliance and safety warnings.
If the Book is lost or damaged a copy may be obtained from:
INDESIT Company UK LTD, Morley W ay, P eterborough, PE2 9JB
2
Page 3

Introduction
Your new electric oven is guaranteed* and will giv e lasting service. This guarantee is only applicable if the appliance has
been installed in accordance with the installation instructions detailed in this booklet.
To help make best use of your cooking equipment, please read this booklet carefully.
The oven is designed specifically for domestic use and responsibility will not be accepted for use in any other installation.
Note: When the oven is first used, an odour ma y be omitted - this will cease after a short period of use.
To help remove the 'new' smell, heat the empty oven to maximum temperature for a minimum of two to three hours,
keeping the door/s closed. Ensure that the room is well ventilated (eg. open a window or use an extractor fan) and that
persons who may be sensitive to the odour avoid any fumes. It is suggested that any pets be removed from the room
until the smell has ceased.
This odour is due to any temporary finish on oven linings and elements and any moisture absorbed by the insulation.
* The guarantee is subject to the provisions that the appliance:
(a) Has been used solely in accordance with this booklet.
(b) Has been properly connected to a suitable supply voltage as stated on the rating plate, attached to the
appliance.
(c) Has not been subjected to misuse or accident or been modified or repaired by any person other than the
manufacturers authorised employee or agent.
(d) Has been correctly installed.
3
Page 4
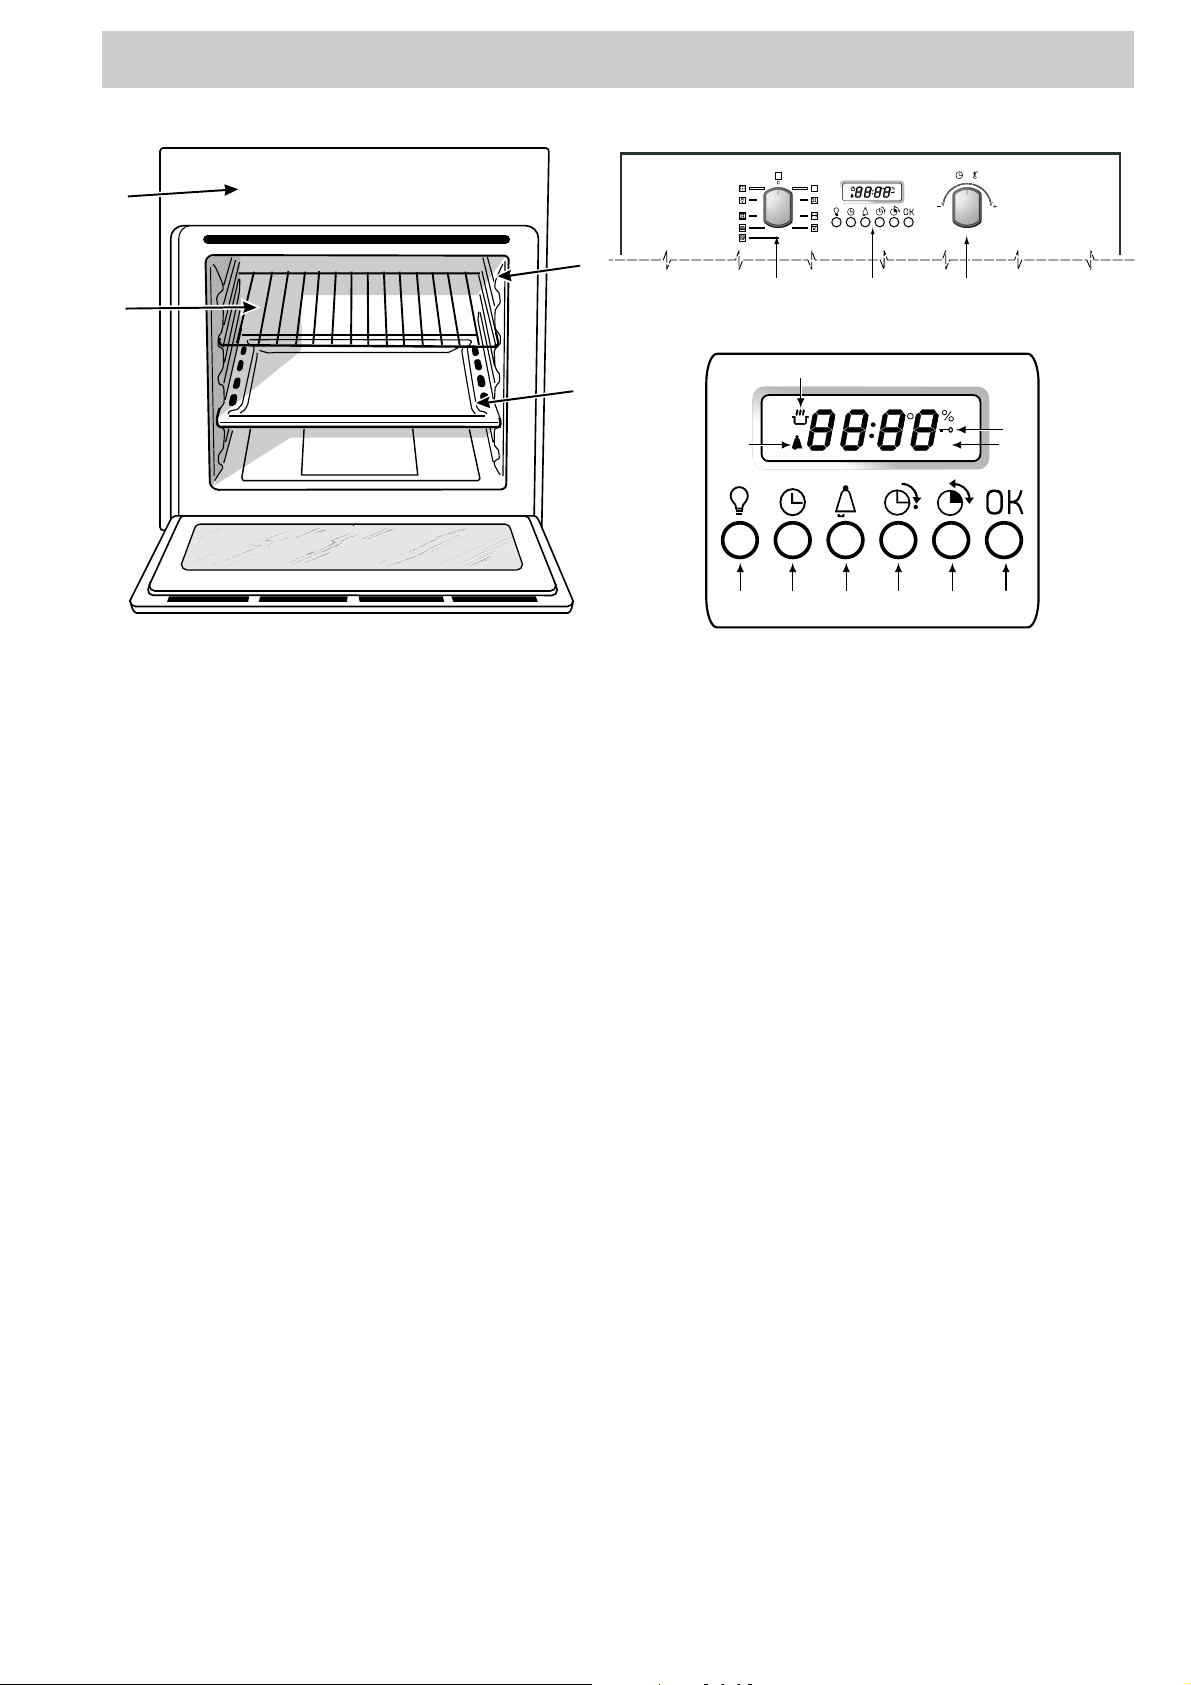
Close-up view
G
A
A
H
B
8
D
C
F
7
1
2 3 4 5 6
A
10
9
A. Control Panel
B. Cooking mode selection knob
C. Cooking temperature selection knob
D. Electronic programmer - Allows you to programme
the desired cooking mode by selecting the cooking time
and the end cooking time. It can also be used as a
timer.
F. Dripping Pan or Baking Sheet
G. Oven Rac k
H. Guides for sliding the racks or dripping pan in and
out
1. Oven Light
2. Clock adjustment
3. Timer adjustment
4. End cooking time
5. Cooking time
6. Setting confirmation
7. Timer indicator
8. Pre-heating (m flashing) or cooking (m on) under
way indicator
9. Programming complete indicator
10.Door lock indicator
4
Page 5

How to use your appliance
The
7 Cuochi
convection ov ens with those of the more modern fan assisted
models in a single appliance.
It is an extremely versatile appliance that allows y ou to choose
easily and safely between 7 different cooking modes. The
various features offered b y the ov en are selected by means
of selector knob “B” situated on the control panel.
Notice: The first time you use y our appliance, we recommend
that you set the thermostat to the highest setting and leave
the oven on for at least half an hour with nothing in it, with the
oven door shut. Then, open the oven door and let the room
air. The odour that is often detected during this initial use is
due to the evaporation of substances used to protect the
oven during storage and until it is installed.
Setting the digital clock
The time can only be set on the clock when knob “B” is in
position 0.
After the appliance has been connected to the power supply ,
or when the power has gone out, the clock display will
automatically reset to 0:00 and begin to blink. 0.00.
T urn knob C to set the hours and then press OK to confirm.
Turn knob C again to set the minutes and then press OK
to confirm the time definitively . Any changes can be made
by pressing button 2 and f ollowing the abo v e procedure .
Timer Feature
The timer does not control the starting or stopping of the
oven, it merely sounds a buzz er when the time is up and
can be interrupted at any time just by pressing a button.
To set the timer, press button 3, adjust it using knob C and
then press the OK button to confirm. The n icon will remind
you the timer is on.
Once the countdown is over , a buzzer will sound, and will stop
doing so after 1 minute or if you press any b utton whatsoever .
The oven light
It can be turned on at any time with the oven turned off,
simply by pressing button 1 or by opening the ov en door.
Cooling ventilation
In order to reduce the temperature of the exterior of the
oven, a cooling fan generates a flow of air that can be
heard exiting between the ov en door and the control panel.
Note: When cooking is done, the fan stays on until
the oven cools down sufficiently.
Note: In “F ast cooking” mode , the fan comes on automatically
only when the oven is hot.
Reminder: the appliance is fitted with a diagnosis system
which detects any malfunctions. The user is informed of the
latter by messages such as “Fn m” that come up on the
display (n and m = single digit numbers). In these cases, you
need to call for technical assistance as the ov en is f aulty.
How T o Use Your Oven
T urn knob B to select the desired cooking mode. The oven
will immediately start the pre-heating phase, during which
the icon m will flash on the displa y , and the cooking temperature associated with the mode selected will be
displayed: should this value not be the one you desire,
you can modify it simply by turning knob C.
oven combines the advantages of traditional
Once pre-heating is complete, an acoustic signal will sound
and the icon m will come on permanently, and at this
stage you can place the food to be cook ed inside the preheated oven.
Note: the F AST COOKING and GRILL modes do not inclu-
de a pre-heating phase. Please remember that you can
always do the f ollowing when cooking is under wa y:
• change the cooking mode by turning knob “B”;
• change the temperature by turning knob “C”;
• programme the cooking time and end cooking time (see
paragraph entitled “Prog ramming the cooking mode”).
• stop it at any time by setting knob “B ” back to 0.
Note: For safety reasons, a cooking time of 2 hours is set
for each cooking mode by def ault. Should this time fail to
be adjusted, the oven will be automatically turned off once
this time is up.
Notice: Place the ov en tra y provided on the bottom shelf of
the oven to pre v ent an y sauce and/or grease from dripping
onto the bottom of the oven only when grilling f ood or when
using the turnspit (only available on certain models). F or all
other types of cooking, never use the bottom shelf and ne ver
place anything on the bottom of the oven when it is in
operation because this could damage the enamel coating.
Always place your cookw are (dishes, aluminium foil, etc. etc.)
on the grid provided with the appliance inserted especially
along the oven guides.
Convection Oven a
Position of thermostat knob “C ”: Between 40°C and 250°C.
On this setting, the top and bottom heating elements come
on. This is the classic, traditional type of oven which has
been perfected, with exceptional heat distrib ution and reduced
energy consumption. The convection o ven is still unequalled
when it comes to cooking dishes made up of several
ingredients, e.g. cabbage with ribs, local stockfish recipes,
tender veal with rice, etc. Excellent results are achieved when
preparing meat-based dishes as well: braised meats , ste w,
goulash, game, ham etc. which need to cook slowly and
require basting or the addition of liquid. It nonetheless remains
the best system for baking cakes and pastries as well as
fruit and cooking casseroles. When cooking in convection
mode, use only one rack, as the temperature would not be
distributed evenly on se v er al rac ks. Using the different rack
heights available, you can balance the amount of heat
between the top and the bottom of the oven. Select from
among the various rack heights based on whether the dish
needs more or less heat from the top.
Multi-Cooking Mode b
Position of thermostat knob “C ”: Between 40°C and 250°C.
The heating elements and the fan come on alternately . Since
the heat remains constant and uniform throughout the oven,
the air cooks and browns food unif ormly over its entire surface.
With this mode, you can also cook various dishes at the
same time, as long as their respective cooking temperatures
are the same. A maximum of 2 racks can be used at the
same time, following the instructions in the section entitled:
“Cooking On More Than One Rac k”.
This cooking mode is particularly recommended for dishes
requiring a gratin finish or for those requiring considerably
prolonged cooking times, such as for example: lasagne, pasta
5
Page 6

How to use your appliance
bakes, roast chicken and potatoes, etc… Moreover, the
excellent heat distribution makes it possible to use lower
temperatures when cooking roasts. This results in less loss
of juices, meat which is more tender and a decrease in the
loss of weight for the roast. The Multi-cooking mode is
especially suited for cooking fish, which can be prepared
with the addition of a limited amount of condiments, thus
maintaining their flavour and appearance . Excellent results
can be attained when cooking vegetable-based side dishes
like courgettes, aubergines, peppers , etc.
Desserts: this mode is also perfect for baking lea vened cakes.
Moreover , this mode can also be used to thaw quickly white
or red meat and bread by setting the temperature to 80 °C.
To thaw more delicate foods, set the thermostat to 60°C or
use only the cold air circulation feature by setting the
thermostat to 0°C.
Grill 2
Position of thermostat knob “C”: Between 50% and 100%.
The top heating element and the turnspit (where present)
come on.
The extremely high and direct temperature of the grill make s
it possible to brown the surface of meats and roasts while
locking in the juices to keep them tender. The grill is also
highly recommended for dishes that require a high
temperature on the surface: such as beef steaks, veal, rib
steak, filets, hamburgers etc...
Always leave the oven door ajar during cooking, except
when using the turnspit.
Some grilling examples are included in the “Practical Cooking
Advice” paragr aph.
Turn knob “C” and the display will indicate the different
energy percentages which represent the minimum (50%)
and maximum (100%) settings.
Gratin T
Position of thermostat knob “C ”: Between 40°C and 250°C.
The top heating element, the fan and the turnspit (where
present) come on.
This combination of features increases the eff ectiv eness of
the unidirectional thermal radiation of the heating elements
through forced circulation of the air throughout the ov en. This
helps prevent f ood from burning on the surface, allo wing the
heat to penetrate right into the food. Excellent results are
achieved with kebabs made with meats and vegetables,
sausages, ribs, lamb chops, chick en in a spicy sauce, quail,
pork chops, etc.
All “gratin” cooking m ust be done with the oven door shut.
The “gratin” mode is ideal f or cooking grouper steaks , tuna,
swordfish, stuff ed cuttlefish etc.
Baking Mode u
Position of thermostat knob “C”: Between 40°C and 250°C.
The rear heating element and the fan come on, guaranteeing
delicate heat distributed uniformly throughout the oven.
This mode is ideal for baking and cooking delicate foods especially cakes that need to rise - and for the preparation of
certain tartlets on 3 shelves at the same time. Here are a few
examples: cream puffs, sweet and sa voury biscuits, savoury
puffs, Swiss rolls and small portions of vegetables au gratin,
etc…..
“Fast cooking” Mode v
Position of thermostat knob “C”: Between 40°C and 250°C.
The heating elements and the fan come on, guaranteeing
constant heat distributed uniformly throughout the oven.
This mode is especially recommended for cooking prepacked f ood quickly (as pre-heating is not necessary), such
as for example: frozen or pre-cooked food) as well as for a
few “home-made” dishes.
The best results when cooking using the “Fast cooking” mode
are obtained if you use one cooking rack only (the second
from the bottom), please see the table entitled “Practical
Cooking Advice”.
“Defrosting” ModeU
Position of thermostat knob “C”: any
The fan located on the bottom of the oven makes the air
circulate at room temperature around the food. This is
recommended for the defrosting of all types of food, b ut in
particular for delicate types of food which do not require
heat, such as for example: ice cream cakes, cream or
custard desserts, fruit cakes. By using the fan, the
defrosting time is approximately halved. In the case of
meat, fish and bread, it is possible to accelerate the
process using the “multi-cooking” mode and setting the
temperature to 80° - 100°C.
Automatic cleaning with the fast clean function
This function is designed to clean your oven thoroughly.
For details on the fast clean function, please refer to the
paragraph entitled “A utomatic cleaning with the fast clean
function”.
The turnspit (only available on certain models)
To start the turnspit, proceed as follows:
a) place the oven tray on the 1st rack;
b) insert the special turnspit suppor t on the 3rd rack and
position the spit by inserting it through the special hole
into the turnspit at the back of the oven;
c) start the turnspit using knob “B” to select setting 2 / T.
V
Pizza Mode w
Position of thermostat knob “C ”: Between 40°C and 250°C.
The bottom and circular heating elements, as well as the
fan, will come on. This combination rapidly heats the oven
due to the large amounts of power used by the appliance
(2800 W), which results in the production of considerable
heat coming prevalently from the bottom.
The pizza mode is ideal for foods requiring high temperatures
to cook, like pizzas and large roasts. Only use one oven tr ay
or rack at a time. However, if more than one is used, these
must be switched halfw ay through the cooking process.
6
Page 7
Programming the cooking mode
The cooking time and/or end cooking time can be
programmed after the desired cooking mode has been
selected.
Programming the cooking time
Press button 5 and then adjust the cooking time by turning
knob C. Press the OK b utton to store the setting. The temperature selected (which can be adjusted using knob C)
and the amount of time left until cooking is complete will
be displayed alternately.
Once this time is up, the word “end” will be displayed and
a sequence of acoustic signals will be emitted to indicate
that cooking is complete.
• Press any button to silence the acoustic signal.
• Turn knob B back to position 0 to remove the word
“end” from the displa y.
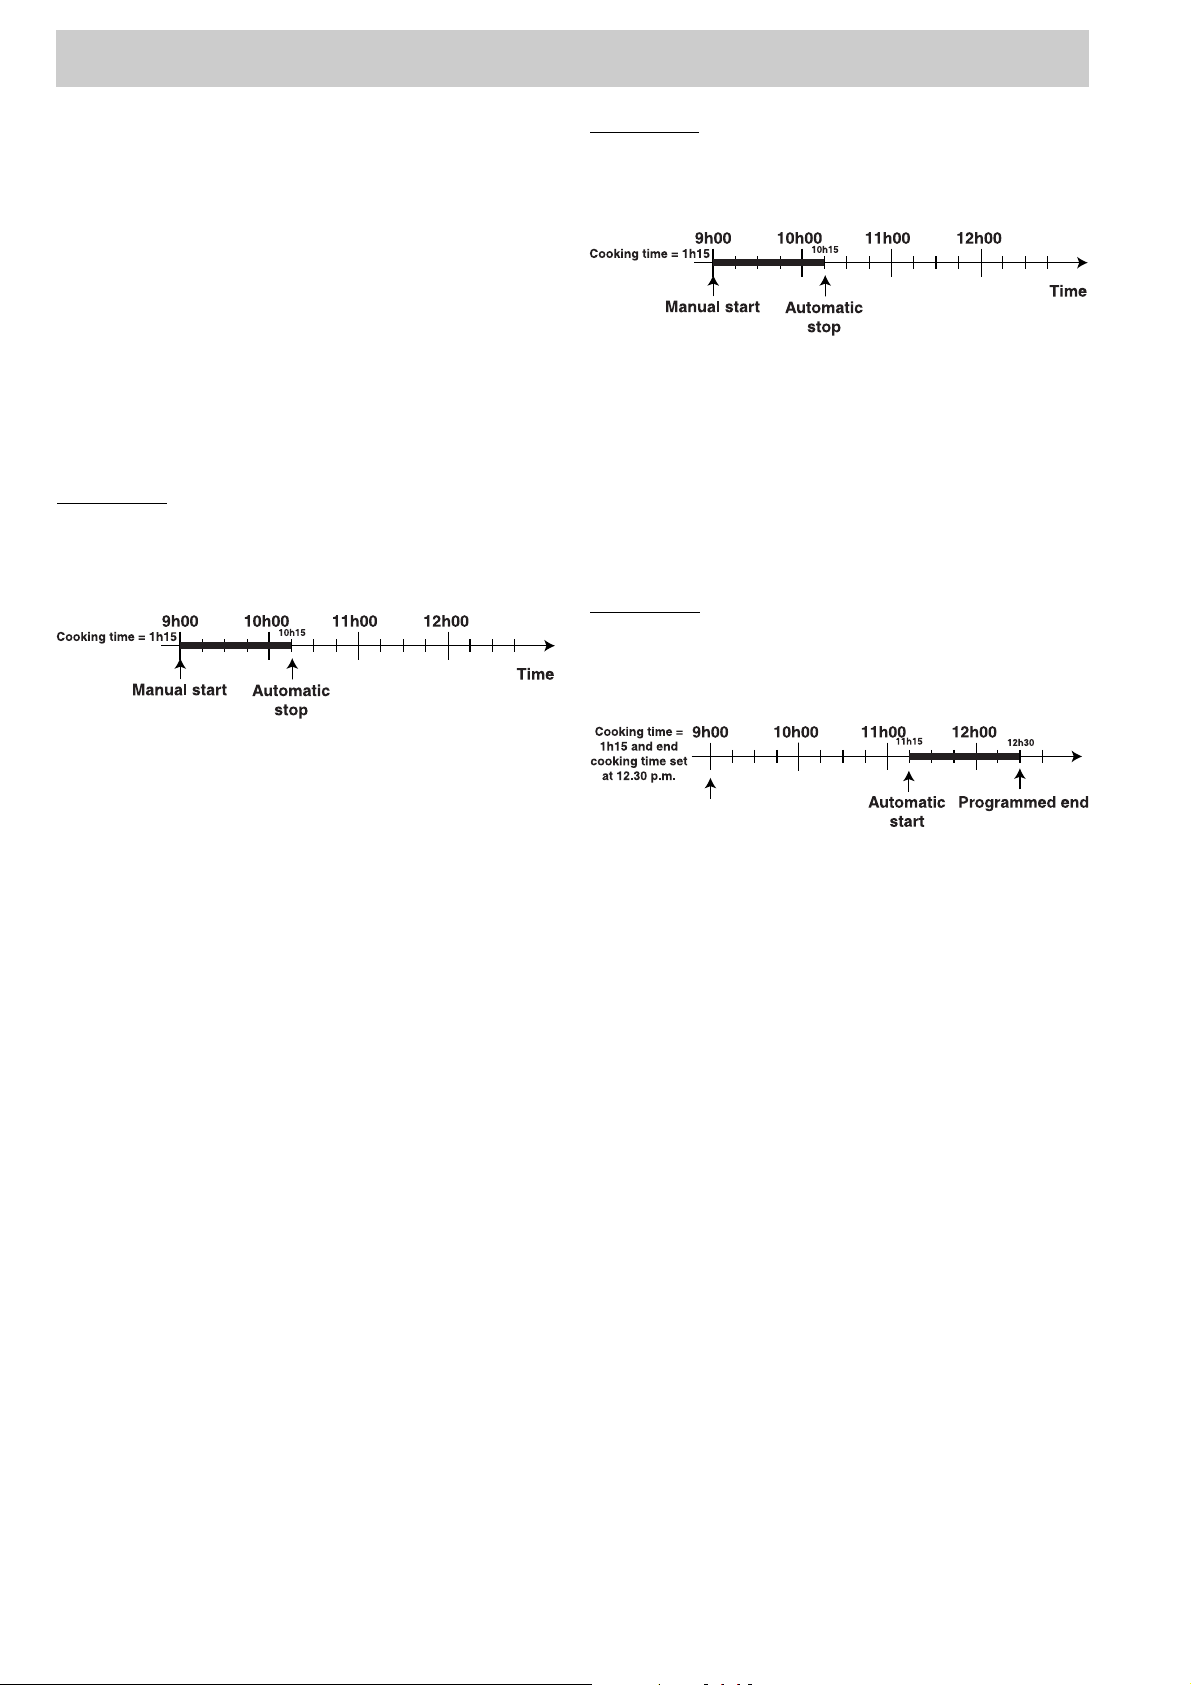
For example
It is 9:00 a.m. and a cooking time of 1 hour and 15 min utes
is programmed. Cooking will stop automatically at 10:15
a.m..
For example
It is 9:00 a.m. and the end cooking time is set at 10:15
a.m.. Cooking will last 1 hour and 15 min utes .
Delayed cooking programming
Press button 5 and then adjust the cooking time by turning
knob C. Press the OK b utton to store the setting. The temperature and the time set previously will be displayed
alternately.
Press button 4 and then adjust the end cooking time by
turning knob C. Press the OK button to store the setting
and the display will remind you of the end cooking time
and of the temperature set alternately .
For e xample
It is 9:00 a.m. and a cooking time of 1 hour and 15 minutes
and 12:20 as the end cooking time are programmed.
Cooking will start automatically at 11:15 a.m..
Programming the end cooking time
Press button 4 and then adjust by turning knob C. Press
the OK button to store the setting. The display will remind
you alternately of the temperature selected and the amount
of time left until cooking is complete.
When the end cooking time selected previously is up , the
word “end” will be displayed and a sequence of acoustic
signals will be emitted to indicate that cooking is complete.
• Press any button to silence the acoustic signal.
• Turn knob B back to position 0 to remove the word
“end” from the displa y.
The icon A will remind you that you hav e programmed the
cooking time and/or the end cooking time.
T o cancel a programmed time
T o cancel an y programming you ha ve made , set knob “B”
to position “0”.
7
Page 8

Automatic cleaning with the fast clean function
When the fast clean function has been enabled, the
temperature inside the oven reaches 500 °C, which is
necessary to burn all food residue that has built up inside it.
If you look through the oven glass, you may notice some
particles that light up as they are destroyed by pyrolysis
upon contact with the heating elements: this is simply
spontaneous combustion: it is perfectly normal and hazard-
free.
A few useful tips before automatic c leaning begins
1- Try to remove large scraps of food and cak ed-on dirt with
a damp sponge. Avoid using detergents or an y other special
products recommended for ov en cleaning.
2- Remove all the accessories from the oven, as these
are not designed to withstand such high temperatures. In
addition, some accessories could affect the efficiency of the
automatic cleaning cycle by obstructing the circulation of heat
along all the interior walls of the oven. The accessories can
easily be washed like ever yday crockery (even in your
dishwasher).
3- Do not place tea towels ov er the ov en handle .
Notice: during the automatic cleaning cyc le, the surfaces
may become very hot. Keep children well a way.
How to enable the fast clean function
– Shut the oven door .
– Set the selector knob to V.
– To programme the fast clean cycle time and/or cycle
end time, follow the instructions provided in the
paragraph entitled “Fast clean programming”. Please
note that you can choose a cycle time of between 60
and 120 minutes, depending on the degree of soil in
your ov en.
Safety devices
Given the high temperatures reached inside it, the oven is
fitted with several saf ety de vices:
• the door is locked automatically as soon as the temperature exceeds a certain value, to avoid all risk of
burns;
• the heating elements are no longer electrically
powered, as a precautionary measure, should a fault
occur.
• Once the oven door has been lock ed, you cannot make
any changes to the cycle time, cycle end and timer
settings.
What happens at the end of an automatic cleaning
cycle?
At the end of the automatic cleaning cycle, the word “end”
is displayed and an acoustic signal is sounded, which can
be silenced just by pressing any one of the buttons. Turn
knob “B” to the “0” setting and the word “end” will disappear .
T o open the o ven door, you will have to wait until the temperature inside it has dropped to a suitable value.
You will notice some white dust deposits on the bottom and
sides of your oven; remov e them with a damp sponge once
the oven has cooled down completely.
You may on the other hand prefer to tak e advantage of the
heat accumulated to start cooking immediately; in this case
the dust can stay where it is: it is completely harmless and
will not affect your f ood in any w a y.
DO NO T W ORR Y IF
1 the cooling fan is operating at low speed at the start of
the fast clean cycle;
2 the electrical system limiter blows when Fast Clean is
in use: this is due to a mains ov erload (too many electric
household appliances used at the same time);
3 the oven door is locked during the Fast Clean
programme: this is an appliance safety device; the door
will only open when the oven has cooled completely;
4 small stains are left on the interior surface of the oven
after the Fast Clean cycle: we recommend y ou remove
the toughest grease spots and large scraps of food
before the self-cleaning cycle and that you set the cycle
time in accordance with the degree of soil in your oven;
5 you see ventilated air exiting the oven for a while when
cooking is complete: it is due to the normal cooling
phase of the oven interior;
6 when using the “grill” mode, the top heating element
isn’t always on (red in colour): its operation is controlled
by a thermostat;
7 a blast of hot steam exits the oven when y ou open the
door during cooking;
8 drops of water or steam form inside the oven if you
leave f ood inside the oven after cooking is complete;
8
Page 9
Fast clean programming
The fast clean cycle time and/or cycle end time can be
programmed after selecting the fast clean mode.
Programming the fast clean cyc le time
Press button 5 and then adjust the cycle time by turning
knob C. Press the OK button to store the setting. The time
left until the end of the fast clean cycle will be display ed.
Once this time is up, the word “end” will be displayed and
a sequence of acoustic signals will be sounded to indicate that the cleaning cycle is complete.
• Press any button to silence the acoustic signal.
• Turn knob B back to position 0 to remove the word
“end” from the displa y.
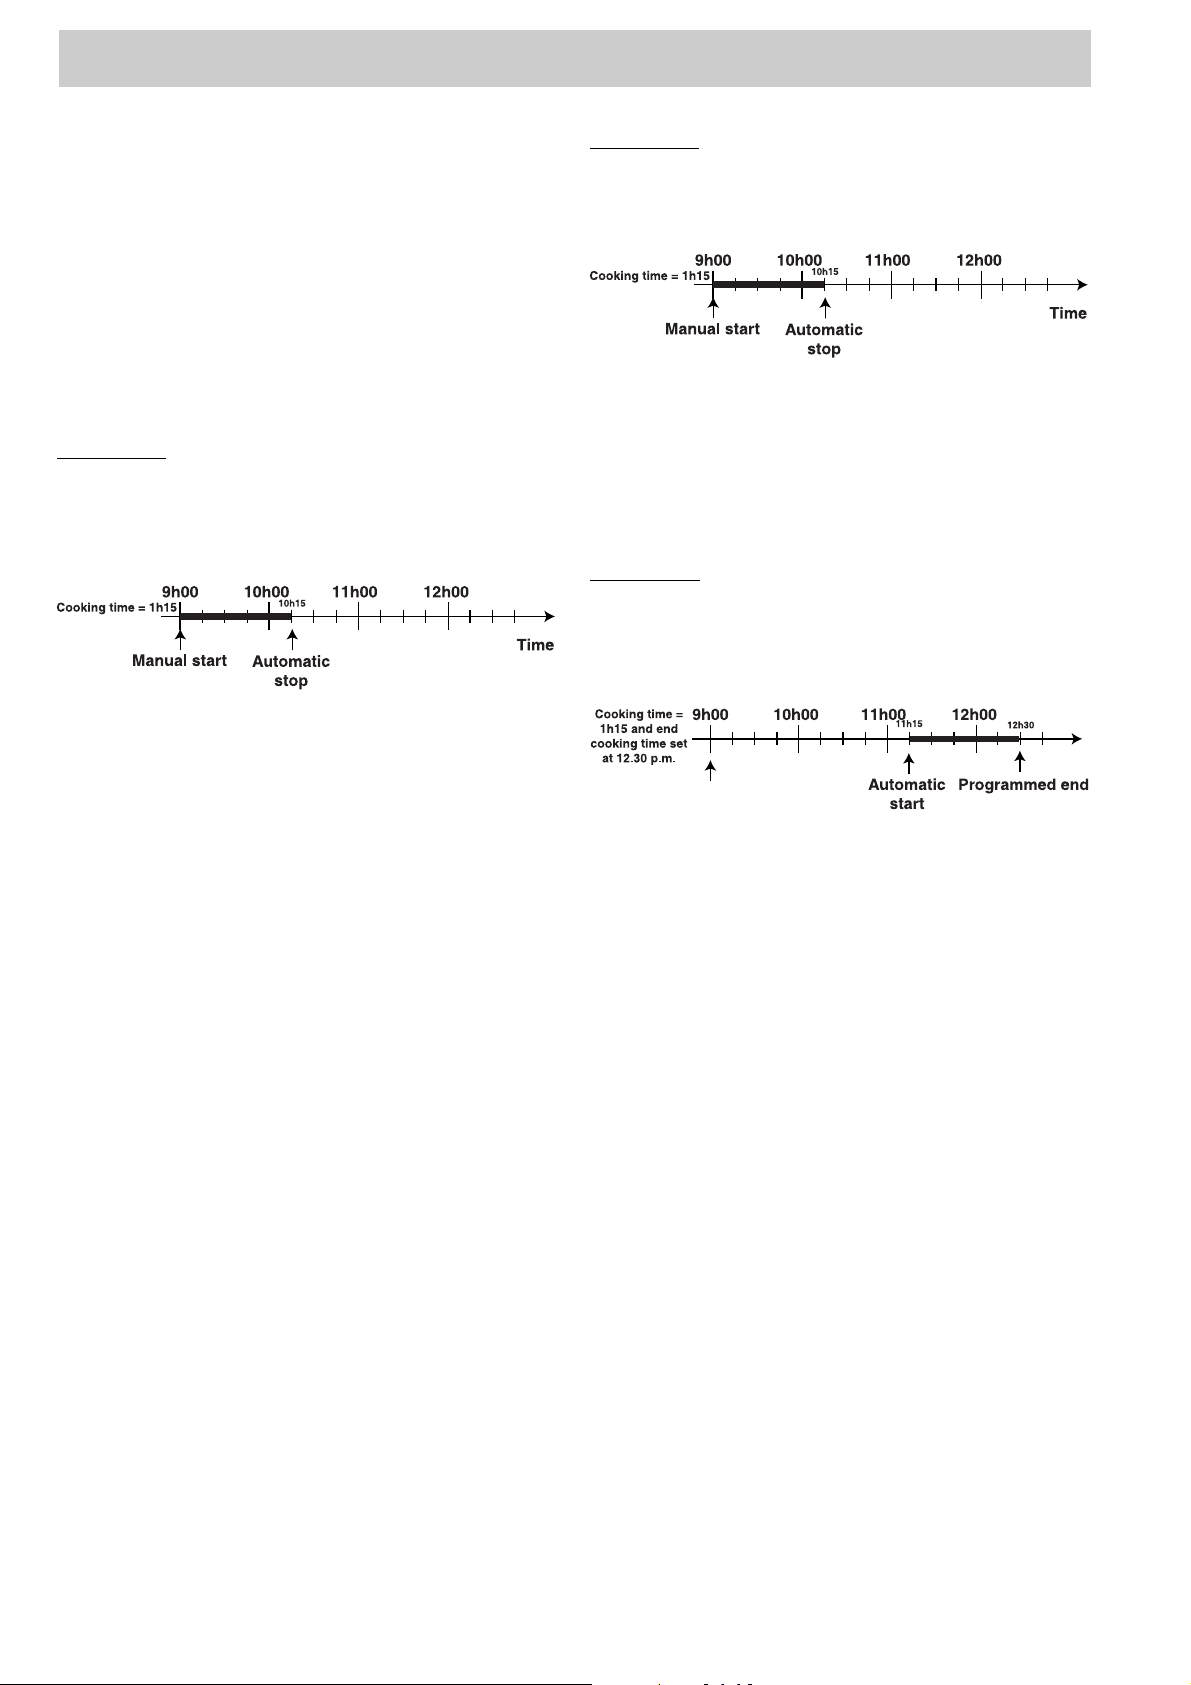
For example
It is 9:00 a.m. and a fast clean cycle time of 1 hour and
15 minutes is programmed. The fast clean cycle will end
automatically at 10:15 a.m..
For example
It is 9:00 a.m. and the fast clean cycle end time is set at
10:15 a.m.. Fast clean will last 1 hour and 15 minutes.
Delayed fast clean cycle programming
Press button 5 and then adjust the cycle time by turning
knob C. Press the OK button to store the setting and
display it.
Press button 4 and then adjust the cycle end time by
turning knob C. Press the OK button to store the setting
and the display will remind you of the cycle end time and
of the actual cycle time set alternately .
For e xample
It is 9:00 a.m. and a f ast clean cycle time of 1 hour and 15
minutes and 12:20 as the cycle end time are programmed.
The fast clean cycle will start automatically at 11:15 a.m..
Programming the fast clean cycle end time
Press button 4 and then adjust by turning knob C. Press
the OK button to store the setting. The time left until the
end of the fast clean cycle will be displayed.
When the fast clean cycle time previously selected is up ,
the word “end” will be displayed and a sequence of acoustic
signals will be sounded to indicate that the fast clean cycle
is complete.
• Press any button to silence the acoustic signal.
• Turn knob B back to position 0 to remove the word
“end” from the displa y.
The icon A will remind you that you have programmed the
fast clean cycle time and/or the cycle end time.
T o cancel a programmed time
T o cancel an y programming you ha ve made , set knob “B”
to position “0”.
9
Page 10
How to Keep Your Oven in Shape
Before cleaning your oven, or performing maintenance, disconnect it from the power supply.
To extend the life of your oven, it must be cleaned
frequently, keeping in mind that:
• Do not use steam equipment to clean the appliance.
• the enamelled or stainless steel parts should be
washed with lukewarm water without using any abrasive powders or corrosiv e substances which could ruin
them; Stainless steel could get stained. If these stains
are difficult to remove, use special products available
on the market. After cleaning, it is advisable to rinse
thoroughly and dry .
• the inside of the oven should preferably be cleaned
immediately after use, when it is still warm, with hot
water and soap; the soap should be rinsed away and
the interior dried thoroughly. Avoid using abrasiv e detergents (for example cleaning powders, etc…) and
abrasive sponges for dishes or acids (such as
limescale-remover , etc…) as these could damage the
enamel. If the grease spots and dir t are particularly
tough to remove, use a special product f or ov en cleaning, following the instructions provided on the pack et.
• if you use your oven for an extended period of time,
condensation may form. Dry it using a soft cloth.
• it is important to ensure that the seal around the oven door
opening is not damaged. Should it be damaged, please
contact your nearest After-sales Service Centre. We
recommend you avoid using the oven until it has been
repaired.
• never line the oven bottom with aluminium foil, as the
consequent accumulation of heat could compromise
the cooking and even damage the enamel.
• clean the glass door using non-abrasive products or
sponges and dry it with a soft cloth.
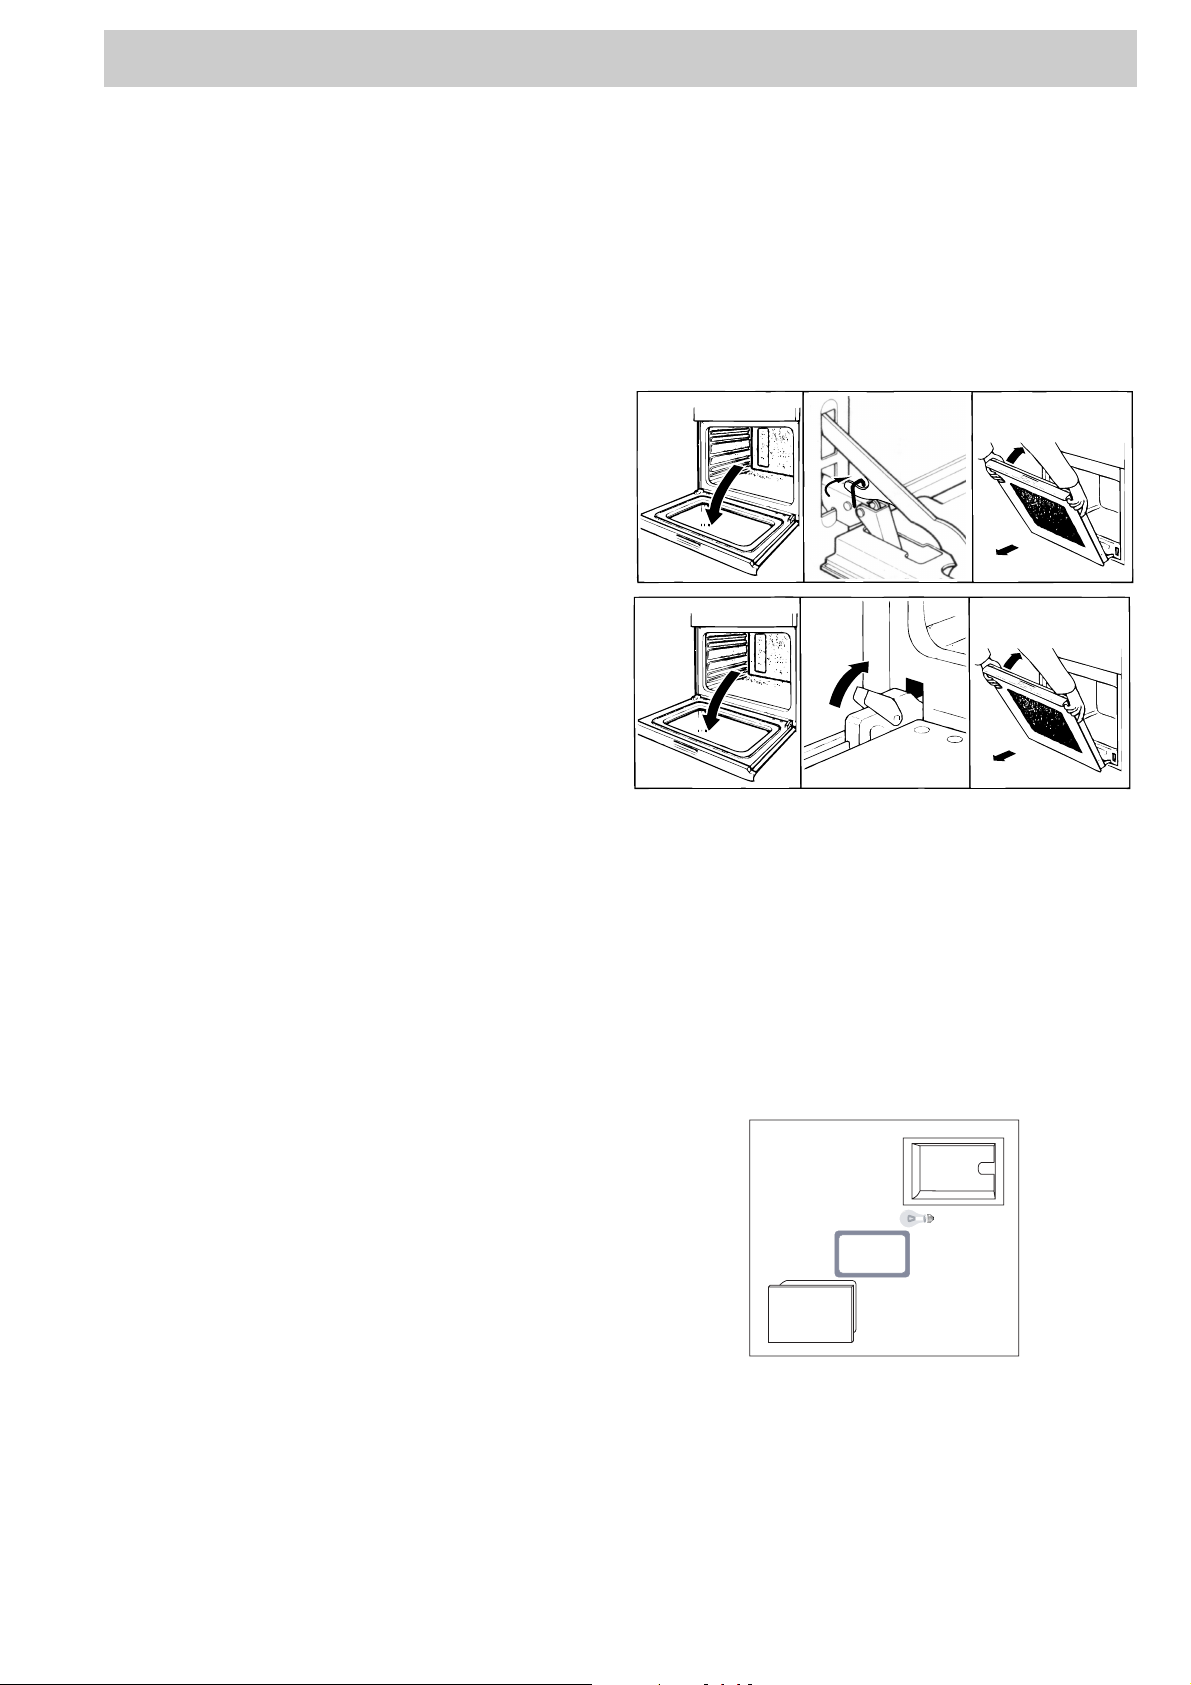
How to remove the oven door
For a more thorough clean, you can remove the oven
door. Proceed as follows:
• open the door fully;
• lift up and turn the small levers situated on the two
hinges;
• grip the door on the two external sides, shut it slowly
but not completely;
• pull the door towards you, pulling it out of its seat;
Reassemble the door by follo wing the abov e procedures
backwards.
132
123
Replacing the oven lamp
• Alwa ys unplug the appliance from the mains or switch
off the main switch before all operations .
• With the aid of a narrow , flat item (such as a screwdriver
or a spoon handle, etc...), remove the glass co ver.
• Unscrew the lamp and replace it with another featuring
the same characteristics:
- voltage 230/240 V
- wattage 15 W
- type E 14
• Replace the glass cover and ensure y ou reposition the
seal correctly.
10
Glass door
Oven
compartment
Lamp
Seal
Page 11
Practical Cooking Advice
The oven offers a wide range of alternatives which allow
you to cook any type of food in the best possib le wa y . With
time you will learn to make the best use of this versatile
cooking appliance and the following directions are only a
guideline which may be varied according to your own personal experience.
Cooking on More Than One Rack
If you have to cook food using several racks, use either
the “baking” mode u or the “Multi-cooking” mode b, as
these are the only modes that allow you to do so.
When cooking delicate food on more than one rack, use
the “baking” mode u, which allows you to cook on 3
racks at the same time (the 1st, 3rd and 5th from the
bottom). Some examples are included in the “Practical
Cooking Advice” table.
When cooking other food on sev eral rac ks, use the “Mul-
ti-cooking” mode b keeping the following suggestions
in mind:
• The oven is fitted with 5 racks. During fan assisted
cooking, use two of the three central racks; the lowest
and highest racks receive the hot air directly and
therefore delicate foodstuffs could be burnt on these
racks.
• As a general rule, use the 2nd and 4th rack from the
bottom, placing the foodstuffs that require greater heat
on the 2nd rack from the bottom. For example, when
cooking meat roasts together with other food, place
the roast on the 2nd rack from the bottom and the more
delicate food on the 4th rack from the bottom.
• When cooking food that requires diffe ring times and
temperatures, set a temperature that is somewhere
between the two temperatures required, place the more
delicate food on the 4th rac k from the bottom and take
the food requiring less time out of the oven first.
• Use the dripping pan on the lower rack and the g rid on
the upper;
Using the “Fast Cooking” Mode
Functional, fast and practical for those of you who use
pre-packed products (such as f or example: froz en or precooked food) along with other food items . You will find useful
suggestions in the “Practical Cooking Advice” tab le.
oven rack from the bottom and the dripping pan on the
bottom rack to collect any sauce and /or dripping fat.
The “Gratin” mode T onl y with the oven door shut, is
extremely useful f or grilling foods rapidly , as the distribution
of heat makes it possible not only to brown the surface,
but also to cook the bottom part.
Moreover, it can also be used for browning foods at the
end of the cooking process, such as adding that gratin
finish to pasta bakes, for e xample.
When using this mode, place the grid on the 2nd or 3rd
oven rack from the bottom (see cooking table) then, to
prevent fat and grease from dripping onto the bottom of
the oven and thus smoke from f orming, place a drippingpan on the 1st rack from the bottom.
Important: always cook in “Gratin” mode with the o ven
door shut. This will allow you both to obtain excellent
results and to save on energy (appro ximately 10%).
When using this mode, we advise you to set the thermostat
to 200°C, as it is the most efficient way to use the gr ill,
which is based on the use of infrared rays . However, this
does not mean you cannot use lower temperatures , simply
by adjusting the thermostat knob to the desired temperature.
In models fitted with a rotisserie T, you can use the spit
kit provided when using the “gratin” mode. In this case,
place the spit kit on the third oven rack from the bottom
and the dripping pan on the bottom rack to collect any
sauce and /or dripping fat.
Therefore the best results when using the grill modes
are obtained by placing the grid on the lower racks
(see cooking table) then, to prevent fat and grease
from dripping onto the bottom of the oven and smoke
from forming, place a dripping-pan on the 1st oven
rack from the bottom.
Baking Cakes
When baking cakes, always place them in a preheated
oven. Do not open the ov en door during baking to prev ent
the cake from dropping. In gener al:
Pastry is too dr y
Increase the tempe rature b y 10°C and r educe th e
cooking time.
Using the Grill
The “7 Cuochi” oven offers you several different grilling
modes.
Use the “grill” mode 2 with the oven door ajar, placing
the food under the centre of the grill (situated on the 3rd
or 4th rack from the bottom).
T o catch any f at and/or grease that may drip from the rac k,
place the dripping pan provided on the first rack from the
bottom.
When using this mode, we recommend you set the energy level to the highest setting, e ven though lo wer lev els
can be set, simply by adjusting the thermostat knob to the
desired level.
In models fitted with a rotisserie 2, you can use the spit
kit provided when using the “grill” mode. In this case , cook
with the oven door shut, placing the spit kit on the third
Pastry dropped
Use less liquid or lower th e temperat ure by 10°C.
Pastry is too dark on top
Place it on a lower rack, l ower the tem perat ure, a nd
increase the cooking tim e.
Cooked well on the inside but sticky on the
outside
Use less liquid, lower t he tempe ratur e, and i ncre ase
the cooking time.
11
Page 12

Practical Cooking Advice
The pastry sticks to the pan
Grease the pan well and s prinkle it wit h a dust ing of
flour or use greaseproof paper.
I used more than one level (in the function
"ventilated oven") and they are not all at the sa me
cooking point
Use a lower temperature s etting. It is not nec essa ry to
remove the food from a ll the rac ks at the same ti me.
Cooking Pizza
For best results when cooking pizza, use the “Pizza Mode”
w:
• Preheat the ov en f or at least 10 min utes
• Use a light aluminium pizza pan, placing it on the rack
supplied with the oven. If the dripping pan is used, this
will extend the cooking time, making it difficult to get a
crispy crust;
• Do not open the oven door frequently while the pizza
is cooking;
• If the pizza has a lot of toppings (three or four), we
recommend you add the mozzarella cheese on top
halfway through the cooking process .
• If cooking on more than one rack (up to 2), we advise
you to use the Multi-cooking Mode b, as the Pizza
Mode w would heat the bottom rack more than the
others.
Cooking Fish and Meat
When cooking white meat, fowl and fish, use temperature
settings from 180 °C to 200 °C.
For red meat that should be well done on the outside while
tender and juicy in the inside, it is a good idea to start with
a high temperature setting (200°C-220°C) for a short time,
then turn the oven down afterwards.
In general, the larger the roast, the lower the temperature
setting. Place the meat on the centre of the grid and place
the dripping pan beneath it to catch the fat.
Make sure that the grid is inserted so that it is in the centre
of the oven. If you would like to increase the amount of
heat from below, use the low rack heights. For savoury
roasts (especially duck and wild game), dress the meat
with lard or bacon on the top.
12
Page 13

Practical Cooking Advice
Preheating tim e
(m in .)
15
15
15
15
15
15
10
10
15
10
10
10
10
10
10
15
-
-
-
-
-
-
-
-
-
-
-
-
-
10
10
10
10
10
10
15
10
10
15
15
15
15
15
15
15
15
15
15
-
-
-
-
-
-
-
-
-
-
oven bottom
1
1
1
-
1
1
1
1
1
1
1
-
1
1
1
Position of
the rack
from th e
3
3
3
3
3
2-4
3
2
2-4
2
2
2-4
2-4
2
2-4
3
4
4
4
4
3/4
4
4
4
4
4
-
-
-
2
2
-
-
-
2
3
2
2/3
3
2/3
3
3
2-4
2-4
2-4
1-3-5
1-3-5
1-3-5
2
2
2
2
2
2
2
2
2
2
Setting made Type of food Weig-
1 Convection
mode
a
2 M u ltic o ttu r a
b
3 G rill
2
4 Gratin
T
5 Pizza
w
6 Baking
u
7 Fast cookin g
v
8 Defrosting
NB: c oo k in g tim e s ar e ap p r ox im a te a n d m a y v a ry a cc o rd in g to p e rs o na l t a ste . W h e n c o ok in g u s ing t h e G rill o r
Gratin mode, the dripping pan must always be placed on the 1st oven rack from the bottom.
Duck
Roast veal or beef
P ork ro as t
Biscuits (short pastry)
Tarts
Pizza (on 2 racks)
Lasagne
Lamb
Roast chicken + potatoes
Mackerel
Fruitcake
Cream puffs (on 2 racks)
Biscuits (on 2 racks)
Sponge cake (on 1 rack) )
Sponge cake (on 2 racks)
Savoury pies
Soles and cuttlefish
Squid and prawn kebabs
Cu ttlefis h
Cod filet
Grilled vegetables
Veal steak
Sausages
Hamburger
Mackerels
Toasted sandw iches (or
toast)
W ith rotiss er ie (w he re
present)
Veal on the spit
Chicken on the spit
Lamb on the spit
G r ille d c h ic k e n
C u ttlefish
W ith rotiss er ie (w he re
present)
Veal on the spit
Lamb on the spit
Chicken (on the spit) +
potatoes (roasted))
Pizza
Roast veal or beef
Chicken
Tarts
Fruit cakes
Fruitcake
Sponge cake
Stuffed pancakes (on 2
racks)
Sm all ca kes (on 2 racks)
Che ese puffs (o n 2 racks)
Cream puffs (on 3 racks)
Biscuits (on 3 racks)
Meringues (on 3 racks)
Frozen food
Pizza
Courgette and praw n pie
Country style spinach pie
Turnovers
Lasagne
G o ld e n R o lls i
Chicken morsels
Pre-co oked food
Go lden chicken w ing s
Fresh Food
Biscuits (short pastry)
Fruitcake
Cheese puffs
All frozen food
U
ht (in
kg)
1+1
0.5
0.5
0.5
1.0
1.5
0.7
0.6
0.6
0.8
0.4
0.8
0.6
0.6
n.° 4-6
1.0
1.5
1.0
1.5
1.5
1.5
1.5
1.5
0.5
0.5
0.7
0.5
1.2
0.6
0.4
0.7
0.7
0.5
0.3
0.4
0.5
0.3
0.5
0.4
0.4
0.4 2 - 200 20-25
0.3
0.6
0.2
Thermostat
se ttin g
200
200
200
180
180
230
180
180
200
180
170
190
180
170
170
200
100%
100%
100%
100%
100%
100%
100%
100%
100%
100%
100%
100%
100%
200
200
200
200
200
200
220
220
180
180
180
180
160
200
190
210
180
180
90
250
200
220
200
200
180
220
200
180
210
Cooking
(m in .)
tim e
65-75
70-75
70-80
15-20
30-35
15-20
30-35
40-45
60-70
30-35
40-50
20-25
10-15
15-20
20-25
25-30
10-12
8-10
10-15
10-15
15-20
15-20
15-20
10-12
15-20
3-5
80-90
70-80
70-80
55-60
30-35
70-80
70-80
70-75
70-75
15-20
25-30
60-70
20-30
40-45
40-50
25-30
30-35
20-25
15-20
20-25
20-25
180
12
20
30-35
25
35
25-30
15-20
15-18
45
10-12
13
Page 14

Safety Is A Good Habit To Get Into
T o maintain the efficiency and safety of this appliance, we recommend that y ou do the following:
• only call the Service Centres authorised by the manufacturer
• always use original spare parts
• When handling the appliance, we recommend you
always use the purpose pro vided handles recessed
into the sides of the oven to prevent harming
people or damaging the appliance itself.
• This appliance is designed for non-prof essional, household use and its functions must not be changed.
• These instructions are only valid for the countries
whose symbols appear on the manual and the serial
number plate.
• The electrical system of this appliance can only be used
safely when it is correctly connected to an efficient
earthing system in compliance with current safety
standards.
• When the appliance is in use, the heating elements
and some parts of the oven door become extremely
hot. Make sure you don’t touc h them and keep children well away.
The following items are potentially danger ous, and
therefore appropriate measures must be taken to
prevent children and the disabled from coming into
contact with them:
- Controls and the appliance in general;
- Pac kaging (bags, polystyrene , nails, etc.);
- The appliance itself, immediately after use of the ov en
or grill due to the heat generated;
- The appliance itself, when no longer in use (potentially
dangerous parts must be made safe).
Av oid the following:
- Touching the appliance with wet parts of the body;
- Using the appliance when barefoot;
- Pulling on the appliance or the supply cable to unplug
it from the electrical outlet;
- Improper or dangerous operations;
- Obstructing the ventilation or heat dissipation slots;
- Allowing power supply cables of small appliances to
come into contact with the hot parts of the appliance;
- Exposing the appliance to atmospheric agents such
as rain, or sunlight;
- Using the oven for storage purposes;
- Using flammable liquids near the appliance;
- Using adapters, multiple sockets and/or extension
leads;
- Attempting to install or repair the appliance without the
assistance of qualified personnel.
Qualified personnel must be contacted in the
following cases:
- Installation (following the manuf acturer’ s instructions);
- When in doubt about operating the appliance;
- Replacing the electrical socket when it is not compatible with the appliance plug.
Service Centres authorised by the manufacturer
must be contacted in the follo wing cases:
- If in doubt about the soundness of the appliance after
removing it from its packaging;
- If the power supply cable has been damaged or needs
to be replaced;
- If the appliance breaks down or functions poorly; ask
for original spare parts.
It is a good idea to do the following:
- Only use the appliance to cook food and nothing else;
- Check the soundness of the appliance after it has been
unpacked;
- Disconnect the appliance from the electrical mains if it is
not functioning properly and before cleaning or performing maintenance;
- When left unused, unplug the appliance form the electricity mains and turn off the gas tap (if foreseen);
- Use oven gloves to place cookw are in the oven or when
removing it;
- Always grip the oven door handle in the centre as the
extremities of the same may be hot due to any hot air
leaks;
- Make sure the knobs are in the “•”/”o” position when the
appliance is not in use.
- Cut the power supply cable after disconnecting it from
the mains when you decide not to use the appliance any
longer.
• The manufacturer may not be held responsible for any
damage due to: incorrect installation, improper , incorrect
and irrational use.
14
Page 15
Instalation
The appliance must be installed only by a qualified
person in compliance with the instructions provided.
The manufacturer declines all responsibility f or improper
installation which may harm persons and animals and
damage property.
Important: The power supply to the appliance must be
cut off before any adjustments or maintenance work is
done on it.
Installation of Built-in Ovens
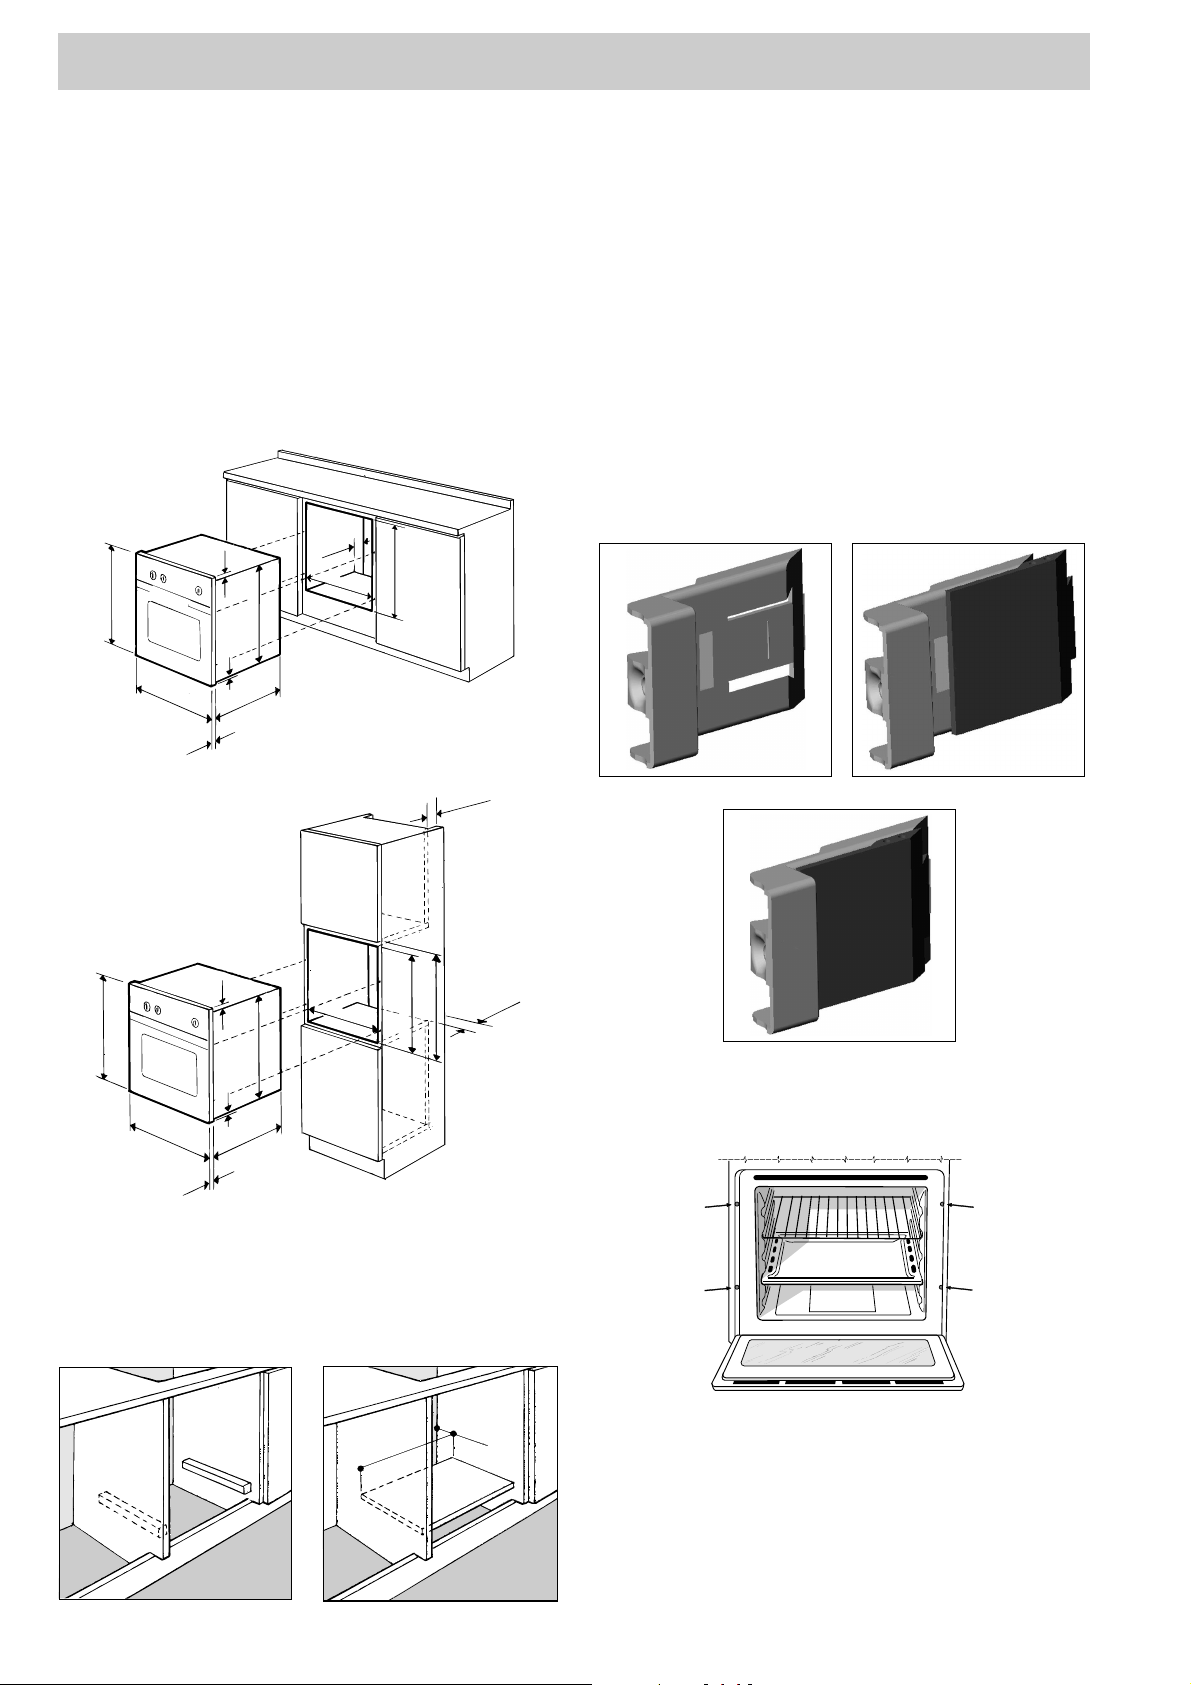
In order to ensure that the built-in appliance functions properly, the cabinet containing it must be appropr iate. The
figure below gives the dimensions of the cut-out f or installation under the counter or in a wall cabinet unit.
567 mm.
45 mm.
558 mm.
593 mm.
23 mm.
595 mm.
5 mm.
595 mm.
545 mm.
The panels of the adjacent cabinets must be made of heatresistant material. In particular, cabinets with a v eneer exterior must be assembled with glues which can withstand
temperatures of up to 100 °C.
In compliance with current safety standards, contact with
the electrical parts of the oven must not be possible once
it has been installed.
All parts which ensure the safe operation of the appliance
must be removab le only with the aid of a tool.
For the correct centring of your appliance, position the 4
tabs on the sides of the oven in correspondence with the
4 holes on the perimeter of the frame. In particular , if the
cabinet side panel:
• is 20 mm thick: the removable part of the tab must be
removed (Fig. A);
• is 18 mm thick: use the first groove, which is factoryset (Fig. B);
• is 16 mm thick: use the second groove (Fig.C)
24 mm.
N.B.: Installation in compliance with the consumption declaration
45 mm.
min.
595 mm.
23 mm.
567 mm.
5 mm.
595 mm.
545 mm.
24 mm.
558 mm.
595 mm.
575-585 mm.
45 mm.
min.
In order to ensure adequate ventilation, the back panel of
the cabinet unit must be removed. Installing the oven so
that it rests on two strips of wood is preferab le. If the oven
rests on a continuous, flat surface, there must be an aperture of at least 45 x 560 mm.
Fig. A Fig. B
Fig. C
To fasten the oven to the cabinet, open the door of the
oven and attach it by inserting the 4 wooden screws into
the 4 holes located on the perimeter of the frame.
560 mm.
45 mm.
15
Page 16
Electrical connection
The electrical connection to the mains must be made on
the appliance. The power voltage and frequency are as
indicated on the rating plate.
! THIS APPLIANCE MUST BE EARTHED.
Connecting the power supply cable
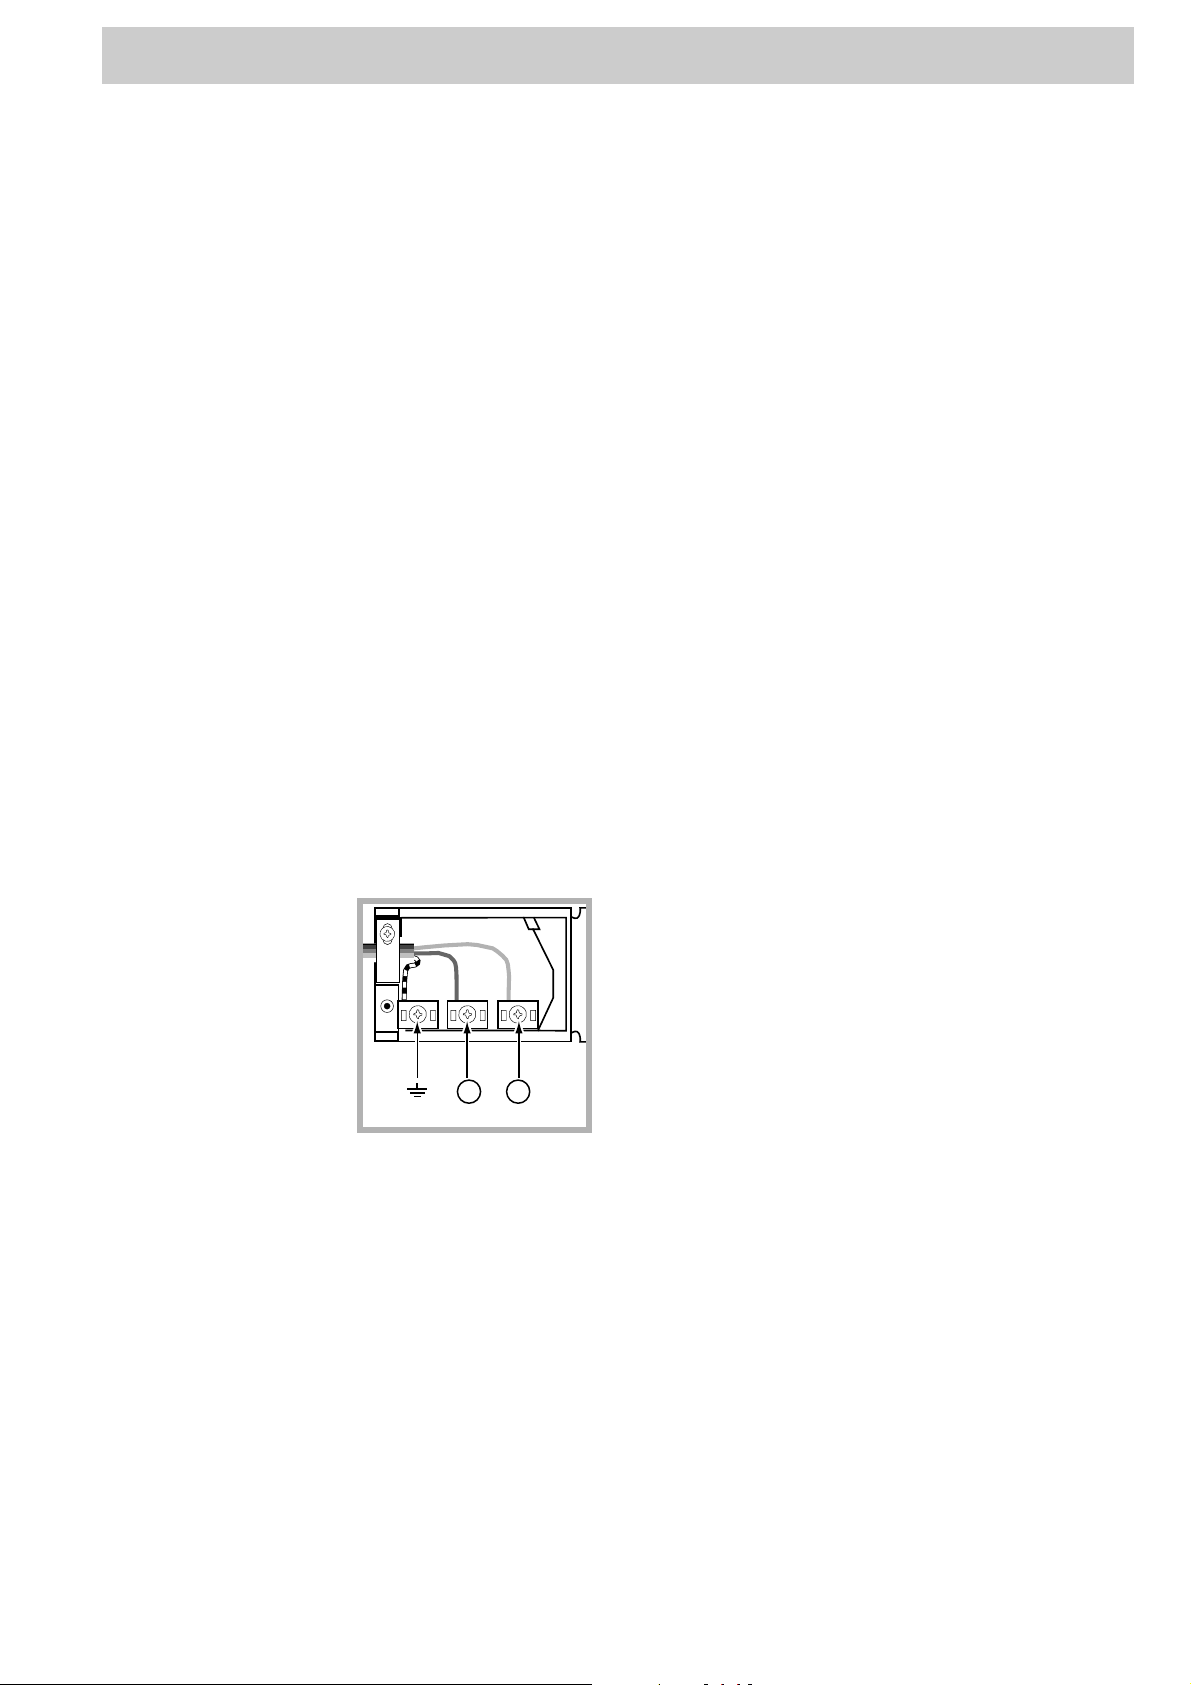
T o open the terminal board:
• Using a screwdriver , press on the tabs situated on each
side of the terminal board cover.
• Pull open the terminal board cover .
To connect the power supply cable, proceed as follows:
• Unscrew the cable clamp screw and the contact screws
L-N-6.
• Fasten the wires beneath the screwheads using the
following colour scheme: Blue (N) Brown (L) Y ello w-Green
6
Unplug the appliance before all operations, even when
replacing the oven lamp.
Using the appliance without correct earthing is highly
dangerous.
! After connecting the appliance to the flexible cable,
tighten all the screws on the terminal board.
• Fasten the power supply cable in the corresponding cab le
clamp and close the cover.
Electrical Connection:
V oltage Frequency: 230 V -1+N 50Hz
Fuse Section: 16A
Supply cable: 3x1.5mm2
4 2
N L
You can connect your oven to the system means of a
terminal board. Refer to above information for the minimal
cable sections and the calibration of the protective
elements according to the connection.
If the appliance is installed with a junction box, an omnipolar
circuit breaker - with a minimum contact opening of 3mm
- should be installed between the appliance and the mains.
Power cab le supply connection to the electrical mains:
We recommend you use a power supply cable which is
long enough to allow you to take the oven out of its recess
in the event of maintenance operations (only use HAR - H
05 - RRF quality cables fitted with a plug conforming to
the regulations in force.
The plug must be accessible at all times.
16
Page 17

Technical Specifications
Inner dimensions of the oven:
Width 43.5 cm
Depth 40 cm
Height 32 cm
Inner Volume of the Oven:
56 litres
ENERGY LABEL
Directive 2002/40/EC on the label of electric ovens
Norm EN 50304
Energy consumption for Natural conv ection
heating mode: a Convection
Declared energy consumption for Forced con vection Class
heating mode: u Baking
V oltage and frequency of power suppl y:
220-240V 50Hz 2560-3050 W
7
This appliance conforms with the following
European Economic Community directives:
- 73/23/EEC of 19/02/73 (Low V oltage) and subsequent
modifications;
- 89/336/EEC of 03/05/89 (Electromagnetic
Compatibility) and subsequent modifications;
- 93/68/EEC of 22/07/93 and subsequent
modifications.
- 2002/96/EC
17
Page 18

After Sales Service
"No company is better positioned to offer an after sales service on a
Hotpoint appliance than us - the manufacturer"
As part of our commitment to you, all Hotpoint appliances have the added benefit of a fully inclusive parts
and labour guarantee for the first 12 months. In addition to this you also have the advantage of free
replacement parts for the first 5 years when fitted by a Hotpoint
engineer. When the 12 months parts and labour guarantee expires we off er the following after sales
service options:
Repair Service and Information Help Desk
UK: 08709 066066
www.theservicecentre.co .uk
Republic of Ireland: 1850 302 200
Note: Our operators will require the Model number and the Serial number of your appliance
Available 364 days a year with a fast, effective and value for money service. We have the largest white
goods repair service in the UK with over 1200 of our own fully trained engineers. All repairs include a
parts and labour guarantee for 12 months from the date of the repair.
If you require any information or have any questions about your appliance, our operators are on hand with
help and advice.
All this ensures that you will receive the best available after sales service possible.
Extended Warranties
UK: 08709 088 088
www.theservicecentre.co .uk
Republic of Ireland: 1850 502 200
Whether you have just one or a number of Hotpoint appliances in your kitchen, we offer two service cover
plans to give you total peace of mind.
l Repair Protection Plan - FREE service repairs for a single Hotpoint appliance during the period
of cover.
l Kitchen Cover - FREE service repairs for all your Hotpoint appliances less than 8
years old.
Genuine Parts and AccessoriesUK: 08709 077 077
www.theservicecentre.co.uk
Republic of Ireland: (01) 842 6836
A wide range of genuine parts and accessories are available from our hotline or through our web site.
Genuine parts and accessories, extended warranties and service repairs are all
available on our web-site at:
www.theservicecentre.co.uk
18
Page 19

Guarantee
"Satisfaction guaranteed or your money back"
We give you a unique 'satisfaction guaranteed' promise - valid for 90 days - after you have
purchased your Hotpoint appliance. If there is a technical problem simply call Hotpoint Repair service
or visit our web-site at www.theservicecentre.co.uk and where necessary, we will arrange for an
engineer to call. If the technical problem is not resolved under this guarantee, we will replace your
machine or, if you prefer, give y ou your money back.
All Hotpoint appliances carry a fully inclusive 12 month parts and labour guarantee as well as free
replacement parts for the first 5 years (except microwaves, selected integrated appliances and cooker
hoods, which hav e a one year guarantee) provided that they are fitted by a Hotpoint engineer.
Guarantee terms and conditions
Your guarantee is only applicable in the United Kingdom or Republic of Ireland and is subject to the
following provisions that your appliance:
l Has been installed and used correctly in accordance with this instruction booklet.
l Has been used solely for domestic purposes and is located on domestic premises (ie. not for
commercial or trade use).
l Has been properly connected to a suitable electrical supply voltage as stated on the appliance
rating plate.
l Has not been subject to misuse, accident, modified or repaired by anyone other than one of our
own service engineers.
For pre purchase information on any other Hotpoint product call: 08701 50 60 70
or visit: www.hotpoint.co.uk
Recycling & Disposal Information
The European Directive 2002/96/EC on Waste Electrical and Electronic Equipment (WEEE), requires
that old household electrical appliances must not be disposed of in the normal unsorted municipal
waste stream. Old appliances must be collected separately in order to optimise the recovery and recycling of the materials they contain and reduce the impact on human health and the environment. The
crossed out “wheeled bin” symbol on the product reminds you of your obligation, that when you dispose of the appliance it must be separately collected.
Consumers should contact their local authority or retailer for information concerning the correct
disposal of their old appliance.
19
Page 20

Key Contacts
After Sales Service
Over 1200 trained specialists, directly employed by us, ensure that you can have complete confidence in
both the appliances and services we offer.
Repair Service and Information Desk
UK: 08709 066 066
(Open 8 to 8 Mon - Fri, 8 to 6 Sat, 10 to 4 Sun & Bank Holidays)
www.theservicecentre.co.uk
Republic of Ireland: 1850 302 200
Note: Our operators will require the following information:
Model number:
Serial number:
Extended Warranties
UK: 08709 088 088
(Open 8 to 8 Mon - Sun)
www.theservicecentre.co.uk
Republic of Ireland: 1850 502 200
Genuine Parts and Accessories
UK: 08709 077 077
(Open 8-30 to 5-30 Mon - Fri & 9 to 12 Sat)
www.theservicecentre.co.uk
Republic of Ireland: (01) 842 6836
Indesit Company UK Ltd. Morley Way, Peterborough, PE2 9JB.
03/2005 - 195045800.00
 Loading...