

Page 1
Operating Instructions
OVEN
GB
SY56X/1
SY10X/1
Contents
GB
Installation, 2
Positioning
Electrical connection, 3
Data plate
Description of the appliance, 4
Overall view
Control panel
Start-up and use, 5
Starting the oven
The electronic cooking programmer, 6
Cooking modes, 7-8
Cooking modes
Practical cooking advice
Cooking advice table
Precautions and tips, 9-10
General safety
Disposal
Respecting and conserving the environment
Recycling & Disposal Information
Maintenance and care, 10
Switching the appliance off
Cleaning the appliance
Cleaning the oven door
Replacing the light bulb
After Sales Service, 11
Guarantee, 12
Page 2
Installation
560 m
m
.
45 mm.
GB
Before you operate yuor new Hotpoint Single Oven,
please read these instructions fully. They contain
important information for safe use, for installation and
for care of the appliance.
Please keep these operating instructions for future
reference. Pass them on to possible new owners of
the appliance.
Keep packaging material out of the reach of
children.It can become a choking or suffocation
hazard. see Precautions and tips).
Positioning
! The appliance must be installed by a qualified
person in compliance with the instructions provided.
Incorrect installation may cause harm to persons,
animals or may damage property.
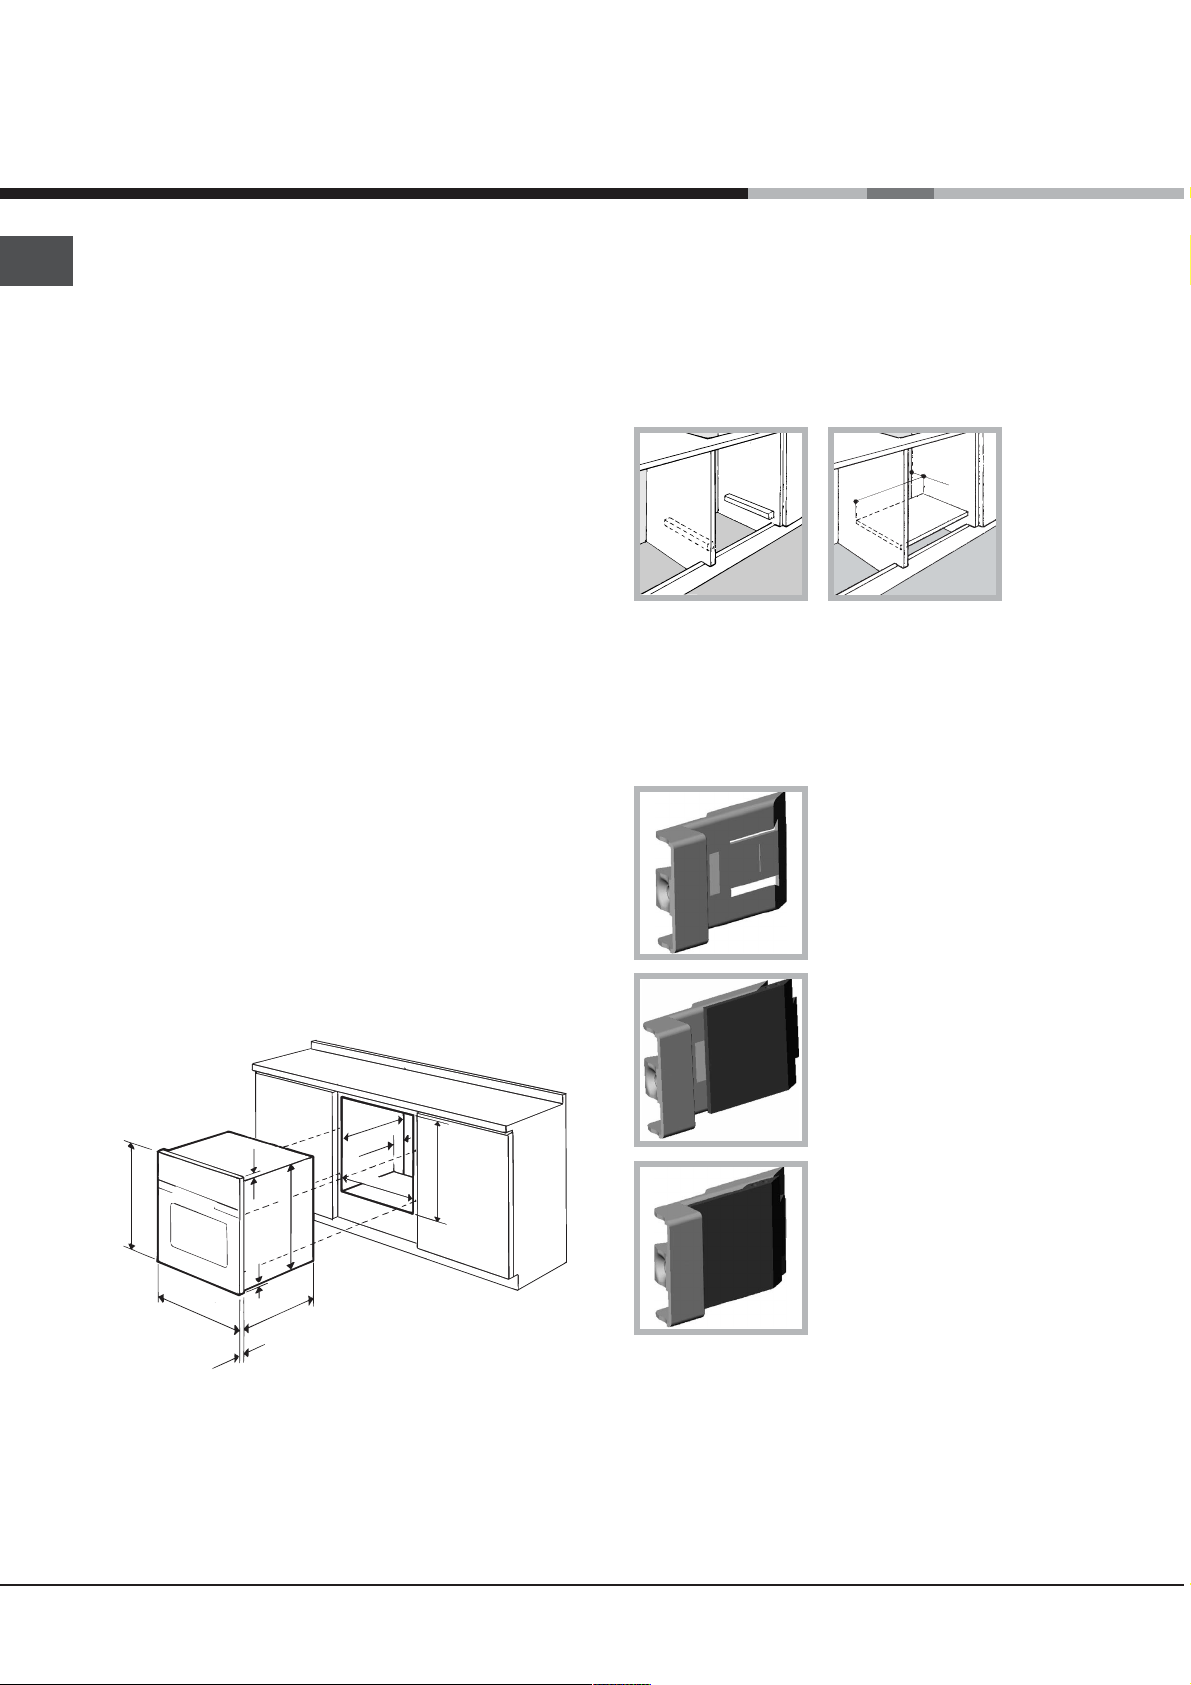
Fitting the appliance
Use the appropriate cabinet to ensure that the
appliance functions properly.
The panels adjacent to the oven must be made of
heat-resistant material.
Ventilation
To ensure good ventilation, the back panel of the
cabinet must be removed. It is advisable to install the
oven so that it rests on two strips of wood, or on a
completely flat surface with an opening of at least 45 x
560 mm (see diagrams).
Centring and fastening
Position the 4 tabs on the side of the oven according
to the 4 holes of the outer frame. Adjust the tabs
according to the thickness of the cabinet side panel,
as shown below:
thickness of 20 mm: take off
the removable part of the tab
(see diagram)
Cabinets with a veneer exterior must be assembled
with glues which can withstand temperatures of up
to 100°C.
To install the oven under the counter (see diagram)
and in a kitchen unit, the cabinet must have the
following dimensions:
.
in
. m
m
m
7
4
5
567 mm.
45 mm.
558 mm.
593 mm.
23 mm.
595 mm.
5 mm.
595 mm.
545 mm.
24 mm.
! The appliance must not come into contact with
electrical parts once it has been installed.
The consumption indications on the data plate have
been calculated for this type of installation.
thickness of 18 mm: use the
first groove, which has already
been set in the factory (see
diagram)
thickness of 16 mm: use the
second groove (see diagram)
Secure the appliance to the cabinet by opening the
oven door and putting 4 screws into the 4 holes of the
outer frame.
! All parts which ensure the safe operation of the
appliance must not be removable without the aid of a
tool.
2
Page 3
Electrical Connection
Electrical connection
The electrical connection to the mains must be made
on the appliance. The power voltage and frequency
are as indicated on the rating plate.
! THIS APPLIANCE MUST BE EARTHED.
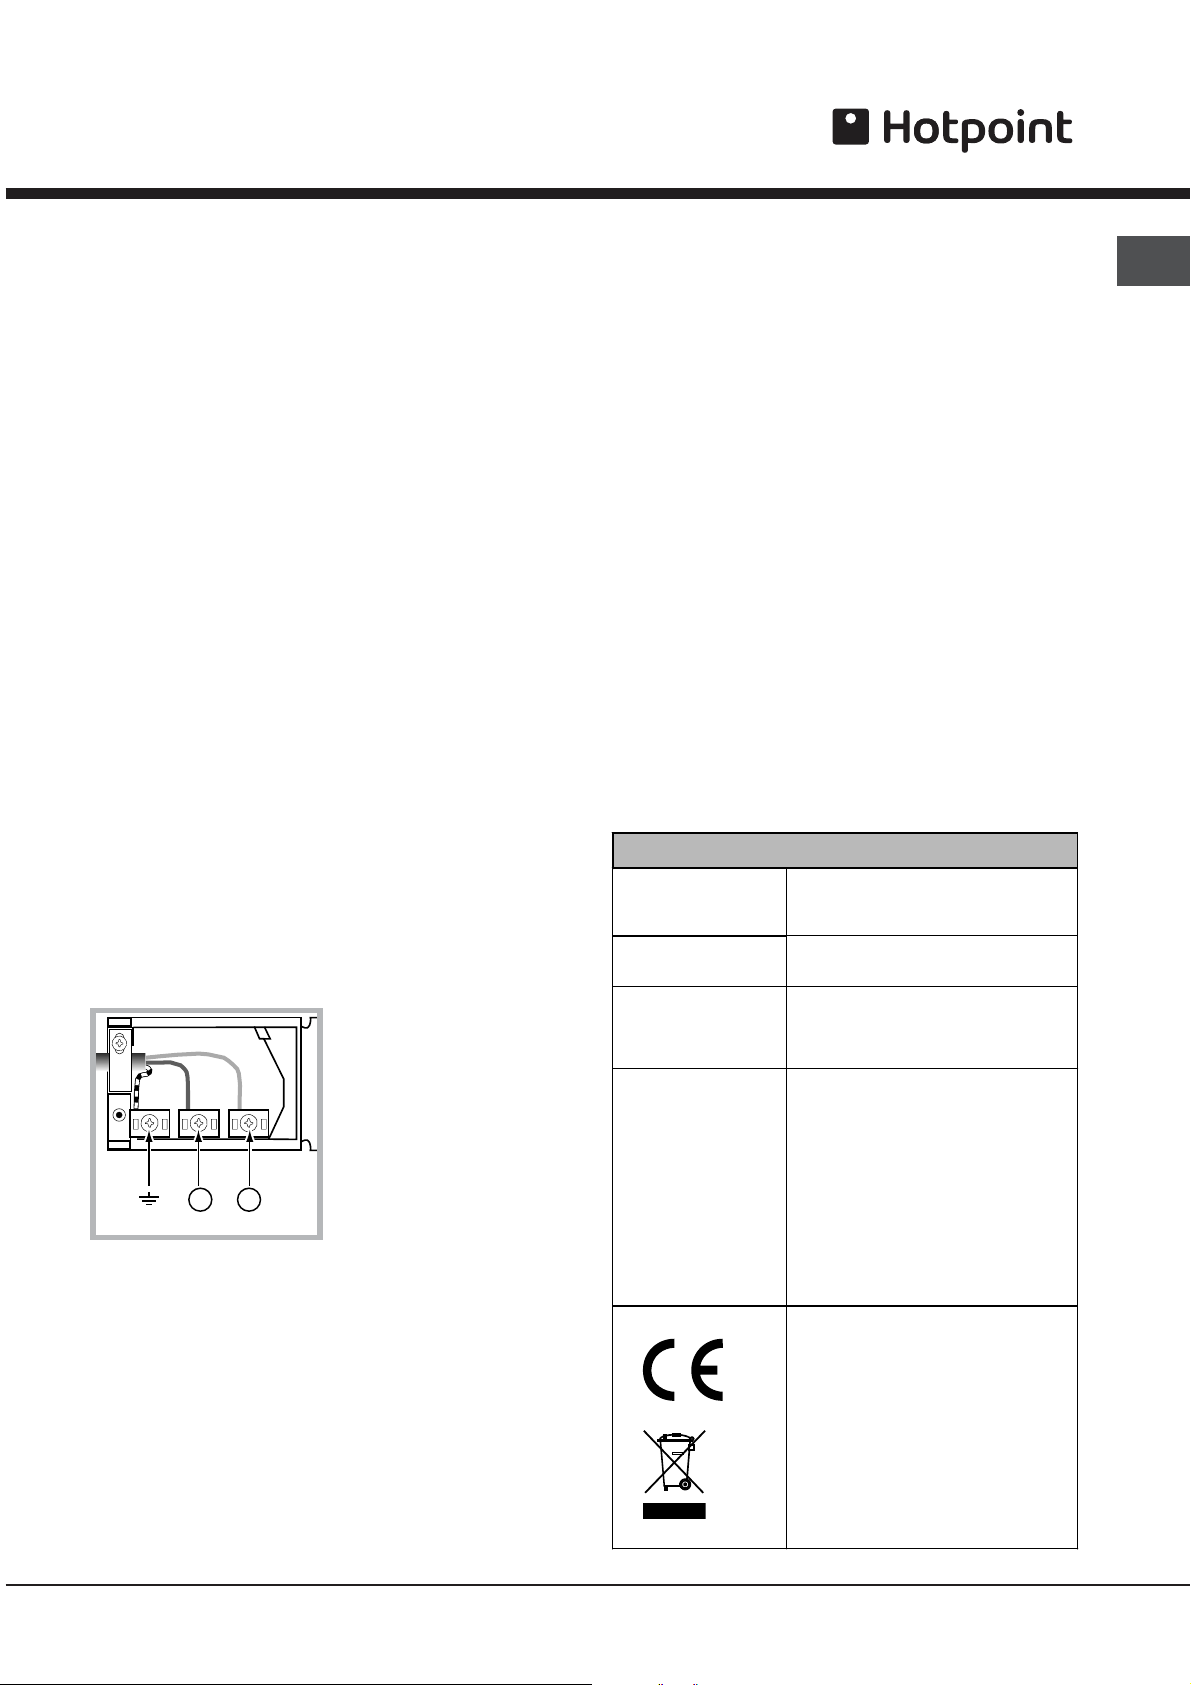
Connecting the power supply cable
To open the terminal board:
Using a screwdriver, press on the tabs situated on
each side of the terminal board cover.
Pull open the terminal board cover.
To connect the power supply cable, proceed as
follows:
_ Unscrew the cable clamp screw and the contact
screws L-N-$.
Fasten the wires beneath the screwheads using the
following colour scheme: Blue (N) Brown (L)
Yellow-Green$
Fasten the power supply cable in the
corresponding cable clamp and close the cover.
Electrical Connection:
Voltage Frequency: 230
V-1+N 50Hz
Fuse Section: 16A
Supply cable: 3x1.5mm
42
NL
You can connect your oven to the system means of a
terminal board. Refer to above information for the
minimal cable sections and the calibration of the
protective elements according to the connection.
If the appliance is installed with a junction box, an
omnipolar circuit breaker - with a minimum contact
opening of 3mm - should be installed between the
appliance and the mains.
Power cable supply connection to the electrical
mains:
GB
We recommend you use a power supply cable which
is long enough to allow you to take the oven out of its
recess in the event of maintenance operations (only
use HAR - H 05 - RRF quality cables fitted with a plug
conforming to the regulations in force.
The plug must be accessible at all times.
Unplug the appliance before all operations, even
when replacing the oven lamp.
Using the appliance without correct earthing is
highly dangerous.
! After connecting
the appliance to the flexible
cable, tighten all the screws on the terminal board.
DATA PLATE
Dimensions
Volume
Electrical
connections
2
ENERGY LABEL
width cm 43.5
height cm 32
depth cm 41.5
lt. 58
voltage: 230-240V ~ 50/60 Hz or
50Hz (see data plate)
maximum power absorbed
2250-2400W
Directive 2002/40/EC on the label
of electric ovens.
Standard EN 50304
Energy consumption for Natural
convection – heating mode:
Convection mode
Declared energy consumption for
Forced convection Class – heating
mode:
This appliance conforms to the
following European Economic
Community directives:
- 2006/95/EEC of 12/12/06 (Low
Voltage) and subsequent
amendments;
-89/336/EEC of 03/05/89
(Electromagnetic Compatibility) and
subsequent amendments;
- 93/68/EEC of 22/07/93 and
subsequent amendments.
- 2002/96/EC
>
Multi-cooking
=
3
Page 4
Description of the appliance
GB
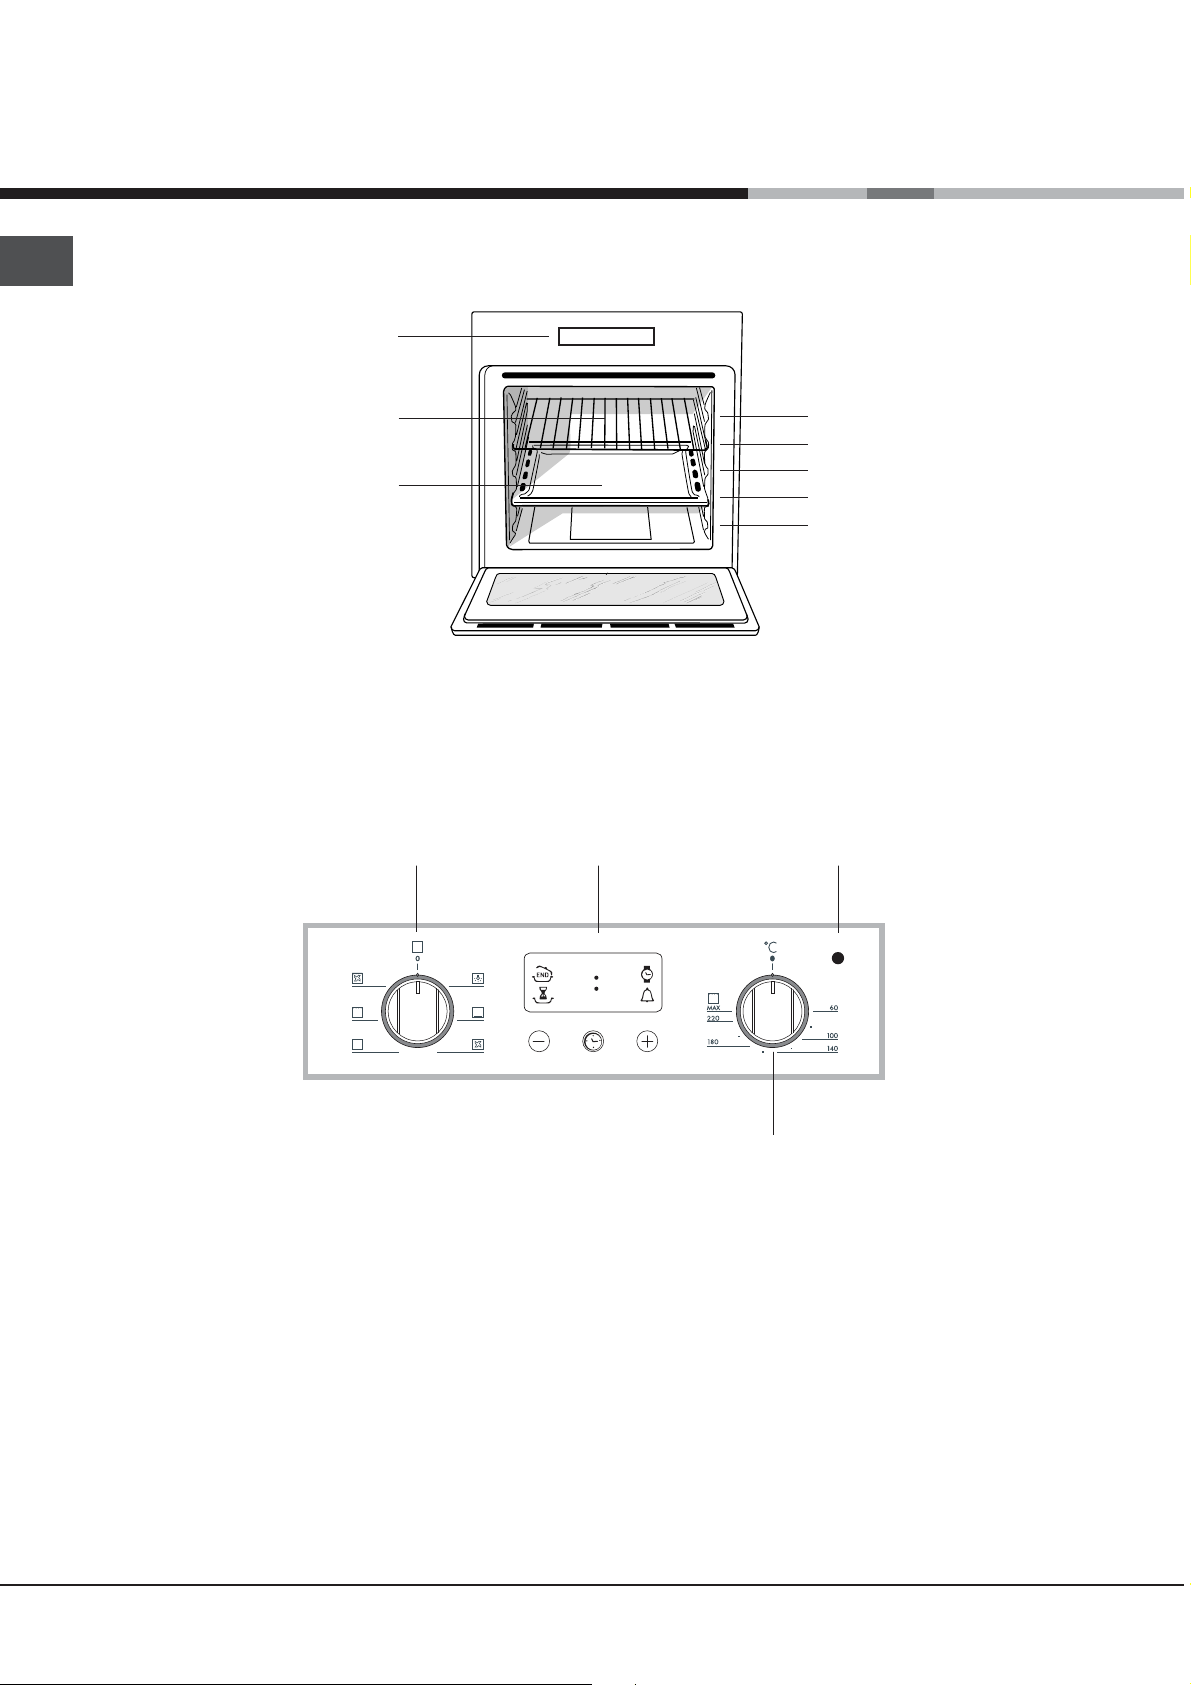
Overall view
Control panel
Control panel
GRILL
DRIPPING PAN
GUIDES for the
sliding racks
position 5
position 4
position 3
position 2
position 1
SELECTOR
Knob
ELECTRONIC
programmer*
•• ••
Indicator light
THERMOSTAT
THERMOSTAT
Knob
4
Page 5

Start-up and use
! The first time you use your appliance, heat the
empty oven with its door closed at its maximum
temperature for at least an hour. Ensure that the
room is well ventilated before switching the oven off
and opening the oven door. The appliance may
produce a slightly unpleasant odour caused by the
burning away of protective substances used during
the manufacturing process.
Starting the oven
1. Select the desired cooking mode by turning the
SELECTOR knob.
2. Select the desired temperature with the
THERMOSTAT knob. See the Cooking advice table for
cooking modes and the suggested cooking
temperatures (see Cooking Modes).
3. When lit, the THERMOSTAT indicator light indicates
that the oven is heating up to the temperature set.
4. You may do the following during cooking:
- change the cooking mode by turning the SELECTOR
knob.
- change the temperature by turning the
THERMOSTAT knob.
- stop cooking by turning the SELECTOR knob to the
0 position.
Cooling ventilation
In order to cool down the external temperature of the
oven, some models are fitted with a cooling fan that
blows out air between the control panel and the oven
door.
! Once the cooking has been completed, the cooling
fan remains on until the oven has cooled down
sufficiently.
Oven light
It goes on when selecting
knob. It stays on when a cooking mode is selected.
& with the SELECTOR
GB
! Never put objects directly on the oven bottom to
avoid damaging the enamel coating.
! Always place cookware on the rack(s) provided.
5
Page 6

GB
The electronic
cooking programmer
Programming cooking
DISPLAY
A cooking mode must be selected before
programming can take place.
END OF
COOKING icon
DURATION
icon
DECREASE TIME
button
•• ••
SET TIME
button
CLOCK icon
TIMER icon
INCREASE TIME
button
Setting the clock
The clock may be set when the oven is switched
off or when it is switched on, provided that a the end
time of a cooking cycle has not been programmed
previously.
After the appliance has been connected to the
mains, or after a blackout, the
numerical digits on the DISPLAY will begin to flash.
1. Press the
icon and the four digits on the display begin to
flash.
2. Use the + and - buttons to adjust the time; if
you press and hold either button, the display will
scroll through the values more quickly, making it
quicker and easier to set the desired value.
3. Wait for 10 seconds or press the
to finalise the setting.
button several times until the
icon and the four
button again
Setting the timer
This function does not interrupt cooking and does
not affect the oven; it is simply used to activate the
buzzer when the set amount of time has elapsed.
1. Press the
icon and the three digits on the display begin to
flash.
2. Use the + and - buttons to set the desired
time; if you press and hold either button, the display
will scroll through the values more quickly, making it
quicker and easier to set the value.
3. Wait for 10 seconds or press the
to finalise the setting.
The display will then show the time as it counts
down. When this period of time has elapsed the
buzzer will be activated.
button several times until the
button again
Programming the cooking duration
1. Press the
icon and the three digits on the DISPLAY begin to
flash.
2. Use the + and - buttons to set the desired
duration; if you press and hold either button, the
display will scroll through the values more quickly,
making it quicker and easier to set the value.
3. Wait for 10 seconds or press the
to finalise the setting.
4. When the set time has elapsed, the text END
appears on the DISPLAY, the oven will stop cooking
and a buzzer sounds.
For example: it is 9:00 a.m. and a time of 1 hour
and 15 minutes is programmed. The programme
will stop automatically at 10:15 a.m.
Setting the end time for a cooking mode
A cooking duration must be set before the cooking
end time can be scheduled.
1. Follow steps 1 to 3 to set the duration as detailed
above.
2. Next, press the
the four digits on the DISPLAY begin to flash.
3. use the + and - buttons to adjust the cooking
end time; if you press and hold either button, the
display will scroll through the values more quickly,
making it quicker and easier to set the desired
value.
4. Wait for 10 seconds or press the
to finalise the setting.
5. When the set time has elapsed, the text END
appears on the DISPLAY, the oven will stop cooking
and a buzzer sounds.
Programming has been set when the
buttons are illuminated. The DISPLAY shows the
cooking end time and the cooking duration
alternately.
Cancelling a programme
To cancel a programme:
press the
the setting you wish to cancel and the digits on the
display are no longer flashing. Press the - button
until the digits 00:00 appear on the display.
Press and hold the + and - buttons; this will
cancel all the settings selected previously,
including timer settings.
button several times until the
button again
button until the icon and
button again
and
button until the icon corresponding to
6
Page 7

Cooking modes
Cooking modes
! A temperature value can be set for all cooking
modes between 60°C and Max, except for
GRILL (recommended: set only to MAX power
level);
GRATIN (recommended: do not exceed 200°C).
= TRADITIONAL OVEN mode
Both the top and bottom heating elements will come
on. With this traditional cooking mode, it is best to use
one cooking rack only; if more than one rack is used,
the heat will be distributed unevenly.
> MULTI-COOKING mode
All the heating elements (top and bottom), as well as
the fan, will come on. Since the heat remains constant
throughout the oven, the air cooks and browns food
uniformly. A maximum of two racks may be used at
the same time.
? TOP OVEN mode
The top heating element comes on. This mode can be
used to brown food at the end of cooking.
@ GRILL mode
The top heating element comes on. The extremely
high and direct temperature of the grill makes it
possible to brown the surface of meats and roasts
while locking in the juices to keep them tender. The
grill is also highly recommended for dishes that
require a high temperature on the surface: such as
beef steaks, veal, rib steak, filets, hamburgers etc...
Some grilling examples are included in the Practical
Cooking Advice paragraph. Always cook in this mode
with the oven door closed.
A GRATIN mode
The top heating element, as well as the fan, will come
on. This combination of features increases the
effectiveness of the unidirectional thermal radiation of
the heating elements through forced circulation of the
air throughout the oven. This helps prevent food from
burning on the surface, allowing the heat to penetrate
right into the food. Always cook in this mode with the
oven door closed.
Practical cooking advice
! Do not place racks in position 1 and 5 during fan-
assisted cooking. Excessive direct heat can burn
temperature sensitive foods.
! In the GRILL and GRATIN cooking modes, place the
dripping pan in position 1 to collect cooking residues
(fat and/or grease).
MULTI-COOKING
Use position 2 and 4, placing the food that requires
more heat on 2.
Place the dripping pan on the bottom and the rack
on top.
GRILL
Insert the rack in position 3 or 4. Place the food in
the centre of the rack.
We recommend that you set the maximum power
level. The top heating element is regulated by a
thermostat and may not always be on.
PIZZA
For best results when cooking pizza, use the
MULTI-COOKING mode.
GB
Use a light aluminium pizza pan. Place it on the
rack provided.
For a crispy crust, do not use the dripping pan
(prevents crust from forming by extending cooking
time).
If the pizza has a lot of toppings, we recommend
adding the mozzarella cheese on top of the pizza
halfway through the cooking process.
7
Page 8

GB
Cooking advice table
Cooking
modes
Convection
Oven
Multi-cooking
Top oven
Grill
Gratin
Foods
Duck
Roast veal or beef
Pork roast
Biscuits (short pastry)
Tarts
Pizza (on 2 racks)
Lasagne
Lamb
Roast chicken + potatoes
Mackerel
Plum cake
Cream puffs (on 2 racks)
Biscuits (on 2 racks)
Sponge cake (on 1 rack)
Sponge cake (on 2 racks)
Savoury pies
Browning food to perfect cooking - 3/4 15 220 -
Soles and cuttlefish
Squid and prawn kebabs
Cod filet
Grilled vegetables
Veal steak
Cutlets
Hamburgers
Mackerels
Toasts
Grilled chicken
Cuttlefish
Weight
(in kg)
1
1
1
1
1
1
1
1+1
1
1
0.5
0.5
0.5
1
1.5
1
1
1
1
1
1
1
1
4
1.5
1.5
Rack
position
3
3
3
3
3
2 and 4
3
2
2 and 4
2
2
2 and 4
2 and 4
2
2 and 4
3
4
4
4
3 or 4
4
4
4
4
4
2
2
Preheating
time (min)
15
15
15
15
15
15
10
10
15
10
10
10
10
10
10
15
5
5
5
5
5
5
5
5
5
5
5
Recommended
temperature
200
200
200
180
180
230
180
180
200
180
170
190
180
170
170
200
Max
Max
Max
Max
Max
Max
Max
Max
Max
200
200
Cooking
time
(minutes)
65-75
70-75
70-80
15-20
30-35
15-20
30-35
40-45
60-70
30-35
40-50
20-25
10-15
15-20
20-25
25-30
8-10
6-8
10
10-15
15-20
15-20
7-10
15-20
2-3
55-60
30-35
8
Page 9

Precautions and tips
! The appliance was designed and manufactured in
compliance with international safety standards. The
following warnings are provided for safety reasons and
must be read carefully.
General safety
The appliance was designed for domestic use inside the
home and is not intended for commercial or industrial
use.
The appliance must not be installed outdoors, even in
covered areas. It is extremely dangerous to leave the
appliance exposed to rain and storms.
When handling the appliance, always use the handles
provided on the sides of the oven.
Do not touch the appliance with bare feet or with wet or
moist hands and feet.
The appliance must be used to cook food by adults only
and according to the instructions in this manual.
W h en th e appliance is in us e , th e heating
elements and s o m e parts of t h e ov en door
becom e ex tremely h ot. M ake sure yo u don' t
tou
ch th e m and keep c hild ren well aw a y.
Ensure that the power supply cable of other electrical
appliances does not come into contact with the hot
parts of the oven.
The openings used for ventilation and dispersion of
heat must never be covered.
Always grip the oven door handle in the centre: the
ends may be hot.
Always use oven gloves to place cookware in the oven
or when removing it.
Do not use aluminium foil to line the bottom of the oven.
Do not place flammable materials in the oven: if the
appliance is switched on by mistake, it could catch fire.
Always make sure the knobs are in the l/
when the appliance is not in use.
When unplugging the appliance always pull the plug
from the mains socket, do not pull on the cable.
Never carry out any cleaning or maintenance work
without having unplugged the plug from the mains.
In the case of a malfunction, under no circumstances
should you attempt to repair the appliance yourself.
Repairs carried out by inexperienced persons may
cause injury or further malfunctioning of the appliance.
Contact a Service Centre (see Assistance).
Do not rest heavy objects on the open oven door.
The appliance should not be operated by people
(including children) with reduced physical, sensory or
mental capacities, by inexperienced individuals or by
anyone who is not familiar with the product. These
¡ position
individuals should, at the very least, be supervised by
someone who assumes responsibility for their safety or
receive preliminary instructions relating to the operation
of the appliance.
Do not let children play with the appliance.
Disposal
Observe local environmental standards when disposing
packaging material for recycling purposes. Observe
existing legislation when disposing of the old appliance.
The European Directive 2002/96/EC on Waste Electrical
and Electronic Equipment (WEEE), requires that old
household electrical appliances must not be disposed
of in the normal unsorted municipal waste stream. Old
appliances must be collected separately in order to
optimise the recovery and recycling of the materials
they contain and reduce the impact on human health
and the environment. The crossed out wheeled bin
symbol on the product reminds you of your obligation,
that when you dispose of the appliance it must be
separately collected.
Consumers should contact their local authority or
retailer for information concerning the correct disposal
of their old appliance.
Respecting and conserving the
envir onment
By using the appliance in the hours between late
afternoon and early morning, you can help reduce the
work load placed on electrical companies.
Always keep the oven door closed when using the
GRILL and GRATIN modes: to attain best results and
to save energy (approximately 10%).
Regularly check the door seals and wipe clean to
ensure they are free of debris so that they stick
properly to the door and do not allow heat to disperse.
Recycling & Disposal
Infor mation
As part of Hotpoint's continued commitment to helping the
environment, Hotpoint reserves the right to use quality
recycled components to keep down customer costs and
minimise material wastage.
Please dispose of packaging and old appliances carefully.
To minimise risk of injury to children, remove the door, plug
and cut mains cable off flush with the appliance. Dispose
of these parts separately to ensure that the appliance can
no longer be plugged into a mains socket, and the door
cannot be locked shut.
GB
9
Page 10

Maintenance and care
GB
Switching the appliance off
Disconnect your appliance from the electricity supply
before carrying out any work on it.
Cleaning the appliance
Never use steam cleaners or pressure cleaners on
the appliance.
The stainless-steel or enamel-coated external parts
as well as the rubber seals may be cleaned using a
sponge that has been soaked in lukewarm water
and neutral soap. If these stains are difficult to
remove, use only specialised products. After
cleaning, rinse and dry thoroughly. Do not use
abrasive powders or corrosive substances.
Ideally, the inside of the oven should be cleaned
after each use, when it is still lukewarm. Use hot
water and detergent, rinse and dry with a soft cloth.
Do not use abrasive products.
The accessories can be washed like everyday
crockery (even in your dishwasher).
Cleaning the oven door
Clean the glass part of the oven door using a sponge
and a non-abrasive cleaning product, then dry
thoroughly with a soft cloth. Do not use rough abrasive
material or sharp metal scrapers as these could
scratch the surface and cause the glass to crack.
To clean more thoroughly, you can remove the oven
door.
1. Open the oven door fully (see diagram).
2. Lift up and turn the small levers located on the two
hinges (see diagram).
Inspecting the seals
Check the door seals around the oven periodically. If
the seals are damaged, please contact your nearest
After-sales Service Centre (see Assistance). We
recommend not using the oven until the seals have
been replaced.
Replacing the light bulb
To replace the oven light bulb:
1. Remove the glass cover of the lamp-holder.
2. Remove the light bulb and replace it with a similar
one: Wattage 25 W, cap E 14.
3. Replace the glass cover (see diagram).
10
F
3. Grip the door on the two
external sides and close it
approximately half way. Unlock
the door by pressing on the
clamps F, then pull the door
F
towards you lifting it out of its
seat (see diagram).
To replace the door, reverse
this sequence.
Page 11

After Sales Service
No one is better placed to care for your Hotpoint appliance during the course of its working life than
us - the manufacturer.
Essential Contact Information
Hotpoint Service
We are the largest service team in Europe offering you access to 400 skilled telephone advisors and
1100 fully qualified engineers on call to ensure you receive fast, reliable, local service.
UK: 08709 066 066
Republic of Ireland: 0818 313 413
www.hotpointservice.co.uk
Please note: Our advisors will require the following information:
Model number:
Serial number:
Parts and Accessories
We supply a full range of genuine replacement parts as well as accessory products that protect and
hygienically clean your appliance to keep it looking good and functioning efficiently throughout its life.
GB
UK: 08709 077 077
Republic
www.hotpointservice.co.uk
We want to give you additional benefits of Hotpoint ownership. To activate your free 5 year parts
guarantee you must register your appliance with us.
Republic of Ireland: 01 230 0800
www.hotpointservice.co.uk
Indesit Company UK Ltd. Morley Way, Peterborough, PE2 9JB
Indesit Company Unit 49 Airways Industrial Estate,Dublin 17
of Ireland: 0818 313 413
Appliance Registration
UK: 0870 6092094
Recycling & Disposal Information
As part of Hotpoint's continued commitment to helping the environment, Hotpoint reserves the right to use
quality, recycled components to keep down customer costs and minimise material wastage.
Please dispose of packaging and old appliances carefully. To minimise the risk of injury to children,
remove the door, plug and cut the mains
separately to ensure that the appliance can no longer be plugged into a mains socket, and the door
cannot be locked shut.
cable off flush with the appliance. Dispose of these parts
11
Page 12

04/2008 - 195068437.00
XEROX BUSINESS SERVICES
GB
Guarantee
12 Months Parts and Labour Guarantee
Your appliance has the benefit of our manufacturers guarantee, which covers the cost of breakdown
repairs for twelve months from the date of purchase.
This gives you the reassurance that if, within that time, your appliance is proven to be defective
because of either
- The appliance has been installed and operated correctly and in accordance with our
operating and maintenance instructions.
- The appliance is used only on the electricity
- The appliance has been used for normal domestic purposes only.
- The appliance has not been altered, serviced, maintained, dismantled, or otherwise
interfered with by any person not authorised by us.
- Any repair work must be undertaken by us or our appointed agent.
- Any
- The appliance is used in the United Kingdom or Republic of Ireland.
The guarantee does not cover:
parts removed during repair work or any appliance that is replaced become our property.
workmanship or materials, we will, at our discretion, either repair or replace the
appliance at no cost to you.
This guarantee is subject to the following conditions:
or gas supply printed on the rating plate.
- Damage resulting from transportation, improper use, neglect or interference or as a result
of improper installation.
- Replacement of any
cables, batteries, light bulbs, fluorescent tubes and starters, covers and filters.
- Replacement of any removable parts made of glass or plastic.
THIS GUARANTEE WILL NOT APPLY IF THE APPLIANCE HAS BEEN USED IN COMMERCIAL
NON-DOMESTIC PREMISES.
OR
Hotpoint also offers you a free 5 year parts guarantee. This additional guarantee is conditional on you
registering your appliance with us and the parts being fitted by one of our authorised engineers.
There will be a charge for our engineer's time. To activate the
simply call our registration line on 0870 6092094 (ROI 01 230 0800).
We offer a selection of repair protection plans that enable you to fully cover yourself against the
expense of repair bills for the life of your policy. To find the ideal
consumable item or accessory . These include but are not limited to: plugs,
5 Year Parts Guarantee
extra parts warranty on your appliance,
Extended Guarantees
plan for you please call our advice
line on 08709 088 088 (ROI 01 230 0233).
Free Helpdesk Service
We have a dedicated team who can provide free advice and assistance with your appliance if you
experience any technical difficulties within the first 90 days of ownership.
Service Hotline on 08709 066 066 (ROI 0818 313 413) for telephone assistance, or, where necessary,
to arrange for an engineer to call. If we cannot resolve the technical problem we will replace your
machine or, if you prefer, give you your money back.
12
Simply call our Hotpoint
 Loading...