


kitchen think
Instructions for Installation and Use
Electric Multifunction Oven
Models ST98, SD98, SC98
The Recipe Book
Hotpoint has come up with a small recipe book - which is practical, full of helpful tips and easy to use - to help you rediscover the delights of cooking.
It contains a wide variety of handy tips to keep in mind to try out new dishes effortlessly.
It also has 15 recipes preprogrammed into the oven, so thanks to the interactive display, once you have done the preparation all you have to do is make one simple selection.
To the Installer
Before installation fill in the product details on the back cover this book.
The information can be found on the rating plate.
To the User
You must read the instructions prior to installing and using the appliance and then retain them for future reference.

GB |
2 |

CONTENTS
Introduction |
4 |
For Your Safety |
5 |
Know your Oven |
6 |
The Controls |
7-9 |
Setting the Oven to Switch On and Off |
9 |
Automatically |
|
The Accessories |
10 |
Cooking Advice |
11-12 |
A Few Examples of Cooking on One Level |
13 |
Care and Cleaning |
|
Fast Clean |
14 |
Installation |
15 |
Electrical Connection |
16-17 |
Troubleshooting |
18 |
After Sales Service |
19 |
Hotpoint Guarantee |
22 |
Key Contacts |
23 |
|
Back Cover |
Retention of this Instruction Book
This Instruction Book must be kept handy for reference as it contains important details on the safe and proper use of the appliance.
If you sell or pass the appliance to someone else, or move house and leave it behind, make sure this Book is also provided so the new owner can become familiar with the appliance and safety warnings.
If the Book is lost or damaged a copy may be obtained from:
GDA LTD., Morley Way, Peterborough, PE2 9JB
3 |
GB |

Introduction
Your new electric oven is guaranteed* and will give lasting service. This guarantee is only applicable if the appliance has been installed in accordance with the installation instructions detailed in this booklet.
To help make best use of your cooking equipment, please read this booklet carefully.
The oven is designed specifically for domestic use and responsibility will not be accepted for use in any other installation.
Note: When the oven is first used, an odour may be omitted - this will cease after a short period of use.
To help remove the 'new' smell, heat the empty oven to maximum temperature for a minimum of two to three hours, keeping the door/s closed. Ensure that the room is well ventilated (eg. open a window or use an extractor fan) and that persons who may be sensitive to the odour avoid any fumes. It is suggested that any pets be removed from the room until the smell has ceased.
This odour is due to any temporary finish on oven linings and elements and any moisture absorbed by the insulation.
* The guarantee is subject to the provisions that the appliance:
(a)Has been used solely in accordance with this booklet.
(b)Has been properly connected to a suitable supply voltage as stated on the rating plate, attached to the appliance.
(c)Has not been subjected to misuse or accident or been modified or repaired by any person other than the manufacturers authorised employee or agent.
(d)Has been correctly installed.
GB |
4 |

For Your Safety
When used properly your appliance is completely safe but as with any electrical product there are certain precautions that must be observed.
PLEASE READ THE BELOW PRECAUTIONS BEFORE USING YOUR APPLIANCE.
To maintain the efficiency and safety of this appliance, we recommend you do the following:
-only call the Service Centres authorised by the manufacturer.
-always use genuine spare parts.
ALWAYS: |
NEVER: |
-make sure you remove all packaging and literature from inside the appliance before switching on for the first time.
-check the soundness of the appliance after it has been unpacked.
-make sure you understand the controls before using the appliance.
-keep children away from the appliance during use, as surfaces will get extremely hot during and after cooking. Care should be taken to avoid touching the heating elements inside the oven during use.
-make sure the controls are turned off when you have finished cooking and when not in use.
-grip the handle in the centre when opening the door.
-stand back when opening the door to allow any build up of steam or heat to disperse.
-use dry, good quality oven gloves when removing items.
-take care to avoid heat/steam burns when operating the controls.
-switch off the electricity supply at the wall switch, and allow to cool, before cleaning or performing maintenance..
-make sure the shelves are in the correct position before switching on the oven.
-keep the door closed when the appliance is not in use.
-keep the appliance clean as a build up of grease or fat from cooking can cause a fire.
-follow the basic principles of food handling and hygiene to prevent the possibility of bacterial growth.
-keep any ventilation slots clear of obstructions.
-attempt to install or repair the appliance without the assistance of qualified personnel.
-remove the oven shelves whilst the oven is hot.
-allow anyone to sit or stand on any part of the appliance.
-store items above the appliance that children may attempt to reach.
-heat up unopened food containers, as pressure can build up causing the container to burst.
-use the appliance to heat up anything other than food.
-use the appliance as a room heater.
-use the grill to warm plates.
-dry items on the oven doors.
-install the appliance next to curtains of other soft furnishings.
-allow children to play with or tamper with the controls.
-use steam cleaners.
-use the oven for storage purposes.
-use flammable liquids near the appliance.
-use adapters, multiple sockets and/or extension leads.
-pull on the appliance or the supply able to unplug it from the electrical outlet.
-allow power cables of other appliances to come into contact with hot parts of this appliance.
-expose the appliance to atmospheric agents, such as rain or sunlight.
-operate the appliance with wet hands.
-operate the appliance when barefoot.
5 |
GB |

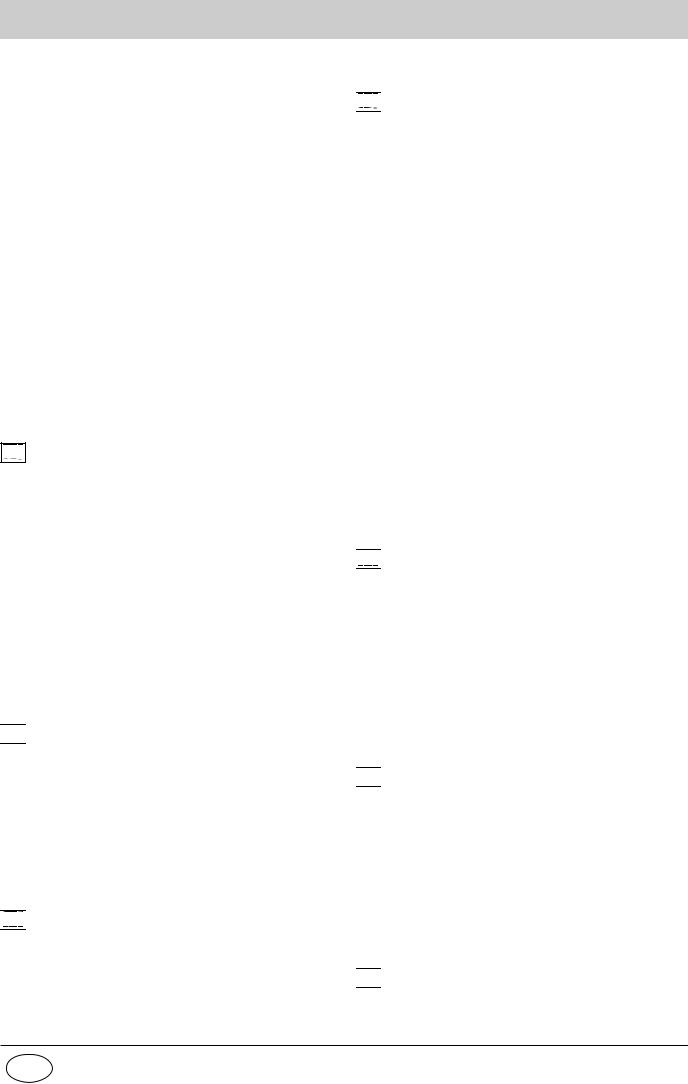
Know your Oven
A 
 H
H
G 
 F
F
|
C |
250 |
|
200 |
|
|
|
150 |
|
|
100 |
|
|
40 |
|
P I Z Z A |
|
B |
D |
C |
12 |
6 |
13 |
9 |
10 |
|
|
C |
250 |
|
|
|
|
200 |
|
14 |
|
|
150 |
|
|
|
100 |
|
|
|
|
|
40 |
|
8 |
P I Z Z A |
7 
1 |
2 |
5 |
11 |
3 |
4 |
A.Control Panel
B.Function Selector
C.Cooking temperature / time selection knob
D.Electronic programmer
F.Grill Pan / Baking Tray
G.Oven Shelf
H.Guides for sliding the shelves or Grill Pan in and out
1.End cooking time setting/ clock/ date
2.Control panel lock / timer / set cooking time
3.Language setting
4.Start cooking / stop cooking / oven light / display brightness
5.Function description
6.Function number
7.Cooking time
8.End cooking time
9.Graduated temperature scale
10.Energy level for grill functions
11.Time or temperature / Energy percentage
12.Electric elements in use
13.Clock display
14.Programmed cooking indicator
GB |
6 |

The Controls
The 7 Chefs oven combines the advantages of a convection oven with those of fan assisted models in a single appliance.
It is extremely versatile allowing you to choose easily and safely between different cooking modes. The various features offered by the oven are selected by means of the function selector "B" situated on the control panel.
Setting Time and Date
Selecting the language
Press button 3 for a few seconds with the oven turned off. The languages available appear in sequence on the display panel. Press button 3 again to select the desired language.
Setting the clock
The clock can only be set if the oven is turned off.
After the appliance has been connected to the power supply, or following a power failure, the clock displays a flashing 12:00 or the last time memorised.
The time can be changed by pressing button 1 and resetting the clock using knob "C", which you can modify only whilst the scrolling writing crosses the display.
Setting the date
To update the date, press and hold down button 1 until the word "YEAR" comes up on the display. Update the year by turning knob "C" and then press button 1 to set the month, again using knob "C". Press button 1 again to set the day using knob "C". Press button 1 to memorise the date set.
Minute Minder Feature
The timer can only operate when the oven is turned off. Please remember that the timer does not control the starting or stopping of the oven, it merely sounds a buzzer when the time is up and can be interrupted at any time just by pressing a button.
To set the Minute Minder, press button 2, and then make the necessary adjustment using knob "C".
Press button 4 to start the timer.
At all times during the Minute Minder operation, you may:
•adjust its duration using knob "C";
•stop the countdown by pressing button 4 for approximately 3 seconds or turning knob "B" anticlockwise;
•enable/disable the control panel lock, by pressing button 2 for at least 3 seconds (see the paragraph entitled "Locking and Unlocking the Control Panel").
Locking and Unlocking the Control Panel
This option enables the user to lock all the buttons and knobs. We especially advise you to use this option if there are children present.To enable the control panel lock, press button 2 for a few seconds. The word "LOCKED" comes up on the display. To restore the usual commands to the appliance, just press button 2 again for a few seconds. The word "UNLOCKED" will come up on the display.
Selecting the display panel brightness
To update the date, press and hold down button 4 until the word "BRIGHTNESS" comes up on the display.
Turn knob "C" clockwise/anticlockwise to increase/ decrease the brightness of the display panel. A few seconds after this selection, the oven will be ready for further instructions.
The oven light
At any time, including during pre-heating and cooking, you can turn the oven light on or off by pressing button 4.When the oven is turned off, the light turns off automatically 10 minutes after the last instructions were entered onto the control panel.
Cooling ventilation
In order to reduce the external temperature of the oven, this appliance has been equipped with a cooling fan.During cooking, the fan is always on and a normal flow of air can be heard exiting between the oven door and the control panel.
In order to raise the temperature inside the oven more quickly during pre-heating, the speed of the air outlet is approximately half the speed of air outlet during cooking. If there is a hob above the oven, the cooling fan may switch itself on automatically to protect the electronic components, even if the appliance has been switched off.
Note:When cooking is done, the fan stays on until the oven cools down sufficiently.
How To Choose a Cooking Mode/Function or a PreSet Recipe:
Turn the function selector "B" clockwise to choose from the default cooking modes or from the pre-entered recipes available (see the recipe book).
For each cooking mode, the display will indicate the following:
•the cooking mode name (or that of the recipe);
•the cooking mode number (or that of the recipe);
•the default temperature;
•the heat sources;
Should the recommended temperature not be to your liking, you can always adjust it using control "C".
Each cooking mode is also associated with a recommended cooking time, which you can modify, from one minute to 10 hours, by pressing button 2 and then turning control "C" to set it to the desired value.The cooking time can be adjusted until the scrolling wording disappears completely from the display panel. The selected cooking time does not include the time required for preheating the oven.
To start cooking, press cooking start button 4.
With the exception of the "Fast cooking" and "Grill" modes, the oven will now begin the pre-heating stage, during which you may still:
•change the temperature by turning control "C";
•change the cooking time by pressing button 2 and then turning control "C";
•enable/disable the control panel lock, by pressing button 2 for at least 3 seconds (see the paragraph entitled "Locking and Unlocking the Control Panel");
•stop cooking and turn the oven off by turning the function selector "B" anti-clockwise.
Note: pre-heating is performed automatically by the appliance, which sets the pre-heating time according to the temperature selected by the user.The display panel will feature how long the oven will take to preheat before cooking starts.
7 |
GB |
The Controls
Once the temperature set has been reached, the oven starts the cooking stage in itself, during which you may still:
•change the temperature by turning control "C"; if you increase it by more than 25°C, the oven returns to the pre-heating mode;
•change the cooking time by pressing button 2 and then turning control "C";
•enable/disable the control panel lock, by pressing button 2 for at least 3 seconds (see the paragraph entitled "Locking and Unlocking the Control Panel");
•stop cooking and turn the oven off by turning the function selector "B" anti-clockwise.
Once cooking is finished, the wording "END-READY" will come up on the display, and a buzzer will sound, which will stop after 1 minute, after you press a button or after you turn one of the two knobs.
Cooking mode description
The cooking modes are selected by turning the function selector "B".
: "Traditional"
Position knob “C”: between 40°C and 250°C.
The top and bottom heating elements are used. In this mode, the coolest part of the oven is the centre. The convection oven is best for cooking dishes made up of several ingredients, e.g. tender veal strips with rice, braised meats, stews, goulash etc. and dishes that need to cook slowly and require basting or the addition of liquid and cooking using covered casserole dishes for oven baking. When cooking in convection mode, only use one baking tray or shelf at a time, otherwise the heat distribution will be uneven. Using the different shelf position available, you can balance the amount of heat between the top and the bottom of the oven. Select from among the various shelf positions based on whether the dish needs more or less heat from the top.


 : "Pastry"
Position knob “C”: between 40°C and 250°C.
Only the circular heating element and the fan come on to provide delicate heat, suitable for baking cakes and pastries such as brioches, chocolate cake, fruitcake, sponge cake, mini cup cakes, meringues, etc.
In this case, use the grill pan as a dish support and place it on the 2nd shelf position from the oven bottom.
We recommend you pre-heat the oven before placing your dishes in it.


 : "Fast cooking"
Position knob “C”: between 40°C and 250°C.
The combination of all the heating elements together with the fan guarantees a uniform distribution of heat throughout the oven.
This particular cooking mode is ideal for fast cooking (not requiring any pre-heating) and for cooked dishes (frozen, pre-cooked food).
In this case, use the grill pan as a dish support and place it on the 2nd shelf position from the oven bottom.


 : "Multicooking"
Position control “C”: between 40°C and 250°C.
All the heating elements are activated alternately and the fan comes on. Since the heat remains constant and uniform throughout the oven, the air cooks and browns food uniformly over its entire surface. With this mode, you can also cook various dishes at the same time, as long as their respective cooking temperatures are the same. A maximum of 2 shelves can be used at the same time, following the instructions in the section entitled: “Cooking On More Than One Shelf”. This cooking mode is particularly recommended for dishes requiring a gratin finish or for those requiring considerably prolonged cooking times.
Moreover, the excellent heat distribution makes it possible to use lower temperatures when cooking roasts. This results in less loss of juices, meat which is more tender and a decrease in the loss of weight for the roast.
The Multi-cooking mode is especially suited for cooking fish, which can be prepared with the addition of a limited amount of condiment, thus maintaining their flavour and appearance.
Excellent results can be attained when cooking vegeta- ble-based side dishes like courgettes, aubergines,peppers, etc.
This mode can also be used to thaw red or white meat, fish and bread, by setting the temperature to 80 °C. To thaw more delicate foods, set the thermostat to 60°C.


 : "Pizza"
Position knob “C”: between 40°C and 250°C.
The heating elements (bottom and circular) are turned on to heat the oven up quickly.
Your pizzas and tarts will benefit from a greater amount of heat from below, thus guaranteeing the rapid baking of the dough during cooking.Whilst the fan browns the surface as necessary, making the food even more appetising.
Use the baking tray as a dish support and place it on the 1st shelf position from the oven bottom.
We recommend you pre-heat the oven before placing your dishes in it.

 : "Grill"
The top heating element comes on: the grill goes red and emits infrared rays, this cooking mode does not intend to heat up the air inside the oven, but rather to expose the food directly to these rays.
Use this cooking mode with the oven door closed.We recommend you start with the oven cold.
The amount of heat radiated is adjustable on the temperature selector.
Place the grill pan on one of the top shelf positions, depending on the size of the food.

 : "Gratin"
Only the top heating element comes on, with the emission of infrared rays. The forced circulation of air caused by the fan at the back of the oven ensures the uniform distribution
GB |
8 |
 Loading...