

Page 1
Instructions for Installation and Use
Electric Multifunction Oven
Models ST55X - ST52
Page 2

CONTENTS
Introduction
For Your Safety
Know your Oven
The Controls
Cooking Advice
Cooking Chart
The Analogue Programmer
Care and Cleaning
Installation
Electrical Connection
After Sales Service
Hotpoint Guarantee
Key Contacts
3
4
5
6
7
8
9
10
11
12
14
15
Back Cover
Retention of this Instruction Book
This Instruction Book must be kept handy for reference as it contains important details on the safe and proper use of the
appliance.
If you sell or pass the appliance to someone else, or move house and leave it behind, make sure this Book is also provided
so the new owner can become familiar with the appliance and safety warnings.
If the Book is lost or damaged a copy may be obtained from:
GDA LTD., Morley Way, Peterborough, PE2 9JB
2
Page 3

Introduction
Your new electric oven is guaranteed* and will give lasting service. This guarantee is only applicable if the appliance has
been installed in accordance with the installation instructions detailed in this booklet.
To help make best use of your cooking equipment, please read this booklet carefully.
The oven is designed specifically for domestic use and responsibility will not be accepted for use in any other installation.
Note: When the oven is first used, an odour may be omitted - this will cease after a short period of use.
To help remove the 'new' smell, heat the empty oven to maximum temperature for a minimum of two to three hours, keeping
the door/s closed. Ensure that the room is well ventilated (eg. open a window or use an extractor fan) and that persons
who may be sensitive to the odour avoid any fumes. It is suggested that any pets be removed from the room until the smell
has ceased.
This odour is due to any temporary finish on oven linings and elements and any moisture absorbed by the insulation.
* The guarantee is subject to the provisions that the appliance:
(a) Has been used solely in accordance with this booklet.
(b) Has been properly connected to a suitable supply voltage as stated on the rating plate, attached to the
appliance.
(c) Has not been subjected to misuse or accident or been modified or repaired by any person other than the
manufacturers authorised employee or agent.
(d) Has been correctly installed.
3
Page 4

For Your Safety
When used properly your appliance is completely safe but as with any electrical product there are certain
precautions that must be observed.
PLEASE READ THE BELOW PRECAUTIONS BEFORE USING YOUR APPLIANCE.
To maintain the efficiency and safety of this appliance, we recommend you do the following:
- only call the Service Centres authorised by the manufacturer.
- always use genuine spare parts.
ALWAYS:
- make sure you remove all packaging and literature from
inside the appliance before switching on for the first time.
- check the soundness of the appliance after it has been
unpacked.
- make sure you understand the controls before using the
appliance.
- keep children away from the appliance during use, as
surfaces will get extremely hot during and after cooking. Care
should be taken to avoid touching the heating elements inside
the oven during use.
- make sure the controls are turned off when you have finished
cooking and when not in use.
- grip the handle in the centre when opening the door.
- stand back when openign the door to allow any build up
of steam or heat to disperse.
- use dry, good quality oven gloves when removing items.
- take care to avoid heat/steam burns when operating the
controls.
- switch off the electricity supply at the wall switch, and
allow to cool, before cleaning or performing maintenance..
- make sure the shelves are in the correct position before
switching on the oven.
- keep the door partially open when grilling, but closed when
fan grilling.
- keep the door closed when the appliance is not in use.
- keep the appliance clean as a build up of grease or fat
from cooking can cause a fire.
- follow the basic principles of food handling and hygiene to
prevent the possibility of bacterial growth.
- keep any ventilation slots clear of obstructions.
NEVER:
- attempt to install or repair the appliance without the
assistance of qualified personnel.
- operate the “grill” mode d with the door closed as this
may cause the appliance to overheat. (Although “fan grill”
mode e is done with the door closed - see Controls).
- remove the oven shelves whilst the oven is hot.
- allow anyone to sit or stand on any part of the appliance.
- store items above the appliance that children may attempt
to reach.
- heat up unopened food containers, as pressure can build
up causing the container to burst.
- use the appliance to heat up anything other than food.
- use the appliance as a room heater.
- use the grill to warm plates.
- dry items on the oven doors.
- install the appliance next to curtains of other soft furnishings.
- allow children to play with or tamper with the controls.
- use steam cleaners.
- use the oven for storage purposes.
- use flammable liquids near the appliance.
- use adapters, multiple sockets and/or extension leads.
- pull on the appliance or the supply able to unplug it from
the electrical outlet.
- allow power cables of other appliances to come into contact
with hot parts of this appliance.
- expose the appliance to atmospheric agents, such as
rain or sunlight.
- operate the appliance with wet hands.
- operate the appliance when barefoot.
4
Page 5
Know your Oven
E
12
3
MA
220
6
180
B
O
60
100
140
C
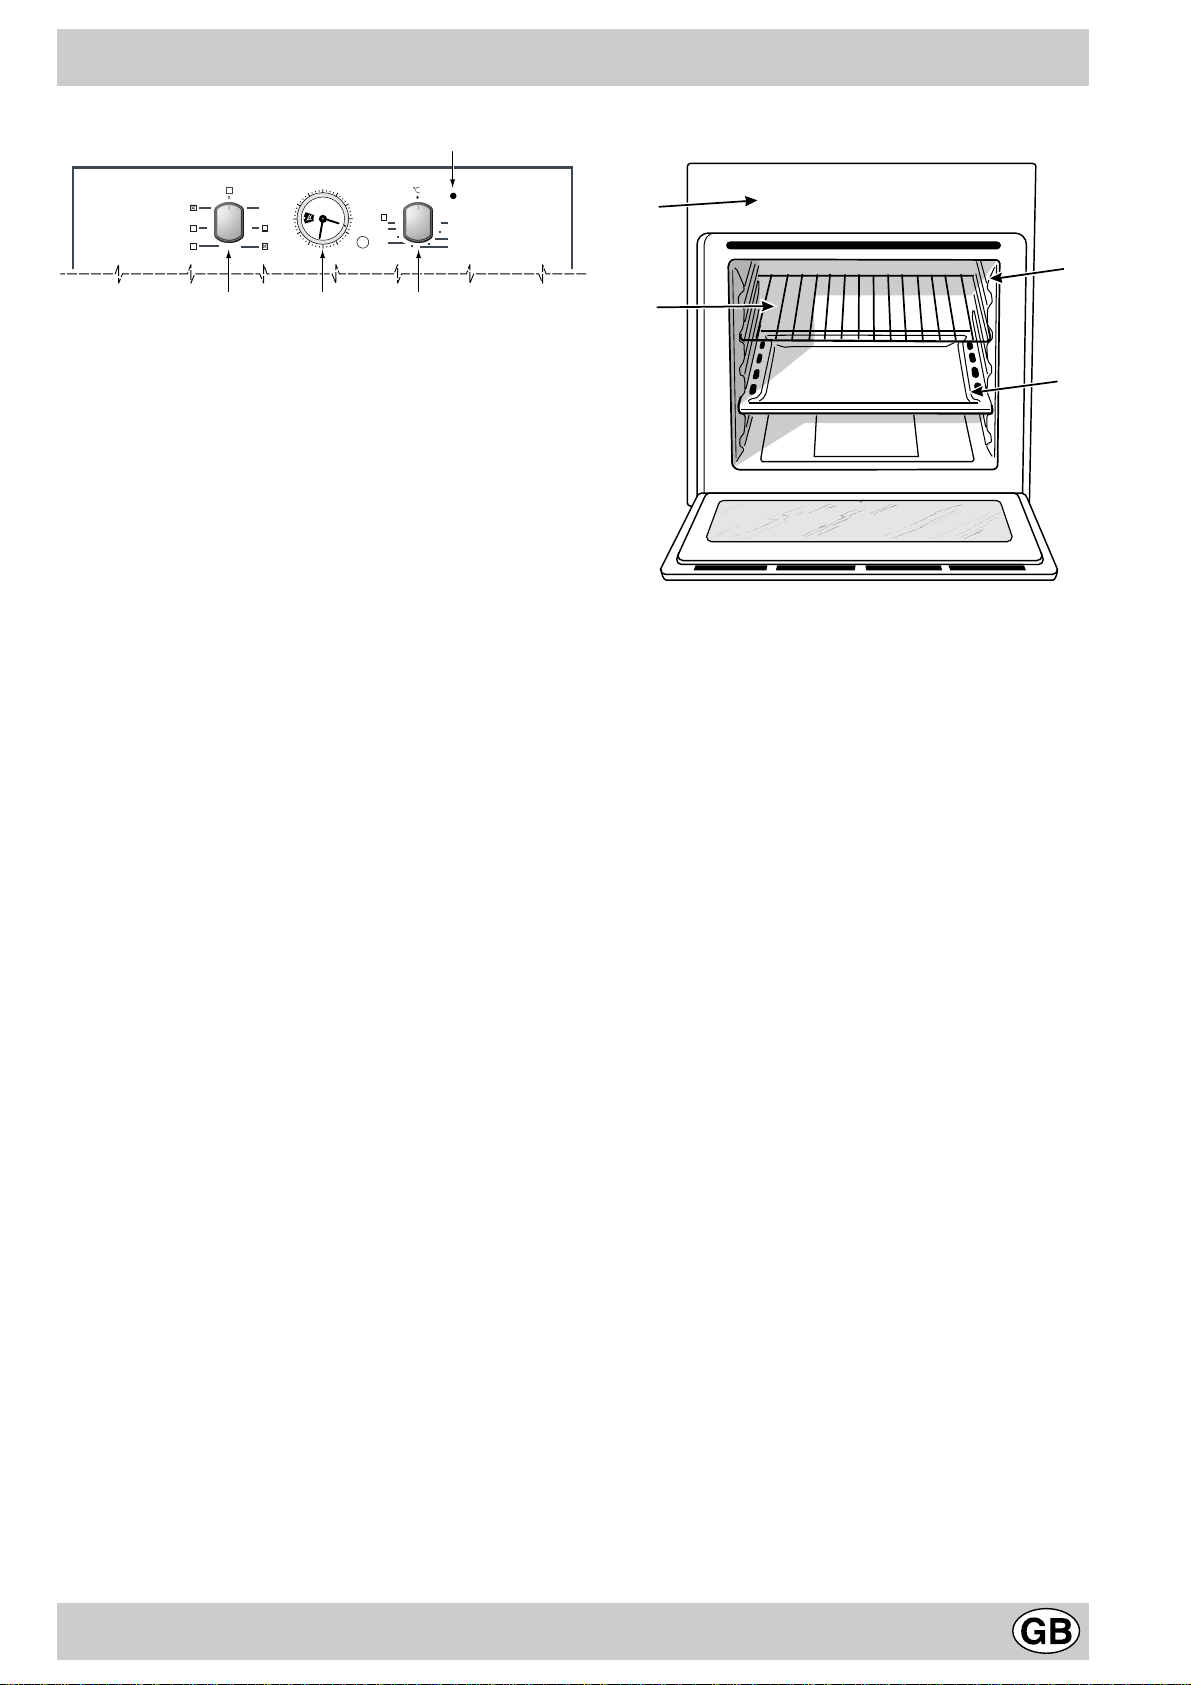
A. Control Panel
B. Function Selector
C. Temperature Control
E. Oven indicator light
- When lit, it indicates the ovens is heating up to the
selected temperature.
F. Grill Pan / Baking Tray
G. Oven Shelf
H. Guides for sliding the shelves or grill pan/baking tray
in and out
O. Analogue Programmer
A
H
G
F
5
Page 6

The Controls
This multi-function oven combines the advantages of a
convection oven with those of a fan assisted model, in a
single appliance. It is extremely versatile allowing you to
choose easily and safely between 5 different cooking modes.
The various features offered by your oven are selected by
means of function selector “B” and temperature selector “C”
situated on the control panel. Choose one of the functions
according to the food to be cooked and follow the relevant
instructions as detailed on the next page.
Notice: Never place anything on the bottom of the oven
when it is in operation because this could damage the
enamel. Always place your cookware (dishes, aluminium
foil, etc. etc.) on the shelf provided with the appliance in-
serted especially along the oven guides.
Function Selector:
Convection Mode a
Position the thermostat selector “C”: between 60°C and Max.
The top and bottom heating elements are used. In this mode,
the coolest part of the oven is the centre. The convection
oven is best for cooking dishes made up of several ingredients, e.g. tender veal strips with rice, braised meats, stews,
goulash etc. and dishes that need to cook slowly and require basting or the addition of liquid and cooking using covered casserole dishes for oven baking. When cooking in
convection mode, only use one baking tray or shelf at a
time, otherwise the heat distribution will be uneven. Using
the different shelf position available, you can balance the
amount of heat between the top and the bottom of the oven.
Select from among the various shelf positions based on
whether the dish needs more or less heat from the top.
Fan Assisted Mode b
Position the thermostat selector “C”: Between 60°C and Max.
The top and bottom heating elements and the fan, will come
on. The temperature is the same throughout the oven and
the air cooks and browns food uniformly over its entire surface. With this mode, you can also cook various dishes at
the same time, as long as they cook at the same temperature. A maximum of 2 shelves can be used at the same
time, following the instructions in the section entitled: “Cooking On More Than One Shelf” (next page).
This fan assisted mode is particularly recommended for dishes
requiring a gratin finish or for those requiring considerably
prolonged cooking times, such as: lasagne, pasta bakes,
roast chicken and potatoes, etc… Moreover, the excellent
heat distribution makes it possible to use lower temperatures when cooking roasts. This results in less loss of juices,
meat which is more tender and a decrease in the loss of
weight for the roast. The fan assisted mode is especially
suited for cooking fish, which can be prepared with the addition of a limited amount of condiment, thus maintaining
flavour and appearance.
The fan assisted mode is also perfect for baking cakes.
This mode can also be used to thaw quickly white or red
meat and bread by setting the temperature to 80 °C. To
thaw more delicate foods, set the temperature to 60°C or
use only the cold air circulation feature by setting the
temperautre to 0°C.
Browning mode c
Position the temperature selector “C”: Between 60°C and
Max.
Only the top heating element comes on.
This mode can be used to brown food at the end of cooking.
Grill d
Position the temperature selector “C” at Max.
The top central heating element comes on.
The extremely high and direct temperature of the grill makes
it possible to brown the surface of meats and roasts while
locking in the juices to keep them tender. The grill is also
highly recommended for dishes that require a high temperature on the surface: beef steaks, veal, rib steak, filets, hamburgers etc...
Some grilling examples are included in the “Cooking Advice”
section.
Fanned Grill e
Cook food in 'fanned grill' mode with the oven door shut.
Position the temperature selector “C”: between 60°C and
200°C.
The top central heating element and the fan come on. This
combination of features increases the effectiveness of the
grill through forced circulation of the air throughout the oven.
This helps prevent food from burning on the surface, allowing the heat to penetrate right into the food. Excellent results
are achieved with kebabs made with meats and vegetables, sausages, ribs, lamb chops, chicken in a spicy sauce,
pork chops, etc.
This mode is also ideal for cooking fish steaks, like swordfish or tuna etc.
The oven light
To turn on the oven light, set the function selector “B” to the
8 symbol. The light will stay on when any of the electrical
heating elements in the oven come on.
Cooling ventilation
In order to cool down the exterior of the appliance, it is
equipped with a cooling fan which comes on when the
function selector “B” is not set to OFF.
During cooking, the fan is always on and a normal flow of
air can be heard exiting between the oven door and the
control panel.
Note. when cooking is finished, the fan stays on until the
oven cools down sufficiently.
6
Page 7
Cooking Advice
The oven offers a wide range of alternatives which allows
you to cook any type of food in the best possible way.
With time you will learn to make the best use of this versatile
cooking appliance and the following are only a guide, which
may be varied according to your own personal taste.
Preheating
If the food being cooked needs to go into a preheated
oven (this is generally the case when cooking leavened
foods), the “fan assisted mode” b can be used to reach
the desired temperature as quickly as possible. When
preheating is over, which is indicated by the red oven
indicator light “E” going out. Place food in the oven and
select the most appropriate cooking mode.
Cooking on More Than One Shelf
If you want to cook on more than one shelf at the same
time, use the “fan assisted mode” b which is the only
mode appropriate for this type of cooking.
• The oven is fitted with 5 shelves. During fan assisted
cooking, use two of the three central shelf positions; the
lowest and highest shelf positions receive the hot air
directly and therefore delicate foodstuffs could be burnt
on these shelf positions.
• As a general rule, use the 2nd and 4th shelf position
from the bottom, placing the foodstuffs that require greater
heat on the 2nd shelf position from the bottom. For
example, when cooking meat roasts together with other
food, place the roast on the 2nd shelf position from the
bottom and the more delicate food on the 4th shelf position
from the bottom.
• When cooking food that require differing times and
temperatures, set a temperature that is somewhere
between the two temperatures required, place the more
delicate food on the 4th shelf position from the bottom
and take the food requiring less time out of the oven first.
• Use the baking tray on the lower shelf position and the
shelf on the upper;
Using the Grill
This multi-function oven offers you 2 different grilling modes.
- Use the “grill” mode d, with the oven door ajar, placing
the food in the centre of the grill pan (situated on the 3rd or
4th shelf position form the bottom) because only the central
part of the top heating element is turned on.
When using this mode, we recommend you set the
temperature to the highest setting. However, this does not
mean you cannot use lower temperatures, simply by
adjusting the temperature control to the desired temperature.
- Setting e “fanned grill”, only with the oven door shut,
is extremely useful for grilling foods rapidly, as the distribution
of heat makes it possible not only to brown the surface, but
also to cook the bottom part.
It can also be used for browning foods at the end of the
cooking process, such as adding that gratin finish to pasta
bakes. When using this mode, place the grill pan on the 2nd
or 3rd shelf position from the bottom (see cooking chart).
This will allow you to obtain excellent results and to save
energy (approximately 10%). When using this mode we
recommend you set the temperature control to 200°C, as it
is the most efficient way to use the grill. However this does
not mean you cannot use lower temperatures, simply by
adjusting the temperature control to the desired temperature.
Baking Cakes
When baking cakes, always preheat the oven. Make
sure you wait until the oven has preheated thoroughly (the
red oven indicator light "E" will go out). Do not open the
oven door during baking to prevent the cake from dropping.
In general, if:
Pastry is too dr y
Increase the tempe rature b y 10°C and r educe th e
cooking time.
Pastry has dropped
Pastry dropped
Use less liquid or lower th e temperat ure by 10°C.
Pastry is too dark on top
Place it on a lower shelf, lower the temperature and increase
Place it on a lower rack, l ower the tem perat ure, a nd
the cooking time.
increase the cooking tim e.
It is cooked well on the inside but is sticky on the
Cooked well on the inside but sticky on the
outside
outside
Use less liquid, lower t he tempe ratur e, and i ncre ase
the cooking time.
The pastry sticks to the pan
Grease the pan well and s prinkle it wit h a dust ing of
flour or use greaseproof paper.
I used more than one level (in the function
You have used more than one shelf (in the fan assisted
"ventilated oven") and they are not all at th e same
mode) and they are not all at the same cooking point.
cooking point
Use a lower temperature setting. It is not necessary to remove
Use a lower temperature s ettin g. It is not nec essa ry to
the food from both shelves at the same time.
remove the food from all the ra cks at t he sam e time.
Cooking Fish and Meat
When cooking white meat, fowl and fish, use temperature
settings from 180 °C to 200 °C.
For red meat that should be well done on the outside while
tender and juicy in the inside, it is a good idea to start with a
high temperature setting (200°C-220°C) for a short time, then
turn the oven down afterwards.
In general, the larger the roast, the lower the temperature
setting. Place the meat on the centre of the shelf and place
the grill pan/baking tray beneath it to catch the fat.
Make sure that the shelf is inserted so that it is in the centre of
the oven. If you would like to increase the amount of heat
from below, use the low shelf positions.
Cooking Pizza
For best results when cooking pizza, use the “fan assisted
mode” b :
- Preheat the oven for at least 10 minutes.
- Use a light aluminium pizza pan, placing it on the shelf. If
the baking tray is used, this will extend the cooking time,
making it difficult to get a crispy crust.
- Do not open the door frequently while the pizza is cooking.
- If the pizza has alot of toppings (three or four), we recommend
you add the mozzarella cheese on top, halfway through the
cooking process.
- When using two shelves, use the 2nd and 4th shelf
positions, with the temperature set to 220°C.
7
Page 8
Cooking Chart
a
b
c
Cooking
Selector knob
Function
setting
1 Convection
2 Fan
assisted
3 Top Oven
Browning
4 Grill
d
5 Fan
Fanned
Grill
assisted grill
e
Food to be cooked
Duck
Roast veal or beef
Pork roast
Biscuits (short pastry)
Tarts
Pizza (on 2 racks)
Lasagne
Lamb
Roast chicken + potatoes
Mackerel
Plum-cake
Cream puffs (on 2 racks)
Biscuits (on 2 racks)
Sponge cake (on 1 rack)
Sponge cake (on 2 racks)
Savoury pies
Browning food to perfect
cooking
Soles and cuttlefish
Squid and prawn kebabs
Cod filet
Grilled vegetables
Veal steak
Cutlets
Hamburgers
Mackerels
Toasted sandwiches
With rotisserie (where
present)
Veal on the spit
Chicken on the spit
Lamb on the spit
Grilled chicken
Cuttlefish
shelves)
shelves)
shelves)
shelf)
shelves)
Weight
(in kg)
1
1
1
-
1
1
1
1
1
1
1
0.5
0.5
0.5
1.0
1.5
- 3/4 15 220 -
1
1
1
1
1
1
1
1
n.° 4
1.0
1.5
1.0
1.5
1.5
Shelf position
Cooking rack
from bottom
position from
bottom
3
3
3
3
3
2-4
3
2
2-4
2
2
2-4
2-4
2
2-4
3
4
4
4
3/4
4
4
4
4
4
-
-
-
3
3
Preheating time
(minutes)
15
15
15
15
15
15
10
10
10
10
10
10
10
10
10
15
5
5
5
5
5
5
5
5
5
5
5
5
5
5
Temperature
Thermostat
setting
knob
setting
200
200
200
180
180
220
200
180
180
180
170
190
180
170
170
200
Max
Max
Max
Max
Max
Max
Max
Max
Max
Max
Max
Max
200
200
Cooking
time
(minutes)
65-75
70-75
70-80
15-20
30-35
15-20
30-35
50-60
60-75
30-35
40-50
20-25
10-15
15-20
20-25
25-30
8-10
6-8
10
10-15
15-20
15-20
7-10
15-20
2-3
80-90
70-80
70-80
55-60
30-35
With rotisserie (where
present)
Veal on the spit
Chicken on the spit
Chicken (on the spit) +
Chicken on the spit and
potatoes (roasted)
roasted potatoes
Lamb on the spit
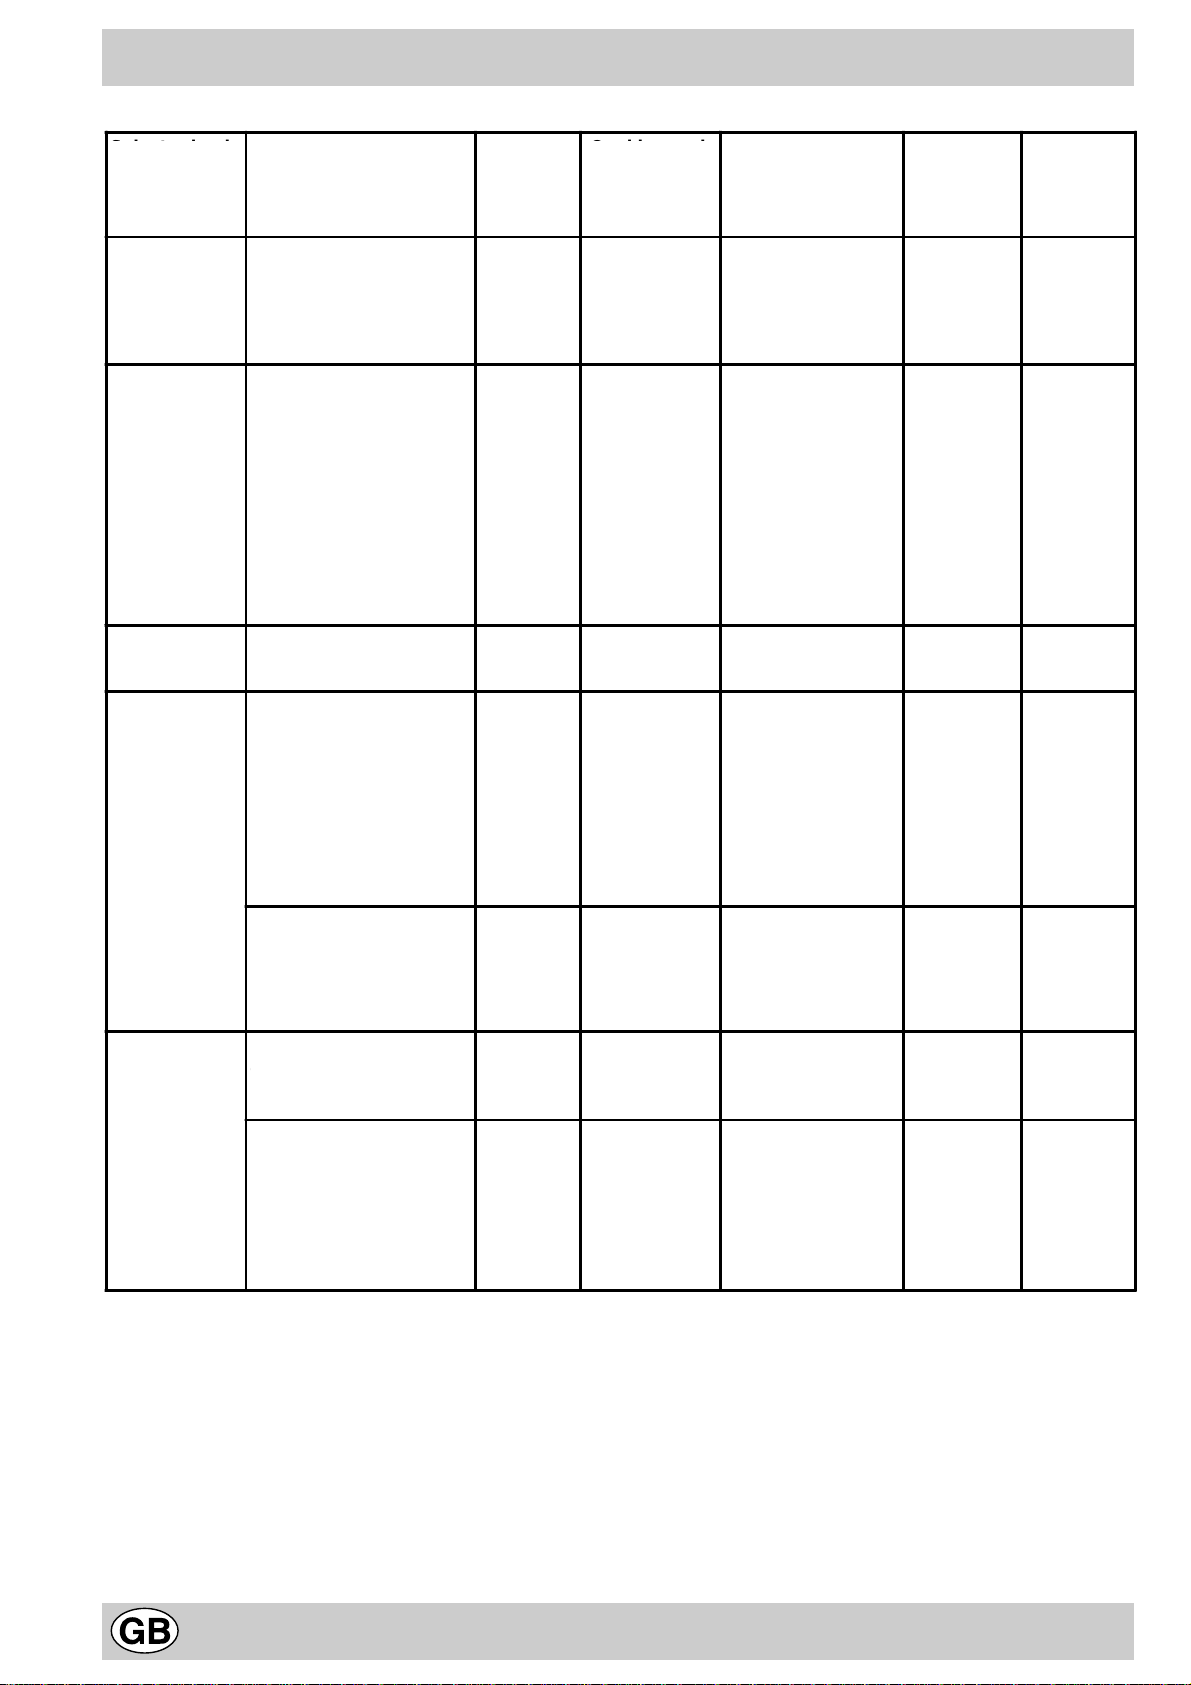
NB: cooking times are approximate and may vary according to personal taste. When cooking using the grill or fan
assisted grill, the dripping pan must always be placed on the 1st oven rack from the bottom.
1.5
2.0
1.5
-
1.5
-
-
-
2
-
5
5
5
5
5
200
200
200
200
200
70-80
70-80
70-75
70-75
70-80
8
Page 9

The Analogue Programmer
12
3
6
How to reset the correct time
The oven must be plugged in.
Press the knob and turn it anticlockwise until you set the correct
time.
NB: The clock is electrically powered, therefore in the event of a
power shortage, it will stop working for the entire duration of the
same. Following this power failure, the correct time will have to
be reset.
Manual operation
NB.: To be used in all cases where programmed
cooking is not necessary.
1 Turn the knob anticlockwise until the symbol 9 appears in
the window.
2 Pull the knob and turn it anticlockwise until the knob marker
lines up with correct time. A click will indicate the operation is
over.
With the oven selector knob, select the desired cooking mode.
To turn the oven off, set the same back to the “0” position.
Programming cooking with immediate start
1 Turn the knob anticlockwise until the desired cooking time is
displayed in the window.
2 Pull the knob and turn it anticlockwise until the knob marker
lines up with the correct time. A click will indicate the opera-
tion is over.
With the oven selector knob, select the desired cooking mode.
The oven comes on immediately and stays on for the entire
duration of the set cooking time. A buzzer will sound to inform
you the oven has come off.
To interrupt it, turn the knob anticlockwise until the symbol !
appears in the window.
Programming cooking with delayed start
1 Cooking time:
Turn the knob anticlockwise until the desired cooking time is
displayed in the window.
2 Cooking start:
Pull the knob and turn it anticlockwise until the knob marker
lines up with the desired time for cooking to start.
With the oven selector knob, select the desired cooking mode.
The oven will come on at the desired cooking start time and will
stay on for the entire duration of the set cooking time. A buzzer
will sound to inform you the oven has come off.
To interrupt it, turn the knob anticlockwise until the symbol !
appears in the window.
9
Page 10
Care and Cleaning
Before cleaning or carrying out any maintenace on your
oven, you must disconnect it from the power supply.
Inside the oven
We recommend you clean your oven each time you use it,
especially after cooking roasts. In fact, it is advisable to prevent
food residue from building up during cooking: the residue would
be re-cooked each time the oven is used and would char
and release smoke and unpleasant odours.
Oven exterior
Clean the enamelled or stainless steel exterior surfaces of
your oven using a sponge soaked in soapy water, making
sure you rinse and dry these thoroughly, without using abrasive
or corrosive products which could damage them.
Stainless steel
Rinse stainless steel parts and dry them thoroughly using a
soft cloth. Use a specific non-abrasive product to remove
tougher stains,
DO NOT use aluminium foil to line the bottom of the oven.
To avoid having to clean the bottom of the oven, you may be
tempted to line it with some aluminium foil. We strongly advise
against this. The aluminium foil sheet in direct contact
with the heated enamel coating could melt and damage
the enamel coating inside the oven irreversibly.
Rubber Seal
There is a rubber seal surrounding the oven opening which
guarantees its perfect functioning. Check the condition of this
seal on a regular basis. If necessary, clean it using warm
water and dry thoroughly.
DO NOT use abrasive products or objects to do so. Should
the seal become damaged, please contact Hotpoint Service
(see KEY CONTACTS, back page). We recommend you
avoid using the oven until it has been repaired.
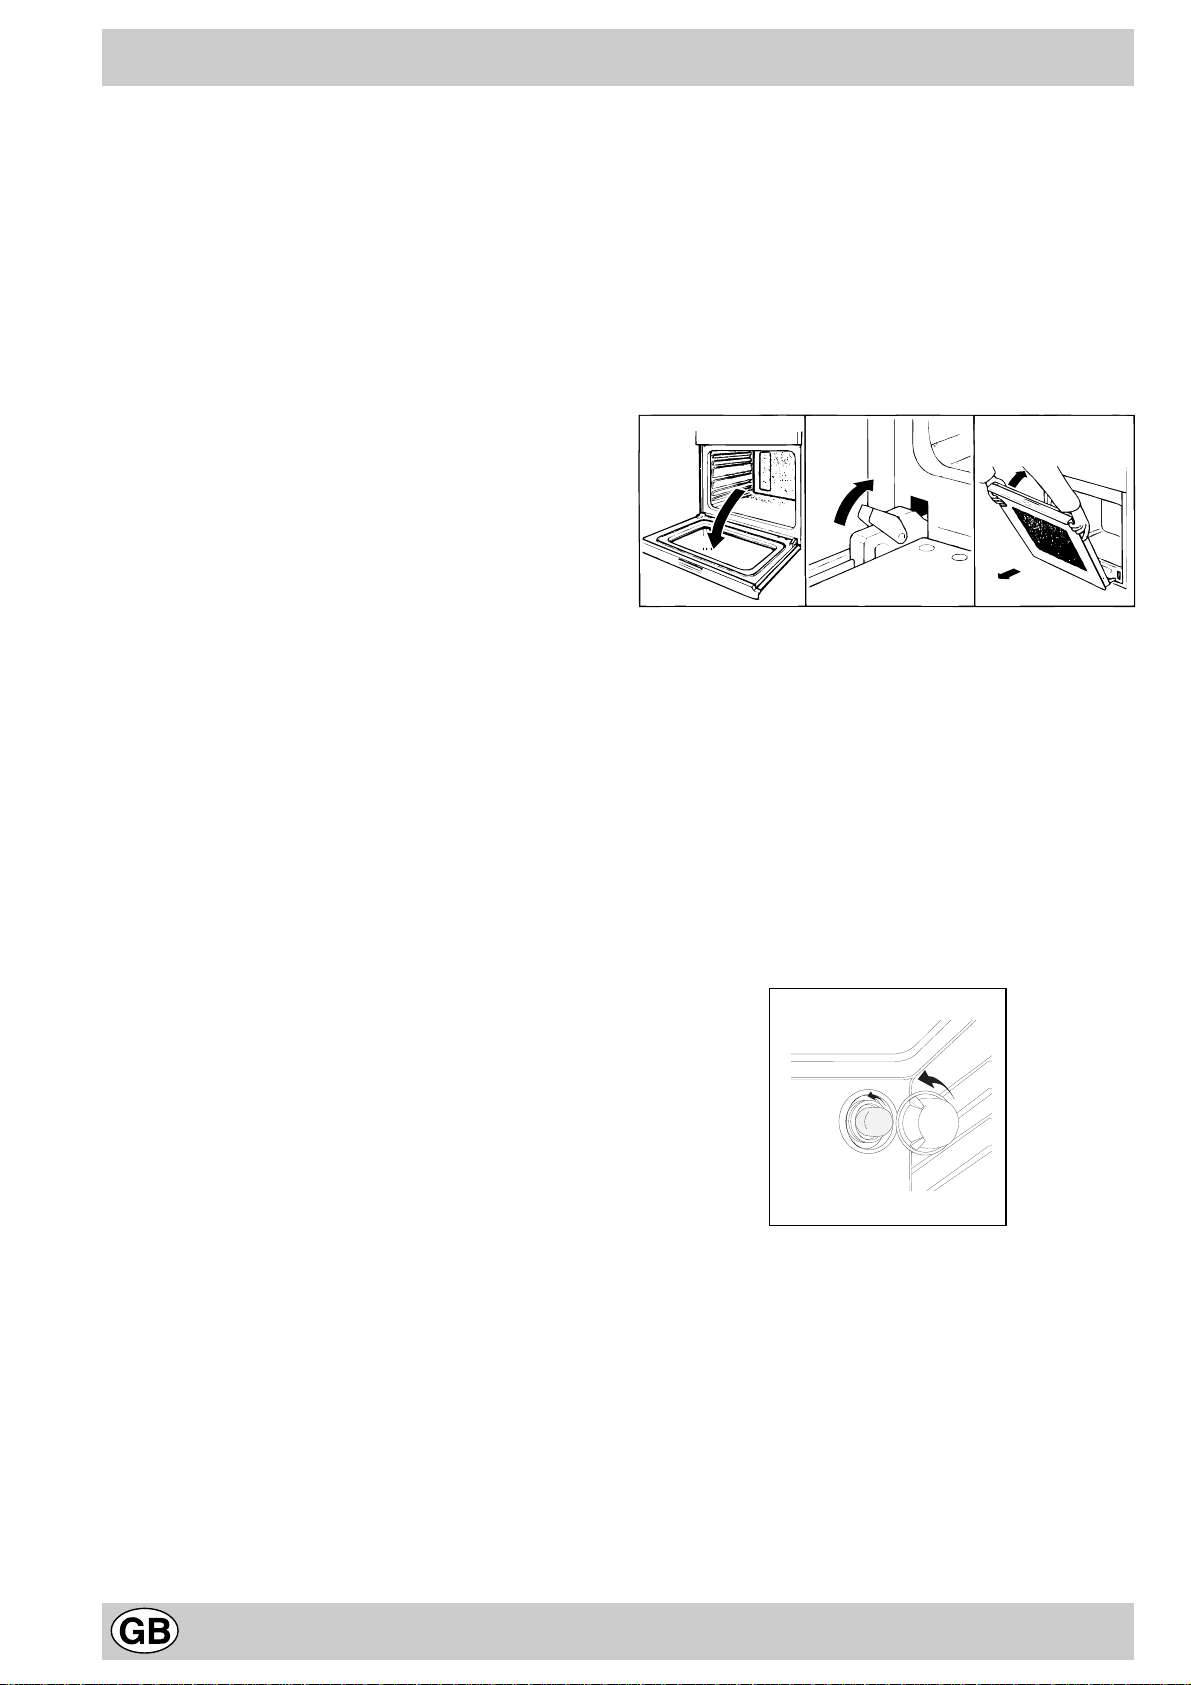
How to Remove the Oven Door
The oven door can easily be removed to clean the space
between the bottom of the door and the front of the oven. To
disassemble the door, proceed as follows:
- open the oven door fully,
- lift up and turn the small levers situated on the two hinges,
- shut the door, but not completely,
- grip the door on the two external sides and pull it towards
you, pulling it out of its seat.
Reassemble the door by following the above procedures
backwards.
123
Replacing the Oven Lamp
• Disconnect the oven from the power supply by means
of the omnipolar switch used to connect the appliance
to the electrical mains.
• Remove the glass cover of the lamp-holder;
• Remove the lamp and replace with a lamp resistant to
high temperatures (300°C) with the following characteristics:
- Voltage: 230/240 V
- Wattage 25W
- Type E14
• Replace the glass cover and reconnect the oven to the
mains power supply.
10
Page 11
Installation
The appliance must be installed only by a qualified
person in compliance with the instructions provided.
The manufacturer declines all responsibility for improper
installation which may harm persons and animals and damage property.
Important: The power supply to the appliance must be
cut off before any adjustments or maintenance work is
done on it.
Installation of Built-in Ovens
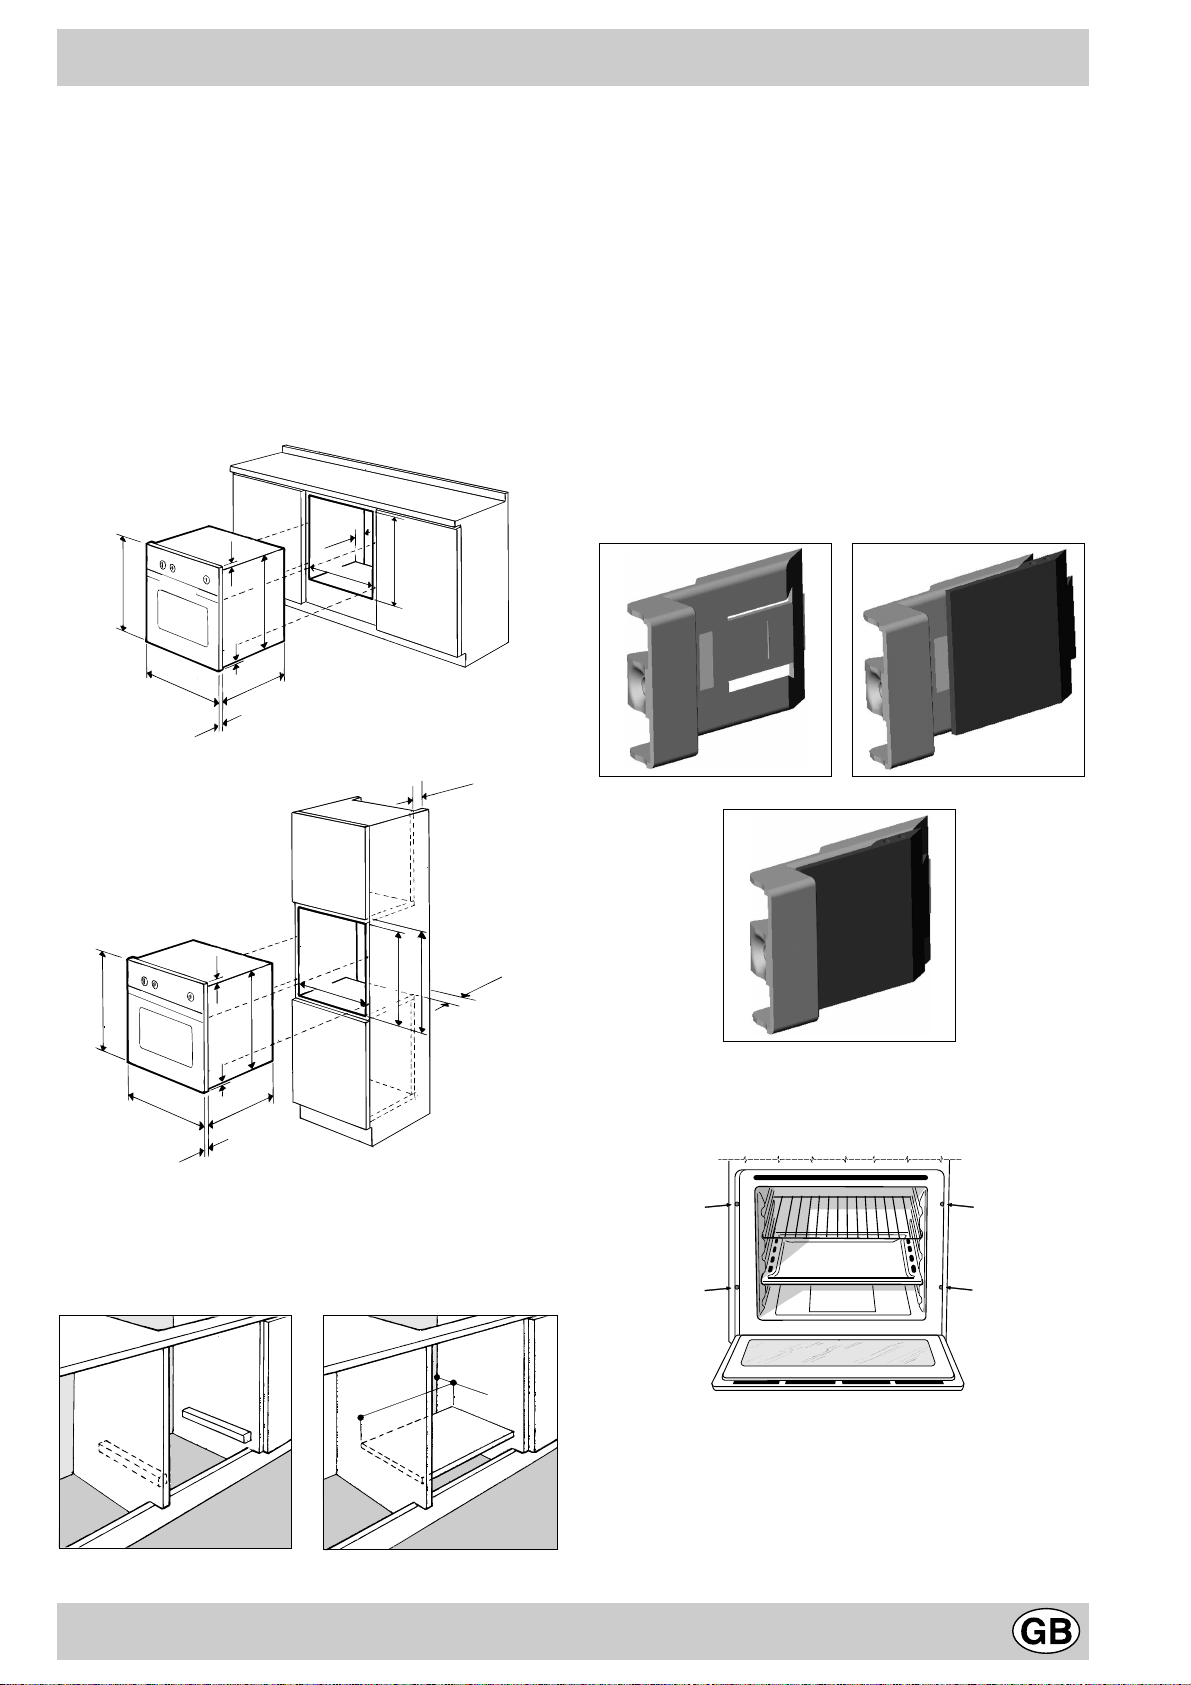
In order to ensure that the built-in appliance functions properly, the cabinet containing it must be appropriate. The
figure below gives the dimensions of the cut-out for installation under the counter or in a wall cabinet unit.
567 mm.
45 mm.
558 mm.
593 mm.
23 mm.
595 mm.
5 mm.
595 mm.
545 mm.
The panels of the adjacent cabinets must be made of heatresistant material. In particular, cabinets with a v eneer exterior must be assembled with glues which can withstand
temperatures of up to 100 °C.
In compliance with current safety standards, contact with
the electrical parts of the oven must not be possible once
it has been installed.
All parts which ensure the safe operation of the appliance
must be removab le only with the aid of a tool.
For the correct centring of your appliance, position the 4
tabs on the sides of the oven in correspondence with the
4 holes on the perimeter of the frame. In particular , if the
cabinet side panel:
• is 20 mm thick: the remov a b le part of the tab must be
removed (Fig. A);
• is 18 mm thick: use the first groove, which is factoryset (Fig. B);
• is 16 mm thick: use the second groo ve (Fig.C)
24 mm.
N.B.: Installation in compliance with the consumption declaration
45 mm.
min.
595 mm.
23 mm.
567 mm.
5 mm.
595 mm.
545 mm.
24 mm.
558 mm.
595 mm.
575-585 mm.
45 mm.
min.
In order to ensure adequate ventilation, the back panel of
the cabinet unit must be removed. Installing the oven so
that it rests on two strips of wood is preferable. If the oven
rests on a continuous, flat surface, there must be an aperture of at least 45 x 560 mm.
Fig. A Fig. B
Fig. C
To fasten the oven to the cabinet, open the door of the
oven and attach it by inserting the 4 wood screws into the
4 holes located on the perimeter of the frame.
560 mm.
45 mm.
11
Page 12
Electrical Connection
Electrical connection
The electrical connection to the mains must be made on
the appliance. The power voltage and frequency are as
indicated on the rating plate.
W ARNING: THIS APPLIANCE MUST BE EAR THED.
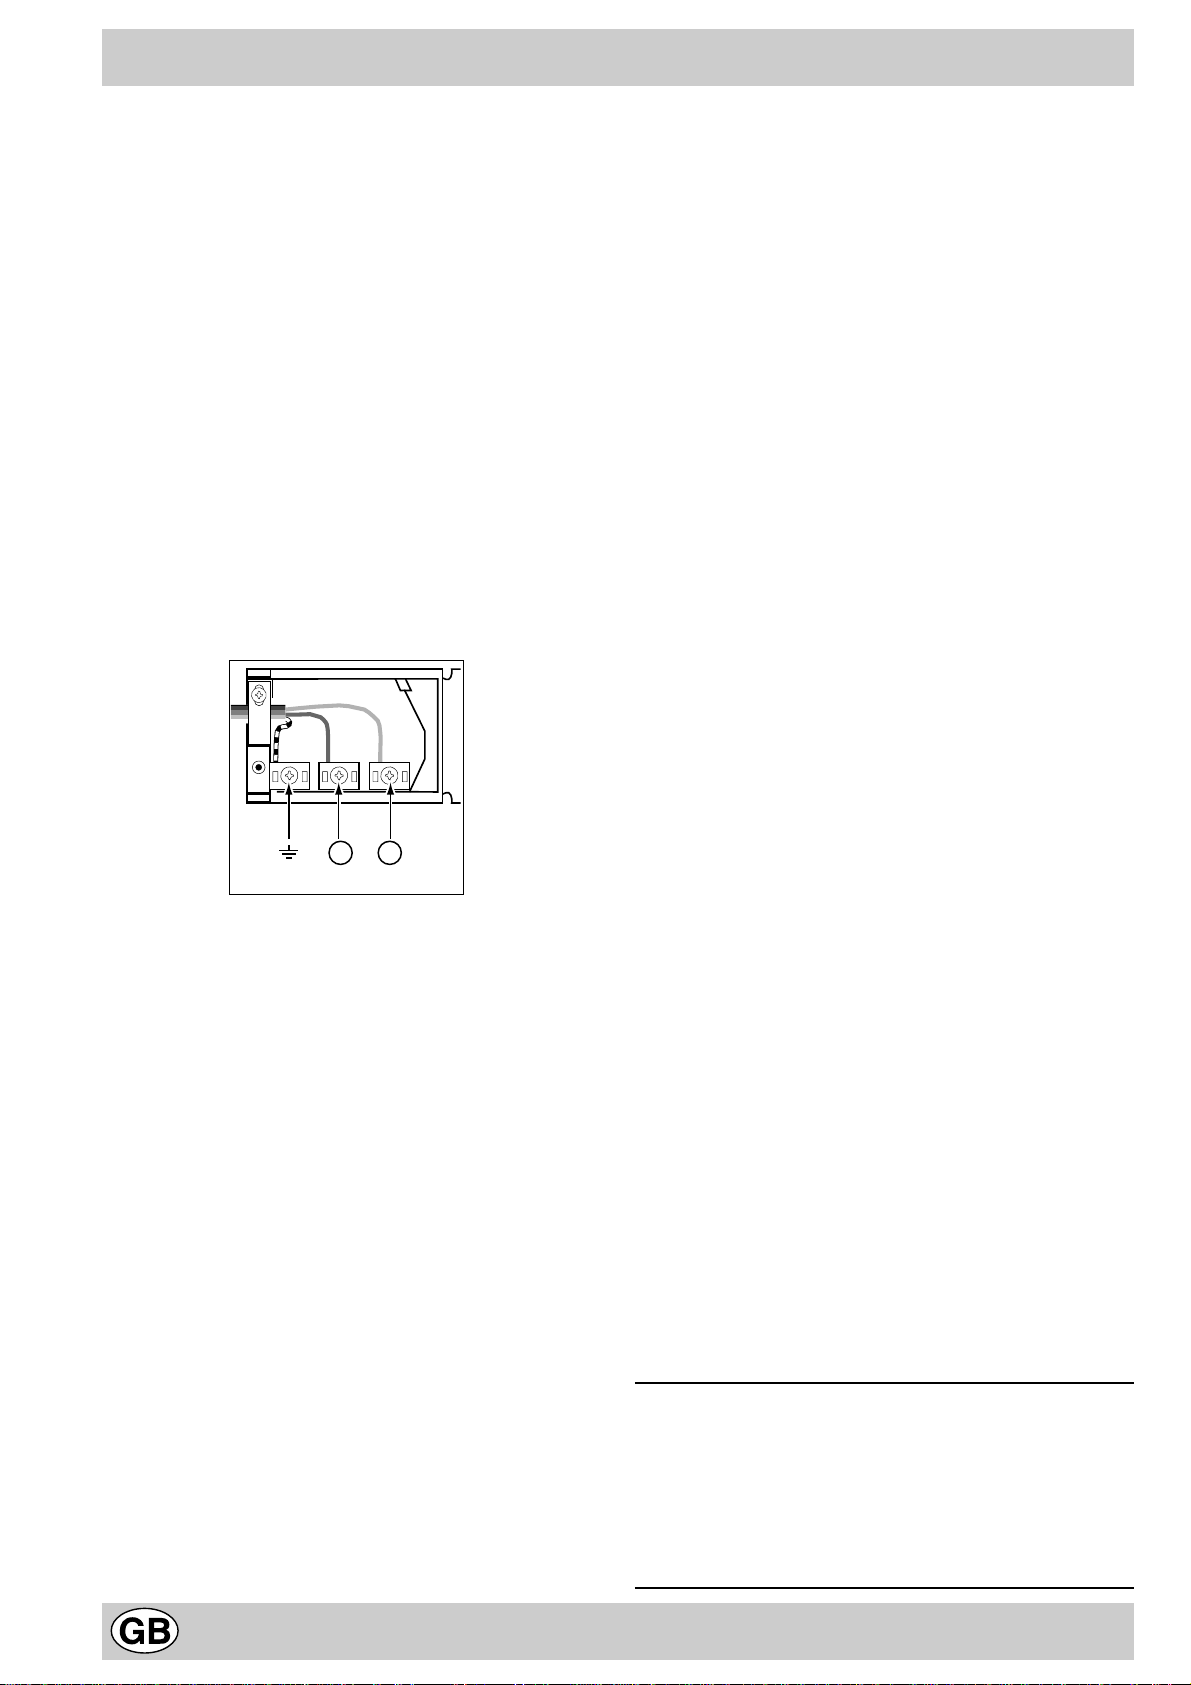
Mounting the power supply cable
T o open the terminal board:
• Using a scre wdriver , press on the tabs situated on each
side of the terminal board cover .
• Pull open the terminal board cover .
To mount the power supply cab le, proceed as f ollows:
• Unscrew the cable clamp screw and the contact screws
L-N-6.
• Fasten the wires beneath the screwheads using the follo wing
colour scheme: Blue (N) Br own (L) Y ellow-Green 6
• Fasten the power supply cable in the corresponding
cable clamp and close the cover.
Electrical Connection:
Power cable suppl y connection to the electrical
mains:
We recommend you use a power supply cable which is
long enough to allow you to take the oven out of its recess
in the event of maintenance operations (only use HAR - H
05 - RRF quality cables fitted with a plug conforming to the
regulations in force.
The plug must be accessible at all times.
Unplug the appliance before all operations, even when
replacing the oven lamp.
Using the appliance without correct earthing is highly
dangerous.
IMPORT ANT :
After connecting the appliance to the flexible cable, tighten
all the screws on the terminal board.
4 2
N L
V oltage Frequency: 230 V -1+N 50Hz
Fuse Section: 16A
Supply cable: 3x1.5mm
You can connect your oven to the system means of a
terminal board. Refer to above information for the
minimal cable sections and the calibration of the
protective elements according to the connection.
If the appliance is installed with a junction box, an
omnipolar circuit breaker - with a minimum contact
opening of 3mm - should be installed between the
appliance and the mains.
2
This appliance conforms to the following EEC Directives:
Low Voltage Equipment
73/23/EEC
93/68/EEC
Electromagnetic Compatibility
89/336/EEC
93/68/EEC
Inner dimensions of the oven:
width 43.5cm
depth 40.0cm
height 32.0cm
Inner volume of the oven: 56 litres
Voltage and frequency of power supply:
230-240V
50-60Hz
2250-2400W
ENERGY LABEL
Directive 2002/40/EC on the label of electric ovens
Norm EN 50304
Energy consumption for Natural convection
heating mode: a Convection
Declared energy consumption for Forced convection Class
heating mode: b F an assisted
12
Page 13

Notes
13
Page 14

After Sales Service
"No company is better positioned to offer an after sales service on a
Hotpoint appliance than us - the manufacturer"
As part of our commitment to you, all Hotpoint appliances have the added benefit of a fully inclusive parts
and labour guarantee for the first 12 months. In addition to this you also have the advantage of free
replacement parts for the first 5 years when fitted by a Hotpoint
engineer. When the 12 months parts and labour guarantee expires we offer the following after sales
service options:
Repair Service and Information Help Desk
UK: 08709 066066
www.theservicecentre.co.uk
Republic of Ireland: 1850 302 200
Note: Our operators will require the Model number and the Serial number of your appliance
Available 364 days a year with a fast, effective and value for money service. We have the largest white
goods repair service in the UK with over 1200 of our own fully trained engineers. All repairs include a parts
and labour guarantee for 12 months from the date of the repair.
If you require any information or have any questions about your appliance, our operators are on hand with
help and advice.
All this ensures that you will receive the best available after sales service possible.
Extended Warranties
UK: 08709 088 088
www.theservicecentre.co.uk
Republic of Ireland: 1850 502 200
Whether you have just one or a number of Hotpoint appliances in your kitchen, we offer two service cover
plans to give you total peace of mind.
l Repair Protection Plan - FREE service repairs for a single Hotpoint appliance during the period
of cover.
l Kitchen Cover - FREE service repairs for all your Hotpoint appliances less than 8
years old.
Genuine Parts and AccessoriesUK: 08709 077 077
www.theservicecentre.co.uk
Republic of Ireland: (01) 842 6836
A wide range of genuine parts and accessories are available from our hotline or through our web site.
Genuine parts and accessories, extended warranties and service repairs are all
available on our web-site at:
GB
www.theservicecentre.co.uk
14
Page 15

Guarantee
"Satisfaction guaranteed or your money back"
We give you a unique 'satisfaction guaranteed' promise - valid for 90 days - after you have
purchased your Hotpoint appliance. If there is a technical problem simply call Hotpoint Repair service or
visit our web-site at www.theservicecentre.co.uk and where necessary, we will arrange for an
engineer to call. If the technical problem is not resolved under this guarantee, we will replace your
machine or, if you prefer, give you your money back.
All Hotpoint appliances carry a fully inclusive 12 month parts and labour guarantee as well as free
replacement parts for the first 5 years (except microwaves, selected integrated appliances and cooker
hoods, which have a one year guarantee) provided that they are fitted by a Hotpoint engineer.
Guarantee terms and conditions
Your guarantee is only applicable in the United Kingdom or Republic of Ireland and is subject to the
following provisions that your appliance:
l Has been installed and used correctly in accordance with this instruction booklet.
l Has been used solely for domestic purposes and is located on domestic premises (ie. not for
commercial or trade use).
l Has been properly connected to a suitable electrical supply voltage as stated on the appliance
rating plate.
l Has not been subject to misuse, accident, modified or repaired by anyone other than one of our
own service engineers.
For pre purchase information on any other Hotpoint product call: 08701 50 60 70
or visit: www.hotpoint.co.uk
Recycling & Disposal Information
As part of Hotpoint's continued commitment to helping the environment, Hotpoint reserves the right to
use quality recycled components to keep down customer costs and minimise material wastage.
Please dispose of packaging and old appliances carefully.
To minimise risk of injury to children, remove the door, plug and cut mains cable off flush with the
appliance. Dispose of these parts separately to ensure that the appliance can no longer be plugged into
a mains socket, and the door cannot be locked shut.
GB
15
Page 16
Key Contacts
After Sales Service
Over 1200 trained specialists, directly employed by us, ensure that you can have complete
confidence in both the appliances and services we offer.
Repair Service and Information Desk
UK: 08709 066 066
(Open 8 to 8 Mon - Fri, 8 to 6 Sat, 10 to 4 Sun & Bank Holidays)
www.theservicecentre.co.uk
Republic of Ireland: 1850 302 200
Note: Our operators will require the following information:
Model number:
Serial number:
Extended Warranties
UK: 08709 088 088
(Open 8 to 8 Mon - Sun)
www.theservicecentre.co.uk
Republic of Ireland: 1850 502 200
Genuine Parts and Accessories
UK: 08709 077 077
(Open 8-30 to 5-30 Mon - Fri & 9 to 12 Sat)
www.theservicecentre.co.uk
Republic of Ireland: (01) 842 6836
General Domestic Appliances Limited, Morley Way, Peterborough, PE2 9JB.
195.036.396.02 04-2004 Part no. FP145 - 02
 Loading...