

HOTPOINT SI5 851 C IX Use & Care
USER MANUAL
SAFETY INSTRUCTIONS
IMPORTANT TO BE READ AND OBSERVED
Before using the appliance, read these safety
instructions. Keep them nearby for future
reference.
These instructions and the appliance itself provide
important safety warnings, to be observed at all
times. The manufacturer declines any liability for
failure to observe these safety instructions, for
inappropriate use of the appliance or incorrect
setting of controls.
Very young children (0-3 years) should be kept
away from the appliance. Young children (3-8
years) should be kept away from the appliance
unless continuously supervised. Children from 8
years old and above and persons with reduced
physical, sensory or mental capabilities or lack of
experience and knowledge can use this appliance
only if they are supervised or have been given
instructions on safe use and understand the
hazards involved. Children must not play with the
appliance. Cleaning and user maintenance must
not be carried out by children without supervision.
WARNING: The appliance and its accessible
parts become hot during use. Care should be taken
to avoid touching heating elements. Children less
than 8 years of age must be kept away unless
continuously supervised.
Never leave the appliance unattended
during food drying. If the appliance is suitable
for probe usage, only use a temperature probe
recommended for this oven - risk of re.
Keep clothes or other ammable materials
away from the appliance, until all the components
have cooled down completely - risk of re. Always
be vigilant when cooking foods rich in fat, oil or
when adding alcoholic beverages - risk of re. Use
oven gloves to remove pans and accessories. At
the end of cooking, open the door with caution,
allowing hot air or steam to escape gradually
before accessing the cavity - risk of burns. Do not
obstruct hot air vents at the front of the oven - risk
of re.
Exercise caution when the oven door is in the
open or down position, to avoid hitting the door.
PERMITTED USE
CAUTION: The appliance is not intended to
be operated by means of an external switching
device, such as a timer, or separate remote
controlled system.
This appliance is intended to be used in
household and similar applications such as: sta
kitchen areas in shops, oces and other working
environments; farm houses; by clients in hotels,
motels, bed & breakfast and other residential
environments.
No other use is permitted (e.g. heating rooms).
This appliance is not for professional use. Do
not use the appliance outdoors.
Do not store explosive or ammable substances
(e.g. gasoline or aerosol cans) inside or near the
appliance - risk of re.
INSTALLATION
The appliance must be handled and installed by
two or more persons - risk of injury. Use protective
gloves to unpack and install - risk of cuts.
Installation, including water supply (if any)
and electrical connections, and repairs must
be carried out by a qualied technician. Do not
repair or replace any part of the appliance unless
specically stated in the user manual. Keep
children away from the installation site. After
unpacking the appliance, make sure that it has
not been damaged during transport. In the event
of problems, contact the dealer or your nearest
After-sales Service. Once installed, packaging
waste (plastic, styrofoam parts etc.) must be
stored out of reach of children - risk of suocation.
The appliance must be disconnected from the
power supply before any installation operation risk of electrical shock. During installation, make
sure the appliance does not damage the power
cable - risk of re or electrical shock. Only activate
the appliance when the installation has been
completed.
Carry out all cabinet cutting works before tting
the appliance in the furniture and remove all wood
chips and sawdust. Do not obstruct the minimum
gap between the worktop and the upper edge of
the oven - risk of burns.
Do not remove the oven from its polystyrene foam
base until the time of installation.
After installation, the bottom of the appliance
must no longer be accessible - risk of burn.
Do not install the appliance behind a decorative
door - risk of re.
ELECTRICAL WARNINGS
The rating plate is on the front edge of the oven
(visible when the door is open).
It must be possible to disconnect the appliance
from the power supply by unplugging it if plug
is accessible, or by a multi-pole switch installed
upstream of the socket in accordance with the
wiring rules and the appliance must be earthed
in conformity with national electrical safety
standards.
Do not use extension leads, multiple sockets
or adapters. The electrical components must not
be accessible to the user after installation. Do not
use the appliance when you are wet or barefoot.
Do not operate this appliance if it has a damaged
power cable or plug, if it is not working properly,
or if it has been damaged or dropped.
2
EN
If the supply cord is damaged, it must be
replaced with an identical one by the manufacturer,
its service agent or similarly qualied persons in
order to avoid a hazard - risk of electrical shock.
In case of replacement of power cable, contact
an authorized service center.
CLEANING AND MAINTENANCE
WARNING: Ensure that the appliance is switched
o and disconnected from the power supply
before performing any maintenance operation;
never use steam cleaning equipment - risk of
electric shock.
Do not use harsh abrasive cleaners or metal
scrapers to clean the door glass since they can
scratch the surface, which may result in shattering
of the glass.
Ensure the appliance is cooled down before
any cleaning or maintenance. - risk of burn.
WARNING: Switch o the appliance before
replacing the lamp - risk of electrical shock.
DISPOSAL OF PACKAGING MATERIALS
The packaging material is 100% recyclable and is marked with the
recycle symbol
be disposed of responsibly and in full compliance with local authority
regulations governing waste disposal.
. The various parts of the packaging must therefore
DISPOSAL OF HOUSEHOLD APPLIANCES
This appliance is manufactured with recyclable or reusable materials.
Dispose of it in accordance with local waste disposal regulations.
For further information on the treatment, recovery and recycling of
household electrical appliances, contact your local authority, the
collection service for household waste or the store where you purchased
the appliance. This appliance is marked in compliance with European
Directive 2012/19/EU, Waste Electrical and Electronic Equipment (WEEE).
By ensuring this product is disposed of correctly, you will help prevent
negative consequences for the environment and human health.
symbol on the product or on the accompanying documentation
The
indicates that it should not be treated as domestic waste but must be
taken to an appropriate collection center for the recycling of electrical
and electronic equipment.
ENERGY SAVING TIPS
Only preheat the oven if specied in the cooking table or your recipe.
Use dark lacquered or enamelled baking trays as they absorb heat better.
Food requiring prolonged cooking will continue to cook even once the
oven is switched o.
ECO DESIGN DECLARATION
This appliance meets the Eco Design requirements of European
Regulations n.65/2014 and 66/2014 in conformity to the European
standard EN 60350-1.
3
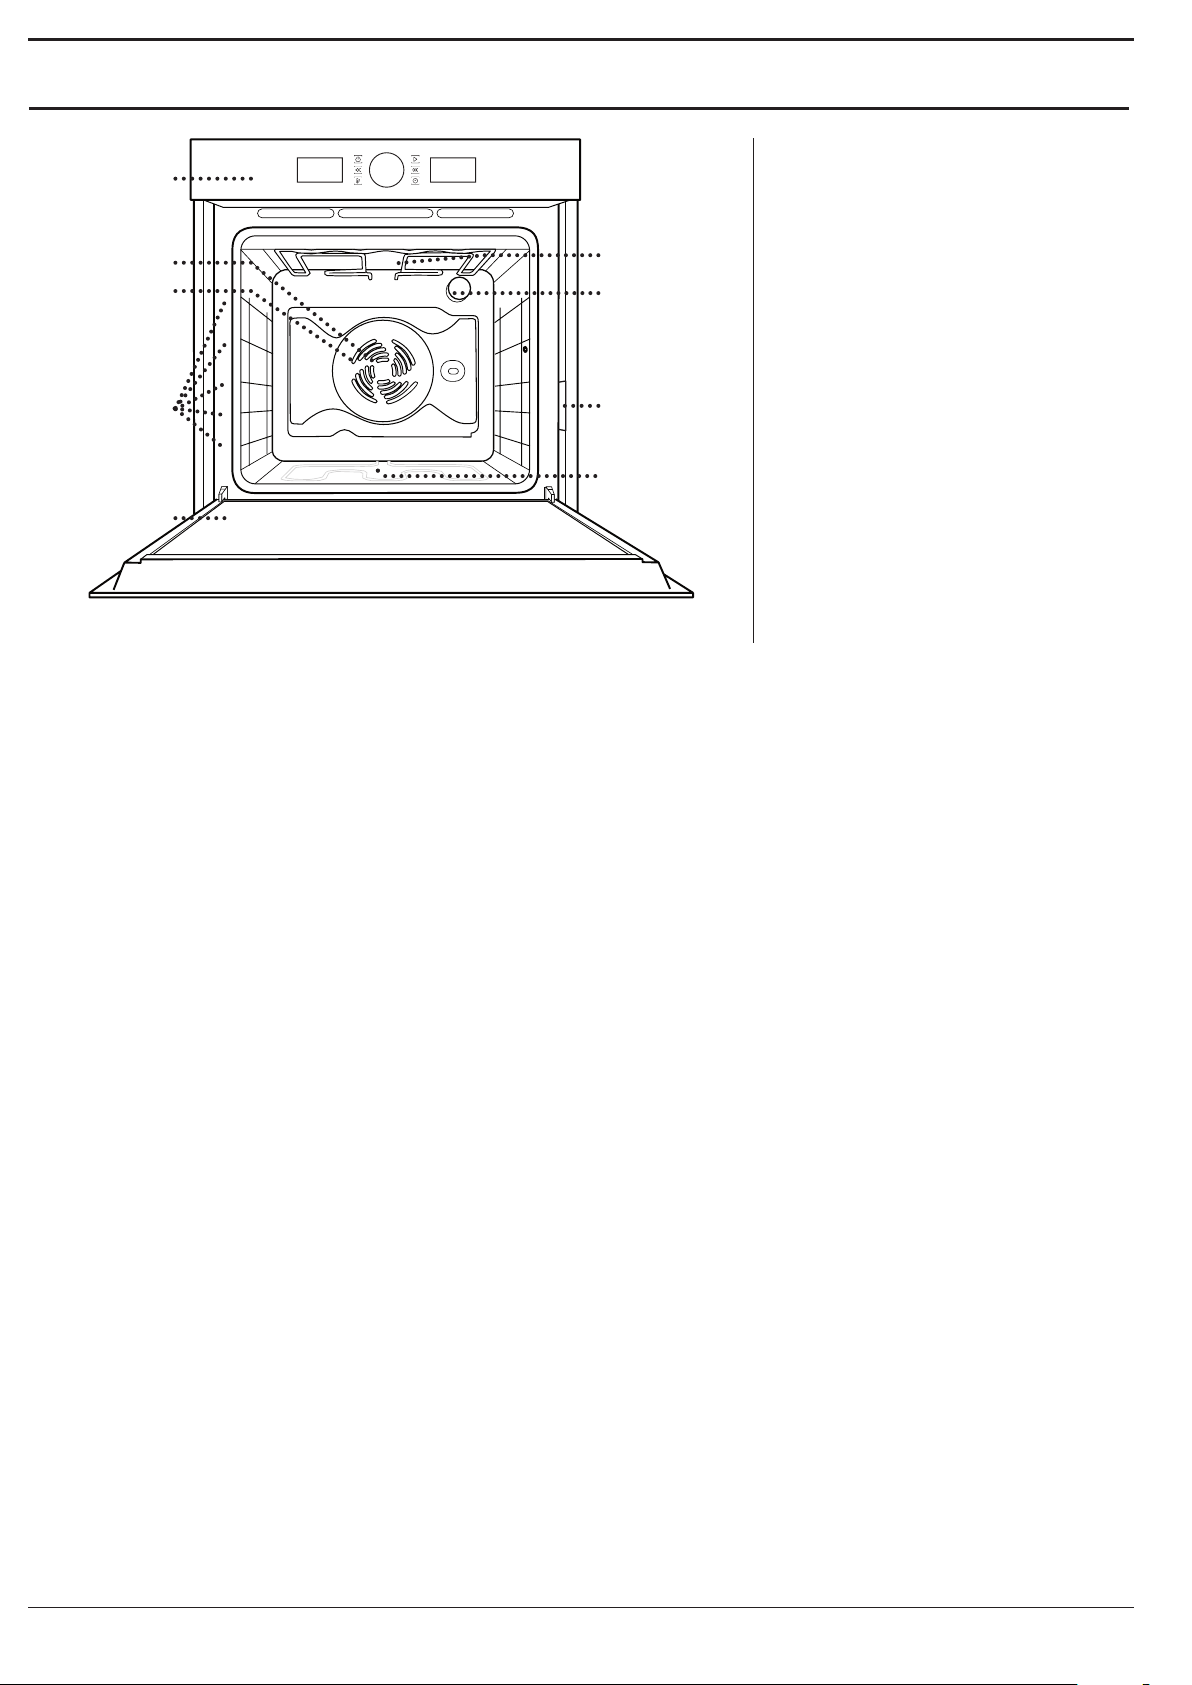
PRODUCT DESCRIPTION
1
2
3
5
4
1. Control panel
2. Fan
3. Circular heating element
6
5
7
(non-visible)
4. Shelf guides
(the level is indicated on the front
4
of the oven)
3
4
2
1
3
2
1
8
9
5. Door
6. Upper heating element/grill
7. Lamp
8. Identification plate
5
(do not remove)
9. Bottom heating element
(non-visible)
Please note:
The cooling fan may switch itself on every so often during cooking in order to reduce energy consumption.
Once cooking is complete and the oven has been switched o, the cooling fan may continue to run for a certain period of
time.
When the oven door is opened during cooking, the heating elements switch o.
4
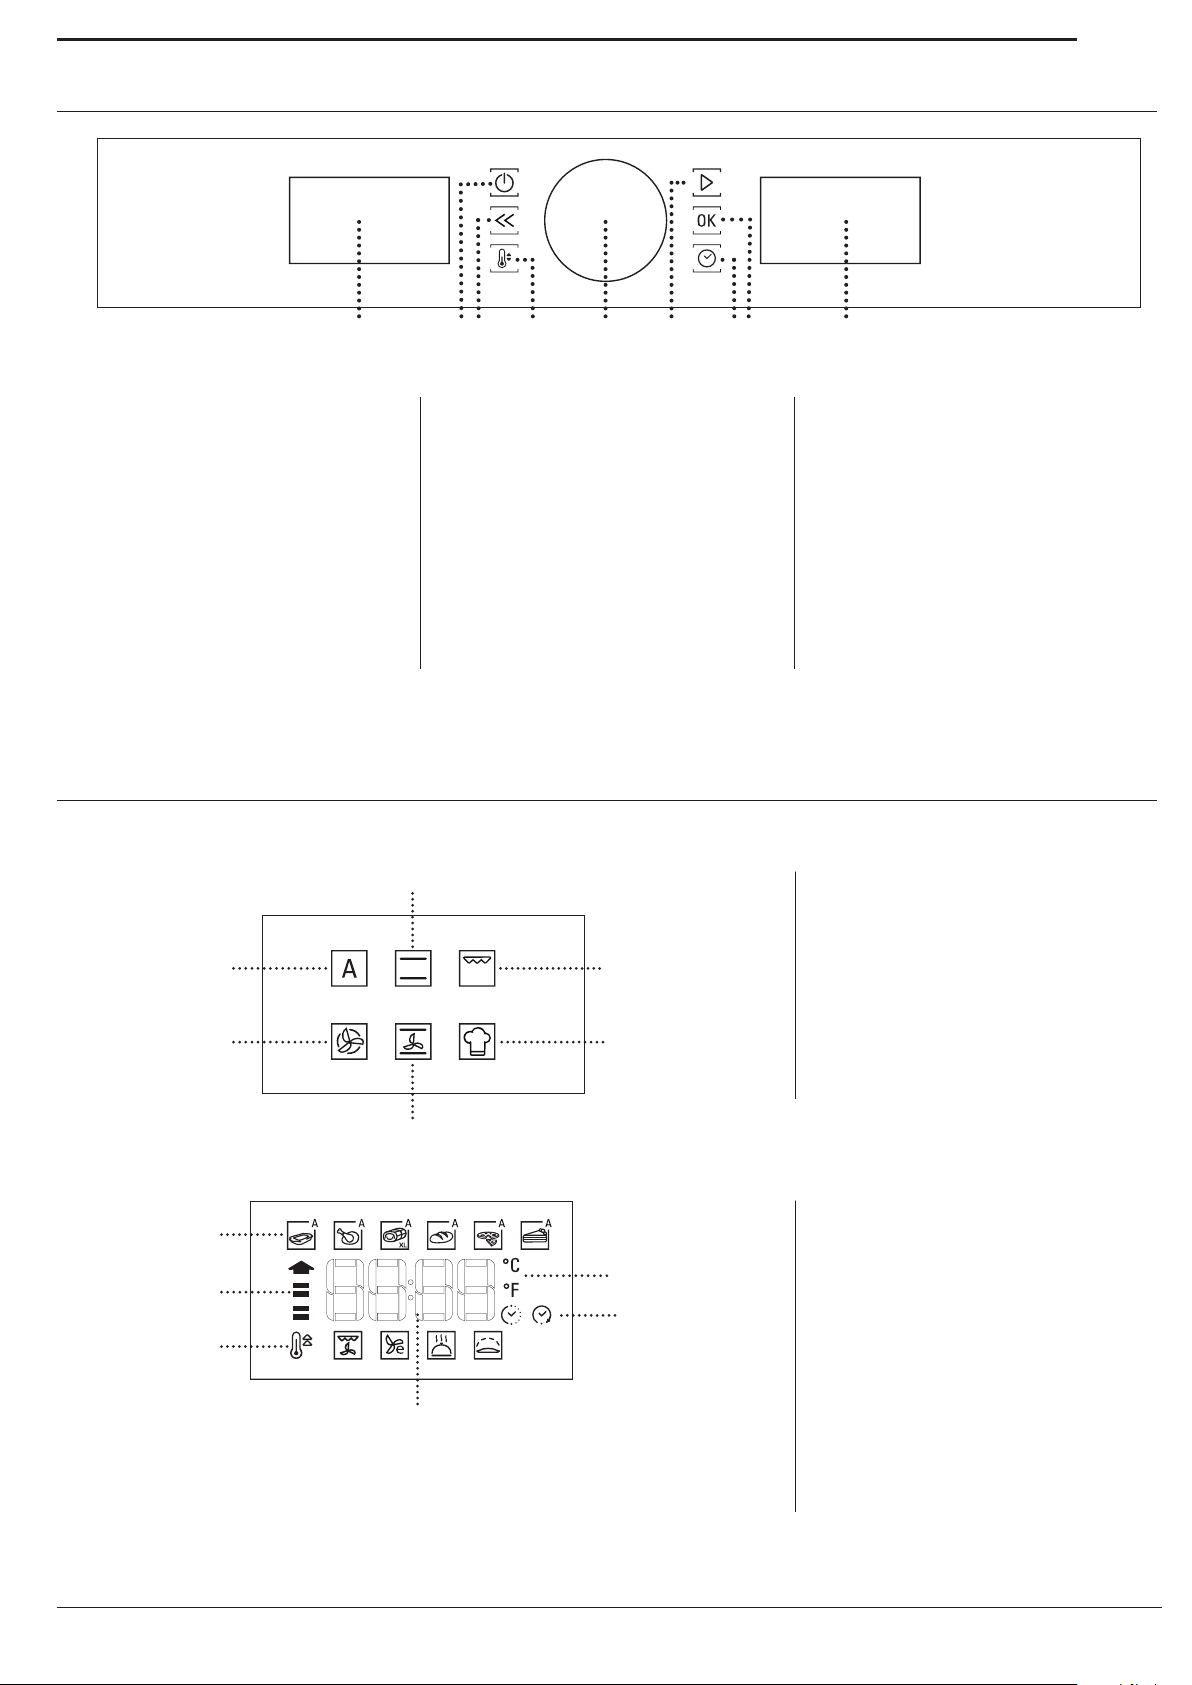
CONTROL PANEL
1 2 5 6 934 78
EN
1. LEFT-HAND DISPLAY
2. ON / OFF
For switching the oven on and off
and for stopping an active function
at any time.
3. BACK
For returning to the previous menu
when configuring settings.
4. TEMPERATURE
For setting the temperature.
5. KNOB
For selecting menu items and
changing or adjusting the settings
of a function.
6. START
For starting functions and
confirming settings.
DESCRIPTION OF DISPLAYS
LEFT HAND DISPLAY
2
1
7. TI ME
For setting or changing the time
and adjusting the cooking time.
8. CONFIRM
For confirming an item you have
selected or the settings for a
function.
9. RIGHT-HAND DISPLAY
1. Automatic functions
2. Conventional function
3
3. Grill function
4. Special functions
RIGHT HAND DISPLAY
1
6
5
46
5
2
3
4
5. Convection bake function
6. Forced air function
1. Automatic functions cluster
2. Unit of measurement
temperature
3. Time options
(duration, start delay)
4. Digital display
(shows ,for exemple: the clock, all
function values or settings)
5. Special functions cluster
6. Preheating phase indication
5
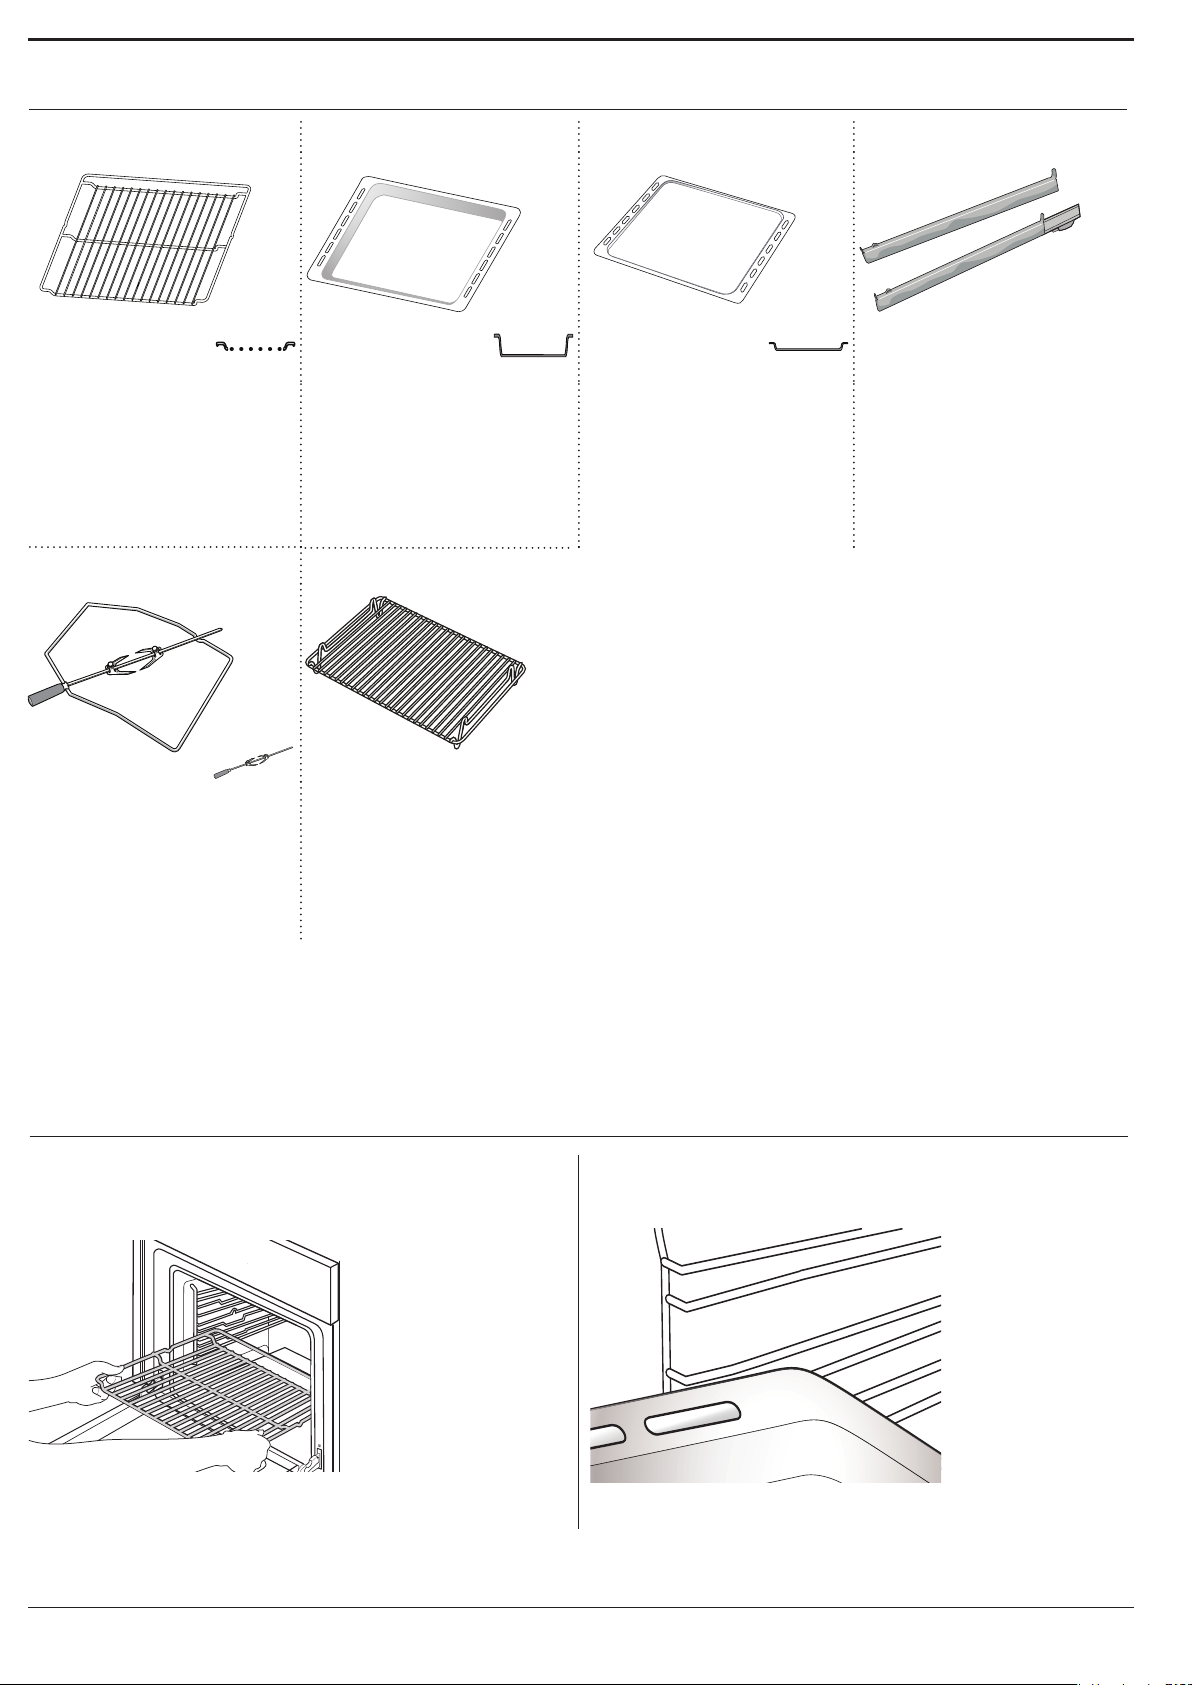
ACCESSORIES
WIRE SHELF DRIP TRAY BAKING TRAY SLIDING RUNNERS *
For use in cooking food
or as a support for pans,
baking pans and other
ovenproof cooking
receptacles.
TURNSPIT *
For roasting large pieces
of meat and poultry.
uniformly in conjunction
with the “Turbo grill”
function.
*Available only on certain models.
The number of accessories may vary depending on which model is purchased.
Other accessories that are not supplied can be purchased separately from the After-Sales Service.
For use as an oven tray
for cooking meat, fish,
vegetables, focaccia,
etc. or to collect cooking
juices when positioned
under the wire shelf.
GRILL PAN SET *
To be placed inside
the drip tray, creating
a useful set for grilling
meat, fish or vegetables.
For use in cooking bread
and pastry products, but
also for meat, fish en
papillotte, etc.
To facilitate inserting or
removing accessories.
INSERTING THE WIRE SHELF AND OTHER ACCESSORIES
1. Insert the wire shelf horizontally by sliding it across
the shelf guides, making sure that the side with the
raised edge is facing upwards.
6
2. Other accessories, such as the drip tray and the
baking tray, are inserted horizontally in the same
way as the wire shelf.
EN
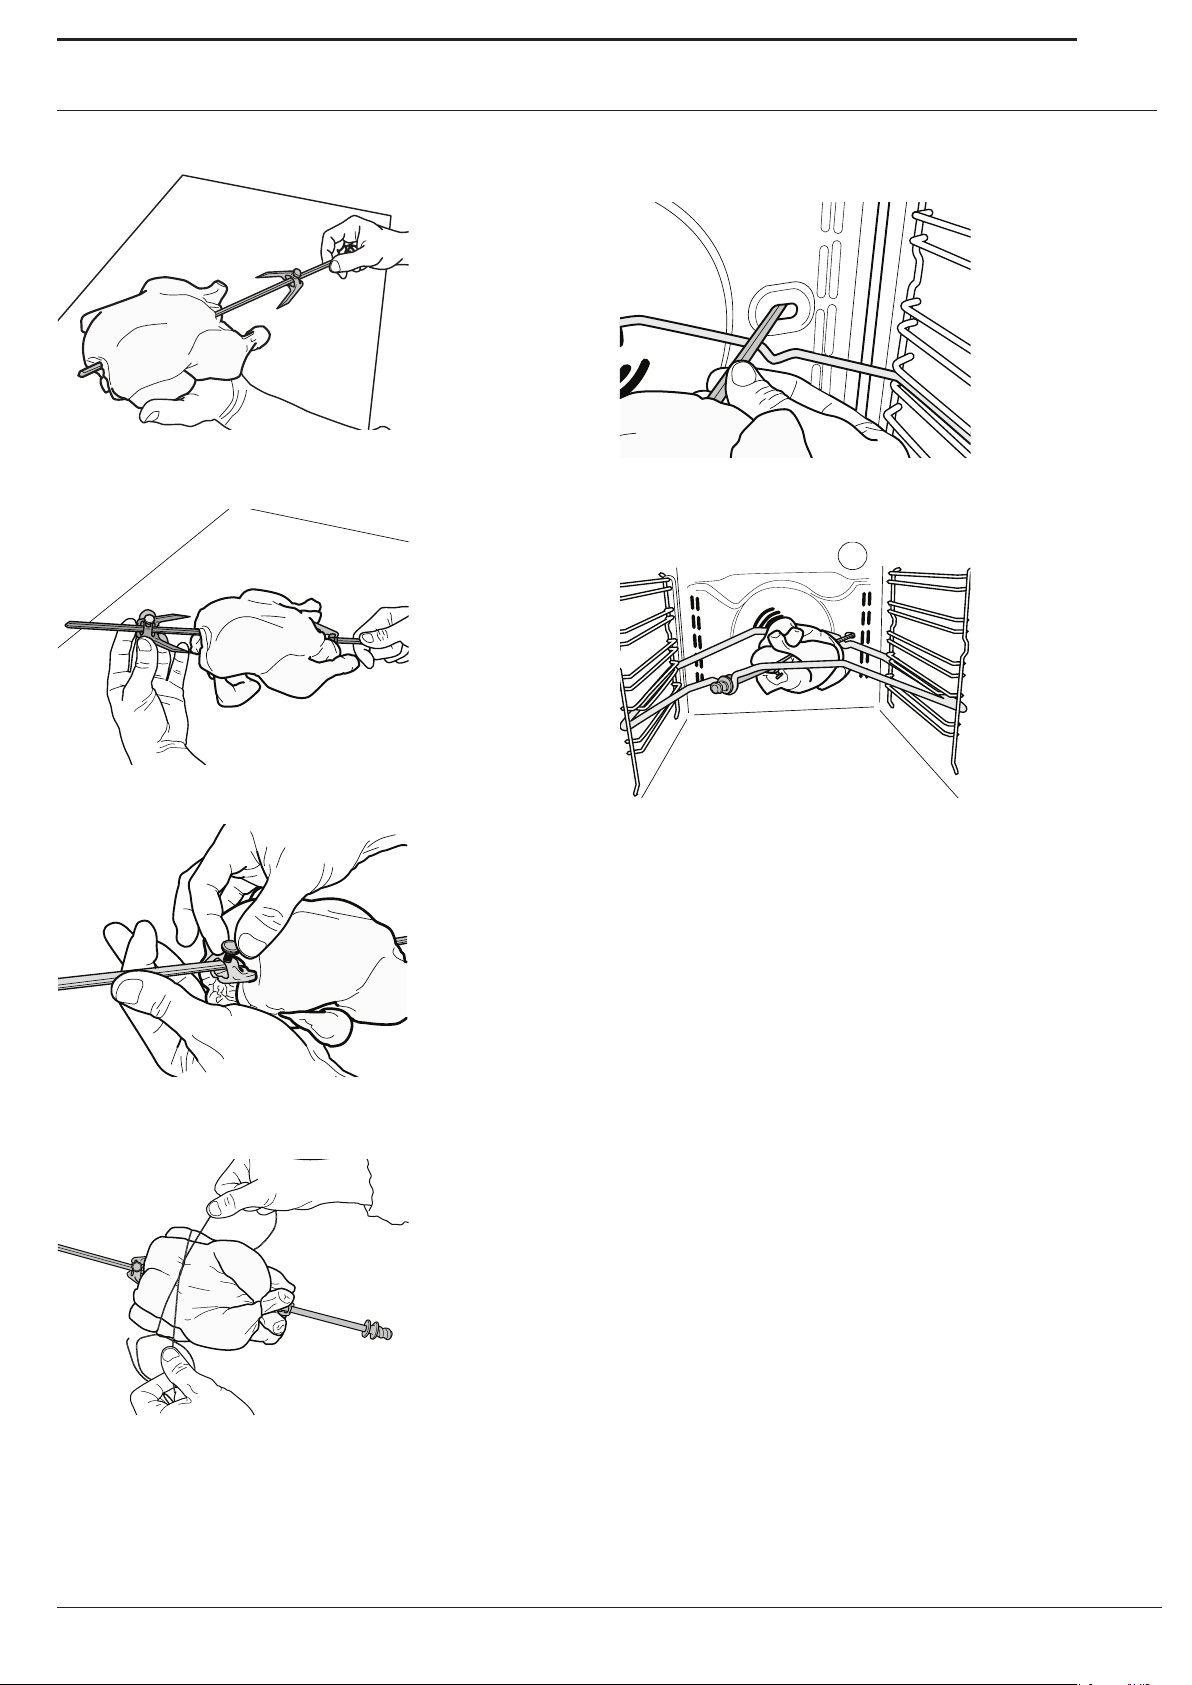
USING THE TURNSPIT
1. Insert the skewer into the centre of the meat and
slide it in until it is held rmly in place on the fork.
Push the second fork onto the skewer and slide it on
2.
until it holds the meat rmly in place.
(IF PRESENT)
5. Insert the support at the second level, then insert
the tip of the skewer in the seating located on the
rear wall of the oven compartment.
Rest the round part of the skewer on the relevant
6.
support.
Tighten the xing screw to secure it in position.
3.
4.
If cooking poultry, be sure to secure the meat with
twine.
To use the turnspit, select the “Turbo grill” function.
To collect the cooking juices, position the drip tray
below the meat and add 500 ml of water.
To avoid burning yourself, manipulate the hot skewer
with the plastic handle (which must be removed
before cooking).
7
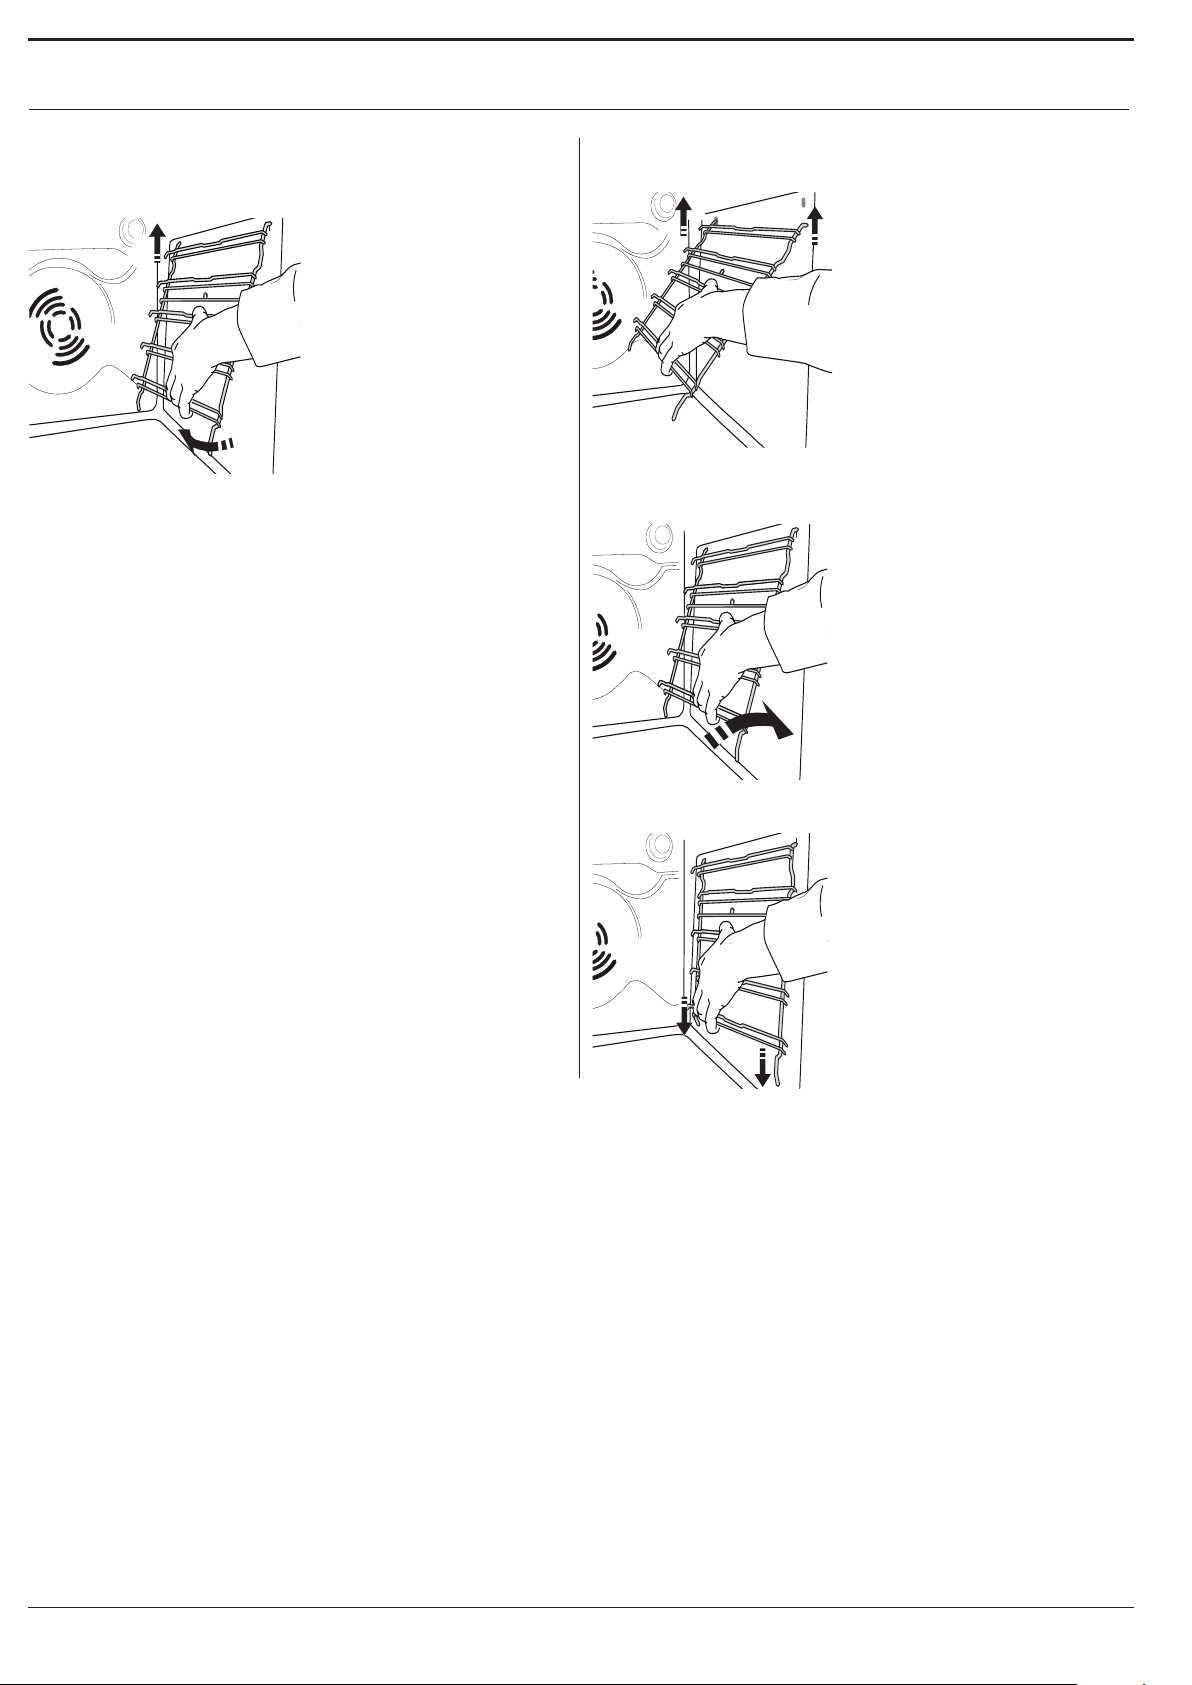
REMOVING AND REFITTING THE SHELF GUIDES
2
1. To remove the shelf guides, lift the guides up (1)
and then gently pull the lower part out of its seating
(2): the shelf guides can now be removed.
1
2. To ret the shelf guides, rst t them back into their
upper seating.
Keep them raised as you bring them nearer to the
3.
compartment.
Position them into the lower seatings.
4.
8
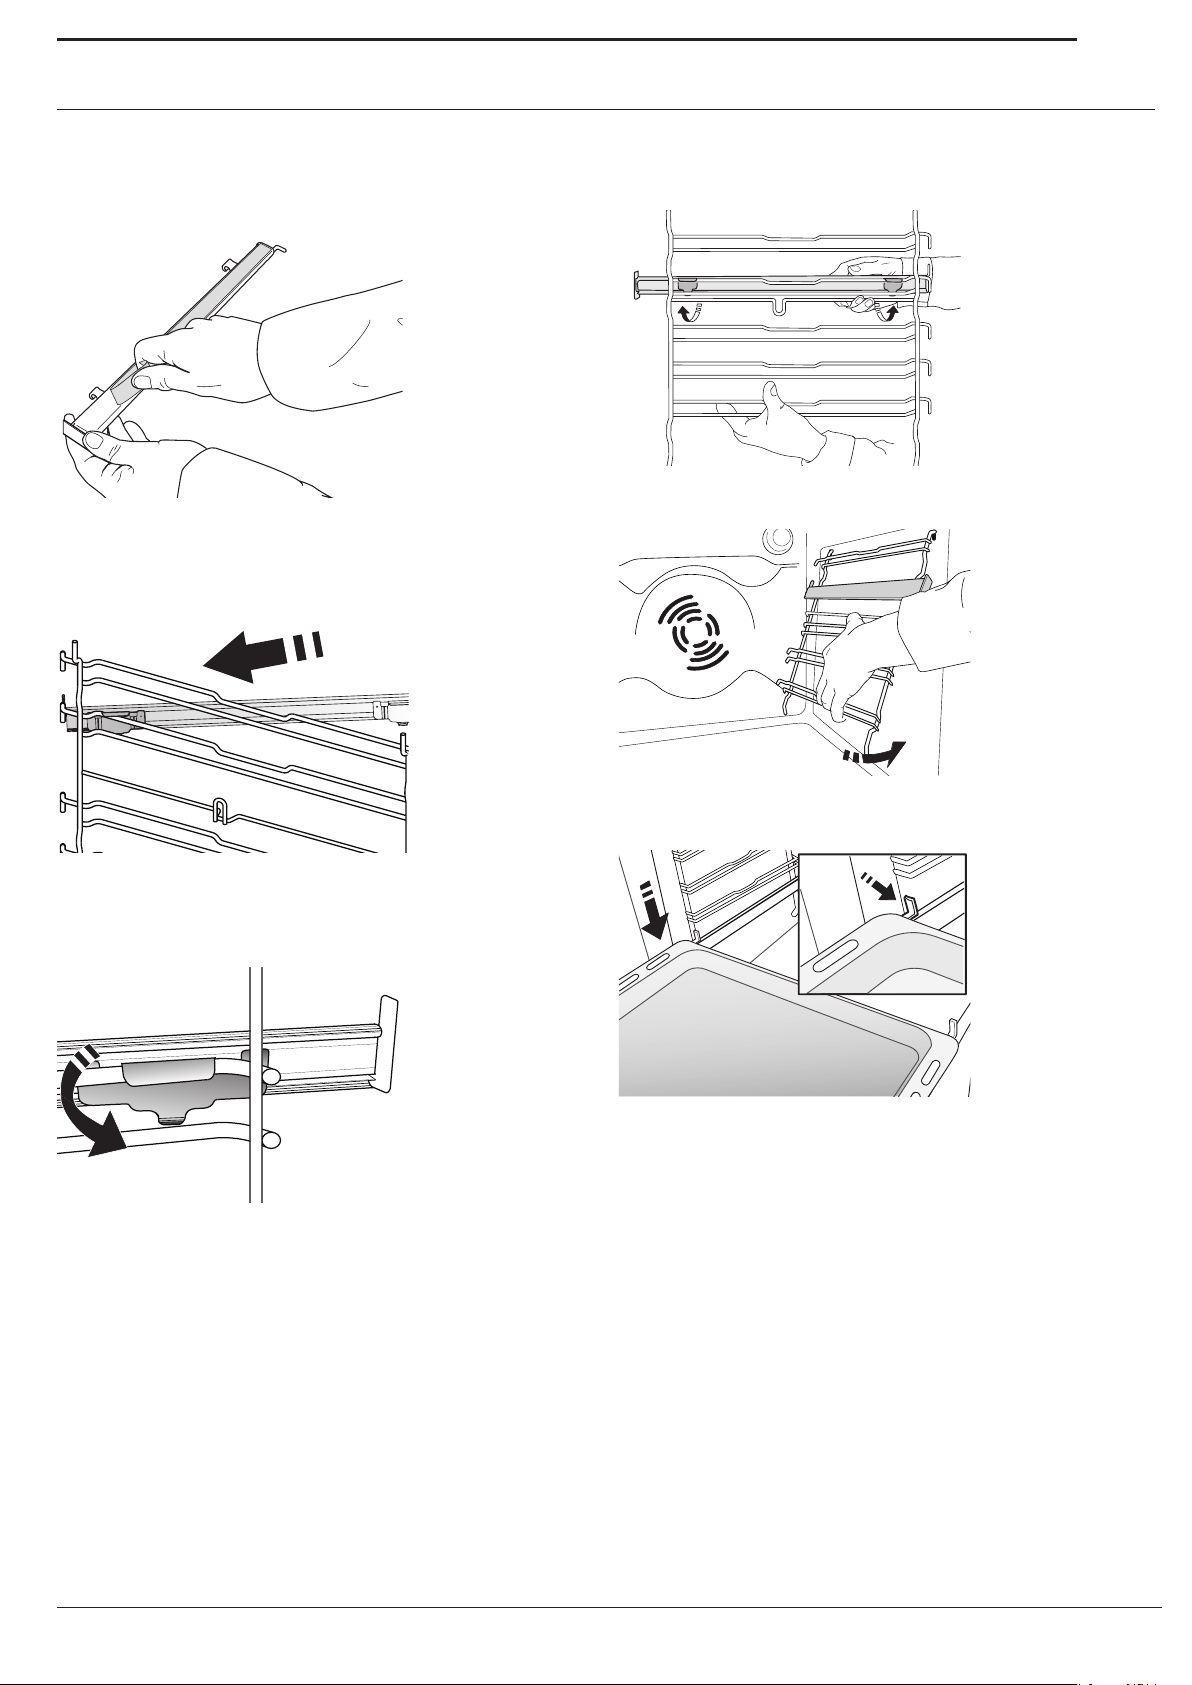
FITTING THE SLIDING RUNNERS
EN
(ONLY IN SOME MODELS)
1. Remove the shelf guides.
2. Remove the plastic protection from the sliding
runners.
Fasten the upper clip of the runner to the shelf
3.
guide and slide it along as far as it will go. (g. A);
lower the other clip into position.
5. Repeat these steps on the other shelf guide on the
same level. The sliding runners can be tted on any
level.
Ret the shelf guides.
6.
To secure the guide, press the lower portion of the
4.
clip rmly against the shelf guide. Make sure that
the runners can move freely.
7.
Position the accessories on the shelf guides.
9
 Loading...