

Page 1

Operating Instructions
OVEN
GB
English,1
SHL 532 X
SHL 532 W
Contents
GB
Installation, 2
Flush fitting
Electrical connection
Start-up and use, 3
First Use
Modes, 4
Cooking functions
- Fan cooking
- Grill cooking
- Defrosting
- Cooling fan
The electronic cooking programmer, 5
Electronic timer
Care and Maintenance, 6
Light replacement
Removing the oven door
Page 2
Installation
GB
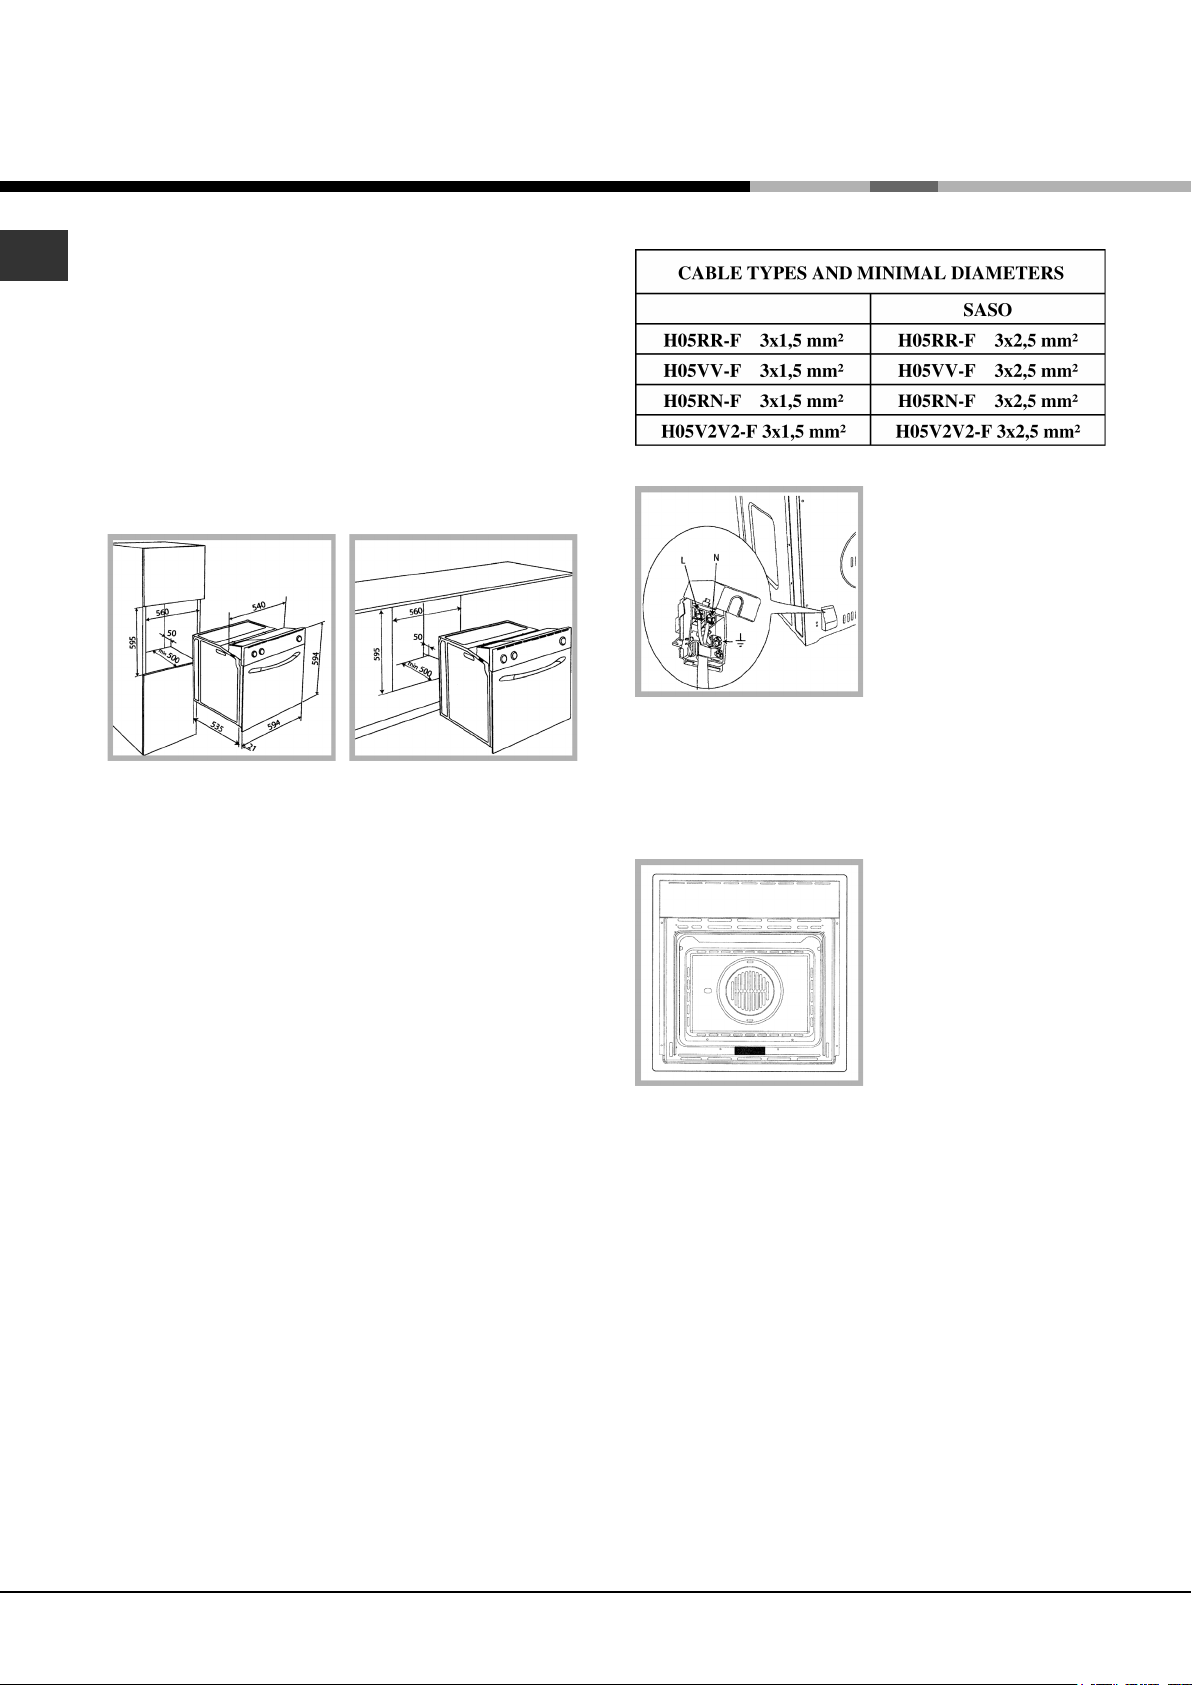
Flush fitting
The oven can be installed under a work top or in a
cooking column. Figure shows the installation
dimensions. Make sure that surrounding materials are
heat resistant. Align the oven centrally with respect to
the sidewalls of the units surrounding it and fix it in
place with the screws and Allen screws provided.
See the accompanying instructions for combining
the oven with multi-functional gas or gas-electric
cookers.
Electrical connection
IMPORTANT
The oven's data plate is accessible even with the oven
fully installed. The plate is visible simply by opening
the door. Always quote the details from it to identify
the appliance when ordering spare parts.
Before connecting the oven to the mains power
supply, make sure that:
• The supply voltage corresponds to the
specifications on the data plate on the front of the
oven.
• The mains supply has an efficient earth (ground)
connection complying with all applicable laws and
regulations. Correct earthing (grounding) is a legal
requirement. The power cable should never reach a
temperature 50°C above ambient temperature at
any point along its length. If a fixed appliance is not
provided with a power cable and plug, or some
other device permitting it to be disconnected from
the mains electricity supply, with a gap between the
contacts big enough to guarantee class III over
voltage protection, then such a device must be
fitted to the power supply incompliance with the
regulations governing electrical installations. The
socket or switch must be easily reachable with the
oven fully installed.
N.B. The manufacturer declines all responsibility for
damage or injury if the above instructions and normal
safety precautions are not respected.
2
Page 3
Start-up and use
THIS APPLIANCE IS CONCEIVED FOR
DOMESTIC USE ONLY. THE MANUFACTURER
SHALL NOT IN ANY WAY BE HELD RESPONSIBLE
FOR WHATEVER INJURIES OR DAMAGES ARE
CAUSED BY INCORRECT INSTALLATION OR BY
UNSUITABLE, WRONG OR ABSURD USE.
THIS APPLIANCE IS NOT INTENDED FOR USE
BY PERSONS (INCLUDING CHILDREN) WITH
REDUCED PHYSICAL, SENSORY OR MENTAL
CAPABILITIES, OR LACK OF EXPERIENCE AND
KNOWLEDGE, UNLESS THEY HAVE BEEN GIVEN
SUPERVISION OR INSTRUCTION CONCERNING
USE OF THE APPLIANCE BY A PERSON
RESPONSIBLE FOR THEIR SAFETY. CHILDREN
SHOULD BE SUPERVISED TO ENSURE THAT THEY
DO NOT PLAY WITH THE APPLIANCE.
DO NOT PLACE TIN FOIL, PANS OR SIMILAR
IN CONTACT WITH THE INNER BASE OF THE
OVEN TO COOK. THE HEATING ACTION OF THE
LOWER RESISTANCE CAUSES THE LOWER PART
OF THE OVEN TO OVERHEAT, LEA-DING TO
DAMAGE AND EVEN SERIOUS CONSEQUENCES
(FIRE RISK) ALSO TO THE UNIT IN WHICH THE
OVEN IS IN-STALLED.
RESPECT FOR THE ENVIRONMENT
The documentation provided with this oven has been
printed on chlorine free bleached paper or recycled
paper to show respect for the environment. The
packaging has also been designed to avoid
environmental impact. Packaging material is
ecological and can be reused or recycled. By
recycling the packaging, you will help save raw
materials as well as reducing the bulk of domestic and
industrial waste.
GB
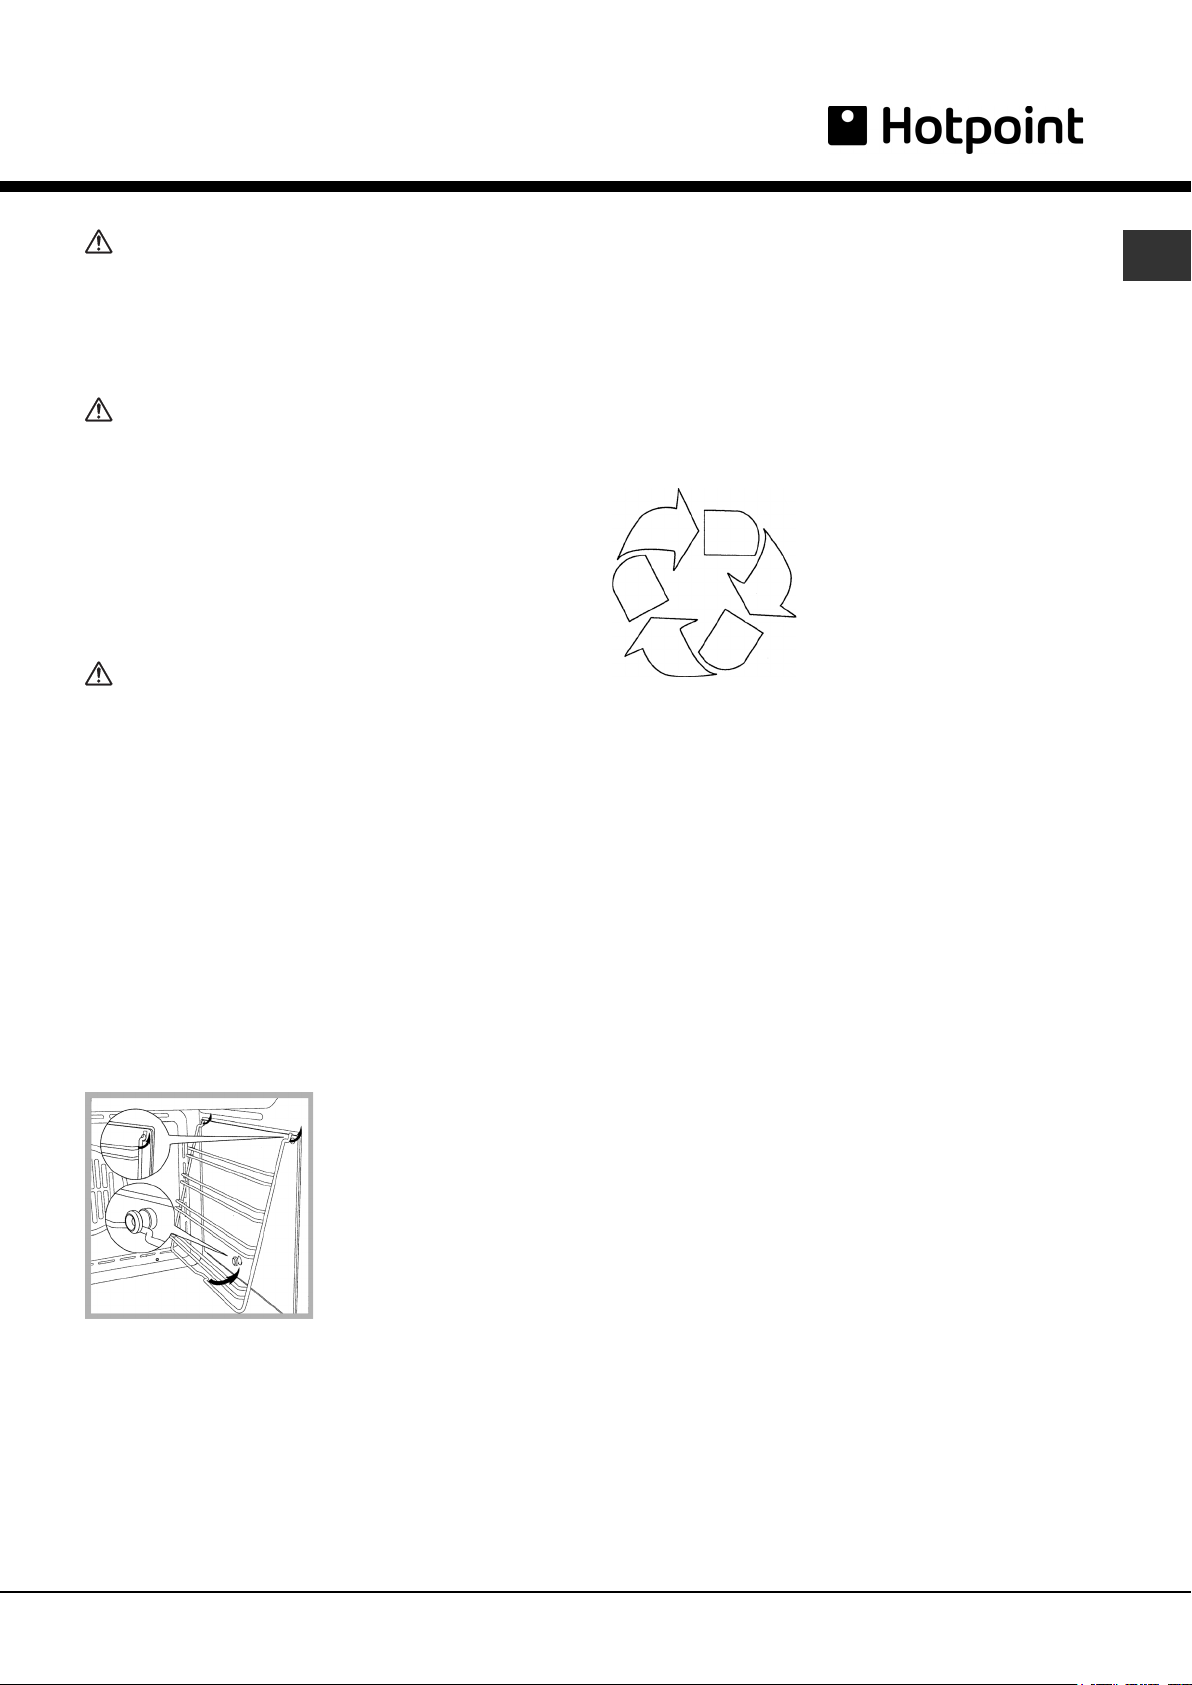
THE FIRST TIME YOU USE THE OVEN
Clean the oven thoroughly with soapy water and rinse
well. To remove the lateral frames from smooth-walled
ovens, proceed as shown in the figure. Operate the
oven for about 30 minutes at maximum temperature to
burn off all traces of grease which might otherwise
create unpleasant smells when cooking.
Important:
As a safety precaution, before cleaning the oven,
always disconnect the plug from the power socket or
the power cable from the oven. Do not use acid or
alkaline substances to clean the oven (lemon juice,
vinegar, salt, tomatoes etc.). Do not use chlorine
based products, acids or abrasive products to clean
the painted surfaces of the oven.
3
Page 4

Modes
GB
CONTROL PANEL FUNCTIONS
FUNCTION SYMBOLS ON THE SELECTOR
Oven light (stays on while oven is in use).
Circular heating elements with fan.
Thermostat setting from 50°C to MAX.
Fan for defrosting.
Thermostat setting at 0°C.
Double top heating element (large area grill).
Thermostat setting from 50°C to200°C.
FAN COOKING
For this type of cooking a fan positioned at the back
allows the circulation of hot air inside the oven, creating
uniform heat. In this way cooking is more rapid than
conventional cooking. It is a suitable method for cooking
dishes on more than one shelf, especially when the food
is of different types (fish, meat etc.).
DEFROSTING
By selecting one of the fan cooking functions and setting
the thermostat to zero, the fan allows cold air to circulate
inside the oven. In this way frozen food can be rapidly
defrosted.
It is not essential to preheat the oven, but you are
advised to do so when cooking pastries.
GRILL COOKING
Grill cooking uses top heat to cook a single dish.
Place the food in the oven only once cooking
temperature has been reached, i.e.
when the heating indicator goes out. If you want to
increase top temperature towards the end of the
cooking cycle, set the temperature control to the right
position. It is advisable to open the oven door as little
as possible during cooking.
COOLING FAN
The fan is positioned on the upper part of the oven
and create a circle of cooling air on the inside of the
furniture and through the door of the oven. It is turned
on when the temperature of the outer shell of the oven
reaches 60°C. By switching on the oven with the
thermostat at 200°C the fan starts working after
approx.10 min. It is turned off when the temperature of
the outer shell of the oven descends under 60°C. By
switching off the oven with the thermostat at 200°C the
fan stops working after approx. 30 min.
4
Page 5

6 key electronic timer
Setting the clock
Press the duration key and the end of cooking
key simultaneously, then press the +/- keys to set the
time.
Manual operation
To start cooking without setting end of cooking time,
press the manual key
.
ALARM TIMER
Press the alarm timer key and press the +/- keys to set
the required duration of cooking. The buzzer sounds
when the cooking time ends. Press any key to silence
it.
PROGRAMMING ERRORS
You cannot program in a cooking period which starts
earlier than the time displayed on the clock. If you try
to do so, the buzzer sounds and the AUTO symbol
flasher. Simply change the duration or cooking time to
correct the error.
CANCELLING A COOKING PROGRAMME
To cancel a cooking programme, simply press the
manual key.
GB
SETTING ONLY THE DURATION OF COOKING IN
SEMI-AUTOMATIC MODE
To set the duration of cooking, press the duration key
and press the +/- keys to set the duration of cooking.
A buzzer sounds when the cooking period finishes,
and the oven switches itself off. Turn the thermostat
and selector knobs back to 0 position and press the
manual key.
SETTING ONLY THE END OF COOKING TIME IN
SEMI-AUTOMATIC MODE
To set the end of cooking time, press the end of
cooking key
at which you want the oven to switch off. A buzzer
sounds when the clock reaches the set time, and the
oven switches itself off. Turn the thermostat and
selector knobs back to 0 position and press the
manual key.
FULLY AUTOMATIC OPERATION
To set the end of cooking time, press the duration key
and press the +/- keys to set the duration of
cooking. Press the end of cooking key
the +/- keys to set the time at which you want the oven
to switch off.
When you finish setting these times, the AUTO symbol
flashes and the buzzer sounds. Press any key to
silence it.
and press the +/- keys to set the time
and press
5
Page 6

Care and Maintenance
GB
Replacing the oven light
IMPORTANT:
The oven light must have these precise features:
a) it must be able to
resist high
temperatures (up to
300°C)
b) power supply: see V/
Hz indicated on data
plate.
c) power 25W.
d) E 14 connection.
Before proceeding, disconnect the appliance from the
main electricity supply.
• to prevent damage, place a tea cloth in the oven
• nscrew the glass cover of the light
• unscrew the old light bulb and replace it with the
new one
• put back the glass cover and remove the tea cloth
• connect the appliance to the main electricity supply
• Remove the four plastic caps from the opposite side
and unscrew the locking pin.
• Turn the door 180°.
• Secure the door in its new position using the 4
screws removed previously.
NOTE: Make sure that the oven door is perfectly
parallel with the front panel. If it is not, adjust it by
means of the screws you have just inserted.
• Fix the oven in the oven recess using the 4 screws
and the plastic spacers provided.
Removing the oven door
• Decide whether you want the door to open to the
left or right before positioning the appliance in the
oven recess.
• Fully open the door.
• Remove the four fixing screws from the door hinge.
• Screw in the door closing pin and secure it in
horizontal position as shown in the figure, or until it
locks in place in the case of a round pin. Fit the 4
plastic caps.
• Adjust the door closing mechanism by means of the
adjuster screws as shown in the figure.
6
Page 7

GB
7
Page 8

GB
09/2011 - 2.000.00.3.4°ed
XEROX FABRIANO
8
 Loading...