

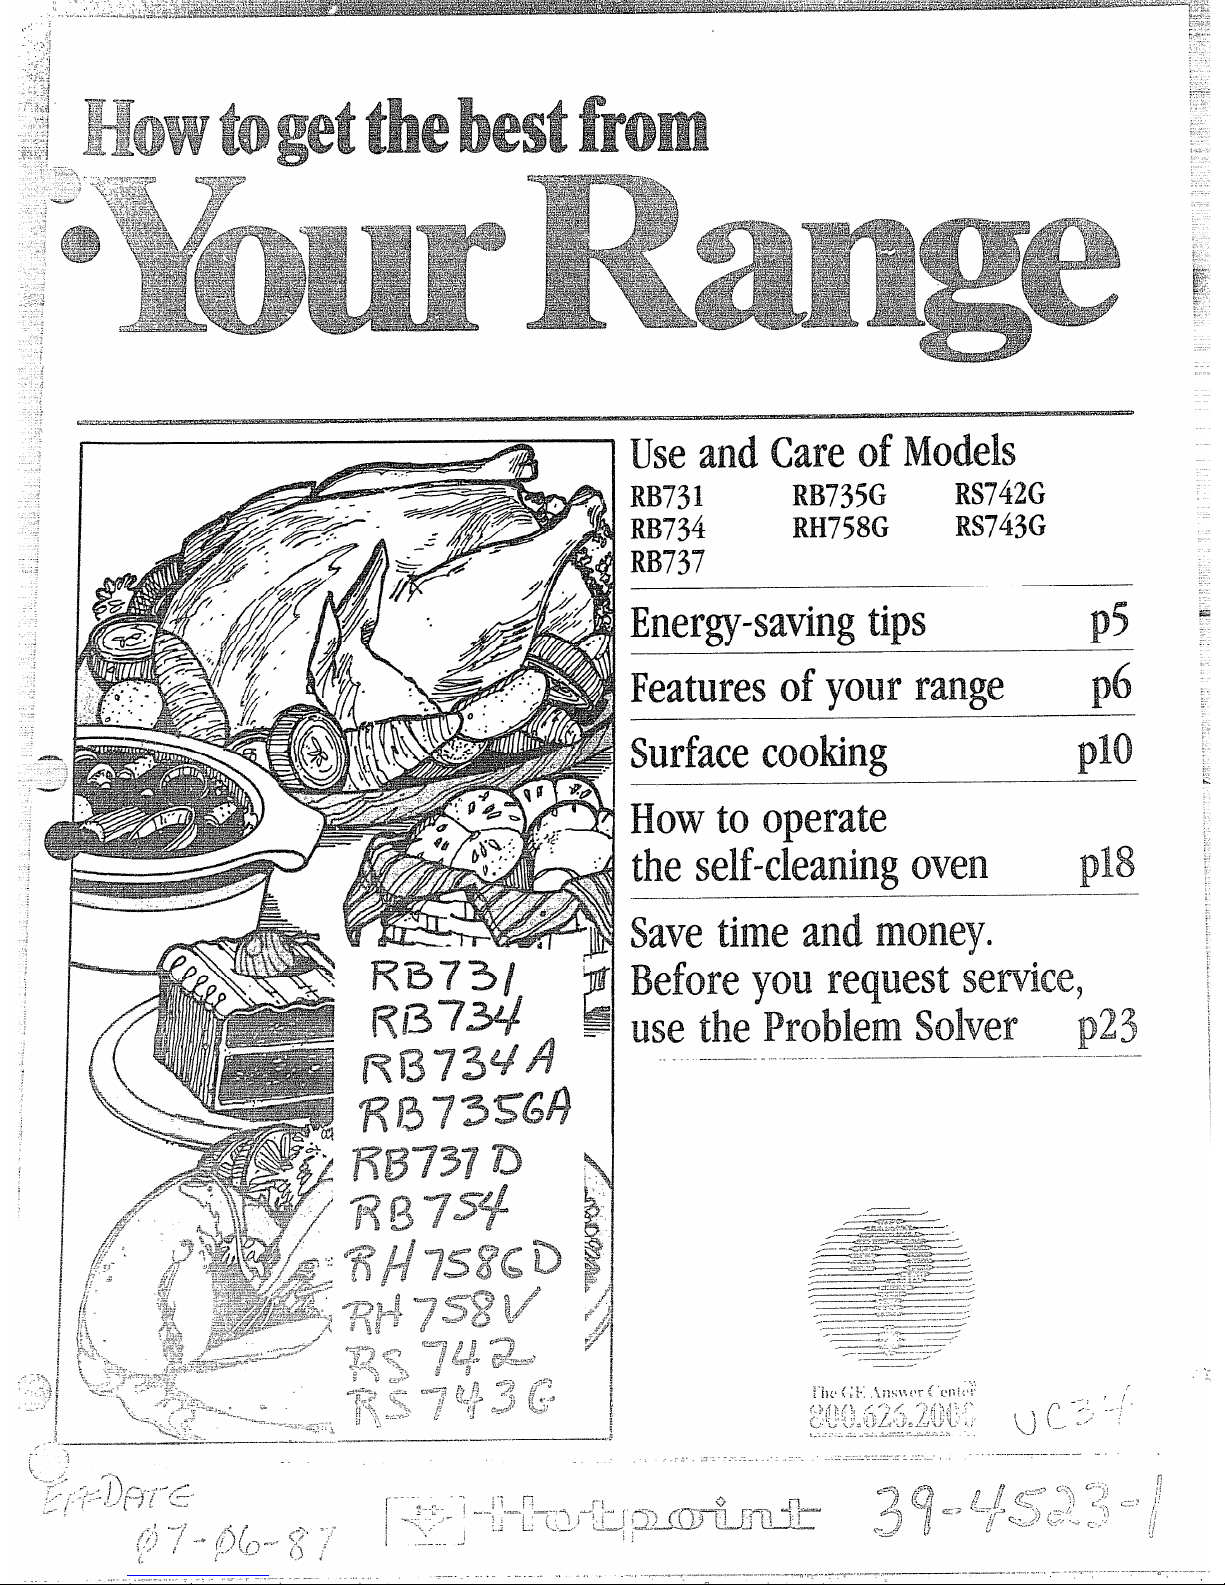
Hotpoint RB731, RB734, RB735G, RB758G, RS742G Use And Care Manual
...
.
,,
.-.,;
.,,
,
~“ ,,
.
..~
j
.. .
.
.-
.;
~j~ovi~og
.....
.:......
j
7----
“-
...
~.---.
~-.——.-— —-..
“ -- .---——, -.
-., -. —.-—. . .
—..
‘1
1
use of’
RB731
RB735G
RS’7’42G
IW?34
RS743G
IW?37
tips
p5
to
oven
-jpN3
and
‘you service,
the Solver
p’7
2
ad~~
—.——-..—-.
..... ... ..—
.
.
1
Before UsingYour Range. .. .....2
Safety Instructions . ..........3-4
Energy SavingTips. . . . . ........5
Features ofYour Range .......6-9
Surface Cooking , . . . . . ........10
Automatic Timer and Clocks ...12
UsingYourOven. . . . . . . ...,...13
How T’oBake and Time Bake ...14
How To Roast... . . . 4.. .......15
How To Broil... . . . . . . . .......16
Exhaust System. . . . . . . . .......17
How Cooperate the
Self-CleaningOven . . . ....18-19
Removable Oven Door . .......20
How ToCare For
YourRange . . . . . . . . . ....20-22
Home Canning Tips . . . . .......22
Problem Solver. . . . . . . . ....,..23
Surface Choking Chart . ....24-25
Baking Chart.. . . . . . .. . .......26
Roasting Chart . . . . ... . .......27
BroilingChart . . . . . . . . . .......28
Cleaning Chart . . . . . . . . ....29-30
IfYouNeed Service . .. . .......31
Warranty . . . . . . . . . . . Back Cover
It willhelp you operate and maintainyour new Range properly.
Keep it handyforanswers to your
questions.
If you don’tunderstand something
or need more help. . .
Call, toll free:
The GE Answer CenterTM
800.626.2000
consumer information service
or write:(includeyour phone
number);
Consumer Affairs
Hotpoint
Appliance Park
Louisville,KY40225
SerialNumbers
You’llfind thereon alabel onthe
front ofthe Range behind the oven
door.
These numbers are also onthe
Consumer Product Ownership Registration Card that came with your
Range. Beforesending in this card,
please write these numbers here:
Model No.
Serial No.
Use these numbers in any correspondence or servicecalls concerning ‘yourRange,
If M-mRewived
——
a Range7
immediately contact the dealer [or —
builder)th~t soldyou the Range.
save Time and Money
● Qo
...
--.:
BefoTeYou Request s@rvice ~,.!
~~y
Check the Problem Solver(page
“-=-
23).It listsminor causesof operating problemsthat you can correct
yourself.
-——
-..--:]
$,.-:.’..
..- .,
.,
-.-=v+
‘----“Rx%-dall
..,----..
-.,...-%.=
.:.
~/hen ~sing~lectric~{~ppknc~s
-=;
r~
$$&isicsafety precautions should be
‘=-”Ilowed,including the following:
.
.-
.’ Use this appliance only for its
in~ende,duse as described in this
manual.
~~~Besure your appliance is proper-1~.installed and grounded by a
qualified technician in accordance
with the provided installation
instructions.
: Don’t attempt to repair or
repiace any part of your range”
unlessit is specificallyrecommended in this book. All other
ser~icingshould be referred to
a qualified technician.
~~~Before performing any service,
DISCONNECT THE RANGE
POWER SUPPLY AT THE
HOUSEHOLD DISTRIBUTION
PANEL BY REMOVING THE
- FLTSEOR SWITCHING OFF
‘THE CIRCUIT BREAKER.
-—
“- Do notk!ave dmren dom!-
ildren should not be left alone
r unattended in area where
appliance is in use. They should
nmer be allowed to sit or stand
on any part of the appliance.
Don’t allow anyone to climb,
stand or hang on the door’, drawel”
or range top. They could damage
the range and even tip it over
causirrgsevere persona! injury.
‘CAUTION: Do NOT STORE
ITEMS OF INTEREST m
C:E-111.DRENIN ~ABINETs
ABOVE A RANGE OR ON THE
!B’ACKSPL14SHOF A RANGE—
CHILDREN ON
THE RANGE? TO REACH
13’1;14SCQIJLD BZ SERIOLJSEY
j~<j[,lf~~~~]”
.
this
f-’ wearprwperClothing=Loose
fitting or hanging garments should
never be worn while using the
appliance. Flammable material
could be ignited if brought in contact with hot heating elements and
may cause severe burns.
@ Use only dry pothoMerw-=—
moist or damp potholders on hot
surfaces may result in burns from
steam. Do not let potholders
touch hot heating elements. Do
not use a towel or other bulky
cloth.
e? pJeveYuseyour appliance for
warming or heating the room.
G Storage in or on Ap@iance=-
Flammable materials should not
be stored in an oven or near surface units.
‘~ Keep hood and grease filters
dean
tomaintain good venting
and to avoid grease fires.
:: Do not let cooking grease or
other flammable materials accurrmkde in the range or near it.
‘: Do not use water on grease
fires. Never pick up a flaming pan.
Smother flaming pan on surface
unit by covering pan completely
with well fitting lid, cookie sheet
or flat tray. Flaming grease outside a pan can be put out by
covering with baking soda or, if’
available, a dry
chemicai or foam.
Q
.d
‘= Do nottmdl heating ‘demerits
m interimsurfaceof oven,These
surf’acesmay be hot enough to
burn even though they are dark in
color, During and after use, do
not touch, or let clothing or other
flammable materials contact surface units, areas nearby surface
units or any interior area of the
oven; allow sufficienttime for
cooling, first.
Potentially hot surfaces include
the cooktop and areas facing the
cooktop, oven vent opening and
surfaces near the openings, and
crevicesaround the oven door.
Remember: The inside surface of
the oven may be hot when the
door is opened.
@ when cooking pOrk fOllOW
OUI”
directions exactly and always cook
the meat to at least 170°, This
assures that, in the remote possibility that trichina may be present
in the meat, it willbe killed and
meat will be safe to eat.
.--.—.-... —.. ... . .. .. . .
“
-
>.--$.
1‘3.0”!. -: 0
-1..: (, l.. p . ,:
‘:’ i%md away frmntile range
when
openingoven (km’. me hot
airor
steam vvhidaescapescan
‘muse bums tohands, facemi/
or’eyes.
=
mm% heat mq.mmil food Con”
tainml
inw? oven. Plwmm could
build Upm-d the Container’could
burst causing m injury.
@
Keep oven vent ducts
unobstructed.
::! Keep oven free from grease
build up.
G Place oven rack in desired position while oven is cool. If racks
must be handIed when hot, do not
let potholder contact heating units
in the oven,
~~Pulling out shelf to the shelf
stop is a convenience in lifting
heavy foods. It is also a precaution against burns from touching
hot surfaces of the door or oven
walls.
> When using cooking or
roasting bags in oven, folIow the
manufacturer’s directions.
c Do not use your oven to dry
newspapers. If overheated, they
can catch fire,
.., .. ,,-,,
,
.. -
fi,, =,,/.,~,*
!’: .’. ,,-~,+ :.- j y :f~ ;;
-
7,-: J
. ~, < :.:: * .
~,, - .- ,-. + ,, J.-, ,.13~
~~Do not clean door gtudu%The
door gasket is essential for a good
scfil.Care should be taken not to
rub, damage. or move the gasket.
Do not use oven ckamm. No
commercial oven cleaner or oven
liner protective coating of any
kind should be used in or around
~ln~:
part of the oven.
Clean only parts listed in this
USCand Care Book,
~~f~j-~%&]egnimg the oven,
remove broiler pan and other
J:!
,L,@Qg~j~”~yJ~T~-:.’-~*
;>~]].f:~[.es’-’-
..ly <Jh~ii!us
0 UW‘propwPan Size—This
appliance is equipped with one or
more surface units of different
size. Select utensils having flat
bottoms large enough to cover the
surface unit heating element. The
use of undersized utensils will
expose a portion of the heating
element to direct contact and may
result in ignition of clothing.
Proper relationship of utensil
to burner willalso improve
efficiency.
@ pq~~~~]~~~~$~~a~~~~~~$
unattended at high heat settings.
130ilovercauses smoking and
greasy spillovers that may catch
on fire.
Q Be sure drip pans and vent
ducts are not covered and are in
place. Their absence during cooking could damage range parts and
wiring.
Q Don% use ahmlim.lm foil to line
drip pans or anywhere in the oven
except as described in this book.
Misuse could result in a shock,
fire hazard, or damage to the
range.
~:~tliy certain types of glass,
glass/ceramic, ceramic, earthenware, or other glazed containers
are suitable for range-top service;
others may break because of the
sudden change in temperature
(see section on “Surface Cooking”
for suggestions.)
‘ TO burns, ignition of
flammable materials, and spillage;
the handle of a container should
be positioned so that it is turned
toward the center of the range
without extending over nearby
surface units.
Don’t immerse or soak rt?movabie .suFf&Xunits. Don% put them
in a dishwasher.
c.2 A&wy+humsurfacewit to
OFIFbefm?WmnovingUtmm.
@ Keep an eye on foods being
fried at HIGH or MED1l.JM
HIGH heats.
@ To avoid the possibilityof a
burn OF electricshock, always be
certainthatthe controlsfor aii
surfaceUnitsan?at ‘OFFposition
and d] C(M$arecod before
to removethe wit.
@ ‘Whenflamingfoods underthe
hood, ttm’nthe fan off. me fan, if
operating9may spreadthe fhne.
@ FOO&forfrying should be as
dry as possible. Frost cmfrozen
foods or moisture on fresh foods
can cause hot fat to bubble up
and over sides of pan.
Q Use littlefat for effective
shallow or deep-fat frying. Filling
the pan too full of fat can cause
spil]overswhen food is added.
@ If a combination of oils or fats
will be used in frying, stir together
before heating, or as fats melt
slowly.
@ Ahvays heat fat slowly, and
watch as it heats.
G Use deep fat thermometer
whenever possible to prevent overheating fat beyond the smoking
point.
utensils.
~-.,
-----
..-” -.
(
‘\
YJ
“%ushioned viny] or carpeting.When
rno\ing the range on this type of
flooring,usecare, and it is reconlmendedthat these simpleand inex-
pensi~einstructions be followed.
The range should be installedon a
sheetof plywood (or similar material}as follows: When thejloor
covering is terminated at the from’
qf the range,
the area that the range
\\ill rest on should be built up with
pl>woodto the same levelor higher
than the floor covering. This will
then allow the range to be moved
for cleaning or servicing.
(not orIRS models)
Lmeling screwsare located on each
corner of the base of the range. By
removingthe bottom drawer you
=+=-arlleve]the range to an uneven
~.~l our with the useof a nutdriver.
To remove drawer, pull drawer out
all the way, tilt up the front and
I-cmovc it. To rcplacc, insertglides
a[ back of drawer beyond stop on
range gJidcs. L~ft drawer if necessar~’to insert easily. Let f’rentof
drawer down, then push in to close.
---..
..——- .. .-...
Usecooking utensils of medium
weightaluminum, tight-fitting
covers,and flat bottoms which
completelycover the heated portion ofthe surface unit.
Cook fresh vegetableswith a
minimumamount of water in
a coveredpan.
Watch foods when bringing them
quicklyto cooking temperatures
at HIGH heat. When food
reachescooking temperature,
reduce heat immediatelyto
lowestsetting that will keep it
cooking.
Useresidual heat with surface
cooking whenever possible. For
example, when cooking eggsin
the shell,bring water to boil,
then turn to OFF position to
complete the cooking.
Usecorrect heat for cooking
task. .
.HIGH—to start cooking
(if time allows, do not use HIGH
heat to start), MEDIUM HI—
quick brownings, MEDIUM—
slowfrying, LOW—finishcooking
most quantities, simmer—double
boiler heat, finish cooking, and
specialfor small quantities.
When boilingwater for tea or
coffee, heat only the amount
needed. It is not economical to
boil a container full of water for
only one or two cups.
-.
,...
L
Preheat the ovenonly when
necessary.Most foods wiHcook
satisfactorilywithout preheating.
If youfind preheating is necessary, watch.the ir~dicatorlight,
and put food in the oven
promptly after the light goes out.
Alwaysturn oven OFF before
removingfood.
During baking, avoid frequent
door openings. Keep door open
as short a time as possiblewhen
it is opened.
Cook completeoven meals
instead ofjust one food item.
Potatoes, other vegetables,and
some desserts willcook together
with a main-dish casserole, meat
loaf, chicken or roast. Choose
foods that cook at the same temperature and in approximately
the same time.
Useresidual heat in oven whenever possibleto finish cooking
casseroles, oven meals, etc. Also
add rolls or precooked desserts
to warm oven, using residual
heat to warm them,
——-... ,-—.—-—————- - --—
—.-—._—
..
, ~
-:.

Model
{
t
.—..
,.
/
‘,
I
~. ,,
------
Model
RE3735G*
r
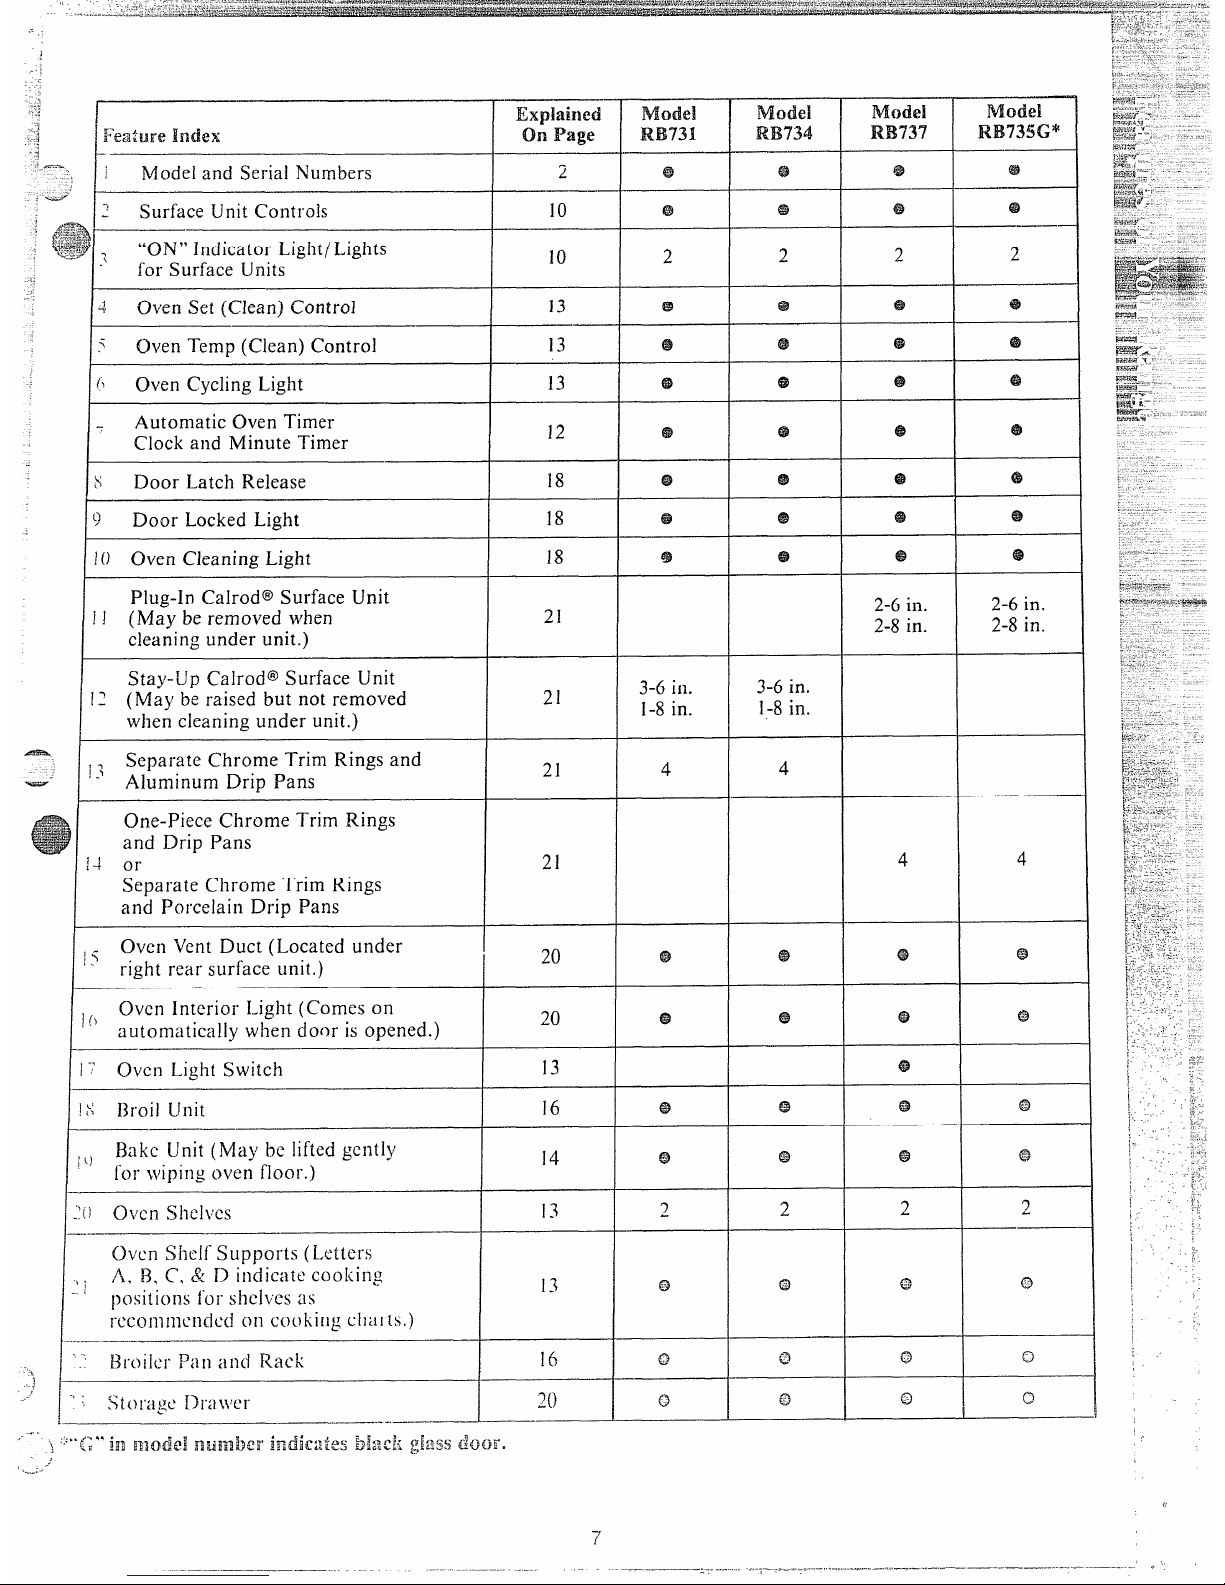
Expkhd Mdd N&k?]
Model i
Feait.weIndex
‘on??Zqy?
REU31
RB734
R13737 I
.
1
R40cieiand Serial Numbers
2 @
@ @
-j
..
Surface Unit Controls
10
@
@$
@
.
“ON”
Indicator Ligflt/Lights
?
10 2
2 2
for Surface Units
f
-Y
Oven Set (Clean) Control
13
@
@
@
i
Oven Temp (Clean) Control 13
@$
@
@
()
Oven CyclingLight
13
a
@ @
Automatic Oven Timer
Clock and Minute Timer
12
@ @
@
\
Door Latch Release
18
e
@
@
1
Door Locked Light
18
e
e
@
@
@
@
83
69
@
10 Oven Cleaning Light
18
a @
e
Plug-In Calrod@Surface Unit
2-6in.
iJ (May be removed when
21
2-8 in.
cleaning under unit.)
2-6 in.
2-8in.
Stay-Up Calrod@Surface Unit
3-6 in.
3-6in.
12 (May be raised but not removed
21
1-8in.
1-8in.
when cleaning under unit.)
i
1~ Separate Chrome Trim Rings and
- Aluminum Drip Pans
21 4
4
-1
One-Piece Chrome Trim Rings
and Drip Pans
14 or
21
4
4
Separate Chrome Trim Rings
and Porcelain Drip Pans
[
~i oven Vent Duct (Located under
I
right
rear surface unit,)
20
@
@
63
..
~(I Oven Interioi. Light (Comes on
20
@ 69
63
automatically when door is opened.)
I
‘~ OVcn Light Switch
13
@
!:; Broil Unit
16
‘al
@
e
—
69
~,, Elakc Unit (May be lifted gently
for wiping oven floor. )
14
@
@
@
j~~j ~v~n S]le]vcs
13
~
2
2
‘@
2
},,
Oven Shelf Supports (Letters
-,j A. B, C. & D indica[e cooking
13 @
0
‘a
nositions for shelves as
1
c)
o
—-J <
1.
f 8 #
,..
!
.——.. _..— —i_._..—..—
,
---,
@
, ,
-,-
@
‘$32
.
.
@
(tSlide-In)
—
@
/“
-.
Model! Mow
RS742G*
RH758G*
a
&+
Model
RB’743’G*
63
—
e
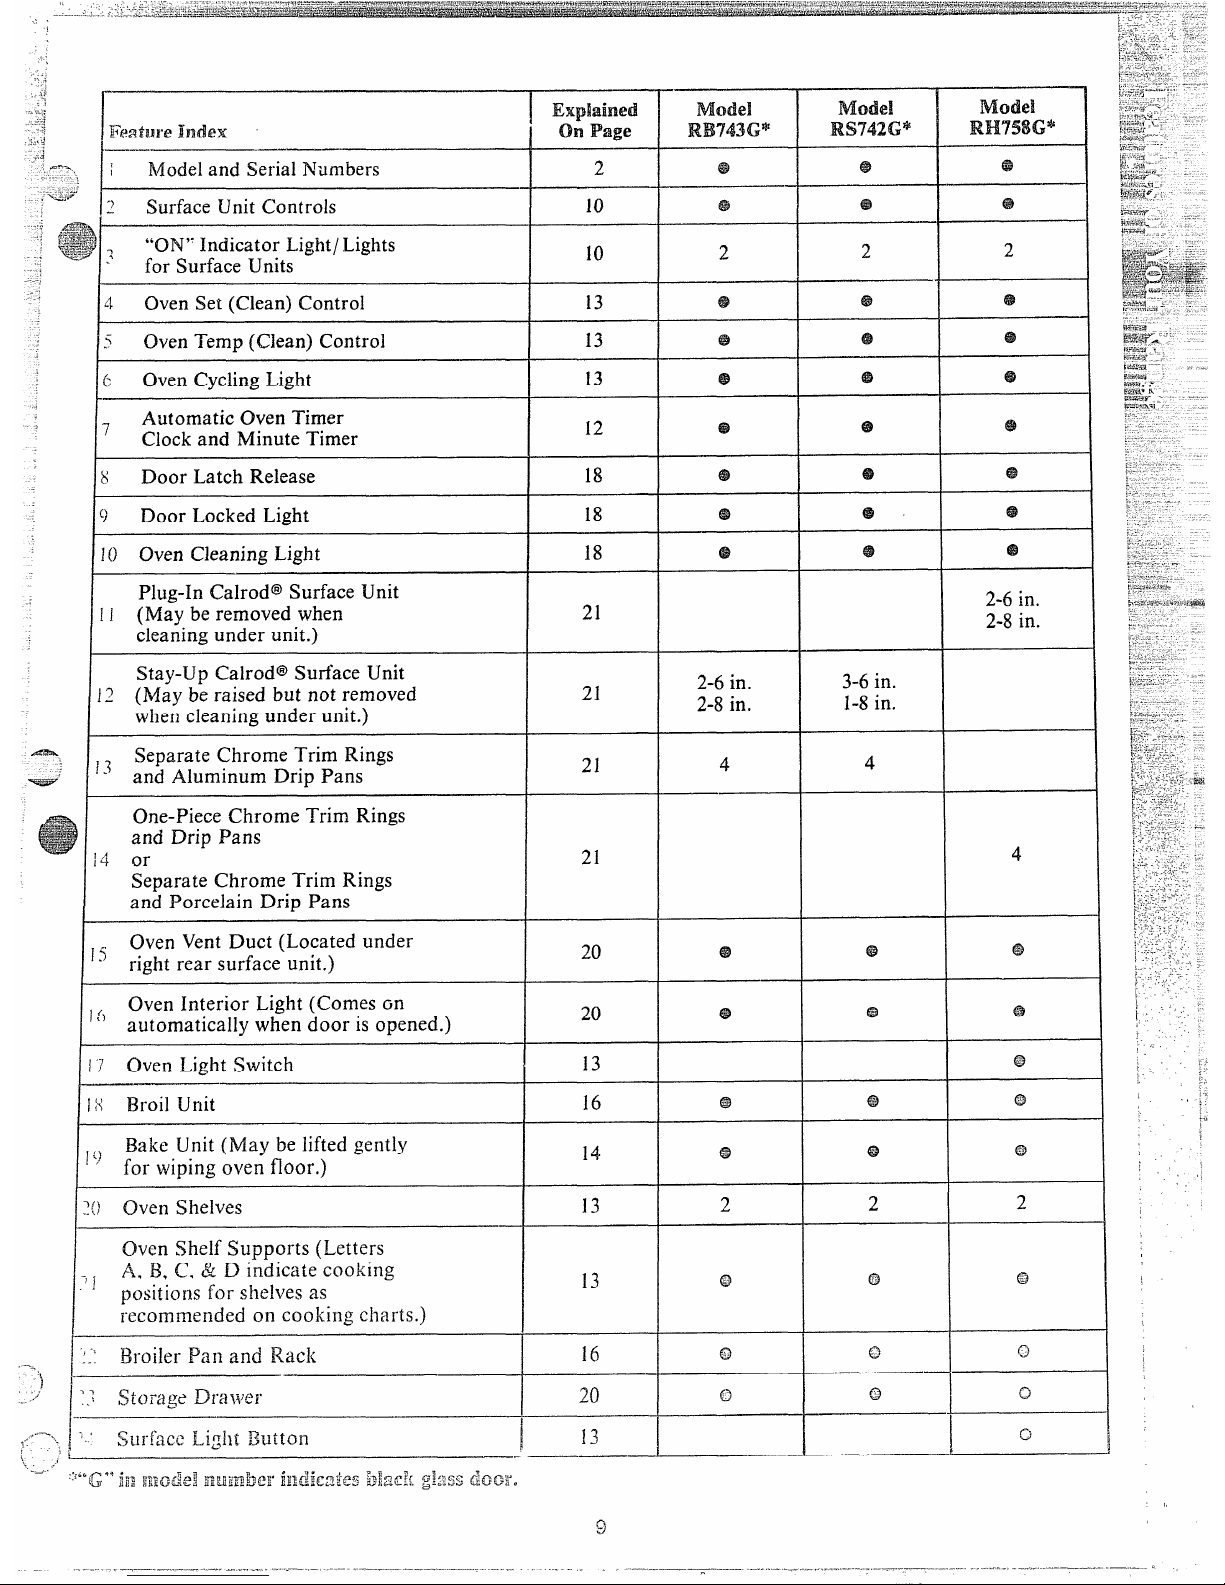
IExpkhed
On Page
...:
-d
.:
~
Feshnre Index
,:
.,..1
—;
—.—
.s
.=-=?.
I
hfiodeland Serial NTumbers
.... .,
,-.++’”
-)
Surface Unit Controls
2
63
1------
63
—
10
5sss%%
.:
)
F*?:*
~L@&*,,
:
r
-*@#i!+2
“ON’-Indicator Light/Lights
for Surface Units
.
9 I ‘1
10
2
@
x.
6?$
4
-F
Oven Set (Clean) Control
!~
Oven Temp (Clean) Control
13
{
13
13
--2
@
@
I(: Oven Cycling Light
I
7
Automatic Oven Timer
Clock and Minute Timer
12
@
@
8
Door Latch Release
g
Door Locked Light
18
18
1810 Oven Cleaning Light
Plug-In Calrod@Surface Unit
Ii (May beremoved when
cleaning under unit.)
@
4$
2-6in.
2-8 in.
21
21
Stay-Up Calrod@Surface Unit
]Z (May beraised but not removed
when cleaning under unit.)
2-6 in.
2-8 in.
4
3-6in.
1-8in.
A?a.
‘e
.+
-._
=+
1-
17 Separate Chrome Trimmings
and Aluminum Drip Pans
21
4
One-Piece Chrome Trim Rings
and Drip Pans
l)
I+ or
Separate Chrome Trim Rings
and Porcelain Drip Pans
~ Oven Vent Duct (Located under
right rear surface unit.)
4
20
Oven Interior Light (Comes Gn
‘) automatically when door is opened.)
—
7 oven Light Switch
~ Broil Unit
~ Bake Unit (May be lifted gently
for wiping oven floor.)
~ Oven Shelves
I
20
13
@
@
16
14
@
62
I
,,
22
2
Oven Shelf Supports (Letters
A.,B, C. & D indicate cooking
positions for shelves as
rccornrnended on cooking charts.)
Broiler %n and Rack
13
C3
16
—
20
(’j
c1
c1
—.
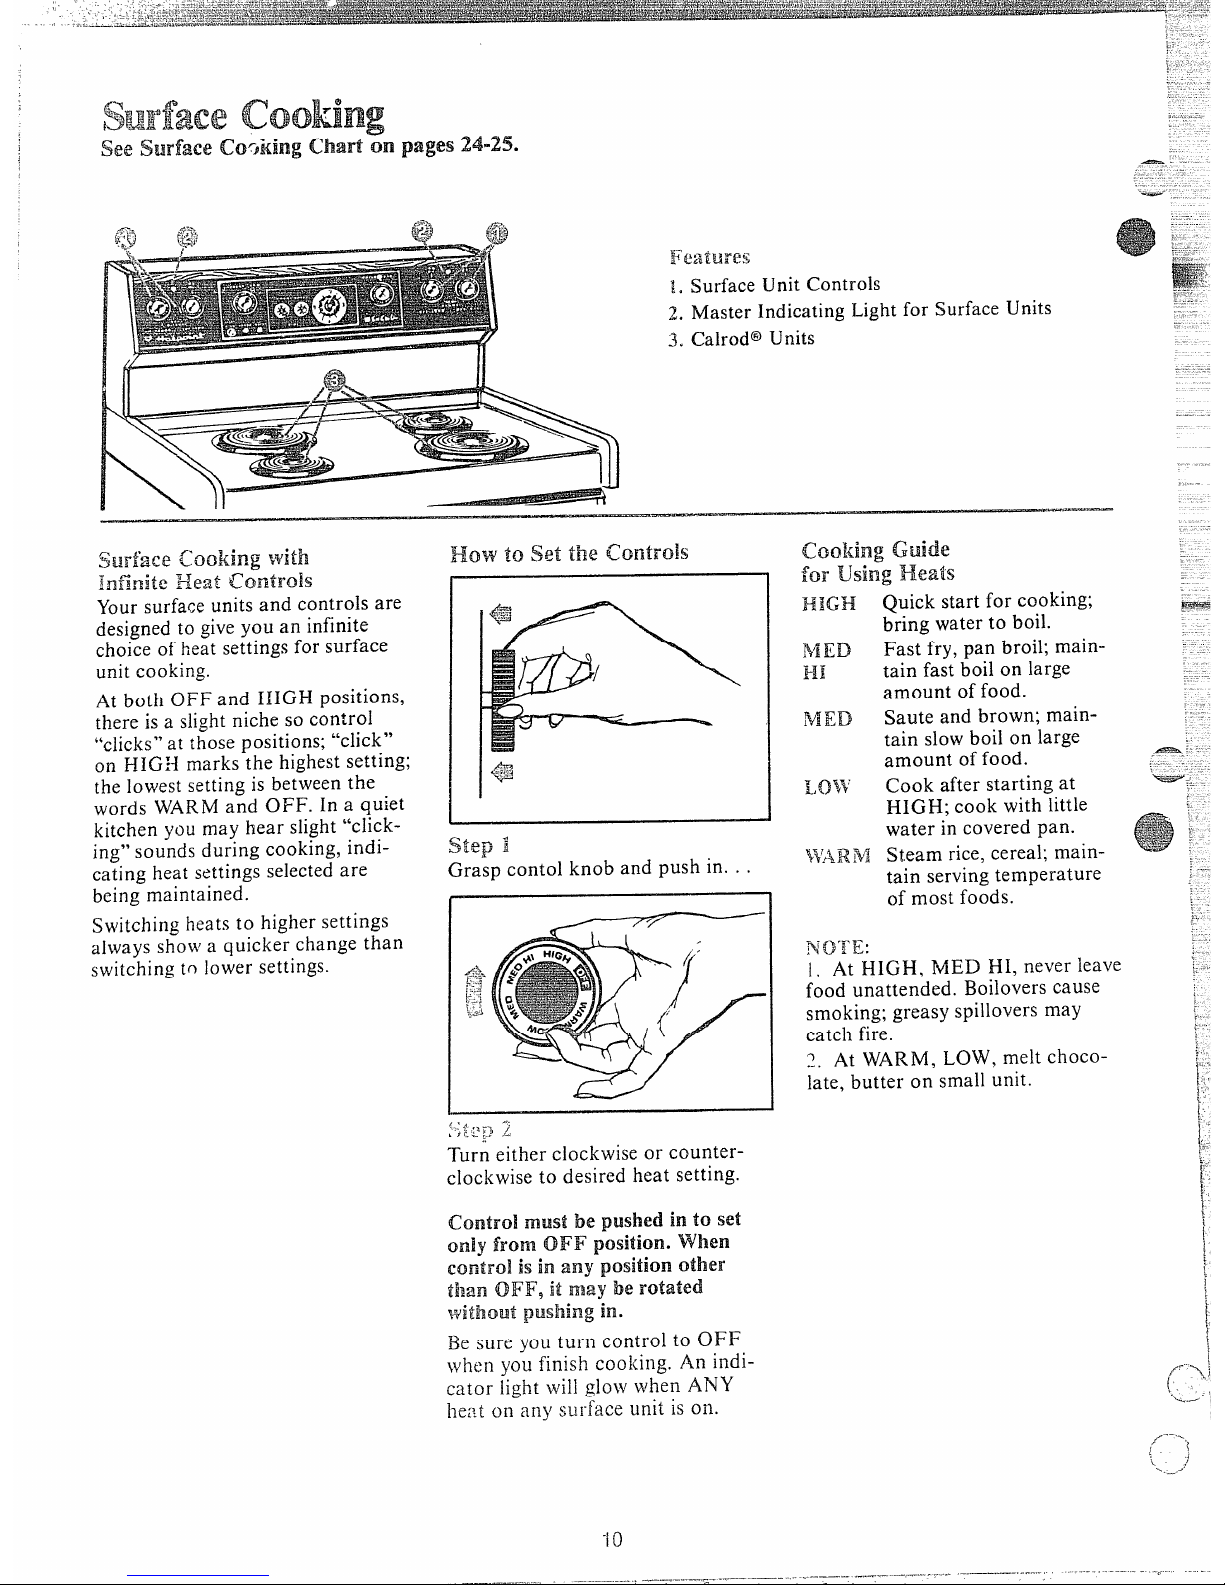
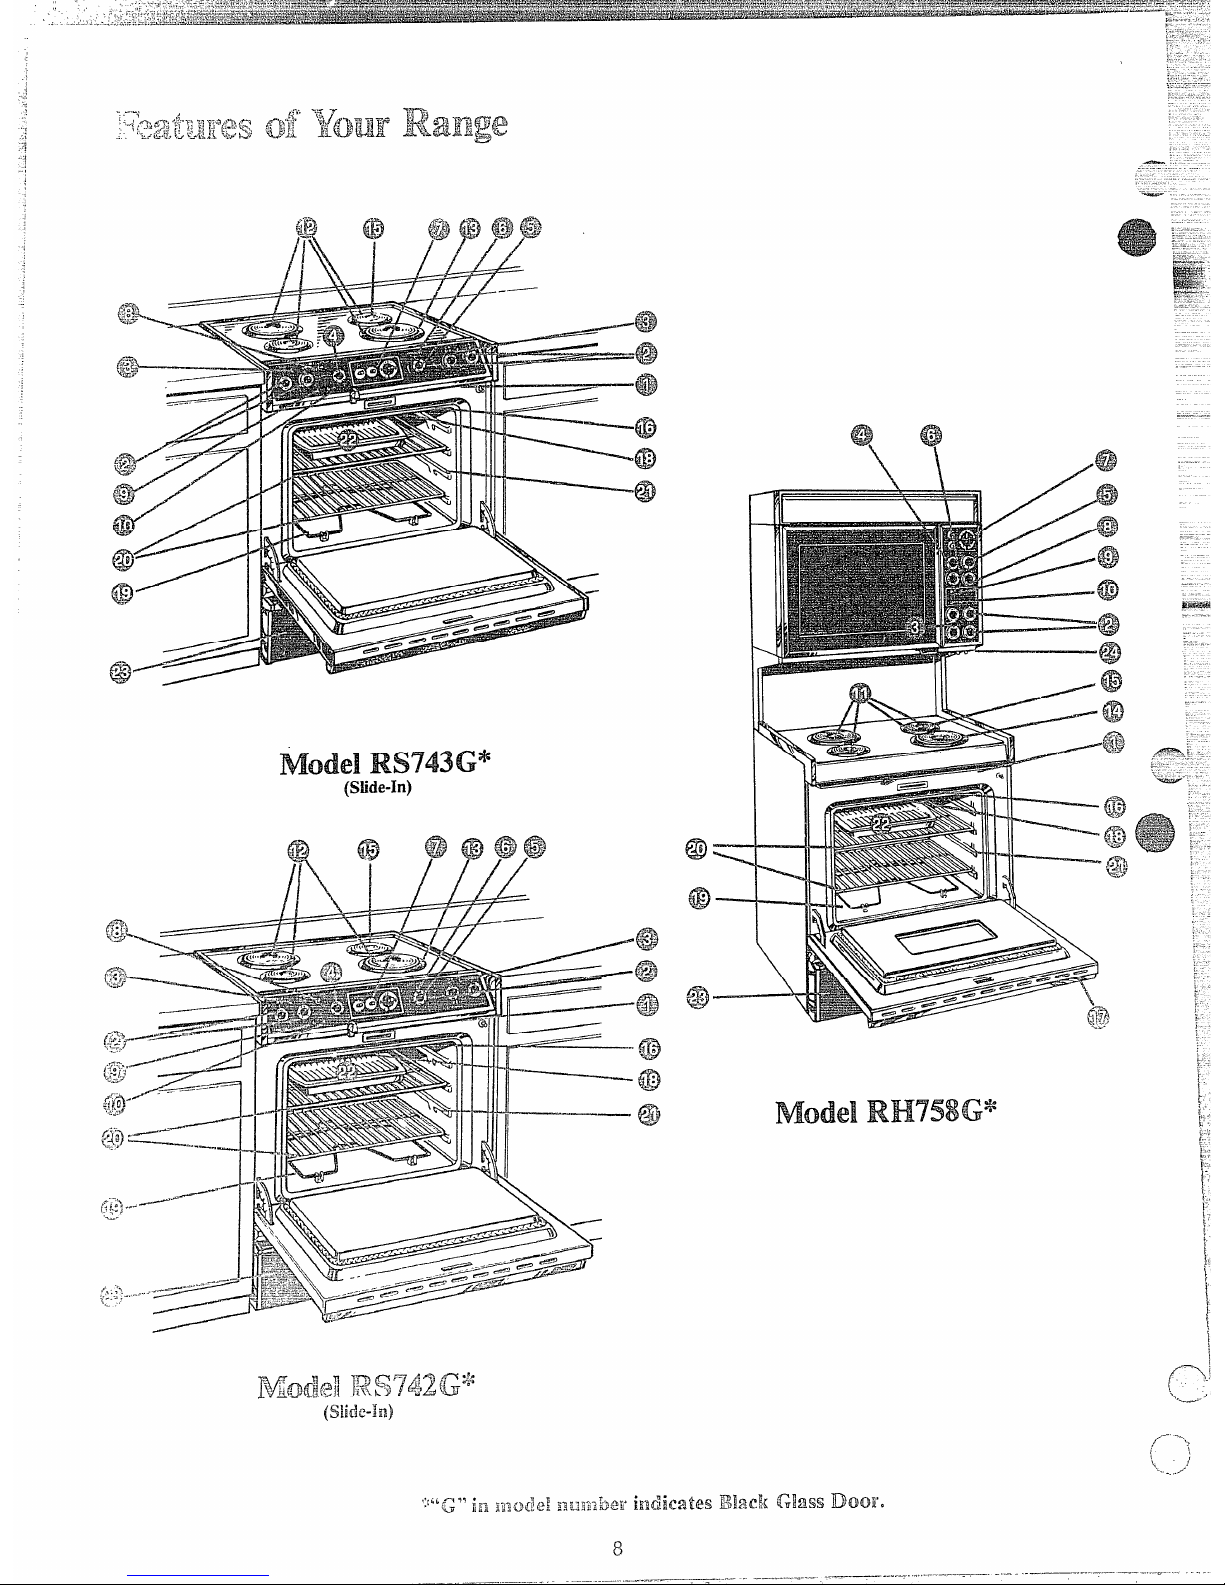
~“g:~$~~g~
}, Surface Unit Controls
2. Master Indicating Light for Surface Units
3. Calrod@Units
Smi’wxcooking with
]fg~~~~ ~~eat
controls
Yoursurface units and controls are
designed to giveyou an infinite
choice of heat settingsfor surface
unit cooking.
At both OFF and HIGH positions,
there is a slightniche so control
“clicks”at those positions; “click”
on HIGH marks the highest setting;
the lowest setting is between the
words WARMand OFF. In a quiet
kitchen you may hear slight“click-
ing”sounds during cooking, indicating heat settings selected are
being maintained.
Sv,itching heats to higher settings
always show a quicker change than
switching to lower settings.
step1
Grasp contol knob and push in. . .
I
/~*
‘-;
‘~
m
,}t%.,.,
4.
Turn either clockwise or counterclockwise to desired heat setting.
control must be pushed in to set
only from OFF’ position. when
control is in any position other
than OFF, it may be rotated
without pushing im.
B%sure you turn control to IOFF
when you finish cooking. An indi-
cator light will glow when ANY
herit on any surface unit is on.
cooking ‘Guide
forusingHeats
Quick start for cooking;
bring water to boil.
Fast fry, pan broil; maintain fast boil on large
amount of food.
Saute and brown; maintain slow boil on large
amount of food.
Cook after starting at
HIGH; cook with little
water in covered pan.
Steam rice, cereal; maintain serving temperature
of most foods.
i, At ljIGH, MED HI, never leave
food unattended. Boilovers cause
smoking; greasy spillovers may
catch fire.
2. At WARM, LOW, melt choco-
late, butter on small unit.
-..—.-
 Loading...