

Hotpoint RB 735, RB 756, RB 745, RB 766, RB 796 Use And Care Manual
...
I
I
SELF-CLEAN OVEN ELECTRIC RANGE
HOTPOINT
,r--
,--
i ‘- ‘?~
f
“s
“ ~.
...
\
II ‘ ‘, “:-” ~ ~
t“ . ~ ‘“), ‘~ ~ ‘
!
; ,“,, .:4 ~
‘7}
N >“ ‘“’L -L “
t“
a
““V
.’
\
1
\
.... .
y> -;’-
)q’,
This book was written for you. It is a guide for using and
caring for your new Hotpoint Range with Self-Clean oven. (See
Feature Chart on the following page.)
This appliance was designed to give you years of dependable
and efficient service. For best results, read the instructions
carefully and refer to them when necessary.
“,//”
‘#4
Remember, as the range does its
work of cookin a,nd cleaning,
&
/
~->-
i
-’~;L-&22i$ ‘my =~$f~r P~~:&~d;~ ‘“:/-- ~ , ‘- “-–2. _
..’*#.
.34
trim rings, reflector pans and other surfaces
cool before touching them.
In case you have any special questions,
we hope you will write us, and we’ll be glad to help.
Sincerely, ._._. ~ >
,.
‘* /’
.
SURFACE COOKING
Calrod@ Surface Units, Controls,
Reflector Pans, Use of Aluminum Foil. .4-7
Cooking Guide and Information . . . . ...7-8
Cooking Heats-How to Use . . . . . . . . . ...5
Cooking Utensils-Materials and Sizes ..5
Fluorescent Lamp-How To Start . . . . ...7
Common Sense Rules . . . . . . . . . . . . . ...6-7
3-in-l unit . . . . . . . . . . . . . . . . . . . . . . . . . ..9
3-in-1 Super-Matic Unit . . . . . . . . . . ...9-11
USING YOUR OVEN
Baking, Guide . . . . . . . . . . . . . . . . . . . . . ..15
Broiling, Guide . . . . . . . . . . . . . . . . . . . ...17
Minute Timer, Clock, Automatic Oven
Timer, Timed Appliance Outlet . ...12-13
Roasting, Guide . . . . . . . . . . . . . . . . . . ...16
Roast-Right Meat Thermometer . . ...18-19
Rota-Grill Rotisserie, Use of
AluminumFoil . . . . . . . . . . . . . . . . . ..20-21
2
Hotpoint Home Economics Institute
“’ 5600 West Taylor Street, Chicago, Illinois 60644
j
“4
--L-i b+..L A
LL’
Rota-Grill Cooking Guide . . . . . . . . . . ...22
Using Your Oven, Aluminum Foil . . . ...14
HOW TO CARE FOR YOUR RANGE
Appliance Outlet (s) —Fuse . . . . . . . . ...24
Broiler Pan, Use of Aluminum Foil . . ...25
Careof Your Range . . . . . . . . . . . . . . ..23-26
Cleaning Charts, Parts, All Finishes ..29-30
Lamps, How To Replace . . . . . . . . . . . ...25
Oven Thermostat, Adjusting . . . . . . . . ...24
Oven Vent, Duct, Use of Aluminum Foil, 24
Porcelain Enamel . . . . . . . . . . . . . . . . . ...23
Surface Units, Stand-Up Feature,
Removable Trim Rings . . . . . . . . . . . . ...23
Self-Clean Oven . . . . . . . . . . . . . . . . . ..26-29
GENERAL
Before You Call For Service . . . . . . . . ...31
Model and Serial Number Location . . ...31
Warranty Information . . . . . . . . . . . . . ...32
$-
t
17ea”tw’e
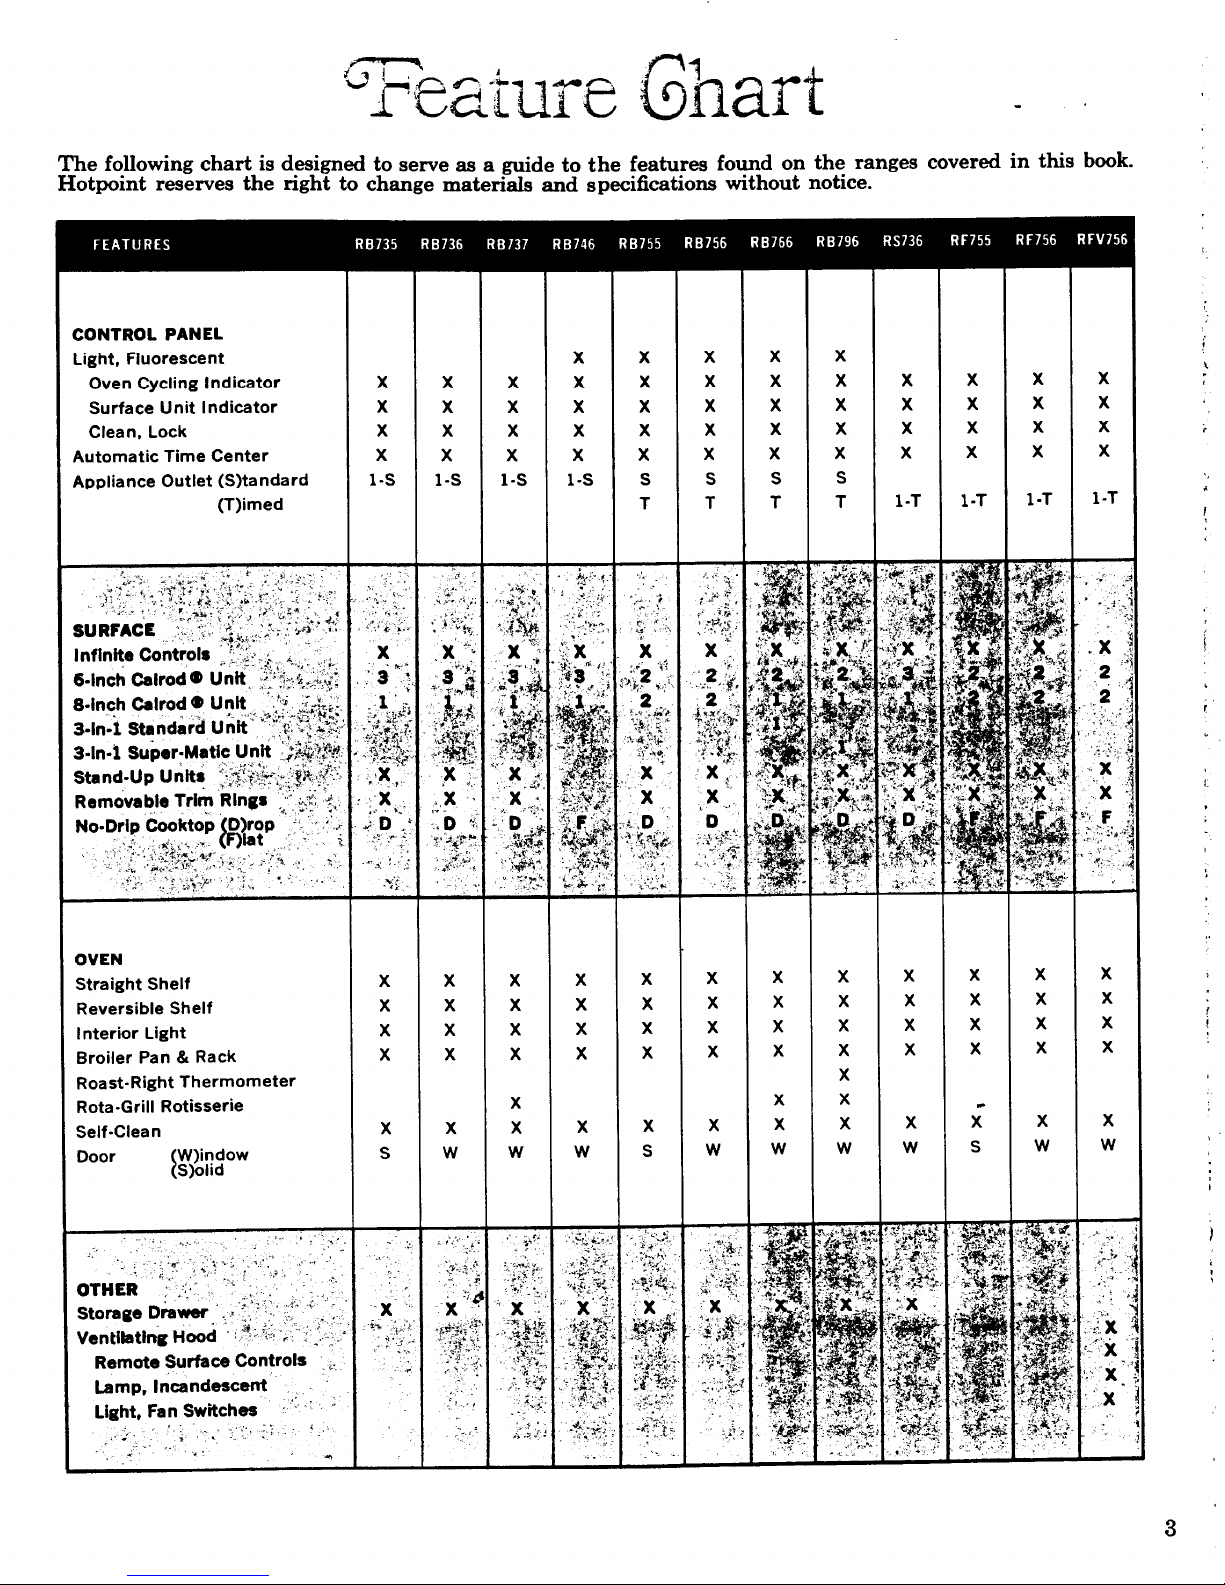
The following chart is designed to serve as a fide to the features found on the ranges covered in this book.
Hotpoint reserves the right to change materials and specifications without notice.
✌✎
❑
:ONTROL PANEL
.ight, Fluorescent
Oven Cycling Indicator
Surface Unit Indicator
Clean, Lock
tutomatic Time Center
\ppiiance Outlet (S)tandard
(T)imed
✎
x
x
x
x
1-s
✌✎
✎✌
❑
x
x
x
x
1
-s
x’
x
x
x
1-s
:,,
•l
x
x
x
x
x
1-s
~ht . .
✚
❑
x
x
x
x
x
s
T
❑
x
x
x
x
1-T
❑
x
x
x
x
1-T
DVEN
Straight Shelf
Reversible Shelf
Interior Light
Broiler Pan & Rack
Roast-Right Thermometer
Rota-Grill Rotisserie
Self-Clean
Door
V#i:ow
[
r
I
x
x
x
x
x
s
x
x
x
x
x
w
x
x
x
x
x
x
w
x
x
x
x
x
w
x
x
x
x
x
s
x
x
x
x
x
w
f
Remote Surface Controls ..
Lamp, Incandescent
Light, Fan Switches ~‘ -
,,, .,.,-’<
J
. . *’
,- .
. .
.’. .
3
WithWourTnfinite
West Gontrds
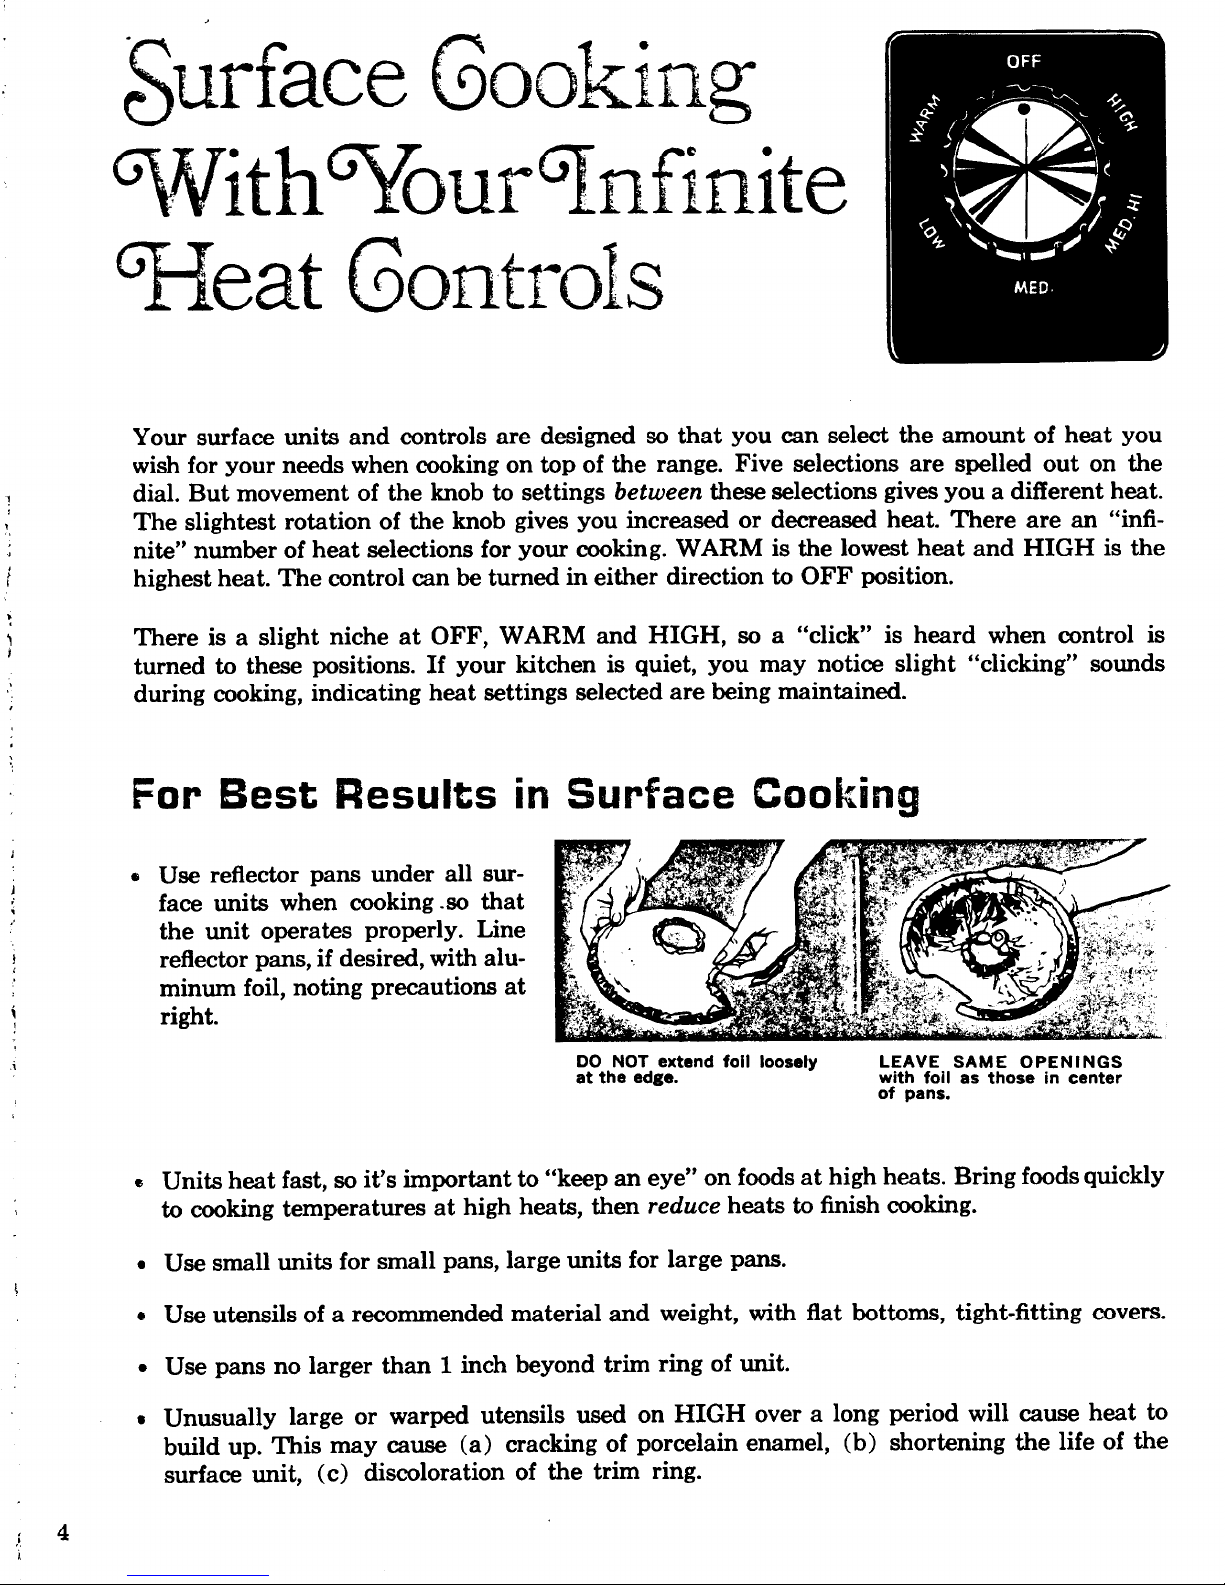
and controls are designed so that you can select the amount of heat youYour surface units
wish for your needs when cooking on top of the range. Five selections are spelled out on the
dial. But movement of the knob to settings between these selections gives you a difYerentheat.
The slightest rotation of the knob gives you increased or decreased heat. There are an “infi-
:
I
nite” number of heat selections for your cooking. WARM is the lowest heat and HIGH is the
highest heat. The control can be turned in either direction to OFF position.
There is a slight niche at OFF, WARM and HIGH, so a “click” is heard when control is
turned to these positions. If your kitchen is quiet, you may notice slight “clicking” sounds
during cooking, indicating heat settings selected are being maintained.
For Best Results in Surface Cocking
I
,
.,
i
1
Use reflector pans under all sur-
face units when cooking .s0 that
the unit operates properly. Line
reflector pans, if desired, with aluminum foil, noting precautions at
right.
DO NOT extend foil loosely LEAVE SAME OPENINGS
at the edge.
6
Units heat fast, so it’s important to “keep an eye” on foods at high heats. Bring foods quickly
with foil as those in center
of pans.
to cooking temperatures at high heats, then reduce heats to fiish cooking.
Use small units for small pans, large units for large pans.
Use utensils of a recommended material and weight, with flat bottoms, tight-fitting covers.
Use pans no larger than 1 inch beyond trim ring of unit.
Unusually large or warped utensils used on HIGH over a long period will cause heat to
build up. T’his may cause (a) cracking of porcelain enamel, (b) shortening the life of the
surface unit, (c) discoloration of the trim ring.

Lkensil hi!iater%k and F-kwvw Use T’hem
ALUMINUM: Medium-weight aluminum utensils (edge of utensil is about 1 to 2 U.S. quarters in thickness) are recommended because they heat evenly and quickly. Skillets do a good
job of browning foods and saucepans (with tight fitting lids) are ideal for nutritious cooking
with little water. Use regular and non-stick type finishes, but follow directions in this book.
Results which may occur with other utensil materials are as follows:
CAST IRON: If heated slowly, most skillets will give satisfactory results.
ENAMELWARE: Many types and varieties of attractive enamelware are on the market.
Because some varieties could, under certain conditions, melt and fuse to the unit, we recommend you follow the utensil manufacturer’s recommendations for cooking with that utensil;
or use only LOW to MED heats.
GLASS: Use glass on heat settings MED, LOW or WARM only. Utensils may break with
sudden temperature changes. Glass manufacturers recommend a wire grid when using glass on
electric surface units. Obtain grid when utensil is purchased, or at housewares section of most
department stores.
HEATPROOF GLASS CERAMIC: This material heats and cools slowly. Use lower heats
than given on Cooking Guide.
STAINLESS STEEL: This metal is usually combined with copper, aluminum or other metals
for improved heat distribution. These combination-metal skillets generally work more satisfactorily if used at a medium heat or as recommended by the manufacturer.
. .
.
&ldmcJ GkMck for Wmg FdeGts
HIGH
MED HI
MED
Low
WARM
NOTE: 1.
Quick start for cooking; bring water to boil.
Fast fry, pan broil; maintain fast boil on large amount of food.
Saute’and brown; maintain slow boil on large amount of food.
Cook after starting at HIGH; cook with little water in covered pan.
Steam rice, cereal; maintain serving temperature of most foods.
At HIGH, MED HI, never leave food unattended. Boilovers cause smoking;
greasy spillovers may catch fire.
At WARM, melt chocolate, butter on small unit.
2.
..- .
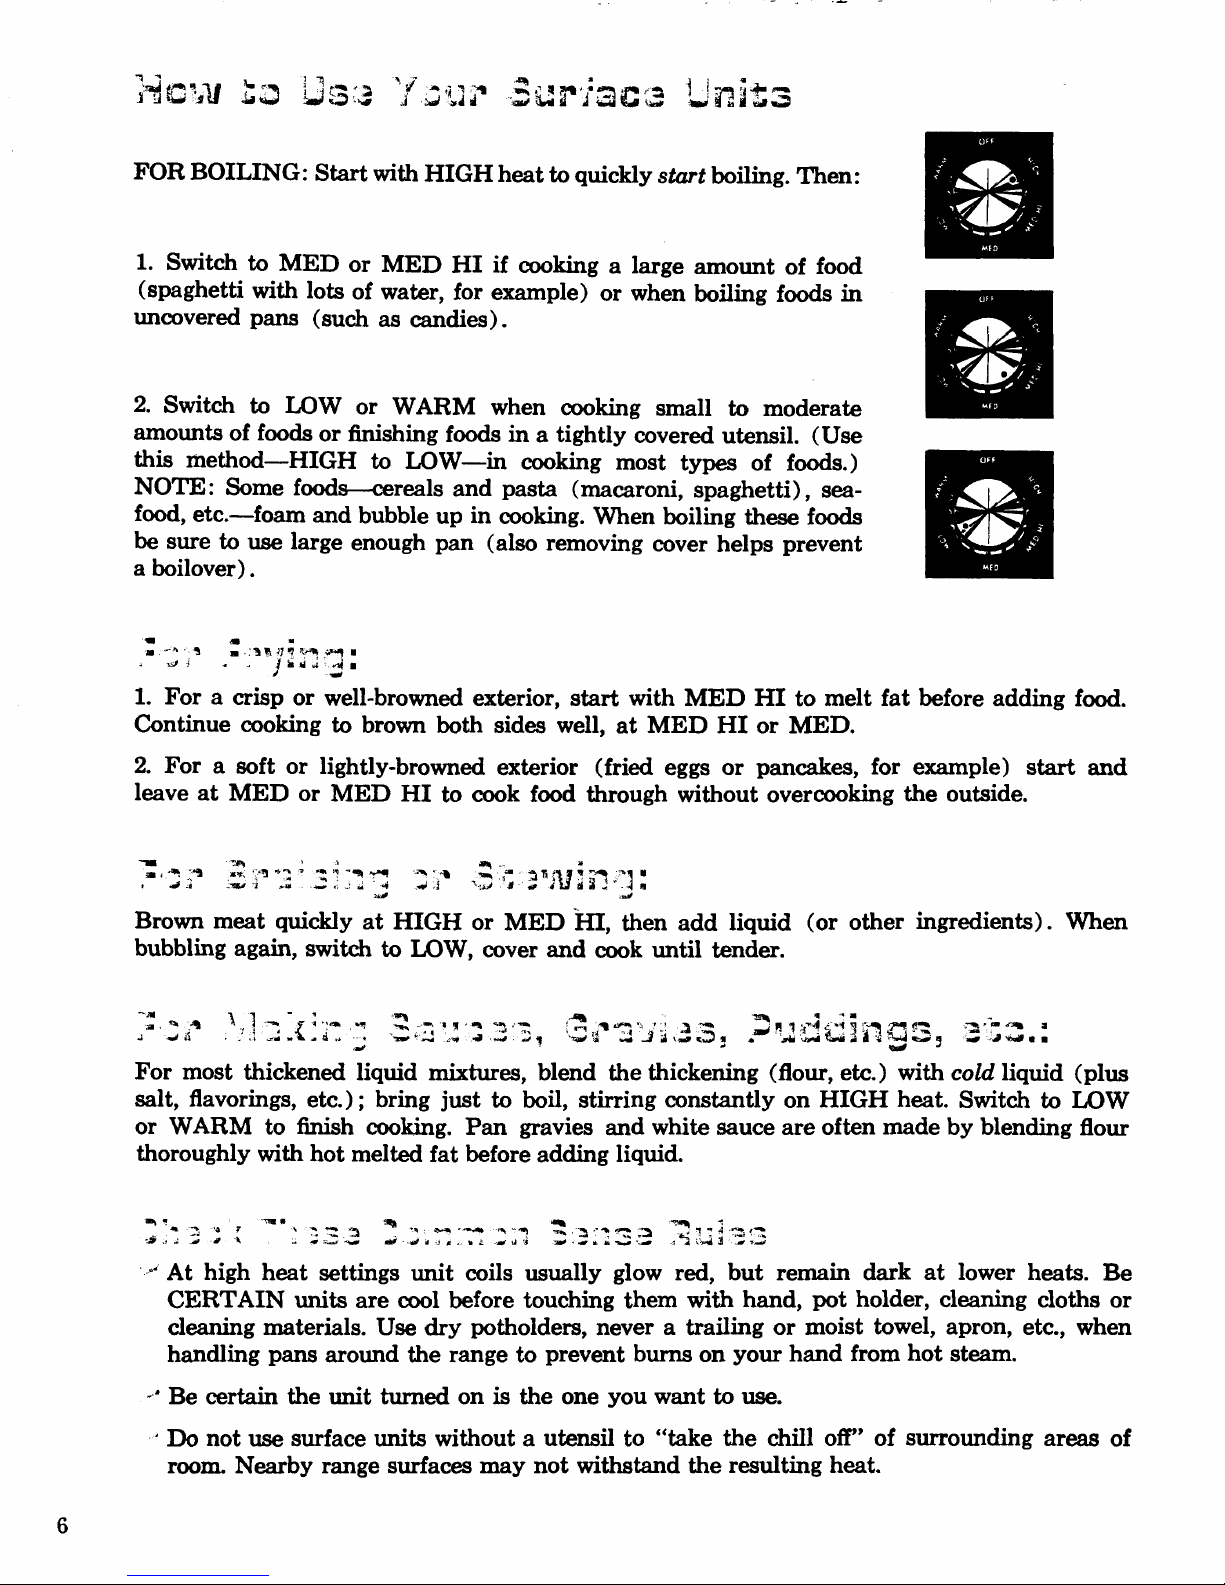
FOR BOILING: Start with HIGH heat to quickly stit boiling. Then:
1. Switch to MED or MED HI if cooking a large amount of food
(spaghetti with lots of water, for example) or when boiling foods in
uncovered pans (such as candies).
2. Switch to LOW or WARM when cooking small to moderate
amounts of foods or fishing foods in a tightly covered utensil. (Use
this method-HIGH to LOW-in cooking most types of foods.)
NOTE: Some foods-cereals and pasta (macaroni, spaghetti), sea-
food, etc.—foam and bubble
up in cooking. When boiling these foods
be sure to use large enough pan (also removing cover helps prevent
a boilover).
1. For a crisp or well-browned exterior, start with MED HI to melt fat before adding food.
Continue cooking to brown both sides well, at MED HI or MED.
2. For a soft or lightly-browned exterior (fried eggs or pancakes, for example) start and
leave at MED or MED HI to cook food through without overcooking the outside.
-
?at-~’-
d; .m..+i.k+=<. .,dd .Ji
*
w
.w..=q.~a*~-q.#q “.. *
>,
*
4.=
..2$, yivii’y-j:
Brown meat quickly at HIGH or MED ‘~, then add liquid (or other ingredients). when
bubbling again, switch to LOW, cover and cook until tender.
For most thickened liquid mixtures, blend the thickening (flour, etc. ) with cokf liquid (plus
salt, flavorings, etc. ); bring just to boil, stirring constantly on HIGH heat. Switch to LOW
or WARM to finish cooking. Pan gravies and white sauce are often made by blending flour
thoroughly with hot melted fat before adding liquid.
-
At high heat settings unit coils usually glow red, but remain dark at lower heats. Be
CERTAIN units are cool before touching them with hand, pot holder, cleaning cloths or
cleaning materials. Use dry potholders, never a trailing or moist towel, apron, etc., when
handling pans around the range to prevent burns on your hand from hot steam.
-’ Be certain the unit turned on is the one you want to use.
4Do not uae surface units without a utensil to “take the chiIl oil” of surrounding areas of
room. Nearby range surfaces may not withstand the resulting heat.
6
#Be sure you turn control all the way to OFF when you finish cooking. An indicator light
will glow when ANY heat on any surface unit is on.
# A VENTILATING HOOD with a fan helps to draw in cooking vapors before they escape
to other rooms. Because the fan has such drawing power, special caution is needed to avoid
spillovers which can catch fire. Never operate the hood unattended when cooking at high
heats.
Turn off fan and remove pan from range before
intentionally “flaming” liquor or other spirits.
4
(on models so equipped)
Push button marked LAMP or PUSH-HOLD-RELEASE; hold a few seconds or until light
fiickers, release, and lamp will turn on. If lamp doesn’t start the first time you push and hold
button, repeat operation twice more to be certain lamp is not burned out. To turn off, push
button and release. To replace lamp, see Care Section.
For ventilating hood model in this book equipped with a light and fan: (a) push LIGHT
switch in and release to turn on and off, (b) push FAN switch once for high speed, push
twice for low speed, push again for off. Also see booklet Instructions on How to Use Your
Hotpoint Ventilating Hood, Model RV465, for operating and maintaining instructions.
.
L
L
“.—J
LJw
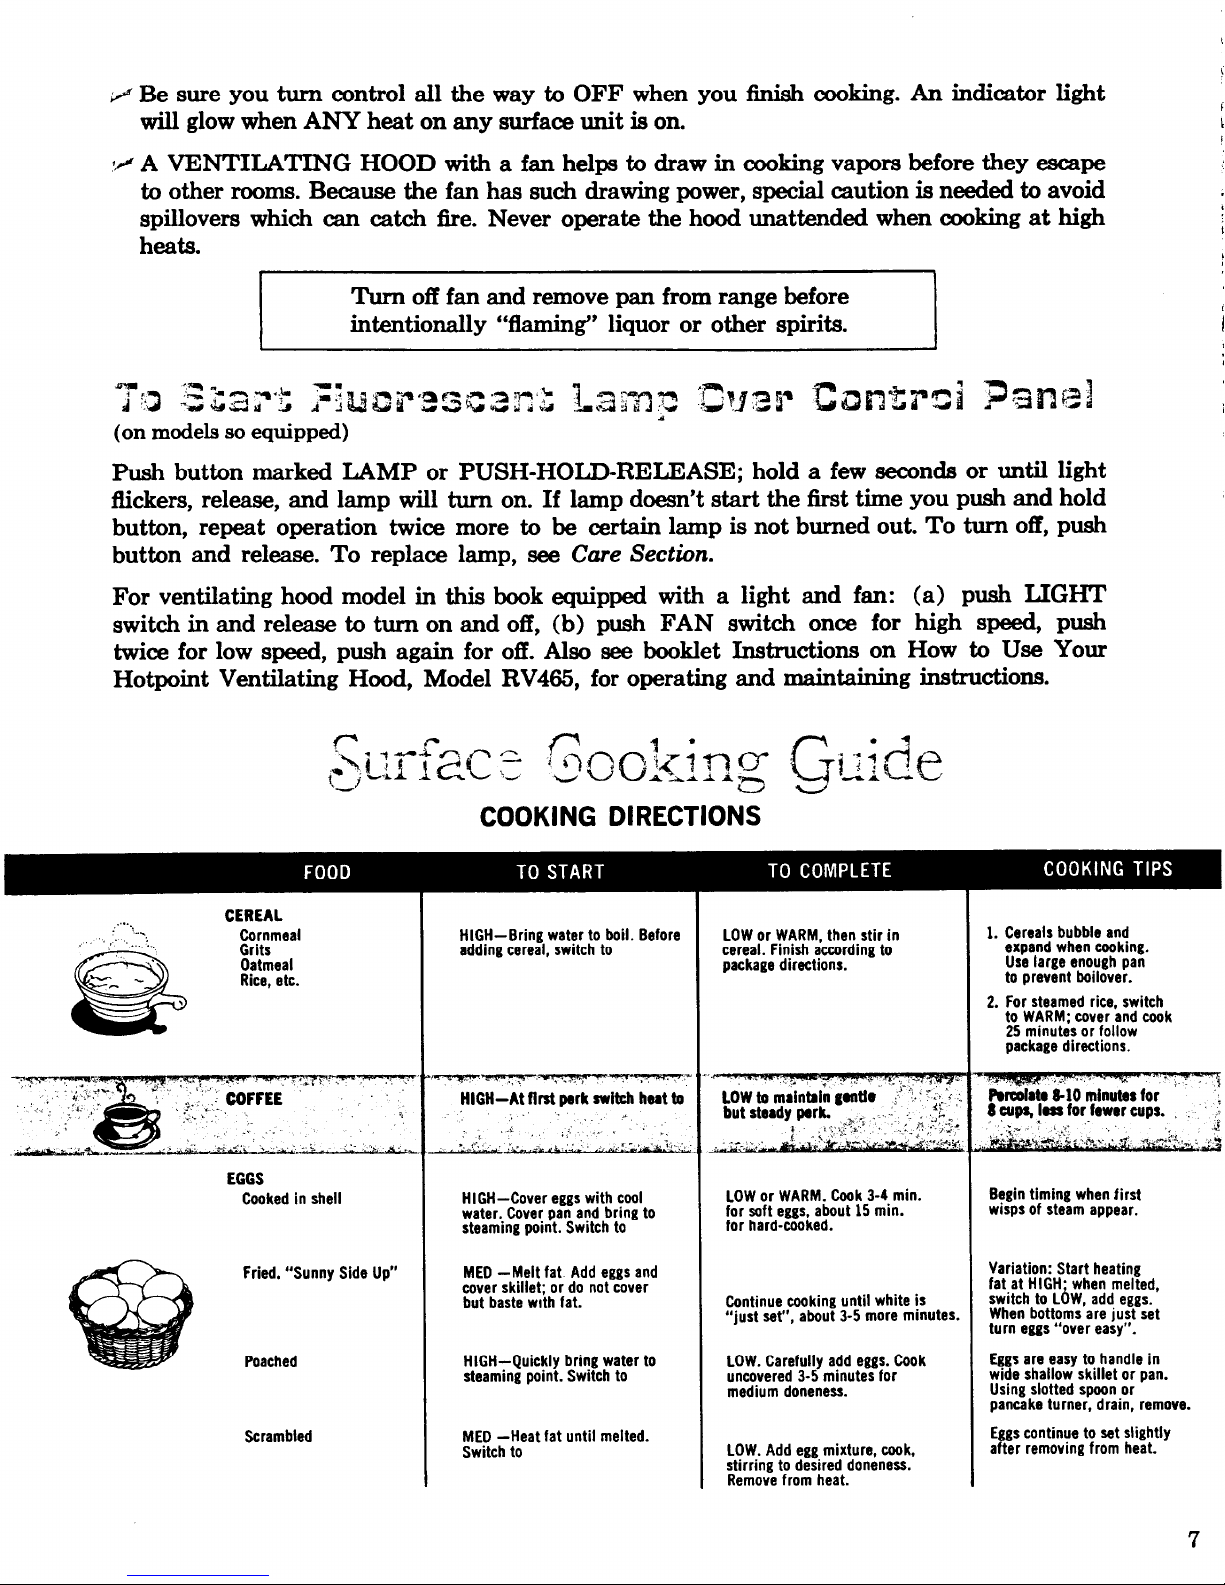
COOKING DIRECTIONS
\
CEREAL
Cornmeal
Grits
Oatmeal
Rice,etc.
EGGS
Cooked in shell
Fried,“SunnySideUp”
Poached
Scrambled
HIGH-Bring watertoboil. Before
addingcereal,switchto
,,
parkswitchheatto
.! --.” .
HIGH-At ffrst
. ..
—~
HIGH-Covereggswith cool
water.Coverpanandbringto
steamingpoint.Switchto
MED
-Meit fat Addeggsand
coverskillet;ordo notcover
butbastewithfat.
HIGH-Quicklybringwaterto
steamingpoint.Switchto
MED-Heat fat untilmelted.
Switchto
LOWor WARM,thenstir in
cereal.Finishaccordingto
packagedirections.
.$
.!,.
LOWto mainta/ngenth “.’-.’ “i;’;
i
.-
LOW or WARM. Cook 3-4 min.
for soft eggs,
for hard-cooked.
Continue cooking until white is
“just wt”, shut 3-5
LOW.Carefullyaddeggs.Cook
uncovered3-5 minutes
medium doneness.
LOW. Add egg mixture, cook,
stirring to desired doneness.
Remove from heat.
f
about15min.
moreminutes.
for
1. Cereals bubble and
expand when cooking.
Uselarge enough pan
to prevent boilover.
2. Forsteamedrice,switch ‘
toWARM;coverandcook
25minutesor follow
packagedirections.
~ ‘
FwcoM 8-10 minutesfor +
8 CUW1.ssforfewercups. ~
Begin timing when first
wisps of steam appear.
Variation: Start heating
fat at HIGH”
switchtoLhW,addeggs.
Whenbottomsarejust sat
turneggs“overeasy”.
Eggsareeasyto handlein
wideshallowskilletor pan.
Usinfislottedsooonor
pam%ke turne~, drain, remove.
Eggscontinue to set slightly
after removing from heat.
,. :..
whenmelted,
“.
.....
‘-.
,6.
s
“..
--
w
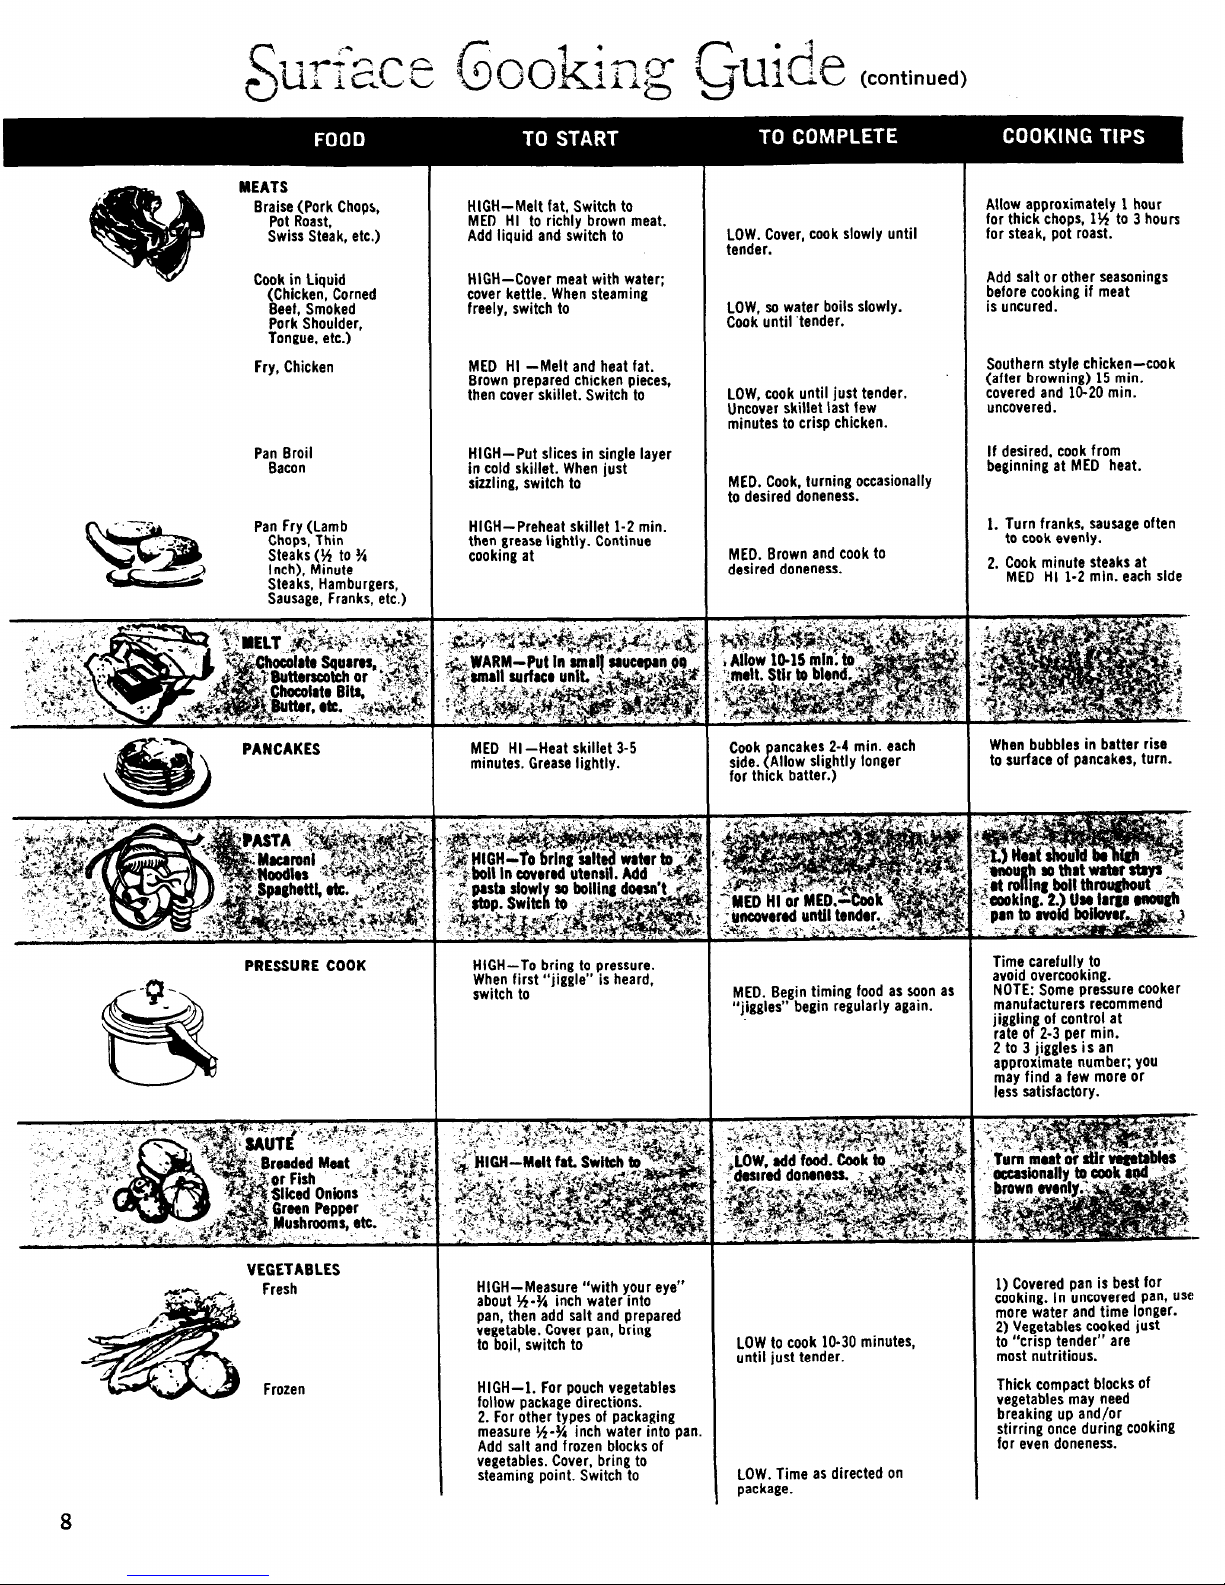
MEATS
,’
Braise (Pork Chops,
Pot Roast,
Swiss Steak, etc.)
Cook in Lirnsirl
‘(Chicke~,-Corned
Beet,Smoked
PorkShoulder,
Tongue,etc.)
Fry,Chicken
PanFry(Lamb
Chops,Thin
Steaks(% to%
Inch), Minute
Steaks, Hamburgers,
Sausage, Franks, etc.)
/
@
PANCAKES
PRESSURE COOK
/-Q’\
VEGETABLES
Fresh
Frozen
HIGH-Melt fat, Switch to
MED HI to richly brown meat.
Add liquid and switch to
tilGH-Cover meat with water;
cover kettle. When steaming
freely, switch to
MED HI -Melt and heat fat.
Brown prepared chicken pieces,
then cover skillet. Switch to
HIGH-Put slices in single layer
in cold skillet. When just
sizzling, switch to
HIGH-Preheat skillet 1-2 min.
ttsen grease lightly. Continue
cooking at
MED HI –Heat skillet 3-5
minutes. Grease fightly.
HfGH-To bring to pressure.
When first “jiggle” is heard,
switch to
HIGH-Measure “with your eye”
about ?4-% inch water into
pan, then add salt and prepared
vegetable. Cover pan, bring
to boil, switch to
HIGH-1. For pouch vegetables
follow package directions.
2. For other types of packaging
measure l%-% inch water into pan
Add salt and frozen blocks of
vegetables. Cover, bring to
steaming point. Switch to
LOW. Cover, cook slowly until
tender.
LOW, so water boils slowly.
Cook until ‘tender.
LOW,cookuntiljusttender.
Uncoverskillet last few
minutestocrispchicken.
MED. Cook, turning occasionally
to desired doneness.
MED. Brown and cook to
desired doneness.
Cook ancakes 2-4 min. each
[
side. Allow slightly longer
for thick batter.)
MED. Begin timing food as won as
“jiggles” begin regularly again.
LOW to cook 10-30 minutes,
until just tender.
Allow approximately 1 hour
for thick chops, 1% to 3 hours
for steak, pot roast.
Add salt or other seasonings
before cooking if meat
is uncured.
Southern style chicken-cook
(after browning) 15 min.
covered and 10-20 min.
uncovered.
If desired,cookfrom
beginningat MED heat.
1. Turnfranks,sausageoften
tocookevenly.
2. Cook minute steaks at
MED HI 1-2 min. each side
Whenbubblesin batterrise
tosurfaceofpancakes,turn.
Time carefully to
avoid overcooking.
NOTE: Some pressure cooker
manufacturers recommend
jiggling of control at
rate of 2-3 per min.
2 to 3 jiggles is an
approximate number: you
may find a few more or
fess satisfactory.
1)Coveredpanis bestfor
cooking. I n uncovered pan, us~!
more water and time longer.
2) Vegetables cooked just
to “crisp tender” are
most nutritious.
Thick compact blocks of
vegetables may need
breaking up and/or
stirring once during cookin8
for even doneness.
8
LOW. Time as directed on
package.

~-
Gt
(
“! !:”r~’~=-ks ,-’ G
A A.&L
AA A
%.+:. A’..d
-~
t<
“; \.n ;.:
A44&
L
(on models so equipped)
This versatile surface unit offers the convenience
of three units in one. The unit may be used as an
8-inch, 6-inch, or 4-inch unit to accommodate any
size utensil. Turn size selector switch, next to
surface unit control, to 8, 6, or 4. Then turn surface unit control to desired heat setting. Match
unit size selection to size of utensil.
LARGE-8-inch unit. Turn
switch to 8 when using large
utensils that completely cover medium-sized cooking utenthe unit (3-quart to 6-quart
saucepans or 8-to-10-inch cover the unit (2 to 21/2skillet). Then select desired quart saucepans or 6 to 7heat setting.
HOW TO USE THE
MEDIUM—6-inch unit.
Turn switch to 6 when using
sils that do not completely
inch skillets). Then select desired heat setting.
This sensor “senses” (measures) the heat of
the pan and it can detect slight changes in
THREE-IN-ONE
temperature. As it measures the heat of the
pan, the sensor tells the control to turn the
heat “on” and “off” to keep pan temperature
just right. Because it happens very frequently, the heat going on and off usually cannot
The Super-Matic is an automatic surface
be noticed.
unit which controls the temperature of your
cooking utensil
to give the same type of
automatic cooking that you may have ex-
perienced with a well-controlled electric skil-
let or saucepan. You can identify this unit
by the “sensor” in the center. It is springmounted and will move when you push down
on it.
SMALH-inch unit. Turn
switch to 4 when using small
cooking utensils about 4
inches in diameter (as a 1quart saucepan). Then select
desired heat setting.
OFF
9
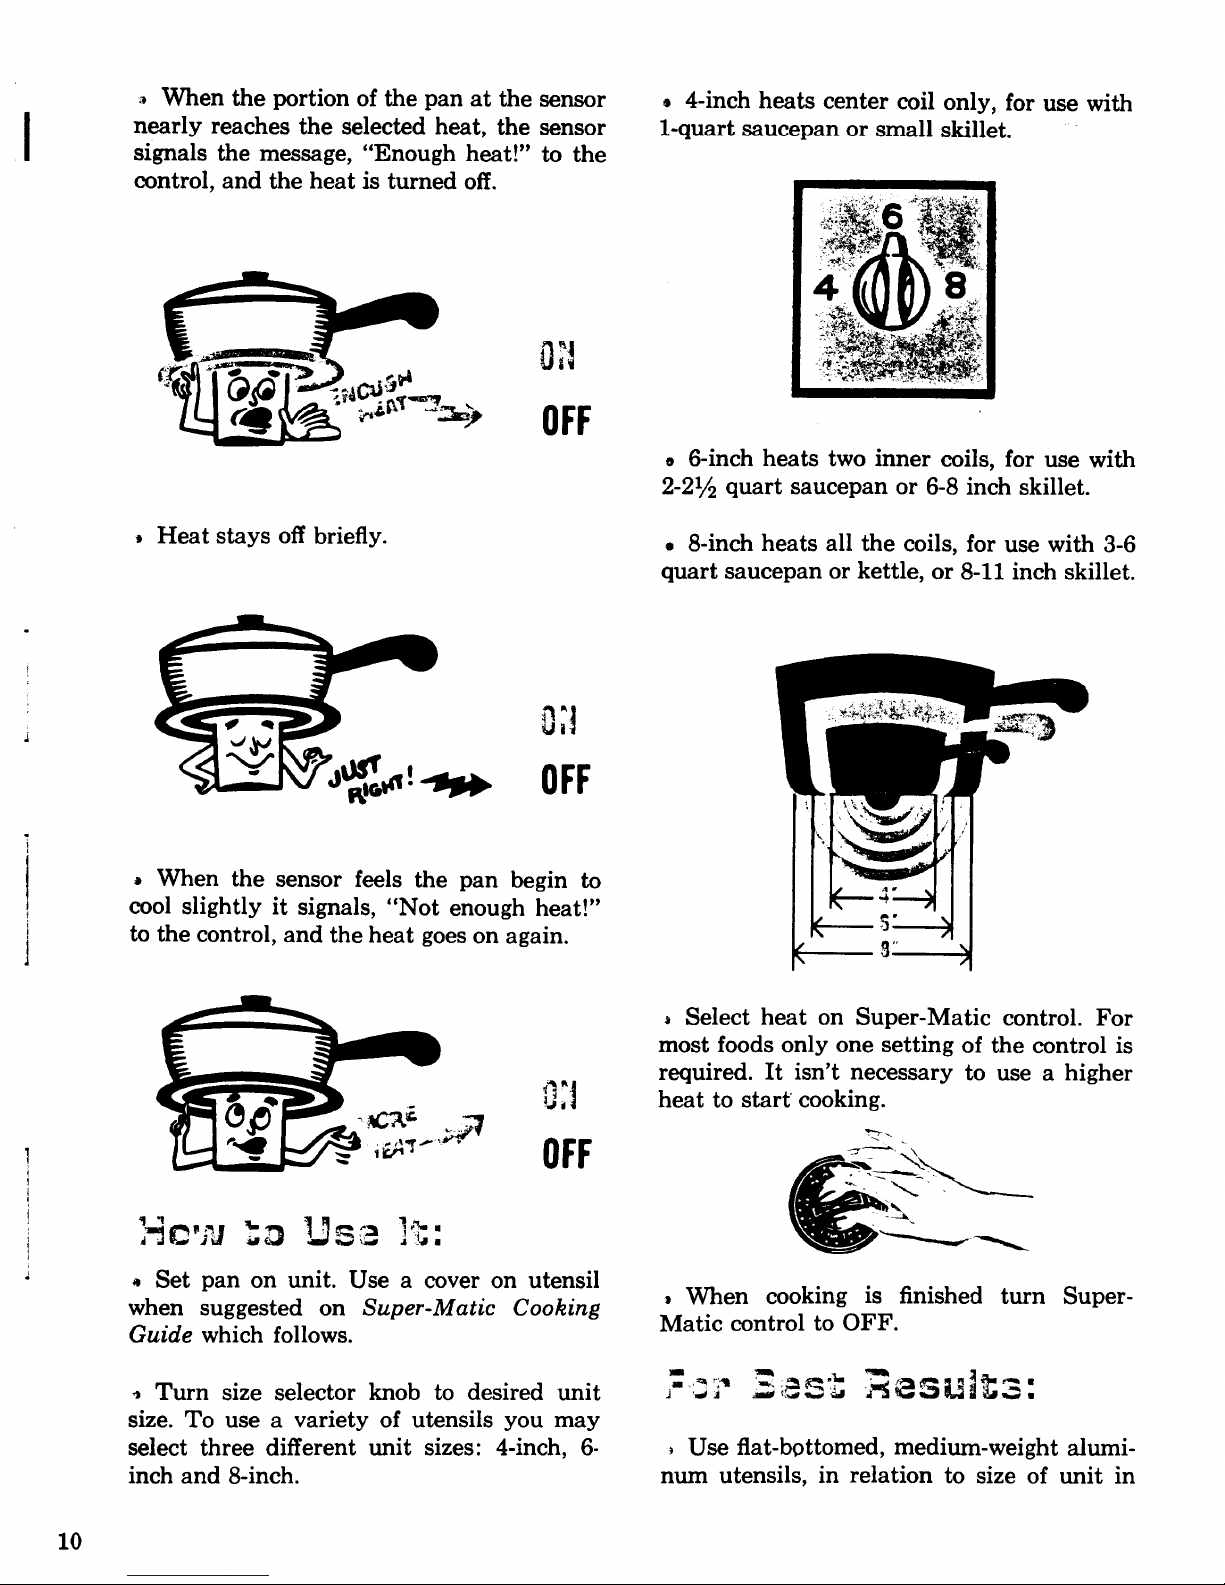
* When the portion of the pan at the sensor
I
I
nearly reaches the selected heat, the sensor
signals the message, “Enough
control, and the heat is turned
heat!” to the
off.
@ 4-inch heats center coil only, for use with
l-quart saucepan or small skillet.
e 6-inch heats two inner coils, for use with
2-2% quart saucepan or 6-8 inch skillet.
.
.
!
Heat stays off briefly.
. 8-inch heats all the coils, for use with 3-6
quart saucepan or kettle, or 8-11 inch skillet.
I
When the sensor feels the pan begin to
cool slightly it signals, “Not enough heat!“
to the control, and the heat goes on again.
9 Select heat on Super-Matic control. For
most foods only one setting of the control is
required. It isn’t necessary to use a higher
heat to start cooking.
1
!
I
I
$
I
1
# Set pan on unit. Use a cover on utensil
when suggested on
Guide
which follows.
Super-Matic Cooking
* Turn size selector knob to desired unit
size. To use a variety of utensils you may
select three different unit sizes: 4-inch, 6inch and 8-inch.
10
~ When cooking is finished turn Super-
Matic control to OFF.
* Use flat-bottomed, medium-weight alumi-
num utensils, in relation to size of unit in
 Loading...