

Page 1

Instructions for use
WASHING MACHINE
GB
English,1
RPD 826 D
CZ
Česky,13
SK
Slovensky,25
Contents
Installation, 2-3
Unpacking and levelling
Connecting the electricity and water supplies
The first wash cycle
Technical data
Care and maintenance, 4
Cutting off the water or electricity supply
Cleaning the washing machine
Cleaning the detergent dispenser drawer
Caring for the door and drum of your appliance
Cleaning the pump
Checking the water inlet hose
Precautions and tips, 5
General safety
Disposal
Opening the porthole door manually
Description of the washing machine, 6-7
Control panel
Display
GB
Running a wash cycle, 8
Wash cycles and functions, 9
Table of wash cycles
Wash functions
Detergents and laundry, 10
Detergent dispenser drawer
Preparing the laundry
Special wash cycles
Load balancing system
Troubleshooting, 11
Service, 12
1
Page 2
Installation
GB
! This instruction manual should be kept in a
safe place for future reference. If the washing
machine is sold, transferred or moved, make
sure that the instruction manual remains with
the machine so that the new owner is able to
familiarise himself/herself with its operation
and features.
! Read these instructions carefully: they contain vital information relating to the safe installation and operation of the appliance.
Unpacking and levelling
Unpacking
1. Remove the washing machine from its
packaging.
2. Make sure that the washing machine has
not been damaged during the transportation
process. If it has been damaged, contact the
retailer and do not proceed any further with
the installation process.
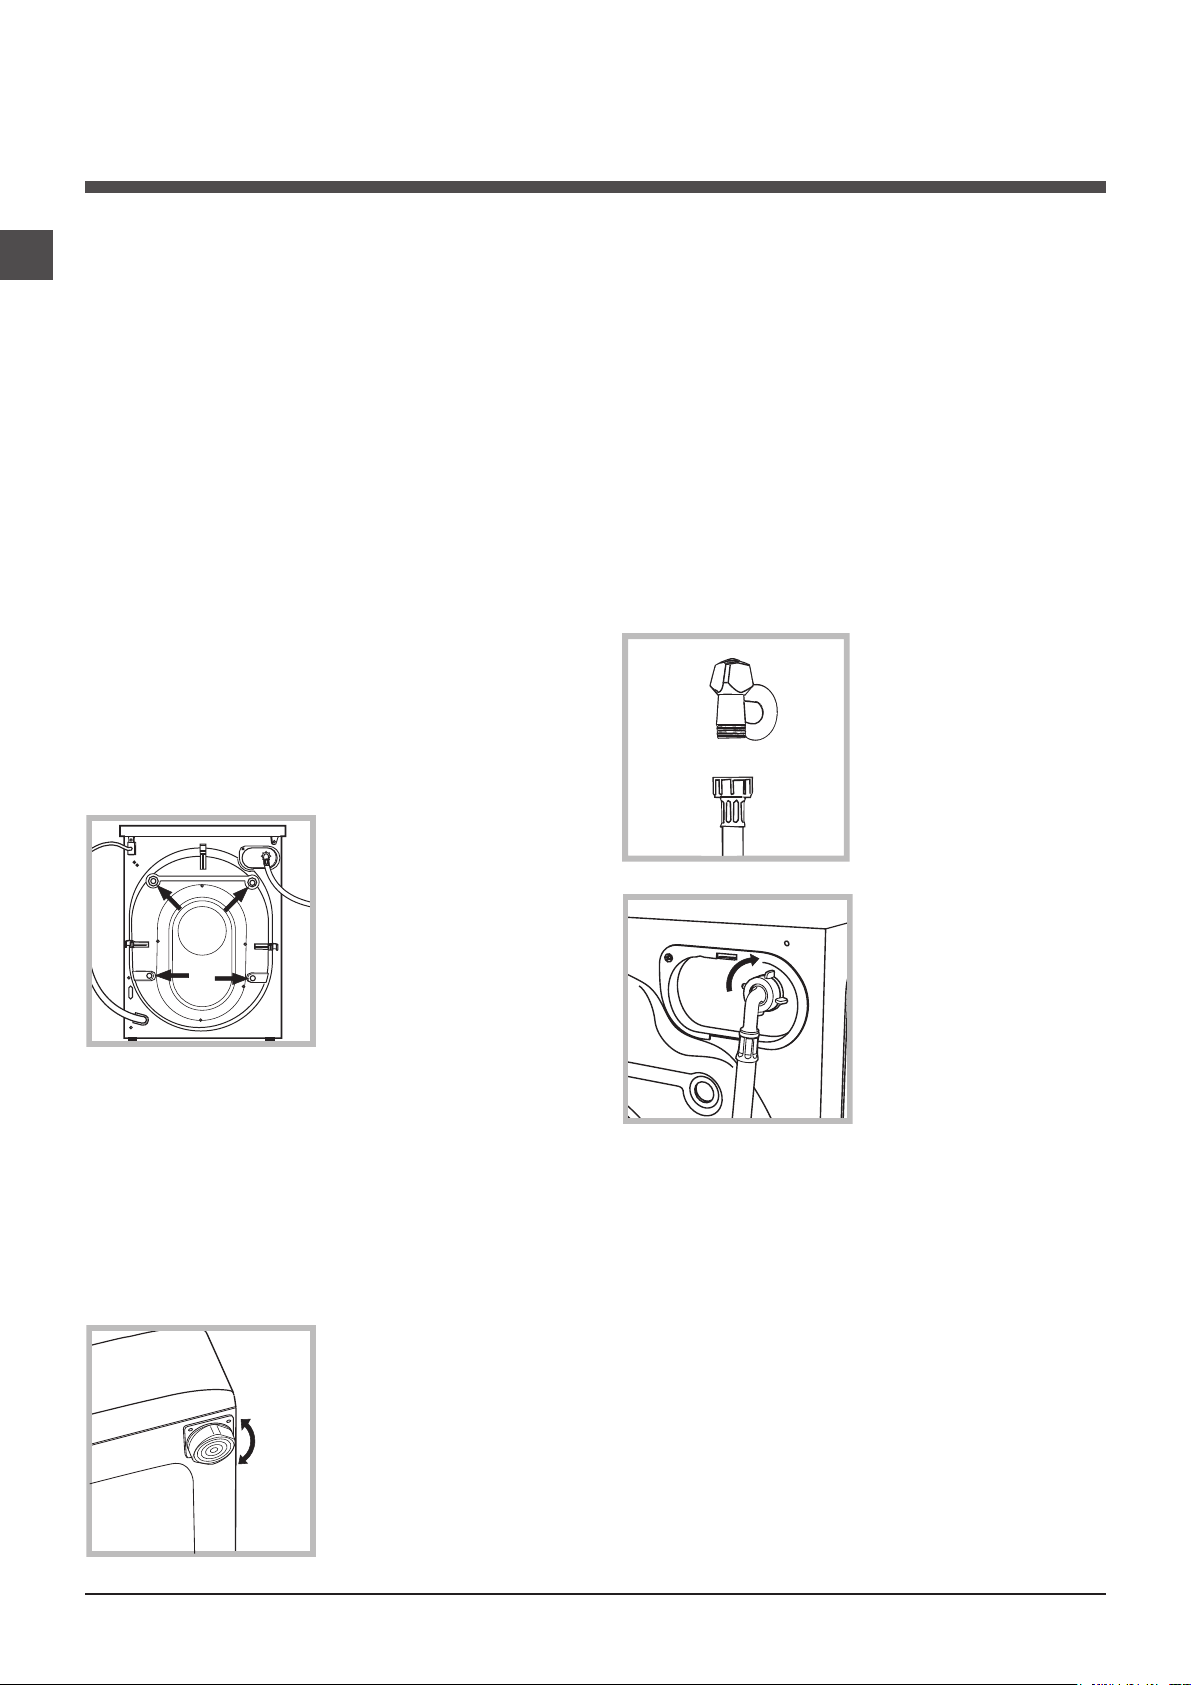
3. Remove the 4 protective screws (used
during transportation)
and the rubber washer with the corresponding spacer,
located on the rear
part of the appliance
(see figure).
4. Close off the holes using the plastic plugs
provided.
5. Keep all the parts in a safe place: you will
need them again if the washing machine needs to be moved to another location.
! Packaging materials should not be used as
toys for children.
Levelling
venness by tightening or loosening the adjustable front feet (see figure); the angle of inclination, measured in relation to the worktop,
must not exceed 2°.
Levelling the machine correctly will provide
it with stability, help to avoid vibrations and
excessive noise and prevent it from shifting
while it is operating. If it is placed on carpet or
a rug, adjust the feet in such a way as to allow
a sufficient ventilation space underneath the
washing machine.
Connecting the electricity and
water supplies
Connecting the water inlet hose
1. Connect the inlet
hose by screwing it to
a cold water tap using
a 3/4 gas threaded
connection (see figu-
re).
Before performing the
connection, allow the
water to run freely until
it is perfectly clear.
2. Connect the inlet
hose to the washing
machine by screwing
it onto the corresponding water inlet of the
appliance, which is
situated on the top
right-hand side of the
rear part of the appliance (see figure).
3. Make sure that the hose is not folded over
or bent.
! The water pressure at the tap must fall within
the range of values indicated in the Technical
data table (see next page).
1. Install the washing
machine on a flat
sturdy floor, without
resting it up against
walls, furniture cabinets or anything else.
2. If the floor is not
perfectly level, compensate for any une-
2
! If the inlet hose is not long enough, contact a
specialised shop or an authorised technician.
! Never use second-hand hoses.
! Use the ones supplied with the machine.
Page 3
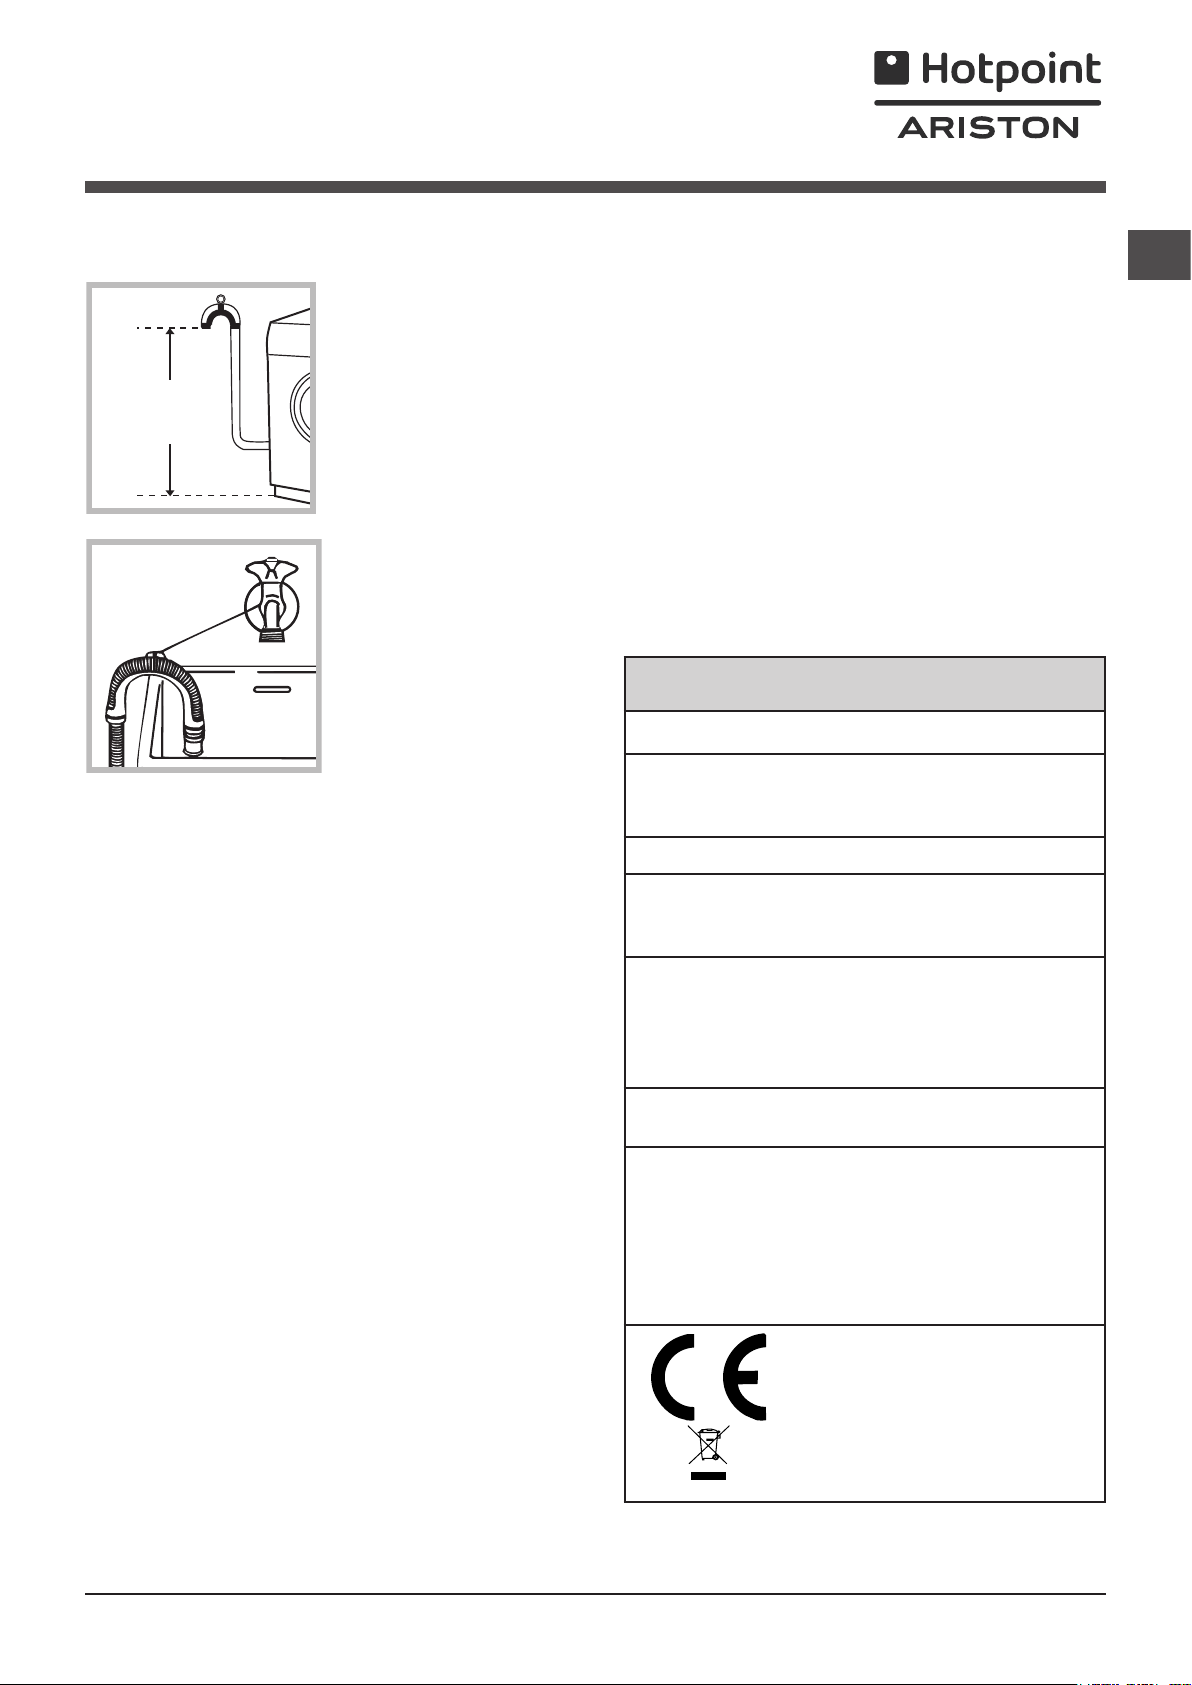
Connecting the drain hose
65 - 100 cm
Connect the drain
hose, without bending
it, to a drain duct or
a wall drain situated
between 65 and 100
cm from the floor;
alternatively, placed
it over the edge of a
basin, sink or tub, fastening the duct supplied to the tap (see
figure). The free end
of the hose should
not be underwater.
! We advise against the use of hose extensions;
if it is absolutely necessary, the extension must
have the same diameter as the original hose
and must not exceed 150 cm in length.
Electrical connections
Before plugging the appliance into the electricity socket, make sure that:
• thesocketisearthedandcomplieswithall
applicable laws;
• thesocketisabletowithstandthemaximum power load of the appliance as indicated
in the Technical data table (see opposite);
• thepowersupplyvoltagefallswithinthevalues indicated in the Technical data table (see
opposite);
• thesocketiscompatiblewiththeplugofthe
washing machine. If this is not the case, replace the socket or the plug.
! The washing machine must not be installed
outdoors, even in covered areas. It is extremely dangerous to leave the appliance exposed
to rain, storms and other weather conditions.
! When the washing machine has been installed, the electricity socket must remain within
easy reach.
! Do not use extension cords or multiple sockets.
! The cable should not be bent or compressed.
! The power supply cable must only be repla-
ced by authorised technicians.
Warning! The company shall not be held responsible in the event that these standards are
not observed.
The first wash cycle
Once the appliance has been installed, and
before you use it for the first time, run a wash
cycle with detergent and no laundry, using
wash cycle auto clean (see “Cleaning the wa-
shing machine”).
Technical data
Model
Dimensions
Capacity
Electrical
connections
Water connections
Spin speed
Test wash
cycles in
accordance
with regulations
1061/2010
1015/2010
RPD 826 D
width 59.5 cm
height 85 cm
depth 60,5 cm
from 1 to 8 kg
please refer to the technical
data plate fixed to the machine
maximum pressure
1 MPa (10 bar)
minimum pressure
0.05 MPa (0.5 bar)
drum capacity 62 litres
up to 1200 rotations per
minute
programme 9 ;
Eco Cotton 60°C.
programme 9 ;
Eco Cotton 40°C.
This appliance conforms to
the following EC Directives:
- 2004/108/EC (Electromagnetic Compatibility)
- 2006/95/EC (Low Voltage)
- 2012/19/EU (WEEE)
GB
3
Page 4
Care and maintenance
1
2
GB
Cutting off the water and electricity supplies
•Turnoffthewatertapaftereverywashcycle.
This will limit wear on the hydraulic system inside the washing machine and help to prevent
leaks.
•Unplugthewashingmachinewhencleaning
it and during all maintenance work.
Cleaning the washing machine
•Theouterpartsandrubbercomponents
of the appliance can be cleaned using a soft
cloth soaked in lukewarm soapy water. Do not
use solvents or abrasives.
•Thewashingmachinehasaautocleanprogramme for its internal parts that must be run
with no load in the drum.
To help the wash cycle you may want to use
either the detergent (i.e. a quantity 10% the
quantity specified for lightly-soiled garments)
or special additives to clean the washing
machine. We recommend running a cleaning
programme every 40 wash cycles.
To activate the programme, press the button for 5 seconds then press START/PAUSE
to start the programme, which will last roughly
70 minutes.
Cleaning the pump
The washing machine is fitted with a self-cleaning pump which does not require any maintenance. Sometimes, small items (such as coins
or buttons) may fall into the pre-chamber which
protects the pump, situated in its bottom part.
! Make sure the wash cycle has finished and
unplug the appliance.
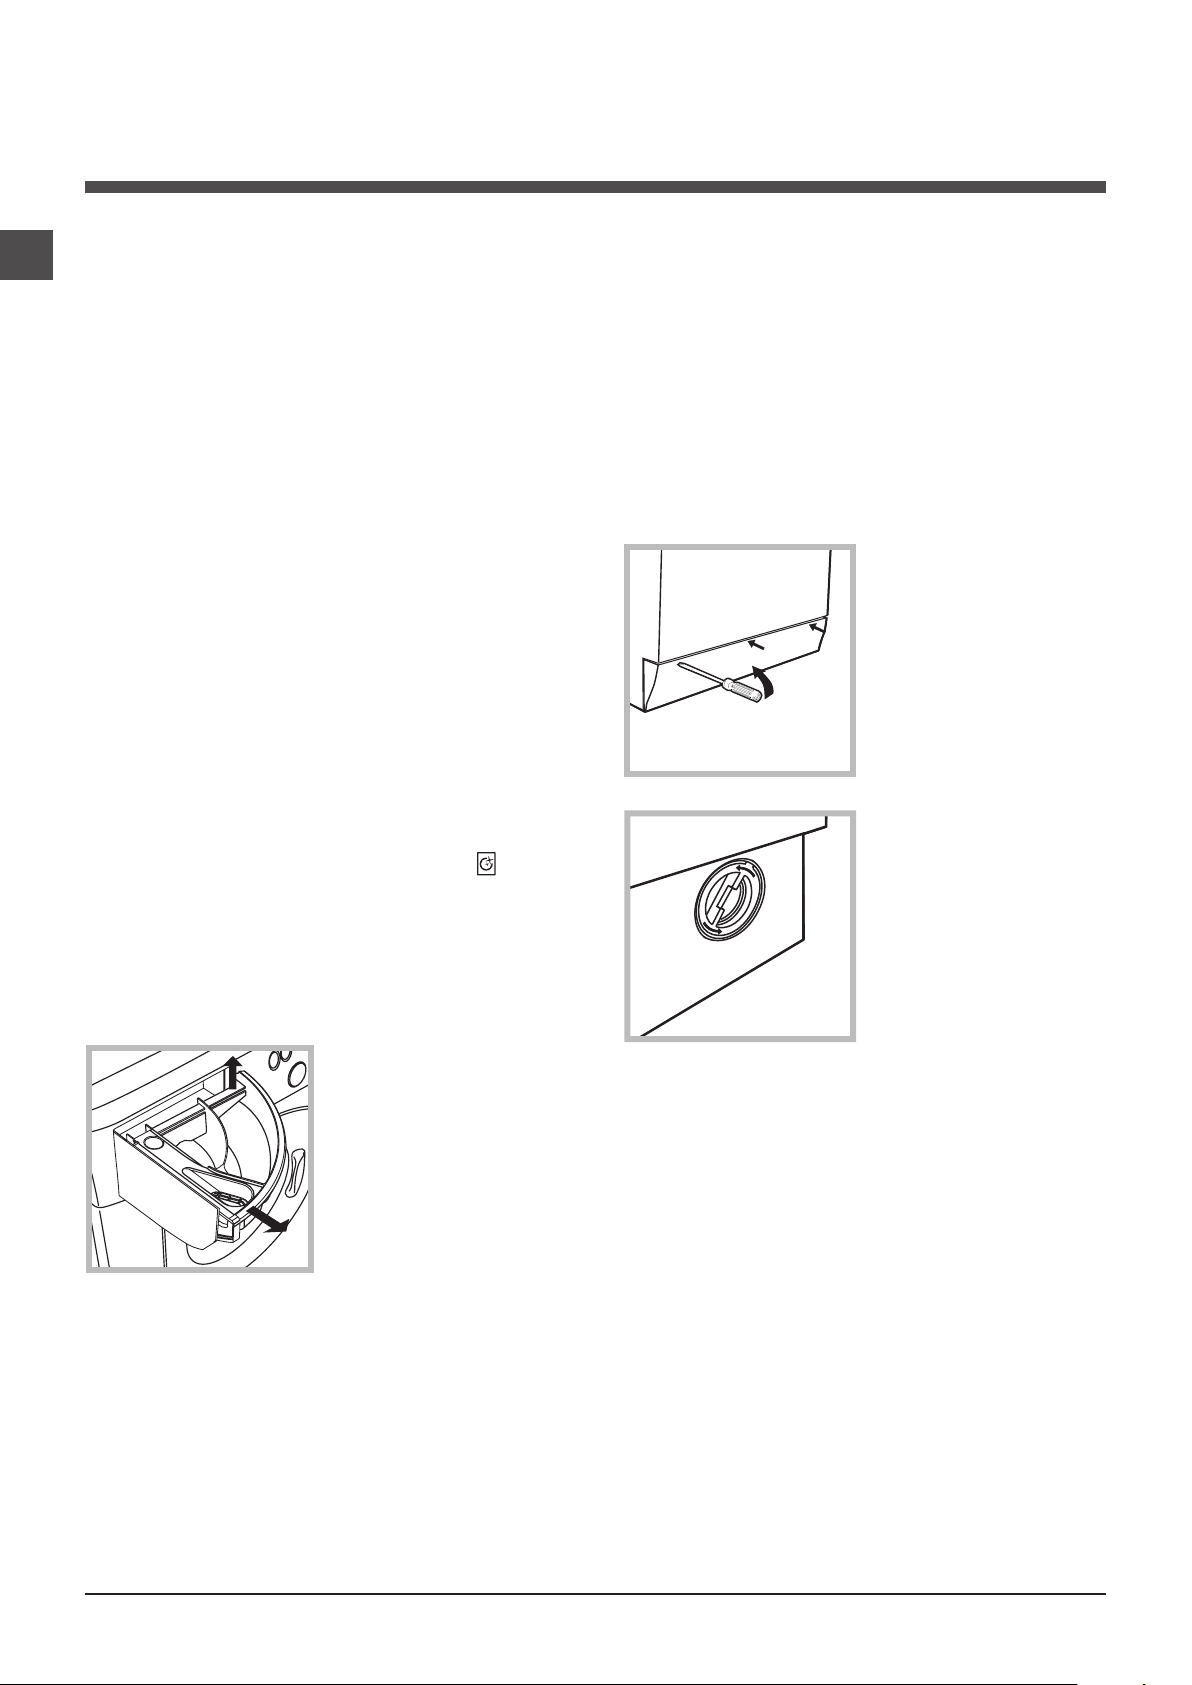
To access the pre-chamber:
1. using a screwdriver, remove the cover
panel on the lower
front part of the washing machine (see
figure);
2. unscrew the lid
by rotating it anticlockwise (see figu-
re): a little water may
trickle out. This is
perfectly normal;
Cleaning the detergent dispenser
drawer
Remove the dispenser by raising it and
pulling it out (see
figure).
Wash it under running
water; this operation
should be repeated
frequently.
Caring for the door and drum of
your appliance
•Alwaysleavetheportholedoorajarinorder
to prevent unpleasant odours from forming.
3. clean the inside thoroughly;
4. screw the lid back on;
5. reposition the panel, making sure the hooks
are securely in place before you push it onto
the appliance.
Checking the water inlet hose
Check the inlet hose at least once a year. If
there are any cracks, it should be replaced
immediately: during the wash cycles, water
pressure is very strong and a cracked hose
could easily split open.
! Never use second-hand hoses.
4
Page 5

Precautions and tips
20
! This washing machine was designed and constructed in
accordance with international safety regulations. The following information is provided for safety reasons and must
therefore be read carefully.
General safety
• Thisappliancewasdesignedfordomesticuseonly.
• This appliance can be used by children aged
from 8 years and above and persons with
reduced physical, sensory or mental capabilities or lack of experience and knowledge if
they have been given supervision or instruction concerning use of the appliance in a
safe way and understand the hazards involved. Children shall not play with the appliance. Cleaning and user maintenance shall not
be made by children without supervision.
• Donottouchthemachinewhenbarefootorwithwetor
damp hands or feet.
• Donotpullonthepowersupplycablewhenunplugging
the appliance from the electricity socket. Hold the plug
and pull.
• Donotopenthedetergentdispenserdrawerwhilethe
machine is in operation.
• Donottouchthedrainedwaterasitmayreachextremely high temperatures.
• Neverforcetheportholedoor.Thiscoulddamagethesafety
lock mechanism designed to prevent accidental opening.
• Iftheappliancebreaksdown,donotunderanycircumstances access the internal mechanisms in an attempt
to repair it yourself.
• Alwayskeepchildrenwellawayfromtheappliancewhile
it is operating.
• Thedoorcanbecomequitehotduringthewashcycle.
• Iftheappliancehastobemoved,workinagroupoftwo
or three people and handle it with the utmost care. Never
try to do this alone, because the appliance is very heavy.
• Beforeloadinglaundryintothewashingmachine,make
sure the drum is empty.
Disposal
•Disposingofthepackagingmaterials:observelocalregu-
lations so that the packaging may be re-used.
•TheEuropeanDirective2012/19/EUonWasteElectrical
and Electronic Equipment, requires that old household
electrical appliances must not be disposed of in the normal
unsorted municipal waste stream. Old appliances must be
collected separately in order to optimise the recovery and
recycling of the materials they contain and reduce the impact on human health and the environment. The crossed
out “wheeled bin” symbol on the product reminds you of
your obligation, that when you dispose of the appliance it
must be separately collected. Consumers should contact
their local authority or retailer for information concerning the
correct disposal of their old appliance.
Opening the porthole door manually
In the event that it is not possible to open the porthole
door due to a powercut, and if you wish to remove the
laundry, proceed as follows:
1. remove the plug from the
electrical socket.
2. make sure the water level
inside the machine is lower
than the door opening; if it
is not, remove excess water
using the drain hose, collecting it in a bucket as indicated
in the figure.
3. using a screwdriver, remove the cover panel on the lower front part of the washing
machine (see figure).
4. pull outwards using the tab as indicated in the figure,
until the plastic tie-rod is freed from its stop position; pull
downwards and open the door at the same time.
5. reposition the panel, making sure the hooks are securely
in place before you push it onto the appliance.
GB
5
Page 6
GB
Description of the washing machine
MULTI
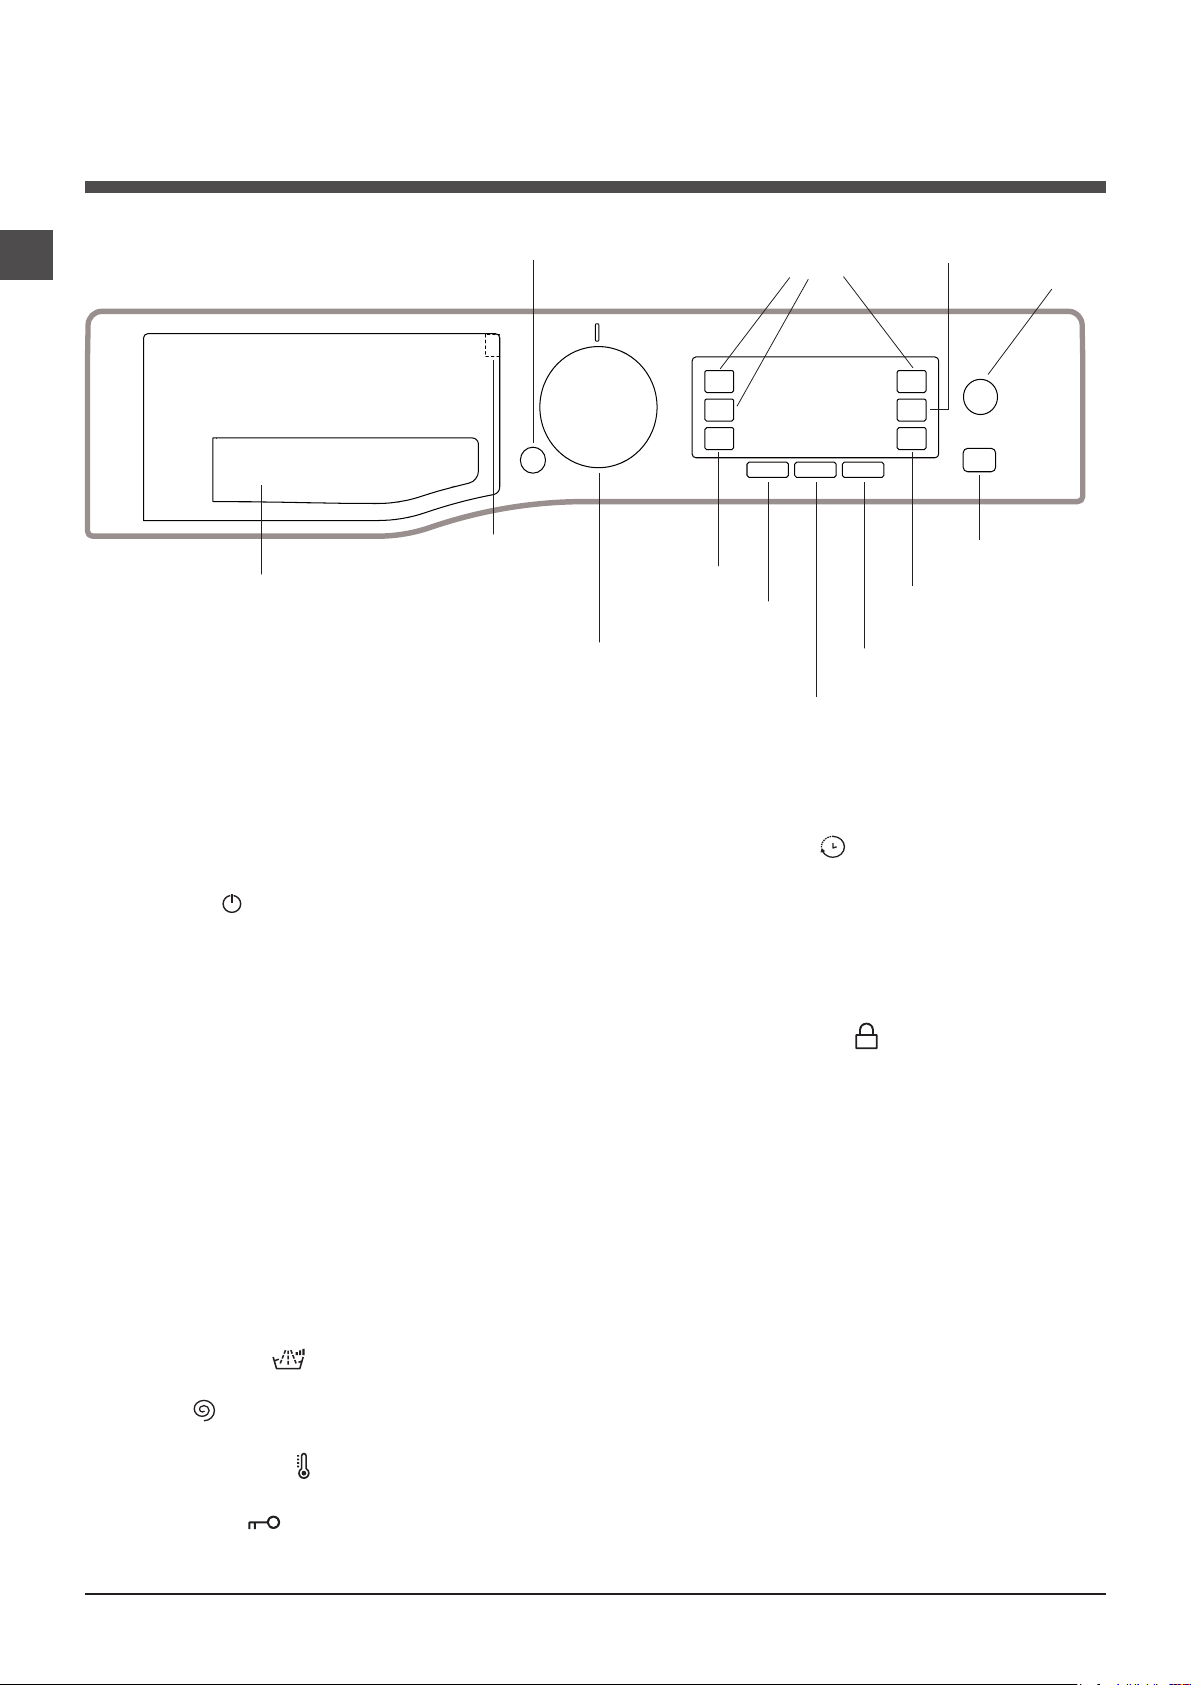
Control panel
ON/OFF
button
FUNCTION
buttons
DISPLAY
RINSE
button
DIRECT
INJECTION
button
Programme
Detergent dispenser drawer
Key
WASH
CYCLE
SELECTOR
KNOB
Detergent dispenser drawer: used to dispense
detergents and washing additives (see “Detergents and
laundry”).
Programme Key: the Programme Key inside the detergent dispenser shows all the available programmes together with a graphical guide on how to use the individual
dispenser compartments.
ON/OFF button : press this briefly to switch the machine on or off. The START/PAUSE indicator light, which
flashes slowly in a green colour shows that the machine is
switched on. To switch off the washing machine during the
wash cycle, press and hold the button for approximately 3
seconds; if the button is pressed briefly or accidentally the
machine will not switch off. If the machine is switched off
during a wash cycle, this wash cycle will be cancelled.
WASH CYCLE SELECTOR KNOB: used to set the
desired wash cycle (see “Table of programmes and wash
cycles”).
FUNCTION buttons: press the button to select the
desired function. The corresponding indicator light on the
display will switch on.
AUTO CLEAN button: press to clean the machine’s internal parts (see “Cleaning the washing machine”).
DIRECT INJECTION button: press to select the DIRECT
INJECTION option.
MULTI RINSE button : press to select the desired
rinse type.
SPIN button : press to reduce or completely exclude
the spin cycle - the value is indicated on the display.
TEMPERATURE button : press to decrease the temperature: the value will be shown on the display.
KEY LOCK button : to activate the control panel
lock, press and hold the button for approximately 2
seconds. When the display visualises “KEY LOCK ON” the
AUTO
CLEAN
button
TEMPERATURE
button
KEY LOCK
button
DELAY
TIMER
button
START/PAUSE
button with indicator light
SPIN
button
control panel is locked (apart from the ON/OFF button).
This means it is possible to prevent wash cycles from
being modified accidentally, especially where there are
children in the home. To deactivate the control panel lock,
press and hold the button for approximately 2 seconds.
DELAY TIMER button : press to set a delayed start
time for the selected wash cycle. The delay time will be
shown on the display.
START/PAUSE button with indicator light: when the green indicator light flashes slowly, press the button to start a
wash cycle. Once the cycle has started the indicator light
will remain lit in a fixed manner. To pause the wash cycle,
press the button again; the indicator light will flash in an
orange colour. If the symbol is not illuminated, the door
may be opened. To start the wash cycle from the point at
which it was interrupted, press the button again.
Standby mode
This washing machine, in compliance with new energy saving regulations, is fitted with an automatic standby system
which is enabled after about 30 minutes if no activity is
detected. Press the ON-OFF button briefly and wait for the
machine to start up again.
Antimicrobial seal
The seal around the porthole door is made from a special
mixture ensuring antimicrobial protection, thus reducing
bacterial proliferation up to 99.99%.
The seal contains zinc pyrithione, a biocidal substance
which reduces the proliferation of harmful microbes (*)
such as batteries and mould prone to causing stains,
unpleasant odours and product deterioration.
(*) According to tests performed by the University of Perugia,
Italy on: Staphylococcus aureus, Escherichia coll, Pseudomonas
aeruginosa, Candida albicans, Aspergillus niger, Penicillium digitatum.
In rare cases an allergic reaction may be caused by prolonged contact between
seal and skin.
6
Page 7
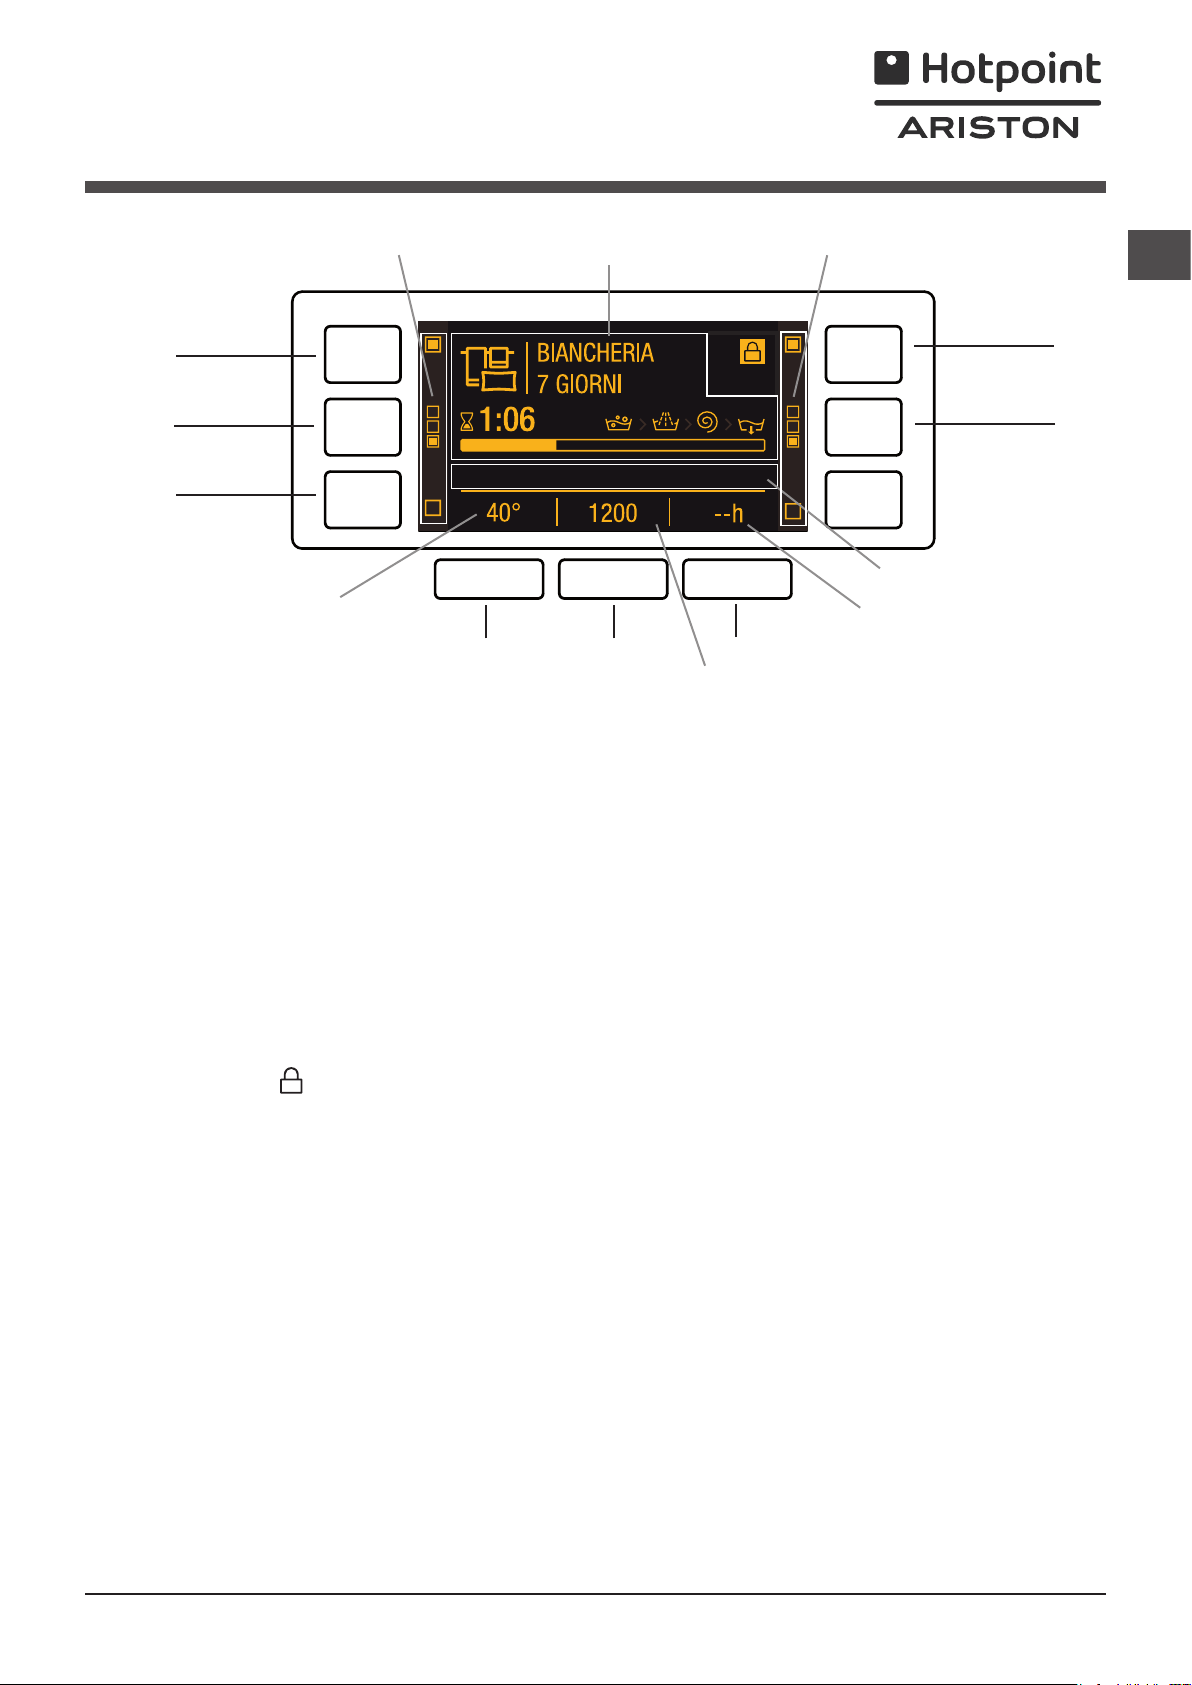
Display
C
A
C
GB
G
H
C
L
M
I
B
F
X Z
Y
D
E
The display is useful when programming the machine and provides a great deal of information.
The following will appear in area A: the icon and selected washing programme, the washing phases and time remaining to
the end of the wash cycle.
Area B will include the two intensity levels relative to the DIRECT INJECTION option.
The indicator lights relative to the available functions appear in area C.
Area D will have the time remaining to the start of the selected programme if the DELAY TIMER function was set.
String E shows the maximum spin speed value (this depends on the selected wash cycle); if the programme does not include the spin cycle, the dimly lit “--” symbol will appear in the area.
Area F will visualise the temperature value selectable on the basis of the set programme; if the temperature of the programme cannot be set, the area will show the symbol “--” dimly lit.
Door locked symbol
If the symbol is lit, this indicates that the washing machine door is blocked to prevent it from being opened accidentally. To
prevent any damage from occurring, wait for the symbol to switch itself off before opening the appliance door.
N.B.: if the DELAY TIMER function has been activated, the door cannot be opened; pauses the machine by pressing the
START/PAUSE button if you wish to open it.
! The first time the machine is switched on, you will be asked to select the language and the display will automatically show
the language selection menu.
To select the desired language press the X and Y buttons; to confirm the selection press the Z button.
To change the language switch off the machine and press buttons G, H, I simultaneously until an alarm is heard: the
language-selection menu will be displayed again.
! To change the display luminosity, which by default is set to the highest value, switch the machine off then simultaneously
press buttons G, L and M until the buzzer sounds. Press buttons X and Y to choose the desired level of luminosity then
confirm by pressing button Z.
! During the wash cycle or when the DELAY TIMER function has been enabled, if the user does not interact with the display
for 1 minute the “SCREEN SAVER” activates. To return to the previous window, simply press any button.
7
Page 8
Running a wash cycle
GB
1. SWITCH THE MACHINE ON. Press the On/Off
button ; the text HOTPOINT will appear on the display
and the START/PAUSE indicator light will flash slowly in
a green colour.
2. LOAD THE LAUNDRY. Open the porthole door.
Load the laundry, making sure you do not exceed
the maximum load value indicated in the table of
programmes on the following page.
3. MEASURE OUT THE DETERGENT. Open the
detergent dispenser drawer and pour the detergent into
the relevant compartments as described in “Detergents
and laundry”.
4. CLOSE THE DOOR.
5. SELECT THE WASH CYCLE. Use the WASH CYCLE
SELECTOR knob to select the desired wash cycle; the
name of the wash cycle will appear on the display. A
temperature and spin speed is set for each wash cycle;
these may be adjusted. The duration of the cycle will
appear on the display.
6. CUSTOMISE THE WASH CYCLE. Use the relevant
buttons:
Modifying the temperature and/or spin speed.
The machine automatically selects the maximum
temperature and spin speed set for the selected wash
cycle; these values cannot therefore be increased.
The temperature can be decreased by pressing the
button, until the cold wash (the display will visualise the
“--” symbol) setting is reached. The spin speed may be
progressively reduced by pressing the button, until
it is completely excluded (the display will visualise the
“--” symbol). If these buttons are pressed again, the
maximum values are restored.
! Exception: if the 2 programme is selected, the
temperature can be increased up to a value of 40°C.
! Exception: if the 3 programme is selected, the
temperature can be increased up to a value of 90°C.
! Exception: if the 4 programme is selected, the
temperature can be increased up to a value of 60°C..
Setting a delayed start.
To set a delayed start for the selected programme,
press the corresponding button repeatedly until the
required delay period has been reached. To remove the
delayed start function press the button until the text
“-- h” appears on the display.
Set the rinse type.
Option makes it possible to select the desired
rinse type for sensitive skin. Press the button once for
the “Extra +1” level, which makes it possible to select
an additional rinse after the standard cycle rinse and
remove all traces of detergent. Press the button again
for the “Extra +2” level, which makes it possible to
select two additional rinses to the standard cycle rinses;
it is recommended for very sensitive skin. When the
button is pressed for the third time, the “Extra +3” level
is set, thus allowing the selection of 3 rinses in addition
to the standard cycle’s rinses. The option - started with
cycles at a temperature of 40°C - makes it possible to
remove major allergens such as pollen, cat and dog
hair. With cycles at a temperature higher than 40° a very
good level of antiallergic protection is achieved. Press
the button again to go back to the “Normal rinse” rinse
type. If the current adjustment can be neither set nor
changed, the display will show “No Selection” or “No
Change”.
Modifying the cycle settings.
• Pressthebuttontoenablethefunction;the relevant
indicator light on the display will light up.
• Pressthebuttonagaintodisablethefunction;the
relevant indicator light on the display will switch off.
! If the selected function is incompatible with the set
programme, the relevant indicator light will appear dimly
lit; in addition, the incompatibility will be signalled by a
buzzer (3 beeps) and the wording “No Selection” will
appear on the display.
! If the selected function is incompatible with another
previously set function, the wording “No Selection”
will appear on the display and the function will not be
enabled.
! The functions may affect the recommended load value
and/or the duration of the cycle.
7. START THE PROGRAMME. Press the START/
PAUSE button. The corresponding indicator light will
become green, remaining lit in a fixed manner, and the
door will be locked (the DOOR LOCKED symbol will
be on). During the wash cycle, the name of the phase in
progress will appear on the display. To change a wash
cycle while it is in progress, pause the washing machine
using the START/PAUSE button (the START/PAUSE
indicator light will flash slowly in an orange colour);
then select the desired cycle and press the START/
PAUSE button again. To open the door while a cycle
is in progress, press the START/PAUSE button; if the
DOOR LOCKED symbol is switched off the door
may be opened. Press the START/PAUSE button again
to restart the wash cycle from the point at which it was
interrupted.
8. THE END OF THE WASH CYCLE. This will be
indicated by the text “CYCLE END” on the display;
when the DOOR LOCKED symbol switches off
the door may be opened. Open the door, unload the
laundry and switch off the machine.
! If you wish to cancel a cycle which has already begun,
press and hold the button. The cycle will be stopped
and the machine will switch off.
Direct Injection
The washing machine is equipped with the innovative
technology «Direct Injection» which pre-mixes water and
detergent, thus immediately activating the detergent’s
cleaning principles. This active emulsion is directly
introduced into the drum of the washing machine and
penetrates the fibres with more efficacy in cleaning
even heavily soiled garments at low temperatures, fully
preserving colours and fabrics.
The mode «Power» ensures the best cleaning performance
and the mode «EcoEnergy» allows more energy saving.
8
Page 9
Wash cycles and functions
60°/40°
60°/40°
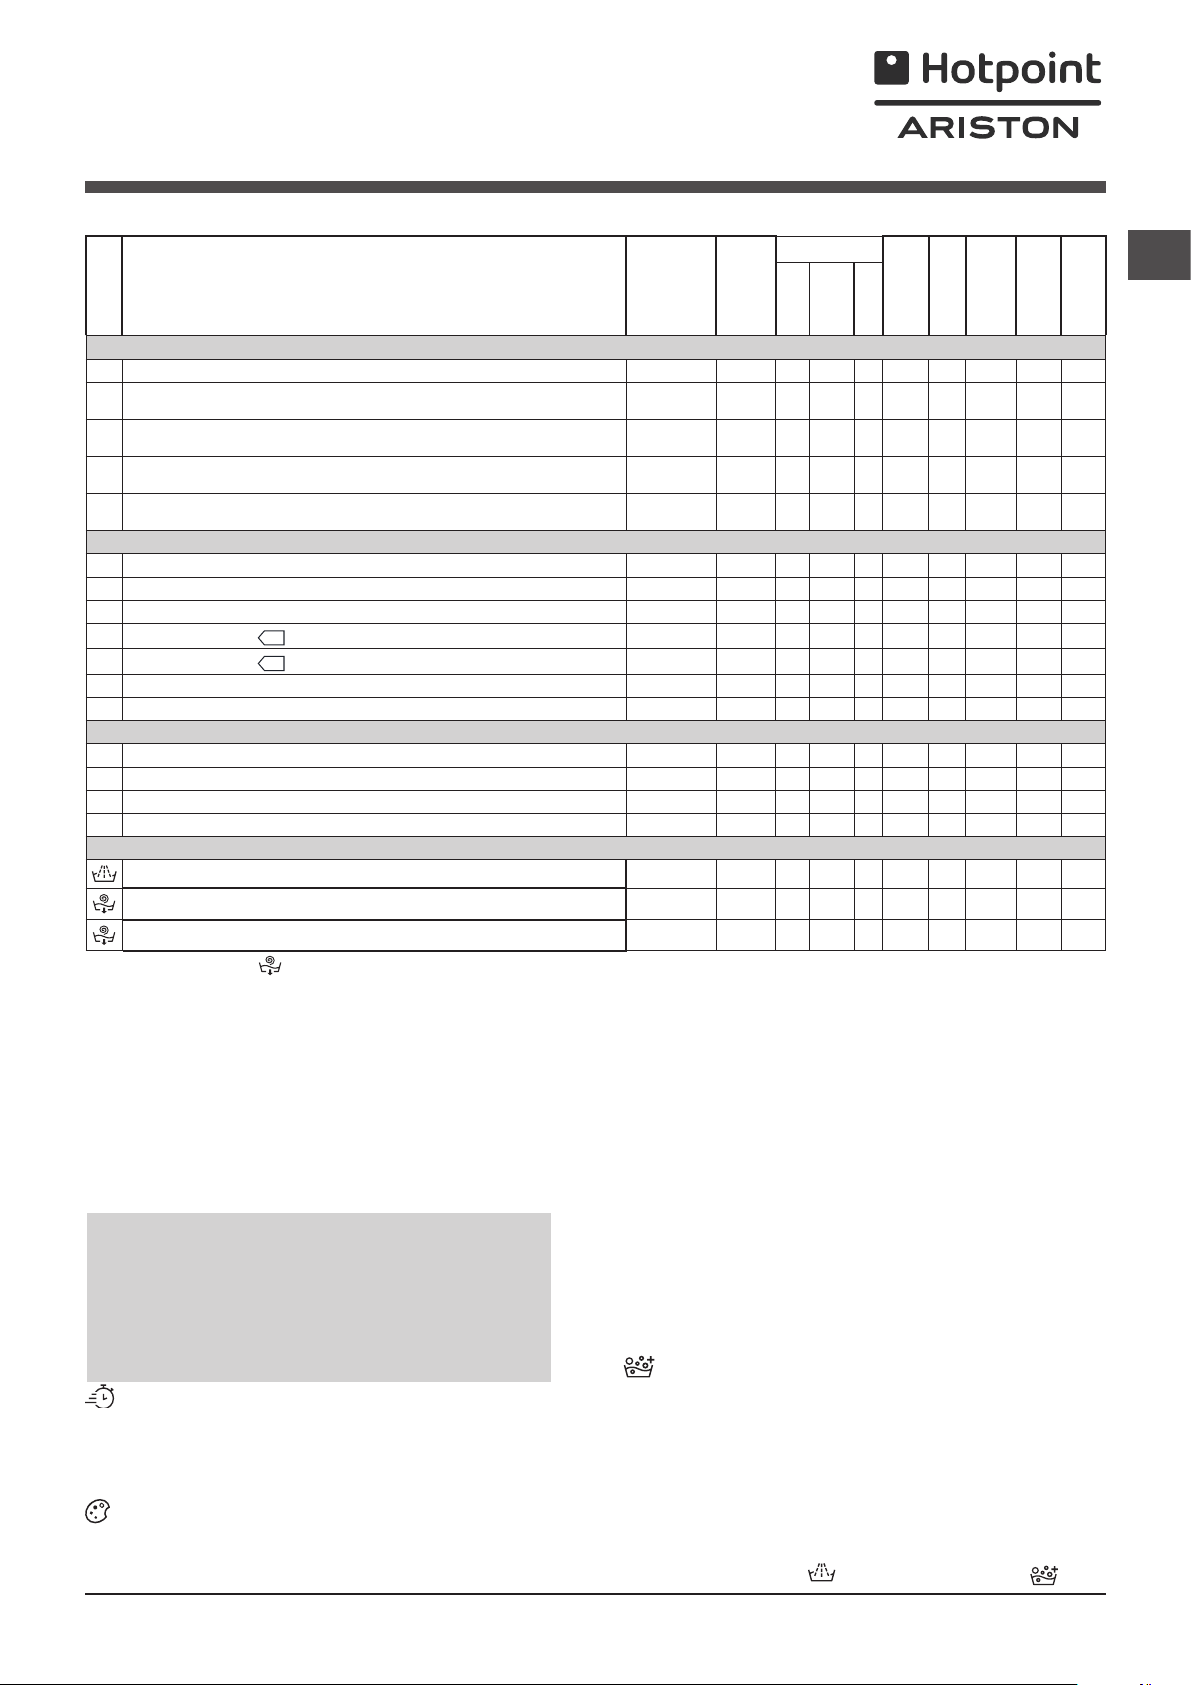
Table of wash cycles
1200
1200
1000
--
--
--
Detergents
(kg)
Energy
Wash
Fabric
Bleach
softener
- - - 8 - - - **
- 8 - - - **
- 4,5 - - - **
- 3,5 71 0,19 47 30’
- 5 - - - **
- 1 - - - **
- 2 - - - **
- 8 53 0,69 54,8 300’
- 8 53 0,69 87 300’
- 8 53 0,89 87 195’
- 5 - - - **
- 5 - - - **
- 2 - - - **
- 3,5 - - - **
Residual
Max. load
dampness%
8 - - - **
4,5 46 0,65 62 100’
8 - - - **
8 - - - **
consum-
ptionkWh
Total water
lt
Cycle dura-
Description of the wash cycle
Wash
cycles
DAILY CLEAN
Anti-Stain Power 20°C
1
2 Anti-Stain Turbo 45’
3
Cotton: lightly soiled resistant and delicate colours.
4
Synthetics (4): lightly soiled resistant colours.
Fast 30’: to refresh lightly soiled garments quickly (not suitable for wool, silk
5
and clothes which require washing by hand).
SPECIALS
6
Colour Care (default) => Colours 40° 1200
Ultra Delicates
7
8
Wool: for wool, cashmere, etc. 40° 800
9
Eco Cotton 60°C
9
Eco Cotton 40°C
9
Eco Cotton 40°C (3): lightly soiled resistant and delicate colours. 40° 1200
Baby
10
EXTRA
Anti-Allergy
11
12
Bed & Bath 7 Days: for bedlinen and towels. 60° 1200
13
Silk & Curtains: for garments in silk and viscose, lingerie. 30°
14
Duvets: for down-stuffed garments. 30° 1000
Partial Programmes
Rinse
Spin + Pump out
Pump out only * -
(1): heavily soiled whites and resistant colours.
(2): lightly soiled resistant and delicate colours.
Max.
temp.
(°C)
20° 1200
20°
(Max. 40°C)
40°
(Max. 90°C)
40°
(Max. 60°C)
30° 800
30°
60° 1200
40° 1200
40° 1000
60° 1200
Max.
speed
(rpm)
- 1200 -
- 1200 - - - 8 - - - **
* If you select programme and exclude the spin cycle, the machine will drain only.
** The duration of the wash cycle can be checked on the display.
The length of cycle shown on the display or in this booklet is an estimation only and is calculated assuming standard working conditions. The actual duration can vary according to factors such as water temperature and pressure, the amount of detergent used, the amount and type of load inserted, load balancing and any wash options selected.
1) Test wash cycle in compliance with regulations 1061/2010: set wash cycle 9 with a temperature of 60°C.
This cycle is designed for cotton loads with a normal soil level and is the most efficient in terms of both electricity and water consumption; it should be used for garments
which can be washed at 60°C . The actual washing temperature may differ from the indicated value.
2) Test wash cycle in compliance with regulations 1061/2010: set wash cycle 9 with a temperature of 40°C.
This cycle is designed for cotton loads with a normal soil level and is the most efficient in terms of both electricity and water consumption; it should be used for garments
which can be washed at 40°C . The actual washing temperature may differ from the indicated value.
For all Test Institutes:
3) Long wash cycle for cottons: set programme 9 at temperature 40°C and press the DIRECT INJECTION button under “Power” mode.
4) Long wash cycle for synthetics: set wash cycle 4 with a temperature of 40°C.
Wash functions
! If the selected function is incompatible with the set programme, the relevant indicator light will appear dimly lit; in
addition, the incompatibility will be signalled by a buzzer
(3 beeps) and the wording “No Selection” will appear on
the display.
! If the selected function is incompatible with another previously set function, the wording “No Selection” will appear
on the display and the function will not be enabled.
Time Saver
If you select this option, the wash cycle duration will be reduced by up to 50%, depending on the selected cycle, thereby
guaranteeing simultaneous water and energy saving. Use this
cycle for lightly soiled garments.
Colour Care
Setting cycle 6 and selecting this function allows for choosing
among 3 different programmes specially designed for optimally preserving colour intensity and the brilliance of whites:
Colours: used to wash light coloured clothes. This programme is designed to maintain bright colours over time.
Darks: this programme is designed to maintain dark colours
over time. We recommend using a liquid detergent for best
results, preferably when washing dark-coloured garments.
Whites: this programme is designed to maintain the brightness of
white clothes over time. Use powder detergent for best results.
Super Wash
This option offers a high-performance wash due to the greater
quantity of water used in the initial phase of the cycle, and due
to the increased wash cycle duration, is particularly useful for
the removal of stubborn stains. It can be used with or without
bleach. If you desire bleaching, insert the extra tray compartment (3) into compartment 1. When pouring in the bleach, be
careful not to exceed the “max” level marked on the central
pivot (see figure pag. 10). To bleach laundry without carrying
out a full wash cycle, pour the bleach into the extra compartment 3, select the cycle and activate the function .
GB
tion
9
Page 10
Detergents and laundry
M
AX
1
3
2
A
B
*
GB
Detergent dispenser drawer
Good washing results also depend on the correct dose of
detergent: adding too much detergent will not necessarily
result in a more efficient wash, and may in fact cause a
build up on the inside of your appliance and contribute to
environmental pollution.
! Use powder detergent for white cotton garments, for
pre-washing, and for washing at temperatures over 60°C.
! Follow the instructions given on the detergent packaging.
! Do not use hand washing detergents because these
create too much foam.
Open the detergent dispenser drawer and pour
in the detergent or washing
additive, as follows.
! Do not pour detergent into
the middle compartment (*).
compartment 1: Detergent for the wash cycle
(powder or liquid)
If liquid detergent is used,
it is recommended that the removable plastic partition A
(supplied) be used for proper dosage. If powder detergent
is used, place the partition into slot B.
compartment 2: Additives (fabric softeners, etc.)
The fabric softener should not overflow the grid.
extra compartment 3: Bleach
Preparing the laundry
•Dividethelaundryaccordingto:
- the type of fabric/the symbol on the label
- the colours: separate coloured garments from whites.
•Emptyallgarmentpocketsandcheckthebuttons.
• Donotexceedthelistedvalues,whichrefertothe
weight of the laundry when dry: see “Table of wash
cycles”.
How much does your laundry weigh?
1 sheet 400-500 g
1 pillow case 150-200 g
1 tablecloth 400-500 g
1 bathrobe 900-1200 g
1 towel 150-250 g
Special wash cycles
Anti-Stain Power 20°C: this programme ensures ma-
ximum stain removal capacity with no need for pre-treatment at low temperatures, preserving fabrics and colours.
Anti-Stain Turbo 45’: this cycle ensures excellent stain
removal capacity even at 20°C in just 45 minutes. The temperature of this cycle can be increased up to 40°C.
Ultra Delicates: use programme 7 to wash very delicate
garments having strasses or sequins.
We recommend turning the garments inside out before
washing and placing small items into the special bag for
washing delicates. Use liquid detergent on delicate garments for best results.
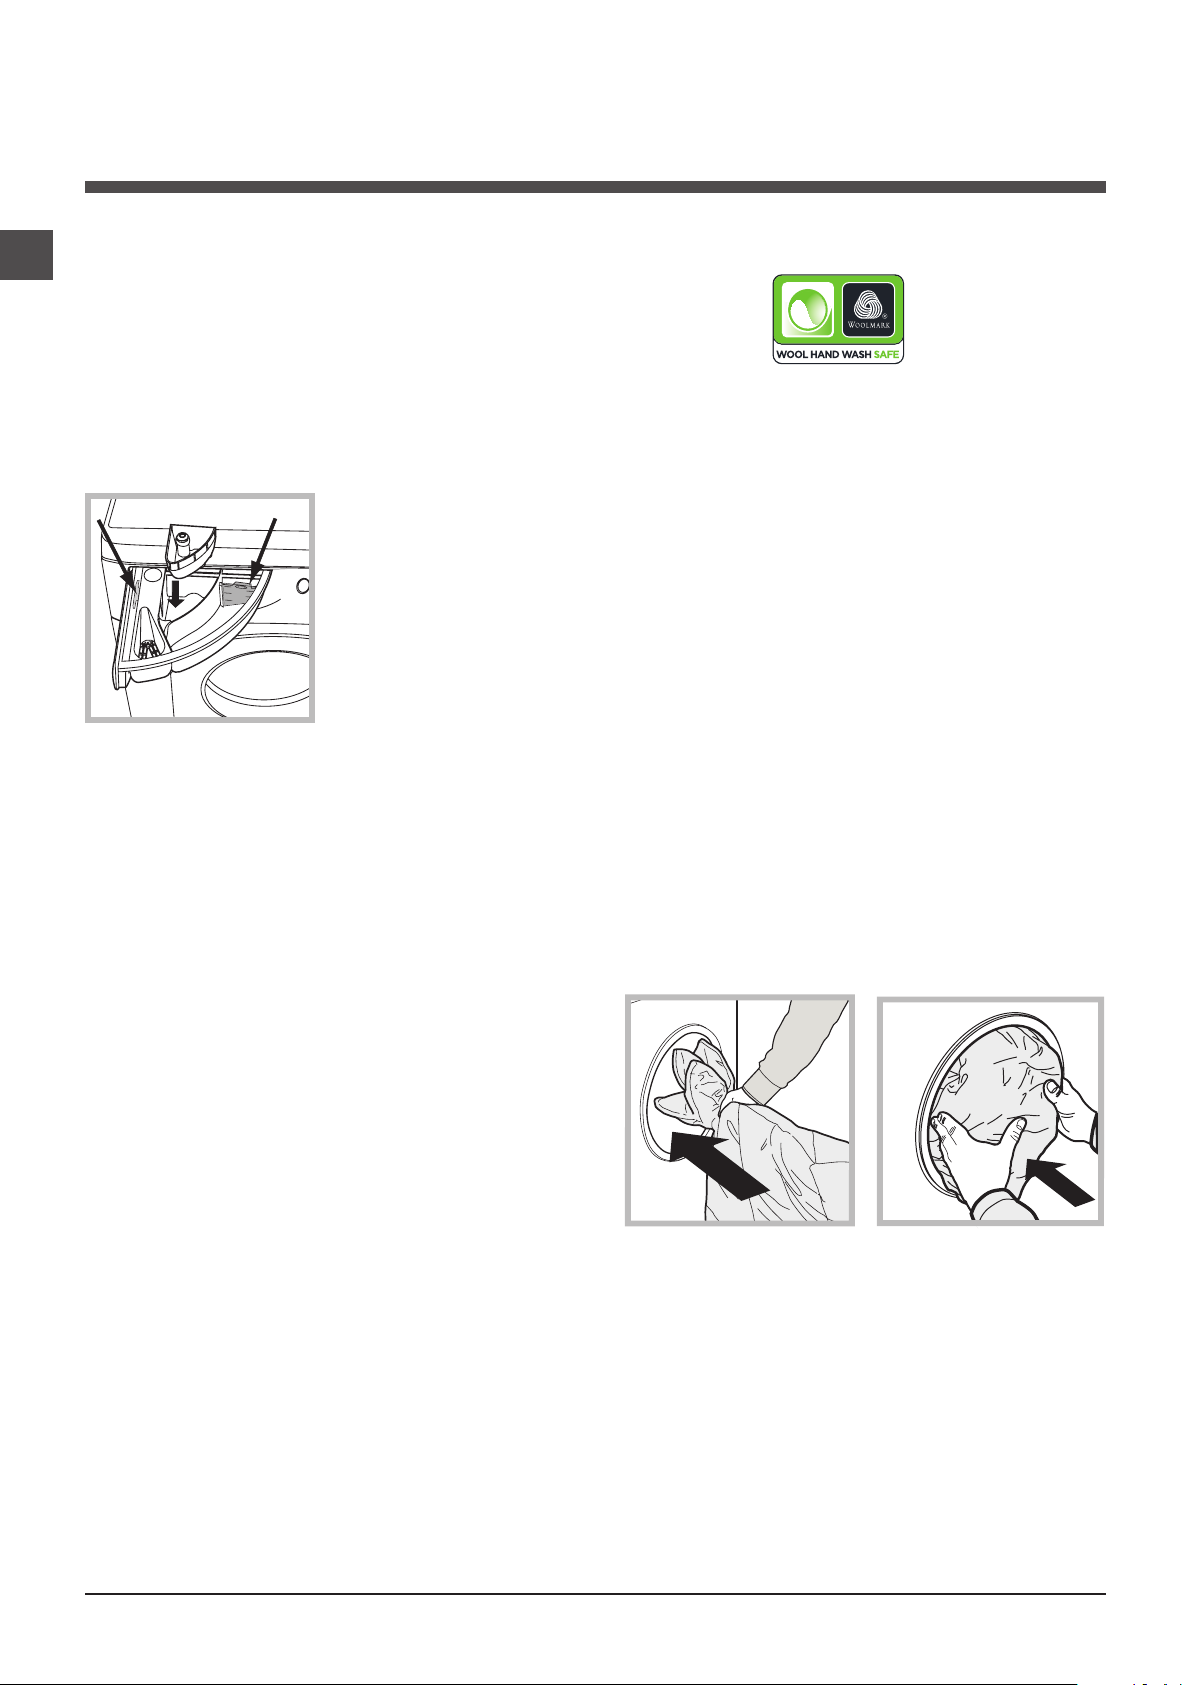
Wool - Woolmark Apparel Care - Green:
the wool wash cycle of this machine has been approved
by The Woolmark Company for the washing of wool garments labelled as “hand wash” provided that the products
are washed according to the instructions on the garment
label and those issued by the manufacturer of this washing
machine (M1127)
Baby: use the special wash cycle 10 to remove the remo-
ve the soiling typically caused by babies, while removing
all traces of detergent from nappies in order to prevent the
delicate skin of babies from suffering allergic reactions. The
cycle has been designed to reduce the amount of bacteria
by using a greater quantity of water and optimising the
effect of special disinfecting additives added to the detergent.
Anti-Allergy: use programme 11 to remove major aller-
gens such as pollen, mites, cat’s and dog’s hair.
Bed & Bath 7 days: use programme 12 to wash bed
linen and towels in one single cycle: it optimises softener
performance and helps you save time and energy. We
recommend the use of powder detergent
Silk: use special wash cycle 13 to wash all silk garments.
We recommend the use of special detergent which has
been designed to wash delicate clothes.
Curtains: fold curtains and place them in a pillow case
or mesh bag. Use wash cycle 13.
Duvets: to wash double or single duvets (the weight of
which should not exceed 3,5 kg), cushions or clothes
padded with goose down such as puffa jackets, use the
special 14 wash cycle. We recommend that duvets are
placed in the drum with their edges folded inwards (see
figure) and that no more than ¾ of the total volume of
the drum is used. To achieve the best results, we recommend that a liquid detergent is used and placed inside
the detergent dispenser drawer.
Load balancing system
Before every spin cycle, to avoid excessive vibrations and
to distribute the load in a uniform manner, the drum rotates
continuously at a speed which is slightly greater than the
washing rotation speed. If, after several attempts, the load
is not balanced correctly, the machine spins at a reduced
spin speed. If the load is excessively unbalanced, the
washing machine performs the distribution process instead
of spinning. To encourage improved load distribution and
balance, we recommend small and large garments are
mixed in the load.
10
Page 11

Troubleshooting
Your washing machine could fail to work. Before contacting the Technical Assistance Centre (see “Assistance”), make sure
that the problem cannot be solved easily using the following list.
Problem:
The washing machine does not
switch on.
The wash cycle does not start.
The washing machine does not
take in water (the text “NO WATER,
Turn tap on” appears on the display).
The washing machine continuously
takes in and
drains water.
Possible causes / Solutions:
• Theapplianceisnotpluggedintothesocketfully,orisnotmakingcontact.
• Thereisnopowerinthehouse.
• Thewashingmachinedoorisnotclosedproperly.
• TheON/OFFbuttonhasnotbeenpressed.
• TheSTART/PAUSEbuttonhasnotbeenpressed.
• Thewatertaphasnotbeenopened.
• Adelayedstarthasbeenset.
• Thewaterinlethoseisnotconnectedtothetap.
• Thehoseisbent.
• Thewatertaphasnotbeenopened.
• Thereisnowatersupplyinthehouse.
• Thepressureistoolow.
• TheSTART/PAUSEbuttonhasnotbeenpressed.
• Thedrainhoseisnotfittedataheightbetween65and100cmfromthefloor
(see “Installation”).
• Thefreeendofthehoseisunderwater(see “Installation”).
• Thewalldrainagesystemisnotfittedwithabreatherpipe.
If the problem persists even after these checks, turn off the water tap, switch
the appliance off and contact the Assistance Service. If the dwelling is on one of
the upper floors of a building, there may be problems relating to water drainage,
causing the washing machine to fill with water and drain continuously. Special
anti-draining valves are available in shops and help to avoid this inconvenience.
GB
The washing machine does not
drain or spin.
The washing machine vibrates a lot
during the spin cycle.
The washing machine leaks.
The machine is locked and the display
flashes, indicating an error code (e.g.
F-01, F-..).
There is too much foam.
• Thewashcycledoesnotincludedraining:somewashcyclesrequirethedrain
phase to be started manually (see “Wash cycles and functions”).
• Thedrainhoseisbent(see “Installation”).
• Thedrainageductisclogged.
• Thedrumwasnotunlockedcorrectlyduringinstallation(see “Installation”).
• Thewashingmachineisnotlevel(see “Installation”).
• Thewashingmachineistrappedbetweencabinetsandwalls(see “Installation”).
• Thewaterinlethoseisnotscrewedonproperly(see “Installation”).
• Thedetergentdispenserdrawerisblocked(forcleaninginstructions,see “Care
and maintenance”).
• Thedrainhoseisnotfixedproperly(see “Installation”).
• Switchoffthemachineandunplugit,waitforapproximately1minuteandthen
switch it back on again.
If the problem persists, contact the Technical Assistance Service.
• Thedetergentisnotsuitableformachinewashing(itshoulddisplaythetext
“for washing machines” or “hand and machine wash”, or the like).
• Toomuchdetergentwasused.
11
Page 12

Service
GB
Before calling for Assistance:
• Check whether you can solve the problem alone (see “Troubleshooting”);
• Restarttheprogrammetocheckwhethertheproblemhasbeensolved;
• Ifthisisnotthecase,contactanauthorisedTechnicalAssistanceCentreusingthetelephonenumberprovidedonthe
guarantee certificate.
! Always request the assistance of authorised technicians.
Have the following information to hand:
• thetypeofproblem;
• theappliancemodel(Mod.);
• theserialnumber(S/N).
This information can be found on the data plate applied to the rear of the washing machine, and can also be found on the
front of the appliance by opening the door.
12
Page 13

Návod k použití
PRAČKA
CZ
Česky
RPD 826 D
Obsah
Instalace, 14-15
Rozbalení a vyrovnání do vodorovné polohy
Připojení k elektrické a k vodovodní síti
První prací cyklus
Technické údaje
Údržba a péče, 16
Uzavření přívodu vody a vypnutí elektrického napájení
Čištění pračky
Čištění dávkovače pracích prostředků
Péče o dvířka a buben
Čištění čerpadla
Kontrola přítokové hadice na vod
Opatření a rady, 17
Základní bezpečnostní pokyny
Likvidace
Manuální otevření dvířeku
Popis pračky, 18-19
Ovládací panel
Displej
CZ
Jak provést prací cyklus, 20
Programy a funkce, 21
Tabulka pracích programů
Funkce praní
Prací prostředky a prádlo, 22
Dávkovač pracích prostředků
Příprava prádla
Speciální programy
Systém automatického vyvážení náplně
Poruchy a způsob jejich odstranění, 23
Servisní služba, 24
13
Page 14

Instalace
CZ
! Je důležité uschovat tento návod tak, abyste jej mohli kdykoli konzultovat. V případě
prodeje, darování nebo přestěhování pračky
se ujistěte, že zůstane uložen v blízkosti
pračky, aby mohl posloužit novému majiteli
při seznámení s její činností a s příslušnými
upozorněními.
! Pozorně si přečtěte uvedené pokyny: ob-
sahují důležité informace týkající se instalace,
použití a bezpečnosti při práci.
Rozbalení a vyrovnání do vodorovné polohy
Rozbalení
1. Rozbalte pračku.
2. Zkontrolujte, zda během přepravy
nedošlo k jejímu poškození. V případě, že
je poškozena, ji nezapojujte a obraťte se na
prodejce.
3. Odstraňte 4
šrouby chránící
před poškozením
během přepravy a
gumovou podložku
s příslušnou
rozpěrkou, které se
nacházejí v zadní
části (viz obrázek).
Dokonalé vyrovnání do vodorovné polohy
zabezpečí stabilitu zařízení a zamezí vzniku
vibrací a hluku během činnosti. V případě
instalace na podlahovou krytinu nebo na
koberec nastavte nožky tak, aby pod pračkou
zůstal dostatečný volný prostor pro ventilaci.
Připojení k elektrické a k vodovodní síti
Připojení přítokové hadice vody
1. Připojte přívodní
hadici jejím
zašroubováním ke
kohoutku studené
vody s hrdlem se
závitem 3/4“ (viz
obrázek).
Před připojením
hadice nechte vodu
odtékat, dokud nebude čirá.
2. Připojte přítokovou
hadici k pračce
prostřednictvím
příslušné přípojky
na vodu, umístěné
vpravo nahoře (viz
obrázek).
4. Uzavřete otvory po šroubech plastovými
krytkami z příslušenství.
5. Uschovejte všechny díly: v případě
opětovné přepravy pračky je bude třeba namontovat zpět.
! Obaly nejsou hračky pro děti!
Vyrovnání do vodorovné polohy
1. Pračku je třeba umístit na rovnou a pevnou podlahu, aniž by se opírala o stěnu,
nábytek či něco jiného.
2. V případě, že
podlaha není do-
konale vodorovná,
mohou být případné
rozdíly vykompenzovány šroubováním
předních nožek (viz
obrázek); Úhel sklonu, naměřený na pracovní ploše, nesmí
přesáhnout 2°.
3. Dbejte na to, aby hadice nebyla příliš oh-
nutá ani stlačená.
! Tlak v rozvodu vody se musí pohybovat
v rozmezí hodnot uvedených v tabulce s
technickými údaji (viz vedlejší strana).
! V případě, že délka přítokové hadice nebude dostatečná, obraťte se na specializovanou prodejnu nebo na autorizovaný technický personál.
! Nikdy nepoužívejte již použité hadice.
! Používejte hadice z příslušenství zařízení.
14
Page 15

Připojení vypouštěcí hadice
65 - 100 cm
Připojte vypouštěcí
hadici, aniž byste ji
ohýbali, k odpadovému potrubí nebo
k odpadu ve stěně,
který se nachází od
65 do 100 cm nad
zemí;
nebo ji uchyťte k
okraji umývadla či
vany a připevněte
vodicí držák
z příslušenství ke
kohoutu (viz obrá-
zek). Volný konec
vypouštěcí hadice nesmí zůstat
ponořený do vody.
! Použití prodlužovacích hadic se
nedoporučuje; je-li však nezbytné,
prodlužovací hadice musí mít stejný průměr
jako originální hadice a její délka nesmí
přesáhnout 150 cm.
Připojení k elektrické síti
Před zasunutím zástrčky do zásuvky se
ujistěte, že:
• Je zásuvka uzemněna a že vyhovuje normám;
• je zásuvka schopna snést maximální zátěž
odpovídající jmenovitému příkonu zařízení,
uvedenému v tabulce s technickými údaji
(viz vedle);
• hodnota napájecího napětí odpovídá
údajům uvedeným v tabulce s technickými
údaji (viz vedle);
• je zásuvka kompatibilní se zástrčkou
pračky. V opačném případě je třeba
vyměnit zásuvku.
! Pračka nesmí být umístěna venku – pod
širým nebem, a to ani v případě, že by se
jednalo o místo chráněné před nepřízní
počasí, protože je velmi nebezpečné vystavit
ji působení deště a bouří.
! Po denitivní instalaci pračky musí zásuvka
zůstat snadno přístupná.
! Nepoužívejte prodlužovací kabely a rozvodky.
! Kabel nesmí být ohnutý ani stlačený.
! Výměna kabelu musí být svěřena výhradně
autorizovanému technickému personálu.
Upozornění! Výrobce neponese žádnou
odpovědnost za následky nerespektování
uvedených předpisů.
První prací cyklus
Po instalaci zařízení je třeba ještě předtím,
než je použijete na praní prádla, provést jeden
zkušební cyklus s pracím prostředkem a bez
náplně prádla nastavením pracího programu
samočištění (viz “Čištění pračky”).
Technické údaje
Model RPD 826 D
šíøka 59,5 cm
Rozmìry
Kapacita od 1 do 8 kg
Napájení
Pøipojení k
rozvodu vody
Rychlost
odstøeïování
Kontrolní programy podle
směrnic
1061/2010
1015/2010
výška 85 cm
hloubka 60,5 cm
Viz štítek s technickými
údaji, aplikovaný na zarízení.
maximální tlak
1 MPa (10 bar)
minimální tlak
0.05 MPa (0.5 bar)
kapacita bubnu 62 litrù
a¡z do 1200 otáèek za
minutu
program 9;
Eko bavlna 60°C.
program 9;
Eko bavlna 40°C.
Toto zaøízení odpovídá
následujícím normám
Evropské unie:
- 2004/108/CE (Elektromagnetická kompatibilita)
- 2006/95/CE (Nízké
napìtí)
- 2012/19/EU (WEEE)
CZ
15
Page 16

Údržba a péče
1
2
CZ
Uzavření přívodu vody a vypnutí
elektrického napájení
• Po každém praní uzavřete přívod vody.
Tímto způsobem dochází k omezení
opotřebení pračky a ke snížení nebezpečí
úniku vody.
• Před zahájením čištění pračky a během
operací údržby vytáhněte zástrčku
napájecího kabelu z elektrické zásuvky.
Čištění pračky
• Vnější části a části z gumy se mohou čistit
hadrem navlhčeným ve vlažné vodě a saponátu. Nepoužívejte rozpouštědla ani abrazivní látky.
• Pračka je vybavena programem
samočištění vnitřních částí, který musí být
proveden bez jakéhokoli druhu náplně v
bubnu.
Prací prostředek (množství rovnající se
10% množství doporučeného pro částečně
znečištěné prádlo) nebo specické přídavné
prostředky pro čištění pračky budou moci být
použity jako pomocné prostředky v pracím
programu. Doporučuje se provést samočisticí
program každých 40 cyklů praní.
Pro aktivaci programu stiskněte tlačítko na
5 sekund a poté stiskněte tlačítko START/
PAUZA; dojde k zahájení programu, který
bude trvat přibližně 70 minut.
Čištění čerpadla
Součástí pračky je samočisticí čerpadlo,
které nevyžaduje údržbu. Může se však stát,
že se v jeho vstupní části, určené k jeho
ochraně a nacházející se v jeho spodní části,
zachytí drobné předměty (mince, knoíky).
! Ujistěte se, že byl prací cyklus ukončen, a
vytáhněte zástrčku ze zásuvky.
Přístup ke vstupní části čerpadla:
1. pomocí šroubováku
odstraňte krycí panel nacházející se v
přední části pračky
(viz obrázek);
2. Odšroubujte víko
jeho otáčením proti
směru hodinových
ručiček (viz obrázek):
vytečení malého
množství vody je
zcela běžným jevem;
Čištění dávkovače pracích
prostředků
Vytáhněte dávkovač
jeho nadzvednutím
a vytažením směrem
ven (viz obrázek).
Umyjte jej pod proudem vody; tento druh
vyčištění je třeba
provádět pravidelně.
Péče o dvířka a buben
• Dvířka ponechte pokaždé pootevřená, aby
se zabránilo tvorbě nepříjemných zápachů.
3. dokonale vyčistěte vnitřek;
4. zašroubujte zpět víko;
5. namontujte zpět panel, přičemž se před
jeho přisunutím k zařízení ujistěte, že
došlo ke správnému zachycení háčků do
příslušných podélných otvorů.
Kontrola přítokové hadice na vodu
Stav přítokové hadice je třeba zkontrolovat
alespoň jednou ročně. Jsou-li na ní viditelné praskliny nebo trhliny, je třeba ji vyměnit:
silný tlak působící na hadici během pracího
cyklu by mohl způsobit její náhlé roztržení.
! Nikdy nepoužívejte již použité hadice.
16
Page 17

Opatření a rady
20
! Pračka byla navržena a vyrobena v souladu s platnými
mezinárodními bezpečnostním předpisy. Tato upozornění
jsou uváděna z bezpečnostních důvodů a je třeba si je
pozorně přečíst.
Základní bezpečnostní pokyny
• Toto zařízení bylo navrženo výhradně pro použití v
domácnosti.
• Toto zařízení mohou používat děti od 8
let a osoby se sníženými fyzickými, senzorickými nebo duševními schopnostmi
nebo osoby s nedostatečnými zkušenostmi
a znalostmi, když se nacházejí pod
náležitým dohledem nebo když byly
náležitě vyškoleny ohledně bezpečného
použití zařízení a uvědomují si související
nebezpečí. Děti si nesmí hrát se zařízením.
Děti nesmí provádět operace údržby a
čištění bez dohledu.
• Pračku mohou používat pouze dospělé osoby podle
pokynů uvedených v tomto návodu.
• Nedotýkejte se zařízení bosí nebo v případě, že máte
mokré ruce či nohy.
• Nevytahujte zástrčku ze zásuvky tahem za kabel, ale
uchopením za zástrčku.
• Neotvírejte dávkovač pracích prostředků během
činnosti zařízení.
• Nedotýkejte se odčerpávané vody, protože může mít
velmi vysokou teplotu.
• Nepokoušejte se o násilné otevření dvířek: mohlo
by dojít k poškození bezpečnostního uzávěru, který
zabraňuje náhodnému otevření.
• Při výskytu poruchy se v žádném případě nepokoušejte
o opravu vnitřních částí zařízení.
• Vždy mějte pod kontrolou děti a zabraňte tomu, aby se
přibližovaly k zařízení během pracího cyklu.
• Během pracího cyklu mají dvířka tendenci ohřát se.
• V případě potřeby přemísťujte pračku ve dvou nebo
ve třech a věnujte celé operaci maximální pozornost.
Nikdy se nepokoušejte zařízení přemísťovat sami, je
totiž velmi těžké.
• Před zahájením vkládání prádla zkontrolujte, zda je
buben prázdný.
skončení jeho životnosti do odděleného sběru.
Spotřebitelé by měli kontaktovat příslušné místní
úřady nebo svého prodejce ohledně informací týkajících se správné likvidace starého zařízení.
Manuální otevření dvířek
V případě, že není možné otevřít dvířka s průzorem
z důvodu výpadku elektrické energie a hodláte pověsit
prádlo, postupujte následovně:
1. vytáhněte zástrčku ze
zásuvky elektrické sítě.
2. Zkontrolujte, zda je
hladina vody uvnitř zařízení
nižší, než je úroveň otevření
dvířek; v opačném případě
vypusťte přebytečnou
vodu vypouštěcí hadicí a
zachyťte ji do vědra, jak je
znázorněno na obrázku.
3. pomocí šroubováku
odstraňte krycí panel nacházející se v přední části
pračky (viz obrázek).
CZ
Likvidace
• Likvidace obalových materiálů: při jejich odstranění
postupujte v souladu s místním předpisy a dbejte na
možnou recyklaci.
• Evropská směrnice 2012/19/EU o odpadních
elektrických a elektronických zařízeních stanovuje, že
staré domácí elektrické spotřebiče nesmí být odkládány do běžného netříděného domovního odpadu.
Staré spotřebiče musí být odevzdány do odděleného
sběru, a to za účelem recyklace a optimálního využití
materiálů, které obsahují, a z důvodu předcházení
negativním dopadům na lidské zdraví a životní
prostředí. Symbol “přeškrtnuté popelnice” na výrobku
vás upozorňuje na povinnost odevzdat zařízení po
4. s použitím jazýčku označeného na obrázku potáhněte
směrem ven z dorazu plastové táhlo až do jeho uvolnění;
následně jej potáhněte směrem dolů a současně
otevřete dvířka.
5. namontujte zpět panel, přičemž se před jeho
přisunutím k zařízení ujistěte, že došlo ke správnému
zachycení háčků do příslušných podélných otvorů.
17
Page 18

Popis pračky
CZ
Ovládací panel
Tlačítko
ON/OFF
Funkční popis
Dávkovač pracích prostředků
Dávkovač pracích prostředků: slouží k dávkování
pracích prostředků a přídavných prostředků (viz „Prací
prostředky a prádlo“).
Funkční popis
: uvnitř zásuvky dávkovače pracích
prostředků se nachází funkční popis, na kterém jsou
uvedeny všechny dostupné programy spolu s grackou
příručkou o použití jednotlivých přihrádek zásuvky.
Tlačítko ON/OFF : zapněte nebo vypněte pračku
krátkým stisknutím tlačítka. Kontrolka START/PAUZA
pomalu blikající zeleným světlem poukazuje na to, že je
stroj zapnutý. Za účelem vypnutí pračky během praní je
třeba držet tlačítko stisknuté déle, přibližně 3 sek.; krátké
nebo náhodné stisknutí neumožní vypnutí pračky. Vypnutí zařízení během praní způsobí zrušení probíhajícího
pracího programu.
OTOČNÝ OVLADAČ PROGRAMŮ: Slouží k nastavení
požadovaného programu (viz “Tabulka programů“).
FUNKČNÍ tlačítka: stiskněte tlačítko kvůli volbě
požadované funkce. Na displeji se rozsvítí příslušná
kontrolka.
Tlačítko
provést čištění vnitřních částí zařízení
SAMOČIŠTĚNÍ: stiskněte jej, když chcete
(viz “Čištění
pračky”).
Tlačítka
DIRECT INJECTION
: jeho stisknutím se pro-
vádí volba volitelné funkce DIRECT INJECTION.
Tlačítko
OPAKOVANÉ MÁCHÁNÍ
: jeho stisknutím
můžete provést volbu požadovaného máchání.
Tlačítko ODSTŘEĎOVÁNÍ : stiskněte za účelem
snížení nebo úplného vyloučení odstřeďování - hodnota
bude uvedena na displeji.
Tlačítko
TEPLOTA
: stiskněte za účelem snížení te-
ploty: Příslušná hodnota bude zobrazena na displeji.
Tlačítko
ZABLOK. TLAČÍTEK
: aktivace
zablokování ovládacího panelu se provádí tak, že
podržíte stisknuté tlačítko přibližně na 2 sekundy. Když
OTOČNÝ OVLADAČ
PROGRAMŮ
FUNKČNÍ
OPAKOVANÉ
tlačítka
Tlačítko
MÁCHÁNÍ
Tlačítko
DIRECT
INJECTION
Displej
Tlačítko s kontrolkou
SAMOČIŠTĚNÍ
Tlačítko
Tlačítko
ZABLOK.
TLAČÍTEK
Tlačítko
Tlačítko
TEPLOTA
ODLOŽENÝ
START
Tlačítko
ODSTŘEĎOVÁNÍ
se na displeji zobrazí nápis „ZABLOK. TLAČÍTEK
AKTIVNÍ“, ovládací panel je zablokován (s výjimkou
tlačítko ON/OFF). Tímto způsobem se zamezí náhodným
změnám programů, zejména když jsou v domácnosti
děti. Zrušení zablokování ovládacího panelu se provádí
tak, že podržíte stisknuté tlačítko přibližně na 2 sekundy.
Tlačítko
ODLOŽENÝ START
: stiskněte za účelem
nastavení odloženého startu zvoleného programu. Doba,
o kterou bude start odložen, bude zobrazena na displeji.
Tlačítko s kontrolkou START/PAUZA: když zelená
kontrolka začne pomalu blikat, stiskněte toto tlačítko pro
zahájení praní. Po zahájení cyklu se kontrolka rozsvítí
stálým světlem. Přejete-li si přerušit praní, opětovně
stiskněte tlačítko; kontrolka bude blikat oranžovým
světlem. Když symbol není rozsvícen, je možné
otevřít dvířka. Za účelem opětovného zahájení cyklu
z místa, v němž byl přerušen, opětovně stiskněte tlačítko.
Pohotovostní režim
Za účelem shody s novými předpisy souvisejícími s
energetickou úsporou je tato pračka vybavena systémem
automatického vypnutí (přechodu do pohotovostního
režimu – standby), který je aktivován po uplynutí 30 minut, když se pračka nepoužívá. Krátce stiskněte tlačítko
ON/OFF a vyčkejte na obnovení činnosti zařízení.
Antimikrobiální těsnění
Těsnění dvířek je vyrobeno ze speciální směsi, která je
schopna zaručit antimikrobiální ochranu a snížit šíření
bakterií až o 99,99%.
Těsnění dvířek obsahuje zinkium-pyrition, biocidní
látku, která snižuje šíření škodlivých mikrobů (*), jako
jsou bakterie a plísně, které by mohly způsobit skvrny,
nepříjemný zápach a zhoršení vlastností výrobku.
(*) Na základě zkoušky na výskyt : Staphylococcus aureus,
Escherichia coll, Pseudomonas aeruginosa, Candida albicans,
Aspergillus niger, Penicillium digitatum, provedené Univerzitou v
Perugia.
Ve vzácných případech by mohl dlouhodobý styk s těsněním způsobit alergickou reakci pokožky.
START/PAUZA
18
Page 19

Displej
C
A
C
CZ
G
C
L M
I
B
F
X Z
Y
D
E
Displej slouží k naprogramování zařízení a poskytuje četné informace.
Na ploše A je zobrazena ikona a zvolený prací program, fáze praní a doby zbývající do konce pracího cyklu.
Na ploše B jsou zobrazeny dvě úrovně intenzity týkající se volitelné funkce DIRECT INJECTION.
Na plochách C se nacházejí kontrolky týkající se dostupných funkcí.
Na ploše D je zobrazena doba zbývající do spuštění zvoleného programu v případě nastavení funkce ODLOŽENÝ
START.
H
V řetězci E je zobrazena maximální hodnota rychlosti odstřeďování, které zařízení může dosáhnout na základě zvoleného programu; když program nepočítá s nastavením odstřeďování, na uvedené ploše je zobrazen symbol “--” s
nízkým jasem.
Na ploše F je zobrazena hodnota teploty, kterou lze zvolit na základě zvoleného programu; když není nastavení teploty
součástí zvoleného programu, na uvedené ploše je zobrazen symbol “--” s nízkým jasem.
Symbol Zablokovaných dvířek
Rozsvícení uvedeného symbolu poukazuje na zablokování dvířek kvůli zabránění jejich náhodnému otevření. Aby se
předešlo poškození, před otevřením dvířek je třeba vyčkat na zhasnutí uvedeného symbolu.
POZN.: Když je aktivována funkce ODLOŽENÝ START, nebude možné otevřít dvířka a pro jejich otevření bude třeba
přerušit činnost zařízení stisknutím tlačítka START/PAUZA.
! Při prvním zapnutí budete vyzváni, abyste provedli volbu jazyka, a poté bude na displeji automaticky zvoleno menu
volby jazyka.
Za účelem volby požadovaného jazyka stiskněte tlačítka X a Y a potvrďte voblu stisknutím tlačítka Z.
Když si přejete provést změnu jazyka, vypněte zařízení, stiskněte současně tlačítka G, H, I a držte je stisknutá, dokud
neuslyšíte akustický signál a neobjeví se menu pro volbu jazyka.
! Když si přejete změnit jas displeje, který je v rámci přednastavení nastaven na nejvyšší hodnotu, vypněte zařízení, při
jeho opětovném zapnutí stiskněte současně tlačítka G, L a M a držte je stisknuta, dokud neuslyšíte akustický signál.
Stisknutím tlačítek X a Y zvolte požadovaný jas a potvrďte volbu stisknutím tlačítka Z.
! Když během pracího cyklu nebo při nastavování funkce „ODLOŽENÝ START“ nebude displej používán po dobu 1
minuty, bude aktivován „SPOŘIČ OBRAZOVKY“. Pro návrat na předchozí zobrazení stačí stisknout kterékoli tlačítko.
19
Page 20

Jak provést prací cyklus
CZ
1. ZAPNUTÍ ZAŘÍZENÍ. Stiskněte tlačítko a na displeji
se zobrazí nápis HOTPOINT; kontrolka START/
PAUZA bude pomalu blikat zelenou barvou.
2. NAPLŇTE PRAČKU PRÁDLEM. Otevřete dvířka.
Naplňte pračku prádlem a dbejte přitom, aby nedošlo
k překročení množství náplně, uvedeného v tabulce
programů na následující straně.
3. DÁVKOVÁNÍ PRACÍHO PROSTŘEDKU. Vytáhněte
dávkovač pracích prostředků a naplňte prací
prostředek do příslušných přihrádek způsobem
vysvětleným v části „Prací prostředky a prádlo“.
4. ZAVŘETE DVÍŘKA.
5. ZVOLTE PRACÍ PROGRAM. Otočným ovladačem
PROGRAMŮ zvolte požadovaný program; název
programu bude zobrazen na displeji; ke zvolenému
programu je přiřazena teplota a rychlost odstřeďování,
které se dají měnit. Na displeji bude zobrazena doba
trvání cyklu.
6. PROVEĎTE UŽIVATELSKÁ NASTAVENÍ PRACÍHO
CYKLU. Použijte příslušná tlačítka:
Změňte teplotu a/nebo odstřeďování. Zařízení
automaticky zvolí teplotu a maximální rychlost
odstřeďování přednastavené pro zvolený program;
tyto hodnoty se nesmí zvyšovat. Stisknutím tlačítka
je možné postupně snížit teplotu až po praní ve
studené vodě (na displeji se zobrazí symbol “--”).
Stisknutím tlačítka je možné postupně snížit
rychlost odstřeďování až po jeho úplné vyloučení (na
displeji se zobrazí symbol “--”). Další stisknutí tlačítek
obnoví nastavení maximálních přednastavených
hodnot.
! Výjimka: při volbě programu 2 bude možné zvýšit
teplotu až na 40°C.
! Výjimka: při volbě programu 3 bude možné zvýšit
teplotu až na 90°C.
! Výjimka: při volbě programu 4 bude možné zvýšit
teplotu až na 60°C.
Nastavte odložený start.
Pro nastavení odloženého startu zvoleného
programu stiskněte příslušné tlačítko až do dosažení
požadované doby odložení. Zrušení odloženého startu
se provádí stisknutím tlačítka až do zobrazení nápisu
“-- h”.
Nastavte druh máchání.
Volitelná funkce umožňuje zvolit požadovaný
druh máchání pro maximální péči o citlivé druhy
pokožky. Při prvním stisknutí tlačítka bude nastavena
úroveň “Extra +1”, která umožní provést volbu
přídavného máchání ve srovnání se standardním
mácháním cyklu, aby se odstranily všechny stopy
po pracím prostředku. Při druhém stisknutí tlačítka
bude nastavena úroveň „Extra +2“, která umožňuje
provést volbu dvou přídavných máchání ve srovnání
se standardním mácháním cyklu a doporučuje se pro
citlivější pokožky. Při třetím stisknutí tlačítka bude
nastavena úroveň „Extra +3“ máchání, která umožní
provést volbu 3 přídavných máchání ve srovnání se
standardním mácháním cyklu. Tato volitelná funkce,
která je aktivována při cyklech s teplotou 40 °C,
umožňuje odstranit hlavní alergeny, jako je kočičí
i psí srst a pyl. Při teplotě nad 40 °C se dosahuje
optimální úrovně protialergické ochrany. Opětovným
stisknutím tohoto tlačítko se můžete vrátit na úroveň
máchání „Běžné máchání“. Když není možné
provést požadované nastavení nebo změnit existující
nastavení, na displeji se zobrazí „NEPOUŽITELNÝ“
nebo „NEMĚNITELNÝ“.
Změňte vlastnosti cyklu.
• Stiskněte tlačítka aktivace funkce; rozsvítí se
odpovídající kontrolka.
• Opětovným stisknutím můžete zvolenou funkci
zrušit; zhasne se odpovídající kontrolka.
! Když zvolená funkce není kompatibilní s nastaveným
programem, příslušná kontrolka bude zobrazena s
nízkým jasem a nekompatibilita bude signalizována
také akustickým signálem (3 pípnutí) a zobrazením
nápisu “NEPOUŽITELNÝ” na displeji.
! Když zvolená funkce není kompatibilní s další,
předtím nastavenou funkcí, na displeji se zobrazí
nápis “NEPOUŽITELNÝ” a funkce nebude aktivována.
! Funkce mohou změnit doporučenou náplň a/nebo
dobu trvání cyklu.
7. SPUSŤTE PROGRAM. Stiskněte tlačítko START/
PAUZA. Příslušná kontrolka se rozsvítí stálým
zeleným světlem a dojde k zablokování dvířek
(rozsvícený symbol ZABLOKOVANÝCH DVÍŘEK
). Během praní se na displeji zobrazí název
probíhající fáze. Za účelem změny programu během
probíhajícího cyklu přerušte činnost pračky stiknutím
tlačítka START/PAUZA (kontrolka START/PAUZA
bude pomalu blikat oranžovým světlem); zvolte
požadovaný cyklus a opětovně stiskněte tlačítko
START/PAUZA. Za účelem otevření dvířek v průběhu
pracího cyklu stiskněte tlačítko START/PAUZA;
když bude symbol ZABLOKOVANÝCH DVÍŘEK
zhasnutý, bude možné otevřít dvířka. Opětovným
stisknutím tlačítka START/PAUZA znovu uveďte do
činnosti prací program z bodu, ve kterém byl přerušen.
8. UKONČENÍ PROGRAMU. Bude oznámeno
zobrazením nápisu „KONEC CYKLU“ na displeji. Po
zhasnutí symbolu ZABLOKOVANÝCH DVÍŘEK
bude možné otevřít dvířka. Otevřete dvířka, vyložte
prádlo a vypněte zařízení.
! Přejete-li si zrušit již zahájený cyklus, znovu dlouze
stiskněte tlačítko . Cyklus bude přerušen a dojde k
automatickému vypnutí zařízení.
Direct Injection
Pračka je vybavena inovační technologií «Direct Injection», která připravuje směs vody s pracím prostředkem,
čímž ihned aktivuje čisticí účinky pracího prostředku.
Tato aktivní emulze se vpouští přímo do bubnu pračky,
účinně proniká do vláken a odstraňuje i ty nejodolnější
nečistoty již při nízkých teplotách, přičemž bere maximální ohled na barvy a tkaniny.
Je možné zvolit režim «Výkon» pro dosažení větší čistoty
nebo režim «EcoEnergy» pro dosažení úspory energie.
20
Page 21

Programy a funkce
Zbytková vlhkost %
60°/40°
60°/40°
Tabulka pracích programů
Prací
prostředky
nutu)
Bělicí
Praní
Max. rychlost
(otáčky za mi-
--
--
--
Aviváž
- - - 8 - - - **
Max. náplň (kg)
prostředek
- 8 - - - **
- 4,5 - - - **
8 - - - **
4,5 46 0,65 62 100’
- 3,5 71 0,19 47 30’
- 5 - - - **
- 1 - - - **
- 2 - - - **
- 8 53 0,69 54,8 300’
- 8 53 0,69 87 300’
- 8 53 0,89 87 195’
- 5 - - - **
- 5 - - - **
8 - - - **
- 2 - - - **
- 3,5 - - - **
8 - - - **
kWh
vody lt
Spotřeba energie
Celkové množství
Popis programu
Programy
DAILY CLEAN
ODSTR. SKVRN POWER 20°C
1
ODSTR. SKVRN TURBO 45’
2
3 BAVLNA: málo znečištěné bílé a barevné prádlo z odolných tkanin.
SYNTETIKA (4): málo znečištěné barevné prádlo z odolných tkanin.
4
RYCHLÉ 30’: k rychlému oživení mírně znečištěného prádla (nedoporučuje se
5
pro vlnu, hedvábí a prádlo určené pro ruční praní).
SPECIALS
PÉČE O BARVY (default) => Barev. prádlo
6
ULTRA JEMNÉ PRÁDLO
7
VLNA: Pro vlnu, kašmír apod.
8
9
EKO BAVLNA 60°C
9
EKO BAVLNA 40°C
9
EKO BAVLNA 40°C (3): málo znečištěné bílé a barevné prádlo z odolných tkanin.
DĚTSKÉ
10
EXTRA
ANTIALERG. (Antialergenní)
11
POVL./RUČN. (Povlečení a Ručníky): pro povlečení a koupelnové prádlo.
12
HEDVÁBÍ / ZÁCLONY: pro prádlo z hedvábí, viskózy, spodní prádlo.
13
PROŠÍVANÉ: pro prádlo plněné husím peřím.
14
Programy Částečné
Máchání
Odstřeďování + Vypouštění vody
Samostatné vypouštění vody *
(1): silně znečištěné bílé a barevné prádlo z odolných tkanin.
(2): málo znečištěné bílé a barevné prádlo z odolných tkanin.
Max.
teplota
(°C)
20° 1200
20°
(Max. 40°C)
40°
(Max. 90°C)
40°
(Max. 60°C)
30° 800
40° 1200
30°
40° 800
60° 1200
40° 1200
40° 1200
40° 1000
60° 1200
60° 1200
30°
30° 1000
1200
1200
1000
- 1200 -
- 1200 - - - 8 - - - **
-
* V případě volby programu a vyloučení odstřeďování zařízení provede pouze odčerpání vody.
** Je možné kontrolovat dobu trvání pracích programù na displeji.
Doba trvání cyklu uvedená na displeji nebo v návodu představuje odhad vypočítaný na základě standardních podmínek. Skutečná doba se může měnit v závislosti na četných
faktorech, jako je např. teplota a tlak vody na vstupu, teplota prostředí, množství pracího prostředku, množství a druh náplně, vyvážení náplně a zvolené volitelné funkce.
1) Kontrolní program podle normy 1061/2010: nastavte program 9 s teplotou 60°C.
Tento cyklus je vhodný pro praní běžně znečištěné bavlny a jedná se o nejúčinnější cyklus z hlediska kombinované spotřeby energie a vody určený pro prádlo, které lze prát při teplotě do
60 °C. Skutečná teplota praní se může lišit od uvedené.
2) Kontrolní program podle normy 1061/2010: nastavte program 9 s teplotou 40°C.
Tento cyklus je vhodný pro praní běžně znečištěné bavlny a jedná se o nejúčinnější cyklus z hlediska kombinované spotřeby energie a vody určený pro prádlo, které lze prát při teplotě do
40 °C. Skutečná teplota praní se může lišit od uvedené.
Pro všechny Test Institutes:
3) Dlouhý program pro praní bavlny: nastavte program 9 s teplotou 40 °C a stiskněte tlačítko DIRECT INJECTION s režimem „Výkon“.
4) Dlouhý program pro syntetiku: nastavte program 4 s teplotou 40°C.
Funkce praní
! Když zvolená funkce není kompatibilní s nastaveným
programem, příslušná kontrolka bude zobrazena s
nízkým jasem a nekompatibilita bude signalizována také
akustickým signálem (3 pípnutí) a zobrazením nápisu
“NEPOUŽITELNÝ” na displeji.
! Když zvolená funkce není kompatibilní s další,
předtím nastavenou funkcí, na displeji se zobrazí nápis
“NEPOUŽITELNÝ” a funkce nebude aktivována.
Úspora Času
Při volbě této volitelné funkce dojde ke zkrácení doby
trvání programu až o 50% v závislosti na zvoleném cyklu
a současně bude zaručena úspora vody a energie. Tento
cyklus použijte na nepříliš znečištěné kusy prádla.
Péče o Barvy
Při nastavení cyklu 6 a volbě této funkce je možné zvolit ze 3
programů, které byly navrženy specicky pro co nejlepší ochranu intenzity barev barevného prádla a zářivosti bílého prádla:
Barev. prádlo: slouží pro praní oblečení světlé barvy. Program je navržen pro dlouhodobé zachování živosti barev.
Tmavé prádlo: tento program je navržen pro dlouhodobé zachování barev tmavého prádla. Pro dosažení co
nejlepších výsledků se doporučuje použít tekutý prací
prostředek pro praní tmavého prádla.
Bílé prádlo: tento program je navržen pro dlouhodobé zachování zářivosti bílého prádla. Pro dosažení co nejlepších
výsledků se doporučuje použít práškový prací prostředek.
Super Wash
Díky použití většího množství vody v počáteční fázi cyklu a díky
použití delší doby tato volitelná funkce zaručuje praní vysoké
kvality. Může se používat s bělicím prostředkem nebo bez něj.
Když si přejete provést také bělení, vložte přídavnou nádobku 3
z příslušenství do nádobky 1. Při dávkování bělícího prostředku
nepřekračujte úroveň „max“ vyznačenou na středové přihrádce
(viz obrázek na str. 22). Pokud si přejete provést samostatné
bělení, nalijte bělicí prostředek do přídavné nádobky 3, nastavte
program a aktivujte volitelnou funkci .
CZ
Doba
trvání cyklu
21
Page 22

Prací prostředky a prádlo
1
2
A
B
*
M
AX
1
3
2
A
B
*
CZ
Dávkovač pracích prostředků
Dobrý výsledek praní závisí také na správném dávkování
pracího prostředku: použití jeho nadměrného množství
snižuje efektivitu praní a napomáhá tvorbě vodního
kamene na vnitřních částech pračky a zvyšuje znečištění
životního prostředí.
! Pro předpírku a praní při teplotě vyšší než 60 °C
používejte práškové prací prostředky pro bílé bavlněné
prádlo.
! Dodržujte pokyny uvedené na obalu pracího prostředku.
! Nepoužívejte prací prostředky určené pro ruční praní,
protože způsobují tvorbu nadměrného množství pěny.
Při vytahování dávkovače
pracích prostředků a při
jeho plnění pracími nebo
přídavnými prostředky postupujte následovně.
! Nevkládejte prací
prostředek do střední
přihrádka (*).
Přihrádka 1: Prací prostředek
(v prášku nebo tekutý)
V případě použití tekutého
pracího prostředku se doporučuje použít pro správné
dávkování malou přepážku A z příslušenství. Pro použití
práškového pracího prostředku vložte malou přepážku
do prohloubeniny B.
Přihrádka 2: Přídavné prostředky (aviváž atd.)
Aviváž nesmí vytékat z mřížky.
Přídavná přihrádka 3: Bělicí prostředek
Příprava prádla
• Roztřiďte prádlo podle:
- druhu tkaniny / symbolu na visačce.
- barvy: oddělte barevné prádlo od bílého.
• Vyprázdněte kapsy a zkontrolujte knoíky.
• Nepřekračujte povolenou náplň, vztahující se na hmotnost suchého prádla: viz “Tabulka pracích programů“.
Kolik váží prádlo?
1 prostěradlo 400-500 g
1 povlak na polštář 150-200 g
1 ubrus 400-500 g
1 župan 900-1.200 g
1 ručník 150-250 g
Speciální programy
ODSTR. SKVRN POWER 20°C: tento program nabízí
maximální schopnost odstraňování skvrn bez nutnosti
přípravného ošetření tkanin; skvrny jsou odstraňovány
při nízké teplotě, tkaniny a barvy jsou zachovány v
neporušeném stavu.
ODSTR. SKVRN TURBO 45’: tento cyklus zaručuje
vynikající schopnost odstranění skvrn již při teplotě 20°C
v průběhu pouhých 45 minut. Teplotu pro tento cyklus lze
zvýšit až na 40°C.
ULTRA JEMNÉ PRÁDLO: pro praní velmi choulostivého prádla, které obsahuje aplikace, jako je štras nebo
pajetky, použijte program 7.
Doporučuje se prádlo před praním převrátit naruby a
vložit malé kusy prádla do příslušného sáčku pro praní
choulostivého prádla. Pro dosažení nejlepších výsledků
se doporučuje použít tekutý prací prostředek pro choulostivé prádlo.
Vlna - Woolmark Apparel Care - Green:
prací cyklus „Vlna“ této pračky byl schválen společností
Woolmark Company pro praní prádla z vlny, které je
klasikováno jako „prádlo určené pro ruční praní“, za
podmínky, že bude praní provedeno v souladu s pokyny
uvedenými na visačce oblečení a pokyny dodanými
výrobcem této pračky. (M1127)
DĚTSKÉ: na odstranění typické špíny dětského oblečení
použijte příslušný program 10 a řádně odstraňte prací
prostředek z prádla, abyste předešli alergickým reakcím
jemné dětské pokožky. Tento prací cyklus byl navržen
pro snížení množství bakterií s použitím vyššího
množství vody a pro optimalizaci účunku specických
hygienických přísad, přidaných k pracímu prostředku.
ANTIALERGENNÍ: použijte program 11 pro odstranění hla-
vních alargenů, jako jsou pyl, roztoči a kočičí a psí chlupy.
POVLEČENÍ A RUČNÍKY: pro praní ložního a koupelnového
prádla v jediném cyklu použijte program 12, který optimalizuje
použití aviváže a umožňuje uspořit čas a energii. Doporučuje
se použití práškového pracího prostředku.
HEDVÁBÍ: použijte příslušný program 13 pro praní
všeho prádla z hedvábí. Doporučujeme použití pracího
prostředku pro choulostivé prádlo.
ZÁCLONY: přehnout je a uložit dovnitř povlaku na polštář
anebo do sáčku ze síťoviny. Použijte program 13.
PROŠÍVANÉ: při praní prádla plněného husím peřím,
jako jsou například „manželské“ nebo samostatné peřiny
(nepřesahující hmotnost 3,5 kg), polštáře, větrovky,
používejte příslušný program 14. Doporučujeme vkládat
peřiny do bubnu tak, že se jejich oba okraje složí směrem
dovnitř (viz obrázky), a nepřekročit přitom ¾ celkového
objemu samotného bubnu. Za účelem optimálního praní
se doporučuje použít tekutý prací prostředek a dávkovat
jej prostřednictvím dávkovače pracích prostředků.
Systém automatického vyvážení náplně
Před každým odstřeďováním buben provede otáčení
rychlostí lehce převyšující rychlost praní, aby se odstranily vibrace a aby se náplň rovnoměrně rozložila.
V případě, že po několikanásobných pokusech o vyvážení
prádlo ještě nebude správně vyváženo, zařízení provede
odstřeďování nižší rychlostí, než je přednastavená rychlost. Při nadměrném nevyvážení pračka provede namísto
odstřeďování vyvážení. Pro dosažení rovnoměrnějšího
rozložení náplně a jejího správného vyvážení se
doporučuje míchat velké a malé kusy prádla.
22
Page 23

Poruchy a způsob jejich
odstranění
Může se stát, že pračka nebude fungovat. Dříve, než zatelefonujete na Servisní službu (viz „Servisní služba“), zkontrolujte, zda se nejedná o problém, který lze snadno vyřešit s pomocí následujícího seznamu.
Poruchy:
Pračku nelze zapnout.
Nedochází k zahájení pracího cyklu.
Pračka nenapouští vodu (Na displeji
se zobrazí nápis „CHYBÍ VODA,
Otevřete ventil“).
Dochází k nepřetržitému napouštění a
odčerpávání vody.
Možné příčiny / Způsob jejich odstranění:
• Zástrčka není zasunuta v zásuvce nebo není zasunuta natolik, aby došlo ke
spojení kontaktů.
• V celém domě je vypnutý proud.
• Nejsou řádně zavřená dvířka.
• Nebylo stisknuto tlačítko ON/OFF.
• Nebylo stisknuto tlačítko START/PAUZA.
• Nebyl otevřen kohout přívodu vody.
• Byl nastaven odložený start.
• Přívodní hadice není připojena k vodovodnímu kohoutu.
• Hadice je příliš ohnutá.
• Nebyl otevřen kohout přívodu vody.
• V celém domě je uzavřený přívod vody.
• V rozvodu vody není dostatečný tlak.
• Nebylo stisknuto tlačítko START/PAUZA.
• Vypouštěcí hadice se nachází mimo určené rozmezí od 65 do 100 cm nad
zemí (viz „Instalace“).
• Koncová část vypouštěcí hadice je ponořena ve vodě (viz „Instalace“).
• Odpad ve stěně není vybaven odvzdušňovacím otvorem.
Když ani po uvedených kontrolách nedojde k odstranění problému, uzavřete
přívod vody, vypněte pračku a přivolejte Servisní službu. V případě, že se byt
nachází na jednom z nejvyšších poschodí, je možné, že dochází k sifonovému
efektu, jehož následkem pračka nepřetržitě napouští a odčerpává vodu. Pro
odstranění uvedeného efektu jsou v prodeji běžně dostupné speciální protisifonové ventily.
CZ
Nedochází k vyčerpání vody nebo
k odstřeďování.
Během odstřeďování je možné pozorovat silné vibrace pračky.
Dochází k úniku vody z pračky.
Stroj je zablokován, displej bliká a
signalizuje poruchový kód (např.:
F-01, F-..).
Dochází k tvorbě nadměrného
množství pěny.
• Odčerpání vody netvoří součást nastaveného programu: u některých
programů je třeba jej aktivovat manuálně (viz „Programy a funkce“).
• Vypouštěcí hadice je ohnutá (viz „Instalace“).
• Odpadové potrubí je ucpáno.
• Během instalace nebyl buben odjištěn předepsaným způsobem
(viz „Instalace“).
• Pračka není dokonale vyrovnána do vodorovné polohy (viz „Instalace“).
• Pračka je stlačena mezi nábytkem a stěnou (viz „Instalace“).
• Přítoková hadice není správně zašroubována (viz „Instalace“).
• Dávkovač pracích prostředků je ucpán (způsob jeho vyčištění je uveden v
části „Údržba a péče“).
• Vypouštěcí hadice není upevněna předepsaným způsobem (viz „Instalace“).
• Vypněte zařízení a vytáhněte zástrčku ze zásuvky, vyčkejte přibližně 1 minutu a opětovně jej zapněte.
Když porucha přetrvává, obraťte se na Servisní službu.
• Použitý prací prostředek není vhodný pro použití v automatické pračce
(musí obsahovat označení „pro praní v pračce“, „pro ruční praní nebo pro
praní v pračce“ nebo podobné označení).
• Bylo použito jeho nadměrné množství.
23
Page 24

Servisní služba
CZ
Před přivoláním Servisní služby:
• Zkontrolujte, zda nejste schopni poruchu odstranit sami (viz „Poruchy a způsob jejich odstranění“);
• Opětovně uveďte do chodu prací program, abyste ověřili, zda byla porucha odstraněna;
• V opačném případě se obraťte na Centrum servisní služby na telefonním čísle uvedeném na záručním listu.
! Nikdy se neobracejte s žádostí o pomoc na techniky, kteří nejsou k výkonu této činnosti oprávněni.
Při hlášení poruchy uveďte:
• druh poruchy;
• model zařízení (Mod.);
• výrobní číslo (S/N).
Tyto informace jsou uvedeny na štítku aplikovaném na zadní částí pračky a v její přední části, dostupné po otevření dvířek.
24
Page 25

Návod na použitie
PRÁČKA
SK
Slovensky
RPD 826 D
Obsah
Inštalácia, 26-27
Rozbalenie a vyrovnanie do vodorovnej polohy
Pripojenie k elektrickej a k vodovodnej sieti
Prvý prací cyklus
Technické údaje
Údržba a starostlivosť, 28
Uzavretie prívodu vody a vypnutie elektrického napájania
Čistenie práčky
Čistenie dávkovača pracích prostriedkov
Starostlivosť o dvierka a bubon
Čistenie čerpadla
Skontrolujte prítokovú hadicu vodu
Opatrenia a rady, 29
Základné bezpečnostné pokyny
Likvidácia
Manuálne otvorenie dvierok
Popis práčky, 30-31
Ovládací panel
Displej
SK
Ako vykonať prací cyklus, 32
Programy a funkcie, 33
Tabuľka pracích programov
Funkcie prania
Pracie prostriedky a prádlo, 34
Dávkovač pracích prostriedkov
Príprava prádla
Špeciálne programy
Systém automatického vyváženia náplne
Poruchy a spôsob ich odstránenia, 35
Servisná služba, 36
25
Page 26

Inštalácia
SK
! Je veľmi dôležité uschovať tento návod
kvôli prípadnému ďalšiemu použitiu. V prípade predaja, darovania alebo presťahovania
práčky sa uistite, že zostane uložený v jej
blízkosti, aby mohol poslúžiť novému
majiteľovi pri oboznámení sa s činnosťou a
s príslušnými upozorneniami.
! Pozorne si prečítajte uvedené pokyny:
obsahujú dôležité informácie, týkajúce sa
inštalácie, použitia a bezpečnosti pri práci.
Rozbalenie a vyrovnanie do vodorovnej polohy
Rozbalenie
1. Rozbaľte práčku.
2. Skontrolujte, či počas prepravy
nedošlo k jej poškodeniu. V prípade, že je
poškodená, nezapájajte ju a obráťte sa na
predajcu.
3. Odstráňte 4
skrutky slúžiace
na ochranu počas
prepravy a gumovú podložku
s príslušným
dištančným členom,
ktoré sa nachádzajú
v zadnej časti (viď
obrázok).
4. Uzatvorte otvory po skrutkách plastovými
krytkami z príslušenstva.
5. Uschovajte všetky diely: v prípade opätovnej prepravy práčky ich bude potrebné
opätovne namontovať.
! Obaly nie sú hračky pre deti!
Vyrovnanie do vodorovnej polohy
1. Práčku je potrebné umiestniť na rovnú a
pevnú podlahu tak, aby nebola opretá o ste-
nu, nábytok alebo o niečo iné.
2. V prípade, že pod-
laha nie je dokonale
vodorovná, môžu byť
prípadné rozdiely vy-
kompenzované skrutkovaním predných
nožičiek (viď obrá-
zok); Uhol sklonu,
nameraný na pracovnej ploche, nesmie
presiahnuť 2°.
Dokonalé vyrovnanie do vodorovnej polohy
zabezpečí stabilitu zariadenia a zamedzí vzniku vibrácií a hluku počas činnosti. V prípade inštalácie na podlahovú krytinu alebo
na koberec, nastavte nožičky tak, aby pod
práčkou zostal dostatočný voľný priestor na
ventiláciu.
Pripojenie k elektrickej a k vodovodnej sieti
Pripojenie prítokovej hadice vody
1. Pripojte prívodnú
hadicu jej zaskrutko-
vaním ku kohútiku
so studenou vody
s hrdlom so závitom
3/4“ (viď obrázok).
Pred pripojením
hadice nechajte vodu
odtiecť, až kým nebude číra.
2. Pripojte prítokovú
hadicu k pračke, jej
zaskrutkovaním k
príslušnej prípojke
na vodu, umiestne-
nej vpravo hore (viď
obrázok).
3. Zabezpečte, aby hadica nebola príliš ohnutá alebo stlačená.
! Tlak v rozvode vody sa musí pohybovať
v rozmedzí hodnôt uvedených v tabuľke s
technickými údajmi (viď vedľajšia strana).
! V prípade, že dĺžka prítokovej hadice nebude dostatočná, obráťte sa na špecializovanú
predajňu alebo na autorizovaný technický
personál.
! Nikdy nepoužívajte už použité hadice.
! Používajte hadice z príslušenstva zariadenia.
26
Page 27

Pripojenie vypúšťacej hadice
65 - 100 cm
Pripojte vypúšťaciu
hadicu, bez toho aby
ste ju ohli, k odpado-
vému potrubiu alebo
k odpadu v stene,
ktorý sa nachádza
od 65 do 100 cm nad
zemou;
alebo ju uchyťte k
okraju umývadla
či vane, a pripevnite vodiaci držiak
z príslušenstva ku
kohútu (viď obrá-
zok). Voľný koniec
vypúšťacej hadice
nesmie zostať ponorený do vody.
! Použitie predlžovacích hadíc sa
neodporúča; ak je však nevyhnutné,
predlžovacia hadica musí mať rovnaký priemer ako originálna hadica a jej dĺžka nesmie
presiahnuť 150 cm.
Pripojenie k elektrickej sieti
Pred zasunutím zástrčky do zásuvky sa uistite, že:
• zásuvka je uzemnená a že vyhovuje normám;
• zásuvka je schopná uniesť maximálnu
záťaž odpovedajúcu menovitému príkonu
zariadenia, uvedenému v tabuľke s technickými údajmi (viď vedľa);
• hodnota napájacieho napätia odpovedá
údajom uvedeným v tabuľke s technickými
údajmi (viď vedľa);
• zásuvka je kompatibilná so zástrčkou
práčky. V opačnom prípade je potrebné
vymeniť zásuvku.
! Práčka nesmie byť umiestnená vonku – pod
holým nebom, a to ani v prípade, keby sa
jednalo o miesto chránené pred nepriazňou
počasia, pretože je veľmi nebezpečné
vystaviť ju dažďu a búrkam.
! Po ukončení inštalácie musí zásuvka zostať
ľahko prístupná.
! Nepoužívajte predlžovacie káble a rozvodky.
! Kábel nesmie byť ohnutý alebo pritlačený.
! Výmena kábla musí byť zverená výhradne
autorizovanému technickému personálu.
Upozornenie! Výrobca neponesie žiadnu
zodpovednosť za následky spôsobené
nerešpektovaním týchto pokynov.
Prvý prací cyklus
Po inštalácii zariadenia je potrebné ešte pred
jeho použitím vykonať jeden skúšobný cyklus
s pracím prostriedkom a bez náplne prádla,
nastavením pracieho programu samočistenie
(viď “Čistenie práčky).
Technické údaje
Model RPD 826 D
šírka 59,5 cm
Rozmery
Kapacita od 1 do 8 kg
Elektrické
zapojeni
Pripojenie k
rozvodu vody
Rýchlos±z
odstreïovania
Kontrolné pro-
gramy podľa
smerníc
1061/2010 a
1015/2010
výška 85 cm
håbka 60,5 cm
Vid štítok s technickými
údajmi, aplikovaný na zariadení.
maximálny tlak
1 MPa (10 bar)
maximálny tlak
0,05 MPa (0.5 bar)
kapacita bubna 62 litrov
a±z do 1200 otáèok za
minútu
program 9;
Eco Bavlna 60°C.
program 9;
Eco Bavlna 40°C.
Toto zariadenie je v zhode
s nasledujúcimi smernicami Európskej únie:
- 2004/108/CE (Elektromagnetická kompatibilita)
- 2006/95/CE (Nízke
napätie)
- 2012/19/EU (WEEE)
SK
27
Page 28

Údržba a starostlivosť
1
2
SK
Uzavretie prívodu vody a vypnutie
elektrického napájania
• Po každom praní uzatvorte prívod vody.
Týmto spôsobom sa znižuje opotrebenie rozvodu vody zariadenia a znížuje sa
nebezpečenstvo úniku vody.
• Pred zahájením čistenia práčky a počas
údržby je potrebné vytiahnuť zástrčku
prívodného kábla zo zásuvky.
Čistenie práčky
• Vonkajšie časti a časti z gumy môžu byť
čistené utierkou navlhčenou vo vlažnej vode
a saponáte. Nepoužívajte rozpúšťadlá alebo
abrazívne prostriedky.
• Práčka je vybavená programom
samočistenie pre vyčistenie vnútorných častí,
ktorý musí byť vykonaný bez akéhokoľvek
druhu náplne v bubne.
Prací prostriedok (množstvo rovnajúce sa
10% množstva odporúčaného pre čiastočne
znečistené prádlo) alebo špecické prídavné prostriedky pre čistenie práčky budú
môcť byť použité ako pomocné prostriedky
v pracom programe. Odporúča sa vykonať
samočistiaci program každých 40 cyklov
prania.
Kvôli aktivácii programu stlačte tlačidlo na
5 sekúnd a potom stlačte tlačidlo ŠTART/
PAUZA; dôjde k zahájeniu programu, ktorý
bude trvať približne 70 minút.
Čistenie čerpadla
Súčasťou práčky je samočistiace čerpadlo,
ktoré nevyžaduje údržbu. Môže sa však
stať, že sa v jeho vstupnej ochrannej časti,
nachádzajúcej na spodku, zachytia drobné
predmety (mince, gombíky).
! Uistite sa, že prací cyklus bol ukončený a
vytiahnite zástrčku zo zásuvky.
Prístup k vstupnej časti čerpadla:
1. pomocou
skrutkovača
odstráňte krycí pa-
nel, nachádzajúci
sa v prednej časti
práčky
(viď obrázok);
2. odskrutkujte veko
otáčaním proti smeru
hodinových ručičiek
(viď obrázok):
vytečenie malého
množstva vody je
úplne bežným javom;
Čistenie dávkovača pracích prostriedkov
Vytiahnite dávkovač
jeho nadvihnutím a
vytiahnutím smerom
von (viď obrázok).
Dávkovač umyte pod
prúdom vody; toto
čistenie je potrebné
vykonávať pravidelne.
Starostlivosť o dvierka a bubon
• Dvierka ponechajte zakaždým pootvorené,
aby sa zabránilo tvorbe nepríjemných
zápachov.
28
3. dokonale vyčistite vnútro;
4. nasaďte naspäť veko;
5. namontujte naspäť krycí panel, pričom
sa pred jeho prisunutím k práčke uistite, že
došlo k správnemu zachyteniu háčikov do
príslušných otvorov.
Skontrolujte prítokovú hadicu vodu
Stav prítokovej hadice je potrebné
skontrolovať aspoň raz ročne. Ak sú na nej
viditeľné praskliny alebo trhliny, je potrebné
ju vymeniť: silný tlak v hadici počas pracieho
cyklu by mohol spôsobiť jej náhle roztrhnutie.
! Nikdy nepoužívajte už použité hadice.
Page 29

Opatrenia a rady
20
! Práčka bola navrhnutá a vyrobená v súlade s platnými
medzinárodnými bezpečnostnými predpismi. Tieto upozornenia sú uvádzané z bezpečnostných dôvodov a je
potrebné si ich pozorne prečítať.
Základné bezpečnostné pokyny
• Toto zariadenie bolo navrhnuté výhradne na použitie
ako spotrebič.
• Toto zariadenie smú používať deti
od 8 rokov, osoby náležite vyškolené
ohľadne bezpečného použitia zariadenia, ktoré si uvedomujú súvisiace
nebezpečenstvo a v prípade dozoru aj
osoby so zníženými fyzickými, senzorickými alebo duševnými schopnosťami alebo
osoby s nedostatočnými skúsenosťami a
znalosťami. Deti sa so zariadením nesmú
hrať. Operácie údržby a čistenia nesmú
vykonávať deti bez dohľadu.
• Práčku môžu používať len dospelé osoby, podľa pokynov uvedených v tomto návode.
• Nedotýkajte sa zariadenia bosí, alebo v prípade, keď
máte mokré ruky alebo nohy.
• Nevyťahujte zástrčku zo zásuvky ťahaním za kábel, ale
uchopením za zástrčku.
• Neotvárajte dávkovač pracích prostriedkov počas
činnosti zariadenia.
• Nedotýkajte sa odčerpávanej vody, pretože môže mať
veľmi vysokú teplotu.
• V žiadnom prípade sa nepokúšajte o násilné otvorenie
dvierok: mohlo by dôjsť k poškodeniu bezpečnostného
uzáveru, ktorý zabraňuje náhodnému otvoreniu.
• Pri výskyte poruchy sa v žiadnom prípade nepokúšajte
o opravu vnútorných častí zariadenia.
• Vždy majte pod kontrolou deti a zabráňte tomu, aby sa
približovali k zariadeniu počas pracieho cyklu.
• Počas pracieho cyklu majú dvierka tendenciu zohrievať
sa.
• Ak je potrebné ju presunúť, je dobré poveriť dve alebo
tri osoby a vykonať to s maximálnou pozornosťou.
Nikdy sa nepokúšajte zariadenie premiestňovať sami,
pretože je veľmi ťažké.
• Pred zahájením vkladania prádla skontrolujte, či je
bubon prázdny.
stredie. Symbol “prečiarknutej popolnice” na výrobku
Vás upozorňuje na povinnosť odovzdať zariadenie po
skončení jeho životnosti do oddeleného zberu.
Spotrebitelia majú povinnosť kontaktovať ich lokálny
úrad alebo maloobchod kvôli informáciám týkajúcich
sa správnemu odovzdaniu a likvidácie ich starých
spotrebičov.
Manuálne otvorenie dvierok
V prípade, ak nie je možné otvoriť dvierka z dôvodu
výpadku elektrickej energie a chceli by ste vybrať prádlo,
postupujte nasledovne:
1. vytiahnite zástrčku zo
zásuvky elektrickej siete.
2. Skontrolujte, či je hladina
vody vo vnútri zariadenia
nižšia ako je úroveň otvorenia dvierok; ak nie je,
vypusťte prebytočnú vodu
vypúšťacou hadicou a
zachyťte ju do vedra, ako je
znázornené na obrázku.
3. pomocou skrutkovača
odstráňte krycí panel nachádzajúci sa v prednej časti
práčky (viď obrázok).
SK
Likvidácia
• Likvidácia obalových materiálov: pri ich odstránení
postupujte v súlade s miestnymi predpismi a dbajte na
možnú recykláciu.
• Európska smernica 2012/19/EU o odpadových
elektrických a elektronických zariadeniach stanovuje,
že staré domáce elektrické spotrebiče nesmú byť odkladané do běžného netriedeného domového odpadu.
Staré spotrebiče musia byť odovzdané do oddeleného
zberu a to za účelom recykláce a optimálneho využitia
materiálov, ktoré obsahujú, z dôvodu prevencie negatívneho dopadu na ľudské zdravie a životné pro-
4. pomocou jazýčka, označeného na obrázku, potiahnite
plastové tiahlo smerom von z dorazu, až kým sa neuvolní; následne ho potiahnite smerom dolu a súčasne
otvorte dvierka.
5. namontujte naspäť krycí panel, pričom sa pred jeho
prisunutím k práčke uistite, že došlo k správnemu zachyteniu háčikov do príslušných otvorov.
29
Page 30

SK
Popis práčky
Ovládací panel
Dávkovač pracích
prostriedkov
OTOČNÝ OVLÁDAČ
Tlačidlo
ON/OFF
Funkčný popis
PROGRAMOV
SAMOČISTENIE
Tlačidlo
Tlačidlo
TEPLOTA
FUNKČNÉ
tlačidlá
Displej
Tlačidlo
ONESKORENÝ
ŠTART
Tlačidlo
ODSTREĎOVANIE
Tlačidlo
OPAKOV.
PLÁKANIE
Tlačidlo
ZABLOK.
TLAČIDIEL
Tlačidlo
DIRECT
INJECTION
Tlačidlo s kontrolkou
ŠTART/PAUZA
Dávkovač pracích prostriedkov: slúži na dávkovanie
pracích prostriedkov a prídavných prostriedkov (viď „Pra-
cie prostriedky a prádlo“).
Funkčný popis
: vo vnútri zásuvky dávkovača pracích
prostriedkov sa nachádza funkčný popis, v ktorom sú
uvedené všetky dostupné programy, spolu s grackou
príručkou o použití jednotlivých priehriadok zásuvky.
Tlačidlo ON/OFF : zapnite alebo vypnite práčku
krátkym stlačením tlačidla. Kontrolka ŠTART/PAUZA
pomaly blikajúca zeleným svetlom signalizuje, že zariadenie je zapnuté. Ak chcete vypnúť práčku počas prania,
je potrebné držať tlačidlo stlačené dlhšie, približne 3
sek.; krátkym alebo náhodným stlačením práčku nevypnete. Vypnutie zariadenia počas prania spôsobí zrušenie
prebiehajúceho pracieho programu.
OTOČNÝ OVLÁDAČ PROGRAMOV: Slúži na nastavenie požadovaného programu (viď “Tabuľka programov”).
FUNKČNÉ tlačidlá: stlačte tlačidlo pre voľbu
požadovanej funkcie. Na displeji sa rozsvieti príslušná
kontrolka.
Tlačidlo
vnútorné časti zariadenia
Tlačidlo
SAMOČISTENIE: stlačte ho, keď chcete očistiť
(viď “Čistenie práčky).
DIRECT INJECTION
: jeho stlačením sa vy-
konáva voľba voliteľnej funkcie DIRECT INJECTION.
Tlačidlo
OPAKOV. PLÁKANIE
: jeho stlačením
môžete zvoliť požadované plákanie.
Tlačidlo
ODSTREĎOVANIE
: stlačte kvôli zníženiu
alebo úplnému vylúčeniu odstreďovania - hodnota bude
uvedená na displeji.
Tlačidlo
TEPLOTA
: stlacte pre zníženie teploty:
príslušná hodnota bude zobrazená na displeji.
Tlačidlo
ZABLOK. TLAČIDIEL
: slúži na aktiváciu
zablokovania ovládacieho panelu; aktivácia sa vykonáva
tak, že podržíte stlačené tlačidlo približne na 2 sekundy.
Keď sa na displeji zobrazí nápis „ZABLOK. TLAČIDIEL
AKTÍVNE“, ovládací panel je zablokovaný (s výnimkou
tlačidlo ON/OFF). Týmto spôsobom sa zamedzí náhodným
zmenám programov, obzvlášť, keď sú v domácnosti deti.
Zrušenie zablokovania ovládacieho panelu sa vykonáva
tak, že podržíte stlačené tlačidlo približne na 2 sekundy.
Tlačidlo
ONESKORENÝ ŠTART
: stlačte za účelom
nastavenia oneskoreného štartu zvoleného programu.
Doba, o ktorú bude štart oneskorený, bude zobrazená na
displeji.
Tlačidlo s kontrolkou ŠTART/PAUZA: keď zelená
kontrolka začne pomaly blikať, stlačte tlačidlo, aby ste
zahájili pranie. Po zahájení cyklu sa kontrolka rozsvieti
stálym svetlom. Ak si želáte prerušiť pranie, opätovne
stlačte tlačidlo; kontrolka bude blikať oranžovým svetlom.
Ak symbol nie je podsvietený bude možné otvoriť
dvierka. Aby ste opätovne spustili cyklus od doby, kedy
bol prerušený, opätovne stlačte tlačidlo.
Pohotovostný režim
Kvôli zhode s novými predpismi súvisiacimi s
energetickou úsporou, je táto práčka vybavená systémom
automatického vypnutia (prechodu do pohotovostného
režimu – standby), ktorý je aktivovaný po uplynutí 30
minút, ak práčka nie je používaná. Krátko stlačte tlačidlo
ON/OFF a vyčkajte na obnovenie činnosti zariadenia.
Antimikrobické tesnenie
Tesnenie dvierok je vyrobené zo špeciálnej zmesi, ktorá
je schopná zaručiť antimikrobickú ochranu a znížiť
šírenie baktérií až o 99,99 %.
Tesnenie dvierok obsahuje zinkium-pyritión, biocídnu
látku, ktorá znižuje šírenie škodlivých mikróbov (*) ako
sú baktérie a pliesne, ktoré by mohli spôsobiť škvrny,
nepríjemný zápach a zhoršenie výrobku.
(*) Na základe skúšky vykonanej Univerzitou v Perugii na
výskyt: Staphylococcus aureus, Escherichia coll, Pseudomonas
aeruginosa, Candida albicans, Aspergillus niger, Penicillium
digitatum.
V zriedkavých prípadoch by mohol dlhodobý styk s tesnením spôsobiť alergickú reakciu pokožky.
30
Page 31

Displej
C
A
C
SK
G
H
C
L M
I
B
F
X Z
Y
D
E
Displej slúži na naprogramovanie zariadenia a poskytuje všetky potrebné informácie.
Na ploche A je zobrazená ikona a zvolený prací program, fáza prania a zostávajúca doba do konca pracieho cyklu.
Na ploche B sú zobrazené dve úrovne intenzity, týkajúce sa voliteľnej funkcie DIRECT INJECTION.
Na plochách C sa nachádzajú kontrolky týkajúce sa dostupných funkcií.
Na ploche D je zobrazená doba zostávajúca do spustenia zvoleného programu v prípade nastavenia funkcie ONESKO-
RENÝ ŠTART.
V reťazci E je zobrazená maximálna hodnota rýchlosti odstreďovania, ktorú zariadenie môže dosiahnuť na základe
zvoleného programu; ak program nepočíta s nastavením odstreďovania, na uvedenej ploche je zobrazený symbol “--” s
nízkym jasom.
Na ploche F je zobrazená teplota, ktorú je možné zvoliť na základe zvoleného programu; ak nie je nastavenie teploty
súčasťou zvoleného programu, na uvedenej ploche je zobrazený symbol “--” s nízkym jasom
Symbol Zablokovaných dvierok
Rozsvietený symbol signalizuje, že dvierka sú zablokované, aby nedošlo k ich neželanému otvoreniu. Aby sa zabránilo
poškodeniu práčky, pred otvorením dvierok je potrebné počkať, kým symbol nezhasne.
POZN.: keď je aktivovaná funkcia ONESKORENÝ ŠTART, nebude možné otvoriť dvierka a na ich otvorenie bude potrebné prerušiť činnosť zariadenia stlačením tlačidla ŠTART/PAUZA.
! Pri prvom zapnutí budete vyzvaní zvoliť jazyk a potom bude na displeji automaticky zobrazené menu voľby jazyka.
Pre voľbu požadovaného jazyka stlačte tlačidlá X a Y, a potvrďte voľbu stlačením tlačidla Z.
Ak si prajete vykonať zmenu jazyka, vypnite zariadenie, stlačte súčasne tlačidlá G, H, I a držte ich stlačené, až kým
nebudete počuť akustický signál a neobjaví sa menu pre voľbu jazyka.
! Ak chcete zmeniť jas displeja, ktorý je v rámci prednastavenia nastavený na najvyššiu hodnotu, vypnite zariadenie a pri
jeho opätovnom zapnutí stlačte súčasne tlačidlá G, L a M a držte ich stlačené, až kým nebude počuť akustický signál.
Stlačením tlačidiel X a Y zvoľte požadovaný jas a potvrďte voľbu stlačením tlačidla Z.
! Ak počas pracieho cyklu alebo pri nastavovaní funkcie „ONESKORENÝ ŠTART“ nebude displej používaný po dobu
1 minúty, bude aktivovaný „ŠETRIČ OBRAZOVKY“. Pre návrat na predchádzajúce zobrazenie stačí stlačiť ktorékoľvek
tlačidlo.
31
Page 32

Ako vykonať prací cyklus
SK
1. ZAPNUTIE ZARIADENIA. Stlačte tlačidlo a na
displeji sa zobrazí nápis HOTPOINT; kontrolka
ŠTART/PAUZA bude pomaly blikať zelenou farbou.
2. NAPLŇTE PRAČKU PRÁDLOM. Otvore dvierka.
Naplnte prácku prádlom, pricom dbajte, aby nedošlo
k prekroceniu množstva náplne, uvedeného v tabulke
programov na nasledujúcej strane.
3. DÁVKOVANIE PRACIEHO PROSTRIEDKU.
Vytiahnite dávkovač pracích prostriedkov a naplňte
príslušné priehradky pracím prostriedkom, spôsobom
vysvetleným v časti „Pracie prostriedky a prádlo“.
4. ZATVORTE DVIERKA.
5. ZVOĽTE PRACÍ PROGRAM. Otočným ovládačom
PROGRAMOV zvoľte požadovaný program;
názov programu bude zobrazený na displeji;
k zvolenému programu je priradená teplota a rýchlosť
odstreďovania, ktoré môžu byť menené. Na displeji
bude zobrazená doba trvania cyklu.
6. NASTAVTE PRACÍ PROGRAM PODĽA VAŠICH
POTRIEB. Použite príslušné tlačidlá:
Zmeňte teplotu a/alebo rýchlosť odstreďovania.
Zariadenie automaticky zvolí teplotu a maximálnu
rýchlosť odstreďovania prednastavené pre zvolený
program, ktoré nesmú byť zvyšované. Stlačením
tlačidla je možné postupne znížiť teplotu až po pranie
v studenej vode (na displeji sa zobrazí symbol “--”).
Stlačením tlačidla je možné postupne znížiť rýchlosť
odstreďovania až po jeho úplné vylúčenie (na displeji
sa zobrazí symbol “--”). Ďalšie stlačenie tlačidiel obnoví
nastavenie maximálnych prednastavených hodnôt.
! Výnimka: pri volbe programu 2 bude možné zvýšit
teplotu až na 40°C.
! Výnimka: pri volbe programu 3 bude možné zvýšit
teplotu až na 90°C.
! Výnimka: pri volbe programu 4 bude možné zvýšit
teplotu až na 60°C.
Nastavte oneskorený štart.
Aby ste nastavili oneskorený štart zvoleného programu,
stláčajte príslušné tlačidlo, až kým sa nezobrazí
požadovaná doba oneskorenia. Oneskorený štart
zrušíte stláčaním tlačidla, až kým sa na displeji
nezobrazí nápis “-- h”.
Nastavte druh plákania.
Voliteľná funkcia umožňuje zvoliť požadovaný druh
plákania pre maximálnu starostlivosť o citlivé druhy
pokožky. Pri prvom stlačení tlačidla bude nastavená
úroveň „Extra +1“, ktorá umožní vykonať prídavné
plákanie v porovnaní so štandardným plákacím cyklom,
aby sa odstránili všetky stopy po pracom prostriedku.
Pri druhom stlačení tlačidla bude nastavená úroveň
„Extra +2“, ktorá umožňuje vykonať dve prídavné
plákania v porovnaní so štandardným plákacím cyklom
a odporúča sa pre citlivejšie pokožky. Pri treťom stlačení
tlačidla bude nastavená úroveň „Extra +3“ plákanie,
ktorá umožní zvoliť 3 prídavné plákania v porovnaní
so štandardným plákacím cyklom. Táto voliteľná
funkcia, ktorá je aktivovaná pri cykloch s teplotou 40
°C, umožňuje odstrániť hlavné alergény, ako mačacia
i psia srsť a peľ. Pri teplote nad 40 °C sa dosahuje
optimálnej úrovne protialergickej ochrany. Opätovným
stlačením tohto tlačidla sa môžete vrátiť na úroveň
plákania „Bežné plákanie“. Ak nie je možné vykonať
požadované nastavenie, alebo zmeniť existujúce
nastavenie, na displeji sa zobrazí „NEPOUŽITEĽNÝ“
alebo „NEMENITEĽNÝ“.
Zmeňte vlastnosti cyklu.
• Stlačte tlačidlo aktivácie funkcie; rozsvieti sa
odpovedajúca kontrolka.
• Opätovným stlačením môžete zvolenú funkciu
zrušiť; zhasne odpovedajúca kontrolka.
! Ak zvolená funkcia nie je kompatibilná s nastaveným
programom, príslušná kontrolka bude zobrazená s
nízkym jasom a nekompatibilita bude signalizovaná aj
akustickým signálom (3 pípnutia) a zobrazením nápisu
“NEPOUŽITEĽNÝ” na displeji.
! Ak zvolená funkcia nie je kompatibilná s inou,
predtým nastavenou funkciou, na displeji sa zobrazí
nápis “NEPOUŽITEĽNÝ” a funkcia nebude aktivovaná.
! Funkcie môžu zmeniť doporučenú náplň a/alebo
dobu trvania cyklu.
7. SPUSTITE PROGRAM. Stlačte tlačidlo ŠTART/
PAUZA. Príslušná kontrolka sa rozsvieti stálym
zeleným svetlom a dôjde k zablokovaniu dvierok
(rozsvietený symbol ZABLOKOVANÝCH DVIEROK
). Počas prania sa na displeji zobrazí názov
prebiehajúcej fázy. Ak chcete zmeniť program počas
prebiehajúceho cyklu, prerušte činnosť práčky
stlačením tlačidla ŠTART/PAUZA (kontrolka ŠTART/
PAUZA bude pomaly blikať oranžovým svetlom);
zvoľte požadovaný cyklus a opätovne stlačte tlačidlo
ŠTART/PAUZA. Ak chcete otvoriť dvierka počas
pracieho cyklu, stlačte tlačidlo ŠTART/PAUZA; keď
bude symbol ZABLOKOVANÝCH DVIEROK
zhasnutý, bude možné otvoriť dvierka. Opätovným
stlačením tlačidla ŠTART/PAUZA opätovne uveďte do
činnosti prací program z bodu, v ktorom bol prerušený.
8. UKONČENIE PROGRAMU. Bude oznámené
zobrazením nápisu „KONIEC CYKLU“ na displeji. Po
zhasnutí symbolu ZABLOKOVANÝCH DVIEROK
bude možné otvoriť dvierka. Otvorte dvierka, vyložte
prádlo a vypnite zariadenie.
! Ak si prajete zrušiť už zahájený cyklus, opätovne na
dlhšiu dobu stlačte tlačidlo . Cyklus bude prerušený a
dôjde k automatickému vypnutiu zariadenia.
Direct Injection
Práčka je vybavená inovačnou technológiou «Direct Injection», ktorá pripravuje zmes vody s pracím prostriedkom,
čím ihneď aktivuje čistiace účinky pracieho prostriedku.
Táto aktívna emulzia je vpúšťaná priamo do bubna práčky
a účinne preniká do vlákien a odstraňuje i najodolnejšie
nečistoty už pri nízkych teplotách, za maximálneho ohľadu
voči farbám a tkaninám.
Je možné zvoliť režim «Výkon» pre dosiahnutie vyššej
čistoty alebo režim «EcoEnergy» pre dosiahnutie úspory
energie.
32
Page 33

Programy a funkcie
60°/40°
60°/40°
Tabuľka pracích programov
Pracie
Popis programu
Pracie
programy
DAILY CLEAN
Odstr. škvŕn Power 20°C
1
Odstr. škvŕn Turbo 45’
2
Bavlna: málo znečistené biele a farebné prádlo z chúlostivých tkanín.
3
4
Syntetika (4): málo znečistené farebné prádlo z chúlostivých tkanín.
Rýchle 30’: k rýchlemu oživeniu ľahko znečisteného prádla (nedoporučuje sa
5
pre vlnu, hodváb a prádlo určené na pranie v rukách).
SPECIALS
6
St. o Farby (default) => Farebné prádlo 40° 1200
Ultra Jemné prádlo
7
Vlna: pre vlnu, kašmír, atď.
8
9
Eko bavlna 60°C
9
Eko bavlna 40°C
Eko bavlna 40°C (3): málo znečistené biele a farebné prádlo z chúlostivých tkanín.
9
Detské
10
EXTRA
Antialerg. (Antialergénne)
11
Obl./Uteráky Týždenné: pre postel’né a kúpel’ové prádlo.
12
Hodváb/Záclony: pre prádlo z hodvábu, viskózy, spodné prádlo.
13
Prešívané: pre prádlo plnené husím perím.
14
Dielčie
Plákanie
Odstreďovanie + Vypúšťanie vody
Samostatné vypúšťanie vody *
(1): značne znečistené biele a farebné prádlo z odolných tkanín.
(2): málo znečistené biele a farebné prádlo z chúlostivých tkanín.
Max.
teplota
(°C)
20° 1200
20°
(Max. 40°C)
40°
(Max. 90°C)
40°
(Max. 60°C)
30° 800
30°
40° 800
60° 1200
40° 1200
40° 1200
40° 1000
60° 1200
60° 1200
30°
30° 1000
- 1200 -
- 1200 - - - 8 - - - **
-
* V prípade voľby programu a vylúčenia odstreďovania, zariadenie vykoná len odčerpanie vody.
** Je možné kontrolovať dobu trvania pracích programov na displeji.
Doba trvania cyklu, uvedená na displeji alebo v návode, je stanovená na základe štandardných podmienok. Skutočná doba sa môže meniť v závislosti na mnohých
faktoroch, ako sú napr. teplota a tlak vody na vstupe, teplota prostredia, množstvo pracieho prostriedku, množstvo a druh náplne, vyváženie náplne a zvolené funkcie.
1) Kontrolný program podľa normy 1061/2010: nastavte program 9 s teplotou 60°C.
Tento cyklus je vhodný pre pranie bežne znečisteného bavlneného prádla a jedná sa o najúčinnejší cyklus z hľadiska kombinovanej spotreby energie a vody, určený pre prádlo, ktoré je možné
prať pri teplote do 60°C. Skutočná teplota prania sa môže líšiť od uvedenej.
2) Kontrolný program podľa normy 1061/2010: nastavte program 9 s teplotou 40°C.
Tento cyklus je vhodný pre pranie bežne znečisteného bavlneného prádla a jedná sa o najúčinnejší cyklus z hľadiska kombinovanej spotreby energie a vody, určený pre prádlo, ktoré je možné
prať pri teplote do 40°C. Skutočná teplota prania sa môže líšiť od uvedenej.
Pre všetky Test Institutes:
3) Dlhý program na pranie bavlny: nastavte program 9 s teplotou 40°C a stlačte tlačidlo DIRECT INJECTION s režimom „Výkon”.
4) Dlhý program pre syntetické prádlo: nastavte program 4 s teplotou 40°C.
Funkcie prania
! Ak zvolená funkcia nie je kompatibilná s nastaveným
programom, príslušná kontrolka bude zobrazená s
nízkym jasom a nekompatibilita bude signalizovaná aj
akustickým signálom (3 pípnutia) a zobrazením nápisu
“NEPOUŽITEĽNÝ” na displeji.
! Ak zvolená funkcia nie je kompatibilná s inou, predtým
nastavenou funkciou, na displeji sa zobrazí nápis
“NEPOUŽITEĽNÝ” a funkcia nebude aktivovaná.
Úspora Času
Po zvolení tejto funkcie dôjde k skráteniu doby trvania
programu až o 50%, v závislosti od zvoleného cyklu, pri
súčasnej úspore vody a energie. Použite tento cyklus pre
nie príliš znečistené prádlo.
St. o Farby (Starostlivosť o farby)
Pri nastavení cyklu 6 a pri voľbe tejto funkcie je možné
zvoliť z 3 programov, ktoré boli navrhnuté špecicky pre
čo najlepšiu ochranu intenzity farieb farebného prádla a
žiarivosti bieleho prádla:
Farebné prádlo: slúži pre pranie oblečenia svetlej farby. Program je navrhnutý pre dlhodobé zachovanie živých farieb.
Tmavé prádlo: tento program je navrhnutý pre dlhodobé
zachovanie farieb tmavého prádla. Pre dosiahnutie čo
najlepších výsledkov sa odporúča použiť tekutý prací prostriedok pre pranie tmavého prádla.
Biele prádlo: tento program je navrhnutý pre dlhodobé
zachovanie žiarivosti bieleho prádla. Pre dosiahnutie najlepších
výsledkov sa odporúča použiť práškový prací prostriedok.
Super Wash
Vdaka použitiu väčšieho množstva vody v počiatočnej fáze
cyklu a vdaka použitiu dlhšej doby, táto volitelná funkcia
zarucuje pranie s vysokou kvalitou.
Môže sa používať s bieliacim prostriedkom alebo bez neho. Ak
si prajete vykonať takéto bielenie, vložte prídavnú nádobku 3
z príslušenstva do nádobky 1. Pri dávkovaní bieliaceho prostriedku neprekračujte úroveň „max“ vyznačenú na stredovom čape
(viď obrázok na str. 34). Ak si prajete vykonať samostatné
bielenie, nalejte bieliaci prostriedok do prídavnej nádobky 3,
nastavte program a aktivujte voliteľnú funkciu .
prostriedky
minútu)
(otáčky za
Pranie
Aviváž
Max. rýchlosť
1200
1200
1000
--
--
--
- - - 8 - - - **
Bieliaci
- 8 - - - **
- 4,5 - - - **
- 3,5 71 0,19 47 30’
- 5 - - - **
- 1 - - - **
- 2 - - - **
- 8 53 0,69 54,8 300’
- 8 53 0,69 87 300’
- 8 53 0,89 87 195’
- 5 - - - **
- 5 - - - **
- 2 - - - **
- 3,5 - - - **
(kg)
dok
prostrie-
Zvyšková
Max. náplň
8 - - - **
4,5 46 0,65 62 100’
8 - - - **
8 - - - **
gie kWh
vlhkosť %
Spotreba ener-
Voda celkom lt
SK
cyklu
Doba trvania
33
Page 34

Pracie prostriedky a prádlo
M
AX
1
3
2
A
B
*
SK
Dávkovač pracích prostriedkov
Dobrý výsledok prania závisí aj od správneho dávkova-
nia pracieho prostriedku: použitie nadmerného množstva
znižuje efektivitu prania a napomáha tvorbe vodného
kameňa na vnútorných častiach práčky a zvyšuje
znečistenie životného prostredia.
! Používajte práškové pracie prostriedky pre biele bavl-
nené prádlo a pre predpieranie a pre pranie pri teplote
vyššej ako 60 °C.
! Dodržujte pokyny uvedené na obale pracieho prostriedku.
! Nepoužívajte pracie prostriedky určené na pranie v rukách,
pretože spôsobujú tvorbu nadmerného množstva peny.
Pri vyťahovaní dávkovača
pracích prostriedkov a pri
jeho plnení pracími alebo
prídavnými prostriedkami
postupujte nasledovne.
! Nevkladajte prací prostri-
edok do strednej priehradka
(*).
Priehradka 1: Prací
prostriedok na pranie
(práškový alebo tekutý) V prípade použitia tekutého
pracieho prostriedku sa odporúča použiť pre správne dávkovanie malú prepážku A z príslušenstva. Pre
použitie práškového pracieho prostriedku vložte malú
prepážku do priehlbiny B.
Priehradka 2: Prídavné prostriedky (aviváž, atď.)
Aviváž nesmie vytekať z mriežky.
Prídavná priehradka 3: Bieliaci prostriedok
Príprava prádla
• Roztrieďte prádlo podľa:
- druhu tkaniny / symbolu na visačke.
- farby: oddeľte farebné prádlo od bieleho.
• Vyprázdnite vrecká a skontrolujte gombíky.
• Neprekračujte povolenú náplň, vzťahujúcu sa na
hmotnosť suchého prádla: viď “Tabuľka programov”.
Koľko váži prádlo?
1 plachta 400-500 g
1 obliečka 150-200 g
1 obrus 400-500 g
1 župan 900-1.200 g
1 uterák 150-250 g
Špeciálne programy
ODSTR. ŠKVŔN POWER 20°C: tento program ponúka
maximálnu schopnosť odstraňovania škvŕn bez potreby
prípravného ošetrenia tkanín, pri nízkej teplote a pri zachovaní tkanín a farieb v neporušenom stave.
ODSTR. ŠKVŔN TURBO 45’: tento cyklus zaručuje vyni-
kajúcu schopnosť odstránenia škvŕn už pri teplote 20°C v
priebehu len 45 minút. Teplotu pre tento cyklus je možné
zvýšiť až na 40°C.
ULTRA JEMNÉ PRÁDLO: pre pranie veľmi jemného
prádla, ktoré obsahuje aplikácie ako je štras alebo
pajetky, použite program 7. Odporúča sa prádlo pred
praním prevrátiť naruby a vložiť malé kusy prádla do
príslušného vrecúška pre pranie jemného prádla. Pre
dosiahnutie najlepších výsledkov sa odporúča použiť
tekutý prací prostriedok pre jemné prádlo.
VLNA - Woolmark Apparel Care - Green:
prací cyklus „Vlna“ bol schválený spoločnosťou Woolmark
Company pre pranie prádla z vlny, klasikovaného ako
prádlo pre ručné pranie, za podmienky, že pranie bude
vykonané v súlade s pokynmi uvedenými na visačke
oblečenia a v súlade s pokynmi dodanými výrobcom tejto
práčky. (M1127)
DETSKÉ: prací program schopný odstrániť znečistenie
typické pre malé deti, pričom je zaručené, že prací
prostriedok bude z prádla odstráný, aby sa zabránilo
alergiám na chúlostivej pleti malých detí. Tento prací
cyklus 10 bol navrhnutý na zníženie množstva baktérií
s použitím vyššieho množstva vody, čím sa optimalizuje
účinok špecických hygienizačných prísad, pridaných
k praciemu prostriedku.
ANTIALERGÉNNE: použite program 11 pre odstránenie hla-
vných alergénov, ako je peľ, roztoče a mačacie a psie chlpy.
OBL./UTERÁKY TÝŽDENNÉ: táto práčka umožňuje
prať prádlo celej domácnosti v jedinom cykle 12, ktorý
optimalizuje použitie aviváže a umožňuje usporiť čas
a energiu. Odporúča sa použitie práškového pracieho
prostriedku.
HODVÁB: použite príslušný program 13 na pranie
všetkého prádla z hodvábu. Odporúča sa použitie pracieho prostriedku pre chúlostivé prádlo.
ZÁCLONY: prehnite ich a uložte do obliečky na vankúš
alebo do sáčku zo sieťoviny. Použite program 13.
PREŠÍVANÉ: na pranie prádla plneného husacím perím,
ako napríklad “manželské” alebo samostatné periny
(nepresahujúce hmotnosť 3,5 kg), hlavnice, vetrovky,
používajte príslušný program 14. Odporúča sa vkladať
periny do bubna tak, že sa ich obidva okraje zložia smerom dovnútra (viď obrázky) a nesmiete pritom prekročiť
¾ celkový objem samotného bubna. Za účelom optimálneho prania sa odporúča použiť tekutý prací prostriedok a dávkovať ho prostredníctvom dávkovača pracích
prostriedkov.
Systém automatického vyváženia náplne
Pred každým odstreďovaním bubon vykoná otáčanie
rýchlosťou o málo prevyšujúcou rýchlosť prania, aby
sa tak odstránili vibrácie a aby sa náplň rovnomerne
rozložila. V prípade, že po niekoľko násobných pokusoch o vyváženie prádlo ešte nebude správne vyvážené,
zariadenie vykoná odstreďovanie nižšou rýchlosťou,
ako je prednastavená rýchlosť. Ak je práčka nadmerne
nevyvážená, vykoná namiesto odstreďovania vyváženie.
Za účelom dosiahnutia rovnomernejšieho rozloženia
náplne a jej správneho vyváženia, odporúča sa pomiešať
veľké a malé kusy prádla.
34
Page 35

Poruchy a spôsob ich
odstránenia
Môže sa stať, že práčka nebude fungovať. Skôr, ako zatelefonujete na Servisnú službu viď „Servisná služba“) skontrolu-
jte, či sa nejedná o problém ľahko odstrániteľný pomocou nasledujúceho zoznamu.
Poruchy:
Pračku nie je možné zapnúť.
Nedochádza k zahájeniu pracieho
cyklu.
Pračka nenapúšťa vodu (Na displeji
sa zobrazí nápis “CHÝBA VODA,
Otvorte ventil”).
Práčka nepretržite napúšťa
a odčerpáva vodu.
Možné príčiny / Spôsob ich odstránenia:
• Zástrčka nie je zasunutá v elektrickej zásuvke, alebo nie je zasunutá
dostatočne, aby došlo k spojeniu kontaktov.
• V celom dome je vypnutý prúd.
• Nie sú riadne zatvorené dvierka.
• Nebolo stlačené tlačidlo ON/OFF.
• Nebolo stlačené tlačidlo ŠTART/PAUZA.
• Nebol otvorený kohútik prívodu vody.
• Bol nastavený oneskorený štart.
• Prítoková hadica nie je pripojená k vodovodnému kohútiku.
• Hadica je príliš ohnutá.
• Nebol otvorený kohútik prívodu vody.
• V celom dome je uzatvorený prívod vody.
• V rozvode vody nie je dostatočný tlak.
• Nebolo stlačené tlačidlo ŠTART/PAUZA.
• Vypúšťacia hadica sa nachádza mimo určeného rozmedzia od 65 do 100
cm nad zemou (viď „Inštalácia“).
• Koncová časť vypúšťacej hadice je ponorená vo vode (viď “Inštalácia”).
• Odpadové potrubie v stene nie je vybavené odvzdušňovacím otvorom.
Ak po týchto kontrolách nedôjde k odstráneniu problému, zatvorte vodovodný
kohútik, vypnite práčku a zavolajte Servisnú službu. V prípade, že sa byt nachádza na jednom z najvyšších poschodí je možné, že dochádza k sifónovému efektu, následkom ktorého práčka nepretržite napúšťa a odčerpáva vodu.
Na odstránenie uvedeného efektu sú v predaji bežne dostupné špeciálne
„protisifónové“ ventily.
SK
Práčka neodčerpáva vodu alebo
neodstreďuje.
Práčka vo fáze odstreďovania veľmi
vibruje.
Z práčky uniká voda.
Zariadenie je zablokované, displej
bliká a signalizuje poruchový kód
(napr.: F-01, F-..).
Dochádza k tvorbe nadmerného
množstva peny.
• Odčerpanie vody netvorí súčasť nastaveného programu: pri niektorých programoch je potrebné aktivovať ho manuálne („Programy a funkcie“).
• Vypúšťacia hadica je ohnutá (viď „Inštalácia“).
• Odpadové potrubie je upchaté.
• Počas inštalácie nebol bubon odistený predpísaným spôsobom (viď „Inštalácia“).
• Práčka nie je dokonale vyrovnaná do vodorovnej polohy (viď „Inštalácia“).
• Zariadenie je stlačené medzi nábytkom a stenou (viď „Inštalácia“).
• Prítoková hadica nie je správne zaskrutkovaná (viď „Inštalácia“).
• Dávkovač pracích prostriedkov je upchatý (spôsob jeho vyčistenia je uve-
dený v časti „Údržba a starostlivosť“).
• Vypúšťacia hadica nie je dobre pripevnená (viď „Inštalácia“).
• Vypnite zariadenie a vytiahnite zástrčku zo zásuvky, vyčkajte 1 minútu a
opätovne ho zapnite.
Ak porucha pretrváva, obráťte sa na Servisnú službu.
• Použitý prací prostriedok nie je vhodný na použitie v automatickej práčke
(musí obsahovať označenie „pre pranie v práčke“, „pre pranie v rukách
alebo v práčke“ alebo podobné označenie).
• Bolo použité jeho nadmerné množstvo.
35
Page 36

Servisná služba
195134935.00
06/2015 - Xerox Fabriano
SK
Pred obrátením sa na Servisnú službu:
• Skontrolujte, či nie ste schopní poruchu odstrániť sami (viď „Poruchy a spôsob ich odstránenia“);
• Opätovne uveďte do chodu prací program, s cieľom overiť, či bola porucha odstránená;
• V opačnom prípade sa obráťte na Centrum servisnej služby, na telefónnom čísle uvedenom na záručnom liste.
! Nikdy sa neobracajte so žiadosťou o pomoc na technikov, ktorí nie sú na vykonávanie tejto činnosti oprávnení.
Pri hlásení poruchy uveďte:
• druh poruchy;
• model zariadenia (Mod.);
• výrobné číslo (S/N).
Tieto informácie sú uvedené na štítku aplikovanom na zadnej časti práčky a v jej prednej časti, dostupnej po otvorení
dvierok.
Indesit Company Spa
Viale Aristide Merloni, 47
60044 Fabriano (AN)
Italy
www.hotpoint.eu
36
 Loading...