

Page 1

User Instructions
for Models
RLB20, RSB20, RZB20
Page 2
Electrical Supply
WARNING:This appliance must be earthed.
Fuses
Your appliance comes fitted with a plug and a 13A fuse.
If you need to replace the fuse,only those rated at 13A and ASTA
approved to BS1362 should be used.
WARNING:Do not use the plug unless the fuse cover is fitted.
Changing the plug
Cut off and dispose of the supplied plug if it does not fit your socket.
WARNING:To avoid a shock hazard do not insert the discarded plug into a socket anywhere
else.
IMPORTANT:WIRES IN THE MAINS LEAD ARE COLOURED IN ACCORDANCE WITH THE
FOLLOWING CODE:
Green / Yellow - Earth
Blue - Neutral
Brown - Live
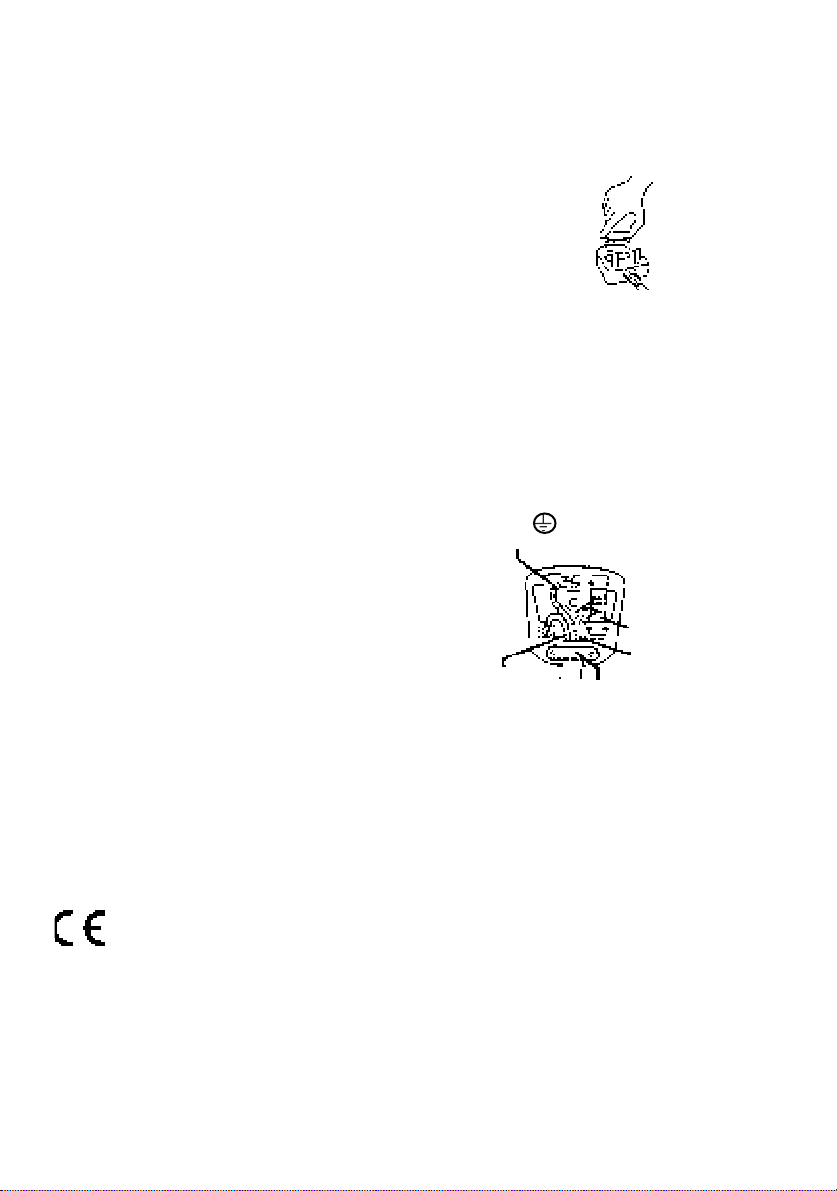
If you change the plug, the colour of
the wires in the mains lead may not
correspond with the colour of the
markings identifying terminals in the
plug. You should therefore wire it as
shown.
Green and yellow (Earth) wire to
terminal marked ‘E’, symbol ,
or coloured green and yellow.
Blue (Neutral) wire to terminal
marked ‘N’or coloured black.
13A ASTA approved fuse
to BS1362.
Brown (Live) wire to
terminal marked ‘L’or
Cord
coloured red.
clamp
Changing the Mains Lead
A special lead can be ordered from your Service Department:
UK: 08709 066 066 or
Republic of Ireland: 1850 302 200
If you have damaged the existing lead or require a longer one a charge will be made.It is
strongly advised that this work is carried out by a qualified electrician.
CE marking certifies that this appliance conforms to the following EEC directives:Low Voltage Equipment - 72/23/EEC & 93/68 EEC
Electromagnetic Compatibility - 89/336/EEC, 92/31/EEC & 93/68/EEC
Retention of the instruction Book
This instruction Book must be kept handy for reference as it contains important details on
the safe and proper use of the appliance.
If you sell or pass the appliance to someone else,or move house and leave it behind,make
sure this Book is also provided so the new owner can become familiar with the appliance
and safety warnings.
2
Page 3

Contents
Page
Electrical requirement 2
Safety advice 4
Installation 5
Get to know your Appliance 6-7
The controls 8
Storing food 9
Other functions 10
Care & Cleaning 10-12
Door reversal 13
Troubleshooting 14
After sales service 15
Guarantee 16
Disposal of your old product 17
Key contacts rear cover
3
Page 4

Safety advice
* Please take time to read this booklet
before installing and switching on this
appliance.The manufacturer assumes
no responsibility for incorrect
installation and usage.
* If this appliance is to replace an old
refrigerator with a lock, break or remove
the lock as a safety measure to avoid the
danger of children playing with the
refrigerator and locking them inside.
* Old refrigerators and freezers contain
insulation gases and refrigerant that must
be disposed of properly.Please ensure that
none of the tubing at the back of the
appliance gets damaged.
* Do not twist and bend the mains lead and
keep it away from hot surfaces.
* Do not let children play with the appliance.
* Do not sit or stand on the appliance.
* Do not use sharp metal objects for
removing any ice build up in the freezer
compartment, as this could cause damage
to the refrigeration system.
* Do not put the plug into the power supply
with wet hands.
* Do not store carbonated (fizzy) drinks or
medicines in the freezer compartment.
* Do not eat iced lollipops or other such
things direct from the freezer
compartment as this could cause low
temperature skin burns, always leave
for a few minutes before eating.
* Do not touch the surfaces inside the
freezer compartment with wet hands as
this could cause low temperature skin
burns.
4
Page 5

Installation.
WARNING:THE APPLIANCE SHOULD
ONLY BE INSTALLED BY A QUALIFIED
ELECTRICIAN IN COMPLIANCE WITH THESE
INSTRUCTIONS, CURRENT STANDARDS
AND REGULATIONS.
Before Fitting:
Before connecting to the electricity supply
leave the appliance to stand for 1 hour to
allow the cooling system to settle.
Please read through this section before
starting any work.
Choosing a location:
The power socket should be in a readily
accessible position, adjacent to the appliance.
Place the appliance in a dry and regularly
ventilated room.
Never place the appliance near heat emitting
devices (eg.cooker, radiator,water heater or
similar devices) and do not expose it to direct
sunlight. In such a position your appliance
will have to work harder and will cost more to
run and could be damaged by the heat.
Ensure that you provide adequate air
circulation around the appliance.
Behind, there should be at least 200cm2.
Placing the appliance:
Place it on a solid base.
Use the adjustable feet to level the appliance.
Check using a spirit level and adjust the feet
accordingly.
Fitting the wall spacer
1. Fit the supplied wall spacer to the top
middle of the condenser at the back of
the appliance
2. Push appliance back, until spacer is
against the wall.
Allow a minimum 30mm between the top of
the appliance and the underside of the work
top,25mm either side and 25mm from the
base of appliance to the floor.
5
Page 6
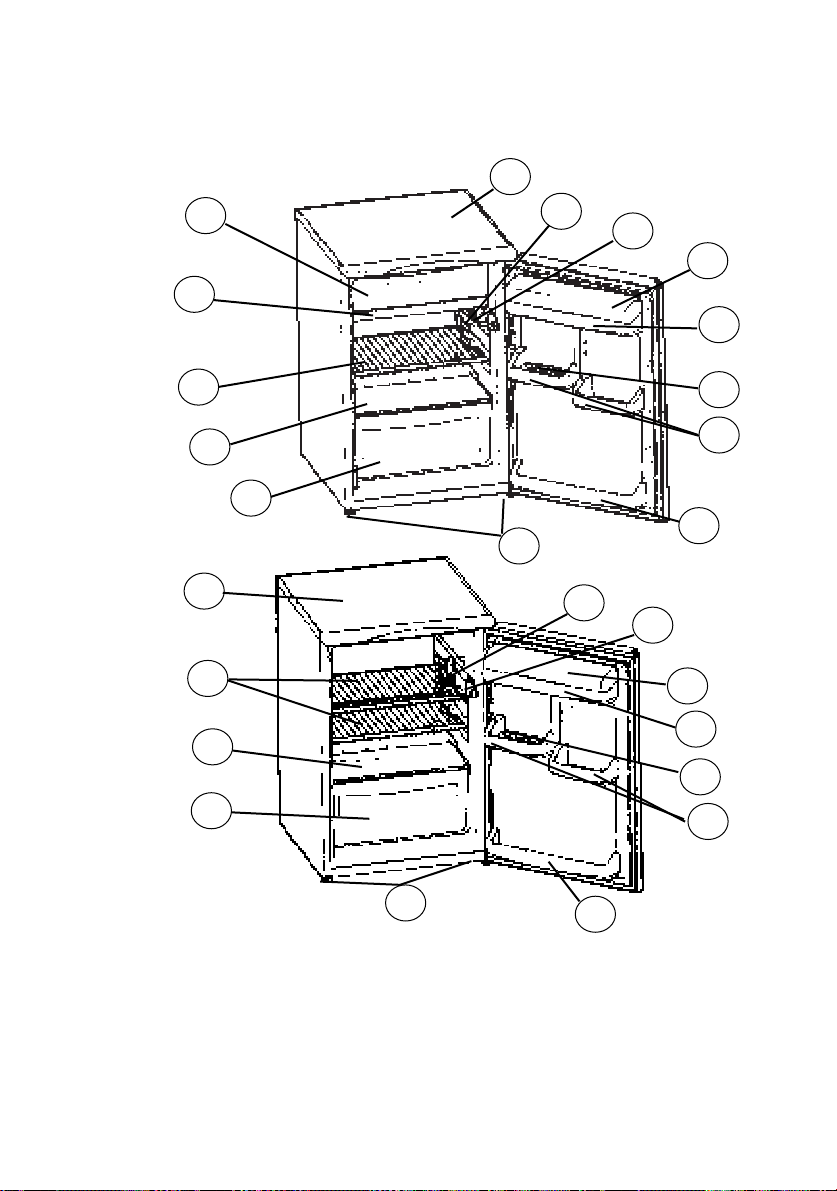
Get to know your Appliance.
Model RSB20
Model RLB20
13
1
14
12
14
11
2
3
4
1
2
3
10
9
8
7
6
5
11
10
9
8
7
6
1. Refrigerator shelf
2. Safety glass
3. Salad bin
4. Levelling feet
5. Bottle rack
6. Commodity racks
7. Egg holder
8. Dairy rack
6
4
9. Dairy rack cover
10. Lamp switch
11. Thermostat box
12. Freezer compartment (*)
13. Water tray (*)
14. Table top
(*) Only in model RSB20
5
Page 7

Get to know your Appliance.
Normal setting; 2
Model RZB20
2
3
7
4
6
1. Levelling feet
2. Controls
3. Table top
5
1
4. Fast freeze compartment
5. Frozen food storage baskets
6. Defrost channel
7. Ice compartment shelf
7
Page 8

The controls
Before switching on your appliance make
sure that the mains cable is not trapped
underneath or behind the appliance.
Thermostat setting
The thermostat setting will depend on the
location of the appliance, room temperature
and how often the door is opened.When
starting the appliance for the first time turn
the thermostat to the 5 setting for the first
24hrs then adjust accordingly.
* The thermostat automatically regulates the
inside temperature of the refrigerator and
freezer compartment.
By turning the knob from 1.to 5.,
colder temperatures can be obtained.
* The “OFF”position shows that the
thermostat is closed and no cooling is
available.
* For short term storage of food in the
freezer compartment, you can set the knob
to the 3 setting.
* For long term storage of food in the
freezer compartment, you can set the knob
between the 3 and 5 position.
* Note:The ambient temperature,
temperature of the freshly stored food
and how often the door is opened,
affects the temperature in the
refrigerator and freezer compartments.
If required,change the temperature
setting.
* Ideally, when you first switch on the
appliance,you should try to run it without
any food in for 24 hours and not open the
door.If you do need to use it straight away
try not to put to much food inside.
Running in the compressor
Your appliance is operated by a compressor,
which maintains the appliance internal temperature.For the first few months the compressor has to work a little harder and may
result in more noise than usual.
Refrigerator RSB20
* The freezer of the refrigerator can cool up
to -12˚C.
RLB20 and RSB20 thermostat box
Freezers RZB20
Thermostat setting
The freezer thermostat automatically
regulates the inside temperature of the
compartments. By turning the knob from
position 1 to 3, colder temperatures can be
obtained.The position “O” (off position)
shows that the thermostat is closed and no
cooling will be available.
Freezer thermostat setting
The temperature in your freezer should be
maintained at -18˚C or colder. The ambient
temperature of the freshly stored food
and how often the door is opened,
affects the temperature in the freezer. If
required,change the temperature control
setting at the rear of the freezer (setting 3 is
the coldest.).
* If the appliance is switched off or unplugged,
you must allow 5 minutes before restarting in
order not to damage the compressor.
8
Page 9

Storing food
Making the best use of your
Appliance
To ensure that your appliance operates as
efficiently as possible:
* Follow packaging “best by/use by”
instructions or your suppliers advice on
a suitable maximum storage time.
* Keep foods covered to retain moisture
and prevent flavour/odour
transference.Plastic bags, aluminium
foil, plastic stretch wrap and containers
with lids are ideal.
* Select chilled and frozen food last
when shopping, transport in a ‘coolbag’
and place in appliance as soon as
possible after arriving home.
* Avoid opening the doors unnecessarily
or for longer than needed.
* Allow hot or warm food to cool down
in covered containers before placing in
appliance, as placing hot food in the
appliance reduces efficiency.
Warning: Do not use to store poisonous,
flammable or dangerous substances,
your appliance has been designed for the
storage of edible foodstuffs only.
Storing food in a freezer
* Freeze and store either fresh food or
long term commercially frozen foods.
(RZB20)
* Place frozen food in the freezer
compartment as soon as possible after
buying it.
* Liquid-filled bottles or sealed fizzy
drinks must not be stored in freezer, as
they may burst.
* Lollipops and water ices should not be
given to children directly from the
freezer.The low temperature may
cause ‘freezer burns’on their lips.
* Store ice cream towards the top front
of the freezer and remove from freezer
15-30 minutes before serving.
* Ensure food is labelled and dated
before placing in freezer.
* Once thawed,food should be cooked
and eaten within 24 hours or cooked
and refrozen.
* Fully defrost your freezer when the ice
is between 3-5mm thick.
Note: A thick layer of ice will increase the
running costs of your appliance.
Storing Food in a Fridge
(RSB20 and RLB20)
* Pack and store cooked and fresh food
separately.
* Generally speaking long term storage
means up to 3 months but this can
vary,so always follow your supplier’s
recommendations otherwise refer to
the pictorial guide on the door liner
(see below).
* Wrap raw or defrosting meat and
poultry in polythene or foil and store
below cooked foods and dairy
products to avoid contamination of
dripping food juices.
* Wrap cheese in greaseproof paper and
place in an airtight polythene bag.
Bring to room temperature before
consuming.
* Empty left over canned food into a
covered storage containers before
placing in fridge.
* Position food to allow cold air to
circulate freely, ensuring nothing
comes into contact with the cooling
plate at the back of the appliance.
9
Page 10

Other functions Care & Cleaning
Fridge compartment chiller tray cold air
control (model no.RSB20)
The slide at the rear of the chiller tray controls
the amount of cold air that flows into the
fridge compartment. The chiller tray must be
pulled out of the fridge in order to adjust the
slide.
Fridge compartment too warm:
Open the slide at the rear of the chiller tray
(indicator pointer visible). If the fridge
compartment is still to warm, turn the
thermostat control to a colder setting (higher
number).
Fridge compartment too cold:
Close the slide at the rear of the chiller tray
(indicator pointer covered). If the fridge
compartment is still to cold, turn the
thermostat control to a warmer setting
(lower number).
A CLOSED
B OPEN
* Disconnect the appliance from the
power supply.
* Do not pour water over the appliance.
* The internal compartments should be
cleaned periodically using a solution of
bicarbonate of soda and warm water.
* Clean the accessories separately with
soapy water. Do not put in a dishwasher.
* Do not use abrasive products, detergents
or soaps. After washing, rinse with clean
water and dry carefully.When the cleaning
operations have finished,reconnect the
plug with dry hands.
* You should clean the condenser at least
twice a year in order to save energy and
increase productivity.
Warmer fridge setting:
Indicator pointer covered A = closed.
Colder fridge setting:
Indicator pointer visible B = open.
10
Replacing the light bulb
When replacing a bulb;
1. unplug the appliance from the power
supply.
2. Press the hooks on the sides of the light
cover top and remove the light cover.
3. Replace the bulb with a new one of not
more than 15W.
4. Replace the light cover and after waiting 5
minutes restart the appliance.
Page 11

Care & Cleaning
For model no. RSB20 Refrigerator
Defrosting the Frozen Food compartment:
WARNING:Never use sharp metal tools for this
operation as they can damage your fridge
beyond repair.
Defrosting should be carried out regularly either,every two or three weeks or when the
ice is between 3 - 5mm thick. This will ensure
that your appliance operates efficiently.
A build up of ice could cause damage to the
freezer door flaps or create incorrect
temperatures inside the fridge compartment.
* The day before you plan to defrost, set the
thermostat dial to the 5. position to
completely freeze the contents.
* During defrosting, frozen foods should be
wrapped in several layers of paper and
kept in a cool place.The inevitable rise in
temperature will shorten their storage life.
Remember to use these foods within a
relatively short period of time.
* Before defrosting pull out the water tray
plug (1) on the water tray (2) and place a
bowl (3) underneath the tray hole to
collect the water.Ensure you use a bowl
large enough to contain the water.
Defrosting
For model no.RLB20 Larders (coolers)
*
The fridge compartment will defrost
automatically.During defrost periods
water droplets form on the cooling
plate and refreeze afterwards.
Note: If your kitchen becomes exceptionally
warm, the cooling plate may not defrost
regularly.
WARNING: Ensure the gutter is kept clear
and that stored food does not come into
contact with the cooling
plate.
* To defrost the fridge turn the thermostat
control knob to the O (OFF) position or
you may switch off the appliance at the
mains socket and pull the plug out.
1
3
* To accelerate the process,leave the door
open and one or more basins of warm
water can be placed in the freezer
compartment.
* Dry the inside of the unit and water tray,
refit the tray plug and set the thermostat
knob to the 5. position.
2
11
Page 12

Care & Cleaning
Defrosting the Freezer RZB20
Do not use sharp metal objects for this
operation.They could puncture the
refrigerator circuit and cause irreparable
damage to the unit.
Before defrosting,place the frozen food in a
cool place after wrapping it in sheets of
newspaper.
Use the drainage system as follows;
1. To defrost the freezer turn the thermostat
control knob to the O (OFF) position or
you may switch off the appliance at the
mains socket and pull the plug out.
2. Pull out the bottom drawer of the freezer
and open the water drain cover (A) which
is at the back of the drawer. (FIGURE 1)
3. Pull out the drain plug (B) placed under the
freezer compartment (FIGURE2)
4. Place the water drain cover (A) beneath the
drain plug (B) (FIGURE 3).
5. Take out the water collected in the drawer.
* To accelerate the defrosting process place
one or more basins of warm water in the
freezer compartment.
* Dry the inside of the compartment with a
sponge or a clean cloth.
* Once the unit has been defrosted, place
the food into the freezer .
12
Page 13

Door reversal
Warning:Before attempting to remove the door, switch off the electrical supply and pull
out the mains plug.
It is recommended that you remove any loose items/fittings from inside the appliance and
place food into insulated containers whilst carrying out this operation.
You may require assistance to carefully lay the appliance onto its back onto suitable protective
materials (i.e. original packaging).
Remove the door
1. Lay down the appliance on its back.
2. Unscrew, remove
and retain both
front
feet.
3. Unscrew and
remove the right
hand bottom hinge
plate and (spacing
washers if fitted).
Reposition the hinge pin into
the other hole on the metal bracket.
4. Slightly open the door,slide downwards,
remove and carefully place to one side.
5. Unscrew the hinge pin from the top right
hand hinge plate and refit on the
opposite side.
6. Use a thin blunt
instrument to remove
the top and bottom
hinge bushes and
blanking plug from the
door (take care
not to mark the door
handle). Reposition
on the opposite side.
Replace the door
1. Slide the door upwards and locate the
top hinge pin into the door bush.
2. Fit the bottom hinge with the (spacing
washers if fitted) into the bottom hinge
bush, making sure that the door is
aligned to the cabinet.
3. Use the fixing screws to secure the
bottom hinge to the cabinet.
4. Replace the adjustable feet, allowing
25mm from the bottom of the cabinet to
the base of the foot.
5. Carefully stand the appliance upright in
its required location and make sure it is
sitting level on the floor.Open and close
the door checking that the gasket makes
a good seal without any gaps when the
door is closed.
Note: Replace loose items/fittings back into
the appliance and leave for at least 15
minutes before switching back on.
13
Page 14

Troubleshooting.
If your appliance is not working properly,it
may be a minor problem, therefore check the
following.
The appliance won’t work. Check the plug is firmly positioned in the wall
socket and the power supply is switched on.
Check that the thermostat setting is not in the
OFF position.
Check the power supply with another
appliance.
Check the fuse.
There has been a power failure. DO NOT OPEN THE DOOR.
The appliance is making a lot of noise. Check the appliance is stabilised.
Continuous Operation of the Compressor Has the door been opened frequently or
Water is leaking from the refrigerator. Check that the defrost water outlet is not
Refrigerator interior light does not work. SWITCH OFF AT THE SOCKET AND PULL OUT
If power does not return within 14 hours,food
should be removed from the low temperature
compartment and either cooked and eaten
within 24 hours or cooked and refrozen.
Ensure the appliance is not touching the wall
or kitchen units. It is normal for it to make a
bubbling or gurgling sound.
left open for a long period of time?
The door is not closed properly/does not seal
properly (clean the gasket if it is contaminated
or replace it if it is damaged).
Check there is adequate air circulation.
blocked.
Check that stored food or packaging is not in
contact with the cooling plate on the interior
rear wall of the refrigerator. (NB. It is normal
for droplets to run down the cooling plate).
Is there ice formation on the interior rear wall?
(see ‘Defrosting of the Frozen Food
compartment’ ).
THE MAIN PLUG,check the bulb is in
correctly.
If it still doesn’t work see ‘Changing the Light
Bulb ‘.
If the appliance is not going to be used for a long time (during holidays) set the thermostat
to the OFF position. Defrost, then clean the appliance and leave the door open to prevent the
formation of mildew and build up of odours.
14
Page 15

Hotpoint After Sales Service
Satisfaction Guaranteed or Your
Money Back
Hotpoint gives you a unique ‘Satisfaction
Guaranteed’ promise – valid for ninety days
after you have purchased your Hotpoint
product. If there is a technical problem with
your Hotpoint appliance,call Hotpoint
Service. If necessary we will arrange for an
engineer to call. If the technical problem is
not resolved under this Guarantee,Hotpoint
will replace your appliance or, if you prefer,
give you your money back.
Hotpoint appliances carry for the first 12
months a fully inclusive parts and labour
guarantee plus FREE replacement parts for
the first 5 years provided that they are fitted
by our own Service Engineer.When the 12
months parts and labour guarantee expires
we offer two after sale service options:
Repair Service
UK: 08709 066 066 or
Republic of Ireland: 1850 302 200
Call our National Service Line and benefit
from our additional 5 years FREE parts.
Although the engineers time and labour is
chargeable, all repairs carry a fully inclusive
parts and labour guarantee for 12 months
from the date of the repair. Note:
Chargeable service is offered on the
basis of payment on completion to our
service engineer,who will issue a receipt.
Extended Warranties
To join:UK 08709 088 088 or
Republic of Ireland: 1850 502 200
Whether you have just one or a number of
Hotpoint appliances in your kitchen,
Hotpoint offer two Service Cover Plans to
give you complete peace of mind.They
enable you to extend your first 12 months
labour guarantee by either 1 or 4 years,so
that you can have FREE repairs during the
membership period.
Service Cover
FREE service repairs for a single Hotpoint
appliance during the period of cover. At an
additional cost Service Cover with
Maintenance includes an Annual Electrical
& Safety Check along with replacement of
any parts necessary.
Kitchen Cover
An annual payment covers repairs for all
your Hotpoint appliances which are less
than ten years old.Additional Hotpoint
appliances purchased after you have joined
Hotpoint Kitchen Cover are automatically
included during the annual period of cover
without further charge.
Easy Payment Methods
We offer a number of payment methods;
cheque, credit card, switch,cash or by taking advantage of one of our Service Cover
Plans you can spread the cost by direct
debit.
For further details telephone:
08709 088 088.
Appliance Registration
To benefit from the above options, complete and return the Appliance Registration
Questionnaire supplied with this appliance.
Full details and costs of our Service/Kitchen
Cover options together with an application
form, will then be sent to you towards the
end of the 12 month guarantee period.
Hotpoint Genuine Parts &
Accessories
A wide range of parts and accessories are
available from Hotpoint Genuine Parts &
Accessories Mail Order Hotline
UK: 08709 077 077 or
Republic Of Ireland: 01 842 6836
15
Page 16

Hotpoint Guarantee
From the moment your appliance is delivered, Hotpoint
guarantees it for five years.
●
Hotpoint appliances carry a fully inclusive 12 months parts
and labour guarantee plus FREE replacement parts for the first
five years provided that they are fitted by our own Service
Engineer (evidence will be required of date and place of
purchase).
●
All Hotpoint servicing is carried out by our own Service
Organisation located throughout the United Kingdom and
Republic of Ireland.We will be happy to deal with any problems which you may have.
Our Engineers ensure every effort to avoid damage to floor
coverings and adjacent units when carrying out repairs/service
work, but in locations where the Engineer advises you that it will
be impossible to move appliances without risk of damage,they
will only proceed with your approval that no liability is accepted.
Guarantee Terms & Conditions
16
Your Guarantee is only applicable in the United Kingdom or
Republic of Ireland and is subject to provision(s) that your
appliance:
●
Has been used solely for domestic purposes and is on
domestic premises ie. not for commercial or trade use.
●
Has been used solely in accordance with this instruction book.
●
Has been properly connected to a suitable electrical
supply voltage as stated on the appliance rating plate.
●
Has not been subject to misuse, accident, modified or repaired
by anyone other than our own Service Engineers.
Page 17

Disposal of your old product
When replacing your old appliance with a new one,please comply with the following:
Old appliances are not worthless rubbish. Valuable raw materials can be reclaimed by
recycling old appliances.
Render your old appliances unusable:
1. Pull out the mains plug.
2. Cut off the power cord and discard with mains plug.
3.To prevent children from locking themselves in the appliance and suffocating.
- REMOVE THE LOCK.
Professional disposal is required for refrigerants in refrigeration appliances and gasses
contained in the insulation. Ensure that refrigeration tubing and coils are not damaged
or punctured prior to their proper disposal.
WARNING:AVOID ACCIDENTS TO CHILDREN.WHEN DISCARDING AN OLD FRIDGE OR
FREEZER BE CERTAIN TO MAKE THE LOCK UNUSABLE. IF POSSIBLE,REMOVE THE DOOR
DO NOT ATTEMPT TO SIT ON TOP OF YOUR APPLIANCE. IT IS NOT DESIGNED FOR SUCH
USE AND YOU COULD INJURE YOURSELF OR DAMAGE THE APPLIANCE BY SUCH ABUSE.
AND DISCARD SEPARATELY.
Page 18

Page 19

Page 20

Key Contacts
Service
Hotpoint has the largest appliance manufacturer’s service team in Europe,
trained specialists directly employed by us to ensure your complete
confidence.
Repair Service
UK: 08709 066 066
Republic of Ireland: 1850 302 200
You will be asked for the following information:-
Name, address and postcode.
Telephone number
Model / Serial number of the appliance
Clear and concise details of the query or fault
Place and Date of purchase
(Please keep the receipt as evidence will be required when the engineer calls).
Extended Warranty
To join: UK 08709 088 088
Republic of Ireland: 1850 502 200
Genuine Parts & Accessories
Mail Order Hotline
UK: 08709 077 077
Republic of Ireland: (01) 842 6836
For further product information
All Hotpoint Services are offered as an extra benefit and do not affect your statutory rights.
General Domestic Appliances Limited, Morley Way, Peterborough, PE2 9JB
Part No.FP091-01
08701 50 60 70
 Loading...