

Hotpoint RK77mM Use And Care Manual
-.
,
‘ow”getYom
3
Buil;%roben
Conkn@
Aluminum Foil
15
Use
and Care of
Appliance Registration
2
Baking, Baking Guide
10, 11
models
Delayed Start and Stop
10
RJ742GJ
Time Bake
10
Broiling, Broiling Guide
15-17
RJ745GJ
Care and Cleaning
22-24
RK747GJ
Clock/Timer
8
RK767GJ
Consumer Services
27
Energy-Saving Tips
4
RK77mM
I
Preheating
9
Problem Solver
25,26
Roasting, Roasting Guide
12-14
Rotisserie
18, 19
Safety Instructions
2-4
Self-Cleaning Instructions
20,21
I
Shelves
9
Thermostat Adjustment
23
I
Warranty
Back Cover
GE
Answer
Center@)
800.626.2000
Help us help you...
Before using your oven,
read this book carefully.
It is intended to help you operate
and
maintain your new oven
properly.
Keep it handy for answers to your
questions.
If you don’t understand something
or need more help, write (include
your phone number):
Consumer Affairs
Hotpoint
Appliance Park
Louisville, KY 40225
Write down the model
and serial numbers.
You’ll
find them on a
label
on the
front of the oven behind the door
(on the lower oven on two-oven
models).
These numbers are also on the
Consumer Product Ownership
Registration Card that came with
your oven. Before sending in this
card, please write these numbers
here:
Model Number
Serial Number
Use these numbers in any
correspondence or service calls
concerning your range.
If you received
a
dam~ed
oven...
Immediately contact the dealer (or
builder) that sold you the oven.
Save time and money.
Before you request
service . . .
Check the Problem Solver on
pages 25 and 26. It lists causes of
minor operating problems that you
can correct yourself.
If you need service...
To obtain service, see the
Consumer Services page in the
back of this book.
We’re proud of our service and
want you to be pleased. If for some
reason you are not happy with the
service you receive, here are three
steps to follow for further help.
FIRST, contact the
people who
serviced your appliance. Explain
why you are not pleased. In most
cases, this will solve the problem.
NEXT, if you are still not pleased,
write all the details—including
your phone number—to:
Manager, Consumer Relations
Hotpoint
Appliance Park
Louisville, Kentucky 40225
FINALLY, if your problem is still
not resolved, write:
Major Appliance
Consumer Action Panel
20 North
Wacker
Drive
Chicago, Illinois 60606
2
S~ETY
INSTRUCTIONS
Read all instructions
before
usi~
this
appliance.
IMPORTANT
SA~TYNOTICE
The California Safe Drinking
Water and Toxic Enforcement
Act requires the Governor of
California to publish a list of
substances known to the state to
cause birth defects or other
reproductive harm, and requires
businesses to warn customers of
potential exposure to such
substances.
The fiberglass insulation in
self-clean ovens gives off a very
small amount of carbon monoxide
during the cleaning cycle.
Exposure can be minimized by
venting with an open window or
using a ventilation fan or hood.
MPO~MT
S~ETY~STRUCTIONS
Read all instructions before
usi~ t~
appliance.
When using electrical appliances,
basic safety precautions should
be followed, including the
following:
●
Use this appliance only for
i~
intended use
as
describd
in this
manual.
●
Be sure your appliance is
properly
instied
and grounded
by a qualified technician in
accordance with the provided
Installation Instructions.
●
Don’t attempt to repair
or replace any part of your
oven
ud-
it is
specifidly
recommended in this book.
All
other servicing should be
tied
to a
qudifid
technician.
●
Mom
performing any
servi~
DISCONNECT THE OWN
POWER SUPPLY AT THE
HOUSEHOLD
D~~ON
PANEL
BY REMOVING THE
FUSE OR SWIKHING OFF
THE CIRCUIT
BREA~R.
●
Do
not leave children
done—
Children should not be
lefi
alone
or unattended in an area where
appliance is in use. They should
never be allowed to sit or stand
on any part of the appliance.
●
Don’t
allow anyone to climb,
stand or hang on the door.
They could damage the oven.
●
CAUTION:
~MS
OF
~TE~T
~ CH~DREN
SHOULD
N~
BE
S~RED
m
cABMm ABom
AN
OWN.
C_DREN
CL~~G
ON THE OWN
~
REACH
MS CO~D
BE
SEWOUSLY ~-.
●
Never
wmr
loose-fitting or
–- hanging garments while using
the appliance.
Flammable
material could be ignited if
brought in contact with hot
heating elements and may cause
severe burns.
c
Use only dry pot
holders—
Moist or damp potholders on
hot surfaces may result in burns
from
s-.
Do not let pot
holdem
touch hot heating elements. Do
not use a towel or other bulky
cloth.
●
Never use your appliance for
warming or heating the room.
●
Storage in or on
applianc*
Do not store
fl
arnmable
materials
in the oven.
●
Keep hood and grease filters
clean
to maintain good venting
and to avoid grease fires.
●
Do
not let cooking grease
or other flammable
materhds
accmmdate
in or near the oven.
●
Do not use water on grease
fire. name in oven can be
smothered by completely
closing door and turning
OWN SET to OFF.
●
Do
not touch
hwting
elements
or interior surface of oven.
These surfaces may be hot
enough to burn even though they
are dark in color. During and
after use, do not touch, or let
clothing or other flammable
materials contact any interior
area of the oven; allow sufficient
time for cooling, first.
Wtentidly
hot
sufices
include
the oven vent openings and
surfaces near the openings,
crevices around the oven door
and the edges of the door window.
Remember:
The inside surface
of the oven maybe hot when the
door is
opend.
c
When cooking pork,
follow
the directions
emcdy
and always
cook the meat to an internal
temperature of at least
170°F.
This assures that, in the remote
possibility that trichina may be
present in the meat, it will be
tilled and the meat will be safe
to eat.
Oven
●
Stand away from oven when
opening oven door. The hot air
or steam which escapes can
burn hands, face and/or eyes.
●
Don’t
heat unopened food
containers in the oven.
-ure
eodd bdd
up and the container
could burst, causing an injury.
●
Keep oven vent
duc~
unobstructed.
●
Keep oven free from
g~e
buildup.
. Place oven shelf in desired
position while oven is cool.
If
shelves must be handled when
hot, do not let pot holder contact
heating units in he oven.
●
PuMing
out shelf to shelf stop
is a convenience in Ming heavy
foods. It is b a
p-ution
against burns from touching
hot surfaces of door or oven
*.
●
When using cooking or
roasting bags in oven,
fo~ow
the
manuticturer’s
directions.
. DO not use
your oven to
dry
nmpapem.
If overheati, they
can catch fire.
@
3
~sTRUCT1ONS
(continu~)
Self-Clea*
Oven
●
Do
not
cl-
door gasket.
The door gasket is essential for a
good seal. Care should be taken
not to rub, damage or move the
gasket.
●
Do not use oven cleaners. No
commercial oven cleaner or oven
liner protective coating of any
kind should be used in or around
any part of the oven.
●
Clean only
pa~
listed in this
Use and Care Book.
●
Before
self+leaning
the oven,
remove broiler
pan
and other
utensils.
●
Listen for fan—a fan noise
should be heard sometime during
the cleaning cycle. If not,
call
for
service before self< leaning again.
SAVE
T-E
~STRUCTIONS
Enegy-Savi~~ps
●
Preheat the oven only when
necessary. Most foods will cook
satisfactorily without preheating.
If you find preheating is necessary,
keep an eye on the indicator light,
and put food in the oven promptly
after the light goes out.
●
Always turn oven OFF before
removing food.
●
During baking, avoid frequent
door openings. Keep door open as
short a time as possible.
●
Be sure to wipe up excess spillage
before self-cleaning operation.
●
Cook complete oven meals instead
of just one food item. Potatoes,
other vegetables and some desserts
will cook together with a main-dish
casserole, meat loaf, chicken or
roast. Choose foods that cook at
the same temperature and in
approximately the same time.
●
Use residual heat in oven
whenever possible to finish
cooking casseroles, oven meals,
etc. Also add rolls or precooked
desserts to warm oven, using
residual heat to warm them.
4
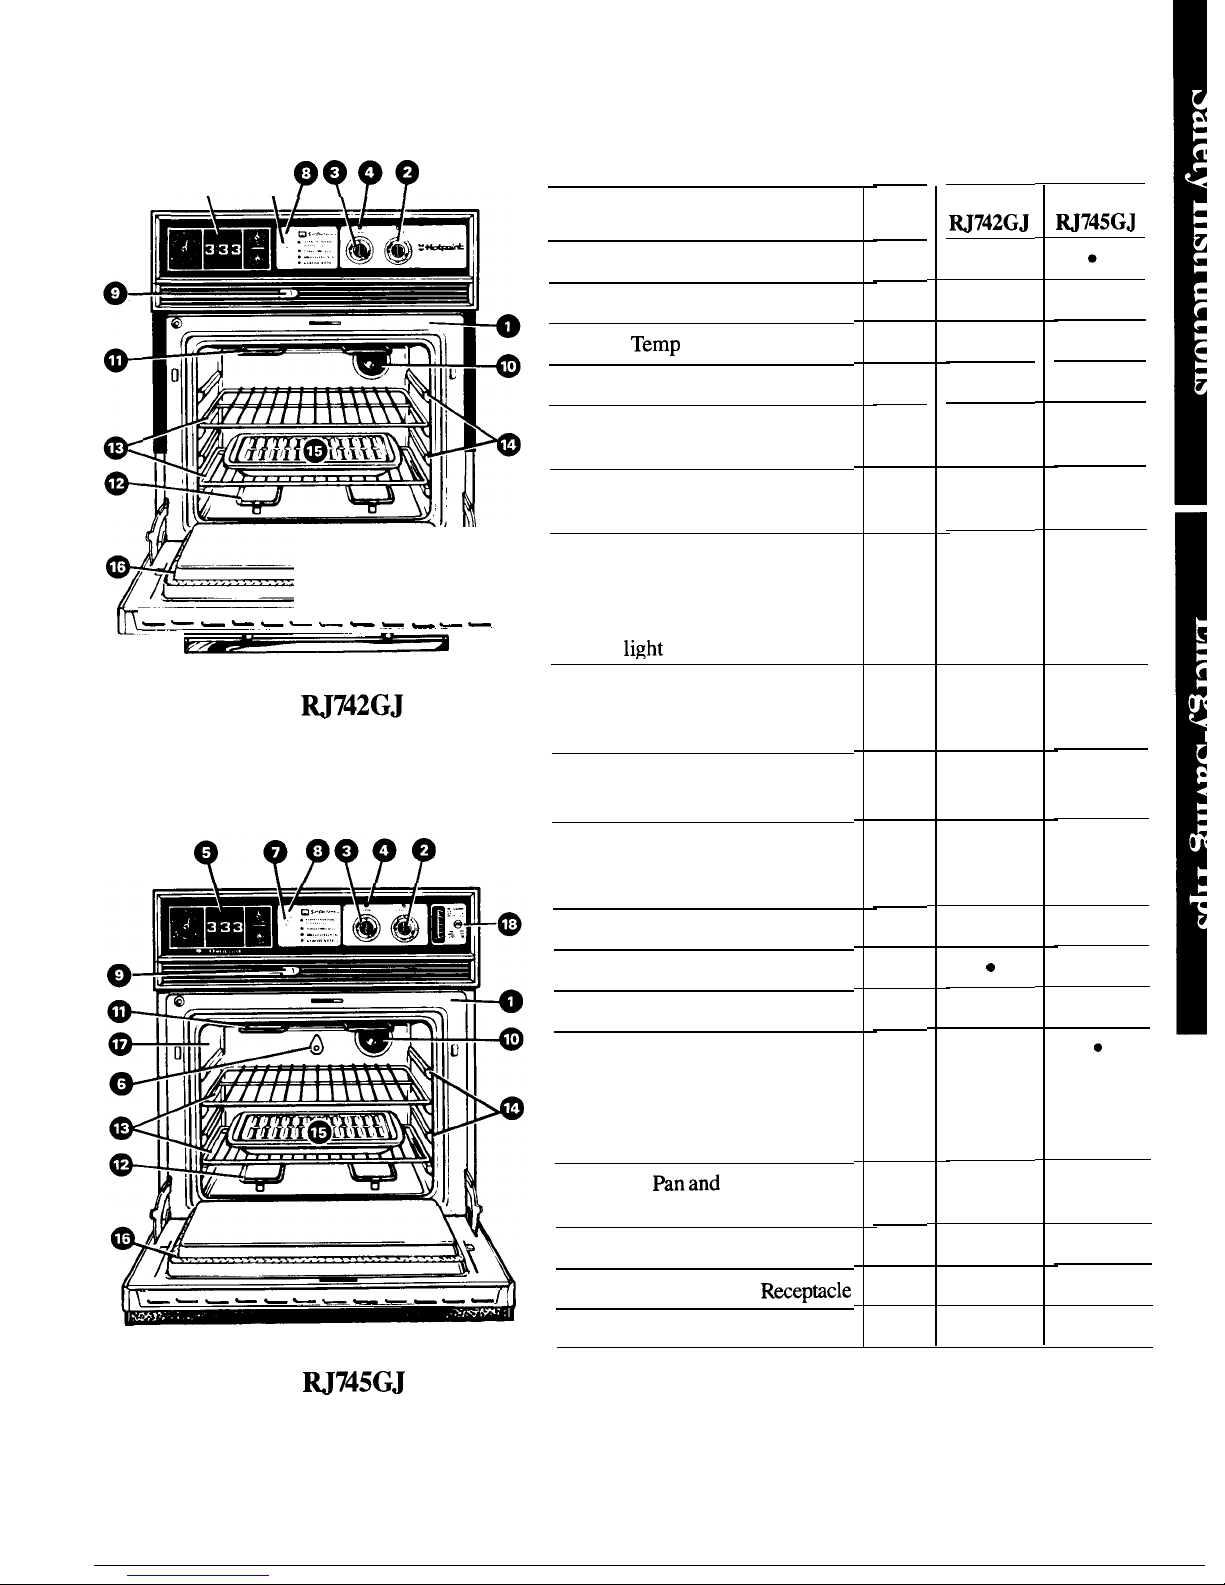
Features of Your Oven
Q Q
PQ??
See
page
2
9
Model
RJ742GJ
●
Model
RJ745GJ
Feature Index
1 Model and Serial Numbers
2 Oven Set Control
3 Oven
Temp
Control
4 Oven Cycling Light
●
●
●
●
9
●
●
●
9
8
5 Automatic Oven Timer,
Clock and Minute Timer
6 Rotisserie Receptacle
(Motor is behind oven wall.)
●
●
18
●
——- —- —— — - — ———
20
7 Locked Light (Glows during
self-cleaning when oven has
reached cleaning temperature.
Oven cannot be opened when
this
light
is on.)
●
8 Oven Cleaning Light (Glows
during self-cleaning when all
controls are set.)
9 Oven Door Latch
(Use for Self-Clean Only)
10 Oven Interior Light
(Comes on automatically
when door is opened. )
20
●
●
●
●
Model
W742GJ
20
●
9,22
15,24
●
●
●
11 Broil Unit
●
12 Bake Unit
10,24
b
2
9
9
2
13 Oven Shelves
14 Oven Shelf Supports
(Letters A, B, C and D
indicate cooking positions for
shelves as recommended on
cooking guides.)
15 Broiler Panand Rack (Do not
clean in self-clean oven. )
●
●
15
20
●
—- —- —— - — - ———
●
●
●
16 Oven Door Gasket
17 Meat Thermometer
RwePQcle
18 Meat Thermometer Dial
13
13
●
Model M745GJ
5
Features of Your Oven
‘~’\
-
— — - - - - - — - --
Model
RK74~J
1 Lf-”---
Y
—...———.
v
~\\
—————
——
Model
RK76~J
Upper oven is
self<leaning,
lower oven is
sbndard
-—————
Model
RK77~M
Upper and lower ovens
are
Self+leaning
6
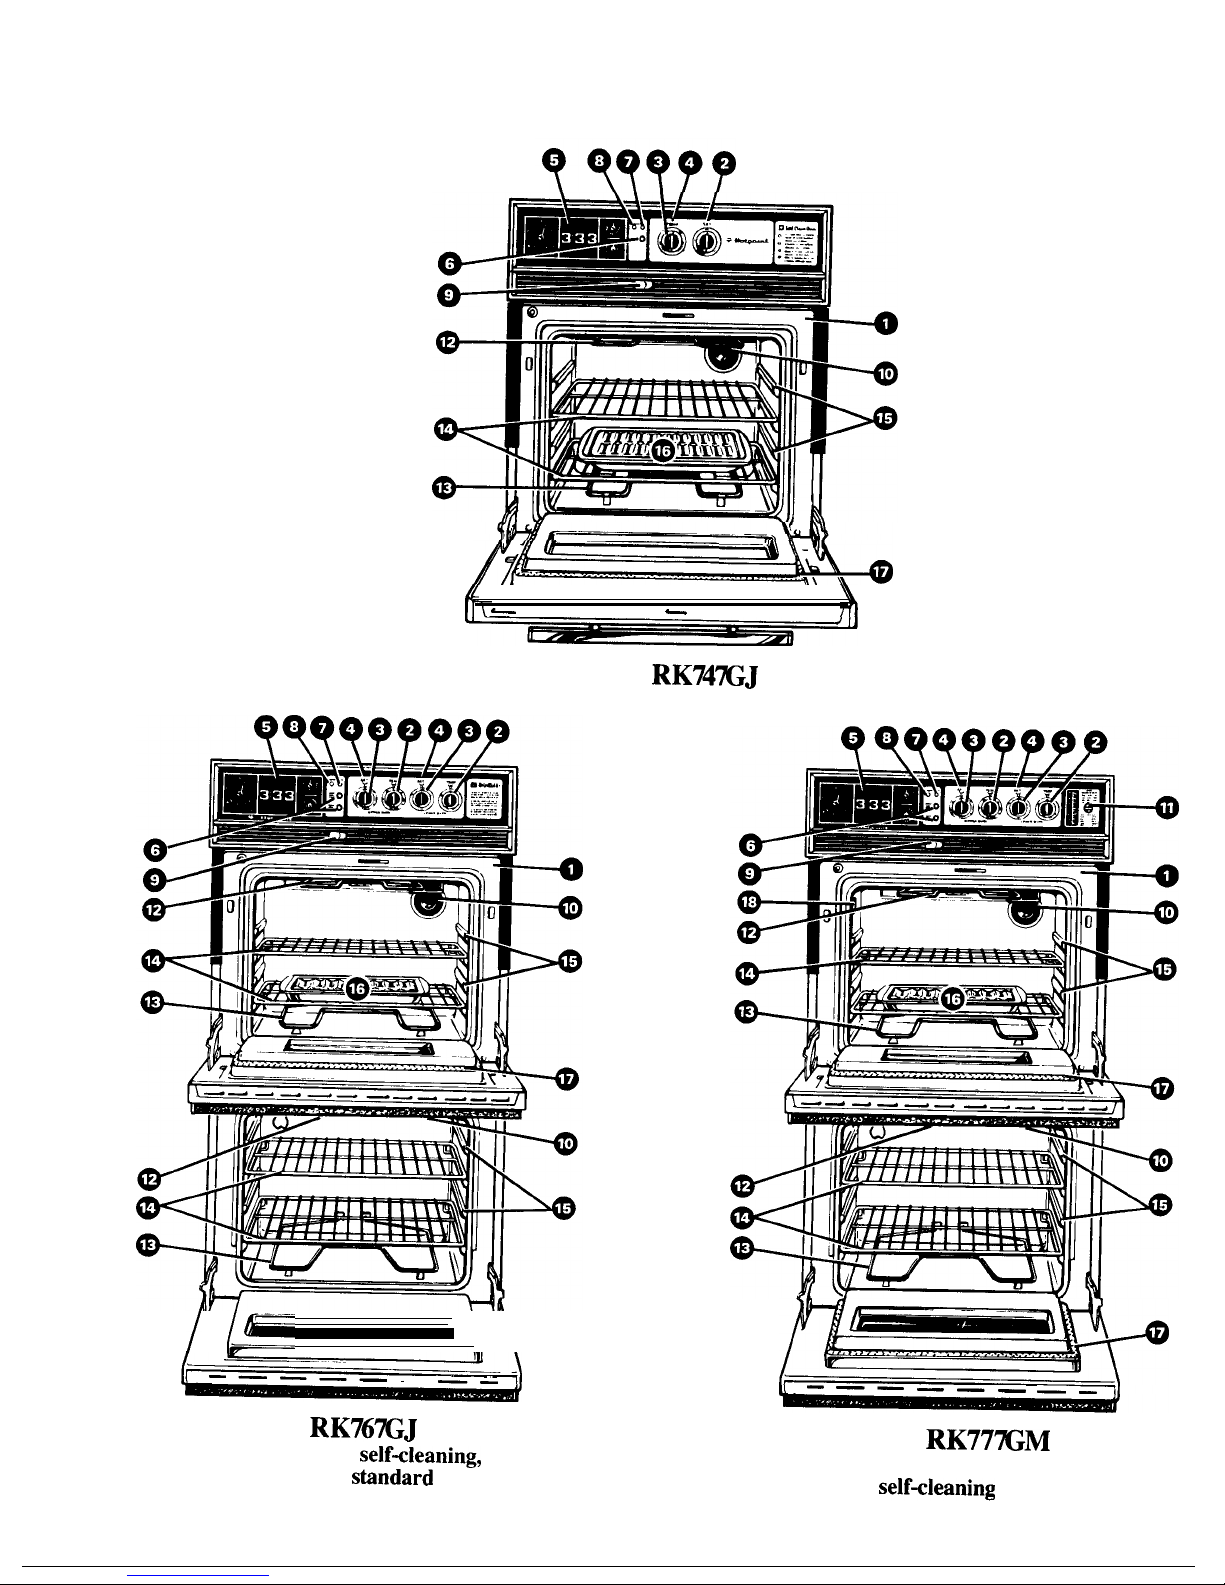
Explained
Model
Model
Model
Feature Index
on page
RK747GJ RK767GJ
RK777GM
1 Model and Serial Numbers
2
●
●
●
2 Oven Set Control
9
●
●
●
3 Oven
Temp
Control
9
●
●
●
4 Oven Cycling Light
9
●
2
2
5 Automatic Oven Timer,
8
●
●
●
Clock and Minute Timer
6 Oven Light Switch
9
●
2
2
7 Locked Light (Glows during self-
20
●
●
●
cleaning when oven has reached cleaning
temperature. Oven cannot be opened
when this light is on. )
8
Oven Cleaning Light
20
● ●
●
9 Oven Door Latch
20
●
●
●
(Use for Self-Clean only.)
10 Oven Interior Light (Comes on
9,22
●
2
2
automatically when door is opened. )
11 Meat Thermometer Dial
13
●
12 Broil Unit
15,24
●
●
●
13 Bake Unit (Maybe lifted gently
10,24
●
●
b
for wiping oven floor.)
14 Oven Shelves
9
2
4 4
15 Oven Shelf Supports (Letters A, B, C and
9
●
● ●
D indicate cooking positions for shelves
as recommended on cooking guides. )
16 Broiler Pan and Rack (Do not
15
●
●
●
clean in self-clean oven. )
17 Oven Door Gasket
20
●
●
2
18 Meat Thermometer Receptacle
13
Upper
(Insert pronged end of thermometer
firmly into receptacle.)
7
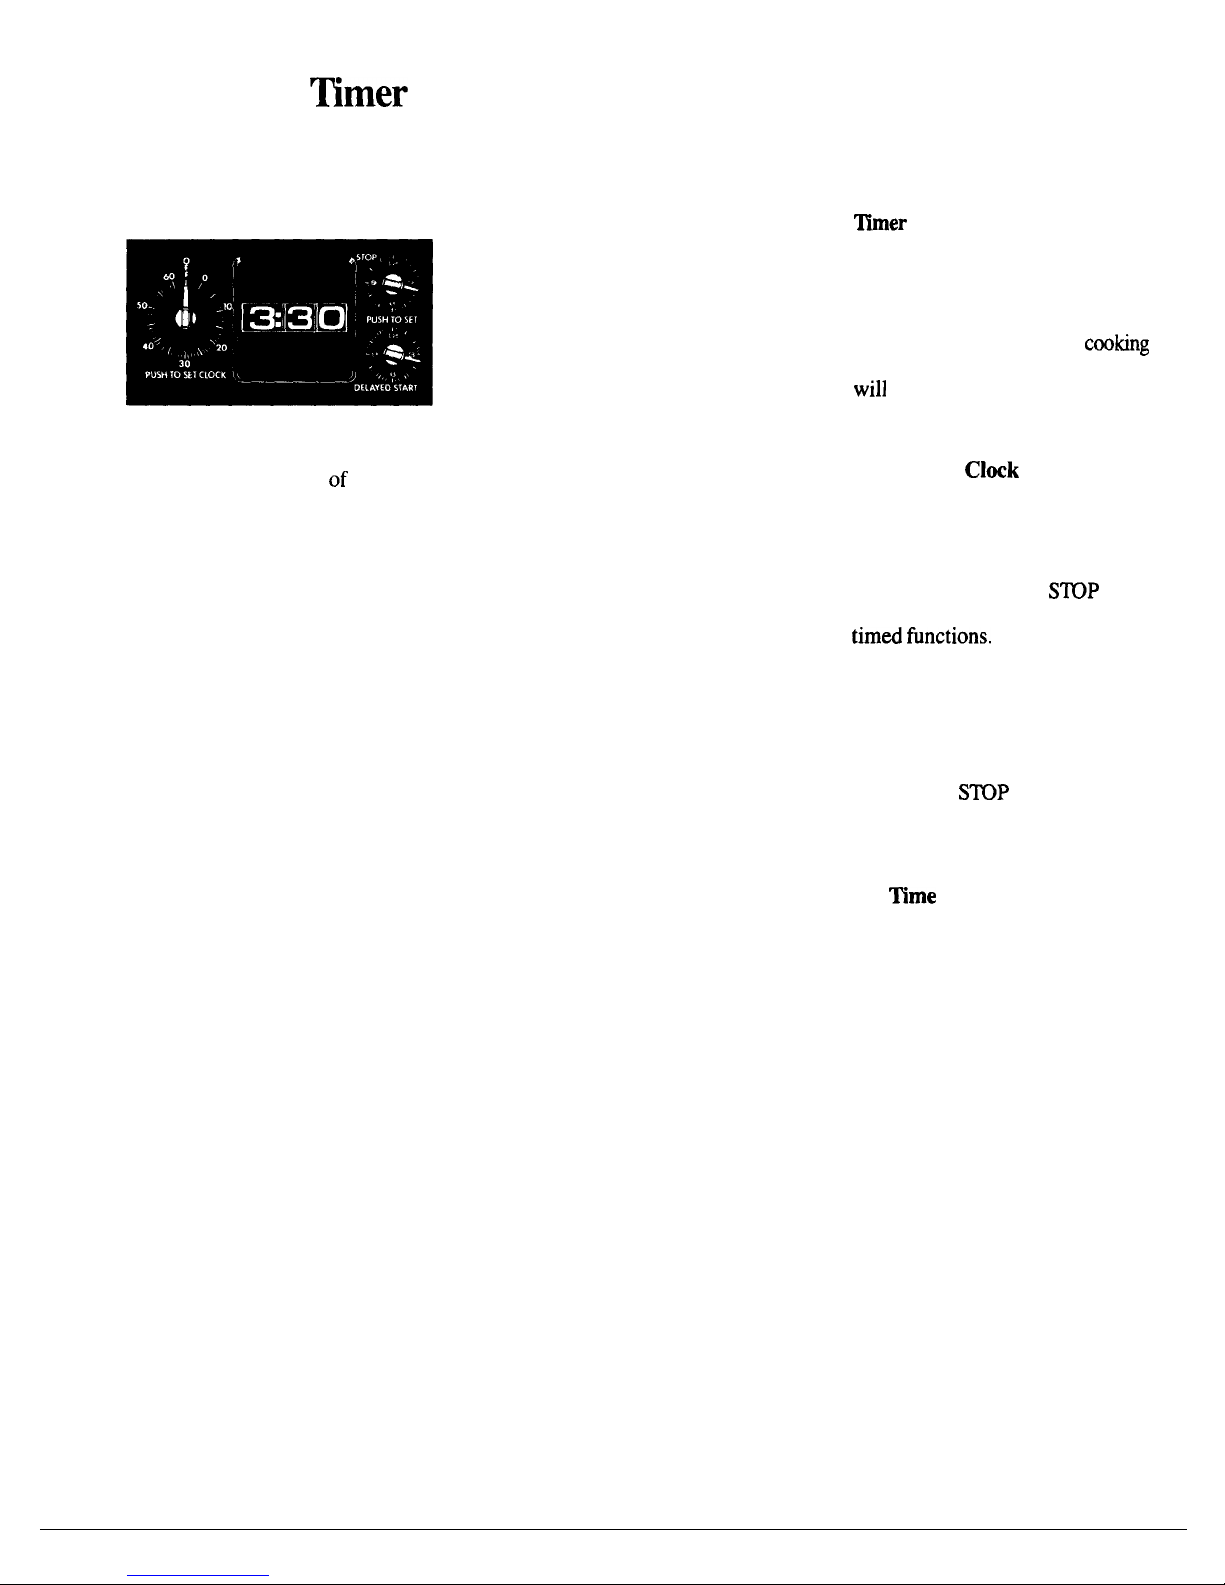
Automatic
~mer
and Clock
The Automatic Timer and Clock on
your oven are helpful devices that
serve several purposes.
To Set the Clock
Push in the center knob of the
Minute Timer and turn knob in
either direction to set the Digital
Clock numerals to the correct time.
(After setting the Clock, let the
knob out, and turn the Minute
Timer pointer to OFF.)
To Set the Minute Timer
The Minute Timer is the large dial
to the left of the Digital Clock. Use
it to time all your precise cooking
operations. This dial also sets or
changes the Digital Clock.
TO SET THE MINUTE TIMER,
turn the center knob clockwise,
without pushing in,
until pointer
reaches number of minutes you
wish to time (up to 60).
Time Bake Uses
Automatic Timer
Using Automatic Timer, you can
TIME BAKE with the oven starting
immediately and turning off at the
Stop Time set or you can set both
DELAYED START (some models
say START) and STOP dials to
automatically start and stop oven at
a later time of day. It takes the
worry out of not being home to
start or stop the oven.
Setting the dials for TIME BAKE
is explained in detail on page 10.
Self-Clean Uses
Automatic Timer
The self-cleaning function on your
oven uses the Automatic Timer to
set the length of time needed to
clean whether you wish to clean
immediately or delay the cleaning
until low energy times such as
during the night. See page 20.
Questions and Answers
Q. How can I use my Minute
~mer
to make
my
surface
cooking easier?
A.
Your Minute Timer will help
time total cooking which includes
time to boil food and change
temperatures. Do not judge
cooting
time by visible steam only. Food
will
cook in covered containers
even though you can’t see any
steam.
Q. Must the
Clock
be set on
correct time of day when I wish
to use the Automatic Timer for
baking?
A. Yes,
if you wish to set the
DELAYED START or
S~P
dials
to turn on and off at set times during
timed
finctions.
Q. Can I use the Minute Timer
during oven cooking?
A. The Minute Timer can be
used during any cooking function.
The Automatic Timers (DELAYED
START and
S~P
dials) are used
with TIME BAKE and self-clean
functions.
Q. Can I
change
the Clock while
I’m
~me
Cooking in the oven?
A. No.
The Clock cannot be changed
during any program that uses the
oven timer. You must either stop
those programs or wait until they
are finished before changing time.
8
Using Your Oven
Before Using Your Oven
1.
Look at the controls. Be sure
you understand how to set them
properly. Read over the directions
for the Automatic Oven Timer so
you understand its use with the
controls.
2. Check oven interior. Look at
the shelves. Take a practice run at
removing and replacing them properly,
to give sure, sturdy support.
3.
Read over information and tips
that follow.
4.
Keep this book handy so you can
refer to it, especially during the
first weeks of getting acquainted
with your oven.
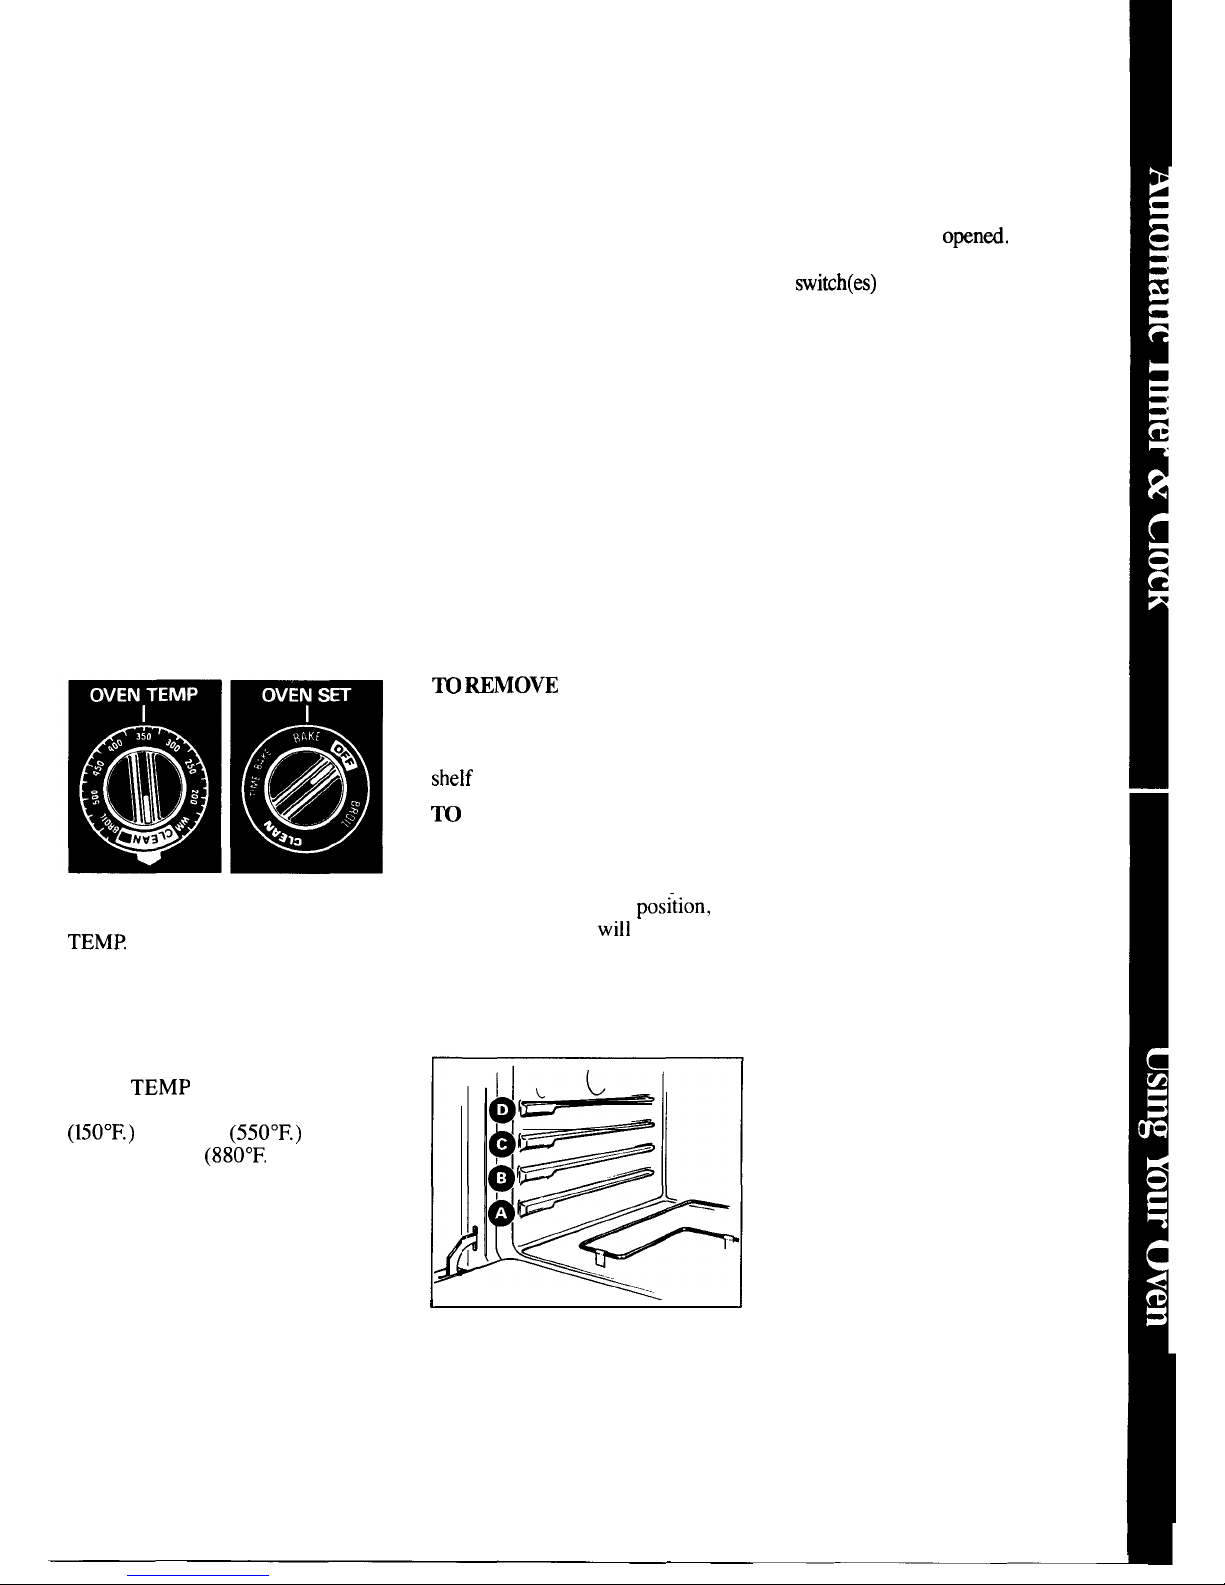
Oven Controls
The controls for the oven(s) are
marked OVEN SET and OVEN
TEMR OVEN SET has settings for
BAKE, TIME BAKE (on models so
equipped), BROIL, CLEAN and OFF.
When you turn the knob to the desired
setting, the proper heating units are
then activated for that operation.
OVEN
TEMP
maintains the
temperature you set, from WARM
(150°F.)
to BROIL
(550°F.)
and
also at CLEAN
(880°F.
).
The Oven Cycling Light
glows
until the oven reaches your selected
temperature, then goes off and on with
the oven unit(s) during cooking.
PREHEATING the oven, even to
high temperature settings, is speedy
—rarely more than about 10 minutes.
Preheat the oven only when
necessary. Most foods will cook
satisfactorily without preheating.
If you find preheating is necessary,
keep an eye on the indicator light
and put food in the oven promptly
after light goes out.
Oven Interior Shelves
The shelves are designed with
stop-locks so that when placed
correctly
on the shelf supports,
they (a) will stop before coming
completely from the oven, and (b)
will not tilt
when removing food
from or placing food on them.
~ ~MO~
shelves from the
oven, lift up
rear
of shelf, pull
forward with stop-locks along
top
of shelf supports. Be certain that
shelf is cool before touching.
TO
REPLACE shelves in oven,
insert shelf with stop-locks resting
on shelf supports. Push shelf toward
rear of oven; it will fall into place.
When shelf is in proper
position,
stop-locks on shelf
will
run under
shelf support when shelf is pulled
forward.
Shelf Positions
1
The oven has four shelf supports
marked A (bottom), B, C and D
(top). Shelf positions for cooking
food are suggested on Baking,
Roasting and Broiling pages.
Oven Light
The light comes on automatically
when the door is
opend.
On a
model with oven window(s), use the
switch(es)
on the control panel to
turn the light on and off when the
door is closed.
9
 Loading...